


CPCCONTROCONTROL
OWNER’S MANUAL |
3 |
BETRIEBSANLEITUNG |
15 |
MODE D’EMPLOI |
29 |
GEBRUIKSAANWIJZING |
43 |
20056 / 040204 © ALL RIGHTS RESERVED MARMITEK ®
PC CONTROL REMOTE
2
4
|
3 |
|||
|
5 |
|||
6 |
7 |
|||
8 |
|
|
|
|
10 |
9 |
|||
12 |
|
|
|
|
|
11 |
|||
14 |
13 |
|||
16 |
17 |
|||
18 |
||||
|
|
|
||
20 |
|
21 |
||
|
||||
22 |
|
23 |
||
|
||||
24 |
|
25 |
||
|
||||
2 |
MARMITEK |

General Security Note
Technical manipulation of the product or any changes to the product are forbidden, because of security and approval issues.
Please take care to set up the device correctly - consult your user guide. Children should use the device only under adult supervision.
Avoid the following
•strong mechanical wear and tear
•high temperature
•strong vibrations
•high humidity
Please also respect the additional security notes in the various user guide chapters. For questions not covered from the user guide please visit www.marmitek.com.
To ensure correct set up please read the manual and security notes carefully.
Battery change
The device may only be used with 4 AAA alkaline batteries - never try to connect to another power supply. When inserting batteries be sure the right polarity is used. Remove the batteries when the device is not used for a longer period. Make sure that the batteries are not short circuited and are not disposed in fire (danger of explosion).
Batteries do not belong in children hands. Don’t let batteries lay around openly - they might be swallowed by children or animals. If this happens see a doctor immediately.
Leaking or damaged batteries can upon contact with skin cause burning or acid damage - if necessary use suitable gloves.
Please dispose of batteries in accordance with local bylaws.
PC Control Remote
Contents
1. |
Introduction |
4 |
2. |
Put in the batteries |
4 |
3. |
PC Control operation |
4 |
|
3.1. Software and CM21A installation. |
4 |
|
3.2. Operation |
5 |
|
3.3. Function of the remote's buttons in PC mode |
6 |
|
3.4. Minimum PC Requirements |
7 |
4. |
A/V functionality |
8 |
|
4.1. Function of the remote’s buttons in TV. VCR, DVD, SAT and |
|
|
Home Automation mode |
8 |
|
4.2. Programming the TV, VCR , DVD, SAT and AUX modes |
10 |
|
4.3. Identifying codes found |
12 |
|
4.4. Default Volume Control for satellite |
12 |
5. |
Controlling home automation modules |
12 |
|
5.1. Changing the home automation House Code |
12 |
|
5.2. Programming the Home Automation IR/RF Mode |
13 |
6. |
Troubleshooting |
13 |
ENGLISH
PC CONTROL |
3 |

1. Introduction
The PC Control Remote can be use as a Wireless Mouse Remote and as a Universal Remote Control.
To control a PC the PC Control remote works with the wireless USB receiver CM21A (included in your PC Control kit).
The PC Control Remote is designed to control up to 6 devices (TV, VCR, DVD, SAT, PC and Home Automation Modules or any other device under AUX mode key). The PC Control Remote contains a library of codes that are pre-programmed into the remote control. This library covers nearly all the audio video products on the market today.
2. Put in the batteries (always use NEW AAA alkaline batteries).
1.Open the cover on the back of the PC Control Remote.
2.Insert 4 AAA alkaline batteries, verify that they are placed correctly with the + on the battery in the same position as marked inside the battery compartment.
3) PC operation
The PC remote works with the wireless USB receiver CM21A. The remote sends wireless RF signals to the CM21A receiver which is connected to your PC's USB port.
The enclosed CD contains a special version of the popular ShowShifter software. You can use ShowShifter to control your PC’s MultiMedia features. ShowShifter uses special fonts and big buttons to let you read the information from your PC screen from a distance.
You are even able to display the information on your TV screen (to do this, your PC will need to have a TV out connection).
TIP: Did you know that you are able to connect your PC to your TV Wireless, even from another room? With the optional Marmitek PC to TV Sender (REF: 09516) you can. For more information, visit www.marmitek.com.
3. PC Control operation
3.1. Software and CM21A installation.
1.Disable or turn off your anti-virus software before you install the software as some anti-virus programs interfere with the installation. Remember to turn on your anti-virus program when you finish the installation.
2.Install DirectX9.0a from the CD-Rom or download it from the Microsoft Website: www.microsoft.com/directx/homeuser/downloads/default.asp If you are running Windows XP, you do not need to install DirectX as it is already installed.
3.If you want to play compressed video files and MP3 files, install Windows Media Player 9 from the CD-Rom or download it from the Microsoft Website: www.microsoft.com/windows/mediaplayer/en/default.asp
4.Run ShowShifter installer from the CD-Rom. If the CD doesn’t start automatically, run the file ShowShifter-Setup-1.55.2177.exe by hand.
5.During the installation, follow the on screen instructions. You will be informed about available upgrades of ShowShifter. You don’t have to upgrade now.
6.The software installation will also launch the "X10 hardware(TM)setup" program which will install different X10 drivers on your system (including the CM21A driver). Follow the on screen instructions. At the appropriate point in the installation you will be instructed to plug the CM21A (uses the same driver as the CM19A USB Firecracker Transceiver)
4 |
MARMITEK |

connector into your PC's USB port and click "OK". When you do this, Windows will tell you it has found new hardware and will automatically install the CM21A driver.
Important note for Windows 98 and Me users
If after plugging in the CM21A USB receiver (X10 hardware(TM)setup), the "add new hardware" wizard starts, follow these steps (Be sure to have click on the OK button in the X10 hardware(TM)setup window BEFORE following these steps)
a.Click next in this window.
b.Select "Search for the best driver for your device (recommended)’ and click next.
c.In the new window, select "Specify a location", click the "Browse" button to search for the driver files.
d.Go to your C: drive in the browse list and then select the folders "Program Files" "Common Files","X10", "Driver Install," and finally "Wireless Transceivers."
e.Click the OK button to use the driver files in that folder. Follow the instructions on your screen. If you are asked for the Windows 98 or Me disk, click "OK." Insert your Windows 98 or Me CD and browse to the "Win98" or "WinMe" folder. Click "OK."
f.The "X10 USB Wireless Transceiver V2.36" should now be installed on your system.
7.When installation is completed, you will be asked to reboot your computer.
8.Once the computer is re-booted, ShowShifter will be launch automatically. You now will have to configure ShowShifter: follow the on-screen instruction. For a complete description of the software, please read the Help File provided with ShowShifter software.
3.2. Operation
ShowShifter allows you to use the remote control as a wireless mouse. You can use the mouse pad on the front of the remote to move the cursor around the PC screen and use the 2 buttons on the left and right of the of the mouse pad as the left and right click. ShowShifter also allows you to plays DVD, CD, video files, music files and watch, record and pause (TimeShift) liveTV The remote control allows you to have direct access to the ShowShifter functionality (play, pause, etc. see paragraph 3.3 below).
For Internet radio, presentations and other applications which are NOT supported by ShowShifter, you can control your software through the mouse function. Via www.showshifter.com you can purchase the most recent version of ShowShifter.
Note To play a DVD, make sure you have a DVD drive and a compatible MPEG2 decoder installed on your PC. To play Video files, make sure you have the decoder for the file you want to play (MPEG4, Divx, etc…) installed on your PC.
To watch TV, make sure you have a compatible video capture card installed on your PC (see the list in help file or visit www.marmitek.com).
For a complete description of the software, please read the Help File provided with the software.
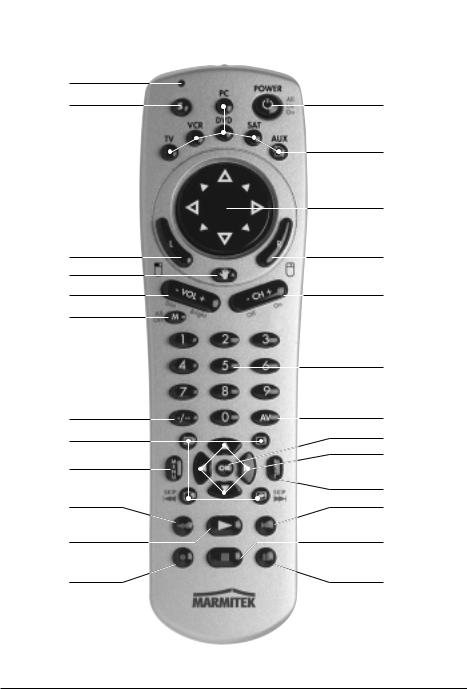
3.3. Function of the remote's buttons in PC mode
[1] POWER
Close the application which is active. You will even be able to shutdown your PC remotely.
[2] RED LED indicator
The indicator light flashes when the remote is operating or lights continuously while you are programming the remote.
ENGLISH
PC CONTROL |
5 |

[3] PC
Press this key to select the PC mode and be able to use the mouse pad and control ShowShifter.
[5] Mouse Pad
Move the cursor around the screen.
[6]L
Left click.
[7]R
Right click.
[8]
Confirm the selection in ShowShifter.
[9] CH +/-
While watching TV: channel up or down.
While playing a DVD: next or pevious chapter.
[10] Volume +/-
Master volume up or down.
[11] Numeric keys 0 - 9
In ShowShifter: direct access to menu items (icons). While watching TV: Direct access to channel number.
While playing a DVD or a CD: Direct access to chapter or track number. While playing audio files: Direct access to track number (if any).
[12] Mute
Turn on or off computer sound.
[14] --/-
Confirm the selection in ShowShifter.
[15] OK
Confirm the selection in ShowShifter.
[16] Toggle between full screen/window screen (maximize/minimize).
 go back one level (ie: if your are in the DVD screen, go back to main ShowShifter screen, if you are in main ShowShifter screen: close ShowShifter).
 Skip
Skip  While playing DVD, CD or Audio file: previous chapter or track.
 Skip
Skip 
 While playing DVD, CD or Audio file: next chapter or track.
[17]Navigation keys
Up, Down, Right, Left.
In showShifter: allows you to select menu items (icons).
While watching a DVD: allows you to navigate into the DVD menu.
[18] Menu
Toggle between full screen/window screen.
6 |
MARMITEK |

[19] Exit
Go back one level
If your are in the DVD screen: go back to main ShowShifter screen.
If you are in main ShowShifter screen: close ShowShifter.
[20]
While playing a DVD: fast backward (x2, x4, x8…).
While playing a CD: fast backward. While playing audio file: previous track.
While watching video file or TV (in time shift mode): move 15s, 30s, 1mn, 3mn, 5mn, etc... backward each time you press the key.
[21]
While playing a DVD: fast forward (x2, x4, x8…).
While playing a CD: fast forward. While playing audio file: Next track.
While watching video file or TV (in time shift mode): move 15s, 30s, 1mn, 3mn, 5mn, etc… forward each time you press the key.
[22]  Play
Play
While playing DVD, CD, audio file, video file: Play the selected file, CD or DVD. If the file, CD or DVD is Paused, it will play from where you paused.
While watching TV (in time shift mode): Resume time shift mode, that means it will let you resume watching TV from where you paused.
[23]  Stop
Stop
While playing DVD, CD, audio file, video file: Stop the playback of the file, DVD, CD.
While watching TV (in time shift mode): Exit time shift mode and take you back to TV broadcast.
[24]  REC (record)
While watching TV: Start the recording of the current channel. Press the key 2 times to start the recording.
[25] 
 Pause
Pause
While playing DVD, CD, audio files or video files: Pause the playback of the file, DVD or CD.
While watching TV: Start time shift mode. This means that ShowShifter will start recording the selected TV channel but the picture will be paused. When you press Play, you can watch TV from where you left off, and ShowShifter will still record ahead for you as you watch.
3.4. Minimum PC Requirements
•Pentium III 800 MHz.
•64MB RAM (128MB recommended).
•Minimum 300MB free space on Hard-Disk (1 GB recommended).
•Windows 98SE/Me/2000/XP.
•Compatible with almost any sound card and TV tuner card (see www.marmitek.com for compatible devices).
•Latest version of DirectX (provided on CD).
•Latest version of Windows Media Player (provided on CD).
•Codec of the video files you want to play.
ENGLISH
PC CONTROL |
7 |

4. A/V Functionality
4.1Functions of the keys in TV, VCR, DVD, SAT and Home Automation mode
[1] POWER
TV, VCR, DVD, SAT, AUX mode: Allows you to switch off the last selected appliance. mode: Turns All Lights on.
[2] RED LED indicator
The indicator light flashes when the remote is operating or lights continuously while you are programming the remote.
[3]PC, TV, VCR, DVD, SAT, AUX or Home Automation (  )
)
These keys allow you to select the appliance you wish to control.
The AUX (  ) key allows you to control any light or appliances connected to Home Automation (Marmitek X10) modules or to program and control any kind of devices such as a TV, satellite receiver, video recorder or DVD player. By default this key is pre-program to control home automation modules.
[4]SETUP
Allows you to program your remote before the first use. It also allows you to access to secondary functions of certain A/V appliances (Shift). Press the SETUP key followed by the function key you want.
[5]Mouse Pad Pc mode only
[6]L
PC mode only
[7] R
PC mode only
[8]
PC mode only
[9] CH +/-
Select the next or the previous channel of your TV or SAT. In DVD mode: next or previous chapter.
 mode: turns on or off the selected home automation module.
[10]Volume +/-
Allows you to controls the volume. You can control the volume of your TV even when you are in VCR, DVD or SAT mode. No need to select the TV mode.
 mode: brights and dims the selected Home Automation Module.
[11]Numeric keys 0 - 9
Work the same way as your original remote.
 mode: select Home Automation module address.
[12]Mute
Allows you to turn on/off the sound. You can control the "Mute" function of your TV
8 |
MARMITEK |

even when you are in VCR, DVD or SAT mode. No need to select the TV mode.  mode: turns All Home Automation module off.
[13]A/V
Selection of an external source (SCART input).
[14]--/-
If you are in programming mode - automatic code search - you can confirm the code of the device you want to control. In connection with the numeric keys, this button allows you with some equipment to select directly channels higher than 9.
[15]OK
Confirms menu selection.
[16] Teletext ON: Start/stop Teletext.
 Teletext OFF: Stop Teletext.
 Info: Displays information of the selected appliance.
 Teletext Hold: Stop page change in teletext mode.
[17]Navigation keys
Up, Down, Right, Left. Allows you to navigate into the menu (TV, DVD, etc).
[18]Menu
Menu On
[19]Exit
Menu OFF
[20]  Rew
Rew
In VCR, DVD or CD mode: This button works the same way as in your original remotes. IN TV mode: Coloured key (Red), control of videotext or special equipment functions.
[21]  Fast Forward
In VCR, DVD or CD mode: This button works the same way as in your original remotes. IN TV mode: Coloured key (Blue), control of videotext or special equipment functions.
[22]  Play
Play
In VCR, DVD or CD mode: This button works the same way as in your original remotes. IN TV mode: Coloured key (Yellow), control of videotext or special equipment functions.
[23]  Stop
Stop
In VCR, DVD or CD mode: This button works the same way as in your original remotes. IN TV mode: Coloured key (Green), control of videotext or special equipment functions.
[24]  REC (record )
This key works the same way as the one on your original remote for your VCR. In order to avoid a mistake you have to press this key twice to activate this feature.
[25] 
 Pause
Pause
In VCR, DVD or CD mode: This button works the same way as in your original remotes. IN TV mode: Coloured key (Magenta), control of videotext or special equipment functions.
ENGLISH
PC CONTROL |
9 |

4.2. Programming the TV, VCR , DVD, SAT and AUX modes
You can program the TV, VCR , DVD, SAT and AUX modes in three different ways.
1.When your equipment is one of the following six brands (Philips, Sony, Thomson, Saba, Grundig, Nokia) you can use the Brand Search method. Use method A in this case.
2.Are you using another brand of equipment ? If so, find your brand in the code book, and use method B to program your PC Control.
3.If the above two methods are not working, you can use method C and search for
the codes manually or automatically.
Note: you can dedicate any appliance (TV, DVD, SAT...) to the VCR, DVD, SAT,or AUX keys.
Method A: Programming using the Brand Search method
If your brand is listed hereafter, you have the possibility to use the brand search method (faster than the "manual" and the "automatic code search").
Brand |
Code |
Brand |
Code |
|
|
|
|
Philips/Radiola |
1 |
Telefunken/Saba/Normende |
4 |
Sony/Panasonic/JVC/Sharp |
|
|
|
|
|
|
|
Akai/Toshiba/Daewoo |
2 |
Grundig/Blaupunkt |
5 |
|
|
|
|
Thomson/Brandt |
3 |
Nokia/ITT |
6 |
|
|
|
|
1.Turn on the device you want to control.
2.Press and hold SETUP (4) until the LED indicator (2) lights steadily. Release SETUP button.
3.Press the mode button (3) that matches the equipment you wish to control. The LED
(2) blinks once.
4.Enter the code corresponding to your brand, point the PC Control Remote in the direction of your equipment, press Channel+ (9) once only. Continue to point the PC Control Remote at your equipment until the equipment changes channel (the remote control sends an IR signal every second. Please wait until your equipment reacts). When your equipment does react, press on the key --/- (14) to confirm. If you accidentally miss the code, you can stop the autosearch by pressing Channel- (9) and by repeatedly pressing this key return to the right code. Press --/- (14) to confirm.
Method B: Programming using the 3 Digit Code Tables
1.Make sure your equipment is switched on (for example TV).
2.Press and hold the SETUP (4) key until the LED indicator lights continuously. Release the SETUP key.
3.Press and release the mode key (3) of the device you want to control (for example TV).
4.Enter the 3 digit code from the Code Book by using the key pad (11). The LED (2) turns off after the last digit is entered. If you entered a wrong code the LED blinks for 3 seconds and then goes off. You have to repeat from step 2.
5.Point the remote in the direction of your TV and press the POWER button (1). Your device should turn off. Check other functions (for example for a VCR FF or REW, etc.). If certain functions are not responding, this indicates that the entered code is not the correct one. In that case repeat the above procedure with the next corresponding code of your brand.
6.Repeat this procedure from step 1 for the other equipment you want to control (VCR, DVD, SAT).
10 |
MARMITEK |
If your equipment (TV, SAT etc....) does not respond, try the other codes for your brand. If it still doesn’t respond, try the manual or automatic code search method
Method C: Manual or automatic code search
When searching an unknown code, you can step through the library manually or automatically. When your equipment responds, you can stop the searching process and store the code you found.
Note: as you can dedicate any appliance (TV, DVD, SAT...) to the VCR, DVD, SAT or AUX keys, you first need to enter any 3 digit code for the kind of appliance you wish to control (found in the code book), i.e.: If you want to program a SAT under the AUX key, enter ANY SAT code found in the code book and then follow the steps below.
Manual code search
1.Make sure your equipment is switched on.
2.Press and hold SETUP (4) until the LED indicator lights steadily. Release SETUP
3.Press the mode key (3) that matches the equipment you want to control (for example TV).
4.Press Channel+ (9) repeatedly until the channel changes. If you step past the correct code use Channel- (9) to go back to the right code.
5.When the equipment you want to control reacts press --/- (14) to confirm the code. That’s all.
Note: If your equipment doesn't have Channel+ you can use PLAY (VCR or DVD) (22) or POWER (1) key. The search starts after the last registered code. If that was 030, the search starts at 031 until the last possible code and then goes from 000 to 029.
Note: if certain functions of your equipment can’t be controlled you will have to find a different code for your brand.
Automatic code search
1.Turn on the device you want to control.
2.Press and hold SETUP (4) until the LED indicator (2) lights steadily. Release SETUP button.
3.Press the mode button (3) that matches the equipment you wish to control. The LED
(2)blinks once.
4.Press Channel+ (9) once. After a few seconds the remote starts stepping through the code library (fast search, 1 code per second). When the device responds, you can press Channel+ (9) to switch to slow search (1 code per 3 seconds). You can step back by pressing Channel- (9) (you can step forward by pressing Channel+ (9) in case you went too far back).
5.As soon as the device responds again, press the --/- key (14) to store the code you found.
4.3. Identifying codes found
1.Press and hold SETUP (4) until the LED indicator (2) lights steadily. Release SETUP.
2.Press the mode key (3) for the equipment you want to identify (TV, VCR, DVD, SAT or AUX). The LED blinks once.
3.Press again SETUP. The LED blinks once.
4.To identify the first digit press each number button from 0 - 9 (11) until the LED blinks. The number you pressed is the first digit of the code.
5.Press each number key from 0 - 9 as above to find the second digit.
6.Press each number key from 0 - 9 as above to find the third digit. When the third digit has been found the LED will go off.
ENGLISH
PC CONTROL |
11 |

4.4. Default Volume Control for satellite
Because some SAT decoders may not have volume control, the PC Control remote can control the television's volume in SAT mode (no need to select TV mode). To choose the equipment that the Mute and Volume keys will control in SAT mode, just proceed as follow:
1.Press and release the TV Mode button (3) - remote must be in TV mode for this procedure.
2.Press and hold SETUP (4) button until LED remains on.
3.Release SETUP button.
4.Press and hold the Mute (12) key for approximately 8 seconds. LED will stay off for the 8 second period, then blink once to indicate volume default acceptance and then remain off.
5.Remote volume default is now set.
6.If the PC Control remote was previously controlling the television volume in SAT mode, it will now control the volume of the satellite decoder. If it was previously controlling the volume of the satellite decoder, it will now control the volume of the television.
5. Controlling home automation modules
The PC Control remote allows you to control all electric appliances you have in your house. In addition to transmitting infrared signals, which controls your TV, VCR, SAT, DVD and AUX, your remote is equipped with a radio transmitter sending Marmitek X10 signals, which will enable you to control lamps and electric appliances from a distance.
Here are some examples that you can do with your PC Control remote using home automation mode:
•Switch on/off, dim lights while you watch TV.
•Switch on the lights at night to frighten intruders when you detect something suspicious.
•Switch on your electric blanket before the film ends to have it warm when you go to sleep.
For controlling your lamps or appliances, you will need additional home automation modules. The modules are simply plugged into AC outlets with no additional wiring required. Visit www.marmitek.com for more information.
To switch on/ off an appliance plugged into an home automation module: Press the  key (3), then press the unit code of the home automation module on the key pad (11) and then press CHAN+ / - (9).
To dim/bright a light plugged into a home automation module: press its unit code on the key pad (11) and then press VOL+ / - (10).
To turn ON all the home automation Lamp modules: Press the Power key (1). To turn Off all the home automation modules (Lamp and appliance): press the Mute key (12).
5.1. Changing the home automation House Code
The preset house code is A and in the majority of cases it is not necessary to change this setting except if there is interference from neighbouring Marmitek X10 systems. In that case:
1.Press and hold SETUP (4) until the LED lights continuously.
12 |
MARMITEK |

2.Release the SETUP (4) button.
3.Use the digit keys to enter the number equivalent to the chosen home code (1=A, 2=B, ... 16=P).
4.Press the --/- (14) to confirm your command. The LED will turn off.
Note : The code you have chosen has to be the same as the one selected on the Transceiver module TM13 or the security console, with which you use your remote.
5.2. Programming the Home Automation IR/RF mode
Your PC remote control can control your electric appliances using infrared signals (via an infrared mini-controller IR7243) or RF signals (via a transceiver module TM13). The  key is set to RF mode by factory setting.
To program the  (AUX) key to send an Infrared signal, proceed as follow
Press and hold SETUP (4) until the LED indicator (2) lights steadily. Release SETUP. Press and release the  (AUX) key
Enter the 3 digit code 821.
The LED (2) turns off after the last digit is entered. If you entered a wrong code the LED blinks for 3 seconds and then goes off.
To program the  (AUX) key to send radio signals, proceed as follow
Press and hold SETUP (4) until the LED indicator (2) lights steadily. Release SETUP. Press and release the  (AUX) key
Enter the 3 digit code 820.
The LED (2) turns off after the last digit is entered. If you entered a wrong code the LED blinks for 3 seconds and then goes off.
6. Troubleshooting
A/V mode
The remote doesn’t work or loses codes entered
•Confirm with your original remote that the equipment works correctly.
•Make sure that you have pressed the corresponding mode key of the equipment or device that you want to control.
•If the listed code does not work, try the AUTOSEARCH method or enter the next code of that brand.
•Check that the batteries have the correct polarity position.
•The programming of the remote requires 4 AAA Alkaline batteries (new). If the remote looses codes within a few days/weeks the problem can be solved by using 4 new batteries from the same brand.
•If the LED is lit permanently, in general it will be necessary to replace the batteries.
•Set the remote back to factory default (see end of this paragraph).
PC modes
NO mouse or PC operation at all
•ensure the remote is in PC mode by pressing the PC button before you operate the mouse pad, mouse buttons or any of the other keys.
•Ensure that the CM21A Receiver is plugged into your USB port.
•Ensure that a compatible driver is loaded (by installing ShowShifter software see 3.1).
•Set the remote back to factory default (see end of this paragraph).
ENGLISH
PC CONTROL |
13 |

Home automation mode
The transceiver module doesn't respond to the remote
•Check the house code of the Transceiver Module is set to A. If you have change the Housecode on the remote (see 5.1), check that it matches the Housecode on the module.
•Check that you have power to the AC outlet where the transceiver is plugged in.
•Check that your remote is programmed with the RF code (see 5.2.)
The transceiver Module works, but other modules don't respond
•Check that the module has the same Housecode as the Transceiver Module.
•Try plugging the Module into a different AC outlet.
•Set the remote back to factory default setting (see end of this paragraph).
How to maximize the RF range
To obtain the best RF range, locate the receiver as far away from your PC as possible. This is to avoid unwanted interference of the PC Control’s signals, due to RF radiation from your PC’s microprocessor.
How to set the PC Control Remote back to factory default
•Press and hold SETUP (4) until the LED indicator (2) lights steadily. Release SETUP.
•Press and release the STOP key (23) twice.
•Press and release the MUTE key (12).
•The LED (2) turns off after few seconds.
For more information, software updates and FAQ’s VISIT WWW.MARMITEK.COM
Important
The PC Control must be used only in the way described in this instruction manual and may not be used for a purpose not intended.
14 |
MARMITEK |

Allgemeiner Sicherheitshinweis
Technische Manipulationen oder Veränderungen des Produktes sind aus Sicherheitsund Zulassungsgründen nicht gestattet.
Bitte sorgen Sie dafür, dass das Gerät korrekt eingestellt ist - nutzen Sie Ihre Bedienungsanleitung. Kinder sollten das Gerät nur unter Aufsicht der Eltern benutzen.
Vermeiden Sie Folgendes
•starke mechanische Abnutzung
•hohe Temperaturen
•starke Vibrationen
•hohe Luftfeuchtigkeit
Bitte beachten Sie auch die zusätzlichen Sicherheitshinweise in den verschiedenen Abschnitten der Bedienungsanleitung.
Um sicherzustellen, dass das Gerät richtig eingestellt ist, lesen Sie die Bedienungsanleitung und die Sicherheitshinweise aufmerksam durch.
Batteriewechsel
Das Gerät darf nur mit 4 AAA Alkalibatterien betrieben werden - versuchen Sie niemals es an eine andere Stromversorgung anzuschließen. Wenn Sie die Batterien einlegen, stellen Sie sicher, dass dies mit der richtigen Polarität erfolgt. Wenn das Gerät für einen längeren Zeitraum nicht benutzt wird, entfernen Sie die Batterien aus dem Gerät. Achten Sie darauf, dass die Batterien nicht kurzgeschlossen und nicht ins Feuer geworfen werden (Explosionsgefahr).
Batterien gehören nicht in die Hände von Kindern. Lassen Sie Batterien nicht offen herumliegen - sie können durch Kinder oder Tiere verschluckt werden. Sollte dies geschehen, suchen Sie unverzüglich einen Arzt auf.
Leckende oder beschädigte Batterien können bei Kontakt mit der Haut Verbrennungen oder Verätzungen verursachen - falls erforderlich, verwenden Sie geeignete Handschuhe.
Bitte entsorgen Sie Batterien entsprechend den gesetzlichen Bestimmungen.
PC-Fernbedienung
Inhalt
1. |
Einführung |
16 |
2. |
Einlegen der Batterien |
16 |
3. |
PC Control Betrieb |
16 |
|
3.1. Softwareund CM21A-Installation |
16 |
|
3.2. Betrieb |
17 |
|
3.3. Funktion der Fernbedienungstasten im PC-Modus |
18 |
|
3.4. Minimale Anforderungen an den PC |
20 |
4. |
A/V-Funktionalität |
20 |
|
4.1. Funktion der Fernbedienungstasten beim TV Videorecorder, DVD, SAT und |
20 |
|
Haustechnik-Modus |
20 |
|
4.2. Programmieren der TV-, Videorecorder-, DVD-, SATund AUX-Modi |
23 |
|
4.3. Erkennungscode gefunden |
25 |
DEUTSCH
PC CONTROL |
15 |

|
4.4. Standardvolumensteuerung für Satelliten |
25 |
5. |
Steuerungsmodule Haustechnik |
25 |
|
5.1. Verändern des Hauscodes für die Haustechnik |
26 |
|
5.2. Programmieren des Haustechnik-Codes (IR oder RF) |
26 |
6. |
Fehlersuche |
27 |
1. Einführung
Die PC-Fernbedienung kann als drahtlose Maus und als allgemeine Fernbedienung verwendet werden.
Für die Bedienung eines PCs arbeitet die PC-Fernbedienung mit dem drahtlosen USBEmpfänger CM21A (in Ihrem PC-Fernbedienungsset enthalten).
Die PC-Fernbedienung wurde konstruiert um bis zu 6 Geräte (TV, Videorecorder, DVD, SAT, PC und Haustechnikmodule oder jedes andere Gerät mit AUX-Modusschlüssel) zu steuern. Die PC-Fernbedienung enthält eine Codebibliothek, mit der die Fernbedienung vorprogrammiert wurde. Diese Bibliothek deckt nahezu alle Audio-/Video-Produkte des aktuellen Marktes ab.
2. Einlegen der Batterien (immer NEUE AAA Alkalibatterien verwenden)
1.Öffnen Sie die Abdeckung auf der Rückseite der PC-Fernbedienung.
2.Legen Sie 4 AAA Alkalibatterien ein und prüfen Sie, ob sie mit dem Pluspol der Batterie in derselben Position wie innen im Batteriefach angegeben, richtig eingelegt wurden.
3.PC Control Betrieb
Die PC-Fernbedienung arbeitet mit dem schnurlosen USB-Empfänger CM21A. Die Fernbedienung sendet schnurlose Funkfrequenzsignale zum CM21A-Empfänger, der mit dem USB-Anschluss des Computers verbunden ist.
Die beiliegende CD enthält eine besondere Version der populären ShowShifter-Software. Sie können ShowShifter zur Steuerung der Multimediafunktionen Ihres Computers verwenden. Damit Sie die Informationen auf dem Bildschirm Ihres Computers aus einiger Entfernung lesen können, verwendet ShowShifter spezielle Schriften und große Schaltflächen. Sie können die Informationen sogar auf dem Bildschirm Ihres Fernsehers anzeigen (dafür benötigt Ihr Computer einen TV-Anschluss).
TIPP: Wissen Sie, dass Sie Ihren Computer schnurlos an Ihren Fernseher anschließen können, sogar von einem anderen Zimmer aus? Mit dem auf Wunsch erhältlichen "PC to TV"-Sender von Marmitek (REF: 09516) können Sie es. Für mehr Informationen besuchen Sie www.marmitek.com.
3.1. Softwareund CM21A-Installation
1.Deaktivieren oder schalten Sie Ihre Antivirus-Software aus, bevor Sie die Software installieren, da einige Antivirus-Programme die Installation behindern. Vergessen Sie nicht, nach der Installation Ihr Antivirus-Programm wieder einzuschalten.
2.Installieren Sie DirectX9.0 von der CD-Rom oder laden Sie es von der Microsoft Webseite herunter: www.microsoft.com/directx/homeuser/downloads/default.asp
Wenn auf Ihrem Computer Windows XP läuft, brauchen Sie DirectX nicht zu
16 |
MARMITEK |

installieren, da es bereits installiert wurde.
3.Wenn Sie komprimierte Videodateien und MP3-Dateien abspielen wollen, dann installieren Sie den Windows Media Player 9 von der CD-Rom oder laden Sie ihn von der Microsoft Webseite herunter: www.microsoft.com/windows/mediaplayer/en/default.asp
4.Starten Sie das ShowShifter-Installationsprogramm von der CD. Wenn die CD nicht automatisch startet, so starten Sie ShowShifter-Setup-1.55.2177.exe manuell.
5.Befolgen Sie während der Installation die Anweisungen auf dem Bildschirm. Sie werden über verfügbare ShowShifter-Upgrades informiert werden. Sie brauchen jetzt kein Upgrade auszuführen.
6.Die Installation der Software wird auch das "X10 Hardware (TM) Setup"-Programm starten, das verschiedene X10-Treiber in Ihr Betriebssystem (einschließlich dem CM21A-Treiber) installiert. Befolgen Sie die Anweisungen auf dem Bildschirm. Am geeigneten Zeitpunkt während der Installation werden Sie gebeten, den CM21AStecker (nutzt denselben Treiber wie das CM19A USB Firecracker - Transceiver) in den USB-Anschluss Ihres Computers zu stecken und auf "OK" zu klicken. Nachdem Sie dies getan haben, wird Windows Ihnen mitteilen, dass es neue Hardware gefunden hat und wird den CM21A-Treiber automatisch installieren.
DEUTSCH
Wichtiger Hinweis für Benutzer von Windows 98 und ME
Wenn während der Installation der X10-Treiber (X10-Hardware(TM)Setup) der "Add new Hardware" (Assistent zum Hinzufügen neuer Hardware) startet, befolgen Sie diese Schritte (Achten Sie darauf, dass Sie die OK-Schaltfläche im X10-Hardware (TM)
Setup Window angeklickt haben, bevor Sie die folgenden Schritte ausführen)
a.Klicken Sie in diesem Fenster auf Next.
b.Wählen Sie "Search for the best driver for your device (recommended)" (Suche nach dem besten Treiber (empfohlen)) und klicken Sie auf Next (folgendes).
c.Im neuen Fenster wählen Sie "Specify a location" (Suchen Sie das Verzeichnis der Treiber) und klicken Sie auf die "Browse" (suchen)-Schaltfläche, um die Treiberdateien zu suchen.
d.Begeben Sie sich zum Laufwerk C: in der Auflistung und dann zu "Programm Files", "Common Files", "X10", "Driver Install" und schließlich zu "Wireless Transceivers".
e.Klicken Sie auf OK, um die Treiberdateien in diesem Ordner zu verwenden. Befolgen Sie die Anweisungen auf dem Bildschirm. Wenn Sie nach der CD von Windows 98 oder ME gefragt werden, klicken Sie auf "OK", legen Sie die Windows 98 oder ME CD ein und begeben Sie sich zum Ordner "Win98" oder "WinME". Klicken Sie auf "OK".
f.Der "X10 USB Wireless Transceiver V2.36" sollte nun auf Ihrem Betriebssystem installiert sein.
7.Wenn die Installation beendet ist, werden Sie gefragt, den Computer erneut zu starten.
8.Nachdem der Computer erneut gestartet wurde, läuft ShowShifter automatisch an. Jetzt müssen Sie ShowShifter konfigurieren: Befolgen Sie die Anweisungen auf dem Bildschirm. Für eine vollständige Beschreibung der Software lesen Sie bitte die Hilfedatei, die mit der ShowShifter-Software geliefert wird.
3.2 Betrieb
ShowShifter ermöglicht es Ihnen, die Fernbedienung wie eine schnurlose Maus zu benutzen. Sie können das Mauspad vorne auf der Fernbedienung verwenden, um den Anzeiger auf dem Computerbildschirm zu bewegen, und die 2 Drucktasten auf der linken und rechten Seite des Mauspads als linke und rechte Klicktaste.
ShowShifter gestattet es Ihnen, um DVD, CDs, Videound Musikdateien abzuspielen und live
PC CONTROL |
17 |
 Loading...