


IPIP EYEEYE
A ANYWHERE™
QUICK INSTALLATION GUIDE |
3 |
KURZ INSTALLATIONSANLEITING |
12 |
GUIDE D’INSTALLATION RAPIDE |
21 |
BREVE MANUAL DE INSTRUCCIONES |
30 |
GUIDA RAPIDA ALL’INSTALLAZIONE |
39 |
KORTE INSTALLATIE HANDLEIDING |
48 |
20309/20091117 • IP Eye Anywhere470™
ALL RIGHTS RESERVED MARMITEK ©
2 |
© MARMITEK |

o To prevent short circuits, this product should only be used inside and only in dry |
ENGLISH |
SAFETY WARNINGS |
|
spaces. |
|
Do not expose the components to rain or moisture. Do not use the product close to a |
|
bath, swimming pool etc. |
|
o Do not expose the components of your systems to extremely high temperatures or |
|
bright light sources. |
|
o In case of improper usage or if you have altered and repaired the product yourself, |
|
all guarantees expire. Marmitek does not accept responsibility in the case of improper |
|
usage of the product or when the product is used for purposes other than specified. |
|
Marmitek does not accept responsibility for additional damage other than covered by |
|
the legal product responsibility. |
|
o This product is not a toy. Keep out of reach of children. |
|
o Do not open the product: the device may contain live parts. The product should |
|
only be repaired or serviced by a qualified expert. |
|
o Only connect the adapter to the mains after checking whether the mains voltage is |
|
the same as the values on the identification tags. Never connect an adapter when it |
|
is damaged. In that case, contact your supplier. |
|
0 1 Getting Started
Package Contents
Check the items contained in the package carefully. You should have the following items. Once any item contained is damaged or missing, contact the authorized dealer of your locale.
One Marmitek IPEyeAnywhere 470 Network Camera
One Power Adapter
One screw pack and drill template
One Ethernet Cable (RJ-45 type)
One Terminal Block Connector
One Installation Wizard CD
One Quick Installation Guide
IPEyeAnywhere 470 ™ |
3 |
System Requirement
Networking
- LAN: 10Base-T Ethernet or 100Base-TX Fast
Ethernet.
Accessing the Camera using UltraView
-Platform: Microsoft® Windows® 2000/XP/Vista/7
Accessing the Camera using Web Browser
-Platform: Microsoft® Windows® 2000/XP/Vista/7
-CPU: Intel Pentium III 800MHz or above
- RAM: 512MB
- Resolution: |
800x600 or above |
- User Interface: Microsoft® Internet Explorer 6.0 or above
Mozilla Firefox 2.00 or above Apple Safari 2 or above
Hardware Requirement
-Resolution: 1024x768 or above
-1 camera: Intel Pentium III 800MHz;
512MB RAM
-2 ~ 4 cameras: Intel Pentium 4 1.3GHz; 512MB RAM
-5 ~ 8 cameras: Intel Pentium 4 2.4GHz; 1GB RAM
-9 ~ 16 cameras: Intel Pentium 4 3.4GHz; 2GB RAM
NOTE If you connect multiple cameras within the network to monitor various places simultaneously, you are recommended to use a PC with higher performance.
4 |
© MARMITEK |
1 2 Installing the Camera
Basic Installation (Surface)
The camera can be mounted to the ceiling surface directly by the following steps:
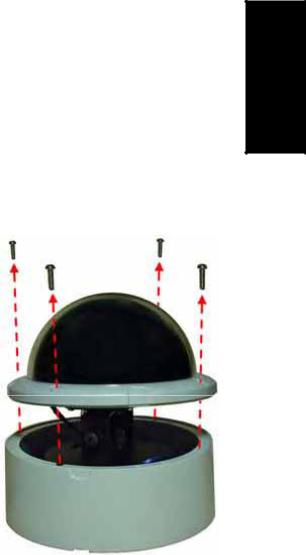
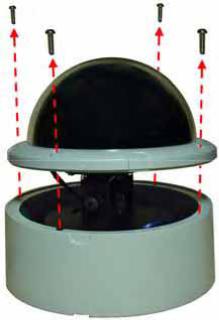
1. Remove the Dome cover by unscrewing four screws.
ENGLISH |
2. Drill three mounting holes into the ceiling and hammer the plastic anchors into the holes.
You can drill the three mounting holes precisely with the provided drill template. Put the drill template on the location where you want to install the camera, and then drill the mounting holes according to the marked position on the drill template.
IPEyeAnywhere 470 ™ |
5 |

3.Install the camera to the ceiling with three screws.
4.Make connections according to your needs.
TIP Before mounting the camera to the ceiling surface, you can cut the cutting part on the bottom of the camera’s side panel by using the pliers, so that the camera can be fitted perfectly on the ceiling and the cables can be arranged through the opening.
6 |
© MARMITEK |
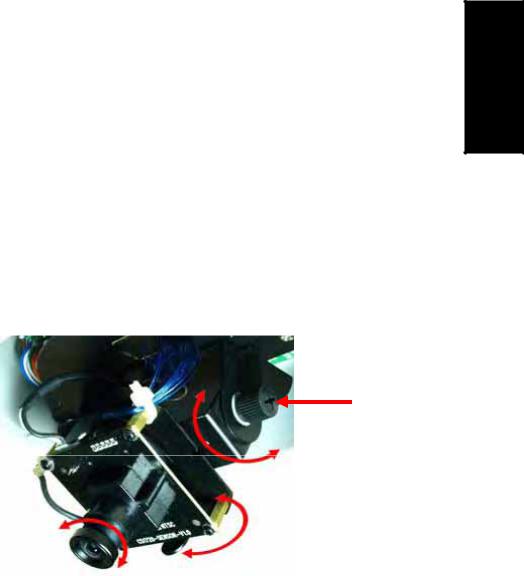
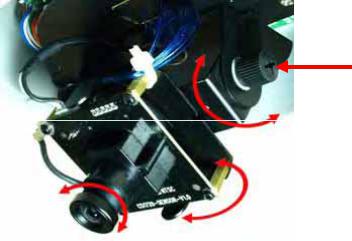
5.To capture the desired image, you can:
Tilt the camera lens to a proper position by loosing the screws ( ) and then swinging the adjustable base ( ).
Rotate the camera lens by turning the base pedestal ( ) in either clockwise or anti-clockwise direction.
Adjust the lens focus by turning the lens ring slowly ( ) in either clockwise or anti-clockwise direction.
NOTE You can review the image quality from the Web browser when you complete the installation. If the image quality is poor, you have to disassemble the Dome cover to adjust the lens focus until the desired image appears clearly.
6.Replace the Dome cover and secure with four screws.
ENGLISH |
IPEyeAnywhere 470 ™ |
7 |

3 Accessing the Camera
Using IPFinder
1.Insert the Installation CD-ROM into your computer’s CDROM drive to initiate the Auto-Run program.
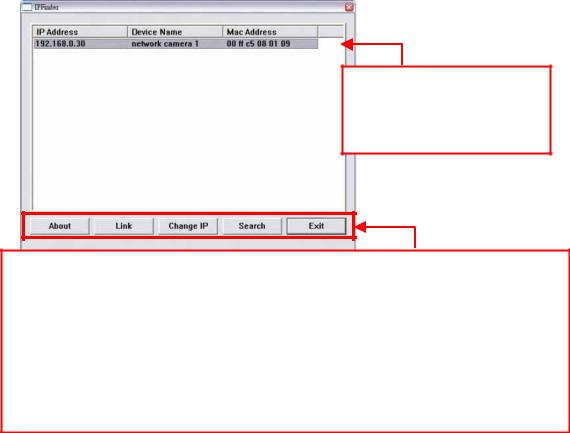
2.Click the IPFinder item to launch the utility. The control panel will appear as below.
Display the connected camera(s).
Double click to link the Camera.
Click About to get the Version information of IPFinder. Click Link to connect the selected camera.
Click Change IP to modify the IP address of the selected camera. Click Search to find the IP address of the connected camera(s). Click Exit to close the utility.
3.Once you get the IP address of the camera, launch the Web browser or UltraView to access your camera.
TIP The Installation CD-ROM provides a setup program that allows you to install IPFinder on your computer. To install IPFinder, click Install Software then select IPFinder on the Auto-Run screen.
8 |
© MARMITEK |
Accessing to the Camera
1.Since the default configuration of the camera is DHCP mode enabled, you are recommended to launch IPFinder to search the IP address that is assigned to the camera by the DHCP server, and then click Link to access the camera via the Web browser.
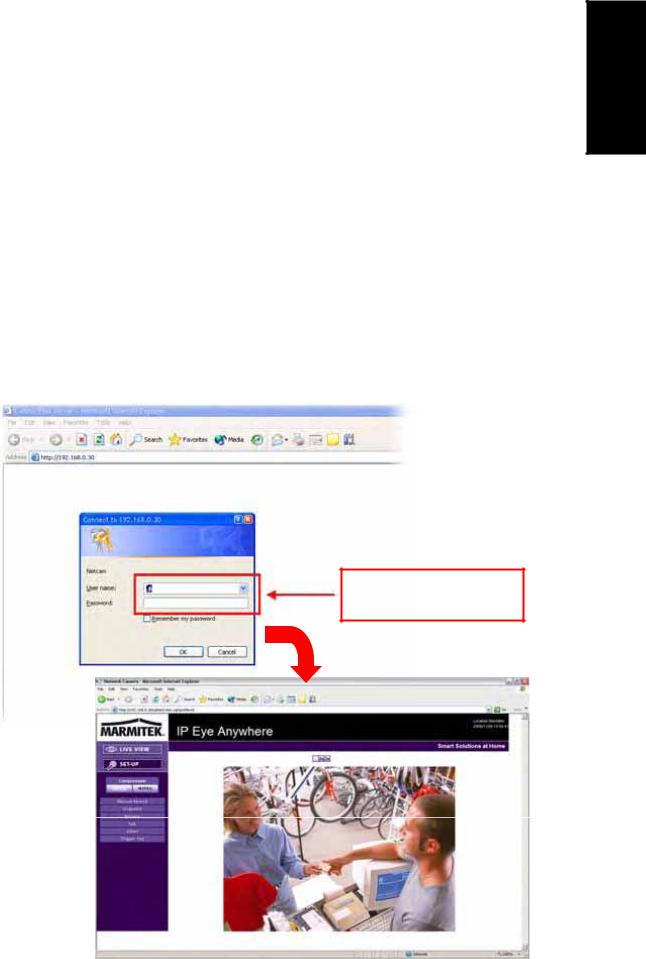
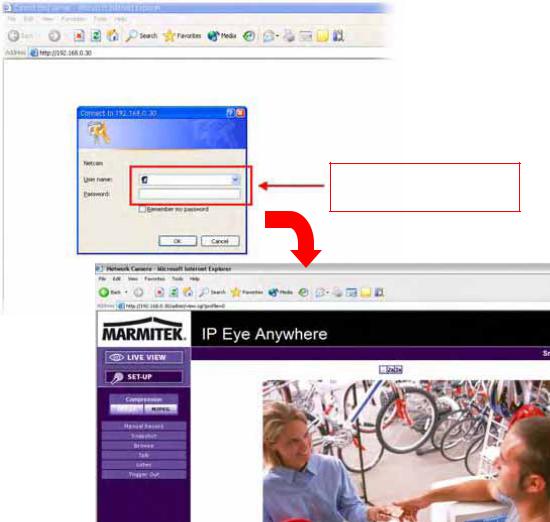
2.If Network Camera can't get IP Address under DHCP mode, the default IP Address will be 192.168.0.30.
3.When the login window appears, enter the default User name (admin) and Password (admin). Then, click the OK button to access to the main screen of the camera’s Web Configuration.
ENGLISH |
Enter the User name and Password.
IPEyeAnywhere 470 ™ |
9 |
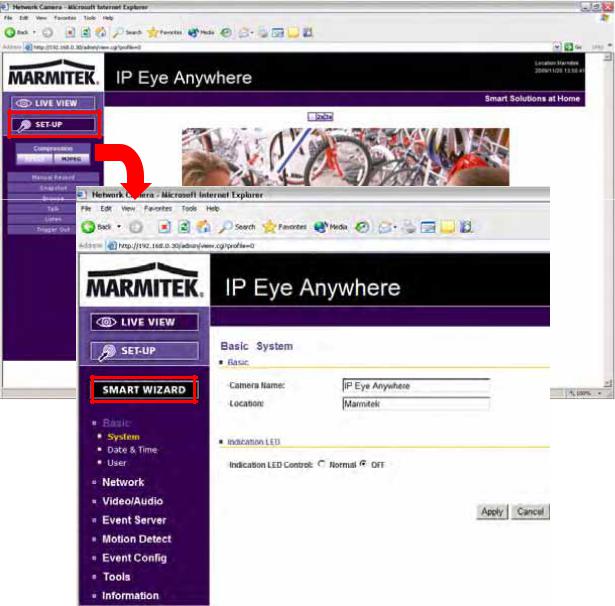
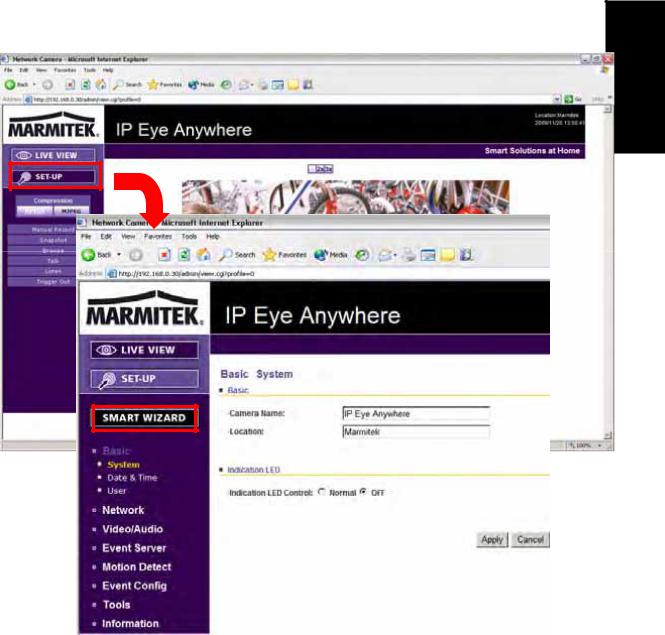
4.Click Setup and then Smart Wizard to set up your camera quickly. The Smart Wizard will guide you through the necessary settings with detailed instructions on each step.
10 |
© MARMITEK |
3 4 Tips
For more information, please refer to the Advanced Installation Guide on the provided Installation CD-ROM.
For details of operating UltraView, please refer to the Software User Guide on the provided Installation CD-ROM.
If you have any problem on the product(s), please contact your local authorized dealer.
ENGLISH |
Environmental Information for Customers in the European Union
European Directive 2002/96/EC requires that the equipment bearing this symbol on the product and/or its packaging must not be disposed of with unsorted municipal waste. The symbol indicates that this product should be disposed of separately from regular household waste streams. It is your responsibility to dispose of this and other electric and electronic equipment via designated
collection facilities appointed by the government or local authorities. Correct disposal and recycling will help prevent potential negative consequences to the environment and human health. For more detailed information about the disposal of your old equipment, please contact your local authorities, waste disposal service, or the shop where you purchased the product.
IPEyeAnywhere 470 ™ |
11 |
SICHERHEITSHINWEISE
o Um Kurzschluss vorzubeugen, dieses Produkt bitte ausschließlich innerhalb des Hauses und nur in trockenen Räumen nutzen. Setzen Sie die Komponenten nicht Regen oder Feuchtigkeit aus. Nicht neben oder nahe eines Bades, Schwimmbades usw. verwenden.
o Setzen Sie die Komponente Ihres Systems nicht extrem hohen Temperaturen oder starken Lichtquellen aus.
o Bei einer zweckwidrigen Verwendung, selbst angebrachten Veränderungen oder selbst ausgeführten Reparaturen verfallen alle Garantiebestimmungen. Marmitek übernimmt bei einer falschen Verwendung des Produkts oder bei einer anderen Verwendung des Produktes als für den vorgesehenen Zweck keinerlei Produkthaftung. Marmitek übernimmt für Folgeschäden keine andere Haftung als die gesetzliche Produkthaftung.
o Dieses Produkt ist kein Spielzeug. Außer Reichweite von Kindern halten. o Das Produkt niemals öffnen: Das Gerät kann Teile enthalten, worauf
lebensgefährliche Stromspannung steht. Überlassen Sie Reparaturen oder Wartung nur Fachleuten.
o Schließen Sie den Netzadapter erst dann an das Stromnetz an, nachdem Sie überprüft haben, ob die Netzspannung mit dem auf dem Typenschild angegeben Wert übereinstimmt. Schließen Sie niemals einen Netzadapter an, wenn diese beschädigt sind. In diesem Fall nehmen Sie Kontakt mit Ihrem Lieferanten auf.
1 INBETRIEBNAHME
Lieferumfang
Kontrollieren Sie den Inhalt der Verpackung sorgfältig. Sie sollten über die folgenden Teile verfügen. Bitte kontaktieren Sie den offiziellen Händler, falls Teile fehlen oder beschädigt sind.
Ein Marmitek IPEyeAnywhere 470 Netzwerkkamera
Ein Netzteil
R Eine Schraubenpackung und eine Bohrschablone
Ein Ethernet Kable (Typ RJ-45)
Eine Anschlussklemmleiste
Eine Installation Wizard CD
Eine kurze Installationsanleitung(Quick Installation Guide)
12 |
IPEyeAnywhere 470 |

SytemAnforderung
Vernetzung
- LAN: 10Base-T Ethernet oder 100Base-TX
Fast Ethernet.
Zugang zur Kamera mittels UltraView
- Plattform: Microsoft® Windows®
2000/XP/Vista/7.
Zugang zur Kamera mittels Webbrowser
- Plattform: Microsoft® Windows®
2000/XP/Vista/7
- Prozessor: Intel Pentium III 800MHz oder darüber
-Arbeitsspeicher: 512MB
-Auflösung: 800x600 oder darüber
-Benutzeroberfläche: Microsoft® Internet Explorer 6.0
oder darüber
Mozilla Firefox 2.00 oder darüber Apple Safari 2 oder darüber
Hardwareanforderung
-Auflösung: 1024x768 oder darüber
-1 Kamera: Intel Pentium III 800MHz; 512MB RAM
-2 ~ 4 Kameras: Intel Pentium 4 1.3GHz; 512MB RAM
-5 ~ 8 Kameras: Intel Pentium 4 2.4GHz; 1GB RAM
-9 ~ 16 Kameras: Intel Pentium 4 3.4GHz; 2GB RAM
DEUTSCH |
Achtung Wenn Sie mehrere Kameras im Netzwerk verbinden, um verschiedene Orte gleichzeitig zu überwachen, empfehlen wir Ihnen die Verwendung eines PC mit einer höheren Leistung.
© MARMITEK |
13 |
2 KAMERA INSTALLIEREN
Grundinstallation (Oberfläche)
Die Kamera kann direkt durch die folgenden Schritte an der Deckenoberfläche angebaut werden:
1.Entfernen Sie die Kuppelhaube indem sie vier Schrauben abschrauben.
2.Bohren Sie drei Montagelöcher in die Decke und hämmern Sie die Kunststoffanker in die Löcher.
Sie können die drei Montagelöcher genau mit der mitgelieferten Bohrschablone bohren. Setzen Sie die Bohrschablone an den Ort, an welchem Sie die Kamera installieren möchten, und bohren Sie dann die Montagelöcher entsprechend der markierten Position auf der Bohrschablone.
14 |
IPEyeAnywhere 470 |

3.Installieren Sie die Kamera an der Decke mit drei Schrauben.
DEUTSCH |
4. Stellen Sie Verbindungen nach Ihren Wünschen her.
TIP Vor der Montage der Kamera an der Deckenoberfläche können Sie die Ausstanzung an der Unterseite der Seitenplatte der Kamera mit der Zange vornehmen, so dass die Kamera perfekt auf die Decke passt und die Kabel durch die Öffnung eingelassen werden kann.
Ausstanzung
© MARMITEK |
15 |
5.Um das gewünschte Bild festzuhalten, können Sie:
Kippen Sie die Kameralinse auf eine angemessene Position, indem Sie die Schrauben auf ( ) lösen und dann drehen Sie die verstellbare Basis ( ).
Drehen Sie die Kameralinse durch Drehen der Basissockel ( ) entweder im Uhrzeigersinn oder im Gegenuhrzeigersinn.
Stellen Sie den Linsenfokus durch Drehen des Linsenringes langsam ( ) entweder im Uhrzeigersinn oder im Gegenuhrzeigersinn.
Achtung Sie können die Bildqualität beim Abschließen der Installation vom Webbrowser aus überprüfen. Wenn die Bildqualität schlecht ist, müssen Sie die Kuppelhaube zerlegen, um den Linsenfokus abzustimmen, bis das gewünschte Bild klar und deutlich erscheint.
6.Ersetzen Sie die Kuppelhaube und befestigen sie mit vier Schrauben.
16 |
IPEyeAnywhere 470 |
3 ZUGREIFEN AUF DIE KAMERA
Verwenden des IPFinder
1. |
Legen Sie die Installations-CD-ROM in Ihr optisches |
|
||
|
||||
|
Laufwerk ein. Die Software startet automatisch. |
DEUTSCH |
||
2. |
Klicken Sie auf das Objekt IPFinder, um das |
|||
|
Dienstprogramm zu starten. Die nachstehend abgebildete |
|||
|
Bedienoberfläche öffnet sich. |
|||
|
|
|
|
|
|
|
|
|
|
|
|
|
|
|
Zeigt verbundene
Kameras.
Doppelklick, um die
Kamera anzuschließen.
Klicken Sie auf About [Über], um die Fassung (Version) von IPFinder zu erkennen.
Klicken Sie auf Link [Anschluß], um die vorgewahlte Kamera anzuschliessen. Klicken Sie auf Change IP [IP ändern], um die IPAdresse der ausgewählten Kamera zu ändern.
Klicken Sie auf Search[Suchen], um die IP-Adresse(n) der verbundenen Kamera(s) zu finden.
Klicken Sie auf Exit [Beenden], um das Dienstprogramm zu schließen
3.Nachdem Sie die IP-Adresse der Kamera erhalten haben, starten Sie bitte Ihren Webbrowser oder UltraView, um auf die Kamera zuzugreifen.
TIP Die Installations-CD-ROM enthält ein Einrichtungsprogramm, mit dem Sie IPFinder auf Ihrem Computer installieren können. Klicken Sie auf Install Software [Software installieren], wählen Sie dann IPFinder im geöffneten Fenster, um IPFinder zu installieren.
© MARMITEK |
17 |
So greifen Sie auf die Kamera zu
1.Da der DHCP-Modus in der Vorgabekonfiguration der Kamera aktiviert ist, empfehlen wir Ihnen, den IPFinder zu starten, um nach der IP-Adresse zu suchen, die der Kamera vom DHCPServer zugewiesen wird. Anschließend klicken Sie auf Link (Verbinden), um über den Webbrowser auf die Kamera zuzugreifen.
2.Wenn die Netzwerk-Kamera keine IP-Adresse unter DHCPModus bekommen kann, wird die Netzwerk-Kamera die Standard-IP-Adresse 192.168.0.30 haben.
3.Wenn das Anmeldungsfenster erscheint, geben Sie bitte den Standardbenutzernamen (admin) und das Standardkennwort (admin) ein. Klicken Sie anschließend auf OK, um die Hauptseite der Kamera-Webkonfiguration zu öffnen.
Benutzernamen und
Kennwort eingeben.
18 |
|
IPEyeAnywhere 470 |
4.Klicken Sie auf Setup [Einstellen] und dann auf Smart Wizard [Intelligenter Assistent], um Ihre Kamera schnell einzustellen. Der Assistent führt Sie mit detaillierten Erläuterungen durch die notwendigen Schritte.
DEUTSCH |
© MARMITEK |
19 |

4TIPPS
Lesen Sie bitte die Erweiterte Installationsanleitung (Advanced Installation Guide) auf der beigelegten Installations-CD-ROM für weitere Informationen.
Lesen Sie bitte die Software-Bedienungsanleitung (Software User Guide) auf der beigelegten Installations-CD-ROM für Details zur Bedienung des Programms UltraView.
Falls Probleme mit dem Produkt auftreten sollten, wenden Sie sich bitte an Ihren Händler.
Umweltinformation für Kunden innerhalb der Europäischen Union
Die Europäische Richtlinie 2002/96/EC verlangt, dass technische Ausrüstung, die direkt am Gerät und/oder an der Verpackung mit diesem Symbol versehen ist nicht zusammen mit unsortiertem Gemeindeabfall entsorgt werden darf. Das Symbol weist darauf hin, dass das Produkt von regulärem Haushaltmüll getrennt entsorgt werden sollte. Es liegt in Ihrer Verantwortung, dieses Gerät und andere
elektrische und elektronische Geräte über die dafür zuständigen und von der Regierung oder örtlichen Behörden dazu bestimmten Sammelstellen zu entsorgen. Ordnungsgemäßes Entsorgen und Recyceln trägt dazu bei, potentielle negative Folgen für Umwelt und die menschliche Gesundheit zu vermeiden. Wenn Sie weitere Informationen zur Entsorgung Ihrer Altgeräte benötigen, wenden Sie sich bitte an die örtlichen Behörden oder städtischen Entsorgungsdienste oder an den Händler, bei dem Sie das Produkt erworben haben.
20 |
IPEyeAnywhere 470 |
 Loading...