


IP CAMERA
IP CAMERA
SERIESSERIES
IP Eye Anywhere - 10 - 11 - 20 - 21
IP RoboCam - 10 - 11 - 21
QUICK INSTALLATION GUIDE |
3 |
KURZ INSTALLATIONSANLEITING |
11 |
GUIDE D’INSTALLATION RAPIDE |
19 |
BREVE MANUAL DE INSTRUCCIONES |
27 |
GUIDA RAPIDA ALL’INSTALLAZIONE |
35 |
KORTE INSTALLATIE HANDLEIDING |
43 |
20272 / 20080623 • IP Eye Anywhere™ / IP RoboCam™
ALL RIGHTS RESERVED MARMITEK ©
2 |
© MARMITEK |

SAFETY WARNINGS
• To prevent short circuits, this product should only be used inside and only in dry spaces. |
ENGLISH |
|
Do not expose the components to rain or moisture. Do not use the product close to a |
||
|
||
bath, swimming pool etc. |
|
|
• Do not expose the components of your systems to extremely high temperatures or bright |
|
|
light sources. |
|
|
• In case of improper usage or if you have altered and repaired the product yourself, all guarantees |
|
|
expire. Marmitek does not accept responsibility in the case of improper usage of the product |
|
|
or when the product is used for purposes other than specified. Marmitek does not accept |
|
|
responsibility for additional damage other than covered by the legal product responsibility. |
|
|
• This product is not a toy. Keep out of reach of children. |
|
|
• Do not open the product: the device may contain live parts. The product should only be |
|
|
repaired or serviced by a qualified expert. |
|
|
• Only connect the adapter to the mains after checking whether the mains voltage is |
|
|
the same as the values on the identification tags. Never connect an adapter when it is |
|
|
damaged. In that case, contact your supplier. |
|
1 GETTING STARTED
Package Contents
Check the items contained in the package carefully. You should have the following items. Once any item contained is damaged or missing, contact the local authorized dealer.
One Marmitek IP Camera with built-in web server
One Power Adapter
One External Antenna*
One Wall/ceiling bracket
One RJ45 network cable
One GPIO Connector**
One Installation CD-ROM with Ultra View software package and user manual (English)
One Quick Installation manual
System Requirement
■ Networking |
|
LAN: |
10Base-T Ethernet or 100Base-TX Fast Ethernet |
WLAN: |
IEEE 802.11b/g (for wireless model) |
■ Accessing the Camera using Web Browser |
|
Platform: |
Microsoft® Windows® 2000/XP/Vista/7 |
CPU: |
Intel Pentium III 800MHz or above |
RAM: |
128MB****** or 512MB*** |
Resolution: |
800x600 or above |
User Interface: Microsoft® Internet Explorer 6.0 or above
Mozilla Firefox 2.00 or above
Apple Safari 2 or above
*IP Eye Anywhere 11, IP Eye Anywhere 21, IP RoboCam 11, IP RoboCam 21 - ** IP RoboCam 10, 11, 21 |
3 |
***IP Eye Anywhere 20, 21, IP RoboCam 21 - ******IP Eye Anywhere 10, 11, IP RoboCam 10, 11 |
■ UltraView software
Platform: |
Microsoft® Windows® 2000/XP/Vista/7 |
CPU: |
Intel Pentium III 800MHz or above and 512MB RAM |
|
for 1 camera connected |
CPU: |
Intel Pentium 4 3.4 GHz or above and 2GB RAM |
|
for 9 ~16 camera connected |
Resolution: |
1024x768 or above |
2 SETTING UP THE CAMERA
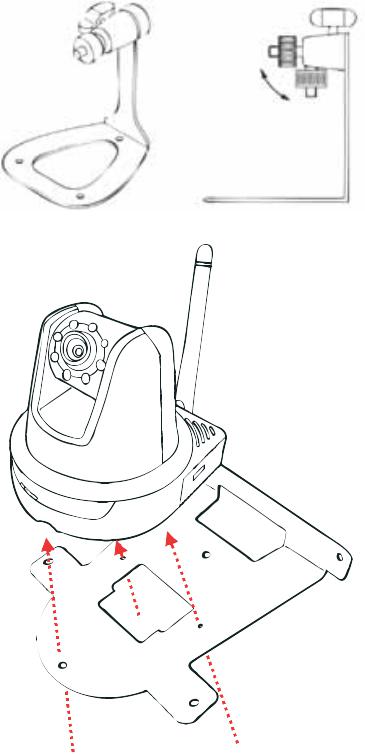
Installing the Camera Stand
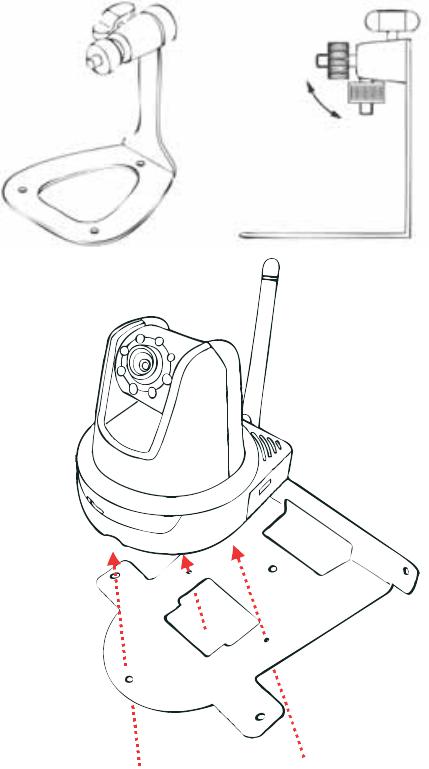
The IP Eye Anywhere comes with a camera stand, which uses a swivel ball screw head to lock to the camera’s screw hole. When the camera stand is attached, you can place the camera anywhere by mounting the camera through the three screw holes located in the base of the camera stand.
Installing the Wall Mount Kit
The IP RoboCam comes with a Wall Mount Kit, which allows you to place your camera anywhere by mounting the camera through the three screw holes located in the base of the Wall Mount Kit.
4 |
© MARMITEK |
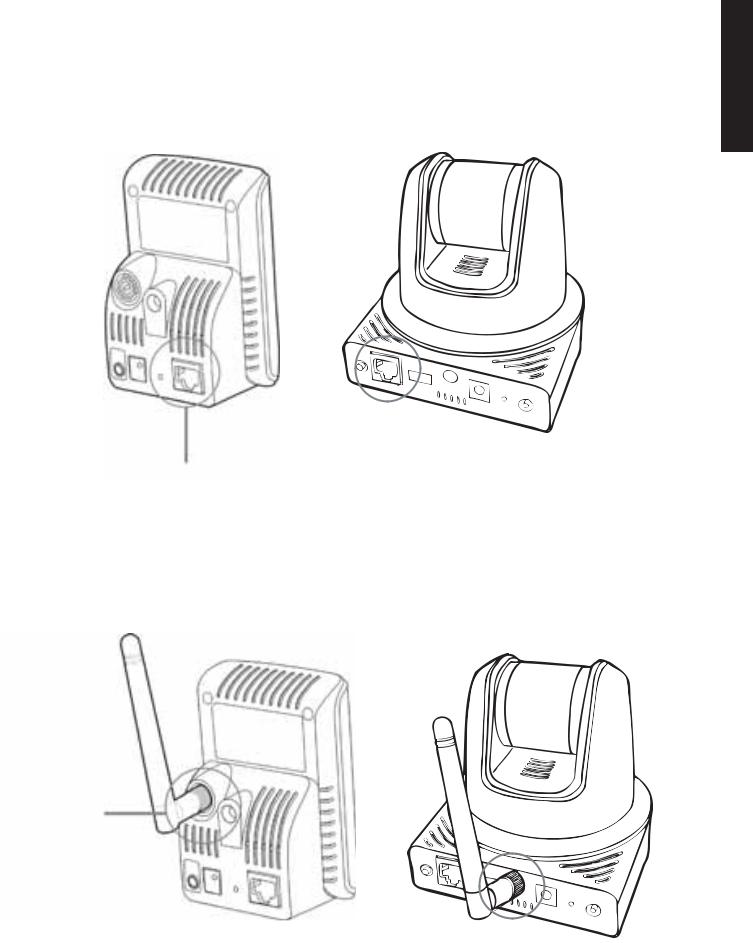
Connecting the IP Camera to LAN
Use the provided Ethernet cable to connect the camera to your local area network (LAN). When you connect the AC power adapter, the camera is powered on automatically. You can verify the power status from the Power LED on the front panel of the camera.
Once connected, the Link LED starts flashing green light and the camera is on standby and ready for use now.
ENGLISH
Connecting the Ethernet cable
Connecting the Camera to WLAN
If you use a wireless network in your application environment, you need to attach the included external antenna to the camera.
When the camera is powered on, the camera will automatically search any access point with “default” SSID.
Connecting the
External Antenna
NOTE If the camera cannot connect to your wireless network, you need to install the camera in LAN and proceed with WLAN settings.
IP EYE ANYWHERE™ / IP ROBOCAM™ |
5 |
3 ACCESSING THE CAMERA
Using IPFinder
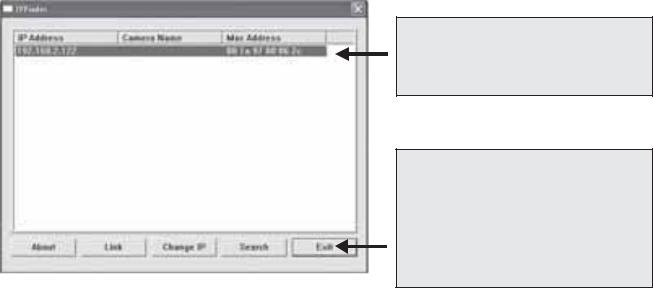
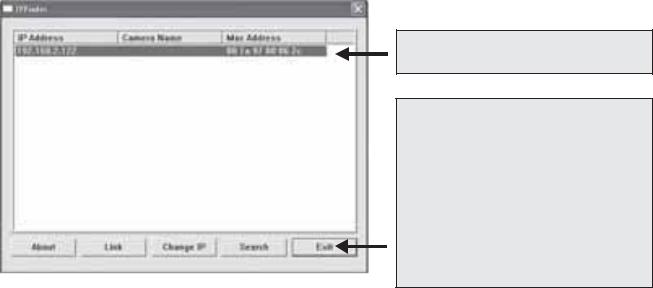
1.Insert the Installation CD-ROM into your computer’s CD-ROM drive to initiate the Auto-Run program.
2.Click the IPFinder item to launch the utility. The control panel will appear as below.
Display the connected camera(s).
Double click to link the Camera.
Click Search to find the IP address of the connected camera(s).
Click Change IP to modify the IP address of the selected camera.
Click Exit to close the utility.
3.Once you get the IP address of the camera, launch the Web browser or UltraView to access your camera.
TIP The Installation CD-ROM provides a setup program that allows you to install IPFinder on your computer. To install IPFinder, click Install Software then select IPFinder on the Auto-Run screen.
Accessing to the Camera
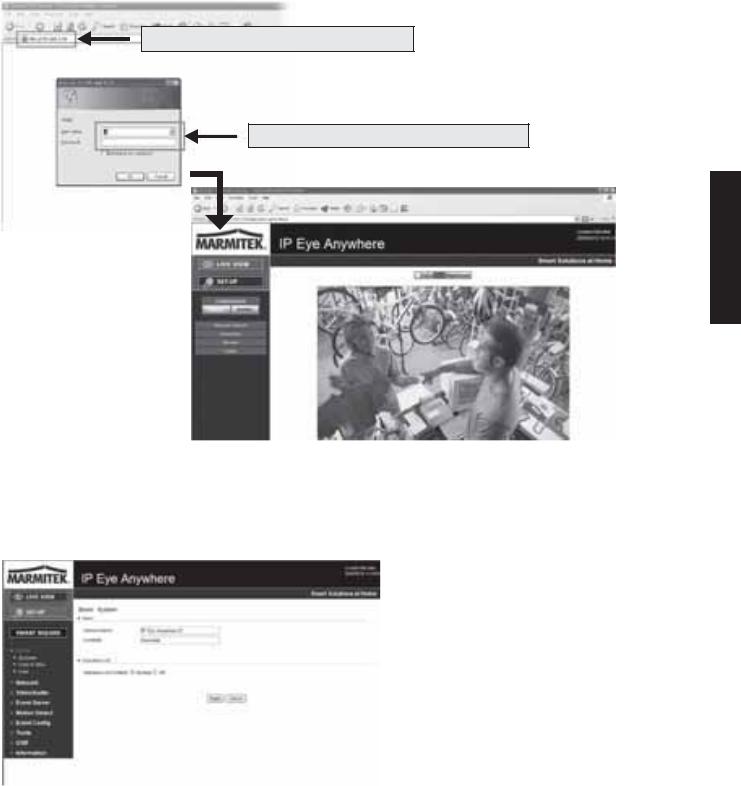
1.Open the Web browser on your computer (for example, Microsoft Internet Explorer in this guide)
2.Type the default IP address (192.168.0.30) or the IP address found by IPFinder in the Address bar, and then press [Enter].
3.When the login window appears, enter the default User name (admin) and password (admin) and press OK to access to the main screen of the camera’s Web Configuration.
4.Right click and select Install Active X Control.
5.Click Install.
6 |
© MARMITEK |
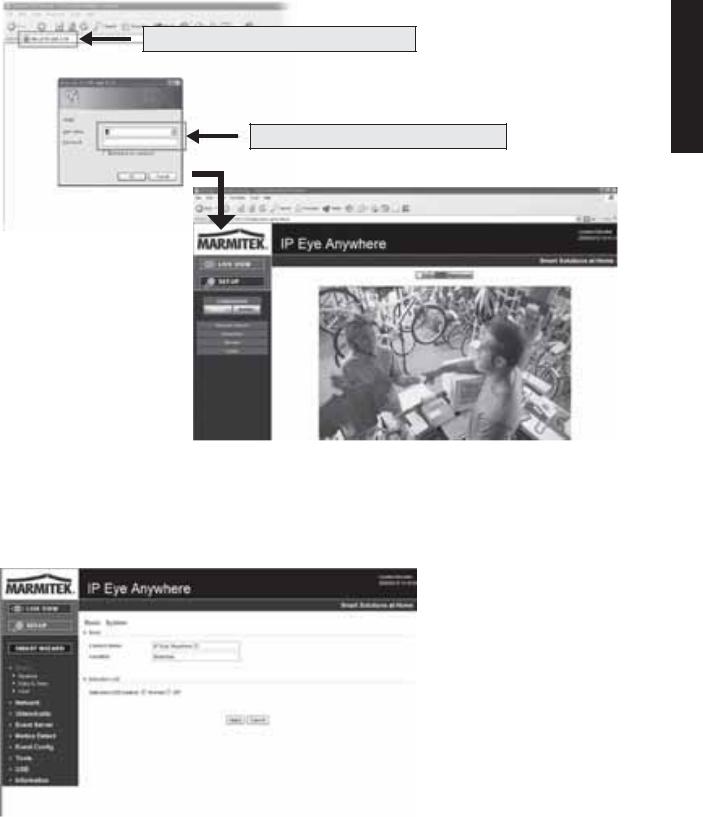
Enter the IP address of the camera here.
Enter the User name and Password.
6.Click Setup and then Smart Wizard to set up your camera quickly. The Smart Wizard will guide you through the necessary settings with detailed instructions on each step.
ENGLISH
4 TIPS
-For more information, please refer to the Advanced Installation Guide on the provided Installation CD-ROM.
-For details of operating UltraView, please refer to the Software User Guide on the provided Installation CD-ROM.
-If you have any problem on the product(s), please contact your local authorized dealer.
IP EYE ANYWHERE™ / IP ROBOCAM™ |
7 |

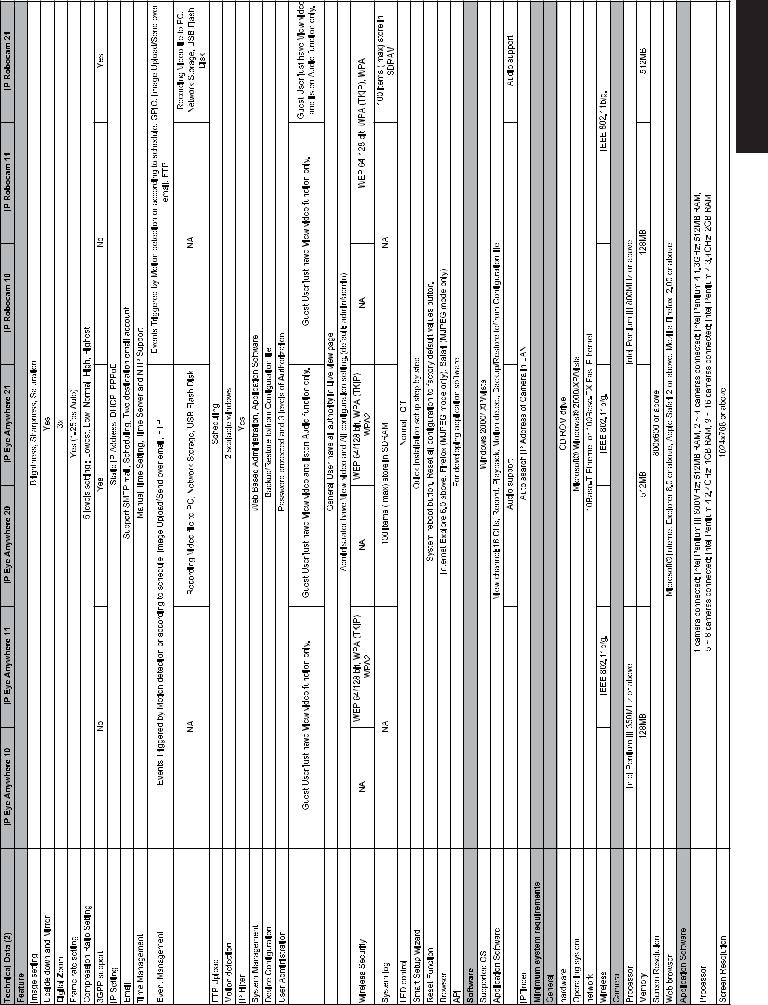
TECHNICAL DATA |
|
8 |
© MARMITEK |
ENGLISH
IP EYE ANYWHERE™ / IP ROBOCAM™ |
9 |

ATTENTION
This appliance is designed to be used in all EU and EFTA countries.
Attention: The use of this product may be restricted in the following countries:
•Belgium: 2.4 GHz Frequency. The use of this frequency may be restricted in some areas. See http://www.bipt.be for current information.
•France: 2.4 GHz Frequency. The use of channels other than: 10, 11, 12, 13 (2457, 2462, 2467, and 2472 MHz) may be restricted in some areas. See l’Autorité de Régulation des Télécommunications (http://www.art-telecom.fr) for current information.
Environmental Information for Customers in the European Union
European Directive 2002/96/EC requires that the equipment bearing this symbol on the product and/or its 
 packaging must not be disposed of with unsorted municipal waste. The symbol indicates that this product
  should be disposed of separately from regular household waste streams. It is your responsibility to dispose of this and other electric and electronic equipment via designated collection facilities appointed by the government or local authorities. Correct disposal and recycling will help prevent potential negative consequences to the environment and human health. For more detailed information about the disposal of your old equipment, please contact your local authorities, waste
disposal service, or the shop where you purchased the product.
10 |
© MARMITEK |
SICHERHEITSHINWEISE
• Um Kurzschluss vorzubeugen, dieses Produkt bitte ausschließlich innerhalb des Hauses |
|
und nur in trockenen Räumen nutzen. Setzen Sie die Komponenten nicht Regen oder |
|
Feuchtigkeit aus. Nicht neben oder nahe eines Bades, Schwimmbades usw. verwenden. |
|
• Setzen Sie die Komponente Ihres Systems nicht extrem hohen Temperaturen oder starken |
|
Lichtquellen aus. |
|
• Bei einer zweckwidrigen Verwendung, selbst angebrachten Veränderungen oder selbst |
|
ausgeführten Reparaturen verfallen alle Garantiebestimmungen. Marmitek übernimmt |
|
|
|
bei einer falschen Verwendung des Produkts oder bei einer anderen Verwendung des |
DEUTSCH |
Produktes als für den vorgesehenen Zweck keinerlei Produkthaftung. Marmitek übernimmt |
|
für Folgeschäden keine andere Haftung als die gesetzliche Produkthaftung. |
|
• Dieses Produkt ist kein Spielzeug. Außer Reichweite von Kindern halten. |
|
• Das Produkt niemals öffnen: Das Gerät kann Teile enthalten, worauf lebensgefährliche |
|
Stromspannung steht. Überlassen Sie Reparaturen oder Wartung nur Fachleuten. |
|
• Schließen Sie den Netzadapter erst dann an das Stromnetz an, nachdem Sie überprüft |
|
|
|
haben, ob die Netzspannung mit dem auf dem Typenschild angegeben Wert übereinstimmt. |
|
Schließen Sie niemals einen Netzadapter an, wenn diese beschädigt sind. In diesem Fall |
|
nehmen Sie Kontakt mit Ihrem Lieferanten auf. |
|
1 INBETRIEBNAHME
Lieferumfang
Prüfen Sie sorgfältig den Inhalt der Packung. Die folgenden Artikel sollten mitgeliefert sein. Falls irgendein Artikel fehlt oder beschädigt ist, wenden Sie sich bitte umgehend an Ihren Händler.
Eine Marmitek Netzwerkkamera
Ein Netzteil
Eine externe Antenne*
Ein Kamerafuß
Ein Ethernet-Kabel (RJ-45)
Ein GPIO-Anschluss**
Eine Installations-CD-ROM (English)
Eine Installations-Kurzanleitung
Systemanforderungen |
|
■ Netzwerkverbindung |
|
LAN: |
10 Base-T Ethernet oder 100 Base-TX Fast Ethernet |
WLAN: |
IEEE 802.11b/g (für das Drahtlos-Modell) |
■ Zugriff auf die Kamera über einen Webbrowser |
|
Plattform: |
Microsoft® Windows® 2000/XP/Vista/7 |
CPU: |
Intel Pentium III 800 MHz oder besser |
RAM: |
128 MB******, 512 MB*** |
Auflösung: |
800 x 600 oder höher |
Benutzerschnittstelle: |
Microsoft® Internet Explorer 5.0 oder aktueller |
*IP Eye Anywhere 11, IP Eye Anywhere 21, IP RoboCam 11, IP RoboCam 21 - ** IP RoboCam 10, 11, 21 |
11 |
***IP Eye Anywhere 20, 21, IP RoboCam 21 - ******IP Eye Anywhere 10, 11, IP RoboCam 10, 11 |
■ UltraView software |
|
Platform: |
Microsoft® Windows® 2000/XP/Vista/7 |
CPU: |
Intel Pentium III 800MHz oder besser und 512MB RAM für 1 |
|
angeschlossene Kamera |
CPU: |
Intel Pentium 4 3.4 GHz oder besser und 2GB RAM für 9 ~16 |
|
angeschlossene Kameras |
Auflösung: |
1024x768 oder besser |
2 EINRICHTEN DER KAMERA
Installieren des Kamerafußes |
|
|||||
Die |
IP |
Eye |
Anywhere |
wird |
mit |
|
einem |
Kamerafuß |
mit |
drehbarer |
|||
Kugellagerung |
geliefert, |
die |
in |
|||
das |
Schraubgewinde |
der |
Kamera |
|||
eingeschraubt werden kann. Nach dem Anbringen des Kamerafußes können Sie die Kamera überall aufstellen, indem Sie die drei Schraublöcher am Boden des Kamerafußes zur Befestigung verwenden.
Installation des Wandmontage-Bausatzes
Im Lieferumfang der IP RoboCam befindet sich ein Wandmontage-Bausatz, der Ihnen die Montage der Kamera an einem beliebigen Ort ermöglicht. Dabei wird die Kamera mit Hilfe der drei Schraubenlöcher befestigt, die sich an den Unterseite des Wandmontage-Bausatzes befinden.
12 |
© MARMITEK |

Verbinden der IP Kamera mit einem LAN
Verwenden Sie das beigelegte Ethernet-Kabel, um die Kamera mit Ihrem lokalen Netzwerk (LAN) zu verbinden. Sobald das Netzteil angeschlossen ist, wird die Kamera sofort mit Strom versorgt. Sie können über die Betriebs-LED an der Frontseite der Kamera den Betriebszustand des Gerätes überprüfen. Sobald die Stromversorgungsverbindung besteht, blinkt die LinkLED grün. Die Kamera ist sofort betriebsbereit.
DEUTSCH
Hier Ethernet-Kabel anschließen
Verbinden der Kamera mit einem WLAN
Wenn Sie ein drahtloses Netzwerk nutzen, müssen Sie die beigelegte externe Antenne an der Kamera anbringen.
Sobald die Kamera mit Strom versorgt wird, sucht das Gerät automatisch nach einem Zugriffspunkt mit der SSID „default”.
Anschließen der externen Antenne
HINWEIS Falls die Verbindung der Kamera mit Ihrem drahtlosen Netzwerk fehlschlägt, müssen Sie die Kamera mit einem LAN verbinden und die WLAN-Einstellungen darüber vornehmen.
IP EYE ANYWHERE™ / IP ROBOCAM™ |
13 |
3 ZUGREIFEN AUF DIE KAMERA
Verwenden des IP Finder
1.Legen Sie die Installations-CD-ROM in Ihr optisches Laufwerk ein. Die Software startet automatisch.
2.Klicken Sie auf das Objekt IP Finder, um das Dienstprogramm zu starten. Die nachstehend abgebildete Bedienoberfläche öffnet sich.
Zeigt verbundene Kameras
Auf Search [Suchen] klicken, um die IP-Adresse(n) der verbundenen Kamera(s) zu finden.
Auf Change IP [IP ändern] klicken, um die IP-Adresse der ausgewählten Kamera zu ändern.
Auf Exit [Beenden] klicken, um das Dienstprogramm zu schließen.
3.Nachdem Sie die IP-Adresse der Kamera erhalten haben, starten Sie bitte Ihren Webbrowser oder Ultra View, um auf die Kamera zuzugreifen.
Tipp Die Installations-CD-ROM enthält ein Einrichtungsprogramm, mit dem Sie IP Finder auf Ihrem Computer installieren können. Klicken Sie auf Install Software [Software installieren], wählen Sie dann IP Finder im geöffneten Fenster, um IP Finder zu installieren.
So greifen Sie auf die Kamera zu
1.Öffnen Sie Ihren Webbrowser auf Ihrem Computer (in dieser Anleitung wird der Microsoft Internet Explorer benutzt).
2.Geben Sie die Standard-IP-Adresse (192.168.0.30) oder die über IP Finder gefundene IP-Adresse in das Adressfeld ein, drücken dann die Eingabetaste.
3.Wenn das Anmeldungsfenster erscheint, geben Sie bitte den Standardbenutzernamen (admin) und das Standardkennwort (admin) ein. Klicken Sie anschließend auf OK, um die Hauptseite der Kamera-Webkonfiguration zu öffnen.
4.Klicken Sie auf die rechte Maustaste und wählen Sie Active X Control aus.
5.Klicken Sie auf Install (Installieren).
14 |
© MARMITEK |
IP-Adresse der Kamera hier eingeben.
Benutzernamen und Kennwort eingeben.
DEUTSCH
6.Klicken Sie auf Setup [Einstellen] und dann auf Smart Wizard [Intelligenter Assistent], um Ihre Kamera schnell einzustellen. Der Assistent führt Sie mit detaillierten Erläuterungen durch die notwendigen Schritte.
4 TIPPS
Lesen Sie bitte die Erweiterte Installationsanleitung auf der beigelegten Installations-CD- ROM für weitere Informationen.
Lesen Sie bitte die Software-Bedienungsanleitung auf der beigelegten Installations-CD- ROM für Details zur Bedienung des Programms Ultra View.
Falls Probleme mit dem Produkt auftreten sollten, wenden Sie sich bitte an Ihren Händler.
IP EYE ANYWHERE™ / IP ROBOCAM™ |
15 |

TECHNISCHEN DATEN |
|
16 |
© MARMITEK |

DEUTSCH
IP EYE ANYWHERE™ / IP ROBOCAM™ |
17 |
 Loading...