


CD-6000
English
4
CD TEXT
TEXT
FOREWORD
This section must be read carefully before any connection is made to the
mains supply.
WARNINGS
Do not expose the equipment to rain or moisture.
Do not remove the cover from the equipment.
Do not insert anything into the equipment through the ventilation
holes.
Do not handle the mains lead with wet hands.
CE marking
This product is in conformity with the EMC directive
and low-voltage directive.
EQUIPMENT MAINS WORKING SET-
TING
Your Marantz product complies with the household power and safety
requirements in your area.
“/N”, “/T” Version product can be powered by 230 V AC only.
IMPORTANT: (FOR /T version only)
This apparatus is fitted with an approved moulded 13 Amp plug. To
change a fuse in this type of plug proceed as follows:
1. Remove fuse cover and fuse.
2. Fix new fuse which should be a BS1362 5A, A.S.T.A. or BSI approved
type.
3. Refit the fuse cover.
If the fitted plug is not suitable for your socket outlets, it should be cut off
and an appropriate plug fitted in its place.
If the mains plug contains a fuse, this should have a value of 5A. If a plug
without a fuse is used, the fuse at the distribution board should not be
greater than 5A.
NOTE : The severed plug must be destroyed to avoid a possible shock
hazard should it be inserted into a 13A socket elsewhere.
HOW TO CONNECT A PLUG
The wires in the mains lead are coloured in accordance with the following
code:
BLUE—”NEUTRAL” (“N”)
BROWN—”LIVE” (“L”)
1. The BLUE wire must be connected to the terminal which is marked with
the letter “N” or coloured BLACK.
2. The BROWN wire must be connected to the terminal which is marked
with the letter “L” or coloured RED.
3. Do not connect either wires to the earth terminal in the plug which is
marked by the letter “E” or by the safety earth symbol
or coloured
green or green-and-yellow.
Before replacing the plug cover, make certain that the cord grip is
clamped over the sheath of the lead — not simply over the two wires.
COPYRIGHT
Recording and playback of some material may require permission. For
further information refer to the following:
– Copyright Act 1956
– Dramatic and Musical Performers Act 1958
– Performers Protection Acts 1963, and 1972
– Any subsequent statutory enactments and orders
ABOUT THIS USER’S GUIDE
Refer to the figures on the pages at the back of this user’s guide. The
callout numbers on the figures correspond to those found in the text.
• Some of the operations described in this user’s guide can only be
operated from the remote control unit. In the description of controls,
the names of the buttons which are available on both the main unit and
the remote control unit are enclosed in
, and the names of the
buttons which are available only on the remote control unit are
enclosed in
.
(The ⁄1
PEAK SEARCH
button is located only on the main unit.)
PRECAUTIONS
The following precautions should be taken when operating the equip-
ment.
GENERAL PRECAUTIONS
When installing the equipment ensure that:
– the ventilation holes are not covered.
– air is allowed to circulate freely around the equipment.
– it is placed on a vibration-free surface.
– it will not be exposed to excessive heat, cold, moisture or dust.
– it will not be exposed to direct sunlight.
– it will not be exposed to electrostatic discharges.
In addition, never place heavy objects on the equipment.
If a foreign object or water does enter the equipment, contact your
nearest dealer or service center.
Do not pull out the plug by pulling on the mains lead; grasp the plug.
It is advisable when leaving the house, or during a thunderstorm, to
disconnect the equipment from the mains supply.
FEATURES
• CD-TEXT compatibility.
• CD-RW (ReWritable) playback capability.
• Latest VAM1201 pickup mechanism.
• A double differential circuit which utilizes two D type 2-channel D/A
converters is used.
• High audio quality parts including the MARANTZ-original HDAM
circuitry.
• Highly rigid, stylish design with extensive use of aluminum front mask.
English
5
COMPACT DISCS
The glossy side shining like a rainbow is the front side of the disc, and
the side on which the label is printed is the back.
Unlike conventional turntables for playing analog discs, the CD6000/
CD6000OSE Compact Disc Player reads the information recorded on
the disc from underneath without contacting it using a beam of laser light.
Therefore, the performance of a compact disc will not degrade like
conventional analog records.
Handle discs carefully so as not to damage or scratch the front side.
To protect the disc, avoid placing it in the following locations:
– In direct sunlight or near a source of heat like a heater.
– In a place which is damp or dirty.
– In a place which could be exposed to rain, such as near a window.
Always keep the disc surface clean.
Up to six billion data units are recorded on the front side of the disc.
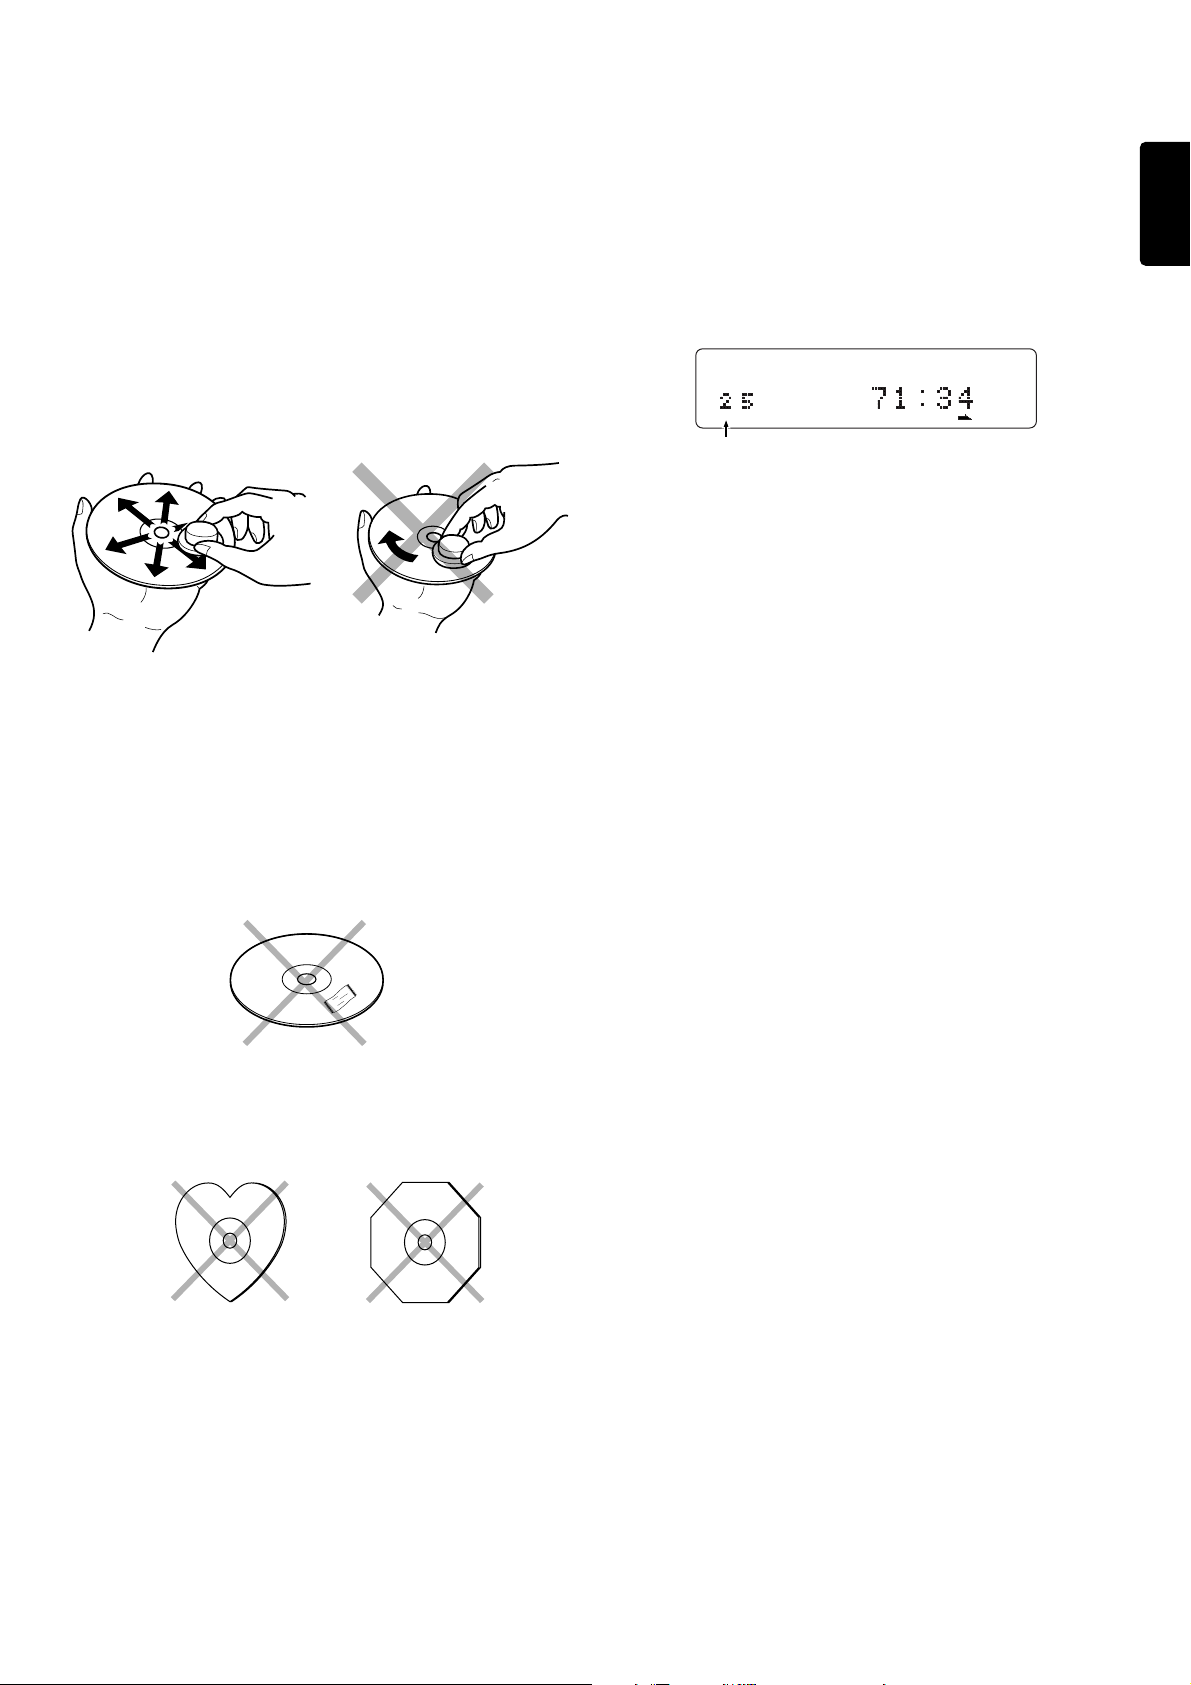
When cleaning the disc surface, always be sure to use a special
compact disc cleaner and wipe as shown below.
• Do not use conventional record cleaner for analog records, as this will
adversely affect the disc surface.
Store discs properly by placing them in their disc cases.
• Do not attach a piece of paper or sticker on the label side of disc.
When a disc has a piece of plastic tape or rental CD label with paste
protruded from the edge or when a disc has a trace of such a sticky
object, do not attempt to play the disc. If such a disc is played on the
CD player, impossibility of taking out the disc or other malfunction may
result.
• Do not use a disc with a special shape.
Do not attempt to play a disc with a special shape such as a heart-
shaped disc or octagonal disc. Otherwise the equipment malfunction
may result.
Wipe in a radial direction. Do not wipe in circumferential direction.
About CD-TEXT
The CD-TEXT is a new type of music CD featuring the recording of
character information on the performer names, album name, track
names, etc., in addition to the audio information contained in music CD.
The character information is recorded in an area which has not been
utilized by previous music CDs. This means that the CD-TEXT discs can
be played back in the same way as ordinary music CD discs on any CD
player and that a CD-TEXT compatible player such as this unit can view
the character information in them as well as the audio.
This unit detects the CD-TEXT compatibility of each disc automatically
and displays the result in the display panel.
By operating the provided remote control unit, the display can show the
character information including the album name, track names, per-
former names, verse writer names, music composer names, arranger
names, message and music genre. However, note that the content of the
character information is variable depending on discs.
* For detailed operating procedures for displaying the character infor-
mation in the CD-TEXT, read the description in the main text of this
manual.
The display of this unit can display up to 12 characters at a time. If the
character information in a disc is longer, the characters are scrolled from
the left to the right on the display.
* Scrolling refers to a method of displaying characters by moving them.
This unit is capable of smooth scrolling by feeding characters bit by
bit.
Some of the CD-TEXT compatible discs also contains the recording of
the highlight sections of its tracks. This unit is capable of playing only the
highlight sections one after another, and this feature is referred to as
HIGHLIGHT SCAN.
Playing CD-RW discs
This unit can play back the CD-RW (ReWritable) discs as well as ordinary
music CD and CD-R (Recordable) discs.
* The CD-R and CD-RW discs should contain properly-recorded TOC
information so that they can be played back. With the CD recorder
system, writing the TOC information in a disc is referred to as finalizing
the disc. A disc cannot be recognized as a CD disc and played back
unless it has been finalized properly. For details, please read the
instruction manual provided with a CD recorder.
* TOC stands for Table Of Contents and contains information such as
the total number of tracks and total playing time of the disc.
* This unit can play only the discs recorded in the CD-DA format
designed for music reproduction. Do not attempt to play a disc
containing other data, such as a CD-ROM for PCs, on this unit.
* As the playback of a CD-RW disc necessitates partial change of the
player setup, it may take longer time for reading the TOC information
than when a music CD or CD-R disc is played.
TEXT 1 2
TTL TTL TIME
34 56 78 91011121314151617181920
Lights up when the loaded disc is CD-TEXT compatible.
Main unit display

English
6
CONTROLS, CONNECTIONS
AND INDICATORS
Please read the following instructions referring to the illustration on page
122.
FRONT
zz
zz
z
POWER switch
Press to switch power ON, and press again to switch OFF.
xx
xx
x
DISC TRAY
Place a disc with the label side up.
cc
cc
c
REMOTE SENSOR
This window receives signals transmitted from the remote control unit.
vv
vv
v
Display
Shows information such as the power ON/OFF state, track number,
playing time and current operation mode.
qq
qq
q
TIME/TEXT information
Shows the time information when an ordinary music CD is played,
and shows the text information when a CD-TEXT compatible disc
is played.
ww
ww
w
TEXT (CD-TEXT) indicator
Lights up when a CD-TEXT compatible disc is loaded.
ee
ee
e
Track number indicator
When a disc is placed on the tray and the tray is closed, the TOC*
is read and the numbers of all the tracks on the disc are displayed
“
” lights up if there are more than 20 tracks on the disc. In
program mode only the track numbers of the programmed tracks
light up.
The track numbers go out in turn as each track finishes playing.
* TOC is the disc’s “Table Of Contents” and contains non-audio
data such as the track numbers and playing times of all the tracks
on the disc.
rr
rr
r
Output level indicator
Shows the analog output level as a relative reference.
tt
tt
t
DISC indicator
Blinks during TOC readout.
yy
yy
y
TTL (Total) indicator
Lights up when the total number of tracks in a disc is displayed.
uu
uu
u
RNDM (Random) indicator
Lights up in the random play mode.
ii
ii
i
PROG (Program) indicator
Lights up in the programming or delete programming mode.
oo
oo
o
TRK (Track) indicator
Lights up when the track number being played is displayed.
!0!0
!0!0
!0
EDIT indicator
Lights up when the player is in edit mode.
!1!1
!1!1
!1
A-B indicators
Both indicators light up in the A-B repeat mode or one of them
lights up during playback of tape side A or B in the edit mode.
!2!2
!2!2
!2
INDX (Index) indicator
Lights up when the index number being played is displayed.
!3!3
!3!3
!3
RPT (Repeat) indicators
RPT: Lights up during all-track repeat mode, which plays all the
tracks on the disc repeatedly. Also lights up during program
repeat mode, which plays all the programmed tracks repeatedly.
RPT 1: Lights up during 1-track repeat mode, which repeatedly
plays a single track repeatedly.
!4!4
!4!4
!4
PEAK indicator
Lights up during peak search, and flashes during playback of the
peak.
!5!5
!5!5
!5
(Pause) indicator
Light up in the pause mode.
!6!6
!6!6
!6
TTL (TOTAL) indicator
Indicates the remaining playing thme of the entire disc. In program
mode, this indicator shows the remaining playing of the current
program.
!7!7
!7!7
!7
(Play) indicator
Light up during CD playback.
!8!8
!8!8
!8
TIME indicator
Lights up in the time display mode.
bb
bb
b
PHONES Jack
Jack for connecting headphones.
nn
nn
n
EDIT button
Press to engage the editing function, which helps record a disc onto a
tape by playing the tracks according to the tape length and leaving a
non-recorded blank of 4 seconds between every track.
mm
mm
m
, (Track Previous/Next) buttons
When the button is pressed during playback, play re-starts at
the beginning of the current or a previous track. When the
button
is pressed, play re-starts at the beginning of the next or a subsequent
track.
Hold down
or button to find a particular passage in a
backward or forward direction.
The selected track number is shown on the display.
These buttons can also be used to select a desired track from which to
start playback.
These buttons are also used in program mode to select tracks for
programming.
,,
,,
,
STOP
button
Press to stop playback. This button is also used for deleting a program.
..
..
.
PAUSE
button
Press to interrupt playback temporarily. The indicator lights up during
pause. When pressed again, the indicator goes out and playback
resumes from the same position.
⁄0⁄0
⁄0⁄0
⁄0
PLAY
button
Press to start playback.
⁄1⁄1
⁄1⁄1
⁄1
PEAK SEARCH
button
When the
PEAK SEARCH
button is pressed, searching for the loudest
passage (peak) on a CD or in a program.
⁄2⁄2
⁄2⁄2
⁄2
OPEN/CLOSE
button
Pressing the
OPEN/CLOSE
button opens the disc tray. Place a compact
disc on the tray ith the label side facing up. Gently press the front of the
disc tray to close.
⁄3⁄3
⁄3⁄3
⁄3
SCROLL/(RECALL) button
Press this button to display the programmed track numbers and program
numbers (the order the tracks are programmed) in sequence.
If the loaded disc is a CD-TEXT disc, press this button while the text
information is displayed to scroll the characters.
⁄4⁄4
⁄4⁄4
⁄4
CD-TEXT. button
When playing a CD-TEXT disc, press this button to switch the time
display to the text information display.
* If this button is pressed when the loaded disc is not a CD-TEXT
compatible disc, the display shows "No Text" then returns to the time
display.
!3
RNDM PROG EDIT A – B RPT 1
DISC
TEXT 1 2
TTL TRK INDX PEAK TTL TIME
34 56 78 91011121314151617181920
r
o
t y u i !0 !1
!2 !6 !8
!4 !5 !7
qw e
English
7
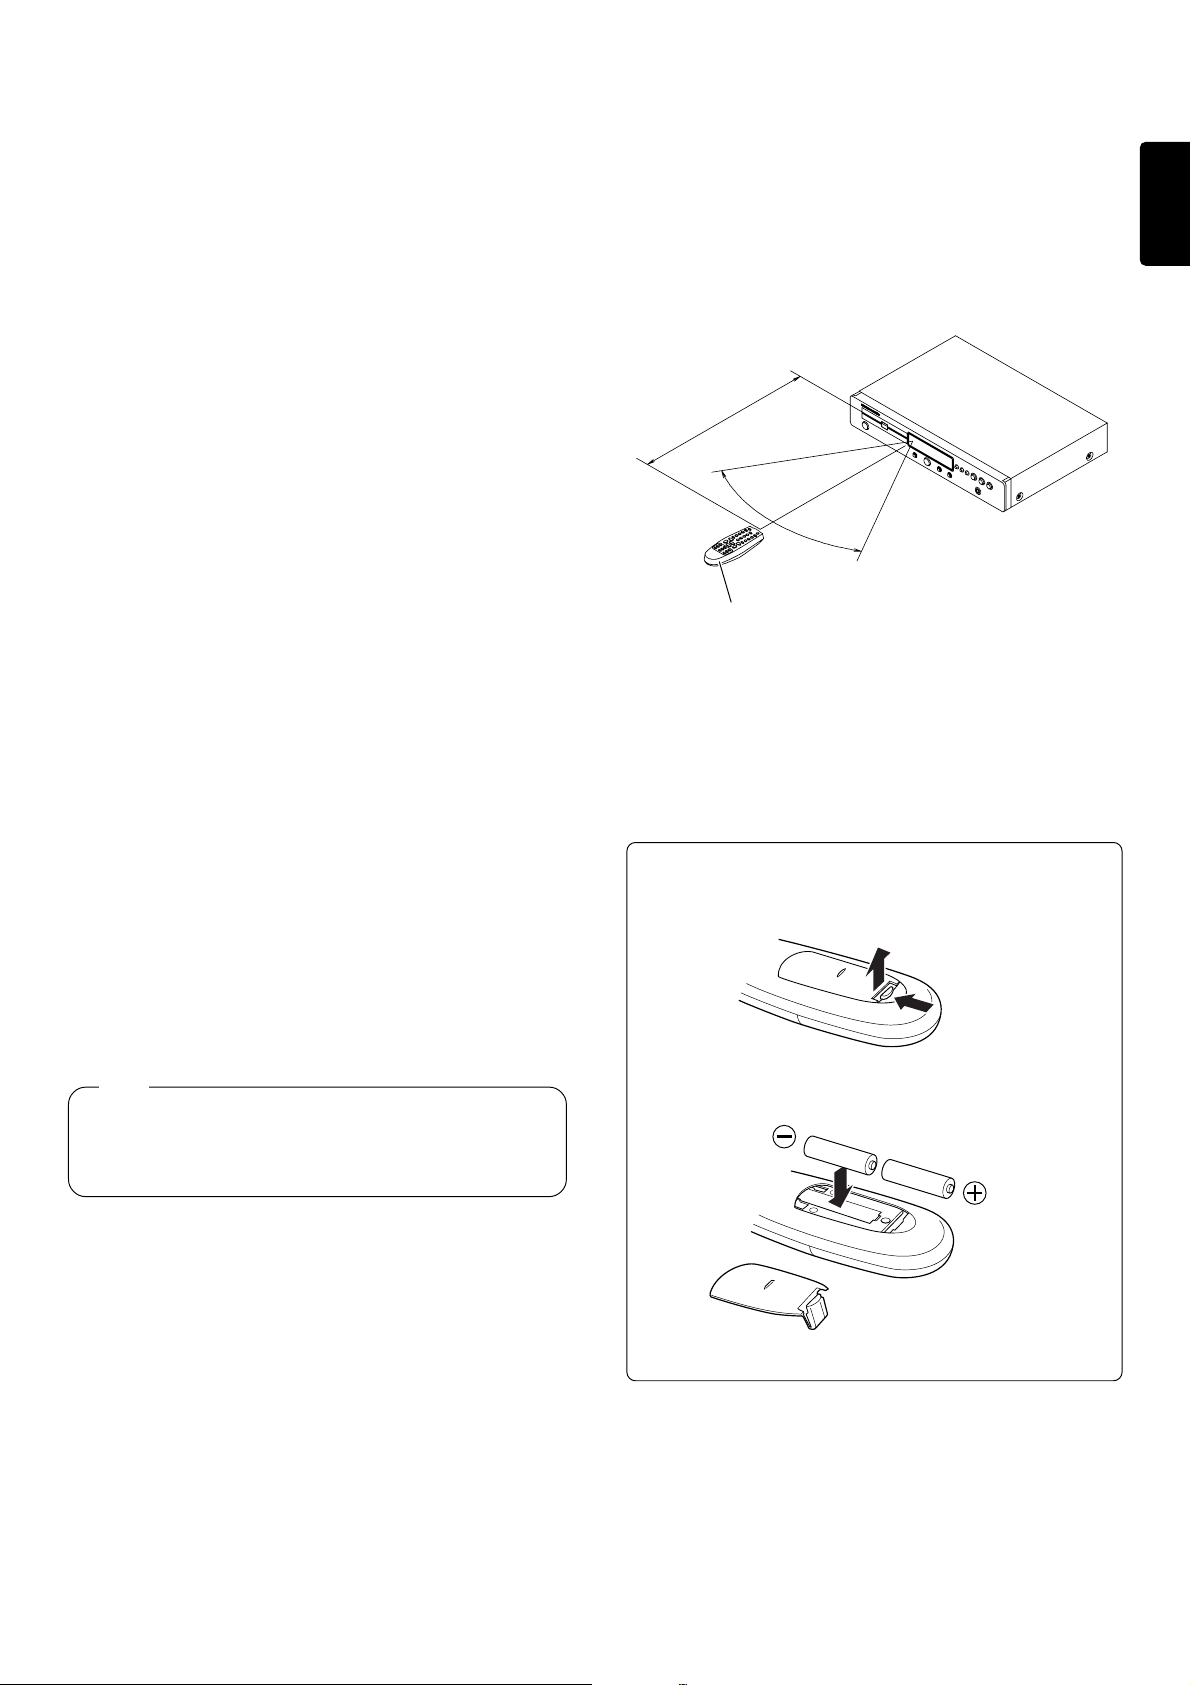
USING THE REMOTE CONTROL UNIT
1. Remote control
Operate the remote control unit (RC6000CD) within a distance of approx.
5 m from the infrared signal reception window (remote sensor) on the
front of the CD player.
Remote control operation may not be possible if the remote control unit’s
transmitter is not pointing in the direction of the remote sensor or if there
is an obstruction between the transmitter and the remote sensor.
Remote control operating range
2. Loading batteries
Batteries in this remote control unit have a life of approximately 1 year
under normal operating conditions. If the remote control unit is not going
to be used for an extended period of time, remove the batteries. Also, if
you notice that the batteries are starting to run down, replace them as
soon as possible.
REAR
AA
AA
A
ANALOG OUTPUT jacks
Connect to the CD or AUX input jacks of a preamplifier.
BB
BB
B
DIGITAL OUTPUT OPTICAL output jack
The digital signal can transmitted in the form of light through an optical
fiber cable and photocoupler. The optical signal transmission features
low signal loss due to cables and complete isolation of the ground loop
so that the very high quality can be reproduced without any digital noise
Connection method:
Connect this jack to aD/A converter, digital sound processor or an
amplifier equipped with a Digital Optical input jack. Remove the caps
from the DIGITAL OUTPUT OPTICAL jack and the Optical input jack of
the connected component and connect the two jacks through an optical
fiber cable.
* Do not bend the optical fiber cable.
* Leave the cap attached when the OPTICAL jack is not used.
CC
CC
C
DIGITAL OUTPUT COAXIAL output jack
By connecting this jack to a digital audio component (D/A converter,
digital sound processor, etc.), digital signals from compact discs can be
transmitted directly from the player without first being converted to
analog.
DD
DD
D
REMOTE CONTROL IN/OUT jacks
By connecting this CD player to another Marantz audio component
using a D-BUS remote control cable, you can operate the components
remotely as a single system.
• When connecting to a component with a remote sensor, connect the
REMOTE CONTROL IN jack of this unit to the REMOTE CONTROL
OUT jack of the component with the remote sensor.
• When connecting to a component which is not equipped with a remote
sensor, connect the component to the REMOTE CONTROL OUT jack
of this unit.
For the D-BUS cable connection, use a commercially available RCA-
type pin lead.
• By connecting this CD player to a Marantz auto reverse cassette deck
(such as the SD4050, SD555), automatic recording from the CD
player to the cassette deck can be carried out.
EE
EE
E
REMOTE switch
When using this unit independently, set this switch to INTERNAL. When
using this unit in a system incorporating a Marantz tuner or timer
equipped with a remote sensor, set the switch to EXTERNAL.
NOTE
Always set this switch to INTERNAL unless the unit is connected with
other MARANTZ equipment through a system connection. When this
switch is set to EXTERNAL, the main unit cannot be controlled from
the provided remote control unit.
FF
FF
F
AC POWER SOURCE CONNECTION
With the POWER switch set to the OFF position, plug the mains lead into
a mains outlet providing the right voltage.
60°
Approx. 5m
Remote control unit (RC6000CD)
CD player
1. Open the battery cover by lifting it in direction B while
pushing section A in the direction of the arrow.
2. Insert the provided batteries with correct polarity.
English
8
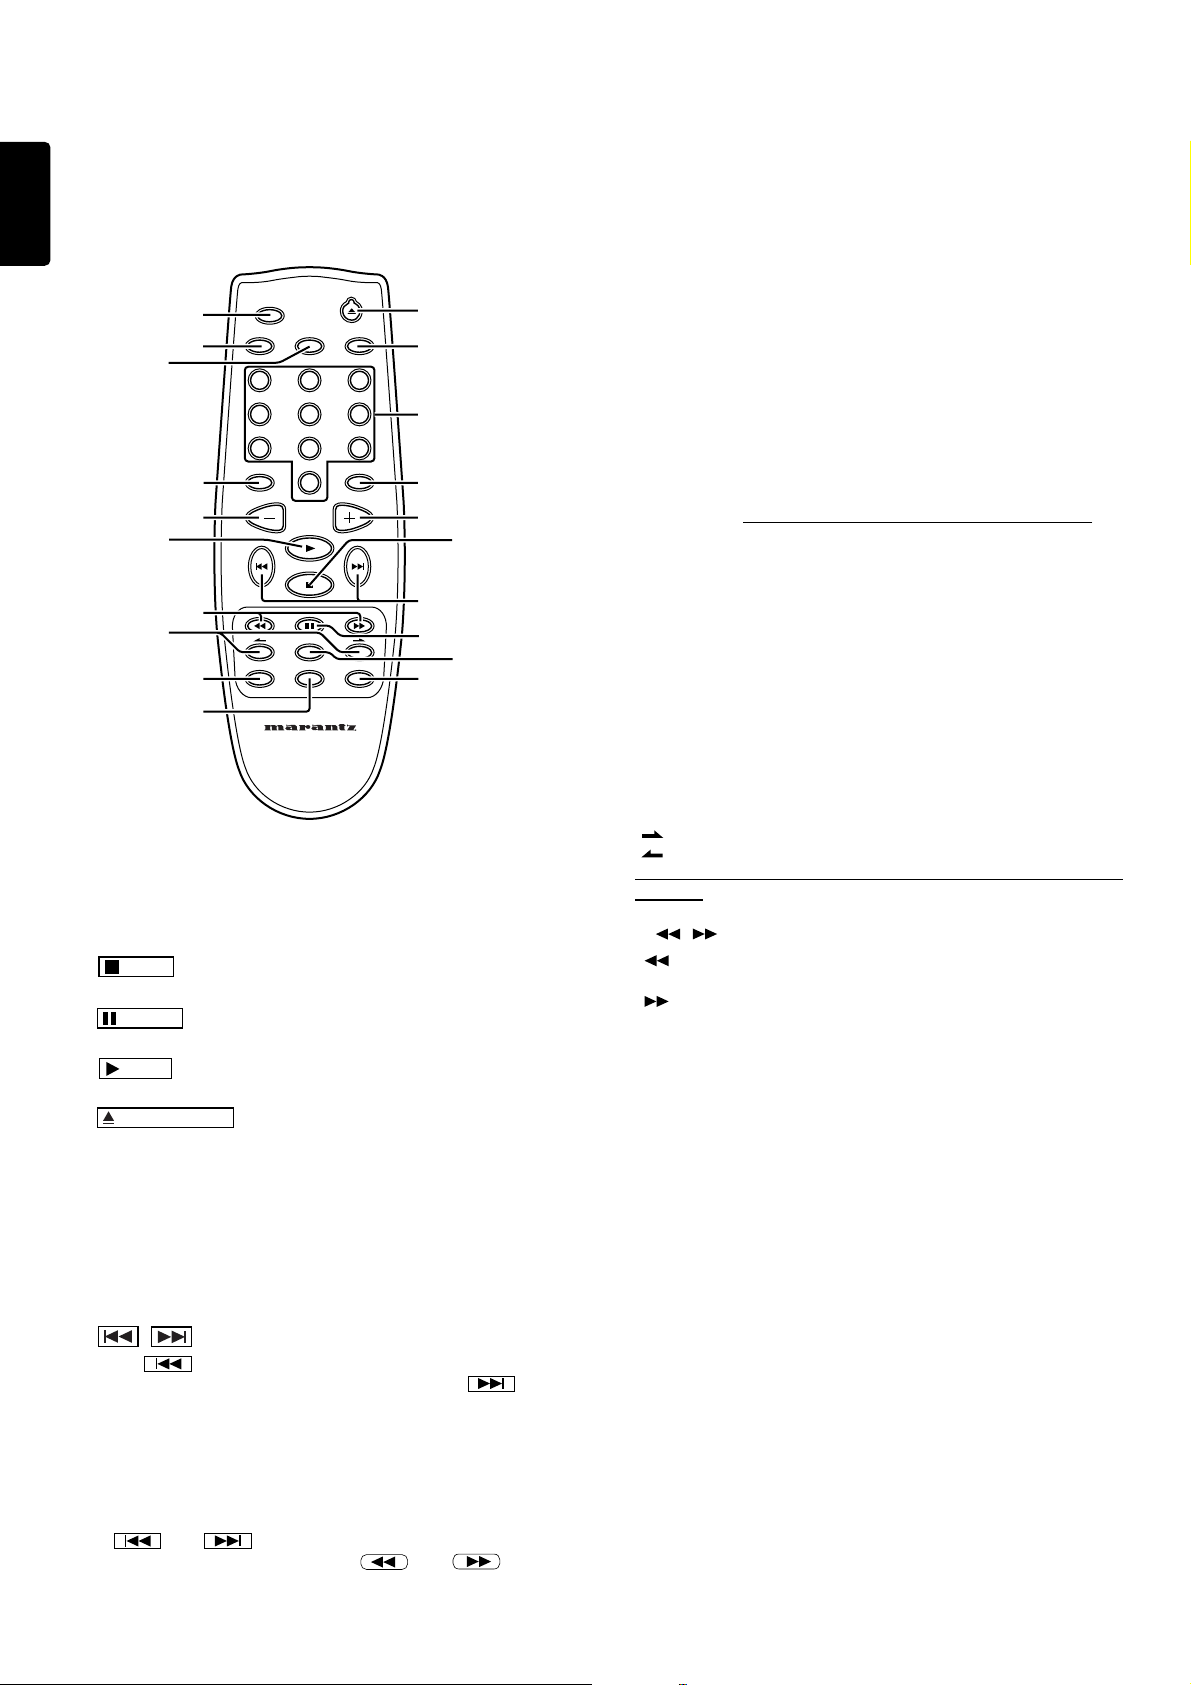
REMOTE CONTROL UNIT RC6000CD
When the power to the CD player is ON and a disc is loaded on the disc
tray, the remote control unit (RC6000CD) can be used to operate the
player’s various functions. However, the power to the CD player must be
switched ON/OFF using the POWER switch on the main unit.
nn
nn
n
EDIT button
,,
,,
,
STOP
button
..
..
.
PAUSE
button
⁄0⁄0
⁄0⁄0
⁄0
PLAY
button
⁄2⁄2
⁄2⁄2
⁄2
OPEN/CLOSE
button
⁄3⁄3
⁄3⁄3
⁄3
SCROLL/(RECALL) button
⁄4⁄4
⁄4⁄4
⁄4
CD-TEXT button
These buttons have the same functions as the buttons with the same
names on the main unit front panel. See the corresponding descriptions
on page 6.
mm
mm
m
, buttons
When the button is pressed during playback, play re-starts at
the beginning of the current or a previous track. When the
button
is pressed, play re-starts at the beginning of the next or a subsequent
track.
The selected track number is shown on the display.
These buttons can also be used to select a desired track from which to
start playback.
These buttons are also used in program mode to select tracks for
programming.
* The
and (Previous/Next Track) buttons on the remote
control do not start a search. Use the
and (Search
Reverse/Forward) buttons to conduct a search.
⁄6⁄6
⁄6⁄6
⁄6
TIME button
Switches the time shown on the display to the remaining time of the
current track or the remaining time of the entire disc.
With a CD-TEXT disc, this switch is also used to switch the displayed
information from the text display mode to the time display mode.
⁄7⁄7
⁄7⁄7
⁄7
REPEAT button
Press to select 1-track repeat, all-track repeat or program repeat
playback mode.
⁄8⁄8
⁄8⁄8
⁄8
A-B button
Used to set the starting and stopping points of a passage for repeated
playback.
⁄9⁄9
⁄9⁄9
⁄9
CANCEL button
Used to delete specified track numbers from a program.
Also used when creating programs by deleting any tracks which you do
not want to listen to (delete programming).
¤0 ¤0
¤0 ¤0
¤0
VOL ( + ),
¤1 ¤1
¤1 ¤1
¤1
VOL ( – ) buttons
Press to vary the ANALOG OUTPUT volume between 0 and -30 dB. The
level when the power is turned on is 0 dB (maximum volume).
¤2¤2
¤2¤2
¤2
PROG button
Press to activate program play, so that only the selected tracks from the
disc loaded on the disc tray will be played.
¤3¤3
¤3¤3
¤3
Numeric (0 to 9) buttons
When used during playback, these buttons allow you to specify the
number of another track you want to play.
When used during stop mode, these buttons allow you to specify the
number of a track from which to start playback.
These buttons are also used to select tracks for programming.
¤4¤4
¤4¤4
¤4
INDEX buttons
: Press during playback to advance to the next index.
: Press during playback to return to the next index.
*
These buttons are valid when playing a disc in which index have been
recorded.
¤5¤5
¤5¤5
¤5
, (Search Reverse/Forward) buttons
: When pressed during playback, this button fast-reverses the
play position.
: When pressed during playback, this button fast-forwards the
play position.
¤6¤6
¤6¤6
¤6
RANDOM button
When this button is pressed, the player enters random play mode (tracks
on the disc are selected and played in a random order). When pressed
again, random play is cancelled.
¤7¤7
¤7¤7
¤7
AMS (Automatic Music Scan)/HIGHLIGHT
When this button is pressed, the player automatically plays the first 10-
second part of each track in the disc.
If the loaded disc is a CD-TEXT disc containing the highlight information,
the first press of the button initiates the Highlight Scan operation and the
second press initiates the normal AMS operation as described above.
TIME
CD TEXT
1
SCROLL
2
HIGHLIGHT
EDIT REPEAT
A – B
RANDOM
RECALL AMS
PROG. CANCEL
3
4 5
8
0
7
6
9
VOLUME
REMOTE CONTROL UNIT
RC6000CD
⁄6
⁄4
¤2
¤1
¤5
n
⁄7
⁄3
⁄0
¤4
⁄2
¤7
¤3
⁄9
¤0
m
.
¤6
⁄8
,
 Loading...