


Makita PLM5121N2 Manual

GB Petrol Lawn Mower Instruction manual
F Tondeuse thermique Manuel d’instructions
D Benzin-Rasenmäher Betriebsanleitung
I Rasaerba con motore a benzina Istruzioni per l’uso
NL Grasmaaier met benzinemotor Gebruiksaanwijzing
E Cortadora de cesped a gasolina Manual de instrucciones
P Cortador de Grama a Gasolina Manual de instruções
DK Benzinplæneklipper Brugsanvisning
GR Βενζινοκίνητο Χλοοκοπτικό Οδηγίες χρήσης
TR Benzinli Çim Biçme Makinesi Kullanım kılavuzu
S Bensindriven gräsklippare Bruksanvisning
N Bensindrevet gressklipper Bruksanvisning
FIN Bensiinikäyttöinen ruohonleikkuri Käyttöohje
LV Benzīna zāles pļaujmašīna Instrukciju rokasgrāmata
LT Benzininė žoliapjovė Naudojimo instrukcija
EE Bensiinimootoriga muruniiduk Kasutusjuhend
RUS Бензогазонокосилка Инструкция
UA Бензинова газонокосарка Інструкція з експлуатації
PL Spalinowa kosiarka do trawy Instrukcja obsługi
RO Maşină de tuns iarba pe bază de benzină Manual de instrucţiuni
HU Benzinmotoros fűnyíró Használati utasítás
SK Benzínová kosačka Návod na obsluhu
CZ Benzínová sekačka na trávu Návod k obsluze
по эксплуатации
PLM5120N2
PLM5121N2
1A PLM5121N2
1
2
3
4
5
6
7
8
9
10
11
12
14
13
B
A
1
2
4
5
6
7
8
9
10
11
12
14
13
B
A
1B PLM5120N2
2
2A 2B
15
16
2C 2D
2E 2F
2G 2H
3
3A 3B
(1)
(2)
(3)
4A 4B
56A
6B 6C
4
7A 7B
8A 8B
8C 9
10A PLM5120N2 10B PLM5121N2
5

11
6
ENGLISH (Original instructions)
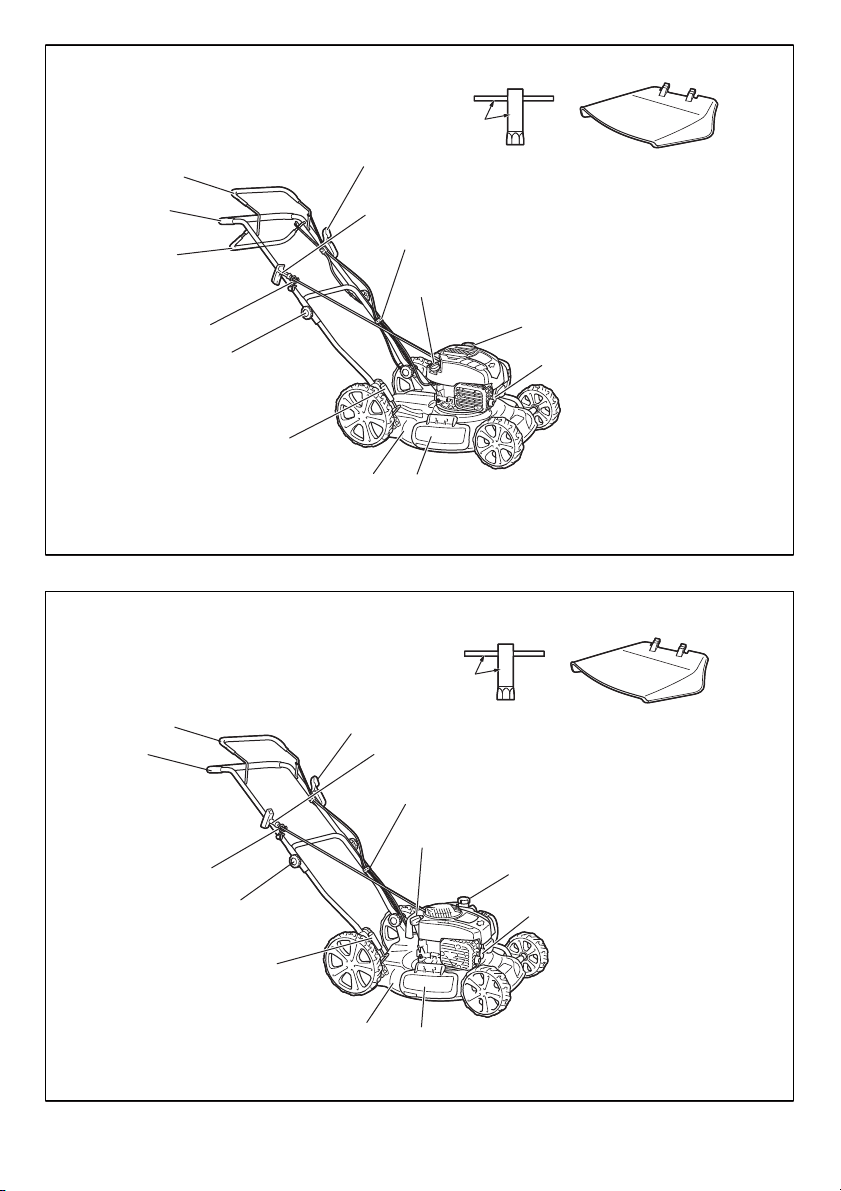
Explanation of general view
1. Brake control handle
2. Upper handle
3. Self-drive control handle
4. Throttle choke lever
5. Rope guide
6. Locking knob
WARNING:
For your own safety please read this manual before
attempting to operate your new unit. Failure to follow
instructions can result in serious personal injury. Spend a
few moments to familiarize yourself with your mower
before each use. Keep this manual in a safe place, so that
the information is available at all times. If you give the
equipment to any other person, hand over these operating
instructions and safety regulations as well.
7. Cable clamp
8. Height adjusting lever
9. Deck
10. Sideward flap
11. Spark plug
12. Fuel cap
Intended use
The equipment may only be used for the tasks it is
designed to handle. Any other use is deemed to be a case
of misuse. The user/operator and not the manufacturer
will be liable for any damage or injuries of any kind caused
as a result of this.
The petrol lawn mower is intended for private use i.e. for
use in home and gardening environments.
Private use of the lawn mower refers an annual operating
time generally not exceeding that of 50 hours, during
which time the machine is primarily used to maintain
small-scale, residential lawns and home/hobby gardens.
Public facilities, sporting halls, and agricultural/forestry
applications are excluded.
Please note that our equipment has not been designed for
use in commercial, trade or industrial applications. Our
warranty will be voided if the machine is used in
commercial, trade or industrial businesses or for
equivalent purposes.
The operating instructions as supplied by the
manufacturer must be kept and referred to in order to
ensure that the lawn mower is properly used and
maintained. The instructions contain valuable information
on operating, maintenance and servicing conditions.
Important! Due to the high risk of bodily injury to the user,
the lawn mower may not be used to trim bushes, hedges
or shrubs, to cut scaling vegetation, planted roofs, or
balcony-grown grass, to clean (suck up) dirt and debris off
walkways, or to chop up tree or hedge clippings.
Moreover, the lawn mower may not be used as a power
cultivator to level out high areas such as molehills.
For safety reasons, the lawn mower may not be used as a
drive unit for other work tools or tool kits of any kind.
13. Oil cap
14. Starter handle
15. Bolt
16. Washer
17. Tab
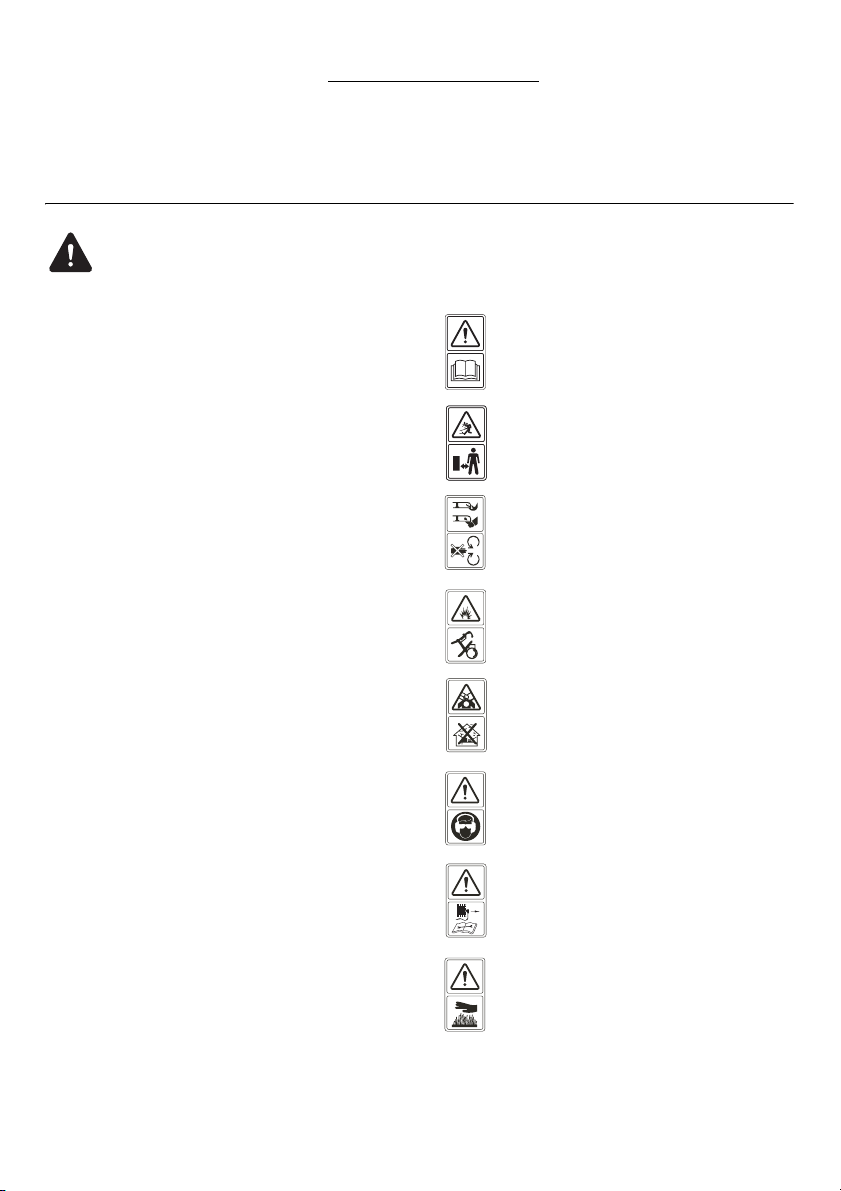
1. SYMBOLS MARKED ON THE
PRODUCT (ON THE REAR
COVER)
Read operator’s manual.
Keep bystanders away.
Pay more attention to the operator’s hands
and feet to avoid injury.
Fuel is flammable, keep fire away. Do not add
fuel with running machine.
Toxic fumes; Don’t operate inside house.
When mowing, please wear the glasses and
ear plugs to defend the operator himself.
When repairing, please pick up the spark plug
and then repair it according to the operational
manual.
Caution: Engine hot.
7

2. GENERAL SAFETY RULES
WARNING: When using petrol tools, basic safety
precautions, including the following, should always be
followed to reduce the risk of serious personal injury and/
or damage to the unit. Read all these instruction before
operating this product and retain these instructions for
future reference.
WARNING: This machine produces an
electromagnetic field during operation. This field may
under some circumstances interfere with active or passive
medical implants. To reduce the risk of serious or fatal
injury, we recommend persons with medical implants to
consult their physician and the medical implant
manufacturer before operating this machine.
Training
• Read the instructions carefully. Be familiar with the
controls and the proper use of the equipment.
Learn how to stop the engine quickly.
• Only use the lawn mower for the purpose for which it
was designed, i.e. for cutting and collecting grass. Any
other use can be hazardous, causing damage to the
machine. Examples of improper use may include, but
are not limited to:
- transport of people, children or animals on the
machine;
- being transported by the machine;
- using the machine to tow or push loads;
- using the machine for leaf or debris collection;
- using the machine to trim hedges, or for cutting
vegetation other than grass;
- use of the machine by more than one person;
- using the blade on surfaces other than grass.
• Never allow children or people unfamiliar with these
instructions to use the lawn mower. Local regulations
can restrict the age of the operator.
• Never use the lawn mower:
- when people, especially children, or pets are
nearby;
- if the operator has taken medicine or substances
that can affect his ability to react and concentrate.
• Keep in mind that the operator or user is responsible
for accidents or hazards occurring to other people or
their property.
• The operators must receive proper training in the use,
adjustment and operation of the machine, including
prohibited operations.
Preparation
• While mowing, always wear substantial footwear and
long trousers. Do not operate the equipment when
barefoot or wearing open sandals.
• Thoroughly inspect the area where the equipment is to
be used and remove all objects, such as stones, toys,
sticks and wires, which can be thrown by the machine.
• WARNING- Petrol is highly flammable.
- Store fuel in containers specifically designed for this
purpose.
- Refuel outdoors only and do not smoke while
refueling.
- Add fuel before starting the engine. Never remove
the cap of the fuel tank or add petrol while the
engine is running or when the engine is hot.
- If petrol is spilled, do not attempt to start the engine
but move the machine away from the area of
spillage and avoid creating any source of ignition
until petrol vapors have dissipated.
- Replace all fuel tank and container caps securely.
• Replace faulty silencers.
• Before using, always visually inspect to see that the
blades, blade bolts and cutter assembly are not worn or
damaged. Replace worn or damaged blades and bolts
in sets to preserve balance.
• Check regularly to ensure that all starting interlocks
and operator presence controls are properly
functioning.
Operation
• Do not operate the engine in a confined space where
dangerous carbon monoxide fumes can collect.
• Do not use the machine while being tired, ill or under
influence of alcohol or other drugs.
• Warning! Do not use the lawn mower when there is a
risk for lighting.
• It is recommended to limit the duration of operation, in
order to minimize the risks from noise and vibration.
• Be careful when using the lawn mower in slopes and
near drop-offs, ditches or embankments.
• Mow only in daylight or in good artificial light.
• Avoid operating the equipment in wet grass, where
feasible.
• Always be sure of your footing on slopes.
• Walk, never run.
• For wheeled rotary machines, mow across the face of
slopes, never up and down.
• Exercise extreme caution when changing direction on
slopes.
• Do not mow excessively steep slopes.
• Use extreme caution when reversing or pulling the
lawn mower towards you.
• Stop the blade(s) if the lawn mower has to be tilted for
transportation when crossing surfaces other than
grass, and when transporting the lawn mower to and
from the area to be mowed.
• Never operate the lawn mower with defective guards,
or without safety devices, for example deflectors and/or
grass catchers, in place.
• Caution: The lawn mower shall not be operated without
either the entire grass catcher or self-closing discharge
opening guard in place.
• Do not change the engine governor settings or
overspeed the engine.
• Do not alter or tamper with any sealed adjustment for
the engine speed control.
• The lawn mower safety systems or features shall not
be tampered with or disabled.
• Disengage all blades and drive clutches before starting
the engine.
• Start the engine carefully according to instructions and
with feet well away from the blade(s).
• Do not tilt the lawn mower when starting the engine.
8
• Do not start the engine when standing in front of the
discharge chute.
• Do not put hands or feet near or under rotating parts.
Keep clear of the discharge opening at all times.
• Never pick up or carry a lawn mower while the engine
is running.
• Stop the engine and disconnect the spark plug wire,
make sure that all moving parts have come to a
complete stop and, where a key is fitted remove the
key:
- Before clearing blockages or unclogging chute.
- Before checking, cleaning or working on the lawn
mower.
- After striking a foreign object. Inspect the lawn
mower for damage and make repairs before
restarting and operating the lawn mower.
- If lawn mower starts to vibrate abnormally (check
immediately).
• Stop the engine and disconnect the spark plug wire,
make sure that all moving parts have come to a
complete stop and, where a key is fitted remove the
key:
- Whenever you leave the lawn mower.
- Before refueling.
• Reduce the throttle setting during engine shut down
and, if the engine is provided with a shut-off valve, turn
the fuel off at the conclusion of mowing.
• Only use the lawn mower for the purpose for which it is
designed, for cutting and collecting grass. Any other
use can be hazardous, causing damage to the
machine.
Maintenance and storage
• Keep all nuts, bolts and screws tight to be sure the
equipment is in safe working condition.
• Never store the equipment with petrol in the tank inside
a building where fumes can reach an open flame or
spark.
• Allow the engine to cool before storing in any
enclosure; Clean and maintain the lawn mower before
storage.
• To reduce the fire hazard, keep the engine, silencer,
battery compartment and petrol storage area free of
grass, leaves, or excessive grease.
• Check the grass catcher frequently for wear or
deterioration.
• Replace worn or damaged parts for safety.
• If the fuel tank has to be drained, this should be done
outdoors.
• Improper maintenance, use of non-conforming
replacement components, or the removal or
modification of safety components can damage the
lawn mower and injure the operators seriously.
• Only use the recommended blades and spare parts by
the manufacturer. The use of non-genuine parts can
damage the machine and injure the operators. Keep
the lawn mower in good working condition.
• If the blade stopping device doesn’t work, please
contact service center for help.
Transportation and handling
• Whenever the machine is to be handled, raised,
transported or tilted you must:
- wear strong working gloves;
- grasp the machine at the points that offer a safe grip,
taking account of the weight and its distribution;
- use an appropriate number of people for the weight
of the machine and the characteristics of the vehicle
or the place where it has to be placed or collected.
• During transport, fasten the machine securely with
ropes or chains.
WARNING: Do not touch rotating blade.
WARNING: Refuel in a well ventilated area with
the engine stopped.
3. PARTS DESCRIPTION (Fig. 1A
& 1B)
Including
A: Spark plug wrench
B: Side discharge channel
4. TECHNICAL DATA
Model PLM5121N2 PLM5120N2
Engine type B&S675EXi Series, ReadyStart B&S625E Series, ReadyStart
Self-Propelled Yes No
Engine Displacement 163 cm
Nominal Power 2.6 kW 2.2 kW
Blade Width 510 mm 510 mm
Rated Speed 2,800/min 2,800/min
Fuel Tank Capacity 1.0 L 0.8 L
Oil Tank Capacity 0.47 L 0.47 L
Net Weight 31 kg 25.5 kg
Height adjustment 25-70 mm, 5 adjustment
3
150 cm
3
9
Model PLM5121N2 PLM5120N2
Guaranteed sound pressure level at
operator’s position (According to
EN ISO 5395-1 Annex F &
EN ISO 5395-2, EN ISO 4871)
Measured sound power level 95.1 dB (A) K=1.94 dB (A) 95.1 dB (A) K=2.36 dB(A)
Guaranteed sound power level
(According to 2000/14/EC)
Vibration (According to EN ISO 5395-1
Annex G & EN ISO 5395-2)
86.0 dB (A) (K=3 dB (A)) 86.2 dB (A) (K=3 dB (A))
98 dB (A) 98 dB (A)
7.38 m/s
K=1.5 m/s
2
2
5.14 m/s
K=1.5 m/s
2
2
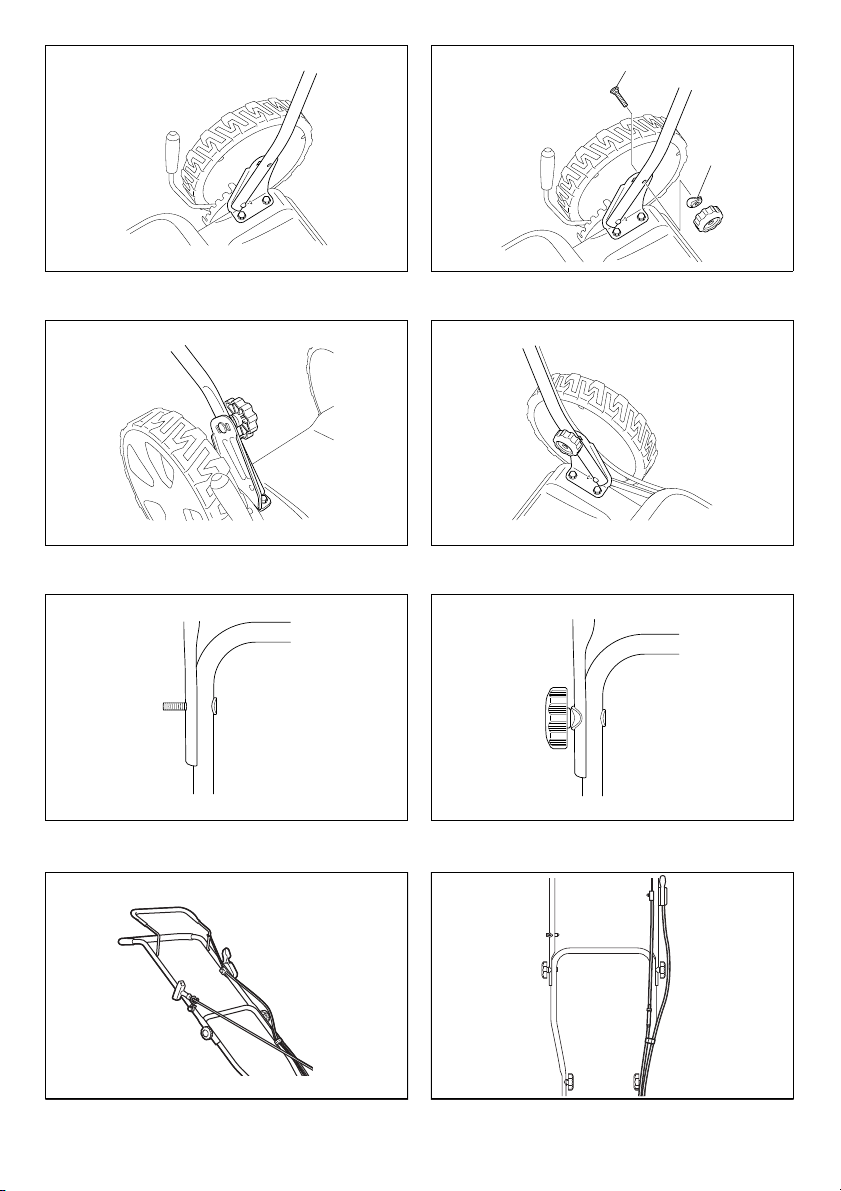
5. ASSEMBLY
5-1 ASSEMBLING THE FOLDING
HANDLE
1. Fix the lower handlebars into the unit body with
locking knobs as shown. (Fig. 2A, Fig. 2B, Fig. 2C,
Fig. 2D)
2. Connect the upper handle and the lower handle with
the locking knob. (Fig. 2E, Fig. 2F, Fig. 2G)
3. Position the cable into the cable clamp first, and then
fix the cable clamp into the hole of lower handle.
(Fig. 2H)
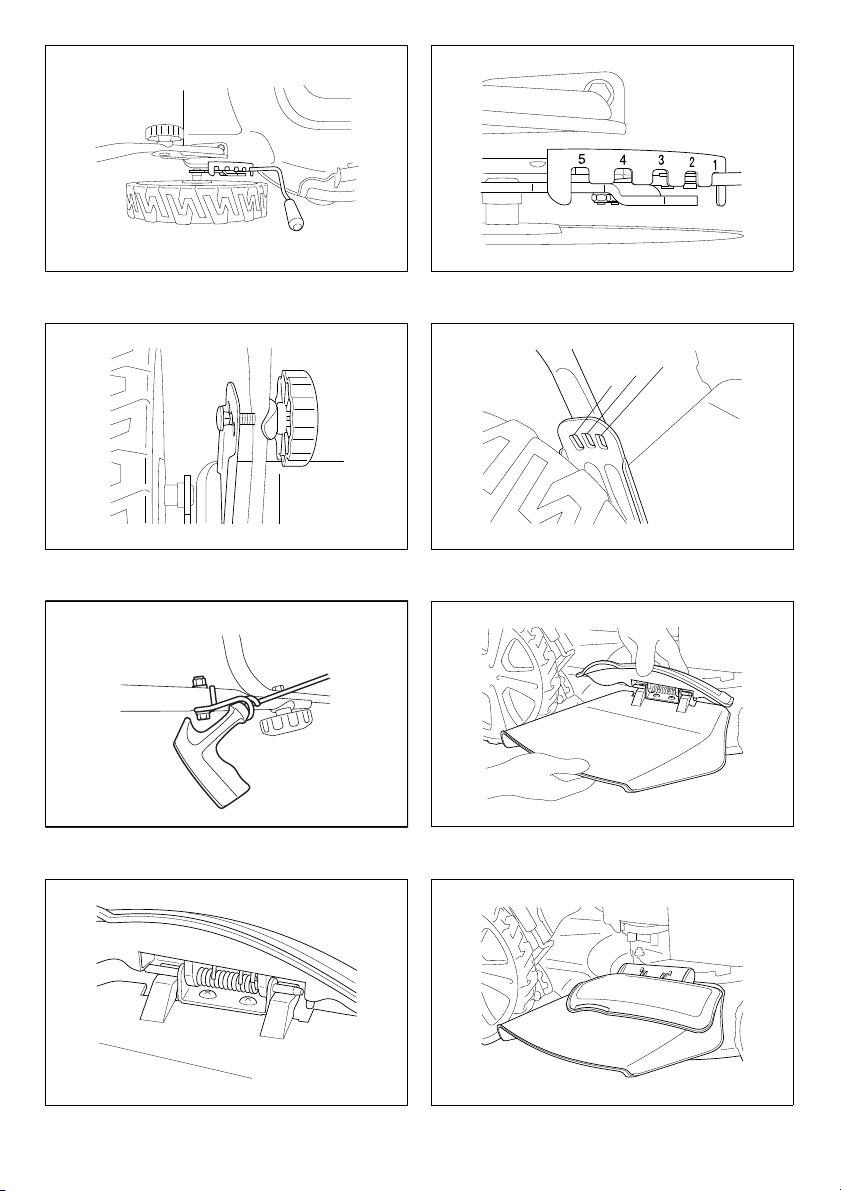
5-2 ADJUSTMENT OF CUTTING HEIGHT
Apply outward pressure to disengage lever from rack.
Move lever forward or back to adjust height.
The height (the blade to the ground) can be adjusted from
25 mm (1 position: the lowest position) to 70 mm
(5 position: the highest position), 5 height positions.
(Fig. 3A, Fig. 3B).
Stop mower and disconnect spark plug cable before
changing mower cutting height.
WARNING: Make this adjustment only when the
blade is stopped.
5-3 ADJUSTMENT FOR AN
APPROPRIATE HEIGHT
1. Back out the locking knobs which fixed the lower
handle, refer to Fig. 4A.
2. Refer to Fig. 4B move the lower handle up and down,
adjust it to the proper height.
There are 3 adjusting heights to be chosen on this
type of lawn mower; at position 1 height is highest., at
position 3 height is the lowest.
3. Adjusting to the proper height, then fix the lower
handle by the locking knobs.
WARNING: The left side and right side of lower
handle must adjust to the same height.
5-4 STARTER HANDLE
Move the starter handle from the engine to the rope guide.
(Fig. 5)
6. “2 IN 1”
6-1 RESETTING FOR SIDE DISCHARGE
MOWING
1. Lift sideward flap for side discharge. (Fig. 6A)
2. Mount the discharge channel for side discharge on the
support pin of the sideward flap. (Fig. 6A, Fig. 6B)
3. Lower the sideward flap- the flap lies on the discharge
channel. (Fig. 6C)
Only when engine and cutter are at standstill!
6-2 MULCHING MOWER
What is mulching?
When mulching, the grass is cut in one working step, then
finely chopped and returned to the grass strip as natural
fertilizer.
Hints for mulch-mowing:
- Regular cut-back by max. 2 cm from 6 cm to 4 cm
grass height.
- Use a sharp cutting knife
- Do not mow wet grass
- Set max. engine speed
- Only move at working pace
- Regularly clean mulching wedge, housing inner side
and mowing blade
WARNING: Only with a stopped engine and
standstill cutter.
Raise the sideward flap and remove the discharge
channel. (Fig. 7A, Fig. 7B)
- The sideward flap automatically closes the discharge
opening on the housing by mean of spring force.
- Regularly clean the sideward flap and discharge
opening form grass rest and stuck dirt.
7. OPERATING INSTRUCTIONS
7-1 BEFORE STARTING
Service the engine with gasoline and oil as instructed in
the separate engine manual packed in your mower. Read
instructions carefully.
WARNING: Petrol is highly flammable.
10
Store fuel in containers specifically designed for this
purpose.
Refuel outdoors only, before starting the engine and do
not smoke while refueling or handling fuel.
Never remove the cap of the fuel tank or add petrol while
the engine is running or when the engine is hot.
If petrol is spilled, do not attempt to start the engine but
move the machine away from the area of spillage and
avoid creating any source of ignition until petrol vapors
have dissipated.
Replace all fuel tanks and container caps securely.
Before tipping the lawn mower to maintain the blade or
drain oil, remove fuel from tank.
WARNING: Never fill fuel tank indoors, with
engine running or until the engine has been allowed to
cool for at least 15 minutes after running.
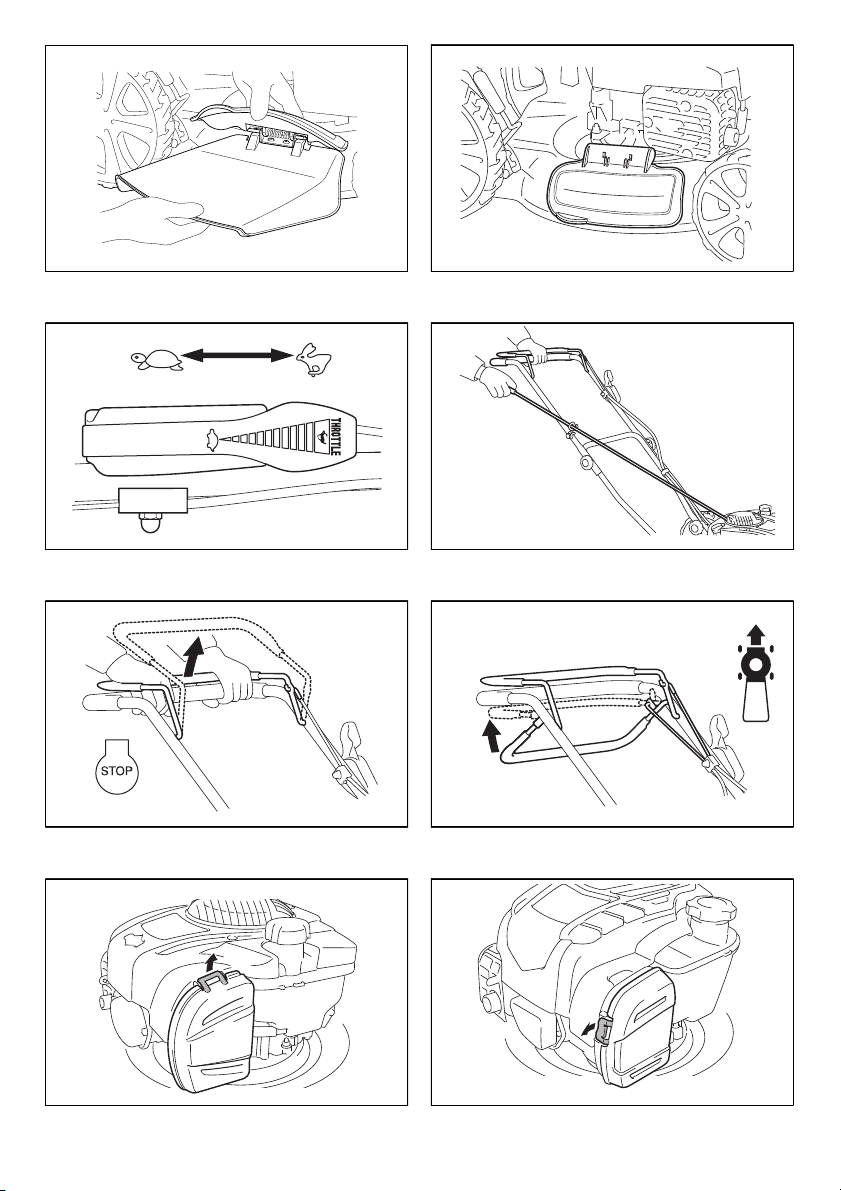
7-2 TO START ENGINE AND ENGAGE
BLADE
1. The unit is equipped with a rubber boot over the end of
the spark plug, make certain the metal loop on the end
of the spark plug wire (inside the rubber boot) is
fastened securely over the metal tip on the spark plug.
2. When starting cool or warm engine, turn throttle choke
lever at anywhere between “ ” position and “ ”
position. When operating, turn throttle choke lever to
“ ” position. (Fig. 8A)
3. Standing behind the unit grasp the brake control
handle and hold it against the upper handle as shown
in Fig. 8B.
4. Grasp the starter handle as shown Fig. 8B and pull up
rapidly. Return it slowly to the rope guide bolt after
engine starts.
Release the brake control handle to stop the engine
and blade. (Fig. 8C)
Start the engine carefully according to
instructions and with feet well away from the blade.
Do not tilt the lawn mower when starting the
engine. Start the mower on a level surface, free of high
grass or obstacles.
Keep hands and feet away from the rotating
parts. Do not start the engine when standing in front of the
discharge opening.
7-3 OPERATION PROCEDURES
During operation, tightly hold the brake handle with both
hands.
NOTE: During operation, when the brake handle
is released, the engine will stop and thus stopping the
lawn mower from operating.
WARNING: In order to avoid any unintentional
start-ups of the lawn mower, it comes equipped with an
engine brake which must be pulled back before the
engine can be started. When the engine control lever is
released it must return to its initial position, at which point
the engine automatically switches off.
NOTE:
to stop the engine. When you release the lever the engine
and the blade stop automatically. To mow, hold the lever in
the working position. Before you start to mow, check the
start/stop lever several times to be sure that it is working
properly. Ensure that the tension cable can be smoothly
operated (i.e. is not catching or kinking in any way).
Engine brake (brake handle): Use the lever
7-4 TO STOP ENGINE
CAUTION: The blade continues to rotate for a
few seconds after the engine is shut off.
1. Release the brake control handle to stop the engine
and blade.
2. Disconnect and ground the spark plug wire as
instructed in the separate engine manual to prevent
accidental starting while equipment is unattended.
7-5 CONNECTION FOR AUTO MOVE
For PLM5121N2
Grip the self-drive control handle, the lawn mower will
move forward automatically with about 3.6 km/h (Fig. 9),
release the self-drive handle, the lawn mower will stop
move.
CAUTION: Your mower is designed to cut normal
residential grass of a height no more than 250 mm.
Do not attempt to mow through unusually tall dry or wet
grass (e.g., pasture) or piles of dry leaves. Debris may
build up on the mower deck or contact the engine exhaust
presenting a potential fire hazard.
7-6 FOR THE BEST RESULTS WHEN
MOWING
Clear lawn of debris. Be sure that the lawn is clear of
stones, sticks, wire or other foreign objects which could be
accidentally thrown out by the mower in any direction and
cause serious personal injury to the operator and others
as well as damage to property and surrounding objects.
Do not cut wet grass. For effective mowing do not cut wet
grass because it tends to stick to the underside of the
deck preventing proper mowing of the grass clippings. Cut
no more than 1/3 the length of the grass. The
recommended cut for mowing is 1/3 the length of the
grass. Ground speed will need to be adjusted so the
clippings can be dispersed evenly into the lawn. For
especially heavy cutting in thick grass it may be
necessary to use one of the slowest speeds in order to get
a clean well mowed cut. When mowing long grass you
may have to cut the lawn in two passes, lowering the
blade another 1/3 of the length for the second cut and
perhaps cutting in a different pattern than was used the
11
 Loading...