

Page 1

1
This is a Supplement to Magellan 750NAV User Manual. Make sure this addendum
is stored with the User Manual for future reference.
• Page 12 - The status bar at the bottom of the screen has changed. The Direction
to Destination Arrow has been moved between the Distance to Destination and
Estimated Time to Destination.
• Page 12 - The next Maneuver Arrow has been moved from the top right corner of
the screen to the lower left corner of the screen above the Direction and Signal
Strength Icon.
• Page 14 User Manual - The format for entering the Street Number Address has
changed. Use the 8-Way Arrow Button to highlight the desired number and press
the Enter button. The number will appear at the top of the screen. Repeat this
process until the address number is complete. Once the address number is complete select DONE and press the Enter button.
• Page 14 Installation Manual - The 750
NAV is now being shipped with all maps
unlocked. Selecting a Temporary Map is no longer necessary.
• Page 19 - The Points of Interest menu has one additional selection. The user may
now choose the Search option.
Search Feature
Does a single word search for any Points of Interest. For example, when trying
to locate Joe Louis Arena they could just type in any one of the three words. A
list will appear showing all POI's that have any combination of the three words.
• Page 22 - On the Select Destination Screen the Freeway Entrance/Exit has been
replaced with Route to a City.
Route to a City feature
This feature allows the user to navigate to the center of a city with Detailed
Coverage. Or the nearest State or County road in a city or town without Detailed
Coverage.
IMPORTANT CHANGES TO THE 750
NAV
U
SER/INSTALLATION MANUALS
Page 2

2
• The User Options screen has been changed from an icon type screen to a menu
type screen. The new menu is:
Communications
Service Directory
Trip Computer
Configuration
Product Demonstration
• Page 32 - The background color theme is now active. The user now has background colors to choose:
Default (Blue)
Pastel
Forest
Desert
• Page 32 - The wallpaper options have been changed:
Default (None)
Tiles
ZigZag
• Page 33 - Auto Map feature has been added to the Map Options.
Auto Map Feature
Automatically changes the DCA map when crossing DCA border.
• Page 38 - Voice Options now excludes the male voice selection.
• Page 39 - The Diagnostics menu is now accessed through the Configuration menu.
• Page 43 User Manual/Page 15 Installation Manual - The 9 DCA's listed have been
consolidated to just 2 DCA's which include Canada in both DCA's.
• Page 48 - The additional Map Area Purchase and Map Area Rental features are no
longer necessary because all DCA's are now included with the purchase of the
750
NAV System.
Page 3

This is a Supplement to Magellan 750NAV User Manual. Make sure this addendum
is stored with the User Manual for future reference.
Route Exclude
This feature gives the user the ability to bypass traffic jams, and construction zones by excluding roads while in route to a selected destination. For instructions on how to use this feature
see page 5.
Off-Road Navigation
Freedom to Explore Off-Road. The Off-Road Navigation feature provides the ability to set waypoints and create routes. There is also a Clinometer which allows the user to check how
aggressive the terrain is. For instructions on how to use the Off-Road Navigation feature see
page 6.
Database Update
The Magellan 750NAV Database has been updated to include more cities, towns, and roads.
DCA Format
The 10 DCA format has been consolidated to just 2 DCA's, which include Canada in each
DCA. (See image on page 4.)
3
ADDITIONAL S OFTWARE FEATURES AND U PGRADES
Page 4
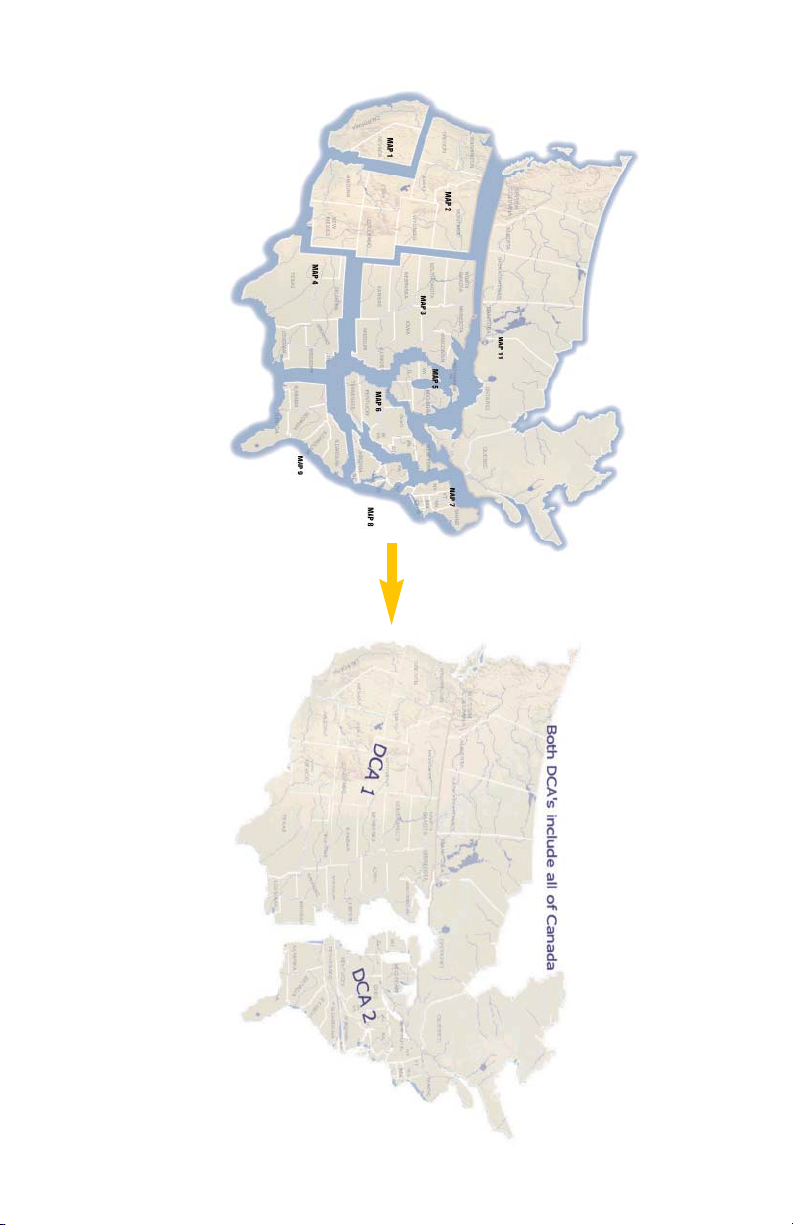
4
10 DCA Format 2 DCA Format
Page 5
5
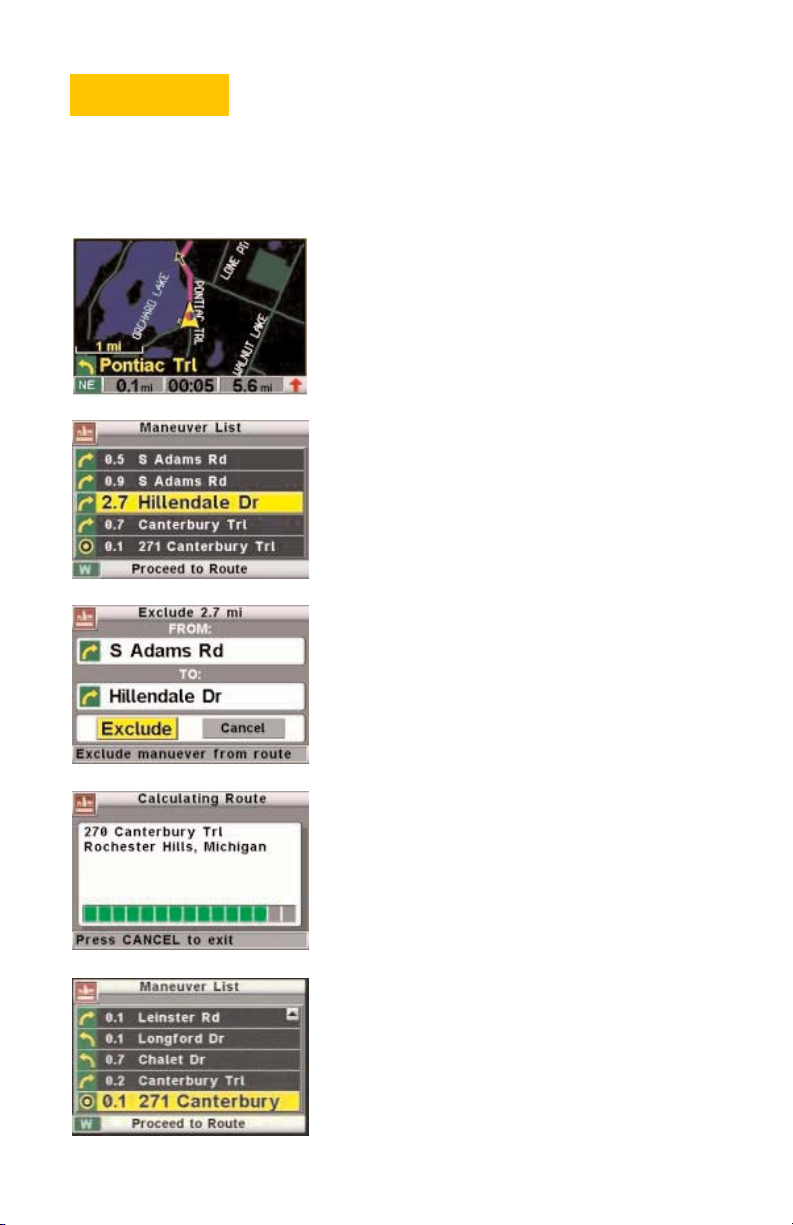
Route Exclude
The Route Exclude feature gives the user the ability to exclude roads while in route to a
selected destination. This will enable users to bypass traffic jams, construction zones, toll
roads and other paths that can make a trip longer than necessary.
To exclude a maneuver from the route press the VIEW
button while in route guidance mode.
A maneuver list will generate. To exclude a maneuver
from the route, highlight the maneuver and press ENTER.
The system will display the maneuver the user would like
to remove, press ENTER to exclude the maneuver.
The system will calculate a new route.
If it is possible to route around the selected maneuver
the 750
NAV will display a new route excluding the
maneuver.
Important note: If the system recalculates the route after
using the route exclude feature, the route will revert back to
the original route.
Page 6

6
Off-Road Navigation
Great for off-road enthusiasts, the 750NAV’S Off-Road Navigation option allows marking of
favorite trails, hunting, and fishing spots. With this option the user can route to points not
on roads, set landmarks, create trails, and more.
Off-Road is a navigation mode separate from turn by turn navigation and provides the user
with the feel of being a separate product. Once Off-Road mode is entered, the unit is functionally transformed into a product, which works just like Magellan’s famous hand held GPS
receiver.
Features
Enter navigation points (waypoints) by marking a waypoint by the systems current position,
using the systems cursor, or by entering latitude and longitude coordinates. The maximum
number of waypoints the system is capable of saving into memory is 100.
Create routes by inserting waypoints into a route list. The 750NAV,guides the user from
point to point by visually connecting the waypoints with highlighted lines in the order of the
route lists. The navigation system then provides directional instruction to the next waypoint
in the route. Waypoint to waypoint navigation continues in this fashion progressively through
the list of waypoints making up the route. Once the final waypoint in the list is navigated to,
the you have arrived voice prompt is heard followed by 3 double chimes. Also a destination
screen will be displayed showing the waypoint name and the Lat/Long coordinates of the
waypoint. The maximum number of routes the systems can save into memory is 10 with 25
waypoints max. for each route.
Reverse Route - Calculate a route from the last waypoint in the list to the first waypoint.
Next Waypoint - Navigate to the next waypoint in a route list, allows the user to step through
a route list or skip the next waypoint while driving a route.
The Clinometer Sensor shows how aggressive the terrain is by showing graphics with pitch
and roll readings of the vehicles current position.
Page 7
7
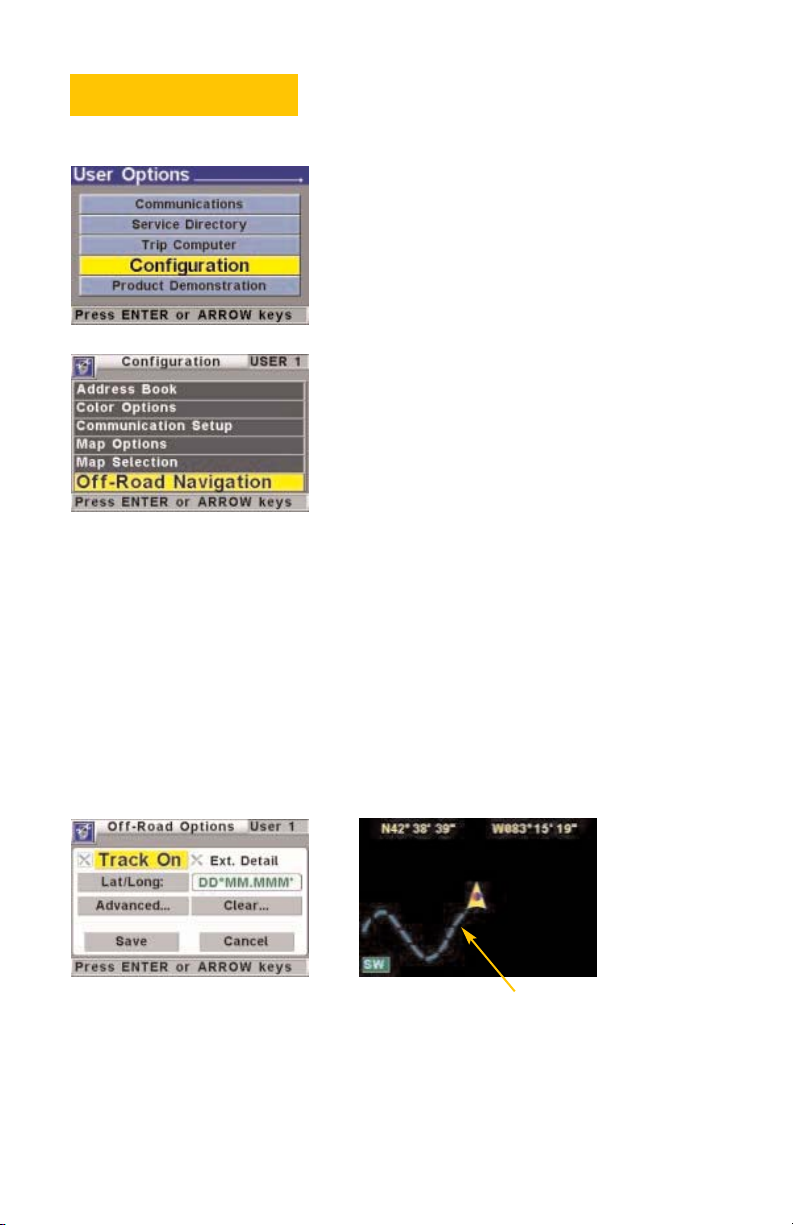
Option Menu Features
To access the Off-Road Option menu features, press the
OPTION button.
Select Configuration from the option list, press ENTER.
Select Off-Road Navigation, press ENTER.
Track On
The tracking feature may be used to “backtrack” the vehicle’s route. The “Breadcrumb
Trail” left on the map display will be in the form of a blue dashed line. Leaving the user a
route to follow back to the point of origin. The blue track will remain on the map display
until cleared from the systems memory. See page 9 for instructions on clearing Track
History.
To turn this feature on or off just highlight Track On in the Off-Road options menu and
press ENTER. When the color of the X changes to blue, tracking is turned on.
Track On
Page 8

8
The Extended Detail feature will display heading and bearing information on the map
screen. To turn this feature on or off simply highlight Ext. Detail in the Off-Road options
menu and press ENTER. When the color of the X changes to blue the feature is on.
Lat/Long
Press ENTER on Lat/Long to change the format for the latitude and longitude coordinates.
Advanced
Press ENTER on Advanced to access Arrival or XTE Alarm setup.
Ext. Detail Bearing InformationExt. Detail Heading Information
Page 9

9
The XTE Alarm is the cross track error alarm. While in route guidance mode, the XTE Alarm
will chime when you are off track by the selected distance. The distance is adjustable
between off and 1 mile. Or from off to 1.5 kilometers, if using the metric system.
Press ENTER on XTE Alarm to adjust the distance for the
cross track error.
The Arrival Alarm will chime after driving past each waypoint and upon arrival to the final
waypoint in a route. The arrival alarm distance is adjustable from 100 feet to 1 mile. Or
from 30 meters to 1.5 kilometers, if using the metric system.
To adjust the distance for the Arrival Alarm, press ENTER
on Arrival Alarm.
After changing the XTE or Arrival Alarms scroll to save
and press ENTER.
Clear
The Clear feature will generate an Off-Road Clear list. From this screen Track History,
Routes, or Routes/Waypoints can be cleared from the systems memory.
To generate the clear list, press ENTER on Clear.
Page 10

10
Pressing ENTER on Track History will prompt the user with a yes or no to clear Track
History.
Pressing ENTER on Routes will prompt the user with a yes or no to clear Routes.
Pressing ENTER on Routes/Waypoints will prompt the user with a Yes or No to clear Routes
and Waypoints.
Pressing ENTER on All will prompt the user with a Yes or No to clear All of the Track
History, Routes, and Waypoints.
Page 11

11
Start Using Off-Road Navigation
Select the Off-Road Navigation icon from the main menu
and press ENTER.
Off-Road Selection Menu
Setting Waypoints, Creating Routes, Next Waypoint, Reverse Route, and Clinometer are all
accessed in the Off-Road Selections Menu.
Press ENTER from the Map View screen to arrive at the Off-Road Selections Menu.
Setting Waypoints
Press ENTER from the Map View screen.
To set waypoints from the current position, press ENTER
on Mark By Position.
Page 12

12
After using the Mark By Position function the user may
save the position name as WAY001. The next waypoint
saved will be WAY002 and the numbers will increment
after each waypoint is saved.
The user may choose to name the waypoint to make it
easier to identify the waypoint. To perform this function,
highlight the waypoint name and press ENTER.
Using the QuickSpell screen, delete the current waypoint
name and spell the desired name (6-character max.).
The waypoint icons are a good way to identify characteristics of specific trails (the default waypoint icon is a red
flag). To select a new waypoint icon, select the waypoint
icon box and press ENTER.
Select the desired waypoint icon and press ENTER.
The lower box is for providing a description on a specific waypoint. Highlight the description box and press
ENTER.
Page 13

13
Using the QuickSpell Screen input the desired description (35-character max.) and press ENTER.
After making any changes to the waypoint scroll to save
and press ENTER.
A waypoint may be saved using Lat/Long coordinates.
Highlight the Lat/Long coordinates and press ENTER.
Using the arrow buttons highlight the value you would
like to change then use the + - keys to adjust the values
to the desired coordinates.
Page 14

14
After the desired Lat/Long coordinates are entered, scroll
to save and press ENTER.
Waypoints may also be entered by using the Mark By
Cursor feature. While viewing the map, use the arrow
keys to pan the map display for the desired location and
press ENTER.
Mark By Cursor will appear on the display then press
ENTER.
Press ENTER again to save the waypoint. Or make any
desired changes to the name, icon, or description box
before saving.
Page 15

15
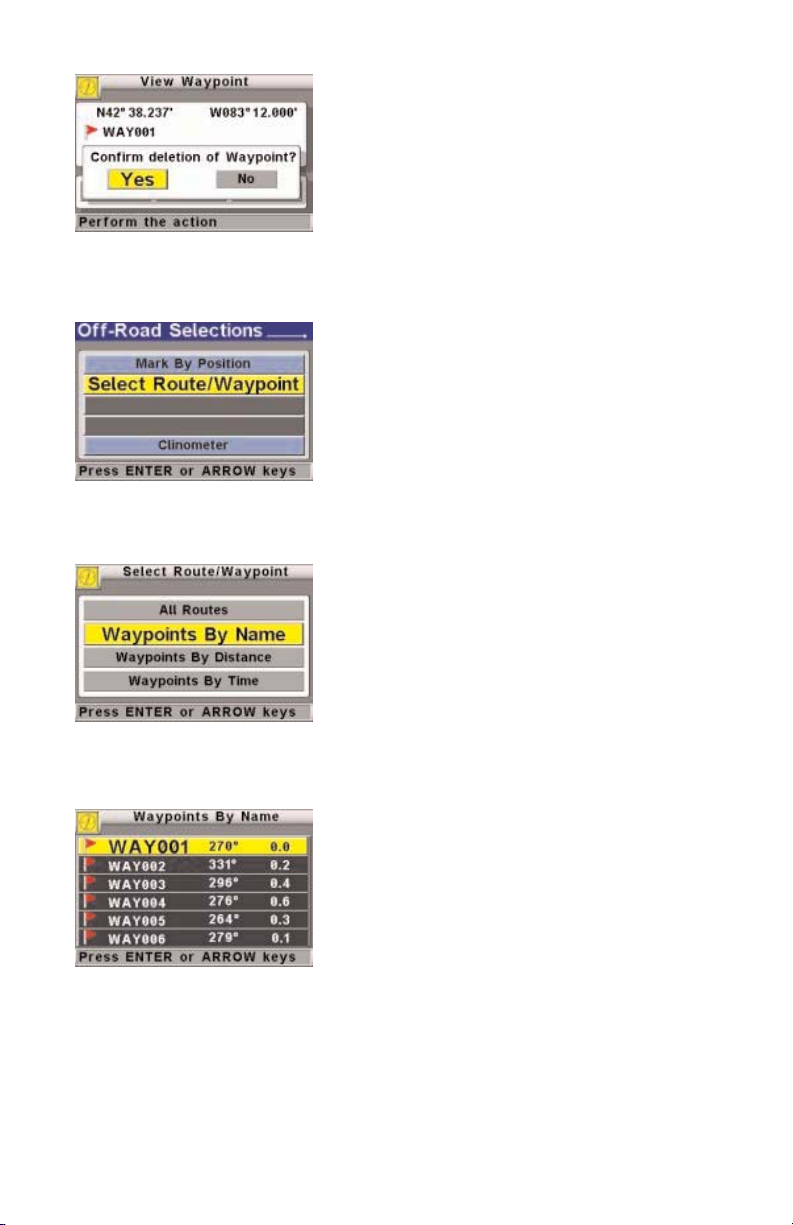
Deleting Waypoints
To delete a waypoint from the waypoint list. Press ENTER
on Select Route/Waypoint.
Press ENTER on Waypoints By Name, Waypoints By
Distance, or Waypoints By Time.
Select the waypoint and Press ENTER.
Select Delete and press ENTER.
Page 16
16
Select Yes and press ENTER.
Edit Waypoints
To Edit a waypoint from the waypoint list. Press ENTER
on Select Route/Waypoint.
Press ENTER on Waypoints By Name, Waypoints By
Distance, or Waypoints By Time.
Select the waypoint and Press ENTER.
Page 17

17
Select Edit and press ENTER.
After making the desired changes, scroll to Save and
press ENTER.
Create Route
To save waypoints into a route scroll to Select
Route/Waypoint and press ENTER.
Select All Routes and press ENTER.
Page 18

18
Choose an empty Route and press ENTER.
Press ENTER on Edit.
Press ENTER on Insert Waypoint.
Press ENTER on each waypoint that will make up the
route.
Page 19

19
After all waypoints are inserted for the desired route
scroll down to Save and press ENTER.
Press ENTER on Route to start Route Guidance.
Route guidance screen.
Press ENTER from the guidance screen to arrive at the
Off-Road Selections menu.
Page 20
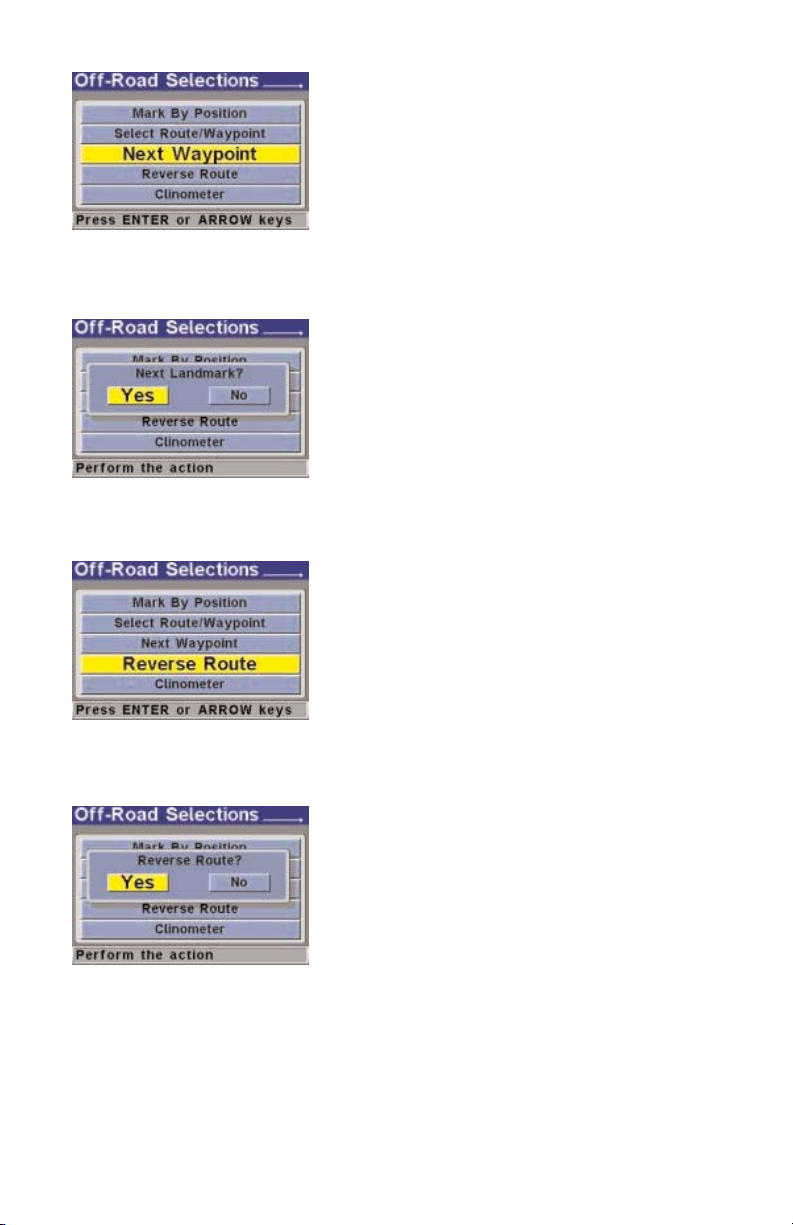
20
To bypass a waypoint select Next Waypoint and press
ENTER.
Select Yes and press ENTER.
To reverse the route select Reverse Route and press
ENTER.
Select Yes and press ENTER.
Page 21

21
Off-Road Navigation Route Guidance
After creating a route the 750NAV guides the user to
each waypoint. As the user drives past each waypoint the
arrival alarm will chime. The arrival alarm is adjustable
between off and 1 mile. Or between off and 1.5 kilometers. See the Off-Road options section on page 8 to adjust
the arrival alarm.
While driving the route an XTE alarm will alert the user
with chimes when the user drives off route. See the
Advanced feature in the Option Menu on page 8 to adjust
the XTE Alarm distance.
The True-View feature may be accessed while in Route
Guidance mode by pressing the VIEW key. When using
True-View mode simply drive in the direction of the
arrow to follow the route. The red triangle shows how
far the vehicle is off route (works as a visual for the XTE
Alarm).
Page 22

22
Once the final waypoint in the list is navigated to, the you
have arrived voice prompt is heard followed by 3 double
chimes. Also a destination screen will be displayed showing the final waypoint name and the Lat/Long coordinates
of the waypoint.
To cancel route guidance, press the CANCEL key, move
the cursor to yes and press ENTER.
If you would like to route to a specific waypoint select
Waypoints By Name, Waypoints By distance, or Waypoints
By Time and press ENTER.
Select a waypoint, Press ENTER.
Page 23

23
Now select Route and Press ENTER.
Clinometer
The Clinometer can be accessed in the Off-Road Selections menu. Press ENTER on
Clinometer. The pitch and roll readings of the vehicle will be displayed while driving. This
feature is useful when driving across or up steep inclines, letting the driver know how
aggressive the terrain is.
Cancel Off-Road Navigation
To cancel Off-Road Navigation press the CANCEL key until
prompted to Cancel Off-Road, select yes and then ENTER.
When the system is in route guidance mode the user will
have to cancel route guidance before canceling Off-Road.
Anytime the user saves information or settings
it is recommended to power down the system by either
turning the ignition off or by pressing the POWER button to allow a proper shutdown. This
procedure ensures the settings will be saved into the 750
NAV'S memory. Off-Road Navigation
is now ready for use.
TIP
©2001 Thales Navigation. All rights reserved.
Specifications subject to change without notice.
750
NAV, 750M are trademarks of Thales Navigation.
All other trademarks are the property of their respective owners.
DIS-DOC-7500104-00
 Loading...