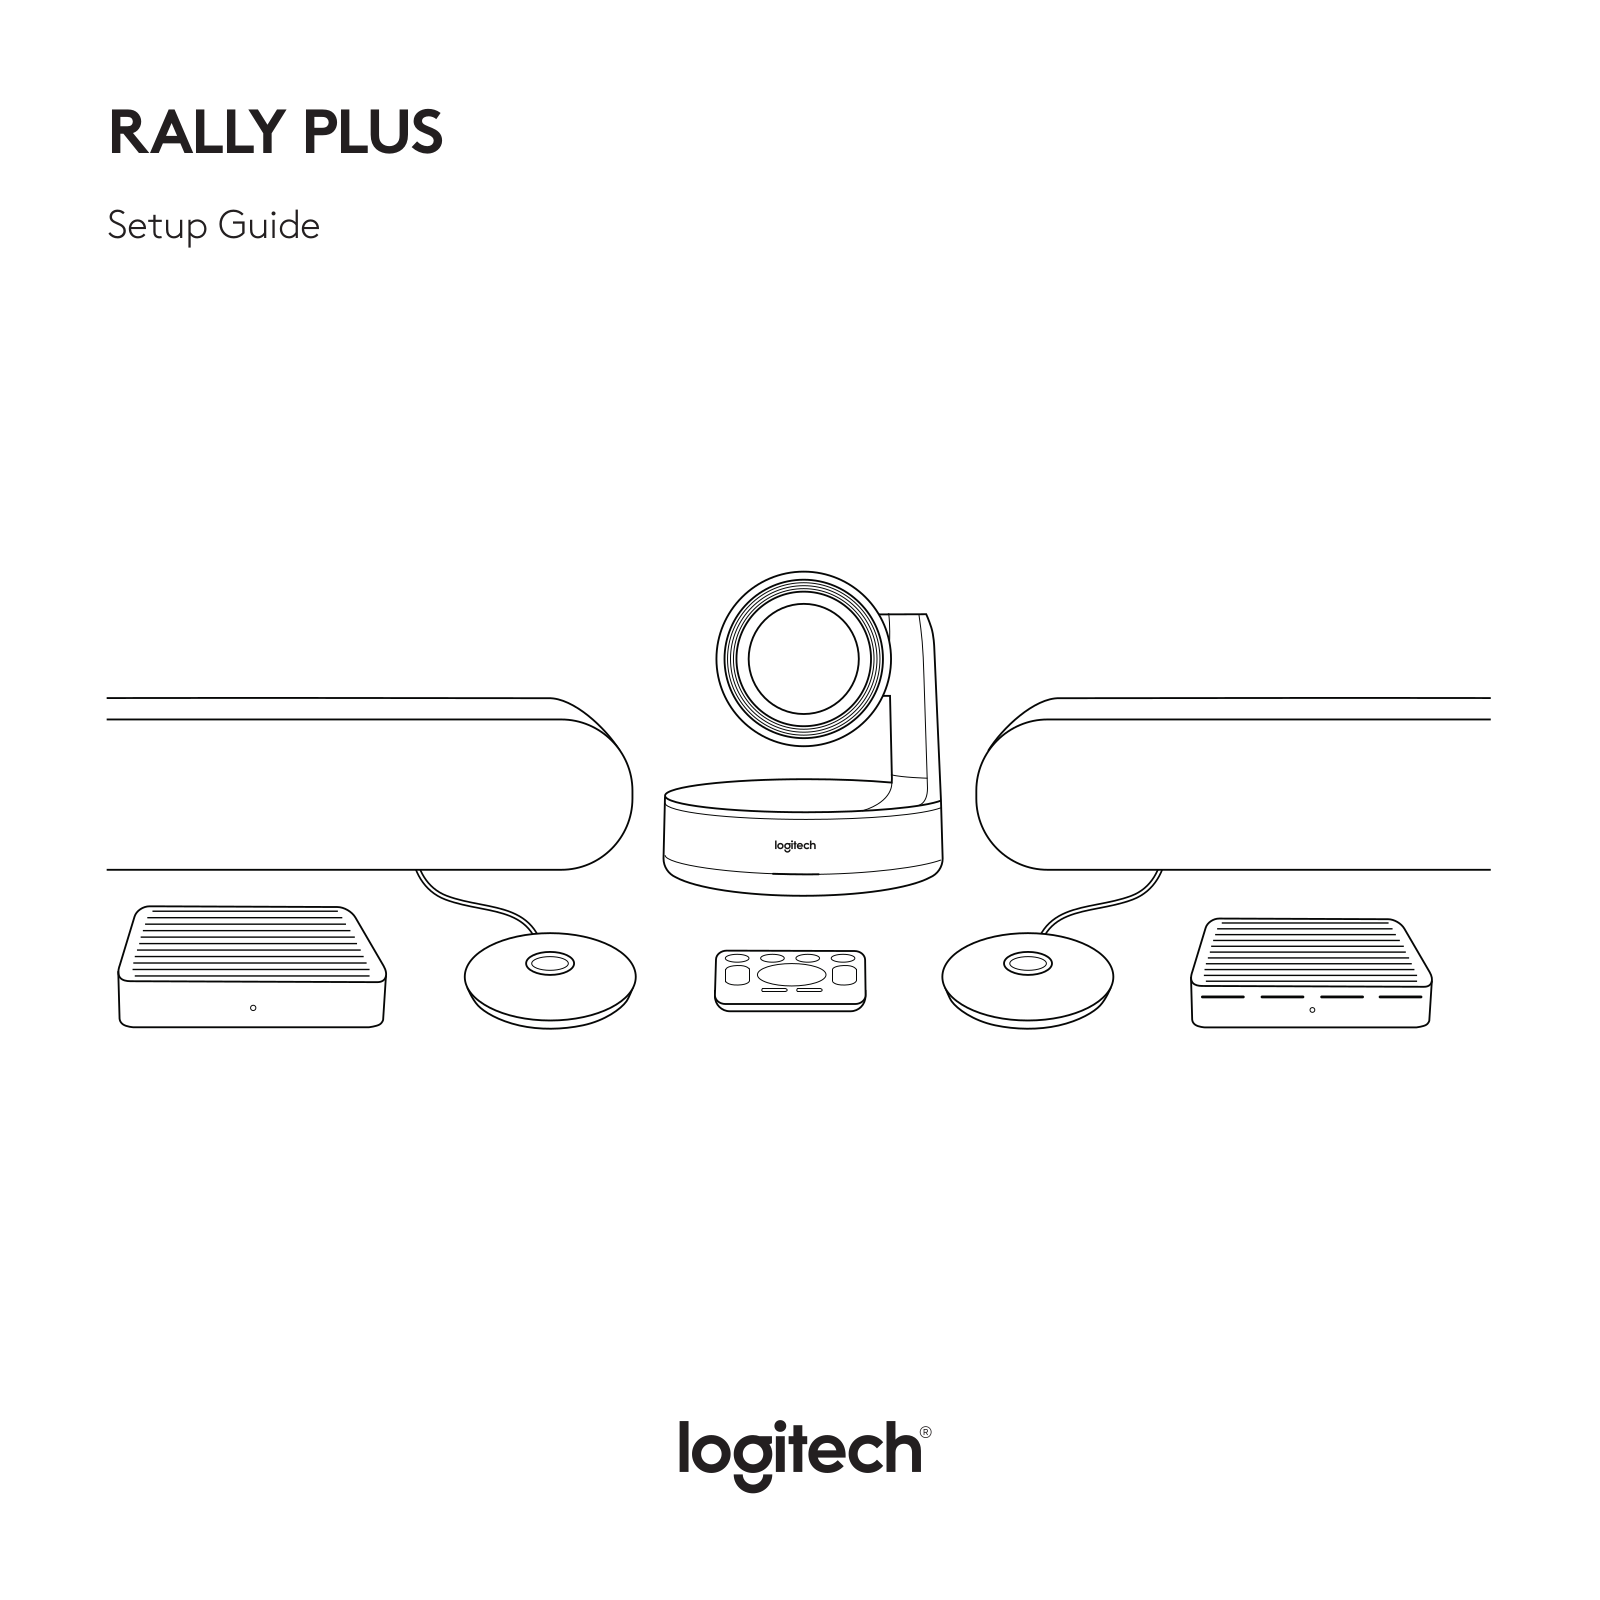
Logitech RALLY PLUS Setup guide [ml]

RALLY PLUS

Setup Guide

English . . . . . . . . . . . . . . 3 Deutsch . . . . . . . . . . . . 10 Français . . . . . . . . . . . . 17 Italiano . . . . . . . . . . . . .24 Español . . . . . . . . . . . . . 31 Português . . . . . . . . . . . 38 Nederlands . . . . . . . . . . 45 Svenska . . . . . . . . . . . . 52 Dansk . . . . . . . . . . . . . 59 Norsk . . . . . . . . . . . . . 66 Suomi . . . . . . . . . . . . . 73

Ελληνικά . . . . . . . . . . . . 80

По-русски . . . . . . . . . . . .87 Po polsku . . . . . . . . . . . 94 Magyar . . . . . . . . . . . . 101

Česká verze . . . . . . . . . .108 Slovenčina. . . . . . . . . . . 115

Українська . . . . . . . . . . . 122 Eesti . . . . . . . . . . . . . . 129 Latviski . . . . . . . . . . . . 136 Lietuvių . . . . . . . . . . . . 143

Български . . . . . . . . . . . 150 Hrvatski . . . . . . . . . . . . 157 Srpski . . . . . . . . . . . . . 164 Slovenščina . . . . . . . . . . 171 Română . . . . . . . . . . . . 178 Türkçe . . . . . . . . . . . . . 185 192. . . . . . . . . . . . . .ةيبرعلا

199. . . . . . . . . . . . . תירבע

2

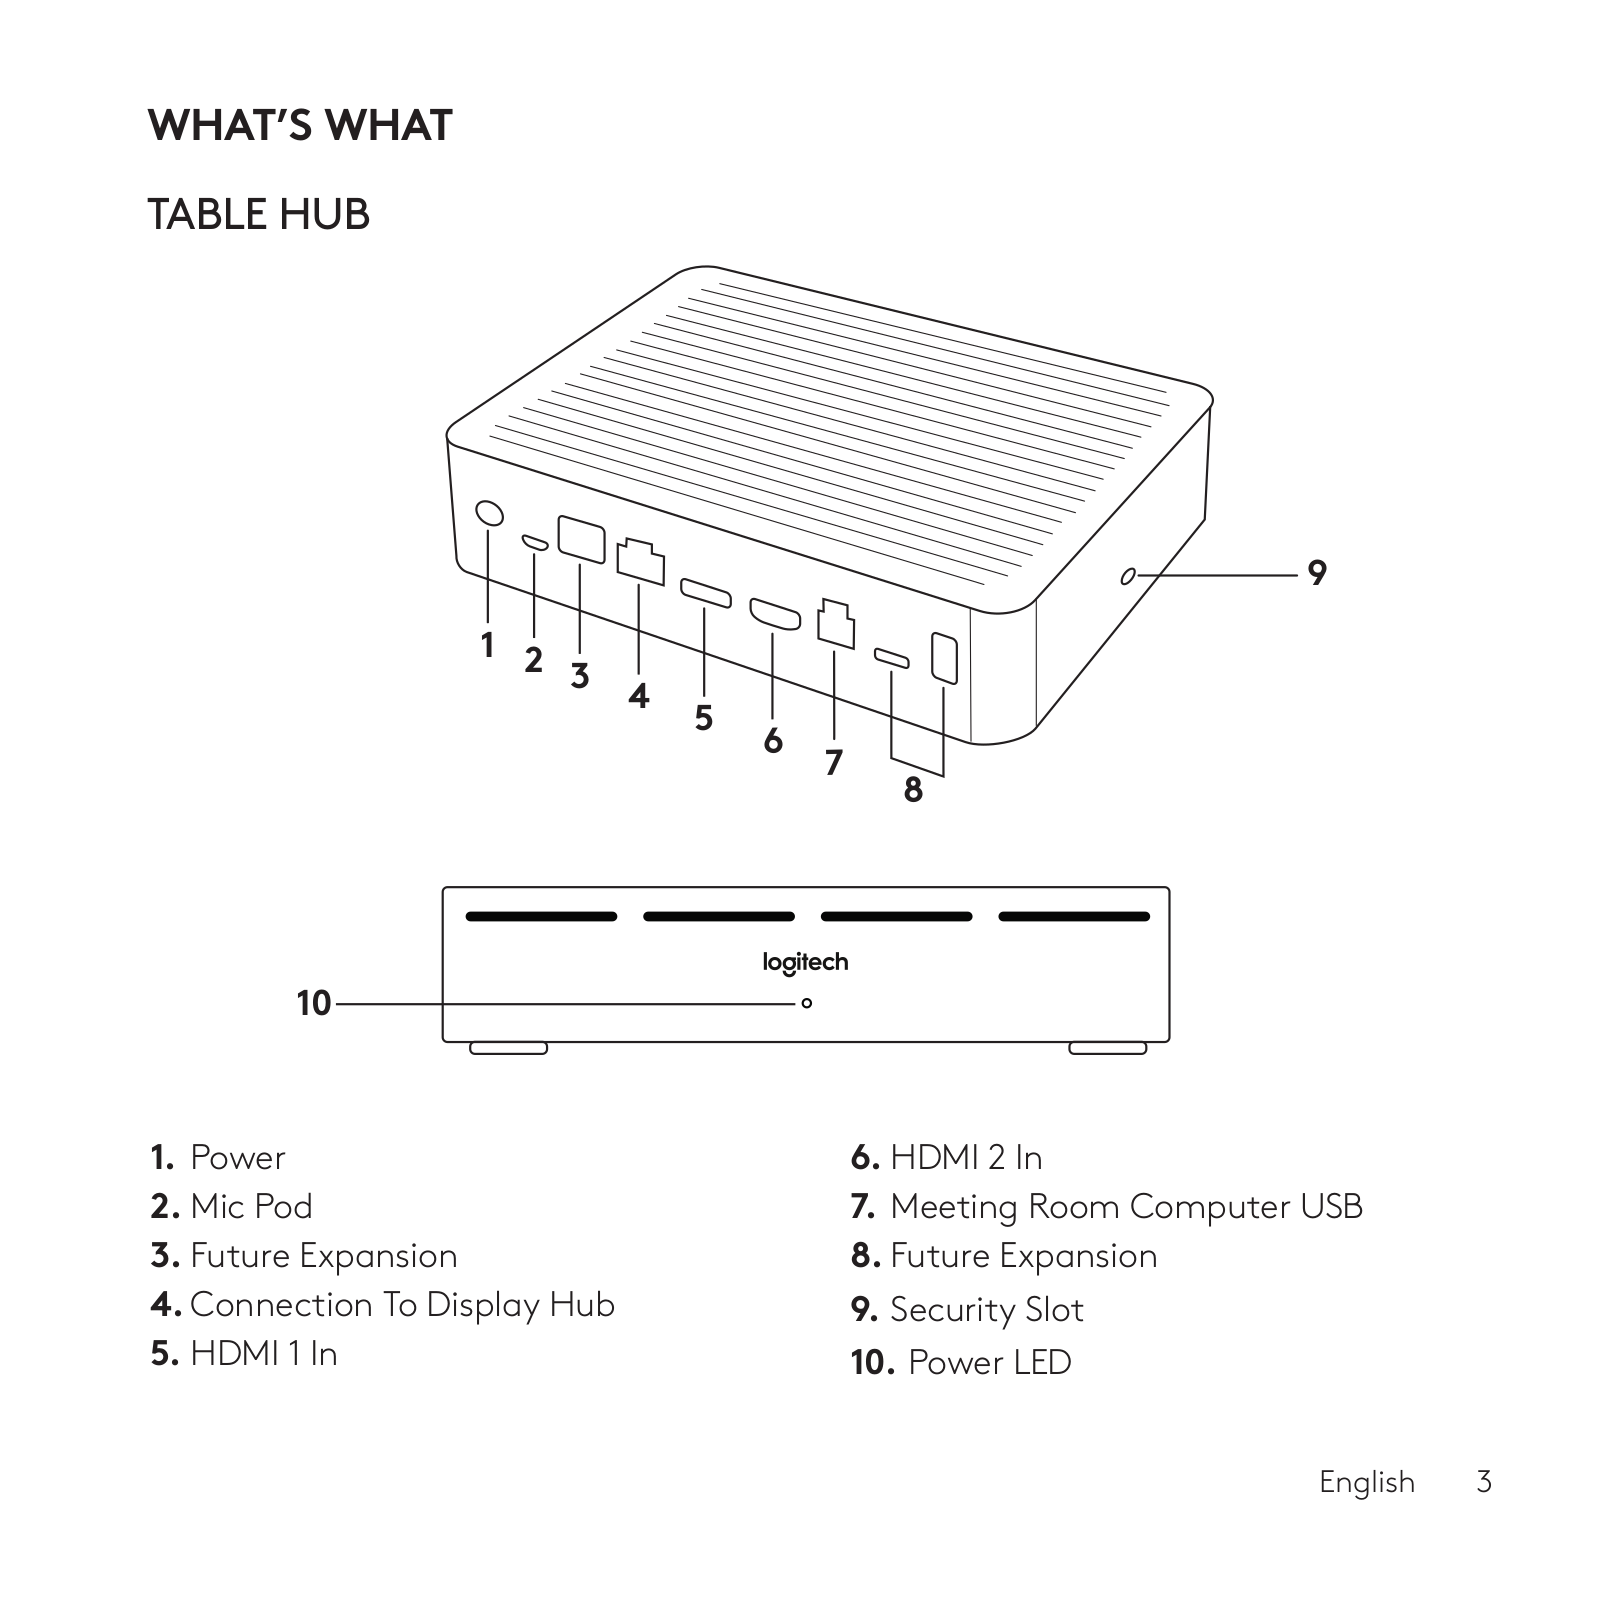
WHAT’S WHAT

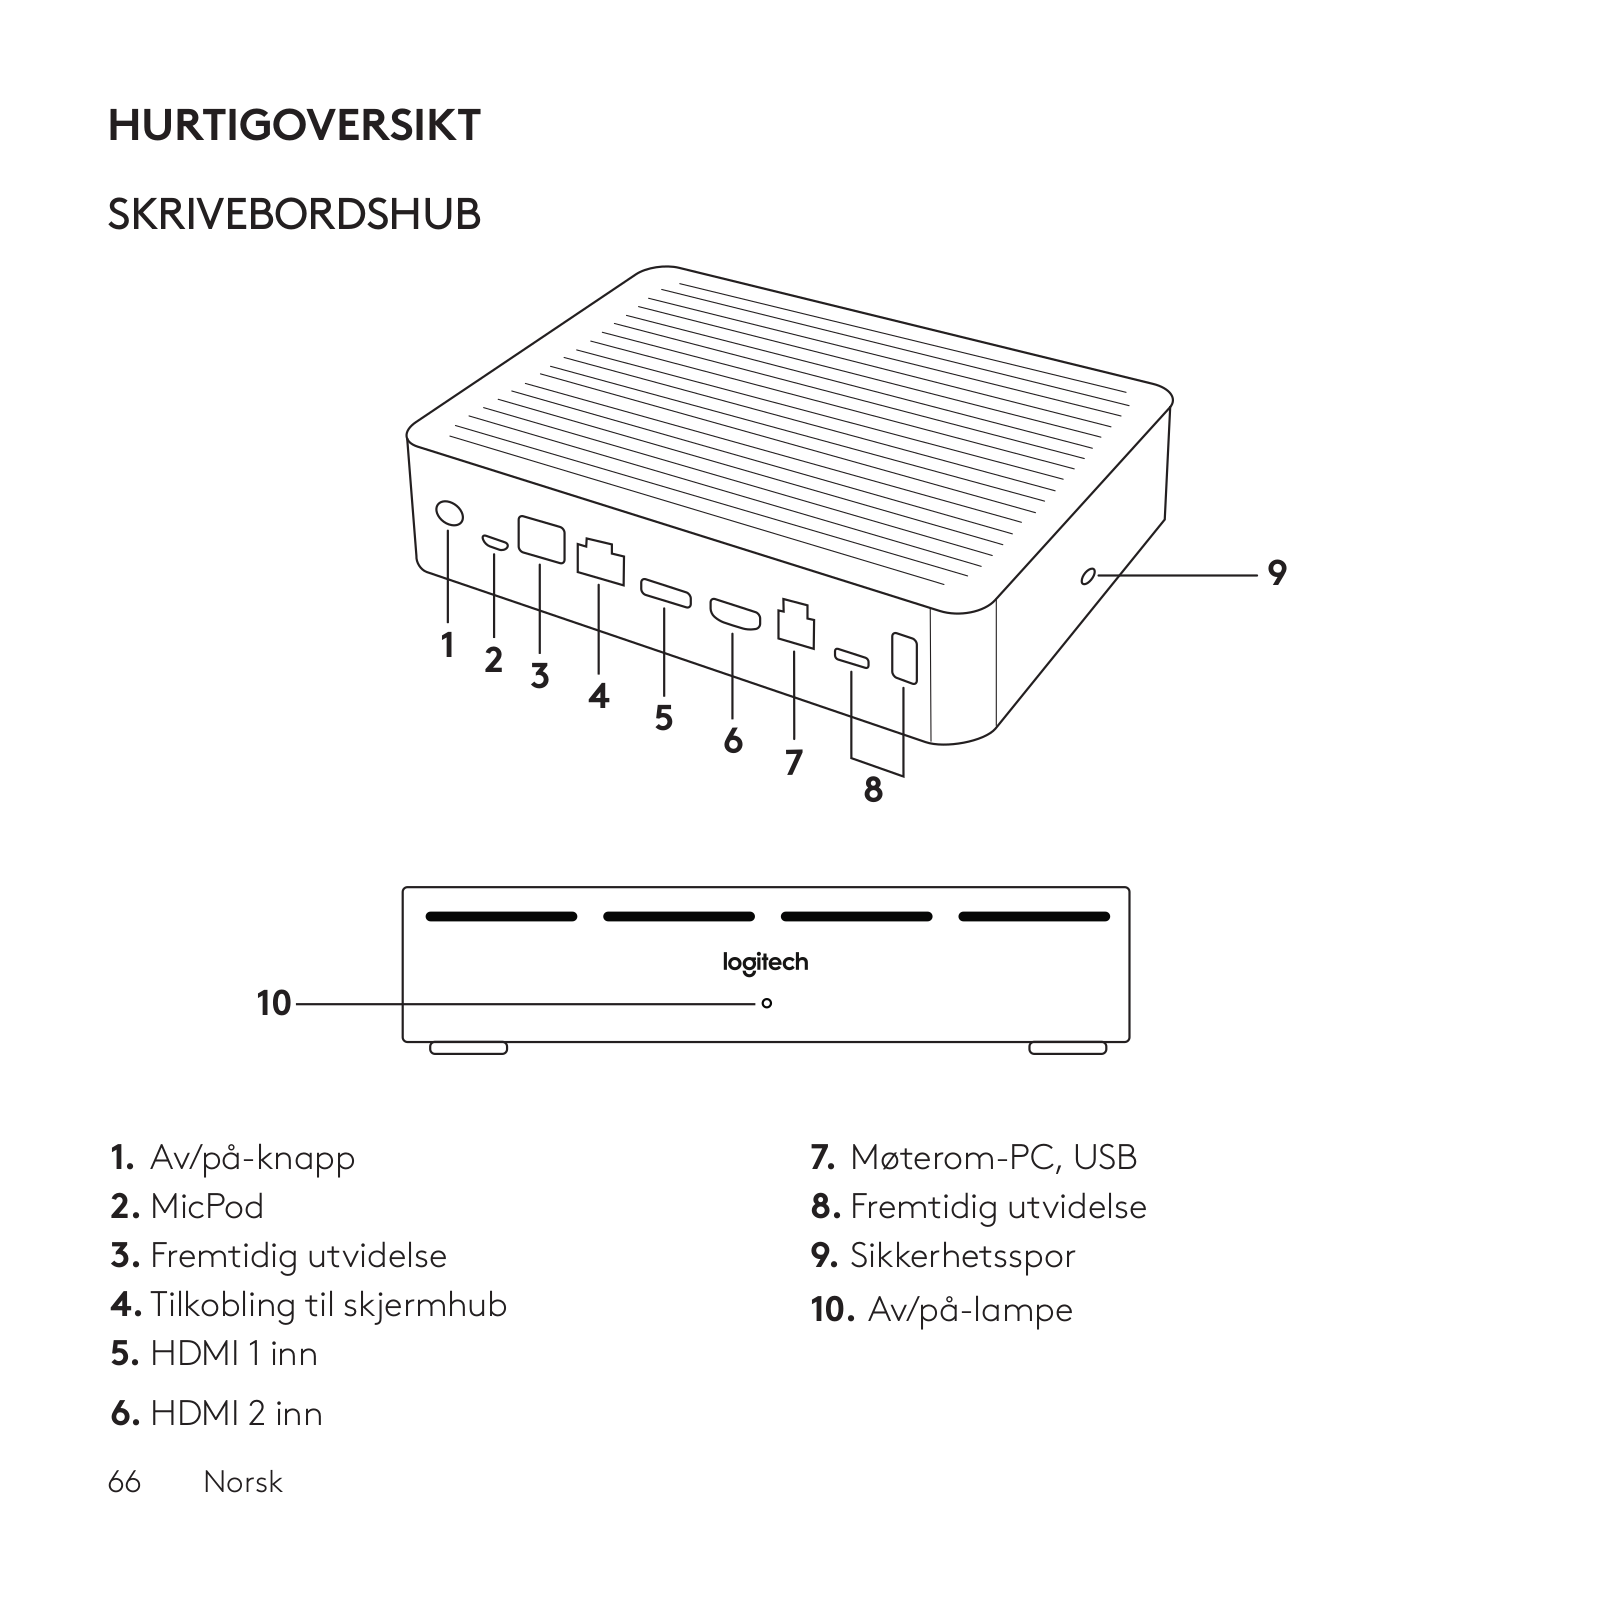
TABLE HUB

1 2 3 4 5

9

6

7

8


10

1.

Power

6. HDMI 2 In

2.

Mic Pod

7. Meeting Room Computer USB

3.

Future Expansion

8. Future Expansion

4. Connection To Display Hub

9. Security Slot

5.

HDMI 1 In

10. Power LED

English    3

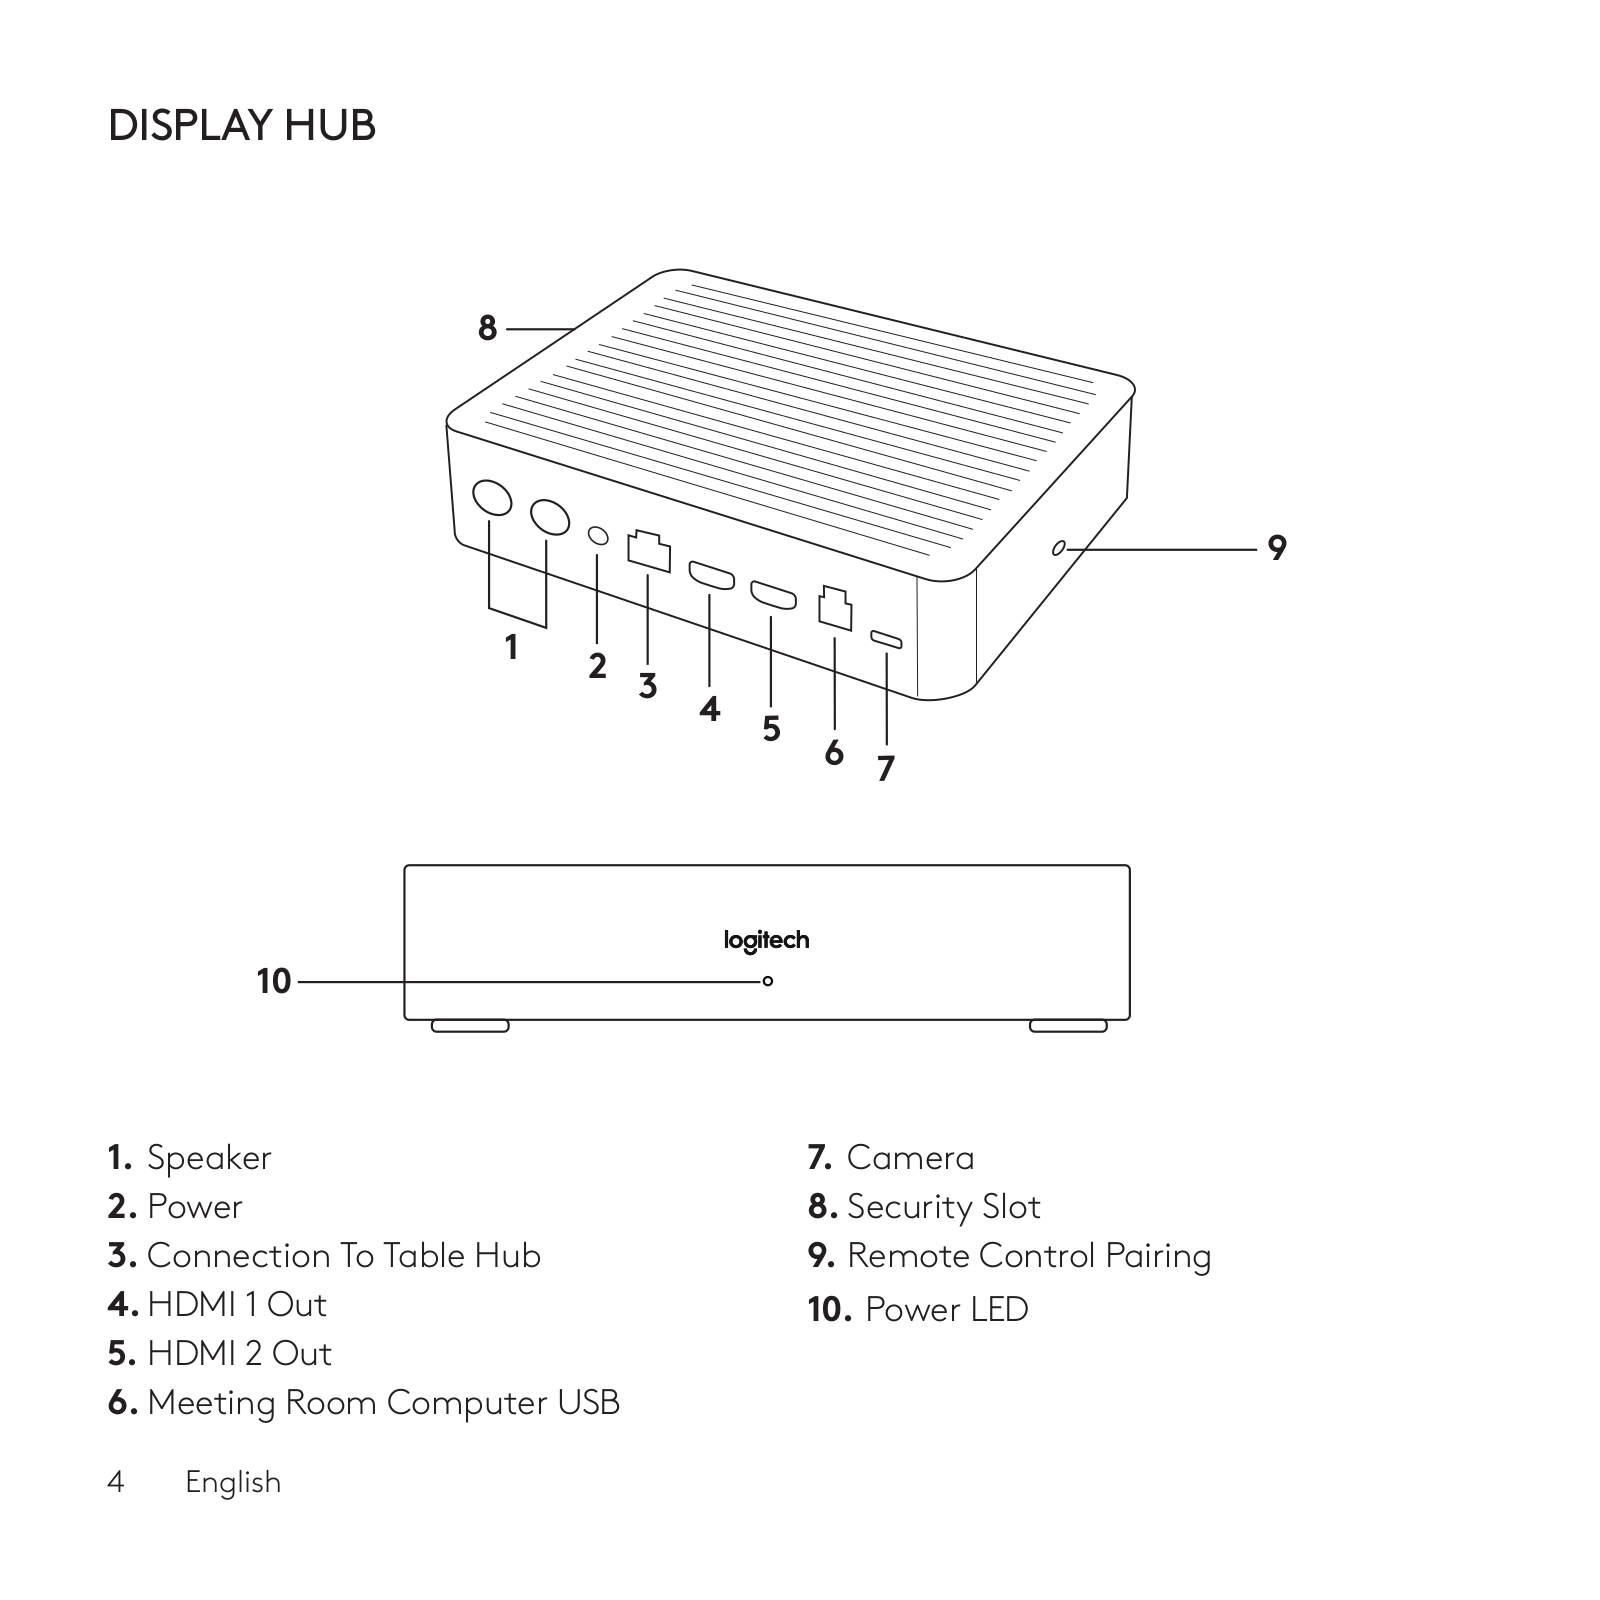
DISPLAY HUB

8

1 2 3 4

9

5

6

7


10

1.

Speaker

7. Camera

2.

Power

8. Security Slot

3.

Connection To Table Hub

9. Remote Control Pairing

4. HDMI 1 Out

10. Power LED

5.HDMI 2 Out

6.Meeting Room Computer USB

4    English

Logitech RALLY PLUS Setup guide

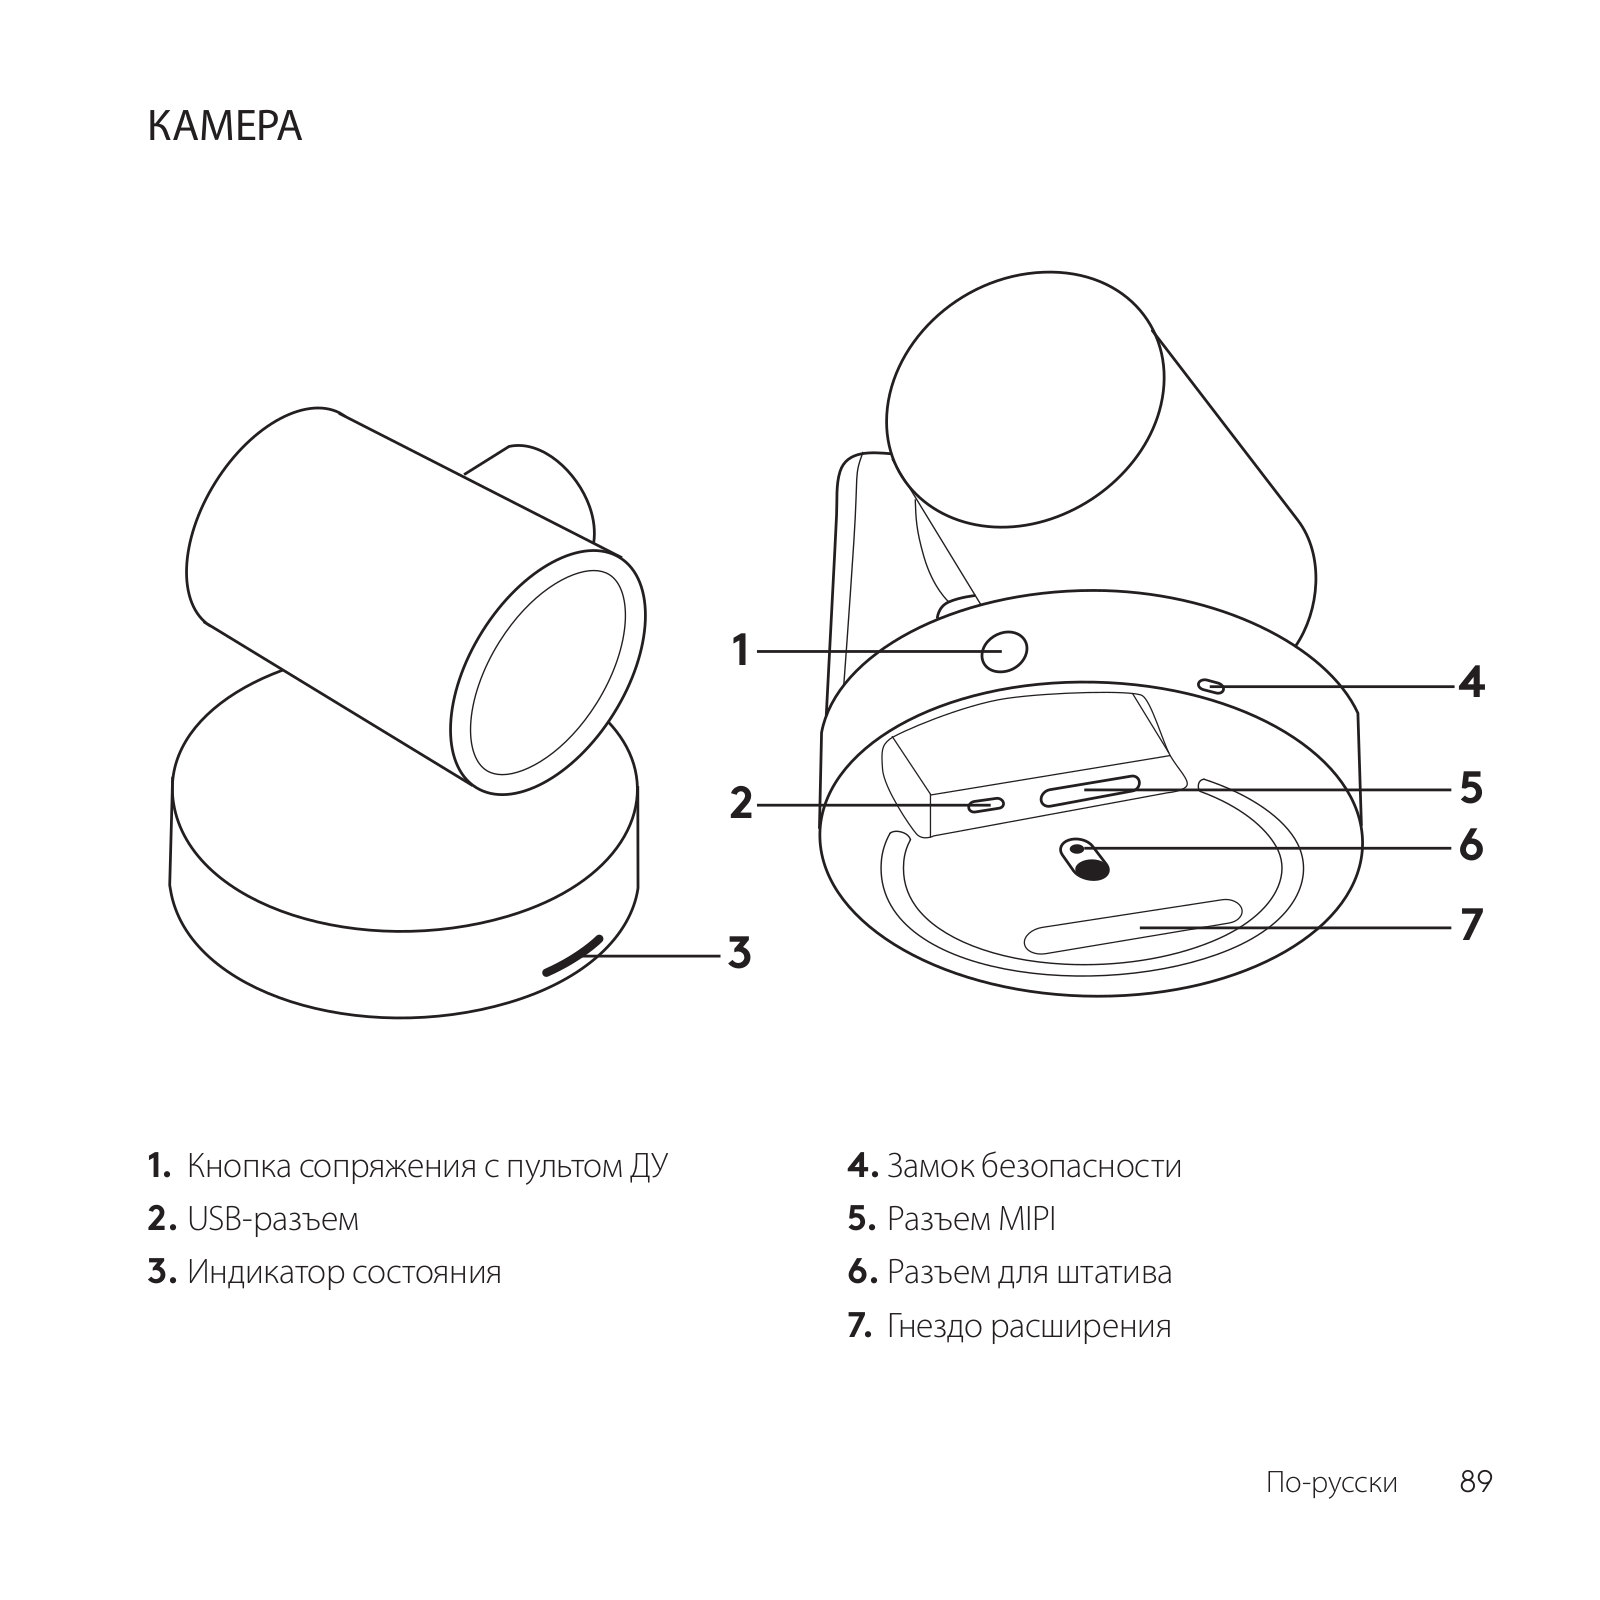
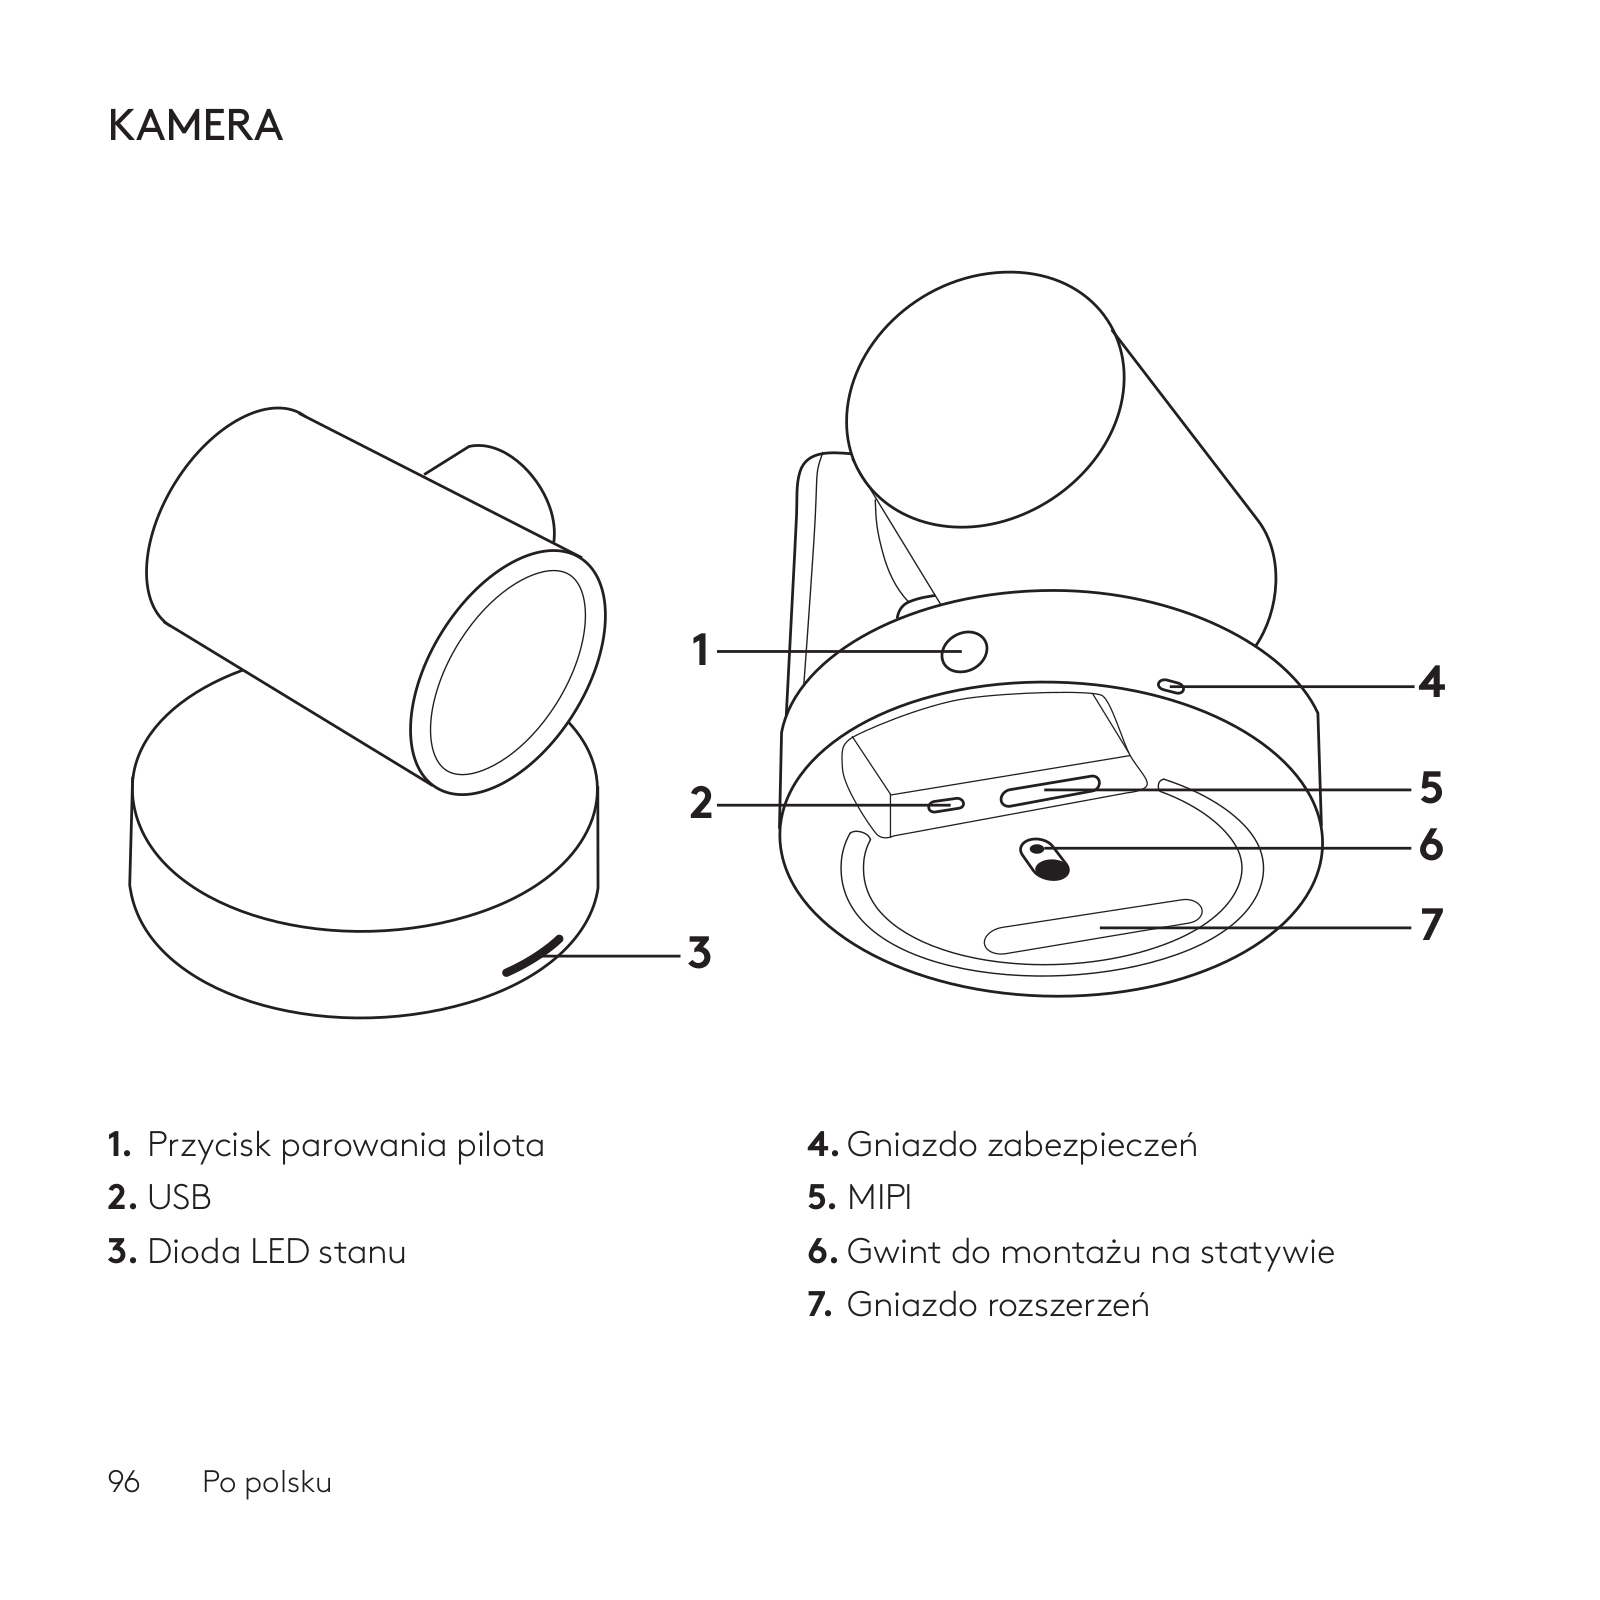
CAMERA

1

2

3

1.

Remote control pairing button

4. Security slot

2.

USB

5. MIPI

3.

Status LED

6. Tripod Thread


7. Expansion Slot

4

5

6

7

English    5

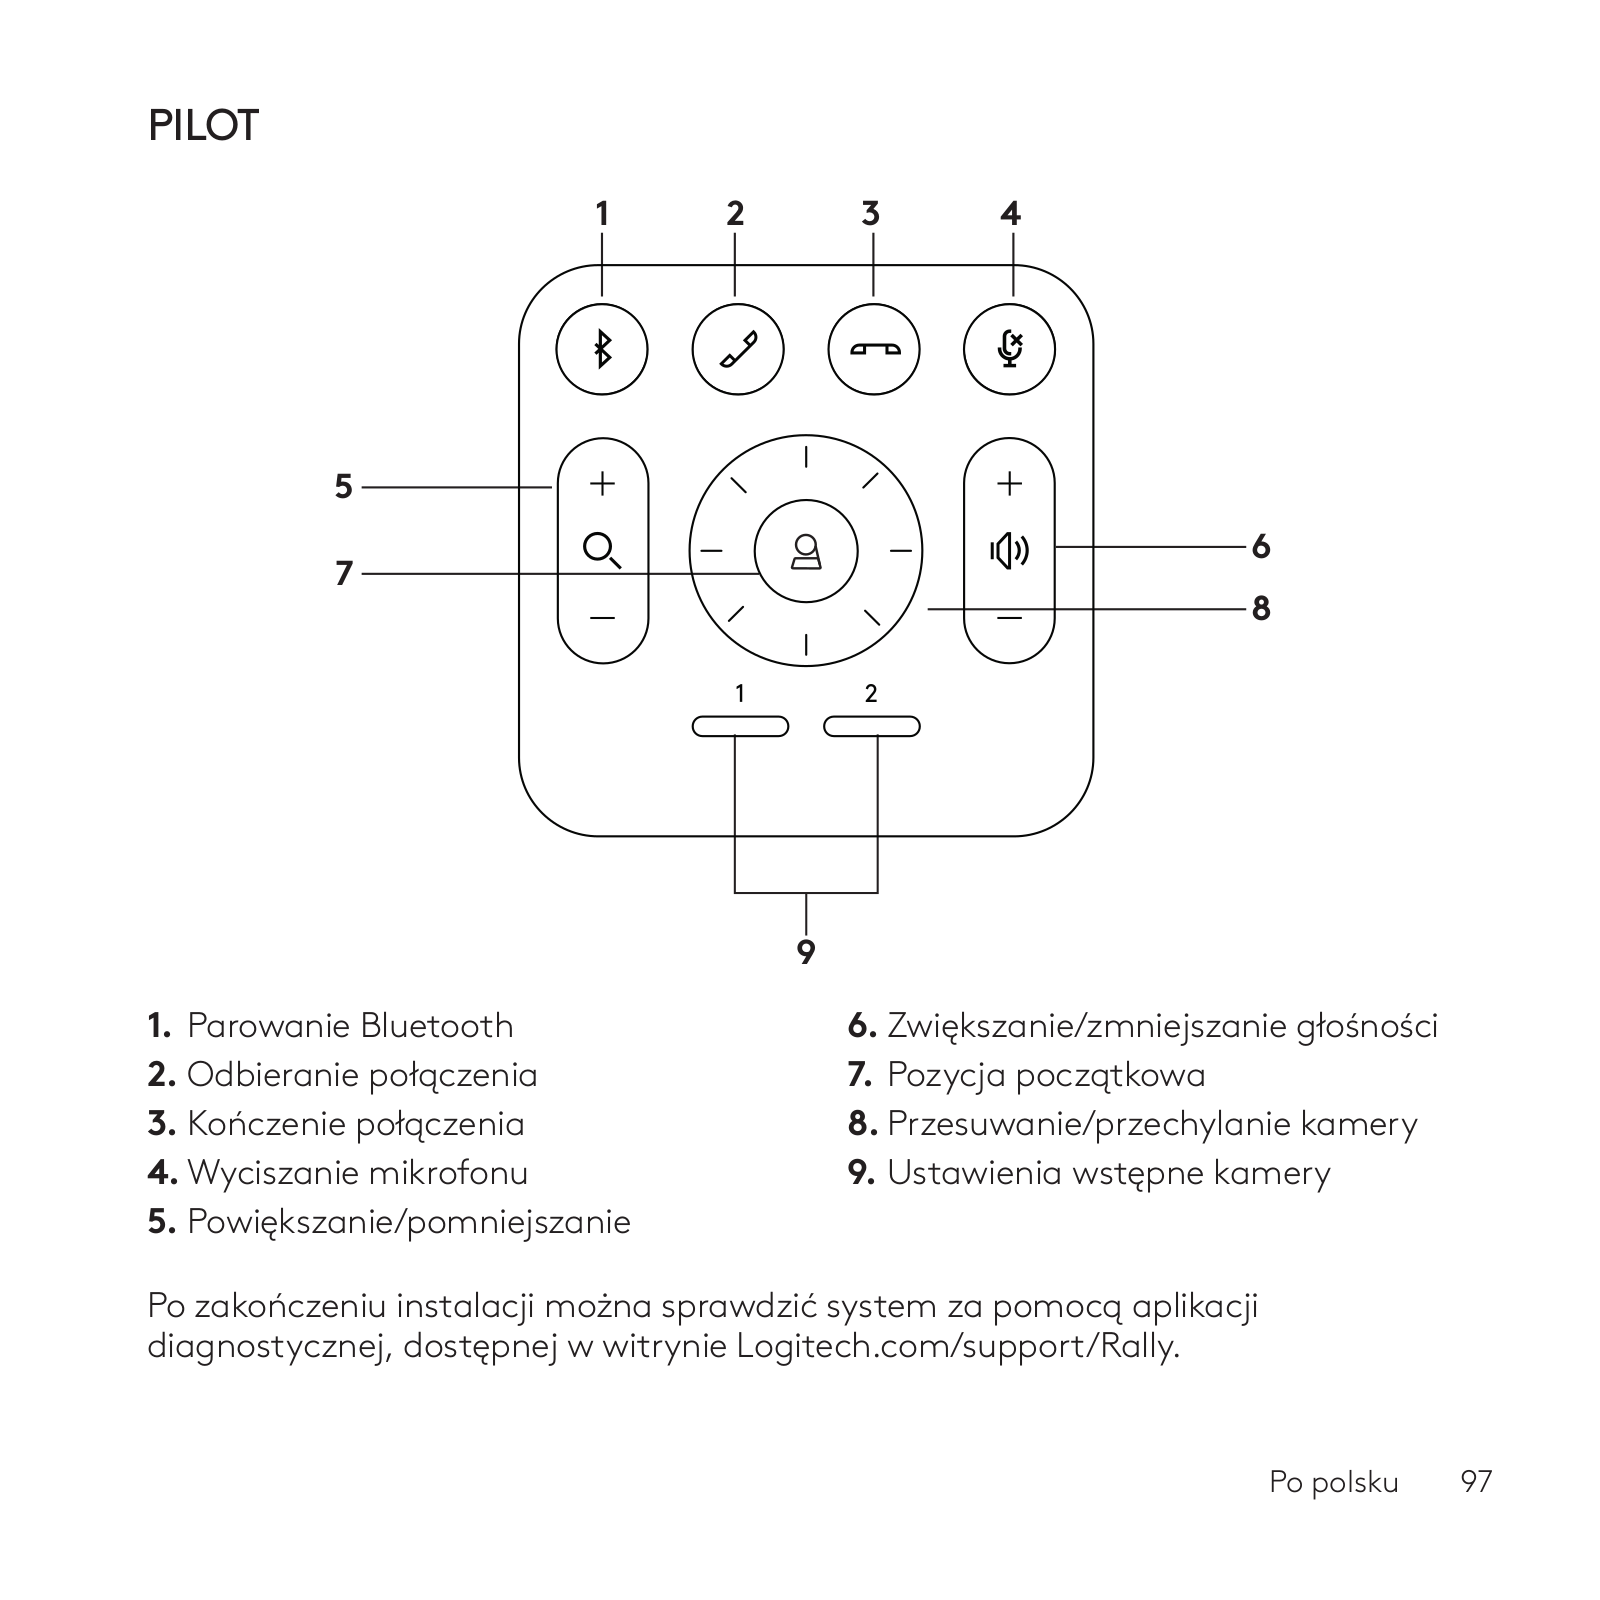
REMOTE

1

2

3

4

5


7

6

8


9


1.

Bluetooth pairing


6. Volume up/down

2.

Call answer


7. Home

3.

Call end


8. Camera pan/tilt

4. Microphone mute


9. Camera presets

5.

Zoom in/out


After completing the installation, the system can be checked by running the diagnostic application available at Logitech.com/support/Rally.

6    English

MAKE RALLY PLUS THE DEFAULT DEVICE

Ensure that RALLY PLUS is chosen as the camera, speaker and microphone in your video conferencing applications. Please consult the application documentation for further instructions on how to do this.

STARTING A VIDEO CALL

After installing RALLY PLUS and ensuring it is the default device in your video conferencing application, simply start the application in the normal manner and enjoy the benefits of improved audio and video.

PAIRING RALLY PLUS

TO A BLUETOOTH DEVICE

You can use RALLY PLUS for audio calls when paired to a Bluetooth device. To pair your Bluetooth device to RALLY PLUS, follow these simple step:

1.Press and hold the Bluetooth button on the remote control until you see a flashing blue light on the camera and microphones.

2.Place your mobile device

in Bluetooth pairing mode and select “Logitech Rally”.

3.You are now ready to use RALLY PLUS for audio calls.

English    7

PAIRING A REMOTE CONTROL TO RALLY PLUS

RALLY PLUS and the remote control are paired at the factory. You can pair up to 5 remote controls to RALLY PLUS to make it easier to control the system in larger rooms. Or, if you need to pair a remote to the camera, such as when replacing a lost remote, do the following:

1.Press and hold the button on the camera until the LED flashes.

2.Press and hold the button on

the Display Hub until the LED flashes.

3.Press and hold the Bluetooth button on the remote control until the LEDs on both the camera and Display Hub stop flashing.

4.If the pairing fails, repeat from step 1.

CAMERA SETTINGS APPLICATION

Use this program to control the camera pan, tilt, zoom, focus, and image quality (like brightness and contrast) from

your computer. The software can be downloaded from www.logitech.com/ support/Rally.

8    English

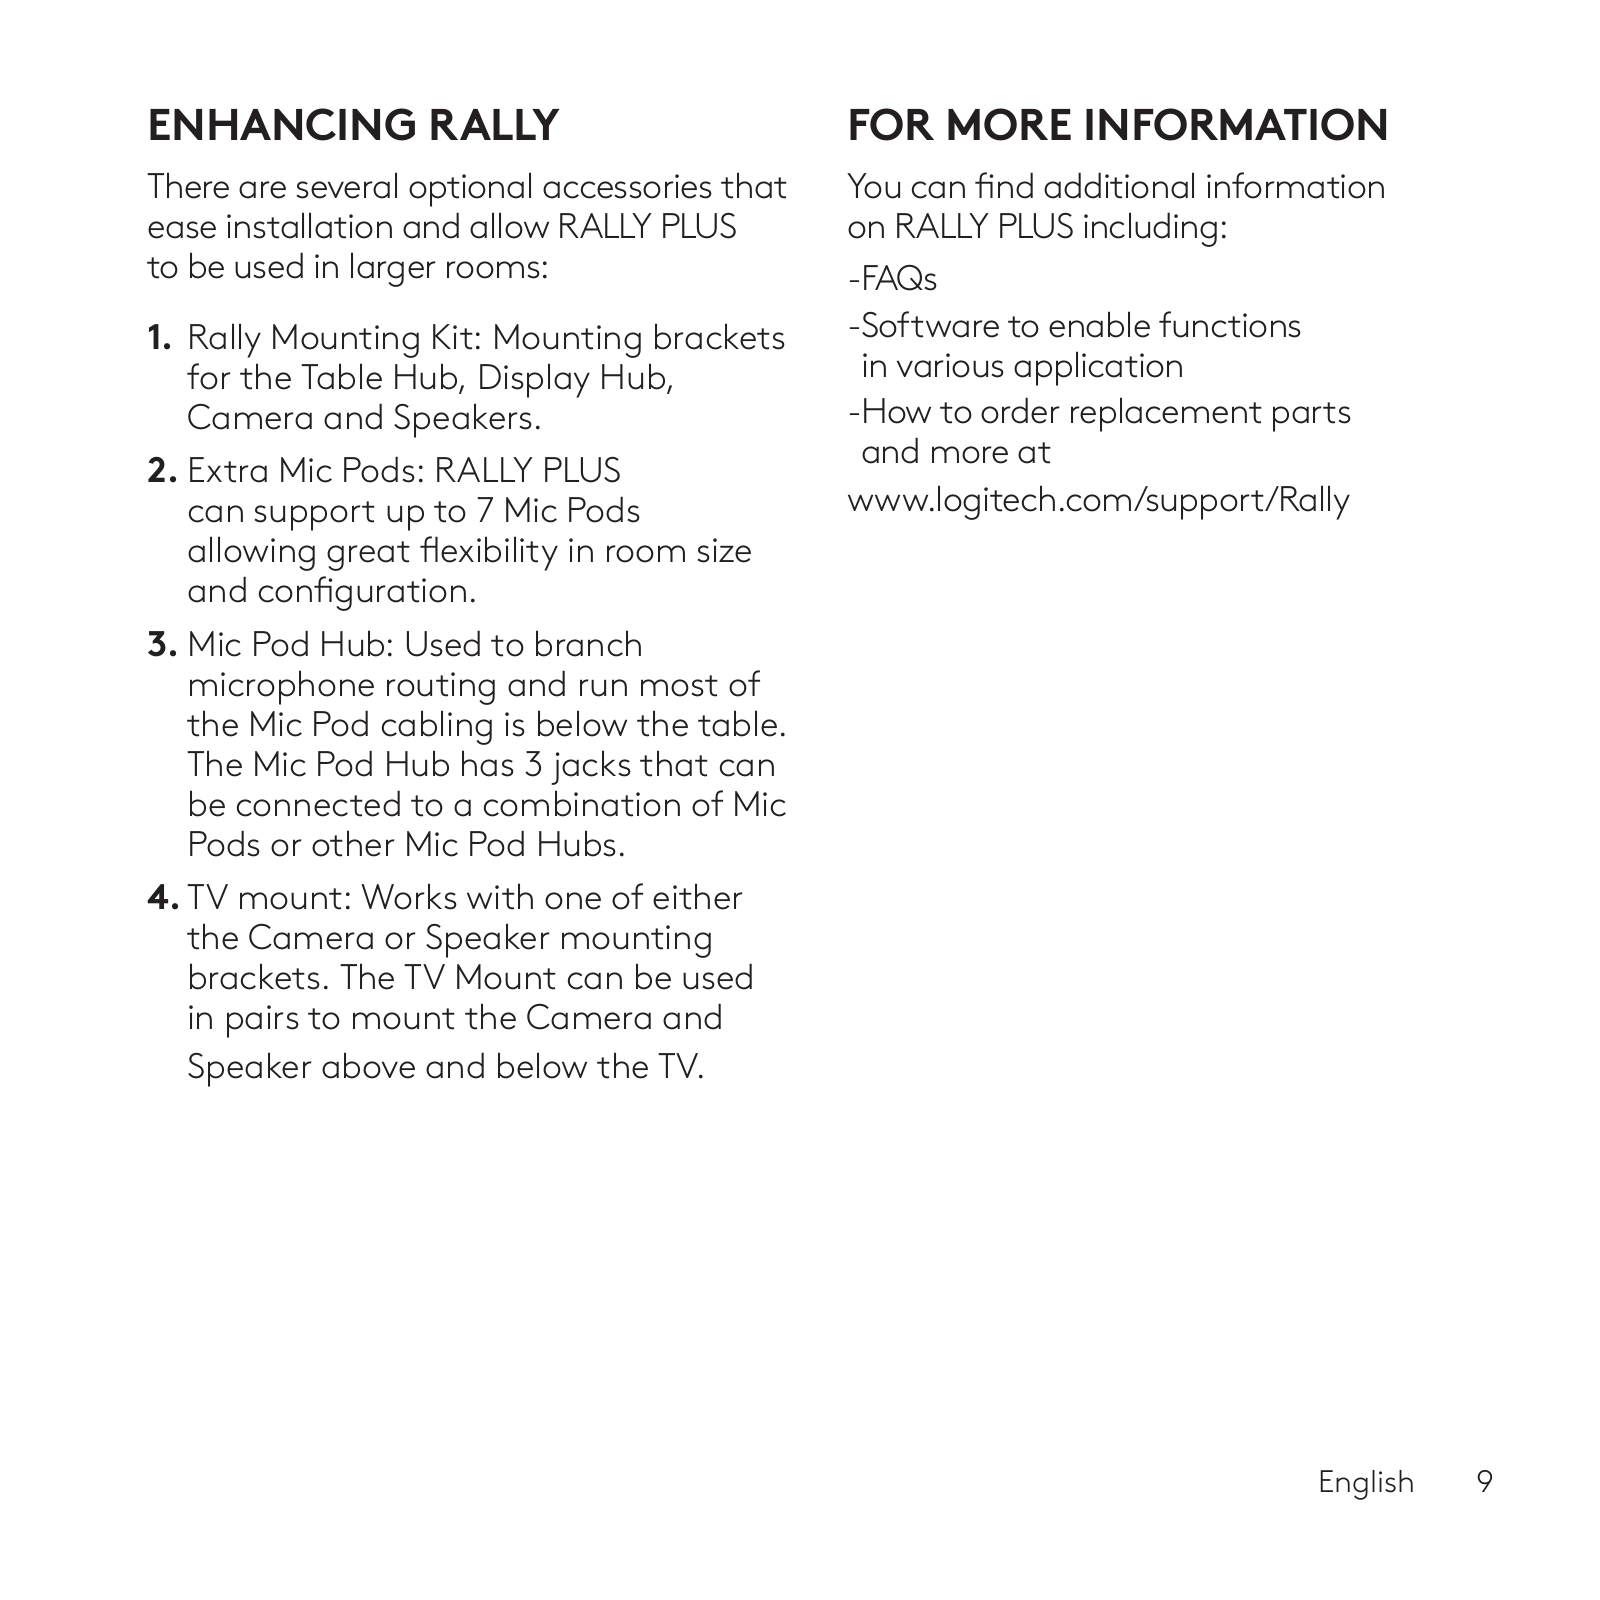
ENHANCING RALLY

There are several optional accessories that ease installation and allow RALLY PLUS

to be used in larger rooms:

1.Rally Mounting Kit: Mounting brackets for the Table Hub, Display Hub, Camera and Speakers.

2.Extra Mic Pods: RALLY PLUS can support up to 7 Mic Pods

allowing great flexibility in room size and configuration.

3.Mic Pod Hub: Used to branch microphone routing and run most of the Mic Pod cabling is below the table. The Mic Pod Hub has 3 jacks that can be connected to a combination of Mic Pods or other Mic Pod Hubs.

4.TV mount: Works with one of either the Camera or Speaker mounting brackets. The TV Mount can be used in pairs to mount the Camera and Speaker above and below the TV.

FOR MORE INFORMATION

You can find additional information on RALLY PLUS including:

-FAQs

-Software to enable functions in various application

-How to order replacement parts and more at

www.logitech.com/support/Rally

English    9

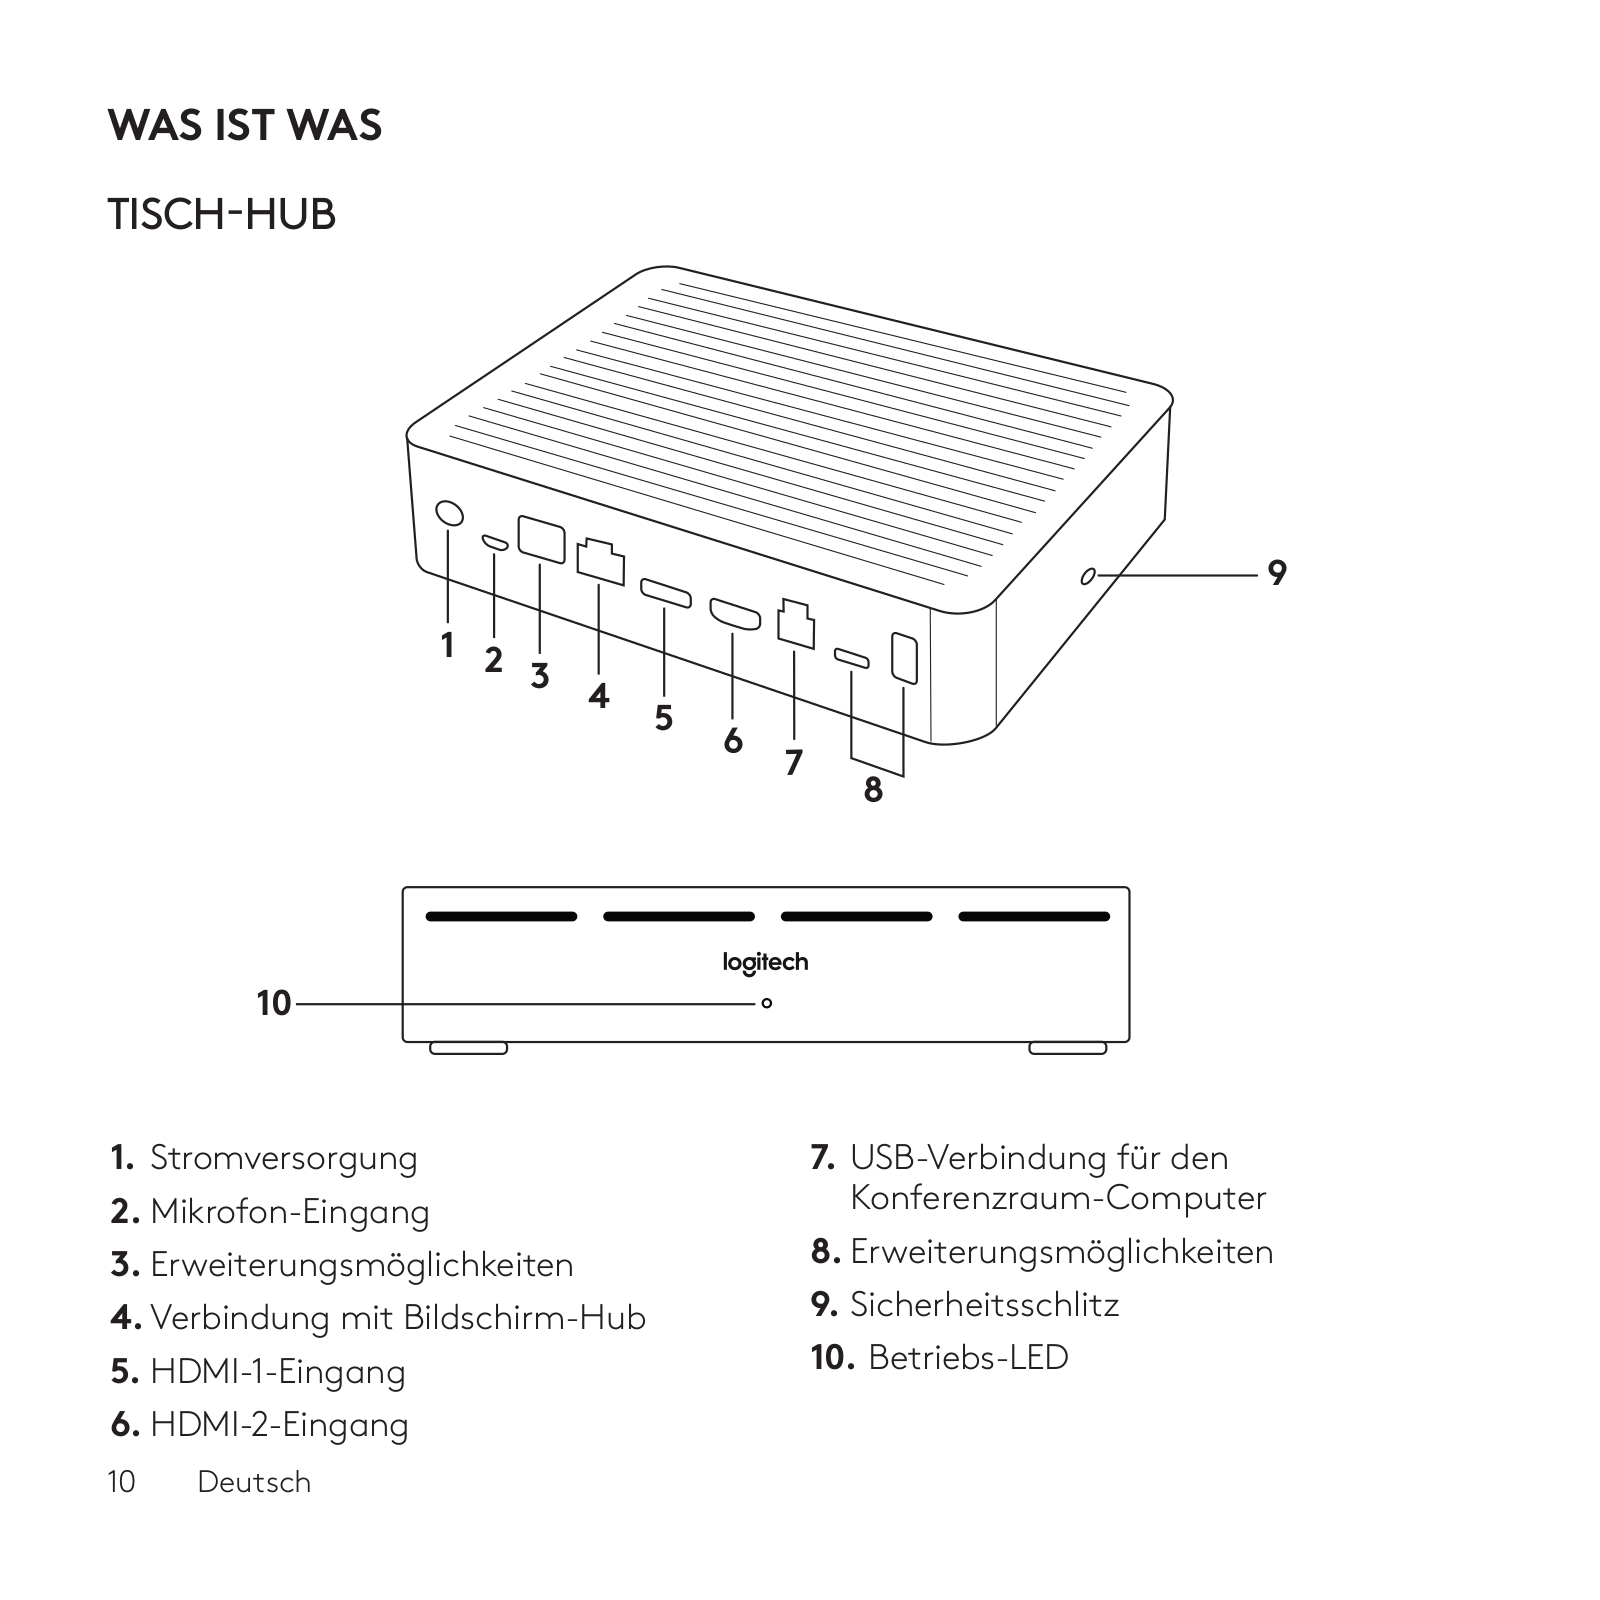
WAS IST WAS

TISCH-HUB

1 2 3 4 5

9

6

7

8


10

1.

Stromversorgung

7. USB-Verbindung fü̈r den

2.

Mikrofon-Eingang

Konferenzraum-Computer

3.

Erweiterungsmöglichkeiten

8. Erweiterungsmöglichkeiten

9. Sicherheitsschlitz

4. Verbindung mit Bildschirm-Hub

10. Betriebs-LED

5.

HDMI-1-Eingang


6. HDMI-2-Eingang

10    Deutsch

BILDSCHIRM-HUB

8

1 2 3 4

9

5

6

7


10

1.

Lautsprecher

6. USB-Verbindung fü̈r den

2.

Stromversorgung

Konferenzraum-Computer

3.

Verbindung mit Tisch-Hub

7. Kamera

8. Sicherheitsschlitz

4. HDMI-1-Ausgang

9. Fernbedienungs-Pairing

5.

HDMI-2-Ausgang

10. Betriebs-LED


Deutsch    11

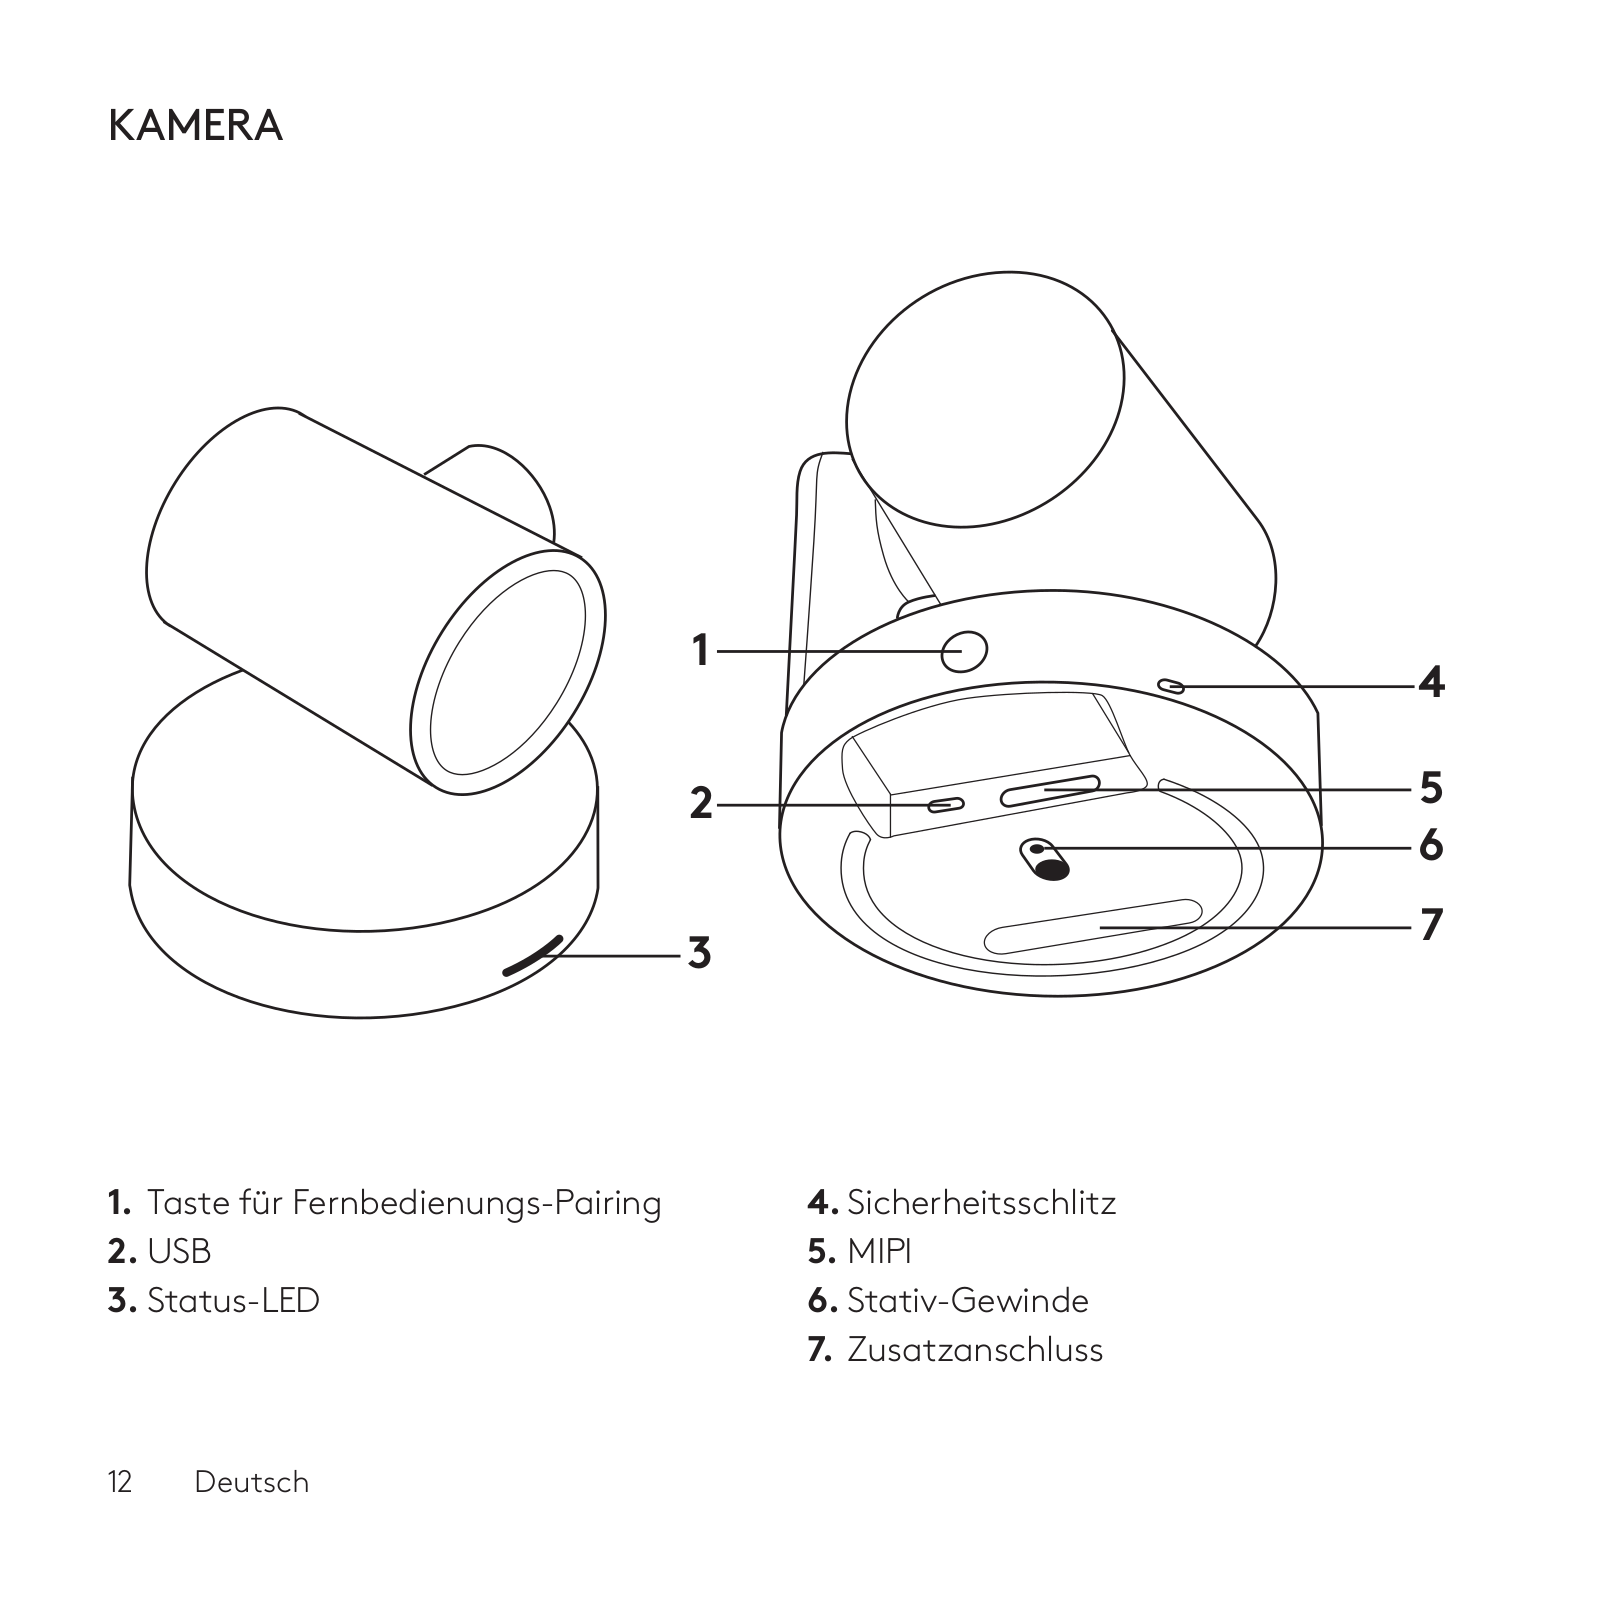
KAMERA

1

2

3

1.

Taste fü̈r Fernbedienungs-Pairing

4. Sicherheitsschlitz

2.

USB

5. MIPI

3.

Status-LED

6. Stativ-Gewinde


7. Zusatzanschluss

4

5

6

7

12    Deutsch

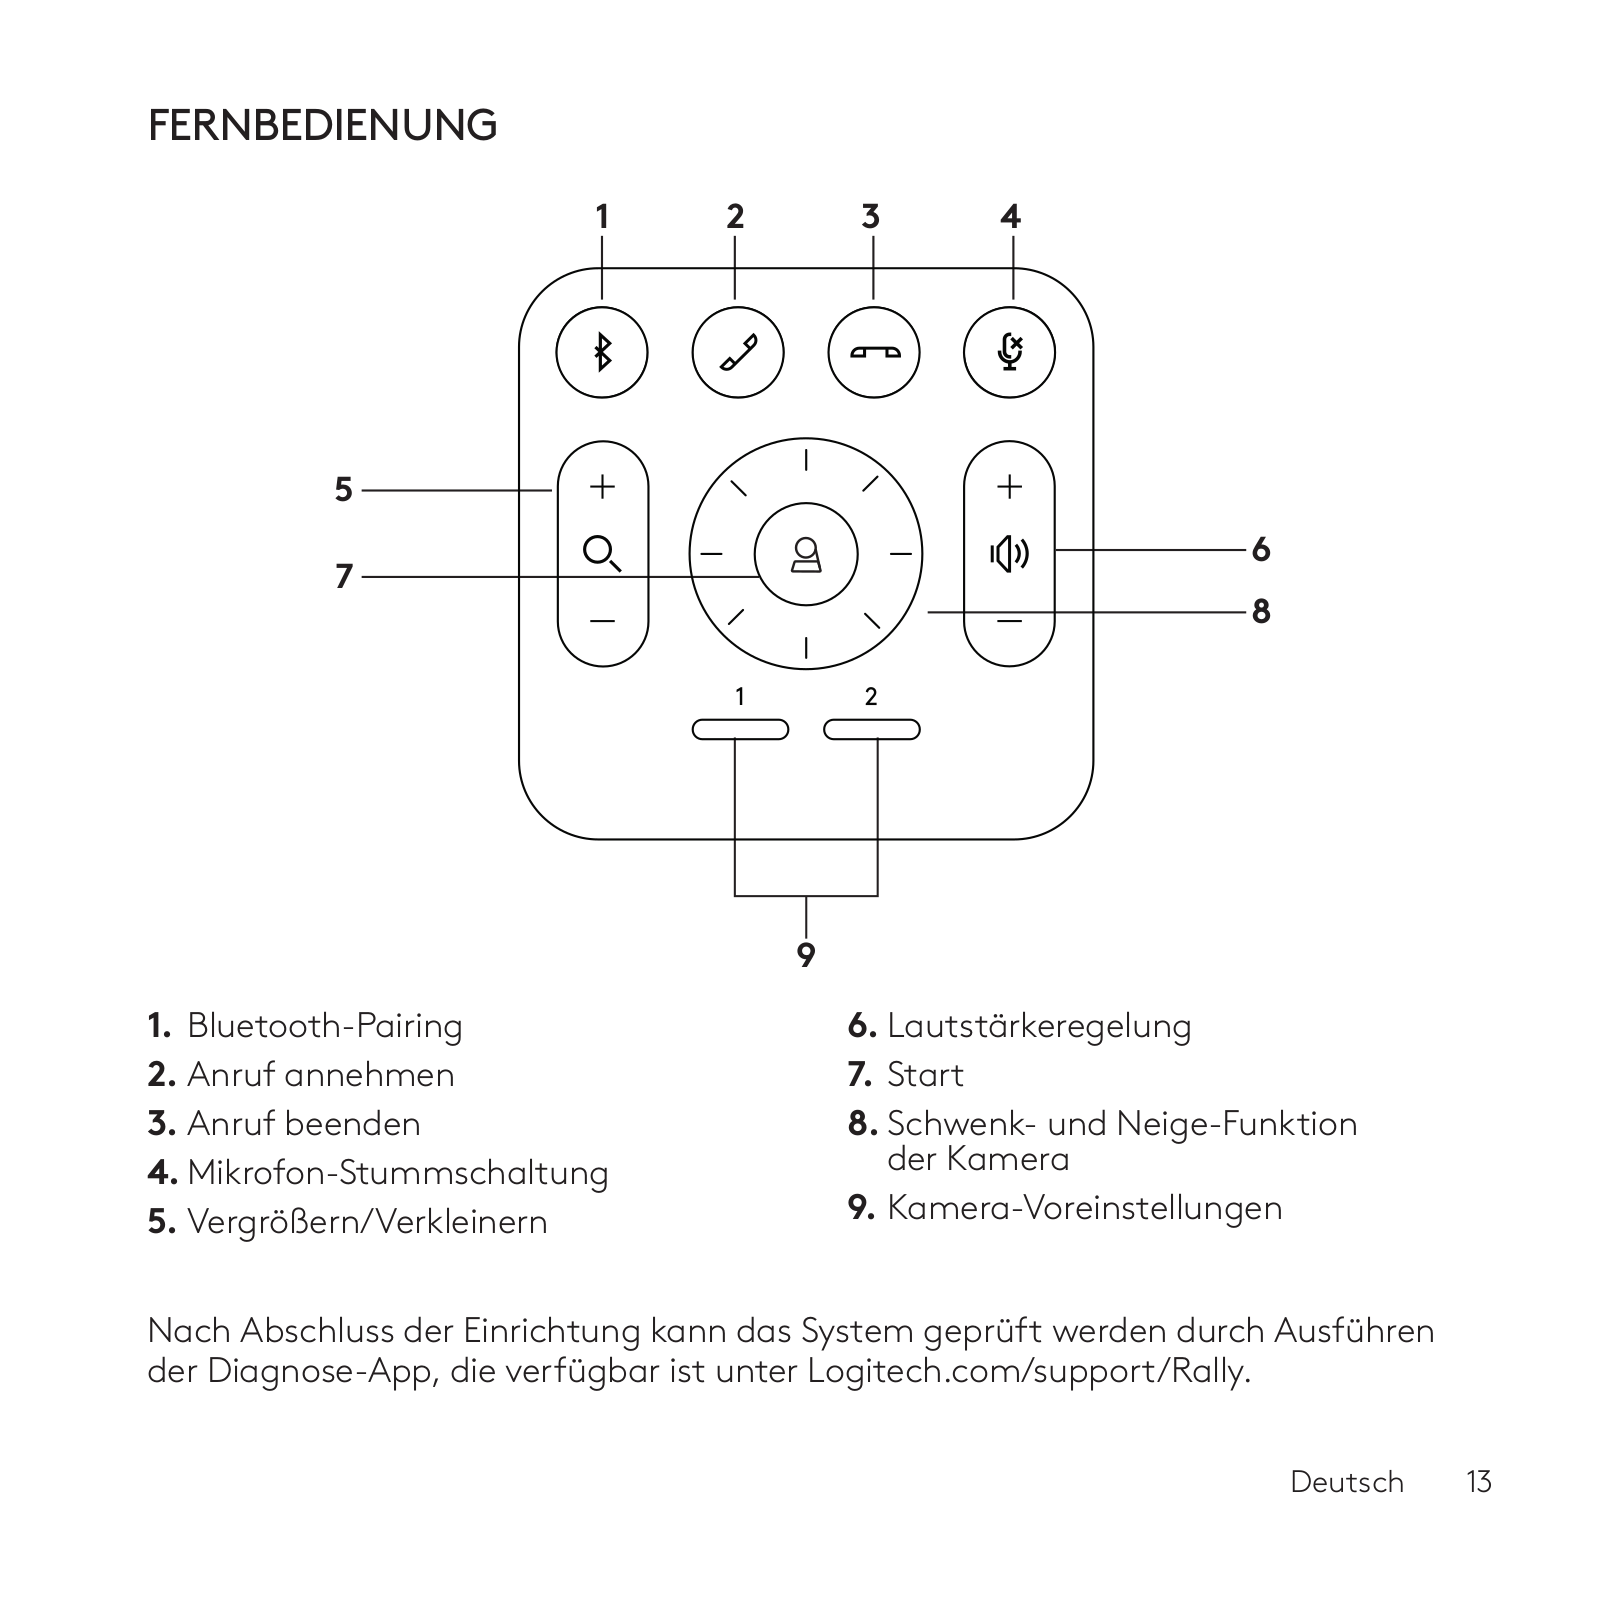
FERNBEDIENUNG

1

2

3

4

5


7

6

8


9


1.

Bluetooth-Pairing


6. Lautstärkeregelung

2.

Anruf annehmen


7. Start

3.

Anruf beenden


8. Schwenkund Neige-Funktion

4. Mikrofon-Stummschaltung


der Kamera

5.

Vergrößern/Verkleinern


9. Kamera-Voreinstellungen


Nach Abschluss der Einrichtung kann das System geprü̈ft werden durch Ausfü̈hren der Diagnose-App, die verfü̈gbar ist unter Logitech.com/support/Rally.

Deutsch    13

RALLY PLUS ALS STANDARDGERÄT EINRICHTEN

Stellen Sie sicher, dass RALLY PLUS

als Kamera, Lautsprecher und Mikrofon in Ihrer Videokonferenz-Anwendung festgelegt ist. Weitere Informationen zur Vorgehensweise finden Sie in

der Bedienungsanleitung der Anwendung.

SO STARTEN SIE EINEN VIDEOANRUF

Wenn Sie RALLY PLUS installieren und

als Standardgerät in Ihrer VideokonferenzAnwendung festlegen, können Sie

die Anwendung einfach aufrufen

und so die Vorteile besserer Audiound Videoqualität genießen.

PAIRING VON RALLY PLUS MIT EINEM BLUETOOTH-GERÄT

Sie können RALLY PLUS fü̈r Audiogespräche verwenden, wenn es mit einem Bluetooth-Gerät gepairt ist. Fü̈hren Sie zum Pairen Ihres BluetoothGeräts mit RALLY PLUS diese einfachen Schritte durch:

1.Drü̈cken und halten Sie die BluetoothTaste auf der Fernbedienung, bis Sie auf der Kamera und den Mikrofonen ein blaues Licht blinken sehen.

2.Versetzen Sie Ihr Mobilgerät

in den Bluetooth-Pairing-Modus und wählen Sie „Logitech Rally“.

3.RALLY PLUS ist jetzt fü̈r Audiogespräche einsatzbereit.

14    Deutsch

PAIRING EINER

FERNBEDIENUNG

MIT RALLY PLUS

RALLY PLUS und Fernbedienung sind bei Auslieferung bereits gepairt. Sie können bis zu 5 Fernbedienungen

mit RALLY PLUS pairen, um das Steuern des System in größeren Räumen zu vereinfachen. Oder tun Sie zum Pairing einer Fernbedienung mit der Kamera, beispielsweise, weil eine abhanden gekommene Fernbedienung ersetzt werden muss, Folgendes:

1.Halten Sie die Taste an der Kamera gedrü̈ckt, bis die LED blinkt.

2.Halten Sie die Taste am BildschirmHub gedrü̈ckt, bis die LED zu blinken beginnt.

3.Halten Sie die Bluetooth-Taste an der Fernbedienung gedrü̈ckt, bis die LEDs an der Kamera und am BildschirmHub nicht mehr blinken.

4.Wenn das Pairing fehlschlägt, wiederholen Sie den Vorgang ab Schritt 1.

KAMERAEINSTELLUNGS-APP

Dieses Programm dient zur Steuerung der Schwenk-, Neigeund ZoomFunktionen der Kamera sowie zum Anpassen der Bildqualität (wie zum Beispiel Helligkeit und Kontrast) von einem Computer aus. Die Software ist zum Download verfü̈gbar unter www.logitech.com/support/Rally.

Deutsch    15

ERWEITERUNGSMÖGLICHKEITEN FÜR RALLY

Es sind mehrere optionale Zubehörartikel verfü̈gbar, die das Einrichten einfacher machen und das Verwenden von

RALLY PLUS in größeren Räumen ermöglichen:

1.Rally Montage-Kit: MontageHalterungen fü̈r das Tisch-Hub, das Bildschirm-Hub, die Kamera und die Lautsprecher.

2.Zusätzliche Mikrofon-Eingänge: RALLY PLUS unterstü̈tzt bis zu

7 Mikrofon-Eingänge und ermöglicht so ein hohes Maß an Flexibilität

in Bezug auf Raumgröße und Raumkonfiguration.

3.Hub fü̈r Mikrofon-Eingänge: Wird verwendet zum Einrichten zusätzlicher Mikrofon-Verbindungen, wobei die meisten Kabelverbindungen fü̈r

einen Mikrofon-Eingang unterhalb des Tisches verlaufen. Das Hub fü̈r Mikrofon-Eingänge ist ausgestattet mit 3 Buchsen, die sich mit unterschiedlichen Mikrofon-Eingängen oder anderen Hubs fü̈r MikrofonEingänge verbinden lassen.

4.TV-Halterung: Funktioniert mit einer Halterung, entweder

mit einer Kamera-Halterung oder einer Lautsprecher-Halterung.

Die TV-Halterung lässt sich paarweise verwenden zum Anbringen von Kamera und Lautsprecher oberhalb und unterhalb des TV-Bildschirms.

WEITERE INFORMATIONEN

Weiterfü̈hrende Informationen zu Rally Plus wie zum Beispiel:

–FAQs – Häufig gestellte Fragen

–Software zum Aktivieren von Funktionen in unterschiedlichen Apps

–Bestellen von Ersatzteilen und mehr auf www.logitech.com/support/Rally

16    Deutsch

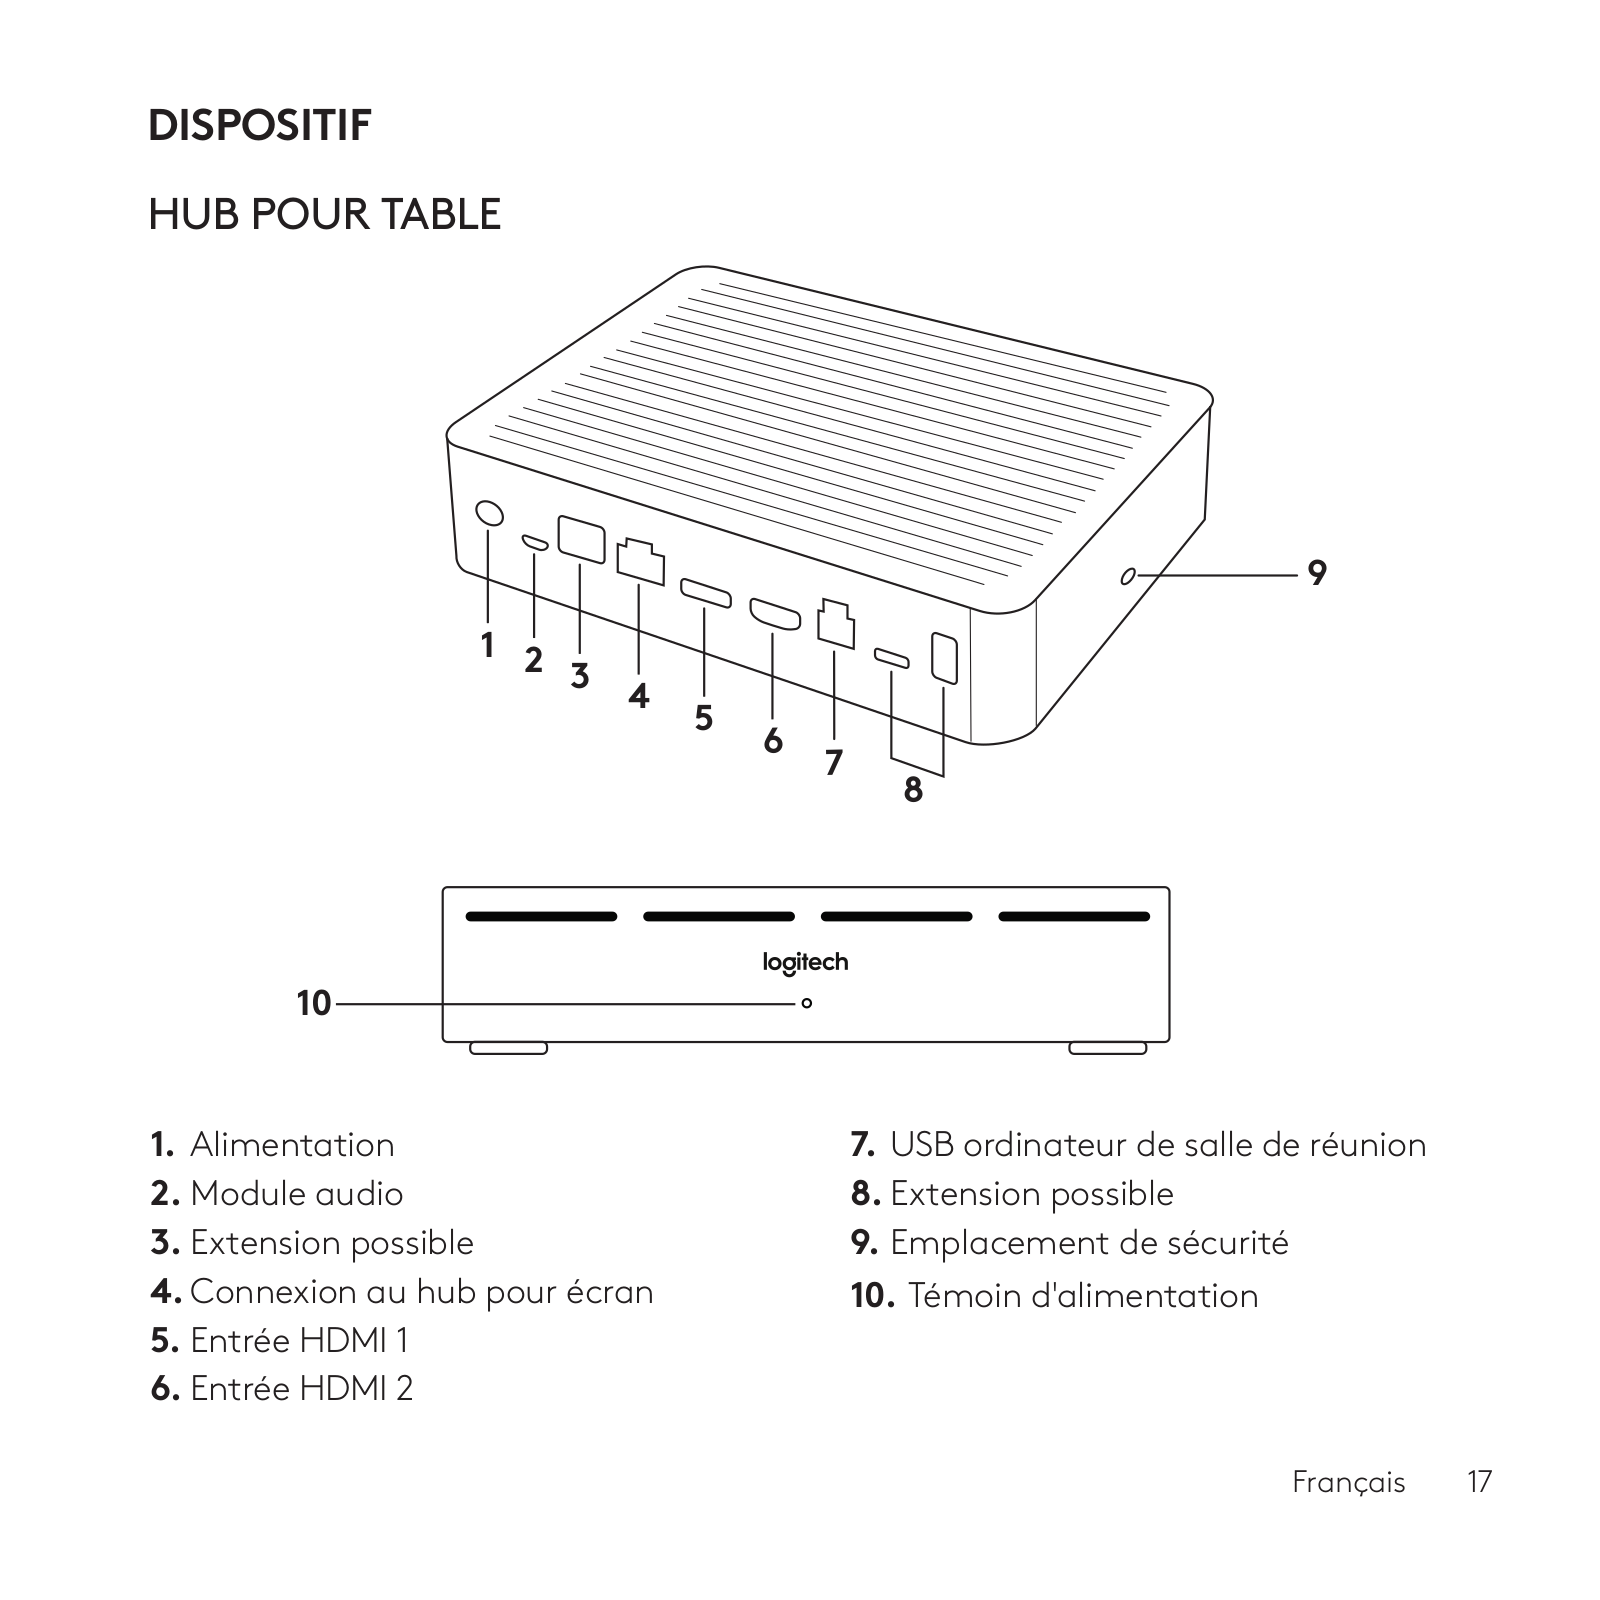
DISPOSITIF

HUB POUR TABLE

1 2 3 4 5

9

6

7

8


10

1.

Alimentation

7. USB ordinateur de salle de réunion

2.

Module audio

8. Extension possible

3.

Extension possible

9. Emplacement de sécurité

4. Connexion au hub pour écran

10. Témoin d'alimentation

5.Entrée HDMI 1

6.Entrée HDMI 2

Français    17

HUB POUR ÉCRAN

8

1 2 3 4

9

5

6

7


10

1.

Haut-parleur

7. Caméra

2.

Alimentation

8. Emplacement de sécurité

3.

Connexion au hub pour table

9. Couplage par télécommande

4. Sortie HDMI 1

10. Témoin d'alimentation

5.Sortie HDMI 2

6.USB ordinateur de salle de réunion

18    Français

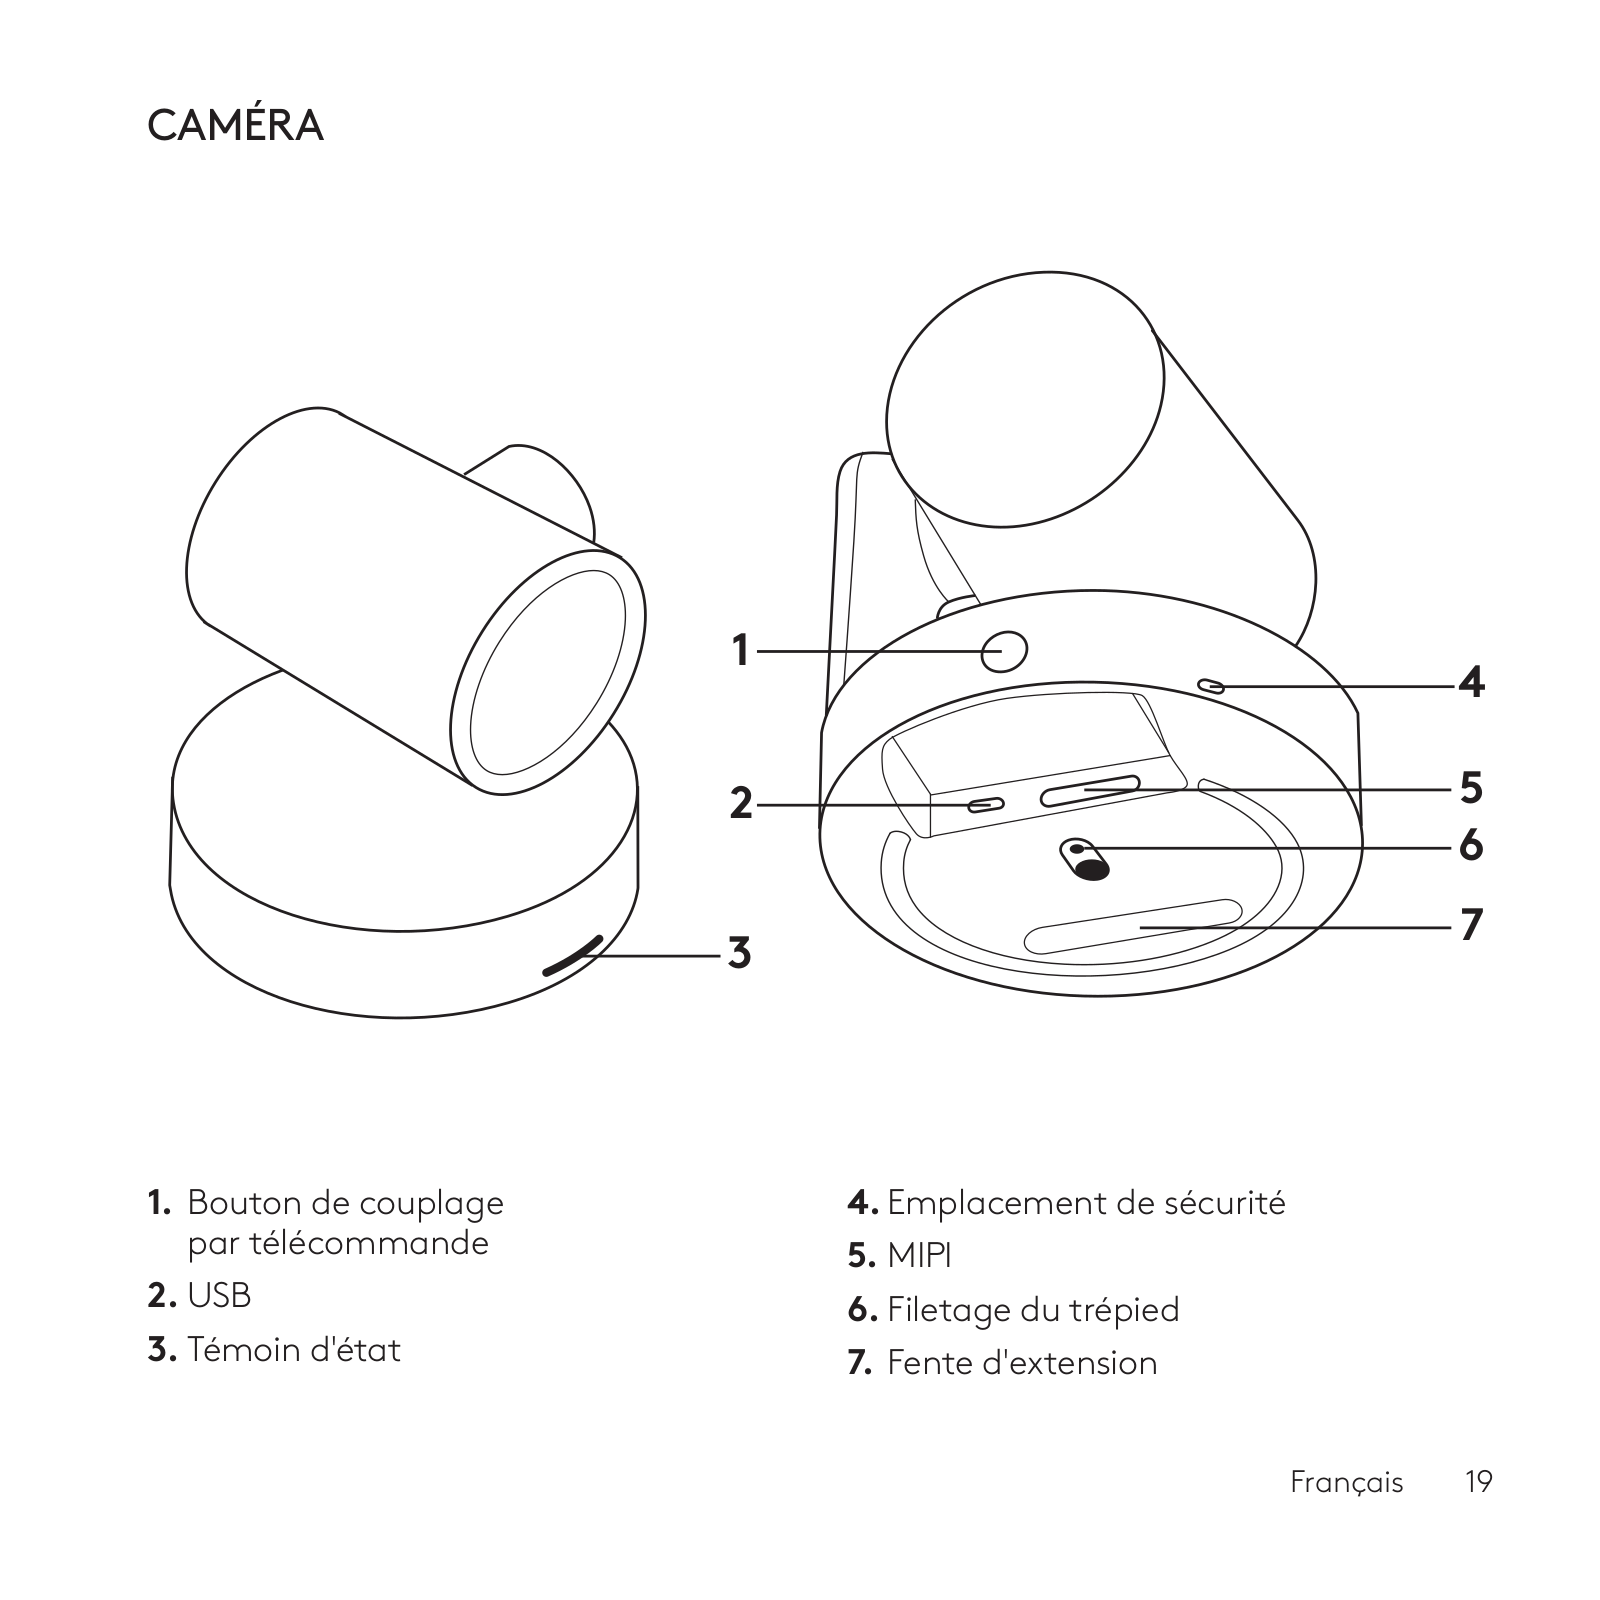
CAMÉRA

1

2

3

1.

Bouton de couplage

4. Emplacement de sécurité

2.

par télécommande

5. MIPI

USB

6. Filetage du trépied

3.

Témoin d'état

7. Fente d'extension


4

5

6

7

Français    19

TÉLÉCOMMANDE

1

2

3

4

5


7

6

8


9


1.

Couplage Bluetooth


6. Volume +/-

2.

Prise d'appel


7. Accueil

3.

Fin d'appel


8. Mouvement panoramique/inclinaison

4. Sourdine du microphone


de la caméra

5.

Zoom avant/arrière


9. Préréglages de la caméra


Une fois l’installation terminée, le système peut être vérifié par le biais de l’application de diagnostic disponible sur Logitech.com/support/Rally.

20    Français

DÉFINIR LE SYSTÈME

RALLY PLUS COMME

LE DISPOSITIF PAR DÉFAUT

Vérifiez que le système RALLY PLUS est sélectionné en tant que caméra, haut-parleur et microphone dans vos applications de visioconférence. Veuillez consulter la documentation

fournie avec vos applications pour savoir comment procéder.

DÉMARRER UN APPEL VIDÉO

Après avoir installé la caméra RALLY PLUS et l’avoir configurée comme dispositif par défaut dans votre application de visioconférence, démarrez l’application normalement et profitez d’une qualité audio et vidéo optimale.

COUPLER LA CAMÉRA RALLY PLUS À UN DISPOSITIF BLUETOOTH

Vous pouvez utiliser la caméra RALLY PLUS pour des appels audio lorsqu’elle est couplée à un dispositif

Bluetooth. Pour coupler votre dispositif Bluetooth à la caméra RALLY PLUS, procédez comme suit:

1.Maintenez appuyé le bouton Bluetooth de la télécommande jusqu’à ce que le témoin de la caméra et des microphones clignote en bleu.

2.Activez le couplage Bluetooth de votre dispositif mobile et sélectionnez «Logitech Rally».

3.Vous pouvez maintenant utiliser la caméra RALLY PLUS pour

vos appels audio.

Français    21

COUPLER

UNE TÉLÉCOMMANDE

À LA CAMÉRA RALLY PLUS

La caméra RALLY PLUS et

la télécommande sont couplées

en usine. Vous pouvez coupler jusqu’à 5 télécommandes à la caméra RALLY PLUS pour faciliter le contrôle du système dans les grandes pièces.

Sinon, si vous souhaitez coupler une autre télécommande à la caméra (lorsque vous avez égaré la télécommande d’origine, par exemple), procédez comme suit:

1.Appuyez sur le bouton de la caméra et maintenez-le enfoncé jusqu’à ce que le témoin lumineux clignote.

2.Appuyez sur le bouton du hub d’écran et maintenez-le enfoncé jusqu’à ce que le témoin lumineux clignote.

3.Appuyez sur le bouton Bluetooth

de la télécommande et maintenez-le enfoncé jusqu’à ce que les témoins lumineux de la caméra et du hub d’écran cessent de clignoter.

4.Si le couplage échoue, répétez les opérations depuis l’étape 1.

APPLICATION CAMERA SETTINGS

Utilisez ce programme pour contrôler les fonctions de panoramique et d’inclinaison, le zoom, la mise au point et la qualité d’image de la caméra (comme la luminosité et le contraste) depuis votre ordinateur. Le logiciel est téléchargeable sur www.logitech.com/ support/Rally.

22    Français

OPTIMISER LE SYSTÈME RALLY

Plusieurs accessoires en option facilitent l'installation et permettent d'utiliser RALLY PLUS dans des pièces plus grandes:

1.Kit de fixation murale: fixations pour le hub pour table, le hub pour écran, la caméra et les haut-parleurs.

2.Modules audio supplémentaires: RALLY PLUS peut prendre en charge jusqu'à 7 modules audio permettant une grande flexibilité au niveau

de la taille et de la configuration de la pièce.

3.Hub pour module audio: utilisé pour connecter les microphones et placer la plupart des câblages du module sous la table. Le hub pour module audio dispose de 3 prises pouvant être connectées à plusieurs modules audio ou à d'autres hubs pour module audio.

4.Support de télévision: compatible avec l'une des fixations de la caméra ou du haut-parleur. Le support de télévision peut être utilisé par paires pour fixer la caméra et le hautparleur au-dessus et en dessous de la télévision.

POUR PLUS D'INFORMATIONS

Des informations supplémentaires

sur la caméra Rally Plus sont disponibles, notamment:

-Questions fréquentes

-Logiciels permettant d'activer des fonctions dans différentes applications

-Modalités de commande de pièces de rechange et plus sur

www.logitech.com/support/Rally

Français    23

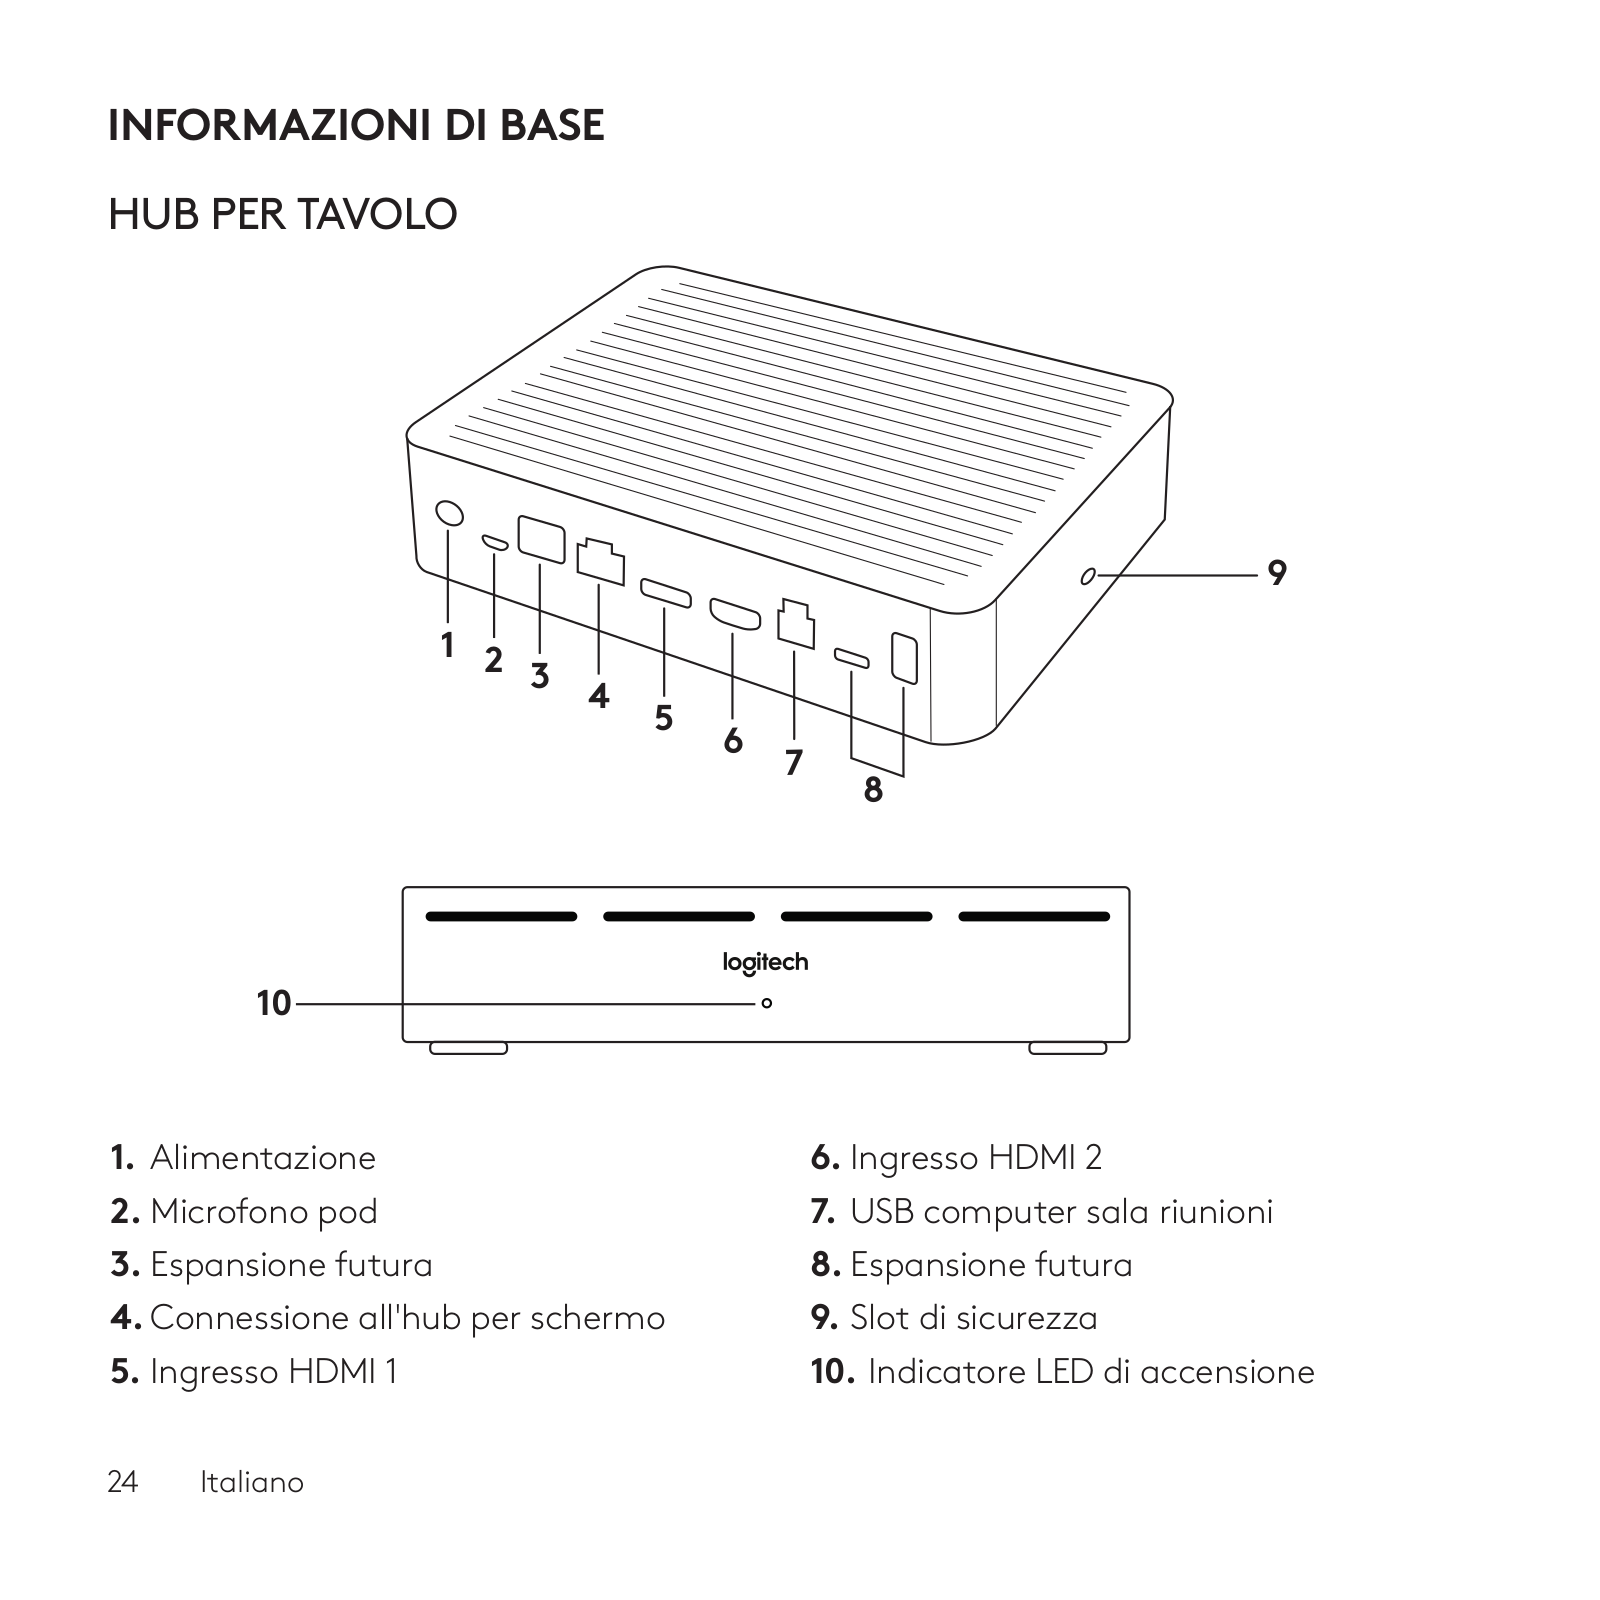
INFORMAZIONI DI BASE

HUB PER TAVOLO

1 2 3 4 5

9

6

7

8


10

1.

Alimentazione

6. Ingresso HDMI 2

2.

Microfono pod

7. USB computer sala riunioni

3.

Espansione futura

8. Espansione futura

4. Connessione all'hub per schermo

9. Slot di sicurezza

5.

Ingresso HDMI 1

10. Indicatore LED di accensione

24    Italiano

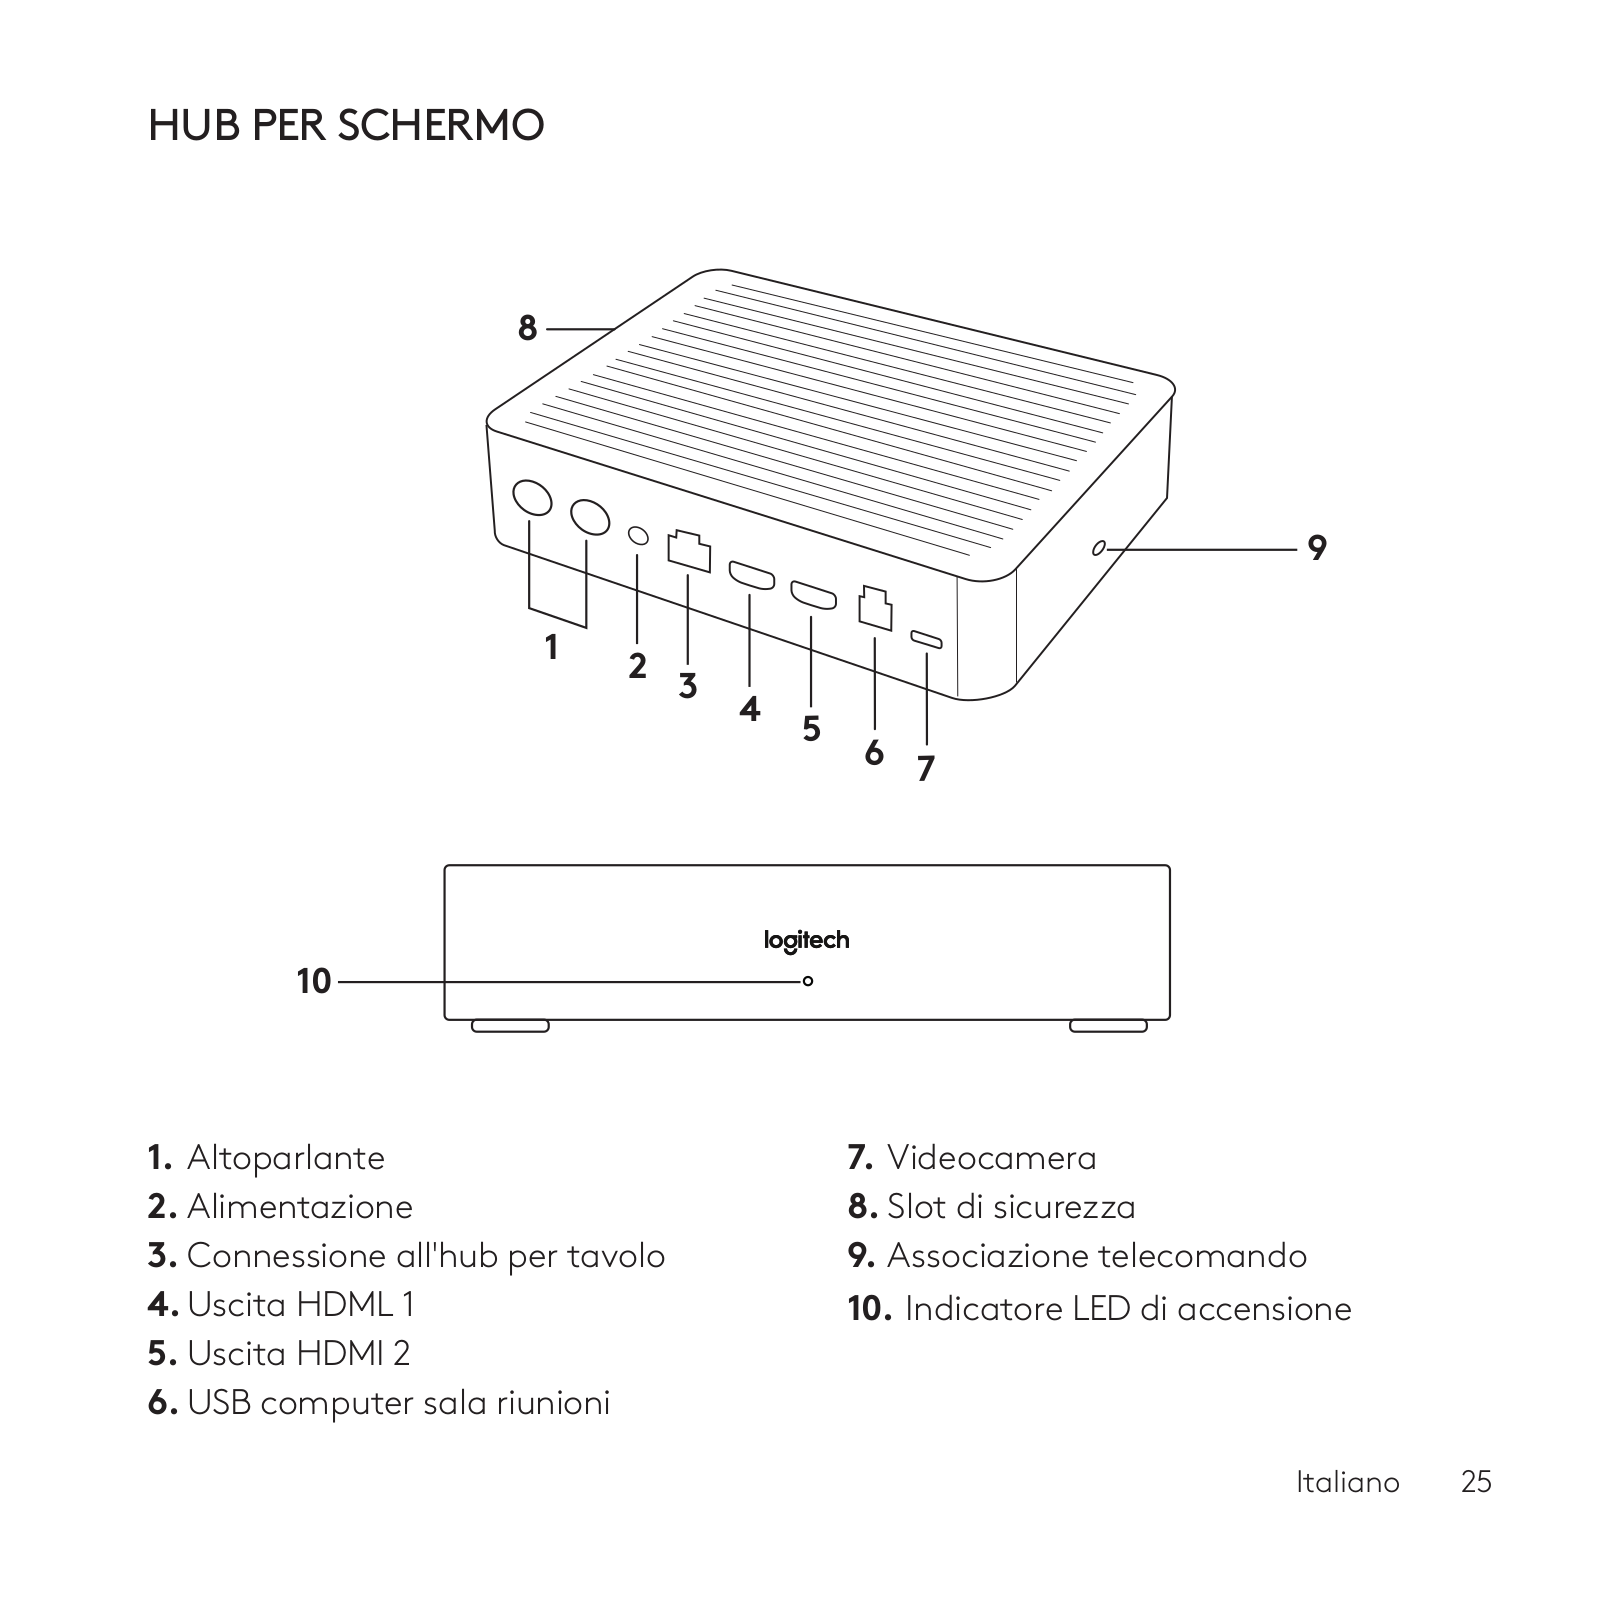
HUB PER SCHERMO

8

1 2 3 4

9

5

6

7


10

1.

Altoparlante

7. Videocamera

2.

Alimentazione

8. Slot di sicurezza

3.

Connessione all'hub per tavolo

9. Associazione telecomando

4. Uscita HDML 1

10. Indicatore LED di accensione

5.Uscita HDMI 2

6.USB computer sala riunioni

Italiano    25

VIDEOCAMERA

1

2

3

1.

Pulsante di associazione telecomando

4. Slot di sicurezza

2.

USB

5. MIPI

3.

LED di stato

6. Filettatura del treppiede


7. Slot di espansione

4

5

6

7

26    Italiano

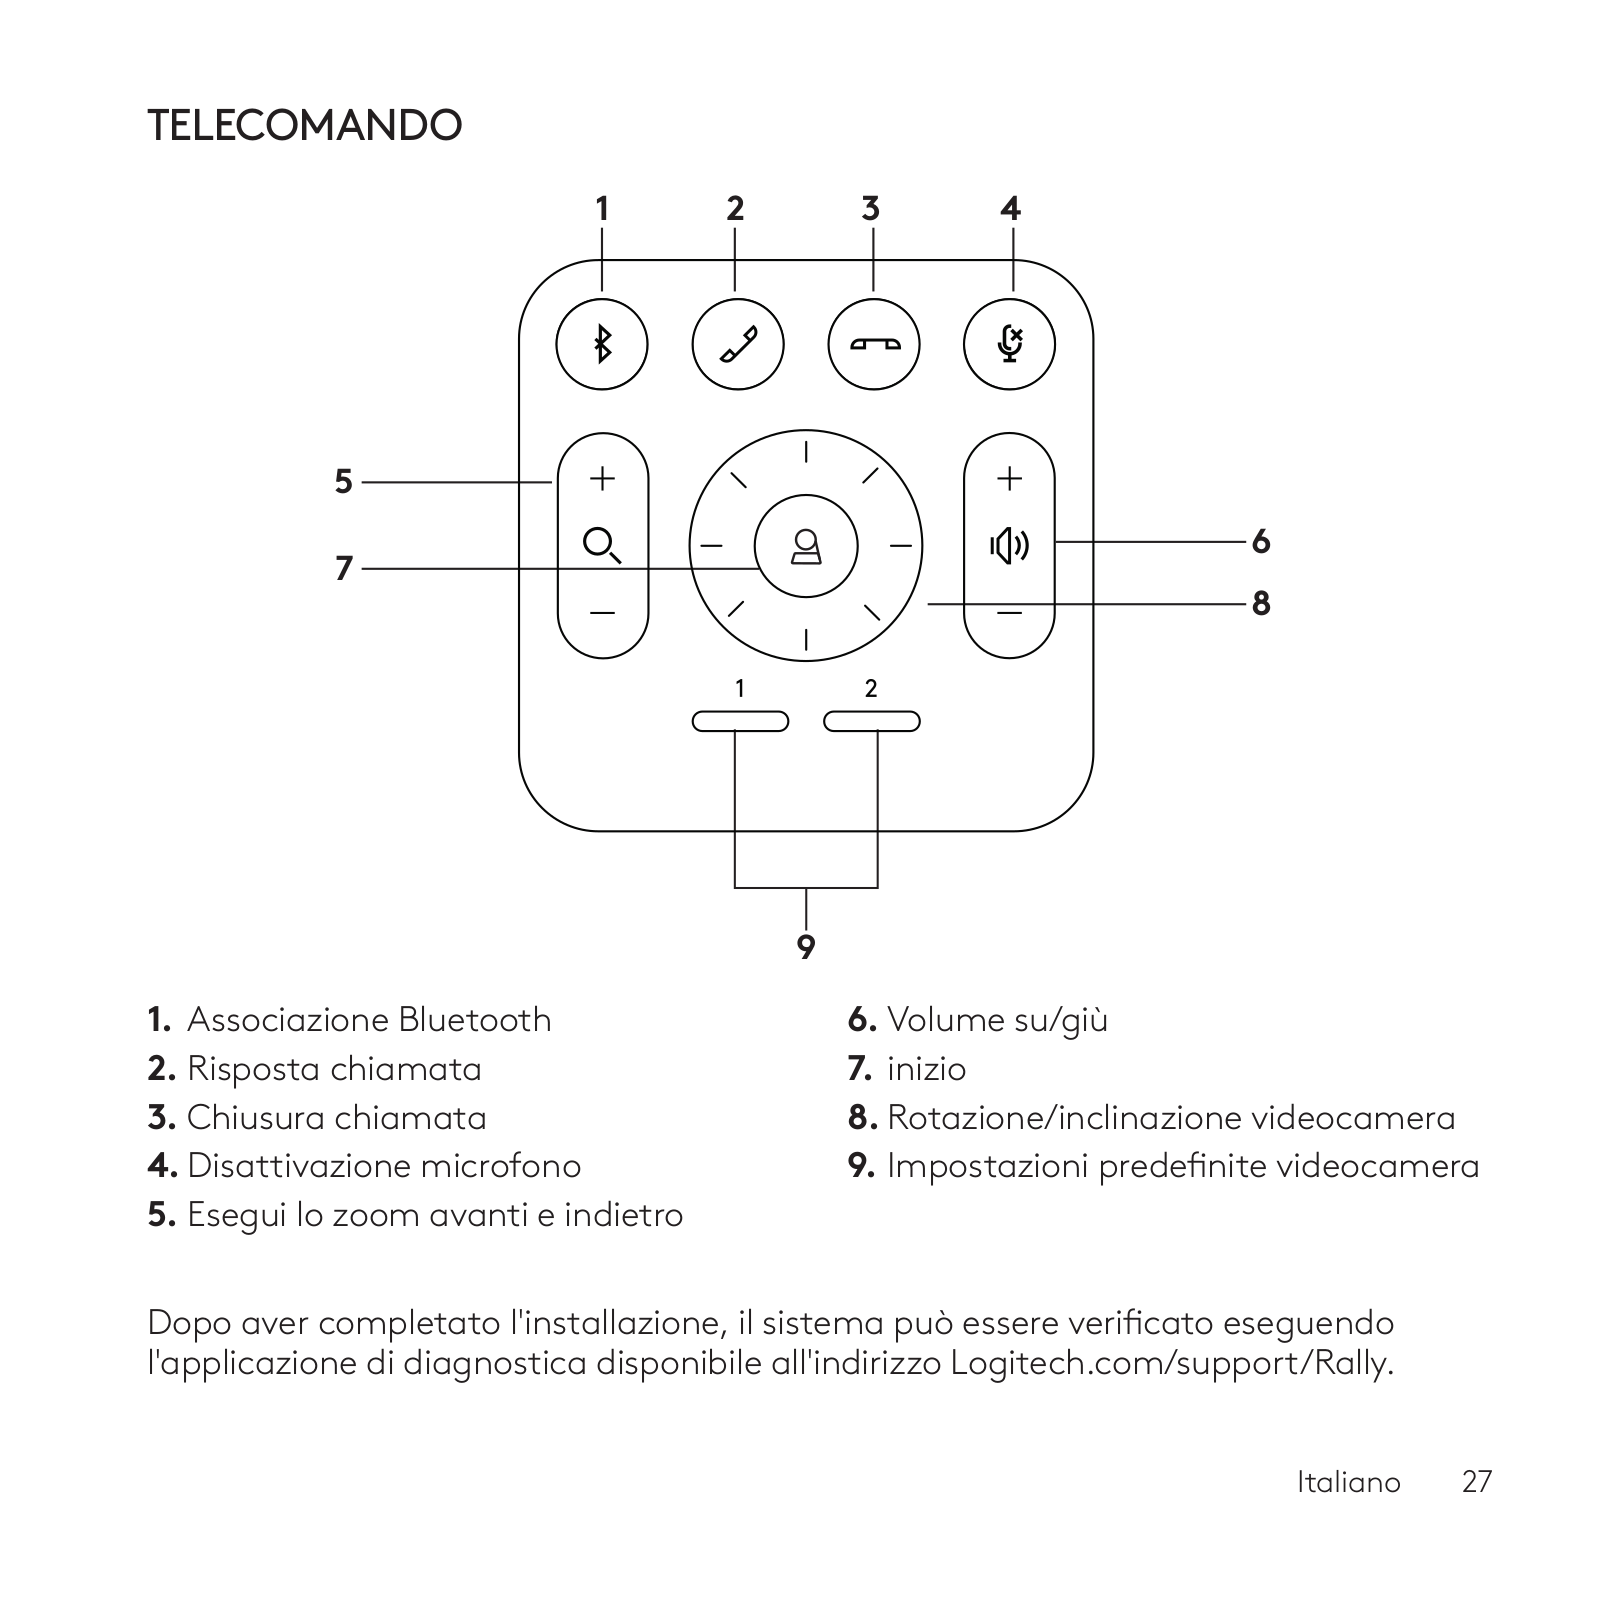
TELECOMANDO

1

2

3

4

5


7

6

8


9


1.

Associazione Bluetooth


6. Volume su/giù

2.

Risposta chiamata


7. inizio

3.

Chiusura chiamata


8. Rotazione/inclinazione videocamera

4. Disattivazione microfono


9. Impostazioni predefinite videocamera

5.

Esegui lo zoom avanti e indietro


Dopo aver completato l'installazione, il sistema può essere verificato eseguendo l'applicazione di diagnostica disponibile all'indirizzo Logitech.com/support/Rally.

Italiano    27

TRASFORMAZIONE DI RALLY PLUS

NEL DISPOSITIVO PREDEFINITO

Assicurarsi che RALLY PLUS sia selezionato come videocamera, altoparlante e microfono nelle applicazioni di videoconferenza. Consultare la documentazione dell'applicazione

per ulteriori istruzioni sulla procedura.

AVVIO DI UNA VIDEOCHIAMATA

Dopo aver installato RALLY PLUS

e verificato che sia impostato come dispositivo predefinito nell'applicazione di videoconferenza, è sufficiente avviare l'applicazione in modalità normale

e sfruttare i vantaggi delle soluzioni audio e video migliorate.

ASSOCIAZIONE DI RALLY PLUS A UN DISPOSITIVO BLUETOOTH

È possibile utilizzare RALLY PLUS per le chiamate quando è stata effettuata

l'associazione a un dispositivo Bluetooth. Per associare il dispositivo Bluetooth

a RALLY PLUS, seguire questi semplici passaggi:

1.Tenere premuto il pulsante Bluetooth sul telecomando fino a visualizzare una luce blu lampeggiante

sulla videocamera e sui microfoni.

2.Attivare la modalità di associazione Bluetooth sul dispositivo mobile

e selezionare "Logitech Rally".

3.RALLY PLUS può essere ora utilizzato per le chiamate.

28    Italiano

ASSOCIAZIONE DI UN TELECOMANDO A RALLY PLUS

L’associazione tra RALLY PLUS

e il telecomando avviene direttamente in fabbrica. È possibile associare un massimo di 5 telecomandi a RALLY PLUS per semplificare il controllo del sistema in stanze di maggiori dimensioni. Oppure, se è necessario associare

un telecomando alla videocamera, come ad esempio in seguito alla sostituzione di un telecomando smarrito, effettuare quanto segue:

1.Tenere premuto il pulsante

sulla videocamera finché il LED non inizia a lampeggiare.

2.Tenere premuto il pulsante sull’hub per schermo finché il LED non inizia a lampeggiare.

3.Tenere premuto il pulsante Bluetooth sul telecomando finché i LED sulla videocamera e sull’hub per schermo smettono di lampeggiare.

4.Se l’associazione non riesce, ripetere la procedura partendo dal passaggio 1.

APPLICAZIONE DELLE IMPOSTAZIONI DELLA VIDEOCAMERA

Utilizzare questo programma per controllare panoramica, inclinazione, zoom, fuoco e qualità dell'immagine della videocamera (come ad esempio luminosità e contrasto) dal computer. Il software può essere scaricato da www.logitech.com/support/Rally.

Italiano    29

MIGLIORAMENTO DI RALLY

Sono disponibili diversi accessori facoltativi per semplificare l'installazione e consentire l'utilizzo di RALLY PLUS in stanze di maggiori dimensioni:

1.Kit di montaggio di Rally: Staffe di montaggio per hub per tavolo,

schermo, videocamera e altoparlanti.

2.Microfoni pod aggiuntivi: RALLY PLUS può supportare fino a 7 microfoni pod, garantendo eccezionale flessibilità

di configurazione e dimensioni della stanza.

3.Hub per microfono pod: Utilizzato per posizionare la maggior parte dei cavi del microfono pod sotto al tavolo.

L'hub per microfono pod dispone di 3 connettori che possono essere

connessi a diversi microfoni pod o altri hub per microfoni pod.

4.Supporto per montaggio su TV: Funziona con le staffe di montaggio per videocamera o altoparlante.

Il supporto per TV può essere utilizzato insieme per montare la videocamera e l'altoparlante sopra e sotto la TV.

PER ULTERIORI INFORMAZIONI

Ulteriori informazioni in merito a Rally Plus, tra cui:

-Domande frequenti

-Software per attivare le funzioni in diverse applicazioni

-Come ordinare parti di ricambio e molto altro su

www.logitech.com/support/Rally

30    Italiano

Loading...
+ 176 hidden pages