

Page 1
Setup
QuickCam
Cordless
®
Page 2

© 2002 Logitech. All Rights Reserved. Logitech, the Logitech logo, and other Logitech marks are owned by Logitech and may be registered.
All other trademarks are the property of their respective owners. Logitech assumes no responsibility for any errors that may appear in this manual.
Information contained herein is subject to change without notice.
Part Number:
FCC Compliance and Advisory Statement.
two conditions: 1) this device may not cause harmful interference, and 2) this device must accept any interference received, including interference
that may cause undesired operation. This equipment has been tested and found to comply with the limits for a Class B digital device, pursuant
to Part 15 of the FCC Rules. These limits are designed to provide reasonable protection against harmful interference in a residential installation.
This equipment generates, uses, and can radiate radio frequency energy and, if not installed or used in accordance with the instructions, may cause
harmful interference to radio communications. However, there is no guarantee that interference will not occur in a particular installation.
If this equipment does cause harmful interference to radio or television reception, which can be determined by turning the equipment off and on,
the user is encouraged to try to correct the interference by one or more of the following measures: 1) reorient or relocate the receiving antenna;
2) increase the separation between the equipment and the receiver; 3) connect the equipment to an outlet on a circuit different from that to which
the receiver is connected; 4) consult the dealer or an experienced radio/TV technician for help. Any changes or modifications not expressly approved
by the party responsible for compliance could void the user's authority to operate the equipment. Where shielded interface cables have been
provided with the product or specified additional components or accessories elsewhere defined to be used with the installation of the product,
they must be used in order to ensure compliance with FCC regulations.
Canadian DOC Statement.
the interference-causing equipment standard entitled “Digital Apparatus,” ICES-003 of the Depar tment of Communications.
This device complies with RSS-210 of Industry and Science Canada. Operation is subject to the following two conditions: 1) this device may not
cause interference, and 2) this device must accept any interference, including interference that may cause undesired operation of the device.
© 2002 Logitech. Tous droits réservés. Logitech, le logo Logitech et les autres marques Logitech sont la propriété exclusive de Logitech et sont
susceptibles d’être des marques déposées. Toutes les autres marques sont la propriété exclusive de leurs détenteurs respectifs. Logitech décline
toute responsabilité en cas d'erreurs dans ce manuel. Les informations énoncées dans le présent document peuvent faire l’objet de modifications
sans avis préalable.
Déclaration FCC.
aux conditions suivantes: 1) l'équipement concerné ne doit pas causer d'interférences dangereuses, et 2) il doit accepter toute interférence reçue,
y compris les interférences risquant d'engendrer un fonctionnement indésirable. Cet équipement a été testé et déclaré conforme aux limitations
prévues dans le cadre de la catégorie B des appareils numériques défini par la section 15 du règlement de la FCC. Ces limitations sont stipulées aux
fins de garantir une protection raisonnable contre les interférences gênantes en installation résidentielle. Cet équipement génère, utilise et diffuse
des ondes radio, et s'il n'est pas installé ni utilisé en conformité avec les instructions dont il fait l'objet, peut causer des interférences gênantes avec
les communications radio. Cependant, nous ne pouvons vous garantir qu'une interférence ne se produira pas dans une installation particulière.
Si cet équipement produit des interférences graves lors de réceptions radio ou télévisées qui peuvent être détectées en allumant et en éteignant
l'équipement, vous êtes invités à les supprimer de plusieurs manières: 1) Réorienter ou déplacer l'antenne de réception; 2) Augmenter la distance
séparant l'équipement et le récepteur; 3) Connecter l'équipement à un circuit différent de celui auquel le récepteur est connecté; 4) Contacter votre
revendeur ou un technicien radio/TV qualifié. Toutes modifications ou tous changements effectués sans l'accord exprès de la partie responsable de
la conformité aux normes pourraient contraindre l'utilisateur à ne plus utiliser son équipement. Afin d'assurer la conformité avec les règlements FCC,
les câbles d'interface blindés fournis avec le produit doivent être utilisés, ainsi que tout autres composants ou accessoires également spécifiés,
lors de l'installation du produit.
Déclaration du Ministère des Communications Canadien.
d'interférences radio par des appareils numériques de catégorie B, telles que stipulées dans le cadre de la norme Appareils numériques ICES-003
édictée par le Ministère canadien de l’Industrie.
Cet équipement a été déclaré conforme à la norme RSS-210 édictée par le Ministère canadien des Sciences et de l'Industrie. Son fonctionnement
est soumis aux conditions suivantes: 1) l'équipement concerné ne doit pas causer d'interférences, et 2) il doit accepter toute interférence reçue, y
compris les interférences risquant d'engendrer un fonctionnement indésirable.
623021-0403
This hardware device complies with Part 15 of the FCC Rules. Operation is subject to the following
This digital device does not exceed the Class B limits for radio noise emissions from digital apparatus specified in
Cet équipement a été testé et déclaré conforme à la section 15 du règlement de la FCC. Son fonctionnement est soumis
Cet appareil numérique est conforme aux limitations concernant l'émission
ii
Page 3

Contents
English . . . . . . . . . . . . . . . . . . . . . . . . . . . . . . . . . . . . . . . . . . . . . . . . . . . . . . . . . . . . . . 1
Español . . . . . . . . . . . . . . . . . . . . . . . . . . . . . . . . . . . . . . . . . . . . . . . . . . . . . . . . . . . . . 9
Français . . . . . . . . . . . . . . . . . . . . . . . . . . . . . . . . . . . . . . . . . . . . . . . . . . . . . . . . . . . . . 17
Português . . . . . . . . . . . . . . . . . . . . . . . . . . . . . . . . . . . . . . . . . . . . . . . . . . . . . . . . . . .25
iii
Page 4

Page 5
1
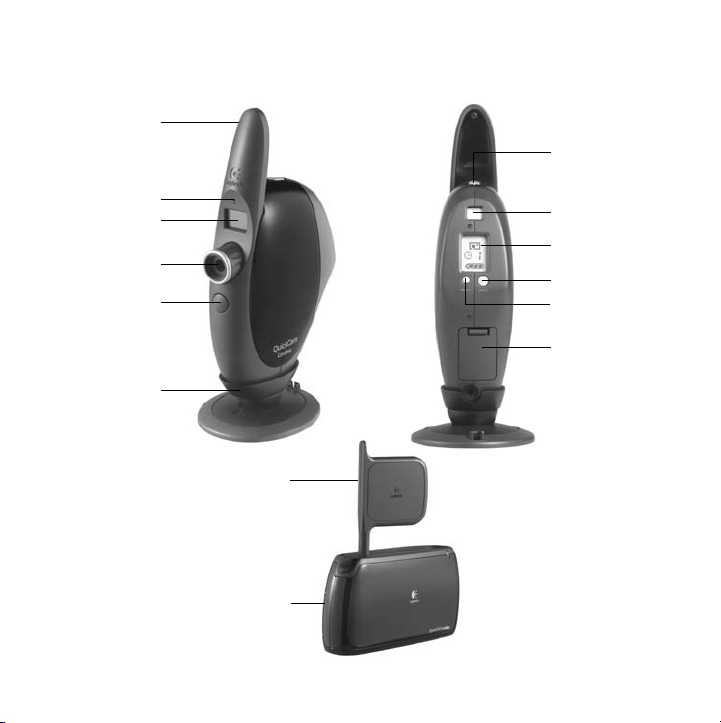
Camera antenna
Camera Features
Power button
Microphone
View finder
Lens
Shutter button
Camera stand
Receiver antenna
Receiver
View finder
Status display
Select button
Mode button
Battery
compartment
English
1
Page 6
2
1.
2.
3.
4.
5.
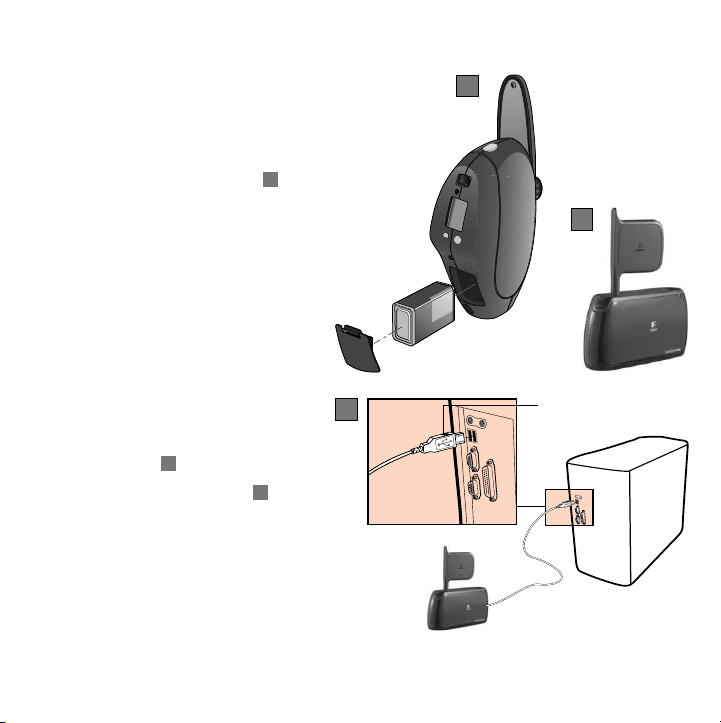
Set Up the Camera
Install software first.
Follow on-screen instructions.
Install batteries in camera .
Refer to the diagram inside
battery compartment.
Turn on camera. Press and hold
camera’s power button
for two seconds.
Note Power Save is on by
default. Camera turns
itself off after 10 minutes
of inactivity. Press Power
button to turn camera
back on.
Insert receiver cable into
USB port when prompted
by software .
Deploy receiver antenna .
A
b
a
A
a
c
b
A
c
USB connector
2
English
Page 7
6.
Mode
button
Select
button
Establish communication between camera and
receiver by selecting a channel:
• If the Preview Test Page displays a clear image
from the camera, simply continue. If not, select
the “Troubleshoot” button to select the channel.
To change the channel later in the software,
select Camera Settings under Preview Window,
and choose Cordless tab.
• Select the same channel that is indicated
on the camera.
Camera and software must
have same channel number.
• To change the channel on the camera,
use Mode button on camera to choose Channel
Indicator on Status Display.
• Use Select button to choose a channel,
1 through 4.
• Click OK. Installation is now complete.
English
3
Page 8
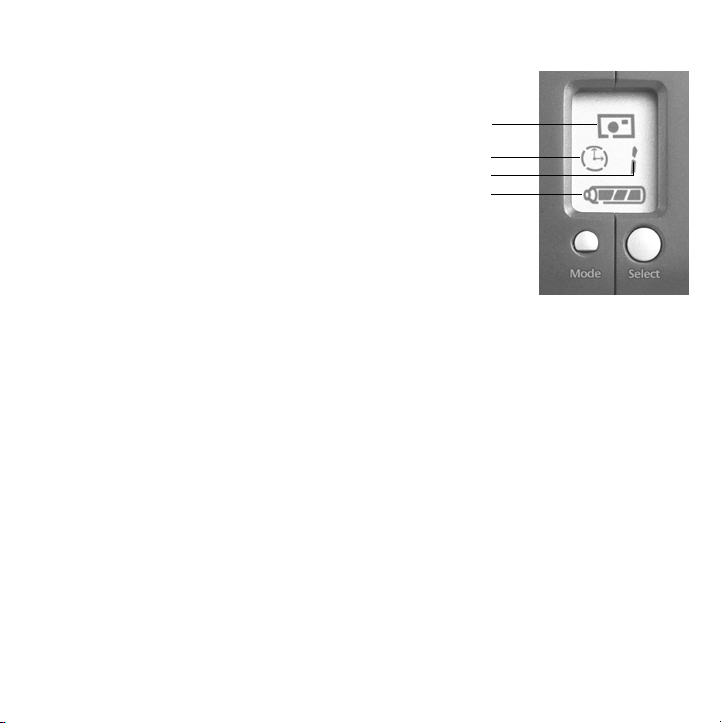
3
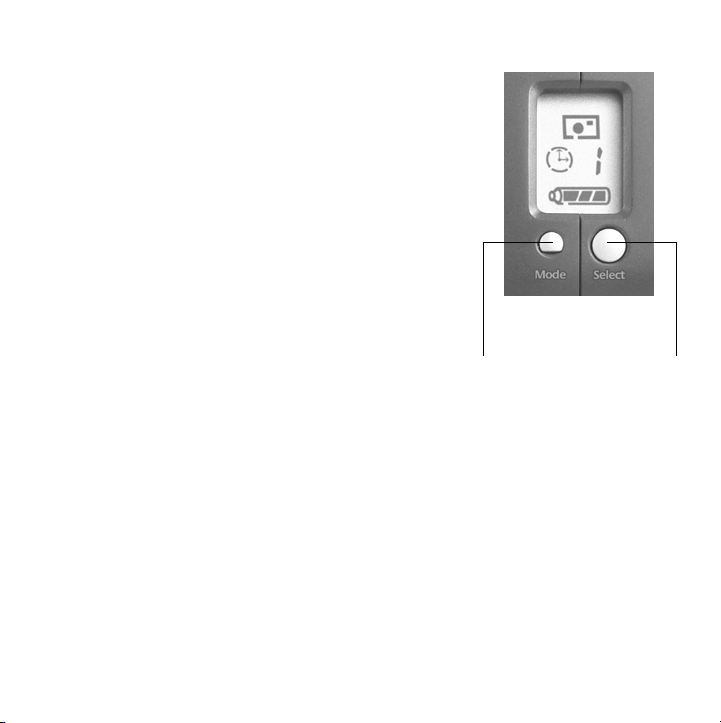
Status Display
1.
Camera modes
• Picture mode. Takes a single picture.
• Video mode. Captures video.
2.
Power save
• Enable (On by default.)
• Disable (when AC adapter is connected)
3.
Channel indicator (Select a channel, 1 through 4.)
4.
Battery level indicator
4
1.
2.
3.
4.
4
Selecting Camera Functions
Press the Mode button to choose camera function.
Camera function flashes when selected.
Press Select button to choose function.
Use Select button to select choices within function (e.g., Channel indicator, channels 1
through 4, or Power save, on or off).
English
1
2
3
4
Page 9

5
Launching the Software
Click Start on Windows® Taskbar, and then select Programs\Logitech
\Logitech® ImageStudio™.
6
1.
2.
3.
4.
5.
7
Camera Ready.
Video Mode.
Picture Mode.
state (green LED blinks slowly).
Taking Pictures and Videos
Press and hold Power button (two seconds) to turn on camera.
Launch camera software.
Choose either Video Mode or Picture mode.
Use viewfinder to frame subject. No focusing required.
Take picture or video. Camera works within 75 feet (25 M) of receiver:
•
Picture mode.
•
Video mode.
Video displays in camera software. Press Shutter button to stop filming.
Status LED in View Finder
Green LED blinks quickly when recording video.
Press Shutter button. Image displays in camera software.
Press Shutter button to start filming.
Green LED blinks slowly.
Green LED stays on for one second, and then the camera returns to ready
®
English
5
Page 10
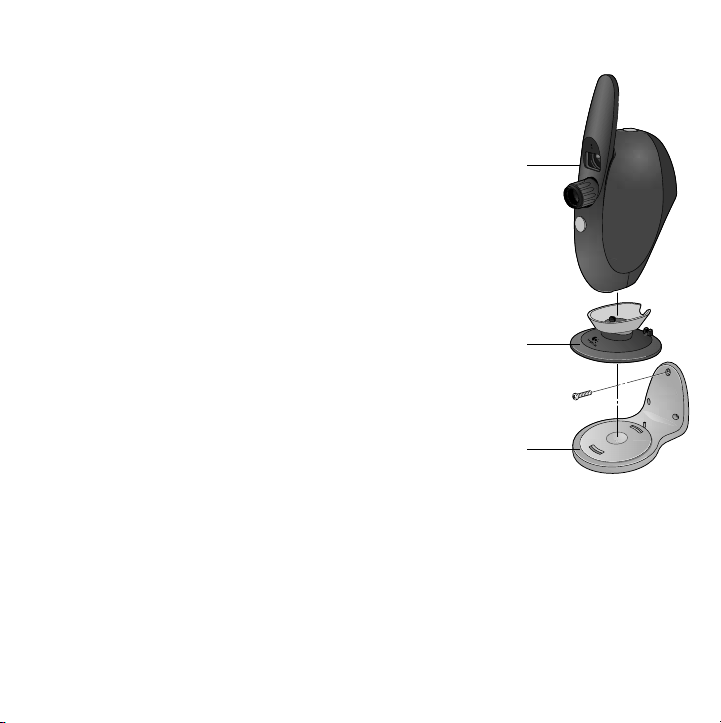
8
Use the wall-mounting bracket and hardware
to attach camera to wall to set up a monitoring
station.
1.
2.
3.
4.
5.
6.
Wall-Mounting the Camera
Find a suitable location for camera mounting.
Mark wall for drilling using holes in wall mount
as a guide.
Drill holes in wall where camera is to be installed.
Attach wall mount to wall using screws.
Attach camera stand to wall mount. Camera stand
snaps into place.
Attach camera to camera stand.
Camera
Camera
stand
Wall mount
6
English
Page 11

9
Tips
Lighting.
of the picture area.
Optimize Reception.
quality. Place receiver as high as possible. Also, try different channels for the best reception.
Set channel in camera first, then software. See “Set Up the Camera” in this booklet
for details.
Wall-mounting the Camera.
camera to wall to set up a monitoring station. See “Wall-Mounting the Camera” in
this booklet to learn how. Wall-mounting works great with the Motion Detection feature
in the camera software.
A/C Adapter and Power Save.
station set-up, use the camera’s A/C adapter to save battery power. Power Save is shut off
automatically.
Camera Range.
communicates with the receiver using radio waves, which can penetrate walls and other
objects with no effect on reception.
Minimize Camera Shake.
mount for remote monitoring.
Software Updates.
the ImageStudio
Shoot pictures and videos with bright light sources behind the camera and out
Adjust receiver position and receiver antenna for the best picture
Use the wall-mounting bracket and hardware to attach
When wall-mounting the camera for a monitoring
Use the camera up to 75 feet (25 meters) from the receiver. The camera
Brace your arms when hand-holding the camera. Use the wall
To check for new software updates, click the Web Links button on
™
software taskbar, and then click “Software Updates.”
English
7
Page 12

10
Access the How to Guide or online help to learn more about the camera and its software:
1.
From any activity within the software, click the Help button.
2.
On the Help menu, click either “How-to Guide” or “Contents and Index.” You can then
click the
• Contents tab to browse by category
• Index tab to search by keyword
• Search tab to search by any word
For additional information about Logitech® QuickCam® Web cameras, as well as other
Logitech® products, please visit
Learn More About the Camera
www.logitech.com
.
Warranty
This product comes with a limited two-year warranty. For more information,
please read the Product Warranty section found in the User’s Guide located on
the Logitech
Logitech camera products are intended to be used in a lawful manner. Certain uses
of digital PC camera products may be prohibited by local laws in some countries or states,
such as the surreptitious recording of audio and/or video communications for certain
purposes. If you have any question about whether a proposed use of your product is lawful,
you should consult a local legal authority before proceeding.
®
software CD.
8
English
Page 13

1
Cámara
Antena de la cámara
Botón de encendido
Micrófono
Visor
Objetivo
Botón del obturador
Soporte
de la cámara
Antena del receptor
Receptor
Visor
Pantalla de estado
Botón Select
Botón Mode
Compartimento
de las pilas
Español
9
Page 14

2
Instalación de la cámara
1.
Instale primero el software.
Siga las instrucciones
que se muestran en pantalla.
2.
Instale las pilas en la cámara .
Consulte el diagrama en
el compartimento de las pilas.
3.
Encienda la cámara. Mantenga
pulsado el botón de encendido
durante dos segundos.
Nota El ahorro de energía
está activado de manera
predeterminada. Después de
10 minutos de inactividad
la cámara se apaga. Para volver
a encender la cámara,
pulse el botón de encendido.
4.
Cuando se lo indique el software,
introduzca el cable del receptor
en el puerto USB .
5.
Despliegue la antena del receptor .
A
b
a
A
a
Conector USB
A
c
c
b
10
Español
Page 15

6.
Botón
Mode
Botón
Select
Establezca la comunicación entre la cámara
y el receptor seleccionando un canal:
• Si la página de prueba muestra una imagen
nítida de la cámara, continúe. Si no es así,
seleccione el botón de resolución de problemas
para seleccionar el canal. Para cambiar el canal más
adelante en el software, seleccione Configuración
en la ventana de vista previa y elija la ficha
Inalámbrico.
• Seleccione el mismo canal que se indica en
la cámara. La cámara y el software deben tener
el mismo número de canal.
• Para cambiar el canal en la cámara, utilice el botón
Mode de la cámara para elegir el indicador de canal
en la pantalla de estado.
• Utilice el botón Select para elegir un canal, del 1 al 4.
• Haga clic en Aceptar. Se ha completado la instalación.
Español
11
Page 16

3
Pantalla de estado
1.
Modos de la cámara
• Modo de fotografía. Toma una sola fotografía.
• Modo de vídeo. Captura vídeo.
2.
Ahorro de energía
• Activado (de manera predeterminada)
• Desactivado (cuando el adaptador CA
está conectado)
3.
Indicador de canal (seleccione un canal, del 1 al 4)
4.
Indicador de estado de las pilas
4
Selección de las funciones de la cámara
1.
Pulse el botón Mode para elegir la función de la cámara.
2.
La función de la cámara parpadea cuando se selecciona.
3.
Pulse el botón Select para elegir la función.
4.
Utilice el botón Select para seleccionar las opciones de la función (por ejemplo,
indicador de canal, canal del 1 al 4, o activación o desactivación del ahorro de energía).
12
Español
1
2
3
4
Page 17

5
Inicio del software
Haga clic en Inicio en la barra de tareas de Windows® y seleccione Programas\Logitech
\Logitech® ImageStudio™.
6
Captura de fotografías y vídeos
1.
Mantenga pulsado el botón de encendido (dos segundos) para encender la cámara.
2.
Inicie el software de la cámara.
3.
Elija el modo de vídeo o el modo de fotografía.
4.
Utilice el visor para encuadrar el sujeto. No es necesario enfocar.
5.
Tome fotografías o vídeo. La cámara funciona a 25 metros del receptor.
•
Modo de fotografía.
el software de la cámara.
•
Modo de vídeo.
se muestra en el software de la cámara. Pulse el botón del obturador para detener
la grabación.
7
Indicador de estado en el visor
Cámara lista.
Modo de vídeo.
Modo de fotografía.
la cámara vuelve al estado de cámara lista (el indicador verde parpadea lentamente).
El indicador verde parpadea lentamente.
El indicador verde parpadea con rapidez al grabar vídeo.
El indicador verde se queda encendido un segundo y, a continuación,
Pulse el botón del obturador. La imagen se muestra en
Pulse el botón del obturador para comenzar a grabar. El vídeo
Español
®
13
Page 18

8
Montaje en pared de la cámara
Utilice la pieza de montaje en pared para
montar la cámara en una pared e instalar
una estación de supervisión.
1.
Busque una ubicación adecuada para el montaje
de la cámara.
2.
Marque la pared antes de taladrar con la ayuda
de los agujeros de la pieza de montaje en pared.
3.
Taladre los agujeros en la pared donde vaya
a instalar la cámara.
4.
Fije la pieza de montaje en pared con
los tornillos.
5.
Instale el soporte de la cámara a la pieza
de montaje en pared. La cámara se ajustará
a la perfección.
6.
Coloque la cámara en su soporte.
Cámara
Soporte
de la cámara
Pieza
de montaje
en pared
14
Español
Page 19

9
Consejos
Iluminación:
intensa queden a su espalda, fuera de la imagen.
Optimización de la recepción.
buena calidad de imagen. Coloque el receptor lo más alto posible. Pruebe con canales
diferentes para obtener la mejor recepción. Configure primero el canal en la cámara y,
a continuación, el software. Consulte la sección "Instalación de la cámara" en este
documento para más información.
Montaje en pared de la cámara.
la cámara en la pared e instalar una estación de supervisión. Consulte la sección
"Montaje en pared de la cámara" en este documento para más información. El montaje
en pared funciona a la perfección con la función de detección de movimiento del software
de la cámara.
Adaptador CA y ahorro de energía.
de una estación de supervisión, utilice el adaptador CA para ahorrar la energía de las pilas.
El ahorro de energía se desactiva automáticamente.
Radio de acción de la cámara.
de distancia del receptor. La cámara se comunica con el receptor por ondas de radio,
para las que paredes u otros obstáculos no suponen un impedimento para la recepción.
Reducción de los movimientos de cámara al capturar imágenes.
firmemente. Utilice la pieza de montaje en pared para la supervisión remota.
Actualizaciones de software.
en el botón de vínculos Web situado en la barra de tareas del software de ImageStudio
a continuación, en "Actualizaciones de software".
Tome fotografías o grabe vídeos de modo que las posibles fuentes de luz
Ajuste la posición y la antena del receptor para obtener
Utilice la pieza de montaje en pared para montar
Al montar la cámara en pared para la instalación
Puede usar la cámara en un radio de hasta 25 metros
Sujete la cámara
Para buscar nuevas actualizaciones de software, haga clic
Español
™
y,
15
Page 20

10
El manual del usuario y el sistema de ayuda en pantalla proporcionan más información
sobre la cámara y el software:
1. En cualquier actividad del software , haga clic en el botón Ayuda.
2. En el menú Ayuda, haga clic en Manual del usuario o Contenido e Índice. A continuación,
podrá hacer clic en la
• Ficha Contenido para navegar por categorías
• Ficha Índice para buscar por palabras clave
• Ficha Buscar para buscar una palabra concreta
Para más información sobre cámaras Web Logitech
Logitech
Más información sobre la cámara
®
, visite la página www.logitech.com.
®
QuickCam® y otros productos
Garantía
Este producto tiene dos años de garantía limitada. Para más información, consulte
la sección de garantía de producto que aparece en el Manual del usuario ubicado en el CD
de software Logitech
Las cámaras Logitech deberían utilizarse dentro de lo permitido por la ley. Es posible
que las leyes de algunos países o estados prohíban usos de cámaras digitales para PC tales
como la grabación subrepticia de audio o vídeo para ciertos propósitos. En caso de dudas
sobre la legalidad del uso que piensa hacer de su cámara, consulte con las autoridades
competentes antes de utilizarla.
®
.
16
Español
Page 21

1 Caméra
Antenne
de la caméra
Micro
Viseur
Objectif
Bouton
du déclencheur
Socle de la caméra
Bouton
d’alimentation
Viseur
Affichage de l’état
Bouton Select
Bouton Mode
Logement des piles
Antenne
du récepteur
Récepteur
Français 17
Page 22

2 Installation de la caméra
1. Commencez par installer le logiciel.
Suivez les instructions qui s'affichent
à l'écran.
A
2. Placez les piles dans la caméra .
Pour ce faire, reportez-vous
au schéma situé dans le logement
des piles.
3. Mettez la caméra sous tension.
Appuyez sur le bouton
d'alimentation et maintenez-le
enfoncé pendant deux secondes.
Remarque le mode d'économie
4. Insérez le câble du récepteur
dans le port USB lorsque vous y êtes
invité .
5. Déployez l'antenne du récepteur .
d'énergie est activé par
défaut. La caméra se met
automatiquement hors
tension après 10 minutes
d'inactivité. Appuyez sur
le bouton d'alimentation
pour remettre la caméra
sous tension.
A
b
a
c
a
c
Connecteur USB
b
A
18 Français
Page 23

6. Sélectionnez un canal pour établir la communication
Bouton
Mode
Bouton
Select
entre la caméra et le récepteur:
• Si la page de test affiche une image nette,
poursuivez normalement. Dans le cas contraire,
sélectionnez le bouton de dépannage pour
sélectionner un canal. Pour changer de canal
ultérieurement dans le logiciel, sélectionnez
Paramètres de la caméra dans la fenêtre d'aperçu,
puis choisissez l'onglet Sans fil.
• Sélectionnez le canal indiqué par la caméra.
La caméra et le logiciel doivent correspondre
au même canal.
• Pour changer le canal de la caméra, appuyez sur
le bouton Mode (sur la caméra) pour choisir
l'indicateur de canal dans l'affichage de l'état.
• Appuyez sur le bouton Select pour choisir
un numéro de canal (de 1 à 4).
• Cliquez sur OK. L'installation est terminée.
Français 19
Page 24

3 Affichage de l'état
1. Modes de la caméra
• Mode photo. Prise de photos.
• Mode vidéo. Enregistrement vidéo.
2. Economie d'énergie
• Activé (par défaut)
• Désactivé (lorsque l'adaptateur AC est connecté)
3. Indicateur de canal (sélection d'un canal: 1 à 4)
4. Indicateur du niveau de charge des piles
1
2
3
4
4 Sélection des fonctions de la caméra
1. Appuyez sur le bouton Mode pour choisir une fonction.
2. La fonction sélectionnée clignote.
3. Appuyez sur le bouton Select pour choisir cette fonction.
4. Appuyez sur le bouton Select pour établir un choix au sein de la fonction
(ex.: indicateur de canal, canaux 1 à 4 ou mode d'économie d'énergie activé
ou désactivé).
20 Français
Page 25

5 Lancement du logiciel
Cliquez sur le menu Démarrer dans la barre des tâches de Windows®, puis sélectionnez
Programmes\Logitech
®
\Logitech® ImageStudio™.
6 Prise de photos et enregistrement vidéo
1. Appuyez sur le bouton d'alimentation et maintenez-le enfoncé (pendant deux secondes)
pour mettre la caméra sous tension.
2. Lancez le logiciel de la caméra.
3. Choisissez le mode photo ou le mode vidéo.
4. Cadrez le sujet à l'aide du viseur. Aucune mise au point n’est nécessaire.
5. Prenez une photo ou enregistrez une vidéo. La caméra fonctionne dans un rayon
de 25 mètres autour du récepteur.
• Mode photo. Appuyez sur le bouton du déclencheur. La photo s'affiche dans
le logiciel de la caméra.
• Mode vidéo. Appuyez sur le bouton du déclencheur pour commencer à filmer.
La vidéo s'affiche dans le logiciel de la caméra. Appuyez sur le bouton
du déclencheur pour cesser de filmer.
7 Témoin d'état du viseur
Caméra prête. Le témoin vert clignote lentement.
Mode vidéo. Le témoin vert clignote rapidement pendant l'enregistrement vidéo.
Mode photo. Le témoin vert est allumé pendant une seconde, puis la caméra est prête
à nouveau (le témoin vert clignote lentement).
Français 21
Page 26

8 Fixation de la caméra au mur
Utilisez les pattes de fixation murale pour fixer
la caméra au mur si vous voulez mettre en place
un poste de surveillance.
1. Trouvez un emplacement adapté pour fixer
la caméra.
2. Marquez le mur au crayon à l'aide des trous de
la fixation.
3. Percez des trous dans le mur à l'endroit où
vous souhaitez installer la caméra.
4. Apposez la fixation au mur à l'aide de vis.
5. Fixez le socle de la caméra à la fixation murale.
Le socle de la caméra produit un clic une fois
qu'il est en place.
6. Fixez la caméra au socle.
Caméra
Socle de
la caméra
Fixation
murale
22 Français
Page 27

9 Conseils
Eclairage. Il est préférable de prendre des photos et d'enregistrer des vidéos avec
des sources de lumière vive situées derrière la caméra et en dehors de la zone de l'image.
Réception optimale. Réglez la position du récepteur et de son antenne afin d'obtenir
une qualité d'image optimale. Pour ce faire, placez le récepteur aussi haut que possible.
Essayez différents canaux jusqu'à obtention de la meilleure réception. Réglez d'abord
le canal dans la caméra, puis dans le logiciel. Reportez-vous à la section Installation de
la caméra de ce livret pour en savoir plus.
Fixation de la caméra au mur. Utilisez les pattes de fixation murale pour fixer la caméra
au mur si vous voulez mettre en place un poste de surveillance. Pour en savoir plus,
reportez-vous à la section Fixation de la caméra au mur de ce livret. La fixation murale
est particulièrement adaptée à la fonction de détection de mouvements du logiciel de
la caméra.
Adaptateur AC et économie d'énergie. Lorsque vous fixez la caméra au mur
pour mettre en place un poste de surveillance, utilisez l'adaptateur AC de la caméra
afin d'économiser la charge des piles. Le mode d'économie d'énergie s'interrompt
automatiquement.
Portée de la caméra. Vous pouvez utiliser la caméra dans un rayon de 25 mètres
autour de son récepteur. La caméra communique avec le récepteur par l'intermédiaire
d'ondes radio pouvant pénétrer les murs et autres objets sans affecter la réception.
Stabilisation de la caméra. Tenez fermement la caméra afin qu'elle soit le plus stable
possible. Utilisez la fixation murale pour la surveillance à distance.
Mises à jour logicielles. Pour rechercher des mises à jour logicielles, cliquez sur le bouton
Liens Web de la barre des tâches du logiciel ImageStudio
logicielles.
™
, puis sélectionnez Mises à jour
Français 23
Page 28

10 Informations complémentaires sur la caméra
Consultez le Guide d’installation ou l’aide en ligne pour de plus amples informations sur
la caméra et le logiciel qui l’accompagne.
1. Quelle que soit l’application du logiciel que vous utilisez, cliquez sur le bouton d’aide.
2. Dans le menu d'aide, cliquez sur Guide d'installation ou sur Sommaire et index.
Vous pouvez ensuite cliquer sur
• l'onglet Sommaire pour effectuer une recherche par catégorie
• l'onglet Index pour effectuer une recherche par mot-clé
• l'onglet Recherche pour rechercher les mots de votre choix.
®
Pour plus d’informations sur les caméras Web QuickCam
produits Logitech
®
, consultez le site www.logitech.com.
Garantie
Ce produit est fourni avec une garantie limitée de deux ans. Pour plus d’informations,
veuillez lire la section intitulée Garantie du produit dans le Guide de l’utilisateur sur le CD
du logiciel Logitech
Les caméras de Logitech doivent faire l’objet d’une utilisation légale. Certaines utilisations
de caméras numériques pour PC peuvent être interdites par les lois locales dans certains
pays ou états, telles que l’enregistrement clandestin de communications audio ou vidéo
pour des usages particuliers. Pour toute question concernant la légalité de l’utilisation
proposée de votre produit, veuillez consulter une autorité légale locale au préalable.
®
.
de Logitech® et sur les autres
24 Français
Page 29

1 Câmara
Antena da câmara
Botão Força
Microfone
Visor
Lente
Botão Obturador
Suporte da câmara
Visor
Exibição do status
Botão Selecionar
Botão Modo
Compartimento
da bateria
Antena do receptor
Receptor
Português 25
Page 30

2 Configure a Câmara
1. Instale primeiro o software.
Siga as instruções na tela.
A
2. Coloque a bateria na câmara .
Consulte o diagrama no interior
do compartimento da bateria.
3. Ligue a câmara. Pressione por
dois segundos o botão de força
da câmara.
Observação O recurso Economia
4. Insira o cabo do receptor
na porta USB quando solicitado
pelo software .
5. Mova a antena do receptor .
de Energia é ativado
por padrão. A câmara
desliga-se após
10 minutos
de inatividade.
Pressione o botão
Força para ligar
a câmara novamente.
A
b
a
A
c
a
c
b
Conector USB
26 Português
Page 31

6. Estabeleça a comunicação entre a câmara e o receptor,
Botão
Modo
Botão
Selecionar
selecionando um canal:
• Se a página de teste de visualização exibir uma
imagem clara da câmara, prossiga. Caso contrário,
selecione o botão Solução de Problemas
para selecionar o canal. Para alterar o canal
posteriormente no software, selecione
Configurações da Câmara, na janela Visualizar,
e escolha a guia Sem Fio.
• Selecione o mesmo canal que estiver indicado
na câmara. A câmara e o software devem usar
o mesmo número de canal.
• Para alterar o canal na câmara, use o botão Modo
na câmara para escolher Indicador de Canal
ou Exibição do Status.
• Use o botão Selecionar para escolher um canal,
de 1 a 4.
• Clique em OK. A instalação está concluída.
Português 27
Page 32

3 Exibição do Status
1. Modos da câmara
• Modo Fotografia. Tira uma única fotografia.
• Modo Vídeo. Captura vídeo.
2. Economia de Energia
• Ativar (ativado por padrão)
• Desativar (quando o adaptador AC
estiver conectado)
3. Indicador de canal (selecione um canal, de 1 a 4)
4. Indicador de nível da bateria
1
2
3
4
4 Selecionando Funções da Câmara
1. Pressione o botão Modo para escolher a função da câmara.
2. A função da câmara pisca ao ser selecionada.
3. Pressione o botão Selecionar para escolher a função.
4. Use o botão Selecionar para selecionar opções de uma função (por exemplo,
indicador de canal, canais de 1 a 4 ou Economia de Energia, ativado ou desativado.
28 Português
Page 33

5 Iniciando o Software
Clique em Iniciar, na barra de tarefas do Windows® e, em seguida, selecione
Programas\Logitech
®
\Logitech® ImageStudio™.
6 Fazendo Fotografias e Vídeos
1. Pressione por dois segundos o botão Força para ligar a câmara.
2. Inicie o software da câmara.
3. Escolha o modo Vídeo ou o modo Fotografia.
4. Use o visor para enquadrar o objeto. Não requer focalização.
5. Faça a fotografia ou o vídeo. A câmara funciona a uma distância de 25 metros
do receptor:
• Modo Fotografia. Pressione o botão Obturador. A imagem é exibida no software
da câmara.
• Modo Vídeo. Pressione o botão Obturador para iniciar a gravação. O vídeo
é exibido no software da câmara. Pressione o botão Obturador para parar.
7 LED de Status no Visor
Câmara Pronta. O LED verde pisca devagar.
Modo Vídeo. O LED verde pisca rapidamente durante a gravação de vídeo.
Modo Fotografia. O LED verde permanece aceso por um segundo e, em seguida,
a câmara volta ao estado de pronta (o LED verde pisca devagar).
Português 29
Page 34

8 Montagem da Câmara na Parede
Use o suporte e peças para montagem na parede
para instalar uma estação de monitoria com
a câmara afixada à parede.
1. Escolha um local adequado para a montagem
da câmara.
2. Use os furos no suporte de parede como guias
para marcar a parede para a perfuração.
3. Fure a parede no local onde a câmara será
instalada.
4. Afixe o suporte à parede usando parafusos.
5. Coloque o suporte da câmara no suporte
de parede. O suporte da câmara irá se encaixar.
6. Coloque a câmara no suporte.
Câmara
Suporte
da câmara
Montagem
na parede
30 Português
Page 35

9 Dicas
Iluminação. Tire fotografias e grave vídeos com fontes de luz forte situadas atrás
da câmara e fora da área a ser fotografada.
Otimize a Recepção. Ajuste a posição do receptor e da antena para obter uma melhor
qualidade de imagem. Coloque o receptor no local mais alto possível. Experimente canais
diferentes para obter melhor recepção. Defina primeiro o canal na câmara, depois no
software. Consulte a seção Configure a Câmara, neste folheto, para obter mais detalhes.
Montagem da Câmara na Parede. Use o suporte e peças para montagem na parede
para instalar uma estação de monitoria com a câmara afixada à parede. Consulte a seção
Montagem da Câmara na Parede, neste folheto, para obter instruções. A montagem
na parede funciona muito bem com o recurso de Detecção de Movimento do software
da câmara.
Adaptador AC e Economia de Energia. Ao montar a câmara na parede para instalar
uma estação de monitoria, use o adaptador AC da câmara para a economizar energia
da bateria. O recurso de Economia de Energia desliga-se automaticamente.
Alcance da Câmara. Use a câmara a uma distância máxima de 25 metros do receptor.
A câmara comunica-se com o receptor usando ondas de rádio que podem penetrar
paredes e outros objetos sem interferência na recepção.
Minimize o Tremor da Câmara. Firme os braços ao segurar a câmara. Use o suporte
de parede para monitoria remota.
Atualizações do Software. Para verificar as atualizações recentes de software,
clique no botão Links da Web, na barra de tarefas do software ImageStudio
em Atualizações do Software.
™
, e clique
Português 31
Page 36

10 Saiba Mais Sobre a Câmara
Acesse o Guia do Usuário ou a ajuda on-line para informações sobre a câmara e o software.
1. A partir de qualquer atividade no software, clique no botão Ajuda.
2. No menu Ajuda, clique em Manual do Usuário ou em Conteúdo e Índice. Em seguida,
clique na
• Guia Conteúdo para procurar por categoria;
• Guia Índice para procurar por palavra-chave;
• Guia Procurar para procurar qualquer palavra.
®
Para obter mais informações sobre câmaras da Web QuickCam
outros produtos da Logitech
®
, visite www.logitech.com.
Garantia
Este produto tem uma garantia limitada de dois anos. Para obter mais informações,
consulte a seção Garantia do Produto, no Guia do Usuário localizado no CD do software
da Logitech
Os produtos de câmara da Logitech destinam-se a usos que se conformem à lei.
Determinados usos da câmara digital de PC podem ser proibidos por leis locais em alguns
países ou estados, tais como gravação clandestina de áudio e/ou comunicações de vídeo
para determinados propósitos. Se tiver alguma dúvida se um uso intencionado do produto
é lícito, consulte uma autoridade legal antes de prosseguir.
®
.
da Logitech®, assim como
32 Português
Page 37

Logitech® Addresses and Telephone Numbers
Country
E URO PE AN, MID DL E EAST ER N
& AFRICAN HEADQUART ER S
LOGITECH Trading S.A.
COR P OR AT E H E AD QU A RT ER S
LOGITECH Inc.
ASIAN PACIFIC HEADQUARTERS
LO GIT EC H F ar Ea st Lt d.
AUSTRALIA
LOGITECH Australia Computer
Peripherals Pty Ltd.
CANADA
S ales & M a rketin g O ffice
JAPAN
LOGICOOL Co. Ltd.
ITALI A
LOGITE CH Ita lia S.r.l
In LAT IN AMER ICA AND
THE CARIBBEAN
Address
Mouli n- du-Choc
CH 1122 Ro manel- sur-Mo rge s
6505 Kaiser Drive
USA Fr emont, CA 94555
#2 C r e a t i o n Ro a d I V
Science-Based – Industrial Park
RO C H s i n c h u , T a i w a n
Level 2, 633 Pittwater Roa d
AUS D ee Wh y NSW 20 99, Austr alia
5025 Orbitor Dr., Bldg. 6, Suite 200
CDN Mississauga, ON L4W 4Y5
Ryoshin Ginza East Mirror Bld
3- 15 - 10 G i nz a
Chuo-ku, Tokyo, Japan 104-0061
Centro Direzionale Colleoni
Palazzo Andromeda 3
I 20041 Agrate Brianza, MI
Contact your local authorized distributor, or call our Customer Support
Hotlin e in the US A
Infoline
Product Information
+41 (0) 21 863 54 00 English
FAX +41 ( 0 ) 21 863 54 02
(800) 231-7 717
(800) 231-7717
g
, 7F
.
+39-02 215 1062
Hotline
Tec hni cal Help
+41 (0) 21 863 54 01 English
FAX +41 (0) 21 863 54 02
+1 702 269 3457
+886 (2) 27466601 x2206
+61 (02) 9804 6968
+61 (02) 9972 3561
+1 702 269 3457
+81 (3) 3543 2122
FAX +81 (3) 3543 2911
+39-02 214 0871
+1 702 269 3457
Page 38

Logitech® on the world wide web: www.logitech.com
Logitech® on the world wide web: www.logitech.com
©2002 Logitech. All rights reserved. Logitech, the Logitech logo, and other Logitech marks are
owned by Logitech and may be registered. All other trademarks are the property of their
©2002 Logitech. All rights reserved. Logitech, the Logitech logo, and other Logitech marks are owned by Logitech and may be
respective owners. Logitech assumes no responsibility for any errors that may appear in this
registered. All other trademarks are the property of their respective owners. Logitech assumes no responsibility for any errors
manual. Information contained herein is subject to change without notice.
that may appear in this manual. Information contained herein is subject to change without notice.
Part number: 623017-0403
Part number: 623021-0403
 Loading...