

Page 1
Getting started with
Logitech
®
HD Webcam C310
Page 2
Logitech® HD Webcam C310
Contents
English . . . . . . . . . . . . . . . . . . . . . . . . . . . . . . . . . . . . . 3
Deutsch . . . . . . . . . . . . . . . . . . . . . . . . . . . . . . . . . . . . 12
Français . . . . . . . . . . . . . . . . . . . . . . . . . . . . . . . . . . . . 21
По-русски . . . . . . . . . . . . . . . . . . . . . . . . . . . . . . . . . . . 30
Po polsku . . . . . . . . . . . . . . . . . . . . . . . . . . . . . . . . . . . . 39
Українська . . . . . . . . . . . . . . . . . . . . . . . . . . . . . . . . . . . 48
Magyar . . . . . . . . . . . . . . . . . . . . . . . . . . . . . . . . . . . . 57
Slovenčina . . . . . . . . . . . . . . . . . . . . . . . . . . . . . . . . . . . 66
Български . . . . . . . . . . . . . . . . . . . . . . . . . . . . . . . . . . . 75
Română . . . . . . . . . . . . . . . . . . . . . . . . . . . . . . . . . . . . 84
Hrvatski . . . . . . . . . . . . . . . . . . . . . . . . . . . . . . . . . . . . 93
Srpski . . . . . . . . . . . . . . . . . . . . . . . . . . . . . . . . . . . . 10 2
Slovenščina . . . . . . . . . . . . . . . . . . . . . . . . . . . . . . . . . . .111
Eesti . . . . . . . . . . . . . . . . . . . . . . . . . . . . . . . . . . . . . 120
Latviski . . . . . . . . . . . . . . . . . . . . . . . . . . . . . . . . . . . 12 9
Lietuvių . . . . . . . . . . . . . . . . . . . . . . . . . . . . . . . . . . . 13 8
Italiano. . . . . . . . . . . . . . . . . . . . . . . . . . . . . . . . . . . . 147
Česká verze . . . . . . . . . . . . . . . . . . . . . . . . . . . . . . . . . . 156
www.logitech.com/support. . . . . . . . . . . . . . . . . . . . . . . . . . . . 167
2
Page 3

Logitech® HD Webcam C310
12
3
4
Thank you for buying a Logitech webcam!
Use this guide to set up and begin using
your Logitech webcam.
If you have questions before you start, or if you
just want to learn more about your Logitech
webcam, please visit logitech.com/support.
English 3
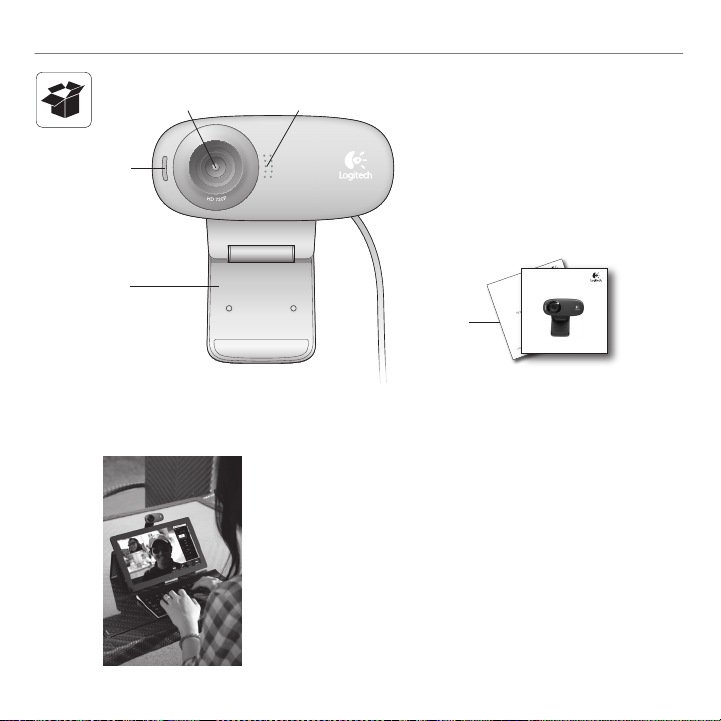
1. Microphone
2. Lens
3. Activity light
4. Flexible clip/base
5. Product documentation
Getting started with
HD
®
Logitech
Webcam C310
Important information
5
Safety, compliance, and warranty
Page 4

Getting started with
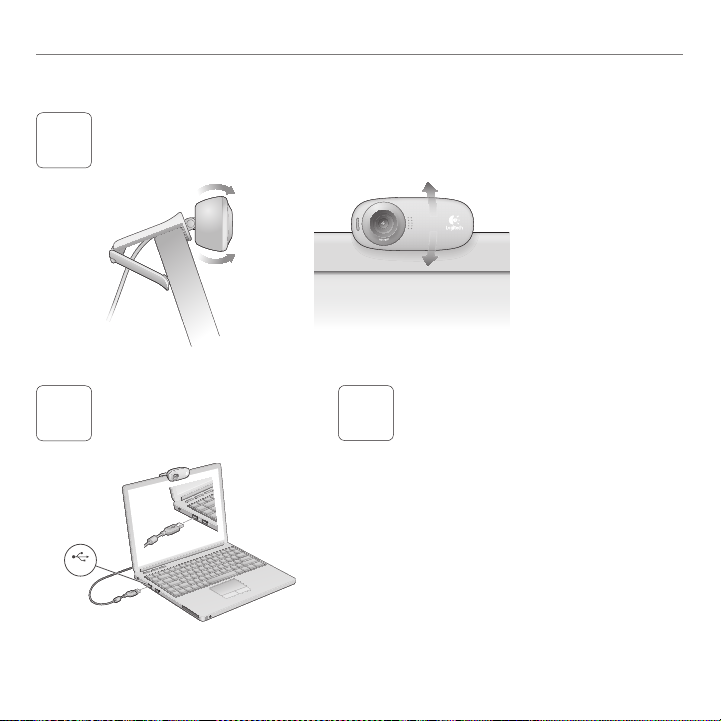
Setting up your webcam
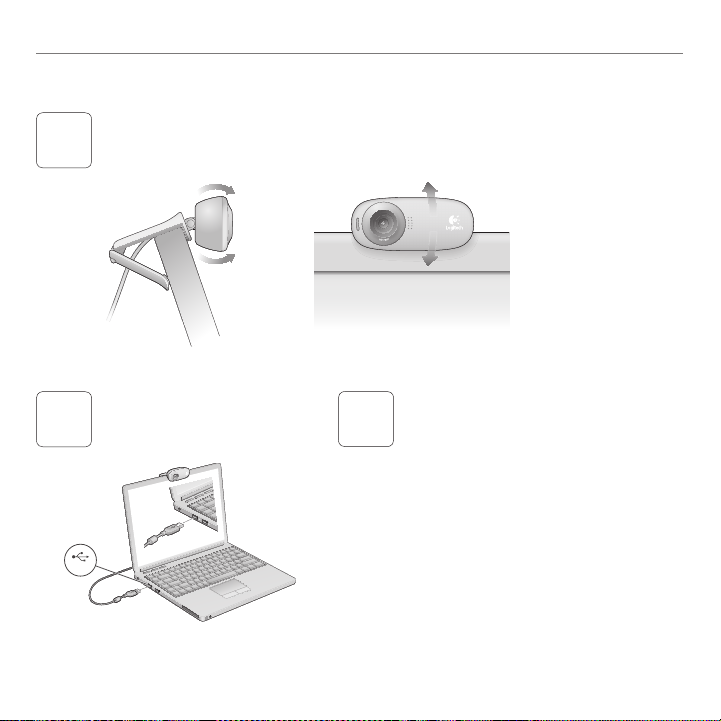
Place your webcam
1
Connect your webcam
2
USB
4 English
Install software
3
If you’re using your webcam with Windows® 8,
the software required is downloaded
automatically when you connect your webcam
for the first time, and installed silently in
the background.
Important: Make sure you’re connected to
the Internet, so the software can be downloaded.
If you’re using your webcam with Windows® 7
or Windows Vista®, you must install the Logitech®
Webcam Software, available from:
logitech.com/downloads
Page 5

Getting started with video calling
Your Logitech HD Webcam c310 provides HD 720p video calling.
To take advantage of video calling both you and the person you call must install
Skype™, or use a different video-calling application such as Yahoo!® Messenger,
Windows Live® Messenger or Gmail.
Learn more: skype.com
As well as a webcam and video calling application, both callers need:
• A computer with speakers
(or a headset) and a microphone;
your Logitech HD Webcam c310
has a built-in microphone.
Logitech® HD Webcam C310
• A broadband Internet connection
(e.g., DSL, T1, or cable).
English 5
Page 6
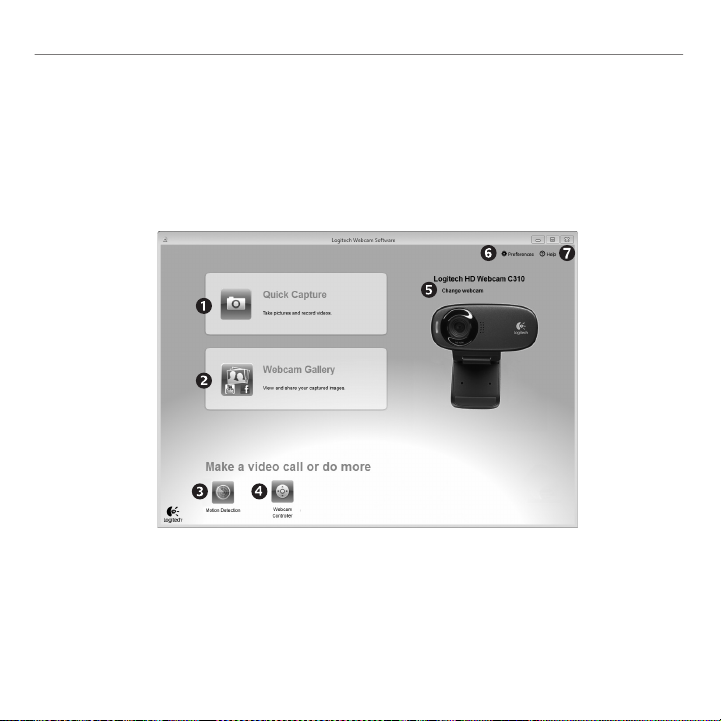
Getting started with
Using your webcam with Windows 8
Use the Camera app, available from the Windows 8 Start screen, to operate and control
your webcam.
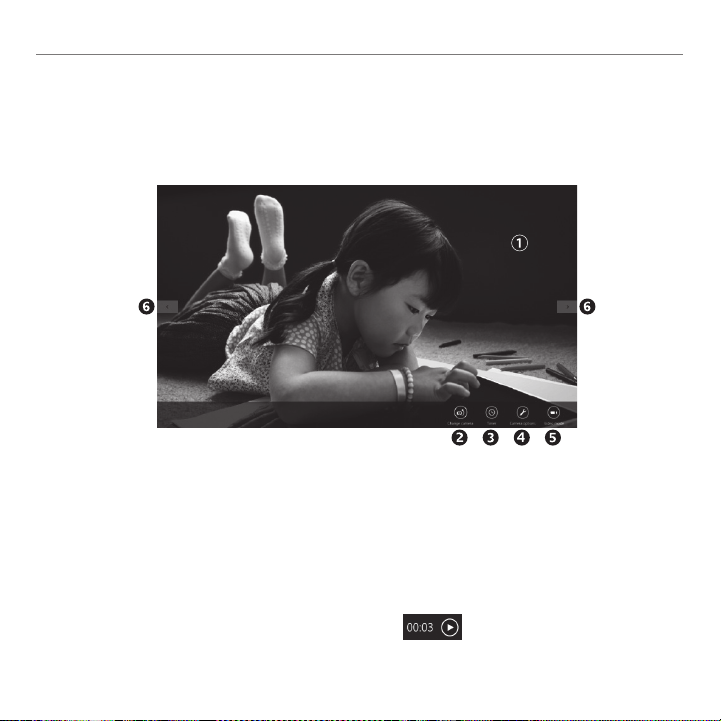
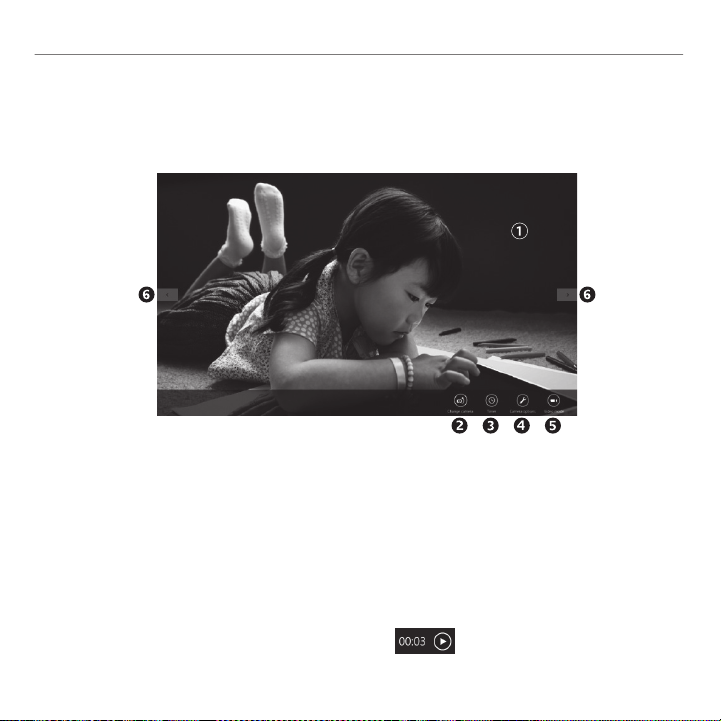
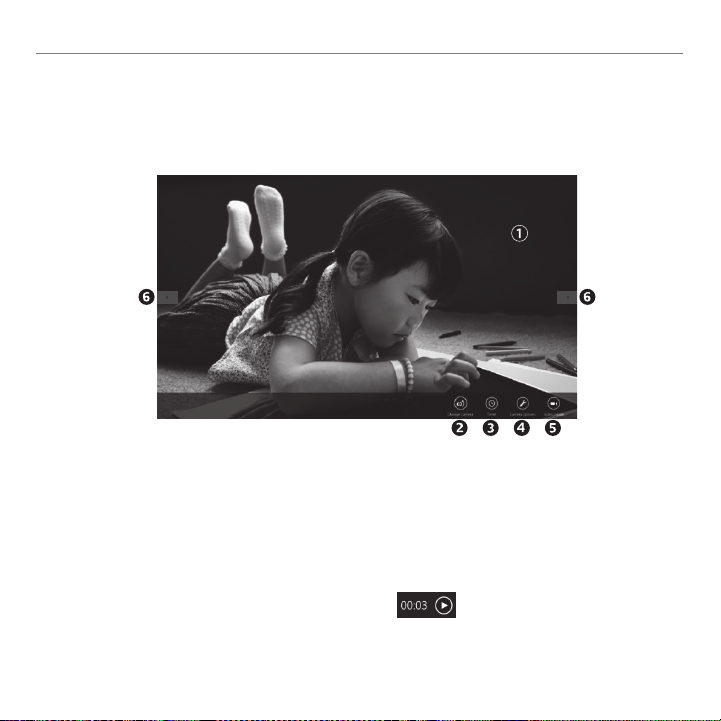
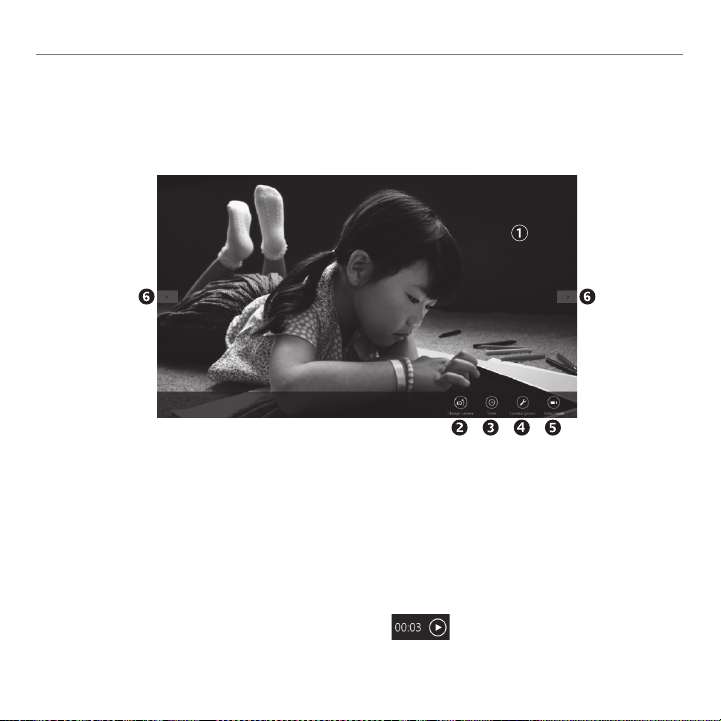
Understanding the Camera app
1. Preview window. Click or tap to capture
photos or videos (depending on whether
Video Mode is selected).
2. Change webcams (when you have more
than one). The face of your Logitech
webcam illuminates when selected.
3. Adjust your camera settings.
4. Activate or deactivate the Timer feature.
When activated, there is a three second
countdown to capturing a photo or video.
6 English
5. Turn Video Mode on (to record videos)
or off (to take photos).
6. Click or tap on the arrows to scroll
through the photos and videos you have
captured.
Videos are denoted by a timer and play
button in the bottom right-hand corner:
Page 7

Logitech® HD Webcam C310
Tip: The Camera app lets you use your webcam’s most popular features quickly and easily.
If you want to take advantage of the enhanced features your webcam offers, such as motion
detection, use the Logitech Webcam Software available from logitech.com/downloads.
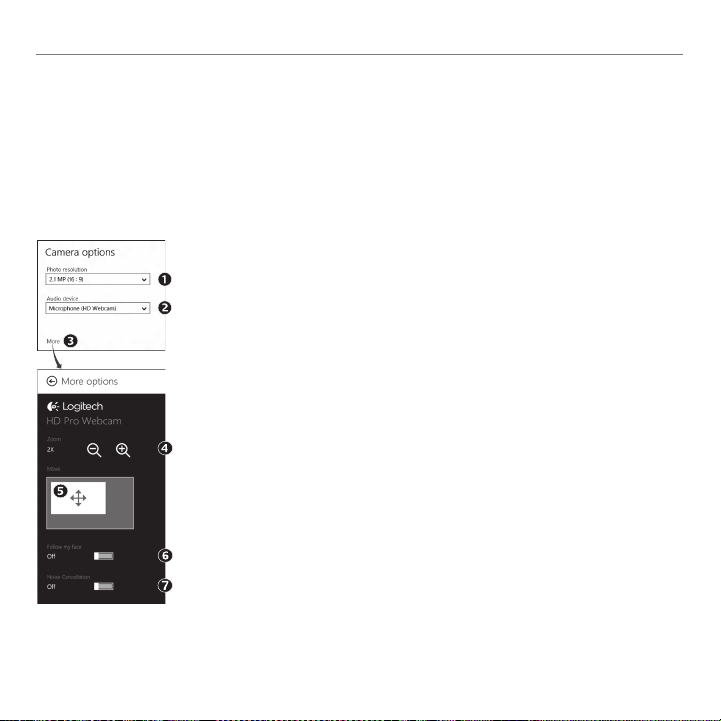
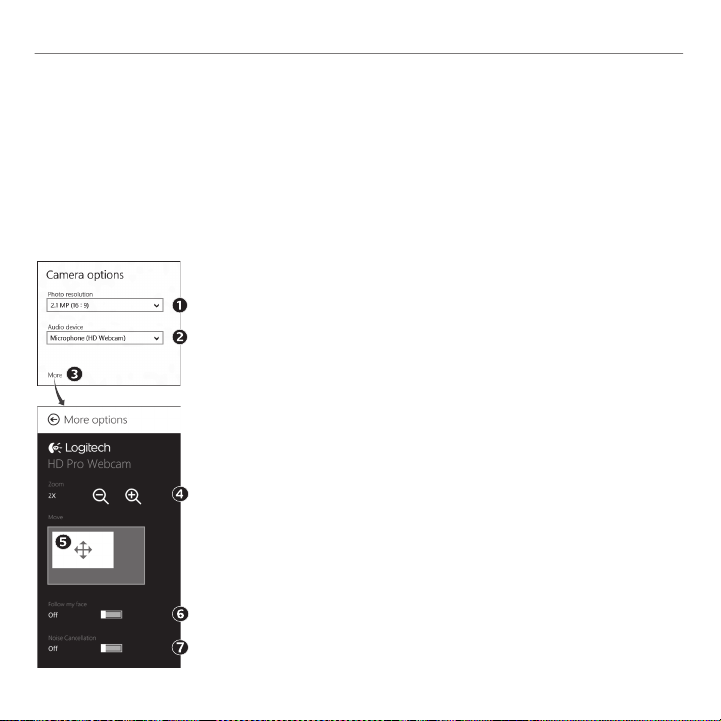
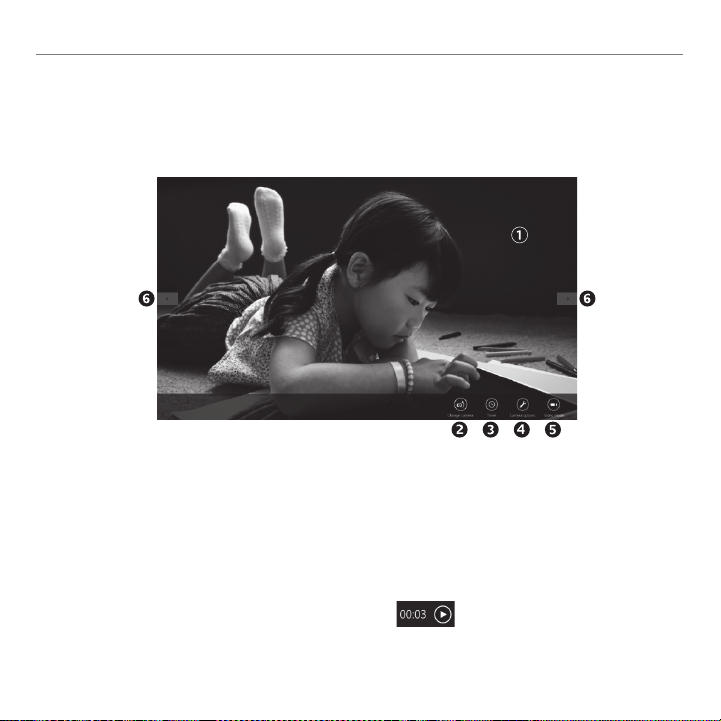
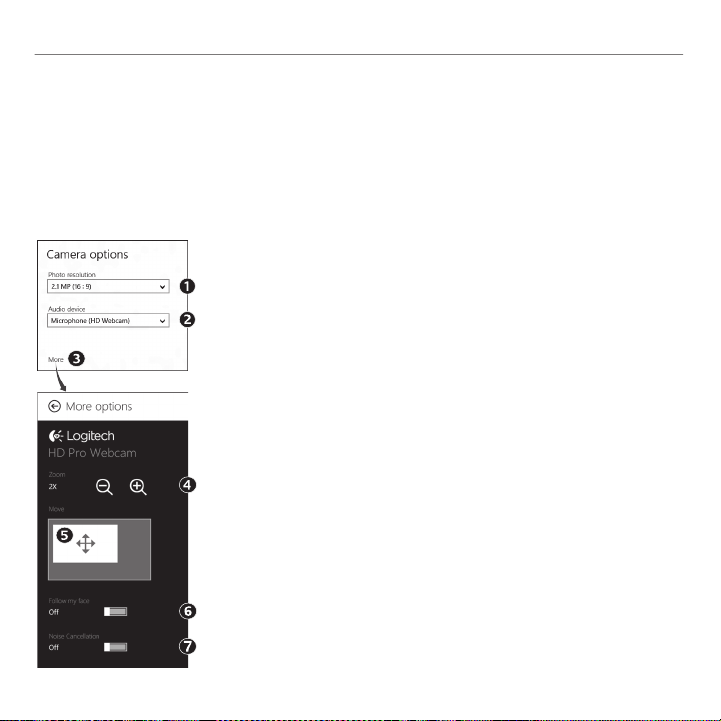
Adjusting your Camera settings
The Logitech software optimizes the settings for your environment automatically. To adjust any
of your settings choose Camera options. This is available from the Camera app (see the previous
page) and from within Metro apps that support webcams.
1. Choose your required resolution for photo capture, or video
capture when in Video Mode.
2. Choose the microphone you want to use to record sound in
your videos, if you have more than one available.
3. Access More Options, to benefit from enhanced features such as
digital Zoom and Move.
If the More Options pane doesn’t show the Logitech logo
and offer enhanced options, it is likely that the Logitech software
didn’t install correctly when you first connected your camera.
To reinstall it, go to the Windows Store and look for Logitech
Camera Controller.
4. Zoom in or out to include/exclude your surroundings.
5. Having zoomed in, drag the white box to pan (adjust the focus area
of your webcam).
6. Use Follow my face so you’re always in the picture.
7. Enjoy clear conversations without annoying background noise.
Depending on the features available with your camera, you can access
further advanced settings by scrolling.
English 7
Page 8
Getting started with
Sharing your photos and videos
You can share your photos and videos via e-mail, Twitter, Facebook®, YouTube®,
or Microsoft SkyDrive®. Follow these steps:
1. In the Camera app, scroll to the photo or video you want to share.
2. Select Share in the Charms bar (or press - H):
3. Choose the media through which you want to share the photo or video.
8 English
Page 9

Logitech® HD Webcam C310
Using your webcam with Windows 7 and Windows Vista
The Logitech Webcam Software provides everything you need to use and control your webcam.
Launch the software from the Windows Start® menu, or by right-clicking on the camera icon in
the Windows taskbar.
Understanding the Logitech Webcam Software
1. Capture pictures and videos.
2. View captured images and share via
e-mail, Facebook, or YouTube.
3. Capture videos triggered by
detected motion.
4. Control your webcam while on
a video call.
5. Change webcams (when you have
more than one).
6. Open Logitech Webcam
Software settings.
7. Open help dashboard.
English 9
Page 10

Getting started with
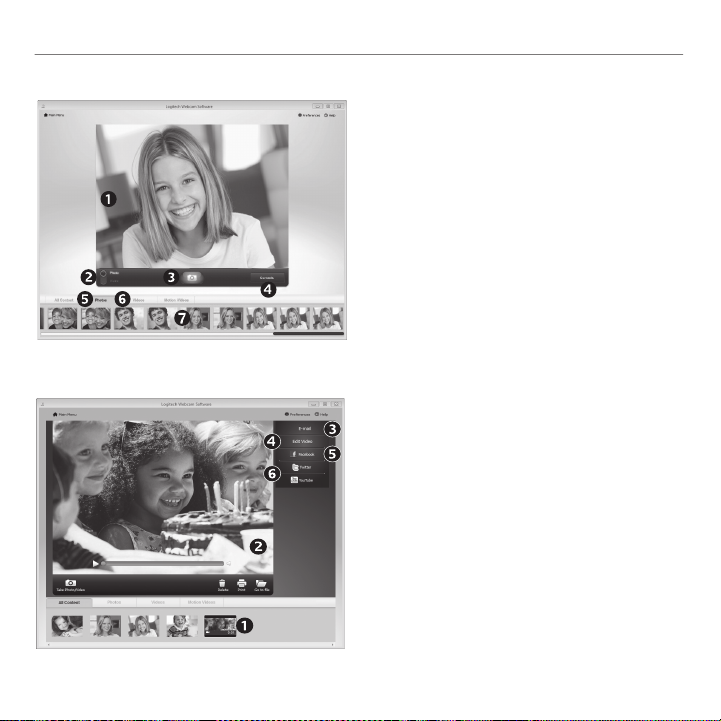
Capturing video and snapping pictures
The gallery: viewing and sharing
Quick Capture allows you to take photos
and record videos easily.
You have quick access to webcam controls
and settings:
1. Preview window
2. Capture mode:
photo/video
3. Capture button
5. Photo thumbnails
6. Video thumbnails
7. Click a thumbnail
to enter the gallery
4. Webcam controls
Clicking on an image thumbnail in the webcam
gallery (1) opens the video or photo in the review
window (2). You can then:
• Attach the video or picture file to an e-mail (3)
• Edit the photo or splice together video (4)
• Upload the picture or video to Facebook (5)
• Upload the video to Twitter or YouTube (6)
You can also drag and drop a gallery image onto
one of the function tiles (items 3-6) to launch
an editing application or to attach or upload.
10 English
Page 11

Using motion detection
Fine tuning your webcam during a video call
1. Launch the webcam controller when on a video call.
2. Use pan and tilt to find the best angle.
3. Zoom in or out to include/exclude your surroundings.
4. Use Follow my face so you’re always in the picture.
5. Enjoy clear conversations without annoying
background noise.
6. Correct for poor lighting environments
using RightLight.
7. Access advanced webcam settings.
Logitech® HD Webcam C310
• Set up your webcam to record video when
it detects movement.
• Adjust captured video duration and detection
sensitivity.
• Captured video is automatically saved
to your computer.
• View content in the Gallery or upload it using
the One-touch Upload window.
English 11
Page 12

Erste Schritte
12
1. Mikrofon
2. Objektiv
3
3. Betriebs-LED
4. Flexibler Clip/Standfläche
5. Dokumentation
Getting started with
4
5
Logitech
Important information
Safety, compliance, and warranty
Vielen Dank, dass Sie sich für eine Webcam von Logitech
entschieden haben!
Verwenden Sie dieses Handbuch für die Einrichtung
und erste Verwendung Ihrer Logitech Webcam.
Wenn Sie vorab Fragen klären oder einfach mehr
über Ihre Logitech Webcam erfahren möchten,
besuchen Sie logitech.com/support.
12 Deutsch
HD
®
Webcam C310
Page 13

Einrichten Ihrer Webcam
Befestigen Sie die Webcam
1
Logitech® HD Webcam C310
Schließen Sie die Webcam an
2
USB
Installieren Sie die Software
3
Wenn Sie Ihre Webcam mit Windows® 8
verwenden, wird die erforderliche Software beim
erstmaligen Anschließen der Webcam automatisch
heruntergeladen und im Hintergrund installiert.
Wichtig: Es muss eine Internetverbindung bestehen,
damit die Software heruntergeladen werden kann.
Wenn Sie die Webcam mit Windows® 7 oder
Windows Vista® verwenden, müssen Sie die Logitech®
Webcam-Software installieren, die hier verfügbar ist:
logitech.com/downloads
Deutsch 13
Page 14
Erste Schritte
Erste Schritte mit Videogesprächen
Ihre Logitech HD Webcam C310 bietet HD-Videogespräche in 720p.
Um Videogespräche nutzen zu können, müssen sowohl Sie als auch Ihr Gesprächspartner
Skype™ installieren oder eine andere Anwendung für Videogespräche verwenden,
z. B. Yahoo!® Messenger, Windows Live® Messenger oder Gmail.
Weitere Informationen finden Sie auf skype.com.
Zusätzlich zur Webcam und Videogesprächsanwendung benötigen beide
Gesprächspartner Folgendes:
• Einen Computer mit Lautsprechern
(oder einem Headset) und einem
Mikrofon. Die Logitech HD Webcam
C310 ist mit einem integrierten
Mikrofon ausgestattet.
• Eine Internet-Breitbandverbindung
(z. B. DSL, T1 oder Kabel).
14 Deutsch
Page 15
Logitech® HD Webcam C310
Verwenden der Webcam mit Windows 8
Verwenden Sie die über den Windows 8-Startbildschirm verfügbare Kamera-App, um Ihre Webcam
zu bedienen und zu steuern.
Funktionen der Kamera-App
1. Vorschaufenster. Klicken oder tippen Sie,
um Fotos oder Videos (bei aktiviertem
Videomodus) aufzunehmen.
2. Wechseln Sie zwischen Webcams (wenn Sie
mehr als eine haben). Die ausgewählte
Logitech Webcam leuchtet auf.
3. Passen Sie die Kameraeinstellungen an.
4. Aktivieren oder deaktivieren Sie die Timer-
Funktion. Bei Aktivierung der Funktion wird
vor Aufnahme eines Fotos oder Videos
ein 3-Sekunden-Countdown abgespielt.
5. Schalten Sie den Videomodus ein
(um Videos aufzuzeichnen) oder aus
(um Fotos zu machen).
6. Klicken oder tippen Sie auf die Pfeiltasten,
um durch die Fotos und Videos zu blättern,
die Sie aufgenommen haben.
Videos werden mit einem Timer und
einer Wiedergabetaste unten rechts
gekennzeichnet.
Deutsch 15
Page 16
Erste Schritte
Tipp: Über die Kamera-App können Sie auf schnelle und einfache Weise auf die beliebtesten
Funktionen Ihrer Webcam zugreifen. Wenn Sie die fortgeschrittenen Funktionen Ihrer Webcam
nutzen möchten, z. B. Bewegungserkennung, verwenden Sie die Logitech Webcam-Software,
die unter logitech.com/downloads verfügbar ist.
Anpassen der Kameraeinstellungen
Die Logitech Software optimiert automatisch die Einstellungen für Ihre Umgebung.
In den Kameraoptionen können Sie sämtliche Einstellungen anpassen. Diese sind über die Kamera-App
(siehe vorherige Seite) und Metro-Apps, die Webcams unterstützen, verfügbar.
1. Wählen Sie die erforderliche Auflösung für die Erfassung von Bildern oder
Videos (wenn Sie sich im Videomodus befinden).
2. Wählen Sie das Mikrofon, das Sie zur Aufzeichnung von Ton in Ihren
Videos verwenden möchten, falls mehr als ein Mikrofon verfügbar ist.
3. Öffnen Sie den Bereich für weitere Optionen, um erweiterte Funktionen
wie z. B. die digitale Zoom- und Schwenkfunktion zu nutzen.
Wenn im Fenster für weitere Optionen das Logitech Logo nicht
angezeigt und keine weiteren Optionen angeboten werden, wurde die
Logitech Software vermutlich beim erstmaligen Anschließen der Kamera
nicht richtig installiert. Um sie erneut zu installieren, rufen Sie den
Windows Store auf und suchen Sie nach Logitech Camera Controller.
4. Vergrößern oder verkleinern Sie das Bild, um weniger bzw. mehr von
Ihrer Umgebung zu zeigen.
5. Ziehen Sie nach dem Vergrößern das weiße Feld zum Schwenken
(Anpassen des Fokusbereichs der Webcam).
6. Verwenden Sie die Gesichtserkennung, um immer im Bild zu bleiben.
7. Genießen Sie klar verständliche Gespräche ohne lästige
Hintergrundgeräusche.
Abhängig von den für Ihre Kamera verfügbaren Optionen können Sie
erweiterte Einstellungen aufrufen, indem Sie scrollen.
16 Deutsch
Page 17
Logitech® HD Webcam C310
Freigabe von Fotos und Videos
Sie können Ihre Fotos und Videos per E-Mail oder über Twitter, Facebook®, YouTube® oder Microsoft
SkyDrive® freigeben. Führen Sie die folgenden Schritte aus:
1. Blättern Sie in der Kamera-App zu dem Foto oder Video, das Sie freigeben möchten.
2. Wählen Sie in der Charms-Bar „Freigabe“ (oder drücken Sie auf + H):
3. Wählen Sie das Medium, über das Sie das Foto oder Video freigeben möchten.
Deutsch 17
Page 18

Erste Schritte
Verwenden der Webcam mit Windows 7 und Windows Vista
Die Logitech Webcam-Software bietet Ihnen alles, was Sie zur Nutzung und Steuerung Ihrer
Webcam brauchen. Starten Sie die Software über das Windows®-Startmenü oder durch
Rechtsklicken auf das Kamerasymbol in der Windows-Taskleiste.
Funktionen der Logitech Webcam-Software
1. Nehmen Sie Bilder und Videos auf.
2. Zeigen Sie aufgenommene Bilder an und
versenden Sie sie per E-Mail oder laden Sie
sie auf Facebook oder YouTube hoch.
3. Lösen Sie Videoaufnahmen durch
die Bewegungserkennung aus.
18 Deutsch
4. Steuern Sie Ihre Webcam während
eines Videogesprächs.
5. Wechseln Sie zwischen Webcams
(wenn Sie mehr als eine haben).
6. Öffnen Sie die Logitech Webcam-SoftwareEinstellungen.
7. Zeigen Sie Hilfefunktionen an.
Page 19

Videoaufnahmen und Schnappschüsse
Logitech® HD Webcam C310
QuickCapture ist die einfache Art, Fotos zu
machen und Videos aufzuzeichnen.
Die Funktion bietet Ihnen Konfigurations- und
Steuermöglichkeiten für Ihre Webcam:
1. Vorschaufenster
2. Aufnahme: Foto/
Video
3. Aufnahmetaste
4. Steuermöglichkeiten
6. Miniaturvideos
7. Klicken Sie auf
ein Miniaturbild,
um die Galerie
zu öffnen.
für die Webcam
5. Miniaturfotos
Die Galerie: Anzeigen und Freigeben Wenn Sie auf ein Miniaturbild in der Webcam-
Galerie (1) klicken, wird das Video oder Foto im
Vorschaufenster (2) geöffnet. Sie können dann
Folgendes tun:
• Die Video- oder Bilddatei an eine E-Mail
anhängen (3)
• Das Foto bearbeiten oder das Video
zusammenschneiden (4)
• Das Bild oder Video auf Facebook hochladen (5)
• Das Video auf Twitter oder YouTube
hochladen (6)
Sie können auch ein Galeriebild auf eine der
Kacheln ziehen (3–6 in der Abbildung), um eine
Bearbeitungsanwendung zu starten oder ein Bild
bzw. Video an eine E-Mail anzuhängen oder auf
Facebook, YouTube oder Twitter hochzuladen.
Deutsch 19
Page 20

Erste Schritte
Verwendung der Bewegungserkennung
• Konfigurieren Sie Ihre Webcam so,
dass die Videoaufzeichnung startet,
wenn Bewegung erkannt wird.
• Stellen Sie die Dauer der Videoaufzeichnung
und die Empfindlichkeit der
Bewegungserkennung ein.
• Das aufgezeichnete Video wird automatisch
auf dem Computer gespeichert.
• Zeigen Sie Galerieinhalte an oder laden Sie
sie per Tastendruck über die Upload-Funktion
hoch.
Feinabstimmung Ihrer Webcam während eines Videogesprächs
1. Starten Sie den Webcam-Controller, während Sie
ein Videogespräch führen.
2. Schwenken und kippen Sie die Kamera, um den besten
Aufnahmewinkel zu finden.
3. Vergrößern oder verkleinern Sie das Bild, um weniger
bzw. mehr von Ihrer Umgebung zu zeigen.
4. Verwenden Sie die Gesichtserkennung, um immer
im Bild zu bleiben.
5. Genießen Sie klar verständliche Gespräche ohne lästige
Hintergrundgeräusche.
6. Gleichen Sie schlechte Lichtverhältnisse mit
RightLight aus.
7. Nutzen Sie erweiterte Webcam-Einstellungen.
20 Deutsch
Page 21
Logitech® HD Webcam C310
12
3
4
Merci d'avoir acheté une webcam Logitech.
Suivez ce guide pour installer et commencer à utiliser
votre webcam Logitech.
Si vous avez des questions avant de commencer,
ou pour en savoir plus sur votre webcam Logitech,
veuillez consulter le site www.logitech.com/support.
1. Microphone
2. Objectif
3. Témoin d'activité
4. Clip/base flexible
5. Documentation sur le produit
Getting started with
HD
®
Logitech
Webcam C310
Important information
5
Safety, compliance, and warranty
Français 21
Page 22
Première utilisation
Installation de la webcam
Positionnez la webcam
1
Connectez votre webcam
2
USB
22 Français
Installez le logiciel
3
Si vous utilisez votre webcam sur Windows® 8,
le logiciel requis est téléchargé automatiquement
et installé en arrière-plan lors de la première
connexion de la webcam.
Important: assurez-vous d'être connecté à Internet
pour permettre le téléchargement du logiciel.
Si vous utilisez la webcam sur Windows® 7 ou Vista®,
vous devez installer le logiciel Logitech® Webcam
Software à l'adresse suivante:
logitech.com/downloads
Page 23

Premiers pas avec les appels vidéo
Votre webcam Logitech HD Webcam c310 permet des appels vidéo HD 720p.
Pour profiter au maximum des appels vidéo, les deux interlocuteurs doivent disposer
de Skype™ ou d'une autre application d'appels vidéo, telle que Yahoo!® Messenger,
Windows Live® Messenger ou Gmail.
Pour en savoir plus: skype.fr
En plus d'une webcam et d'une application d'appels vidéo, les deux interlocuteurs ont
besoin de:
• un ordinateur disposant de hautparleurs ou d'un casque, et
d'un microphone (votre webcam
Logitech HD Webcam c310 dispose
d'un microphone intégré);
Logitech® HD Webcam C310
• une connexion Internet haut débit
(par exemple, ADSL, T1 ou câble).
Français 23
Page 24
Première utilisation
Utilisation de la webcam sur Windows 8
Utilisez l'application Camera disponible sur l'écran d'accueil de Windows 8 pour utiliser et contrôler
votre webcam.
Application Camera pas à pas
1. Fenêtre d'aperçu. Cliquez ou appuyez
pour capturer des photos ou des vidéos
(selon le mode sélectionné).
2. Changement de webcam (lorsque vous
en possédez plusieurs). Le témoin lumineux
à l'avant de votre webcam s'allume lorsque
celle-ci est sélectionnée.
3. Ajustement des paramètres de la caméra.
4. Activation/désactivation de la fonctionnalité
de minuteur. Lorsque la fonction est activée,
un compte à rebours de trois secondes a lieu
avant la capture.
24 Français
5. Activation du mode vidéo (pour enregistrer
des vidéos) ou désactivation (pour prendre
des photos).
6. Cliquez ou appuyez sur les flèches pour faire
défiler les photos et vidéos capturées.
Les vidéos sont marquées par une indication
de durée et un bouton de lecture en bas
à droite:
Page 25
Logitech® HD Webcam C310
Conseil: l'application Camera permet d'utiliser rapidement et simplement les fonctions les plus
courantes de votre webcam. Pour profiter au maximum des fonctionnalités avancées de
votre webcam, telles que la détection des mouvements, utilisez le logiciel Logitech Webcam Software
disponible à l'adresse logitech.com/downloads.
Réglage des paramètres de Camera
Le logiciel Logitech optimise automatiquement les paramètres en fonction de votre environnement.
Pour ajuster un paramètre, utilisez le menu des options de la caméra. Celui-ci est disponible dans
l'application Camera (voir page précédente) ainsi que dans les autres applications Metro prenant
en charge les webcams.
1. Choisissez la résolution requise pour la capture photo, ou vidéo si
le mode vidéo est activé.
2. Si vous disposez de plusieurs microphones, choisissez celui que vous
voulez utiliser pour l'enregistrement du son des vidéos.
3. Accédez à More Options (Plus d'options) pour bénéficier
des fonctionnalités avancées telles que le zoom numérique et
le mouvement.
Si l'écran More Options n'affiche pas le logo Logitech et ne propose
pas les options avancées, il est possible que le logiciel Logitech n'ait
pas été correctement installé lors de la première connexion de la
caméra. Pour le réinstaller, accédez au Windows Store et recherchez
le logiciel Logitech Camera Controller.
4. Effectuez un zoom avant ou arrière pour inclure ou exclure
l'environnement à l'image.
5. Une fois le zoom effectué, faites glisser la zone blanche pour ajuster
le panoramique (zone de mise au point de la caméra).
6. Utilisez la fonction Follow my face (Suivre mon visage) pour être sûr
de toujours être à l'image.
7. Profitez de conversations claires sans bruit de fond.
Suivant les fonctionnalités disponibles sur votre caméra, vous pouvez
accéder à davantage de paramètres avancés en faisant défiler l'écran.
Français 25
Page 26
Première utilisation
Partage de vos photos et vidéos
Vous pouvez partager vos photos et vidéos par courrier électronique, ou sur Twitter, Facebook®,
YouTube®, ou Microsoft SkyDrive®. Procédez comme suit:
1. Dans l'application Camera, faites défiler les photos ou vidéos pour atteindre celle que vous
souhaitez partager.
2. Sélectionnez Partager dans la barre Icônes (ou appuyez sur + H):
3. Choisissez le média de partage de la photo ou de la vidéo.
26 Français
Page 27

Logitech® HD Webcam C310
Utilisation de la webcam sur Windows 7 et Windows Vista
Le logiciel Logitech Webcam Software fournit toutes les options nécessaires à l'utilisation et au
contrôle de la webcam. Lancez le logiciel à partir du menu Démarrer® de Windows ou en cliquant
avec le bouton droit de la souris sur l'icône de la caméra dans la barre des tâches de Windows.
Logiciel Logitech Webcam Software pas à pas
1. Capture de photos et de vidéos.
2. Affichage des images capturées et partage
par courrier électronique ou sur Facebook®
ou YouTube®.
3. Capture de vidéos en cas de détection
de mouvement.
4. Contrôle de la webcam lors d'un appel vidéo.
5. Changement de webcam
(lorsque vous en possédez plusieurs).
6. Ouverture des paramètres du logiciel
Logitech Webcam Software.
7. Ouverture du tableau de bord de l'aide.
Français 27
Page 28

Première utilisation
Capture vidéo et prise photo
Quick Capture vous permet de prendre des photos
et d'enregistrer des vidéos facilement.
Vous pouvez accéder rapidement aux commandes
et paramètres de la webcam:
1. Fenêtre d'aperçu
2. Mode de capture:
photo/vidéo
3. Bouton de capture
4. Commandes
5. Vignettes photo
6. Vignettes vidéo
7. Cliquez sur
une vignette pour
ouvrir la galerie.
de la caméra
Galerie: visionnage et partage Si vous cliquez sur la vignette d'une image dans
la galerie de la webcam (1), la vidéo ou la photo
correspondante s'ouvre dans la fenêtre de
visionnage (2). Vous pouvez alors:
• joindre la vidéo ou la photo à un message
électronique (3)
• modifier la photo ou assembler des vidéos (4)
• télécharger la photo ou la vidéo sur
Facebook (5)
• télécharger la vidéo sur Twitter ou YouTube (6)
Vous pouvez également faire glisser une
image de la galerie sur une des fonctionnalités
(éléments 3-6) pour la joindre à un message
ou la télécharger sur Internet, ou encore lancer
une application d'édition.
28 Français
Page 29
Utilisation du détecteur de mouvement
• Configurez votre webcam pour
l'enregistrement vidéo lors d'une détection
de mouvement.
• Modifiez la durée de capture vidéo
et la sensibilité de la détection.
• Les vidéos capturées sont automatiquement
enregistrées sur votre ordinateur.
• Affichez le contenu dans la galerie ou
téléchargez-le à partir de la fenêtre de
téléchargement d'une simple pression.
Personnalisation de votre webcam lors d'un appel vidéo
1. Lancez le logiciel Webcam Controller lors
d'un appel vidéo.
2. Utilisez la fonction panoramique et inclinaison
pour trouver le meilleur angle de vue.
3. Effectuez un zoom avant ou arrière pour inclure
ou exclure l'environnement à l'image.
4. Utilisez la fonction Follow my face (Suivre mon visage)
pour être sûr de toujours être à l'image.
5. Profitez de conversations claires sans bruit de fond.
6. Corrigez le manque d'éclairage grâce à RightLight.
7. Accédez aux paramètres avancés de la webcam.
Logitech® HD Webcam C310
Français 29
Page 30

Начало работы
12
1. Микрофон
2. Объектив
3
3. Индикатор активности
4. Подвижное крепление-зажим
5. Документация по продукту
4
5
Благодарим вас за приобретение веб-камеры Logitech.
Для подготовки веб-камеры Logitech к работе и началу
работы с ней следуйте инструкциям из данного
руководства.
При наличии вопросов до начала работы или желании
узнать больше о веб-камере Logitech посетите веб-сайт
logitech.com/support.
30 По-русски
Important information
Safety, compliance, and warranty
Getting started with
HD
®
Logitech
Webcam C310
Page 31

Настройка веб-камеры
Разместите веб-камеру
1
Logitech® HD Webcam C310
Подключите веб-камеру
2
USB
Установите программное обеспечение
3
Если веб-камера используется с Windows® 8,
то необходимое программное обеспечение
автоматически загружается при первом подключении
веб-камеры и устанавливается в фоновом режиме.
Важно! Убедитесь в наличии подключения
к Интернету для возможности загрузки
программного обеспечения.
Если веб-камера используется с Windows® 7 или
Windows Vista®, то необходимо установить ПО
Logitech® Webcam Software, доступное по адресу:
logitech.com/downloads
По-русски 31
Page 32

Начало работы
Начало использования видеовызовов
Веб-камера Logitech HD Webcam c310 позволяет выполнять видеовызовы
в формате высокой четкости (720p).
Чтобы воспользоваться преимуществами видеообщения, и вам, и вашему
собеседнику нужно будет установить Skype™ или какое-либо другое приложение
для видеовызовов, такое как Yahoo!® Messenger, Windows Live® Messenger или Gmail.
Дополнительные сведения: skype.com
Помимо веб-камеры и приложения для видеовызовов обоим собеседникам
потребуется следующее.
• Компьютер с колонками
(или гарнитурой) и микрофон.
Веб-камера Logitech HD Webcam c310
оснащена встроенным микрофоном.
• Широкополосное подключение
к Интернету (например, DSL, T1 или
кабельное соединение)
32 По-русски
Page 33

Logitech® HD Webcam C310
Использование веб-камеры с Windows 8
Для работы с веб-камерой и управления ею воспользуйтесь приложением «Камера», доступным на
начальном экране Windows 8.
Знакомство с приложением «Камера»
1. Окно предварительного просмотра.
Щелкните или коснитесь для фото- или
видеосъемки (в зависимости от того, выбран
ли видеорежим).
2. Смена веб-камеры (если установлено
несколько веб-камер). При выборе вебкамеры Logitech загорается подсветка на ее
передней панели.
3. Настройка параметров камеры.
4. Активация и деактивация функции «Таймер».
При активации начинается трехсекундный
отсчет до начала съемки фото или видео.
5. Включите видеорежим (для записи видео)
или отключите его (для фотосъемки).
6. Для прокрутки снятых фотографий или
видео щелкните или коснитесь стрелок.
Видеозаписи отмечены значком таймера
и кнопкой воспроизведения в правом углу:
По-русски 33
Page 34

Начало работы
Совет. Приложение «Камера» позволяет быстро и легко пользоваться наиболее популярными
функциями веб-камеры. Чтобы воспользоваться преимуществами расширенных функций веб-камеры,
таких как обнаружение движения, воспользуйтесь ПО Logitech Webcam Software, доступным по
адресу logitech.com/downloads.
Настройка параметров приложения «Камера»
ПО Logitech позволяет автоматически оптимизировать настройки. Для изменения какихлибо параметров выберите раздел настроек камеры. Он доступен в приложении «Камера»
(см. предыдущую страницу) и в приложениях Metro, поддерживающих веб-камеру.
1. Выберите необходимое разрешение для фотосъемки или видеосъемки
в видеорежиме.
2. Выберите микрофон для записи звука при видеосъемке, если имеется
несколько доступных микрофонов.
3. Для использования преимуществ дополнительных функций, таких как
цифровое масштабирование и перемещение, воспользуйтесь разделом
«Дополнительные параметры».
Если на вкладке «Дополнительные параметры» отсутствует эмблема
Logitech и расширенные функции, то, возможно, ПО Logitech не
было правильно установлено при первом подключении камеры.
Чтобы переустановить его, посетите Windows Store и найдите
контроллер камеры Logitech.
4. Увеличение и уменьшение масштаба позволяет показать окружающую
вас обстановку или убрать ее из кадра.
5. При увеличении масштаба перетащите белый прямоугольник для
панорамирования (настройки области фокуса веб-камеры).
6. Воспользуйтесь функцией «Поиск лица», чтобы лицо всегда оставалось
в кадре.
7. Чистое изображение без раздражающих фоновых шумов.
В зависимости от функций, доступных для имеющейся камеры, с помощью
прокрутки можно получить доступ к другим дополнительным функциям.
34 По-русски
Page 35

Logitech® HD Webcam C310
Публикация фотографий и видео
Поделиться фотографиями и видео можно с помощью электронной почты, Twitter, Facebook®,
YouTube® или Microsoft SkyDrive®. Выполните следующие действия.
1. В приложении «Камера» перейдите к нужной фотографии или видеозаписи.
2. На панели Charms выберите команду «Опубликовать» (или нажмите клавиши - H):
3. Выберите носитель, фотографии или видеозаписи с которого требуется опубликовать.
По-русски 35
Page 36

Начало работы
Использование веб-камеры с Windows 7 и Windows Vista
ПО Logitech Webcam Software предоставляет пользователям все необходимое для работы с вебкамерой и управления ею. Запустите программу с помощью меню Start (Пуск) Windows® или щелкнув
правой кнопкой мыши значок камеры на панели задач Windows.
Знакомство с ПО Logitech Webcam Software
1. Съемка фотографий и видео.
2. Просмотр снятых материалов и отправка
их по электронной почте, на Facebook
или YouTube.
3. Съемка видео, активируемая при
обнаружении движения.
4. Управление веб-камерой во время
видеовызова.
36 По-русски
5. Смена веб-камеры (если установлено
несколько веб-камер).
6. Доступ к настройкам ПО Logitech Webcam
Software
7. Доступ к справочной панели.
Page 37
Logitech® HD Webcam C310
Съемка видео и фотографий
Quick Capture позволяет с легкостью снимать
фотографии и видео.
Имеется быстрый доступ к элементам управления
и настройкам веб-камеры.
1. Окно предварительного просмотра
2. Режим съемки: фото/видео
3. Кнопка съемки
4. Элементы управления веб-камерой
5. Эскизы фотографий
6. Эскизы видео
7. Для входа в галерею щелкните эскиз
Галерея: просмотр и отправка Если нажать один из эскизов в галерее веб-
камеры (1), соответствующий ему видеоролик
или фотография открывается в окне
предварительного просмотра (2). Затем можно
выполнить следующие действия.
• Прикрепить файл видеоролика или
изображения как вложение к сообщению
электронной почты (3).
• Отредактировать фотографию или смонтировать
видеоролик (4).
• Загрузить фотографию или видеоролик
на Facebook (5).
• Загрузить видеоролик на Twitter или YouTube (6).
Также можно просто перетащить эскиз из
галереи на одну из функциональных кнопок
(обозначены цифрами 3–6), чтобы запустить
приложение для редактирования, отправки по
электронной почте или загрузки в Интернет.
По-русски 37
Page 38

Начало работы
Использование обнаружения движения
• Настройте свою веб-камеру для выполнения
записи видео при обнаружении движения.
• Отрегулируйте длительность снимаемого
видео и чувствительность датчика.
• Снятое видео автоматически сохраняется
на жесткий диск компьютера.
• Материалы можно просмотреть в галерее или
загрузить в Интернет с помощью окна загрузки
в одно касание.
Точная настройка веб-камеры во время видеовызова
1. Запустите контроллер веб-камеры во время видеовызова.
2. Используйте наклон и поворот для нахождения
оптимального угла.
3. Увеличение и уменьшение масштаба позволяет показать
окружающую вас обстановку или убрать ее из кадра.
4. Воспользуйтесь функцией «Поиск лица», чтобы лицо
всегда оставалось в кадре.
5. Чистое изображение без раздражающих фоновых шумов.
6. Вносите корректировки, необходимые для
использования камеры при слабом освещении,
с помощью функции RightLight.
7. Воспользуйтесь дополнительными параметрам
веб-камеры.
38 По-русски
Page 39

Logitech® HD Webcam C310
12
1. Mikrofon
2. Obiektyw
3. Wskaźnik działania
3
4. Elastyczny klips/podstawka
5. Dokumentacja
Getting started with
HD
®
Logitech
4
5
Webcam C310
Important information
Safety, compliance, and warranty
Dziękujemy za zakup kamery internetowej firmy Logitech.
Skorzystaj z tej instrukcji, aby skonfigurować
kamerę internetową firmy Logitech i rozpocząć
korzystanie z niej.
Jeśli przed rozpoczęciem masz jakieś pytania
lub chcesz po prostu uzyskać więcej informacji
dotyczących kamery internetowej firmy Logitech,
odwiedź stronę logitech.com/support.
Po polsku 39
Page 40

Rozpoczynanie pracy z produktem
Konfigurowanie kamery internetowej
Umieść kamerę internetową
1
Podłącz kamerę internetową
2
USB
40 Po polsku
Zainstaluj oprogramowanie
3
Jeśli kamera internetowa jest używana w systemie
Windows® 8, wymagane oprogramowanie
jest pobierane automatycznie po pierwszym
podłączeniu kamery internetowej i instalowane w tle
w trybie cichym.
Ważne: Upewnij się, że istnieje połączenie internetowe,
aby możliwe było pobranie oprogramowania.
Jeśli kamera internetowa jest używana w systemie
Windows® 7 lub Windows Vista®, należy zainstalować
oprogramowanie Logitech® Webcam Software,
które jest dostępne pod adresem:
logitech.com/downloads
Page 41

Rozpoczynanie korzystania z połączeń wideo
Kamera internetowa Logitech HD Webcam C310 obsługuje połączenia wideo
o jakości HD 720p.
Aby skorzystać z funkcji połączeń wideo, obaj rozmówcy muszą zainstalować program
Skype™ lub użyć innej aplikacji do obsługi połączeń wideo, takiej jak Yahoo!® Messenger,
Windows Live® Messenger lub Gmail.
Dowiedz więcej: skype.com
Oprócz kamery internetowej i aplikacji do obsługi połączeń wideo obaj rozmówcy
muszą mieć:
• Komputer z głośnikami (lub zestawem
słuchawkowym) i mikrofonem;
kamera internetowa Logitech HD
Webcam c310 ma wbudowany
mikrofon.
• Szerokopasmowe połączenie
internetowe (np. DSL, T1 lub kablowe).
Logitech® HD Webcam C310
Po polsku 41
Page 42
Rozpoczynanie pracy z produktem
Korzystanie z kamery internetowej w systemie Windows 8
Aplikacja Kamera, dostępna na ekranie startowym systemu Windows 8, umożliwia obsługę
kamery internetowej i sterowanie nią.
Przedstawienie aplikacji Kamera
1. Okno podglądu Kliknij lub dotknij, aby
wykonywać zdjęcia lub nagrywać filmy wideo
(w zależności od tego, czy wybrano tryb
wideo).
2. Zmiana kamer internetowych (jeśli
dostępna jest więcej niż jedna). Symbol
kamery internetowej firmy Logitech zostaje
podświetlony po wybraniu.
3. Dostosowywanie ustawień kamery.
4. Aktywacja lub dezaktywacja funkcji
samowyzwalacza. Po aktywacji rozpoczyna się
trzysekundowe odliczanie przed wykonaniem
zdjęcia lub nagraniem filmu wideo.
42 Po polsku
5. Włączanie trybu wideo (w celu nagrywania
filmów wideo) lub wyłączanie tego trybu
(w celu wykonywania zdjęć).
6. Kliknij lub dotknij strzałek, aby przewijać
zarejestrowane zdjęcia i filmy wideo.
Filmy wideo są oznaczone licznikiem
i przyciskiem odtwarzania w prawym
dolnym rogu:
Page 43

Logitech® HD Webcam C310
Porada: Aplikacja Kamera umożliwia szybkie i proste użycie najpopularniejszych funkcji
kamery internetowej. Aby skorzystać z rozszerzonych funkcji kamery internetowej, takich jak
wykrywanie ruchu, użyj oprogramowania Logitech Webcam Software, które jest dostępne
pod adresem logitech.com/downloads.
Dostosowywanie ustawień aplikacji Kamera
Oprogramowanie firmy Logitech automatycznie optymalizuje ustawienia dla danego środowiska.
Aby dostosować ustawienia, wybierz opcję Opcje kamery. Jest ona dostępna w aplikacji Kamera
(patrz poprzednia strona) i w aplikacjach Metro, które obsługują kamery internetowe.
1. Wybierz żądaną rozdzielczość w celu wykonywania zdjęć
lub nagrywania wideo w trybie wideo.
2. Wybierz mikrofon, który ma być używany do nagrywania
dźwięku w filmach, jeśli dostępny jest więcej niż jeden mikrofon.
3. Uzyskaj dostęp do dodatkowych opcji, aby skorzystać
z rozszerzonych funkcji, takich jak zoom cyfrowy i przesuwanie.
Jeśli okienko Więcej opcji nie wyświetla logo firmy Logitech
i rozszerzonych opcji, prawdopodobnie oprogramowanie
firmy Logitech nie zostało zainstalowane poprawnie po pierwszym
podłączeniu kamery. Aby ponownie zainstalować oprogramowanie,
przejdź do sklepu Windows i wyszukaj aplikację Logitech Camera
Controller.
4. Powiększaj lub pomniejszaj obraz, aby uwzględnić/pominąć
otoczenie.
5. Po powiększeniu przeciągnij białą ramkę, aby przesunąć
(dostosować obszar ostrości kamery internetowej).
6. Użyj funkcji Śledź moją twarz, aby zawsze być w kadrze.
7. Prowadź rozmowy bez irytujących hałasów z otoczenia.
Zależnie od funkcji zapewnianych przez kamerę,
możesz uzyskać dostęp do dodatkowych ustawień zaawansowanych
przez przewijanie.
Po polsku 43
Page 44

Rozpoczynanie pracy z produktem
Udostępnianie zdjęć i filmów wideo
Zdjęcia i filmy wideo można udostępniać pocztą e-mail lub w serwisach Twitter, Facebook®,
YouTube® albo Microsoft SkyDrive®. Wykonaj następujące czynności:
1. W aplikacji Kamera przewiń do zdjęcia lub filmu wideo, które chcesz udostępnić.
2. Wybierz opcję Udostępniane na pasku funkcji (lub naciśnij klawisze - H):
3. Wybierz sposób udostępnienia zdjęcia lub filmu wideo.
44 Po polsku
Page 45
Logitech® HD Webcam C310
Korzystanie z kamery internetowej w systemie Windows 7
lub Windows Vista
Oprogramowanie Logitech Webcam Software udostępnia wszystkie funkcje potrzebne do obsługi
kamery internetowej firmy Logitech i sterowania nią. Uruchom oprogramowanie poprzez menu
Start® systemu Windows lub klikając prawym przyciskiem myszy ikonę kamery na pasku zadań
systemu Windows.
Przedstawienie oprogramowania Logitech Webcam Software
1. Wykonywanie zdjęć i nagrywanie
filmów wideo.
2. Wyświetlanie wykonanych zdjęć
i udostępnianie ich pocztą e-mail lub
w serwisach Facebook i YouTube.
3. Nagrywanie filmów wideo w wyniku
zadziałania funkcji wykrywania ruchu.
4. Sterowanie kamerą internetową podczas
połączenia wideo.
5. Zmiana kamer internetowych (jeśli dostępna
jest więcej niż jedna).
6. Otwieranie ustawień oprogramowania
Logitech Webcam Software.
7. Otwieranie pulpitu pomocy.
Po polsku 45
Page 46

Rozpoczynanie pracy z produktem
Nagrywanie filmów wideo i wykonywanie zdjęć
Program Quick Capture ułatwia wykonywanie
zdjęć i nagrywanie filmów wideo.
Możliwy jest szybki dostęp do elementów
sterujących i ustawień kamery internetowej:
1. Okno podglądu
2. Tryb rejestrowania:
3. Przycisk
4. Elementy
Galeria: przeglądanie i udostępnianie
Kliknięcie miniatury obrazu w galerii
kamery internetowej (1) powoduje otwarcie
filmu wideo lub zdjęcia w oknie podglądu (2).
Następnie można:
• Załączyć plik wideo lub zdjęcia do wiadomości
• Edytować zdjęcie lub skleić filmy wideo (4)
• Przesłać zdjęcie lub film do serwisu Facebook (5)
• Przesłać film do serwisu Twitter lub YouTube (6)
Aby uruchomić aplikację do edycji albo dołączyć
lub przesłać plik, można również przeciągnąć
obraz z galerii i upuścić go na jedną z ikon funkcji
(elementy 3-6).
zdjęcie/wideo
rejestrowania
sterujące kamery
internetowej
e-mail (3)
5. Miniatury zdjęć
6. Miniatury wideo
7. Kliknij miniaturę,
aby przejść
do galerii
46 Po polsku
Page 47

Logitech® HD Webcam C310
Użycie funkcji wykrywania ruchu
• Kamerę internetową można skonfigurować
tak, aby automatycznie nagrywała obraz
wideo po wykryciu ruchu.
• Można dostosować czas trwania
rejestrowanego filmu wideo i czułość
wykrywania.
• Rejestrowany film wideo jest automatycznie
zapisywany na komputerze.
• Zawartość można przejrzeć w galerii lub
przekazać ją przy użyciu okna przesyłania
plików po kliknięciu jednego przycisku.
Dostosowywanie ustawień kamery internetowej podczas połączenia wideo
1. Uruchom kontroler kamery internetowej w czasie
połączenia wideo.
2. Użyj funkcji przesuwania i przechylania, aby znaleźć
najlepszy kąt.
3. Powiększaj lub pomniejszaj obraz, aby uwzględnić/
pominąć otoczenie.
4. Użyj funkcji Śledź moją twarz, aby zawsze być w kadrze.
5. Prowadź rozmowy bez irytujących hałasów z otoczenia.
6. Popraw skutki słabego oświetlenia za pomocą
funkcji RightLight.
7. Uzyskaj dostęp do zaawansowanych ustawień
kamery internetowej.
Po polsku 47
Page 48

Починайте з
12
3
4
Дякуємо за покупку веб-камери Logitech!
Скористайтесь цим посібником, щоб налаштувати вебкамеру Logitech і почати здійснювати відеовиклики.
Якщо у вас виникли запитання ще до початку роботи або
ви бажаєте дізнатися більше про веб-камеру Logitech,
відвідайте веб-сайт logitech.com/support.
1. Мікрофон
2. Об'єктив
3. Індикатор активного стану
4. Гнучкий затискач/підставка
5. Документація продукту
Getting started with
HD
®
Logitech
Webcam C310
Important information
5
Safety, compliance, and warranty
48 Українська
Page 49

Налаштування веб-камери
Розташуйте веб-камеру.
1
Logitech® HD Webcam C310
Підключіть веб-камеру.
2
USB
Встановіть програмне забезпечення.
3
Якщо ви використовуєте веб-камеру з Windows® 8,
необхідне програмне забезпечення буде завантажено
автоматично та встановлено у фоновому режимі під
час першого підключення веб-камери.
Увага! Переконайтеся, що встановлено підключення
до Інтернету для завантаження програмного
забезпечення.
Якщо ви використовуєте веб-камеру з Windows® 7
або Windows Vista®, необхідно встановити
програмне забезпечення для веб-камери Logitech®,
доступне на веб-сайті
logitech.com/downloads
Українська 49
Page 50

Починайте з
Здійснення відеовикликів
Веб-камера Logitech HD Webcam c310 дає змогу здійснювати відеовиклики
з якістю HD 720p.
Щоб здійснювати відеовиклики, вам і вашому співрозмовнику необхідно встановити
програму Skype™ або іншу аналогічну програму для здійснення відеовикликів,
наприклад Yahoo!® Messenger, Windows Live® Messenger або Gmail.
Щоб дізнатися більше, див. веб-сайт skype.com
Крім веб-камери та програми для здійснення відеовикликів співрозмовникам необхідні:
• комп'ютер із динаміками (або гарнітура)
і мікрофон; веб-камера Logitech HD
Webcam c310, оснащена вбудованим
мікрофоном;
• широкосмугове підключення
до Інтернету (наприклад DSL,
T1 або кабельне).
50 Українська
Page 51

Logitech® HD Webcam C310
Використання веб-камери з Windows 8
Щоб керувати веб-камерою, використовуйте програму Camera («Камера») на початковому
екрані Windows 8.
Ознайомлення із програмою Camera («Камера»)
1. Вікно попереднього перегляду. Натисніть,
щоб створити фотографію або записати відео
(якщо вибрано відеорежим).
2. Переключення веб-камер (якщо їх декілька).
У разі вибору потрібної камери на її передній
частині загориться індикатор стану.
3. Налаштування параметрів камери.
4. Увімкнення або вимкнення функції таймера.
Після активації таймера у вас є три секунди
для підготовки камери до фотографування
або запису відео.
5. Увімкніть відеорежим (для запису відео)
або вимкніть (для фотографування).
6. Натисніть стрілки для прокручування
фотографій і записаного відео.
Відео можна знайти за часом його запису,
а кнопка відтворення розташована у правому
нижньому куті.
Українська 51
Page 52

Починайте з
Порада. Програма Camera («Камера») дає змогу швидко та легко використовувати найголовніші
функції веб-камери. Щоб скористатися вдосконаленими функціями веб-камери, наприклад
функцією розпізнавання рухів, скористайтесь програмним забезпеченням для веб-камери Logitech,
яке доступне на веб-сайті logitech.com/downloads.
Налаштування параметрів камери
Програмне забезпечення Logitech автоматично налаштовує параметри відповідно
до використовуваної системи. Щоб змінити налаштування, виберіть Camera options
(«Параметри камери»). Це меню доступне у програмі Camera («Камера») (див. попередню сторінку)
та Metro, у яких підтримуються функції веб-камери.
1. Виберіть потрібну роздільну здатність для створення фотографій або
запису відео у відеорежимі.
2. Якщо мікрофонів декілька, виберіть потрібний мікрофон для запису
звуків для відео.
3. Відкрийте панель More Options («Додаткові параметри»), щоб
скористатися вдосконаленими функціями, наприклад цифровим
масштабуванням і переміщенням.
Якщо на панелі More Options («Додаткові параметри») не
відображається логотип Logitech, а вдосконалені функції залишаються
неактивними, можливо, програмне забезпечення Logitech не було
встановлено належним чином під час першого підключення камери.
Щоб встановити його повторно, перейдіть до Магазину Windows
і знайдіть контролер камери Logitech.
4. Збільшуйте або зменшуйте масштаб, щоб охопити або прибрати
оточення.
5. Після збільшення масштабу перетягніть біле поле для панорамування
(налаштуйте область фокусування веб-камери).
6. Використовуйте функцію «Слідкування за обличчям», щоб завжди
залишатися на зображенні.
7. Насолоджуйтеся чіткими розмовами без дратівливого фонового шуму.
Залежно від доступних функцій веб-камери можна використовувати інші
розширені параметри за допомогою прокручування.
52 Українська
Page 53

Logitech® HD Webcam C310
Обмін фотографіями та відео
Ви можете обмінюватися фотографіями та відео за допомогою електронної пошти, служб Twitter,
Facebook®, YouTube® або Microsoft SkyDrive®. Виконайте такі дії.
1. У програмі Camera («Камера») знайдіть фотографію або відео, яким потрібно обмінятися.
2. Виберіть «Обмін» на панелі «Ключові кнопки» (або натисніть - H).
3. Виберіть медіапристрій для обміну фотографіями або відео.
Українська 53
Page 54

Починайте з
Використання веб-камери з Windows 7 і Windows Vista
Програмне забезпечення для веб-камери Logitech включає все необхідне для використання
та керування веб-камерою. Запустіть програмне забезпечення в меню «Пуск» Windows ® або клацніть
правою кнопкою миші піктограму на панелі завдань Windows.
Ознайомлення із програмним забезпеченням для веб-камери Logitech.
1. Створення фотографій і запис відео.
2. Перегляд фотографій та обмін ними
за допомогою електронної пошти,
Facebook або YouTube.
3. Записування відео під час розпізнавання
рух у.
54 Українська
4. Керування веб-камерою під час здійснення
відеовиклику.
5. Переключення веб-камер (якщо їх декілька).
6. Відкривання параметрів програмного
забезпечення для веб-камери Logitech.
7. Відкривання панелі довідки.
Page 55
Записування відео та створення фотографій
Logitech® HD Webcam C310
Функція «Швидка зйомка» дає змогу легко
створювати фотографії та записувати відео.
Можливість швидкого доступу до елементів
керування та параметрів веб-камери.
1. Вікно попереднього перегляду
2. Режим запису: фото/відео
3. Кнопка запису
4. Елементи керування веб-камерою
5. Фотоескізи
6. Відеоескізи
7. Натисніть ескіз, щоб перейти до галереї.
Галерея. Перегляд та обмін Якщо натиснути ескізне зображення в галереї
веб-камери (1), у вікні перегляду відкриється
відео або фотографія (2). Після цього можна
виконати такі дії.
• Прикріпити відео або фотографію до
електронного листа (3)
• Редагувати фотографію або компонувати
частини відео (4)
• Завантажити фотографію або відео
до Facebook (5)
• Завантажити відео у Twitter або YouTube (6)
Можна також перетягнути або перемістити
зображення з галереї до одного з функціональних
елементів (3–6), щоб запустити програму
редагування, прикріпити або завантажити файл.
Українська 55
Page 56

Починайте з
Використання функції розпізнавання рухів
• Налаштуйте веб-камеру, щоб записувати відео
під час розпізнавання руху.
• Налаштуйте тривалість запису відео
та чутливість розпізнавання.
• Записане відео автоматично зберігається
на комп’ютері.
• Перегляньте вміст у галереї або завантажте
його, використовуючи вікно «Завантаження
одним дотиком».
Налаштування веб-камери під час здійснення відеовиклику
1. Запуск контролера веб-камери під час відеовиклику.
2. Використання панорамування й нахилу для пошуку
найкращого кута.
3. Збільшення або зменшення масштабу для охоплення
або прибирання оточення.
4. Використання функції «Слідкування за обличчям»,
щоб завжди залишатися на зображенні.
5. Чіткі розмови без дратівливого фонового шуму.
6. Коригування недостатнього освітлення за допомогою
функціії RightLight.
7. Відкривання розширених параметрів налаштування
веб-камери.
56 Українська
Page 57

Logitech® HD Webcam C310
12
1. Mikrofon
2. Objektív
3
3. Működésjelző LED
4. Hajlítható csíptető/talp
5. Termékdokumentáció
4
Important information
5
Köszönjük, hogy a Logitech webkameráját választotta.
Ez az útmutató segítséget nyújt Önnek
Logitech webkamerájának üzembe helyezéséhez
és használatához.
Ha előtte kérdése volna, vagy csak többet
szeretne megtudni Logitech webkamerájáról,
látogasson el a logitech.com/support webhelyre.
Getting started with
Logitech
Safety, compliance, and warranty
HD
®
Webcam C310
Magyar 57
Page 58

Első lépések
A webkamera üzembe helyezése
Helyezze el a webkamerát
1
Csatlakoztassa a webkamerát
2
USB
58 Magyar
Telepítse a szoftvert
3
Ha a webkamerát Windows® 8 rendszerrel használja,
a szükséges szoftver automatikusan letöltődik
és beavatkozás nélkül települ a webkamera első
csatlakoztatásakor.
Fontos: Győződjön meg arról, hogy csatlakozik
az internethez, hogy a szoftver le tudjon töltődni.
Ha a webkamerát Windows® 7 vagy Windows Vista®
rendszerrel használja, telepítenie kell a Logitech®
webkameraszoftvert, amely a következő webhelyen
érhető el:
logitech.com/downloads
Page 59

Videohívás – első lépések
A Logitech HD Webcam c310 készülék 720p felbontású HD-videohívást
tesz lehetővé.
A videohívásokhoz Önnek és a hívott személynek egyaránt telepítenie kell
a Skype™ alkalmazást vagy egy másik videohívást lehetővé tévő programot,
például a Yahoo!® Messenger, a Windows Live® Messenger vagy a Gmail alkalmazást.
További információk: skype.com
A webkamerán és a videohívási alkalmazáson kívül mindkét félnek szüksége van
a következőkre:
• Hangszóróval (vagy fejhallgatóval)
és mikrofonnal rendelkező számítógép;
a Logitech HD Webcam c310 beépített
mikrofont tartalmaz.
Logitech® HD Webcam C310
• Szélessávú internetkapcsolat
(például DSL, T1 vagy kábel).
Magyar 59
Page 60
Első lépések
A webkamera használata Windows 8 rendszerrel
A Windows 8 kezdőképernyőjéről elérhető Kamera alkalmazással működtetheti és vezérelheti
a webkamerát.
A Kamera alkalmazás áttekintése
1. Előnézeti ablak. Kattintson vagy koppintson
fényképek vagy videók rögzítéséhez
(attól függően, hogy videó módban van-e).
2. Váltás másik webkamerára (ha több
is rendelkezésre áll). A kiválasztott
Logitech webkamera előlapja felvilágít.
3. A kamerabeállítások módosítása.
4. Az időzítő funkció aktiválása vagy
inaktiválása. Az aktiválás után három
másodperc áll rendelkezésre a fénykép
vagy videó rögzítéséig.
60 Magyar
5. A videó mód bekapcsolása
(videorögzítéshez) vagy kikapcsolása
(fényképezéshez).
6. A nyilakra kattintva vagy koppintva
görgethet az elkészült fényképek
és videók között.
A videók jobb alsó sarkában egy időmérő
és egy lejátszási gomb látható:
Page 61

Logitech® HD Webcam C310
Tipp: A Kamera alkalmazással gyorsan és könnyedén elérheti a webkamera legnépszerűbb funkcióit.
Ha azonban ki szeretné használni a webkamera speciális funkcióit, például a mozgásérzékelést,
használja a Logitech webkameraszoftvert, amely a logitech.com/downloads webhelyről tölthető le.
A kamerabeállítások módosítása
A Logitech szoftver automatikusan a környezetnek megfelelően optimalizálja a beállításokat.
A beállítások módosításához válassza a Kamerabeállítások lehetőséget. Ez a lehetőség a Kamera
alkalmazásban (lásd az előző oldalt) és a webkamerákat támogató Metro-alkalmazásokban érhető el.
1. Megadhatja, hogy milyen felbontást szeretne használni
a fényképezéshez, illetve videó módban a videók rögzítéséhez.
2. Ha több mikrofonnal is rendelkezik, kiválaszthatja a videók
hangjának rögzítéséhez használni kívánt mikrofont.
3. A További beállítások lapot megnyitva érheti el a speciális
funkciókat, például a digitális nagyítást és mozgatást.
Ha a További beállítások lapon nem látható a Logitech emblémája
és a speciális beállítások, akkor a Logitech szoftver valószínűleg
nem települt megfelelően, amikor első alkalommal csatlakoztatta
a kamerát. Az ismételt telepítéshez lépjen be a Windows Áruházba,
és keresse meg a Logitech kameravezérlő szoftvert.
4. Ha többet vagy kevesebbet szeretne a képbe foglalni
a környezetéből, nagyíthatja vagy kicsinyítheti a képet (zoom).
5. A kép kinagyítása után a fehér téglalap húzásával pásztázhat
(mozgathatja a webkamera fókuszterületét).
6. Az arckövetési funkcióval (Follow my face) elkerülheti, hogy az arca
kikerüljön a képből.
7. Tiszta hangú beszélgetéseket élvezhet zavaró háttérzajok nélkül.
A webkamera funkcióitól függően görgetéssel további speciális
beállítások is elérhetők lehetnek.
Magyar 61
Page 62

Első lépések
Fényképek és videók megosztása
Fényképeit és videóit megoszthatja e-mailben, illetve a Twitter, a Facebook®, a YouTube®
vagy a Microsoft SkyDrive® szolgáltatással. Kövesse az alábbi lépéseket:
1. A Kamera alkalmazásban görgessen a megosztani kívánt fényképre vagy videóra.
2. Válassza a Megosztás lehetőséget a Gombok sávon
(vagy nyomja meg a + H billentyűkombinációt):
3. Válassza ki a felületet, amelyen meg szeretné osztani a fényképet vagy videót.
62 Magyar
Page 63

Logitech® HD Webcam C310
A webkamera használata Windows 7 és Windows Vista rendszerrel
A Logitech webkameraszoftver minden eszközt biztosít a webkamera használatához
és vezérléséhez. A szoftvert a Windows Start® menüjéből, illetve a jobb gombbal a Windows
tálcáján látható kameraikonra kattintva indíthatja el.
A Logitech webkameraszoftver áttekintése
1. Képek és videók rögzítése.
2. Az elkészült képek megtekintése
és megosztása e-mailben, a Facebookon
vagy a Youtube-on.
3. Videorögzítés mozgásérzékelésre.
4. A webkamera vezérlése videohívás közben.
5. Váltás másik webkamerára (ha több
is rendelkezésre áll).
6. A Logitech webkameraszoftver
beállításainak megnyitása.
7. A súgó irányítópultjának megjelenítése.
Magyar 63
Page 64

Első lépések
Videorögzítés és fényképezés
A galéria: megtekintés és megosztás
64 Magyar
A gyorsrögzítési funkcióval könnyedén készíthet
fényképeket és videofelvételeket.
A webkamera vezérlőit és beállításait gyorsan
elérheti:
1. Előnézeti ablak
2. Rögzítési mód:
fénykép/videó
3. Rögzítő gomb
4. Webkamera
vezérlői
5. Fényképek
miniatűrjei
6. Videók miniatűrjei
7. Kattintson
egy miniatűrre
a galériába való
belépéshez
Ha egy miniatűr képre kattint a webkameragalériában (1), a megfelelő videó vagy
fénykép megnyílik a megtekintő ablakban (2).
Ezt követően:
• a video- vagy képfájlt e-mailhez csatolhatja (3),
• szerkesztheti a fényképet,
illetve összeilleszthet videókat (4),
• feltöltheti a képet vagy videót
a Facebookra (5), vagy
• feltöltheti a videót a Twitterre vagy
a Youtube-ra (6).
A galériában lévő képeket rá is húzhatja az
egérrel az egyik funkciócsempére (3–6. elem),
és ezzel elindíthatja a szerkesztőalkalmazást,
illetve elvégezheti a csatolást vagy a feltöltést.
Page 65

A mozgásérzékelés használata
• Beállíthatja, hogy a webkamera elindítsa
• Módosíthatja a rögzített videó időtartamát
• A rögzített videót a rendszer automatikusan
• A tartalmakat megtekintheti a galériában
A webkamera videohívás közbeni finombeállítása
1. Elindíthatja a webkamera-vezérlőt videohívás közben.
2. Pásztázással és döntéssel megtalálhatja a legjobb
szöget.
3. Ha többet vagy kevesebbet szeretne a képbe
foglalni a környezetéből, nagyíthatja vagy kicsinyítheti
a képet (zoom).
4. Az arckövetési funkcióval (Follow my face) elkerülheti,
hogy az arca kikerüljön a képből.
5. Tiszta hangú beszélgetéseket élvezhet zavaró
háttérzajok nélkül.
6. A rossz fényviszonyokat kompenzálhatja a RightLight
funkcióval.
7. Hozzáférhet a speciális webkamera-beállításokhoz.
Logitech® HD Webcam C310
a videorögzítést, ha mozgást érzékel.
és az észlelési érzékenységet.
menti a számítógépre.
vagy egyetlen gombnyomással feltöltheti
a feltöltési ablakból (One-touch Upload ablak).
Magyar 65
Page 66

Začíname pracovať
12
1. Mikrofón
2. Objektív
3
3. Indikátor aktivity
4. Nastaviteľný držiak so svorkou
5. Dokumentácia k výrobku
4
5
Ďakujeme, že ste kúpili webovú kameru Logitech!
Pomocou tejto príručky nastavte a začnite používať
vašu webovú kameru Logitech.
Ak máte nejaké otázky alebo sa chcete len dozvedieť
viac informácií o vašej webovej kamere Logitech,
navštívte stránku logitech.com/support.
Important information
Safety, compliance, and warranty
Getting started with
HD
®
Logitech
Webcam C310
66 Slovenčina
Page 67

Nastavenie webovej kamery
Umiestnite webovú kameru
1
Logitech® HD Webcam C310
Pripojte webovú kameru
2
USB
Nainštalujte softvér
3
Ak používate webovú kameru v systéme Windows® 8,
požadovaný softvér sa po prvom pripojení kamery
automaticky prevezme a nainštaluje bez nutnosti
zásahu používateľa.
Dôležité: Aby ste mohli softvér prevziať, je nutné,
aby ste boli pripojení k Internetu.
Ak používate webovú kameru v systéme Windows® 7
alebo Windows Vista®, je potrebné nainštalovať
softvér Logitech® Webcam Software, ktorý je
k dispozícii na stránke:
logitech.com/downloads
Slovenčina 67
Page 68

Začíname pracovať
Začíname s videotelefonovaním
Vaša webová kamera Logitech HD Webcam c310 umožňuje videotelefonovanie
v rozlíšení HD 720p.
Ak chcete využiť funkciu videotelefonovania, musíte si vy a volaná osoba
nainštalovať aplikáciu Skype™, alebo použiť inú aplikáciu na videotelefonovanie,
napríklad Yahoo!® Messenger, Windows Live® Messenger alebo Gmail.
Viac informácií nájdete na: skype.com
Okrem webovej kamery a aplikácie na videotelefonovanie potrebujú obaja
účastníci hovoru:
• Počítač s reproduktormi
(alebo slúchadlami) a mikrofón;
vaša webová kamera Logitech HD
Webcam c310 disponuje integrovaným
mikrofónom.
• Širokopásmové pripojenie k Internetu
(napríklad DSL, T1 alebo káblové
pripojenie).
68 Slovenčina
Page 69

Logitech® HD Webcam C310
Používanie webovej kamery v systéme Windows 8
Na obsluhu a ovládanie webovej kamery použite aplikáciu Camera, ktorá je k dispozícii na obrazovke
Štart systému Windows 8.
Význam funkcií aplikácie Camera
1. Okno ukážky. Kliknutím alebo ťuknutím
vytvorte fotografiu alebo zaznamenajte video
(ak je aktivovaný režim Video).
2. Prepínanie medzi webovými kamerami
(ak máte viac než jednu). Ak je vybratá vaša
webová kamera Logitech, jej predná časť
sa podsvieti.
3. Úprava nastavenia kamery.
4. Aktivácia alebo deaktivácia funkcie Časovač.
Ak je aktívny, pred vytvorením fotografie
alebo začatím záznamu videa prebehne
trojsekundový odpočet.
5. Zapnutie (za účelom záznamu videí)
alebo vypnutie (za účelom vytvárania
fotografií) režimu Video.
6. Kliknutím alebo ťuknutím na šípky
prechádzajte fotografiami alebo videami,
ktoré ste zaznamenali.
Videá sú označené časovačom a tlačidlom
pre prehranie v pravom dolnom rohu.
Slovenčina 69
Page 70

Začíname pracovať
Tip: Aplikácia Camera vám umožní rýchlo a jednoducho využívať najobľúbenejšie funkcie vašej webovej
kamery. Ak chcete využívať pokročilé funkcie kamery – napríklad detekciu pohybu – použite softvér
Logitech Webcam Software, ktorý je k dispozícii na stránke logitech.com/downloads.
Úprava nastavenia kamery
Softvér Logitech automaticky optimalizuje nastavenie s ohľadom na prostredie, kde sa nachádzate.
Ak chcete niektoré z nastavení upraviť, vyberte voľbu Camera Options (Možnosti kamery).
Tú nájdete v aplikácii Camera (pozri predchádzajúcu stranu) alebo v rámci aplikácií Metro
podporujúcich webové kamery.
1. Vyberte požadované rozlíšenie pre vytváranie fotografií alebo
záznam videa (pri prepnutí do režimu Video).
2. Vyberte mikrofón, ktorý chcete používať na záznam zvuku vo vašich
videách (ak je k dispozícii viac než jeden mikrofón).
3. Zobrazte voľbu More Options (Ďalšie možnosti), kde nájdete
pokročilé funkcie, napríklad Zoom (Lupa) a Move (Presunúť).
Ak sa v podokne More Options (Ďalšie možnosti) nezobrazí logo
Logitech ani pokročilé možnosti, softvér Logitech sa pri prvom
pripojení kamery zrejme nenainštaloval správne. Ak ho chcete
znovu nainštalovať, prejdite do Windows Store a vyhľadajte aplikáciu
Logitech Camera Controller.
4. Priblížením alebo oddialením môžete podľa potreby zaberať priestor
okolo vás.
5. Pri priblížení môžete ťahaním bieleho obdĺžnika posúvať náhľad
(meniť oblasť ostrenia vašej webovej kamery).
6. Funkcia Follow my face (Sledovanie tváre) zaistí, že budete vždy
v zábere.
7. Vychutnajte si konverzácie s krištáľovo čistým zvukom bez
nepríjemného šumu na pozadí.
V závislosti od funkcií dostupných pre vašu kameru posunom zobrazíte
ďalšie pokročilé funkcie.
70 Slovenčina
Page 71

Logitech® HD Webcam C310
Zdieľanie fotografií a videí
Svoje fotografie a videá môžete zdieľať prostredníctvom e-mailu, sietí Twitter, Facebook®, YouTube®
alebo Microsoft SkyDrive®. Postupujte takto:
1. V aplikácii Camera sa presuňte na fotografiu alebo video, ktoré chcete zdieľať.
2. Na paneli Charms vyberte možnosť Zdieľať (alebo stlačte - H):
3. Vyberte médium, prostredníctvom ktorého chcete fotografiu alebo video zdieľať.
Slovenčina 71
Page 72
Začíname pracovať
Používanie webovej kamery v systéme Windows 7 a Windows Vista
Softvér Logitech Webcam Software poskytuje všetko potrebné pre používanie a ovládanie vašej
webovej kamery. Spustite softvér z ponuky Štart® systému Windows alebo kliknutím pravým
tlačidlom na ikonu kamery na paneli úloh systému Windows.
Význam funkcií softvéru Logitech Webcam Software
1. Záznam fotografií a videí.
2. Zobrazenie vytvorených fotografií
a ich zdieľanie prostredníctvom e-mailu,
siete Facebook alebo YouTube.
3. Vytvorenie videa na základe detekcie pohybu.
4. Ovládanie webovej kamery počas
videotelefonovania.
72 Slovenčina
5. Prepínanie medzi webovými kamerami
(ak máte viac než jednu).
6. Zobrazenie nastavenia softvéru Logitech
Webcam Software.
7. Zobrazenie panela pomocníka.
Page 73

Záznam videa a vytvorenie fotografií
Galéria: prezeranie a zdieľanie
Logitech® HD Webcam C310
Funkcia Rýchly záznam umožňuje jednoduché
vytvorenie fotografií a záznam videí.
K dispozícii máte rýchly prístup k ovládacím
prvkom a nastaveniam webovej kamery:
1. Preview window
(Okno s ukážkou)
2. Režim záznamu:
fotografia/video
3. Tlačidlo
5. Miniatúry fotografií
6. Miniatúry videí
7. Kliknutím
na miniatúru
vstúpite do galérie
pre záznam
4. Ovládacie prvky
webovej kamery
Kliknutím na miniatúru obrázka v galérii webovej
kamery (1) sa video či fotografia zobrazí v okne
ukážky (2). Potom môžete:
• Pripojiť súbor s videom alebo fotografiou
ako prílohu e-mailu (3)
• Upraviť fotografiu alebo spojiť videá dokopy (4)
• Odoslať fotografiu alebo video na sieť
Facebook (5)
• Odoslať video na sieť Twitter alebo YouTube (6)
Spustiť aplikáciu na úpravy alebo pripojiť či
odoslať fotografiu môžete taktiež pretiahnutím
obrázka v galérii na ikonu príslušnej funkcie
(položky 3-6).
Slovenčina 73
Page 74

Začíname pracovať
Používanie detekcie pohybu
• Webovú kameru je možné nastaviť tak,
aby pri detekcii pohybu spustila záznam videa.
• Môžete určiť dĺžku zaznamenaného videa
a citlivosť detekcie.
• Zaznamenané video sa automaticky uloží
do počítača.
• Obsah môžete zobraziť v Galérii
alebo ho odoslať pomocou okna Odoslanie
jedným dotykom.
Úprava nastavenia webovej kamery počas videohovoru
1. Spustenie ovládača webovej kamery počas
videohovoru.
2. Pomocou otáčania a naklápania je možné nastaviť
optimálny uhol.
3. Priblížením alebo oddialením môžete podľa
potreby zaberať priestor okolo vás.
4. Funkcia Follow my face (Sledovanie tváre)
zaistí, že budete vždy v zábere.
5. Vychutnajte si konverzácie s krištáľovo čistým
zvukom bez nepríjemného šumu na pozadí.
6. Pomocou technológie RightLight je možné
kompenzovať nepriaznivé svetelné podmienky.
7. Zobrazenie rozšírených nastavení webovej kamery.
74 Slovenčina
Page 75

Logitech® HD Webcam C310
12
3
4
Благодарим ви, че закупихте уеб камера Logitech!
Използвайте това ръководство, за да настроите и да
започнете да използвате вашата уеб камера Logitech.
Ако имате въпроси, преди да започнете или, ако просто
искате да научите повече за вашата уеб камера Logitech,
моля посетете logitech.com/support.
1. Микрофон
2. Леща
3. Светлина на активност
4. Гъвкава щипка/основа
5. Документация на продукта
Getting started with
HD
®
Logitech
Webcam C310
Important information
5
Safety, compliance, and warranty
Български 75
Page 76
Започване на работа с
Настройка на уеб камерата
Поставете уеб камерата си
1
Свържете вашата уеб камера
2
USB
76 Български
Инсталирайте софтуер
3
Ако използвате вашата уеб камера с Windows® 8,
необходимият софтуер се изтегля автоматично,
когато свържете уеб камерата си са първи път
и се инсталира тихо във фонов режим.
Важно: Уверете се, че сте свързани към Интернет,
за да може софтуерът да бъде изтеглен.
Ако използвате вашата уеб камера с Windows® 7
или Windows Vista®, трябва да инсталирате софтуер
за уеб камера Logitech®, достъпен на
logitech.com/downloads
Page 77

Начални стъпки с видео разговори
Вашата уеб камера Logitech HD c310 предлага HD 720p видео разговори.
За да се възползвате от видео разговорите, вие и лицето на което се обаждате трябва
да имате инсталиран Skype™, или да използвате друго приложение за видео разговори
като Yahoo!® Messenger, Windows Live® Messenger или Gmail.
Научете повече: skype.com
Двамата разговарящи трябва, както да имат уеб камера и приложение за видео разговори,
така и:
• Компютър с говорители (или слушалки)
и микрофон; вашата уеб камера Logitech
HD c310 има вграден микрофон.
Logitech® HD Webcam C310
• Широколентова интернет връзка
(например, DSL, T1, или кабелна).
Български 77
Page 78
Започване на работа с
Използване на вашата уеб камера с Windows 8
Използвайте приложението Camera (Камера), налично от началния екран на Windows 8,
за да управлявате и контролирате вашата уеб камера.
Запознаване с приложението Camera (Камера)
1. Прозорец за преглед. Кликнете или
докоснете, за да правите снимки или
видеоклипове (в зависимост от това дали
е избран Video Mode (Видео режим)).
2. Сменете уеб камерите (когато имате повече
от една). Предната част на вашата уеб камера
Logitech светва, когато е избрана.
3. Регулиране на настройките на вашата камера.
4. Активиране или деактивиране на функцията
Timer (Таймер). Когато е активирана, има
отброяване от три секунди, преди да бъде
направена снимка или видеоклип.
78 Български
5. Включете Video Mode (Видео режим)
(за запис на видеоклипове) или го изключете
(за да правите снимки).
6. Кликнете или докоснете стрелките,
за да прегледате снимките и видеоклиповете,
които сте заснели.
Видеоклиповете са обозначени с таймер
и бутон за възпроизвеждане в долния
десен ъгъл:
Page 79
Logitech® HD Webcam C310
Съвет: Приложението Camera (Камера) ви позволява да използвате най-популярните функции на
вашата уеб камера бързо и лесно. Ако искате да се възползвате от подобрените функции, които
предлага вашата уеб камера като засичане на движение, използвайте софтуера за уеб камера Logitech,
достъпен на logitech.com/downloads..
Регулиране на настройките на Camera (Камера)
Софтуерът на Logitech оптимизира настройките за вашата среда автоматично. За да регулирате някои от
настройките, изберете опциите на Camera (Камера). Това е достъпно от приложението Camera (Камера)
(вижте предишната страница) и в рамките на приложението Metro, което поддържа уеб камери.
1. Изберете желаната от вас резолюция за снимки или видеоклипове,
когато сте във видео режим.
2. Изберете микрофона, който желаете да използвате за запис на звук
във вашите видеоклипове, ако имате наличен повече от един.
3. Влезте в More Options (Повече опции), за да се възползвате
от подобрените функции като digital Zoom (Цифрово увеличение)
и Move (Преместване).
Ако прозорецът More Options (Повече опции) не показва
логото на Logitech и не предлага разширени опции, вероятно
софтуерът на Logitech не се е инсталирал правилно, когато сте
свързали вашата камера за първи път. За да го преинсталирате,
отидете на Windows Store и потърсете Logitech Camera Controller
(Контролер на Logitech камера).
4. Увеличете или намалете мащаба, за да включите/изключите
заобикалящата ви среда.
5. След като сте увеличили мащаба, плъзнете белия прозорец
за панорамно придвижване (регулира фокуса на вашата уеб камера).
6. Използвайте Follow my face (Следвай лицето ми) , така че винаги
да сте в картината.
7. Насладете се на разговори с ясен звук без досаден фонов шум.
В зависимост от функциите, налични на вашата камера,
можете да получите достъп до допълнителни разширени настройки
чрез превъртане.
Български 79
Page 80

Започване на работа с
Споделяне на вашите снимки и видеоклипове
Можете да споделяте вашите снимки и видеоклипове чрез имейл, Twitter, Facebook®, YouTube® или
Microsoft SkyDrive®. Следвайте тези стъпки:
1. В приложението Camera (Камера), превъртете до снимката или видеоклипа, който искате
да споделите.
2. Изберете Share (Сподели) в лентата Charms (или натиснете - H):
3. Изберете медията, чрез която искате да споделите вашата снимка или видеоклип.
80 Български
Page 81

Logitech® HD Webcam C310
Използване на вашата уеб камера с Windows 7 и Windows Vista
Софтуерът за уеб камера Logitech осигурява всичко, което ви е нужно, за да използвате
и контролирате вашата уеб камера. Стартирайте софтуера от менюто Windows Start®, или като
кликнете с десен бутон на мишката върху иконата на камерата в лентата със задачи на Windows.
Запознаване със софтуера за уеб камери Logitech
1. Фото и видео заснемане
2. Преглед на заснетите изображения и
споделяне чрез имейл, Facebook или
YouTube.
3. Заснемане на видеоклипове, задействано от
засечено движение.
4. Контролиране на вашата уеб камера по
време на видео разговор.
5. Смяна на уеб камери (когато имате повече
от една).
6. Отваряне на настройките на софтуера за уеб
камери Logitech.
7. Отваряне на прозореца за помощ.
Български 81
Page 82

Започване на работа с
Заснемане на видеоклипове и прилепване на снимки
Quick Capture (Бързо заснемане) ви позволява
лесно да правите снимки и да записвате
видеоклипове.
Имате бърз достъп до управлението
и настройките на уеб камерата:
1. Прозорец за преглед
2. Режим на заснемане: фото/видео
3. Бутон за заснемане
4. Бутони за управление на уеб камерата
5. Фото миниатюри
6. Видео миниатюри
7. Кликнете върху някоя миниатюра,
за да влезете в галерията
Галерията: преглед и споделяне
Когато кликнете върху миниатюра на изображение
в галерията на уеб камерата (1), видеото или
снимката се отварят в прозорец за преглед (2).
След това можете да:
• Прикрепите файла на видеото или снимката
към имейл (3)
• Редактирате снимката или да снадите
видеоклипа (4)
• Качите снимката или видеоклипа във Facebook (5)
• Качите видеоклипа в Twitter или YouTube (6)
Можете също така да плъзнете и пуснете
изображение на галерия върху една от иконите
с функции (елементи 3-6), за да стартирате
приложение за редактиране или да прикрепите,
или качите.
82 Български
Page 83

Използване на засичане на движение
• Настроите уеб камерата си да записва видео,
когато засече движение.
• Регулирайте времетраенето и чувствителността
на засичане на заснетото видео.
• Заснетият видеоклип автоматично се запазва
на вашия компютър.
• Прегледайте съдържанието в галерията или го
качете като използвате прозореца One-touch
Upload (Качване с едно докосване).
Фина настройка на вашата уеб камера по време на видео разговор
1. Стартиране на контролера на уеб камерата по време
на видео разговор.
2. Използвайте панорамно придвижване и наклон,
за да намерите най-добрия ъгъл.
3. Увеличете или намалете мащаба, за да включите/
изключите заобикалящата ви среда.
4. Използвайте Follow my face (Следвай лицето ми) ,
така че винаги да сте в картината.
5. Насладете се на разговори с ясен звук без досаден
фонов шум.
6. Коригирайте за среди със слабо осветление с помощта
на RightLight.
7. Достъп до разширени настройките на уеб камерата.
Logitech® HD Webcam C310
Български 83
Page 84

Noţiuni de bază pentru
12
1. Microfon
2. Obiectiv
3
3. Indicator de activitate
4. Clemă flexibilă/bază
5. Documentaţie produs
Getting started with
4
5
Logitech
Important information
Safety, compliance, and warranty
Vă mulţumim că aţi achiziţionat o cameră web Logitech!
Utilizaţi acest ghid pentru a configura şi a începe
să utilizaţi camera web Logitech.
Dacă aveţi întrebări înainte de a începe sau dacă doriţi
doar să aflaţi mai multe despre camera web Logitech,
accesaţi logitech.com/support.
HD
®
Webcam C310
84 Română
Page 85

Configurarea camerei web
Plasaţi camera web
1
Logitech® HD Webcam C310
Conectaţi camera web
2
USB
Instalaţi software-ul
3
Dacă utilizaţi camera web cu Windows® 8,
software-ul necesar se descarcă automat
când conectaţi camera web pentru prima dată
şi se instalează silenţios în fundal.
Important: Pentru ca software-ul să se poată descărca,
asiguraţi-vă că sunteţi conectat la Internet.
Dacă utilizaţi camera web cu Windows® 7
sau Windows Vista®, trebuie să instalaţi software-ul
Logitech® pentru camera web disponibil de la:
logitech.com/downloads
Română 85
Page 86

Noţiuni de bază pentru
Noţiuni de bază pentru apelurile video
Camera web Logitech HD Webcam c310 oferă posibilitatea de efectuare
a apelurilor video HD pe 720 p.
Pentru a beneficia la maximum de apelurile video, atât dvs., cât şi persoana pe care
o apelaţi trebuie să instalaţi Skype™ sau să utilizaţi o altă aplicaţie de apelare video,
cum ar fi Yahoo!® Messenger, Windows Live® Messenger sau Gmail.
Aflaţi mai multe: skype.com
În afară de o cameră web şi de aplicaţia de apelare video, ambii apelanţi au nevoie de:
• un computer cu difuzoare (sau un set
de căşti) şi un microfon; camera web
Logitech HD Webcam c310 are
un microfon încorporat.
• o conexiune în bandă lată la Internet
(de exemplu, DSL, T1 sau cablu).
86 Română
Page 87
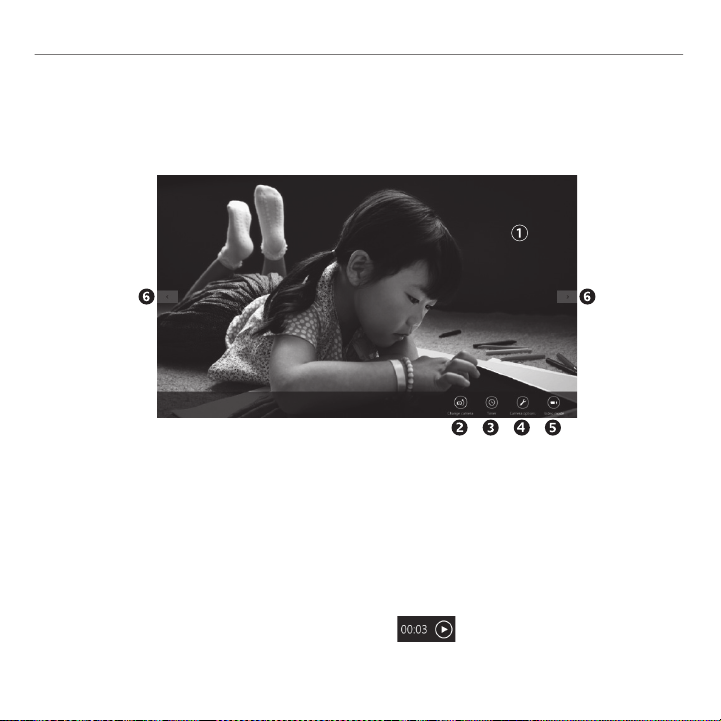
Logitech® HD Webcam C310
Utilizarea camerei web cu Windows 8
Utilizaţi aplicaţia Cameră, disponibilă din ecranul Start din Windows 8, pentru a acţiona şi controla
camera web.
Înţelegerea aplicaţiei Cameră
1. Fereastra de examinare Faceţi clic sau atingeţi
pentru a realiza fotografii sau videoclipuri
(în funcţie de selectarea modului Video).
2. Schimbarea camerelor web (când aveţi mai
multe). Când este selectată, partea frontală
a camerei web Logitech se iluminează.
3. Ajustarea setărilor camerei.
4. Activarea sau dezactivarea caracteristicii Timer
(Cronometru). Când este activat, cronometrul
numără invers timp de 3 secunde până la
realizarea unei fotografii sau a unui videoclip.
5. Activaţi modul Video (pentru a înregistra
videoclipuri) sau dezactivaţi modul respectiv
(pentru a fotografia).
6. Faceţi clic sau atingeţi săgeţile
pentru a derula prin fotografiile
şi videoclipurile realizate.
Videoclipurile sunt indicate de
un cronometru şi de un buton de redare
din colţul din dreapta jos:
Română 87
Page 88

Noţiuni de bază pentru
Sfat: Aplicaţia Cameră vă permite să utilizaţi rapid şi uşor cele mai populare caracteristici ale
camerei web. Dacă doriţi să beneficiaţi la maximum de funcţiile îmbunătăţite oferite de camera
web, cum ar fi detecţia mişcării, utilizaţi software-ul Logitech pentru camera web disponibil de
la logitech.com/downloads.
Ajustarea setărilor aplicaţiei Cameră
Software-ul Logitech optimizează automat setările în funcţie de mediul în care vă aflaţi. Pentru a
ajusta oricare dintre setări, alegeţi Camera Options (Opţiuni cameră). Puteţi efectua acest lucru din
aplicaţia Cameră (consultaţi pagina anterioară) şi din aplicaţiile Metro care acceptă camere web.
1. Alegeţi rezoluţia necesară pentru captura foto sau video atunci
când sunteţi în modul Video.
2. Alegeţi microfonul pe care doriţi să-l utilizaţi pentru a înregistra
sunetul în videoclipuri (dacă sunt disponibile mai multe
microfoane).
3. Accesaţi More Options (Mai multe opţiuni) pentru a beneficia
de caracteristici îmbunătăţite, cum ar fi Zoom (Mărire/micşorare)
digital şi Move (Deplasare).
Dacă panoul More Options (Mai multe opţiuni) nu afişează
sigla Logitech şi nu oferă caracteristici îmbunătăţite, este foarte
posibil ca software-ul Logitech să nu se fi instalat corect la prima
conectare a camerei. Pentru a-l reinstala, accesaţi Magazin
Windows şi căutaţi Logitech Camera Controller (Controler cameră
Logitech).
4. Măriţi sau micşoraţi imaginea pentru a include/exclude elemente
din mediul înconjurător.
5. După ce aţi mărit imaginea, glisaţi caseta albă pentru
a panorama (ajustaţi zona de focalizare a camerei web).
6. Utilizaţi funcţia Follow my face (Urmărire faţă) pentru a fi mereu
în cadru.
7. Bucuraţi-vă de conversaţii clare, fără zgomote neplăcute
în fundal.
În funcţie de caracteristicile disponibile în cameră, puteţi derula
şi accesa setări mai complexe.
88 Română
Page 89

Logitech® HD Webcam C310
Partajarea fotografiilor şi a videoclipurilor
Puteţi partaja fotografiile şi videoclipurile prin e-mail, Twitter, Facebook®, YouTube® sau
Microsoft SkyDrive®. Parcurgeţi aceşti paşi:
1. În aplicaţia Cameră, derulaţi la fotografia sau la videoclipul pe care doriţi să-l partajaţi.
2. Selectaţi Share (Partajare) din bara de butoane (sau apăsaţi - H):
3. Alegeţi mediul prin care doriţi să partajaţi fotografia sau videoclipul.
Română 89
Page 90

Noţiuni de bază pentru
Utilizarea camerei web cu Windows 7 şi Windows Vista
Software-ul Logitech pentru camera web oferă toate elementele necesare pentru utilizarea
şi controlul camerei web. Lansaţi software-ul din meniul Windows Start® sau făcând clic dreapta
pe pictograma cameră din bara de activităţi Windows.
Înţelegerea software-ului Logitech pentru camera web
1. Realizarea fotografiilor şi a videoclipurilor.
2. Vizualizaţi imaginile realizate şi partajaţi-le
prin e-mail, Facebook sau YouTube.
3. Realizarea videoclipurilor declanşată prin
detecţia mişcării.
4. Controlul camerei web în timpul unui
apel video.
90 Română
5. Schimbarea camerelor web (când aveţi
mai multe).
6. Deschideţi setările software-ului Logitech
pentru camera web.
7. Deschideţi panoul de ajutor.
Page 91

Realizarea videoclipurilor şi a fotografiilor
Galeria: vizualizarea şi partajarea
Logitech® HD Webcam C310
Quick Capture (Captură rapidă) vă permite
să realizaţi fotografii şi să înregistraţi videoclipuri
cu uşurinţă.
Puteţi accesa rapid controalele şi setările
camerei web:
1. Fereastra de examinare
2. Mod captură: foto/video
3. Butonul de captură
4. Controalele camerei web
5. Miniaturi foto
6. Miniaturi video
7. Faceţi clic pe o miniatură pentru
a accesa galeria
Dacă faceţi clic pe o miniatură imagine din
galeria camerei web (1), videoclipul sau
fotografia se deschide în fereastra de examinare
(2). După aceasta, puteţi:
• Să ataşaţi fişierul videoclip sau fotografie la
un e-mail (3)
• Să editaţi fotografii sau să îmbinaţi videoclipuri
(4)
• Să încărcaţi fotografii sau videoclipuri pe
Facebook (5)
• Să încărcaţi fotografii sau videoclipuri pe
Twitter sau YouTube (6)
De asemenea, puteţi glisa şi fixa o imagine din
galerie pe una din dalele funcţionale (elementele
3-6) pentru a lansa o aplicaţie de editare, pentru
a ataşa sau pentru a încărca.
Română 91
Page 92

Noţiuni de bază pentru
Utilizarea detecţiei mişcării
• Configuraţi camera web să înregistreze
un videoclip când detectează mişcare.
• Ajustaţi durata şi sensibilitatea detecţiei
videoclipului realizat.
• Videoclipul realizat este salvat automat
pe computer.
• Vizualizaţi conţinut în Gallery (Galerie)
sau încărcaţi-l utilizând fereastra One-touch
Upload (Încărcare cu o atingere).
Reglarea fină a camerei web în timpul unui apel video
1. Lansaţi controlerul camerei web în timpul unui apel video.
2. Utilizaţi funcţiile de panoramare şi înclinare pentru a găsi
unghiul optim.
3. Măriţi sau micşoraţi imaginea pentru a include/exclude
elemente din mediul înconjurător.
4. Utilizaţi funcţia Follow my face (Urmărire faţă)
pentru a fi mereu în cadru.
5. Bucuraţi-vă de conversaţii clare, fără zgomote neplăcute
în fundal.
6. Compensaţi mediile cu lumină slabă utilizând RightLight.
7. Accesaţi setările complexe ale camerei web.
92 Română
Page 93

Logitech® HD Webcam C310
12
3
4
Zahvaljujemo na kupnji web-kamere Logitech!
Ovaj će vam vodič pomoći pri postavljanju i početku
upotrebe web-kamere Logitech.
Ako imate pitanja prije početka ili ako želite saznati
više o web-kameri Logitech, posjetite logitech.com/
support.
1. Mikrofon
2. Objektiv
3. Žaruljica aktivnosti
4. Fleksibilna kvačica/postolje
5. Dokumentacija proizvoda
Getting started with
HD
®
Logitech
Webcam C310
Important information
5
Safety, compliance, and warranty
Hrvatski 93
Page 94

Prvi koraci
Postavljanje web-kamere
Postavite web-kameru
1
Povežite web- kameru
2
USB
94 Hrvatski
Instalirajte softver
3
Ako upotrebljavate web-kameru s operacijskim
sustavom Windows® 8, potrebni softver automatski
se preuzima pri prvom povezivanju web-kamere
i instalira u pozadini.
Važno: Provjerite jeste li povezani s internetom
da biste omogućili preuzimanje softvera.
Ako upotrebljavate web-kameru s operacijskim
sustavom Windows® 7 ili Windows Vista®,
morate instalirati softver Logitech® Webcam koji
možete pronaći na stranici:
logitech.com/downloads
Page 95

Početak rada s videopozivima
Vaša web-kamera Logitech HD Webcam c310 omogućuje HD 720p
videopozive.
Kako biste iskoristili prednosti videopoziva, vi i osoba koju zovete morate
instalirati Skype™ ili neku drugu aplikaciju koja omogućuje videopozive,
primjerice Yahoo!® Messenger, Windows Live® Messenger ili Gmail.
Saznajte više: skype.com
Osim web-kamere i aplikacije za videopozive, oba sudionika u videopozivu moraju
imati sljedeće:
• Računalo sa zvučnicima (ili slušalicu
s mikrofonom) i mikrofon; web-kamera
Logitech HD Webcam c310 ima
ugrađen mikrofon.
Logitech® HD Webcam C310
• Širokopojasnu internetsku vezu
(npr. DSL, T1 ili kabelsku).
Hrvatski 95
Page 96

Prvi koraci
Upotreba web-kamere s operacijskim sustavom Windows 8
Pomoću aplikacije Camera, koja je dostupna na početnom zaslonu operacijskog sustava Windows 8,
možete upravljati svojom web-kamerom.
Uvod u aplikaciju Camera
1. Prozor za prikaz. Kliknite ili dodirnite
da biste snimili fotografije ili videozapise
(ovisno o tome je li odabran način
videozapisa).
2. Promijenite web-kameru (ako imate više od
jedne). Prednja strana web-kamere Logitech
zasvijetlit će nakon odabira.
3. Prilagodite postavke kamere.
4. Aktivirajte ili deaktivirajte značajku brojila
vremena. Nakon aktivacije slijedi odbrojavanje
koje traje tri sekunde do snimanja fotografije
ili videozapisa.
96 Hrvatski
5. Uključite Video Mode (Način videozapisa)
(da biste snimali videozapise) ili ga isključite
(da biste snimali fotografije).
6. Kliknite ili dodirnite strelice da biste se
pomicali kroz fotografije i videozapise koje
ste snimili.
Videozapisi su označeni brojilom vremena
i gumbom za reprodukciju koji se nalaze u
donjem desnom kutu:
Page 97

Logitech® HD Webcam C310
Savjet: Aplikacija Camera omogućuje vam da brzo i jednostavno upotrebljavate najpopularnije
značajke web-kamere. Ako želite iskoristiti sve prednosti naprednih značajki vaše web-kamere, kao
što je otkrivanje pokreta, upotrijebite softver Logitech Webcam koji možete pronaći na stranici
logitech.com/downloads.
Prilagođavanje postavki aplikacije Camera
Softver Logitech automatski optimizira postavke okoline. Da biste prilagodili neku od postavki,
odaberite opcije kamere. To je dostupno u aplikaciji Camera (pogledajte prethodnu stranicu) i unutar
aplikacija Metro koje podržavaju web-kamere.
1. Odaberite potrebnu razlučivost za snimanje fotografija ili
videozapisa kada se nalazite u Video Mode (Načinu videozapisa).
2. Odaberite mikrofon koji želite upotrebljavati za snimanje zvuka
s videozapisa, ako imate više mikrofona.
3. Pristupite oknu More Options (Više opcija) da biste uživali
u naprednim značajkama, kao što je digitalni Zoom (Zum)
i Move (Pomicanje).
Ako okno More Options (Više opcija) ne prikazuje logotip Logitech
i nudi napredne opcije, moguće je da se softver Logitech nije
ispravno instalirao prilikom prvog povezivanja kamere. Da biste ga
ponovno instalirali, idite u Windows trgovinu i potražite program
Logitech Camera Controller.
4. Uvećajte ili smanjite prikaz da biste uključili/isključili okolinu.
5. Kada ste uvećali prikaz, povucite bijeli okvir da biste ga pomaknuli
(namjestite područje fokusiranja web-kamere).
6. Upotrijebite funkciju Follow my face (Slijedi moje lice) da biste
uvijek bili na slici.
7. Uživajte u jasnim razgovorima bez neugodne pozadinske buke.
Ovisno o dostupnim značajkama web-kamere, možete pristupiti
dodatnim naprednim postavkama tako što ćete se pomaknuti.
Hrvatski 97
Page 98

Prvi koraci
Dijeljenje fotografija i videozapisa
Možete dijeliti fotografije i videozapise putem e-pošte i usluga Twitter, Facebook®, YouTube® ili
Microsoft SkyDrive®. Slijedite ove korake:
1. U aplikaciji Camera, pomaknite se na fotografiju ili videozapis koji želite dijeliti.
2. Odaberite Share (Dijeli) na traci s gumbima (ili pritisnite - H):
3. Odaberite medij preko kojeg želite podijeliti fotografiju ili videozapis.
98 Hrvatski
Page 99
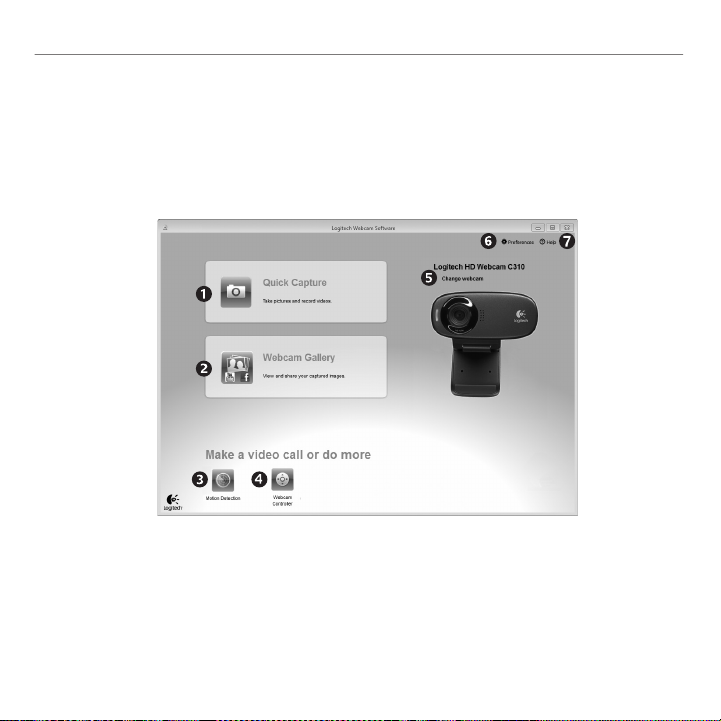
Logitech® HD Webcam C310
Upotreba web-kamere s operacijskim sustavima Windows 7
i Windows Vista
Softver Logitech Webcam pruža vam sve što trebate za upotrebu web-kamere i upravljanje njezinim
postavkama. Pokrenite softver iz izbornika Windows Start® ili kliknite desnom tipkom miša ikonu
kamere na programskoj traci operacijskog sustava Windows.
Uvod u softver Logitech Webcam
1. Snimite fotografije i videozapise.
2. Prikažite snimljene slike i podijelite ih putem
e-pošte ili usluga Facebook i YouTube.
3. Snimite videozapise pomoću funkcije
otkrivanja pokreta.
4. Upravljajte web-kamerom tijekom
aktivnog videopoziva.
5. Promijenite web-kameru (ako imate više
od jedne).
6. Otvorite postavke softvera Logitech
Webcam.
7. Otvorite ploču za pomoć.
Hrvatski 99
Page 100

Prvi koraci
Snimanje videozapisa i slika
Galerija: prikaz i dijeljenje
Funkcija Quick Capture (Brzo snimanje)
omogućuje vam jednostavno snimanje slika
i videozapisa.
Moguć je brz pristup kontrolama i postavkama
web-kamere:
1. Prozor za prikaz
2. Način snimanja:
fotografija/
videozapis
3. Gumb za snimanje
4. Kontrole web-
kamere
5. Minijaturni prikazi
fotografija
6. Minijaturni prikazi
videozapisa
7. Kliknite minijaturu
da biste ušli
u galeriju
Kada kliknete na minijaturni prikaz slike u galeriji
web-kamere (1), u prozoru za pregled (2) otvara
se videozapis ili fotografija. Zatim možete:
• Priložiti datoteku videozapisa ili slike poruci
e-pošte (3)
• Urediti fotografiju ili spojiti videozapise (4)
• Poslati sliku ili videozapis na Facebook (5)
• Poslati videozapis na Twitter ili YouTube (6)
Možete također povući i ispustiti sliku iz galerije
u neku od funkcijskih pločica (stavke 3-6) da biste
pokrenuli aplikaciju za uređivanje ili priložili
i poslali sliku na mrežu.
100 Hrvatski
 Loading...