

Setup Guide
Logitech® HD Pro Webcam C920

Logitech® HD Pro Webcam C920
Contents
English 3
Español 13
Français 23
Português 33
www.logitech.com/support 43
2
Logitech® HD Pro Webcam C920
1
2
3
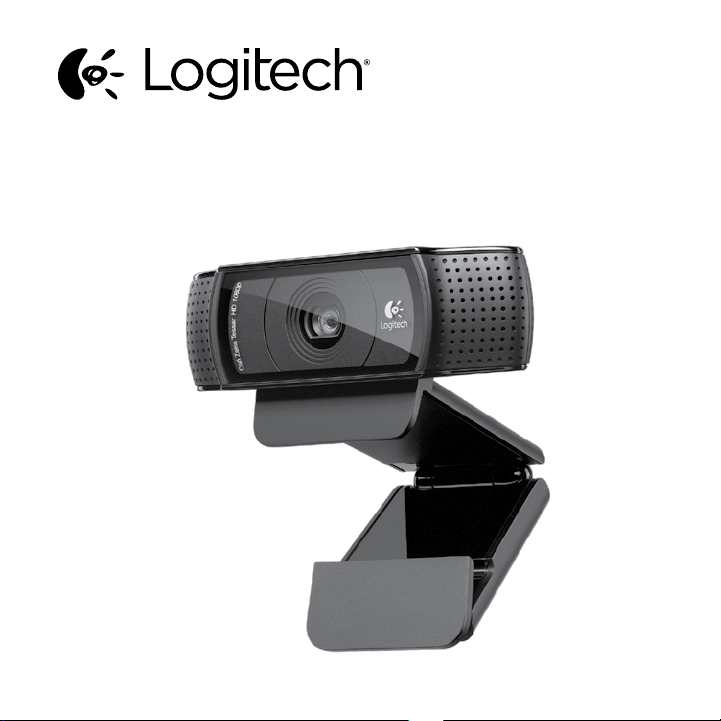
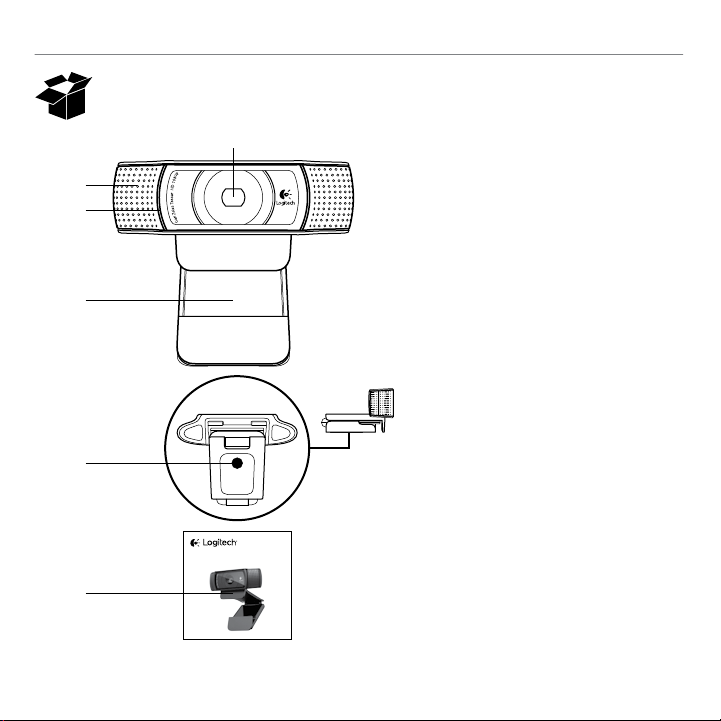
Features
1. Carl Zeiss® autofocus HD 1080p lens
2. Microphone
3. Activity light
4. Flexible clip/base
5. Tripod attachment
6. Product documentation
4
5
Setup Guide
Logitech® HD Pro Webcam C920
6
English 3
Getting started with
1 2 3
Thank you for buying your C920!
Use this guide to set up your Logitech webcam
and to begin making video calls.
If you have questions before you start, please visit
the websites listed below to learn more about
Logitech webcams and video calling.
www.logitech.com/support
www.logitech.com/webcam_howto
www.logitech.com/whatisvid
www.logitech.com
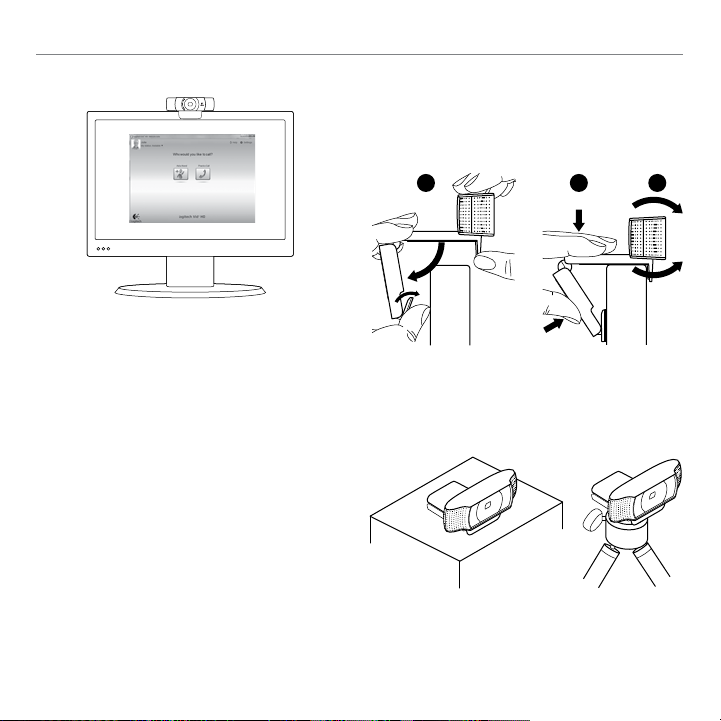
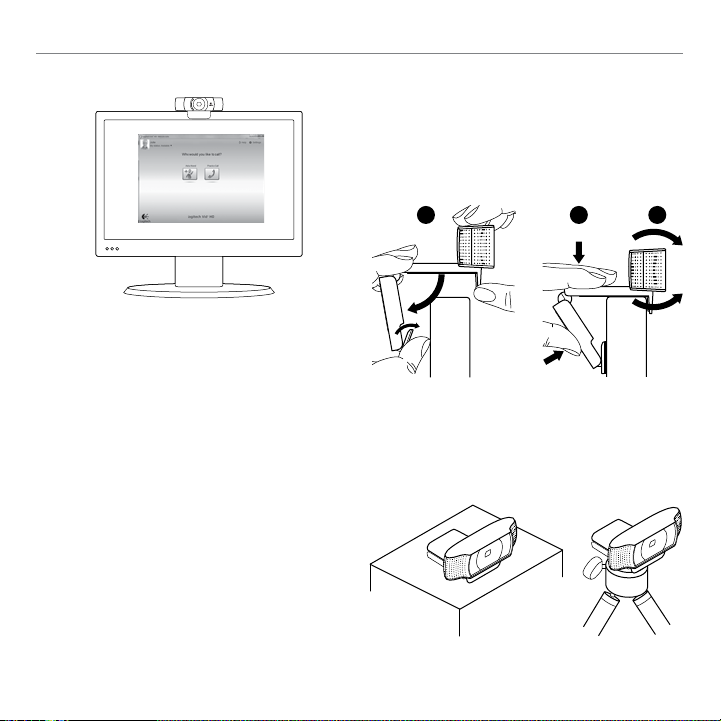
Setting up your webcam
1 Place your webcam
Designed for the way you like to make a video call,
place the Webcam C920 where you want it—
on a computer monitor, desktop, or tripod.
For placement on a monitor
Grasp the webcam as shown and open the flexible/
clip base with your other hand. Mount the webcam,
making sure the foot on the flexible/clip base is
flush with the back of your monitor.
4 English
Logitech® HD Pro Webcam C920
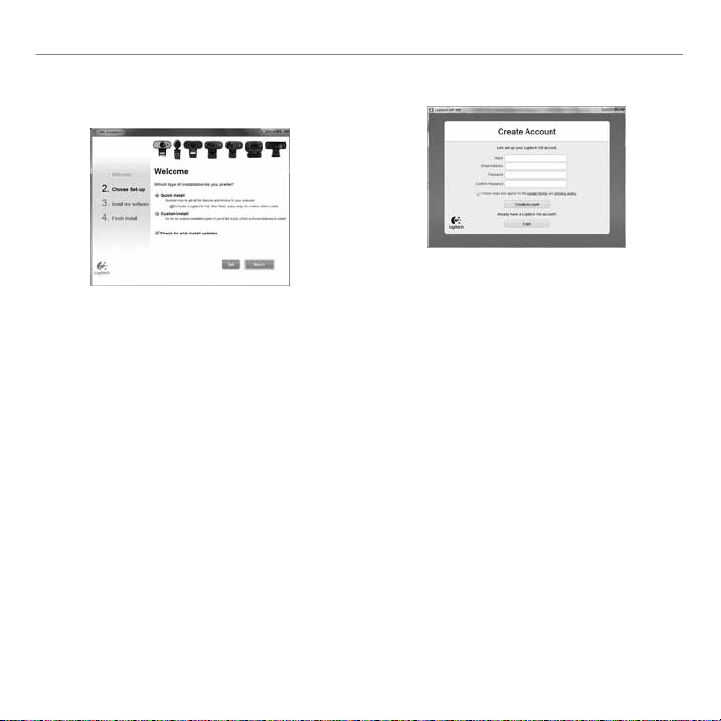
2 Install the software
To get started, you will need to download and
install the Logitech Webcam Software. Make sure
your computer has access to the internet.
For Windows XP, Windows Vista
or Window 7:
Visit www.logitech.com/LWS to download
your webcam software. Choose your operating
system and then follow the on-screen prompts
to download and install the software.
Connect your webcam when prompted.
USB
For Windows 7:
Plug your webcam into a USB port to automatically
download your software. Follow the on-screen
prompts to download and install your software.
Tip: After downloading, if the installation does
not begin automatically, locate the LWS file
in the Download folder on your computer.
Double-click to begin the installation.
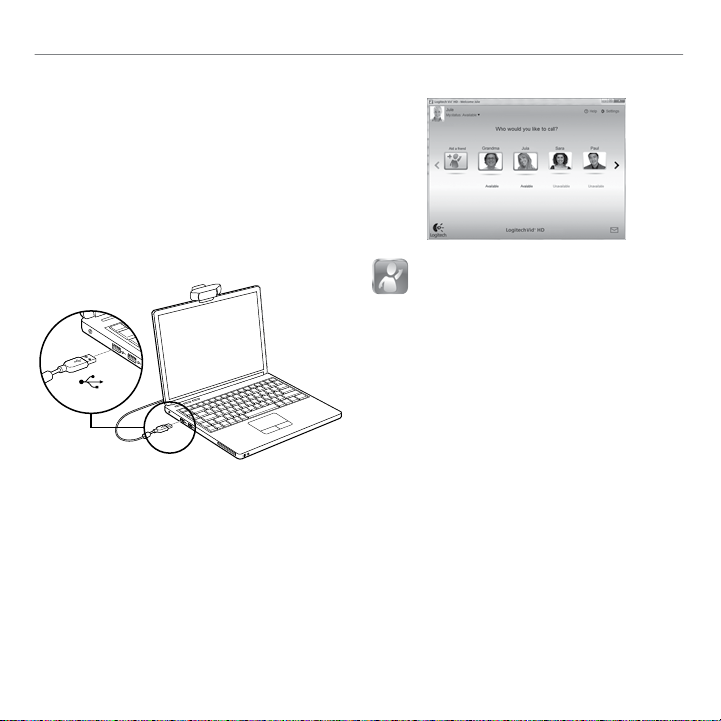
Getting started with videocalling
Your webcam comes with Logitech
Vid™ HD
With Logitech Vid HD, video calling live over
the Internet takes only a few, easy steps:
• Install Logitech Vid HD
• Create an account
• Add a friend and make a video call
Learn more:
http://www.logitech.com/whatisvid
For a 1080p calling experience, download and
install Skype 5.7 from www.skype.com.
English 5
Getting started with
Setting up Logitech Vid HD
1 Install Logitech Vid HD
Tip: If you prefer another video-calling application,
you will need to download and install thirdparty software.
Learn more:
http://www.logitech.com/webcam_howto
2 Create an account
Follow the on-screen instructions to create
your Logitech Vid HD account and to set up
your webcam for video calling.
To make video calls with any application,
both you and the person you call must have:
• A webcam
• A computer with speakers and a microphone
(or a headset with a microphone; many Logitech
webcams have a built-in microphone)
• A broadband Internet connection
(e.g., DSL, T1, or cable)
• The same video-calling application
(e.g., Logitech Vid HD)
• Video calling accounts
6 English
Logitech® HD Pro Webcam C920
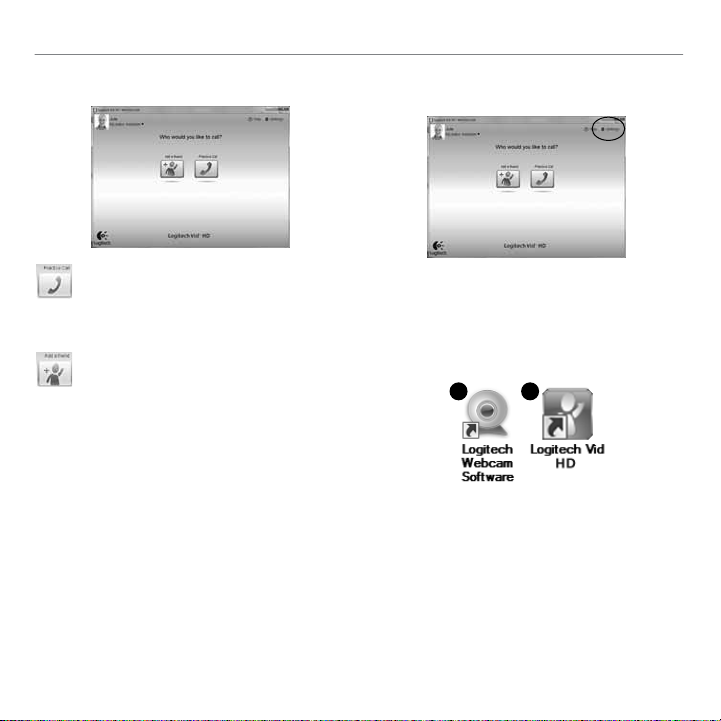
3 Add a friend or make a practice call
Click on the Practice Call tile to test
your settings.
Tip: The Practice Call tile is always available
on your Contact List so you can test
your settings.
To add a friend, click on the Add a Friend
tile and enter your friend’s e-mail
when prompted.
After your friend has accepted your invitation,
click on your friend’s picture to make a call.
Accessing account settings
andstarting applications
Logitech automatically detects and adjusts
the best settings for your webcam. If you would
like to re-take your profile picture or update any
of your settings, click the Settings icon.
Double-click the icons on your desktop to launch
your applications.
1 2
1. Logitech Webcam Software
2. Logitech Vid HD
Tip: The Logitech Vid HD icon is only present
if you chose to install Logitech Vid HD. To learn
about third-party video calling, please visit:
www.logitech.com/webcam_howto
English 7
Getting started with
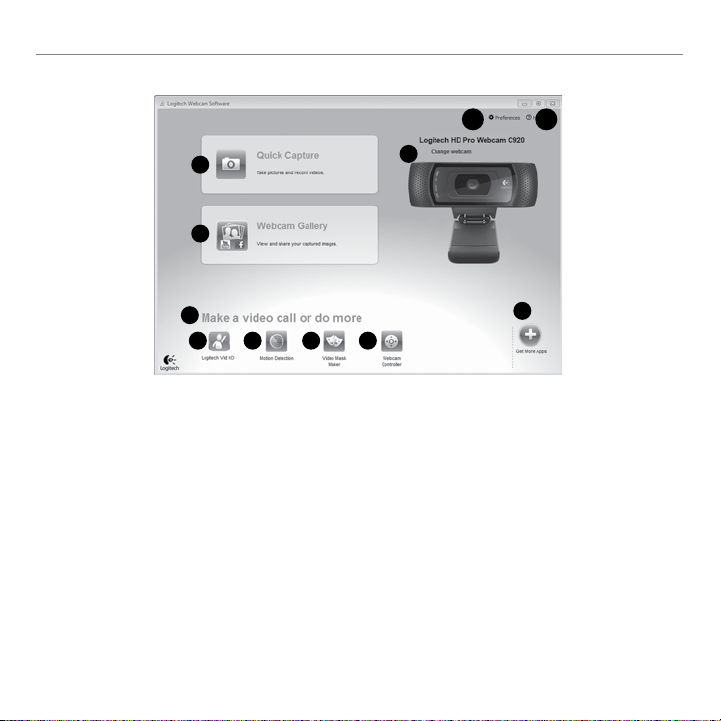
Navigating the Logitech Webcam Software
10 11
1
2
3
4 5 6 7
1. Capture pictures and videos
2. View captured images and share via e-mail,
Facebook,® or YouTube®. Registration may
be required.
3. An area for easy access to your installed
webcam related applications
4. Launch Logitech Vid HD (if installed)
5. Capture videos triggered by detected motion
6. Create your own custom video mask
(for webcams that support this feature)
8 English
9
8
7. Control your video eects and webcam while
on a video call
8. Download additional webcam applications
9. Change webcams (when you have more
than one)
10. Open Logitech Webcam Software settings
11. Open help dashboard (manuals and
how-to videos)
Logitech® HD Pro Webcam C920
Capturing video and
snappingpictures
1
2
6 7
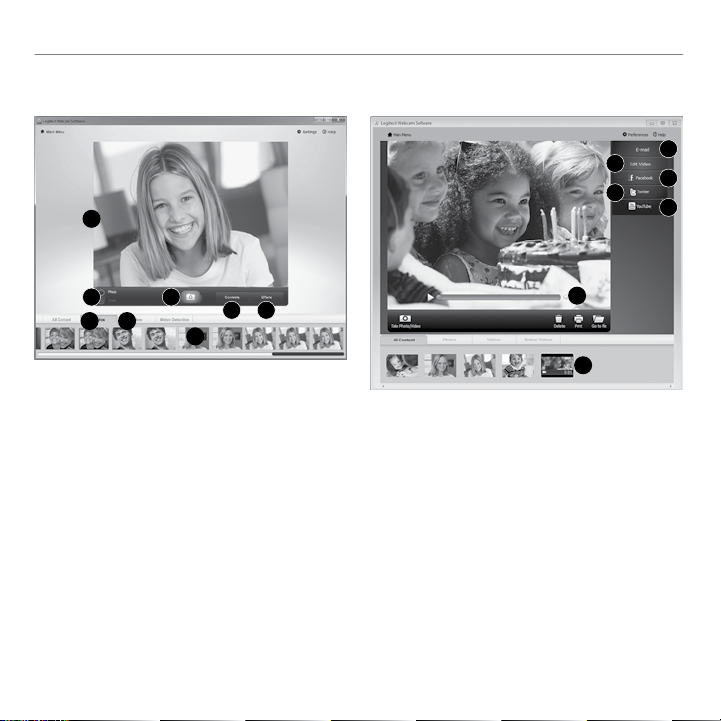
Quick Capture allows you to take photos or record
videos easily.
You have easy access to webcam controls
and settings as well as video eects to personalize
your images and recordings.
1. Preview window
2. Capture mode: photo/video
3. Capture button
4. Webcam controls
5. Video eects and fun filters
6. Photo thumbnails
7. Video thumbnails
8. Click a thumbnail to enter the gallery
3
4 5
8
Viewing and sharing using
theGallery
3
4
5
6
7
2
1
Clicking on an image thumbnail in the gallery (1)
opens the video or photo in the review window (2).
• Attach a video or picture file to an e-mail (3)
• Edit a photo or splice together video (4)
• Upload a picture or video to Facebook (5)
• Upload a video to Twitter (6)
• Upload a video to YouTube (7)
You may also drag and drop a gallery image onto
one of the function tiles (items 3–7) to launch
an editing application or to attach or upload.
Registration may required for applications.
Additional software required for Twitter.
English 9

Getting started with
Using motion detection
• Set up your webcam to record video when
it detects movement.
• Adjust captured video duration and
detection sensitivity.
• Captured video is automatically saved
to your computer.
• View content in the Gallery or upload it using
the One-touch Upload window.
Personalizing videos and pictures
Your webcam oers Video Eects™,
including avatars, face accessories
(mustache, glasses, hats, etc.), fun filters,
and video masks.
Want to create your own video mask? Simply open
the Video Mask Maker on the Main Menu and follow
the on-screen instructions.
Note that when you use video eects during
video recording, your webcam uses an MJPEG
compression format. MJPEG-compressed files
may take longer to upload than H.264 files.
10 English
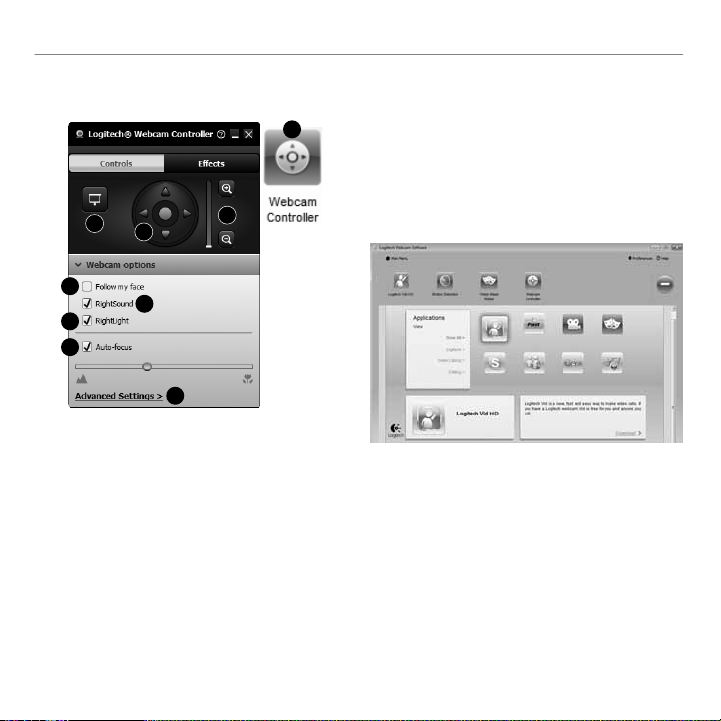
Fine tuning your webcam during
a video call
1
2
3
4
Logitech® HD Pro Webcam C920
6. Enjoy clear conversations without annoying
background noise.
7. Correct for poor lighting environments
using RightLight.
8. Choose between auto- or manual focus.
9. Adjust the advanced settings for your webcam.
Get more applications
foryourwebcam
5
6
7
8
9
1. Launch the webcam controller when
on a video call.
2. Hide your video image with a photo while
your webcam stays connected.
3. Use pan and tilt to find the best angle.
4. Zoom in or out to include/exclude
your surroundings.
5. Use Follow my face so you’re always
in the picture.
Download and install additional applications
for your webcam, like video calling, photo and
video editing, and other value-added programs.
English 11
Getting started with
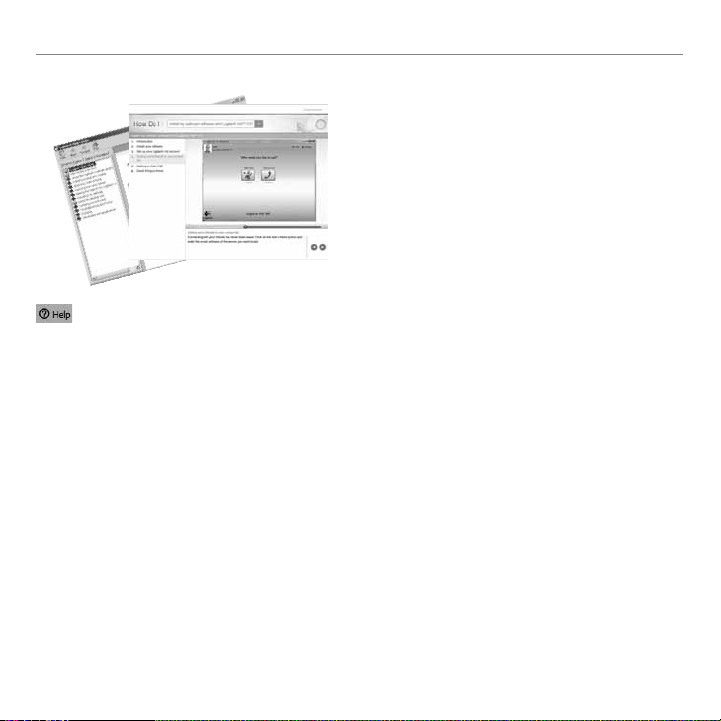
Getting help
Click on the help icon to access a complete
user manual, or watch how-to videos
that show you how to get the most out
of your Logitech webcam and software.
Tip: If you are not sure about a feature,
click the help icon, and our manual will open
to the right place.
12 English

Logitech® HD Pro Webcam C920
1
2
3
Características
1. Objetivo Carl Zeiss® con enfoque
automático, alta definición y 1080p
2. Micrófono
3. Diodo de actividad
4. Clip/base versátil
5. Acoplamiento de trípode
6. Documentación del producto
4
5
Setup Guide
Logitech® HD Pro Webcam C920
6
Español 13
Utilización
1 2 3
Gracias por la compra de C920.
Usa esta guía para configurar la cámara Web
Logitech y comenzar a realizar videoconferencias.
Si tienes alguna pregunta antes de comenzar,
visita los sitios Web que aparecen abajo para
obtener más información sobre las cámaras Web
Logitech y videoconferencias.
www.logitech.com/support
www.logitech.com/webcam_howto
www.logitech.com/whatisvid
www.logitech.com
Configuración de la cámara Web
1 Coloca la cámara Web
La cámara Web C920 se ha diseñado pensando
en las preferencias de todos los usuarios y,
por tanto, puede colocarse donde uno quiera:
en el monitor de la computadora, en el escritorio
o en un trípode.
Para la colocación en un monitor
Toma la cámara Web en una mano como se
indica y abre el clip/base versátil con la otra
mano. Monta la cámara Web. El pie del clip/base
versátil debe quedar a ras con la parte posterior
del monitor.
14 Español

Logitech® HD Pro Webcam C920
2 Instala el software
Para empezar, tendrás que descargar e instalar
Logitech Webcam Software. Asegúrate de que
tu computadora tiene acceso a Internet.
Para Windows XP, Windows Vista
o Window 7:
Visita www.logitech.com/LWS para descargar
el software de cámara Web. Selecciona tu sistema
operativo y sigue las instrucciones en pantalla para
descargar e instalar el software.
Conecta la cámara Web cuando se te indique.
USB
Para Windows 7:
Conecta la cámara Web a un puerto USB
para descargar el software automáticamente.
Sigue las instrucciones en pantalla para descargar
e instalar el software.
Consejo: tras la descarga, si la instalación no
comienza automáticamente, localiza el fichero LWS
en la carpeta de descargas de tu computadora.
Haz doble click para iniciar la instalación.
Introducción a videoconferencias
La cámara Web se entrega
con Logitech Vid™ HD
Con Logitech Vid HD, para realizar
videoconferencias en directo por Internet
sólo se requieren unos escasos y sencillos
pasos:
• Instalar Logitech Vid HD
• Crear una cuenta
• Añadir un amigo y realizar
una videoconferencia
Más información:
http://www.logitech.com/whatisvid
Si quieres llamadas con resolución 1080p,
descarga e instala Skype 5.7 desde www.skype.com.
Español 15

Utilización
Configuración de Logitech Vid HD
1 Instala Logitech Vid HD
Se recomienda la instalación de la cámara Web
Logitech y del software Logitech Vid HD.
Consejo: si prefieres otra aplicación de videoconferencias, deberás descargar e instalar
el software de otro fabricante.
Más información:
http://www.logitech.com/webcam_howto
2 Crea una cuenta
Sigue las instrucciones en pantalla para crear
la cuenta Logitech Vid HD y para configurar
la cámara Web para videoconferencias.
Para realizar videoconferencias con cualquier
aplicación, tanto tú como la persona a quien llames
deberán tener:
• Una cámara Web
• Una computadora con altavoces y micrófono
(o un audífono con micrófono; muchas cámaras
Web Logitech incluyen un micrófono integrado)
• Una conexión de banda ancha a Internet
(p. ej., DSL, T1 o cable)
• La misma aplicación de videoconferencias
(p. ej., Logitech Vid HD)
• Cuentas para videoconferencias
16 Español

Logitech® HD Pro Webcam C920
3 Agrega un amigo o realiza una llamada
de práctica
Haz click en la ficha Llamada de práctica
para probar la configuración.
Consejo: la ficha Llamada de práctica estará
siempre disponible en la lista de contactos
para que pruebes la configuración.
Para agregar un amigo, haz click en la ficha
Agregar un amigo e introduce la dirección
de correo electrónico del amigo cuando
se te pida.
Cuando el amigo acepte la invitación, haz click
en su imagen para realizar una llamada.
Acceso a la configuración de
lacuenta e inicio de aplicaciones
Logitech detecta y ajusta automáticamente
la mejor configuración para la cámara. Si deseas
volver a tomar la fotografía de perfil o actualizar la
configuración, haz click en el icono Configuración.
Haz doble click en los iconos del escritorio para
iniciar las aplicaciones.
1. Software de cámara Web Logitech
2. Logitech Vid HD
Consejo: el icono de Logitech Vid HD sólo estará
presente si decidiste instalar Logitech Vid HD.
Para obtener información sobre videoconferencias
de otros fabricantes, visita:
www.logitech.com/webcam_howto
1 2
Español 17

Utilización
Navegación por el software de la cámara Web Logitech
10 11
1
2
3
4 5 6 7
1. Captura imágenes y videos
2. Ve las imágenes capturadas y compártelas
por correo electrónico, Facebook® o YouTube®.
Es posible que sea necesario registrarse.
3. Un área de acceso rápido a las aplicaciones
relacionadas con la cámara Web que hayas
instalado
4. Inicia Logitech Vid HD (si se ha instalado)
5. Captura videos generados por la detección
de movimiento
6. Crea tu propia máscara de video
(para cámaras Web que admiten esta función)
9
7. Controla los efectos de video y la cámara Web
durante una videoconferencia
8. Descarga aplicaciones de cámara Web
adicionales
9. Cambia de cámara Web (si tienes más de una)
10. Abre la configuración del software de
la cámara Web Logitech
11. Abre el panel de ayuda
(manuales y videos de demostración)
8
18 Español

Logitech® HD Pro Webcam C920
Capturar fotografías y videos
1
2
6 7
QuickCapture permite hacer fotografías
y grabar video fácilmente.
Ofrece acceso fácil a controles y parámetros
de la cámara Web, así como a efectos de video
para personalizar imágenes y grabaciones.
1. Ventana de vista previa
2. Modo de captura: fotografía/video
3. Botón de captura
4. Controles de cámara Web
5. Video Eects y Fun Filters
6. Miniaturas de fotografías
7. Miniaturas de videos
8. Haz click en una miniatura para entrar
en la galería
3
4 5
8
Ver y compartir en la Galería
4
6
2
1
Al hacer click en la miniatura de una imagen
en la galería (1), se abre el video o la foto en
la ventana de vista previa (2).
• Adjunta un fichero de video o imagen
a un mensaje de correo electrónico (3)
• Edita una foto o empalme videos (4)
• Carga una imagen o un video en Facebook (5)
• Carga un video en Twitter (6)
• Carga un video en YouTube (7)
También puedes arrastrar y colocar una imagen
de la galería en una de las fichas de función
(elementos 3-7) para iniciar una aplicación
de edición, o para adjuntar o cargar. Es posible
que sea necesario registrar las aplicaciones.
Twitter requiere software adicional.
3
5
7
Español 19

Utilización
Uso de la detección de movimiento
• Configura la cámara Web para que grabe video
cuando detecte movimiento.
• Ajusta la duración del video capturado
y la sensibilidad de detección.
• El video capturado se guarda automáticamente
en la computadora.
• Ve contenido en la Galería o cárgalo mediante
la ventana para este fin con una sola pulsación.
Personalización de videos
eimágenes
Tu cámara Web ofrece Video Eects™,
incluidos avatares, accesorios faciales
(bigote, gafas, sombreros, etc.), Fun Filters
y Video Masks.
¿Deseas crear tu propia máscara de video?
Sólo tienes que abrir Video Mask Maker en el menú
principal y seguir las instrucciones en pantalla.
Ten en cuenta que al usar Video Eects durante
la grabación de video, la cámara Web usa
un formato de compresión MJPEG. Es posible
que los ficheros comprimidos MJPEG tarden más
en cargarse que los ficheros H.264.
20 Español

Logitech® HD Pro Webcam C920
Ajuste de la cámara Web durante
una videoconferencia
2
3
4
5
6
7
8
9
1. Inicia el controlador de cámara Web cuando
te encuentres en una videoconferencia.
2. Oculta tu imagen de video con una foto mientras
la cámara está conectada.
3. Usa panorámico e inclinación para obtener
el mejor ángulo.
4. Acerca o aleja el sujeto para incluir/excluir
el entorno.
5. Usa Seguir mi cara para ser siempre el centro
de atención.
1
6. Disfruta de conversaciones con sonido nítido
sin molestos ruidos de fondo.
7. Corrige los entornos de poca iluminación
mediante RightLight.
8. Elige entre enfoque automático o manual.
9. Ajusta la configuración avanzada de
la cámara Web.
Obtén más aplicaciones para
lacámara Web
Descarga e instala aplicaciones adicionales
para la cámara Web, como videoconferencias,
edición de fotografías y videos, y otros programas
de valor añadido.
Español 21

Utilización
Obtener ayuda
Haz click en el icono de ayuda para
acceder a un manual de usuario o ver
videos demostrativos y aprender a obtener
el máximo de la cámara Web y el software
Logitech.
Consejo: si tienes dudas sobre una función,
haz click en el icono de ayuda y nuestro manual
se abrirá en el sitio pertinente.
22 Español

Logitech® HD Pro Webcam C920
1
2
3
Fonctionnalités
1. Lentille HD 1080p avec mise au point
automatique Carl Zeiss®
2. Microphone
3. Témoin d'activité
4. Clip/base flexible
5. Fixation pour trépied
6. Documentation sur le produit
4
5
Setup Guide
Logitech® HD Pro Webcam C920
6
Français 23

Première utilisation
1 2 3
Merci d'avoir acheté la caméra
WebC920!
Utilisez ce guide pour configurer votre caméra Web
Logitech et passer des appels vidéo.
Si vous avez des questions avant de commencer,
veuillez consulter les sites Web répertoriés cidessous pour en savoir plus sur les caméras Web
Logitech et sur les appels vidéo.
www.logitech.com/support
www.logitech.com/webcam_howto
www.logitech.com/whatisvid
www.logitech.com
Installation de la caméra Web
1 Positionnez la caméra Web
Conçue pour s'adapter à votre utilisation, la caméra
Web C920 peut être placée aussi bien sur un écran
d'ordinateur, sur un bureau ou sur un trépied.
Installation sur un écran d'ordinateur
Prenez la caméra Web d'une main tel qu'indiqué,
puis ouvrez la base flexible (clip) avec l'autre main.
Fixez la caméra Web en veillant à ce que la patte
de la base flexible soit bien alignée avec l'arrière
de l'écran.
24 Français

Logitech® HD Pro Webcam C920
2 Installer le logiciel
Pour commencer, téléchargez et installez le logiciel
Logitech Webcam Software. Assurez-vous que
votre ordinateur est connecté à Internet.
Pour Windows XP, Windows Vista
ou Window 7:
Pour télécharger le logiciel de caméra Web,
rendez-vous sur le site www.logitech.com/LWS.
Sélectionnez votre système d’exploitation,
puis suivez les instructions apparaissant à l’écran
pour télécharger et installer le logiciel.
A l’invite, connectez votre caméra Web.
USB
Pour Windows 7:
Pour télécharger et installer automatiquement
le logiciel, branchez votre caméra Web au port USB,
puis suivez les instructions apparaissant à l’écran.
Conseil: après le téléchargement, si l’installation
ne démarre pas automatiquement, recherchez le
logiciel Logitech Webcam Software dans le dossier
de téléchargement de votre ordinateur, puis cliquez
deux fois dessus pour démarrer l’installation.
Première utilisation
desappelsvidéo
Logitech Vid™ HD est fourni avec
votre caméra Web.
Avec Logitech Vid HD, passez des appels
vidéo en direct sur Internet en quelques
étapes très simples:
• Installez Logitech Vid HD
• Créez votre compte d'utilisateur
• Ajoutez un contact et passez
un appel vidéo
Pour en savoir plus, consultez le site
http://www.logitech.com/whatisvid
Pour des appels de qualité 1080p,
téléchargez Skype 5.7 sur www.skype.com.
Français 25

Première utilisation
Installation du logiciel
Logitech
VidHD
1 Installez Logitech Vid HD
Nous vous recommandons d'installer
le logiciel de caméra Web Logitech ainsi que
le logiciel Logitech Vid HD.
Remarque: si vous préférez utiliser une autre
application d'appels vidéo, vous devez télécharger
et installer le logiciel tiers correspondant.
Pour en savoir plus, consultez le site
http://www.logitech.com/webcam_howto
2 Créez votre compte d'utilisateur
Suivez les instructions à l'écran pour créer
votre compte Logitech Vid HD puis configurez
votre caméra Web pour vos appels vidéo.
Pour passer un appel vidéo depuis n'importe quelle
application, votre interlocuteur et vous devez
posséder:
• Une caméra Web
• Un ordinateur avec haut-parleurs et un micro
(ou un casque avec micro: de nombreuses
caméras Web Logitech sont dotées
d'un micro intégré)
• Une connexion Internet haut débit
(de type ADSL, T1 ou câble)
• Une application d'appels vidéo similaire
(par exemple Logitech Vid HD)
• Un compte d'utilisateur pour les appels vidéo
26 Français

Logitech® HD Pro Webcam C920
3 Ajoutez un ami et passez
un appel d'essai
Cliquez sur l'icône Appel d'essai pour tester
vos paramètres.
Remarque: l'icône d'appel d'essai apparaît
en permanence dans votre liste de
contacts pour vous permettre de tester
vos paramètres.
Pour ajouter un contact cliquez sur l'icône
Ajouter un contact, puis saisissez l'adresse
électronique de votre ami.
Dès que votre ami aura accepté votre invitation,
cliquez sur son image de profil pour passer
un appel.
Accès aux paramètres du compte
etdémarrage des applications
Logitech détecte et définit automatiquement
les paramètres les plus adaptés pour
votre caméra Web. Pour changer l'image de
votre profil ou mettre à jour vos paramètres,
cliquez sur l'icône Paramètres.
Cliquez deux fois sur les icônes présentes sur
votre bureau pour lancer vos applications.
1. Logitech Webcam Software
2. Logitech Vid HD
Remarque: l'icône Logitech Vid HD apparaît
uniquement si vous avez choisi d'installer
ce logiciel. Pour en savoir plus sur les logiciels
d'appels vidéo tiers, rendez-vous sur
www.logitech.com/webcam_howto
1 2
Français 27

Première utilisation
Utilisation du logiciel Logitech Webcam Software
1
2
3
4 5 6 7
1. Prenez des photos et réalisez des vidéos.
2. Visualisez vos images et partagez-les par
courrier électronique, sur Facebook® ou sur
YouTube®. Une inscription peut être requise.
3. Accédez facilement aux applications liées
à votre caméra Web.
4. Lancez Logitech Vid HD (si déjà installé).
5. Capturez des vidéos déclenchées par
la détection de mouvements.
6. Créez votre masque vidéo personnalisé
(pour les caméras Web prenant en charge
cette fonction).
9
7. Contrôlez la caméra Web et ses eets vidéo
pendant un appel vidéo.
8. Téléchargez des applications de caméra Web
supplémentaires.
9. Changez de caméra Web
(si vous en possédez plusieurs).
10. Ouvrez les paramètres du logiciel Logitech
Webcam Software.
11. Ouvrez le tableau de bord de l’aide
(manuels et vidéos de démonstration).
10 11
8
28 Français

Logitech® HD Pro Webcam C920
Réalisation de photos et de vidéos
1
2
6 7
Quick Capture vous permet de prendre des photos
ou d'enregistrer des vidéos facilement.
L'application vous permet d'accéder facilement
aux commandes, aux paramètres et aux eets
vidéo de la caméra pour personnaliser vos images
et vos enregistrements.
1. Fenêtre d'aperçu
2. Mode de capture: photo/vidéo
3. Bouton de capture
4. Commandes de la caméra
5. Eets vidéo et filtres amusants
6. Vignettes photo
7. Vignettes vidéo
8. Cliquez sur une vignette pour accéder
à la galerie
3
4 5
8
Visualisation et partage à partir
dela galerie
3
4
5
6
7
2
1
En cliquant sur la vignette d'une image dans
la galerie (1), la vidéo ou la photo correspondante
s'ouvre dans la fenêtre d'aperçu (2).
• Joignez une vidéo ou une photo à un courrier
électronique (3).
• Modifiez une photo ou montez une vidéo (4).
• Téléchargez une photo ou une vidéo sur
Facebook (5).
• Téléchargez une vidéo sur Twitter (6).
• Téléchargez une vidéo sur YouTube (7).
Vous pouvez également faire glisser une
image de la galerie sur une icône de fonction
(éléments 3 à 7) pour lancer une application
d'édition ou l'envoyer par courrier électronique
ou sur Internet. Une inscription peut être requise
pour les applications. Logiciel supplémentaire
requis pour Twitter.
Français 29

Première utilisation
Mode de détection
desmouvements
• Configurez votre caméra Web pour lancer
l'enregistrement vidéo à la détection de
mouvements.
• Ajustez la durée de l'enregistrement et
la sensibilité de la détection.
• Les vidéos capturées sont automatiquement
enregistrées sur votre ordinateur.
• Achez le contenu dans la galerie
ou téléchargez-le à partir de la fenêtre
de téléchargement instantané.
Personnalisation des photos
etdesvidéos
Votre caméra Web est équipée de Video Eects™,
une application comprenant des avatars,
des accessoires de déguisement (moustaches,
lunettes, chapeaux, etc.), des filtres amusants
ou encore des masques vidéo.
Pour créer votre propre masque vidéo,
ouvrez simplement le créateur de masques vidéo
depuis le menu principal et suivez les instructions
à l'écran.
Notez que lorsque vous utilisez des eets vidéo
durant un enregistrement vidéo, votre caméra
Web enregistre au format MJPEG. Les fichiers
MJPEG peuvent être plus longs à télécharger
que les fichiers H.264.
30 Français

Logitech® HD Pro Webcam C920
Personnalisation de votre caméra
Web lors d'un appel vidéo
2
3
4
5
6
7
8
9
1. Lancez le contrôleur de caméra Web lors
d'un appel vidéo.
2. Masquez votre image vidéo avec une photo
pendant que la caméra est connectée.
3. Utilisez les fonctions d'inclinaison et de zoom
pour définir le meilleur angle.
4. Eectuez un zoom avant ou arrière pour inclure
ou exclure votre environnement.
5. Utilisez la fonction Suivre mon visage pour être
sûr d'apparaître dans le cadre.
1
6. Bénéficiez de conversations claires, sans bruits
de fond désagréables.
7. Corrigez les mauvaises conditions d'éclairage
grâce à RightLight.
8. Sélectionnez le mode de mise au point
automatique ou manuelle.
9. Réglez les paramètres avancés de
votre caméra Web.
Applications supplémentaires
pourvotre caméra Web
Téléchargez et installez des applications
supplémentaires pour votre caméra Web,
notamment des programmes d'appel vidéo
ou encore de montage photo et vidéo.
Français 31

Première utilisation
Aide
Cliquez sur l'icône d'aide pour accéder
au guide de l'utilisateur complet ou visionner
des vidéos de démonstration expliquant
comment exploiter au mieux le logiciel et
la caméra Web Logitech.
Remarque: si vous avez des doutes concernant
une fonction, cliquez sur l'icône d'aide pour ouvrir
le manuel à la page correspondante.
32 Français

Logitech® HD Pro Webcam C920
1
2
3
Recursos
1. Lente com foco automático Carl Zeiss®
HD 1080 p
2. Microfone
3. Luz de atividade
4. Base/clipe flexível
5. Ligação do tripé
6. Documentação do produto
4
5
Setup Guide
Logitech® HD Pro Webcam C920
6
Português 33

Introdução ao
1 2 3
Obrigado por ter adquirido a C920!
Use este guia para configurar a câmara Web
da Logitech e começar a fazer videochamadas.
Se tiver dúvidas antes de começar, visite os sites
listados abaixo para saber mais sobre câmaras Web
da Logitech e videochamada.
www.logitech.com/support
www.logitech.com/webcam_howto
www.logitech.com/whatisvid
www.logitech.com
Configurar a câmara Web
1 Posicione a câmara Web
Projetada para o modo como você gosta de fazer
uma videochamada, coloque a Webcam C920
onde desejar — em um monitor de computador,
mesa ou tripé.
Para posicionamento em um monitor
Segure a câmara Web como mostrado e abra
a base de clipe/flexível com a outra mão.
Monte a câmara Web, certificando-se de que
o pé da base de clique/flexível esteja no nível
na parte posterior do monitor.
34 Português

Logitech® HD Pro Webcam C920
2 Instalar o software
Para poder começar, será necessário fazer
o download e instalar o software da câmara Web
da Logitech. Verifique se o computador tem acesso
à Internet.
Para Windows XP, Windows Vista
ou Windows 7:
Visite www.logitech.com/LWS para fazer
o download do software da sua câmara Web.
Selecione o sistema operacional e siga as instruções
exibidas na tela para fazer o download e instalar
o software.
Quando solicitado, conecte a câmara Web.
USB
Para Windows 7:
Conecte a câmara Web a uma porta USB para fazer
o download do software de forma automática.
Siga as instruções na tela para fazer o download
e instalar o software.
Dica: Após o download, se a instalação não se
iniciar automaticamente, localize o arquivo LWS
na pasta de downloads do seu computador.
Clique duas vezes para começar a instalação.
Introdução a videochamada
A câmara Web inclui
o Logitech Vid™ HD
Com o Logitech Vid HD, a videochamada
ao vivo pela Internet requer apenas algumas
etapas fáceis:
• Instalar o Logitech Vid HD
• Criar uma conta
• Adicionar um amigo e fazer
videochamada
Saiba mais:
http://www.logitech.com/whatisvid
Para uma experiência de chamada 1080p,
descarregue e instale Skype 5.7 do site
www.skype.com.
Português 35

Introdução ao
Configurar o Logitech Vid HD
1 Instalar o Logitech Vid HD
Recomendamos que instale o software da câmara
Web da Logitech e o Logitech Vid HD.
Dica: se preferir outro aplicativo de videochamada,
será necessário descarregar e instalar software
de outro fabricante.
Saiba mais:
http://www.logitech.com/webcam_howto
2 Criar uma conta
Siga as instruções na tela para criar uma conta
do Logitech Vid HD e configurar a câmara Web
para videochamadas.
Para fazer videochamadas com qualquer aplicativo,
você e a pessoa a ser chamada devem ter:
• Uma câmara Web
• Um computador com alto-falantes e um um
microfone (ou um headset com um microfone;
várias câmaras Web da Logitech têm um
microfone embutido)
• Conexão com a Internet de banda larga
(por exemplo, DSL, T1 ou cabo)
• O mesmo aplicativo de videochamada
(por exemplo, Logitech Vid HD)
• Contas de videochamada
36 Português

Logitech® HD Pro Webcam C920
3 Adicionar um amigo ou praticar
uma chamada
Para testar as configurações, clique no botão
de prática de chamada para testar
as configurações.
Dica: o botão de prática de chamada está
sempre disponível na lista de contatos para
você poder testar as configurações.
Para adicionar um amigo, clique no botão
Adicionar um amigo
e, quando solicitado, insira o e-mail
do amigo.
Depois de o amigo aceitar seu convite, clique na
imagem do amigo para fazer uma chamada.
Acessar configurações da conta
einiciar aplicativos
A Logitech detecta e define automaticamente
as melhores configurações para a câmara Web.
Se desejar tirar novamente a foto de seu perfil
ou atualizar uma configuração, clique no ícone
Configurações.
Clique duas vezes nos ícones na área de trabalho
para iniciar os aplicativos.
1. Logitech Webcam Software
2. Logitech Vid HD
Dica: o ícone do Logitech Vid HD estará presente
somente se você escolher instalar Logitech Vid HD.
Para saber mais sobre videochamada de terceiros,
visite:
www.logitech.com/webcam_howto
1 2
Português 37

Introdução ao
Navegar o software da câmara Web da Logitech
1
2
3
4 5 6 7
1. Capturar fotos e vídeos
2. Exibir imagens capturadas e compartilhar
através de e-mail, Facebook® ou YouTube®
Pode ser necessário registrar-se.
3. Uma área para fácil acesso a aplicativos
instalados relacionados à câmara Web
4. Iniciar o Logitech Vid HD (se instalado)
5. Capturar vídeos acionados por movimentos
detectados
6. Criar sua própria máscara de vídeo
personalizada
(para câmaras Web que oferecem suporte
a esse recurso)
7. Controlar os efeitos de vídeo e a câmara Web
durante uma videochamada
8. Download de aplicativos adicionais
da câmara Web
9. Mudar câmaras da Web (quando houver
mais de uma)
10. Abrir configurações do Logitech
Webcam Software
11. Abrir o painel de ajuda (manuais e vídeos
"como fazer")
10 11
9
8
38 Português

Logitech® HD Pro Webcam C920
Capturar vídeo e tirar fotos
1
2
6 7
O Quick Capture permite que você tire fotos
ou grave vídeos facilmente.
Você tem fácil acesso aos controles e
às configurações da câmara Web, assim como
a efeitos de vídeo, para personalizar imagens
e gravações.
1. Janela de visualização
2. Modo de captura: foto/vídeo
3. Botão de captura
4. Controles da câmara Web
5. Efeitos de vídeo e filtros divertidos
6. Miniaturas de fotos
7. Miniaturas de vídeos
8. Clique em uma miniatura para entrar na galeria
3
4 5
8
Exibir e compartilhar usando
agaleria
4
6
2
1
Um clique em uma miniatura de imagem
na galeria (1) abre o vídeo ou a foto na janela
de visualização (2).
• Anexar um vídeo ou uma foto a um e-mail (3)
• Editar uma foto ou unir vídeo (4)
• Carregar uma foto ou um vídeo no Facebook (5)
• Carregar um vídeo no Twitter (6)
• Carregar um vídeo no YouTube (7)
Você também pode arrastar e soltar uma
imagem da galeria em um dos ladrilhos de
função (itens 3-7) para iniciar um aplicativo
de edição ou para anexar ou carregar.
Para aplicativos, talvez seja necessário registrar-se.
Software adicional é necessário para o Twitter.
Português 39
3
5
7

Introdução ao
Usar detecção de movimentos
• Configure a câmara Web para gravar vídeo
quando movimentos forem detectados.
• Ajuste a duração de vídeo capturado
e a sensibilidade de detecção.
• O vídeo capturado é salvo automaticamente
no computador.
• Exiba conteúdo na galeria ou carregue-o usando
a janela Carregamento de um único toque.
Personalizar vídeos e fotos
A câmara Web oferece Video Eects™,
incluindo avatares, acessórios de rosto
(bigodes, óculos, chapéus etc.), filtros divertidos
e máscaras de vídeo.
Deseja criar sua própria máscara de vídeo?
Simplesmente abra o Criador de máscara de vídeo
no menu principal e siga as instruções na tela.
Observe que, quando efeitos de vídeo são usados
durante a gravação de vídeo, a câmara Web usa
um formato de compactação MJPEG. Arquivos de
compactação MJPEG podem levar mais tempo para
serem carregados do que arquivos H.264.
40 Português

Logitech® HD Pro Webcam C920
Ajustar a câmara Web durante
uma videochamada
2
3
4
5
6
7
8
9
1. Inicie o controle da câmara Web quando estiver
em uma videochamada.
2. Oculte uma imagem de vídeo com uma foto
enquanto a câmara Web estiver conectada.
3. Use panorâmica e inclinação para obter
o melhor ângulo.
4. Efetue mais ou menos zoom para incluir/excluir
áreas contíguas.
5. Use Siga meu rosto para estar sempre
no quadro.
1
6. Desfrute de conversas cristalinas, sem irritantes
ruídos de fundo.
7. Corrija ambientes pouco iluminados
usando RightLight.
8. Escolha entre foco automático ou manual.
9. Ajuste as configurações avançadas para
a câmara Web.
Obter mais aplicativos para
acâmara Web
Descarregue e instale aplicativos adicionais para
a câmara Web, como videochamada, edição de foto
e vídeo, e outros programas de valor agregado.
Português 41

Introdução ao
Obter ajuda
Clique no ícone da Ajuda para acessar
um manual de usuário completo ou ver
vídeos "como fazer" que mostram como
aproveitar ao máximo o software e a câmara
Web da Logitech.
Dica: se não tiver certeza quanto a um recurso,
clique no ícone da Ajuda e o manual se abrirá
no local correto.
42 Português

www.logitech.com/support
United States +1 646-454-3200
Argentina +00800-555-3284
Brasil +0 800-891-4173
Canada +1 866-934-5644
Chile 1230 020 5484
Colombia 01-800-913-6668
Latin America +1 800-578-9619
Mexico 01.800.800.4500
Logitech® HD Pro Webcam C920
43

www.logitech.com
© 2012 Logitech. All rights reserved. Logitech, the Logitech logo, and other Logitech marks are owned by Logitech
andmaybe registered. Microsoft, Windows, and the Windows logo are trademarks of the Microsoft group of companies.
Allother trademarks are the property of their respective owners. Logitech assumes no responsibility for any errors
thatmayappear in this manual. Information contained herein is subject tochange without notice.
© 2012 Logitech. Tous droits réservés. Logitech, le logo Logitech et les autres marques Logitech sont lapropriété exclusive
de Logitech et sont susceptibles d’être déposés. Microsoft, Windows et le logo Windows sont des marques déposées
du groupe et des sociétés Microsoft. Toutes les autres marques commerciales sont la propriété de leurs détenteurs
respectifs. Logitech décline toute responsabilité encas d’erreurs susceptibles de s’être glissées dans le présent manuel.
Lesinformations énoncées dans cedocument peuvent faire l’objet de modifications sans avis préalable.
620-003253.003
 Loading...