

Page 1

SPIDER CLASSIC 15
PILOT’S GUIDE
MANUEL DE PILOTAGE
PILOTENHANDBUCH
MANUAL DEL PILOTO
パイロット・ガイド
新手指南
40-00-0377 Rev A Pilot’s Guide also available at www.line6.com/manuals ©2016 Line 6, Inc.
Page 2
Basic Operation
2
5 7
1
3
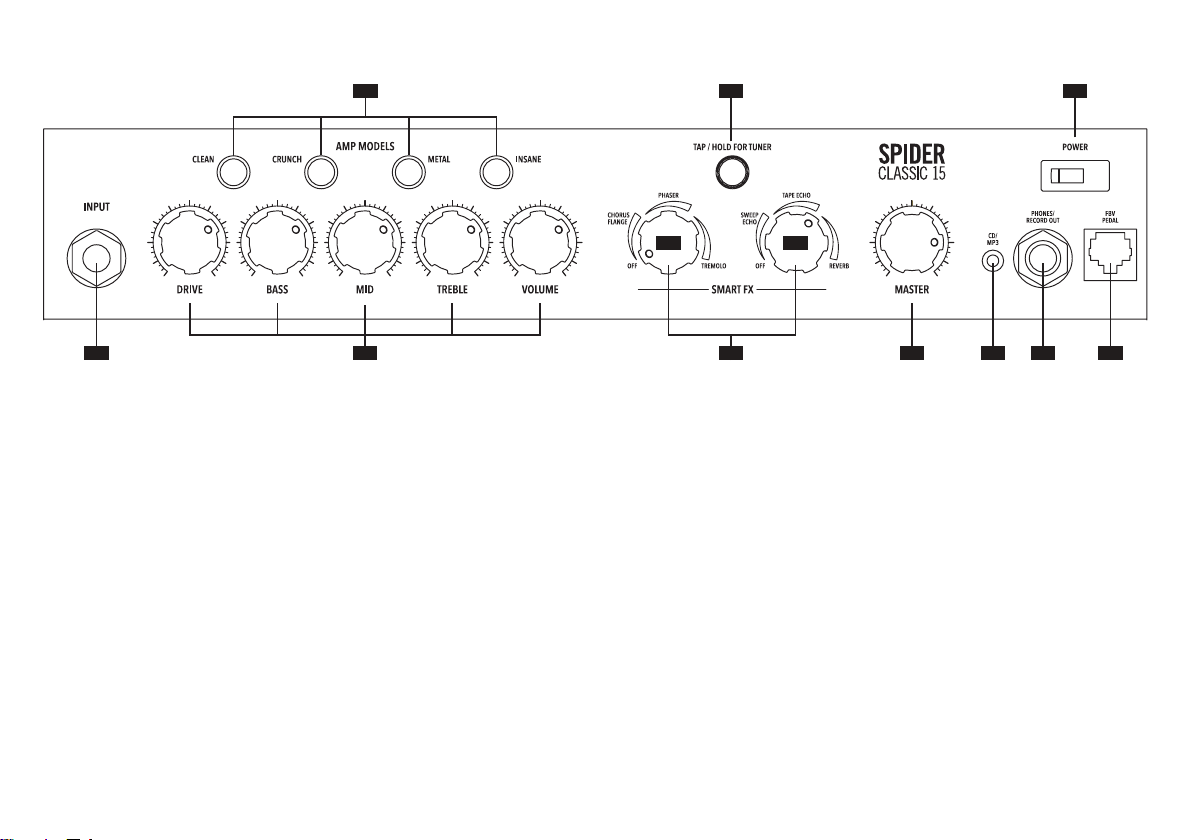
1. Guitar In – Plug your guitar in here.
2. Channel Memories / Amp Models – The four channels each
use a different Amp Model, and all come pre-loaded with a factory preset dialed in to nail a great tone. Press one of these buttons to hear the presets. To replace any preset with your own
“snapshot” of all tone and effect knob positions (except Master
Volume), press and hold one of these four buttons for two seconds. The light ashes when the save is complete.
3. Tone Controls – Drive is like the volume or gain knob on other
amps; controls how much “dirt” or “distortion” you get in your
sound. Bass, Mid, and Treble controls are customized for each
Amp Model to give you optimal tonal control.
4. Smart Control FX – Spin one of these knobs to get great FX.
Knob A picks Chorus/Flange, Phaser or Tremolo, with a range
of settings “from subtle to extreme ” for each effect. Turning the
knob all the way down turns this effect off.
A
4
B
8 9 106
Knob B picks Delay, Tape Echo or Sweep Echo, with a range
of mix settings from low to high. The Tap LED ashes the delay
time. To change the delay time, tap the Tap button. Turning this
knob all the way down turns the effect off.
5. Tap – Tapping the TAP button a few times sets the tempo of your
Delay effects.
To activate the tuner press and hold the TAP button for a few
seconds.
If the low E string on the guitar is more than 6 cents at, the far
left LED (Clean) will ash. Tune the low E string by raising the
pitch until the two center LED’s (Crunch and Metal amp models)
are lit.
The tuner will always look for notes that correspond to the stan-
dard guitar string tunings (E A D G B E) and the 4 amp model
LED’s will light to indicate how much your string is sharp and at,
as follows:
• Channel A (Clean) lit: Signicantly lower in pitch (Deviation
more than or equal to 20 Cents Flat).
Page 3

• Channel B (Crunch) lit: Slightly lower in pitch (Deviation
more than or equal to 5 cents Flat).
• Channel B and C lit: In Tune (Deviation +/-5 Cents).
• Channel C (Metal) lit: Slightly higher in pitch (Deviation more
than or equal to 5 Cents Sharp but less than 20 Cents Sharp).
• Channel D (Insane) lit: Signicantly higher in pitch (Deviation
more than or equal to 20 Cents Sharp).
If you are uncertain if the guitar is tuned correctly, double check
your work by using the ‘5th fret method’. For example, fret your
low E string at the 5th fret, then tune your open A string to that
note. Now fret your A string at the 5th fret, and tune your open
D string to that note. Tune your other strings in pairs the same
way, with the exception of the open B string, which should tune
to your G string fretted at the 4th fret, instead of the 5th.
Boost
Press and hold the Tap button as you turn the Drive knob past 12
o’clock. As you do this, Spider Classic 15’s Clean Channel LED
comes on. This gives the kind of extra ‘dirt’ that you’d expect
from a Distortion pedal with the distortion control set low and
the output control set high. It boosts your guitar signal before it
reaches the Amp Model, so that you hit the model harder and get
a more distorted sound.
Noise Gate
Press and hold TAP as you turn the second SmartFX knob B into
the Reverb “swoosh”. This turns the built in noise gate on and off,
which helps to cut down on hiss and noise. When you do this, the
“Insane” LED comes on to indicate the Gate is on. By default the
gate is on for all the amp models , except Crunch.
6. Master Volume – You can choose the overall volume of the
amplier, without affecting your tone.
7. Power Switch – Flip the switch to bring Spider Classic 15 to life.
8. CD/MP3 Inputs – Plug in any audio source to jam with your
favorite music or drum machine. Use the device’s output control
to adjust the volume. Start with the volume on your device at its
lowest setting and bring it up to volume you desire.
9. Phones/Record Out – Connect a pair of stereo headphones
here. When you do so, the speakers are muted. This jack also
doubles as a Record Output. Use a stereo 1/4” TRS cable to
connect to a mixer or recording device.
10. FBV – Connect an FBV2™ to easily change from clean to overdriven sounds. For more control connect an FBV Express MK
II™ for channel switching, tap tempo, wah/volume control and
tuner capabilities.
Factory Reset
Reset the factory programmed states by holding the Clean
Channel button down on power up. Warning: This will erase all
your custom sounds, so be sure you want to start fresh before
you do it!
Additional Tips
When you select an Amp Model, Spider Classic 15 automatically
sets its tone controls and effects to match the Amp Model. You
can disable the auto-FX selection (but not the tone control autoselection) by powering up with the Insane Channel button held.
The auto-selection is re-enabled next time you power up.
Learn more online www.line6.com/manuals
You can always download the latest version of your Spider Classic
15 Pilot’s Guide online. While you’re online be sure to register
your Spider Classic 15 or simply ll out and mail us your included
registration card. Registering gets you all set up for warranty
service should you have a warranty issue with your Spider Classic
15, and also qualies you for contests, special offers and more.
Page 4

 Loading...