

Page 1

®
POWERCAB FAMILY
POWERCAB 112
POWERCAB 112 PLUS
POWERCAB 212 PLUS
40-00-0485 Rev D www.line6.com/manuals © 2019 Yamaha Guitar Group, Inc. All rights reserved.
PILOT’S GUIDE
Page 2

Contents
Specifications � � � � � � � � � � � � � � � � � � � � � � � � � � � � � � � � � � � � � � � � � � � 3
Overview � � � � � � � � � � � � � � � � � � � � � � � � � � � � � � � � � � � � � � � � � � � � � � � � 4
Background � � � � � � � � � � � � � � � � � � � � � � � � � � � � � � � � � � � � � � � � �4
Speakers � � � � � � � � � � � � � � � � � � � � � � � � � � � � � � � � � � � � � � � � � � �4
Amplier � � � � � � � � � � � � � � � � � � � � � � � � � � � � � � � � � � � � � � � � � � � �4
Features � � � � � � � � � � � � � � � � � � � � � � � � � � � � � � � � � � � � � � � � � � � �5
Powercab 112 Plus & 212 Plus - Top Panel Controls � � � � � � � � � � �6
Powercab 112 Plus & 212 Plus - Rear Panel Controls � � � � � � � � � � 7
Powercab 112 - Rear Panel Controls � � � � � � � � � � � � � � � � � � � � � � � �8
Speaker Models vs Cabinet Modeling � � � � � � � � � � � � � � � � � � � � � � � � 9
Full Range, Flat Response and Cabinet Modeling/Impulse
Response Methods � � � � � � � � � � � � � � � � � � � � � � � � � � � � � � � � � � �9
Amp-in-the-Room Speaker Modeling Method � � � � � � � � � � � � �10
Impulse Responses � � � � � � � � � � � � � � � � � � � � � � � � � � � � � � � � � � � � � � 16
Powercab Edit Software � � � � � � � � � � � � � � � � � � � � � � � � � � � � � � � � � � 16
USB Audio � � � � � � � � � � � � � � � � � � � � � � � � � � � � � � � � � � � � � � � � � � � � � � 16
ASIO Driver (Windows only) � � � � � � � � � � � � � � � � � � � � � � � � � � � �16
USB Audio Modes � � � � � � � � � � � � � � � � � � � � � � � � � � � � � � � � � � �17
Global Settings � � � � � � � � � � � � � � � � � � � � � � � � � � � � � � � � � � � � � � � � � � 17
Input 2 Monitor Mode � � � � � � � � � � � � � � � � � � � � � � � � � � � � � � � �19
Input 2/Aux USB Mode � � � � � � � � � � � � � � � � � � � � � � � � � � � � � � �19
Setup Examples � � � � � � � � � � � � � � � � � � � � � � � � � � � � � � � � � � � � � � � � � 20
L6 LINK � � � � � � � � � � � � � � � � � � � � � � � � � � � � � � � � � � � � � � � � � � � � � � � � 23
Powercab Remote using HELIX via L6 LINK � � � � � � � � � � � � � � �23
L6 LINK Setup Examples � � � � � � � � � � � � � � � � � � � � � � � � � � � � � �23
AES/EBU � � � � � � � � � � � � � � � � � � � � � � � � � � � � � � � � � � � � � � � � � � � � � � � 24
Powercab Speaker Models � � � � � � � � � � � � � � � � � � � � � � � � � � � � � � � 10
MIDI � � � � � � � � � � � � � � � � � � � � � � � � � � � � � � � � � � � � � � � � � � � � � � � � � �24
User Presets � � � � � � � � � � � � � � � � � � � � � � � � � � � � � � � � � � � � � � � � � � � 12
Preset Parameters � � � � � � � � � � � � � � � � � � � � � � � � � � � � � � � � � � �12
Please Note:
Line 6, the Line 6 logo, Powercab, Helix, POD, and POD Farm are trademarks or registered trademarks of Yamaha Guitar Group, Inc� in the U�S� and/or other jurisdictions�
Apple, Mac, OS X, macOS, iPhone, iPad, and iTunes are trademarks of Apple Inc� registered in the U�S� and other countries� iOS is a trademark of Cisco, registered in
the U�S� and other countries� Apple is not responsible for the operation of this device or its compliance with safety and regulatory standards� Windows is a registered
trademark of Microsoft Corporation in the United States and/or other countries� YouTube is a trademark of Google, Inc�
MIDI Program Changes � � � � � � � � � � � � � � � � � � � � � � � � � � � � � � �24
MIDI CC � � � � � � � � � � � � � � � � � � � � � � � � � � � � � � � � � � � � � � � � � � �24
2
SERIAL NO:
Page 3

Specifications
+
+
POWERCAB SPECIFICATIONS
Features
Wattage
Speaker Size
Speaker Type
Compression Driver
Frequency Response
Porting
Calculated Maximum Output
XLR Direct Outs
Combination Input Jacks
L6 LINK™ / AES/EBU
USB Audio Interface
User Presets
Display
Speaker Models
User Impulse Response Support
MIDI I/O
Kick Stands
Weight
Dimensions
Powercab 112
Powercab 112 Plus
Powercab 212 Plus
250W RMS 250W RMS 500W RMS Total, Stereo Amplier
(1x) 12" Mono (1x) 12" Mono (2x) 12" Stereo/Dual Mono
Ceramic Coaxial Custom by
Eminence
®
Ceramic Coaxial Custom by
Eminence
Neodymium Coaxial Custom by
Eminence
(1x) Celestion® CDX 1-1010 (1x) Celestion CDX 1-1010 (2x) Celestion CDX 1-1010
70Hz – 20kHz 70Hz – 20kHz 70Hz – 20kHz
Front Front Rear
125dB (C) SPL @ 1m 125dB (C) SPL @ 1m 131dB (C) SPL @ 1m
1 (Mono) 1 (Mono) 2 (Stereo)
1 2 2
No Input and Output Input and Output
No Yes Yes
No Yes (128) Yes (128)
No 2" LCD 2" LCD
6 6 (+6 more with rmware v2.0) 12
No Yes (48kHz, 24-bit, Mono,
2048-sample)
Yes (48kHz, 24-bit, 2048-sample
Mono, 1024-sample Stereo)
No Yes Yes
Yes Yes Yes
33 lb, 4 oz (15�08 kg) 35 lb, 8 oz (16�10 kg) 47 lb, 10 oz (21�59 kg)
22�3 x 18�2 x 12 (in)
567 x 462 x 305 (mm)
22�3 x 18�2 x 12 (in)
567 x 462 x 305 (mm)
28 x 21�1 x 12 (in)
711 x 537 x 305 (mm)
3
Page 4

Overview
Congratulations on your purchase of the Line 6® Powercab® active guitar
speaker system� This Powercab Family Pilot's Guide contains details
of the Powercab system's features and functionality�
The Powercab is a rst-of-its-kind, powered speaker unit, designed
specically for users of guitar amp modelers that desire a compact,
lightweight amplication solution. This system provides either a at
response or the sound and feel of a traditional guitar cab� It is also
designed to be intuitive and easy to setup and operate - whether you're
on stage or in the studio�
Package includes: Powercab 112, Powercab 112 Plus, or Powercab
212 Plus, IEC power cable, Pilot's Guide, and amp-top Quick Start
Guide�
Background
Typically, users of modeling gear have two choices when it comes to
amplifying their signal while playing live or in the studio; plug into a
traditional amplier and utilize their modeler primarily for eects, or
use speaker cabinet emulation and play through full-range monitor
speakers� While this latter option may be simpler and provide a more
direct translation to a recording or the front-of-house PA, it can often
sound more like a recording, and lack the feel and response of standing
in front of, and playing through, a traditional amplier "in the room." The
Powercab family of products aim to bridge this gap by allowing the user
to choose which method they prefer depending on their needs�
Speakers
The Powercab family of products are active speaker cabinets with
internal power ampliers designed to faithfully reproduce a modeled
guitar signal chain� Each speaker is comprised of a 12" low frequency
driver, with a 1" high frequency compression driver mounted in a coaxial
conguration. This speaker system has been carefully engineered with a
very distinct concept in mind; to be very loud and consistent like a PA,
but also provide the faster, mid-focused transient response and natural
breakup of a guitar speaker� To achieve this goal, we've specied a
custom driver, with components built by Eminence and Celestion to our
exact specications.
Amplifier
The Powercab family utilizes specially designed, Class D ampliers.
These ampliers are designed specically to provide the optimum
wattage for the speakers to achieve the maximum throughput and
eciency. The passive cooling design means noisy cooling fans are not
required, and there is no need for bulky heat sinks on the outside of the
Powercab�
4
Page 5

Features
+
+
Powercab 112
• 12" coaxial drivers, custom speakers
by Eminence®, designed by Line 6
• High frequency compression driver by
Celestion® CDX 1-1010
• Full-Range, Flat-Response (FRFR)
Mode
• 6 "real feel" guitar Speaker Modes
• 250W RMS
• 125dB (C) SPL @ 1m
• Combination Line Input (balanced,
1/4" TRS and XLR)
• XLR Line Output
• High Pass Filter switch
• Ground Lift switch
Powercab 112 Plus (also includes)
• Additional combination Line Input
• L6 LINK / AES In/Out
• Daisy chain two units for stereo
conguration
• MIDI In/Out
• 128 User Presets
• Bright, auto-dimming display
• USB Audio Interface functionality
(stereo, low latency)
• Support for up to 128 User Impulse
Responses
• 6 additional Speaker Models with
rmware version 2.0
Powercab 212 Plus (also includes)
• 500W RMS total, stereo amplier
• 131dB (C) SPL @ 1m
• Two 12" neodymium coaxial custom
speakers by Eminence, designed by
Line 6
• 2 high frequency compression drivers
by Celestion CDX 1-1010
• Blend two Speaker Models or two User
IRs simultaneously
• Ships with rmware version 2.0 for a
total of 12 Speaker Models
5
Page 6

+
+
Powercab 112 Plus & 212 Plus - Top Panel Controls
+
2
1 2
7
1
3 5
STEREO ACTIVE GUITAR SPEAKER SYSTEM
1. VOLUME Knob - Controls the output level of the power amp to
the speaker system� Center position is 6dB down from maximum
output�
2. Signal LEDs - Indicate the overall level of the sound as it is processed
through the system� Green indicates the presence of an input signal,
yellow indicates that it is approaching the upper limit, and red
indicates clipping� If you encounter clipping, try turning down the
level of the source device (e�g�, your amp modeling device)� When
the signal LED(s) turn yellow, the Powercab speaker system will have
the most realistic non-linear natural breakup characteristics�
NOTE: Powercab 112 Plus has one signal LED, while Powercab 212
Plus has two signal LEDs�
3. HOME Button - If you ever get lost, press this button to return to the
main Home screen, or press and hold it for 2 seconds to enter the
Global Settings� See "Global Settings" on page 17�
4. Backlit Display - This backlit display shows the current preset on
its Home screen� It can also display the Preset Editing and Global
Settings screens� The display backlight will dim automatically after a
short period of inactivity�
4
6
5. SAVE Button - Once you've modied the settings of a given preset,
press Save to conrm the changes, re-name, or copy it to a new
preset location�
6. SELECT Knob - This is the main control for changing presets or their
parameter values� From the Home screen, turn this knob to cycle
through the presets� Press to select and turn to edit the value of the
currently highlighted parameter�
7. LED Ring - This ring indicates the "Color" parameter assigned to the
current preset for easy identication.
Powercab 212 Plus allows you to select up to two LED colors,
representing Speaker 1 and Speaker 2�
TIP: Assign dierent colors for user presets to see them from afar�
The LED ring will dim automatically after a short period of inactivity�
6
Page 7

+
+
Powercab 112 Plus & 212 Plus - Rear Panel Controls
+
+
OUTPUTS INPUTS 12
10
*
LEFT/MONORIGHT/AUXLEFT/MONORIGHT
1312 15
PUSHPUSH
14
8
9
Powercab 212 Plus rear panel (112 Plus features dier slightly, as noted below)
11
16
8. POWER Switch - Turns the Powercab on or o.
9. AC In - Connect the included IEC power cable here�
10. *LOW CUT Switch - + Powercab 112 Plus only� Toggles the
80Hz Low Cut Filter on/o, useful for removing unwanted low end
vibration (does not apply to the XLR or L6 LINK - AES/EBU
Outputs' signals)�
*
On Powercab 212 Plus, access the Low Cut feature within
the Global Settings�
11. GROUND GND/LIFT Switch - Controls whether the ground circuit
is lifted for the XLR Output jacks� Can be useful for identifying ground
loops, which can cause unwanted hum�
12. & 13. XLR Output Jacks - Connect to a mixer's input� The output
level is switchable between Line Level (+13dBu) or Mic Level
(~0�0dBu) - see "Global Settings" on page 17�
Powercab 112 Plus includes only a single XLR Output jack�
NOTE: XLR Outputs are not aected by 48V phantom power.
PUSH
17
18
19 20
14. & 15. Combo Input Jacks - Connect the line level output(s) of your
amp modeler to these balanced 1/4" TRS/XLR inputs (e�g�, Line 6
Helix® or POD® devices, etc�)� A Helix device should be set to Line
Level� A POD® HD device should be set to +4dB� "Amp-in-a-box"
type preamp pedals may require additional boosting to achieve the
appropriate line level for these inputs (maximum +13dBu)�
16. USB-B Jack - Connect to a Mac or PC to use the Powercab Edit
software to load IRs, customize, backup & restore all presets, or
to use the Line 6 Updater software� Both are available free from
line6�com/software/�
17. & 18. MIDI IN, OUT/THRU Jacks - Connect to your MIDI gear
for sending and receiving MIDI program change and continuous
controller messages� Connect a second Powercab Plus to send
patch changes to both units�
7
Page 8
19. L6 LINK, AES/EBU OUT - Connect one Powercab Plus to another
Powercab Plus to automatically congure them as a stereo pair. See
page 23 for details�
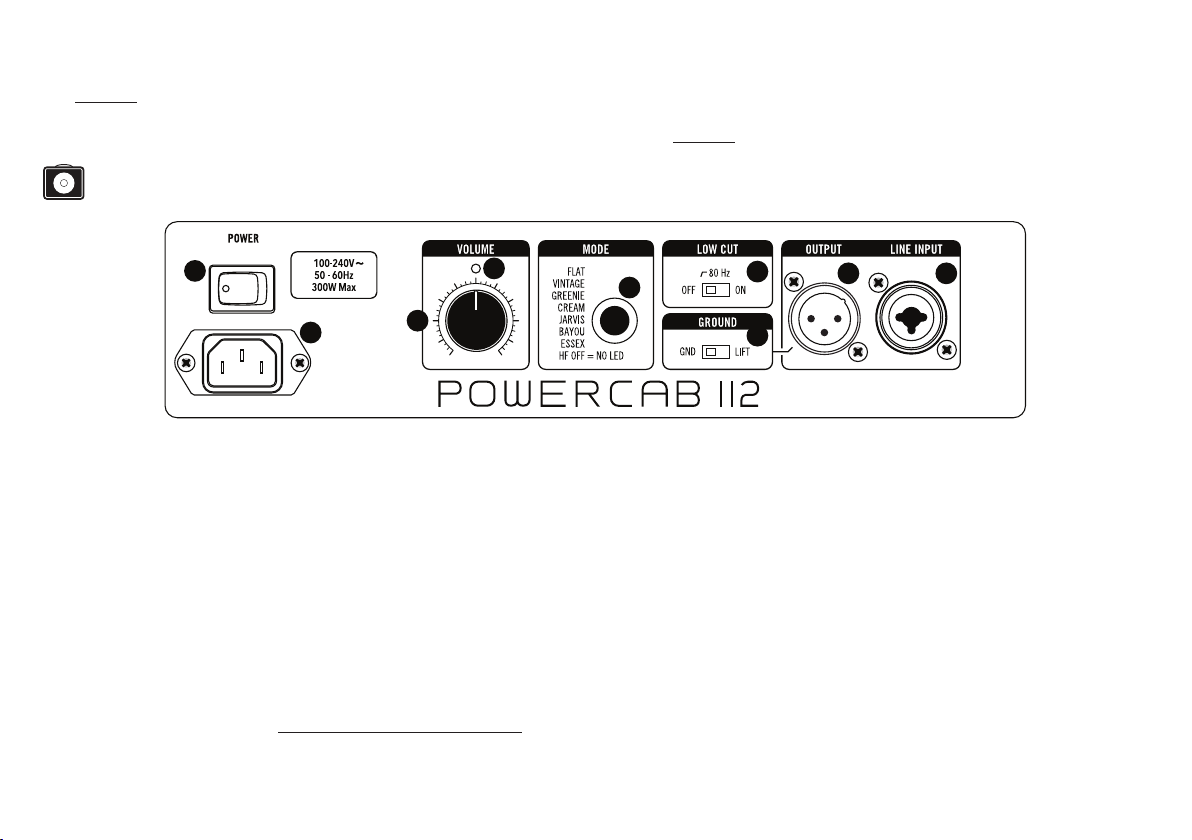
Powercab 112 - Rear Panel Controls
20. L6 LINK, AES/EBU IN - L6 LINK provides easy digital audio
connectivity and remote control capability between Helix and
Powercab Plus devices� Alternatively, digitally connect your amp
modeler that supports AES using an AES/EBU (110Ω XLR) cable.
See page 23 for details�
1
2
3
4
1. POWER Switch - Turns the Powercab 112 on or o.
2. AC In - Connect the included IEC power cable here�
3. VOLUME Knob - Controls the output of the power amp to the
speaker system� 12 o'clock is -6dB from maximum�
4. Signal LED - Bright green indicates the presence of an input signal,
yellow indicates that it is approaching the limit of the unit's output
capabilities, and red indicates digital clipping� If you encounter
clipping, try turning down the level of the source device (e�g�,
your amp modeling device)� When the signal LED turns yellow, the
speaker in Powercab will have the most realistic non-linear breakup
characteristics�
5. MODE Button and LED Ring - Push the button to cycle through
dierent Speaker Modes. The button's LED color indicates the
Speaker Mode in use� See "Preset Parameters" on page 12�
NOTE: HF OFF is equivalent to the Natural speaker model�
5
6
7
8 9
6. LOW CUT Switch - Toggles the 80Hz Low Cut Filter on/o, useful
for removing unwanted low end vibration (does not apply to the XLR
Out)�
7. GROUND GND/LIFT Switch - Controls whether the ground circuit
is lifted for the XLR Output jack� Can be useful for identifying ground
loops, which can cause unwanted hum�
8. XLR Output Jack - Connect to an analog mixer's input� The output
is mic level, with a maximum of 0�0dBu�
NOTE: This XLR Output is not aected by 48V phantom power.
9. Combo Input Jack - Connect the line level output of your amp
modeler to this balanced 1/4" TRS/XLR input (e�g�, Line 6 Helix
or POD device, etc�)� Helix should be set to Line Level� POD HD
should be set to +4dB� "Amp-in-a-box" type preamp pedals may
require additional boosting to achieve the appropriate line level for
these inputs (maximum +13dBu)�
8
Page 9

Speaker Models vs Cabinet Modeling
A Speaker Model is our proprietary method of taking a known, at and neutral guitar cabinet and through signal processing, we virtually "install" a
dierent speaker into it. Each speaker model is intended to sound like wiring up your cabinet with that guitar speaker.
You might say "But wait��� isn't that the same thing as cabinet model?" No! A cabinet model is a speaker cabinet that has a microphone placed over
one or more of its speakers, which is then typically run through a mic preamp and other post processing—similar to placing a mic on a cab in the
studio, which is then piped into the studio monitors or headphones (as in the following illustration)�
Instead, a speaker model takes an existing speaker, resonating in a cabinet, and only changes its frequency response to match that of a dierent
speaker. The result is, when standing in front, it still behaves like a traditional guitar amp, just with a dierent speaker. For the most authentic
experience, Powercab is designed to sound like a high-powered cabinet of the same size (1x12 or 2x12) rather than attempting to emulate the sound
of a larger (4x12) cabinet through a microphone and studio preamp�
Full Range, Flat Response and Cabinet Modeling/Impulse Response Methods
Live Room (isolated)
Preamp, EQ, Compression
Amp
Mic
Speaker Cabinet
Pro: You hear what the audience hears�
Con: It's not the same as the sound and feel of the amp by itself�
Cabinet Modeling
Cabinet &
Speakers
+
Microphones
+ +
Position
y
Post Processing
Distance
x
Room
Reections
+
Control Room
Full Range Monitors
20Hz–20kHz
You
Impulse Response
Preamp, EQ,
Compression
+
Playback
System(s)
? ? ?
x
9
Page 10

Amp-in-the-Room Speaker Modeling Method
Neutral
Amp
You
Speaker
Pro: Sounds like you're playing through an amp and you're in front of it�
Con: Audience isn't hearing the same thing that you are�
1x12 Cabinet
+
Speaker Model Powercab
Powercab Speaker Models
To properly take advantage of these speaker models, disable cabinet emulation blocks within your modeler or "amp-in-a-box" type pedal, and let the
Powercab take over to provide the accurate speaker sound and feel. An added benet is that these models provide a variety of speaker tones that
can still be captured through a microphone at any placement, thanks to the coaxial speaker system design�
Powercab 112 includes the rst six speaker models in the list below, as well as HF OFF / Natural, and cannot be updated by an end-user to
add or change speaker models�
VINTAGE – Based on* the ubiquitous Celestion Vintage 30 which, despite its name, is commonly used and beloved for "modern" tones.
GREEN – Based on* the Celestion Greenback speaker, typically paired with vintage Marshall® Plexi ampliers for a signature classic rock tone.
CREAM – Based on* the Celestion G12M-65, a higher powered version of the ceramic C12N with a brighter top end�
JARVIS – Based on* the Jensen® P12Q, often paired with Fender® amps for great rich, full clean tones�
BAYOU – Based on* the Eminence Patriot Series Swamp Thang™, which provides big aggressive bottom end with classic American tone,
perfect for blues and jazz�
ESSEX – Based on* the Blue Bell speakers often paired with Vox® ampliers and Class A style amps for a "chimey" tone.
HF OFF / Natural – This is the natural sound and feel of the speaker in the Powercab with the high-frequency compression driver disabled and
no EQ of any kind applied
*See "U�S� Registered Trademarks" on page 11� All product names used in this document are trademarks of their respective owners and neither Yamaha Guitar
Group nor Line 6 are associated or aliated with them. These trademarks appear solely to identify products whose tones and sounds were studied by Line 6 during
sound model development�
10
Page 11

+ +
The following models are only available in the Powercab 112 Plus and 212 Plus running rmware version 2.0 and higher. To update your
rmware, please download the Line 6 Updater application at line6�com/software/�
DINO – Based on* the Eminence Cannabis Rex™� Uniquely constructed with a hemp-based speaker cone material, the Cannabis Rex is
described as having a smoky, smooth high-end denition, and boasts a full, clean tonality, with lots of body and sparkle.
LECTO – Based on* the Electro-Voice® EVM 12L. Designed for professionally precise, fully overdriven, punchy tones and brilliant cleans. They
are a signature component of the classic Mesa/Boogie® sound�
HERALD – Based on* the Celestion G12H(55) Heritage� Featuring a heavier magnet than the original G12M Greenback, this speaker replicates
the sound of the original G12H�
BROWN – Based on* the Celestion G12 EVH®. While the Greenback 20 played an essential role in the sound of Eddie Van Halen's unmistakable
sound, this speaker was the based on the 60s version Greenback and used in his signature amplier.
SHADE – Based on* the Mesa/Boogie Black Shadow C90� Custom made for Mesa/Boogie by Celestion in the UK, this speaker provides a tight
and controlled low end, aggressive midrange attack, and strong high-bass / low-mid punch� They are a feature in many Mesa/Boogie amps�
JETSON – Based on* the Jensen C12K� The C12K is often paired with Fender® amps for great for a heavy mid and solid, straight forward, slightly
darker tone� Can also present bold and heavy overdriven tones�
U.S. Registered Trademarks
*All product names used within this document are trademarks of their respective owners, which are in no way associated or aliated with Line 6. These trademarks
of other manufacturers are used solely to identify the products of those manufacturers whose tones and sounds were studied during Line 6’s sound model development� Celestion is a registered trademark of KH Technology Corp� Eminence, Swamp Thang, and Cannabis Rex are trademarks or registered trademarks of Eminence
Speaker, LLC� Marshall is a registered trademark of Marshall Amplication Plc. Jensen is a registered trademark of Electronics Trademark Holding Company LLC. Vox
is a registered trademark of Vox R&D Limited. EVH is a registered trademark of E.L.V.H., Inc. Electro-Voice is a registered trademark of Electro-Voice, Inc. Mesa/Boogie
is a registered trademark of Mesa/Boogie, Ltd� Fender is a registered trademark of Fender Musical Instruments Corp�
11
Page 12

+
+
User Presets
+
+
+
Powercab Plus systems include the ability to create and save customized presets� A preset allows you to store and recall your complete speaker
tone, which consists of the Speaker Mode in use (Flat, Speaker, or IR), its color, and parameter settings� To change presets, turn the Select Knob�
To edit a preset, press the Select Knob� Presets can also be selected or automated via L6 LINK or MIDI - please see these respective sections�
Preset Parameters
For Powercab 212 Plus, Speaker 1 refers to the physical left speaker and Speaker 2 refers to the physical right speaker, as you're facing
1 2
the front of the unit� With stereo inputs connected, the Powercab 212 Plus will send the left channel audio to Speaker 1 and the right channel
audio to Speaker 2, unless the Stereo Width parameter is set to 0% (see "Global Settings" on page 17)� With a mono input, the Powercab 212
Plus will send the mono audio to both speakers�
1. To view preset parameters, press the SELECT knob.
2. Turn the SELECT knob to scroll up and down the parameter list; press SELECT to toggle between scrolling the list and setting values.
NOTE: Features indicated with + are available on Powercab 212 Plus only�
EDIT SETTINGS
Name Value Default MIDI CCCC VALUE Function
Mode
FLAT MODE
PARAMETERS
Voicing
Flat
Speaker
Dual Speaker +
User IR
Dual User IR +
Essentially full-range, at-response, and equivalent to the signal being sent to a front-of-house mixer. This mode is most
helpful for simple plug-and-play compatibility, letting your amp modeler do all the work. This mode is ideal for simply plugging
in as if you were connecting directly to a PA, active monitor, or recording interface. It provides a at frequency response, ideal
for guitar signals that already include cabinet emulation or for playing back music and backing tracks.
FRFR
LF Flat
LF Raw
Flat CC 20 0 = Flat
1 = Speaker
2 = User IR
3 = Dual Speaker +
4 = Dual User IR +
FRFR CC 21 0 = FRFR
1 = LF Flat
2 = LF Raw
12
Selects between the supported modes
(Flat, Speaker, User IR - and additionally, Dual Speaker and Dual User IR on
Powercab 212 Plus) and provides access
to available mode parameters�
Selects the nal post-processing EQ
and crossover settings for the speaker
system�
Page 13

+
+
EDIT SETTINGS
+
+
+
Name Value Default MIDI CCCC VALUE Function
SPEAKER MODE
PARAMETERS
Speaker 1
Speaker 2
Mic Model 1
Mic Distance 1
Mic Model 2
Mic Distance 2
Intended to respond like a real guitar speaker for a traditional "amp-in-the-room" experience. This mode applies dierent tonal
characteristics of the selected speaker model to the system's coaxial driver, with the following adjustable parameters.
Vintage
Green
Cream
Jarvis
Bayou
Essex
Natural
Same Value options as
Speaker 1, but for Speaker
2
57 Dyn
409 Dyn
421 Dyn
30 Dyn
20 Dyn
121 Ribbon
160 Ribbon
4038 Ribbon
Dino
Lecto
Herald
Brown
Shade
Jetson
414 Cond
84 Cond
67 Cond
87 Cond
47 Cond
112 Dyn
12 Dyn
7 Dyn
Vintage CC 22 0 = Vintage
1 = Green
2 = Cream
3 = Jarvis
4 = Bayou
5 = Essex
6 = Natural
Vintage CC 102 0 - 12
Same MIDI CC Value options as
Speaker 1, but for Speaker 2
57 Dyn CC 23 0 = 57 Dyn
1 = 409 Dyn
2 = 421 Dyn
3 = 30 Dyn
4 = 20 Dyn
5 = 121 Ribbon
6 = 160 Ribbon
7 = 4038 Ribbon
7 = Dino
8 = Lecto
9 = Herald
10 = Brown
11 = Shade
12 = Jetson
8 = 414 Cond
9 = 84 Cond
10 = 67 Cond
11 = 87 Cond
12 = 47 Cond
13 = 112 Dyn
14 = 12 Dyn
15 = 7 Dyn
Selects which speaker model is applied
to Speaker 1�
Selects which speaker model is applied
to Speaker 2�
Selects the microphone model that is
applied to the XLR Left output signal
while in Speaker Mode, intended to
emulate placing the selected mic type in
front of the Powercab�
1" – 12" 1�5" CC 24 0 – 22 Sets the distance between the simulated
microphone and the simulated cabinet�
Same Value options as Mic
Model 1, but for XLR Out
Right
57 Dyn CC 103 0 – 15
Same MIDI CC Value options as
Mic Model 1, but for Speaker 2
Same Function as Mic Model 1, but for
XLR Out Right�
1" – 12" 1�5" CC 104 0 – 22 Same Function as Mic Distance 1, but for
XLR Out Right�
13
Page 14

+
+
EDIT SETTINGS
+
+
+
Name Value Default MIDI CCCC VALUE Function
USER IR MODE
PARAMETERS
IR (1)
IR (2)
GENERAL PRESET
PARAMETERS
Low Cut 1
High Cut 1
Low Cut 2
High Cut 2
Level 1
This mode allows for the use of a third-party cabinet simulation (Impulse Response) that reproduce the sound of a "miked"
cabinet. See "Impulse Responses" and "Powercab Edit Software"
IR location 0 – 127 0 CC 25 0 – 127 Selects which User IR is being applied
to Speaker 1� The selected IR's name is
displayed on the screen�
IR location 0 – 127 0 CC 105 0 – 127 Same Function as IR (1), but for
Speaker 2�
The following parameters are available regardless of which mode is selected within the preset.
O
20Hz – 500Hz
O
500Hz – 20kHz
O CC 26 0 – 127 Tone too muddy or boomy? Apply the
Low Cut Filter to clean it up�
O CC 27 0 – 127 Guitar speakers typically roll o high
frequencies well below the range of a
full-range reproduction system� Tone too
harsh and unnatural? Apply the High Cut
Filter to reduce the higher frequencies�
O
20Hz – 500Hz
O
500Hz – 20kHz
-60�0dB to +6�0dB 0�0dB
O CC 106 0 – 127 Same as Function as Low Cut 1, but for
Speaker 2�
O CC 107 0 – 127 Same as Function as High Cut 1, but for
Speaker 2�
CC 28 0 – 127 Controls the volume of the current preset
(Flat
Mode)
-15�0dB
(Speaker)
-18�0dB
(User IR)
and can be adjusted to match levels
between presets� When an IR is in use,
the default is -18�0dB to compensate for
the higher amplitude common to IR les.
When the Flat Mode is in use, this is set
to 0�0dB for maximum headroom�
14
Page 15

+
+
EDIT SETTINGS
+
+
Name Value Default MIDI CCCC VALUE Function
Level 2
Color 1
Color 2
-60�0dB to +6�0dB Same
Default
as Level
1, but for
Speaker 2
Auto
White CC 29 0 = O
White
Red
Blue
Green
Yellow
Cyan
Magenta
O
Same Value options as
White CC 109 Same CC Value options as Color
Color 1, but for Speaker 2
CC 108 0 – 127 Same Function as Level 1, but for
Speaker 2�
Allows you to customize the color of
1–18 = White
19–36 = Red
37–54 = Blue
55–72 = Green
73–90 = Yellow
the Select Knob's LED Ring� This can
be helpful for identifying which speaker
model or user IR you've selected for your
preset, if automating or remotely control-
ling it with a Helix or other MIDI gear�
91–108 = Cyan
109–126 = Magenta
127 = Auto
Same Function as Color 1, but for
1, but for Speaker 2
Speaker 2�
15
Page 16

Impulse Responses
Powercab Plus systems allow you to import 128 Impulse Response (IR)
les for an even greater variety of speaker cabinet models. By default,
the Line 6 Allure pack of IRs is already included, and you can optionally
load your choice of third-party IRs. This can be a great way to o-load
some of the DSP usage from your Helix or POD device, making room for
additional eects on your modeler.
Powercab Plus systems can import IRs by way of the Powercab Edit
software (see next section)� It is possible to import any mono .wav le
IR, provided it conforms to the compatible IR properties (48kHz, 24-bit,
mono, 2048 samples)� While this is very convenient, please be careful
not to load just any .wav le as an IR or you may experience unexpected
sonic results. SysEx les are not supported.
When used in User IR stereo mode, the sample length is carefully
truncated to 1024 samples�
TIP: You can also load Acoustic Guitar IRs for enhancing the tone of
your acoustic guitar� It is recommended that a preamp is used to
achieve proper impedance when connecting a line level input signal�
Powercab Edit Software
Powercab Edit is the free editor software for Mac and PC that allows
you to customize & manage presets and load your own IRs into a
Powercab Plus� The latest Powercab Edit application version is available
at line6�com/software/� Once you've downloaded the application to your
computer, launch it and follow its installation steps�
Connect your Powercab Plus to your computer's USB port and launch
the Powercab Edit application� You'll see a list of 128 presets and all
adjustable parameters available� Click on the Impulses tab to see and
manage IRs� You may add one or more IRs by selecting an IR slot and
clicking Import�
USB Audio
Powercab Plus systems function as USB 2�0, low latency, stereo input/
output, 16-bit, 44�1 kHz or 48 kHz, audio interfaces for Mac or PC, and
are also capable of being used as an audio interface for iPad and iPhone
mobile devices�* They are compatible with all major DAW software�
*NOTE: Connectivity with iPad & iPhone requires an Apple Camera
Connection Kit USB adapter (sold separately)� There is no driver
installation necessary for Mac or Windows® computers or for Apple iPad
or iPhone mobile devices� (See the ASIO Driver section below for
Windows low-latency audio performance�)
This USB audio functionality allows you to jam along with your backing
tracks, YouTube™, iTunes, or to record high quality audio within your
DAW software. By conguring your DAW software track to record from
the Powercab Plus USB 1/2 source, you'll capture your processed signal
from the Powercab within the DAW track—with zero-latency monitoring,
since you are hearing your input from the Powercab Plus hardware
outputs before it is routed through your software�
ASIO Driver (Windows only)
When using a Powercab Plus as an audio interface for Windows DAW
applications, it is highly recommended to download and install the Line
6 Powercab ASIO driver, available free from line6�com/software/� This
ASIO driver oers the superior, low-latency USB audio performance
required for DAW recording. It is also necessary to congure your DAW
software to utilize the Powercab ASIO driver� This setting is typically
found within your DAW software's Preferences or Options dialog - please
see your software's documentation�
16
Page 17

USB Audio Modes
+
+
Powercab Plus systems oer two dierent USB Modes for use as your computer or mobile device interface� You can access these options in the
Global Settings (see next section)�
Normal - In this mode, incoming USB audio remains unprocessed,
and is routed directly to the Powercab Plus speaker system for
playback�
Processed - In this mode, incoming USB audio is processed by the
Powercab Plus, adding even greater exibility when used as your
computer's audio interface for amp modeling software, such as the
Line 6 Helix Native plug-in or POD Farm® application�
Global Settings
These global parameters allow you to optimize the Powercab Plus system for your particular needs, whether it be for practice, on stage or in the
studio� These settings are persistent (automatically saved) and not part of the preset data�
1. To view Global Settings, press and hold HOME.
2. Turn the SELECT knob to scroll up and down the Global Settings list; press SELECT to toggle between scrolling the list and setting
values.
NOTE: Settings indicated with + are available on Powercab 212 Plus only�
+
+
Name Value Range Default MIDI CC CC VALUE Function
Input 1/L Gain
Input 1/L
Level
Input 2/R Gain
Input 2/R
Level
dB -96�0 to +12�0 0�0 CC 1 0-127
Line
Instrument
dB -96�0 to +12�0 0�0 CC 2 0-127
Line
Instrument
Line CC 30 0-63: Line
Line CC 31 0-63: Line
GLOBAL SETTINGS
100 = 0�0dB
64-127:
Instrument
100 = 0�0dB
64-127:
Instrument
Adjustable input gain level for Input 1 (Left/Mono)�
Controls the input level and impedance for Input 1� Use
Instrument impedance when connecting a guitar or pedals�
Use Line Level for modelers that support line level output�
Adjustable input gain level for Input 2 (Right/Aux)�
Controls the input level and impedance for Input 2� Use
Instrument impedance when connecting a guitar or pedals�
Use Line Level for modelers that support line level output�
17
Page 18

+
+
GLOBAL SETTINGS
+
Name Value Range Default MIDI CC CC VALUE Function
Input 2/R Mode
Normal
Monitor
USB
Normal CC 3 0-4 0: Normal
41-80: Monitor
81-127: USB
Normal: Processes input and routes signal through the XLR
Output�
Monitor: No processing is applied and the signal is not
rerouted to XLR Output�
USB: Input 2 is routed to the USB 1/2 input and can be
used with guitar amp modeling software like Helix Native�
Be sure to enable input monitoring in your DAW software
and arm the track for recording� Also see "Input 2 Monitor
Mode"�
Link Inputs
HF Trim
O
On
dB -96�00 to +12�00 0�0 CC 5 0-127
On CC 4 0-63: O
64-127: On
Selects whether or not both Input 1 & Input 2 Gain levels
are matched to the same value�
Gain adjustment for the high frequency compression driver�
100 = 0�0dB
Low Cut
MIDI Channel
O
On
# 1–16, Omni 1 Selects the MIDI channel to which the Powercab Plus
O CC 111 0-63: O
64-127: On
Applies a global 80 Hz low cut (high pass lter) to speaker
output
responds and transmits to the MIDI DIN (when MIDI Thru is
set to "On")�
MIDI Thru
MIDI Receive
MIDI Send
O
On
O
PC+CC
PC Only
CC Only
O
PC
On Determines whether or not incoming MIDI is passed
through the unit�
PC+CC Determines whether or not this unit changes presets
in response to incoming MIDI Program Change (PC)
messages, MIDI Control Change (CC) messages, both, or
neither�
PC Determines whether or not MIDI PC messages are
transmitted whenever a local PC change event occurs
(when a preset change is made on the unit)�
MIDI Over USB
USB Mode
O
On
Normal
Processed
O Determines whether or not MIDI data is received and sent
over USB�
Normal CC 6 0-63: Normal
64-127:
Processed
Normal: Use for playback directly to an FRFR system�
Processed: Processes the USB signal with Flat, Speaker, or
User IR modes�
18
Page 19

+
+
GLOBAL SETTINGS
+
Name Value Range Default MIDI CC CC VALUE Function
Direct Out Level
+
Direct Out
Mode
Stereo Width
Auto Dim
Firmware Version
Factory Reset Press SELECT and conrm to restore all factory presets
Line
Mic
Mono
Stereo
% 0 – 200 100 CC 110 0-100
O
5 seconds
10 seconds
30 seconds
2�00�0 Displays the Powercab system's current rmware version
O – 30 seconds 10
Mic Controls the output level of the XLR Direct Outs� Use Line
Stereo Determines whether or not the Left/Mono XLR output is
50 = 100%
100 = 200%
seconds
Level for nominal line inputs and use Mic Level when going
into the mic preamp of a mixing board or audio interface�
merged to mono�
Collapses to mono at 0%, nominal at 100%, and extra
wide at 200%�
Selects how long the time out is before the Auto-Dim
feature activates for the LCD display and Select knob
LEDs�
(x�xx�x)
and global settings�
Input 2 Monitor Mode
This mode is intended for running a monitor feed, which may include
vocals or other instruments, from a mixing board back into Input 2 of
your Powercab Plus. This signal goes straight to the power amplier
system and does not loop back out to the XLR Output�
Input 2/Aux USB Mode
This mode is intended for the use of Powercab Plus as a traditional audio
interface� Plug your guitar or line level feed into Input 2 ("Right/Aux"
on Powercab 212 Plus) and you can use a DAW or audio software to
process your signal� For example, this mode could be for processing the
guitar signal with the Helix Native plug-in, which then plays back through
the Powercab Plus amplier and speaker(s). This could be done with or
without speaker/IR processing, depending on the Powercab Plus USB
Mode global setting� This method does add some round trip latency and
will depend on your computer processing power and buer settings.
19
Page 20

Setup Examples
FXFX
PREAMP
FXFX
PREAMP
+
FXFX
PREAMP
Several setup congurations are possible with your Powercab or
Powercab Plus system(s)�
• Connect your modeler's analog 1/4" or XLR mono output to the
Powercab input, or your modeler's stereo analog outputs each to
a separate Powercab input�
• If using an "amp-in-the-box" type and/or eects pedals, connect
them into to the Powercab with a 1/4" audio cable�
• Connect digitally via L6 LINK or AES/EBU to one or two Powercab
Plus systems (see "L6 LINK" on page 23)�
• To use a remote MIDI controller device, connect it to the Powercab
Plus MIDI IN ("MIDI" on page 24)�
• Send a direct signal to a P�A� or mixer using the Powercab analog
XLR Output�
• Optionally, you can use the Powercab Plus combo Input 2 to
receive a monitor feed from a mixer, or as a USB audio interface
to process your guitar signal on a computer and listen through
Powercab�
Analog
Direct out to
front-of-house
L6 LINK
or AES
Input 2 as monitor feed from a mixer
Direct out to
front-of-house
Powercab 112 Analog Setup
Direct out to mixing board or
audio interface
FXFX
PREAMP
1. Connect the 1/4" or XLR output from the modeler/processor to
the combo input on Powercab�
2. Optional: Connect an XLR cable to the output of Powercab to
send to a mixing board or recording interface� The output signal
will have an SM57 microphone model applied when using speaker
models�
Powercab 112 or 112 Plus Analog Stereo Setup
Analog
+ MIDI
FXFX
PREAMP
Connect the left and right analog 1/4" or XLR outputs of your
modeler (or stereo eects unit) separately to two Powercab devices.
20
Page 21

+
+
Powercab Plus Analog Setup
+
+
OR
1. Connect the 1/4" or XLR output(s) from the modeler/processor
to the combo input(s) on Powercab Plus�
2. Optional: Connect XLR cable(s) to the output of Powercab Plus
to a mixing board or recording interface� The output signal will have
a user-dened microphone model applied when using Speaker
models, congurable within the Powercab Plus preset.
Powercab Plus Doubling as a Floor Monitor for Vocals
L6 LINK
OUTPUT
LEFT/MONO INPUT 2
OUTPUT
RIGHT
1. Connect your modeler to Powercab 112 Plus or 212 Plus using
either analog or L6 LINK/AES cables�
2. Connect an XLR or 1/4" balanced cable from a mixer or audio
interface's Aux or Monitor Send (as would be used to route to active
monitors)�
3. On Powercab, navigate to Global Settings by holding the
HOME button and set Input 2 Mode to Monitor� This will use a
separate crossover and lters to provide at-response, full-range
audio through the Powercab built-in amplier and speaker(s) – just
like an active PA monitor�
XLR output(s) on Powercab Plus can still be used but will only output
processed signals from Input 1 or L6 LINK�
21
Page 22

+
+
Powercab Plus USB Processing (Instrument Level)
+
+
FXFX
PREAMP
If for some reason your modeler is unavailable, borrowed, stolen, broken,
etc�, your Powercab Plus can still perform! Using a computer in lieu of
a dedicated hardware modeler, Powercab Plus can double as an audio
interface with DSP for speaker modeling and IR processing� This can be
used in tandem with a DAW or a plug-in, such as Line 6 Helix Native, to
process the guitar signal�
RIGHT/
AUX
USB
1. Connect the guitar directly to Powercab Plus Input 2 (Right/Aux)
2. Connect a USB cable to a computer or mobile device�
3. On Powercab Plus, navigate to Global Settings by holding the
HOME button and set Input 2 Mode to USB�
4. Optional: If you want to add speaker modeling or IRs to the output
signal, set the USB Mode to Processed�
NOTE: If you are playing backing tracks through Powercab Plus, set
the USB Mode to Normal to hear them unprocessed�
Powercab Plus Digital Stereo Setup
L6 LINK or AES
L6 LINK
or AES
1. Connect a L6 LINK/AES cable from the Helix/POD HD device to
the L6 LINK Input on Powercab Plus�*
2. Connect a L6 LINK/AES cable from the rst Powercab Plus L6
LINK Output to a second Powercab Plus L6 LINK Input�
3. Optional: Connect XLR cable(s) to the output of each Powercab
Plus to send to a mixing board or recording interface� The output
signal will have a user-dened microphone model applied when
using speaker models, congurable within the preset on Powercab
Plus�
Also see "L6 LINK" on page 23�
*NOTE: A 110Ω type XLR cable should be used for all L6 LINK and
AES connections�
22
Page 23

L6 LINK
+
+
+
Powercab Plus devices include the Line 6 proprietary L6 LINK technology,
providing a simple, single-cable connection for mono/stereo audio and
remote control capability between a Line 6 Helix device and one or more
Powercab Plus systems� This allows you to store and recall Powercab
Plus parameters via your Helix device, globally or even per Helix preset!
For L6 LINK functionality, it is required that Helix device rmware
is updated to v2.80 (or later), and Powercab Plus system rmware
is updated to v2.00 (or later). For best results, always run the latest
available rmware version on all your Line 6 devices.
NOTE: A 110Ω type XLR cable should be used for all L6 LINK and
AES connections�
L6 LINK Setup Examples
One Powercab 112 Plus - Mono
Mono
+
1
Powercab Remote using HELIX via L6 LINK
Use the following steps to congure a Line 6 Helix Floor, Rack, or LT
device for L6 LINK remote functionality with Powercab Plus�
1. On Helix, from any Output > Multi or Output > Digital block, press
PAGE> once. Powercab remote parameters appear�
2. Turn Knob 1 (Powercab Remote) to select:
• O - No remote control of Powercab Plus parameters, but audio
is still active
• Per Preset - Powercab Plus parameters are stored and recalled
with the Helix preset
• Global - Powercab Plus parameters are stored and recalled
globally
3. Turn Knob 3 (Speaker Select) to select which speaker(s) you’d like
to control� If you have a single Powercab 112 Plus, leave this set to
“Speaker 1+2�"
When using one Powercab 112 Plus, it can be controlled from Helix by
selecting Speaker 1�
Two Powercab 112 Plus Systems - Stereo
Stereo
+
Left Right
When using two Powercab 112 Plus systems, the rst can be controlled
from Helix by selecting Speaker 1, the second can be controlled by
selecting Speaker 2, or both can be controlled as one by selecting
Speaker 1+2�
23
1
+
2
Page 24

+
One Powercab 212 Plus - Stereo
+
+
+
+
+
Stereo
Left Right
1 2
When using a single Powercab 212 Plus, both speakers can be matched
by selecting Speaker 1+2, or congured individually by selecting
Speaker 1 or Speaker 2�
Two Powercab 212 Plus Systems - Stereo
Stereo
Left Right
1 2
1 2
AES/EBU
Powercab Plus systems can also accept AES/EBU with 48kHz sample
rate. When an AES signal is detected by the rst Powercab Plus unit in
the chain, the chain will split the signal's #1 channel going to the rst
Powercab Plus and the #2 channel to the second Powercab Plus� If
there is only one Powercab 112 Plus in the chain, the signal will merge to
mono� If there is only one Powercab 212 Plus, the signal will be in stereo�
MIDI
By default, Powercab Plus devices are set to transmit and receive
MIDI on MIDI Channel 1. To congure the MIDI Channel, enable MIDI
over USB, and other settings, see the MIDI options within the "Global
Settings" on page 17�
MIDI Program Changes
Powercab Plus systems respond to traditional MIDI Program Change
messages from an external MIDI device (or from MIDI software via USB)
and will recall presets 000–127 accordingly�
MIDI CC
Powercab Plus systems include reserved MIDI CC values for numerous
functions, allowing remote control via an external MIDI device (or from
MIDI software via USB)� Please see the tables in "Preset Parameters"
on page 12 and "Global Settings" on page 17 to reference MIDI CC
and CC Value information.
When using two Powercab 212 Plus systems, both speakers can
be matched by selecting Speaker 1+2, or congured individually by
selecting Speaker 1 or Speaker 2 - with any of these Speaker settings,
both Powercab 212 Plus systems will have their settings matched to
create a stereo pair�
24
 Loading...