

Page 1

V
ERSION
N
EW
Rev A. Electrophonic version available at www.line6.com.
EATURES
F
2.0
Page 2

New Goodies In 2.0:
N
EW
Version 2.0 software enhances the already beloved POD with a host of new features
and improvements requested by the growing community of POD users, or dreamed up
by the product design crew at Line 6. This publication gives you all the details.
G
OODIES IN
2.0
WE’RE L
ISTENING
UP•1
WE’RE L
Before we dive into the new stuff, this is a good time to let you know that if you’ve got
ideas about products and features, we want to hear them! A lot of the new goodies that
await you in POD 2.0 software were suggested to us by happy POD owners. We invite
you to email
or other products you’d like to see from Line 6. If you’re not up on the email thing yet,
you can call and talk to our customer service team, or track down one of our Product
Specialists – the roving band of Line 6 evangelists that help support Line 6 products at
your local dealer. At Line 6, we’re eager to work with you to create the tools that help
all of us make great music.
ISTENING
ideas@line6.com
with your own thoughts about features for your POD
Page 3

New Goodies In 2.0:
VERVIEW
O
UP• 2
O
VERVIEW
The following pages cover everything in detail, but we figured you’d want a little
overview to get you started:
EW FEATURES
N
32 Amp Models
they’re all available right from the front panel knobs (so you no longer have to use
SoundDiver software to access more than Amp Models 1-16). Hold the
and turn the Amp Models knob to get amps 17-32; details on the new Amp Models
are in the pages ahead.
Mix ‘n’ Match Cabinet Models
speaker cabinet models via SoundDiver. Now you can do it right from POD: Hold the
Ta p
button and turn the Effects knob to choose cabs; details on the Cabinet Models
are in the pages ahead.
Customization
Amp Model or Effect selection. When you turn to the Rectifier Amp Model, say, the
Drive, Bass, Mid, Treble, etc. will be set automatically to give you an awesome readyto-rock tone – so with one knob twist, you’re ready to go. The Effects knob works the
same way. Even cooler, you can set exactly what the memorized settings are for each of
the Amp Models and Effects knob positions, and thereby customize your POD tones to
reflect your very own sonic genius or depravity. The MANUAL button, as always, lets
you override these automatic settings for the where-the-knobs-are-is-how-it-sounds
experience. We go into it all in the pages ahead.
– POD now includes 32 Amp Models (before 2.0, it was 28), and
Ta p
button
– POD has always allowed you to access a variety of
– The Amp Models and Effects knobs now set more than just the
ToneTransfer
incredible sounds, and our ToneTransfer system lets you take advantage of all that
sonic creativity. Number one, all the sounds you use in your POD can be transferred to
(and from) any Flextone II series amplifier or the new POD Pro. Number two, an
expanding library of these sounds is available for you at
search the library by musical style, artist, and more, to find just the sounds you’re
– All those folks with PODs have been busy using them to make some
www.line6.com
. Log in and
Page 4

New Goodies In 2.0:
VERVIEW
O
looking for. And while you’re there, we invite you to add your own great tones to the
library. We’ll be continually adding to this great collection of sounds ourselves as well,
to make it
Tuning POD for use with amplifiers
the
place for great guitar tone.
– POD has always had an AMP/DIRECT
switch for optimizing POD to run in various setups. The DIRECT position is used
when you’re running POD directly into your mixer or recorder. The AMP position is
used when you’re using POD as a tone-shaping front-end for another guitar amplifier.
We’ve now added a choice of tuning modes for the AMP position, selectable at power
up. By default, POD expects to be plugged into the guitar input of an open-backed
combo. But with the new tuning modes, you can alternatively optimize your POD to
run into the power amp input of a closed-back system, or with closed-back cabinets.
Details are in the pages ahead, along with some illustrations that folks suggested would
be helpful for getting PODsters plugged in and happening with a variety of setups.
I
MPROVEMENTS
While we were in there adding the new features to POD, we also took the time to
make a few additional improvements:
Faster Channel Switching
– Channel switching has been made more intelligent,
and is faster and smoother as a result. When changing channels, POD only updates
those parameters that change from one channel to another. So, for instance, if two
channels have all the same settings except the reverb level, switching between them
means POD only updates the reverb level. That means the channel switch is nearly
instantaneous, and as glitch-free as possible.
UP•3
New SoundDiver
– The SoundDiver software has also been updated, and now
includes support for the Flextone II amplifiers, POD Pro, and POD 2.0 as well as
original PODs (be sure to check the Support section of www.line6.com for the latest
free SoundDiver download).
Better Tuner
– The chromatic tuner now tracks faster and more accurately.
Page 5

New Goodies In 2.0:
AMP M
ODELS
UP• 4
A
M
MP
ODELS
Before Version 2.0 software, POD had 28 Amp Models – 16 available from the
Models
knob, and the rest available from the SoundDiver “Deep Editing” software, or
Amp
the factory presets that use these models. POD users asked us to find a way to give
them easy access to all the Amp Models right from their POD without the computer,
so that’s just what we did with version 2.0. And we added 4 additional Amp Models to
the menu while we were at it:
Amp Models 1-16:
Turn the
Amp Models
knob to select Amp Models 1-16. The
names of these Amp Models are labeled around the knob.
Amp Models 17-32:
Hold the
Ta p
button and turn the
Amp Models
knob to select
Amp Models 17-32. The table below shows which Amp Model lives at each knob
position:
(Hold Tap and turn to:)
(Line 6 Clean)
(Line 6 Crunch)
(Line 6 Drive)
(Line 6 Layer)
(Small Tweed)
(Tweed Blues)
(Black Panel)
(Modern Class A)
(Brit Class A)
(Brit Blues)
(Brit Classic)
(Brit Hi Gain)
(Rectified)
(Modern HiGain)
(Fuzz Box)
(Tube Preamp)
Amp Models 17-32
Line 6 Twang*
Line 6 Crunch #2*
Line 6 Blues*
Line 6 Insane*
Small Tweed #2
Boutique #3
Black Panel #2
Brit Class A #3
Brit Class A #2
California Crunch #1
California Crunch #2
Boutique #1
Rectified #2
Modern HiGain #2
Boutique #2
Jazz Clean
Based on
Fender Deluxe and Bassman
’68 Marshall Plexi 50 watt
Marshall JTM-45 meets Budda Twinmaster
Way too many hours of shredding
’60 Tweed Fender Champ
Budda Twinmaster head
’65 Blackface Fender Twin
’60 Vox AC 15
’60 Vox AC 30 non-Top Boost
’85 Mesa Boogie Mark IIc+ Clean Channel
’85 Mesa Boogie Mark IIc+ Drive Channel
Dumble Overdrive Special Clean Channel
’95 Mesa Boogie Dual Rectifier Head
’89 Soldano SLO Super Lead Overdrive
Dumble Overdrive Special Drive Channel
1987 Roland JC-120 Jazz Chorus
*These models are new in 2.0.
Page 6

New Goodies In 2.0:
AMP M
ODELS
Here are the descriptions for these new Amp Models:
Line 6 Twang
the '60s Fender blackface Deluxe amps and the '50s Fender Bassman. (It includes
the classic Fender glassy high end, plus the snap and bite of these vintage amps.)
Things don’t really get too crunchy until you get to the top range of the
knob. The tone controls provide more range than the blackface Deluxe or Bassman.
Line 6 Crunch #2
during our studies of the '68 50 Watt Marshall Plexi. But unlike the Plexi, this
Amp Model provides more wide-ranging tone controls. With the Plexi, once
you’re overdriven, the tone controls really don’t do much, but POD will allow you
to scoop out the mids even at the highest
Line 6 Blues
Marshall JTM-45 Bluesbreaker but incorporates wider range tone controls. Once
you get into higher
variant of the Budda Twinmaster (a high end boutique amp) for sweeter overdrive
tonality.
(Hold Tap + Line 6 Clean)
(Hold Tap + Line 6 Crunch)
(Hold Tap + Line 6 Drive)
Drive
settings, this Amp Model begins to transition into a
-
This model draws on our analysis of
-
This sound was crafted
Drive
settings.
This tone is based on the '65
-
Drive
UP•5
Line 6 Insane
with as much input gain distortion as possible short of complete meltdown. You
get ridiculous, rich tube drive to shame the distortion of pretty much any amp on
the planet (sort of like a Dual Rectifier on 10 being used as a preamp for a
Soldano), while still retaining tonal definition and character. As a result, you get
way lots of bottom end and cabinet character with tons of wide-ranging tone
shaping. Crank up the
(Hold Tap + Line 6 Layer)
Drive
control and take no prisoners!
Our goal here was to provide you
-
Page 7

New Goodies In 2.0:
MIX ‘N’ M
ATCH CAB MODELS
UP• 6
MIX ‘N’ M
ATCH CAB MODELS
Before version 2.0, POD had Cabinet Models that were automatically selected with
each Amp Model, and you could change the Cabinet Model selection from the
SoundDiver software. The folks who used SoundDiver realized this was a very cool
thing, and asked us to give them a way to access the full selection of these Cabinet
Models when they were away from their computer as well. So that’s what we did:
Selecting Cabinet Models: Hold the Ta p button and turn the Effects knob to
select one of the sixteen cabinet model selections.
Here are the Cabinet Models available:
1x8 1960 Fender Tweed Champ
1x12s 1952 Fender Tweed Deluxe
1960 Vox AC-15
1964 Fender Blackface Deluxe
Line 6 1x12
2x12s 1965 Fender Blackface Twin
1967 Vox AC-30
1995 Matchless Chieftain
Line 6 2x12
4x10s 1959 Fender Bassman
Line 6 4x10
4x12s 1996 Marshall with Vintage 30s
1978 Marshall with stock 70s
1968 Marshall Basketweave with Greenbacks
Line 6 4x12
No Cab You will probably want to use this Cabinet model with the Tube
Preamp model for non-guitar sources. It is selected by default
when you pull up the Tube Preamp Amp Model.
Page 8

New Goodies In 2.0: CUSTOMIZATION
CUSTOMIZATION
New with Version 2.0 software, you can customize the settings that are called up
by the Amp Models and Effects knobs. Using this powerful new feature, you can
pack your POD with all the special sound genius that only you possess, and have
this brilliance available instantly at the turn of a single knob. To understand how
this Customization works, we’ll start with an explanation of what happens when
you turn the Amp Models and Effects knobs: Turning the Amp Models knob
picks an Amp Model, and turning the Effects knob picks an effect, right?
Actually, each of these knobs is setting a number of parameters behind the scenes.
When you pick an Amp Model, POD sets the following controls to values
determined by the Amp Models knob:
Controls affected by the Amp Models Knob
Amp Model
Cabinet Model
Drive (and also Drive 2, if Amp Model is Line 6 Layer)*
Bass
Middle
Treble
Bright Switch (if available on Amp Model) *
Channel Volume
Distortion On/Off (Hold Tap, turn Drive to set)
Volume Boost On/Off (Hold Tap, Turn Channel Volume to set)
Presence Bump On/Off (Hold Tap, Turn Treble to set)
Presence Level
Reverb Decay
Reverb Type *
Reverb Tone *
Reverb Diffusion *
Reverb Density *
Noise Gate Decay Time *
Volume Pedal Location (before or after the Amp Model) *
Volume Pedal Minimum *
Wah Minimum *
Wah Maximum *
UP•7
*You only get access to these extra controls via the SoundDiver software or MIDI.
Page 9

New Goodies In 2.0: CUSTOMIZATION
UP• 8
In the same way, turning the Effects knob sets all the parameters related to the
effect you choose.
Customization allows you to store your own personal favorite adjustments for all
these parameters so they live on the 16 positions of the Amp Models and Effects
knobs. This way, when you turn the Amp Models knob to the Rectifier position,
you’ll get your personal Rectifier, with all the controls in the list above set for your
very own version of the Rectifier. Same thing for the Effects – your Chorus,
Tremolo, etc. is always just one knob click away.
So where is stuff going to be saved, exactly? If you’re customizing the Amp Model,
then you’ll be saving to the knob position of the selected Amp Model. For
instance, if your sound uses the Rectifier, and you do the Customized Save of the
Amp settings, you will now get those settings whenever you turn the knob to the
Rectifier position. Alternatively, if your sound uses the Small Tweed, then doing
the Customized Save will save your settings there. Your POD will choose the
correct place to store the information regardless of the present physical position of the
Amp Models encoder – so don’t worry, you can’t accidentally copy your Modern
HiGain settings to the Small Tweed position. Same deal goes for the effects; your
POD knows whether you’re using Tremolo or Rotary Speaker or whatever, and will
save to that knob position.
So what if you’re not sure which Amp Model or effect you are using right now, and
want to find out before you make your Customization? That’s easy, too:
Just press (and keep holding) the Save button and turn the Amp Models or
Effects knob. Once you have them in the right position, both the arrows for the
tuning indicator will light up. The Ta p light will also light solid if your Amp
Model is part of the second “layer” of models (17-32).
So, now that you know exactly what you’re getting yourself into, lets get to it:
Page 10

New Goodies In 2.0: CUSTOMIZATION
Activating Customization Mode
The first thing to do is get an Amp or Effect setting that you really like and want
to store to the Amp Models or Effects knob. This amp or effect setting can come
from a factory preset, one of your own edits, a sound you downloaded off the web,
or a sound you’ve tweaked up in SoundDiver. Whatever its source, all you have to
do is get that sound into your POD so it’s active and you’re playing though it.
With that done, you’ll hold (and keep holding) the Save button, then press the
Manual button. The Save, Manual, A and B lights will all start a-flashing (and
you can let go of those buttons now). You have entered the Customization Mode. If
you use the Up/Down buttons to select A now, you will instruct your POD that
you want to save your present Amp settings to live on the Amp Models knob. If
you select B, your POD will understand that you want to save your current effects
setting to the Effects knob. Got it? Here are the steps in handy list form:
1. Get an amp or effect you love happening on your POD.
2. Hold Save, and press Manual. Save, Manual, A, and B lights flash.
3. Use Up/Down arrows to select A (Amps) or B (Effects).
4. Press Save to complete the deed. (Or press Manual to abort.)
UP•9
Page 11

New Goodies In 2.0: TONETRANSFER
UP• 10
TONETRANSFER
With your POD, you get a constantly-expanding universe of sounds, and the
ability to use those sounds with POD, POD Pro, or the Flextone II series
amplifiers. Use your POD in the studio or for practice, and then transfer your
sounds to a Flextone II amp for your gigs. Or transfer sounds from your friend’s
Flextone II into your POD.
You’ll also want to be sure to visit our ToneTransfer Web Library at
www.line6.com. Check out the library of tones, searchable by artist, musical
style and more. Or brew up a few custom POD tones yourself, and add them to the
library for the world to share. Its part of our effort to insure that your POD and the
rest of the Line 6 product line are some of the most powerful tools available for
you and your music.
TUNING POD FOR USE WITH AMPLIFIERS
POD can be used as a powerful tone-shaping front end for another guitar amplifier,
or as a supremely versatile preamp, driving a power amp and speaker cabinets.
New with Version 2.0, we’ve provided you with several optimized tunings for
different scenarios, to help you get the best sound from several different kinds of
setups.
New Cabinet Tuning Modes
By default, your POD expects to be plugged in before an open-backed cabinet. If
you want to plug into something else, you’ll want to change the Cabinet Tuning
Mode. To do this, follow the easy steps on the opposite page.
Page 12
New Goodies In 2.0: TUNING POD FOR USE WITH AMPLIFIERS
1. Hold the Save button while powering up your POD. The POD’s display will
show a letter for one of the Cabinet Tuning Modes.
2. Press the Up and Down arrows to pick the mode (see table below),
3. Then press Save. POD remembers this setting from now on.
Use Mode... when POD is... & your speaker cabs are...
A
B
C (default)
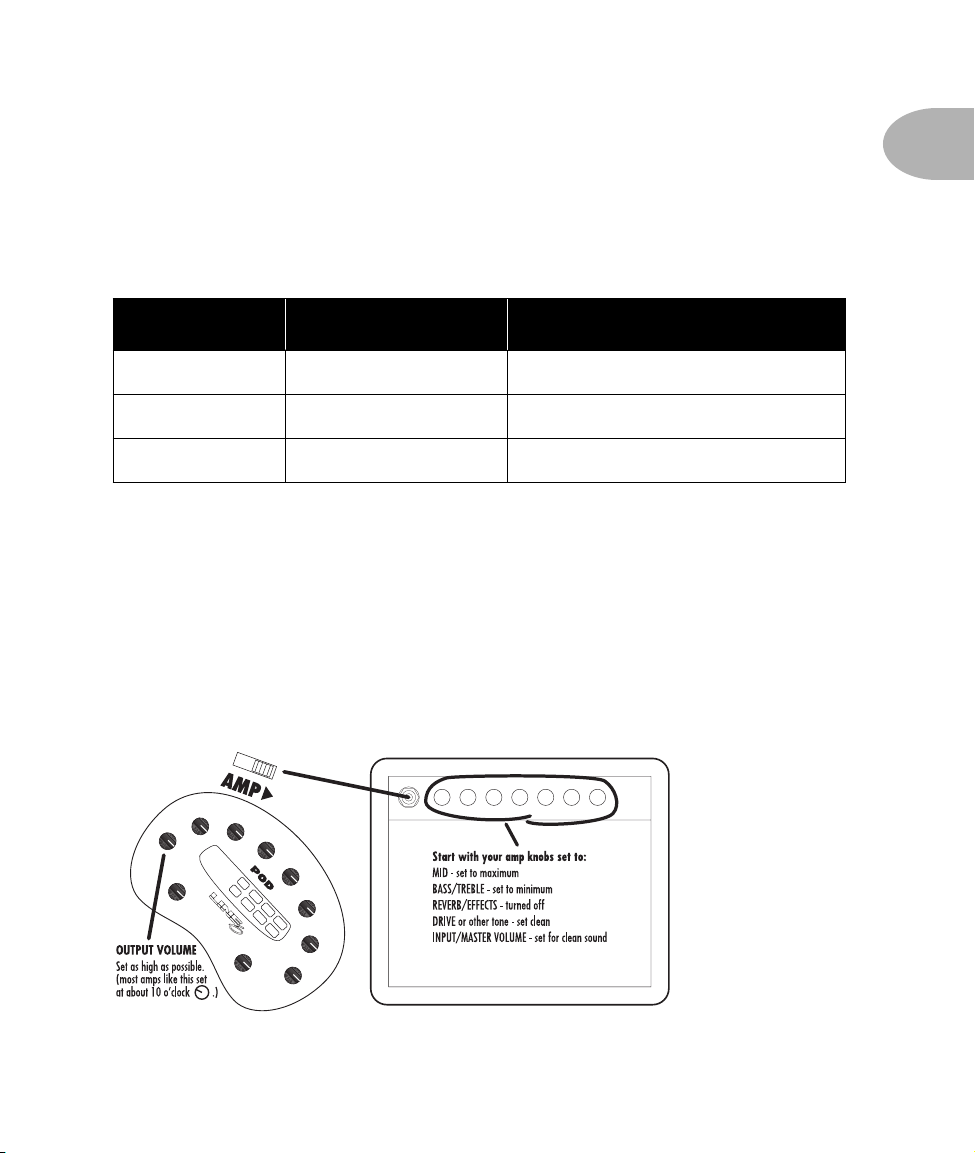
If you are going to use your POD in front of another guitar amp, or feeding a power
amp and speakers, you may find the following illustrations handy. In all cases,
you’ll be plugging the left output of your POD into your amp’s input for mono
operation. Experiment to get the best from your setup; try the A.I.R. switch in the
DIRECT position (this can work great with smaller amps) and also try other knob
settings on your amp:
feeding power amp closed back (ideal for 4x12 cab)
feeding power amp open back (ideal for 1x12 or 2x12 cab)
in front of combo/head open back (ideal for 1x12 or 2x12 cab)
UP•11
POD As Front End for a Combo Amp or Head
Page 13

New Goodies In 2.0: TUNING POD FOR USE WITH AMPLIFIERS
UP• 12
POD In Insert/Return of a Combo Amp or Head
POD Into a Power Amplifier Driving Speaker Cabinets
 Loading...