


Website : http://biz.lgservice.com
WASHING MACHINE
SERVICE MANUAL
 CAUTION
READ THIS MANUAL CAREFULLY TO DIAGNOSE
PROBLEMS CORRECTLY BEFORE SERVICING THE UNIT.
MODEL: WM3885H*CA / WM3875H*CA

OCT. 2009 PRINTED IN KOREA |
P/No.: MFL30599154 |
69

|
CONTENTS |
|
1. |
Specifications .................................................................................................................................. |
5 |
2. |
Features and Technical Explanation ............................................................................................ |
6-8 |
3. |
Parts Identification ........................................................................................................................... |
9 |
4. |
Installation and Test ................................................................................................................. |
10-12 |
5. |
Operation ................................................................................................................................. |
13-19 |
|
5-1. Control Panel Features ..................................................................................................... |
13-15 |
|
5-2. Cycle Guide ........................................................................................................................... |
16 |
|
5-3. Special Functions ................................................................................................................... |
17 |
|
5-4. Explanation of Each Process ............................................................................................ |
18-19 |
6. |
Wiring Diagram / Program Chart .............................................................................................. |
20-21 |
7. |
Test Mode ...................................................................................................................................... |
22 |
|
7-1. Safety Caution ....................................................................................................................... |
22 |
|
7-2. Load Test Mode ..................................................................................................................... |
22 |
|
7-3. How To Read the Display in Load Test Mode ........................................................................ |
23 |
|
7-4. How To Check the Water Level Frequency and Vibration Sensor Error ................................ |
23 |
8. |
Troubleshooting ....................................................................................................................... |
24-39 |
|
8-1. Safety Caution ....................................................................................................................... |
24 |
|
8-2. Error Mode Summary ....................................................................................................... |
24-25 |
|
8-3. Troubleshooting Summary ..................................................................................................... |
26 |
|
8-4. Troubleshooting With Error ............................................................................................... |
27-33 |
|
8-5. Troubleshooting Else ........................................................................................................ |
34-39 |
9. |
Component Testing Information ............................................................................................... |
40-54 |
|
9-1. Filter Assembly (Line Filter) ................................................................................................... |
40 |
|
9-2. Door Look Switch Assembly ............................................................................................. |
41-42 |
|
9-3. Stator Assembly ................................................................................................................ |
43-45 |
|
9-4. Pump Motor Assembly ........................................................................................................... |
46 |
|
9-5. Inlet Valve Assembly .............................................................................................................. |
47 |
|
9-6. Heater Assembly .................................................................................................................... |
48 |
|
9-7. Thermistor Assembly ........................................................................................................ |
49-50 |
|
9-8. Steam Generator Assembly .............................................................................................. |
51-52 |
|
9-9. Lamp ...................................................................................................................................... |
53 |
|
9-10. Vibration sensor assembly ................................................................................................... |
54 |
10. |
Disassembly Instructions ......................................................................................................... |
55-65 |
11. |
Exploded View ......................................................................................................................... |
66-68 |
|
11-1. Cabinet and Control Panel Assembly ................................................................................... |
66 |
|
11-2. Drum and Tub Assembly ...................................................................................................... |
67 |
|
11-3. Dispenser Assembly ............................................................................................................. |
68 |
4

1. SPECIFICATIONS
ITEM |
|
WM3885H*CA / WM3875H*CA |
||
|
|
|
|
|
COLOR |
|
W : White, C : Chardonnay Steel |
||
|
|
|
||
POWER SUPPLY |
AC 120 V, 60 Hz |
|||
|
|
|
||
PRODUCT WEIGHT |
220.5 lbs (100 kg) |
|||
|
|
|
||
ELECTRIC POWER |
WASHING |
280 W |
||
|
|
|
||
DRAIN MOTOR |
80 W |
|||
CONSUMPTION |
||||
|
|
|
||
WASH HEATER |
1000 W |
|||
|
||||
|
|
|
|
|
REVOLUTION |
|
WASH |
46 rpm |
|
|
|
|
|
|
SPEED |
|
SPIN |
0-1,400 rpm |
|
|
|
|
|
|
CYCLES |
|
14 |
||
|
|
|
||
WASH/RINSE TEMPERATURES |
5 |
|||
|
|
|
|
|
SPIN SPEEDS |
|
5 |
||
|
|
|
|
|
|
|
|
STEAM, DELAY WASH, STAIN CARE, CUSTOM PGM, COLD |
|
|
|
|
WASHTM WASH/RINSE OPTIMIZERTM, EXTRA RINSE, CHILD |
|
OPTIONS |
|
LOCK, DRUM LIGHT, FRESH CARE, LANGUAGE, PRE-WASH, |
||
|
|
|
||
|
|
|
WATER PLUS, ENERGY USAGE DISPLAY |
|
|
|
|
||
WATER CIRCULATION |
Incorporated |
|||
OPERATIONAL WATER PRESSURE |
14.5-116 psi (100-800 kPa) |
|||
CONTROL TYPE |
Electronic |
|||
|
|
|
||
WASH CAPACITY [cu.ft. ] |
4.13 (4.8 IEC) |
|||
|
|
|
|
|
DIMENSIONS |
|
27”(W) X 293/4”(D) X 3811/16”(H), 5013/16” (D, door open) |
||
DELAY WASH |
|
up to 19 hours |
||
|
|
|
||
DOOR SWITCH TYPE |
PTC + Solenoid |
|||
|
|
|
|
|
WATER LEVEL |
|
10 steps (by sensor) |
||
|
|
|
||
LAUNDRY LOAD SENSING |
Incorporated |
|||
|
|
|
||
ERROR DIAGNOSIS |
Incorporated |
|||
|
|
|
||
AUTO POWER OFF |
Incorporated |
|||
|
|
|
|
|
CHILD LOCK |
|
Incorporated |
||
|
|
|
|
|
STEAM |
|
Incorporated |
||
|
|
|
|
|
5
2. FEATURES & TECHNICAL EXPLANATION
2-1. FEATURES
Ultra Capacity
The larger drum enables not just higher head drop and stronger centrifugal force, but also less tangling and wrinkling of the laundry. Heavier loads, such as king size comforters, blankets, and curtains, can be washed.
Direct Drive System
The advanced brushless DC motor directly drives the drum without belt and pulley.
Tilted Drum and Extra Large Door Opening
Tilted drum and extra large opening make it possible to load and unload clothing more easily.
TM
Steam Washing and SteamFresh
Steam washing features upgraded washing performance with low energy and water consumption. SteamFreshTM cycle removes wrinkles from dry clothes.
RollerJets
Washing ball enhances the wash performance and reduces damage to the clothing. The jets spray and help tumble clothes to enhance washing performance while maintaining fabric care.
Automatic Wash Load Detection
Automatically detects the load and optimizes the washing time.
Built-in Heater
Internal heater helps to maintain water temperature at its optimum level for selected cycles.
Child Lock
The child lock prevents children from pressing any button to change the settings during operation.
6
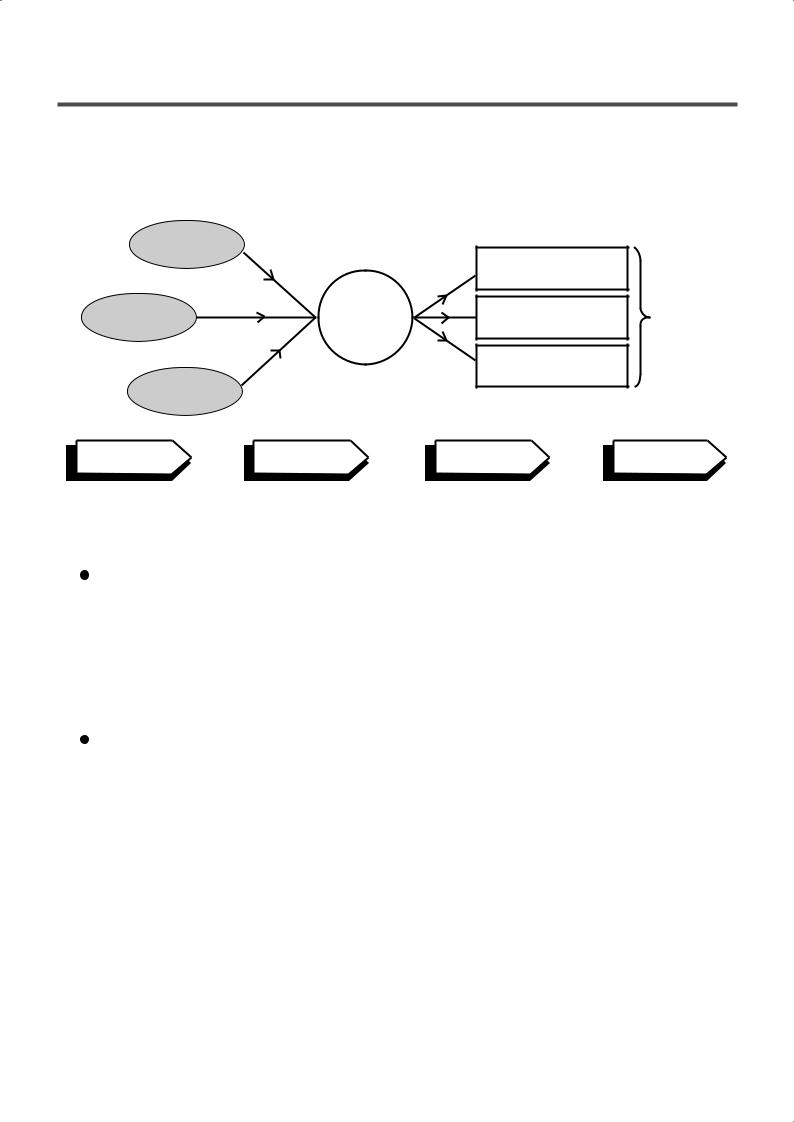
2-2. NEURO FUZZY WASHING TIME OPTIMIZATION
To get the best washing performance, optimal time is determined by the water temperature, the selected washing temperature, and the size of the load.
water temperature
washing time
selected |
NEURO- |
|
the best |
|
washing |
rinsing time |
washing |
||
FUZZY |
||||
temperature |
|
performance |
||
|
|
|
||
|
|
spin rhythm, time |
|
|
load |
|
|
|
|
size |
|
|
|
|
SENSING |
PROCESSING |
DETERMINATION |
EFFECT |
2- WATER LEVEL CONTROL
level in the tub.
 The water supply is stopped when the water level reaches the preset level, the washing program then proceeds.
 Spinning does not proceed until the water in the tub drains to a certain level.
2-4. DOOR CONTROL
washer is not in operation.  When the cycle is completed, the DOOR LOCKED light will turn off.
 If a power failure has occurred while in operation, the door will unlock after 5 minutes.
 Clicking sounds can be heard when the door is locked/unlocked.
7

2-5. THE DOOR CAN NOT BE OPENED
 While program is operating.
When a power failed and power plug is taken out in operation.
 While Door Lock lights turn on.
 White the motor is in the process of inertial rotating, through the operation is paused.
2-6. DOOR LOCKED LAMP LIGHTS
 When the frequency of water level is lower than 22.9 kHz.
(It can be canceled when the frequency is more than 23.8 kHz.)
 When the temperature inside the tub is higher than 45°C and water level is not 25.5 kHz.
(It can be canceled when the water level is 25.5 kHz or the temperature inside the tub is lower than 40°C.)
2-7. CHILD LOCK
 Use this option to prevent unwanted use of the washer. Press and hold STAIN CARE button for 3 seconds to lock/unlock control.
 When child lock is set, CHILD LOCK lights and all buttons are disabled except the POWER
  button. You can lock the controls of the washer while washing.
 CHILD LOCK lasts after the end of cycle. If you want to deactivate this function, Press and hold the STAIN CARE button for 3 seconds.
2-8. WATER CIRCULATION
 When washing and rinsing function of shower at the upper part of Gasket.
 When washing, it continuously operates for 3 minutes and intermittently.
  When rinsing, it continuously operates after completion of water supply.
2-9. STEAM
 For tough stained clothes, sick room linens, or baby clothes.
 Steam Wash is available with Sanitary, Bulk/Large, Perm. Press, Cotton/Normal, and Baby Wear cycles.
 This option features upgraded washing performance with low energy and water consumption.
 Do not load delicates such as wool, silk, and easily discolored clothes.
2-10. DRUM LIGHT
 The drum light comes on when the power button is pressed. It goes off when the door is closed and the washer starts operation.
 The drum light remains off when the door is locked.
 The drum light can be turned on while the washer is in operation by pressing the DELAY WASH button for 3 seconds. The light will turn off automatically 4 minutes later.
 The drum light comes on when the washing cycle is finished and goes off 4 minutes later.
8
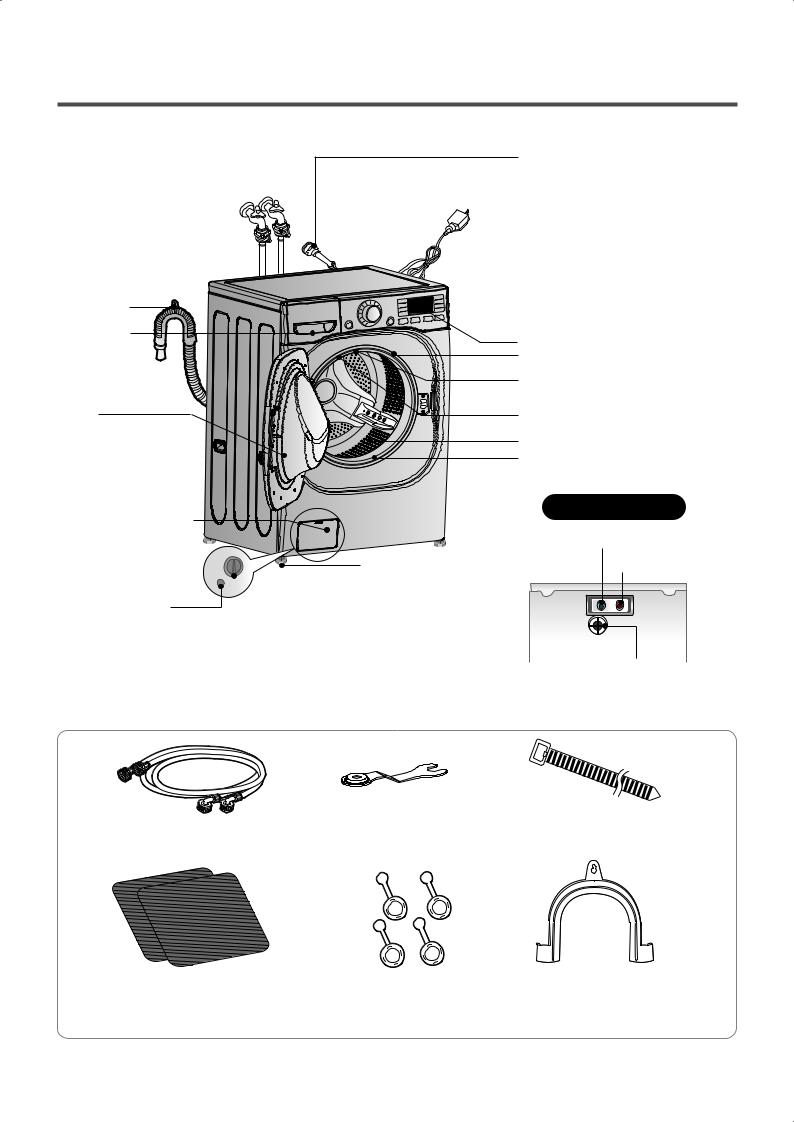
3. PARTS IDENTIFICATION
Drain Hose
Dispenser
Door
Magnetic Door Plunger 

Lower Cover Cap
Shipping Blots

 Power Plug
• If the supply cord is damaged, it must be
replaced by the manufacturer or its authorized service
technician in order to
avoid a hazard.
Control Panel
Door Cleaning Nozzle
|
Water Circulation & |
|
Steam Nozzle |
|
Drum Light |
|
Drum |
|
Door Seal |
|
Back of Washer |
|
Cold Water Inlet |
Adjustable Feet |
Hot Water Inlet |
|
|
|
|
|
|
|
|
|
|
Drain Plug |
|
Drain Pump Filter |
||
|
||||
Hoses (1 Hot and 1 Cold)
Vent for Safety
 ACCESSORIES
Hot/Cold (1 each) |
Wrench |
Tie strap (Option) |
|
to secure drain hose to standpipe, |
|||
Hose |
|
||
|
inlet hose, or laundry tub |
||
|
|
Non-skid pads |
Caps(4) |
Elbow Bracket |
|
(for covering shipping |
|
|
(for securing drain hose) |
|
|
bolt holes) |
|
|
|
9

4. INSTALLATION & TEST
1Before servicing, ask the customer what the trouble is.
2When installing or repairing the washer, put on long gloves and safety glasses.
3Check the setup (power supply is 120 VAC, remove the transit bolts, level the washer, etc.)
4Check with the troubleshooting guide.
5Plan your service method by referring to the disassembly instructions.
6Service the unit.
7After servicing, operate the appliance to see whether it functions correctly.
STANDARD INSTALLATION
The appliance should be installed as follows:
REMOVE THE SHIPPING |
INSTALL THE APPLIANCE |
ADJUST THE |
||
BOLTS |
ON A FLAT AND FIRM SURFACE |
LEVELING |
||
|
|
|
|
|
Remove the 4 shipping bolts |
|
|
|
Turn the leveling feet to |
with the supplied wrench. |
|
|
|
adjust the appliance. |
Remove the lower boits fist. |
|
|
|
|
It is easier that way. |
|
|
|
|
 Keep the shipping bolts and spanner for future use.
  Insert the 4 caps (provided) into the hole.
Lower
Higher
Keeping
Turn clockwise to raise; counterclockwise to lower.
10
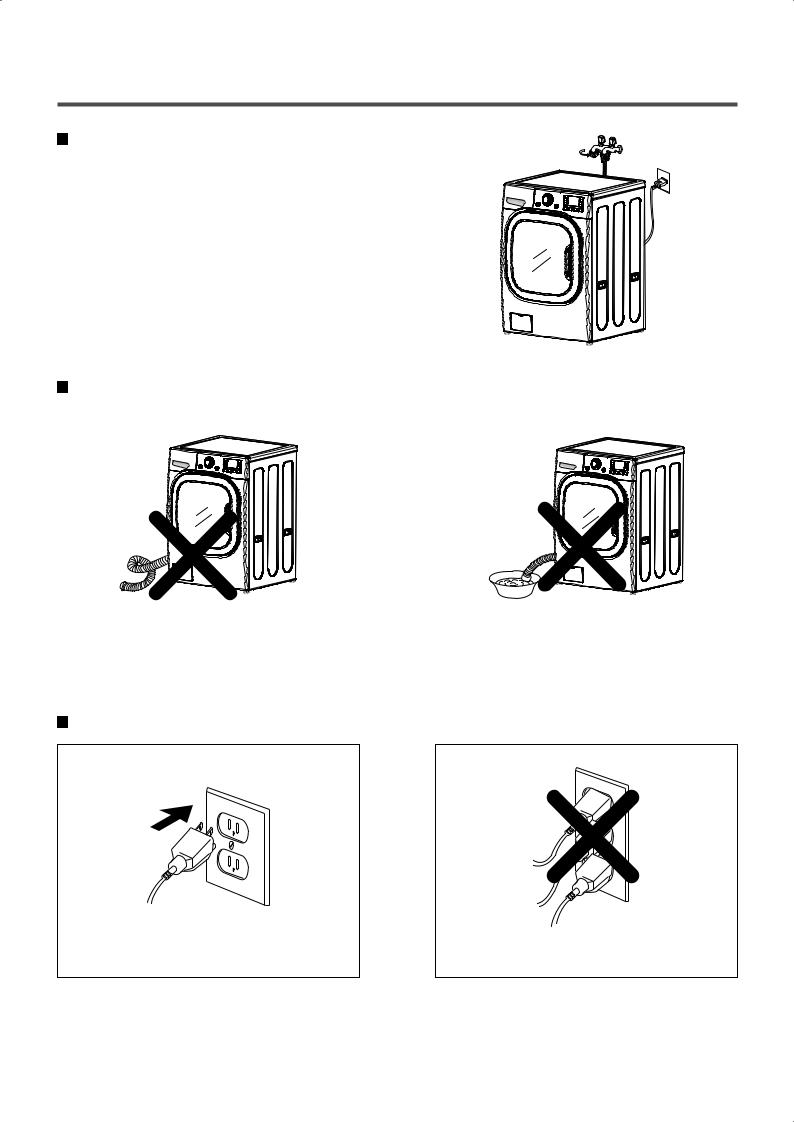
HOW TO CONNECT THE INLET HOSE
 Verify that the rubber washer is inside of the valve connector.
 Tighten the inlet hose securely to prevent leaks.
 Install the inlet hose to correct temperature water tap.
Otherwise, it cause drips on the drawer panel handle and drawer panel.
CONNECT THE DRAIN HOSE
Hot 
 Cold
Cold
• Make sure that the hose is not twisted. |
|
• Avoid submerging the end of the hose. |
|
|
|
The end of the drain hose should be placed less than 96” from the floor.
CONNECT POWER PLUG
• Connect the power plug to the wall outlet.
•Avoid connecting several electric devices, as doing so may cause a fire.
11
7 |
TEST OPERATION |
|
|
1 |
Preparation for |
2 Press the POWER button. |
3 Press the START/PAUSE |
|
washing. |
|
button. |
•Connect the power plug to the outlet.
•Connect the inlet hoses.
6 Check the water heating function.
•Press the WASH/RINSE button and the present temperature will be displayed.
|
• Listen for a click to determine if the |
|
door has locked. |
5 Check the automatic reverse |
4 Check the water supply. |
rotation. |
|
• Check if the drum rotates |
• Check if water is supplied through |
clockwise and counterclockwise. |
the detergent dispenser. |
7 Check the drain and spin |
8 Press the START/PAUSE |
9 Water removal |
functions. |
button. |
|
•Power off and the power on.
•Press the SPIN SPEED button.
•Press the START/PAUSE button.
•Check the spin and drain functions.
• Listen for a click to determine if the door is unlocking.
•If SERVICE is needed during check, remove the remaining water by pulling out the hose cap.
12

5. OPERATION
5-1. CONTROL PANEL FEATURES
E D H
F
|
|
|
|
|
|
|
|
|
|
|
|
|
|
|
|
|
|
|
|
|
|
|
|
|
|
|
|
|
|
|
|
|
|
|
|
|
|
|
|
|
|
|
|
|
|
|
|
|
|
|
|
|
|
|
|
|
|
|
|
|
|
|
|
|
|
|
|
|
|
|
|
|
|
|
|
|
|
|
|
|
|
|
|
|
|
|
|
|
|
|
|
|
|
|
|
|
|
|
|
|
|
|
|
|
|
|
|
|
|
|
|
|
|
|
|
|
|
|
|
|
|
|
|
|
|
A |
B |
C |
|
|
|
|
|
|
|
|
|
||||||
|
|
|
|
I |
G |
||||||||||||
|
|
|
|
|
|
|
|
|
|
|
|
|
|||||
|
|
|
|
|
|
|
|
|
|
SPECIAL FUNCTION BUTTONS |
|||||||
Press to turn |
washer ON. Press again to turn the washer OFF. |
|
The special function buttons allow you to select additional |
||||||||||||||
NOTE: Pressing the ON/OFF button during a cycle will cancel that |
|
functions and will light when selected. Certain buttons |
|||||||||||||||
cycle and |
settings will be lost. |
|
|
|
|
|
also allow you to activate secondary functions by pressing |
||||||||||
|
|
|
|
|
|
|
|
|
|
and holding the button for 3 seconds. For detailed |
|||||||
CYCLE |
KNOB |
|
|
|
|
|
information about the individual functions, please see the |
||||||||||
Turn this |
select the desired cycle. Once the desired |
|
following pages. |
|
|
||||||||||||
cycle has |
selected, the standard presets will be shown in |
|
|
|
|
|
|
|
|
|
|||||||
the display |
settings can be adjusted using the cycle |
|
OPTION BUTTON |
|
|
||||||||||||
setting |
before starting the cycle. |
|
|
|
|
|
Press this button to select additional cycle options such as |
||||||||||
C START/PAUSE BUTTON |
|
|
|
|
|
WATER PLUS, PRE WASH and ENERGY USAGE |
|||||||||||
|
|
|
|
|
DISPLAY. |
|
|
||||||||||
Press this button to START the selected cycle. |
If the |
|
Press the button next to the desired option in the display |
||||||||||||||
washer is running, use this button to PAUSE the cycle without |
|
to select. The button will light to show the option has been |
|||||||||||||||
losing the current settings. |
|
|
|
|
|
selected. |
|
|
|||||||||
NOTE: If |
not press the START/PAUSE button within 4 |
|
LCD DISPLAY |
|
|
||||||||||||
minutes of selecting a cycle, the washer automatically turns off. |
|
|
|
||||||||||||||
|
|
|
|
|
|
|
|
|
|
The display shows the settings, estimated time remaining, |
|||||||
STEAM |
|
|
|
|
|
|
|
options, and status messages for your Steam Washer™. |
|||||||||
Press the STEAM button to add steam to the selected cycle |
|
The light in the display will remain on through the cycle. |
|||||||||||||||
for added cleaning power. |
|
|
|
|
I |
CYCLE SETTING BUTTONS |
|
|
|||||||||
NOTE: |
be added to only the following cycles: |
|
|
||||||||||||||
STEAM FRESH™, ALLERGIENE™, SANITARY, BRIGHT |
|
Use these buttons to select the desired cycle options for |
|||||||||||||||
WHITES™, |
PERM. PRESS, |
|
|
|
|
|
the selected cycle. The current options are shown in the |
||||||||||
COTTON/NORMAL, HEAVY DUTY and TOWELS. |
|
|
|
|
|
display. Press the button for that option to view and select |
|||||||||||
|
|
|
|
|
|
|
|
|
|
other settings. |
|
|
|||||
E DELAY WASH BUTTON
Press this button to delay the start of the wash cycle. Each press of the button increases the delay time by one hour, up to 19 hours.
13

Power Button
•Use this button to turn the power On/Off.
Status Indicator
•It shows elapsed time of the cycle the washer is operating.
|
|
|
Cycle Selector Knob |
Start/Pause |
|
• Rotate the Cycle selector knob to select the cycle |
• Use this button to |
|
designed for different types of fabric and soil |
Start/Stop the washer. |
|
levels. |
|
|
14
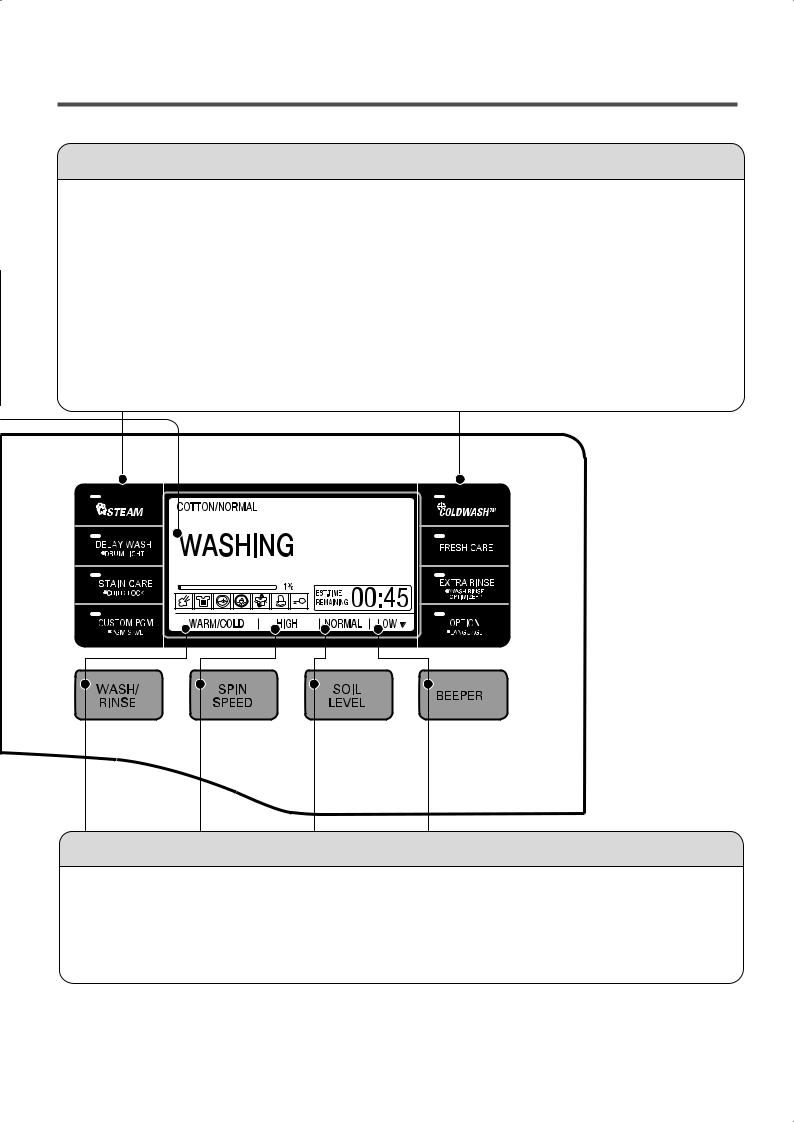
Option Button
•STEAM: Use the STEAM button to add steam to the cycle for the extra cleaning.
•WASH/RINSE OPTIMIZERTM: Use the WASH/RINSE OPTIMIZERTM button to select the water level, and
detergent mount automatically by the smart sensor and program.
•PRE-WASH: Use the PREWASH button to select to wash temporary before to start the course which you chosen.
•CUSTOM PGM: Use the CUSTOM PGM button to select the course that you has been saved by PGM SAVE.
•DELAY WASH: Once you have selected the cycle and other settings, press this button to delay the start of the wash cycle.
•COLDWASHTM : Use this function to wash without hot water and heating.
•EXTRA RINSE : This option will add an extra rinse cycle to the selected cycle.
•STAIN CARE : Select this option for heavily stained clothes, such as play clothes or work clothes.
•DRUM LIGHT : The drum is equipped with a blue LED light that illuminates when the washer is turned on.
•CHILD LOCK : Use this option to prevent unwanted use of the washer or to keep cycle settings from being
changed while the washer is operating.
Wash/Rinse, Spin speed, Soil Level, Beeper Button
•Select a water temperature based on the type of load you are washing.
•To change the spin speed, press the Spin Speed button repeatedly to cycle through available options.
•To change the soil level, press the Soil Level button repeatedly until the desired setting is on.
•Press repeatedly to adjust the volume of the Beeper.
15
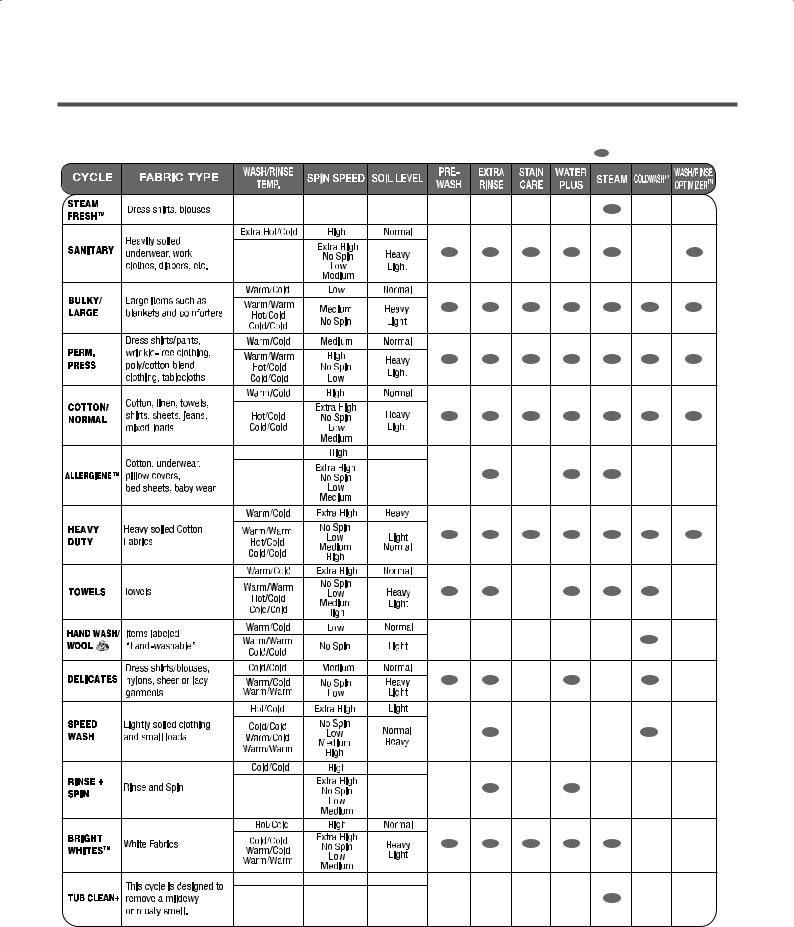
5-2. Cycle Guide
The cycle guide below shows the options and recommended fabric types for each cycle.
NOTE: To protect your garments, not every wash/rinse temperature, spin speed, soil level, or option is available with every cycle.
16
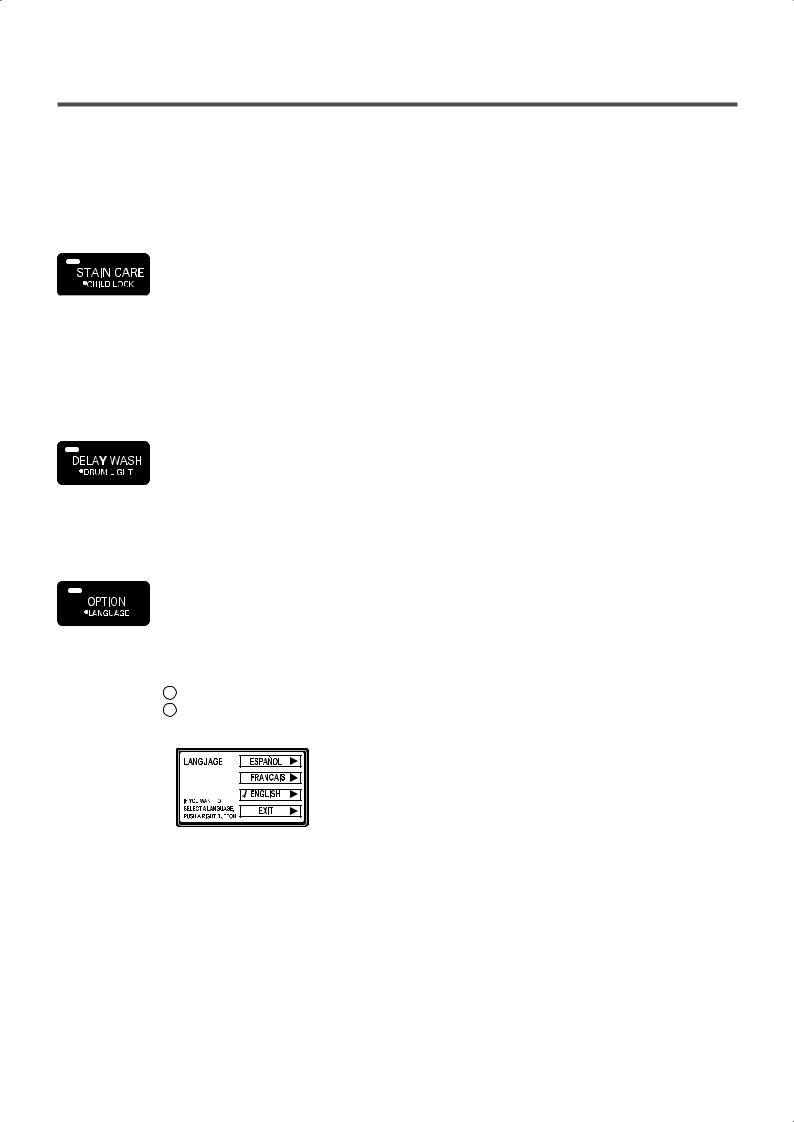
5-3. SPECIAL FUNCTIONS
The option buttons also activate special functions, including CHILD LOCK, DRUM LIGHT, FRESH CARE, and LANGUAGE. Press and hold the option button marked with the special function for 3 seconds to activate.
CHILD LOCK
Use this option to prevent unwanted use of the washer or to keep cycle settings from being changed while the washer is operating. Press and hold the STAIN CARE button for 3 seconds to activate or deactivate CHILD LOCK. CHILD LOCK will be shown in the display, and all controls are disabled except the ON/OFF button. The washer can be locked during a cycle.
NOTE: CHILD LOCK lasts after the end of cycle. If you want to deactivate this function, Press and hold the STAIN CARE button for 3 seconds.
DRUM LIGHT
The drum is equipped with a blue LED light that illuminates when the washer is turned on. This light automatically turns off when the door is closed and the cycle starts. To turn on the light during a cycle, press and hold the DELAY WASH button for 3 seconds. The drum light will illuminate and then turn off automatically after 4 minutes.
LANGUAGE
This option allows you to change the language shown in the display. Once set, the selected language will stay set even after the power is turned off. The display language options are English, French, and Spanish; English is the default language.
To change the language:
1Press the ON/OFF button to turn on the washer.
2Press and hold the OPTION button for 3 seconds, until the following screen appears in the display.
When OPTION is pushed, English is displayed as the default language.
Press the COLDWASHTM button to select ESPAÑOL (Spanish) or FRESH CARE for FRANÇAIS (French).
17

5-4. Explanation of each process
No. |
Process |
Explanation |
|
|
|
1. |
Stay |
• Electrical power is supplied. |
|
|
• Washer is ready to work and the micom is in the active mode. |
|
|
|
2. |
Water |
• After loading laundry and selecting a course and a cycle, water is |
|
supply |
supplied and drum rotates. |
|
|
• When a user selects Pre-wash course, water is supplied through pre |
|
|
wash valve. |
|
|
|
3. |
Soaking |
• To get laundry wet, drum rotates clockwise and counterclockwise. |
|
and washing |
• If water amount is insufficient at this time, the Inlet valve will supply |
|
laundry |
water again. |
|
|
|
4. |
Heating and |
• The heater heats the water in drum to the selected water temperature |
|
washing |
and drum rotates for washing. |
|
|
|
5. |
Washing |
• When the water temperature reaches to the selected temperature, |
|
and heating |
the heating stops and only the drum rotates. |
6. |
/ washing |
• If water temperature becomes lower than selected because of |
|
|
re-supplied water, the heating starts again. |
|
|
|
7. |
Washing |
• Fuzzy logic decides washing time according to the laundry load, water |
|
|
temperature, and other factors. |
|
|
|
8. |
Drainage |
• A pump motor drains the water from the drum. |
|
|
• After sensing drained water amount by water level frequency, spin starts. |
|
|
• When a heating course is selected, stay cooling process is performed to |
|
|
decrease the water temperature gradually to prevent laundry from being |
|
|
damaged and for safety reasons. |
|
|
|
9. |
Untangling |
• It balances laundry load and senses the eccentricity of the load, to only |
|
(Sensing |
allow spinning without vibration. |
|
eccent- |
• If the eccentricity is worse than the allowed level, it repeats the |
|
ricity) |
disentangling process. When the repeated time is more than allowed |
|
|
level, it displays UE. |
|
|
• If the eccentricity is good, the intermittent spin starts. |
|
|
• During this process, the drain pump works for drainage intermittently. |
|
|
|
18

No. |
Process |
Explanation |
|
|
|
A. |
Intermittent |
• To reach the correct set speed, the motor rotates clockwise and |
|
spin |
counterclockwise directions after spin process starts. |
|
|
• If the water level frequency is lower than 23.0 kHz, |
|
|
a washer senses suds and starts suds removal process. |
|
|
|
B. |
Rinse |
• In this process, the remaining water during washing process is |
|
spin |
extracted and the selected speed is kept. |
|
|
• Removing suds process is in active mode at this cycle. |
|
|
|
C. |
Remaining |
• After spin finishes, the drum rotates by remaining spin power until it |
|
spin |
stops. Motor power is off. |
|
|
• This process is overlapped with next process. |
|
|
|
D. |
Rinse water |
• Water supply for rinse process. |
|
supply |
|
|
|
|
E. |
Rinse |
• Rinsing process. |
|
|
|
F. |
Last |
• After spin finishes and power is not supplied to motor, the drum |
|
drainage |
rotates by remaining spin power. |
|
|
• If rinse hold is selected, the drainage is not proceeded after rinse |
|
|
finishes. |
|
|
|
G. |
Disentangling |
• The same as item 9. |
|
|
|
H. |
Intermittent spin |
• The same as item A. |
|
|
|
I. |
Main spin1 |
• The same as item B. |
|
|
|
J. |
Main spin2 |
• At the end of a main spin, the spin speed will reach the selected rpm. |
|
|
|
K. |
Remaining spin |
• The same with item C. |
|
|
|
L. |
Disentangling |
• After spin finishes, disentangling starts to remove unbalanced |
|
|
laundry. |
|
|
|
M. |
End |
• After ‘end’ signal is displayed, it stays for 8 seconds and power is |
|
|
automatically turned off. (Auto type door switch) |
|
|
• After door switch is off, end signal is displayed in the case of |
|
|
manual type and it takes around 2 minute to turn off door switch. |
|
|
|
19
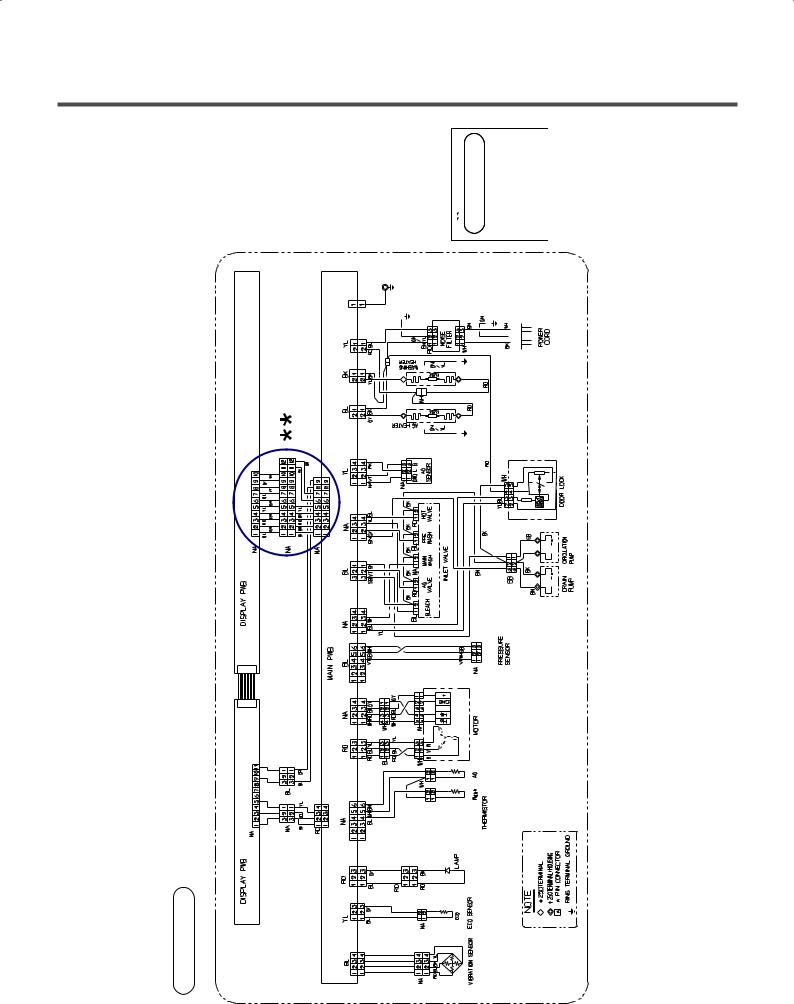
6. WIRING DIAGRAM / PROGRAM CHART
WM3875H*CA

WM3885H*CA
20

|
|
|
|
|
|
|
|
Extra Rinse |
|
|
|
|
Cool-down |
|
|
|
|
|
|
|
4 |
|
|
|
|
|
|
|
|
|
|
|
|
360 |
|
|
420 |
600 |
120 |
420 |
120 |
420 |
120 |
420 |
120 |
~ |
60 |
|
720 |
|
|||||||||
|
|
|
|
|
|
|
|
|
|
|
|
|
Steam Refresh |
|
|
|
|
|
|
|
|
|
20 |
|
59 |
|
|
|
|
|
|
|
|
|
113 |
|
65 |
|
|
|
|
|
|
|
|
|
|
|
|
|
|
|
|
|
|
|
|
|
|
|
23 |
|
|
|
|
|
|
|
|
|
65 |
|
|
|
|
|
|
|
|
|
|
|
|
21 |
Allergiene |
|
|
|
|
|
|
|
|
|
118 |
70 |
|
|
|
|
|
|
|
|
|
|
|
12 |
|
|
|
|
|
|
|
|
|
60 |
|
|
15 |
|
|
|
|
|
|
|
|
|
|
|
|
|
|
|
|
|
|
|
|
|
|
|
18 |
|
|
|
|
|
|
|
|
|
43 |
|
|
|
|
|
|
|
|
|
|
|
|
|
25 |
|
|
|
|
|
|
|
|
|
57 |
|
|
|
|
|
|
|
|
|
|
|
|
|
2 |
|
60 |
|
60 |
|
60 |
|
60 |
|
15 |
|
|
|
|
|
|
|
|||||
|
14 |
|
|
|
|
|
|
|
|
|
68 |
|
Perm . Press |
|
|
|
|
|
|
|
|
|
|
|
20 |
|
|
|
|
|
|
|
|
|
|
|
15 |
|
|
|
|
|
|
|
|
|
83 |
|
Bright Whites |
|
|
|
|
|
|
|
|
|
|
|
21 |
|
|
|
|
|
|
|
|
|
|
|
40 |
|
|
|
|
|
|
|
|
|
103 |
|
Heavy Duty |
|
|
|
|
|
|
|
|
|
|
|
55 |
|
|
|
|
|
|
|
|
|
|
|
10 |
|
|
|
|
|
|
|
|
|
72 |
|
Towels |
|
|
|
|
|
|
|
120 |
|
|
|
16 |
|
|
|
|
|
|
|
|
|
|
|
|
|
|
|
|
|
|
|
|
|
20 |
7. TEST MODE
7-1. SAFETY CAUTION
Both 120 volts AC and DC voltages are present on the main board. Be careful to avoid a shock hazard. Be careful electric shock when disconnecting parts while trouble shooting. (Wear Electro Static Discharge gloves when working.)
After cutting off the power when changing PWB assembly, disconnect or assemble.
Be careful static when handling PWB assembly, and use electro static discharge plastic pack when handling or storing the board or other components.
7-2. LOAD TEST MODE
The washer must be empty and the controls must be in the off state.
1.Press the SPIN SPEED and SOIL LEVEL buttons simultaneously.
2.Press the Power  button, while the above condition. Then buzzer will sound twice.
3.Press the STEAM button to load test mode. Without pressing the STEAM button, you can load demo mode.
4.Press the START/PAUSE  button repeatedly to cycle through the test modes.
Number of times the |
Check Point |
Display Status |
|
Start/Pause button is pressed |
|||
|
|
||
None |
Turns on all lamps. |
LOAD TEST MODE |
|
1 time |
Tumble clockwise. |
rpm (42~50) |
|
2 times |
Low speed Spin. |
rpm (35~45) |
|
3 times |
High speed Spin. |
rpm (110~117) |
|
4 times |
Inlet valve for prewash turns on. |
Water level frequency (0~255) |
|
|
|
|
|
5 times |
Inlet valve for main wash turns on. |
Water level frequency (0~255) |
|
|
|
|
|
6 times |
Inlet valve for Hot water turns on. |
Water level frequency (0~255) |
|
|
|
|
|
7 times |
Inlet valve for bleach turns on. |
Water level frequency (0~255) |
|
|
|
|
|
8 times |
Inlet valve for steam turns on. |
Water level frequency (0~255) |
|
|
|
|
|
9 times |
Tumble counterclockwise. |
rpm (42~50) |
|
|
|
|
|
10 times |
Heater turns on for 3 seconds. |
Water temperature |
|
|
|
|
|
11 times |
Circulation pump turns on. |
Water level frequency (0~255) |
|
|
|
|
|
12 times |
Drain pump turns on. |
Water level frequency (0~255) |
|
|
|
|
|
13 times |
Steam water level sensor operates. |
AG tub water level frequency (0~255) |
|
|
|
|
|
14 times |
Steam Heater turns on for 1.2 sec. |
Steam generator temperature |
|
|
|
|
|
15 times |
off |
|
|
|
|
|
22
 Loading...