


website : http://www.lg.ca
e-mail : http://www.LGEservice.com/techsup.html
WASHING MACHINE
OWNER’S MANUAL
MODEL : WF-T8500TP / WF-T8501TP S/N :

Contents
Read this manual
Inside you will find many helpful hints on how to use and maintain your washer properly. Just a little preventive care on your part can save you a great deal of time and money over the life of your washer. You will find many answers to common problems in the Troubleshooting section. If you review our chart of Troubleshooting first, you may not need to call for service at all.
Important Safety Information
Identification of Parts
Before Starting to Wash
Operating Instructions
Additional Function
Options
Installation Instructions
User Maintenance Instructions
Troubleshooting
Warranty
Specifications
Fabric Care Labels
|
3 |
|
4 |
How To Remove Stains |
5 |
Preparation Before Washing |
6 |
Water Level and Temperature |
7 |
Use of Detergent |
8 |
Use of Softener and Bleach |
9 |
Function of Each Button |
10 |
Normal Wash |
12 |
Economy Wash |
12 |
Heavy Wash |
12 |
Wool Wash |
12 |
Speedy Soak Wash |
12 |
Delay Start Wash |
13 |
Washing Option |
14 |
Other Useful Functions |
15 |
Placing and Leveling |
16 |
Connecting Hose |
17 |
Washer Connections for Portable Model |
18 |
Grounding Instructions |
19 |
|
21 |
|
24 |
|
25 |
|
26 |
|
27 |
Important Safety Information
READ ALL INSTRUCTIONS BEFORE USE
For your safety, the information in this manual must be followed WARNING! to minimize the risk of fire or explosion, electric shock, or to
prevent property damage, personal injury, or loss of life.
IMPORTANT SAFETY INSTRUCTIONS
WARNING : To reduce the risk of fire, electric shock, or injury to persons when using the washer, follow basic precautions, including the following:
¥Read all instructions before using the washer.
¥Do not wash articles that have been previously cleaned in, washed in, soaked in, or spotted with gasoline, dry cleaning solvents, or other flammable or explosive substances, as they give off vapors that could ignite or explode.
¥Do not add gasoline, dry cleaning solvents, or other flammable or explosive substances to the wash water. These substances give off vapors that could ignite or explode.
¥Under certain conditions, hydrogen gas may be produced in a hot water system that has not been used for 2 weeks or more. HYDROGEN GAS IS EXPLOSIVE. If the hot water system has not been used for such a period, before using the washing machine, turn on all hot water faucets and let the water flow from each for several minutes. This will release any accumulated hydrogen gas. As the gas is flammable, do not smoke or use an open flame during this time.
¥Do not allow children to play on or in the washer. Close supervision of children is necessary when the washer is used near children.
¥Before the washer is removed from service or discarded, remove the lid to prevent children from hiding inside.
¥Do not reach into the washer if the basket or agitator is moving.
¥Do not install or store the washer where it will be exposed to the weather.
¥Do not tamper with controls.
¥Do not repair or replace any part of the washer or attempt any servicing unless specifically recommended in the user-maintenance instructions or published user-repair instructions that you understand and have the skills to carry out.
¥See Installation Instructions for grounding requirements.
SAVE THESE INSTRUCTIONS
GROUNDING INSTRUCTIONS
This appliance must be grounded. In the event of malfunction or breakdown, grounding will reduce the risk of electric shock by providing a path of least resistance for electric current. This appliance is equipped with a cord having an equipment-grounding conductor and grounding plug. The plug must be plugged into an appropriate outlet that is properly installed and grounded in accordance with all local codes and ordinances.
Do not use an adapter or otherwise defeat the grounding plug. If you donÕt have the proper outlet, consult an electrician.
WARNING : Improper connection of the equipment-grounding conductor can result in risk of electric shock. Check with a qualified electrician or serviceman if you are in doubt as to whether the appliance is properly grounded. Do not modify the plug provided with the appliance - if it does not fit the outlet, have a proper outlet installed by a qualified electrician.
3
Safety Important
Information

4
 Identification of Parts
Identification of Parts
POWDER DETERGENT
BOX FOR DELAYED
WASHING ( 
 )
)
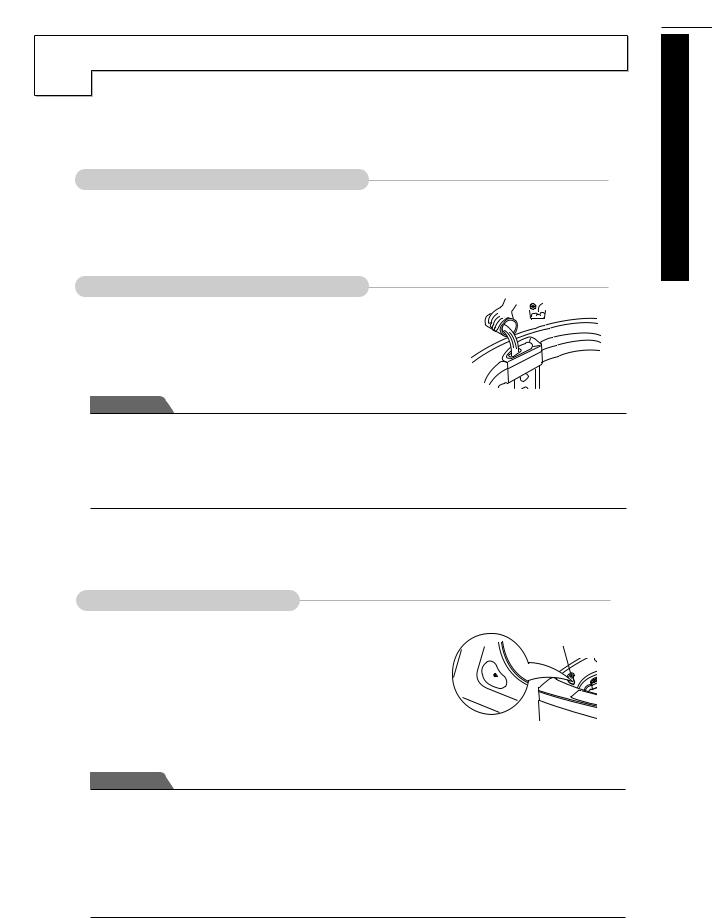
SOFTENER INLET
Softner will automatically
 flow into
 the tub. (
 )
)
INLET HOLE FOR
BLEACH (
( 
 )
)
FUNCTION SELECTOR
START/PAUSE
BUTTON

Use to
to start or stop
 the
the 

 washing machine


 temporarily.
WASHING WINGS
Vertical movement of agitator occurs when a
 sufficient amount of laundry is deposited.
Set the proper water level, an excessive
 amount of
 water may increase entanglement of laundry.
HOT WATER SUPPLY
HOSE


 COLD WATER SUPPLY HOSE


Make sure
sure  the
the water does not leak.


LINT FILTER


Clean regularly
 to stop linting on the clothes
 load.
load. 
 DRAIN HOSE

Check if the drain hose is hung up before operating the washing machine.
POWER PLUG
If the
the supply cord is damaged, it
 must be replaced by the manufacturer or its
 service agents or similarly qualified person
 in order to avoid a hazard.


BASE
 Accessories
Leg Stopper |
Complete hose |
Inlet hose |
Drain hose |
Tie strap |
(Option) |
(Option) |
|
|
|
|
1 Each for cold and |
to secure drain hose |
|
2 Pieces |
to standpipe, inlet |
||
hot water |
|||
|
hose or laundry tub |
||
|
|

How To Remove Stains
 How To Remove Stains
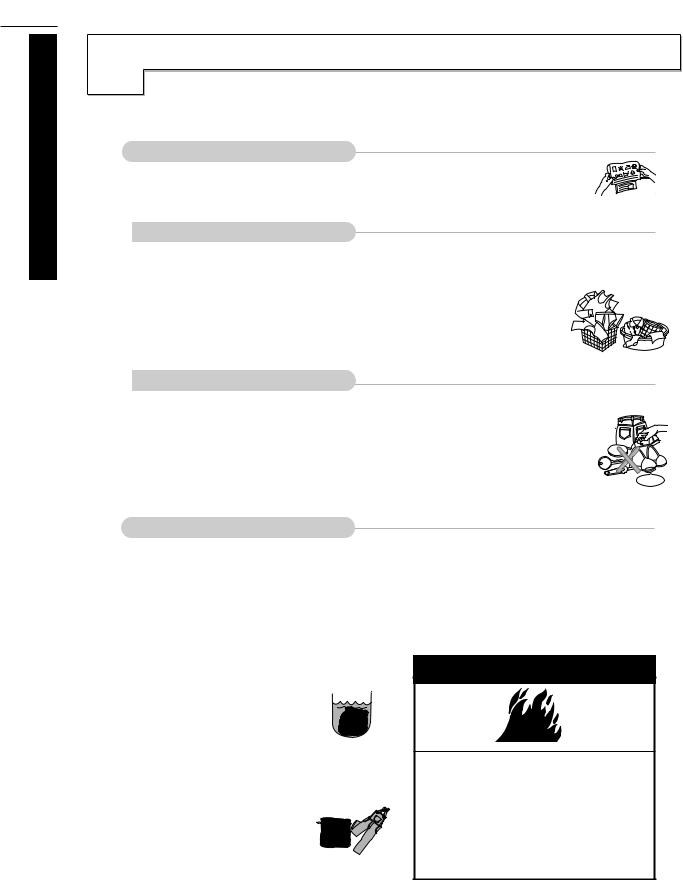
Pretreating dirt and stains
Brush a little washing detergent dissolved in water onto stains, collars, and cuffs to help shift dirt. The secret of stain treatment is immediate action. When an accident happens, plunge the stained area into cold water, or sponge it down. This prevents the stain from setting. Wash as soon as possible afterwards.
¥Treat stains AS SOON AS POSSIBLE. The longer they are left, the harder they are to remove.
¥Always consider the type of fabric you are treating to make sure you do not use a water temperature that is too hot or a treatment that will alter the color of the fabric.
It pays to pre-wash products and solvents on an inconspicuous part of the garment first.
¥Place the garment being treated on an absorbent cloth (e.g. on an old towel). Work from the reverse side of the stain, as this can force the stain off the fabric instead of through it.
¥Use cold or warm water on unknown stains as hot water can set some stains.
¥Some stains are not easily seen when the fabric is wet. Do air dry the stained garment to be sure the stain has been removed, as heat from a dryer may set the stain.
¥Take care with stain removal treatments as they are often flammable and highly poisonous. Do not use them in your washer as they may damage the paint or plastic components.
¥Some pretreatment sprays or liquids can damage your washer's control panel.
 Diaper Sanitizers
¥Diaper sanitizers are very corrosive to metal surfaces. DO NOT soak diapers in sanitizers in your washer or tip the contents of the diaper bucket into your machine. Rinse and wring diapers out thoroughly before placing them in your machine.
 Diapers
¥Scrape off any excess baby cream, such as Vaseline from the diapers before washing and handwash to prevent the cream being transferred to other items in the wash.
5
 Starting Before Wash to
6
 Before Starting to Wash
Washing
 Care Labels
* Look for a care label on your clothes. This will tell you about the fabric content of your garment and how it should be washed. (Refer to p. 26.)
Sort clothes into loads that can be washed with the same wash cycle, water temperature and spin speed.
be washed in different ways.
clothes according to the type and amount of soil. white fabrics from colored fabrics.
lint producers and lint collectors.
Chenile, Towels, Nappies, Diapers
Corduroy, Permanent Press, Socks
¥ Check all pockets to make sure that they are empty. Things such as nails, hairclips, matches,
pens, coins, and keys can damage both your washer and your clothes.
¥ Mend any torn garments or loose buttons. Tears or holes may become larger during washing. ¥ Remove belts, underwires, etc. to prevent damage to the machine or your clothes.
¥ Pretreat any dirt and stains.
WIRE
¥ Make sure the clothes are washable in water.
¥ Check the washing instructions on care label (Refer to p. 26.)
 Loading
(waxes, cleaning fluids, etc.).
the load size accordingly. Loosely load clothes no higher than the washer has started, press Start button and submerge additional
restart.
Light and Large-sized clothing
Clothes like downs and woollens are light weight, large and float easily. Use a nylon net and wash them in a small amount of water. 

If the laundry floats during the
wash cycle, it may become damaged. Use dissolved detergent to prevent the detergent from clumping.
Long laundry items
Use nylon nets for long, delicate items.
For laundry with long strings or long length , a net will prevent tangling during washing.
Fasten zippers, hook, and strings to make sure that these items don't snag on other clothes.
 Nylon net is not supplied by LG.
 WARNING
Fire Hazard
Never place items in the washer that are dampened with gasoline or other flammable fluids. No washer can completely remove oil.
Do not dry anything that has ever had any type of oil on it (including cooking oils).
Doing so can result in death, explosion, or fire.
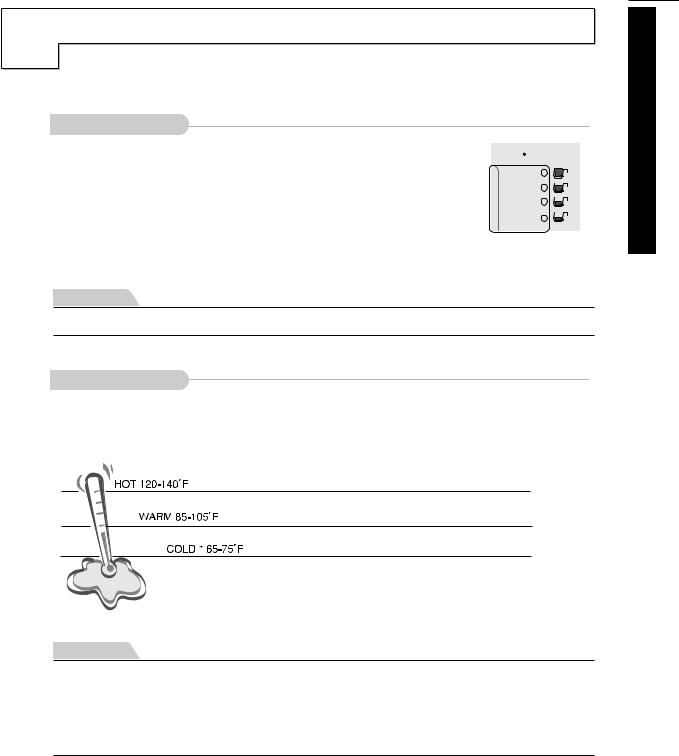
Water Level and Temperature
|
Water Detergent |
|
Ex-Large |
|
Large |
|
Medium |
WATER |
Small |
Note
¥Temperature below 65ûF (18ûC) will not activate laundry additives and may cause lint, residue, poor cleaning, etc. In addition, detergent manufactures and care labels define cold water as 80~85ûF (26.5~29.5ûC).
If the temperature of the water in the tub is cold to your hands, the detergent will not be activated and clean effectively.
7
 Starting Before Wash to
8
 Before Starting to Wash
 Choosing the Right Detergent
¥We recommend powdered detergent, or liquid detergent diluted with water. (manufacturerÕs recommanded ratio)
¥Soap or granulated soap powders should not be used in your washing machine to prevent build-up.
¥When washing woolens, remember to use a detergent suitable for washing woolens.
 Amount of Detergent
¥Follow the detergent package directions.
¥Using too little detergent is a common cause of laundry problems.
¥Use more detergent if you have hard water, large loads, greasy or oily soils, or lower water temperature.
¥The correct amount of detergent will vary depending on the amount of soil in your clothes. (Jeans and work clothes may be needed more detergent while bath towels are less.)
¥For liquid and concentrated detergent, follow the recommendations of the detergent manufacturer.
Note
To see if you are using the correct amount of detergent, lift the lid of your machine about half-way through the wash. There should be a thin layer of foam over the surface of the water. Lots of foam may look good, but it does not contribute to cleaning your clothes. No foam means not enough detergent has been used; soil and lint can settle back on the clothes or the washing machine.
Attention
If excessive detergent is used, the rinse will not be as clean and efficient.
Also, it could cause environmental pollution, so use detergent accordingly.
 Adding the Detergent
¥Some detergents MUST be fully dissolved before adding to your machine to get the best wash results. Check the instructions on the detergent packet.
If you use powdered detergent, it is essential that the required amount be fully dissolved in very hot water before being added to warm or hot water for the actual wash.
Pre-dissolving detergent in warm water when washing in cold water can improve its performance.
Powder Detergent Box.
(  )
)
Where you deposit the detergent
Use of Softener and Bleach
Using Softener
 Available Fabric Softener Type
¥Do not use concentrated fabric softener. This may cause some problems in automatic dispensing.
¥For more details refer to the softener product instructions for use.
 Depositing Fabric Softener
¥ Add 60ml (2 oz.) of fabric softener in the dispenser when starting the washer. |
( |
) |
It will be dispensed into the final rinse at the proper time. See the attention, |
|
|
below, for using concentrated fabric softener in the dispenser. |
|
|
Attention
is dispensed into the last rinse water.
1 oz. (30ml) of softener with 1 oz. (30ml) of fresh water.
. It may stain clothes.
. It may stain them.
liquid (or mild bar soap) and rewash.
Using Bleach Check fabric care labels for special instructions.
 Depositing Bleach
¥Separate the laundry to be bleached.
¥Measure liquid bleach carefully, following instructions on the bottle.
¥Before starting the washer, pour measured amount of bleach directly into bleach dispenser.
¥Avoid splashing or over-filling dispenser. If you prefer to use powdered bleach, add it into the wash basket with your detergent.
¥The dispenser dilutes liquid bleach before it reaches into your wash load.
Bleach dispenser
(  )
)
Attention
¥Never pour undiluted liquid bleach directly onto clothes or into the wash basket. This may affect decolorization or damage of laundry.
¥Do not mix chlorine bleach with ammonia or acids such as vinegar and/or rust remover. Mixing can produce a toxic gas which may cause death.
¥Do not pour powered bleach into bleach dispenser.
¥Powdered bleach should be dissolved with water and then be deposited into the tub.
¥For more details refer to the product instructions for use.
9
 Starting Before Wash to
10
 InstructionsOperatingtitle
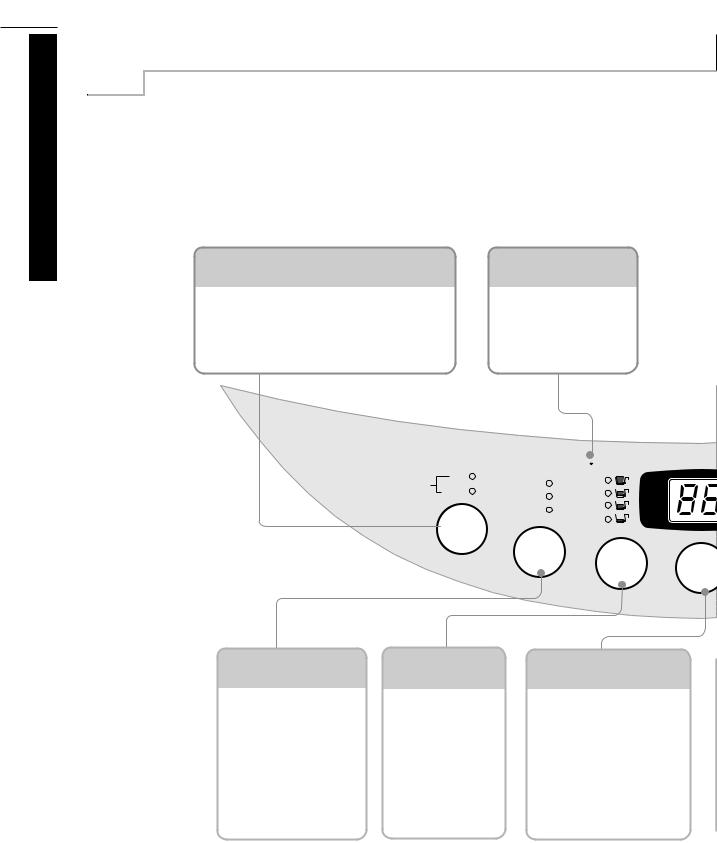
F unction of Each Button
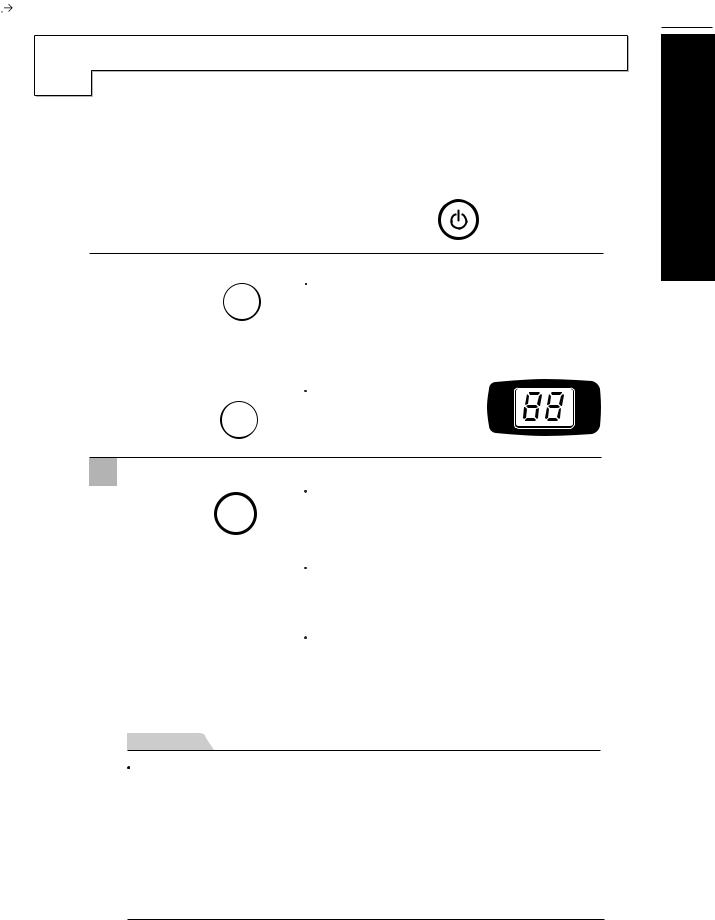
Fully automatic control
● The Normal program is used for average |
● The water level lights will scroll up and down while the washer |
day-to-day washing. |
is working out to find the optimum water level for your load. |
● Press the POWER button to turn power on. |
● Add detergent, bleach, and softener as desired |
● Load clothes. |
into the appropriate dispenser. |
● Press the START/PAUSE button. |
● Close the lid. |
WATER TEMP. SELECTOR
¥Used to select proper water temperature of washing water.
¥[Warm(Hot and Cold light on) Hot Cold Warm] mode repeats.
Hot
Warm Cold
 WATER
WATER
TEMP.
DETERGENT
VOLUME
¥Used to indicate proper amount of detergent for each water level.
|
Water Detergent |
|
|
Extra Wash |
Ex-Large |
Delay |
|
Extra Rinse |
Large |
||
|
|||
Gentle Spin |
Medium |
Time |
|
|
Small |
Left |
|
|
|
||
WASH |
WATER |
|
|
OPTION |
DELAY |
||
|
LEVEL |
START |
WASH
OPTION
¥Select the desired wash option according to your laundry type, soil level, or load size.
¥Press the button to cycle through the options.
WATER LEVEL SELECTOR
¥Use to select the proper amount of water in relation to the weight and type of laundry.
¥Controlled automatically in the Normal programs.
DELAY START
¥Used to set the time when wash program ends from now to prevent wrinkle while you are away for a while.
¥Press the button to increase the delay time.
To change cycles during the process of cycle.
• Step 1. Press START/PAUSE button.
•Step 2. Select desired cycle or function.
•Step 3. Press START/PAUSE button to restart the washer at the beginning of the new cycle.
Manual control
Other programs are selected as follows :
●Press the POWER button to turn power on.
●Load clothes.
●Add detergent, bleach, and softener as desired in the appropriate dispenses.
●Select water temperature, water level, process, program, and wash options as described below.
●Close the lid and press the START/PAUSE button.
DISPLAY |
|
PROCESS |
|
START/PAUSE |
|
SELECTOR |
|
BUTTON |
|
|
|
|
||
¥ Used to indicate the time |
¥ |
Use to select the desired |
¥ |
Use to start or stop the washing |
left of all processes or |
|
function among Speedy |
|
machine temporarily. |
delay. |
|
Soak, Wash, Rinse, or |
¥ |
After 10 minutes in pause state, |
|
|
Spin. |
|
the power is automatically turned |
|
|
|
|
off. |
AUTO OFF
|
Speedy Soak |
Normal |
|
|
Hour |
Economy |
|
||
Wash |
Heavy |
START |
||
|
||||
Min. |
Rinse |
Wool |
||
|
Spin |
|
PAUSE |
DELAY |
PRO- |
PRO- |
GRAM |
||
START |
CESS |
|
CHILD LOCK
¥Used to lock or unlock the control buttons to prevent all the setting from being changed by a child.
¥For locking, push both buttons simultaneously and for unlocking push them once more in washing process.
PROGRAM
SELECTOR
¥According to laundry and stain, you can select suitable program yourself.
¥Press the button to cycle through the options.
POWER BUTTON
¥Power is automatically turned off after the wash program finishes.
11
Operating
Introduction
Instructions
 : 3 step works at large and medium water level of Normal and Heavy program.

12
 InstructionsOperatingtitle
|
W |
ashing Programs |
|
|
|
|
|||||
|
|
|
|
PRO- |
|
|
|
||||
|
|
|
|
|
|
|
|
|
|
||
|
|
|
|
|
|
|
PRO- |
GRAM |
|
|
|
|
|
1 |
|
|
|
|
CESS |
|
AUTO OFF |
||
|
|
|
|
Press the POWER button to turn the power on. |
|
|
|
||||
|
|
|
|
|
|
|
|
START |
|
|
|
|
|
2 |
|
|
Press the PROGRAM button to select the washing program. |
||||||
|
|
|
PRO- |
|
Normal Wash |
|
|
|
|
||
|
|
|
|
|
|
|
|
||||
|
|
|
|
|
|
|
|||||
|
|
|
|
|
|
|
|
|
|||
|
|
|
|
|
|
|
|
||||
PRO- |
|
GRAM |
except woolen clothes and lingerie. |
||||||||
CESS |
|
|
|
|
|
|
|
|
|
|
|
Economy Wash
Economy wash can be selected to wash lightly soiled clothes of less than 41Ú2 lb. (2.0 kg) in a short time.
 Heavy Wash
are excessively dirty like jeans or working
 Wool Wash
etc.) which may be easily damaged can be washed.
Attention
care label for the washing instructions.
modified to prevent felting when they are machine washed. machine washable wool so we recommend that you wash them with hand.)
recommended for washing wool. washing machine to reduce the time to dry.
towel and pat into shape. Dry woolens out of direct sunlight. cause shrinkage or felting of woolen garments.)
machine may cause pump blockages during washing. machine washing and not just the backing material.
|
|
|
|
Speedy Soak Wash |
|
|
|
|
|
|
|||
|
|
|
|
Speed Soak Wash can be selected to wash heavily soiled laundry by soaking in water for an |
||
|
|
|
|
|||
|
|
|
|
extended period to remove dirt and grime. |
||
|
|
|
|
Speedy Soak Wash cannot be selected for the Economy and Wool wash program. |
||
|
|
PRO- |
|
|||
|
PRO- |
GRAM |
|
|||
|
3 |
Add the laundry and press the START/PAUSE button. |
||||
|
CESS |
|
|
|
|
|
|
|
|
|
START |
you press the START/PAUSE button the light will |
|
|
|
|
|
blink. |
||
|
|
|
|
PAUSE |
||
|
PRO- |
PRO- |
|
|||
DELAY |
GRAM |
|
||||
CESS |
|
|
||||
|
|
|
|
|
|
|
4 Add the detergent.
The appropriate quantity of detergent is marked next to the water level of Water Detergent.
When the lid is open the machine will not operate and an alarm signal will remind you to close the lid
5 Close the lid.
Water will be supplied for up to 2 minutes after the start of the wash to supplement the water which the laundry has absorbed.
Delay Start Wash
Delay Start wash is used to delay the finishing time of the operation. The hours to be delayed can be set by the user accordingly.
The time on the display is the finishing time , not the start time.
1 |
|
|
|
PRO- |
button to turn power on. |
AUTO OFF |
|
|
|
|
Press the POWER |
|
|
|
|||||
|
|
|
CESS |
|
|
|
|
||
|
|
|
|
|
START |
|
|
|
|
|
|
|
|
|
PAUSE |
|
|
|
|
2 |
|
|
|
|
|
|
|
|
|
|
Press the PROGRAM button to select the washing program. |
|
|
||||||
|
WATER |
|
PRO- |
PRO- |
|
|
|
|
|
|
|
DELAY |
GRAMSelect the program for laundry on the control panel. |
|
|
||||
|
LEVEL |
START |
PRO- |
You cannot use DELAY START with the woolen setting. |
|||||
|
|
|
PRO- |
GRAM |
|
|
|
|
|
|
|
|
CESS |
|
|
|
|
|
|
|
|
|
|
||||||
3 |
Press the DELAY START button to set the time when the delayed |
|
|
||||||
|
|
washing is to be completed. |
|
|
|
|
|||
|
WASH |
|
PRO- |
The time changes as following |
Delay |
Hour |
|||
|
PRO- |
order (3 4 |
|
||||||
|
|
|
Time |
|
|
||||
|
DELAY |
|
|
|
|
||||
|
OPTION |
WATER |
DELAY |
|
|
Left |
Min. |
||
|
START |
CESS |
|
|
|||||
|
LEVEL |
START |
|
|
|
|
|
||


 Hours).
4 Add the laundry and
|
START |
|
PAUSE |
PRO- |
PRO- |
GRAM |
|
CESS |
|
the START/PAUSE button.
When you press the START/PAUSE button, the light will blink.
5 |
|
Add the detergent. |
The appropriate amount of detergent is marked at the |
|
|
|
|
|
|||
|
|
|
Water Detergent on the water level button. |
||
|
|
|
|||
|
|
|
|
|
|
6 |
|
Close the lid. |
Water will be supplied 2 minutes into the wash cycle |
||
|
to supplement the water the laundry has absorbed. |
||||
|
|
|
|||
|
|
|
|
|
|
|
|
Finish |
The washing will be finished according to the delayed time. |
||
Note
If the lid is open, the machine will not work and an alarm signal will alarm to remind you to close the lid.
 To select washing program, process, water level, wash option, or water temperature manually, press the DELAY START button and select the desired option. Then press the
START/PAUSE button.
 When the laundry cannot be taken out immediately after the wash program ends, it is better to omit the spinning program. The laundry will be wrinkled if it is left for a long time after spinning.
13
Function Additional
Options
14
OptionsFunction
Additional
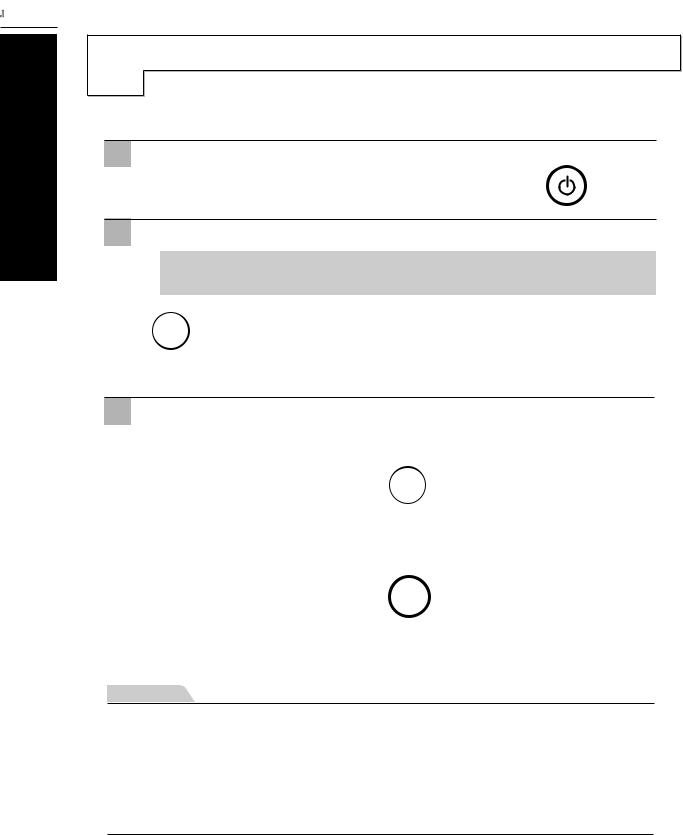
Washing Option
When you only need the Wash, Wash/Rinse or Rinse cycles, these can be set manually.
1 Press the AUTO OFF (Power) button to turn power on. AUTO OFF
2 Press the PROCESS button until below desired option light is on. ( Refer to p. 11.)
 Wash ,
 Wash+Rinse
 Rinse
Rinse Rinse+Spin
 Spin only options
|
PRO- |
PRO- |
¥ When you want to only drain, wait until the water in the washing tub |
GRAM |
|
CESS |
drains completely and then turn off the power. |
PRO-
PROGRAM
CESS
3 Press the WATER LEVEL button.
¥Control the water level according to the amount of laundry.
¥If you do not choose anything, it is set the ÔLargeÕ water level automatically. (Refer to p. 10.)
|
|
|
WATER |
|
PRO- |
PRO- |
||
|
|
|
DELAY |
GRAM |
||||
|
|
|
LEVEL |
START |
CESS |
|
|
|
|
|
|
|
|
|
|
|
|
|
4 |
Add the laundry into the washing tub. |
|
|
|
|
|
|
|
|
|
|
|
|
|
|
|
|
5 |
Press the START/PAUSE button. |
START |
|
|
|
|
|
|
|
|
|
|
|
|
|
|
|
|
|
PAUSE |
|
|
|
|
|
|
|
|
|
|
|
|
||
|
6 |
Add the detergent if required and close the lid. |
|
|
|
|
||
Note
•When spin option is not selected, the water will not be drained off after the process is completed . When you want the water to drain only, wait until the water in the wash tub finishes draining and turn off the power.
•If you do not specify the water level, then Large will be selected automatically.
¥ If Rinse only is selected, the process will start from water spply.

Other Useful Functions
Child Lock Function
You can use the child lock option, if you want to lock all the buttons to prevent all the setting from being changed by a child.
 How to Lock
1 |
Press the |
POWER button. |
|
|
||
|
|
|
AUTO OFF |
|
|
Turn Power on. |
|
|
|
|
|
||
|
|
|
|
|
|
|
|
START |
|
|
|
|
|
2 |
|
|
|
|
|
|
PAUSE |
|
|
|
|
|
|
Press the START/PAUSE button to start washing after all washing |
||||||
|
conditions are set according to this manual. |
|||||
|
|
|
|
|
|
START |
|
WATER |
|
|
|
|
PAUSE |
|
TEMP. |
WASH |
|
|
|
PRO- |
|
|
WATER |
|
PRO- |
||
|
OPTION |
DELAY |
GRAM |
|||
3 |
|
|
LEVEL |
START |
CESS |
|
Press both PROCESS and |
PROGRAM button simultaneously |
|||||
|
|
|
|
|
|
while wash is proceeding, then all |
|
PRO- |
PRO- |
Delay |
|
Hour |
the keys are locked the wash or |
|
GRAM |
Time |
|
Min. |
until unlocking them. |
|
|
CESS |
|
Left |
|
||
To unlock this function during the wash, press both PROCESS and
PROGRAM button simultaneously again.
Note
¥[ 
 ] and the remaining time are alternatively shown on the diplay. ( [
 ] means Controls Locked.)
Wash Option
One or more wash options can be selectable for every washing program.
Wash program is changed as follows according to selected wash options.
¥Extra Wash : It gives additional 3 min wash. (Except for Speedy and Wool)
¥Extra Rinse : It gives additional one deep rinse. (Except for Speedy and Wool)
¥Gentle Spin : It gives gentle spin instead of normal spin. (Set for Wool automatically)
Mute Option
If you want to use the washing machine without alarm signal sounds, press both the WATER LEVEL and PROCESS buttons simultaneously.
To make buzzer work, press both the WATER LEVEL and PROCESS buttons simultaneously one more time.
15
Function Additional
Options
16
 InstructionsInstallation
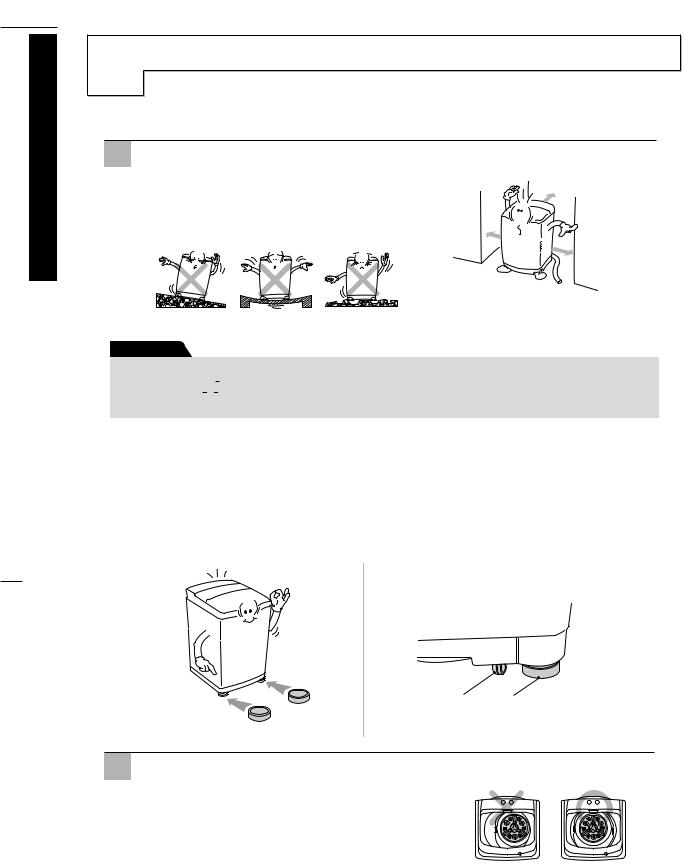
Placing and Leveling
Please ensure that the transit restraint has been removed before operating your machine.
1 Place the machine on a flat and firm surface which allows proper clearance.
Concreate flooring is best. Washer should not be installed on rugs or exposed to the weather.
We suggest a minimum clearance of 1” from right and left sides and 4” from rear wall.
more than 1”
more than 4”
more than 1”
Caution
If the washer is installed on a uneven,weak or tilted floor causing excessive vibration, spin failure or Ò

 Ó error can happen to it.
It must be placed on a firm and level floor to prevent spin failure.
■ Washer with Casters
An insecure installation may cause walking during spin cycles because the washer has casters for convenience to move.
To protect it from walking, place the leg stoppers, which are provided a accessory, under the two front legs of washer as shown in the figure.
Caster Leg Stopper
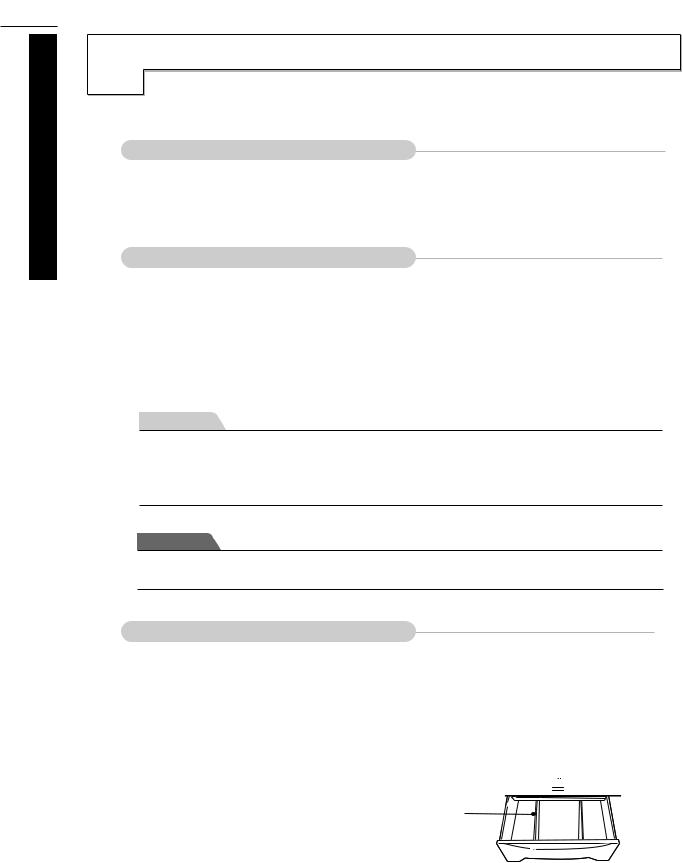
2 Check that the machine is level and securely installed not to move.
Top view of the machine
Open the lid and look from above to see if it is same as shown beside.
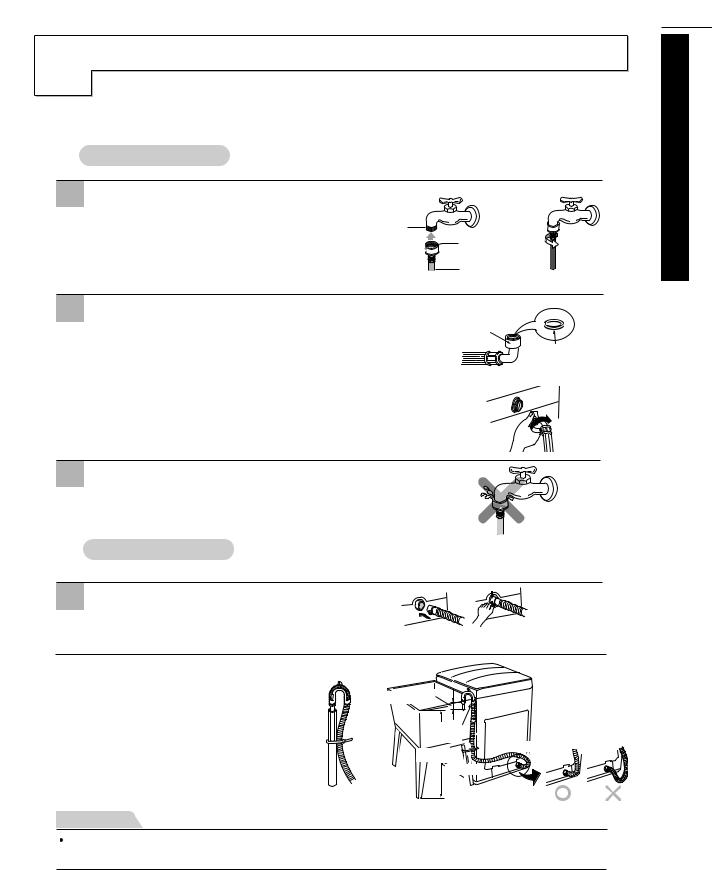
Connecting Hose
 Water Supply Hose
1 |
hose to the tap. |
|
|
|
up so that the sealing |
Water |
|
|
adhere completely to |
|
|
|
|
Tap |
Sealing Washer |
|
|
|
|
|
right. |
|
Water Supply Hose |
|
|
|
|
2 |
hose to the machine. |
|
Hose Connector |
|
washer |
|
Sealing Washer |
|
to inlet valve of |
|
lock it by turning |
3 |
|
 Drain Hose
1 Fit the end of the drain hose to the outlet of the drain pump of washer and tighten the clamp.
2 |
Put the other end of the drain hose |
|
over the standpipe or wash tub. |
|
To prevent accidental dislodging secure the drain hose to the standpipe, inlet hose or laundry tub with the tie strap provided in the parts package.
Within 2”
Hose
Guide

 Drain Hose 36~47”

Tie Strap
Note
17 InstallationInstructions 
To prevent siphoning, the drain hose should not be extended more than 2” from the end of the hose guide.  The discharge height should be approximately 36 ~ 47” from the floor.
 Loading...