


P/No.: MFL30138443

WD-14276RD Washing Machine
OWNER’S MANUAL (2P~24P)
Thank you for buying a
LG Fully Automatic Washing machine.
Please read your owner's manual carefully, it provides instructions on safe installation, use and maintenance. Retain it for future reference.
Record the model and serial numbers of your washing machine.


 (25P~47P)

P roduct Feature
Direct Drive System
The advanced Brushless DC motor directly drives the drum without belt and pulley.
Tilted Drum and Extra Large Door Opening
Tilted drum and extra large opening make it possible to load and unload clothing more easily.
Water Circulation
Spray detergent solution and water onto the load over and over. Clothes are soaked more quickly and thoroughly during wash cycle.
The detergent suds can be removed more easily by the water shower during rinse cycle. The water circulation system uses both water and detergent more efficiently.
RollerJets
Washing ball enhances the wash performance and reduces damage to the clothing. The jets spray and help tumble clothes to enhance washing performance while maintaining fabric care.
Automatic Wash Load Detection
Automatically detects the load and optimizes the washing time.
Built-in Heater
Internal heater helps to maintain water temperature at its optimum level for selected cycles.
Child Lock
The Child lock prevents children from pressing any button to change the settings during operation.
C ontents |
|
Warnings............................................................................................... |
3 |
Specification.......................................................................................... |
4 |
Installation............................................................................................. |
5 |
Care before washing........................................................................... |
10 |
Using the dispenser ............................................................................ |
11 |
Function .............................................................................................. |
13 |
How to use washer ............................................................................. |
14 |
Maintenance ....................................................................................... |
18 |
Troubleshooting guide ........................................................................ |
21 |
Terms of Warranty .............................................................................. |
24 |
2

W arnings
READ ALL INSTRUCTIONS BEFORE USE
For your safety, the information in this manual must be followed to minimize WARNING! the risk of fire or explosion, electric shock, or to prevent property damage,
personal injury, or loss of life.
IMPORTANT SAFETY INSTRUCTIONS
!WARNING : To reduce the risk of fire, electric shock, or injury to persons when using the washer, follow basic precautions, including the following:
•Read all instructions before using the washer.
•Do not wash articles that have been previously cleaned in, washed in, soaked in, or spotted with gasoline, dry cleaning solvents, or other flammable or explosive substances, as they give off vapors that could ignite or explode.
•Do not add gasoline, dry cleaning solvents, or other flammable or explosive substances to the wash water. These substances give off vapors that could ignite or explode.
•Under certain conditions, hydrogen gas may be produced in a hot water system that has not been used for 2 weeks or more. HYDROGEN GAS IS EXPLOSIVE. If the hot water system has not been used for such a period, before using the washing machine, turn on all hot water faucets and let the water flow from each for several minutes. This will release any accumulated hydrogen gas. As the gas is flammable, do not smoke or use an open flame during this time.
•Do not allow children to play on or in the washer. Close supervision of children is necessary when the washer is used near children.
•Before the washer is removed from service or discarded, remove the door to prevent children from hiding inside.
•Do not install or store the washer where it will be exposed to the weather.
•Do not tamper with controls.
•Do not repair or replace any part of the washer or attempt any servicing unless specifically recommended in the user-maintenance instructions or published user-repair instructions that you understand and have the skills to carry out.
•See Installation Instructions for grounding requirements.
•ALWAYS follow the fabric care instructions supplied by the garment manufacturer.
•Do not place items exposed to cooking oil in your washer. Items contaminated with cooking oils may contribute to a chemical reaction that could cause a load to catch fire.
•Do not use fabric softeners or products to eliminate static unless recommended by the manufacturer of the fabric softener or product.
SAVE THESE INSTRUCTIONS
GROUNDING INSTRUCTIONS
This appliance must be grounded. In the event of malfunction or breakdown, grounding will reduce the risk of electric shock by providing a path of least resistance for electric current. This appliance is equipped with a cord having an equipment-grounding conductor and grounding plug. The plug must be plugged into an appropriate outlet that is properly installed and grounded in accordance with all local codes and ordinance.
•Do not use an adapter or extension cord.
•Do not remove ground prong.
•If you don’t have the proper outlet, consult an electrician.
!WARNING : Improper connection of the equipment-grounding conductor can result in risk of electric shock. Check with a qualified electrician or serviceman if you are in doubt as to whether the appliance is properly grounded. Do not modify the plug provided with the appliance - if it does not fit the outlet, have a proper outlet installed by a qualified electrician.
3

S pecification
|
|
|
|
|
|
|
|
|
|
|
|
|
|
|
|
|
|
|
|
|
|
|
|
|
|
|
|
|
|
|
|
|
|
|
|
|
|
|
|
|
|
|
|
|
|
|
|
|
|
|
|
|
|
|
|
|
|
|
|
|
|
|
|
|
|
|
|
|
|
|
|
|
|
|
|
|
|
|
|
|
|
|
|
|
|
|
|
|
|
|
|
|
|
|
|
|
|
|
|
|
|
|
|
|
|
|
|
|
|
|
|
|
|
|
|
|
|
|
|
|
|
|
|
|
|
|
|
|
|
|
|
|
|
|
|
|
|
|
|
|
|
|
|
|
|
|
|
|
|
|
|
|
|
|
|
|
|
|
|
|
|
|
|
|
|
|
|
|
|
|
|
|
|
|
|
|
|
|
|
|
|
|
|
|
|
|
|
|
|
|
|
|
|
|
|
|
|
|
|
|
|
|
|
|
|
|
|
|
|
|
|
|
|
|
|
|
|
|
|
|
|
|
|
|
|
|
|
|
|
|
|
|
|
|
|
|
|
|
|
|
|
|
|
|
|
|
|
|
|
|
|
|
|
|
|
|
|
|
|
|
|
|
|
|
|
|
|
|
|
|
|
|
|
|
|
|
|
|
|
|
|
|
|
|
|
|
|
|
|
|
|
|
|
|
|
|
|
|
|
|
|
|
|
|
|
|
|
|
|
|
|
|
|
|
|
|
|
|
|
|
|
|
|
|
|
|
|
|
|
|
|
|
|
|
|
|
|
|
|
|
|
|
|
|
|
|
|
|
|
|
|
|
|
|
|
|
|
|
|
|
|
|
|
|
|
|
|
|
|
|
|
|
|
|
|
|
|
|
|
|
|
|
|
|
|
|
|
|
|
|
|
|
|
|
|
|
|
|
|
|
|
|
|
|
|
|
|
|
|
|
|
|
|
|
|
|
|
|
|
|
|
|
|
|
|
|
|
|
|
|
|
|
|
|
|
|
|
|
|
|
|
|
|
|
|
|
|
|
|
Name |
: Front loading washing machine |
|
|||||||||||||||||||||||||||
Power supply |
: 120 V~, 60 Hz |
|
|||||||||||||||||||||||||||
Size |
: 686 mm(W) 767 mm(D) 982 mm(H) |
|
|||||||||||||||||||||||||||
Weigh |
: 91 kg (201 lbs) |
|
|||||||||||||||||||||||||||
Spin speed |
: 1100 rpm max. |
|
|||||||||||||||||||||||||||
Permissible water pressure |
: 0.3-10kgf/cm2 (30-1000kPa) |
|
|||||||||||||||||||||||||||
The appearance and specifications may be varied without notice to raise the units quality.
Accessories
4
I nstallation
Install or store where it will not be exposed to temperatures below freezing or exposed to the weather. Properly ground washer to conform with all governing codes and ordinances.
To reduce the risk of electric shock, do not install the washer in humid spaces.
The base opening must not be obstructed by carpeting when the washing machine is installed on a carpeted floor.
In countries where there are areas which may be subject to infestation by cockroaches or other vermin, pay particular attention to keeping the appliance and its surroundings in clean condition at all times.
Any damage which may be cause by cockroaches or other vermin will not be covered by the appliance guarantee.
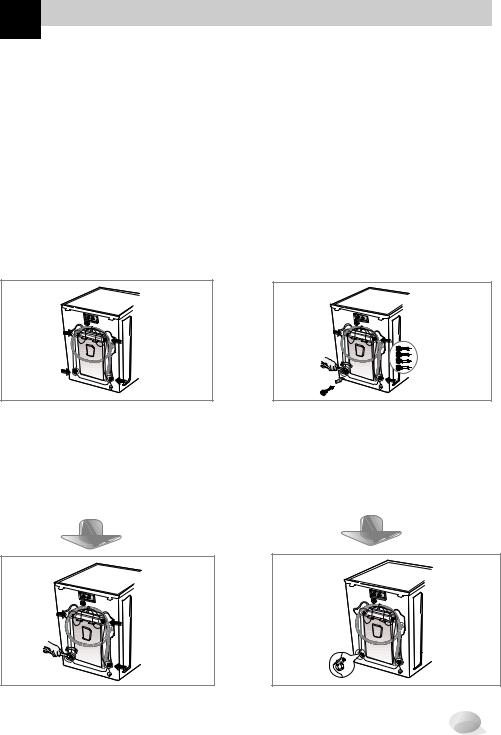
Transit bolts
The appliance is fitted with transit bolts to prevent internal damage during transport.
Removing transit bolts
1. To prevent internal damage during transport, the special 4 bolts are locked. Before operating the washer, remove the bolts along with the rubber bungs.
•If they are not removed, it may cause severe vibration, noise and malfunction.
3. Take out the 4 bolts along with the rubber bungs by slightly twisting the bung. Keep the 4 bolts and the spanner for future use.
•Whenever the appliance is transported, the transit bolts must be refitted.
cap
2. Unscrew the 4 bolts with the spanner supplied.
4. Close the holes with the caps supplied.
5

I nstallation
Installation clearances
The location must be large enough to fully open the washer door.
Washer dimensions
.1 |
cm |
|
|
129 |
|
98.2 cm
cm
cm
•Most installations require a minimum 10 cm clearance behind the washer.
Minimum installation spacing for recessed area installation.
The following dimensions shown are for the minimum spacing allowed. Additional spacing should be considered for installation and servicing.
•Additional clearances might be required for wall, door and floor moldings.
•Additional spacing of 2.5 cm on all sides of the washer is recommended to reduce noise transfer.
Companion appliance spacing should also be considered.
76.7 cm
[Vista lateral] |
2.5 cm 68.6 cm
  2.5 cm
[Vista frontal]
Level floor
•Allowable slope under entire washer is 1°.
•To minimize noise and vibration, the washer MUST be installed on a solidly constructed floor.
•Wood floors may need to be reinforced to reduce noise and vibration.
•Carpeting and soft tile surfaces are not recommended.
•Never install the washer on a platform or weakly supported structure.
Power outlet
Must be within 1.5 m of either side of the washer. Do not overload the outlet with more than one appliance.
6

I nstallation
Electrical connection
1. Do not use an extension cord or double adapter.
2. If the supply cord is damaged, it must be replaced by the manufacturer or its service agents or similarly qualified person in order to avoid a hazard.
3. Always unplug the machine and turn off the water supply after use.
4. Connect the machine to an earthed socket in accordance with current wiring regulations. 5. The appliance must be positioned so that the plug is easily accessible.
•Repairs to the washing machine must only be carried out qualified personnel. Repairs carried out by inexperienced persons may cause injury or serious malfunctioning. Contact your local service center.
•Do not install your washing machine in rooms where temperatures below freezing may occur. Frozen hoses may burst under pressure. The reliability of the electronic control unit may be impaired at temperatures below freezing point.
•If the appliance is delivered in the winter months and temperatures are below freezing : Store the washing machine at room temperature for a few hours before putting it into operation.
CAUTION
CAUTION concerning the Power Cord
Most appliances recommend they be placed upon a dedicated circuit; that is, a single outlet circuit which powers only that appliance and has no additional outlets or branch circuits. Check the specification page of this owner's manual to be certain.
Do not overload wall outlets. Overloaded wall outlets, loose or damaged wall outlets, extension cords, frayed power cords, or damaged or cracked wire insulation are dangerous. Any of these conditions could result in electric shock or fire. Periodically examine the cord of your appliance, and if its appearance indicates damage or deterioration, unplug it, discontinue use of the appliance, and have the cord replaced with an exact replacement part by an authorized servicer.
Protect the power cord from physical or mechanical abuse, such as being twisted, kinked, pinched, closed in a door, or walked upon. Pay particular attention to plugs, wall outlets, and the point where the cord exits the appliance.
Washing Machine is to be connected to the water mains using new hose-sets and that old hose-sets should not be used.
Connecting water supply hose
Hose connector |
Rubber seal |
Water supply pressure must be between 30kPa and 1000kPa (0.3~10kgf/cm2)
Don’t strip or crossthread when connecting Inlet hose to the valve.
If the water supply pressure is more than 1000kPa, a decompression device should be installed.
•Two rubber seals are supplied with the water inlet hoses these are in order to prevent water leaks.
•Check water tightness of washing machine connections by turning the tap completely on.
•Periodically check the condition of the hose and replace the hose if necessary.
•Make sure that there is no kink on the hose and that it is not crushed.
When your washer has two valves,
•The Inlet hose which has red connector is for the hot water tap.
•If the washer has two valves, the energy is saved by using
hot valve. |
7 |

I nstallation
This equipment is not designed for maritime use or for use mobile installations such as caravans, aircraft etc.
Turn off the stopcock if the machine is to be left for any length of time (e.g. holiday), especially if there is no floor drain(gully) in the immediate vicinity.
When disposing of the appliance, cut off the mains cable, and destroy the plug Disable the door lock to prevent young children being trapped inside.
Packaging material (e.g. Films, Styrofoam) can be dangerous for children. There is a risk of suffocation !
Keep all packaging well away from children.
Installation of drain hose
about |
about |
about |
•When installing the drain hose sink, secure it tightly with a string.
•Proper securing of the drain hose will protect the floor from damage due to water leakage.
Laundry tub
about


Hose
Retainer
about
|
Tie |
max. 100cm |
|
strap |
min. 60cm |
max. 100cm |
|
|
|
|
|
min. 60cm |
|
|
about


•The drain hose should not be placed higher than 100 cm above the floor.
•Proper securing of the drain hose will protect the floor from damage due to water leakage.
•When the drain hose is too long, do not force back into the washer. This will cause abnormal noise.
8
I nstallation
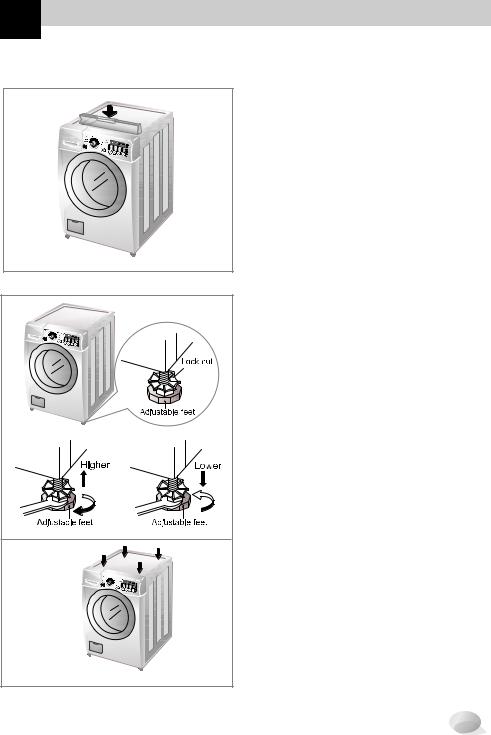
Level adjustment
1. Adjusting the washing machine level properly prevents excessive noise and vibration.
Install the appliance on a solid and level floor surface, preferably in a corner of the room.
2. If the floor is uneven, adjust the adjustable feet as required. (Do not insert pieces of wood etc. under the feet) Make sure that all four feet are stable and resting on the floor and then check that the appliance is perfectly level. (Use a spirit level)
After the washer is level, tighten the lock nuts up towards of the base of the washer. All lock nuts must be tightened.
Diagonal Check
When pushing down the edges of the washing machine top plate diagonally, the machine should not move up and down at all. (Please, check both of two directions)
If machine rocks when pushing the machine top plate diagonally, adjust the feet again.
9
C are before washing
 WARNING
To reduce the risk of fire, electric shock, or injury to persons, read the IMPORTANT SAFETY INSTRUCTIONS before operating this appliance.
1.Fabric Care Labels
Look for a care label on your clothes. This will tell you about the fabric content of your garment and how it should be washed.
2.Sorting
To get the best results, sort clothes into loads that can be washed with the same wash cycle.
Different fabrics need to be washed in different ways.
Always sort dark colors from pale colors and whites. Wash separately as dye and lint transfer can occur causing discoloration of white clothing. If possible, do not wash heavily soiled items with lightly soiled ones.
|
Soil (Heavy, Normal, Light) |
Separate clothes according to amount of soil. |
|
|
|
||
|
Color (White, Lights, Darks) |
Separate white fabrics from colored fabrics. |
|
|
Lint (Lint Producers, Collectors) |
Wash lint producers and lint collectors separately. |
|
|
|
|
|
|
|
|
|
3.Check before loading
Combine large and small items in a load. Load large items first. Large items should not be more than half the total wash load.
Do not wash single items. This may cause an out-of-balance load. Add one or two similar items.
•Check all the pockets to make sure that they are empty. Things such as clip, matches,
pens, coins, and keys can damage both your washer and your clothes.
• Close zippers, hooks, and strings to make sure that these items do not snag on other clothes.
• Pretreat dirt and stains by brushing a little detergent dissolved in water onto stains like collars and cuffs to help lift dirt.
NOTE: Do not wash or spin water-proof clothes.
10
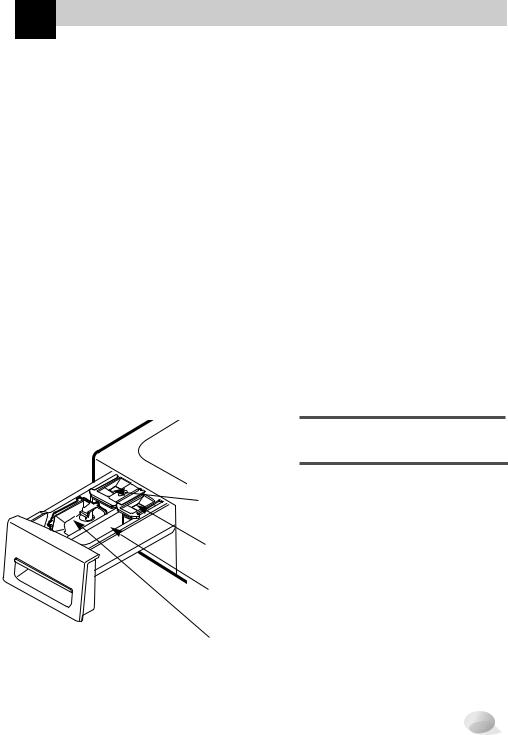
U sing the dispenser
The automatic dispenser consists of four compartments which hold 1) liquid chlorine bleach, 2) liquid fabric softener, 3) liquid or powdered detergent for prewash and 4) liquid or powdered detergent and color safe bleach for main wash.
All laundry products can be added at once in their respective dispenser compartments. They will be dispensed at the appropriate time for most effective cleaning. After loading the laundry additives into the dispenser, close the dispenser drawer.
Add detergent, bleach and fabric softener to the automatic dispenser following these steps:
1.Open the dispenser drawer.
2.Load the laundry products into the appropriate compartments.
3.Close the dispenser drawer.
About detergent
Low sudsing detergent is recommended for this washer. Use the manufacturer's recommended amount.
If low sudsing detergent is not available, a reduced amount of regular detergent may be used.
Because reducing the amount of detergent may reduce cleaning, it is important to pretreat stains,
sort carefully by color and soil level, and avoid overloading.
Detergent usage may need to be adjusted for water temperature, water hardness, size and soil level of the load.
For best results, avoid using too much detergent.
Liquid Chlorine
Bleach
Compartment
Liquid Fabric
Softener
Compartment
Prewash
Compartment
Main Wash
Compartment
1.Prewash Detergent Compartment
•Add detergent to this compartment when using the Prewash option. Liquid or powdered detergent may be used in this compartment. The detergent will automatically be dispensed during Prewash if the Prewash option is selected.
•Add 1/2 the recommended amount of detergent to the Prewash compartment and the recommended amount of detergent to the main wash compartment.
NOTE : Liquid detergent will drain into the washer drum as it is added.
11

U sing the dispenser
2.Main Wash Detergent Compartment
•Add measured detergent to this compartment for Main wash. Detergent is flushed from the dispenser at the beginning of the cycle. Either powdered or liquid detergent can be used.
•Liquid or powdered color-safe bleach may be added to the main wash compartment along with the same type of liquid or powdered detergent.
•When using liquid detergent, make sure the liquid detergent box and insert are in place. Do not exceed the maximum fill line.
•For powered detergent, remove both the liquid detergent box and insert.
•Powdered detergent will not dispense with the liquid detergent box and insert in place.
Insert
Liquid Detergent Box
3. Liquid Bleach Compartment
•Add measured liquid chlorine bleach to this compartment. The bleach will be automatically dispensed at the proper time during the wash cycle.
•Do not exceed the maximum fill line. Overfilling can cause early dispensing of the bleach which could result in damaged clothes.
•Do not pour undiluted liquid chlorine bleach directly onto the load or into the drum. Fabric damage can occur.
•Do not use powdered bleach in this compartment.
4. Fabric Softener Compartment
•Add recommended amount of fabric softener to this compartment.
•Dilute concentrated softeners with warm water to the fill line.
•Do not exceed the maximum fill line. Overfilling can cause early dispensing of the fabric softener which could result in stained clothes.
•Do not pour fabric softener directly on the wash load.
•The fabric softener will be automatically dispensed during the last rinse cycle.
12

F unction
Select cycles designed for different types of fabric and soil levels.
1)Automatic wash load (weight) detection:
Automatically detects the load and optimizes the washing time. After detecting, the estimated time remaining in the cycle will be displayed.
13

H ow to use washer
1. Power (


 )
)
• Use this button to turn the Power On/Off.
2.Cycles
•Rotate the Cycle selector knob to select cycle designed for different types of fabric and soil levels.
•Each cycle has a preset Water Temperature, Spin Speed, Soil Level, and Option.
See the page 13.
•The preset settings can be changed anytime before Start.
3.Start/Pause ( 


 )
)
•Use this button to start/stop the washer.
14
4. Delay Wash
•Allows the start of any cycle to be delayed for 1~12 hours.
•Choose the wash cycle for your load, and then press the Delay Wash button once for one hour or press the button again to increase the delay wash time up to 12 hours in one hour increments.
5. Custom program
•Custom Program allows you to store a customized wash cycle for future use.
•To make a Custom Program:
1.Select a cycle.
2.Select Wash/Rinse Temperature,
Spin Speed, and Soil Level.
3.Select other desired Options.
4.Press and hold Custom Program button 3 seconds (2 beep sounds).
5.Press Start/Pause (


 ).
).
The Custom program is now stored for future use. To reuse the program,
select Custom Program and press
Start/Pause ( 


 ).
).
 Loading...