


 Loading...
Lexmark 30G0213, 30G2259, 30G0108, 30G0300, 30G0100 User Manual
...T650, T652, T654
User's Guide
August 2008 |
www.lexmark.com |
Lexmark and Lexmark with diamond design are trademarks of Lexmark International, Inc., registered in the United States and/or other countries. All other trademarks are the property of their respective owners.
© 2008 Lexmark International, Inc. All rights reserved.
740 West New Circle Road
Lexington, Kentucky 40550

Contents |
|
Safety information............................................................................. |
9 |
Learning about the printer............................................................. |
11 |
Finding information about the printer........................................................................................................................ |
11 |
Printer configurations........................................................................................................................................................ |
12 |
Selecting a location for the printer............................................................................................................................... |
14 |
Understanding the printer control panel................................................................................................................... |
15 |
Additional printer setup.................................................................. |
17 |
Installing internal options................................................................................................................................................ |
17 |
Available internal options............................................................................................................................................................ |
17 |
Accessing the system board to install internal options.................................................................................................... |
18 |
Installing a memory card ............................................................................................................................................................. |
20 |
Installing a flash memory or firmware card........................................................................................................................... |
22 |
Installing an Internal Solutions Port......................................................................................................................................... |
24 |
Installing a printer hard disk ....................................................................................................................................................... |
30 |
Installing hardware options............................................................................................................................................. |
34 |
Order of installation ....................................................................................................................................................................... |
34 |
Installing paper drawers............................................................................................................................................................... |
34 |
Installing an optional duplex unit (T650 only) ..................................................................................................................... |
35 |
Attaching cables.................................................................................................................................................................. |
36 |
Verifying printer setup....................................................................................................................................................... |
37 |
Printing a menu settings page................................................................................................................................................... |
37 |
Printing a network setup page .................................................................................................................................................. |
38 |
Setting up the printer software...................................................................................................................................... |
38 |
Installing printer software ........................................................................................................................................................... |
38 |
Updating available options in the printer driver................................................................................................................. |
39 |
Setting up wireless printing............................................................................................................................................. |
40 |
Information you will need to set up the printer on a wireless network...................................................................... |
40 |
Installing the printer on a wireless network (Windows) ................................................................................................... |
40 |
Installing the printer on a wireless network (Macintosh)................................................................................................. |
42 |
Installing the printer on a wired network................................................................................................................... |
45 |
Changing port settings after installing a new network Internal Solutions Port........................................... |
48 |
Setting up serial printing.................................................................................................................................................. |
50 |
Loading paper and specialty media............................................. |
52 |
Setting the Paper Size and Paper Type........................................................................................................................ |
52 |
Configuring Universal paper settings.......................................................................................................................... |
52 |
Contents |
|
3
Loading the standard or optional 250-sheet or 550-sheet tray.......................................................................... |
53 |
Loading the 2000-sheet tray........................................................................................................................................... |
56 |
Loading the multipurpose feeder................................................................................................................................. |
60 |
Loading the envelope feeder.......................................................................................................................................... |
62 |
Linking and unlinking trays............................................................................................................................................. |
64 |
Linking trays...................................................................................................................................................................................... |
64 |
Unlinking trays................................................................................................................................................................................. |
64 |
Linking exit bins .............................................................................................................................................................................. |
64 |
Changing a Custom Type <x> name....................................................................................................................................... |
65 |
Paper and specialty media guidelines......................................... |
66 |
Paper guidelines.................................................................................................................................................................. |
66 |
Paper characteristics...................................................................................................................................................................... |
66 |
Unacceptable paper ...................................................................................................................................................................... |
67 |
Selecting paper................................................................................................................................................................................ |
67 |
Selecting preprinted forms and letterhead........................................................................................................................... |
67 |
Using recycled paper and other office papers ..................................................................................................................... |
68 |
Storing paper.................................................................................................................................................................................... |
68 |
Supported paper sizes, types, and weights............................................................................................................... |
69 |
Paper sizes supported by the printer ...................................................................................................................................... |
69 |
Paper types and weights supported by the printer ........................................................................................................... |
71 |
Paper types and weights supported by the output bins ................................................................................................. |
71 |
Printing............................................................................................... |
73 |
Printing a document.......................................................................................................................................................... |
73 |
Printing on specialty media............................................................................................................................................. |
73 |
Tips on using letterhead............................................................................................................................................................... |
73 |
Tips on using transparencies...................................................................................................................................................... |
74 |
Tips on using envelopes............................................................................................................................................................... |
74 |
Tips on using labels........................................................................................................................................................................ |
75 |
Tips on using card stock............................................................................................................................................................... |
75 |
Printing confidential and other held jobs................................................................................................................... |
76 |
Holding jobs in the printer .......................................................................................................................................................... |
76 |
Printing confidential and other held jobs.............................................................................................................................. |
77 |
Printing from a flash drive................................................................................................................................................ |
78 |
Printing information pages.............................................................................................................................................. |
79 |
Printing a font sample list............................................................................................................................................................ |
79 |
Printing a directory list.................................................................................................................................................................. |
79 |
Printing the print quality test pages........................................................................................................................................ |
80 |
Canceling a print job.......................................................................................................................................................... |
80 |
Canceling a print job from the printer control panel ........................................................................................................ |
80 |
Canceling a print job from the computer.............................................................................................................................. |
80 |
Contents |
|
4
Clearing jams..................................................................................... |
82 |
Avoiding jams....................................................................................................................................................................... |
82 |
Understanding jam numbers and locations.............................................................................................................. |
83 |
200 and 201 paper jams.................................................................................................................................................... |
83 |
202 and 203 paper jams.................................................................................................................................................... |
84 |
230 paper jam....................................................................................................................................................................... |
85 |
231–239 paper jams (optional external duplex unit)............................................................................................. |
87 |
241–245 paper jams........................................................................................................................................................... |
89 |
250 paper jam....................................................................................................................................................................... |
89 |
260 paper jam....................................................................................................................................................................... |
90 |
271–279 paper jams........................................................................................................................................................... |
91 |
280 paper jams..................................................................................................................................................................... |
91 |
281 paper jam....................................................................................................................................................................... |
92 |
282 paper jam....................................................................................................................................................................... |
92 |
283 staple jam....................................................................................................................................................................... |
93 |
Understanding printer menus....................................................... |
95 |
Menus list................................................................................................................................................................................ |
95 |
Paper menu........................................................................................................................................................................... |
96 |
Default Source menu..................................................................................................................................................................... |
96 |
Paper Size/Type menu .................................................................................................................................................................. |
96 |
Configure MP menu..................................................................................................................................................................... |
100 |
Envelope Enhance........................................................................................................................................................................ |
100 |
Substitute Size menu................................................................................................................................................................... |
100 |
Paper Texture menu .................................................................................................................................................................... |
101 |
Paper Weight menu..................................................................................................................................................................... |
102 |
Paper Loading menu ................................................................................................................................................................... |
104 |
Custom Types menu.................................................................................................................................................................... |
105 |
Universal Setup menu................................................................................................................................................................. |
106 |
Bin Setup menu............................................................................................................................................................................. |
107 |
Reports menu..................................................................................................................................................................... |
108 |
Network/Ports menu....................................................................................................................................................... |
109 |
Active NIC menu............................................................................................................................................................................ |
109 |
Standard Network or Network <x> menus ......................................................................................................................... |
109 |
Network Reports menu .............................................................................................................................................................. |
111 |
Network Card menu..................................................................................................................................................................... |
112 |
TCP/IP menu ................................................................................................................................................................................... |
112 |
IPv6 menu........................................................................................................................................................................................ |
113 |
Wireless menu................................................................................................................................................................................ |
114 |
Contents |
|
5
AppleTalk menu ............................................................................................................................................................................ |
115 |
NetWare menu............................................................................................................................................................................... |
115 |
LexLink menu................................................................................................................................................................................. |
116 |
Standard USB menu..................................................................................................................................................................... |
116 |
Parallel <x> menu......................................................................................................................................................................... |
118 |
Serial <x> menu ............................................................................................................................................................................ |
120 |
SMTP Setup menu ........................................................................................................................................................................ |
122 |
Security menu.................................................................................................................................................................... |
124 |
Miscellaneous menu.................................................................................................................................................................... |
124 |
Confidential Print menu............................................................................................................................................................. |
125 |
Disk Wiping menu ........................................................................................................................................................................ |
125 |
Security Audit Log menu ........................................................................................................................................................... |
127 |
Set Date/Time menu.................................................................................................................................................................... |
127 |
Settings menu.................................................................................................................................................................... |
128 |
General Settings menu ............................................................................................................................................................... |
128 |
Setup menu .................................................................................................................................................................................... |
132 |
Finishing menu.............................................................................................................................................................................. |
134 |
Quality menu.................................................................................................................................................................................. |
136 |
Utilities menu ................................................................................................................................................................................. |
138 |
XPS menu......................................................................................................................................................................................... |
139 |
PDF menu ........................................................................................................................................................................................ |
139 |
PostScript menu............................................................................................................................................................................ |
139 |
PCL Emul menu ............................................................................................................................................................................. |
140 |
HTML menu..................................................................................................................................................................................... |
143 |
Image menu.................................................................................................................................................................................... |
144 |
Flash Drive menu .......................................................................................................................................................................... |
144 |
Help menu........................................................................................................................................................................... |
146 |
Understanding printer messages............................................... |
148 |
List of status and error messages................................................................................................................................ |
148 |
Maintaining the printer................................................................. |
169 |
Cleaning the exterior of the printer............................................................................................................................ |
169 |
Storing supplies................................................................................................................................................................. |
169 |
Conserving supplies......................................................................................................................................................... |
169 |
Checking the status of supplies................................................................................................................................... |
170 |
Checking the status of supplies from the printer control panel.................................................................................. |
170 |
Checking the status of supplies from a network computer.......................................................................................... |
170 |
Ordering supplies.............................................................................................................................................................. |
170 |
Ordering print cartridges ........................................................................................................................................................... |
170 |
Ordering a maintenance kit ...................................................................................................................................................... |
172 |
Ordering charge rolls................................................................................................................................................................... |
172 |
Contents |
|
6
Ordering a fuser............................................................................................................................................................................. |
172 |
Ordering a fuser wiper ................................................................................................................................................................ |
172 |
Ordering pick rollers .................................................................................................................................................................... |
173 |
Ordering staple cartridges......................................................................................................................................................... |
173 |
Ordering a transfer roller............................................................................................................................................................ |
173 |
Recycling Lexmark products......................................................................................................................................... |
173 |
Moving the printer............................................................................................................................................................ |
173 |
Before moving the printer......................................................................................................................................................... |
173 |
Moving the printer to another location................................................................................................................................ |
174 |
Shipping the printer .................................................................................................................................................................... |
174 |
Administrative support................................................................. |
175 |
Finding advanced networking and administrator information....................................................................... |
175 |
Using the Embedded Web Server............................................................................................................................... |
175 |
Checking the device status............................................................................................................................................ |
175 |
Setting up e-mail alerts................................................................................................................................................... |
175 |
Viewing reports.................................................................................................................................................................. |
176 |
Adjusting Power Saver.................................................................................................................................................... |
176 |
Restoring the factory default settings....................................................................................................................... |
177 |
Troubleshooting............................................................................. |
178 |
Solving basic problems................................................................................................................................................... |
178 |
Solving basic printer problems................................................................................................................................................ |
178 |
Printer control panel display is blank or displays only diamonds............................................................................... |
178 |
Embedded Web Server does not open................................................................................................................................. |
178 |
Solving printing problems............................................................................................................................................. |
179 |
Multiple-language PDFs do not print.................................................................................................................................... |
179 |
Error message about reading USB drive appears.............................................................................................................. |
179 |
Jobs do not print........................................................................................................................................................................... |
179 |
Confidential and other held jobs do not print ................................................................................................................... |
180 |
Job takes longer than expected to print .............................................................................................................................. |
180 |
Job prints from the wrong tray or on the wrong paper ................................................................................................. |
181 |
Incorrect characters print........................................................................................................................................................... |
181 |
Tray linking does not work........................................................................................................................................................ |
181 |
Large jobs do not collate ........................................................................................................................................................... |
181 |
Unexpected page breaks occur............................................................................................................................................... |
182 |
Solving option problems................................................................................................................................................ |
182 |
Option does not operate correctly or quits after it is installed .................................................................................... |
182 |
Paper trays....................................................................................................................................................................................... |
183 |
2000-sheet tray.............................................................................................................................................................................. |
183 |
Envelope feeder ............................................................................................................................................................................ |
183 |
Duplex unit...................................................................................................................................................................................... |
184 |
Contents |
|
7
5-bin mailbox ................................................................................................................................................................................. |
184 |
Output options .............................................................................................................................................................................. |
184 |
Memory card .................................................................................................................................................................................. |
184 |
Flash memory card....................................................................................................................................................................... |
184 |
Hard disk with adapter................................................................................................................................................................ |
184 |
Internal Solutions Port ................................................................................................................................................................ |
185 |
Solving paper feed problems....................................................................................................................................... |
185 |
Paper frequently jams ................................................................................................................................................................. |
185 |
Paper jam message remains after jam is cleared .............................................................................................................. |
185 |
Page that jammed does not reprint after you clear the jam......................................................................................... |
186 |
Solving print quality problems.................................................................................................................................... |
186 |
Isolating print quality problems.............................................................................................................................................. |
186 |
Blank pages..................................................................................................................................................................................... |
186 |
Clipped images.............................................................................................................................................................................. |
187 |
Ghost images.................................................................................................................................................................................. |
187 |
Gray background .......................................................................................................................................................................... |
188 |
Incorrect margins.......................................................................................................................................................................... |
188 |
Paper curl......................................................................................................................................................................................... |
189 |
Print irregularities ......................................................................................................................................................................... |
189 |
Print is too dark.............................................................................................................................................................................. |
190 |
Print is too light ............................................................................................................................................................................. |
191 |
Repeating defects......................................................................................................................................................................... |
192 |
Skewed print................................................................................................................................................................................... |
192 |
Solid black or white streaks....................................................................................................................................................... |
192 |
Solid color pages........................................................................................................................................................................... |
193 |
Streaked horizontal lines............................................................................................................................................................ |
193 |
Streaked vertical lines ................................................................................................................................................................. |
194 |
Toner fog or background shading appears on the page ............................................................................................... |
195 |
Toner rubs off................................................................................................................................................................................. |
195 |
Toner specks................................................................................................................................................................................... |
196 |
Transparency print quality is poor.......................................................................................................................................... |
196 |
Contacting Customer Support..................................................................................................................................... |
196 |
Notices.............................................................................................. |
198 |
Product information......................................................................................................................................................... |
198 |
Edition notice..................................................................................................................................................................... |
198 |
Power consumption......................................................................................................................................................... |
205 |
Index................................................................................................. |
212 |
Contents
8

Safety information


Connect the power cord to a properly grounded electrical outlet that is near the product and easily accessible.
Do not place or use this product near water or wet locations.
CAUTION—POTENTIAL INJURY: This product uses a laser. Use of controls or adjustments or performance of procedures other than those specified herein may result in hazardous radiation exposure.
This product uses a printing process that heats the print media, and the heat may cause the media to release emissions. You must understand the section in your operating instructions that discusses the guidelines for selecting print media to avoid the possibility of harmful emissions.
Use care when you replace a lithium battery.
CAUTION—POTENTIAL INJURY: There is a danger of explosion if a lithium battery is incorrectly replaced. Replace it only with the same or an equivalent type of lithium battery. Do not recharge, disassemble, or incinerate a lithium battery. Discard used batteries according to the manufacturer's instructions and local regulations.
CAUTION—HOT SURFACE: The inside of the printer might be hot. To reduce the risk of injury from a hot component, allow the surface to cool before touching.
CAUTION—POTENTIAL INJURY: The printer weight is greater than 18 kg (40 lb) and requires two or more trained personnel to move it safely.
CAUTION—POTENTIAL INJURY: Before moving the printer, follow these guidelines to avoid personal injury or printer damage:
•Turn the printer off using the power switch, and then unplug the power cord from the wall outlet.
•Disconnect all cords and cables from the printer before moving it.
•Lift the printer off of the optional drawer and set it aside instead of trying to lift the drawer and printer at the same time.
Note: Use the handholds located on both sides of the printer to lift it off the optional drawer.
Use only the power cord provided with this product or the manufacturer's authorized replacement.
Use only the telecommunications (RJ-11) cord provided with this product or a 26 AWG or larger replacement when connecting this product to the public switched telephone network.
CAUTION—SHOCK HAZARD: If you are accessing the system board or installing optional hardware or memory devices sometime after setting up the printer, then turn the printer off, and unplug the power cord from the wall outlet before continuing. If you have any other devices attached to the printer, then turn them off as well, and unplug any cables going into the printer.
CAUTION—SHOCK HAZARD: Make sure that all external connections (such as Ethernet and telephone system connections) are properly installed in their marked plug-in ports.
This product is designed, tested, and approved to meet strict global safety standards with the use of specific manufacturer's components. The safety features of some parts may not always be obvious. The manufacturer is not responsible for the use of other replacement parts.
CAUTION—POTENTIAL INJURY: Do not twist, bind, crush, or place heavy objects on the power cord. Do not subject the power cord to abrasion or stress. Do not pinch the power cord between objects such as furniture and walls. If the power cord is misused, a risk of fire or electrical shock results. Inspect the power cord regularly for signs of misuse. Remove the power cord from the electrical outlet before inspecting it.
Safety information
9

Refer service or repairs, other than those described in the user documentation, to a professional service person.
CAUTION—SHOCKHAZARD:To avoid the risk of electric shock when cleaning the exterior of the printer, unplug the power cord from the wall outlet and disconnect all cables from the printer before proceeding.
CAUTION—SHOCK HAZARD: Do not use the fax feature during a lightning storm. Do not set up this product or make any electrical or cabling connections, such as the fax feature, power cord, or telephone, duringa lightning storm.

 CAUTION—TIPPING HAZARD: Floor-mounted configurations require additional furniture for stability. You must use either a printer stand or printer base if you are using a high-capacity input tray, a duplex unit and an input option, or more than one input option. If you purchased a multifunction printer (MFP) that scans, copies, and faxes, you may need additional furniture. For more information, see www.lexmark.com/multifunctionprinters.
SAVE THESE INSTRUCTIONS.
Safety information
10
Learning about the
the
 printer


Finding information about the printer
Setup information
Description |
Where to find |
The Setup information gives you instructions for |
You can find the Setup information on the side of the printer |
setting up the printer. Follow the set of instructions |
box or on the Lexmark Web site at www.lexmark.com. |
for local, network, or wireless, depending on what |
|
you need. |
|
|
|
Help
Description |
Where to find |
|
|
The Help gives you instructions for using the software. While in any Lexmark software program, click Help,
Tips Help, or Help Help Topics.
Customer support
Description |
Where to find (North America) |
Where to find (rest of world) |
|
Telephone support |
Call us at |
Telephone numbers and support hours |
|
|
• |
US: 1-800-332-4120 |
vary by country or region. |
|
|
Monday–Friday (8:00 AM–11:00 PM |
Visit our Web site at |
|
|
ET) |
www.lexmark.com. Select a country or |
|
|
Saturday (Noon–6:00 PM ET) |
region, and then select the Customer |
|
|
Support link. |
|
|
• |
Canada: 1-800-539-6275 |
|
|
Note: For additional information about |
||
|
|
Monday–Friday (8:00 AM–11:00 PM |
|
|
|
contacting Lexmark, see the printed |
|
|
|
ET) |
warranty that came with your printer. |
|
|
Saturday (Noon–6:00 PM ET) |
|
|
|
|
|
|
• |
Mexico: 001-888-377-0063 |
|
|
|
Monday–Friday (8:00 AM–8:00 PM |
|
|
|
ET) |
|
Note: Telephone numbers and support times may change without notice. For the most recent telephone numbers available, see the printed warranty statement that came with your printer.
Learning about the printer
11
Description |
Where to find (North America) |
Where to find (rest of world) |
|
E-mail support |
For e-mail support, visit our Web site: |
E-mail support varies by country or |
|
|
www.lexmark.com. |
region, and may not be available in some |
|
|
1 |
Click SUPPORT. |
instances. |
|
2 |
Click Technical Support. |
Visit our Web site at |
|
3 |
Select your printer type. |
www.lexmark.com. Select a country or |
|
region, and then select the Customer |
||
|
4 |
Select your printer model. |
|
|
Support link. |
||
|
5 |
From the Support Tools section, |
Note: For additional information about |
|
|
click e-Mail Support. |
contacting Lexmark, see the printed |
|
6 |
|
|
|
Complete the form, and then click |
warranty that came with your printer. |
|
|
|
Submit Request. |
|
|
|
|
|
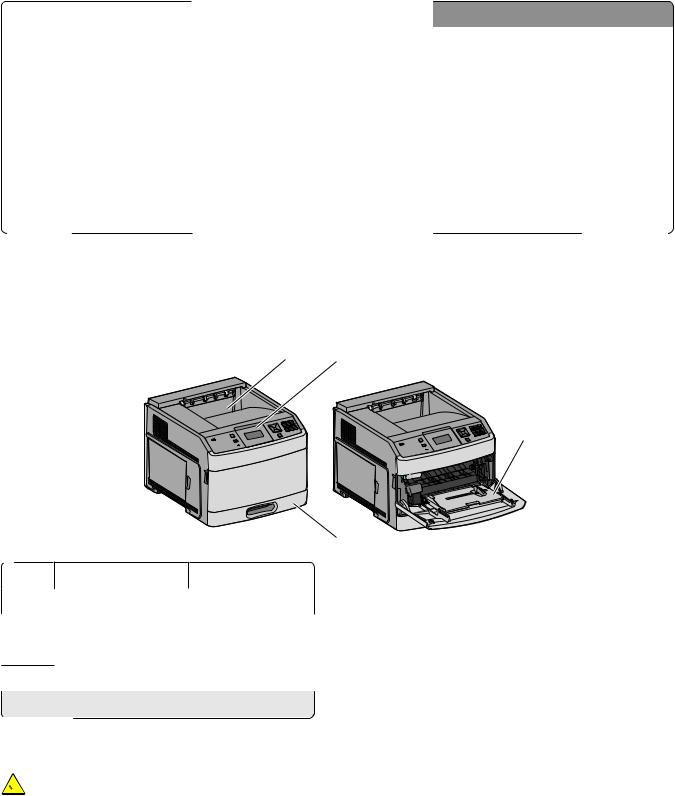
Printer configurations
Basic model
1 2
3
4
|
Feature |
Paper Capacity1 |
1 |
Standard exit bin |
350or 550-sheets |
|
|
|
2 |
Printer control panel |
Not applicable |
|
|
|
3 |
Multipurpose feeder |
100 sheets |
4Standard tray (Tray 1) 250or 550-sheets
1 Based on 75 g/m2 (20 lb.) paper.
Fully configured model

 CAUTION—TIPPING HAZARD: Floor-mounted configurations require additional furniture for stability. You must use either a printer stand or printer base if you are using a high-capacity input tray, a duplex unit and an input option, or more than one input option. If you purchased a multifunction printer (MFP) that scans, copies, and faxes, you may need additional furniture. For more information, see www.lexmark.com/multifunctionprinters.
Learning about the printer
12
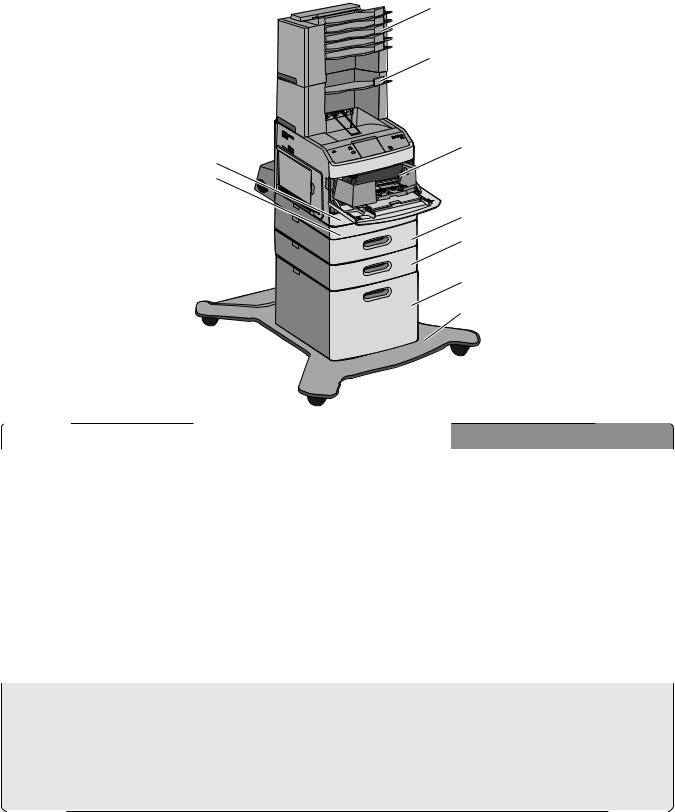
1
2


 3 4
3 4 
 5
5 


6
7
8
9
|
|
Feature/Option |
Paper Capacity1 |
|
1 |
5-bin mailbox2 |
500 sheets |
|
2 |
Output expander3 |
550 sheets |
|
3 |
Envelope feeder |
85 envelopes |
|
|
|
|
|
4 |
Standard tray (Tray 1) |
250or 550-sheets |
|
|
|
|
|
5 |
Duplex unit4 |
Not applicable |
|
6 |
Optional tray (Tray 2) |
250or 550-sheets |
|
|
|
|
|
7 |
Optional tray (Tray 3) |
250or 550-sheets |
|
|
|
|
|
8 |
Optional 2000-sheet tray (Tray 4) |
2000 sheets |
|
|
|
|
|
9 |
Caster base |
Not applicable |
|
|
|
|
1 Based on 75 g/m2 (20 lb.) paper.
2 Up to two 5-bin mailbox units are supported.
3 The printer supports up to three output expander units, or one output expander combined with one 5-bin mailbox, one high capacity output expander (not depicted), or one stapler unit (not depicted).
4 Optional duplex unit available for basic model with a 250-sheet standard tray. Models with a 550-sheet standard tray may have an internal duplex unit.
Learning about the printer
13
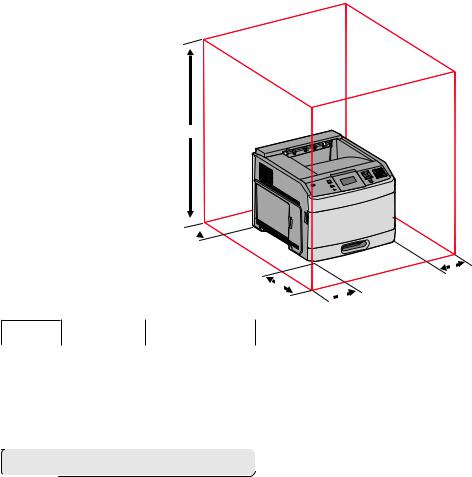
Selecting a location for the printer
When selecting a location for the printer, leave enough room to open trays, covers, and doors. If you plan to install any options, leave enough room for them also. It is important to:
•Make sure airflow in the room meets the latest revision of the ASHRAE 62 standard.
•Provide a flat, sturdy, and stable surface.
•Keep the printer:
–Away from the direct airflow of air conditioners, heaters, or ventilators
–Free from direct sunlight, humidity extremes, or temperature fluctuations
–Clean, dry, and free of dust
•Allow the following recommended amount of space around the printer for proper ventilation:
5
 4
4
1

3
 2
2
1 |
Right Side |
31 cm (12 in.) |
2 |
Left Side |
31 cm (12 in.) |
|
|
|
3 |
Front |
51 cm (20 in.) |
|
|
|
4 |
Rear |
31 cm (12 in.) |
|
|
|
5 |
Top1 |
137 cm (54 in.) |
1 Allows for addition of all output options.
Learning about the printer
14
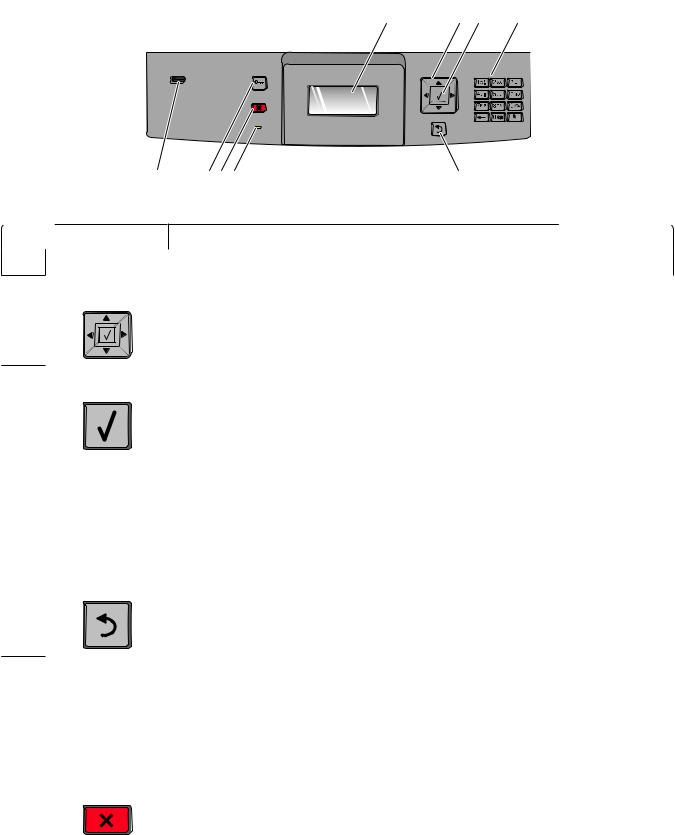
Understanding the printer control panel
1 |
2 |
3 |
4 |
9 8 7 6 5
Item |
Description |
1 Display |
Shows messages and pictures that communicate the status of the printer |
2Navigation buttons Press the up or down arrow buttons to scroll through menus or menu items, or to
increase or decrease a value when entering numbers.
Press the left or right arrow buttons to scroll through menu settings (also called values or options), or to scroll through text that rolls to another screen.
3 Select |
• Opens a menu item and displays the available values or settings. The current setting |
|
is indicated by an asterisk (*). |
• Saves a displayed menu item as the new user default setting.
|
|
Notes: |
|
|
• When a new setting is saved as the user default setting, it remains in effect until a |
|
|
new setting is saved or until factory defaults are restored. |
|
|
• Settings chosen from a software program can also change or override the user |
|
|
default settings selected from the printer control panel. |
|
|
|
4 |
Keypad |
Enter numbers or symbols on the display. |
|
|
|
5 |
Back |
Returns the display to the previous screen |
6 |
Indicator light |
Indicates the printer status: |
|
|
• Off—The power is off. |
|
|
• Blinking green—The printer is warming up, processing data, or printing. |
|
|
• Solid green—The printer is on, but idle. |
|
|
• Solid red—Operator intervention is needed. |
|
|
|
7 |
Stop |
Stops all printer activity |
|
|
A list of options is offered once Stopped appears on the display. |
|
|
|
|
|
Learning about the printer |
15

|
Item |
Description |
|
8 Menu |
Opens the menu index |
|
|
Note: The menus are available only when the printer is in the Ready state. |
|
|
|
9 |
USB port |
Insert a flash drive into the front of the printer to print saved files. |
|
|
Note: Only the front USB port supports flash drives. |
Learning about the printer
16

Additional printer
 setup
setup


Installing internal options
CAUTION—SHOCK HAZARD: If you are accessing the system board or installing optional hardware or memory devices sometime after setting up the printer, then turn the printer off, and unplug the power cord from the wall outlet before continuing. If you have any other devices attached to the printer, then turn them off as well, and unplug any cables going into the printer.
Available internal options
•Memory cards
–Printer memory
–Flash memory
–Fonts
•Firmware cards
–Bar Code and Forms
–IPDS and SCS/TNe
–PrintCryptionTM
•Printer hard disk
•LexmarkTM Internal Solutions Ports (ISP)
–RS-232-C Serial ISP
–Parallel 1284-B ISP
–MarkNetTM N8150 802.11 b/g/n Wireless ISP
–MarkNet N8130 10/100 Fiber ISP
–MarkNet N8120 10/100/1000 Ethernet ISP
All of these options may not be available. For more information, contact the place where you purchased the printer.
Additional printer setup
17
Accessing the system board to install internal options
CAUTION—SHOCK HAZARD: If you are accessing the system board or installing optional hardware or memory devices sometime after setting up the printer, then turn the printer off, and unplug the power cord from the wall outlet before continuing. If you have any other devices attached to the printer, then turn them off as well, and unplug any cables going into the printer.
Note: This task requires a #2 Phillips screwdriver.
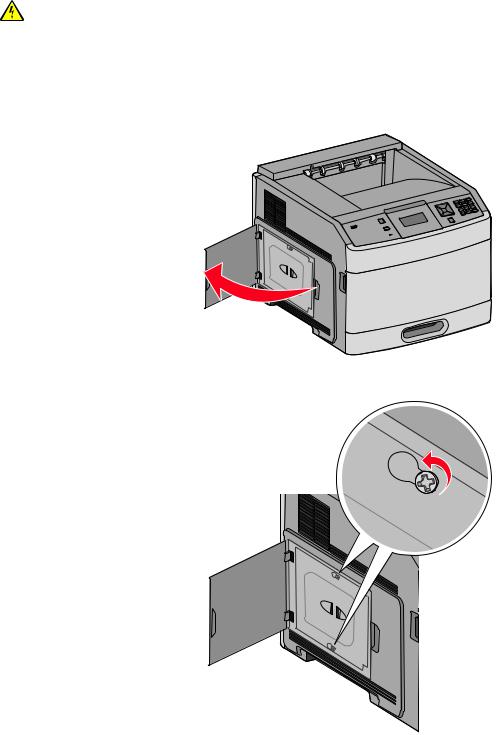
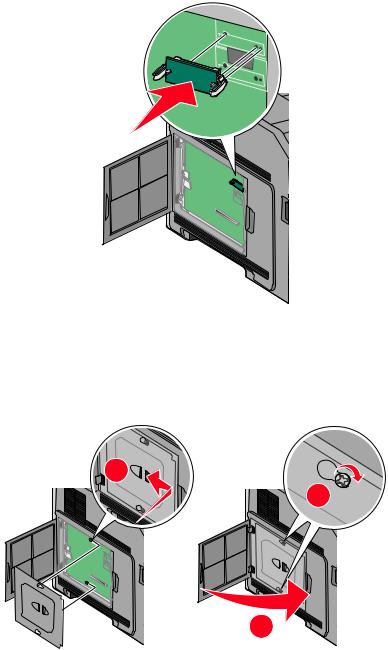
1 Open the system board door.
2 Loosen the screw on the system board cover.
Additional printer setup
18
3 Remove the system board cover.
4 Use the illustration below to locate the appropriate connector.
Warning—Potential Damage: System board electronic components are easily damaged by static electricity. Touch something metal on the printer before touching any system board electronic components or connectors.
1 |
2 |
3 |
1 Firmware and flash memory card connectors
2Memory card connector
3 Lexmark Internal Solutions Port or printer hard disk connector
Additional printer setup
19
Installing a memory card
CAUTION—SHOCK HAZARD: If you are accessing the system board or installing optional hardware or memory devices sometime after setting up the printer, then turn the printer off, and unplug the power cord from the wall outlet before continuing. If you have any other devices attached to the printer, then turn them off as well, and unplug any cables going into the printer.
Warning—Potential Damage: System board electronic components are easily damaged by static electricity. Touch something metal on the printer before touching any system board electronic components or connectors.
An optional memory card can be purchased separately and attached to the system board. To install the memory card:
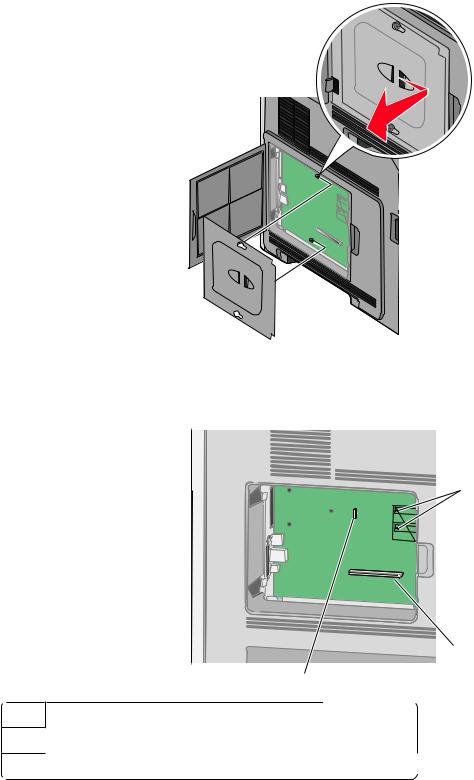
1 Access the system board.
2 |
1 |
3 |
2 Unpack the memory card.
Note: Avoid touching the connection points along the edge of the card.
3 Open the memory card connector latches.
Additional printer setup
20
4 Align the notches on the memory card with the ridges on the connector.
2
1
|
1 |
Notches |
|
|
|
|
|
|
2 |
Ridges |
|
5 |
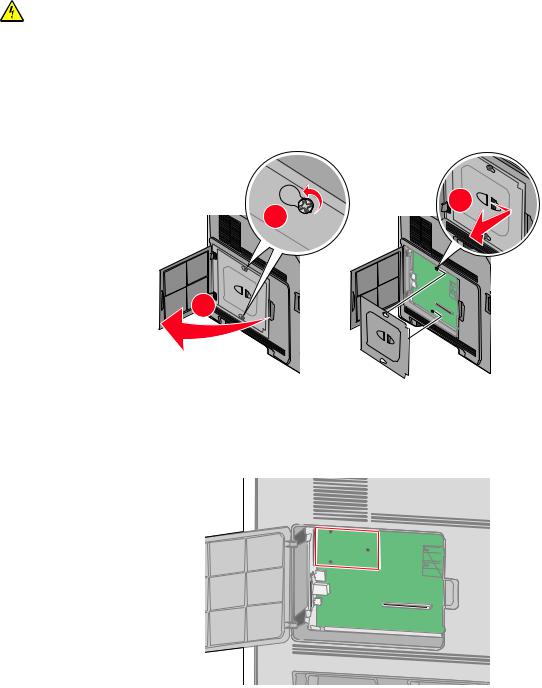
Push the memory card straight into the connector until it snaps into place. |
||
6 |
Replace the system board cover and close the system board door. |
||
1 |
2 |
3 |
Additional printer setup
21
Installing a flash memory or firmware card
The system board has two connections for an optional flash memory or firmware card. Only one of each may be installed, but the connectors are interchangeable.
CAUTION—SHOCK HAZARD: If you are accessing the system board or installing optional hardware or memory devices sometime after setting up the printer, then turn the printer off, and unplug the power cord from the wall outlet before continuing. If you have any other devices attached to the printer, then turn them off as well, and unplug any cables going into the printer.
Warning—Potential Damage: System board electronic components are easily damaged by static electricity. Touch something metal on the printer before touching any system board electronic components or connectors.
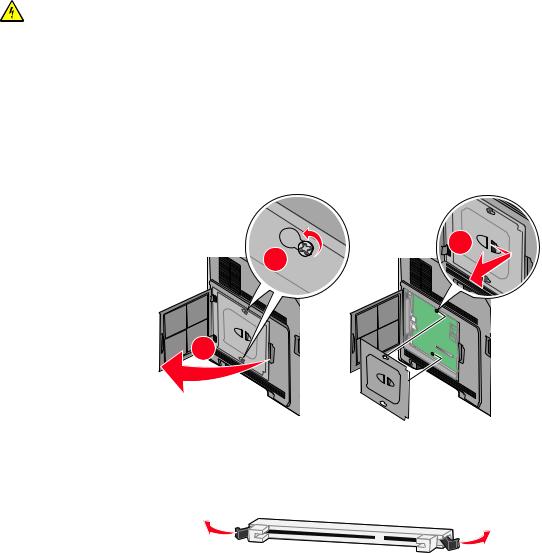
1 Access the system board.
2 |
1 |
3 |
2 Unpack the card.
Note: Avoid touching any electrical components on the card.
3 Holding the card by its sides, align the plastic pins on the card with the holes on the system board.
1
2
1 Plastic pins
2 Metal pins 
Additional printer setup
22
4 Push the card firmly into place.
Notes:
•The entire length of the connector on the card must touch and be flush against the system board.
•Be careful not to damage the connectors.
5 Replace the system board cover and close the system board door.
1 |
2 |
3 |
Additional printer setup
23
Installing an Internal Solutions Port
The system board supports one optional Lexmark Internal Solutions Port (ISP). Install an ISP for additional connectivity options.
Note: This task requires a #2 Phillips screwdriver.
CAUTION—SHOCK HAZARD: If you are accessing the system board or installing optional hardware or memory devices sometime after setting up the printer, then turn the printer off, and unplug the power cord from the wall outlet before continuing. If you have any other devices attached to the printer, then turn them off as well, and unplug any cables going into the printer.
Warning—Potential Damage: System board electronic components are easily damaged by static electricity. Touch something metal on the printer before touching any system board electronic components or connectors.
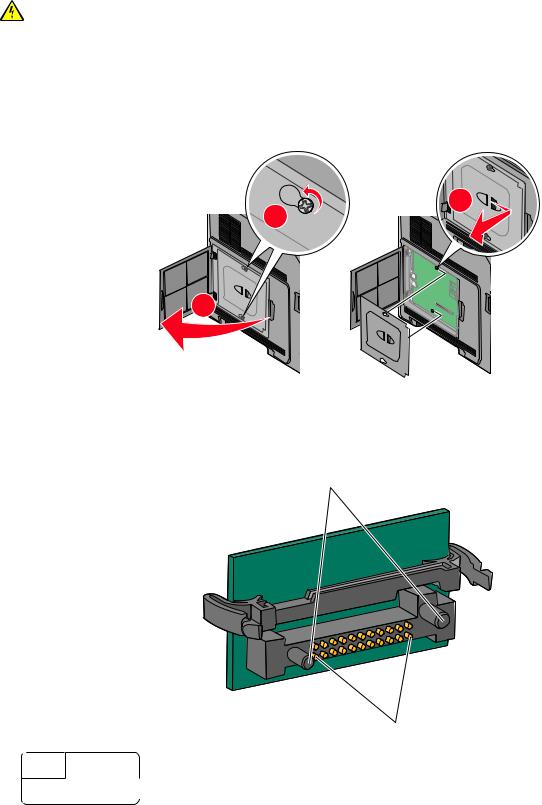
1 Access the system board.
2 |
1 |
3 |
2 Unpack the ISP and plastic tee.
Note: Avoid touching the components on the card.
3 Locate the appropriate connector on the system board.
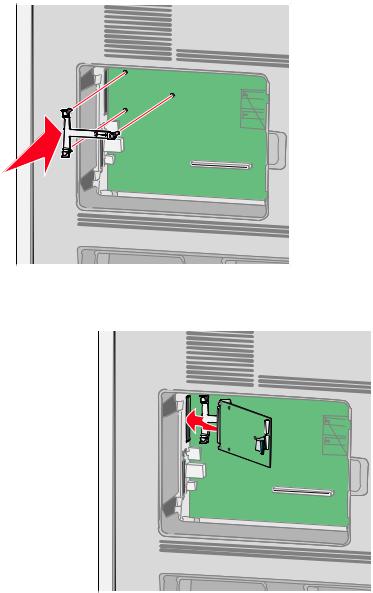
Note: If an optional printer hard disk is currently installed, then the printer hard disk must first be removed. To remove the hard disk:
Additional printer setup
24
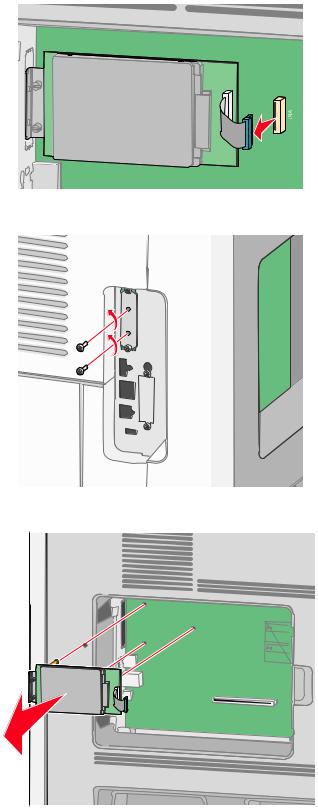
aUnplug the printer hard disk interface cable from the system board, leaving the cable attached to the printer hard disk. To unplug the cable, squeeze the paddle at the plug of the interface cable to disengage the latch before pulling the cable out.
b Remove the screws holding the printer hard disk in place.
c Remove the printer hard disk by pulling it upward to unseat the standoffs.
Additional printer setup
25
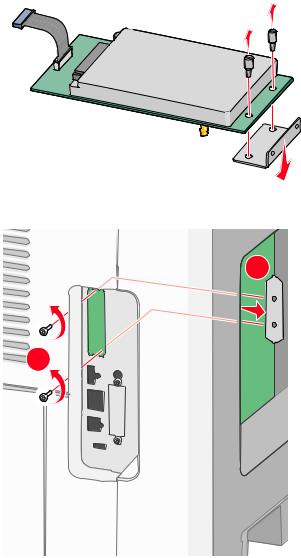
dRemove the thumbscrews that attach the printer hard disk mounting bracket to the printer hard disk, and then remove the bracket. Set the printer hard disk aside.
4 Remove the metal cover from the ISP opening.
2 |
1 |
Additional printer setup
26
5Align the posts of the plastic tee to the holes in the system board, and then press downward until the tee snaps into place. Be sure each post of the tee has latched completely, and that the tee is seated firmly onto the system board.
6Install the ISP onto the plastic tee. Angle the ISP over the plastic tee, and then approach the plastic tee so that any overhanging connectors will pass through the ISP opening in the system board cage.
Additional printer setup
27
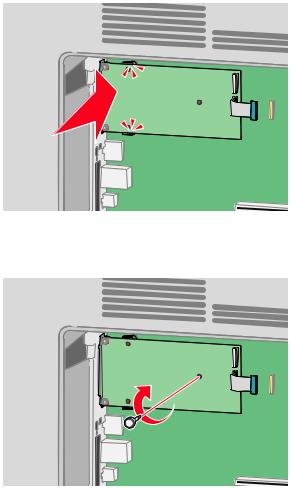
7 Lower the ISP toward the plastic tee until the ISP is seated between the guides of the plastic tee.
8Insert the long thumbscrew and turn it clockwise enough to hold the ISP in place, but do not tighten the thumbscrew at this time.
Additional printer setup
28

9 Attach the two provided screws to secure the ISP mounting bracket to the system board cage.
10 Tighten the long thumbscrew.
Note: Do not overtighten the thumbscrew.
11Insert the plug of the ISP interface cable into the receptacle of the system board.
Note: The plugs and receptacles are color coded.
12If a printer hard disk was previously installed, then attach the printer hard disk to the ISP. For more information, see “Installing a printer hard disk” on page 30.
Additional printer setup
29

13 Replace the system board cover and close the system board door.
1 |
2 |
3 |
Installing a printer hard disk
The optional printer hard disk can be installed with or without a Lexmark Internal Solutions Port (ISP).
Note: This task requires a #2 Phillips screwdriver and a flathead screwdriver.
CAUTION—SHOCK HAZARD: If you are accessing the system board or installing optional hardware or memory devices sometime after setting up the printer, then turn the printer off, and unplug the power cord from the wall outlet before continuing. If you have any other devices attached to the printer, then turn them off as well, and unplug any cables going into the printer.
Warning—Potential Damage: System board electronic components are easily damaged by static electricity. Touch something metal on the printer before touching any system board electronic components or connectors.
1 Access the system board.
2 |
1 |
2 Unpack the printer hard disk.
Note: Avoid touching the components on the card.
3 |
Additional printer setup
30
Loading...