

Page 1

LEICA D-LUX 6
Instructions
About
downloading
Adobe® Photoshop®
Lightroom®
see page 189.
Page 2

Table of contents
Preparations
Before use ..............................................6
Scope of Delivery ..................................8
Accessories ...........................................8
Names of the components .................... 9
Attaching lens cap and
shoulder strap...................................... 13
Charging the battery ...........................14
Remaining battery capacity .........................15
Guidelines for the number of recordable
pictures and operating time .........................16
Inserting and removing the card/
the battery ............................................ 18
Saving your pictures
(to an inserted memory card or the
built-in memory) ..................................20
Recording capacity guidelines
(pictures/recording time) .............................21
Setting time and date .......................... 23
Changing settings .......................................24
Setting the menu .................................25
Using the [Setup] menu ...................... 27
[Clock Set] ...................................................27
[World Time] ................................................27
[Travel Date] ................................................28
[Beep] ..........................................................29
[Volume] ......................................................30
[Cust.Set Mem.] ..........................................30
[Fn Button Set] ............................................30
[LCD Display] / [Viewfinder] ........................31
[LCD Mode] .................................................31
[EVF Disp.Style] / [LCD Disp.Style] .............32
[Guide Line] .................................................32
[Histogram] ..................................................33
[Video Rec Area] .........................................34
[Remaining Disp.] ........................................34
[Highlight] ....................................................34
[Expo.Meter] ................................................35
[Lens Resume] ............................................35
[MF Assist] ...................................................35
[Economy] ...................................................36
[Play on LCD] ..............................................37
[Auto Review] ..............................................37
[Start Mode] .................................................38
[No.Reset] ...................................................38
[Reset] .........................................................39
[USB Mode] .................................................39
[Output] .......................................................39
[HDTV Link] .................................................40
[3D Playback] ..............................................40
[Rotate Disp.] ..............................................40
[Scene Menu] ..............................................41
[Menu Resume] ...........................................41
[User’s Name Rec] ......................................41
[Version Disp.] .............................................42
[Format] .......................................................42
[Language] ..................................................43
[O.I.S. Demo.] .............................................43
Entering Text ........................................ 44
- 2 -
Page 3

Table of contents
Taking pictures
Sequence of operations ...................... 45
About recording modes ......................48
Snapshot mode .................................... 49
Automatic Scene Detection .........................49
Determining the extent of the area
rendered sharply .........................................50
Using the built-in flash .................................52
[Color Mode] ................................................53
[Motion Deblur] ............................................53
[iHandheld Nite Shot] ..................................53
[iHDR] ..........................................................54
AF Tracking .................................................55
[Snapshot Plus Mode] .................................56
About setting items ......................................57
Program mode ..................................... 58
Program Shift ..............................................58
[Program Diagram] ......................................59
Aperture priority mode ........................ 60
Shutter speed priority mode ............... 61
Manual exposure mode....................... 62
Using [Creative Control] Mode ........... 64
[Expressive] .................................................66
[Retro] .........................................................66
[High Key] ....................................................67
[Low Key] ....................................................67
[Sepia] .........................................................68
[Dynamic Monochrome] ..............................68
[Impressive Art] ...........................................69
[High Dynamic] ............................................69
[Cross Process] ...........................................70
[Toy Effect] ..................................................70
[Miniature Effect] .........................................71
[Soft Focus] .................................................72
[Star Filter] ...................................................72
[One Point Color] .........................................73
[Smooth Defocus] ........................................73
[Radial Defocus] ..........................................74
Using [Scene Mode] ............................ 75
[Portrait] .......................................................76
[Soft Skin] ....................................................76
[Scenery] .....................................................76
[Panorama Shot] .........................................76
[Sports] ........................................................78
[Night Portrait] .............................................78
[Night Scenery] ............................................78
[Handheld Night Shot] .................................78
[HDR] ..........................................................79
[Food] ..........................................................79
[Baby] ..........................................................79
[Pet] .............................................................79
[Sunset] .......................................................80
[Glass Through] ...........................................80
[3D Photo Mode] .........................................81
Taking motion pictures .......................82
Taking still pictures while a motion picture
is being recorded .........................................86
Taking motion pictures with manual
operation [Creative Video Mode] .......87
[High Speed Video] .....................................89
Registering your own settings and
recording [Custom] Mode .................. 90
[Cust.Set Mem.] ..........................................90
[Custom] ......................................................91
- 3 -
Page 4

Table of contents
Using the zoom lens ............................ 92
Optical Zoom ...............................................93
Extended optical zoom ................................93
[i.Zoom] .......................................................94
[Digital Zoom] ..............................................94
[Step Zoom] .................................................95
Using Autofocus .................................. 96
Face Detection ............................................97
AF Tracking .................................................98
Focusing on off-center subjects ..................98
Spot focusing ..............................................99
Using Manual Focus together with
Autofocus ..................................................101
Close-up pictures .............................. 102
Locking the exposure and/or
focus ...................................................103
Manual focusing ................................ 104
Using the built-in flash ...................... 106
Changing the flash mode ..........................107
Setting the ISO Sensitivity ................ 109
Setting White Balance ........................111
Setting the White Balance manually .........112
Setting the White Balance using a color
temperature ...............................................113
Performing White Balance fine
adjustments ...............................................113
White Balance bracketing .........................114
Using with self-timer ......................... 116
Setting the exposure series
function .............................................. 118
Changing the aspect ratio for
still pictures .......................................121
[Aspect Bracket] ........................................122
Using the built-in ND filter ................ 123
Compensating the exposure ............ 124
[Auto Bracket] .................................... 125
Switching the displays ...................... 127
Using the level gauge........................ 128
Using the Quick menu ....................... 129
Using the Face Recognition function
[Face Recog.] .....................................130
Registering faces .....................................131
Editing or deleting information about
registered faces ........................................133
Using the [Rec] menu ........................ 134
[Photo Style] ..............................................134
[Picture Size] .............................................135
[Quality] .....................................................136
[ISO Limit Set] ...........................................137
[ISO Increments] .......................................137
[Extended ISO] ..........................................137
[Program Diagram] ....................................137
[Face Recog.] ............................................137
[AF Mode] ..................................................137
[Quick AF] ..................................................138
[AF/AE Lock] .............................................138
[Metering Mode] ........................................139
[i.Dynamic] ................................................139
[Multi Expo.] ..............................................140
[Min. Shtr Speed] ......................................141
[i.Resolution] .............................................141
[i.Zoom] .....................................................141
[Digital Zoom] ............................................141
[Step Zoom] ...............................................142
[Stabilizer] .................................................142
[AF Assist Lamp] .......................................143
[Flash] .......................................................143
[Flash Synchro] .........................................144
[Flash Adjust.] ............................................145
[Red-Eye Removal] ...................................145
[Color Mode] ..............................................146
[Motion Deblur] ..........................................146
[iHandheld Nite Shot] ................................146
[iHDR] ........................................................146
[Opt. Viewfinder] ........................................146
[Aspect Bracket] ........................................146
[Time Lapse Shot] .....................................147
[Date Stamp] .............................................149
[Clock Set] .................................................149
Using the [Motion Picture] menu ..... 150
[Rec Mode] ................................................150
[Rec Quality] ..............................................150
[Continuous AF] .........................................151
[Wind Cut] .................................................151
- 4 -
Page 5

Table of contents
Playback
Viewing your pictures
[Normal Play] .....................................152
Enlarged viewing .......................................153
Viewing several pictures simultaneously ...154
Viewing pictures by their recording date ...155
Playing back pictures recorded as exposure
series and with interval recording
Panorama playback ..................................158
Viewing motion pictures ...................159
Capturing still pictures from
motion pictures .................................. 160
Splitting motion picture takes ..........161
Switching the displays ...................... 162
Deleting pictures ...............................163
To delete multiple (up to 100)/
all pictures .................................................164
Different playback methods
[Playback Mode] ................................ 165
[2D/3D Settings] ........................................165
[Slide Show] ..............................................166
[Filtering Play] ...........................................168
[Calendar] ..................................................168
Retouching pictures .......................... 169
[Auto Retouch] ..........................................169
[Creative Retouch] ....................................170
Using the [Playback] menu............... 171
[Title Edit] ..................................................171
[Text Stamp] ..............................................172
[Video Divide] ............................................173
[Resize] .....................................................174
[Cropping] ..................................................175
[Leveling] ...................................................176
[Favorite] ...................................................177
[Print Set] ..................................................178
[Protect] .....................................................179
[Face Rec Edit] ..........................................180
[Copy] ........................................................181
................ 156
Miscellaneous
Viewing on a TV screen ....................182
HDTV Link (HDMI) ....................................184
Viewing 3D still pictures ............................186
Storing recorded still and motion
pictures............................................... 188
Copying by inserting the SD card into a
recorder .....................................................188
Dubbing playback pictures via the
supplied AV cable ......................................188
Copying the recorded image data to a
computer with the available software ........189
Using with your computer ................ 190
Copying still and motion pictures
recorded in [MP4]
(except AVCHD motion pictures) ............... 191
Printing ...............................................193
Printing multiple pictures ...........................195
Printing with date and text .........................195
Making print settings on the camera .........196
Using the external electronic
viewfinder ........................................... 197
Using an external flash unit.............. 198
List of monitor displays ....................200
Message displays ..............................205
Q&A Troubleshooting ...................... 207
Usage cautions and notes ................216
Leica Service Addresses .................. 220
- 5 -
Page 6
Preparations
Before use
■
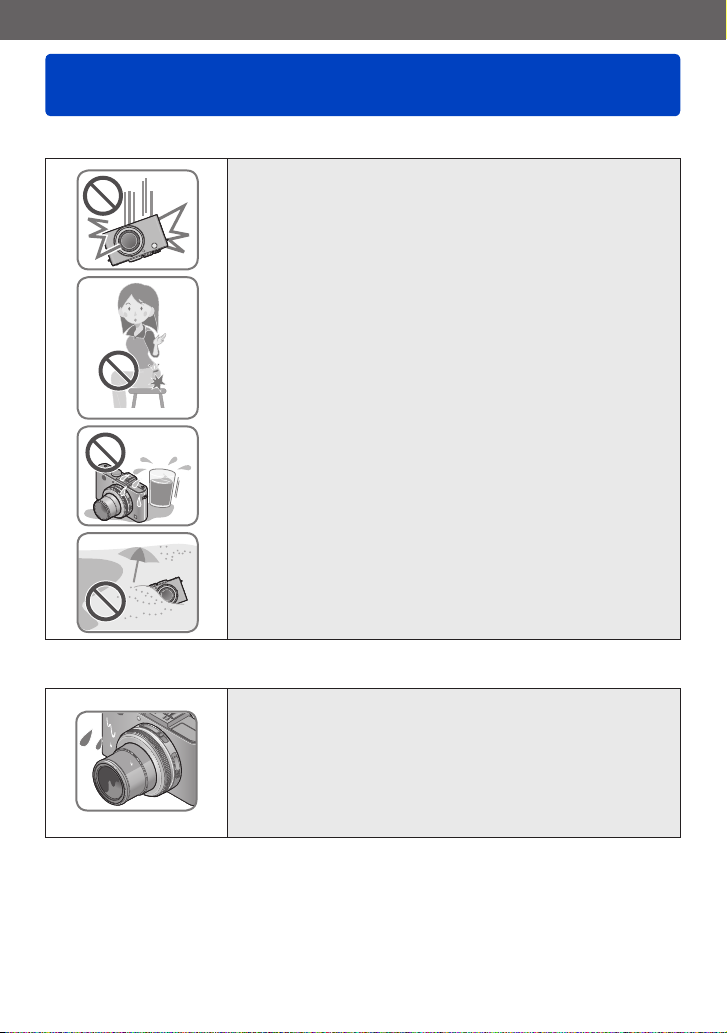
Camera handling
Protect the camera from excessive vibration, force, or
pressure.
Avoid using the camera under the following conditions,
●
which may damage the lens, the monitor, or the camera
body. This may also cause the camera to malfunction or
prevent recording.
• Dropping or hitting the camera against a hard surface
• Sitting down with the camera in your pants pocket or
forcing it into a full bag
• Attaching accessories to the camera strap
• Exerting excessive force on the lens or the monitor
The camera is not dust resistant, splash resistant, or
waterproof.
Avoid using the camera in places with excessive dust
or sand, or where water can come into contact with the
camera.
Avoid using the camera under the following conditions,
●
which present a risk that sand, water, or foreign material
may enter the camera through the lens or gaps around
buttons. Be especially careful because these conditions
may damage the camera, and such damage may not be
repairable.
• In extremely dusty or sandy places
• In the rain or by the shore, where the camera may be
exposed to water
■
Condensation (When the lens or the monitor is fogged up)
Condensation may occur when the camera is exposed to
●
sudden changes of temperature or humidity. Avoid these
conditions, which may soil the lens or the monitor, cause
mold, or damage the camera.
If condensation does occur, turn off the camera and wait
●
about two hours before using it. Once the camera adjusts
to the surrounding temperature, the fogging will clear
naturally.
- 6 -
Page 7
Preparations
Before use
■
Always take a test shot first
Before important events when you will use the camera (at weddings, for example),
always take a test shot to make sure that pictures and sound are recorded correctly.
■
No compensation for missed shots
We cannot compensate for missed shots if technical problems with the camera or card
prevent recording.
■
Carefully observe copyright laws
Unauthorized use of recordings that contain works with copyright for purposes other
than personal use is prohibited under copyright law. Recording of certain material may
be restricted even for the purpose of personal use.
■
Also refer to “Usage cautions and notes” (→216)
Please note that the actual controls and components, menu items, and other
●
information for your camera may differ from those in the illustrations provided in
these instructions.
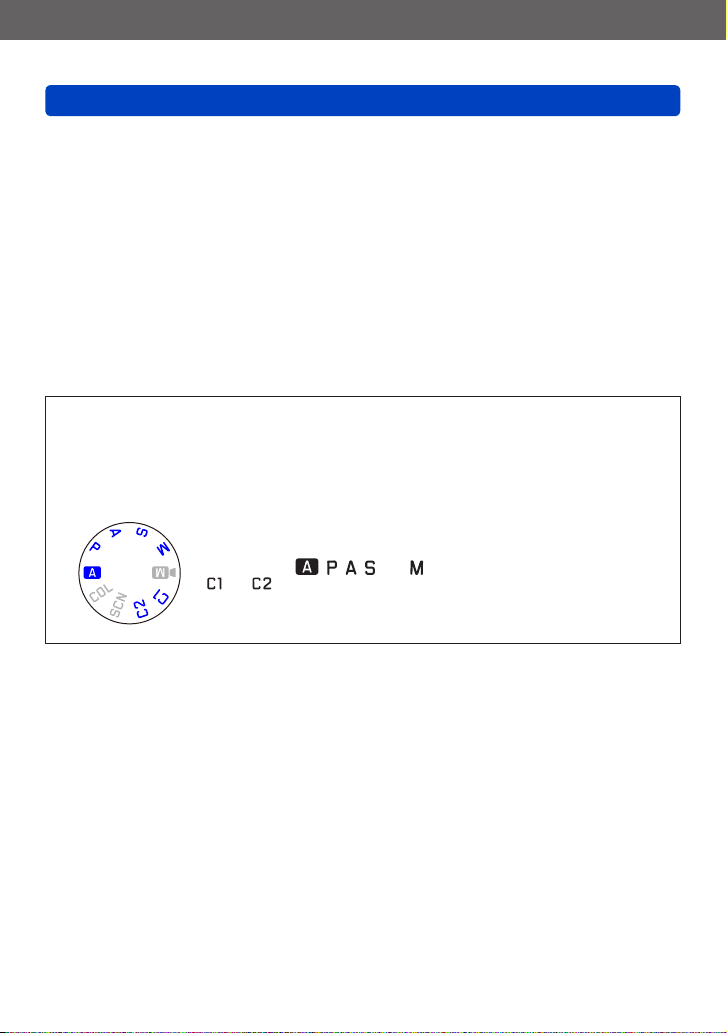
Recording mode icons
●
You can select and execute the indicated menus and functions for the recording
modes displayed in blue on mode dial illustrations next to section titles.
In the example shown on the left, the following recording modes
are available: , , , and .
*
and will differ depending on the recording modes registered under
custom settings.
- 7 -
Page 8

Preparations
Scope of Delivery Accessories
Order No.
Rechargeable battery
BP-DC10-E 18 719
BP-DC10-U 18 720
Charger
BC-DC10-E 423-092.001-010
BC-DC10-U 423-092.002-010
Mains cable
EU 423-111.001-006
UK 423-111.001-007
AUS 423-068.801-023
TW 423-111.001-009
CN 423-111.001-010
KR 423-111.001-008
(delivery differs
depending on markets)
Shoulder strap 423-108.001-020
Lens cap 423-108.001-018
String for lens cap 423-108.001-019
Hot shoe cover 423-108.001-015
CD with instr. PDFs 423-108.001-016
USB cable 423-106.001-010
AV cable 423-105.001-010
Button template for
Canada / Taiwan
Short instructions 93 479 -482
Warranty Card 439-399.100-026
423-108.001-021/-022
(only with camera
models: 18 461/18 462)
(delivery differs
depending on markets)
Order No.
Leather case D-LUX 6 18 727
Protector 18 730
Small system case 18 746
Shoulder strap 18 747
Hand grip D-LUX 6 18 733
LEICA Electronic
Viewfinder EVF 3
HDMI mini cable 14 491
LEICA CF 22
Flash unit
Tabletop tripod 14 100
Ball and Socket head 14 110
18 734
18 694
Notes:
• Memory cards are optional. You can
record or play back pictures on the
internal memory when you are not using
a card.
• Check that all items belonging to the
scope of delivery are included before
using the camera.
• The items and their shape may differ
depending on the country or area where
the camera was purchased.
• Keep small parts in a safe place out of
the reach of children.
• Please dispose of all packaging
appropriately.
- 8 -
Page 9
Preparations
Names of the components
1 2 3 4
8 7 6 5
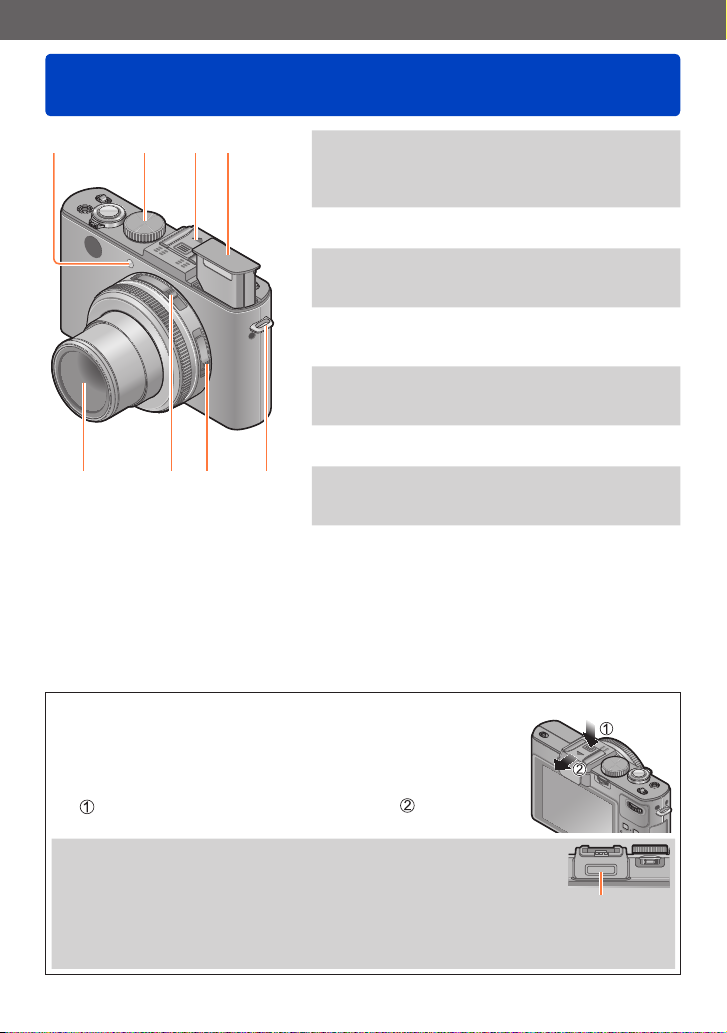
■
About the hot shoe cover
To attach (optionally available) accessories in the hot shoe,
the cover must be removed first.
Removing the hot shoe cover
While pressing down on the hot shoe cover release button
, pull the cover in the direction of the arrow to remove it.
1 Self-timer indicator / AF Assist Lamp
Illuminates when the self-timer is set
or when Autofocus is operated in dark
locations. (→116, 143)
2 Mode dial
Switches the recording mode. (→48)
3 Hot shoe (Hot shoe cover)
The hot shoe cover is on the hot shoe at
the time of purchase.
4 Built-in flash
Use the flash open switch to open the
flash. (→106)
5 Shoulder strap eyelet
Attach the supplied shoulder strap and lens
cap string to this eyelet. (→13)
6 Focus selector switch
Switches the focus setting. (→96, 102, 104)
7 Aspect ratio selector switch
Switches the aspect ratio of a still picture.
(→121)
8 Lens
The lens barrel extends forward when you
take a picture.
Be sure to attach the hot shoe cover when the hot shoe is not in
●
use.
When not in use, keep the hot shoe cover in a safe place so that
●
you do not lose it.
When the hot shoe cover is removed, make sure that connection
●
socket is not damaged by liquids or sand.
Keep the hot shoe cover out of reach of children to prevent swallowing.
●
- 9 -
Connection
socket
Page 10
Preparations
Names of the components
9 10 11 12
15 14 13
16 17 18
19
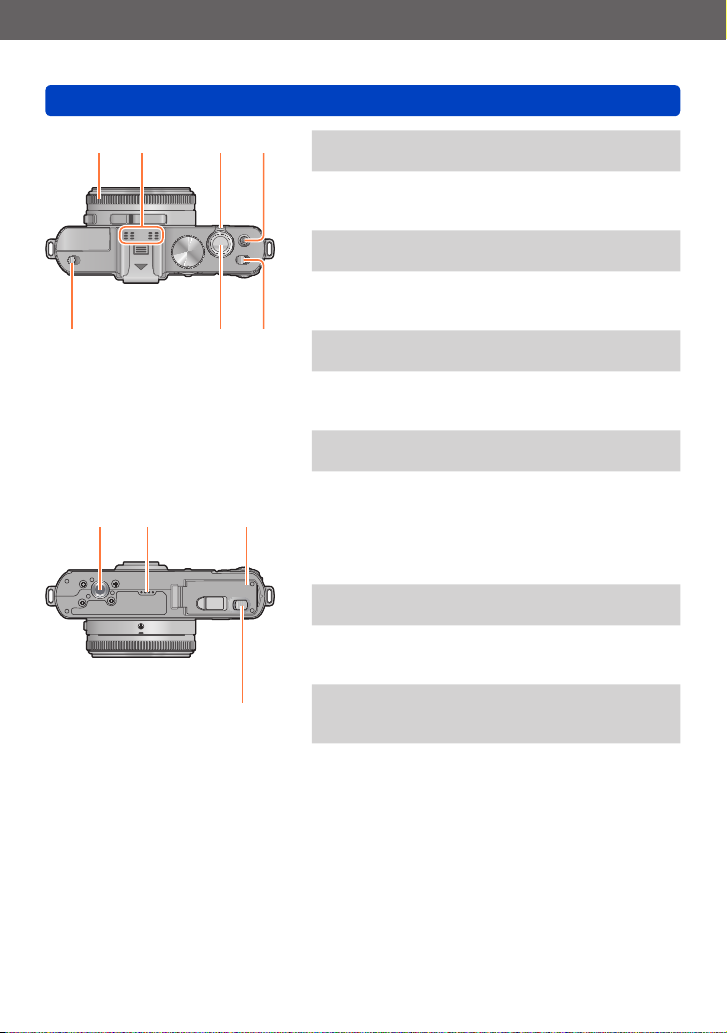
9 Aperture ring
Adjusts the aperture value. (→60, 62)
10 Microphone
Records sound when you record motion
pictures. (→82)
11 Zoom lever
Adjusts the recording range. (→92)
12 Motion picture button
Press this button to start and stop motion
picture recording. (→46)
13 Camera ON/OFF switch
Turns the camera on or off.
14 Shutter button
Press this button to record a still picture.
(→46)
15 Flash open switch
Operate this switch to open the flash. (→106)
16 Tripod thread
For attaching the camera to a tripod or
other accessories.
Do not attach to a tripod using longer than
5.5mm screws. Doing so may damage the
camera.
17 Speaker
Do not cover the speaker with your fingers.
18 Card/Battery door
Open this door to insert and remove a card
or battery. (→18)
19 Release slider
Push this slider to open the card/battery
door. (→18)
- 10 -
Page 11
Preparations
Names of the components
20 21 22
26
24
25
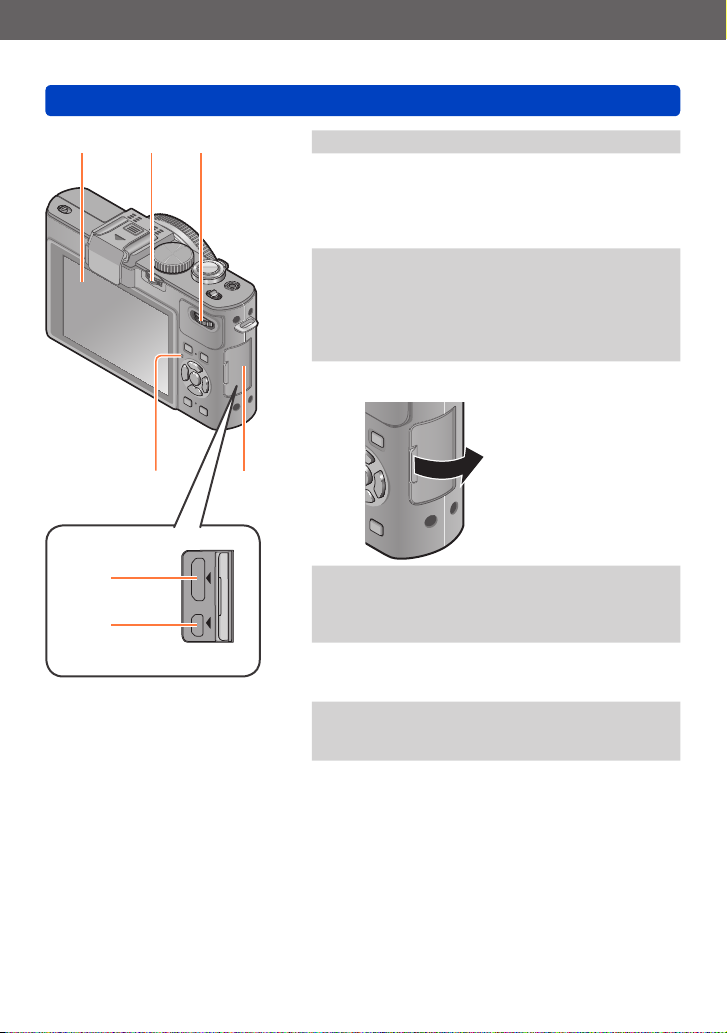
20 LCD monitor (→200)
21 [ND/FOCUS] lever
To operate the lever, move it left or right or
press it forwards. Use this lever for Manual
Focus adjustment or for turning the built-in
ND filter on/off, etc. (→104, 123)
22 Dial
To operate the dial, rotate it left or right
or press it forwards. Use this dial for
operations such as adjusting the shutter
speed or selecting an operation item.
(→61, 62, 124)
23 Terminal cover
How to open the terminal cover
23
24 [HDMI] socket
For connecting the HDMI mini cable
(available as accessory (→8)) to this
socket. (→182)
25 [AV OUT/DIGITAL] socket
For connecting the USB cable or the AV
cable (→8). (→182, 191, 193)
26 Status indicator
This indicator lights up in accordance with
the operating conditions of the camera.
- 11 -
Page 12
Preparations
35
34
33
32
31
27
28
29
30
Names of the components
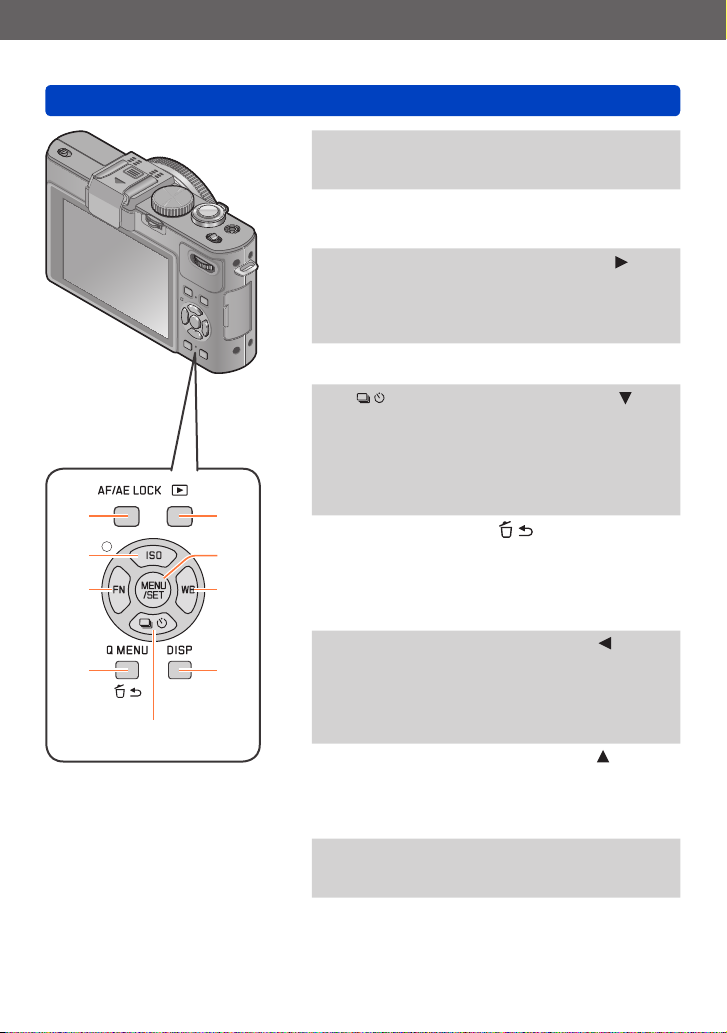
27 Playback button
Switches between picture taking and
playback mode. (→152)
28 [MENU/SET]
Mainly used to display menu screens or to
set menu items. (→25)
29 [WB] button / Right cursor button (
Displays the White Balance setting screen.
This button is also used to move the
cursor on the menu screens and for other
functions. (→25, 111)
30 [DISP] button
Switches the displayed screens. (→127, 162)
31 [
32
33 [FN] button / Left cursor button (
34 [ISO] button / Up cursor button (
35 [AF/AE LOCK] button
] button / Down cursor button ( )
Displays the setting screens for serial
exposures, self-timer and other functions.
This button is also used to move the
cursor on the menu screens and for other
functions.
(→25, 116, 118, 125)
[Q MENU] button / [
Displays the Quick menu in picture taking
mode. Deletes pictures in playback mode.
This button is also used to return to the
previous screen during menu operations.
(→129, 163)
Displays the screen of the function
registered to the corresponding [FN]
button. This button is also used to move the
cursor on the menu screens and for other
functions. (→25, 30)
Displays the setting screen for ISO
Sensitivity. This button is also used to move
the cursor on the menu screens and for
other functions. (→25, 109)
Locks the exposure and focus settings.
(→103, 138)
] button
)
)
)
- 12 -
Page 13
Preparations
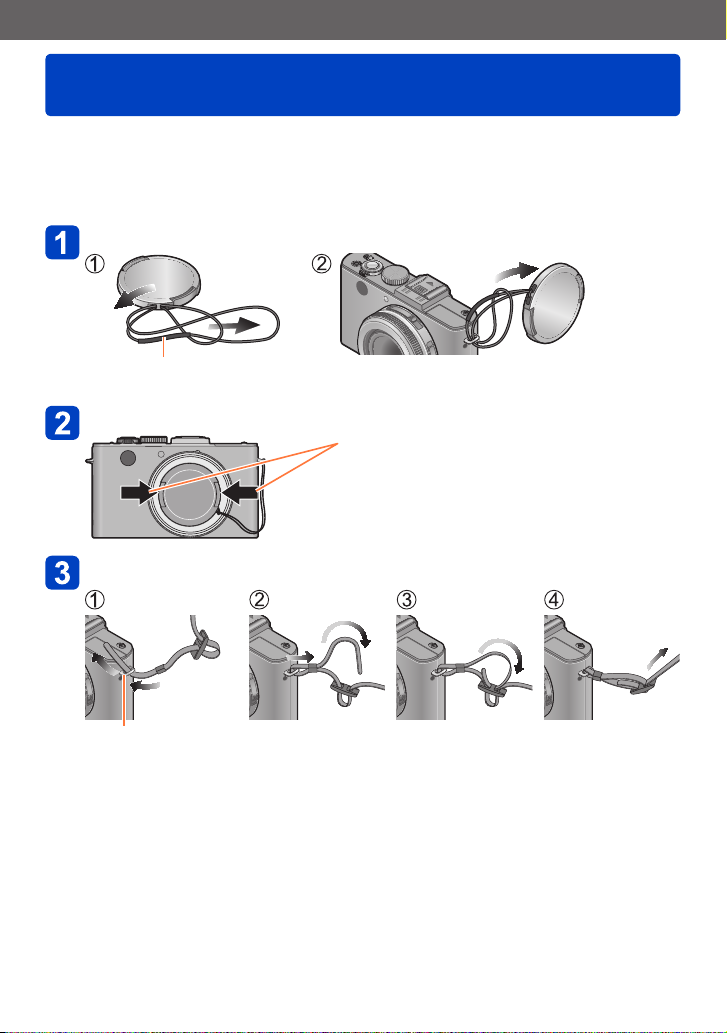
Attaching lens cap and shoulder strap
Protect the lens with the lens cap when you are not taking pictures. We recommend
attaching the lens cap to the camera using the lens cap string to prevent loss of the lens
cap. We also recommend attaching the shoulder strap to prevent the camera from being
dropped.
Use the supplied string to attach the lens cap to the camera
Make sure that the thicker section of the string is not caught in the lens cap or the shoulder
strap eyelets.
Attach the lens cap
To attach and remove the lens cap, press the
areas shown by arrows in the illustration.
Attach the shoulder strap
Shoulder strap eyelet
• Attach the other end of the shoulder strap the same way.
• Make sure that the shoulder strap does not come loose.
• Attach the shoulder strap with the LEICA logo on the strap facing outwards.
• Use the shoulder strap on your shoulder.
- Do not use the strap around your neck. It may result in injury or accident.
• Do not leave the shoulder strap where a child can reach it.
- This may result in the child accidentally strangling itself.
- 13 -
Page 14
Preparations
Charging light
([CHARGE])
On: Charging in progress
Off: Charging complete
If light is flashing:
• Charging may take longer
than normal if battery
temperature is too high or
too low (charging may not be
completed).
• Battery/charger contacts are
dirty. Clean with a dry cloth.
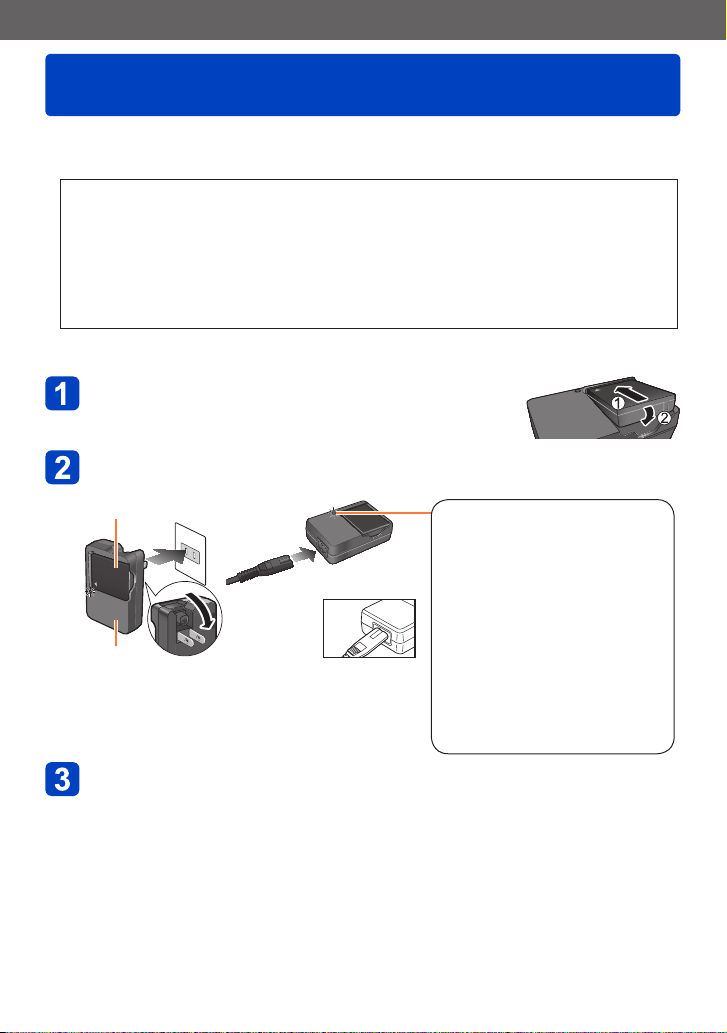
Charging the battery
Always charge before first use! (the battery is shipped uncharged)
■
About batteries that you can use with this camera
It has been found that counterfeit batteries which look very similar to the
genuine product are available in some markets. Some of these batteries are
not adequately protected with internal circuitry to meet the requirements of
appropriate safety standards. There is a possibility that these batteries may
lead to fire or explosion. Please be advised that Leica Camera AG is not liable
for any accident or failure occurring as a result of use of a counterfeit battery.
To ensure that safe products are used we urgently recommend to use only the
Leica battery BP-DC10 (→8).
• Use only the specified charger and battery.
Insert the battery into the charger
The terminals should face the charger’s contacts.
●
Connect the charger to the electrical outlet
Plug-in type
●
Battery
Charger
(model-specific)
It is recommended to charge the battery
●
indoors (10°C to 30°C (50°F to 86°F)).
Cable type
●
• The mains
cable
does not
fit entirely
into the
respective socket. A gap will
remain.
Detach the battery after charging is
completed
The charger is in the standby condition as long as it is connected to the mains.
●
The primary circuit is always “live” as long as it is connected to the mains.
- 14 -
Page 15
Preparations
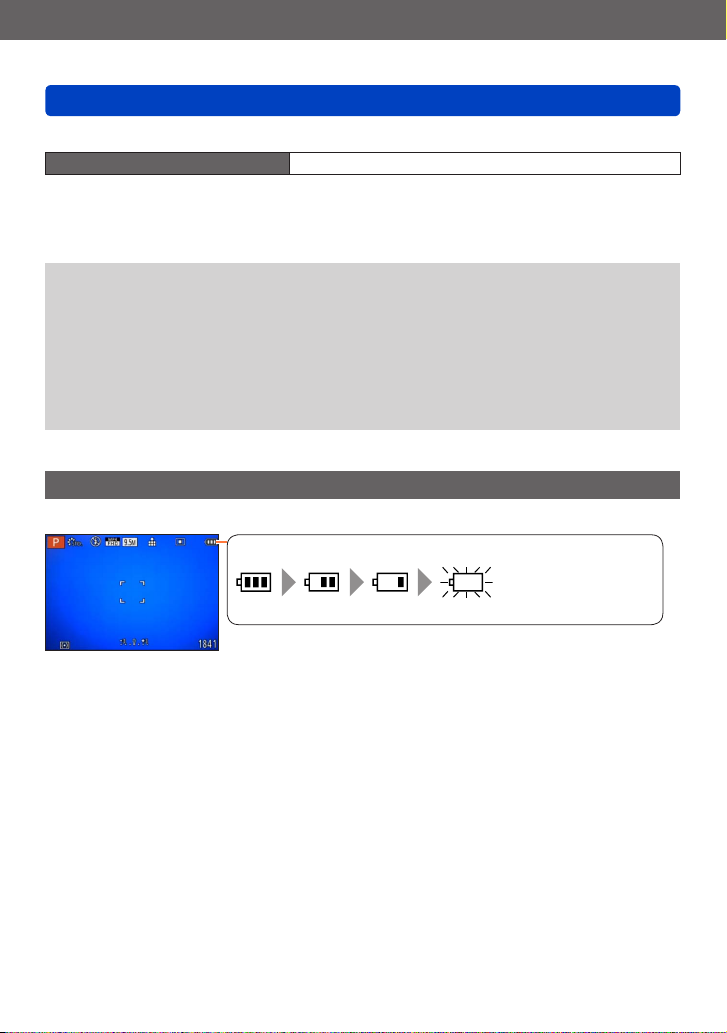
Remaining battery capacity
(flashes red*)
If the battery mark flashes red, recharge or replace battery.
Charging the battery
■
Notes on the charging time
Charging time Approx. 155 min
• The indicated charging time is for when the battery has been discharged completely.
The charging time may vary depending on how the battery has been used. The
charging time for a battery in hot/cold environments or for a battery that has not been
used for a long time may be longer than normal.
Use only the Leica battery BP-DC10 (→8).
●
We cannot guarantee the quality of any other batteries.
●
Remove the battery from camera when you are not going to use the camera for
●
a long time.
• Store the battery in a plastic case, making sure that it is kept away from metal
objects (such as clips).
To remove the battery, turn the camera off and wait until the Leica indicator on the
●
monitor goes off. (Failure to wait may cause the camera to malfunction and may
damage the card or recorded data.)
Remaining battery capacity
When using the camera, the remaining battery capacity is displayed.
*
When the monitor is turned off, the status indicator will flash.
- 15 -
Page 16

Preparations
Charging the battery
Guidelines for the number of recordable pictures and operating time
The number of recordable pictures or available operating time may vary according to the
surrounding environment and usage conditions. Figures may be reduced if flash, zoom,
or other functions are used frequently, or in colder conditions.
■
Recording still pictures
Number of recordable pictures Approx. 330
Recording time Approx. 165 min
Recording conditions by CIPA standard
●
CIPA is an abbreviation of [Camera & Imaging Products Association].
• [Program AE] Mode
• Temperature: 23°C (73.4°F)/Humidity: 50% RH when the monitor is on.
• Using a 32MB memory card.
• Using the supplied battery.
• Starting recording 30 seconds after the camera is turned on (when the Optical Image
Stabilizer function is set to [ON]).
• Recording once every 30 seconds with full flash every second recording.
• Zooming form the maximum wide-angle to the maximum telephoto setting or vice
versa in every recording.
• Turning the camera off every 10 recordings and leaving it until the temperature of the
battery decreases.
The number is reduced if intervals are longer (e.g. to approx. one quarter for 2-minute
intervals under the above conditions).
By CIPA standard
- 16 -
Page 17

Preparations
Charging the battery
■
Recording motion pictures
[Rec Mode]
[Rec Quality]
Available recording time Approx. 90 min Approx. 100 min Approx. 110 min
Actual available recording time Approx. 50 min Approx. 55 min Approx. 60 min
Recording conditions
●
• Temperature 23°C (73.4°F), humidity 50% RH
• The time you can actually record when repeatedly turning the power on and off,
starting and stopping recording and using the zoom.
Remaining time for continuous recording displayed on the monitor
●
• With camera model 18 460
You can continuously record a motion picture in [MP4] for up to 29 minutes or approx.
4 GB. (Since recording in [MP4] with [FHD] creates larger files, the recording time for
such motion pictures will be shorter than 29 minutes.)
You can continuously record [AVCHD] motion pictures for up to 29 minutes.
• With camera models 18 461 / 18 462
You can continuously record a motion picture in [MP4] for up to 29 minutes or approx.
4 GB. (Since recording in [MP4] with [FHD] creates larger files, the recording time for
such motion pictures will be shorter than 29 minutes.)
If [Rec Quality] of [AVCHD] motion pictures is set to [PSH] or [FSH], you can
continuously record a motion picture for up to 29 minutes.
■
Viewing pictures
Playback time Approx. 240 min
[AVCHD] [MP4]
[PSH] [FSH] [FHD]
The number of recordable pictures or available operating time may vary according to
●
the surrounding environment and usage conditions.
If the available battery capacity is significantly reduced, it is reaching the end of its
●
lifespan. Please purchase a new battery.
- 17 -
Page 18
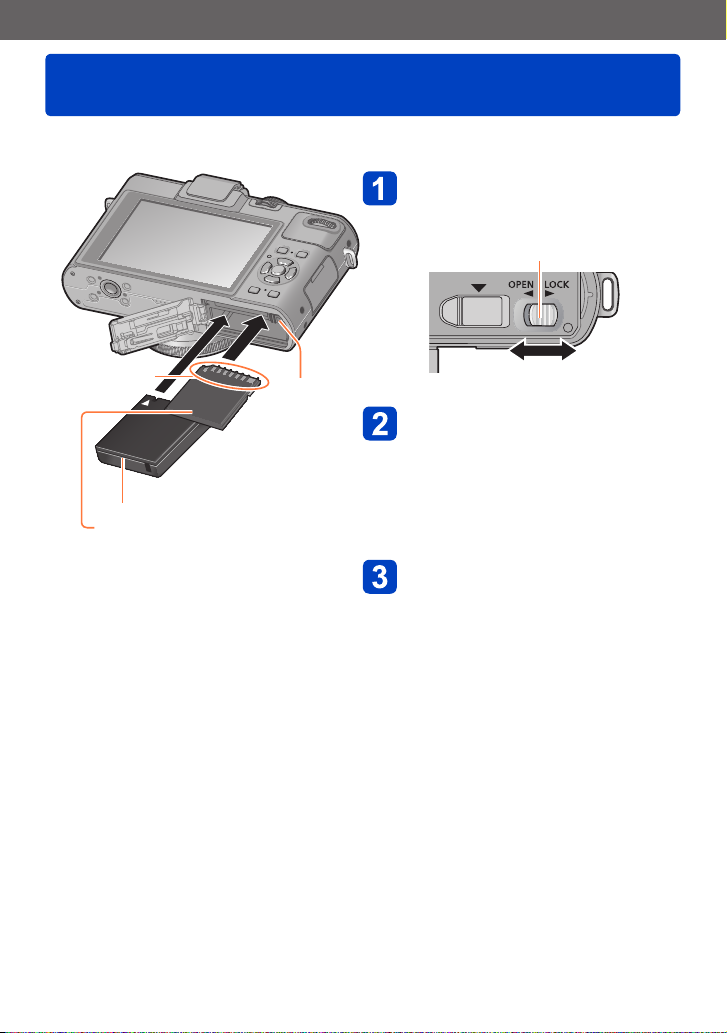
Preparations
Inserting and removing the card/the battery
• Set the camera ON/OFF switch to [OFF].
Push the release slider to the
[OPEN] position and open
the card/battery door
Release slider
Do not touch the
terminals
Charged battery (check orientation)
Card
(check orientation: terminals face monitor)
Latch
[OPEN] [LOCK]
Insert battery and card,
making sure that they are
correctly aligned
• Battery: Push it in until it is locked
by the latch.
• Card: Push it down until it clicks into
place.
Close the door and push the
release slider to the [LOCK]
position
- 18 -
Page 19

Preparations
■
To remove
• To remove the battery:
Pull the latch in the direction of the
arrow.
Latch
Inserting and removing the card/the battery
• To remove the card:
Press it further down until it clicks,
then pull it out upright.
Remove battery from the camera when you are not going to use the camera for a long
●
time.
Keep memory cards out of reach of children to prevent swallowing.
●
To remove the card or the battery, turn the camera off and wait until the Leica logo
●
display on the monitor and the status indicator go out. (Failure to wait may cause the
camera to malfunction and may damage the card or recorded data.)
- 19 -
Page 20
Preparations
Saving your pictures (to an inserted memory
card or the built-in memory)
Pictures will be saved to a card if one is inserted, or to the built-in memory if not.
■
Built-in memory (approx. 70 MB)
• Pictures can be copied between cards and the built-in memory. (→181)
• The access time for the built-in memory may be longer than the access time for a
card.
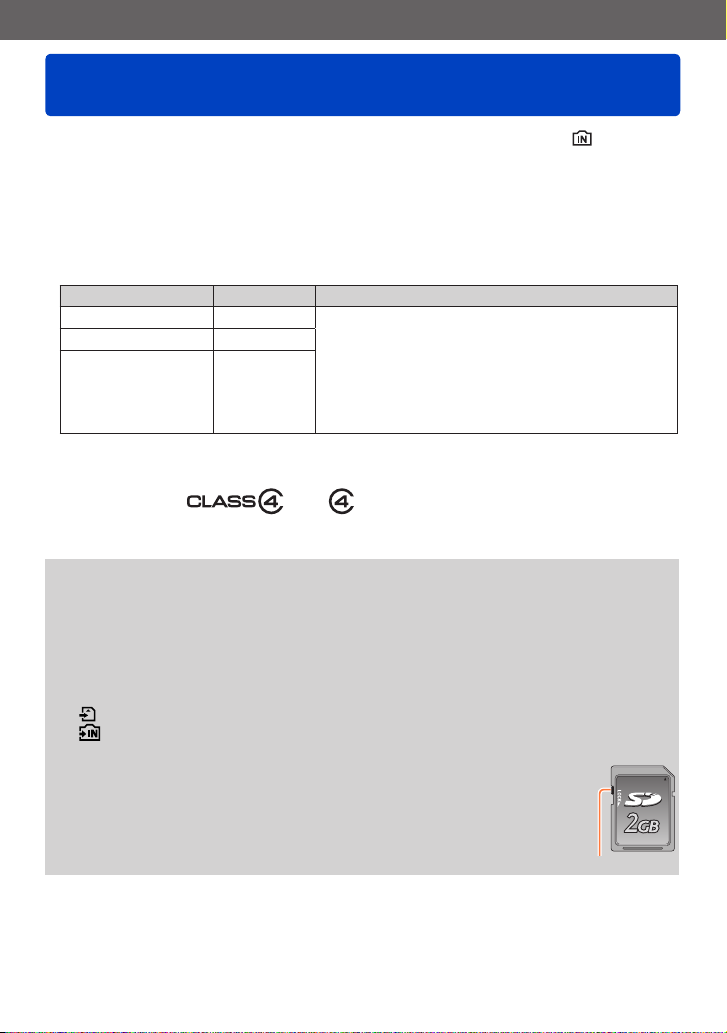
■
Compatible memory cards
The following SD standard-based cards
Type of Card Capacity Notes
SD Memory Cards 8 MB – 2 GB • Can be used with devices compatible with the
SDHC Memory Cards 4 GB – 32 GB
SDXC Memory Cards 48 GB, 64 GB
*
SD speed class refers to a specification for sustained write speeds. Confirm the SD speed by
checking the card label or other card related materials.
(Example)
While the camera is accessing the card or the built-in memory (for an operation such
●
as picture writing, reading, deletion, or formatting), do not turn off the camera or
remove the battery or the card. Do not subject the camera to vibrations, impact, or
static electricity.
The card or the data on the card may be damaged, and the camera may no longer
operate normally. If operation fails due to vibration, impact or static electricity, perform
the operation again.
• Icons displayed while recording
: When using a card
: When using the built-in memory
Please reformat the card with this camera if it has already been
●
formatted with a computer or another device. (→42)
If the write-protect switch is set to “LOCK”, the card cannot be used to
●
record or delete pictures, and it cannot be formatted.
It is recommended that you copy important pictures to your computer
●
(as electromagnetic fields, static electricity, or faults may cause data to
be damaged). Switch
respective formats.
• Before using SDXC Memory Cards, check that your
computer and other devices support this type of card.
• Using a card of SD speed “Class 4”
recommended for recording motion pictures.
• Only the cards listed on the left with the given
capacities are supported.
*
or above is
- 20 -
Page 21
Preparations
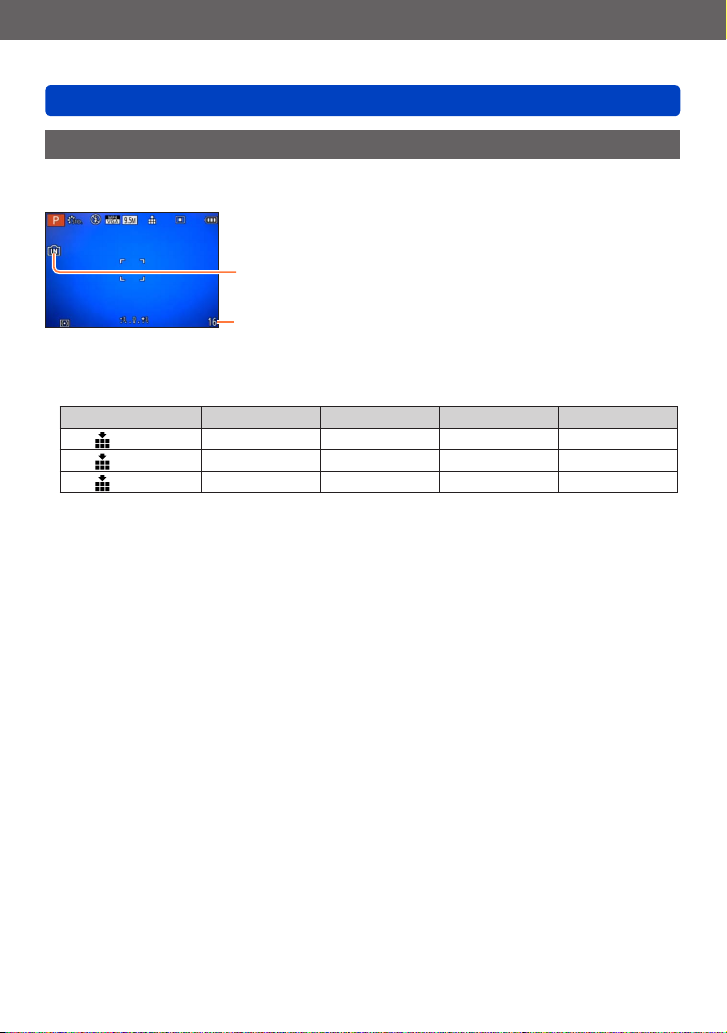
Saving your pictures (to an inserted memory card or the built-in memory)
Recording capacity guidelines (pictures/recording time)
The number of pictures you can take and the recording time vary in proportion to card
capacity (and depending on recording conditions and type of card).
Displayed when no card is inserted
(pictures will be saved to built-in memory)
Estimated remaining number of pictures or recording time
(The display switches depending on the settings.)
■
Recording picture capacity (still pictures)
[Picture Size] Built-in memory 2 GB 32 GB 64 GB
4:3
4:3
4:3
• When the number of recordable pictures exceeds 99,999, “+99999” is displayed.
10M 16 440 7290 14530
5M 24 650 10620 21490
0.3M 380 10050 162960 247150
- 21 -
Page 22

Preparations
Saving your pictures (to an inserted memory card or the built-in memory)
■
Recording time capacity (motion pictures)
([h], [m] and [s] indicate “hour”, “minute” and “second”.)
When the [AVCHD] recording mode is used
[Rec Quality] Built-in memory 2 GB 32 GB 64 GB
[PSH] – 8m00s 2h31m00s 5h07m00s
[FSH]/[SH] – 14m00s 4h10m00s 8h26m00s
When the [MP4] recording mode is used
[Rec Quality] Built-in memory 2 GB 32 GB 64 GB
[FHD] – 12m02s 3h22m58s 6h50m54s
[HD] – 22m59s 6h27m29s 13h04m28s
[VGA] 1m42s 50m36s 14h12m48s 28h46m30s
• The time displayed in the table is the total time.
Remaining time for continuous recording is displayed on the screen
●
• With camera model 18 460
You can continuously record a motion picture in [MP4] for up to 29 minutes or approx.
4 GB. (Since recording in [MP4] with [FHD] creates larger files, the recording time for
such motion pictures will be shorter than 29 minutes.)
You can continuously record [AVCHD] motion pictures for up to 29 minutes.
• With camera models 18 461 / 18 462
You can continuously record a motion picture in [MP4] for up to 29 minutes or approx.
4 GB. (Since recording in [MP4] with [FHD] creates larger files, the recording time for
such motion pictures will be shorter than 29 minutes.)
If [Rec Quality] of [AVCHD] motion pictures is set to [PSH] or [FSH], you can
continuously record a motion picture for up to 29 minutes.
- 22 -
Page 23
Preparations
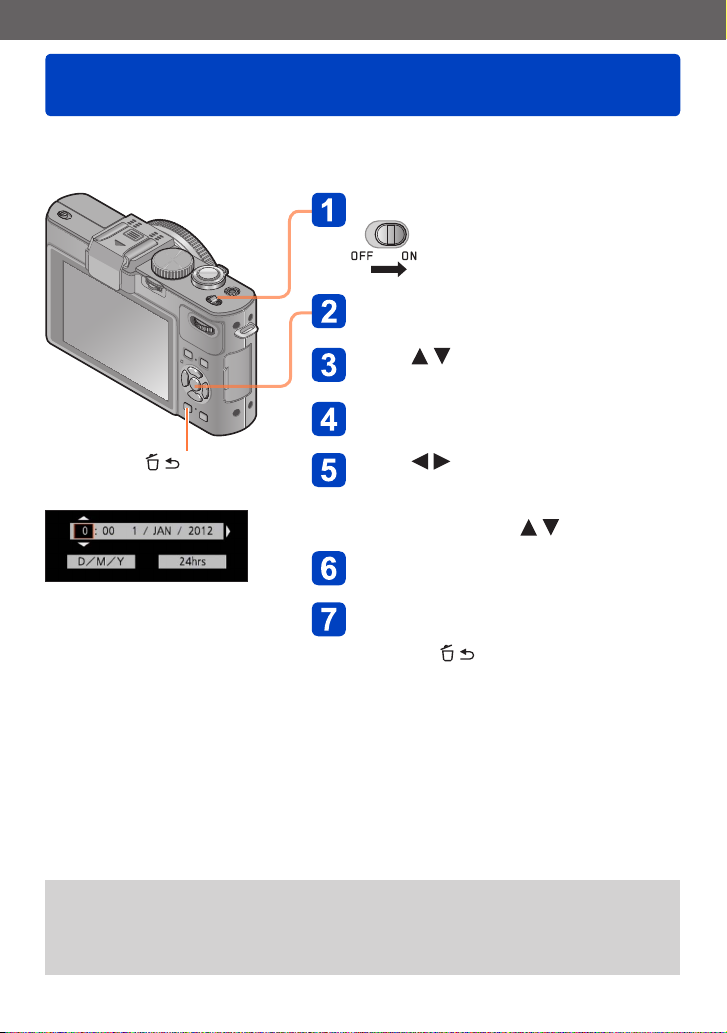
Setting time and date
The clock is not set when the camera is shipped.
Preparation: Before using the camera, remove the lens cap.
Turn on the power
Press [MENU/SET] while the
message is displayed
Press to select the language
and then [MENU/SET]
The [Please set the clock] message appears.
Press [MENU/SET]
[ ] button
Press to select the items
(year, month, day, hour, minute,
display order or time display
format), and then to set
Press [MENU/SET]
Press [MENU/SET] to set
• To return to the previous screen,
press the [ ] button.
If the clock is not set, the correct date cannot be printed when you order a photo
●
studio to print the picture, or when you stamp the date on the pictures with [Date
Stamp] or [Text Stamp].
If the clock is set, the correct date can be printed even if the date is not displayed on
●
the monitor.
- 23 -
Page 24

Preparations
Setting time and date
Changing settings
Select [Clock Set] from the [Setup] or [Rec] menu to change the current time settings.
• Clock settings will be saved for approx. 3 months even after the battery is removed,
provided a fully-charged battery was installed in the camera for 24 hours beforehand.
Select [Clock Set] from the [Setup] or [Rec] menu
• For details about how to set the menu (→25)
Set the date and time (Perform steps - . (→23))
- 24 -
Page 25
Preparations
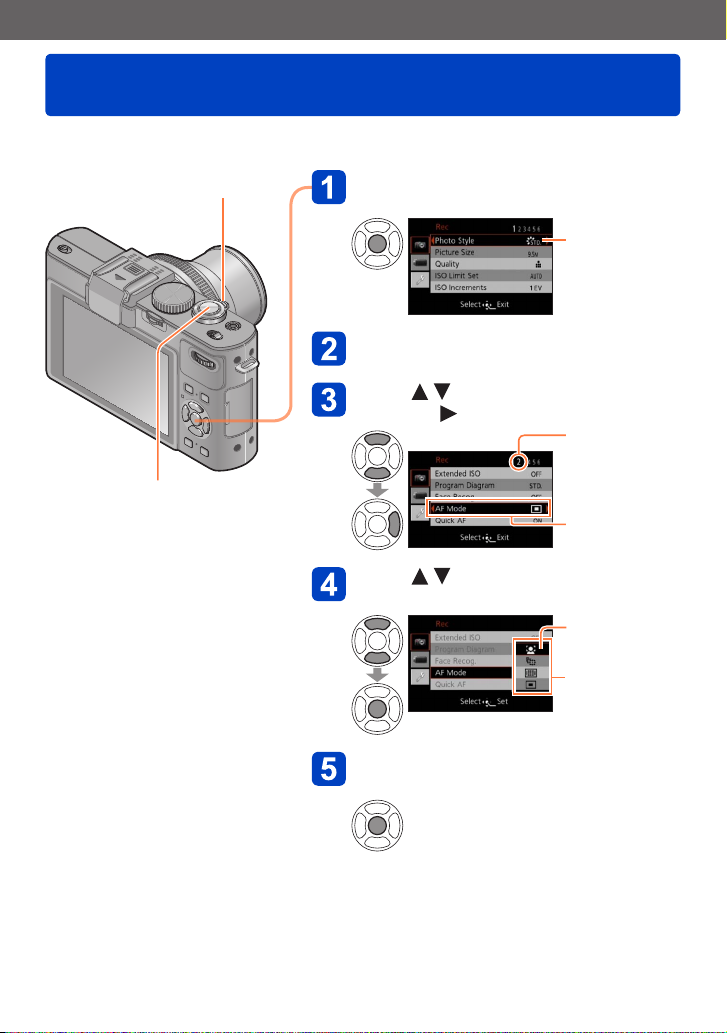
Setting the menu
You can use the menu to set camera and picture taking functions, operate playback
functions, and perform other operations.
Zoom lever
Shutter button
Press [MENU/SET] to bring up the
menu
Each item’s
background color
changes when it
is selected
Select the menu type (→26)
Press to select the menu item
and then
Page number
(Zoom lever can
be used to switch
to next page.)
Item
Press to select the setting
and then [MENU/SET]
Selected setting
Available settings
Press [MENU/SET] to close the
menu
• You can also close the menu by pressing
the shutter button halfway. (The camera
switches to picture taking mode.)
- 25 -
Page 26
Preparations
Setting the menu
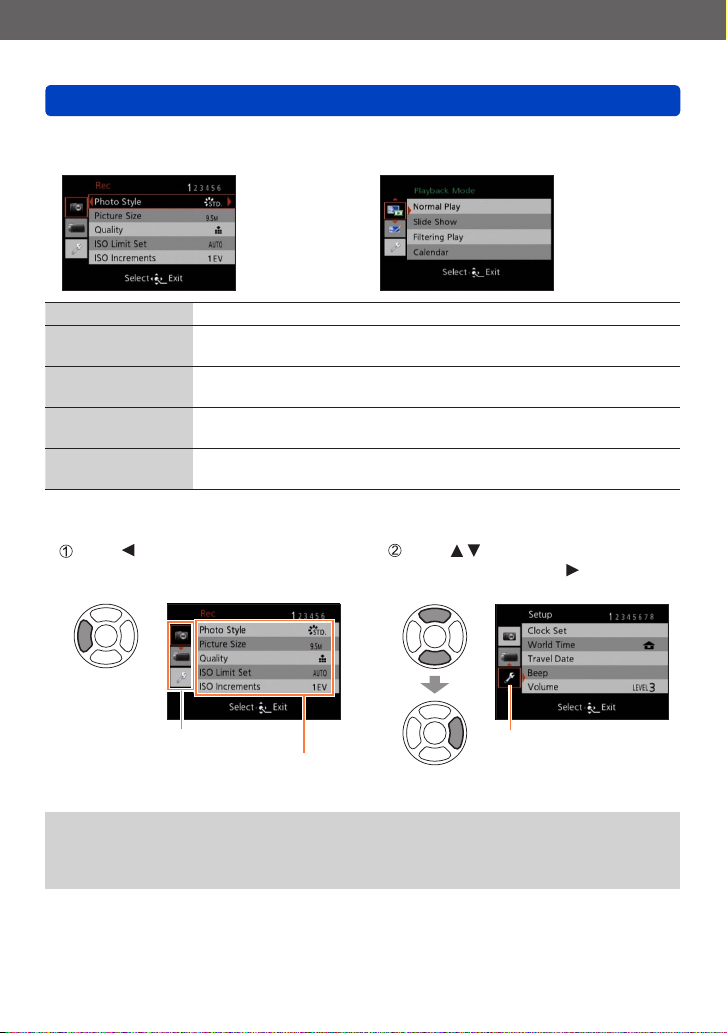
■
Menu type
In recording mode
●
[Rec] menu For settings such as resolution and flash mode.
[Motion Picture]
menu
[Playback Mode]
menu
[Playback] menu For settings for recorded pictures, such as picture protection and
[Setup] menu For basic camera settings, such as setting the clock and changing
■
Switching menu type
Press to move the cursor from the
menu item to the menu type (shown
in left-hand frame).
For settings such as recording method and resolution.
For settings for playback methods such as [Slide Show] and
[Filtering Play].
cropping and print settings.
the beep sounds.
In playback mode
●
Press to select the menu type to
be displayed and then to return to
the menu item
Menu type
Item
The monitor screen examples in these instructions may differ from the actual displays
●
or some parts of the display may be omitted.
The menu types and items that are displayed vary according to the mode.
●
The setting methods vary depending on the menu item.
●
Selected menu type
- 26 -
Page 27
Preparations
Using the [Setup] menu
[Clock Set], [Economy] and [Auto Review] are important for clock setting and
battery life. Please check these before use.
• For the setting procedures of the menu. (→25)
In [Snapshot Mode], only [Clock Set], [World Time], [Beep], [Language] and [O.I.S.
●
Demo.] are set.
[Clock Set]
For setting time, date, and display format.
For details (→24).
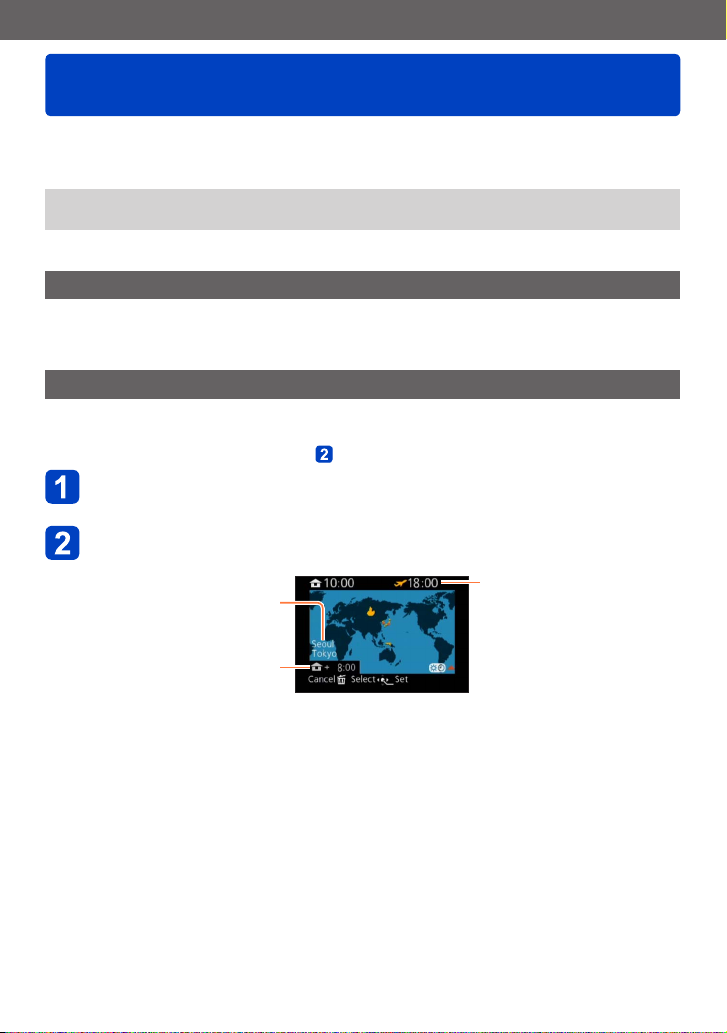
[World Time]
For setting the local recording date and time at your destination.
• A message will be displayed when setting for the first time. In this case,
press [MENU/SET] and skip to step
Use cursor buttons to select [Destination] and then press
[MENU/SET]
Use cursor buttons to select the area and then press
[MENU/SET]
City/area name
.
Current time at selected
destination
Difference with home time
When [Destination] has been selected
- 27 -
Page 28
Preparations
Using the [Setup] menu
■
To set summer time
Press in step . (Press again to release the setting)
• When summer time is set, the current time is advanced by 1 hour. If the setting is
canceled, the time automatically returns to the current time.
■
When you come back from your travel destination
Select [Home] in step and then press [MENU/SET].
If you cannot find your destination in the area displayed on the screen, set based on
●
difference with home time.
is displayed on the screen for pictures recorded at the destination when they are
●
played back.
• For the setting procedures of the menu. (→25)
[Travel Date]
If you set your travel schedule and record pictures, the day of your trip on which the
picture was taken will be recorded.
Use cursor buttons to select [Travel Setup] and then press
Use cursor buttons to select [SET] and then press
[MENU/SET]
Use cursor buttons to select the departure date and then
press [MENU/SET]
Use cursor buttons to select the return date and then press
[MENU/SET]
■
To record [Location]
Once [Travel Setup] is set, you can set the location.
Use cursor buttons in step above to select [Location] and then press
Use cursor buttons to select [SET] and then press [MENU/SET]
Enter your location (Entering text (→44))
- 28 -
Page 29
Preparations
Using the [Setup] menu
The travel date is calculated from the set departure date and the date set in the
●
camera’s clock. When the destination is set in [World Time], the elapsed days are
calculated based on the local destination time.
When [Travel Setup] is set to [OFF], the number of elapsed days is not recorded. It is
●
not displayed even if [Travel Setup] is set to [SET] after recording.
If settings are made before the departure date, the number of days to departure are
●
not recorded.
To print [Location] or the number of days that have passed, use [Text Stamp].
●
[Travel Date] cannot be recorded for AVCHD motion pictures.
●
[Destination] cannot be recorded for MP4 motion pictures.
●
• For the setting procedures of the menu. (→25)
[Beep]
With this function, you can change or mute the beep/shutter sounds.
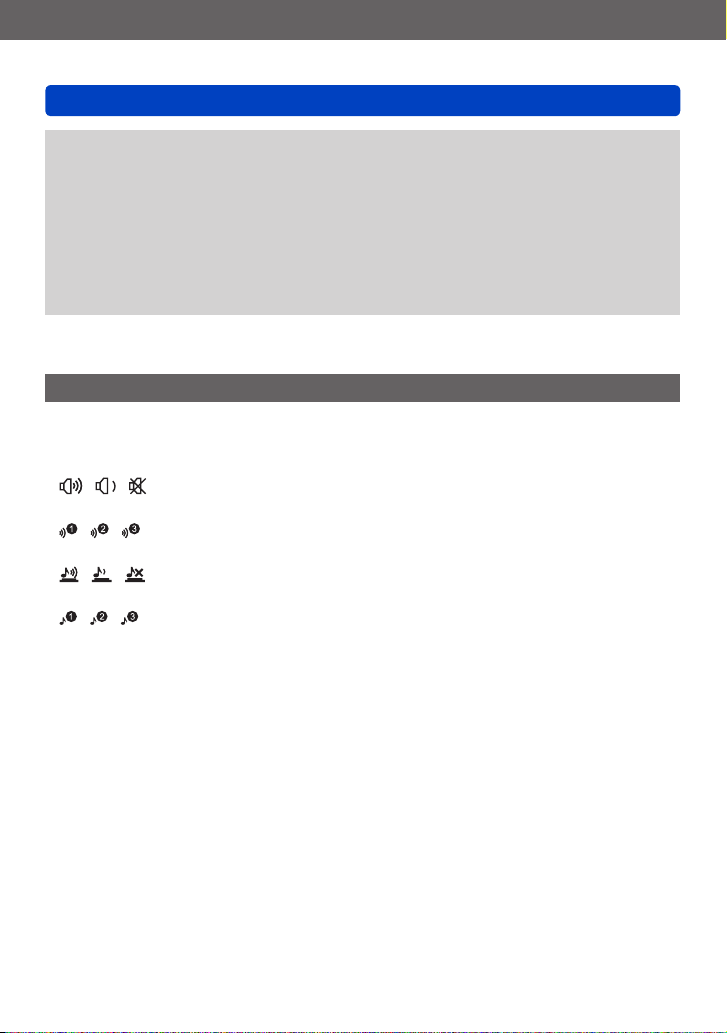
■
Settings
[Beep Level]
/ / : High / Low / Mute
[Beep Tone]
/ / : Changes the beep tone.
[Shutter Vol.]
/ / : High / Low / Mute
[Shutter Tone]
/ / : Changes the shutter tone.
- 29 -
Page 30

Preparations
Using the [Setup] menu
• For the setting procedures of the menu. (→25)
[Volume]
For adjusting the volume of sound from the loudspeaker (7 levels).
■
Settings: [0] / [1] / [2] / [3] / [4] / [5] / [6]
This function cannot be used to adjust TV speaker volume when the camera is
●
connected to a TV.
[Cust.Set Mem.]
For registering the current camera settings.
For details (→90).
[Fn Button Set]
For registering frequently used functions from the [Rec], [Setup] or other menus to the
[FN] button for faster operation.
■
Settings
[Photo Style] (→134) [Level Gauge] (→128)
[Quality] (→136) [Guide Line] (→32)
[Metering Mode] (→139) [Video Rec Area] (→34)
[AF Mode] (→97) [Remaining Disp.] (→34)
[Focus Area Set] (→100) [Flash] (→107)
[1 Shot AF] (→105) [Flash Adjust.] (→145)
[i.Dynamic] (→139) [Aspect Bracket] (→122)
- 30 -
Page 31

Preparations
Using the [Setup] menu
• For the setting procedures of the menu. (→25)
[LCD Display] / [Viewfinder]
For adjusting the brightness and the color rendition of the monitor. When the display is
switched to an attached external electronic viewfinder (available as accessory (→8)), the
brightness and color rendition of the viewfinder are adjusted.
Press to select the setting item, and then to make
adjustments
Press [MENU/SET]
Some subjects may look different from their actual appearance, but the recorded
●
picture will not be affected.
[LCD Mode]
For enhancing the visibility of the monitor image.
■
Settings
: The display brightness is adjusted automatically depending on the ambient
brightness.
: Increases the monitor image brightness (for outdoor use).
[OFF]
This function [ ] is not available in playback mode.
●
[ ] returns to ordinary brightness if there is no operation for 30 seconds when
●
recording. (Press any button to increase the monitor image brightness again.)
Because the picture shown on the monitor is brighter than normal, some subjects may
●
look different than their actual appearance, but this will not affect the recorded picture.
Setting [LCD Mode] reduces the operating time.
●
- 31 -
Page 32

Preparations
Using the [Setup] menu
• For the setting procedures of the menu. (→25)
[EVF Disp.Style] / [LCD Disp.Style]
[EVF Disp.Style]: Set the display mode for an attached external electronic viewfinder
[LCD Disp.Style]: Set the display mode for the monitor.
■
Settings
: External electronic viewfinder display layout
: Monitor display layout
Display screen example (when using the monitor)
●
(External electronic viewfinder display layout) (Monitor display layout)
[EVF Disp.Style] can be selected only when an electronic viewfinder (available as
●
accessory (→8)) is attached.
[Guide Line]
For displaying guide lines that can be used as a reference for picture composition.
■
Settings: / / / [OFF]
■
Setting the position of the guidelines
Select [ ] to set the position of the guidelines.
Select [ ] under [Guide Line] in the [Setup] menu
Use cursor buttons to move the position of the guidelines (point of intersection) and
then press [MENU/SET]
• When you press the [DISP] button, the point of intersection will return to the center.
(available as accessory (→8)).
- 32 -
Page 33

Preparations
Using the [Setup] menu
• For the setting procedures of the menu. (→25)
[Histogram]
A histogram illustrates the distribution of brightness
in the picture – e.g. if the graph peaks at the right,
this means there are more bright areas in the picture.
A peak in the center represents a correct exposure.
This can be used as a reference for exposure
compensation, etc.
■
Settings: [ON] / [OFF]
When the histogram is not the same as that of the recorded picture under the
●
following conditions, it will be displayed in orange.
• When manual exposure assist indicates settings other than 0 EV in [Manual
Exposure] mode or during Exposure Compensation.
• When the flash fires.
• When the proper exposure is not achieved while the flash is closed or the
brightness of a picture on the monitor cannot be displayed correctly in dark
locations.
The histogram displayed during recording is only a reference.
●
The histogram displayed during recording and that displayed during playback may be
●
different.
The histogram is different from those displayed using the image editing software of a
●
computer.
The histogram will not be displayed in the following cases.
●
• [Snapshot Mode]
• During motion picture recording
• Playback Zoom
• Multi Playback
• When the HDMI mini cable is connected
(Example)
Dark ← OK → Bright
- 33 -
Page 34

Preparations
Using the [Setup] menu
• For the setting procedures of the menu. (→25)
[Video Rec Area]
This mode allows the identification of the recordable area for a motion picture before
recording.
■
Settings: [ON] / [OFF]
The recordable area displayed for motion pictures should be interpreted as an
●
approximation.
When using Extended optical zoom, the recordable area may not always be displayed
●
for certain zoom ratios.
[Remaining Disp.]
This mode switches the display between the remaining number of still pictures you can
take or the remaining recording time of a motion picture that you can record on the
available card or to the built-in memory.
■
Settings
(Displays the number of pictures that can be recorded)
(Displays the remaining recording time)
[Highlight]
With this mode activated, bright areas without any detail, i.e. that are rendered totally
white are indicated by flashing on the screen when the [Auto Review] function is activated
or during playback.
■
Settings: [ON] / [OFF]
To reduce or prevent overexposure, use a negative exposure compensation with
●
the help of e.g. the histogram display as a reference. (A peak on the right side of the
histogram indicates overexposure.)
This feature is disabled during Multi Playback, Calendar Playback, Playback Zoom or
●
motion picture playback.
If the subject is too close to the camera using flash, overexposure may occur.
●
- 34 -
Page 35

Preparations
Using the [Setup] menu
• For the setting procedures of the menu. (→25)
[Expo.Meter]
For selecting whether or not to display the setting display when e.g. shutter speed and
aperture value settings or Exposure Compensation are performed.
■
Settings: [ON] / [OFF]
If the setting display is not displayed, press the [DISP] button to switch the display of
●
the monitor.
The setting display will turn off if no operation is performed for approximately 4
●
seconds.
[Lens Resume]
For saving the zoom position and the Manual Focus position in the memory when the
camera is turned off.
■
Settings
[Zoom Resume]
[ON]: Returns to the zoom position that was saved in the memory when the camera
is turned on the next time.
[OFF]
[MF Resume]
[ON]: Saves the Manual Focus position in the memory when the camera is turned
[OFF] or when the focus selector switch is set to modes other than [
setting will return to the focus position saved in the memory when the camera
is turned on or the focus selector switch is set to [ ] next time.
[OFF]
The Manual Focus position saved in the memory and the position to which the
●
camera returns when it is turned on may differ depending on the recording conditions.
]. This
[MF Assist]
This mode facilitates simple and precise manual focusing by enlarging a section of the
monitor image.
• About MF assist (→105)
■
Settings: [ON] / [OFF]
- 35 -
Page 36

Preparations
Using the [Setup] menu
• For the setting procedures of the menu. (→25)
[Economy]
For switching off the camera and/or the monitor when they are not being used to minimize
battery consumption.
[Sleep Mode]
■
Settings: [10MIN.] / [5MIN.] / [2MIN.] / [1 MIN.] / [OFF]
Automatically switches the camera off when no operation is performed for a preset
period of time.
• To restore → Press the shutter button halfway, or turn on the camera again.
This mode cannot be used in the following cases:
●
When the camera is connected to a computer or printer, when recording or playing
back motion pictures or playing back pictures using Slide Show, or during interval
recording
The settings are fixed to [5MIN.] in [Snapshot Mode].
●
[Auto LCD Off]
■
Settings: [30 MIN.] / [5MIN.] / [2MIN.] / [1 MIN.]
Automatically switches the monitor off when no operation is performed for a preset
period of time.
The status indicator lights up when the monitor is turned off. To turn on the monitor
●
again, press any button.
[Live View Mode]
■
Settings: [NORMAL] / [ECO] (Reduces power consumption)
Although the monitor image quality may deteriorate when [ECO] is set (compared to
●
[NORMAL]), the recorded pictures will not be affected.
When [Live View Mode] is set to [NORMAL], the operating time will be reduced.
●
- 36 -
Page 37

Preparations
Using the [Setup] menu
• For the setting procedures of the menu. (→25)
[Play on LCD]
This mode automatically switches on the monitor during playback even if an external
electronic viewfinder (available as accessory (→8)) is attached.
■
Settings: [ON] / [OFF]
[Auto Review]
This mode automatically displays still pictures immediately after taking them.
■
Settings
[HOLD]: The playback mode remains until a button (other than the [DISP] button) is
[2SEC.] / [1SEC.]: The playback mode is replaced by the previous picture taking mode
[OFF]
The setting is fixed to [2SEC.] in [Snapshot Mode].
●
This mode automatically displays still pictures immediately after they are taken during
●
[Auto Bracket], [Aspect Bracket], [WB Bracket] and series exposures, regardless of
the [Auto Review] setting.
The Auto Review function is disabled during motion picture recording or interval
●
recording.
pressed
after the preset time
- 37 -
Page 38

Preparations
Using the [Setup] menu
• For the setting procedures of the menu. (→25)
[Start Mode]
For determining whether picture taking or playback mode is active when the camera is
switched on.
■
Settings
: When the camera is turned on, recording mode is activated.
: When the camera is turned on, playback mode is activated.
Even when [ ] is set, if the camera is turned on while pressing the playback button,
●
the camera is activated in playback mode.
[No.Reset]
For resetting the file number for the next picture to be taken to 0001.
The folder number is updated and the file number for the next picture to be taken is
●
set to 0001.
A folder number between 100 and 999 can be assigned.
●
Numbers cannot be reset once the folder number reaches 999. In this case, save all
necessary pictures to your computer, and format the built-in memory/card (→42).
To reset folder number to 100:
●
First, format the built-in memory and card in the camera, and select [Yes] in [No.
Reset]. Then select [Yes] on the folder number reset screen.
- 38 -
Page 39

Preparations
Using the [Setup] menu
• For the setting procedures of the menu. (→25)
[Reset]
For returning the [Rec] menu and [Setup] menu settings to the default settings.
■
Settings: [Reset Rec. settings?] / [Reset setup parameters?]
The information registered in [Face Recog.] is reset if recording settings are reset.
●
Resetting the setup parameters will also reset the following:
●
Age in years/months and names in [Baby] and [Pet] Scene Modes
Folder numbers and clock settings will not be reset.
●
Camera functions may be audible as the lens function is reset. This is not a fault.
●
[USB Mode]
For selecting the communication method for when connecting the camera to a computer
or printer with the USB cable.
■
Settings
[Select on connection]: Selects the communication method each time you
[PictBridge(PTP)]: Select this mode when connecting to a PictBridge-compatible
[PC]: Select this mode when connecting to a computer.
connect to a computer or PictBridge-compatible printer.
printer.
[Output]
For changing the settings to be used when the camera is connected to a TV or other
device.
■
Settings
[Video Out] (With camera model 18 460)
[NTSC] / [PAL]
If the default setting is changed, AVCHD motion pictures may not be played correctly.
[TV Aspect] (This setting performs when the supplied AV cable is connected.)
/
- 39 -
Page 40

Preparations
Using the [Setup] menu
• For the setting procedures of the menu. (→25)
[HDTV Link]
This mode allows automatic linking with other HDTV Link-compatible devices, and
operability with a HDTV compatible remote control when connecting via the HDMI mini
cable (available as accessory (→8)) (→184).
■
Settings
[ON]: Operations may be performed via the remote control of the HDTV Link-
compatible device. (Not all operations will be available.)
Operability of the camera’s own buttons will be limited.
[OFF]: Operations must be performed via the camera’s own buttons.
[3D Playback]
For setting how 3D still picture is output.
■
Settings: [3D] / [2D]
If you want to play back a picture in 2D (conventional picture) on a 3D television, set
●
to [2D].
This item of the menu functions when the HDMI mini cable (available as accessory
●
(→8)) is connected.
For the procedure for playing back a 3D still picture (→186).
●
[Rotate Disp.]
For automatic rotation of portrait still pictures.
■
Settings
: Rotates and displays pictures displayed on a TV screen as well as those
displayed on the monitor of the camera in portrait orientation.
: Rotates and displays only pictures displayed on a TV screen in portrait
orientation.
[OFF]
[Rotate Disp.] cannot be used with motion pictures.
●
Still pictures taken with the lens facing up or down, or still pictures taken on other
●
cameras may not be rotated.
Pictures cannot be rotated during Multi Playback.
●
With a computer, pictures will only be rotated if in Exif-compatible (→152) environment
●
(OS, software).
- 40 -
Page 41

Preparations
Using the [Setup] menu
• For the setting procedures of the menu. (→25)
[Scene Menu]
For setting whether or not to display the selection screen for Scene Mode when the
camera is switched to Scene Mode.
■
Settings
[AUTO]: Displays the selection screen.
[OFF]: Displays the currently selected Scene Mode recording screen.
[Menu Resume]
For saving the last operated menu position.
■
Settings: [ON] / [OFF]
[User’s Name Rec]
For recording a user name on a picture while recording.
• Entering text (→44)
■
Settings: [ON] / [OFF] / [SET] (Register or change user name)
You cannot record a user name on the following pictures.
●
• AVCHD motion pictures
• Already recorded pictures
- 41 -
Page 42

Preparations
Using the [Setup] menu
• For the setting procedures of the menu. (→25)
[Version Disp.]
For checking the camera firmware version or display software information.
When you press [MENU/SET] while the version is displayed, software information
●
such as the license is displayed.
[Format]
Use this function when [Built-In Memory Error] or [Memory Card Error] appears, or when
formatting the built-in memory or card.
When a card/the built-in memory is formatted, the data cannot be restored. Check
the content of the card/built-in memory carefully before formatting.
When formatting the built-in memory, remove the card.
●
(If a card is inserted, it will be formatted, if not, the internal memory.)
Always format cards with this camera.
●
All protected pictures and other picture data will be deleted.
●
This requires a sufficiently charged battery. Do not turn off power or perform other
●
operations during formatting.
Formatting the built-in memory may take several minutes.
●
Consult the dealer or your nearest Leica Customer Care center if formatting cannot be
●
successfully completed.
- 42 -
Page 43

Preparations
Using the [Setup] menu
• For the setting procedures of the menu. (→25)
[Language]
For changing the display language.
Set the language displayed on the screen.
[O.I.S. Demo.]
The amount of camera shake is shown on a graph (Guide)
Amount of camera shake
Effect of camera shake after correction
During demo screen display, the Optical Image Stabilizer switches ON and OFF every
●
time [MENU/SET] is pressed.
This cannot be displayed during playback mode.
●
- 43 -
Page 44

Preparations
Entering Text
Use the cursor button to enter names with the Face Recognition function and in Scene
Modes [Baby] and [Pet], or to register locations in [Travel Date] etc.
Use cursor button to select characters
Press [MENU/SET] until the desired character is displayed
Text is inserted at the cursor position.
• To change the character type
→ Select , and then press [MENU/SET].
Cursor position
■
Editing text
Use cursor buttons to select and then press [MENU/SET]. Then, move the
cursor to the text to edit
• You can also use the zoom lever to reposition the cursor.
Use cursor buttons to select [Delete] and then press [MENU/SET]
Use cursor buttons to select the correct text and then press [MENU/SET]
When you are finished entering text, use cursor buttons to
select [Set] and then press [MENU/SET]
A maximum of 30 characters can be entered (max. of 9 characters for [Face Recog.]
●
names).
- 44 -
Page 45

Taking pictures
Sequence of operations
Before using the camera, remove the lens cap.
Turn on the power
Rotate the mode dial to select the
recording mode
Align the desired mode with
index.
• Make sure the dial is set
Status indicator
exactly to the click-stop
position of the desired mode.
Use the zoom lever to set the
desired focal length, i.e. the
captured section of the subject
To widen the angle
of view, use shorter
(hence wideangle,
subjects appear
Status indicator illuminated for
approx. 1 second.
focal lengths
also makes
further away)
To make subjects
appear closer, use
longer focal lengths
(telephoto, also
narrows
the angle of view)
- 45 -
(Continued on the next page)
Page 46

Taking pictures
Sequence of operations
Take pictures
■
Taking still pictures (Shutter button)
Camera shake alert display
If a warning is displayed
●
about camera shake, use
[Stabilizer], a tripod, or [Self
Timer].
In some cases, camera shake
can be reduced by using a
higher setting for [Sensitivity].
Press halfway
(Press lightly to focus)
■
Recording motion pictures
Press fully
(Press the button all
the way to record)
(Motion picture button)
Press
(Start recording)
Press
(End recording)
- 46 -
Page 47

Taking pictures
Sequence of operations
■
Holding the camera
AF Assist Lamp
Microphone
Shoulder strap
We recommend using the supplied shoulder strap to avoid dropping the camera.
●
■
About the direction detect function
Still pictures recorded with the camera held vertically can be automatically displayed in
portrait orientation during playback. (Only when [Rotate Disp.] is set to .)
• The direction detect function may not operate correctly if pictures are taken with the
camera pointing up or down.
• Motion pictures cannot be displayed in portrait orientation.
• To avoid camera shake, hold the camera with both
hands keeping your arms close to your body while
standing with your feet slightly apart.
• Do not touch the lens.
• Do not cover the microphone when recording motion
pictures.
• Do not cover the flash or the lamp. Do not look at
them from close range.
• Make sure not to move the camera when you press
the shutter button.
- 47 -
Page 48

Taking pictures
About recording modes
Rotate the mode dial to switch recording modes.
Set to the desired recording mode
Make sure the dial is set exactly to the
click-stop position of the desired mode.
[Snapshot Mode]
[Program AE] Mode
[Aperture-Priority] Mode
[Shutter-Priority] Mode
[Manual Exposure] Mode
[Creative Video Mode]
[Custom] Mode
[Scene Mode]
[Creative Control] Mode
→
For taking pictures with extended automatic
settings. (→49)
For taking pictures with automatic exposure
control. (→58)
The exposure is determined by the
automatically controlled shutter speed,
based on the manually set aperture value.
(→60)
The exposure is determined by the
automatically controlled aperture value,
based on the manually set shutter speed.
(→61)
The exposure is determined by the
manually set aperture value and shutter
speed. (→62)
For recording motion pictures with manual
settings. (→87)
For taking pictures with previously
registered settings. (→90)
For taking pictures that match the scene
being recorded. (→75)
For taking pictures using different picture
effects such as [Dynamic Monochrome] or
[Miniature Effect]. (→64)
- 48 -
Page 49

Taking pictures
Snapshot mode
Optimum settings are made automatically based on information such as “face”,
“movement”, “brightness”, and “distance” just by pointing the camera at the subject,
meaning that sharp and correctly exposed pictures can be taken without the need to
make settings manually.
• About recording modes (→48)
Automatic Scene Detection
The camera recognizes the type of subject it is pointed at, and makes optimum settings
automatically.
Recognizes people
Recognizes children
Recognizes landscapes
Recognizes night scenes and people in them
Recognizes night scenes
Recognizes night scenes to be taken without a tripod
Recognizes close-ups
The icon of scene detected
1
*
When children (under 3 years) that are registered with the Face Recognition function are
recognized.
2
*
Only when using flash. We recommend using a tripod and the self-timer.
3
*
When [iHandheld Nite Shot] is [ON].
Depending on recording conditions, different scene types may be determined for the
●
Recognizes sunsets
Reads subject movement to avoid blurring when the scene
does not correspond to any of the above.
same subject.
If the desired scene type is not selected, we recommend manually selecting the
●
appropriate Scene Mode.
When , or is detected, Face Detection is activated, and focus and exposure
●
are set for the recognized faces.
1
*
2
2
*
*
3
*
■
About Backlight Compensation ( )
Backlight is a situation in which a subject is comparatively small and located in front of
a bright background. In such situations a normal exposure would render such subjects
too dark. A backlight compensation increases the exposure, resulting in such subjects
being rendered brighter. In [Snapshot Mode], backlight compensation is activated
automatically. When the camera detects backlight, is displayed on the monitor
(depending on the conditions, backlighting may not be detected correctly).
- 49 -
Page 50

Taking pictures
Snapshot mode
Determining the extent of the area rendered sharply
You can also use [Snapshot Mode] to easily adjust the depth of field, i.e. which parts are
rendered sharply and which are not, as with [Aperture-Priority] mode.
Press the dial
Press
Rotate the dial to adjust the
aperture value (which determines
the depth of field)
] button
[
• You can also press to make
adjustments.
• To return to automatic adjustment
→ Press [ ] button
Press the dial to finalize the
setting
Press
- 50 -
The aperture value is displayed.
([AUTO] is displayed in the icon
during automatic adjustment)
Page 51

Taking pictures
Snapshot mode
Shallow depth
of field
When you record motion pictures, the camera performs aperture control within the
●
appropriate exposure range, and the depth of field may not change due to the subject
brightness.
You can use [Snapshot Plus Mode] to adjust brightness and coloring. (→56)
●
Extended depth
of field
The yellow range shown in the left figure
is the depth of field, i.e. the range in which
subject parts are rendered sharply.
• This range changes based on the distance
to the focused subject, the set focal length,
etc.
- 51 -
Page 52

Taking pictures
Using the built-in flash
Let the built-in flash pop up to use it. (→106)
■
Closing the built-in flash
When you do not want to use the flash or after
using it, press it back down until it clicks into
place.
Snapshot mode
Open the built-in flash
Set to [ ], [ ], [ ] or [ ] depending on the subject and brightness.
●
When [ ] or [ ] is selected, the red-eye reduction function is activated.
●
When [ ] or [ ] is selected, longer shutter speeds are possible.
●
- 52 -
Page 53

Taking pictures
Snapshot mode
[Color Mode]
By changing the [Color Mode] setting in the [Rec] menu, you can determine the color
rendition of still and motion pictures.
• For the setting procedures of the menu. (→25)
Setting Description
[STANDARD] Records pictures with colors close to the actual ones.
[Happy] Records pictures with sharp and vivid colors.
[B&W] Records pictures in black and white.
[SEPIA] Records pictures with sepia tones to produce a nostalgic effect.
[Motion Deblur]
With this mode, the camera automatically sets the optimum shutter speed in accordance
with the movements of the subject to minimize the blur of the subject.
• For the setting procedures of the menu. (→25)
When [Motion Deblur] is set to [ON], and the shutter button is pressed halfway,
●
appears on the screen.
The subject may be recorded with a lower resolution than the one that has been set.
●
[iHandheld Nite Shot]
If a night scene is detected automatically while the camera is handheld, the camera can
record a still picture with less camera shake and less noise by combining a series of
pictures.
• For the setting procedures of the menu. (→25)
When the camera is fixed in place on a tripod or by other means, [iHandheld Nite
●
Shot] will not be identified.
- 53 -
Page 54

Taking pictures
Snapshot mode
[iHDR]
When [iHDR] is set to [ON] and there is, for example, strong contrast between different
parts of the subject, multiple still pictures are recorded with differing exposures and
combined to create a single still picture rich in gradation.
• For the setting procedures of the menu. (→25)
This function is automatically activated only when (→49) is displayed on the monitor.
●
In the case that a single picture is going to be composed from a series of exposures,
●
a message indicating that multiple pictures are to be recorded appears on the screen
and the exposure series is carried out. Note that an exposure series will not take
place if the camera determines that it can compensate for the difference in contrast in
a single exposure.
In the case of composition from an exposure series, the resulting image may appear if
●
the subject was moving.
The camera does not combine pictures in the following cases:
●
• When the zoom ratio exceeds 3.8x
• With [Burst Shooting] mode
- 54 -
Page 55

Taking pictures
Snapshot mode
AF Tracking
In [Snapshot Mode], you can select [AF Tracking] in [AF Mode] in a single operation.
When [AF Tracking] mode is used, the camera can continuously focus on a subject and
adjust its exposure even when it is moving.
Press to set [AF Tracking]
• To cancel AF Tracking → Press again.
Aim the AF Tracking frame at the
subject
Press the [AF/AE LOCK] button to
lock
• To cancel AF Lock → Press .
AF Tracking frame
AF Lock successful:
Yellow
AF Lock failed:
Red
The optimal scene mode for the AF locked subject is automatically identified.
●
Face Recognition will be inactive while using AF Tracking.
●
Under certain conditions, such as when the subject is small or when it is dark, [AF
●
Tracking] may not operate correctly.
- 55 -
Page 56

Taking pictures
Snapshot mode
[Snapshot Plus Mode]
When [Snapshot Plus Mode] is selected, you can easily adjust the brightness and
coloring, in addition to the depth of field, without compromising the user-friendly operation
of the [Snapshot Mode].
■
Switching to [Snapshot Plus Mode]
Use the [Snapshot Mode] menu to switch the mode.
• For the setting procedures of the menu. (→25)
: [Snapshot Mode]
: [Snapshot Plus Mode]
■
Adjusting brightness, coloring, and depth of field
Press the dial
Press to select an item to adjust
Adjusts brightness.
Adjusts depth of field.
Adjusts coloring.
• [AUTO] is displayed in the icon during automatic adjustment.
Press to make adjustments
Brightness Underexposure (dark) Overexposure (bright)
Depth of field Shallower
Coloring Warmer colors
• You can also rotate the dial to make adjustments.
• To return to automatic adjustment → Press [ ] button.
Extended
Cooler colors
Press [MENU/SET]
- 56 -
Page 57

Taking pictures
Snapshot mode
When you record motion pictures, the camera performs aperture control within the
●
appropriate exposure range, and the depth of field may not change for some subject
brightness levels.
About setting items
Only the menu items which are displayed in the [Snapshot Mode] can be set. The settings
selected in the [Program AE] or other modes will reflect on the menu items in the [Setup]
menu that are not displayed.
Settings that can be made for the following items are different from the settings that
●
can be made in other recording modes.
• [Self Timer]
• [Burst Shooting]
• [Picture Size] in the [Rec] menu
• [Beep] in the [Setup] menu
The settings for the following functions are fixed:
●
• [Quality]:
• [White Balance]: [AWB]
• [AF Assist Lamp]: [ON]
• [Flash Synchro]: [1ST]
• [Stabilizer]: [ON]
• [Continuous AF]: [ON]
• [Wind Cut]: [AUTO]
*
The function will turn [OFF] in the following cases.
•
, ,
• [Sensitivity]:
• [AF Mode]:
• [Quick AF]: [ON]
• [Metering Mode]:
• [i.Resolution]: [LOW]
• [i.Zoom]: [ON]
• [Min. Shtr Speed]: [AUTO]
*
- 57 -
Page 58

Taking pictures
Program mode
The camera automatically sets both shutter speed and aperture value according to the
brightness of the subject.
You can change various settings in the [Rec] menu.
• About recording modes (→48)
Aperture and shutter speed are shown in red, if an
●
appropriate exposure is not possible. You should
either use the flash, change [Sensitivity] settings or
set [Min. Shtr Speed] to a slower speed.
Aperture value Shutter speed
Program Shift
In Program Mode, you can change the preset aperture value and shutter speed without
changing the exposure. This is called Program Shift.
You can make the back- and foreground more blurred by decreasing the aperture value
or record a moving subject more dynamically by slowing the shutter speed.
Press the shutter button halfway
Select the desired shutter speed/
aperture value combination
Setting display
Shutter speed
(Automatic adjustment)
• To cancel Program Shift
→ Rotate the dial until the Program Shift
Aperture value
(Automatic adjustment)
When the camera is turned off, Program Shift is canceled.
●
Program Shift may not function for some subject brightness levels.
●
indicator goes off.
Program Shift indicator ( )
Setting display
- 58 -
Page 59

Taking pictures
■
Example of Program Shift
(Aperture value)
0 1 2 3 4 5 6 7 8 9 10 11 12 13
1.4
2.0
2.8
4.0
5.6
8.0
11
Program mode
(Ev)
14
15
16
17
18
19
20
1
1/4
1/15
1/60
1/250
1/2
1/8
1/30
1/125
1/500
1/1000
1/2000
1/4000
(Shutter speed)
Program Shift range
Automatic camera setting
Program Shift limit
[Program Diagram]
You can change the automatically controlled shutter speed/aperture combinations in
Program Mode.
You can preset the maximum aperture or an aperture value that achieves the best lens
resolution as a combination of shutter speed and aperture value.
Select [Program Diagram] from the [Rec] menu
• For the setting procedures of the menu. (→25)
Use cursor buttons to select the setting and then press
[MENU/SET]
■
Setting: ([Standard]) / ([Max. Aperture]) /
When the [ ] or [ ] mode is set, the built-in ND filter functions automatically.
●
You cannot perform manual settings.
Even if you change the [Program Diagram] setting, the shutter speed and aperture
●
value combination can be changed using Program Shift. (→58)
([Optimum Accuracy])
- 59 -
Page 60

Taking pictures
Aperture priority mode
Set the aperture value to a higher number when you want a larger in-focus area (in front
of and behind the main subject), to a lower number for a smaller in-focus area.
• About recording modes (→48)
Rotate the aperture ring to select
the aperture value
You can set the aperture values between
[1.4] and [8] in 1/3-stop increments.
(Set the aperture ring only to the click-stop
positions.)
Setting display
Shutter speed
(Automatic adjustment)
Setting display
Set aperture value
• Proper exposure is not
possible in the range
indicated in red.
• When the aperture value is increased, the
depth of field expands, i.e. more of the foreand background is rendered sharply.
• When the aperture value is reduced, the
depth of field gets smaller, i.e. less of the
fore- and background is rendered sharply.
The aperture ring rotates only within the range of the printed values.
●
Since the maximum aperture value changes in accordance with the zoom setting, the
●
printed indication on the aperture ring and the actual aperture value may be different.
Refer to the setting display for the aperture value when you take a picture.
When the resulting picture would be too bright or too dark, i.e. incorrectly exposed,
●
the numbers for the aperture value and shutter speed are shown in red.
The monitor brightness may vary from the actual still picture recorded.
●
- 60 -
Page 61

Taking pictures
Shutter speed priority mode
When you want to take a sharp picture of a fast moving subject, set with a faster shutter
speed. When you want to create a trailing effect, set to a slower shutter speed.
• About recording modes (→48)
Rotate the dial to select the
shutter speed
Setting display
Set shutter speed
Aperture value
(Automatic adjustment)
• Proper exposure is not
possible in the range
indicated in red.
When the resulting picture would be too bright or too dark, i.e. incorrectly exposed,
●
the numbers for the aperture value and shutter speed are shown in red.
The monitor brightness may vary from the actual still picture recorded.
●
Setting display
• At faster shutter speeds, moving subjects
are rendered sharper.
• At slower shutter speeds, moving subjects
are rendered less sharp.
- 61 -
Page 62

Taking pictures
Manual exposure mode
Determine the exposure by manually setting the aperture value and the shutter speed.
• About recording modes (→48)
Select shutter speed and aperture
value
■
Setting the aperture value
You can set the aperture values between
[1.4] and [8] in 1/3-stop increments.
(Set the aperture ring only to the click-stop
positions.)
■
Setting display
Set shutter speed
Set aperture value
• Proper exposure is not
possible in the range
indicated in red.
Setting the shutter speed
Setting display
Manual exposure assist
- 62 -
Page 63

Taking pictures
Manual exposure mode
■
Light balance (approximation)
Indicates pictures with standard brightness.
Indicates overexposure. For a correct exposure, use a faster shutter speed and/or a
higher aperture value.
Indicates underexposure. For a correct exposure, use a slower shutter speed and/or
a lower aperture value.
The aperture ring rotates only within the range of the printed values.
●
When the resulting picture would be too bright or too dark, i.e. incorrectly exposed,
●
the numbers for the aperture value and shutter speed are shown in red.
The monitor brightness may vary from the actual still picture recorded.
●
The shutter speed setting range changes depending on the [Sensitivity] setting.
●
[Sensitivity] Shutter speed
80 - 1600 250 - 1/4000th
2000 - 3200 30 - 1/4000th
4000 - 12800 8 - 1/4000th
- 63 -
Page 64

Taking pictures
Using [Creative Control] Mode
You can select your own settings from various effects and take pictures while confirming
these effects on the monitor.
• About recording modes (→48)
Press to select the effect and
then [MENU/SET]
Preview screen
• When you press the [DISP] button,
a description of the selected effect is
displayed.
• When you select [ ] by rotating the mode
dial, the menu appears automatically.
• You can display the [Creative Control] menu
by pressing [MENU/SET]. For the setting
procedures of the menu. (→25)
The display of a picture with a selected effect in the preview or recording screen may
●
differ from the actual recorded pictures.
A setting that was selected in [Creative Control] Mode is retained even after the
●
camera is turned off.
The following recording menu and settings are automatically adjusted, and cannot be
●
set manually.
[Sensitivity] [White Balance] [i.Dynamic] [Min. Shtr Speed] [Photo Style]
- 64 -
Page 65

Taking pictures
Using [Creative Control] Mode
■
Adjusting the brightness, depth of field, setting conditions of a selected
effect, etc.
Press the dial
Press to select an item to adjust
Adjusts the brightness.
Adjusts the depth of field.
Adjusts the setting conditions of the selected effect, etc. (The
settings to be adjusted vary depending on the selected effect.)
• [AUTO] is displayed in the icon during automatic adjustment.
• The items that can be adjusted differ depending on the selected effect.
Press to make adjustments
• You can also rotate the dial to make adjustments.
• To return to automatic adjustment → Press [ ] button.
Press [MENU/SET]
When you record motion pictures, the camera performs aperture control within the
●
appropriate exposure range, and the depth of field may not change for some subject
brightness levels.
- 65 -
Page 66

Taking pictures
Using [Creative Control] Mode
For the [Creative Control] menu setting procedures. (→64)
[Expressive]
This effect creates a pop art style picture that enhances the color.
■
Items that can be set
Brightness
Depth of field Shallower
Vividness Subdued
Underexposure
(darker)
[Retro]
This effect creates the soft appearance of a tarnished picture.
■
Items that can be set
Brightness
Depth of field Shallower
Coloring Yellowish
Underexposure
(darker)
Overexposure
(brighter)
Extended
Gaudy
Overexposure
(brighter)
Extended
Reddish
- 66 -
Page 67

Taking pictures
Using [Creative Control] Mode
For the [Creative Control] menu setting procedures. (→64)
[High Key]
This effect creates a brighter and lighter toned appearance for the
entire picture.
■
Items that can be set
Brightness
Depth of field Shallower
Coloring Pinkish
Underexposure
(darker)
[Low Key]
This effect creates a darker somber appearance for the entire
picture to emphasize the bright portions.
■
Items that can be set
Brightness
Depth of field Shallower
Coloring Reddish
Underexposure
(darker)
Overexposure
(brighter)
Extended
Light-bluish
Overexposure
(brighter)
Extended
Bluish
- 67 -
Page 68

Taking pictures
For the [Creative Control] menu setting procedures. (→64)
[Sepia]
This effect creates a picture with sepia tone.
■
Items that can be set
Brightness
Depth of field Shallower
Contrast Low
Underexposure
(darker)
[Dynamic Monochrome]
This effect creates a monochromatic picture with a higher
contrast and more dramatic atmosphere.
■
Items that can be set
Brightness
Depth of field Shallower
Contrast Low
Underexposure
(darker)
Overexposure
(brighter)
Extended
High
Overexposure
(brighter)
Extended
High
Using [Creative Control] Mode
- 68 -
Page 69

Taking pictures
Using [Creative Control] Mode
For the [Creative Control] menu setting procedures. (→64)
[Impressive Art]
This effect creates a picture with a higher contrast and surreal
appearance.
■
Items that can be set
Brightness
Depth of field Shallower
Coloring Black & white
Underexposure
(darker)
[High Dynamic]
This effect creates a picture with well-balanced brightness for the
entire picture (from dark areas to bright areas).
■
Items that can be set
Brightness
Depth of field Shallower
Coloring Black & white
Underexposure
(darker)
Overexposure
(brighter)
Extended
Gaudy
Overexposure
(brighter)
Extended
Gaudy
- 69 -
Page 70

Taking pictures
For the [Creative Control] menu setting procedures. (→64)
[Cross Process]
This effect allows you to play with color effects.
■
Items that can be set
Brightness
Depth of field Shallower
Coloring Greenish / Bluish / Yellowish / Reddish
Underexposure
(darker)
[Toy Effect]
This effect creates a picture that resembles pictures taken by a
toy camera with vignetted (darker) corners.
■
Items that can be set
Brightness
Depth of field Shallower
Coloring Orangish
Underexposure
(darker)
Overexposure
(brighter)
Extended
Overexposure
(brighter)
Extended
Bluish
Using [Creative Control] Mode
- 70 -
Page 71

Taking pictures
Using [Creative Control] Mode
For the [Creative Control] menu setting procedures. (→64)
[Miniature Effect]
This effect creates a diorama-like picture by intentionally
defocusing all but one section of the picture.
■
Items that can be set
Brightness
Vividness Subdued coloring
■
Defocusing a picture
Press
Press or to move the focusing area (frame)
Rotate the dial to select the size of the focusing area (frame)
Press [MENU/SET]
• When you press [DISP] button, the initial setting condition
is restored.
The monitor image is displayed with a slight delay compared to normal recording.
●
No audio is recorded for motion pictures.
●
With camera model 18 460
●
When a motion picture is recorded, the finished recording will be approximately 1/8th
of the actual recorded time period. (If you record a motion picture for 8 minutes,
the resulting motion picture recording time will be approximately 1 minute.) The
recordable time displayed on the camera is approx. 8x longer than actual recording.
When the recording mode is changed, be sure to check the recordable time.
With camera models 18 461 / 18 462
●
When a motion picture is recorded, the finished recording will be approximately 1/10th
of the actual recorded time period. (If you record a motion picture for 10 minutes,
the resulting motion picture recording time will be approximately 1 minute.) The
recordable time displayed on the camera is approx. 10x longer than actual recording.
When the recording mode is changed, be sure to check the recordable time.
If you stop recording motion pictures too soon, the camera may continue recording for
●
a certain time. Hold the camera in the same position until it stops recording.
When you take a picture using a high resolution setting, the screen will become dark
●
for a certain period of time after the picture is taken. However, this occurs due to
signal processing and is not a defect.
Underexposure
(darker)
Overexposure
(brighter)
Gaudy coloring
- 71 -
Page 72

Taking pictures
Using [Creative Control] Mode
For the [Creative Control] menu setting procedures. (→64)
[Soft Focus]
This effect creates a soft appearance by intentionally blurring the
entire picture.
■
Items that can be set
Brightness
Depth of field Shallower
Degree of
defocusing
The monitor image is displayed with a slight delay compared to normal recording.
●
When you take a picture using a high resolution setting, the screen will become dark
●
for a certain period of time after the picture is taken. However, this occurs due to
signal processing and is not a defect.
Motion pictures cannot be recorded.
●
[Star Filter]
This effect creates a picture with all light points displaying a 4x
light cross.
■
Items that can be set
Brightness
Depth of field Shallower
Length of the rays
of light
Underexposure
(darker)
Slight defocusing
Underexposure
(darker)
Cross rays are
shorter
Overexposure
(brighter)
Extended
Strong defocusing
Overexposure
(brighter)
Extended
Cross rays are
longer
Motion pictures cannot be recorded.
●
- 72 -
Page 73

Taking pictures
Using [Creative Control] Mode
For the [Creative Control] menu setting procedures. (→64)
[One Point Color]
This effect creates a monochromatic picture by retaining only the
amount of color you determine.
■
Items that can be set
Brightness
Depth of field Shallower
Amount of color
retained
■
Selecting the color to be retained
Press
Select the color to be retained using the frame in the center
of the screen and then press [MENU/SET]
The selected color may not be retained for some subjects.
●
[Smooth Defocus]
This effect creates a smooth defocused area that emphasizes the
subject by operating the aperture when the shutter is open during
the exposure.
■
Items that can be set
Brightness
Vividness Subdued coloring
Underexposure
(darker)
Leaves a small
amount
Underexposure
(darker)
Overexposure
(brighter)
Extended
Leaves a large
amount
Overexposure
(brighter)
Gaudy coloring
The result of this effect may be hard to see for some subjects.
●
Motion pictures cannot be recorded.
●
Use a tripod or other device since this effect slows the shutter speed.
●
- 73 -
Page 74

Taking pictures
Using [Creative Control] Mode
For the [Creative Control] menu setting procedures. (→64)
[Radial Defocus]
This effect defocuses the entire picture by retaining a sharper
focus on the main subjects than with [Soft Focus] by operating
focus when the shutter is open during the exposure. This effect is
recommended when recording night scenes, for example.
■
Items that can be set
Brightness
Degree of
defocusing
Motion pictures cannot be recorded.
●
Use a tripod or other device since this effect slows the shutter speed.
●
Underexposure
(darker)
Slight defocusing
Overexposure
(brighter)
Strong defocusing
- 74 -
Page 75

Taking pictures
Using [Scene Mode]
Using [Scene Mode] enables you to take pictures with optimum settings (exposure,
coloring, etc.) for given scenes.
• About recording modes (→48)
Use cursor buttons to select
the scene mode and then press
[MENU/SET]
• When you select [ ] by rotating the
mode dial, the menu appears automatically.
(When [Scene Menu] in the [Setup] menu is
[AUTO])
• You can display the [Scene Mode] menu
by pressing [MENU/SET]. For the setting
procedures of the menu. (→25)
Selecting a Scene Mode inappropriate for the actual scene may affect the coloring of
●
your picture.
The following recording menu and settings are automatically adjusted, and cannot be
●
set manually.
[Sensitivity] [Metering Mode] [i.Dynamic] [Min. Shtr Speed] [i.Resolution] [Photo Style]
- 75 -
Page 76

Taking pictures
• How to select a scene (→75)
Improves the skin tone of subjects for a healthier appearance in bright
daylight conditions.
[Portrait]
[Soft Skin]
[Scenery]
Tip
• The longer the set focal length and the closer the camera is to the subject, the
greater the effect will be.
Smooths skin colors in bright, outdoor daylight conditions (portraits from
chest upwards).
Tip
• The longer the set focal length and the closer the camera is to the subject, the
greater the effect will be.
Takes sharp pictures of distant subjects.
Creates a single panorama picture by stitching multiple still pictures taken
in rapid succession.
Use cursor buttons to select the recording direction, and then press
[MENU/SET] to set.
Check the recording direction and then press [MENU/SET]
• Special panorama guidelines will be displayed during recording.
Press the shutter button halfway to focus
Press the shutter button fully and pan the camera in a small circular motion in
the selected direction to start recording
• Taking pictures from left to right
1 sec.
Using [Scene Mode]
2 sec.
3 sec.
[Panorama
Shot]
Recording direction
and progress status
(approximate)
• Pan the camera so that you make a complete circuit in approx. 8 seconds
- Pan the camera at a constant speed.
- You may not be able to take pictures successfully if you move the camera too
quickly or too slowly.
Press the shutter button fully again to end recording
• You can also end recording if you stop panning the camera while taking
pictures.
- 76 -
Page 77

Taking pictures
• How to select a scene (→75)
Tip
• Pan the camera in the recording direction as steadily as possible.
Pan the camera to a point slightly ahead of the point that you want to take.
(However, the last frame is not recorded to the end.)
Notes
• The shortest focal length is fixed.
• Motion pictures cannot be recorded.
• Focus, White Balance, and Exposure Compensation are all fixed to optimal
values for the first picture. If the focusing or brightness of pictures recorded as
part of a panorama picture after the first picture are significantly different from
those of the first picture, the panorama picture as a whole (when all pictures
are stitched together) may not have consistent focus and brightness.
[Panorama
Shot]
(Continued)
• The following functions are fixed to the settings indicated below.
[Stabilizer]: [OFF] [Date Stamp]: [OFF]
• Since several pictures are stitched together to create a panorama picture,
some subjects may be distorted or the joining sections of successively taken
pictures that are stitched may be noticeable.
• The resolution of a panorama picture varies depending on the recording
direction and number of stitched pictures.
The maximum resolution is as follows:
- Taking pictures in landscape orientation: Approx. 8000 x 1080 pixels
- Taking pictures in portrait orientation: Approx. 1440 x 8000 pixels
• Panorama pictures may not be created or pictures may not be recorded
properly when taking pictures of the following subjects or when taking pictures
in the following recording conditions:
- Subjects that have a continuous or monotone pattern (sky, beach, etc.)
- Moving subjects (person, pet, vehicle, waves, or flowers swaying in the wind,
etc.)
- Subjects whose colors or patterns change quickly (such as an image
appearing on a display)
- Dark locations
- Locations with a flickering light source (fluorescent lamp, candle light, etc.)
Using [Scene Mode]
If the camera shakes too
much, it may not be able to
take pictures or may end up
creating a narrow (small)
panorama picture.
- 77 -
Page 78

Taking pictures
• How to select a scene (→75)
Takes pictures of scenes with fast movement, e.g. sports.
Tip
[Sports]
[Night Portrait]
[Night
Scenery]
[Handheld
Night Shot]
• Stand at least 5m (16 feet) away.
Notes
• Sports mode requires adequate lighting, to enable the higher shutter speed
to be used. This mode may not product acceptable results when shooting
indoors, under limited lighting.
• The shutter speed may slow down to 1 second.
Takes pictures of people and nightscapes with close to actual brightness.
Tips
• Use flash.
• The subject should not move.
• Tripod, self-timer recommended.
Notes
• The shutter speed may slow down to 8 seconds.
• After recording, the shutter may stay closed (up to 8 seconds) to process the
signal. This is not a malfunction.
Takes sharp pictures of night scenes.
Tip
• Tripod, self-timer recommended.
Notes
• The shutter speed may slow down to 8 seconds.
• After recording, the shutter may stay closed (up to 8 seconds) to process the
signal. This is not a malfunction.
Takes sharp still pictures of night scenes with less camera shake and less
noise by combining a series of still pictures.
Tip
• After the shutter button has been pressed, do not move the camera during the
exposure series.
Note
• Since a series of still pictures are combined after they have been recorded, it
will be a few moments before you will be able to record another picture.
Using [Scene Mode]
- 78 -
Page 79
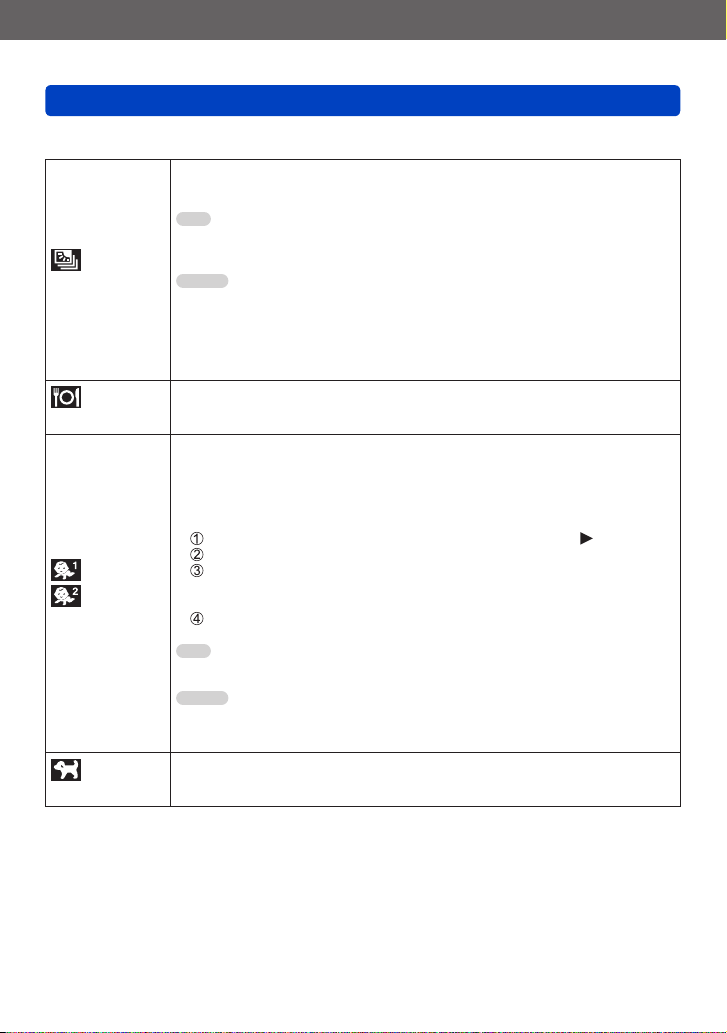
Taking pictures
• How to select a scene (→75)
The camera can combine several still pictures taken with different
exposures into a single properly exposed picture with rich gradation.
Tip
• After the shutter button has been pressed, do not move the camera during the
[HDR]
[Food]
[Baby]
[Pet]
exposure series.
Notes
• Since a series of still pictures are combined after they have been recorded, it
will be a few moments before you will be able to record another picture.
• A subject that was in motion when it was recorded may be rendered like a
double exposure.
• The camera may take a single still picture instead of several pictures under
certain recording conditions.
Takes natural-looking pictures of food.
Takes pictures of a child with a healthy complexion. When you use the
flash, the light from it is weaker than usual.
■
To record age and name
[Baby1] and [Baby2] can be set separately.
Use cursor buttons to select [Age] or [Name] and then press
Select [SET] with cursor buttons, and then press [MENU/SET]
Set the birthday and name
Age: Set birthday with cursor buttons, and then press [MENU/SET]
Name: (Entering text (→44))
Press [MENU/SET]
Tip
• Make sure [Age] and [Name] are [ON] before taking a picture.
Notes
• Age display format depends on the [Language] setting.
• The shutter speed may slow down to 1 second.
• Text may be stamped onto the still picture using [Text Stamp].
Records a pet’s age and name when taking pictures.
• Refer to [Baby] for other tips and notes.
Using [Scene Mode]
- 79 -
Page 80

Taking pictures
• How to select a scene (→75)
[Sunset]
[Glass
Through]
Takes clear pictures of scenes such as sunsets.
Most suitable for taking pictures such as a landscapes through a window.
Notes
• If there are stains such as dust or a reflection on the glass, the camera may
focus on the glass instead of the subject.
• The color of pictures may appear unnatural due to the color of the glass.
(You may be able to reproduce the appropriate color by adjusting the White
Balance.)
Using [Scene Mode]
- 80 -
Page 81

Taking pictures
• How to select a scene (→75)
Pictures are recorded continuously while moving the camera horizontally,
two of which are automatically selected and combined to make a single 3D
picture.
To view 3D pictures, a television that supports 3D is required (The camera
will play back in 2D).
■
Recording procedure
Press the shutter button fully to start
recording, and then move the camera
horizontally from left to right in a straight
line.
• A guide is displayed while recording.
• Move the camera approximately
10 cm (4”) within approximately
4 seconds using the guide.
Tips for recording pictures
• Record a stationary subject.
[3D Photo
Mode]
• Record a picture outdoors or in other bright locations.
• Press the shutter button halfway to fix the focus and the exposure, press
the shutter button fully, and then pan the camera.
• Hold the camera so that the subject is slightly to the right of the center on
the display at the start of the recording. This makes it easier to position the
subject in the center of the recorded picture.
Notes
• 3D still pictures cannot be recorded by holding this camera vertically.
• 3D still pictures are recorded in MPO format (3D).
• The longest focal length is fixed.
• The resolution is fixed to 2M [16:9].
• ISO Sensitivity is automatically adjusted. However, ISO Sensitivity is
increased to allow faster shutter speeds.
• Motion pictures cannot be recorded.
• It may be impossible to record pictures under any of the conditions below.
Even if pictures are recorded, they may not have a 3D effect or may appear
distorted.
- When the subject is too dark or too bright
- When the subject’s brightness changes
- When the subject is moving
- When the subject lacks contrast
Using [Scene Mode]
- 81 -
Page 82

Taking pictures
Taking motion pictures
You can record motion pictures with audio (stereo).
Do not cover the microphone when
recording motion pictures.
Press the motion picture button to
start recording
[Rec Mode] (→150)/[Rec Quality] (→150)
Elapsed
recording time
Immediately release the motion picture
●
button after pressing it.
Remaining recording time
(approx.)
Press the motion picture button
again to end recording
■
About zoom operation
You can also use zoom while recording motion pictures.
• The zoom speed will be slower than normal.
• When using zoom while recording motion pictures, it may take some time to focus.
• The operating sounds of the zoom lens may be recorded in some cases.
- 82 -
Page 83

Taking pictures
Taking motion pictures
You can record motion pictures to the built-in memory only in [VGA] mode. (→150)
●
Use a sufficiently charged battery.
●
The available recording time displayed on the monitor may not decrease regularly.
●
[Sensitivity] is set automatically while a motion picture is being recorded. Also [ISO
●
Limit Set] is disabled.
The following functions are not available:
●
Extended optical zoom, flash, [Face Recog.], [Rotate Disp.] for pictures taken
vertically.
For certain memory cards, recording may end while in progress.
●
The recording range may become narrower in motion pictures compared to still
●
pictures. Also, if the aspect ratio is different for still pictures and motion pictures, the
angle of view will change when starting to record a motion picture. The recordable
area is displayed by setting [Video Rec Area] (→34) to [ON].
If Extended optical zoom is used before pressing the motion picture button, these
●
settings will be cleared, and the recordable area will be changed significantly.
- 83 -
Page 84

Taking pictures
Taking motion pictures
■
About the recording format for recording motion pictures
This camera can record motion pictures in either AVCHD or MP4 formats.
AVCHD:
You can record high definition quality images with this format. It is suitable for
viewing motion pictures on a high-resolution TV or for saving them to a disc.
AVCHD Progressive:
With camera model 18 460
The [PSH] in [AVCHD] is a mode that allows motion pictures to be recorded at
1920 x 1080/50p, the highest quality* that complies with the AVCHD standard.
With camera models 18 461 / 18 462
The [PSH] in [AVCHD] is a mode that allows motion pictures to be recorded at
1920 x 1080/60p, the highest quality* that complies with the AVCHD standard.
Recorded motion pictures can be saved and played back using this camera or the
available software.
*
This means the highest quality for this camera.
MP4:
This is a simpler video format best used when extensive editing is needed, or when
uploading videos to the Internet.
■
About the compatibility of the recorded motion pictures
Motion pictures recorded in [AVCHD] or [MP4] may be played back with poor picture
or sound quality or playback may not be possible even when played back with
equipment compatible with these formats. Also, the recording information may not
be displayed properly. In this case, use this camera.
• Motion pictures recorded with [PSH] in [AVCHD] can be played back on equipment
that is compatible with AVCHD Progressive.
- 84 -
Page 85

Taking pictures
■
About recording modes
The camera automatically detects the scene to record motion pictures with
optimal settings.
When the scene does not correspond to any on the right.
• In mode, focus and exposure will be set according to the face
detected.
• will be selected for nightscapes and other dark scenes.
• If the camera does not select your desired Scene Mode, choosing an
appropriate mode manually is recommended.
Records a motion picture at your preferred settings.
• Aperture and shutter speed are automatically or manually set, depending
on the mode.
Records a motion picture with manual operations.
For details (→87).
See the description about the registered recording mode.
Taking motion pictures
Records a motion picture at the optimum settings for the selected scene.
• Some scenes are switched to the following scenes:
Selected scene Scenes for motion picture
[Baby] Portrait motion picture
[Night Portrait], [Night Scenery], [Handheld Night Shot] Low light motion picture
[Sports], [HDR], [Pet] Normal motion picture
• A motion picture cannot be recorded in [Panorama Shot] or [3D Photo
Mode] Scene Mode.
Records a motion picture at the optimum settings for the selected effects.
• A motion picture cannot be recorded using [Star Filter], [Soft Focus],
[Smooth Defocus] and [Radial Defocus] in [Creative Control] Mode.
The aperture value cannot be changed even when the aperture ring is rotated.
●
(Except [Creative Video Mode])
The built-in ND filter cannot be manually set even when the [ND/FOCUS] lever is
●
pressed.
- 85 -
Page 86

Taking pictures
Taking motion pictures
Taking still pictures while a motion picture is being recorded
Still pictures can be recorded even while a motion picture is being recorded.
Press the shutter button fully during the motion picture
recording
Still pictures are recorded with an aspect ratio setting of [16:9] and [Picture Size]
setting of 3.5 M. (Max. 20 pictures)
Motion picture recording continues unchanged.
• The clicking sound made when the shutter button is operated may be recorded.
• When still pictures are recorded during zooming, the zooming may stop.
• Using [Miniature Effect] in [Creative Control] Mode, a still picture may be taken
with a slight delay from the time when the shutter button is pressed fully.
■
Exposure series function
When the exposure series function has been set in advance, a series of still pictures
can be recorded during motion picture recording.
• When the series setting is set to [ ], [ ], [ ] or [ ], still pictures are
automatically recorded using the [ ] setting.
• Even at the [ ] or [ ] setting, the focus is fixed at the first picture.
The camera will refocus if the shutter button is pressed halfway during motion picture
●
recording. This refocus movement is recorded even during motion picture recording.
When priority is to be given to the motion picture videos, press the shutter button fully,
and record the still pictures. Still pictures can also be created after motion picture
recording. (→160)
When the shutter button is pressed halfway, the resolution and the number of
●
recordable pictures are displayed.
Still pictures cannot be recorded when [Rec Quality] is set to [VGA].
●
The flash is set to [ ] (Forced flash off).
●
Since the electronic shutter is used for recording, the pictures recorded may be
●
distorted.
You cannot record pictures in RAW file format. (Only pictures in JPEG file format with
●
the [Quality] setting [ ] can be recorded.)
- 86 -
Page 87

Taking pictures
Taking motion pictures with manual
operation [Creative Video Mode]
You can set the desired shutter speed and aperture value.
• About recording modes (→48)
Press to select the setting
and then [MENU/SET]
• When you select [ ] by rotating the mode
dial, the menu appears automatically.
• You can display the [Creative Video] menu
by pressing [MENU/SET]. For the setting
procedures of the menu. (→25)
Setting Description
P [Program AE] Automatically sets the shutter speed and aperture value.
A [Aperture-Priority]
S [Shutter-Priority]
M [Manual Exposure]
HS [High Speed Video] For details (→89).
Records motion pictures at a set aperture value. (The shutter speed
is automatically adjusted.)
Records motion pictures at a set shutter speed. (The aperture value
is automatically adjusted.)
Records motion pictures at a set shutter speed and a set aperture
value.
- 87 -
Page 88

Taking pictures
Taking motion pictures with manual operation [Creative Video Mode]
About aperture value
●
To record motion pictures with a larger depth of field, set the aperture value to a higher
number. To record motion pictures with a smaller depth of field, set a lower number.
Setting the aperture value
You can set the aperture values between [1.4] and [8]
in 1/3-stop increments.
(Set the aperture ring only to the click-stop positions.)
About the shutter speed
●
To record a sharp motion picture of a fast-moving subject, set a faster shutter speed.
To record a motion picture with a trailing effect for a subject’s movements, set a slower
shutter speed.
Setting the shutter speed
Press the shutter button to start and stop recording motion pictures.
●
Still pictures cannot be recorded while motion pictures are being recorded.
●
The shutter speed that can be set using [Creative Video Mode] is different from the
●
values that can be set using [Program AE], [Aperture-Priority], [Shutter-Priority], and
[Manual Exposure] Modes.
Although you can change camera settings such as shutter speed and aperture value
●
even when a motion picture recording is in progress, the beeps and camera operation
sounds may be recorded in some cases.
When you set a faster shutter speed, the monitor image noise may increase due to
●
the higher sensitivity.
When you take a picture under a fluorescent lamp, LED, mercury arc lamp or sodium
●
lamp, for example, the coloring and the brightness of the screen may change.
- 88 -
Page 89

Taking pictures
Taking motion pictures with manual operation [Creative Video Mode]
[High Speed Video]
With this mode, you can capture subjects during sporting events or other
active scenes at a high frame rate, i.e. with a rapid succession of exposures,
which allows details to be revealed that cannot be seen with the naked eye.
Press to select [HS] and then
[MENU/SET]
• When you select [ ] by rotating the mode
dial, the menu appears automatically.
• You can display the [Creative Video] menu
by pressing [MENU/SET]. For the setting
procedures of the menu. (→25)
■
Resolution of high-speed motion pictures
1280×720 pixels (Aspect ratio of 16:9)
100 pictures/s (With camera model 18 460)
120 pictures/s (With camera models 18 461 / 18 462)
Recording format: MP4 (without audio)
You can record a motion picture of up to 4 GB per recording session.
●
When converted into playback time, motion pictures can be recorded for up to
●
29 minutes.
The shutter speed and aperture value are automatically adjusted.
●
Press the shutter button to start and stop recording motion pictures.
●
Still pictures cannot be recorded while motion pictures are being recorded.
●
The settings for focus, zoom, exposure and White Balance are fixed to the settings
●
specified when recording was started.
The Optical Image Stabilizer does not work.
●
The [AF Mode] is set to (1-area-focusing).
●
Flickering or horizontal stripes may appear while recording under fluorescent lighting.
●
- 89 -
Page 90

Taking pictures
Registering your own settings and recording
[Custom] Mode
Registering your preferred recording mode, [Rec] menu settings, etc. to [Cust.Set Mem.]
and setting the mode dial to / allows you to switch quickly to those settings.
[Cust.Set Mem.]
Up to 4 current camera settings can be registered.
Select the recording mode you wish to register and set the
[Rec], [Motion Picture], [Setup] menu, etc.
Select [Cust.Set Mem.] from the [Setup] menu
• For the setting procedures of the menu. (→25)
Use cursor buttons to select custom set for registration and
then press [MENU/SET]
• A confirmation screen is displayed. Select [Yes] with cursor buttons, and then
press [MENU/SET].
• The custom settings registered in [C1] can be used with the position of the
mode dial. It will be convenient if the settings used often are registered, since they
can be used by just setting the mode dial.
• The custom settings registered in [Custom Set 2-1], [Custom Set 2-2] or [Custom
Set 2-3] can be selected with the position of the mode dial. Up to 3 custom
settings can be registered, so select the one matching your needs.
Since certain menu items would be reflected in other recording modes, they are not
●
saved.
- 90 -
Page 91

Taking pictures
Registering your own settings and recording [Custom] Mode
[Custom]
Settings registered in [Cust.Set Mem.] can be quickly called up by setting the
mode dial to
Set mode dial to / ([Custom] mode)
■
When changing the menu settings
Even if the menu settings are changed temporarily when [C1], [Custom Set 2-1],
[Custom Set 2-2] or [Custom Set 2-3] is selected, the currently registered settings will
remain unchanged.
To change the currently registered settings, overwrite the registered data using [Cust.
Set Mem.] (→90) on the [Setup] menu.
/ .
• When set to
→ The camera switches to the recording mode and settings registered in .
• When set to
→ Use cursor buttons to select custom set and then press [MENU/SET] to switch
to the recording mode and settings registered in .
- 91 -
Page 92

Taking pictures
Using the zoom lens
You can determine how much of a subject is to be captured / how large a subject is to be
rendered by selecting the appropriate focal length, i.e. by zooming.
Zoom In/Out
To widen the angle
of view, use shorter
focal lengths
(hence wideangle,
also makes
subjects appear
further away)
To make subjects
appear closer use
longer focal lengths
(telephoto, also
narrows
the angle of view)
When Extended optical zoom is set
Optical Zoom range
Adjust the focus after setting the focal length.
●
Do not touch the lens barrel during zooming.
●
The zoom ratio and the zoom bar displayed on the monitor are approximations.
●
The camera may make a rattling noise and vibrate when the zoom lever is operated -
●
this is not a malfunction.
Focus range
Zoom ratio
Digital Zoom range
i.Zoom range
- 92 -
Page 93

Taking pictures
Using the zoom lens
Optical Zoom
With this mode, a zoom ratio up to 3.8x is possible if pictures without
selected by [Picture Size] in the [Rec] menu. (→135)
Optical Zoom cannot be used in the following cases:
●
• Scene Modes ([Panorama Shot] [3D Photo Mode])
Extended optical zoom
With this mode, a zoom ratio up to 6.7x is possible when pictures with
selected by [Picture Size] in the [Rec] menu (→135). EZ is short for “Extended optical zoom”.
Extended optical zoom cannot be used in the following cases:
●
• With [Snapshot Mode] (when [Motion Deblur] is [ON])
• With motion picture recording
• When the [Burst Shooting] setting is set to [ ], [ ] or [ ]
• When the [Sensitivity] setting is set to [H.8000], [H.10000] or [H.12800]
• With the Scene Modes ([Panorama Shot] [HDR] [3D Photo Mode])
• With [Creative Control] Mode ([Toy Effect])
• When the [Quality] setting is set to [ ], [ ] or [ ]
• When [Multi Expo.] is set in the [Rec] menu
have been
have been
- 93 -
Page 94

Taking pictures
Using the zoom lens
[i.Zoom]
You can use the camera’s Intelligent Resolution technology to increase the zoom ratio up
to 2x higher than the original zoom ratio with limited deterioration of the resolution.
Set the [i.Zoom] in the [Rec] menu to [ON]. (→141)
The camera’s Intelligent Resolution technology is applied to a picture in the zoom
●
range of [i.Zoom].
[i.Zoom] does not function in the following cases.
●
• With [Snapshot Mode] (when [Motion Deblur] is [ON])
• When the [Burst Shooting] setting is set to [ ], [ ] or [ ]
• When the [Sensitivity] setting is set to [H.8000], [H.10000] or [H.12800]
• With the Scene Modes ([Panorama Shot] [Handheld Night Shot] [HDR]
[3D Photo Mode])
• With [Creative Control] Mode ([Toy Effect] [Smooth Defocus] [Radial Defocus])
• When [Multi Expo.] is set in the [Rec] menu
[Digital Zoom]
With this mode, a zoom ratio 4x higher than Optical/Extended optical zoom is possible.
Note that, with Digital Zoom, enlarging will decrease the resolution. Set the [Digital Zoom]
in the [Rec] menu to [ON]. (→141)
[Digital Zoom] cannot be used in the following cases:
●
• With [Snapshot Mode]
• When the [Burst Shooting] setting is set to [ ], [ ] or [ ]
• When the [Sensitivity] setting is set to [H.8000], [H.10000] or [H.12800]
• With the Scene Modes ([Panorama Shot] [Handheld Night Shot] [HDR]
[3D Photo Mode])
• With [Creative Control] Mode ([Miniature Effect] [Toy Effect])
• When the [Quality] setting is set to [ ], [ ] or [ ]
• With [High Speed Video] in [Creative Video Mode]
• When [Multi Expo.] is set in the [Rec] menu
When [Digital Zoom] is used simultaneously with [i.Zoom], you can only increase the
●
zoom ratio up to 2x.
- 94 -
Page 95

Taking pictures
Using the zoom lens
[Step Zoom]
You can set the zoom operation to allow easy visualization of the angle of view (picture
angle) for the focal length of a regular fixed focal length lens (as with a 35mm film
camera). When using the Step Zoom, you can operate the zoom ratio as easily as
changing the camera lens.
Preparation:
Set [Step Zoom] for the [Rec] menu to [ON].
• For the setting procedures of the menu. (→25)
Select the focal length
Every time you operate the zoom lever,
zooming will stop at the indicated focal
lengths.
To widen the angle
of view, use shorter
focal lengths
(hence wideangle,
also makes
subjects appear
further away)
Current zoom position
(The indicated focal lengths are not the actual ones,
but rather the equivalent ones for the 35mm format)
To make subjects
appear closer use
longer focal lengths
(telephoto, also
narrows
the angle of view)
■
[Step Zoom] stop positions
24mm, 28mm, 35mm, 50mm, 70mm, and 90mm
• In addition to the above focal lengths, the zoom will stop at the following positions
when a setting other than Optical Zoom is set.
135mm, 200mm, 300mm, 400mm, 500mm, 600mm, the focal length at max. Tele,
and so on.
The focal length values are only approximations.
●
The focal length will change in the following cases:
●
• When the aspect ratio is 1:1
• When [Burst Shooting] is set to [ ]
• When [Handheld Night Shot] is set in Scene mode
[Step Zoom] cannot be used in the following cases:
●
• With [Snapshot Mode]
• When recording motion pictures
The focal length is displayed during playback for pictures recorded using the [Step
●
Zoom].
- 95 -
Page 96

Taking pictures
Using Autofocus
When Autofocus is enabled, press the shutter button halfway to focus. The focusing
methods differ depending on [Rec] mode and [AF Mode] setting.
Switch the focus selector switch
to [ ] or [ ]
Autofocus is activated.
Align with the index
Subjects/environments which may make auto focusing difficult:
●
• Fast-moving or extremely bright objects, or objects with no color contrast.
• Taking pictures through glass or near objects emitting light. In the dark, or with
significant camera shake.
• When an object is too close or when both distant and close objects are registered.
The focus display flashes and beep sounds when focusing is not
●
possible. Use the focus range displayed in red as a reference.
Even if the focus display is lit, the camera may be unable to bring
the subject into focus if it is out of range.
Focus display
Focus range
- 96 -
Page 97

Taking pictures
Using Autofocus
■
Switching [AF Mode]
Select [AF Mode] from the [Rec] menu
• For the setting procedures of the menu. (→25)
Press to select Autofocus mode items and then
[MENU/SET]
(Face Detection) For taking front-on pictures of people
(AF Tracking) For automatically locking the focus on a moving subject (→98)
(23-area-focusing) For off-center subjects (→98)
(1-area-focusing) For precise focusing on small subjects (→99)
Face Detection
Recognizes faces (up to 15 people) and adjusts exposure and focus accordingly.
AF area
Yellow: When the shutter button is pressed halfway, the frame turns
green when the camera is focused.
White: Displayed when more than one face is detected. Other faces that
are the same distance away as faces within the yellow AF area
are also focused.
(Face Detection) is not available in the following cases:
●
• With the Scene Modes ([Panorama Shot] [Night Scenery] [Handheld Night Shot]
[Food])
• [Creative Control] Mode ([Soft Focus] [Miniature Effect])
If the camera misinterprets a non-human subject as a face, switch to another setting.
●
If conditions prevent the face from being recognized, such as when the movement of
●
the subject is too rapid, the [AF Mode] setting switches to (23-area-focusing).
- 97 -
Page 98

Taking pictures
Using Autofocus
AF Tracking
Align the subject with the AF Tracking frame and then press
the [AF/AE LOCK] button
AF Tracking frame
When the subject is recognized, the AF Tracking frame changes
from white to yellow, and the subject is automatically kept in
focus.
If AF Lock fails, a red frame flashes.
• To release AF Tracking → Press the [AF/AE LOCK] button.
• Focus range (same as macro recording)
Under certain conditions, such as when the subject is small or dark, (AF Tracking)
●
may not operate correctly. When it does not work, the [AF Mode] will be switched to
(1-area-focusing).
(AF Tracking) is not available in the following cases.
●
• With [Panorama Shot] Scene Mode
• With [Creative Control] Mode ([Sepia] [Dynamic Monochrome] [High Dynamic]
[Toy Effect] [Soft Focus] [Miniature Effect] [Radial Defocus])
• With the [Monochrome] setting in [Photo Style]
• [Creative Video Mode]
Focusing on off-center subjects
With this mode, focusing is based on the closest registered object in the 23 metered
areas.
- 98 -
Page 99

Taking pictures
Using Autofocus
Spot focusing
Focusing is based on the subject registered in the center of the picture. (Recommended
when focusing is difficult, or when it is supposed to be based on a specific off-center
detail)
• You can adjust the position of the AF area. (→100)
Focus is fixed to (1-area-focusing) in the following cases:
●
• With [Miniature Effect] in [Creative Control] Mode
• [High Speed Video] in [Creative Video Mode]
The AF area display may be larger depending on recording conditions such as dark
●
locations or the set focal length.
■
Locking the focus
When a subject you want to base focusing on is not in the center of the monitor image,
use the following procedure.
Aim the AF area at the subject
Hold down halfway
Return to desired composition
Press fully
AF area
- 99 -
Focus display
When focus is set: illuminated
When focus is not possible: flashing
AF area
When focus is set: green
When focus is not possible: red
Page 100

Taking pictures
Using Autofocus
■
Changing the position and size of the AF area
When [AF Mode] is set to (1-area-focusing), you can move the position or change
the size of the AF area.
Select [AF Mode] from the [Rec] menu
• For the setting procedures of the menu. (→25)
Use cursor buttons to select [ ] from the [AF Mode] items
and then press
To move/change the AF area
To move the AF area: Press
To change the size of the AF area: Rotate the dial
• To restore the AF area to its initial state (position and
size) → Press the [DISP] button
Press [MENU/SET]
While a motion picture is being recorded, you cannot move the AF area or change its
●
size.
When the AF area is small, focusing may be difficult.
●
When [Metering Mode] is set to (spot-focusing), the new position of the AF area
●
will be measured.
The AF area display may be larger depending on recording conditions such as dark
●
locations or the set focal length.
- 100 -
 Loading...