


PC88
Musician’s Guide
©1997 All rights reserved. Kurzweil is a product line of Young Chang Co.; Kurzweil, PC88, and VGM are trademarks of Young Chang Co. All other products and brand names are trademarks or registered trademarks of their respective companies. Product features and specifications are subject to change without notice.
Part Number: 910243 Rev. C

INSTRUCTIONS PERTAINING TO A RISK OF FIRE, ELECTRIC SHOCK, OR INJURY TO PERSONS
IMPORTANT SAFETY AND INSTALLATION INSTRUCTIONS
WARNING - When using electronic products, basic precautions should always be followed. Read all of the Safety and Installation Instructions before using the product.
Do not use this product near water, such as near a bathtub, sink, in a wet basement, near a swimming pool, or the like.
This product, in combination with an amplifier and speakers or headphones, may be capable of producing sound levels that could cause permanent hearing loss. Do not operate for a long period of time at a high volume level or at a level that is uncomfortable. If you experience any hearing loss or ringing in the ears, you should consult an audiologist.
The product should be located away from heat sources such as radiators, heat registers, or other products that produce heat.
The product should be connected to a power supply only of the type described in the operating instructions or as marked on the product.
This product is equipped with a polarized line plug (one blade wider than the other). This is a safety feature. If you are unable to insert the plug into the outlet, contact an electrician to replace your obsolete outlet. Do not defeat the safety purpose of the plug.
The product should be serviced by qualified service personnel when:
A.The plug has been damaged; or
B.Objects have fallen upon, or liquid has been spilled into the product; or
C.The product has been exposed to rain; or
D.The product does not appear to be operating normally or exhibits a marked change in performance; or
E.The product has been dropped, or the enclosure damaged.
Do not attempt to service the product. All servicing should be referred to qualified service personnel.
WARNING - Do not place the power cord, or the product in a position where anyone could trip over, walk on, or roll equipment over them. Do not allow the product to rest on or be installed over cords of any type. Do not place the power module where it cannot receive cooling air, such as under a rug. Improper installations of this type may create the possibility of a fire hazard and/or personal injury.
RADIO AND TELEVISION INTERFERENCE
Warning: Changes or modifications to this instrument not expressly approved by Young Chang could void your authority to operate the instrument.
Important: When connecting this product to accessories and/or other equipment use only high quality shielded cables.
Note: This instrument has been tested and found to comply with the limits for a Class B digital device, pursuant to Part 15 of the FCC Rules. These limits are designed to provide reasonable protection against harmful interference in a residential installation. This instrument generates, uses, and can radiate radio frequency energy and, if not installed and used in accordance with the instructions, may cause harmful interference to radio communications. However, there is no guarantee that interference will not occur in a particular installation. If this instrument does cause harmful interference to radio or television reception, which can be determined by turning the instrument off and on, the user is encouraged to try to correct the interference by one or more of the following measures:
•Reorient or relocate the receiving antenna.
•Increase the separation between the instrument and the receiver.
•Connect the instrument into an outlet on a circuit other than the one to which the receiver is connected.
•If necessary consult your dealer or an experienced radio/television technician for additional suggestions.
NOTICE
This apparatus does not exceed the Class B limits for radio noise emissions from digital apparatus set out in the Radio Interference Regulations of the Canadian Department of Communications.
AVIS
Le present appareil numerique n’emet pas de bruits radioelectriques depassant les limites applicables aux appareils numeriques de la class B prescrites dans le Reglement sur le brouillage radioelectrique edicte par le ministere des Communications du Canada.
ii |
PC88 |

Young Chang Distributors
Contact the nearest Young Chang office listed below to locate your local Young Chang/ Kurzweil representative.
Young Chang America, Inc.
13336 Alondra Blvd.
Cerritos, CA 90703-2245
Tel: (562) 926-3200
Fax: (562) 404-0748
Young Chang
Kang Nam P.O.Box 998
Seoul, Korea
Tel: 011-82-2-3451-3500
Fax: 011-82-2-3451-3599
Young Chang Akki Europe GmbH
Industriering 45
D-41751 Viersen
Germany
Tel: 011-49-2162-4491
Fax: 011-49-2162-41744
Young Chang Canada Corp.
250 Shields Court, Unit #11
Markham, Ontario L3R 9W7
Tel: (905) 948-8052
Fax: (905)948-8172
Musician’s Guide |
iii |

PC88 Specifications
Physical
•
•
•
•
Height: |
4 5/16” |
(10.95 cm) |
Width: |
14” |
(35.6 cm) |
Length: |
54 5/16” |
(137.95 cm) |
Weight: |
55 lbs. |
(25 kg) |
Electrical
•
•
•
•
|
120 VAC |
240 VAC |
Voltage Range: |
100-125 Volts RMS |
200-250 Volts RMS |
Frequency Range: |
48-65 Hz |
48-65 Hz |
Input Voltage: |
9.5 Volts AC |
9.5 Volts AC |
Power Consumption: |
2.0 Amps maximum |
2.0 Amps maximum |
Environmental
•
•
•
Temperature (Operating): |
40 to 104°F |
(5 to 40°C) |
Temperature (Storage): |
–13 to 185°F |
(–25 to 85°C) |
Relative Humidity |
|
|
(Operating and Storage): |
5 to 95%, non-condensing |
|
Audio
•
•
•
•
Output Connection: |
2 x 1/4” Mono Phone Plug |
Impedance: |
2K Ohms |
Output Level: |
3.5 Volts RMS Max, 1 Volt RMS Nominal |
Dynamic Range: |
>103 dB “A” Weighted |
iv |
PC88 |

Young Chang Distributors ................................................................................................ |
iii |
PC88 Specifications .......................................................................................................... |
iv |
Physical ................................................................................................................. |
iv |
Electrical ............................................................................................................... |
iv |
Environmental....................................................................................................... |
iv |
Audio..................................................................................................................... |
iv |
Introducing the PC88 ........................................................................................................................... |
1-1 |
For People Who Never Read Manuals…........................................................................ 1-1 |
|
Unpacking the Unit… ..................................................................................................... |
1-2 |
Setup ............................................................................................................................... |
1-2 |
Installing the Music Rack ............................................................................................... |
1-3 |
Demo Sequence .............................................................................................................. |
1-3 |
Internal Voices ................................................................................................................ |
1-4 |
Assigning Controllers ..................................................................................................... |
1-4 |
MIDI Setups.................................................................................................................... |
1-5 |
Effects ............................................................................................................................. |
1-7 |
Just the Beginning! ......................................................................................................... |
1-7 |
A Note About the VGM Board and the PC88mx ........................................................... |
1-7 |
Checking Battery Voltage Level..................................................................................... |
1-8 |
Setup, Connections, and Controls ....................................................................................................... |
2-1 |
Setting Up the PC88........................................................................................................ |
2-1 |
Connections..................................................................................................................... |
2-1 |
Power .................................................................................................................. |
2-1 |
Audio................................................................................................................... |
2-1 |
Pedals .................................................................................................................. |
2-2 |
MIDI ................................................................................................................... |
2-2 |
Front Panel Controls ....................................................................................................... |
2-3 |
Display (LCD) .................................................................................................... |
2-3 |
Cursor Buttons .................................................................................................... |
2-3 |
Sound/Setup Select ............................................................................................. |
2-4 |
Zone Buttons....................................................................................................... |
2-4 |
Zone Parameters.................................................................................................. |
2-5 |
Data Entry ........................................................................................................... |
2-7 |
Intuitive Entry ..................................................................................................... |
2-7 |
Jump Editing ....................................................................................................... |
2-9 |
Assignable Controllers, Buttons, and Wheels..................................................... |
2-9 |
Master Volume.................................................................................................. |
2-10 |
Panic.................................................................................................................. |
2-10 |
Effects ............................................................................................................... |
2-10 |
Internal Voices ...................................................................................................................................... |
3-1 |
Program Numbers and Other Ways of Selecting Voices................................................ |
3-2 |
Customizing the Internal Voices Mode .......................................................................... |
3-3 |
440-Tuned Piano Voices..................................................................................... |
3-3 |
Ride Cymbal and Metronome Click ................................................................... |
3-3 |
The VGM Banks ............................................................................................................. |
3-4 |
TOC- i

Setups and Zones................................................................................................................................... |
4-1 |
Analyzing a Setup ........................................................................................................... |
4-1 |
Selecting Parameters ....................................................................................................... |
4-2 |
Selecting Zones ............................................................................................................... |
4-2 |
I Don’t Hear a Zone: Is It Active (But Not Soloed), Muted, or Off? ................. |
4-3 |
Creating a Setup from an Internal Voice ........................................................................ |
4-4 |
Zone Parameters ................................................................................................................................... |
5-1 |
Zone Parameters and Internal Voices ................................................................. |
5-1 |
MIDI Transmit ................................................................................................................ |
5-2 |
MIDI Channel ..................................................................................................... |
5-2 |
Destination .......................................................................................................... |
5-2 |
Pitchbend Range ................................................................................................. |
5-2 |
Program ........................................................................................................................... |
5-3 |
Bank .................................................................................................................... |
5-3 |
Entry Transmit .................................................................................................... |
5-4 |
Bank Mode .......................................................................................................... |
5-5 |
Program Number Display ................................................................................... |
5-5 |
Program Name Display ....................................................................................... |
5-6 |
Key Range....................................................................................................................... |
5-6 |
Low, Hi ............................................................................................................... |
5-6 |
Note Map............................................................................................................. |
5-6 |
Transpose ....................................................................................................................... |
5-7 |
Velocity ........................................................................................................................... |
5-8 |
Velocity Scale ..................................................................................................... |
5-8 |
Velocity Offset .................................................................................................... |
5-8 |
Velocity Curve .................................................................................................... |
5-9 |
Velocity Minimum, Velocity Maximum .......................................................... |
5-10 |
Controllers..................................................................................................................... |
5-11 |
Getting Around ................................................................................................. |
5-12 |
The Continuous Controllers .............................................................................. |
5-12 |
MIDI Controllers and Other Parameters ........................................................... |
5-13 |
Scaling............................................................................................................... |
5-14 |
Entry and Exit Values ....................................................................................... |
5-15 |
The Switch Controllers ..................................................................................... |
5-15 |
Do These Parameters Always Mean Something? ............................................. |
5-16 |
Do I Need All Those Pedals? ............................................................................ |
5-17 |
Multiple Controllers .......................................................................................... |
5-17 |
Copying Parameters ...................................................................................................... |
5-17 |
Storing a Setup .............................................................................................................. |
5-19 |
Names................................................................................................................ |
5-19 |
Dumping a Setup............................................................................................... |
5-20 |
Deleting a Setup ................................................................................................ |
5-20 |
The Arpeggiator .................................................................................................................................... |
6-1 |
Arpeggiator Active.............................................................................................. |
6-2 |
Key Range........................................................................................................... |
6-2 |
TOC-ii

Zone Enable ........................................................................................................ |
6-2 |
Latch Mode ......................................................................................................... |
6-3 |
Play Order ........................................................................................................... |
6-3 |
Beats.................................................................................................................... |
6-4 |
Initial Tempo....................................................................................................... |
6-4 |
Duration .............................................................................................................. |
6-4 |
Velocity Mode and Fixed Velocity..................................................................... |
6-4 |
Note Shift ............................................................................................................ |
6-4 |
Shift Limit........................................................................................................... |
6-5 |
Limit Option........................................................................................................ |
6-5 |
Glissando............................................................................................................. |
6-6 |
Available MIDI controllers................................................................................. |
6-6 |
Copying the Arpeggiator................................................................................................. |
6-6 |
Effects Editing ....................................................................................................................................... |
7-1 |
Internal Effects.................................................................................................... |
7-2 |
Internal Reverb Wet ............................................................................................ |
7-2 |
Internal Reverb Time .......................................................................................... |
7-2 |
Internal Effects Wet ............................................................................................ |
7-2 |
Internal Effects Delay ......................................................................................... |
7-2 |
Saving Effects ................................................................................................................. |
7-2 |
VGM Effects................................................................................................................... |
7-3 |
Copying Effects .................................................................................................. |
7-3 |
Effects and Drum Sounds ................................................................................... |
7-3 |
MIDI Control of Effects.................................................................................................. |
7-4 |
Transmitting PC88 Effects Settings to a Sequencer ....................................................... |
7-4 |
MIDI Receive......................................................................................................................................... |
8-1 |
Channel On/Off................................................................................................... |
8-1 |
Program............................................................................................................... |
8-1 |
General MIDI Considerations......................................................................................... |
8-2 |
Global Parameters ................................................................................................................................ |
9-1 |
Local Control ...................................................................................................... |
9-2 |
Clock ................................................................................................................... |
9-2 |
Transmit Clock.................................................................................................... |
9-2 |
Touch .................................................................................................................. |
9-2 |
Effects Change Mode.......................................................................................... |
9-2 |
Change Setups..................................................................................................... |
9-3 |
Setup Change Channel........................................................................................ |
9-3 |
MIDI In ............................................................................................................... |
9-3 |
Tuning and Receive Transpose ........................................................................... |
9-4 |
Bank Select Control ............................................................................................ |
9-4 |
All Notes Off....................................................................................................... |
9-4 |
General MIDI...................................................................................................... |
9-4 |
Device ID ............................................................................................................ |
9-4 |
Transmit Buttons................................................................................................. |
9-5 |
Transmit Reverb Sysex ....................................................................................... |
9-5 |
TOC- iii

Memory Available .............................................................................................. |
9-5 |
Reset PC88 .......................................................................................................... |
9-5 |
Dump all Setups .................................................................................................. |
9-5 |
MIDIScope.......................................................................................................... |
9-6 |
PC88 in the Real World...................................................................................................................... |
10-1 |
At a Gig ............................................................................................................. |
10-1 |
In the Recording Studio .................................................................................... |
10-1 |
In the MIDI Composing Studio ........................................................................ |
10-2 |
In the Home....................................................................................................... |
10-2 |
Internal Voices...................................................................................................................................... |
A-1 |
VGM Board Voices .............................................................................................................................. |
B-1 |
General MIDI voices...................................................................................................... |
B-1 |
Expansion voices............................................................................................................ |
B-2 |
Drum sounds......................................................................................................................................... |
C-1 |
General MIDI ................................................................................................................. |
C-1 |
Kurzweil Drums ............................................................................................................. |
C-3 |
Latin Percussion ............................................................................................................. |
C-5 |
Orchestral Percussion..................................................................................................... |
C-6 |
Effects Algorithms................................................................................................................................ |
D-1 |
MIDI Setups.......................................................................................................................................... |
E-1 |
Standard Setups............................................................................................................... |
E-1 |
VGM Setups.................................................................................................................... |
E-3 |
Application Notes ............................................................................................... |
E-4 |
Default Setup Parameters (Generic Template) ............................................................... |
E-5 |
Default Controller Assignments (Internal Voices) ......................................................... |
E-6 |
Setup Template ............................................................................................................... |
E-6 |
Continuous Controllers in the MIDI Specification ............................................................................ |
F-1 |
The first 64: 14-bits? ........................................................................................... |
F-1 |
The Switches: 64-69............................................................................................ |
F-2 |
Sound Controllers: 70-79 .................................................................................... |
F-3 |
Controllers 80-97 ................................................................................................ |
F-4 |
Registered and Non-Registered Parameters: Controllers 98-101 ....................... |
F-4 |
102-119: Uncharted Territory ............................................................................. |
F-5 |
120-127: Mode Messages ................................................................................... |
F-6 |
PC88 Internal Diagnostics................................................................................................................... |
G-1 |
Entering Diagnostics .......................................................................................... |
G-1 |
Running the Debug Sequence ............................................................................ |
G-1 |
Exiting Diagnostics ............................................................................................ |
G-2 |
TOC-iv
Introducing the PC88
For People Who Never Read Manuals…
Chapter 1
Introducing the PC88
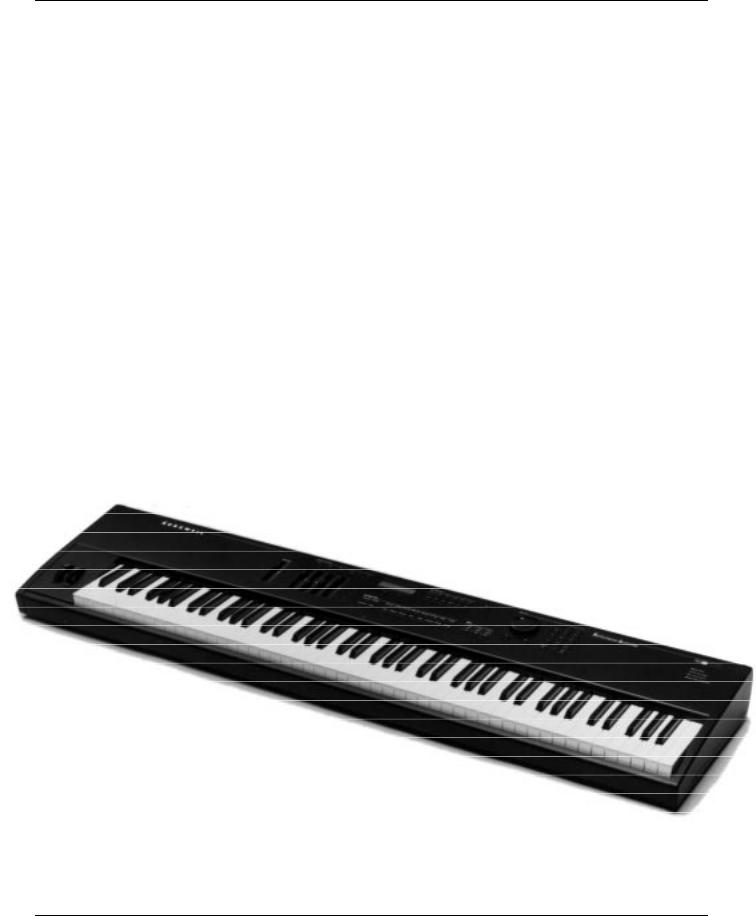
The PC88 is a self-contained portable keyboard that features quick and intuitive access to 64 (and optionally more) internal sounds derived from Kurzweil’s renowned ROM samples. It can produce up to 32-note polyphony in full stereo, and lets you layer as many as 4 (and sometimes more) sounds at once. Built-in reverb and chorus are also provided, and there’s a sophisticated on-board arpeggiator for composing, performing, or just fooling around.
Thirty-two versatile MIDI Setups are provided to let you start making great music immediately. You can also use these Setups as templates, or create new Setups from the Internal Voices.
Furthermore, the PC88 is a high-quality MIDI keyboard controller, with 88-key weighted action, adjustable velocity and pressure (aftertouch) curves, two programmable on-board wheels, four sliders, three buttons, and jacks for two footswitches and four continuous control pedals. Data on four independent MIDI channels can be sent simultaneously, using four different “zones”, each of which has its own key range — which can overlap with any others — and its own controller definitions, as well as the ability to be muted or soloed instantly. Other features allow merging and remapping of incoming MIDI data (listening on all 16 channels), and the ability to go instantaneously from one complex setup to another.
Finally, the PC88 is a versatile multitimbral instrument that can be used to complement any MIDI setup. With the optional plug-in VGM™ (Voice/GM expansion) board, the PC88 becomes a top-of-the-line General MIDI instrument, for use in education, multimedia production, games, and other exciting applications. In addition to expanding the PC88’s complement of sounds to match the General MIDI spec, the VGM board adds 12 sets of drum and percussion sounds, and doubles the PC88’s maximum polyphony to 64 notes.
For People Who Never Read Manuals…
Read this chapter, at least. If you’re an experienced MIDI musician, you will have no trouble getting the PC88 up and running right away, and that’s what we’ll do here. But even if you’ve mastered every other keyboard in the world, take some time to go through the manual and learn about the advanced features of the PC88. You’ll discover some unique new ideas.
Musician’s Guide |
1-1 |
Introducing the PC88
Unpacking the Unit…
Unpacking the Unit…
is pretty straightforward. It’s always a good idea to keep the box and packing material, in case you need to ship it for any reason. Your PC88 carton should contain the following:
•
•
•
•
•
•
PC88 Performance Controller AC adapter
switch pedal
six adhesive-backed rubber feet manual
warranty card
Setup
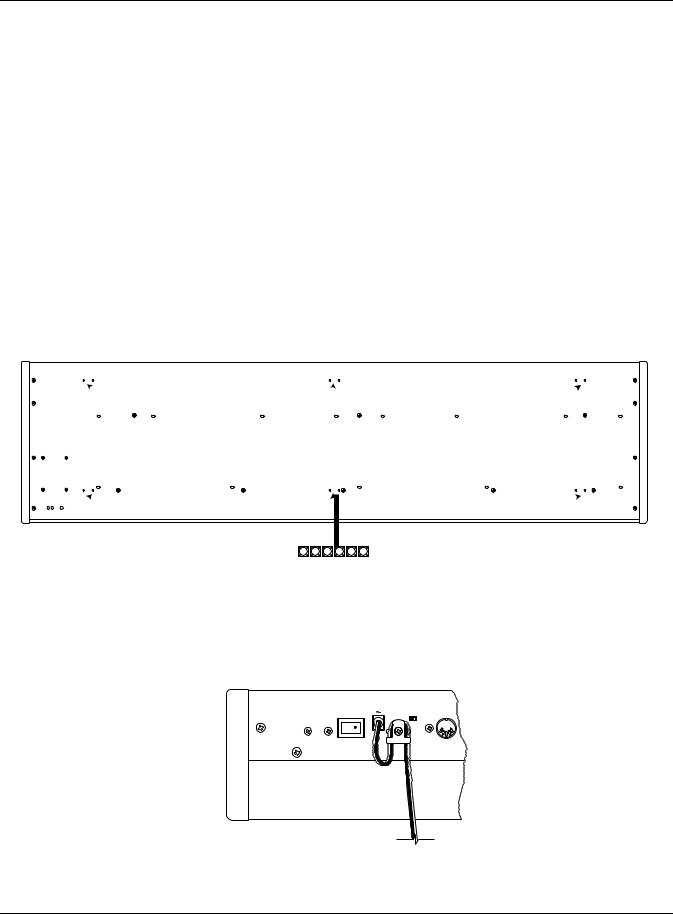
Set the PC88 on a keyboard stand or table. Always make sure the ends are supported — not just the middle. Use the stick-on rubber feet if you’re putting the unit on a flat surface (or even if you might in the future). As shown in the following illustration, pairs of guide holes on the bottom of the PC88 show recommended locations for the feet. Remove the backing paper from each rubber foot, then attach to the bottom of the PC88, just forward of a pair of guide holes.
Plug the audio outputs into your mixer or amplifier, and set your system up to listen in stereo. If you have another MIDI instrument, run a cable from the PC88’s MIDI Out jack to the MIDI In of that synth. Connect the supplied switch pedal to the jack labelled Switch Pedals 1.
Locate the small plug at the end of the wire on the power supply. Locate the 9.5V~AC In socket on the rear panel. Next to the socket is a protruding plastic strain relief “T”. Wrap the wire once, not too tightly, around the strain relief, and insert the plug into the socket, as shown below.
Power |
9.5V |
AC In |
MIDI Select |
MIDI In |
|
|
|
|
Thru |
Out |
|
|
|
.0A |
|
|
|
Use Kurzweil Power |
pply |
95-20 |
y |
|
|
Now plug the large end of the power supply into an AC socket. Turn on the power by pushing in the side of the switch with the white dot. The two-line LCD display in the middle of the instrument comes to life and welcomes you to the PC88. Turn up the audio, and we’re ready to go.
1-2 |
PC88 |
Introducing the PC88
Demo Sequence
Installing the Music Rack
Installing the PC88’s optional music rack is a simple procedure that requires only a Phillips screwdriver. To install the music rack, first remove the four screws on the back panel of the PC88, as shown in the illustration below. Then, use these screws to attach the music rack bracket, making sure that the rounded edge of this bracket is towards the top. When you have installed this bracket, slide the music rack in from the top (as shown in the illustration).
Installing the PC88’s optional music rack.
Demo Sequence
There is an onboard sequence you can play at any time to demonstrate the capabilities of the PC88 and impress your friends. A removable label shows that you start it by pressing the Acoustic Bass and Synth Pad Sound/Setup Select buttons simultaneously (buttons 14 and 16). It will play through to the end, but you can stop it by pressing the buttons again.
If your PC88 has a VGM board and software version 1.1 (or higher), more than one demo sequence is available for your listening pleasure. In this case, several instrument lights will blink after you press buttons 14 and 16 simultaneously, each one representing a different demo. Press any of the blinking lights to listen to one of the demo sequences. We think you’ll want to listen to all the sequences, since they go a long way towards demonstrating the possibilities you have with your PC88.
Musician’s Guide |
1-3 |

Introducing the PC88
Internal Voices
Internal Voices
Let’s explore the onboard instruments. When the PC88 is first turned on, the button labelled Internal Voices in the group of four buttons under the left side of the label Sound/Setup Select, is lit. Now the group of 16 numbered buttons to the immediate right of this can be used to choose from 16 families of instruments. Button number 1, Classical Piano, is lit right now. This is the selected voice; its name appears in the display. Press the other numbered buttons to select among the other voices. While you’re doing that, play with the modulation wheel (the second one in from the left, or “Wheel 2”) and the sustain pedal, and see how the sounds change. On most of the organ sounds, for example, pushing the modulation wheel brings in a rotating speaker effect.
Sound/Setup Select
Internal Voices |
MIDI Setups |
Previous Group |
Next Group |
Classical Piano |
Stage Piano |
Classic E Piano |
Digital E Piano |
Electric Grand |
Piano & Strings |
Strings |
Harpsichord |
1 |
2 |
3 |
4 |
5 |
6 |
7 |
8 |
Acoustic Guitar |
Clav |
Rock Organ |
Jazz Organ |
Vibes |
Acoustic Bass |
Electric Bass |
Synth Pad |
9 |
10 |
11 |
12 |
13 |
14 |
15 |
16 |
To select a different instrument within a family, use the Previous Group and Next Group buttons. Each family contains 4 different instruments, arranged in Groups labelled (as you’ll see on the display) A through D. (Press Previous Group and Next Group simultaneously at any time to return to Group A.) Press the Select button marked Piano & Strings, and then press the Previous Group button until the upper-right corner of the display says A06. This is a layered sound of a bright stage piano and a string pad. Hold a chord and move the slider in the Assignable Controllers section labelled C. Listen to how the timbre changes.
Assigning Controllers
Let’s have Wheel 2 do something else. Find the group of buttons at the top of the panel labelled
Zone Parameters. The topmost right button is labelled Controllers. Press that button so that its light comes on. The top line of the display reads Wheel 1 Up. Now press the Controllers
button again, but this time hold it down while you move the modulation wheel slightly. The display changes to read Wheel 2. This is an example of a feature called “Intuitive Entry” which makes it possible to adjust parameters quickly without having to scroll through pages of them. The PC88’s display now looks like this:
Zone:1|||Wheel|2|||
Ctrl|Num:|1|Mod|Whl
Right now, the lower line on the display tells us that Wheel 2 is controlling Modulation (MIDI Controller #1). Turn the big black knob on the panel under the label Data Entry — we’ll be calling this the “Alpha Wheel” — clockwise until the lower line of the display says Ctrl Num: 10 Pan. Wheel 2 has now been configured as a pan control. Play a passage of short notes while you quickly move the wheel. The notes will appear at different points in the stereo spectrum depending on the position of the wheel.
Exiting from PC88 Menus
You can exit from any PC88 menu by going directly to Internal Voices mode or MIDI Setups mode. You do not have to explicitly exit from the menu; the PC88 will change modes automatically, as soon as you press the Internal Voices or MIDI Setups button. For example, to return to Internal Voices mode without changing the controller assignment in the above example, press Internal Voices (which will begin blinking), then press one of the Sound Select buttons, Harpsichord for example. Notice that the Internal Voices button stops blinking when you select a sound. (Since we didn’t save the controller assignment when we selected this Internal Voice, the wheel resumes its modulation function.)
1-4 |
PC88 |

Introducing the PC88
MIDI Setups
MIDI Setups
We’ve been dealing with one instrument so far, but the PC88 lets us play with four at a time. Multiple instrument setups are called, logically enough, “MIDI Setups”, or just “Setups”. You get to them by pressing the button marked (you guessed it) MIDI Setups. Do it now. It blinks, awaiting your selection of a Setup.
In the Sound/Setup Select section, press the Button numbered 16, and press the Previous Group button until the top line of the display reads "S016 Volume Sliders." This Setup consists of four “zones”, each with its own instrument. You know that four zones are playing, because all four of the Zone buttons to the left of the display (right under the heading Zone Select & Assignable Controllers) are showing green lights. All of the zones in this setup cover the entire keyboard, so any note you play will sound four different instruments simultaneously. Additionally, each of the four zones has an assignable slider programmed to send MIDI Volume commands on its channel. As is common practice (but not required), Sliders A, B, C, and D are controllers for zones 1, 2, 3, and 4, respectively.
The light in each of the Zone buttons can show three colors: green, orange, or red, or it can be off. Green means “active”; orange means “muted”; red means “soloed”; and dark means “off” or inactive. There’s one more mode for a zone, and that’s “current”. The current zone is the one whose parameters are showing in the display. Since you've just selected the setup, the current zone is indicated by a number 1 through 4 on the second line of the display just before the name of the program assigned to that zone. Any zone, regardless of whether it is on or off, can be the current one. The PC88’s display shows you the following right now:
Setup ID |
Setup |
||||
|
number |
name |
|||
|
|
|
|
|
|
|
|
|
|
|
|
S016|Volume|Sliders|
A16|1:Stage|Piano|||
Setup |
Current Zone’s number |
group & button |
& Program name |
Look at the display and see if Zone 1 is current. If is isn't, press the Zone 1 button.
Press the Zone 1 button (again). Its light changes to orange. The zone is now muted, and the next time you play a note, a portion of the sound won’t be audible. Press the Zone 1 button again to make it active (green). To mute any other zone, press its button once to make it current, then again to mute.
To mute all but one zone, press the Solo button to the right of the Zone buttons. It glows red. The current zone’s button also turns red, showing it’s being soloed. Even if the zone was muted, soloing it turns it on. (However, if the zone were off — dark — soloing wouldn't bring it to life.) To solo a different zone, press its button to make it current. To turn off the Solo function, press Solo again.
Let’s edit the Setup. For this tutorial, keep all the sliders up, so you will be able to hear the zones as you work on them. In the Zone Parameters section, select Key Range. As shown
Musician’s Guide |
1-5 |

Introducing the PC88
MIDI Setups
below, the display now shows the current zone and its program number on the top line of the display, and the first two Key Range parameters in the bottom of the display.
Current |
Bank & Program number |
||||
Zone |
for current Zone |
||||
|
|
|
|
|
|
|
|
|
|
|
|
Zone:1||||||0:001|||
Low:C|-1|Hi:G|9|||||
ParaValue ParaValue meter meter
Press the Solo button. We can now work on the key range of Zone 1, without being confused by other zones sounding.
The display tells us that the range of the zone is set to C-1 to G9, which is the entire MIDI range. (For reference, C4 is middle C.) Push the right cursor button immediately under the display (it’s labelled >>>) once, so that the underline cursor on the display is under the “Hi” value. Turn the Alpha wheel counterclockwise until the “Hi” note reads “B2”. Press the Acoustic Bass button in the Sound Select group, and (if necessary) press the Previous Group button until the upper right of the display shows “0:013”. You’ve chosen Internal Voice number 13. The result is that you have an acoustic bass sound that plays from the bottom of the keyboard up to the third B.
Press the Zone 2 button to listen to and work on the second zone (still in Solo mode). Let’s use a different technique to set the key limits of this zone. With the cursor under the “Hi” value, press and hold the Enter button in the numeric keypad to the right of the Alpha wheel. While you’re holding it, play the note B4 (the B above the key marked “C4”). The display shows that the note you’ve played has become the high limit of the zone. Use the <<< button to move the cursor to the Low limit, press and hold Enter, and play C3 (an octave below C4). The low limit is now defined as C3. This is another example of the “Intuitive entry” editing technique.
Now let’s put a different program into this zone. Press the button labelled Strings and the Previous Group button (if necessary) until the display reads 0:006 in the top right corner. You've chosen the first internal string sound for this zone. Go to Zone 3, set the range from C5 (an octave above C4) to B6, and select Digital E Piano as the voice. If you want to see the name of the program, and not just the number, press the Program button. This menu allows you to select any of the programs by scrolling, pressing the sound select buttons, or by typing in program numbers. For now, (if necessary) press the Previous Group button until the display shows Program # 3, Digital EPiano. Note the asterisk (*) next to the Zone number; this tells you that the current Zone is soloed.
Zone:3*|||||0:003|
003|Digital|EPiano
Now you have two octaves of electric piano, but it’s pitched rather high. Press the Transpose button, and move the Alpha wheel counterclockwise until the display says “Transposition: - 12”. This brings the sound of the zone down an octave, without changing its position on the keyboard.
Zone:3*|||||0:003|
Transposition:|-12
For Zone 4, use the top octave of the keyboard (C7-C8), and select your own instrument and transposition. Now you’ve got a complete Setup. Just for fun, change the Hi limit of Zone 2 (the strings) to C8. Since zones can overlap freely, this will extend the string sound so that it acts as a “pad” underneath the sounds in the upper two zones. Now press the Solo button to turn it off, and listen to all four of your newly edited zones.
1-6 |
PC88 |

Introducing the PC88
A Note About the VGM Board and the PC88mx
If you would like to store this Setup, press the Store button, and see "Replace Setup 16?" Now, move the alpha wheel clockwise until it stops asking to replace existing setups, and instead says, "Save Setup 33? (or "Save Setup 65?" if you have VGM installed). Press the Enter button now, and it will save the new Setup.
Exiting Without Changing a Setup
If you don’t want to save the Setup, press MIDI Setups followed by the sound select button that lights up when you press MIDI Setups; this returns you to the unedited Setup. Alternatively, you can go directly to Internal Voices mode (without saving the edits you made to the Setup) by pressing Internal Voices followed by one of the sound select buttons. More details about naming and saving setups may be found in Chapter 5
Effects
Our last stop on this get-acquainted tour is setting the effects. You may have noticed as you were changing instruments in the Internal Voices mode that the Effects lights changed as well, and so did the reverb and chorus. The PC88 is capable of generating a huge variety of reverb and delay effects, and each Internal Voice comes with its own effect assigned to it.
Effects
|
|
Room |
|
Bright |
|
Chorus 1 |
|
|
|
|
|
||||
|
|
Stage |
|
Normal |
|
Chorus 2 |
|
|
|
Hall |
|
Warm |
|
Delay |
|
|
|
|
|
|
|
|
|
|
|
|
|
|
|
|
|
You can change the effect assigned to a Voice. Go back to Internal Voices mode. Press the leftmost button under the Effects label to toggle among Room, Stage, and Hall-type reverbs. The lights show what you have selected. You can also select no reverb at all: the lights go off. The middle button lets you adjust the tone color of the reverb: Bright, Normal, or Warm. The right button lets you choose from among two Chorus effects, a Delay, or no effect. The reverb and the effects selections are independent of each other, so you can use one without the other. The effects settings are remembered with each Internal Voice, so if you select a different Voice and then come back to this one, the effects will be as you left them.
Just the Beginning!
That’s the quick tour, which should give you some idea of the capabilities of the PC88. If anything we’ve covered so far was confusing, or you have questions about any aspect of what you’ve just done, feel free to jump around this manual to look up the things that interest you. In the next chapter we’ll start again from the beginning, in depth.
A Note About the VGM Board and the PC88mx
The PC88 has many important extra features when the optional VGM™ (Voice/GM expansion) board is installed, although the basic operation is the same with or without the board. In those places in the manual where a special explanation is needed for a VGM board feature, we’ve put the VGM logo in the margin. By the way, when you start up the PC88 a message will appear on its display to indicate whether or not a VGM board is installed.
The PC88mx model comes with the VGM board already installed. Refer to the sections of this manual with the VGM logo in the margin for information on the PC88mx’s features.
Musician’s Guide |
1-7 |

Introducing the PC88
Checking Battery Voltage Level
Checking Battery Voltage Level
Your PC88 stores Setups you’ve created, as well as information about your effects and group preferences, in internal memory. This memory is backed by a lithium battery that will last 3-5 years. Although a start-up message alerts you to a low battery level, you may want to check the battery voltage from time to time. As a safeguard, you may want to back up your Setups to an external device with the Dump all Setups option on the Global menu.
Internal Voices and ROM Setups are not dependent on battery-backed memory.
To check the battery level:
1.Press the 4, 5, and 6 buttons simultaneously. The top line of the PC88’s display will look something like this:
SCAN|2.4|W=123|B=2.9
2.Check the part of the display labelled “B=x.x”. This is the battery voltage level. It should normally be 2.8 or higher. When this value declines to 2.4 or below, you should have your Kurzweil dealer replace the battery. Note that when the battery voltage level is 2.4 there is less than two months of battery life remaining; when the battery voltage level is 2.0 or below, memory failure is likely.
3.Press Cancel and Enter simultaneously to return to normal PC88 operation.
1-8 |
PC88 |

Setup, Connections, and Controls
Connections
Chapter 2
Setup, Connections, and Controls
Setting Up the PC88
The PC88 is designed to be portable, and therefore doesn’t come with its own stand. You can use a conventional keyboard stand that is strong enough to hold the unit’s weight (about 55 pounds). Other methods of supporting it can be used, but make sure that the two ends are equally well-supported—don’t just lay it on top of a chair in the middle. It’s a good idea to use the stick-on rubber feet even if you are going to be putting the PC88 on a metal stand — you never know when you’ll have to put it down on a table. Just make sure the feet don’t get in the way of the stand’s supports. A figure in Chapter 1 illustrates the recommended attachment points for the feet.
Connections
Power
Power is supplied by an external AC power supply (it helps the balance and keeps the weight down, since you asked). Use only the unit supplied with your PC88, and make sure the power switch on the rear panel of the PC88 is off— the side with the white dot is out— before connecting the power supply.
The black box containing the transformer plugs into a wall socket or power strip, and the small plug on the end of the wire goes into the jack marked 9.5V~AC In on the rear panel. A protruding plastic strain relief is next to the power socket — wrap the wire once around it before plugging it into the jack, and this will prevent damage should the cord ever be yanked. A figure in the “Setup” section of Chapter 1 shows how to do this.
If you are using the PC88 in a different country from the one you bought it in, make sure the power supply is the correct one for that country’s AC power. Contact your dealer for information.
Audio
Audio connections are 1/4-inch, unbalanced, for use with a standard instrument amplifier or mixer. To use the PC88 with a hi-fi system, you will need cables with 1/4” jacks on one end, and RCA (phono) plugs on the other. Use only the Left (Mono) jack if you want to listen in mono
— for example, if you have only a one-speaker instrument amplifier, or only a single mixer channel available. Use both jacks for stereo.
|
Audio Outs |
|
Left (Mono) |
Right |
Headphones |
The headphone jack carries the same signal as the main outputs, and is useful for solo practicing or monitoring. It provides a stereo signal, using a standard 1/4-inch tip/ring/sleeve configuration. Plugging it in does not disconnect the main outputs.
Musician’s Guide |
2-1 |

Setup, Connections, and Controls
Connections
Pedals
The PC88 has jacks for connecting up to four external control pedals (Continuous Control Pedals) and two foot switches (Switch Pedals). The control pedals are typically used for continuous functions like volume or stereo pan, while the switches are used for on/off operations like sustain, sostenuto, or to shift to the next setup. The action of every pedal is programmable within each zone: a pedal may have one function in one zone, and a totally different function — even a directly opposite function — in another zone.
Switch Pedals |
|
|
|
Continuous Control Pedals |
|
||
|
|
|
|
||||
1 |
2 |
1 |
2 |
3 |
4 |
||
There’s no need to connect the pedals in any particular order — you can have any combination of pedals plugged in and active at any time.
The control pedals should be 10kΩ linear-taper potentiometers, with 1/4” tip/ring/sleeve plugs. These are available from Kurzweil/Young Chang (Model CC-1), as well as other manufacturers. The switch pedals use two-conductor 1/4” plugs. Either normally-on or normally-off switches can be used: the PC88 will sense what kind of switch is plugged into each jack when it powers up, and will set itself accordingly. Therefore, it’s a good idea to have any switch pedals that you plan to use plugged in when you turn the power on. (Don’t press the pedal while you’re turning the unit on, however, or you may end up with something that works upside-down.) Three models of switch pedals are also available from Kurzweil/Young Chang: FS-1, a conventional pedal; KFP-1, a piano-style; and KFP-2M, a dual piano-style pedal.
The Internal Voices have default settings for many of the PC88’s pedal controllers:
Controller |
Default setting |
|
|
Switch Pedal 1 |
Controller #64 (“Sustain”) |
|
|
Switch Pedal 2 |
Controller #66 (“Sostenuto”) |
|
|
Continuous Control Pedal 1 |
MIDI Controller #11 (“Expression”) |
|
|
Continuous Control Pedal 2 |
Controller #4 (“Foot Pedal”) |
|
|
Continuous Control Pedal 3 |
None |
|
|
Continuous Control Pedal 4 |
None |
|
|
MIDI
The MIDI In jack is used when you are using the PC88 with another MIDI controller device, such as a keyboard, guitar, wind controller, or drum pad; or with a sequencer. Connect the MIDI Out of the device or sequencer to the MIDI In of the PC88. The PC88 can receive 16 separate channels of MIDI data through the MIDI In jack.
MIDI Out is used when the PC88 is acting as a controller for one or more other instruments, or for a sequencer. MIDI data being created by the PC88 is sent through this jack. The PC88 can send information on up to four MIDI channels simultaneously, depending on the configuration of the keyboard zones.
2-2 |
PC88 |

Setup, Connections, and Controls
Front Panel Controls
MIDI Thru/Out serves two functions, depending on the position of the recessed slide switch (MIDI Select) to the left of the MIDI In jack. In the Out position, the jack doubles as a second Out jack, and sends MIDI data being created by the PC88. Since you can’t just split a MIDI line with a Y-cable, having a second Out jack makes it more convenient to hook up multiple instruments that are being driven directly from the PC88. In the Thru position, this jack sends MIDI data which is being sent to the PC88—echoing what appears at the MIDI In jack (without any delay)—but not data being generated by the PC88 itself. In this configuration, you can “daisy-chain” multiple MIDI instruments which are under the control of something else, like a sequencer, through the PC88. There is also a special “Merge” feature that combines these functions. We’ll talk about it in Chapter 9.
Front Panel Controls
|
Zone Select & Assignable Controllers |
|
|
|
|
|
|
|
Zone Parameters |
|
|
|
|
|
|
Data |
Entry |
|
|
|||
|
Zone 1 |
Zone 2 |
Zone 3 |
Zone 4 |
Solo |
|
|
|
|
|
MIDI Transmit |
Program |
Key Range |
Transpose |
Velocity |
Controllers |
Panic |
|
|
|
|
|
|
|
|
|
|
|
|
|
|
|
|
|
|
|
|
|
|
|
|
|
1 |
2 |
3 |
Master Volume |
|
|
|
|
|
|
|
|
|
|
Arpeggiator |
Effects |
MIDI Receive |
Global |
Copy |
Store |
|
|
|
ABC |
DEF |
GHI |
A |
B |
C |
D |
|
|
|
|
|
|
|
|
|
|
|
|
|
|
|
|
|
|
|
|
|
|
|
|
|
|
|
|
|
|
|
|
|
|
|
|
|
|
|
4 |
5 |
6 |
|
|
|
|
|
|
|
< < < |
> > > |
|
|
|
|
|
|
|
|
|
|
|
JKL |
MNO |
PQR |
|
|
|
|
|
|
|
|
|
|
|
|
|
|
|
|
|
|
|
|
|
||
|
|
|
|
|
|
|
|
|
|
|
|
|
|
|
|
|
|
|
|
7 |
8 |
9 |
|
|
|
|
|
E |
|
|
|
|
|
|
|
|
|
|
|
|
|
|
STU |
VWX |
YZ |
|
|
|
|
|
|
|
|
|
|
|
|
|
|
|
|
|
|
|
|
|
|
|
|
|
|
|
|
|
Sound/Setup Select |
|
|
|
|
|
|
|
|
|
Effects |
|
|
+/- |
0 |
Clear |
|
|
|
|
|
|
|
|
|
|
|
|
|
|
|
|
|
|
|
|
|
|||
|
|
|
|
|
F |
Internal Voices |
MIDI Setups |
Classical Piano |
Stage Piano |
Classic E Piano |
Digital E Piano |
Electric Grand Piano & Strings |
Strings |
Harpsichord |
Room |
Bright |
Chorus 1 |
UPPER/lower |
0 - 9 |
Space |
||
|
|
|
|
|
|
|
|
1 |
2 |
3 |
4 |
5 |
6 |
|
7 |
8 |
Stage |
Normal |
Chorus 2 |
Cancel |
|
Enter |
|
|
|
|
|
G |
Previous Group |
Next Group |
Acoustic Guitar |
Clav |
Rock Organ |
Jazz Organ |
Vibes |
Acoustic Bass Electric Bass |
Synth Pad |
Hall |
Warm |
Delay |
No |
|
Yes |
||
|
|
|
|
|
|
|
|
|
||||||||||||||
|
|
|
|
|
|
|
|
9 |
10 |
11 |
12 |
13 |
14 |
|
15 |
16 |
|
|
|
|
|
|
Display (LCD)
The LCD display is your “window” into the PC88. In two lines of text and numbers, it tells you what you need to know about the settings and functions of the instrument. You can adjust the contrast of the LCD to accommodate different playing positions, by using the small black knob on the back panel of the PC88. The illustration below shows the location of this knob (labelled LCD Contrast Adj.), between the MIDI jacks and the pedal jacks.
MIDI In |
MIDI Thru/Out MIDI Out |
LCD |
Switch Pedals |
|
|
|
Contrast Adj. |
1 |
2 |
Cursor Buttons
Directly below the display are two buttons marked <<< and >>>. These are the cursor buttons. When you are making adjustments to parameters, these let you move among the parameters within a “menu”. Pressing the right or left button changes the display to show the next or previous parameter in the menu. The value of the parameter is then changed with the Alpha wheel or the keypad, or by using Intuitive Entry.
Sometimes there will be two parameters on the display at once, for example (as we’ve seen) when setting the key range of a zone. The cursor buttons will let you select which parameter to adjust.
The cursor buttons have a “repeat” characteristic — if you press and hold one down, it will scroll quickly through the list of parameters on the menu.
When the menu is long, such as when you are assigning MIDI controllers to the PC88’s physical controllers (wheels, sliders, etc.), or when you are editing effects, the cursor buttons have a “jump” feature: press both of them at the same time, and the display jumps to a parameter some distance down the list. We’ll deal with exactly how this works in the appropriate sections.
Musician’s Guide |
2-3 |

Setup, Connections, and Controls
Front Panel Controls
Sound/Setup Select
These two groups of buttons — four on the left, 16 on the right — are the principal ways to switch among sounds and configurations of the PC88.
The PC88 plays in one of two modes. In the Internal Voices mode, the instrument is a singlesound keyboard instrument that transmits on a single MIDI channel. The MIDI Setups (or just “Setups”) mode turns it into a four-part multi-timbral synth and controller, with independent MIDI transmission on four different channels. These two buttons select between the two modes. (When it comes to receiving MIDI data, the PC88 is capable of receiving multi-timbrally on 16 MIDI channels, regardless of which mode it is playing in.)
In the Internal Voices mode, the 16 numbered buttons select among 16 types of sounds. They are also labelled with instrument names, showing you the type of instrument that will be selected. Other groups contain different, but related instrument sounds. To get to them, you can press the Next Group or Previous Group buttons. If the current instrument is “Clavinet” (#9), pressing Next Group will call up “Stereo Clav” (#25), and pressing it again will call up “Super Clav” (#41). Each sound “family” contains a total of four variations. The groups are labelled A, B, C, and D, and these labels appear at the upper right of the display.
The PC88 remembers the group that your last selection of any instrument came from. Say, for example, you press Classical Piano, and then Next Group to hear Voice #16 “Class Piano 440”. The display shows “B01”, meaning you’re in group B, Voice 1. Then select another Voice in a different group — say #11, “Jazz Organ 1, A12”. The next time you select Classical Piano, it will remember that the Classical Piano Voice you last used was from group B, and it will call up “Class Piano 440”, not some other Classical Piano sound from another group. For your convenience, the PC88 even remembers your group selections across power cycles.
In Setup mode, the Select buttons work in a similar way, except that because all setups are userprogrammable, there’s no direct correspondence between the names printed on the panel and any of the Setups. Furthermore, they do not remember the group that your last selection came from. There is room for 128 Setups in the PC88, and they are arranged in groups A through H, with the group letter at the bottom left of the display. Unlike Internal Voices, Setups in different groups that share a common number are not necessarily related.
Zone Buttons
Moving to the left of the display, immediately under the label Zone Select and Assignable Controllers are the four Zone buttons. These have several functions. They turn zones on and off, they select which zone will be “current” and thus have its parameters adjusted, and they select zones for soloing. The Zone buttons contain three-color LEDs. When the LED is green, the zone is on (active). When it is orange, it is muted. When it is red, it is being soloed, and when it is dark, the zone is off or inactive.
Remember that zones are only operative in MIDI Setup mode. In Internal Voices mode, only Zone 1 is used.
To select a zone for editing, press its button once. The number of the zone shows up on the display, showing that it’s the “current” Zone. If you are not in Zone Parameters mode, the zone number is displayed on the second line, next to the program name. If you are working on parameters, the zone number is on the first line. Next to it may be a character: if the zone is muted there will be a “-”, while if it is soloed, there will be a “*”.
active: |
muted : |
soloed: |
Zone:1 |
Zone:1- |
Zone:1* |
|
|
|
2-4 |
|
PC88 |
Setup, Connections, and Controls
Front Panel Controls
Once a Zone is selected, its button acts as a mute/unmute toggle. Press it once and it turns orange, and mutes. Press it again, and it un-mutes, becoming active and turning green.
The Solo button to the right of the Zone buttons mutes all zones except the current one. The button of the zone being soloed will glow red.
Zone Parameters
Moving to the top of the panel, we find 12 buttons. The first row of six are for accessing parameters within each of the four zones of a Setup, while the ones in the bottom row are for dealing with Setup parameters, global settings, and memory functions. Each of these buttons opens up a list, or “menu” of parameters. Some of the menus are very short — as short as a single item — while others have several dozen parameters.
Zone Parameters
MIDI Transmit |
Program |
Key Range |
Transpose |
Velocity |
Controllers |
Arpeggiator |
Effects |
MIDI Receive |
Global |
Copy |
Store |
Chapters 4 and 5 have complete descriptions of using zones and zone parameters, so for now we’ll give a brief summary of these menus.
MIDI Transmit determines the MIDI channel the zone will send on, as well as the “destination” of the played data: whether it goes to the internal sounds and/or the MIDI Out jack. Also, the pitchbend range of the Zone’s destination channel is set here.
Program selects what voice, or program, will be used in the zone. It also lets you determine whether a MIDI program change will be sent when the setup is called up; whether a MIDI Bank Select message will be sent and what form it takes; and how program numbers and names will be displayed for the voice assigned to the zone.
Key Range sets the high and low limits for the zone. It also lets you set up “maps” for sending alternately-played notes to different zones. This is important when you are using the special “64-Note Poly” bank on the VGM board. It can also be used when you are driving multiple similar instruments and want to have them handle the same data, but in such a way that their polyphonic capabilities complement each other and add up.
Transpose changes the pitch of the zone up or down, up to 127 semitones.
Velocity opens a large menu with parameters relating to how the keyboard generates velocity information. You can adjust velocity scaling from none — the same velocity value is always sent — to three times normal, to three times normal but upside-down. You can also set the curve used for the scaling, the offset from normal, and minimum and maximum values.
Controllers opens the largest menu. These parameters determine how the PC88’s physical controllers — the wheels, sliders, pressure, pedals, and programmable buttons—work. In addition to specifying which MIDI controller (or other performance parameter, like pitchbend) is sent, this menu also determines for each controller scaling, curves, offsets, and the values that the controller will send — if any — when you enter or leave the setup.
The Controllers button has its own special “Intuitive Entry” mode, which we’ll explain a little later in this chapter.
The buttons on the second row are not Zone-specific, but are considered “Global”. Chapters 5 through 9 describe these buttons completely.
Musician’s Guide |
2-5 |

Setup, Connections, and Controls
Front Panel Controls
The first one is Arpeggiator. The PC88 has a sophisticated arpeggiator for live performance or sequencing or just fooling around. The menu includes controls for tempo, interval, note duration, and direction. Each Setup has its own Arpeggiator settings. See Chapter 6.
Effects lets you edit the on-board reverb, chorus, and delay. Each Setup has one set of Effects parameters associated with it. The effects are editable — see Chapter 7.
MIDI Receive turns on and off individual MIDI channels in the PC88, and also shows which program is assigned to each channel, when you’re using an external sequencer. Chapter 8 discusses using a sequencer with the PC88.
The Global button’s menu includes many parameters for both local and MIDI operation; they are detailed in Chapter 9. These include:
•Turning local control on and off for the entire instrument, which is very useful in a sequencer setup.
•Allowing synchronization to external clocks.
•Turning on and off the PC88’s MIDI Clock generator.
•Adjusting the feel of the keyboard.
•Indicating whether or not you want effects to change when you change voices or Setups.
•Setting a parameter that tells the instrument to change Setups immediately whenever it receives an appropriate command, or to wait before changing until all of the keys being played are released.
•Using an external MIDI device to change the PC88’s setups.
•Rerouting incoming MIDI data according to the channel and key limit parameters of the current Setup, or merging incoming MIDI data with generated data at the MIDI Out jack.
•Adjusting the master tuning of the PC88.
•Setting a transposition interval for received MIDI notes.
•Determining how Bank Select messages will be received by the PC88.
•Accepting or ignoring All Notes Off commands, which can be a problem with some external keyboards.
•Turning on and off the General MIDI mode in the PC88 (if the VGM board is present) and also in any other General MIDI modules connected to the PC88’s MIDI output.
•Assigning device ID in multi-PC88 environments.
•Transmitting button presses as MIDI System Exclusive commands.
•Transmitting PC88 effects settings to a sequencer.
•Displaying the amount of user memory currently available.
•Performing a “hard reset”, which returns the PC88 to its original factory state. Be careful with this: you will lose any Setups or any other edits that you’ve stored.
•Dumping all Setups in memory as System Exclusive data.
•Monitoring generated and incoming MIDI data with a built-in utility known as MIDIScope.
Copy allows you to duplicate groups of parameters from one zone to another (and sometimes even within a zone), so that you can quickly create zones with similar characteristics. It works in several modes: it will either copy all of a Zone’s parameters, or only those in a specific subset. You can also use the “Clear” function at the end of each copy menu to copy information that is stored in Setup 128. This setup has default parameter information stored in it, though you can overwrite this setup with your own, creating your own “default” parameter settings. A full explanation is in Chapter 5.
Store is the button for saving Setups to internal memory. Press it once and use the Data Entry controls to select a location to store the Setup to, then press Enter to make it so. Also from this menu you can delete and rename Setups, and dump them over MIDI System Exclusive. See Chapter 5.
2-6 |
PC88 |

Setup, Connections, and Controls
Front Panel Controls
Data Entry
The Data Entry section is used to set the various parameters associated with a Voice or a Setup. It consists of three parts: the Alpha wheel, the decrement/increment buttons (- and +), and the numeric keypad.
Data Entry
1 |
2 |
3 |
ABC |
DEF |
GHI |
4 |
5 |
6 |
JKL |
MNO |
PQR |
7 |
8 |
9 |
STU |
VWX |
YZ |
+/- |
0 |
Clear |
UPPER/lower |
0 - 9 |
Space |
Cancel |
|
Enter |
No |
|
Yes |
•The Alpha Wheel is used to move rapidly through lists of voices and setups, to select them for playing or modification. It also sets parameter values when you are in Parameter mode. It has no markings of its own, but refers to what is showing in the display. You can move it either clockwise or counterclockwise without limit.
•The decrement/increment buttons complement the Alpha wheel by providing a quick way to make small adjustments, once the Alpha wheel has gotten you into the neighborhood of where you want to be. The buttons are auto-repeating: hold them down and they will continue to increment or decrement. In Parameter mode, they also have an “automatic reset” feature: press both simultaneously, and whatever parameter is showing on the display will return to its default setting.
•The numeric keypad is useful for when you know the exact number of the voice, setup, or parameter value you want. For example, if you know that you want to set a zone to transpose up four octaves (48 semitones), press the Transpose button, then enter the numbers 4 and 8 from the keypad. Then press Enter, and the display shows “Transposition: 48”. The “+/-” button is used to enter negative numbers. Use the “+/-” button any time before you press Enter: e.g., to enter -100, you can press +/-, 1, 0, 0, Enter; or 1, +/-, 0, 0, Enter; or 1, 0, 0, +/-, Enter; etc.
The +/- button has a secondary use when entering program numbers with banks: it acts as a separator between the bank number and the program number, and puts a colon (“:”) in the display. More on this in Chapters 3 and 9.
If you make a mistake with the numeric keypad, press Clear and everything you’ve entered is erased. If you decide you don’t want to change the parameter or voice after all, press Cancel and the display goes back to whatever it was showing previously.
•The numeric keyboard is also an alphabetical keypad, and is used to name Setups. More on this in Chapter 5.
•The Enter and Cancel buttons act as “Yes” and “No” for when the display asks you a question. The Enter button is also used in Intuitive Entry mode.
Intuitive Entry
The PC88 includes a feature called “Intuitive Entry”. This has three modes: in one, when a parameter is being displayed, you can enter a value for it using a physical controller or key, thus avoiding the Alpha wheel and numeric keypad. In the second, you can avoid scrolling
Musician’s Guide |
2-7 |

Setup, Connections, and Controls
Front Panel Controls
through long lists of parameters to find the one you want to adjust. In the third, you can instantly select a MIDI Receive channel to audition and edit. (We’ll refer to the more conventional way of getting around the instrument as “Direct Entry”.)
Value setting
The “value setting” mode of Intuitive Entry lets you use any physical controller (including the keyboard) to adjust a parameter shown on the display. Press and hold down the Enter button (on the numeric keypad) and move any controller or play a note. The value of the parameter will change to reflect the position of the controller or the number of the note.
Here’s an example. Press Transpose. With Direct Entry, you would move the Alpha wheel to set the value of this parameter. Press and hold Enter, and move one of the four controller sliders — it doesn’t matter which. Watch the Transpose value in the display change. The slider covers the entire range from -127 to 127.
Here’s another. Press Key Range (under Zone Parameters) to look at the key range of the current zone. Hold down the Enter button, and play a note. That note is now the low limit of the range. Press the right cursor (>>>) button, press and hold Enter again, and play another note. This sets the high limit. And one more example. Press Controllers. The display says “Wheel 1 Up/Ctrl Num: Pitch Up”. Moving the Alpha wheel clockwise will scroll you through a dozen or so assorted functions, while moving it counter-clockwise will scroll down through 128 MIDI controllers. Getting to something at the the other end of the list can be pretty timeconsuming, so there’s an alternative: press and hold Enter, grab a slider, and shove it to the bottom of its range. You’re now at the beginning of the list: “None”. If you’d like to be somewhere else in the list, move the slider accordingly.
At all times, the Alpha Wheel and + and – buttons are active, so if Intuitive Entry doesn’t get you exactly where you want to go, you can make fine adjustments with them. Any continuous foot pedals can be used to perform Intuitive Entry, and so can the modulation and pitch wheels.
Parameter Selecting
The second way to use Intuitive Entry is used only when assigning physical controllers. Normally, when you press the Controllers button, the display shows “Wheel 1 Up”, and you can now assign a MIDI command to the upper half of the pitch wheel. If you want to adjust a different physical controller, you have to use the cursor buttons to scroll through the entire menu of parameters for each controller: a half-dozen or so parameters for 17 physical controllers.
You can speed up the process by holding down the cursor button and letting it auto-repeat, but there’s an even faster way: press and hold the Controllers button, and while you’re holding, move the physical controller you want to work on. The display will jump to the first parameter for that controller. This works with all of the programmable sliders, buttons, wheels, pedals, and switch pedals, and it also works with keyboard pressure: hold the Controllers button, and press hard on any note. The display will jump to “MPressure” (mono pressure), and you can set its assignment.
MIDI Receive
The third Intuitive Entry mode is used when setting the MIDI Receive channels. Setting these channels is important when using the PC88 with a sequencer, and a complete explanation is in Chapter 8. To choose a channel quickly, either to inspect, audition, or edit, press and hold the MIDI Receive button, and then one of the numbered Voice buttons. The display will jump to the channel corresponding to the number of the Voice button.
2-8 |
PC88 |

Setup, Connections, and Controls
Front Panel Controls
Jump Editing
While we’re on the subject of moving around the Controllers menu quickly, there’s one more technique to discuss. If you want to adjust the same parameter (for example, Scale) in different physical controllers, there’s another way to get where you want to go without scrolling the entire list. If you press both cursor buttons simultaneously, the display will jump to the same parameter for the next controller on the list. So if you are working on the offset for Slider A, as shown here:
Zone:2||Slider|A|
Ctrl|Scale:|25|%|
and you want to see what the offset on Slider B is set to, simultaneously press both cursor buttons (<<< and >>>) and the offset for Slider B shows on the display:
Zone:2||Slider|B|
Ctrl|Scale:|110|%
Repeated double-pressings will take you through all of the physical controllers. What happens when you get to the end? It stops — but you can go immediately to the beginning of the list (Wheel 1 Up) by simply pressing the Controllers button.
Assignable Controllers, Buttons, and Wheels
The sliders underneath the zone buttons (labelled A, B, C, and D); the three buttons to the right of the sliders (labelled E, F, and G); and the two wheels at the far left of the keyboard are all assignable to different MIDI (and PC88) functions, just like the Pedals and Switch Pedals. The buttons can be configured as momentary (they only stay on when they are being pressed) or toggle (they alternate between two different states each time you press). They contain red LED’s whose action conforms to their current configuration: the LED in a momentary only lights while you hold it, while the LED in a toggle will alternate on and off with each press.
The first wheel, which is most commonly used for pitchbend, can have different effects depending on which way you push it: up from the center resting place, or down. The second wheel has one continuous effect over its whole range.
The sliders, buttons, and wheels are all assignable on a per-zone basis, so not only can they do different things in different setups, they may also do different things within a setup. For example, a slider may send out Controller #7 (MIDI Volume) to one zone’s MIDI channel, and at the same time send Controller #10 (Pan) to another zone’s MIDI channel. Much more on this in Chapter 5.
Like the pedals, there are default settings for the assignable controllers that come with the factory Setups.
|
Controller |
Default Setting |
|
|
|
|
|
|
Wheel 1 Up |
Pitchbend up (values above 64) |
|
|
|
|
|
|
Wheel 1 Down |
Pitchbend down (values below 64) |
|
|
|
|
|
|
Wheel 2 |
Controller #1 (Modulation) |
|
|
|
|
|
|
Slider A |
Controller #91 (Reverb Depth) |
|
|
|
|
|
|
Slider B |
Controller #93 (Effects Depth) |
|
|
|
|
|
|
|
|
|
Musician’s Guide |
2-9 |

Setup, Connections, and Controls
Front Panel Controls
Controller |
Default Setting |
|
|
Slider C |
Controller #4 (Foot Pedal - same as Pedal 2) |
|
|
Slider D |
Controller #72 (Envelope Control) |
|
|
Button E |
Controller #71 (Sound Control 2) |
|
|
Button F |
None |
|
|
Button G |
Controller #119 (Arpeggiator Latch 1) |
|
|
Master Volume
This slider is not programmable. It does exactly what you think it does: set the level for both the main outputs and the headphone output. It does not generate MIDI Volume commands or any other MIDI data.
Panic
Pressing the Panic button is the fastest way to get all sound, both within the PC88 and in any MIDI devices that it is connected to, to stop. It immediately releases all notes in the PC88, plus it sends the MIDI messages “All Notes Off” and “Reset All Controllers” on all 16 MIDI channels to the MIDI Out jack. If you hold the button down for a few seconds, it additionally sends out pitchbend resets (pitchbend value of 64), and note-off commands for every note on all 16 channels (that’s 2048 note-offs, in case you’re counting). Panic is your friend. It can be used to reset your entire MIDI setup to a known state, if you ever need to do that (which can happen pretty often with a complex setup). If you find yourself stuck in MIDI Purgatory, and notes that you don’t want are sounding from who knows where, the Panic button can even save your life (and your audience’s ears).
Effects
The three buttons in the Effects section allow you to switch among several combinations of effects. The first button selects the type of reverb: pressing it repeatedly toggles through Room, Stage and Hall reverbs, in order of increasing reverb time and level. The light indicates the current setting. Press the button yet again, and no light shines, indicating that reverb has been turned off. The second button controls the tone of the reverb: Bright emphasizes the highfrequency components of the reverb, for simulating a room with hard surfaces; Normal plays the reverb “flat”; and Warm emphasizes the low frequencies in the reverb, for simulating a room with soft surfaces, such as furniture or curtains. When the first button has shut the reverb off, none of the tone lights will be lit.
The third button selects the chorus or delay effect. It has four choices: Chorus 1, which imparts a two-voice chorus onto the sound; Chorus 2, a more complex four-voice chorus; Delay, which produces an echo effect; and off. The settings of the reverb and chorus/delay controls are independent of each other, and one can be used freely with or without the other. If you change the settings on an Internal Voice, the change is remembered, and the new settings will appear every time you call up that Internal Voice. Similarly, in Setup mode, the effects settings are automatically stored along with a Setup when you perform a Store operation. Besides these simple adjustments, there are many more ways to modify the effects in the PC88. See Chapter 7 for details.
2-10 |
PC88 |
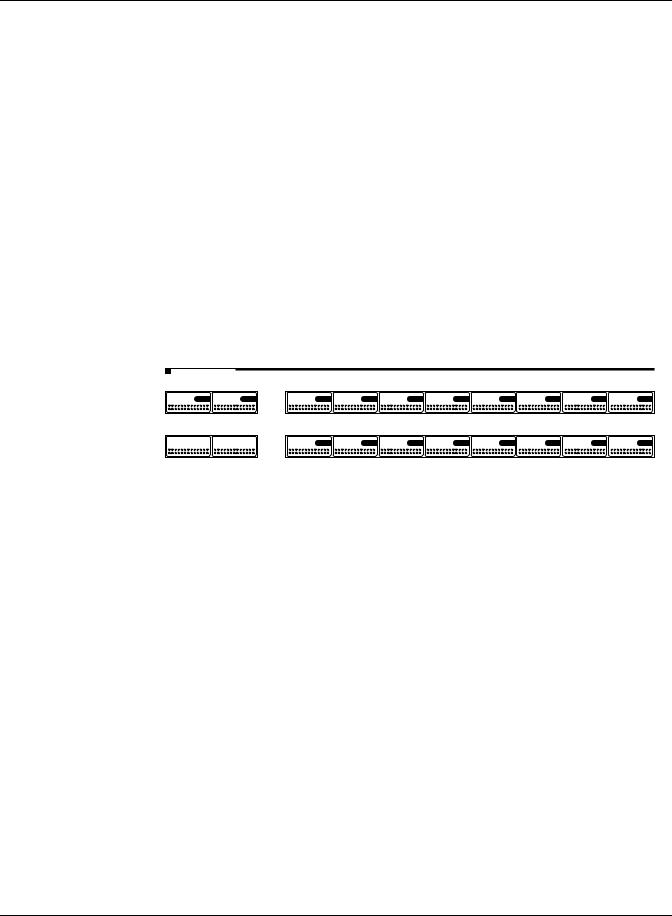
Internal Voices
Chapter 3
Internal Voices
Internal Voices mode lets you play one sound at a time across the PC88 keyboard. The PC88 transmits on one MIDI channel, and all of its real-time controls are assigned to that channel. You might think of the Internal Voices mode as the PC88’s “digital piano” mode: it is the simplest way to use the unit, especially for live performance or teaching. In MIDI Setups mode, up to four “Zones” can be active at once, but in Internal Voices mode the PC88 is operating as a single Zone. (However, in either mode, the PC88 can receive MIDI data on 16 channels simultaneously.) If your unit has the optional VGM board installed, the Internal Voices mode is considerably enhanced. We’ll deal with those features at the end of this chapter.
When you turn the power on to the PC88, it “wakes up” in Internal Voices mode. To enter this mode from the other mode (“MIDI Setups”), press the Internal Voices button. Its green LED blinks until you select a sound by pressing a voice button.
Sound/Setup Select
Internal Voices |
MIDI Setups |
Previous Group |
Next Group |
Classical Piano |
Stage Piano |
Classic E Piano |
Digital E Piano |
Electric Grand |
Piano & Strings |
Strings |
Harpsichord |
1 |
2 |
3 |
4 |
5 |
6 |
7 |
8 |
Acoustic Guitar |
Clav |
Rock Organ |
Jazz Organ |
Vibes |
Acoustic Bass |
Electric Bass |
Synth Pad |
9 |
10 |
11 |
12 |
13 |
14 |
15 |
16 |
Each voice button is labelled with the name of the types of sounds it provides. The display for each sound shows its name (e.g., “Classical Piano”), a number (e.g.,“000”) and a “Group/ Preset” number (e.g.,“A01”). For example, here’s the display for the “Tack Piano” voice:
1:Internal|Voice|D02
049|Tack|Piano||||||
Pressing a different voice button selects another sound — for example, Jazz Organ brings up the voice “Jazz Organ 1”, which is “A12”. Pressing the Next Group button calls up another sound of the same type: “Jazz Organ 2”. The Group/Preset number of this new sound is “B12”, meaning you are playing sound number 12 in the B Group. Repeatedly pressing the Next Group button will take you through the rest of the Groups: there are more organ sounds in Groups C and D. To go back to lower-numbered groups, use the Previous Group button. Or, you can press Previous Group and Next Group simultaneously to return to the A group from any of the other groups.
Press the voice buttons, and see what is in the different Groups associated with each one. There are 64 factory-programmed internal voices in the PC88, filling Groups A through D. The groups of voices are shown in an illustration on the following page, and are detailed in Appendix A.
When you select an Internal Voice and a Group, the PC88 remembers the association between the Voice and the Group, and will go back to the same Group the next time you select that Voice. Here’s an example: If you are playing Jazz Organ 2, which is in Group B, and you press Vibes and Next Group to access the Vibes-related sound in Group C (which happens to be Marimba), then go back to Jazz Organ, what will be recalled will be Jazz Organ 2, in Group B — not the organ sound in Group C. Press Vibes again, and Marimba in group C appears — the association of that button with that Group is remembered as well. This feature allows you to choose 16 of your favorite Internal Voices and make them all accessible with single buttonpushes; you don’t have to remember that the Electric Piano sound you like comes from group D, while those cool Strings are in group A, but the nice Piano & Strings is in group B, and so on.
Musician’s Guide |
3-1 |

Internal Voices
Program Numbers and Other Ways of Selecting Voices
Program Numbers and Other Ways of Selecting Voices
Internal Voices can also be called up using an external sequencer or controller that sends MIDI Program Change commands. The MIDI program number for the selected Internal Voice is shown in the bottom line of the display. There are several ways to display the program numbers, which will be discussed in the next chapter, but the default is to refer to them by the numbers 0-127.
You can also select voices using the numeric keypad, and the program numbers are important here as well. Type in the program number you wish to select (either 1, 2, or 3 digits — you don’t have to use leading zeroes), and press Enter. The program you selected will appear in the display. If you make a mistake, press Clear and the numbers will reset, or if you decide you don’t want to change voices after all, press Cancel. One more way of selecting voices is with the Alpha wheel. Turning it clockwise increments the current voice, and turning it counterclockwise decrements it. The increment/decrement (+ and -) buttons are also operational.
The table below summarizes the PC88’s Internal Voices, showing the four groups available from each front panel button. Use Previous Group and Next Group to move between groups.
A:Stage Piano |
|
A:Digital E Pno |
|
A:Digital E Grand |
|
A:Strings 1 |
|
B:Stage Piano 440 |
2 |
B:St Trem Digital |
4 |
B:Warm E Grand |
5 |
B:Att Vel Strings |
7 |
C:Bright Piano |
C:FM & Marimba |
C:Tight E Grand |
C:Touch Strings |
||||
D:Tack Piano |
|
D:E Pno & Marimba |
|
D:St Elec Grand |
|
D:...& Strings |
|
A:Classical Piano |
|
A:Classic E Pno |
|
A:Stage Piano & Str |
|
A:Harpsichord |
|
||
B:ClassPiano 440 |
1 |
B:Dyn Hard E Pno |
3 |
B:Dyn Pno & Str Pad |
6 |
B:Stereo Harpsi |
8 |
||
C:Sustain Piano |
C:Rhodes & Vibes |
C:Digi Pno & Str Pad |
C:8ve Harpsichord |
||||||
D:Sus Piano 440 |
|
D:Suitcase E Pno |
|
D:Ac Gtr&Str Pad |
|
D:Pedals Harpschrd |
|
||
Classical Piano |
Stage Piano |
Classic E Piano Digital E Piano |
Electric Grand |
Piano & Strings |
Strings |
Harpsichord |
|||
1 |
2 |
3 |
4 |
5 |
6 |
|
7 |
8 |
|
Acoustic Guitar |
Clav |
Rock Organ |
Jazz Organ |
Vibes |
Acoustic Bass |
Electric Bass |
Synth Pad |
|
|
9 |
10 |
11 |
12 |
13 |
14 |
|
15 |
16 |
|
A:Acoustic Guitar |
|
A:Rock Organ 1 |
|
A:Acoustic Bass |
|
A:Stereo Strings |
|
B:12-str Guitar |
9 |
B:Rock Organ 2 |
11 |
B:A Bass & Ride |
14 |
B:Slo String Pad |
16 |
C:Fluid Guitar |
C:Ballad Organ 1 |
C:Legato A Bass |
C:Slo Vibes |
||||
D:St Clav Guitar |
|
D:Full Pipes |
|
D:Leg Bass & Ride |
|
D:Slow Digital Pad |
|
A:Clavinet |
|
A:Jazz Organ 1 |
|
A:St Trem Vibes |
|
A:Dual E Bass |
|
B:Stereo Clav |
10 |
B:Jazz Organ 2 |
12 |
B:Simple Vibes |
13 |
B:E Bass & Ride |
15 |
C:Super Clav |
C:Ballad Organ 2 |
C:Marimba |
C:Sustain E Bass |
||||
D:Organi Clav |
|
D:Chiffy Pipes |
|
D:Metal Marimba |
|
D:Slap E Bass |
|
3-2 |
PC88 |

Internal Voices
Customizing the Internal Voices Mode
Customizing the Internal Voices Mode
In keeping with the “digital piano” concept of the Internal Voices mode, and in order to make the PC88 as easy as possible to use, the sounds in the Internal Voices are always going to be the same, and you cannot change them. (In Setups mode, you can do all sorts of things, as we’ll soon see.) You can, however, change certain aspects of PC88 operation in Internal Voices mode.
These fall under the category of “Zone parameters”, and are discussed fully in Chapter 5. They work much the same way in Internal Voices mode as in MIDI Setups mode, with some important differences. The Internal Voices mode uses only one “Zone” (Setups can use up to four), so there is only one set of Zone parameters to adjust. Even more significantly, while in Setups mode each of the 128 possible Setups has its own set of parameters, in Internal Voices mode there is a single set of parameters that applies to all of the Internal Voices.
Here’s an example of how to change the Internal Voices’ parameters. From any Internal Voice, press the MIDI Transmit button under Zone Parameters. The bottom line of the display says “MIDI Channel: 01”, meaning that the PC88 is transmitting all MIDI data on channel 1. Use the alpha wheel to change the MIDI channel to “06”, and then press the Store button. The display asks if you want to store a Setup with a particular number. Instead of pressing Enter, press the Internal Voices button. The display will change to ask if you want to store the changed parameter to the Internal Voices. Now push Enter (in the numeric keypad) and the new data is stored. From now on, whenever you are in Internal Voices mode, the PC88 will transmit on MIDI channel 6, until you change it again.
Let’s try another example. Press the Velocity button under Zone Parameters. The display shows the velocity scale factor (Vel Scale), which is 100%: the sound responds directly and faithfully to the keyboard velocity. Hold down the Enter key and move any slider upwards until the display reads “200%”. Now play the keyboard. The velocity response has been “expanded”: the keyboard is now much more sensitive to louder notes. If you were now to press Store, Internal Voices, and Enter, this would become a permanent characteristic of every Internal Voice. Of course, if you don’t want to do that, we won’t blame you. (Reset the velocity to 100% or press Internal Voices, then a Sound Select button, without pressing Store to go back to the old settings.)
When you store anything to the Internal Voices, you are storing all of the current operating parameters: velocity, transposition, controller definitions, etc. There is only one storage area for Internal Voices parameters, so when you store parameters to it, all previous settings are erased. Of course, if some parameters haven’t been changed, the new settings will be the same as the old. Effects do not have to be manually stored with a Voice — that happens automatically. As we’ve seen, each Voice can have its own Effects settings. If you change the effects on any Voice, the settings are remembered, so the next time you call up the Voice, the effects will be as you left them.
440-Tuned Piano Voices
Unless otherwise noted, piano programs are “beat” tuned, like an acoustic piano. Since the higher harmonics of a stretched string tend to be sharper than those of the real harmonic series, beat tuning ensures that the piano remains in tune with itself harmonically. Beat tuning is sometimes referred to as “solo” or “stretched” tuning. Some programs, though, such as “ClassPiano 440”, offer straight tuning, where the fundamental of each note is tuned to A440. This allows for better mixing with other acoustic and electronic instruments. This type of tuning, therefore, is sometimes known as “ensemble” tuning.
Ride Cymbal and Metronome Click
Ride Cymbal and Metronome Click are two special voices that are layered with the “E Bass & Ride” and “A Bass & Ride” Internal Voices. Metronome click is available as the notes A0 and A#0, which happen to be the lowest two notes on the keyboard when you use the default key range and transposition. Ride cymbal is included along with the bass notes (check out Setups 1 and 2, “A Piano Trio” and “E Piano Trio” to see how useful this can be), and is also assigned to the notes that are above the range of the bass. You can get the ride cymbal by itself (without the bass sound) by setting Note Map to “Const” on the Key Range menu, then going to the Transpose menu and transposing above the range of the bass.
Musician’s Guide |
3-3 |

Internal Voices
The VGM Banks
The VGM Banks
The optional VGM board adds three extra “Banks” of instruments to the PC88’s internal sounds. A Bank is different from a PC88 Group. A Bank is defined by the MIDI Specification, and it can have 128 different programs, while a Group has only 16 programs. When talking about the various banks, we’ll refer to the Internal Voices bank we’ve just been playing with as “the Internal sounds”, or “Bank 0”, because that is its bank number when selected over MIDI.
To look at the different banks, press the Program button in the Zone Parameters section, and then the left cursor button (<<<). The display will now show the name of the Bank on the bottom line, with its number (and the currently selected program number) above. For example:
Zone:1||||||0:049|||
Bank:Internal|Voices
Use the Data Entry section to select other banks. Bank 1 is a complete set of “General MIDI” instruments, which follows the General MIDI Level 1 Specification. It provides 128 sounds, including all members of the orchestra, keyboards, guitars, basses, tuned percussion, pads, and sound effects, as well as a large set of “keyed” (one note per sound) percussion. The PC88’s General MIDI bank also includes seven extra sets of percussion sounds, which are compatible with Roland’s “GS” instruments. Besides the large number of useful instrument sounds, and the ability to play back General MIDI files from other sources, the General MIDI bank makes the PC88 well-suited to development of General MIDI scores, for publishing, educational, and multimedia applications. General MIDI is now the preferred medium of exchange for music files among musicians, on floppy disk, CD-ROM, and on-line services.
Bank 2 is “Expansion Sounds”. These sounds are adapted from the Kurzweil Mark 10 series of digital pianos, and include keyboards, guitars, orchestral instruments, sound effects, and percussion. (They are not in the same order as the Mark 10 sounds, so you shouldn’t try to play Mark 10 disk files with them.) In addition, the seven extra “GS” drum kits appear here as well , plus there are five additional percussion sets.
Bank 3 is called “64-Note Poly”. It contains special “duplicates” of several of the sounds in the Internal bank, including piano, guitar, and vibes. Since these sounds are produced by the VGM board, and the Internal sounds are produced on the Internal board, this allows you to play the sounds with up to 64 voices of polyphony. See the “Key Range” section of Chapter 5 for details.
When you are in Internal Voices mode, you can access the sounds in the VGM banks, although not as quickly as the Internal sounds. There are several ways to do this. You can scroll through all of the programs in all of the banks using the Alpha wheel, and as you pass program 127 in one bank, the display jumps to program 0 of the next bank (the name of the new bank appears on the top line of the display). Or you can use the left cursor and Alpha wheel to set the bank, then the right cursor and Alpha wheel to select the program. Perhaps the fastest way is with the numeric keypad. When you’re in the Internal Voices “play” mode (i.e., you’re not editing anything), go to the numeric keypad and press the number of the bank of the VGM sound you want to play: 1, 2, or 3. Then press the +/- button on the keypad, followed by the program number (one, two, or three digits — you don’t need to enter leading zeroes) of the sound, and finally the Enter button. The bank number and name will appear on the top line of the display, and the program number and name on the bottom. The keyboard will play the selected sound.
Note, however, that in Internal Voices mode, the PC88 will not remember that a VGM sound has been selected. If you subsequently press any of the Select or Group buttons, you will jump back to the Internal Voices bank (Bank 0). VGM voices are only remembered in Setups mode.
3-4 |
PC88 |
 Loading...