

Page 1

Pa700
ENGLISH | MAN0010114
Pa700
ORIENTAL
Quick Guide
4E
Page 2

Important safety instructions
1. Read these instructions.
2. Keep these instructions.
3. Heed all warnings.
4. Follow all instructions.
5. Do not use this apparatus near water.
6. Clean only with dry cloth.
7. Do not block any ventilation openings. Install
in accordance with the manufacturer’s instructions.
8. Do not install near any heat sources such as
radiators, heat registers, stoves, or other apparatus (including amplifiers) that produce
heat.
9. Do not defeat the safety purpose of the po-
larized or grounding-type plug. A polarized
plug has two blades with one wider than the
other. A grounding type plug has two blades
and a third grounding prong. The wide blade
or the third prong are provided for your safety. If the provided plug does not fit into your
outlet, consult an electrician for replacement
of the obsolete outlet.
10. Protect the power cord from being walked on
or pinched particularly at plugs, convenience
receptacles, and the point where they exit
from the apparatus.
11. Only use attachments/accessories specified
by the manufacturer.
12. Use only with the cart, stand, tripod, bracket,
or table specified by the manufacturer, or
sold with the apparatus. When a cart is used,
use caution when moving the cart/apparatus
combination to avoid injury from tip-over.
▪ The ventilation should not be impeded by
covering the ventilation openings with items,
such as newspapers, table-cloths, curtains,
etc.
▪ No naked flame sources, such as lighted can-
dles, should be placed on the apparatus.
▪ Do not install this equipment in a confined
space such as a box for the conveyance or
similar unit.
▪ WARNING – This apparatus shall be connect-
ed to a mains socket outlet with a protective
earthing connection.
▪ Turning off the standby switch does not com-
pletely isolate this product from the power
line, so remove the plug from the socket if
not using it for extended periods of time,
or before cleaning. Please ensure that the
mains plug or appliance couple remains readily accessible.
▪ Mains powered apparatus shall not be ex-
posed to dripping or splashing and that no
objects filled with liquids, such as vases, shall
be placed on the apparatus.
▪ Install this product near the wall socket and
keep the power plug easily accessible.
▪ The marking plate is located at the bottom
of the instrument. The model number, serial
number, power requirements, etc., are located on this plate.
13. Unplug this apparatus during lightning
storms or when unused for long periods of
time.
14. Refer all servicing to qualified service per-
sonnel. Servicing is required when the apparatus has been damaged in any way, such as
power-supply cord or plug is damaged, liquid
has been spilled or objects have fallen into
the apparatus, the apparatus has been exposed to rain or moisture, does not operate
normally, or has been dropped.
Serial number
Please record the model number, serial number, and date of purchase below. Keep this
manual, as use these information as a record
of your purchase.
Model ________________________________
Serial No. _____________________________
Purchase Date ________________________
Page 3
WARNING – Do not ingest battery, chemical burn hazard. This
product contains a coin/button
cell batter y.
If the coin/button cell battery is swallowed
it can cause severe internal burns in just 2
hours and can lead to death.
Keep new and used batteries away from children. If the battery compartment does not
close securely, stop using the product and
keep it away from children.
If you think the battery may have been swallowed or placed inside any part of the body
seek immediate medical attention.
▪ WARNING – Date/time Lithium button cell
battery inside. Danger of explosion if the
battery is incorrectly replaced. Replace only
with the same or equivalent type. The internal date/time Lithium button cell battery is
user replaceable.
▪ Do not expose batteries to excessive heat,
such as direct sunshine, fire or the like.
▪ Dispose of used batteries according to the
battery manufacturer’s instructions.
The lightning flash with arrowh ead symbol
within an equilateral triang le, is in tende d
to alert the user to the presence of u ninsu lated “da ngero us voltage” within the p roduct’s e nclosure that m ay be of suf ficient
magnitude to constitu te a risk of electric
shock to persons.
The excla mation point within an equilateral
triang le is intended to alert the user to the
presen ce of imp ortant ope rating and mai ntenance (servicing) instructions in the literature accompanying the product.
This sym bol is i ntended to identify Cl ass II
equip ment with func tional ear thing (ground ing).
Page 4

Other notices
Automatic power-off
To avoid wasting power, Pa700 will by default
automatically enter standby mode after two
hours of non-active use (playing, pressing buttons or using the touch-screen). Please save any
edited data (Keyboard Sets, Styles, Songs, and
so on) before taking a prolonged pause.
Data handling
Data in memory may sometimes be lost due to
incorrect user action. Be sure to save impor tant
data to the internal drive or to an external USB
device. KORG will not be responsible for damages caused by data loss.
Display handling
Be very careful not to apply too much pressure
on the display while carrying the instrument, or
it might break.
Cleaning
If the exterior becomes dirty, wipe it with a
clean, dry cloth. Do not use liquid cleaners such
as benzene or thinner, or cleaning compounds
or flammable polishes.
Use a soft cotton cloth to clean the display.
Some materials, such as paper towels, could
cause scratches and damage it. Computer wipes
are also suggested, provided they are specifically designed for LCD screens.
Do not spray any liquid on the LCD screen directly. Always apply the solution to your cloth first,
then clean the screen.
Example screens
Some pages of the manuals show snapshots of
the screen along with an explanation of functions and operations. All sound, style, song or
parameter names, as well as shown values, are
merely examples and may not always match the
actual display you are working on.
Trademarks
Acrobat and PDF are registered trademarks of
Adobe Systems Incorporated. Mac and iOS are
registered trademarks of Apple, Inc.
trademark of Google Inc.
registered trademarks of Microsoft Corporation.
All other trademarks or registered trademarks
are the property of their respective holders.
Open source notice
Portions of this product’s software are copyright ©2007 “The FreeType Project” (www.
freetype.org). All rights reserved.
Disclaimer
The information contained in this manual have
been carefully revised and checked through.
Due to our constant efforts to improve our products, the specifications might differ to those
in the manual. KORG is not responsible for any
differences found between the specifications
and the contents of the instruction manual – all
specifications being subject to change without
prior notice.
Liability
KORG products are manufactured under strict
specifications and voltages required by each
country. These products are warranted by the
KORG distributor only in each country. Any
KORG product not sold with a warranty card or
carrying a serial number disqualifies the product sold from the manufacturer’s/distributor’s
warranty and liability. This requirement is for
your own protection and safety.
Service and user’s assistance
For service, please contact your nearest
Authorized KORG Service Center. For more information on KORG products, and to find software and accessories for your keyboard, please
contact your local Authorized KORG distributor.
For up-to-date information, please point your
web browser to our web site.
Keep your keyboard up-to-date
Your instrument can be constantly updated as
new versions of the operating system are released by KORG. You can download the operating system from our web site. Please, read the
instructions supplied with the operating system.
MS-DOS and Windows are
Android is a
Page 5

Contents
PART I 1 LET’S START!
2 Introduction
13 Setting up the pedals, audio connections, music stand
17 Powering up
21 Interface basics
PART II 33 PLAYING AND SINGING
34 Playing the Sounds
43 Customizing the Sound sets
53 Tempo and Metronome
57 Playing the Styles
70 Customizing the Styles
74 The Chord Sequencer
76 Playing the Pads
78 Playing the Songs
88 Lyrics, chords, markers and score
95 Using the KAOSS effects
102 Searching for files and other items
|i
PART III 107 SONGBOOK
108 Using the SongBook
PART IV 119 RECORDING THE SONGS, CREATING THE STYLES
120 Recording MIDI Songs
125 Recording MP3 Songs
128 Converting a MIDI Song to a Style
PART V 131 VIDEO OUT AND AUDIO IN
132 Connecting an external display
134 Connecting the audio inputs
140 Talking with your audience
141 Using the voice/guitar effects
Page 6

ii|
PART VI 147 APPENDIX
148 Installing the options
155 Specs
Page 7

PART I: LET’S
START!
Page 8

2| Let’s start!
01 Introduction
Welcome to Pa700!
Many thanks, and congratulation on purchasing the KORG Pa700 Professional
Arranger! We’re sure it’ll give you countless hours of great tones that will
feel as good as they sound.
Slim, powerful and easy to use
With its elegant cabinet, Pa700 provides a professional and stylish look, that
will be much appreciated on stage or at home. The main panel’s logical layout ensures easy access to buttons, knobs and all controls.
Using your Pa700 is easy, thanks to the touch screen and the clean, clearly
laid-out, modern user interface, based on icons reproducing real objects in
the real world.
The real solo and band experience
Pa700 has been designed to assist you equally well during live performance
and songwriting. The detailed natural sounds and finely crafted styles have
been created by some of the finest musicians in the music industry. You will
feel you are playing in a real band – no matter what your musical tastes are.
The naturally responsive 61-note keyboard is designed for musicians of all
levels, from beginners to demanding keyboard players, and gives you a completely authentic feel and full control of expression.
More than just recorded sounds
The huge, realistic collection of classic and contemporary keyboard, band
and orchestral sounds, includes a multi-layer stereo grand piano (with damper and body resonance) and electric pianos; wind instruments, basses and
stunning acoustic and electric guitars; plus a digital drawbars organ with
leakage and key on/off noises.
Sounds have been recorded with the most up-to-date technologies, and
KORG’s own proprietary EDS-X (Enhanced Definition Synthesis-eXpanded)
sound engine allows for fine detail to be accurately reproduced. The integrated sample and sound editor allows to fill the vast user memory with
newly created or imported sounds.
Page 9

Introduction |3
All these authentic sounds become alive with KORG’s DNC (Defined Nuance
Control) system, allowing the performer to accurately and expressively introduce the most subtle nuances and sound articulation. For example, the
joystick and assignable switches can introduce the growl of a saxophone,
breath elements found in trumpet, clarinet and harmonica, and add authenticity to the pizzicato and bowed sounds of a string section. You will even
hear keys opening when saxophone notes are going up, and closing when
going down!
Listen the natural way
Each Pa700 sound go through separate EQs and studio-quality effect processors, that further refine your sound before coming through high-quality stereo audio outputs. Effects run from the standard reverbs and delays
through to the more unusual effects (like a Vocoder), realistic amp simulators and carefully recreated vintage effects. The final mastering effects
make the sound louder, clearer, fuller, and more polished.
The sound of the super high-fidelity integrated speakers is clear and detailed
even at the lowest volume level, for the pleasure of the late-night rehearsing
musician.
A band always ready to play with you
Ultra-realistic sounds in the Pa700 are always ready to play along with you,
in the music style best fitting your music. The high number of included Styles
will satisfy any music genre, but can also be expanded by adding new Styles.
You may also create your Styles, customize the existing ones, or easily convert MIDI Songs to Styles.
There are eight accompaniment parts which will follow your chords. The
Auto Fill function will automatically choose a Fill for you. You can play in the
simplest way or with the rich harmonization of a competent jazz player. We
have programmed them to sound natural, and give you the feeling of a real
band, ready to play with you at any time.
The convenient Chord Sequencer function records your chord progressions
on-the-fly allowing the users to immediately play along with their own chord
sequence, which is useful not only for practice, but for freeing up a hand
while performing live. Chord Sequences can also be saved in Styles and
SongBook Entries for easy recall.
Play and write songs
You can play Songs in MID and MP3 formats. With both Songs and Styles,
you can show lyrics for the singer and chords for your fellow guitarist. Any
MIDI Song track can be converted into a readable score. Markers allow for
Page 10

4| Let’s start!
jumping back to a passage you wish to repeat, for example in a piece you are
studying or rehearsing.
Use the video output to display lyrics or score on an external monitor, making it perfect for karaoke or band leading.
You can record a MIDI Song using a full-featured Sequencer, or by using the
Styles to record your live performance. Even easier, just record what you
sing and play (including MP3 Songs) as an MP3 file, and listen to it anywhere
you like.
Your music book
What is a huge collection of Styles and Songs, without an effective form of
organization? Pa700 has the one most known to musicians: the SongBook,
a music database allowing for fast song retrieving based on name, artist,
genre or tempo. Styles and Songs are easily recalled by the SongBook.
Particularly useful for live use, the SongBook can assign songs from any custom Set List to dedicated buttons on the control panel. Your entire show will
be under your fingers, with immediate access to any Style, Song and Sounds
needed for your performance.
The SongBook can even be edited from a personal computer through our
free editor. It can also be synchronized with most modern tablets to become
your handy external digital music sheet reader (third-party software needed).
Sing naturally
Connect a dynamic microphone, and adjust parameters such as the EQ,
Compressor, Gate, Reverb and Delay to make the vocals sound smooth and
studio-produced. The Vocal Remover will even let you remove the voice from
MP3 Songs, and let you sing along with them.
Refine your guitar’s pure sound
Guitar FXs let you add pedal and studio effects to a guitar connected to the
dedicated Guitar input on the back of the instrument. We selected some of
the best guitar effects from the KORG collection, to add the sound of alltube amplifiers, realistic distortion, chorus or delay pedals, and the highestquality studio reverbs.
Page 11

Introduction |5
Creative control with the KAOSS effects
KAOSS effects give you creative control on your performance. From subtle
morphing between Variations and Drum Kit types, fine mixing between accompaniment Sounds, live reshaping of ongoing rhythms, to the most radical note-crunching effects of DJ heritage, to tape delay and arpeggios, you
can add ‘liquid mixing’ to any Style or MIDI Song with the aid of easy-to-use
computer-assisted composition features. Break the boundaries of preset
music!
Open to the world, ready to the future
The use of standard file formats, like MID or MP3 for songs, or WAV and AIFF
for samples, opens a world of possibilities when exchanging files. The USB
ports allow for connecting Pa700 to any external storage device or personal
computer, smartphone or tablet without the need for a dedicated MIDI interface. However, you can connect Pa700 to any existing MIDI musical instrument, thanks to its complete set of programmable MIDI ports.
Oriental edition
The Pa700 ORIENTAL version contains all the functionality of the standard
Pa700, and adds a mini-keyboard on the left side, which can be used to customize quarter tone scales and quickly access scale presets. In addition to
the standard content, Pa700 ORIENTAL also contains Sounds and Styles that
are specific to Middle Eastern music genres. Ouds, bouzuks, kanouns, various percussion instruments, and many more sounds are joined by dozens of
extra Styles that are suitable for traditional and modern music.
Page 12

6| Let’s start!
Before starting to play…
What’s in the box
After you get your Pa700, please check that all the following items are included in the package. If any of the following items is missing, please contact
your KORG dealer immediately.
▪ Pa700
▪ Music stand
▪ AC power cable
▪ Quick Guide
What you can download
Point your web browser to our web site (www.korg.com), to download video
manuals, a MIDI driver, up-to-date software and manuals.
What you can add
After having purchased Pa700, you might want to add one of the sturdy pedals and footswitches from the KORG catalogue.
Contacts
Your KORG dealers not only deliver this instrument, but also carry hardware
and software accessories, as well as useful information on how to use these
products. Ask them for any help you should eventually need.
Our international web site is www.korg.com. A list of all KORG Distributors
can be found in our dedicated web page (www.korg.com/us/corporate/dis-
tributors/).
Page 13
Introduction |7
Overview of the instrument
The following pages show the functional areas of the front and real panels.
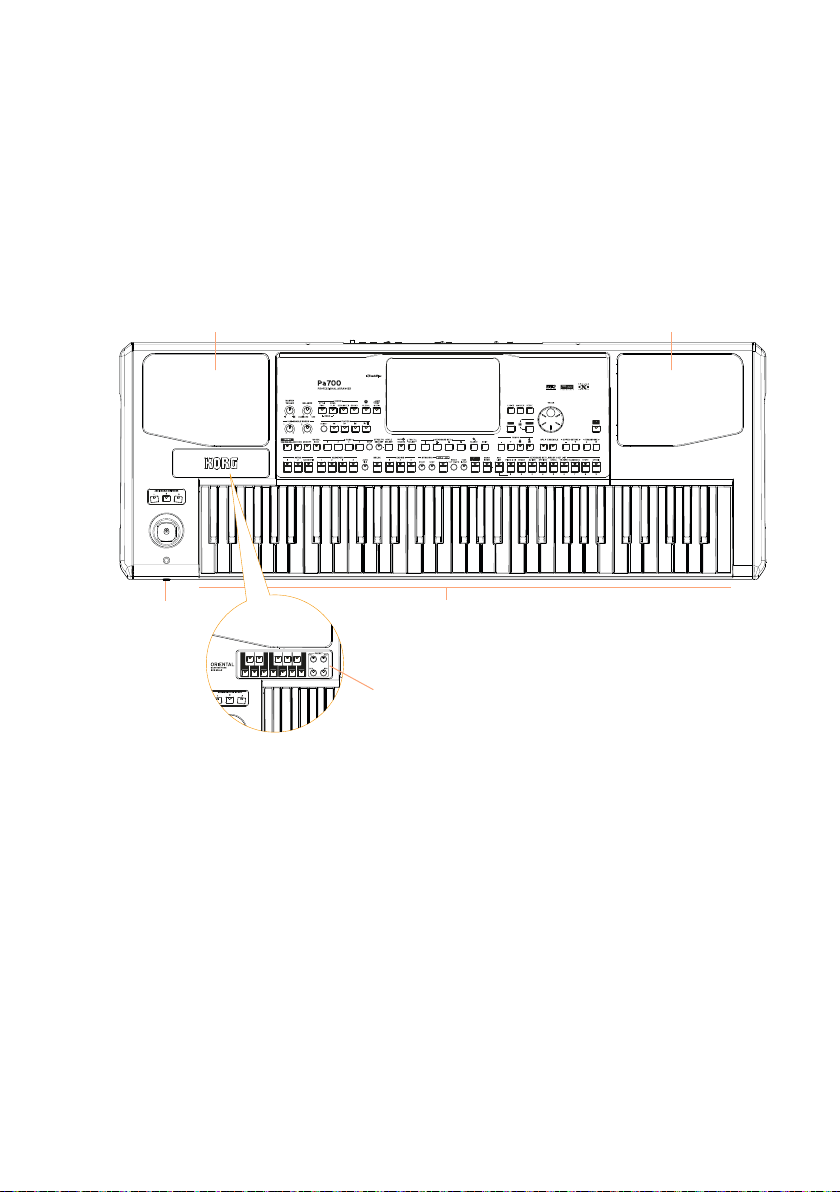
Front panel
The front panel is where you can find the instrument’s controls and the loudspeakers.
Left speaker Right speaker
Headphones
Keyboard
Scale keypad
(Pa700 ORIENTAL only)
Speakers
Control the output volume of the integrated speakers with the MASTER
VOLUME knob.
The speakers are automatically deactivated when connecting the headphones. You can also manually deactivate them by deselecting the Speakers
checkbox in the Global > Audio & Video > MP3/Speakers page.
Headphones connector
Connect a pair of headphones to this output. You can use headphones with
an impedance of 16-200 Ohms (50 Ohms suggested).
Keyboard
Use the keyboard to play notes and chords. Depending on the status of the
SPLIT indicator, the keyboard may be joint or split between different sounds.
Page 14
8| Let’s start!
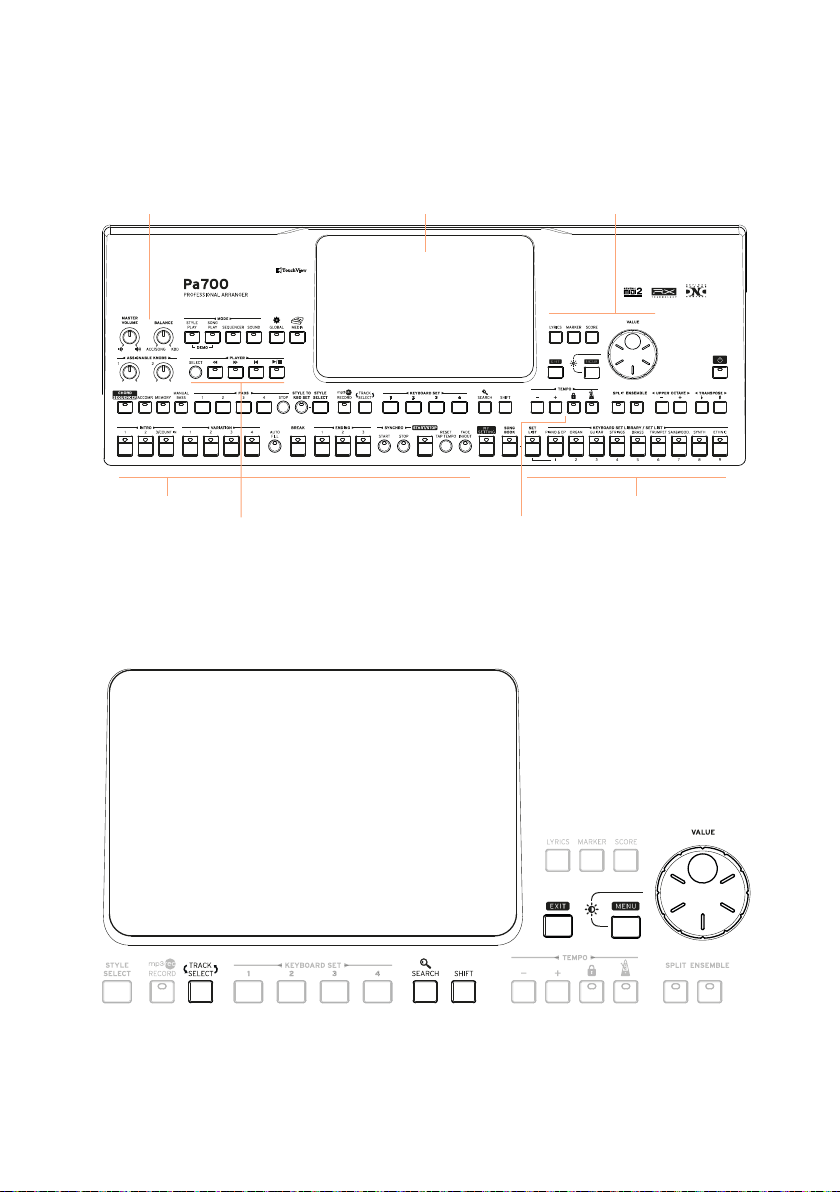
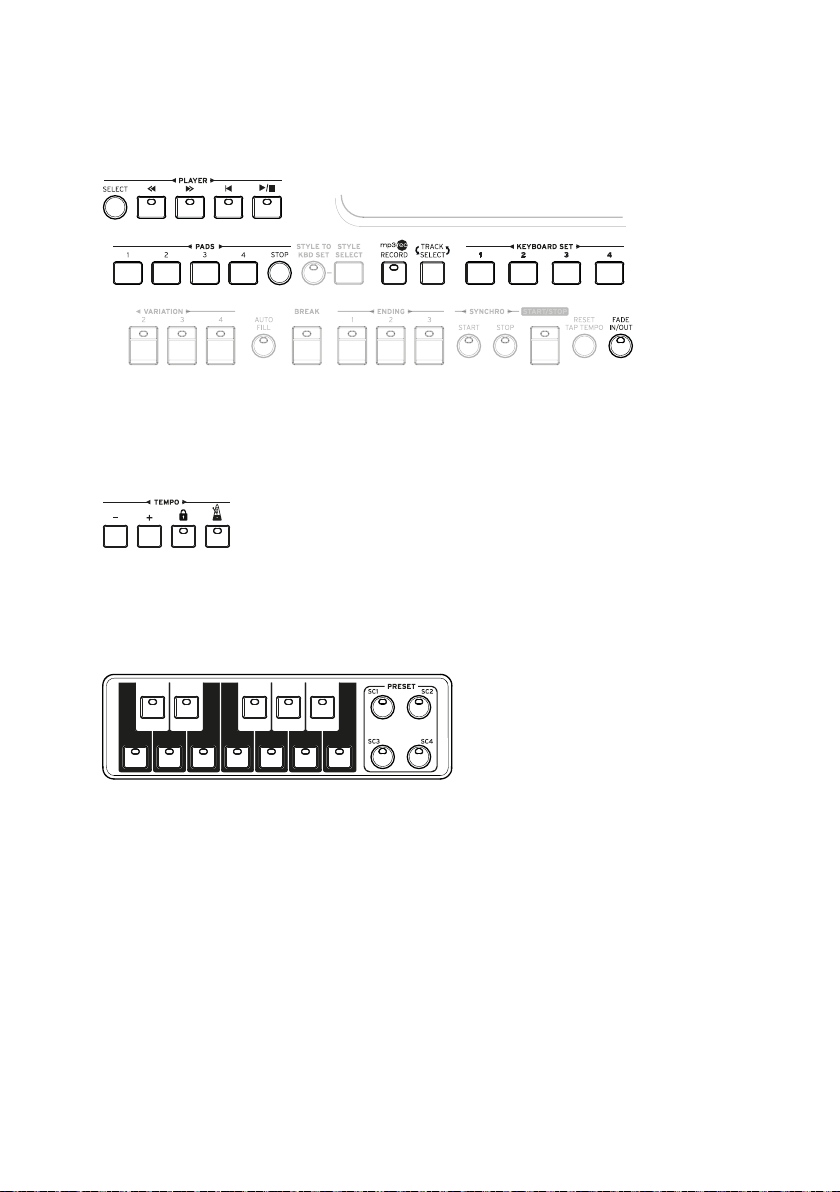
Control panel
The control panel is the part of the front panel where you can find the instrument’s controls.
Styles area
Player area
DisplayKnobs
Metronome and Tempo area
Navigation area
Sounds/Set List area
Display
Use this touchscreen display to interact with the instrument. There are controls around the display, to help you select the various elements.
Page 15
Introduction |9
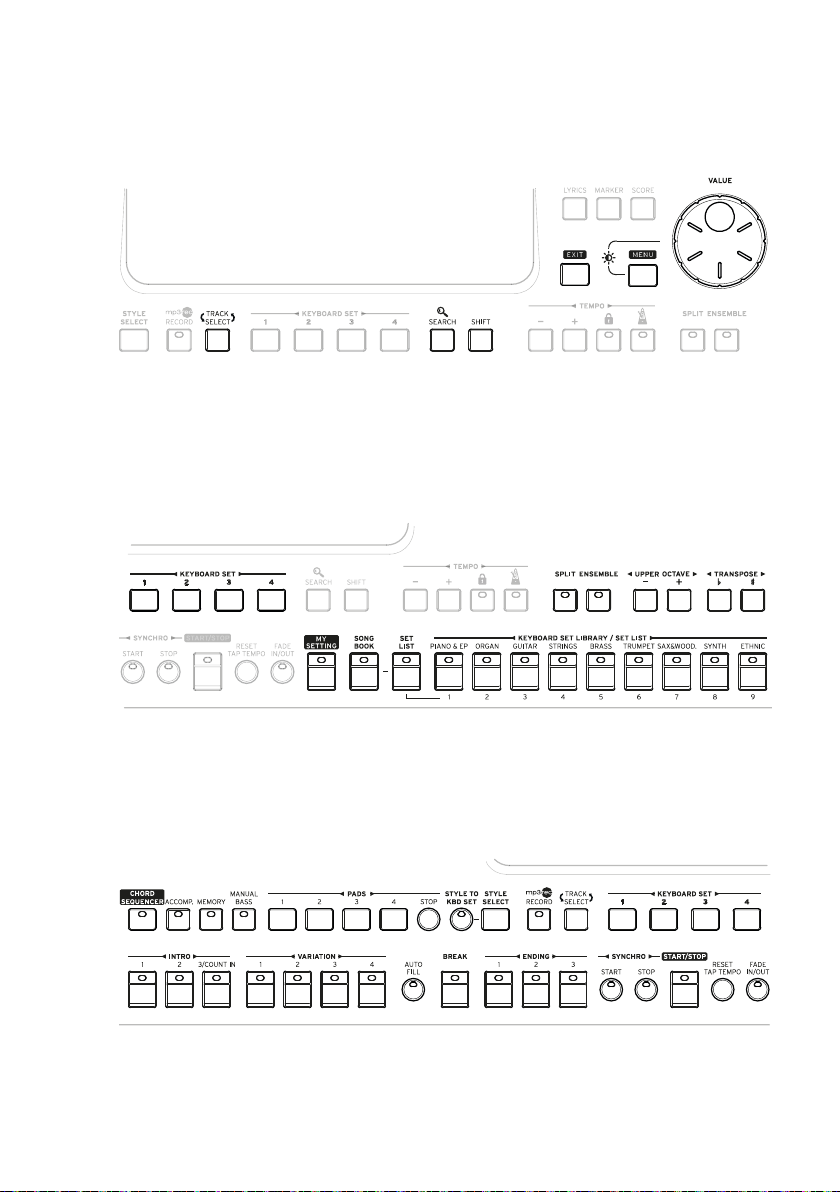
Navigation area
Use these controls to go through the menus, pages and parameters, and
search for the various musical resources.
Sounds (and Set Lists) area
Sounds are what you can play on the keyboard. Here you can choose Sound
sets saved as Keyboard Sets in a dedicated library. Or you can choose Set
Lists from the SongBook, that are collections of Sound sets with an associated Style or Song.
Styles (and Pads) area
Styles supply the automatic accompaniment with a virtual band. You can
play Sounds (selected via the Keyboard Sets) and Pads along with the automatic accompaniment.
Page 16
10| Let’s start!
Player area
Songs can be played back by the onboard Player. You can play Sounds (selected via the Keyboard Sets) and Pads along with the Songs.
Metronome and Tempo area
Use these controls to practice with the metronome and control the Tempo of
the metronome, the Styles and the Songs.
Scale keypad (Pa700 ORIENTAL only)
Use the mini-keyboard to modify the Quarter Tone Scale, and the four Scale
Preset buttons to select one of the preset scales.
Page 17
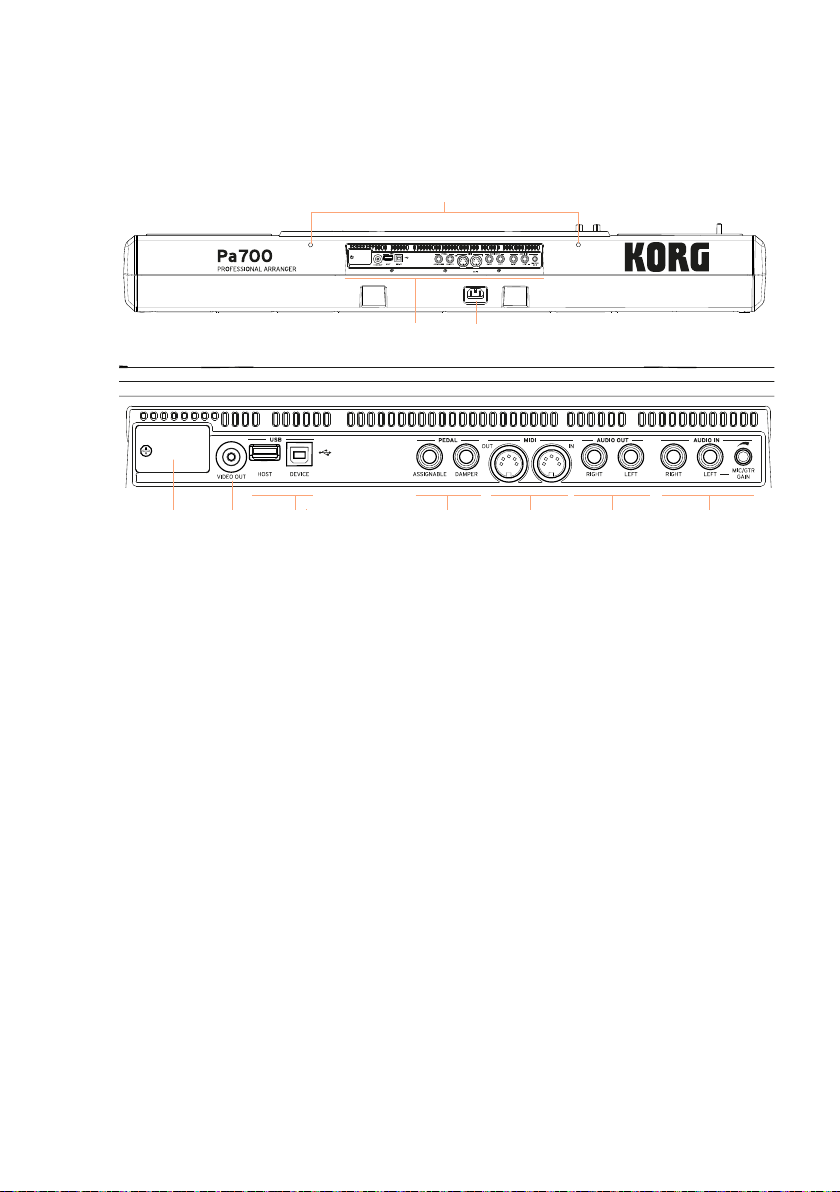
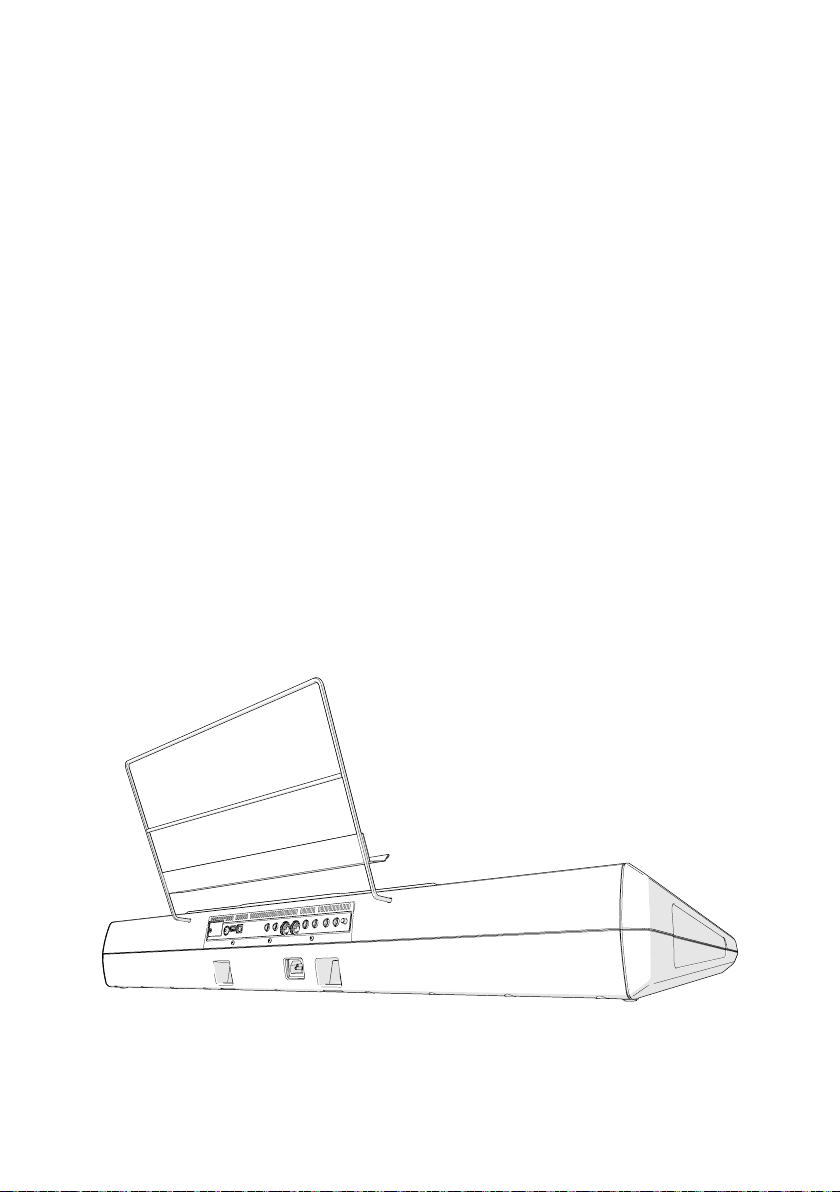
Rear panel
The rear panel is where you can find the various connections.
Holes for the music stand
Connectors Power connector
Introduction |11
Battery and
microSD slot
Video
out
ports
PedalsUSB
MIDI
ports
Audio
outputs
Audio
inputs
Music stand
A music stand is included with your Pa700. Insert its legs into the two dedicated holes on the rear panel.
Power connector
Use this socket to plug in the supplied IEC power cable.
Battery and microSD slot
This opening contains the clock battery and the microSD card slot.
Video out
Connect Pa700 to a TV or video monitor, to read lyrics and chords on a bigger display.
USB ports
Use these connectors to connect your Pa700 to a personal computer or a
tablet (DEVICE) or to connect an USB device, like an USB pendrive or another musical instrument to be used as a controller (HOST).
Page 18

12| Let’s start!
Pedal connectors
Use the DAMPER connector to connect a damper pedal, and the ASSIGNABLE
connector to connect either a continuous pedal or footswitch.
MIDI ports
Use these ports to connect Pa700 to external controllers (master keyboard,
MIDI guitar, wind controller, MIDI accordion, MIDI pedalboard…), to a series of
expanders, or to a computer with a MIDI interface.
Audio outputs
Use these connectors to send the audio signal (sound) to a mixer, a PA system, a set of powered monitors, or your hi-fi system.
Audio inputs
Use these connectors to connect a microphone, a guitar or another musical instrument. You can also connect the audio output of a media player, a
smartphone or a tablet.
Page 19

Setting up the pedals, audio connections, music stand |13
02 Setting up the pedals,
audio connections, music
stand
Connecting the pedals
Connecting the damper pedal
Use the PEDAL > DAMPER connector to connect a damper pedal, like the
(optional) KORG PS1, PS3 or DS1H. The DS1H pedal supports all the nuances
of half-pedaling on some acoustic piano sounds. You can experiment how it
works by gradually pressing it down, and gradually releasing it, while playing
the Concert Grand Sound.
If you need to change the pedal’s polarity and calibrate it, go to the Global >
Controllers > Foot page.
Connecting a pedal or footswitch
Use the PEDAL > ASSIGNABLE connector to connect a footswitch pedal
like the (optional) KORG PS1, PS3 or DS1H, or a continuous pedal like the
(optional) KORG XVP-10 or VOX V860 Volume pedals, or the KORG EXP-2
Expression pedal.
By default, this connector will work as an Expression pedal. If you want to
change the assigned function, or you need to change the pedal’s polarity
and calibrate it, go to the Global > Controllers > Foot page.
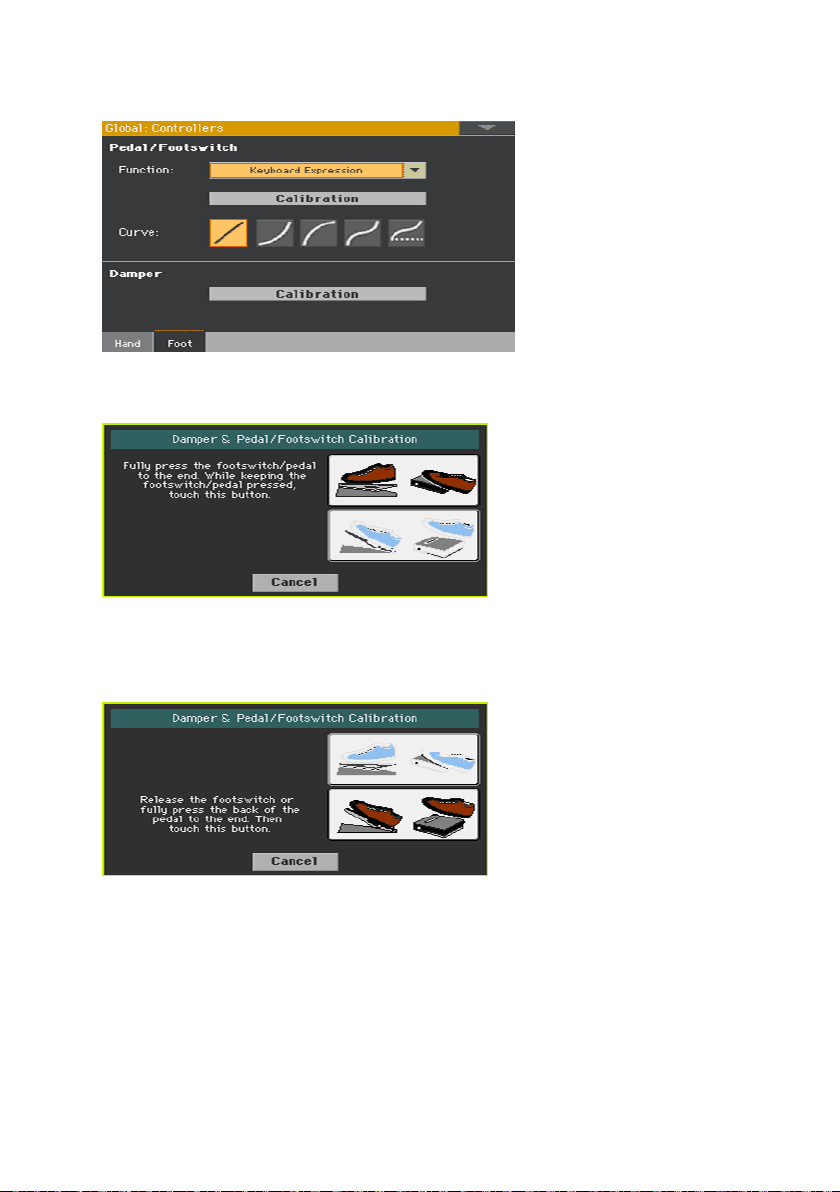
What if the pedals do not behave correctly?
If needed, you might have to calibrate the pedals to use their full range of
values, without any ‘dead spot’. Also, this procedure allows to choose the
pedal’s polarity.
Page 20
14| Let’s start!
1 Go to the Global > Controllers > Foot page.
2 Touch the Calibration button in the area of the button to calibrate, to make
the Damper & Pedal/Footswitch Calibration dialog appear.
3 Fully press the pedal down, and while continuing to press touch the Push
button to confirm the maximum value.
4 When the following dialog appears, release the pedal.
5 Touch the Push button in the display to confirm the minimum value. Check if
the pedal is working properly. In case it isn’t, repeat the procedure.
6 Press the EXIT button to return to the previous page.
Page 21
Setting up the pedals, audio connections, music stand |15
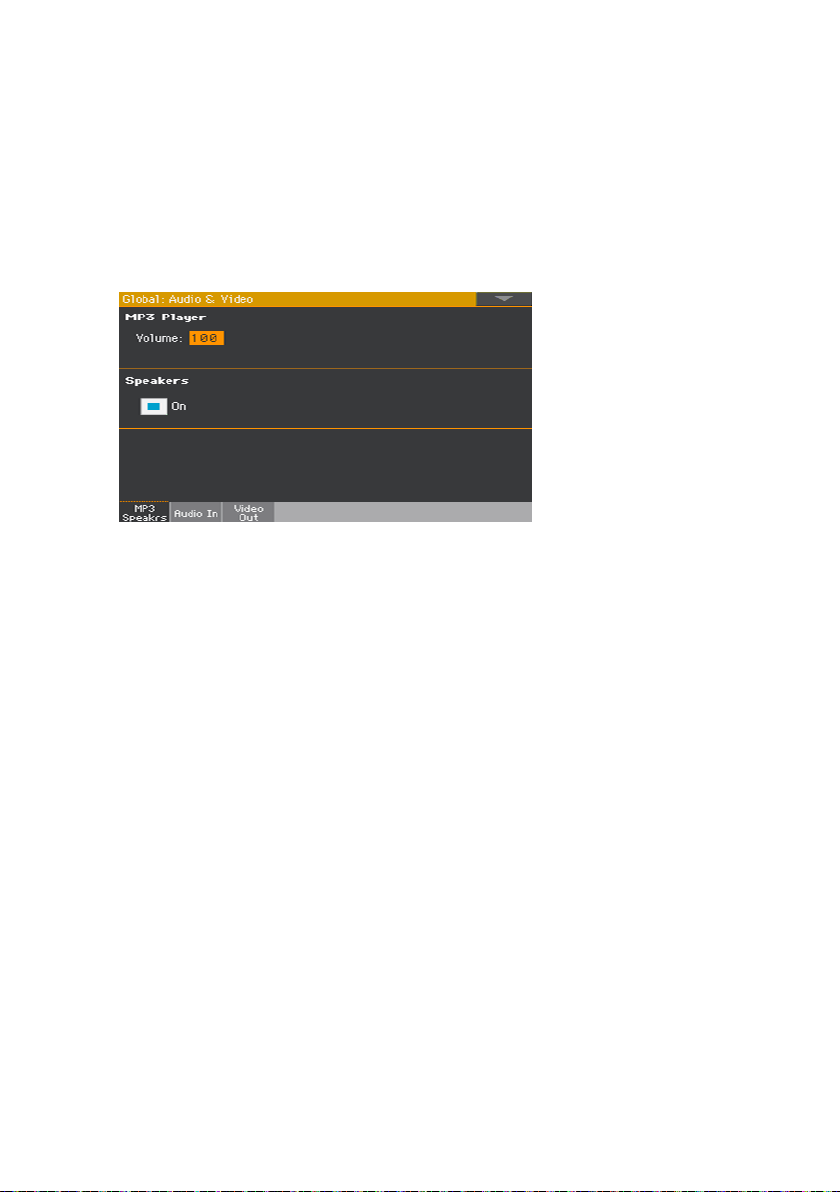
Turning the integrated speakers on and off
The integrated speakers are automatically deactivated when inserting a jack
into the PHONES connector. They can also be deactivated from the display.
Turn the speakers off (or back on)
1 Go to the Global > Audio & Video > MP3/Speakers page.
2 Use the Speakers On/Off checkbox to turn the (optional) integrated speak-
ers on or off.
3 Press the EXIT button to return to the previous page.
Connecting the headphones
Connect a pair of headphones to the PHONES connector. You can use headphones with an impedance of 16-200 Ohms (50 Ohms suggested). When connecting the headphones, the integrated speakers are automatically deactivated.
Adjust the output level with the MASTER VOLUME knob.
Page 22
16| Let’s start!
Connecting the audio outputs
Use the AUDIO OUT connectors to send the audio output to a mixer, a set of
powered monitors, or an audio amplification system. These are unbalanced
(TS) 6.35 mm, or 1/4”, jack connectors.
When using a home audio amplifier, connect the other end of the cable to the
CD, LINE IN or TAPE/AUX input of your audio system. Don’t use the PHONO
inputs of your audio system!
Use either the LEFT or RIGHT connector to output a mono signal.
Adjust the output level with the MASTER VOLUME knob.
If they are not deactivated, the integrated speakers will work in parallel with
the main audio outputs.
Installing the music stand
A music stand comes with your Pa700. Insert its legs into the two dedicated
holes on the rear panel, as shown in the following illustration. Please note
that the latest 0,5 cm (0.2”) require more strength to fit. Push harder, until
you feel a ‘click’ and the legs are completely inserted.
Page 23
Powering up |17
03 Powering up
Turning the instrument on
Connecting the power cable
Plug the supplied power cable into the AC IN socket on the back of the instrument, and the cable plug into a wall power socket.
When the cable is connected, the instrument is in standby.
Warning: When the instrument is in standby, it is still connected to the power line.
Accessing the inside of the instrument can be dangerous. To completely disconnect
the instrument from the power, unplug the power plug from the power socket on the
wall.
Turning the power on or off
Turn the instrument on
▪ Press the POWER (
standby’). After you turn the instrument on, wait for the welcome screen to
disappear, then the main page of the Style Play mode will be shown in the
display.
Turn the instrument off (standby)
▪ Keep the POWER (
it when the screen appears dimmed. The shutdown procedure will begin and
last for a few seconds. Please do not disconnect the power cable during this
procedure.
) button to turn the instrument on (that is, ‘exit from
) button pressed for about one second, then release
Page 24
18| Let’s start!
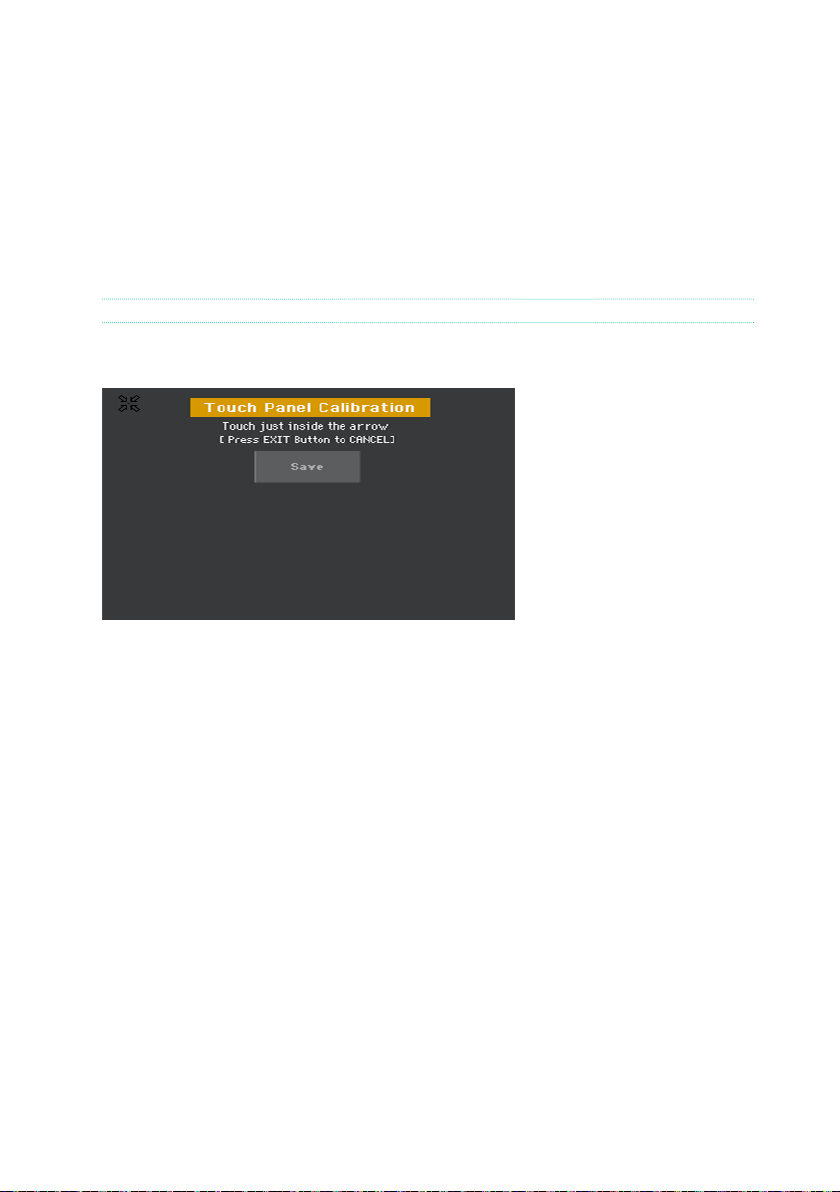
Calibrating the touch screen
Calibrating the display
It may happen (for example, after loading a new operating system) that the
Color TouchView™ display has to be recalibrated, to make pointing more accurate.
Warning: Do not use sharp objects, or you will damage your screen!
1 Keep the GLOBAL button pressed, until the Touch Panel Calibration page
appears.
2 First touch exactly inside the set of arrows in the upper left corner of the
display.
3 The arrows will subsequently move to the other corners of the display. Touch
exactly inside them.
4 Finally, touch Save to confirm the new calibration.
▪ In case you want to exit and cancel the calibration, press the EXIT button
before completing the procedure.
Page 25
Powering up |19
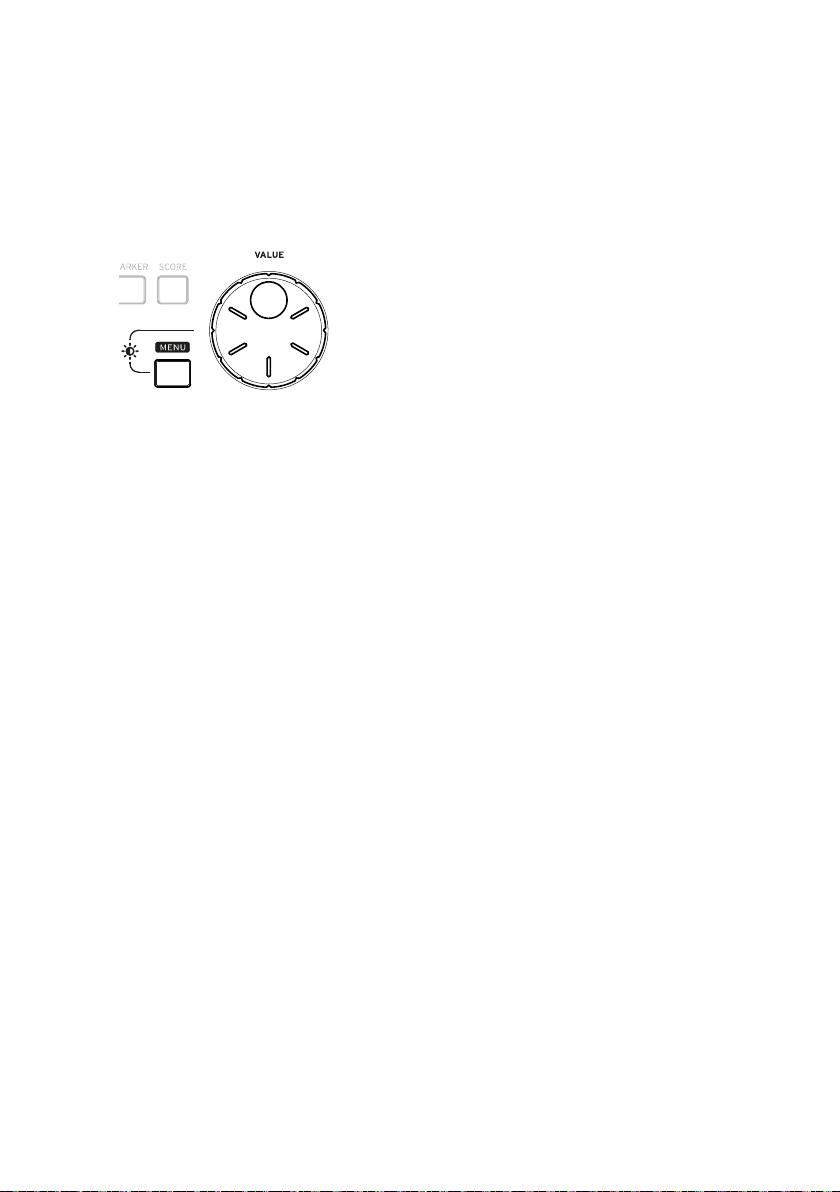
Adjust the display brightness
Brightness can be adjusted to match the ambient’s light.
▪ Keep the MENU button pressed, and use the VALUE control to adjust the
display brightness.
Page 26
20| Let’s start!
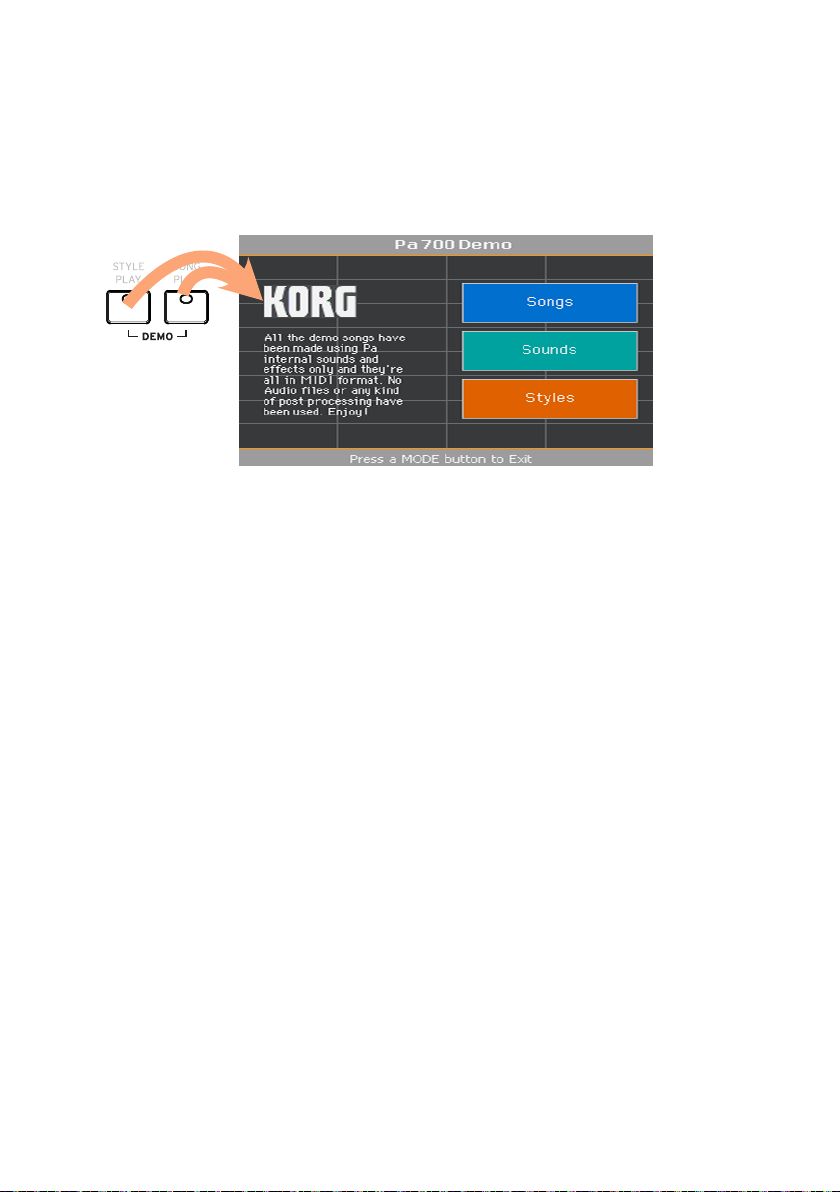
Listening to the Demo Songs
Access the Demo mode
▪ Press the DEMO buttons together.
Listen to all the Demo Songs
▪ After accessing the Demo mode, do not press any button. All the Demo
Songs will be played back.
Choose a single Demo Song
▪ Touch one of the options on the display (Songs, Sounds, Styles), then choose
one of the Demo Songs.
Exit from the Demo mode
▪ Press any of the MODE buttons.
Page 27
Interface basics |21
04 Interface basics
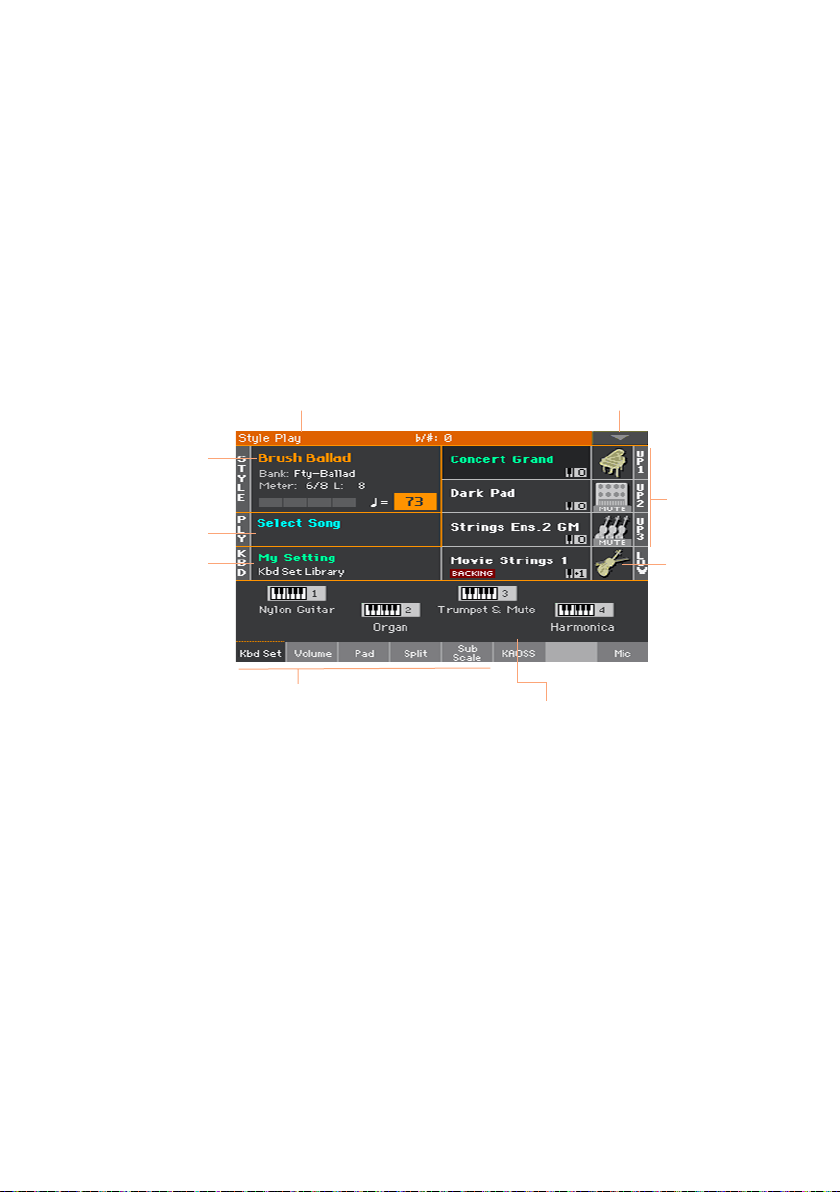
The main page
The Main page of the Style Play mode appears when turning the instrument
on. You can return to this page by pressing the EXIT button while in Style
Play mode, or the S T YL E P L AY button when in a different mode.
Title bar Page menu
Selected Style
Right-hand/
Upper Sounds
Selected Song
Selected
Keyboard Set
Left-hand/
Lower Sound
Tabs recalling
other panes
Keyboard Set pane
Page 28
22| Let’s start!
The user interface in detail
Display and user interface elements
Color TouchView graphical user interface
Pa700 features our exclusive easy-to-use TouchView™ graphic interface,
based on a touch panel LCD screen. By touching items on the LCD screen,
you can select pages, tabs, and parameters, and set parameter values via
on‐screen menus and buttons.
Operative modes
The pages of Pa700 are grouped in various operating modes. Each mode is
accessed by pressing the corresponding button in the MODE section on the
control panel.
Each operating mode is marked with a different color code, that helps you
understand where you are at first sight.
Two special modes (Global and Media) overlap the current operating mode,
that remains active in the background.
The Record mode can be accessed from the Style Play, Sequencer and Sound
modes, and allows for creating new Styles, Pads, Songs or Samples.
Edit menus and sections
Pages are grouped into sections, to be selected by touching the corresponding buttons in the edit menu that opens up when you press the MENU button.
Page 29
Interface basics |23
Pages and tabs
Parameters are grouped into separate pages, to be selected by touching the
corresponding tabs in the lower area of the display.
Overlapping windows
Several windows, like the Style Select or Sound Select, the Global, the Media,
or the Lyrics, overlap the current window. After you select an item in the window, or press the EXIT button, the window closes, and the underlying page
is shown again. (The following example is the Keyboard Set Select window).
Dialogs
Similar to selecting windows, dialogs overlap the underlaying page. Touch
one of the button on the display to give Pa700 an answer, and the dialog will
close.
Page 30
24| Let’s start!
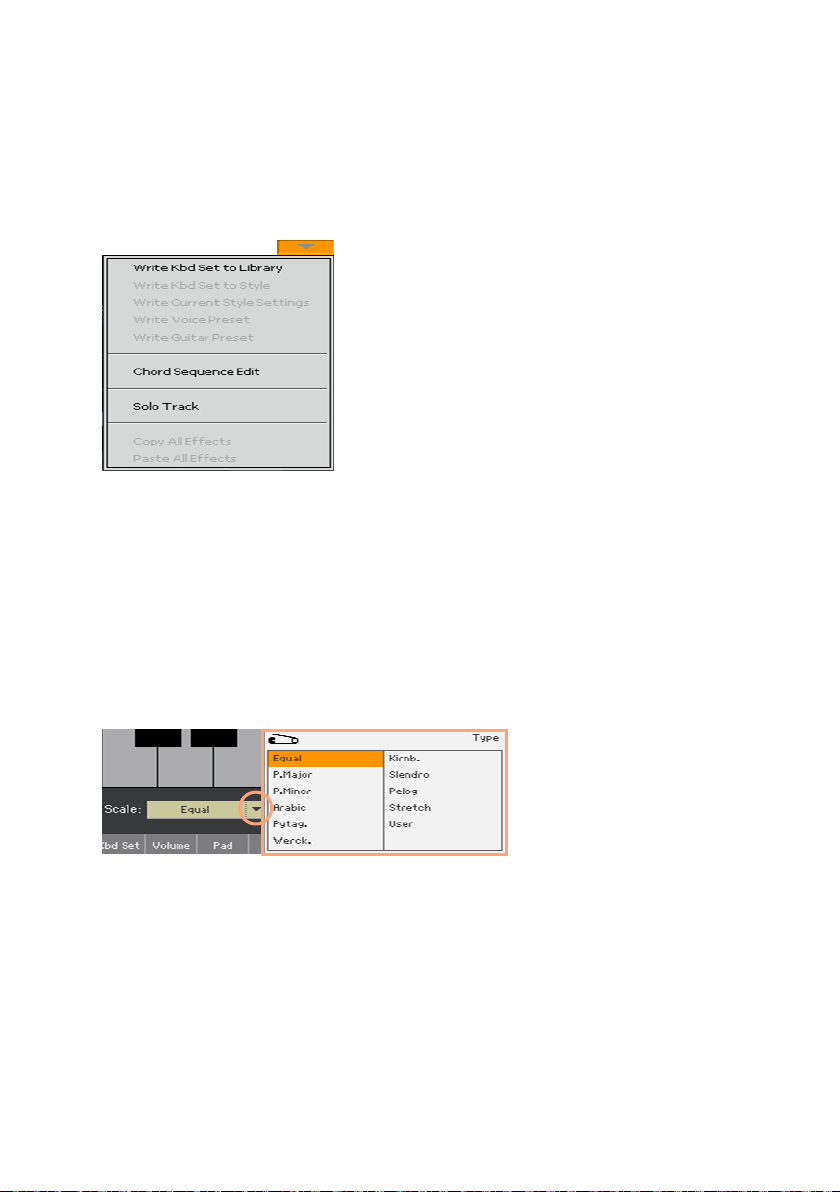
Page menus
Touch the down-pointing arrow icon in the upper right corner of each page,
and a menu with commands relevant to the current page will appear.
Touch one of the available commands to select it. (Or, touch anywhere else
on the screen to make it disappear, with no command selected).
Pop-up menus
When a down-pointing arrow appears next to a parameter name, touch the
arrow to open the pop-up menu and choose an option from there (by touching the option, or scrolling the list with the VALUE control). As an alternative,
touch the parameter name and use the VALU E control to scroll the list of
options.
If you want to make the menu disappear without selecting anything, touch
anywhere else on the display.
Page 31

Interface basics |25
Scrollbar
Lists and scrollbars
Files on storage media, as well as other kinds of data, are shown as lists. Use
the scrollbar to scroll the list content. Also, you can use the VALU E control
to scroll.
When the Name label is selected on top of a list, keep the SHIFT button
pressed while touching one of the arrows on the scrollbar, to jump to the
next or previous alphabetic section.
Selected
label
Selected
item
List
Page 32

26| Let’s start!
On Off
Parameters
Checkboxes
This kind of parameters are on/off switches. Touch them to change their
status.
Editable names
When the Text Edit (
) button appears next to a name, touch it to open the
Tex t Edit window and edit the name.
The virtual keyboard works exactly as a personal computer’s keyboard.
Some of the symbols are context-sensitive, and only appear when they can
actually be used.
Numeric fields
When a numeric value can be edited, touch it a second time to open the
Numeric Keypad.
The virtual numeric keypad works exactly as the numeric keypad of a personal computer.
Page 33

Interface basics |27
As an alternative, touch a numeric field and keep it held. Then move your
fingers up (or right) to increase the value, or move it down (or left) to decrease it.
This also includes the Tempo numeric field in various pages.
Icons
Various icons help identifying the type of a file, a folder, a Song. For example:
Icon Meaning
Folder
File of Style bank
MID le
Selected, highlighted items
Any operation on parameters, data or list entries, is executed on highlighted
items. First touch the parameter or item to select it, then execute the operation. Most parameters can be edited with the VALUE control.
Non-available, dimmed parameters
When a parameter or command is not currently available, it is shown dimmed
on the display. This means it cannot be selected, but may become available
when a different option is selected.
Page 34

28| Let’s start!
Virtual controllers
Virtual sliders
To change a virtual slider’s position, touch it and keep it held, then slide up or
down to change its position. As an alternative, touch it, then use the VALUE
control to change its position.
Virtual knobs
To change a virtual knob’s position, touch it and keep it held, then slide your
finger up (or right) to rotate it clockwise, or slide it down (or left) to rotate
the knob counter-clockwise. As an alternative, touch it, then use the VALUE
control to change its position.
Virtual drawbars
To change a virtual drawbar’s position, touch it and keep it held, then slide
it up or down to change its position. As an alternative, touch it, then use the
VALUE control to change its position.
Page 35

Interface basics |29
Navigating through the pages
Going to a page
Through this manual, page addresses are shown as in the following example:
Style Play > Mixer/Tuning > EQ Gain
Mode Edit section Page
Here is how the above works:
1 Press the S TY LE P LAY button to go to the Style Play mode. When the in-
strument turns on, it is already in this mode (this the Main page of the Style
Play mode).
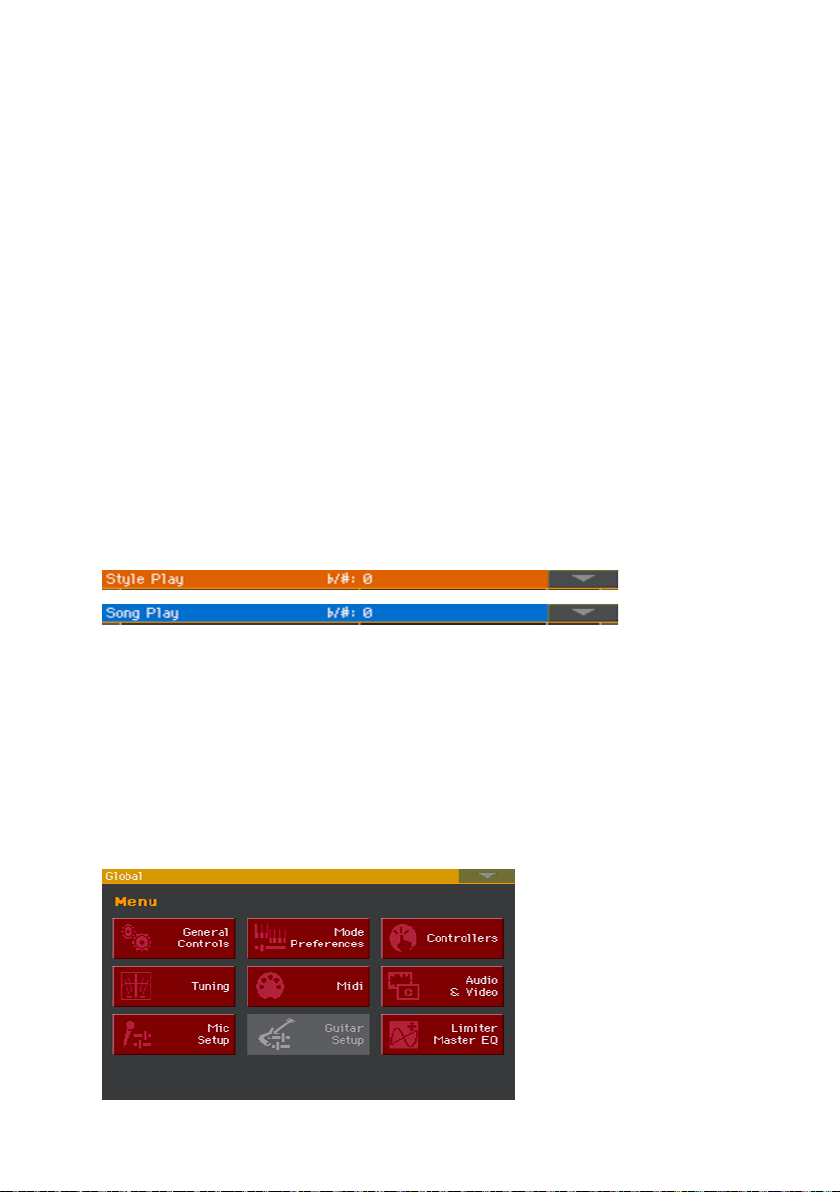
2 Press the MENU button on the control panel to see the edit menu of the
Style Play mode.
Page 36

30| Let’s start!
3 Touch the Mixer/Tuning button in the edit menu to choose the Mixer/Tuning
section.
The selected edit section is always shown in the title bar:
Mode Edit section
4 If the page is not yet shown in the display, touch the EQ Gain tab to choose
the EQ Gain page.
5 Edit the parameters.
Page 37

Interface basics |31
6 Try a different page in the same edit section. Touch the Volume/Pan tab to
go to the Volume/Pan page, and edit the parameters.
7 Press the EXIT button to return to the main page of the Style Play mode.
If you were in Song Play mode, pressing EXIT would have returned to the
main page of the Song Play mode.
Page 38

32| Let’s start!
Groups
Groups
Selecting the musical resources
Opening a Select window
When you press one of the KEYBOARD SET LIBRARY buttons, or touch the
name of a Keyboard Set, Style, Sound, Pad or Voice/Guitar Preset in the
display, the corresponding Select window appears. For example, this is the
Sound Select window:
Type
Sounds
Pages Previous/Next
Pages
You can always exit from this window by pressing the EXIT button.
In Pa700, Select windows stay always open until you press the EXIT button.
If you prefer they automatically close after a few seconds, or after you select
something, turn the Display Hold parameter off (see Display Hold on page
40).
Page 39

PART II:
PLAYING AND SINGING
Page 40

34| Playing and singing
05 Playing the Sounds
Sounds and Keyboard Sets
Sounds are the basic element of what you hear from your instrument.
Pa700 contains Sounds from any instrumental family (pianos, strings,
synthesizers…). A set of Sounds playing together on the keyboard can be
memorized as a Keyboard Set.
To automatically recall Sounds and settings, you usually select a Keyboard
Set. A Keyboard Set is a single memory location that can remember the
Keyboard Sounds and all their transposition, effects, etc…
Keyboard Sets are individually contained in the Keyboard Set Library
(KEYBOARD SET LIBRARY buttons). They are also associated to a Style
or SongBook Entry; a group of four Keyboard Sets is recalled each time
you select a Style or SongBook Entry (KEYBOARD SET buttons under the
display).
Page 41

Playing the Sounds |35
Choosing your preferred set of Sounds
Choosing the ‘My Setting’ Keyboard Set
▪ Press the MY SETTING button to choose your preferred Sounds.
This is a special Keyboard Set, that is automatically selected when the instrument is turned on.
The My Setting Keyboard Set
My Setting is a special Keyboard Set, where you can save your preferred
settings for things like Keyboard Sounds, Effects, Assignable Switches, a
Style to be selected on startup. This Keyboard Set is automatically chosen
when the instrument is turned on, and will automatically configure the instrument for you.
Writing the My Setting Keyboard Set
Keep the MY SETTING button pressed for about one second, until the Write
dialog appears, then touch the OK button to confirm saving to memory.
Page 42

36| Playing and singing
Choosing the Keyboard Sets
Choosing a Keyboard Set from the library
Keyboard Sets are contained in a dedicated library, that you can access from
the control panel or from the display.
Open the Keyboard Set Select window from the control panel
1 Be sure the SET LIST indicator is turned off.
2 Press one of the buttons of the KEYBOARD SET LIBRARY section. You will
notice that each of them has an instrument family name printed over it.
Open the Keyboard Set Select window from the display
▪ While in the Main page, touch the name of the selected Keyboard Set.
Page 43

Playing the Sounds |37
As soon as you press the button or touch the display, the Keyboard Set
Select window appears.
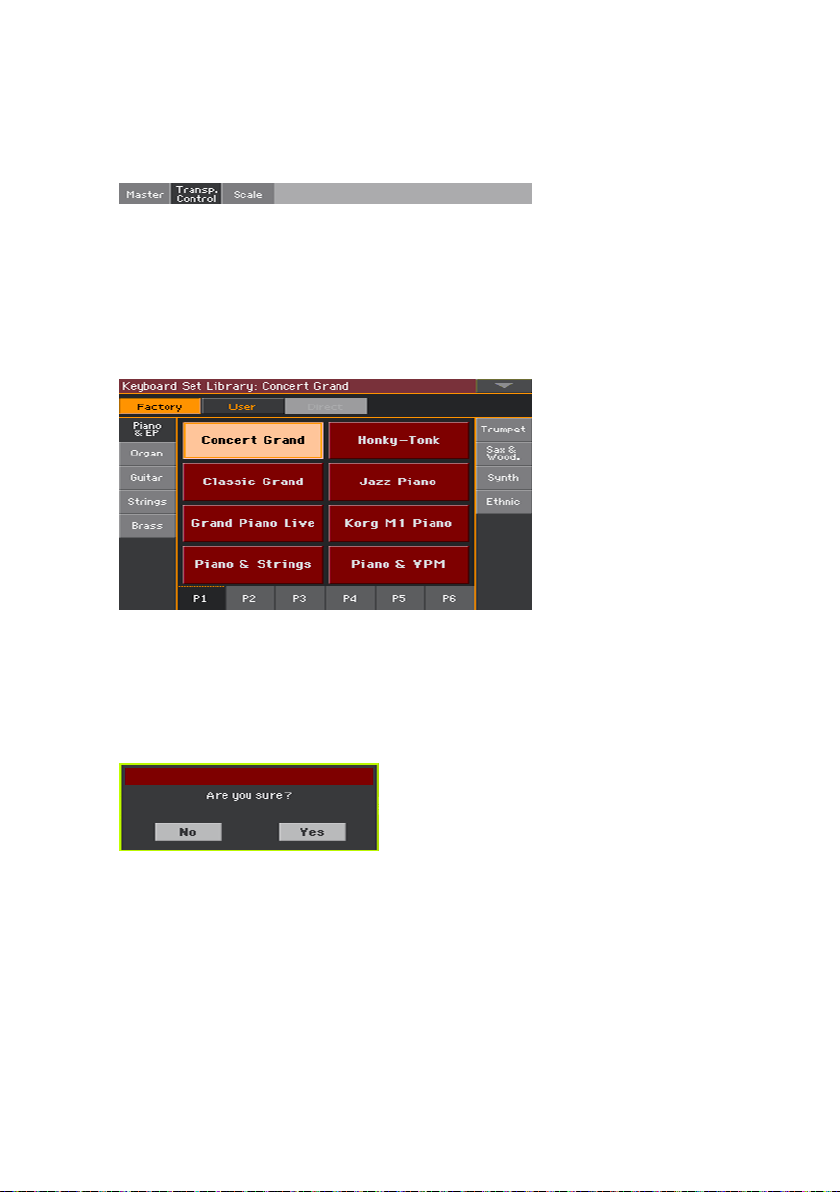
Select a Keyboard Set
1 To choose one of the available types of Keyboard Sets, touch the buttons
at the top of the window.
Type of Kbd Set Meaning
Factory Keyboard Sets included at the factory, that cannot be modied.
Local Some models could include Local-type Keyboard Sets, that are
User Locations where you can load new Keyboard Sets from an external
Direct User Keyboard Sets accessed directly from a storage device, without
Factory data customized for a particular country.
device, or save new or edited Keyboard Sets.
rst having to load them.
Page 44

38| Playing and singing
2 In case you want to choose a different group of Keyboard Sets, either press
a different button in the KEYBOARD SET LIBRARY section, or touch one of
the tabs on the sides of the Keyboard Set Library Select window.
3 To choose one of the available pages in the selected Keyboard Set group, ei-
ther touch one of the P1…P6 tabs at the bottom of the window, or repeatedly
press the button of the selected group of Keyboard Sets in the KEYBOARD
SET LIBRARY section of the control panel.
Page 45

Playing the Sounds |39
4 Touch the name of the Keyboard Set you want to choose.
5 If you want to close the Keyboard Set Library Select window (and it does
not close by itself), press the EXIT button.
In the end, you will see the name of the selected Keyboard Set in the dedicated area of the Main page. The Sounds assigned to the keyboard (shown in
the right half of the display) will change.
Choosing a Keyboard Set from a Style or a SongBook Entry
There are four matched Keyboard Sets in each Style or SongBook Entry,
fine-tuned for the containing Style or SongBook Entry. You can choose them
from the control panel or from the display.
Choose a Keyboard Set from the control panel
▪ Press one of the buttons in the KEYBOARD SET section under the display.
Page 46

40| Playing and singing
Select a Keyboard Set from the display
1 While in the Main page, be sure the Kbd Set pane is selected. If it isn’t, touch
the Kbd Set tab to select it.
2 Touch one of the Keyboard Set names in the display to select it.
You will see the name of the selected Keyboard Set highlighted in the dedicated area of the Main page. The Sounds assigned to the keyboard (shown in
the right half of the display) will change.
Digital Drawbars
You will notice that some Keyboard Sets in the Organ group of the library
contain the ‘DWB’ abbreviation in their name. These Keyboard Sets contain Digital Drawbars Sounds, that are simulations of electro-mechanical
organs of the past.
Display Hold
You may prefer to leave a Select window open after you have chosen a
Sound, Keyboard Set or Style, to continue trying other elements in that
window. Or, you may prefer it automatically closes after you have completed your choice. This is determined by the Display Hold parameter.
Turn the Display Hold parameter on or off
1 Go to the Global > General Controls > Interface page.
2 Turn the Display Hold parameter on or off:
▪ Select the Display Hold On checkbox to turn it on. Sound, Keyboard
Set, Style, Pad or Voice/Guitar Preset Select windows will remain open
on the display, until you press the EXIT button.
▪ Deselect the Display Hold On checkbox to turn it off. Sound, Keyboard
Set, Style, Pad, or Voice/Guitar Preset Select windows will automatically close after you choose an element.
3 Press the EXIT button to return to the previous page.
Page 47

Playing the Sounds |41
Factory, User, Direct
Across the pages, you will find words like Factory, User, Direct. These
terms refer to the type of protection from writing, or how much you can
customize them.
▪ Fac t o ry (Keyboard Sets, Sounds, Styles, Pads, Voice and Guitar
Presets) are elements that you cannot normally overwrite or modify. They are meant to warrant that musical resources (like SongBook
Entries) will always find linked musical resources (like Styles).
▪ User (Keyboard Sets, Sounds, Styles, Pads, Voice and Guitar Presets)
are elements that you can write, modify or overwrite. User Style banks
(the side tabs) can be freely renamed to create your own categories.
▪ Direct (Keyboard Sets, Styles, Pads, SongBook Entries, Voice and
Guitar Presets) are User elements that you can directly access from
a storage device.
Page 48

42| Playing and singing
Playing and controlling the Sounds
Playing the keyboard
The instrument’s keyboard is like a piano keyboard. Just play it!
Using the pedals
Pedals do different things depending on how they are programmed. The
Damper pedal is just that – a damper pedal, sustaining notes until you release the pedal. The Assignable pedal (or footswitch) may change depending
on how it is programmed in the Global > Controllers > Foot page.
Using the assignable knobs
The assignable knobs can control different things, like volume levels of the
different Sounds, the organ drawbars or some assignable functions. They
can be programmed in the Global > Controllers > Knobs page.
Using the assignable switches
Depending on the chosen Keyboard Set and the assigned DNC functions,
these controllers can do different things. The switches can either ‘book’
a function, that will be triggered while playing, or enable (or disable) it by
pressing the button to ‘toggle’ it.
Indicator status Meaning
Off No DNC function assigned.
Red steady Booking DNC function available.
Red blinking Booking DNC function waiting to be executed. Then, it will return
Green steady Toggle DNC function available.
Green blinking Toggle activated. Press it again to disable it.
steady.
Using the joystick
Moving the joystick left of right usually changes the Sound’s pitch. Moving
it forward usually trigger modulation, but this depends on the selected
Sounds. With the electro-mechanical organs, pushing the joystick forward
changes the rotary speaker’s speed. What it does when pulled back depends
on the selected Sounds. Just experiment!
Page 49

Customizing the Sound sets |43
06 Customizing the Sound
sets
Playing different Sounds with the left and
right hand
Splitting the keyboard
Split the keyboard into a Lower (left hand) and Upper (right hand) part
▪ Press the SPLIT button on the control panel to light up its indicator. The
keyboard will be divided into a Lower (left hand) and Upper (right hand) part.
Lower
Remove the split and play the Upper Sounds over the full keyboard range
▪ Press the SPLIT button again to turn its indicator off. The Upper Sounds will
play on the full keyboard range, as in an acoustic piano.
Upper
Upper
Page 50

44| Playing and singing
Split, Keyboard modes, Sounds
When changing the SPLIT status, the number of Sounds you hear may
change.
SPLIT
indicator
Off Full No Lower Sound Up to three Upper Sounds as-
On Split A single Lower Sound as-
Keyboard
mode
Left hand (Lower) Sounds Right hand (Upper) Sounds
signed to the full extension of
the keyboard
signed to the left hand
Up to three Upper Sounds assigned to the right side of the
keyboard.
Changing the split point
You can choose a different point where the keyboard is split into an Upper
and a Lower part. This is called the split point.
Change the split point from the control panel
1 Keep the SPLIT button pressed to open the Split Point dialog.
2 Play the lowest note of the Upper (right hand) part on the keyboard.
Change the split point from the display
1 While in the Main page, touch the Split tab to see the Split pane.
2 Touch the keyboard diagram in the display, then play the lowest note of the
Upper (right) part on the keyboard.
As an alternative, touch the Split Point parameter to select it, and use the
VALUE control to select the new split point.
Page 51

Customizing the Sound sets |45
Parts, tracks, channels
On the keyboard, Sounds are assigned to one of the keyboard parts
(Upper, Lower). Linked to a part there is a track. In Styles and MIDI Songs,
Sounds are directly assigned to tracks. Tracks are the equivalent of recorder tracks (with the associated mixer channels). In fact, Pa700 does
include a recorder and a digital mixer!
Keyboard
Parts
Upper
1,2,3 1,2,3
Lower
Rec/Seq
Tracks
Upper
Lower
Accomp.
Bs,Dr,Acc1…5 Bs,Dr,Acc1…5
Song
1,2,3…16 1,2,3…16
Mixer
Channels
Upper
1,2,3
Lower
Accomp.
Song
Page 52

46| Playing and singing
Playing two or three Sounds at the same
time
You can play up to three layered Sounds on the keyboard. This is useful to
add, for example, a layer of Strings or Synth Pads to a Grand Piano sound.
The Sounds will be assigned to the Upper part of the keyboard.
When the SPLIT button indicator is turned off (Full Keyboard mode), the
Upper parts will play on the full range of the keyboard, as it happens on an
acoustic piano. Otherwise (Split Keyboard mode), you will play the Upper
Sounds with the right hand.
Upper
Lower
Turn the selected Sound on of off from the display
▪ If the Sound you want to mute is in Play, touch the Play/Mute icon to set it
to Mute.
▪ If the Sound you want to hear is in Mute, touch the Play/Mute icon to set it
to Play.
Upper
Page 53

Customizing the Sound sets |47
Choosing different Sounds
You can assign different Sounds to the keyboard. The new combination of
Sounds can then be written into a Keyboard Set.
Open the Sound Select window from the display
1 Be sure to be in the main page of the Style Play or Song Play mode. If you
are not there, press either the S T YL E P L AY or the SONG PLAY buttons in
the control panel.
2 Touch the name of the Sound you want to change to select it.
3 Touch a second time the name of the Sound you want to change.
Choose a Sound
1 Browse through the Sounds in the Sound Select window.
Page 54

48| Playing and singing
▪ To choose one of the available types of Sound, touch the buttons at the top
of the window.
Type of Sound Meaning
Factory Standard Pa700 Sounds, that cannot normally be modied. These are
Legacy Legacy Sounds allowing for greater compatibility with older Pa-Series
Local Some models could include Local-type Sounds, that are Factory
GM/ XG Sounds allowing for full compatibility with MIDI Songs based on
User Locations where you can load new Sounds and Drum Kits from an
the richest, most modern Sounds of the whole collection.
instruments.
Sounds customized for a particular country.
General MIDI and XG Sounds and Drum Kits.
external device, or save new or edited Sounds and Drum Kits.
▪ To choose a different group of Sounds, touch one of the tabs on the sides
of the window.
▪ To choose one of the available pages in the selected Sound group, touch one
of the P1…P6 tabs at the bottom of the window.
2 Touch the name of the Sound you want to choose.
3 If you want to close the Sound Select window (and it does not close by itself),
press the EXIT button.
Page 55

Customizing the Sound sets |49
Mixing the Keyboard Sounds
Adjusting the Sound’s volume
At its core, Pa700 is a mixer. As with any mixer, you can adjust the volume
level of each Sound, therefore changing the balance between the different
Sounds on the keyboard.
Adjust a Sound’s volume from the display
1 While in the Main page, touch the Volume tab to select the Volume pane.
Accompaniment
Groups
2 Touch the mixer channel whose volume level you want to change.
3 Keep the virtual volume slider held on the screen, and drag it to the desired
level.
As an alternative, use the VALUE control to change the volume level of the
selected channel.
Keyboard Sounds
Page 56

50| Playing and singing
Turning the Sounds on or off from the Volume pane
Sounds can be muted, in case you don’t want to hear them in the mix.
Select the mixer channel
▪ Select the mixer channel to turn on of off.
Turn a channel off (Mute)
▪ Touch the Play icon (
to mute ( ).
Turn a channel on (Play)
▪ Touch the Mute icon (
to play ( ).
) in the mixer channel corresponding to the Sound
) in the mixer channel corresponding to the Sound
Page 57

Customizing the Sound sets |51
Transposing
Transposing the Upper Sounds to a different octave
All Upper Sounds can be transposed to an upper or lower octave at the press
of a single button.
Transpose the Upper Sounds one octave up
▪ Press the UPPER OCTAVE + button on the control panel.
Transpose the Upper Sounds one octave down
▪ Press the UPPER OCTAVE - button on the control panel.
Reset the octave transposition
▪ Press both UPPER OCTAVE buttons together.
Transposing the whole instrument
The instrument’s key can be transposed to make singing or playing together
with another instrument more comfortable.
The transpose value is usually shown in the page header.
Transpose down from the control panel
▪ Use the TRANSPOSE > FLAT (
steps of one semitone.
Transpose up from the control panel
▪ Use the TRANSPOSE > SHARP (
steps of one semitone.
Reset transposition
▪ Press both TRANSPOSE buttons together.
) button to lower the Master Transpose in
) button to raise the Master Transpose in
Page 58

52| Playing and singing
Using the Ensemble to add harmony
There are several types of Ensemble, but with most of them what you play
with your right hand will be harmonized with the chords you play with your
left hand.
Turn the Ensemble function on
1 Be sure the SPLIT indicator is turned on.
2 Press the ENSEMBLE button to light up its indicator.
Play chords with your left hand, and a melody with your right hand. You will
hear the chord notes added to the melody.
Turn the Ensemble function off
▪ Press the ENSEMBLE button again to turn its indicator off.
Page 59

Tempo and Metronome |53
07 Tempo and Metronome
Tempo
Setting the Tempo value
While an optimal Tempo value is saved with each Style or Song, you can
freely adjust it at your will. This will also set the Tempo for the Metronome.
Adjust the Tempo value from the control panel
▪ Use the TEMPO controls to adjust the Tempo value (or the speed of the MP3
Song).
As an alternative, for bigger Tempo changes, keep the SHIFT button pressed
and use the VALUE control.
Adjust the Tempo value from the display
1 If it is not highlighted, touch the Te mpo value in the display.
2 Use the VALU E control to adjust the Tempo value.
As an alternative, touch the Tem p o field again to open the numeric keypad,
and enter the Tempo value as a number.
Reset the Tempo value
▪ Press both TEMPO buttons at the same time.
The Tempo value memorized in the Style or the MIDI Song will be recalled.
With MP3 Songs, the original speed of the Song will be restored.
Page 60

54| Playing and singing
Visual Tempo count while the Style is not playing
While the accompaniment is not playing, the current Tempo is still beaten by
the indicator of the START/STOP button.
Tapping the Tempo value
In Style Play mode, you can ‘tap’ (beat) the Tempo value.
▪ While the accompaniment is not playing, beat the Tempo on the TAP TEMPO
button. Beat as many times as indicated by the Meter numerator (for example, three times in 3/4).
At the end, the accompaniment will start playing with the ‘tapped’ Tempo.
Locking the Tempo value
You can prevent the Tempo value from automatically changing when choosing a different Style or MIDI Song. MP3 Songs are not affected by this ‘lock’,
and will always play at the recorded Tempo.
You are free to continue setting the Tempo manually, including beating the
Style’s Tempo with the Tap Tempo function. Please note that there is a separate Tempo for the Style Play and Song Play modes.
Prevent the Tempo value from changing
▪ Press the TEMPO > LOCK (
value will not change when choosing a different Style or Song. You can still
manually change the Tempo value (as seen above).
Let the Style or Song change the Tempo value
▪ Press the TEMPO > LOCK (
choosing a different Style or Song, the memorized Tempo value will be recalled.
Tempo Change events found in the Style pattern or the MIDI Song may still
change the Tempo.
) button to light up its indicator. The Tempo
) button again to turn its indicator off. When
Page 61

Metronome
Turning the metronome on and off
Turn the metronome on
Tempo and Metronome |55
▪ Press the METRONOME (
window will open, and the metronome will start playing, beating the current
Tempo.
Turn the metronome off
▪ Press the METRONOME (
will stop.
) button to turn its indicator on. The Metronome
) button to turn its indicator off. The metronome
Setting the meter, accent and volume
You can mark the beginning of the measure, by setting the meter and accent.
Open the Metronome window
▪ Press the METRONOME (
Set the meter (time signature)
) button.
▪ Choose the meter (time signature) by using the Meter parameter.
Page 62

56| Playing and singing
Turn the accent on or off
▪ Choose the accent by using the Accent parameter.
Accent Meaning
Off No accent.
On The rst beat of each measure is accented.
Bell A bell sound is heard at the rst beat of each measure.
Adjust the metronome volume
▪ Adjust the metronome volume by using the Volume parameter.
Exit the Metronome window
▪ Press the METRONOME (
) button to exit the window and stop the metro-
nome.
▪ Press the EXIT button to exit the window without stopping the metronome.
Then, press the METRONOME (
) button to stop the metronome.
Page 63

Playing the Styles |57
08 Playing the Styles
Choosing the Styles
Choosing a Style
You can choose a Style from the control panel or from the display.
Go to the Style Play mode
▪ When turning the instrument on, you are already in Style Play mode. If you
are not, press the ST YL E PL AY button in the control panel.
▪ If you are not in the Main page of the Style Play mode, press the EXIT button
to return there.
Open the Style Select window from the control panel
▪ Press the STYLE SELECT button.
Open the Style Select window from the display
▪ Touch the name of the Style in the display.
Page 64

58| Playing and singing
Choose a Style
1 Browse through the Styles in the Style Select window.
▪ To choose one of the available types of Styles, touch the buttons at the top
of the window.
Type of Styles Meaning
Factory Styles included at the factory, that cannot be modied.
Local Some models could include Local-type Styles, that are Factory data
User Locations where you can load new Styles from an external device, or
Direct Styles accessed directly from a storage device, without rst having
customized for a particular country.
save new or edited Styles. The name of these banks can be edited in
order to create custom banks.
to load them.
▪ To choose a different group of Styles, touch one of the tabs on the sides of
the window.
▪ To choose one of the available pages in the selected Style group, touch one
of the P1…P6 tabs at the bottom of the window.
Page 65

Playing the Styles |59
As an alternative, press again the STYLE SELECT button.
2 Touch the name of the Style you want to choose.
3 If you want to close the Style Select window (and it does not close by itself),
press the EXIT button.
In the end, you will see the name of the selected Style in the dedicated area
of the main screen.
Letting Styles choose the Keyboard Sounds
Choosing a Style might automatically choose Keyboard Sounds. This depends on the STYLE TO KBD SET indicator (KBD SET = Keyboard Set).
STYLE TO KBD
SET indicator
Off Styles do not select a Keyboard Set.
On When choosing a Style, Keyboard Set 1 is automatically selected.
Blinking Choosing a Variation automatically recalls the corresponding
Meaning
Keyboard Set (1 – 4) inside the Style. For example, choose Variation 2,
and Keyboard Set 2 will be automatically recalled; choose Variation 3,
and Keyboard Set 3 will be automatically recalled.
Page 66

60| Playing and singing
Intro
Ending 3
What is a Style?
Styles are collections of musical patterns in a particular music genre – or
‘musical style’ – offering an eight-parts automatic accompaniment, similar to an eight-member band playing with you. Chords you play on the
keyboard will be recognized and will adapt the patterns to suit the music.
Different sections can be selected to let you create a complete song in
realtime.
Accompaniment parts
Accompaniment parts are like the members of a band. With Pa700 you get
five pitched instrument players (for example: guitar, piano, strings, synthesizers), a bass player, a percussion player, and a drum player.
Chords and patterns
Accompaniment patterns are repeating musical sequences (like a bass
groove, a guitar riff or a piano chord progression) that are dynamically
adapted to match the recognized chords. They may vary depending on the
type of chord (like C Major, C minor, or 7th).
Sections
Songs are made of different sections (Intro, Verse 1, Bridge, Chorus 1 and
so on). There are different patterns for each song section, and they are
collected under the Style Element buttons (INTRO, VARIATION, AUTO FILL,
BREAK, ENDING). While the name of the Intro, Fill, Break and Ending are
the same as the name of the corresponding song section, Variations can
be used either for Verse, Bridge, Chorus or Special sections. The arrangement becomes denser the higher the element numbers go.
Verse Fill Chorus Break / Verse Fill Chorus Ending
Intro 1 Fill 1 Fill 3
Variation 1 Variation 2 Variation 3 Variation 4
Auto Fill
Pa700 can automatically play a matching fill before each Variation. When
the AUTO FILL indicator is on, when going from a Variation to a different
one a Fill is automatically selected.
Break
Page 67

Playing the Styles |61
Playing a manual accompaniment (Bass &
Lower Backing)
You can play a simple manual accompaniment, where the chord you play
with your left hand is split between the Bass (chord root) and Lower (the
remaining notes) Sounds.
1 Be sure the Bass & Lower Backing function is active. When it is, the Backing
icon appears in the Lower Sound’s area.
If the icon does not appear, go to the Global > Mode Preferences > Style 2
page and select the Bass & Lower Backing checkbox to activate the function. (Also, you can deactivate the function in the same page).
2 Be sure the SPLIT indicator is turned on, and the automatic accompaniment
is not running.
3 Play a chord sequence with your left hand.
Notice how the chord root is played by the Bass Sound, while the remaining
chord notes are played by the Lower Sound (even if it is muted).
Page 68

62| Playing and singing
Recognized chord
Beat indicator
Playing the automatic accompaniment
Starting and stopping the accompaniment
You can manually start and stop the accompaniment.
Start the accompaniment
1 Press the START/STOP button.
2 Play some chords with your left hand, while playing a melody with your right
hand.
On the START/STOP button, a red indicator will mark the first beat, while a
green indicator will mark the other beats of the measure.
While the accompaniment is playing, please note the various indicators in
the display.
Pattern length in measures (‘L’)
or remaining measures (‘M’)
Tempo value
Stop the accompaniment
▪ Press again the START/STOP button.
Page 69

Playing the Styles |63
Automatic start and stop
You can let the accompaniment automatically start or stop by just playing on
the keyboard, without having to press the START/STOP button. This leaves
your hands free for playing.
Make the accompaniment start automatically (Synchro Start)
1 Press the SYNCHRO > START button to light up its indicator.
2 Play a chord, and see how the accompaniment will start automatically.
3 Stop the accompaniment by pressing the START/STOP button.
Make the accompaniment start and stop automatically (Synchro Start and
Stop)
1 Be sure the SYNCHRO > START indicator is turned on.
2 Press the SYNCHRO > STOP button, to light up both the START and STOP
indicators.
3 Play a chord to start the accompaniment, and keep the keys pressed.
4 Lift your hands from the keyboard, and see how the accompaniment will
automatically stop.
Make the accompaniment stop automatically (Synchro Stop)
1 Press the SYNCHRO > START button again to turn it off, and leave only the
SYNCHRO > STOP indicator lightened.
2 Press the START/STOP button to start the accompaniment, then play a
chord and keep the keys pressed.
3 Lift your hands from the keyboard, and see how the accompaniment will
automatically stop.
Deactivate the Synchro Start/Stop functions
▪ Press the SYNCHRO > START and/or SYNCHRO > STOP buttons to turn both
indicators off.
Page 70

64| Playing and singing
Choosing an Intro
An Intro is the introduction of the song. To choose the right Intro for your
song, please note that Intro 1 plays a short sequence with a prerecorded
chord sequence and melody, while Intro 2 plays on the chord recognized on
the keyboard. Intro 3 is usually a one-bar Count In.
Style Element Suggested use
Intro 1 Intro with prerecorded chord sequence and melody.
Intro 2 Intro with chord recognized on the keyboard.
Intro 3/Count In One-measure Count In.
1 Press one of the VARIATI O N buttons on the control panel to choose the
Variation you want to use for the first verse. The button’s indicator will be
on, meaning the Variation is waiting to start.
2 Press one of the INTRO buttons on the control panel to ‘book’ one of the
Intro sections. The button’s indicator will be on, meaning the Intro is waiting
to start. The button’s indicator on the selected VARIATI O N button will be
flashing, meaning it is booked after the Intro.
3 Start the accompaniment.
Choosing a Variation to play a Verse or Chorus
Variations can be used for verses, choruses, bridges or specials. To choose
the right Variation for your verse, please note that Variations are of growing
‘density’ and ‘loudness’. This means that Variation 1 will be the ‘sparsest’ and
the ‘quietest’ of the arrangements, while Variation 4 will be the ‘densest’
and ‘loudest’ of them. Usually, you will use Variation 1 for the first verse,
Variation 4 for the last chorus.
Style Element Suggested use
Variation 1 Verse, Bridge, Chorus or Special (lowest density)
Variation 2 Verse, Bridge, Chorus or Special (medium-low density)
Variation 3 Verse, Bridge, Chorus or Special (medium-high density)
Variation 4 Verse, Bridge, Chorus or Special (highest density)
▪ Wait for the Intro to end playing, and then the selected Variation will start
playing. The selected VA R I AT IO N indicator will stay lit.
▪ As an alternative, you can start the Variation before the end of the Intro.
While the Intro is playing, press one of the VAR I AT I ON buttons. The Variation
will start at the next measure.
Page 71

Playing the Styles |65
Playing a Fill
Fills are phrases that can be used for smoothly bridging between different
sections of a song. If you like, you can let Pa700 automatically choose a Fill
when you choose a Variation.
Turn the Auto Fill function on
▪ Press the AUTO FILL button to light up its indicator.
Automatically play a Fill, then a Variation
▪ Press one of the VA RIATI O N buttons. A Fill will be automatically selected.
Turn the Auto Fill function off
▪ When you no longer need this function, press the AUTO FILL button again
to turn the indicator off.
Choosing a Break
A break introduces a short pause in your song, creating a suspension and a
sense of surprise.
Style Element Suggested use
Break One-measure break
▪ When the Variation is nearing its end, press the BREAK button to play a
short musical break.
Page 72

66| Playing and singing
Choosing an Ending
To choose the right Ending for your song, please note that Ending 1 plays a
sequence with a prerecorded chord sequence and melody, while Ending 2
plays on the chord recognized on the keyboard.
Style Element Suggested use
Ending 1 Ending with prerecorded chord sequence and melody. If selected near
Ending 2 Ending with the chord recognized on the keyboard. If selected near the
Ending 3 Two-measure Ending, starting immediately, without waiting for the
the end of the measure, it will only start at its end.
end of the measure, it will only start at its end.
measure to end.
▪ When it is time to end the song, press one of the ENDING buttons on the
control panel to ‘book’ one of the Ending sections.
After the Ending, the Style will automatically stop.
Looping sections
If you feel that an Intro, a Break or an Ending should last longer than the
recorded pattern, you can put it in a cycling loop.
Set a Style Element to loop
▪ Press twice the button of the Intro, Break or Ending to put in loop.
The indicator on the button will start flashing, and the pattern will start repeating.
Exit from the loop
Do one of the following:
▪ Press the same Style Element button again, or
▪ Select a different Style Element.
Keep a Style Element looping while its button is pressed
▪ Keep an Intro, Break or Ending button pressed to loop it. Release it when you
want the Style Element to exit from the loop.
▪ If the Auto Fill function is turned on, keep a Variation button pressed to loop
the corresponding Fill. Release it when you want the Fill to exit from the loop,
and the Variation to start playing.
Page 73

Playing the Styles |67
Fade In/Out
You can start and/or stop your playing with a smooth fade-in or fade-out.
Fade i n
▪ While the accompaniment is not playing, press the FADE IN/OUT button to
light up its indicator and start the accompaniment with a smooth fade-in.
The accompaniment will start. When the maximum volume is reached, the
indicator will turn off.
Fade o u t
▪ When the song is approaching its end, press the FADE IN/OUT button to stop
the accompaniment with a smooth fade-out.
Balancing the accompaniment against the keyboard
While playing, you may want to balance the Keyboard Sounds against the
Accompaniment Sounds, to make the soloist stand out of the background or
go back in the mix.
Balance the Accompaniment against the Keyboard Sounds
▪ While the accompaniment is playing, use the BALANCE knob to balance be-
tween the Accompaniment (Style) and the Keyboard (Keyboard Set) Sounds.
Page 74

68| Playing and singing
Making the accompaniment sparser
You can easily turn off any of the accompaniment groups by using the Play/
Mute buttons in the Main > Volume pane. For example, you may want to mute
the ACCOMP (Accompaniment) group to play with the backing of the drums
and bass alone.
If you only want to listen to Drums and Percussions, press the ACCO M P. button on the control panel to turn its indicator off. Press it again to reactivate
all the accompaniment sounds.
Page 75

Playing the Styles |69
Manually playing the Bass line
You can play the Bass Sound with your left hand, freeing it from the automatic accompaniment.
Turn the Manual Bass function on
▪ Press the MANUAL BASS button to turn its indicator on.
The automatic accompaniment will stop playing (except for the Drum and
Percussion Sounds), and you can manually play the Bass line on the Lower
part of the keyboard.
When in Manual Bass mode, the volume level of the Bass Sound will be automatically increased.
Turn the Manual Bass function off
▪ Press the MANUAL BASS button to turn its indicator off.
When turning the Manual Bass mode off, the volume level of the Bass Sound
will be automatically set back to the original value.
Page 76

70| Playing and singing
09 Customizing the Styles
Setting the Chord Recognition
Choosing where to play chords (Chord Scan area)
You can play chords with your left hand, or with both hands. You can choose
the recognition area, depending on the song you are playing and your preferred playing style.
The area where chords are recognized depends on the status of the SPLIT
in dicato r.
SPLIT/
CHORD SCAN
On Left hand (Lower area of the keyboard) Depends on the
Off Both hands (full keyboard) Three or more
Make chords be recognized when played with your left hand
▪ Press the SPLIT button to turn its indicator on.
Make chords be recognized when played with both hands
▪ Press the SPLIT button to turn its indicator off.
Always play three or more notes to let the arranger recognize a chord.
Deactivate chord recognition
▪ Press the ACCOM P. button to turn its indicator off.
Only the Drum and Percussion tracks will continue to play.
Automatically holding chords and Lower notes (Memory)
Where to play chords (Chord Scan area) Notes to play
Chord Recognition
mode
Page 77

Customizing the Styles |71
Automatically holding chords and Lower notes (Memory)
You can keep the chords and/or Lower notes in memory even after raising
your hand from the keyboard.
▪ Press the MEMORY button to turn its indicator on, and keep the chords and/
or Lower notes in memory.
▪ Press the MEMORY button to turn its indicator off. The chords and/or Lower
notes are released as soon as you raise your hand from the keyboard.
Recognizing the root note (Bass Inversion)
The instrument’s internal arranger recognizes chords by analyzing all the
notes you play in the chord recognition area, and considering their function
in a chord. You can however always force the lowest (leftmost) note of the
chord to be considered the chord’s root of a slashed chord (such as ‘C/E’ or
‘F/C’ ).
You can activate/deactivate this function in the Split pane.
Turn Bass Inversion on
1 While in the Main page of the Style Play mode, touch the Split tab to see the
Split pane.
2 Select the Bass Inversion checkbox to turn it on.
The lowest note of a chord will always be detected as the root note of a
slashed chord.
Turn Bass Inversion off
1 While in the Main page of the Style Play mode, touch the Split tab to see the
Split pane.
2 Deselect the Bass Inversion checkbox to turn it off.
The lowest note will be scanned together with the other chord notes, and will
not always be considered as the root note.
Page 78

72| Playing and singing
Mixing the grouped Accompaniment
Sounds
Grouped Accompaniment Sounds
As in a mixer, the Accompaniment Sounds can be grouped together. For
example, instead of separately muting the guitar and the strings parts in
the Accompaniment, you can mute the Accompaniment (ACCOMP) group
by touching a single button.
Grouped Accompaniment Sounds can be accessed directly from the Main
page > Volume pane:
Muting grouped Accompaniment parts
Turn a group of Accompaniment Sounds off (Mute)
▪ If the group you want to mute is in Play, touch the Play/Mute icon to set it
to Mute.
Turn a group of Accompaniment Sounds on (Play)
▪ If the group you want to hear is in Mute, touch the Play/Mute icon to set it
to Play.
Page 79

Customizing the Styles |73
Turning the individual Accompaniment Sounds on or off
Sounds can be muted, in case you don’t want to hear them in the mix. As an
example, the accompaniment might contain a piano part, and you want to
play it live on the keyboard.
See the Accompaniment parts mixer
▪ While in the Main page, touch the Volume tab to select the Volume pane, then
press the TRACK SELECT button to switch to the Accompaniment Sounds.
Accompaniment parts
Turn a channel on (Play) or off (Mute)
▪ Select the mixer channel, then touch the Play (
) or Mute ( ) icon to
turn the corresponding Sounds on or off.
Return to the Main page
▪ When done, press the TRACK SELECT button again to switch back to the
Main page and see the grouped parts.
Page 80

74 | Playing and singing
10 The Chord Sequencer
Recording Chord Sequences
You can record a Chord Sequence, that will play the chords for you. This
will be useful, for example, when you have to play a repeated sequence, and
prefer to use your left hand to play a solo on the keyboard, or to select the
DNC controllers.
You can start recording while the Arranger is playing.
1 Press the START/STOP button to start the automatic accompaniment.
2 Keep the CHORD SEQUENCER button pressed for about one second to en-
ter record-pending. Its indicator will become steady red.
3 Press the CHORD SEQUENCER button again to start recording. At the be-
ginning of the next measure, the CHORD SEQUENCER indicator will start
flashing in red. Start recording your Chord Sequence.
4 When the Chord Sequence is done, press the CHORD SEQUENCER button
again to stop recording. Its indicator will turn steady green, to show there is
a sequence in memory.
The Chord Sequence will remain in memory until you record a new Chord
Sequence, choose a different Style or SongBook Entry, or you turn the instrument off. If the sequence is locked, it will not change when choosing a
different Style or SongBook Entry.
Page 81

The Chord Sequencer |75
Playing back Chord Sequences
1 While the accompaniment is playing, press the CHORD SEQUENCER button
to start the Chord Sequence.
The indicator will start flashing in green. The Chord Sequence will be played
back in loop starting from the next measure.
2 Play your solo part, while the Chord Sequence plays the chords for you.
During Chord Sequence looping, you can freely select any Variation, as if you
where playing chords with your hands.
3 Press the CHORD SEQUENCER button again to stop the Chord Sequence (or
stop the accompaniment). The button’s indicator will become steady green.
Page 82

76| Playing and singing
11 Playing the Pads
Choosing the Pad sets
Choose the Pads by selecting a Style
▪ Choose a Style. The four Pads it contains will be selected.
Choose the Pads by selecting a SongBook Entry
▪ Choose a SongBook Entry. The four Pads it contains will be selected.
What is a Pad?
Pads are single-track hits or sequences, that you can instantly play with
the dedicated PADS buttons. They can either play single sounds or short,
cycling sequences that play in time with the Style or the MIDI Song. In Style
Play mode, sequences are transposed according to the recognized chords.
Page 83

Playing the Pads |77
Playing the Pads
Starting and stopping the Pads
You can play up to four Pads at the same time, by using the dedicated PADS
buttons on the control panel.
Play the Pads
▪ Press one or more PADS buttons to trigger the Pads.
▪ Play some chords, and transpose any Pad of the Sequence type.
Stop a single Pad
▪ Press a PADS button to stop the corresponding Pad.
Stop all Pads at the same time
▪ Press the PADS > STOP button to stop all the Pads.
Stop all the Pads and the Style at the same time
▪ Press the START/STOP button, or one of the ENDING buttons.
Stop all the Pads and start a Song
▪ Press the PL AY/STO P button to start a Song. All the Pads will stop playing.
Changing Tempo
In Style Play mode, Pads are synchronized to the Style’s Tempo. Change the
Style’s Tempo, and the Pads’ Tempo will change accordingly.
In Song Play mode, Pads are synchronized to the latest MIDI Song’s Tempo.
Since Pads cannot be synchronized with MP3 Songs, the Tempo of the latest
MIDI Song will be considered when playing MP3 Songs.
Page 84

78| Playing and singing
Upper Sounds
12 Playing the Songs
Choosing the Songs
Choosing a Song
Switch to the Song Play mode
Press the SONG PLAY button.
Title bar Page menu
Selected Song
Selected Style
Selected
Keyboard Set
Right-hand/
Left-hand/
Lower Sound
Tabs recalling
other panes
Open the Song Select window from the control panel
▪ Press the SELECT button in the PL AYER section.
Keyboard Set
pane
Page 85

Playing the Songs |79
Open the Song Select window from the display
▪ Touch the name of the Song on the display.
Browse through the Songs
While in the Song Select window, browse through the files to find the Song
you are looking for.
Current path
Device
▪ Choose a storage device by using the Device menu.
If the Song is contained in an external USB device, connect the device to the
USB HOST port.
Device Typ e
DISK Internal drive
SD Optional internal microSD
USB Optional device connected to the USB HOST port
The actual name (label) of the device will appear between square brackets.
▪ Scroll the file list by using the scrollbar. As an alternative, use the VALUE
control (if the focus is on the Device selector, touch any item in the list before
using the dial).
▪ Open the selected folder/directory by touching the Open button.
▪ Go to the upper folder/directory by touching the Close button.
▪ Jump to the folder/directory, containing the Song currently assigned to the
Player, by touching the Locate button.
Page 86

80| Playing and singing
Current measure
Jump to a different alphabetical section
1 If it is not selected, touch the Name label on top of the list.
2 Keep the SHIFT button pressed and touch one of the arrows of the scrollbar
to jump to the previous or next alphabetical section.
Change the list sorting
▪ Reorder the items according to a different criterion (Type, Name, Size, Date)
by touching the corresponding label on top of the list.
▪ By touching the label again, the order of the files will switch between as-
cending and descending.
Select the Song
1 Touch the name of the Song you want to choose to highlight it.
2 Touch the Select button. If a Song is already playing, it will stop, and the new
Song will be ready to play. You will return to the Main page of the Song Play
mode.
When a Song has been selected, it will appear in the Song area.
▪ MIDI Song selected:
(Time Signature)
Meter
▪ MP3 Song selected:
Total time
Tempo
Elapsed time
Tempo variation
Page 87

Playing the Songs |81
KAR file
MP3 file
on disk
Song
What is a MIDI Song
MIDI Songs’ jargon name is Standard MIDI File, often abbreviated as SMF.
The filename extension is .mid. The Standard MIDI File is the industry standard format for songs, and is used by Pa700 as the native file format when
playing or recording MIDI Songs.
The MIDI Karaoke File (.kar) is an extension of the SMF format, and is also
supported. It always contains lyrics.
MIDI
Song
MID file
on disk
on disk
What is an MP3 Song
MP3 Songs’ real name is even funnier: MPEG Layer-3, usually abbreviated
as MP3. The filename extension is .mp3. This is a compressed audio file,
used to store recorded songs in the smallest amount of space, without
losing too much audio quality. At the highest quality, MP3 files are usually
impossible to distinguish from non-compressed audio files. Pa700 can play
and record MP3 files.
MP3
Page 88

82| Playing and singing
Playing a Song
Starting, stopping and controlling the Player
Pa700 features a set of Player controls in the PL AY ER section.
Start the Player
▪ Press the PLAY/STOP (
While the Song is playing, the indicators in the display will show the current
position.
Fast Forward the Song
▪ Press the FAST FORWARD (
(MIDI Song) or to the next second (MP3 Song).
▪ Keep the FAST FORWARD (
ously. Release it when you have reached the desired location.
Rewind the Song
▪ Press the REWIND (
Song) or to the previous second (MP3 Song).
▪ Keep the REWIND (
Release it when you have reached the desired location.
Pause and resume playback
▪ Press the PLAY/STOP (
The button’s indicator will turn off.
▪ Press the PLAY/STOP (
tor will turn on again.
) button.
) button once to jump to the next measure
) button pressed to scroll the Song continu-
) button once to jump to the previous measure (MIDI
) button pressed to scroll the Song continuously.
) button to stop the Song at the current position.
) button again to resume playback. The indica-
Stop the Player and return to the beginning of the Song
▪ Press the HOME (
the Song. The button’s indicator will turn off.
) button to stop the Player and move to the beginning of
Page 89

Playing the Songs |83
Fade In/Out
You can start and/or stop a Song with a smooth fade-in or fade-out.
Fade i n
▪ While the Song is not playing, press the FADE IN/OUT button to light up its
indicator and start with a smooth fade-in.
The Song will start. When the maximum volume is reached, the indicator will
turn off.
Fade o u t
▪ When the Song is approaching its end, press the FADE IN/OUT button to end
it with a smooth fade-out.
Page 90

84| Playing and singing
Playing along with the Song
Playing the keyboard
Play along with the Song
▪ While the Song is playing, play on the keyboard.
Choose different Sounds from the Keyboard Set Library
▪ Choose a different Keyboard Set from the KEYBOARD SET LIBRARY sec-
tion of the control panel, or by touching the KBD area in the Main page.
Choose different Sounds from the Style or SongBook Entry
▪ The latest Style or SongBook Entry you selected contain up to four Keyboard
Set. Choose a different Keyboard Set from the KEYBOARD SET section under the display, or from the Kbd Set pane of the Main page.
Muting the melody
Mute the melody if you are going to play or sing live. This will avoid overlapping between your playing or singing and the internal Sounds.
1 Go to the Song Play > Volume pane.
2 Use the TRACK SELECT button to see the Sound you want to mute.
3 Touch the Play (
you want to mute. The Mute ( ) icon will appear.
Saving the Play/Mute status
To make the Play/Mute status of the Song Sounds permanent for all the subsequent MIDI Songs, write it to memory.
▪ Go to the Global > Mode Preferences > Song & Sequencer page, and choose
the Write Song Play Track & FX command from the page menu.
) icon in the mixer channel corresponding to the Sound
Page 91

Playing the Songs |85
Transpose the Songs to play in an easier key
You may want to play on the keyboard in an easier key, and transpose a Song
in the same key, without transposing the keyboard.
Activate transposition on the Players only
1 Go to the Global > Tuning > Transpose Control page.
2 Activate Transpose on the Player, and deactivate it on the Style and Keyboard
tracks.
Transpose the Songs
▪ Use the TRANSPOSE buttons on the control panel.
Balancing the Songs against the keyboard
While playing, you may want to balance the Keyboard Sounds against the
Songs, to make the soloist stand out of the background or go back in the mix.
Balance the Songs against the keyboard
▪ While the Songs are playing, use the BALANCE knob to balance between the
Songs and the Keyboard (Keyboard Set) Sounds.
Page 92

86| Playing and singing
Setting the general volume of the MP3 Songs
You can balance the volume of MP3 Songs against that of MIDI Songs and
Styles.
1 Go to the Global > Audio & Video > MP3/Speakers page.
2 Use the MP3 Player > Volume parameter to set the maximum volume of the
MP3 Player.
MP3 Volume Meaning
0 … 100 Max volume in percentage
Page 93

Playing the Songs |87
Playing all the Songs in a folder
You can play all the Songs in a folder with a single command.
Open the Song Select window from the control panel
▪ Press the SELECT button.
Open the Song Select window from the display
▪ Touch the name of the Song in the display.
Select the folder containing the Songs to play
1 Browse through the files, until you find the folder containing the Songs to
play, and open it.
2 Touch the Play All button to pre-select all the Songs in the folder.
A Jukebox file will be automatically generated and assigned to the Player.
The order in which the Songs will be played back will depend on how they
appear in the Song Select window.
Play the list of Songs
3 Start and stop the Songs by pressing the PLAY/STOP (
4 Use the standard PL AY ER controls to play, pause, stop, fast forward and
rewind the Songs.
Move through the Songs
▪ Jump to the next Song in the list by keeping the SHIFT button pressed and
pressing the FAST FORWARD (
▪ Jump to the previous Song by keeping the SHIFT button pressed and press-
ing the REWIND (
▪ Press the HOME (
) button.
) button to go back to the beginning of the current Song.
) button.
) button.
Page 94

88| Playing and singing
13 Lyrics, chords, markers
and score
Reading the lyrics and chords contained in
a Song
Reading lyrics and chords
Open the Lyrics page
▪ Press the LY R IC S button on the control panel. The Lyrics page will appear,
and you will see the lyrics.
Read the lyrics
▪ While the Song is playing, lyrics contained in a MIDI or MP3 Song will auto-
matically scroll in the display, in time with the music. Lyrics at the current
position will be highlighted.
Exit from the Lyrics page
▪ When done with the lyrics, press either the LY R ICS or the EXIT button.
Page 95

Changing the text size
You can choose between two text sizes.
Lyrics, chords, markers and score |89
▪ Use the
aA button in the Lyrics page to change the font size.
Showing chords
You can show or hide the chord symbols that might be included as Lyrics
events in the MIDI Songs.
▪ Be sure the Chord button appears pressed in the Lyrics page to see the
chord symbols. Chord symbols (if any) will appear above the lyrics, in time
with the music.
▪ Be sure the Chord button doesn’t appear pressed in the Lyrics page to hide
the chord symbols.
Page 96

90| Playing and singing
Moving through a Song with the markers
Song Marker events that might be contained in a MID file (that is, a MIDI
Song) can be read by Pa700. They are immediately shown in the Markers
page.
Open the Markers page
▪ While in Song Play mode, press the MARKER button.
Jump to a marker
1 If you like, start the Player by pressing the PLAY/STOP (
You can jump to a marker even if the Player is not running.
2 When you want to jump to a marker, touch it in the markers list. At the begin-
ning of the next measure, the Song will jump to the saved position.
Make the markers list scroll automatically
Select the Auto Scroll parameter, to let the markers list scroll automatically,
and always let the current marker be shown in the display.
Loop the current section
You can use the markers to repeat a passage you need practicing.
1 Start the Player.
2 When you reach the beginning of the point you need practicing, touch the
Add button to create a first marker.
Usually, you will create the marker one or two measures before the actual
starting point.
3 When you reach the end of the point you need practicing, touch the Add
button to create a second marker.
) button.
Page 97

Lyrics, chords, markers and score |91
4 Select the first marker, then select the Loop checkbox to repeat (loop) be-
tween the first and second marker.
5 If you no longer need them, delete the markers. In any case, they will be
automatically removed when choosing a different Song or turning off the
instrument.
Page 98

92| Playing and singing
Current staff
Selected trackView options Clef
Reading the music score
Creating and reading the music score
Create the music score
1 Choose a MIDI Song to play with the Player.
2 Press the SCORE button to open the Score page. A score of the selected
track will be generated.
Depending on the content of the track, either notes or chords are shown in
the staff.
Song name TempoChord symbols
Current
position
Lyrics
Choose a different track
▪ Choose a different track to be seen as music score by using the Tr k menu.
Usually, the melody is track #4.
Choose the clef
▪ Choose a different clef by using the Clef menu.
Usually, the correct clef is automatically assigned by the score generator.
Page 99

Lyrics, chords, markers and score |93
Clef Meaning
Treble Standard Treble clef.
Treble +8 Treble clef with transposition one octave upper.
Treble - 8 Treble clef with transposition one octave lower.
Bass Standard Bass clef.
Bass-8 Bass clef with transposition one octave lower.
Exit from the Score page
▪ When done with the score, press either the SCORE or the EXIT button.
Intelligent display of the score
Score generation is smart enough to ‘clean-up’ a track with automatic
quantization, syncopation, key and clef generation. Even non-quantized
tracks will be shown in a very readable way.
If a Key Signature event is found at the beginning of the Song (position
‘001.01.000’ of the Song’s Master track), the correct key signature is also
shown.
Following the Song
You can always see where you are in the score by watching at these indicators:
▪ A red vertical line, showing indicating the current staff in play.
▪ A red triangle, showing the current position.
Page 100

94| Playing and singing
Showing lyrics, chords, note names
Read the Lyrics
▪ Touch the Lyrics button to make the lyrics (if available) appear or disappear.
Read the chords
▪ Touch the Chord button to make the chord symbols (if available) appear or
disappear.
Read the note names
▪ Touch the Note button to make the note name appear or disappear next to
each note.
Choosing the chords and note names language
Chords and note names are shown either according to the English (A, B, C…)
or Italian (Do, Re, Mi…) system, depending on the selected language.
▪ Go to the Global > General Controls > Interface page, and use the Language
parameter to change the language.
Muting the selected track
Mute the selected track
▪ Touch the Play/Mute (
track.
Mute the track if you are going to play or sing it live. This will avoid overlapping between your playing or singing and the internal Sounds.
Saving the Play/Mute status
To make the Play/Mute status of the Song tracks permanent for all the subsequent MIDI Songs, write it to memory.
▪ Go to the Global > Mode Preferences > Song & Sequencer page, and choose
the Write Song Play Track & FX command from the page menu.
/ ) button to listen or mute the selected
Music score and transposition
The Score page shows the actual MIDI notes. Using the TRANSPOSE buttons
or transposing the selected track does not affect the music score.
 Loading...