

Page 1
Reference Guide
ENGLISH | OS Ver. 1.0
1E
Page 2

Page 3
Important safety instructions
• Read these instructions.
• Keep these instructions.
• Heed all warnings.
• Follow all instructions.
• Do not use this apparatus near water.
• Clean only with dry cloth.
• Do not block any ventilation openings, install in accordance with the manufacturer’s instructions.
• Do not install near any heat sources such as radiators, heat registers, stoves, or
other apparatus (including amplifiers) that produce heat.
• Protect the power cord from being walked on or pinched particularly at plugs,
convenience receptacles, and the point where they exit from the apparatus.
• Only use attachments/accessories specified by the manufacturer.
• Unplug this apparatus during lightning storms or when unused for long periods of time.
• Refer all servicing to qualified service personnel. Servicing is required when
the apparatus has been damaged in any way, such as power-supply cord or
plug is damaged, liquid has been spilled or objects have fallen into the apparatus, the apparatus has been exposed to rain or moisture, does not operate normally, or has been dropped.
• Turning off the power switch does not completely isolate this product from
the power line so remove the plug from the socket if not using it for extended
periods of time, or before cleaning. Please ensure that the mains plug or appliance couple remains readily accessible.
• Mains powered apparatus shall not be exposed to dripping or splashing and that
no objects filled with liquids, such as vases, shall be placed on the apparatus.
• Install this product near the wall socket and keep the power plug easily accessible.
• Do not install this equipment on the far position from wall outlet and/or convenience receptacle.
• WARNING – Date/time Lithium button cell battery inside. Danger of explosion if battery is incorrectly replaced. Replace only with the same or equivalent type. The internal date/time Lithium button cell battery is user
replaceable.
• Do not expose batteries to excessive heat, such as direct sunshine, fire or the like.
• Dispose of used batteries according to the battery manufacturer’s instructions.
• Do not install this equipment in a confined space such as a box for the conveyance or similar unit.
• When a cart is used, use caution when moving the cart/apparatus combination to avoid injury from tip-over.
The lightning flash with arrowhead symbol within an equilateral triangle, is intended to alert the user to the presence of
uninsulated “dangerous voltage” within the product’s enclosure that may be of sufficient magnitude to constitute a risk
of electric shock to persons.
The exclamation point within an equilateral triangle is
intended to alert the user to the presence of important operating and maintenance (servicing) instructions in the literature accompanying the product.
THE FCC REGULATION WARNING (for U.S.A.)
This equipment has been tested and found to comply with the limits for a Class B
digital device, pursuant to Part 15 of the FCC Rules. These limits are designed to
provide reasonable protection against harmful interference in a residential
installation. This equipment generates, uses, and can radiate radio frequency energy
and, if not installed and used in accordance with the instructions, may cause
harmful interference to radio communications. However, there is no guarantee that
interference will not occur in a particular installation. If this equipment does cause
harmful interference to radio or television reception, which can be determined by
turning the equipment off and on, the user is encouraged to try to correct the
interference by one or more of the following measures:
• Reorient or relocate the receiving antenna.
• Increase the separation between the equipment and receiver.
• Connect the equipment into an outlet on a circuit different from that to which the
receiver is connected.
• Consult the dealer or an experienced radio/TV technician for help.
Unauthorized changes or modification to this system can void the user’s authority to
operate this equipment.
CE mark for European Harmonized Standards
CE mark which is attached to our company’s products of AC mains operated
apparatus until December 31, 1996 means it conforms to EMC Directive (89/336/
EEC) and CE mark Directive (93/68/EEC).
And, CE mark which is attached after January 1, 1997 means it conforms to EMC
Directive (89/336/EEC), CE mark Directive (93/68/EEC) and Low Voltage Directive
(73/23/EEC).
Also, CE mark which is attached to our company’s products of Battery operated
apparatus means it conforms to EMC Directive (89/336/EEC) and CE mark
Directive (93/68/EEC).
Notice regarding disposal (EU only)
If this symbol is shown on the product, manual, battery, or package, you
must dispose of it in the correct manner to avoid harm to human health
or damage to the environment. Contact your local administrative body
for details on the correct disposal method. If the battery contains heavy
metals in excess of the regulated amount, a chemical symbol is displayed
below the symbol on the battery or battery package.
Perchlorate (California, USA only)
Perchlorate Material – special handling may apply.
See www.dtsc.ca.gov/hazardouswaste/perchlorate.
IMPORTANT NOTICE TO CONSUMERS
This product has been manufactured according to strict specifications and voltage
requirements that are applicable in the country in which it is intended that this
product should be used. If you have purchased this product via the internet, through
mail order, and/or via a telephone sale, you must verify that this product is intended
to be used in the country in which you reside.
WARNING: Use of this product in any country other than that for which it is
intended could be dangerous and could invalidate the manufacturer's or distributor's
warranty.
Please also retain your receipt as proof of purchase otherwise your product may be
disqualified from the manufacturer's or distributor's warranty.
Page 4

Further notices
Automatic Power-Off
To avoid wasting power, Pa600 will by default automatically turn
off after two hours of non-active use (playing, pressing buttons
or using the touch-screen). Please save your data (Performances,
Styles, Songs, and so on) before taking a prolonged pause.
Data Handling
Data in memory may sometimes be lost due to incorrect user
action. Be sure to save important data to the internal memory or
to an external USB device. Korg will not be responsible for damages caused by data loss.
Example screens
Some pages of the manuals show LCD screens along with an
explanation of functions and operations. All sound, style, song
or parameter names, as well as shown values, are merely examples and may not always match the actual display you are working on.
Cleaning the display
Use a soft cotton cloth to clean the screen. Some materials, such
as paper towels, could cause scratches and damage it. Computer
wipes are also suggested, provided they are specifically designed
for LCD screens.
Do not spray any liquid on the LCD screen directly. Always
apply the solution to your cloth first, then clean the screen.
Trademarks
Open Source notice
Portions of this product’s software are copyright ©2007 “The
FreeType Project” (www.freetype.org). All rights reserved.
Disclaimer
The information contained in this manual have been carefully
revised and checked through. Due to our constant efforts to
improve our products, the specifications might differ to those in
the manual. Korg is not responsible for any eventual differences
found between the specifications and the contents of the instruction manual – all specifications being subject to change without
prior notice.
Liability
Korg products are manufactured under strict specifications and
voltages required by each country. These products are warranted
by the Korg distributor only in each country. Any Korg product
not sold with a warranty card or carrying a serial number disqualifies the product sold from the manufacturer's/distributor's
warranty and liability. This requirement is for your own protection and safety.
Service and User’s Assistance
For service, please contact your nearest Authorized Korg Service
Center. For more information on Korg products, and to find
software and accessories for your keyboard, please contact your
local Authorized Korg distributor. For up-to-date information,
please point your web browser to our web site.
Acrobat and PDF are registered trademarks of Adobe Systems
Incorporated. Mac is a registered trademark of Apple, Inc.
MS-DOS and Windows are registered trademarks of Microsoft
Corporation. All other trademarks or registered trademarks are
the property of their respective holders.
Keep your keyboard up-to-date
Your instrument can be constantly updated as new versions of
the operating system are released by Korg. You can download
the operating system from our web site. Please, read the instructions supplied with the operating system.
Copyright © 2012 KORG Italy Spa.
Page 5

Table of Contents
Table of Contents
1
Reference
Selecting elements . . . . . . . . . . . . . . . . . . . . . . . . . . . . . . . . . . . 6
Style Select window . . . . . . . . . . . . . . . . . . . . . . . . . . . . . . . . . . . . . .6
Sound Select window . . . . . . . . . . . . . . . . . . . . . . . . . . . . . . . . . . . .7
Performance Select window . . . . . . . . . . . . . . . . . . . . . . . . . . . . . .8
Pad Select window . . . . . . . . . . . . . . . . . . . . . . . . . . . . . . . . . . . . . .8
STS Select . . . . . . . . . . . . . . . . . . . . . . . . . . . . . . . . . . . . . . . . . . . . . .9
Song Select window . . . . . . . . . . . . . . . . . . . . . . . . . . . . . . . . . . . . .9
Style Play operating mode . . . . . . . . . . . . . . . . . . . . . . . . . . . 12
Start-up settings . . . . . . . . . . . . . . . . . . . . . . . . . . . . . . . . . . . . . . 12
How Styles, Variations, Performances and STSs are
linked together . . . . . . . . . . . . . . . . . . . . . . . . . . . . . . . . . . . . . . 12
Styles and Pads . . . . . . . . . . . . . . . . . . . . . . . . . . . . . . . . . . . . . . . 12
Master Volume and Balance . . . . . . . . . . . . . . . . . . . . . . . . . . . . 12
Factory, Favorite and User Styles . . . . . . . . . . . . . . . . . . . . . . . . 12
Main page . . . . . . . . . . . . . . . . . . . . . . . . . . . . . . . . . . . . . . . . . . . . 13
STS Name panel . . . . . . . . . . . . . . . . . . . . . . . . . . . . . . . . . . . . . . 15
Volume panel . . . . . . . . . . . . . . . . . . . . . . . . . . . . . . . . . . . . . . . . 15
Pad panel . . . . . . . . . . . . . . . . . . . . . . . . . . . . . . . . . . . . . . . . . . . . 17
Split panel . . . . . . . . . . . . . . . . . . . . . . . . . . . . . . . . . . . . . . . . . . . . 18
Sub-Scale panel . . . . . . . . . . . . . . . . . . . . . . . . . . . . . . . . . . . . . . . 18
Edit menu . . . . . . . . . . . . . . . . . . . . . . . . . . . . . . . . . . . . . . . . . . . . 19
Edit page structure . . . . . . . . . . . . . . . . . . . . . . . . . . . . . . . . . . . . 19
Mixer/Tuning: Volume/Pan . . . . . . . . . . . . . . . . . . . . . . . . . . . . 19
Mixer/Tuning: FX Send . . . . . . . . . . . . . . . . . . . . . . . . . . . . . . . . 20
Mixer/Tuning: EQ Gain . . . . . . . . . . . . . . . . . . . . . . . . . . . . . . . . 21
Mixer/Tuning: EQ Control . . . . . . . . . . . . . . . . . . . . . . . . . . . . . 21
Mixer/Tuning: Tuning . . . . . . . . . . . . . . . . . . . . . . . . . . . . . . . . . 22
Mixer/Tuning: Sub Scale . . . . . . . . . . . . . . . . . . . . . . . . . . . . . . . 22
Effects: A/B FX Configuration . . . . . . . . . . . . . . . . . . . . . . . . . . 24
Effects: Master 1, 2 . . . . . . . . . . . . . . . . . . . . . . . . . . . . . . . . . . . . 25
Track Controls: Mode . . . . . . . . . . . . . . . . . . . . . . . . . . . . . . . . . 25
Track Controls: Drum Edit . . . . . . . . . . . . . . . . . . . . . . . . . . . . . 26
Track Controls: Easy Edit . . . . . . . . . . . . . . . . . . . . . . . . . . . . . . 27
Keyboard/Ensemble: Key/Velocity Range . . . . . . . . . . . . . . . . 28
Keyboard/Ensemble: Ensemble . . . . . . . . . . . . . . . . . . . . . . . . . 29
Keyboard/Ensemble: Keyboard Control . . . . . . . . . . . . . . . . . . 30
Pad/Switch: Pad . . . . . . . . . . . . . . . . . . . . . . . . . . . . . . . . . . . . . . . 30
Pad/Switch: Switch . . . . . . . . . . . . . . . . . . . . . . . . . . . . . . . . . . . . 31
Style Controls: Drum/Fill . . . . . . . . . . . . . . . . . . . . . . . . . . . . . . 31
Style Controls: Keyboard Range On/Off / Wrap Around . . . . 32
Page menu . . . . . . . . . . . . . . . . . . . . . . . . . . . . . . . . . . . . . . . . . . . 32
Write Performance dialog box . . . . . . . . . . . . . . . . . . . . . . . . . . 33
Write Single Touch Setting dialog box . . . . . . . . . . . . . . . . . . . 34
Write Style Settings dialog box . . . . . . . . . . . . . . . . . . . . . . . . . . 34
The Favorite banks . . . . . . . . . . . . . . . . . . . . . . . . . . . . . . . . . . . . 35
Style/Pad Record mode . . . . . . . . . . . . . . . . . . . . . . . . . . . . . . 36
Recording Styles and Pads . . . . . . . . . . . . . . . . . . . . . . . . . . . . . . 36
Style/Pad Import/Export . . . . . . . . . . . . . . . . . . . . . . . . . . . . . . . 38
Entering the Style/Pad Record mode . . . . . . . . . . . . . . . . . . . . . 38
Exit by saving or deleting changes . . . . . . . . . . . . . . . . . . . . . . . 38
Listening to the Style while in Edit mode . . . . . . . . . . . . . . . . . 38
List of recorded events . . . . . . . . . . . . . . . . . . . . . . . . . . . . . . . . . 39
Main page - Record 1 . . . . . . . . . . . . . . . . . . . . . . . . . . . . . . . . . . 39
Main page - Record 2/Cue . . . . . . . . . . . . . . . . . . . . . . . . . . . . . . 43
Main page - Guitar Mode . . . . . . . . . . . . . . . . . . . . . . . . . . . . . . 44
Style/Pad Record procedure . . . . . . . . . . . . . . . . . . . . . . . . . . . . 48
Edit menu . . . . . . . . . . . . . . . . . . . . . . . . . . . . . . . . . . . . . . . . . . . . 50
Edit page structure . . . . . . . . . . . . . . . . . . . . . . . . . . . . . . . . . . . . 50
Event Edit: Event Edit . . . . . . . . . . . . . . . . . . . . . . . . . . . . . . . . . . 51
Event Edit: Filter . . . . . . . . . . . . . . . . . . . . . . . . . . . . . . . . . . . . . . 53
Style/Pad Edit: Quantize . . . . . . . . . . . . . . . . . . . . . . . . . . . . . . . . 54
Style/Pad Edit: Transpose . . . . . . . . . . . . . . . . . . . . . . . . . . . . . . . 54
Style/Pad Edit: Velocity . . . . . . . . . . . . . . . . . . . . . . . . . . . . . . . . 55
Style/Pad Edit: Cut . . . . . . . . . . . . . . . . . . . . . . . . . . . . . . . . . . . . 56
Style/Pad Edit: Delete . . . . . . . . . . . . . . . . . . . . . . . . . . . . . . . . . . 56
Style/Pad Edit: Delete All . . . . . . . . . . . . . . . . . . . . . . . . . . . . . . . 57
Style/Pad Edit: Copy from Style . . . . . . . . . . . . . . . . . . . . . . . . . 57
Style/Pad Edit: Copy from Pad . . . . . . . . . . . . . . . . . . . . . . . . . . 58
Style Element Track Controls: Sound/Expression . . . . . . . . . . 59
Style Element Track Controls: Keyboard Range . . . . . . . . . . . . 60
Style Element Track Controls: Noise/Guitar . . . . . . . . . . . . . . . 60
Pad Track Controls: Sound/Expression . . . . . . . . . . . . . . . . . . . 61
Style Element/Pad Chord Table: Chord Table . . . . . . . . . . . . . 62
Style Track Controls: Type/Trigger/Tension . . . . . . . . . . . . . . 62
Import: Import Groove . . . . . . . . . . . . . . . . . . . . . . . . . . . . . . . . 63
Import: Import SMF . . . . . . . . . . . . . . . . . . . . . . . . . . . . . . . . . . . 63
Export SMF . . . . . . . . . . . . . . . . . . . . . . . . . . . . . . . . . . . . . . . . . . 65
Page menu . . . . . . . . . . . . . . . . . . . . . . . . . . . . . . . . . . . . . . . . . . . 66
Write Style/Pad dialog box . . . . . . . . . . . . . . . . . . . . . . . . . . . . . . 67
Copy Key/Chord dialog box . . . . . . . . . . . . . . . . . . . . . . . . . . . . 68
Copy Sounds dialog box . . . . . . . . . . . . . . . . . . . . . . . . . . . . . . . . 68
Copy Expression dialog box . . . . . . . . . . . . . . . . . . . . . . . . . . . . . 68
Copy Key Range dialog box . . . . . . . . . . . . . . . . . . . . . . . . . . . . . 68
Copy Chord Table dialog box . . . . . . . . . . . . . . . . . . . . . . . . . . . 69
Overdub Step Recording window . . . . . . . . . . . . . . . . . . . . . . . . 69
Song Play operating mode . . . . . . . . . . . . . . . . . . . . . . . . . . . 71
MIDI Clock . . . . . . . . . . . . . . . . . . . . . . . . . . . . . . . . . . . . . . . . . . 71
Tempo Lock . . . . . . . . . . . . . . . . . . . . . . . . . . . . . . . . . . . . . . . . . . 71
Master Volume, Balance . . . . . . . . . . . . . . . . . . . . . . . . . . . . . . . . 71
Track parameters . . . . . . . . . . . . . . . . . . . . . . . . . . . . . . . . . . . . . . 71
Standard MIDI Files and Sounds . . . . . . . . . . . . . . . . . . . . . . . . 71
Keyboard, Pad and Player tracks . . . . . . . . . . . . . . . . . . . . . . . . . 72
Main page (Normal view) . . . . . . . . . . . . . . . . . . . . . . . . . . . . . . 72
STS Name panel . . . . . . . . . . . . . . . . . . . . . . . . . . . . . . . . . . . . . . . 75
Volume panel . . . . . . . . . . . . . . . . . . . . . . . . . . . . . . . . . . . . . . . . . 75
Pad panel . . . . . . . . . . . . . . . . . . . . . . . . . . . . . . . . . . . . . . . . . . . . 75
Split panel . . . . . . . . . . . . . . . . . . . . . . . . . . . . . . . . . . . . . . . . . . . . 75
Sub-Scale panel . . . . . . . . . . . . . . . . . . . . . . . . . . . . . . . . . . . . . . . 76
Jukebox panel . . . . . . . . . . . . . . . . . . . . . . . . . . . . . . . . . . . . . . . . . 76
Edit menu . . . . . . . . . . . . . . . . . . . . . . . . . . . . . . . . . . . . . . . . . . . . 77
Edit page structure . . . . . . . . . . . . . . . . . . . . . . . . . . . . . . . . . . . . 77
Mixer/Tuning: Volume/Pan . . . . . . . . . . . . . . . . . . . . . . . . . . . . 77
Mixer/Tuning: FX Send . . . . . . . . . . . . . . . . . . . . . . . . . . . . . . . . 77
Mixer/Tuning: EQ Gain . . . . . . . . . . . . . . . . . . . . . . . . . . . . . . . . 78
Mixer/Tuning: EQ Control . . . . . . . . . . . . . . . . . . . . . . . . . . . . . 79
Mixer/Tuning: Tuning . . . . . . . . . . . . . . . . . . . . . . . . . . . . . . . . . 79
Effects: A/B FX Configuration . . . . . . . . . . . . . . . . . . . . . . . . . . . 79
Effects: Master 1, 2 . . . . . . . . . . . . . . . . . . . . . . . . . . . . . . . . . . . . . 80
Track Controls: Mode . . . . . . . . . . . . . . . . . . . . . . . . . . . . . . . . . . 80
Track Controls: Drum Edit . . . . . . . . . . . . . . . . . . . . . . . . . . . . . 80
Track Controls: Easy Edit . . . . . . . . . . . . . . . . . . . . . . . . . . . . . . . 80
Keyboard/Ensemble: Key/Velocity Range . . . . . . . . . . . . . . . . . 80
Keyboard/Ensemble: Ensemble . . . . . . . . . . . . . . . . . . . . . . . . . . 80
Keyboard/Ensemble: Keyboard Control . . . . . . . . . . . . . . . . . . 80
Pad/Switch: Pad . . . . . . . . . . . . . . . . . . . . . . . . . . . . . . . . . . . . . . . 80
Pad/Switch: Assignable Switch . . . . . . . . . . . . . . . . . . . . . . . . . . 81
Introduction
Page 6

2
Table of Contents
Jukebox Editor . . . . . . . . . . . . . . . . . . . . . . . . . . . . . . . . . . . . . . . . 81
Page menu . . . . . . . . . . . . . . . . . . . . . . . . . . . . . . . . . . . . . . . . . . . . 82
Sequencer operating mode . . . . . . . . . . . . . . . . . . . . . . . . . .84
Standard MIDI Files and MP3 . . . . . . . . . . . . . . . . . . . . . . . . . . . 84
Sequencer Play - Main page . . . . . . . . . . . . . . . . . . . . . . . . . . . . . 84
Entering Record mode . . . . . . . . . . . . . . . . . . . . . . . . . . . . . . . . . 86
Record mode: Multitrack Sequencer page . . . . . . . . . . . . . . . . . 87
Record mode: Step Record page . . . . . . . . . . . . . . . . . . . . . . . . . 89
Record mode: Backing Sequence (Quick Record) page . . . . . . 91
Record mode: Step Backing Sequence page . . . . . . . . . . . . . . . . 94
Edit menu . . . . . . . . . . . . . . . . . . . . . . . . . . . . . . . . . . . . . . . . . . . . 96
Edit page structure . . . . . . . . . . . . . . . . . . . . . . . . . . . . . . . . . . . . . 96
Mixer/Tuning: Volume/Pan . . . . . . . . . . . . . . . . . . . . . . . . . . . . . 97
Mixer/Tuning: FX Send . . . . . . . . . . . . . . . . . . . . . . . . . . . . . . . . 97
Mixer/Tuning: EQ Gain . . . . . . . . . . . . . . . . . . . . . . . . . . . . . . . . 97
Mixer/Tuning: EQ Control . . . . . . . . . . . . . . . . . . . . . . . . . . . . . 97
Mixer/Tuning: Tuning . . . . . . . . . . . . . . . . . . . . . . . . . . . . . . . . . 98
Mixer/Tuning: Sub Scale . . . . . . . . . . . . . . . . . . . . . . . . . . . . . . . . 98
Effects: A/B FX Configuration . . . . . . . . . . . . . . . . . . . . . . . . . . . 98
Effects: Master 1, 2 . . . . . . . . . . . . . . . . . . . . . . . . . . . . . . . . . . . . . 99
Track Controls: Mode . . . . . . . . . . . . . . . . . . . . . . . . . . . . . . . . . .99
Track Controls: Drum Edit . . . . . . . . . . . . . . . . . . . . . . . . . . . . . 99
Track Controls: Easy Edit . . . . . . . . . . . . . . . . . . . . . . . . . . . . . . . 99
Event Edit: Event Edit . . . . . . . . . . . . . . . . . . . . . . . . . . . . . . . . . . 99
Event Edit: Filter . . . . . . . . . . . . . . . . . . . . . . . . . . . . . . . . . . . . . 101
Song Edit: Quantize . . . . . . . . . . . . . . . . . . . . . . . . . . . . . . . . . . . 101
Song Edit: Transpose . . . . . . . . . . . . . . . . . . . . . . . . . . . . . . . . . . 102
Song Edit: Velocity . . . . . . . . . . . . . . . . . . . . . . . . . . . . . . . . . . . . 102
Song Edit: Cut/Insert Measures . . . . . . . . . . . . . . . . . . . . . . . . . 103
Song Edit: Delete . . . . . . . . . . . . . . . . . . . . . . . . . . . . . . . . . . . . . 103
Song Edit: Copy . . . . . . . . . . . . . . . . . . . . . . . . . . . . . . . . . . . . . . 104
Song Edit: Move . . . . . . . . . . . . . . . . . . . . . . . . . . . . . . . . . . . . . . 104
Song Edit: RX Convert . . . . . . . . . . . . . . . . . . . . . . . . . . . . . . . .104
Page menu . . . . . . . . . . . . . . . . . . . . . . . . . . . . . . . . . . . . . . . . . . . 105
Song Select window . . . . . . . . . . . . . . . . . . . . . . . . . . . . . . . . . . .106
Save Song window . . . . . . . . . . . . . . . . . . . . . . . . . . . . . . . . . . . . 106
Sound Edit operating mode . . . . . . . . . . . . . . . . . . . . . . . . 108
The MIDI channel . . . . . . . . . . . . . . . . . . . . . . . . . . . . . . . . . . . . 108
How to select oscillators . . . . . . . . . . . . . . . . . . . . . . . . . . . . . . . 108
Sounds, Drum Kits . . . . . . . . . . . . . . . . . . . . . . . . . . . . . . . . . . . 108
Main page . . . . . . . . . . . . . . . . . . . . . . . . . . . . . . . . . . . . . . . . . . . 108
Edit menu . . . . . . . . . . . . . . . . . . . . . . . . . . . . . . . . . . . . . . . . . . . 110
Edit page structure . . . . . . . . . . . . . . . . . . . . . . . . . . . . . . . . . . . . 110
Basic: Sound Basic . . . . . . . . . . . . . . . . . . . . . . . . . . . . . . . . . . . . 110
Basic: OSC Basic . . . . . . . . . . . . . . . . . . . . . . . . . . . . . . . . . . . . . . 112
Basic: Vel/Key Zone . . . . . . . . . . . . . . . . . . . . . . . . . . . . . . . . . . . 114
Basic: Damper Mode . . . . . . . . . . . . . . . . . . . . . . . . . . . . . . . . . .114
Basic: Damper Trigger . . . . . . . . . . . . . . . . . . . . . . . . . . . . . . . . . 115
Basic: EQ . . . . . . . . . . . . . . . . . . . . . . . . . . . . . . . . . . . . . . . . . . . . 116
DrumKit: Sample Setup (Drum Kits) . . . . . . . . . . . . . . . . . . . .116
DrumKit: EQ (Drum Kits) . . . . . . . . . . . . . . . . . . . . . . . . . . . . . 118
DrumKit: Voice Mixer (Drum Kits) . . . . . . . . . . . . . . . . . . . . .118
Pitch: Pitch Mod . . . . . . . . . . . . . . . . . . . . . . . . . . . . . . . . . . . . . 119
Pitch: Pitch EG . . . . . . . . . . . . . . . . . . . . . . . . . . . . . . . . . . . . . . .121
Filter: Filter Type . . . . . . . . . . . . . . . . . . . . . . . . . . . . . . . . . . . . . 123
Filter: Filter Mod . . . . . . . . . . . . . . . . . . . . . . . . . . . . . . . . . . . . . 124
Filter: Filter LFO . . . . . . . . . . . . . . . . . . . . . . . . . . . . . . . . . . . . . 125
Filter: Filter EG . . . . . . . . . . . . . . . . . . . . . . . . . . . . . . . . . . . . . . . 126
Amp: Amp Level/Pan . . . . . . . . . . . . . . . . . . . . . . . . . . . . . . . . . 128
Amp: Amp Mod . . . . . . . . . . . . . . . . . . . . . . . . . . . . . . . . . . . . . . 128
Amp: Amp EG . . . . . . . . . . . . . . . . . . . . . . . . . . . . . . . . . . . . . . . 129
LFO: LFO1 . . . . . . . . . . . . . . . . . . . . . . . . . . . . . . . . . . . . . . . . . .131
LFO: LFO2 . . . . . . . . . . . . . . . . . . . . . . . . . . . . . . . . . . . . . . . . . . .132
Effects: “B” FX Config . . . . . . . . . . . . . . . . . . . . . . . . . . . . . . . . .132
Effects: Master 1 / Reverb . . . . . . . . . . . . . . . . . . . . . . . . . . . . . .132
Effects: Master 2 / Chorus . . . . . . . . . . . . . . . . . . . . . . . . . . . . . .133
User PCM Samples: User Samples . . . . . . . . . . . . . . . . . . . . . . .133
Page menu . . . . . . . . . . . . . . . . . . . . . . . . . . . . . . . . . . . . . . . . . . .134
Write Sound dialog box . . . . . . . . . . . . . . . . . . . . . . . . . . . . . . . .135
Copy Oscillator dialog box . . . . . . . . . . . . . . . . . . . . . . . . . . . . .135
Copy Drum Kit dialog box . . . . . . . . . . . . . . . . . . . . . . . . . . . . .135
AMS (Alternate Modulation Source) list . . . . . . . . . . . . . . . . .136
Global mode . . . . . . . . . . . . . . . . . . . . . . . . . . . . . . . . . . . . . . 138
Overview on the Global mode . . . . . . . . . . . . . . . . . . . . . . . . . .138
Main page . . . . . . . . . . . . . . . . . . . . . . . . . . . . . . . . . . . . . . . . . . .138
Edit menu . . . . . . . . . . . . . . . . . . . . . . . . . . . . . . . . . . . . . . . . . . .138
Edit page structure . . . . . . . . . . . . . . . . . . . . . . . . . . . . . . . . . . . .138
General Controls: Basic . . . . . . . . . . . . . . . . . . . . . . . . . . . . . . . .139
General Controls: Interface . . . . . . . . . . . . . . . . . . . . . . . . . . . . .140
General Controls: Lock . . . . . . . . . . . . . . . . . . . . . . . . . . . . . . . .141
General Controls: Clock & Power . . . . . . . . . . . . . . . . . . . . . . .142
Mode Preferences: Style . . . . . . . . . . . . . . . . . . . . . . . . . . . . . . . .143
Mode Preferences: Song & Sequencer . . . . . . . . . . . . . . . . . . . .145
Mode Preferences: Media . . . . . . . . . . . . . . . . . . . . . . . . . . . . . .145
Controllers: Hand Controllers . . . . . . . . . . . . . . . . . . . . . . . . . .146
Controllers: Foot Controllers . . . . . . . . . . . . . . . . . . . . . . . . . . .146
Tuning: Basic . . . . . . . . . . . . . . . . . . . . . . . . . . . . . . . . . . . . . . . . .147
Tuning: Transpose Control . . . . . . . . . . . . . . . . . . . . . . . . . . . . .147
Tuning: Scale . . . . . . . . . . . . . . . . . . . . . . . . . . . . . . . . . . . . . . . . .148
MIDI: General Controls . . . . . . . . . . . . . . . . . . . . . . . . . . . . . . .149
MIDI: MIDI In Controls . . . . . . . . . . . . . . . . . . . . . . . . . . . . . . .150
MIDI: MIDI In Channels . . . . . . . . . . . . . . . . . . . . . . . . . . . . . .151
MIDI: MIDI Out Channels . . . . . . . . . . . . . . . . . . . . . . . . . . . . .151
MIDI: Filters . . . . . . . . . . . . . . . . . . . . . . . . . . . . . . . . . . . . . . . . .152
Audio & EQ: MP3 / Speakers . . . . . . . . . . . . . . . . . . . . . . . . . . .152
Audio & EQ: Limiter . . . . . . . . . . . . . . . . . . . . . . . . . . . . . . . . . .152
Audio & EQ: Master EQ . . . . . . . . . . . . . . . . . . . . . . . . . . . . . . .153
Touch Panel Calibration . . . . . . . . . . . . . . . . . . . . . . . . . . . . . . .154
Page menu . . . . . . . . . . . . . . . . . . . . . . . . . . . . . . . . . . . . . . . . . . .154
Write Quarter Tone SC Preset dialog box . . . . . . . . . . . . . . . .155
Write Midi Preset dialog box . . . . . . . . . . . . . . . . . . . . . . . . . . .155
Write Limiter Preset dialog box . . . . . . . . . . . . . . . . . . . . . . . . .155
Write Master EQ Preset dialog box . . . . . . . . . . . . . . . . . . . . . .155
Media mode . . . . . . . . . . . . . . . . . . . . . . . . . . . . . . . . . . . . . . . 156
Storage devices and internal memory . . . . . . . . . . . . . . . . . . . .156
Supported device . . . . . . . . . . . . . . . . . . . . . . . . . . . . . . . . . . . . .156
Selecting and deselecting files . . . . . . . . . . . . . . . . . . . . . . . . . . .156
Searching files . . . . . . . . . . . . . . . . . . . . . . . . . . . . . . . . . . . . . . . .156
Preferences . . . . . . . . . . . . . . . . . . . . . . . . . . . . . . . . . . . . . . . . . . .156
File types . . . . . . . . . . . . . . . . . . . . . . . . . . . . . . . . . . . . . . . . . . . .157
Media structure . . . . . . . . . . . . . . . . . . . . . . . . . . . . . . . . . . . . . . .158
Main page . . . . . . . . . . . . . . . . . . . . . . . . . . . . . . . . . . . . . . . . . . .159
Page structure . . . . . . . . . . . . . . . . . . . . . . . . . . . . . . . . . . . . . . . .159
Navigation tools . . . . . . . . . . . . . . . . . . . . . . . . . . . . . . . . . . . . . .159
Load . . . . . . . . . . . . . . . . . . . . . . . . . . . . . . . . . . . . . . . . . . . . . . . .160
Save . . . . . . . . . . . . . . . . . . . . . . . . . . . . . . . . . . . . . . . . . . . . . . . . .163
Copy . . . . . . . . . . . . . . . . . . . . . . . . . . . . . . . . . . . . . . . . . . . . . . . .167
Delete . . . . . . . . . . . . . . . . . . . . . . . . . . . . . . . . . . . . . . . . . . . . . . .168
Format . . . . . . . . . . . . . . . . . . . . . . . . . . . . . . . . . . . . . . . . . . . . . .169
Utility . . . . . . . . . . . . . . . . . . . . . . . . . . . . . . . . . . . . . . . . . . . . . . .169
USB . . . . . . . . . . . . . . . . . . . . . . . . . . . . . . . . . . . . . . . . . . . . . . . . .171
Page menu . . . . . . . . . . . . . . . . . . . . . . . . . . . . . . . . . . . . . . . . . . .172
Care of mass storage devices . . . . . . . . . . . . . . . . . . . . . . . . . . . .173
Merging PCM Samples from various sources . . . . . . . . . . . . .173
Page 7

3
Table of Contents
SongBook . . . . . . . . . . . . . . . . . . . . . . . . . . . . . . . . . . . . . . . . . 174
Book . . . . . . . . . . . . . . . . . . . . . . . . . . . . . . . . . . . . . . . . . . . . . . . 174
Custom List . . . . . . . . . . . . . . . . . . . . . . . . . . . . . . . . . . . . . . . . . 176
List Edit . . . . . . . . . . . . . . . . . . . . . . . . . . . . . . . . . . . . . . . . . . . . 177
Book Edit 1 . . . . . . . . . . . . . . . . . . . . . . . . . . . . . . . . . . . . . . . . . . 178
Book Edit 2 . . . . . . . . . . . . . . . . . . . . . . . . . . . . . . . . . . . . . . . . . . 179
Book Edit 3 . . . . . . . . . . . . . . . . . . . . . . . . . . . . . . . . . . . . . . . . . . 180
Info . . . . . . . . . . . . . . . . . . . . . . . . . . . . . . . . . . . . . . . . . . . . . . . . 181
Page menu . . . . . . . . . . . . . . . . . . . . . . . . . . . . . . . . . . . . . . . . . . 181
Lyrics, Score, Markers . . . . . . . . . . . . . . . . . . . . . . . . . . . . . . 183
Lyrics page . . . . . . . . . . . . . . . . . . . . . . . . . . . . . . . . . . . . . . . . . . 183
Score page . . . . . . . . . . . . . . . . . . . . . . . . . . . . . . . . . . . . . . . . . . 185
Markers page . . . . . . . . . . . . . . . . . . . . . . . . . . . . . . . . . . . . . . . . 186
MIDI . . . . . . . . . . . . . . . . . . . . . . . . . . . . . . . . . . . . . . . . . . . . . . . 187
What is MIDI? . . . . . . . . . . . . . . . . . . . . . . . . . . . . . . . . . . . . . . . 187
What is MIDI Over USB? . . . . . . . . . . . . . . . . . . . . . . . . . . . . . 187
Standard MIDI Files . . . . . . . . . . . . . . . . . . . . . . . . . . . . . . . . . . 188
The General MIDI standard . . . . . . . . . . . . . . . . . . . . . . . . . . . 188
The Global channel . . . . . . . . . . . . . . . . . . . . . . . . . . . . . . . . . . . 188
The Chord 1 and Chord 2 channels . . . . . . . . . . . . . . . . . . . . . 188
The Control channel . . . . . . . . . . . . . . . . . . . . . . . . . . . . . . . . . . 188
MIDI Presets . . . . . . . . . . . . . . . . . . . . . . . . . . . . . . . . . . . . . . . . 188
Connecting Pa600 to a Master keyboard . . . . . . . . . . . . . . . . . 189
Connecting Pa600 to a MIDI accordion . . . . . . . . . . . . . . . . . 189
Connecting Pa600 to an external sequencer . . . . . . . . . . . . . . 190
Playing another instrument with Pa600 . . . . . . . . . . . . . . . . . 191
Appendix
Factory data . . . . . . . . . . . . . . . . . . . . . . . . . . . . . . . . . . . . . . . 194
Styles . . . . . . . . . . . . . . . . . . . . . . . . . . . . . . . . . . . . . . . . . . . . . . . 194
Style Elements . . . . . . . . . . . . . . . . . . . . . . . . . . . . . . . . . . . . . . . 198
Style and Player controls . . . . . . . . . . . . . . . . . . . . . . . . . . . . . . 198
Single Touch Settings (STS) . . . . . . . . . . . . . . . . . . . . . . . . . . . 198
Sounds (Bank order) . . . . . . . . . . . . . . . . . . . . . . . . . . . . . . . . . 199
Sounds (Program Change order) . . . . . . . . . . . . . . . . . . . . . . . 211
Drum Kits . . . . . . . . . . . . . . . . . . . . . . . . . . . . . . . . . . . . . . . . . . . 221
Multisamples . . . . . . . . . . . . . . . . . . . . . . . . . . . . . . . . . . . . . . . . 222
Drum Samples . . . . . . . . . . . . . . . . . . . . . . . . . . . . . . . . . . . . . . . 227
Pads . . . . . . . . . . . . . . . . . . . . . . . . . . . . . . . . . . . . . . . . . . . . . . . . 234
Effects . . . . . . . . . . . . . . . . . . . . . . . . . . . . . . . . . . . . . . . . . . . . . . 237
MIDI Preset . . . . . . . . . . . . . . . . . . . . . . . . . . . . . . . . . . . . . . . . . 239
Assignable parameters . . . . . . . . . . . . . . . . . . . . . . . . . . . . .240
List of Pedal/Footswitch functions . . . . . . . . . . . . . . . . . . . . . . 240
List of Assignable Switches functions . . . . . . . . . . . . . . . . . . . . 241
Scales . . . . . . . . . . . . . . . . . . . . . . . . . . . . . . . . . . . . . . . . . . . . . . . 242
Effects . . . . . . . . . . . . . . . . . . . . . . . . . . . . . . . . . . . . . . . . . . . . .243
Dynamic Modulation sources . . . . . . . . . . . . . . . . . . . . . . . . . . 243
Dynamics (Dynamic) . . . . . . . . . . . . . . . . . . . . . . . . . . . . . . . . . 244
EQ and Filters (EQ/Filter) . . . . . . . . . . . . . . . . . . . . . . . . . . . . . 247
Overdrive, Amp models, and Mic models (OD Amp Mic) . 254
Chorus, Flanger, and Phaser (Cho/Fln Phaser) . . . . . . . . . . . 259
Modulation and Pitch Shift (Mod./P.Shift) . . . . . . . . . . . . . . . 265
Delay . . . . . . . . . . . . . . . . . . . . . . . . . . . . . . . . . . . . . . . . . . . . . . . 276
Reverb and Early Reflections (Reverb ER) . . . . . . . . . . . . . . . 286
Mono-Mono Serial (Mono-Mono) . . . . . . . . . . . . . . . . . . . . . . 288
Double Size . . . . . . . . . . . . . . . . . . . . . . . . . . . . . . . . . . . . . . . . . . 305
Installing the Korg USB MIDI Driver . . . . . . . . . . . . . . . . . .314
Connecting Pa600 to a personal computer . . . . . . . . . . . . . . . 314
KORG USB-MIDI Driver system requirements . . . . . . . . . . . 314
Please note before use . . . . . . . . . . . . . . . . . . . . . . . . . . . . . . . . . 314
Windows: Installing the KORG USB-MIDI Driver . . . . . . . . 314
Mac OS X: Installing the KORG USB-MIDI Driver . . . . . . . 314
MIDI Data . . . . . . . . . . . . . . . . . . . . . . . . . . . . . . . . . . . . . . . . . .316
MIDI Controllers . . . . . . . . . . . . . . . . . . . . . . . . . . . . . . . . . . . . . 316
Recognized chords . . . . . . . . . . . . . . . . . . . . . . . . . . . . . . . . . 317
Shortcuts . . . . . . . . . . . . . . . . . . . . . . . . . . . . . . . . . . . . . . . . . .319
Troubleshooting . . . . . . . . . . . . . . . . . . . . . . . . . . . . . . . . . . .320
Index . . . . . . . . . . . . . . . . . . . . . . . . . . . . . . . . . . . . . . . . . . . . . .321
Introduction
Page 8

4
Table of Contents
Page 9

Page 10
6
Selecting elements
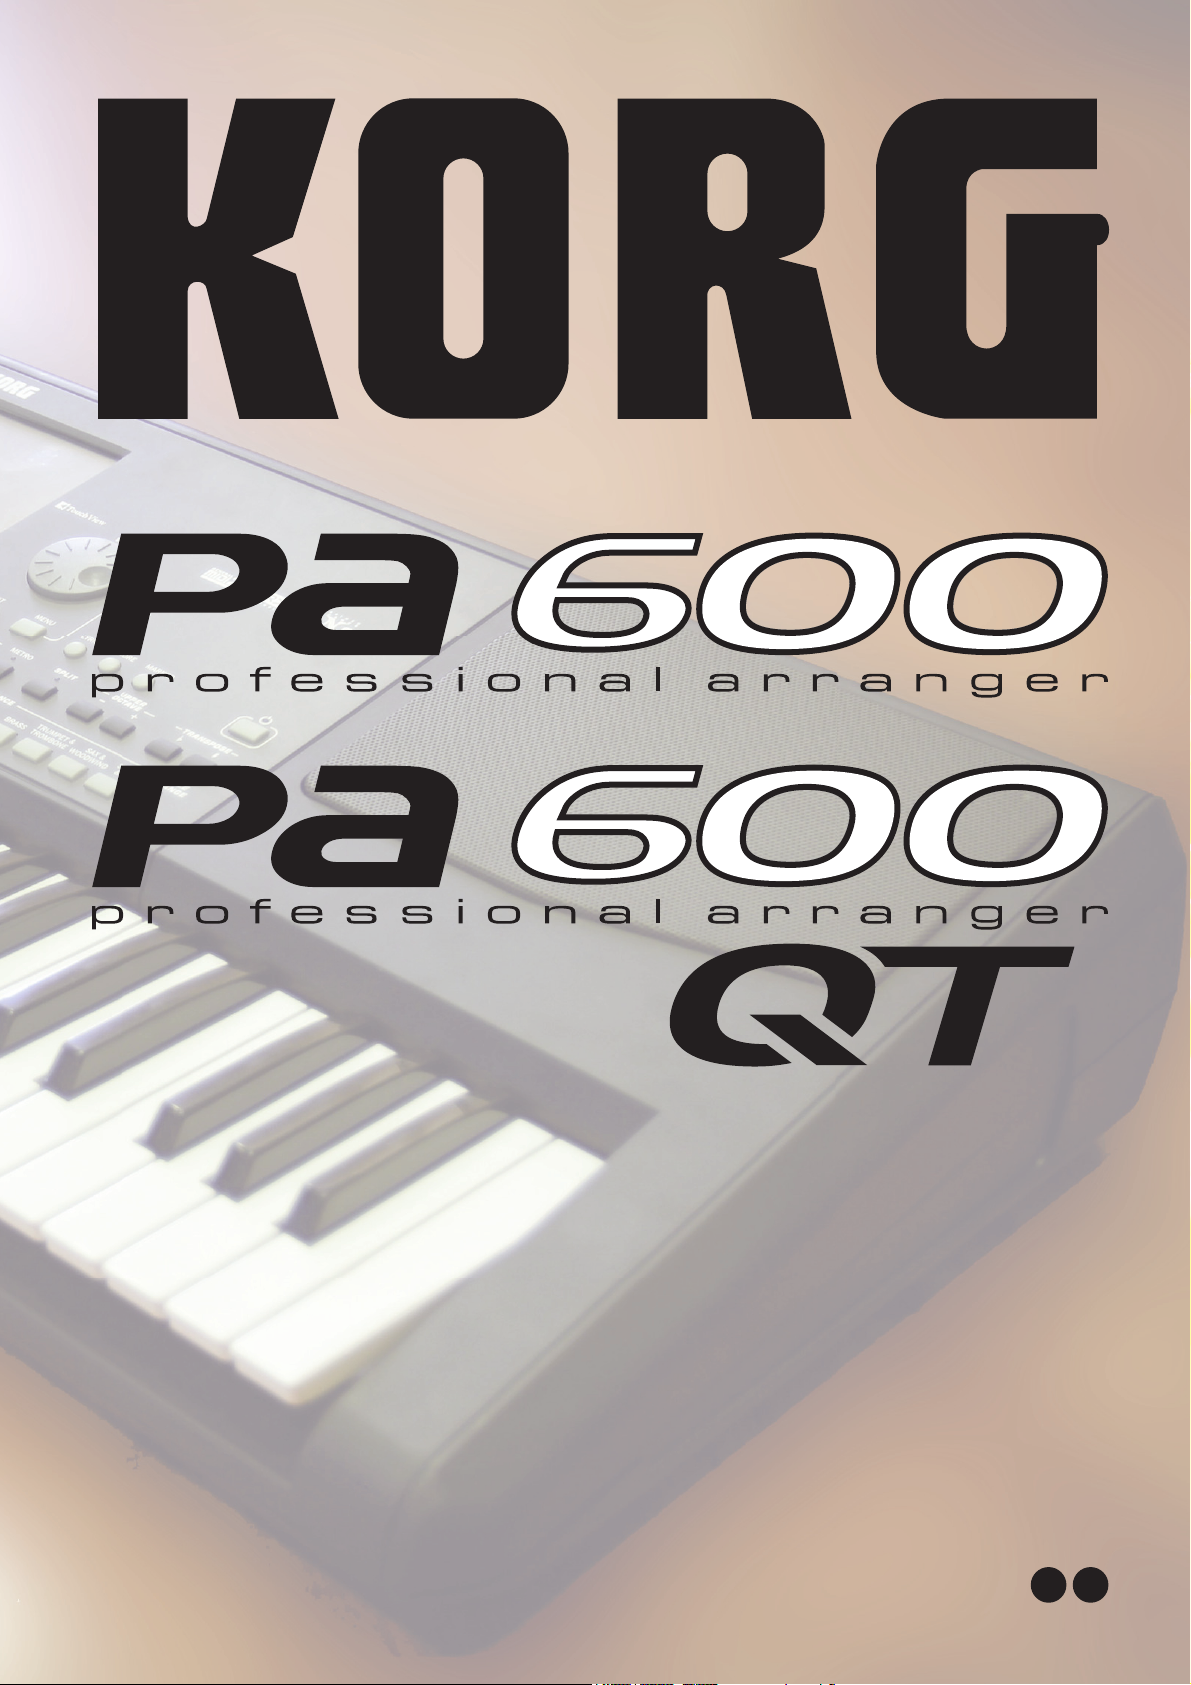
Style Select window
Side tabs (banks)
Lower tabs (pages)
Style sets
Styles
Selecting elements
The following windows are shown in the various operating
modes, whenever you try to select a Sound, Performance, Style
or Song.
Style Select window
To open the Style Select window, touch the Style area whereas it
appears in the display, or the STYLE button in the SELECTION
section on the control panel.
Press EXIT to exit from this page and go back to the previous
page without selecting any Style.
Style Select page menu
Touch the page menu icon to open the menu. Touch a command
to select it. Touch anywhere in the display to close the menu
without selecting a command.
Copy and Paste
Use this command to copy the selected Style to a different selection,
1. Select the Style to be copied. To select more items, keep the
SHIFT button and touch all the item to be selected for
copying. Hint: You can deselect one of the selected items by
touching it while still keeping the SHIFT button pressed.
2. Choose the Copy and Paste command.
3. Select the target location. In case you are copying more
than a single item, all subsequent items will sequentially
follow the first one. Wa r n in g : Any Style already existing at
the target location will be overwritten!
Note: Depending on the status of the “Auto Select” parameter (see
page 140), a Style may be immediately selected when pressing one
of the STYLE SELECT buttons. The latest selected Style for that
bank will be selected.
Style sets
Selected set of Styles. Factory Styles are Styles supplied as stan-
dard. Fav/User are Favorite Styles (locations for custom-made
Styles with editable names) and User Styles (locations for cus-
tom-made Styles with fixed names).
Side tabs (banks)
Use these tabs to select a bank of Styles. Favorite tabs can be
renamed (see “Renaming the Favorite banks” on page 35).
Lower tabs (pages)
Use these tabs to select one of the available pages in the selected
bank.
Styles
Touch one of these buttons in the display to select a Style. Unless
the “Display Hold” parameter (see page 140) is turned on, the
window automatically closes shortly after you select a Style.
After selecting a Style from this window, and another Style is
playing, the name of the new Style name begins to flash, meaning it is ready to start playing at the beginning of the next measure.
Delete
Choose this command from the page menu, and delete the
selected item. Please keep in mind that you can only delete nonprotected items.
1. Select the Style to be deleted,
2. Choose the Delete command, and confirm deletion. Wa r n -
ing: Unless you have a copy of it, the deleted item will be gone
forever!
Rename
Choose this command from the page menu, and edit the name
of the selected item. Please keep in mind that you can only
rename non-protected items.
1. Select the Style to be renamed,
2. Choose the Rename command, and use the virtual key-
board to edit the name.
3. When done, touch OK to confirm.
Page 11

7
Selecting elements
Sound Select window
Side tabs (banks)
Lower tabs (pages)
Sound sets
Sounds
If more than five pages are
available, the Previous/Next
tabs are shown in this area
Rename Favorite
Choose this command from the page menu, and edit the name
of the Favorite Style banks.
The assigned name can be spanned over two lines, by separating
them with the paragraph character (¶). For example, to write
“World Music” on two lines, enter “World¶Music”.
In any case, the Pa600 will try to automatically put on two lines
two words separated by two spaces.
Be careful not to write words exceeding the width of the side tabs
of the Style Select window.
1. Choose the Rename Favorites command.
2. Touch the (Text Edit) symbol next to the bank to be
renamed.
3. Use the virtual keyboard to edit the name.
4. When done, touch OK to confirm.e
Sound sets
Selected set of Sounds. Factory Sounds are the Sounds supplied
as standard. Legacy Sounds are Sounds compatible with older
Pa-Series models. GM are Drum Kits mapped according to the
General MIDI 2 or XG standards. User Sounds are custom-created or edited Sounds.
Side tabs (banks)
Use these tabs to select a bank of Sounds.
Lower tabs (pages)
Use these tabs to select one of the available pages in the selected
bank.
Previous/Next tabs
Scroll the lower tabs to the left or the right, when additional tabs
are available but cannot be seen in the display.
Sounds
Touch one of these buttons in the display to select a Sound.
Unless the “Display Hold” parameter (see page 140) is turned
on, the window automatically closes shortly after you select a
Sound.
Program Change
Program Change number. Shown only when the “Show” parameter is turned on in Global mode. (See page 140).
Sound Select window
To open the Sound Select window, touch the Sound area whereas
it appears in the display, or the SOUND button in the SELECTION section of the control panel.
Press EXIT to exit from this page and go back to the previous
page without choosing any Sound.
Sound Select page menu
Touch the page menu icon to open the menu. Touch a command
to select it. Touch anywhere in the display to close the menu
without selecting a command.
The commands are the same seen for the Style Select window’s
page menu, apart for a difference with the Delete command.
Delete
When deleting a Sound based on User PCM Samples, you are
asked if you want to delete the Samples and Multisamples. Confirm deletion only if you don’t plan to reuse the same Samples
and Multisamples for some other new User Sounds. Choosing to
delete them frees PCM Sample memory for other data.
Hint: In case you need more free PCM Sample memory, and you
know there are unused Samples and Multisamples in memory, use
the “Delete Non-assigned User PCM Samples” command in the
Sound > User PCM Sample page to clean memory (see page 133).
Reference
Page 12
8
Selecting elements
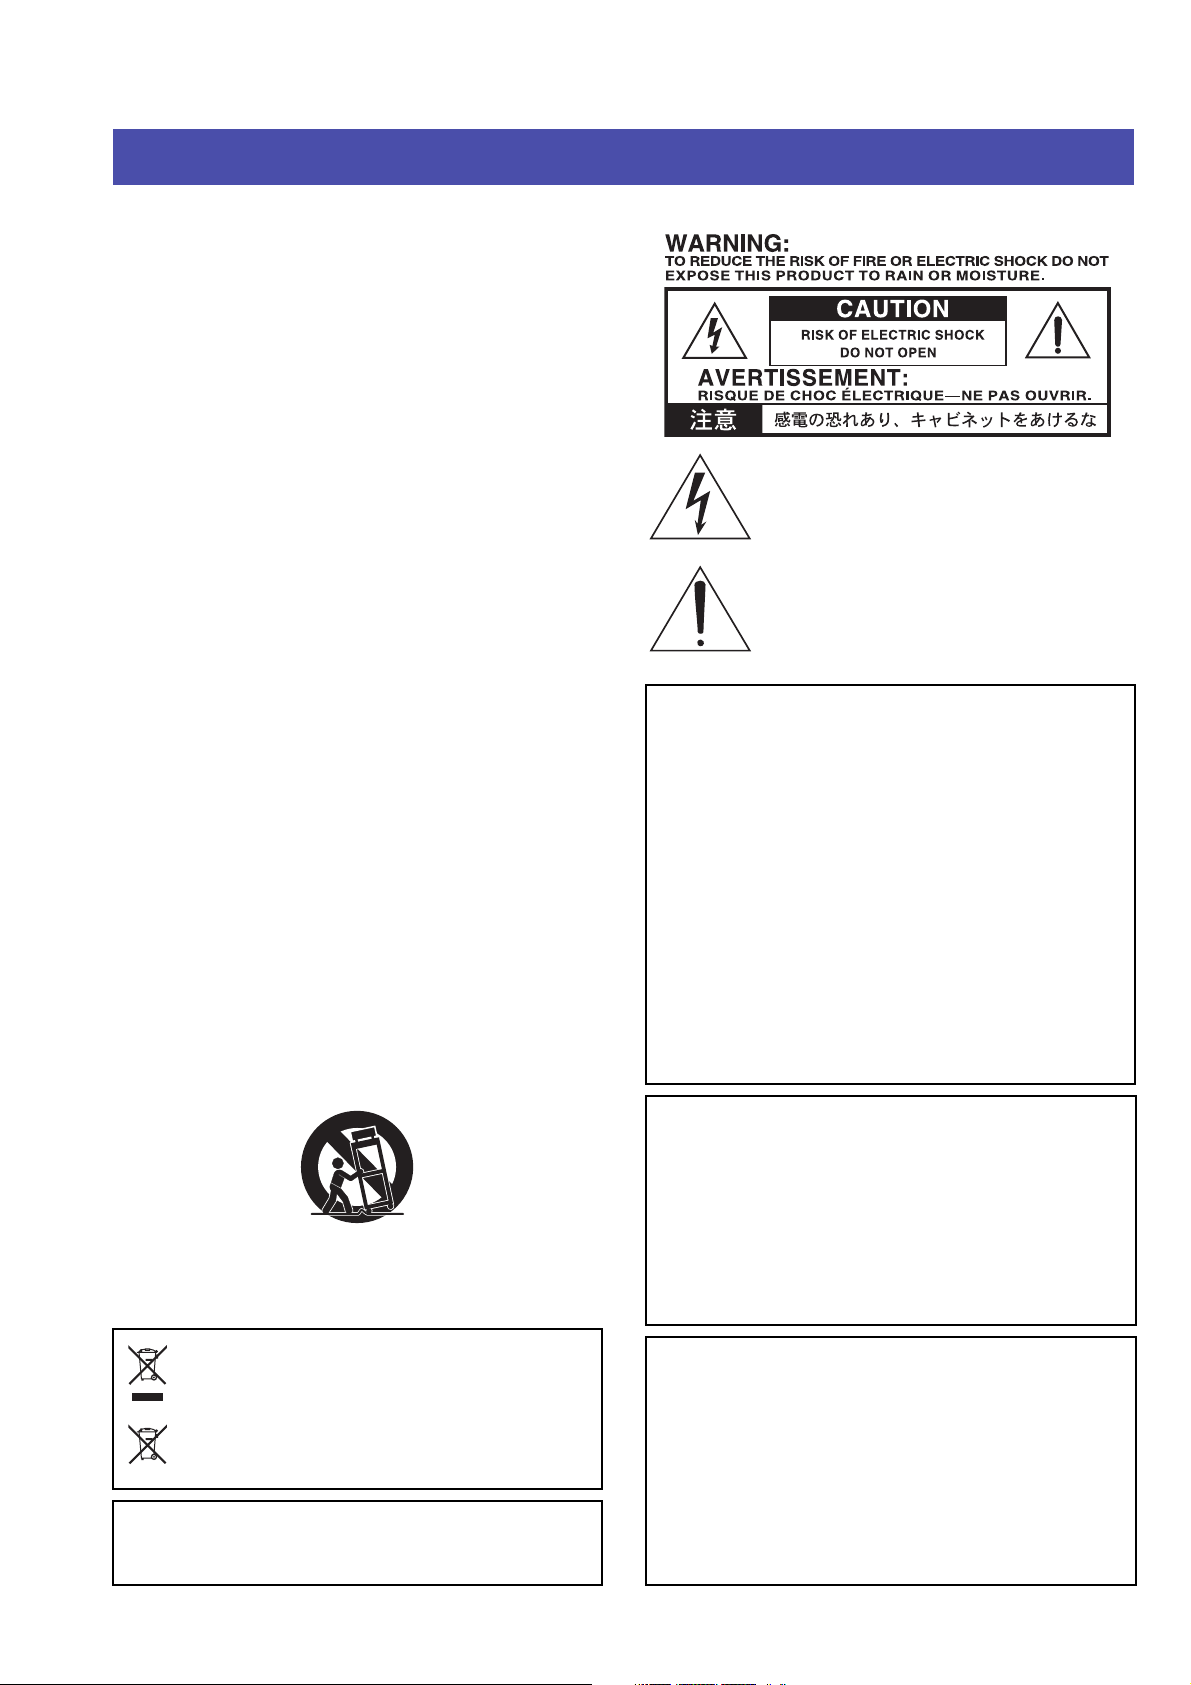
Performance Select window
Side tabs (banks)
Lower tabs (pages) Performances
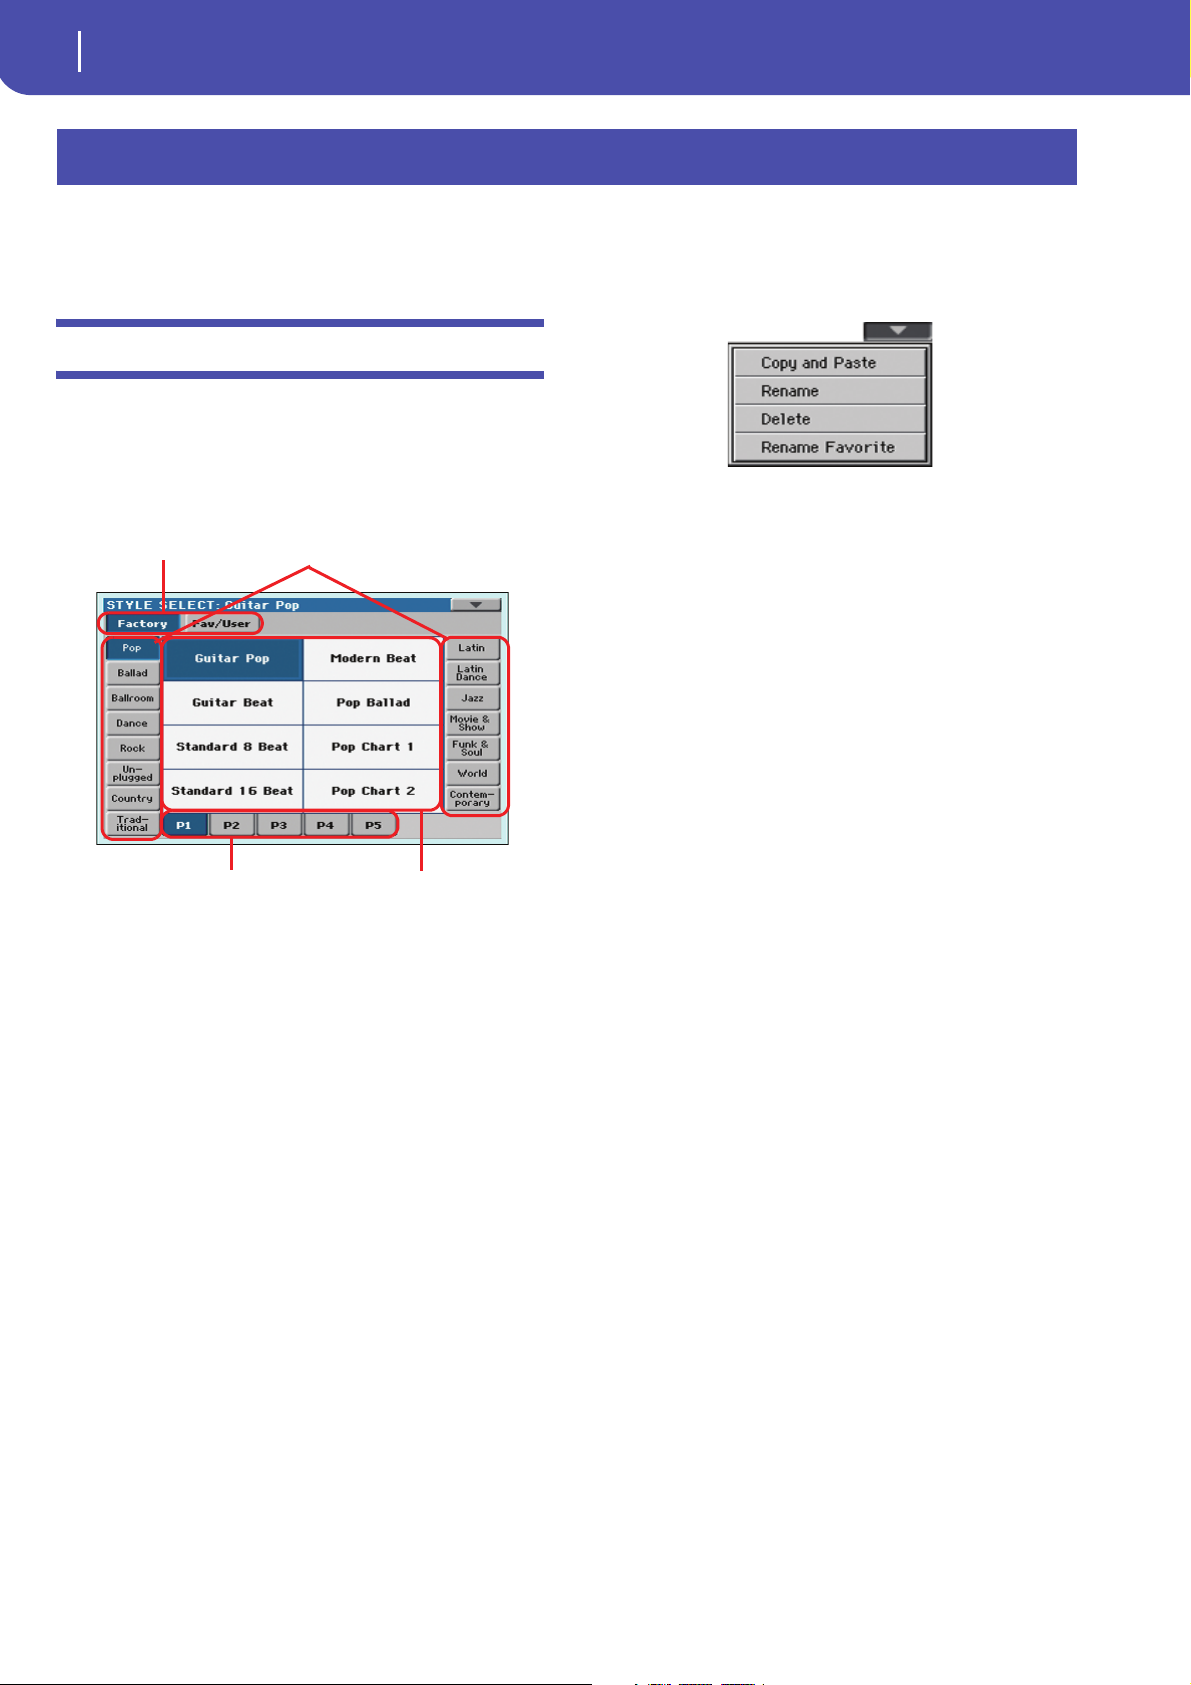
Side tabs (banks)
Lower tabs (pages)
Pad sets
Pads
Performance Select window
To open the Performance Select window, touch the Performance
area whereas it appears in the display, or one of the PERFORMANCE buttons on the control panel,. Use the PERFORMANCE buttons to go directly to the selected bank.
Press EXIT to exit from this page and go back to the previous
page without selecting any Performance.
Note: Depending on the status of the “Auto Select” parameter (see
page 140), a Performance may be immediately selected when
pressing one of the PERFORMANCE buttons. The latest selected
Performance for that bank will be selected.
Side tabs (banks)
Use these tabs to select a bank of Performance. Each tab corresponds
to one of the PERFORMANCE buttons on the control panel.
Lower tabs (pages)
Use these tabs to select one of the available pages in the selected bank.
If you press again the same PERFORMANCE button on the control panel, the next page in the same bank is selected. This way,
you do not need to touch one of the corresponding tabs in the
display in order to select a different page.
Performances
Touch one of these buttons in the display to select a Performance. Unless the “Display Hold” parameter (see page 140) is
turned on, the window automatically closes shortly after you
select a Performance.
Performance Select page menu
Touch the page menu icon to open the menu. Touch a command
to select it. Touch anywhere in the display to close the menu
without selecting a command.
Pad Select window
Touch the Pad area whereas it appears in the display, to open the
Pad Select window.
Press EXIT to exit from this page and go back to the previous
page without selecting any Pad.
Pad sets
Selected set of Pads. Hit are single-note, pre-programmed factory Pads. Sequence are sequence-based, pre-programmed fac-
tory Pads. Locale are like Factory Pads, but contain Pads
customized for the music of your Country. User can be either
single-note or sequence-based Pads, and can be user-recorded or
modified.
Side tabs (banks)
Use these tabs to select a bank of Pads.
Lower tabs (pages)
Use these tabs to select one of the available pages in the selected
bank.
Pad
Touch one of these buttons in the display to select a Pad. Unless
the “Display Hold” parameter (see page page 140) is turned on,
the window automatically closes short after you select a Pad.
Sound Select page menu
Touch the page menu icon to open the menu. Touch a command
to select it. Touch anywhere in the display to close the menu
without selecting a command.
The commands are the same seen for the Style Select window’s
page menu.
The commands are the same seen for the Style Select window’s
page menu.
Page 13
Selecting elements
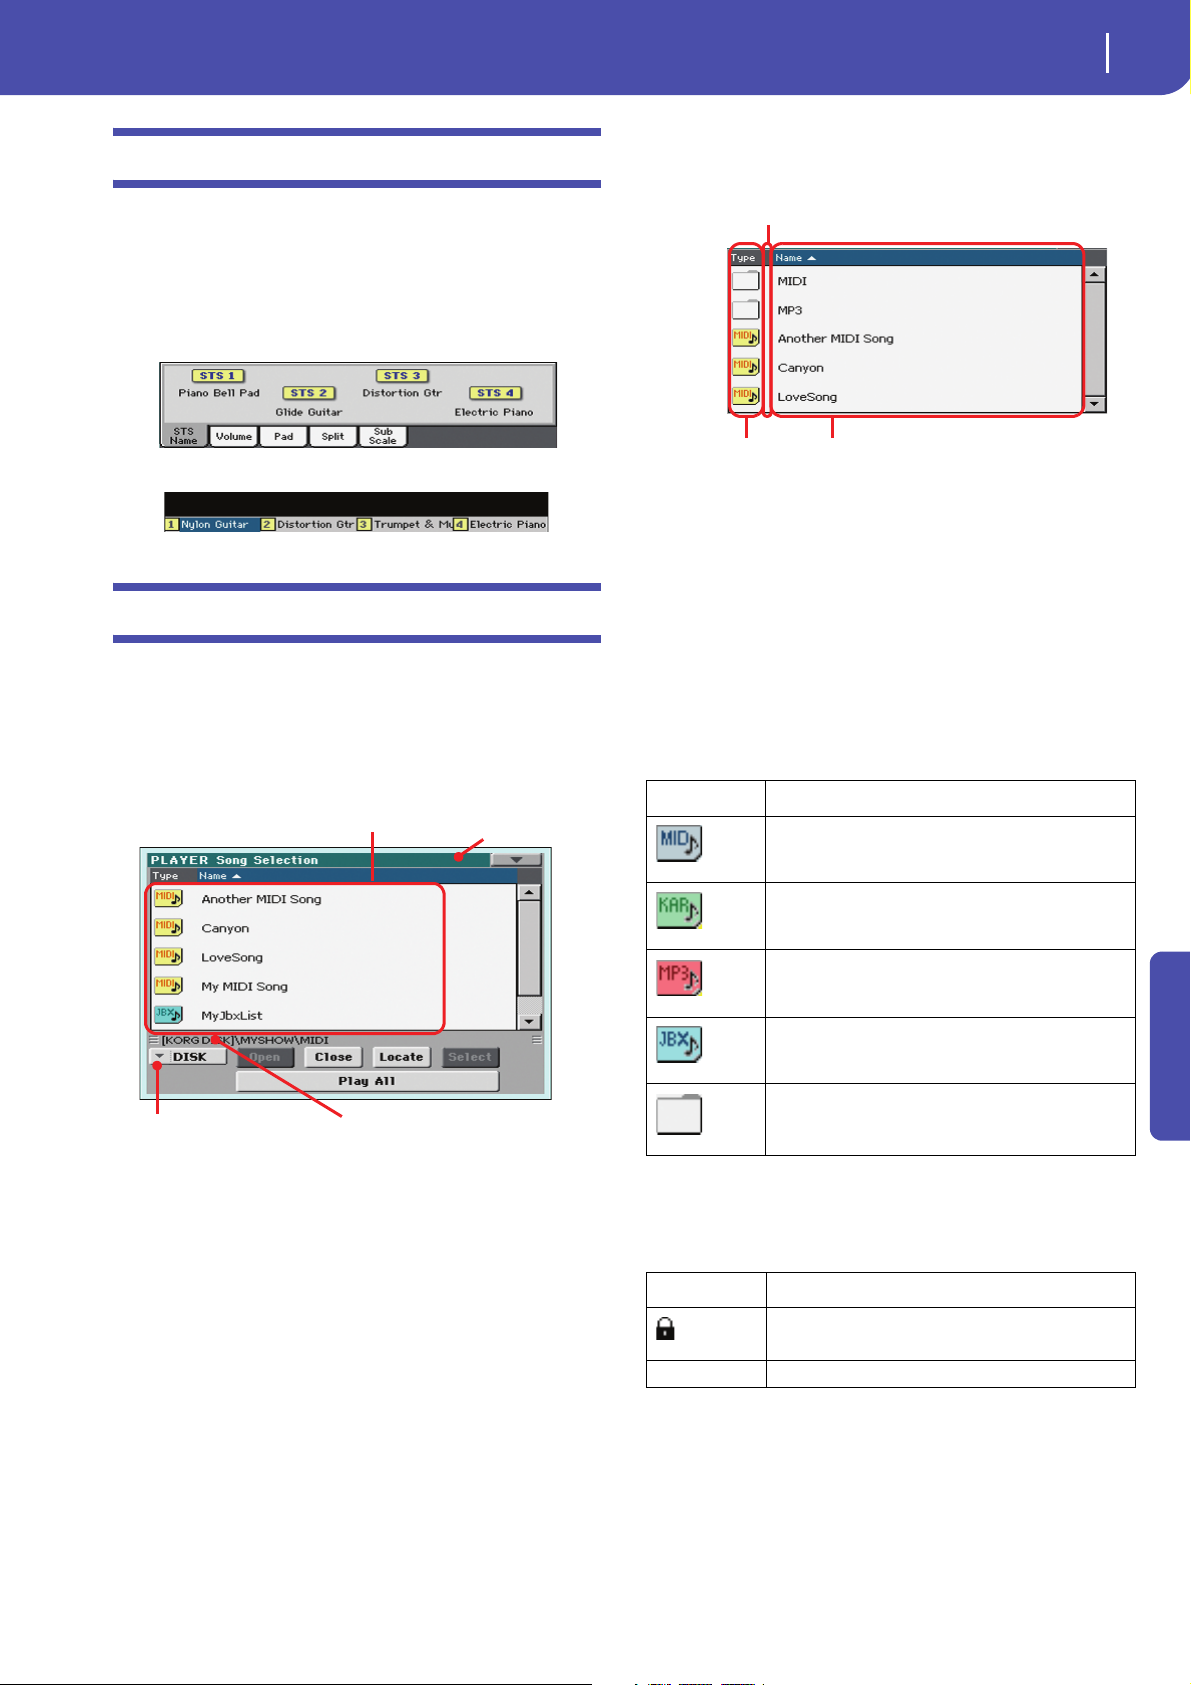
STS Select
STS Select
Song path
Directory
Storage device
Page menu
Type of the file
or folder
File status
File or folder
name
To select one of the four STS associated with the current Style or
the selected SongBook entry, use the four STS buttons on the
control panel.
As an alternative, touch the STS name tab in the main page of
the Style Play or Song Play mode, where you can see the name of
the available STSs.
The STS’s name can also be seen in the Lyrics and Markers page:
Song Select window
This page appears when you touch the Song name in the display,
or press the SONG buttons in the SELECTION section on the
control panel.
Press EXIT to exit from this page and go back to the main page
of the Song Play operating mode without selecting a Song.
9
Directory
This is the list of the selected device’s content.
Use the scrollbar to scroll the list items. As an alternative, you
can scroll the list using the VALUE dial.
When the Name label is selected on top of the list, keep the
SHIFT button pressed and touch one of the arrows to jump to
the previous or next alphabetical section.
You can touch one of the labels on top of the list, to reorder the
list items accordingly. By touching the label again, the order of
the files will switch between ascending and descending.
A list can contain several different types of files or folders.
Type icon File/folder type
Standard MIDI File (MID)
While in this page, you can select a Standard MIDI File, Karaoke, MP3 or Jukebox file.
Karaoke file (KAR)
MPEG Layer 3 (MP3)
Jukebox file (JBX)
Folde r
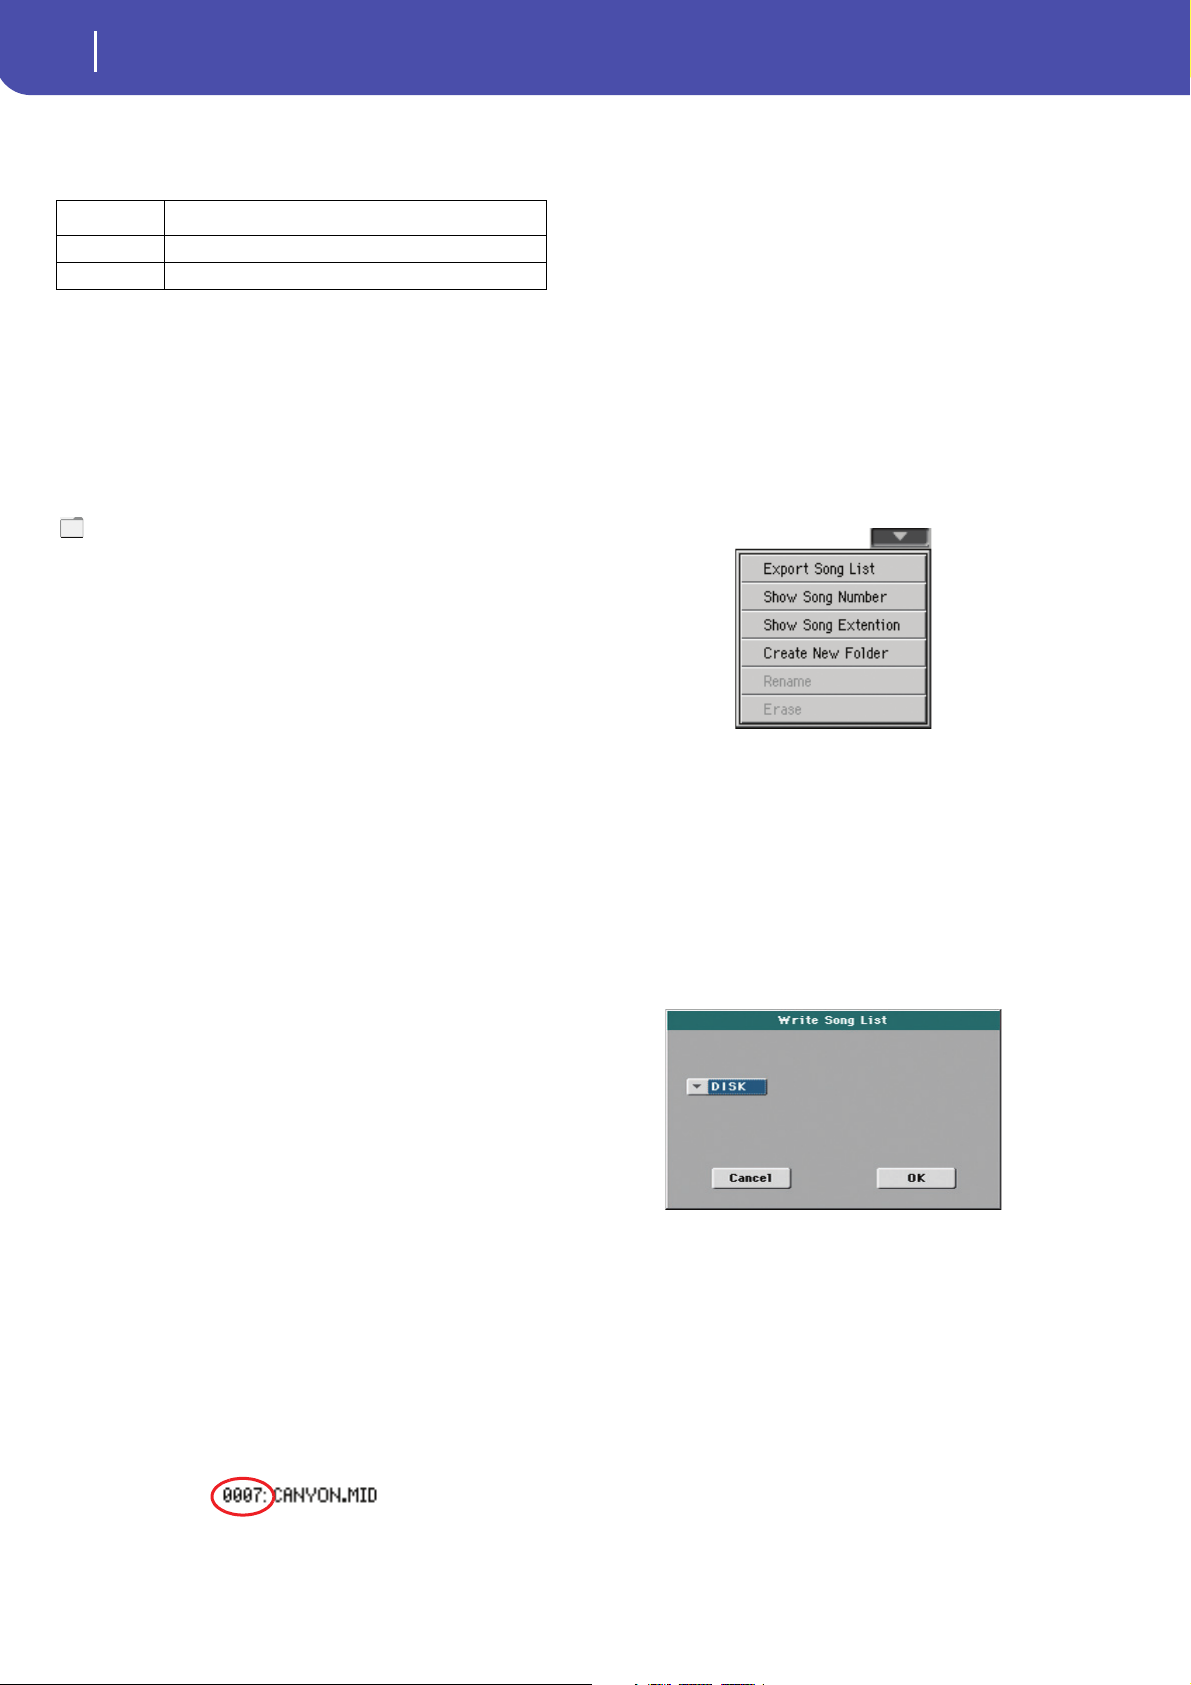
A file or folder may be in one of the following status. (See “Protect” and “Unprotect” on page 172 for information on how to
change the file status).
Status icon File/folder status
Protected
– Unprotected
Page menu icon
Touch the page menu icon to open the menu. See “Song Select
page menu” on page 10 for more information.
Reference
Page 14
10
Selecting elements
Song Select window
Storage device
Use this menu to select one of the available storage devices.
Device Type
DISK Internal memory
USB Device connected to the rear USB Host port
The actual name (label) of the device appears within square
brackets ([]).
Song path
This line shows the current device path.
Open
Opens the selected folder (item whose icon looks like this one:
).
Close
Closes the current folder, returning to the parent (“upper”)
folder.
Locate
Touch this button to go back to the folder containing the selected
Song. This is useful to quickly locate it, after you have browsed
through long directories and “dug” into different folders.
Select
Selects the highlighted item in the display. If a Song is already
playing, it stops, and the new Song is ready to play. You will
return to the main page.
Play All
When you touch this button, all Standard MIDI Files and MP3
files contained in the current directory are added to a new Jukebox list, that is automatically assigned to the Player. The order in
which they are played depends on the current sorting method,
i.e., how the files are shown in the display.
You can use this Jukebox list as any other list of this type (i.e.,
start the playback with PLAY/STOP, jump to the next Song in
the list with SHIFT + >>, edit it in the Jukebox page…).
Note: A Jukebox list can include up to 127 Songs. If your folder
contains more items, only the first 127 will be considered.
Hint: If you don’t want the list to be deleted when turning the
instrument off, go to the Jukebox page and save it as a “.JBX” file.
Selecting a Song by its ID number
Each Song in a folder on a device (up to 9,999) has a progressive
ID number assigned. When the “Show Song Number” option is
selected in the Song Select page menu (see below), you can see
this number before the Song’s name in the Song Select window.
You can use this number to select the Song by composing the
corresponding number, speeding up the Song retrieval when you
are using an hard disk filled with midifiles.
While in the Song Select window, press the SONG button in the
SELECTION section to open the keypad, and enter the number
corresponding to the Song to be selected.
While in any page of the Song Play mode, press the SONG button in the SELECTION section twice to open the keypad.
Note: If no Song corresponds to the dialed number, the “Song not
available” message will appear.
Wa r ni n g : While the directory may contain more than 9999 files,
you can’t select Songs outside the 0001-9999 range when using the
numeric keypad.
Song Select page menu
Touch the page menu icon to open the menu. Touch a command
to select it. Touch anywhere in the display to close the menu
without selecting a command.
Export Song List
Select this command to save the current list as a text file. This
way, you will be able to print a list of Songs, to see which number
matches each Song.
1. While in the Song Select window, select the folder whose
Song list you wish to save as a text file.
2. Select the Export Song List command from the page menu.
3. A dialog box will appear, asking you to select either the
internal storage memory or the HOST USB ports.
4. Select one of the options, and touch OK to confirm.
Note: The text file will contain a list of “*.mid”, “*.kar”, “.mp3”
and “*.jbx” files only. Folders and other types of files will not be
included.
When saved, the text file will be named after the selected folder.
For example, a folder named “Dummy” will generate a
“Dummy.txt” file. If a file with the same name already exists in the
target, it will be overwritten without waiting for any confirmation.
A file containing the list of all valid files contained into the root of
the disk will generate a “Root.txt” file.
The list will include the progressive number assigned to each Song,
the file names, the total number of files in the list.
To correctly display and print the list on a personal computer, use a
fixed size (i.e., non-proportional) character in your text editor.
Page 15
11
Selecting elements
Song Select window
Show Song Number
Check this option to make the Song’s progressive ID number
appear in the list, next to each Song.
Show Song Extension
Check this option to make the file extension (“*.mid”, “*.kar”,
“*.jbx”, “*.mp3”) appear in the list, at the end of each Song’s
name.
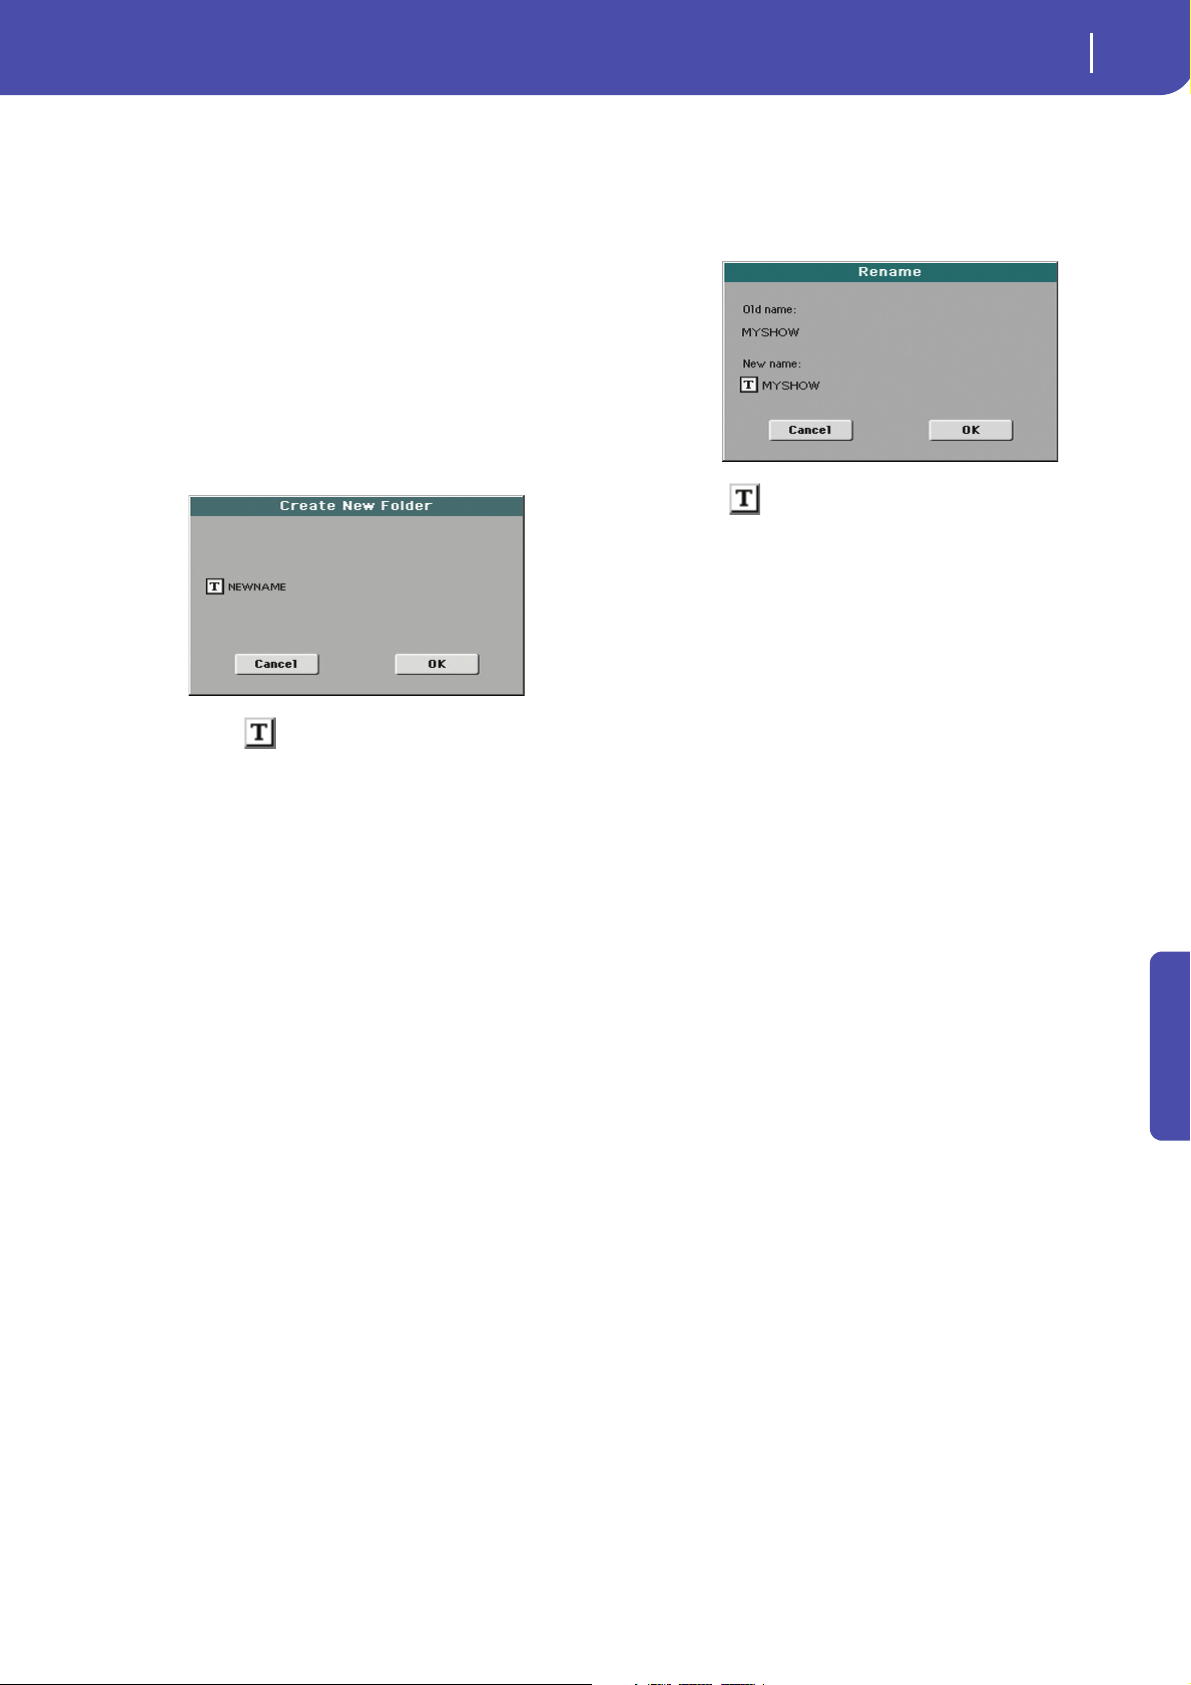
Create New Folder
This command will let you create a new generic folder in the
root of any device, or inside any other generic folder. You can’t
create a “.SET” folder with this command, since this type of
folder is reserved to the Save operations (and can be created with
the New SET button in any Save page).
Rename
Available only when an item is selected in a list.
Use this function to change the name of an existing file or folder.
You cannot change the 3-character extension of files and “.SET”
folders, since they are used to identify the type of file or folder.
Touch the (Text Edit) button to open the Text Edit window.
Enter the new name, then touch OK to confirm and close the
Text Edit window.
Delete
Use this command to delete the selected file or folder.
By touching the (Text Edit) button you can open the Text
Edit window. Enter the name, then touch OK to confirm and
close the Text Edit window.
Reference
Page 16
12
Style Play operating mode
Start-up settings
Overall instrument’s
volume
Balance of Style and
Pad tracks against the
Keyboard tracks
Style Play operating mode
The Style Play mode is the boot-up operating mode. When in
this mode, you can play with Styles (i.e. automatic accompaniments), while playing with one to four tracks (Upper 1-3 and
Lower) on the keyboard. You can choose different Sounds and
Effects by selecting Performances and STSs. Four Pads will provide single-shot sounds or repeating patterns in sync with the
Style. You can also use the SongBook to automatically select
Styles suited for a particular song.
Start-up settings
Since the “My Setting” Performance is automatically selected
when turning the instrument on, you can save to it your preferred start-up settings.
Select the Sounds, Effects, and other settings you would like to
see automatically selected when turning the instrument on.
Then keep the MY SETTING button pressed for about one second. When the Write Startup Settings window appears, confirm
by touching OK.
Note: If you like some settings to be preserved even when choosing
different Performances, STSs and Styles, turn on the desired
“locks” to avoid changes to the selected parameters (see “General
Controls: Lock” on page 141).
Styles and Pads
Each Style includes four Pads. Each time you select a Style, the
four Pads are assigned to the four PAD buttons. The Style and
the Pads will play using the same Tempo value.
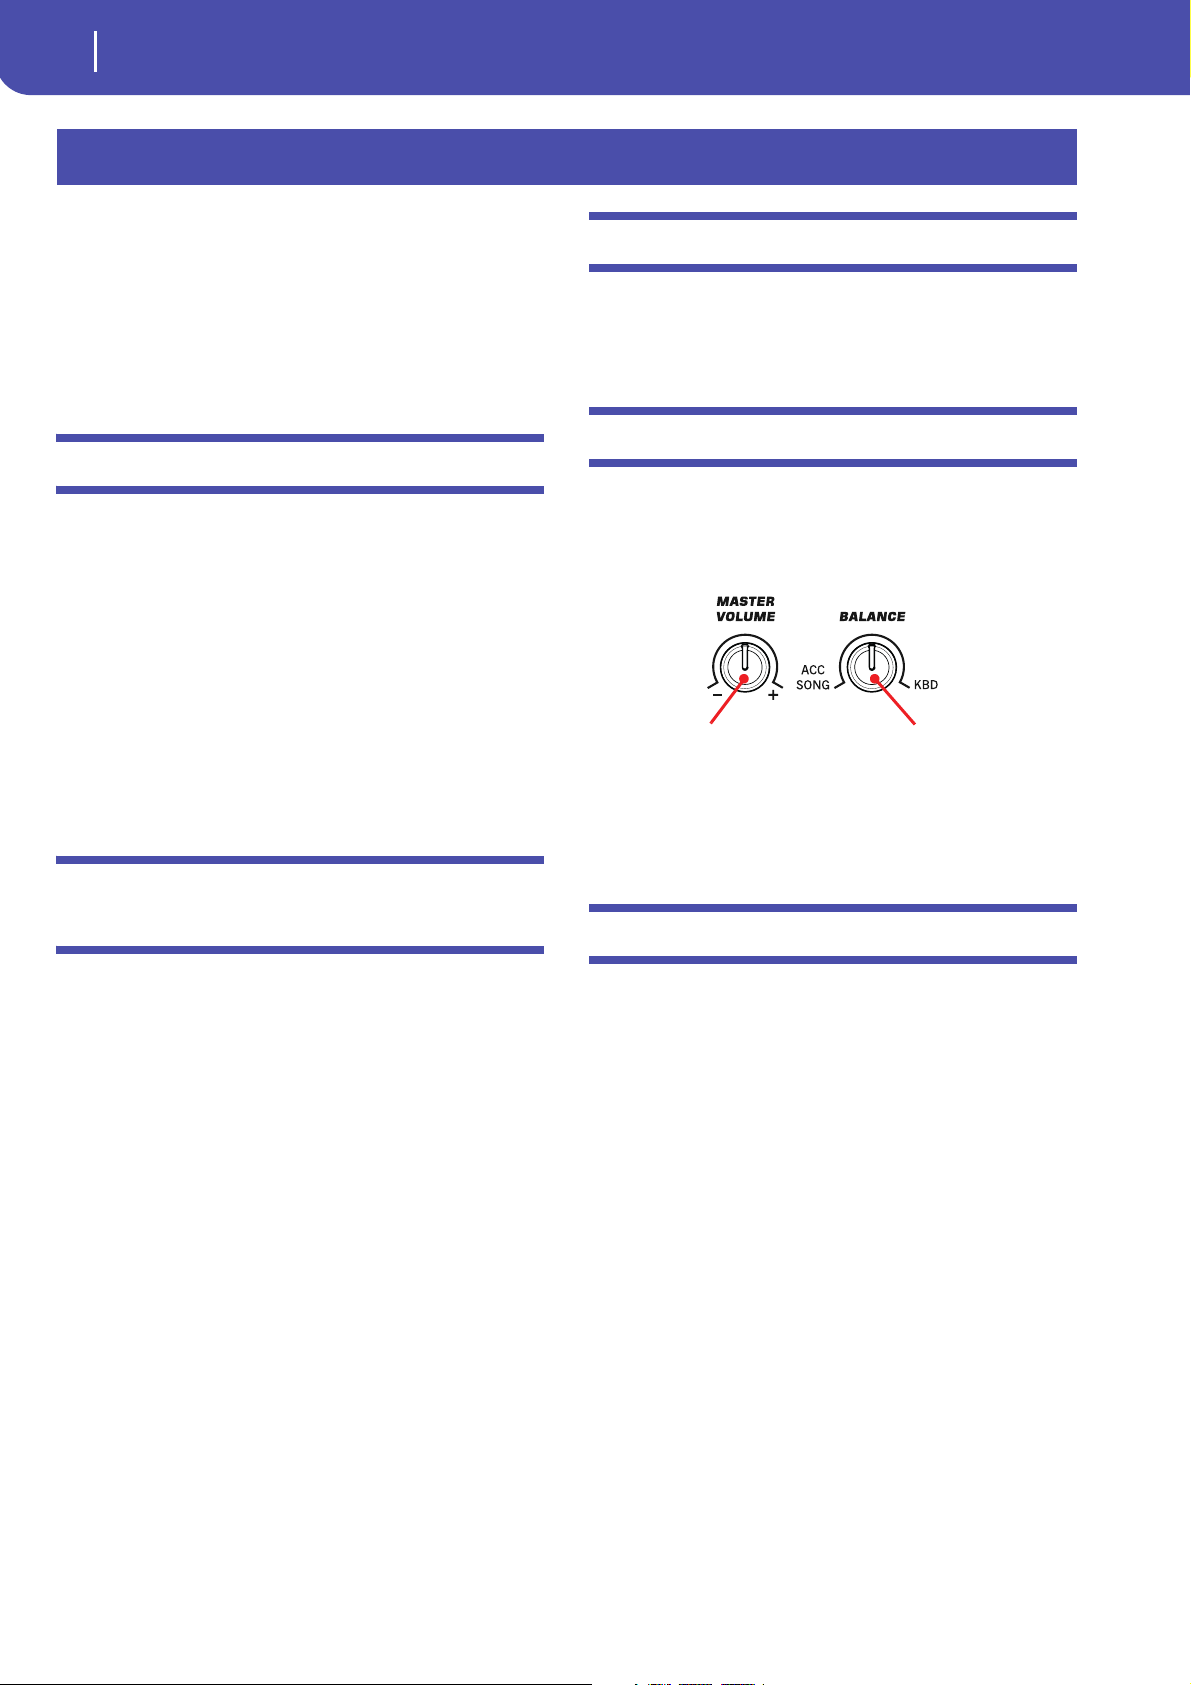
Master Volume and Balance
While the MASTER VOLUME knob controls the general volume of the instrument, you can use the BALANCE knob to balance the Style Accompaniment and Pad tracks against the
Keyboard tracks.
Note: As an alternative, the BALANCE knob can also work as a
volume control. See “Balance Slider” on page 146.
How Styles, Variations, Performances and STSs are linked together
Styles, Variations, Performances and STSs are linked in many
ways.
• When the STS MODE LED is steadily on or blinking, selecting
a Style also changes the Keyboard tracks (STS 1 is automatically
selected). Performance settings are overridden.
• When the STS MODE LED is blinking, selecting a Variation
also select the corresponding STS.
• When the STYLE CHANGE LED is on, selecting a Performance also selects a Style (the one memorized with the Performance).
• Current track settings can be saved either to a Performance, an
STS, or the Style Settings, depending on the page menu command you select.
Factory, Favorite and User Styles
There are three different types of Style locations:
• Factory Style banks are the preloaded Styles, that you can’t
usually edit (unless you don’t want to do so, by turning the
protection off, see “Factory Style and Pad Protect” on
page 145).
• Favorite Style banks are Styles loaded from an external
device, created or edited by yourself. You can rename the
tabs in the Style Select window to create places for custom
banks, or for additional music genres that are not already
included among the supplied banks. See “The Favorite
banks” on page 35 for information on how to manage these
Styles.
• User Style banks are, like the Favorite banks, Styles loaded
from an external device, created or edited by yourself (the
User). These are banks conceived as a ‘workbench’ – a place
where to manage Styles and banks before saving them to a
final location. See the “Style/Pad Record mode” chapter for
information on how to edit or create Styles.
Page 17

Style Play operating mode
Main page
Main page
Style area Page header Page menu icon
Song
area
Perfor-
mance/
STS area
Keyboard
tracks area
Panel s
Operating mode Master Transpose (in
semitones)
Recognized chord
Style name
Style Element meter
Style bank
Measure length/number
Current
Tem po
Current beat
This is the page you see after you turn the instrument on.
To access this page from another operating mode, press the
STYLE PLAY button.
To return to this page from one of the Style Play edit pages, press
the EXIT button.
13
Recognized chord
Displays the recognized chord, when you play a chord on the
keyboard. If no chord abbreviation is shown, check if the
ACCOMP LED is turned on.
You can choose how chords are recognized by using the “Chord
Recognition” parameter in the Global > Style page (see
page 143).
Page menu icon
Touch the page menu icon to open the menu. See “Page menu”
on page 32 for more information.
Style area
This is where the Style name is shown, together with its Tempo
and Meter (Time Signature) parameters.
Details on individual tracks can be seen by pressing the Volume tab. Use the TRACK SELECT button to switch between
Normal view (Keyboard tracks, grouped Style tracks) and
Style view (individual Style tracks). (See “Volume panel”
starting from
page 15).
Page header
This line shows the current operating mode, transposition and
recognized chord.
Operating mode name
Name of the current operating mode.
Master transpose
Master transpose value in semitones. This value can be changed
using the TRANSPOSE buttons on the control panel.
Note: Transpose may be automatically changed when selecting a
different Performance or Style. It may also be changed when loading a Standard MIDI File generated with an instrument of the
Korg Pa series.
To avoid transposition, the Master Transpose is “locked” by
default. If you want to lock or unlock it, change the Master Transpose Lock parameter’s status (see “General Controls: Lock” on
page 141).
Style name
Currently selected Style. Touch the Style name (or press the
STYLE button in the SELECTION section) to open the Style
Select window.
Style bank
Bank the current Style belongs to.
Style Element meter
Meter (time signature) of the current Style Element.
Measure length/number
While the Style is playing, an ‘M’ appears, to show the current
measure number of the current Style Element playing. While it is
in stop, an ‘L’ appears, to show the length (total number of measures) of the current Style Element.
Current beat
Beat number currently playing.
Current Tempo
Metronome Tempo (from 30 to 250). Use the TEMPO buttons to
change the Tempo.
As an alternative, keep the SHIFT button pressed and use the
VALUE DIAL to change the Tempo. Also, you can touch the
Tempo field and drag it with your finger, or change it with the
VAL U E DI A L.
To recall the Tempo stored in the current Style, press the
TEMPO– and + buttons together.
Reference
Page 18
14
Style Play operating mode
Main page
Song name
Selected Performance
or STS
Sound
name
Track name
Track’s octave transpose
Sound bank’s
icon
Track status
Volume panel
Tab s
You can prevent the Tempo from changing by turning the
TEMPO LOCK LED on.
Note: Tempo may change while a Style Element is playing. Each
Style Element may contain Tempo Change data.
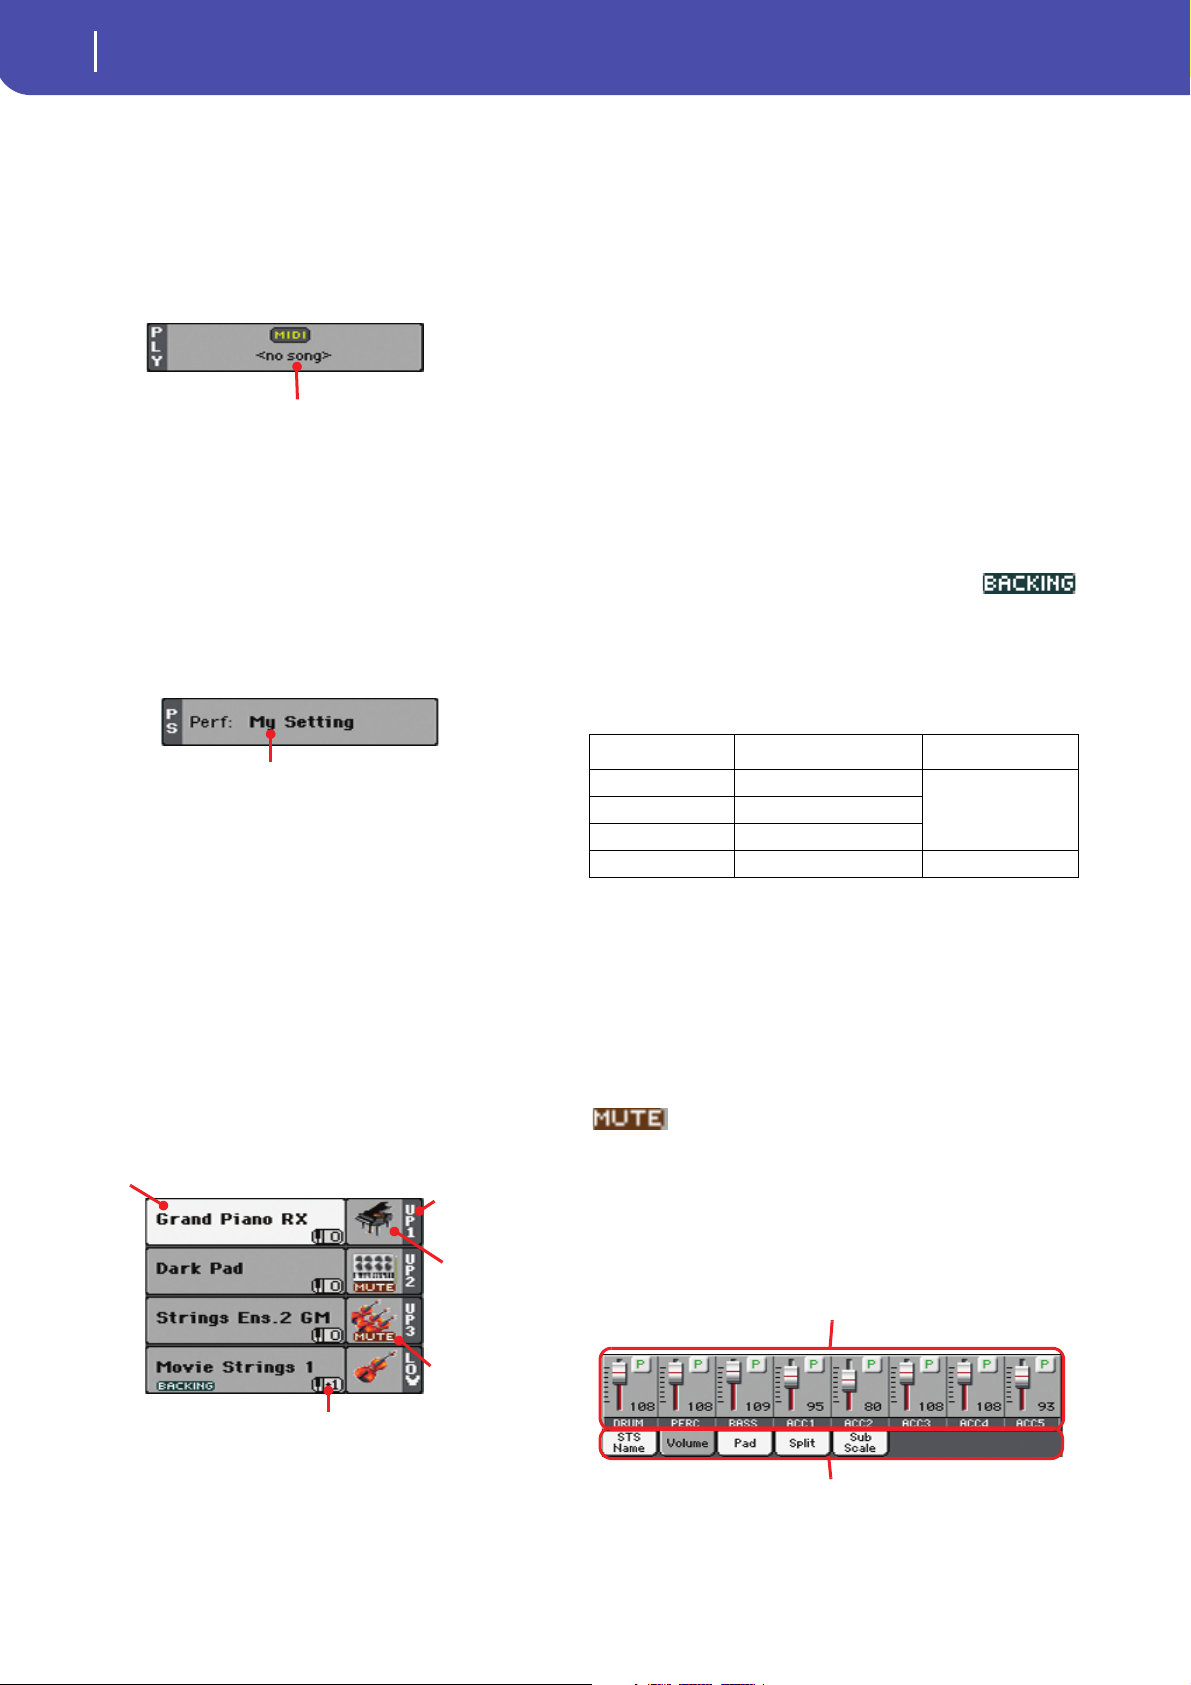
Song area
This is where the Song assigned to the onboard Player is shown.
Song name
Name of Song assigned to the Player. You can select Songs while
playing Styles, to have them ready when switching to Song Play
mode.
Performance/STS area
This is where the latest selected Performance or STS name is
shown.
• If the track is already selected (white background), touch the
Sound name to open the Sound Select window.
• If the track is not selected (dark background), first select it,
then touch the Sound name to open the Sound Select window.
You can also open the Sound Select window by using the
SOUND button in the SELECTION section of the control panel.
For more information about the Sound Select window, see
“Sound Select window” on page 7.
Keyboard track octave transpose
Non editable. Octave transpose of the corresponding track. To
individually edit the octave transpose for each track, go to the
“Mixer/Tuning: Tuning” edit page (see page 22).
You can also transpose all Upper tracks by using the UPPER
OCTAVE buttons on the control panel.
Bass & Lower Backing icon
When the Bass & Lower Backing function is
active, the Backing icon appears in the Lower
track Sound area (see “Bass & Lower Backing” on page 144).
Keyboard track name
Non editable. Name of the corresponding track:
Selected Performance or STS
This is the latest selected Performance (Perf) or Single Touch
Setting (STS#).
Touch the name to open the Performance Select window (see
“Performance Select window” on page8). As an alternative, use
the PERFORMANCE section to select a different Performance.
To select a different STS, use the four STS buttons under the display, or the STS panel.
Keyboard tracks area
This is where Keyboard tracks are shown.
Abbreviation Track Hand
UP1 Upper 1 Right hand
UP2 Upper 2
UP3 Upper 3
LOW Lower Left hand
Sound bank’s icon
This picture illustrates the bank the current Sound belongs to.
Keyboard track status
Play/mute status of the current track. Select the track, then touch
this area to change the track status.
No icon Play status. The track can be heard.
Mute status. The track cannot be heard.
Panels
The lower half of the main page contains the various panels, you
can select by touching the corresponding tabs. See more information in the relevant sections, starting from page 15.
Sound name
Name of the Sound assigned to the corresponding Keyboard
track.
Page 19
15
Style Play operating mode
STS Name panel
Sliders
Track status icons
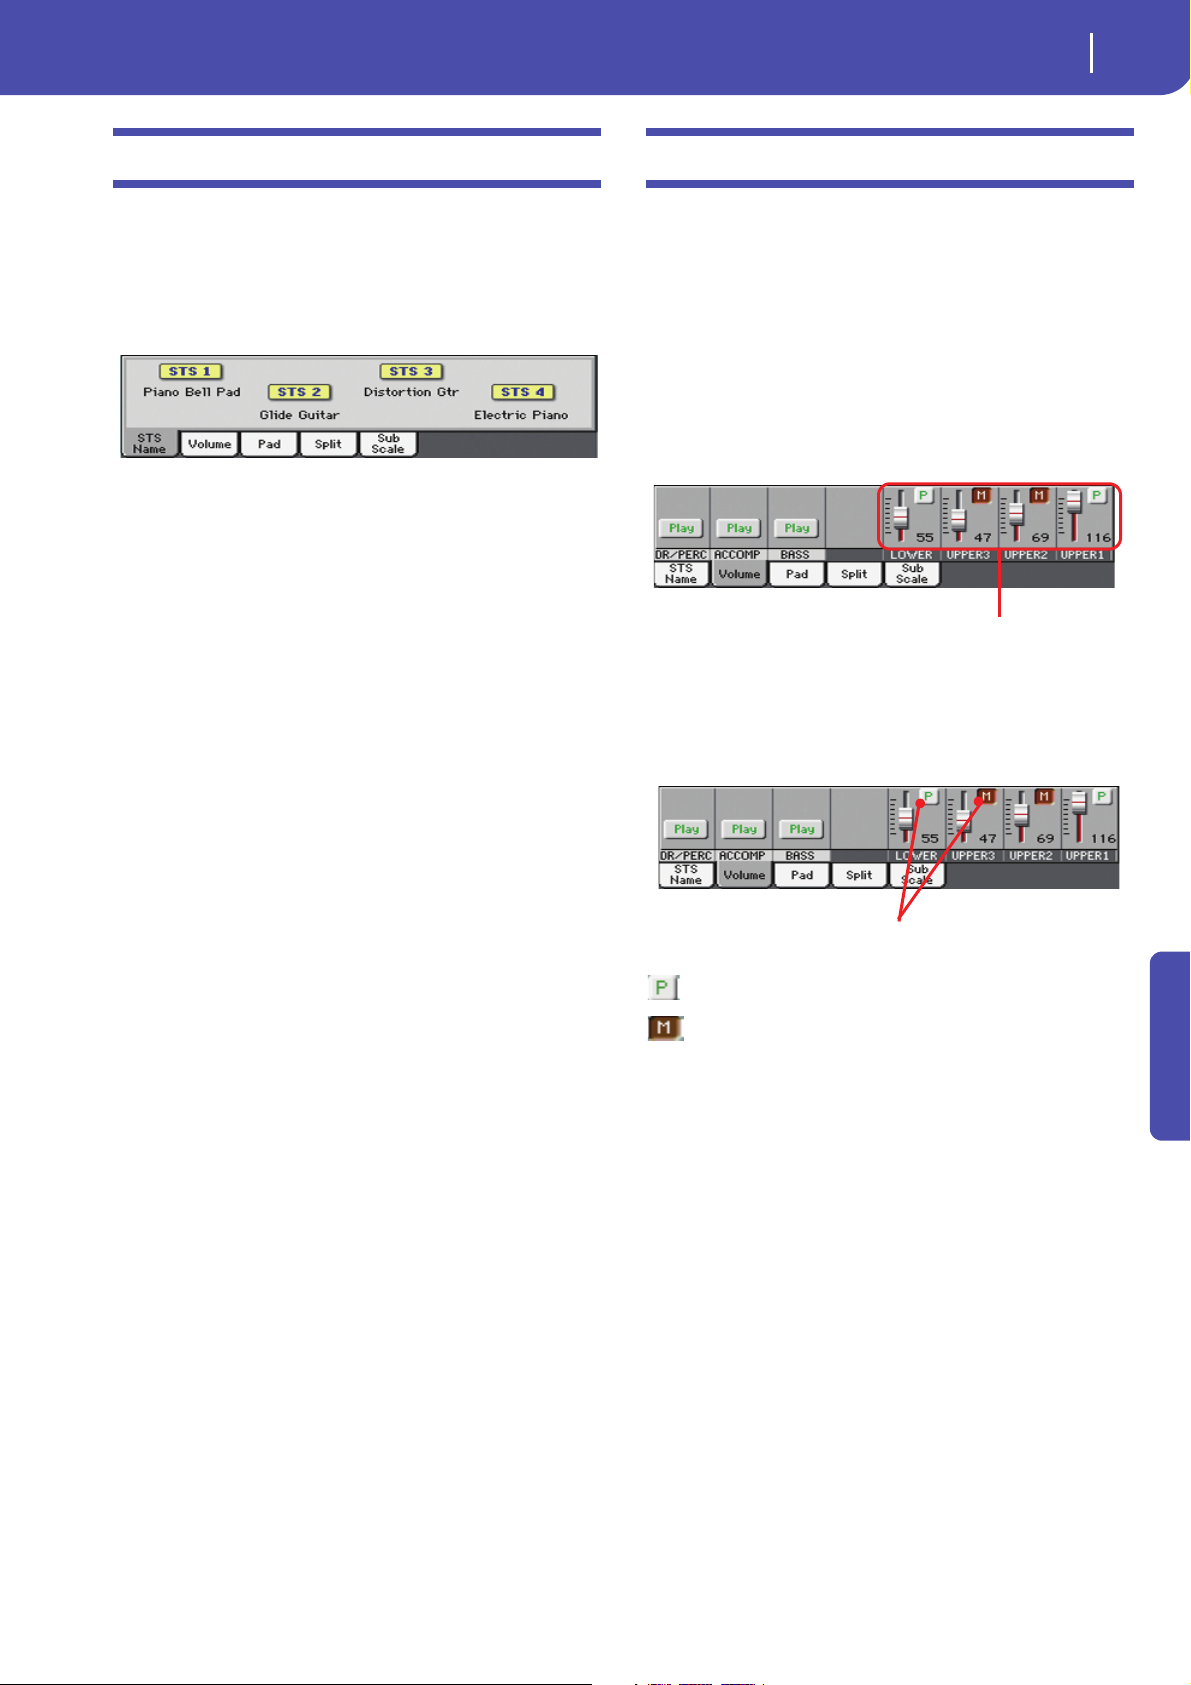
STS Name panel
Touch the STS Name tab to select this panel. Single Touch Settings (STS) are memory locations intended for quickly choosing
Keyboard Sounds, contained in each Style or SongBook entry.
While in this panel, you can see the name of the four STSs
belonging to the latest selected Style or SongBook entry. Touch
one of the names to select the corresponding STS.
Note: You cannot edit the STS names in this panel. To edit a name,
select the STS to be renamed, then select the Write Single Touch
Setting command from the page menu (see “Write Single Touch
Setting dialog box” on page 34).
Volume panel
Touch the Volume tab to select this panel. This is where you can
set the volume of each track, and mute/unmute them.
Note: The volume of the Keyboard tracks may be saved to a Performance or STS. The volume of the separate Style tracks (Style
Tracks view) can be memorized to the current Style Settings.
Changing the tracks’ volume
You can change the volume of each track by dragging the sliders
in the display. You can also change the volume by touching a
track’s slider, then using the VALUE DIAL.
Changing the Play/Mute status
Play/mute status of the current track. Select the track, then touch
this area to change its status.
Play status. The track can be heard.
Mute status. The track cannot be heard.
Saving the track’s volume and play/mute status
Each set of tracks can be saved into a different structure. This
allows for a great flexibility when mixing Keyboard and Accompaniment tracks through the use of Performances, STSs and
Styles.
• The volume and play/mute status of the Keyboard tracks can
be saved to a Performance or STS (see “Write Performance” on
page 32 and “Write Single Touch Setting” on page 32).
• The volume and play/mute status of the separate Style tracks
can be saved to the current Style Settings (see “Write Current
Style Settings” on page 32).
• The offset volume of the grouped Style tracks is automatically
saved to the Global.
Reference
Page 20
16
Style Play operating mode
Volume panel
Grouped Style tracks
Keyboard tracks
Grouped Style Tracks
Selected
track
info area
Sounds
area
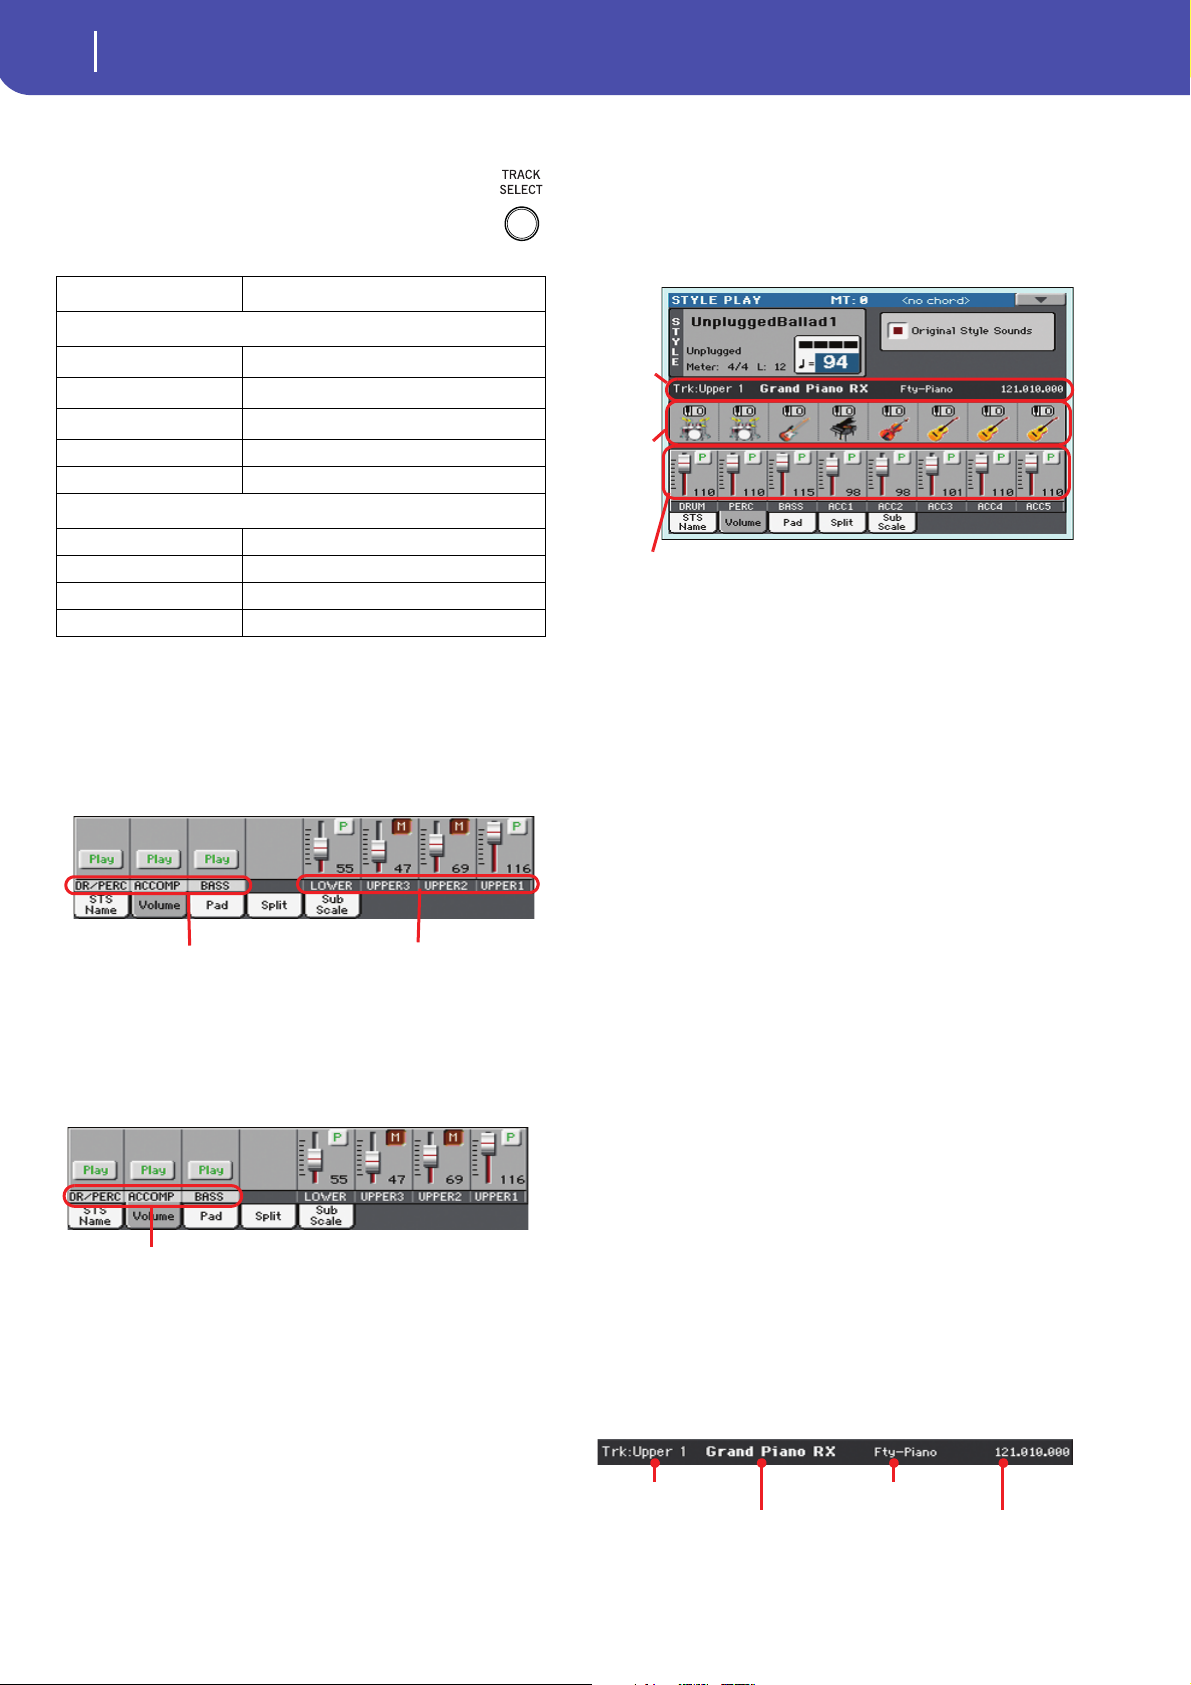
Style tracks Volume
Track name
Sound name
Sound bank
Program Change sequence
Track names
Under the sliders, a label for each track is shown. Use
the TRACK SELECT button to switch between the Nor-
mal (grouped Style tracks, Keyboard tracks) and the
Style Tracks view (separate Style tracks).
Track Description
Normal View
(*)
DR/PERC
(*)
ACCOMP
(*)
BASS
LOWER Lowe r track.
UPPER1…3 Upper tracks.
Style Tracks View
DRUM Drum Style track.
PERC Percussion Style track.
BASS Bass Style track.
ACC1…5 Accompaniment Style tracks.
(*).Volume for these grouped tracks is a global offset, that can be adjusted in
the Global > Mode Preferences > Style page.
Grouped Drum and Percussion tracks.
Grouped Accompaniment tracks (Acc1-5).
Grouped Bass Style track.
Normal view
In Normal view you can see the grouped Style tracks (Play/Mute
only), and the separate controls for the Keyboard tracks:
Grouped Style tracks
In the Normal view, Style tracks are grouped together (Dr/Perc,
Accomp, Bass groups), to allow for instant play/mute of several
tracks at the same time.
Changing the volume of the grouped Style tracks can be done (as
a general control) in the Global mode > Mode Preferences >
Style page (see “Style Tracks Global Volume” on page 144).
Keyboard tracks
Here you can separately control the volume and play/mute status
of each Keyboard track.
Style Tracks view
Press the TRACK SELECT button to switch from the Normal
view to the Style Tracks view. In this view, individual Style tracks
are shown in the lower half of the display, while the upper half of
the main page changes to show parameters for the selected Style
track.
Press TRACK SELECT again to return to the Normal view (Keyboard tracks, grouped Style tracks, Mic/In controls).
Style tracks Volume
Here you can change the volume and play/mute status of each of
the individual Style tracks.
Original Style Sounds
This parameter lets you choose if the Style has to play the
Sounds saved in the Performance or Style Settings, or the ones
saved in each Style Element.
Note: When assigning a Sound to a Style track, the “Original Style
Sounds” parameter is automatically turned off.
Note: This parameter can be saved with the Performance or Style
Settings.
On Style tracks always use the original Sounds
recorded in each Style Element. If you assign a
different Sound to a Style track, this parameter is
automatically set to Off.
Off You can assign different Sounds to each Style
track, and save them in a Performance or Style
Settings. The selected Sounds are the same for all
Style Elements (there are no different Sounds for
each Style element).These Sounds can be saved
into a Performance or Style Settings with the
“Write Performance” or “Write Current Style Settings” commands (see page 32). Assigned Sounds
are shown in the Sounds area of this page.
Selected Track Info area
This line lets you see the Sound assigned to the selected track. It
appears both in the main page, and in several edit pages.
Page 21
Style Play operating mode
Pad panel
Track name
Style track’s octave transpose icon
Sound bank’s icon
Name of the selected track.
17
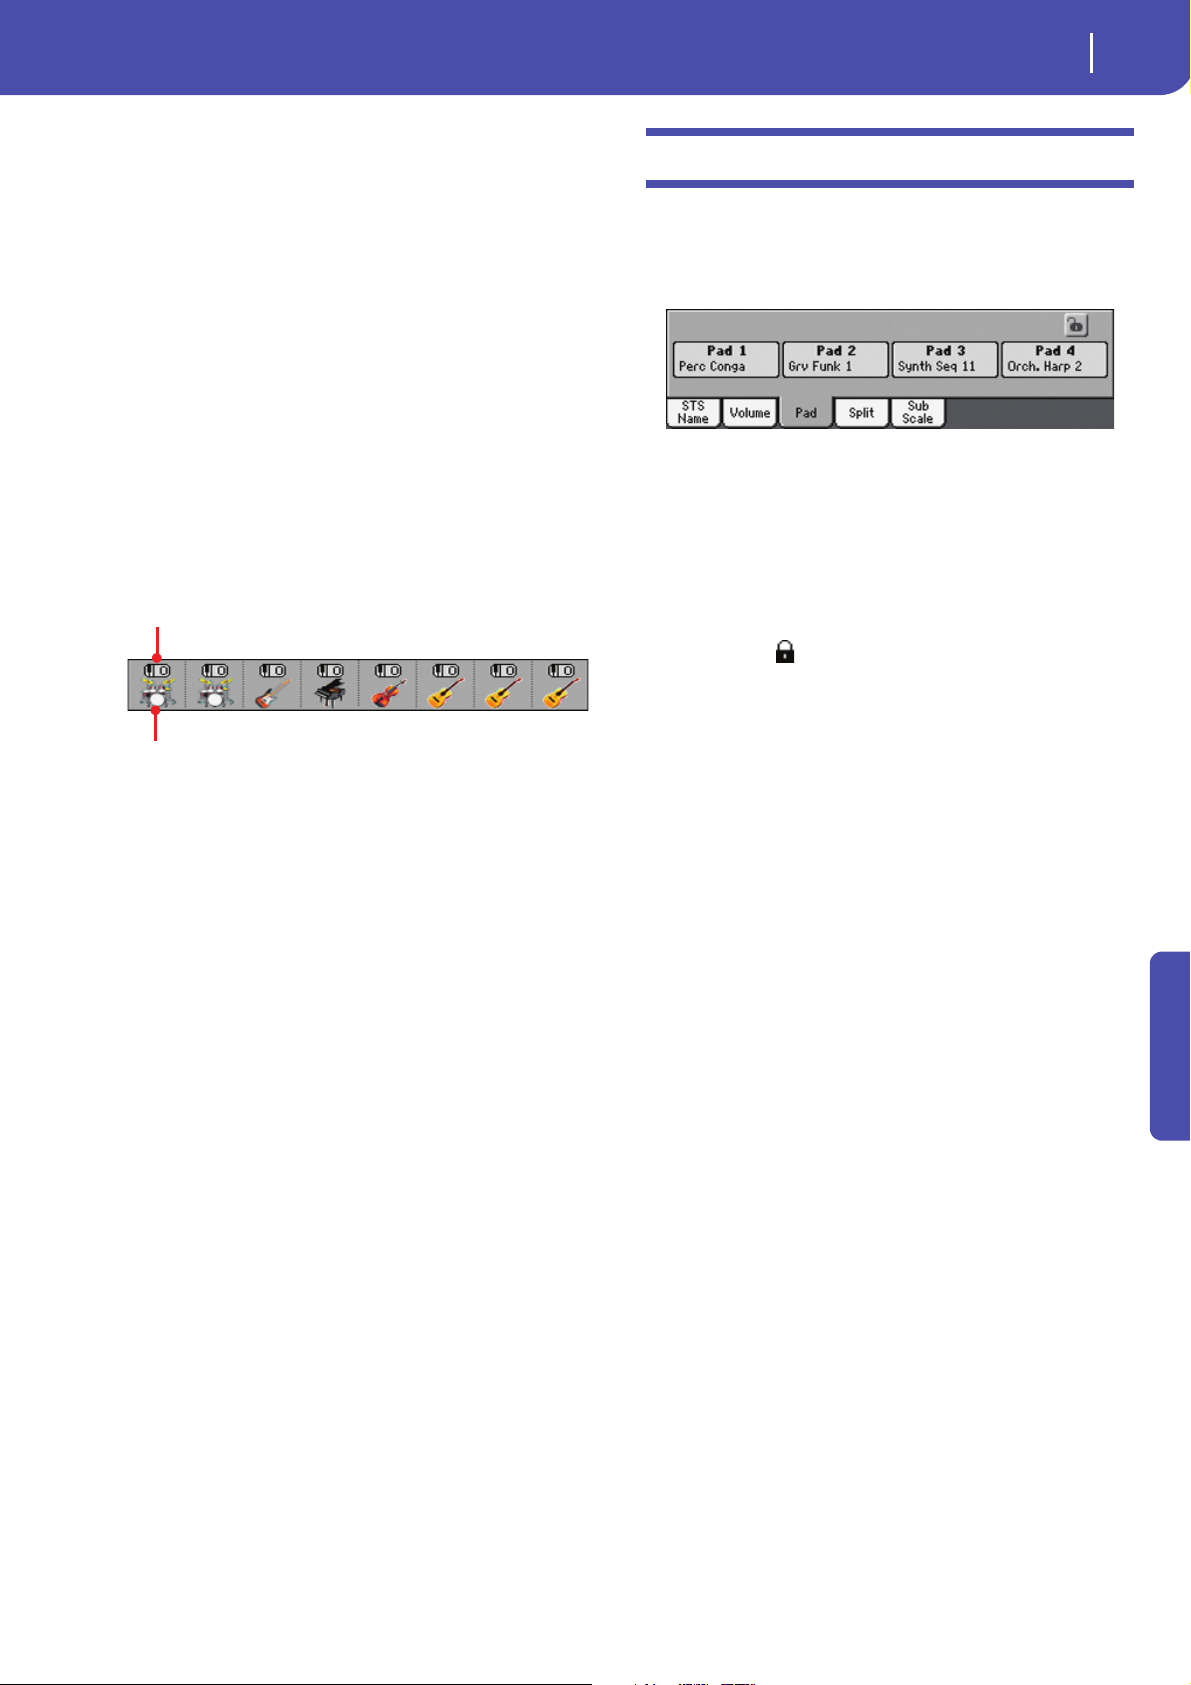
Pad panel
Sound name
Sound assigned to the selected track. Touch anywhere in this
area to open the Sound Select window, and select a different
Sound.
Sound bank
Bank of the selected Sound.
Program Change
Program Change number sequence (Bank Select MSB, Bank
Select LSB, Program Change).
Sounds area
This area lets you see the Sound bank’s icon and octave transposition for the eight Style tracks.
Touch the Pad tab to select this panel. This is where you can
assign a different Hit or Sequence Pad to each of the four pads,
and see at a glance how pads are programmed. For more options,
go to the “Pad/Switch: Pad” page (see page 30).
Pad assignment
Name of the Hit or Sequence assigned to each Pad. Touch the
box to make the Pad Select window appear (see “Pad Select window” on page 8).
When the Lock is open, Pads can be changed when choosing a
Style or SongBook entry.
Pads lock icon ( )
Close this lock to prevent Pads from changing when choosing a
different Style or SongBook entry.
Style track’s octave transpose icon
Non editable. Octave transpose of the corresponding track. To
change the octave transpose, use the UPPER OCTAVE buttons,
or go to the “Mixer/Tuning: Tuning” edit page (see page 22).
Sound bank’s icon
This picture illustrates the bank the current Sound belongs to.
Touch an icon a first time to select the corresponding track
(detailed information are shown on the Selected Track Info area,
see above). Touch it a second time to open the Sound Select window.
Reference
Page 22
18
Style Play operating mode
Split panel
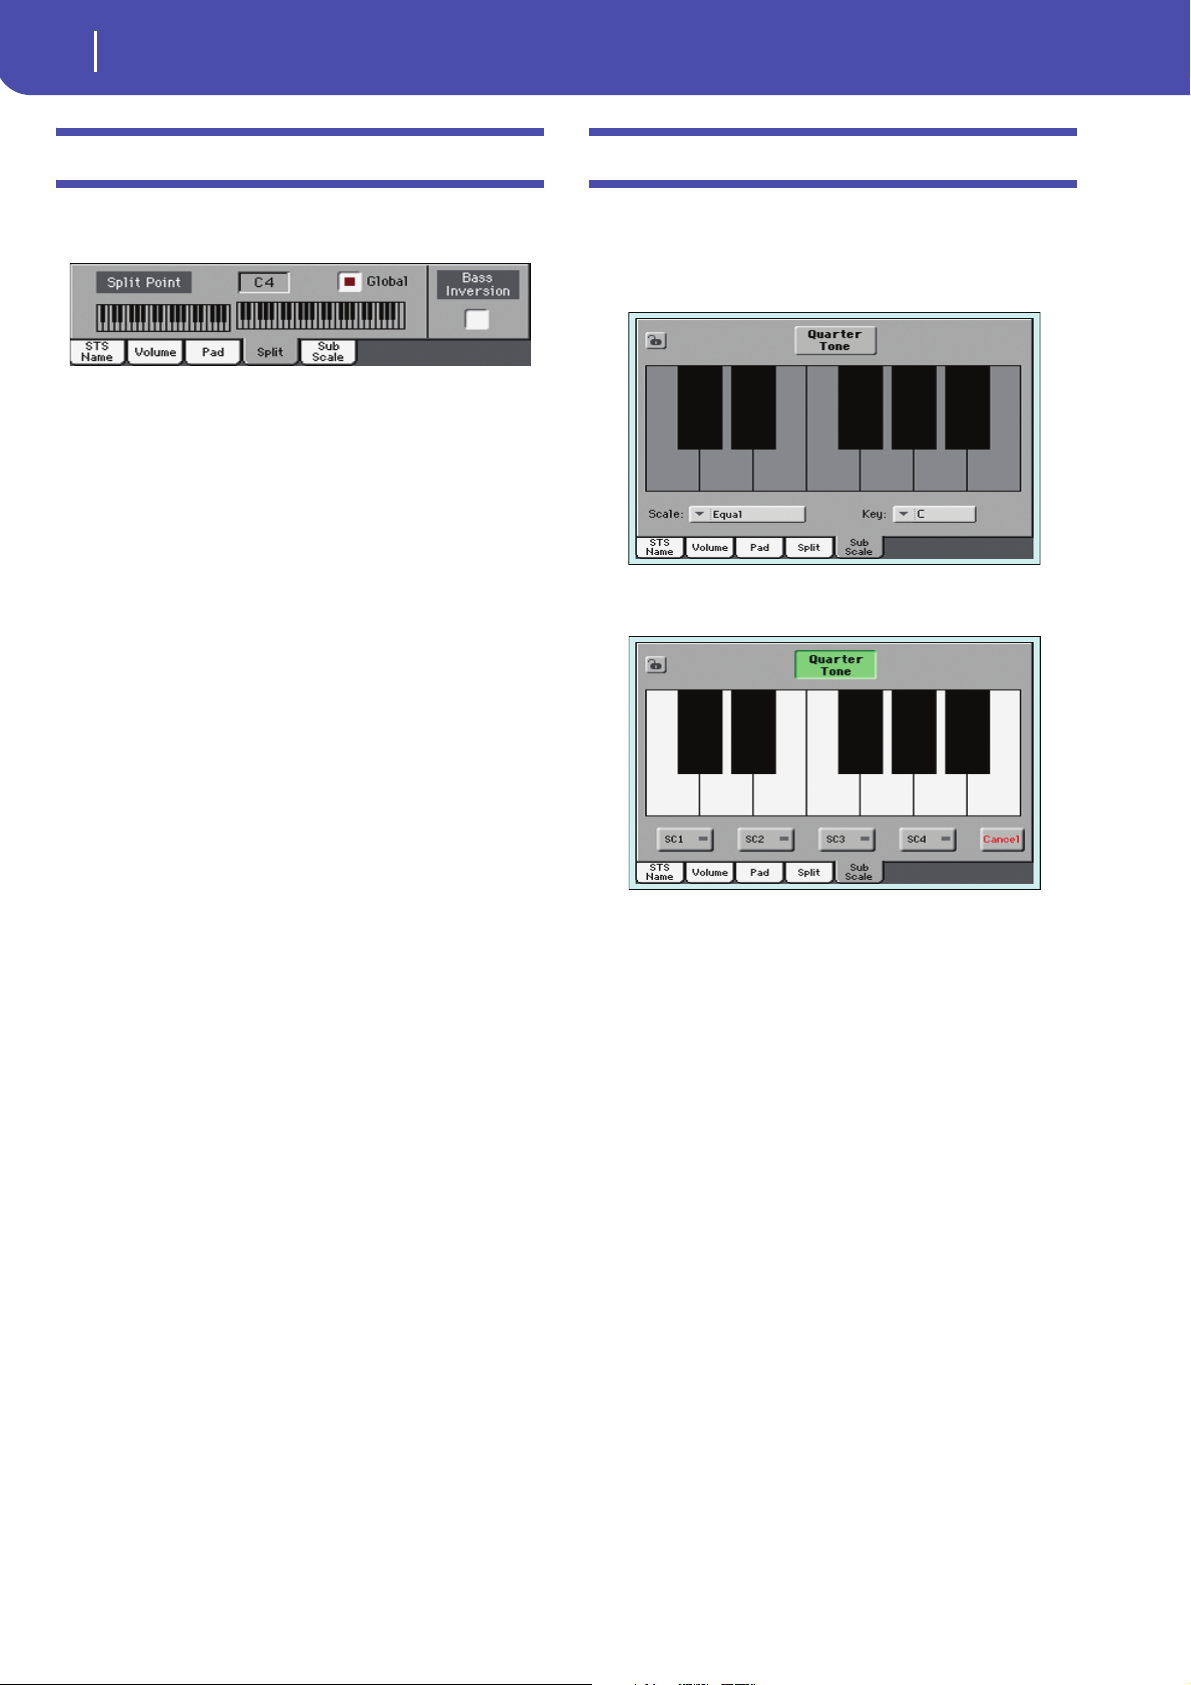
Split panel
Touch the Split tab to select this panel. This is where you can set
the split point and activate the Bass Inversion.
Split Point
Use this parameter to select a different split point. A full-range
piano keyboard is shown in the display, divided at the selected
split point. Upper tracks play on the right of this point, while the
Lower track plays on the left.
Keyboard diagram
Touch anywhere on the keyboard diagram. A message will
appear, asking you to press the new split point on the keyboard
of your Pa600 (or to press the EXIT button to close the message
with no changes).
Global
There is a global split point, and “local” one, that can be memorized into the Performances and STSs.
On You are editing the global split point. The global
split point is considered when selecting a Performance or STS that does not contain a local split
point.
Off You are editing the “local” split point memorized
in the current Performance or STS.
Sub-Scale panel
Touch the Sub-Scale tab to select this panel. This panel replicates
the “Mixer/Tuning: Sub Scale” edit page (see page 22). When the
Quarter Tone button is pressed, it corresponds to the QUARTER
TONE section on the control panel (Pa600 Quarter tone only).
With the “Quarter Tone” button non-pressed
With the “Quarter Tone” button pressed
Bass Inversion
Use this parameter to turn the Bass Inversion function on or off.
On The lowest note of a chord played in inverted
form will always be detected as the root note of
the chord. Thus, you can specify to the arranger
composite chords such as “Am7/G” or “F/C”.
Off The lowest note is scanned together with the
other chord notes, and is not always considered
as the root note.
Note: This function can be automatically activated by playing the
keyboard harder. See “Velocity Control” on page 144.
Page 23
Style Play operating mode
Edit menu
Edit menu
Operating mode Edit section
Selected
track info
Page menu
icon
Parameters
area
Tab s
From any page, press the MENU button to open the Style Play
edit menu. This menu gives access to the various Style Play edit
sections.
When in the menu, select an edit section, or press EXIT or
STYLE PLAY to exit the menu and return to the main page. To
return to the main page, you can also select the Main Page menu
item.
When in an edit page, press EXIT or the STYLE PLAY button to
return to the main page of the Style Play operating mode.
19
Page menu icon
Touch this icon to open the page menu (see “Page menu” on
page 32).
Parameters area
Each page contains various parameters. Use the tabs to select
one of the available pages. For detailed information on the various types of parameters, see sections starting below.
Ta bs
Use tabs to select one of the edit pages of the current edit section.
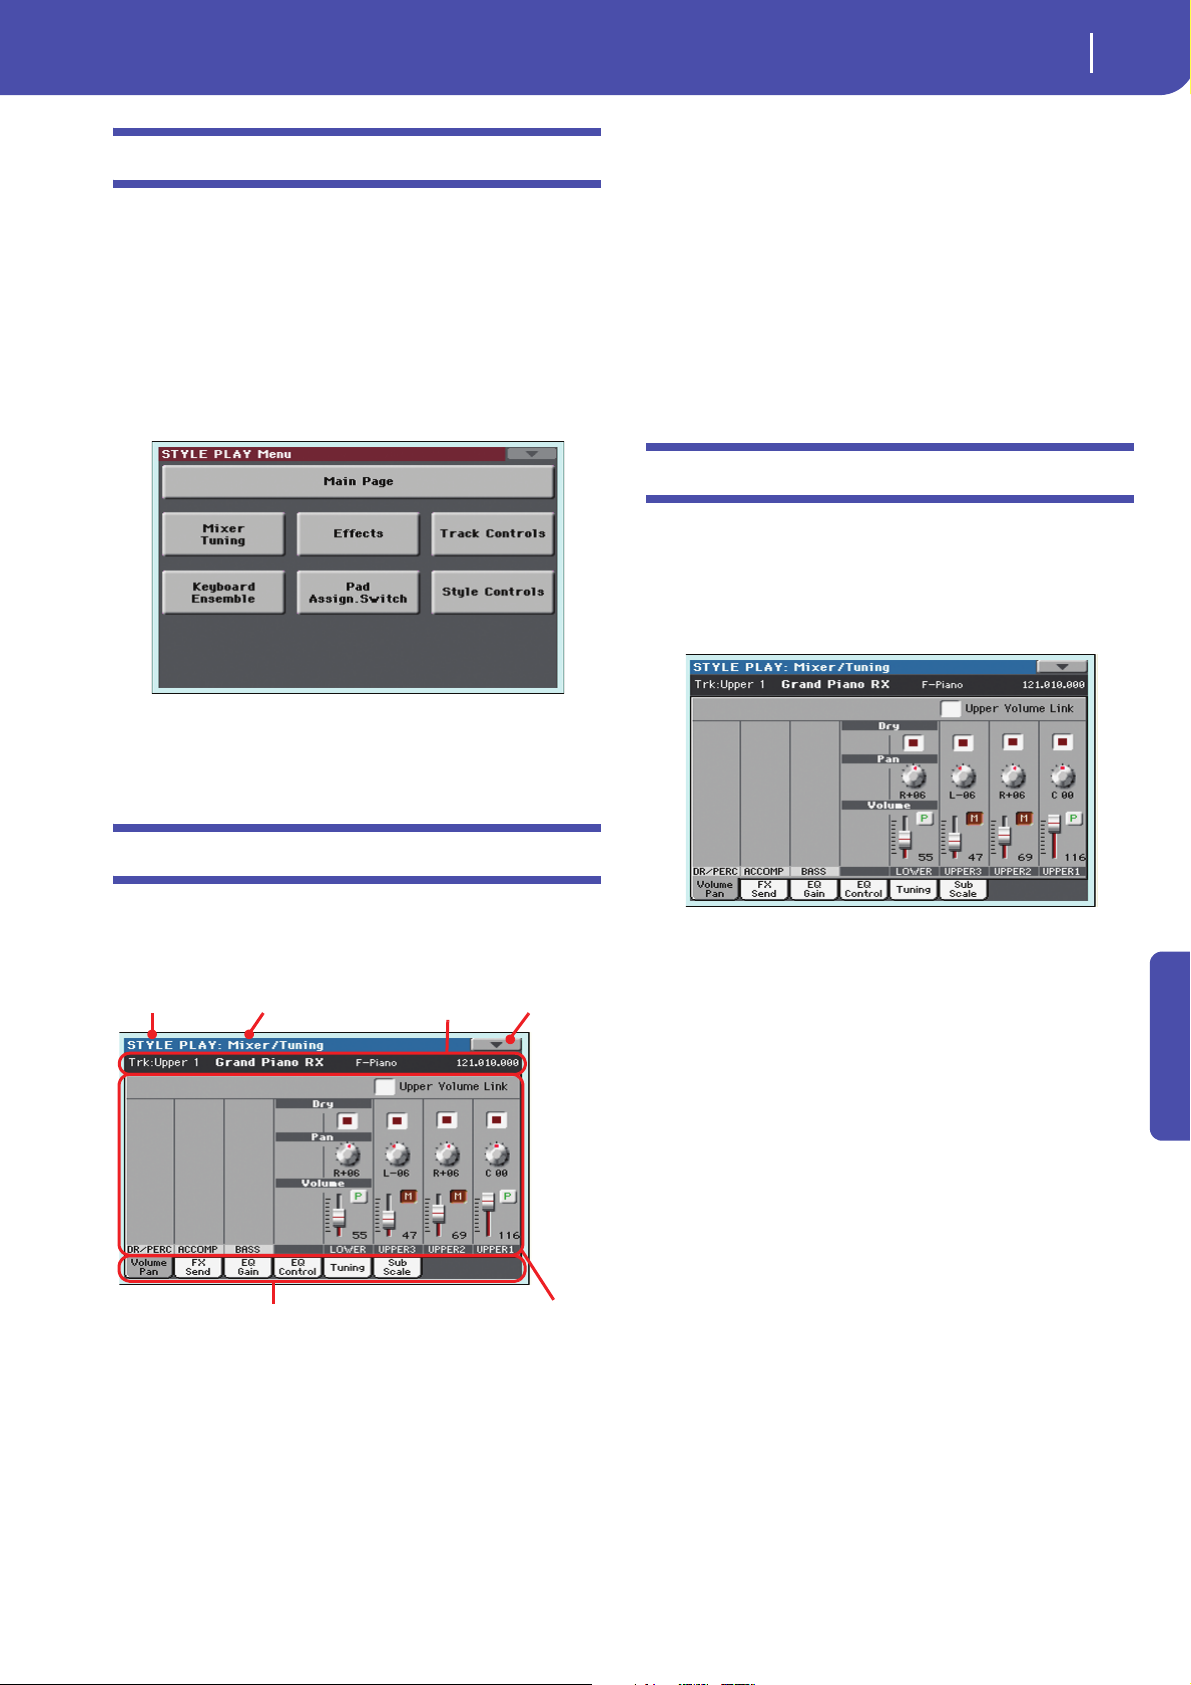
Mixer/Tuning: Volume/Pan
This page lets you set the volume and pan for each of the Keyboard or Style tracks. Volume settings are the same as in the Volume panel of the main page.
Use the TRACK SELECT button to switch from the Keyboard to
the Style tracks, and vice versa.
Each item in this menu corresponds to an edit section. Each edit
section groups various edit pages, that may be selected by touching the corresponding tab on the lower part of the display.
Edit page structure
All edit pages share some basic elements.
Upper Volume Link
With this parameter, you define if changing the volume of one of
the Upper tracks also proportionally changes the volume of the
other Upper tracks.
On When changing the volume of one of the Upper
tracks, volume for the other Upper tracks changes
in proportion.
Off When changing the volume of one of the Upper
tracks, only that track’s volume is changed. Other
Upper tracks are left unchanged.
Reference
Operating mode
This indicates that the instrument is in Style Play mode.
Edit section
This identifies the current edit section, corresponding to one of
the items of the edit menu (see “Edit menu” on page 19).
Page 24
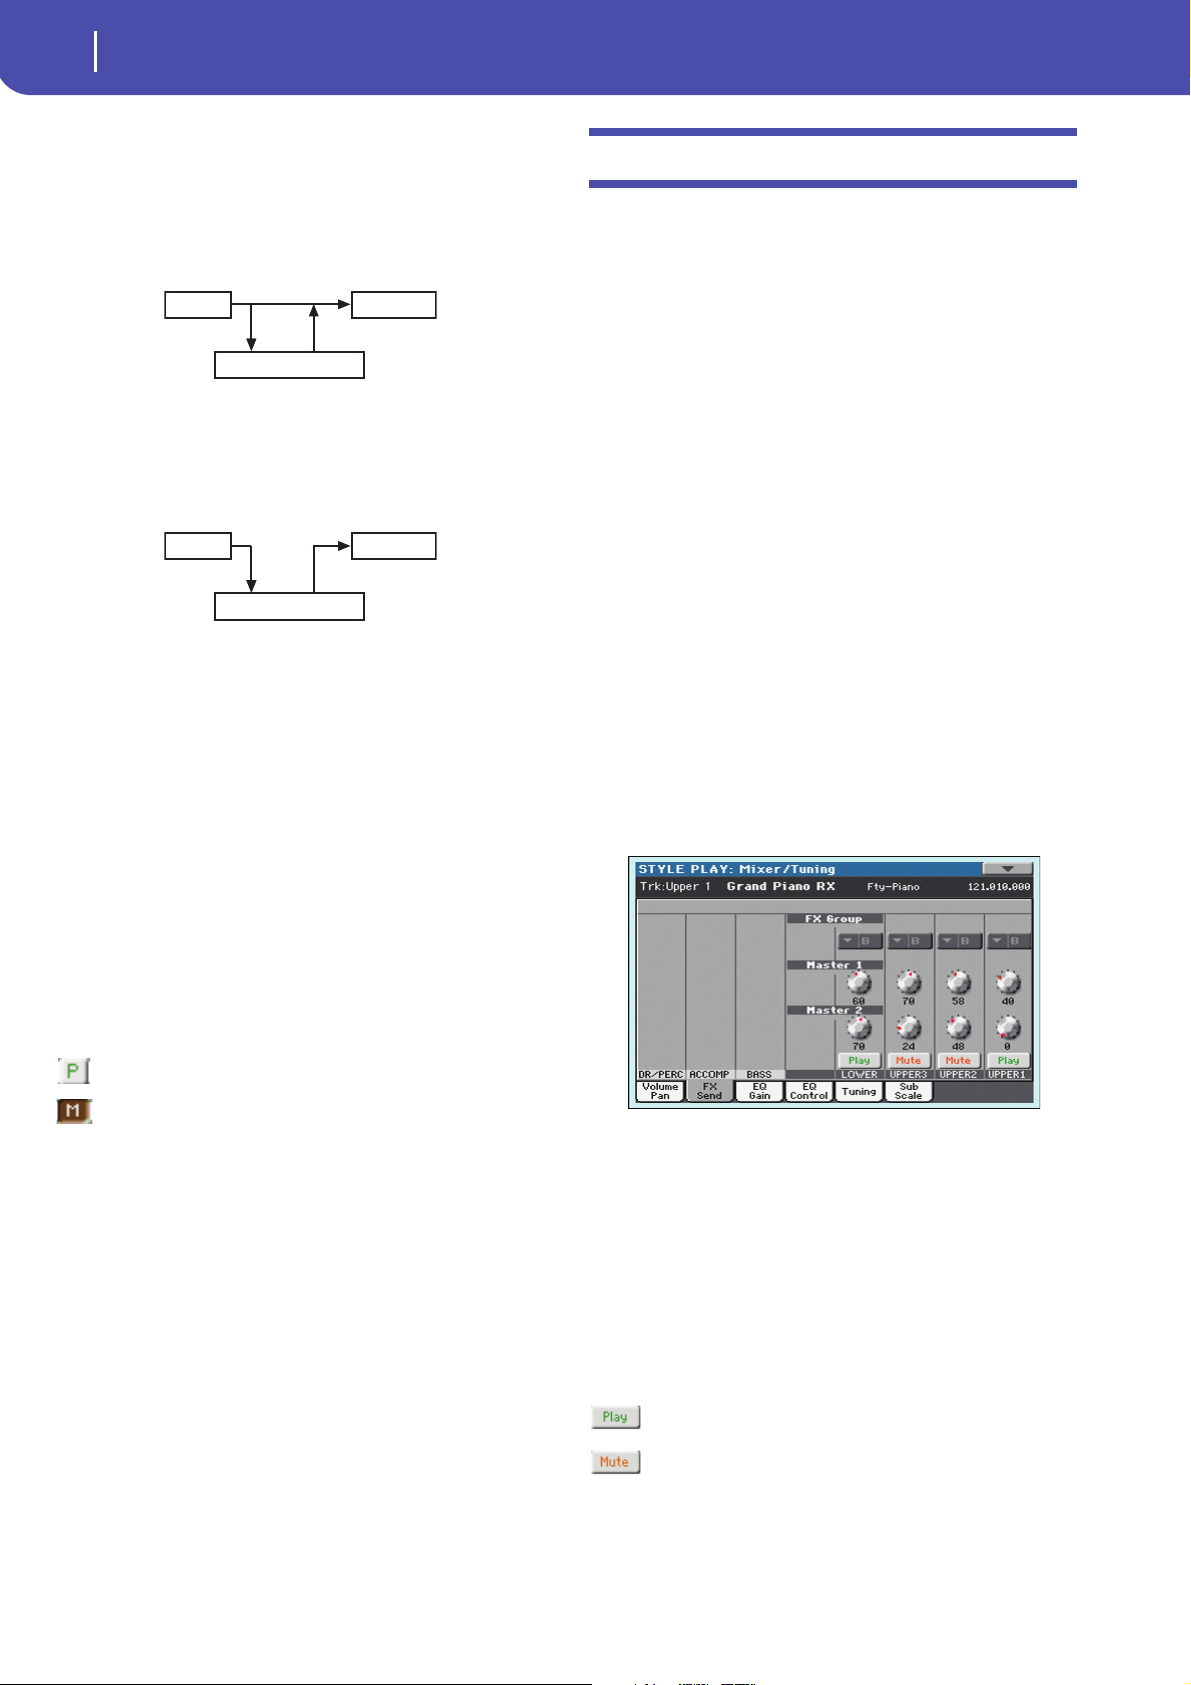
20
Style Play operating mode
Mixer/Tuning: FX Send
Track L/R Out
Master FX
Track L/R Out
Master FX
Dry
Use this checkbox to turn the dry (direct) track signal on or off
from the outputs.
On When checked, the direct signal coming from the
track is sent to the output, mixed with the Master
FXs.
Off When unchecked, the direct signal coming from
the track is removed from the audio output, and
only sent to the Master FXs. The effected signal
will still be panned (in stereo FXs only) according
to the Pan value.
Pan
Track position in the stereo field.
L-64…L-1 Left stereo channel.
C 00 Center.
R+1…R+63 Right stereo channel.
Volum e
Track’s volume. This is the volume of each track, as saved in the
Style (Style Settings), Performance or STS. It may change when
choosing a different Style, Performance or STS.
0…127 MIDI value of the track’s volume.
Mixer/Tuning: FX Send
Pa600 includes two groups of effects (FX A and FX B). While in
Style Play mode, the A group is reserved to the Style and Pad
tracks, the B group to the Keyboard tracks.
Choosing and editing the effects is done in the dedicated Effect
section (see “Effects: A/B FX Configuration” on page 24).
This page lets you set the level of the track’s signal going to the
Master FX processors. The Master FX processors are connected
in parallel with the dry/direct signal, so you can decide the
amount of direct signal that will be sent to the Master FX processors.
In case you do not want to hear the direct signal, just set the Dry
parameter to Off (see “Dry” above).
You can assign to the Master FXs any kind of available effects,
but we found it convenient to arrange them in the following way,
for most of the Styles, STS and Performances included with the
Pa600:
A-Master 1 Reverb processor for the Style and Pad tracks.
A-Master 2 Modulating FX processor for the Style and Pad
tracks.
B-Master 1 Reverb processor for the Keyboard tracks.
B-Master 2 Modulating FX processor for the Keyboard
tracks.
Use the TRACK SELECT button to switch from Keyboard to
Style tracks, and vice-versa.
Play/Mute icon
Track’s play/mute status.
Play status. The track can be heard.
Mute status. The track cannot be heard.
FX Group
This indicates the FX group (A or B) assigned to the group of
tracks shown.
Send level (Master 1, Master 2)
0…127 Level of the track (direct) signal sent to the corre-
sponding Master FX effect processor.
Play/Mute icon
Track’s play/mute status.
Play status. The track can be heard.
Mute status. The track cannot be heard.
Page 25
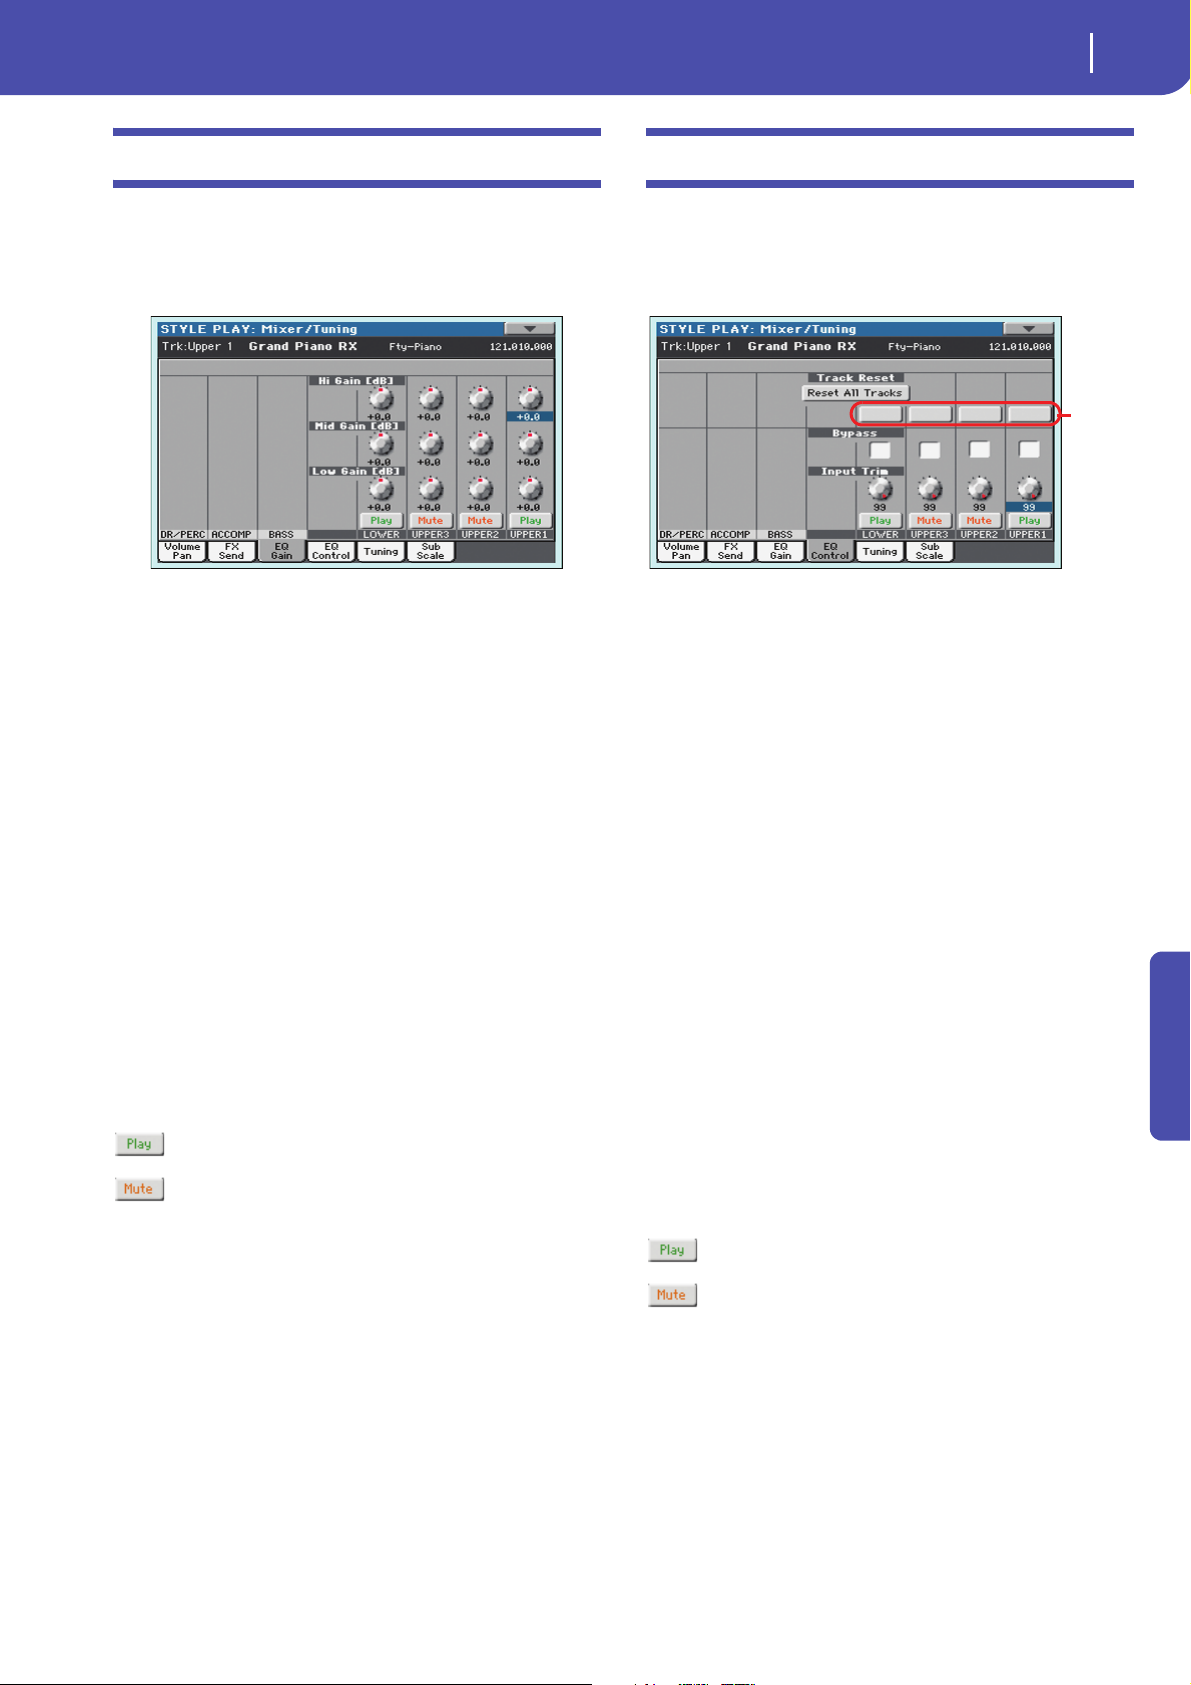
21
Style Play operating mode
Mixer/Tuning: EQ Gain
Trac k
Reset
buttons
Mixer/Tuning: EQ Gain
In this page you can set the three-band equalization (EQ) for
each individual track.
Use the TRACK SELECT button to switch from the Keyboard to
the Style tracks, and vice-versa.
Hi (High) Gain
This parameter lets you adjust the high frequencies equalization
on each individual track. This is a shelving curve filter. Values
are shown in decibels (dB).
-18…+18dB High gain value in decibels.
Mid (Middle) Gain
This parameter lets you adjust the middle frequencies equalization on each individual track. This is a bell curve filter. Values
are shown in decibels (dB).
-18…+18dB Middle gain value in decibels.
Low Gain
This parameter lets you adjust the low frequencies equalization
on each individual track. This is a shelving curve filter. Values
are shown in decibels (dB).
-18…+18dB Low gain value in decibels.
Play/Mute icon
Track’s play/mute status.
Play status. The track can be heard.
Mute status. The track cannot be heard.
Mixer/Tuning: EQ Control
This page lets you reset or bypass the track’s equalization, programmed in the previous page.
Use the TRACK SELECT button to switch from the Keyboard to
the Style tracks, and vice-versa.
Reset All Tracks button
Touch this button to reset (i.e., “flatten”) equalization for all
tracks (both Realtime and Style tracks).
Track Reset buttons
Use these buttons to reset (i.e., “flatten”) equalization for the corresponding track.
Bypass
Check any of these checkboxes to bypass the equalization for the
corresponding track. When bypassed, equalization has no effect on
the track, but all parameters are preserved. When the box is
unchecked, equalization is activated again.
On The bypass function is engaged, so no equaliza-
tion is active on the corresponding track.
Off The bypass function is not engaged, so the equal-
ization is active on the corresponding track.
Input Trim
This knob allows you to limit the level of the signal passing
through the equalizer. Extreme equalization values can overload
the audio circuits and lead to distortion. This control lets you set
equalization as desired, and at the same time avoid overloading.
0…99 Limiting value. The higher, the most effective it is.
Play/Mute icon
Track’s play/mute status.
Reference
Play status. The track can be heard.
Mute status. The track cannot be heard.
Page 26
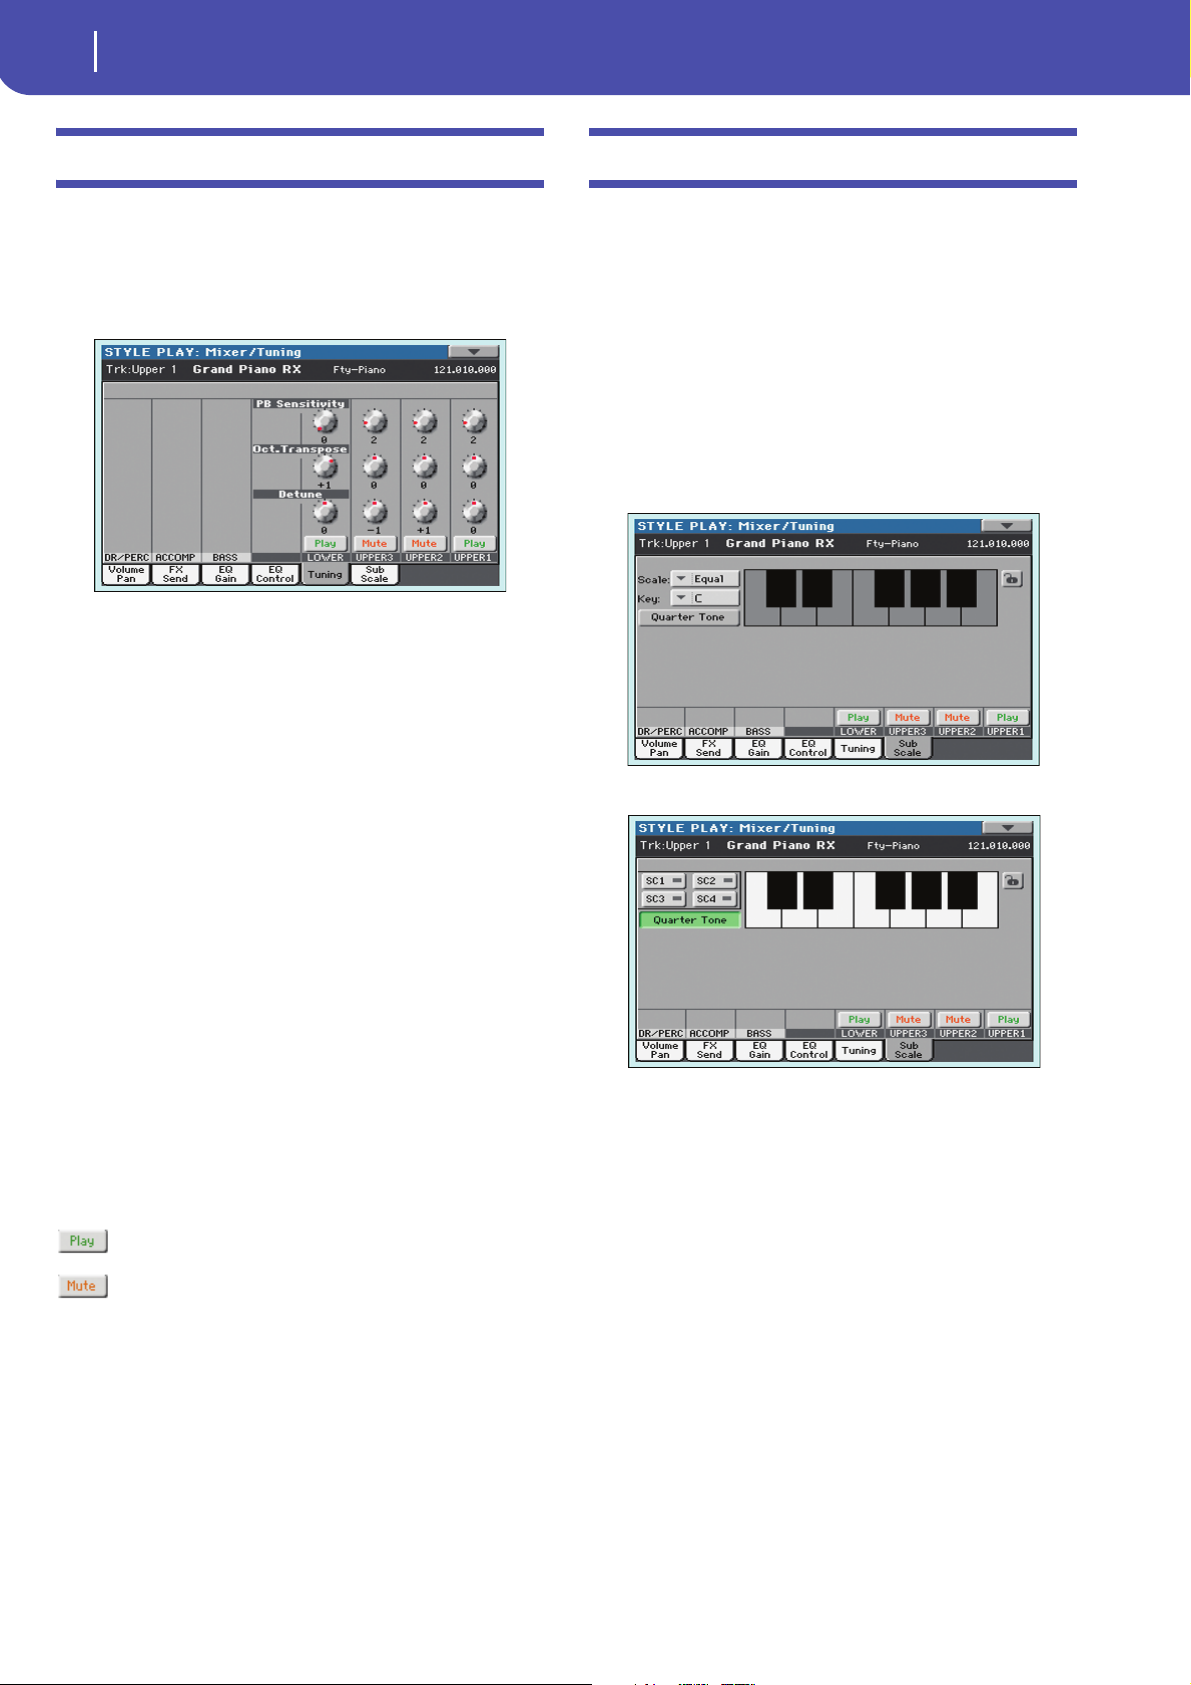
22
Style Play operating mode
Mixer/Tuning: Tuning
Mixer/Tuning: Tuning
This page is where you can set the octave transpose and fine tuning for each track. Plus, you can program the Pitch Bend range
for each track.
Use the TRACK SELECT button to switch from the Keyboard to
the Style tracks, and vice-versa.
PB Sensitivity
These parameters show the Pitch Bend range for each track, in
semitones.
1…12 Maximum up/down pitch bend range (in semi-
tones). 12 = ±1 octave.
0 No pitch bend allowed.
Mixer/Tuning: Sub Scale
You can assign a different scale (a sub-scale) to the Keyboard
tracks, the Upper tracks or all tracks. This will allow, for example, to play a solo with a particular Quarter Tone tuning, while
the backing tracks play in the Equal tuning.
This page is where you can program the sub-scale for the
selected tracks; a different sub-scale can be associated to each
Performance or STS. Track selection is general, and can be done
with the “Scale Mode” parameter of the Global > Mode Preferences > Style page (see page 144).
The remaining tracks will use the basic scale set in the Global
> Tuning > Scale page (see “Main Scale” on page 148). This is
the “standard” scale of the instrument.
With the “Quarter Tone” button non-pressed
Octave Transpose
This is the octave transpose value.
-3 Lowest octave.
0 Standard tuning.
+3 Highest octave.
Detune
This is the fine tuning value.
-64 Lowest pitch.
00 Standard tuning.
+63 Highest pitch.
Play/Mute icon
Track’s play/mute status.
Play status. The track can be heard.
Mute status. The track cannot be heard.
With the “Quarter Tone” button pressed
Note: Quarter Tone selection can be received by MIDI (i.e., by an
external sequencer or controller). Conversely, selection of Quarter
Tone settings can be sent by the Pa600 to an external MIDI
recorder as System Exclusive data.
Scale
Selected scale. See “Scales” on page 242 for a list of the available
scales. When selecting the User scale, the keyboard diagram
becomes active, letting you program a custom scale (see “How to
create a custom scale by fine-tuning each note of the User scale”
below).
Key
This parameter is needed by some scales to set the preferred
key (see
“Scales” on page 242).
Page 27

23
Style Play operating mode
Mixer/Tuning: Sub Scale
Fine tuning values
Quarter Tone
Pa600 Quarter Tone only: When this option is turned on, this page
corresponds to the QUARTER TONE section of the control panel.
You can program the Quarter Tone scale on the display, or by using
the keys on the control panel. The controls on the control panel
remain functional, even when going to a different page.
Press the Quarter Tone button to make the keyboard diagram
active (Pa600 Quarter Tone only: this also activates the QUAR-
TER TONE section of the control panel). In the display, touch any
note you want to lower a quarter tone, making a big dot appear
on the note diagram. Touch the note again to make the dot disappear.
Touch one of the four SC Preset buttons to recall the corresponding preset, and touch any note you want to lower a quarter
tone down, making a big dot appear on the detuned note in the
diagram. Touch the note again to make the dot disappear.
Scale alteration made in this page is momentary and is not
memorised. It is only meant to allow for fast scale alteration
while playing.
To make realtime changes faster, you can also assign the Quarter
Tone function to the footswitch or an Assignable Switch (see
below “How to use the Quarter Tone function with a footswitch
or Assignable Switch” for more information).
The use of SC Presets allows for immediate recall of previously
programmed Quarter Tone scales (see below “How to use the
Quarter Tone function with the SC Presets” for more information).
SC Preset buttons
These buttons appear only when the “Quarter Tone” parameter is
checked. Use these buttons to recall the corresponding custom
scale presets. See “How to use the Quarter Tone function with
the SC Presets” below for information on how to use them.
Keyboard diagram
When “Quarter Tone” is checked, this diagram allows for lowering each note of a quarter tone. When a User scale is selected, it
allows you to fine-tune each note’s pitch.
Scale lock icon
When locked, Scale parameters remain unchanged when selecting a different Performance or STS.
For more information on parameter locks, see “General Controls: Lock” on page 141.
How to create a custom scale by fine-tuning each note of the User scale
way, you can create a custom scale, that you can save to a Performance or STS.
After having selected the User scale, touch a note in the keyboard diagram, and use VALUE DIAL to adjust the selected note
tuning in cents.
Note: These settings can be saved to a Performance or STS, as
described below.
How to use the Quarter Tone function with the SC Presets
When the “Quarter Tone” button is pressed, four “SC Preset”
buttons appear, and you can select one of four SC Presets to
recall a preset custom scale. (Pa600 Quarter Tone: these buttons
correspond to the SC buttons in the QUARTER TONE section of
the control panel.)
1. Program and save a custom scale into an SC Preset.
To do so, go to the Global mode, and reach the “Tuning:
Scale” page. When programming is done, choose the
“Write SC Preset” command from the page menu, then
select one of the preset locations where to save the current
settings (see “Write Quarter Tone SC Preset dialog box” on
page 155).
2. Return to this page, and touch the “Quarter Tone” button to
make the “SC Preset” buttons appear.
3. Touch one of the “SC Preset” buttons to recall a preset cus-
tom scale.
Each preset contains custom detuning of each note of the
scale, and memorizes the selected degree(s) of the scale.
When no preset is selected, the default scale is automatically recalled. This scale assigns a -50 cent value to all
notes, and turns all scale degrees off.
You can also select an SC Preset by assigning the relevant
function to an Assignable Switch (see “Pad/Switch: Switch”
on page 31) or Assignable Footswitch (see “Controllers:
Foot Controllers” on page 146).
4. Use the keyboard diagram to turn the note detuning on or
off.
Make a big dot appear to detune the corresponding note, or
make it disappear to reset tuning.
5. Reset the original scale.
Touch the “Quarter Tone button again, to deselect it and
recall the main scale.
Reference
When the User scale is selected, the keyboard diagram becomes
active. You can then change each note tuning in cents of a semitone (within a range of ±99 cents, referred to Equal tuning). This
Page 28
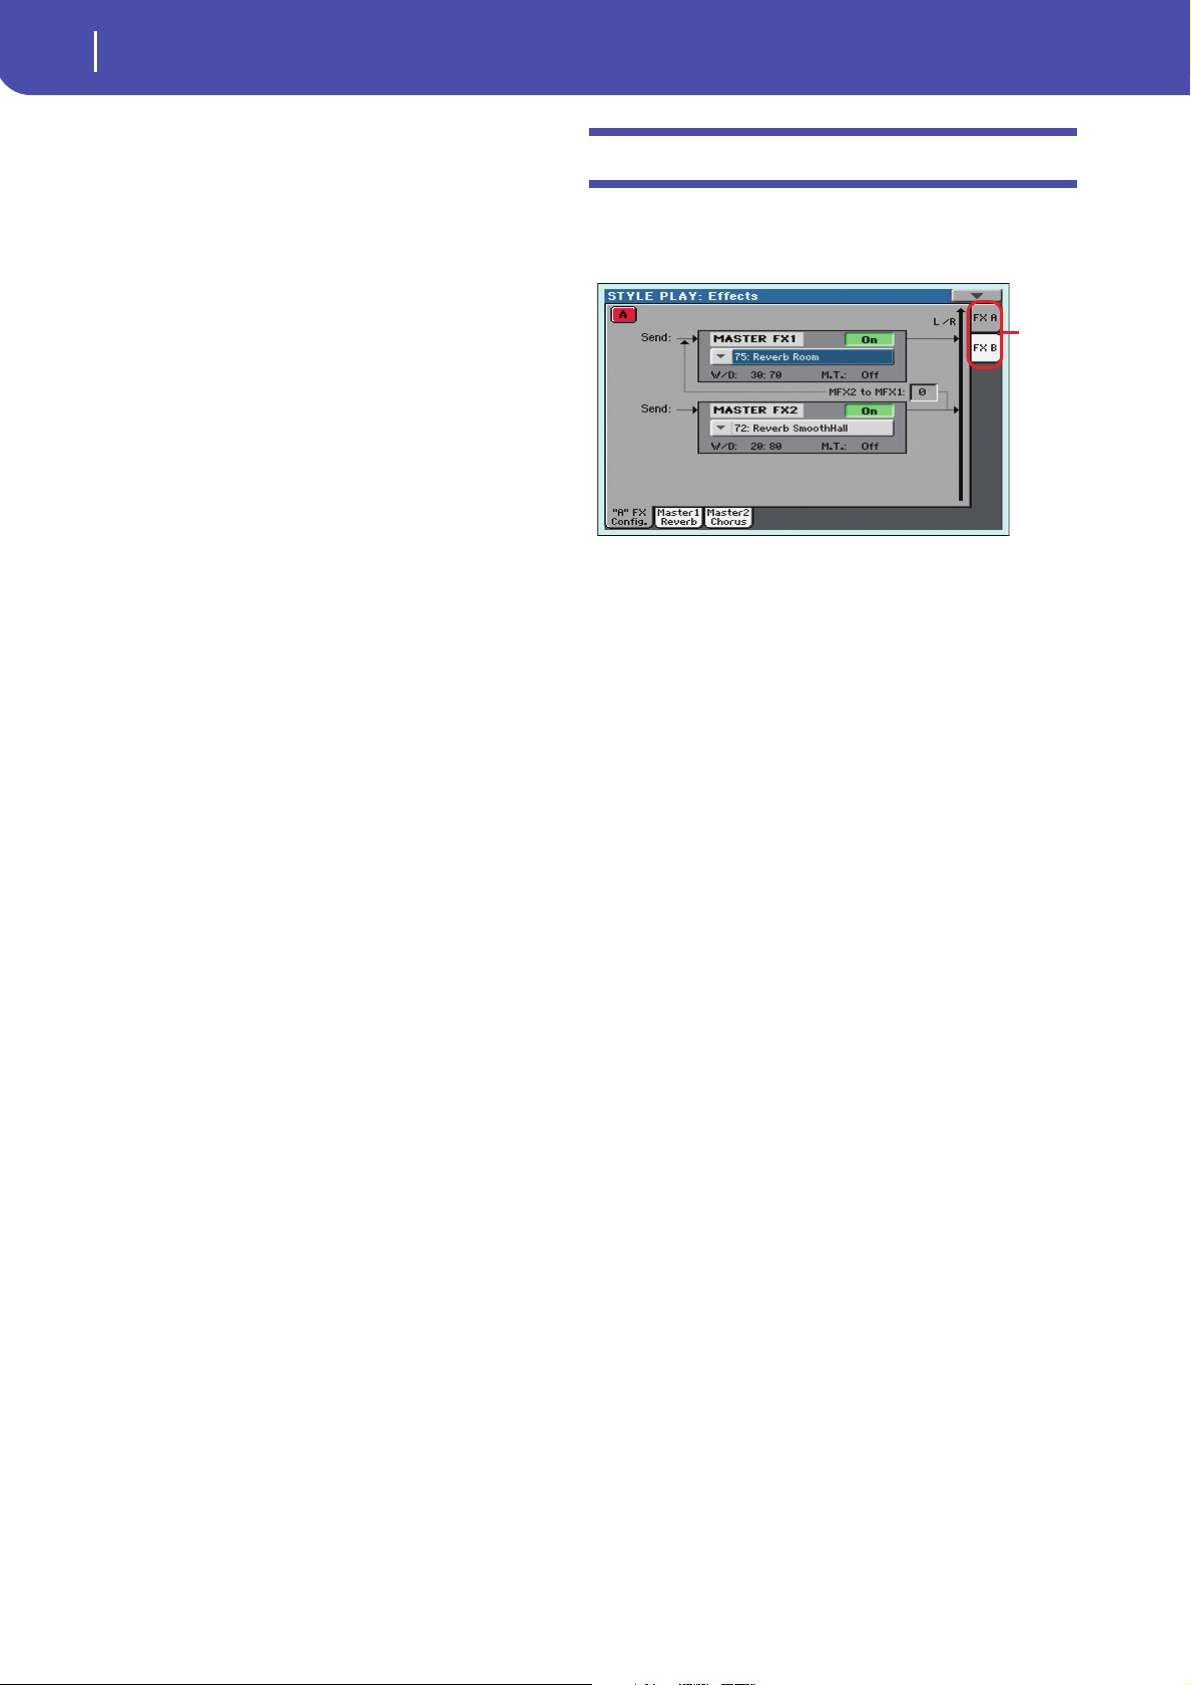
24
Style Play operating mode
Effects: A/B FX Configuration
FX
group
How to use the Quarter Tone function with a footswitch or Assignable Switch
Effects: A/B FX Configuration
You can assign the “Quarter Tone” function to a footswitch or an
Assignable Switch, to program a custom scale in realtime, for
example to allow for those sudden scale changes typical of the
Arabic music. These changes are not saved anywhere, so the
scale is easily “wiped-out” when selecting a different Performance or STS, or when pressing the Quarter Tone pedal again.
Note: While in Style Play mode, you can create a custom scale, to
be assigned to a Performance or STS, simply by selecting and editing a User scale, and saving any change to a Performance or STS.
See “How to create a custom scale by fine-tuning each note of the
User scale” above.
While in Global mode, you can create a custom scale and save it to
one of the four SC Presets, and recall it by touching one of the SC
Preset buttons in the display. Then, you can start your realtime
scale editing from the selected preset. See “How to use the Quarter
Tone function with the SC Presets” above.
1. Program the footswitch or an Assignable Switch to be the
Quarter Tone switch.
Simply go to the Global mode, and reach the “Controllers:
Foot Controllers” page. There, you will find the “Pedal/
Footswitch” parameter, to which you can assign the Quarter Tone function.
2. Lower some note pitches.
Keep the Quarter Tone pedal pressed. The keyboard will
not play at this time. Press the notes you want to lower a
quarter tone. Release the pedal.
3. Play with your new scale.
Notes you pressed on step 2 are now lowered of a quarter
tone.
4. Reset the original scale.
Press and release the Quarter Tone pedal again, without
playing any note. All pitches will be reset, and the scale
selected by the Performance or STS will be recalled.
This page allows you to select the A (Style and Pads) and B (Keyboard) groups of effects. Please use the “FX A” and “FX B” side
tabs to switch from one group to the other one.
FX Groups (FX A, FX B)
Pa600 includes two groups of effects (FX A and FX B). There are
two master FXs for group. In Style Play mode, the A group is
reserved to the Style and Pad tracks, the B group to the Realtime
(Keyboard) tracks.
Master FX 1, 2
Effects assigned to the corresponding effect processors. Usually,
FX1 are reverbs, while FX2 are modulating effects (chorus,
flanger, delay…). For a list of the available effects, see in the
Appendix.
Effects assigned to both FX groups can be saved to a Performance. Effect assigned to the FX A group (Style and Pad tracks)
can be saved to the Style Settings. Effects assigned to the FX B
group (Keyboard tracks) can be saved to an STS.
W/D
Use this parameter to set the amount of the effect (Wet) against
the non-effected (Dry) signal coming from the track.
MFX2 to MFX1
Amount of the MFX2 effect going back to the input of the MFX1
effect.
M.T. (Modulating Track)
Source track for modulating MIDI messages. You can modulate
an effect parameter with a MIDI message generated by an internal physical controller.
Page 29
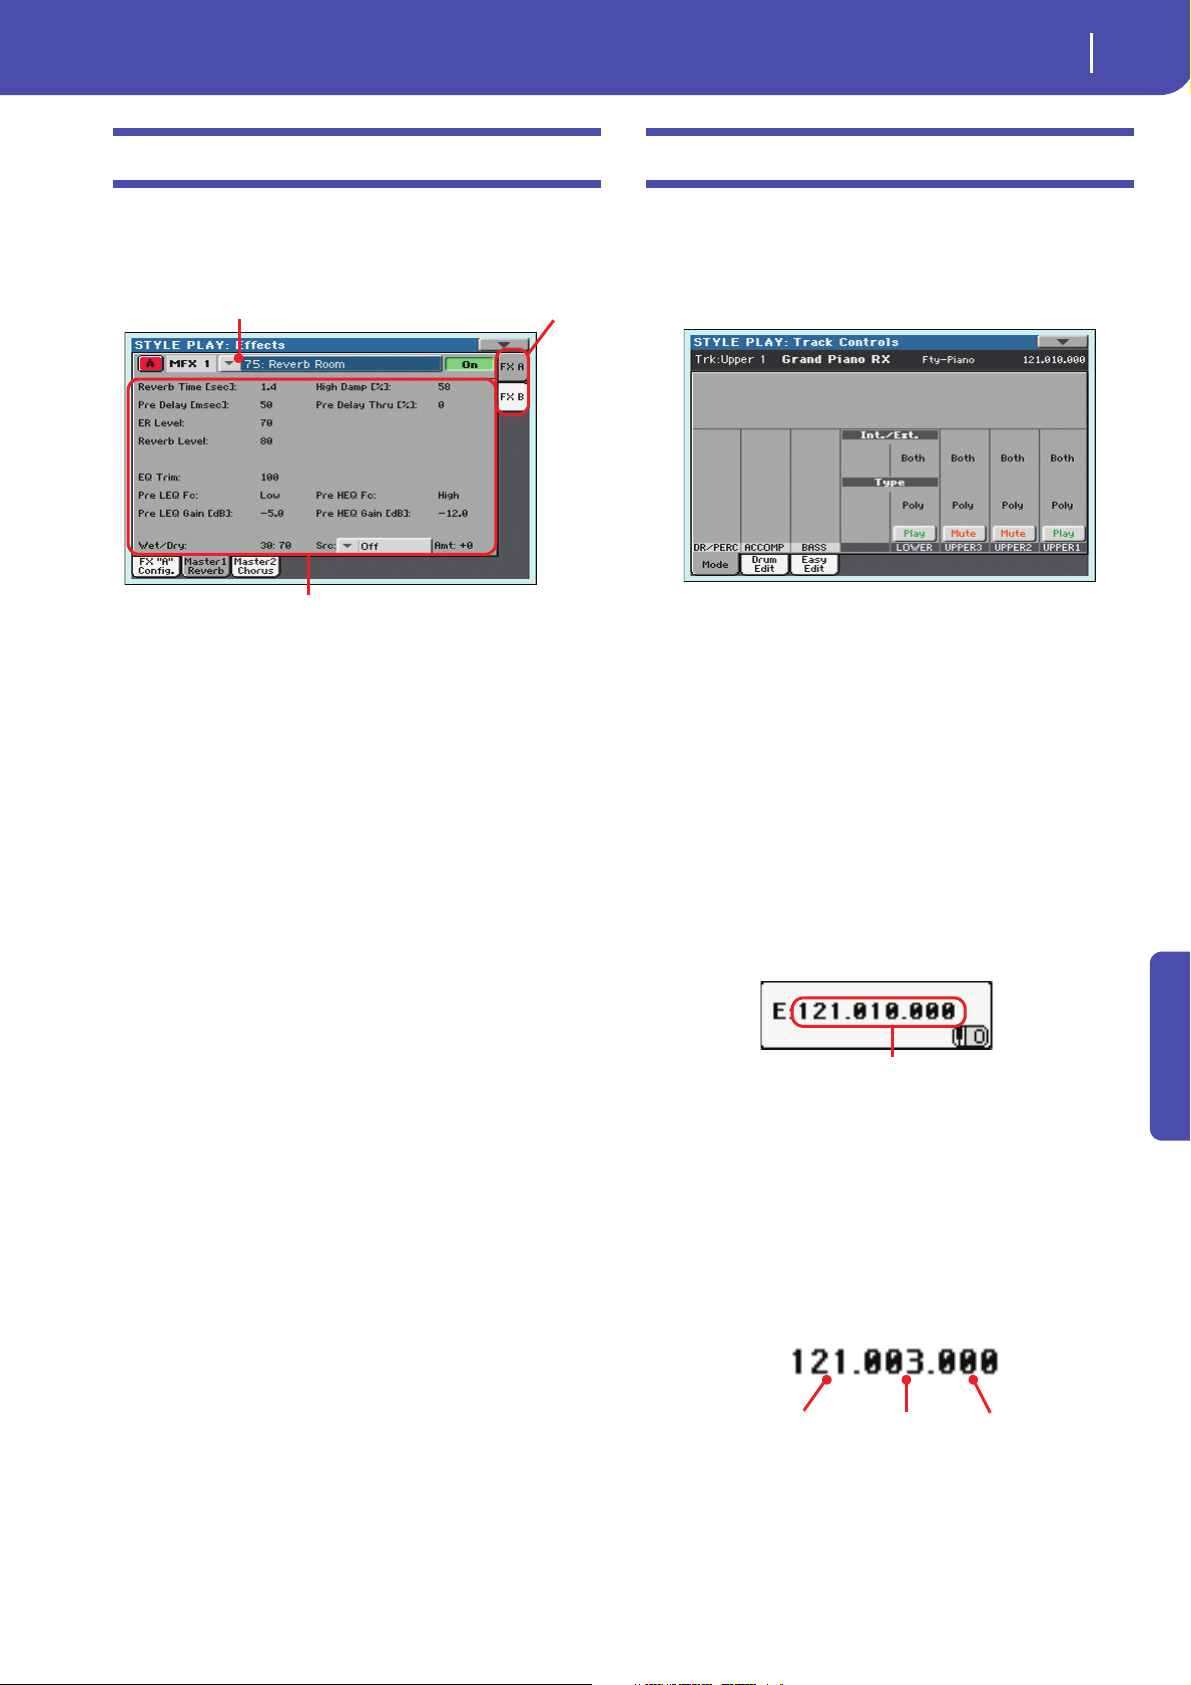
25
Style Play operating mode
Effects: Master 1, 2
Selected effect
FX parameters
FX group
Control Change/Program Change area
CC#0 value
CC#32 value
PC value
Effects: Master 1, 2
These pages contain the editing parameters for the four effect
processors. Here is an example of the FX A page, with the Reverb
Wet P la te ef f ect a ss i gne d .
Selected effect
Select one of the available effects from this pop-up menu.
Note: Effects can be different for each one of the editing pages.
FX parameters
Parameters may be different, depending on the selected effect.
See the relevant chapter in the Appendix for a list of the available
parameters for each effect type.
Wet /Dr y
Use this parameter to set the amount of the effect (Wet) against
the non-effected (Dry) signal coming from the track.
Track Controls: Mode
This page lets you connect each track to the internal sound generator and to external MIDI devices. This is very useful to let a
Style track drive an external expander, or play a digital piano
with one of Pa600’s Keyboard tracks. In addition, here you can
set the polyphony mode for each track.
Int./Ext. (Internal/External)
Internal The track plays the sounds generated by the
internal sound engine. It does not play an external instrument connected to the MIDI OUT.
External The track plays an external instrument connected
to the MIDI OUT. The connected device must
receive on the MIDI channel associated with this
track on the Pa600 (see “MIDI: MIDI Out Channels” on page 151).
A track set to this status cannot play the internal
sounds.
Instead of the assigned Sound name, the
<E: aaa.bbb.ccc> indicator is shown on a track’s
area in the Main page:
Src (Source)
Modulation source. To select the track generating this message,
see the “M.T. (Modulating Track)” parameters found in the
“Effects: A/B FX Configuration” page (see above). See the relevant chapter in the Appendix for a list of the modulation
sources.
Reference
This indicator begins with a remark saying the
track is in External (”E”) mode, and continues
with a strings of transmitted Control Change and
Program Change data. This will let you know
what the track is transmitting to the MIDI OUT.
In the following example, CC#0 is the Control
Change 0 (Bank Select MSB), CC#32 is the Control Change 32 (Bank Select LSB), PC is the Program Change:
When touching the Sound area, the numeric keypad appears, instead of the Sound Select window.
You can enter the Control Change/Program
Change bundle shown above, separating the three
parts with a dot (.).
Page 30
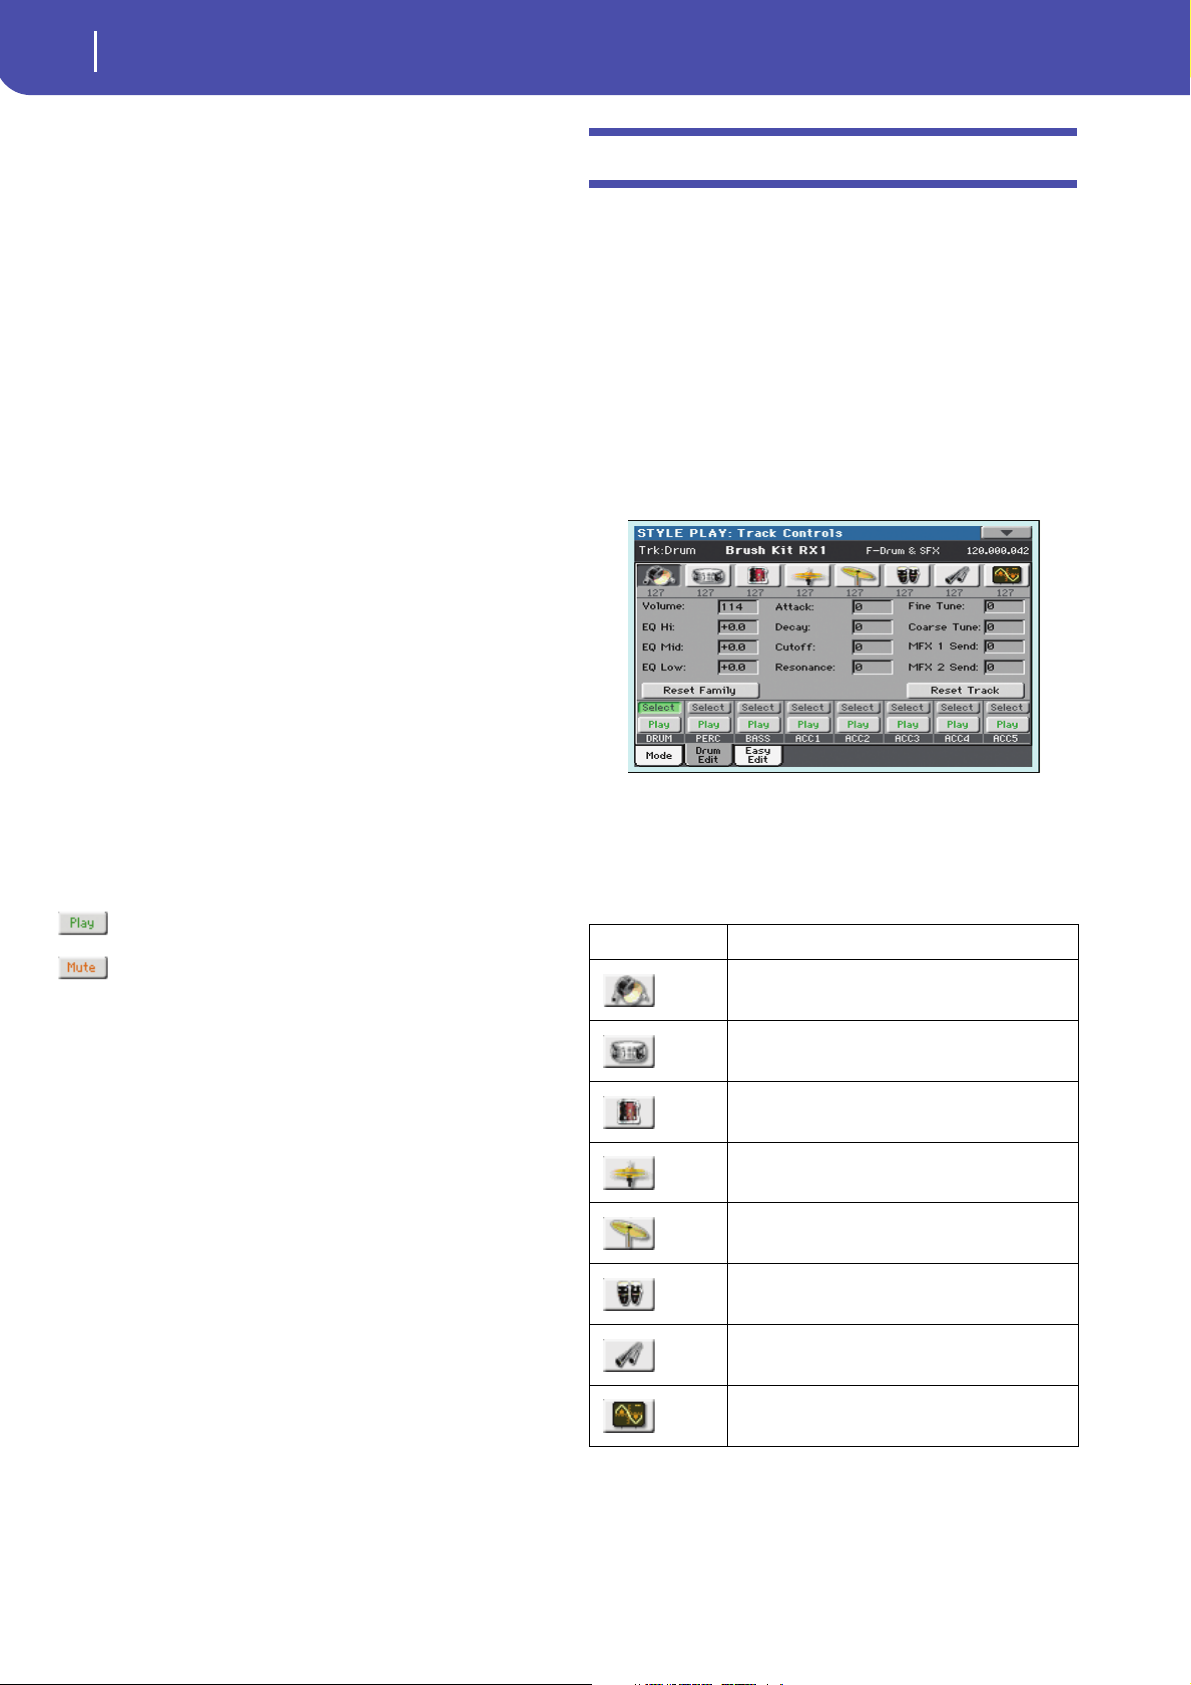
26
Style Play operating mode
Track Controls: Drum Edit
Both The track plays both the internal sounds and an
external instrument connected to the MIDI OUT.
Typ e
Drum Drum/Percussion track. Set a track to Drum
mode if you wish to separately adjust the volume
and set a different output for each percussive
family of the assigned Drum Kit Sound. (See
“Track Controls: Drum Edit” on page 26).
Note: Tracks set to Drum or Percussion mode while
in Style Record (see “Track Type” on page 62) cannot be edited here. This option appears in grey.
Other Style tracks cannot be set to Drum mode
here.
Note: Drum Kits are not affected by transpose
whichever the type of track they are assigned to.
Hint: Set any track to Drum mode, if you don’t
want the assigned Sound to be transposed (it will
behave as a Drum Kit).
Poly Tracks of this kind are polyphonic, i.e. they can
play more than one note at the same time.
Mono Tracks of this kind are monophonic, i.e. each new
note stops the previous note.
Mono Right A Mono track, but with priority assigned to the
rightmost (highest) note.
Mono Left A Mono track, but with priority assigned to the
leftmost (lowest) note.
Play/Mute icon
Track’s play/mute status.
Track Controls: Drum Edit
In this page you can adjust the volume and edit the main parameters for each family of Drum and Percussion instrument for the
selected track. A list of families is shown below.
These parameters can be accessed only on tracks set to the Drum
mode (see above). Use them on tracks with a Drum Kit assigned,
or you will not be able to hear any change.
Hint: Use the TRACK SELECT button to cycle between the track
groups. After selecting a track, choose the “Solo Track” command
from the page menu to avoid listening to the other tracks during
editing.
Note: All values are offsets referred to the value of the original
Sounds.
Family Select
Use these icons/buttons to select the drum family you want to
edit. These buttons are only accessible when you select a Drum
track.
Play status. The track can be heard.
Mute status. The track cannot be heard.
Drum family icon Drum family
Kick drums
Snare drums
Tom s
Hi-Hat cymbals
Ride, Crash and other cymbals
Low-pitched percussions
High-pitched percussions
Special effects
Overview of the current parameter
Under the icons of the Drum families you can see the value of
the selected parameter for all the families. This will let you compare the value of the selected family with all the others. The values are shown in grey (non editable).
Page 31

27
Style Play operating mode
Track Controls: Easy Edit
Drum Edit parameters
Use these parameters to adjust the offset value.
Sound parameters Meaning
Volume Instrument’s Volume.
EQ Hi Equalization, High band.
EQ Mid Equalization, Middle band.
EQ Low Equalization, Low band.
Attack Attack time. This is the time during which the sound
goes from zero (at the moment when you strike a
key) to it’s maximum level.
Decay Decay time. Time to go from the final Attack level to
the minimum level.
Cutoff Filter cutoff. This sets the sound brightness.
Resonance Use the Filter Resonance to boost the cutoff fre-
quency.
Fine Tune Fine instrument tuning.
Coarse Tune Coarse instrument tuning.
MFX 1 Send Scales the Send level to the Master FX1.
MFX 2 Send Scales the Send level to the Master FX2.
0…127 Volume (see above).
-64…0…+63 Offset value for all sound generation parameters. ‘0’
means no change to the original value memorized in
the Drum or Percussive instrument, while any other
value means a decrease or increase to the original
value.
5. While listening to the Style, select the Snare family, then
select the Volume parameter, and use the VALUE DIAL to
turn the volume completely off.
You’ll notice how all snares stops sounding.
6. Touch the Reset Track button in the display to recall the
original Snare’s volume.
Track Controls: Easy Edit
In this page you can edit the main parameters of the Sounds
assigned to each track.
Hint: Use the TRACK SELECT button to cycle between the track
groups. After selecting a track, choose the “Solo Track” command
from the page menu to avoid listening to the other tracks during
editing.
Note: All values are offsets referred to the value of the original
Sound.
Select
Use these buttons to select the track to edit. The button corresponding to the selected track turns green.
Reset Family
Touch this button to reset all changes to the selected family.
Reset Track
Touch this button to reset all changes to percussive instrument
volumes in the selected track.
Play/Mute icon
Track’s play/mute status.
Play status. The track can be heard.
Mute status. The track cannot be heard.
How to edit a single Drum Family
Here is a quick example of the use of the Drum Volume function.
1. While in this page, press TRACK SELECT to see individual
Style tracks.
2. Touch the “Select” button, in the display, corresponding to
the Drum track to edit.
3. Press START/STOP to let the Style go.
4. If you like, choose the “Solo Track” command from the
page menu to solo the Drum track.
Easy Sound Edit parameters
Use these knobs to adjust the offset value.
Sound parameters Meaning
Attack Attack time. This is the time during which the sound
goes from zero (at the moment when you strike a
key) to it’s maximum level.
Decay Decay time. Time to go from the final Attack level to
the beginning of the Sustain.
Release Release time. This is the time during which the
sound goes from the sustaining phase, to zero. The
Release is triggered by releasing a key.
Cutoff Filter cutoff. This sets the sound brightness.
Resonance Use the Filter Resonance to boost the cutoff fre-
quency.
LFO Depth Intensity of the Vibrato (LFO).
LFO Speed Speed of the Vibrato (LFO).
LFO Delay Delay time before the Vibrato (LFO) begins, after the
sound starts.
-64…0…+63 Offset value. ‘0’ means no change to the original value
memorized in the Sound, while any other value
means a decrease or increase to the original value.
Portamento knob and switch
Use the Time knob to adjust the speed of the portamento (a slide
between notes). Check the box to turn portamento on, or
uncheck it to turn portamento off.
Reference
Page 32

28
Style Play operating mode
Keyboard/Ensemble: Key/Velocity Range
Select
Use these buttons to select the track to edit. The button corresponding to the selected track turns green.
Reset Track
Touch this button to reset all changes to Sound parameters in the
selected track.
Reset All Tracks
Touch this button to reset all changes to Sound parameters in all
tracks.
Play/Mute icon
Track’s play/mute status.
Play status. The track can be heard.
Mute status. The track cannot be heard.
How to adjust sound parameters for a single Sound
Keyboard/Ensemble: Key/Velocity Range
This page lets you program a key and dynamic (velocity) range
for each of the Keyboard tracks.
Key range is useful to create a set of Keyboard tracks playing in
different zones of the keyboard. For example, you may have
french horns and woodwinds playing in the center range of the
keyboard, while only woodwinds play on the higher range.
Velocity range is useful to create a sound made of up to three
dynamic layers, assigning each of the Upper tracks to a different
dynamic range.
As an example, you may assign the El.Piano 1 Sound to the
Upper 1, and the El.Piano 2 Sound to the Upper 2 track. Then,
set Upper 1 to [Bottom=0, Top=80], and Upper 2 to [Bottom=81, Top=127]. The El.Piano 1 will play when playing softer,
the El.Piano 2 when playing louder.
Here is a quick example of the use of the Easy Sound Edit function.
1. If needed, while in this page press TRACK SELECT to see
Keyboard tracks.
2. Touch the “Select” button, in the display, corresponding to
the Upper 1 track.
3. While playing on the keyboard to hear the Sound, select
the Cutoff knob, and use VALUE DIAL to turn its value
completely off.
You’ll notice how the filter progressively cuts out high frequencies, making the sound darker and mellower.
4. Touch the Reset Track button in the display to recall the
original Cutoff value.
Top/Bottom Key (Key Range)
This parameter pair sets the Top and Bottom key range for the
track.
C-1…G9 Selected key.
Top/Bottom Vel. (Velocity Range)
This parameter pair sets the Top and Bottom dynamic range for
the track.
0 Lowest velocity value.
127 Highest velocity value.
Play/Mute icon
Track’s play/mute status.
Play status. The track can be heard.
Mute status. The track cannot be heard.
Page 33

Style Play operating mode
Keyboard/Ensemble: Ensemble
Keyboard/Ensemble: Ensemble
This page lets you program the Ensemble function. This function harmonizes the right-hand melody (played in realtime)
using the recognized chords of the left-hand.
Note: The Ensemble function also works in Song Play mode (with
these same settings). Chords are recognized in the Lower Chord
Scan area.
Ensemble
Harmonization type.
Duet Adds a single note to the melody.
Close Adds a closed-position chord to the melody.
Open 1 Adds an open-position chord to the melody.
Open 2 As the above, but with a different algorithm.
Block Block harmonization – very typical of jazz music.
Power Ensemble
Adds a fifth and an octave to the melody, as heard
in hard rock.
Third Up This option adds a third over the melody note
(depending on the recognized chord).
Fourths LO Typical of jazz, this option adds two perfect
fourths under the melody.
Fourths UP As the above, but with notes added over the mel-
ody.
Fifths This adds a series of fifths below the original
note.
Octave Adds one or more octaves to the melody.
Dual This option adds to the melody line a second
note, at a fixed interval set with the “Note”
parameter. When selecting this option, a transposition value appears (-24…+24 semitones to the
original note).
Brass Typical Brass section harmonization.
Reed Typical Reed section harmonization.
29
Trill When two notes are played on the keyboard, this
option trills them. If three or more notes are
played, only the last two are trilled. You can set
the trill speed by using the Tempo parameter (see
below).
Repeat The played note is repeated in sync with the
Tempo parameter (see below). When playing a
chord, only the last note is repeated.
Echo As the Repeat option, but with the repeated notes
fading away after the time set with the Feedback
parameter (see below).
AutoSplit1 If more than a single Upper track is in play, the
Upper 1 track plays the melody in mono, while
the other Upper tracks play the chord notes.
If only the Upper 1 track is in play, it plays polyphonically all the chord notes.
AutoSplit2 Similar to AutoSplit1, but the Upper 1 track
always plays the uppermost note.
Note Velocity
This parameter sets the velocity difference between the righthand melody and the added harmonization notes.
-10…0 Subtracted velocity value.
Te mp o
Note: This parameter only appears when the Trill, Repeat or Echo
options are selected.
Note value for the Trill, Repeat or Echo Ensemble options. This
is in sync with the Metronome Tempo.
Feedback
Note: This parameter only appears when the Echo option is
selected.
This parameter sets how many times the original note/chord is
repeated by the Echo option.
Ensemble Track Assign
Use these parameters to separately set Upper tracks for the
Ensemble function.
Off There is no harmonization on this track.
Normal This track is included in the harmonization.
Mute This track only plays the Ensemble notes, but not
the original note.
Play/Mute icon
Track’s play/mute status.
Play status. The track can be heard.
Mute status. The track cannot be heard.
Reference
Page 34

30
Style Play operating mode
Keyboard/Ensemble: Keyboard Control
Keyboard/Ensemble: Keyboard Control
This page lets you enable/disable the Damper and Expression
pedals, plus the Joystick, for each of the Upper Keyboard tracks.
Damper
On When you press the Damper pedal and release
the keys, the track’s sound is kept sustained.
Off The Damper pedal is not active on any track set
to this status.
Joystick X
This enables/disables the left/right movement of the Joystick
(Pitch Bend, and sometimes a Sound parameter’s control; for
Pitch Bend settings, see “Mixer/Tuning: Tuning” on page 22).
Joystick Y
This enables/disables the front/rear movement of the Joystick
(Y+: Modulation, and sometimes a different Sound parameter’s
control; Y-: Various controls, or non-active).
Expression
This parameter allows you to switch the Expression control on/
off on each individual Keyboard track. The Expression control is
a relative level control, always subtracted from the Volume value
of the track.
As an example, imagine you have a Piano sound assigned to
Upper 1, and a Strings sound assigned to Upper 2. If you turn
the Expression switch on on Upper 2, and off on Upper 1, you
can use a continuous pedal to control only the Strings’ volume,
while the Piano remains unchanged.
To program a pedal or Assignable Slider to act as an Expression
control, see “Controllers: Foot Controllers” on page 146. You can
only assign this function to a volume-type pedal, not to a switchtype one. Assign the “KB Expression” option to the pedal or
Assignable Slider, then select Write Global-Global Setup from
the page menu to save the setting to the Global.
Play/Mute icon
Track’s play/mute status.
Play status. The track can be heard.
Mute status. The track cannot be heard.
Pad/Switch: Pad
This page lets you select a different hit sound or sequence for
each of the four PAD buttons.
Assignments can be saved into the current Style Settings or
SongBook entry. The Pads share the FX A group with the Style
tracks.
Note: You can also choose different Hits or Sequences from the Pad
panel of the main page.
Note: Each Style or SongBook entry can change the Pad assignment.
Pad assignment
Name of the Hit or Sequence assigned to each Pad. Touch the
box to make the Pad Select window appear (see “Pad Select window” on page 8).
Volum e
Volume for each of the four Pad tracks.
0…127 Volume level.
Pan
Pan for each of the four Pad tracks.
-64…-1 Left stereo channel.
0Center.
+1…+63 Right stereo channel.
FX Send (Master 1, 2)
Send level to the Master FX processors for each of the four Pad
tracks.
0…127 Level of the Pad track (direct) signal sent to the
effect processor.
EQ Gain [dB] (Hi, Mid, Low)
Equalization for each of the four Pad tracks.
-18.0…+0.0…18.0
Gain value of the High, Middle, or Low band.
Pad lock icon
This lock avoids selecting a different Style or SongBook entry
changes also the Hit or Sequence Pads assigned to the Pads.
For more information on parameter locks, see “General Controls: Lock” on page 141.
Page 35

31
Style Play operating mode
Pad/Switch: Switch
Pad/Switch: Switch
This page lets you select a different function for each of the
ASSIGNABLE SWITCH buttons.
Assignable Switches can be saved into a Performance, STS or
SongBook entry.
Switch 1, 2
Each of the ASSIGNABLE SWITCH buttons. Use these pop-up
menus to assign a function to each switch. See “List of Assignable Switches functions” on page 241.
Assignable Switch lock icon
This lock avoids selecting a different Performance or STS
changes also the functions assigned to the switches.
For more information on parameter locks, see “General Controls: Lock” on page 141.
Style Controls: Drum/Fill
In this page you can select various general parameters for the
Style.
Drum Mapping (Var.1…Var.4)
The Drum Mapping lets you select an alternative arrangement of
percussive instruments for the selected Drum Kit, without any
additional programming. Just select a Drum Map, and some percussive instruments will be replaced with different instruments.
Off Standard mapping.
Drum Mapping 1…7
Drum Map number. Mapping 1 is “soft-sounding”, while mapping 7 is “loud-sounding”.
Kick and Snare Designation
The Kick Designation replaces the original Kick (Bass Drum)
sound with a different Kick of the same Drum Kit, while the
Snare Designation replaces the original Snare Drum sound with
a different Snare of the same Drum Kit.
Hint: Select different Designations while listening to the Style, and
see how they affect the Style. When you like the result, save your
setting to a Performance or Style Settings.
Off Original Kick or Snare.
Type 1…3 Kick or Snare replacing the original one.
Reference
Track s tatu s
Track play/mute status. Touch these icons to change it.
Play status. The track can be heard.
Mute status. The track cannot be heard.
Page 36

32
Style Play operating mode
Style Controls: Keyboard Range On/Off / Wrap Around
Style Controls: Keyboard Range On/Off /
Wrap Around
In this page you can program the Wrap Around point, and turn
on/off the Keyboard Range included in each Style tracks.
Keyboard Range On/Off
This parameter is an on/off switch for the Key Range parameter
memorized into each Style Element track.
On The Keyboard Range is considered – provided it
has been programmed (see “Style Element Track
Controls: Keyboard Range” on page 60 in Style
Record mode). When a track goes over the lower
or higher Keyboard Range point, it is automatically transposed, to stay in the programmed
range.
Off No Keyboard Range used.
Wrap Around
The wrap-around point is the highest register limit for the backing track. The accompaniment patterns will be transposed
according to the detected chord. If the chord is too high, the
Style tracks might play in a register that is too high, and therefore unnatural. If, however, it reaches the wrap-around point, it
will be automatically transposed an octave lower.
The wrap-around point can be individually set for each track in
semitone steps up to a maximum of 12 semitones, relative to the
chord root set in Style Record mode (see “Key/Chord” on
page 41).
It is advisable to set different Wrap Around points for each track,
to avoid all tracks “jump” to a different octave at the same time.
1…12 Maximum transposition (in semitones) of the
track, referred to the original key of the Style pattern.
Play/Mute icon
Track’s play/mute status.
Play status. The track can be heard.
Mute status. The track cannot be heard.
Page menu
Touch the page menu icon to open the menu. Touch a command
to select it. Touch anywhere in the display to close the menu
without selecting a command.
Write Performance
Select this command to open the Write Performance dialog box,
and save most of the current control panel settings to a Performance.
See “Write Performance dialog box” on page 33 for more information.
Write Single Touch Setting
Select this command to open the Write Single Touch Setting
(STS) dialog box, and save Keyboard track settings to one of the
Single Touch Settings (STS) of the current Style.
See “Write Single Touch Setting dialog box” on page 34 for more
information.
Write Current Style Settings
Select this command to open the Write Current Style Settings
dialog box, and save Style track settings to the current Style.
See “Write Single Touch Setting dialog box” on page 34 for more
information.
Solo Track
Select the track to be soloed, and check this item. You will hear
only the selected track, and the ‘Solo’ warning will flash on the
page header.
Uncheck this item to exit the Solo function.
The Solo function works in a slightly different way, depending
on the selected track:
• Keyboard track: The selected Keyboard track is the only track
you can hear when playing on the keyboard. All other Keyboard
tracks are muted. The status of the Style tracks is unaffected.
• Style track: The selected track is the only Style track you can
hear. All other Style tracks are muted. The status of the Keyboard
tracks is unaffected.
• Grouped Style tracks: The Solo function does not work on these
special tracks.
Keep the SHIFT button pressed and touch one of the
tracks to solo it. Do the same on a soloed track to deactivate the
Solo function.
Page 37

Style Play operating mode
Write Performance dialog box
Copy/Paste FX
You can copy a single effect (Master 1, Master 2), or both effects
of an FX group (A or B). You can copy them between different
elements (for example, between Styles and Performances, or
STSs and Songs or Sounds).
Note: This operation only copies the parameters of the “Effects”
section. Parameters contained in other sections, like “Dry” or “FX
Send”, are not copied. Please note that these parameters are relevant in the overall sound of the effect, so please fine-tune them.
To copy a single effect:
1. Select the source Performance, STS, Style, Song or Sound.
2. Choose the source FX group (A or B) by touching the cor-
responding side tab.
3. Go to the page of the single effect you want to copy (Master
1, Master 2).
4. Choose the “Copy FX” command from the page menu.
5. Select the target Performance, STS, Style, Song or Sound,
6. Choose the same FX group (A or B) as the target by touch-
ing the corresponding side tab.
7. Go to the page of the single effect you want to paste (Master
1, Master 2).
8. Choose the “Paste FX” command from the page menu.
To copy all the effects in an FX group:
1. Select the source Performance, STS, Style, Song or Sound,
then go to the Effects > A/B FX Config page, to copy all the
effects.
2. Choose the source FX group (A or B) by touching the cor-
responding side tab.
3. Choose the “Copy FX” command from the page menu.
4. Select the target Performance, STS, Style, Song or Sound,
then go to the page of the Effects > A/B FX Config page.
5. Choose the FX group (A or B) as the target by touching the
corresponding side tab.
6. Choose the “Paste FX” command from the page menu.
Easy Mode
Easy Mode allows you to use the Style Play and Song Play modes
with an easier-to-use user interface. It is recommended to beginners, and to professionals alike that do not want to deal with the
extra parameters of the Advanced mode.
At any time, you can manually turn the Easy Mode on/off with
the Easy Mode command in the page menu of the Style Play and
Song Play modes.
33
Write Performance dialog box
Open this window by selecting the Write Performance item from
the page menu. Here, you can save all track settings, the selected
Style, and various Style settings to a Performance.
Keep the SHIFT button pressed and press one of the
PERFORMANCE buttons to open this window.
Name
Name of the Performance to be saved. Touch the (Text Edit)
button next to the name to open the Text Edit window.
Perf Bank
Target bank of Performances. Each bank corresponds to one of
the PERFORMANCE buttons. Use the VALUE DIAL to select a
different bank.
Performance
Target Performance location in the selected bank. Use the
VALUE DIAL to select a different location.
Select… button
Touch this button to open the Performance Select window, and
select a target location.
Reference
Page 38

34
Style Play operating mode
Write Single Touch Setting dialog box
Write Single Touch Setting dialog box
Open this window by selecting the Write Single Touch Setting
item from the page menu. Here, you can save Keyboard track
settings, and the selected Voice Processor Preset, to one of the
four single Touch Settings (STS) belonging to the current Style.
Keep the SHIFT button pressed and press one of the STS
buttons to open this window.
Note: When the “Factory Style and Pad Protect” option is checked
in the Global > Mode Preferences > Media page, you cannot write
an STS over a Factory Style. The “Write Single Touch Setting”
command in the page menu is greyed out and cannot be selected.
All original settings of the Factory Styles will be left untouched.
Name
Name of the STS to be saved. Touch the (Text Edit) button
next to the name to open the Text Edit window.
Current Style
Non editable. Settings are saved in one of the four STSs belonging to the current Style. This parameter displays the name of the
“parent” Style.
Write Style Settings dialog box
Open this window by selecting the Write Style Settings item
from the page menu. Here, you can save Style track settings to
the Style Settings of the current Style.
Keep the SHIFT button pressed and press one of the
STYLE SELECT buttons to open this window.
Note: When the “Factory Style and Pad Protect” option is checked
in the Global > Mode Preferences > Media page, you cannot write
any Style Settings onto Factory Styles. The “Write Current Style
Settings” command in the page menu is greyed out and cannot be
selected. All original settings of the Factory Styles will be left
untouched.
Style bank
Non editable. Bank of Styles the current Style belongs to.
Current Style
Non editable. Name of the current Style.
STS
Target STS location. The name of the STS currently saved at the
target location is shown. Use the VALUE DIAL to select a different location.
Page 39

Style Play operating mode
The Favorite banks
The Favorite banks
You can create a custom set of Styles, made of up to ten Favorite
banks. You can assign a different name to the tabs that appear in
the Style Select window, in order to add musical genres not
included among the Factory Styles.
The Favorite Styles are contained in ten files, automatically created by the Pa600 inside the Style folder in the SYS area of the
internal storage memory. Even if different bank names can
appear in the display, these files have fixed names:
35
Renaming the Favorite banks
While the Style Select window is in the display, you can choose
the “Rename Favorite” command from the page menu, and
assign the Favorite Style tabs any name you like.
File Name FAVORITE Banks
FAVORITE01…10.STY Bank 1…10
Hint: New Styles are released from time to time on our web site.
Creating the Favorite banks
There are two ways to create the Favorite banks:
• While in Style Record mode, you can write the new or
edited Style in the Favorite banks, as an alternative to the
User Style banks. See the “Style Record” chapter for more
information on saving a Style.
• While in Media mode, you can load any Style into the
Favorite banks, as an alternative to the User Style banks.
See the “Media” chapter for more information on the Load
operations.
The assigned name can be spanned over two lines, by separating
them with the paragraph character (¶). For example, to write
“World Music” on two lines, enter “World¶Music”.
Be careful not to write words exceeding the width of the side tabs
of the Style Select window.
Reference
Page 40

36
Style/Pad Record mode
Recording Styles and Pads
P op Balla d
Va ri ation 1
CV1
Dr um
P erc
Bass
Acc1
Acc2
Acc3
Acc4
Acc5
CV2
CV3
CV4
CV5
CV6
Va ri ation 2
Va ri ation 3
Va ri ation 4
Intro1
CV1
CV2
Intro 2
Intro 3/C.In
Fill 1
Fill 2
Break
Fill 3
Fill 4
Ending 1
Ending 2
Ending 3
Style/Pad Record mode
By entering the Style/Pad Record mode, you can create your own
Styles or Pads, or edit an existing Style or Pad.
Recording Styles and Pads
Styles and Pads share most of the same structure and recording/
editing operations. Here is how they are made.
The Style’s structure
The term “Style” relates with music sequences automatically
played by the arranger of the Pa600. A Style consists of a predefined number of Style Elements (E) (Pa600 features fifteen
different Style Elements: Variation 1-4, Intro 1-3, Fill 1-4, Break,
Ending 1-3). When playing, most of these Style Elements can be
directly selected by using the corresponding buttons on the control panel.
To explain the Style structure, we can use a tree structure, as
shown in the following diagram:
Each Style Element is made up of smaller units, called Chord
Vari a t io ns (C V), but not all of them have the same number of
CVs. Variations 1-4 have up to 6 CVs each, while the other Style
Elements have only up to 2 CVs.
When you play in the chord recognition area (Lower, Upper
or
Full, depending on the On or Off status of the SPLIT button), the
arranger scans the keyboard and determines which chord you
are playing. Then, depending on the selected Style Element, it
determines which Chord Variation (CV) should be played for
the scanned chord. Which Chord Variation corresponds to each
scanned chord is a setting of the Style: the Chord Variation
Ta bl e . Each Style Element contains a Chord Variation Table,
whose prototype is the following:
Chord Chord Variations (CVs)
Intro 1-2, Count-In, Fill 1-4, Break,
Ending 1-3
Major
6
M7
(b5)
M7
sus
sus2
M7sus
m
m6
m7
(b5)
m7
(M7)
m(
7
(b5)
7
7sus4
dim
(M7)
dim
#5
(#5)
7
(#5)
M7
1+5
1+8
b5
dim7
Variation 1-4
CV1 – CV6 CV1 – CV2
After deciding what CV to play, the arranger triggers the right
sequence for each track. Since each sequence is written in a particular key (for example, CMajor, GMajor or Emin), the arranger
transposes it according to the scanned chord. Notes in the
sequence are carefully transposed, to make them work fine with
all recognized chords.
Going deeper into the Style structure, we can see that each
Chord Variation is made up of Tra c k Se quen c e s, and the Pa600
supports 8 different tracks. DRUM and PERC are used for drum
and percussion sequences, BASS for bass and ACC1-5 are for
Page 41

37
Style/Pad Record mode
Recording Styles and Pads
Pad
CV1
Pad Track
CV2
CV3
CV4
CV5
CV6
accompaniment sequences (string, guitar, piano or other accompaniment instruments).
Just to summarize, when you play a chord on the chord recognition area, the arranger determines which Style Element is used,
then determines which Chord Variation should be used for the
played chord, then Style sequences for every track of that Chord
Variation are transposed from the original chord to the recognized chord, and so on every time you play a chord.
The Pad’s structure
A Pad is basically a single-track Style. Most of what applies to
Style recording also applies to Pad recording.
There are two different categories of Pads:
•“Hit” Pads. While they are
mostly used as non-transposing events, they can also be
transposing notes or chords.
Basically, they are single-note
or single-chord Sequences
(see below).
• “Sequence” Pads, i.e., complex
single-track patterns, that can
be transposed by playing different chords on the keyboard
– exactly as a Style track. They
are roughly equivalent to single-element, single-track,
multi-chord variation Styles
(see illustration).
Each Pad is made up of up to six smaller units, called Chord
Var i at ions ( CV ) . Each Chord Variation is made of a single track
(the Pad track).
Exactly as with the Styles, when playing a chord in the chord recognition area, the corresponding Chord Variation is recalled.
Recognized chords are associated to a Chord Variation by means
of the Chord Variation Table. Each Pad contains a Chord Varia-
tion Table.
As with the Styles, the Note Transposition Tables (NTT) applies
to the Pads.
The same differences between the different types of tracks
applies (see “Track Type” on page 61).
Ordinary, Guitar and Drum tracks
There are different types of tracks (see “Track Type” on page 62),
and each of them is treated in a different way by the arranger;
• Acc (Accompaniment) and Bass tracks: When a chord is
recognized, the programmed chord notes are transposed to
a suitable scale, according to the Note Transposition
Tables (NTT) The NTT allows you to record just some
Chord Variations, and have all the notes play in the right
place, avoiding dissonances and transposing the pattern
notes to the notes of the recognized chord.
• Drum & and Perc (Percussion) tracks: No transposition is
applied.The original pattern plays always.
• Gtr (Guitar) tracks: When a chord is recognized, the
arranger triggers single notes, strumming and arpeggios on
a “virtual guitar”, keeping care of the way notes are played
on the guitar keyboard. Note that inside a Guitar track you
can also have some parts typical of an Acc track - a useful
addition for short “free-form” passages.
What to record in a Style
Recording a Style means recording tracks, inside a series of
Chord Variations, inside a series of Style Elements, inside the
Style itself.
You don’t have to record all Chord Variations for all Style Elements. It is often only needed to record a single Chord Variation
for each Style Element. Exceptions are the Intro 1 and Ending 1,
where we suggest to record both a Major and minor Chord Variations.
What to record in a Pad
Recording a Pad is a matter of recording a single track, inside a
series of Chord Variations, inside the Pad itself.
You don’t need to record all Chord Variations. It is often only
needed to record just a Chord Variation.
Pattern data vs. track data
While the Style/Pad Record mode is where you can create or edit
the music patterns, track parameters (like Volume, Pan, Octave
Transpose, FX settings…) are to be edited in Style Play mode.
• After having created or edited music patterns in Style/Pad
Record mode, save them by selecting the “Write Style” or
“Write Pad” command from the page menu of the Style
Record mode (see “Write Style/Pad dialog box” on
page 67).
• After having edited track parameters in Style Play mode,
save them to the Style Settings by selecting the “Write Current Style Settings” command from the page menu of the
Style Play mode (see “Write Style Settings dialog box” on
page 34).
Reference
Sounds
There are two ways of assigning Sounds to the Style tracks.
• While in Style Record mode you can assign different
Sounds to each Style Element in the “Style Element Track
Controls: Sound/Expression” page (see “Sounds area” on
page 43). You can assign a Sound to the Pad in the same
page of the Pad Record mode.
• While in Style Play mode, you can assign a single Sound to
the Style Settings (together with the other track parameters), that remains the same for all Style Elements.
Which Sounds are used by the Style tracks depends on the status
of the “Original Style Sounds” parameter (see page 16).
Note: When assigning a Sound in Style Play mode, the “Original
Style Sounds” parameter is automatically turned off.
Page 42

38
Style/Pad Record mode
Style/Pad Import/Export
Style/Pad Import/Export
As an alternative to creating Styles on the Pa600, you can import
a Standard MIDI Files (SMF) from your computer to a Pa600’s
Style. See “Import: Import SMF” on page 63 and “Export SMF”
on page 65.
Note: After a record or edit operation, the memory is automatically reorganized. Therefore, when you press START/STOP there is
a delay before you can actually listen to the Style. This delay is
higher with a Style containing more MIDI events.
Note: While in Record mode, the footswitch is disabled. On the
contrary, volume/expression-type pedals can be used.
Exit by saving or deleting changes
Entering the Style/Pad Record mode
While in the Style Play operating mode, press the RECORD button. The following page will appear in the display:
You can edit Factory Styles of Pads, assuming the status of the
“Factory Style and Pad Protect” parameter in the Global > Mode
Preferences > Media page is set to Off (see page 145)
•Select Record/Edit Current Style to edit the current Style.
•Select Record New Style to start from a new, empty Style.
Default Style Settings will be recalled. When finished
recording, you will save the new Style onto a Favorite or
User Style location. (Styles may also be saved onto Factory
Style locations only when the “Factory Style and Pad Protect” parameter is set to Off ).
•Select Record/Edit Pad to select an existing Pad to edit.
•Select Record New Pad to start from a new, empty Pad.
When finished recording, you will save the new Pad into a
User Pad location. (Pads can be saved into Factory Pad
locations only when the “Factory Style and Pad Protect”
parameter is set to Off).
After having edited the Style or Pad, please save it (see “Exit by
saving or deleting changes” below) and exit the Style/Pad Record
mode.
Then, edit the Style or Pad track settings.
• With a Style: Go to the Style Play mode, edit the Style Settings
to adjust track settings (Tempo, Volume, Pan, FX Send… see
page 19 and following in the “Style Play operating mode” chapter) and save it by selecting the “Write Current Style Settings”
from the page menu (see “Write Style Settings dialog box” on
page 34).
• With a Pad: Go to the Pad page of the Style Play or Song Play
mode, assign the new Hit or Sequence to a Pad button, and
adjust the various Pad settings (Volume, Pan, and FX Send… see
“Pad/Switch: Pad” on page 30). Finally, save the Pad settings by
selecting the “Write Current Style Settings” command from the
page menu.
When finished editing, you can save your Style or Pad in memory, or abort any change.
• To save changes, select the “Write Style/Pad” command from
the page menu (see “Write Style/Pad dialog box” on page 67).
• To abort all changes, select the “Exit from Record” command
from the page menu, or press the RECORD button, to exit from
record and return to the main page of the Style Play mode.
Hint: Save often while recording, to avoid accidentally losing your
changes to the Style/Pad.
Listening to the Style while in Edit mode
While you are in Style/Pad Record mode, you can listen to the
selected Chord Variation or to the whole Style or Pad, depending
on the page you are in.
To select a Chord Variation, go to the Main page of the Record/
Edit mode. For more details, see “Element (Style Element)” and
“Chord Var (Chord Variation)” on page 40.
• When you are in the Main, Event Edit, Quantize, Transpose,
Velocity, or Delete pages, you can listen to the selected Chord
Variation. Press START/STOP to check how it works. Press
START/STOP again to stop the playback.
• When you are in the Sounds/Expression, Keyboard Range,
Chord Table, Trigger/Tension, Delete All, Copy, Style/Pad
Element Controls or Style/Pad Control pages, you can listen to the whole Style or Pad. Press START/STOP and play
some chords to do your tests. Select any Style/Pad Element
using the control panel buttons (VARIATION 1-4, INTRO
1-3, AUTO FILL, BREAK, ENDING 1-3). Press START/
STOP again to stop the playback.
• When you are in the Guitar Mode page, you can listen to the
pattern you are programming, played in the selected Key.
Note: When entering Style Record mode, the Chord Recognition
mode changes according to the mode that was selected while in
Style Play mode. For a chord to be recognized, a minimum of three
notes must be played.
Chord Recognition Mode
Style Play mode Style Record mode Notes (min.)
One Finger Fingered 3
Fingered Fingered 3
Expert Expert 3
Note: In this mode, the pattern is always played back in loop, even
if the “Pad Type” parameter is set to “One Shot” (see page 61).
Page 43

39
Style/Pad Record mode
List of recorded events
Page h eader Page menu icon
Selected track
info area
Key/Chord area
Track volume/status area
Recording
parameters area
Page s ub-header
NTT area
Page h eader Page menu icon
Selected track
info area
Track volume/status area
Key/Chord area
Recording
parameters area
Page s ub-header
NTT area
Operating mode Master Transpose (in
semitones)
List of recorded events
The Style/Pad Record mode filters out some events that may
cause wrong operation of the Style or Pad. Here are the recorded
events, and the most important filtered-out events.
Control function CC#
Allowed
Note On
RX Noise On
Pitch Bend
Channel After Touch
Modulation 1
Breath 2
Pan 10
Expression 11
CC#12 12
CC#13 13
Damper (Hold 1) 64
Filter Resonance (Harmonic Content) 71
Low Pass Filter Cutoff (Brightness) 74
CC#80 (General Purpose #5) 80
CC#81 (General Purpose #6) 81
CC#82 (General Purpose #7) 82
Main page - Record 1
After having pressed the RECORD button, and having chosen
whether you want to edit an existing Style or create a new one,
the main page of the Style Record mode appears, with the tab
“Record 1” selected.
Style Record
Note: Some Control Change messages cannot be recorded directly
by using the integrated controls of Pa600.
All allowed controllers can be assigned to an Assignable Pedal/
Slider/Switch.
MIDI Control Change messaged inserted by using a software on
an external computer are imported when using the Import function (“Import: Import SMF” on page 63).
Some controllers are reset at the end of the pattern.
Reference
Pad Record
Page header
This line shows the current operating mode and transposition.
Operating mode name
Name of the current operating mode.
Master Transpose
Master Transpose value in semitones. This value can be changed
using the TRANSPOSE buttons on the control panel.
Page 44

40
Style/Pad Record mode
Main page - Record 1
Style/Pad in record/edit Beat counter Measure number
No quantiza-
tion
1/16
1/8
The beat counter
Page menu icon
Touch this icon to open the page menu. See “Page menu” on
page 66.
Page sub-header
This area shows some performing info on the Style/Pad.
Style in record/edit
Name of the Style currently in edit or record.
Beat counter
This indicator shows the current beat.
Measure number
Current measure you are recording.
Recording parameters area
Element (Style Element)
(Style only) This parameter lets you select a Style Element for
editing. Each Style Element corresponds to a button on the control panel carrying the same name. After selecting a Style Element, select a Chord Variation for actual editing (see below).
Var1…End3 This is the selected Style Element
Grid resolution, in musical values. For example,
when you select 1/16, all notes are moved to the
nearest 1/16 division. When you select 1/8, all
notes are moved to the nearest 1/8 division. A ‘3’
after the quantization value means triplet.
Pad Sync
(Pad only) This parameter allows you to set a synchronization
mode for the Pad’s pattern.
Off No synchronization. The sequence will start as
soon as you press the PAD button.
Continued The pattern will start immediately, in sync with
the arranger’s or active player’s tempo. Depending on the current position of the beat counter, it
might not start from its very beginning; instead,
it will continue from the current position.
For example, if the arranger’s or player’s beat
counter shows the third beat, and is playing tick
91, the Pad will start from its third beat, at tick 91.
Chord Var (Chord Variation)
This parameter lets you select a Chord Variation for editing
(inside the selected Style Element or Pad).
Note: When this parameter and the assigned value is in small letters (cv1…cv6), the Chord Variation is empty; when it is in capitals (CV1…CV6), it is already recorded.
• If the Style Element is Var1, Var2, Var 3 or Var4, you can select
one of 6 Chord Variations to edit.
• If the Style Element is Intro1, Intro2, Intro3, Fill1, Fill2, Fill3,
Fill4, Ending1, Ending2 or Ending3, you can select one of 2
Chord Variations to edit.
• With a Pad you can choose one of the six available Chord Variations (CV1 … CV6).
Note: When this parameter and the assigned value is in small letters (cv1…cv6), the Chord Variation is empty; when it is in capitals (CV1…CV6), it is already recorded.
Resolution
Use this parameter to set the quantization during recording.
Quantization is a way of correcting timing errors; notes played
too soon or too later are moved to the nearest axis of a rhythmic
“grid”, set with this parameter, thus playing perfectly in time.
Note: To quantize after recording, use the Quantize function in the
Edit section (see “Style/Pad Edit: Quantize” on page 54).
High No quantization applied.
(1/32)… (1/8)
This works exactly as if it was a Fill.
Beat The sequence will start at the next beat, in sync
with the arranger’s or player’s tempo. It will start
from its very beginning (i.e., tick 1 or measure 1).
Rec Length (Recording Length)
This parameter sets the recording length (in measures) of the
selected track. Its value is always equal to, or a divider of, the
Chord Variation Length (see next parameter).
This is not the total length of the Chord Variation, but just of the
current track. For example, you may have a Chord Variation
eight measures long, with a drum pattern repeating each two
measures. If so, set the CV Length parameter to “8”, and the Rec
Length parameter to “2” before starting recording the Drum
track. When playing back the Style, saving it or executing any
edit operation on the Style, the 2-measures pattern will be
extended to the full 8-measures length of the Chord Variation.
Wa r ni n g : If you assign a value lower than Rec Length to CV
Length, the value of Rec Length is not immediately updated in the
display. Therefore, you are still free of changing the value of CV
Length, before the measures exceeding its value are deleted. For
more details, see the warning in “CV Length (Chord Variation
Length)” below.
Page 45

41
Style/Pad Record mode
Main page - Record 1
Track name
Sound name
Sound bank
Program Change sequence
However, if you press START/STOP to begin recording, the real
Rec Length value is changed to the new one, even if the display still
shows the old value.
For example, you may have CV Length = 4 and Rec Length = 4. If
you set CV Length to 2, and press START/STOP to begin recording, Rec Length is still shown as 4, but it is in reality set to 2, and
recording will cycle for just 2 measures. After you press START/
STOP to stop recording, Rec Length is updated to 2, and all measures after the second measure are deleted.
CV Length (Chord Variation Length)
This parameter sets the total length (up to 32 measures) for the
selected Chord Variation. When playing a Style, this will be the
length of the accompaniment pattern, when the chord corresponding to the Chord Variation is recognized on the keyboard.
Wa r n in g : If you reduce the Chord Variation Length after recording, any measure after the selected length will be deleted. Be very
careful when setting the CV Length to a lower value after recording! If it happens, we suggest to exit from record without saving
(see “Exit from Record” on page 67).
Te mp o
Select this parameter to use the TEMPO controls to set the
Temp o v al u e.
Hint: You can always change the Tempo, when other parameters
are selected, by keeping the SHIFT button pressed, and rotating the
DIAL.
Note: When recording Tempo, old data is always replaced by the
new data.
Note: The actual Tempo of the Style will be the one shown when
saving the Style Settings in Style Play mode (see “Current Tempo”
on page 13).
Meter
This is the meter (time signature) of the Style Element or the Pad
Sequence. You can edit this parameter only when the Style Element or Pad is empty, i.e. before you begin recording anything.
Track n ame
Name of the selected track.
Drum…Acc5 Style track.
Sound name
Sound assigned to the selected track. You can touch the name to
open the Sound Select window, and select a different Sound.
Sound bank
Bank the selected Sound belongs to.
Program Change
Program Change number sequence (Bank Select MSB, Bank
Select LSB, Program Change).
Key/Chord area
Key/Chord
This parameter pair allows you to define the track’s original key
and chord type, for the current Chord Variation. When playing
the pattern back, this chord will be played back exactly as it was
recorded, without any NTT processing (see above).
Note: To conform to Korg specifications, it is advisable to record
both the “Major” and “minor” Chord Variations for the Intro 1 and
Ending 1 Style Elements.
When you select a track, the original key/chord assigned to the
selected track will be shown. All recorded tracks will play back
on that key/chord. For example, if the original key/chord for the
Acc1 track is A7th, when selecting the Acc1 track all the remaining tracks will play on the A7th key/chord.
In the example above, you will record the Acc1 track in the
AMajor key, with notes pertaining to the A7th scale. This exact
pattern will be recalled, when an A7th chord will be recognized.
Note: This does not apply to Guitar Mode, relying on a different
rule. See “Main page - Guitar Mode” on page 44 for more information.
Selected track info area
This line lets you see the Sound assigned to the selected track.
Reference
Page 46

42
Style/Pad Record mode
Main page - Record 1
as written as played back
as written as played back
As recorded with
NTT = Root or 5t h
(Key/Chord = C)
When you play a C7
with NTT = Root
When you play a C7
with NTT = 5th
As recorded with
NTT = i-Series
(Key/Chord = CM7 )
When you play a C
with NTT = i-Series
When you play a C7
with NTT = i-Series
NTT Area
NTT Type/Table
NTTs (Note Transposition Tables) are the sophisticated algorithms that allow Korg arrangers to convert recognized chords
into musical patterns. The Note Transposition Table (NTT)
determines how the arranger will transpose pattern notes, when
a chord is recognized that does not exactly match the original
chord of a Chord Variation. For example, if you only recorded a
Chord Variation for the CMaj chord, when a CMaj7 is recognized on the keyboard the arranger must transpose some notes
to create the missing 7th.
Note: These parameters cannot be selected with Drum or Percussion tracks, and are therefore greyed out.
Note: NTT parameters are separately programmed for each track
of the Style Element.
There are two general types of NTTs:
•When Parallel types are selected, notes are transposed inside
the area set by the Wrap Around parameter. These tables are ideally suited to melody parts.
•When Fixed types are selected, the arranger moves as few notes
as possible, making legato lines and chord changes more natural.
They are ideally suited to chord tracks (strings, piano etc…).
Note: To conform to Korg specifications, it is advisable to set the
NTT to “No Transpose” on the Intro 1 and Ending 1.
Parallel/Root The root note (in CMaj = C) is transposed to the
missing notes.
Parallel/Fifth The 5th note (in CMaj = G) is transposed to the
missing notes.
Parallel/i-Series
All original patterns must be programmed on the
“Maj7” or “min7” chords. When loading old Korg
i-Series Styles, this option is automatically
selected.
Parallel/No Transpose
The chord is not modified, and is moved to the
new key unchanged. The pattern plays exactly the
recorded notes, and is moved to the new key as is.
This is the standard setting of Intro 1 and Ending
1 in Korg’s original Styles (where a chord progression is usually recorded, and should remain
unchanged in any key).
Fixed/Chord This table moves as few notes as possible, making
legato lines and chord changes more natural. It is
ideally suited to chord tracks (strings, piano
etc…). Contrary to the Parallel mode, the programmed chord is not transposed according to
the Wrap Around parameter, but always stays
around its original position, looking for common
notes between the chords.
Fixed/No Transpose
The programmed notes can only be transposed
by the Master Transpose. They are never transposed when chords are changed.
Page 47

Style/Pad Record mode
Main page - Record 2/Cue
Delete Note button
Sounds area
Cue area
Octave transpose icon
Sound bank’s icon
Use this command to delete a single note or a single percussive
instrument from a track. For example, to delete a snare, keep the
D2 note (corresponding to the snare) pressed.
1. Select a track.
2. Touch the “Delete Note” button, and keep it pressed.
3. Press START/STOP to start the Style.
4. When you reach the passage containing the note to be
deleted, play the note on the keyboard. Keep it pressed, up
to the last note to be deleted.
5. When finished, release the Delete button and the note to be
deleted, and press START/STOP again to stop the Style.
Note: If the note is at the beginning of the pattern, press the
note before starting the Style.
Tracks volume/status area
Virtual slider(s)
Drag a virtual sliders on the display to change the volume of the
corresponding track.
As an alternative, touch a track to select it, and use VALUE DIAL
to change the value.
43
Main page - Record 2/Cue
(Style only) While in the main page, touch the “Record 2/Cue”
tab to see this page. Most parameters in this page are the same as
in “Main page - Record 1”. In addition, here you can see and
select Sounds for each Style track, and the Cue mode for the
Style Element.
Sounds area
This area lets you see Sounds and octave transposition for the
eight Style tracks.
Track s tatu s icons
Status of tracks. Touch this icon to change the status.
Play status. The track can be heard.
Mute status. The track cannot be heard.
Record status. After starting recording, the track
will receive notes from the keyboard and the
MIDI IN connector.
Track names
(Style only) Under the sliders, a label for each track is shown.
Drum…Acc5 Shown Style tracks.
Octave transpose icon
Non editable. This indicator shows the track’s octave transposition. Tracks will be recorded with the selected octave transposition. To change this value, use the UPPER OCTAVE buttons, or
go to the “Mixer/Tuning: Tuning” edit page in the Style Play
mode (see page 22). Save this value to the Style Settings.
Sound bank’s icon
This picture illustrates the bank the current Sound belongs to.
Touch an icon a first time to select the corresponding track
(detailed information are shown on the Selected Track Info area,
see the “Main page - Record 1” page above). Touch it a second
time to open the Sound Select window.
Note: These Sounds can be replaced by Sounds selected by a Performance, provided the “Original Style Sounds” parameter is left
unchecked in Style Play mode (see page 16).
Reference
Page 48

44
Style/Pad Record mode
Main page - Guitar Mode
Cue area
Cue mode for [Style element]
This parameter lets you decide how the current Style Element
will enter after it has been selected. This setting is only available
for the ‘Variation’ and ‘Fill’ Style Elements.
Immediate, first measure
The Style Element enters immediately, and begins
from the first measure. Only available on Fills.
Immediate, current measure
The Style Element enters immediately, and begins
from the current measure. Only available on Fills.
Next measure, first measure
The Style Element enters at the beginning of the
next measure, and begins from the first measure
of the new pattern. Available on both Fills and
Va ri at i on s .
Next measure, current measure
The Style Element enters at the beginning of the
next measure, and begins from the current measure. Only available on Variations.
Main page - Guitar Mode
While in the main page, and a Guitar track has been selected,
touch the “Guitar Mode” tab to see this page. This is where you
can access Guitar Mode programming:
Note: To access this page, a Guitar track must first be selected (see
“Track Type” on page 62). The Pad track must be of Guitar type
(Pad Track Controls > Sound/Expression page, see “Track Type”
on page 61). Otherwise, the Guitar Mode tab will remain grey (not
selectable).
Note: When programming a Guitar track from an external
sequencer, you must be sure the Guitar tracks is associated to the
right channel. Go to the Global > MIDI > MIDI IN Channels page,
and assign the corresponding Style track (usually Acc1 ~ Acc5) to
the same channel of the Guitar track on the external sequencer.
Then, go to the Style Record > Style Track Controls > Type/Tension/Trigger page, and set the track as a track of type “Gtr” (see
“Track Type” on page 62).
Guitar Mode allows for easy creation of realistic rhythm guitar
parts, without the artificial, unmusical playing typical of MIDI
programming of guitar parts. Just record a few measures, and
you will end up with realistic rhythm guitar tracks, where each
chord is played according to its real position on the guitar, and
not generated by simply transposing a written pattern.
Recording overview
Recording a Guitar track is unlike recording the other tracks,
where you play exactly all the notes of a melody line or all the
chords of an accompaniment part. With Guitar tracks you can:
a) play the keys corresponding to the strumming modes,
b) play an arpeggio using the six keys corresponding to the six
guitar strings (and the special keys corresponding to the root
and fifth notes),
c) play RX Noises to add realism to the pattern,
d) add regular patterns, for short melodic passages without wast-
ing an Acc track,
e) use the finest MIDI programing to select Chord Shapes, and
recreate any nuance of a guitar performance.
The following sections describe the various control keys available for this guitar simulation.
Page 49

45
Style/Pad Record mode
Main page - Guitar Mode
61-keys
76-keys
Full Up
Full D own Mute
Full Up Mute
Full Down
Full Down Mute Body
Full D own Slow Mute
Full Up Slow
Full D own
Slow
Up 4-Strings
Down 4-Strings
Down Mute 4-Strings
Up Mute 4-Strings
IV String (D)
V String (A) II String (B)
Down/Up
4-Strings
Full Down/Up
All Mute
VI String (E)
III String (G)
I String (e)
Recognized
Chord Root
Recognized Chord
Fifth
Power Ch ord
61-keys
76-keys
RX Noises
Recording strumming types
The octave from C1 to B1 is devoted to selecting a strumming
type. By pressing these keys, you play fast strumming samples:
key; with them, you can always play the lowest notes of an arpeggio. This octave also includes an ‘all mute’ key (F#):
76-keys
61-keys
Recording single strings
The octave from C2 to B2 is devoted to selecting a single string
(or more than one) for playing arpeggios or power chords. You
can either play a free arpeggio with the six guitar chords
assigned to the C~A keys, or play one of the faster sampled
arpeggios on the higher keys. The root note is always available
on the C# key, while the fifth note is always assigned to the D#
Recording RX Noises
Further on, the upper octaves are used to trigger RX Noises:
Reference
Selecting a Capo
Together with strumming types, single strings and RX Noises,
you can choose a Capo (“capotasto”). Note that this might prevent some single strings to sound, depending on the composed
chord. You can always see which strings are playing and which
are not, as described in the “Diagram” section below.
Recording a regular pattern
Together with strums and arpeggios, you can record regular patterns, exactly as if the track was of Acc type (see “Track Type” on
page 62). This will save an Accompaniment track, when all you
need is just to record some short melodic passages (for example,
the closing of a strumming pattern).
Page 50

46
Style/Pad Record mode
Main page - Guitar Mode
61-keys
76-keys
You can record the pattern by playing it in the range shown by
the diagram.
Recording a Chord Shape
You can finely choose Chord Shapes by using MIDI messages.
When you play a C0 note with the velocity value shown in the
following table, a chord is played in a particular position and on
a certain number of strings.
Vel. Range from Str. to Str. Position
06 Strings I VI 0
16 Strings I VI 0
26 Strings I VI 1
36 Strings I VI 2
46 Strings I VI 3
56 Strings I VI 4
66 Strings I VI 5
7 5 Strings Bass II VI 0
8 5 Strings Bass II VI 1
9 5 Strings Bass II VI 2
10 5 Strings Bass II VI 3
11 5 Strings Bass II VI 4
12 5 Strings Bass II VI 5
13 5 Strings Treble I V 0
14 5 Strings Treble I V 1
15 5 Strings Treble I V 2
16 5 Strings Treble I V 3
17 5 Strings Treble I V 4
18 5 Strings Treble I V 5
19 4 Strings Bass III VI 0
20 4 Strings Bass III VI 1
21 4 Strings Bass III VI 2
22 4 Strings Bass III VI 3
23 4 Strings Bass III VI 4
24 4 Strings Bass III VI 5
25 4 Strings Middle II V 0
26 4 Strings Middle II V 1
27 4 Strings Middle II V 2
28 4 Strings Middle II V 3
29 4 Strings Middle II V 4
30 4 Strings Middle II V 5
31 4 Strings Treble I IV 0
32 4 Strings Treble I IV 1
33 4 Strings Treble I IV 2
Vel. Range from Str. to Str. Position
34 4 Strings Treble I IV 3
35 4 Strings Treble I IV 4
36 4 Strings Treble I IV 5
37 3 Strings Bass IV VI 0
38 3 Strings Bass IV VI 1
39 3 Strings Bass IV VI 2
40 3 Strings Bass IV VI 3
41 3 Strings Bass IV VI 4
42 3 Strings Bass IV VI 5
43 3 Strings MiddleBas III V 0
44 3 Strings MiddleBas III V 1
45 3 Strings MiddleBas III V 2
46 3 Strings MiddleBas III V 3
47 3 Strings MiddleBas III V 4
48 3 Strings MiddleBas III V 5
49 3 Strings MiddleTreble II IV 0
50 3 Strings MiddleTreble II IV 1
51 3 Strings MiddleTreble II IV 2
52 3 Strings MiddleTreble II IV 3
53 3 Strings MiddleTreble II IV 4
54 3 Strings MiddleTreble II IV 5
55 3 Strings Treble I III 0
56 3 Strings Treble I III 1
57 3 Strings Treble I III 2
58 3 Strings Treble I III 3
59 3 Strings Treble I III 4
60 3 Strings Treble I III 5
61 2 Strings Bass V VI 0
62 2 Strings Bass V VI 1
63 2 Strings Bass V VI 2
64 2 Strings Bass V VI 3
65 2 Strings Bass V VI 4
66 2 Strings Bass V VI 5
67 2 Strings MiddleBas IV V 0
68 2 Strings MiddleBas IV V 1
69 2 Strings MiddleBas IV V 2
70 2 Strings MiddleBas IV V 3
71 2 Strings MiddleBas IV V 4
72 2 Strings MiddleBas IV V 5
73 2 Strings Middle III IV 0
74 2 Strings Middle III IV 1
75 2 Strings Middle III IV 2
76 2 Strings Middle III IV 3
77 2 Strings Middle III IV 4
78 2 Strings Middle III IV 5
79 2 Strings MiddleTreble II III 0
80 2 Strings MiddleTreble II III 1
81 2 Strings MiddleTreble II III 2
82 2 Strings MiddleTreble II III 3
83 2 Strings MiddleTreble II III 4
84 2 Strings MiddleTreble II III 5
85 2 Strings Treble I II 0
86 2 Strings Treble I II 1
Page 51

47
Style/Pad Record mode
Main page - Guitar Mode
Vel. Range from Str. to Str. Position
87 2 Strings Treble I II 2
88 2 Strings Treble I II 3
89 2 Strings Treble I II 4
90 2 Strings Treble I II 5
Choosing a Key/Chord for Intro 1 and Ending 1
The pattern is recorded in the key indicated by the Key/Chord
pair of parameters. However, this parameter is only used for
playback by the Intro 1 and Ending 1 Style Elements. All other
Style Elements will be played back according to the recognized
chord.
With Intro 1 and Ending 1 (both Chord Variation 1 and 2) you
can also prefer to enter a chord progression, to be played on the
lowest MIDI octave (C-1 ~ B-1). Chord types are inserted by
using velocity values, as shown in the following table:
Vel. Chord Type Vel. Chord Type
1 Major 2 Major 6th
3 Major 7th 4 Major 7th flatted 5th
5 Suspended 4th 6 Suspended 2nd
7 Major 7th suspended 4th 8 Minor
9 Minor 6th 10 Minor 7th
11 Minor 7th flatted 5th 12 Minor major 7th
13 Dominant 7th 14 7th flatted 5th
15 7th suspended 4th 16 Dimished
17 Diminished major 7th 18 Augmented
19 Augmented 7th 20 Augmented major 7th
21 Major w/o 3rd 22 Major w/o 3rd and 5th
23 Flatted 5th 24 Diminished 7th
Playing back the pattern
Guitar mode parameters
Here is a detailed description of the parameters of the Guitar
Mode page.
Key/Chord
This parameter pair allows you to define the track’s original key
and chord type. This parameter works in a different way than the
other tracks. While with other tracks this is always the reference
key used for NTT transposition, with Guitar tracks there is a difference, whether you are recording a Chord Variation contained
in an Intro 1 or Ending 1 Style Element, or any other Chord
Va r ia t i on :
• With Intro 1 and Ending 1, this chord will be used as the
reference key for the chord progression.
• With all the other Chord Variations, this chord will be used
only for listening during recording. During playback in
Style Play mode, the chord will follow chord recognition.
Capo - Fret
A capo (from the Italian “capotasto”, “head of fingerboard”) is a
movable bar attached to the fingerboard of the guitar, to uniformly raise the pitch of all the strings. Its use makes the strings
shorter, therefore changing the timbre and position of the chords
(but not its shape).
0 Open string – no capo.
I…X Position of the capo over the fingerboard (i.e., “I”
corresponds to the first fret, “II” to the second
one, and so on).
Strings - High/Low
Use this pair of parameters to choose the strings the pattern will
be played on.
1…6 Position of the capo over the fingerboard (i.e., “I”
corresponds to the first fret, “II” to the second
one).
When in Stye Play mode, the recorded Guitar pattern is transposed according to the chord recognized on the keyboard. The
way it is transposed depends on the programmed pattern, with
the chosen positions, strumming mods, etc…
Diagram
The diagram shows how a chord would be composed on the fingerboard. Here is the meaning of the various symbols:
Red dot Fingered string (i.e., played note).
White dot Fifth, playing on the D#2 key.
X Non played or muted note.
Light grey bar Barré (a finger crossing all the strings, like a
mobile capo).
Dark grey bar Capo.
Reference
Page 52

48
Style/Pad Record mode
Style/Pad Record procedure
Style/Pad Record procedure
There are two different methods for recording a Style/Pad: Realtime and Step.
• Realtime Recording allows you to record Style/Pad patterns
in realtime.
• Step Recording allows you to create a new Style/Pad by
entering single notes or chords in each track. This is very
useful when transcribing an existing score, or needing a
higher grade of detail, and is particularly suitable to create
drum and percussion tracks.
In addition, you can program a Style/Pad on a personal computer, and then import it via the Import function (see “Import:
Import SMF” on page 63).
Preparing to record
1. If you like to edit an existing Style/Pad, select it.
2. Press the RECORD button to enter the Style/Pad Record
mode. You are prompted to either select the Current Style
or an existing Pad, or create a New Style or Pad.
Select “Record/Edit Current Style” or “Record/Edit Current
Pad” if you want to edit the current Style/Pad, or make a
new Style/Pad starting from an existing one. Select “Record
New Style/Pad” if you want to start from scratch with an
empty Style/Pad.
3. After you select your preferred option, the main page of the
Style/Pad Record mode will appear.
4. Use the Element (Style Element) (Style only) and Chord Var
(Chord Variation) parameters, to select the Chord Variation to be recorded/edited.
Note: For more information on the Style Elements and Chord
Variations, and the Style/Pad structure in general, see “The
Style’s structure” on page 36 or “The Pad’s structure” on
page 37.
5. Use the Rec Length (Recording Length) parameter to set
the length (in measures) of the pattern to record.
6. Use the Meter parameter to set the Style Element’s or Pad’s
meter (time signature).
Note: You can edit this parameter only if you selected the
“Record New Style/Pad” option when entering the Record
mode, or when editing an empty Style Element.
7. Select the Tempo parameter and set the Tempo.
8. (Style only) Touch the Record 2 tab to see the Sounds area.
Here you can assign the right Sound to each Style track.
(Pad only) Press the SOUND button to select a Sound to be
assigned to the Pad track.
9. If needed, set the Octave Transpose for each track. Note:
The Octave Transpose will affect only the notes coming from
the keyboard, and not from the arranger.
10. At this point, if you want to do a Realtime Recording go on
reading “Realtime Record procedure” below. Otherwise, if
you prefer to do a Step Record, jump to “Step Record procedure” on page 49.
Realtime Record procedure
1. Select the track to record. Its status icon will turn to
‘Record’. (For more details, see “Tracks volume/status area”
on page 43).
Note: When entering the Record mode, a track is already
in Record status. When you press START/STOP after
entering the Record mode, you can immediately start
recording.
If you like, you can try your part before recording:
•Mute the track, by repeatedly touching its icon status,
until the (Mute) status icon appears.
• Press START/STOP to let any recorded track play back,
and practice on the keyboard.
• When you have finished practicing, press START/STOP
to stop the arranger, and unmute the track by repeatedly
touching its icon status, until the (Record) status icon
appears again.
2. While the shown status icon is Record, press START/STOP
to begin recording. A 1-bar precount will play before the
recording actually begins. When it begins, play freely. The
pattern will last for some measures, according to the Rec
Length value, then restart.
Since the recording will happen in overdub, you can add
notes on any following passage. This is very useful to
record different percussive instruments at any cycle on a
Drum or Percussion track.
Note: While recording, the track’s Keyboard Range (see
page 60) is ignored, and notes can be recorded and played
back over the whole keyboard range. The Local parameter
(see “Local Control On” on page 150) is also automatically
set to On, to allow playing on the keyboard.
3. When finished recording, press START/STOP to stop the
arranger. Select a different track, and go on recording the
full Chord Variation.
Note: You can select a different track only when the arranger
is not running.
4. When finished recording the Chord Variation, select a dif-
ferent Chord Variation or Style Element (Style only) to go
on recording the full Style/Pad.
5. When finished recording the new Style/Pad, select the
“Write Style/Pad” command from the page menu, to open
the Write Style/Pad dialog box (see “Write Style/Pad dialog
box” on page 67) and save it to memory.
To exit the Style/Pad Record mode without saving any
change, select the “Exit from Record” command from the
page menu, or press the RECORD button.
Page 53

49
Style/Pad Record mode
Style/Pad Record procedure
Step Record procedure
1. While in the main page of the Style/Pad Record mode,
select the “Overdub Step Recording” command from the
page menu, to enter the Overdub Step Record mode.
2. The “Pos” parameter shows the current position.
• If you do not want to insert a note or chord at the current
position, insert a rest instead, as shown in step 4.
• To jump to the next measure, filling the remaining beats
with rests, touch the Next M. button in the display.
3. To change the step value, use the “Step Time values” area in
the display.
4. Insert a note, rest or chord at the current position.
• To insert a single note, just play it on the keyboard. The
inserted note length will match the step length. You may
change the velocity and relative duration of the note, by
editing the “Duration” and “Velocity” parameters (see
page 70).
• To insert a rest, just touch the Rest button in the display.
Its length will match the step value.
• To tie the note to be inserted to the previous one, touch
the Tie button in the display. A note will be inserted, tied to
the previous one, with exactly the same name. You don’t
need to play it on the keyboard again.
• To insert a chord or a second voice, see “Chords and second voices in Step Record mode” on page 90.
5. After inserting a new event, you may go back by touching
the Back button in the display. This will delete the previously inserted event, and set the step in edit again.
6. When the end of the pattern is reached, the “End of Loop”
event is shown, and the recording restarts from the
“001.01.000” position. Any note exceeding the pattern
length, inserted at its end, will be reduced to fit the total
length of the pattern.
At this point, you may go on, inserting new events in overdub mode (the previously inserted events will not be
deleted). This is very useful when recording a drum or percussion track, where you may want to record the bass drum
on a first cycle, the snare drum on the second cycle, and the
hi-hat and cymbals during the following cycles.
7. When finished recording, touch the Done button in the
display to exit the Step Record mode.
A dialog box appears, asking you to either cancel, discard
or save the changes.
If you touch Cancel, exit is canceled, and you can continue
editing. If you choose No, changes are not saved, and the
Step Record window is closed. If you choose Yes, changes
are saved, and the Step Record window is closed.
8. When back to the main page of the Style Record mode, you
may turn all tracks to the play status, then press START/
STOP to listen to the Style. Press START/STOP again to
stop the playback.
9. From the main page of the Style Record mode, select the
“Write Style/Pad” command to save, or the “Exit from
Record” command to exit from the Style/Pad Record mode
(see “Write Style/Pad dialog box” on page 67), or by canceling any change.
Chords and second voices
With Pa600, you are not limited to inserting single notes in a
track. There are several ways to also insert chords and double
voices. For more information, see “Chords and second voices in
Step Record mode” on page 90.
Reference
Page 54

50
Style/Pad Record mode
Edit menu
Operating
mode
Edit section
Selected
track info
Page
menu
icon
Parameters areaTab s
Selected Style
Element
Chord
Operating
mode
Edit section
Page menu
icon
Track stat usTab s
Chord
Parameters
area
Edit menu
From any page (apart for Step Record), press the MENU button
to open the Style Record or Pad edit menu. This menu gives
access to the various Style/Pad Record edit sections.
When in the menu, select an edit section, or press EXIT to exit
the menu and return to the main page. To return to the main
page, you can also select the Main Page menu item.
When in an edit page, press the EXIT button to return to the
main page of the Style Record mode.
Style Record menu
Edit page structure
Most edit pages share some basic elements.
Other pages have a slightly different structure.
Pad Record menu
Note: While the Style/Pad is in play, you cannot access the Edit
section pages from the main page (see page 39). Stop the playback
before pressing MENU.
Note: When switching from the Edit section pages (Quantize,
Transpose, Velocity, Delete) to the other pages, or vice-versa, the
Style (if in play) is automatically stopped.
Operating mode
This indicates that the instrument is in Style/Pad Record mode.
Edit section
This identifies the current edit section, corresponding to one of
the items of the edit menu (see “Edit menu” on page 50).
Chord
(Style only) Chord in edit.
Selected Style Element
(Style only) In Style Record mode, edits always happen on the
selected Style Element.
Page menu icon
Touch this icon to open the page menu (see “Page menu” on
page 66).
Page 55

Style/Pad Record mode
Event Edit: Event Edit
Parameters area
Page header Page menu icon
Trac k
pop-up
menu
Tab s
Event
list
Page sub-
header
Scrollbar
Chord
Selected track Selected Style
Element
Selected Chord
Variation
Each page contains various parameters. Use the tabs to select
one of the available pages. For detailed information on the various types of parameters, see sections starting from page 51.
Track s tatu s
Use these buttons to mute/unmute tracks while editing.
Tab s
Use tabs to select one of the edit pages of the current edit section.
51
Event Edit: Event Edit
The Event Edit is the page where you can edit each single MIDI
event of the selected Chord Variation. You can, for example,
replace a note with a different one, or change its playing strength
(i.e., velocity value). See “Event Edit procedure” on page52 for
more information on the event editing procedure.
Page header
See “Page header” on page 39.
Page menu icon
Touch this icon to open the page menu. See “Page menu” on
page 66.
Page sub-header
This area shows some performing info on the Song.
Reference
Selected track
(Style only) Name of the track in edit. Use the Track pop-up
menu to select one of the Style tracks.
SE/CV (Style Element/Chord Variation)
Selected Style Element (Style only) and Chord Variation. This
parameter cannot be edited. To select a different Style Element
and Chord Variation, press EXIT to go back to the main page of
the Style/Pad Record mode (see “Main page - Record 1” on
page 39).
Event list
Use the Event list to see all events contained in the selected track
in the selected Style Element.
Use the scrollbar to browse through the events. You can also
scroll by using the SHIFT + VALUE DIAL combination.
Page 56

52
Style/Pad Record mode
Event Edit: Event Edit
Touch the event to be selected. Selected events are highlighted
and can be heard.
Position
Position of the event, expressed in the form ‘aaa.bb.ccc’:
•‘aaa’ is the measure
•‘bb’ is the beat
• ‘ccc’ is the tick (each quarter beat = 384 ticks)
You can edit this parameter to move the event to a different position. You can edit a position in either of the following ways:
(a) select the parameter, and use the VALUE DIAL to change
the value, or
(b) select the parameter, then touch it again; the numeric key-
pad will appear. Enter the new position by dialing in the
three parts of the number, separated by a dot. Zeroes at the
beginning can be omitted, as well as the least important
parts of the number. For example, to enter position
002.02.193, dial “2.2.193”; to enter position 002.04.000 dial
“2.4”; to enter position 002.01.000, simply dial “2”.
Type, Value 1, Value 2
Type and values of the event shown in the display. Depending on
the selected event, the value may change. This parameter also
shows the (greyed-out, so non editable) “CC#11” (Expression)
event at the beginning of the pattern, and the “End Of Track”
marking, when the end of a track is reached.
To change the event type, select the Type parameter, then use the
VALUE DIAL to select a different event type. A set of default values will be automatically assigned to the event.
To select and edit the event’s value, select the corresponding
parameter, and use VALUE DIAL.
Length
Length of the selected Note event. The value format is the same
as the Position value. This is only available for Note events.
Note: If you change a length of “000.00.000” to a different value,
you can’t go back to the original value. This rather uncommon
zero-length value may be found in some drum or percussion
tracks.
Scrollbar
Use the scrollbar to browse the event through the list. (As an
alternative, use SHIFT + VALUE DIAL).
Other elements
Track p op-up m enu
Use this pop-up menu to select the track to edit, inside the current Chord Variation.
Drum…Acc5 Style track.
Go Meas.
While the Style is not running, touch this button to open the Go
to Measure dialog box:
When in this dialog box, select a target measure, and touch OK.
The first event available in the target measure will be selected.
Insert
Touch the Insert button in the display to insert a new event at the
current shown Position. The default values are Type = Note,
Pitch = C4, Velocity = 100, Length = 192.
Delete
Touch the Delete button in the display to delete the event
selected in the display.
Event Edit procedure
Here is the general procedure to follow for the event editing.
1. Select the Style/Pad to edit, and press the RECORD button.
Select the “Current Style/Pad” option to enter recording.
The main page of the Style/Pad Record mode will appear.
2. Select the “Element (Style Element)” (Style only) and
“Chord Var (Chord Variation)” parameters.
Note: For more information on the Style Elements and Chord
Variations, and the Style structure in general, see “The Style’s
structure” on page 36.
3. Press MENU, and select the Event Edit section. The Event
Edit page appears (see “Event Edit: Event Edit” on page 51
for more information).
4. Press START/STOP to listen to the selected Chord Varia-
tion. Press START/STOP to stop it. Chord Scanning does
not work, so you will listen the pattern at the original Key/
Chord.
5. Touch the Filter tab to select the Filter page, and uncheck
the filters for the event types you wish to see in the display
(see “Event Edit: Filter” on page 53 for more information).
6. Touch the Event Edit tab to go back to the Event Edit page.
7. (Style only) Use the Track pop-up menu to select the track
to edit (see “Track pop-up menu” on page 52).
8. The list of events contained in the selected track (inside the
Chord Variation selected on step 2) will appear in the display. Some events on the beginning of the Chord Variations, as well as the “EndOfTrk” event (marking its ending
point) cannot be edited, therefore appearing in grey.
Page 57

Style/Pad Record mode
Event Edit: Filter
9. Scroll though the various events by using the scrollbar.
10. Select an event to be edited by touching it in the display.
This is usually a note, that you can edit.
For more information on the event types and their values, see “Event Edit: Event Edit” on page 51.
11. Edit the event.
• Select the “M” parameter. Use VALUE DIAL to change
the event’s position.
• Select the Type parameter. You may use VALUE DIAL to
change the event type, as well as its Value 1 and Value 2.
• If a Note event is selected, select the Length parameter,
and use VALUE DIAL to change the event’s length.
12. You may use the Go Meas. command to go to a different
measure (see “Go Meas.” on page 52)
13. As described in step 4, you may press START/STOP to lis-
ten how the pattern sounds after your changes. Press
START/STOP again to stop the pattern running.
14. Touch the Insert button in the display to insert an event at
the Position shown in the display (a Note event with default
values will be inserted). Touch the Delete button in the display to delete the selected event.
15. When editing is complete, you may select a different track
to edit (go to step 7).
16. When finished editing the selected Chord Variation, press
EXIT to go back to the main page of the Style Record
mode, then go to step 2 to select and edit a different Chord
Va ri a ti o n .
17. When finished editing the whole Style, select the “Write
Style/Pad” command from the page menu to open the
Write Style/Pad dialog box (see “Write Style/Pad dialog
box” on page 67), or select the “Exit from Record” command to cancel all changes.
• Touch the (Text Edit) button to enter the Text Edit
dialog box. Enter a name and confirm by selecting OK.
• Select a target memory location where to save the Style/
Pad. The name of the Style/Pad already existing at the
selected location is shown after the Bank-Location number.
Wa r ni n g : If you select an existing Style/Pad and confirm
writing, the older Style/Pad is deleted and replaced by the
new one. Save the Styles/Pads you don’t want to lose to a
storage device, before overwriting them.
18. Touch OK to save the Style/Pad to the internal memory, or
Cancel to delete any changes made in Style/Pad Record
mode. When the “Are you sure?” message appears, touch
OK to confirm, or Cancel to go back to the “Write Style” or
“Write Pad” dialog box.
53
Event Edit: Filter
This page is where you can select the event types to be shown in
the Event Edit page.
Turn On the filter for all event types you do not wish to see in
the Event Edit page.
Note: Some of the events are “ghosted”, and non editable, since the
corresponding events are not editable in a Style/Pad.
Note/RX Noise
Notes and RX Noises.
Control Control Change events. Only the following Con-
trol Change numbers are allowed with Styles/
Pads.
Control function CC# (Control Change Number)
Modulation 1 1
Modulation 2 2
Pan 10
Expression
CC#12 12
CC#13 13
Ribbon 16
Damper 64
Filter Resonance 71
Low Pass Filter Cutoff 74
CC#80 80
CC#81 81
CC#82 82
(a). Expression events cannot be inserted at the starting Position (001.01.000). An
Expression value is already among the default “header ” parameters of the Style Element or Pad Track.
(a)
Tempo/Meter Tempo and Meter (time signature) changes (Mas-
ter Track only).
Pitch Bend Pitch Bend events.
11
Reference
Page 58

54
Style/Pad Record mode
Style/Pad Edit: Quantize
No quantiza-
tion
1/8
1/4
Style/Pad Edit: Quantize
The quantize function may be used to correct any timing mistake after recording, or to give the pattern a “groovy” feeling.
After setting the various parameters, touch Execute.
Tra ck
(Style only) Use this parameter to select a track.
All All tracks selected.
Drum…Acc5 Selected track.
E / CV (Style Element/Chord Variation)
Use these parameters to select the Style Element (Style only) and
Chord Variation for editing.
Top parameters, you can select a single percussive instrument in
a Drum or Percussion track.
Note: These parameters are available only when a Drum or Percussion track is selected.
Execute
Touch this button to execute the operation set in this page.
Track s tatu s icon
Status of tracks. Touch this icon to change the status.
Play status. The track can be heard.
Mute status. The track cannot be heard.
Track n ames
Under the buttons, a label for each track is shown.
Style/Pad Edit: Transpose
In this page you can transpose the selected track(s).
Note: After transposing, please don’t forget to readjust the “Key/
Chord” parameter in the main page of the Style Record mode (see
page 41).
Resolution
This parameter sets the quantization after recording. For example, when you select 1/8, all notes are moved to the nearest 1/8
division. When you select 1/4, all notes are moved to the nearest
1/4 division.
(1/32)… (1/4)
Grid resolution, in musical values. A “b…f” character added after the value means swing-quantization. A “3” means triplet.
Start / End Tick
Use these parameters to set the starting and ending points of the
range to quantize.
If a Chord Variation is four measures long, and you want to
select it all, the Start will be positioned at 1.01.000, and the End
at 5.01.000.
Bottom / Top Note
Use these parameters to set the bottom and top of the keyboard
range to quantize. If you select the same note as the Bottom and
After setting the various parameters, touch Execute.
Tra ck
(Style only) Use this parameter to select a track.
All All tracks selected, apart for tracks set in Drum
mode (like the Drum and Percussion tracks). The
whole selected Chord Variation will be transposed.
Drum…Acc5 Single selected track.
E / CV (Style Element/Chord Variation)
Use these parameters to select the Style Element (Style only) and
Chord Variation for editing.
Value
Transpose value (±127 semitones).
Start / End Tick
Use these parameters to set the starting and ending points of the
range to be transposed.
Page 59

55
Style/Pad Record mode
Style/Pad Edit: Velocity
Start
Value
Curve 1
Velocity
Start Value = 0%, End Value = 100%
127
1
End
Value
Start
Value
Curve 2
Velocity
127
1
End
Value
Start
Value
Curve 3
Velocity
127
1
End
Value
Start
Value
Curve 4
Velocity
127
1
End
Value
Start
Value
Curve 5
Velocity
127
1
End
Value
Start
Value
Curve 6
Velocity
RANDOM
127
1
End
Value
If a Chord Variation is four measures long, and you want to
select it all, the Start will be positioned at 1.01.000, and the End
at 5.01.000.
Bottom / Top Note
Use these parameters to set the bottom and top of the keyboard
range to be transposed. If you select the same note as the Bottom
and Top parameters, you can select a single percussive instrument in a Drum or Percussion track. Since in a Drum Kit each
instrument is assigned to a different note of the scale, transposing a percussive instrument means assigning the part to a different instrument.
Execute
Touch this button to execute the operation set in this page.
Track s tatu s icon
Status of tracks. Touch this icon to change the status.
Play status. The track can be heard.
Mute status. The track cannot be heard.
Track names
Under the buttons, a label for each track is shown.
E / CV (Style Element/Chord Variation)
Use these parameters to select the Style Element (Style only) and
Chord Variation for editing.
Value
Velocity change value (±127).
Start / End Tick
Use these parameters to set the starting and ending points of the
range to be modified.
If a Chord Variation is four measures long, and you want to
select it all, the Start will be positioned at 1.01.000, and the End
at 5.01.000.
Bottom / Top Note
Use these parameters to set the bottom and top of the keyboard
range to be modified. If you select the same note as the Bottom
and Top parameters, you can select a single percussive instrument in a Drum or Percussion track.
Advanced
When this checkbox is checked, the “Intensity”, “Curve”, “Start
Velo ci ty Va l u e” a n d “ En d Vel o city Va lu e” p ar am eter s can b e
edited.
Style/Pad Edit: Velocity
In this page you can change the velocity (dynamics) value of
notes in the selected track. An Advanced mode is available,
allowing you to select a velocity curve for the selected range.
This is useful to create fade-ins or fade-outs.
After setting the various parameters, touch Execute.
Note: When an RX Sound is assigned to the track being edited, the
resulting sound may change, since this kind of Sounds is made of
several different layers triggered by different velocity values.
Also, a fade-out may result in the level “jumping” up next to the
zero, since a higher-level layer may be selected by low velocity values.
Tra ck
(Style only) Use this parameter to select a track.
All All tracks selected. The velocity for all notes of
Drum…Acc5 Selected track.
the whole selected Chord Variation will be
changed.
Intensity
(Only available in Advanced mode). Use this parameter to specify
the degree to which the velocity data will be adjusted toward the
curve you specify in “Curve”.
0…100% Intensity value. With a setting of 0 [%], the veloc-
ity will not change. With a setting of 100 [%], the
velocity will be changed the most.
Curve
(Only available in Advanced mode). Use this parameter to select
one of the six curves, and to specify how the velocity will change
over time.
Reference
Start / End Vel. Value
(Only available in Advanced mode). Velocity change at the starting and ending ticks of the selected range.
0…100 Velocity change in percentage.
Execute
Touch this button to execute the operation set in this page.
Page 60

56
Style/Pad Record mode
Style/Pad Edit: Cut
Track s tatu s icon
Status of tracks. Touch this icon to change the status.
Style/Pad Edit: Delete
Play status. The track can be heard.
Mute status. The track cannot be heard.
Track n ames
Under the buttons, a label for each track is shown.
Style/Pad Edit: Cut
This function lets you quickly delete a selected measure (or a
series of measures) from the selected Chord Variation. All following events are moved back, to replace the cut measure(s).
This page is where you can delete MIDI events out of the Style/
Pad. This function does not remove measures from the pattern.
To remove whole measure, use the Cut function (see “Style/Pad
Edit: Cut” on page 56)
After setting the various parameters, touch Execute.
Tra ck
(Style only) Use this parameter to select a track.
All All tracks selected. After deletion, the selected
Chord Variation will remain empty.
Drum…Acc5 Selected track.
After setting the various parameters, touch Execute.
E / CV (Style Element/Chord Variation)
Use these parameters to select the Style Element (Style only) and
Chord Variation for editing.
Start
First measure to be cut.
Length
Number of measures to be cut.
Execute
Touch this button to execute the operation set in this page.
Track s tatu s icon
Status of tracks. Touch this icon to change the status.
Play status. The track can be heard.
Mute status. The track cannot be heard.
Track n ames
Under the buttons, a label for each track is shown.
E / CV (Style Element/Chord Variation)
Use these parameters to select the Style Element (Style only) and
Chord Variation for editing.
Event
Type of MIDI event to delete.
All All events. The measures are not removed from
the Chord Variation.
Note All notes in the selected range.
Dup.Note All duplicate notes. When two notes with the
same pitch are encountered on the same tick, the
one with the lowest velocity is deleted.
Af t er Tou c h A fte r Touc h ev e nts .
Pitch Bend Pitch Bend events.
Prog.Change Program Change events, excluding the bundled
Control Change #00 (Bank Select MSB) and #32
(Bank Select LSB).
Note: This kind of data is automatically removed
during recording.
Ctl.Change All Control Change events, for example Bank
Select, Modulation, Damper, Soft Pedal…
CC00/32…CC127
Single Control Change events. Double Control
Change numbers (like 00/32) are MSB/LSB bundles.
Note: Some CC data are automatically removed
during recording. See the table on page 39 for more
information on the allowed data.
Page 61

57
Style/Pad Record mode
Style/Pad Edit: Delete All
Start / End Tick
Use these parameters to set the starting and ending points of the
range to delete.
If a Chord Variation is four measures long, and you want to
select it all, the Start will be positioned at 1.01.000, and the End
at 5.01.000.
Bottom / Top Note
Use these parameters to set the bottom and top of the keyboard
range to delete. If you select the same note as the Bottom and
Top parameters, you can select a single percussive instrument in
a Drum or Percussion track.
Note: These parameters are available only when the All or Note
option is selected.
Execute
Touch this button to execute the operation set in this page.
Track s tatu s icon
Status of tracks. Touch this icon to change the status.
Play status. The track can be heard.
Mute status. The track cannot be heard.
All All Style Elements, i.e. the whole Style. When E/
Track=All and CV=All, the whole Style is deleted,
and all parameters are set to the default status.
Va r 1… C o u nt I n
Single Style Element.
V1-CV1…CI-CV2
Single Chord Variation.
Execute
Touch this button to execute the operation set in this page.
Track s tatu s icon
Status of tracks. Touch this icon to change the status.
Play status. The track can be heard.
Mute status. The track cannot be heard.
Track n ames
Under the buttons, a label for each track is shown.
Style/Pad Edit: Copy from Style
Track names
Under the buttons, a label for each track is shown.
Style/Pad Edit: Delete All
This function lets you quickly delete a selected Style Element or
Chord Variation, or the whole Style.
After setting the various parameters, touch Execute.
Tra ck
(Style only) Use this parameter to select a track.
All All tracks of the selected Style, Style Element or
Chord Variation.
Drum-Acc5 Single track of the selected Style, Style Element or
Chord Variation.
E / CV (Style Element/Chord Variation)
Use these parameters to select the Style Element (Style only) and
Chord Variation for editing.
Here you can copy a track, Chord Variation or Style Element
inside the same Style, or from a different one. Furthermore, you
can copy a whole Style.
Wa r n in g : The Copy operation deletes all data at the target location (overwrite).
Reference
After setting the various parameters, touch Execute.
Note: If you copy too many events on the same “tick”, the “Too
many events!” message appears, and the copy operation is aborted.
Note: When you copy over an existing Chord Variation, Program
Change data is not copied, to leave the original Sounds unchanged
for that Chord Variation.
From Style
Choose this option to select the source Style to copy the track,
Chord Variation or Style Element from. Touch the Select button
to open the Style Select window and select the source Style.
From… To E/CV (Style Element/Chord Variation)
Use these parameters to select the source and target Style Elements or Chord Variations.
Note: You can’t copy from a Variation to a different Style Element
(or vice-versa), because of their different structure.
Page 62

58
Style/Pad Record mode
Style/Pad Edit: Copy from Pad
1 2 3 4
1 2 3 4 1 2 3 4
1 2 3 4
1 2 3 4 5 6 1 2
5 6
All All Style Elements, i.e. the whole Style. You can’t
change the target, that is automatically set to All.
Var1…End2 Single Style Element.
V1-CV1…E2-CV2
Single Chord Variation.
From… To Track
Use this parameter to select the source and target track to copy.
You can double a track, to strengthen a pattern.
All All tracks of the selected Style, Style Element or
Chord Variation.
Drum-Acc5 Single track of the selected Style, Style Element or
Chord Variation.
Execute
Touch this button to execute the operation set in this page.
Style/Pad Edit: Copy from Pad
Here you can copy a Chord Variation from a Pad. Furthermore,
you can copy a whole Pad.
Wa r ni n g : The Copy operation deletes all data at the target location (overwrite).
Track s tatu s icon
Status of tracks. Touch this icon to change the status.
Play status. The track can be heard.
Mute status. The track cannot be heard.
Track n ames
Under the buttons, a label for each track is shown.
Copying to a Chord Variation of a different length
You can copy a Chord Variation to a different one of a different
length. Just keep in mind the following:
• If the source length is a divider of the target length, the
source Chord Variation will be multiplied to fit the target
Chord Variation. For example, if the source is 4-measures
long, and the target 8-measures, the source will be copied
two times.
After setting the various parameters, touch Execute.
Note: If you copy too many events on the same “tick”, the “Too
many events!” message appears, and the copy operation is aborted.
Note: When you copy over an existing Chord Variation, Program
Change data is not copied, to leave the original Sounds unchanged
for that Chord Variation.
From Pad
Choose this option to select the source Pad to copy the Chord
Var i at io n fr o m . Tou c h t he Select button to open the Pad Select
window and select the source Pad.
From CV (Chord Variation)
Use this parameter to select the source Chord Variation.
All All Chord Variations, i.e. the whole Pad. You can’t
change the target, that is automatically set to All.
CV1…CV6 Single Chord Variation.
To CV (Chord Variation)
Use this parameter to select a target Chord Variation inside the
current Style/Pad.
CV1…CV6 Target Chord Variation. Automatically set to All
if the “From CV” parameter is also set to All.
• If the source length is not a divider of the target length, the
source Chord Variation will be copied for as many measures as can fit the target Chord Variation. For example, if
the source is 6-measures long, and the target 8-measures,
the source will be copied once, then the first 2 measures
will be copied to fit the remaining 2 measures.
Note: Avoid copying to a Chord Variation with a different meter
(time signature), for example a 4/4 Chord Variation onto a 3/4
one.
To Trac k
(Style only) Use this parameter to select the target track to copy.
All All tracks of the selected Style, Style Element or
Chord Variation.
Drum-Acc5 Single track of the selected Style, Style Element or
Chord Variation.
Execute
Touch this button to execute the operation set in this page.
Page 63

Style/Pad Record mode
Style Element Track Controls: Sound/Expression
Style Element Track Controls: Sound/
Selected Style E lement
Expression level
Expression
In this page you can assign a different Sound to each track of the
selected Style Element. Each Style Element can have different
Sound; after saving the new Style, please don’t forget to check the
“Original Style Sounds” parameter in the Style Play mode (see
page 16), to let the Style select the Sound bypassing the Style Settings.
In this page you can also check and modify the Expression
(CC#11) value for each of the Style Element tracks. This lets you
reduce the relative level of a track in a single Style Element, without reducing the overall Volume of the Style. This is a very useful
control, when you have different Sounds assigned to the same
track in different Style Elements, and the internal level of these
Sounds must be different.
59
Expression
Use these knobs to set the Expression (CC#11) value for the corresponding track. This value can be seen at the beginning of the
Event Edit list (see “Event Edit: Event Edit” on page 51).
Different Expression values can be defined for each Style Element. This way, you can set a different volume in each Style Element, relative to the general Volume value set in the Style
Header.
Expression leveling
You can quickly and easily adjust the Expression level of all
tracks in a Style Element (Variation, Intro…). This allows for a
more precise control over the volume level of all Style Element.
1. While in this page, select one of the Style Elements by
pressing its button in the control panel.
When in this page, press the corresponding button on the
control panel to select a Style Element (VARIATION1 …
ENDING3).
To copy the settings of this page to another Style Element, use
the “Copy Sound” and “Copy Expression” commands from the
page menu (see “Copy Sounds dialog box” and “Copy Expression dialog box” starting from page 68).
Selected Track Info area
See “Selected track info area” on page 41 for detailed information.
Sounds area
See “Sounds area” on page 43 for detailed information.
Expression area
Expression Monitor
You can use these indicators to check if CC#11 (Expression)
messages are contained in a track. Expression messages contained in a track can vary the volume of the track. It is very difficult to catch them out – unless you carefully read all the events
in the Event Edit page.
This monitor should help you keeping track of them, and let you
access Event Edit only on the tracks containing the messages.
Press the START/STOP button to start playback, and look at the
indicators. When one of them lights up, you can enter Event Edit
on the corresponding track, and edit or remove the Expression
messages.
2. Keep the SHIFT button pressed, and press the TEMPO+
button to increase the Expression value of all the Style Variation’s tracks, TEMPO- to decrease it.
3. Release the SHIFT button.
4. Repeat the above operation with all the desired Style Ele-
ments.
Note: A track’s volume may be changed by an Expression event
contained in a track. To check if any of these events exist in a track,
let the Style Element play and look at the Expression Monitor in
this same page. If one or more Expression events are found, go to
the Event Edit page and delete it (or them)
Volume area
Use these controls to set the volume and status of each track. See
page 43 for more information.
The Volume value is the same for the whole Style. Use the
Expression controls to adjust the relative balance between tracks
in each Style Element.
Reference
Page 64

60
Style/Pad Record mode
Style Element Track Controls: Keyboard Range
Style Element Track Controls: Keyboard
Range
The Keyboard Range automatically transposes any pattern note
that would otherwise play too high or too low in pitch, compared to the original acoustic instrument, when transposed by
the arranger. This will result in a more natural sound for each
accompaniment instrument.
For example, the lower limit for a guitar is E2. If you play a chord
under the E2, the transposed pattern could exceed this limit, and
sound unnatural. A Bottom limit set to E2 for the guitar track
will solve the problem.
Different Keyboard Range values can be set for each Style Element.
Style Element Track Controls: Noise/Guitar
The Noise/Guitar page is where you can set the RX Noise level
and the ‘human feel’ of Guitar tracks.
RX Noise
Use these controls to adjust the volume of RX Noises in the corresponding tracks. This control applies to all types of tracks
(provided the Sound includes RX Noises).
Humanize GTR
Use these controls to apply a random value to the position,
velocity and length of notes of Guitar tracks (see “Track Type”
on page 62). This control has no effect on other types of track.
Note: The Keyboard Range is ignored while recording. The selected
track can be recorded and played back on the full range of the keyboard.
When in this page, press the corresponding button on the
control panel to select a Style Element (VARIATION1 …
ENDING3).
To copy the settings of this page to another Style Element, use
the “Copy Keyboard Range” command from the page menu (see
“Copy Key Range dialog box” on page 68).
To p/ B ot t om
Use these parameters to set the bottom and top of the keyboard
range for the corresponding track of the current Style Element.
Volume area
Use these controls to set the volume and status of each track. See
page 43 for more information.
Page 65

Style/Pad Record mode
Pad Track Controls: Sound/Expression
Pad Track Controls: Sound/Expression
In this page you can assign a Sound to the Pad track, adjust its
Volume (CC#07) and Expression (CC#11) values, and set various other parameters, like the Keyboard Range, Track Type,
Trigger Mode, Tension and Wrap Around.
Sound/Bank
Sound assigned to the Pad track.
Volum e
Use this slider to set the Volume (CC#07) value for the Pad track.
This value is not saved with the Pad, and is only used to test the
Pad’s volume during editing or recording.
Pad Type
Use this parameter to decide if the Pad will play once or if it will
loop.
Note: While in Pad Record mode, the pattern is always played
back in loop, even if this parameter is set to “One Shot”.
One Shot When you press one of the PAD buttons, the cor-
responding Pad is only played once. This is useful
for playing Hits or Sequences that must only play
once.
Loop When you press one of the PAD buttons, the cor-
responding Pad plays up to the end, then continues playing from the start. Press STOP in the
PAD section to stop it playing. This is useful for
playing cyclic sequences.
Keyboard Range
The Keyboard Range automatically transposes any pattern note
that would otherwise play too high or too low in pitch, compared to the original acoustic instrument, when transposed by
the arranger. This will result in a more natural sound for the Pad
instrument.
Note: The Keyboard Range is ignored while recording. The Pad
track can play on the full range of the keyboard.
Trigger Mode
(Not available if Track Type = Drum). This setting lets you define
how Bass and Acc-type tracks are retriggered when the chord is
changed.
Off Each time you play a new chord, current notes
will be stopped. The track will remain silent until
a new note will be encountered in the pattern.
61
Rt (Retrigger) The sound will be stopped, and new
notes matching the recognized chord will be
played back.
Rp (Repitch) New notes matching the recognized
chord will be played back, by repitching notes
already playing. There will be no break in the
sound. This is very useful on Guitar and Bass
tracks.
Track Ty pe
Use this parameter to set the type of the Pad track.
Drum Drum track. This type of track is not transposed
by the arranger, and is used for Drum Kits, or for
tracks that you don’t want to be transposed when
playing a different chord.
Bass Bass track. This type of track always plays the
root when changing chord.
Acc Accompaniment track. This type of track can be
used freely, for melodic or harmonic accompaniment patterns.
Expression
Use this knob to set the Expression (CC#11) value for the Pad
track. This value can be seen at the beginning of the Event Edit
list.
The Expression is useful to balance the Pad with the other Pads.
For example, if you want the Pad you are recording to be mellower than the average, just lower the Expression value.
Te ns i on
Tension adds notes (a 9th, 11th and/or 13th) that have actually
been played, even if they haven't been written in the Pad pattern.
This parameter specifies whether or not the Tension included in
the recognized chord will be added to an Acc-type track.
On The Tension will be added.
Off No Tension will be added.
RX Noise
Use these controls to adjust the volume of RX Noises in the corresponding tracks. This control applies to all types of tracks
(provided the Sound includes RX Noises).
Humanize GTR
Use these controls to apply a random value to the position,
velocity and length of notes of Guitar tracks (see “Track Type”
on page 61). This control has no effect on other types of track.
Wrap Around
The wrap-around point is the highest register limit for the Pad
track. The Pad pattern will be transposed according to the
detected chord. If the chord is too high, the Pad track might play
in a register that is too high, and therefore unnatural. If, however, it reaches the wrap-around point, it will be automatically
transposed an octave lower.
The wrap-around point can be individually set in semitone steps
up to a maximum of 12 semitones, relative to the chord root set
in the main page of the Pad Record mode (see “Key/Chord” on
page 41).
Reference
Page 66

62
Style/Pad Record mode
Style Element/Pad Chord Table: Chord Table
1…12 Maximum transposition (in semitones) of the
track, referred to the original key of the Pad pattern.
Style Element/Pad Chord Table: Chord
Table
This is the page where you can assign a Chord Variation to each
of the most important recognized chord. When a chord is recognized, the assigned Chord Variation will be automatically
selected by the arranger to play the accompaniment.
When in this page, press the corresponding button on the
control panel to select a Style Element (VARIATION1 …
ENDING3).
Chord / Chord Variation
Use these parameters to assign a Chord Variation to each of the
most important chords.
Style Track Controls: Type/Trigger/Tension
In this page you can set the Mode, Trigger mode for the Style
tracks, and activate/deactivate the Tension for the Accompaniment tracks.
Track Type
Use this parameter to set the type of the corresponding track.
Drum Drum track. This type of track is not transposed
by the arranger, and is used for Drum Kits made
of Drum sounds. It can be affected by the Drum
Mapping of the Style Play mode (see “Drum
Mapping (Var.1…Var.4)” on page 31).
Perc Percussion track. This type of track cannot be
transposed, and is used for Drum Kit made of
Percussion sounds. It is NOT affected by the
Drum Mapping.
Bass Bass track. This type of track always plays the
root when changing chord.
Acc Accompaniment track. This type of track can be
used freely, for melodic or harmonic accompaniment patterns.
Gtr Guitar track. This type of track uses Guitar Mode
to create guitar strumming (see “Main page Guitar Mode” on page44). When this type is
selected, the “Tension” parameter can no longer
be edited.
Trigger Mode
This setting lets you define how Bass and Acc-type tracks are
retriggered when the chord is changed.
Off Each time you play a new chord, current notes
will be stopped. The track will remain silent until
a new note will be encountered in the pattern.
Rt (Retrigger) The sound will be stopped, and new
notes matching the recognized chord will be
played back.
Rp (Repitch) New notes matching the recognized
chord will be played back, by repitching notes
already playing. There will be no break in the
sound. This is very useful on Guitar and Bass
tracks.
Te ns i on
Tension adds notes (a 9th, 11th and/or 13th) that have actually
been played to the accompaniment, even if they haven't been
written in the Style pattern. This parameter specifies whether or
not the Tension included in the recognized chord will be added
to the Acc-type tracks.
On The Tension will be added.
Off No Tension will be added.
When in this page, press the corresponding button on the
control panel to select a Style Element (VARIATION1 …
ENDING3).
Page 67

63
Style/Pad Record mode
Import: Import Groove
Import: Import Groove
The Import Groove function allows the loading of MIDI
Grooves (“.GRV” files)). By importing these data to a track, and
assigning the Sound based on the sliced samples to the same
track, you can play the original audio groove, and freely change
its Tempo.
Note: After importing a groove generated by a melody line (not by
a percussive groove), the imported groove and samples will not be
transposed together with the other Style tracks. Audio data cannot
be transposed by the arranger.
Note: Please execute the Import Groove operation before turning
the instrument off. All “.GRV” files generated by a Time Slice operation are deleted when turning the instrument off.
From
Use this parameter to select one of the MIDI Groove patterns
(“.GRV” files) generated when saving data after a Time Slice
operation.
To E/CV (Style Element/Chord Variation)
Use this parameter to select the target Style Element (Style only)
and Chord Variation.
To Trac k
(Style only) Use this parameter to select the target track inside
the selected Chord Variation. The Percussion track is usually
suggested, since the Drum track is still suitable for standard
Drum Kit sounds (count-in, break etc.). After importing the
MIDI Groove pattern, assign the Sound, to which the sliced
samples are assigned, to the track playing the MIDI Groove pattern.
Import: Import SMF
The Import SMF function allows you to import MIDI data from
a Standard MIDI File (SMF) created on your preferred external
sequencer, and transform them in a Chord Variation.
Note: You cannot use this function to import data from any
generic Song. The Standard MIDI File to be imported must be programmed as if it was one of Pa600’s Chord Variations.
When importing an SMF, parameters like CV Length, Meter,
Tempo Changes, Program Changes and Expression are recognized. These parameters will be imported as the header of the
Style Element containing the Chord Variation, provided the
“Initialize” parameter is checked, or the Style Element is empty.
Hint: It is a good idea to check the “Initialize” parameter when
importing the first Chord Variation of a Style Element, and
uncheck it when importing the following Chord Variations.
• Sounds assigned to each track can be imported, provided the
Program Change, Bank Select MSB and LSB events are on the
first ‘tick’ of the SMF. These data are loaded in the Style Element’s header, and not as Sounds assigned to the Style Performance.
Note: Sounds in the Style Element header can be overridden by
Sounds assigned to the Style Settings, by checking the “Original
Style Sound” parameter in the main page of the Style Play mode
(Style Track view).
• If the above data was not found on the first ‘tick’ of the
imported SMF, Sounds must be manually assigned to each track.
You can do this in the “Record 1” or “Record 2”, or the “Sound/
Expression” page of the Style Record mode,.
• Key/Chord, Chord Table, Expression, and any other Style Variation parameter, must be manually programmed in the relevant
Style Record pages.
• The starting Tempo, and each track’s Volume, must be programmed as Style Settings data, and then saved in the Style Settings.
• Meter (time signature) Change is not allowed, therefore not
recognized.
• The Chord Variation length is the same as the imported SMF.
You can change length by changing the value of the CV Length
parameter, on the main page of the Style/Pad Record mode.
Reference
Page 68

64
Style/Pad Record mode
Import: Import SMF
Hint: If a note extends beyond the last measure of the Chord Variation, an additional measure is appended (for example, if a note
extends after the end of the fourth measure in a 4-measure pattern, a 5-measure Chord Variation will be generated). If so, change
the CV Length value to reset the Chord Variation length. The
exceeding note will be cut, to fit the new pattern length.
When programming a Chord Variation on an external
sequencer, please assign each Style track to the correct MIDI
channel, according to the following table.
Style Track MIDI Channel
Bass 09
Drum/Pad 10
Percu ssion 11
Accompaniment 1 12
Accompaniment 2 13
Accompaniment 3 14
Accompaniment 4 15
Accompaniment 5 16
When programming a Chord Variation on the external
sequencer, please assign the Pad track to the MIDI channel #10.
Note: Only SMF in format 0 can be loaded.
From Song
This is the name of the Standard MIDI File to be loaded. Touch
the Select button to open the file selector, and select an “.SMF”
file.
Select
Touch this button to open the file selector and load the SMF.
Initialize
Check this parameter if you want all settings of the target Style
Element (i.e., Key/Chord, Chord Table, Sounds…) are reset
when loading the SMF.
Hint: It is a good idea to check the “Initialize” parameter when
importing the first Chord Variation of a Style Element, and
uncheck it when importing the following Chord Variations.
Importing an SMF separated by Markers into a Style
As an alternative to importing single Chord Variations, you can
import a whole Style as an SMF separated by Markers, i.e., a single SMF containing all the Chord Variations (Variation 1, Variation 2, etc.) each one separated by a Marker (the same events
used in Song Play mode).
1. While in this page, touch the Select button, and choose the
Standard Midi File to be imported.
2. Keep the SHIFT button pressed.
3. Without releasing the SHIFT button, touch the Execute
button in the display.
4. Release the SHIFT button.
When creating a new Style, we suggest to check the “Initialize”
checkbox. Do not check it if the SMF you are loading was previously exported from a Style to be edited; in this case, it is very
important to keep all the previous settings.
Style Tracks and MIDI Channels must be lined as in the previous
table, as per Korg’s standard Style format definition.
Note: Tracks/MIDI Channels other than the above mentioned are
ignored during the import procedure.
For a list of MIDI events supported during the import operations, please see “List of recorded events” on page 39. If any, the
following events are stripped off and automatically transferred to
the Style Element header during the import procedure:
• Time signature (this event is mandatory)
• Control Change bundle #00-32 (Bank Select MSB/LSB)
• Program Change
• Control Change #11 (Expression)
Control Change 00, Control Change 32 and Program Change
messages must be placed at the very beginning of each Chord
Vari at io n ( ti c k 0 ) .
To E/C V
Use this parameter to select a target Chord Variation.
Execute
After setting all parameters in this page, touch this button to
import the Standard MIDI File into the target Chord Variation.
Page 69

Style/Pad Record mode
Export SMF
Whenever they are not saved in the SMF, Program Change, Control Change 00, 11 and 32, can be still programmed in Style
Record mode, by using the edit features available.
Wa r n in g : Pa600 can only handle SMF format 0 (Zero). If you are
in trouble importing your file, maybe your sequencer (or DAW) is
exporting using a different format. Please refer to the software’s
user’s manual.
The naming structure for the Markers inside the SMF is
“EnCVn”, whose single components are shown in the following
table:
Component Meaning
E Style Element (‘v’ = variation, ‘i’ = intro, ‘f ’ = fill,
‘e’ = ending)
n Style Element number (‘1’~’4’ for variations, ‘1’~’2’ for all
other style elements)
CV Chord Variation (‘cv’ = chord variation – no other choices
allowed)
n Chord Variation number [1~6 for Variations, 1~2 for all oth-
ers]
Wa r n in g : It is mandatory not to use capital letters in Marker
names. Some examples of valid names:
‘i1cv2’ = Intro1 – Chord Variation 2
‘v4cv3’ = Variation 4 – Chord Variation 3
Examples of non accepted names:
‘V1cv2’, ‘v1CV2’, ‘intro i1cv2’, ‘v1cv1 chorus’
The order of the Chord Variations inside the SMF is not relevant.
They can be freely placed inside the SMF.
At the end of this page you can find a screenshot of a test file created in Steinberg Cubase, just as an example of how a SMF sepa-
rated by Markers can look like. Considering analogies between
actual workstations, it will not look much different in other
applications like Logic, Digital Performer, Pro Tools or Sonar.
65
Export SMF
The Export SMF function allows you to export a Chord Variation as a Standard MIDI File (SMF), and edit it on your preferred
external sequencer.
To Song
This (non editable) parameter shows the name of the Standard
MIDI File to be generated. The (automatically assigned) name
will be the same of the exported Chord Variation.
From E/CV
Use this pop-up menu to select one of the available Chord Variations from the current Style.
Execute
After selecting a Chord Variation, touch this button to export it
as a Standard MIDI File. A standard file selector will appear.
Select the target device and directory, then touch Save. After you
touch Save, a dialog box appears, letting you assign a name to the
file.
Reference
Page 70

66
Style/Pad Record mode
Page menu
Exporting a Style as an SMF separated by Markers
Page menu
As an alternative to exporting single Chord Variations to individual Standard MIDI Files, you can export a whole Style as an
SMF separated by Markers, i.e., a single SMF containing all the
Chord Variations (Variation 1, Variation 2, etc.) each one separated by a Marker (the same events used in Song Play mode).
1. While in this page, keep the SHIFT button pressed.
2. Without releasing the SHIFT button, touch the Execute
button in the display.
3. Release the SHIFT button.
4. Assign a name to the Standard Midi File where to save the
Style in edit.
This operation creates, in the selected device, an SMF format 0
(Zero), containing all the MIDI data included in the selected
Style, with each Chord Variation starting from a different
Marker (named as per the naming convention explained in the
Import section above).
Each Chord Variation will include, at the very beginning (tick 0),
the following informations:
•Time signature
• Control Change bundle #00-32 (Bank Select MSB/LSB)
• Program Change
• Control Change #11 (Expression)
Touch the page menu icon to open the page menu. Touch a command to select it. Touch anywhere in the display to close the
menu without selecting a command.
Style Record
Pad Record
Write Style/Pad
Select this command to open the Write Style or Write Pad dialog
box, and save the Style/Pad to the internal memory.
See “Write Style/Pad dialog box” on page 67 for more information.
Undo
Only available in Record mode. While in Record mode, cancels
the latest recorded data and restores the previous situation.
Selected a second time, it restores recorded data again (“Redo”
function).
Delete Pad Track
Only available in the Main page of the Pad Record mode. Select
this command to delete the Pad track.
Copy Key/Ch (Copy Key/Chord) button
Select this command to open the Copy Key/Chord dialog box,
and copy Key/Chord settings of the currently selected track to all
other tracks of the same Chord Variation, or to the whole Style.
See “Copy Key/Chord dialog box” on page 68 for more information.
Copy Sound
(Only available in some edit pages). While the Style Element
Track Control edit section is selected, use this command to open
the Copy Sound dialog box and copy all Sounds assigned to the
current Style Element tracks to a different Style Element.
See “Copy Sounds dialog box” on page 68 for more information.
Page 71

Style/Pad Record mode
Write Style/Pad dialog box
Copy Expression
(Only available in some edit pages). While the Style Element
Track Control edit section is selected, use this command to open
the Copy Expression dialog box and copy all Expression values
assigned to the current Style Element tracks to a different Style
Element.
See “Copy Expression dialog box” on page 68 for more information.
Copy Keyboard Range
(Only available in some edit pages). While the Style Element
Track Control edit section is selected, use this command to open
the Copy Keyboard Range dialog box and copy all Keyboard
Range values for the current Style Element tracks to a different
Style Element.
See “Copy Key Range dialog box” on page 68 for more information.
Copy Chord Table
Only available while in the Style Element Chord Table page. Select
this command to open the Copy Chord Table dialog box (see
“Copy Chord Table dialog box” on page 69).
Delete Current Track
(Only available in the Main Record pages). Select this command
to delete the selected track.
Overdub Step Recording
(Only available in the Main Record pages). Select this command
to open the Overdub Step recording window (see “Overdub Step
Recording window” on page 69).
Solo Track
Select the track to be soloed, then check this item. You will hear
only the selected track, and the ‘Solo’ warning will flash on the
page header.
Uncheck this item to exit the Solo function.
67
Write Style/Pad dialog box
Open this window by choosing the Write Style or Write Pad item
from the page menu. Here you can save the recorded or edited
Style/Pad to memory.
Name
Name of the Style/Pad to be saved. Touch the (Text Edit)
button next to the name to open the Text Edit window.
Style/Pad Bank
Target bank of Styles/Pad. Use the Select button on the display,
or the VALUE DIAL to select a different bank.
Style
Target Style/Pad location in the selected bank. Use the Select
button on the display, or the VALUE DIAL to select a different
location.
Note: A User or Favorite Style, or a User Pad, is usually prompted
when writing a Style/Pad. However, you can overwrite a Factory
Style/Pad when the “Factory Style and Pad Protect” parameter is
left unchecked (see page 145).
Select… button
Touch this button to open the Style/Pad Select window, and
select a target location.
Keep the SHIFT button pressed and touch one of the
tracks to solo it. Do the same on a soloed track to deactivate the
Solo function.
Exit from Record
Select this command to exit from Record without saving changes
to the Style.
Reference
While in the Style/Pad Select window, use the buttons on top of
the window to select either the User or the Favorite banks.
Page 72

68
Style/Pad Record mode
Copy Key/Chord dialog box
Copy Key/Chord dialog box
(Style only) Open this window by choosing the Copy Key/Chord
item from the page menu. Here you can copy Key/Chord settings
of the currently selected track to all other tracks of the same
Chord Variation, or to the whole Style. This function is useful to
speed-up pattern programming, and to avoid having different
tracks in different keys within the same Chord Variation.
Current Chord Variation Tracks
The Key/Chord of the current track will be cop-
ied to all tracks of the current Chord Variation.
All Style Tracks
The Key/Chord of the current track will be cop-
ied to all tracks of the Style (i.e., all Chord Varia-
tions).
Copy Expression dialog box
(Style only) Open this window by choosing the Copy Expression
item from the page menu. Here you can copy all Expression values assigned to the current Style Element tracks to a different
Style Element.
From Style Element
Non editable. Currently selected Style Element.
To Style Element
Target Style Element.
All Settings will be copied to all Style Element of the
Style in edit.
Va r1 … C ou n tI n
Single Style Element where to copy settings to.
Copy Sounds dialog box
(Style only) Open this window by choosing the Copy Sounds
item from the page menu. Here you can copy all Sounds
assigned to the current Style Element tracks to a different Style
Element.
From Style Element
Non editable. Currently selected Style Element.
To Style Element
Target Style Element.
All Settings will be copied to all Style Element of the
Style in edit.
Va r1 … C ou n tI n
Single Style Element where to copy settings to.
Copy Key Range dialog box
(Style only) Open this window by choosing the Copy Keyboard
Range item from the page menu. Here you can copy all Keyboard Range values for the current Style Element tracks to a different Style Element.
From Style Element
Non editable. Currently selected Style Element.
To Style Element
Target Style Element.
All Settings will be copied to all Style Element of the
Style in edit.
Va r1 … C ou n tI n
Single Style Element where to copy settings to.
Page 73

69
Style/Pad Record mode
Copy Chord Table dialog box
Copy Chord Table dialog box
(Style only) Open this window by choosing the Copy Chord
Table item from the page menu. Here you can copy the Chord
Table of the current Style Element to a different Style Element.
To Style Element
Target Style Element.
All Settings will be copied to all Style Element of the
Style in edit.
Va r 1… C o u nt I n
Single Style Element where to copy settings to.
Overdub Step Recording window
The Step Record allows you to create a new Style/Pad by entering
single notes or chords to each track, by playing them on the keyboard one at a time, with no need to play on time. This is very
useful when transcribing an existing score, or needing a higher
grade of detail, and is particularly suitable to create drum and
percussion tracks.
To access this page, select the “Overdub Step Recording” command from the page menu.
Track (Selected track)
Name of the selected track in record.
DRUM…ACC5
Style track.
SE (Selected Style Element)
See “Element (Style Element)” on page 40.
CV (Selected Chord Variation)
See “Chord Var (Chord Variation)” on page 40.
Pos (Position)
This is the position of the event (note, rest or chord) to be
inserted.
Event list
Previously inserted events. You may delete this event, and set it
in edit again, by touching the Back button.
Step Time values
Length of the event to be inserted.
… Note value.
Standard (–) Standard value of the selected note.
Dot (.) Augments the selected note by one half of its
value.
Triplet (3) Triplet value of the selected note.
Reference
Meter
Meter (time signature) of the current measure. This parameter
cannot be edited. You can set the Meter in the main page of the
Style Record mode, before actually starting recording (see step 6
on page 48 for more information).
Page 74

70
Style/Pad Record mode
Overdub Step Recording window
Free Memory
Remaining memory for recording.
Duration
Relative duration of the inserted note. The percentage is always
referred to the step value.
25% Staccatissimo.
50% Staccato.
85% Ordinary articulation.
100% Legato.
Veloc ity
Set this parameter before entering a note or chord. This will be
the playing strength (i.e., velocity value) of the event to be
inserted.
Kbd Keyboard. You can select this parameter, by turn-
ing all counter-clockwise the dial. When this
option is selected, the playing strength of the
played note is recognized and recorded.
1…127 Velocity value. The event will be inserted with
this velocity value, and the actual playing
strength of the note played on the keyboard will
be ignored.
Rest
Touch this button to insert a rest.
Tie
Touch this button to tie the note to be inserted to the previous
note.
Back
Goes to the previous step, erasing the inserted event.
Next M. (Next Measure)
Goes to the next measure, and fills the remaining space with
rests.
Done
Exits the Step Record mode. If you have inserted some notes, a
dialog box appears, asking you to either cancel, discard or save
the changes.
If you touch, Cancel, exit is canceled, and you can continue editing. If you choose No, changes are not saved, and the Step
Record window is closed. If you choose Yes, changes are saved,
and the Step Record window is closed.
Page 75

Song Play operating mode
MIDI Clock
Song Play operating mode
Overall instrument’s
volume
Balance of Songs and Pads
against the Keyboard tracks
The Song Play operating mode is where you can listen to Songs.
Songs can be in Standard MIDI File, Karaoke™ or MP3 format.
The MID+G and MP3+G formats are also supported.
You can play along with the Song with up to four Keyboard
tracks (Upper 1-3, Lower) and four Pads. You can select different
Sounds and Effects for Keyboard tracks by selecting Performances and STSs.
While in Song Play mode, you can use the SongBook to automatically select Songs for a desired music genre. With each Song
entry in the SongBook, up to four STSs are also selected.
Song Play mode can also be used in Easy Mode.
MIDI Clock
In Song Play mode the MIDI Clock is always generated by the
internal player, even if the Clock parameter is set to MIDI or
USB mode in the Global > MIDI > Setup/General Controls page
(see “Clock Source” on page 150). While in this mode, Pa600
cannot receive MIDI Clock messages from the MIDI IN.
For MIDI Clock messages to be sent, the “Clock Send” parameter must be activated in the Global > MIDI > Setup/General
Controls page (see “Clock Send” on page 149).
Tempo Lock
If you don’t want the Tempo to change when selecting a new
Song, turn on the Tempo Lock function by using the TEMPO
LOCK buttons on the control panel. When the LED of this button is turned on, you can still manually change the Tempo with
the TEMPO +/– buttons, or by touching the Tempo field and
using the VALUE DIAL. As an alternative, you can keep the
SHIFT button pressed and use the VALUE DIAL to change the
Te mp o .
Master Volume, Balance
71
Track parameters
Changes to Keyboard tracks can be saved to a Performance. You
can then recall different settings by just selecting a single Performance.
Settings for Song tracks, like Pan, Volume and FX Sends, depend
on each individual Standard MIDI File. Changes to Song tracks
made in Song Play mode cannot be saved to a Standard MIDI
File, and are only intended for realtime control.
To make permanent changes Song tracks, edit and save the Standard MIDI File in Sequencer mode.
Standard MIDI Files and Sounds
The native Song file format of Pa600 is the Standard MIDI File
(SMF), an universal standard set by all manufacturers. Filename
extension is .MID, but Pa600 can also read files with the .KAR
extension. You can read these files with any musical instrument
or computer.
Even if the Standard MIDI File format is standard, differences
may appear in sounds when playing the various files. If you
recorded a Song on the Pa600 in Sequencer mode using only
General MIDI sounds (i.e., those of the “GM” type), you can be
confident you can play the same Song on virtually any other
musical instrument or computer. If you used Korg native
sounds, you may not find the same sounds on instruments from
other manufacturers.
When you read Standard MIDI Files in Song Play mode, there is
no problem reading files made using only General MIDI sounds.
Sounds could be different when playing a Song made on a different instrument: despite the wide compatibility of Pa600 with
other standards (like GS or XG), differences may arise.
Should this happen, load the Standard MIDI File in Sequencer
mode, then manually reassign the non-matching Sounds, replacing them with similar Sounds on the Pa600. Finally, save the
Standard MIDI File again, and you will be able to play it in Song
Play mode with the correct Sounds.
Reference
While the MASTER VOLUME knob controls the general volume of the instrument, you can use the BALANCE knob to balance the Song and Pad tracks against the Keyboard tracks.
Page 76

72
Song Play operating mode
Keyboard, Pad and Player tracks
Keyboard traks
STS names
Song area Page header Page menu icon
Style
area
Perf./
STS area
Keyboard tracks area
Panel s
Operating mode Master Transpose (in
semitones)
Recognized chord
Keyboard, Pad and Player tracks
Pa600 is equipped with a player that can play up to a maximum
of 16 Song tracks. In addition, you can play the keyboard with
four additional Keyboard tracks (Upper 1-3 and Lower).
When the Volume panel is shown in the main page of the Song
Play mode (see illustration below), you can adjust the Volume
and Play/Mute status of these tracks, but please keep in mind
that these changes will not be saved in the Standard MIDI File.
While in Song Play mode, you can select Performances or STSs.
STSs are from the latest selected Style; choose a different Style to
select a different set of STSs. You can see the name of the available STSs when the STS Name panel is shown in the main page
of the Song Play mode (see illustration):
Main page (Normal view)
Press the SONG PLAY button to access this page from another
operating mode.
Note: When switching from Style Play to Song Play mode, the Song
Setup is automatically selected, and various track parameters and
settings may change.
To return to this page from one of the Song Play edit pages, press
the EXIT or SONG PLAY button.
Details on individual tracks can be seen by touching the Volume
tab. To switch between Keyboard tracks (Normal view) and Song
tracks (Song Tracks views), use the TRACK SELECT button.
Pressed a first time, you will see tracks 1-8; a second press will
show tracks 9-16; pressed again will go back to Keyboard tracks.
Selecting a different Style or SongBook entry may also change
the Pads.
When entering Song Play mode from the Style Play mode, Keyboard and Pad tracks remain the same they were in Style Play
mode.
Page header
This line shows the current operating mode, transposition and
recognized chord.
Operating mode name
Name of the current operating mode.
Master Transpose
Master Transpose value in semitones. This value can be changed
using the TRANSPOSE buttons on the control panel.
Note: You can also transpose MP3 files. Keep in mind, however,
that transposition always remains inside the -5…+6 semitones
range. This is enough to cover all keys, while avoiding excessive
audio degradation. Any further transposing will be reversed to fit
the range. So, you might see a +7 transpose value (Just Fifth Up)
shown in the display, but the MP3 will actually play 5 semitones
lower (Just Fourth Down).
Note: Transpose may automatically change when selecting a different Performance. It may also change when loading a Standard
MIDI File generated with an instrument of the Korg Pa-Series.
Page 77

73
Song Play operating mode
Main page (Normal view)
Song name
Meter
Current measure
Song type icon
Tem po
Song name
Total time
Elapsed time
Song type icon
Tempo variation
To avoid transposing, “lock” the Master Transpose parameter in
the Global (see “General Controls: Lock” on page 141).
Recognized chord
Displays the recognized chord, when you play a chord on the
keyboard.
Page menu icon
Touch the page menu icon to open the menu. See “Page menu”
on page 82 for more information.
Song area
This is where the Song name is shown, together with parameters
depending on the selected type of Song.
This is how a Song’s area appears when a Standard MIDI File or
Karaoke file has been selected:
shown in this area. The JBX icon will instead
appear, together with the name of the currently
selected Song, in the Jukebox list.
Note: To create or edit a Jukebox file, go to the
Jukebox Edit page (see page 81).
Song name
Displays the name of the Song assigned to the player.
Touch the Song name to open the Song Select window. When
the Song Select window appears, you can select a single Song or
a Jukebox file (see “Song Select window” on page 9).
If you select another Song while a Song is playing, the previous
Song will stop, and the new Song will be selected and be ready to
play.
To select a Song, you can also press the SONG button in the
SELECTION section of the control panel. Press it a second time
to select a Song by dialing in its ID number (see “Selecting a
Song by its ID number” on page 10).
Meter
This parameter only appears when a Standard MIDI File or Karaoke file has been selected.
Current Song’s meter (time signature).
And this is how it appears when an MP3 File has been selected:
Song type icon
Songs of different types can be assigned to the players. This icon
shows the file type.
Standard MIDI File, often abbreviated as SMF
(file extension: *.MID or *.KAR). The SMF
(*.MID) is the industry standard song format,
used by Pa600 as its basic Song format when
recording a new Song. A MIDI Karaoke File
(*.KAR) is an extension of the SMF format.
MPEG Layer-3 format, or MP3 (file extension:
*.MP3). This is a compressed audio file, that may
be generated on any personal computer, or on the
Pa600 itself.
Measure number
This parameter only appears when a Standard MIDI File or Karaoke file has been selected.
Current measure number.
Te mp o
This parameter only appears when a Standard MIDI File or Karaoke file has been selected.
Metronome Tempo. Select this parameter and use the TEMPO+
and TEMPO– buttons to change the Tempo. As an alternative,
touch this parameter and drag with your finger.
Total time
This parameter only appears when an MP3 file has been selected.
Total length (in minutes:seconds) of the selected MP3 file.
Elapsed time
This parameter only appears when an MP3 file has been selected.
Elapsed time (in minutes:seconds) of the MP3 file currently in
play.
Tempo va r i ation
This parameter only appears when an MP3 file has been selected.
Variation of the original MP3 file’s tempo, inside a range of
±30% of the original tempo. When Tempo is changed, MP3 files
are smoothly accelerated or slowed down (inside a range of
±30% of the original tempo). This may seem trivial, but it is
really rocket-science instead, and it is made possible by Korg
sophisticated time-stretching algorithms.
Reference
A Jukebox file (file extension: *.JBX) can be
assigned to the Player, but its name will not be
Page 78

74
Song Play operating mode
Main page (Normal view)
Selected Style
Selected Performance or STS
Sound
name
Track name
Track’s octave transpose
Sound bank’s
icon
Track status
Volume panel
Tab s
Style area
Currently selected Style. You can select a Style while playing
Songs, to have it ready when switching to Style Play mode. Also,
this lets you change the Pads and STSs (both are recalled by
selecting a Style).
Touch the Style name to open the Style Select window. As an
alternative, use the STYLE button in the SELECTION section of
the control panel.
Performance/STS area
This is where the Performance or STS name is shown.
Selected Performance or STS
This is the latest selected Performance (PERF) or Single Touch
Setting (STS).
Touch the name to open the Performance Select window. As an
alternative, use the PERFORMANCE section to select a different
Performance.
To select a different STS from the latest selected Style, use the
four STS buttons under the display.
For more information about the Sound Select window, see
“Sound Select window” on page 7.
Keyboard track octave transpose
Non editable. Octave transpose of the corresponding track. To
individually edit the octave transpose for each track, go to the
“Mixer/Tuning: Tuning” edit page of the Song Play mode (see
“Mixer/Tuning: Tuning” on page 22 for more details).
You can also transpose all Upper tracks by using the UPPER
OCTAVE buttons on the control panel.
Keyboard track name
Non editable. Name of the corresponding track:
Abbreviation Track Hand
UP1 Upper 1 Right hand
UP2 Upper 2
UP3 Upper 3
LOW Lower Left hand
Sound bank’s icon
This icon shows the bank the current Sound belongs to.
Keyboard track status
Play/mute status of the current track. Touch this icon to change
the status.
No icon Play status. The track can be heard.
Mute status. The track cannot be heard.
Keyboard tracks area
This is where Keyboard tracks are shown.
Sound name
Name of the Sound assigned to the corresponding Keyboard
track.
• If the track is already selected (white background), touch the
Sound name to open the Sound Select window.
• If the track is not selected (dark background), first select it,
then touch the Sound name to open the Sound Select window.
You can also open the Sound Select window by using the
SOUND button in the SELECTION section of the control panel.
Panels
The lower half of the main page contains the various panels, you
can select by touching the corresponding tabs. See more information in the relevant sections, starting from page 75.
Page 79

Song Play operating mode
STS Name panel
STS Name panel
Virtual sliders
Track status icons
Select this panel to see the name of the four available STSs. See
“STS Name panel” on page 15 for details.
Volume panel
75
This allows for leaving the track status unchanged even when
playing a different Standard MIDI File. You can leave, for example, the bass track in mute, and let your bassist play it live for the
whole show.
However, an exception to the above is when reading a Standard
MIDI File created with a Pa-Series instrument. These files do
include special commands to force the Play/Mute status of each
track.
Track names
Under the sliders, a label for each track is shown. Use
the TRACK SELECT button to switch between the Key-
board Traks and the Song Tracks 1-8 and Song Tracks
9-16 views.
Touch the Volume tab to select this panel. This is where you can
set the volume of each track, and mute/unmute tracks.
Note: The volume of the Keyboard tracks can be saved to a Performance or STS, while the Song tracks volume cannot be memorized.
Changing the tracks’ volume and play/mute status
You can change the volume and play/mute status of each track in
the same way seen for the Style (see “Volume panel” on page 15
for details).
Abbreviation Track
UPPER1…3 Upper tracks. Volume and play/mute status memo-
rized into a Performance or STS.
LOWER Lo wer trac k. Volume and play/mute status memorized
into a Performance or STS.
T01…T16 Song tracks. Volume memorized into a Standard MIDI
File. Play/mute status memorized as a general setting.
Pad panel
Select this panel to see which Hit or Sequence Pads are assigned
to the four Pads. See “Pad panel” on page 17 for details.
Split panel
Reference
Select this panel to adjust the split point for the Keyboard tracks.
See “Split panel” on page 18 for details.
Saving the tracks’ volume and play/mute status
Each set of tracks can be saved into a different structure. This
allows for a great flexibility when mixing Keyboard and Song
tracks through the use of Performances, STSs and Standard
MIDI Files.
•The status of Keyboard tracks can be saved to a Performance
or STS (see “Write Performance” on page 32 and “Write Single
Touch Setting” on page 32).
• The status of the Song tracks can saved as a general setting in
the Global > Mode Preferences > Song & Sequencer page (see
“Save Trk & FX” on page 145).
Page 80

76
Song Play operating mode
Sub-Scale panel
Song list Jukebox fileSelected Song
Sub-Scale panel
Select this panel to select a secondary scale for the Keyboard
tracks. See “Mixer/Tuning: Sub Scale” on page 22 for details.
Song list
Use this list to browse through the Songs in the Jukebox list. Use
the scrollbar to scroll the list.
Selected Song
Name of the Song currently in play. You can select a different
Song from the list, and touch the Select button in the display to
select it for playback.
Select button
Touch this button to select the Song highlighted in the list, and
assign it to the player. If a Song is already playing, it will be
stopped, and the selected Song will start playing back.
Jukebox file
Name of the selected Jukebox file. To edit this file, see “Jukebox
Editor” on page 81.
Jukebox panel
When a Jukebox (JBX) file is assigned to the player, you can use
the list shown in this panel to browse the Jukebox list, and touch
the Select button in the display to select a Song to play. This way,
you can select any Song in the list as your starting Song, and
manually change the order of the Songs to play.
Note: This panel is only available after loading a Jukebox file.
Hint: To create or edit a Jukebox file, go to the Jukebox Edit page
(see page 81). A quick way to create a Jukebox list is to touch the
“Play All” button in the Song Select window (see page 10).
Wa r ni n g : If you delete a Song included in the Jukebox list currently in play, the player will stop, and the “No Song” message will
appear. At this point, you can select the JukeBox tab to open the
Jukebox panel, and select a different Song.
As an alternative, you can select the next Song by pressing SHIFT
+ >> (FAST FORWARD) in the PLAYER section of the control
panel, then press (PLAY/STOP) in the PLAYER section
again.
Transport controls for the Jukebox
When you select a Jukebox file, the player’s transport controls
behave in a slightly different way than with single Songs.
<< and >> Pressed alone, these buttons are the Rewind and
Fast Forward commands.
Keep the SHIFT button pressed, and press
these buttons to scroll to the previous or next
Song in the Jukebox list.
(HOME) Returns to measure 1 of the current Song.
(PLAY/STOP)
Starts or stops the current Song. When you stop
the Song, it is stopped at the current position.
Press HOME to go back to measure 1 of the current Song.
If the Jukebox panel is open, you can select the
Song from which to start. See “Jukebox panel”
above.
Page 81

77
Song Play operating mode
Edit menu
Edit menu
From any page, press the MENU button to open the Song Play
edit menu. This menu gives access to the various Song Play edit
sections.
When in the menu, select an edit section, or press EXIT or
SONG PLAY to exit the menu.
When in an edit page, press the EXIT or SONG PLAY button to
go back to the main page of the Song Play operating mode.
Each item in this menu corresponds to an edit section. Each edit
section groups various edit pages, that may be selected by touching the corresponding tab on the lower part of the display.
Note: Some of the edit parameters are only meant for realtime. As
a general rule, Keyboard track parameters can be saved to a Performance or SongBook STS, while Song track’s Play/Mute status
and FX settings can be saved as a general setting in the Global >
Mode Preferences > Song & Sequencer page (see “Save Trk & FX”
on page 145).
Edit page structure
All edit pages share some basic elements, already described for
the Style Play mode (see “Edit page structure” on page 19 for
details).
Mixer/Tuning: Volume/Pan
This page lets you set the volume and pan for each of the Keyboard or Song tracks.
Note: The play/mute status of a Song track may be reset when
selecting a Song made on a Pa-Series instrument.
Use the TRACK SELECT button to switch from the Keyboard to
the Song tracks, and vice versa.
Parameters
The parameters shown in this page are the same already seen for
the Style Play mode. See “Mixer/Tuning: Volume/Pan” on
page 19 for details.
Mixer/Tuning: FX Send
Pa600 is equipped with two groups of effect processors (A and
B). In Song Play mode, these groups can be used to process Keyboard, Pad and MIDI tracks.
• Keyboard tracks always use the effects of the FX B group.
• Pad tracks always use the effects of the FX A group.
• Standard MIDI Files and Karaoke files can only use the
effects of the FX A group.
• Standard MIDI Files created on a Pa-Series instrument (in
Sequencer mode) can use effects of the FX A and B groups.
Choosing and editing the effects is done in the dedicated Effect
section (see “Effects: A/B FX Configuration” on page 79).
In case you do not want to hear the direct signal, just set the Dry
parameter to Off (see the “Dry” parameter above).
You can assign to the Master FXs any kind of available effects,
but we suggest you assign the effects based on this scheme:
A-Master 1 Reverb processor for the Song tracks.
A-Master 2 Modulating FX processor for the Song tracks.
B-Master 1 Reverb processor for the Keyboard tracks.
B-Master 2 Modulating FX processor for the Realtime (Key-
board) tracks.
Reference
Page 82

78
Song Play operating mode
Mixer/Tuning: EQ Gain
Use the TRACK SELECT button to switch from Keyboard to
Song tracks, and vice-versa.
Note: When you stop, then start the Song again, or select a different Song, the default Song track settings are selected again. You
can, however, pause the Song, change the effects, then exit from
pause and start the Song again. Edit the Song in Sequencer mode
to permanently change the effects.
Note: Track FX setting can be saved as a general setting in the
Global > Mode Preferences > Song & Sequencer page (see “Save
Trk & FX” on page 145). This will help adapting the Pa600’s sound
to personal taste for any Standard MIDI File (excluding those
saved by a Pa-Series instrument, that may override the general
preferences).
Parameters
The parameters shown in this page are the same already seen for
the Style Play mode. See “Mixer/Tuning: FX Send” on page 20
for details.
Mixer/Tuning: EQ Gain
In this page you can set the three-band equalization (EQ) for
each individual track.
Use the TRACK SELECT button to switch from the Keyboard to
the Song tracks, and vice-versa.
Hint: Track EQ can be saved as a general setting in the Global >
Mode Preferences > Song & Sequencer page (see “Save Trk & FX”
on page 145). This will help adapting the Pa600's sound to personal
taste for any Standard MIDI File you will ever play (excluding those
saved by a Pa-Series instrument, that may override the general
preferences). Need a lighter Bass track? Save the right equalization,
and the Bass will stay light with all the subsequent Songs.
Parameters
The parameters shown in this page are the same already seen for
the Style Play mode. See “Mixer/Tuning: EQ Gain” on page 21
for details.
Page 83

79
Song Play operating mode
Mixer/Tuning: EQ Control
FX
group
Mixer/Tuning: EQ Control
This page lets you reset or bypass track equalization, programmed in the previous page.
Use the TRACK SELECT button to switch from the Keyboard to
the Song tracks, and vice-versa.
Parameters
The parameters shown in this page are the same already seen for
the Style Play mode. See “Mixer/Tuning: EQ Control” on page 21
for details.
Mixer/Tuning: Tuning
Parameters in this page let you set various tuning settings. All
parameters in this page are the same found in Global mode. See
“Mixer/Tuning: Tuning” on page 22 for details.
Effects: A/B FX Configuration
This page allows you to select the effects for the A (Song) and B
(Keyboard) FX groups. You can use the “FX A” and “FX B” side
tabs to switch from one group to the other one. (Songs created in
Sequencer mode on a Pa-Series instrument can also use the B FX
group).
The effect types and the FX matrix are the same seen for the
Style Play mode (see “Effects: A/B FX Configuration” on
page 24).
Note: The default effect settings can be saved as a general setting in
the Global > Mode Preferences > Song & Sequencer page (see
“Save Trk & FX” on page 145).
Note: When you stop the Song, or select a different Song, the
default effects are selected again. You can, however, stop the Song,
change the effects, then start the Song again with the new effects.
Edit the Song in Sequencer mode to permanently change the
effects.
Parameters
The parameters shown in this page are the same already seen for
the Style Play mode. See “Effects: A/B FX Configuration” on
page 24 for details.
Parameters
The parameters shown in this page are the same already seen for
the Style Play mode. See “Mixer/Tuning: Tuning” on page 22 for
details.
Note: Song track values edited in this page are not saved, and are
only intended for realtime use.
M.T. (Modulating Track)
Source track for modulating MIDI messages. You can modulate
an effect parameter with a MIDI message generated by an internal physical controller, or a MIDI message coming from a Song
track.
Reference
Page 84

80
Song Play operating mode
Effects: Master 1, 2
Selected effect
FX parameters
FX
group
Effects: Master 1, 2
These pages contain the editing parameters for the effect processors. Here is an example of the FX A page, with the Reverb Hall
effect assigned.
Parameters
The parameters shown in this page are the same already seen for
the Style Play mode. See “Effects: Master 1, 2” on page 25 for
details.
Track Controls: Easy Edit
These parameters let you “fine-tune” edit parameters for Sounds
assigned to the tracks.
Easy Sound Edit parameters
The parameters shown in this page are the same already seen for
the Style Play mode. See “Track Controls: Easy Edit” on page 27
for details.
Note: Song track values edited in this page are not saved, and are
only intended for realtime use.
Keyboard/Ensemble: Key/Velocity Range
These parameters let you select a note and velocity range for the
Keyboard tracks.
Parameters
The parameters shown in this page are the same already seen for
the Style Play mode. See “Keyboard/Ensemble: Key/Velocity
Range” on page 28 for details.
Track Controls: Mode
These parameters let you set the Internal/External, and the Poly/
Mono status of Song tracks.
Parameters
The parameters shown in this page are the same already seen for
the Style Play mode. See “Track Controls: Mode” on page 25 for
details.
Note: These parameters can be saved as a general setting in the
Global > Mode Preferences > Song & Sequencer page (see “Save
Trk & FX” on page 145).
Track Controls: Drum Edit
These parameters let you adjust the volume and edit the main
parameters for each percussive instrument family.
Drum Edit parameters
The parameters shown in this page are the same already seen for
the Style Play mode. See “Track Controls: Drum Edit” on
page 26 for details.
Note: Song track values edited in this page are not saved, and are
only intended for realtime use.
Keyboard/Ensemble: Ensemble
This page lets you program the Ensemble function.
Parameters
The parameters shown in this page are the same already seen for
the Style Play mode. See “Keyboard/Ensemble: Ensemble” on
page 29 for details.
Keyboard/Ensemble: Keyboard Control
These parameters let you set parameters for the Keyboard tracks.
Parameters
The parameters shown in this page are the same already seen for
the Style Play mode. See “Keyboard/Ensemble: Keyboard Control” on page 30 for details.
Pad/Switch: Pad
This page lets you select a different hit sound or sequence for
each of the four PAD buttons.
Parameters
The parameters shown in this page are the same already seen for
the Style Play mode. See “Pad/Switch: Pad” on page 30 for
details.
Page 85

81
Song Play operating mode
Pad/Switch: Assignable Switch
Pad/Switch: Assignable Switch
This page lets you select a different function for each of the
ASSIGNABLE SWITCH buttons.
Parameters
The parameters shown in this page are the same already seen for
the Style Play mode. See “Pad/Switch: Switch” on page 31 for
details.
Jukebox Editor
The Jukebox function lets you play a list of Songs (127 max), at
the simple touch of a button. You can play a Jukebox file by
assigning it to the Player, after having selected it in the Song
Select page, just as if it was an ordinary Song (see “Jukebox
panel” on page 76).
In this page you can create, edit and save a Jukebox file. A Jukebox list can contain Standard MIDI Files, Karaoke™ files, and
MP3 files.
If a Jukebox file is already selected, you will enter this page with
that file ready to be edited. Otherwise, you will enter this page
with an empty list.
To create a new Jukebox file, touch Del All to remove all Songs
from the current list. Add new Songs, then touch Save and enter
a different name before confirming. A new Jukebox file will be
saved to the storage device.
Move Up/Down
Use these button to move the selected item up or down in the
list.
Add
Adds a Song at the end of the current list. You can add up to 127
Songs to a list. When this button is pressed, a standard file selector opens up in the display.
Note: A Jukebox list can include only Songs contained in the same
folder.
Hint: Instead of a single Song, you can select a Jukebox file, and
add its whole content to the current Jukebox list.
Insert
Inserts a Song at the current position (i.e., between the selected
item and the preceding one). All subsequent Songs are moved to
the next higher-numbered slot. You can add up to 127 Songs to a
list.
Note: A Jukebox list can include only Songs contained in the same
folder.
Hint: Instead of a single Song, you can select a Jukebox file, and
insert its whole content to the current Jukebox list.
Reference
Delete
This command lets you delete the selected Song from the list.
Del All
Select this command to delete the whole Jukebox list.
Page 86

82
Song Play operating mode
Page menu
Save
Touch this button to save the Jukebox file. The Save Jukebox File
dialog box appears, allowing you to edit the name and save your
file.
Touch the (Text Edit) button to open the Text Edit window,
and edit the name.
If you are editing an existing list, and do not change its name, the
old file is overwritten. If you change it, a new file will be created
in the storage device.
If you are saving a new list, the “NEWNAME.JBX” name is automatically assigned, and you can edit it.
Note: You can save your “.JBX” file only in the same folder as the
Song files included in the list.
Page menu
Touch the page menu icon to open the menu. Touch a command
to select it. Touch anywhere in the display to close the menu
without selecting a command.
Write Performance
Select this command to open the Write Performance dialog box,
and save most of the current control panel settings to a Performance.
See “Write Performance dialog box” on page 33 for more information.
Save Song Marker
Select this command to save the markers created in the corresponding player (see “Markers page” on page 186).
Export Jukebox List
Only available when a Jukebox list is selected. Select this command to save the current Jukebox list as a text file to a storage
device. Here is how it works.
1. While a Jukebox file is assigned to the player, select the
Export Jukebox List command from the page menu.
2. A dialog box will appear, asking you to select either the
internal disk or a storage device connected to one of the
USB Host ports.
3. Select an option, and touch OK to confirm.
Note: When saved, the text file will be named after the selected
Jukebox file. For example, a Jukebox file named “Dummy.jbx” will
generate a “Dummy.txt” file. A new, unnamed Jukebox file will
generate a “New_name.txt” file. If a file with the same name
already exists on the target device, it will be overwritten without
waiting for any confirmation.
The list will include the progressive number assigned to each Song,
the file names, the total number of files in the list.
For the correct display and printing of the list on a personal computer, use a fixed size (i.e., non-proportional) character in your
text editor.
Page 87

83
Song Play operating mode
Page menu
Solo Track
Select the track of the current Player to be soloed, and check this
item. You will hear only the selected track, and the ‘Solo’ warning
will flash on the page header.
Uncheck this item to exit the Solo function.
The Solo functions works in a slightly different way, depending
on the selected track:
• Keyboard track: The selected Keyboard track is the only track
you can hear when playing on the keyboard. All other Keyboard
tracks are muted. Song tracks are left in play status.
• Song track: The selected track is the only Song track you can
hear. All other Song tracks are muted. Keyboard tracks are left in
play status.
Keep the SHIFT button pressed and touch one of the
tracks to solo it. Do the same on a soloed track to deactivate the
Solo function.
Copy/Paste FX
Use this command to copy a single effect, or both effects of an
FX group (A or B). See “Copy/Paste FX” on page 33 for detailed
instructions.
Easy Mode
Easy Mode allows you to use the Style Play and Song Play modes
with an easier-to-use user interface. It is recommended to beginners, and to professionals alike that do not want to deal with the
extra parameters of the Advanced mode.
At any time, you can manually turn the Easy Mode on/off with
the Easy Mode command in the page menu of the Style Play and
Song Play modes.
Reference
Page 88

84
Sequencer operating mode
Standard MIDI Files and MP3
Song area Page header
Page menu icon
Selected
track info
area
Sounds
area
Track volume/status area
Operating mode Master Transpose (in
semitones)
Sequencer operating mode
The Sequencer operating mode is the full-featured onboard
sequencer, where you can create a Song from scratch, or edit it.
You can also use this mode to edit the initial parameters of a
Standard MIDI File, either made with an external sequencer or
with Pa600’s own sequencer.
You can save the new or edited Song as a Standard MIDI File
(SMF, i.e., a file with the “.MID” extension), and play it back
either in Song Play or Sequencer mode – or on any external
sequencer.
While in Sequencer mode, use the PLAYER transport controls to
play back the Song.
Standard MIDI Files and MP3
Sequencer Play - Main page
Press the SEQUENCER button to access this page from another
operating mode. In this page you can load a Song, and play it
back using the PLAYER transport controls.
Note: When switching from Style Play to Sequencer mode, the
Sequencer Setup is automatically selected, and various track
parameters may change.
To return to this page from any of the Sequencer edit pages,
press the EXIT or SEQUENCER button.
To switch between Song tracks 1-8 and 9-16, use the TRACK
SELECT button.
The Songs and the Standard MIDI File format
The native Song format for Pa600 is the Standard MIDI File
(“.MID” file).
When saving a Song as a SMF, a setup measure is automatically
inserted at the beginning of the Song. This measure contains
various Song initialization parameters.
When an SMF is loaded, the setup measure is automatically
removed.
Sequencer mode and the MP3
While in Sequencer mode, you cannot load nor record MP3
files. This mode only allows for editing of the Standard MIDI
Files.
Page header
This line shows the current operating mode and transposition.
Operating mode name
Name of the current operating mode.
Master Transpose
Master transpose value in semitones. This value can be changed
using the TRANSPOSE buttons on the control panel.
Note: Transpose may be automatically changed when loading a
Standard MIDI File generated with an instrument of the Korg PaSeries.
Page menu icon
Touch the page menu icon to open the menu. See “Page menu”
on page 105 for more information.
Page 89

85
Sequencer operating mode
Sequencer Play - Main page
Song name
Tem po
Measure number
Beat counter
Track name
Sound name
Sound bank
Program Change sequence
Song track octave transpose icon
Sound bank’s icon
Song area
This is where the Song name is shown, together with its tempo
and meter (time signature) parameters, and the current measure.
Song name
Displays the name of the selected Song. “NEWSONG” means
that a new (blank) Song is selected, and you can record it.
Touch the Song name to make the Song Select window appear,
allowing for selection of a different Song (see “Song Select window” on page 9).
To select a Song, you can also press the SONG button in the
SELECTION section of the control panel. Press SONG a second
time to select a Song by dialing in its ID number (see “Selecting a
Song by its ID number” on page 10).
Note: Only Standard MIDI Files can be loaded. MP3 files cannot
be loaded in Sequencer mode.
Selected track info area
This line lets you see the Sound assigned to the selected track.
Not only it is shown on the main page, but also in several edit
pages.
Track n ame
Name of the selected track.
Sound name
Sound assigned to the selected track. Touch anywhere in this
area to open the Sound Select window, and select a different
Sound.
Sound bank
Bank the selected Sound belongs to.
Program Change
Program Change number sequence (Bank Select MSB, Bank
Select LSB, Program Change).
Sounds area
This area lets you see Sounds and octave transposition for the
eight tracks currently displayed.
Meter
Current meter (time signature).
Measure number
Current measure number.
Te mp o
Metronome Tempo. Select this parameter and use the TEMPO
buttons to change Tempo. As an alternative, when a different
parameter is selected, or you are in a different page, keep the
SHIFT button pressed and use the DIAL to change Tempo for
the sequencer.
Start from
When checked, the measure shown by this parameter is a temporary start point of the song, instead of measure 1. When you
press the (HOME) button, or use the << (REWIND) button
to go back to the beginning, the Song returns to this point.
Tempo (Tempo mode)
Use this menu to select the Tempo change mode.
Manual In this mode, you can change Tempo by using the
Auto Tempo recorded in the Song will be used.
TEMPO buttons. The Song will be played back
using the manually selected tempo.
Song track octave transpose
Non editable. Octave transpose of the corresponding track. To
edit the octave transpose, go to the “Mixer/Tuning: Tuning” edit
page (see page 22 for programming information).
Sound bank’s icon
This picture illustrates the bank the current Sound belongs to.
Touch an icon a first time to select the corresponding track
(detailed information are shown on the Selected Track Info area,
see above). Touch it a second time to open the Sound Select window.
Reference
Page 90

86
Sequencer operating mode
Entering Record mode
Virtual sliders
Track volume/status area
This area is where you can set the volume of each Song track,
and mute/unmute tracks.
Volume and virtual sliders
Drag the sliders to adjust the volume of the corresponding
tracks. You can also change the volume by touching a slider and
using the VALUE DIAL.
Entering Record mode
To enter Record mode, press the RECORD button while you are
in Sequencer mode. The following dialog box will appear:
Use the TRACK SELECT button to switch between Song Tracks
1-8 and Song Tracks 9-16,
Track s tatu s icon
Play/mute status of the current track. Select the track, then touch
this area to change the track status. The status of Song tracks is
saved when saving the Song.
Play status. The track can be heard.
Mute status. The track cannot be heard.
Track n ames
Under the sliders, a label for each track is shown. Use the
TRACK SELECT button to switch between tracks 1-8 and 9-16.
Abbreviation Track
T01…T16 Song tracks. Volume memorized into a Standard MIDI
File. Play/mute status memorized into the Standard
MIDI File as well, and can be read in Song Play mode.
Select one of the three available recording options and touch OK
(or Cancel if you don’t want to enter Record mode).
Multitrack Sequencer
Full-featured sequencer. Select this option for
classic multitrack recording. (See “Record mode:
Multitrack Sequencer page” on page 87).
Backing Sequence (Quick Record)
Easy way of recording. Just play with Styles, and
record your realtime performance.
Step Backing Sequence
Step-record. Edit chords and controls for the
Style. Very useful if you are not a keyboard player.
Page 91

Sequencer operating mode
Record mode: Multitrack Sequencer page
Record mode: Multitrack Sequencer page
Page header Page menu icon
Selected
track
info area
Sounds
area
Tracks volume/status area
Recording parameters area
Page sub-header
Song name Beat counter Measure numberFree m emory %
No quantiza-
tion
1/16
1/8
While in Sequencer mode, press the RECORD button and select
the “Multitrack Sequencer” option. The Multitrack Sequencer
page appears.
87
Overdub The newly recorded events will be mixed to any
existing events.
Overwrite The newly recorded events will replace any exist-
ing events.
Auto Punch Recording will automatically begin at the “Start”
position, and stop at the “End” position.
Note: The Auto Punch function will not work on
an empty Song. At least one track must already be
recorded.
PedalPunch Recording will begin when pressing a pedal set to
the “Punch In/Out” function, and will finish
when pressing the same pedal again.
Note:
The Pedal Punch function will not work on an
empty Song. At least one track must already be recorded.
Start from
When checked, the measure shown by this parameter is a temporary start point of the song, instead of measure 1. When you
press the (PLAY/STOP) button to stop recording, or use
the << (REWIND) button to go back to the beginning, the Song
returns to this point.
See “Multitrack recording procedure” on page 88 for information on the record procedure.
Page header
See “Page header” on page 84.
Page menu icon
See “Page menu icon” on page 84.
Page sub-header
This area shows some performing info on the Song.
Song name
Name of the Song in record.
Free memory %
Percentage of remaining memory available for recording.
Beat counter
This indicator shows the current beat inside the current measure.
Measure number
Current measure you are recording.
Recording parameters area
Rec mode (Recording mode)
Set this parameter before starting record, to select a recording
mode.
Resolution
Use this parameter to set the quantization during recording.
Quantization is a way of correcting timing errors; notes played
too soon or too late are moved to the nearest axis of a rhythmic
“grid”, set with this parameter, thus playing perfectly in time.
High No quantization applied.
(1/32)… (1/8)
Grid resolution, in musical values. For example,
when you select 1/16, all notes are moved to the
nearest 1/16 division. When you select 1/8, all
notes are moved to the nearest 1/8 division.
Reference
Start/End
Start and End locators. These parameters area available only
when the “Auto Punch” recording mode is selected. They set the
starting and ending points of the Punch recording.
Te mp o
Select this parameter, and use the TEMPO or VALUE controls to
set the Tempo value.
Note: You can always change the Tempo, when other parameters
are selected, by keeping the SHIFT button pressed, and rotating the
VALUE DI A L.
Page 92

88
Sequencer operating mode
Record mode: Multitrack Sequencer page
Meter
This is the basic meter (or time signature) of the Song. You can
edit this parameter only when the Song is empty, i.e., before you
begin recording anything. To insert a meter change in the middle of the Song, use the “Insert Measure” function (see
page 103).
Tempo (Tempo mode)
This parameter sets the way tempo events are read or recorded.
Manual Manual reading. The latest manual Tempo setting
(made using the TEMPO buttons) is considered
the current Tempo value. No Tempo change
events will be recorded. This is very useful when
you want to record the Song at a much slower
speed than the actual Tempo.
Auto Auto reading. The Sequencer plays back all
recorded Tempo events. No Tempo change events
are recorded.
Record All Tempo changes made during recording will
be recorded to the Master Track.
Note: Tempo is always recorded in overwrite mode
(old data is replaced by the new data).
Selected track info area
This line lets you see the Sound assigned to the selected track.
See “Selected track info area” on page 85 for more information.
Sounds area
This area lets you see Sounds and octave transposition for the
eight tracks currently displayed. See “Sounds area” on page 85
for more information.
Track volume/status area
This area is where you can set the volume of each Song track,
and change track status. See “Track volume/status area” on
page 86.
Track status icons
Play/mute/record status of the current track. Select the track,
then touch this area to change its status.
Play status. The track can be heard.
Mute status. The track cannot be heard.
Record status. After pressing (PLAY/
STOP) to start recording, the track will receive
notes from the keyboard and the MIDI IN or
USB Device connector.
Multitrack recording procedure
Here is the general procedure to follow for the Multitrack
Recording.
1. Press the SEQUENCER button to enter Sequence mode.
2. Press the RECORD button, and select the “Multitrack
Sequencer” option to enter the Multitrack Record mode.
Now you can prepare your recording parameters. (For
more details, see “Record mode: Multitrack Sequencer
page” on page 87).
3. Be sure the Overdub or Overwrite recording options is
selected (see “Rec mode (Recording mode)” on page 87).
4. Set the Tempo. There are two ways of changing Tempo:
• Use the TEMPO buttons to change the tempo
• Touch the “Tempo” parameter, and use the VALUE DIAL
to change Tempo.
5. Use the TRACK SELECT button to switch between Song
Tracks 1-8 and Song Tracks 9-16, and assign the desired
Sound to each track (see “Sound bank’s icon” on page 85).
6. Select the track to be recorded. Its status icon will automat-
ically change to Record (see “Track status icons” on
page 88).
7. If this is a second-pass recording, use the “Start from”
parameter to enter a measure where you want to start
recording.
8. Press the METRO button to turn the metronome on, and
start practicing.
9. Press (PLAY/STOP) to start recording. After a 1-bar
precount, the recording actually begins. After the precount,
play freely.
• If you selected the Auto Punch recording mode, the
recording will begin only when reaching the Start point.
• If you selected the Pedal Punch recording mode, press the
pedal when you want to begin recording. Press it again to
finish recording.
Note: The Punch functions will not work on an empty Song.
At least one track must already be recorded.
10. When finished recording, press (PLAY/STOP) to
stop the sequencer. Select a different track, and go on
recording the whole Song.
11. When finished recording the new Song, either press the
RECORD button, or select the “Exit from Record” command from the page menu (see page 106).
Wa rn i n g : Save the Song to a storage device, to avoid losing it
when turning the instrument off.
Note: When exiting the Record mode, the Octave Transpose
is automatically reset to “0”.
12. If you wish, edit the new Song, by pressing the MENU but-
ton, and selecting the various edit pages.
Page 93

Sequencer operating mode
Record mode: Step Record page
Record mode: Step Record page
Page header Note parameters
Step
time
Buttons
Page sub-header
Event list
The Step Record allows you to create a new Song by entering single notes or chords to each track. This is very useful when transcribing an existing score, or needing a higher grade of detail,
and is particularly suitable to create drum and percussion tracks.
To access this page, select the “Overdub Step Recording” or
“Overwrite Step Recording” command from the page menu.
In Overdub Step Recording mode you will add to existing
events, while in Overwrite Step Recording mode you will overwrite all existing events.
See “Step Record procedure” below, for information on the
record procedure.
Page header
89
Note parameter area
Meter
Meter (Time Signature) of the current measure. This parameter
cannot be edited. You can set a Meter change by using the Insert
function of the Edit menu, and inserting a new series of measures with a different Meter (see “Song Edit: Cut/Insert Measures” on page 103).
Free Memory
Available memory for recording.
Duration
Relative duration of the inserted note. The percentage is always
referred to the step value.
50% Staccato.
85% Ordinary articulation.
100% Legato.
Veloc ity
Set this parameter before entering a note or chord. This will be
the playing strength (i.e., velocity value) of the event to be
inserted.
Kbd Keyboard. You can select this parameter, by turn-
ing the VALUE DIAL all counter-clockwise.
When this option is selected, the playing strength
of the played note is recognized and recorded.
1…127 Velocity value. The event will be inserted with
this velocity value, and the actual playing
strength of the note played on the keyboard will
be ignored.
This line shows the current operating mode.
Page sub-header
Tra ck
Name of the selected track in record.
Tr01…Tr16 Song track.
Pos (Position)
This is the position of the event (note, rest or chord) to be
inserted.
Step Time area
Step Time
Length of the event to be inserted.
… Note value.
Standard (–) Standard value of the selected note.
Dot (.) Augments the selected note length by one half of
its value.
Triplet (3) Triplet value of the selected note.
Event list area
List of inserted events
Previously inserted events. You may delete the last of these
events, and make it ready for a new event, by touching the Back
button in the display.
Position Position where the event has been inserted. The
value is shown in the “measure.beat.tick” format.
Note/RX Noise
Name of the inserted Note or RX Noise. When
entering a chord, a series of dots is shown after
the name of the root note.
Vel. Velocity of the inserted event.
Dur.% Percentage duration of the inserted event.
Buttons
Rest
Touch this button to insert a rest.
Tie
Touch this button to tie the note to be inserted to the previous
one. A note with the same pitch, and the specified length, will be
created, and tied to the previous one.
Reference
Page 94

90
Sequencer operating mode
Record mode: Step Record page
Step Time =
Step Time =
On
Press E and C
On
Press G
Off
Off
Release G and C
Release E (continue holding C)
Back
Goes to the previous step, erasing the inserted event.
Next M. (Next Measure)
Goes to the next measure, and fills the remaining space with
rests.
Done
Exits the Step Record mode.
Step Record procedure
Here is the general procedure to follow for the Step Recording.
1. Press the SEQUENCER button to enter Sequencer mode.
2. Press the RECORD button, and select the “Multitrack
Sequencer” option to enter the Multitrack Record mode.
From the page menu, select the “Overdub Step Recording”
or “Overwrite Step Recording” mode. At this point, the
Step Record window will appear in the display.
3. The next event will be entered at the position shown by the
Pos indicator in the upper right corner of the display.
• If you don’t want to insert a note at this position, insert a
rest instead, as shown in step 5.
• To jump to the next measure, filling the remaining beats
with rests, touch the Next M. button in the display.
4. To change the step value, use the Step Time parameters.
5. Insert a note, rest or chord at the current position.
• To insert a single note, just play it on the keyboard. The
inserted note length will match the step length. You may
change the velocity and relative duration of the note, by
editing the Velocity and Duration parameters. See “Velocity” and “Duration” on page 89.
• To insert a rest, just touch the Rest button in the display.
Its length will match the step value.
• To tie the note to be inserted to the previous one, touch
the Tie button in the display. A note will be inserted, tied to
the previous one, with exactly the same pitch. You don’t
need to play it on the keyboard again.
• To insert a chord or a second voice, see “Chords and second voices in Step Record mode” on page 90.
6. After inserting a new event, you may go back by touching
the Back button in the display. This will delete the previously inserted event, and set the step in edit again.
7. When finished recording, touch the Done button in the
display. A dialog box appears, asking you to either cancel,
discard or save the changes.
8. From the main page of the Multitrack Recording mode,
either select the “Exit from Record” command from the
page menu, or press the RECORD button to exit the Record
mode.
9. While in the main page of the Sequencer mode, you may
press the (PLAY/STOP) button in the PLAYER section to listen to the Song, or select the Save Song command
from the page menu to save the Song to a storage device
(see “Save Song window” on page 106).
Chords and second voices in Step Record mode
You are not obliged to insert single notes in a track. There are
several ways to insert chords and double voices. Lets look at
some.
Entering a chord. Simply play a chord instead of a single note.
The event name will be the first note of the chord you pressed,
followed by the “…” abbreviation.
Entering a chord made of notes with different velocity values.
You can make the upper or lower note of a chord, for example,
louder than the remaining ones, to let the most important stand
out from the chord. Here is how to insert a three-note chord:
1. Edit the first note’s Velocity value.
2. Press the first note and keep it pressed.
3. Edit the second note’s Velocity value.
4. Press the second note and keep it pressed.
5. Edit the third note’s Velocity value.
6. Press the third note, then release all notes.
Entering a second voice. You can insert passages where one
note is kept pressed, while another voice moves freely.
Ex. 1:
If you touch Cancel, exit is canceled, and you can continue
editing. If you choose No, changes are not saved, and the
Step Record window is closed. If you choose Yes, changes
are saved, and the Step Record window is closed.
Page 95

Sequencer operating mode
Record mode: Backing Sequence (Quick Record) page
Ex.2:
Step Time = Step Time = Step Time =
Press F and C
Press G
(continue holding C)
OffOn On
Release F
(continue holding C)
Step Time = Step Time =
Press E
(continue holding C)
OffOn
Release E and C
Step Time = Step Time =
Press D
(continue holding C)
Off On
Release G
(continue holding C)
Step Time =
Off
Release D
(continue holding C)
Step Time = Step Time =
On
Press C
On
Press G (continue holding C)
Off
Release G and C
Tie
Page header Page menu icon
Selected
track
info area
B.S.
groupe
d tracks
area
Track volume/status area
Recording
parameters area
Page sub-header
91
Record mode: Backing Sequence (Quick
Record) page
Backing Sequence (Quick Record) mode allows you to quickly
record your live performance with the backing of the Styles. To
make things easier, just two grouped tracks are provided: Kbd/
Pad (Keyboard and Pads) to record keyboard and pads, and Ch/
Acc (Chords/Accompaniment) to record chords and the accom-
paniment provided by the Style.
While in Sequencer mode, press the RECORD button and select
the “Backing Sequence (Quick Record)” option. The Backing
Sequence (Quick Record) page appears.
Ex.3:
See “Backing Sequence (Quick Record) recording procedure” on
page 93 for information on the record procedure.
Page header
See “Page header” on page 84. Here, this line also shows the recognized chord.
Page menu icon
See “Page menu icon” on page 84.
Page sub-header
See “Page sub-header” on page 87.
Recording parameters area
Style
This parameter shows the selected Style. Either touch it, or press
the STYLE button in the SELECTION section to open the Style
Select window and select a different Style (see “Style Select window” on page 6).
Free memory
Percentage of remaining memory for recording.
Reference
Page 96

92
Sequencer operating mode
Record mode: Backing Sequence (Quick Record) page
High (no
quantization)
1/16
1/8
Resolution
Use this parameter to set the quantization during recording.
Quantization is a way of correcting timing errors; notes played
too soon or too late are moved to the nearest axis of a rhythmic
“grid”, set with this parameter, thus playing perfectly in time.
High No quantization applied.
(1/32)… (1/8)
Grid resolution, in musical values. For example,
when you select 1/8, all notes are moved to the
nearest 1/8 division. When you select 1/4, all
notes are moved to the nearest 1/4 division.
Chord/Acc Track, Kbd/Pad Track
These parameters let you define grouped track status during
recording. This status is reflected by the big status indicator
above the track sliders.
Play The Backing Sequence track is set to play. If there
are recorded data, they will be heard while
recording the other Backing Sequence track.
Mute The Backing Sequence track is muted. If this
tracks has already been recorded, it will not be
heard during recording of the other Backing
Sequence track.
Rec The Backing Sequence track is in record. All pre-
viously recorded data will be deleted. After press-
ing (PLAY/STOP) to start recording, the
track will receive notes from the keyboard, the
MIDI IN or the USB Device connector.
Chord/Acc: This Backing Sequence track groups all Style tracks,
together with recognized chords and Style controls and Style
Elements selection. After finishing recording, they will be saved
as Song tracks 9-16, as in the following table:.
Kbd/Pad: This Backing Sequence track includes the four Keyboard tracks and the four Pads. After finishing recording, they
will be saved as Song tracks 1-8, as in the following table:
Kbd/Pad track Song track/Channel
Upper 1 1
Upper 2 2
Upper 3 3
Lower 4
Pad 1 5
Pad 2 6
Pad 3 7
Pad 4 8
Te mp o
Metronome Tempo. Select this parameter and use the VALUE
DIAL to change Tempo. You can always change Tempo using the
TEMPO buttons.
Meter
(Non Editable). This parameter shows the meter (or time signature) of the selected Style for reference.
PERF or STS (Performance or STS)
This parameter shows the selected Performance or STS (depending on the latest item selected).
To select a Performance, either touch it, or press one of the PERFORMANCE buttons to open the Performance Select window
and select a different Performance (see “Performance Select window” on page 8).
To select an STS (Single Touch Setting), use the four STS buttons
under the display.
Backing Sequence tracks area
Backing Sequence tracks status indicators
These giant indicators show the status of the Backing Sequence
tracks. They reflect the status of the Kbd/Pad and Ch/Acc
parameters (see “Chord/Acc Track, Kbd/Pad Track” above).
Selected track info area
Chord/Acc track Song track/Channel
Bass 9
Drum 10
Percu ssion 11
Accompaniment 1 12
Accompaniment 2 13
Accompaniment 3 14
Accompaniment 4 15
Accompaniment 5 16
This line lets you see the Sound assigned to the selected track.
See “Selected track info area” on page 85 for more information.
Track volume/status area
This area is where you can set the volume of each single Keyboard track, and mute/unmute tracks.
Sliders (track volume)
Graphical display of each track’s volume.
Page 97

93
Sequencer operating mode
Record mode: Backing Sequence (Quick Record) page
Individual track status icons
While you can use the Kbd/Pad Backing Sequence track to
change the status of all Keyboard tracks at once, you can also
change the status of each separate track. Touch this icon to
change the status of the corresponding individual track.
Play status. The track can be heard.
Mute status. The track cannot be heard.
Track names
Under the sliders, a label for each track is shown.
Abbreviation Track
UPPER1…3 Upper tracks.
LOWE R Lower track.
Backing Sequence (Quick Record) recording procedure
Here is the general procedure to follow for the Backing Sequence
(Quick) Recording.
1. Press the SEQUENCER button to enter the Song mode.
2. Press the RECORD button, and select the “Backing
Sequence (Quick Record)” option to enter the Backing
Sequence (Quick Record) mode. Now you can prepare your
recording parameters. (For more details, see “Record
mode: Backing Sequence (Quick Record) page” on
page 91).
3. The latest selected Style is currently selected. If it is not the
right one, select a different Style to start recording with.
(See “Style Select window” on page 6).
4. The latest selected Performance or STS is currently
selected. If you prefer, select a different Performance or
STS. (See “Performance Select window” on page 8, and
“STS Select” on page 9).
5. Select the status of the Backing Sequence tracks, by using
the Kbd/Pad and Ch/Acc parameters. (Kbd/Pad stays for
Keyboard and Pads; Ch/Acc stays for Chord and Accompaniment, i.e. the Style tracks). To record all you play on the
keyboard, plus the automatic accompaniment, leave their
status to Rec (see “Track status icons” on page 88).
Wa r n in g : Tracks set to REC are automatically overwritten
when starting recording. Set a track to the PLAY or MUTE
status, when you don’t want to delete it. For example, if you
are recording a keyboard part on an existing Style track, set
the Ch/Acc parameter to PLAY, and the Kbd/Pad track to
REC.
6. Start recording by pressing the left (PLAY/STOP)
button (or the START/STOP button, if you want the Style
to start immediately).
•By pressing the left (PLAY/STOP) button (or the
START/STOP button), you can record a keyboard intro
with no Style playing. After a count-in, start recording.
Play a solo intro, then start the auto-accompaniment by
pressing the START/STOP button.
• By pressing the START/STOP button you can start the
Style right at the beginning of the Song.
Since you can use any Style control, you could start with the
usual combinations (INTRO, ENDING…).
Note: While in Backing Sequence mode, you can’t record the
SYNCHRO, TAP TEMPO/RESET, MANUAL BASS, BALANCE controls.
7. Play your music. While recording you can even change the
Style, or stop it by pressing START/STOP or one of the
ENDINGs. While recording you can even start the style
again, by pressing START/STOP.
8. When finished recording your performance, press the
(PLAY/STOP) button in the PLAYER section. You
will go back to the Sequencer Play Main page (see
“Sequencer Play - Main page” on page 84).
At this point, you may press the (PLAY/STOP) button in the PLAYER section to listen to the new Song.
You may also edit the Song by pressing the MENU button
(see “Edit menu” on page 96).
9. Save the song to a storage device (see “Save Song window”
on page 106).
Wa r n in g : The recorded Song will be deleted when turning
the instrument off, switching to the Style Play or Song Play
mode, or entering Record again. If you wish to preserve it,
save the Song to a storage device.
Reference
Page 98

94
Sequencer operating mode
Record mode: Step Backing Sequence page
Parameters area“Soft” transport buttons
Page menu icon
Name Type Extension
Record mode: Step Backing Sequence page
The Step Backing Sequence mode allows you to enter single
chords, to create or edit the Style (Chord/Acc) part of a Song.
This mode lets you enter chords even if you are not a keyboard
player, or fix any error made playing chords or selecting Style
controls, during a Backing Sequence (Quick Record) recording.
In this mode, you can only edit Songs created using the Backing
Sequence (Quick Record) recording mode. When saving a Song
created using the Backing Sequence (Quick Record) recording
mode, all Chord/Acc data is preserved, and can be loaded later,
to be edited again by using the Step Backing Sequence mode.
While in Sequencer mode, press the RECORD button and select
the “Step Backing Sequence” option. The Step Backing Sequence
window appears.
The locator value is shown in the “measure.beat.tick” format.
Measure Measure or bar number.
Beat Divider in the Time Signature ratio (e.g., a quar-
ter in a 3/4 time).
Tick Smallest position value. Both Pa600 internal play-
ers feature a resolution of 384 ticks per quarter.
Style
This is the latest selected Style. To insert a Style change at the
current position, touch the Style name to open the Style Select
window, or follow the standard selecting procedure using the
STYLE button in the SELECTION section.
Note: Any Style Change inserted after the beginning of the measure (i.e., to a position other than Mxxx.01.000) will be effective at
the following measure. For example, if a Style Change event has
been inserted at M004.03.000, the selected Style will be effectively
selected at M005.01.000. (This works exactly as in Style Play
mode).
Note: When inserting a Style Change, you may also insert a
Tempo Change at the same position. A Style Change will not automatically insert the Style’s Tempo.
See “Step Backing Sequence procedure” on page 96 for information on the record procedure.
Page menu icon
Touch the page menu icon to open the menu. See “Step Backing
Sequence page menu” on page 95 for more information.
Parameters area
Side arrow ( )
The small arrow next to a parameter means that its value is effective at the current position. For example, if you are at the
“003.01.000” position, and an arrow lights up next to the Chord
parameter, this means that a chord change happens at the
“003.01.000” position.
Performance
This is the latest selected Performance. Select a Performance to
recall the Style it links to. To insert a Performance change at the
current position, touch the Performance name to open the Performance Select window, or follow the standard selecting procedure using the PERFORMANCE section.
Note: The STYLE CHANGE LED is automatically turned on
when entering the Chord/Acc Step Mode. This means that selecting
a Performance automatically selects the Style memorized in the
Performance.
The STS MODE and STS buttons are automatically disabled,
meaning that you can’t change Keyboard tracks while in Chord/
Acc Step Mode.
Te mp o
This is the Tempo Change parameter. To insert a Tempo Change
event at the current position, select this parameter and use the
VALUE DIAL to change its value.
Chord
The chord parameter is divided in four separate parts:
Measure
This parameter shows the current position of the Step Editor. To
go to a different position within the Song, use one of the following systems:
• Select this parameter, then use the VALUE DIAL to go to a
different measure.
• Use the Measure buttons in the display to move to a different measure. Use the Step buttons in the display to move in
steps of 1/8 (192 ticks). Use the Event buttons in the display
to jump to the next event.
Select one of the parts, then use the VALUE DIAL to modify it.
As an alternative, you can play a chord, and it will be automatically recognized. While recognizing a chord, the status of the
Bass Inversion parameter will be considered.
The lack of a chord (--) means that the accompaniment will not
play at the current position (apart for the Drum and Percussion
tracks). To select the “--” option, select the Name part of the
Chord parameter, then use VALUE DIAL to select the very last
value (C…B, Off).
Page 99

95
Sequencer operating mode
Record mode: Step Backing Sequence page
Note: If you replace a chord with a different one, please remember
that the Lower track (if recorded) will not be automatically
changed, and may cause a dissonance against the accompaniment.
Style Element
This is the Style Element (i.e., a Variation, Fill, Intro, or Ending).
The length of the selected Style Element is always shown by the
“Length” parameter (see below).
“Off ” means that the accompaniment will not play at the
selected position – only Keyboard and Pad tracks will play.
Hint: Insert a Style Element Off event exactly where the automatic
accompaniment must stop (at the end of the Song).
Length
This parameter will let you know where to place the following
Style Element Change. For example, if you inserted an Intro
event lasting for 4 measures, you can insert 4 empty measure
after this event, and a Variation event at the end of the Intro,
beginning at the 4th empty measure.
Del (Delete) button
When a side arrow ( ) is shown next to a parameter, there is an
event at the current position. You can touch the Del button next
to it, to delete the event at the current position.
Hint: To delete all events starting from the current position, select
the “Delete All from Selected” command from the page menu (see
below).
“Soft” transport buttons
Previous or Next Event
Use these buttons to move to the previous or next recorded
event.
Previous or Next Step
Use these buttons to go to the previous or next step (1/8, or 192
ticks). If an event is located before the previous or next step, the
locator stops on that event. For example, if you are positioned on
M001.01.000, and no event exists before M001.01.192, the > button moves to the M001.01.192 location. If an event exists on
M001.01.010, the > button stops to the M001.01.010 location.
These commands are effective even if the Measure parameter is
not selected.
Previous or Next Measure
Use these buttons to move to the previous or following measure.
These commands are effective even if the Measure parameter is
not selected.
Done button
Done
Touch this button to exit the Step Backing Sequence mode. All
changes will be saved to memory.
Hint: Save the Song to a storage device, by selecting the “Save
Song” command from the page menu, to avoid losing it when turning the instrument off.
Step Backing Sequence page menu
Touch the page menu icon to open the menu. Touch a command
to select it. Touch anywhere in the display to close the menu
without selecting a command.
Insert Measure
Use this command to insert an empty measure starting from the
current measure. All Chord/Acc events contained in the current
measure will be moved to the following measure. The event at
the Mxxx.01.000 position (i.e., exactly at the beginning of the
measure, like a Time Signature or Style change) will not be
moved.
Cut Measure
Use this command to delete the current measure. All Chord/Acc
event contained in the following measures will be moved one
measure back.
Delete All from Selected
Use this command to delete events of all types, starting from the
current position.
Note: All events on the very first tick (M001.01.000), like Perf,
Style, Tempo, Chord, Style Element selection, cannot be deleted.
Delete All Styles/Perfs from Selected
Delete All Styles Elements from Selected
Delete All Chords from Selected
Delete All Tempos from Selected
Select one of these commands to delete all events of the corresponding type, starting from the current position to the end of
the Song. To delete all events of the same type from the whole
Song, go back to the M001.01.000 position, and select one of
these commands.
Note: All events on the very first tick (M001.01.000), like Perf,
Style, Tempo, Chord, Style Element selection, cannot be deleted.
Reference
Page 100

96
Sequencer operating mode
Edit menu
Operating mode Edit section
Selected
track
info
Page menu
icon
Parameters
area
Tab s
Step Backing Sequence procedure
Here is the general Step Backing Sequence recording procedure.
Hint: Before entering Step Backing Sequence mode to edit an existing Song, select the “Save Song” command from the page menu,
and save the Song to a storage device. This way, you will have a
copy of the Song, in case you don’t like the results of your editing.
1. While in Sequencer mode, press the RECORD button, and
choose the “Step Backing Sequence” recording option.
2. Select the Measure parameter, and go to the desired posi-
tion in the Song, by using the VALUE DIAL. Alternatively,
you can move the locator using the “soft” transport buttons
in the display. See ““Soft” transport buttons” on page 95.
3. Select the parameter type (Style, Performance, Tempo…) to
insert, edit or delete at the current position. If an arrow ( )
appears next to a parameter, the shown event has been
inserted at the current position.
4. Use the VALUE DIAL to modify the selected event. Delete
it by touching the Del button next to the event. When editing a parameter without the arrow ( ) next to it, a new
event is inserted at the current position.
5. Exit the Step Backing Sequence recording mode, by touch-
ing the Done button in the display.
Edit menu
From any page, press the MENU button to open the Sequencer edit
menu. This menu gives access to the various Sequencer edit sections.
When in the menu, select an edit section, or press EXIT to exit
the menu.
When in an edit page, press EXIT or the SEQUENCER button to
go back to the main page of the Sequencer operating mode.
Each item in this menu corresponds to an edit section. Each edit
section groups various edit pages, that may be selected by touching the corresponding tab on the lower part of the display.
6. Press (PLAY/STOP) in the PLAYER section to listen
to the result of your editing. If it is fine, save the Song to a
storage device.
Edit page structure
All edit pages share some basic elements.
Operating mode
This indicates that the instrument is in Sequencer mode.
Edit section
This identifies the current edit section, corresponding to one of
the items of the edit menu (see “Edit menu” on page 96).
Page menu icon
Touch this icon to open the page menu (see “Page menu” on
page 105).
Parameters area
Each page contains various parameters. Use the tabs to select
one of the pages. For detailed information on the various types
of parameters, see sections starting below.
 Loading...