

Page 1

User’s Manual
ENGLISH
OS Ver. 1.1
MAN0010038
4E
Page 2

Important safety instructions
• Read these instructions.
• Keep these instructions.
• Heed all warnings.
• Follow all instructions.
• Do not use this apparatus near water.
• Clean only with dry cloth.
• Do not block any ventilation openings, install in accordance with the manufacturer’s instructions.
• Do not install near any heat sources such as radiators, heat registers, stoves, or
other apparatus (including amplifiers) that produce heat.
• Do not defeat the safety purpose of the polarized or grounding-type plug. A
polarized plug has two blades with one wider than the other. A grounding
type plug has two blades and a third grounding prong. The wide blade or the
third prong are provided for your safety. If the provided plug does not fit into
your outlet, consult an electrician for replacement of the obsolete outlet. (for
U.S.A. and Canada)
• Protect the power cord from being walked on or pinched particularly at plugs,
convenience receptacles, and the point where they exit from the apparatus.
• Only use attachments/accessories specified by the manufacturer.
• Unplug this apparatus during lightning storms or when unused for long periods of time.
• Refer all servicing to qualified service personnel. Servicing is required when
the apparatus has been damaged in any way, such as power-supply cord or
plug is damaged, liquid has been spilled or objects have fallen into the apparatus, the apparatus has been exposed to rain or moisture, does not operate normally, or has been dropped.
• WARNING – This apparatus shall be connected to a mains socket outlet with
a protective earthing connection.
• Turning off the power switch does not completely isolate this product from
the power line so remove the plug from the socket if not using it for extended
periods of time, or before cleaning. Please ensure that the mains plug or appliance couple remains readily accessible.
• Mains powered apparatus shall not be exposed to dripping or splashing and
that no objects filled with liquids, such as vases, shall be placed on the apparatus.
• Install this product near the wall socket and keep the power plug easily accessible.
• Do not install this equipment on the far position from wall outlet and/or convenience receptacle.
• WARNING – Date/time Lithium button cell battery inside. Danger of explosion if battery is incorrectly replaced. The internal date/time Lithium button
cell battery is not user replaceable. The unit should be returned to a Korg
Authorized Service Center when the date/time Lithium button cell battery
needs replacing.
• CAUTION – Battery Pack NiMH (Nickel Metal Hydride). Danger of explosion if NiMH battery-pack is incorrectly replaced. Replace only with the same
type (KORG BAT0001002).
• Do not expose batteries to excessive heat, such as direct sunshine, fire or the
like.
• Dispose of used batteries according to the battery manufacturer’s instructions.
• Do not install this equipment in a confined space such as a box for the conveyance or similar unit.
• Do not put your fingers under the display while it is moving, or you will risk
to pinch them under the display!
• When a cart is used, use caution when moving the cart/apparatus combination to avoid injury from tip-over.
The lightning flash with arrowhead symbol within an equilateral triangle, is intended to alert the user to the presence of
uninsulated “dangerous voltage” within the product’s enclosure that may be of sufficient magnitude to constitute a risk
of electric shock to persons.
The exclamation point within an equilateral triangle is
intended to alert the user to the presence of important operating and maintenance (servicing) instructions in the literature accompanying the product.
THE FCC REGULATION WARNING (for U.S.A.)
This equipment has been tested and found to comply with the limits for a Class B
digital device, pursuant to Part 15 of the FCC Rules. These limits are designed to
provide reasonable protection against harmful interference in a residential
installation. This equipment generates, uses, and can radiate radio frequency energy
and, if not installed and used in accordance with the instructions, may cause
harmful interference to radio communications. However, there is no guarantee that
interference will not occur in a particular installation. If this equipment does cause
harmful interference to radio or television reception, which can be determined by
turning the equipment off and on, the user is encouraged to try to correct the
interference by one or more of the following measures:
• Reorient or relocate the receiving antenna.
• Increase the separation between the equipment and receiver.
• Connect the equipment into an outlet on a circuit different from that to which the
receiver is connected.
• Consult the dealer or an experienced radio/TV technician for help.
Unauthorized changes or modification to this system can void the user’s authority to
operate this equipment.
CE mark for European Harmonized Standards
CE mark which is attached to our company’s products of AC mains operated
apparatus until December 31, 1996 means it conforms to EMC Directive (89/336/
EEC) and CE mark Directive (93/68/EEC).
And, CE mark which is attached after January 1, 1997 means it conforms to EMC
Directive (89/336/EEC), CE mark Directive (93/68/EEC) and Low Voltage Directive
(73/23/EEC).
Also, CE mark which is attached to our company’s products of Battery operated
apparatus means it conforms to EMC Directive (89/336/EEC) and CE mark
Directive (93/68/EEC).
IMPORTANT NOTICE TO CONSUMERS
This product has been manufactured according to strict specifications and voltage
requirements that are applicable in the country in which it is intended that this
product should be used. If you have purchased this product via the internet, through
mail order, and/or via a telephone sale, you must verify that this product is intended
to be used in the country in which you reside.
WARNING: Use of this product in any country other than that for which it is
intended could be dangerous and could invalidate the manufacturer's or distributor's
warranty.
Please also retain your receipt as proof of purchase otherwise your product may be
disqualified from the manufacturer's or distributor's warranty.
Page 3

Notice regarding disposal (for EU only)
If this “crossed-out wheeled bin” symbol is shown on the product or in the operating manual, you must dispose of the product in an appropriate way. Do not dispose of this product along with your household trash. By disposing of this product correctly, you can avoid environmental harm or health risk. The correct
method of disposal will depend on your locality, so please contact the appropriate local authorities for details.
Data Handling
Data in memory may sometimes be lost due to incorrect user
action. Be sure to save important data to the internal hard disk
or to an external USB device. Korg will not be responsible for
damages caused by data loss.
Example screens
Some pages of the manuals show LCD screens along with an
explanation of functions and operations. All sound names,
parameter names, and values are merely examples and may not
always match the actual display you are working on.
Cleaning the display
Use a soft cotton cloth to clean the screen. Some materials, such
as paper towels, could cause scratches and damage it. Computer
wipes are also suggested, provided they are specifically designed
for LCD screens.
Do not spray any liquids on the LCD screen directly. Always
apply the solution to your cloth first, then clean the screen.
Trademarks
Akai is a registered trademark of Akai Professional Corporation.
Mac is a registered trademark of Apple, Inc. MS-DOS and Windows are registered trademarks of Microsoft Corporation. TCHelicon is a registered trademark of TC-Helicon Vocal Technologies Ltd. PurePath is a registered trademark of Texas Instruments Incorporated. Waves and Maxx are registered trademarks
of Waves Audio Ltd. All other trademarks or registered trademarks are the property of their respective holders.
Disclaimer
The information contained in this manual have been carefully
revised and checked through. Due to our constant efforts to
improve our products, the specifications might differ to those in
the manual. Korg is not responsible for any eventual differences
found between the specifications and the contents of the instruction manual – the specifications being subject to change without
prior notice.
Liability
Korg products are manufactured under strict specifications and
voltages required by each country. These products are warranted
by the Korg distributor only in each country. Any Korg product
not sold with a warranty card or carrying a serial number disqualifies the product sold from the manufacturer's/distributor's
warranty and liability. This requirement is for your own protection and safety.
Service and User’s Assistance
For service, please contact your nearest Authorized Korg Service
Center. For more information on Korg products, and to find
software and accessories for your keyboard, please contact your
local Authorized Korg distributor. For up-to-date information,
please point your web browser to www.korg.com
Copyright © 2011 KORG Italy Spa. Printed in Italy.
.
Page 4

Warning
The 76-key model features a motorized display that includes moving parts. The motorized
display includes a safety system that prevents the display from closing (and automatically
raises it) when fingers or an external object are detected in its path. However, inadver-
tently activating the motorized display may cause physical harm, in particular to children.
Be very careful when using the motorized display, and keep children away while using it.
This instrument is not a toy, so please don't let children play with the display.
Keep your keyboard up-to-date
Your instrument can be constantly updated as new versions of the operating system are
released by Korg. You can download the operating system from www.korg.com
read the instructions supplied with the operating system.
. Please,
The BALANCE and X-FADER sliders
When turning the instrument on, please be assured the BALANCE and X-FADER slider
are set to the center position. This sets both Player 1 and Player 2 to their maximum level,
and balances between the keyboard and Style/Song tracks. This will prevent that you start
a Style or Song, or to play the keyboard, without hearing anything.
Page 5

Table of Contents
Table of Contents
1
Introduction
Overview . . . . . . . . . . . . . . . . . . . . . . . . . . . . . . . . . . . . . . . . . . . . 6
Front Panel . . . . . . . . . . . . . . . . . . . . . . . . . . . . . . . . . . . . . . . . . . . . .7
Rear Panel . . . . . . . . . . . . . . . . . . . . . . . . . . . . . . . . . . . . . . . . . . . 19
Welcome! . . . . . . . . . . . . . . . . . . . . . . . . . . . . . . . . . . . . . . . . . . . 22
Live Performing . . . . . . . . . . . . . . . . . . . . . . . . . . . . . . . . . . . . . . 23
Easy Mode . . . . . . . . . . . . . . . . . . . . . . . . . . . . . . . . . . . . . . . . . . . 23
Useful links . . . . . . . . . . . . . . . . . . . . . . . . . . . . . . . . . . . . . . . . . . 23
What’s in the box . . . . . . . . . . . . . . . . . . . . . . . . . . . . . . . . . . . . . 24
About this manual . . . . . . . . . . . . . . . . . . . . . . . . . . . . . . . . . . . . 24
Making a backup . . . . . . . . . . . . . . . . . . . . . . . . . . . . . . . . . . . . . . 24
Restoring the original data . . . . . . . . . . . . . . . . . . . . . . . . . . . . . 24
Loading the Operating System . . . . . . . . . . . . . . . . . . . . . . . . . . 24
Start up . . . . . . . . . . . . . . . . . . . . . . . . . . . . . . . . . . . . . . . . . . . . 25
Connecting the AC power cord . . . . . . . . . . . . . . . . . . . . . . . . . 25
Turning the instrument on and off . . . . . . . . . . . . . . . . . . . . . . 25
Controlling the Volume . . . . . . . . . . . . . . . . . . . . . . . . . . . . . . . . 25
The X-Fader slider . . . . . . . . . . . . . . . . . . . . . . . . . . . . . . . . . . . . 26
Headphones . . . . . . . . . . . . . . . . . . . . . . . . . . . . . . . . . . . . . . . . . . 26
Loudspeakers . . . . . . . . . . . . . . . . . . . . . . . . . . . . . . . . . . . . . . . . . 26
Audio Outputs . . . . . . . . . . . . . . . . . . . . . . . . . . . . . . . . . . . . . . . . 26
Audio Inputs . . . . . . . . . . . . . . . . . . . . . . . . . . . . . . . . . . . . . . . . . 26
MIDI connections . . . . . . . . . . . . . . . . . . . . . . . . . . . . . . . . . . . . . 26
Damper pedal . . . . . . . . . . . . . . . . . . . . . . . . . . . . . . . . . . . . . . . . 27
Assignable pedal . . . . . . . . . . . . . . . . . . . . . . . . . . . . . . . . . . . . . . 27
Demo . . . . . . . . . . . . . . . . . . . . . . . . . . . . . . . . . . . . . . . . . . . . . . . 27
The music stand . . . . . . . . . . . . . . . . . . . . . . . . . . . . . . . . . . . . . . 27
Glossary of Terms . . . . . . . . . . . . . . . . . . . . . . . . . . . . . . . . . . . 28
Sound . . . . . . . . . . . . . . . . . . . . . . . . . . . . . . . . . . . . . . . . . . . . . . . 28
Style . . . . . . . . . . . . . . . . . . . . . . . . . . . . . . . . . . . . . . . . . . . . . . . . . 28
Pad . . . . . . . . . . . . . . . . . . . . . . . . . . . . . . . . . . . . . . . . . . . . . . . . . . 28
Keyboard tracks . . . . . . . . . . . . . . . . . . . . . . . . . . . . . . . . . . . . . . 28
Performance . . . . . . . . . . . . . . . . . . . . . . . . . . . . . . . . . . . . . . . . . 29
Sequencer . . . . . . . . . . . . . . . . . . . . . . . . . . . . . . . . . . . . . . . . . . . . 29
Player . . . . . . . . . . . . . . . . . . . . . . . . . . . . . . . . . . . . . . . . . . . . . . . 29
The LOGO decoder . . . . . . . . . . . . . . . . . . . . . . . . . . . . . . . . . . . 29
Interface basics . . . . . . . . . . . . . . . . . . . . . . . . . . . . . . . . . . . . . 30
The Color TouchView™ graphical user interface . . . . . . . . . . . 30
Operative modes . . . . . . . . . . . . . . . . . . . . . . . . . . . . . . . . . . . . . . 32
Selected, highlighted items . . . . . . . . . . . . . . . . . . . . . . . . . . . . . 32
Non-available, grayed-out parameters . . . . . . . . . . . . . . . . . . . 32
Shortcuts . . . . . . . . . . . . . . . . . . . . . . . . . . . . . . . . . . . . . . . . . . . . 32
Easy Mode . . . . . . . . . . . . . . . . . . . . . . . . . . . . . . . . . . . . . . . . . . 33
The Style Play page in detail . . . . . . . . . . . . . . . . . . . . . . . . . . . . 34
The Song Play page in detail . . . . . . . . . . . . . . . . . . . . . . . . . . . . 35
Quick Guide
Turning the instrument on and listening to the demos . 38
Turning the instrument on, and viewing the main screen . . . 38
Playing the demos . . . . . . . . . . . . . . . . . . . . . . . . . . . . . . . . . . . . . 39
Playing Sounds . . . . . . . . . . . . . . . . . . . . . . . . . . . . . . . . . . . . . 40
Selecting a Sound and playing it on the keyboard . . . . . . . . . . 40
Playing two or three Sounds at the same time . . . . . . . . . . . . . 42
Playing different Sounds with your left and right hand . . . . . . 45
Changing the split point . . . . . . . . . . . . . . . . . . . . . . . . . . . . . . . . 46
Raising or lowering the Upper octave . . . . . . . . . . . . . . . . . . . . 48
Digital Drawbars . . . . . . . . . . . . . . . . . . . . . . . . . . . . . . . . . . . . . . 48
Selecting and saving Performances . . . . . . . . . . . . . . . . . . . 51
Selecting a Performance . . . . . . . . . . . . . . . . . . . . . . . . . . . . . . . . 51
Saving your settings to a Performance . . . . . . . . . . . . . . . . . . . . 52
Selecting and playing Styles . . . . . . . . . . . . . . . . . . . . . . . . . 55
Selecting and playing a Style . . . . . . . . . . . . . . . . . . . . . . . . . . . . 55
Tempo . . . . . . . . . . . . . . . . . . . . . . . . . . . . . . . . . . . . . . . . . . . . . . . 57
Intro, Variation, Fill, Break, Ending . . . . . . . . . . . . . . . . . . . . . . 57
Single Touch Settings (STS) . . . . . . . . . . . . . . . . . . . . . . . . . . . . . 58
The Pads . . . . . . . . . . . . . . . . . . . . . . . . . . . . . . . . . . . . . . . . . . . . . 60
Adjusting balance between the Style and the keyboard . . . . . . 60
Adjusting the volume of each track . . . . . . . . . . . . . . . . . . . . . . 61
Turning the Style tracks on/off . . . . . . . . . . . . . . . . . . . . . . . . . . 62
Adding harmony notes to your right-hand melody with
the ENSEMBLE function . . . . . . . . . . . . . . . . . . . . . . . . . . . . . 63
The Chord Sequence . . . . . . . . . . . . . . . . . . . . . . . . . . . . . . . . . . . 65
Song Play . . . . . . . . . . . . . . . . . . . . . . . . . . . . . . . . . . . . . . . . . . . 67
Selecting a Song to play . . . . . . . . . . . . . . . . . . . . . . . . . . . . . . . . 67
Playing back a Song . . . . . . . . . . . . . . . . . . . . . . . . . . . . . . . . . . . . 69
Changing the tracks’ volume . . . . . . . . . . . . . . . . . . . . . . . . . . . . 70
Turning the Song tracks on/off . . . . . . . . . . . . . . . . . . . . . . . . . . 73
Soloing a track . . . . . . . . . . . . . . . . . . . . . . . . . . . . . . . . . . . . . . . . 73
Removing the voice from an MP3 file . . . . . . . . . . . . . . . . . . . . 73
Removing the Melody track from a Standard MIDI File . . . . 75
Mixing two Songs . . . . . . . . . . . . . . . . . . . . . . . . . . . . . . . . . . . . . 76
The SongBook . . . . . . . . . . . . . . . . . . . . . . . . . . . . . . . . . . . . . . 77
Selecting the desired entry from the Main List . . . . . . . . . . . . . 78
Displaying Artist or Genre . . . . . . . . . . . . . . . . . . . . . . . . . . . . . . 78
Sorting entries . . . . . . . . . . . . . . . . . . . . . . . . . . . . . . . . . . . . . . . . 79
Searching entries . . . . . . . . . . . . . . . . . . . . . . . . . . . . . . . . . . . . . . 80
Adding entries . . . . . . . . . . . . . . . . . . . . . . . . . . . . . . . . . . . . . . . . 82
Creating a Custom List . . . . . . . . . . . . . . . . . . . . . . . . . . . . . . . . . 84
Selecting and using a Custom List . . . . . . . . . . . . . . . . . . . . . . . 87
Selecting a SongBook STS . . . . . . . . . . . . . . . . . . . . . . . . . . . . . . 87
Introduction
Page 6

2
Table of Contents
Singing with a microphone . . . . . . . . . . . . . . . . . . . . . . . . . . .88
Connecting a microphone . . . . . . . . . . . . . . . . . . . . . . . . . . . . . . 88
Setting up your voice tone . . . . . . . . . . . . . . . . . . . . . . . . . . . . . . 90
Choosing a Voice Processor Preset . . . . . . . . . . . . . . . . . . . . . . . 92
Applying harmony to your voice . . . . . . . . . . . . . . . . . . . . . . . . . 93
Applying doubling to your voice . . . . . . . . . . . . . . . . . . . . . . . . . 94
Soloing your voice (Talk) . . . . . . . . . . . . . . . . . . . . . . . . . . . . . . . 95
Locking the Voice Processor settings . . . . . . . . . . . . . . . . . . . . . 95
Recording a new Song (Standard MIDI File) . . . . . . . . . . . .96
Accessing the Backing Sequence (Quick Record) mode . . . . . 96
Preparing to record . . . . . . . . . . . . . . . . . . . . . . . . . . . . . . . . . . . . 97
Recording . . . . . . . . . . . . . . . . . . . . . . . . . . . . . . . . . . . . . . . . . . . . 98
Second-take recording (Overdubbing) . . . . . . . . . . . . . . . . . . . . 99
Saving a Song to disk . . . . . . . . . . . . . . . . . . . . . . . . . . . . . . . . . . . 99
Recording a new Song (MP3 file) . . . . . . . . . . . . . . . . . . . . 101
Reference
Selecting elements . . . . . . . . . . . . . . . . . . . . . . . . . . . . . . . . 104
Sound Select window . . . . . . . . . . . . . . . . . . . . . . . . . . . . . . . . . . 104
Performance Select window . . . . . . . . . . . . . . . . . . . . . . . . . . . .104
Style Select window . . . . . . . . . . . . . . . . . . . . . . . . . . . . . . . . . . . 105
Pad Select window . . . . . . . . . . . . . . . . . . . . . . . . . . . . . . . . . . . . 105
STS Select . . . . . . . . . . . . . . . . . . . . . . . . . . . . . . . . . . . . . . . . . . .106
Song Select window . . . . . . . . . . . . . . . . . . . . . . . . . . . . . . . . . . .106
Searching files and musical resources . . . . . . . . . . . . . . . 109
How to use the Search function . . . . . . . . . . . . . . . . . . . . . . . . . 109
Notes on searching . . . . . . . . . . . . . . . . . . . . . . . . . . . . . . . . . . . . 110
Style Play operating mode . . . . . . . . . . . . . . . . . . . . . . . . . 111
Start-up settings . . . . . . . . . . . . . . . . . . . . . . . . . . . . . . . . . . . . . . 111
How Styles, Variations, Performances and STSs are
linked together . . . . . . . . . . . . . . . . . . . . . . . . . . . . . . . . . . . . . 111
Master Volume and Balance . . . . . . . . . . . . . . . . . . . . . . . . . . . 111
Factory, User and Favorite Styles . . . . . . . . . . . . . . . . . . . . . . . 111
Main page (Normal view) . . . . . . . . . . . . . . . . . . . . . . . . . . . . . . 112
Style Tracks view page . . . . . . . . . . . . . . . . . . . . . . . . . . . . . . . . . 114
STS Name panel . . . . . . . . . . . . . . . . . . . . . . . . . . . . . . . . . . . . . .115
Volume panel . . . . . . . . . . . . . . . . . . . . . . . . . . . . . . . . . . . . . . . . 115
Pad panel . . . . . . . . . . . . . . . . . . . . . . . . . . . . . . . . . . . . . . . . . . . . 117
Split panel . . . . . . . . . . . . . . . . . . . . . . . . . . . . . . . . . . . . . . . . . . . 118
Mic panel . . . . . . . . . . . . . . . . . . . . . . . . . . . . . . . . . . . . . . . . . . . . 118
Sub-Scale panel . . . . . . . . . . . . . . . . . . . . . . . . . . . . . . . . . . . . . . . 119
Edit menu . . . . . . . . . . . . . . . . . . . . . . . . . . . . . . . . . . . . . . . . . . . 119
Edit page structure . . . . . . . . . . . . . . . . . . . . . . . . . . . . . . . . . . . . 119
Mixer/Tuning: Volume/Pan . . . . . . . . . . . . . . . . . . . . . . . . . . . . 120
Mixer/Tuning: FX Send . . . . . . . . . . . . . . . . . . . . . . . . . . . . . . .121
Mixer/Tuning: EQ Gain . . . . . . . . . . . . . . . . . . . . . . . . . . . . . . . 122
Mixer/Tuning: EQ Control . . . . . . . . . . . . . . . . . . . . . . . . . . . . 122
Mixer/Tuning: Tuning . . . . . . . . . . . . . . . . . . . . . . . . . . . . . . . . 123
Mixer/Tuning: Sub Scale . . . . . . . . . . . . . . . . . . . . . . . . . . . . . . . 123
Effects: A/B FX Configuration . . . . . . . . . . . . . . . . . . . . . . . . . . 125
Effects: IFX 1…3, Master 1…3 . . . . . . . . . . . . . . . . . . . . . . . . . . 127
Track Controls: Mode . . . . . . . . . . . . . . . . . . . . . . . . . . . . . . . . .127
Track Controls: Drum Edit . . . . . . . . . . . . . . . . . . . . . . . . . . . . 128
Track Controls: Easy Edit . . . . . . . . . . . . . . . . . . . . . . . . . . . . . . 129
Keyboard/Ensemble: Keyboard Control 1 . . . . . . . . . . . . . . . .130
Keyboard/Ensemble: Keyboard Control 2 . . . . . . . . . . . . . . . .131
Keyboard/Ensemble: Key/Velocity Range . . . . . . . . . . . . . . . . 131
Keyboard/Ensemble: Ensemble . . . . . . . . . . . . . . . . . . . . . . . . .132
Pad/Switch: Pad . . . . . . . . . . . . . . . . . . . . . . . . . . . . . . . . . . . . . . 133
Pad/Switch: Switch . . . . . . . . . . . . . . . . . . . . . . . . . . . . . . . . . . . . 133
Style Controls: Drum/Fill . . . . . . . . . . . . . . . . . . . . . . . . . . . . . . 134
Style Controls: Keyboard Range On/Off / Wrap Around . . .135
Preferences: Style Preferences . . . . . . . . . . . . . . . . . . . . . . . . . . .135
Preferences: Style Play Setup . . . . . . . . . . . . . . . . . . . . . . . . . . . .136
Page menu . . . . . . . . . . . . . . . . . . . . . . . . . . . . . . . . . . . . . . . . . . .137
Write Performance dialog box . . . . . . . . . . . . . . . . . . . . . . . . . .138
Write Single Touch Setting dialog box . . . . . . . . . . . . . . . . . . .139
Write Style Settings dialog box . . . . . . . . . . . . . . . . . . . . . . . . . .139
Write Global-Style Play Setup dialog box . . . . . . . . . . . . . . . . .139
The Favorite banks . . . . . . . . . . . . . . . . . . . . . . . . . . . . . . . . . . . .140
Song Play operating mode . . . . . . . . . . . . . . . . . . . . . . . . . 141
Transport controls . . . . . . . . . . . . . . . . . . . . . . . . . . . . . . . . . . . .141
MIDI Clock . . . . . . . . . . . . . . . . . . . . . . . . . . . . . . . . . . . . . . . . . .141
Tempo Lock . . . . . . . . . . . . . . . . . . . . . . . . . . . . . . . . . . . . . . . . . .141
Master Volume, Balance, X-Fader . . . . . . . . . . . . . . . . . . . . . . .141
Track parameters . . . . . . . . . . . . . . . . . . . . . . . . . . . . . . . . . . . . .141
Standard MIDI Files and Sounds . . . . . . . . . . . . . . . . . . . . . . . .141
Keyboard, Pad and Player tracks . . . . . . . . . . . . . . . . . . . . . . . .142
Main page (Normal view) . . . . . . . . . . . . . . . . . . . . . . . . . . . . . .143
Song Tracks 1-8 and 9-16 pages . . . . . . . . . . . . . . . . . . . . . . . . .145
STS Name panel . . . . . . . . . . . . . . . . . . . . . . . . . . . . . . . . . . . . . .146
Volume panel . . . . . . . . . . . . . . . . . . . . . . . . . . . . . . . . . . . . . . . .146
Pad panel . . . . . . . . . . . . . . . . . . . . . . . . . . . . . . . . . . . . . . . . . . . .148
Split panel . . . . . . . . . . . . . . . . . . . . . . . . . . . . . . . . . . . . . . . . . . .148
Mic panel . . . . . . . . . . . . . . . . . . . . . . . . . . . . . . . . . . . . . . . . . . . .148
Sub-Scale panel . . . . . . . . . . . . . . . . . . . . . . . . . . . . . . . . . . . . . . .148
Jukebox panel . . . . . . . . . . . . . . . . . . . . . . . . . . . . . . . . . . . . . . . .148
Edit menu . . . . . . . . . . . . . . . . . . . . . . . . . . . . . . . . . . . . . . . . . . .149
Edit page structure . . . . . . . . . . . . . . . . . . . . . . . . . . . . . . . . . . . .149
Switching between players during editing . . . . . . . . . . . . . . . .150
Mixer/Tuning: Volume/Pan . . . . . . . . . . . . . . . . . . . . . . . . . . . .150
Mixer/Tuning: FX Send . . . . . . . . . . . . . . . . . . . . . . . . . . . . . . . .151
Mixer/Tuning: EQ Gain . . . . . . . . . . . . . . . . . . . . . . . . . . . . . . .152
Mixer/Tuning: EQ Control . . . . . . . . . . . . . . . . . . . . . . . . . . . . .153
Mixer/Tuning: Tuning . . . . . . . . . . . . . . . . . . . . . . . . . . . . . . . . .154
Effects: A/B FX Configuration . . . . . . . . . . . . . . . . . . . . . . . . . .154
Effects: IFX 1…3, Master 1…3 . . . . . . . . . . . . . . . . . . . . . . . . . .155
Track Controls: Mode . . . . . . . . . . . . . . . . . . . . . . . . . . . . . . . . .155
Track Controls: Drum Edit . . . . . . . . . . . . . . . . . . . . . . . . . . . . .155
Track Controls: Easy Edit . . . . . . . . . . . . . . . . . . . . . . . . . . . . . .155
Keyboard/Ensemble: Keyboard Control . . . . . . . . . . . . . . . . . .155
Keyboard/Ensemble: Keyboard Control 2 . . . . . . . . . . . . . . . .155
Keyboard/Ensemble: Key/Velocity Range . . . . . . . . . . . . . . . .156
Keyboard/Ensemble: Ensemble . . . . . . . . . . . . . . . . . . . . . . . . .156
Pad/Switch: Pad . . . . . . . . . . . . . . . . . . . . . . . . . . . . . . . . . . . . . .156
Pad/Switch: Assignable Switch . . . . . . . . . . . . . . . . . . . . . . . . . .156
Jukebox Editor . . . . . . . . . . . . . . . . . . . . . . . . . . . . . . . . . . . . . . .156
Preferences: General Setup . . . . . . . . . . . . . . . . . . . . . . . . . . . . .157
Preferences: Play Setup . . . . . . . . . . . . . . . . . . . . . . . . . . . . . . . .157
Page menu . . . . . . . . . . . . . . . . . . . . . . . . . . . . . . . . . . . . . . . . . . .158
Write Global-Song Play Setup dialog box . . . . . . . . . . . . . . . . .159
SongBook . . . . . . . . . . . . . . . . . . . . . . . . . . . . . . . . . . . . . . . . . 160
Book . . . . . . . . . . . . . . . . . . . . . . . . . . . . . . . . . . . . . . . . . . . . . . . .160
Custom List . . . . . . . . . . . . . . . . . . . . . . . . . . . . . . . . . . . . . . . . . .163
List Edit . . . . . . . . . . . . . . . . . . . . . . . . . . . . . . . . . . . . . . . . . . . . .163
Book Edit 1 . . . . . . . . . . . . . . . . . . . . . . . . . . . . . . . . . . . . . . . . . .164
Book Edit 2 . . . . . . . . . . . . . . . . . . . . . . . . . . . . . . . . . . . . . . . . . .166
Book Edit 3 . . . . . . . . . . . . . . . . . . . . . . . . . . . . . . . . . . . . . . . . . .166
Info . . . . . . . . . . . . . . . . . . . . . . . . . . . . . . . . . . . . . . . . . . . . . . . . .167
Page menu . . . . . . . . . . . . . . . . . . . . . . . . . . . . . . . . . . . . . . . . . . .168
Lyrics, Score, Markers . . . . . . . . . . . . . . . . . . . . . . . . . . . . . . 169
Lyrics page . . . . . . . . . . . . . . . . . . . . . . . . . . . . . . . . . . . . . . . . . . .169
Score page . . . . . . . . . . . . . . . . . . . . . . . . . . . . . . . . . . . . . . . . . . .171
Page 7

3
Table of Contents
Markers page . . . . . . . . . . . . . . . . . . . . . . . . . . . . . . . . . . . . . . . . 172
Sequencer operating mode . . . . . . . . . . . . . . . . . . . . . . . . . 173
Transport controls . . . . . . . . . . . . . . . . . . . . . . . . . . . . . . . . . . . 173
The Songs and the Standard MIDI File format . . . . . . . . . . . 173
Sequencer mode and the MP3 . . . . . . . . . . . . . . . . . . . . . . . . . 173
Songs and Voice Processor Presets . . . . . . . . . . . . . . . . . . . . . 173
Sequencer Play - Main page . . . . . . . . . . . . . . . . . . . . . . . . . . . 173
Entering Record mode . . . . . . . . . . . . . . . . . . . . . . . . . . . . . . . . 176
Record mode: Multitrack Sequencer page . . . . . . . . . . . . . . . 176
Record mode: Step Record page . . . . . . . . . . . . . . . . . . . . . . . . 178
Record mode: Backing Sequence (Quick Record) page . . . . 181
Record mode: Step Backing Sequence page . . . . . . . . . . . . . . 183
Edit menu . . . . . . . . . . . . . . . . . . . . . . . . . . . . . . . . . . . . . . . . . . . 186
Edit page structure . . . . . . . . . . . . . . . . . . . . . . . . . . . . . . . . . . . 186
Mixer/Tuning: Volume/Pan . . . . . . . . . . . . . . . . . . . . . . . . . . . 186
Mixer/Tuning: FX Send . . . . . . . . . . . . . . . . . . . . . . . . . . . . . . . 187
Mixer/Tuning: EQ Gain . . . . . . . . . . . . . . . . . . . . . . . . . . . . . . . 187
Mixer/Tuning: EQ Control . . . . . . . . . . . . . . . . . . . . . . . . . . . . 188
Mixer/Tuning: Tuning . . . . . . . . . . . . . . . . . . . . . . . . . . . . . . . . 188
Mixer/Tuning: Sub Scale . . . . . . . . . . . . . . . . . . . . . . . . . . . . . . 188
Effects: A/B FX Configuration . . . . . . . . . . . . . . . . . . . . . . . . . 189
Effects: IFX 1…3, Master 1…3 . . . . . . . . . . . . . . . . . . . . . . . . . 189
Track Controls: Mode . . . . . . . . . . . . . . . . . . . . . . . . . . . . . . . . 189
Track Controls: Drum Edit . . . . . . . . . . . . . . . . . . . . . . . . . . . . 189
Track Controls: Easy Edit . . . . . . . . . . . . . . . . . . . . . . . . . . . . . 189
Event Edit: Event Edit . . . . . . . . . . . . . . . . . . . . . . . . . . . . . . . . 190
Event Edit: Filter . . . . . . . . . . . . . . . . . . . . . . . . . . . . . . . . . . . . . 191
Song Edit: Quantize . . . . . . . . . . . . . . . . . . . . . . . . . . . . . . . . . . 192
Song Edit: Transpose . . . . . . . . . . . . . . . . . . . . . . . . . . . . . . . . . 192
Song Edit: Velocity . . . . . . . . . . . . . . . . . . . . . . . . . . . . . . . . . . . 193
Song Edit: Cut/Insert Measures . . . . . . . . . . . . . . . . . . . . . . . . 193
Song Edit: Delete . . . . . . . . . . . . . . . . . . . . . . . . . . . . . . . . . . . . . 194
Song Edit: Copy . . . . . . . . . . . . . . . . . . . . . . . . . . . . . . . . . . . . . . 194
Song Edit: Move . . . . . . . . . . . . . . . . . . . . . . . . . . . . . . . . . . . . . 195
Song Edit: RX Convert . . . . . . . . . . . . . . . . . . . . . . . . . . . . . . . . 195
Preferences: Sequencer Setup . . . . . . . . . . . . . . . . . . . . . . . . . . 196
Page menu . . . . . . . . . . . . . . . . . . . . . . . . . . . . . . . . . . . . . . . . . . 196
Write Global-Sequencer Setup dialog box . . . . . . . . . . . . . . . 197
Song Select window . . . . . . . . . . . . . . . . . . . . . . . . . . . . . . . . . . 197
Save Song window . . . . . . . . . . . . . . . . . . . . . . . . . . . . . . . . . . . 197
Global edit mode . . . . . . . . . . . . . . . . . . . . . . . . . . . . . . . . . . . 200
What is it, and how the Global is structured . . . . . . . . . . . . . 200
Main page . . . . . . . . . . . . . . . . . . . . . . . . . . . . . . . . . . . . . . . . . . . 200
Edit menu . . . . . . . . . . . . . . . . . . . . . . . . . . . . . . . . . . . . . . . . . . . 201
Edit page structure . . . . . . . . . . . . . . . . . . . . . . . . . . . . . . . . . . . 201
General Controls: Basic . . . . . . . . . . . . . . . . . . . . . . . . . . . . . . . 201
General Controls: Transpose Control . . . . . . . . . . . . . . . . . . . 202
General Controls: Scale . . . . . . . . . . . . . . . . . . . . . . . . . . . . . . . 203
General Controls: Lock . . . . . . . . . . . . . . . . . . . . . . . . . . . . . . . 204
General Controls: Interface . . . . . . . . . . . . . . . . . . . . . . . . . . . . 206
General Controls: Clock & Battery . . . . . . . . . . . . . . . . . . . . . . 207
Controllers: Pedal/Switch . . . . . . . . . . . . . . . . . . . . . . . . . . . . . 208
Controllers: Assignable Sliders . . . . . . . . . . . . . . . . . . . . . . . . . 209
Controllers: EC5 . . . . . . . . . . . . . . . . . . . . . . . . . . . . . . . . . . . . . 209
MIDI: MIDI Setup / General Controls . . . . . . . . . . . . . . . . . . 210
MIDI: MIDI In Control . . . . . . . . . . . . . . . . . . . . . . . . . . . . . . . 211
MIDI: MIDI In Channels . . . . . . . . . . . . . . . . . . . . . . . . . . . . . . 212
MIDI: MIDI Out Channels . . . . . . . . . . . . . . . . . . . . . . . . . . . . 212
MIDI: Filters . . . . . . . . . . . . . . . . . . . . . . . . . . . . . . . . . . . . . . . . . 213
Audio Setup: Style/Kbd . . . . . . . . . . . . . . . . . . . . . . . . . . . . . . . 213
Audio Setup: Player 1 . . . . . . . . . . . . . . . . . . . . . . . . . . . . . . . . . 214
Audio Setup: Player 2 . . . . . . . . . . . . . . . . . . . . . . . . . . . . . . . . . 214
Audio Setup: Drums . . . . . . . . . . . . . . . . . . . . . . . . . . . . . . . . . . 214
Audio Setup: Audio In . . . . . . . . . . . . . . . . . . . . . . . . . . . . . . . . 215
Audio Setup: Metro / MP3 / Speakers . . . . . . . . . . . . . . . . . . . 216
Voice Processor Setup and Preset sections . . . . . . . . . . . . . . . 216
Video Interface: Video Out . . . . . . . . . . . . . . . . . . . . . . . . . . . . 217
MaxxAudio: MaxxEQ . . . . . . . . . . . . . . . . . . . . . . . . . . . . . . . . . 217
Maxx Master EQ: MaxxAUDIO . . . . . . . . . . . . . . . . . . . . . . . . 218
Maxx Default Preset . . . . . . . . . . . . . . . . . . . . . . . . . . . . . . . . . . 219
Touch Panel Calibration . . . . . . . . . . . . . . . . . . . . . . . . . . . . . . 219
Page menu . . . . . . . . . . . . . . . . . . . . . . . . . . . . . . . . . . . . . . . . . . 220
Write Global - Global Setup dialog box . . . . . . . . . . . . . . . . . . 220
Write Global - Midi Setup dialog box . . . . . . . . . . . . . . . . . . . 220
Write Global - Voice Processor Setup dialog box . . . . . . . . . . 221
Write Global - Voice Processor Preset dialog box . . . . . . . . . 221
Write Global - Maxx Preset dialog box . . . . . . . . . . . . . . . . . . 221
Write Quarter Tone SC Preset dialog box . . . . . . . . . . . . . . . . 221
Media edit mode . . . . . . . . . . . . . . . . . . . . . . . . . . . . . . . . . . .222
Storage devices and internal memory . . . . . . . . . . . . . . . . . . . 222
Supported device . . . . . . . . . . . . . . . . . . . . . . . . . . . . . . . . . . . . . 222
Selecting and deselecting files . . . . . . . . . . . . . . . . . . . . . . . . . . 222
Searching files . . . . . . . . . . . . . . . . . . . . . . . . . . . . . . . . . . . . . . . 222
File types . . . . . . . . . . . . . . . . . . . . . . . . . . . . . . . . . . . . . . . . . . . . 223
Media structure . . . . . . . . . . . . . . . . . . . . . . . . . . . . . . . . . . . . . . 224
Main page . . . . . . . . . . . . . . . . . . . . . . . . . . . . . . . . . . . . . . . . . . . 225
Page structure . . . . . . . . . . . . . . . . . . . . . . . . . . . . . . . . . . . . . . . . 225
Navigation tools . . . . . . . . . . . . . . . . . . . . . . . . . . . . . . . . . . . . . . 225
Load . . . . . . . . . . . . . . . . . . . . . . . . . . . . . . . . . . . . . . . . . . . . . . . . 226
Save . . . . . . . . . . . . . . . . . . . . . . . . . . . . . . . . . . . . . . . . . . . . . . . . 229
Copy . . . . . . . . . . . . . . . . . . . . . . . . . . . . . . . . . . . . . . . . . . . . . . . 233
Erase . . . . . . . . . . . . . . . . . . . . . . . . . . . . . . . . . . . . . . . . . . . . . . . 234
Format . . . . . . . . . . . . . . . . . . . . . . . . . . . . . . . . . . . . . . . . . . . . . . 235
Utility . . . . . . . . . . . . . . . . . . . . . . . . . . . . . . . . . . . . . . . . . . . . . . 235
Preferences . . . . . . . . . . . . . . . . . . . . . . . . . . . . . . . . . . . . . . . . . . 237
USB . . . . . . . . . . . . . . . . . . . . . . . . . . . . . . . . . . . . . . . . . . . . . . . . 238
Page menu . . . . . . . . . . . . . . . . . . . . . . . . . . . . . . . . . . . . . . . . . . 239
Care of mass storage devices . . . . . . . . . . . . . . . . . . . . . . . . . . . 240
Merging PCM samples from various sources . . . . . . . . . . . . . 241
MIDI . . . . . . . . . . . . . . . . . . . . . . . . . . . . . . . . . . . . . . . . . . . . . . .242
What is MIDI? . . . . . . . . . . . . . . . . . . . . . . . . . . . . . . . . . . . . . . . 242
What is MIDI Over USB? . . . . . . . . . . . . . . . . . . . . . . . . . . . . . . 242
Standard MIDI Files . . . . . . . . . . . . . . . . . . . . . . . . . . . . . . . . . . 243
The General MIDI standard . . . . . . . . . . . . . . . . . . . . . . . . . . . 243
The Global channel . . . . . . . . . . . . . . . . . . . . . . . . . . . . . . . . . . . 243
The Chord 1 and Chord 2 channels . . . . . . . . . . . . . . . . . . . . . 243
The Control channel . . . . . . . . . . . . . . . . . . . . . . . . . . . . . . . . . . 243
MIDI Setup . . . . . . . . . . . . . . . . . . . . . . . . . . . . . . . . . . . . . . . . . . 243
Connecting Pa3X to a Master keyboard . . . . . . . . . . . . . . . . . . 244
Connecting the Pa3X to a MIDI accordion . . . . . . . . . . . . . . . 244
Connecting the Pa3X to an external sequencer . . . . . . . . . . . 245
Playing another instrument with the Pa3X . . . . . . . . . . . . . . . 246
Introduction
Page 8

4
Table of Contents
Appendix
Installing the Pa3X Amplification System (PaAS) . . . . . 248
Precautions . . . . . . . . . . . . . . . . . . . . . . . . . . . . . . . . . . . . . . . . . . 248
Installation . . . . . . . . . . . . . . . . . . . . . . . . . . . . . . . . . . . . . . . . . .248
Installing the Video Interface (VIF4) . . . . . . . . . . . . . . . . . 250
NTSC, PAL, SECAM . . . . . . . . . . . . . . . . . . . . . . . . . . . . . . . . . . 250
Precautions . . . . . . . . . . . . . . . . . . . . . . . . . . . . . . . . . . . . . . . . . . 250
Installation . . . . . . . . . . . . . . . . . . . . . . . . . . . . . . . . . . . . . . . . . .250
Connections and setup . . . . . . . . . . . . . . . . . . . . . . . . . . . . . . . . 252
Installing additional Sampling RAM (EXB-M256) . . . . . 253
Precautions . . . . . . . . . . . . . . . . . . . . . . . . . . . . . . . . . . . . . . . . . . 253
Installation . . . . . . . . . . . . . . . . . . . . . . . . . . . . . . . . . . . . . . . . . .253
Installing an Hard Disk (HDIK-2) (only 61-key model) . 255
Precautions . . . . . . . . . . . . . . . . . . . . . . . . . . . . . . . . . . . . . . . . . . 255
Backup . . . . . . . . . . . . . . . . . . . . . . . . . . . . . . . . . . . . . . . . . . . . . . 255
Installation . . . . . . . . . . . . . . . . . . . . . . . . . . . . . . . . . . . . . . . . . .255
Formatting the Hard Disk and installing the Operating
System . . . . . . . . . . . . . . . . . . . . . . . . . . . . . . . . . . . . . . . . . . . . .256
Replacing the Sample RAM backup battery . . . . . . . . . . 258
Precautions . . . . . . . . . . . . . . . . . . . . . . . . . . . . . . . . . . . . . . . . . .258
Installation . . . . . . . . . . . . . . . . . . . . . . . . . . . . . . . . . . . . . . . . . . .258
Installing the Korg USB MIDI Driver . . . . . . . . . . . . . . . . . 260
Connecting the Pa3X to a personal computer . . . . . . . . . . . . .260
KORG USB-MIDI Driver system requirements . . . . . . . . . . .260
Please note before use . . . . . . . . . . . . . . . . . . . . . . . . . . . . . . . . .260
Windows: Installing the KORG USB-MIDI Driver . . . . . . . .260
Mac OS X: Installing KORG USB-MIDI Driver . . . . . . . . . . .261
Shortcuts . . . . . . . . . . . . . . . . . . . . . . . . . . . . . . . . . . . . . . . . . . 262
MIDI Implementation Chart . . . . . . . . . . . . . . . . . . . . . . . . 263
Troubleshooting . . . . . . . . . . . . . . . . . . . . . . . . . . . . . . . . . . . 264
Technical specifications . . . . . . . . . . . . . . . . . . . . . . . . . . . . 266
Index . . . . . . . . . . . . . . . . . . . . . . . . . . . . . . . . . . . . . . . . . . . . . 268
Page 9

Page 10
6
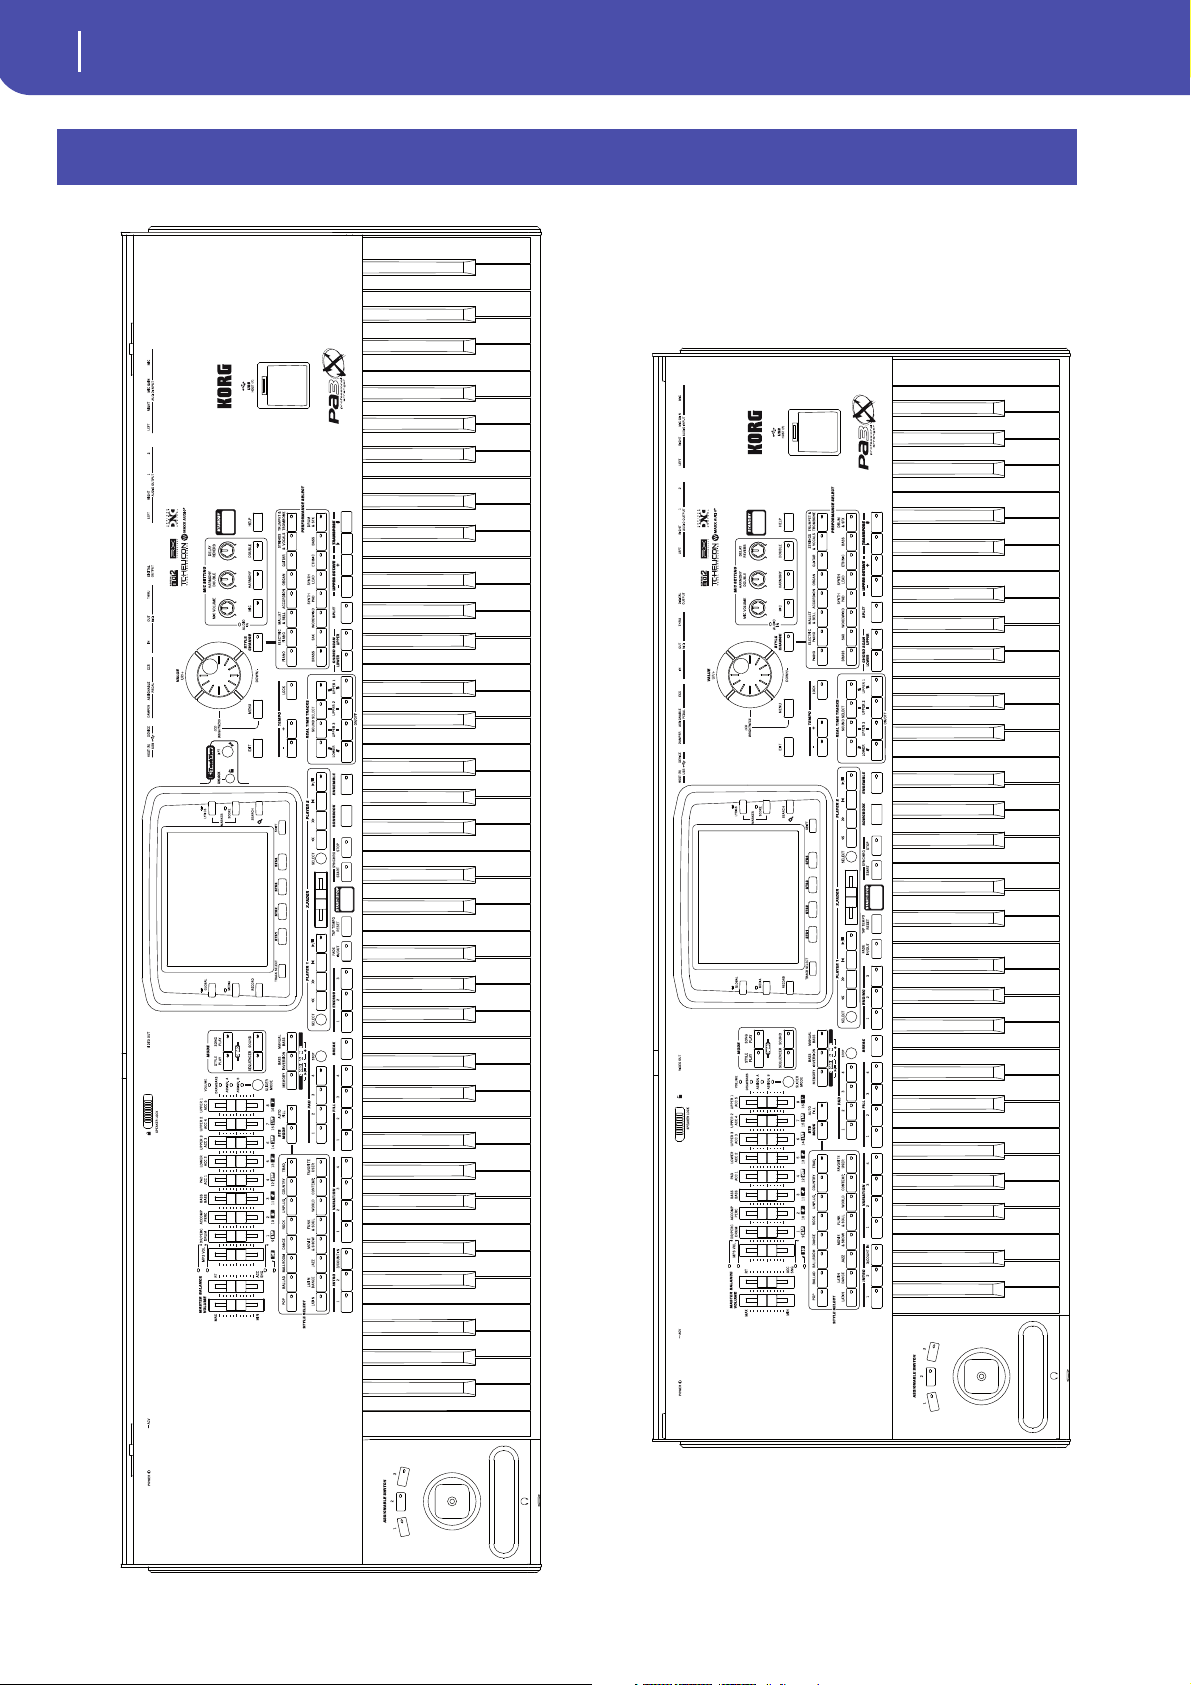
Overview
Pa3X 76-keys
Pa3X 61-keys
Overview
Page 11
Overview
Front Panel
Front Panel
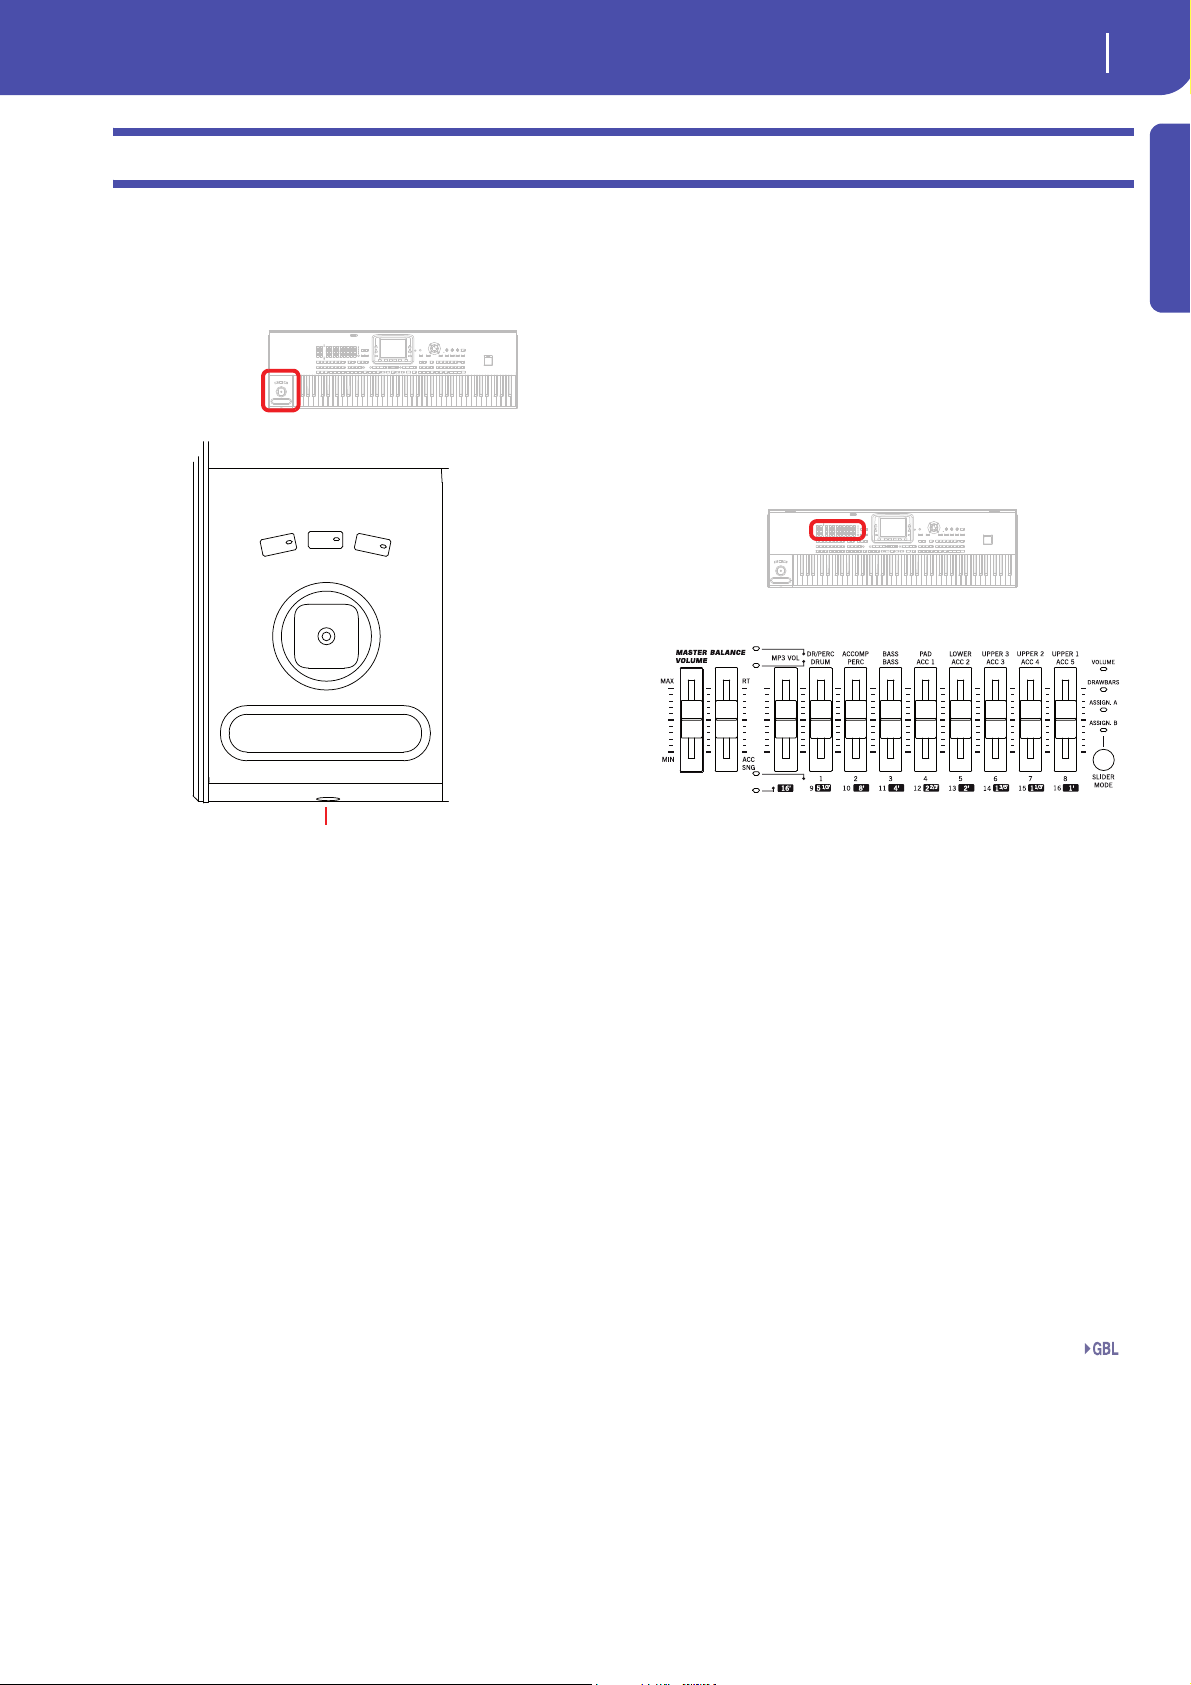
Phones connector
7
Connectors and controllers
The left side of the front panel contains the manual physical controllers and the headphones connector.
PHONES
Connect a pair of headphones to this output. You can use headphones with an impedance of 16-200 Ohms (50 Ohms suggested). Use a headphone splitter to connect more than one pair
of headphones.
Volume controls and assignable sliders
Use these sliders to control master and section volumes, drawbars or assignable functions. Press the SLIDER MODE button to
choose the assigned functions.
Introduction
ASSIGNABLE SWITCH
These are freely assignable switches (see “Pad/Switch: Switch” on
page 133 for information on how to assign functions to them).
JOYSTICK
This joystick triggers different functions, depending on the
direction it is moved towards. The joystick can be separately
turned on or off for each track (see “Keyboard/Ensemble: Keyboard Control 1” on page 130).
X (+/–) Move the joystick towards the left (–) to lower the
pitch, or towards the right (+) to raise it. This is
also called Pitch Bend.
Y+ Move the joystick forward to trigger Modulation.
Y– Move the joystick backward, to trigger the func-
tion assigned in Sound mode.
RIBBON CONTROLLER
This strip controls a Sound parameter. Slide towards the left (–)
to decrease its value, or towards the right (+) to increase it.
You can set the ribbon’s sensitivity in the Global > Pedal/Switch
page (see “Sensivity” on page 209). To assign the ribbon to a
sound’s parameter, assign it as an AMS control for the corresponding parameter (see the “Sound” chapter in the “Advanced
Edit” manual, available in the Accessory Disk).
MASTER VOLUME
This slider controls the overall volume of the instrument, both of
the (optional with the PaAS system) integrated speakers, the
LEFT and RIGHT Audio Outputs, and the PHONES output. It
does not control the volume of the 1 and 2 sub-outputs.
BALANCE
While in Style Play and Song Play mode, this slider usually balances the volume of the Keyboard tracks, against the Style
(Accompaniment), Pad and Song tracks. This is a relative control, whose effective maximum value is determined by the MASTER VOLUME slider position.
It can be programmed to work as the volume control for the
Accompaniment/Song tracks only (leaving the Keyboard tracks
unchanged). See “Balance Slider” on page 206 for more information.
When moved, a magnified version of the virtual slider appears in
the display, for more accurate positioning.
Note: This does not work in the Sequencer and Sound modes.
ASSIGNABLE SLIDERS
The first slider acts either as an MP3 volume controller in most
cases, or as the 16’ footage when in Drawbar mode. When controlling the MP3 volume, it starts working only when the current
volume level is reached.
The other eight sliders act as volume controls or drawbars, or are
freely assignable sliders (see “Controllers: Assignable Sliders” on
page 209 for information on how to assign functions to them).
Four slider modes are available, and can be selected by pressing
the SLIDER MODE button (see below).
Gbl
Page 12
8
Overview
Front Panel
SB
While in Style Play or Sequencer mode, with the sliders
in Volume mode, you can use the physical sliders to change the
volume of several tracks at once. Keep the SHIFT button pressed,
and move one of these sliders to proportionally change the volume of all similar tracks.
Note: In Song Play mode, this does not work on the Song tracks,
but it still works on the Keyboard tracks.
• In Style Play and Song Play mode: Keep the SHIFT button
pressed and move one of the UPPER sliders, to proportionally change the volume of all Upper tracks at the same time.
• In Style Play mode: First press the TRACK SELECT button
to see the separate Style tracks in the display. Then keep the
SHIFT button pressed and move one of the sliders, to proportionally change the volume of all Style tracks at the
same time.
• In Sequencer mode: Keep the SHIFT button pressed and
move one of the sliders, to proportionally change the volume of all Song tracks at the same time.
SLIDER MODE
Use this button to select one of the four available operating
modes for the sliders. The sliders can be freely programmed in
Global mode (see “Controllers: Assignable Sliders” on page 209).
VOLUME When in this mode, each of the sliders controls
the volume of the corresponding track or device
in the display.
DRAWBARS Each slider controls the corresponding drawbar
of the selected Digital Drawbars Sound.ASSIGN.
A/BTwo sets of eight freely assignable controls,
that can be programmed in Global mode. The
first slider (labeled MP3 Vol) always controls the
volume of the MP3 player. For information on
how to program them, see “Controllers: Assignable Sliders” on page 209.
MODE section
Each of these buttons recalls one of the instrument’s operating
modes. When selected, each mode excludes the others.
In the main page, Keyboard tracks are shown in the right half of
the display. You can reach the main page by pressing EXIT from
any of the Style Play edit pages. If you are in a different operating
mode, press STYLE PLAY to recall the Style Play mode. If Keyboard tracks are not shown in the display, press the TRACK
SELECT button to see them.
This operating mode is automatically selected when turning the
instrument on.
SONG PLAY
Song Play mode, where you can play back Songs in Standard
MIDI File (SMF or KAR) and MP3 format. Since the Pa3X is
equipped with two players, you can even play two Songs at the
same time, and mix them with the X-Fader.
In addition to the Song tracks, you can play up to four Keyboard
tracks and four Pads along with the Song(s). In the main page,
Keyboard tracks are shown in the right half of the display. You
can reach the main page by pressing EXIT from any of the Song
Play edit pages. If you are in a different operating mode, press
SONG PLAY to recall the Song Play mode. Use the TRACK
SELECT button to cycle between Keyboard and Song tracks.
SEQUENCER
Sequencer mode, where you can play, record or edit a Song (in Standard MIDI File format). The Backing Sequence mode lets you
record a new Song based on the Keyboard and Style tracks, and save
it as a new Standard MIDI File.
SOUND
Sound mode, to play single Sounds on the keyboard, or edit
them. By pressing RECORD you can access the Sampling mode,
Pa3X full-featured sampler.
User Sounds may be based on User PCM Samples that are
loaded into the dedicated Sample RAM memory. Pa3X includes
128 MB of Sample RAM as standard; this memory can be
increased by installing the (optional) EXB-M256 expansion
board.
Please note that the actual amount of User PCM Samples that
can fit the Sample RAM varies depending on the amount of
compression applied to the Samples, and may be up to 200%
over the non-compressed size. Therefore, the full 256 MB Sample RAM could contain the equivalent of over 500 MB or Samples.
User PCM Samples are stored in a battery-backed Sample RAM
memory when the Pa3X is turned off or put to standby mode.
See “Turning the instrument on and off ” on page 25for more
information).
Information about the Sound and Sampling modes can be found
in the “Advanced Edit” manual, contained in the Accessory Disk.
STYLE PLAY
Style Play mode, where you can play Styles (automatic accompaniments) and play up to four Keyboard tracks and four Pad
tracks.
DEMO
Press the STYLE PLAY and SONG PLAY buttons together to
select the Demo mode. This mode lets you listen to some Demo
Songs, to let you understand the sonic power of the Pa3X. To exit
from this mode, press any of the MODE buttons.
Page 13
9
Overview
Front Panel
Special Mode Buttons
These buttons are used to recall settings, file management and
record modes.
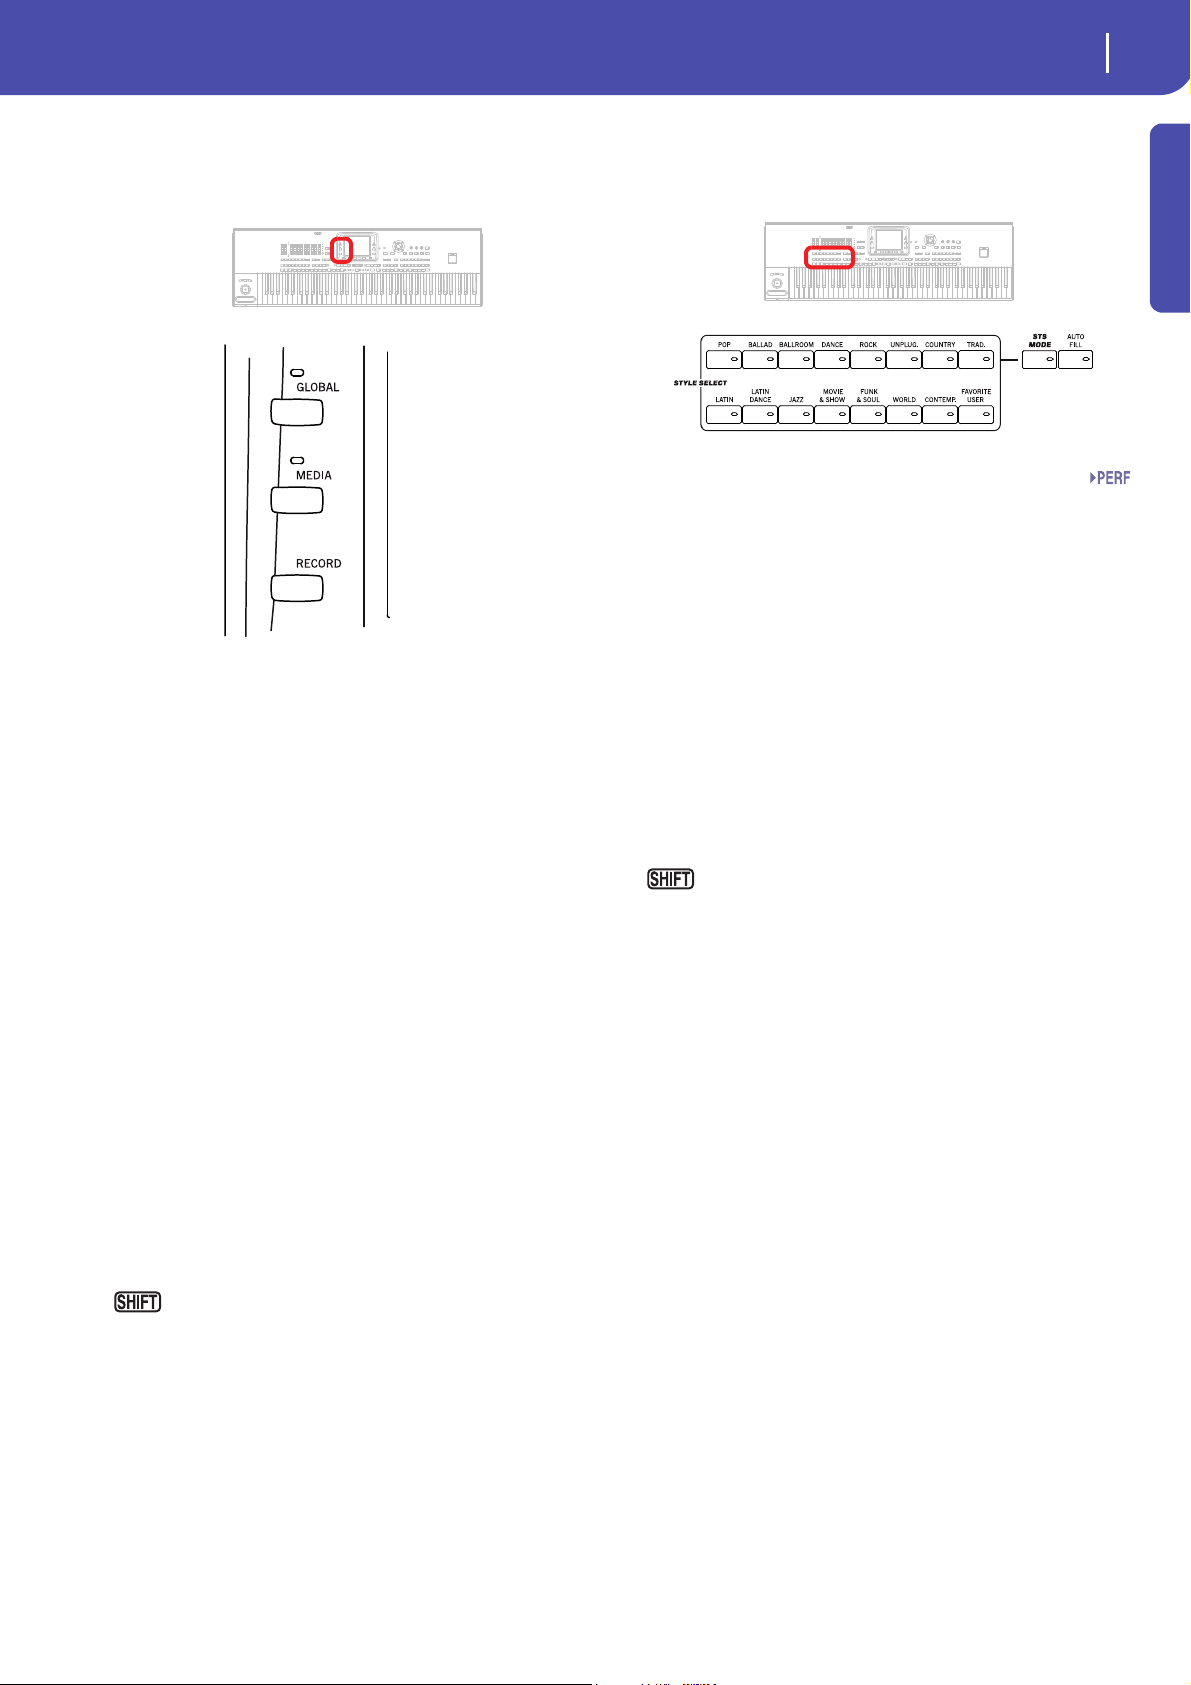
GLOBAL
This button recalls the Global edit environment, where you can
adjust various global settings. This edit environment overlaps
any operating mode, that still remains active in the background.
Press EXIT to go back to the underlying operating mode.
MEDIA
This button recalls the Media edit environment, where you can
execute various operations on files and storage devices (Load,
Save, Format, etc…). This edit environment overlaps any operating mode, that still remains active in the background. Press
EXIT to go back to the underlying operating mode.
Please note that the 76-key model is fitted with a hard disk as
standard, while the 61-key model includes a flash-memory module, that can be replaced with a hard disk by using the (optional)
HDIK-2 kit. Both storage devices are shown as “HD” inside the
Media and Song Select pages.
The internal hard disk or flash-memory module contain both
the Factory data (inside the SYS area) and User-editable data
(inside the HD area).
RECORD
This button sets the instrument to the Record or Sampling mode
(which one depends on the current operating mode).
You can keep the SHIFT button pressed and press this
button to open the “MP3 Record” dialog box (see “Recording a
new Song (MP3 file)” on page 101).
Style Section
Here you can select a Style, and activate the automatic selection
of STSs and/or Fills.
Introduction
STYLE SELECT section
Use these buttons to open the Style Select window and select a
Style. See “Style Select window” on page 105.
The USER button gives access to three User Style banks and
twelve Favorite Style banks. You can use User locations to load
new Styles from an external device, or save newly created or
edited Styles.
Favorite locations, too, can be used to load new Styles from an
external device, or to save newly created or edited Styles, but in
addition you can edit the names of these Sound banks, so that
you can create a custom set of Styles. See “The Favorite banks”
on page 140.
Each button (Style banks) contains five pages, each with up to
eight Styles. Repeatedly press a STYLE SELECT button to cycle
between the available pages.
You can keep the SHIFT button pressed and press one of
the buttons of this section, to make the “Write Style Settings”
window appear in the display. Then, you can save the current
Style Setup (see “Write Style Settings dialog box” on page 139).
STS MODE
This button cycles between the following functions.
On When a different Style (or the same again) is
selected, STS 1 is automatically selected. The
Keyboard sounds and effects will change, along
with the Style sounds and effects.
Flashing Variation/STS Link function activated. This func-
tion makes each Variation recall the corresponding STS when selected. For example, select
Variation 2, and STS 2 will be automatically
recalled; select Variation 3, and STS 3 will be
automatically recalled.
Off When you select a different Style (or the same
again), the Style sounds and effects will change.
The Keyboard sounds and effects will not change.
AUTO FILL
This button allows to turn the Auto Fill function on or off.
Note: This function is automatically turned off when turning the
instrument off.
On When selecting a different Variation, the Fill hav-
ing the same number of the previous Variation is
automatically selected. For example, if going from
Page 14
10
Overview
Front Panel
SB
SB
SB
Variation 2 to Variation 3, Fill 2 is automatically
selected.
Off When choosing a Variation, no fill is automati-
cally selected.
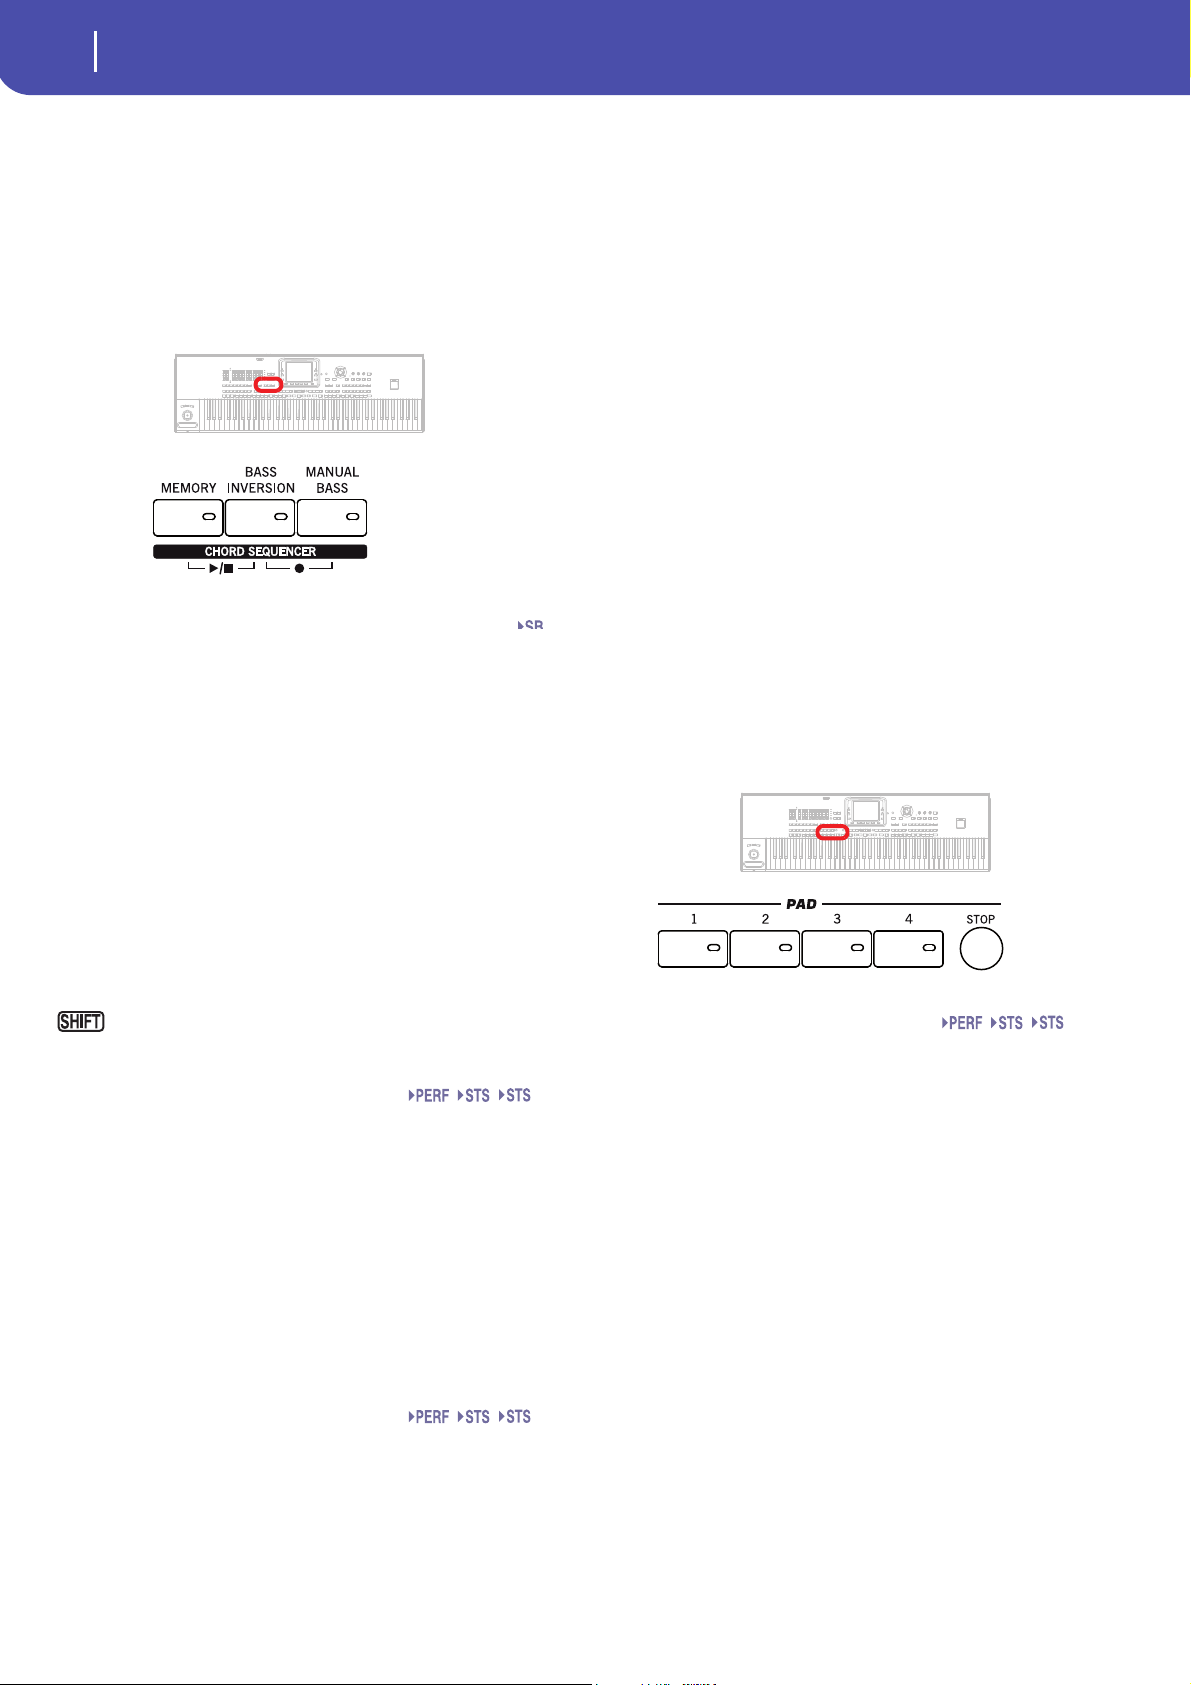
Memory, Bass Controls, Chord Sequencer
These buttons lets you decide what should remain in memory,
and how the bass is played back.
MEMORY
This button allows you to choose if the Lower track and/or the
accompaniment chords must remain in memory even after raising your hand from the keyboard.
On Depending on the setting of the “Memory Mode”
in the “Preferences: Style Preferences” page (Style
Play mode, see page 136), the sound on the left of
the split point (Lower), and/or the chords for the
automatic accompaniment can kept in memory
even when you raise your hand from the keyboard.
Off The sound and chords are released as soon as you
raise your hand from the keyboard.
Note: This function can be automatically activated by playing the
keyboard harder. See “Velocity Control” on page 136.
button again, or one of the CHORD SCANNING
buttons.
Off The bass track is automatically played by the Style.
Note: When you press the MANUAL BASS button, the Bass track
volume is automatically set to its maximum value. The volume is
automatically set back to the original value when the MANUAL
BASS button is deactivated.
CHORD SEQUENCER (PLAY/STOP AND RECORD)
While a Style is in play, you can use this section as a Chord
Sequencer and record a looping sequence of chords. The chords
will drive the arranger, leaving your hands free for solo playing.
RECORD (BASS INVERSION + MANUAL BASS): Press these
buttons together to start recording the Chord Sequence (starting
from the next measure). Press these buttons again to stop
recording.
PLAY/STOP (MEMORY + BASS INVERSION): Press these buttons together to let the Chord Sequence play in loop, and drive
the arranger. Press them again to stop the sequence.
The Chord Sequence will remain in memory up until you record
a new Chord Sequence, or you turn the Pa3X off.
Pads
Here you can play (and stop) the Pads, i.e. single sounds or looping sequences.
You can jump to the Style Play > Style Preferences page
by keeping SHIFT pressed, and pressing the MEMORY button.
BASS INVERSION
This button turns the Bass Inversion function on or off.
On The lowest note of a chord played in inverted
form will always be detected as the root note of
the chord. Thus, you can specify to the arranger
composite chords such as “Am7/G” or “F/C”.
Off The lowest note is scanned together with the
other chord notes, and is not always considered
as the root note.
Note: This function can be automatically activated by playing the
keyboard harder. See “Velocity Control” on page 136.
MANUAL BASS
This button turns the Manual Bass function on or off.
On The automatic accompaniment stops playing
(apart for the Drum and Percussion tracks), and
you can manually play the Bass track on the
Lower part of the keyboard. You can start the
automatic accompaniment again by pressing this
PAD 1-4
STOP
Each Pad button corresponds to a dedicated Pad track. Use these
buttons to trigger up to four sounds or sequences at the same
time.
• Press a single PAD button to trigger a single sound or
sequence.
• Press more PAD buttons to trigger several sounds or
sequences.
The sequences will play up to the end. Then, they will stop or
continue repeating, depending on their “One Shot/Loop” status
(see the “Pad Type” parameter in the Pad Record mode).
You can stop all sequences, or just some of them, by pressing the
STOP button of the PAD section:
• Press STOP to stop all sequences at once.
• Keep STOP pressed and press one (or more) of the PAD
buttons to stop the corresponding sequence(s).
• Press one of the ENDING buttons to stop both the accompaniment and the Pads at the same time.
Page 15
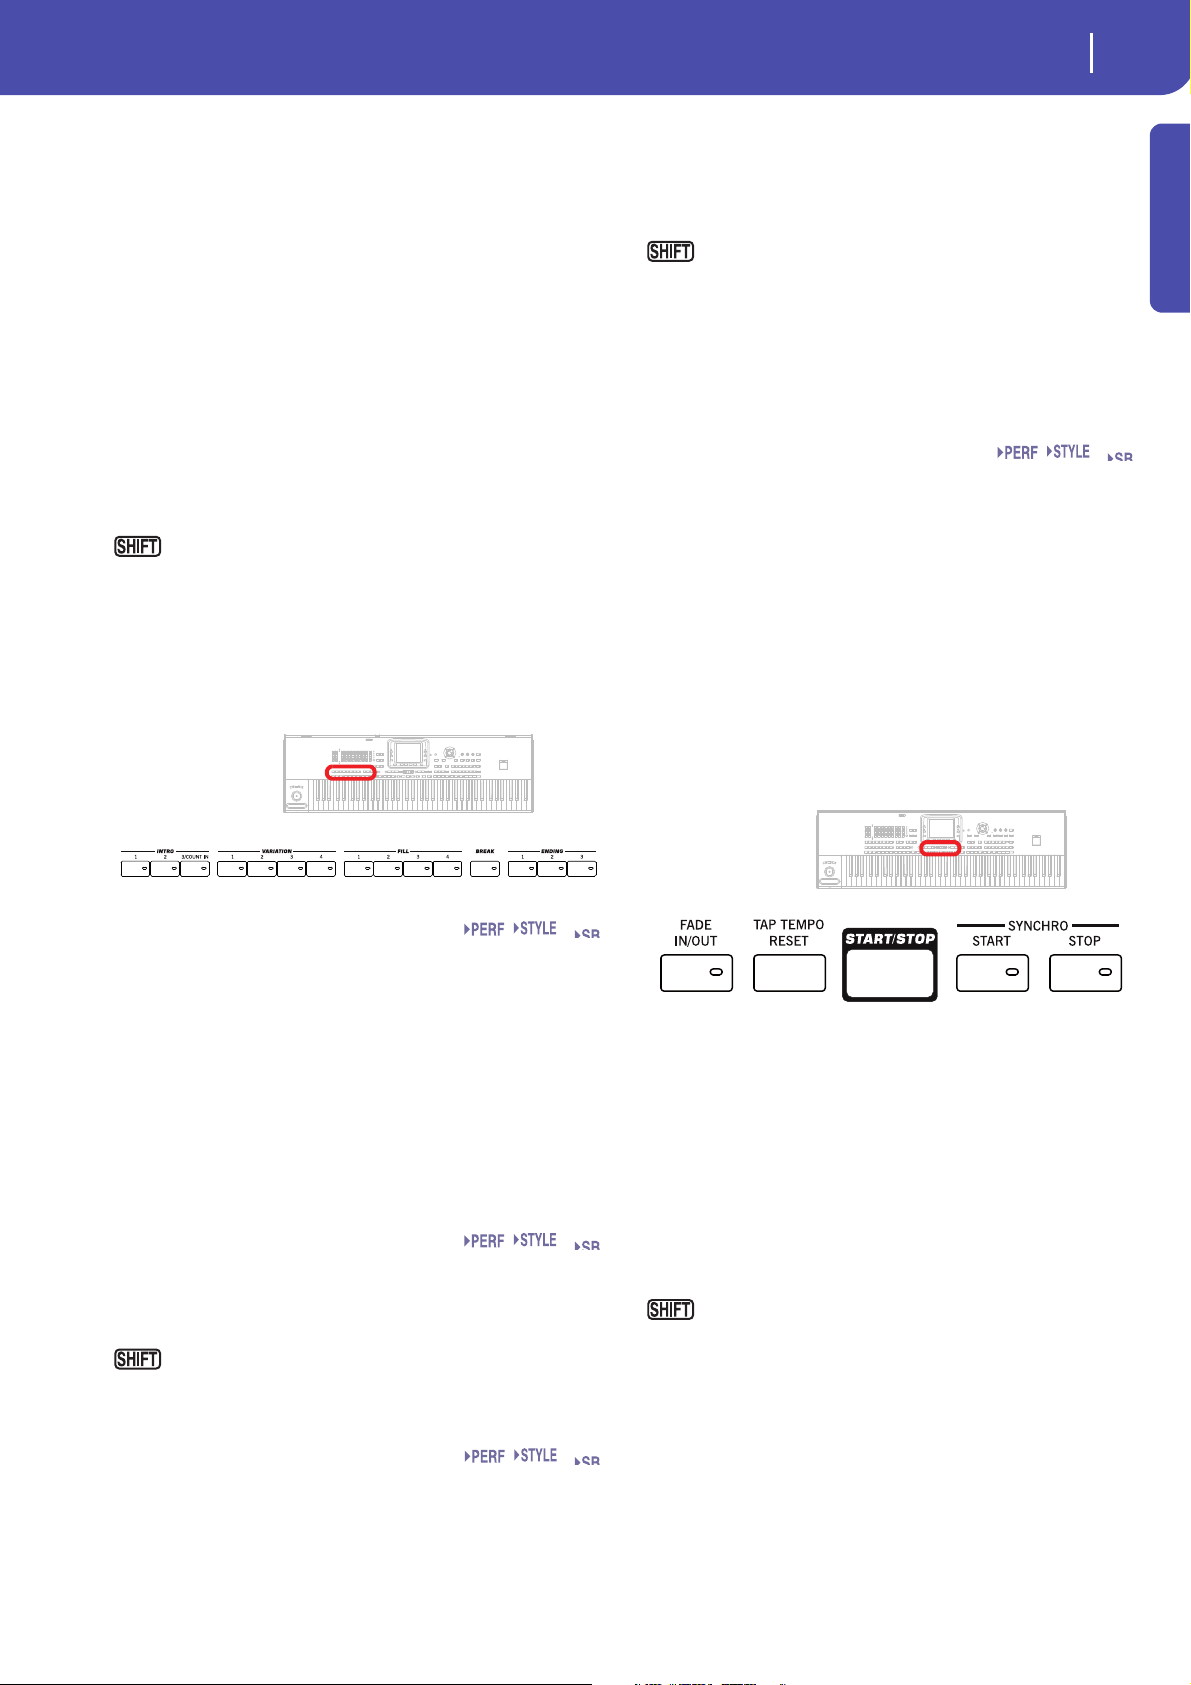
11
Overview
Front Panel
Set
Set
Note: Pads share polyphony voices with the other tracks, so avoid
using too many of them together with a dense Style or Song
arrangement.
About Pad synchronization. In Style Play mode, Pads are synchronized to the Style’s Tempo. In Song Play mode, they are synchronized to the latest Player you set to play. For example,
assume you pressed PLY2-PLAY; when pressing one of the PAD
buttons, it will play in sync with Player 2.
Note: There is no synchronization with MP3 files. Pads can only
be synchronized to the Tempo of the last selected Standard MIDI
Files. Therefore, when an MP3 file is assigned to the last select
Player, Pads will synchronize to the Tempo of the last Standard
MIDI File that has been played back.
About Pads’ and the Players’ Play command. When you press
one of the PLAY buttons to start the corresponding Player, all
Pads will stop playing.
You can jump to the Style Play > Pad/Assignable Switch
page by keeping SHIFT pressed, and pressing one of the PAD
buttons.
Style Elements
This section contains the separate elements of a Style (Fill, Variation, etc.).
Note: This function can be automatically activated by playing the
keyboard harder. See “Velocity Control” on page 136.
Note: If the Auto Fill function is activated, a Fill will be automatically selected when choosing the corresponding Variation.
You can jump to the Style Play > Drum/Fill page by
keeping SHIFT pressed, and pressing one of the FILL buttons.
BREAK
This button triggers a break. Press it twice (LED blinking) to let
it play in loop. Press it again or select any other Style Element
(Fill, Intro, Variation, Ending) to exit from the loop.
ENDING 1-3 buttons
While the Style is running, these three buttons trigger an Ending, and stop the Style. Press one of them, and the Style will stop
running with an Ending.
Press them twice (LED blinking) to let them play in loop, and
select any other Style element (Fill, Intro, Variation…) to exit the
loop (or press the same button again).
Note: Ending 1 plays a short sequence with different chords, while
Ending 2 plays on the latest recognized chord. Ending 3 starts
immediately, and is just two measures long.
Introduction
INTRO 1-3/COUNT IN buttons
These buttons turn the corresponding Intro on. After pressing
one of these buttons, start the Style, and it will begin with the
selected intro. The INTRO LED automatically goes off at the end
of the intro.
Press them twice (LED blinking) to let them play in loop, and
select any other Style element (Fill, Intro, Variation…) to exit the
loop (or press the same button again).
Note: Intro 1 plays a short sequence with different chords, while
Intro 2 plays on the latest recognized chord. Intro 3 is usually a
one-bar Count In.
VARIATION 1-4 buttons
Each of these buttons selects one of the four Variations of the
current Style. The higher the Variation number, the denser the
arrangement.
You can jump to the Style Play > Drum/Fill page by
keeping SHIFT pressed, and pressing one of the VARIATION
buttons.
Set
Set
FILL 1-4 buttons
These buttons trigger a fill-in. Press them twice (LED blinking)
to let them play in loop, and select any other Style element (Fill,
Intro, Variation…) to exit the loop (or press the same button
again).
Style Controls
Use these buttons to start/stop the accompaniment.
FADE IN/OUT
When the Style or Song is not playing, press this button to start it
with a volume fade-in (the volume goes from zero to the maximum).
When the Style or Song is playing back, press this button to stop
it with a volume fade-out (the volume gradually decreases).
You don’t need to press START/STOP or PLAY/STOP to start or
stop the Style or Song.
Note: This does not work in Sequencer mode.
You can jump to the Global > Basic page by keeping
SHIFT pressed, and pressing the FADE IN/OUT button.
TAP TEMPO/RESET
This is a double-function button, acting in a different way
depending on the Style status (Start/Stop).
Note: This button only works while in Style Play mode.
Tap Temp o: When the Style is not playing, you can “beat” the
tempo on this button. Tap as many times as the Time Signature’s
numerator (for example, four times with a 4/4 Time Signature, or
Page 16

12
Overview
Front Panel
three times with a 3/4 one). At the end, the accompaniment
starts playing, using the “tapped in” tempo.
Reset: When you press this button while the Style is playing
back, the Style pattern goes back to the beginning of measure 1.
START/STOP
Starts or stops the Style.
Note: This function can be automatically activated by playing the
keyboard harder. See “Velocity Control” on page 136.
You can reset all ‘frozen’ notes and controllers on the Pa3X
and any instrument connected to its MIDI OUT or the USB
Device port, by using the “Panic” (SHIFT + START/STOP) key
combination. Just press SHIFT + START/STOP to stop all notes
and reset all controllers.
SYNCHRO START / STOP buttons
These buttons turn the Synchro Start and Synchro Stop functions on or off. This lets you decide if you must press START/
STOP to start and/or stop a Style, or just play the keyboard in the
Chord Scan area.
Start On, Stop Off
In this situation, just play a chord in the chord
recognition area (usually under the split point,
see “Chord Scan and Keyboard Split” on page 17)
to automatically start the Style. If you like, turn
one of the INTROs on before starting the Style.
Start Off, Stop On
In this case, raising your hands from the keyboard
stops the Style running.
Start On, Stop On
When both LEDs are lit, raising your hands from
the keyboard momentarily stops the Style running.
If you play a chord again, the Style starts again.
Start Off, Stop Off
All Synchro functions are turned off.
Display and controls
In the 76-key model, the display tilt angle can be adjusted either
using the motor, or manually.
COLOR TOUCHVIEW™ GRAPHICAL DISPLAY
Use this display to interact with the instrument. To set the display brightness, keep the MENU button pressed, and turn the
DIAL counter-clockwise to decrease the brightness, or clockwise
to increase it.
In the 76-key model, you can use the UNLOCK and LIFT buttons to change the display tilt angle by using the motorized display controls (see below).
Wa r ni n g : Before moving the Pa3X, always lower the display completely down, or you will risk to damage it!
Wa r ni n g : Do not put anything over or under the display, or you
will risk to damage the motor or the display!
Wa r ni n g : Do not put your fingers under the display while it is
moving, or you will risk to pinch them under the display!
UNLOCK
(76-key model only) Use this button to disconnect the display
from the motor. Keep it pressed while gently adjusting the tilt
manually, then release the button to reconnect the motor. This is
particularly useful when you turned the instrument off, and forgot to lower the display down.
Wa r ni n g : Do not force the display if it does not move! Press the
button and try again.
Note: The last position is recalled when turning the instrument on
again.
LIFT
(76-key model only) Use this button to alternatively tilt the display up or down. Keep it pressed until the display is in the
desired position.
Wa r ni n g : Do not force the display while the motor is engaged!
Page 17

13
Overview
Front Panel
Second Function Controls
Use the TRACK SELECT and SHIFT buttons to choose alternate
functions.
TRACK SELECT
Depending on the operating mode, this button switches between
the various track views.
STYLE PLAY MODE
Toggles between Keyboard and Style tracks.
SONG PLAY MODE
Toggles between Keyboard tracks, Song tracks 18, and Song tracks 9-16.
SEQUENCER MODE
Toggles between Song tracks 1-8 and Song tracks
9-16.
SHIFT
With this button held down, pressing certain other buttons gives
access to a second function. For a list of the available shortcuts,
see “Shortcuts” on page 262.
STS Section
Use the STS (Single Touch Settings) buttons to select sounds for
the keyboard.
selected, and you can save the current keyboard track settings in a
STS (see “Write Single Touch Setting dialog box” on page 139).
Players Controls
Pa3X is equipped with two players (Player 1 and Player 2), each
with its own set of transport controls. The Player 1 group is also
used for the Sequencer mode.
SELECT
Press this button to open the Song Select window and choose a
Songs.
<< and >>
Rewind and Fast Forward commands. If you use them while the
Song is in play, they make it scroll back or forward.
When pressed once, these buttons move the Song to the previous
or following measure (with a Standard MIDI File) or to the previous or next second (with an MP3 file). When kept pressed, they
make the Song scrolling continuously, until you release them.
In Sequencer mode, if you set a Locate Measure other than 1,
when pressing the << button the Song rewinds up to that measure instead of the first one (see “Locate measure” on page 174).
In Jukebox mode (Player 1), keep the SHIFT button
pressed, and press these buttons to scroll to the previous or next
Song in the Jukebox list (see “Jukebox Editor” on page 156).
(HOME)
Sends the Song Position back to measure 1 (i.e., the beginning of
the Song).
In Sequencer mode, if you set a Locate Measure other than 1, the
Song Position goes back to that measure (see “Locate measure”
on page 174).
Introduction
STS 1-4 buttons
These buttons allow to select up to four Single Touch Settings
(abbreviated as STS). Each of the Styles and SongBook entries
includes four Single Touch Settings (STS), to automatically configure Keyboard tracks and effects, and the Voice Processor, at
the touch of a finger. When the STS MODE LED is lit, an STS is
automatically selected when selecting a Style.
If you keep the SHIFT button pressed, and press one of
the buttons of this section, the “Write Single Touch Setting (STS)”
window appears in the display, with the current STS already
(PLAY/STOP)
Starts or stops the Song from the current Song Position.
In Song Play mode, pressed while keeping SHIFT
pressed, starts both players at the same time.
X-FADER
In Song Play mode, this slider balances the volume of the two
on-board Players. When fully on the left, only Player 1 can be
heard. When fully on the right, only Player 2 can be heard.
When in the middle, both Players play at full volume.
This slider also selects the Lyrics, Score and Markers from one of
the Players.
Note: This slider does not work in Style Play, Sequencer or Sound
mode.
Page 18

14
Overview
Front Panel
SongBook
The SongBook is the music database of the Pa3X.
SONGBOOK
Press this button to recall the SongBook mode. While in this
mode, you can browse through the music database.
You can jump to the SongBook > Custom List page by
keeping SHIFT pressed, and pressing the SONGBOOK button.
Lyrics, Score, Markers, Search
Use these buttons to access the Lyrics, Markers or Search pages.
Data Entry and Navigation
The VALUE DIAL and the DOWN/- and UP/+ buttons can be
used to assign a different value to the selected parameter in the
display, or to scroll a list of files in the Song Select, Search and
Media pages.
VALUE DIAL
Turn the dial clockwise to increase the value of the selected
parameter. Turn it counter-clockwise to decrease its value.
LY RI C S
This button recalls the Lyrics page for the active Player, the Style
or the SongBook entry. You can use the X-Fader to select either
Player 1 or Player 2.
SCORE
Press this button to open the Score page (in Song Play or SongBook mode). You can use the X-Fader to select either Player 1 or
Player 2.
MARKERS
Press both the LYRICS and SCORE buttons together to open the
Markers page. You can use the X-Fader to select either Player 1
or Player 2.
SEARCH
Press this button to open the Search window, and look for a
specified file or musical resource. The Search window appears
slightly different depending on the current context. For information on how to use this function, see “Searching files and musical
resources” on page 109.
When used while pressing the MENU button, this con-
trol always acts as a Display Brightness control.
UP/+ and DOWN/-
UP/+ increases the value; DOWN/- decreases it.
EXIT
Use this button to perform various actions, leaving from the current status:
• exit the edit menu page, without selecting any item
• make the page menu disappear, without selecting any
item
• return to the main page of the current operating mode
• exit the Global or Media edit environment, and return to
the current page of the current operating mode
• exit from the SongBook mode
• exit from the Lyrics, Score and Marker pages
• exit from a Style, Pad, Performance or Sound Select window
MENU
This button opens the edit menu page for the current operating
mode or edit mode. After opening an edit menu, you can jump
to one of the edit sections by touching the corresponding button
in the display.
Otherwise, press EXIT to return to the main page of the current
operating mode, or the current page of the underlying operating
mode.
See the relevant chapter devoted to each operating mode or edit
environment, to see their “maps” in detail.
Page 19

15
Overview
Front Panel
Temp o S ec tion
The TEMPO– and TEMPO+ buttons can be used to control the
Te mp o .
TEMPO +/– buttons
TEMPO– decreases the Tempo value; TEMPO+ increases it.
Press both buttons together to reset the Tempo to the value
memorized in the selected Style, Standard MIDI File or MP3.
TEMPO LOCK
This button turns the Tempo Lock function on or off.
On When you select a different Style or Performance,
or select a different Song, the Tempo does not
change. You can still manually change it, by using
the TEMPO +/– buttons, or select the Tempo
value and change it using the VALUE controls.
Off When you select a different Style or Performance,
or select a different Song, the memorized Tempo
is automatically selected.
Note: This button does not work with MP3 files.
Set
level so that this LED remains on green most of the time, with
orange appearing at signal peaks. Never go to red.
Off: No signal entering.
Green: Low- to mid-level signal entering. If the LED
turns off too often, the input gain is too low. Use
the MIC GAIN control and/or the source device’s
volume to increase the input level.
Orange: Slight overload in the signal path. This is fine if it
turns on only on signal peaks.
Red: Clipping is occurring in the signal path. Use the
MIC GAIN control and/or the source device’s
volume to lower the input level.
See “Audio Input Section” on page 19 for more
information on the AUDIO INPUTs.
MIC VOLUME
Use this knob to set the volume of the [lead voice].
HARMONY/DOUBLE
Use this knob to set the volume of the Harmony and Double sections of the Voice Processor.
DELAY/REVERB
Use this knob to set the volume of the Delay and Reverb sections
of the of the Voice Processor.
MIC ON/OFF
Press this button to turn the microphone input on or off. The
LED shows the status of the microphone section.
Introduction
You can jump to the Global > Lock page by keeping
SHIFT pressed, and pressing this button.
Mic Setting Section
Use these buttons to check the microphone input level, set the
volume of the various sections, and turn the various voice sections on or off in the Voice Processor.
If you keep the SHIFT button pressed, and press this buttons, the Voice Processor Setup > Mic Setup page will appear
(see “Voice Processor Setup: Setup” in the Advanced Edit Manual).
HARMONY
Turns the Voice Harmony effect on or off. This adds up to four
harmonization voice to the lead voice.
If you keep the SHIFT button pressed, and press this button, the Voice Processor Preset > Harmony page will appear (see
“Voice Processor Preset: Easy Preset” in the Advanced Edit Manual). This adds choir voices in unison to the lead voice.
DOUBLE
Turns the Double effect on or off.
If you keep the SHIFT button pressed, and press this button, the Voice Processor Preset > Double page will appear (see
“Voice Processor Preset: Double” in the Advanced Edit Manual
contained in the Accessory Disk).
AUDIO IN LED
This LED shows the level of the audio signal entering the
AUDIO INPUT connectors (both MIC and LEFT/RIGHT line
in connectors, see “Audio Input Section” on page 19). Three different colors (green, orange, red) show the level. Try to keep the
Page 20

16
Overview
Front Panel
Standby
Use the Standby function to “pause” the instrument, rather than
turning it off.
STANDBY
When the instrument is in standby (LED colored red), press this
button to exit from standby mode (the LED becomes green).
When the instrument is completely turned off (LED off), press
the POWER button, then press the STANDBY button to turn the
instrument on.
To turn the instrument off, you can keep the STANDBY button
pressed for 2 seconds to put it in standby mode, or you can press
the POWER button to completely disconnect it from the power.
When the Pa3X is completely turned off via the POWER button,
the internal battery preserving the Sample RAM memory is not
recharged, and will discharge after three-four days. When the
battery is discharged, turning on will take a longer time (since all
Samples will have to be reloaded).
Note: It is advisable to put the instrument in standby mode instead
of turning it off, if you want the internal battery to recharge, and
let the Pa3X start-up quickly. On the contrary, it is advisable to
completely turn it off to save power.
“General Controls: Clock & Battery” page (see
page 207).
Help
The multi-language context-sensitive Help lets you learn about
the current page, and more.
HELP
Press this button to open the context-sensitive Help.
Real Time Tracks Section
Use these buttons to select and turn on/off the Sounds assigned
to the keyboard (Real Time tracks).
Standby Power Off
Battery Recharged Discharged after
three-four days
With battery charged Fast boot-up time
With battery discharged Slow boot time
Wa r ni n g : When the instrument is in standby mode, it is still connected to the power line. Accessing the inside of the instrument can
be dangerous.
Hint: You can check the battery charge level by going to the Global
> General Controls > Clock & Battery page (see “General Controls: Clock & Battery” on page 207).
STANDBY LED and battery status
The STANDBY LED let you see the status of the backup battery.
Off No power. Instrument completely turned off.
Green Power on, battery fully charged.
Green flashing Power on, batter y charging.
Red Standby, battery fully charged.
Red flashing Standby, battery charging.
Red and green alternating (even in standby mode)
Malfunctioning, or batteries exhausted and to be
replaced. Please read the error messages in the
SOUND SELECT
Press the button corresponding to the Upper 1-3 or Lower track
to open the Sound Select window, and assign a Sound to the corresponding track.
Sounds of the “FACTORY” type are standard sounds, that cannot be modified.
Sounds of the “LEGACY” type are standard sounds allowing
greater compatibility with older Pa-Series instruments.
Sounds of the “GM/XG” type allow for compatibility with General MIDI sounds and XG Drum Kits.
Sounds of the “USER” type are locations where you can load new
Sounds from an external device, or save new or edited Sounds.
The “USER DK” type is where you can load new Drum Kits, or
save new or edited Drum Kits.
For each type of Sounds there are several Sound banks, that can
be selected using the side tabs.
Each Sound bank contains various pages, each with up to eight
Sounds, that can be selected using the lower tabs.
ON/OFF
Use these buttons to turn on/off the corresponding track.
On The track can play.
Off The track is muted.
Page 21

17
Overview
Front Panel
Gbl
Set
Ensemble
The Ensemble function automatically harmonizes the right hand
melody.
ENSEMBLE
This button turns the Ensemble function on or off. When on, the
right-hand melody is harmonized with the left-hand chords.
Note: The Ensemble function works only when the keyboard is in
SPLIT mode, and the LOWER Chord Scan mode is selected.
You can jump to the Style Play > Ensemble page by
keeping SHIFT pressed, and pressing the ENSEMBLE button.
Performance Select Section
Use these buttons to select a Performance.
STYLE CHANGE
This button turns the Style Change function on or off.
On When you select a Performance, the Style might
change, according to which Style is memorized
onto the Performance.
Off When you select a Performance, the Style and
Style track settings remain unchanged. Only Keyboard track settings are changed.
PERFORMANCE SELECT section
Use these buttons to open the Performance Select window, and
select a Performance. See “Performance Select window” on
page 104.
Each Performance bank contains four pages, each with up to
eight Performances. Repeatedly press a PERFORMANCE
SELECT button to cycle between the available pages.
All Performances can be freely customized. See the “Style Play
operating mode” for more information.
SB
If you keep the SHIFT button pressed, and press one of
the buttons of this section, the “Write Performance” window
appears in the display, and you can save the current track settings into a Performance (see “Write Performance dialog box”
on page 138).
Chord Scan and Keyboard Split
Use these buttons to choose chord recognition and keyboard
splitting.
SB
CHORD SCAN section
In Style Play, Song Play and Sequencer-Backing Sequence mode,
use these buttons to define the way chords are recognized.
LOWER Chords are detected below the split point. The
number of notes you should play to form a chord
is defined by the Chord Scan Mode parameter
(see “Chord Recognition Mode” on page 135).
UPPER Chords are detected above the split point. You
must always play three or more notes to let the
arranger recognize a chord.
FULL (both LEDs On)
Chords are detected on the full keyboard range.
You must always play three or more notes to let
the arranger recognize a chord. (You can use this
mode even when the Split keyboard mode is
selected). The “Fingered 3” Chord Recognition
Mode is automatically selected (see “Chord Recognition Mode” on page 135).
OFF No chords detected. After pressing START/STOP,
only the Drum and Percussion accompaniment
tracks will play.
SPLIT
In Style Play, Song Play and Sequencer-Backing Sequence mode,
use this button to define how the four Keyboard tracks are positioned on the keyboard, and how chords are recognized by the
arranger.
Note: One of the Chord Scan options must be selected for the
accompaniment to play.
On The Lower track plays below the split point, while
the Upper 1, Upper 2 and Upper 3 tracks play
above it. This is called the Split keyboard mode.
By default, turning on the Split mode automatically selects the Lower chord scanning mode (see
above). In this mode, chords are detected below
the split point. The number of notes you should
play to form a chord is defined by the “Chord
Recognition Mode” parameter (see page 135).
Introduction
SB
SB
Page 22

18
Overview
Front Panel
SB
Set
Off The Upper 1, Upper 2 and/or Upper 3 tracks play
over the whole keyboard range. The Lower track
does not play. This is also called the Full keyboard mode.
By default, turning off the Split mode automatically selects the Full chord scanning mode (see
above). In this mode, chords are detected over the
full keyboard range. You must always play three
or more notes to let the arranger recognize a
chord (see “Chord Recognition Mode” on
page 135).
You can jump to the Style Play > Key/Velocity Range
page by keeping SHIFT pressed, and pressing the SPLIT button.
See “Keyboard/Ensemble: Key/Velocity Range” on page 131.
Transpose
Use these buttons to transpose the Sounds.
(Just Fifth Up) shown in the display, but the MP3 will actually play
5 semitones lower (Just Fourth Down).
♭ Lowers the Master Transpose in steps of one
semitone.
♯ Raises the Master Transpose in steps of one semi-
tone.
You can jump to the Global > Transpose Control page by
keeping SHIFT pressed, and pressing one of the TRANSPOSE
buttons. See “General Controls: Transpose Control” on page 202.
Front USB connector
Use this connector to connect USB mass storage devices.
UPPER OCTAVE section
Use these buttons to transpose the selected track in steps of one
whole octave (12 semitones; max ±3 octaves). The octave transposition value is always shown (in octaves) next to the Sound’s
name.
Press both buttons together, to reset the Octave Transpose to the
saved value.
– Lowers the selected track by one octave.
+ Raises the selected track by one octave.
You can jump to the Style Play > Tuning page by keeping
SHIFT pressed, and pressing one of the UPPER OCTAVE buttons. See “Mixer/Tuning: Tuning” on page 123.
TRANSPOSE section
These buttons transpose the whole instrument in steps of one
semitone (Master Transpose). The transpose value is usually
shown on the page header in the display.
USB HOST(F) CONNECTOR
This is a USB Type A (Master/Host) connector, USB 2.0 compliant (High Speed). Use it to connect to the Pa3X an USB Flash
Memory stick, an external CD-ROM drive, an USB hard disk. To
access the connected device, go to the Media edit mode (see
“Media edit mode” on page 222).
Press both buttons together, to reset the Master Transpose to zero.
Note: You can also transpose MP3 files. Keep in mind, however,
that transposition always remains inside the range -5…+6 semitones. This range is enough to cover all keys, but allows to avoid
excessive audio degradation. Any further transposing will be
reversed to fit the range. So, you might see a +7 transpose value
Page 23

Overview
Rear Panel
Rear Panel
Pa3X 76-keys
Pa3X 61-keys
(a)
(b)
19
Introduction
Music stand and speakers
Music stand / Amplification bar support
This guide can be used to connect either the supplied music
stand or the optional PaAS amplification system.
A music stand comes standard with your Pa3X. For instructions
on how to install it, see on page 27.
The (optional) PaAS – Amplification System can be installed,
adding a three-way amplification system, a pair of integrated
speakers and a bass-reflex box. For instructions on how to install
it, see “Installing the Pa3X Amplification System (PaAS)” on
page 248.
Speakers connector and pin hole
The connector and pin hole are used when the (optional) PaAS –
Amplification System is installed. See “Installing the Pa3X
Amplification System (PaAS)” on page 248.
Note: Since the Pa3X must recognize the new circuit, the integrated speakers will start operating only a few seconds after the
speaker box has been installed.
The output volume of the integrated loudspeakers can be controlled via the MASTER VOLUME slider.
Note: Speakers are automatically deactivated when connecting the
headphones. You can manually deactivate them by using the
“Speakers On/Off ” parameter of the “Audio Setup” section of the
Global mode (see “Speakers On/Off” on page 216).
Audio Input Section
Use these connectors to connect a microphone, another keyboard/synthesizer, or a CD player.
MIC
Only active when the “Input Routing” parameter is set to “Mic In
to Voice Processor” (Global > Audio Setup > Audio In page, see
page 215).
Connect your microphones, guitars, or any other musical instrument, to the AUDIO INPUTs on the back of the instrument. A
microphone connected to the MIC input is also sent to the Voice
Processor for sophisticate processing.
This is a combo connector, featuring an XLR and a 1/4” jack on
the same connector. Use the balanced XLR jack to connect a
condenser microphone, or the 1/4” jack to connect a dynamic
microphone.
The internal +48V Phantom Power on the MIC input also allows
to connect any condenser microphone. After having connected a
condenser microphone, use the “+48V Phantom Power” soft
switch to turn the +48V phantom power on (in the Global mode,
Page 24

20
Overview
Rear Panel
see page 215). Phantom power is only supplied to the balanced
XLR jack.
When disconnecting a microphone from the XLR jack, the
phantom power is automatically turned off. Phantom power is
also automatically turned off each time you turn the Pa3X off.
Use the MIC GAIN knob to adjust the input gain, and set the
volume level using the MIC VOLUME knob, while watching at
the AUDIO IN LED on the control panel (see “Mic Setting Section” on page 15).
MIC GAIN
Use this controls to adjust the input sensitivity of the MIC connector (from 20 to 55dB). You can check the input level by
watching at the AUDIO IN LED on the control panel (see “Mic
Setting Section” on page 15).
LEFT, RIGHT
Always active. Use these balanced/unbalanced connectors to
connect a line-level input source, such as a CD player or a synthesizer. Depending on the status of the “Input Routing” parameter (Global > Audio Setup > Audio In page, see page 215), the
signal goes directly to the Left and Right outputs or to the MP3
Recorder. In the latter case, the volume is controlled by the
MASTER VOLUME slider.
Set the input level by adjusting the source’s output volume. You
can check the input level by watching at the AUDIO IN LED on
the control panel (see “Mic Setting Section” on page 15).
Note: The MIC VOLUME knob has no effect on these inputs.
mono channel of your mixer, a powered monitor, or a single channel of your CD, LINE IN or TAPE/AUX input of a hi-fi system (you
will hear that channel only, unless you can set the amplifier to Mono
mode).
OUT 1, 2
These are the sub outputs. Use them to create a stereo sub-mix of
just some tracks, or to output just a single instrument to be
mixed alone, or to be processed or amplified externally. Adjust
the volume of these outputs with the mixer’s or external speaker’s
level controls.
Multitrack audio connection. You can connect your Pa3X to
four channels of a mixer. This is very useful when recording, or
if you want to send a player’s or backing track to a separate channel. For example, by using the separate outputs, you may send
the Drum or Bass track to an external compressor or reverb unit,
or mix the separate tracks on an external mixer.
Connect four mono cables to each of the main (LEFT, RIGHT)
and sub (1, 2) outputs. To feed the sub-outputs (1, 2) you must
program the track(s) you wish to send them (see the “Audio Output” section in the Global, starting from page 213).
Note: When a track is sent to OUTPUT 1 or 2, it is removed from
the main mix going to the LEFT & RIGHT OUTPUTS.
Note: OUTPUTs 1 & 2 carry a dry sound with no effects applied.
The volume of these outputs cannot be controlled with the MASTER VOLUME slider.
Note: The MASTER VOLUME slider has no effect on these outputs. Signal is sent dry, with no effects applied.
Audio Output Section
Use these balanced/unbalanced connectors to send the audio
signal (sound) to a mixer, a PA system, a set of powered monitors, or your hi-fi system.
To assign an audio output to each track, or set the routing for the
audio inputs, see the “Audio Output” section, starting from
page 213.
LEFT, RIGHT
These are the main stereo outputs. Use them to send the final
stereo mix to an external device. Connect either of them to output the signal in mono. Adjust the output level with the MASTER VOLUME slider.
Stereo audio connection. Connect two mono cables to the main
(LEFT, RIGHT) OUTPUTs. Connect the other end of the cables
to a stereo channel of your mixer, two mono channels, two powered monitors, or the CD, LINE IN or TAPE/AUX input of your
audio system. Don’t use the PHONO inputs of your audio system!
Mono audio connection. Connect a mono cable to either the LEFT
or RIGHT OUTPUT alone. Connect the other end of the cable to a
DIGITAL OUTPUT
Use this 48 kHz S/PDIF output to digitally connect the Pa3X to
the S/PDIF input connector of another digital device, like a digital mixer, audio card, or stand-alone recorder. The same signal
output from the internal speakers (with the optional PaAS
Amplification System) or the Left and Right connectors is sent
by this connector.
MIDI Interface
The MIDI interface allows your Pa3X to be connected to external controllers (master keyboard, MIDI guitar, wind controller,
MIDI accordion…), to a series of expanders, or to a computer
running a sequencer. For more information on how to use the
MIDI interface, see the “MIDI” chapter.
IN
This connector receives MIDI data from a computer or a controller. Connect it to an external controller’s or computer’s MIDI
OUT.
Page 25

21
Overview
Rear Panel
OUT
This connector sends MIDI data generated by Pa3X’s keyboard,
controllers, and/or the internal player. Connect it to an
expander’s or computer’s MIDI IN.
THRU
This connector sends an exact copy of the data received on the
IN connector. Use it to cascade the Pa3X with other MIDI
instruments.
Pedals
Use these connectors to connect various types of pedals.
EC5
This connects to an (optional) Korg EC5 multiswitch pedalboard, to control many functions in realtime. To program the
EC5, see “EC5-A…E” on page 209.
ASSIGNABLE
Use this port to connect a continuous- or footswitch-type pedal,
like the (optional) Korg EXP-2, XVP10, or PS-1. To program and
calibrate it, see “Pedal/Footswitch” on page 208.
MIDI over USB is supported, so you can use this connector
instead of the MIDI ports (see “What is MIDI Over USB?” on
page 242). The drivers for PC and Mac needed for full use of this
function are supplied in the Accessory Disk that comes with the
instrument, or can be downloaded from our web site
(www.korg.com
).
HOST(R)
This is a USB Type A (Master/Host) connector, USB 2.0 compliant (High Speed). Use it to connect to the Pa3X an USB Flash
Memory stick, an external CD-ROM drive, an USB hard disk. To
access the connected device, go to the Media edit mode (see
“Media edit mode” on page 222).
Video
VIDEO OUT (optional)
If an optional VIF4 video interface is fitted, you can connect the
Pa3X to a TV or video monitor. See “Installing the Video Interface (VIF4)” on page 250 for more information.
Power
This section is where you connect the Pa3X to the power line.
Introduction
DAMPER
Use this to connect a Damper pedal, like the (optional) Korg PS1 or DS1H. To change its polarity and calibrate it, see “Damper”
on page 209.
Note: Half-pedalling on Piano Sounds is available when connecting a DS1H damper pedal.
USB Connectors
Use these connectors to connect USB devices, or a personal
computer.
DEVICE
This is a USB Type B (Slave/Device) connector, USB 1.1 compliant (Full Speed). Use it to connect the Pa3X to a personal computer, and transfer data to/from its internal devices (Hard Disk,
Flash-memory SSD). See “HD Connection” on page 238 for
more information.
ACV cable connector
Plug the supplied AC cable into this connector.
POWER switch
Use this switch to supply power to the instrument, or to disconnect it from the power circuit. This does not turn the instrument
on: after pressing it, press the STANDBY button to boot the system.
To turn the instrument off, either keep the STANDBY button
pressed for 2 seconds to put it in standby mode (STANDBY LED
colored red), or press the POWER button to completely turn it
off (STANDBY LED off).
For more information about how the POWER and STANDBY
buttons are related, see “STANDBY” on page 16.
Page 26

22
Welcome!
Welcome!
Welcome to the world of Korg Pa3X Professional Arranger!
Pa3X is the most powerful arranger available today, both for professional and home entertainment use.
Here are some of the features of your new instrument:
• Two keyboard version, 61 and 76 semi–weighted keys with
velocity and aftertouch.
• New aluminum cabinet with elegant design.
• TFT graphic touch screen display. Motorized tilting for the
76 and fixed for the 61 keys.
• Professional TouchView™ graphic interface with a Search
facility for quickly find files and musical resources.
• High quality optional PaAS – Amplification System with
Easy Connection systems (no support, no cables, no power
supply needed).
• RX (Real eXperience) Technology, the cutting edge engine
that drives every aspect of the Pa3X – from the synthesis to
the display and how it all works together.
• Powerful EDS (Enhanced Definition Synthesis) Korg
sound generation system, as seen in our best professional
synthesizers.
• DNC (Dynamic Nuance Control) Sounds, more realistic
and vivid than ever including Ambience Drums and Pianos
from the acclaimed SV-1 Stage Vintage Piano.
• Up to 256 MB of User PCM Samples, equivalent to 512 MB
(with compression), together with the huge internal memory provides one of the most powerful sound engine available for the best sound quality possible.
• Self refresh memory backup battery for User PCM Sam-
ples, supported by an Intelligent re-charging system,
ensures fast startup operations.
• Onboard sampling to create and edit new sounds and audio
grooves.
• General MIDI Level 2 Sound-compatible. Enhanced Sound
compatibility for GM Songs.
• More than 1100 Sounds, plus 90 Drum Kits.
• 512 Performance locations, and more than preloaded Sin-
gle Touch Settings (STS), for fast setting of keyboard
sounds and effects.
• 120 voices of polyphony.
• OPOS (Objective Portable Operating System) multitasking
operating system, to let you load data while playing your
instrument.
• Operating System updates, to load new features and
enhancements from disk. Don’t let your instrument get old!
• Eight fully-programmable sliders, plus one MP3 Volume
slider, can be used as volume control or organ drawbars.
• Three assignable switches, joystick and ribbon strip ensure
total control for all the various levels of articulation of the
sound.
• Improved Style and Performance selection. Over 400 Factory Styles with 4 Variations and 4 Fill In + Break, plus 15
Favorite and User Style banks for unlimited storage of your
custom Styles and settings.
• Style and Pad Record, including the enhanced “Guitar
Mode 2” for even more realistic guitar parts.
• “Chord Sequencer” function to record on-the-fly any chord
progression.
• Double MP3/Standard MIDI File player and recorder with
Advanced Vocal Remover.
• Enhanced compatibility with Lyrics in graphical format
(+G) for Standard MIDI Files and MP3 files.
• New “Audio Chord Detection” function that automatically
extracts chords to send to the Vocal Processor from MP3
files.
• Double MP3 player and MP3 recorder as standard.
• XDS Double Player with X-Fader. Lyrics, Score and Marker
display.
• Full-featured 16-track sequencer.
• Fully editable music database, for fast song retrieving, supplied by the SongBook.
• Up to 8 Stereo Effects including flexible Master and Insert
routing for styles and songs. New vintage effects from the
acclaimed SV-1 Stage Vintage Piano.
• Sophisticated TC-Helicon Voice Processor, with dedicated
professional effects, including pitch correction, doubling,
and a 4-voice harmonizer.
• High-quality microphone preamplifier, with a balanced
XLR/1/4” jack combo connector and +48V phantom power
on the XLR connector.
• “Adaptive Mic Setting” which provides a virtual sound
engineer who automatically sets the best EQ/Compressor/
Gate settings for your voice.
• Professional Final Mastering tools from Waves audio
plugins Maxx Suite.
• High-quality input (ADC) and output (DAC) audio converters.
• Optional hardware expansions, to add a video out board,
more Sample RAM and a kit to install an internal hard disk
(61-key model only). Get more and more for the money!
• Standard hard disk (optional on the 61-note model), for the
widest space to your data. Standard flash-memory SSD
(Solid State Disk) in the 61-note model.
•2 x USB 2.0 High Speed Host ports, for connecting external
devices like hard disks, CD-ROM drives, USB memory
sticks, etc.
• USB 1.1 Full Speed Device port, to connect a personal
computer to your Pa3X. This port can be used for file transfer, and for MIDI connection (without the need of a dedicated MIDI interface for the personal computer).
Page 27
23
Welcome!
Live Performing
Live Performing
Pa3X has been carefully designed to be used live. The “realtime”
word has its full meaning in this instrument. Performances
allow the instant selection of all the tracks on the keyboard and a
suitable Style; STSs allow an instant selection of the keyboard
tracks; Styles are the realtime backing companions for your realtime playing; Pads are looping sequences or single hit sounds;
Songs can be mixed in realtime; the SongBook is the quick way
to select a song from a sophisticated music database; the Search
function allows for instant localization of all the files and musical resources of the instrument.
Easy Mode
If you are the kind of musician that prefers to play, more than
deal with technical matters, you can use the Pa3X in Easy Mode,
and forget all its most powerful features, and let them out of your
way.
Useful links
Your preferred Korg dealer not only carries this keyboard, but
also a whole bunch of hardware and software accessories. You
should ask him for more Sounds, Styles, and other useful music
materials.
Each Korg distributor can give you useful information. Just give
them a call for additional services. In the English-speaking
world, here are the relevant addresses:
USA KORG USA, 316 South Service Road, Melville,
New York, 11747, USA
Tel:1-516-333-9100, Fax:1-516-333-9108
Canada KORG CANADA, a division of Jam Industries,
21000 Trans-Canadienne, Baie D'Urfé, Quebec,
H9X 4B7
Tel: 514-457-2555, Fax: 514-457-0055
E-mail: support@korgcanada.com
UK KORG UK Ltd, 9 Newmarket Court, Kingston,
Milton Keynes, Buckinghamshire, MK10, 0AU
Tel.: 01908 857100
UK Technical Support Tel: 01908 857122, Fax:
01908 857199
E-mail: info@korg.co.uk
Many Korg distributors also have their own web page on the
internet, where you can find infos and software. Useful web
pages in English are the following:
Introduction
Korg USA www.korg.com
Korg UK www.korg.co.uk
Korg Canada www.korgcanada.com
Other useful information in various languages can be found
worldwide by accessing the other Korg web sites, like the following:
Korg Inc. (Japan) www.korg.co.jp
Gaffarel Musique (France) www.laboitenoiredumusicien.com
Korg & More (Germany and Austria) www.korg.de
Eko Music Group (Italy) www.ekomusicgroup.com
Letusa (Spain) www.korg.es
Page 28
24
Welcome!
What’s in the box
Set
What’s in the box
After you buy your Pa3X, please check all the following items are
included in the package. If some of them are missing, immediately contact your Korg dealer.
•Pa3X
•Music stand
•Power cable
•Owner’s Manual
• Accessory Disk (containing the USB driver, additional
manuals, the Bonus Software, and various other support
files)
About this manual
This manual is divided in four sections:
•An Introduction, containing an overview of the instru-
ment and of basic operations.
•A Quick Guide, containing a series of practical guides.
•A Reference Guide, with each page and parameter
described in detail.
•An Appendix, with a list of data and useful information for
the advanced user.
In addition, in the Accessory Disk and in our web site, you will
find:
•An Advanced Edit Manual, containing information on the
Style and Pad Record mode, the Sound mode, Sampling,
the Voice Processor and the Effects’ editing parameters.
This manual also includes tables listing all Factory data and
assignable controls.
Within the manual, you will find the following abbreviations:
The parameter can be saved to a Performance by
selecting the Write Performance command from
the page menu.
The parameter can be saved to one of the Single
Touch Settings of the current Style, or to a Single
Touch Setting of a SongBook entry. To save it to a
Style, select the Write STS command from the
page menu of the Style Play mode. To save it to a
SongBook entry (either of Style or Song type),
check the Write STS option in the Book Edit 1
page of the SongBook mode.
The parameter can be saved to the current Style
Settings by selecting the Write Style Settings command from the page menu.
The parameter can be saved to the Global, by
selecting one of the available Write Global commands from the page menu. Several Global areas
are available, and a smaller symbol after the GBL
abbreviation will appear for each relevant parameter. More information is given in each Reference
chapter.
The parameter can be saved to a SongBook entry.
Making a backup
In case you customize your Musical Resources (Sounds, Performances and Styles), we suggest you make frequent backup copies
of them, to avoid accidental loss. See “Full Resources Backup” on
page 235.
Restoring the original data
In case you want to restore the original data, you can use the
“Factory Restore” procedure. See page 236.
Loading the Operating System
Your Pa3X can be constantly updated as new versions of the
operating system are released by Korg. You can download the
operating system from www.korg.com
tions supplied with the operating system on the site.
You can see which version of the operating systems is installed in
your Pa3X by going to the “Utility” page of the Media mode (see
“OS Version Number” on page 236).
Wa r ni n g : Do not install an OS other than the official OS supplied
by Korg for the Pa3X. Trying to install an OS created for different
models or downloaded from unofficial web sites may cause data
loss and permanent damage to the instrument. Korg is not responsible for any damage caused by improper installation of the OS.
. Please, read the instruc-
Page 29
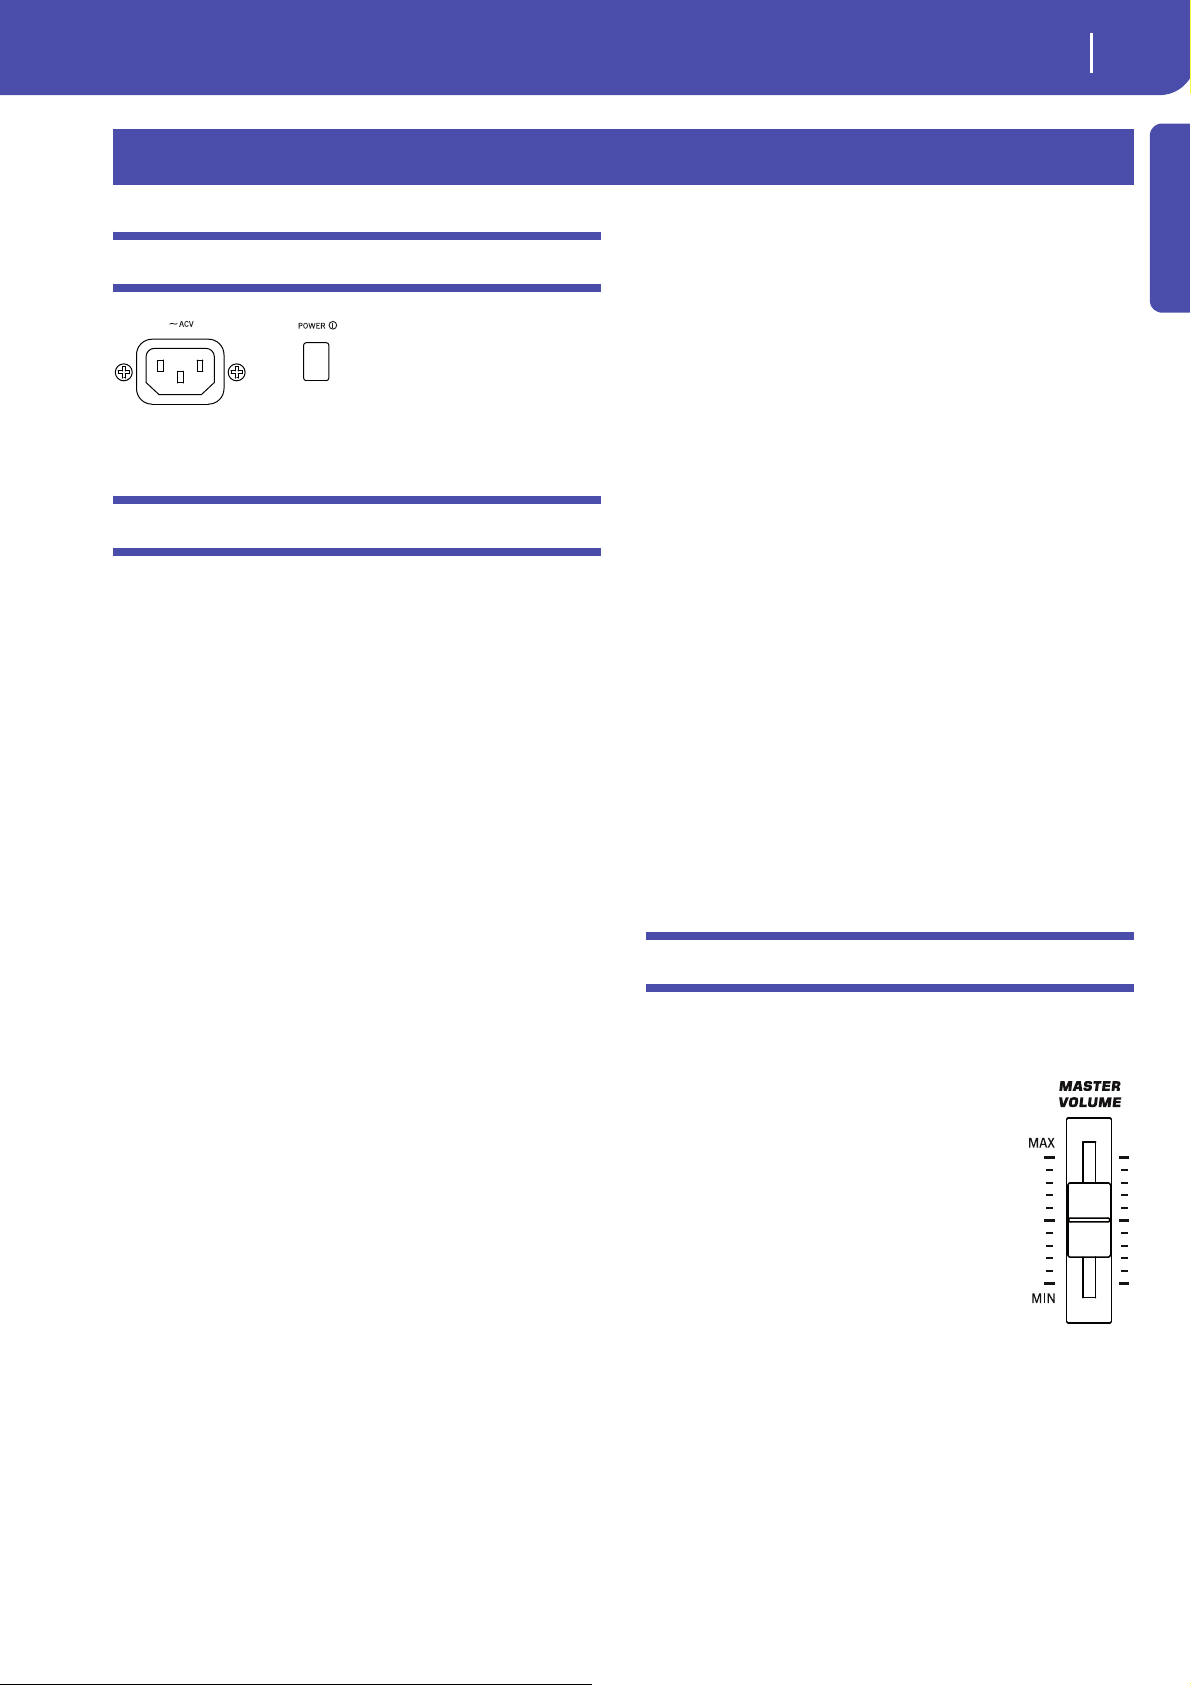
Start up
Connecting the AC power cord
Start up
Connecting the AC power cord
25
While in standby mode, the internal battery is recharged, therefore PCM Samples will not be deleted as long as the instrument
is connected to a power socket and the battery is charged.
Introduction
Connect the supplied power
cord to the dedicated socket on
the rear of the instrument.
Then, plug it into a wall socket.
You don’t need to worry about
the local voltage, since the Pa3X uses a universal power adapter.
Turning the instrument on and off
Power on
When the STANDBY LED is off, the instrument is completely
turned off. In this case, to turn the Pa3X on you must press the
POWER button on the back of the instrument, then press the
STANDBY button in the control panel.
The STANDBY LED will become green, and the display will
light up, showing the boot procedure. Loading times vary
depending on the status of the battery charge:
Battery discharged (or not yet charged) – If it is the first time
you turn the instrument on, or the internal battery has been
completely discharged (after a power off of three-four days),
Factory and User PCM Samples will be loaded from the internal
storage memory to the battery-backed Sample RAM memory.
This procedure might take about two minutes, and varies
depending on the number of User PCM Samples to be loaded.
Battery charged – If Factory and User PCM Samples have
already been loaded, and the internal battery is still charged,
PCM Sample will not have to be loaded again, and the boot procedure will take a shorter time.
Exit from standby
When the STANDBY LED is red, the instrument is in standby
mode. In this case, to turn the Pa3X on you must press the
STANDBY button in the control panel.
The STANDBY LED will become green, and the display will
light up, showing the boot procedure. Factory and User PCM
Samples will not be loaded, since they already are in the batterybacked Sample RAM memory.
Put the instrument in standby
If you want to let the internal battery recharge, put the instrument in standby instead of powering it off.
Keep the STANDBY button pressed for two seconds to put the
instrument in standby mode. The STANDBY LED become red.
Factory and User PCM Samples are not removed from the battery-backed Sample RAM memory.
Power off
If you want to save power, turn the instrument completely off.
Press the POWER button on the back of the instrument to completely turn the instrument off. The STANDBY LED turns off.
Factory and User PCM Samples are not deleted from the batterybacked Sample RAM memory.
While the instrument is powered off, the internal battery is not
recharged. PCM Samples in the battery-backed Sample RAM
memory will be preserved for about three or four days (depending on the condition of the battery, and the size of the Sample
RAM). When the battery discharges, PCM Samples are deleted
from the Sample RAM memory, and must be reloaded the next
time you power the instrument on.
Wa r n in g : When turning the instrument off or putting it in
standby mode, all data contained in the volatile RAM area (Song
recorded or edited in Sequencer mode, PCM Samples in edit and
not yet saved) will be lost. MIDI Grooves generated by the Time
Slice function will be lost, too.
On the contrary, data contained in the SYS area of the internal
storage memory (Factory data, User Sounds, Performances, Styles,
Pads and Multisamples) will be preserved. Saved PCM Samples
will also be preserved.
Controlling the Volume
Master Volume
Use the MASTER VOLUME slider to control
the overall volume of the instrument. This
slider controls the volume of the sound going to
the integrated speakers (when the optional
PaAS – Amplification System is installed), the
main (LEFT & RIGHT) OUTPUTs and the
HEADPHONES connector.
The 1 & 2 OUTPUT connectors are not affected
by this slider. So, use the mixer’s or speaker’s
level controls to adjust the volume.
Note: Begin with a moderate level, then raise the
MASTER VOLUME up. Don’t keep the volume at an uncomfortable level for too long.
Page 30

26
Start up
The X-Fader slider
Player 2Player 1
Keyboard, Style and Song Volume
By default, this slider balances the volume of the
Keyboard (RT, Realtime) tracks, against the
Style (ACC, Accompaniment), Pad and Song
(SEQ) tracks.
• When in Style Play mode, this slider balances between the Keyboard tracks, and
the Style and Pad tracks.
• When in Song Play mode, this slider balance between the Keyboard tracks, and the
Player and Pad tracks.
As an alternative, the slider can be used to control the Style/Song Volume without affecting the Keyboard
tracks (see “Balance Slider” on page 206 for information on setting the slider’s behavior).
This is a relative control, whose effective maximum level is
determined by the MASTER VOLUME slider position.
When moved, a magnified version of the virtual slider appears in
the display, for more accurate positioning.
Note: This slider only works in Style Play and Song Play mode; it
does not work in Sequencer mode.
The X-Fader slider
Loudspeakers
Connect the optional PaAS – Amplification System to make it
the integrated loudspeakers of the Pa3X, adding a three-way
amplification system, a pair of dual-coil integrated speakers and
a bass-reflex box.
To install the amplification system, see “Installing the Pa3X
Amplification System (PaAS)” on page 248.
After installation, the overall volume can be controlled via the
MASTER VOLUME slider.
Speakers can be deactivated with the “Speakers On/Off” parameter, that you can find in the “Audio Setup: Metro / MP3 / Speakers” page of the Global mode (see page 216 for more
information).
Note: When connecting the headphones, the speakers are automatically deactivated.
Audio Outputs
Audio outputs allow for connecting the Pa3X to an external
amplification system. See “Audio Output Section” on page 20 for
more details.
The X-Fader slider sets the relative volume of the two onboard
players (Player 1 and Player 2).
• Move it fully to the left to set Player 1 to the maximum level
and Player 2 to zero.
• Move it fully to the right to set Player 1 to zero and Player 2
to the maximum level.
• Move it to the center to set both Players at the same level.
This slider also selects the (see “Harmony Control” on
page 157), and may select the Lyrics, Score and Markers of one
of the two players.
Note: When moving this slider fully to the right or to the left, the
Lyrics, Chords, Markers and Score page shown may change.
Note: When turning the instrument on, move this slider to the center, to avoid starting a Song at the minimum level.
Headphones
Connect a pair of headphones to the PHONES output, under the left
part of the keyboard (just under the joystick). You can use headphones with an impedance of 16-200 Ohms (50 Ohms suggested).
Use a headphone splitter to connect more than one pair of headphones.
Audio Inputs
Audio inputs allow for connecting a microphone and other
audio source to the Pa3X. See “Audio Input Section” on page 19
for more details.
Use the MIC GAIN knob next to the MIC input to set the input
sensitivity. Use the MIC SETTING section in the control panel
to set the input volume and other parameters.
See the “Singing with a microphone” chapter on page 88, and the
“Audio Setup: Audio In” section on page 215, for more information on connecting and setting the inputs and the audio source.
MIDI connections
You can play the internal sounds of your Pa3X with an external
controller, i.e. a master keyboard, a MIDI guitar, a wind controller, a MIDI accordion, or a digital piano.
You can also control other MIDI devices with the Pa3X, or connect it to a computer for use with an external sequencer.
As an alternative to the MIDI connectors, you can use the USB
Device port for direct connection to a personal computer.
See the “MIDI” chapter on page 242 for more information on
MIDI connections.
Page 31

Start up
Damper pedal
Damper pedal
Connect a Damper (Sustain) pedal to the DAMPER connector
on the back panel. Use an (optional) Korg PS1 or DS1H footswitch pedal, or a compatible one. With the Korg DS1H, halfpedalling can be used on some Grand Piano Sounds. To calibrate
and switch the Damper polarity, see “Damper” on page 209
Assignable pedal
Connect either a footswitch or an expression pedal to the
ASSIGNABLE PEDAL connector. Use an (optional) Korg PS1
footswitch pedal, a Korg EXP-2 expression pedal, a Korg XVP-10
volume pedal, or a compatible one,
Demo
27
• If the (optional) PaAS – Amplification System is installed,
make it rest over the nylon supports in front of the PaAS, as
shown in the illustration.
Introduction
Listen to the built-in Demo Songs to appreciate the power of the
Pa3X. There are several Demo Songs to choose from.
1. Press the STYLE PLAY and SONG PLAY buttons together.
Their LEDs start blinking.
At this point, if you don’t press any other button, all the
Demo Songs will be played back.
2. Select one of the available options, to listen to a specified
Demo Song.
3. Stop the Demo by touching the STOP button on the display, or
by exiting the Demo mode by pressing any MODE button.
The music stand
A music stand comes standard with your Pa3X.
• If the (optional) PaAS – Amplification System is not installed,
insert the music stand into this dedicated guide on the back of
the Pa3X, as shown in the illustration:
The music stand can be freely adjusted, by sliding it to the left or
the right of the standard central position.
Page 32

28
Glossary of Terms
Sound
Glossary of Terms
Before you begin, take a few moments to familiarize yourself
with the names and terms we will be using to talk about the various elements of the Pa3X.
In this section, you will find a brief description of various key
elements of the Pa3X. A professional arranger (Pa) keyboard
uses different terminology than a traditional synthesizer or
workstation. By familiarizing yourself with the names and functions in this section, you will get a better understanding of how
all the different parts of the Pa3X work together to create a realistic musical performance. This will also help you to get the most
out of the rest of the User’s Manual.
Sound
A Sound is the most basic unit of an Arranger Keyboard performance. A Sound is basically a playable instrument timbre (piano,
bass, sax, guitar…) that can be edited, saved, recalled and
assigned to any track. An individual Sound can be played on the
keyboard in the Sound mode. In the Style Play, Song Play or
Sequencer mode, Sounds may be freely assigned to Sequencer
tracks, Style tracks, or Keyboard tracks.
Variation
For each Style, there are four Variations. In general, each Variation is a slightly different version of the others. As you progress
from Variation one to Variation four, the arrangements will
become more complex, and more parts (Tracks) may be added.
This allows your performance to have a more dynamic arrangement, without losing the original “feel” of the Style.
Fill-in & Break
During a performance, a drummer may often perform a “fill” such as when transitioning from a verse to a chorus – adding
extra dynamics and keeping the beat from getting too repetitive.
The Pa3X offers four Fill-ins specifically programmed for each
Style. A Fill-in may be drums alone or drums with instrumentation. Then, there is even a silent “break”.
Intro & Ending
Each Style also allows you to embellish your performance with a
set of musical introductions and endings. A long and short version of the Intro and Ending are usually provided, with the former more harmonically elaborated, and the latter with a fixed
chord. A “count-in” style Intro is also provided, as well as the
quick Ending 3.
Style
The Style is the heart of a professional arranger keyboard. At its
basic level, a Style will consist of up to eight parts, or “Tracks”.
Drums
The Drum track will provide a repeating rhythmic phrase,
played by the standard instruments of a Drum Kit.
Percussion
An additional rhythmic phrase played by various percussion
instruments (conga, shaker, cowbell, etc.) is provided by the Percussion track.
The Drum and Percussion tracks will play the same phrase
repeatedly, regardless of the notes and chords being played on
the keyboard, although it is possible to assign a different Drum
Kit to either part, or to edit the Kit itself.
Bass & Accompaniment
The Bass track and the (up to) five additional Style tracks will
each play musical phrases that are musically related to and in
sync with the Drum and Percussion tracks. However, the notes
being played by these tracks will change to follow the chord pro-
gression that you play on the keyboard.
Again, any Sound you choose may be assigned to any track in a
Style.
Pad
Pads are like single-track Styles, that can be triggered by using
the dedicated PAD buttons. They can be used to play in realtime
single sounds, as well as short, cycling sequences that play in
time with the Style or Standard MIDI File, and are transposed
according to the recognized chords.
Keyboard tracks
In addition to the Style and Pad tracks, up to four additional
parts can be played on the keyboard in real-time. Each of these
Keyboard tracks can be limited to a particular range of keys or
velocities, but in general three can be assigned to play above the
split point (Upper), and one below (Lower). This allows the
Upper Sounds to be layered together. The split point can be set
to any note on the keyboard. In addition to performing along
with a Style, these same Keyboard tracks will allow you to play
along with the Player.
STS (Single Touch Settings)
Single Touch Settings allow you to instantly change the sounds
assigned to each of the Keyboard tracks with a single button
press, allowing for wide variation in sounds during a performance. Four STS (Single Touch Settings) can be saved with each
Style or SongBook entry.
Page 33

Glossary of Terms
Performance
Ensemble
By turning the Ensemble feature on, a single note played on one
of the Keyboard tracks will be embellished by additional notes to
create a complete chord voicing. The Ensemble knows which
notes to add by looking at the chord that you are playing. In
addition, the Ensemble parameters allow you to select the type of
voicing that will be added – from a simple one-note harmony to
a full “Brass” section – even a marimba-style trill!
Performance
29
The LOGO decoder
On the front panel of your Pa3X you have probably noticed five
logos, and may have even wondered what they stand for. Well,
here is a quick explanation of each one.
RX Technology is the cutting edge engine
that drives every aspect of the Pa3X –
from the synthesis to the display and how
it all works together.
Introduction
The Performance is the most encompassing setting on the Pa3X
– a single setting that can remember a Style (with all the appropriate sounds), the Keyboard tracks (with all the appropriate
sounds) and all their Settings, Tempo, transposition, effects,
etc… A Performance can be stored in one of the Performance
bank locations, or it can be saved in a “database” format using
the SongBook function.
Sequencer
The Sequencer acts as a recorder, so you can capture and playback your performances. The Pa3X sequencer can function in
different modes. In the Backing Sequence mode, each Style element and each Real-Time (Keyboard and Pads) element can be
recorded on a separate track in a single pass. This can be a big
help in getting a song recorded quickly. The sequencer can also
behave as a traditional 16-track linear sequencer, where each
track is recorded individually one at a time.
Player
The two Players act as two music player, so you can playback
your performances or any Standard MIDI File or MP3 file. Like
a DJ console, you can mix two songs with the X-Fader slider.
A variety of professional
vocal effects are provided by
the Pa3X – including reverb,
delay, compression, hard tune, doubling, modulation, filtering,
and even four-part vocal harmonies! All of the vocal effects are
provided by TC-Helicon, the leader in vocal processing technology.
Waves, the celebrated maker of worldrenowned professional studio effects,
provides a set of mastering-level tools,
called the MaxxAudio suite. This suite increases the perceived
loudness and sizzle of the output, either amplified by the
(optional with PaAS Amplification System) integrated speakers
or by any external amplification system.
General MIDI (GM) is a standard that
ensures the compatibility of sounds and
messages between GM compatible instru-
ments available from different manufacturers. For example, sequenced songs created on any GM equipped
product and saved in the GM format will playback correctly on
the Pa3X.
General MIDI 2 extends the basic features of the General MIDI,
allowing for 256 Sounds and 9 Drum Kits (instead of 128 and 1).
DNC (Defined Nuance Control) is the way of
fine-controlling Korg’s powerful synth sound
engine. Every nuance and every detail of the
sound can be assigned to a different control, be it
the keyboard velocity or a physical controller. Play the sound live
using all of your body, as if you were interacting with an acoustic
instrument.
Page 34

30
Interface basics
The Color TouchView™ graphical user interface
Interface basics
The Color TouchView™ graphical user
interface
Pa3X features an easy-to-use graphical user interface, based on
Korg’s patented Color TouchView™ interface. Here are the basic
elements of the user’s interface.
Pages
Parameters are grouped into separate pages, to be selected by
touching the corresponding tabs on the lower area of the display.
Overlapping windows
Several windows, like the Style Selection, the Global, the Media,
or the Lyrics, overlap the current window. After you select an
item in the window, or press the EXIT button, the window
closes, and the underlying page is shown again. (The following
example is the Sound Select window).
Menus and sections
Pages are grouped in sections, to be selected by touching the corresponding buttons in the Edit menu that opens up when you
press the MENU button.
Dialog boxes
Similar to selecting windows, dialog boxes overlap the underlaying page. Touch one of the button on the display to give Pa3X an
answer, and the dialog box will close.
Page menus
Touch the icon on the upper right corner of each page, and a
menu with suitable commands for the current page will appear.
Touch one of the available commands to select it. (Or, touch anywhere else on the screen to make it disappear, with no command
selected).
Page 35

31
Interface basics
The Color TouchView™ graphical user interface
List
Scrollbar
Pop-up menus
When an arrow appears next to a parameter name, touch it to
open a pop-up menu. Select any of the available options (or anywhere else on the screen to make the menu disappear).
Checkboxes
This kind of parameters are on/off switches. Touch them to
change their status.
Editable names
When the (Text Edit) button appears next to a name, touch
it to open the Text Edit window and edit the name.
Introduction
The virtual keyboard works exactly as a personal computer’s
keyboard. Some of the symbols are context-sensitive, and only
appear when they can actually be used.
Lists and scrollbars
Files on storage media, as well as other kinds of data, are shown
as lists. Use the scrollbar to scroll the list content.
Numeric fields
When a numeric value can be edited, touch it a second time to
open the Numeric Keypad.
The virtual numeric keypad works exactly as the numeric keypad of a personal computer.
As an alternative, touch a numeric field and keep it held. Then
move your fingers up (or right) to increase the value, or move it
down (or left) to decrease it.
This also includes the Tempo numeric field in the main page of
the Style Play, Song Play, and Sequencer modes.
Keep the SHIFT button pressed while touching one of the
arrows, to scroll to the next or previous alpha-numeric section.
Virtual sliders
To change a virtual slider’s position, select it, then use the
VALUE controls to change its position. As an alternative, touch a
slider with your fingers and keep it held; then move it up or
down to change its position.
The position of the virtual sliders often corresponds to that of
the physical sliders, so move these latter to change the virtual
slider’s position.
Page 36

32
Interface basics
Operative modes
Virtual knobs
To change a virtual knob’s position, select it, then use the VALUE
controls to change its position. As an alternative, touch a knob
with your finger and keep it held; then move your fingers up (or
right) to rotate it clockwise, or move it down (or left) to rotate
the knob counter-clockwise.
The position of the virtual knobs often corresponds to that of the
physical knobs, so move these latter to change the virtual knob’s
position.
Virtual drawbars
Operative modes
Pa3X pages are grouped into various operating modes. Each
mode is accessed by pressing the corresponding button in the
MODE section on the control panel.
Each operating mode is marked with a different color code, that
helps you understand at first sight where you are.
Three special modes (Global, Media, and SongBook) overlap the
current operating mode, that remains active in the background.
The SongBook mode can recall the Style Play or Song Play
modes.
The Record mode can be accessed from the Style Play, Sequencer
and Sound modes, and allows for creating new Styles, Songs or
Samples.
The MP3 Record mode can be accessed by keeping the SHIFT
button pressed and pressing the RECORD button, and allows for
recording a Song in MP3 format.
To change a virtual drawbar’s position, use the physical sliders
on the control panel (provided they are in Drawbars mode).
As an alternative, you can change a drawbar position in the display. Select it, then use the VALUE controls to change its position.
Also, you can touch a drawbar with your fingers and keep in
held. Then move it up or down to change its position.
Icons
Various icons help identifying the type of a file, a Song, a folder.
For example:
Folder
Selected, highlighted items
Any operation carried on on parameters, data or list entries, is
executed on highlighted items. First select the parameter or item,
then execute the operation.
Non-available, grayed-out parameters
When a parameter or command is not currently available, it is
shown in grey on the display. This means it cannot be selected,
but may become available when a different option is selected, or
you switch to a different page.
Shortcuts
File of Style bank
Standard MIDI File
Some commands or pages can be recalled by keeping the SHIFT
button pressed, and pressing other buttons or elements in the
display. See the “Shortcuts” chapter on page 262 for a list of available shortcuts.
Page 37

Easy Mode
Easy Mode
The page menu
33
If you have never used an arranger before, we suggest you to
switch to the Easy Mode. Easy Mode allows you to play Styles
and Songs with a simple user interface, free from the many
advanced parameters that you will want to learn at a later date.
Turning the Easy Mode on
Touch the little rectangle on the top right corner of the display,
to open the page menu:
Touch the “Easy Mode” menu item, to make the checkmark
appear:
Introduction
At this point, the Easy Mode has been activated, and the elements in the display appear less cluttered:
Note: The Easy Mode will remain active even after turning the
instrument off and on again.
Turning the Easy Mode off
The instrument will stay in this mode even after having been
turned off. Repeat the above operation when you want to deactivate the Easy Mode.
Page 38

34
Easy Mode
The Style Play page in detail
Sound icon and status. If the
icon appears, the Sound
is in mute and cannot be heard. If
the icon does not appear, the
Sound is in play and can be
heard. See page 42
Sounds assigned to the right hand (UP1 to UP3) and to
the left hand (LOW). Touch the Sound’s name to open
the Sound Select window and choose a different Sound.
See page 104
Style name and info. Touch the Style’s name to
open the Style Select window and choose a dif-
ferent Style. See page 105
Tempo. Use the
TEMPO buttons to
change it.
Length of the accompaniment pat-
tern, and current beat.
Performance or STS. Touch it to open
the Performance Select window and
choose a different Performance.
Sounds on the keyboard will change.
See page 104
Single Touch Settings (STS). Touch one of them to choose it, or use the dedicated buttons on
the control panel. Sounds on the keyboard will change. See page 106
Split Point. Touch here and play a
note to set the new split point.
See page 46
Voice Processor Preset. Touch
here to change preset, therefore
the microphone’s effects and
doubling/harmonization. See
page 92
Talk On/Off. Turn it on to talk with your
audience. See page 95
The Style Play page in detail
To see this page, press the STYLE PLAY button.
Notes:
• There are three Sounds for the right hand (Upper 1, Upper 2,
Upper 3), and only one Sound for the left hand (Lower). Their
names are abbreviated as UP1, UP2 UP3, LOW, and are shown
in the right side of the display.
• Right hand (Upper) and left hand (Lower) Sounds are separated by the Split Point.
• Performances and STSs are collections of Sounds. Just choose
one of them to change all the Sounds of the keyboard (and, when
the STYLE CHANGE LED is lit on the control panel, of the
Style).
• Choose a Style to change the musical style of the accompaniment patterns. Touching the Style name in the display is the
same as to press one of the buttons of the STYLE section on the
control panel.
Page 39

Easy Mode
The Song Play page in detail
The Song Play page in detail
Sound icon and status. If the
icon appears, the
Sound is in mute and cannot
be heard. If the icon does not
appear, the Sound is in play
and can be heard. See
page 42
Sounds assigned to the right hand (UP1 to UP3) and to
the left hand (LOW). Touch the Sound’s name to open
the Sound Select window and choose a different Sound.
See page 104
Song assigned to Player 1. Touch it to open the
Song Select window and choose a different Song.
See page 106
Tempo. Use the
TEMPO buttons to
change it.
Song assigned to Player 2. Touch it to
open the Song Select window and
choose a different Song. See page 106
Performance or STS. Touch it to open
the Performance Select window and
choose a different Performance.
Sounds on the keyboard will change.
See page 104
Single Touch Settings (STS). Touch one of them to choose it, or use the dedicated buttons on
the control panel. Sounds on the keyboard will change. See page 106
Split Point. Touch here and play a
note to set the new split point.
See page 46
Voice Processor Preset. Touch
here to change preset, therefore
the microphone’s effects and
doubling/harmonization. See
page 92
Talk On/Off. Turn it on to talk with your
audience. See page 95
To see this page, press the SONG PLAY button.
35
Introduction
Notes:
• As in Style mode, there are three Sounds for the right hand
(Upper 1, Upper 2, Upper 3), and only one Sound for the left
hand (Lower). Their names are abbreviated as UP1, UP2 UP3,
LOW, and are shown in the right side of the display.
• Right hand (Upper) and left hand (Lower) Sounds are separated by the Split Point.
• Performances and STSs are collections of Sounds. Just choose
one of them to change all the Sounds of the keyboard.
• Available STSs depend on the Style or SongBook entry you last
selected.
• Since there are two onboard Players, you can play two Songs at
the same time. Mix them using the X-Fader on the control panel.
• Touching a Song name in the display is the same as to press one
of the SELECT buttons on the control panel. Each Player has its
own SELECT and transport buttons.
Page 40

36
Easy Mode
The Song Play page in detail
Page 41

Page 42

38
Turning the instrument on and listening to the demos
Turning the instrument on, and viewing the main screen
Power switch DisplayDemo buttons
Real Time (Keyboard) Tracks
Turning the instrument on and listening to the demos
First of all, turn the instrument on and familiarize yourself with the main screen. You can also listen
to the demos.
Turning the instrument on, and viewing the main screen
1 Turn the Pa3X on by pressing the POWER button, located on the back panel, then the
STANDBY button located in the control panel.
After you turn the instrument on, a welcome screen is shown for a few seconds, and then the
main display appears.
Note: The POWER button
connects the Pa3X to the
power line, while the
STANDBY button turns it on.
2 When you want to turn the Pa3X off, keep the STANDBY button pressed for two sec-
onds, and put it in standby mode.
The preferred way to turn the Pa3X off is to put it in standby mode, so that the internal battery
will continue charging and preserve the Sample RAM content intact. If you prefer to save some
power, turn the Pa3X off by pressing the POWER button instead. Please note that in the latter
case the internal battery preserving the content of the Sample RAM will discharge in three-four
days, and loading PCM Samples with then take longer.
Page 43

Turning the instrument on and listening to the demos
Playing the demos
Playing the demos
A variety of demo songs have been included to demonstrate the sonic power of the Pa3X.
1 To open the Demo page, press the STYLE PLAY and SONG PLAY buttons at the same
time.
2 Follow the instructions in the display. That’s it!
39
Quick Guide
Page 44

40
Playing Sounds
Selecting a Sound and playing it on the keyboard
Performance Select section
Split button
Sound Select section
i
A selected track is shown with a white background. In this example, the Upper 1 track is
selected. If it is not selected, touch it once to
select it.
The fact that there isn’t a icon
over the bank icon means that the
Upper 1 track is set to play. If it is
muted, touch the bank icon to set it
to play, or use the ON/OFF buttons
in the REAL TIME TRACKS section of
the control panel.
(Full) Upper
Playing Sounds
You can play up to three sounds at the same time on the keyboard. You can also split the keyboard
into two parts, to play up to three sounds with your right hand (Upper), and one with your left hand
(Lower).
Selecting a Sound and playing it on the keyboard
1 Be sure the Upper 1 track is selected and set to play.
2 If you want to play the Sound on the whole keyboard, be sure the keyboard is in Full
Upper mode (i.e., no SPLIT LED turned on). If it is split in two parts, press the SPLIT button to turn its LED off.
Note: Be sure tracks
Upper 2 and Upper 3 are
muted, and are not playing. If
you hear more than one
sound, see also page 42 for
how to mute tracks.
Page 45

Playing Sounds
Selecting a Sound and playing it on the keyboard
3 Touch the Upper 1 track’s area in the display, to open the Sound Select window.
The selected Sound is highlighted.
Touch a Sound’s name to select it.
Touch one of the side tabs to select a
different Sound bank.
Touch one of the lower tabs to select
a different Sound page.
A Previous and Next Page pair of button
may appear in this area, when more than
five pages are available.
The currently
selected Sound
appears in the page
header.
Target track for the
selected Sound
Sound bank icon
Sound’s name
Type of Sounds.
The Sound Select window closes,
and the main screen appears again,
with the selected Sound assigned to
the Upper 1 track.
41
i
Note: You can also open
the Sound Select window by
pressing one of the SOUND
SELECT buttons in the REAL
TIME TRACKS section.
4 Select a Sound from the Sound Select window, then press the EXIT button to close the
window.
5 Play the Sound on the keyboard.
i
Note: Selection windows
may automatically close
after a selection. To do this,
uncheck the “Display Hold”
box in the Global > General
Controls > Interface page. In
this case, press the EXIT button only if you don’t make
any selection but want to
close the window.
Quick Guide
Page 46

42
Playing Sounds
Playing two or three Sounds at the same time
Please note how the
icon appears in the Upper 2
and Upper 3 status boxes.
These tracks will not be heard.
After touching in this
area, the icon
disappears. The
Upper 2 track will be
set to play and will be
heard.
Note how the ‘Dark Pad’ sound (assigned to the Upper 2 track) has been layered
with the ‘Grand Piano’ (assigned to the Upper 1 track).
Playing two or three Sounds at the same time
You can layer all three Upper tracks and play them on the keyboard.
1 Either press the UPPER 2 ON/OFF button in the REAL TIME TRACKS section of the con-
trol panel, or touch the
play.
icon in the Upper 2 status box, to set the Upper 2 track to
2 Play the keyboard.
Page 47

Playing Sounds
Playing two or three Sounds at the same time
3 Either press the UPPER 3 ON/OFF button in the REAL TIME TRACKS section of the con-
As above, after touching
in this area, the
icon disappears. The
Upper 3 track will be set
to play and will be heard.
Note how the ‘StringEns2’ sound (assigned to the Upper 3 track) has been added
to the ‘Dark Pad’ (assigned to the Upper 2 track) and the ‘Grand Piano’ (assigned
to the Upper 1 track).
trol panel, or touch Touch the icon in the Upper 3 status box, to set the Upper 3
track to play.
43
4 Play the keyboard.
5 Either press the UPPER 3 ON/OFF button in the REAL TIME TRACKS section of the con-
trol panel, or touch the bank icon in the Upper 3 status box, to mute the Upper 3 track
again.
Quick Guide
Page 48

44
Playing Sounds
Playing two or three Sounds at the same time
Note how the ‘StringEns2’ sound (assigned to the Upper 3 track) has been muted
again. Only tracks Upper 1 and Upper 2 can be heard at this time.
Note how the ‘Dark Pad’ sound (assigned to the Upper 2 track) has been muted
again. Only track Upper 1 can be heard at this time.
6 Play the keyboard.
7 Either press the UPPER 2 ON/OFF button in the REAL TIME TRACKS section of the con-
trol panel, or touch the bank icon in the Upper 2 status box, to mute the Upper 2 track
again.
8 Play the keyboard.
Page 49

Playing Sounds
Playing different Sounds with your left and right hand
Playing different Sounds with your left and right hand
Lower
Upper
If the Lower track is muted, touch its icon
to make it disappear from this area, or press the
LOWER ON/OFF button in the REAL TIME TRACKS
section of the control panel (its LED must turn
on).
Note how the keyboard is split into two parts, each playing different
sounds.
Lower Upper
You can play a single Sound with your left hand, in addition to playing up to three Sounds with your
right hand.
1 Press the SPLIT button to turn its LED on, and split the keyboard into Lower (left hand)
and Upper (right hand) parts.
45
2 Be sure the Lower track is set to play.
3 Play the keyboard.
i
Hint: You can sel ect a di fferent Sound for the Lower
part by pressing the LOWER
SOUND SELECT button in the
REAL TIME TRACKS section of
the control panel, and following the same procedure used
for the Upper 1 track. See
page 40.
Quick Guide
Page 50

46
Playing Sounds
Changing the split point
(Full) Upper
Note how the keyboard once again plays the Upper tracks for the entire
length of the keyboard.
Upper
4 Return to the full keyboard playing mode by pressing the SPLIT button to turn its LED
off.
5 Play the keyboard.
Changing the split point
If you are not comfortable with the selected split point, you may set the split point to any key.
1 Touch the Split tab to see the Split Point panel.
Page 51

Playing Sounds
Changing the split point
2 Touch the keyboard in the display, then play the lowest note of the Upper section on
the keyboard.
47
Lower
Upper
3 As an alternative, touch the Split Point parameter to select it, and use the VALUE con-
trols to select the new split point.
4 Touch the STS Name tab to go back to the STS Name panel.
Quick Guide
Page 52

48
Playing Sounds
Raising or lowering the Upper octave
i
Each press of this button will
lower the pitch by one octave.
Each press of this button will
raise the pitch by one octave.
The Upper 1 track is set to play
and selected.
Upper 2 and 3 tracks are
muted (they cannot be heard).
Raising or lowering the Upper octave
If all Upper tracks sound too high or too low, you can quickly change which octave they are playing
in.
1 Use the UPPER OCTAVE buttons on the control panel, to transpose all Upper tracks at
the same time.
2 Press both UPPER OCTAVE buttons together to reset the octave to the value saved in
the current Performance.
Note: The Octave Transpose value for each of the
keyboard track is shown
under the Sound’s name.
Digital Drawbars
A special Sound in the Pa3X is the “Digital Drawbars”. This sound emulates the classic tonewheel
organs of the past. You can use the Assignable Sliders of the Pa3X to adjust the position of each drawbar, and then save these settings to a Performance (see “Saving your settings to a Performance” on
page 52).
1 Mute all Upper tracks, apart for the Upper 1 track. Select the Upper 1 track.
2 Touch the Sound name to open the Sound Select window.
Page 53

Playing Sounds
Digital Drawbars
3 Select the Organ bank, then choose the Digit.DRAWBARS Sound.
After you select the Digital Drawbars
Organ Sound, the Drawbars Setting
page appears.
To change the Digital Drawbar Organ settings by using
the Assignable Sliders, the
DRAWBARS LED must be
turned on. This automatically
happens when recalling the
Drawbars page.
Due to the nature of this Sounds, there is only one Digital Drawbar Organ Sound. Different
drawbar settings may be stored with each Performance. So, selecting a different Performance
will select different settings for the Digital Drawbar Organ.
49
4 As soon as the Drawbars Setting page appears in the display, the Assignable Sliders
will function as if they were organ drawbars (the slider’s DRAWBAR LED will be lit).
Move the Assignable Sliders to change the various drawbar settings.
i
Note: You don’t need to
be in the Digital Drawbars
page to use the Assignable
Sliders to change the sound.
When a Drawbar Organ is
assigned to a Keyboard track,
the sound can also be modified while in the main page,
provided that the DRAWBARS
LED is turned on.
Quick Guide
Page 54

50
Playing Sounds
Digital Drawbars
Check this checkbox to turn Percussion on. Percussion will make
the sound more aggressive
Experiment with the
Percussion’s settings
Turn the Rotary effect on or off, and
listen to how much more lively it
makes the sound
Experiment with the
Rotary speed
i
Leakage from adjacent tone-
wheels, making the sound richer
Timbre
Volume of the noise
generated when
pressing or releasing
the keys
5 Select different parameters in this page, and change their settings to see how each set-
ting affects the sound.
6 Touch the “Tone/Noise” tab, and try the sound parameters of the second page.
Hint: As an alternative to
using Assignable Sliders to
change drawbar values, you
can touch a drawbar in the
display and use the VALUE
controls to change it, or just
drag it in the display.
7 When you have found some settings that you like, you can save them to a Performance,
as described later in this section.
8 Press the EXIT button to go back to the main page.
Page 55

Selecting and saving Performances
Selecting a Performance
Selecting and saving Performances
Performance Select sectionSingle Touch Settings (STS) section
i
The selected Performance is high-
lighted. Touch a Performance name
to select it.
Touch one of the side tabs to select a
different Performance bank.
Touch one of the lower tabs to select a
different Performance page.
The Performance is the musical heart of the Pa3X. Unlike selecting single Sounds, selecting a Performance will recall several Sounds at the same time, the needed effects and transpositions, a suitable
Voice Processor preset, plus many more parameters useful for playing in a musical situation.
You can save all control panel settings to a Performance memory location (including your Digital
Drawbar Organ settings). While many Performances are already supplied with the instrument, you
can customize each of them to your own taste, and then save them in their customized version.
Similar to Performances, you can also save your settings to a Single Touch Setting (STS), which will
store all the settings for the Keyboard tracks. Four STSs are supplied with each Style and SongBook
entry, and can be selected with the four dedicated buttons under the display.
Please note that settings saved in Performance 1 of bank 1 are automatically selected when the
instrument is turned on. This means you can save your preferred startup settings to Performance
1-1.
51
Note: As for Style tracks, they
are saved to a third object
called the Style Settings.
Selecting a Performance
1 Touch the Performance area in the display, to open the Performance Select window.
Quick Guide
Note: You can also open
the Performance Select window by pressing one of the
buttons in the PERFORMANCE SELECT section. This
will let you jump directly to
the desired Performance
bank.
Page 56

52
Selecting and saving Performances
Saving your settings to a Performance
The Performance Select window
closes, and the main screen appears
again. Sounds, Effects, and other
settings, change according to the
setting memorized in the selected
Perf ormance .
i
i
Settings memorized in the selected Performance have been
selected. Sounds, effects and other settings have been recalled.
i
Page menu icon
Page menu
2 Select one of the Performances in the Performance Select window, then press the EXIT
button to close the window.
Note: Selection windows
may automatically close
after a selection. To do this,
uncheck the “Display Hold”
box in the Global > General
Controls > Interface page. In
this case, press the EXIT button only if you don’t make
any selection but want to
close the window.
3 Play the keyboard.
Saving your settings to a Performance
All the control panel settings, plus the Keyboard track settings, selected effects and Voice Processor
Preset, can be saved to a single Performance, to be quickly recalled at a later time.
1 Touch the page menu icon to open the page menu.
Note: If the
LED of the
STYLE CHANGE
button is
turned on,
selecting a Performance may
automatically select a different Style and its settings
(Sounds, Effects, Drawbar
settings for the Style
tracks…)
Note: To open the Write
Performance dialog box, you
can press the SHIFT + one of
the PERFORMANCE SELECT
buttons.
Page 57

Selecting and saving Performances
Saving your settings to a Performance
2 Select the ‘Write Performance’ command to open the Write Performance dialog box.
After choosing the Write Performance
menu item, the Write Performance dialog
box appears.
Touch the (Text Edit) symbol to open the
Text Edit dialog box.
Use the alphabetic
characters to enter
text.
Use the ‘<–’ and ‘–>’
buttons or the DIAL to
move the cursor.
Use the SHIFT button to
switch between capitals
and small characters.
Touch the ‘Backspace’ symbol to delete
just a single character, ‘Clear’ to delete
the whole string.
When done, touch OK to
confirm the new name,
or Cancel to abandon all
changes.
3 If you like, you may assign a new name to the Performance.
53
Quick Guide
Page 58

54
Selecting and saving Performances
Saving your settings to a Performance
To select the target bank and
Performance location, select the
bank and Performance parameters, and use the VALUE controls.
A)
B)
The selected Performance location is highlighted. Touch a
Performance’s name to
select it.
Touch one of the side tabs to select a
different Performance bank.
Touch one of the lower tabs to select
a different Performance page.
or…
Note: A Performance
can be saved to an
‘Empty’ location. An
‘Empty’ locations currently contains no data.
!
4 Select a bank and Performance location in memory, where you would like to save the
Performance.
5 When you have edited the name to the Performance, and selected the target location,
touch OK to save the Performance to memory (or cancel to stop the operation).
Warn ing : Saving a Performance to an already used
location overwrites any existing data at that location. The
old data are lost. Make a
backup of all your important
data.
Page 59

Selecting and playing Styles
Selecting and playing a Style
Selecting and playing Styles
Style Select section
Style Controls
Style Elements
The selected Style is highlighted.
Touch a Style’s name to select it.
Touch one of the side tabs to select a
different Style bank.
Touch one of the lower tabs to select
a different Style page.
Type of Style.
Pa3X is an arranger, i.e. a musical instrument providing automatic accompaniments, or arrangements.
Each arrangement style is called, as a consequence, “Style”.
A Style is made of several Style Elements (Intro, Variation, Fill, Break, Ending), corresponding to the
various sections of a song. By selecting Style Elements, you can make your playing more varied and
musical.
When selecting a Style, Style Settings for the Style tracks are also selected. If the STS MODE LED is
turned on, the first of the four Single Touch Settings (STS) associated with the Style is also selected,
and Keyboard tracks, Pads, Effects and some other useful parameters are automatically configured.
Use the Style controls to start or stop the Style.
55
Selecting and playing a Style
1 Touch the Style area in the display. The Style Select window appears.
i
Note: You can also open
the Style Select window by
pressing one of the buttons in
the STYLE SELECT section.
This will let you jump directly
to the desired Style bank.
Quick Guide
Page 60

56
Selecting and playing Styles
Selecting and playing a Style
The Style Select window closes, and
the main screen appears again, with
the selected Style ready to go.
i
For chord scanning to work, either of both LEDs must be turned
on. Lower: chords are recognized on the left of the split point;
Upper: chords are recognized on the right of the split point; Full
(both LEDs on): chords are recognized on the whole keyboard.
Off: only the Drum track can be heard.
i
When the Syncho-Start function is turned on, the Style starts
playing as soon as you play a note or chord in the chord recognition area. Play chords with your left hand, and the melody with
your right hand. The arranger will follow your playing.
2 Select a Style from the Style Select window.
3 Be sure one of the Chord Scan modes is selected.
Note: Selection windows
may automatically close
after a selection. To do this,
uncheck the “Display Hold”
box in the Global > General
Controls > Interface page. In
this case, press the EXIT button only if you don’t make
any selection but want to
close the window.
4 Press the SYNCHRO-START button to turn its LED on.
5 Play the keyboard.
6 Press START/STOP to stop the Style.
Note: You could simply
press START/STOP to start the
Style, but the Synchro-Start
function allows you to make
the Style start in sync with
your playing on the keyboard. Therefore, it may be
considered a “more musical”
way of starting a Style.
Page 61

Selecting and playing Styles
Tempo
Te mp o
While a Tempo setting is saved with each Style or Performance, you can change it to be whatever you
like. You can use either of the following two methods.
• Use the TEMPO + or – buttons to change the Tempo value.
• Press the TEMPO– and + buttons together to recall the saved Tempo value.
57
i
Hint: As an alternative to
using the TEMPO buttons,
hold the Tempo value in the
display, then move your finger up/down or left/right (or
change the value with the
VALUE controls).
• As an alternative, keep the SHIFT button pressed, and use the DIAL to change the
Tempo. The selected tempo will be shown in a small window.
Intro, Variation, Fill, Break, Ending
When playing Styles, you can select various “Style Elements” to make your playing richer. A Style is
made of three Intros (or two Intros and a Count-In), up to four basic patterns (Variations), four Fills,
a Break, and three Endings.
1 Make sure the SYNCHRO-START LED is turned on (otherwise, press the button to turn it
on).
Quick Guide
Activating the Synchro Start function is not mandatory, but it might be handy.
2 Press one of the INTRO buttons to set the corresponding Intro to play.
Page 62

58
Selecting and playing Styles
Single Touch Settings (STS)
The Style starts with the selected Intro. When the Intro is completed, the basic pattern (selected Variation) starts to play.
i
i
i
When the Fill ends, the selected Variation
will start playing.
When the Ending is finished, the Style automatically stops.
3 Play the keyboard.
4 While playing, press one of the FILL buttons to select a Fill.
5 Before the Fill ends, press one of the VARIATION buttons, to select a different variation
of the basic pattern.
Hint: Tu rn the AUTO FIL L
LED on to let the Pa3X automatically select a Fill when
selecting a Variation.
Note: You do not need to
select a Fill before selecting a
different Variation, but
selecting a Fill makes the
transition “smoother” and
more musical.
Note: You do not need to
select a Variation during a
Fill, since a Variation may
already be automatically
recalled at the end of the Fill.
See “Fill Mode (1…4, Break)”
on page 134.
6 When you like to stop playing, press one of the ENDING buttons to stop the Style with
an Ending.
Single Touch Settings (STS)
Each Style or SongBook entry may come with up to four Keyboard track and Voice Processor settings,
called the STS (short for “Single Touch Settings”). STSs are very similar to Performances, but they are
fine-tuned to the Style or SongBook entry they are associated to.
STS #1 is automatically selected when choosing a Style, provided the STS MODE LED is turned on.
STS #1 is also recalled each time a SongBook entry is selected.
Page 63

59
Selecting and playing Styles
Single Touch Settings (STS)
Settings memorized in the selected STS have been selected.
Sounds, effects and other settings have been recalled.
1 Press one of the four STS buttons under the display, or touch the name of an STS in the
STS panel in the display.
2 Play the keyboard.
3 Try all the other STSs, and see how settings change with each of them.
i
Hint: Yo u can al ways see
the name of the four available STSs for the current
Style, by touching the STS
Name tab from any other
panel.
Quick Guide
4 You can also link the STSs to the Variations. First of all press the STS MODE button, to
make its LED flash.
5 Then press the various VARIATION buttons, and see how an STS is automatically
selected when the corresponding Variation is selected.
6 Press the STS MODE again to turn its LED on (or off ).
Page 64

60
Selecting and playing Styles
The Pads
i
i
The Pads
Each Style can assign different sounds or patterns to the four PADS. These sounds or patterns can be
played along with the Keyboard and Style tracks.
1 Press one of the four PADS.
2 If the selected PAD triggers an endless sound or pattern (i.e. an applause, or a guitar
arpeggio), pressing STOP will stop that sound.
Hint: You can see which
sounds or patterns are associated to the four Pads for the
current Style, by touching the
Pad tab.
3 Select a different Style, and see how the sounds or patterns assigned to the PADS
change.
You can even press more Pads at once, and play two or more sounds or patterns at the same time.
Pressing STOP stops them all at the same time. Keeping STOP pressed and pressing one of the
PAD buttons only stops that sound or pattern.
Adjusting balance between the Style and the keyboard
Balancing between the Keyboard and Style tracks may be useful, to gently fade them and adjust their
respective volume.
• While the Style is playing, use the BALANCE slider (next to the MASTER VOLUME slider)
to balance between the Keyboard and Style tracks’ volume.
Hint: You ca n open th e
Pad Select window to assign
a different sound or pattern
to the Pads, by pressing SHIFT
+ one of the PADs.
Page 65

Selecting and playing Styles
Adjusting the volume of each track
Adjusting the volume of each track
In Normal view, all Style
tracks are seen as three
‘grouped’ tracks.
To control the volume, the VOLUME LED must be turned on. If it is
off, repeatedly press the SLIDER
MODE button to change it. Please
note that the SLIDER MODE sta-
tus is saved with each Performance or STS.
The LED indicator of
“grouped” Style
tracks and Keyboard
tracks turns on.
You can adjust the volume of each of the Style and Keyboard tracks, for example to soften the bass a
little, or to make the keyboard solo louder.
1 Touch the Volume tab to see the Volume panel.
While you do not need to see the Volume panel to change the volume, doing so will let you see
the internal mixer of the Pa3X and visualize the status and volume of each track.
61
2 Use the Assignable Sliders (be sure the VOLUME LED is turned on) to adjust each Key-
board track’s volume, as well as ‘grouped’ Style tracks.
Quick Guide
Page 66

62
Selecting and playing Styles
Turning the Style tracks on/off
i
In Style view, all separate
Style tracks are shown,
and can be controlled
using the corresponding
Assignable Sliders.
The LED indicator of
single Style tracks
turns on.
i
3 To separately adjust each Style track, press the TRACK SELECT button to change the
track’s view.
Hint: As an alternative,
you can change each track’s
volume, by touching a track’s
area to select it, then using
the VALUE controls to change
the volume. Also, you can just
touch a track’s slider in the
display, then move your finger up/down.
4 To return to the Keyboard/Grouped Style Tracks view, press the TRACK SELECT button
again.
Turning the Style tracks on/off
You may easily turn on or off any Style track while you are playing. For example, try muting all
accompaniment tracks, while drums and bass continue to play.
1 Be sure the Volume panel is shown, or touch the Volume tab to show it.
Note: While in the Normal view of the Style Play
mode, you can see Style
tracks grouped in just three
“grouped” tracks. To see each
Style track as separate, individual tracks, just press the
TRACK SELECT button.
Page 67

Selecting and playing Styles
Adding harmony notes to your right-hand melody with the ENSEMBLE function
2 While the Style is playing, touch anywhere in the ACCOMP track’s channel strip to
Mute the ACCOMP track.
All accompaniment tracks
will go silent (apart from
Drum, Percussion and
Bass).
Set the ACCOMP track
to Play. All accompaniment tracks will return
to their original volumes.
i
select the track (volume value highlighted), then touch it again to set the track to
Mute.
3 To set the tracks back to the Play status, touch the Mute icon on the ACCOMP track.
63
4 To mute/unmute each single Style track, first press TRACK SELECT to switch to the Style
Tracks view, then repeat the above procedure.
slider of a muted track, the
track is automatically set to
On again.
5 Press the TRACK SELECT button again to go back to the Normal view.
Adding harmony notes to your right-hand melody with the
ENSEMBLE function
Chords played with your left hand may be applied to the right-hand melody.
1 Press the SPLIT button to turn its LED on and split the keyboard.
The Ensemble function only works in Split mode.
Quick Guide
Hint: When moving the
2 Press the ENSEMBLE button to turn its LED on.
Page 68

64
Selecting and playing Styles
Adding harmony notes to your right-hand melody with the ENSEMBLE function
Notice how the right hand is automatically harmonized, according to the chords composed with your left hand.
While the Ensemble parameter is
selected, use the VALUE controls to select
one of the available harmonization types.
While in an edit page, press EXIT
to go back to the main page of the
current operating mode.
3 Play chords with the left hand and single notes in the right hand.
4 To select a different harmonization style, keep the SHIFT button pressed, and press the
ENSEMBLE button to open the Ensemble page.
This is a fast ‘shortcut’ to recall this page. The longer would have been entering the Edit mode by
pressing the MENU button, touching the Keyboard/Ensemble section, and then going to the
Ensemble page.
5 When the right harmonization type has been selected, press the EXIT button to go
back to the main page.
6 Press the ENSEMBLE button again to turn its LED off. The automatic harmonization will
be turned off.
Page 69

Selecting and playing Styles
The Chord Sequence
The Chord Sequence
In case you need both hands free for playing a solo while a Style is playing, you can record a Chord
Sequence and let Pa3X play the chords for you.
1 Press the START/STOP button to set the Style to play.
2 Press the BASS INVERSION and MANUAL BASS (RECORD) buttons together to start
recording.
65
3 Start recording your Chord Sequence at the beginning of the next measure.
While recording, you will see a red flashing icon in the display.
4 Play the chords in the Chord Scan area.
5 When the Chord Sequence is done, press the BASS INVERSION and MANUAL BASS
(RECORD) buttons together again to stop recording.
6 Press the MEMORY and BASS INVERSION (PLAY/STOP) buttons to start playback.
The LED of the two buttons will start flashing. The Chord Sequence will be played back in loop
starting from the next measure. Recorded chords will be sent to the arranger, and the Style will
play with the recorded chords.
Quick Guide
7 Play your solo part, while the Chord Sequence plays the chords for you.
During Chord Sequence looping, you can freely select any Fill or Variation, as if you where playing chords with your hands.
Page 70

66
Selecting and playing Styles
The Chord Sequence
8 Press the MEMORY and BASS INVERSION (PLAY/STOP) buttons together again to stop
playback of the recorded Chord Sequence.
The last chord played by the Chord Sequence remains in memory. The Chord Sequence will
remain in memory up until you record a new Chord Sequence, or you turn the Pa3X off.
Page 71

Song Play
Selecting a Song to play
Song Play
Players controls
The SONG PLAY button
The Songs area of the
Style Play main page.
After pressing the SONG PLAY but-
ton, the main page of the Song
Play mode appears.
Pa3X is equipped with two onboard players that can be run at the same time to mix between different
Songs. Pa3X can read Songs in Standard MIDI File (MID), Karaoke™ (KAR) and MP3 format.
It may be of great interest to singers and guitar players to know that if a Standard MIDI File or an MP3
file contains lyrics and chords, they can be seen in the display. Lyrics can also be seen on an external
video monitor, provided you have the (optional) VIF4 Video Interface installed.
In addition to lyrics and chords, you can also see the score and the markers of a Standard MIDI File.
67
Selecting a Song to play
1 Press the SONG PLAY button to switch to the Song Play mode.
i
Hint: In Style Play mode,
you can pre-select the Songs
to be assigned to both players. This way, you will be
ready to start them, as soon
as you switch to Song Play
mode.
Quick Guide
Page 72

68
Song Play
Selecting a Song to play
i
The selected Song is highlighted.
Touch a Song’s name to select it.
Use the scroll bar to see all Songs in
the list. Keep SHIFT pressed and
touch the Up/Down arrow to scroll
to the next/previous alphabetic section. As an alternative, you can use
the VALUE section.
Use the Open and Close buttons to
browse through the folders.
Use the Device pop-up menu to select one of
the available mass-storage devices.
Use the Sync P. (Synchronized Path) button
to see the selected Song again.
Touch the Select button to select the highlighted Song, and assign it to Player 1.
After touching the Select button in the display, the
main page of the Song Play mode appears again.
Selected Song
2 Touch the Player 1 area to open the Song Select window.
3 Scroll through the list and select the Song to play.
Hint: As an alternative,
you can open the Song Select
window by pressing the
SELECT button in the PLAYER
1 section on the control
panel.
4 When the Song is selected, touch the Select button to confirm your selection; this will
automatically close the Song Select window.
Page 73

Song Play
Playing back a Song
Playing back a Song
After pressing the (PLAY/STOP) button, the button’s LED turns on, and the measure counter begins to
show the current measure number.
Press the REWIND button once to go back. Keep it
pressed to go back more.
Press the FAST FORWARD button once to go forward. Keep it pressed to go forward more.
Press the PLAY/STOP button to stop the Song at the
current position. Press it again to resume playback.
Press the HOME button to move the
Song to the beginning.
When the Song is stopped,
the LED on the PLAY/STOP
button goes dark.
Once a Song has been selected, it may be played back by the player.
1 Be sure the X-Fader is completely moved to the left (toward Player 1).
2 Press the (PLAY/STOP) button in the PLAYER 1 section to start playback.
69
3 Use the PLAYER 1 control section to control the Song’s playback.
4 When you want to stop the song and go back to the beginning, press the (HOME)
button.
i
Note: In any case, the
player will automatically
stop when the end of the
Song is reached.
Quick Guide
Page 74

70
Song Play
Changing the tracks’ volume
To control the volume,
the VOLUME LED must be
turned on. If it is off,
repeatedly press the
SLIDER MODE button to
change it. Please note
that the SLIDER MODE
status is saved with
each Performance or
STS.
The LED indicator of
the controlled group
of tracks turns on.
Use the TRACK
SELECT button to
cycle between differ-
ent groups of tracks
Changing the tracks’ volume
While playing back a Standard MIDI File, you may wish to change each track’s volume, to create a mix
“on the f l y”.
1 Be sure the Volume panel is shown, or touch the Volume tab to show it.
2 As seen for the Styles, you can use the Assignable Sliders (when the VOLUME LED is
turned on) to adjust each track’s volume. Use the TRACK SELECT button to cycle
between track groups.
Page 75

Song Play
Changing the tracks’ volume
3 Otherwise, you can use the display to change each track’s volume. In Normal view, you
Keyboard tracks
In Track 1-8 view, the first 8 tracks
of the selected Song are shown.
In Track 9-16 view, the second
group of 8 tracks of the selected
Song are shown.
can adjust each Keyboard track’s volume. Touch a track and use the VALUE controls to
change its volume.
4 Press the TRACK SELECT button once to see tracks 1-8 (Track 1-8 view).
71
i
Hint: As an alternative to
using the VALUE controls,
hold the track slider in the
display, then move your finger up/down.
i
Note: Changes to Song
tracks will not be saved, and
will be reset each time you
press the (Home) button.
They may also be reset while
pressing the << (Rewind)
button. To save changes, you
must edit the Song in
Sequencer mode.
Quick Guide
5 Press TRACK SELECT once again to see tracks 9-16 (Track 9-16 view).
Page 76

72
Song Play
Changing the tracks’ volume
Keyboard tracks
Selected track Assigned Sound. Touch it to
open the Sound Select window.
Sound bank Program Change
6 Press TRACK SELECT again, to return to the Normal view (Keyboard tracks).
7 Press the (PLAY/STOP) button to start the Song.
8 While listening to the Song, switch from Normal view to Track 1-8 and Track 9-16 view,
to see which tracks are playing.
To see if a track is playing, look at its name, and see if it changes color.
• Touch each track’s channel strip, to see each track’s detail in the Track Info line.
Page 77

Song Play
Turning the Song tracks on/off
• Alternatively, you can see which type of Sound is assigned to each track in the Sound
Octave Transpose
Sound bank icons. Touch to open the
Sound Select window.
area of the Track 1-8 and Track 9-16 views.
73
Turning the Song tracks on/off
While playing back a Standard MIDI File, you may wish to mute one or more tracks, for example to
sing along with the Song, or play an instrumental part live on the keyboard.
To mute/unmute Song tracks you simply touch the Play/Mute icon in the Volume panel, as seen for
the Style tracks. See “Turning the Style tracks on/off” on page 62 for more information.
Soloing a track
Contrary to the above, you may want to make a single track of a Standard MIDI File play alone. This
is called the Solo function.
1 While the Song is playing, keep the SHIFT button pressed and touch the track you want
to listen to in Solo mode.
2 To set all tracks back to the Play status, keep the SHIFT button pressed again, and
touch the track that is currently in Solo mode.
Please remember that you can also use the Solo function in Style Play and Sequencer mode. The
Solo command can also be selected from the page menu.
i
Note: These changes will
not be saved to the Song. To
save changes, edit the Song
in Sequencer mode.
Quick Guide
Removing the voice from an MP3 file
If you want to sing along with a Song in MP3 format, you can try to remove the vocal part from the
MP3 file. This features may be more or less effective, depending on the Song.
1 Program one of the Assignable Switches as the Vocal Remover.
Page 78

74
Song Play
Removing the voice from an MP3 file
i
Press the MENU button, and choose the “Pad/Assignable Switch” section. Then touch the
Switch tab to open the “Switch” page. While in this page, assign the Vocal Remover function to
the ASSIGNABLE SWITCH 2:
2 Press the EXIT button to return to the main page of the Song Play mode.
3 Assign an MP3 file to one of the players.
4 Start the player with the MP3 Song assigned.
5 Press the ASSIGNABLE SWITCH 2 to activate the Vocal Remover, and remove the origi-
nal singer’s voice.
Listen to how the original singer’s voice is reduced or totally removed.
6 Keep the SHIFT button pressed and press the SONG PLAY button to open the “Prefer-
ences: General Setup” page.
Note: The Vocal Remover
only works on a single player
at a time. To switch from a
player to the other, please use
the X-FADER.
7 Experiment with the various settings of the “MP3 Vocal Remover Preset”.
Each setting is optimized for a particular kind of voice. Find the one that better fit the original
singer’s voice.
8 When done, press the ASSIGNABLE SWITCH 2 to deactivate the Vocal Remover, and
make the original singer’s voice appear again.
9 Stop the player.
Page 79

Song Play
Removing the Melody track from a Standard MIDI File
Removing the Melody track from a Standard MIDI File
If you want to sing along with a Song in Standard MIDI File format, you can remove the Melody track
from the Song.
1 Assign a Standard MIDI File with a Melody track to one of the players.
2 Start the player with the Standard MIDI File Song assigned.
3 Press the ASSIGNABLE SWITCH 3 to mute the Melody track.
The Melody track disappears. If it is the wrong track, continue to the following step to select a
different track.
4 Keep the SHIFT button pressed and press the SONG PLAY button to open the “Prefer-
ences: General Setup” page.
75
5 Choose a different Melody track.
6 When done, you can press the ASSIGNABLE SWITCH 3 switch to unmute the Song’s Mel-
ody track and let the original MIDI instrument play the Melody line again.
7 Stop the player.
Quick Guide
Page 80

76
Song Play
Mixing two Songs
i
Mixing two Songs
You can select two Songs at the same time, and mix between them using the X-FADER slider.
1 Touch the Player 1 area to open the Song Select window and select the Song to be
played by Player 1. Touch Select to confirm.
2 Once a Song is assigned to Player 1, touch the Player 2 area once to select it, and a sec-
ond time to open the Song Select window. Select a Song to be assigned to Player 2, and
touch Select to confirm.
3 Keep the SHIFT button pressed, and press any of the two (PLAY/STOP) buttons, to
start both Players at the same time.
4 During playback, move the X-Fader, to mix between the two Songs.
Hint: You don’t need to
start both players at the
same time. You can start the
first Song – then start the second one when the first one is
near to the end. This way, you
can use the X-FADER slider to
gently crossfade between the
end of one Song and the
beginning of the following
one.
5 During playback, you may control each Player separately, by using the dedicated
Player controls.
6 Press the relevant (PLAY/STOP) button to stop the corresponding Player.
Page 81

The SongBook
Mixing two Songs
The SongBook
The SONGBOOK button
One of the most powerful features of the Pa3X is the onboard music database, that allows you to organize your Styles and Songs (in the MID, KAR and MP3 formats) for easy retrieving. Each entry of this
database may include the artist, title, genre, number, key, tempo, and meter (time signature) of a specified song. When selecting one of the entries, the associated Style, Standard MIDI File or MP3 file – as
well as the Style Play or Song Play mode – is automatically recalled.
In addition to helping you organize your shows, the SongBook allows you to associate up to four Pads,
and up to four STSs to each Standard MIDI File or MP3 file. This way, it is easy to recall a complete
setup for Keyboard tracks, effects, and the Voice Processor, for realtime playing over a Standard MIDI
File or MP3 file.
Also, you can link a text file to a Standard MIDI File, MP3 file or to a Style, to read the Lyrics in the
display or on an external monitor, even if there are no Lyrics events in the Standard MIDI File or MP3
file, or if you prefer to play the song live with the help of the Styles.
You can add your own entries to the SongBook, as well as edit the existing ones. Korg has already supplied some hundred entries as standard. Furthermore, the SongBook allows you to create various custom lists, that may suit your different shows.
77
Quick Guide
Page 82

78
The SongBook
Selecting the desired entry from the Main List
Tou ch t his c heck box
to turn the view filter
on.
Touch this button to
edit the view filter.
Adds the selected entry to
the Custom List (if activated – see page 84).
Touch this button to
select the current entry to
play.
Use the scroll bar to see all
Songs in the list. Keep SHIFT
pressed and touch the Up/
Down arrow to scroll to the
next/previous alphabetic
section. As an alternative,
you can use the VALUE
DIAL.
SongBook Main List
Style, Standard MIDI File(s) or MP3 file(s) currently
assigned to the arranger or player(s)
i
Selecting the desired entry from the Main List
A large database is already included with the instrument, and you can later customize it. You may
browse through this database in a variety of ways.
1 While you are in Style Play or Song Play mode, press the SONGBOOK button to open
the SongBook window.
2 Browse through the entries.
Icons in the Type column will help you identify the type of the entry. The Genre column is
shown by default, but you can switch to the Artist column (see “Displaying Artist or Genre”
below).
3 When the entry you are looking for becomes visible in the display, select it and touch
the Select button in the display.
After selecting an entry, the corresponding Style, MID, KAR or MP3 file will be recalled,
together with the relevant operating mode (Style Play or Song Play). Up to four STSs will also be
recalled. Any TXT file associated with the entry can be seen in the Lyrics page.
The selected Style, MID, or KAR file, or MP3 is shown in the higher part of the screen.
Displaying Artist or Genre
For space matters, either the Genre or Artist column can be seen in the display. You cannot see both at
the same time.
1 Touch the page menu icon to open the page menu.
Note: The Artist and Key
fields of all supplied entries
have been intentionally left
empty.
Page 83

The SongBook
Sorting entries
2 Choose Show Artist (now Genre) to switch from Genre to Artist in the List view. The Art-
Touch the Name label…
…to alphabetically reorder the names in the
list. Each time you touch the same label, the
order changes between Ascending and
Descending.
ist column will be shown.
3 Open the page menu again, and choose the Show Genre (now Artist) item. The Genre
column will be shown again.
79
Sorting entries
You can change the order entries are shown in the display.
1 You can change the sorting order by touching one of the labels in a list of names.
You can do the same by touching the Type, Name, Genre, Artist, Key, Number, Tempo or Meter
label.
Quick Guide
2 Each time you touch the same label again, the order changes between ascending and
descending.
Page 84

80
The SongBook
Searching entries
Available search
criteria. “Genre”
and “Artist” are
both considered, even
though only one
of them may be
shown in the List
Searching entries
The SongBook database may be really huge. You can, however, look for (say) specific artists or song
titles, using the filtering functions.
1 Touch the Filter button in the display, to open the Filter dialog box.
2 Touch the (Text Edit) button next to the search criteria (even more than one) you
want to enter.
For example, you may want to find all songs containing the word “love” in the title (in any position in the string). If so, select the ‘Name’ criterion, and enter the word ‘love’. Capitals are not relevant for the search.
3 Touch OK in the display, and close the Text Edit dialog box. The entered text is now the
search criteria.
Page 85

The SongBook
Searching entries
4 Touch OK to close the Filter dialog box and return to the SongBook page.
Once the Filter dialog box has been closed by touching OK, the Filtered check box is automatically checked, and the filter is activated. Only entries matching the entered criterion are seen in
the Main List.
5 To see the whole SongBook database again, touch the Filtered check box again, to
make the check mark disappear.
81
Quick Guide
Page 86

82
The SongBook
Adding entries
Entry’s name
Name of the Style, MID, or KAR or MP3 file, memorized
with the entry.
When checked, current settings for Style tracks,
or the path for the MID, KAR or MP3 file, are
saved with the entry. If unchecked, the original
Style track settings are saved with the entry.
This parameter is mandatory when creating a
new entry by touching the New Song button.
When checked, you can save the current Key-
board tracks and Voice Processor settings into
one of the four STSs available for each entry, or
save all the current Style STSs to the SongBook
entry.
One of the four STS available for
each entry, where you can save the
current settings for Keyboard
tracks and the Voice Processor.
Touch New Song to cre-
ate a new entry.
Currently selected resource. If a different Style, MID, KAR or MP3 file
has been selected, it may differ
from the saved resource (shown on
top of the page).
Song Selection number (ID number
for numeric selection)
Choose All Current Style STS to save the four STSs
(recalled by the latest selected Style ) with the new
entry.
Adding entries
You can add your own entries to the SongBook database.
1 Go to the Style Play or Song Play mode, depending on the type of entry you want to
add to the SongBook database.
2 Select the Style, Standard MIDI File or MP3 file to be added to the SongBook.
Assign the selected Song to Player 1. (Only Songs assigned to Player 1 will be saved in the SongBook entry. Songs assigned to Player 2 will not be saved).
3 Edit Keyboard and Style tracks as you prefer, by selecting different Sounds and Effects,
or editing any other parameter.
Please note that changes to Standard MIDI File’s tracks will not be saved as SongBook data. Only
data included in the Standard MIDI File will always be used.
4 If you like, select a different Voice Processor Preset.
The Voice Processor Preset selection will be saved in a SongBook entry, only if you will also save
an STS. So, please don’t forget to check the “Write” checkbox in the “STS” area.
5 When your entry is ready, press the SONGBOOK button, then the Book Edit 1 tab to see
the Book Edit 1 page and link a Musical Resource to the SongBook entry.
6 Touch the New Song button in the display to add a new item to the SongBook list.
Page 87

The SongBook
Adding entries
7 When done with this page, press the Book Edit 2 tab to see the Book Edit 2 page and
Database entry’s
parameters
Track from which to take notes to be sent
to the Voice Harmony.
Text file linked to the entry. This
text will be seen as Lyrics in the display (or in the external monitor,
with the VIF4 option installed). See
“Viewing lyrics and chords in the
Song Play and SongBook modes”
on page 169.
Synchro (for Style) and Memory (for Style
and Songs) On/Off status
edit the SongBook database details.
8 Touch the (Text Edit) button next to the field(s) you want to edit. Set all other
parameters.
You can write the genre and artist name. If you are saving a single STS, you can assign it a name
(this is not possible if you are saving all STSs). Select a Tempo matching the song’s tempo, and
select the Meter (time signature) and Key of the song. You can also specify a Master Transpose
value, to be automatically selected when selecting the entry.
9 When done with this page, touch the tab to go to the Book Edit 3 page, where you can
and set the Synchro and Memory parameters, link a text file to the entry, and choose
the Harmony Control.
83
Quick Guide
10 After having filled up all the desired fields (be as comprehensive as you can), touch the
Write button in the display to open the Write dialog box.
Page 88

84
The SongBook
Creating a Custom List
Entry’s name. By default it is the same name of the associated Standard
MIDI File of MP3 file, or the associated Style. The name can be up to 16 char-
acters long.
Select Rename/Overwrite to overwrite
an existing entry. Warning: the older
entry will be deleted!
Select New Song to add a new entry to
the SongBook database. This option is
automatically selected when a new entry
has been created (by touching the New
Song button while in the Edit 1 page).
After you check the ‘Enable
List Edit’ item, the List Edit
page becomes available.
11 Touch the (Text Edit) button to assign a name to the new entry, then touch OK to
save the entry to the SongBook database.
Creating a Custom List
You can create several Custom Lists in the SongBook, to make a set of entries suitable for your various
shows. Before starting a new Custom List, be sure you have added all needed entries to the SongBook
main database (see “Adding entries” above).
1 While in SongBook mode, open the page menu and check the ‘Enable List Edit’ item.
2 Select a Custom List to be edited.
To edit an existing list, touch the Custom List tab to open the Custom List page, and select one of
the available Custom Lists. To create a new list, touch the List Edit tab to open the List Edit page,
and touch the New List button to create a new, blank list.
Page 89

The SongBook
Creating a Custom List
3 Touch the Book tab to open the Book page and see the full database. Use the various
Touch this checkbox
to turn the view filter
on (if any).
Touch this button to edit the
view filter.
Use the scroll bar to
see all Songs in the
list. Keep SHIFT
pressed and touch the
Up/Down arrow to
scroll to the next/previous alphabetic section. As an
alternative, you can
use the VALUE DIAL.
SongBook list
Adds the highlighted entry to the
Custom List.
Use the vertical arrows
to move the selected
entry up or down in the
list.
Touch Del Song to delete
the selected entry.
Touch New List to create a new Custom List. Touch
Del List to delete the current Custom List. Warning:
Del List will delete the current Custom List.
Touch Write to save the current Custom List.
Select an entry on the list to
edit
List name
Scrollbar
sorting, searching and filtering options (seen above) to find the entries you are looking
for. Touch the Add to List button when the desired entry has been selected.
4 When finished adding entries to the Custom List, touch the List Edit tab to go to the List
Edit page, and use the various commands to edit the list.
85
Quick Guide
Page 90

86
The SongBook
Creating a Custom List
Touch the ( Text Edit) symbol to open the
Text Edit dialog box.
Use alphabetic characters to enter text.
Use the arrows or the
DIAL to move the cur-
sor.
Use the SHIFT but-
ton to switch
between capitals
and small charac-
ters.
Touch Delete to delete just a
single character, Clear to
delete the whole string.
When done, touch OK to
confirm the new name,
or Cancel to abandon all
changes.
5 When the Custom List is ready, touch the Write button in the display to save it to mem-
ory. Assign a new name to the Custom List.
Page 91

The SongBook
Selecting and using a Custom List
Selecting and using a Custom List
Use the List pop-up menu to select
one of the available Custom Lists.
Touch Next to select the next entry in the list.
(This command can also be assigned to an
Assignable Switch).
Touch Select to set the
highlighted entry to play (if
different than the one automatically selected).
Entry in play. To select a different one, highlight it and
touch the Select button in
the display.
STSs associated to the
current entry.
After creating one or more Custom Lists, you can select one and use it for your show.
1 Touch the Custom List tab to select the Custom List page.
2 Use the List pop-up menu to select one of the available Custom Lists.
87
3 Select one of the entries in the list (it turns dark red), then touch the Select button in
the display to confirm selection (the selected entry turns green). Press the PLAY button
to start playing back the selected Song.
Selecting a SongBook STS
Up to four STSs can be associated to any SongBook entry. It doesn’t matter if it is based on a Style, a
Standard MIDI File or an MP3 file.
1 Press the LYRICS button to open the Lyrics/STS page and see the four STSs associated
to the current SongBook entry.
Quick Guide
2 Select the desired STS by pressing the corresponding STS button on the control panel.
As an alternative, touch its name in the display.
The STS is selected. Keyboard tracks and Voice Processor settings may change.
Page 92

88
Singing with a microphone
Connecting a microphone
Microphone inputMicrophone controls
Microphone, Harmony and Double switches
i
Singing with a microphone
Pa3X is fitted with a powerful digital voice processor, based on technologies developed by TC Helicon, including innovative effects and four-part harmonization. While very powerful, the Pa3X’s voice
processor is also extremely easy to use, automatically adjusting its settings to your particular voice and
the way you sing at different times of your performance.
Connecting a microphone
To sing along with the Pa3X, you must first connect a suitable microphone to the MIC input (the one
that goes into the Voice Processor). Both dynamic and condenser microphones are directly supported. Phantom power is available to condenser microphones.
1 Lower the Mic volume by using the dedicated MIC VOLUME knob on the control panel.
2 Connect a microphone.
Note: Lowering the Mic
volume helps avoiding feedback. Feedback is caused by
audio generated by the Pa3X,
returning to the audio circuitry via the microphone.
Page 93

Singing with a microphone
Connecting a microphone
3 In case you are using a condenser microphone connected to the XLR MIC input, press
Touch this checkbox to turn
phantom power on on the
XLR MIC input, and switch a
condenser microphone on.
Mic panel. To test the microphone level, be sure the
“Talk” button is ‘pressed in’
(On).
Adjust the input level by using the MIC GAIN knob next to
the MIC input. Sing into the microphone, and watch at the
AUDIO IN LED on the control panel – it ought to stay green. If
it goes orange too often (or even red), turn down the input
gain; if it turns off too often, increase the input gain. No hint
of distortion should be heard in the audio system when you
sing.
While you adjust the gain,
gradually increase the Micro-
phone volume, by using the
MIC VOLUME knob.
the GLOBAL button, choose the Audio Setup section, then go to the Audio In page to
see the microphone settings, and turn the phantom power on.
4 Press the EXIT button to return to the main page of the Style Play or Song Play mode.
5 Touch the Mic tab to see the Mic panel, then touch the Talk button in the display to
remove all the effects from the microphone.
You can also check the status of buttons, and the status of the Talk function, in the Mic panel.
Press the EXIT button to go to the main page of the Style Play or Song Play mode, then select the
Mic tab.
89
Quick Guide
6 Sing into the microphone, and adjust the input gain and the Microphone volume, until
you achieve the correct settings.
i
Note: You h a ve a c orre c t
microphone volume setting
when the AUDIO IN LED stays
green most of the time. The
MIC VOLUME knob must be
set accordingly, to compensate a too loud or weak
incoming signal.
Page 94

90
Singing with a microphone
Setting up your voice tone
Be sure the “Talk” button is
‘pressed out’ (Off ).
7 Try the MIC ON/OFF button in the MIC SETTING section, to turn the whole microphone
section on/off.
8 If you like, start a Style or Song. Adjust the microphone’s final volume by using the
dedicated MIC VOLUME knob.
9 Touch the Talk button in the Mic panel to reactivate all the effects.
10 Adjust the other settings, balancing the Style/Song and microphone with the BAL-
ANCE slider and the MIC VOLUME knob.
The settings for the BALANCE slider and the MIC VOLUME knob are not saved in memory, so
they remain consistent when selecting different Styles, Performances, Songs or Voice Processor
settings.
Setting up your voice tone
You can add pitch correction, equalization, compression and gate to the microphone signal, to make
your voice perfectly in tune, tonally pleasant and dynamically even. In case your microphone emphasizes them, de-essing will remove sibilants. While these effects cannot be considered a replacement
for some good training, they can fix a few common problems in a live context.
1 Press the GLOBAL button, then touch the Voice Processor Setup button in the display,
and then (if it is not selected) touch the Mic Setup tab.
The Mic Setup page appears in the display.
Hint: You c a n keep t h e S HIFT
button pressed, and press the
MIC ON/OFF button, to jump
to the Voice Processor Setup
page.
Page 95

Singing with a microphone
Setting up your voice tone
2 Check the “Auto-Chromatic Amount” box, and adjust the correction amount while
singing and listening to your tuning.
Try first with a setting of 50%, that should work in most situations. A lower value will make correction less effective, a higher value will make the correction more evident.
3 Touch t h e Mic To n e tab.
The Mic Tone page appears.
91
4 Be sure that the “Adaptive” box in the EQ section is checked, and use the Shape knob to
adjust the brightness of your voice, and the Warmth checkbox to add warmth to the
sound.
The Adaptive setting automatically adjusts the EQ parameters. The Shape control adds an airy
brightness, or “sizzle” to your voice while reducing “mud” due to the proximity effect from singing closely into a cardioid microphone. The Warmth control further reduces the mud, while
adding warmth to the sound.
5 Be sure that the “Adaptive” box in the Compress/DeEss section is checked, and use the
Compress knob to adjust the amount of compression while singing and listening to
your dynamics.
The Adaptive setting automatically adjusts the Compressor parameters. In this mode, the compressor listens to your singing over time and adjusts the internal parameters accordingly. You
can use the Compress knob to increase or decrease the amount of compression.
6 In case you also want to keep the sibilants under control, play with the DeEss knob to
fix them.
There is a side effect that comes from adding high frequencies and compression to your voice,
and that’s excessive sibilance. The DeEss control monitors the level of sibilance and, when it is
detected, will quickly and transparently reduce it.
Quick Guide
To reduce the risk of feedback and the amount of environmental noise (from other musicians on
stage, from the audience…) use the Gate control. Be sure the “Adaptive” option is selected in the
Page 96

92
Singing with a microphone
Choosing a Voice Processor Preset
Use this pop-up menu to select a
Voice Processor Preset
Mic panel lock
Gate section. Use the “Lead Atten.” and “Harm. Atten.” to separately control the amount of gating in your voice and in the harmony voices.
The Gate analyzes your singing style to automatically reduce the other noises or the feedback
from the loudspeakers.
7 Press the EXIT button to return to the main page.
Choosing a Voice Processor Preset
You can add several effects to your voice, and you can set them up quickly through the Voice Processor Presets. These are memories containing all the settings for the Voice Processor effects. You can
customize these memories at will.
1 Touch the Mic tab to see the Mic panel, and select one of the available Voice Processor
Presets.
Voice Processor Presets are settings for the various Voice Processor sections. By selecting a Preset, all processing parameters may change.
A Voice Processor Preset is assigned to each Performance or STS. When selecting a different
Performance or STS, the Voice Processor Preset may change (depending on the Mic panel lock
status), changing the type of processing applied to your voice.
2 Sing into the microphone to listen to the effects.
3 Adjust the level of the Reverb or Delay effect, by using the REVERB/DELAY knob in the
MIC SETTING section of the control panel.
4 Choose a different Preset, and listen to how the effects changed.
Page 97

Singing with a microphone
Applying harmony to your voice
5 Use the “Filter”, “HardTune”, “uMod” and “Delay” buttons to turn the various effect sec-
Use these buttons to turn the
effect sections on/off
tions on/off, and listen to the resulting sound.
Applying harmony to your voice
You can let Pa3X add automatically-generated harmonize your lead voice with up to four backing
voices. Each Voice Processor Preset may contain a different harmonization style (for example, changing the number of voices, or the way notes from the keyboard, the Style or the Song are received).
1 Select a Voice Processor Preset containing the desired harmonization style.
By default,
• Preset #1 expects you play chords, and receives notes from the keyboard (the recognition zone
depends on the Chord Scan section);
• Preset #2 expects notes from a track of the Standard MIDI File. To choose the track go to the
Song Play mode, press the MENU button, touch the Preferences item, be sure the “General
Setup” page is selected, and choose a track from the “Harmony Control” parameter. (Usually,
harmony notes are contained in Track #5).
• Preset #3 is meant for use with an MP3 Song. Choose this preset when playing an MP3, and the
Pa3X will recognize chords by analyzing the file.
93
Quick Guide
2 Press the HARMONY button in the control panel to turn its LED on.
3 Play some chords, to let the Voice Processor create new voices based on their notes.
Contrary to doubling, harmonizing adds chord notes, or counterpoint notes, to the note you
sing.
4 Sing along with the chords and melody you play on the keyboard.
5 Adjust the level of the harmony voices by using the HARMONY/DOUBLE knob in the
MIC SETTING section of the control panel.
6 While in the Mic panel, choose the various Voice Processor Presets to test the various
harmonization styles.
7 If it is playing, stop the Style.
8 Press the HARMONY button again, to turn its LED off.
Page 98

94
Singing with a microphone
Applying doubling to your voice
Applying doubling to your voice
You can let Pa3X add automatically-generated unison chorus voices to your lead voice. Each Voice
Processor Preset may contain a different doubling style (usually changing the number of doubling
voices and the spread between them in the stereo panorama).
1 Press the DOUBLE button in the control panel to turn its LED on.
2 Sing into the microphone, and listen to how other voices are added in unison to your
melody line.
Doubling does not play chords: it just adds the other voices (in unison) to the same note you
sing.
3 While singing, adjust the level of the choir voices by using the HARMONY/DOUBLE
knob in the MIC SETTING section of the control panel.
4 Press the DOUBLE button again, to turn its LED off.
Page 99

Singing with a microphone
Soloing your voice (Talk)
Soloing your voice (Talk)
Lock on. Voice Processor
settings will not change
when selecting a different Performance or STS.
Lock off. Voice Processor
settings will change
when selecting a new
Performance or STS.
Sometimes, during a live show, you might like to talk to your audience. Use the Talk function to attenuate the music, and let your voice pass through clean and clear.
1 While in the main page of the Style Play or Song Play mode, touch the Mic tab to see
Voice Processor’s settings.
2 During playback, touch the Talk button to turn the TalkBack function on.
3 Sing or talk into the microphone.
You’ll hear that background music has been made softer, while your voice will be heard loud and
proud.
95
4 To turn the TalkBack function off, touch the Talk button again.
The background music returns to the original volume.
Locking the Voice Processor settings
If you like the selected Voice Processor Preset, you can “lock” them, to prevent them from changing
each time you select a Performance, Style or STS that may be saved using different settings.
1 While the Mic panel is shown in the display, touch the lock icon to freeze it.
2 To unlock the settings, touch the lock icon again.
Quick Guide
The lock status can be saved into the Global Setup (see “Write Global - Global Setup dialog box”
on page 220).
Page 100

96
Recording a new Song (Standard MIDI File)
Accessing the Backing Sequence (Quick Record) mode
Style Select section
Style Controls
Style Elements
Player 1 controls
SEQUENCER button
After pressing the
SEQUENCER button, the main
page of the Sequencer mode
appears.
Press the RECORD button, to open
the Song Record Mode Select dia-
log box
Recording a new Song (Standard MIDI File)
There are several ways to create a Song on the Pa3X. The easiest and fastest is to use the Styles to
record what you are playing in realtime on the keyboard, while the arranger gives you the accompaniment tracks.
Accessing the Backing Sequence (Quick Record) mode
1 Press the SEQUENCER button to switch to the Sequencer mode.
2 Press the RECORD button to open the Song Record Mode Select dialog box.
 Loading...