

Page 1

Pa-Series
Connecting
an external
controller
1E
Page 2

II|
Preliminary notice
Liability
KORG shall not be liable for errors contained
in information downloaded from the KORG
Website, or otherwise obtained from the KORG
Website in any manner. KORG will not in any
event be liable for any direct, indirect, special,
incidental or consequential damages whatsoever (including lost profits, lost data, or business
interruption) related to any information or links
provided by the KORG Website.
Data handling
Data may sometimes be lost due to incorrect
user action. Be sure to backup important data.
KORG will not be responsible for damages
caused by data loss.
Disclaimer
The information contained in this manual have
been carefully revised and checked through.
Due to our constant efforts to improve our
products, the specications might differ to those
in the manual. KORG is not responsible for any
eventual differences found between the specifications and the contents of the instruction
manual – the specifications being subject to
change without prior notice.
Trademarks
All trademarks or registered trademarks are
the property of their respective holders.
Cited products
Citation of third party products found in this
text is just an information, and should not be
considered an endorsement or a recommendation.
Page 3

Contents
Connecting a Pa-Series instrument to an external controller ...........3
Connecting the controller ............................................4
Connection through the USB HOST port .........................................4
Connection through the MIDI ports .............................................5
Setting the MIDI channels ............................................6
Programming the master controller .............................................6
Programming the Pa-Series instrument .........................................6
Some examples of external controller connections .....................8
Connecting a master controller to replace the internal keyboard ...................8
Connecting an external keyboard to control a single Sound .......................10
Connecting an external control surface to mix the Sounds ........................13
Connecting an external controller with pads to play percussive sounds or
special effects ...............................................................19
Connecting an external controller with pads to send chords to the arranger ....... 23
Connecting an external controller with an X/Y pad to control sound parameters ... 26
Connecting a studio controller to send more controls at the same time ........... 29
Connecting a breath controller ............................................... 35
|i
Page 4

ii|
Page 5

Connecting a Pa-Series instrument to an external controller |3
Connecting a Pa-Series
instrument to an external
controller
The world of KORG Pa-Series instruments is open to any kind of configuration. You can control Pa-Series instrument with an external controller, like
a KORG synthesizer, a controller of the KORG nano series, a mute master
keyboard, a digital piano, or a breath controller.
These devices allow to replace the internal keyboard with an external one.
Also, they allow for adding new controls to play some of the sounds while still
using the internal keyboard for the other sounds. Furthermore, they allow
for easier mixing, or to play percussions and special effects.
This manual will show some examples based on a few selected devices.
These are only to be intended as examples. Since the Pa-Series instruments
can be freely and deeply programmed by the user, you can adapt them to a
plethora of different situations.
For a general introduction to the MIDI system, please check the relevant
chapter in the User Manual.
Page 6
4|
Connecting the controller
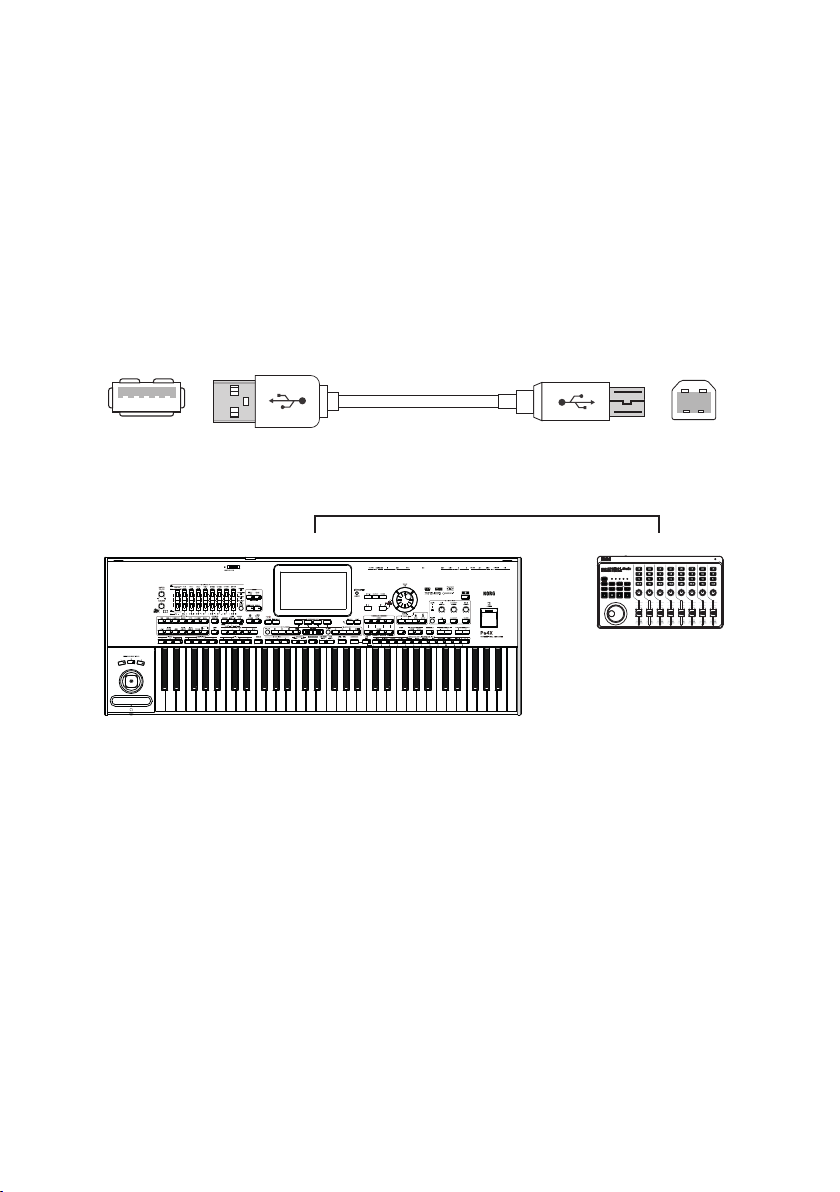
Connection through the USB HOST port
If your controller has an USB port, you can use it to connect it to Pa-Series
instrument.
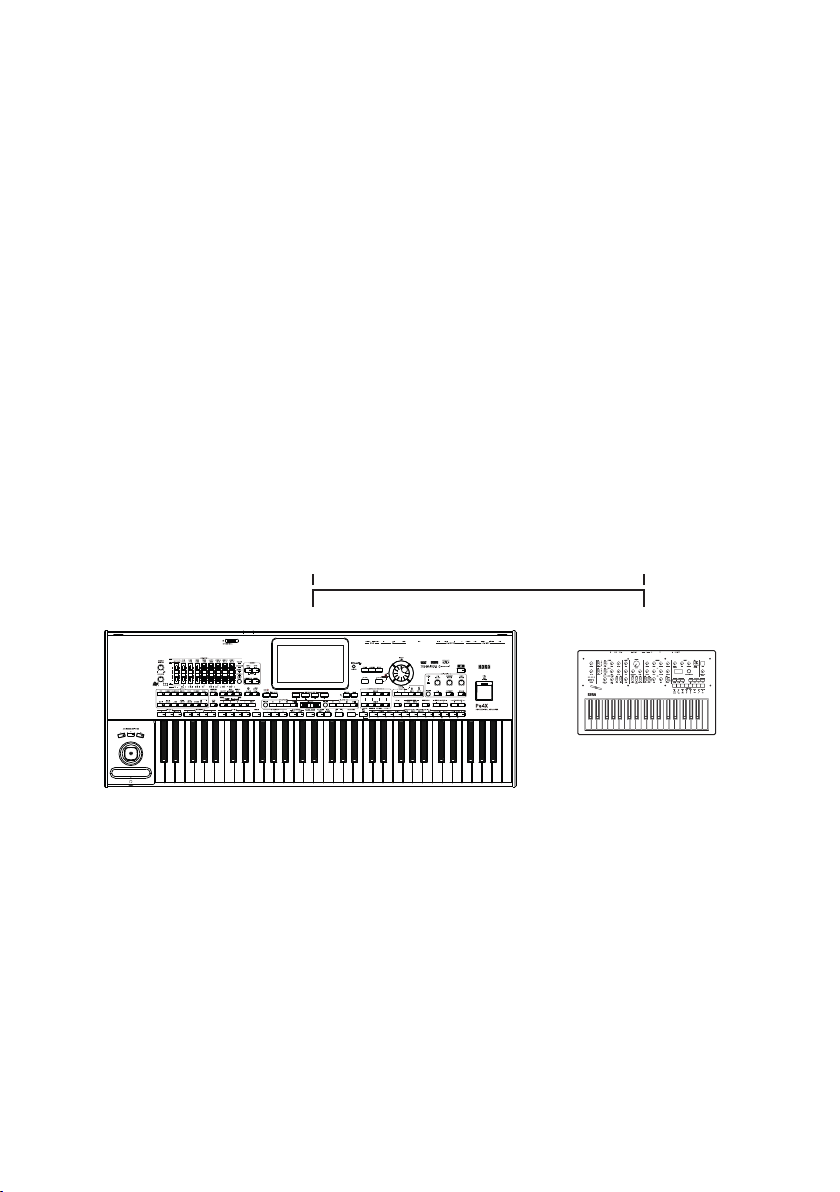
▪ Connect the USB HOST port (Type-A) of the Pa-Series instrument to the
USB port of the master controller (Type-B, sometimes named TO HOST or
DEVICE).
Pa-Series USB HOST
(Type-A connector)
External controller USB TO HOST / DEVICE
(Type-B connector)
USB HOST USB (TO HOST)
Page 7
Connecting a Pa-Series instrument to an external controller |5
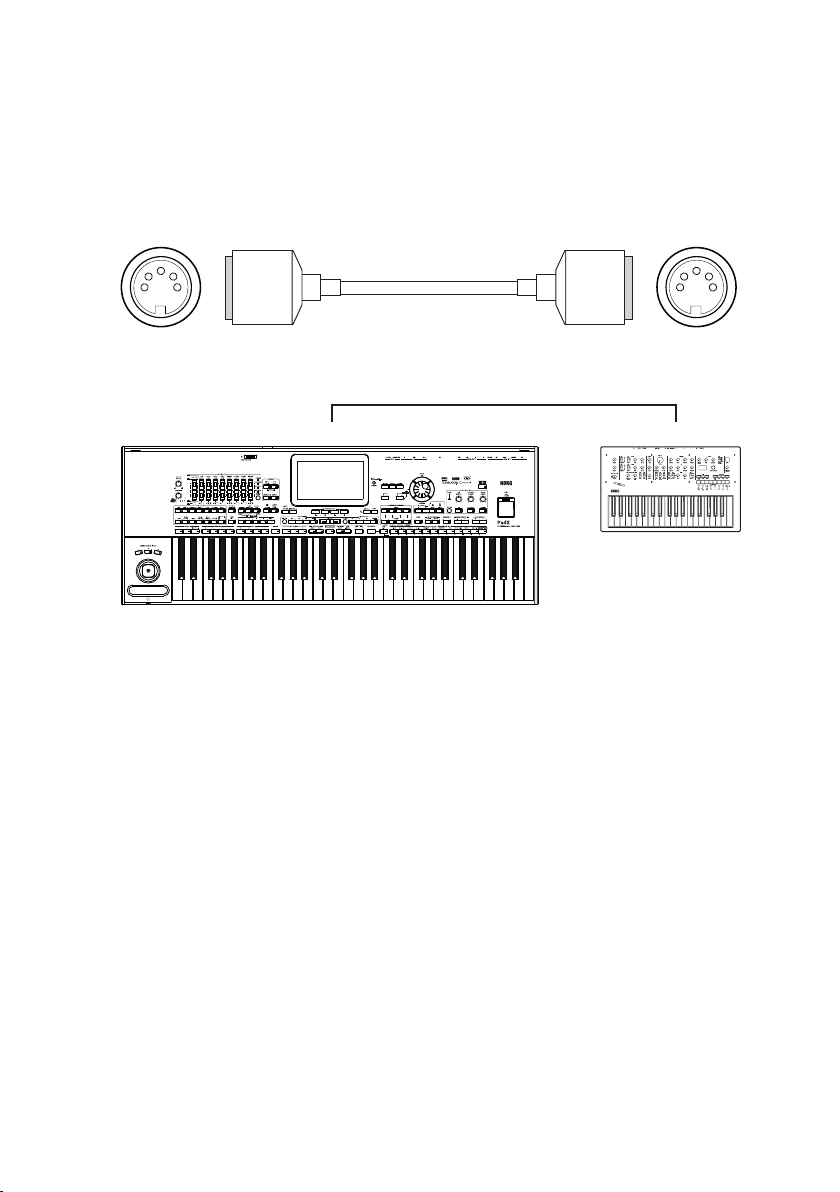
Connection through the MIDI ports
If your controller has a MIDI interface, you can use it to connect it to the PaSeries instrument.
▪ Connect the MIDI OUT port of the master controller to the MIDI IN port of
the Pa-Series instrument.
Pa-Series MIDI IN External controller MIDI OUT
MIDI IN MIDI OUT
Page 8

6|
Setting the MIDI channels
Programming the master controller
Match the MIDI channel(s) on which the master controller will send data with
those on which the Pa-Series instrument will receive data.
1 On the master controller, set the MIDI channel(s) on which data will be trans-
mitted. Usually, channel 1 is the default setting (when only a single channel
is transmitted).
2 If the master controller also includes a sound generator, lower its master vol-
ume to zero, to avoid hearing its own sounds. If you want to layer the sounds
of the master controller and the Pa-Series instruments, increase the volume.
As an alternative, you can set it to the Local Off status, to only allow it to play
via MIDI the sounds of the Pa-Series instrument, and not its own.
Please, read the manual of the master controller for instructions on how to
set the various parameters.
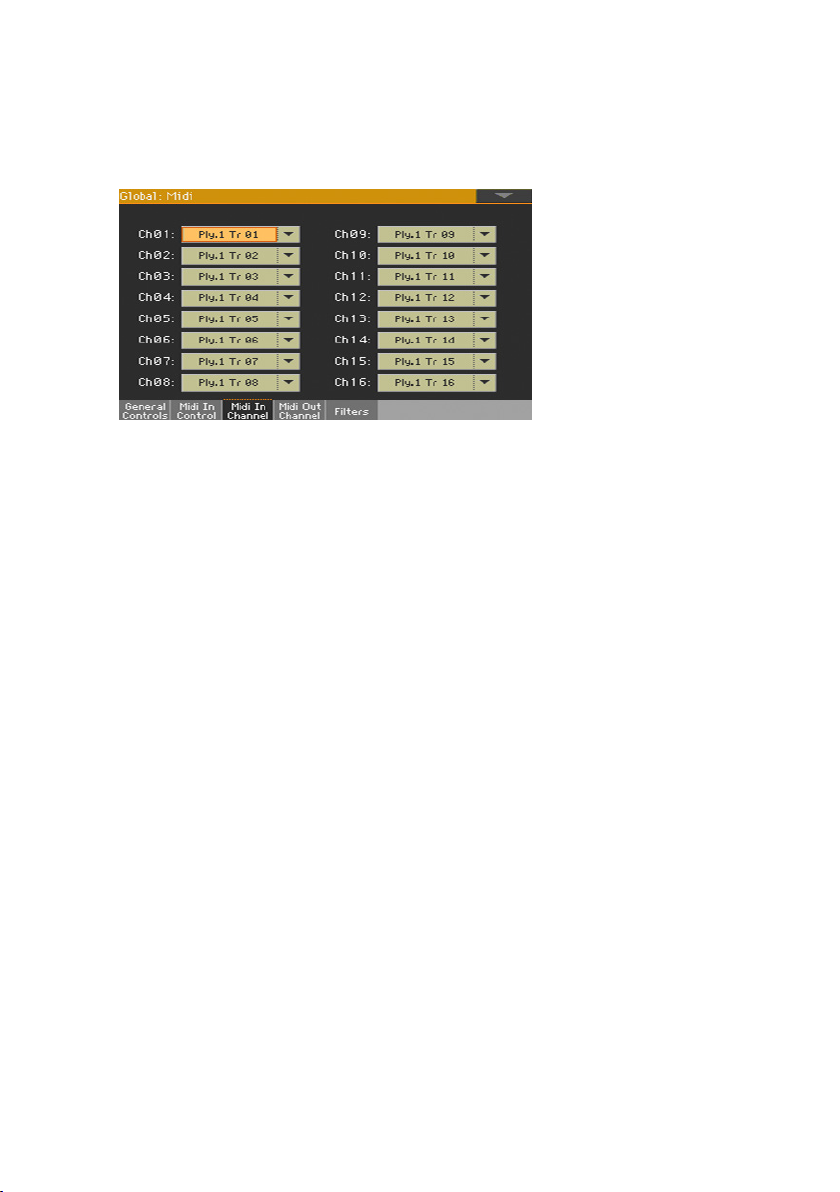
Programming the Pa-Series instrument
Configure the MIDI channels on the Pa-Series instrument.
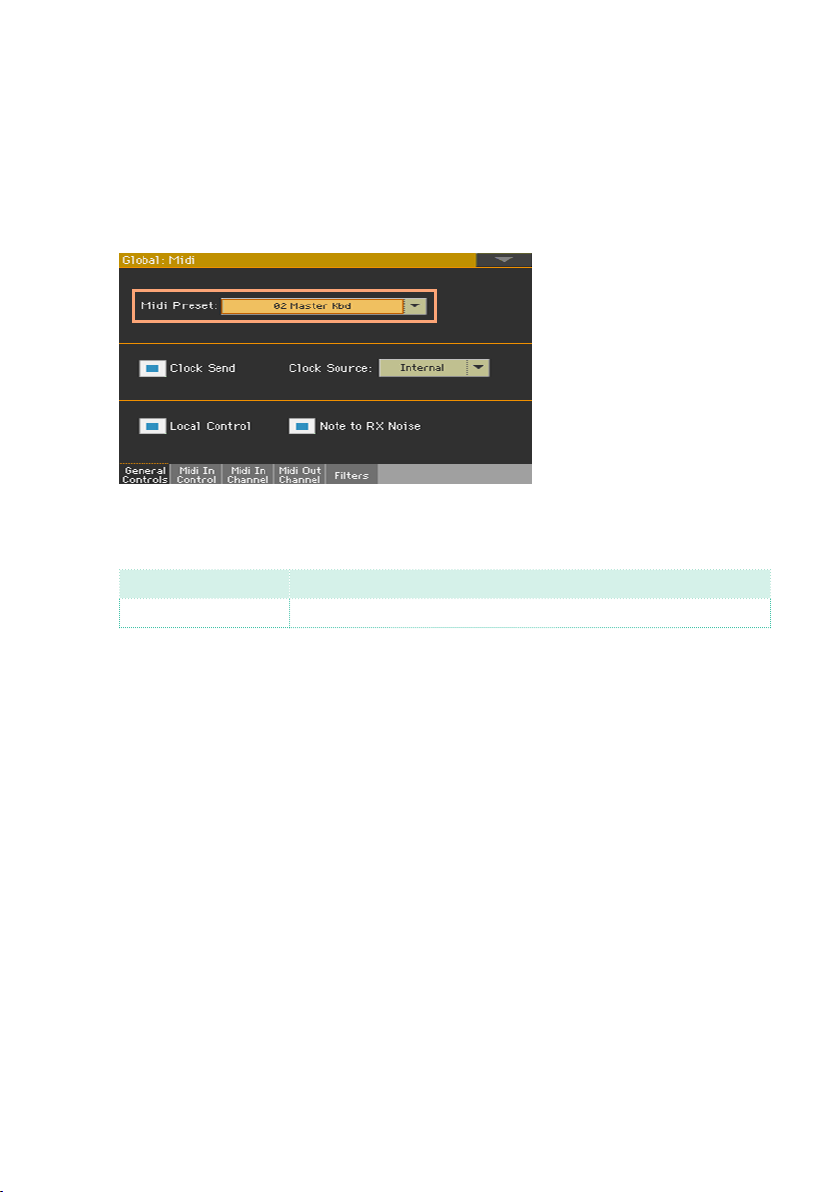
1 Go to the Global > MIDI pages.
2 Either choose a MIDI Preset, or manually program the MIDI IN channels.
▪ If a MIDI Preset matching your type of connection exists, go to the Global
> MIDI > General Controls page and use the Midi Preset pop-up menu to
choose the MIDI Preset.
Page 9
Connecting a Pa-Series instrument to an external controller |7
▪ If no MIDI Preset matches your type of connection, go to the Global > MIDI >
MIDI IN Channel page and set the MIDI channels to match the incoming data.
You can start from an existing MIDI Preset with some of the programming
already set to your needs.
3 After having set the MIDI channels, you can save the new configuration into
a new MIDI Preset, by choosing the Write Midi Preset command from the
page menu.
Page 10
8|
Some examples of external controller connections
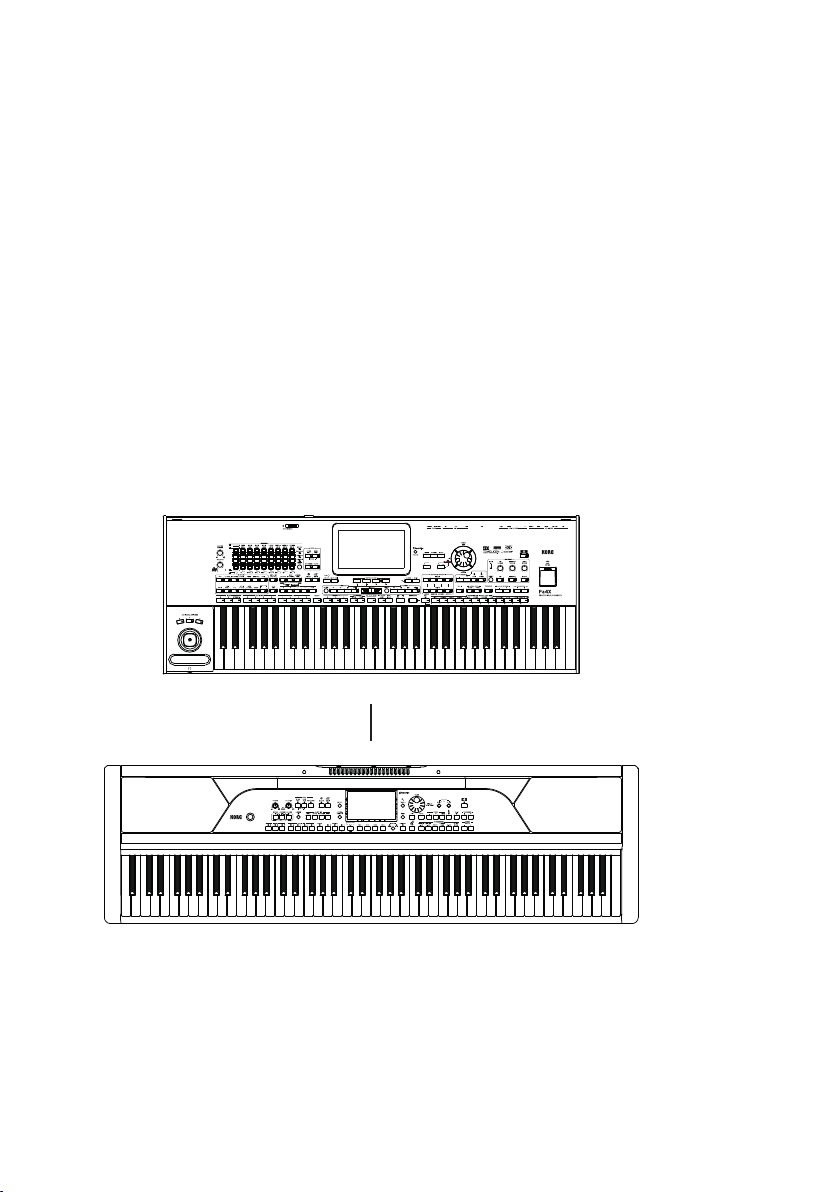
Connecting a master controller to replace the internal keyboard
A master controller can be, for example, an 88-key master keyboard without a sound generator, a digital piano, or a synthesizer. You can use it as a
replacement of the internal keyboard, in case you prefer to control all your
setup from a single keyboard.
Connect the devices
1 Connect the USB (TO HOST or DEVICE) or MIDI OUT port of the master con-
troller to the USB HOST or MIDI IN port of the Pa-Series instrument.
USB HOST / MIDI IN
USB (TO HOST/DEVICE) / MIDI OUT
Configure the master controller
2 In the master controller, set the MIDI channel on which data will be transmit-
ted to channel 1. This is usually the default setting.
3 If the master controller also includes a sound generator, lower its master vol-
ume to zero, to avoid hearing its own sounds. If you want to layer the sounds
of the master controller and the Pa-Series instruments, increase the volume.
Page 11
Connecting a Pa-Series instrument to an external controller |9
As an alternative, you can set it to the Local Off status, to only allow it to play
via MIDI the sounds of the Pa-Series instrument, and not its own.
Configure the Pa-Series instrument
4 In the Pa-Series instrument, go to the Global > MIDI > General Controls page,
and use the Midi Preset pop-up menu to choose the Master Kbd MIDI Preset.
You can go to the Global > MIDI > MIDI IN Channel page to see how MIDI
channels for the Keyboard Sounds are programmed.
MIDI IN Channel Keyboard Sound
Ch01 Global (Upper 1-3, Lower Sounds)
This setup will let the external keyboard, transmitting on MIDI channel 1, play
all the Sounds on the keyboard.
Play
5 Play the master controller. Notes played on it will be considered as if they
were generated by the internal keyboard and controllers of the Pa-Series
instrument.
Page 12
10|
Connecting an external keyboard to control a single Sound
You can use an external keyboard, for example a master keyboard, a synthesizer, or one of the KORG microKEY or nanoKEY models, as a secondary
keyboard to play one of the Upper Sounds (for example, Upper 3), while still
using the internal keyboard to play the other Sounds.
Configure the external keyboard
1 Be sure the external keyboard is sending data on MIDI channel 1. This is usu-
ally the default setting.
With the KORG microKEY, nanoKEY and devices of the same series, you can
choose a different MIDI channel by using the KORG KONTROL Editor software, that you can freely download from our web site.
Connect the devices
2 Connect the USB or MIDI OUT port of the external keyboard to the USB
HOST or MIDI IN port of the Pa-Series instrument. Be sure the external key-
board’s USB port is enabled.
MIDI IN MIDI OUT
USB HOST USB
(TO HOST/DEVICE)
Page 13

Connecting a Pa-Series instrument to an external controller |11
Configure the Pa-Series instrument
3 In the Pa-Series instrument, go to the Global > MIDI > General Controls page,
and use the Midi Preset pop-up menu to choose the Key Control MIDI Preset.
You can go to the Global > MIDI > MIDI IN Channel page to see how the MIDI
channel for the Upper 3 Sound is programmed.
MIDI IN Channel Keyboard Sound
Ch01 Upper 3
This setup will let the external keyboard, transmitting on MIDI channel 1, play
the Upper 3 Sound. The internal keyboard will still play the Upper and Lower
Sounds that are not set in mute.
Also, you can go to the Global > MIDI > MIDI IN Controls page, and see how
the Track Mute Active parameter has been deselected. This will let you play
from an external keyboard any Sound that is set in mute in the Pa-Series
instrument.
4 Program some Keyboard Sets, with the Upper 1 and 2 Sounds meant for play-
ing from the integrated keyboard, and the Upper 3 Sound (set in mute) meant
for playing with the external keyboard. Don’t forget to Write it to memory.
Page 14

12|
Play
5 When you want, play the Upper 3 Sound on the external keyboard. You can
still play the other Upper (1 and 2) Sounds and the Lower Sound on the internal keyboard.
internal keyboard
internal keyboard
Page 15

Connecting a Pa-Series instrument to an external controller |13
Connecting an external control surface to mix the Sounds
You can use an external control surface, for example a KORG nanoKONTROL,
nanoKONTROL Studio or a KORG taktile, to mix the Sounds live, as you would
do with a stage mixer when playing acoustic instruments.
Configure the external control surface
1 Program the external control surface to match the parameters you want to
control in the Pa-Series instrument.
Make each slider and/or knob of the external control surface send data on
separate MIDI channels, according to the programming suggested below. For
example, make the sliders send Control Change #07 (Channel Volume) messages, and the knobs send Control Change #10 (Pan) messages.
With devices like the KORG controllers cited above, program the sliders and
knobs by using the KORG KONTROL Editor software, that you can freely
download from our web site.
Devices like the KORG nanoKONTROL Studio allow for saving programming
to different Scenes, to be recalled when needed. In the following examples,
we will program two Scenes to control (1) Keyboard Sounds and Pads, and
(2) Accompaniment Sounds. With a Song, we will control two groups of eight
tracks with each Scene.
Page 16

14|
Scene 2: MIDI channels 9-16 Scene 2: CC numbers (CC#7)
Scene 1/2: CC numbers (CC#10)
In the following images, you can see how nanoKONTROL Studio sliders are
programmed in the KORG KONTROL Editor for the first Scene, sending data
on MIDI channels 1-8.
Scene 1: MIDI channels 1-8 Scene 1: CC numbers (CC#7)
In the following images, you can see how sliders are programmed for the
second Scene, sending data on MIDI channels 9-16.
You can program the knobs in the same way. Here is an example of the Pan
messages assigned to the eight knobs of a Scene:
After having programmed these two Scenes, save them in the nanoKONTROL Studio’s memory.
Connect the devices
2 Connect the USB or MIDI OUT port of the external control surface to the
USB HOST or MIDI IN port of the Pa-Series instrument. Be sure the external
controller’s USB port is enabled.
MIDI IN MIDI OUT
USB HOST USB
(TO HOST/DEVICE)
Page 17

Connecting a Pa-Series instrument to an external controller |15
Configure the Pa-Series instrument
3 In the Pa-Series instrument, go to the Global > MIDI > General Controls page,
and use the Midi Preset pop-up menu to choose a MIDI Preset.
When working with the Styles…
When working with the Styles, choose the Mix Control Preset.
With this preset, Keyboard Sounds and Pads are assigned to MIDI channels
1-8 (Scene 1), and the Accompaniment Sounds to MIDI channels 9-16 (Scene
2). You can go to the Global > MIDI > MIDI IN Channel page to see how MIDI
channels are programmed.
SCENE 1 (Keyboard/Pads) SCENE 2 (Accompaniment)
MIDI IN Channel Sound/Track MIDI IN Channel Sound/Track
Ch01 Pad 1 Ch09 Drum
Ch02 Pad 2 Ch10 Percussion
Ch03 Pad 3 Ch11 Bass
Ch04 Pad 4 Ch12 Acc 1
Ch05 Lower Ch13 Acc 2
Ch06 Upper 3 Ch14 Acc 3
Ch07 Upper 2 Ch15 Acc 4
Ch08 Upper 1 Ch16 Acc 5
Page 18

16|
Scene 1 (MIDI channels 1-8):
01 02 03 04
05
06 07 08
Scene 2 (MIDI channels 9-16):
09 10 11 12 13 14 15 16
Page 19

Connecting a Pa-Series instrument to an external controller |17
When working with the MIDI Songs…
When working with MIDI Songs, choose the Player 1 or Player 2 Preset
(where available). If you instrument features two Players, the external controller will only control the one selected in the MIDI Preset.
With one of the presets, each slider will match the corresponding MIDI channel. Song Tracks 1-8 will be Scene 1, Song Tracks 9-16 will be Scene 2.
SCENE 1 (Song Tracks 1-8) SCENE 2 (Song Tracks 9-16)
MIDI IN Channel Sound/Track MIDI IN Channel Sound/Track
Ch01 Player Track 1 Ch09 Player Track 9
Ch02 Player Track 2 Ch10 Player Track 10
Ch03 Player Track 3 Ch11 Player Track 11
Ch04 Player Track 4 Ch12 Player Track 12
Ch05 Player Track 5 Ch13 Player Track 13
Ch06 Player Track 6 Ch14 Player Track 14
Ch07 Player Track 7 Ch15 Player Track 15
Ch08 Player Track 8 Ch16 Player Track 16
Page 20

18|
Scene 1 (MIDI channels 1-8):
Scene 2 (MIDI channels 9-16):
0501 02 03 04 06 07 08
1309 10 11 12 14 15 16
Play
4 When you want to mix the Sounds on the Pa-Series instrument, select the
Scene of the external controller corresponding to the group of Sounds to be
mixed, and move the sliders and/or knobs on the control surface.
If you like, you can create your own set of sounds to be controlled, by mixing and matching the different MIDI channels. This is especially useful when
using a controller with no memorizable Scenes (like our nanoKONTROL2).
Page 21

Connecting a Pa-Series instrument to an external controller |19
Connecting an external controller with pads to play percussive sounds or special effects
You can use an external controller with pads, for example one of the KORG
nanoPADs, to play percussive sounds or special effects in the Pa-Series instrument.
In this example, the percussive sounds or special effects will be assigned to
the Upper 3 Sound, so that you can easily program it from the main page of
the Pa-Series instrument.
As an alternative, you could play the percussive instruments usually assigned
to MIDI channels 10 (Drums) or 11 (Percussion), but you will have a more limited control on the sounds, and will compete with the internal Arranger or
Player for the same sounds.
Configure the external controller
1 Be sure the external controller is sending data on MIDI channel 1. This is usu-
ally the default setting.
With the nanoPAD2 and devices of the same series, you can choose a transmission MIDI channel by using the KORG KONTROL Editor software, that you
can freely download from our web site.
In the following image, you can see how the nanoPAD2’s Global channel has
been set to MIDI channel 1 in the Global dialog.
If you have changed the transmit MIDI channel (that is, in this case, the
Global channel), press the Write button to save the setting in the controller’s
memory. Then press the Close button to close the dialog.
2 Be sure the external controller is sending Note data to trigger a percussive
sound.
Page 22

20|
By default, KORG nanoPAD2 transmits Note messages from C2 to D#3. This
will cover a wide range of percussive sounds in the Pa-Series instrument.
You can use the KORG KONTROL Editor software to choose different notes.
Connect the devices
3 Connect the USB or MIDI OUT port of the external controller to the USB
HOST or MIDI IN port of the Pa-Series instrument. Be sure the external con-
troller’s USB port is enabled.
MIDI IN MIDI OUT
USB HOST USB
(TO HOST/DEVICE)
Page 23

Connecting a Pa-Series instrument to an external controller |21
Configure the Pa-Series instrument
4 In the Pa-Series instrument, go to the Global > MIDI > General Controls page,
and use the Midi Preset pop-up menu to choose the Pad Control MIDI Preset.
You can go to the Global > MIDI > MIDI IN Channel page to see how the MIDI
channel for the Upper 3 Sound is programmed.
MIDI IN Channel Keyboard Sound
Ch01 Upper 3
This setup will let the external controller, transmitting on MIDI channel 1, play
the Upper 3 Sound. The internal keyboard will still play the Upper and Lower
Sounds that are not set in mute.
Also, you can go to the Global > MIDI > MIDI IN Controls page, and see how
the Track Mute Active parameter has been deselected. This will let you play
from an external controller any Sound that is set in mute in the Pa-Series
instrument.
5 Program some Keyboard Sets, with the Upper 1 and 2 Sounds meant for play-
ing from the integrated keyboard, and the Upper 3 Sound meant for playing
percussive sounds and special effects with the external controller. Be sure
the Upper 3 Sound is set to mute. Don’t forget to Write it to memory.
Page 24

22|
Play
6 Play the percussive sounds or special effects assigned to Upper 3 on the
pads of the external controller. You can still play the other Upper and Lower
Sounds on the internal keyboard.
internal keyboard
internal keyboard
Page 25

Connecting a Pa-Series instrument to an external controller |23
Connecting an external controller with pads to send chords to the arranger
You can play chords on an external set of pads, like those of the KORG nanoPADs. This way, you can play freely with both hands, without having to play
chords for the Arranger on the keyboard.
Configure the external controller
1 Program the external controller to send data on MIDI channel 16 (that we will
use for the Chord 1 channel in the Pa-Series instrument).
With the KORG nanoPAD2 and devices of the same series, program the transmit channel and message sent by the pads by using the KORG KONTROL
Editor software, that you can freely download from our web site.
In the following image, you can see how the nanoPAD2’s Global channel has
been set to MIDI channel 16 in the Global dialog.
After having chosen the transmit MIDI channel (that is, in this case, the
Global channel), press the Write button to save the setting in the controller’s
memory. Then press the Close button to close the dialog.
Page 26

24|
2 Be sure the external controller is sending Note data.
To send chords, assign the chord notes to each pad. Assign a different chord
of a chord sequence to each pad.
Connect the devices
3 Connect the USB or MIDI OUT port of the external controller to the USB
HOST or MIDI IN port of the Pa-Series instrument. Be sure the external con-
troller’s USB port is enabled.
MIDI IN MIDI OUT
USB HOST USB
(TO HOST/DEVICE)
Page 27

Connecting a Pa-Series instrument to an external controller |25
Configure the Pa-Series instrument
4 In the Pa-Series instrument, go to the Global > MIDI > General Controls page,
and use the Midi Preset pop-up menu to choose the Pad Control MIDI Preset.
You can go to the Global > MIDI > MIDI IN Channel page to see how the MIDI
channel for the special Chord 1 channel is programmed.
MIDI IN Channel Sound/Track
Ch16 Chord 1
This setup will let the external controller send data on the Chord 1 channel.
These notes will be used as chords sent to the Arranger.
Play
5 When you want to play a chord, play the corresponding pad on the external
controller.
Page 28

26|
Connecting an external controller with an X/Y pad to control sound parameters
By connecting an external controller with an X/Y pad (for example, the KORG
nanoPAD2 or padKONTROL) you can control specific parameters of the
sound, like Brightness or Resonance, or both at the same time.
Configure the external controller
1 Program the external controller to send data on the MIDI channel corre-
sponding to the Sound you wish to control. For example, use MIDI channel 1,
usually the default.
With the nanoPAD2 and devices of the same series, you can choose a transmission MIDI channel by using the KORG KONTROL Editor software, that you
can freely download from our web site.
In the editor, press the Global button to open the Global dialog, and go to
the X-Y Pad page.
In the following image, you can see how the nanoPAD2’s Global channel has
been set to MIDI channel 1.
Page 29

Connecting a Pa-Series instrument to an external controller |27
2 Make the external controller control Brightness on the X-axis, Resonance on
the Y-axis.
Still in the X-Y Pad page, program the X/Y pad. Assign to the X-axis CC#74
(corresponding to the Brightness parameter), to the Y-axis CC#71 (corresponding to the Resonance parameter).
3 After having edited the parameters, press the Write button to save the set-
ting in the controller’s memory. Then press the Close button to close the
dialog.
Connect the devices
4 Connect the USB or MIDI OUT port of the external controller to the USB
HOST or MIDI IN port of the Pa-Series instrument. Be sure the external con-
troller’s USB port is enabled.
MIDI IN MIDI OUT
USB HOST USB
(TO HOST/DEVICE)
Page 30

28|
Configure the Pa-Series instrument
5 In the Pa-Series instrument, go to the Global > MIDI > General Controls page,
and use the Midi Preset pop-up menu to choose the X/Y Control MIDI Preset.
You can go to the Global > MIDI > MIDI IN Channel page to see how MIDI
channels for the Keyboard Sounds are programmed.
MIDI IN Channel Keyboard Sound
Ch01 Upper 1
6 Choose a Synth Sound for Upper 1. This category usually features a filter
with controllable Brightness (a.k.a. Filter Cutoff) and Resonance.
internal keyboard
internal keyboard
Play
7 Play on the keyboard, and move your finger along the X- and Y-axis of the
X/Y pad. You will hear the sound’s timbre change while you move your finger.
Page 31

Connecting a Pa-Series instrument to an external controller |29
Connecting a studio controller to send more controls at the same time
You can connect an external controller incorporating several different controls, conceived for a complex studio configuration. For example, the KORG
nanoKEY Studio includes a keyboard, a set of knobs, an X/Y pad, a set of
pads and a series of programmable switches. Each of them can send data to
a Pa-Series instrument.
Configure the external controller
1 Program the external controller to match the parameters you want to con-
trol in the Pa-Series instrument.
With the nanoKEY Studio and devices of the same type, program the various
controls by using the KORG KONTROL Editor software, that you can freely
download from our web site.
Make each control of the external controller send data on separate MIDI channels, according to the programming suggested below. For example, make
the knobs adjust the volume of the Upper and Accompaniment Sounds, the
keyboard play the Upper 2 Sound, the XY pad change the filter’s Brightness
and Resonance of the Upper 1 Sound, and the pads play percussive sounds
or effects on the Upper 3.
Devices like the KORG nanoKEY Studio allow for saving programming to different Scenes, to be recalled when needed. So, you can make different programming, and save them in different scenes.
Page 32

30|
In the following image, you can see how nanoKEY Studio’s knobs are programmed in the KORG KONTROL Editor for the first Scene, sending Volume
messages on MIDI channels 1-3.
Control Sound/Track MIDI Channel Parameter
SCENE 1
Knobs Upper 1 Ch01 Volume
Upper 2 Ch02
Upper 3 Ch03
Lower Ch04
Pad 1 Ch05
Pad 2 Ch06
Pad 3 Ch07
Pad 4 Ch08
Page 33

Connecting a Pa-Series instrument to an external controller |31
Then, here is how the knobs are programmed for the second Scene, sending
Volume messages on MIDI channels 9-16.
Control Sound/Track MIDI Channel Parameter
SCENE 2
Knobs Drum Ch09 Volume
Percussion Ch10
Bass Ch11
Acc 1 Ch12
Acc 2 Ch13
Acc 3 Ch14
Acc 4 Ch15
Acc 5 Ch16
Page 34

32|
And here is how the keyboard, XY pad and Pads are programmed for both
Scenes.
Control Sound/Track MIDI Channel Parameter
SCENE 1+2
Keyboard Upper 2 Ch02 Notes (Melody/Harmony)
XY pad (X) Upper 1 Ch01 CC#74 (Brightness)
XY pad (Y) Upper 1 Ch01 CC#71 (Resonance)
Pads Upper 3 Ch03 Notes (Percussive/SFX)
After having programmed these two Scenes, save them in the nanoKEY
Studio’s memory.
Page 35

Connecting a Pa-Series instrument to an external controller |33
Connect the devices
2 Connect the USB or MIDI OUT port of the external control to the USB HOST
or MIDI IN port of the Pa-Series instrument. Be sure the external controller’s
USB port is enabled.
MIDI IN MIDI OUT
USB HOST USB
(TO HOST/DEVICE)
Configure the Pa-Series instrument
3 In the Pa-Series instrument, go to the Global > MIDI > General Controls page,
and use the Midi Preset pop-up menu to choose the Studio Ctrl MIDI Preset.
With this preset, Keyboard Sounds are assigned to MIDI channels 1-3 (Scene
1), and the Accompaniment Sounds to MIDI channels 9-16 (Scene 2). You can
go to the Global > MIDI > MIDI IN Channel page to see how MIDI channels are
programmed.
Page 36

34|
SCENE 1 (Keyboard/Pads) SCENE 2 (Accompaniment)
MIDI IN Channel Sound/Track MIDI IN Channel Sound/Track
Ch01 Upper 1 Ch09 Drum
Ch02 Upper 2 Ch10 Percussion
Ch03 Upper 3 Ch11 Bass
Ch04 — Ch12 Acc 1
Ch05 — Ch13 Acc 2
Ch06 — Ch14 Acc 3
Ch07 — Ch15 Acc 4
Ch08 — Ch16 Acc 5
Play
4 When you want to send messages to the Pa-Series instrument, select the
Scene of the external controller corresponding to the group of Sounds to be
controlled, and use the controls on the external controler.
If you like, you can create your own set of sounds to be controlled, by mixing
and matching the different MIDI channels. This is especially useful when using a controller with no memorizable Scenes.
Page 37

Connecting a Pa-Series instrument to an external controller |35
Connecting a breath controller
You can use a breath controller to control some parameters of the sound, in
particular the volume/expression. Some controllers also allow for controlling
multiple parameters, for example volume/expression with the wind pressure,
and vibrato with the lip pressure.
Configure the breath controller
1 First of all, set the breath controller to transmit on MIDI channel 1 (usually,
the default setting).
When configuring the breath controller, you will also have to choose which
Control Change message(s) to send. By default, breath controllers send
CC#02 (Breath Controller) messages. In the Pa-Series instruments, not all
Sounds can react to this CC message, so changing it to CC#11 (Expression)
is a safer choice.
When lip pressure control is also available, it can be set to send CC#01
(Modulation) messages. Some controllers also allow for messages generated
by tilting your head. Choose the sound parameter better fitting your style of
playing.
When programming a breath controller and the sounds to use with it, also
consider the different use of wind pressure on the different categories of
sounds. Controlling expression and filter with wind pressure is great on wind
instruments and synths, while using it for vibrato can work very well on
strings.
Connect the devices
2 After having configured it, connect the breath controller to the Pa-Series in-
strument. Modern-day controllers are equipped with an USB port, but some
older models could still feature the MIDI port. Connect the USB or MIDI OUT
port of the breath controller to the USB HOST or MIDI IN port of the PaSeries instrument.
MIDI IN MIDI OUT
USB HOST
USB
(TO HOST/DEVICE)
Page 38

36|
Configure the Pa-Series instrument
3 In the Pa-Series instrument, go to the Global > MIDI > General Controls page,
and use the Midi Preset pop-up menu to choose the Breath Ctrl MIDI Preset.
You can go to the Global > MIDI > MIDI IN Channel page to see how MIDI
channels for the Keyboard Sounds are programmed.
MIDI IN Channel Keyboard Sound
Ch01 Upper 1
This setup will let data from MIDI channel 1 go to the Upper 1 Sound. You will
play notes with the internal keyboard, while controlling the sound expression
with your breath. Other controls, like pitch bend, modulation and aftertouch,
will still go to the Upper 1 Sound.
Play
4 Use the breath controller to control expression of the sound(s) you are play-
ing on the keyboard.
Page 39

Page 40

Address
Pa-Series | External Controllers
KORG ITALY SpA
Via Cagiata, 85
60027 Osimo (AN)
Italy
Web
www.korg.com
© KORG Italy 2019. All rights reserved
 Loading...