


DI2510F
Table of contents
 Loading...
Advanced Information
Di2510f/Di3510f
www.minoltaeurope.com The essentials of imaging


Table of Contents
1 Introduction
1.1 We Want You to Be a Satisfied Customer ................................. 1-1
1.2 Explanation of Manual Conventions .......................................... 1-2
1.3 Explanation of Basic Concepts and Symbols ........................... 1-3
Paper Feeding.................................................................................1-3
“Width” and “Length” .....................................................................1-3
Lengthwise......................................................................................1-4
Crosswise .......................................................................................1-4
Portrait and Landscape ..................................................................1-4
Display Icons...................................................................................1-5
Paper Supply Icons.........................................................................1-5
1.4 Energy Star® ................................................................................ 1-6
What is an ENERGY STAR® Product?...........................................1-6
1.5 Components and Their Functions.............................................. 1-7
1.6 Part Names and Their Functions.............................................. 1-11
Main Unit.......................................................................................1-11
Options .........................................................................................1-16
Fax Option Names and Functions ................................................1-19
2 Safety Information
2.1 Warning and Precaution Symbols .............................................. 2-1
2.2 Meaning of Symbols .................................................................... 2-1
WARNING .......................................................................................2-1
CAUTION ........................................................................................2-4
2.3 Precautions for Routine Use....................................................... 2-6
2.4 Miscellaneous .............................................................................. 2-7
Gebührenimpuls (for German and Swiss Users).............................2-8
CE Marking (Declaration of Conformity) .........................................2-8
2.5 Laser Safety.................................................................................. 2-9
Internal Laser Radiation ..................................................................2-9
CDRH Regulation..........................................................................2-10
For European Users......................................................................2-11
For Denmark Users.......................................................................2-11
For Finland, Sweden Users...........................................................2-11
For Norway Users .........................................................................2-12
Laser Safety Label ........................................................................2-13
Di2510f/Di3510f

Ozone Release ............................................................................. 2-13
Acoustic Noise .............................................................................2-14
Notice for Ni-MH Batteries...........................................................2-14
2.6 Installation Precautions .............................................................2-15
Installation Site ............................................................................. 2-15
Power Source...............................................................................2-15
Space Requirements....................................................................2-16
2.7 Operation Precautions...............................................................2-17
Operating environment.................................................................2-17
Proper use....................................................................................2-17
Transporting the machine ............................................................2-18
Care of machine supplies............................................................. 2-19
Storage of copies .........................................................................2-19
2.8 Legal Restrictions on Copying ..................................................2-20
3 Available Features
3.1 Useful Operations.........................................................................3-1
Copying a Book or Magazine......................................................... 3-1
Copying to Form a Booklet ............................................................ 3-4
Automatically Stapling Pages While Copying ................................3-6
Printing Multiple Copies of Tickets.................................................3-8
Copying While Erasing an Area Around the Document ...............3-12
Reducing Paper Usage ................................................................3-15
Reducing Electricity Usage ..........................................................3-17
4 Before Making Copies
4.1 Names of Control Panel Parts and Their Functions.................. 4-1
4.2 Checking the Settings.................................................................. 4-3
To check the settings .....................................................................4-3
To change the settings...................................................................4-3
4.3 User Accessibility Operations .....................................................4-4
To change the screen display setting (“Screen Mode” function) ... 4-4
To change the key settings (“Key Speed Settings” function).........4-5
To change the auto panel reset time
(“Confirming Screen” function)....................................................... 4-6
To change the display time for the “The job is accepted.” screen
(“Notification Screen” function)......................................................4-7
To change the volume of touch panel beeps and alarms
(“Sound Setting” function).............................................................. 4-7
4.4 Enlarging the Touch Panel Screens............................................ 4-8
Di2510f/Di3510f

4.5 Turning the Machine On and Off ................................................ 4-9
To turn on the machine...................................................................4-9
When the machine is turned on ....................................................4-10
To turn off the machine.................................................................4-10
When the main switch is turned off ..............................................4-11
Auto Panel Reset ..........................................................................4-11
Energy Save Mode........................................................................4-12
Sleep Mode...................................................................................4-12
4.6 Adjusting the Angle of the Control Panel ................................ 4-13
4.7 Using the Touch Panel .............................................................. 4-14
Description of the Touch Panel.....................................................4-14
Default Settings.............................................................................4-14
Auto-mode Screen........................................................................4-15
Copy Screen .................................................................................4-15
Fax Screen....................................................................................4-16
Operating the Touch Panel...........................................................4-17
Description of the Screens ...........................................................4-18
Job List Screen.............................................................................4-19
To check the status of a job .........................................................4-20
To check the printing order...........................................................4-21
To check/delete listed items from the Print screen ......................4-22
Memory Recall ..............................................................................4-23
To use the memory recall feature .................................................4-24
To verify transmission activity.......................................................4-25
To confirm reception results.........................................................4-26
To verify the documents saved on the bulletin board ..................4-27
To verify the documents stored in the confidential box ...............4-28
To check the general documents stored......................................4-29
5 Copy Operations
5.1 Copying from the Auto-mode Screen ........................................ 5-1
5.2 Making Basic Copies................................................................... 5-2
5.3 Stopping Copying ........................................................................ 5-4
To stop/restart/delete a copy job ...................................................5-4
5.4 Interrupting a Copy Job............................................................... 5-5
To interrupt copying........................................................................5-5
5.5 Making Copies Using Accounts ................................................. 5-6
Using the “Copy Track Mode” Parameter ......................................5-6
To make copies when accounts are specified ...............................5-6
5.6 “Cover Mode” Function............................................................... 5-8
Adding Cover Pages.......................................................................5-8
To make settings for the “Cover Mode” function .........................5-10
Di2510f/Di3510f

5.7 “Page Insertion” Function .........................................................5-11
Inserting Pages (Interleaves) Between Copies.............................5-11
To make settings for the “Page Insertion” function ..................... 5-12
5.8 “OHP Interleaving” Function ..................................................... 5-13
Inserting Pages Between Copies of Transparencies ...................5-13
To make settings for the “OHP Interleaving” function ................. 5-14
5.9 “File Margin” Function ............................................................... 5-15
Making Copies With Binding Margins ..........................................5-15
To make settings for the “File Margin” function...........................5-16
5.10 “Edge/Frame Erase” Function ..................................................5-17
Erasing Sections of Copies ..........................................................5-17
To make settings for the “Edge/Frame Erase” function............... 5-18
5.11 “Image Repeat” Function ..........................................................5-19
Printing Multiple Copies of the Same Document Page
on One Sheet................................................................................5-19
To make settings for the “Image Repeat” function...................... 5-19
5.12 “Distribution #” Function ...........................................................5-21
Printing Distribution Numbers on Sets of Copies ........................ 5-21
To make settings for the “Distribution #” function .......................5-21
5.13 “Watermark” Function ...............................................................5-23
Printing Copies with a Watermark................................................5-23
To make settings for the “Watermark” function........................... 5-23
5.14 “Image Stamping” Function ...................................................... 5-25
To make copies using the “Image Stamping” function................ 5-25
5.15 “Black-White Reverse” Function ..............................................5-27
Reversing White- and Black-Colored Areas of Copies ................5-27
To set the “Black-White Reverse” function..................................5-27
5.16 “Separate Scan” Function ......................................................... 5-28
Scanning a Document in Separate Batches ................................5-28
To make copies using the “Separate Scan” function...................5-28
6 Fax Operations
6.1 Before Using Fax Operations ......................................................6-1
The Basic Screen ...........................................................................6-1
The Auto-mode Screen ..................................................................6-1
Sending a fax..................................................................................6-1
Copying ..........................................................................................6-2
Displaying the fax screen ...............................................................6-2
Fax Screen .....................................................................................6-2
Displaying the copy screen............................................................6-6
Di2510f/Di3510f

Copy Screen ...................................................................................6-6
Registration Necessary at Startup..................................................6-7
Convenient Functions with Registration .........................................6-7
Regarding Onscreen Notations ......................................................6-8
Sending a fax (Auto-mode Screen)...............................................6-10
6.2 Performing Dial Transmission .................................................. 6-11
When Setting in the paper feed tray .............................................6-12
When Setting on the Glass ...........................................................6-13
6.3 Quality Adjustment .................................................................... 6-15
When Transmitting After Adjusting the Quality .............................6-15
6.4 Density Adjustment.................................................................... 6-16
Transmitting to Match the Density and Color of the Original .......6-16
6.5 Reducing the Original................................................................ 6-17
6.6 Automatic Fax Reception.......................................................... 6-19
Manual Fax Reception..................................................................6-20
6.7 Using the Telephone and Receiving Calls ............................... 6-21
Talking on the Phone ....................................................................6-21
Placing a Telephone Call with the Telephone Receiver Hung Up 6-22
Receiving Telephone Calls............................................................6-22
Sending a Fax After a Phone Call.................................................6-23
6.8 Verification of Results ............................................................... 6-24
What is the Job List? ....................................................................6-24
Verifying the Job Status................................................................6-25
Verifying the Print Order................................................................6-26
Verifying the Print Status ..............................................................6-27
Verifying Transmission Activity .....................................................6-28
Verifying Reception Activity ..........................................................6-29
6.9 Transmitting Various Faxes ...................................................... 6-30
Transmitting by a One-touch Key.................................................6-30
Transmitting by a One-touch Number..........................................6-31
Transmission after Searching by destination................................6-32
Transmitting by a Fax Program.....................................................6-33
Transmitting to Multiple Destinations ...........................................6-34
Transmitting with Chain Dial .........................................................6-35
Designating the Scan Range for the Original................................6-36
Transmission with Name and Number on the Original (TSI).........6-38
Inserting the Destination...............................................................6-40
Outputting the Activity Report ......................................................6-41
Transmitting 2in1 ..........................................................................6-42
Transmitting a Double-sided Original ...........................................6-43
Transmitting A4 Paper Set to Landscape.....................................6-45
Transmitting with Prioritization .....................................................6-47
Di2510f/Di3510f

Transmitting at a Designated Time ..............................................6-48
Placing a Stamp on the Transmitted Document ..........................6-50
Transmitting while Scanning the Original
(Real-time Transmission)..............................................................6-52
Performing Password Transmission.............................................6-53
Remote Copying...........................................................................6-54
Polling Transmission ....................................................................6-56
6.10 Receiving Various Faxes............................................................ 6-58
Password Reception ....................................................................6-58
Setting Manual Reception............................................................6-59
Performing Manual Reception......................................................6-61
Performing Polling Reception.......................................................6-62
6.11 Using the Document Functions................................................. 6-64
Verifying the Documents Saved on the Bulletin Board ................ 6-65
Verifying the Documents stored in the Confidential Box .............6-66
Checking the General Documents Stored....................................6-67
6.12 F Codes .......................................................................................6-68
What is an F Code?......................................................................6-68
What is F Code Confidential Communication? ............................6-68
F Code Confidential Transmission ...............................................6-69
The Bulletin Board........................................................................6-70
Remote Copying...........................................................................6-70
6.13 Registration of Documents on Bulletin Boards....................... 6-71
Saving Documents to Bulletin Boards..........................................6-72
Saving Documents to Bulletin Boards from Other Fax Machines 6-73
6.14 Retrieving Bulletin Board Documents ......................................6-74
Transacting Bulletin Board Documents from Another Fax........... 6-74
7 Utility Mode Operations
7.1 Utility Mode Screens....................................................................7-1
Utility screen...................................................................................7-1
User Set-up Screen........................................................................7-1
Meter Count screen........................................................................7-2
Copy Job Program Recall screen ..................................................7-2
User Management screen ..............................................................7-2
Administrator Management screens ..............................................7-3
7.2 User’s Choice Functions.............................................................. 7-4
7.3 Changing Default Settings...........................................................7-6
To set the “Memory Recall” function .............................................7-6
To set the “Mixed Original Detection” function..............................7-7
To set the “Language Selected for LCD” function.........................7-8
To set the “Original > Copy Default” function................................7-9
Di2510f/Di3510f

To set the “Auto Paper/Auto Size” function .................................7-10
To set the “Drawer Priority” function ............................................7-11
To set the “Special Paper” function..............................................7-12
To set the “Multiple-in-1 and Booklet Copy Zoom” function .......7-14
To set the “Energy Save Mode” function......................................7-15
To set the “Sleep Mode Setting” function ....................................7-16
To set the “LCD Back-light Off” function......................................7-17
To set the “Auto Panel Reset” function ........................................7-18
To set the “Plug-In Counter, ID key Reset” function ....................7-19
To set the “4in1 Copy Order” function .........................................7-20
To set the “Density Priority” function............................................7-21
To set the “Default Copy Output Levels” function........................7-22
To set the “Printing Density” function...........................................7-23
To set the “Output Priority” function.............................................7-24
To set the “Intelligent Sorting” function........................................7-25
To set the “Output Tray” function (optional).................................7-26
To set the “Small” Originals” function ..........................................7-28
To set the “Scanner Dry” function ................................................7-29
To set the “Crease/Center Staple” function .................................7-30
Selecting the Priority Screen ........................................................7-31
To set the “Density (ADF only)” function.......................................7-33
7.4 Registering an Image Stamp .................................................... 7-34
To register an image stamp ..........................................................7-34
7.5 Viewing Counters (“Meter Count” Function)........................... 7-36
To view the counters.....................................................................7-36
7.6 Using Copy Programs ............................................................... 7-37
To store a copy program ..............................................................7-37
To delete a copy program.............................................................7-38
To use a copy program.................................................................7-39
7.7 User Management Functions.................................................... 7-40
To adjust beep volumes (“Confirmation Beep”,
“Alarm Volume” and “Line Monitor Volume” functions)................7-40
To clean the touch panel (“Panel Cleaning” function) ..................7-41
To dehumidify the duplexing document feeder
(“Dehumidify” function).................................................................7-42
To replenish the toner (“Toner Replenisher” function)..................7-42
8 Copy Paper
8.1 Paper Specifications.................................................................... 8-1
Paper Types....................................................................................8-1
Paper Sizes.....................................................................................8-2
Paper Capacity ...............................................................................8-3
8.2 Unsuitable Paper.......................................................................... 8-4
Di2510f/Di3510f

8.3 Print Area ...................................................................................... 8-5
8.4 Paper Storage............................................................................... 8-5
8.5 Automatically Selecting the Paper Source ................................ 8-6
Operating conditions......................................................................8-6
Order for Selecting Another Paper Drawer ....................................8-6
8.6 Loading Paper...............................................................................8-7
Loading Paper Into the 1st/2nd/3rd/4th Paper Drawer.................. 8-8
Loading Paper Into the Large-Capacity Cabinet............................8-9
Loading Paper Into the Multiple Bypass Tray ..............................8-10
To load plain paper.......................................................................8-10
To load postcards ........................................................................8-11
To load envelopes ........................................................................8-12
To load overhead projector transparencies .................................8-13
To load label sheets .....................................................................8-13
To set a non-standard (custom) paper size..................................8-14
To store a non-standard (custom) paper size ..............................8-16
To select a stored non-standard (custom) paper size.................. 8-18
8.7 Selecting the Paper Setting....................................................... 8-19
To select paper loaded into a paper drawer ................................8-19
To select paper loaded into the multiple bypass tray ..................8-19
9 Original Documents
9.1 Feeding the Document................................................................. 9-1
Using the Duplexing Document Feeder .........................................9-1
Document Types ............................................................................9-1
Documents of Uniform Sizes..........................................................9-1
“Mixed Orig Detection” Function ................................................... 9-2
Mixed Width Document Sizes........................................................9-2
Sizes of Documents That Can Be Faxed ....................................... 9-3
Precautions Concerning the Documents .......................................9-4
9.2 Feeding the Document Through the Duplexing
Document Feeder.........................................................................9-5
Loading the Document...................................................................9-5
To load a document of mixed sizes
(“Mixed Orig Detection” function)...................................................9-7
9.3 Positioning Documents on the Original Glass........................... 9-9
To position sheet documents.......................................................9-10
To position transparent or translucent documents......................9-11
To position books or magazines ..................................................9-12
Di2510f/Di3510f

9.4 Loading Documents for Specific Applications........................ 9-13
Description of the Table................................................................9-13
Single-Sided Documents..............................................................9-14
Left-Bound Double-Sided Documents .........................................9-21
Top-Bound Double-Sided Documents .........................................9-28
9.5 Large Documents....................................................................... 9-35
Precautions for A3 L/B4 L Copies ................................................9-35
10 Specifying Copy Settings
10.1 Specifying Finishing Settings.................................................... 10-1
Available Finishing Settings ..........................................................10-1
Notes on Using the “Sort” and “Group” Settings.........................10-4
Shift Sorting ..................................................................................10-5
Crisscross Sorting.........................................................................10-5
Shift Grouping...............................................................................10-5
Crisscross Grouping .....................................................................10-5
To make copies using a stapling setting ......................................10-6
To make copies using the “Hole Punch” setting ..........................10-8
Creasing and Folding....................................................................10-9
Notes on the Staple Position ......................................................10-10
Notes on the Number of Possible Stapled Sets .........................10-12
Notes on the Hole Punch Position..............................................10-13
10.2 Specifying a Zoom Setting...................................................... 10-14
To select a Zoom setting ............................................................10-15
To enter a custom zoom ratio.....................................................10-16
To store CustomZoom and Minimal zoom ratios .......................10-17
To recall a stored custom zoom ratio .........................................10-18
To specify different vertical and horizontal scaling
proportions (“X/Y Zoom” setting)................................................10-19
10.3 Selecting the Orig. > Copy Settings ....................................... 10-20
Orig. > Copy Settings .................................................................10-20
To specify Orig. > Copy settings ................................................10-23
Copying a Bound Document ......................................................10-25
Copying a Book ..........................................................................10-27
Copying Book Pages onto Separate Double-Sided Pages........10-29
Quickly Selecting Default Settings..............................................10-31
10.4 Specifying a Copy Density ...................................................... 10-32
Selecting a Density Setting.........................................................10-32
Selecting the “Text” Setting........................................................10-32
Selecting the “Photo” Setting.....................................................10-33
Selecting the “Text/Photo” Setting.............................................10-34
Di2510f/Di3510f

11 Configuring the Utilities and Fax
11.1 Registering Index Lists ..............................................................11-1
How to Register Indexes ..............................................................11-1
Changing Index Names................................................................11-3
Deleting Index Names ..................................................................11-4
11.2 One-Touch Dial Number Registration ......................................11-5
How to Register One-Touch Keys................................................11-5
Registering Overseas Recipients ................................................11-8
Registering F-CODEs ...................................................................11-9
Setting the Communication Speed ...........................................11-10
Changing and Deleting One-Touch Keys...................................11-10
How to Copy One-Touch Keys ..................................................11-11
11.3 FAX Program Registration....................................................... 11-12
Registering Transmission Programs ..........................................11-13
How to Register FAX Programs .................................................11-13
How to Register Post Programs.................................................11-16
How to Register Polling Reception Programs............................11-18
How to Change or Delete a FAX Program ................................. 11-20
11.4 Setting up Bulletin Boards.......................................................11-21
How to Set up Bulletin Boards ..................................................11-21
11.5 Registering Confidential Boxes...............................................11-24
How to Register Confidential Boxes ..........................................11-24
11.6 Character Input and Registration ...........................................11-27
About Character Input................................................................11-27
About the Character Input Screen ............................................ 11-27
Inputting Alphanumerics ............................................................11-28
Inputting Symbols ......................................................................11-29
11.7 How to Use Reports and Lists ................................................11-30
11.8 Confirming Transmission Details............................................ 11-31
How to Output Transmission Activity Reports ..........................11-31
11.9 Confirming Receiving Details..................................................11-33
How to Output Receiving Activity Reports ................................ 11-33
11.10 Confirming the Information Registered to
One-Touch Dial Keys ..............................................................11-35
How to Output One-Touch Lists ................................................11-35
11.11 Confirming the Contents Registered to FAX Programs .......11-36
How to Output FAX Program Lists.............................................11-36
11.12 Confirming Text Registered to Bulletin Boards.....................11-38
How to Output the Bulletin Board List .......................................11-38
Di2510f/Di3510f

11.13 Confirming the Contents Registered to Confidential Boxes 11-39
How to Output the Confidential List ...........................................11-39
11.14 Checking Account Information............................................... 11-40
How To Output Account Lists.....................................................11-40
11.15 Confirming the Settings of Various Functions ..................... 11-42
How to Output the Setting List ...................................................11-42
11.16 Confirming the Conditions for Forwarding ........................... 11-44
How to Output the Forwarding List ............................................11-44
12 Administrator Management Operations
12.1 Administrator Management Screens ....................................... 12-1
To display the Administrator Management screens .....................12-1
12.2 Specifying the Date and Time................................................... 12-3
To set the date and time...............................................................12-3
To set the time zone .....................................................................12-5
12.3 Specifying Administrator Settings............................................ 12-6
To set the administrator access code
(“Administrator Code Input” parameter) .......................................12-6
To specify a limit on copies that can be printed
(“Max. Copy Sets” parameter)......................................................12-7
To disable the Sleep function (“Disable Sleep Mode” parameter)12-8
12.4 Account Management Operations ........................................... 12-9
To change the account management mode
(“Copy Track Mode” parameter)...................................................12-9
To set the Account Management Mode .....................................12-10
To print account information (“Copy Track Data” parameter) ....12-12
To clear all counters....................................................................12-13
To change account information..................................................12-14
12.5 Setting Account Registration.................................................. 12-15
Account Registration ..................................................................12-15
To register accounts ...................................................................12-15
To check the number of prints made by each account..............12-18
12.6 Setting the Language for the TSI Name and Reports........... 12-19
How to Set the Communication Language.................................12-19
12.7 Registering Telephone Numbers............................................ 12-20
How to Set up the FAX Telephone Number Information ............12-21
12.8 Registering TSI Names ........................................................... 12-24
How to Register and Change TSI Names...................................12-24
Di2510f/Di3510f

12.9 Registering the FAX ID Displayed at the Destination ...........12-26
How to Register and Change the FAX ID...................................12-26
12.10 Transmission Settings .............................................................12-28
Specifying Default Values for Quality and
Mode when Transmitting ........................................................... 12-29
Specifying the Default Transmission Settings............................12-31
12.11 Setting Memory Lock for Received Documents ................... 12-35
Setting Memory Lock and Batch Printing for
Received Documents .................................................................12-35
Manually Printing Received Faxes with Memory Lock............... 12-38
12.12 Setting the Receiving Mode and No. of
Receiving Call Rings ................................................................12-39
How to Set the Receiving Functions .......................................... 12-39
12.13 Password Registration for Password Communication ........12-41
How to Register the Communication Password ........................ 12-41
12.14 Setting Document Management for RX ................................12-43
Document Management with F-CODE....................................... 12-44
Document Management by Port ...............................................12-48
Document Management for Public Documents ........................ 12-50
12.15 Report Output ...........................................................................12-52
How to Output Reports ............................................................. 12-52
12.16 Settings for Report Output ......................................................12-53
How to Set up the TX Report .....................................................12-53
How to Set up Activity Reports..................................................12-55
12.17 Configuring Functions (Soft Switches)................................... 12-56
How to Set Soft Switches .........................................................12-58
Specifications for Stamps and Password Look-up (Mode 000) 12-60
Specifications for Destination Insertion
on the Original (Mode 001) ........................................................12-61
Specifying Memory Clear Report and
Broadcast TX Report Output (Mode 002) ..................................12-62
Specifications for Transmission Receiving (Mode 003) ............12-63
Specifying the Save Time for Failed Transmissions (Mode 004)12-64
Specifications for Receiving Long Originals (Mode 007) ........... 12-65
Specifications for Paper Selection
when RX Printing (Mode 008) ....................................................12-66
Specifications for Set-up Confirmation Screen
when Broadcasting (Mode 014) ...............................................12-67
Specifying Settings Concerning Whether or Not
There Is a Connected Telephone or a Received Date
Report and Their Formats (Mode 016) .......................................12-68
Specifications for the Failure Report Image (Mode 023) ...........12-69
Di2510f/Di3510f

Specifications for Incoming Fax Functions (Mode 030) .............12-70
Specifications for Cassette Selection
with Incoming Faxes (Mode 037)................................................12-71
Specifications for Set-up of Automatic Paper Feed
after Copying (Mode 429) ..........................................................12-72
13 Touch Panel Messages
13.1 When the Message “Ready to copy Please add toner.”
Appears....................................................................................... 13-1
13.2 When the Message “Please add toner.” Appears................... 13-2
To replace the toner bottle............................................................13-2
13.3 When the Message “Stapler empty.” Appears........................ 13-5
To replace the staple cartridge for finisher ...................................13-5
To replace the staple cartridge for the saddle kit .........................13-8
13.4 When a Paper Misfeed Occurs ............................................... 13-10
Locations of Paper Misfeeds ......................................................13-10
To clear a paper misfeed in the duplexing document feeder .....13-11
To clear a paper misfeed in the fusing section...........................13-13
To clear a paper misfeed in the duplex unit................................13-17
To clear a paper misfeed in the multiple bypass tray .................13-17
To clear a paper misfeed in the 1st or 2nd paper drawer...........13-18
To clear a paper misfeed in the 3rd or 4th paper drawer ...........13-19
To clear a paper misfeed in the large-capacity cabinet..............13-20
To clear a paper misfeed in the built in finisher ..........................13-21
To clear a paper misfeed in the mailbin kit.................................13-23
To clear a paper misfeed in the saddle kit..................................13-25
13.5 When the Message “Cannot Staple.” Appears ..................... 13-26
To clear jammed staples.............................................................13-26
13.6 When the Message “Hole Punch collection box in full.”
Appears..................................................................................... 13-30
To empty the punch box.............................................................13-30
14 Troubleshooting
14.1 Main Messages and Their Remedies ....................................... 14-1
14.2 When Incorrect Copies Are Printed ......................................... 14-3
14.3 When the Machine Is Not Operating Correctly ....................... 14-8
14.4 The Fax Does not Work Properly............................................ 14-10
Transmission is Poor...................................................................14-10
Reception is Poor .......................................................................14-12
Telephone Calls are Difficult to Make.........................................14-13
Di2510f/Di3510f

14.5 Replacing the Completion Stamp...........................................14-14
Replacing the Spare TX Marker STAMP 2 .................................14-14
15 Appendix
15.1 Specifications .............................................................................15-1
Di2510f/Di3510f............................................................................ 15-1
Duplexing Document Feeder AFR-19 ..........................................15-3
Duplex Unit AD-16........................................................................15-3
Switchback Unit SB-1..................................................................15-4
Paper Feed Cabinet PF-124.........................................................15-4
2way Paper Feed Cabinet PF-210 ...............................................15-4
Large Capacity Cabinet PF-122...................................................15-5
Built in Finisher FN-117................................................................15-6
Additional Bin Kit AK-1................................................................. 15-7
Mail Bin Kit MK-1 .........................................................................15-7
Punch Kit PK-6.............................................................................15-7
Saddle Kit SK-1............................................................................15-8
Job Separator JS-203..................................................................15-8
15.2 Care of the machine...................................................................15-9
Cleaning .......................................................................................15-9
Housing cover ..............................................................................15-9
Original glass................................................................................15-9
Operation panel............................................................................15-9
Original glass..............................................................................15-10
15.3 Function Combination Table ...................................................15-11
Function combination codes......................................................15-14
15.4 Paper Size and Zoom Ratio Tables ........................................15-16
Paper Sizes ................................................................................15-16
Zoom Ratios...............................................................................15-17
15.5 Consumables ............................................................................15-20
Paper ..........................................................................................15-20
Toner Bottle................................................................................15-20
Staple Cartridges........................................................................15-21
15.6 Should Power Failure Occurs..................................................15-22
Documents in Memory are Retained for about 12 Hours...........15-22
Programmed Settings are Retained...........................................15-22
Telephone Cannot be Used .......................................................15-22
15.7 List of Terms ............................................................................. 15-23
Explanation of Terms..................................................................15-23
15.8 Index .......................................................................................... 15-26
Di2510f/Di3510f

Di2510f/Di3510f

Di2510f/Di3510f

Introduction
1 Introduction
1.1 We Want You to Be a Satisfied Customer
Thank you for choosing a Minolta System.
To ensure the best performance and effective use of your machine, this
manual will provide information on the following topics:
Getting to Know Your Copier
G
Initial Steps . . .
G
Customizing Your Copy
G
Combining Functions
G
Utilities
G
Troubleshooting
G
Please read this manual carefully before using your copier and keep it
handy at all times. Store the manual in the holder on the rear side of the
copier.
For further information and assistance, please contact:
your Minolta Technical Representative;
G
our Web site, http://www.minolta.com
G
Please keep the serial number (located on the copier's rating plate) and
the copier's date of purchase handy to ensure fast, accurate assistance
in the event of difficulties.
. . . because we want you to be a satisfied customer.
Di2510f/Di3510f 1-1
1.2 Explanation of Manual Conventions
The marks and text formats used in this manual are described below.
WARNING
Failure to observe instructions highlighted in this manner may result
in fatal or critical injuries.
Observe all warnings in order to ensure safe use of this machine.
§
CAUTION
Failure to observe instructions highlighted in this manner may result
in serious injuries or property damage.
Observe all cautions in order to ensure safe use of this machine.
§
Note*
(*May also appear as “Important” or “Tip”)
Text highlighted in this manner contains useful information and tips to
ensure safe use of this machine.
Introduction
The number 1 as formatted here
indicates the first step of a
sequence of actions.
Subsequent numbers as formatted
here indicate subsequent steps of a
sequence of actions.
Text formatted in this style
"
provides additional assistance.
Text formatted in this style describes the action that will ensure
§
the desired results are achieved.
[Copy] key
The names of keys on the control panel are written as shown above.
1-2 Di2510f/Di3510f
$QLOOXVWUDWLRQLQVHUWHG
KHUHVKRZVZKDW
RSHUDWLRQVPXVW
EHSHUIRUPHG
Introduction
1.3 Explanation of Basic Concepts and Symbols
The use of words and symbols in this manual are explained below.
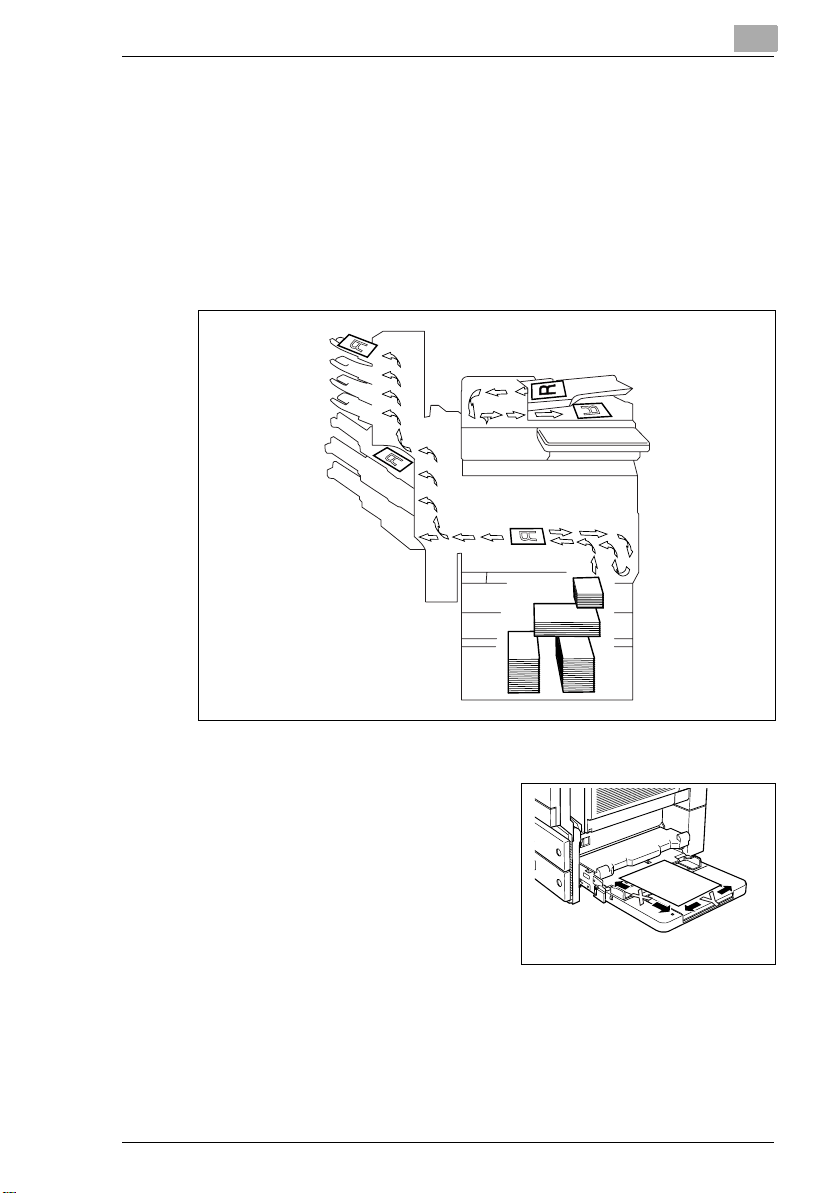
Paper Feeding
During printing, paper is supplied from the right side of the machine and
fed into the output tray on top or the output option at the left with the
printed surface of the page facing down. The paper feed direction is
shown by the arrows in the diagram below.
“Width” and “Length”
Whenever paper dimensions are
mentioned in this manual, the first
value always refers to the width of the
paper (shown as “Y” in the illustration)
and the second to the length (shown as
“X”).
Di2510f/Di3510f 1-3
Introduction
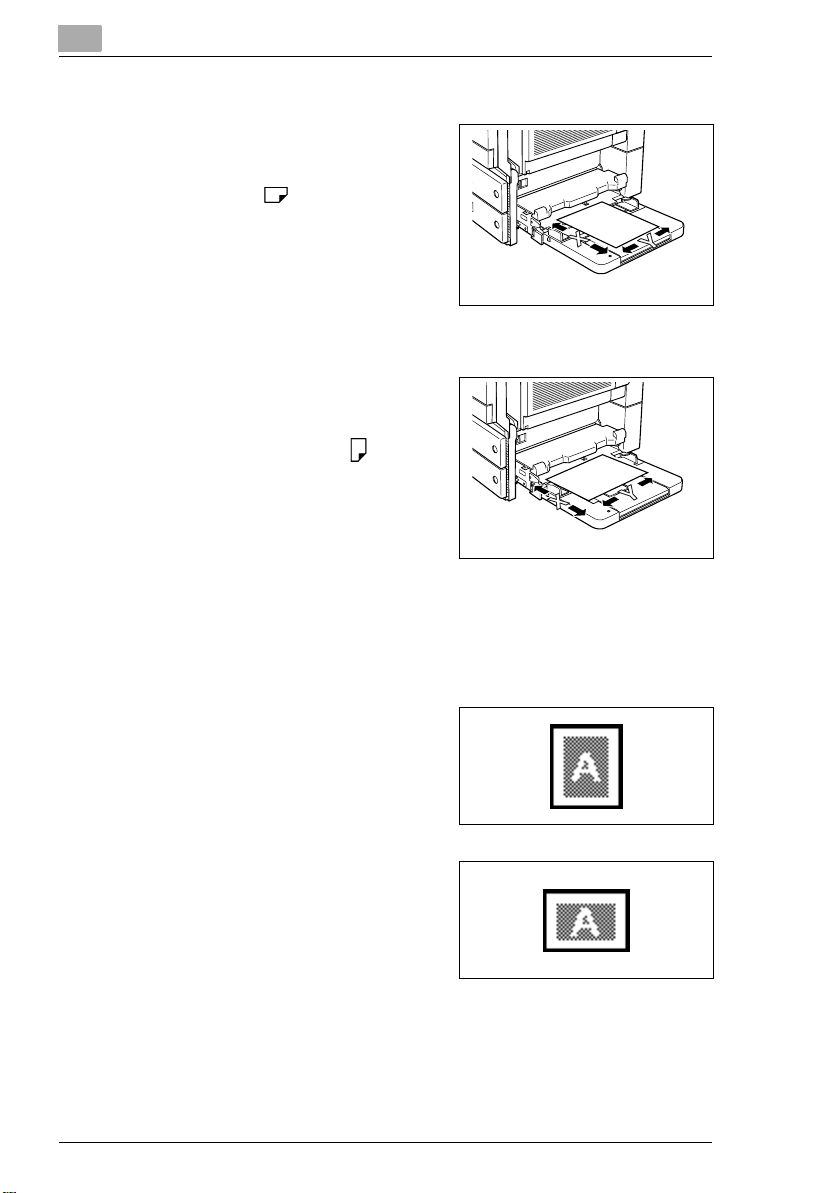
Lengthwise
If the width (Y) of the paper is shorter
than the length (X), the paper has a
vertical or portrait orientation, indicated
by either “L” or .
Crosswise
If the width (Y) of the paper is longer
than the length (X), the paper has a
horizontal or landscape orientation,
indicated by either “C” or .
Portrait and Landscape
Portrait
With the “portrait” orientation, the
paper is vertical, like a portrait.
Landscape
With the “landscape” orientation, the
paper is horizontal, like a landscape.
1-4 Di2510f/Di3510f
Introduction
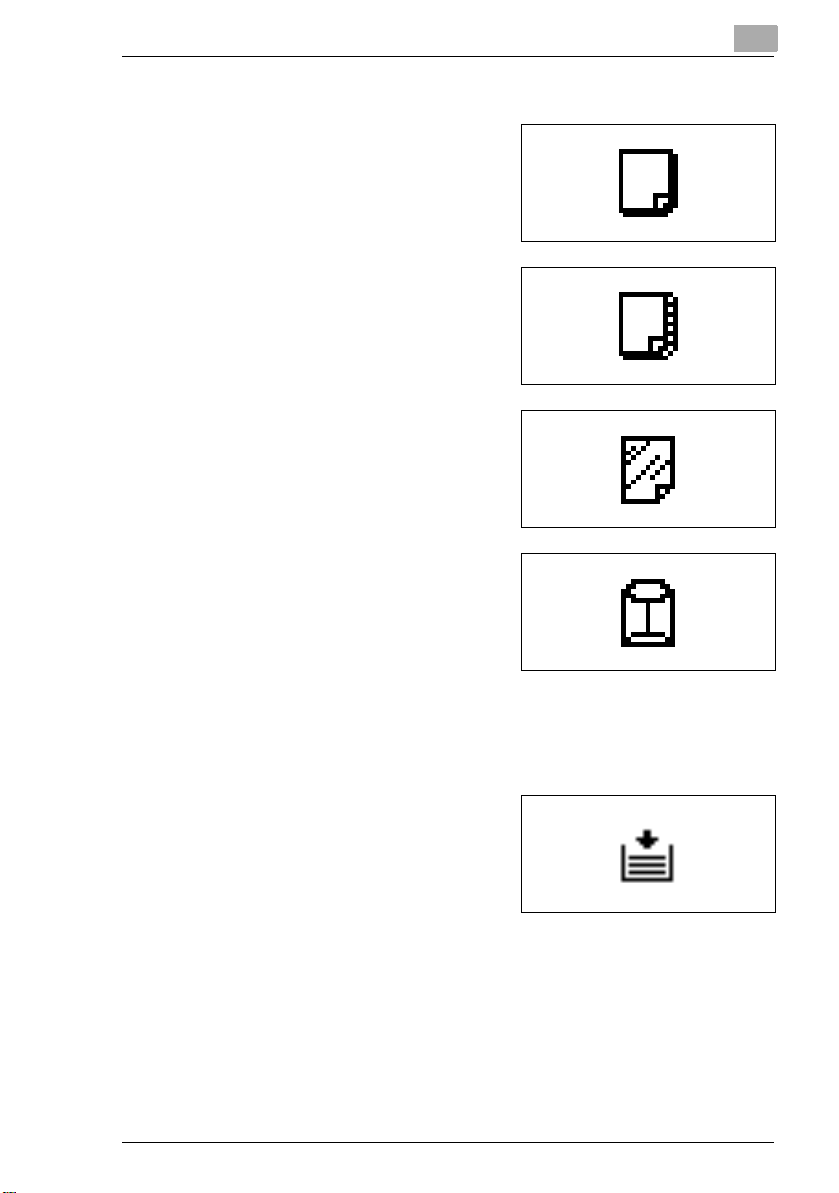
Display Icons
Plain paper
Thick paper
Overhead projector transparencies
Envelope
Paper Supply Icons
7KHLFRQVVKRZQEHORZPD\DSSHDULQGLFDWLQJWKDWQRPRUHSDSHUUH
PDLQV.
The paper is empty.
Di2510f/Di3510f 1-5

1.4 Energy Star®
Introduction
As an ENERGY STAR® Partner, we have determined that this machine
meets the ENERGY STAR
What is an ENERGY STAR® Product?
An ENERGY STAR
automatically switch to a “low-power mode” after a period of inactivity.
An ENERGY STAR
money on utility bills and helps protect the environment.
®
Guidelines for energy efficiency.
®
product has a special feature that allows it to
®
product uses energy more efficiently, saves you
1-6 Di2510f/Di3510f
Introduction
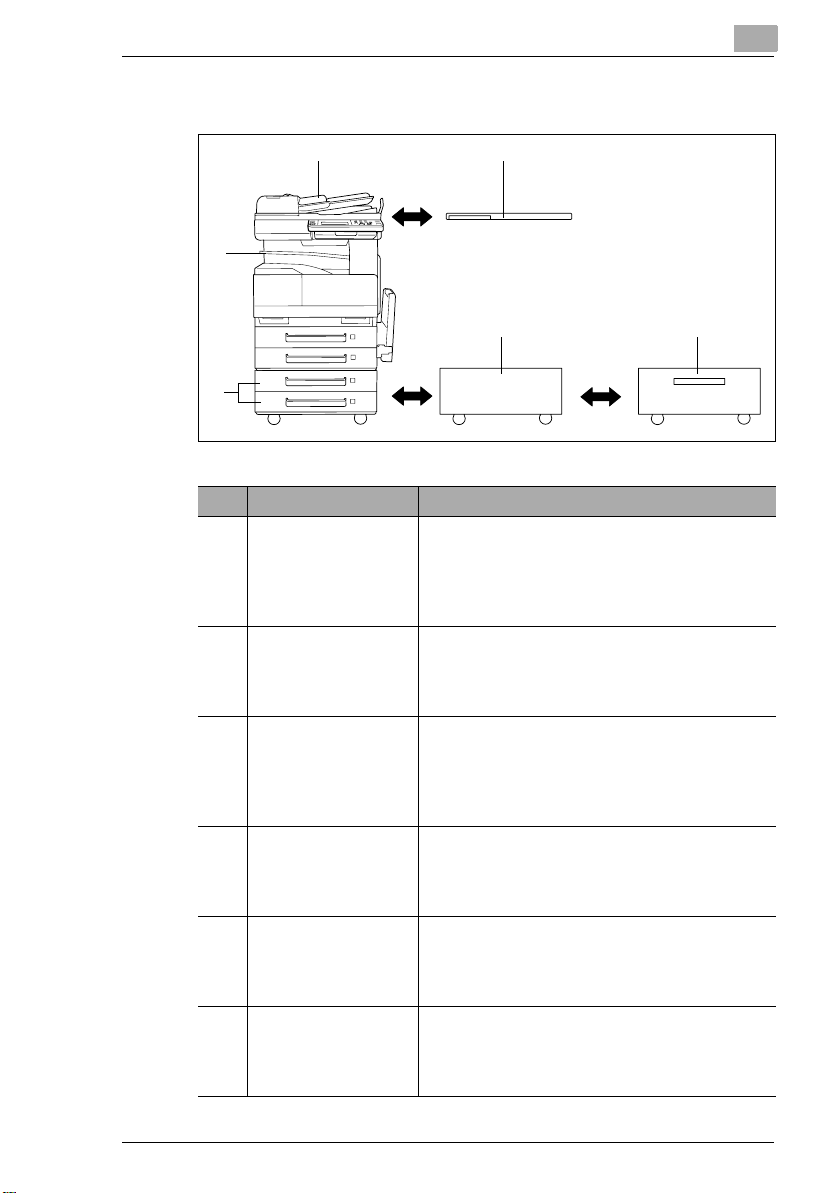
1.5 Components and Their Functions
No. Part Name Description
1 Duplexing Document
Feeder AFR-19
(optional)
2 Original Cover Kit
OC-6
(optional)
3 Copy Desk CD-4M
(optional)
4 Large Capacity
Cabinet
PF-122 (optional)
52 way Paper Feed
Cabinet
PF-210 (optional)
6 Job Separator JS-203
(optional)
Automatically feeds one document sheet at a
time for scanning, and automatically turns over
double-sided documents for scanning.
Referred to as the “duplexing document feeder”
throughout the manual.
Presses down on the loaded document to keep
it in place.
Referred to as the “original cover” throughout
the manual.
This machine can be placed on the copy desk.
Using the copy desk allows the machine to be
set up on the floor.
Referred to as the “copy desk” throughout the
manual.
Equipped with a large-capacity paper drawer
that can supply 2,500 sheets of paper.
Referred to as the “large-capacity cabinet”
throughout the manual.
Equipped with two paper drawers, each drawer
can be supply 500 sheet.
Referred to as the “paper feed cabinet”
throughout the manual.
Allows printed pages to be separated
Pull the lever when taking out the paper.
*In order to use the job separator, the
switchback unit must be installed.
Di2510f/Di3510f 1-7

Introduction
No. Part Name Description
7 Duplex Unit AD-16 Automatically turns the pages over, and prints
on both sides. Referred to as the “duplex unit”
throughout the manual. When using the duplex
unit, the switchback unit is required.
8 Switchback Unit
SB-1
9 Paper Feed Unit
PF-124 (optional)
10 Built in Finisher
FN-117 (optional)
11 Additional Bin Kit
AK-1 (optional)
When copying to both sides of a page, this turns
over the paper. Required when using the duplex
unit.
Equipped with a paper drawer that can supply
500 sheets of paper, for upper paper feed unit
only.
Referred to as the “paper feed cabinet”
throughout the manual.
Finishes printed pages according to the selected
finishing mode (sorting or stapling), then feeds
out the pages.
Referred to as the “finisher” throughout the
manual.
If this option is attached to the finisher, the bins
for separating printed pages increases.
Referred to as the “3rd paper output tray”
throughout the manual.
1-8 Di2510f/Di3510f

Introduction
No. Part Name Description
12 Saddle Kit SK-1
(optional)
13 Mail Bin Kit MK-1
(optional)
14 Punch Kit PK-6
(optional)*
15 32MB/64MB Memory
M32-4/M64-2
(optional)*
16 Hard Disk Drive Kit
HDD-6 (optional)*
17 Printer controller
Pi3505e, Pi3505e/PS
(optional)
18 Internet Fax &
Network Scan Kit
SU-3 (optional)*
If this option is attached to the finisher, stapling,
hole-punching, creasing and booklet-printing
are available as Finishing settings.
Referred to as the “saddle kit” throughout the
manual.
If this option is attached to the finisher, the
printed pages can be divided and fed into the
appropriate bin assigned to a specific individual
or group.
*This option can only be used with computer
printouts.
Referred to as the “mail bin kit” throughout the
manual.
If this option is attached to the finisher, holepunching is possible.
Referred to as the “punch kit” throughout the
manual.
Increases the memory of this machine to as
much as 128 MB (64 MB standard memory + 32/
64 MB expanded memory).
By expanding the memory, the number of pages
that can be stored in the memory can be
increased.
Referred to as the “expansion memory”
throughout the manual.
Allows more pages to be stored.
Increases the number of pages that can be
scanned.
Additionally, can scan multiple jobs.
• To install the function expansion Hard Disk
Drive Kit HDD-6, optional printer controllers
Pi3505e or Pi3505e/PS are required.
Referred to as the “hard disk” throughout the
manual.
An internal printer controller. This allows this
machine to be used as a computer printer.
For more details, refer to the manual of the
printer controller.
An internal Internet Fax & Network Scan Kit. You
can use this machine as a network scanner or as
an Internet fax machine.
For more details, refer to the Scanner Mode User
Manual.
Di2510f/Di3510f 1-9
No. Part Name Description
19 Network Scan Kit
SU-2 (optional)*
20 Network Interface
Card NC-4 (optional)*
* The internal options are not shown.
An internal Network Scan Kit. You can use this
machine as a network scanner. For more details,
refer to the Scanner Mode User Manual.
Required when using this machine as a printer,
scanner, or as an Internet fax machine.
For more details, refer to the Scanner Mode User
Manual or the Printer Controller Manual.
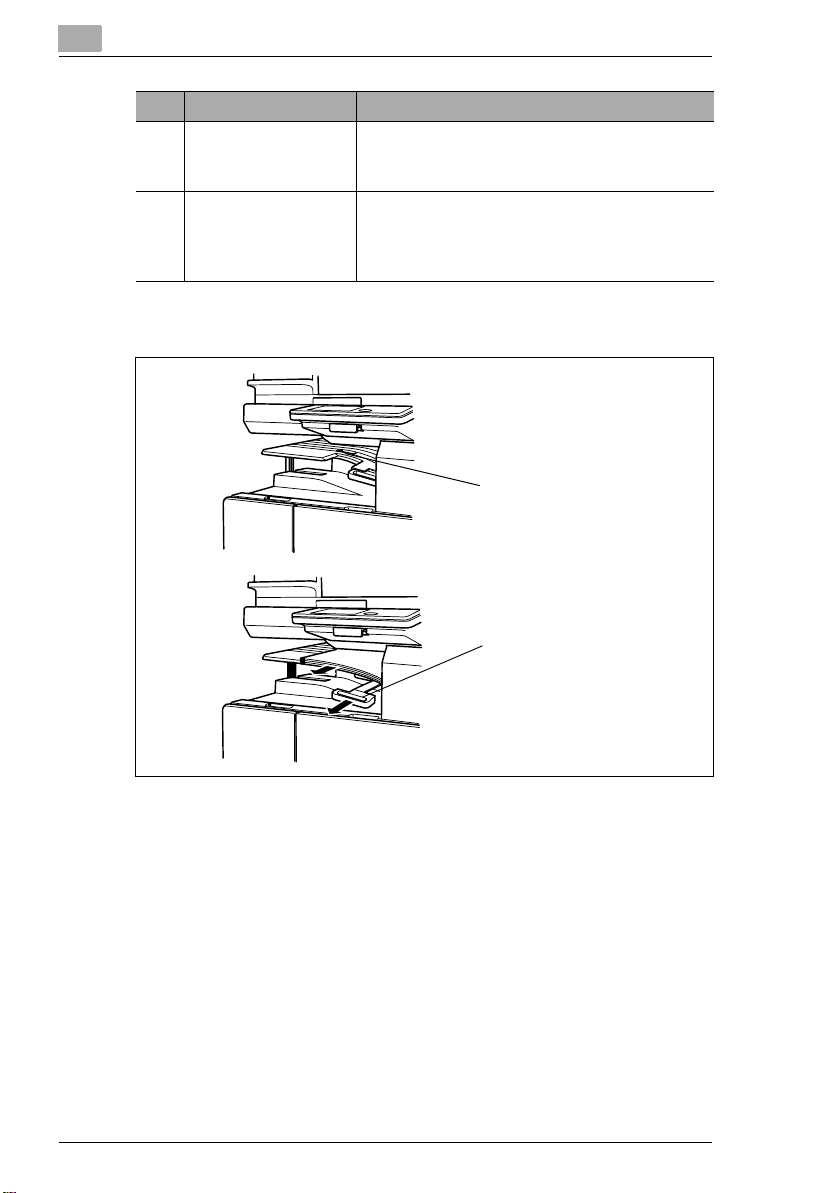
How to use the job separator (JS-203)?
Introduction
$OORZVSULQWHG
SDJHVWREH
VHSDUDWHG
3XOOWKHOHYHU
ZKHQWDNLQJRXW
WKHSDSHU
1-10 Di2510f/Di3510f
Introduction
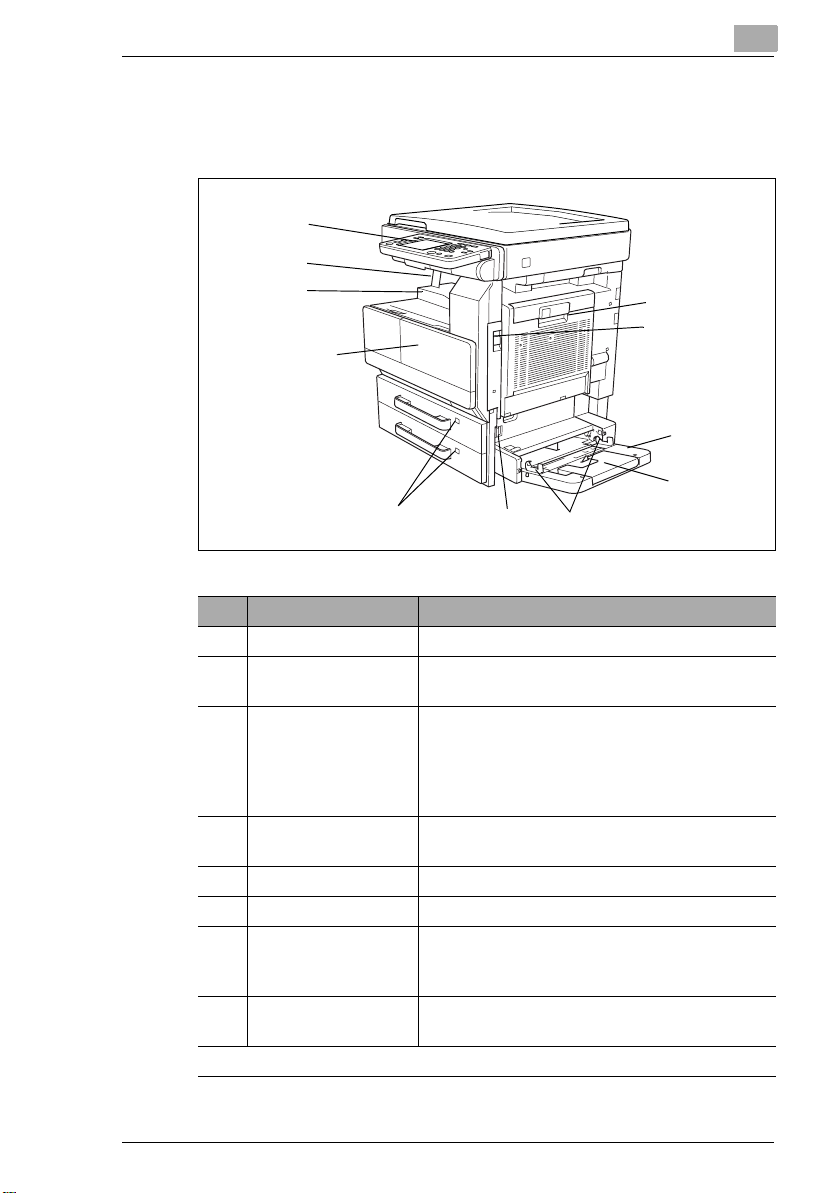
1.6 Part Names and Their Functions
Main Unit
No. Part Name Description
1 Right-side door Opened when clearing paper misfeeds
2Right-side door
release lever
3 Multiple bypass tray Used for manual feeding paper for making
4 Tray extension Open the tray extension when loading large-
5 Paper guide Adjust to the width of the paper
6 Release lever Opened when clearing paper misfeeds
7 Paper supply
indicator
8 Front door Opened when replacing the toner bottle, see
. . . continued on next page
Used to open the right-side door
copies and printouts
Can be loaded with 150 sheets of paper
Can be loaded with special paper, see
page 8-10
sized paper.
As the amount of paper in the paper drawer
decreases, the area that appears in red
increases.
page 13-2
Di2510f/Di3510f 1-11
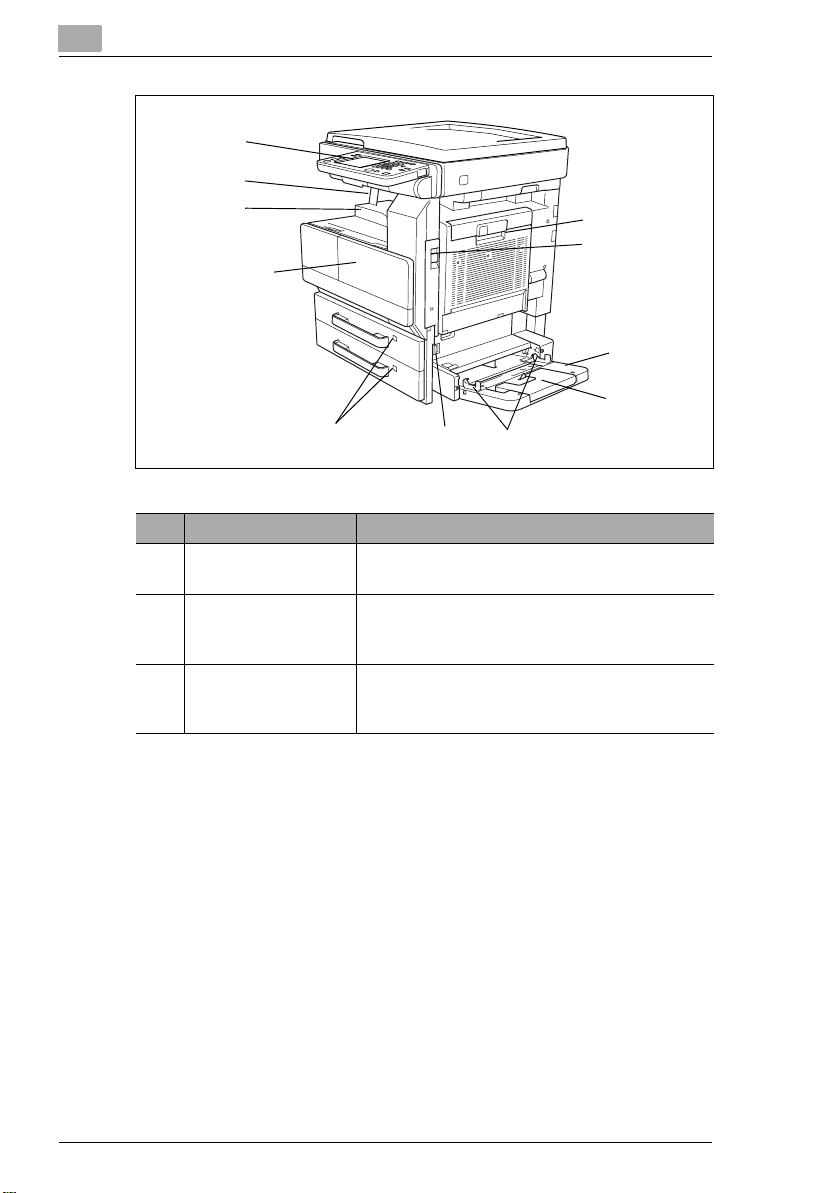
Introduction
No. Part Name Description
9 Paper output tray Collects printed pages fed out of the machine
facing down
10 Paper stopper Prevents printed pages from falling out of the
paper output tray
Used when the optional sorter is installed
11 Touch panel Liquid crystal display in the control panel
Used to specify various copy and fax settings
and program or change functions
1-12 Di2510f/Di3510f
Loading...