

Page 1

“Limited Warranty”,“FCC Statement” and “T rademarks Copyright”
1. Limited Warranty
Except as otherwise stated herein, warrants to the first
end-user who purchases a Projector from a dealer
("Customer") that the Projector is free from defects in
parts and labour under nor mal use dur ing the warranty
period.The warranty period means the twelve (12)
month period from the date of the Customer's purchase
of the Projector from a dealer. During the warranty
period, Distributor will, at its option and in its sole
discretion, repair or replace defective par ts, including
replacement of the entire Projector unit, at no additional
charge to the Customer. However, Customer is responsible for all shipping and insurance costs incurred in
sending any Projector to any authorised personnel for
repair or replacement, and Customer is also responsible for all shipping and insurance costs incurred in
returning any such Projector to the Customer which
does not require any repair or replacement work, as
determined by Distributor in its sole discretion.This
limited warranty does not extend to the Projector lamp,
and does not extend to any Distributor product that has
been damaged as a result of accident, misuse, or
abuse; by the use of par ts not manufactured or sold by
Distributor; by unauthorised modification of the
Projector; or as a result of servicing by unauthorised
personnel.This limited warranty extends only to the
Customer, and is not transferable or applicable to any
other third party or user, including any one who purchases a used Projector. Any person asserting a claim
under this limited warranty must establish to
Distributor's satisfaction the date of purchase and
that the Projector was purchased new.
2. OTHER WARRANTY AND LIABILITY LIMITATIONS
ASIDE FROM THIS STANDARD PUBLISHED
WARRANTY, DISTRIBUTOR MAKES NO WARRANTY
OF ANY KIND, EXPRESS OR IMPLIED, INCLUDING
WITHOUT LIMITATION, THOSE OF MERCHANTABILITY AND OF FITNESS FOR A PARTICULAR
PURPOSE.Without limiting the generality of the foregoing, any description of the Projector is for the sole
purpose of identifying it, is not par t of the basis of any
bargain, and does not constitute a warranty that the
item sold shall conform to that description.The use of
any sample or model is for illustrative purposes only, is
not part of the basis of any bargain, and is not to be
construed as a warranty that the Projector will conform
to the sample or model. No affirmation of fact or
1
Contents
Page 2

promise made by Customer shall constitute a warranty
that the Projector will conform to the affirmation or
promise. Distributor makes no warranty that the goods
are free from claims of infringement of patents, trademarks, or copyrights.THIS LIMITED WARRANTY
SHALL BE THE EXCLUSIVE REMEDY. DISTRIBUTOR
SHALL NOT BE LIABLE TO CUSTOMERS OR OTHERS FOR INCIDENTAL, CONSEQUENTIAL, OR SPECIAL DAMAGES, OR LOST PROFITS.UNDER NO
CIRCUMSTANCE SHALL DISTRIBUTOR'S LIABILITY
OR CUSTOMER'S REMEDY FOR DAMAGES
AGAINST DISTRIBUTOR EXCEED ITS COST FOR
THE PROJECTOR.
3. Procedure for Claims
Any and all questions or claims concerning the
Projector shall be made to Distributor authorised
personnel. In no case shall the Projector be returned
without first securing the authority of Distributor or its
authorised personnel. Any damages to, defects in, loss
of, nonconformities in, or any other claim concer ning
the Projector which could be discovered by inspection
upon delivery must be reported to the distributor
promptly and in no event later than thir ty (30) days after
delivery. In the case of any such claim, inspection shall
be promptly arranged with Distributor or its authorised
personnel, and where appropriate, representatives of
the carrier.Any other claim or action respecting the
condition or conformity of the Projector or any other
matter affecting the Projector must be submitted in
writing to Distributor promptly upon discovery and in no
event later than expiration of the Warranty Period. Any
part of the Projector which is subject of any claim shall
be set aside and protected, without further processing
or use, until Distributor or its authorised personnel have
an opportunity to inspect it and advise Customer of the
disposition, if any, to be made thereof. FAILURE TO
GIVE TIMELY WRITTEN NOTICE OF ANY CLAIM
SHALL BAR ANY REMEDY.
4.Technical Advice
Distributor, or its authorised personnel, may furnish
technical advice with reference to the use of the
Projector, but there is no obligation to furnish such
advice, and if any advice or assistance is furnished, it
shall be given and accepted at Customer's risk,
Distributor shall not be responsible or liable for the
advice or assistance given or the results thereof.
5. FCC Statement
The Projector has been tested and found to comply
with the limits for a Class A digital device, pursuant to
Part 15 of the FCC rules.These limits are designed to
provide reasonable protection against harmful inter-
2
Contents
Page 3

ference when it is operated in a commercial environment.The Projector generates, uses and can radiate
radio frequency energy and, if not installed and used in
accordance with the instructions manual, may cause
harmful interference to radio communications.Operation of the Projector in a residential area is likely to
cause harmful interference in which case the user will
be required to correct the interference at his own
expense.
Trademarks Copyright
DLP and DMD are registered trademarks of Texas
Instrument Inc. IBM is a registered trademark of International Business Machines Corporation. Macintosh
and Macintosh Powerbook are registered trademarks of
Apple Computer Inc. Other trademarks are the property
of their respective owners. Norwegian and foreign
patents are pending.
All rights reserved. Specifications subject to change without notice.
3
Contents
Page 4

Contents
1.
Introduction............................................................................................5
2.
Identifying the different parts of the Projector ..................................5
3.
Important Information...........................................................................7
4.
Connecting the Projector to your computer.........................................8
5.
Connecting the Projector to your video player...................................11
6.
Using the Projector.............................................................................13
7.
Maintenance.........................................................................................46
8.
Trouble shooting .................................................................................49
9.
TV-Tuner (Option)................................................................................51
10.
4
INDEX ...................................................................................................57
Page 1
Page 5

1 Introduction
Thank you for buying this Projector,
2 Identifying the different parts of
the Projector
and for choosing "the brighter way of
presenting".
The Projector will display high brightness images with
vivid colours, even under normal light conditions. As
input for your presentation you can use CD-I, (ask your
dealer for the CD-I player),CD ROM, Photo CDs, Laser
Disks, normal VCRs or computers.You can connect a
microphone and have multiple inputs connected simultaneously for high impact true multimedia presentation.
Thanks to the unique Graphical User interface, the
Projector offer true plug and play operation from
remote control, which by the way can also control your
computer! For good measure we have even included
the Slide Works presentation utility software with over
50 powerful presentation tools included.
Ask your dealer for information about other presentation
products and accessories. For added security and
convenience try our extended warranty program.
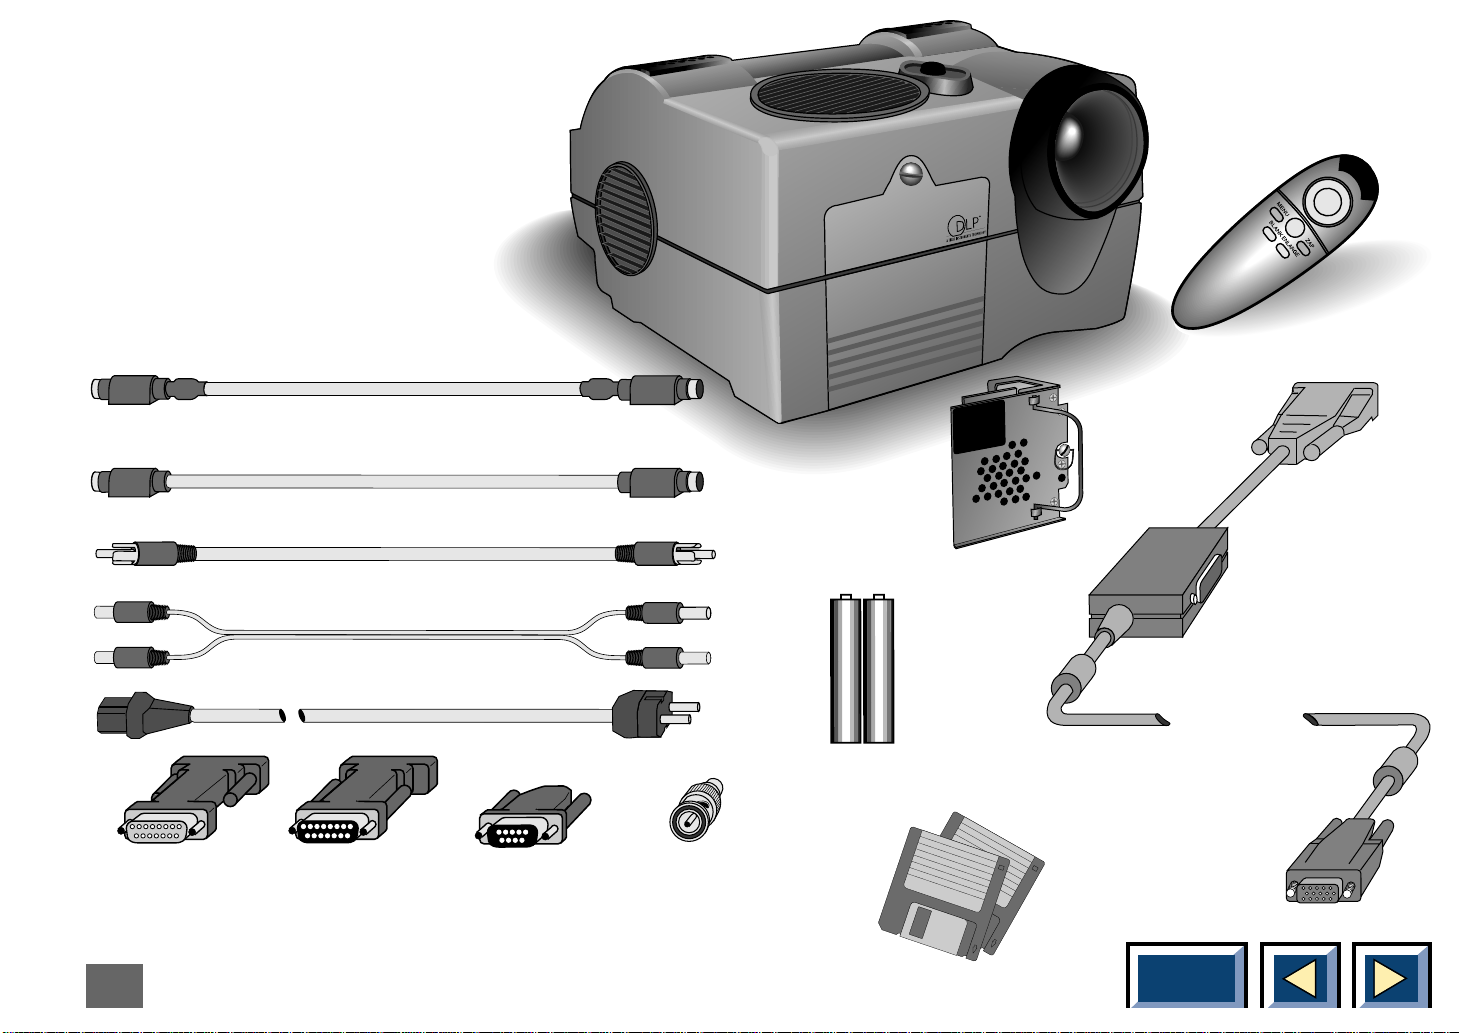
Before you star t
Please take a few minutes to make sure that your
system contains the necessary components for your
particular application:
◆ Projector Hardcase
◆ Projector
◆ 5 meter (16 ft.) RGB buffer cable
◆ Interactive remote control
◆ Batteries for the remote control
◆ 2 Macintosh adapters
◆ Diskette with Macintosh driver software
◆ Diskette with the Slideworks presentation
utility software
◆ Composite video cable
◆ Super video cable (4 pin)
◆ Cable for Audio (2RCAm - 2RCAm)
◆ Adapter BNC-Composite
◆ AC cable (4m)
◆ Serial cable (8 pin)
◆ 9 pin serial adapter
5
Contents
Page 6
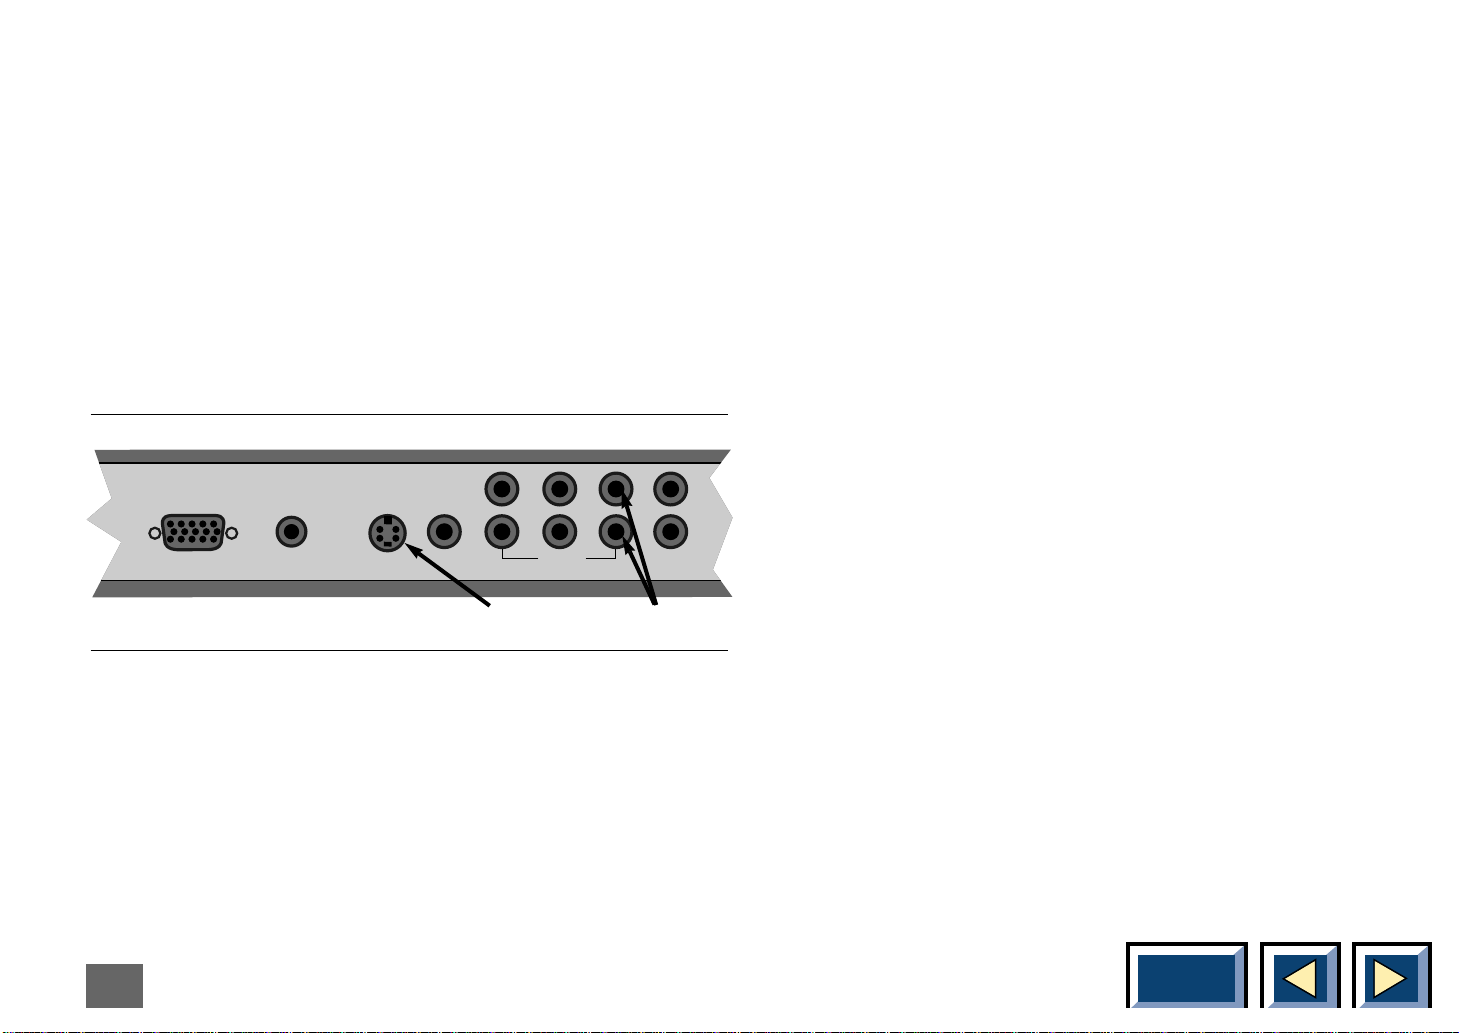
If you want to use the Projector
to display video information, you
will need the cables for S-video
or composite video, all depending on the system you use.
Serial cable
S-video
Composite video
Audio In/Out
Interactive Remote
Control
Lamp
Batteries
Apple Macintosh
Adapter with
Macintosh
Male Pin-Out
6
AC-cable
Apple Macintosh
Adapter With
Macintosh Female
Pin-Out
9 pin adapter
(serial)
5 m Buffer cable
Diskettes
Adapter for
composite video
to BNC
Contents
Page 7

3 Important Information
◆ Please fill in the warranty card and return it to Cus-
tomer.
◆ Always use the Projector Hardcase when you are
transporting the Projector.
NB! Even though the Projector is a rugged piece of
presentation equipment, it is also a finely tuned optical
equipment.The Projector is therefore susceptible to
damage by vibration or shock. Please therefore use
caution when transporting the unit.
The Projector lamp is installed on delivery. The lamp
manufacturer specifies an average lifetime for the lamp.
You should not use the lamp beyond this average lifetime. offers no warranty on the lamp.See the Quick
Guide or part 7, Maintenance, Changing the lamp.
WARNING! Never work inside the Projector if it is
connected to the mains! Always unplug it from the
wall outlet when changing the lamp!
When the lamp has been replaced reset the lamp
counter by selecting the icon with the lamp in the MAIN
MENU.Select the Reset button, and then click OK.
◆ The height of the projected image on the screen can
be adjusted by using the tilt screw underneath the
back of the Projector.
7
Contents
Page 8

4 Connecting the Projector to your computer
This section describes how to connect
the Projector to your PC, Macintosh,
Powerbook or notebook in order to
show computer graphics.
1. Identify the parts needed to connect your computer
with the Projector.
2. Identify the RGB Out connector on the back of your
computer (the one that connects the monitor to the
computer).
3. Make sure that the computer, monitor and the
Projector are switched off.
4. Connect the power cable from the Projector to the
wall outlet.
5. Locate the On/Off switch on the Projector.With all
the connections done and the screws properly
fastened, the Projector, and computer may be
powered up. Switch on the units in the mentioned
sequence.
6. The Projector will now automatically display the
computer’s image in parallel with the monitor.If not,
see the section:Trouble shooting.
7. If you want to control your computer with the
remote control, also connect the serial interface
cable from the RGB buffer cable to the computer
COM-port, see fig 10 or 11. Connecting the serial
interface cable. Also see "Using the Interactive
Remote Control to control your PC or Apple
Macintosh computer".
8
Contents
Page 9
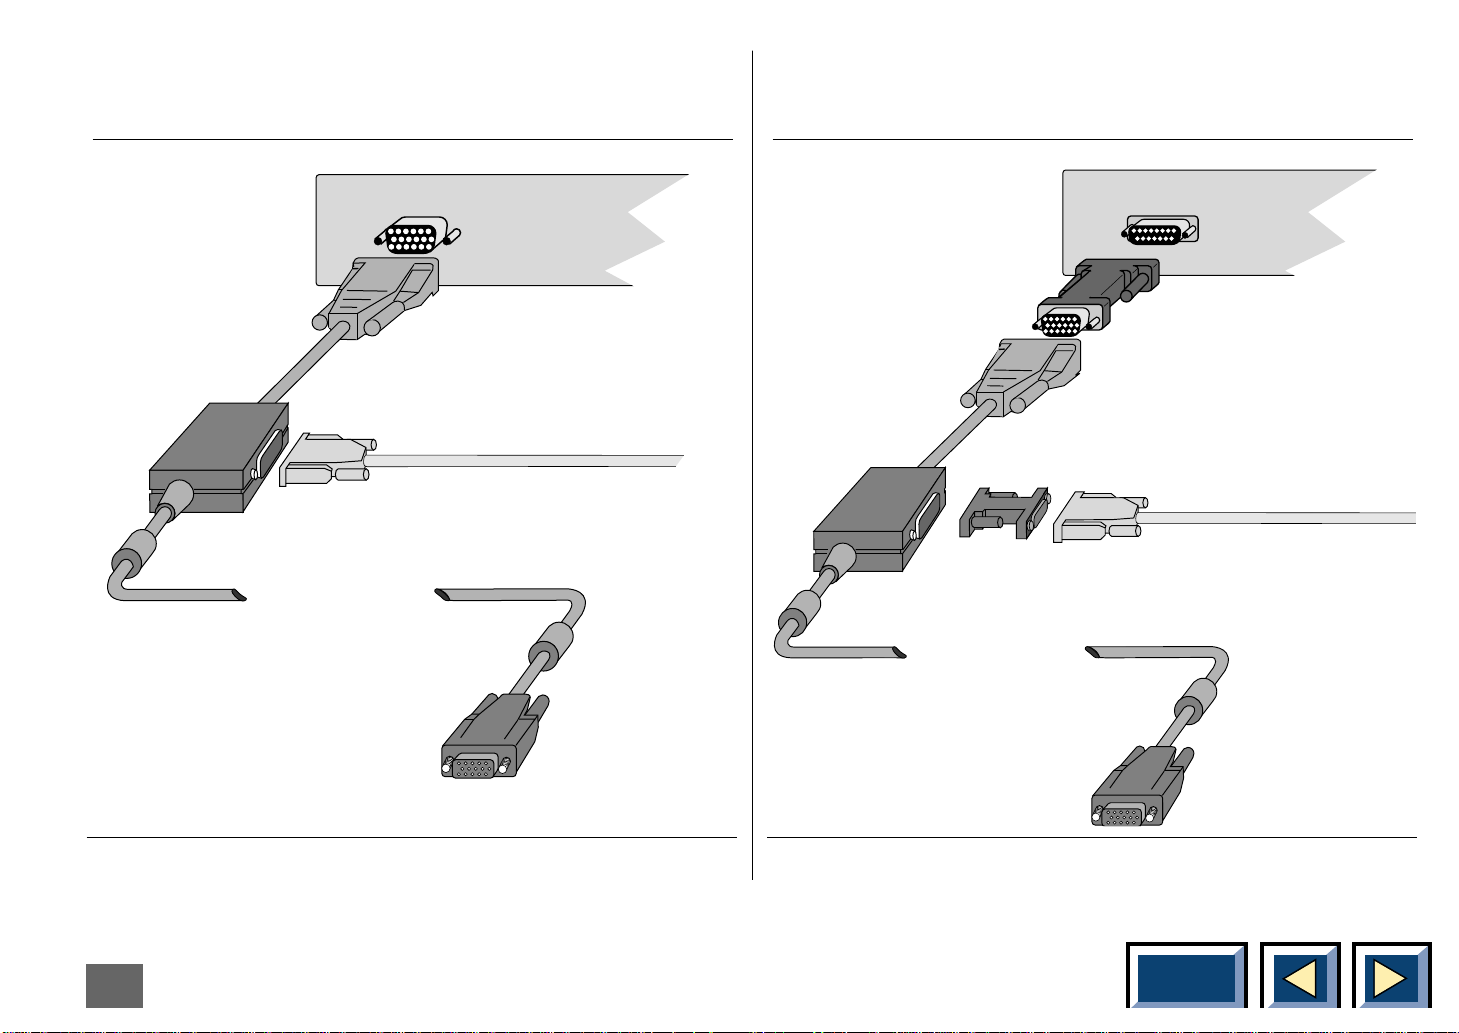
Backpanel of computer
RGB OUT
Computer
Monitor Cable
To DAVIS Powerbeam
Connecting to a
Backpanel of computer
RGB OUT
Macintosh adapter
with Macintosh
Male Pin-Out
Macintosh
adapter
with Macintosh Female
Pin-Out.
Macintosh
monitor cable
To DAVIS Powerbeam
Connecting to an Apple
desktop computer
To Projector
Macintosh desktop computer
To Projector
Fig. 3. Connecting to a desktop PC with standard RGB
9
Fig. 3. Connecting to an Apple
Macintosh desktop computer
Contents
Page 10
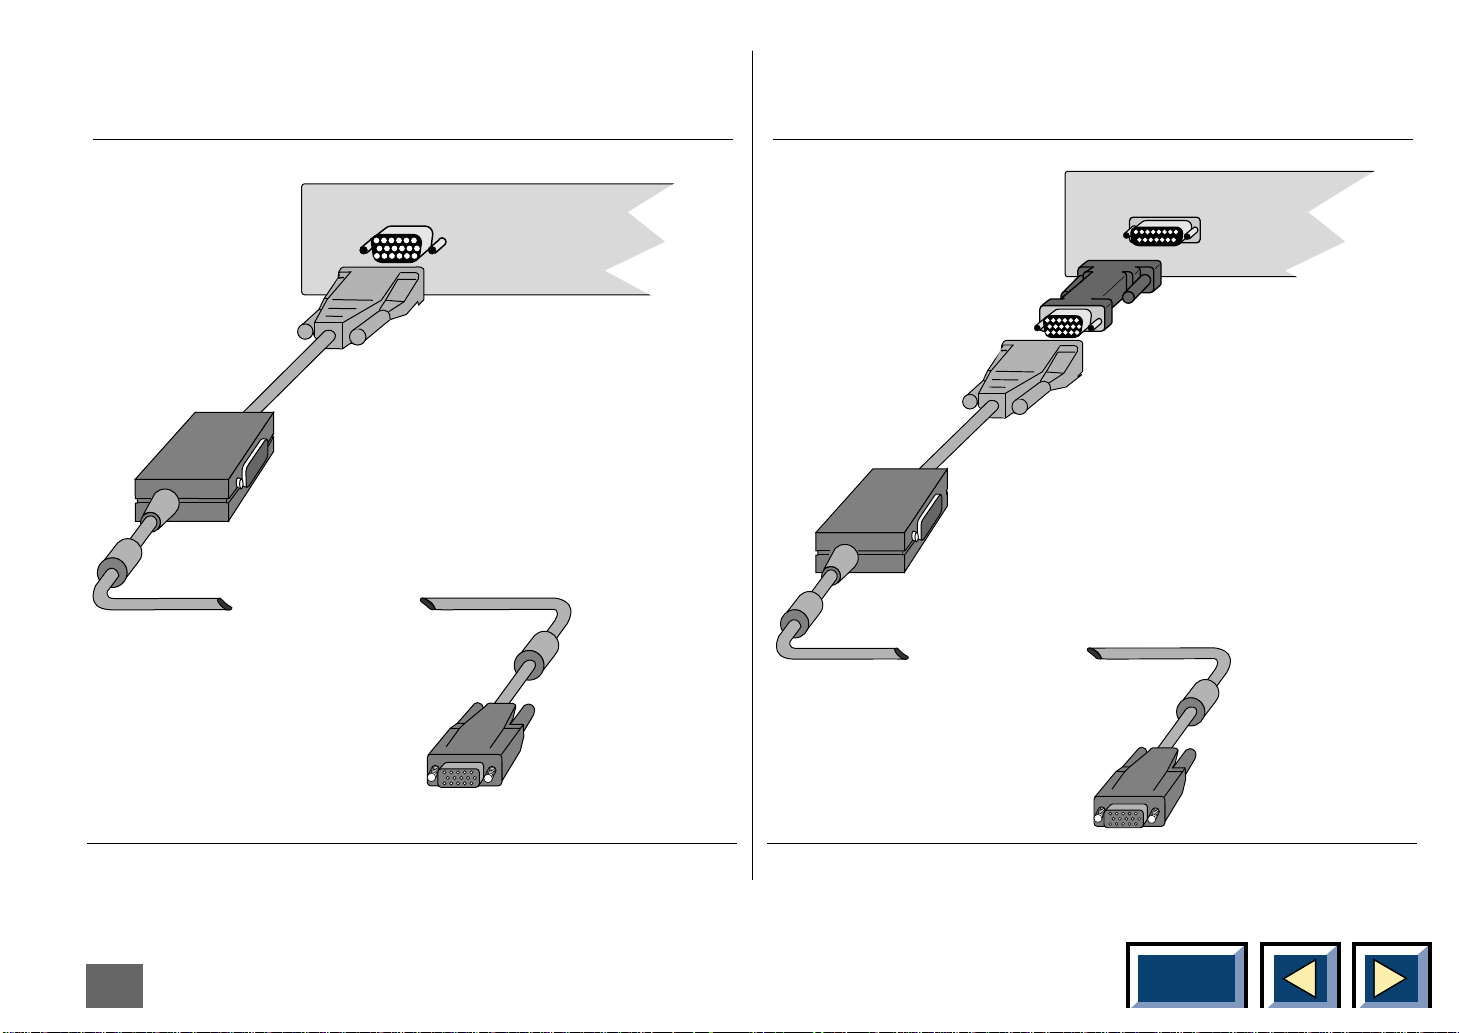
Backpanel of computer
RGB OUT
To DAVIS Powerbeam
Connecting to a standard
Backpanel of computer
RGB OUT
Macintosh adapter
with Macintosh
Male Pin-Out
To DAVIS Powerbeam
Connecting to an Apple Macintosh
laptop, notebook
To Projector
Powerbook
To Projector
Fig. 4. Connecting to a laptop, notebook
10
Fig. 5. Connecting to an Apple
Macintosh Powerbook
Contents
Page 11
5 Connecting the Projector to your video player
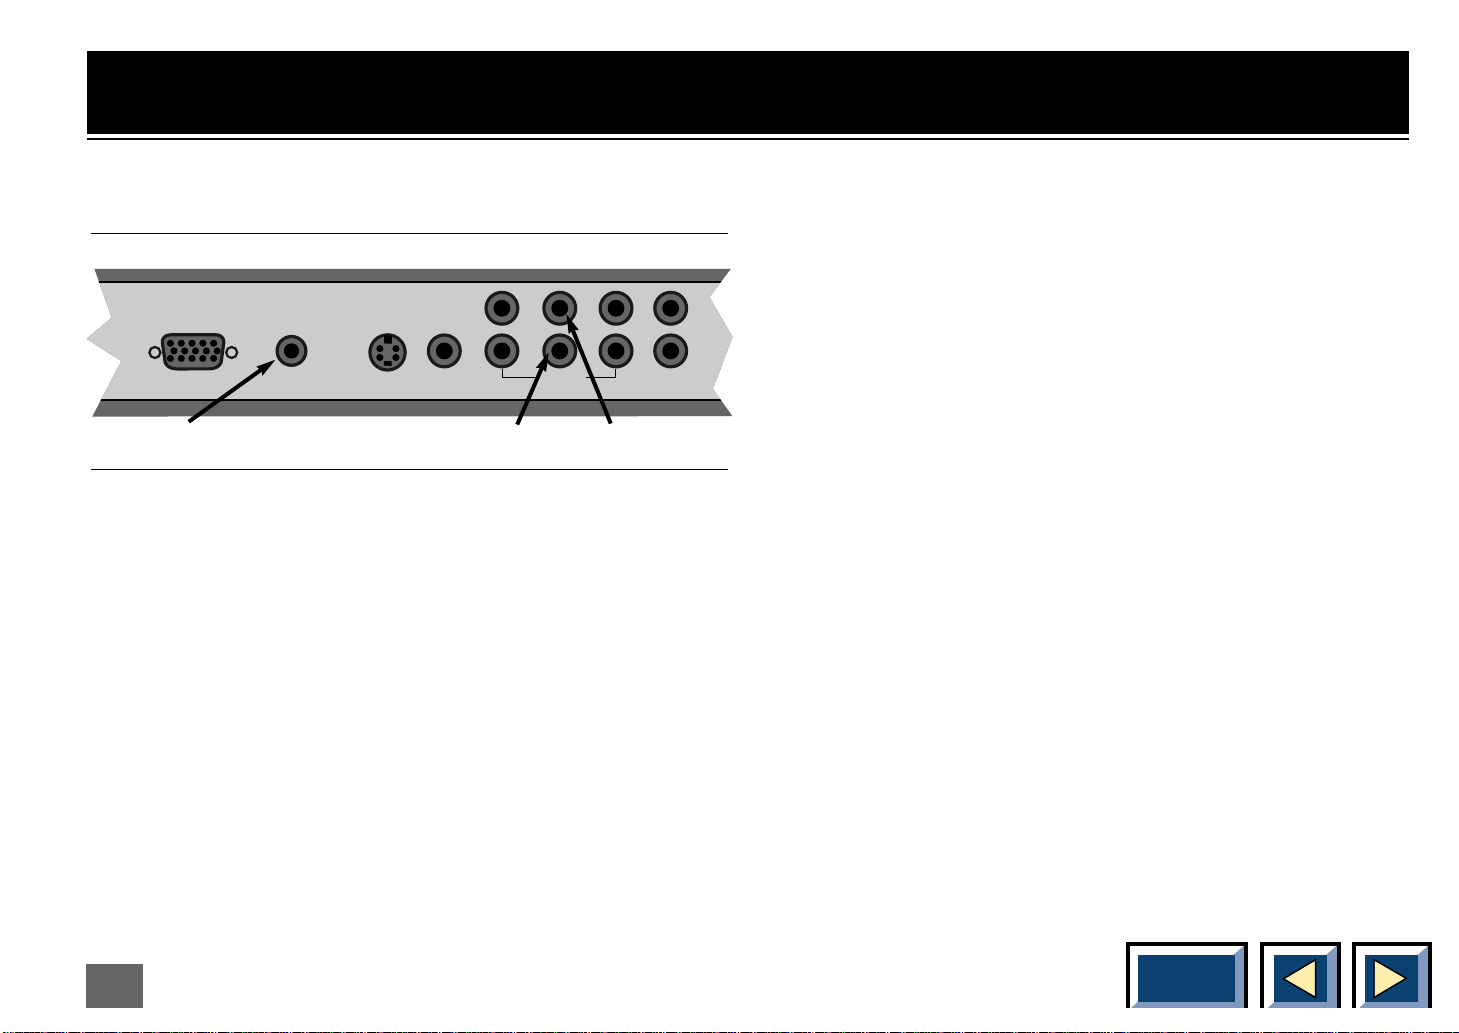
RGB INPUT
COMPOSITE
VIDEO
PC/COMMON
AUDIO IN
COMP.VIDEOS.VIDEOAUDIO OUT
LEFT
RIGHT
SUPER-
VIDEO
MIC
Using composite video
Plug panel
Connect to video
out part of VCR
Fig. 6. Connecting to a composite video source
1. Find the Composite video cable, and the audio
cable.See page 6, All cables and adapters are
provided with the Projector.
2. Make sure that the video source and the Projector
are switched off. Connect the Composite video
cable (see page 6) from the Video out connector of
the video source to the Composite video connector
on the Projector plug panel, see fig. 6.Connect the
audio cable from the Audio out connectors of the
R L
Connect to VCR audio out
video source to the Composite Audio in connectors
on the Projector. Connect the red plug to the red
connector, and the other plug to the white connector.Red is the right stereo channel.
3. Connect the power cable from the Projector to the
wall outlet.
4. When all the connections are done and verified,
switch on the video source, and then switch on the
Projector.
5. The Projector will now automatically display the
pictures from the video source. If not, see the
section Trouble shooting.
You can connect external speakers to the Projector
from the Audio out connectors on the plug panel.
11
Contents
Page 12
Using Scart video
RGB INPUT
COMPOSITE
VIDEO
PC/COMMON
AUDIO IN
COMP.VIDEOS.VIDEOAUDIO OUT
LEFT
RIGHT
SUPER-
VIDEO
MIC
The signals from the Scart connector are the same as
from the Composite connector. If you have a Scar t
connector on your video, you will have to purchase a
Scart to Composite interconnection. Connect the Scart
end of the interconnection cable to your video, and then
follow the procedure in the previous section, Using
composite video.
Using S-video
Plug panel
Connect to VCR, S-video out.
2. Make sure that the video source and the Projector
are switched off. Connect the SuperVideo cable
from the S-Video out connector on the video source
to the S-video connector on the Projector plug
panel, see fig. 7.
Connect the audio cable from the audio out connectors
on the video source to the S-video Audio in connectors
on the Projector. Connect the red plug to the red connector, and the other plug to the white connector. Red
is the right stereo channel.
3. Connect the power cable from the Projector
to the wall outlet.
4. When all the connections are done and verified,
switch on the video source, and then switch on the
Projector.
Fig. 7. Connecting to a SuperVideo source
1. Find the SuperVideo cable, see page 6.
All cables and adapters are provided with the
Projector .
12
5. The Projector will now automatically display the
pictures from the video source. If not, see the
section Trouble shooting.
You can connect external speakers to the Projector
from the Audio out connectors on the plug panel.
Contents
Page 13

Using external speakers
You can connect external speakers to the Projector in
two ways:
1. Powered speakers (Speakers with built in amplifier).
These speakers can be connected directly to the
audio out connectors on the Projector amplifier.
2. Amplifier.Connect the amplifier to the audio out on
the Projector.
When external speakers are connected, These can be
turned on or off from the Projector.To control the internal speakers, see section on Adjust audio
settings, page 44.
6 Using the Projector
Evaluating the environmental
conditions
Light conditions
The Projector will display a high brightness image, even
under normal light conditions and does not require any
special considerations with respect to lighting. However,
if you want to optimise the presentation environment,
these are some of the aspects you may want to take
into consideration:
Please take care to avoid direct and indirect light on the
projection screen, as it will reduce the contrast of the
image, and the quality of your presentation.
13
Further you should avoid light from the ceiling between
the Projector and the projection screen. Behind the Projector, where the audience usually are, you could allow
some more light, allowing the audience to see enough
to for example take notes.
Contents
Page 14

High Brightness Monochrome Mode
If you want to present information in black and white
you have the option of pulling the colour filter of the
Projector out of the light path. By pulling the handle up
you take away the colour filter, and the light goes
unobstructed to the DMD (Digital Mirror Device) chip.
This results in a projected image with much greater
light output.
Projection screen
The quality of the projection screen will also have a
significant impact on the quality of the image presented.
Different models offer varying degree of reflection. In
general, screens with some form of reflective coating
offer better image quality than do “regular screens”.
Avoid overheating the Projector
Cooling is very important for the Projector.Always place
the Projector so that it has free space all around it, in
order to enable air to circulate through the Projector.
WARNING! Never use the Projector if the
cooling fan is not working. Using the
Projector without cooling can
seriously damage the projector.
Always make sure that the cooling fan is working.The
DMD™ (Digital Mirror Device) inside the Projector is
heat sensitive, and needs to be cooled.If the cooling
fan is not working, turn off the Projector and consult
your dealer.
14
Contents
Page 15
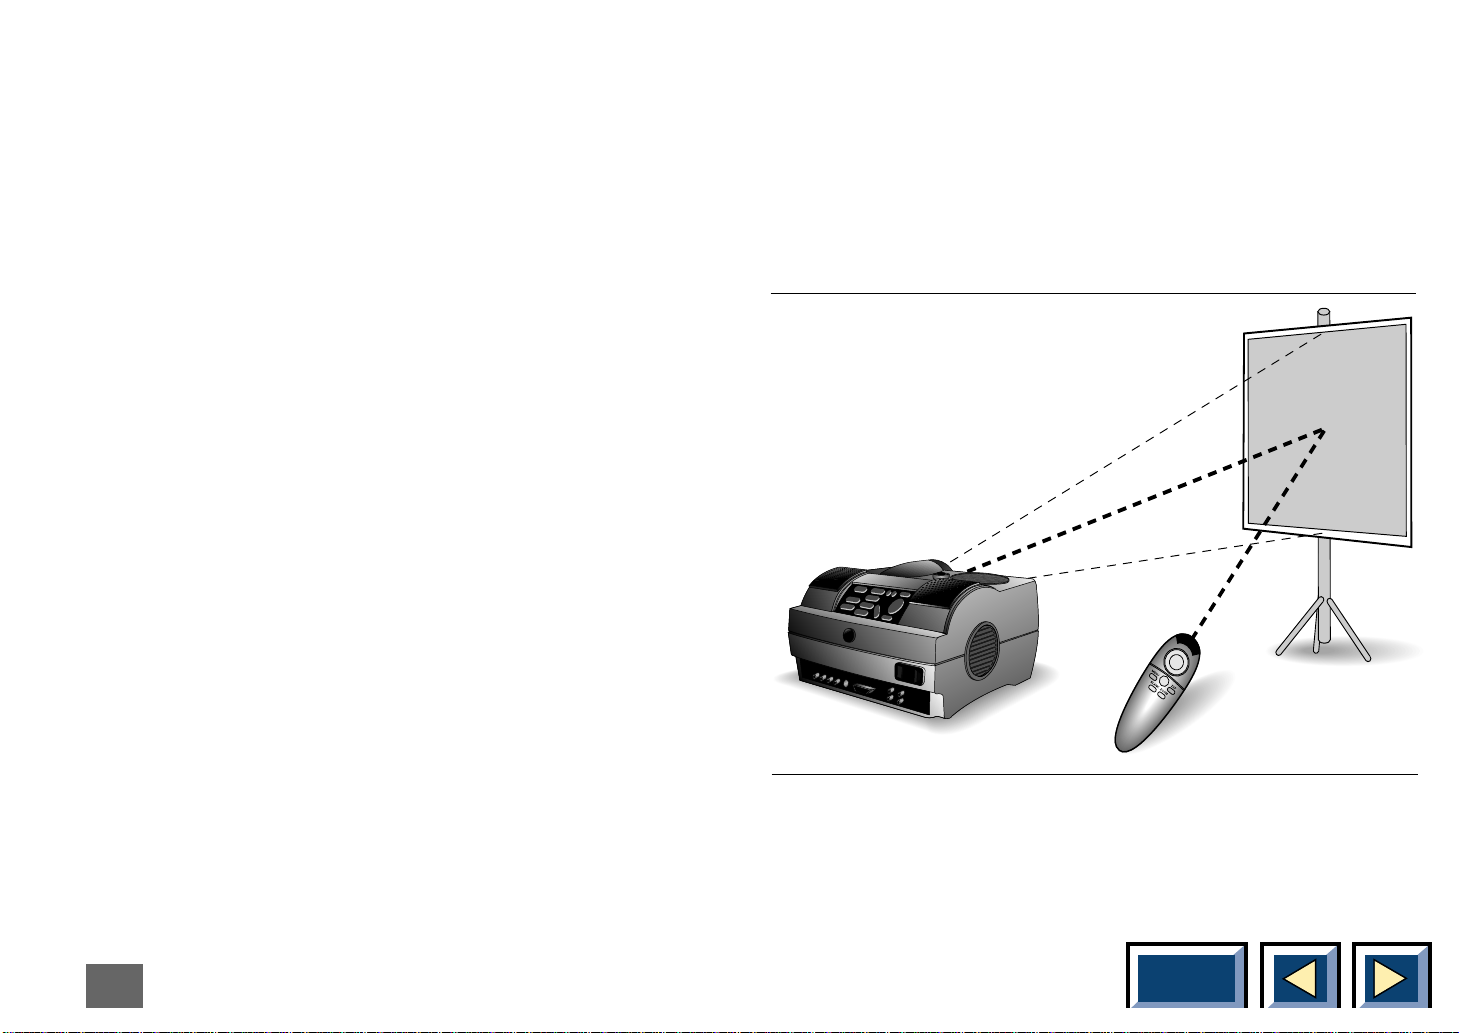
Using the Interactive
Remote Control
The Interactive Remote Control has two purposes:
1. To access the MAIN MENU and control the various
image adjustment and utility functions of the
Projector.
2. To allow remote control of your computer.
Identify the Interactive Remote Control.The Interactive
Remote Control is operated by pointing it towards the
projection screen. An infra red beam bounces from the
screen to an infra red receiver on the Projector.
NOTE
Make sure that nothing is blocking the IR receiver
located beneath the lens, or at the back of the
projector, as this will prevent the communication
between the Interactive Remote Control, and the
Projector.
NOTE
To ensure smooth operation, the combined
distance from the remote control to the screen and
back to the Projectorshould not exceed 10 meters
(33 ft). If the distance via the screen is longer, you
should point the remote control directly towards
one of the IR receivers.
15
Fig. 8. The Interactive Remote Control communicates
with the Projector.
Contents
Page 16
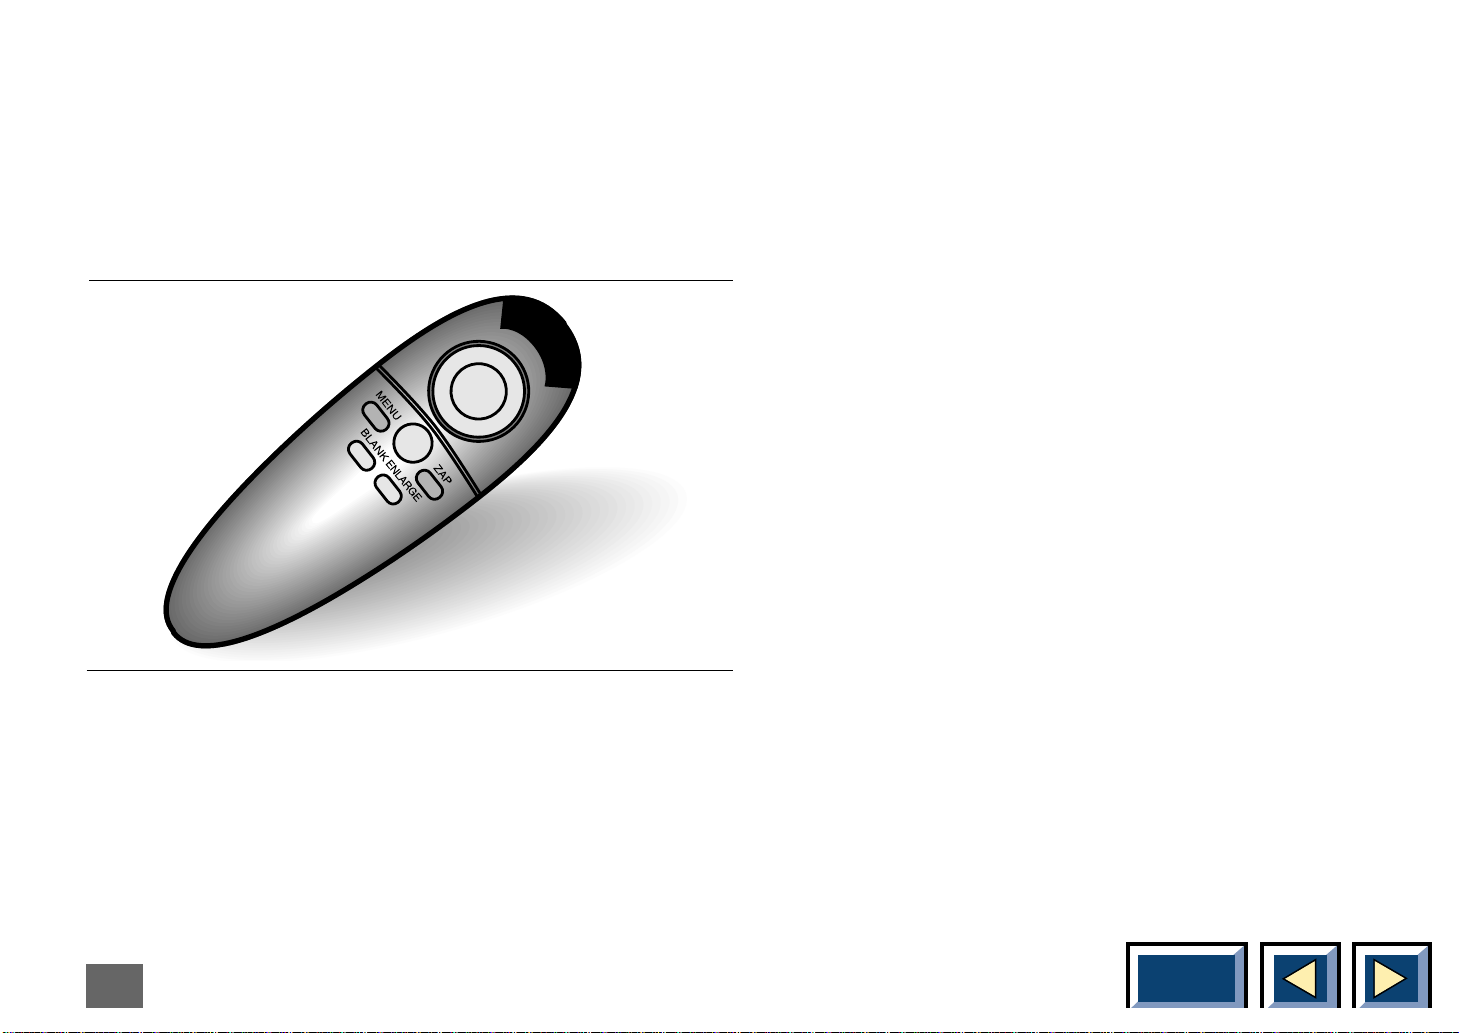
This remote control works with Macintosh and with
Microsoft Windows version 3.1 and higher, for interactive distance control of your computer. A unique pressure sensing pad on the remote control makes it ver y
easy to control the computer, and to perform the exact
same operations as you would with a normal mouse.
The six keys are:
Key underneath the Control: Left mouse key.
Small grey key: Interrupt/break an action
(Right mouse key)
Menu: Press the Menu key to access the
menu control functions.To move within the various
menu functions, position the arrow cursor by pressing
the sensitive mouse pad and doubleclick on the highlighted icon.
Enlarge: Press the Enlarge key to enlarge any part of
the image.The image will automatically be enlarged
four times.To move and enlarge any par t of the image,
press the sensitive mouse pad.
Fig. 9. The keys on the Interactive Remote Control
The serial interface cable and the PC serial adapter are
supplied with the projector.
The Interactive Remote Control is very easy to operate.
It has only six keys in addition to the pressure sensitive
mouse pad.
16
Blank: Press the Blank key to blank the image.
To reveal parts of the image, press the sensitive
mouse pad downwards.(cur tain function).
Zap: Press the Zap key to perform the assigned
function.To assign a function to the Zap key select the
Zap icon from the menu. Choose between Freeze,
Mute, Source, Pointer and On/off.
Contents
Page 17

Hints for using the
Interactive Remote Control
The Interactive Remote Control is unlike any other
mouse device you have used before, and we therefore
suggest that you take a few minutes to become accustomed to the new sensation of controlling the cursor by
rocking your thumb.
Below we have included some suggestions to help you
get started. With a little practice, you will quickly
become a skilled user.
Holding the Interactive Remote Control
The best way to hold the remote control is like a pistol
grip, with your middle finger in the contoured channel
on the underside, and your index-finger poised in front
of the primary tr igger button (button underneath; left
mouse key).The thumb can be pulled back to activate
any one of the other keys.You will also notice that the
Interactive Remote Control works well for both left and
right handed users.
Using the pressure-sensing mouse pad
The Interactive Remote Control’s pressure-sensing
mouse pad converts the touch of your thumb into
smooth cursor movement.To move the cursor, place
your thumb on the centre of the mouse pad and rock it
in the direction you want the cursor to go.You can move
the cursor in any direction - the Interactive Remote
Control has a full 360° control. A light touch will produce slow, precise cursor movement.More pressure
will increase the cursor speed - the harder you press,
the faster the cursor moves.When you first try the Interactive Remote Control we suggest that you set the
mouse speed (in the mouse control panel in Windows)
to a minimum.This will facilitate the learning process.
You can increase the sensivity as you become more
familiar with the Interactive Remote Control.
To click an item
The button underneath and the small gray key on the
Interactive Remote Control emulate those on a conventional mouse.The trigger button under the front of the
Interactive Remote Control is equivalent to the left
mouse button, and is used as the primary button.The
small gray key on top of the Interactive Remote Control
is equivalent to the right mouse button (the secondary
button). Operation of these two buttons/keys are the
same as on a regular mouse.
17
Contents
Page 18
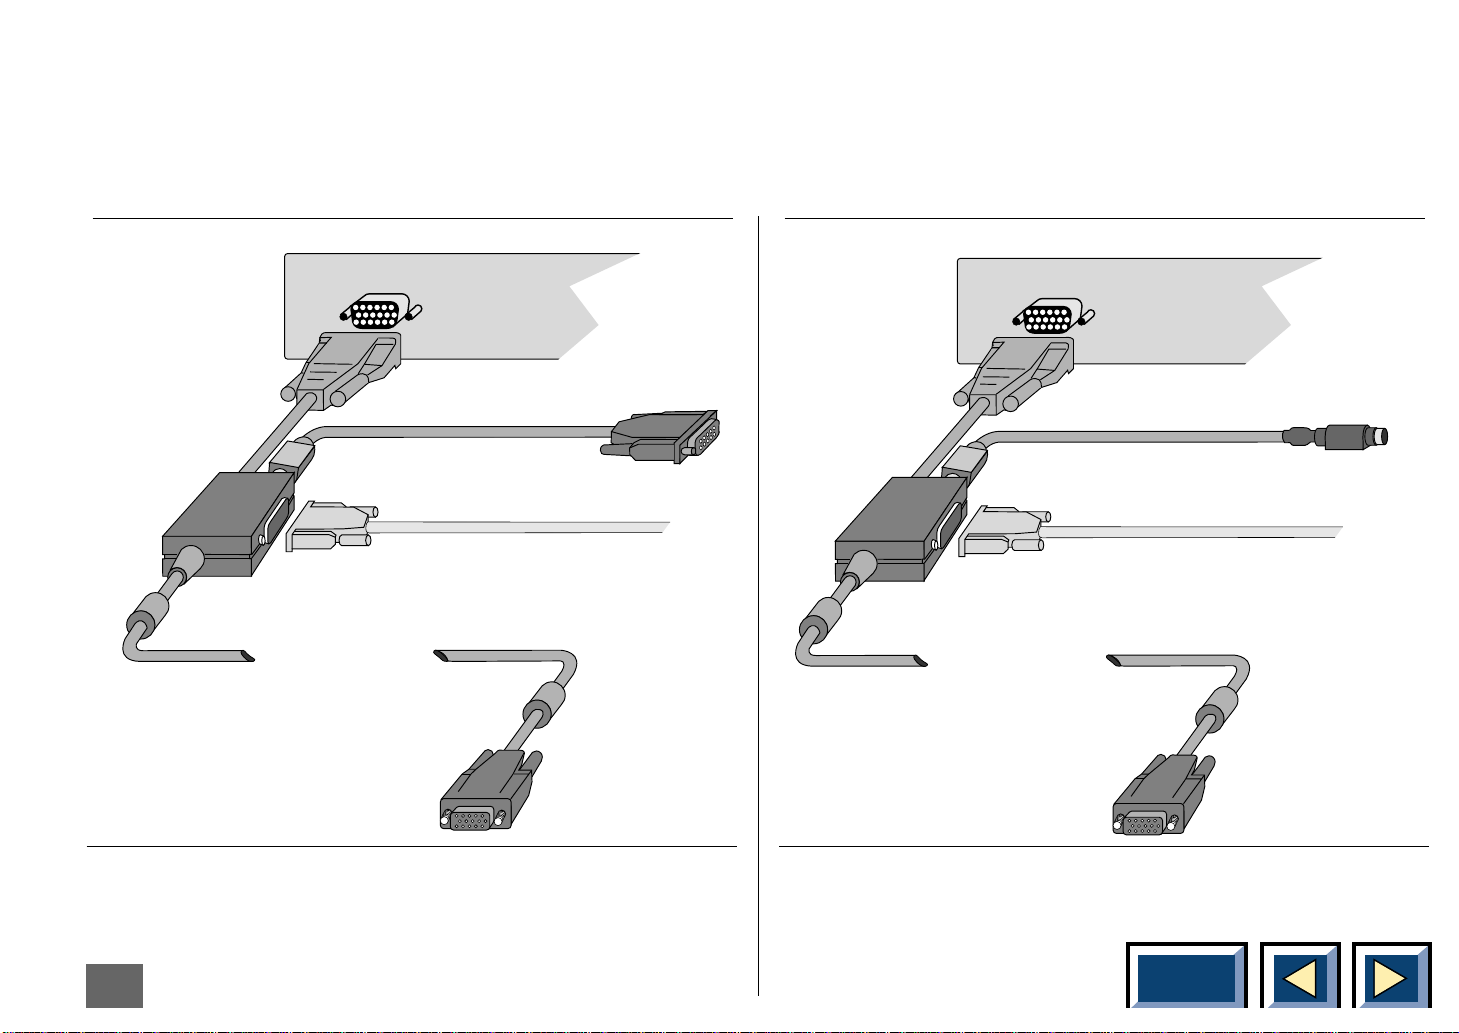
To drag an item
Backpanel of computer
RGB OUT
Computer
Monitor Cable
To COM port
To DAVIS Powerbeam
Backpanel of computer
RGB OUT
Computer
Monitor Cable
To COM port
To DAVIS Powerbeam
Simply press and hold the primary button (button
underneath) while moving the cursor to the desired
location. Release this button to complete the drag
To Projector
operation. If your computer has Windows installed, you
may wish to practice this function by playing the game
of solitaire.
To Projector
Fig. 10. Connecting the serial interface cable and
adapter (PC)
18
Fig. 11. Connecting the serial interface cable
(Macintosh)
Contents
Page 19

"Using the Interactive Remote Control to control your
PC or Apple Macintosh computer."
Follow the easy steps below to set-up
your computer to communicate with
the products.
If you have a PC
The products will tell your computer that a serial mouse
is connected, and this will make the Interactive Remote
Control work just like your ordinary mouse. Remember
that your mouse driver must be a Microsoft serial driver
or compatible for the product to be able to communicate
with your PC.
Setup procedure
◆ Turn all units off
◆ Follow the User Manual's guide for connecting the
product to a PC.
◆ If you have a mouse connected to your PC this must
be disconnected because the PC cannot find more
than one mouse.
◆ Connect the serial data cable (8 pin) to the serial
connector on the buffer box of your 5m buffer cable.
◆ Attach the other end to the serial adapter, and con-
nect it to the serial port (9 pin) of your PC.
◆ Turn on the product
◆ Turn on your PC
When you enter Windows (or DOS, if your mouse driver
is loaded here) you should now have full mouse control
from your Interactive Remote Control.
19
Contents
Page 20

Projector:
Special considerations
If the Interactive Remote Control does not work when
you have followed the above steps please try the
following
1. Make sure that your mouse driver in Windows
Setup is "Microsoft, or IBM PS/2" in Windows 3.1
and 3.11 and "Microsoft serial mouse" or “standard
serial mouse” in windows95 and WindowsNT. If
another driver is installed please change it and
restart Windows.
If changing the mouse driver does not help (this is
something we have only experienced on portables)
you must add/change information in your mouse.ini
file (could also be named "mousedrive.ini").
2. Enter File Manager, and double click on the
apropriate mouse initiation file and make sure of
the following.The important here is that "serial" is
written as the first search point in the mousetype
line of the INI-file.
Click on File and choose Save, and then exit the
file.With the mouse.ini or mousedrive.ini marked
click on File (in File Manager) and choose
Properties cross out the "read only" box in the
properties dialog box and then choose OK. This
action will prevent Windows to overwrite the file
later.
3. If this still does not help contact your dealer or call
technical support (see your warranty card or the
infopage in the main menu for telephone number)
20
Contents
Page 21

If you have an Apple Macintosh
Setup procedure
computer
The products will tell your Macintosh that a serial communications device is connected.This means that the
Interactive Remote Control together with the Apple
Macintosh driver will work just like your ordinary mouse.
◆ Follow the User Manuals guide for connecting the
product to a Macintosh.
◆ Connect the serial data cable (8 pin) to the serial
connector on the buffer box of your 5m buffer cable.
◆ Attach the other end to either the MODEM or
PRINTER port on your Macintosh.
◆ Turn on the product.
◆ Turn on your Macintosh.
To install the Apple Macintosh
driver software
◆ Insert the Apple Macintosh driver diskette
◆ Make sure the system folder is visible and closed.
◆ Drag the Remote Controller onto your system folder
icon.
◆ The Macintosh will do the rest.
21
◆ If prompted about placing the Remote Controller in
the control panel folder answer OK.
◆ It is not necessary to restar t your Macintosh.
Refer to the section:
Special consideration
Contents
Page 22

Special considerations:
The communication with the hardware is handled via a
serial communications connection to your Macintosh.
As with all communication devices, extra care must be
taken both in connecting the device and using it. Here
are some points to remember:
1. The hardware serial connection must be connected
to either the MODEM or PRINTER port of your
Macintosh. If you connect to the printer port, you
must check the Use Printer Port option in the
control panel.
2. When using the remote control, you must be sure
that all other installed devices / protocols
(FaxModem software, AppleTalk, etc.) that use the
port you have selected are either disabled (via the
software supplied with the product) or switched to
the other port.
3. After use you should re-enable all devices that were
disabled in step 2 above.
PowerBook:
If you are using the Interactive Remote Control with a
PowerBook por table with no printer port, please
observe the following:
1. Be sure that AppleTalk is turned off before using
the Interactive Remote Control.If AppleTalk was on,
you may have to restart your PowerBook for the
changes to take affect.
2. If you have a built in modem, select the external
modem option in the PowerBook control panel
3. If you get an alert to the extent that you cannot turn
off the internal modem because it is in use, follow
these steps:
a) Go into the control panel of the control panel,
and make sure the software is turned off (the
LED on the main switch will be green)
b) Now you should be able to select the external
modem option in the PowerBook control panel.
c) Afterwards, you can simply turn ON the driver
via the control panel and you should not need
to restart.
22
Contents
Page 23

AppleTalk:
Using the Remote Controller:
To turn off AppleTalk do the following:
1) Select Chooser from the Apple menu
2) Select the Inactive radio button in the AppleTalk
area (lower righthand side of the window)
3) You may have to restart your Macintosh
Make sure to complete the procedures above.To open
the Remote Controller (control panel) double click on
the icon in the control panel folder. Each time you open
the control panel, it will check to see if the mouse driver
is installed in the system. If it is not, the driver will be
installed and activated automatically.You do not need to
turn it on or restar t.
23
Figure 1 shows control panel.
Contents
Page 24

The window is divided into
4 main sections.
The two checkboxes allow you to control certain
basic features.
1. The logo (upper left)
2. The primary controls area (upper r ight)
3. The remote controller picture, options popup menu
and custom setting input area (centre)
4. The on-line help area (bottom)
The logo:
Clicking here will bring up the about box (also includes
telephone numbers for technical support)
The primary controls area:
In figure 1 (above) the on/off button indicates that the
mouse driver is installed and activated (red LED
indicates that things are turned on).To de-install and
de-activate the driver, simply click on the button (the
button text will change to TURN ON, and the LED will
be green). It is always a good idea to turn off the driver
when the unit is not connected, especially if you wish to
attach another device to the modem or printer port of
your Macintosh.Turning off the dr iver completely
removes it from the system heap.This means, that
when it is off, the remote driver uses NO SYSTEM
RESOURCES AT ALL!
1. Placing a checkmark in Use Printer Port will instruct
the driver to expect remote data over the printer
port on your Macintosh (the default connection is
via the MODEM port). This setting will be remembered the next time you either tur n on your
Macintosh or open the control panel. As with
activation / deactivation there is no need to restar t
your Macintosh.
2. Placing a checkmark in Load at Startup will enable
the auto load function. Afterwards, every time you
start your Macintosh, the remote driver will be
loaded into the system and activated.
24
Contents
Page 25

The options popup menu:
Figure 2 shows control panel:
The Options Menu
The options menu (figure 2) allows you to associate
certain actions with pressing the secondar y button
(small grey key) on top of the Interactive Remote Control.There are 5 pre-defined selections as well as Custom (see below). As an example, say that you want the
secondary button to emulate the Enter key. Simply
choose the Enter key item in the popup menu and the
software will link your choice to the secondary button.
Now, every time you press the secondary button the
driver will pass that action, (in this example, enter key
pressed) to the front application.
The Custom Settings area:
Selecting Custom from the options popup menu will
activate the Custom Settings area. As long as the title
Custom Settings is blinking, the control panel will
record any combination of key strokes and / or mouse
clicks.Clicking cancel will stop recording and return you
to the previously selected popup menu item.Clicking
done will record your key strokes (clicks) and make that
combination the current setting for the secondary
button. Remember, while recording a sequence, do not
inadvertently click on the done or cancel buttons.
General and Special features:
The button underneath the Interactive Remote Control
acts as the primary button or your standard Macintosh
mouse button.
If you press the primary button and the secondary
button (regardless of the action setting) you will activate
the sticky button (button lock) feature.You can then
release both buttons (first the secondary button) but
leave the system in a mouse-down state.This can be
25
Contents
Page 26

very useful when doing click-drags in either the Finder
or word-processor. To release, press the secondary
button again.
The On-Line help area:
Moving the mouse over different items of the window
will activate the on-line help for that item. In figure 1,
the mouse is over the controller graphic, and the on-line
help is giving you some infor mation per tinent to it
(notice that the on-line help for includes the driver
version, this way you can easily check if you have the
latest driver installed).
Using the control panel
on the Projector
Stand by
Zoom
Focus
TV tuner
Computer
Comp. Video
Vol
S. Video
Menu
Enter
The control panel on the Projector provides you with
direct access to the most important control functions.
The control panel on the Projector is very handy to use
when the Remote Control has low batteries, or you simply have forgotten to bring it with you.The key functions
are as follows:
SENSITIVE MOUSE PAD:
The sensitive mouse pad works just like the sensitive
mouse pad on the Interactive Remote Control, and is
used to move the cursor within the Projector menu system. It will also control your computer mouse.
MENU
Press this key to access the menu and to project the
MAIN MENU on the projection screen. Pressing the
Menu key again will remove the menu and return the
Projectorto nor mal operation.
ENTER
The ENTER key is used to select the menu option
pointed to by the menu cursor. In a level two window
the Enter key is used to execute the function pointed to
by the menu cursor.
Fig. 12. The keys on the control panel on
the Projector
26
Contents
Page 27

VOLUME +
The VOLUME + is used to control the sound when the
Projector is used together with a video source or a
computer with a sound card. Press the VOLUME + to
increase the volume.
TV-TUNER: Press this key if you want to select TV
as your source
COMPUTER: Press this key if you want to select
COMPUTER as your source
VOLUME –
The VOLUME – is used to control the sound when the
Projector is used together with a video source or a
computer with a sound card. Press the VOLUME – to
reduce the volume.
ZOOM
Press this key to zoom the projected image to the
desired size.
FOCUS
Press this key to focus the projected image.
SOURCE
The Projector has direct keys for all four sources.
COMP.VIDEO: Press this key if you want to select
Composite Video as your source
S.VIDEO: Press this key if you want to select
S-Video as your source
LEFT AND RIGHT ARROW KEYS
These keys are used to change the TV channel when
TV is selected as your source.
STAND BY
This key will put the Projector in to stand by mode.The
lamp and fans will turn off.To return to nor mal mode
press the Menu or Enter key.
27
Contents
Page 28

Using the menus
Enter the MAIN MENU
With the Interactive Remote Control or the Control
Panel, press the MENU key to get the MAIN MENU.
Then use the pressure sensing pad to move the
mouse pointer to a menu icon and click the button
(left mouse) underneath the Interactive Remote Control
or the Enter key on the Control Panel.You click once to
select the icon and once more to activate it.If the icon
has a level 2 window, this will now appear on the
screen.You may then change the settings in the level
2 window.
1. If you click OK you store the displayed settings and
exit from the menus.
2. If you click Cancel you discard any changes you
made to the settings in the current level 2 window
and return to the MAIN MENU.
A menu overview
MAIN MENU (Projector VGA)
28
MAIN MENU (Projector SVGA)
Contents
Page 29

Picture
Adjust
brightness/
contrast
Configuration
Run automatic
system setup
Utilities
Dedicate function to the
ZAP button
Source
Adjust
image
settings
Change
picture
orientation
Info Show test
Adjust
product/source
synchronisation
Advanced
picture adjustments
picture
Adjust
picture
position
Choose menu
language
Tur n off
projector
Audio
Adjust
Zoom /
Focus
Change to
alternative
picture mode
Expand
image
Show accumulated
lamp time
Compress
image
TV-Tuner
Select
external
computer
as source
Icon overview
29
Select
composite
video as
source
Select
S-video as
source
Adjust
audio
settings
Select/
microphone
as audio
source
Deselect
microphone
as audio
source
Select TV Tuner as
source
TV-program
menu
Located in the main menu pictu
group when TV is selected
Contents
TV-Tuner
settings
Page 30

How to change the settings
The window above also has two slide controls and a
check box.You change the slide controls by moving the
mouse pointer over the arrow buttons and press the
button underneath the Interactive Remote control, or
the Enter key on the Control Panel.To change the state
of the check box, move the mouse pointer over it, and
press the button underneath the Interactive Remote
control, or by pressing the Enter key on the Control
Panel.
NOTE In order to make your changes effective,
always remember to click OK.
A typical level 2 window
Above is a typical level 2 window. All these windows
have a number of controls and at least two buttons, one
OK-button and one Cancel-button.After having done
the changes you wish to do, select the OK-button to
save the new settings and exit the window. If you want
to exit the window without saving the changes you
made, select the Cancel-button.You select the buttons
by moving the mouse pointer over them, and click the
button underneath the Interactive Remote control, or by
using the Enter key on the Control Panel.
30
Removing the MAIN MENU
To remove the menu system press the MENU key on
the Interactive Remote Control or on the control panel
on the Projector. It will also disappear automatically
after 20 sec.
Contents
Page 31

The MAIN MENU functions
Adjusting brightness and contrast
Adjust brightness and contrast with the two slider
controls. If you want the Projector always to use the
optimal contrast, switch on the check box “Auto contrast”.When the check box is on it is not possible to
adjust the contrast with the slider.
This icon will only appear when connected to a
computer source.
Select the above icon from the MAIN MENU.You will
get the window below.
Colour Manager which is a system where you can
select how you want the Projector to treath colours.
We have programed the Projector for four different
modes which are:
True colours, High brightness, Warm colours I and
Warm colours II.
Select the Colour Manager mode you wish to use.
Select OK to save your changes and exit, or select
Cancel to exit without saving your changes.
31
Contents
Page 32

Adjust image settings
This icon will only appear when connected to a video
source.
Select the above icon from the MAIN MENU.
You will get one of the windows below depending on
the video system connected.
Adjust image settings
The window above is the one you get if you have
connected NTSC video standard as source, and the
window to the left is the one you get if you have connected PAL or SECAM video standards as source. In
these windows you can adjust four video parameters,
tint (only in NTSC), saturation, brightness and contrast.
Adjust the sliders until the screen image looks satisfying, or choose Default to get a predefined setting.
Adjust image settings
32
In the PAL/SECAM window you also have checkboxes
for each system.The default setting is PAL, so if you
Contents
Page 33

need to show SECAM video you must change this
setting by clicking in the SECAM box.
Both windows have the Colour Manager which is a
system where you can select how you want the
Projector to treat colours.We have programed the
Projector for four different modes which are:
Adjust product/source
synchronization
This icon will only appear when connected to a
computer source.
True colours, High brightness, Warm colours I and
Warm colours II.
Select the Colour Manager mode you wish to use.
Select OK to save your changes and exit, or select
Cancel to exit without saving your changes.
Select the above icon from the MAIN MENU.You will
get the window below.
Adjust product/source synchronization
Use this function to synchronize the Projector with the
source if you have flicker in the picture.
33
Contents
Page 34

Adjust picture position
Select the above icon from the MAIN MENU.You will
get the window below.
Adjust vertical and horizontal position of the picture on
the screen with the two sliders. If you want the Projector
always to select the optimal position, switch on the
check box "Auto position".When this check box is on it
is still possible to adjust the position with the two sliders.This will result in the auto position function being
disabled.
NB! The auto position is only available with a
computer as source.
Select OK to save your changes and exit, or select
Cancel to exit without saving your changes.
Adjust picture position
34
Contents
Page 35

Zoom / Focus Adjustments
Select the above icon from the MAIN MENU.You will
get the window below.
Projector V GA:
Expand / compress
image vertically
One of these icons will appear if resolution is higher or
lower than 640x480.
Select one of the above icons from the MAIN MENU.
This function will expand or compress the screen image
vertically. This is useful if you are displaying software
that has lower resolution than 640x480 or PAL video
with resolution higher than 640x480.
Zoom / Focus Adjustments
In this window you can adjust the Zoom and Focus of
the Projector by clicking on the up and down arrows in
the menu.When you have adjusted the image to your
satisfaction click on the CLOSE button to exit and save
your new settings.
35
If you have expanded the image and want to compress
it, select the compress icon.
If you have compressed the image and you want to
expand it, select the expand icon.
Contents
Page 36

Projector SVGA:
Expand / compress
image vertically
One of these icons will appear if resolution is lower
than 800x600.
Expand image
If you have a computer resolution of less than 800 x
600, or a NTSC Video image you can expand it to fill
the screen by clicking on the expand icon.
If you have expanded the image and want to compress
it, select the compress icon.
Compress image
If you have a higher computer resolution than 800 x
600 the image will allways be shown in compressed
mode and none of the icons will apear.
Run automatic system setup
Select the icon above to run an automatic system
setup.This optimizes the Projectorsettings to fit the
selected source.
36
Contents
Page 37

Change picture orientation
Switch on the leftmost check box to rotate the screen
image 180° (front ceiling mounting). Switching on the
rightmost check box will mirror the screen image (rear
projection). Switch on both for rear ceiling mounting.
The Projector is designed for rear projection and ceiling
mounting upside down.These adjustments let you
easily set up the correct image for your application.
Select the above icon from the MAIN MENU.You will
get the window below.
Change picture orientation
Select OK to save your changes and exit, or select
Cancel to exit without saving your changes.
37
Contents
Page 38

Projector:
Advanced picture adjustments
In this window you can tune the values for the parameters Htot, Hsize and Vsize.
The Projector has 15 different set-ups to choose,
and will automatically configure the Projector to the
correct mode.
When you select this icon you get the window below.
The purpose of these Advanced Adjustments is that
you, as a user can manually override all parameters,
and fine tune settings to make them fit your particular
application exactly.This is very useful if you, eg. have a
scaleable graphics board.
NB! If you find, that adjusting the parameters here
reduces image quality, press DEFAULT to return to
factory settings.
NB! Make sure both the Hsync and Vsync values
are within the Projector specifications.
Advanced picture adjustments
38
Contents
Page 39

Choose menu language Change to alternative picture mode
Select the above icon from the MAIN MENU.You will
get the window below.
Choose language
Click on the icon with the flag representing the lan-
guage you want to use. The window will disappear, and
the selected language will be used in the MAIN MENU
and in all the level 2 windows.
This icon will only appear if alternative picture mode is
available.
You will have the option of selecting an alternative
picture mode, if the system recognizes a graphics
mode which has the exact characteristics of a different
mode, and where the system is not able to distinguish
between the two. An example of 2 modes which have
identical characteristics is VGA text (720x400
resolution) and VGA 320x200 graphics.
Select the above icon to change to an alternative
picture mode.
39
Contents
Page 40

Show accumulated lamp time
Selecting the above icon gives you the window below.
Show accumulated lamp time
In this window you can see the accumulated time that
the lamp has been used.You also use this window to
reset the accumulated lamp time when you have
changed the lamp.
The lamp reset indicator and the whole lamp replacement mechanism of the Projector is designed with user
convenience in mind, eliminating the need for costly
service calls.
WARNING! Do not reset the lamp indicator
unless you have just installed a new lamp
Resetting the lamp when it is not warranted
may cause you to use the lamp longer than
recommended, and may cause damage to
the Projector
40
Contents
Page 41

Dedicate function to the ZAP button Info
Select the above icon from the MAIN MENU.You will
get the window below.
Dedicate function to the ZAP button
Activate the check box that represent the function you
will dedicate to the ZAP button on the Interactive
Remote Control.
Select OK to save your changes and exit, or select
Cancel to exit without saving your changes.
By selecting this icon you will get information about, the
Projector and Support ser vice.
41
Contents
Page 42

Projector V GA:
Show test picture
Select the above icon from the MAIN MENU to display
a reference picture on the screen.The reference picture
is meant to serve as a reference image to ensure that
you have correct set-up, that the projected image displays full 640x480 and that product/source synchronization is correct.
Turn off Projectorin Stand By mode
Select the above icon from the MAIN MENU.This will
set the Projectorin standby position. Press the MENU or
ENTER key to return to normal screen image.This
function may also be dedicated to the Zap button
Select external computer as source
Projector SVGA:
Show test picture
Select the above icon from the MAIN MENU to display
a reference picture on the screen.The reference picture
is meant to serve as a reference image to ensure that
you have correct set-up, that the projected image displays full 800x600 and that product/source synchronization is correct.
42
Select the above icon from the MAIN MENU to select
an external computer as signal source.
Select composite video as source
Select the above icon from the MAIN MENU to select
composite video as signal source.This mode should
also be selected if connected to a Scart video source.
Contents
Page 43

Select S-video as source
TV-Tuner icon
Select the above icon from the MAIN MENU to select
S-video as signal source.
If a TV-Tuner is installed in your Projector, you can see
the above icon in the source section of the MAIN
MENU.If you activate this icon the Projector will tell you
that you have selected the picture section.
TV-Tuner as source.To enter the TV-Tuner menu you
simply press the MENU key again.You will now see the
TV-Tuner addition to the MAIN MENU in the picture
section.
43
Contents
Page 44

Projector
Adjust audio settings
Select the above icon from the MAIN MENU.
You will get the window below.
44
Adjust audio settings
Use this function when you have connected an audio
signal to the “Audio in” connectors or the microphone
connector on the Projector. Use the four sliders to
Contents
Page 45

adjust Volume, Bass, Treble and Balance until you have
a satisfying sound.
When common audio source is selected, only the
PC/common audio in channel is activ.
The Adjust Audio Settings menu also has five checkboxes.The first three control the speakers and the
sound functions.You can turn Inter nal speakers, external speakers, and the Sound on or off. Deactivating the
internal speakers does not have any influence on the
External speakers.Turning the sound off will disable all
audio functions of the Projector.
The Projector can use both internal and external speakers simultaneously (for connection of external speakers,
see Using external speakers, page 12).
There is one box for the enabeling of microphone
detection, and to get optimal performance, we recommend that you use a dynamic microphone with 600
ohm and 6,3 mm plug.
The final box lets you select a common audio source
for all your connected computer and video sources.This
feature is especially handy if you want to run a presentation from multiple sources with background music or
speech.
Select OK to save your changes and exit, or select
Cancel to exit without saving your changes.
Select/deselect microphone
as audio source
Selecting this icon toggles between selecting and
deselecting a microphone as audio source.The icon
without a cross means that you are not using a
microphone as audio source, but can select it to be so.
The icon with a cross has the reverse function.
If autodetection of microphone is on, this will not
be shown.
45
Contents
Page 46

7 Maintenance
Changing batteries in the remote control
Figure 13 shows the remote control with the battery lid
removed.Slide off the batter y lid, remove the batteries,
and replace them with fresh batteries of the same type.
Be sure to insert the new batteries with the + and poles correct. Slide the battery lid back on again.
Changing/installing the lamp
Figure 14 illustrates how to remove the lamp module
from the Projector.
WARNING! Never work inside the Projector
if it is connected to the mains! Always
unplug it from the wall outlet when
changing the lamp!
The lamp producer specifies an average lifetime.You
should not use the lamp beyond this average lifetime.
offers no warranty on the lamp.
1. Switch off the Projector and unplug it from the wall
outlet.The lamp assembly lid is locked as long as
the Projector is switched on.
Fig. 13, Batteries and covers on the remote control.
46
NOTE
Take care when removing the lamp, it may
be very warm! Do not under any circumstance
touch the lamp itself, the lamp holder or the lamp
reflector. Use only the handle to remove the lamp
module.
Contents
Page 47

2. Open the lamp lid, using a coin or similar tool, by
turning the lock 90º anti-clockwise.
3. Turn the screw of the lamp module anti-clockwise,
and pull the lamp module out of the Projectorusing
the small handle.
4. Take the new lamp module out of its package and
slide it into the Projector.
5. Fasten the screw of the lamp module by pushing it
in and turning it clockwise.
6. Close the lamp lid by turning the lock 90º clockwise.
It is not possible to switch on the Projector without
the lid closed.
7. When the lamp module has been replaced, reset
the lamp counter by selecting the icon with the
lamp in the MAIN MENU.Select the Reset button.
Fig. 14, Changing/installing the lamp
47
3.2.1.
4.
Contents
Page 48

Changing fuses
User spare parts
WARNING! Never work inside the Projector
if it is connected to the mains! Always
unplug it from the wall outlet when
changing fuse!
The fuse is next to the On/Off switch at the back of the
Projector.
1. Remove the thin plastic lid covering the voltage
selector.Do not use excessive force, the lid can
easily be damaged.
2. Pull out the fuse assembly and replace the fuse
with a fresh one.
3. Insert the fuse assembly.
4. Mount the plastic lid.
You should always have the following spare
parts available:
◆ Lamp
◆ Batteries for the remote controls
◆ Fuses
5. Connect the Projector to the wall outlet,
and switch it on.
48
Contents
Page 49

8 Trouble shooting
Symptom:
No image on the Projectorscreen
Possible causes and remedies:
1. The unit has not been switched on. Check the
ON/OFF switch on the plug panel.
2. No mains connected. Check that the mains cable is
connected to the plug panel and the wall outlet.
3. Unit left in Standby mode. Press Menu key on the
interactive remote control, or ENTER key on the
Control Panel
4. Unit left in BLANK mode.Press BLANK on the
Interactive Remote Control.
5. Contrast has been turned too far. Adjust the contrast.
6. The Projector has not been set up for this par ticular
application. Run the setup procedure.
7. The lamp does not function, see the Quick Guide or
part 7, Maintenance, Changing the lamp.
8. The “open lid”detector prevents the Projector from
being turned on. Lock the lamp lid properly.
Symptom:
Low brightness
Possible causes and remedies:
1. Adjust brightness until a satisfactory image is
achieved.
Symptom:
No source signal detected
(Black screen with blue frame)
Possible causes and remedies:
1. The signal source has not been switched on. Turn
on signal source.
2. The cables are not properly connected. Check all
the connections.
NB! Make sure the buffer cable is connected the
correct way with the buffer box and short end
cable at the computer.
3. For notebooks:The external RGB port may need to
be manually activated.Please consult the notebook
operating manual on how to operate.
49
Contents
Page 50

Symptom:
Symptom:
Overheating of the Projector.
(projector turns itself off)
Let the Projector cool for 10 minutes, and then
check the following:
1. Check that the fan is running.
2. Check that nothing is blocking the air inlet or
outlets.
3. Leave the Projector running.
If the unit turns itself off again you should
disconnect the Projectorfrom the mains and contact
your dealer.
Poor response from the Interactive Remote Control
Possible causes and remedies:
1. Check that nothing is blocking the IR receiver on
the Projectorfront, or rear.
2. If the combined distance remote control - screen Projectorexceeds 10 m (33 ft), point the remote
control directly towards the Projector.
3. Change the batteries in the remote control.
50
Contents
Page 51

9 Projector:TV-Tuner
Using the menus
The TV-Tuner can be purchased as an
optional add-on to the Projector.You can
easily install the TV-Tuner yourself. See fig. 15.
This user manual will, in connection with the
main user manual for the Projector, give you
all the information necessary to operate the
TV-Tuner.
Enter the MAIN MENU
With the Interactive Remote Control, or the Control
Panel, press the MENU key to get the MAIN MENU.
Then use the pressure sensing pad to move the mouse
pointer to a menu icon and click the button (left mouse)
underneath the Interactive Remote Control or the Enter
key of the Control Panel.You click once to select the
icon, and once more to activate it.If the icon has a level
2 window, this will now appear on the screen.You may
change the settings in the level 2 window.
1. If you click OK you store the displayed settings and
exit from the menus.
2. If you click Cancel you discard any changes you
made to the settings in the current level 2 window,
and return to the MAIN MENU.
Fig. 15, Changing/installing the TV-Tuner card
51
Contents
Page 52

How to Change the settings
Read the section in the main user manual (page 30) on
adjusting the settings in a level 2 window. In the chapter
on the TV-Tuner Setup Menu we will explain in detail
how to use this specific menu.
Removing the MAIN MENU
To remove the MAIN MENU from the screen press the
MENU key on the Interactive Remote Control, or on the
Control Panel of the Projector. It will also automatically
disappear after 20 seconds.
TV-Tuner
If a TV-Tuner is installed in your Projector, you can see
the above icon in the Source section of the MAIN
MENU.If you activate this icon the Projector will tell you
that you have selected TV-Tuner as source. To enter the
TV-Tuner menu you simply press the MENU key again.
You will now see the TV-Tuner addition to the MAIN
MENU.
52
Contents
Page 53

TV-Tuner MAIN MENU
Above you see the MAIN MENU with the
TV-Tuner icons present.
TV-Tuner settings
Activating this icon will open the TV-Tuner Setup Menu
where you can adjust the TV-Tuner settings.
Select the above icon from the MAIN MENU.You will
get the window below.
The TV-Tuner Setup Menu has five main parts:
TV System:
First you should select the right TV System for your
tuner.In the TV Systems section you can choose
between the following two systems:
West Europe
USA
Use the up or down arrows to scroll and select between
the different systems.
53
Contents
Page 54

TV Program:
Here you can program your TV channels.Using the up
and down arrows you can select between programs 1 -
30. Each of these programs can be assigned to TV
channels.
Assign button:
If this button is pushed the TV Channel shown will be
assigned to the TV Program shown.The User will get
feedback in the form of a TV Channel name change in
the TV Program box (if there is a change), and that
arrows above and under the assign button gives a short
green blink.
TV Channel Name:
The channel frequencies will have different names
depending on your TV System, and the names shown
are the technical names for the channel frequencies.
This means that you cannot find the publicly known
name of TV channel you are looking for, but you should
use the up and down arrows to scroll the channels.
When you get to a channel that you would like to have
easy access to you can assign it to the current TV Program (1 - 30) by pressing the assign button. Go through
all of the channels and assign up to 30 programs for
easy access.
Close button:
When you are finished adjusting the TV-Tuner settings
you press this button to leave the menus.The channel
programmed at the currently shown TV Program will be
shown on your screen.
TV-program menu
Select the above icon from the MAIN MENU.You will
get the window below.
TV Program menu:
When you have assigned TV Channels to your different
TV Programs you can enter the TV Program menu by
activating the TV Program icon in the MAIN MENU. This
will bring up a small menu consisting only of a number
and up and down arrows.You move through your
assigned TV Programs by using the arrows.You can
54
Contents
Page 55

also use the LEFT and RIGHT arrows in the Control
Panel to move between channels.This menu will not
dissappear until closed by the user, so you can keep it
on the screen for as long as you want. If you want to
close the menu you just press Menu on the interactive
remote control or the touch panel.
Operational Tips
The Projector TV-Tuner will behave just like a normal
TV.This means that you should consider the following
when adjusting the TV-Tuner settings:
Source of TV signals
There are basically three ways of taking in the TV
signals to the Projector.
◆ Antenna
◆ Cable
◆ Satellite dish
These three work differently, and it is important to
consider the options of each when adjusting the Projector TV-Tuner settings.
Antenna:
When you adjust your TV to signals from an antenna
you must store each channel in a different location
meaning that you must switch channels on the TV itself.
The same is true for the Projector TV-Tuner.When
hooked up to an antenna you assign the different channels to the programs in the TV-Tuner Setup Menu. Then
you use the Up and Down arrows in the menu to go
from one channel to another.
Cable:
When you are connected to a cable system you can
have two options. If you have a cable decoder you set
your TV to the channel for the cable, and then you use
the remote control for the decoder to switch between
channels. If you do not have a decoder you simply set
your TV up just like you would with an antenna.This is
also the same with the Projector.You must scroll the
channel name in the TV-Tuner Setup Menu until you
find the correct channel for your cable system.When
this channel has been assigned to one of the program
numbers you simply select this program and use your
decoder's remote control to switch between channels.
55
Contents
Page 56

Satellite dish:
This works like the cable decoder meaning that you
easily select the channel that reads the signals from the
satellite dish, and then you use the decoders remote
control to switch between channels. Follow the
explanation under cable to set up the correct channel,
and then use your decoder for the satellite dish to
switch between the different channels.
Follow the instructions in the TV-Tuner Setup Menu to
assign channels to the different TV Programs.
Programming Channels
You are free to program the different TV Programs to
the number you want from 1 - 30.
The chosen programming will stay in place even if you
move the Projector, as long as the programs are locked
to that channel. Channel locations might be different in
different areas, and also wether you are receiving from
antenna, cable or satellite dish.
56
Contents
Page 57

INDEX
A
adjust picture position,.......34
adjust Zoom / Focus..........35
adjusting brightness,..........31
adjusting contrast, .............31
advanced picture
adjustments....................38
alternative picture mode ....39
audio adjustments,............44
automatic system setup.....36
B
balance, ............................44
bass, .................................44
batteries, changing, ..........46
brightness, ........................30
brightness, adjusting, ........31
C
ceiling mounting, ...............37
change settings, menus, ...30
changing batteries, ...........44
changing bulb, ...................46
changing fuses, .................48
choose Menu Language, ..39
colourmode, ......................32
composite video,
connecting......................11
selecting, .......................42
using, .............................11
compress image,VGA, ......35
compress image,SVGA, ....36
57
connecting
to a Apple Macintosh
desktop computer, ...........9
to a desktop PC, ..............9
to a laptop or notebook, .10
to a video player, ...........11
to an Apple Macintosh
Powerbook, ....................10
contrast, ............................31
contrast, adjusting, ............31
control panel, ....................26
cooling, .............................14
cooling fan, .......................14
E
expand image VGA ...........35
expand image SVGA ........36
external computer,
selecting, .......................42
F
fan, cooling, ......................14
H
Hardcase ............................5
I
image compressing, ..........35
interactive remote
control, ...........................15
driver software, ..............21
keys, ..............................16
IR receiver, ........................15
Info, product, supor t ..........41
L
language, choosing menu..39
light conditions, .................13
lamp time...........................40
M
menus
change settings, ............30
MAIN MENU, .................28
MAIN MENU functions, .31
removing, .......................30
overview ........................29
microphone select/
deselect .........................45
P
PAL video, .........................32
picture mode......................39
picture orientation, ............37
picture position,
adjusting,........................34
pressure sensing
mouse pad, .....................17
projection screen, .............14
R
remove MAIN MENU, .......30
resolution, VGA, ................35
resolution, SVGA, .............36
RGB Out, ............................9
S
saturation, .........................32
screen resolution,VGA ......35
screen resolution,SVGA ...36
spare parts, .......................48
S-video, .............................12
using, .............................12
standby ..............................42
system setup, ....................36
Scart video.........................12
T
test picture, .......................42
tint, ....................................32
treble, ................................44
TV-tuner .............................51
main menue, ..................53
setings............................53
setup menu
Tv-program menue
V
volume, .............................44
W
warranty card, .....................7
Z
ZAP button, .......................41
Contents
Page 58

•
IDENTIFYING THE DIFFERENT PARTS OF THE
PROJECTOR
.......................................................................5
• Before you start....................................................................5
Contents
Page 59

•
CONNECTING THE PROJECTOR
PROJECTOR TO YOUR COMPUTER
..............................8
• Connecting to a desktop computer....................................9
• Connecting to an Apple Macintosh desktop computer....9
• Connecting to a standard laptop, notebook....................10
• Connecting to an Apple Macintosh Powerbook..............10
Contents
Page 60

•
CONNECTING THE PROJECTOR
PROJECTOR TO YOUR VIDEO PLA YER
.....................11
• Using composite video......................................................11
• Using Scar t video...............................................................12
• Using S-video ......................................................................12
Contents
Page 61

•
USING THE PROJECT OR
....................................................................13
• Evaluating the environmental conditions .........................................................13
• Light conditions ...................................................................................................13
• High Brightness Monochrome Mode .................................................................14
• Projection screen.................................................................................................14
• Avoid overheating the Projector........................................................................14
• Using the Interactive Remote Control...............................................................15
• Hints for using the Interactive Remote Control................................................17
• Holding the Interactive Remote Control............................................................17
• Using the pressure-sensing mouse pad...........................................................17
• To click an item....................................................................................................17
• To drag an item....................................................................................................18
• Using the Interactive Remote Control
to control your PC or Apple Macintosh computer...........................................19
• To install the Apple Macintosh driver software................................................21
• The window is divided into 4 main sections ....................................................24
• Using the control panel on the
Projector...............................................................................................................26
• Using the menus..................................................................................................28
• Enter the MAIN MENU.........................................................................................28
• A menu overview.................................................................................................28
• How to change the settings................................................................................30
• Removing the MAIN MENU.................................................................................30
• The MAIN MENU functions.................................................................................31
Contents
Page 62

•
MAINTENANCE
................................................................46
• Changing batteries in the remote control........................46
• Changing/installing the lamp ............................................46
• Changing fuses ..................................................................48
• User spare parts.................................................................48
Contents
 Loading...