

Page 1

9
Page 2
Page 3

Kia, THE COMPANY
Thank you for becoming the owner of a new Kia vehicle.
As a global car manufacturer focused on building high-quality vehicles with exceptional value, Kia Motors is dedicated to providing you
with a customer service experience that exceeds your expectations.
All information contained in this Owner’s Manual was accurate at the
time of publication. However, Kia reserves the right to make changes
at any time so that our policy of continual product improvement can
be carried out.
This manual applies to all trims of this vehicle and includes images,
descriptions, and explanations of optional as well as standard equipment. As a result, some material in this manual may not be applicable
to your specific Kia vehicle. Some images are shown for illustration
only and may show features that differ from those on your vehicle.
Drive safely and enjoy your Kia!
Page 4

Foreword
Thank you for choosing a Kia vehicle.
When you require service, remember that your Kia dealer
knows your vehicle best. Your dealer has factory-trained technicians, recommended special tools and genuine Kia replacement parts. It is dedicated to your complete customer satisfaction.
Because subsequent owners require this important information
as well, this publication should remain with the vehicle if it is
sold.
This manual will familiarize you with operational, maintenance and safety information about your new vehicle. It is supplemented by a Warranty and Consumer Information manual
that provides important information on all warranties regarding
your vehicle.
We urge you to read these publications carefully and follow the
recommendations to help assure enjoyable and safe operation
of your new vehicle.
Kia offers a great variety of options, components and features
for its various models. Therefore, some of the equipment
described in this manual, along with the various illustrations,
may not be applicable to your particular vehicle.
The information and specifications provided in this manual
were accurate at the time of printing. Kia reserves the right to
discontinue or change specifications or design at any time
without notice and without incurring any obligation. If you
have questions, always check with your Kia dealer.
We assure you of our continuing interest in your motoring
pleasure and satisfaction in your Kia vehicle.
© 2019 Kia Motors America, Inc.
All rights reserved. May not be reproduced or translated in
whole or in part without the written consent of Kia Motors
America, Inc.
Printed in Korea
i
Page 5
HOW T O USE THIS MANUAL
We want to help you get the greatest
possible driving pleasure from your
vehicle. Your Owner’s Manual can
assist you in many ways.We strongly recommend that you read the
entire manual. In order to minimize
the chance of death or injury, you
must read the WARNING and CAUTION sections in the manual.
Illustrations complement the words
in this manual to best explain how to
enjoy your vehicle. By reading your
manual, you will learn about features, important safety information,
and driving tips under various road
conditions.
The general layout of the manual is
provided in the Table of Contents.
Use the index when looking for a
specific area or subject; it has an
alphabetical listing of all information
in your manual.
Sections:This manual has 8 sections
plus an index. Each section begins
with a brief list of contents so you
can tell at a glance if that section has
the information you want.
You will find various WARNINGs,
CAUTIONs, and NOTICEs in this
manual.These WARNINGs were prepared to enhance your personal safety.You should carefully read and f ollow
ALL procedures and recommendations provided in these WARNINGs,
CAUTIONs and NOTICEs.
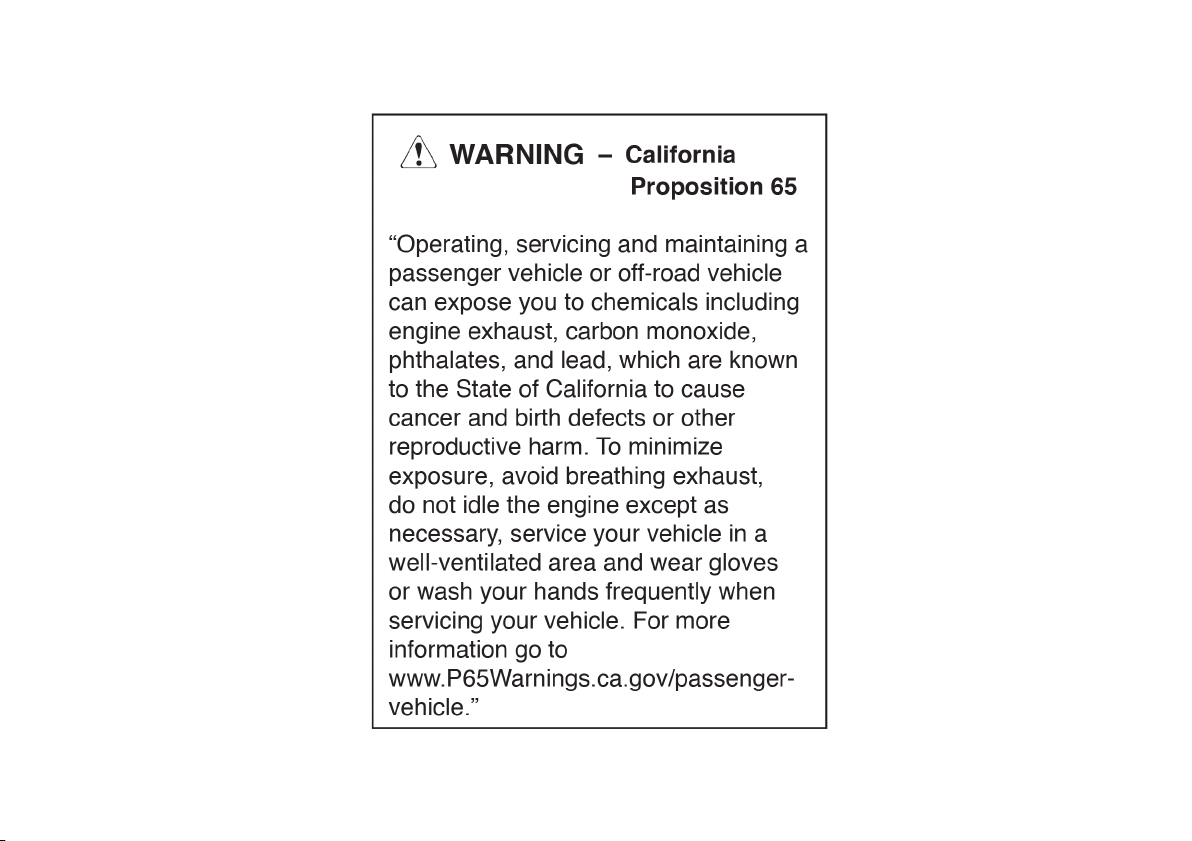
WARNING
A WARNING indicates a situation in which harm,serious bodily injury or death could result if
the warning is ignored.
CAUTION
A CAUTION indicates a situation
in which damage to your vehicle
could result if the caution is
ignored.
✽✽
NOTICE
A NOTICE indicates interesting or
helpful information is being provided.
Foreword
ii
Page 6

Page 7

Introduction
1
table of contents
Your vehicle at a glance
Safety features of your vehicle
Features of your vehicle
Driving your vehicle
What to do in an emergency
Maintenance
Specifications, Consumer information and Reporting safety defects
Index
2
3
4
5
6
7
8
I
Page 8

Hybrid/Plug-in Hybrid System Overview
HEV (HYBRID ELECTRIC VEHICLE) SYSTEM / H2
PHEV (PLUG-IN ELECTRIC VEHICLE) SYSTEM / H3
CHARGING THE PLUG-IN HYBRID VEHICLE / H4
DRIVING THE HYBRID/PLUG-IN HYBRID VEHICLE / H25
ENERGY FLOW HYBRID/PLUG-IN HYBRID VEHICLE / H32
STARTING THE HYBRID/PLUG-IN HYBRID VEHICLE (SMART KEY) / H38
COMPONENTS OF THE HYBRID/PLUG-IN HYBRID VEHICLE / H40
Page 9

HEV (HYBRID ELECTRIC VEHICLE) SYSTEM
The Kia Hybrid Electric Vehicle (HEV) uses both the gasoline engine and the electr ic motor for power. The electric
motor is run by a 270V high-voltage HEV battery.
Depending on the driving conditions, the HEV computer selectively operates between the engine and the electric
motor or even both at the same time.
Fuel efficiency increases when the engine is at idle, or when the vehicle is driven by the electric motor with the HEV
battery.
The HEV battery charge must be maintained because, at times, the engine may come on e v en at idle to act as a generator.Charging also occurs when decelerating or by regenerative braking.
H2
OJFH055281L
Page 10
PHEV (PLUG-IN ELECTRIC VEHICLE) SYSTEM
The Kia Plug-in Hybrid Electric Vehicle (PHEV) shares the characteristics of both a conventional hybrid electric vehicle and an all-electric vehicle.
When used as a conventional h ybrid electric vehicle , the HEV computer selectively operates between the engine and
the electric motor or even both at the same time.
When it is operating in the electric vehicle mode, the vehicle is driven only using the electric motor over a certain distance until the hybrid battery becomes low.The driving distance in EV mode depends on customer driving style and road
conditions. Aggressive driving maneuvers may at times temporarily enable the engine to operate for maximum power.
The hybrid battery can be fully charged by connecting a plug to an external electric power source.
CD (Charge Depleting) Mode
Electric Vehicle Mode
Electric motor
Motor
Start up/Low speed
CS (Charge Sustaining) Mode
Engine+Motor
Acceleration High speed
Engine
Charging
Deceleration
Charging
Battery charging
6
External charging
OJFHP056290L
H3
Page 11

CHARGING THE PLUG-IN HYBRID VEHICLE
Charging Information
• AC Charger: The plug-in hybrid
vehicle is charged by plugging into
a AC charger installed in your
home or a public charging station.
(For further details, refer to the 'AC
Charge'.)
• Tr ickle Charger: The plug-in hybrid
vehicle can be charged by using
household electricity.
The electrical outlet in your home
must comply with regulations and
can safely accommodate the
Voltage / Current (Amps) / Power
(Watts) ratings specified on the
trickle charge.
Charging Time
• AC Charger: Takes about from 2
and a half hours to 3 hours at room
Depending on the condition and
durability of the high-voltage battery, charger specifications, and
ambient temperature, the time
required for charging the high-voltage battery may vary.
• Trickle Charger: For charging at
home. Please note that the Trickle
Charger is slower than the AC
Charger.
temperature (Can be charged to
100%.).
Charging T ypes
Category
AC Charger
Trickle
Charger
An actual charger image and a charging method may vary in accordance with the charger manufacturers.
Charging Inlet
(Vehicle)
OJFHPQ016006
OJFHPQ016006
Charging Connector Charging Outlet Charging Method Charging Time
Approximately from 2
and a half hours to 3
hours (to fully charge
the plug-in hybrid
vehicle, 100%)
For charging at home.
Please note that the
Trickle Charger is slower than the AC Charger.
ODEPQ017019
ODEPQ017019
AC charger installed
in homes or public
charging stations
OJFHPQ016021L
Household current
OAEEQ016024
H4
Page 12

Charging Status
OJFHPQ016009L
You can monitor the charging status
outside of the vehicle when charging
the high-voltage battery.
Charging Status Indicator
Charging in
progress
Fully charged Off
Scheduled charging
Auxiliary battery
saver+ or scheduled
air conditioner is
operating
Malfunction Blinks (red)
Illuminates (green)
Blinks (green) and
then turns off
Quickly blinks
(Green) and then
turns off
Scheduled Charging
(if equipped)
• You can set reserved charging
using the AVN.
Refer to the AVN for detailed information about setting reserved
charging.
• Scheduled charging can only be
done when using a AC charger or
the portable charging cable (ICCB:
In-Cable Control Box).
H5
Page 13
CHARGING THE PLUG-IN HYBRID VEHICLE (CONT.)
OJFHPQ017009L
• When scheduled charging is set
and the AC charger or the portable
charging cable (ICCB: In-Cable
Control Box) is connected for
charging, the indicator lamp blinks
(for 3 minutes) to indicate that
scheduled charging is set.
• When scheduled charging is set,
charging is not initiated immediately when the AC charger or portable
charging cable (ICCB: In-Cable
Control Box) is connected. When
immediate charging is required,
use the AVN to deactivate the
scheduled charge setting.
Charging Precautions
■ AC Charger
OJFHPQ016021L
■ Portable Charging Cable (ICCB)
(if equipped)
Connector
(vehicle)
Plug
(Charger)
OAEEQ016028
❈ Actual charger image and charging
method may vary in accordance with
the charger manufacturer.
WARNING
- Fires caused by dust or
water
Do not connect the charging
cable connector plug to the
vehicle if there is water or dust
on the charging inlet.
Connecting while there is water
or dust on the charging cable
connector and plug may cause
a fire or electric shock.
WARNING
Public Electric Outlets
-
Do not use old or worn out public electric outlets to charge
your vehicle. There may be a
risk of fire and injury when
using old worn out public electrical outlets.
H6
Page 14
WARNING
Interference with electron-
-
ic medical devices
When using medical electric
devices such as an implantable
cardiac pacemaker ,make sure to
ask the medical team and manufacturer whether charging your
electric vehicle will impact the
operation of the medical
devices.In some instances,electromagnetic waves that are generated from the charger can seriously impact medical electric
devices such as an implantable
cardiac pacemaker.
■ Connector (Vehicle)
■ Plug (Charger)
ODEPQ017050
WARNING
Touching the charging
-
connector
Do not touch the charging connector, charging plug, and the
charging inlet when connecting
the charging connector cable to
the charging outlet and the
charging inlet on the vehicle.
Doing so may result in electrocution.
• Comply with the following in order
to prevent electrical shock when
charging:
- Use a waterproof charger
- Make sure to not touch the charg-
ing connector and charging plug
when your hand is wet
- Do not charge when there is light-
ning
- Do not charge when the charging
connector and plug is wet
H7
Page 15
CHARGING THE PLUG-IN HYBRID VEHICLE (CONT.)
WARNING - Charging
cable
• Immediately stop charging
when you discover abnormal
symptoms (smell, smoke).
• Replace the charging cable if
the cable coating is damaged
to prevent electrical shock.
• When connecting or removing
the charging cable, make sure
to hold the charging connector handle.
If you pull the cable itself
(without using the handle),the
internal wires may disconnect
or get damaged.This may lead
to electric shock or fire.
WARNING - Cooling fan
Do not touch the cooling fan
while vehicle is charging.When
the vehicle is switched OFF
while charging, the cooling fan
inside the motor compartment
may automatically operate.
• Always keep the charging connector and charging plug in clean and
dry condition. Be sure to keep the
charging cable in a condition where
there is no water or moisture.
• Make sure to use the designated
charger for charging the vehicle.
Using any other charger may
cause failure.
• Before charging the battery, turn
the vehicle OFF.
• Be careful not to drop the charging
connector.The charging connector
can be damaged.
H8
Page 16

AC Charge
■ AC Charger
OJFHPQ016021L
■ AC Charger cable
OAEEQ016028
You can charge your vehicle by plugging into a public charger at a charging station.
How to Connect to an AC Charger
OJFHPQ016010L
1.Depress the brake pedal and
apply the parking brake.
2. Turn OFF all switches, move the
shift lever to P (Park), and turn
OFF the vehicle.
3. After unlocking doors, open the
charging door by pressing it.
✽✽
NOTICE
• The charging door does not open
when the theft alarm system is
armed.
• To open the charging inlet cover,
all vehicle doors must be
unlocked. When the doors are
locked, the charging inlet cover
will not open.
H9
Page 17

CHARGING THE PLUG-IN HYBRID VEHICLE (CONT.)
OJFHPQ018064L OJFHPQ018039
4. Remove any dust on the charging
connector and charging inlet.
5. Hold the charging connector handle and insert it into the charging
inlet while pressing the release
button, until you hear a click
sound.If it is not fully connected, a
bad connection between the
charging connector and the charging terminals may cause a fire.
6. Check if the charging cable connection indicator of the high voltage battery in the instrument cluster is turned ON.
Charging does not occur when the
indicator is OFF. When the charging connector is not connected
properly, reconnect the charging
cable to charge.
✽✽
NOTICE
Moving the shift lever from P (Park)
to R (Reverse)/N(Neutral)/D (Drive)
stops the charging process.
To restart the charging process,
move the shift lever to P (Park),
press the Engine Start/Stop button
to the OFF position, and disconnect
the charging cable. Then, connect
the charging cable.
H10
Page 18

OJFHPQ018041L
7. After charging has started, the
estimated charging time is displayed on the instrument cluster
for about 1 minute. It is also displayed when the driver's door is
opened with charging in progress.
When scheduled charging is set,
the estimated charging time is displayed as “--” .
Unlock Charging Door in
Emergency
OJFHP076232N OJFHPQ016009L
If the charging door does not open
due to battery discharge, open the
hood and slightly pull the emergency
cable which is located in headlamp
cover as shown above.
The charging door will then open.
Charging Status
Checking Charging Status
You can monitor the charging status
outside of the vehicle when charging
the high-voltage battery.
H11
Page 19

CHARGING THE PLUG-IN HYBRID VEHICLE (CONT.)
Charging Status Indicator
Charging in
progress
Fully charged Off
Scheduled charging
Auxiliary battery
saver+ or sched-
uled air conditioner
is operating
Malfunction Blinks (red)
Illuminates (green)
Blinks (green) and
then turns off
Quickly blinks
(Green) and then
turns off
How to Disconnect an AC
Charger
1.The vehicle doors must be
unlocked in order to be able to disconnect the charging connector.A
lock system prevents charger
cable disconnection when the
vehicle's doors are locked.
CAUTION
In order to disconnect the
charging connector, unlock the
doors to unlatch the charging
connector lock system. If not,
the charging connector and the
vehicle's charging inlet may be
damaged.
OJFHPQ018028L
2. Press the door unlock button on
the smart key.
3. Hold the charging connector handle and pull it while pressing the
release button (1).
CAUTION
When disconnecting the charging connector, do not try to disconnect it by force while not
pressing the release button.
This may damage the charging
connector and vehicle charging
inlet.
H12
Page 20
OJFHPQ016013
4. Make sure to securely close the
charging door.
✽✽
NOTICE
• Keep the charging connector and
the charging plug clean and dry.
The charging cable should also be
kept dry.
• Use an air gun to blow any foreign
substances from the charging connector and the charging plug.
WARNING
Do not modify or disassemble
the charging cable components. Doing so may cause a
fire or an electric shock resulting in personal injuries.
Trickle Charger
OJFHPQ018065N
➀ : Code and Plug (Code set)
➁ : Control Box
➂ : Charging Cable and Charging
Connector
H13
Page 21

CHARGING THE PLUG-IN HYBRID VEHICLE (CONT.)
When you cannot drive to a public
charging station due to low battery,
you can charge the car by using the
220V portable charger (ICCB: In
Cable Control Box) which you can
buy as an option.
✽✽
NOTICE
This cable is designed to prevent
problems caused by unexpected battery discharge and when you use
general outlets, it may lead to excessive electricity charges as the electricity charges for electric vehicles
will not be applied. So refrain from
using it to fully charge your car.
WARNING
If this cable is connected to a
household power source, it may
exceed the capacity of the distributor, resulting in safety
problems such as electrical
shutdown and fire.
How to Set Charging Current of
Portable Charging Cable
OJFHPQ016015N
1. Check the outlet’s current rating
before connecting the plug to the
outlet.
2. Connect the power plug to the
household electrical outlet.
3. Check the status of the control box
display.
ODEEVQ018041
4. Adjust the charging current by
pressing the button (1) on the
back of the control box for more
than 1 second.(Refer to the e xamples of charging cable type and
charging current setting.)
5. Each time the button (1) is
pressed, the control box display is
sequentially changed to 12A, 10A
and 8A.
6. Once the charging current setting
is complete, start charging according to Trickle Charge procedure.
H14
Page 22
❈ Examples of ICCB Charging Current Setting
(However, examples are only for reference and situations may var y depend-
ing on the surrounding environment.)
Outlet current ICCB charge level Control box display
14-16A 12A
13-12A 10A
11-10A 8A
9-8A 6A
How to Connect Portable
Charging Cable
(ICCB: In-Cable Control Box)
OJFHPQ016015N
1. Turn OFF all switches, move the
shift lever to P (Park), and turn
OFF the vehicle.
2. Connect the plug to a household
electric outlet.
CAUTION
If the outlet is aged, damaged or
cracked, do not use it.
H15
Page 23

CHARGING THE PLUG-IN HYBRID VEHICLE (CONT.)
3. Check if the power lamp (green)
on the control box turns ON.
❈ Make sure that the plug is not
loosely put into the outlet. (If it is
loose, it may generate heat.)
H16
ODEEVQ018043 OJFHPQ018064L
4.Depress the brake pedal and
apply the parking brake.
5. After unlocking doors, open the
charging door by pressing it.
✽✽
NOTICE
The charging door does not open
when the theft alarm system is
armed.
OJFHPQ016010L
6. Remove any dust on the charging
connector and charging inlet.
7. Hold the charging connector handle and insert it into the charging
inlet while pressing the release
button, until you hear a click
sound. If it is not fully connected,
improper connection between the
charging connector and the charging terminals are a potential fire
hazard.
Page 24

8. Charging star ts automatically and
the charging indicator lamp starts
to blink.
OJFHPQ018039ODEEVQ018044
9. Check if the charging cable connection indicator of the high voltage battery in the instrument cluster is turned ON.
Charging does not occur when the
indicator is OFF. When the charging connector is not connected
properly, reconnect the charging
cable to charge.
✽✽
NOTICE
Moving the shift lever from P (Park)
to R (Reverse)/N(Neutral)/D (Drive)
stops the charging process.
To restart the charging process,
move the shift lever to P (Park),
press the Engine Start/Stop button
to the OFF position, and disconnect
the charging cable. Then, connect
the charging cable and restart the
vehicle again.
H17
Page 25

CHARGING THE PLUG-IN HYBRID VEHICLE (CONT.)
OJFHPQ018041L
10. After charging has started, the
estimated charging time is displayed on the instrument cluster
for about 1 minute. It is also displayed when the driver's door is
opened with charging in progress.
When scheduled charging is set,
the estimated charging time is displayed as "--".
Unlock Charging Door in
Emergency
OJFHP076232N
If the charging door does not open
due to battery discharge, open the
hood and slightly pull the emergency
cable which is located in headlamp
cover as shown above.
The charging door will then open.
Checking Charging Status
OJFHPQ016009L
You can monitor the charging status
outside of the vehicle when charging
the high-voltage battery.
H18
Page 26

Charging Status Indicator
Charging in
progress
Fully charged Off
Illuminates (green)
Charge cable storage
Scheduled charging
Auxiliary battery
saver+ or sched-
uled air conditioner
is operating
Malfunction Blinks (red)
Blinks (green) and
then turns off
Quickly blinks
(Green) and then
turns off
OJFHPQ016029N
We recommend that the trickle
charger cable be put in a storage box
after use. Keep the storage box
above the main battery pack inside
the trunk.
H19
Page 27
CHARGING THE PLUG-IN HYBRID VEHICLE (CONT.)
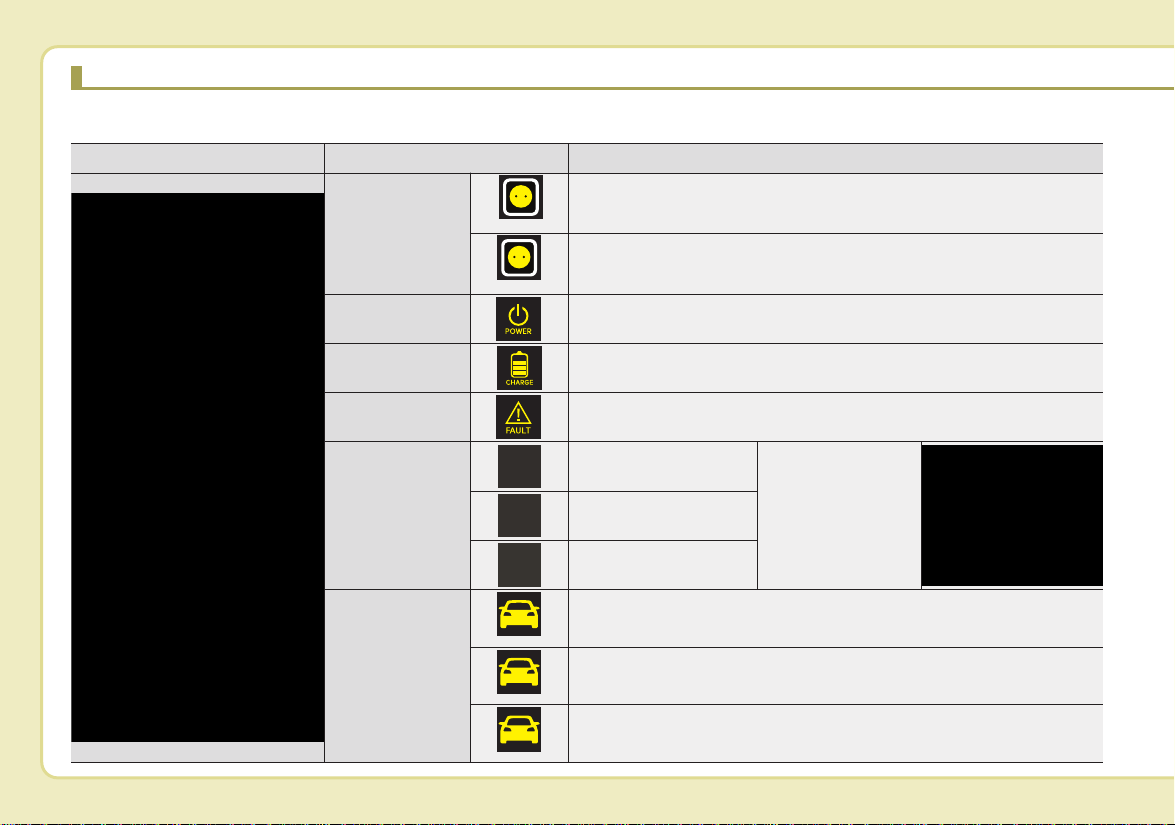
Charging Status Indicator Lamp for Portable Charger
Control Box Indicator Details
On : Power on
PLUG
(Green)
(Red)
POWER On : Power on
Blink : Plug temperature sensor failure
On : Plug high temperature protection
Blink : Plug high temperature warning
H20
CHARGE
Blink : Charging In power saving mode, only the CHARGE
indicator is illuminated.
FAULT Blink : Charging interrupted
Charging current 12 A
CHARGE LEVEL
Charging current 10 A
Charging current 8 A
Charging connector plugged
(Green)
VEHICLE
(Blue)
Charging
Blink : Charging impossible
(Red)
The charging current
changes (3 level)
whenever the button
(1) is pressed for 1 sec
with the charger
plugged into an electrical outlet but not the
vehicle.
Page 28

Charging Status Indicator Lamp for Portable Charger
NO Control Box Status / Diagnosis / Countermeasure NO Control Box Status / Diagnosis / Countermeasure
• Connected to power plug (Green On)
• Plug temperature sensor failure (Green
blink)
1
3
• Plug high temperature protection (Red
blink)
• Plug high temperature warning (Red On)
(Contact an authorized Kia dealer.)
- While charging
• Charging indicator (Green blink)
• Vehicle indicator (Blue On)
2
4
- Charging connector plugged into the
vehicle (Green On)
- Before plugging charging connector
into the vehicle (Red blink)
• Abnormal internal temperature
• Device failure
(Contact an authorized Kia dealer.)
H21
Page 29

CHARGING THE PLUG-IN HYBRID VEHICLE (CONT.)
NO Control Box Status / Diagnosis / Countermeasure NO Control Box Status / Diagnosis / Countermeasure
H22
- Plugged into the vehicle (Red blink)
• Inter nal diagnostic device failure
5
7
• Current leakage
• Abnor mal inter nal temperature
(Contact an authorized Kia dealer.)
• Plug temperature sensor failure (Green
blink)
• Plug high temperature protection (Red
blink)
• Plug high temperature warning (Red On)
(Contact an authorized Kia dealer.)
6
8
- After plugging charging connector
into vehicle (Red blink)
• Communication failure
(Contact an authorized Kia dealer.)
- Power saving mode
• 3minutes after charging star ts
(Green blink)
Page 30

How to Disconnect Portable
Charging Cable
(ICCB: In-Cable Control Box)
1. Before disconnecting the charging
connector, make sure the doors
are unlocked. When the door is
locked, the charging connector
lock system will not allow disconnection.
CAUTION
In order to disconnect the charging connector, unlock the doors
to unlatch the charging connector lock system.If not,the charging connector and the vehicle's
charging inlet may be damaged.
OJFHPQ018028L
2. Hold the charging connector handle and pull it while pressing the
release button (1).
3. Make sure to securely close the
charging door.
OJFHPQ016015N
4.Disconnect the plug from the
household electric outlet. Do not
pull the cable when disconnecting
the plug.
5. Close the protective cover for the
charging connector so that foreign
material cannot get into the terminal.
6. Put the charging cable inside the
cable compartment to protect it.
H23
Page 31

CHARGING THE PLUG-IN HYBRID VEHICLE
Precautions for Portable
Charging Cable
(ICCB: In-Cable Control Box)
• Use a portable charging cable that
is certified by Kia.
• Do not try to repair, disassemble, or
adjust the portable charging cable.
• Do not use an extension cord or
adapter.
• Stop using immediately if failure
warning light occurs.
• Do not touch the plug and charging
connector with wet hands.
• Do not touch the terminal part of the
AC charging connector and the AC
charging inlet on the vehicle.
• Do not connect the charging connector to voltage that does not
comply with regulations.
• Do not use the portable charging
cable if it is worn out, exposed, or
there exists any type of damage on
the portable charging cable.
• If the ICCB case and AC charging
connector is damaged, cracked, or
the wires are exposed in any way,
do not use the portable charging
cable.
• Do not let children operate or touch
the portable charging cable.
• Keep the control box free of water.
• Keep the AC charging connector or
plug terminal free of foreign substances.
• Do not step on the cable or cord.
Do not pull the cable or cord and
do not twist or bend it.
• Do not charge when there is lightning.
• Do not drop the control box or
place a heavy object on the control
box.
• Do not place an object that can
generate high temperatures near
the charger when charging.
• Charging with a worn out or damaged household electric outlet can
result in a risk of electric shock If
you have doubts about the household electric outlet condition, have
it checked by a licensed electrician.
• Stop using the portable charging
cable immediately if the household
electric outlet or any components
are overheating or smell burning.
H24
Page 32

DRIVING THE HYBRID/PLUG-IN HYBRID VEHICLE
Changing plug-in hybrid mode
OJFHP056292L
Pressing the HEV button changes
the plug-in hybrid system modes,
between Electric (Charge
Depleting/CD) mode and Hybrid
(Charge Sustaining/CS) mode.
Each time the mode is changed a
corresponding message is displayed
on the instrument cluster as follows.
Plug-in hybrid mode indicator
• CD (Charge Depleting, Electric) mode
:The high-voltage
(hybrid) battery is
used to drive the
vehicle.
OJFHP048420N
• CS (Charge Sustaining, Hybrid) mode
:The high-voltage
(hybrid) battery
and gasoline
engine is used to
OJFHP048421N
drive the vehicle.
OJFHP048634L/OJFHP048633L
A corresponding message is displayed
to indicate the selected mode.
H25
Page 33

DRIVING THE HYBRID/PLUG-IN HYBRID VEHICLE (CONT.)
Warning and indicator lights
Ready Indicator
This indicator illuminates :
When the vehicle is ready to be driven.
- ON : Normal driving is possible.
- OFF : Normal driving is not possible,
or a problem has occurred.
- Blinking : Emergency driving.
When the ready indicator goes OFF
or blinks, there is a problem with the
system. In this case, have your vehicle inspected by an authorized Kia
dealer.
Hybrid system warning
light
This warning light illuminates:
When there is a malfunction with the
hybrid system.
In this case, have the vehicle
inspected by an authorized Kia dealer.
When the warning light illuminates
while driving, or does not go OFF
after starting the vehicle, have your
vehicle inspected by an authorized
Kia dealer.
EV Mode Indicator
EV
This indicator illuminates when the
vehicle is driven by the electric motor .
Charging Cable
Connection Indicator
(Plug-in hybrid)
This indicator illuminates in red when
the charging cable is connected.
H26
Page 34

Coasting guide (if equipped)
OJFHP048604L
A chime will sound and the coasting
guide indicator will blink four times to
inform the driver when to take the
foot off the accelerator by anticipating a decelerating event* based on
the analysis of driving routes and
road conditions according to the navigation system. It encourages the
driver to remove the foot from the
pedal and allow coasting down the
road with EV motor only. This helps
preventing unnecessary fuel consumption and increases fuel efficiency.
❈ Example of a deceleration event is
going down an extended hill,
approaching a toll booth, and
approaching reduced speed
zones.
• User settings
Press the Engine Start/Stop button
and put the shift lever in P(Par k). In
the User Settings Mode, select
Driver assistance, Coasting Guide,
and then On to turn on the system.
Cancel the selection of coasting
guide to turn off the system. For the
explanation of the system, press and
hold the [OK] button.
• Operation conditions
To activate the system, take the fol-
lowing procedures. Enter your destination information on the navigation
and select the driving route. Select
the ECO mode in the Integrated
Driving Control System.Then, satisfy
the following.
- The driving speed should be
between 37 mph (60 km/h) and 99
mph (160 km/h).
❈ The operating speed may vary
due to difference between instrument cluster and navigation effected by tire inflation level.
H27
Page 35

DRIVING THE HYBRID/PLUG-IN HYBRID VEHICLE (CONT.)
✽✽
NOTICE
Coasting guide is only a supplemental system to assist with fuel-efficient
driving in certain situations. Thus,
the operating conditions may be different in accordance with
traffic/road conditions (i.e. driving
in a traffic jam, driving on a slope,
driving on a curve). Thus, take the
actual driving conditions into consideration, such as distances from
the vehicles ahead/ behind, while
referring to the coasting guide system as guidance.
Unplug vehicle to start
(Plug-in hybrid)
This message is displayed when you
start the engine without unplugging
the charging cable. Unplug the
charging cable, and then start the
vehicle.
Remaining time (Plug-in hybrid)
This message is displayed to notify
the remaining time to fully charge the
battery.
Shift to P to charge
(Plug-in hybrid)
This message is displayed when the
charging connector is plugged with
the shift lever in R (Reverse), N
(Neutral) or D (Drive). Move the shift
lever to P (Park) and re-start the
charging process.
Electric/Hybrid modes
(Plug-in hybrid)
A corresponding message is displayed when a mode is selected by
pressing the HEV button.
Low battery. Maintaining Hybrid
mode (Plug-in hybrid)
This message is displayed when the
vehicle is unable to convert to EV
mode even when pressing the HEV
button during HEV mode driving due
to insufficient high-voltage (hybrid)
battery level.
Low battery temp. Maintaining
current (Plug-in hybrid)
This message is displayed when the
vehicle is unable to convert to EV
mode even when pressing the HEV
button during HEV mode driving due
to low battery temperature.
H28
Page 36

Charger Error! (Plug-in hybrid)
This message is displayed when the
charging failed due to an external
charger error.
The purpose of this message is to let
you know the error has occurred in
the charger itself, not in the vehicle.
Low/High System temperature
Maintaining Hybrid mode
(Plug-in hybrid)
This message is displayed when the
vehicle is unable to convert to EV
mode even when pressing the HEV
button during HEV mode driving due
to low/high system temperature.
Switching to Hybrid mode to
allow heating or air conditioning
(Plug-in hybrid)
• When the coolant temperature is
lower than 57 °F (-14 °C), and you
turn the climate control On for
heating, this message will be displayed in the cluster. Then, the
vehicle will automatically switch to
HEV mode.
• When the coolant temperature is
higher than 57 °F (-14 °C), or you
turn the climate control Off, the
vehicle will automatically return to
EV mode.
Wait until fuel door opens
(Plug-in hybrid)
This message is displayed when you
attempt to open the fuel filler lid with
the fuel tank pressurized. Wait until
the fuel tank is depressurized.
✽✽
NOTICE
• It may take up to 20 seconds to
open fuel filler lid.
• When the fuel filler lid is frozen
and does not open after 20 seconds
at freezing temperature, slightly
tap the fuel filler lid and then
attempt to open it.
H29
Page 37

DRIVING THE HYBRID/PLUG-IN HYBRID VEHICLE (CONT.)
Fuel door open (Plug-in hybrid)
This message is displayed when the
fuel filler lid is opened.
Also means "Ready to refuel".
Check fuel door (Plug-in hybrid)
This message is displayed when the
fuel filler lid is open or an abnormality has occurred.
Refuel after stopping
(Plug-in hybrid)
This message is displayed when the
fuel filler lid open button is pressed
when a vehicle equipped with a plugin hybrid seal-type fuel tank is in
motion (vehicle speed is greater than
mi/h (0 km/h)).
Disconnect charging cable before
opening fuel door (Plug-in hybrid)
This message is displayed when you
press the fuel filler lid open button
while charging.
The fuel lid will not open when the
charging cable is connected to the
vehicle.
Charging Door Open
(Plug-in hybrid)
This message indicates that the
charging door is open while in driving-ready state to encourage you to
inspect and close the door.
(Driving with the charging door open
may result in moisture inflow or damage.This message is used to prevent
such occurrences.)
H30
Page 38

EV / HEV modes
(Plug-in hybrid)
OJFHP048634L
OJFHP048633L
A corresponding message is displayed when a mode is selected by
pressing the HEV button.
H31
Page 39

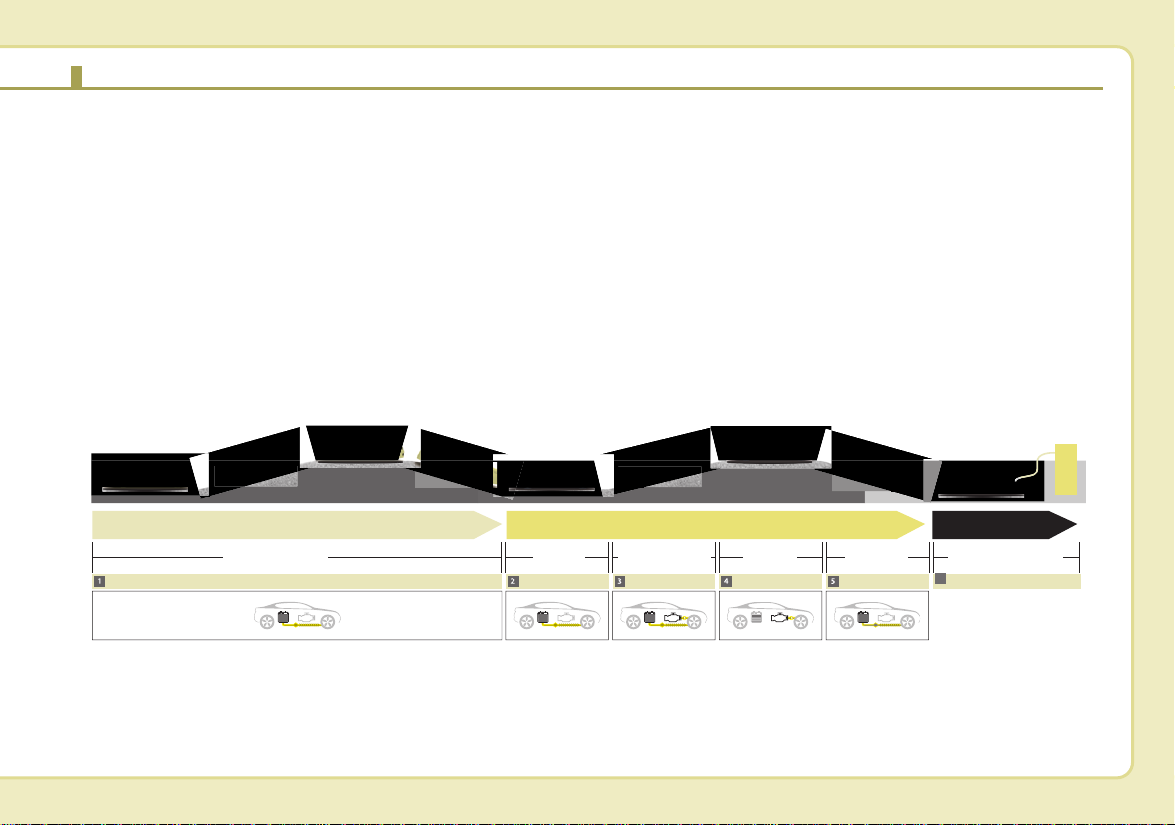
ENERGY FLOW HYBRID/PLUG-IN HYBRID VEHICLE
Kia hybrid system notifies the driver
of energy flow in various operating
modes.Eleven Modes show the driver the current operating condition.
Vehicle Stop
OJFHPQ018042L OJFHPQ018043L
In this mode, the vehicle is at a stop.
(There is no energy flow.)
EV Propulsion
Electric power is used to move the
vehicle.(Battery ➞ Wheel)
H32
Page 40

Power Assist
OJFHPQ018044L OJFHPQ018045L OJFHPQ018046L
Electric and Engine power are used
to move the vehicle.
(Battery & Engine ➞ Wheel)
Engine Only Propulsion
Engine power is used to move the
vehicle.(Engine ➞ Wheel)
Engine Generation
Vehicle is stopped with the Engine
charging the hybrid battery.
(Engine ➞ Battery)
H33
Page 41

ENERGY FLOW HYBRID/PLUG-IN HYBRID VEHICLE (CONT.)
Regeneration
Hybrid battery is being charged by
regenerative braking.
(Wheel ➞ Battery)
Engine Brake
OJFHPQ018050L OJFHPQ018048LOJFHPQ018047L
The vehicle is slowed down by
engine compression.
(Wheel ➞ Engine)
Power Reserve
Engine is both driving the vehicle
and charging the hybrid battery.
(Engine ➞ Wheel & Batter y)
H34
Page 42

Engine Generation/Motor Drive
Engine Generation/Regeneration
Engine Brake/Regeneration
OJFHPQ018051L
The vehicle is being slowed b y engine
compression and regenerative braking. The hybrid battery is being
charged by regenerative braking.
(Engine ➞ Battery ➞ Wheel)
OJFHPQ018049L
The engine and regenerative brake
system charge up the high-voltage
battery.
(Engine & Wheel ➞ Battery)
OJFHPQ018052L
The engine compression can be
used to slow down the vehicle. The
regenerative braking system can be
used to charge the hybrid system.
(Wheel ➞ Engine & Batter y)
H35
Page 43

ENERGY FLOW HYBRID/PLUG-IN HYBRID VEHICLE (CONT.)
AUX. BATTERY SAVER+ (For
Plug-in Hybrid, if equipped)
The Aux.Battery Saver+ is a function
that monitors the charging status of
the 12V auxiliary battery.
If the auxiliary battery level is low , the
main high voltage battery charges
the auxiliary battery.
✽✽
NOTICE
The Aux. Battery Saver+ function will
be ON when the vehicle is delivered. If
the function is not needed, you may
turn it off in the Users Settings mode
on the LCD display. For more information, refer to the "System setting"
on the following page.
Mode
• Cycle Mode :
When the vehicle is OFF with all
doors, hood and liftgate closed, the
Aux.Battery Saver+ periodically activates according to the auxiliary battery status.
• Automatic Mode :
When the engine start/stop button is
in the ON position with the charging
connector plugged in, this function
activates according to the auxiliary
battery status to prevent over-discharge of the auxiliary battery.
✽✽
NOTICE
The Aux. Battery Saver+ activates
for a maximum of 20 minutes. If the
Aux. Battery Saver+ function activates more than 10 times consecutively, in the Automatic Mode, this
function will stop activating, judging that there is a problem with the
auxiliary battery. In this case, drive
the vehicle for some period of time.
The function will start activating if
the auxiliary battery returns to normal.
CAUTION
The Aux. Battery Saver+ function cannot prevent battery discharge if the auxiliary battery is
damaged, worn out, used as a
power supply or unauthorized
electronic devices are used.
✽✽
NOTICE
If the Aux. Battery Saver+ function
was activated, a message will be displayed on the instrument cluster
and the high voltage battery level
may have decreased.
H36
Page 44

System setting
The driver can activate the Aux.
Battery Saver+ function by placing
the engine start/stop button to the
ON position and by selecting:
"User Settings ➞ Other ➞ Aux.
Battery Saver+"
LCD message
WARNING
OJFHP048632L
This message is displayed when the
Aux. Battery Saver+ function has
been completed when the vehicle is
turned ON.
However, if the LCD message pops
up frequently, have your vehicle`s
auxiliary battery or electric/electronic
components serviced by an authorized Kia dealer.
OJFHPQ017009L
The Aux. Battery Saver+ relies
on the high voltage battery to
charge the 12V battery. The
charging indicator lamp will blink
rapidly when this is occurring.
To reduce the risk of electrical
shock, do not touch any high
voltage components (orange) or
other electrical devices while
charging is occurring.
H37
Page 45

STARTING THE HYBRID/PLUG-IN HYBRID VEHICLE (SMART KEY)
Starting the Hybrid System
1. Carr y the smart key into the vehicle.
2. Make sure the parking brake is
firmly applied.
3. Place the shift lever in the P(Park)
position. In N (neutral) position,
you cannot start the vehicle.
4. Depress the brake pedal.
5. Press the engine start/stop button.
6. The engine should be started without pressing the accelerator. In
extremely cold weather or after the
vehicle has not been operated for
several days, let the engine warm
up without depressing the accelerator.
• Even if the smart key is in the
vehicle, if it is far away from you,
the engine may not start.
• When the engine start/stop button is in the ACC or ON position
and if any door is open, the system checks for the smart key. If
the smart key is not in the vehicle,
the warning, “Key is not in vehicle” will come on, and if all doors
are closed, the chime will also
sound for about 5 seconds. Keep
the smart key in the vehicle when
using the ACC position or if the
vehicle engine is on. The indicator will turn off while the vehicle is
moving.
If the starting procedure is followed, the “ ” symbol on the
instrument cluster will turn on.
For more details, Please check
chapter 5.
H38
Page 46

ECONOMICAL and SAFE
OPERATION of Hybrid system
• Drive smoothly. Accelerate at a
moderate rate and maintain a
steady cruising speed. Don't make
“jack-rabbit” starts. Don't race
between stoplights.
Avoid heavy traffic whenever possible. Always maintain a safe distance from other vehicles so you
can avoid unnecessary braking.
This also reduces brake wear.
• The regenerative brake generates
energy when the vehicle decelerates.
• When the hybrid battery power is
low , the h ybrid system automatically recharges the hybrid battery.
• When the engine runs in “N” position, the hybrid system cannot generate electricity. The hybrid battery
cannot recharge in “N” position.
Please refer to chapter 5.
✽✽
NOTICE
When the hybrid system is in
READY mode, the engine will automatically start and stop as needed.
The “ ” symbol will illuminate in
the cluster when the system is operational.
CAUTION - Extended
cranking
Do not crank the engine for a
prolonged period of time without the engine starting. This
could result in damage to the
HEV battery and become totally
discharged.
H39
Page 47

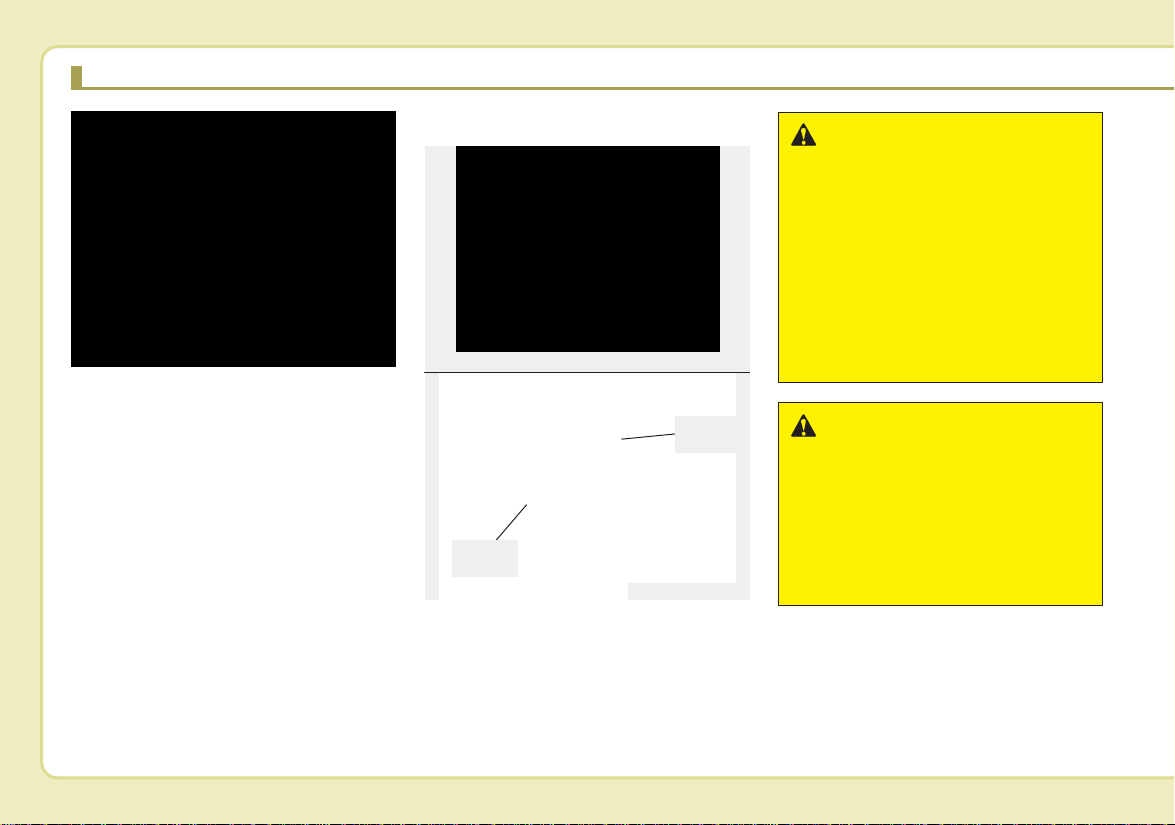
COMPONENTS OF THE HYBRID/PLUG-IN HYBRID VEHICLE
1. Engine : 2.0L
2. Motor : 38kW (Hybrid) / 50kW (Plug-in hybrid)
3.Transmission : 6AT
4. Hybrid starter generator (HSG)
❈ The actual shape may differ from the illustration.
- PHEV
- HEV
5. HPCU (Hybrid Power Control Unit)
6. High voltage battery system
7. Regenerative brake system
8.Virtual Engine Sound System (VESS)
OJFHPQ018001N
H40
Page 48

The Hybrid battery uses high-voltage
to operate the electric motor and
other components. High voltage is
dangerous if touched.
Your vehicle is equipped with orange
colored insulation which covers over
the high voltage components to protect people from electric shock.
High voltage warning labels are
attached to some system components as additional warnings. Your
vehicle is recommended to be serviced by an authorized Kia dealer.
HPCU
HEV Battery
PHEV Battery
OJFHQ015002
OJFHQ015003
OJFHPQ018003N
WARNING - High voltage
components
Never touch orange or high-voltage labeled components including wires, cables, and connectors. If the insulators or covers
are damaged or removed,severe
injury or death from electrocution may occur.
WARNING - Touching
HPCU
When replacing the fuses in the
engine compartment, never
touch the HPCU.The HPCU carries high voltage. Touching the
HPCU could result in electrocution, serious injur y, or death.
H41
Page 49

COMPONENTS OF THE HYBRID/PLUG-IN HYBRID VEHICLE (CONT.)
CAUTION - High Voltage
Battery Damage
When loading your vehicle, be
careful transporting items in a
manner that could damage the
high voltage battery. Do not
store items on top of the high
voltage battery or overload the
trunk area. Such actions may
ultimately damage the high voltage battery unit.
CAUTION - Carrying
Liquids in Trunk
Do not load large amounts of liquid in open containers in the vehicle. If spilled onto the HEV battery, the liquid may cause a short
or further damage to the battery.
Motor
OYFH021002N
WARNING - Battery
Electrolyte
As with all batteries, avoid fluid
contact with the Hybrid battery.
If the battery is damaged and if
electrolyte comes in contact
with your body, clothes or eyes,
immediately flush with a large
quantity of fresh water. Have
your eyes examined by a doctor
as soon as possible.
WARNING - After-market
Battery Charger
Do not use an after-market battery charger to charge the
Hybrid battery. Doing so may
result in death or serious injury.
✽✽
NOTICE - Prolonged parking
Prolonged parking might cause battery discharge and operation failure
due to natural discharge. Driving
the vehicle approximately once
every 2 months, more than 9 mile
(15 km) is recommended. The battery will be charged automatically
when driving the vehicle.
H42
Page 50

WARNING - High Waters
• Avoid high waters as this may
result in your vehicle becoming saturated with water and
could compromise the high
voltage components.
• Do not touch any of the high
voltage components within
your vehicle if your vehicle
has been submerged in water
equal to half of the vehicle
height. Touching high voltage
components once submerged
in water could result in severe
burns or electric shock that
could result in death or serious injury.
CAUTION - Cleaning
Engine
When you clean the engine compartment, do not wash using
water. Water may cause electric
arcing to occur and damage electronic parts and components.
WARNING
Exposure to High Voltage
-
• High voltage in the hybrid battery system is very dangerous
and can cause severe burns
and electric shock. This may
result in serious injury or death.
• For your safety, never touch,
replace, dismantle or remove
any portion of the hybrid battery system including components, cables and connectors.
WARNING - Use of Water
or Liquids
If water or liquids come into
contact with the hybrid system
components, and you are also
in contact with the water,severe
injury or death due to electrocution may occur.
WARNING
Hot Components
-
When the hybrid battery system
operates, the HEV battery system can be hot. Heat burns may
result from touching even insulated components of the HEV
system.
H43
Page 51

COMPONENTS OF THE HYBRID/PLUG-IN HYBRID VEHICLE (CONT.)
Safety plug
OJFHPQ018053
WARNING - Safety Plug
Never touch the safety plug.
Safety plug is attached to high
voltage hybrid battery system.
Touching safety plug will result
in death or serious injury.
Service personnel should follow
procedure in service manual.
Some Special Features of the
Hybrid Vehic le.
Hybrid vehicles sound different than
gasoline engine vehicles. When the
hybrid system operates, you may
hear a sound from the hybrid battery
system behind the rear seat. If you
apply the accelerator pedal rapidly,
you may hear a sound. When you
apply the brake pedal, you may hear
a sound from the regenerative brake
system. When the hybrid system is
turned off or on, you may hear a
sound in the engine compartment. If
you depress the brake pedal repeatedly when the hybrid system is
turned on, you may hear a sound in
the engine compartment. None of
these sounds indicate a problem.
They are characteristics of hybrid
vehicles.
When the hybrid system is turned on,
the engine may run. This does not
indicate a malfunction. If the “ ”
symbol is on, the hybrid system is
operating.Even if the gasoline engine
is off, you can operate the vehicle.
The HEV system may emit electromagnetic waves which can affect the performance of electronic devices appliances, such as laptop computers,
which are not part of the vehicle design.
If you park the vehicle for a long time,
the hybrid system will discharge.You
need to drive the vehicle sev eral times
per month to maintain a charge.
When you start the hybrid system in
the "P" transmission position, the
“ ” symbol is illuminated in the
cluster.The driver can drive the vehicle even if the engine is stopped.
WARNING - Turning off
HEV system
When you leave the vehicle, you
should turn off the hybrid system. If you depress the accelerator pedal by mistake and the vehicle is not in the "P" position, the
vehicle will accelerate. This may
result in serious injury or death.
H44
Page 52

Virtual Engine Sound System
(VESS)
The Virtual Engine Sound System
generates a simulated engine sound
for pedestrians to hear the vehicle
while at low speeds in EV mode.
WARNING - Interference
with electronic medical
devices
Electromagnetic waves that are
generated from the charger can
impact medical electric devices
such as an implantable cardiac
pacemaker. When using such
medical electric devices, ask
your medical professional and
the device manufacturer
whether charging your electric
vehicle will impact the operation
of the medical electric devices.
High Voltage Battery Air Intake
Hybrid battery air intake
OJFHQ015005
The hybrid battery air intake is located at the bottom the rear seats.
The air intake cools down the hybrid
battery.
When the hybrid battery air intake is
blocked, the hybrid battery may overheat. Do not obstruct the air intake
with any other objects.
Plug-in Hybrid Vehicle
OJFHP036114L
The high-voltage battery air intake is
located on the left side of the rear
seats. The air intake cools down the
high-voltage battery.
When the high-voltage battery air
intake is blocked, the high-voltage
battery may overheat and the vehicle
performance may become limited
and set a hybrid warning lamp. Do
not obstruct the air intake with any
other objects.
H45
Page 53

COMPONENTS OF THE HYBRID/PLUG-IN HYBRID VEHICLE (CONT.)
WARNING - Air Intake
• Blocking the air intake behind
the rear seats may damage
the HEV battery.
• Do not allow any water to
enter cleaning. If any water
enters the air intake, the
Hybrid battery may cause an
electric shock which can
cause serious injury or death
due to electrocution.
If An Accident Occurs
• Avoid the engine compartment.
• Avoid making contact with any
orange or high voltage wires,
cables, or components.
• Assume that a high voltage component is exposed and move away
from the vehicle as promptly as
possible.
• Refer to Chapter 6 for towing information.
✽✽
NOTICE
• If a small scale fire occurs, use a
fire extinguisher rated ABC or BC
for electrical fires.
If it is impossible to extinguish the
fire in the early stage, remain a
safe distance from the vehicle and
immediately call 911. Also, advise
them that a hybrid vehicle is
involved.
If the fire spreads to the high voltage battery, large amount of water
is needed to put out the fire.
Using small amount of water or
fire extinguishers not meant for
electrical fires could cause serious
injury or death from electrical
shocks.
• If you need towing, refer to chapter 6.
H46
Page 54

If a vehicle accident occurs:
1. Stop the vehicle and shift the
transmission into "P" position. And
then depress the parking brake.
2.Turn off the Hybrid system by
pushing the Engine Start/Stop
Button.
3. Step away from the vehicle to a
safe place.
4. Call emergency services for help
and let them know the vehicle is a
Hybrid vehicle.
If an immersion in water occurs:
If your vehicle was flooded and has
soaked carpeting or water on the
flooring, you should not try to start
the Hybrid system. Have the car
towed to an authorized Kia dealer.
WARNING
If a submersion in water occurs:
If your vehicle was flooded and
has soaked carpeting or water
on the flooring, you should not
try to start the Hybrid system.
Never touch the high voltage
cables, connectors and package modules, because an electrical shock may occur causing
injury or death. High Voltage
cables are orange in color.
In this case, have the vehicle be
towed to and inspected by an
authorized Kia dealer.
When the hybrid vehicle shuts
off
When the high voltage battery or 12volt battery discharges, or fuel tank is
empty, the hybrid system may not
operate.
If the Hybrid system stops operating
while the vehicle is moving, reduce
the vehicle speed gradually. Pull
your vehicle off the road to a safe
area, and shift the transmission in to
Park (P) position and;
1. T urn on the hazard warning flashers.
2. Set the start button at OFF, and try
to start the Hybrid system by
applying the brake pedal and
pushing the start button.
3. If the Hybrid system will not operate, refer to “EMERGENCY
STARTING” in chapter 6.
Before you try to jump start the vehicle, confirm the fuel level. If the fuel
level is low, add more fuel before
attempting an emergency start.
H47
Page 55

COMPONENTS OF THE HYBRID/PLUG-IN HYBRID VEHICLE
WARNING - Accident
Vehicle
Never touch electric wires or
cables. If exposed electric wires
or cables are visible inside or
outside of your vehicle, an electric shock may occur.
WARNING - Putting out
fire
Never use a small quantity of
water to put out a fire in your
vehicle. If a fire occurs, evacuate the car immediately and
contact the fire department.
H48
Page 56

Introduction
Fuel requirements . . . . . . . . . . . . . . . . . . . . . . . . . . 1-2
• Gasoline containing alcohol and methanol . . . . . . . . . 1-2
• Do not use methanol . . . . . . . . . . . . . . . . . . . . . . . . . . . 1-3
• Fuel additives . . . . . . . . . . . . . . . . . . . . . . . . . . . . . . . . . 1-4
• Operation in foreign countries. . . . . . . . . . . . . . . . . . . 1-4
Vehicle modifications . . . . . . . . . . . . . . . . . . . . . . . . 1-5
Vehicle break-in process . . . . . . . . . . . . . . . . . . . . . 1-5
HEV/PHEV powertrain. . . . . . . . . . . . . . . . . . . . . . 1-5
Vehicle data collection and event data recorders. . 1-6
1
Page 57

Introduction
FUEL REQUIREMENTS
Your new vehicle is designed to use
only unleaded fuel having a pump
octane number ((R+M)/2) of 87
(Research Octane Number 91) or
higher. (Do not use methanol blended fuels.)
Your new vehicle is designed to
obtain maximum performance with
UNLEADED FUEL, as well as minimize exhaust emissions and spark
plug fouling.
Never add any fuel system cleaning
agents to the fuel tank other than
what has been specified.(Consult an
authorized Kia dealer for details.)
• Tighten the cap until it clicks one
time, otherwise the Check Engine
light will illuminate.
WARNING - Refueling
• Do not "top off" after the nozzle automatically shuts off.
Attempts to force more fuel
into the tank can cause fuel
overflow onto you and the
ground causing a risk of fire.
• Always check that the fuel cap
is installed securely to prevent fuel spillage, especially
in the event of an accident.
Gasoline containing alcohol and
methanol
Gasohol, a mixture of gasoline and
ethanol (also known as grain alcohol), and gasoline or gasohol containing methanol (also known as
wood alcohol) are being marketed
along with or instead of leaded or
unleaded gasoline.
Pursuant to EPA regulations, ethanol
may be used in your vehicle.
Do not use gasohol containing more
than 15% ethanol, and do not use
gasoline or gasohol containing any
methanol. Ethanol provides less
energy than gasoline and it attracts
water, and it is thus likely to reduce
your fuel efficiency and could lower
your MPG results.
Methanol may cause drivability problems and damage to the fuel system,
engine control system and emission
control system.
Discontinue using gasohol of any
kind if drivability problems occur.
Vehicle damage or drivability problems may not be covered by the
manufacturer’s warranty if they result
from the use of:
1. Gasoline or gasohol containing
methanol.
2. Leaded fuel or leaded gasohol.
3.Gasohol containing more than
15% ethanol.
21
Page 58

Introduction
"E85" fuel is an alternative fuel comprised of 85 percent ethanol and 15
percent gasoline, and is manufactured exclusively for use in Flexible
Fuel Vehicles. “E85” is not compatible with your vehicle. Use of “E85”
may result in poor engine performance and damage to your vehicle's
engine and fuel system. Kia recommends that customers do not use
fuel with an ethanol content exceeding 15 percent.
✽✽
NOTICE
Your New Vehicle Limited Warranty
does not cover damage to the fuel system or any performance problems
caused by the use of “E85” fuel.
✽✽
NOTICE
Never use any fuel containing
methanol. Discontinue use of any
methanol containing product which
may inhibit proper drivability.
Other fuels
Using fuels that contain Silicone (Si),
MMT (Manganese, Mn), Ferrocene
(Fe), and other metalic additives,
may cause vehicle and engine damage or cause misfiring, poor acceleration, engine stalling, catalyst melting, clogging, abnormal corrosion,
life cycle reduction, etc.
Also, the Malfunction Indicator Lamp
(MIL) may illuminate.
✽✽
NOTICE
Damage to the fuel system or performance problem caused by the use
of these fuels may not be covered by
your New Vehicle Limited
Warranty.
Gasoline containing MMT
Some gasoline contains harmful manganese-based fuel additives such as
MMT(Methylcyclopentadienyl
Manganese Tr icarbonyl). Kia does not
recommend the use of gasoline containing MMT. This type of fuel can
reduce vehicle performance and affect
your emission control system. The
Malfunction Indicator Lamp on the
cluster may come on.
Do not use methanol
Fuels containing methanol (wood
alcohol) should not be used in your
vehicle.This type of fuel can reduce
vehicle performance and damage
components of the fuel system,
engine control system and emission
control system.
13
Page 59

Introduction
Fuel Additives
Kia recommends that you use good
quality gasolines treated with detergent additives such as TOP TIER
Detergent Gasoline, which help prevent deposit formation in the engine.
These gasolines will help the engine
run cleaner and enhance performance of the Emission Control System.
For more information on TOP TIER
Detergent Gasoline, please go to the
website (www.toptiergas.com)
For customers who do not use TOP
TIER Detergent Gasoline regularly,
and have problems starting or the
engine does not run smoothly, additives that can be purchased separately may be added to the gasoline.
If TOP TIER Detergent Gasoline is
not available, one bottle of additive
should be added to the fuel tank at
every 7,500 miles (12,000 km) or
every engine oil change is recommended.Additives are av ailab le from
your authorized Kia dealer along with
information on how to use them. Do
not mix other additives.
Operation in foreign countries
If you are going to drive your vehicle
in another country, be sure to:
• Observe all regulations regarding
registration and insurance.
• Determine that acceptable fuel is
available.
41
Page 60

Introduction
This vehicle should not be modified.
Modification of your vehicle could
affect its performance, safety or
durability and may even violate governmental safety and emissions regulations.
In addition, damage or performance
problems resulting from any modification may not be covered under
warranty.
• If you use unauthorized electronic
devices, it ma y cause the vehicle to
operate abnormally, wire damage,
battery discharge and fire. For your
safety, do not use unauthorized
electronic devices.
VEHICLE BREAK-IN
PROCESS
No special break-in period is needed.
By following a f e w simple precautions
for the first 600 miles (1,000 km) you
may add to the performance, economy and life of your vehicle.
• Do not race the engine.
• While driving, keep your engine
speed (rpm, or revolutions per
minute) between 2,000 rpm and
4,000 rpm.
• Do not maintain a single speed for
long periods of time, either fast or
slow. Varying engine speed is
needed to properly break-in the
engine.
• Avoid hard stops, except in emergencies, to allow the brakes to seat
properly.
HEV/PHEV POWERTRAINVEHICLE MODIFICATIONS
By following a f e w simple precautions
for the first 600 miles (1,000 km) you
may add to the performance, economy and life of your vehicle.
• Do not race the engine.
• Avoid hard stops, except in emergencies, to allow the brakes to seat
properly.
15
Page 61

Introduction
VEHICLE DATA COLLECTION AND EVENT DATA RECORDERS
This vehicle is equipped with an
event data recorder (EDR). The
main purpose of an EDR is to
record, in certain crash or near
crash-like situations, such as an
air bag deployment or hitting a
road obstacle, data that will assist
in understanding how a vehicle's
systems performed. The EDR is
designed to record data related to
vehicle dynamics and safety systems for a short period of time,
typically 30 seconds or less. The
EDR in this vehicle is designed to
record such data as:
• How various systems in your
vehicle were operating;
• Whether or not the driver and
passenger safety belts were
buckled/ fastened;
• How far (if at all) the driver was
depressing the accelerator
and/or brake pedal; and,
• How fast the vehicle was traveling.
These data can help provide a better understanding of the circumstances in which crashes and
injuries occur. NOTE: EDR data
are recorded by your vehicle only
if a non-trivial crash situation
occurs; no data are recorded by
the EDR under normal driving
conditions and no personal data
(e.g., name , gender, age, and
crash location) are recorded.
However, other parties, such as
law enforcement, could combine
the EDR data with the type of personally identifying data routinely
acquired during a crash investigation.
To read data recorded by an EDR,
special equipment is required, and
access to the vehicle or the EDR is
needed. In addition to the vehicle
manufacturer, other parties, such
as law enforcement, that have the
special equipment, can read the
information if they have access to
the vehicle or the EDR.
61
Page 62

Your vehicle at a glance
Exterior overview. . . . . . . . . . . . . . . . . . . . . . . . . . . 2-2
Interior overview . . . . . . . . . . . . . . . . . . . . . . . . . . . 2-4
Instrument panel overview . . . . . . . . . . . . . . . . . . . 2-5
Engine compartment . . . . . . . . . . . . . . . . . . . . . . . . 2-6
2
Page 63

Your vehicle at a glance
EXTERIOR OVERVIEW
■ Front view
1. Hood......................................................4-29
2. Head lamp (Features of your vehicle)...4-103
Head lamp (Maintenance).....................7-75
3. Daytime running light ..........................4-103
4. Front fog lamp
(Features of your vehicle).....................4-110
Front fog lamp (Maintenance) ...............7-75
5.Wheel and tire................................7-39, 8-4
6. Outside rearview mirror.........................4-50
7. Panorama sunroof.................................4-38
8. Front windshield wiper blades
(Features of your vehicle)....................4-112
Front windshield wiper blades
(Maintenance) .......................................7-33
9.Windows................................................4-24
10. Charging door ...............................H9, H16
❈ The actual shape may differ from the illustration.
22
OJFHP018001N
Page 64

■ Rear view
Your vehicle at a glance
1. Door locks.............................................4-13
2. Fuel filler lid..................................4-31, 4-35
3. Rear combination lamp
(Maintenance) .......................................7-83
4. High mounted stop lamp
(Maintenance) .......................................7-86
5.Trunk......................................................4-18
6. Antenna...............................................4-152
7. Rear view monitor...............................4-102
8. Parking Distance War ning - reverse......4-99
❈ The actual shape may differ from the illustration.
OJFHP018008L
23
Page 65

Your vehicle at a glance
INTERIOR OVERVIEW
1. Inside door handle.................................4-14
2. Driver position memory button..............3-11
3. Power window switch ............................4-24
4. Central door lock switch ........................4-15
5. Power window lock button .....................4-28
6. Outside rearview mirror control .............4-50
7. Outside rearview mirror folding.............4-51
8. Fuel filler lid open button..............4-31, 4-35
9. Seat.........................................................3-4
10. ESC off button.....................................5-34
11. Instrument panel illumination control ..4-54
12. BCW On/Off button...........................5-101
13. LKA On/Off button.............................5-117
14. Steering wheel ....................................4-44
15.Tilt and telescopic steering control
lever.....................................................4-45
16. Inner fuse panel ..................................7-59
17. Brake pedal.........................................5-23
18. Parking brake pedal............................5-21
19. Hood release lever..............................4-29
❈ The actual shape may differ from the illustration.
42
OJFHP018011N
Page 66

INSTRUMENT PANEL OVERVIEW
❈ The actual shape may differ from the illustration.
Your vehicle at a glance
1. Cruise control......................................5-72
Smart Cruise Control with Stop & Go .5-76
2. Driver’s front air bag............................3-59
3. Horn.....................................................4-47
4. Instrument cluster................................4-53
5.Wiper and washer control lever.........4-112
6. Engine start/stop button........................5-7
7. Passenger’s front air bag ....................3-60
8. Glove box..........................................4-139
9. Hazard warning flasher.........................6-2
10. Automatic climate control system....4-119
11. Shift lever A/T....................................5-12
12. Heated steering wheel button ...........4-46
13.Drive mode button (Hybrid vehicle)....5-96
14. Seat warmer....................................4-142
Air ventilation seat...........................4-143
15. Electronic parking brake (EPB)
switch.................................................5-22
16. Auto Hold On/Off button....................5-29
17. Center console storage box............4-138
18.Power outlet......................................4-144
19. USB charger....................................4-145
20. Smart phone wireless charger ........4-146
21. ECO button (Plug-in hybrid vehicle)..5-98
OJFHP018014N
25
Page 67

Your vehicle at a glance
ENGINE COMPARTMENT
■■
Gasoline Engine (Nu 2.0 L - GDI)
1. Engine coolant reservoir ...................7-22
2. Engine oil filler cap ...........................7-18
3. Engine oil dipstick .............................7-18
4. Brake fluid reservoir..........................7-25
5. Air cleaner.........................................7-28
6. Fuse box...........................................7-57
7. Inverter coolant reservoir ..................7-22
8. Radiator cap .....................................7-23
9.Windshield washer fluid reser voir.....7-26
❈ The actual engine room in the vehicle may differ from the illustration.
62
OJFHP078161
Page 68

Safety features of your vehicle
Important safety precautions . . . . . . . . . . . . . . . . . 3-2
• Always wear your seat belt. . . . . . . . . . . . . . . . . . . . . . 3-2
• Restrain all children . . . . . . . . . . . . . . . . . . . . . . . . . . . 3-2
• Air bag hazards. . . . . . . . . . . . . . . . . . . . . . . . . . . . . . . 3-2
• Driver distraction . . . . . . . . . . . . . . . . . . . . . . . . . . . . . 3-2
• Control your speed . . . . . . . . . . . . . . . . . . . . . . . . . . . . 3-3
• Keep your vehicle in safe condition. . . . . . . . . . . . . . . 3-3
Seat. . . . . . . . . . . . . . . . . . . . . . . . . . . . . . . . . . . . . . . 3-4
• Front seat adjustment - manual. . . . . . . . . . . . . . . . . . 3-7
• Front seat adjustment - power. . . . . . . . . . . . . . . . . . . 3-8
• Driver position memory system (for power seat). . . 3-11
• Headrest (for front seat) . . . . . . . . . . . . . . . . . . . . . . . 3-12
• Seatback pocket. . . . . . . . . . . . . . . . . . . . . . . . . . . . . . 3-15
• Rear seat adjustment . . . . . . . . . . . . . . . . . . . . . . . . . 3-15
Seat belts . . . . . . . . . . . . . . . . . . . . . . . . . . . . . . . . . 3-21
• Seat belt restraint system . . . . . . . . . . . . . . . . . . . . . . 3-21
• Pre-tensioner seat belt . . . . . . . . . . . . . . . . . . . . . . . . 3-28
• Seat belt precautions. . . . . . . . . . . . . . . . . . . . . . . . . . 3-30
• Care of seat belts. . . . . . . . . . . . . . . . . . . . . . . . . . . . . 3-32
Child Restraint System (CRS) . . . . . . . . . . . . . . . 3-33
• Children always in the rear . . . . . . . . . . . . . . . . . . . . 3-33
• Selecting a Child Restraint System (CRS) . . . . . . . . 3-34
• Installing a Child Restraint System (CRS). . . . . . . . 3-37
Air bag - advanced supplemental restraint
system . . . . . . . . . . . . . . . . . . . . . . . . . . . . . . . . . . 3-44
• How does the air bag system operate? . . . . . . . . . . . 3-45
• Air bag warning light . . . . . . . . . . . . . . . . . . . . . . . . . 3-47
• SRS components and functions . . . . . . . . . . . . . . . . . 3-48
• Occupant Detection System (ODS) . . . . . . . . . . . . . . 3-51
• Driver's and passenger's front air bag . . . . . . . . . . . 3-59
• Side air bag . . . . . . . . . . . . . . . . . . . . . . . . . . . . . . . . . 3-62
• Curtain air bag . . . . . . . . . . . . . . . . . . . . . . . . . . . . . . 3-64
• Inflation and non-inflation conditions of the
air bag. . . . . . . . . . . . . . . . . . . . . . . . . . . . . . . . . . . . . 3-65
• SRS Care . . . . . . . . . . . . . . . . . . . . . . . . . . . . . . . . . . . 3-70
• Adding equipment to or modifying your air
bag-equipped vehicle. . . . . . . . . . . . . . . . . . . . . . . . . 3-71
• Air bag warning label. . . . . . . . . . . . . . . . . . . . . . . . . 3-71
3
Page 69

Safety features of your vehicle
IMPORTANT SAFETY PRECAUTIONS
You will find many safety precautions
and recommendations throughout
this section, and throughout this manual.The safety precautions in this section are among the most important.
Always wear your seat belt
A seat belt is your best protection in
all types of accidents. Air bags are
designed to supplement seat belts,
not replace them. So even though
your vehicle is equipped with air
bags, ALWAYS make sure you and
your passengers wear your seat
belts, and wear them properly.
Restrain all children
All children under age 13 should ride
in your vehicle properly restrained in
a rear seat, not the front seat.Infants
and small children should be
restrained in an appropriate child
restraint. Larger children should use
a booster seat with the lap/shoulder
belt until they can use the seat belt
properly without a booster seat.
Air bag hazards
While air bags can save lives, they
can also cause serious or fatal
injuries to occupants who sit too
close to them, or who are not properly restrained. Infants, young children, and shorter adults are at the
greatest risk of being injured by an
inflating air bag. Follow all instructions and warnings in this manual.
Driver distraction
Driver distraction presents a serious
and potentially deadly danger, especially for inexperienced drivers.
Safety should be the first concern
when behind the wheel and drivers
need to be aware of the wide array of
potential distractions, such as drowsiness, reaching for objects, eating,
personal grooming, other passengers, and using cellular phones.
Drivers can become distracted when
they take their eyes and attention off
the road or their hands off the wheel
to focus on activities other than driving.To reduce your risk of distraction
or getting into an accident:
• ALWAYS set up your mobile
devices (i.e., MP3 pla yers, phones,
navigation units, etc.) when your
vehicle is parked or safely stopped.
23
Page 70

Safety features of your vehicle
• ONLY use your mobile device
when allowed by laws and when
conditions permit safe use.NEVER
text or email while driving. Most
states have laws prohibiting driv ers
from texting. Some states and
cities also prohibit drivers from
using handheld phones.
• NEVER let the use of a mobile
device distract you from driving.
You have a responsibility to your
passengers and others on the road
to always drive safely, with your
hands on the wheel as well as your
eyes and attention on the road.
Control your speed
Excessive speed is a major factor in
crash injuries and deaths. Generally,
the higher the speed, the greater the
risk, but serious injuries can also
occur at lower speeds. Never drive
faster than is safe for current conditions, regardless of the maximum
speed posted.
Keep your vehicle in safe condition
Having a tire blowout or a mechanical failure can be extremely hazardous. To reduce the possibility of
such problems, check your tire pressures and condition frequently, and
perform all regularly scheduled
maintenance.
33
Page 71

Safety features of your vehicle
SEAT
Driver’s seat
(1) Seat adjustment, forward /
backward
Seatback recliner
(2)
Seat adjustment, height
(3)
(4) Lumbar support *
Driver position memory system *
(5)
(6) Headrest
Front passenger’s seat
(7) Seat adjustment, forward /
backward
Seatback recliner
(8)
(9) Seat cushion height
(10) Lumbar support*
(11) Headrest
Rear seat
(12) Armrest
(13) Headrest
(14) Seat-back folding lever*
* : if equipped
OJFA035001
43
Page 72

Safety features of your vehicle
WARNING - Loose
objects
Do not place anything in the driver's foot well or under the front
seats. Loose objects in the driver's foot area could interfere
with the operation of the foot
pedals.
WARNING - Uprighting
seat
Do not press the release lever
on a manual seatback without
holding and controlling the
seatback. The seatback will
spring upright possibly impacting you or other passengers.
W ARNING - Driver respon-
sibility for passengers
1KMN3662
The driver must advise the passengers to keep the seatback in
an upright position whenever
the vehicle is in motion. If a seat
is reclined during an accident,
the restraint system's ability to
restrain will be greatly reduced.
WARNING - Seat cushion
Occupants should never sit on
aftermarket seat cushions or sitting cushions. The passenger's
hips may slide under the lap portion of the seat belt during an
accident or a sudden stop.
WARNING - Driver’s seat
• Never attempt to adjust the
seat while the vehicle is moving. This could result in loss
of control of your vehicle.
• Do not allow anything to interfere with the normal position
of the seatback. Storing items
against the seatback could
result in serious or fatal injury
in a sudden stop or collision.
• Sit as far back as possible from
the steering wheel while still
maintaining comfortable control of the your vehicle. A distance of at least 10" from your
chest to the steering wheel is
recommended. Failure to do so
can result in air bag inflation
injuries to the driver.
35
Page 73

Safety features of your vehicle
W ARNING - Rear seatbacks
Always lock the rear seatback
before driving. Failure to do so
could result in passengers or
objects being thrown forward
injuring vehicle occupants.
WARNING - Unexpected
Seat Movement
After adjusting a manual seat,
always check that it is loc ked b y
shifting your weight to the front
and back. Sudden or unexpected movement of the driver's
seat could cause you to lose
control of the vehicle.
WARNING - Seat
adjustment
• Do not adjust the seat while
wearing seat belts. Moving the
seat forward will cause strong
pressure on the abdomen.
• Do not place your hand near
the seat bottom or seat track
while adjusting the seat. Your
hand could get caught in the
seat mechanism.
WARNING - Small
Objects
Use extreme caution when picking up small objects trapped
under the seats or between the
seat and the center console.
Your hands might be cut or
injured by the sharp edges of
the seats mechanism.
Feature of Seat Leather
• Leather is made from the outer
skin of an animal, which goes
through a special process to be
available for use. Since it is a natural substance, each part differs in
thickness or density.
Wrinkles may appear as a natural
result of stretching and shrinking
depending on the temperature and
humidity.
• The seat is made of stretchable
fabric to improve comfort.
• The parts contacting the body are
curved and the side supporting
area is high which provides driving
comfort and stability.
• Wrinkles may appear naturally
from usage. It is not a fault of the
product.
63
Page 74

Safety features of your vehicle
CAUTION
• Belts with metallic accessories, zippers or keys inside
your back pants pocket may
damage the seat fabric.
• Make sure not to wet the seat.
It may change the nature of
natural leather.
• Jeans or clothes which contain bleach may contaminate
the surface of the seat covering fabric and cause damage
or discoloration.
✽✽
NOTICE
Wrinkles or abrasions which appear
naturally from usage are not covered by warranty.
Front seat adjustment - manual
Forward and backward
OJF035003
T o mo ve the seat f orward or backward:
1.Pull the seat slide adjustment
lever up and hold it.
2. Slide the seat to the position you
desire.
3. Release the lever and make sure
the seat is locked in place.
Adjust the seat before driving, and
make sure the seat is locked securely
by trying to move forward and backward without using the lever. If the
seat moves, it is not locked properly.
Seatback angle
OJF035004
To recline the seatback:
1. Lean forward slightly and lift up the
seatback recline lever.
2. Carefully lean back on the seat
and adjust the seatback of the
seat to the position you desire.
3. Release the lever and make sure
the seatback is locked in place.
(The lever MUST return to its original position for the seatback to
lock.)
37
Page 75

Safety features of your vehicle
Seat height
OJF035005
To change the height of the seat, push
the lever upwards or downwards.
• T o lo wer the seat cushion, push the
lever down several times.
• To raise the seat cushion, pull the
lever up several times.
Lumbar support (if equipped)
OJF035006
The lumbar support can be adjusted
by pressing the lumbar support
switch on the side of the seat.
1.Press the front portion of the
switch to increase support, or the
rear portion of the switch, to
decrease support.
2. Release the switch once it reaches the desired position.
Front seat adjustment - power
(if equipped)
The front seat can be adjusted by
using the control switches located on
the outside of the seat cushion.
Before driving, adjust the seat to the
proper position so you can easily control the steering wheel, pedals and
switches on the instrument panel.
WARNING - Unattended
children
Do not leave children unattended in the vehicle.Children might
operate features of the vehicle
that could injure them.
83
Page 76

Safety features of your vehicle
CAUTION - Power seat
adjustments
The power seating controls
function by electronic motor.
Excessive operation may cause
damage to the electrical equipment.
CAUTION - Power Seating
Do not operate two or more
power seat control switches at
the same time. Doing so may
damage the power seat motor or
electrical components.
When in operation, the power seatconsumes a large amount of electrical power. To prevent unnecessary
system drain, don’t adjust the power
seat longer than necessary while the
engine is not running.
Forward and backward
OJF035008 OJFA035009
Push the control switch forward or
backward to move the seat to the
desired position. Release the switch
once the seat reaches the desired
position.
Seatback angle
Push the control switch forward or
backward to move the seatback to
the desired angle. Release the
switch once the seat reaches the
desired position.
39
Page 77

Safety features of your vehicle
Seat height
OJF035010L OJF035011L
Pull the front portion of the control
switch up to raise or press down to
lower the front part of the seat cushion. Pull the rear portion of the control switch up to raise or press down
to lower the seat cushion. Release
the switch once the seat reaches the
desired position.
Lumbar support (if equipped)
■ Type A
The lumbar support can be adjusted
by pressing the lumbar support
switch on the side of the seat.
Type A
1.Press the front portion of the
switch to increase support, or the
rear portion of the switch, to
decrease support.
2. Release the switch once it reaches the desired position.
■ Type B
OJF035075L
Type B
1.Press the front portion of the
switch (1) to increase support, or
the rear portion of the switch (2),
to decrease support.
2. Release the switch once it reaches the desired position.
3. Press the upper por tion (3) of the
switch to move the support position up, or press the lower portion
(4) of the switch, to move the support position down.
4. Release the switch once it reaches the desired position.
103
Page 78

Safety features of your vehicle
Driver position memory system
(if equipped, for power seat)
OJF035065L
A driver position memory system is
provided to store and recall the driver seat and outside rearview mirror
position with a simple button operation. By saving the desired position
into the system memory, different
drivers can reposition the driver seat
and outside rearview mirror based
upon their driving preference. If the
battery is disconnected, the desired
seat position memory will need to be
re-saved.
WARNING - Driver
Position Memory System
Never attempt to operate the
driver position memory system
while the vehicle is moving.
This could result in loss of control, and an accident causing
death or serious injury.
Storing positions into memory
using the buttons on the door
Storing driver’s seat positions
1. Shift the shift lever into P while the
engine start/stop button is ON.
2. Adjust the driver’s seat and outside rearview mirror comfortable
for the driver.
3. Press SET button on the control
panel.The system will beep once.
4. Press one of the memory buttons
(1 or 2) within 5 seconds after
pressing the SET button.The system will beep twice when memory
has been successfully stored.
When recalling an adjustment memory button while sitting in the vehicle,
you can be surprised by the setting
chosen if the memory has been
adjusted by someone else. If that
occurs, immediately push the seat
position control knob in the direction
of the desired position to stop further
undesired movement.
311
Page 79

Safety features of your vehicle
Recalling positions from memory
1. Shift the shift lever into P while the
engine start/stop button is ON.
2.To recall the position in the memory, press the desired memory button (1 or 2). The system will beep
once, then the driver’s seat will
automatically adjust to the stored
position.
Adjusting the control switch for the
driver’s seat and outside rearview
mirror while the system is recalling
the stored position will cause the
movement to stop and move in the
direction that the control switch is
moved.
Easy access function (if equipped)
The system will move the driver's
seat automatically as follows:
• With smart key system
- It will move the driver’s seat rearward when the engine start/stop
button is changed to the OFF
position.
- It will move the driver’s seat forward when the engine start/stop
button is changed to the ACC or
START position.
You can activate or deactivate this
feature. Refer to "User settings" in
chapter 4.
Headrest (for front seat)
OMG038400
The driver's and front passenger's
seats are equipped with a headrest
for the occupant's safety and comf ort.
The headrest not only provides comfort for the driver and front passenger ,
but also helps protect the head and
neck in the event of a rear collision.
For maximum effectiveness in case
of an accident, the headrest should
be adjusted so the middle of the
headrest is at the same height of the
center of gravity of an occupant's
head. Generally, the center of gravity
of most people's head is similar with
the height of the top of their eyes.
123
Page 80

Safety features of your vehicle
Also, adjust the headrest as close to
your head as possible. For this reason, the use of a cushion that holds
the body away from the seatback is
not recommended.
WARNING - Headrest
removal/adjustment
• Do not operate the vehicle
with the headrests removed.
Headrests can provide critical
neck and head support in a
crash.
• Do not adjust the headrest
height while the vehicle is in
motion. Driver may lose control of the vehicle.
Adjusting the height up and down
OJF035013
To raise the headrest, pull it up to the
desired position (1). To lower the
headrest, push and hold the release
button (2) on the headrest support
and lower the headrest to the desired
position (3).
OYFH034205
✽✽
NOTICE
If you recline the seatback towards
the front with the headrest and seat
cushion raised, the headrest may
come in contact with the sunvisor or
other parts of the vehicle.
313
Page 81

Safety features of your vehicle
Removal and reinstallation
■ Type A
■ Type B
OJF035015
OJF035016L
To remove the headrest:
1.Recline the seatback with the
recline lever or switch (1).
2. Raise headrest (2) as far as it can
go.
3. Press the headrest release button
(3) while pulling the headrest up (4).
WARNING - Headrest
Removal
NEVER allow anyone to ride in a
seat with the headrest removed.
Headrests can provide critical
neck and head support in a
crash.
■ Type A
OJF035017
■ Type B
OJF035018L
143
Page 82

Safety features of your vehicle
To reinstall the headrest :
1. Put the headrest poles (2) into the
holes while pressing the release
button (1) or switch(1).
2. Recline the seatback (4) with the
recline lever or switch (3).
3. Adjust the headrest to the appropriate height.
WARNING - Headrest
Reinstallation
To reduce the risk of injury to
the head or neck, always make
sure the headrest is locked into
position and adjusted properly
after reinstalling.
Seatback pocket
OJF035020
The seatback pocket is provided on
the back of the front passenger’ s and
driver’s seatbacks.
WARNING - Seatback
pockets
Do not put heavy or sharp
objects in the seatback pockets.
In an accident they could come
loose from the pocket and
injure vehicle occupants.
Rear seat adjustment
Headrest
OCK037073N
The rear seat is equipped with headrests in all the seating positions for
the occupant's safety and comfort.
The headrest not only provides comfort for passengers, but also helps
protect the head and neck in the
event of a collision.
315
Page 83

Safety features of your vehicle
For maximum effectiveness in case
of an accident, the headrest should
be adjusted so the middle of the
headrest is at the same height of the
center of gravity of an occupant's
head. Generally, the center of gravity
of most people's heads is similar with
the height as the top of their eyes.
Also, adjust the headrest as close to
your head as possible. For this reason, the use of a cushion that holds
the body away from the seatback is
not recommended.
OJF035021 OJF035077L
Adjusting the height up and down
(if equipped)
To raise the headrest, pull it up to the
desired position (1). To lower the
headrest, push and hold the release
button (2) on the headrest support
and lower the headrest to the desired
position (3).
Removal and reinstallation
(if equipped)
To remove the headrest, raise it as
far as it can go then press the
release button (1) while pulling the
headrest upward (2).
To reinstall the headrest, put the
headrest poles (3) into the holes
while pressing the release button (1).
Then adjust it to the appropriate
height and ensure that it locks in
position.
163
Page 84

Safety features of your vehicle
Armrest
OJF035026
To use the armrest, pull it forward
from the seatback.
Folding the rear seat (if equipped)
The rear seatbacks may be folded to
facilitate carrying long items or to
increase the luggage capacity of the
vehicle.
WARNING - Folded
Seatback
The purpose of the fold-down
rear seatbacks is to allow you to
carry longer objects that could
not otherwise be accommodated.
• Never allow a passenger to sit
on top of the folded down
seatback while the car is moving. This is not a proper seating position since no seat
belts are available for use.
• To reduce the risk of injury
caused by sliding cargo within
the passenger compartment
of the vehicle, objects carried
on the folded down seatback
should not extend higher than
the top of the front seats.
CAUTION - Blocked HEV
battery duct
■ Hybrid
OJFHQ015005
Do not put objects in the center
lower part of rear seats. This
could block the battery cooling
duct causing battery degradation.
317
Page 85

Safety features of your vehicle
CAUTION - Blocked PHEV
Battery Duct
■ Plug-in hybrid
OJFHP036114L
Do not put objects on the left
side of rear seat. This could
block the battery cooling duct
causing battery degradation.
WARNING - Objects
Objects carried on the folded
down seatback should not
extend higher than the top of
the front seatbacks. This could
allow cargo to slide forwar d and
cause injury or damage during
sudden stops.
OJF035081L
To fold down the rear seatback
(for Hybrid, if equipped):
1. Make sure the rear seat belt webbing is in the guide to prevent the
seat belt from being damaged.
2.Set the front seatback to the
upright position and if necessary,
slide the front seat forward.
3. Lower the rear headrests to the
lowest position.
183
Page 86

OJFHP038024L
OJF035025
4.Pull out the seatback locking
knob(1) in the trunk, then fold the
seat toward the front of the vehicle .
5. To use the rear seat, lift and pull
the seatback backward. Pull the
seatback firmly until it clicks into
place. Make sure the seatback is
locked in place.
6. Return the rear seat belt to the
proper position.
✽✽
NOTICE
Unless the driver's position is properly set according to the driver's
physical figure, do not fold the rear
seat. It may increase body injuries in
a sudden stop or collision.
WARNING - Uprighting
seat
When you return the seatback
to its upright position, hold the
seatback and return it slowly. If
the seatback is returned without holding it, the back of the
seat could spring forward,
resulting in injury caused by
being struck by the seatback.
Safety features of your vehicle
WARNING - Rear
Seatback
To ensure maximum protection
in the event of an accident or
sudden stop,when returning the
rear seat to the upright position:
• Be careful not to damage the
seat belt webbing or buckle.
• Do not allow the seat belt
webbing or buckle to become
pinched or caught in the rear
seat.
• Ensure the seatback is completely locked into its upright
position by pushing on the
top of the seatback.
Failure to adhere to any of
these instructions could
result in serious injury or
death in the event of a crash.
319
Page 87

Safety features of your vehicle
CAUTION - Damaging
rear seat belt buckles
When you fold the rear seatback, insert the buckle between
the rear seatback and cushion.
Doing so can prevent the buckle
from being damaged by the rear
seatback.
When returning the rear seatbacks to
the upright position, remember to
return the rear shoulder belts to their
proper position.
WARNING - Cargo
Cargo should always be
secured to prevent it from being
thrown about the vehicle in a
collision and causing injury to
the vehicle occupants. Do not
place objects in the rear seats,
since they cannot be properly
secured and may hit the front
seat occupants in a collision.
WARNING - Cargo loading
Make sure the engine is off, the
automatic transmission is in P
(Park) and the parking brake is
securely applied whenever loading or unloading cargo. Failure
to take these steps may allow
the vehicle to move if the shift
lever is inadvertently moved to
another position.
203
Page 88

SEAT BELTS
Seat belt restraint system
• For maximum restraint system protection, the seat belts must always
be used whenever the vehicle is
moving. A properly positioned
shoulder belt should be positioned
midway over your shoulder across
your collarbone.
• Never allow children to ride in the
front passenger seat. See child
restraint system section for further
discussion.
WARNING - Twisted seat
belt
Make sure your seat belt is not
twisted when worn. A twisted
seat belt may not properly protect you in an accident and
could even cut into your body.
WARNING - Shoulder Belt
• Never wear the shoulder belt
under your arm or behind
your back. An improperly
positioned shoulder belt cannot protect the occupant in a
crash.
• Always wear both the shoulder portion and lap portion of
the lap/shoulder belt.
WARNING - Damaged
seat belt
Replace the entire seat belt
assembly if any part of the webbing or hardware is damaged as
you can no longer be sure that a
damaged seat belt will provide
protection in a crash.
Safety features of your vehicle
Seat belts are designed to bear upon
the bony structure of the body, and
should be worn low across the front
of the pelvis, chest and shoulders, as
applicable;wearing the lap section of
the belt across the abdominal area
must be avoided.
Seat belts should be adjusted as
firmly as possible, consistent with
comfort, to provide the protection for
which they have been designed.
A slack belt will greatly reduce the
protection afforded to the wearer.
Care should be taken to avoid contamination of the webbing with polishes, oils and chemicals, and particularly battery acid. Cleaning may
safely be carried out using mild soap
and water. The belt should be
replaced if webbing becomes frayed,
contaminated or damaged.
321
Page 89

Safety features of your vehicle
• No modifications or additions
should be made by the user which
would either prevent the seat belt
adjusting devices from operating to
remove slack, or prevent the seat
belt assembly from being adjusted
to remove slack.
• When you fasten the seat belt, be
careful not to latch the seat belt in
buckles of other seat.It's very dangerous and you may not be protected by the seat belt properly.
• Do not unfasten the seat belt and
do not fasten and unfasten the seat
belt repeatedly while driving. This
could result in loss of control, and
an accident causing death, serious
injury, or property damage.
• When fastening the seat belt,
make sure that the seat belt does
not pass over objects that are hard
or can break easily.
WARNING - Seat belt
buckle
Do not allow foreign material
(gum, crumbs, coins, etc.) to
obstruct the seat belt buckle.
This may prevent the seat belt
from fastening securely.
OJF035091L
Driver's seat belt warning
As a reminder to the driver, the seat
belt warning light will illuminate and
warning chime will sound for approximately 6 seconds each time engine
start/stop button is ON if the seat belt
is unfastened.
223
Page 90

Safety features of your vehicle
If you continue not to fasten the seat
belt and you drive over 6 mph (9
km/h), the warning light will stay illuminated until you drive under 4 mph
(6 km/h). (if equipped)
If you continue not to fasten the seat
belt and you drive over 12 mph (20
km/h) the seat belt warning chime
will sound for approximately 100 seconds and the corresponding warning
light will blink. (if equipped)
If you unfasten the seat belt while
driving under 12 mph (20 km/h), the
seat belt warning light will illuminate
until the seat belt is fastened.
If you unfasten the seat belt while
driving over 12 mph (20 km/h), the
seat belt warning chime will sound
for approximately 100 seconds and
the corresponding warning light will
blink.
If the front passenger unfastens the
seat belt while driving over 12 mph
(20 km/h), the seat belt warning
chime will sound for approximately
100 seconds and the corresponding
warning light will blink.
OJF035092L
Front passenger's seat belt warning
As a reminder to the front passenger,
the front passenger’s seat belt warning lights will illuminate for approximately 6 seconds each time engine
start/stop button is ON regardless of
belt fastening.
If the front passenger continues not
to fasten the seatbelt and you drive
over 6 mph (9 km/h), the warning
light will stay illuminated.
If the front passenger unfastens the
seat belt while driving in case of
under 12 mph (20 km/h) the seat belt
warning light will illuminate until the
seat belt is fastened.
323
Page 91

Safety features of your vehicle
Lap/shoulder belt
Front seat
OJF035031
Height adjustment
You can adjust the height of the shoulder belt anchor to one of the 4 positions for maximum comf ort and safety.
The height of the adjusting seat belt
should not be too close to your neck.
The shoulder portion should be
adjusted so that it lies across your
chest and midway over your shoulder
near the door and not your neck.
To adjust the height of the seat belt
anchor, lower or raise the height
adjuster into an appropriate position.
To raise the height adjuster, pull it up
(1). To lower it, push it down (3) while
pressing the height adjuster button (2).
Release the button to lock the
anchor into position. Try sliding the
height adjuster to make sure that it
has locked into position.
Improperly positioned seat belts can
cause serious injuries in an accident.
WARNING - Shoulder belt
positioning
Never position the shoulder belt
across your neck or face.
WARNING - Seat belt
replacement
Replace your seat belts after
being in an accident. Failure to
replace seat belts after an accident could leave you with damaged seat belts that will not provide protection in the event of
another collision.
Seat belt - Driver's 3-point system
with emergency locking retractor
B180A01NF-1
To fasten your seat belt:
To fasten your seat belt, pull it out of
the retractor and insert the metal tab
(1) into the buckle (2). There will be
an audible "click" when the tab locks
into the buckle.
243
Page 92

Safety features of your vehicle
B200A02NF
The seat belt automatically adjusts to
the proper length only after the lap
belt portion is adjusted manually so
that it fits snugly around your hips. If
you lean forward in a slow, easy
motion, the belt will extend and let
you move around. If there is a sudden stop or impact, however, the belt
will lock into position. It will also lock
if you try to lean forward too quickly.
✽✽
NOTICE
If you are not able to pull out the
seat belt from the retractor, firmly
pull the belt out and release it. Then
you will be able to pull the belt out
smoothly.
Seat belts - Front passenger and
rear seat 3-point system with
combination locking retractor
To fasten your seat belt:
Combination retractor type seat belts
are installed in the rear seat positions to help accommodate the
installation of child restraint systems.
Although a combination retractor is
also installed in the front passenger
seat position, it is strongly recommended that children always be
seated in the rear seat. NEVER
place any infant restraint system in
the front seat of the vehicle.
This type of seat belt combines the
features of both an emergency locking retractor seat belt and an automatic locking retractor seat belt. To
fasten your seat belt, pull it out of the
retractor and insert the metal tab into
the buckle. There will be an audible
"click" when the tab locks into the
buckle. When not securing a child
restraint, the seat belt operates in the
same way as the driver's seat belt
(Emergency Locking Retractor Type).
It automatically adjusts to the proper
length only after the lap belt portion
of the seat belt is adjusted manually
so that it fits snugly around your hips.
When the seat belt is fully extended
from the retractor to allow the installation of a child restraint system, the
seat belt operation changes to allow
the belt to retract, but not to extend
(Automatic Locking Retractor Type).
Refer to “Using a child restraint system” in this section.
✽✽
NOTICE
Although the combination retractor
provides the same level of protection
for seated passengers in either emergency or automatic locking modes,
have the seated passengers use the
emergency locking feature for improved convenience. The automatic locking
function is intended to facilitate child
restraint installation. To convert from
the automatic locking feature to the
emergency locking operation mode,
allow the unbuckled seat belt to fully
retract.
325
Page 93

Safety features of your vehicle
CAUTION
Do NOT fold down the left portion of the rear seat back when
the rear center seat belt is buckled. ALWAYS UNBUCKLE the
rear center seat belt before folding down the left portion of the
rear seat back. If the rear center
seat belt is buckled when the
left portion of the rear seat back
is folded down, distortion and
damage to the top portion of the
seat back and seat belt garnish
may result, causing the seat
back to lock into the folded
down position.
WARNING
You should place the lap belt
portion as low as possible and
snugly across your hips, not on
your waist.If the lap belt is located too high on your waist, it may
increase the chance of injury in
the event of a collision. Both
arms should not be under or
over the belt. Rather, one should
be over and the other under, as
shown in the illustration on the
previous page.
Never wear the seat belt under
the arm near the door.
OJF035096L
OJF035094L
To fasten seat belts in the rear seats:
Pull the metal tab (3) and insert it
into the buckle (4). There will be an
audible “clic k”when the tab locks into
the buckle. Make sure the belt is not
twisted.
263
Page 94

WARNING
Always have the metal tab (1)
inserted into the buckle (2).
✽✽
NOTICE
If you are not able to pull out the
safety belt from the retractor, firmly
pull the belt out and release it. Then,
you will be able to pull the belt out
smoothly.
OJFHP038137 OJF037124
The seat belt should be locked into
the buckle on each seat cushion to
be properly fastened.
➀ : Rear right seat belt fastening
buckle
➁ : Rear center seat belt fastening
buckle
➂ : Rear left seat belt fastening buckle
Safety features of your vehicle
When using the rear center seat belt,
the buckle with the “CENTER” mar k
must be used.
WARNING
Prior to fastening the rear seat
belts, ensure the latch matches
the seat belt buckle. Forcefully
fastening the left or right seat
belt to the center buckle can
result in an improper fastening
scenario that will not protect
you in an accident.
327
Page 95

Safety features of your vehicle
OUM036100L
To release the seat belt:
The seat belt is released by pressing
the release button (A) in the locking
buckle. When it is released, the belt
should automatically draw back into
the retractor.
If this does not happen, check the
belt to be sure it is not twisted, then
try again.
Pre-tensioner seat belt
OXMA033101
Your vehicle is equipped with driver's
and front passenger's pre-tensioner
seat belts (retractor pretensioner and
EFD (Emergency Fastening Device)).
The pre-tensioner seat belts may be
activated, when a frontal collision is
severe enough, together with the air
bags.
When the vehicle stops suddenly, or if
the occupant tries to lean forward too
quickly, the seat belt retractor may
lock into position.In certain frontal collisions, the pre-tensioner will activate
and pull the seat belt into tighter contact against the occupant's body.
(1) Retractor Pretensioner
The purpose of the retractor pre-
tensioner is to make sure that the
shoulder belts fit in tightly against
the occupant's upper body in certain frontal collisions.
(2) EFD (Emergency Fastening Device)
The purpose of the EFD is to
make sure that the pelvis belts fit
in tightly against the occupant's
lower body in certain frontal collisions.
283
Page 96

If the system senses excessive tension on the driver or passenger's
seat belt when the pre-tensioner system activates, the load limiter inside
the retractor pre-tensioner will release
some of the pressure on the affected
seat belt.
✽✽
NOTICE
When the pre-tensioner seat belts
are activated, a loud noise may be
heard and fine dust, which may
appear to be smoke, may be visible
in the passenger compartment.
These are normal operating conditions and are not hazardous.
OJF045207L
The seat belt pre-tensioner system
consists mainly of the following components.Their locations are shown in
the illustration:
(1) SRS air bag warning light
(2) Front retractor pre-tensioner
assembly
(3) SRS control module
(4) Emergency fastening device
(EFD)
Safety features of your vehicle
WARNING - Skin Irritation
Wash all exposed skin areas
thoroughly after an accident in
which the pre-tensioner seat
belts were activated. The fine
dust from the pre-tensioner
activation may cause skin irritation and should not be breathed
for prolonged periods.
✽✽
NOTICE
• Both the driver's and front passenger's seat belt pre-tensioner system may be activated not only in
certain frontal collisions, but also
in certain side collisions or
rollovers, if the vehicle is equipped
with a side or curtain air bag.
• Because the sensor that activates
the SRS air bag is connected with
the pre-tensioner seat belt, the
SRS air bag warning light on
the instrument panel will illuminate for approximately 6 seconds
after engine start/stop button has
been changed to ON position, and
then it should turn off.
329
Page 97

Safety features of your vehicle
If the pre-tensioner seat belt system
is not working properly, this warning
light will illuminate even if there is not
a malfunction with the SRS air bag. If
the SRS air bag warning light does
not illuminate when engine start/stop
button has been changed to ON, or if
it remains illuminated after illuminating for approximately 6 seconds, or if
it illuminates while the vehicle is
being driven, have an authorized Kia
dealer inspect the pre-tensioner seat
belt and SRS air bag system as soon
as possible.
✽✽
NOTICE
Do not attempt to service or repair
the pre-tensioner seat belt system in
any manner. Do not attempt to
inspect or replace the pre-tensioner
seat belts yourself. This must be
done by an authorized Kia dealer.
WARNING - Hot preten-
sioner
Do not touch the pre-tensioner
seat belt assemblies for several
minutes after they have been
activated. When the pre-tensioner seat belt mechanism
fires during a collision the pretensioner becomes hot and can
burn you.
Pre-tensioners are designed to operate only one time. After activation,
pre-tensioner seat belts must be
replaced. If the pre-tensioner must
be replaced, contact an authorized
Kia dealer.
Seat belt precautions
Infant or small child
All 50 states have child restraint la ws.
You should be aware of the specific
requirements in your state. Child
and/or infant seats must be properly
placed and installed in the rear seat.
For more information about the use of
these restraints, refer to “Child
restraint system” in this section.
✽✽
NOTICE
Small children are best protected
from injury in an accident when
properly restrained in the rear seat
by a child restraint system that meets
the requirements of the Federal
Motor Vehicle Safety Standards.
Before buying any child restraint system, make sure that it has a label certifying that it meets Federal Motor
Vehicle Safety Standard 213. The
restraint must be appropriate for
your child's height and weight.
Check the label on the child restraint
for this information. Refer to “Child
restraint system” in this section.
303
Page 98

Safety features of your vehicle
Larger children
Children who are too large for child
restraint systems should always
occupy the rear seat and use the
available lap/shoulder belts. The lap
portion should be fastened and
snugged on the hips as low as possible. Check periodically to insure that
the belt fits.A child's squirming could
put the belt out of position. Children
are given the most safety in the e v ent
of an accident when they are
restrained by a proper restraint system in the rear seat. If a larger child
(over age 13) must be seated in the
front seat, the child should be
securely restrained by the available
lap/shoulder belt and the seat should
be placed in the rearmost position.
Children age 13 and under should be
restrained securely in the rear seat.
NEVER place a child age 13 and
under in the front seat.NEVER place
a rear facing child seat in the front
seat of a vehicle.
If the shoulder belt portion slightly
touches the child’s neck or face, try
placing the child closer to the center of
the vehicle. If the shoulder belt still
touches their face or neck the y need to
be returned to a child restraint system.
WARNING - Small children
Do not allow small children to
ride in the vehicle without an
appropriate child restraint system. If the shoulder belt comes
in contact with your child's neck
or face your child is too small to
ride in the vehicle. In a crash the
seat belt will inflict injury to your
child's neck, throat and face.
Restraint of pregnant women
Pregnant women should wear
lap/shoulder belt assemblies whenever possible according to specific
recommendations by their doctors.
The lap portion of the belt should be
worn AS SECURELY AND LOW AS
POSSIBLE.
WARNING - Pregnant
women
Pregnant women must never
place the lap portion of the seat
belt above or on the abdomen
where the fetus is located. The
force of the seat belt during a
collision will crush the fetus.
331
Page 99

Safety features of your vehicle
Injured person
A seat belt should be used when an
injured person is being transported.
When this is necessary, you should
consult a physician for recommendations.
One person per belt
Two people (including children)
should never attempt to use a single
seat belt. This could increase the
severity of injuries in case of an accident.
Do not lie down
To reduce the chance of injuries in
the event of an accident and to
achieve maximum effectiveness of
the restraint system, all passengers
should be sitting up and the front and
rear seats should be in an upright
position when the vehicle is moving.
A seat belt cannot provide proper
protection if the person is lying down
in the rear seat or if the front and rear
seats are in a reclined position.
Care of seat belts
Seat belt systems should never be
disassembled or modified. In addition, care should be taken to assure
that seat belts and belt hardware are
not damaged by seat hinges, doors
or other abuse.
WARNING - Pinched seat
belt
Make sure that the webbing
and/or buckle does not get
caught or pinched in the rear
seat when returning the rear
seatback to its upright position.
A caught or pinched webbing/
buckle may become damaged
and could fail during a collision
or sudden stop.
WARNING
Seatbelts can become hot in a
vehicle that has been closed up
in sunny weather. They could
burn infants and children.
Periodic inspection
All seat belts should be inspected
periodically for wear or damage of
any kind. Any damaged parts should
be replaced as soon as possible.
Keep belts clean and dry
Seat belts should be kept clean and
dry .If belts become dirty, they can be
cleaned by using a mild soap solution and warm water. Bleach, dye,
strong detergents or abrasives
should not be used because they
may damage and weaken the fabr ic.
When to replace seat belts
The entire in-use seat belt assembly
or assemblies should be replaced if
the vehicle has been involved in an
accident.This should be done even if
no damage is visible. Additional
questions concerning seat belt operation should be directed to an
authorized Kia dealer.
323
Page 100

CHILD RESTRAINT SYSTEM (CRS)
Children Always in the Rear
WARNING - Restraint
Location
Never install a child or infant
seat on the front passenger's
seat. A child riding in the front
passenger seat can be forcefully struck by an inflating airbag
and seriously injured.
WARNING - Hot Child
Restraint
A child restraint system can
become very hot if it is left in a
closed vehicle on a sunny day.
Be sure to check the seat cover,
buckles and latches before
placing a child in the restraint
system.
Children under age 13 must always
ride in the rear seats and must always
be properly restrained to minimize the
risk of injury in an accident, sudden
stop or sudden maneuver. According
to accident statistics, children are
safer when properly restrained in the
rear seats than in the front seat. Even
with air bags, children can be seriously injured or killed. Children too large
for a child restraint must use the seat
belts provided.
All 50 states have child restraint la ws
which require children to travel in
approved child restraint devices.The
laws governing the age or
height/weight restrictions at which
seat belts can be used instead of
child restraints differs among states,
so you should be aware of the specific requirements in your state, and
where you are travelling.
Safety features of your vehicle
Child restraint systems must be
properly placed and installed in the
rear seat. You must use a commercially available child restraint system
that meets the requirements of the
Federal Motor Vehicle Safety
Standards (FMVSS).
Child restraint systems are generally
designed to be secured in a vehicle
seat by lap belt portion of a
lap/shoulder belt, or by a LATCH system in the rear seats of the vehicle.
333
 Loading...