


KIA Navigation System
QUICK REFERENCE GUIDE

LOOKING FOR MORE INFORMATION?
This Quick Reference Guide does not replace your System
Owner's Manual.
If you require additional information or are unsure of a specific
issue, refer to the System User's Manual for additional information.
iPod®
iPod® is a registered trademark of Apple Inc.
Bluetooth® Wireless Technology
The
Bluetooth
trademarks owned by
use of such marks by Kia is under license.
Bluetooth
A
Bluetooth
®
Wireless Technology word mark and logos are registered
Bluetooth
®
Wireless Technology enabled cell phone is required to use
®
Wireless Technology.
®
Wireless Technology SIG, Inc. and any
HD Radio™ Technology
HD Radio Technology manufactured under license from iBiquity Digital
Corporation. U.S. and Foreign Patents.
HD Radio™ and the HD, HD Radio, and “Arc” logos are proprietary trademarks of iBiquity Digital Corp.
All Map Database cannot be copied without permission.
Warning: This is protected by U.S. copyright laws. All rights not expressly granted are
reserved.
You may not otherwise reproduce, modify, and distribute the content without M&Soft,
Inc's prior written consent.
Please ensure that this information is accurately stated and approved for use in this context.

•
SiriusXM service requires a subscription, sold separately, after 3-month trial
included with vehicle purchase. If you decide to continue your SiriusXM service at the end of your trial subscription, the plan you choose will automatically
renew and bill at then-current rates until you call Sirius XM at 1-866-635-2349 to
cancel. See our Customer Agreement for complete terms at www.siriusxm.com.
Programming subject to change. Sirius satellite service is available only to those
at least 18 and older in the 48 contiguous USA, D.C., and PR (with coverage
limitations). Traffic information not available in all markets. See siriusxm.com/traf
fic for details. Sirius, XM and all related marks and logos are trademarks of Sirius
XM Radio Inc.
WARNING
• Driving while distracted can result in a loss of vehicle control that may lead to an
accident, severe personal injury, and death. The driver’s primary responsibility
is in the safe and legal operation of a vehicle, and use of any handheld devices,
other equipment, or vehicle systems which take the driver’s eyes, attention and
focus away from the safe operation of a vehicle or which are not permissible by
law should never be used during operation of the vehicle.”
•
Infinity is a trademark of Harman International Industries, Inc.
•
UVO eServices is compatible with many popular smartphone devices. Please
see MyUVO.com for phone compatibility.
•
App Store and Google Play are service marks of Apple Inc. and Google Inc.
respectively. No charge for the UVO eServices App. App runs on your smartphone cellular data service. Normal data rates will apply.
•
HD Radio and the HD Radio logo are proprietary trademarks of iBiquity Digital
Corporation.
•
24-hour Roadside Assistance is a service plan provided by Kia Motors America,
Inc. Certain limitations apply. Coverage details are available in the Kia Warranty
and Consumer Information Manual. For access to Enhanced Roadside
Assistance, a connected mobile phone via Bluetooth within the cellular service
coverage area is required.
•
Vehicle Diagnostics do not take the place of regularly scheduled maintenance.
Feature checks powertrain, chassis, and airbag systems only. For factory-recommended maintenance schedule, see the Maintenance Feature of UVO eServices
or the Owner’s Manual.
•
911 Connect activates after an airbag deployment. Feature requires a connected
mobile phone via Bluetooth. Dependant on cellular service coverage.
•
The rear-camera display is not a substitute for proper and safe backing-up procedures. The rear-camera display may not display every object behind the vehicle.
Always drive safely and use caution when backing up.

Table of Contents
Controls and Functions
Sound Settings
Display Settings
FM/AM Mode
HD RadioTM Mode
SIRIUS Mode
CD Mode
MP3 CD Mode
USB Mode
iPod Mode
AUX Mode
Bluetooth® Audio
My Music Mode
Navigation
Bluetooth® Handsfree
Voice Recognition
..........................................................................................................................
........................................................................................................................
.............................................................................................................................
...................................................................................................................
..........................................................................................................................
..................................................................................................................................
........................................................................................................................
................................................................................................................................
................................................................................................................................
................................................................................................................................
....................................................................................................................
......................................................................................................................
................................................................................................................................
...........................................................................................................
.................................................................................................................
..........................................................................................................
2
5
7
8
11
13
16
18
21
25
27
28
29
32
48
59

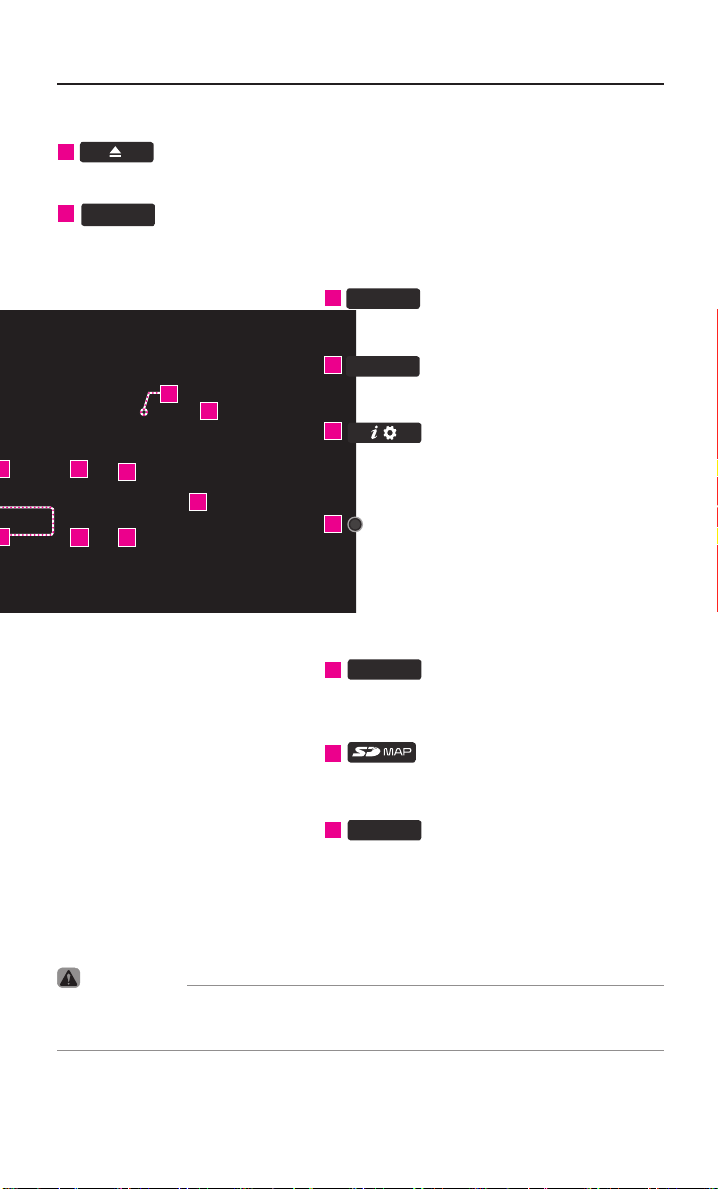
Controls and Functions
Control Panel
1
PWR VOL
•
When power is off, press to turn power on.
•
When power is on, press and hold (over 0.8 seconds) to turn power off.
•
When power is on, press shortly (under 0.8 seconds) to turn Audio off.
•
Turn left/right to control volume.
FM/AM
2
•
Selects to FM/AM mode.
•
Each time the key is pressed, the mode
is changed in order of FM1 → FM2 →
AM → FM1.
3
PHONE
Takes user to phone screen.
4
SAT
Converts to SIRIUS mode
Each time the key is pressed, the mode is
changed in order of SIRIUS1 → SIRIUS2 → SIRIUS3 → SIRIUS1.
7
1
3 5
42
14
MEDIA
5
•
Displays CD, MP3, USB, iPod, AUX,
Bluetooth
•
If the media is not connected or a disc is not
inserted, corresponding modes will be disabled.
6
®
Audio Streaming, My Music modes.
,
Pressed shortly. (under 0.8 seconds)
•
In FM/AM mode, plays previous/next frequency.
•
In SIRIUS mode, plays the previous/next channel.
•
In CD/MP3/USB/iPod/My Music modes, changes
the track, file or chapter.
Pressed and held. (over 0.8 seconds)
•
In FM/AM mode, continuously changes the frequency until
plays the current frequency.
•
In SIRIUS mode, continuously changes the channel until the key is released
and plays the current channel.
•
In CD/MP3/USB/iPod/My Music modes, rewinds or fast-forwards the track or file.
2
the key is released and
Controls and Functions
7
Press to insert or eject disc.
MAP
8
VOICE
Displays the map for the current position.
9
ROUTE
Displays Route menu screen.
10
DEST
13
15
Displays the Destination setup menu.
11
8
10
12
9
11
Displays the Setup mode.
12
TUNE
•
In FM/AM mode, changes the frequency.
•
In SIRIUS mode, changes the channel.
•
In CD, MP3, USB, iPod, My Music modes,
changes the track, file or chapter.
RESET
13
Resetting the system.
14
SD Card insert slot.
15
DISP
Turns off the screen or displays the default
image.
CAUTION
•
Always give your full attention to driving. Do not operate your system in such a
way that you may be distracted from driving your vehicle.
3

Controls and Functions
Steering Wheel Remote Controller
1
Controls the volume.
2
Mutes the sound.
3
Pressed shortly. (under 0.8 seconds)
•
•
•
Pressed and held. (over 0.8 seconds)
•
•
•
4
•
•
•
•
5
When pressed shortly. (under 0.8 seconds)
4
VOL-
VOL+
MUTE
Λ V
In FM/AM mode, searches broadcast frequencies saved to Presets.
In SIRIUS modes, searches broadcast channels saved to Presets.
In CD/MP3/USB/iPod/My Music modes,
changes the track, file or chapter.
In FM/AM mode, automatically
searches broadcast frequencies
and channels.
In SIRIUS modes, automatically
searches broadcast channels.
In CD/MP3/USB/iPod/My Music modes:
rewinds or fast forwards the track of file.
MODE
Each time this key is pressed, the mode
is changed in order of FM1→ FM2 → AM
→
SIRIUS1 → SIRIUS2 → SIRIUS3 →
USB or iPod → AUX → Bluetooth
→
My Music.
®
Audio
If the media is not connected or a disc
is not inserted, corresponding modes
will be disabled.
Press and hold the key (over 0.8 seconds) to turn the Audio system on/off.
When power is off, press the key to turn
power back on.
1
•
3
2
4
6
7
Activates voice recognition.
5
When pressed and held. (over 0.8 seconds)
•
Ends voice recognition.
6
Pressed shortly. (under 1.2 seconds)
•
When pressed in the phone screen,
displays call history screen.
•
When pressed in the dial screen,
makes a call.
•
When pressed in the incoming call
screen, answers the call.
•
When pressed during call waiting,
switches to waiting call (Call Waiting)
Pressed and held. (over 1.2 seconds)
•
When pressed in the Bluetooth®
Handsfree phone mode, redials the
last call.
•
When pressed during a Bluetooth®
Handsfree call, switches call back to
mobile phone (Private).
•
When pressed while calling on the
mobile phone, switches call back to
®
Bluetooth
when Bluetooth
Handsfree (Operates only
®
Handsfree is con-
nected).
7
•
When pressed during a call, ends the
phone call.
•
When pressed in the incoming call
screen, rejects the call.
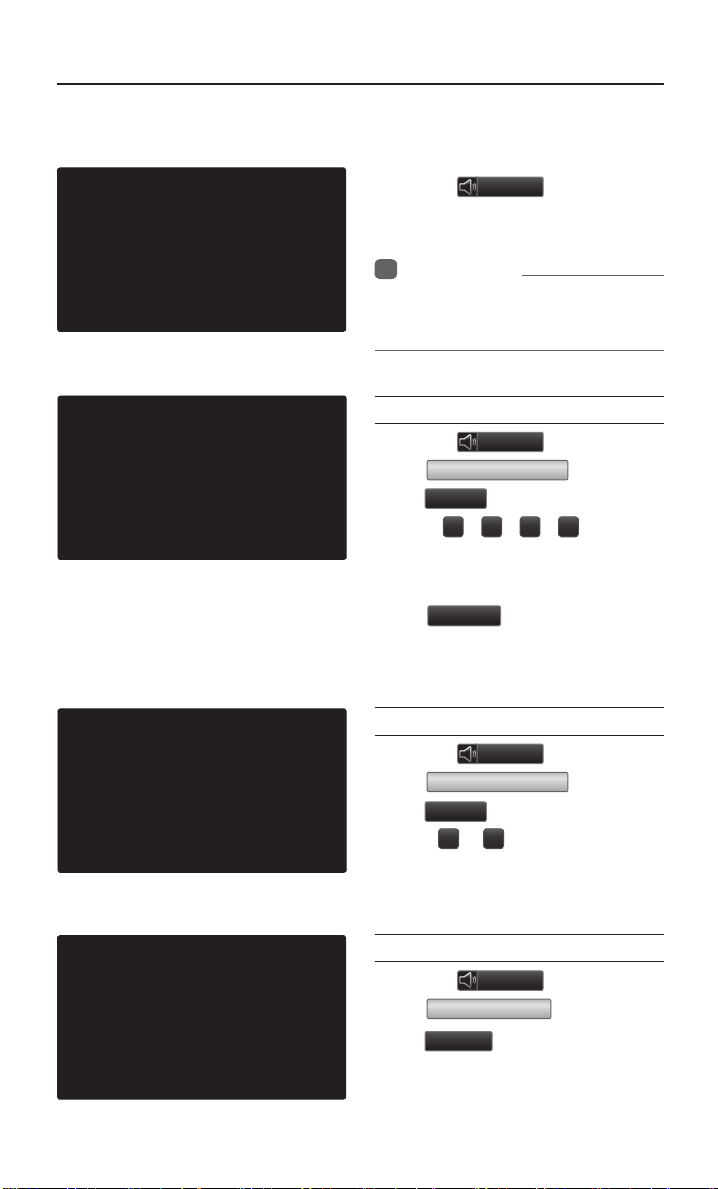
Sound Settings
Sound Settings
Press the
Sound
button to
display the sound setting screen.
Information
i
•
UVO eServices is an optional feature
available in select vehicles on select trims.
Setting Balance/Fader
Press the
Press
press
Use the ▲ , ▼ , ◀ , ▶ buttons to
move the cursor on the control screen
to the desired position.
Press
the center position.
Sound
button ▶
Fader/Balance
Done
.
CENTER
to restore sound to
▶ Set and
Setting Bass/Mid/Treble
Press the
Press
press
Use the ◀ or
Bass/Mid/Treble settings.
Sound
button ▶
Bass/Mid/Treble
Done
.
buttons to adjust the
▶
▶ Set and
Setting Volume Ratio
Press the
Press
press
These options are used to set the volume ratio by selecting from Navigation
Priority/ Audio Priority/Same Ratio.
Sound
Volume Ratio
Done
.
button ▶
▶ Set and
5

Sound Settings
Advanced
Press the
Press
Done
This is used to set the Surround and
Speed Dependent Volume Control
features.
Surround
Speed Dependent Volume Control
allows you to automatically control
the volume according to the speed of
the vehicle. This feature will gradually
increase the volume as vehicle speed
increases, to offset outside noise.
Speed Dependent Volume Control
Press the
Press
feature
Done
The volume level is controlled automatically according to the vehicle
speed.
Sound
Advanced
.
Advanced
On
.
▶ Set and press
Sound
▶ Turn the
▶ Set and press
button ▶
button ▶
Setting Beep
Press the
Press
Done
Each press of this button turns the
BEEP tone on/off.
6
Sound
▶ Set and press
Beep
.
button ▶
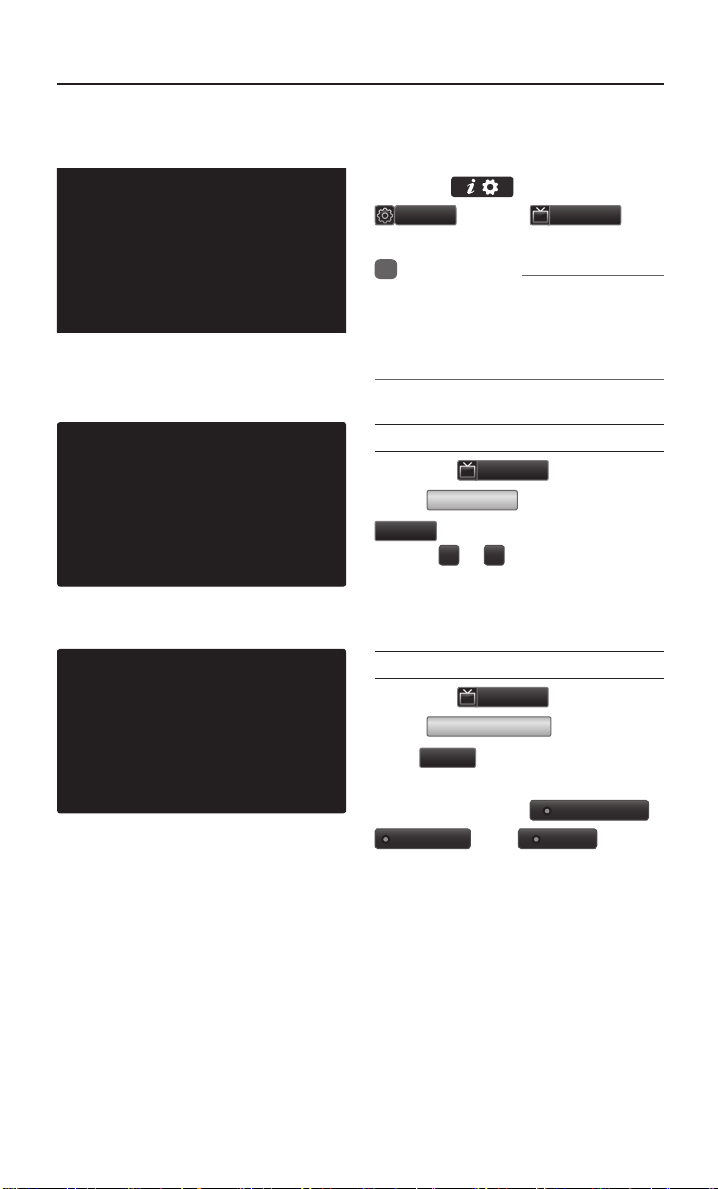
Display Settings
Display Settings
Press the
i
•
▶ Press
Setup
Information
UVO eServices is an optional feature
available in select vehicles on select
trims.
key ▶ Press
Display
.
Adjusting Brightness
Press the
Press
Done
Use the ◀ or ▶ buttons to adjust the
display brightness.
Display
Brightness
.
button ▶
▶ Set and press
Setting Display Mode
Press the
Press
press
Press the button for the desired display mode from
Daylight
Display
Display Mode
.
Done
, and
button ▶
▶ Set and
Automatic
modes.
Light
,
7

FM/AM Mode
Starting Mode
Press the
FM/AM
key to change
the mode in order of FM1 → FM2
→ AM.
When the power is OFF, pressing the
FM/AM
play a radio broadcast
key will turn the power on and
Using Seek
Press the
,
automatically search for frequencies.
•
Shortly press the key (under 0.8 seconds) :
Plays previous/next frequency
•
Press and hold the key (over 0.8 seconds) :
Changes the frequency while pressed
and
receives the next frequency upon
release.
key to
Using TUNE
Turn the TUNE knob left/right to
select the frequency.
•
FM1/FM2 : Increases/decreases by
200kHz
•
AM : Increases/decreases by 10kHz
Selecting Presets
From the 6 presets, select the frequency you want to listen to.
8

FM/AM Mode
Saving Radio Frequency
Saving Manually
After selecting frequency ▶ Press
and hold (over 0.8 seconds) the
preset button.
•
A 'beep' will sound and the frequency will
preset button.
Saving Automatically
Press the
save receivable frequencies to Preset
buttons.
A total of 18 frequencies with six preset frequencies each for FM1/FM2/
AM modes can be saved.
be saved to the selected
Auto Store
to automatically
Scanning Radio
Frequency
Press the
all radio frequencies.
Starting from the current frequency,
frequencies with superior reception
are scanned for 5 seconds and the
previous frequency is restored.
Scan
button to scan
9

ON
ON
Off
FM/AM Mode
Using the Menu Buttons
Press the
Menu
button to use the
Preset Scan menu.
Preset Scan
Press the
Preset Scan
•
Frequencies saved to the 6 preset
Menu
button ▶ Press
.
buttons are each played for 5 seconds and the previous frequency is
restored.
Text On/Text Off
Text On
.
Press the
The Text feature is turned on/off.
•
If the
(Text off state), information will not
be displayed even if there is infor
mation being transmitted from the
broadcast station.
•
If the
played (Text on state), then broadcast information will be displayed.
Information may not be displayed if
th
mitted from the broadcast station.
Text On
ere is no information being trans-
Menu
button ▶ Press
button is displayed
Text Off
button is dis-
-
10

HD RadioTM Mode
Starting Mode
Press the
FM/AM
key to turn on
Radio mode.
If an HD RadioTM broadcast is received,
the radio mode will switch from analog
broadcast to HD Radio
TM
broadcast.
Operating HD RadioTM
Mode
Selecting a Frequency
As HD RadioTM reception is included
within FM/AM mode, the methods of
moving between channels, saving presets, searching, or methods of searching frequencies are identical. However,
while the HD Radio
display will become active when within
regions where an HD Radio
can be received.
TM
related icon
TM
signal
Using TUNE
Turn the TUNE knob left/right to
select the frequency.
Selecting through Preset
From the 6 presets, select the HD RadioTM
broadcast you want to listen to.
11
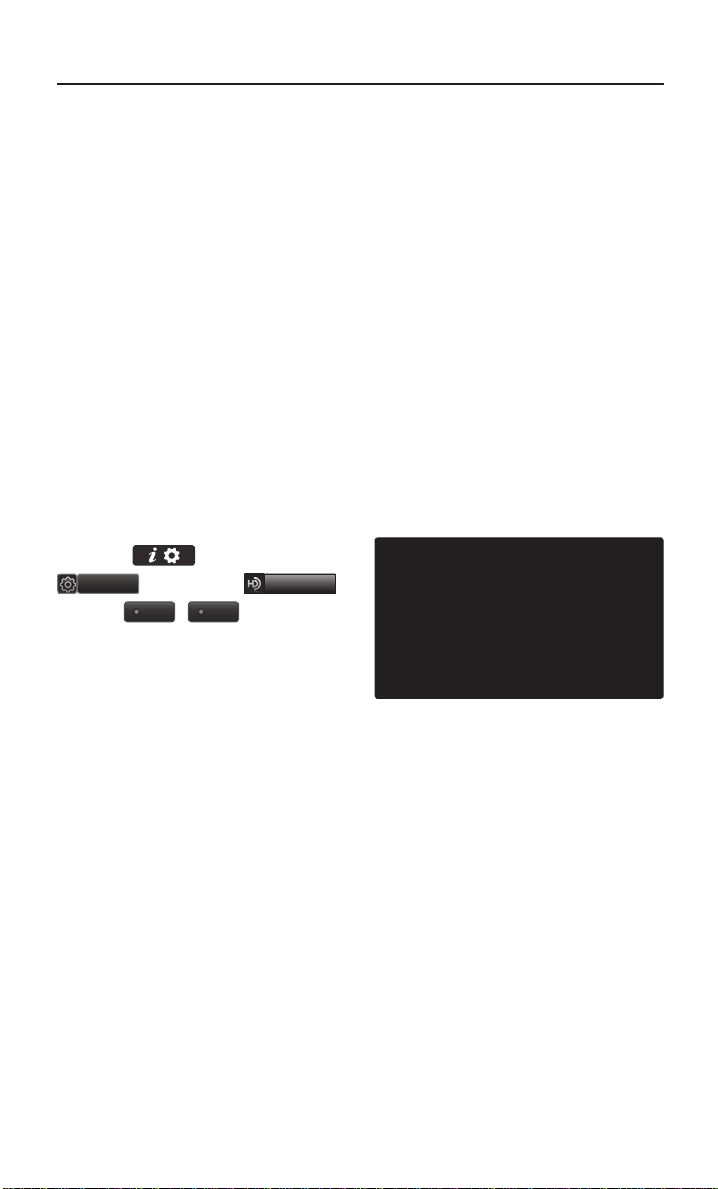
HD Radio Mode
Song-Tagging
The song tagging feature provides
a way to capture broadcasted song
information from the radio for future
purchase in iTunes
Upon connection of an Apple audio
playback device , the "tagged songs"
will be transferred to your iTunes
account in your Tagged songs folder.
HD RadioTM Digital
Broadcast On/Off
®
.
®
Setup
On
key ▶ Press
▶ Press the
Off
/
HD Radio
.
Press the
▶ Press
HD RadioTM Broadcasts can be turned
On and Off for HD RadioTM FM and
AM mode.
12

SIRIUS Mode
Starting Mode
Press the
the mode in order of SIRIUS1 →
SIRIUS2 → SIRIUS3.
When the power is OFF, pressing the
key will turn the power on
SAT
and play an SIRIUS Radio broadcast.
key to change
SAT
Using SEEK
Press the
on the control panel for under 0.8
seconds.
The previous or next channel will be
selected.
,
key
Using TUNE
Turn the TUNE knob to display
the previous or next channel
information.
After a brief moment, the selected
channel will be played.
Selecting Presets
From the 6 presets, select the channel you want to listen to.
13

SIRIUS Mode
Selecting through Channel/
Category List
Press the
the desired category and channel.
Once selected, the previous screen will
be restored and the selected channel
will begin playing.
Saving SIRIUS Channels
Saving Manually
After selecting channel ▶ Press
and hold (over 0.8 seconds) the
preset button.
•
A confirmation ‘beep’ will be heard
and the channel will be saved to the
selected preset button.
button ▶ Select
List
14

SIRIUS Mode
Using the Menu Buttons
Press the
the Search, Preset Scan, and Scan
menus.
Search
Press the
Search
press
Enter the number of the channel you
want to receive.
Preset Scan
Press the
Preset Scan
Channels saved to the 6 preset buttons are each played for 10 seconds
and then the previous channel is
restored.
Menu
button to use
Menu
button ▶ Press
▶ Enter numbers and
Done
.
Menu
button ▶ Press
.
Scan
Press the
all channels.
Starting from the current channel,
channels with superior reception are
scanned for 10 seconds and the previous channel is restored once scanning is complete.
Scan
button to scan
15

CD Mode
Starting Mode
.
MEDIA
key ▶ Press
Press the
CD
Playing a CD
•
Press the
track.
•
Press the ll button to pause the
track.
▶
button to play the
Fast-forwarding or Rewinding CD Tracks
While playing ▶ Press and hold the
key. (over 0.8
,
seconds)
This will rewind or fast-forward the
track.
While the
being pressed, the track will rewind or
fast-forward at 20x speed.
Once released, the track will begin
playing at normal speed.
key is
,
Searching CD Tracks
Turn the TUNE knob ▶ Search
tracks ▶ Once the desired track
name is displayed, press the
TUNE knob.
When searching tracks, the track number
is displayed in orange. Pressing the
TUNE knob will play the corre-
sponding track.
16
CD Mode
Using the Menu Buttons
Press the
repeat, shuffle, scan and Info On/
Info Off menus.
Repeat
Press the
Repeat
The current track is repeated.
Shuffle
Press the
Shuffle
Tracks within the disc are played in
random order.
Scan
Press the
Scan
The beginning (approx. 10 seconds) of all tracks within the CD are
scanned.
Menu
button to set the
Menu
button ▶Press
.
Menu
button ▶Press
.
Menu
button ▶ Press
.
Info On/Info Off
Press the
Info On
The amount of information displayed
on the screen can be selected. When
the title, artist, and album info are displayed, the button will automatically
change to
Press
ous information display setting.
Menu
.
Info Off
Info Off
button ▶ Press
.
to restore the previ-
17

MP3 CD Mode
Starting Mode
Press the
MP3
MEDIA
.
key ▶ Press
Playing MP3
•
Press the
•
Press the
▶
button to play the file.
ll
button to pause the file.
Selecting MP3 files
Selecting from the Mode Screen
•
Press the , key
to select the previous or next file.
•
Pressing and holding the
, key will rewind or fast-
forward the current file.
Using Menus within List Screen
Press the
the file from the list.
button ▶ Select
List
Fast-forwarding or Rewinding
MP3 Files
While playing ▶ Press and hold the
key (over 0.8
,
seconds).
This will rewind or fast-forward the file.
While the
being pressed, the file will rewind or
fast-forward at 20x speed.
Once released, the file will begin playing at normal speed.
key is
,
Searching MP3 Files
Turn the TUNE knob ▶ Search
files ▶ Once the desired file na me
is displayed, press the
knob.
18
TUNE

MP3 CD Mode
Using the Menu Buttons
Press the
copy, repeat, shuffle, scan, and Info
On/Off options.
Menu
button to set the
Copy
Copy
.
Press the
The currently playing file is copied and
saved in My Music.
Menu
button ▶ Press
Repeat
Press the
Repeat
Menu
.
button ▶ Press
Shuffle
Press the
Shuffle
Menu
.
button ▶ Press
Scan
.
Menu
button ▶ Press
Press the
Scan
Info On/Info Off
Press the
Info On
The amount of information displayed
on the screen can be changed.
When the title, artist, and album info
are displayed, the button will auto
matically change to
Info Off
formation display setting.
Menu
button ▶ Press
.
Info Off
to restore the previous in-
. Press
19
-

MP3 CD Mode
Using Menus within
the List Screen
Moving between Lists
Press the
the
▲
If five (5) or more files or folders exist
in the same folder, the list will be displayed across two or more pages.
Press the
quickly find the desired page.
Moving between Folders
Press the
from the folder list.
Pressing the button will move to the
folder one level above the current folder.
Pressing the
move to the root folder.
button ▶ Press
List
,
▼
buttons.
, ▼ cursor buttons to
▲
button ▶ Select folder
Home
button folder will
Returning to Current Location
While searching files within other
folders, press the
button to return to the currently
playing file screen.
20
Now Playing
 Loading...