

Page 1

C2
C1
OFF
OFF
N.C.
N.O.
ES-M1
SENS
ALM
OUT
10ms
C2
C1
OFF
OFF
N.C.
N.O.
ES-M2
SENS
ALM
OUT
10ms
2
3
4
WARNING
96M1093
Separate-amplifier Proximity Sensor
ES-M1(P)/M2(P)
Instruction Manual
Read this manual before using the product in order to achieve
maximum performance.
Keep this manual in a safe place after reading it so that it can be used
at any time.
• The ES-M1/M2 are intended for target detection. Do not use
these products in a safety circuit for protecting the human
body.
• The ES-M1/M2 are not explosion-proof. Do not use these
products in an environment where inflammable gas, liquid or
powder is present.
PART NAMES AND FUNCTIONS
ES-M1 (Main unit) ES-M2 (Expansion unit)
Sensor cable insertion port
Terminal block tightening screws
Mutual interference suppression selector switch
Operating indicator (Red)
Disconnection alarm indicator (Yellow)
Sensitivity adjustment trimmer
Output timer selector switch
Output delay: 10 ms
Output timer OFF
Output mode selector switch
N.C. (NEAR-OFF)
N.O. (NEAR-ON)
1. In N.O. operation mode: OFF-delay timer 10 ms
In N.C. operation mode: ON-delay timer 10 ms
I/O CIRCUIT DIAGRAM
■ NPN
ES-M1
Main circuit
Overcurrent
protection circuit
Brown
Black
(Control
output)
Orange
Blue
100mA max
Load
100mA max
Load
(Disconnection
alarm output)
12 to 24 VDC
5 to 40 VDC
5 to 40 VDC
0V
1.
ES-M2
Main circuit
Expansion
connector
Overcurrent
protection circuit
100mA max
Black
(Control output)
5 to 40 VDC
Load
FEATURES
■ One-line connection system
See “MOUNTING SEVERAL AMPLIFIERS” on page 2.
A wire-saving sensor system can be established by combining other
one-line connection amplifiers such as the FS-V10 Series or LV
Series.
■ Easy connection with the European terminal
See “SENSOR HEAD CONNECTION” on page 1.
The sensor head is connected to the amplifier through the European
terminal, allowing easy and quick connection.
■ Disconnection alarm indicator & output
See “PART NAMES AND FUNCTIONS” on page 1.
The alarm indicator and output turn on when the sensor head is
disconnected, enabling quick discovery of abnormal condition. (The
ES-M2 features the indicator only.)
■ Mutual interference suppression function
See “MUTUAL INTERFERENCE SUPPRESSION” on page 2.
Mutual interference among several sensors that are used in close
proximity can be suppressed by a simple operation.
ACCESSORIES
Instruction Manual: 1 End unit: 2 (ES-M2 only)
Metal screwdriver: 1 Cautions sticker: 1 (ES-M2 only)
Mounting bracket: 1 (ES-M1 only)
SENSOR HEAD CONNECTION
1. Modify the end of the sensor
cable as illustrated on the right.
Outer sheath
Be sure to tightly twist the shield
wire and core wire separately.
Core wire
* When the outer sheath is stripped, the shield wire appears around the core
wire. Separate the core wire and shield wire before modifying the cable.
2. Turn the terminal block tightening
screws counterclockwise to loosen
them.
Terminal block
tightening screws
3. Insert the sensor cable straight into
the insertion port of the amplifier.
Make sure that the core wire and
Shield wire
shield wire are inserted into the correct
ports and that the cable does not twist.
4. Turn the terminal block tightening
screws clockwise to tighten them. Be
sure to limit the tightening torque to
0.15 N•m.
Terminal block
tightening screws
5. Turn ON the amplifier and check that
the disconnection alarm indicator
remains OFF. If the indicator is ON, go
back to step 1 and repeat the
procedure again.
Shield wire
5 ±1 mm
14 ±1 mm
Core wire
MOUNTING AMPLIFIER
■ Mounting/Detaching the amplifier to/from a DIN rail or
the mounting bracket
Hook the claw located at the amplifier cable side onto the DIN rail, and
then hook the front side claw to the rail while pressing the amplifier
forward. To detach the amplifier, unhook the front claw by lifting the
amplifier front side while pressing it forward.
Mounting Detaching
■ PNP
ES-M1P
Overcurrent
Main circuit
protection circuit
Brown
Black
(Control output)
100mA max
Orange
(Disconnection
alarm output)
Blue
100mA max
Load
Load
12 to 24 VDC
OV
ES-M2P
Overcurrent
Main circuit
protection circuit
12 to 24 VDC
100mA max
Black
(Control output)
■ Side mounting
Using the side holes of the supplied mounting bracket (ES-M1 only),
fix the amplifier with screws.
M3 screw
Load
OV
1
Page 2
A
B
A
B
øA
B
HINTS ON CORRECT USE
• To extend the sensor head cable, be sure to use a high-frequency
coaxial cable and limit the length between the amplifier and sensor
head to 10 m or less (5 m when the EH-302/402 is used). Be sure to
use an BNC connector (see the table below).
Plug BNC-P-1.5 (or equivalent products)
Jack BNC-J-1.5 (or equivalent products)
• To extend the amplifier cable, use a cable with at least a 0.3 mm
2
nominal cross-section area. Limit the length of cable extension to no
more than 100 m. (To connect several amplifiers, contact KEYENCE
for further information.)
• If the amplifier cable is placed together with power lines or highvoltage lines in the same conduit, detection error may occur due to
noise interference, or the sensor may be damaged. Isolate the
amplifier cable from these lines.
• When using a commercially available switching regulator, ground
the F.G. terminal and ground terminal.
• During maximum sensitivity setting, the detecting distance may vary
due to the difference in characteristics of each unit.
• If the wiring is incorrect, the unit may heat up, or the sensitivity may
fluctuate. (See “I/O CIRCUIT DIAGRAM”.)
• The EH-422, 430, 440, and 290 sensor heads cannot be connected
to the ES-M1/M2. Contact KEYENCE for information on connectable
amplifiers.
MOUNTING THE SENSOR HEAD
• Cylindrical type
Secure the sensor head with a
screw at a position 5 mm or more
from the tip of the head. (Tightening
torque: 0.2 N•m max.)
• For the EH-402, secure the sensor
head to the metal part 15 mm or
more from the tip.
• Threaded type
When mounting the threaded-type sensor head, do not tighten
beyond the torque specified in the following table.
Model Tightening torque
EH-108 8 N•m max.
EH-110 10 N•m max.
EH-114
EH-416
M3 screw
(Flat point or cup point)
20 N•m max.
5 mm min.
SURROUNDING METAL
Shielded-type sensors can be flush-mounted in a metal base. Sensors
of the non-shielded type, however, should be mounted according to
the guidelines given below in order to minimize interference from the
surrounding metal.
Distance (mm)
Model
EH-402 20 15
EH-416 30 10
AB
NEAR-ON OPERATION
■ NEAR-ON operation
1. With the target in place, turn the trimmer
clockwise and find point A at which the
output indicator lights. (If the output
indicator is already lit, turn the trimmer
counterclockwise.)
2. With the target removed, again turn the
trimmer clockwise and find point B at
which the output indicator lights.
Lights when target
is in place
Indicator
turns off
Trimmer
Optimal position
Detecting range
Lights when there
is no target
2. With the target removed, again turn the trimmer clockwise and find
point B at which the output indicator lights.
3. Set the trimmer midway between points A and B. The output circuit
will now actuate when the output indicator lights.
The values in parentheses are the values when the mutual interference suppression function is used.
MUTUAL INTERFERENCE SUPPRESSION
• When installing two or more sensors of the same model face-to-face
or in parallel, separate by the distance specified in the following
table to prevent interference. The values in parentheses are for
when the mutual interference suppression function is used.
Distance Face-to-face Parallel
Model
EH-302 2 (1) No space required
EH-303A 2 (1) No space required
EH-305(S) 5 (3) No space required
EH-308(S) 10 (7) No space required
EH-110(S) 7 (4) 35 (no space required)
EH-114 11(6) 39 (no space required)
EH-605 5 (3) 14 (no space required)
EH-614A 11(6) 64 (no space required)
EH-108 7 (4) No space required
EH-910 26 (9) 22 (no space required)
EH-402 53 (12) 23 (11)
EH-416 11 (7) 115 (no space required)
(mm min.) (mm min.)
[Note]
The above figures apply when the trimmer is turned to its optimal
position for stable detection.
• When the mutual interference suppression function is used for three
or less sensor heads, set the mutual interference suppression
selector switch located on the amplifier to “OFF” for the first unit,
“C1” for the second unit, “C2” for the third unit. Contact KEYENCE
when four or more sensors are connected.
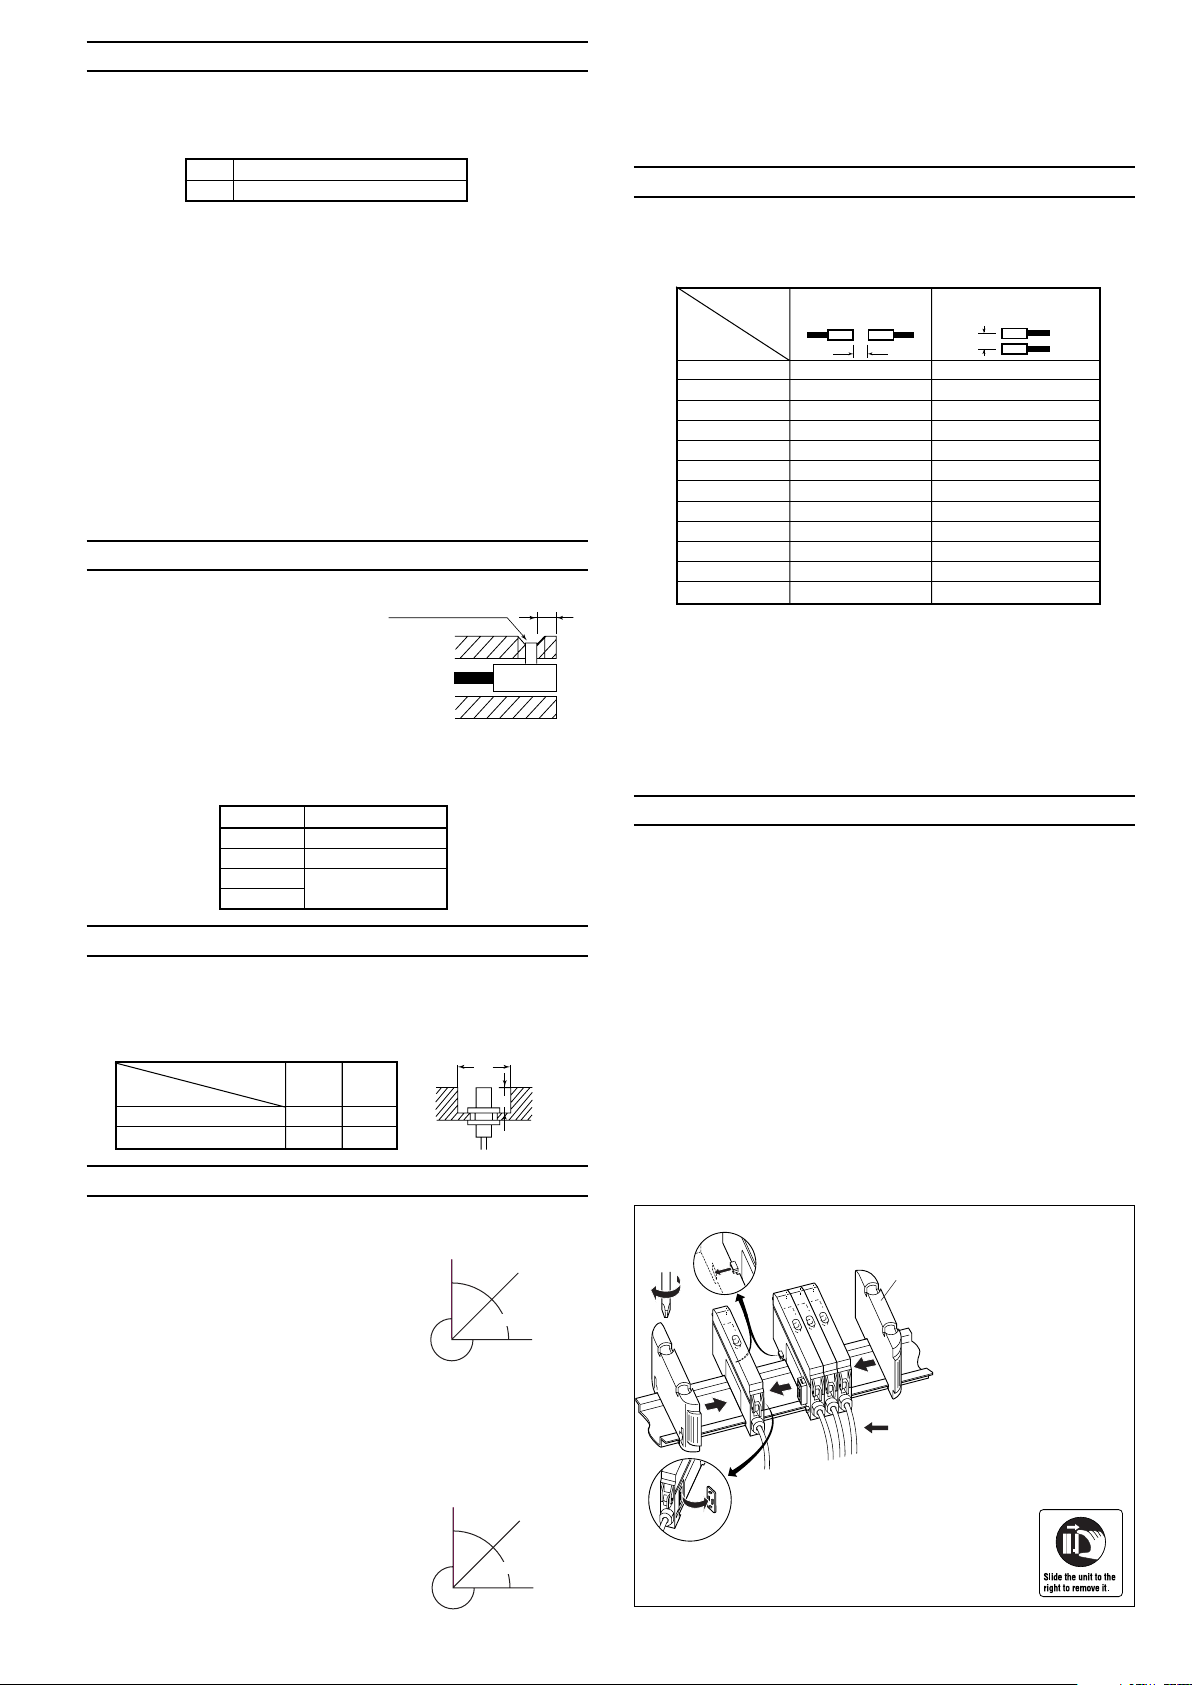
MOUNTING SEVERAL AMPLIFIERS
■ Mounting several units
1. Remove the protective cover.
2. Mount the amplifiers to the DIN rail one by one.
3. Slide one expansion unit toward another. Align the front claws of
the amplifiers and push the amplifiers together until they click.
4. Fix the amplifiers together by pushing the end units toward each end
(End units are included with the ES-M2).
■ Detaching amplifiers from DIN rail
1. Remove the end units.
2. Slide the expansion units apart and detach them individually.
(Do not detach multiple amplifiers connected together with end
units.)
[Notes]
• To connect several units, be sure to use a DIN rail and end units.
• To mount or detach several units, be sure to turn the power off.
• Do not remove the protective cover of the expansion connector on
the outermost unit.
Align the claw.
Expansion
unit
Main
unit
End unit (Included with expansion unit)
3. Set the trimmer midway between points A and B. The output circuit
will now actuate when the output indicator lights.
The values in parentheses are the values when the mutual interfer-
Up to 16 expansion units can
be connected.
ence suppression function is used.
Lights when target
■ NEAR-OFF operation
1. With the target in place, turn the trimmer
clockwise and find point A at which the
output indicator lights. (If the output
indicator is already lit, turn the trimmer
counterclockwise.)
is in place
Indicator
lights
Trimmer
Optimal position
Detecting range
Turns off when
there is no target
2
Remove the protective cover.
• The sticker shown on the right is included in the
expansion unit. Apply this sticker near the sensor.
Page 3

(1) KEYENCE warrants the Products to be free of defects in materials and workmanship for a
period of one (1) year from the date of shipment. If any models or samples were shown
to Buyer, such models or samples were used merely to illustrate the general type and
quality of the Products and not to represent that the Products would necessarily conform
to said models or samples. Any Products found to be defective must be shipped to
KEYENCE with all shipping costs paid by Buyer or offered to KEYENCE for inspection
and examination. Upon examination by KEYENCE, KEYENCE, at its sole option, will
refund the purchase price of, or repair or replace at no charge any Products found to be
defective. This warranty does not apply to any defects resulting from any action of Buyer,
including but not limited to improper installation, improper interfacing, improper repair,
unauthorized modification, misapplication and mishandling, such as exposure to
excessive current, heat, coldness, moisture, vibration or outdoors air. Components
which wear are not warranted.
(2) KEYENCE is pleased to offer suggestions on the use of its various Products. They are
only suggestions, and it is Buyer's responsibility to ascertain the fitness of the Products
for Buyer's intended use. KEYENCE will not be responsible for any damages that may
result from the use of the Products.
(3) The Products and any samples ("Products/Samples") supplied to Buyer are not to be
used internally in humans, for human transportation, as safety devices or fail-safe
systems, unless their written specifications state otherwise. Should any
Products/Samples be used in such a manner or misused in any way, KEYENCE assumes
no responsibility, and additionally Buyer will indemnify KEYENCE and hold KEYENCE
harmless from any liability or damage whatsoever arising out of any misuse of the
Products/Samples.
(4) OTHER THAN AS STATED HEREIN, THE PRODUCTS/SAMPLES ARE
PROVIDED WITH NO OTHER WARRANTIES WHATSOEVER. ALL EXPRESS,
IMPLIED, AND STATUTORY WARRANTIES, INCLUDING, WITHOUT
LIMITATION, THE WARRANTIES OF MERCHANTABILITY, FITNESS FOR A
PARTICULAR PURPOSE, AND NON-INFRINGEMENT OF PROPRIETARY
RIGHTS, ARE EXPRESSLY DISCLAIMED. IN NO EVENT SHALL KEYENCE
AND ITS A FFILIATED ENTITIES BE LIABLE TO ANY PERSON OR ENTITY FOR
ANY DIRECT, INDIRECT, INCIDENTAL, PUNITIVE, SPECIAL OR
CONSEQUENTIAL DAMAGES (INCLUDING, WITHOUT LIMITATION, ANY
DAMAGES RESULTING FROM LOSS OF USE, BUSINESS INTERRUPTION,
LOSS OF INFORMATION, LOSS OR INACCURACY OF DATA, LOSS OF
PROFITS, LOSS OF SAVINGS, THE COST OF PROCUREMENT OF
SUBSTITUTED GOODS, SERVICES OR TECHNOLOGIES, OR FOR ANY
MATTER ARISING OUT OF OR IN CONNECTION WITH THE USE OR
INABILITY TO USE THE PRODUCTS, EVEN IF KEYENCE OR ONE OF ITS
AFFILIATED ENTITIES WAS ADVISED OF A POSSIBLE THIRD PARTY'S
CLAIM FOR DAMAGES OR ANY OTHER CLAIM AGAINST BUYER. In some
jurisdictions, some of the foregoing warranty disclaimers or damage limitations may not
apply.
E 1110-2
DIMENSIONS
epyT
dradnatS
dedleihS
epahS lacirdnilyCdedaerhTnihT
ledoM 203-HEA303-HE503-HE803-HE011-HE411-HE506-HEA416-HE
gnitcetedelbatS
egnar
6.0ot0
mm
8.0ot0
mm
mm1ot0mm2ot0mm5ot0mm1ot0mm5ot0
gnitcetedmumixaM
ecnatsid
.1
mm2.1mm2mm3mm5mm8mm3mm8
epyT
-lioylhgiH
tnatsiser
-lacimehC
tnatsiser
ebutlarips-sselniatSdradnatS
dedleihSdedleihs-noN
epahS dedaerhTlacirdnilyCdedaerhTlacirdnilyC
lacirdnilyC
dna
dedaerhT
ledoM 801-HE
.2
019-HES503HES803-HES011-HE204-HE614-HE
gnitcetedelbatS
egnar
5.1ot0
mm
mm2ot0mm1ot0mm2ot0mm3ot0mm6ot0
gnitcetedmumixaM
ecnatsid
.1
mm5.2mm5.4mm3mm5mm7mm31
ES-M1
ES-M2
EH-302
EH-305S
EH-303A
EH-305
ø2.6 coaxial cable
ø3.8
18 3000
ø2 coaxial cable
ø2.8
12 3000
ø3.2
coaxial cable
ø4.1 spiral tube
ø5.4
ø5.4
18
1000 2000
18
ø3.2 coaxial cable
ø5.4
18 3000
EH-114
M14 x P1
18 3000
3000
3000
ø3.2 coaxial cable
EH-614A
ø3.2 coaxial cable
2 x ø3.3
mounting hole
14
4
3
30
10710
2.5
6
4.8
2.7
1.6
6
3000
EH-416
ø3.2 coaxial cable
ø14.5
M16 x P1
146 3000
EH-308
EH-308S
ø3.2
coaxial cable
ø5.8 coaxial cable
ø8
ø7
18
1000 2000
12
ø3.2 coaxial cable
ø8
18 3000
EH-108
ø3 coaxial cable
M8 x P1
25 3000
EH-110
ø3.2 coaxial cable
M10 x P1
18 3000
EH-110S
ø3.2
coaxial cable
ø5.8 spiral tube
ø7
18
1000 2000
12
M10 x P1
EH-402
ø2 coaxial cable
ø2.8
10
20
3000
18
6
64
10
3.5
2
1
6
2
8
4
ø2 coaxial cable
2 x ø2.3 mounting hole
EH-605
ø2.5 coaxial cable
(4)
26
ø10
EH-910
2 x ø3.4,
Spot facing: ø6, 2.7 (d)
2 x (4.4 x 3.4),
Spot facing: ø7, 4 (d)
31
15
9
3
1.3
36.5
3.8
30.8
25.425.6
22.8
16
8
3
66
35.420.7
(12.5)
(33)
1.3
28.5
9
9.2 35.4
53.8
6
20.8
(22.6)
(12.5)
66
35.420.7
3
(338)
1.3
28.5
9
*Minimum bending radius: 15
Across-flats: 14,
t=3
*Minimum bending radius: 21.5
Across-flats:
14, t=3
Detecting
surface
Across-flats: 19,
t=3.5
Across-flats: 12,
t=3
Across-flats: 21,
t=4
ø3.9, 4-core x
Brown/Blue: 0.34 mm
2
Black/Orange: 0.18 mm
2
Cable length: 2 m
DIN-rail mounting
135° max.
(Maximum
when the cover
is opened)
87.4
(Maximum
when the cover
is opened)
87.4
ø2.6 single-core x 0.34 mm
2
Cable length: 2 m
DIN-rail mounting
DIN-rail mounting
End unit (accessory for ES-M1)
12 min.
*Minimum bending radius: 21.5
12 min.
11 min.
■ Sensor head
WARRANTIES AND DISCLAMERS
SPECIFICATIONS
■ Sensor head
1. Shows the maximum detecting distance obtained at constant temperature of +23°C (73.4°F) while accuracy is ignored.
2. Although the EH-109 is designed to be highly oil-resistant, do not immerse it in oil.
Contact KEYENCE for detailed specifications of the sensor heads.
■ Amplifier
Model
Output
1. The ES-M2 does not include the disconnection alarm output. It allows monitoring with the disconnection alarm
indicator only.
2. When several units are connected, the ambient temperature requirement varies depending on the total number
of units connected as shown below. To connect several units, be sure to mount them to a metallic DIN rail. Make
sure that the output current does not exceed 20 mA.
When 1 to 10 units are connected: 0 to +50°C (32 to 122°F)
When 11 to 16 units are connected: 0 to +45°C (32 to 113°F)
NPN output
PNP output
tnemtsujdaytivitisneS remmirtnrut-52
emitesnopseR .xamsm1
edomnoitarepO elbatceleshctiws.C.N/.O.N
srotacidnI wolleY:rotacidnimralanoitcennocsiD,deR:rotacidnituptuO
noitcnufremiT FFOremiT/sm01:yaleD
noitautculferutarepmeT
tuptuolortnoC
tiucricnoitcetorP rebrosbaegrus,noitcetorptnerruc-revo,noitcetorpytiralopesreveR
egatlovylppusrewoP .xam%01)P-P(elppiR,CDV42ot21
noitpmusnoctnerruC .xamAm52
erutarepmettneibmA 05+ot0 ° 221ot23(C ° gnizeerfoN,)F
ytidimuhevitaleR noitasnednocoN,%58ot53
NPN or PNP open-collector 100 mA max. (NPN: 40 V max, PNP: 26.4 V max), Residual voltage: 1 V max
NPN or PNP open-collector 100 mA max
.1
tuptuomralanoitcennocsiD
)elbacm2gnidulcni(thgieW Approx. 65 g Approx. 35 g
ES-M1
ES-M1P
± 32+taecnatsidgnitcetedehtfosselro%8 ° 4.37(C ° )F
.xamV1:egatlovlaudiseR,).xamV04(
ES-M2
ES-M2P
05+ot0foegnarerutarepmetehtnihtiw ° 221ot23(C ° )F
—
.2
3
Copyright (c) 2003 KEYENCE CORPORATION. All rights reserved.
1093E 1031-4 96M1093
Printed in Japan
 Loading...