


DVD-RECEIVER
KDV-MP4339 KDV-MP4439 KDV-MP5032
INSTRUCTION MANUAL
© B64-4139-08/00 (M/X/R)

Contents
Before use |
3 |
Component Names and |
|
Functions |
8 |
Basic Operation |
10 |
Turning the unit on Turning the unit off Inserting a disc Ejecting a disc Selecting a source Selecting a media type Adjusting the volume Mute
Setting the clock Checking the clock Loudness
Using the EQ (Equalizer) Adjusting the sound level Changing the general settings
Tuner Operation |
13 |
Listening to radio stations Storing broadcast frequencies Auto search memory
To scan the preset stations To tune in the preset stations
CD/MP3/WMA Operation 14
MP3/WMA Disc compatibility with this unit is limited as follows
Playing an Audio CD MP3/ WMA disc
Pause
Skip to next track/file Skip to previous track/file
Return to the beginning of the current track/file Moving to another track/file
Search Intro scan Repeat Random
CD TEXT/ID3 TAG
To skip to the next or previous folder
SETUP Menu |
17 |
SETUP Menu
Language
Menu Language
Disc Audio/Subtitle/Menu
Display
TV Aspect
B.L.E. (Black Level Expansion)
Audio
Dolby Digital/DTS/MPEG
Dynamic Range Control (DRC)
Lock (Parental Control)
Rating
Password
Area Code
Others
PBC
DivX VOD
DVD/VCD Operation |
21 |
Displaying Disc Information on-screen
Playing a DVD and Video CD Pre-Stop
Stop
Pause
Still picture and frame-by frame playback
Slow motion
Moving to another title When a disc has more than
one title, you can move to another title as follows
Moving to another chapter/ track
Skip to next chapter/track Skip to previous chapter/track Return to the beginning of
the current chapter/track Scan
Repeat Time search Disc menu PBC menu
Camera angle
Changing the audio language Changing the audio channel Subtitles
Zoom
2 | KDV-MP4339/KDV-MP4439/KDV-MP5032
Photo Operation |
25 |
JPEG/TIFF disc compatibility with this player is limited as follows
Viewing slide shows |
|
Moving to another folder |
|
Moving to another file |
|
Slide show interval time |
|
Repeat |
|
Viewing still picture |
|
Zoom |
|
Rotating the picture |
|
Movie Operation |
27 |
DivX disc compatibility with this player is limited as follows
Playing a movie file Playing DivX VOD content Pre-Stop
Stop
Pause
Still picture and frame-by- frame playback
Slow motion Scan
Skip Repeat Time search
Changing the audio language Subtitles
Notice for displaying the DivX subtitle
AUX Operation |
31 |
Playing an auxiliary |
|
equipment |
|
Language code list |
32 |
Area code list |
33 |
Accessories/ Installation |
|
Procedure |
34 |
Installation/Removing the |
|
Unit |
35 |
Connecting Wires to |
|
Terminals |
36 |
Troubleshooting Guide |
38 |
Specifications |
39 |
Before use
2WARNING
To prevent injury or fire, take the following precautions:
•To prevent a short circuit, never put or leave any metallic objects (such as coins or metal tools) inside the unit.
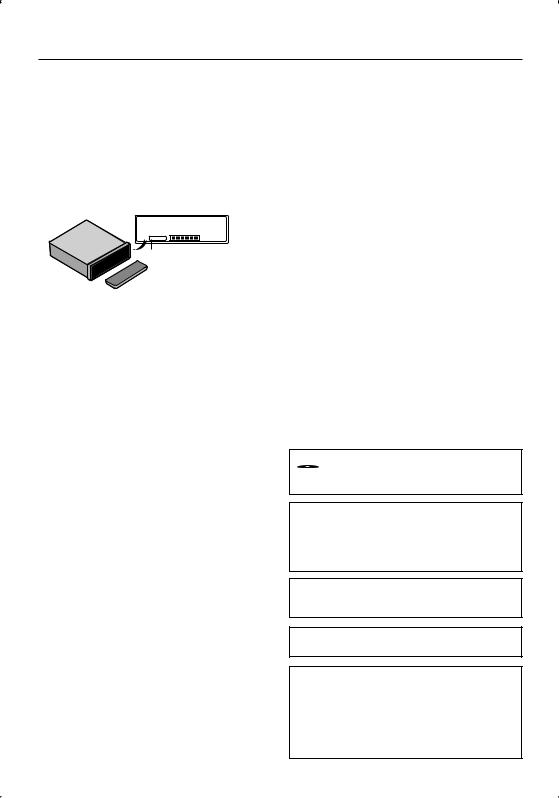
How to reset your unit
•If the unit fails to operate properly, press RESET button using a ball point pen or a similar tool.
 RESET
RESET
Reset button
Cleaning the Unit
If the faceplate of this unit is stained, wipe it with a dry soft cloth such as a silicon cloth.
If the faceplate is stained badly, wipe the stain off with a cloth moistened with neutral cleaner, then wipe it again with a clean soft dry cloth.
¤
•Applying spray cleaner directly to the unit may affect its mechanical parts. Wiping the faceplate with a hard cloth or using a volatile liquid such as thinner or alcohol may scratch the surface or erases characters.
Cleaning the Faceplate Terminals
If the terminals on the unit or faceplate get dirty, wipe them with a clean soft dry cloth.
Lens Fogging
When you turn on the car heater in cold weather, dew or condensation may form on the lens in the CD player of the unit. Called lens fogging, this condensation on the lens may not allow CDs to play. In such a situation, remove the disc and wait for the condensation to evaporate. If the unit still does not operate normally after a while, consult your Kenwood dealer.
•If you experience problems during installation, consult your Kenwood dealer.
•When you purchase optional accessories, check with your Kenwood dealer to make sure that they work with your model and in your area.
•The illustrations of the display and the panel appearing in this manual are examples used to explain more clearly how the controls are used. Therefore, what appears on the display in the illustrations may differ from what appears on the display on the actual equipment, and some of the illustrations on the display may be inapplicable.
 is a trademark of DVD Format/Logo Licensing Corporation registered in the U.S., Japan and other countries.
Manufactured under license under U.S. Patent #: 5,451,942 & other U.S. and worldwide patents issued & pending. DTS and DTS Digital Out are registered trademarks and the DTS logos and Symbol are trademarks of DTS, Inc.
© 1996-2007 DTS, Inc. All Rights Reserved.
Manufactured under license from Dolby Laboratories. "Dolby" and the double-D symbol are trademarks of Dolby Laboratories.
DivX, DivX Certified, and associated logos are trademarks of DivX, Inc. and are used under license.
This product incorporates copyright protection technology that is protected by U.S. patents and other intellectual property rights. Use of this copyright protection technology must be authorized by Macrovision, and is intended for home and other limited viewing uses only unless otherwise authorized by Macrovision. Reverse engineering or disassembly is prohibited.
English | 3

Before use
TV system selection
You must select the appropriate system mode for your TV system. When the selected system does not coincide with the system of your TV, normal colour picture may not be displayed.
•AUTO: Select when the unit is connected with Multi system TV.
•NTSC: Select when the unit is connected with NTSCTV.
•PAL: Select when the unit is connected with PAL-TV.
1 Press [SRC] to select the CD/DVD.
2Press [0] EJECT.
Confirm that no disc is loaded in the built-in player (“NO DISC” is displayed).
3Press and hold [ENTER/ 38] ([8] on the remote control) for more than 5 seconds.
Each time you press and hold the button for more than 5 seconds, the TV system switches as follows:
PAL—AUTO—NTSC
Symbols used in this manual
A section whose title has one of the following symbols is applicable only to the disc represented by the symbol.
DVD DVD
VCD Video CDs
ACD Audio CDs MP3 MP3 files WMA WMA files
The marking of products using lasers (Except for some areas)
The label is attached to the chassis/case and says that the component uses laser beams that have been classified as Class 1. It means that the unit is utilizing laser beams that are of a weaker class. There is no danger of hazardous radiation outside the unit.
4 | KDV-MP4339/KDV-MP4439/KDV-MP5032
About Audio file
•Playable Audio file
MP3 (.mp3), WMA (.wma)
•Playable disc file format
ISO 9660 Level 1/2, Joliet.
Although the audio files are complied with the standards listed above, the play maybe impossible depending on the types or conditions of media or device.
•Playing order of the Audio file
In the example of folder/file tree shown below, the files are played in the order from to .
CD ( ) <<: Folderer v vv: Audiofile
v v
v
v
v.
About DivX
DivX is a popular media technology created by DivX, Inc. DivX media Files contain highly compressed video with high visual quality that maintains a relatively small file size. DivX files can also include advanced media features like menus, subtitles, and alternate audio tracks. Many DivX media files are available for download online, and you can create your own using your personal content and easy-to-use tools from DivX.com.
About DivX Certified
DivX Certified products are officially tested by the creators of DivX and guaranteed to play of DivX video, without DivX 6.
Certified products qualify for one of several DivX Profiles that designate the type of video the product supports, from compact portable video to highdefinition video.
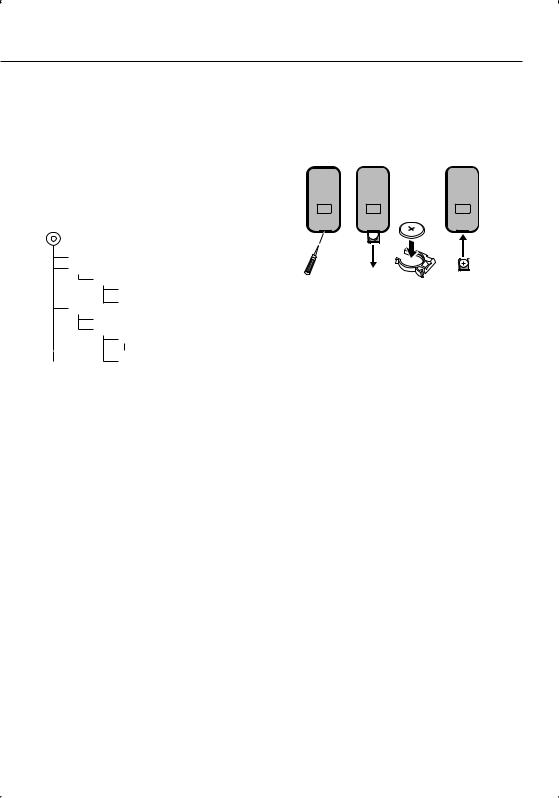
Battery installation:
1.Remove the battery holder with a sharp object such as a ballpoint pen.
2.Install the battery on the battery holder.
3.Install the battery holder back into its original position.
2WARNING
Keep the battery out of the reach of children. Should the battery be swallowed, consult a doctorimmediately.
2CAUTION
•Use one CR2025 (3 V) lithium battery.
•Remove the battery if the remote control is not used for a month or longer.
•Do not leave the product in a hot or humid place.
•Do not handle the battery with metallic tools.
•Do not store the battery with metallic materials.
•In the event of battery leakage, wipe the remote control completely clean and install a new battery.
•When disposing of used batteries, please comply with governmental regulations or environmental public institutions’ rules that apply in your country/ area.
Using the remote control
Point the remote control in the direction of the control panel to operate.
¤
•Do not store the remote control in high temperatures or direct sunlight.
•Do not let the remote control fall onto the floor, where it may become jammed under the brake or accelerator pedal.
English | 5

Before use
Region codes in the world
The DVD players are given a region code according to the country or area it is marketed, as shown in the following map.
1 |
5 |
|
|
2 |
|
1 |
6 |
2 |
|
|
|
|
3 |
|
4 |
|
1 |
|
|
|
|
5 |
|
|
2 |
|
|
|
4 |
DVD disc marks
Symbol |
|
Description |
ALL |
|
Indicates a region number. The discs with this mark can |
|
be played with any DVD player. |
|
|
|
|
|
|
Indicates the number of audio languages recorded. Up |
8to 8 languages can be recorded in a movie. You can select a favorite language.
32 |
|
Indicates the number of subtitled languages recorded. |
|
|
Up to 32 languages can be recorded. |
|
|
|
9 |
|
If a DVD disc has scenes shot from multiple angles, you |
|
can select a favorite angle. |
|
|
|
|
|
|
Indicates the type of screen for the image. The left mark |
16:9 LB |
|
indicates that a wide image picture (16:9) is displayed |
|
|
on a standard TV set screen (4:3) with a black band at |
|
|
both the top and bottom of the screen (letter box). |
|
|
|
Operation regulatory marks
With this DVD, some functions of this unit such as the play function may be restricted depending on the location where the DVD is playing. In this case, the following marks will appear on the screen. For more information, refer to the disc manual.
Prohibition Mark
6 | KDV-MP4339/KDV-MP4439/KDV-MP5032
List of playable discs
Disc |
Standard |
|
Support |
|
types |
|
|
|
|
DVD |
|
DVD Video |
|
‡ |
|
|
DVD Audio |
|
× |
|
|
DVD-R |
|
‡ |
|
|
|
|
|
|
|
DVD-RW |
|
‡ |
|
|
|
|
|
|
|
DVD+R |
|
‡ |
|
|
|
|
|
|
|
DVD+RW |
|
‡ |
|
|
|
|
|
|
|
DVD-R DL (Double layer) |
× |
|
|
|
DVD+R DL (Double layer) |
|
× |
|
|
DVD-RAM |
|
× |
CD |
|
Music CD |
|
‡ |
|
|
CD-ROM |
|
‡ |
|
|
CD-R |
|
‡ |
|
|
CD-RW |
|
‡ |
|
|
|
|
|
|
|
DTS-CD |
|
‡ |
|
|
Video CD (VCD) |
|
‡ |
|
|
Super video CD |
|
× |
|
|
Photo CD |
|
× |
|
|
CD-EXTRA |
% |
|
|
|
|
|
|
|
|
HDCD |
× |
|
|
|
CCCD |
|
× |
Others |
|
Dualdisc |
|
× |
|
|
Super audio CD |
|
× |
Remark
MP3/WMA/JPEG/MPEG/ DivX Playback
VR mode/Multi-border/ Multisession/CPRM not supported
(Playback depends on authoring conditions)
MP3/WMA/JPEG/DivX playback
Multisession supported Packet write not supported.
Only music CD session can be played.
‡ : Playback is possible.
% : Playback is partly possible. × : Playback is impossible.
Use of "DualDisc"
When playing a "DualDisc" on this unit, the surface of the disc that is not played may be scratched while the disc is inserted or ejected. Since the music CD surface does not conform to the CD standard, playback may be impossible.
(A "DualDisc" is a disc with one surface containing DVD standard signals and the other surface containing music CD signals.)
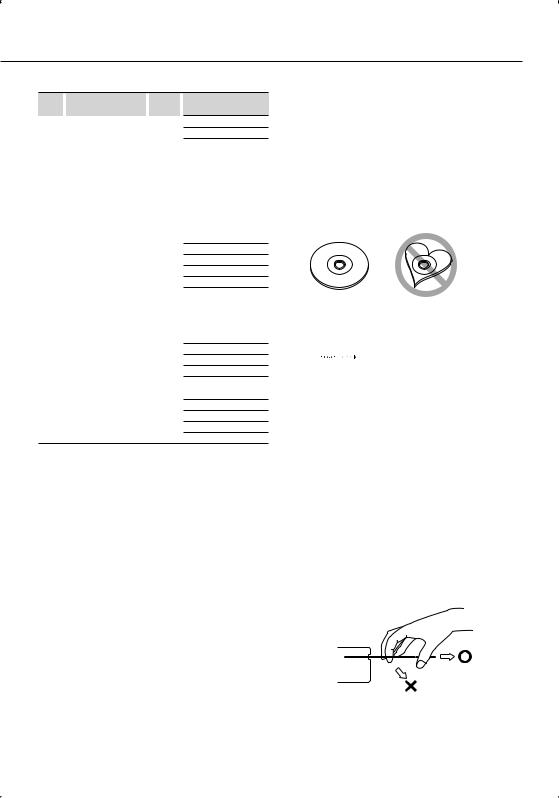
Handling discs
•Do not touch the recording surface of the disc.
•CD-R/RW, DVD-R/RW, and DVD+R/RW discs are easier to be damaged than a ordinary music CD. Use a CD-R/RW, DVD-R/RW, or DVD+R/RW disc after reading the cautions on the package.
•Do not stick a tape, sticker, etc., on the disc.
Also, do not use a disc with those materials pasted on it.
Discs that can not be used
•Discs that are not round cannot be used.
•Discs with coloring on the recording surface or that are dirty cannot be used.
•This unit can only play the CDs with one of 
 labels.
Discs without the label may not be played on the unit.
•A CD-R or CD-RW that hasn’t been finalized cannot be played. (For the finalization process refer to your CD-R/CD-RW writing software, and your CD-R/CD- RW recorder instruction manual.)
Disc storage
•Do not leave discs place them in direct sunlight (On the seat or dashboard etc.) and where the temperature is high.
•Put discs in their cases and store them in such a storage as disc cabinet.
How to eject a disc
When ejecting a disc from this unit, pull it out horizontally.
If pulled out with a strong downward force, the recording surface of the disc may be scratched.
English | 7
Component Names and Functions
1 |
2 |
3 |
4 |
5 6 |
7 |
|
|
|
|
|
|
|
|
|
|
|
|
|
|
|
|
|
|
|
|
|
|
|
|
|
|
|
|
j |
i h g f e d c b a 0 9 8 |
||||||||||||
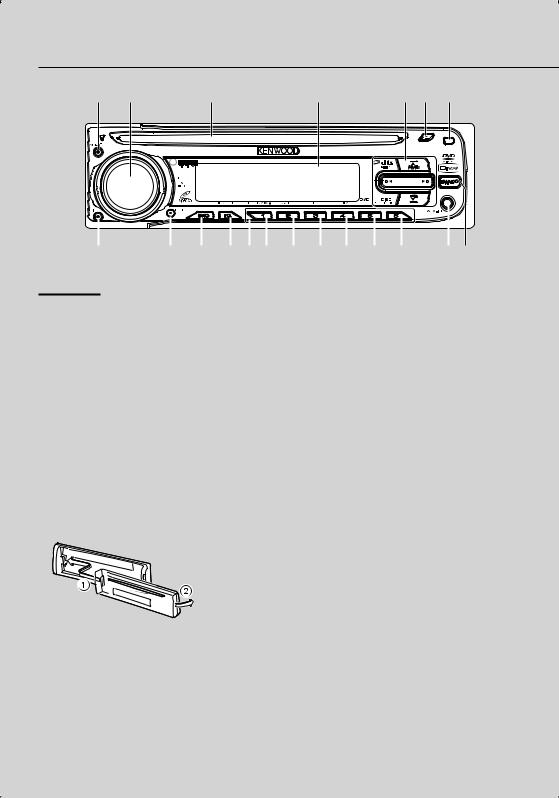
Control panel |
• [BAND] |
|
¡ [AUDIO] |
• Selects 3 FM and MW bands. |
|
• Moves to any other fi le on the disc with various |
||
|
||
™ VOL/MUTE/[PWR7OFF] |
types of fi les. |
|
£ Disc Slot |
ª AUX IN |
|
¢ Display |
Auxiliary input |
|
|
||
∞ [5]/[∞]/[2]/[3] |
º [DISC MENU] |
|
|
||
• Skip/Search [2]/[3] |
⁄ [DVD SETUP] |
|
• Seek/Tune [2]/[3] |
¤ [RDM] |
|
• Folder Up/Down [5]/[∞] |
||
‹ [REP] |
||
• Select [5]/[∞]/[2]/[3] |
||
› [SCN] |
||
§ [0] EJECT |
||
fi [ENTER/38] |
||
¶ FaceplateRelease |
||
• Play/Pause [38] |
||
Press the Release button. |
||
• Enter [ENTER] |
||
Releases the faceplate lock so that it can be |
||
fl [1] - [6] |
||
removed. |
||
Selects a stored radio station frequency. |
||
Refer to the following diagram when reattaching |
||
‡ [EQ/ 7LOUD] |
||
the faceplate. |
||
|
• Equalizer [EQ] |
|
|
• Loudness [LOUD] |
|
|
° [SRC] |
|
|
Selects a source. |
|
|
· [MENU] |
|
¤ |
‚ [DISP] |
|
Accesses On-Screen display. |
||
|
•The faceplate is a precision piece of equipment and can be damaged by shocks or jolts.
•Keep the faceplate in its faceplate case while detached.
•Do not place the faceplate (and the faceplate case) in areas exposed to direct sunlight, excessive heat or humidity. Also avoid places with too much dust or the possibility of water splashing.
•To prevent deterioration, do not touch the terminals of the unit or faceplate with your fingers.
⁄
•7indicates the button operation (hold) activates the particular function.
8 | KDV-MP4339/KDV-MP4439/KDV-MP5032
1


 6 2
6 2


3

 7
7
|
8 |
4 |
9 |
0
a
5


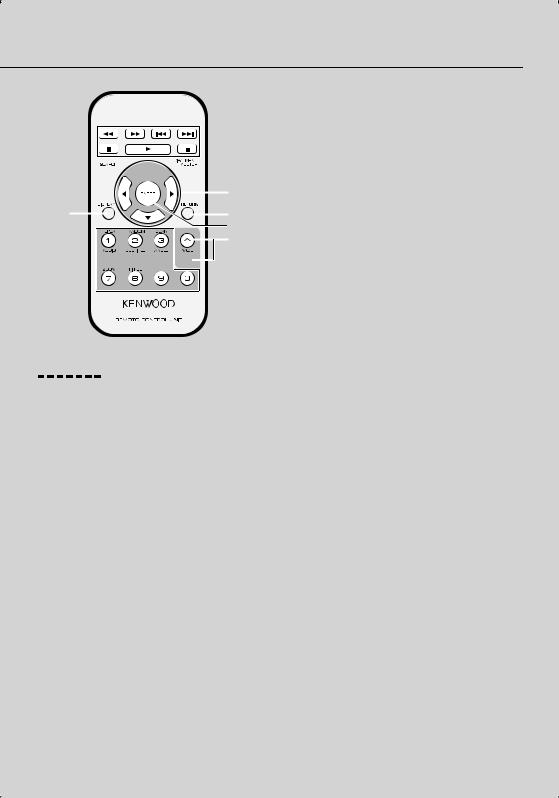
Remote control unit
¡[PWR]
Switches the unit ON/OFF.
[SRC]
Selects a source.
[MUTE]
Mutes the volume.
™[4]/[¢] SKIP
•Goes to the next (previous) chapter, track or fi le.
•Returns to the beginning of the current chapter, track, or fi le.
[1]/[¡] SCAN/SLOW
Backward (Forward) search playback.
[8] PAUSE
•Pause playback temporarily.
•Press repeatedly for frame-by-frame playback.
[3] PLAY
Starts playback.
[7] STOP
Stops playback.
£[SEARCH]
Selects a track or fi le.
¢[DISPLAY]
Accesses On-Screen display.
∞[0- 9]
•Selects numbered items in the menu.
•Selects a stored radio station frequency (1 - 6).
[REPEAT]
Repeats chapter, track, title or fi le.
[RANDOM]
Plays tracks or fi les in random order.
[SCAN]
Plays the fi rst 10 seconds of all track.
[AUDIO]
Selects audio language.
[SUBTITLE]
Selects subtitle language.
[ANGLE]
Selects a DVD camera angle if available.
[ZOOM]
Enlarges video image.
[TITLE]
Displays title menu, if available.
§[BAND]
•Selects 3 FM and MW bands.
•Moves to any other fi le on the disc with various types of fi les.
¶[DISC MENU]/[SETUP]
•Accesses menu on a DVD disc.
•Accesses or removes the Setup menu.
•[5]/[∞]/[2]/[3] up/down/left/right
Selects an item in the menu.
ª[RETURN]
Displays the menu of a video CD with PBC.
º[ENTER]
Confi rms menu selection.
⁄[VOL (UP +/ DOWN –)]
Adjusts the volume level.
English | 9
Basic Operation
Turning the unit on |
Selecting a source |
1 Press any button ([PWR] on the remote |
1 Press [SRC] to select a source. |
control) other than eject [0] and release. |
Press [SRC] repeatedly to switch between the |
|
following sources: |
|
Tuner—CD/DVD—AUX (AUX IN) |
Turning the unit off
1Press and hold the [OFF] ([PWR] on the remote control).
Inserting a disc
1Draws the disc, and starts playback automatically.
⁄
•The DVD player plays one, standard 12-cm disc at a time. Playing back an 8-cm disc is not possible with this unit and can not use adapter.
•Do not insert anything other than a disc into the disc loading slot. Discs which can be played back are listed on Types of Playable Discs (page 7).
Ejecting a disc
1Press [0]. The disc automatically ejects from the loading slot.
⁄
•When the disc is ejected by pressing [0] during playback, it will be loaded automatically after 10 seconds unless you remove the disc from the unit.
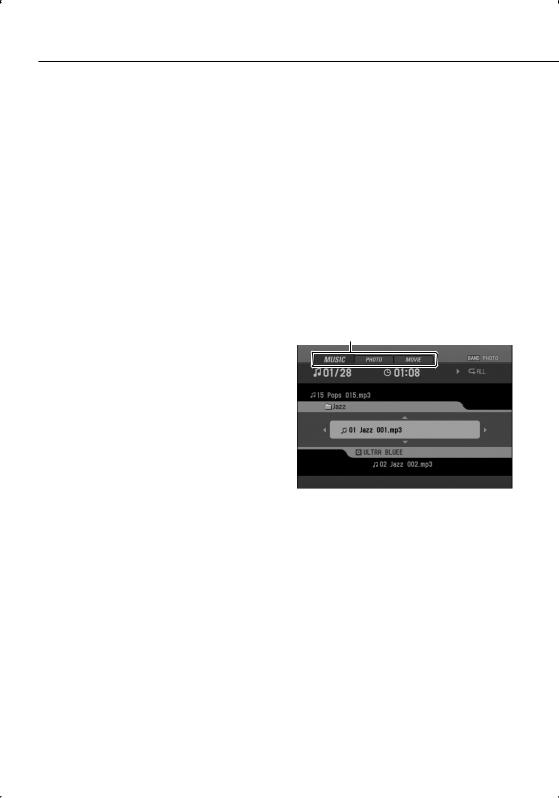
Selecting a media type
When you select CD/DVD as a source, you can switch the MUSIC, PHOTO and MOVIE menu on a disc with audio, photo, and movie files.
Each menu has a media type indication tab which shows what media you are selecting.
1Press [BAND] ([BAND] on the remote control) to select other media types.
Media type indication tab
⁄
•For a disc with only audio files, “MUSIC” is displayed. If the disc has photo or movie files, “PHOTO” tab or “MOVIE” tab is displayed.
Adjusting the volume
1Rotate [VOL] (Press [VOL +/–] on the remote control) to adjust the sound level.
⁄
•When you turn the unit off, the current volume level is automatically memorized. Whenever you turn the unit on again, it will operate at the memorized volume level.
10 | KDV-MP4339/KDV-MP4439/KDV-MP5032
Mute
1 Press [MUTE] to cut the sound.
2 To cancel it, press [MUTE] again.
Setting the clock
1Press [DISP] .
The clock indicator appears.
2Press and hold [DISP].
The clock (Hour/Minute) indicator flashes.
3 Press [2] to adjust the hour.
4 Press [3] to adjust the minute.
Checking the clock
1You can see the clock pressing [DISP] on the control panel.
Using the EQ (Equalizer)
1Press [EQ/LOUD] repeatedly.
The indicator lights in the following order.
POP—CLASSIC—ROCK—JAZZ—VOCAL— SALSA—SAMBA—USER1—USER2— off (no display)
•POP: Optimized for R&B, Soul and Country music.
•CLASSIC: Optimized for orchestral music.
•ROCK: Optimized for Hard Rock and Heavy Metal music.
•JAZZ: Sweet sound with soft feeling.
•VOCAL: Powerful realism with strong sound quality.
•SALSA: Reproduces salsa music acoustics.
•SAMBA: Reproduces samba music acoustics.
•USER1: Use the menu to set the sound level you want.
•USER2: Use the menu to set the sound level you want.
⁄
•You can adjust each sound level to your preference. Once you select a USER mode and then make an adjustment, it automatically stored for the currently selected USER mode. Refer to Adjusting the sound level (page11).
Loudness
1Press and hold [EQ/LOUD] to reinforce treble, bass and surround effect.
Loudness off (no display)—loudness on (“LOUD” indicator lights)
Adjusting the sound level
1Press [AUDIO] repeatedly to select the mode you want to adjust from volume, bass, middle, treble, balance and fader.
The indicator lights in the following order.
VOL — BAS— MID — TRB— BAL— FAD
2Rotate [VOL] (Press [VOL +/–] on the remote control) to adjust the sound quality.
Indication |
Turn right |
Turn left |
“VOL” |
Increase the volume level. |
Decrease the volume level. |
“BAS” |
Increase the bass level. |
Decrease the bass level. |
“MID” |
Increase the middle level. |
Decrease the middle level. |
“TRB” |
Increase the treble level. |
Decrease the treble level. |
“BAL” |
Decrease the level of the |
Decrease the level of the right |
|
left speaker(s). |
speaker(s). |
“FAD” |
Decrease the level of the |
Decrease the level of the rear |
|
front speaker(s). |
speaker(s). |
⁄
•When EQ or LOUD is set to Off, you can adjustthe sound level (BAS, MID, TRB) settings.
English | 11

Basic Operation
Changing the general settings
1Press [MENU] so that one of menu items appears.
2Press [MENU] repeatedly to scroll between menus.
AUX ON—AUX 0dB—DEMO OFF—BEEP 2ND
3Rotate [VOL] clockwise or counterclockwise to select one of the settings.
The setting displayed on the display is set and automatically disappears after about 6 seconds.
•AUX (Auxiliary) ON/OFF
It is possible to use auxiliary equipment with this unit. Activate the auxiliary setting when using auxiliary equipment connected to this unit. AUX ON: When using a auxiliary equipment.
AUX OFF: When not using a auxiliary equipment.
•AUX (Auxiliary) 0 dB/+6 dB
You can adjust the volume level of each source to prevent radical changes in volume when switching between sources. You can set to 0dB or +6dB. If the input level of the connected component is not high enough, increase the input level properly. Without adjusting the line input level, you may be surprised at a loud sound when you change the source from the external component to another source.
•DEMO ON/OFF
You can change the initial indication on the display to information name (function name, EQ name, etc...) while listen to a source.
DEMO ON: Displays information name while listen to source.
DEMO OFF: Cancels the function.
•BEEP 2ND/ALL
Sets the beep sound every time a button is pressed.
BEEP 2ND: The beep is generated when a key is long pressed (one sec.).
BEEP ALL: The beep is generated when any key is pressed.
⁄
•You can also select one of the settings by pressing [VOL+/–] on the remote control.
12 | KDV-MP4339/KDV-MP4439/KDV-MP5032
 Loading...