


POWERED SUBWOOFER
COMPACT COMPONENT SYSTEM
SUBWOOFER MIT STROMVERSORGUNG |
SUBWOOFER (ALTOPARLANTE PER TONI BASSI) ALIMENTATO |
CAISSON DE GRAVE ACTIF |
NÄTDRIVEN LÅGBASHÖGTALARE |
SUBWOOFER MET INGEBOUWDE VERSTERKER |
SUBWOOFER MED INDBYGGET FORSTÆRKER |
SUBWOOFER MOTRIZ |
TEHOSTETTU APUBASSOKAIUTIN |
|
|
SP-PW880
INSTRUCTIONS
BEDIENUNGSANLEITUNG MANUEL D’INSTRUCTIONS GEBRUIKSAANWIJZING MANUAL DE INSTRUCCIONES ISTRUZIONI BRUKSANVISNING VEJLEDNING
KÄYTTÖOHJE
For Customer Use:
Enter belowthetheModelNoNo. and. andSerialSerialNo. Nowhich. whichare locatedare locatedon theeithrear,onbottomthe rear,or bottomside of theor sidecabinetof the. Retcabinetthis. informaRetain thision informationfuture refeorencefuture. reference.
Model No.
Serial No.
LVT0508-001A
[ B, E, EN ]

Warnings, Cautions and Others Warnungen, Vorsichtshinweise usw.
 CAUTION
To reduce the risk of electrical shocks, fire, etc.:
1.Do not remove screws, covers or cabinet.
2.Do not expose this appliance to rain or moisture.
 Caution –– POWER switch
This apparatus is provided with a POWER switch to be able to minimize power consumption for safe use. Therefore,
1.When doing initial setting, complete all the connections required, connect the mains plug into the wall outlet, and set the POWER switch
to ON.
2.When not in use, set the POWER switch to OFF.
3.Disconnect the mains plug to shut the power off completely. The POWER switch in any position do not disconnect the mains line.
Caution: Proper Ventilation
To avoid risk of electric shock and fire, and to prevent damage, locate the apparatus as follows:
1 Front:
No obstructions and open spacing. 2 Sides/ Top/ Back:
No obstructions should be placed in the areas shown by the dimensions below.
3 Bottom:
Place on the level surface. Maintain an adequate air path for ventilation by placing on a stand with a height of 10 cm or more.
 Achtung
Zur Verringerung des Risikos von elektrischem Schlag, Feuer usw.:
1.Entfernen Sie nicht Schrauben, Abdeckungen oder das Gehäuse.
2.Setzen Sie dieses Gerät nicht Regen oder Feuchtigkeit aus.
 Achtung - Einschaltknopf (POWER)
Dieser Apparat hat einen Einschaltknopf (POWER), um den Stromverbrauch für sichere Verwendung auf einem Minimum zu halten. Beachten Sie deshalb die folgenden Punkte:
1.Stellen Sie beim ersten Einrichten alle erforderlichen Anschlüsse her, schließen Sie den Stecker des Netzkabels an eine Wandsteckdose an, und stellen Sie dann den Einschaltknopf (POWER) auf ON (An).
2.Stellen Sie den Einschaltknopf (POWER) auf OFF (Aus), wenn das Gerät nicht verwendet wird.
3.Ziehen Sie den Stecker aus der Steckdose, um die Stromversorgung vollkommen auszuschalten. Der Einschaltknopf (POWER) führt in keiner Stellung Trennung vom Netz durch.
Achtung: Angemessene Ventilation
Stellen Sie das Gerät wie folgt auf, um das Risiko von elektrischem Schlag und Feuer zu vermeiden und Beschädigung zu verhüten:
1. Vorderseite:
Keine Hindernisse und offener Raum. 2. Seiten, Oberseite und Rückseite:
In dem Bereich mit den folgenden Abmessungen sollten sich keine Hindernisse befinden.
3. Unterseite:
Stellen Sie das Gerät auf eine ebene Oberfläche. Stellen Sie das Gerät auf einen Stand mit einer Höhe von mindestens 10 cm, um einen angemessenen Luftpfad für Ventilation zu erhalten.
Avertissements, précautions et autres Waarschuwingen en andere aandachtspunten
 PRECAUTION
Pour réduire tout risque de choc électrique, feu, etc. :
1.Ne pas retirer les vis, les couvercles ni le coffret.
2.Ne pas exposer l’appareil à la pluie ni à l’humidité.
 Précaution - Interrupteur POWER
Cet appareil est doté d’un interrupteur POWER qui permet de réduire la consommation d’énergie à des fins de sécurité. En conséquence,
1.Lors des réglages initiaux, effectuer tous les raccordements, brancher la fiche secteur dans la prise secteur, puis mettre l’interrupteur POWER sur ON.
2.Lorsqu’on ne se sert pas de l’appareil, mettre l’interrupteur POWER sur OFF.
3.Débrancher l’appareil de la prise secteur pour couper complètement l’alimentation. L’interrupteur POWER ne coupe pas l’appareil du secteur, quelle que soit la position sur laquelle il est réglé.
Précaution : Ventilation
Pour réduire tout risque de choc électrique et de feu, et pour éviter d’endommager l’appareil, le disposer comme suit :
1. Avant :
Pas d’obstacles, et espace dégagé. 2. Côté/dessus/dos :
Il ne devra pas y avoir d’obstacles dans les zones représentées par les dimensions ci-dessous.
3. Dessous :
Le placer sur une surface de niveau. Garantir un trajet d’air adéquat pour la ventilation en le plaçant sur un socle d’une hauteur de 10 cm minimum.
 LET OP
Verminder het risico van elektrische schokken, brand enz.:
1.Verwijder geen schroeven, afdekkingen of andere onderdelen van de behuizing.
2.Stel dit toestel niet bloot aan regen of vocht.
 Let op - Aan/uit (POWER) schakelaar
Dit toestel is uitgerust met een aan/uit schakelaar bedoeld om het stroomverbruik te verminderen en het toestel veilig te kunnen gebruiken. Dus,
1.Bij het opstellen van het toestel dient u eerst alle vereiste aansluitingen te maken, vervolgens de stekker in het stopcontact te steken en dan pas de aan/uit schakelaar op ON (aan) te zetten.
2.Zet de aan/uit schakelaar uit (OFF) wanneer u het toestel niet gebruikt.
3.Haal de stekker uit het stopcontact om de stroomvoorziening volledig af te sluiten. De aan/uit schakelaar koppelt het toestel in geen enkele stand los van het elektriciteitsnet.
Let op: Voldoende ventilatie
Om het risico van een elektrische schok of brand te vermijden en om schade te voorkomen, dient u het toestel als volgt op te stellen:
1. Voorkant:
Geen belemmeringen en open ruimte. 2. Zijkanten/bovenkant/achterkant:
Er mogen geen belemmeringen geplaatst worden binnen de hieronder aangegeven grenzen.
3. Onderkant:
Zet het toestel op een horizontaal oppervlak. Zorg voor vrije luchtcirculatie en voldoende ventilatie door het toestel op een standaard van tenminste 10 cm hoogte te zetten.
– G1 –

Advertencias, precauciones y notas Avvertenze, Precauzioni e Altro
 PRECAUCIÓN
Para reducir el riesgo de incendios, descargas eléctricas, etc.:
1.No retire los tornillos, las cubiertas o la caja.
2.No exponga este aparato a la lluvia o la humedad.
 Precaución – Conmutador POWER
Este aparato está provisto de un conmutador POWER capaz de reducir el consumo de energía al mínimo para un uso seguro. Por consiguiente,
1.Cuando realice los ajustes iniciales, efectúe todas las conexiones requeridas, conecte el enchufe de la red en el tomacorriente de pared, y ajuste el conmutador POWER a ON.
2.Cuando no esté en uso, ajuste el conmutador POWER a OFF.
3.Extraiga el enchufe del tomacorriente para desconectar la alimentación por completo. La línea de la red no se desconecta en ninguna de las posiciones del conmutador POWER.
Precaución: Ventilación apropiada
Para evitar riesgos de incendios o de descargas eléctricas u otros daños, coloque el aparato de la siguiente manera:
1. Parte delantera:
Sin obstrucciones y con espacio abierto. 2. Laterales/parte superior/parte trasera:
No debe haber ninguna obstrucción dentro de las áreas indicadas por las dimensiones de abajo.
3. Parte inferior:
Debe instalarse sobre una superficie nivelada. Para una ventilación adecuada, colóquelo sobre un soporte de 10 cm o más de altura para permitir el paso de aire.
 ATTENZIONE
Per ridurre il rischio di scosse elettriche, incendio, ecc.
1.Non rimuovere viti, coperchi o il mobiletto esterno.
2.Non esporre quest’apparecchio agli effetti deleteri di elementi quali pioggia e umidità.
 Attenzione - Interruttore POWER
Quest’apparecchio è dotato di un interruttore POWER che serve a ridurre il consumo di energia elettrica e per sicurezza. Si raccomanda quindi di osservare quanto sotto.
1.Per l’impostazione iniziale, completare tutti i collegamenti necessari, inserire la spina del cavo di alimentazione nella presa a muro della rete elettrica e mettere l’interruttore POWER in posizione ON (accensione).
2.Se l’apparecchio non deve essere usato, mettere l’interruttore POWER in posizione OFF (spegnimento).
3.Per togliere completamente l’alimentazione di corrente, disinserire la spina del cavo di alimentazione dalla presa a muro della rete elettrica. Altrimenti l’alimentazione di corrente elettrica permane a prescindere dall’impostazione dell’interruttore POWER.
Attenzione: Ventilazione Appropriata
Per evitare i rischi di scosse elettriche e incendio, e prevenire eventuali danneggiamenti, collocare l’apparecchio osservando quanto sotto.
1. Davanti:
Spazio libero e nessun ostacolo. 2. Lati/sopra/dietro:
Nessun ostacolo entro i limiti indicati in figura. 3. Base:
Collocare su superficie a livello. Mantenere le condizioni idonee a un buon flusso d’aria di ventilazione collocando l’apparecchio su una base di appoggio di altezza non inferiore a 10 cm.
Varningar, försiktighetsåtgärder m.m. Advarsler, forsigtighedsregler og andet
 FÖRSIKTIGT!
För att minska risken för elektriska stötar, eldsvåda etc.:
1.Lösgör inga skruvar, skydd eller höljet.
2.Utsätt inte högtalaren för regn eller fukt.
 Försiktigt! - Strömbrytaren POWER
Högtalaren är försedd med en strömbrytare (POWER). Följ nedanstående råd för att minimera strömförbrukningen och garantera säker användning.
1.Slutför först alla andra nödvändiga anslutningar, innan nätkabeln ansluts till ett nätuttag och strömbrytaren POWER ställs i tillslaget läge (ON). Påbörja därefter de grundläggande inställningarna.
2.Ställ strömbrytaren POWER i frånslaget läge (OFF), när högtalaren inte ska användas.
3.Koppla loss nätkabeln från nätuttaget för att stoppa strömtillförseln helt. Strömtillförseln fortsätter oberoende av i vilket läge strömbrytaren POWER ställs.
Försiktigt! - Tillbörlig ventilation
Placera högtalaren enligt följande anvisningar för att undvika risken för elektriska stötar eller eldsvåda och för att förebygga skador.
1. Framför högtalaren:
Se till att inga hinder förekommer och att ett öppet utrymme lämnas. 2. Ovanför, bakom och på sidorna om högtalaren:
Inga hinder får förekomma inom de avstånd som anges på illustrationen nedan.
3. Under högtalaren:
Placera högtalaren på ett plant underlag. Sörj för tillräckligt god ventilationsmöjlighet genom att placera högtalaren på ett minst 10 centimeter högt ställ.
 FORSIGTIG
For at reducere risikoen for elektrisk stød, brand, osv:
1.Fjern ikke skruer, afskærmninger eller kabinettet.
2.Udsæt ikke dette apparat for regn eller fugt.
 Forsigtig! POWER afbryder
Dette apparat er forsynet med en POWER afbryder for at gøre det muligt at minimere strømforbruget og give sikker anvendelse. Derfor skal følgende overholdes:
1.Når den indledende opstilling skal foretages, skal alle tilslutninger først udføres, før netledningen sættes i en vægstikkontakt, hvorefter POWER afbryderen sættes til ON.
2.Når apparatet ikke er i anvendelse, sættes POWER afbryderen til OFF.
3.Tag netledningen ud af stikkontakten for at slukke helt for strømmen. Ligegyldigt hvad position POWER afbryderen er i, så afbryder den ikke forbindelsen til lysnettet.
Forsigtig: Korrekt ventilation
For at undgå risikoen for elektrisk stød og brand, og forebygge beskadigelse, skal apparatet placeres som følger:
1. Front:
Ingen forhindringer og frit rum til stede. 2. Sider/top/bag:
Der må ikke være nogen forhindringer placeret i de områder, der er defineret af nedenstående dimensioner.
3. Bund
Anbring på en plan overflade. Sørg for at der er tilstrækkelig luftpassage til ventilationsformål, idet apparatet anbringes på et underlag, der er 10 cm eller højere.
– G2 –
 Varoituksia, huomautuksia ym.
 Huomautus
Sähköiskujen, tulipalon ym. vaaran välttämiseksi:
1.Älä irrota ruuveja, kansia tai koteloa.
2.Älä saata tätä laitetta alttiiksi sateelle tai kosteudelle.
 Huomautus - Virtapainike (POWER)
Tässä laitteessa on virtapainike, jotta virrankulutus saadaan vähennettyä minimiin. Siksi
1.Kun teet alkusäätöjä, tee kaikki tarvittavat liitännät, liitä verkkopistoke verkkoulosottoon ja aseta virtapainike (POWER) kytkettyyn asentoon ON.
2.Kun laitetta ei käytetä, aseta virtapainike (POWER) katkaistuun asentoon OFF.
3.Virta katkaistaan kokonaan irrottamalla verkkopistoke. Virtapainike (POWER) ei katkaise missään asennossa verkkolinjaa kokonaan.
Huomautus: Kunnollinen ilmanvaihto
Sähköiskujen ja tulipalon syttymisvaaran välttämiseksi ja vaurioiden estämiseksi laite on sijoitettava seuraavalla tavalla:
1. Edessä:
Ei esteitä ja avoin tila 2. Sivuillapäällä/takana:
Mitään esteitä ei saa asettaa alla näkyvien mittojen osoittamaan tilaan. 3. Alapuolella:
Aseta tasaiselle pinnalle. Jotta ilma pääsee vaihtumaan riittävästi, aseta 10 cm tai korkeamman tuen päälle.
Front view
Vorderansicht
Vue de face
Voor-aanzicht
Vista delantera
Vista anteriore
Sett framifrån
Set forfra
Edestä katsottuna
IMPORTANT for the U.K.
DO NOT cut off the mains plug from this equipment. If the plug fitted is not suitable for the power points in your home or the cable is too short to reach a power point, then obtain an appropriate safety approved extension lead or consult your dealer.
BE SURE to replace the fuse only with an identical approved type, as originally fitted.
If nontheless the mains plug is cut off ensure to remove the fuse and dispose of the plug immediately, to avoid a possible shock hazard by inadvertent connection to the mains supply.
If this product is not supplied fitted with a mains plug then follow the instructions given below:
IMPORTANT:
DO NOT make any connection to the terminal which is marked with the letter E or by the safety earth symbol or coloured green or green-and- yellow.
The wires in the mains lead on this product are coloured in accordance with the following code:
Blue : Neutral Brown : Live
As these colours may not correspond with the coloured markings identifying the terminals in your plug proceed as follows:
The wire which is coloured blue must be connected to the terminal which is marked with the letter N or coloured black.
The wire which is coloured brown must be connected to the terminal which is marked with the letter L or coloured red.
IF IN DOUBT - CONSULT A COMPETENT ELECTRICIAN.
Side view
Seitenansicht
Vue de côté
Zij-aanzicht
Vista lateral
Vista laterale
Sett från sidan
Set fra siden
Sivulta katsottuna
|
20 cm |
20 cm |
15 cm |
15 cm |
20 cm |
|
|
10 cm |
Thank you for purchasing JVC speakers.
Before you begin using them, please read the instructions carefully to be sure you get the best possible performance. If you have any questions, consult your JVC dealer.
Vielen Dank für den Kauf dieser JVC-Lautsprecher.
Lesen Sie bitte diese Bedienungsanleitung vor Ingebrauchnahme sorgfältig durch, um stets optimale Ergebnisse zu erzielen. Wenden Sie sich bei etwaigen Fragen bitte an Ihren JVC Händler.
Nous vous remercions pour l’achat de ces enceintes JVC.
Avant de les utiliser, lire ces instructions avec attention pour en obtenir les meilleures performances possibles. En cas de questions, consulter votre revendeur JVC.
Dank u voor de aanschaf van deze luidsprekers.
Lees alvorens over te gaan tot aansluiten, deze gebruiksaanwijzing door zodat u de best mogelijke prestaties zult verkrijgen. Neem contact op met de JVC dealer indien u vragen heeft.
Le estamos muy agradecidos por haber adquirido estos altavoces de JVC. Antes de utilizarlos, sirvase leer las instrucciones detenidamente a fin de obtener el mejor rendimiento posible. Si tienenaluna pregunta, acuda a su agente de JVC.
Grazie per aver acquistato questi altoparlanti della JVC.
Prima di cominciare l’uso degli altoparlanti, leggete attentamente le istruzioni per assicurare le migliori prestazioni. Qualora sorgessero dei dubbi, rivolgetevi al vostro rivenditore JVC.
Tack för ditt val av dessa JVC-högtalare.
Innan du kopplar in högtalarna i din ljudanläggning bör du för att få maximala prestanda från högtalarna läsa igenom bruksanvisningen noggrant. Kontakta din JVC-återförsäljare om du har frågor eller känner dig osäker.
Tak for købet af denne JVC-højttaler.
Gennemlæs venligst vejledningen omhyggeligt før højttaleren tages i brug, så De kan opnå den bedst mulige ydelse. Forhør hos Deres JVC forhandler hvis De har nogen spørgsmål.
Kiitos siitä että päädyit valinnassasi JVC-kaiuttimiin.
Ennen kuin alat käyttää niitä, lue käyttöohje huolellisesti, jotta ne toimisivat parhaalla mahdollisella tavalla. Jos Sinulla on kysyttävää ota yhteys JVCedustajaan.
– G3 –
— SAFETY INSTRUCTIONS —
“SOME DOS AND DON’TS ON THE SAFE USE OF EQUIPMENT”
This equipment has been designed and manufactured to meet international safety standards but, like any electrical equipment, care must be taken if you are to obtain the best results and safety is to be assured.
Do read the operating instructions before you attempt to use the equipment.
Do ensure that all electrical connections (including the mains plug, extension leads and interconnections between pieces of equipment) are properly made and in accordance with the manufacturer’s instructions. Switch off and withdraw the mains plug when making or changing connections.
Do consult your dealer if you are ever in doubt about the installation, operation or safety of your equipment.
Do be careful with glass panels or doors on equipment.
DON’T continue to operate the equipment if you are in any doubt about it working normally, or if it is damaged in any way — switch off, withdraw the mains plug and consult your dealer.
DON’T remove any fixed cover as this may expose dangerous voltages.
DON’T leave equipment switched on when it is unattended unless it is specifically stated that it is designed for unattended operation or has a standby mode.
Switch off using the switch on the equipment and make sure that your family know how to do this.
Special arrangements may need to be made for infirm of handicapped people.
DON’T use equipment such as personal stereos or radios so that you are distracted from the requirements of traffic safety. It is illegal to watch television whilst driving.
DON’T listen to headphones at high volume as such use can permanently damage your hearing.
DON’T obstruct the ventilation of the equipment, for example with curtains or soft furnishing.
Overheating will cause damage and shorten the life of the equipment.
DON’T use makeshift stands and NEVER fix legs with wood screws — to ensure complete safety always fit the manufacturer’s approved stand or legs with the fixings provided according to the instructions.
DON’T allow electrical equipment to be exposed to rain or moisture.
ABOVE ALL
–NEVER let anyone, especially children, push anything into holes, slots or any other opening in the case.
–this could result in a fatal electrical shock;
–NEVER guess or take chances with electrical equipment of any kind
–it is better to be safe than sorry!
Contents |
English |
Confirming Supplied Accessories ............................................................ |
1 |
Precautions for Use .................................................................................. |
1 |
Precautions for Installation ....................................................................... |
1 |
Names of Parts and Functions ................................................................ |
2 |
Connections ............................................................................................. |
3 |
Operation ................................................................................................. |
5 |
Troubleshooting ........................................................................................ |
6 |
Specifications ........................................................................................... |
6 |
Inhalt |
Deutesch |
Überprüfen des mitgelieferten Zubehörs ................................................. |
1 |
Vorsichtsmaßnahmen für den Gebrauch ................................................. |
1 |
Vorsichtsmaßnahmen für die Installation ................................................. |
1 |
Namen von Teilen und Funktionen .......................................................... |
2 |
Verbindungen ........................................................................................... |
3 |
Bedienung ................................................................................................ |
5 |
Störungsbehebung ................................................................................... |
6 |
Spezifizierungen ...................................................................................... |
6 |
Contenus |
Français |
Confirmation des accessoires fournis ..................................................... |
7 |
Précautions pour l’emploi ......................................................................... |
7 |
Précautions pour l’installation .................................................................. |
7 |
Nomenclature des différents éléments et fonctions ................................. |
8 |
Connexions .............................................................................................. |
9 |
Fonctionnement ..................................................................................... |
11 |
Dépannage ............................................................................................ |
12 |
Spécifications ......................................................................................... |
12 |
Inhoud |
Nederlands |
Controleren toebehoren ........................................................................... |
7 |
Voorzorgen voor het gebruik .................................................................... |
7 |
Voorzorgen voor de installatie .................................................................. |
7 |
Namen van onderdelen en functies ......................................................... |
8 |
Aansluitingen ........................................................................................... |
9 |
Bediening ............................................................................................... |
11 |
Oplossen van problemen ....................................................................... |
12 |
Technische gegevens ............................................................................. |
12 |
Contenido |
Españpl |
Indice |
Italiano |
Verifica degli accessori in dotazione ...................................................... |
13 |
Precauzioni per l’uso .............................................................................. |
13 |
Precauzioni per l’installazione ................................................................ |
13 |
Nome delle parti e funzioni ................................................................... |
14 |
Collegamenti .......................................................................................... |
15 |
Funzionamento ...................................................................................... |
17 |
Guida e rimedi in caso di problemi di funzionamento ............................ |
18 |
Dati caratteristici .................................................................................... |
18 |
Innehåll |
Svenska |
Kontroll av medföljande tillbehör ........................................................... |
19 |
Säkerhetsföreskrifter för användning .................................................... |
19 |
Säkerhetsföreskrifter för installation ....................................................... |
19 |
Namn på delar och funktioner ................................................................ |
20 |
Anslutningar ........................................................................................... |
21 |
Drift ....................................................................................................... |
23 |
Felsökning .............................................................................................. |
24 |
Tekniska data ......................................................................................... |
24 |
Indhold |
Dansk |
Tjek af medfølgende tilbehør .................................................................. |
19 |
Sikkerhedsregler for brug ....................................................................... |
19 |
Sikkerhedsregler for installation ............................................................. |
19 |
Delenes navne og funktioner ................................................................. |
20 |
Tilslutninger ............................................................................................ |
21 |
Betjening ................................................................................................ |
23 |
Fejlfinding ............................................................................................... |
24 |
Specifikationer ....................................................................................... |
24 |
Sisältö |
Suomi |
Vakiovarusteiden tarkastaminen ............................................................ |
25 |
Huomautuksia käytöstä .......................................................................... |
25 |
Huomautuksia asennuksesta ................................................................. |
25 |
Osien nimet ja toiminnot ........................................................................ |
26 |
Liitännät ................................................................................................. |
27 |
Käyttö ..................................................................................................... |
29 |
Vianmääritys .......................................................................................... |
30 |
Tekniset tiedot ........................................................................................ |
30 |
Confirmación de los accesorios suministrados ...................................... |
13 |
Precauciones sobre el uso ..................................................................... |
13 |
Precauciones sobre la instalación ......................................................... |
13 |
Nombres de las partes y funciones ........................................................ |
14 |
Conexiones ............................................................................................ |
15 |
Funcionamiento ..................................................................................... |
17 |
Solución de problemas ........................................................................... |
18 |
Especificaciones .................................................................................... |
18 |
– G4 –

|
Confirming Supplied Accessories |
|
|
Precautions for Installation |
|
Überprüfen des mitgelieferten Zubehörs |
|
|
Vorsichtsmaßnahmen für die Installation |
|
|
|
|
|
Before use, check that you have received all of the following items, which are supplied with the unit.
Überprüfen Sie vor dem Gebrauch, dass Sie alle der folgenden Teile, die mit der Anlage mitgeliefert werden, erhalten haben.
• Speaker Cord (2)
• Lautsprecherkabel (2)
• Signal Cord (1)
• Signalkabel (1)
Precautions for Use Vorsichtsmaßnahmen für den Gebrauch
 To maintain the look of the unit
Wipe with a dry, soft cloth if the cabinet or control panel should become dirty. If very dirty, apply a small amount of water or neutral detergent to the cloth and wipe clean. Then wipe with a dry cloth.
 Zum Erhalten des Aussehens der Anlage
Wischen Sie die Box oder das Bedienungsfeld mit einem trockenen, weichen Tuch ab, wenn sie schmutzig geworden sind.
Wenn sie sehr schmutzig geworden sind, dann geben Sie etwas Wasser oder eine kleine Menge eines neutralen Reinigungsmittels auf das Tuch und reiben sie sauber. Dann wischen Sie mit einem trockenen Tuch ab.
 Good manners when listening to stereo
When you are listening to music on a stereo system, please listen at volume that will not disturb your neighbors. At night, in particular, even soft sounds spread easily to the surroundings. Please shown consideration and close windows, or listen using headphones, etc. in order to maintain a pleasant living
environment. Sound etiquette
The symbol shown here is the Sound Etiquette symbol mark.
 Angepasstes Verhalten beim Hören in Stereo
Wenn Sie Musik auf einem Stereosystem hören, dann achten sie bitte bei der Lautstärke darauf, dass die Nachbarn nicht gestört werden. Besonders nachts verbreiten sich selbst leise Töne in der Umgebung. Bitte nehmen Sie Rücksicht und schließen Sie die Fenster oder benutzen Kopfhörer usw., um eine angenehme Wohnatmosphäre zu erhalten.
Das hier gezeigte Symbol ist das Symbolzeichen des Klangetikettes (Sound Etiquette).
•To prevent deformation or discoloration of the cabinet, do not install the unit where it is exposed to direct sunlight or high humidity, and avoid installation near air conditioning outlets.
•Um Deformierung oder Verfärbung der Box zu vermeiden, stellen Sie die Anlage nicht an einem Ort auf, wo sie direktem Sonnenlicht oder großer Feuchtigkeit ausgesetzt ist und vermeiden Sie die Installation nahe an Ausgängen von Klimaanlagen.
•Speaker vibrations may cause howling. Place the unit as far away from the player as possible.
•Lautsprechervibrationen können Rückkopplungen verursachen. Stellen Sie die Anlage so weit wie möglich entfernt von dem Spieler auf.
•Take the occurrence of earthquakes or other physical shocks into consideration when selecting the installation place, and secure the unit thoroughly.
•Ziehen Sie das Auftreten von Erdbeben oder anderen physikalischen Erschütterungen in Betracht, wenn Sie den Ort für die Installation auswählen und sichern Sie die Anlage sorgfältig.
•This unit is magnetically shielded so as not to cause color distortions on color television sets. However, depending on the installation method, color distortions may occur. Please pay attention to the following points when installing the unit.
1.When placing these speakers near a TV set, turn off the TV’s main power switch or unplug it before installing the speakers.
Wait at least 30 minutes after the system is installed before turning on the TV’s power.
2.If another speaker system has been set up near the TV set, that system may cause color unevenness in the TV’s picture.
3.In spite of the shielded design of these speakers, some types of TV’s may be affected by them. If this happens, move the speakers a short distance form the TV set.
•Die Anlage ist magnetisch abgeschirmt, so dass sie keine Farbverzerrungen auf Farbfernsehern verursachen kann. Jedoch können in Abhängigkeit der Installationsmethode Farbverzerrungen auftreten. Beachten Sie bitte die folgenden Punkte bei der Installation der Anlage.
1.Bei Aufstellung dieser Boxen in der Nähe eines Fernsehers den Netzschalter des Fernsehers ausschalten oder seinen Netzstecker aus der Steckdose ziehen, bevor die Boxen installiert werden.
Mindestens 30 Minuten nach der Installation des Systems warten, bis der Fernseher eingeschaltet wird.
2.Wenn ein anderes Lautsprechersystem in der Nähe des Fernsehers aufgestellt ist, kann das andere System Farbverfälschungen hervorrufen.
3.Trotz der abgeschirmten Konstruktion dieser Boxen können manche Fernseher von ihnen beeinflußt werden. Wenn dies der Fal ist, müssen die Boxen etwas weiter entfemt vom Fernseher aufgestellt werden.
 Improving the sound field
•If the speakers are facing a solid wall or glass door, etc., it is recommended to furnish the wall with materials that absorb sound, for example by hanging up heavy curtains, to prevent generation of reflections and standing waves.
 Verbessern des Klangfeldes
•Ein Wohnzimmer, in dem leicht Reflexionen und Resonanzen erzeugt werden können, sollte mit schweren Vorhängen oder Teppichböden usw. ausgestattet werden.
Wenn die Lautsprecher auf eine feste Wand oder eine Glastür usw. gerichtet sind, ist es empfehlenswert, die Wand mit klangabsorbierenden Materialien auszustatten, z. B. durch das Aufhängen von schweren Vorhängen, um die Erzeugung von Reflexionen und stehenden Wellen zu verhindern.
– 1 –

Names of Parts and Functions
Namen von Teilen und Funktionen
|
|
|
|
|
|
|
|
|
Front Panel |
|
Rear Panel |
|
|
|
|
||
|
|
|
|
||
|
|
|
Vorderseitenteil |
|
Rückseitenteil |
|
|
|
|
 /
/
STANDBY/ON
 Amp Section
 Verstärkerteil
This lights when the power is ON, and when the unit is in the standby mode.
Red: Standby mode Green: ON mode
Stromversorgungslampe Diese Lampe leuchtet, wenn die Stromversorgung auf EIN (ON)geschaltet ist und die Anlage in der Betriebsart Standby läuft. Rot: Betriebsart Standby Grün: Betriebsart EIN (ON)
INPUT 1 (LOW LEVEL)
You can connect the subwoofer output terminal, MONO output terminal, or line output terminals of the amplifier, etc., here.
(For details, see "Connections" on the next page.)
INPUT 1 (UNTERE STUFE) (LOW LEVEL)
Sie können den SubwooferAusgangsanschluss, den MONOAusgangsanschluss oder die Leitungsausgangsanschlüsse des Verstärkers usw. hier anschließen. (Siehe „Verbindungen" auf der nächsten Seite für weitere Einzelheiten.)
POWER button
Turns the unit ON/OFF.
EINSCHALTknopf (POWER)
Schaltet die Anlage auf
EIN/AUS (ON/OFF).
AC power cord
ACStromkabel
VOLUME knob
Used to adjust the volume.
LAUTSTÄRKEregler (VOLUME) Dient zum Einstellen der Lautstärke.
PHASE button
Used to obtain a rich bass sound.
: NORMAL
 : REVERSE
PHASENregler (PHASE) Dient zum Erhalten eines reichen Bassklanges.
: NORMAL
 : UMGEKEHRT (REVERSE)
INPUT 2 (HIGH LEVEL) When the amplifier, etc., to be connected is not equipped with subwoofer output terminal, connect the speaker output terminals of the amplifier, etc., here.
(For details, see "Connections" on the next page.)
INPUT 2 (OBERE STUFE) (HIGH LEVEL)
Wenn der Verstärker usw., der angeschlossen werden muss, nicht mit einem SubwooferAusgangsanschluss ausgestattet ist, dann schließen Sie hier die Lautsprecherausgangsanschlüsse des Verstärkers an.
(Siehe „Verbindungen" auf der nächsten Seite für weitere Einzelheiten.)
– 2 –

Connections
Verbindungen
Make all the connections before plugging the AC power cord into an AC outlet.
Stellen Sie alle Verbindungen her, bevor Sie die ACStromkabel in einen ACAusgang stecken.
CAUTION
•Before connecting to an amplifier, be sure that the power is turned OFF on the amplifier side.
•INPUT 1 and INPUT 2 on this unit cannot be used simultaneously. Doing so will increase noise and could result in damage.
•Do not connect INPUT 1 on this unit to the REC OUT terminals of an amplifier, etc.
VORSICHT
•Stellen Sie vor dem Anschließen eines Verstärkers sicher, dass die Stromversorgung auf der Verstärkerseite auf AUS gestellt ist.
•INPUT 1 und INPUT 2 können an dieser Anlage nicht gleichzeitig benutzt werden. Wird dies getan, so steigt der Lärmpegel und es kann zur Beschädigung führen.
•Schließen sie nicht den INPUT 1 an der Anlage an den REC OUTAnschlüssen eines Verstärkers usw. an.
MEMO |
MEMO |
If the amplifier, etc. to be connected to is equipped with both subwoofer output terminal and line output terminals, it is recommended to connect to the subwoofer output terminal.
Also, if neither of these output terminals is provided, please connect to the speaker output terminals.
Ist der Verstärker usw., der angeschlossen werden soll, sowohl mit SubwooferAusgangsanschlüssen als auch mit Leitungsausgangsanschlüssen ausgestattet, wird empfohlen, ihn an dem SubwooferAusgangsanschluss anzuschließen.
Sind keine dieser Ausgangsanschlüsse vorhanden, dann schließen Sie ihn bitte an den Lautsprecherausgangsanschlüssen an.
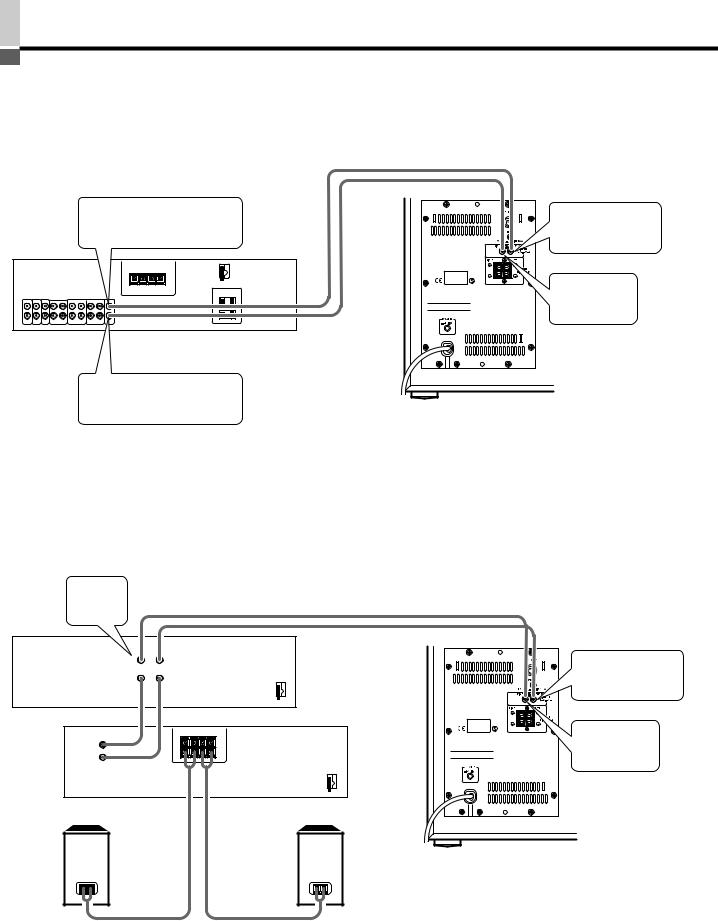
 Connecting to an amplifier with subwoofer output terminal or an amplifier with MONO output terminal
Connect to the LEFT/MONO terminal of INPUT 1. (The LEFT and RIGHT terminals are mixed inside the unit.)
• Use the supplied signal cord.
 Anschließen an einen Verstärker mit SubwooferAusgangsanschluss oder an einen mit MONOAusgangsanschluss.
Anschließen an den LEFT/MONOAnschluss des INPUT 1. (Der RIGHT und der LEFT Anschluss sind im Inneren der Anlage „vermischt").
• Benutzen Sie das mitgelieferte Signalkabel.
Subwoofer output terminal |
INPUT 1 |
(MONO output terminal) |
LEFT/MONO terminal |
SubwooferAusgangsanschluss |
INPUT 1 |
(MONOAusgangsanschluss) |
LEFT/MONOAnschluss |
 Connecting to the speaker output terminals of an amplifier
Connect the speaker cords in parallel to the speaker output terminals on the amplifier.
Be sure to confirm and match the RIGHT and LEFT speaker terminals with the + and - polarities when connecting.
• Use the supplied signal cords for the connection.
 Anschließen an die Lautsprecherausgangsanschlüsse eines Verstärkers
Schließen Sie die Lautsprecherkabel parallel an den Lautsprecherausgangsanschlüssen an dem Verstärker an.
Stellen Sie sicher, dass die RIGHT und LEFT Lautsprecheranschlüsse mit den
+ und - Polaritäten zusammenpassen, wenn Sie sie verbinden.
•Benutzen Sie das mitgelieferte Signalkabel.
Speaker output terminals
Lautsprecherausgangsanschlüsse
INPUT 2 |
RIGHT |
INPUT 2 |
RIGHT |
INPUT 2 LEFT
INPUT 2 LEFT
– 3 –
Connections (Continued)
Verbindungen (Fortsetzung)
Make all the connections before plugging the AC power cord into an AC outlet.
Stellen Sie alle Verbindungen her, bevor Sie die ACStromkabel in einen ACAusgang stecken.
 Connecting to an amplifier with LINE OUT output terminals
Connect to the RIGHT and LEFT/MONO terminals of INPUT 1.
Be sure to connect the correct cord to the RIGHT and LEFT terminals, respectively.
• Use separately purchased connecting cords.
 Anschließen an einen Verstärker mit Leitungsausgangsanschlüssen
Anschließen an den RIGHT und LEFT/MONOAnschluss von INPUT 1. Stellen Sie sicher, dass Sie jeweils das richtige Kabel an den RIGHT und LEFT Anschlüssen anschließen.
• Benutzen Sie separat gekaufte Verbindungskabel.
Sound output (LINE OUT) (LEFT)
Klangausgang (LINE OUT) (LEFT)
RIGHT |
LEFT |
INPUT 1 LEFT/MONO
INPUT 1 LEFT/MONO
INPUT 1 RIGHT
INPUT 1 RIGHT
Sound output (LINE OUT) (RIGHT) Klangausgang (LINE OUT) (RIGHT)
 Connecting to an amplifier set
Connect to the RIGHT and LEFT/MONO terminals of INPUT 1. Be sure to connect the correct cord to the RIGHT and LEFT terminals, respectively.
• Use separately purchased connecting cords.
OUT PUT
OUT PUT
Preamplifier
Vorverstärker
RIGHT |
LEFT |
|
Power amplifier |
|
Leistungsverstärker |
 Anschließen an ein Verstärkerset
Schließen Sie ihn an den RIGHT und LEFT/MONOAnschlüssen von INPUT 1 an.
Stellen Sie sicher, dass Sie jeweils das richtige Kabel an den RIGHT und LEFT Anschlüssen anschließen.
• Benutzen Sie separat gekaufte Verbindungskabel.
INPUT 1 LEFT/MONO
INPUT 1 LEFT/MONO
INPUT 1 RIGHT
INPUT 1 RIGHT
– 4 –

Operation
Betrieb
When all the connections to the amplifier, etc. are completed, plug the AC power cord into an AC outlet.
Wenn alle Verbindungen zum Verstärker usw. hergestellt sind, stecken Sie das ACStromkabel in einen ACAusgang.
Connecting the AC power cord (after all connections have |
Adjusting the volume |
||
been made) |
|
Adjust the volume level of this speaker to match those of the other speakers. |
|
When connecting to the AC OUTLET on an amplifier, ensure that the AC |
Einstellen der Lautstärke |
||
OUTLET is capable of delivering a power that is larger than the power consump- |
|||
tion (30 W) of this unit. |
|
Stellen Sie die Lautstärkenstufe dieses Lautsprechers so ein, dass Sie sie an |
|
Anschließen des ACStromkabels (nachdem alle |
die der anderen Lautsprecher anpassen. |
||
1. Turn the VOLUME knob on this unit to the |
|||
Verbindungen hergestellt worden sind). |
|||
Beim Anschließen an einen ACAUSGANG (AC OUTLET) an einem |
"MIN" position. |
||
Verstärker, stellen Sie sicher, dass der ACAUSGANG (AC OUTLET) dazu |
1. Drehen Sie den LAUTSTÄRKEregler |
||
geeignet ist, eine Leistung zu liefern, die größer ist, als der Leistungsverbrauch |
|||
(30 W) dieser Anlage. |
|
(VOLUME) an dieser Anlage auf die |
|
|
|
Position „MIN". |
|
Turning the Power ON |
|
|
|
Einstellen der Stromversorgung auf AN (ON) |
2. Adjust the volume of the amplifier to your normal listening level, and play a |
||
• Front panel |
• Rear panel |
||
music source. |
|||
• Vorderseitenteil |
• Rückseitenteil |
2. Stellen Sie die Lautstärke an Ihrem Verstärker auf Ihre normale |
|
|
|
||
|
|
Lautstärkenstufe und spielen Sie eine Musikquelle ab. |
|
|
• POWER button |
|
|
|
ON :Power is ON. |
3. Turn the VOLUME knob on this unit to |
|
|
OFF :Power is OFF. |
||
/ |
balance the volume with the other |
||
STANDBY/ON |
|
|
speakers. |
|
• Einschaltknopf |
||
|
|
||
|
AN (ON) |
:Stromversorgung ist AN (ON). |
3. Drehen Sie den Lautstärkeregler an dieser |
|
AUS (OFF) :Stromversorgung ist AUS (OFF). |
Anlage, um die Lautstärke mit den anderen |
|
|
|
|
Lautsprechern abzugleichen. |
•  lamp (with auto power on/off function)
When the POWER button is pressed to ON, the |
lamp lights up green. If |
• After obtaining balance between the volume level of this unit and the other |
|||||
about 4 to 8 minutes elapse with no signals, the mode switches to the standby |
|||||||
mode, and the |
lamp lights red. |
|
|
|
speakers, use the amplifier's volume control to match the volume level of the |
||
When audio signals are input, the mode automatically becomes the ON mode, |
|
other speakers to that of this unit. |
|||||
and the |
lamp lights green. |
|
|
• Nachdem Sie die Lautstärkenstufe dieser Anlage mit den anderen |
|||
ON mode |
: |
lamp lights green. |
|
|
|||
Standby mode : |
lamp lights red. |
|
|
|
Lautsprechern abgeglichen haben, benutzen Sie die Lautstärkenkontrolle, um |
||
• Lampe |
(mit Autofunktion An/Aus) |
|
|
die Lautstärkenstufe der anderen Lautsprecher mit der dieser Anlage |
|||
|
|
abzugleichen. |
|||||
Wenn der Einschaltknopf (POWER) auf An (ON) gedrückt wird, leuchtet die |
|
|
|||||
Lampe |
grün auf. Wenn ungefähr 4 bis 8 Minuten ohne Signale vergehen, |
|
PHASE button |
||||
wird die Betriebsart zu Bereitschaftsbetrieb geschaltet und die Lampe |
|
||||||
leuchtet rot. |
|
|
|
|
|
|
Set this button to obtain a rich bass. |
Wenn Audiosignale eingehen, dann schaltet die Betriebsart automatisch auf |
|
|
|||||
An (ON) und die Lampe |
leuchtet grün. |
|
|
PHASENregler (PHASE) |
|||
|
|
||||||
Betriebsart AN (ON) : Die Lampe |
leuchtet grün. |
|
Stellen Sie diesen Regler so ein, dass Sie einen reichen Bass erhalten. |
||||
Betriebsart Standby : Die Lampe |
leuchtet rot. |
|
|
||||
CAUTION
If the VOLUME knob on this unit is near MIN, the amplifier's sound volume is 0, or the sound signals from the amplifier are exceptionally low, the mode is not switched from the standby mode to the ON mode.
•To completely cut off the power to this unit, press the POWER button on the rear panel to the "OFF" position, and disconnect the power cord from the AC outlet.
VORSICHT
Wenn der LAUTSTÄRKEregler (VOLUME)dieser Anlage nahe bei MIN steht, das Klangvolumen des Verstärkers 0 ist oder die Klangsignale von dem Verstärker außergewöhnlich niedrig sind, dann schaltet die Betriebsart nicht von der Betriebsart Standby in die Betriebsart AN (ON).
•Um die Stromversorgung der Anlage ganz abzuschalten, drücken Sie den Einschaltknopf auf dem Rückseitenteil in die Position „AUS" (OFF) und ziehen Sie das Stromkabel aus dem ACAusgang.
• PHASE button
: NORMAL
(Normally used in this position.) : REVERSE
(Use in this position when the bass sound is otherwise insufficient.)
• PHASENregler (PHASE)
: NORMAL
(Wird normalerweise in dieser Position benutzt.) : UMGEKEHRT (REVERSE)
(Benutzen Sie ihn in dieser Position, wenn der Bassklang in irgendeiner Weise unzureichend ist.)
– 5 –
Troubleshooting
Störungsbehebung
|
|
|
|
|
|
|
|
|
|
|
|
|
|
|
|
|
|
|
|
|
Symptom |
Possible Cause |
Action |
||||
Symptom |
Mögliche Ursache |
Maßnahme |
||||
|
|
|
|
|
|
|
Power does not come on.
Es wird keine Leistung erreicht.
No sound is heard.
Man hört keinen Ton.
Howling is generated.
Es werden Rückkopplungen erzeugt.
Is the AC power cord disconnected from the AC outlet?
Ist das ACStromkabel nicht an den ACAusgang angeschlossen?
Is the VOLUME knob turned to the "MIN" position?
Connections are incorrect, or loose.
Ist der LAUTSTÄRKEregler (VOLUME) auf die Position „MIN" eingestellt?
Die Verbindungen sind falsch oder locker.
Was installation performed correctly?
Is the volume too loud?
Wurde die Installation korrekt durchgeführt?
Ist die Lautstärke zu laut?
Plug the AC power cord firmly into the AC outlet.
Stecken Sie das ACStromkabel fest in den ACAusgang.
Turn the VOLUME knob to a suitable volume is found.
Check the connections and make necessary corrections. (See pages 3-4.)
Drehen Sie den LAUTSTÄRKEregler (VOLUME) bis eine geeignete Lautstärke erreicht ist.
Überprüfen Sie die Verbindungen und machen Sie die notwendigen Korrekturen. (Siehe die Seiten 3-4)
Check the installation. (See page 1.)
Turn the VOLUME knob in the direction of "MIN" until howling is no longer generated.
Überprüfen Sie die Installation. (Siehe Seite 1)
Drehen Sie den Lautstärkeregler in die Richtung auf „MIN", bis keine Rückkopplungen mehr erzeugt werden.
Specifications
Spezifizierungen
|
Type |
: Powered subwoofer |
||
|
||||
|
|
Bass-reflex type, |
||
|
|
(magnetically shielded) |
||
|
Speaker unit |
: 25 cm (9-7/8 in.) cone × 1 |
||
|
Frequency range |
: 30 Hz ~ 120 Hz |
||
|
Maximum Sound pressure level |
: 105 dB/W·m |
||
|
Input impedance |
: 50 kΩ |
(LOW-LEVEL) |
|
|
|
1 kΩ |
(HIGH-LEVEL) |
|
|
Input terminals |
: INPUT 1 (LOW-LEVEL) |
||
|
|
INPUT 2 (HIGH-LEVEL) |
||
|
Power requirements |
: AC 230 V |
, 50 Hz |
|
|
Max. output power of built-in amp |
: 60 W (4 Ω |
, 10 % THD) |
|
|
Power consumption |
: 30 W |
|
|
Power consumption in standby mode |
: 5.5 W |
|
||
|
Dimensions |
: 330 mm × |
480 mm × 339 mm |
|
|
|
(W/H/D) |
|
|
|
Mass |
: 14.0 kg |
|
|
|
Accessories |
: Speaker cord (2) |
||
|
|
Signal cord (1) |
||
Typ
Lautsprechereinheiten
Frequenzgang
Max. Ausgangsschalldruckpegel
Eingangsimpedanz
Eingangsanschlüsse
Leistungsanforderungen Max. Ausgangsleistung des eingebauten Verstärkers Leistungsverbrauch Leistungsverbrauch in der Betriebsart Standby Abmessungen
Gewicht
Zubehör
:Subwoofer mit Stromversorgung Bassreflexbox,
(magnetisch abgeschirmt)
:25,0 cm Konus × 1
:30 Hz bis 120 Hz
:105 dB/W·m
:50 kΩ (UNTERE STUFE)
(LOW LEVEL)
1 kΩ (OBERE STUFE) (HIGH LEVEL)
:INPUT 1 (UNTERE STUFE) (LOW LEVEL)
INPUT 2 (OBERE STUFE) (HIGH LEVEL)
:AC 230 V , 50 Hz
:60 W (4 Ω , 10 % THD)
:30 W
:5,5 W
:330 mm × 480 mm × 339 mm (W/H/T)
:14,0 kg
:Lautsprecherkabel (2) Signalkabel (1)
– 6 –
 Loading...