

Page 1
.
ENGLISH
Instructions
.
ESPAÑOL
FRANÇAIS
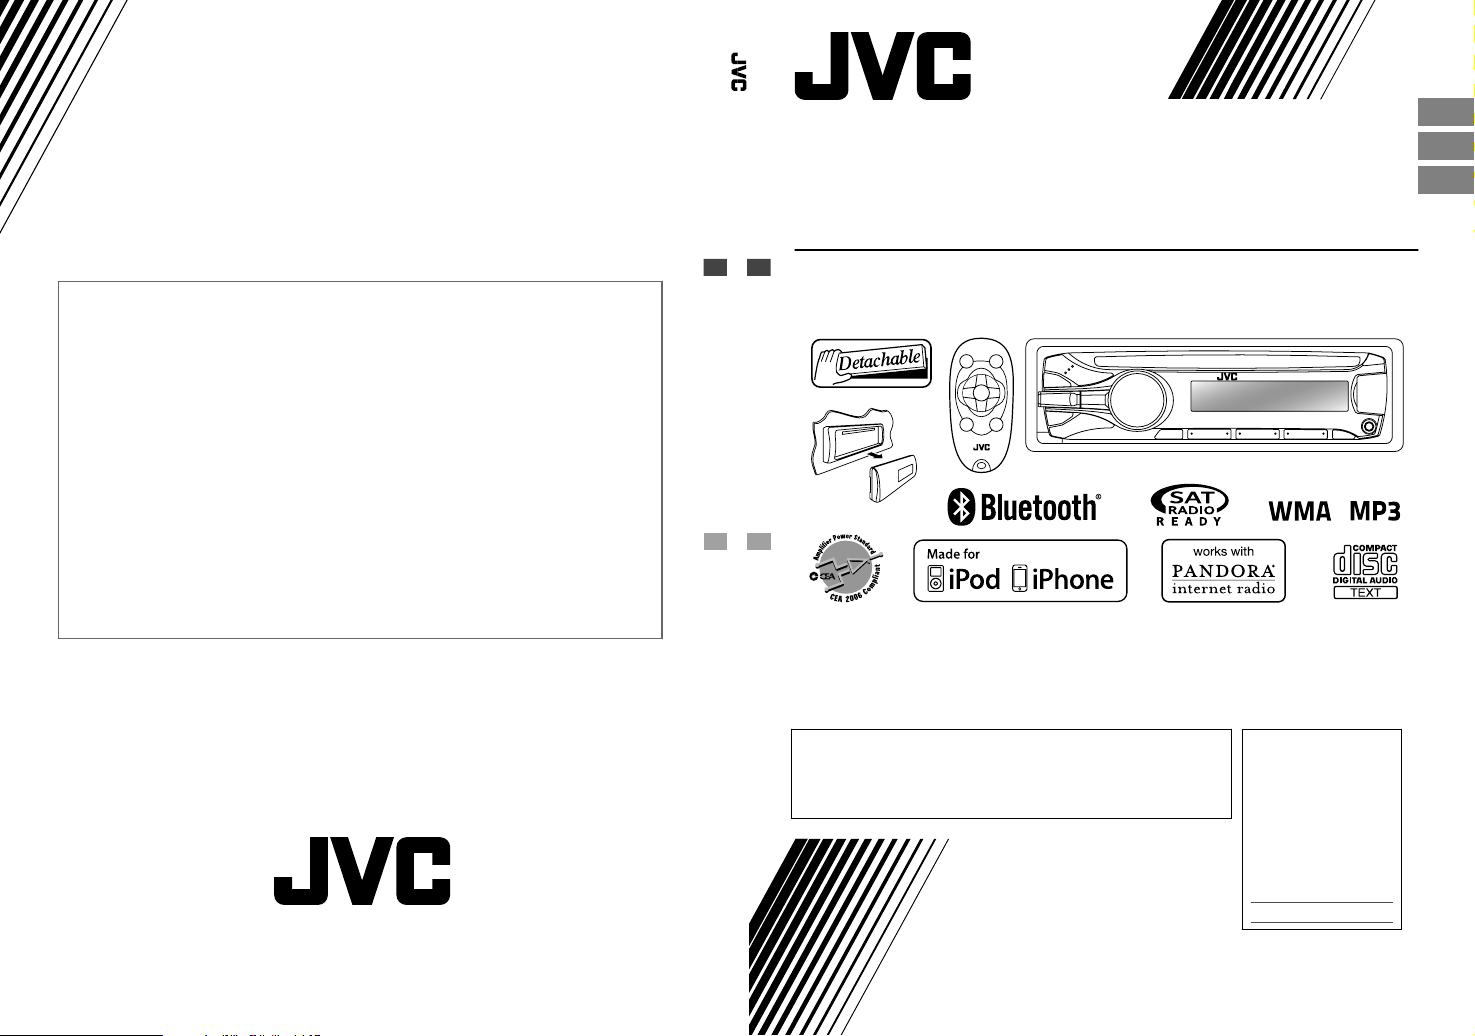
KD-A735BT/KD-R730BT
CD RECEIVER / RECEPTOR CON CD / RÉCEPTEUR CD
Having TROUBLE with operation?
Please reset your unit
Refer to page of How to reset your unit
Still having trouble??
USA ONLY
Call 1-800-252-5722
http://www.jvc.com
We can help you!
.
CD RECEIVER
For canceling the display demonstration, see page 4. /
Para cancelar la demostración en pantalla, consulte la página 4. /
Pour annuler la démonstration des affichages, référez-vous à la page 4.
KD-A735BT/KD-R730BT
For installation and connections, refer to the separate manual.
Para la instalación y las conexiones, refiérase al manual separado.
Pour l’installation et les raccordements, se référer au manuel
séparé.
INSTRUCTIONS
MANUAL DE INSTRUCCIONES
MANUEL D’INSTRUCTIONS
For Customer Use:
Enter below the
Model No. and Serial
No. which are located
on the top or bottom
of the cabinet. Retain
this information for
future reference.
Model No.
Serial No.
K EN, SP, FR
© 2011 JVC KENWOOD Corporation
1111DTSSANJEIN
GET0777-001A
[J]
Page 2
Please read all instructions carefully before operation, to ensure your complete understanding and to
Thank you for purchasing a JVC product.
obtain the best possible performance from the unit.
For U.S.A.
This equipment has been tested and found to comply with the limits for a Class B digital device,
pursuant to Part 15 of the FCC Rules. These limits are designed to provide reasonable protection
against harmful interference in a residential installation. This equipment generates, uses, and can
radiate radio frequency energy and, if not installed and used in accordance with the instructions,
may cause harmful interference to radio communications. However, there is no guarantee that
interference will not occur in a particular installation. If this equipment does cause harmful
interference to radio or television reception, which can be determined by turning the equipment
off and on, the user is encouraged to try to correct the interference by one or more of the
following measures:
– Reorient or relocate the receiving antenna.
– Increase the separation between the equipment and receiver.
– Connect the equipment into an outlet on a circuit different from that to which the receiver is
connected.
– Consult the dealer or an experienced radio/TV technician for help.
Caution:
Changes or modifications not expressly approved by the party responsible for compliance could
void the user’s authority to operate the equipment.
Use of controls or adjustments or performance of
procedures other than those specified herein may
result in hazardous radiation exposure.
In compliance with Federal Regulations, following
are reproductions of labels on, or inside the
product relating to laser product safety.
JVC KENWOOD Corporation
2967-3, ISHIKAWA-MACHI,
HACHIOJI-SHI, TOKYO, JAPAN
THIS PRODUCT COMPLIES WITH DHHS
RULES 21CFR SUBCHAPTER J IN EFFECT AT
DATE OF MANUFACTURE.
Location: Bottom Plate
IMPORTANT FOR LASER PRODUCTS
1. CLASS 1 LASER PRODUCT
2. CAUTION: Do not open the top cover. There are no user serviceable parts inside the unit;
3. CAUTION: (For U.S.A.) Visible and/or invisible class II laser radiation when open. Do
4. REPRODUCTION OF LABEL: CAUTION LABEL, PLACED OUTSIDE THE UNIT.
leave all servicing to qualified service personnel.
not stare into beam.
(For Canada) Visible and/or invisible class 1M laser radiation when open. Do
not view directly with optical instruments.
|ޓENGLISH
2
[European Union only]
Page 3
Warning:
Stop the car before operating the unit.
Caution:
Adjust the volume so that you can hear sounds
outside the car. Driving with the volume too high
may cause an accident.
Avoid using the USB device or iPod/iPhone if it
might hinder driving safety.
Caution on volume setting:
Digital devices (CD/USB) produce very little noise
compared with other sources. Lower the volume
before playing these digital sources to avoid
damaging the speakers by the sudden increase of
the output level.
Temperature inside the car:
If you have parked the car for a long time in hot
or cold weather, wait until the temperature in the
car becomes normal before operating the unit.
Condensation:
When the car is air-conditioned, moisture may
collect on the laser lens. This may cause disc read
errors. In this case, remove the disc and wait for
the moisture to evaporate.
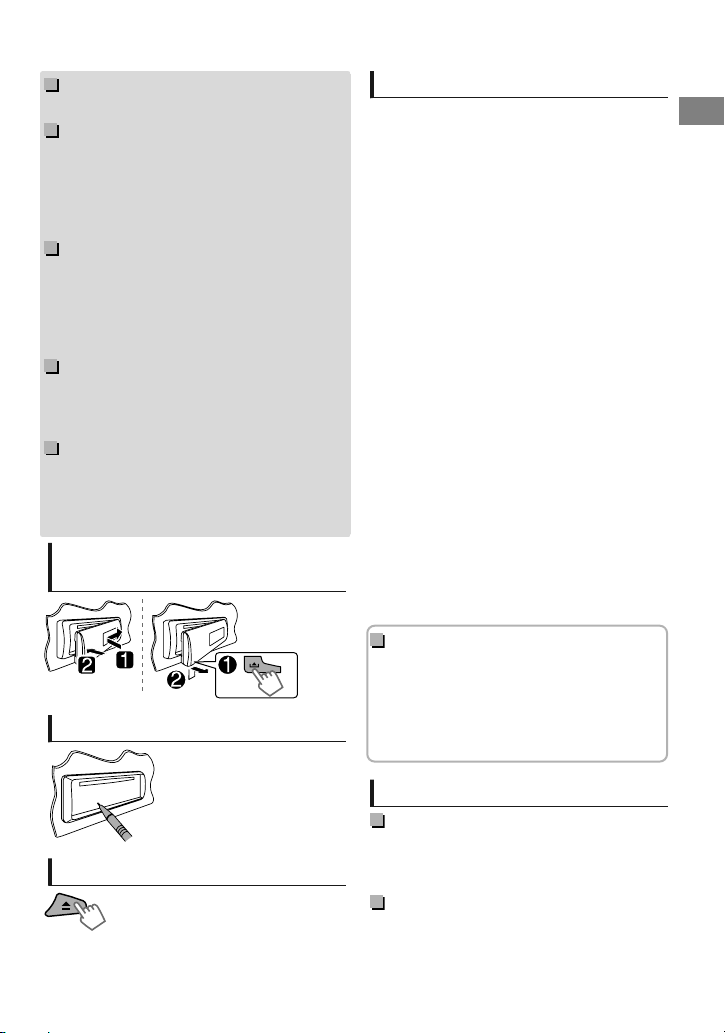
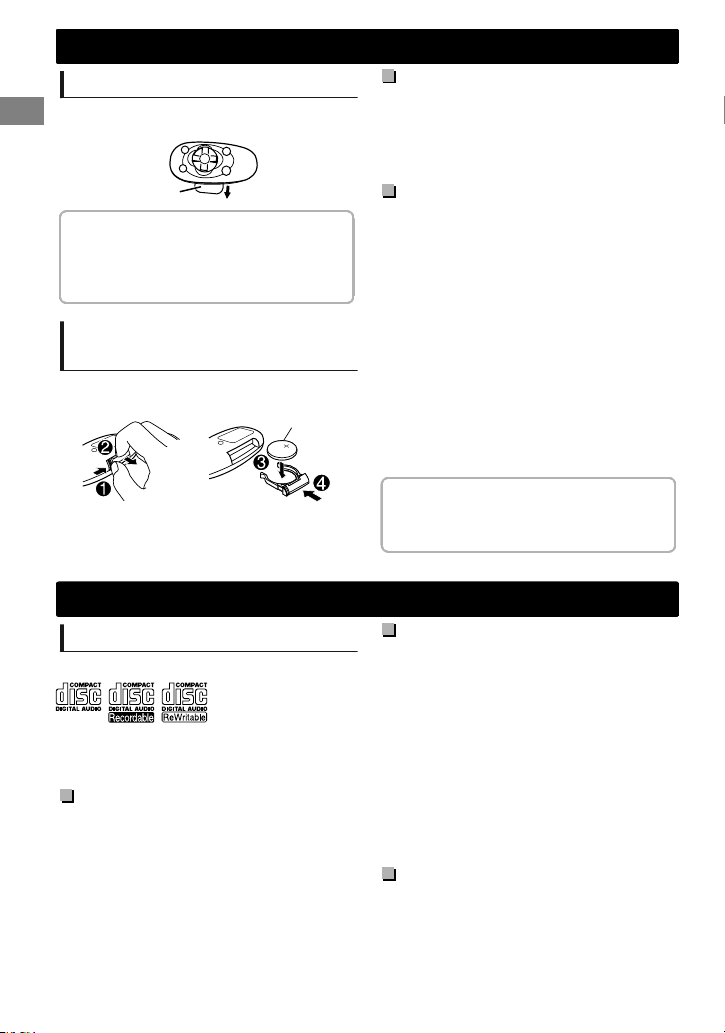
How to attach/detach the
control panel
How to reset your unit
Your preset adjustments will
also be erased.
How to forcibly eject a disc
(Hold)
Be careful not to drop the disc when it ejects.
If this does not work, reset your unit.
Contents
Preparation ............................................................ 4
Canceling the display demonstration
Setting the clock
Basic operations ................................................... 4
Radio ........................................................................ 6
HD Radio™ tuner control .................................. 8
Satellite Radio tuner control ............................ 9
CD/USB ................................................................. 10
iPod/iPhone
.......................................................... 11
Quick Search ....................................................... 13
External components ...................................... 13
Bluetooth姞 connection
..................................... 14
Bluetooth mobile phone ................................ 16
Bluetooth audio player ................................... 20
Illumination color adjustments .................... 21
Brightness adjustments .................................. 22
Sound adjustments .......................................... 22
Menu operations ............................................... 23
Remote controller
............................................... 26
Additional information ................................... 26
Troubleshooting ................................................ 29
Specifications ..................................................... 32
How to read this manual:
This manual mainly explains operations using
the buttons on the control panel.
< > indicates the displays on the control
panel.
[XX] indicates the initial setting of a menu
item.
Maintenance
Cleaning the unit
Wipe off the dirt on the panel with a dry silicon or
soft cloth. Failure to observe this precaution may
result in damage to the unit.
Cleaning the connector
Wipe off dirt on the connector of the unit and
panel. Use a cotton swab or cloth.
ENGLISHޓ|
3
Page 4

(Hold)
Preparation
Preparation
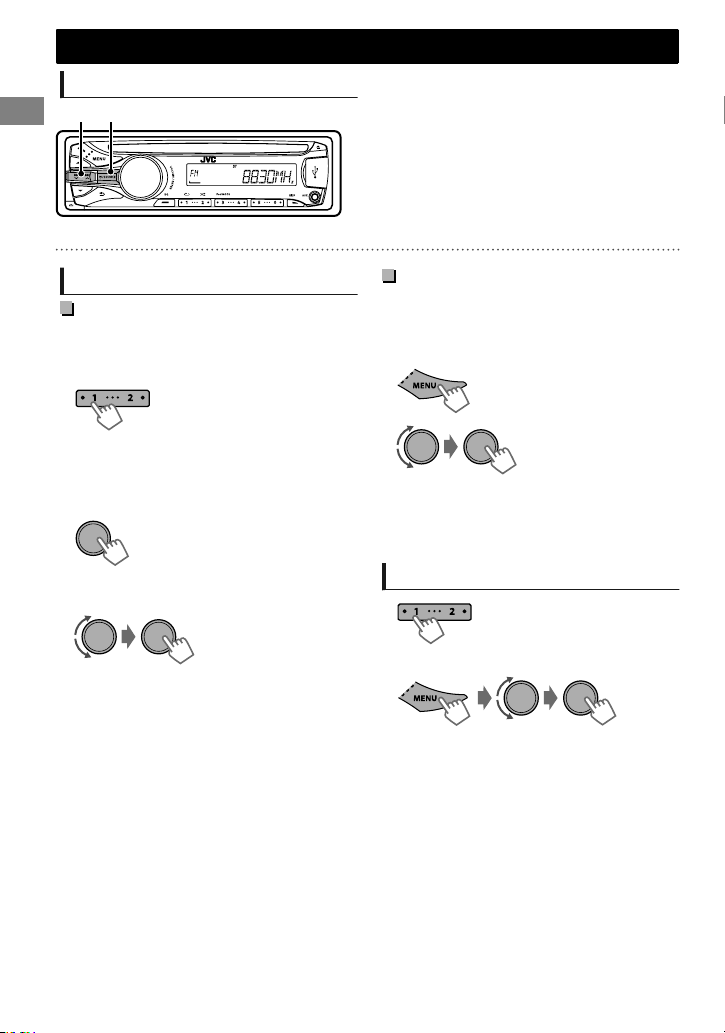
Canceling the display
demonstration
The display demonstration is always turned on
unless you cancel it.
1
2
3
Select <DEMO OFF>.
4
Press MENU to exit.
(Hold)
(Initial setting)
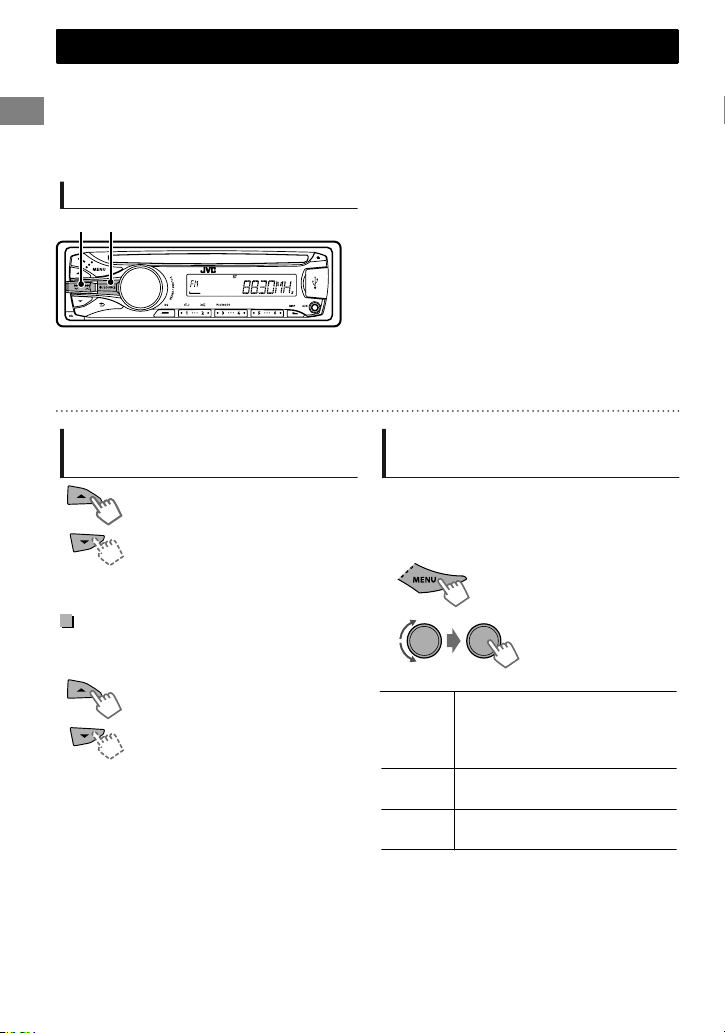
Basic operations
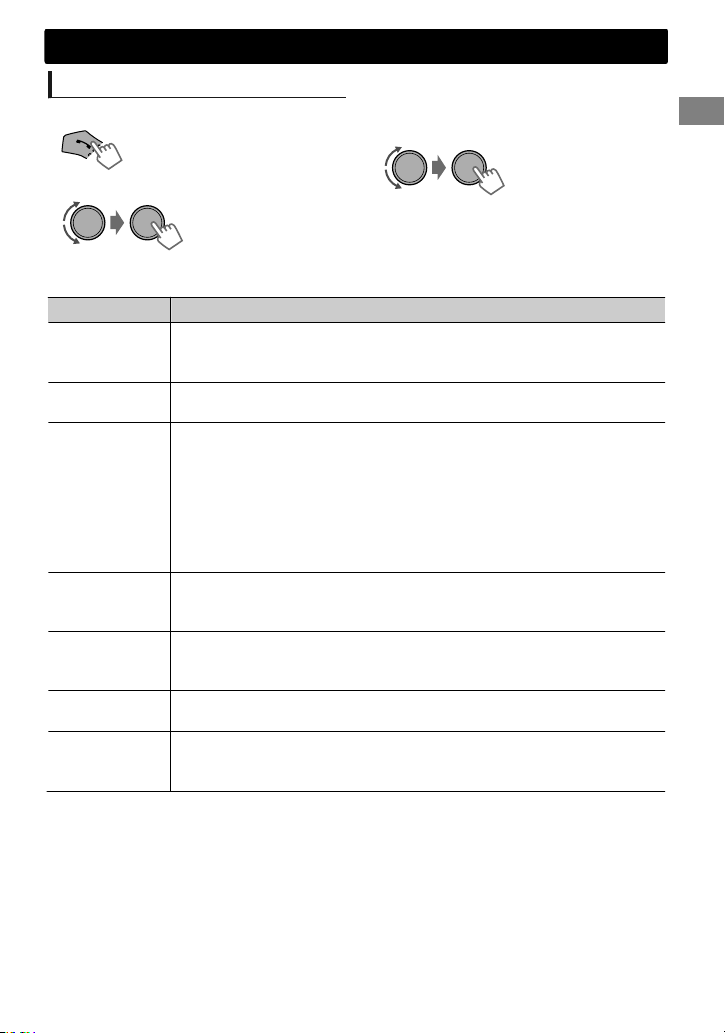
Display information
Changes the display information. (Press)
Scrolls the current display information. (Hold)
Radio
HD Radio
Satellite Radio
CD/USB/Bluetooth Audio
iPod/iPhone (HEAD MODE/
IPOD MODE)
iPod/iPhone (APP MODE)
iPod/iPhone (Pandora姞
internet radio)
External Components
*1 “****-FM” or “****” appears when no Call Sign is received.
*2 “NO TEXT” appears when no text is received.
*3 Only for SIRIUS Satellite Radio.
|ޓENGLISH
4
Source Display
Non-Radio Broadcast Data System station: Frequency ) Clock
FM Radio Broadcast Data System station: Station name (PS) -
Frequency - Program type (PTY) - Clock - (back to the beginning)
Call Sign*1 - Frequency - Title/artist/album name of the current
segment*2 - Clock - (back to the beginning)
Category name - Channel name - Artist name - Composer
name*3 - Song/program name/title - Clock - (back to the
beginning)
Album title/Artist* - Track title* - Track no./Playing time - Track
no./Clock - (back to the beginning)
* “NO NAME” appears for conventional CDs or if not recorded.
APP MODE) APP/Clock
Station name - Album title/Artist - Track title - Playing time -
Clock - (back to the beginning)
EXT INPUT or AUX IN) Clock
Setting the clock
1
2
Select <CLOCK>.
3
Select <CLOCK SET>.
4
Adjust the hour.
5
Adjust the minute.
6
Press MENU to exit.
Page 5
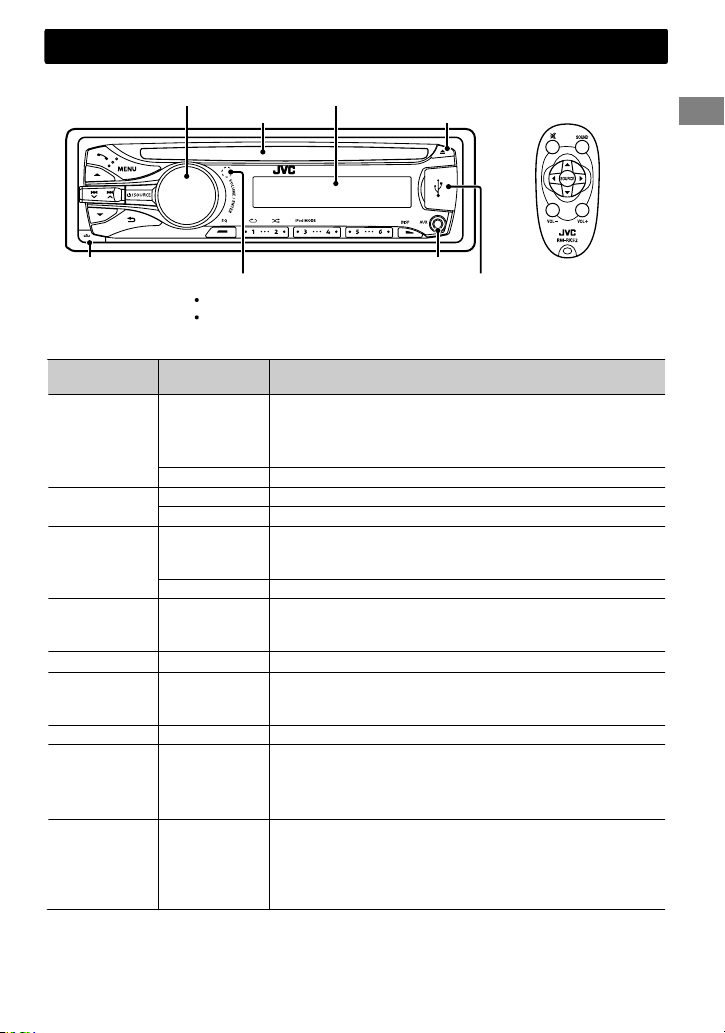
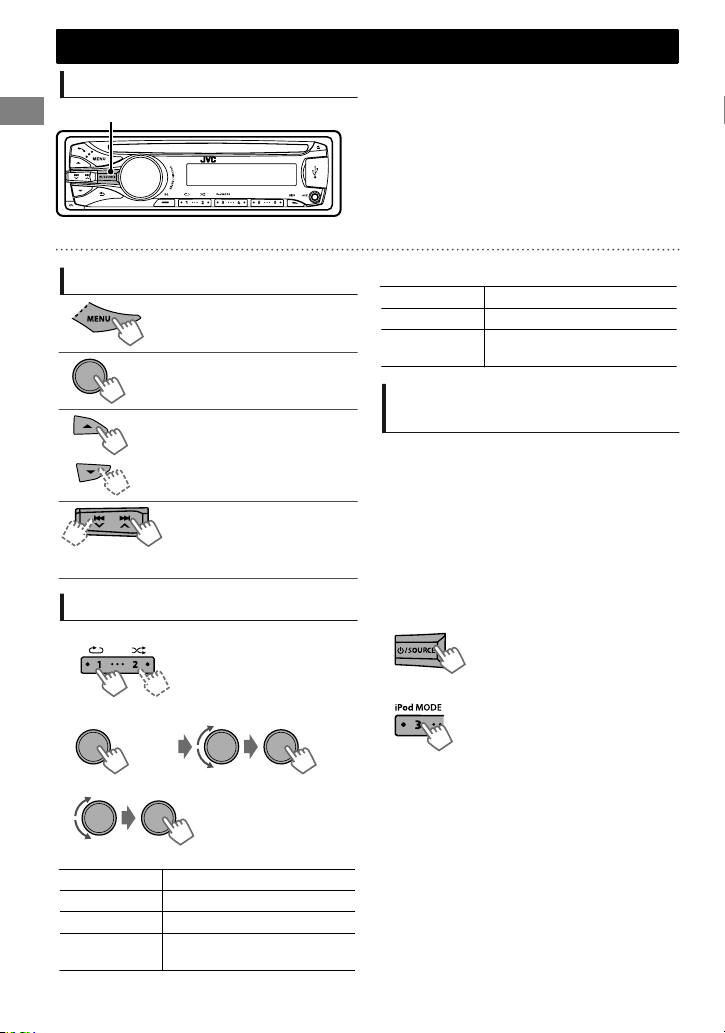
Control panel
Control dial
Loading slot
Basic operations
Remote controller
Display window
Ejects the disc
Detaches the panel
Remote sensor
Aim the remote controller directly at the sensor.
DO NOT expose to bright sunlight.
AUX input jack
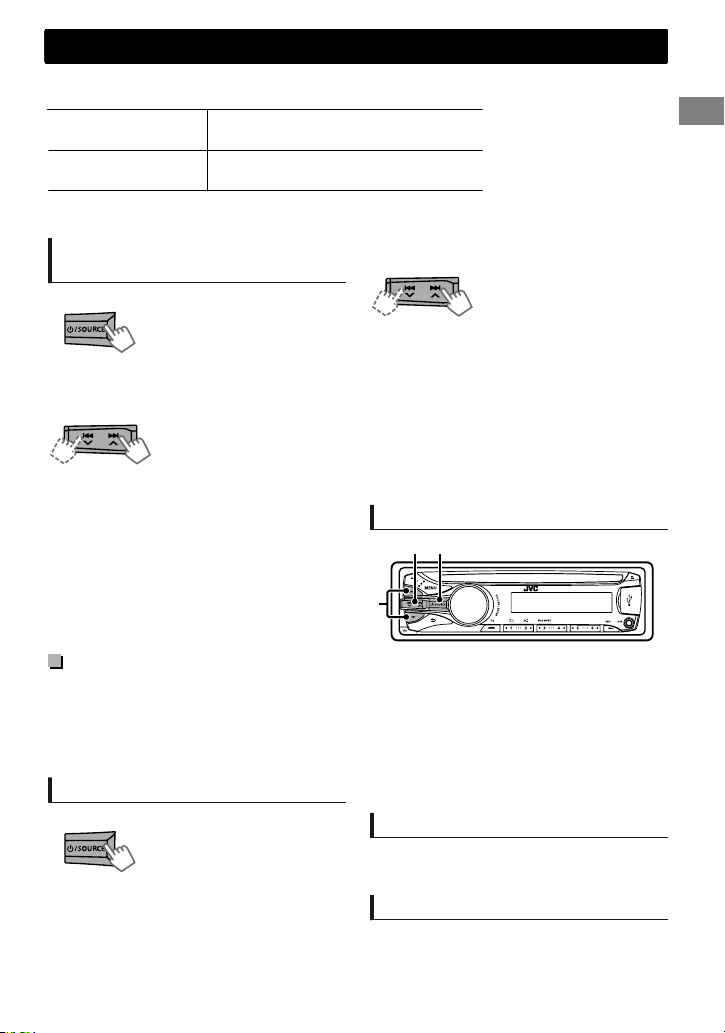
When you press or hold the following button(s)...
Control panel
/SOURCE
Control dial
(turn)
Control dial
(press)
Number
buttons
(1 - 6)
EQ SOUND
/ /
/
Remote
controller
—
Turns on.
Turns off. (Hold)
Press the /SOURCE button on the control panel and turn
the control dial within 2 seconds to select the source.
SOURCE Press repeatedly to select the source.
VOL - / + Adjusts the volume level.
— Selects items.
Mutes the sound or pauses playback.
)
Press the button again to cancel muting or resume
playback.
— Confirms selection.
—
Selects the preset stations.
Stores the current station into the selected number button.
(Hold) (' page 6)
Selects the preset sound mode. (' page 22)
Enters “Hands-Free” menu (' page 17), or answers
—
incoming call when the unit rings.
Ends a call. (Hold)
— Returns to the previous menu.
Selects a preset station. (' page 6)
Searches for HD Radio stations only. (Hold)
Selects a category. (' page 9)
Selects MP3/WMA folder. (' page 10)
Searches for a station automatically. (' page 6)
/
Searches for a station manually. (Hold)
Selects track (' page 10, 11, 20)/Satellite Radio channel.
Fast-forwards or reverses track. / Changes Satellite Radio
channel rapidly. (Hold)
USB input terminal
General function
ENGLISHޓ|
5
Page 6
(Hold)
Radio
Radio
Searching for a station
A
B
“ST” lights up when receiving an FM stereo broadcast with sufficient signal strength.
Select <FM> or <AM>.
Auto search. (Press)
Manual search. (Hold)
“M” flashes, then press the button repeatedly.
Storing stations in memory
Manual presetting
You can preset up to 18 stations for FM and 6
stations for AM.
While listening to a station...
(Hold)
The preset number flashes and “MEMORY”
appears. The current station is stored to the
selected number button (1 - 6).
- - - - - - - - or - - - - - - - -
1
“PRESET MODE” flashes.
2
The preset number flashes and “MEMORY”
appears.
(Hold)
Select preset number.
Auto presetting (FM)
SSM (Strong-station Sequential Memory)
You can preset up to 18 stations for FM.
If an HD Radio tuner box is connected, you can
also preset up to 6 stations for AM.
1
2
“SSM” flashes. When all the stations are stored,
“SSM” stops flashing.
To preset <SSM 07 – 12>/<SSM 13 – 18>,
repeat steps 1 and 2.
-<TUNER>
-<SSM>
-<SSM 01 – 06>
Selecting a preset station
- - - - - - - - or - - - - - - - -
You can also select a preset station using / .
|ޓENGLISH
6
Page 7
(Hold)
Radio
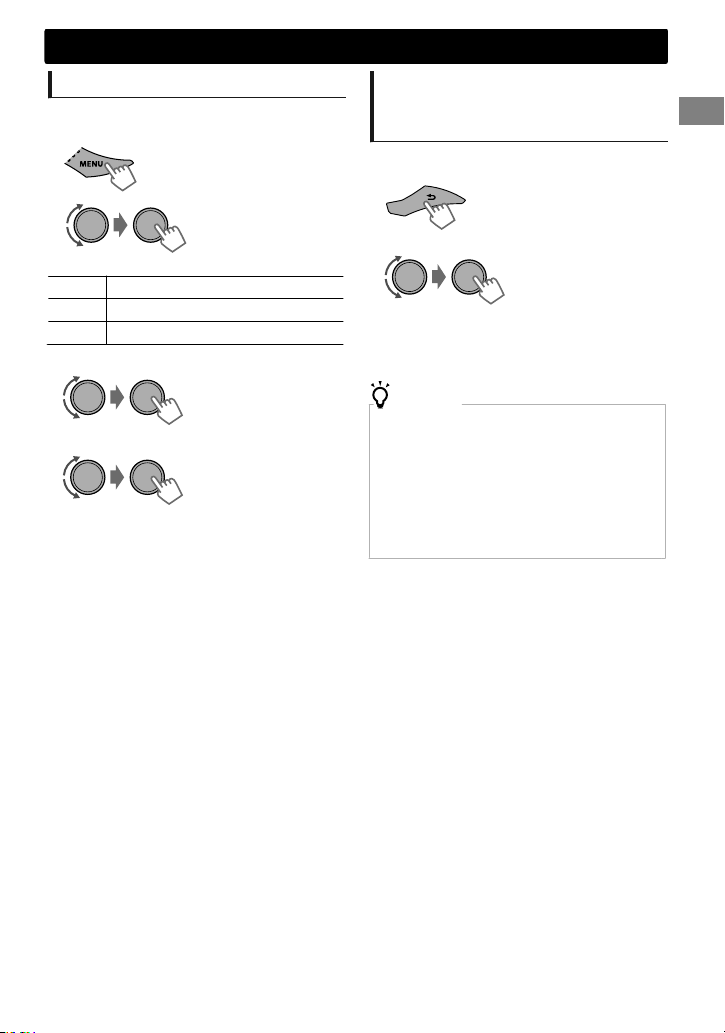
Setting the Radio Timer
You can tune in to a preset station at a specific
time regardless of the current source.
1
2
[OFF] Cancels Radio Timer.
ONCE Activates once.
DAILY Activates daily.
3
Select the preset station.
4
Set the activation time.
5
Press MENU to exit.
lights up after the Radio Timer has been set.
Only one timer can be set. Setting a new timer
will override the previous setting.
The Radio Timer will not activate if the unit is
turned off or if <AM> is set to <OFF> after
selecting an AM station for the timer.
(Hold)
-<TUNER>
-<RADIO TIMER>
-<OFF>/<ONCE>/
<DAILY>
-<FM>/<AM>
-<01> ... <18> for FM/
<01> ... <06> for AM
.
Searching for your favorite
Programs—Program Type (PTY)
Search
This feature is only available for FM Radio
Broadcast Data System stations.
1
2
Select a PTY code.
PTY Search starts.
.
If there is a station broadcasting a program of the
same PTY code as you have selected, that station is
tuned in.
PTY codes
NEWS, INFORM (information), SPORTS, TALK, ROCK, CLS
ROCK (classic rock), ADLT HIT (adult hits), SOFT RCK (soft
rock), TOP 40, COUNTRY, OLDIES, SOFT, NOSTALGA
(nostalgia), JAZZ, CLASSICL (classical), R & B (rhythm and
blues), SOFT R & B (soft rhythm and blues), LANGUAGE, REL
MUSC (religious music), REL TALK (religious talk), PERSNLTY
(personality), PUBLIC, COLLEGE, HABL ESP (spanish talk),
MUSC ESP (spanish music), HIP HOP, WEATHER
ENGLISHޓ|
7
Page 8
(Hold)
HD Radio™ tuner control
iPod/iPhone
This unit can control the JVC KT-HD300 HD Radio tuner box (separately purchased).
Refer to the KT-HD300 instruction manual for installation and connection details.
HD Radio tuners can also tune in to conventional analog broadcasts.
Many HD Radio stations offer more than one channel of programming. This service is called
multicasting.
To find HD Radio stations in your area, visit <http://www.hdradio.com/>.
Searching for a station
A
B
HD Radio station: “HD” lights up when receiving digital audio, or flashes when receiving analog
audio.
Conventional FM station: “ST” lights up when receiving an FM stereo broadcast with sufficient signal
strength.
Select <FM> or <AM>.
Auto search. (Press)
Manual search. (Hold)
“M” flashes, then press the button repeatedly.
Searching for HD Radio stations
only
(Hold)
“HD” flashes when a station is tuned in, and
searching stops.
Selecting an HD Radio multicast
channel
When receiving HD Radio multicast channels...
Select your desired channel
(HD1 to HD8).
“LINKING” appears while linking to a multicast
channel.
|ޓENGLISH
8
Changing HD Radio reception
mode
While receiving an HD Radio broadcast, you can
change the reception mode—digital or analog.
This setting does not take effect for the
conventional FM/AM stations.
1
2
Switches between digital and
[AUTO]
ANALOG
DIGITAL
The setting automatically returns to <AUTO>
when you tune in to another broadcast.
For storing stations in memory and selecting a
preset station, ' page 6.
analog audio automatically.
“HOLD” flashes if the radio station
forces only analog reception.
Tunes to analog audio only.
“HOLD” lights up.
Tunes to digital audio only.
“HOLD” lights up.
-<TUNER>
-<BLEND HOLD>
-<AUTO>/<ANALOG>/
<DIGITAL>
Page 9
A
C
B
Satellite Radio tuner control
Before operating, connect either one of the following systems (not supplied) to the expansion port on
the rear of this unit. Refer to the “Installation/Connection Manual” for details.
SIRIUS Satellite Radio
XM Satellite Radio
For details, refer also to the instructions supplied with the other components.
For SIRIUS/XM programming, visit <www.siriusxm.com>.
Activating your SIRIUS
subscription
1
Select <SIRIUS>.
SIRIUS Satellite Radio starts updating the SIRIUS
channels. Once completed, SIRIUS Satellite Radio
tunes in to the Preview Channel.
2
Select “Channel 0” to check your SIRIUS ID.
SCC1 and KS-SRA100
D&P, SCVDOC1 and KS-SRA100
JVC Smart Digital Adapter (XMDJVC100)
CNP2000UCA and CNPJVC1
2
The display alternates between “RADIO ID” and
the 8-digit alphanumeric ID number.
3
Satellite Radio tuner control
Select “Channel 0” to check your XM
Satellite Radio ID.
You can also check your XM Satellite Radio ID
labeled on the casing of the XMDirect2 Tuner
System.
Contact XM Satellite Radio on the internet
at <www.siriusxm.com/activatenow> to
activate your subscription, or call 1-800-
The 12-digit SIRIUS ID will be displayed.
You can also check your SIRIUS ID from the
label on the packaging, or from menu
operations (' page 24).
3
Contact Sirius Satellite Radio on the
XM-RADIO (1-800-967-2346).
Once subscription has been activated, the unit
can be tuned to one of the available channels.
Selecting a channel
internet at <www.siriusxm.com/
activatenow> to activate your
subscription, or call SIRIUS toll-free at
1-888-539-SIRIUS (7474).
Once subscription has been activated, “SUB UPDT
PRESS ANY KEY” scrolls on the display.
Channel Updates (SIRIUS)
If channels are updated after subscription,
updating starts automatically. “UPDATING”
flashes and no sound can be heard.
Updates take a few minutes to complete.
During an update, you cannot operate your
Satellite Radio.
Activating your XM subscription
1
Select <XM>.
XMDirect2 Tuner System starts updating all the
XM channels. “Channel 1” is tuned in
automatically.
Select <SIRIUS> or <XM>.
Select a category.
If you want to select channels of all categories...
SIRIUS: Select <ALL>.
XM: Skip this step.
Select a desired channel.
Holding the button changes the channels rapidly.
While searching, invalid and unsubscribed
channels are skipped.
Storing channels in memory
You can preset up to 18 channels for both SIRIUS
and XM.
(“Manual presetting” ' page 6)
Selecting a preset station
(“Selecting a preset station” ' page 6)
ENGLISHޓ|
9
Page 10
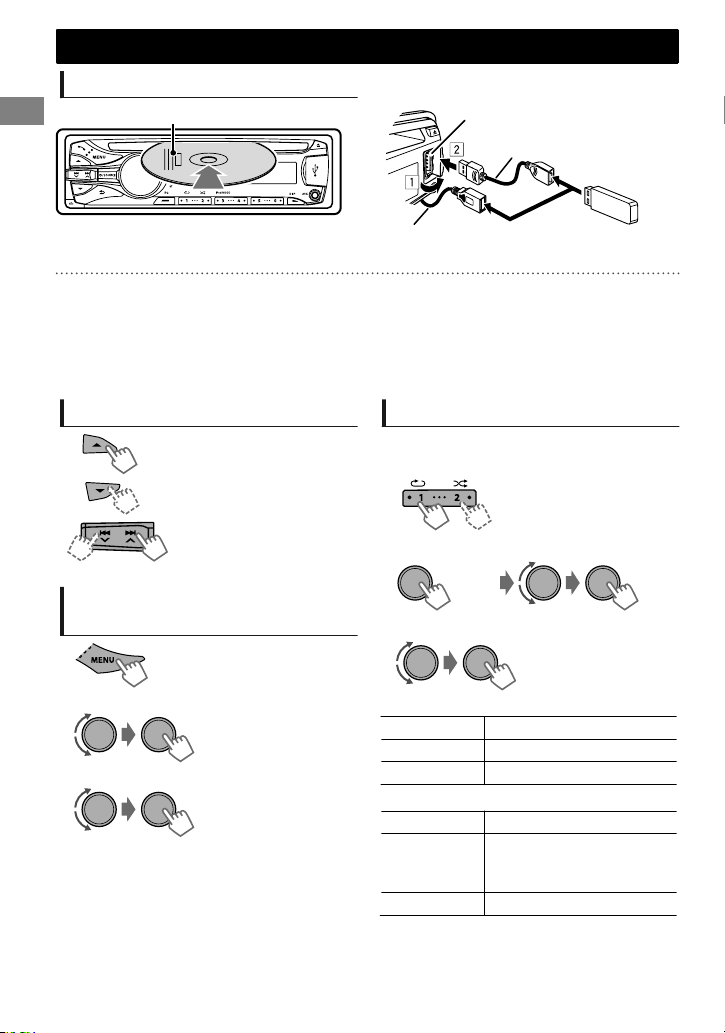
USB 2.0 cable
(not supplied)
USB input terminal
USB cable from the rear of the unit
or
(Hold)
CD/USB
CD/USB
Playing a CD/USB device
Label side
The source changes to “CD” and playback starts.
This unit can play MP3/WMA files stored in CD-R, CD-RW, and MP3/WMA/WAV files in USB mass
storage device (such as a USB memory and Digital Audio Player).
Make sure all important data has been backed up. We shall bear no responsibility for any loss of data
in USB mass storage class device while using this system.
Ejected disc not removed within 15 seconds will reload automatically.
If the disc cannot be ejected, ' page 3.
Selecting a folder/track
Selects folder.
(For MP3/WMA/WAV)
Selects track. (Press)
Fast-forwards or reverses
the track. (Hold)
The source changes to “USB” and playback starts.
Selecting the playback modes
You can select one of the following playback
modes at a time.
1
- - - - - - - - or - - - - - - - -
Press 1 for REPEAT.
Press 2 for RANDOM.
Press again to exit.
Selecting a track/folder from
the list
1
2
Select a folder. (For MP3/WMA/WAV)
3
Select a track.
For MP3/WMA/WAV
If there are many folders or tracks, you can fast
search for the desired folder or track by turning
the control dial quickly, or use Quick Search
(' page 13).
2
REPEAT
RPT OFF Cancels repeat playback.
TRACK RPT Repeats current track.
FOLDER RPT * Repeats current folder.
RANDOM
RND OFF Cancels random playback.
FOLDER RND *
ALL RND Randomly plays all tracks.
* For MP3/WMA/WAV
<REPEAT>)<RANDOM>
Randomly plays all tracks of
current folder, then tracks of
next folders.
|ޓENGLISH
10
Page 11
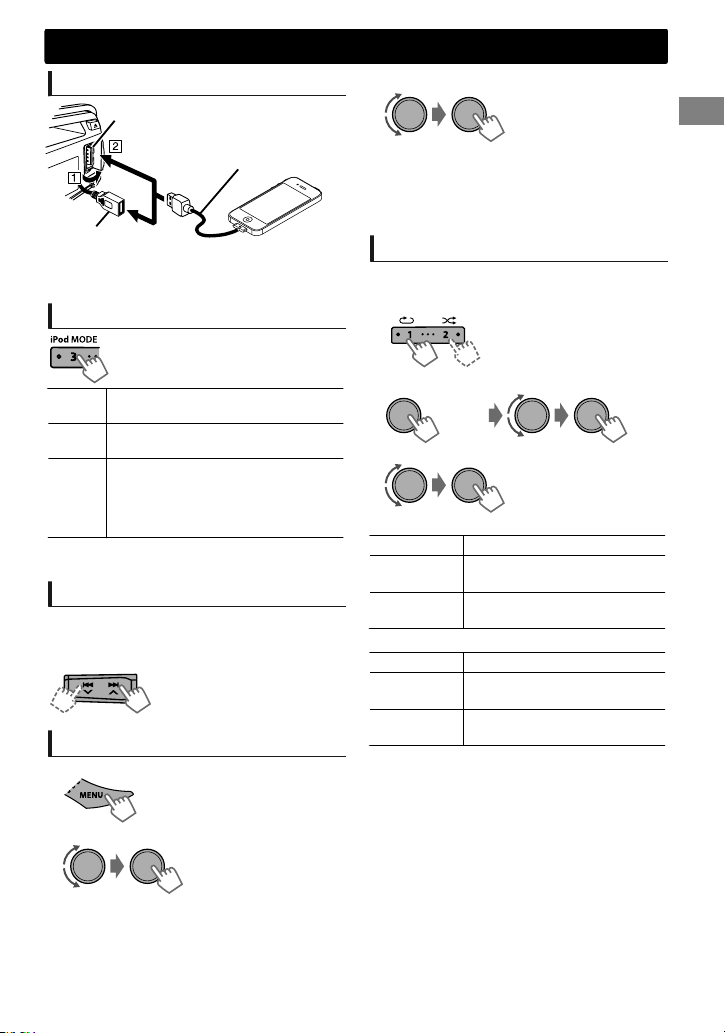
iPod/iPhone
(Hold)
Playing an iPod/iPhone
USB input terminal
USB 2.0 cable (accessory
of the iPod/iPhone)
or
USB cable from the
rear of the unit
The source changes to “IPOD-FRONT/IPOD-REAR”
and playback starts.
Selecting the control mode
#<HEAD MODE>/<IPOD MODE>/
<APP MODE>
HEAD
Controls iPod playback through this
MODE
unit.
IPOD
Controls iPod playback from the
MODE
iPod/iPhone.
APP
The sound of any functions (music,
MODE
games, applications, etc.) running on
the connected iPod/iPhone is
emitted through the speakers
connected to this unit.
You can also change the setting using <IPOD
SWITCH> in the menu. (' page 25)
Selecting a track
Applicable under <HEAD MODE/IPOD MODE>
only.
For <APP MODE>, applicable only for some audio
applications.
Selecting a track from the list
Applicable under <HEAD MODE> only.
1
Selects track/chapter. (Press)
Fast-forwards or reverses the
track. (Hold)
3
Select the desired track.
Repeat this step until the desired track is selected.
If the selected menu contains many tracks, you
can fast search for the desired track by turning
the control dial quickly, or use Quick Search
(' page 13).
Selecting the playback modes
Applicable under <HEAD MODE> only.
You can select one of the following playback
modes at a time.
1
- - - - - - - - or - - - - - - - -
2
REPEAT
RPT OFF Cancels repeat playback.
ONE RPT
ALL RPT
RANDOM
RND OFF Cancels random playback.
SONG RND
ALBUM RND
“ALBUM RND” is not applicable for some iPod/
iPhone.
Press 1 for REPEAT.
Press 2 for RANDOM.
Press again to exit.
<REPEAT>)<RANDOM>
Functions the same as “Repeat
One” of the iPod.
Functions the same as “Repeat
All” of the iPod.
Functions the same as “Shuffle
Songs” of the iPod.
Functions the same as “Shuffle
Albums” of the iPod.
2
Select the desired list.
PLAYLISTS)ARTISTS)ALBUMS)SONGS)
PODCASTS)GENRES)COMPOSERS)
AUDIOBOOKS) (back to the beginning)
ENGLISHޓ|
11
Page 12
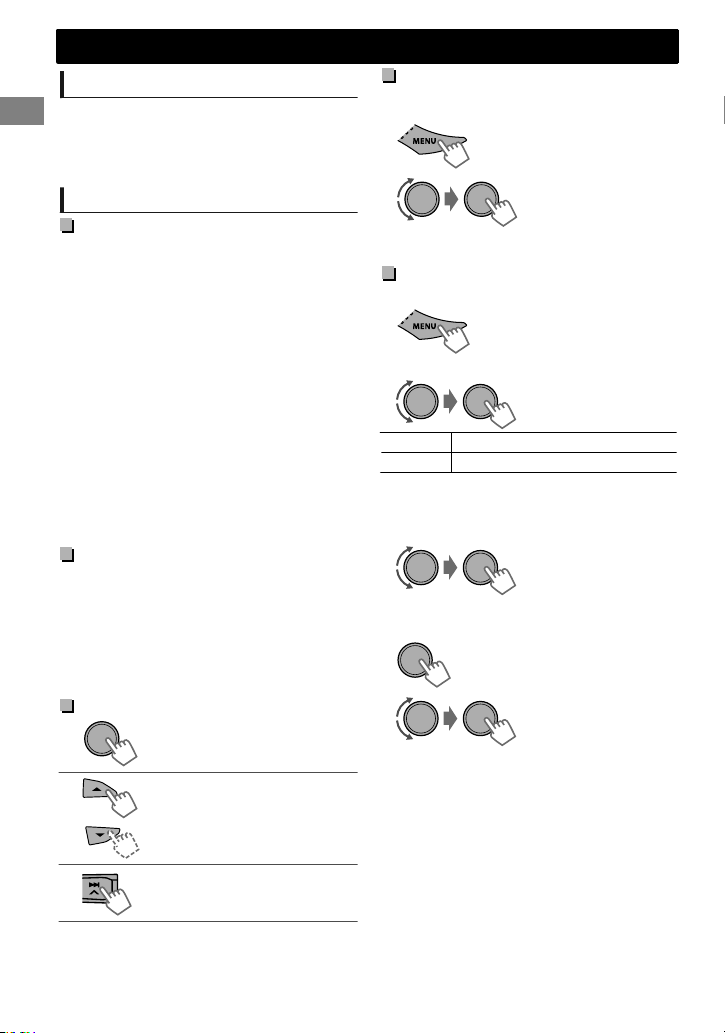
(Hold)
iPod/iPhone
iPod/iPhone application
You can operate JVC original application with this
unit in <APP MODE>. For more details, visit JVC
website: <http://www3.jvckenwood.com/
english/car/index.html> (English website only).
Pandora姞 internet radio
Preparation
1
Search for “Pandora” in the Apple iTunes
App Store to find and install the most
current version of the Pandora姞
application onto your device.
2
In the application on your device, log in
and create an account with Pandora姞. If
you are not a registered user, an account
can also be created at www.pandora.com.
Pandora姞 is only available in the US.
Because Pandora姞 is a third-party service, the
specifications are subject to change without
prior notice. Accordingly, compatibility may be
impaired or some or all of the services may
become unavailable.
Some functions of Pandora姞 cannot be
operated from this unit.
For issues using the application, please contact
Pandora at pandora-support@pandora.com.
Listening to
Pandora姞 internet radio
1
Open the Pandora姞 application on your
device.
2
Connect the device to one of the USB
terminals. (' page 11)
The source switches and broadcast starts
automatically from your current station.
Basic Operations
Starts/pauses playback.
Selects thumbs up/thumbs
down.
If thumbs down is selected,
current track is skipped.
Skips track.
Creating a new station
You can create a new station based on the
currently playing song or artist.
1
2
A new station is created based on the current
song or artist.
-<NEW STATION>
-<FROM ARTIST>/
<FROM SONG>
Searching the registered station
from the list
1
2
Select the station list display mode.
BY DATE According to the registration date
A - Z Alphabetical order
You can proceed directly to step 3 to select
station or use the search menu to scroll through
the desired menu. (' page 13)
3
Select the desired station.
To bookmark song/artist information
While receiving a song...
<THIS ARTIST>)<THIS TRACK>
“BOOKMARKED” appears and the song/artist
information is stored to the iPod/iPhone.
This unit allows you to bookmark songs and/or
artists in your personalized Pandora姞 account.
The bookmarks will not be available for review
on the unit but will be available in your
Pandora姞 account.
|ޓENGLISH
12
Page 13
(Hold)
Quick Search
If you have many folders/tracks/contacts, you can search through them quickly according to the first
character (A to Z, 0 to 9 and OTHERS).
1
Enter list menu or “Hands-Free” menu.
CD (MP3/WMA)/
USB (MP3/WMA/WAV)
iPod/iPhone Bluetooth phonebook
Quick Search
Select the desired list.
2
Select the desired character (A to Z, 0 to 9
3
Select your desired folder/track/contact.
Select <PHONEBOOK>.
and OTHERS).
For CD/USB and iPod/iPhone, repeat step 3 until
the desired track is selected.
Searching may not work on some of the layers
“OTHERS” appears if the first character is not A to
Z or 0 to 9, such as #, -, !, etc.
of the selected menu (for iPod/iPhone).
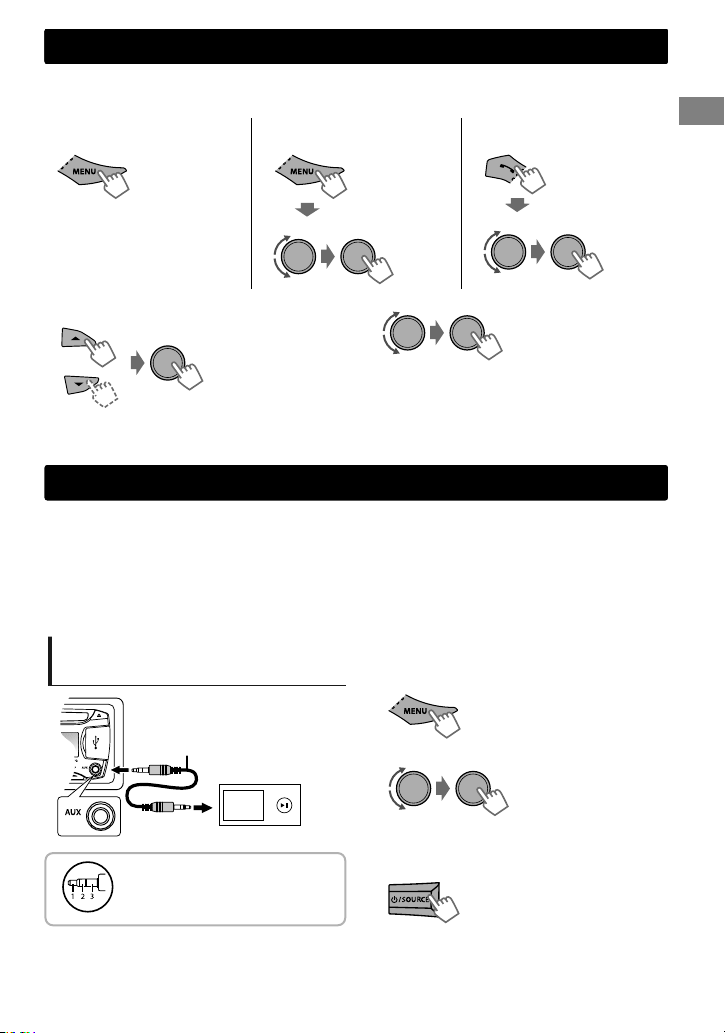
External components
You can connect an external component to the following terminals:
EXT IN: Expansion port on the rear of this unit using the following adapters (not supplied):
- JVC KS-U57, Line Input Adapter
- JVC KS-U58, AUX Input Adapter
AUX IN: AUX (auxiliary) input jack on the control panel.
For details, refer also to the instructions supplied with the adapters or external components.
For connection to expansion port on the rear of this unit, refer to the “Installation/Connection Manual”.
Playing an external component
from AUX/expansion port
3.5 mm (1/8") stereo mini plug
(not supplied)
Portable audio player, etc.
Use a 3-terminal plug head
stereo mini plug for optimum
audio output.
1
Connect to AUX on the control panel and/
or the expansion port on the rear panel.
2
Set the source as necessary.
Select <AUX ON> or <EXT ON>.
Press MENU to exit.
3
Select <AUX IN> or <EXT IN>.
4
Turn on the connected component and
-<SRC SELECT>
-<AUX IN> or <EXT IN>
-<AUX ON> or
<EXT ON>
start playing the source.
ENGLISHޓ|
13
Page 14
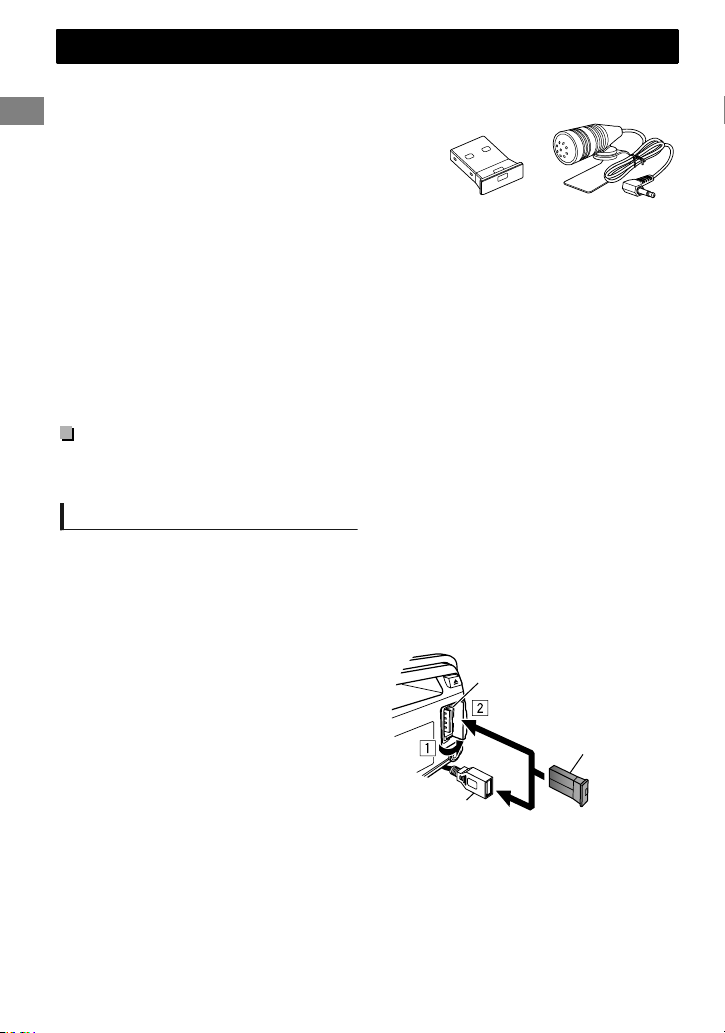
KS-UBT1
Microphone
KS-UBT1
or
USB cable from the
rear of the unit
USB input terminal
Bluetooth姞 connection
iPod/iPhone
By connecting the supplied KS-UBT1 USB Bluetooth Adapter and microphone to this unit, you can
operate a Bluetooth device using this unit. Refer to the “Installation/Connection Manual” for details on
connecting the microphone.
Once the USB Bluetooth Adapter is attached, this unit is always
available for pairing.
Refer also to the instructions supplied with the Bluetooth
device.
Refer to the separate appendix to check the countries where
you may use the Bluetooth function.
If you turn off the unit, detach the control panel, or unplug the USB Bluetooth Adapter during a
phone call conversation, the Bluetooth connection is disconnected. Continue the conversation using
your mobile phone.
This unit supports the following Bluetooth profiles
Hands-Free Profile (HFP 1.5)
Object Push Profile (OPP 1.1)
Phonebook Access Profile (PBAP 1.0)
Advanced Audio Distribution Profile (A2DP 1.2)
Audio/Video Remote Control Profile (AVRCP 1.3)
Warning:
Stop the car in a safe place before operating complicated steps such as dialing numbers, using
phonebook, etc.
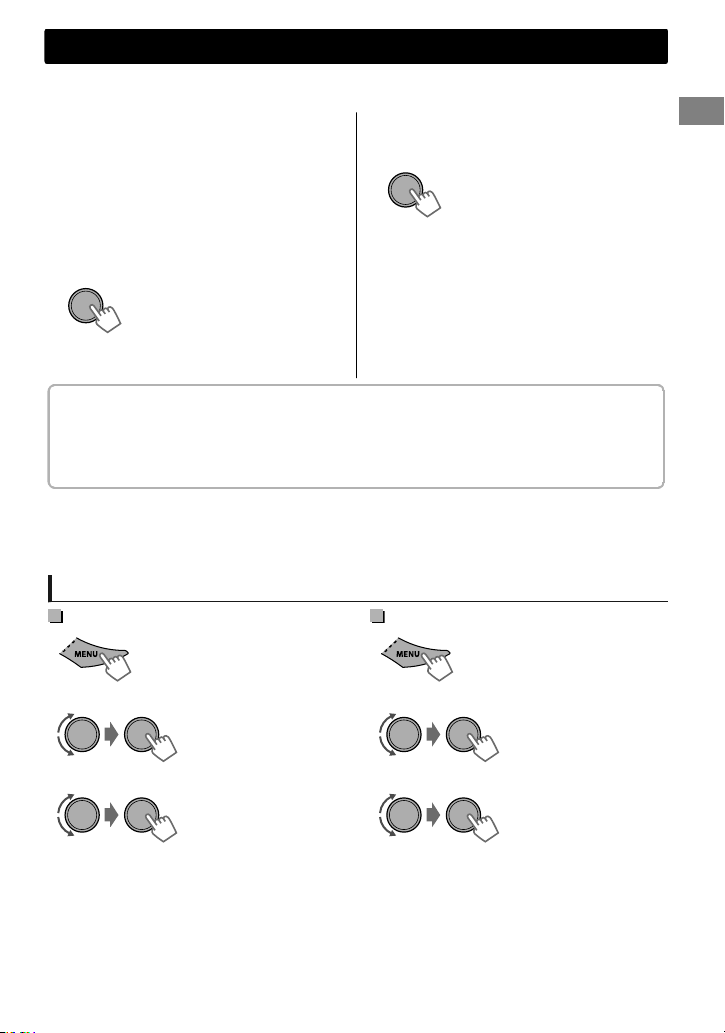
Pairing a Bluetooth device
When connecting a Bluetooth device to the unit for the first time, perform pairing between the unit and
the device.
Up to five Bluetooth devices can be registered in this unit.
A maximum of two Bluetooth phones and one Bluetooth audio device can be connected at any
time.
This unit supports Secure Simple Pairing (SSP).
1
Connect the USB Bluetooth adapter
(KS-UBT1) to one of the USB input
terminals.
2
Search and select “JVC Unit” on the Bluetooth device.
“BT PAIRING” flashes on the display.
For some Bluetooth devices, you may need to enter the Personal Identification Number (PIN) code
immediately after searching.
|ޓENGLISH
14
Page 15
(Hold)
Bluetooth姞 connection
3
Perform (A) or (B) depending on what scrolls on the display.
For some Bluetooth devices, pairing sequence may vary from the steps described below
(A) If “[Device Name]”#“XXXXXX”#
“VOL – YES”#“BACK – NO” scrolls on the
display,
“XXXXXX” is a 6-digit passkey randomly
generated during each pairing.
Ensure that the passkey which appears
on the unit and Bluetooth device is the
same.
Select “YES” to confirm the passkey.
(B) If “[Device Name]”#“VOL – YES”#
“BACK – NO” scrolls on the display,
Select “YES” to start the pairing.
(1) If “PAIRING”#“PIN 0000” scrolls on the
display, enter the PIN code “0000” into the
Bluetooth device.
You can change to a desired PIN code before
pairing. (' page 25)
(2) If only “PAIRING” appears, operate the
Operate the Bluetooth device to confirm
Bluetooth device to confirm pairing.
the passkey.
After pairing is successful, “PAIRING COMPLETED” appears on the display.
The unit will establish a connection with the newly paired Bluetooth device, “” lights up on the
display and you can now control the Bluetooth device through the unit.
“” will light up when a phone is connected.
“” will light up when an audio device is connected.
Once the connection is established, the device is registered to the unit and there is no need to
perform the pairing again unless you delete the registered device.
Some Bluetooth devices may not be able to connect to the unit after pairing. Connect the device to
the unit manually. Refer to the instruction manual of the Bluetooth device for more information.
Connecting/Disconnecting a registered device manually
To connect
1
(Hold)
To disconnect
1
2
Select <CONNECT>.
3
Select the desired device.
“CONNECTING”#“[Device Name]” scrolls on the
display when the unit is connecting to the device.
“CONNECTED”#“[Device Name]” scrolls on the
display when the device is connected.
4
Press MENU to exit.
-<BLUETOOTH>
-<PHONE>/<AUDIO>
-<CONNECT>
2
Select <DISCONNECT>.
3
Select the desired device.
“DISCONNECT”#“[Device Name]” scrolls on the
display when the device is disconnected.
4
Press MENU to exit.
-<BLUETOOTH>
-<PHONE>/<AUDIO>
-<DISCONNECT>
ENGLISHޓ|
15
Page 16

(Hold)
(Hold)
or
(Hold)
Bluetooth姞 connection
Connecting to JVC original
application
JVC original application is designed to view JVC
car receiver status and perform simple control
operations on Android smart phones.
For JVC original application operations, visit JVC
website:
<http://www3.jvckenwood.com/english/car/
index.html> (English website only).
1
2
Select <CONNECT>.
3
Select the desired smart phone.
“CONNECTED”#“[Device Name]” scrolls on the
display when the device is connected.
4
Press MENU to exit.
(Hold)
-<BLUETOOTH>
-<APPLICATION>
-<CONNECT>
Bluetooth mobile phone
Receiving a call
To receive a call
When there is an incoming call, the source
automatically changes to “BT FRONT”/“BT REAR”.
“RECEIVING” appears on the display, followed
by the phone number or name.
The display flashes in blue. (' page 19)
or
You can also press ////SOURCE on the
remote control to answer a call.
When <AUTO ANSWER> is set to <ON>, the
unit answers incoming calls automatically.
(' page 19)
Deleting a registered device
1
2
Select <DELETE YES>.
“DELETED” appears when the device is deleted.
3
Press MENU to exit.
To end a call
You can also press and hold ////SOURCE
on the remote control to end a call.
To deactivate/activate hands-free
mode
During a phone conversation...
Operations may vary according to the
connected Bluetooth device.
-<BLUETOOTH>
-<DELETE PAIR>
- [Device name]
-<DELETE YES>
|ޓENGLISH
16
Page 17
Bluetooth mobile phone
Adjustments during a call
Phone volume(00 — 50)
[VOLUME 15]: Volume
adjustments made during a call
will not affect the other
sources.
Microphone level
(01— 03)[02]: As the number
increases, the microphone
becomes more sensitive.
Noise Reduction and Echo
Cancellation mode:
Turns on/off.
Text message notification
When a text message is received, the unit rings
and “RCV MESSAGE”#“[Device name]” appears.
<MSG NOTICE> must be set to <ON>.
(' page 19)
You cannot read, edit, or send a message
through the unit.
Switching between two connected mobile phones
When two mobile phones are connected to the unit, you can access to both “Hands-Free” menus.
Press to enter 1st phone’s “Hands-Free” menu.
Press twice to enter 2nd phone’s “Hands-Free” menu.
Press to return to 1st phone’s “Hands-Free” menu.
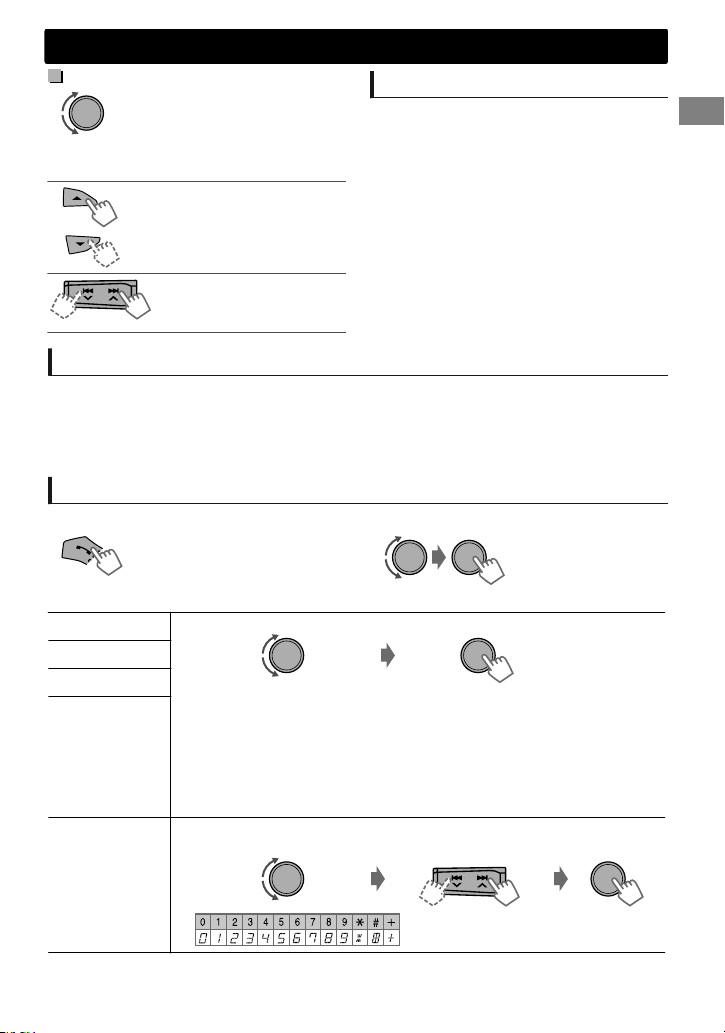
Making a call from the hands-free menu
1
Enter the “Hands-Free” menu.
3
Select and call the contact (name/phone number).
DIALED
RECEIVED
MISSED CALL
PHONEBOOK
DIAL NUMBER Enter the phone number to dial.
Select the name/phone number
If the phonebook contains many numbers, you can fast search for the desired
number by turning the control dial quickly, or use Quick Search (' page 13).
“NO HISTORY” appears if there is no recorded call history.
“NO DATA” appears if no entries are found in the Bluetooth device’s
phonebook.
“SEND P.BOOK MANUALLY” appears if <P.BOOK SEL> is set to
<P.BOOK IN UNIT> or the phone does not support PBAP. (' page 19)
Select number/character
2
Select a calling method.
Call
Move the entry position
Refer to the table below
for options.
Call
ENGLISHޓ|
17
Page 18
(Hold)
Select the desired phone
Enter “phone list”
Phone Number
or
Name
(Hold)
Bluetooth mobile phone
Making a call from memory
You can store up to 6 contacts in the memory of
this unit for speed dialing.
To store contacts in memory
1
Enter the “Hands-Free” menu.
2
Select a call method.
3
Select a contact (name/phone number).
Name
4
Store in memory.
(Hold)
“MEMORY PX” flashes. The contact is stored to the
selected number button (1 - 6).
To erase a contact from preset memory, select
<DIAL NUMBER> in step 2 and store a blank
number.
To make a call from memory
1
Enter the “Hands-Free” menu.
-<DIALED>/
<RECEIVED>/
<MISSED CALL>/
<PHONEBOOK>/
<DIAL NUMBER>
Phone Number
or
If two phones are connected,
2
When “WAIT VOICE”#“[Device Name]”
scrolls on the display, speak the name of
the contact you want to call or the voice
command to control the phone functions.
Supported voice recognition features vary for
each phone. Please refer to the instruction
manual of the connected phone for details.
Deleting a contact (name/
phone number)
Only when <P.BOOK SEL> is set to <P.BOOK IN
UNIT>. (' page 19)
1
Enter the “Hands-Free” menu.
2
Select a call method.
3
Select the contact (name/phone number)
to be deleted.
-<DIALED>/
<RECEIVED>/
<MISSED CALL>/
<PHONEBOOK>
2
Select and call the contact.
“NO PRESET” appears if there are no contacts
stored in memory.
Using voice recognition
You can use the voice recognition features of the
connected phone through this unit.
“NOT SUPPORT” appears if the connected
phone does not support this feature.
1
Enter voice recognition mode.
If only one phone is connected,
|ޓENGLISH
18
(Hold)
4
Enter “Delete Entries” menu.
5
Select <DELETE> or <DELETE ALL>.
DELETE Selected name/phone number
DELETE
ALL
from step 3 is deleted.
All name/phone numbers from
selected menu in step 2 are
deleted.
Page 19
Bluetooth mobile phone
Using the SETTINGS menu
3
1
Enter the “Hands-Free” menu.
2
Select <SETTINGS>.
The following settings are applicable to the paired device. If another device is paired, perform the
settings again.
Menu item
P.BOOK SEL * [PB IN PHONE]: The unit browses the phonebook of the connected phone.
AUTO ANSWER ON: The unit answers incoming calls automatically.
RING TONE [IN UNIT]: The unit rings to alert you when a call/text message comes in.
RING COLOR
NR/EC MODE [ON]: Turns on the Noise Reduction and Echo Cancellation of the connected
MIC LEVEL
MSG NOTICE
* Selectable only when the connected phone supports PBAP.
PB IN UNIT: The unit browses the phonebook registered in the unit. (You can
copy the phonebook memory using <P.BOOK WAIT> (' page 25).)
[OFF]: The unit does not answer incoming calls automatically.
– CALL: Select your preferred ring tone (TONE 1 — 5) for incoming calls.
– MESSAGE: Select your preferred ring tone (TONE 1 — 5) for incoming text
messages.
Default ring tone is different according to the paired device.
IN PHONE: The unit uses the connected phones’ ring tone to alert you when a
call/text message comes in. (The connected phone will ring if it does not
support this feature.)
COLOR 01 — 29[06]: Select your preferred color for incoming call/text
message alerts.
OFF: Cancels.
microphone for clearer sound.
OFF: Cancels.
(01— 03)[02]: The sensitivity of the microphone increases as the MIC level is
increased.
[ON]: The unit rings and “RCV MESSAGE”#“[Device Name]” appears to alert you
of an incoming text message.
OFF: The unit does not alert you of an incoming text message.
Selectable setting (Initial: [XX])
Repeat this step to perform the necessary
settings.
To return to the previous menu, press .
To exit from the menu, press MENU.
ENGLISHޓ|
19
Page 20
Bluetooth audio player
Bluetooth audio player
Playing a Bluetooth audio player
A
Operations and display indications may differ according to their availability on the connected device.
Basic operations
Starts or resumes playback.
Mutes the sound.
Select <BT REAR> or <BT FRONT>
depending on the location of the USB
Bluetooth adapter KS-UBT1.
Operate the Bluetooth audio player to start
playback.
.
RANDOM
RND OFF Cancels random playback.
ALL RND
GROUP RND
Randomly plays all tracks.
Randomly plays all tracks of
the current group.
Listening to BT Pandora姞
Selects group/folder.
Reverse skips or forward skips.
(Press)
Fast-forwards or reverses the
track. (Hold)
Selecting the playback modes
For Bluetooth devices that support AVRCP 1.3.
1
- - - - - - - - or - - - - - - - -
2
REPEAT
RPT OFF Cancels repeat playback.
TRACK RPT Repeats current track.
ALL RPT Repeats all tracks.
GROUP RPT
Press 1 for REPEAT.
Press 2 for RANDOM.
Press again to exit.
(Hold)
<REPEAT>)<RANDOM>
Repeats all tracks of the
current group.
internet radio
You can listen to Pandora姞 internet radio on your
smart phone through Bluetooth on this unit.
1
Open the Pandora姞 application on your
device.
2
Connect to Bluetooth audio.
Refer to “To connect” ' page 15, select
<BLUETOOTH>#<AUDIO>#<CONNECT>.
3
Select <BT REAR> or <BT FRONT>
depending on the location of the USB
Bluetooth adapter KS-UBT1.
4
Press 3 to select <BT PANDORA>.
The source switches and broadcast starts
automatically.
You can also activate Pandora姞 on your
Bluetooth smart phone via <BT AUDIO SW>.
(' page 25)
BT Pandora姞 internet radio is only for Android
OS and RIM OS.
You can operate Pandora姞 in the same way as
Pandora姞 for iPod/iPhone. (' page 12)
|ޓENGLISH
20
Page 21
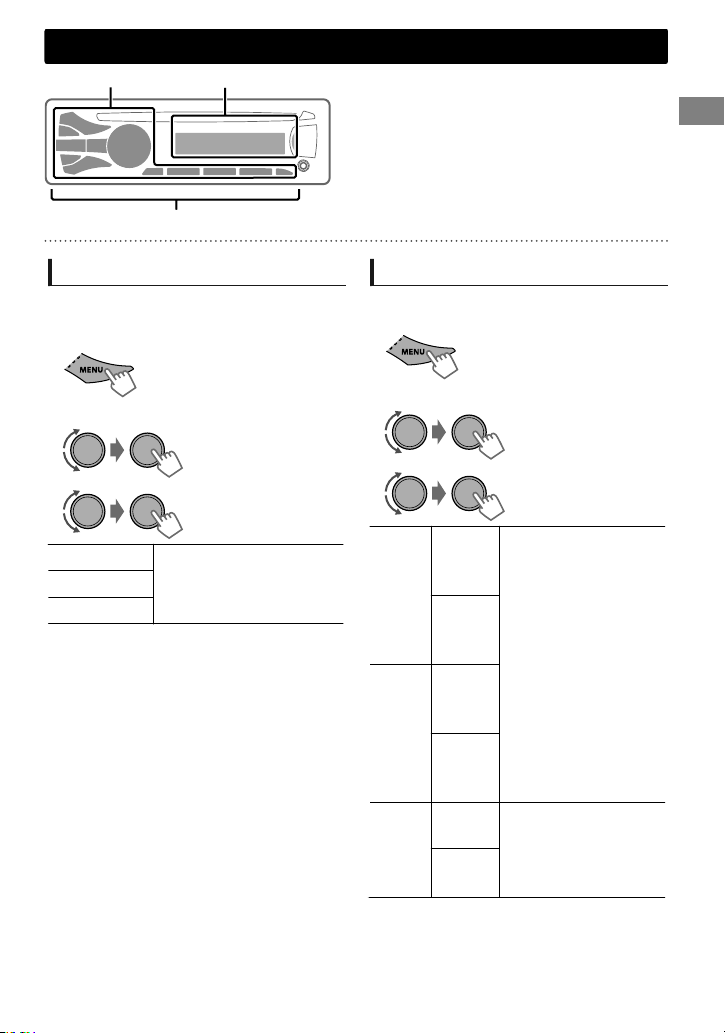
Illumination color adjustments
(Hold)
Display zoneButton zone
All zone
All zone: Includes both Button zone and
Display zone.
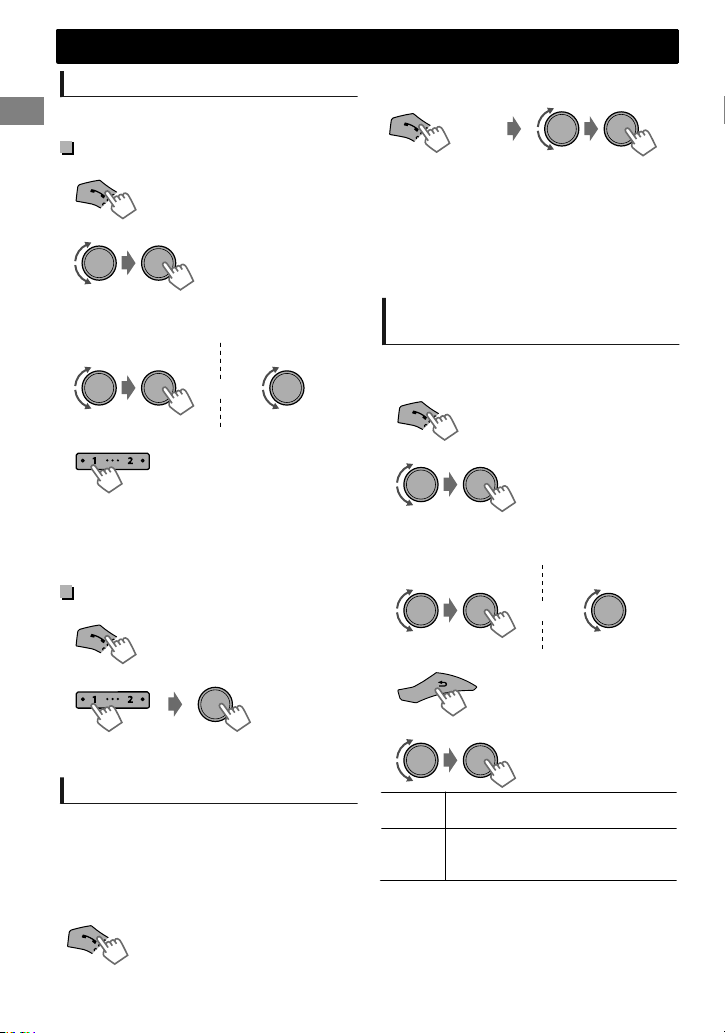
Selecting the preset color
You can select a preset color for <BUTTON
ZONE>, <DISP ZONE>, and <ALL ZONE>
separately.
1
2
Select <COLOR>.
3
BUTTON ZONE
DISP ZONE
ALL ZONE
Initial color: BUTTON ZONE [06], DISP ZONE
[01], ALL ZONE [06].
If <ALL ZONE> is selected, the button and
display illumination will change to the current/
selected <BUTTON ZONE> color.
4
Press MENU to exit.
(Hold)
COLOR 01-29/USER/
COLOR FLOW 01-03*
* Color changes in
different speeds.
Storing your own adjustments
You can store your own day and night colors for
<BUTTON ZONE> and <DISP ZONE> separately.
1
2
Select <COLOR SETUP>.
3
BUTTON
DAY
COLOR
NIGHT
COLOR
MENU
COLOR
4
ZONE
DISP
ZONE
BUTTON
ZONE
DISP
ZONE
ON
OFF
NIGHT COLOR/DAY COLOR is changed by
turning on/off your car’s headlight.
Press MENU to exit.
Select a primary
color <RED/GREEN/
BLUE>, and then
adjust the level
<00-31>. Repeat this
procedure until you
have adjusted all the
three primary colors.
Your adjustment is
automatically stored
to “USER”.
If “00” is selected for
all the primary colors
for <DISP ZONE>,
nothing appears on
the display.
Changes the display and
buttons illumination
during menu, list search,
and playback mode
operations.
ENGLISHޓ|
21
Page 22
(Hold)
Brightness adjustments
Brightness adjustments
You can select your preferred brightness for <BUTTON ZONE>, <DISP ZONE> separately.
1
(Hold)
3
2
-<DIMMER>
-<BRIGHTNESS>
-<DAY>/<NIGHT>
BUTTON ZONE BUTTON 00 to 31
DISP ZONE DISP 00 to 31
4
Press MENU to exit.
Sound adjustments
This unit memorizes sound settings adjusted for each individual source.
HD Radio tuner, Satellite Radio tuner and EXT IN share the same sound adjustment settings.
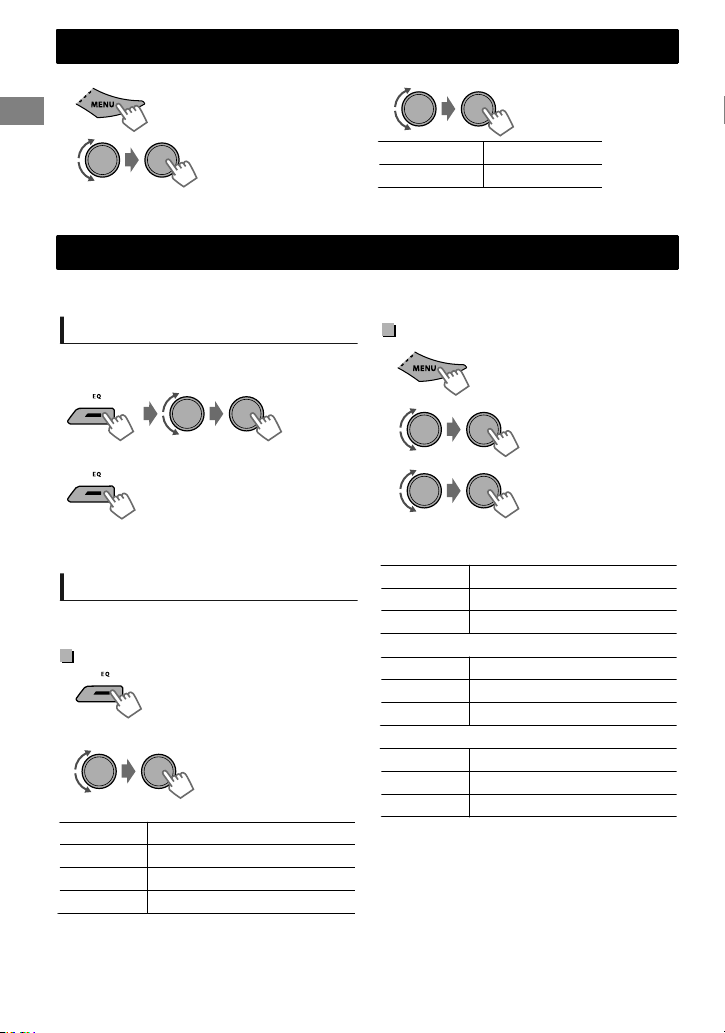
Selecting the preset sound
You can select a preset sound mode, for each
individual source, suitable for the music genre.
- - - - - - - - or - - - - - - - -
Press repeatedly.
DYNAMIC-VOCAL BOOST-BASS BOOSTUSER-FLAT-NATURAL-(back to the beginning)
Storing your own adjustments
While listening, you can adjust and store the tone
level for each individual source.
Easy Equalizer
1
2
Adjust the level.
SUB.W * 00 to 08 [08]
BASS LVL ** -06 to +06 [+05]
MID LVL -06 to +06 [00]
TRE LVL -06 to +06 [+05]
The adjustments are stored and <USER> is
activated.
|ޓENGLISH
22
(Hold)
(Initial: [XX])
Pro Equalizer
1
2
3
Adjust the sound elements of the selected tone.
BASS (Initial: [XX])
Frequency 60/80/[100]/200 Hz
Level LVL -06 to +06 [+05]
Q [Q1.0]/Q1.25/Q1.5/Q2.0
MIDDLE
Frequency 0.5/[1.0]/1.5/2.5 kHz
Level LVL -06 to +06 [00]
Q Q0.75/Q1.0/[Q1.25]
TREBLE
Frequency 10.0/[12.5]/15.0/17.5 kHz
Level LVL -06 to +06 [+05]
Q [Q FIX]
4
Repeat steps 2 and 3 to adjust other tones.
The adjustments are stored and <USER> is
activated.
5
Press MENU to exit.
* Available only when <SUB.W> is set to
<ON>. (' page 24)
** Available only when <HPF> is set to <OFF>.
(' page 24) (KD-R730BT only)
-<PRO EQ>
-<BASS>**/<MIDDLE>/
<TREBLE>
Page 23
Menu operations
1
If no operation is done for about 60 seconds, the
operation will be canceled.
2
(Hold)
Menu operations
3
Repeat step 2 if necessary.
To return to the previous menu, press .
To exit from the menu, press DISP or MENU.
Menu item
DEMO
CLOCK SET
CLOCK ADJ *1 [AUTO]: The built-in clock is automatically adjusted using the clock data
TIME ZONE *1*2 [EASTERN]/ATLANTIC/NEWFOUND/ALASKA/PACIFIC/MOUNTAIN/
CLOCK
DST *1*2 [DST ON]: Activates daylight savings time if your residential area is subject
COLOR
COLOR SETUP
DIMMER SET Selects the display and button illumination adjusted in the <BRIGHTNESS>/
DIMMER
BRIGHTNESS DAY[31]/NIGHT[15]: Brightness settings for the display and button
SCROLL *4 [ONCE]: Scrolls the display information once.
TAG DISPLAY [ON]: Shows the TAG information while playing MP3/WMA tracks.
DISPLAY
PRO EQ
*1 Displayed only when SIRIUS Satellite Radio or XM Satellite Radio is connected.
*2 Displayed only when <CLOCK ADJ> is set to <AUTO>.
*3 The illumination control lead connection is required. (See “Installation/Connection Manual”.)
This setting may not work correctly on some vehicles (particularly on those having a control
dial for dimming). In this case, change the setting to other than <DIMMER AUTO>.
*4 Some characters or symbols will not be shown correctly (or will be blanked) on the display.
For settings, ' page 4.
For settings, ' page 4.
provided via the Satellite Radio channel.
OFF: Cancels.
CENTRAL: Selects your residential area from one of the time zones for clock
adjustment.
to DST.
DST OFF: Cancels.
For settings, ' page 21.
<COLOR SETUP> setting.
[AUTO]: Changes between the Day and Night adjustments when you turn
off/on the car headlights. *3
ON: Selects the Night adjustments.
OFF: Selects the Day adjustments.
illumination for day and night.
BUTTON ZONE/DISP ZONE: Sets the brightness levels 00 — 31.
AUTO: Repeats scrolling (at 5-second intervals).
OFF: Cancels.
OFF: Cancels.
For settings, ' page 22.
Selectable setting (Initial: [XX])
ENGLISHޓ|
23
Page 24

Menu operations
Menu item
FADER *5*6
BALANCE *6
LOUD
(Loudness)
VOL ADJUST
(Volume adjust)
SUB. W
(Subwoofer)
SUB.W LPF *7
(Subwoofer lowpass filter)
SUB.W LEVEL *7
AUDIO
(Subwoofer level)
HPF *7
(High-pass filter)
(KD-A735BT only)
HPF *7
(High-pass filter)
(KD-R730BT only)
BEEP
(Keytouch tone)
AMP GAIN *8
(Amplifier gain)
SSM
SID The 12-digit SIRIUS identification number appears on the display. (Displayed
AREA
(Frequency
tuning interval)
MONO
(Monaural mode)
TUNER
BLEND HOLD
IF BAND
(Intermediate
frequency band)
RADIO TIMER
*5 If you are using a two-speaker system, set the fader level to “00”.
*6 This adjustment will not affect the subwoofer output.
*7 Displayed only when <SUB.W> is set to <ON>.
*8 The volume level automatically changes to “VOLUME 30” if you change to <LOW POWER>
with the volume level set to higher than “VOLUME 30”.
R06 — F06[00]: Adjusts the front and rear speaker output balance.
L06 — R06[00]: Adjusts the left and right speaker output balance.
ON: Boosts low and high frequencies to produce a well-balanced sound at
a low volume level.
[OFF]: Cancels.
-05 — +05[00]: Presets the volume adjustment level of each source,
compared to the FM volume level. Before adjustment, select the source you
want to adjust. (“VOL ADJ FIX” appears if “FM” is selected.)
OFF: Cancels.
[ON]: Turns on the subwoofer output.
LOW 55Hz/MID 85Hz/[HIGH 120Hz]: Audio signals with frequencies
lower than 55 Hz/85 Hz/120 Hz are sent to the subwoofer.
00 — 08[08]: Adjusts the subwoofer output level.
LOW 100Hz/MID 120Hz/HIGH 150Hz: Activates the High Pass Filter.
Audio signal with frequencies lower than 100 Hz/120 Hz/150 Hz are cut off
from the front/rear speakers.
[OFF]: Deactivates. (All signals are sent to the front/rear speakers.)
ON: Activates the High Pass Filter. Low frequency signals are cut off from
the front/rear speakers.
[OFF]: Deactivates. (All signals are sent to the front/rear speakers.)
[ON]/OFF: Activates or deactivates the keypress tone.
LOW POWER: VOLUME 00 — VOLUME 30 (Select if the maximum power of
each speaker is less than 50 W to prevent damaging the speakers.)
[HIGH POWER]: VOLUME 00 — VOLUME 50
For settings, ' page 6. (Displayed only when the source is “FM”.)
only when SIRIUS Satellite Radio is connected.)
[AREA US]: For North/Central/South America, AM/FM intervals: 10kHz/200kHz.
AREA EU: For any other areas, AM/FM intervals: 9kHz/50kHz.
AREA SA: For some South American countries, AM/FM intervals: 10kHz/50kHz.
Displayed only when the source is “FM”.
[OFF]: Enables stereo FM reception.
ON: Improves the FM reception but stereo effect will be lost.
For settings, ' page 8. (Displayed only when the source is “FM” or “AM”.)
[AUTO]: Increases the tuner selectivity to reduce interference noises
between adjacent stations. (Stereo effect may be lost.)
WIDE: Subject to interference noises from adjacent stations, but sound
quality will not be degraded and the stereo effect will remain.
For settings, ' page 7.
Selectable setting (Initial: [XX])
|ޓENGLISH
24
Page 25
Menu operations
Menu item
USB *9 DRIVECHANGE: Selects to change the drive when a device with multiple
IPOD SWITCH *10
(iPod/iPhone control)
AUDIOBOOKS *10 NORMAL/FASTER/SLOWER: Selects the playback speed of the
PHONE *12 CONNECT/DISCONNECT: Connects or disconnects the Bluetooth phone/
AUDIO
APPLICATION CONNECT/DISCONNECT: Connects or disconnects the application in the
BT AUDIO SW *13
DELETE PAIR
P. BOOK WAIT Copies up to 400 numbers from the phonebook memory of a connected
SET PINCODE Changes the PIN code (1 to 6-digits). (Default PIN code: 0000)
AUTO CNNCT [ON]: Establishes connection automatically with the Bluetooth device when
BLUETOOTH *11
INITIALIZE YES: Initializes all the Bluetooth settings (including stored pairing,
INFORMATION PH CNNT DEV/AU CNNT DEV/APP CNT DEV *14: Displays connected
AM *15 [ON]/OFF: Enables or disables “AM” in source selection.
EXT IN *15 EXT ON/[EXT OFF]: Enables or disables “EXT IN” in source selection.
AUX IN *15 [AUX ON]/AUX OFF: Enables or disables “AUX IN” in source selection.
BT AUDIO *16 [BT AU ON]/BT AU OFF: Enables or disables “BT AUDIO” in source
SRC SELECT
SOFT VER Displays the firmware version of the unit.
*9 Displayed only when the source is “USB FRONT/USB REAR”.
*10 Displayed only when the source is “IPOD-FRONT/IPOD-REAR”.
*11 If the USB Bluetooth Adapter is not connected to the unit, “PLEASE CNNT BT ADAPTER” scrolls
on the display.
*12 <CONNECT> will not be displayed if two Bluetooth phones are connected at the same time.
*13 Displayed only when the source is “BT FRONT/BT REAR”.
*14 Displayed only when a Bluetooth phone/audio player/application is connected.
Displayed only when the unit is in any source other than the corresponding source “AM/EXT IN/AUX IN”.
*15
*16 Displayed only when the USB Bluetooth Adapter (KS-UBT1) is attached and current source is
not “BT FRONT/ BT REAR”.
drives is connected to the USB input terminal (front/rear).
[HEAD MODE]/IPOD MODE/APP MODE:
For settings, ' page 11.
Audiobooks sound file in your iPod/iPhone.
Initial selection depends on your iPod/iPhone setting.
audio device. (' page 15)
smart phone. (' page 16)
Switches between “BT AUDIO” and “BT PANDORA”.
For settings, ' page 16.
phone to the unit via OPP.
Turn the control dial to select a number, press / to move to the entry
position. After entering the PIN code, press the control dial to confirm.
the unit is turned on.
OFF: Cancels.
phonebook, and etc.).
[NO]: Cancels.
phone/audio/application device name.
MY BT NAME: Displays the unit name (JVC Unit).
MY ADDRESS: Shows address of USB Bluetooth Adapter.
selection.
Selectable setting (Initial: [XX])
ENGLISHޓ|
25
Page 26
Remote controller
Remote controller
Preparing
When you use the remote controller for the first
time, pull out the insulation sheet.
Insulation sheet
For USA-California Only:
This product contains a CR Coin Cell Lithium
Battery which contains Perchlorate Material—
special handling may apply. See
www.dtsc.ca.gov/hazardouswaste/perchlorate
Replacing the lithium coin
battery
If the effectiveness of the remote controller
decreases, replace the battery.
CR2025
Additional information
About discs
This unit can only play the following CDs:
This unit can play back multi-session discs;
however, unclosed sessions will be skipped
during playback.
Unplayable discs
Discs that are not round.
Discs with coloring on the recording surface or
discs that are dirty.
Recordable/ReWritable disc that has not been
finalized. (For details on disc finalization, refer
to your disc writing software and your disc
recorder instruction manual.)
8 cm (3 inch) CD. Attempting to insert using an
adapter can cause malfunction. There may also
be problems ejecting the disc if inserted.
|ޓENGLISH
26
Caution:
Danger of explosion if battery is incorrectly
replaced. Replace only with the same or
equivalent type.
Battery shall not be exposed to excessive heat
such as sunshine, fire, or the like.
Warning:
Do not install any battery other than CR2025 or
its equivalent.
Do not leave the remote controller in places
(such as dashboards) exposed to direct
sunlight for a long time.
Store the battery in places out of reach of
children.
Do not recharge, short, disassemble, heat the
battery, or dispose of it in a fire.
Do not place the battery with other metallic
materials.
Do not poke the battery with tweezers or
similar tools.
Insulate the battery by wrapping it with tape
when disposing or storing it.
This unit is equipped with the steering wheel
remote control function. For details, refer also to
the instructions supplied with the remote
adapter.
Handling discs
Do not touch the recording surface of the disc.
Do not stick tape etc. on the disc, or use a disc
with tape stuck on it.
Do not use any accessories for the disc.
Clean from the center of the disc and move
outwards.
Clean the disc with a dry silicon or soft cloth.
Do not use any solvents.
When removing discs from this unit, pull them
out horizontally.
Remove any burrs from the center hole and
disc edge before inserting a disc.
DualDisc playback
The Non-DVD side of a “DualDisc” does not
comply with the “Compact Disc Digital Audio”
standard. Therefore, the use of Non-DVD side of a
DualDisc on this product may not be
recommended.
Page 27

Additional information
About audio files
Playable files
File extensions: MP3(.mp3), WMA(.wma),
WAV(.wav)
For MP3/WMA discs:
Bit rate:
MP3/WMA: 5 kbps - 320 kbps
Sampling frequency:
MP3 (MPEG-1): 32 kHz, 44.1 kHz, 48 kHz
MP3 (MPEG-2): 16 kHz, 22.05 kHz, 24 kHz
WMA: 8 kHz - 48 kHz
For USB devices:
Bit rate:
MP3 (MPEG-1): 32 kbps - 320 kbps
MP3 (MPEG-2): 8 kbps - 160 kbps
WMA: 5 kbps - 320 kbps
WAV: Linear PCM at 705 kbps and 1 411 kbps
Sampling frequency:
MP3 (MPEG-1): 32 kHz, 44.1 kHz, 48 kHz
MP3 (MPEG-2): 16 kHz, 22.05 kHz, 24 kHz
WMA: 8 kHz - 48 kHz
WAV: 44.1 kHz
Channel:
WMA/WAV: 1 ch/2 ch
Variable bit rate (VBR) files. (The elapsed time
for VBR files will not be displayed correctly.)
Unplayable files
MP3 files:
- encoded in MP3i and MP3 PRO format
- encoded in an inappropriate format
- encoded with Layer 1/2
WMA files:
- encoded in lossless, professional, and voice
format
- not based upon Windows Media® Audio
- copy-protected with DRM
Files which include data such as AIFF, ATRAC3,
etc.
File/folder names
This unit supports files/folder names recorded in a
format compliant with ISO 9660 Level 1, Level 2,
Romeo, or Joliet, and the proper extension code
<.mp3>, <.wma> or <.wav>.
Others
This unit can show WMA Tag and ID3 Tag
Version 1.0/1.1/2.2/2.3/2.4 (for MP3).
The search function works but search speed is
not constant.
About USB device
When connecting a USB cable, use the USB 2.0
cable.
You cannot connect a computer or portable
HDD to the USB input terminal of the unit.
Connect only one USB device to the unit at a
time. Do not use a USB hub.
USB devices equipped with special functions
such as data security functions cannot be used
with the unit.
Do not use a USB device with 2 or more
partitions.
This unit cannot recognize a USB device whose
rating is other than 5 V and exceeds 1 A.
This unit may not recognize a memory card
inserted into the USB card reader.
This unit may not play back files in a USB
device properly when using a USB extension
cord.
Depending on the shape of the USB devices
and connection ports, some USB devices may
not be attached properly or the connection
might be loose.
Operation and power supply may not work as
intended for some USB devices.
The maximum number of characters for:
– Folder names: 25 characters
– File names: 25 characters
– MP3 Tag: 128 characters
– WMA Tag: 128 characters
- WAV Tag: 128 characters
This unit can recognize a total of 20000 files,
2000 folders (999 files per folder including
folder without unsupported files), and of 8
hierarchies. However, the display can only
show until 999 folders/files.
Cautions
Do not pull out and attach the USB device
repeatedly while “READING” is shown on the
display.
Electrostatic shock at connecting a USB device
may cause abnormal playback of the device. In
this case, disconnect the USB device then reset
this unit and the USB device.
Do not leave a USB device in the car, expose to
direct sunlight, or high temperature. Failure to
do so may result in deformation or cause
damages to the device.
ENGLISHޓ|
27
Page 28

Additional information
About iPod/iPhone
iPod/iPhone that can be connected to this unit:
- iPod touch (4th generation)
- iPod touch (3rd generation)
- iPod touch (2nd generation)
- iPod touch (1st generation)
- iPod classic
- iPod with video (5th generation)*
- iPod nano (6th generation)
- iPod nano (5th generation)
- iPod nano (4th generation)
- iPod nano (3rd generation)
- iPod nano (2nd generation)
- iPod nano (1st generation)*
- iPhone 4S
- iPhone 4
- iPhone 3GS
- iPhone 3G
- iPhone
*<IPOD MODE>/<APP MODE> are not
applicable.
It is not possible to browse video files on the
“Videos” menu in <HEAD MODE>.
The song order displayed on the selection
menu of this unit may differ from that of the
iPod.
When operating an iPod/iPhone, some
operations may not be performed correctly or
as intended. In this case, visit the following JVC
website:
<http://www3.jvckenwood.com/english/car/
index.html> (English website only).
About Bluetooth
Depending on the Bluetooth version of the
device, some Bluetooth devices may not be
able to connect to this unit.
This unit may not work with some Bluetooth
devices.
Signal conditions vary, depending on the
surroundings.
When the unit is turned off, the device is
disconnected.
For more information about Bluetooth, visit the
following JVC website:
<http://www3.jvckenwood.com/english/car/
index.html> (English website only)
Trademark and license notice
Microsoft and Windows Media are either
registered trademarks or trademarks of
Microsoft Corporation in the United States
and/or other countries.
The Bluetooth word mark and logos are owned
by the Bluetooth SIG, Inc. and any use of such
marks by JVC KENWOOD Corporation is under
license. Other trademarks and trade names are
those of their respective owners.
Ready to receive HD Radio broadcasts when
connected to the KT-HD300, sold separately.
SIRIUS, XM and SAT Radio Ready, and related
marks are registered trademarks of SIRIUS XM
Radio Inc. All rights reserved.
“Made for iPod” and “Made for iPhone” mean
that an electronic accessory has been designed
to connect specifically to iPod, or iPhone,
respectively, and has been certified by the
developer to meet Apple performance
standards. Apple is not responsible for the
operation of this device or its compliance with
safety and regulatory standards. Please note
that the use of this accessory with iPod, or
iPhone may affect wireless performance.
iPhone, iPod, iPod classic, iPod nano, and iPod
touch are trademarks of Apple Inc., registered
in the U.S. and other countries.
PANDORA, the PANDORA logo, and the
Pandora trade dress are trademarks or
registered trademarks of Pandora Media, Inc.,
used with permission.
|ޓENGLISH
28
Page 29
Troubleshooting
Troubleshooting
Symptom Remedy/Cause
4 General
No sound, sound interrupted or
static noise.
“MISWIRING CHK WIRING THEN
RESET UNIT”/“WARNING CHK
WIRING THEN RESET UNIT”
appears on the display and no
operations can be done.
The unit does not work at all.
Source cannot be selected.
The correct characters are not
displayed (e.g. album name).
Check the cords, antenna and cable connections.
Check the condition of the disc, connected device and
recorded tracks.
Ensure to use the recommended stereo mini plug when
connecting to an external component. (' page 13)
Ensure the terminals of the speaker leads are properly insulated
with tape before resetting the unit. (' page 3)
If the message does not disappear, consult your JVC car audio
dealer or kits supplying company.
Reset the unit. (' page 3)
Check the <SRC SELECT> setting. (' page 25)
This unit can only display letters (upper case), numbers, and a
limited number of symbols.
4 FM/AM
SSM automatic presetting does
not work.
Store stations manually.
4 CD/USB/iPod/iPhone
“PLEASE” and “EJECT” appear
alternately on the display.
“IN DISC” appears on the display. The disc cannot be ejected properly. Make sure nothing is
“READING” keeps flashing on the
display.
Tracks/folders are not played
back in the order you have
intended.
The elapsed playing time is not
correct.
“NO FILE” appears on the display. Check whether the selected folder, the connected USB device,
“NOT SUPPORT” appears on the
display and track skips.
“CANNOT PLAY” flashes on
the display.
The unit cannot detect the
connected device.
The iPod/iPhone does not turn
on or does not work.
Press [], then insert the disc correctly.
blocking the loading slot.
A longer readout time is required. Do not use too many
hierarchical levels and folders.
Reload the disc or reattach the USB device.
The playback order is determined by the file name (USB) or the
order in which files were recorded (disc).
This sometimes occurs during playback. This is caused by how
the tracks are recorded on the disc.
or the iPod/iPhone contains a playable file.
Check whether the track is a playable file format.
Check whether the connected device is compatible with this
unit. (USB: ' page 32) (iPod/iPhone: ' page 28)
Ensure that the device contains files in the supported
formats. (' page 27)
Reattach the device.
Check the connection between this unit and iPod/iPhone.
Detach and reset the iPod/iPhone using hard reset. For
details on resetting the iPod/iPhone, refer to the instruction
manual supplied with the iPod/iPhone.
Check whether <IPOD SWITCH> setting is appropriate.
(' page 11)
“CANNOT SKIP” The skip limit has been reached.
“NO STATION” No registered station in your iPod/iPhone.
“NO ACTIVE STATION” No active station.
“SET UP PANDORA ON YOUR
Pandora姞
DEVICE”
Pandora姞 setup is not completed. Connect the iPod/iPhone to
this unit after completing the setup in your iPod/iPhone.
ENGLISHޓ|
29
Page 30
Troubleshooting
Symptom Remedy/Cause
4 CD/USB/iPod/iPhone
New station creation:
“NO STATION” There are no stations found for the current song or artist.
“STATION REACH LIMIT” You may not create more than 100 stations.
“CANNOT MAKE NEW
Pandora姞
STATION”
4 HD Radio
Sound quality changes when
receiving HD Radio stations.
No sound can be heard.
“RESET 8” appears on the display. Reconnect this unit and the HD Radio tuner box correctly, then
4 Satellite Radio
“UNSUB CH” appears on the
display while listening to the
SIRIUS Satellite Radio.
No sound can be heard.
“UPDATING” appears on the
display.
“NO SIG” or “NO SIGNAL”
appears on the display.
“NO ANT” or “NO ANTENNA”
appears on the display.
“INVALID CH” appears on the
display for about 5 seconds, then
returns to the previous channel
or default channel while listening
to the SIRIUS Satellite Radio.
Blank display appears. No text information for the selected channel.
“NO CH AV” or “CH UNAVL”
appears on the display for about
2 seconds, then returns to the
previous channel while listening
to the XM Satellite Radio.
“OFF AIR” appears on the display
while listening to the XM
Satellite Radio.
“LOADING” appears on the
display while listening to the XM
Satellite Radio.
“RESET 8” appears on the display.
Satellite Radio does not work at all.
There is a problem creating a new station, such as a network
issue.
Fix the reception mode to either <ANALOG> or <DIGITAL>.
(' page 8)
<ANALOG> is selected when receiving all digital broadcast
of HD Radio station. Select <AUTO> or <DIGITAL>.
(' page 8)
<DIGITAL> is selected when receiving weak digital signals or
receiving conventional radio broadcast. Select <AUTO> or
<ANALOG>. (' page 8)
reset the unit.
SIRIUS Satellite Radio is connected but does not have an active
subscription. For information on how to subscribe, ' page 9.
The unit is updating the channel information and it takes a few
minutes to complete.
Make sure your Satellite Radio antenna is mounted outside the
vehicle. Move the vehicle to an area with a clear view of the sky.
Check your Satellite Radio antenna connection and be sure it is
firmly attached.
No broadcast on the selected channel.
Select another channel or continue listening to the previous
channel or default channel.
Selected channel is no longer available or is unauthorized.
Select another channel or continue listening to the previous
channel.
Selected channel is not broadcasting at this time.
Select another channel or continue listening to the previous
channel.
The unit is loading the channel information and audio.
Text information are temporarily unavailable.
Reconnect this unit and the Satellite Radio correctly and reset
this unit.
|ޓENGLISH
30
Page 31

Troubleshooting
Symptom Remedy/Cause
4 Bluetooth
“BT FRONT”/“BT REAR” cannot be
selected.
No Bluetooth device is detected.
Pairing cannot be made.
“PAIRING FULL” scrolls on the
display when trying to perform
pairing.
Echo or noise occurs.
Phone sound quality is poor.
The unit does not respond when
you try to copy the phonebook
to the unit.
Sound is being interrupted or
skipped during playback of a
Bluetooth audio player.
The connected Bluetooth audio
player cannot be controlled.
“VOICE” calling method is not
successful.
“NOT SUPPORT” appears when
trying to perform voice dial.
“ERROR CNNCT” appears on the
display.
“ERROR” appears on the display. Try the operation again. If “ERROR” appears again, check if the
“PLEASE WAIT” appears on the
display.
“HW ERROR” appears on the
display.
“BT DEVICE NOT FOUND”
appears on the display.
Check <BT AUDIO> in the <SRC SELECT> setting. (' page 25)
Search from the Bluetooth device again.
Reset the unit. (' page 3)
Make sure you have entered the same PIN code to both the
unit and Bluetooth device.
Delete pairing information from both the unit and the
Bluetooth device, then perform pairing again.
You have already registered the maximum of five Bluetooth
devices in the unit. To pair another device, delete an existing
paired device from the unit first. (' page 16)
Adjust the microphone unit’s position.
Adjust <NR/EC MODE> and <MIC LEVEL> to a better
combination. (' page 19)
Reduce the distance between the unit and the Bluetooth
device.
Move the car to a place where you can get a better signal
reception.
You may have tried to copy the same entries (as stored) to the
unit. Press DISP or to exit.
Reduce the distance between the unit and the Bluetooth
audio player.
Turn off, then turn on the unit and try to connect again.
Other Bluetooth devices might be trying to connect to the
unit.
Check whether the connected Bluetooth audio player
supports Audio/Video Remote Control Profile (AVRCP). (Refer
to the instructions of your audio player.)
Disconnect and connect the Bluetooth player again.
Use “VOICE” calling method in a more quiet environment.
Reduce the distance from the microphone when you speak
the name.
Change “NR/EC MODE” to “OFF” (' page 19), then try again.
The connected phone does not support this feature.
The device is registered but the connection has failed. Connect
the device manually. (' page 15)
device supports the function you have tried.
The unit is preparing to use the Bluetooth function. If the
message does not disappear, turn off and turn on the unit, then
connect the device again (or reset the unit). (' page 3)
Reset the unit and try the operation again. If “HW ERROR”
appears again, consult your nearest JVC car audio dealer.
The unit failed to search for the registered Bluetooth devices
during Auto Connect. Turn on Bluetooth from your device
and connect manually.
ENGLISHޓ|
31
Page 32

Specifications
Specifications
AUDIO AMPLIFIER SECTION
Power Output 20 W RMS x 4 Channels at 4Ω and
Load Impedance 4Ω (4Ω to 8Ω allowance)
Frequency Response 40 Hz to 20 000 Hz
Signal-to-Noise Ratio 80 dBA (reference: 1 W into 4Ω)
Line-Out, Subwoofer-Out Level/Impedance 4.8 V (KD-A735BT), 2.5 V (KD-R730BT)/20 kΩ load
Output Impedance ≤ 600Ω
≤1% THD+N
(full scale)
TUNER SECTION
FM Frequency Range 200 kHz step: 87.9 MHz to 107.9 MHz
Usable Sensitivity 9.3 dBf (0.8 μV/75Ω)
50 dB Quieting Sensitivity 16.3 dBf (1.8 μV/75Ω)
Alternate Channel
Selectivity (400 kHz)
Frequency Response 40 Hz to 15 000 Hz
AM Frequency Range 10 kHz step: 530 kHz to 1 700 kHz
Stereo Separation 40 dB
Sensitivity/Selectivity 20 μV/40 dB
50 kHz step: 87.5 MHz to 108.0 MHz
65 dB
9 kHz step: 531 kHz to 1 611 kHz
CD PLAYER SECTION
Signal Detection System Non-contact optical pickup (semiconductor
Number of Channels 2 channels (stereo)
Frequency Response 5 Hz to 20 000 Hz
Signal-to-Noise Ratio 98 dB
Wow and Flutter Less than measurable limit
laser)
USB SECTION
USB Standard USB 1.1, USB 2.0
Data Transfer Rate (Full Speed) Max. 12 Mbps
Compatible Device Mass storage class
Compatible File System FAT 32/16/12
Playable Audio Format MP3/WMA/WAV
Maximum Supply Current
DC 5 V " 1 A
BLUETOOTH SECTION
Version Bluetooth 2.1 certified (+EDR)
Power Class Class 2 Radio
Service Area 10 m (10.9 yd)
Profile HFP 1.5, OPP 1.1, A2DP 1.2, AVRCP 1.3, PBAP 1.0
|ޓENGLISH
32
Page 33

GENERAL
Power Requirement (Operating Voltage) DC 14.4 V (11 V to 16 V allowance)
Grounding System Negative ground
Allowable Operating Temperature 0°C to +40°C (32°F to 104°F)
Dimensions
(W × H × D)
(approx.)
Mass
Subject to changes without notice.
Installation Size 182 mm × 52 mm × 158 mm
Panel Size 188 mm × 59 mm × 14 mm
(7-3/16" × 2-1/16" × 6-1/4")
(7-7/16" × 2-3/8" × 9/16")
1.3 kJ (2.9 lbs) (excluding accessories)
Specifications
ENGLISHޓ|
33
Page 34

Como primer paso, por favor lea detenidamente este manual para comprender a fondo todas las
Muchas gracias por la compra de un producto JVC.
instrucciones y obtener un máximo disfrute de esta unidad.
Para EE.UU.
Este equipo se ha sometido a todo tipo de pruebas y cumple con las normas establecidas para
dispositivos de Clase B, de conformidad con la Parte 15 de las reglas de la FCC (Comisión Federal de
Comunicaciones). Estas reglas están diseñadas para asegurar una protección razonable contra este
tipo de interferencias en las instalaciones residenciales. Este equipo genera y utiliza energía de
radiofrecuencia. Si no se instala y utiliza debidamente, es decir, conforme a las instrucciones, podrían
producirse interferencias en radiocomunicaciones. Sin embargo, no se garantiza que estas
interferencias no se produzcan en una instalación determinada. Si este equipo ocasiona interferencias
en la recepción de radio o televisión, lo cual puede comprobarse mediante la conexión o desconexión
del equipo, el problema podrá corregirse mediante una o una combinación de las siguientes medidas:
– Reoriente la antena receptora o cámbiela de lugar.
– Aumente la separación entre el equipo y el aparato receptor.
– Enchufe el equipo a una toma de corriente situada en un circuito distinto del aparato receptor.
– Consulte a su distribuidor o a un técnico experto en radio/televisión.
Precaución:
Los cambios o modificaciones no aprobados por la parte responsable del funcionamiento
pueden anular la autoridad del usuario para utilizar el equipo.
El uso de controles o ajustes o procedimientos de
rendimiento que no sean los que se especifican
en este documento puede causar exposiciones
peligrosas a radiación.
En cumplimiento con las normativas federales, las
siguientes etiquetas son reproducciones de las
que aparecen en el producto o en su interior,
relativas a la seguridad del producto láser.
JVC KENWOOD Corporation
2967-3, ISHIKAWA-MACHI,
HACHIOJI-SHI, TOKYO, JAPAN
THIS PRODUCT COMPLIES WITH DHHS
RULES 21CFR SUBCHAPTER J IN EFFECT AT
DATE OF MANUFACTURE.
Ubicación: placa inferior
IMPORTANTE PARA PRODUCTOS LÁSER
1. PRODUCTO LÁSER CLASE 1
2. PRECAUCIÓN: No abra la tapa superior. En el interior de la unidad no hay piezas que pueda reparar
3. PRECAUCIÓN: (Para EE.UU.) Radiación láser de clase II visible y/o invisible cuando ésta
4. REPRODUCCIÓN DE LA ETIQUETA: ETIQUETA DE PRECAUCIÓN, COLOCADA EN EL EXTERIOR DE LA UNIDAD.
el usuario; encargue el servicio a personal técnico cualificado.
abierto. No mirar fijamente hacia el haz.
(Para Canadá) Radiación láser de clase 1M visible y/o invisible cuando ésta
abierto. No mirar directamente con instrumental óptico.
|ޓESPAÑOL
2
[Sólo Unión Europea]
Page 35

Advertencia:
Detenga el automóvil antes de operar la unidad.
Precaución:
Ajuste el volumen a un nivel que permita
escuchar el ruido del tráfico y otros sonidos
ambientales. La conducción con el volumen
demasiado alto puede causar un accidente.
Evite usar el dispositivo USB o iPod/iPhone si
puede amenazar la seguridad de la conducción.
Precaución sobre el ajuste de volumen:
Los dispositivos digitales (CD/USB) producen muy
poco ruido al compararse con otras fuentes. Baje el
volumen antes de reproducir estas fuentes digitales
para evitar daños en los altavoces resultantes de un
repentino aumento del nivel de salida.
Temperatura dentro del automóvil:
Si ha dejado el automóvil estacionado durante largo
tiempo en un sitio cálido o frío, no opere la unidad
hasta que se normalice la temperatura del habitáculo.
Condensación:
Cuando se está usando el aire acondicionado, se
puede condensar humedad en la lente láser. Esto
puede ocasionar errores de lectura del disco. En
este caso, extraiga el disco y espere hasta que se
evapore la humedad.
Cómo montar/desmontar el
panel de control
Cómo reposicionar su unidad
También se borrarán los
ajustes preestablecidos por
usted.
Índice
Preparativos ........................................................... 4
Cancelación de las demostraciones en
pantalla
Puesta en hora del reloj
Operaciones básicas ........................................... 4
Radio ........................................................................ 6
Control de sintonizador de HD Radio™ ....... 8
Control de sintonizador de radio por satélite
..................................................................................... 9
CD/USB ................................................................. 10
iPod/iPhone ........................................................ 11
Búsqueda rápida ............................................... 13
Componentes externos .................................. 13
Conexión Bluetooth姞 ...................................... 14
Teléfono móvil Bluetooth .............................. 16
Reproductor de audio Bluetooth ................ 20
Ajustes de color de la iluminación .............. 21
Ajustes de brillo ................................................. 22
Ajustes de sonido .............................................. 22
Operaciones de los menús ............................ 23
Control remoto .................................................. 26
Información adicional ..................................... 26
Localización de averías ................................... 29
Especificaciones ................................................ 32
Cómo leer este manual:
Este manual explica principalmente las
operaciones realizadas mediante los botones
del panel de control.
< > indica las pantallas del panel de control.
[XX] indica la configuración inicial de una
opción de menú.
Cómo expulsar el disco por la fuerza
(Sostener)
Tenga cuidado de no dejar caer el disco al ser
expulsado.
Si esto no funciona, intente reposicionar su
receptor.
Mantenimiento
Limpieza de la unidad
Limpie la suciedad del panel con un paño de
silicona seco o un paño suave. La negligencia en
la observación de esta precaución puede causar
daños a la unidad.
Limpieza del conector
Elimine la suciedad del conector de la unidad y
del panel. Utilice un paño o un palillo de algodón.
ESPAÑOLޓ|
3
Page 36

(Sostener)
Preparativos
Preparativos
Cancelación de las
demostraciones en pantalla
La demostración en pantalla siempre se activa a
menos que la cancele.
1
2
3
Seleccione <DEMO OFF>.
4
Pulse MENU para salir.
(Sostener)
(Conguración inicial)
Puesta en hora del reloj
1
2
Seleccione <CLOCK>.
3
Seleccione <CLOCK SET>.
4
Ajuste la hora.
5
Ajuste los minutos.
6
Pulse MENU para salir.
Operaciones básicas
Información de pantalla
Cambia la información en pantalla. (Pulse)
Desplaza la información actual de la pantalla. (Sostener)
Radio
HD Radio
Radio por satélite
Audio CD/USB/Bluetooth
iPod/iPhone (HEAD MODE/
IPOD MODE)
iPod/iPhone (APP MODE)
iPod/iPhone (Pandora姞
internet radio)
Componentes Externos
*1 “****-FM” o “****” aparece cuando no se recibe ninguna Sigla de identificación.
*2 “NO TEXT” aparece cuando no se ha recibido texto.
*3 Solo para la Radio por satélite SIRIUS.
|ޓESPAÑOL
4
Fuente Pantalla
Emisoras que no sean Radio Broadcast Data System: Frecuencia ) Reloj
Emisoras FM Radio Broadcast Data System: Nombre de la emisora (PS) -
Frecuencia - Tipo de programa (PTY) - Reloj - (vuelta al comienzo)
Distintivo de llamada*1 - Frecuencia - Título/artista/nombre del
álbum del segmento actual*2 - Reloj - (vuelta al comienzo)
Nombre de la categoría - Nombre del canal - Nombre del artista -
Nombre del compositor*3 - Nombre de la canción/programa/título
- Reloj - (vuelta al comienzo)
Título de álbum/Artista* - Título de pista* - N.º de pista/Tiempo de
reproducción - N.º de pista/Reloj - (vuelta al comienzo)
* “NO NAME” aparece para los CD convencionales, o en caso de que
no esté grabado.
APP MODE) APP/Reloj
Nombre de la emisora - Título del álbum/Artista - Título de la pista
- Tiempo de reproducción - Reloj - (vuelta al comienzo)
EXT INPUT o AUX IN) Reloj
Page 37

Panel de control
Ventanilla de visualizaciónDisco de control
Ranura de carga
Operaciones básicas
Control remoto
Expulsa el disco
Desmonta el panel
Sensor remoto
Apunte el control remoto directamente al sensor.
NO exponga el sensor remoto a la luz solar directa.
Toma de entrada AUX
Terminal de entrada USB
Si pulsa o mantiene pulsado(s) el(los) siguiente(s) botón(es)...
Panel de
control
/SOURCE
Disco de
control (girar)
Disco de
control (pulse)
Botones
numéricos
(1 - 6)
EQ SOUND
/ /
/
Control
remoto
—
Se enciende.
Se apaga. (Sostener)
Pulse el botón /SOURCE del panel de control y gire el
disco de control en menos de 2 segundos para seleccionar
la fuente.
Función general
SOURCE Pulse repetidamente para seleccionar la fuente.
VOL - / + Ajusta el nivel de volumen.
— Selecciona las opciones.
Enmudece el sonido o pausa la reproducción.
)
Pulse de nuevo el botón para cancelar el silenciamiento o
reanudar la reproducción.
— Confirma la selección.
—
Selecciona las emisoras preajustadas.
Guarda la emisora actual en el botón numérico
seleccionado. (Sostener) (' página 6)
Selecciona el modo de sonido preajustado. (' página 22)
Entra en el menú de “Manos libres” (' página 17) o
—
responde la llamada entrante cuando la unidad emite un
sonido.
Finaliza la llamada. (Sostener)
— Vuelve al menú anterior.
Selecciona una emisora preajustada. (' página 6)
Buscar solamente emisoras de HD Radio. (Sostener)
Selecciona una categoría. (' página 9)
Selecciona la carpeta MP3/WMA. (' página 10)
Busca una emisora automáticamente. (' página 6)
Busca una emisora manualmente. (Sostener)
/
Seleccionar la pista (' página 10, 11, 20)/canal de radio
por satélite.
Avanzar o retroceder rápidamente la pista. / Cambiar
rápidamente la emisora de radio por satélite. (Sostener)
ESPAÑOLޓ|
5
Page 38

(Sostener)
Radio
Radio
Búsqueda de una emisora
A
B
“ST” se enciende cuando se recibe una radiodifusión FM estéreo con una intensidad de señal suficiente.
Seleccione <FM> o <AM>.
Búsqueda automática. (Pulse)
Búsqueda manual. (Sostener)
“M” parpadea, a continuación, pulse el botón
repetidamente.
Almacenamiento de emisoras
en la memoria
Preajuste manual
Es posible preajustar hasta 18 emisoras para FM y
6 emisoras para AM.
Mientras escucha una emisora...
(Sostener)
El número de preajuste parpadea y aparece
“MEMORY”. La emisora actual se guarda en el
botón numérico seleccionado (1 - 6).
- - - - - - - - o - - - - - - - -
1
Parpadea “PRESET MODE”.
2
El número de preajuste parpadea y aparece
“MEMORY”.
(Sostener)
Selecciona el número de preajuste.
Preajuste automático (FM)
SSM (Memoria secuencial de las emisoras
más fuertes)
Se pueden preajustar hasta 18 emisoras para FM.
Si se conecta el sintonizador de HD Radio, se
pueden preajustar hasta seis emisoras de AM.
1
2
Parpadea “SSM”. Cuando se han almacenado
todas las emisoras, “SSM” deja de parpadear.
Para preajustar <SSM 07 – 12>/
<SSM 13 – 18>, repita los pasos 1 y 2.
-<TUNER>
-<SSM>
-<SSM 01 – 06>
Selección de emisoras
preajustadas
- - - - - - - - o - - - - - - - -
También puede seleccionar una emisora
preajustada usando / .
|ޓESPAÑOL
6
Page 39

(Sostener)
Radio
Ajuste del temporizador de la
radio
Puede sintonizar una emisora preajustada en un
momento concreto independientemente de la
fuente actual.
1
2
[OFF] Cancela el temporizador de la radio.
ONCE Lo activa una vez.
DAILY Lo activa diariamente.
3
Selecciona la emisora preajustada.
4
Ajusta la hora de activación.
5
Pulse MENU para salir.
se ilumina después de haber ajustado el
temporizador de la radio.
Sólo se puede ajustar un temporizador. Al
ajustar un nuevo temporizador se borra el
ajuste anterior.
Tras seleccionar una emisora AM para el
temporizador de la radio, este no se activará si
la unidad esta unidad o si <AM> está ajustado
en <OFF>.
(Sostener)
-<TUNER>
-<RADIO TIMER>
-<OFF>/<ONCE>/
<DAILY>
-<FM>/<AM>
-<01> ... <18> para FM/
<01> ... <06> para AM
.
Búsqueda de programas
favoritos—Búsqueda de tipo de
programa (PTY)
Esta función solo está disponible para las
emisoras de FM Radio Broadcast Data
System.
1
2
Seleccione un código PTY.
Se inicia la búsqueda PTY.
.
Si hay una emisora que está difundiendo un
programa que tenga el mismo código PTY que el
seleccionado por usted, se sintoniza.
Códigos PTY
NEWS, INFORM (información), SPORTS, TALK, ROCK, CLS
ROCK (rock clásico), ADLT HIT (éxitos adultos), SOFT RCK
(rock suave), TOP 40, COUNTRY, OLDIES, SOFT, NOSTALGA
(nostalgia), JAZZ, CLASSICL (clásico), R & B (música negra
norteamericana), SOFT R & B (música negra norteamericana
suave), LANGUAGE, REL MUSC (música religiosa), REL TALK
(debates religiosos), PERSNLTY (personalidad), PUBLIC,
COLLEGE, HABL ESP (conversaciones en español), MUSC ESP
(música española), HIP HOP, WEATHER
ESPAÑOLޓ|
7
Page 40

(Sostener)
Control de sintonizador de HD Radio™
iPod/iPhone
Esta unidad puede controlar el sintonizador de HD Radio JVC KT-HD300 HD (se compra por separado).
Consulte el manual de instrucciones de KT-HD300 para obtener información sobre la instalación y la
conexión.
Los sintonizadores HD Radio también pueden recibir difusiones analógicas convencionales.
Numerosas emisoras HD Radio ofrecen más de un canal de programación. Este servicio recibe el
nombre de “multicasting”.
Para encontrar emisoras de HD Radio en su área, visite <http://www.hdradio.com/>.
Búsqueda de una emisora
A
B
Emisora de HD Radio: “HD” se enciende cuando se recibe una señal de audio digital o destella es
analógica.
Emisora convencional de FM: “ST” se enciende cuando se recibe una radiodifusión FM estéreo con
una intensidad de señal suficiente.
Seleccione <FM> o <AM>.
Búsqueda automática. (Pulse)
Búsqueda manual. (Sostener)
“M” parpadea, a continuación, pulse el botón
repetidamente.
Para buscar emisoras de HD
Radio solamente
(Sostener)
“HD” destella cuando se sintoniza una emisora y
la búsqueda se detiene.
Selección de un canal de HD Radio
multicast
Cuando se reciben canales HD Radio multicast...
Seleccione el canal que desea
(HD1 a HD8).
Aparece “LINKING” mientras se enlaza con un
canal multicast.
|ޓESPAÑOL
8
Para cambiar el modo de
recepción de HD Radio
Es posible cambiar el modo de recepción
mientras se recibe una transmisión HD Radio—
digital o analógico.
Este ajuste no posee ningún efecto en las
emisoras FM/AM convencionales.
1
2
Cambia automáticamente entre
[AUTO]
ANALOG
DIGITAL
El ajuste volverá automáticamente a <AUTO>
cuando se sintonice otra difusión.
Para guardar las emisoras en la memoria y
seleccionar una emisora preajustada,
' página 6.
audio digital y audio analógico.
“HOLD” destella si la emisora de
radio fuerza la recepción
analógica solo.
Sintoniza solo audio analógico.
“HOLD” se enciende.
Sintoniza solo audio digital.
“HOLD” se enciende.
-<TUNER>
-<BLEND HOLD>
-<AUTO>/<ANALOG>/
<DIGITAL>
Page 41

A
C
B
Control de sintonizador de radio por satélite
Antes de la operación, conecte cualquiera de los dos sistemas siguientes (no suministrados) al puerto de expansión
de la parte trasera de esta unidad. Si desea más información, consulte el “Manual de instalación/conexión”.
Radio por satélite SIRIUSSCC1 y KS-SRA100
Radio por satélite XM
Si desea más información, consulte también las instrucciones suministradas con los otros componentes.
Para las programaciones SIRIUS/XM, visite <www.siriusxm.com>.
Activación de su suscripción de
SIRIUS
1
Seleccione <SIRIUS>.
La radio por satélite SIRIUS comienza a actualizar
los canales SIRIUS. Cuando finalice, la radio por
satélite SIRIUS sintonizará el canal de vista previa.
2
Seleccione “Channel 0” para comprobar su
ID de SIRIUS.
Control de sintonizador de radio por satélite
D&P, SCVDOC1 y KS-SRA100
JVC Smart Digital Adapter (XMDJVC100)
CNP2000UCA y CNPJVC1
2
Seleccione “Channel 0” para comprobar su
ID de radio por satélite XM.
La pantalla cambia entre “RADIO ID” y el número
del ID alfanumérico de 8 dígitos.
También puede comprobar su ID de radio por
satélite XM en la etiqueta de la caja del
XMDirect2 Tuner System.
3
Póngase en contacto con la radio por
satélite XM en Internet visitando
<www.siriusxm.com/activatenow> para
activar su suscripción o llame a 1-800-XM-
Aparecerán los el ID de 12 dígitos de SIRIUS.
También puede comprobar su ID de SIRIUS en
la etiqueta del embalaje o en las operaciones
del menú (' página 24).
3
Póngase en contacto con radio por
RADIO (1-800-967-2346).
Una vez activada la suscripción, la unidad puede
sintonizar cualquiera de los canales disponibles.
Selección de un canal
satélite Sirius en Internet visitando
<www.siriusxm.com/activatenow> para
activar su suscripción o haga una llamada
gratuita a SIRIUS marcando 1-888-539SIRIUS (7474).
Una vez que haya activado la suscripción, “SUB
UPDT PRESS ANY KEY” se desplaza por la pantalla.
Actualizaciones de canales (SIRIUS)
Si los canales han sido actualizados después de la
suscripción, la actualización se inicia
automáticamente. “UPDATING” parpadea y no se
escucha ningún sonido.
Las actualizaciones tardan algunos minutos en
finalizar.
Durante la actualización, no podrá utilizar la radio
por satélite.
Activación de su suscripción de XM
1
Seleccione <XM>.
Seleccione <SIRIUS> o <XM>.
Seleccione una categoría.
Si desea seleccionar canales de todas las
categorías...
SIRIUS: Seleccione <ALL>.
XM: Sáltese este paso.
Seleccione el canal que desea.
Al mantener pulsado el botón, los canales se
cambian rápidamente.
Durante la búsqueda, se omiten los canales no
válidos y aquellos a los que no está suscrito.
Almacenamiento de canales en
la memoria
Se pueden preajustar hasta 18 canales para SIRIUS
XMDirect2 Tuner System comienza la
actualización de todos los canales XM. “El canal 1”
se sintoniza automáticamente.
y XM.
(“Preajuste manual” ' página 6)
Selección de emisoras preajustadas
(“Selección de emisoras preajustadas” ' página 6)
ESPAÑOLޓ|
9
Page 42
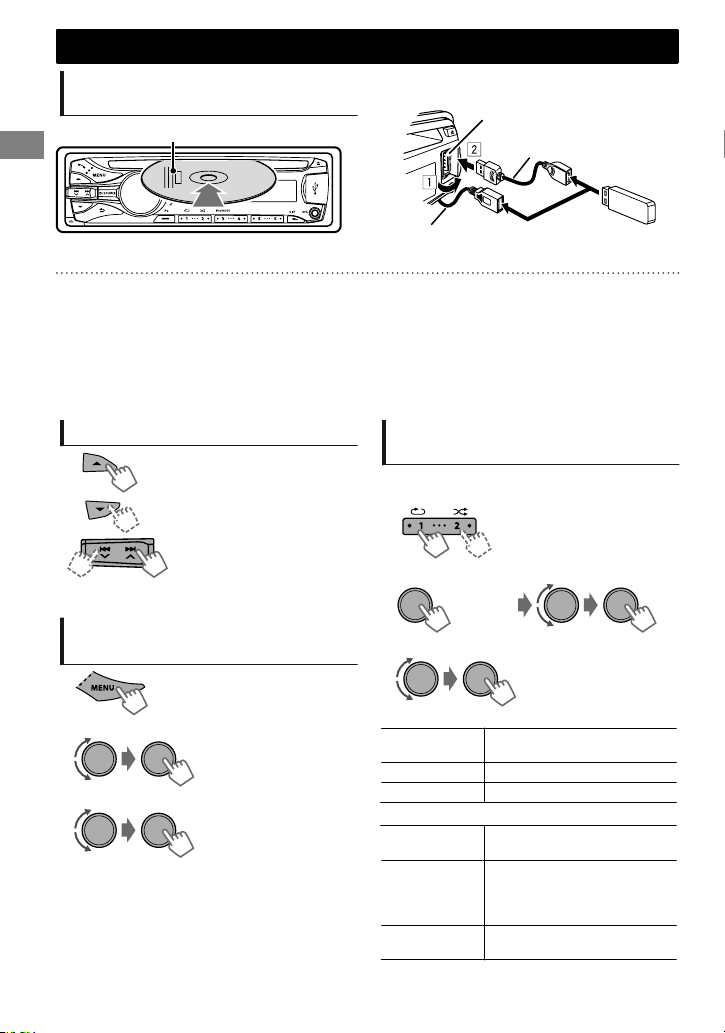
Cable USB 2.0
(no suministrado)
Terminal de entrada USB
Cable USB desde la parte trasera de la unidad
o
(Sostener)
CD/USB
CD/USB
Reproducción de un dispositivo
CD/USB
Lado de la etiqueta
La fuente cambia a “CD” y se inicia la reproducción.
Esta unidad puede reproducir archivos MP3/WMA guardados en un CD-R, un CD-RW y archivos MP3/
WMA/WAV de un dispositivo de almacenamiento masivo USB (como una memoria USB y un
reproductor de audio digital).
Asegúrese de tener una copia de respaldo de todos los datos importantes. No asumiremos
responsabilidad alguna por la pérdida de datos en dispositivos de almacenamiento masivo USB
durante el uso de este sistema.
Los discos expulsados no retirados en 15 segundos se reintroducirán automáticamente.
Si el disco no puede expulsarse, ' página 3.
Selección de una carpeta/pista
Selecciona una carpeta.
(Para MP3/WMA/WAV)
Selecciona la pista. (Pulse)
Avanzar o retroceder
rápidamente la pista.
(Sostener)
Selección de una pista/carpeta
de la lista
1
2
Seleccione una carpeta. (Para MP3/WMA/WAV)
3
Seleccione una pista.
Para MP3/WMA/WAV
Si hay muchas carpetas o pistas, puede realizar
una búsqueda rápida de la carpeta o pista que
desea girando rápidamente el disco de control
o utilizando la Búsqueda Rápida
(' página 13).
|ޓESPAÑOL
10
La fuente cambia a “USB” y se inicia la reproducción.
Cómo seleccionar los modos de
reproducción
Podrá seleccionar uno de los siguientes modos
de reproducción a la vez.
1
- - - - - - - - o - - - - - - - -
2
REPEAT
RPT OFF
TRACK RPT Repetir la pista actual.
FOLDER RPT * Repetir la carpeta actual.
RANDOM
RND OFF
FOLDER RND *
ALL RND
* Para MP3/WMA/WAV
Pulse 1 para REPEAT.
Pulse 2 para RANDOM.
Vuelva a pulsar para salir.
<REPEAT>)<RANDOM>
Cancelar la reproducción
repetida.
Cancelar la reproducción
aleatoria.
Reproducir aleatoriamente
todas las pistas de la carpeta
actual y luego las pistas de
las siguientes carpetas.
Reproducir aleatoriamente
todas las pistas.
Page 43

iPod/iPhone
(Sostener)
Reproducción de un iPod/iPhone
Terminal de entrada USB
Cable USB 2.0 (accesorio
del iPod/iPhone)
o
Cable USB desde la
parte trasera de la unidad
La fuente cambia a “IPOD-FRONT/IPOD-REAR” y
se inicia la reproducción.
Selección del modo de control
#<HEAD MODE>/<IPOD MODE>/
<APP MODE>
HEAD
Controla la reproducción del iPod a
MODE
través de la unidad.
IPOD
Controla la reproducción del iPod
MODE
desde el iPod/iPhone.
APP
El sonido de algunas funciones
MODE
(música, juegos, aplicaciones, etc.)
ejecutadas en el iPod/iPhone
conectado se emite a través de los
altavoces conectados a esta unidad.
También puede cambiar el ajuste mediante
<IPOD SWITCH> en el menú. (' página 25)
Selección de una pista
Aplicable únicamente en <HEAD MODE/IPOD MODE>.
Con <APP MODE>, aplicable sólo en algunas
aplicaciones de audio.
Selección de una pista de la lista
Aplicable únicamente en <HEAD MODE>.
1
2
Seleccione la lista deseada.
Selecciona la pista/capítulo.
(Pulse)
Avanzar o retroceder
rápidamente la pista.
(Sostener)
3
Seleccione la pista que desea.
Repita este paso hasta que se seleccione la pista
que desee.
Si el menú seleccionado contiene numerosas
pistas, puede realizar una búsqueda rápida de
la pista que desea girando rápidamente el
disco de control o utilizando la Búsqueda
Rápida (' página 13).
Cómo seleccionar los modos de
reproducción
Aplicable únicamente en <HEAD MODE>.
Podrá seleccionar uno de los siguientes modos
de reproducción a la vez.
1
- - - - - - - - o - - - - - - - -
2
REPEAT
RPT OFF
ONE RPT
ALL RPT
RANDOM
RND OFF
SONG RND
ALBUM RND
“ALBUM RND” no es aplicable en el caso de
algunos iPod/iPhone.
Pulse 1 para REPEAT.
Pulse 2 para RANDOM.
Vuelva a pulsar para salir.
<REPEAT>)<RANDOM>
Cancelar la reproducción
repetida.
Funciona de igual manera que
“Repetir Una” del iPod.
Funciona de igual manera que
“Repetir Todas” del iPod.
Cancelar la reproducción
aleatoria.
Funciona de igual manera que
“Aleatorio Canciones” del iPod.
Funciona de igual manera que
“Aleatorio Álbumes” del iPod.
PLAYLISTS)ARTISTS)ALBUMS)SONGS)
PODCASTS)GENRES)COMPOSERS)
AUDIOBOOKS) (vuelta al comienzo)
ESPAÑOLޓ|
11
Page 44

(Sostener)
iPod/iPhone
Aplicación de iPod/iPhone
Puedes utilizar la aplicación original de JVC de
esta unidad en <APP MODE>. Para obtener más
información, visite la página web de JVC: <http://
www3.jvckenwood.com/english/car/index.html>
(sitio web solo en inglés).
Pandora姞 internet radio
Preparativos
1
Busque “Pandora” en el Apple iTunes App
Store para encontrar e instalar la última
versión de la aplicación Pandora姞 en su
dispositivo.
2
En al aplicación de su dispositivo, inicie
sesión y cree una cuenta de Pandora姞. Si
todavía no es usuario registrado, también
puede crear una cuenta en
www.pandora.com.
Pandora姞 sólo está disponible en EE.UU.
Dado que Pandora姞 es un servicio de terceros,
las especificaciones están sujetas a cambios sin
previo aviso. Igualmente, pueden producirse
problemas de compatibilidad e incluso es
posible que algunos o todos sus servicios
lleguen a no estar disponibles.
Algunas funciones de Pandora姞 no puede
utilizarse en esta unidad.
Para cuestiones sobre el uso de la aplicación,
contacte con Pandora en
pandora-support@pandora.com.
Escuchar Pandora姞 internet radio
1
Abra la aplicación de Pandora姞 en su
dispositivo.
2
Conecte el dispositivo a uno de los
terminales USB. (' página 11)
La fuente cambia y la emisión comienza
automáticamente desde su emisora actual.
Operaciones básicas
Inicia/pausa la reproducción.
Creación de una emisora nueva
Puede crear una emisora basándose en la canción
o artista que esté sonando en ese momento.
1
2
Se ha creado una emisora basándose en la
canción o artista actual.
-<NEW STATION>
-<FROM ARTIST>/
<FROM SONG>
Búsqueda de la emisora registrada
en la lista
1
2
Selecciona el modo de visualización de la
lista de emisoras.
BY DATE Según la fecha de registro
A - Z Orden alfabético
Puede pasar directamente al paso 3 para
seleccionar una emisora o utilizar el menú de
búsqueda, para desplazarse por el menú que
desee. (' página 13)
3
Seleccione la emisora deseada.
Para marcar canción/información del
artista
Mientras se recibe una canción...
|ޓESPAÑOL
12
Selecciona pulgar arriba/pulgar
abajo.
Si selecciona pulgar abajo, se
omitirá la pista actual.
Salta la pista.
<THIS ARTIST>)<THIS TRACK>
Aparece “BOOKMARKED” y la canción/
información del artista se almacena en el iPod/
iPhone.
Esta unidad le permite marcar canciones y/o
artistas en su cuenta personalizada de
Pandora姞. Las marcas no estarán disponibles
para su revisión en la unidad, pero sí estarán
disponibles en su cuenta de Pandora姞.
Page 45

(Sostener)
Búsqueda rápida
Si tiene muchas carpetas/pistas/contactos, puede buscarlos de forma rápida conforme al primer
carácter (de la A a la Z, del 0 al 9 y OTHERS).
1
Entre en el menú de la lista o en el menú de “Manos libres”.
CD (MP3/WMA)/
USB (MP3/WMA/WAV)
iPod/iPhone Guía telefónica Bluetooth
Búsqueda rápida
Seleccione la lista deseada.
2
Seleccione el carácter deseado (de la A a la
Z, del 0 al 9 y OTHERS).
“OTHERS” aparece si el primer carácter no es de la
A a la Z o del 0 al 9, por ejemplo, #, -, !, etc.
3
Seleccione la carpeta/pista/contacto que
desea.
Para CD/USB y iPod/iPhone, repita el paso 3 hasta
que se seleccione la pista que desea.
La búsqueda puede no funcionar en algunas de las
capas del menú seleccionado (para iPod/iPhone).
Seleccione <PHONEBOOK>.
Componentes externos
Podrá conectar un componente externo a los siguientes terminales:
EXT IN: Puerto de expansión de la parte trasera de esta unidad que utiliza los siguientes adaptadores
(no suministrados):
- JVC KS-U57, Adaptador de entrada de línea
- JVC KS-U58, Adaptador de entrada AUX
AUX IN: Jack de entrada AUX (auxiliar) en el panel de control.
Si desea más detalles, consulte también las instrucciones que se suministran con los adaptadores o los
componentes externos.
Para conectarlos al puerto de expansión de la parte trasera de esta unidad, consulte el “Manual de
instalación/conexión”.
Reproducción de un
componente externo desde
AUX/puerto de expansión
Miniclavija estéreo de 3,5 mm
(1/8") (no suministrada)
Reproductor de
audio portátil, etc.
Para una óptima salida de audio,
utilice una miniclavija estéreo
para enchufe de 3 terminales.
1
Conecte al AUX del panel de control y/o al
puerto de expansión en el panel trasero.
2
Ajustar la fuente si es necesario.
Seleccione <AUX ON> o <EXT ON>.
Pulse MENU para salir.
3
Seleccione <AUX IN> o <EXT IN>.
4
Encienda el componente conectado y
-<SRC SELECT>
-<AUX IN> o <EXT IN>
-<AUX ON> o
<EXT ON>
comience a reproducir la fuente.
ESPAÑOLޓ|
13
Page 46

KS-UBT1
Micrófono
KS-UBT1
o
Cable USB desde la
parte trasera de la unidad
Terminal de entrada
USB
Conexión Bluetooth姞
iPod/iPhone
Conectando a esta unidad el adaptador USB Bluetooth KS-UBT1 y el micrófono que se suministran, el
dispositivo Bluetooth puede funcionar utilizando esta unidad. Consulte el “Manual de instalación/
conexión” para obtener más detalles sobre cómo conectar el micrófono.
Una vez conectado el adaptador USB Bluetooth, esta unidad
siempre estará disponible para el emparejamiento.
Consulte también las instrucciones suministradas con el
dispositivo Bluetooth.
Consulte el documento adjunto para ver los países donde
puede utilizar la función de Bluetooth.
Si apaga la unidad, desmonta el panel de control, o desconecta el adaptador USB Bluetooth durante
una conversación telefónica, se desconectará la conexión Bluetooth. Continúe la conversación con su
teléfono móvil.
Esta unidad es compatible con los perfiles Bluetooth siguientes
Perfil de Manos libres (HFP 1.5)
Perfil de carga de objetos (OPP 1.1)
Perfil de acceso a la guía telefónica (PBAP 1.0)
Perfil Avanzado de Distribución de Audio (A2DP 1.2)
Perfil de Control Remoto de Audio/Vídeo (AVRCP 1.3)
Advertencia:
Estacione el vehículo en un lugar seguro antes de llevar a cabo pasos complicados, como marcar
números de teléfono, utilizar la guía telefónica, etc.
Emparejamiento de un
dispositivo Bluetooth
Cuando se conecta por primera vez un dispositivo Bluetooth a la unidad, efectúe el emparejamiento
entre ellos.
Se pueden registrar hasta un máximo de cinco dispositivos Bluetooth en esta unidad.
Se pueden conectar al mismo tiempo hasta un máximo de dos teléfonos Bluetooth y un dispositivo
Bluetooth de audio en cualquier momento.
Esta unidad es compatible con el Emparejamiento Simple Seguro (SSP por sus siglas en inglés).
1
Conecte el adaptador USB Bluetooth
(KS-UBT1) a uno de los terminales de
entrada USB.
2
Busque y seleccione “JVC Unit” en el dispositivo Bluetooth.
“BT PAIRING” parpadea en la pantalla.
Con algunos dispositivos Bluetooth, puede que tenga que introducir el código del Número de
Identificación Personal (PIN) inmediatamente después de la búsqueda.
|ޓESPAÑOL
14
Page 47

(Sostener)
Conexión Bluetooth姞
3
Realice (A) o (B), dependiendo de lo que se desplace en la pantalla.
Con algunos dispositivos Bluetooth, la secuencia de emparejamiento puede variar en algunos pasos
que se describen a continuación.
(A) Si “[Nombre del dispositivo]”#“XXXXXX”
#“VOL – YES”#“BACK – NO” se desplaza en
la pantalla,
“XXXXXX” es una clave de acceso de 6 dígitos
que se genera de forma aleatoria en cada
emparejamiento.
Asegúrese de que la clave de acceso que
aparece en la unidad y en el dispositivo
Bluetooth sea la misma.
Seleccione “YES” para confirmar la clave
de acceso.
(B) Si “[Nombre del dispositivo]”#
“VOL – YES”#“BACK – NO” se desplaza en la
pantalla,
Seleccione “YES” para iniciar el
emparejamiento.
(1) Si “PAIRING”#“PIN 0000” se desplaza
en la pantalla, introduzca el código PIN
“0000” en el dispositivo Bluetooth.
Puede cambiar el código PIN antes del
emparejamiento. (' página 25)
(2) Si solo aparece “PAIRING”, haga
Opere el dispositivo Bluetooth para
confirmar la clave de paso.
Una vez que se haya realizado el emparejamiento, “PAIRING COMPLETED” aparece en la pantalla.
La unidad establecerá una conexión con el dispositivo Bluetooth que se acaba de emparejar, “” se
enciende en la pantalla y usted ya puede controlar el Bluetooth a través de la unidad.
“” se encenderá cuando se conecte un teléfono.
“” se encenderá cuando se conecte un dispositivo de audio.
Cuando se haya establecido la conexión, el dispositivo se registra en la unidad y no hace falta realizar
el emparejamiento de nuevo, a menos que haya borrado el dispositivo registrado.
Es posible que algunos dispositivos Bluetooth no se puedan conectar a la unidad después del
emparejamiento. Conecte el dispositivo a la unidad manualmente. Consulte el manual de
instrucciones del dispositivo Bluetooth para obtener más información.
funcionar el dispositivo Bluetooth para
confirmar el emparejamiento.
Conexión/desconexión de un dispositivo registrado manualmente
Para conectar
1
(Sostener)
Para desconectar
1
2
Seleccione <CONNECT>.
3
Seleccione el dispositivo que desea.
“CONNECTING”#“[Nombre del dispositivo]” se
desplaza en la pantalla cuando la unidad se está
conectando al dispositivo.
“CONNECTED”#“[Nombre del dispositivo]” se
desplaza en la pantalla cuando se conecta el
dispositivo.
4
Pulse MENU para salir.
-<BLUETOOTH>
-<PHONE>/<AUDIO>
-<CONNECT>
2
Seleccione <DISCONNECT>.
3
Seleccione el dispositivo que desea.
“DISCONNECT”#“[Nombre del dispositivo]” se
desplaza en la pantalla cuando se desconecta el
dispositivo.
4
Pulse MENU para salir.
-<BLUETOOTH>
-<PHONE>/<AUDIO>
-<DISCONNECT>
ESPAÑOLޓ|
15
Page 48

(Sostener)
(Sostener) o (Sostener)
Conexión Bluetooth姞
Conexión a una aplicación
original de JVC
La aplicación original de JVC está diseñado para
visualizar el estado del receptor para automóviles
de JVC y para efectuar operaciones sencillas de
control en los smart phones de Android.
Para operaciones de aplicaciones originales de
JVC, visite el sitio web de JVC:
<http://www3.jvckenwood.com/english/car/
index.html> (Sitio web sólo en inglés).
1
2
Seleccione <CONNECT>.
3
Seleccione el smart phone que desee.
“CONNECTED”#“[Nombre del dispositivo]” se
desplaza en la pantalla cuando se conecta el
dispositivo.
4
Pulse MENU para salir.
(Sostener)
-<BLUETOOTH>
-<APPLICATION>
-<CONNECT>
Teléfono móvil Bluetooth
Recibiendo una llamada
Para recibir una llamada
Cuando hay una llamada entrante, la fuente
cambia automáticamente a “BT FRONT”/
“BT REAR”.
“RECEIVING” aparece en la pantalla, seguido de
un número de teléfono o de un nombre.
La pantalla parpadea en azul. (' página 19)
o
Para contestar una llamada, también puede
pulsar ////SOURCE en el control remoto.
Cuando <AUTO ANSWER> esté configurado en
<ON>, la unidad responde las llamadas
entrantes automáticamente. (' página 19)
Borrar un dispositivo registrado
1
2
Seleccione <DELETE YES>.
“DELETED” aparece cuando se borra el
dispositivo.
3
Pulse MENU para salir.
Para finalizar una llamada
Para finalizar una llamada, también puede pulsar sin
soltar ////SOURCE en el control remoto.
Para desactivar o activar el modo
de manos libres
Durante una conversación telefónica...
Las operaciones pueden variar en función del
dispositivo Bluetooth conectado.
-<BLUETOOTH>
-<DELETE PAIR>
- [Nombre del
dispositivo]
-<DELETE YES>
|ޓESPAÑOL
16
Page 49

Teléfono móvil Bluetooth
Ajustes durante una llamada
Volumen del teléfono
(00 — 50)[VOLUME 15]: los
ajustes de volumen que se
realicen durante una llamada
no afectar a las demás fuentes.
Nivel del micrófono
(01— 03)[02]: conforme
aumenta el número, el
micrófono se vuelve más
sensible.
Reducción del ruido y modo
de cancelación de eco:
se enciende/apaga.
Notificación de mensaje de
texto
Cuando se recibe un mensaje de texto, la unidad
emite un sonido y aparece “RCV MESSAGE”#
“[Nombre del dispositivo]”.
<MSG NOTICE> se debe configuar en <ON>.
(' página 19)
No se puede leer, editar ni enviar un mensaje a
través de la unidad.
Cambio entre dos teléfonos móviles conectados
Cuando hay dos teléfonos móviles conectados a la unidad, puede acceder a ambos menús “Manos libres”.
Pulse para introducir el menú de “Manos libres” del primer teléfono.
Pulse dos veces para introducir el menú de “Manos libres” del segundo teléfono.
Pulse para volver al menú de “Manos libres” del primer teléfono.
Realización de una llamada desde el menú de manos libres
1
Entre en el menú de “Manos libres”.
3
Seleccione y llama al contacto (nombre/número de teléfono).
DIALED
RECEIVED
MISSED CALL
PHONEBOOK
DIAL NUMBER Introduzca el número de teléfono que desea llamar.
Seleccione el nombre/número de teléfono
Si la guía telefónica contiene muchos números, puede realizar una búsqueda
rápida del número que desea girando rápidamente el disco de control o
utilizando la Búsqueda Rápida (' página 13).
“NO HISTORY” aparece si no hay ningún historial de llamadas registrado.
“NO DATA” aparece si no se encuentran entradas en al guía telefónica del
dispositivo Bluetooth.
“SEND P.BOOK MANUALLY” aparece si <P.BOOK SEL> está configurado
como <P.BOOK IN UNIT> o el teléfono no es compatible con PBAP.
(' página 19)
Seleccione el número/carácter
2
Seleccione el método de llamada.
Vaya a la posición de la entrada
Consulte la tabla
siguiente con las
opciones.
Realice la llamada
Realice la llamada
ESPAÑOLޓ|
17
Page 50

(Sostener)
Seleccione el teléfono
que desea
Entre en la “lista de
teléfonos”
Número de teléfono
o
Nombre
(Sostener)
Teléfono móvil Bluetooth
Realización de una llamada
desde la memoria
Puede guardar hasta 6 contactos en la memoria
de esta unidad para una marcación rápida.
Para guardar contactos en la memoria
1
Entre en el menú de “Manos libres”.
2
Seleccione un método de llamada.
3
Seleccione un contacto (nombre/número
de teléfono).
Nombre
4
Guardar en la memoria.
(Sostener)
Parpadea “MEMORY PX”. El contacto se guarda en
el botón numérico seleccionado (1 - 6).
Para borrar un contacto de la memoria
preajustada, seleccione <DIAL NUMBER> en el
paso 2 y guarde un número que esté vacío.
Para realizar una llamada desde la
memoria
1
Entre en el menú de “Manos libres”.
-<DIALED>/
<RECEIVED>/
<MISSED CALL>/
<PHONEBOOK>/
<DIAL NUMBER>
Número de teléfono
o
Si hay dos teléfonos conectados,
2
Cuando “WAIT VOICE”#“[Nombre del
dispositivo]” se desplace en la pantalla,
diga el nombre del contacto al que desea
llamar o el comando de voz para controlar
las funciones del teléfono.
Las prestaciones de reconocimiento de voz
compatibles son diferentes para cada teléfono.
Consulte el manual de instrucciones del teléfono
conectado, si desea obtener más información.
Borrar un contacto (nombre/
número de teléfono)
Sólo cuando <P.BOOK SEL> se configura a
<P.BOOK IN UNIT>. (' página 19)
1
Entre en el menú de “Manos libres”.
2
Seleccione un método de llamada.
3
Seleccione el contacto (nombre/número
de teléfono) que se va a borrar.
-<DIALED>/
<RECEIVED>/
<MISSED CALL>/
<PHONEBOOK>
2
Seleccione y llame al contacto.
“NO PRESET” aparece si no hay contactos
guardados en la memoria.
Uso del reconocimiento de voz
Esta unidad le permite utilizar las prestaciones de
reconocimiento de voz del teléfono conectado.
Aparece “NOT SUPPORT” si el teléfono
conectado no es compatible con esta función.
1
Introducir el modo de reconocimiento de voz.
Si solo hay un teléfono conectado,
|ޓESPAÑOL
18
(Sostener)
4
Entre en el menú “Borrar entradas”.
5
Seleccione <DELETE> o <DELETE ALL>.
DELETE El nombre/número de teléfono
DELETE
ALL
seleccionado en el paso 3 se borra.
Todos los nombres/números de
teléfono del menú seleccionado en
el paso 2 se borran.
Page 51

Teléfono móvil Bluetooth
Uso del menú SETTINGS
3
1
Entre en el menú de “Manos libres”.
2
Seleccione <SETTINGS>.
Los siguientes ajustes son aplicables al dispositivo emparejado. Si hay otro dispositivo emparejado,
vuelva a realizar los ajustes.
Opción del
menú
P.BOOK SEL * [PB IN PHONE]: la unidad busca en la guía telefónica del teléfono conectado.
AUTO ANSWER ON: la unidad contesta automáticamente las llamadas entrantes.
RING TONE [IN UNIT]: la unidad hace sonar un timbre para informarle de que se ha
RING COLOR
NR/EC MODE [ON]: enciende la Reducción de Ruido y la Cancelación de Eco del micrófono
MIC LEVEL
MSG NOTICE
* Se puede seleccionar solamente cuando el teléfono conectado es compatible con PBAP.
PB IN UNIT: la unidad busca en la guía telefónica registrada en la misma.
(Puede copiar la memoria de la guía telefónica usando <P.BOOK WAIT>
(' página 25).)
[OFF]: la unidad no contesta automáticamente las llamadas entrantes.
recibido una llamada/mensaje de texto.
– CALL: seleccione el tono de llamada que prefiera (TONE 1 — 5) para las
llamadas entrantes.
– MESSAGE: seleccione el tono de llamada que prefiera (TONE 1 — 5) para los
mensajes de texto entrantes.
El tono de llamada predeterminado difiere según el dispositivo emparejado.
IN PHONE: la unidad hace sonar un timbre para informarle de que se ha
recibido una llamada/mensaje de texto. (El teléfono conectado sonará si no es
compatible con esta función.)
COLOR 01 — 29[06]: seleccione el color que prefiera para las alertas de
llamada o mensaje de texto entrantes.
OFF: se cancela.
conectado para obtener un sonido más nítido.
OFF: se cancela.
(01— 03)[02]: la sensibilidad del micrófono aumenta a medida que lo hace el
nivel MIC.
[ON]: la unidad suena y el “RCV MESSAGE”#“[Nombre del dispositivo]” aparece
para alertarle de que ha entrado un mensaje de texto.
OFF: la unidad no le alerta de un mensaje de texto entrante.
Ajuste seleccionable (Inicial: [XX])
Repita este paso para realizar los ajustes
necesarios.
Para volver al menú anterior, pulse .
Para salir de un menú, pulse MENU.
ESPAÑOLޓ|
19
Page 52

Reproductor de audio Bluetooth
Reproductor de audio Bluetooth
Puesta en marcha del
reproductor de audio Bluetooth
A
Las operaciones y las indicaciones en pantalla pueden variar según la disponibilidad del dispositivo conectado.
Operaciones básicas
Inicia o reanuda la
reproducción.
Enmudece el sonido.
Seleccione <BT REAR> o <BT FRONT>,
dependiendo de la ubicación del
adaptador USB Bluetooth KS-UBT1.
Haga funcionar el reproductor de audio
Bluetooth para que comience la reproducción.
.
RANDOM
RND OFF
ALL RND
GROUP RND
Cancelar la reproducción
aleatoria.
Reproducir aleatoriamente
todas las pistas.
Repite aleatoriamente todas
las pistas del grupo actual.
Selecciona el grupo/carpeta.
Salto hacia atrás/salto hacia
adelante. (Pulse)
Avanzar o retroceder
rápidamente la pista. (Sostener)
Cómo seleccionar los modos de
reproducción
Para dispositivos Bluetooth compatibles con AVRCP 1.3.
1
- - - - - - - - o - - - - - - - -
(Sostener)
2
REPEAT
RPT OFF
TRACK RPT
ALL RPT
GROUP RPT
|ޓESPAÑOL
20
Pulse 1 para REPEAT.
Pulse 2 para RANDOM.
Vuelva a pulsar para salir.
<REPEAT>)<RANDOM>
Cancelar la reproducción repetida.
Repetir la pista actual.
Repite todas las pistas.
Repite todas las pistas del grupo
actual.
Escuchar por BT Pandora姞
internet radio
Esta unidad le permite escuchar Pandora姞
internet radio en su smart phone, a través de
Bluetooth.
1
Abra la aplicación de Pandora姞 en su
dispositivo.
2
Conéctela al audio Bluetooth.
Diríjase a “Para conectar” ' página 15, seleccione
<BLUETOOTH>#<AUDIO>#<CONNECT>.
3
Seleccione <BT REAR> o <BT FRONT>,
dependiendo de la ubicación del
adaptador USB Bluetooth KS-UBT1.
4
Pulse 3 para seleccionar <BT PANDORA>.
La fuente se conecta y la emisión comienza
automáticamente.
También puede activar Pandora姞 en su smart
phone Bluetooth a través de <BT AUDIO SW>.
(' página 25)
Pandora姞 internet radio por BT solo es para
Android OS y RIM OS.
Puede ejecutar Pandora姞 igual que Pandora姞
para iPod/iPhone. (' página 12)
Page 53

Ajustes de color de la iluminación
(Sostener)
Zona PantallaZona Botones
Zona Todo
Zona Todo: incluye la zona Botones y la zona
Pantalla.
Selección del color preajustado
Puede seleccionar un color preajustado para
<BUTTON ZONE>, <DISP ZONE> y <ALL ZONE>
por separado.
1
2
Seleccione <COLOR>.
3
BUTTON ZONE
DISP ZONE
ALL ZONE
Color inicial: BUTTON ZONE [06], DISP ZONE
[01], ALL ZONE [06].
Si se selecciona <ALL ZONE>, la iluminación de
los botones y de la pantalla cambiará al color
<BUTTON ZONE> actual/seleccionado.
4
Pulse MENU para salir.
(Sostener)
COLOR 01-29/USER/
COLOR FLOW 01-03*
* El color varía a
diferentes velocidades.
Almacenamiento de sus propios
ajustes
Puede almacenar sus propios colores diurnos y
nocturnos para <BUTTON ZONE> y <DISP ZONE>
por separado.
1
2
Seleccione <COLOR SETUP>.
3
Seleccione un color
BUTTON
ZONE
DAY
COLOR
DISP
ZONE
BUTTON
ZONE
NIGHT
COLOR
DISP
ZONE
MENU
COLOR
4
ON
OFF
NIGHT COLOR/DAY COLOR se cambia
encendiendo/apagando los faros del coche.
Pulse MENU para salir.
primario <RED/GREEN/
BLUE> y, a
continuación, ajuste el
nivel <00-31>. Repita
este procedimiento
hasta que haya
ajustado los tres
colores primarios.
Su ajuste se almacena
automáticamente en
“USER”.
Si se selecciona “00”
para todos los colores
primarios de
<DISP ZONE>, no
aparece nada en la
pantalla.
Cambia la iluminación de
la pantalla y de los
botones durante las
operaciones de los modos
de menú, búsqueda de
lista y reproducción.
ESPAÑOLޓ|
21
Page 54

(Sostener)
Ajustes de brillo
Ajustes de brillo
Puede seleccionar el brillo que prefiera para <BUTTON ZONE>, <DISP ZONE> por separado.
1
(Sostener)
3
2
-<DIMMER>
-<BRIGHTNESS>
-<DAY>/<NIGHT>
BUTTON ZONE BUTTON 00 a 31
DISP ZONE DISP 00 a 31
4
Pulse MENU para salir.
Ajustes de sonido
La unidad memoriza los ajustes de sonido que se han hecho para cada fuente individual.
El sintonizador HD Radio, el sintonizador de Radio por Satélite y EXT IN tienen las mismas
configuraciones de ajuste de sonido.
Selección del sonido preajustado
Podrá seleccionar un modo de sonido
preajustado, para cada fuente individual,
adecuado al género musical.
- - - - - - - - o - - - - - - - -
DYNAMIC-VOCAL BOOST-BASS BOOSTUSER-FLAT-NATURAL-(vuelta al comienzo)
Pulse repetidamente.
Almacenamiento de sus propios
ajustes
Mientras escucha, puede ajustar y guardar el nivel
del tono de cada fuente individual.
Ecualizador sencillo
1
2
Ajuste el nivel.
SUB.W * 00 a 08 [08]
BASS LVL ** -06 a +06 [+05]
MID LVL -06 a +06 [00]
TRE LVL -06 a +06 [+05]
Se almacenan los ajustes y se activa <USER>.
(Sostener)
(Inicial: [XX])
Ecualizador profesional
1
2
3
Ajuste los elementos de sonido del tono seleccionado.
BASS (Inicial: [XX])
Frecuencia 60/80/[100]/200 Hz
Nivel LVL -06 a +06 [+05]
Q [Q1.0]/Q1.25/Q1.5/Q2.0
MIDDLE
Frecuencia 0.5/[1.0]/1.5/2.5 kHz
Nivel LVL -06 a +06 [00]
Q Q0.75/Q1.0/[Q1.25]
TREBLE
Frecuencia 10.0/[12.5]/15.0/17.5 kHz
Nivel LVL -06 a +06 [+05]
Q [Q FIX]
4
Repita los pasos 2 y 3 para ajustar otros
tonos.
Se almacenan los ajustes y se activa <USER>.
5
Pulse MENU para salir.
* Disponible sólo cuando <SUB.W> se ajusta a
<ON>. (' página 24)
** Disponible sólo cuando <HPF> se ajusta a
<OFF>. (' página 24) (Sólo KD-R730BT)
-<PRO EQ>
-<BASS>**/<MIDDLE>/
<TREBLE>
|ޓESPAÑOL
22
Page 55

Operaciones de los menús
1
La operación se cancela si no se efectúa ninguna
operación durante aproximadamente 60
segundos.
2
(Sostener)
Operaciones de los menús
3
Repita el paso 2, si es necesario.
Para volver al menú anterior, pulse .
Para salir del menú, pulse DISP o MENU.
Opción del menú
DEMO
CLOCK SET
CLOCK ADJ *1 [AUTO]: el reloj incorporado se ajusta automáticamente utilizando los
TIME ZONE *1*2 [EASTERN]/ATLANTIC/NEWFOUND/ALASKA/PACIFIC/MOUNTAIN/
CLOCK
DST *1*2 [DST ON]: el horario de ahorro de luz diurna se activa si su zona residencial
COLOR
COLOR SETUP
DIMMER SET Selecciona la iluminación de la pantalla y los botones ajustada en el
DIMMER
BRIGHTNESS DAY[31]/NIGHT[15]: ajustes de brillo de la pantalla y la iluminación de los
SCROLL *4 [ONCE]: desplaza una vez la información visualizada.
TAG DISPLAY [ON]: muestra la información de etiqueta mientras se reproducen pistas
DISPLAY
PRO EQ
*1 Sólo aparece cuando está conectada la radio por satélite SIRIUS o la XM.
*2 Se visualiza sólo cuando <CLOCK ADJ> se ajusta a <AUTO>.
*3 Se requiere la conexión del conductor de control. (Consulte el “Manual de instalación/
conexión”.) Este ajuste podría no funcionar correctamente en algunos vehículos
(especialmente en aquellos que disponen de un dial de control). En este caso, cambie el ajuste
a cualquier otra opción distinta de <DIMMER AUTO>.
*4 Algunos caracteres o símbolos no serán mostrados correctamente (o aparecerán en blanco)
sobre la pantalla.
Para obtener información sobre los ajustes, ' página 4.
Para obtener información sobre los ajustes, ' página 4.
datos horarios que aporta el canal de radio por satélite.
OFF: se cancela.
CENTRAL: para el ajuste del reloj, seleccione su zona residencial entre una
de las zonas horarias.
está sujeta a DST.
DST OFF: se cancela.
Para obtener información sobre los ajustes, ' página 21.
parámetro <BRIGHTNESS>/<COLOR SETUP>.
[AUTO]: cambia entre los ajustes Diurnos y Nocturnos al apagar/encender
los faros del coche. *3
ON: selecciona los ajustes Nocturnos.
OFF: selecciona los ajustes Diurnos.
botones para uso diurno y nocturno.
BUTTON ZONE/DISP ZONE: ajusta los niveles de brillo 00 — 31.
AUTO: el desplazamiento se repite (a intervalos de 5 segundos).
OFF: se cancela.
MP3/WMA.
OFF: se cancela.
Para obtener información sobre los ajustes, ' página 22.
Ajuste seleccionable (Inicial: [XX])
ESPAÑOLޓ|
23
Page 56

Operaciones de los menús
Opción del menú
FADER *5*6
BALANCE *6
LOUD
(Intensidad)
VOL ADJUST
(Ajuste del
volumen)
SUB. W
(Subwoofer)
SUB.W LPF *7
(Filtro de paso bajo
de subwoofer)
SUB.W LEVEL *7
(Nivel del
subwoofer)
AUDIO
HPF *7
(Filtro de paso alto)
(sólo KD-A735BT)
HPF *7
(Filtro de paso alto)
(sólo KD-R730BT)
BEEP
(Tono de pulsación
de tecla)
AMP GAIN *8
(Factor de
amplificación)
SSM
SID El número de identificación SIRIUS de 12 dígitos aparece en la pantalla. (Se
AREA
(Intervalo de
sintonización de
la frecuencia)
MONO
(Modo
TUNER
monoaural)
BLEND HOLD
IF BAND
(Banda de
frecuencias
intermedias)
RADIO TIMER
*5 Si está utilizando un sistema de dos altavoces, ajuste el nivel de fader a “00”.
*6 El ajuste no afecta a la salida del subwoofer.
*7 Se visualiza sólo cuando <SUB.W> se ajusta a <ON>.
*8 Si usted cambia a <LOW POWER> cuando el nivel de volumen está ajustado a un nivel
superior a “VOLUME 30”, se cambiará automáticamente a “VOLUME 30”.
|ޓESPAÑOL
24
R06 — F06[00]: ajusta el balance de salida de los altavoces delanteros y traseros.
L06 — R06[00]: ajusta el balance de salida de los altavoces izquierdo y derecho.
ON: refuerza las frecuencias altas y bajas para producir un sonido bien
balanceado a bajos niveles de volumen.
[OFF]: se cancela.
-05 — +05[00]: preajuste el nivel de volumen de cada fuente, en comparación con
el nivel de volumen de FM. Antes del ajuste, seleccione la fuente que desea ajustar.
Aparece (“VOL ADJ FIX” si se selecciona “FM”).
OFF: se cancela.
[ON]: activa la salida del subwoofer.
LOW 55Hz/MID 85Hz/[HIGH 120Hz]: las señales de audio con
frecuencias inferiores a 55 Hz/85 Hz/120 Hz se envían al subwoofer.
00 — 08[08]: ajusta el nivel de salida del subwoofer.
LOW 100Hz/MID 120Hz/HIGH 150Hz: activa el filtro de paso alto. La señal de
audio con frecuencias inferiores a 100 Hz/120 Hz/150 Hz se interrumpen en los
altavoces delanteros y traseros.
[OFF]: se desactiva. (Todas las señales se envían a los altavoces delanteros/traseros.)
ON: activa el filtro pasaaltos. Las señales de baja frecuencia se suprimen de los
altavoces delanteros/traseros.
[OFF]: se desactiva. (Todas las señales se envían a los altavoces delanteros/traseros.)
[ON]/OFF: activa o desactiva el tono de pulsación de teclas.
LOW POWER: VOLUME 00 — VOLUME 30 (Selecciónelo si la potencia
máxima de cada altavoz es inferior a 50 W, con el fin de evitar posibles
daños en los altavoces).
[HIGH POWER]: VOLUME 00 — VOLUME 50
Para obtener información sobre los ajustes, ' página 6. (Se visualiza sólo
cuando la fuente es “FM”).
visualiza sólo cuando está conectada la radio por satélite SIRIUS.)
[AREA US]: para Norteamérica/Centroamérica/Suramérica, intervalos AM/FM:
10kHz/200kHz.
AREA EU: para otras áreas, intervalos AM/FM: 9kHz/50kHz.
AREA SA: para algunos países de Sudamérica, intervalos AM/FM: 10kHz/50kHz.
Se visualiza sólo cuando la fuente es “FM”.
[OFF]: activa la recepción de FM estéreo.
ON: mejora la recepción de FM, pero se pierde el efecto estereofónico.
Para obtener información sobre los ajustes, ' página 8. (Se visualiza sólo
cuando la fuente es “FM” o “AM”).
[AUTO]: aumenta la selectividad del sintonizador para reducir las interferencias
entre emisoras adyacentes. (El efecto estereofónico puede perderse.)
WIDE: sujeto a interferencias de las emisoras adyacentes, pero la calidad del
sonido no se degrada y se conserva el efecto estereofónico.
Para obtener información sobre los ajustes, ' página 7.
Ajuste seleccionable (Inicial: [XX])
Page 57

Operaciones de los menús
Opción del menú
USB *9 DRIVECHANGE: selecciona para cambiar la unidad cuando se conecta un
IPOD SWITCH *10
(Control del iPod/
iPhone)
AUDIOBOOKS *10 NORMAL/FASTER/SLOWER: selecciona la velocidad de reproducción del
PHONE *12 CONNECT/DISCONNECT: conecta o desconecta el dispositivo audio o de
AUDIO
APPLICATION CONNECT/DISCONNECT: conecta o desconecta la aplicación en el smart
BT AUDIO SW *13
DELETE PAIR
P. BOOK WAIT Copia hasta 400 números de la memoria de una guía telefónica de un
SET PINCODE Cambia el código PIN (de 1 a 6 dígitos). (Código PIN por defecto: 0000)
AUTO CNNCT [ON]: establece la conexión automáticamente con el dispositivo Bluetooth
BLUETOOTH *11
INITIALIZE YES: inicia todos los ajustes Bluetooth (incluyendo el emparejamiento
INFORMATION PH CNNT DEV/AU CNNT DEV/APP CNT DEV *14: muestra el nombre del
AM *15 [ON]/OFF: activa o desactiva “AM” en la selección de fuente.
EXT IN *15 EXT ON/[EXT OFF]: activa o desactiva “EXT IN” en la selección de fuente.
AUX IN *15 [AUX ON]/AUX OFF: activa o desactiva “AUX IN” en la selección de fuente.
BT AUDIO *16 [BT AU ON]/BT AU OFF: activa o desactiva “BT AUDIO” en la selección de
SRC SELECT
SOFT VER Muestra la versión de firmware de la unidad.
*9 Se visualiza sólo cuando la fuente es “USB FRONT/USB REAR”.
*10 Se visualiza sólo cuando la fuente es “IPOD-FRONT/IPOD-REAR”.
*11 Si el adaptador USB Bluetooth no está conectado a la unidad, “PLEASE CNNT BT ADAPTER” se
desplaza en la pantalla.
*12 <CONNECT> no se visualiza cuando hay dos teléfonos Bluetooth conectados
simultáneamente.
Se visualiza sólo cuando la fuente es “BT FRONT/BT REAR”.
*13
*14 Aparece sólo cuando se ha conectado un teléfono/reproductor de audio/aplicación
Bluetooth.
Aparece sólo cuando la unidad tiene una fuente distinta de la fuente “AM/EXT IN/AUX IN”
*15
correspondiente.
*16 Aparece sólo cuando el adaptador USB Bluetooth (KS-UBT1) está acoplado y la fuente actual
no es “BT FRONT/ BT REAR”.
dispositivo de múltiples unidades al terminal de entrada USB (delantero/
trasero).
[HEAD MODE]/IPOD MODE/APP MODE:
para obtener información sobre los ajustes, ' página 11.
archivo de sonido de los Audiolibros en su iPod/iPhone.
La selección inicial depende del ajuste de su iPod/iPhone.
teléfono del Bluetooth. (' página 15)
phone. (' página 16)
Cambia entre “BT AUDIO” y “BT PANDORA”.
Para obtener información sobre los ajustes, ' página 16.
teléfono conectado a la unidad a través de OPP.
Gire el control giratorio para seleccionar un número, pulse / para ir a la
posición de la entrada. Cuando haya introducido el código PIN, pulse el
control giratorio para confirmar.
cuando se enciende la unidad.
OFF: se cancela.
almacenado, la guía telefónica, etc.).
[NO]: se cancela.
dispositivo del teléfono, del dispositivo de audio y del dispositivo de la
aplicación contectados.
MY BT NAME: muestra el nombre de la unidad (JVC Unit).
MY ADDRESS: muestra la dirección del Adaptador USB Bluetooth.
fuente.
Ajuste seleccionable (Inicial: [XX])
ESPAÑOLޓ|
25
Page 58

Control remoto
Control remoto
Preparación
Cuando utilice el control remoto por primera vez,
quite la lámina de aislamiento.
Lámina de aislamiento
Sólo para EE.UU.-California:
Este producto contiene una batería de litio CR
de tipo botón que contiene perclorato (puede
requerirse una manipulación especial). Visite
www.dtsc.ca.gov/hazardouswaste/perchlorate
Sustitución de la pila botón de
litio
Si disminuye la efectividad de acción del
control remoto, cambie la pila.
CR2025
Información adicional
Acerca de los discos
Esta unidad solo puede reproducir los siguientes CD:
Este receptor puede reproducir discos
multisesión; no obstante, las sesiones no cerradas
serán omitidas durante la reproducción.
Discos no reproducibles
Discos que no sean redondos.
Discos con coloración en la superficie de
grabación o discos sucios.
Discos regrabables que no se hayan finalizado.
(Para obtener información sobre la finalización
de discos, consulte su software de escritura de
discos o el manual de instrucciones de su
grabador de discos).
CD de 8 cm (3 pulgadas). Cualquier intento de
usar un adaptador puede causar un mal
funcionamiento. Si se introduce un disco, también
puede haber dificultades para expulsarlo.
Precaución:
Peligro de explosión si se instala la pila de
manera incorrecta. Cámbiela solamente por
una del mismo tipo o de un tipo equivalente.
No debe exponer la batería a una fuente de
calor intensa como, por ejemplo, a los rayos
directos del sol, al fuego, etc.
Advertencia:
No instale ninguna otra pila distinta de CR2025
o su equivalente.
No deje el control remoto en un lugar
expuesto a la luz directa del sol (como los
cubretableros) durante un tiempo prolongado.
Almacene la pila en lugares fuera del alcance
de los niños.
Evite recargar, cortocircuitar, desarmar, calentar
la pila, o arrojarla al fuego.
No deje la pila con otros materiales metálicos.
No toque la pila con pinzas u otras
herramientas similares.
Aísle la pila envolviéndola con cinta al
eliminarla o almacenarla.
Esta unidad viene equipada con función de control
remoto para volante. Si desea más información,
consulte también el manual de instrucciones
entregado con el adaptador para control remoto.
Manejo de los discos
No toque la superficie de grabación del disco.
No pegue cintas, etc. en el disco, ni utilice un
disco que lleve una cinta adherida.
No utilice accesorios para discos.
Limpie el disco desde el centro hacia fuera.
Limpie el disco con un paño de silicona seco o
un paño suave. No utilice ningún tipo de
solvente.
Cuando extraiga el disco de la unidad, hágalo
en sentido horizontal.
Antes de insertar un disco, elimine las rebabas
del orificio central y del borde del disco.
Reproducción DualDisc
El lado no DVD de un “DualDisc” no es
compatible con la norma “Compact Disc Digital
Audio”. Por consiguiente, no se recomienda usar
el lado no DVD de un DualDisc en este producto.
|ޓESPAÑOL
26
Page 59

Acerca de los archivos de audio
Archivos reproducibles
Extensiones de archivo: MP3(.mp3),
WMA(.wma), WAV(.wav)
Para discos MP3/WMA:
Velocidad de bit:
MP3/WMA: 5 kbps - 320 kbps
Frecuencia de muestreo:
MP3 (MPEG-1): 32 kHz, 44,1 kHz, 48 kHz
MP3 (MPEG-2): 16 kHz, 22,05 kHz, 24 kHz
WMA: 8 kHz - 48 kHz
Para dispositivos USB:
Velocidad de bit:
MP3 (MPEG-1): 32 kbps - 320 kbps
MP3 (MPEG-2): 8 kbps - 160 kbps
WMA: 5 kbps - 320 kbps
WAV: PCM lineal a 705 kbps y 1 411 kbps
Frecuencia de muestreo:
MP3 (MPEG-1): 32 kHz, 44,1 kHz, 48 kHz
MP3 (MPEG-2): 16 kHz, 22,05 kHz, 24 kHz
WMA: 8 kHz - 48 kHz
WAV: 44,1 kHz
Canal:
WMA/WAV: 1 ch/2 ch
Archivos de velocidad variable de bits (VBR). (El
tiempo transcurrido de los archivos VBR no se
visualizará correctamente.)
Archivos no reproducibles
Archivos MP3:
- codificado en formato MP3i y MP3 PRO
- codificado en un formato inadecuado
- codificado con capa 1/2
Archivos WMA:
- codificado en un formato sin pérdida,
profesional y de voz
- que no se basan en Windows Media® Audio
- protegido contra copia con DRM
Archivos que disponen de datos tales como
AIFF, ATRAC3, etc.
Nombres de archivo/carpeta
Esta unidad es compatible con nombres de
archivos/carpetas que se graban en formatos
conformes con la ISO 9660 Nivel 1, Nivel 2, Romeo
o Joliet, y con el código de extensión correcto
<.mp3>, <.wma> o <.wav>.
Otros
Esta unidad es capaz de mostrar etiquetas
WMA y etiquetas ID3 Versión 1,0/1,1/2,2/2,3/2,4
(para MP3).
La función de búsqueda funciona pero la
velocidad de búsqueda no es constante.
Información adicional
Acerca del dispositivo USB
Al efectuar la conexión con un cable USB,
utilice un cable USB 2.0.
No es posible conectar una computadora o un
HDD portátil al terminal de entrada USB de la
unidad.
Conecte a la unidad un solo dispositivo por
vez. No utilice un hub USB.
Los dispositivos USB equipados con funciones
especiales, como por ejemplo, funciones de
seguridad de datos, no se pueden usar con
esta unidad.
No utilice un dispositivo USB con 2 o más
particiones.
Esta unidad no puede reconocer ningún
dispositivo USB que tenga un régimen distinto
de 5 V y que exceda de 1 A.
Esta unidad puede no reconocer una tarjeta de
memoria insertada en un lector de tarjetas USB.
Puede suceder que esta unidad no pueda
reproducir correctamente archivos en un
dispositivo USB cuando se utilice un cable
prolongador USB.
Dependiendo la forma de los dispositivos USB y de
los puertos de conexión, puede suceder que
algunos de ellos no puedan conectarse
correctamente o que haya flojedad en la conexión.
El funcionamiento y la fuente de alimentación
pueden no funcionar como es deseado con
algunos dispositivos USB.
Número máximo de caracteres para:
– Nombres de las carpetas: 25 caracteres
– Nombres de los archivo: 25 caracteres
– Etiqueta MP3: 128 caracteres
– Etiqueta WMA: 128 caracteres
- Etiqueta WMA: 128 caracteres
Esta unidad puede reconocer un total de
20000 archivos, 2000 carpetas (999 archivos
por carpeta, incluyendo carpeta sin archivos no
compatibles) y 8 jerarquías. Sin embargo, la
pantalla solo puede mostrar hasta 999
carpetas/archivos.
Precauciones
No extraiga ni conecte repetidamente el
dispositivo USB mientras parpadea “READING”
en la pantalla.
La descarga electrostática en el momento de
conectar el dispositivo USB puede provocar
que el dispositivo no reproduzca de la manera
normal. Si este fuera el caso, desconecte el
dispositivo USB y, a continuación, reinicialice
esta unidad y el dispositivo USB.
No deje un dispositivo USB en el coche,
expuesto a luz solar directa o a altas
temperaturas. De lo contrario, el dispositivo
podría sufrir deformaciones o daños.
ESPAÑOLޓ|
27
Page 60

Información adicional
Acerca del iPod/iPhone
iPod/iPhone que se pueden conectar a esta
unidad:
- iPod touch (4ta. generación)
- iPod touch (3ra. generación)
- iPod touch (2da. generación)
- iPod touch (1ra. generación)
- iPod classic
- iPod con Vídeo (5ta. generación)*
- iPod nano (6ta. generación)
- iPod nano (5ta. generación)
- iPod nano (4ta. generación)
- iPod nano (3ra. generación)
- iPod nano (2da. generación)
- iPod nano (1ra. generación)*
- iPhone 4S
- iPhone 4
- iPhone 3GS
- iPhone 3G
- iPhone
*<IPOD MODE>/<APP MODE> no son
aplicables.
No se puede navegar a través de archivos de
video en el menú “Videos” en <HEAD MODE>.
El orden de canciones mostrado en el menú de
selección de esta unidad puede diferir del que
se encuentra en el iPod.
Cuando opera un iPod/iPhone, algunas
operaciones pueden no funcionar
correctamente o como se desea. En tal caso,
visite el siguiente sitio web de JVC:
<http://www3.jvckenwood.com/english/car/
index.html> (Sitio web sólo en inglés).
Nota sobre marcas comerciales
y licencias
Microsoft y Windows Media son marcas
registradas o bien marcas comerciales de
Microsoft Corporation en los Estados Unidos y/
u otros países.
La marca Bluetooth y sus logotipos son
propiedad de Bluetooth SIG, Inc., y cualquier
uso de los mismos por JVC KENWOOD
Corporation se realiza bajo licencia. Otras
marcas y nombres comerciales son de sus
respectivos propietarios.
Puede recibir transmisiones de HD Radio
cuando se conecta al KT-HD300, que se vende
por separado.
SIRIUS, XM y SAT Radio Ready y las marcas
relacionadas son marcas comerciales
registradas de SIRIUS XM Radio Inc. Todos los
derechos reservados.
“Made for iPod” and “Made for iPhone” mean
that an electronic accessory has been designed
to connect specifically to iPod, or iPhone,
respectively, and has been certified by the
developer to meet Apple performance
standards. Apple is not responsible for the
operation of this device or its compliance with
safety and regulatory standards. Please note
that the use of this accessory with iPod, or
iPhone may affect wireless performance.
iPhone, iPod, iPod classic, iPod nano, and iPod
touch are trademarks of Apple Inc., registered
in the U.S. and other countries.
PANDORA, the PANDORA logo, and the
Pandora trade dress are trademarks or
registered trademarks of Pandora Media, Inc.,
used with permission.
Acerca de Bluetooth
Dependiendo de la versión de Bluetooth del
dispositivo, algunos dispositivos Bluetooth
quizá no puedan conectarse a esta unidad.
Esta unidad podría no funcionar con algunos
dispositivos Bluetooth.
El estado de la señal varía, dependiendo del
entorno.
El dispositivo se desconecta al apagar la
unidad.
Para obtener más información acerca de
Bluetooth, visite el sitio web de JVC:
<http://www3.jvckenwood.com/english/car/
index.html> (Sitio web sólo en inglés)
|ޓESPAÑOL
28
Page 61

Localización de averías
Localización de averías
Síntoma Soluciones/Causas
4 General
No hay sonido, el sonido se
interrumpe o se oye ruido estático.
“MISWIRING CHK WIRING THEN
RESET UNIT”/“WARNING CHK
WIRING THEN RESET UNIT” en la
pantalla y no se puede realizar
ninguna operación.
El receptor no funciona en absoluto.
La fuente no se puede seleccionar.
No se visualizan los caracteres
correctos (por ej.: nombre del álbum).
Inspeccione los cables, la antena y las conexiones de los cables.
Compruebe el estado del disco, del dispositivo conectado y de
las pistas grabadas.
Utilice siempre la miniclavija estéreo que se recomienda cuando
se conecte a un componente externo. (' página 13)
Asegúrese de que los terminales de los controles de los altavoces
están aislados adecuadamente con cinta antes de reinicializar la
unidad. (' página 3)
Si el mensaje no desaparece, consulte con su concesionario de
equipos de audio para automóvil JVC o con una compañía que
suministra tales kits.
Reinicialice la unidad. (' página 3)
Verifique el ajuste <SRC SELECT>. (' página 25)
Esta unidad sólo puede visualizar letras (mayúsculas), números, y un
número limitado de símbolos.
4 FM/AM
El preajuste automático SSM no
funciona.
Almacene manualmente las emisoras.
4 CD/USB/iPod/iPhone
“PLEASE” y “EJECT” aparecen
alternativamente en la pantalla.
Aparece “IN DISC” en la pantalla. El disco no puede expulsarse correctamente. Asegúrese de que no
“READING” permanece
parpadeando en la pantalla.
Las pistas/carpetas no se
reproducen en el orden que desea.
El tiempo de reproducción
transcurrido no es correcto.
Aparece “NO FILE” en la pantalla. Compruebe que la carpeta seleccionada, el dispositivo USB
“NOT SUPPORT” aparece en la
pantalla y se salta la pista.
“CANNOT PLAY” parpadea en
la pantalla.
La unidad no puede detectar
el dispositivo conectado.
El iPod/iPhone no se enciende o
no funciona.
Pulse [], luego inserte un disco correctamente.
hay ningún obstáculo en la ranura de carga.
Se requiere mayor tiempo de lectura. No utilice demasiados
niveles de jerarquías y carpetas.
Vuelva a cargar el disco o a conectar el dispositivo USB.
El orden de reproducción viene determinado por el nombre de
archivo (USB) o el orden en el que los archivos se grabaron (disco).
Esto sucede a veces durante la reproducción. Esto depende de
cómo fueron grabadas las pistas en el disco.
conectado o el iPod/iPhone contenga un archivo reproducible.
Compruebe que la pista sea de un formato de archivo reproducible.
Verifique si el dispositivo conectado es compatible con esta
unidad. (USB: ' página 32) (iPod/iPhone: ' página 28)
Asegúrese de que el dispositivo contiene archivos cuyo formato
es compatible. (' página 27)
Vuelva a conectar el dispositivo.
Verifique la conexión entre esta unidad e iPod/iPhone.
Extráigalo y reinicialice el iPod/iPhone reinicializando el hardware.
Para más información sobre la reinicialización del iPod/iPhone,
consulte el manual de instrucciones suministrado con el iPod/iPhone.
Verifique si el ajuste <IPOD SWITCH> es apropiado. (' página 11)
“CANNOT SKIP” Se ha llegado al límite de salto.
“NO STATION” No hay emisora registrada en su iPod/iPhone.
“NO ACTIVE STATION” No hay emisora activa.
“SET UP PANDORA ON YOUR
Pandora姞
DEVICE”
La configuración de Pandora姞 no está completada. Conecte el
iPod/iPhone a esta unidad después de finalizar la configuración en
su iPod/iPhone.
ESPAÑOLޓ|
29
Page 62

Localización de averías
Síntoma Soluciones/Causas
4 CD/USB/iPod/iPhone
Creación de una emisora:
“NO STATION” No hay emisoras para la canción o artista actuales.
“STATION REACH LIMIT” No puede crear más de 100 emisoras.
“CANNOT MAKE NEW
Pandora姞
STATION”
4 HD Radio
La calidad del sonido cambia
cuando se reciben emisoras HD
Radio.
El sonido no se escucha.
Aparece “RESET 8” en la pantalla. Vuelva a conectar esta unidad y el sintonizador HD Radio
4 Radio por satélite
“UNSUB CH” aparece en la
pantalla mientras se escucha la
radio por satélite SIRIUS.
El sonido no se escucha.
Aparece “UPDATING” en la
pantalla.
Aparece “NO SIG” o “NO SIGNAL”
en la pantalla.
Aparece “NO ANT” o
“NO ANTENNA” en la pantalla.
Aparece “INVALID CH” en la
pantalla durante unos 5
segundos y, a continuación,
vuelve al canal anterior o al canal
predeterminado mientras se
escucha la radio por satélite
SIRIUS.
Aparece una pantalla en blanco. No hay información de texto para el canal seleccionado.
Aparece “NO CH AV” o
“CH UNAVL” en la pantalla por
unos 2 segundos y después
vuelve al canal anterior mientras
escucha la radio por satélite XM.
“OFF AIR” aparece en la pantalla
mientras se escucha la radio por
satélite XM.
“LOADING” aparece en la
pantalla mientras se escucha la
radio por satélite XM.
Aparece “RESET 8” en la pantalla.
La radio por satélite no funciona.
Hay un problema para crear una emisora nueva, por ejemplo, un
problema de red.
Fije el modo de recepción en <ANALOG> o <DIGITAL>.
(' página 8)
Se selecciona <ANALOG> cuando se reciben todas las
transmisiones digitales de una emisora HD Radio. Seleccione
<AUTO> o <DIGITAL>. (' página 8)
Se selecciona <DIGITAL> cuando se reciben señales digitales
débiles o una emisión de radio convencional. Seleccione
<AUTO> o <ANALOG>. (' página 8)
correctamente, a continuación, reajuste la unidad.
El sistema de radio por satélite SIRIUS está conectado pero no
tiene la suscripción activada. Para obtener más información
sobre cómo suscribirse, ' página 9.
El receptor está actualizando la información de canal y tarda
algunos minutos en finalizar.
Asegúrese de que la antena de la radio por satélite esté
montada fuera del vehículo. Mueva el vehículo a un área que
tenga una clara línea de visión hacia el cielo.
Verifique la conexión de la antena de radio por satélite y
asegúrese de que esté firmemente fijada.
No hay transmisión en el canal seleccionado.
Seleccione otro canal o continúe escuchando el canal
anterior o canal predeterminado.
El canal seleccionado ya no está disponible o no está
autorizado.
Seleccione otro canal o continúe escuchando el canal
anterior.
El canal seleccionado no está emitiendo en ese momento.
Seleccione otro canal o continúe escuchando el canal
anterior.
El receptor está cargando la información del canal y el audio.
La información de texto no está disponible temporalmente.
Vuelva a conectar correctamente esta unidad y la radio por
satélite y, a continuación, reinicie la unidad.
|ޓESPAÑOL
30
Page 63

Localización de averías
Síntoma Soluciones/Causas
4 Bluetooth
“BT FRONT”/“BT REAR” no se
puede seleccionar.
No se detectó ningún dispositivo
Bluetooth.
No se puede realizar el
emparejamiento.
“PAIRING FULL” se desplaza por
la pantalla cuando intenta
realizar un emparejamiento.
Hay eco o ruidos.
La calidad del sonido telefónico
es mala.
La unidad no responde cuando
intenta copiar la guía telefónica a
la unidad.
El sonido se interrumpe o salta
durante la reproducción de un
reproductor de audio Bluetooth.
No puede controlarse el
reproductor de audio Bluetooth
conectado.
El método de llamada “VOICE” ha
fracasado.
Aparece “NOT SUPPORT” cuando
intente realizar una marcación
por voz.
Aparece “ERROR CNNCT” en la
pantalla.
Aparece “ERROR” en la pantalla. Intente la operación otra vez. Si aparece “ERROR” otra vez, revise
Aparece “PLEASE WAIT” en la
pantalla.
Aparece “HW ERROR” en la
pantalla.
Aparece “BT DEVICE NOT
FOUND” en la pantalla.
Compruebe <BT AUDIO> en el ajuste <SRC SELECT>.
(' página 25)
Busque de nuevo en el dispositivo Bluetooth.
Reinicie la unidad. (' página 3)
Asegúrese de haber introducido el mismo código PIN para la
unidad y el dispositivo Bluetooth.
Borre la información del emparejamiento tanto de la unidad,
como del dispositivo Bluetooth y a continuación, realice el
emparejamiento de nuevo.
Ya ha registrado un máximo de cinco dispositivos Bluetooth
en la unidad. Para emparejar otro dispositivo, borre primero
el emparejamiento que ya existe en la unidad. (' página 16)
Ajuste la posición de la unidad del micrófono.
Ajuste <NR/EC MODE> y <MIC LEVEL> para una
combinación mejor. (' página 19)
Reduzca la distancia entre la unidad y el dispositivo Bluetooth.
Desplace el coche a un lugar donde consiga una señal mejor.
Tal vez está intentado copiar las mismas entradas (que las
almacenadas) en la unidad. Pulse DISP o para salir.
Reduzca la distancia entre la unidad y el reproductor de
audio Bluetooth.
Apague y vuelva a encender la unidad e intente conectarse
de nuevo.
Puede que otros dispositivos Bluetooth estén intentando
conectarse a la unidad.
Revise si el reproductor de audio Bluetooth conectado es
compatible con el perfil de control remoto de audio/vídeo
(AVRCP). (Consulte las instrucciones de su reproductor de audio.)
Desconecte y vuelva a conectar el reproductor de Bluetooth.
Utilice el método de llamada “VOICE” en un entorno más
silencioso.
Acérquese al micrófono cuando diga el nombre.
Cambie de “NR/EC MODE” a “OFF” (' página 19) y vuelva a
intentarlo.
El teléfono conectado no es compatible con esta función.
El dispositivo está registrado pero ha fallado la conexión.
Conecte el dispositivo manualmente. (' página 15)
si el dispositivo admite la función que ha intentado realizar.
La unidad se está preparando para usar la función Bluetooth. Si
el mensaje no desaparece, apague y encienda la unidad y, a
continuación, vuelva a conectar el dispositivo (o reinicie la
unidad). (' página 3)
Reposicione la unidad e intente la operación otra vez. Si aparece
“HW ERROR” de nuevo, póngase en contacto con el distribuidor
de audio para coches de JVC más cercano.
La unidad no puede buscar los dispositivos Bluetooth
registrados durante la conexión automática. Encienda el
Bluetooth desde su dispositivo y conéctese manualmente.
ESPAÑOLޓ|
31
Page 64

Especificaciones
Especificaciones
SECCIÓN DEL AMPLIFICADOR DE AUDIO
Potencia de salida
Impedancia de carga 4Ω (tolerancia de 4Ω a 8Ω)
Respuesta de frecuencias 40 Hz a 20 000 Hz
Relación señal a ruido 80 dBA (referencia: 1 W en 4Ω)
Nivel/impedancia de salida de línea o salida del
subwoofer
Impedancia de salida ≤ 600Ω
20 W RMS x 4 canales a 4Ω y ≤1%
THD+N
4,8 V (KD-A735BT), 2,5 V (KD-R730BT)/20 kΩ de
carga (plena escala)
SECCIÓN DEL SINTONIZADOR
FM Gama de frecuencias Intervalo 200 kHz: 87,9 MHz a 107,9 MHz
Sensibilidad útil 9,3 dBf (0,8 μV/75Ω)
50 dB sensibilidad de
silenciamiento
Selectividad de canal
alternativo (400 kHz)
Respuesta de frecuencias 40 Hz a 15 000 Hz
AM Gama de frecuencias Intervalo 10 kHz: 530 kHz a 1 700 kHz
Separación estereofónica 40 dB
Sensibilidad/Selectividad 20 μV/40 dB
Intervalo 50 kHz: 87,5 MHz a 108,0 MHz
16,3 dBf (1,8 μV/75Ω)
65 dB
Intervalo 9 kHz: 531 kHz a 1 611 kHz
SECCIÓN DEL REPRODUCTOR DE CD
Sistema de detección de señal Captor óptico sin contacto (láser semiconductor)
Número de canales 2 canales (estereofónicos)
Respuesta de frecuencias 5 Hz a 20 000 Hz
Relación señal a ruido 98 dB
Lloro y trémolo Inferior al límite medible
SECCIÓN USB
Norma USB USB 1.1, USB 2.0
Velocidad de transferencia de datos (Velocidad
máxima)
Dispositivo compatible Clase de almacenamiento masivo
Sistema de archivo compatible FAT 32/16/12
Formato de audio reproducible MP3/WMA/WAV
Suministro eléctrico máximo
Máx. 12 Mbps
5 V CC " 1 A
SECCIÓN DE BLUETOOTH
Versión Bluetooth 2.1 certified (+EDR)
Clase de potencia Radio Clase 2
Área de servicio 10 m (10,9 yardas)
Perfil HFP 1.5, OPP 1.1, A2DP 1.2, AVRCP 1.3, PBAP 1.0
|ޓESPAÑOL
32
Page 65

GENERAL
Requisitos de potencia (Voltaje de
funcionamiento)
Sistema de puesta a tierra Negativo a masa
Temperatura de funcionamiento admisible 0°C a +40°C (32°F a 104°F)
Dimensiones
(An × Al × Pr)
(aprox.)
Peso
Sujeto a cambios sin previo aviso.
Tamaño de instalación 182 mm × 52 mm × 158 mm
Tamaño del panel 188 mm × 59 mm × 14 mm
14,4 V CC (tolerancia de 11 V a 16 V)
(7-3/16" × 2-1/16" × 6-1/4")
(7-7/16" × 2-3/8" × 9/16")
1,3 kJ (2,9 lbs) (excluyendo accesorios)
Especificaciones
ESPAÑOLޓ|
33
Page 66

Veuillez lire attentivement toutes les instructions avant d’utiliser l’appareil afin de bien comprendre son
fonctionnement et d’obtenir les meilleures performances possibles.
Merci pour avoir acheté un produit JVC.
Précautions :
Los cambios o modificaciones no aprobados por la parte responsable del funcionamiento
pueden anular la autoridad del usuario para utilizar el equipo.
L’utilisation de commandes ou de réglages ou
l’application de procédures ne figurant pas dans
ce manuel peuvent entraîner une exposition à
des rayonnements dangereux.
Conformément aux Réglementations Fédérales
des États-Unis, nous reproduisons à continuation
les étiquettes figurant sur le produit (ou bien à
l’intérieur de celui-ci) concernant la sécurité des
produits laser.
JVC KENWOOD Corporation
2967-3, ISHIKAWA-MACHI,
HACHIOJI-SHI, TOKYO, JAPAN
THIS PRODUCT COMPLIES WITH DHHS
RULES 21CFR SUBCHAPTER J IN EFFECT AT
DATE OF MANUFACTURE.
Emplacement : embase
IMPORTANT POUR PRODUITS LASER
1. PRODUIT LASER CLASSE 1
2. ATTENTION : N’ouvrez pas le couvercle supérieur. Il n’y a aucune pièce réparable par
3. ATTENTION : (Pour les États-Unis) Rayonnement laser visible et/ou invisible de classe II
4. REPRODUCTION DE L’ÉTIQUETTE : ÉTIQUETTE DE PRÉCAUTION PLACÉE À L’EXTÉRIEUR DE
L’APPAREIL.
l’utilisateur à l’intérieur de l’appareil; confiez toute réparation à un
personnel qualifié.
une fois ouvert. Ne regardez pas le rayon.
(Pour le Canada) Rayonnement laser visible et/ou invisible de classe
1M une fois ouvert. Ne pas regarder directement
avec des instruments optiques.
|ޓFRANÇAIS
2
[Union européenne seulement]
Page 67

Avertissement :
Arrêtez la voiture avant de manipuler l’appareil.
Attention :
Ajustez le volume de façon à pouvoir entendre les
sons extérieurs à la voiture. Conduire avec le
volume trop haut peut être la cause d’un accident.
Évitez d’utiliser un périphérique USB ou un iPod/
iPhone s’il peut gêner une conduite en toute sécurité.
Précautions sur le réglage du volume :
Les appareils numériques (CD/USB) produisent très
peut de bruit par rapport aux autres sources. Réduisez
le volume avant de reproduire ces sources
numériques afin d’éviter d’endommager les enceintes
par la soudaine augmentation du niveau de sortie.
Température à l’intérieur de la voiture :
Si votre voiture est restée garée pendant
longtemps dans un climat chaud ou froid, attendez
que la température à l’intérieur de la voiture
redevienne normale avant d’utiliser l’appareil.
Condensation :
Quand une voiture est climatisée, de la
condensation peut se produire sur la lentille du
laser. Cela peut être la cause d’une erreur de
lecture du disque. Dans ce cas, retirez le disque et
attendez que l’humidité s’évapore.
Comment attacher/détacher le
panneau de commande
Comment réinitialiser votre appareil
Vos ajustements préréglés
sont aussi effacés.
Table des matières
Préparation ............................................................ 4
Annulation des démonstrations des
affichages
Réglage de l’horloge
Opérations de base ............................................. 4
Radio ........................................................................ 6
Commande du tuner HD Radio™ ................... 8
Commande du tuner de la Radio Satellite
..................................................................................... 9
CD/USB ................................................................. 10
iPod/iPhone ........................................................ 11
Recherche rapide .............................................. 13
Appareils extérieurs ......................................... 13
Connexion Bluetooth姞 .................................... 14
Téléphone portable Bluetooth .................... 16
Lecteur audio Bluetooth ................................. 20
Réglages de la couleur d’éclairage ............. 21
Réglages de la luminosité .............................. 22
Réglages du son ................................................ 22
Utilisation des menus ...................................... 23
Télécommande .................................................. 26
Informations complémentaires ................... 26
Guide de dépannage ....................................... 29
Spécifications ..................................................... 32
Comment lire ce manuel :
Ce manuel explique principalement les opérations
à l’aide des touches du panneau de commande.
< > indique les affichages du panneau de
commande.
[XX] indique le réglage initial d’un article de menu.
Comment forcer l’éjection d’un disque
(Maintenez pressée)
Faites attention de ne pas faire tomber le
disque quand il est éjecté.
Si cela ne fonctionne pas, essayez de
réinitialiser l’appareil.
Entretien
Nettoyage de l’appareil
Essuyez la saleté sur le panneau avec un chiffon
sec au silicone ou un chiffon doux. Ne pas
respecter ces précautions peut entraîner des
dommages à l’appareil.
Nettoyage du connecteur
Essuyez toute les saletés sur le connecteur de
l’appareil et le panneau. Utilisez une coton-tige
ou un chiffon.
FRANÇAISޓ|
3
Page 68

(Maintenez
pressée)
Préparation
Préparation
Annulation des démonstrations
des affichages
Les démonstrations d’affichage sont toujours
activées sauf si vous les annulez.
1
2
3
Choisissez <DEMO OFF>.
4
Appuyez sur MENU pour quitter.
(Maintenez
pressée)
(Réglage initial)
Réglage de l’horloge
1
2
Choisissez <CLOCK>.
3
Choisissez <CLOCK SET>.
4
Ajustez les heures.
5
Ajustez les minutes.
6
Appuyez sur MENU pour quitter.
Opérations de base
Informations à l’écran
Change l’information sur l’affichage. (Appuyez sur la touche)
Fait défiler les informations actuelles de l’affichage. (Maintenez pressée)
Radio
HD Radio
Radio satellite
CD/USB/Audio Bluetooth
iPod/iPhone (HEAD MODE/
IPOD MODE)
iPod/iPhone (APP MODE)
iPod/iPhone (Radio Internet
Pandora姞)
Appareils extérieurs
*1 “****-FM” ou “****” apparaît quand aucun signe d’appel est reçu.
*2 “NO TEXT” apparaît quand aucun texte n’est reçu.
*3 Uniquement pour la radio satellite SIRIUS.
Source Affichage
Station non Radio Broadcast Data System : Fréquence ) Horloge
Station FM Radio Broadcast Data System : Nom de la station (PS) -
Fréquence - Type de programme (PTY) - Horloge - (retour au début)
Signe d’appel*1 - Fréquence - Titre/artiste/nom de l’album du
segment actuel*2 - Horloge - (retour au début)
Nom de la catégorie - Nom du canal - Nom de l’artiste - Nom du
compositeur*3 - Nom de la chanson/programme/titre - Horloge (retour au début)
Titre de l’album/artiste* - Titre de la plage* - Numéro de la plage/
durée de lecture - Numéro de la plage/horloge - (retour au début)
* “NO NAME” apparaît pour les CD ordinaires ou si aucun nom n’a été enregistré.
APP MODE) APP/Horloge
Nom de la station - Titre de l’album/artiste - Titre de la plage -
Durée de lecture - Horloge - (retour au début)
EXT INPUT ou AUX IN) Horloge
|ޓFRANÇAIS
4
Page 69

Panneau de commande
Fente d’insertion
Opérations de base
Télécommande
Fenêtre d’affichageMolette de commande
Éjection d’un disque
Retrait du panneau
Capteur de télécommande
Visez la télécommande directement en direction du capteur.
N’EXPOSEZ PAS à la lumière directe du soleil.
Prise d’entrée AUX
Prise d’entrée USB
Quand vous appuyez ou maintenez pressées les touches suivantes...
Panneau de
commande
/SOURCE
Molette de
commande
(tournez)
Molette de
commande
(appuyez)
Boutons à
numéros
(1 - 6)
EQ SOUND
/ /
/
Télécommande
—
Met l’appareil sous tension.
Met l’appareil hors tension. (Maintenez pressée)
Appuyez sur le bouton /SOURCE du panneau de
commande et tournez la molette de commande en moins
de 2 secondes pour sélectionner la source.
Fonctionnement général
SOURCE Appuyez plusieurs fois pour sélectionner la source.
VOL - / + Ajuste le niveau de volume.
— Choisissez les éléments.
Coupe le son ou met sur pause la lecture.
)
Appuyez de nouveau sur la touche pour annuler la
sourdine ou reprendre la lecture.
— Valide la sélection.
—
Sélectionne les stations préréglées.
Mémorise la station actuelle en l’associant au bouton à
numéro sélectionné. (Maintenez pressée) (' page 6)
Sélectionne les modes sonores préréglés. (' page 22)
Affiche le menu “Mains libres” (' page 17) ou répond à
—
un appel quand l’appareil sonne.
Permet de terminer un appel. (Maintenez pressée)
— Retourne au menu précédent.
Sélectionne une station préréglée. (' page 6)
Recherche uniquement des station HD Radio. (Maintenez
pressée)
Permet de choisir une catégorie. (' page 9)
Sélectionne le dossier MP3/WMA. (' page 10)
Recherche automatiquement une station. (' page 6)
Recherche manuellement une station. (Maintenez pressée)
/
Choisit une plage (' page 10, 11, 20)/un canal de radio
satellite.
Avance ou recule rapidement la plage. / Change
rapidement de canal de la radio satellite. (Maintenez
pressée)
FRANÇAISޓ|
5
Page 70

(Maintenez pressée)
Radio
Radio
Recherche d’une station
A
B
“ST” s’allume lors de la réception d’une émission FM stéréo avec un signal suffisamment fort.
Choisissez <FM> ou <AM>.
Recherche automatique. (Appuyez sur la
touche)
Recherche manuelle. (Maintenez pressée)
“M” clignote, puis appuyez sur la touche
répétitivement.
Mémorisation de stations
Préréglage manuel
Vous pouvez prérégler un maximum de 18
stations pour FM et de 6 stations pour AM.
Pendant l’écoute d’une station...
(Maintenez pressée)
Le numéro de préréglage clignote et “MEMORY”
apparaît. La station actuelle est mémorisée sous le
bouton à numéro sélectionné (1 - 6).
- - - - - - - - ou - - - - - - - -
1
“PRESET MODE” clignote.
2
Le numéro de préréglage clignote et “MEMORY”
apparaît.
(Maintenez pressée)
Choisissez un numéro de préréglage.
Préréglage automatique (FM)
SSM (Mémorisation automatique
séquentielle des stations puissantes)
Vous pouvez prérégler un maximum de 18
stations pour FM.
Si un tuner HD Radio est connecté, vous
pouvez également prérégler jusqu’à un
maximum de 6 stations pour AM.
1
2
“SSM” clignote. Lorsque toutes les stations sont
mémorisées, “SSM” arrête de clignoter.
Pour prérégler <SSM 07 – 12>/
<SSM 13 – 18>, répétez les étapes 1 et 2.
-<TUNER>
-<SSM>
-<SSM 01 – 06>
Sélection d’une station
préréglée
- - - - - - - - ou - - - - - - - -
Vous pouvez également sélectionner une station
préréglée à l’aide de / .
|ޓFRANÇAIS
6
Page 71

(Maintenez pressée)
Radio
Réglage du temporisateur de la
radio
Vous pouvez accorder une station préréglée à un
moment donné indépendamment de la source
actuelle.
1
2
[OFF] Annule le temporisateur de la radio.
ONCE S’active une seule fois.
DAILY S’active tous les jours.
3
Sélectionnez la station préréglée.
4
Réglez l’heure d’activation.
5
Appuyez sur MENU pour quitter.
s’allume après avoir réglé le temporisateur
de la radio.
Un seul temporisateur peut être réglé. Si un
nouveau temporisateur est réglé, le réglage
précédent sera éliminé.
Le temporisateur de la radio ne s’activera pas si
l’appareil est éteint ou si <AM> est réglé sur
<OFF> après avoir sélectionné une station AM
pour le temporisateur.
(Maintenez pressée)
-<TUNER>
-<RADIO TIMER>
-<OFF>/<ONCE>/
<DAILY>
-<FM>/<AM>
-<01> ... <18> pour FM/
<01> ... <06> pour AM
.
Recherche de vos programmes
préférés—Recherche par type
de programme (PTY)
Cette fonctionnalité n’est accessible que
pour les stations FM Radio Broadcast Data
System.
1
2
Choisissez un code PTY.
La recherche PTY démarre.
.
S’il y a une station diffusant un programme du code
PTY que vous avez choisi, la station est accordée.
Codes PTY
NEWS, INFORM (information), SPORTS, TALK, ROCK, CLS
ROCK (rock classique), ADLT HIT (tubes pour adultes), SOFT
RCK (soft rock), TOP 40, COUNTRY, OLDIES, SOFT, NOSTALGA
(nostalgie), JAZZ, CLASSICL (classique), R & B (rhythm and
blues), SOFT R & B (soft rhythm and blues), LANGUAGE, REL
MUSC (musique sacrée), REL TALK (conversation religieuse),
PERSNLTY (personnalité), PUBLIC, COLLEGE, HABL ESP
(conversation en espagnol), MUSC ESP (musique en
espagnol), HIP HOP, WEATHER
FRANÇAISޓ|
7
Page 72

(Maintenez pressée)
Commande du tuner HD Radio™
iPod/iPhone
Cet appareil peut contrôler le tuner HD Radio KT-HD300 de JVC (vendu séparément).
Veuillez consulter le mode d’emploi de KT-HD300 pour plus de détails sur l’installation et la connexion.
Les tuners HD Radio peuvent aussi accorder les diffusions analogiques conventionnelles.
Beaucoup de stations HD Radio offrent plus d’un canal de programmes. Ce service est appelé
multiplex.
Pour en savoir plus sur les stations HD Radio dans votre région, consultez le site
<http://www.hdradio.com/>.
Recherche d’une station
A
B
Station HD Radio : “HD” elle s’allume lorsqu’elle reçoit des signaux audio numériques et elle clignote
lorsqu’elle reçoit des signaux audio analogiques.
Station FM conventionnelles : “ST” elle s’allume lors de la réception d’une émission FM stéréo avec un
signal suffisamment fort.
Choisissez <FM> ou <AM>.
Recherche automatique. (Appuyez sur la
touche)
Recherche manuelle. (Maintenez pressée)
“M” clignote, puis appuyez sur la touche
répétitivement.
Recherche de station HD Radio
uniquement
(Maintenez pressée)
“HD” clignote lorsqu’une station est accordée et
la recherche prend fin.
Sélection d’un canal multiplex HD
Radio
Lors de la réception de canaux multiplex HD
Radio...
Choisissez le canal souhaité
(HD1 à HD8).
“LINKING” apparaît pendant la liaison à un canal
multiplex.
|ޓFRANÇAIS
8
Changement du mode de
réception HD Radio
Lors de la réception d’une émission HD Radio,
vous pouvez commuter le mode de réception
entre—numérique ou analogique.
Ce réglage n’a pas d’effet pour les stations FM/
AM conventionnelles.
1
2
Commute automatiquement
entre les signaux numériques et
[AUTO]
ANALOG
DIGITAL
Le réglage retourne automatiquement sur <AUTO>
quand vous accordez une autre émission.
Pour mettre en mémoire des stations et choisir
une station préréglée, ' page 6.
analogiques.
“HOLD” clignote si la station radio
force uniquement la réception
analogique.
Accorde uniquement les signaux
analogiques.
“HOLD” s’allume.
Accorde uniquement les signaux
numériques.
“HOLD” s’allume.
-<TUNER>
-<BLEND HOLD>
-<AUTO>/<ANALOG>/
<DIGITAL>
Page 73

A
C
B
Commande du tuner de la Radio Satellite
Avant de commencer, connectez un des systèmes suivants (non fournis) au port d’extension à l’arrière
de l’appareil. Consultez la partie “Manuel d’installation/raccordement” pour plus de détails.
SIRIUS Radio satellite
XM Radio satellite
Pour plus d’informations, référez-vous aussi aux instructions fournies avec les autres appareils.
Pour la programmation de SIRIUS/XM, veuillez vous rendre sur <www.siriusxm.com>.
Activation de votre suscription
SIRIUS
1
Choisissez <SIRIUS>.
La radio satellite SIRIUS commence à mettre à
jour tous les canaux SIRIUS. Une fois que
l’opération est terminée, la radio satellite SIRIUS
accorde le canal de présentation.
2
Sélectionnez “Channel 0” pour vérifier
votre identifiant SIRIUS.
L’identifiant SIRIUS à 12 chiffres sera affiché.
Vous pouvez aussi vérifier votre identifiant
SIRIUS sur l’étiquette figurant sur l’emballage
ou en utilisant le menu (' page 24).
3
Contactez la radio Satellite Sirius sur
SCC1 et KS-SRA100
D&P, SCVDOC1 et KS-SRA100
Adaptateur JVC Smart Digital (XMDJVC100)
CNP2000UCA et CNPJVC1
Commande du tuner de la Radio Satellite
2
Sélectionnez “Channel 0” pour vérifier
votre identifiant de la radio satellite XM.
L’affichage fait alterner “RADIO ID” et le numéro
d’identification alphanumérique à 8 chiffres.
Vous pouvez aussi vérifier votre identifiant de la
radio XM satellite figurant sur l’enveloppe de
XMDirect2 Tuner System.
3
Contactez la radio Satellite XM sur Internet
à l’adresse <www.siriusxm.com/
activatenow> pour activer votre
suscription, ou appelez le numéro 1-800XM-RADIO (1-800-967-2346).
Une fois que la suscription est activée, l’appareil
peut être accordé sur un des canaux disponibles.
Sélection d’un canal
Internet à l’adresse <www.siriusxm.com/
activatenow> pour activer votre
suscription, ou appelez le numéro vert
SIRIUS au 1-888-539-SIRIUS (7474).
Une fois que la suscription a été activée, “SUB
UPDT PRESS ANY KEY” défile sur l’affichage.
Mise à jour des canaux (SIRIUS)
Si les canaux ont été mis à jour après la
suscription, la mise à jour démarre
automatiquement. “UPDATING” clignote et
aucun son n’est entendu.
Les mises à jour durent plusieurs minutes.
Pendant une mise à jour, vous ne pouvez pas
utiliser votre radio satellite.
Activation de votre suscription XM
1
Choisissez <XM>.
XMDirect2 Tuner System commence à mettre à
jour tous les canaux XM. “Channel 1” est accordé
automatiquement.
Choisissez <SIRIUS> ou <XM>.
Choisissez une catégorie.
Si vous souhaitez sélectionner des canaux de
toutes les catégories...
SIRIUS : Choisissez <ALL>.
XM : sautez cette étape.
Choisissez le canal souhaité.
Maintenir la touche pressée permet de changer
les canaux rapidement.
Pendant la recherche, les canaux invalides et ceux
auxquels vous n’avez pas souscrits sont sautés.
Mémorisation de canaux
Vous pouvez prérégler un maximum de 18
canaux pour SIRIUS et XM.
(“Préréglage manuel” ' page 6)
Sélection d’une station préréglée
(“Sélection d’une station préréglée” ' page 6)
FRANÇAISޓ|
9
Page 74

Câble USB 2.0
(non fourni)
Prise d’entrée USB
Câble USB à partir de l’arrière de l’appareil
ou
(Maintenez
pressée)
CD/USB
CD/USB
Lecture d’un CD/périphérique USB
Face de l’étiquette
La source change en “CD” et la lecture démarre.
Cet appareil peut reproduire les fichiers MP3/WMA contenus dans un CD-R, un CD-RW et des fichiers
MP3/WMA/WAV contenus dans un périphérique USB à mémoire de grande capacité (tel qu’une
mémoire USB ou un lecteur audio numérique).
Assurez-vous que toutes les données importantes ont été sauvegardées. Nous ne pouvons nous
porter responsables de la perte de données d’un périphérique USB à mémoire de grande capacité
pendant l’utilisation de ce système.
Si le disque éjecté n’est pas retiré avant 15 secondes, il sera automatiquement réinséré.
Si le disque ne peut pas être éjecté, ' page 3.
Sélection d’un dossier/plage
Choisit un dossier.
(pour MP3/WMA/WAV)
Choisit une plage.
(Appuyez sur la touche)
Avance ou recule
rapidement la plage.
(Maintenez pressée)
Sélection d’une plage/dossier à
partir de la liste
1
2
Choisissez un dossier. (pour MP3/WMA/
WAV)
3
Choisissez une plage.
Pour MP3/WMA/WAV
S’il y a beaucoup de dossiers ou de plages, vous
pouvez effectuer une recherche rapide du dossier
ou de la plage de votre choix en tournant
rapidement la molette de commande ou en utilisant
la Recherche Rapide (' page 13).
|ޓFRANÇAIS
10
La source change en “USB” et la lecture démarre.
Sélection des modes de lecture
Vous pouvez sélectionner un des modes de
lecture suivants à la fois.
1
- - - - - - - - ou - - - - - - - -
2
REPEAT
RPT OFF Annule la lecture répétée.
TRACK RPT Répète la plage actuelle.
FOLDER RPT * Répète le dossier actuel.
RANDOM
RND OFF Annule la lecture aléatoire.
FOLDER RND *
ALL RND
* Pour MP3/WMA/WAV
Appuyez sur 1 pour
REPEAT.
Appuyez sur 2 pour
RANDOM.
Appuyer de nouveau pour
quitter.
<REPEAT>)<RANDOM>
Reproduit aléatoirement
toutes les plages du dossier
actuel, puis toutes les plages
des dossiers suivants.
Reproduit aléatoirement
toutes les plages.
Page 75

iPod/iPhone
(Maintenez
pressée)
Lecture d’un iPod/iPhone
Prise d’entrée USB
Câble USB 2.0 (accessoire
du iPod/iPhone)
ou
Câble USB à partir de
l’arrière de l’appareil
La source change en “IPOD-FRONT/IPOD-REAR”
et la lecture démarre.
Sélection du mode de contrôle
#<HEAD MODE>/<IPOD MODE>/
<APP MODE>
HEAD
Commande la lecture du iPod à travers cet
MODE
appareil.
IPOD
Commande la lecture du iPod provenant
MODE
du iPod/iPhone.
APP
Le son de n’importe quelle fonction
MODE
(musique, jeux, applications, etc.) exécutée
sur l’iPod/iPhone connecté est émis par les
enceintes connectées à cet appareil.
Vous pouvez également modifier le réglage à l’aide
de <IPOD SWITCH> dans le menu. (' page 25)
Sélection d’une plage
Applicable sous <HEAD MODE/IPOD MODE>
uniquement.
Pour <APP MODE>, applicable uniquement pour
certaines applications audio.
Sélection d’une plage à partir
de la liste
Applicable sous <HEAD MODE> uniquement.
1
2
Choisissez la liste souhaitée.
PLAYLISTS)ARTISTS)ALBUMS)SONGS)
PODCASTS)GENRES)COMPOSERS)
AUDIOBOOKS) (retour au début)
Choisit une plage/chapitre.
(Appuyez sur la touche)
Avance ou recule
rapidement la plage.
(Maintenez pressée)
3
Choisissez la plage souhaitée.
Répétez cette étape jusqu’à ce que la plage
souhaitée soit choisie.
Si le menu sélectionné contient beaucoup de
plages, vous pouvez effectuer une recherche
rapide de la plage souhaitée en tournant
rapidement la molette de commande ou en
utilisant la Recherche Rapide (' page 13).
Sélection des modes de lecture
Applicable sous <HEAD MODE> uniquement.
Vous pouvez sélectionner un des modes de
lecture suivants à la fois.
1
- - - - - - - - ou - - - - - - - -
2
REPEAT
RPT OFF Annule la lecture répétée.
ONE RPT
ALL RPT
RANDOM
RND OFF Annule la lecture aléatoire.
SONG RND
ALBUM RND
“ALBUM RND” n’est pas applicable à certains
iPod/iPhone.
Appuyez sur 1 pour
REPEAT.
Appuyez sur 2 pour
RANDOM.
Appuyer de nouveau pour
quitter.
<REPEAT>)<RANDOM>
Fonctionne de la même façon
que la fonction “Répéter Un”
pour iPod.
Fonctionne de la même façon
que la fonction “Répéter Tous”
pour iPod.
Fonctionne de la même façon
que la fonction “Aléatoire
Morceaux” pour iPod.
Fonctionne de la même façon
que la fonction “Aléatoire
Albums” pour iPod.
FRANÇAISޓ|
11
Page 76

(Maintenez pressée)
iPod/iPhone
Application iPod/iPhone
Vous pouvez exécuter une application originale de
JVC avec cet appareil dans <APP MODE>. Pour plus
de détails, veuillez vous rendre sur le site Web de
JVC : <http://www3.jvckenwood.com/english/car/
index.html> (Site web en anglais uniquement).
Radio Internet Pandora姞
Préparation
1
Cherchez “Pandora” dans l’App Store
iTunes d’Apple pour trouver et installer la
version la plus récente de l’application
Pandora姞 dans votre appareil.
2
Dans l’application de votre appareil, ouvrez
une session et créez un compte avec
Pandora姞. Si vous n’êtes pas un utilisateur
inscrit, il est également possible de créer
un compte sur www.pandora.com.
Pandora姞 n’est disponible qu’aux États-Unis.
Étant donné que Pandora姞 est un service fourni
par un tiers, les spécifications peuvent faire
l’objet de modifications sans avis préalable. En
conséquence, la compatibilité peut être affectée
ou les services peuvent devenir indisponibles,
aussi bien partiellement qu’en leur totalité.
Certaines fonctions de Pandora姞 ne peuvent
pas être exécutées sur cet appareil.
Pour toute question liée à l’utilisation de
l’application, veuillez contacter Pandora à
l’adresse suivante :
pandora-support@pandora.com.
Comment écouter
la Radio Internet Pandora姞
1
Ouvrez l’application Pandora姞 sur votre
appareil.
2
Connectez l’appareil sur une des prises
USB. (' page 11)
La commutation de la source se produit et la
diffusion commence automatiquement à partir
de la station actuelle.
Opérations de base
Démarre/met sur pause la
lecture.
Sélectionne pouces levés/
pouces baissés.
Si “pouces baissés” est
sélectionné, la plage actuelle
sera sautée.
Saute la plage.
Création d’une nouvelle station
Vous pouvez créer une nouvelle station basée sur
le morceau ou l’artiste qui est en cours de lecture.
1
2
Une nouvelle station est créée sur la base du
morceau ou de l’artiste actuel.
-<NEW STATION>
-<FROM ARTIST>/
<FROM SONG>
Comment chercher la station
enregistrée de la liste
1
2
Sélectionnez le mode d’affichage de la
liste de stations.
BY DATE Par date d’enregistrement
A - Z Par ordre alphabétique
Vous pouvez passer directement à l’étape 3 pour
sélectionner une station ou bien utiliser le menu
de recherche pour faire défiler les options jusqu’à
atteindre le menu de votre choix. (' page 13)
3
Sélectionnez la station de votre choix.
Comment mettre en signet
l’information d’une chanson/d’un
artiste
Pendant la réception d’une chanson...
<THIS ARTIST>)<THIS TRACK>
“BOOKMARKED” apparaît et l’information de la
chanson/l’artiste est mémorisée sur l’iPod/iPhone.
Cet appareil vous permet de mettre en signet
les chansons et/ou artistes sur votre compte
Pandora姞 personnalisé. Les signets ne
pourront pas être visualisés de nouveau sur
l’appareil mais ils seront disponibles sur votre
compte Pandora姞.
|ޓFRANÇAIS
12
Page 77

(Maintenez pressée)
Recherche rapide
Si vous avez beaucoup de dossiers/plages/contacts, vous pouvez les parcourir rapidement en saisissant
le caractère initial (A à Z, 0 à 9 et OTHERS).
1
Accédez au menu de la liste ou au menu “Mains libres”.
CD (MP3/WMA)/
USB (MP3/WMA/WAV)
iPod/iPhone Répertoire d’adresses
Recherche rapide
Bluetooth
Choisissez la liste souhaitée.
2
Sélectionnez le caractère de votre choix (A
à Z, 0 à 9 et OTHERS).
“OTHERS” apparaît si le premier caractère
n’appartient pas à la série A à Z ou 0 à 9, comme
par exemple #, -, !, etc.
3
Sélectionnez le dossier/la plage/le contact
de votre choix.
Pour les sources CD/USB et iPod/iPhone, répétez
l’étape 3 jusqu’à ce que la plage de votre choix
soit sélectionnée.
Il se peut que la recherche ne fonctionne pas sur certains
niveaux du menu sélectionné (pour iPod/iPhone).
Choisissez <PHONEBOOK>.
Appareils extérieurs
Vous pouvez connecter un appareil extérieur aux prises suivantes :
EXT IN : Port d’extension à l’arrière de cet appareil en utilisant les adaptateurs suivants (non fournis) :
- Adaptateur d’entrée de ligne, JVC KS-U57
- Adaptateur d’entrée auxiliaire, JVC KS-U58
AUX IN : Prise d’entrée AUX (auxiliaire) sur le panneau de commande.
Pour en savoir plus, référez-vous aussi aux instructions fournies avec les adaptateurs ou les appareils
extérieurs.
Pour une connexion sur le port d’extension à l’arrière de cet appareil, consultez la partie “Manuel
d’installation/raccordement”.
Lecture d’un appareil extérieur
à partir de l’entrée auxiliaire/du
port d’extension
Mini fiche stéréo de 3,5 mm
(1/8") (non fournie)
Lecteur audio portable, etc.
Utilisez une mini fiche stéréo munie
d’une fiche à 3 connecteurs pour
obtenir une sortie audio optimum.
1
Connectez sur AUX sur le panneau de
commande et/ou sur le port d’extension
sur le panneau arrière.
2
Régler la source si nécessaire.
Choisissez <AUX ON> ou <EXT ON>.
Appuyez sur MENU pour quitter.
3
Choisissez <AUX IN> ou <EXT IN>.
4
Mettez l’appareil connecté sous tension et
-<SRC SELECT>
-<AUX IN> ou <EXT IN>
-<AUX ON> ou
<EXT ON>
démarrez la lecture de la source.
FRANÇAISޓ|
13
Page 78

KS-UBT1
Microphone
KS-UBT1
ou
Câble USB à partir de
l’arrière de l’appareil
Prise d’entrée USB
Connexion Bluetooth姞
iPod/iPhone
En connectant l’adaptateur USB Bluetooth KS-UBT1 fourni et le microphone à cet appareil, vous pouvez
utiliser un périphérique Bluetooth sur cet appareil. Consultez le “Manuel d’installation/raccordement”
pour plus de détails sur comment connecter le microphone.
Une fois que l’adaptateur USB Bluetooth est attaché, cet appareil
est toujours disponible pour le pairage.
Référez-vous aussi aux instructions fournies avec le
périphérique Bluetooth.
Veuillez consulter l’annexe à part pour voir la liste des pays où
la fonction Bluetooth est disponible.
Si vous mettez l’appareil hors tension, détachez le panneau
de commande ou débranchez l’adaptateur USB Bluetooth
pendant une conversion téléphonique, la connexion
Bluetooth est déconnectée. Continuez la conversation en
utilisant votre téléphone portable.
Cet appareil prend en charge les profiles Bluetooth suivants
Hands-Free Profile — Profile mains libres (HFP 1.5)
Object Push Profile — Profile de poussée d’objet (OPP 1.1)
Phonebook Access Profile — Profile d’accès au répertoire d’adresses (PBAP 1.0)
Advanced Audio Distribution Profile — Profile de distribution audio avancé (A2DP 1.2)
Audio/Video Remote Control Profile — Profile de télécommande audio/vidéo (AVRCP 1.3)
Avertissement :
Arrêtez la voiture dans un lieu sûr avant de faire des opérations compliquées comme composer des
numéros, utiliser le répertoire d’adresses, etc.
Pairage d’un périphérique
Bluetooth
Quand vous connectez un périphérique Bluetooth à l’appareil pour la première fois, faites le pairage
entre l’appareil et le périphérique.
Un maximum de cinq périphériques Bluetooth peut être enregistré sur cet appareil.
Un maximum de deux téléphones Bluetooth et d’un périphérique audio Bluetooth peuvent être
connectés à tout moment.
Cet appareil prend en charge le Pairage simple sécurisé (SSP).
1
Connectez l’adaptateur USB Bluetooth
(KS-UBT1) à une des prises d’entrées USB.
2
Cherchez et sélectionnez “JVC Unit” sur le périphérique Bluetooth.
“BT PAIRING” clignote sur l’affichage.
Pour certains périphériques Bluetooth, il se peut que vous ayez besoin d’entrer le code du Numéro
d’Identification Personnelle (PIN) juste après la recherche.
|ޓFRANÇAIS
14
Page 79

(Maintenez pressée)
Connexion Bluetooth姞
3
Suivez les instructions (A) ou (B) en fonction de ce qui apparaît à l’affichage.
Pour les périphériques Bluetooth, la séquence de pairage peut différer des étapes décrites ci-dessous.
(A) Si “[Nom du périphérique]”#“XXXXXX”
#“VOL – YES”#“BACK – NO” défile sur
l’affichage,
“XXXXXX” est un mot de passe à 6 chiffres créé
au hasard au cours de chaque pairage.
Assurez-vous que le mot de passe qui
apparaît sur l’appareil et sur le
périphérique Bluetooth soit le même.
Sélectionnez “YES” pour confirmer le mot
de passe.
(B) Si “[Nom du périphérique]”#“VOL – YES”
#“BACK – NO” défile sur l’affichage,
Sélectionnez “YES” pour commencer le
pairage.
(1) Si “PAIRING”#“PIN 0000” défile sur
l’affichage, saisissez le code PIN “0000”
dans le périphérique Bluetooth.
Vous pouvez changer le code PIN avant le
pairage. (' page 25)
(2) Si seulement “PAIRING” apparait,
Utilisez le périphérique Bluetooth pour
valider le code.
Si le pairage s’est bien réalisé, “PAIRING COMPLETED” apparaît sur l’affichage.
L’appareil établira une connexion avec le périphérique Bluetooth qui vient d’être apparié ; “”
s’allume sur l’affichage et vous pouvez à présent contrôler le périphérique Bluetooth par
l’intermédiaire du périphérique.
“” s’allume lorsqu’un téléphone est connecté.
“” s’allume lorsqu’un périphérique audio est connecté.
Une fois que la connexion est établie, le dispositif est enregistré sur l’appareil et il n’est pas nécessaire
d’effectuer le pairage de nouveau à moins que le périphérique enregistré ne soit supprimé.
Il se peut que certains périphériques Bluetooth ne puissent pas se connecter avec l’appareil après le
pairage. Connectez le périphérique à l’appareil manuellement. Consultez le mode d’emploi du
périphérique Bluetooth pour obtenir plus d’informations.
utilisez le périphérique Bluetooth pour
confirmer le pairage.
Connexion/déconnexion manuelle d’un appareil enregistré
Pour connecter
1
(Maintenez pressée)
Pour déconnecter
1
2
Choisissez <CONNECT>.
3
Choisissez le périphérique souhaité.
“CONNECTING”#“[Nom du périphérique]” défile
sur l’affichage quand l’appareil est en cours de
connexion au périphérique.
“CONNECTED”#“[Nom du périphérique]” défile
sur l’affichage quand le périphérique est
connecté.
4
Appuyez sur MENU pour quitter.
-<BLUETOOTH>
-<PHONE>/<AUDIO>
-<CONNECT>
2
Choisissez <DISCONNECT>.
3
Choisissez le périphérique souhaité.
“DISCONNECT”#“[Nom du périphérique]” défile
sur l’affichage quand le périphérique est
déconnecté.
4
Appuyez sur MENU pour quitter.
-<BLUETOOTH>
-<PHONE>/<AUDIO>
-<DISCONNECT>
FRANÇAISޓ|
15
Page 80

(Maintenez pressée)
(Maintenez
pressée)
ou
(Maintenez
pressée)
Connexion Bluetooth姞
Conexión a una aplicación
original de JVC
La aplicación original de JVC está diseñado para
visualizar el estado del receptor para automóviles
de JVC y para efectuar operaciones sencillas de
control en los smart phones de Android.
Para operaciones de aplicaciones originales de
JVC, visite el sitio web de JVC :
<http://www3.jvckenwood.com/english/car/
index.html> (Sitio web sólo en inglés).
1
2
Choisissez <CONNECT>.
3
Sélectionnez le smartphone de votre
(Maintenez pressée)
-<BLUETOOTH>
-<APPLICATION>
-<CONNECT>
choix.
“CONNECTED”#“[Nom du périphérique]”
défile sur l’affichage quand le périphérique est
connecté.
4
Appuyez sur MENU pour quitter.
Téléphone portable Bluetooth
Réception d’un appel
Pour recevoir un appel
Lorsqu’il y a un appel entrant, la source change
automatiquement sur “BT FRONT”/“BT REAR”.
“RECEIVING” apparaît sur l’affichage, suivi du
numéro ou du nom du téléphone.
L’affichage clignote en émettant une lumière
bleue. (' page 19)
ou
Vous pouvez aussi appuyer sur ////
SOURCE sur la télécommande pour répondre à
un appel.
Lorsque <AUTO ANSWER> est réglé sur <ON>,
l’appareil répond automatiquement aux appels
entrants. (' page 19)
Suppression d’un appareil
enregistré
1
2
Choisissez <DELETE YES>.
“DELETED” apparaît quand le périphérique a été
supprimé.
3
Appuyez sur MENU pour quitter.
Pour terminer un appel
Vous pouvez aussi appuyer sur ////
SOURCE sur la télécommande pour terminer un
appel.
Pour désactiver/activer le mode
mains libres
Pendant une conversation téléphonique...
Les opérations peuvent différer en fonction du
périphérique Bluetooth connecté.
-<BLUETOOTH>
-<DELETE PAIR>
- [Nom du périphérique]
-<DELETE YES>
|ޓFRANÇAIS
16
Page 81

Téléphone portable Bluetooth
Réglages pendant un appel
Volume du téléphone
(00 — 50)[VOLUME 15] : les
ajustements de volume réalisés
pendant un appel n’auront pas
d’incidence sur les autres
sources.
Niveau du microphone
(01— 03)[02] : plus le
numéro augmente, plus le
microphone devient sensible.
Mode de réduction du bruit
et de suppression d’écho :
met l’appareil sous/hors
tension.
Notification de message textuel
Lorsqu’un message textuel est reçu, l’appareil
sonne et “RCV MESSAGE”#“[Nom du
périphérique]” s’affiche.
<MSG NOTICE> doit être réglé sur <ON>.
(' page 19)
Vous ne pouvez pas lire, modifier ou envoyer
un message via cet appareil.
Commutation entre deux téléphones portables connectés
Quand deux téléphones portables sont connectés à l’appareil, vous pouvez accéder aux deux menus
“Mains libres”.
Appuyez sur pour accéder au menu “Mains libres” du premier téléphone.
Appuyez deux fois sur pour accéder au menu “Mains libres” du deuxième téléphone.
Appuyez sur pour revenir au menu “Mains libres” du premier téléphone.
Comment faire un appel depuis le menu mains libres
1
Accédez au menu “Mains libres”.
3
Sélectionnez et appelez le contact (nom/numéro de téléphone).
DIALED
RECEIVED
MISSED CALL
PHONEBOOK
DIAL NUMBER Entrez le numéro de téléphone à composer.
Sélectionnez le nom/numéro de téléphone
Si le répertoire d’adresses contient beaucoup de numéros, vous pouvez
effectuer une recherche rapide du numéro souhaité en tournant rapidement la
molette de commande ou en utilisant la Recherche Rapide (' page 13).
“NO HISTORY” apparaît s’il n’y a pas d’historique d’appels enregistré.
“NO DATA” apparaît s’il n’y a pas d’entrées dans le répertoire d’adresses du
périphérique Bluetooth.
“SEND P.BOOK MANUALLY” apparaît si <P.BOOK SEL> est réglé sur
<P.BOOK IN UNIT> ou si le téléphone n’est pas compatible avec PBAP.
(' page 19)
Sélectionnez le numéro/caractère
2
Choisissez une méthode d’appel.
Changez la position de l’entrée
Consultez les options
disponibles dans le
tableau ci-dessous.
Appelez
Appelez
FRANÇAISޓ|
17
Page 82

(Maintenez
pressée)
Choisissez le
téléphone souhaité.
Accédez à la “liste
du téléphone”
Numéro de téléphone
ou
Nom
(Maintenez pressée)
Téléphone portable Bluetooth
Comment faire un appel depuis
la mémoire
Vous pouvez mettre en mémoire jusqu’à 6 contacts
dans cet appareil pour la composition abrégée.
Pour mettre en mémoire des contacts
1
Accédez au menu “Mains libres”.
2
Choisissez une méthode d’appel.
3
Sélectionnez un contact (nom/numéro de
téléphone).
Nom
4
Mettez-le en mémoire.
-<DIALED>/
<RECEIVED>/
<MISSED CALL>/
<PHONEBOOK>/
<DIAL NUMBER>
Numéro de téléphone
ou
Si deux téléphones sont connectés,
2
Lorsque “WAIT VOICE”#“[Nom du
périphérique]” défile sur l’affichage,
prononcez le nom du contact que vous
souhaitez appeler ou prononcez la
commande vocale pour contrôler les
fonctions du téléphone.
Les caractéristiques de reconnaissance vocale
varient en fonction du téléphone. Consultez le
mode d’emploi du téléphone connecté pour plus
de détails.
Suppression d’un contact (nom/
numéro de téléphone)
Uniquement quand <P.BOOK SEL> est réglé sur
<P.BOOK IN UNIT>. (' page 19)
1
Accédez au menu “Mains libres”.
(Maintenez pressée)
“MEMORY PX” clignote. Le contact est mémorisé
sous le bouton à numéro sélectionné (1 - 6).
Pour effacer un contact de la mémoire préréglée,
sélectionnez <DIAL NUMBER> dans l’étape 2 et
mettez en mémoire un numéro en blanc.
Comment faire un appel depuis la
mémoire
1
Accédez au menu “Mains libres”.
2
Sélectionnez et appelez le contact.
“NO PRESET” apparaît s’il n’y a pas de contacts mémorisés.
Utilisation du système de
reconnaissance vocale
Vous pouvez utiliser le système de reconnaissance
vocale du téléphone connecté à cet appareil.
“NOT SUPPORT” apparaît si le téléphone
connecté ne prend pas en charge cette fonction.
1
Accéder au mode de reconnaissance vocale.
.
Si un seul téléphone est connecté,
|ޓFRANÇAIS
18
(Maintenez pressée)
2
Choisissez une méthode d’appel.
3
Sélectionnez le contact (nom/numéro de
-<DIALED>/
<RECEIVED>/
<MISSED CALL>/
<PHONEBOOK>
téléphone) à supprimer.
4
Accédez au menu “Supprimer entrées”.
5
Choisissez <DELETE> ou <DELETE ALL>.
DELETE Le nom/numéro de téléphone
DELETE
ALL
sélectionné dans l’étape 3 sera
supprimé.
Tous les noms/numéros de
téléphone du menu sélectionné
dans l’étape 2 sont supprimés.
Page 83

Téléphone portable Bluetooth
Utilisation du menu SETTINGS
3
1
Accédez au menu “Mains libres”.
2
Choisissez <SETTINGS>.
Les réglages suivants sont applicables aux périphériques appariés. Si un autre périphérique est apparié,
réalisez de nouveau les réglages.
Article de menu
P.BOOK SEL * [PB IN PHONE] : l’appareil parcourt le répertoire téléphonique du téléphone
AUTO ANSWER ON : l’appareil répond automatiquement aux appels entrants.
RING TONE [IN UNIT] : l’appareil sonne vous avertissant de l’arrivée d’un appel/message
RING COLOR
NR/EC MODE [ON] : active les fonctionnalités de réduction du bruit et de suppression de
MIC LEVEL
MSG NOTICE
* Peut être sélectionné uniquement quand le téléphone connecté prend en charge PBAP.
connecté.
PB IN UNIT : l’appareil parcourt le répertoire téléphonique enregistré dans
l’appareil. (Vous pouvez copier la mémoire du répertoire d’adresses en utilisant
<P.BOOK WAIT> (' page 25).)
[OFF] : l’appareil ne répond pas automatiquement aux appels entrants.
textuel.
– CALL : sélectionnez votre sonnerie préférée (TONE 1 — 5) pour les appels
entrants.
– MESSAGE : sélectionnez votre sonnerie préférée (TONE 1 — 5) pour les
messages textuels entrants.
IN PHONE : l’appareil utilise la sonnerie des téléphones connectés pour vous
avertir de l’arrivée d’un appel/message textuel. (le téléphone connecté sonnera
s’il n’est pas compatible avec cette fonctionnalité).
COLOR 01 — 29[06] : sélectionnez votre couleur préférée pour les alertes
d’appels/messages textuels entrants.
OFF : annulation.
l’écho du microphone connecté pour que le son soit plus net.
OFF : annulation.
(01— 03)[02] : la sensibilité du microphone augmente au fur et à mesure que
son niveau de volume est augmenté.
[ON] : l’appareil sonne et “RCV MESSAGE”#“[Nom du périphérique]” apparaît
pour vous alerter d’un message textuel entrant.
OFF : l’appareil ne vous alerte pas d’un message textuel entrant.
Réglages pouvant être choisis (Réglage initial : [XX])
La tonalité de sonnerie par défaut est différente en fonction du périphérique
apparié.
Répétez cette étape pour effectuer les
réglages nécessaires.
Pour revenir au menu précédent, appuyez sur
.
Pour quitter le menu, appuyez sur MENU.
FRANÇAISޓ|
19
Page 84

Lecteur audio Bluetooth
Lecteur audio Bluetooth
Reproduction d’un lecteur
audio Bluetooth
A
Les opérations et les indications de l’affichage peuvent différer en fonction de leur disponibilité sur le
périphérique connecté.
Opérations de base
Démarre ou reprend la lecture.
Cette touche coupe les sons.
Sélectionnez <BT REAR> ou <BT FRONT>
en fonction de l’emplacement de
l’adaptateur USB Bluetooth KS-UBT1.
Utilisez le lecteur audio Bluetooth pour
démarrer la lecture.
.
RANDOM
RND OFF
ALL RND
GROUP RND
Annule la lecture aléatoire.
Reproduit aléatoirement toutes
les plages.
Reproduit aléatoirement toutes
les plages du groupe actuel.
Permet de choisir un groupe/
dossier.
Saut vers l’arrière ou saut vers
l’avant. (Appuyez sur la touche)
Avance ou recule rapidement
la plage. (Maintenez pressée)
Sélection des modes de lecture
Pour les périphériques Bluetooth compatibles
avec AVRCP 1.3.
1
- - - - - - - - ou - - - - - - - -
2
REPEAT
RPT OFF Annule la lecture répétée.
TRACK RPT Répète la plage actuelle.
ALL RPT Répète toutes les plages.
GROUP RPT
|ޓFRANÇAIS
20
Appuyez sur 1 pour REPEAT.
Appuyez sur 2 pour RANDOM.
Appuyer de nouveau pour quitter.
(Maintenez
pressée)
<REPEAT>)<RANDOM>
Répète toutes les plages du
groupe actuel.
Comment écouter la Radio
Internet Pandora姞 par Bluetooth
Vous pouvez écouter la radio Internet Pandora姞
sur votre téléphone intelligent via Bluetooth sur
cet appareil.
1
Ouvrez l’application Pandora姞 sur votre
appareil.
2
Connectez l’audio Bluetooth.
Accédez à “Pour connecter” ' page 15, sélectionnez
<BLUETOOTH>#<AUDIO>#<CONNECT>.
3
Sélectionnez <BT REAR> ou <BT FRONT>
en fonction de l’emplacement de
l’adaptateur USB Bluetooth KS-UBT1.
4
Appuyez sur 3 pour sélectionner
<BT PANDORA>.
La commutation de la source se produit et la
diffusion commence automatiquement.
Vous pouvez aussi activer Pandora姞 sur votre
smartphone Bluetooth par l’intermédiaire de
<BT AUDIO SW>. (' page 25)
La radio Internet Pandora姞 ne fonctionne par
Bluetooth que sous les systèmes d'exploitation
Android et RIM.
Vous pouvez utiliser Pandora姞 de la même
manière que vous utilisez Pandora姞 pour iPod/
iPhone. (' page 12)
Page 85

Réglages de la couleur d’éclairage
(Maintenez pressée)
Zone d’affichageZone des touches
Toutes les zones
Toutes les zones : inclut la zone Touches et la
zone Affichage.
Sélection de la couleur
préréglée
Vous pouvez choisir une couleur prédéfinie pour
<BUTTON ZONE>, <DISP ZONE>, et <ALL ZONE>
séparément.
1
2
Choisissez <COLOR>.
3
BUTTON ZONE
DISP ZONE
ALL ZONE
Couleur initiale : BUTTON ZONE [06], DISP
ZONE [01], ALL ZONE [06].
Si <ALL ZONE> est sélectionné, l’éclairage des
touches et de l’affichage passera à la couleur
actuelle/choisie de <BUTTON ZONE>.
4
Appuyez sur MENU pour quitter.
(Maintenez pressée)
COLOR 01-29/USER/
COLOR FLOW 01-03*
* La couleur change à des
vitesses différentes.
Mémorisation de vos réglages
Vous pouvez mémoriser vos propres couleurs de
jour et de nuit pour <BUTTON ZONE> et
<DISP ZONE> séparément.
1
2
Choisissez <COLOR SETUP>.
3
Choisissez une
BUTTON
DAY
COLOR
NIGHT
COLOR
MENU
COLOR
4
ZONE
DISP
ZONE
BUTTON
ZONE
DISP
ZONE
ON
OFF
NIGHT COLOR/DAY COLOR est modifié en
activant/désactivant les phares de votre
voiture.
Appuyez sur MENU pour quitter.
couleur primaire
<RED/GREEN/BLUE>,
puis ajustez le niveau
<00-31>. Répétez
cette procédure
jusqu’à ce que les
trois couleurs
principales soient
ajustées.
Votre réglage est
automatiquement
mémorisé sur “USER”.
Si “00” est choisi pour
les principales
couleurs de
<DISP ZONE>, rien
n’apparaît sur l’écran.
Modifie l’éclairage de
l’affichage et des
touches durant les
opérations en mode de
menu, recherche de liste
et lecture.
FRANÇAISޓ|
21
Page 86

(Maintenez pressée)
Réglages de la luminosité
Réglages de la luminosité
Vous pouvez sélectionner la luminosité de votre choix pour <BUTTON ZONE>, <DISP ZONE>
séparément.
1
(Maintenez pressée)
3
2
-<DIMMER>
-<BRIGHTNESS>
-<DAY>/<NIGHT>
BUTTON ZONE BUTTON 00 à 31
DISP ZONE DISP 00 à 31
4
Appuyez sur MENU pour quitter.
Réglages du son
Cet appareil met en mémoire les réglages de son effectués pour chaque source.
Le tuner de la Radio HD, le tuner de la Radio Satellite et EXT IN ont les mêmes réglages du son.
Sélection du son préréglé
Vous pouvez sélectionner un mode sonore
préréglé pour chaque source, adapté à votre
genre de musique.
- - - - - - - - ou - - - - - - - -
DYNAMIC-VOCAL BOOST-BASS BOOSTUSER-FLAT-NATURAL-(retour au début)
Appuyez plusieurs fois sur le
bouton.
Mémorisation de vos réglages
Pendant l’écoute, il est possible d’ajuster et de
mettre en mémoire le niveau de tonalité de
chaque source.
Égaliseur simple
1
2
Ajustez le niveau.
SUB.W * 00 à 08 [08]
BASS LVL ** -06 à +06 [+05]
MID LVL -06 à +06 [00]
TRE LVL -06 à +06 [+05]
Les réglages sont mémorisés et <USER> est activé.
|ޓFRANÇAIS
22
(Maintenez pressée)
(Réglage initial : [XX])
Égaliseur pro
1
2
3
Ajustez les éléments sonores de la tonalité
sélectionnée.
BASS (Réglage initial : [XX])
Fréquence 60/80/[100]/200 Hz
Niveau LVL -06 à +06 [+05]
Q [Q1.0]/Q1.25/Q1.5/Q2.0
MIDDLE
Fréquence 0.5/[1.0]/1.5/2.5 kHz
Niveau LVL -06 à +06 [00]
Q Q0.75/Q1.0/[Q1.25]
TREBLE
Fréquence 10.0/[12.5]/15.0/17.5 kHz
Niveau LVL -06 à +06 [+05]
Q [Q FIX]
4
Répétez les étapes 2 et 3 pour ajuster les
autres tonalités.
Les réglages sont mémorisés et <USER> est
activé.
5
Appuyez sur MENU pour quitter.
* Disponible uniquement quand <SUB.W> est
réglé sur <ON>. (' page 24)
** Disponible uniquement quand <HPF> est
réglé sur <OFF>. (' page 24) (KD-R730BT
uniquement)
-<PRO EQ>
-<BASS>**/<MIDDLE>/
<TREBLE>
Page 87

Utilisation des menus
1
Si aucune opération n’est effectuée pendant
environ 60 secondes, l’opération est annulée.
2
(Maintenez pressée)
Utilisation des menus
3
Répéter l’étape 2 si nécessaire.
Pour revenir au menu précédent, appuyez sur
.
Pour quitter le menu, appuyez sur DISP ou
MENU.
Article de menu
DEMO
CLOCK SET
CLOCK ADJ *1 [AUTO] : l’horloge intégrée est ajustée automatiquement en utilisant les
TIME ZONE *1*2 [EASTERN]/ATLANTIC/NEWFOUND/ALASKA/PACIFIC/MOUNTAIN/
CLOCK
DST *1*2 [DST ON] : mettez en service l’heure d’été si votre zone d’habitation y est
COLOR
COLOR SETUP
DIMMER SET Sélectionne l’éclairage de l’affichage et des boutons ajusté dans le réglage
DIMMER
BRIGHTNESS DAY[31]/NIGHT[15] : paramètres de luminosité pour l’éclairage de jour et
SCROLL *4 [ONCE] : fait défiler une fois les informations affichées.
TAG DISPLAY [ON] : affiche les informations des BALISES lors de la lecture de plages MP3/
DISPLAY
PRO EQ
*1 Est affiché uniquement quand la radio satellite SIRIUS ou XM est connectée.
*2 Est affiché uniquement quand <CLOCK ADJ> est réglé sur <AUTO>.
*3 La connexion du fil de commande de l’éclairage est requise. (Référez-vous au “Manuel
d’installation/raccordement”.) Ce réglage peut ne pas fonctionner correctement sur certains
véhicules (en particulier sur ceux qui possèdent une bague de commander de gradation).
Dans ce cas, changez le réglage sur autre que <DIMMER AUTO>.
*4 Certains caractères ou symboles n’apparaissent pas correctement (ou un blanc apparaît à leur
place) sur l’affichage.
Réglages pouvant être choisis (Réglage initial : [XX])
Pour les réglages, ' page 4.
Pour les réglages, ' page 4.
données de l’horloge comprises dans le canal de la radio satellite.
OFF : annulation.
CENTRAL : choisit votre zone d’habitation parmi les fuseaux horaires pour
l’ajustement de l’horloge.
soumise.
DST OFF : annulation.
Pour les réglages, ' page 21.
<BRIGHTNESS>/<COLOR SETUP>.
[AUTO] : bascule entre les réglages Jour et Nuit lorsque vous activez/
désactivez les phares de la voiture. *3
ON : sélectionne les réglages Nuit.
OFF : sélectionne les réglages Jour.
de nuit de l’affichage et du bouton.
BUTTON ZONE/DISP ZONE : règle les niveaux de luminosité 00 — 31.
AUTO : répète le défilement (à 5 secondes d’intervalle).
OFF : annulation.
WMA.
OFF : annulation.
Pour les réglages, ' page 22.
FRANÇAISޓ|
23
Page 88

Utilisation des menus
Article de menu
FADER *5*6
BALANCE *6
LOUD
(Intensité)
VOL ADJUST
(Réglage du
volume)
SUB. W
(Caisson de grave)
SUB.W LPF *7
(Filtre passe bas de
caisson de grave)
SUB.W LEVEL *7
(Niveau de
caisson de grave)
AUDIO
HPF *7
(Filtre passe haut)
(KD-A735BT
uniquement)
HPF *7
(Filtre passe haut)
(KD-R730BT
uniquement)
BEEP
(Tonalité de touche)
AMP GAIN *8
(Gain
d’amplificateur)
SSM
SID Le numéro d’identification SIRIUS à 12 chiffres apparaît sur l’affichage.
AREA
(Intervalle de
l’accord de la
fréquence)
MONO
(Mode monaural)
TUNER
BLEND HOLD
IF BAND
(Bande de
fréquence
intermédiaire)
RADIO TIMER
*5 Si vous utilisez un système à deux enceintes, réglez le niveau du fader sur “00”.
*6 L’ajustement ne peut pas affecter la sortie du caisson de grave.
*7 Est affiché uniquement quand <SUB.W> est réglé sur <ON>.
*8 Le niveau de volume change automatiquement sur “VOLUME 30” si vous réglez sur
<LOW POWER> quand le niveau de volume est plus haut que “VOLUME 30”.
|ޓFRANÇAIS
24
Réglages pouvant être choisis (Réglage initial : [XX])
R06 — F06[00] : ajuste la balance de sortie avant-arrière des enceintes.
L06 — R06[00] : ajuste la balance de sortie gauche-droite des enceintes.
ON : accentue les basses et hautes fréquences pour produire un son plus
équilibré aux faibles niveaux de volume.
[OFF] : annulation.
-05 — +05[00] : prérègle le niveau d’ajustement du volume de chaque source, en
comparaison avec le niveau de volume FM. Avant un ajustement, choisissez la
source que vous souhaitez ajuster. (“VOL ADJ FIX” apparaît si “FM” est sélectionné.)
OFF : annulation.
[ON] : active la sortie du caisson de grave.
LOW 55Hz/MID 85Hz/[HIGH 120Hz] : les signaux audio avec des
fréquences inférieures à 55 Hz/85 Hz/120 Hz sont envoyés sur le caisson de
grave.
00 — 08[08] : ajuste le niveau de sortie du caisson de grave.
LOW 100Hz/MID 120Hz/HIGH 150Hz : met en service le filtre passe haut.
Les signaux audio dont les fréquences sont inférieures à 100 Hz/120 Hz/
150 Hz sont coupés des enceintes avant/arrière.
[OFF] : met hors service. (Tous les signaux sont envoyés aux enceintes
avant/arrière.)
ON : met en service le filtre passe haut. Les signaux basse fréquence sont
coupés des enceintes avant/arrière.
[OFF] : met hors service. (Tous les signaux sont envoyés aux enceintes
avant/arrière.)
[ON]/OFF : met en ou hors service la tonalité des touches.
LOW POWER : VOLUME 00 — VOLUME 30 (Choisissez ce réglage si la
puissance maximum de chaque enceinte est inférieure à 50 W pour éviter
tout dommage des enceintes.)
[HIGH POWER] : VOLUME 00 — VOLUME 50
Pour les réglages, ' page 6. (Est affiché uniquement quand la source “FM”.)
(affiché uniquement quand la radio satellite SIRIUS est connectée).
[AREA US] : pour l’Amérique du Nord/du Sud/Centrale, intervalles AM/FM : 10kHz/
200kHz.
AREA EU : pour les autres régions, intervalles AM/FM : 9kHz/50kHz.
AREA SA : pour certains pays d’Amérique du Sud, intervalles AM/FM : 10kHz/50kHz.
Affiché uniquement quand la source est “FM”.
[OFF] : active la réception FM stéréo.
ON : améliore la réception FM, mais l’effet stéréo est perdu.
Pour les réglages, ' page 8. (Est affiché uniquement quand la source est
“FM” ou “AM”).
[AUTO] : augmente la sélectivité du tuner pour réduire les interférences
entre les stations adjacentes. (L’effet stéréo peut être perdu.)
WIDE : il y a des interférences des stations adjacentes, mais la qualité du
son n’est pas dégradée et l’effet stéréo est conservé.
Pour les réglages, ' page 7.
Page 89

Utilisation des menus
Article de menu
USB *9 DRIVECHANGE : choisissez ce réglage pour changer le périphérique
IPOD SWITCH *10
(Commande d’un
iPod/iPhone)
AUDIOBOOKS *10 NORMAL/FASTER/SLOWER : sélectionne la vitesse de lecture du fichier
PHONE *12 CONNECT/DISCONNECT : connecte ou déconnecte le périphérique
AUDIO
APPLICATION CONNECT/DISCONNECT : connecte ou déconnecte l’application dans le
BT AUDIO SW *13
DELETE PAIR
P. BOOK WAIT Copie jusqu’à 400 numéros depuis la mémoire du répertoire d’adresses
SET PINCODE Change le code PIN (1 à 6 chiffres). (Code PIN par défaut : 0000)
AUTO CNNCT [ON] : établit de manière automatique une connexion avec le périphérique
BLUETOOTH *11
INITIALIZE YES : initialise tous les réglages Bluetooth (y compris le pairage mémorisé,
INFORMATION PH CNNT DEV/AU CNNT DEV/APP CNT DEV *14 : affiche le nom du
AM *15 [ON]/OFF : met en ou hors service “AM” dans la sélection de la source.
EXT IN *15 EXT ON/[EXT OFF] : met en ou hors service “EXT IN” dans la sélection de la
AUX IN *15 [AUX ON]/AUX OFF : met en ou hors service “AUX IN” dans la sélection de
SRC SELECT
BT AUDIO *16 [BT AU ON]/BT AU OFF : met en ou hors service “BT AUDIO” dans la
SOFT VER Affiche la version du micrologiciel de l’appareil.
*9 Affiché uniquement quand la source est “USB FRONT/USB REAR”.
*10 Affiché uniquement quand la source est “IPOD-FRONT/IPOD-REAR”.
*11 Si l’adaptateur USB Bluetooth n’est pas connecté à l’appareil, “PLEASE CNNT BT ADAPTER”
défile sur l’affichage.
*12 <CONNECT> n’apparaîtra pas si deux téléphones Bluetooth sont connectés en même temps.
*13 Affiché uniquement quand la source est “BT FRONT/BT REAR”.
*14 Affiché uniquement quand un téléphone/un lecteur audio/une application Bluetooth est
connecté.
Affiché uniquement lorsque l’appareil se trouve dans une source autre que la source correspondante
*15
“AM/EXT IN/AUX IN”.
*16 Affiché uniquement lorsque l’adaptateur USB Bluetooth (KS-UBT1) est branché et lorsque la
source actuelle n’est pas “BT FRONT/ BT REAR”.
Réglages pouvant être choisis (Réglage initial : [XX])
quand plusieurs périphériques sont connectés à la prise d’entrée USB
(avant/arrière).
[HEAD MODE]/IPOD MODE/APP MODE :
pour les réglages, ' page 11.
sonore des livres audio dans votre iPod/iPhone.
La sélection initiale dépend du réglage de votre iPod/iPhone.
téléphonique/audio Bluetooth. (' page 15)
smartphone. (' page 16)
Commute entre “BT AUDIO” et “BT PANDORA”.
Pour les réglages, ' page 16.
d’un téléphone connecté à l’appareil par l’intermédiaire d’OPP.
Tournez la molette de commande pour choisir un numéro et appuyez sur
/ pour changer la position de l’entrée. Après avoir saisi le code PIN,
appuyez sur la molette de commande pour confirmer.
Bluetooth lorsque l’appareil est mis sous tension.
OFF : annulation.
le répertoire téléphonique, etc.).
[NO] : annulation.
périphérique (téléphone/audio/application) connecté.
MY BT NAME : affiche le nom de l’appareil (JVC Unit).
MY ADDRESS : montre l’adresse de l’adaptateur USB Bluetooth.
source.
la source.
sélection de la source.
FRANÇAISޓ|
25
Page 90

Télécommande
Télécommande
Préparation
Lorsque vous utilisez la télécommande pour la
première fois, retirez la feuille d’isolation.
Feuille d’isolation
Pour les États-Unis/la Californie uniquement :
Ce produit comprend une pile bouton CR au
lithium contenant du perchlorate : une
manipulation spéciale peut s’avérer nécessaire.
Veuillez consulter :
www.dtsc.ca.gov/hazardouswaste/perchlorate
Remplacement de la pilebouton au lithium
Si la télécommande perd de son efficacité,
remplacez la pile.
CR2025
Informations complémentaires
À propos des disques
Cet appareil ne peut lire que les CD suivants :
Cet appareil peut reproduire les disques multisession; mais les sessions non fermée sont
sautées lors de la lecture.
Disques non pris en charge
Disques qui ne sont pas ronds.
Disques avec des colorations sur la surface
d’enregistrement ou disques sales.
Disque enregistrable/réinscriptible qui n’a pas
été finalisé. (Pour plus d’informations sur la
finalisation du disque, reportez-vous au logiciel
utilisé pour graver le disque et au mode
d’emploi du graveur de disque.)
CD de 8 cm (3 pouces). Essayer d’insérer un
disque à l’aide d’un adaptateur peut entraîner
un dysfonctionnement de l’appareil. Il peut
aussi y avoir des problèmes pour éjecter le
disque s’il est inséré.
|ޓFRANÇAIS
26
Attention :
Danger d’explosion si la pile est remplacée de
façon incorrecte. Remplacez-la uniquement avec le
même type de pile ou un type équivalent.
Les piles ne doivent en aucun cas être
exposées à une chaleur excessive (lumière du
soleil, feu, etc.).
Avertissement :
N’installez pas une autre pile qu’une CR2025 ou
son équivalent.
Ne laissez pas la télécommande dans un
endroit (tel que le tableau de bord) exposé à la
lumière directe du soleil pendant longtemps.
Conservez la pile dans un endroit hors
d’atteinte des enfants.
Ne rechargez pas, ne court-circuitez pas, ne
chauffez pas la pile ni ne la jeter dans un feu.
Ne laissez pas la pile avec d’autres objets
métalliques.
Ne piquez pas la pile avec des ciseaux ou
d’autres objets similaires.
Isolez la pile en l’enveloppant d’un ruban lors
de son dépôt ou rangement.
Cet appareil est équipé d’un fonction de
télécommande de volant. Pour plus
d’informations, référez-vous aussi aux instructions
fournies avec l’adaptateur de télécommande.
Manipulation des disques
Ne pas toucher la surface d’enregistrement du
disque.
Ne pas coller de ruban adhésif, etc. sur les
disques et ne pas utiliser de disque avec du
ruban adhésif collé dessus.
N’utilisez aucun accessoire pour le disque.
Nettoyez le disque en partant du centre vers
l’extérieur.
Nettoyez le disque avec un chiffon sec au
silicone ou un chiffon doux. N’utilisez aucun
solvant.
Pour retirer les disques de cet appareil, tirez-les
horizontalement.
Retirez les bavures du bord du trou central du
disque avant d’insérer un disque.
Lecture de disques à double face
La face non DVD d’un disque à “DualDisc” n’est
pas compatible avec le standard “Compact Disc
Digital Audio”. Par conséquent, l’utilisation de la
face non DVD d’un disque à double face sur cet
appareil n’est pas recommandée.
Page 91

À propos des fichiers audio
Fichiers compatibles
Extensions de fichiers : MP3(.mp3),
WMA(.wma), WAV(.wav)
Pour les disques MP3/WMA :
Débit binaire :
MP3/WMA : 5 kbps à 320 kbps
Fréquence d’échantillonnage :
MP3 (MPEG-1) : 32 kHz, 44,1 kHz, 48 kHz
MP3 (MPEG-2) : 16 kHz, 22,05 kHz, 24 kHz
WMA : 8 kHz à 48 kHz
Pour les périphériques USB :
Débit binaire :
MP3 (MPEG-1) : 32 kbps à 320 kbps
MP3 (MPEG-2) : 8 kbps à 160 kbps
WMA : 5 kbps à 320 kbps
WAV : Linear PCM à 705 kbps et 1 411 kbps
Fréquence d’échantillonnage :
MP3 (MPEG-1) : 32 kHz, 44,1 kHz, 48 kHz
MP3 (MPEG-2) : 16 kHz, 22,05 kHz, 24 kHz
WMA : 8 kHz à 48 kHz
WAV : 44,1 kHz
Canal :
WMA/WAV : 1 ca./2 ca.
Fichiers à débit binaire variable (VBR). (La durée
écoulée des fichiers VBR ne s’affichera pas
correctement.)
Fichiers incompatibles
Fichiers MP3 :
- codé au format MP3i et MP3 PRO
- codé dans un format inapproprié
- codé avec une couche 1/2
Fichiers WMA :
- codés au format sans perte (lossless),
professionnel et vocal
- avec un format non basé sur Windows Media®
Audio
- protégé contre la copie avec DRM
Fichiers qui contiennent des données telles
que AIFF, ATRAC3, etc.
Noms du fichier/dossier
L’appareil est compatible avec les noms de
fichier/dossier enregistrés sous un format
conforme à ISO 9660 Niveau 1, Niveau 2, Romeo
ou Joliet, et portant le code d’extension <.mp3>,
<.wma> ou <.wav>.
Autres
Cet appareil peut affiché les balises WMA et
ID3, version 1,0/1,1/2,2/2,3/2,4 (pour MP3).
La fonction de recherche fonctionne mais la
vitesse de recherche n’est pas constante.
Informations complémentaires
À propos du périphérique USB
Lors de la connexion avec un câble USB, utilisez
un câble USB 2.0.
Vous ne pouvez pas connecter un ordinateur
ou un disque dur portable à la prise d’entrée
USB de l’appareil.
Connectez uniquement un périphérique USB à
la fois à cet appareil. N’utilisez pas de nœud de
raccordement USB.
Les périphériques USB munis de fonctions
spéciales telles que des fonctions de protection
des données ne peuvent pas être utilisés avec
cet appareil.
N’utilisez pas un périphérique USB avec 2
partitions ou plus.
Cet appareil ne peut pas reconnaître les
périphériques USB dont l’alimentation n’est pas
de 5 V et dépasse 1 A.
Il se peut que cet appareil ne reconnaisse pas la
carte mémoire insérée dans le lecteur de carte USB.
Il se peut que cet appareil ne puisse pas
reproduire correctement des fichiers d’un
périphérique USB quand celui-ci est connecté
à l’aide d’un cordon prolongateur.
En fonction de la forme du périphérique USB et du
port de connexion, il se peut que certains
périphériques USB ne puissent pas être connectés
correctement ou que la connexion soit lâche.
Le fonctionnement et l’alimentation peuvent
ne pas fonctionner comme prévu pour certains
périphériques USB.
Nombre maximum de caractère pour :
– Noms de dossier : 25 caractères
– Noms de fichier : 25 caractères
– Balises MP3 : 128 caractères
– Balises WMA : 128 caractères
– Balises WAV : 128 caractères
Cet appareil peut reconnaître un maximum de
20000 fichiers, 2000 dossiers (999 fichiers par
dossier y compris les dossiers sans fichier) et 8
hiérarchies. Cependant, l’affichage ne peut montrer
que 999 dossiers/fichiers.
Attention
Ne déconnectez puis ne reconnectez pas le
périphérique USB répétitivement pendant que
“READING” apparaît sur l’affichage.
Un choc électrostatique à la connexion d’un
périphérique USB peut causer une lecture
anormale du périphérique. Dans ce cas,
déconnectez le périphérique USB puis
réinitialiser cet appareil et le périphérique USB.
Ne laissez pas un périphérique USB dans une
voiture, exposé à la lumière directe du soleil, ou
à une température élevée. Ne pas respecter ces
précautions peut entraîner des déformations
ou des dommages à l’appareil.
FRANÇAISޓ|
27
Page 92

Informations complémentaires
À propos d’iPod/iPhone
iPod/iPhone qui peuvent être raccordés à cet
appareil :
- iPod touch (4e Génération)
- iPod touch (3e Génération)
- iPod touch (2e Génération)
- iPod touch (1e Génération)
- iPod classic
- iPod avec vidéo (5e Génération)*
- iPod nano (6e Génération)
- iPod nano (5e Génération)
- iPod nano (4e Génération)
- iPod nano (3e Génération)
- iPod nano (2e Génération)
- iPod nano (1e Génération)*
- iPhone 4S
- iPhone 4
- iPhone 3GS
- iPhone 3G
- iPhone
*<IPOD MODE>/<APP MODE> ne sont pas
applicables.
Il n’est pas possible de parcourir les fichiers
vidéo sur le menu “Videos” en mode
<HEAD MODE>.
L’ordre des morceaux affichés sur le menu de
sélection de cet appareil peut être différent de
celui de iPod.
Lors de l’utilisation d’un iPod/iPhone, certaines
opérations peuvent ne pas être réalisées
correctement ou comme prévues. Dans ce cas,
consultez le site Web JVC suivant :
<http://www3.jvckenwood.com/english/car/
index.html> (Site web en anglais uniquement).
Notification de marque de
commerce et de licence
Microsoft et Windows Media est une marque
déposée ou une marque de commerce de
Microsoft Corporation aux États-Unis et/ou
dans les autres pays.
La marque du mot et les logos Bluetooth sont
la propriété de Bluetooth SIG, Inc. et toute
utilisation de ces marques par JVC KENWOOD
Corporation est faite sous licence. Les autres
marques et noms de commerce sont la
propriété de leur propriétaire respectif.
Prêt à recevoir les émissions HD Radio quand il
est connecté au KT-HD300, vendu séparément.
SIRIUS, XM et SAT Radio Ready et les marques
connexes sont des marques déposées de
SIRIUS XM Radio Inc. Tous droits réservés.
“Made for iPod” and “Made for iPhone” mean
that an electronic accessory has been designed
to connect specifically to iPod, or iPhone,
respectively, and has been certified by the
developer to meet Apple performance
standards. Apple is not responsible for the
operation of this device or its compliance with
safety and regulatory standards. Please note
that the use of this accessory with iPod, or
iPhone may affect wireless performance.
iPhone, iPod, iPod classic, iPod nano, and iPod
touch are trademarks of Apple Inc., registered
in the U.S. and other countries.
PANDORA, the PANDORA logo, and the
Pandora trade dress are trademarks or
registered trademarks of Pandora Media, Inc.,
used with permission.
À propos de Bluetooth
Selon la version Bluetooth du périphérique, il
est possible que certains périphériques
Bluetooth ne puissent pas se connecter à cet
appareil.
Il se peut que cet appareil ne fonctionne avec
certains périphériques Bluetooth.
L’état du signal dépend de l’environnement.
Quand cet appareil est mis hors tension,
l’appareil extérieur est déconnecté.
Pour plus d’informations sur Bluetooth, veuillez
vous rendre sur le site Web de JVC :
<http://www3.jvckenwood.com/english/car/
index.html> (Site web en anglais uniquement)
|ޓFRANÇAIS
28
Page 93

Guide de dépannage
Guide de dépannage
Symptôme Remède/Cause
4 Généralités
Pas de son, son coupé ou bruit
statique.
“MISWIRING CHK WIRING THEN
RESET UNIT”/“WARNING CHK
WIRING THEN RESET UNIT”
apparaît sur l’affichage et aucune
opération ne peut être réalisée.
Cet appareil ne fonctionne pas
du tout.
Impossible de sélectionner la source.
Les caractères corrects ne sont pas
affichés (ex. : nom de l’album).
Vérifiez les cordons, l’antenne et les connexions du câble.
Vérifiez l’état du disque, le périphérique connecté et les plages
enregistrées.
Assurez-vous d’utiliser la mini fiche stéréo recommandée au moment
de faire une connexion à un appareil extérieur. (' page 13)
Assurez-vous que les prises des fils d’enceinte sont
correctement recouvertes de ruban isolant avant de réinitialiser
l’appareil. (' page 3)
Si le message ne disparaît pas, consultez votre revendeur
d’autoradio JVC ou la société qui fabrique les kits.
Réinitialisez l’appareil. (' page 3)
Cochez le réglage <SRC SELECT>. (' page 25)
Cet appareil peut uniquement afficher les lettres (majuscules),
les chiffres et un nombre limité de symboles.
4 FM/AM
Le préréglage automatique SSM
ne fonctionne pas.
Mémorises les stations manuellement.
4 CD/USB/iPod/iPhone
“PLEASE” et “EJECT” apparaissent
alternativement sur l’affichage.
“IN DISC” apparaît sur l’affichage. Le disque ne peut pas être éjecté correctement. Assurez-vous
“READING” continue de clignoter
sur l’affichage.
Les plages/dossiers ne sont pas
reproduites dans l’ordre prévu.
La durée de lecture écoulée n’est
pas correcte.
“NO FILE” apparaît sur l’affichage. Vérifiez si le dossier choisi, le périphérique USB connecté ou le
“NOT SUPPORT” apparaît sur
l’écran et la plage est sautée.
“CANNOT PLAY” clignote sur
l’affichage.
L’appareil ne peut pas
détecter le périphérique
connecté.
L’iPod/iPhone ne peut pas être
mis sous tension ou ne
fonctionne pas.
Appuyez sur [], puis insérez le disque correctement.
que rien ne bloque la fente d’insertion.
Un temps d’initialisation plus long est requis. N’utilisez pas
trop de niveaux de hiérarchie et de dossiers.
Réinsérer le disque ou rattachez le périphérique USB.
L’ordre de lecture est déterminé par le nom du fichier (USB) ou
par l’ordre dans lequel les fichiers ont été enregistrés (disque).
Cela se produit quelque fois pendant la lecture. C’est causé par
la façon don’t les plages ont été enregistrées sur le disque.
iPod/iPhone contient un fichier reproductible.
Vérifiez si la plage est dans un format compatible.
Vérifiez si le périphérique connecté est compatible avec cet
appareil. (USB : ' page 32) (iPod/iPhone : ' page 28)
Assurez-vous que le périphérique contienne des fichiers
dont les formats sont compatibles. (' page 27)
Rattachez le périphérique.
Vérifiez la connexion entre cet appareil et l’iPod/iPhone.
Détachez et réinitialisez l’iPod/iPhone en réalisant un redémarrage
à froid. Pour plus d’informations sur la réinitialisation de l’iPod/
iPhone, référez-vous au manuel d’instruction de votre iPod/iPhone.
Vérifiez si le réglage <IPOD SWITCH> est correct. (' page 11)
“CANNOT SKIP” La limite d’omission a été atteinte.
“NO STATION” Il n’y a pas de station enregistrée sur votre iPod/iPhone.
“NO ACTIVE STATION” Il n’y a pas de station active.
“SET UP PANDORA ON YOUR
Pandora姞
DEVICE”
La configuration de Pandora姞 ne s’est pas achevée. Connectez
l’iPod/iPhone à cet appareil après avoir complété la
configuration de votre iPod/iPhone.
FRANÇAISޓ|
29
Page 94

Guide de dépannage
Symptôme Remède/Cause
4 CD/USB/iPod/iPhone
Création d’une nouvelle station :
“NO STATION” Aucune station trouvée pour le morceau ou l’artiste actuel.
“STATION REACH LIMIT” Vous ne pouvez pas créer plus de 100 stations.
“CANNOT MAKE NEW
Pandora姞
STATION”
4 HD Radio
La qualité du son change lors de
la réception de stations HD
Radio.
Aucun son n’est entendu.
“RESET 8” apparaît sur l’affichage. Reconnectez cet appareil et le tuner HD Radio correctement,
4 Radio satellite
“UNSUB CH” apparaît sur
l’affichage pendant l’écoute de la
radio satellite SIRIUS.
Aucun son n’est entendu.
“UPDATING” apparaît sur
l’affichage.
“NO SIG” ou “NO SIGNAL”
apparaît sur l’affichage.
“NO ANT” ou “NO ANTENNA”
apparaît sur l’affichage.
“INVALID CH” apparaît sur
l’affichage pendant environ 5
secondes, puis retourne sur le
canal précédent ou le canal par
défaut pendant l’écoute de la
radio satellite SIRIUS.
L’affichage est vide. Il n’y a pas de texte d’information pour le canal choisi.
“NO CH AV” ou “CH UNAVL”
apparaît sur l’affichage pendant
environ 2 secondes, puis
l’affichage retourne au canal
précédent pendant l’écoute de la
radio satellite XM.
“OFF AIR” apparaît sur l’affichage
pendant l’écoute de la radio
satellite XM.
“LOADING” apparaît sur
l’affichage pendant l’écoute de la
radio satellite XM.
“RESET 8” apparaît sur l’affichage.
La radio satellite ne fonctionne
pas du tout.
Un problème s’est produit pendant la création d’une nouvelle
station (un problème de réseau, par exemple).
Fixez le mode de réception sur <ANALOG> ou <DIGITAL>.
(' page 8)
<ANALOG> est choisi lors de la réception d’une station HD
Radio entièrement numérique. Choisissez <AUTO> ou
<DIGITAL>. (' page 8)
<DIGITAL> est choisi lors de la réception de signaux
numériques faibles ou de la réception d’émissions de radio
conventionnelles. Choisissez <AUTO> ou <ANALOG>.
(' page 8)
puis réinitialisez l’appareil.
La radio satellite SIRIUS est connectée mais vous ne possédez
pas d’abonnement actif. Pour plus d’informations sur comment
s’abonner, ' page 9.
L’autoradio est en train de mettre à jour les informations des
canaux et cela prend plusieurs minutes.
Assurez-vous que votre antenne radio satellite est montée à
l’extérieure du véhicule. Déplacez le véhicule dans un endroit
avec une vue dégagée sur le ciel.
Vérifiez la connexion de l’antenne radio satellite et assurez-vous
qu’elle est fixée solidement.
Aucune émission sur le canal choisi.
Choisissez un autre canal ou continuez d’écouter le canal
précédent ou le canal par défaut.
Le canal choisi n’est plus disponible ou autorisé.
Choisissez un autre canal ou continuez d’écouter le canal
précédent.
Le canal choisi n’est pas diffusé actuellement.
Choisissez un autre canal ou continuez d’écouter le canal
précédent.
L’appareil est en train de changer les informations du canal
et audio.
Le texte d’information est temporairement indisponible.
Reconnectez cet appareil et la radio satellite correctement, puis
réinitialisez cet appareil.
|ޓFRANÇAIS
30
Page 95

Guide de dépannage
Symptôme Remède/Cause
4 Bluetooth
Vous ne pouvez pas choisir
“BT FRONT”/“BT REAR”.
Aucun périphérique Bluetooth
n’est détecté.
Le pairage ne peut pas être
réalisé.
“PAIRING FULL” défile sur
l’affichage lorsque l’on tente de
faire le pairage.
Il y a un écho ou du bruit.
Le son du téléphone est de
mauvaise qualité.
L’appareil ne répond pas quand
vous essayez de copier le
répertoire d’adresses.
Le son est interrompu ou saute
pendant la lecture d’un lecteur
audio Bluetooth.
Le lecteur audio Bluetooth
connecté ne peut pas être
commandé.
La méthode d’appel “VOICE” ne
réussit pas.
“NOT SUPPORT” apparaît lorsque
vous tentez de faire une
composition vocale.
“ERROR CNNCT” apparaît sur
l’affichage.
“ERROR” apparaît sur l’affichage. Essayez de nouveau l’opération. Si “ERROR” apparaît de
“PLEASE WAIT” apparaît sur
l’affichage.
“HW ERROR” apparaît sur
l’affichage.
“BT DEVICE NOT FOUND”
apparaît sur l’affichage.
Cochez <BT AUDIO> dans le réglage <SRC SELECT>.
(' page 25)
Cherchez de nouveau depuis le périphérique Bluetooth.
Réinitialisez l’appareil. (' page 3)
Assurez-vous que vous avez entré le même code PIN pour
l’appareil et le périphérique Bluetooth.
Effacez l’information du pairage depuis l’appareil et le
périphérique Bluetooth et réalisez le pairage de nouveau.
Vous avez déjà enregistré le maximum de cinq dispositifs
Bluetooth dans l’appareil. Pour appairer un autre
périphérique, supprimez d’abord un des périphériques
appariés de l’appareil. (' page 16)
Ajustez la position du microphone.
Ajustez <NR/EC MODE> et <MIC LEVEL> sur une meilleure
combinaison. (' page 19)
Réduisez la distance entre l’appareil et le périphérique Bluetooth.
Déplacez la voiture vers un lieu où la réception du signal est meilleure.
Vous avez peut-être essayé de copier les mêmes entrées (déjà
mémorisées) sur l’appareil. Appuyez sur DISP ou pour
quitter.
Réduisez la distance entre l’appareil et le lecteur audio Bluetooth.
Mettez hors tension et puis sous tension l’appareil et essayez de
nouveau de faire la connexion.
Il est possible que d’autres périphériques Bluetooth soient en
train de tenter de se connecter à l’appareil.
Vérifiez si le lecteur audio Bluetooth connecté prend en
charge Audio/Video Remote Control Profile (AVRCP).
(Consultez le mode d’emploi de votre lecteur audio).
Connectez et déconnectez de nouveau le lecteur Bluetooth.
Utilisez “VOICE” la méthode d’appel dans un lieu plus tranquille.
Réduisez la distance vous séparant du microphone lorsque vous
prononcez le nom.
Changez “NR/EC MODE” sur “OFF” (' page 19) et essayez de
nouveau.
Le téléphone connecté ne prend pas en charge cette fonction.
Le périphérique est enregistré mais la connexion a échouée.
Connectez manuellement le dispositif. (' page 15)
nouveau, vérifiez si l’appareil extérieur prend en charge la
fonction que vous avez essayée.
L’appareil se prépare pour utiliser la fonction Bluetooth. Si le
message ne disparaît pas, mettez l’appareil hors tension puis
sous tension, puis connectez de nouveau le périphérique (ou
réinitialisez l’appareil). (' page 3)
Réinitialisez l’appareil et essayez de nouveau l’opération. Si “HW ERROR”
apparaît de nouveau, consultez votre revendeur d’autoradio JVC.
L’appareil n’a pas réussi à chercher les périphériques
Bluetooth enregistrés pendant la connexion automatique.
Activez Bluetooth sur votre périphérique et réalisez
manuellement la connexion.
FRANÇAISޓ|
31
Page 96

Spécifications
Spécifications
SECTION DE L’AMPLIFICATEUR AUDIO
Puissance de sortie
Impédance de charge 4 (4 à 8 admissible)
Réponse en fréquence 40 Hz à 20 000 Hz
Rapport signal sur bruit 80 dBA (référence : 1 W en 4)
Niveau de sortie de ligne, niveau de sortie du
caisson de grave/Impédance
Impédance de sortie ≤ 600
20 W RMS x 4 canaux à 4 et ≤1%
THD+N
4,8 V (KD-A735BT), 2,5 V (KD-R730BT)/20 k en
charge (pleine échelle)
SECTION DU TUNER
FM Plage de fréquences Pas de 200 kHz : 87,9 MHz à 107,9 MHz
Sensibilité utile 9,3 dBf (0,8 µV/75)
Sensibilité utile à 50 dB 16,3 dBf (1,8 µV/75)
Sélectivité de canal alterné
(400 kHz)
Réponse en fréquence 40 Hz à 15 000 Hz
AM Plage de fréquences Pas de 10 kHz : 530 kHz à 1 700 kHz
Séparation stéréo 40 dB
Sensibilité/Sélectivité 20 V/40 dB
Pas de 50 kHz : 87,5 MHz à 108,0 MHz
65 dB
Pas de 9 kHz : 531 kHz à 1 611 kHz
SECTION DU LECTEUR CD
Système de détection du signal
Nombre de canaux 2 canaux (stéréo)
Réponse en fréquence 5 Hz à 20 000 Hz
Rapport signal sur bruit 98 dB
Pleurage et scintillement Inférieur à la limite mesurable
Capteur optique sans contact (laser semi-conducteur)
SECTION USB
Standard USB USB 1.1, USB 2.0
Vitesse de transfert de données (Full Speed) Max. 12 Mbps
Périphériques compatibles À mémoire de grande capacité
Système de fichiers compatible FAT 32/16/12
Format audio compatible MP3/WMA/WAV
Courant d’alimentation maximum
CC 5 V " 1 A
SECTION BLUETOOTH
Version Bluetooth 2.1 certifié (+EDR)
Classe d’alimentation Classe 2 Radio
Zone de fonctionnement 10 m (10,9 yards)
Profile HFP 1.5, OPP 1.1, A2DP 1.2, AVRCP 1.3, PBAP 1.0
|ޓFRANÇAIS
32
Page 97

GÉNÉRALITÉS
Alimentation (tension de fonctionnement) CC 14,4 V (11 V à 16 V admissibles)
Système de mise à la masse Masse négative
Températures de fonctionnement admissibles 0°C à +40°C (32°F à 104°F)
Dimensions
(L × H × P)
(environ)
Masse
Sujet à changement sans notification.
Taille d’installation 182 mm × 52 mm × 158 mm
Taille du panneau 188 mm × 59 mm × 14 mm
(7-3/16" × 2-1/16" × 6-1/4")
(7-7/16" × 2-3/8" × 9/16")
1,3 kJ (2,9 lbs) (accessoires exclus)
Spécifications
FRANÇAISޓ|
33
 Loading...