


COMPUTER SEWING MACHINE
HZL-NX7
INSTRUCTION MANUAL
EN
Please read this instruction manual before using
the machine as it contains important operational Attention and safety information.
Keep this manual accessible so that you may refer to it at anytime while operating the machine.

“IMPORTANT SAFETY INSTRUCTIONS”
When using an electrical appliance, basic safety precautions should always be followed, including the following: Read all instructions before using this sewing machine.
“DANGER ____ To reduce the risk of electric shock:”
1.The appliance should never be left unattended when plugged in.
2.Always unplug this appliance from the electric outlet immediately after using and before cleaning.
“WARNING ____ To reduce the risk of burns, fire, electric shock, or injury to persons:”
1.Do not allow this appliance to be used as a toy. Close attention is necessary when this appliance is used by or near children. This appliance can be used by children aged from 8 years and above and persons with reduced physical, sensory or mental capabilities or lack of experience and knowledge if they have been given supervision or instruction concerning use of the appliance in a safe way and understand the hazards involved. Children shall not play with the appliance. Cleaning and user maintenance shall not be made by children without supervision.
2.Use this appliance only for its intended use as described in this manual. Use only attachments recommended by the manufacturer as contained in this manual.
3.Never operate this appliance if it has a damaged cord or plug, if it is not working properly, if it has been dropped or damaged, or dropped into water. Return the appliance to the nearest authorized dealer or service center for examination, repair, electrical or mechanical adjustment.
4.Never operate the appliance with any air openings blocked. Keep ventilation openings of the sewing machine and foot control free from the accumulation of lint, dust, and loose cloth.
5.Keep fingers away from all moving parts. Special care is required around the sewing machine needle.
6.Always use the proper stitch plate. The wrong plate can cause the needle to break.
7.Do not use bent needles.
8.Do not pull or push fabric while stitching. It may deflect the needle causing it to break.
9.Switch the sewing machine off “O” when making any adjustments in the needle area, such as changing needle, threading bobbin, or changing presser foot.
10.Always unplug the machine from the electrical outlet when removing covers, when lubricating or when making any other user servicing adjustments mentioned in the instruction manual.
11.Never drop or insert any object into any opening.
12.Do not use outdoors.
13.Do not operate where aerosol (spray) products are being used or where oxygen is being administered.
14.To disconnect, turn all controls to the off “O” position, then remove plug from outlet.
15.Do not unplug by pulling on cord. To unplug, grasp the plug, not the cord.
16.Basically, the machine should be disconnected from the electricity supply when not in use.
17.If the power cord of this appliance is damaged, it must be replaced with a special cord by your nearest authorized dealer or service center.
18.(Except USA/Canada) This machine is provided with double insulation.
Use only identical replacement parts. See instructions for servicing Double-Insulated machine.
“SERVICING DOUBLE-INSULATED PRODUCTS”
In a double-insulated product, two systems of insulation are provided instead of grounding. No grounding means is provided on a double-insulated product nor should a means for grounding be added to the product. Servicing a double-insulated product requires extreme care and knowledge of the system and should only be done by qualified service personnel. Replacement parts for a double-insulated product must be identical to those parts in the product. A double-insulated product is marked with the words DOUBLE INSULATION or DOUBLE INSULATED.
The symbol  may also be marked on the product.
“SAVE THESE INSTRUCTIONS”
“This sewing machine is intended for household use only.”
1
Congratulations on your purchase of a JUKI sewing machine.
Please be sure to read safety precautions in “To use the sewing machine safely” in the Instruction Manual before use to fully understand the functions and operating procedures of the sewing machine so as to use the sewing machine for a long time.
After you have read the Instruction Manual, please be sure to keep it together with the warranty so that you can read it whenever necessary.
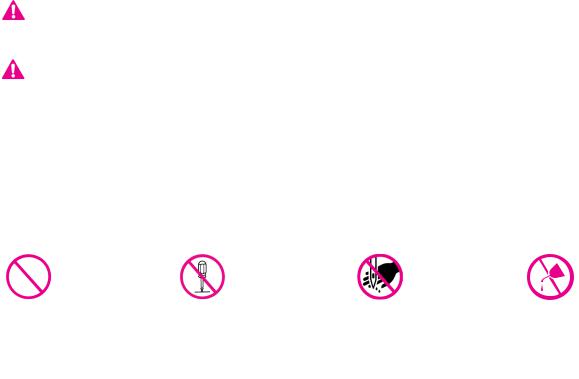
To use the sewing machine safely
Marks and pictographs included in the Instruction Manual and shown on the sewing machine are used so as to ensure safe operation of the sewing machine and to prevent possible risk of injury to the user and other people.
Warning marks are used for different purposes as described below.
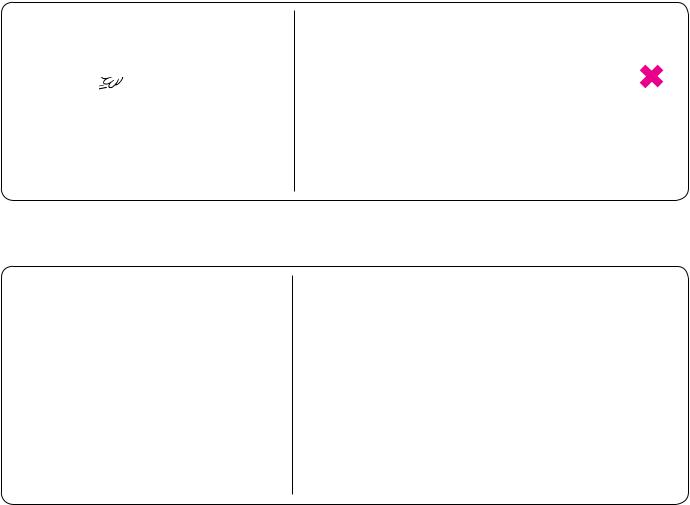
WARNING |
|
Indicates that there is a possible risk of death or serious injury if this |
|||||||
|
|
|
mark is ignored and the sewing machine is used in a wrong manner. |
||||||
ATTENTION |
|
Indicates the operation, etc. which can cause a possible risk of person- |
|||||||
al injury and/or physical damage if this mark is ignored and the sewing |
|||||||||
|
|
|
machine is used in a wrong manner. |
|
|
|
|||
|
|
|
|
|
|
|
|||
Pictographs mean the following: |
|
|
|
|
|
||||
|
|
|
|
|
|
|
|
|
|
|
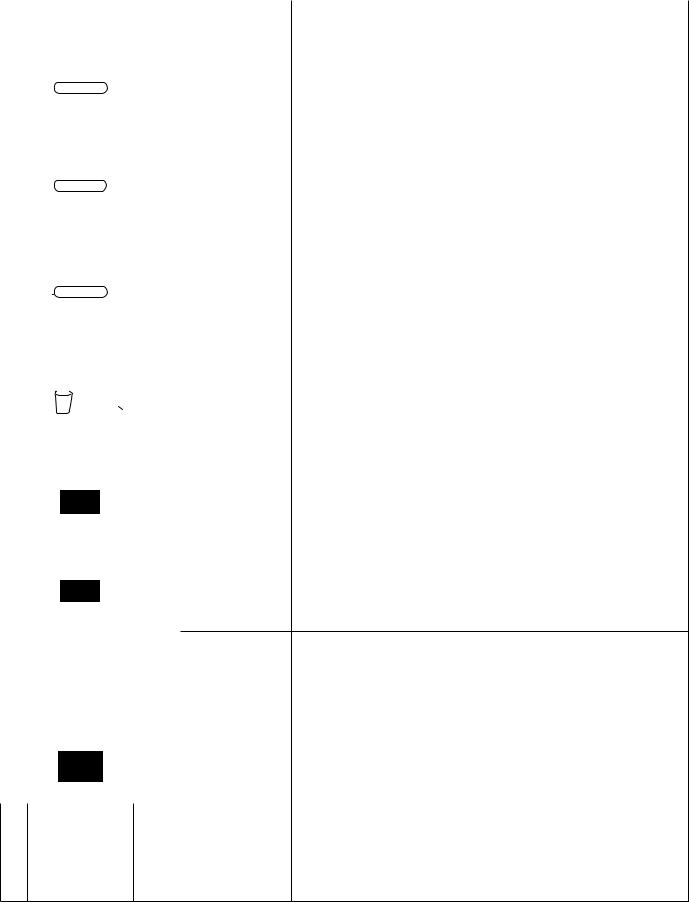
Danger |
|
|
There is a |
|
There is a |
|
There is |
|
|
warning |
|
|
risk of elec- |
|
risk of fire |
|
a risk of |
|
|
which is not |
|
trical shock |
|
|
|
injury to |
||
|
specified |
|
|
|
|
|
|
hands, etc. |
|
|
Prohibit- |
|
|
Disas- |
|
Do not |
|
Do not |
|
|
ed matter |
|
|
sembly/ |
|
place fin- |
|
pour oil, |
|
|
which is not |
|
alteration is |
|
gers under |
|
etc. |
||
|
specified |
|
|
prohibited |
|
the needle |
|
|
|
|
Generally |
|
|
Disconnect |
|
|
|
|
|
|
required |
|
|
the power |
|
|
|
|
|
|
behavior |
|
|
plug |
|
|
|
|
|
|
|
|
|
|
|
|
|
|
|
2
 WARNING
For the combination of the material and the thread and needle, in particular, refer to the explanation table in “Replacement of the needle”.
If the needle or thread does not match the material used such as in the case that an extra heavyweight material (e.g., denim) is sewn with a thin needle (#11 or higher), the needle can break resulting in an unexpected personal injury.
Other precautions
●Do not put the sewing machine under the direct sunlight or in a humid place.
●Do not wipe the sewing machine with solvent such as thinner.
When the sewing machine is soiled, put a small quantity of neutral detergent on a piece of soft cloth and carefully wipe off the sewing machine with it.
Be aware that the following state can take place since the sewing machine incorporates semi-conductor electronic parts and precise electronic circuits.
●Be sure to use the sewing machine in the temperature range from 5ºC to 40ºC.
If the temperature is excessively low, the machine can fail to operate normally.
●The safety device of the sewing machine will work to stop the sewing machine in order to prevent the generation of abnormal heat in the case the sewing machine is continuously engaged in sewing at a low sewing speed for a long time or it is continuously engaged in sewing for a long time under the high temperature environment. In this event, Start and Stop button will not light.
The sewing machine will Stop! return to working condition
after about 10 minutes.
*The operating temperature of the sewing machine is between 5ºC and 40ºC. Do not use the sewing machine under the direct sunlight, near the burning things such as a stove and candle, or in a humid place. By so doing, the temperature in the interior portion of the sewing machine can rise or the coating of the power cord can melt, causing fire or electrical shock.
3
Contents |
|
“IMPORTANT SAFETY INSTRUCTIONS” |
...1 |
Contents.................................................... |
4 |
1. Configuration and functions............... |
6 |
1.1. Names and functions of the operational |
|
buttons...................................................... |
7 |
1.2. Names and functions of the operation |
|
icons and operational keys..................... |
8 |
2. Accessories........................................ |
12 |
3. Set-up.................................................. |
13 |
3.1. How to install Wide Table....................... |
13 |
3.2. Changing the position of the foot switch.. 14 |
|
3.3. Installation of knee lifting lever............. |
15 |
4. Basic settings and basic operations..16 |
|
4.1. Connecting to the power supply .......... |
16 |
4.2. Speed control.......................................... |
18 |
4.3. Lifting/lowering of the presser foot....... |
19 |
4.4. Changing the presser foot..................... |
20 |
4.5.Placing and releasing “JUKI Smart Feed”.. 22
4.6.Changing the throat plate and the feed
dog........................................................... |
23 |
4.7. How to use the throat plate for straight |
|
stitch........................................................ |
24 |
4.8. Attaching the needle............................... |
25 |
4.9. Fabric, thread and needle table............. |
26 |
4.10. Bobbin thread preparation..................... |
27 |
4.11. Needle thread preparation...................... |
31 |
4.12. How to adjust thread tension................. |
36 |
4.13. Setting the presser foot pressure.......... |
38 |
4.14. Setting the micro-lifter............................ |
39 |
4.15. Twin needle sewing................................. |
40 |
4.16. Setting the automatic back tacking, thread |
|
trimming and presser foot lifting........... |
42 |
4.17. Needle positions / Zigzag width / Stitch |
|
length....................................................... |
44 |
4.18. Bobbin thread counter............................ |
46 |
4.19. Setting the stop position of needle....... |
48 |
4.20. Pivot setting............................................. |
48 |
4.21. How to lower the feed dog..................... |
49 |
5. Operation in detail.............................. |
50 |
5.1. Options..................................................... |
50 |
Standard thread tension setting.......... |
51 |
Presser foot lifting height..................... |
51 |
Screen to set the functions while |
|
presser foot is up.................................. |
52 |
Foot switch functions........................... |
53 |
Start-up.................................................. |
53 |
Adjustable starting stitch speed.......... |
54 |
Adjustable reverse stitch speed.......... |
54 |
Darning adjustment.............................. |
55 |
Buzzer volume setting.......................... |
56 |
Brightness adjustment......................... |
56 |
Selecting language............................... |
57 |
Initialization / deletion of the settings.. 57 |
|
Firmware update................................... |
58 |
Machine log........................................... |
60 |
5.2. Operation guide....................................... |
61 |
5.3. Lock mode............................................... |
61 |
5.4. “Return” operation.................................. |
61 |
5.5. “Clear” operation.................................... |
61 |
6. Setting for the pattern sewing.......... |
62 |
6.1. Single stitching mode / combination |
|
stitching mode........................................ |
62 |
6.1.1. Single stitching mode..................... |
62 |
6.1.2. Combination stitching mode.......... |
62 |
6.1.3. Setting for the repetition stitching.. 67 |
|
6.2. How to select a stitch pattern................ |
68 |
6.2.1. Practical patterns............................. |
68 |
6.2.2. Decorative patterns......................... |
70 |
6.2.3. Quilt patterns................................... |
72 |
6.2.4. Buttonhole patterns......................... |
73 |
6.2.5. Letters............................................... |
74 |
6.2.6. User memory.................................... |
75 |
6.2.7. How to select the pattern by |
|
selecting its number............................. |
76 |
4
6.3. Types of edit functions and how to use |
|
them......................................................... |
77 |
6.3.1. Adjusting the darning...................... |
77 |
6.3.2. Pattern inversion............................. |
79 |
6.3.3. Changing the elongation size......... |
80 |
6.3.4. Changing the tapering size............. |
81 |
6.3.5. Selecting the combined patterns |
|
collectively............................................ |
81 |
6.3.6. Deletion............................................. |
81 |
6.3.7. Setting the interval between |
|
patterns.................................................. |
81 |
6.3.8. Change of seam width of |
|
buttonhole............................................. |
81 |
7. Sewing................................................. |
82 |
7.1. Straight stitch.......................................... |
82 |
7.2. Inserting zippers..................................... |
87 |
7.3. Patchwork piecing.................................. |
88 |
7.4. Overcasting stitch................................... |
89 |
7.5. Blind stitch............................................... |
90 |
7.6. Shell tuck................................................. |
93 |
7.7. Bartacking................................................ |
94 |
7.8. Eyelet........................................................ |
96 |
7.9. Decorative stitches................................. |
97 |
7.10. Lace / feather patterns............................ |
98 |
7.11. Scallop stitches....................................... |
99 |
7.12. Random pattern..................................... |
100 |
7.13. Tapering................................................. |
101 |
7.14. Hand look quilt stitches........................ |
103 |
7.15. Buttonhole stitches............................... |
104 |
7.16. Manual 2-step buttonhole..................... |
110 |
7.17. Sewing buttons..................................... |
112 |
7.18. Quilting (free motion)............................ |
113 |
7.19. Quilting (quilt guide)............................. |
115 |
8. |
Message catalog.............................. |
116 |
9. |
Machine Maintenance...................... |
119 |
10. Introduction of optional accessory |
||
|
parts................................................ |
120 |
11. Performance check list.................. |
122 |
|
12. List of stitch patterns..................... |
124 |
|
Specification list...................... |
back cover |
|
5

1. Confi guration and functions
Presser foot auto lift button |
Spool cap (large) |
|
Needle up/down button |
Spool pin |
|
Thread trimming button |
|
|
|
Bobbin winding |
|
Face plate cover |
shaft |
|
Threading lever |
LCD Screen |
|
Speed controller |
|
|
Presser foot lifting lever |
Light under arm |
|
Sensor pinhole for buttonholing |
||
Lock stitch |
||
Thread cutter |
||
button |
||
“JUKI Smart Feed” |
||
Reverse stitch |
||
Start/stop button |
button |
|
Knee lifting lever |
||
Wide table |
||
hole |
Hand wheel (pulley)
Power switch
USB insertion slot
Foot-controller-jack
Machine-socket-inlet
|
Needle setscrew |
Presser foot holder setscrew |
|
Presser foot releasing button |
Needle |
Presser foot holder |
|
|
Presser foot |
Throat plate |
|
Feed dog |
Hook cover release but- |
Hook cover |
ton |
6
1.1. Names and functions of the operational buttons
|
|
|
|
|
|
|
|
|
|
|
|
Name |
Function |
|
|
|
|
|
|
|
|
|
|
|
|
|
|
|
|
|
|
|
|
|
|
|
|
Thread trimming |
After sewing, press this button to trim both threads automatically. |
||
|
|
|
|
|
|
|
|
|
|
button |
The sewing machine stops with its needle up after thread trim- |
||
|
|
|
|
|
|
|
|
|
|
|
|
ming. |
|
|
|
|
|
|
|
|
|
|
|
|
|
|
In the case of 2-needle setting, this button will not operate even if |
|
|
|
|
|
|
|
|
|
|
|
|
|
the thread trimming button is pressed. |
|
|
|
|
|
|
|
|
|
|
|
|
|
|
|
|
|
|
|
|
|
|
|
|
Needle up/down |
When machine stops, press this button to change the needle po- |
||
|
|
|
|
|
|
|
|
|
|
button |
sition. |
||
|
|
|
|
|
|
|
|
|
|
|
|
When the needle is up, the needle moves down and vise versa. |
|
|
|
|
|
|
|
|
|
|
|
|
|
|
The sewing machine performs sewing at a low speed by keeping |
|
|
|
|
|
|
|
|
|
|
|
|
|
this button held pressed for a long time. |
|
|
|
|
|
|
|
|
|
|
|
|
|
|
|
|
|
|
|
|
|
|
|
|
Presser foot auto lift |
When this button is pressed while the sewing machine is at rest, |
||
|
|
|
|
|
|
|
|
|
|
button |
the presser foot position is changed. |
||
|
|
|
|
|
|
|
|
|
|
|
|
|
When the presser foot is in its upper position,it comes down to its |
|
|
|
|
|
|
|
|
|
|
|
|
lower position and vice versa. |
|
|
|
|
|
|
|
|
|
|
|
|
|
|
|
|
|
|
|
|
|
|
|
|
|
|
|
|
When the presser foot is lifted by operating the presser foot auto |
|
|
|
|
|
|
|
|
|
|
|
|
|
lift button, the feed dog is also automatically lowered. |
|
|
|
|
|
|
|
|
|
|
|
|
|
|
|
|
|
|
|
|
|
|
|
|
Speed controller |
Sewing speed can be adjusted with the sliding lever of Speed |
||
|
|
|
|
|
|
|
|
|
|
|
|
|
Controller freely. |
|
|
|
|
|
|
|
|
|
|
|
|
|
The sewing speed is increased by moving the speed controller to |
|
|
|
|
|
|
|
|
|
|
|
|
the right, or decreased by moving it to the left. |
|
|
|
|
|
|
|
|
|
|
|
|
|
|
|
|
|
|
|
|
|
|
|
|
|
|
|
|
|
|
|
|
|
|
|
|
|
|
|
|
|
|
When sewing with foot controller, Max. sewing speed can be set |
|
|
|
|
|
|
|
|
|
|
|
|
|
by Speed Controller. |
|
|
|
|
|
|
|
|
|
|
|
|
|
|
|
|
|
|
|
|
|
|
|
|
Lock |
stitch button |
When this button is pressed, the sewing machine performs lock |
|
|
|
|
|
|
|
|
|
|
stitch. |
||||
|
|
|
|
|
When this button is pressed while the sewing machine is engaged |
||||||||
|
|
|
|
|
|
|
|
|
|
|
|
|
in pattern sewing, the sewing machine stops after it has complet- |
|
|
|
|
|
|
|
|
|
|
|
|
|
ed the sewing of the one-cycle/one-point of the pattern. |
|
|
|
|
|
|
|
|
|
|
|
|
|
|
|
|
|
|
|
|
|
|
|
|
Reverse stitch button |
For straight stitch/zigzag stitch: The sewing machine performs |
||
|
|
reverse stitch as long as this button is held |
|||||||||||
|
pressed. |
||||||||||||
|
|
|
|
|
|
|
|
|
|
|
|
|
|
|
|
|
|
|
|
|
|
|
|
|
|
|
For other stitch types: The sewing machine performs lock stitch. |
Start/stop button When pressing this button, machine starts to sew slowly and then up to the speed set by speed controller. Another press of this button stops the sewing machine.
Color of button indicates machine status. Green: Ready to start and/or while sewing Red: Not ready to start
Orange: When the lock stitch button is pressed while the sew- ing machine is engaged in pattern sewing (The sewing machine performs lock stitch after it has completed the
sewing of the pattern by one cycle. Then, the sewing machine stops.)
*When the foot controller is plugged in, the start/stop button cannot be used to start sewing.
Start button: Can not operate to start sewing. Stop button: Can operate to stop sewing.
7
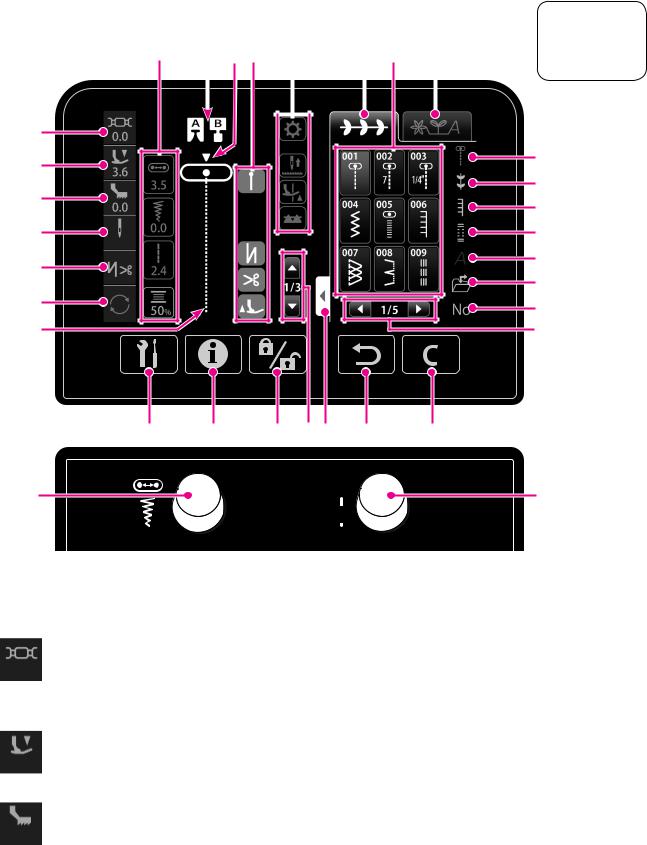
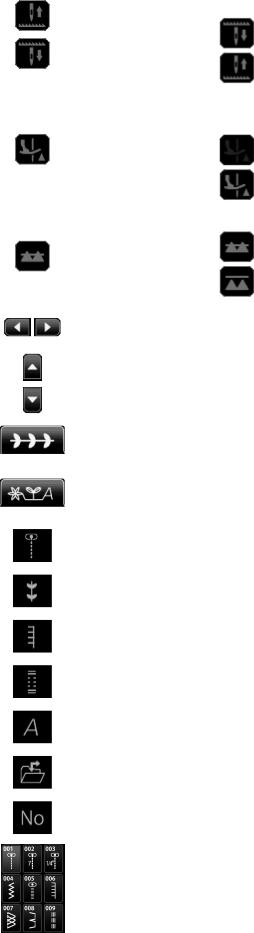
1.2. Names and functions of the operation icons and operational keys
|
|
|
|
|
|
|
|
Touch the icon |
|
|
|
|
|
|
|
|
|
||
|
|
|
|
|
|
with fingers or |
|||
|
|
|
|
a stylus pen. |
|||||
|
|
|
|
|
|
|
|
||
|
|
|
|
|
|
|
|
|
|
|
|
|
|
|
|
|
|
|
|
|
|
|
|
|
|
|
||
|
||
|
||
|
||
|
|
|
|
|
|
|
||
|
||
|
||
|
||
|
|
A |
B |
C D |
E |
F |
|
|
G |
|
|
|
|
|
|
|
|
|
|
|
|
|
|
|
|
|
|
|
|
|
|
|
|
|
|
Name |
|
|
Function |
|
|
|
|
|
|
|
|
Thread tension icon |
Detailed setting of the thread tension is displayed. |
||
|
|
|
Press the thread tension icon when you want to change the thread ten- |
||
|
|
sion. |
|||
|
|
|
The thread tension set value will be returned to the initial value by select- |
||
|
|
|
ing a different pattern. |
||
|
|
|
|
|
|
|
|
Presser foot pres- |
Presser foot pressure is displayed. |
||
|
|
sure icon |
Press the presser foot pressure icon when you want to change the pres- |
||
|
|
sure foot pressure. |
|||
|
|
|
The presser foot pressure will be returned to the initial value by re-turning |
||
|
|
|
the power ON. |
||
|
|
|
|
|
|
|
|
“JUKI Smart Feed” |
This icon is displayed by placing “JUKI Smart Feed” in position. |
||
|
adjustment icon |
Adjustment value of “JUKI Smart Feed” can be set. |
|||
|
|
||||
|
|
|
|
|
|
8
|
|
Name |
Function |
|
|
|
|
|
|
Needle icon |
Detailed setting of the needle is displayed. |
|
|
|
Press the needle icon when you want to change the setting of the needle. |
|
|
|
: One needle |
|
|
|
: Two needles |
|
|
|
|
|
|
Automatic back |
The back tacking at the beginning and end of sewing and the back tack- |
|
tacking and thread |
ing and thread trimming / presser foot lift after thread trimming at the end |
|
|
|
trimming icon |
of sewing can be set. |
|
|
|
|
|
|
Repetition sewing |
Sewing of a pattern under the combination stitching mode in repetition or |
|
|
|
sewing of a pattern only by one cycle under the single stitching mode can |
|
|
|
be set. |
|
|
"1" is displayed in the case of sewing a pattern only by one cycle. |
|
|
|
|
Initial setting |
|
|
|
Pattern available under the single stitching mode: Repetition |
|
|
|
Pattern available under the combination stitching mode: 1 |
|
|
|
|
|
|
Needle position icon |
Press the needle position icon when you want to set the adjustment item |
|
|
of adjusting dial (left) to the "needle position". |
|
|
|
|
|
|
|
Zigzag width icon |
Press the zigzag width icon when you want to set the adjustment item of |
|
|
adjusting dial (left) to the "zigzag width". |
|
|
|
|
|
|
|
Stitch length icon |
"Stitch length" that is set with the stitch length adjusting dial (right) is dis- |
|
|
played. |
|
|
|
|
|
|
|
Bobbin thread count- |
The state of the bobbin thread counter is displayed |
|
er icon |
Press the bobbin thread counter icon when you want to set details of the |
|
|
|
|
bobbin thread counter. |
|
|
|
|
|
|
Sewing-start back |
This icon is displayed by setting the back tacking at the beginning of sew- |
|
|
tacking icon |
ing. |
|
|
|
ON/OFF of the back tacking at the beginning of sewing can be changed |
|
|
|
over by pressing the sewing-start back tacking icon. |
|
|
: Reverse stitch |
|
|
|
|
|
|
|
|
: Lock stitch |
|
|
|
|
|
|
Sewing-end back |
This icon is displayed by setting the automatic back tacking at the end of |
|
|
tacking icon |
sewing. |
|
|
|
ON/OFF of the back tacking at the beginning of sewing can be changed |
|
|
|
over by pressing the sewing-end back tacking icon. |
|
|
: Reverse stitch |
|
|
|
|
|
|
|
|
: Lock stitch |
|
|
|
|
|
|
Thread trimming |
This icon is displayed by setting the back tacking and thread trimming. |
|
icon |
Push icon to turn on/off. |
|
|
|
||
|
|
|
|
|
|
Presser foot lift after |
This icon is displayed by setting presser foot lifting after thread trimming. |
|
thread trimming icon |
Push icon to turn on/off. |
|
|
|
||
|
|
|
|
|
|
Pattern edit icon |
Stitch patterns can be edited. |
|
|
|
|
|
|
|
|
9
|
|
Name |
Function |
|
|
|
|
|
|
Needle stop position |
Stop position of the needle (upper or lower position) when stopping the |
|
|
changeover icon |
sewing machine can be changed over. |
|
|
|
: The sewing machine stops with its needle down |
|
|
|
: The sewing machine stops with its needle up |
|
|
|
|
|
|
Pivot function icon |
You can select the setting where the presser foot goes up with the needle |
|
|
|
held in the needle-down stop position when you stop the sewing machine. |
|
|
|
: Pivot function is OFF |
|
|
|
: Pivot function is ON |
|
|
|
|
|
|
Drop feed icon |
Feed Dog can be disengaged or engaged. |
|
|
|
: Feed Dog is engaged |
|
|
|
|
|
|
|
: Feed Dog is disengaged |
|
|
|
|
|
|
Change the page |
Push this icon to change the page. |
|
icon |
|
|
|
|
|
|
|
|
|
|
|
|
Pattern changeover |
Use this icon when you want to change over the pattern under the combi- |
|
|
icon |
nation stitching mode. |
|
|
|
|
|
|
Single stitching tab |
The sewing mode can be set to the single stitching mode by pressing the |
|
|
single stitching tab. |
|
|
|
|
|
|
|
|
|
|
|
Combination stitch- |
The sewing mode can be set to the combination stitching mode under |
|
ing tab |
which two or more patterns are sewn in combination by pressing the com- |
|
|
|
|
bination stitching tab. |
|
|
|
|
|
|
Practical pattern |
Push it to change the screen to utility stitch patterns. |
|
icon |
|
|
|
|
|
|
|
|
|
|
|
|
Decorative pattern |
Push it to change the screen to decorative stitch patterns. |
|
icon |
|
|
|
|
|
|
|
|
|
|
|
|
Quilt pattern icon |
Push it to change the screen to quilting stitch patterns. |
|
|
|
|
|
|
|
|
|
|
Buttonhole pattern |
Push it to change the screen to buttonholing patterns. |
|
icon |
|
|
|
|
|
|
|
|
|
|
|
|
Letter icon |
Push it to change the screen to letters. |
|
|
|
|
|
|
|
|
|
|
User memory icon |
Use the user memory icon when you want to select the pattern stored in |
|
|
the user memory. |
|
|
|
|
|
|
|
|
|
|
|
No. selection icon |
Push it to change the screen to the one to select the stitch pattern by |
|
|
pattern No. |
|
|
|
|
|
|
|
|
|
|
|
Pattern icon |
It is possible to select stitch pattern. |
|
|
|
|
|
|
|
|
10

|
|
Name |
Function |
|
|
|
|
|
|
Selection screen |
The pattern group display screen can be changed to the full-screen dis- |
|
|
extension tab |
play. |
|
|
The previous screen can be restored by pressing the selection screen |
|
|
|
|
|
|
|
|
extension tab again. |
|
|
|
|
|
|
Presser Foot |
Suitable presser foot for the stitch pattern is displayed. |
|
|
|
|
|
|
|
|
|
|
Needle Position |
Needle position is displayed. |
|
|
|
|
|
|
|
|
|
|
Type of Throat Plate |
The type of throat plate is displayed. |
|
|
|
: Standard throat plate |
|
|
|
: Throat plate for straight stitch |
|
|
|
|
|
- |
Sewing Condition |
Stitch Pattern which is sewn currently or to be sewn is displayed. |
|
|
||
|
|
|
|
A |
|
Option key |
Setting of 14 types of options can be set. |
|
|
* Available options differs according to the selected stitch pattern. |
|
|
|
|
|
|
|
|
|
B |
|
Guide key |
Basic operations can be checked. |
|
|
|
|
|
|
|
|
C |
|
Lock Mode Key *1 |
When pushing it, all the operations are disabled. |
|
|
In order to release the lock mode, press the lock mode key for 1 seconds. |
|
|
|
|
|
|
|
|
|
D |
|
Return key |
When pushing it, the screen goes back to the previous page. |
|
|
Combination Pattern mode can delete the selected pattern. |
|
|
|
|
|
|
|
|
|
E |
|
Clear key |
Setting of Stitch Pattern can be returned to the default setting. |
|
|
|
Adjusting Dial (Left) This dial will be used when adjusting zigzag width or needle position. The zigzag width can be changed by pressing the zigzag width icon. The zigzag width is increased by turning this dial clockwise.
F  The zigzag width is decreased by turning this dial counterclockwise. The needle position can be changed by pressing the needle position icon. The needle is shifted to the right by turning this dial clockwise.
The needle is shifted to the left by turning this dial counterclockwise.
|
Adjusting Dial |
This dial will be used when adjusting stitch length. |
G |
(Right) |
The stitch length is increased by turning this dial clockwise. |
|
|
The stitch length is decreased by turning this dial counterclockwise. |
* 1

 Lock Mode given in the Instruction Manual means
that operation of all keys is disabled by pressing the  . (Refer to page 61)
11
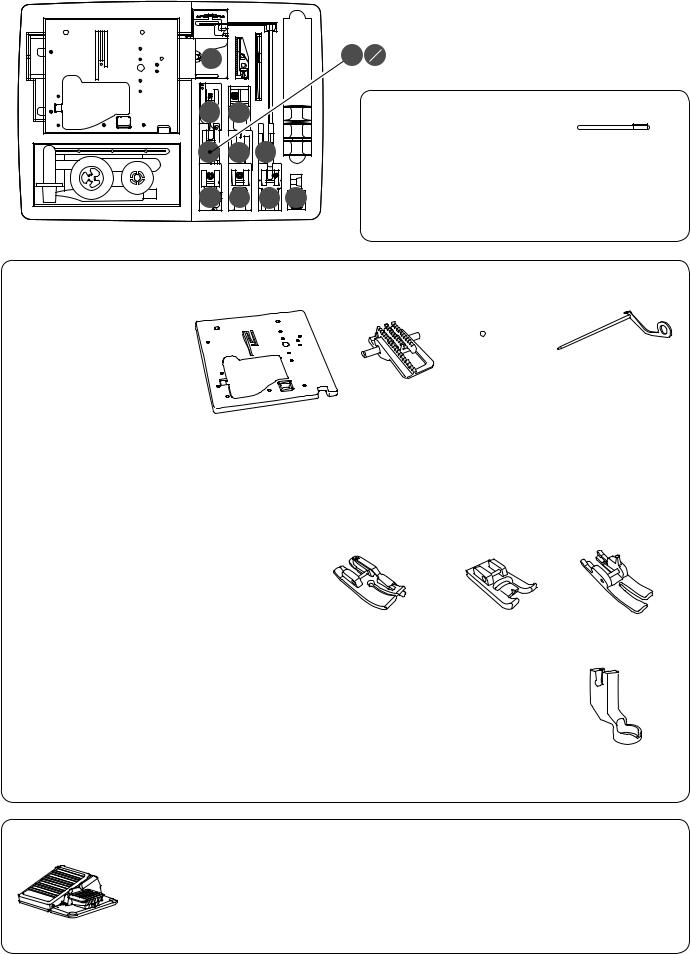
2. Accessories |
|
|
|
|
|
E |
|
|
7 |
1 4 |
|
D |
|
|
|
● Supplied with the machine |
|
|
|
|
|
|
|
|
|
|
|
|
Touch pen |
C |
O |
P |
Q |
Bobbin (1) |
|
Standard presser |
|
||||
|
|
|
|
|
|
Auxiliary box |
|
|
|
foot (A) |
Spool cap (large) |
|
|
|
|
|
● Inside the auxiliary box.
|
|
|
|
T-shape |
Quilt guide |
|
|
|
|
|
|
|
|
|
Straight feed dog screwdriver |
|
|
|
foot (E) |
Straight throat plate |
|
Bobbin (3) |
|
|
|
|
|
|
|
Auxiliary spool pin |
|
|
Blind stitch presser |
Zipper presser |
|
Needle set |
foot (D) |
foot (B) |
|
||
|
|
|
|
||
|
HA × 1 # 11 (1) |
|
|
|
|
Ripper |
|
# 14 (1) |
|
|
|
|
# 16 (1) |
|
|
|
|
|
for knit # 11 (1) |
7mm guide foot or |
Manual buttonhole |
Straight presser |
|
|
|
|
|||
Cleaning brush |
|
|
1/4" guide foot |
presser foot (I) |
foot (S) |
|
|
|
|
|
|
Spool cap (Small)
Spool cap (Middle)
Overcasting |
Open toe presser |
presser foot (C) |
foot (O) |
● It is contained in the packing.
|
Power cord |
|
Foot Controller |
Knee-lifting lever |
Sewing machine cover |
|
||
Patchwork |
Quilt presser foot |
presser foot (P) |
(for the ruler) (Q) |
Instruction manual
(This manual)
Wide table
12
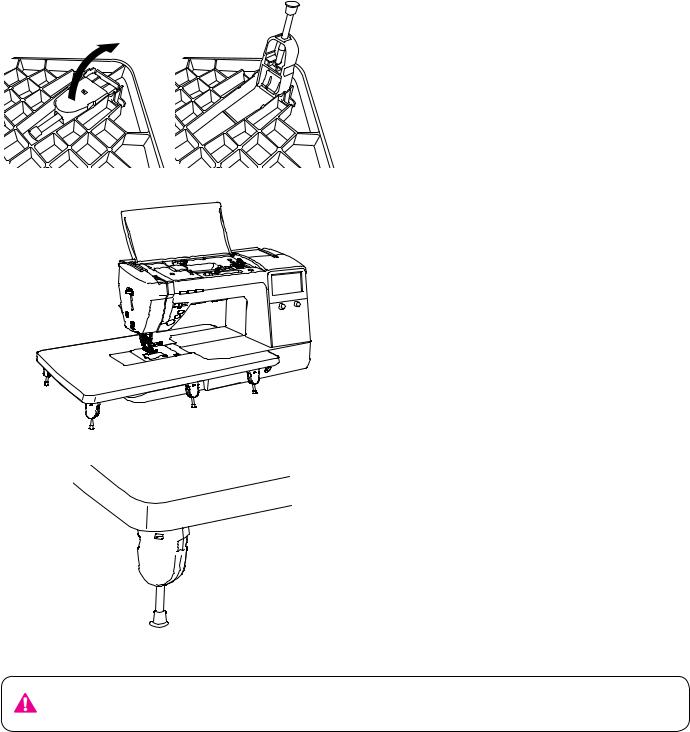
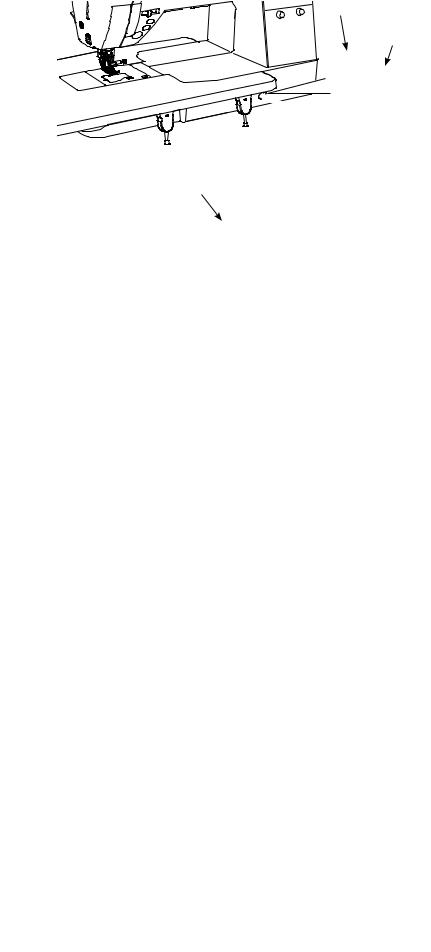
3.Set-up
3.1.How to install Wide Table
1 Open legs of Wide Table until they stop securely at the stopping position.
2 Assemblebody. Wide Table to sewing machine
Attach it to free arm of sewing machine.
3 Adjust the height of legs so that the top surface of Wide Table is the same height of sewing machine body.
*Don't put any heavy materials on the Wide Table.
*Don't move sewing machine with Wide Table attached.
13

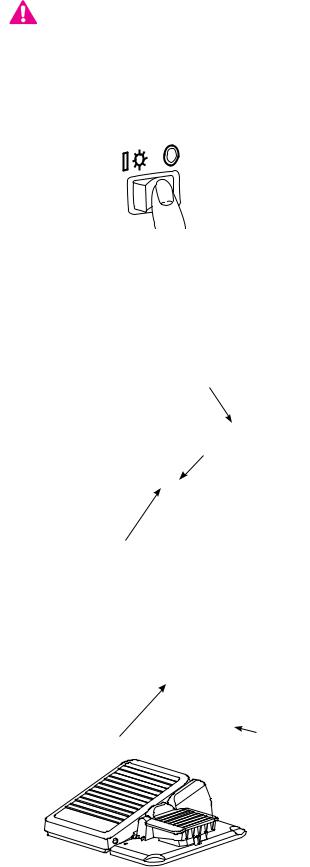
3.2. Changing the position of the foot switch
The lateral position of the foot switch in reference to the pedal can be changed.
Use the foot switch at your desired position.
Unplug the controller before you  Attention change the position of the foot
switch.
1 Remove pedal setscrew and block setscrew .
|
Attach pedal and block to the |
|
2 opposite side while turning them in the |
|
other way around, and tighten the pedal |
|
setscrew and block setscrew. |
|
Foot switch |
|


14
3.3. Installation of knee lifting lever
|
|
Insert the knee lifting lever so that concave |
|
|
and convex meet. |
|
|
15
4.Basic settings and basic operations
4.1.Connecting to the power supply
WARNING |
• Disconnect the plug and turn off the power switch (turn to “O”) that al- |
ways sewing machine is not to use. |
|
|
|
■ Connecting the codes
Turn OFF the power switch (turn to “O”)
 WARNING (For U.S.A.,Canada only)
This appliance has a polarized plug (one blade wider than the other). To reduce the risk of electric shock, this plug is intended to fit in a polarized outlet only one way. If the plug does not fit fully in the outlet, reverse the plug. If it still does not fit, contact a qualified electrician to install the proper outlet. Do not modify the plug in any way.
●Not-using foot-controller that using
start/stop-button:
Insert cord-connector into machine-socket-inlet .
Insert plug into socket-outlet.
● Using the foot-controller:
Insert the foot-controller-plug into the foot-control- ler-jack .
|
|
Insert cord-connector into machine-socket-inlet. Insert |
|
|
plug into socket-outlet. |
|
|
* When the foot controller is plugged in, the start/stop button |
|
cannot be used to start sewing. |
|
|
|
|
|
|
●Start button: Can not operate to start sewing. |
|
|
●Stop button: Can operate to stop sewing. |
16
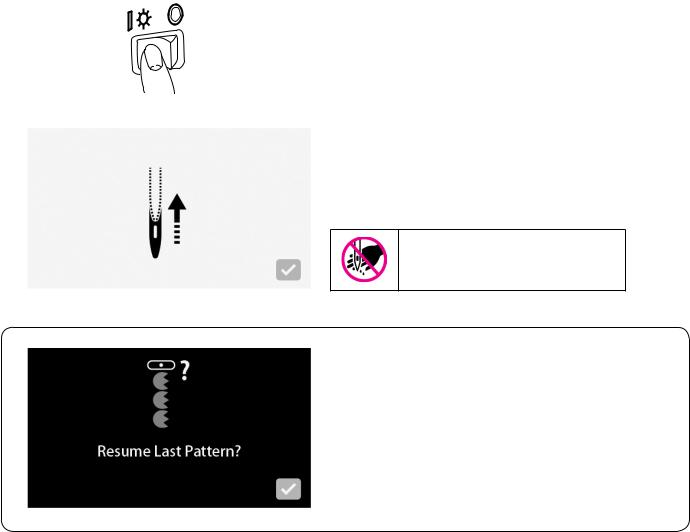
■ Turning the power ON
Turn ON the power switch. (Turn to “I”)
* Be aware that the presser foot goes up automatically when the power to the sewing machine is turned ON.
The screen shown on the left when the power to the sewing machine is turned ON.
The needle moves and the screen shown on the left disappears by pressing  .
.
Do not place fingers under the needle
In the case the function of retaining the pattern that has been sewn immediately before stopping the sewing machine is optionally set for the startup, the message shown on the left will be displayed.
17
4.2.Speed control
■Speed controller
■Foot controller


■Low-speed inching sewing
Maximum sewing speed can be freely set by the speed controller.
: Faster speed  : Slower speed
To run the machine, press the foot controller.
The harder you press, the faster the machine sews. Speed controller will set the maximum sewing speed.
Pressing harder → faster speed
Pressing weaker → slower speed
* Always clean the foot controller.
It is important that you do not place any objects on the foot controller as it may cause injury to the user and may cause malfunctions.
When the needle up/down switch is held pressed, the sewing machine performs sewing at a low speed.
 Adjustable starting stitch speed
The sewing speed to be employed at the beginning of sewing can be changed by using the option setting function. (Refer to page 54)
 Adjustable reverse stitch speed
The sewing speed for reverse stitch can be changed by using the option setting function. (Refer to page 54)
18
4.3. Lifting/lowering of the presser foot
■ Presser foot lifting lever
A
B
The presser foot B is lifted/lowered with the presser foot lifting lever A. The presser foot can be lifted higher than the ordinary lift position. This feature is useful when placing a heavy-weight material on the sewing machine.
Even after the presser foot has been lifted with the presser foot lifting lever, the presser foot can be lowered with the presser foot auto lift button.
Lowered position…………… Presser foot should be lowered when sewing.
Ordinary lift position…………This position is used for fab-
ric removal and/or changing the presser foot.Extra lift position……This position is used to put heavy
materials underneath the presser foot.
*Be careful that the presser foot and the needle should not interfere when the needle is in down position and the presser foot is raised to the extra lift position.
■Presser foot auto lift button
The presser foot can be lifted/lowered by pressing the presser foot auto lift button. (Refer to page 7)
Operation of the presser foot lifting lever is enabled by lifting the lever to position 3 once after lifting the presser foot with the presser foot auto lift button.
■ Knee lifting lever
It is possible to lift and lower the presser foot with your knee instead of using your hands.
Push the lever to right-hand side to lift the presser foot. The presser foot is lowered when the lever goes back to the original position.
Operation of the knee lifter lever is enabled by pressing the lever to the rightmost position after lifting the presser foot with the presser foot auto lift button.
*Do not touch the knee lifting lever while sewing. If you touch the knee lifter lever during sewing, the presser foot will go up causing a deformation in the pattern.
■Automatic presser foot lifting
 Pivot setting
It is possible to set so that the presser foot goes up automatically with the needle kept at the lower position when the sewing machine is stopped.
 Presser foot lift after trimming setting
It is possible to set so that the presser foot goes up automatically after thread trimming.
● Automatic lowering of the feed dog when lifting the presser foot
The feed dog comes down automatically when the presser foot is lifted with the presser foot lifting lever or the presser foot auto lift button.
This feature is helpful for placing the material under the presser foot or removing it from there as well as preventing the material from being damaged since the material will not be caught in the feed dog.
* The feed dog does not come down in the case of setting the “presser foot lift after thread trimming”.
19
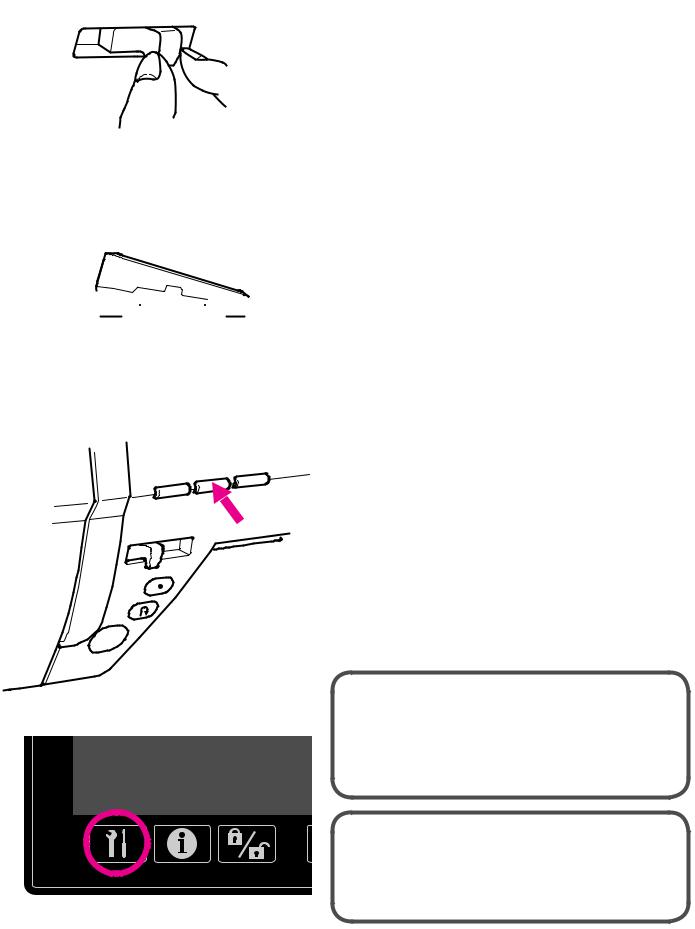
4.4. Changing the presser foot
■Removing and installing the presser foot


A

 Leave the machine in Lock mode
● Removing presser foot
Raise the needle.
Move up the presser foot lifting lever.
Press the presser foot releasing button to remove the presser foot.
● Installing presser foot
Align the pin of the presser foot and the groove in the presser foot holder.
Move down the presser foot lifting lever.
*Each presser foot has a marking . Use the appropriate presser foot for the stitch pattern to be sewn.
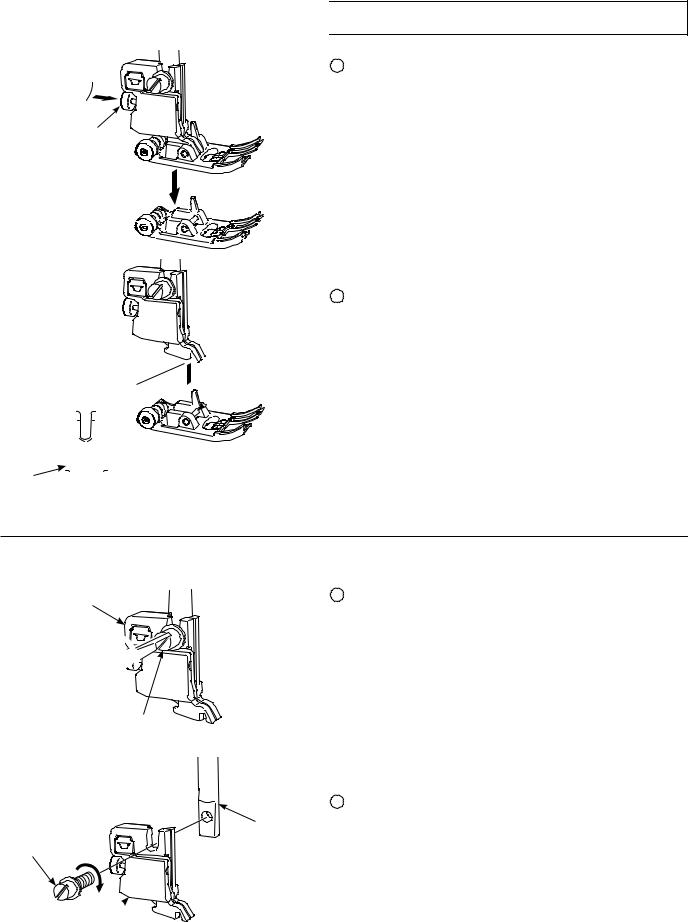
■ Removing and installing presser foot holder
|
● Removing presser foot holder |
Lift the needle and presser foot lifting lever.
Loosen the setscrew of the presser foot holder to the left and remove the presser foot holder .
|
|
● Installing presser foot holder |
|
Align the screw hole at the presser bar with the hole of |
|
|
|
|
|
presser foot holder (long groove). |
|
|
|
Tighten the setscrew firmly by turning it to the right |
side.

20
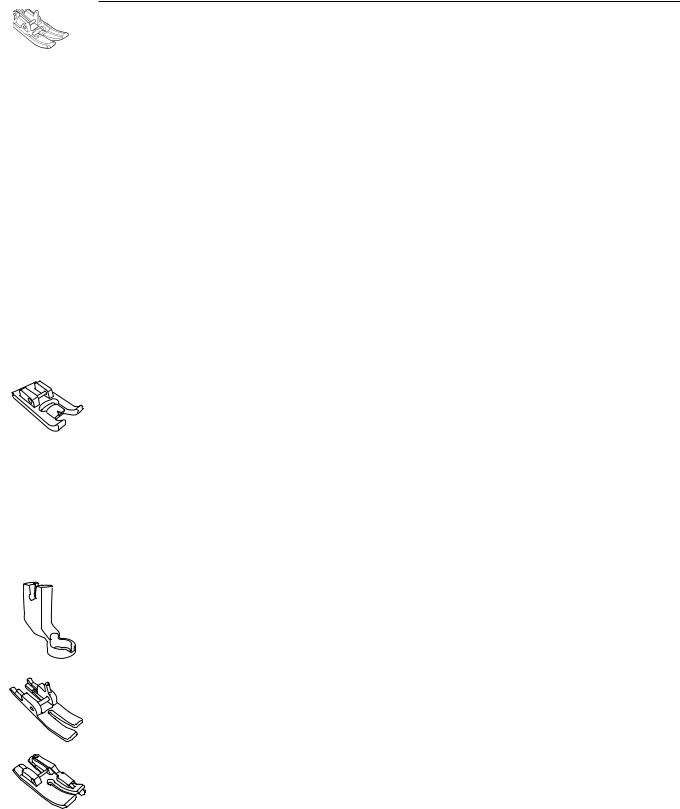
■ The type and application of the presser foot
Marking of presser foot
↓
Standard presser foot |
A |
This is used mainly for straight stitch and zigzag stitches. |
|
|
Use this presser foot especially when sewing heavy-weight |
|
|
materials. |
|
|
|
Zipper presser foot |
B |
This is used to attach zippers. |
|
|
|
Overcasting presser |
C |
This presser foot is used exclusively for overcasting to prevent |
foot |
|
the cut edge of fabrics from fraying. |
|
|
|
Blind stitch presser |
D |
This presser foot is used for blind stitch on hems of trousers |
foot |
|
and skirts, or sleeves. |
|
|
|
Buttonhole presser |
E |
This presser foot is used for automatic buttonholing. |
foot |
|
|
|
|
|
Manual buttonhole |
I |
This is used for sewing decorative stitches, letters and bartacks. |
presser foot |
|
Also for manual buttonhole (pattern No.402, No.403). |
|
|
|
Patchwork presser |
P |
This presser foot is used for patchwork stitches. There are two |
foot |
|
seam lines, 1/4-inch and 1/8-inch from center needle position. |
|
|
|
Open toe presser foot |
O |
This is used for the applique and decorative stitches. |
|
|
(Front part of the presser foot is open for better visibility.) |
|
|
|
Quilt presser foot |
Q |
This is used for the quilt stitch. |
(for the ruler) |
|
(Machine setting: Straight Stitch and Center needle position) |
|
|
The ruler can be used together with the quilt presser foot. |
|
|
|
Straight presser foot |
S |
Use this presser foot when using the throat plate for straight |
|
|
stitch. |
|
|
|
7mm guide foot or |
7 |
This guide presser foot is provided with a guide for 7-mm or |
1/4” guide foot |
|
1/4-inch seam allowance for piecing. |
|
|
|
21
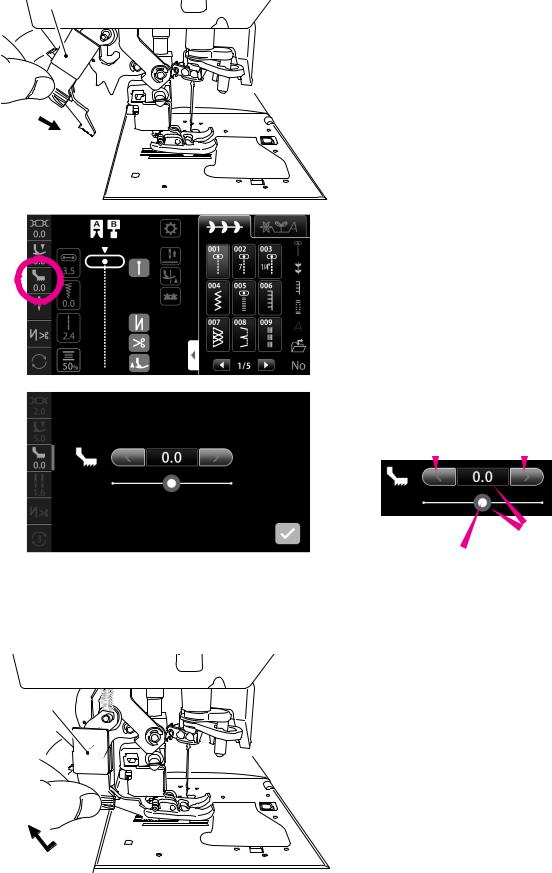
4.5. Placing and releasing “JUKI Smart Feed”
“JUKI Smart Feed” is used when sewing the materials (knit, jersey, vinyl cloth, artificial leather, etc.) that are generally hard to be fed, and the materials (quilt, etc.) that are likely to cause uneven material feed.
“JUKI Smart Feed” can only be used for sewing limited types of patterns.
|
● Placing “JUKI Smart Feed” |
|
Raise the presser foot.
Fully lower “JUKI Smart Feed” while pinching it with fingers.
When “JUKI Smart Feed” is fitted appropriately, the relevant icon is displayed on the screen.
● Adjusting “JUKI Smart Feed”
Press  .
.
Adjust “JUKI Smart Feed” by pressing the icon. (Setting range: -5.0 - 5.0)
The top feed amount |
The top feed amount |
is decreased. |
is increased. |
The top feed amount can also be adjusted by sliding the slide bar to the right or left.
The top feed amount will be returned to its initial value by pressing the blue frame.
The set value is confirmed by pressing  .
.
● Releasing “JUKI Smart Feed”
|
Raise the presser foot. |
Pinching “JUKI Smart Feed” , pull it down and push backward until it is brought to its upper position.
22
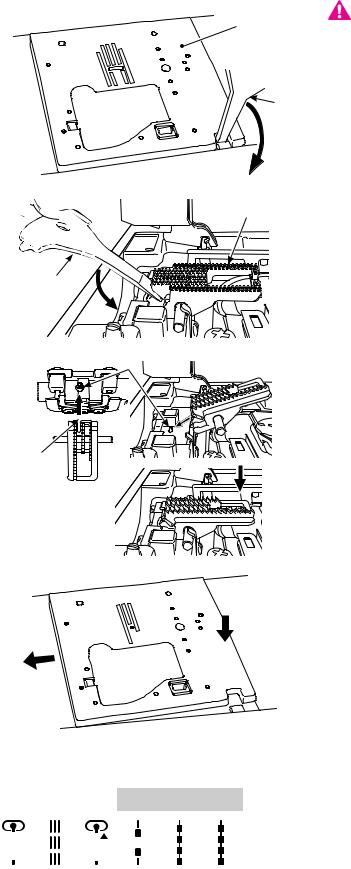
4.6. Changing the throat plate and the feed dog
The normal throat plate and feed dog can be changed to the throat plate and feed dog for straight stitch.
In the case of starting sewing from the edge of material, the material can be smoothly fed without being pulled into the needle hole by changing the throat plate and feed dog to those for straight stitch.
|
Turn off the machine or leave the |
|
Machine in Lock Mode |
||
|
||
|
|
|
|
● Removing the throat plate |
|
Remove the presser foot and needle. |
|
|
Push the T-shape screwdriver into the groove in front of |
|
|
the throat plate . When pressing the screw-driver down- |
|
|
ward, throat plate will come off. |
|
|
● Removing the feed dog |
|
|
||
|
Push the T-shape screwdriver into the groove in the |
|
|
back of the feed dog . When pressing the screw-driver |
|
downward, feed dog will come off. |
||
|
|
|
● Attaching the feed dog |
|
|
|
|
|
Follow the angle in the sketch and place the feed dog so |
|
|
that the pins of the feed dog meet the groove in the |
|
|
back of feed dog. |
|
Press down the front part of feed dog and engage the |
feed dog.
|
● Attaching the throat plate |
|
Place the area ( ) fi rst and then push center to right |
|
hand part of the throat plate to assemble ( ). |
|
● Patterns that can be sewn with the throat plate for straight stitch
001 |
009 |
011 |
391 |
392 |
393 |
Once the throat plate and feed dog for straight stitch are installed, the |
||||
|
|
|
|
|
|
|
|
|
|
limited types of patterns that can be sewn with them can be selected. |
|
|
|
|
|
|
|
|
|
|
|
|
|
|
|
|
|
|
|
|
|
|
|
|
|
|
|
|
|
|
|
|
|
|
|
|
|
|
|
|
|
|
|
|
|
|
|
|
|
|
|
|
|
|
|
23

4.7. How to use the throat plate for straight stitch
The throat plate is provided with a useful guide for you to determine the sewing position of material.
Standard throat plate
|
|
Throat plate for straight stitches
|
|
|
|
|
|
120 |
|
|
|
135 |
|
|
|
|
|
|
|
60° |
7mm |
45° |
|
7mm |
7mm |
|
7mm |
|
|
|
|
120° |
|
135° |
● Guide lines
It is possible to sew the material from its edge by sewing the material while aligning its edge with the guide line on the throat plate.
On center needle position basis
5 mm
* Numbers on the guide line show the distance in mm and inches between the center needle position and the guide line.
Numbers, 7, 10 and 20 are millimeter. Numbers, 1/ 4, 5/ 8 and 1 are inches.
● Angle index
The angle index is useful when using it for piecing of patchworks.
If you align the material edge with the angle index which is same of the angle of patchwork (piece) corner , you will know the start and end positions while setting the seam allowance to 7 mm without marking the material.
Guide
24
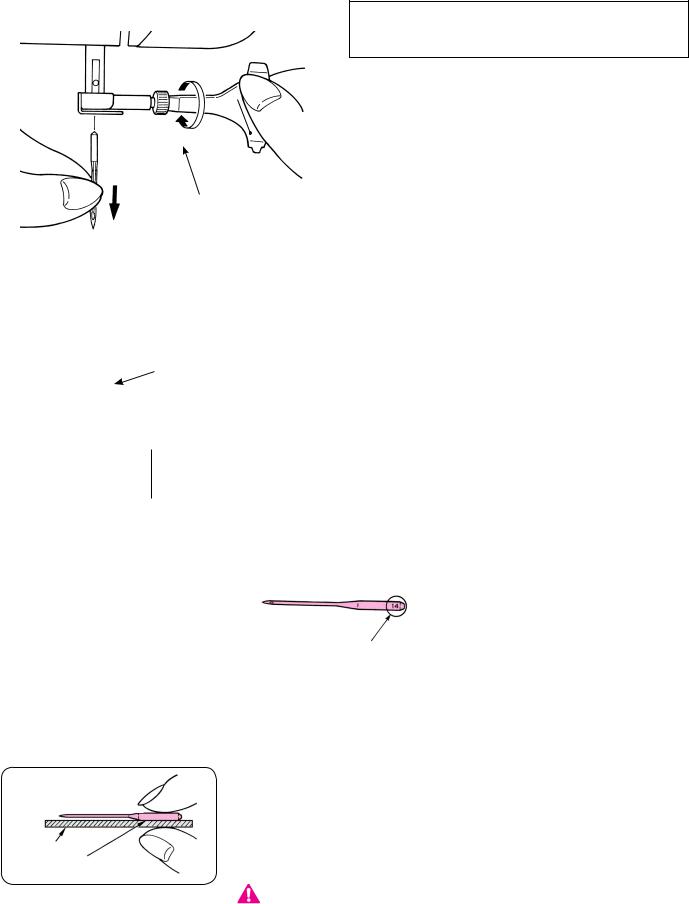
4.8. Attaching the needle
 Turn off the machine or leave the Machine in Lock Mode
● Removing needle
Turn the hand wheel towards you until the needle comes to the highest position and lower the presser foot.
Turn the needle setscrew towards you 1-2 times and remove the needle.
T-shape screwdriver
●Attaching the needle
Hold the needle with its flat part facing away from you ( ), and insert it fully until it touches the stopper pin . Securely tighten the needle setscrew.
The needle cannot be inserted unless it is correctly positioned.
● Needles to be purchased
When purchasing spare needles, specify HA×1 (130/705H) or HA×1 SP (needle for knits) .
● Checking the needle
Needle size:
The larger the number, the thicker the needle.
|
Check the needle for its straightness occasionally. |
|
Any bent needle would cause skipped stitches, thread breakage or damage |
|
to materials. |
|
The flat part of the needle |
Flat object |
|
|
Attention: If the needle is not properly installed or a bent |
|
needle is used, needle breakage can be caused. |
|
It will cause damage to the machine. |
25

4.9. Fabric, thread and needle table
|
Fabric |
Thread |
Needle |
|
|
|
|
HA×1 |
|
Light-weight |
Lawn |
Silk thread …………………………… No.80,90 |
|
|
materials |
|
No.11 |
||
Georgette |
Spun thread ………………………… No.80,90 |
|||
|
|
|||
|
|
|
||
|
|
|
|
|
|
Tricot |
Spun thread ………………………… No.60-90 |
Knit needle |
|
|
No.11 |
|||
|
|
|
||
|
Wool and synthetic |
Silk thread ……………………………… No.80 |
No.11-14 |
|
|
fabrics |
Spun thread ………………………… No.60-90 |
||
|
|
|||
|
|
|
|
|
Medium-weight |
Cotton and synthetic |
Spun thread ………………………… No.50, 60 |
No.11-14 |
|
materials |
fabrics |
|||
|
|
|||
|
|
|
|
|
|
Light jersey |
Silk thread ……………………………… No.50 |
Knit needle |
|
|
Spun thread ………………………… No.50, 60 |
No.11 |
||
|
|
|||
|
|
|
|
|
|
Ordinary wool and |
Silk thread ……………………………… No.50 |
No.11-14 |
|
|
synthetic fabrics |
Spun thread ………………………… No.50, 60 |
||
|
|
|||
|
|
|
|
|
Heavy-weight |
Denim |
Spun thread ………………………… No.30-50 |
No.14-16 |
|
materials |
||||
|
|
|
||
|
|
|
|
|
|
Jersey |
Silk thread ……………………………… No.50 |
Knit needle |
|
|
Spun thread ………………………… No.50, 60 |
No.11-14 |
||
|
|
|||
|
|
|
|
|
|
Coat |
Silk thread ……………………………… No.50 |
No.11-14 |
|
|
|
|
|
*In general, the same thread is used for both needle and bobbin threads.
*Thin thread and needle will be used for light-weight fabrics and thick thread and needle will be used for heavyweight materials.
*Check that the combination of needle and thread is OK by trial sewing on the material which will be sewn.
*Knit needle is good for stretchy fabrics (such as knits) and synthetic fabrics.
*Use thread No. 30 - 90.
*When it is difficult to go over an overlapped section, guide the fabric by hand.
*When sewing “quilt patterns”, “decorative patterns” or “letters”, better finish will be ensured by using a knit needle.
26
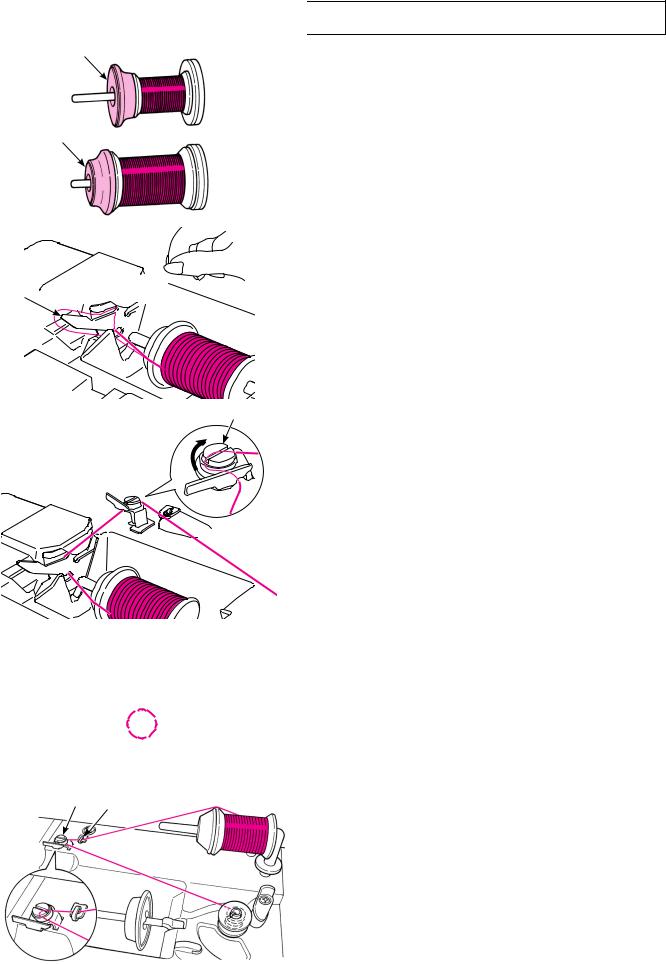
4.10. Bobbin thread preparation
■ Winding a bobbin
A
A


 Turn off the machine
● In the case of using the spool pin
1 Place the thread spool to the spool pin.
There are three types of the spool caps A, large, medium and small.
Select the size of spool cap according to the thread spool to be used and use it while changing its direction appropriately.
* Be aware that a spool with a small remaining amount of thread can cause tangling or slip-off of thread.
2 Thread the guide .
3 Thread the thread guide (guide in the
circle) .
Pull the thread by both hands and thread it to bobbin winding thread guide.
● In the case of using the auxiliary spool pin
1
2
3
Place the auxiliary spool pin.
Place the thread spool to the auxiliary spool pin.
Pass the thread through thread guide
. Then, pass the thread through thread guide for bobbin winding .
Pull the thread by both hands and thread it to bobbin winding thread guide.
27
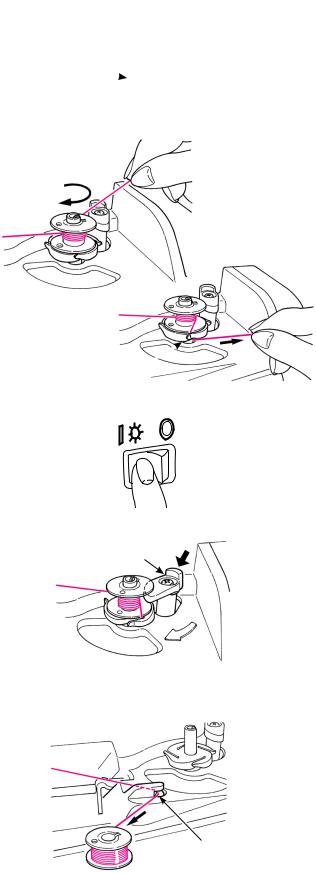
4

5
Set the bobbin on the bobbin winding shaft .
Pay attention that the thread from bobbin winding thread guide is not loose and wind the thread to the bobbin 4-5 times in clockwise direction.
Put the thread end into the guide at the bobbin winding shaft and pull it to the right side to cut it.

|
6 Turn the power ON. |
|
Push the bobbin winding regulator |
|
7 towards the bobbin to start winding the |
|
bobbin. |
*Be careful that the bobbin winding regulator works as a switch.
|
When winding is finished, the shaft |
|
|
8 stops automatically, the bobbin winding |
|
|
regulator moves to right and return to the |
|
|
original position. |
|
|
Remove the bobbin from the bobbin |
|
|
winding shaft and cut the thread by cutter |
|
. |
||
|
||
|
* Bobbin winding will automatically stop even |
|
|
while winding, when the winding speed is |
|
|
reduced due to a load to the bobbin winding |
|
|
motor caused by thread tangling. |
28
 Loading...