


LBH-1790AB
取扱説明書 / パーツリスト
INSTRUCTION MANUAL/PARTS LIST
BETRIEBSANLEITUNG MANUEL D’UTILISATION
MANUAL DE INSTRUCCIONES MANUALE D’ISTRUZIONI
使用说明书 / 零件表
KULLANMA KILAVUZU/PARÇA LİSTESİ
ИНСТРУКЦИЯ ПО ЭКСПЛУАТАЦИИ MANUAL DE INSTRUÇOES
No.00
40160112
LBH-1790AB
残短仕様
/
Shorter-thread remaining type /
Fadenabschneider mit kürzerem Fadenrestbetrag / Coupe-l de type l plus court restant /
Cortahilos tipo hilo remanente más corto / Rasalo a lo rimanente corto /
短残线规格
/
Daha kısa iplik bırakan tip iplik kesicinin /
Обрезателем короткого остатка нити / Tipo de linha restante mais curta
注意: このたびは、当社の製品をお買い上げいただきまして、ありがとうございました。
安全に使用していただくために、使用前に必ずこの取扱説明書をお読みください。
また、いつでもすぐに読めるように、この取扱説明書を保管してください。
NOTE : Congratulations on your purchase of a JUKI sewing machine.
Read safety instructions carefully and understand them before using.
Retain this Instruction Manual for future reference.
HINWEIS : Herzlichen Glückwunsch zu Ihrem Kauf einer JUKI-Nähmaschine.
Lesen Sie die Sicherheitsanweisungen aufmerksam durch, um sich mit ihnen vertraut
zu machen, bevor Sie diese Maschine in Betrieb nehmen. Bewahren Sie diese
Bedienungsanleitung für spätere Bezugnahme auf.
NOTE : Félicitations pour votre achat d’une machine à coudre JUKI.
Avant d’utiliser la machine, lire attentivement toutes les consignes de sécurité.
Conserver ce manuel pour pouvior le consulter en cas de besoin.
NOTA : Nuestro agradecimiento y felicitaciones por su compra de esta máquina de coser JUKI.
Antes de comenzar a usar esta máquina lea con detención hasta comprender todas las
instrucciones de sequridad. Conserve este Manual de instrucciones a mano para futuras
consultas.
NOTA : Congratulazioni per l'acquisto di una macchina per cucire JUKI.
Leggere attentamente e compredere tutte le istruzioni per la sicurezza prima di inziare l’ uso
di questa macchina. Conservare questo Manuale d’Instruzioni per pronto riferimento.
注意 : 感谢您购买本公司的产品。
为了安全地使用,请您在使用之前一定阅读本使用说明书。
另外,请您注意保管本使用说明书,以便随时查阅。
NOT : Bir JUKI dikiş makinesi satın aldığınız için tebrik ederiz.
Güvenlik talimatını dikkatle okuyun ve makineyi kullanmadan önce tümüyle öğrenin.
Gelecekte de yararlanmak için, bu kullanma kılavuzunu muhafaza edin.
Примечание : Поздравляем Вас с покупкой швейной машины JUKI.
Внимательно прочитайте и усвойте правила техники безопасности перед использованием швейной
машины. Сохраните эту инструкцию по эксплуатации для того, чтобы обращаться к ней и в будущем.
NOTA : Congratulações por sua compra de uma máquina de costura JUKI.
Certique-se de ler o conteúdo coberto nas manual de instruçoes antes de usar o produto.
Guarde estas manual de instruçoes para futuras consultas.
– 1 –
I. 使用上の注意
1) ご使用される前に、本取扱説明書および、LBH-1790A 取扱説明書・安全注意書を必ずお読みく
ださい。
2) 本項に書かれている内容は、LBH-1790AB 残短仕様にて変更となった箇所のみ記載されていま
す。(記載されていない項目は、LBH-1790A 取扱説明書に記載されています。)
3) LBH-1790AB を使用する際は、必ず最新のプログラムにて、メモリースイッチで「残短機能あり」
を選択してください。(未対応のプログラムや「残短機能無し」を選択して動作を行うと、布切り
メスが正常な位置で動作しません。)
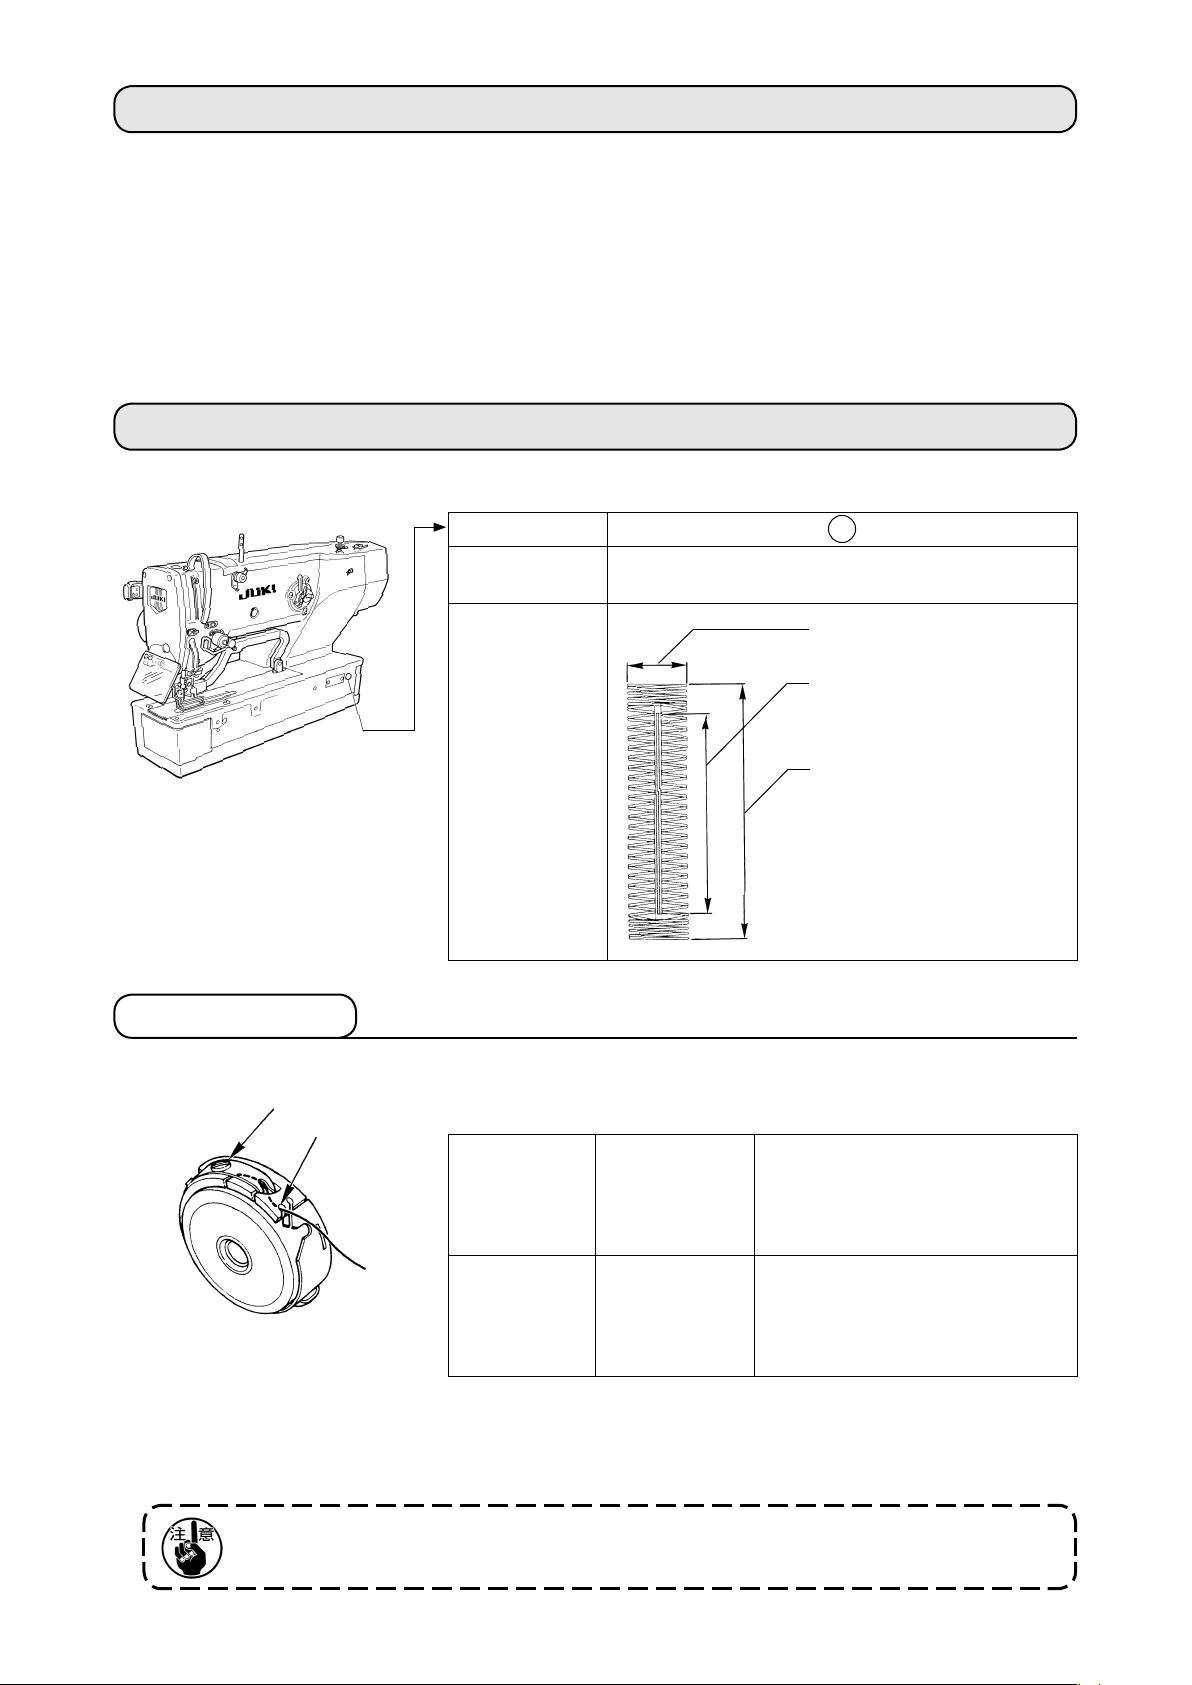
サブクラス B
主な用途
ワイシャツ・ブラウス・作業服・婦人服などの布綿用
のボタン穴
ボタン穴かがり
サイズ
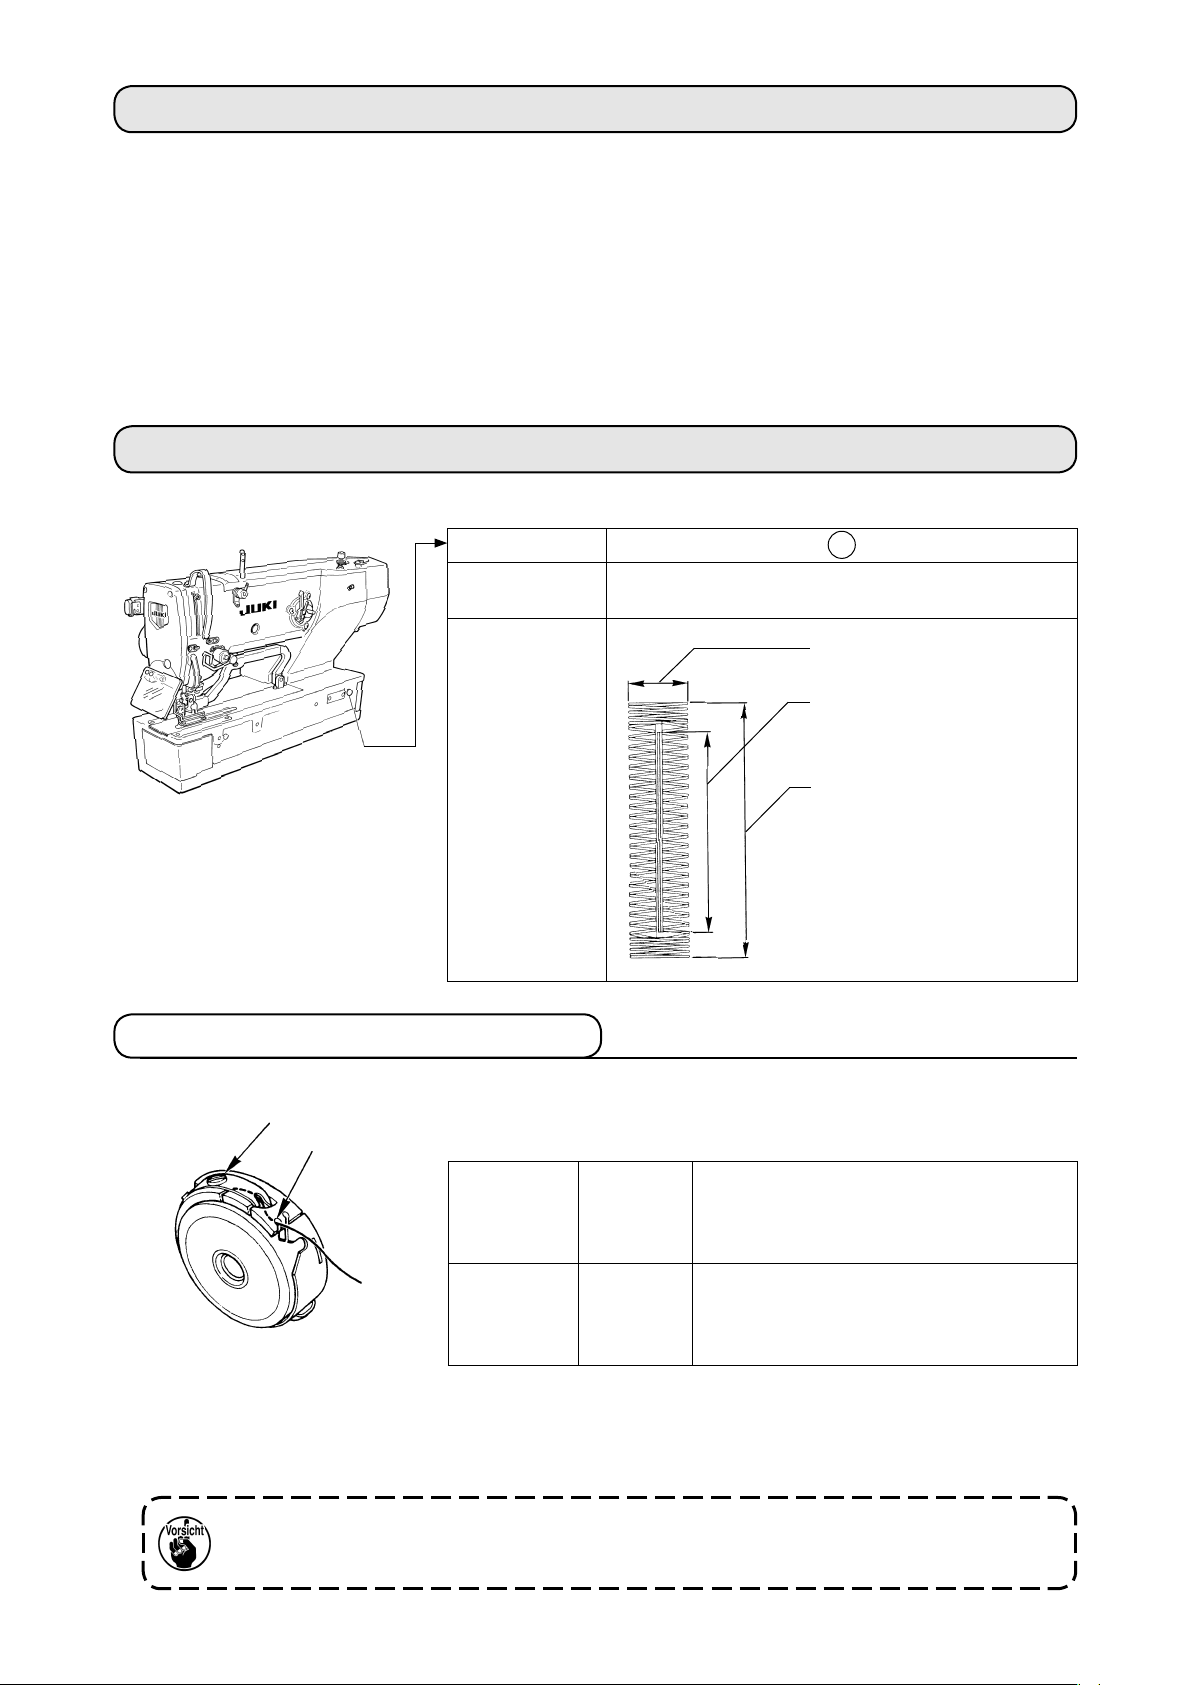
II. 仕様
LBH-1790AB 本縫電子ボタン穴かがりミシン(残短)の主な仕様
使用メス寸法
6.4 〜 22.2mm
(1/4' 〜 7/8' ※)
穴かがり縫い長さ
標準:最大 25mm
標準:最大 4mm
※ 残短仕様は押え 1 タイプのため、
メスサイズは 7/8' までとなります。
(針板は 1 インチまで対応可 )
縫い不具合(糸切れや山立ち不良等)に問題無い範囲で下糸張力を上げてください。下糸
張力が強いほど下糸残り長さが短くなります。
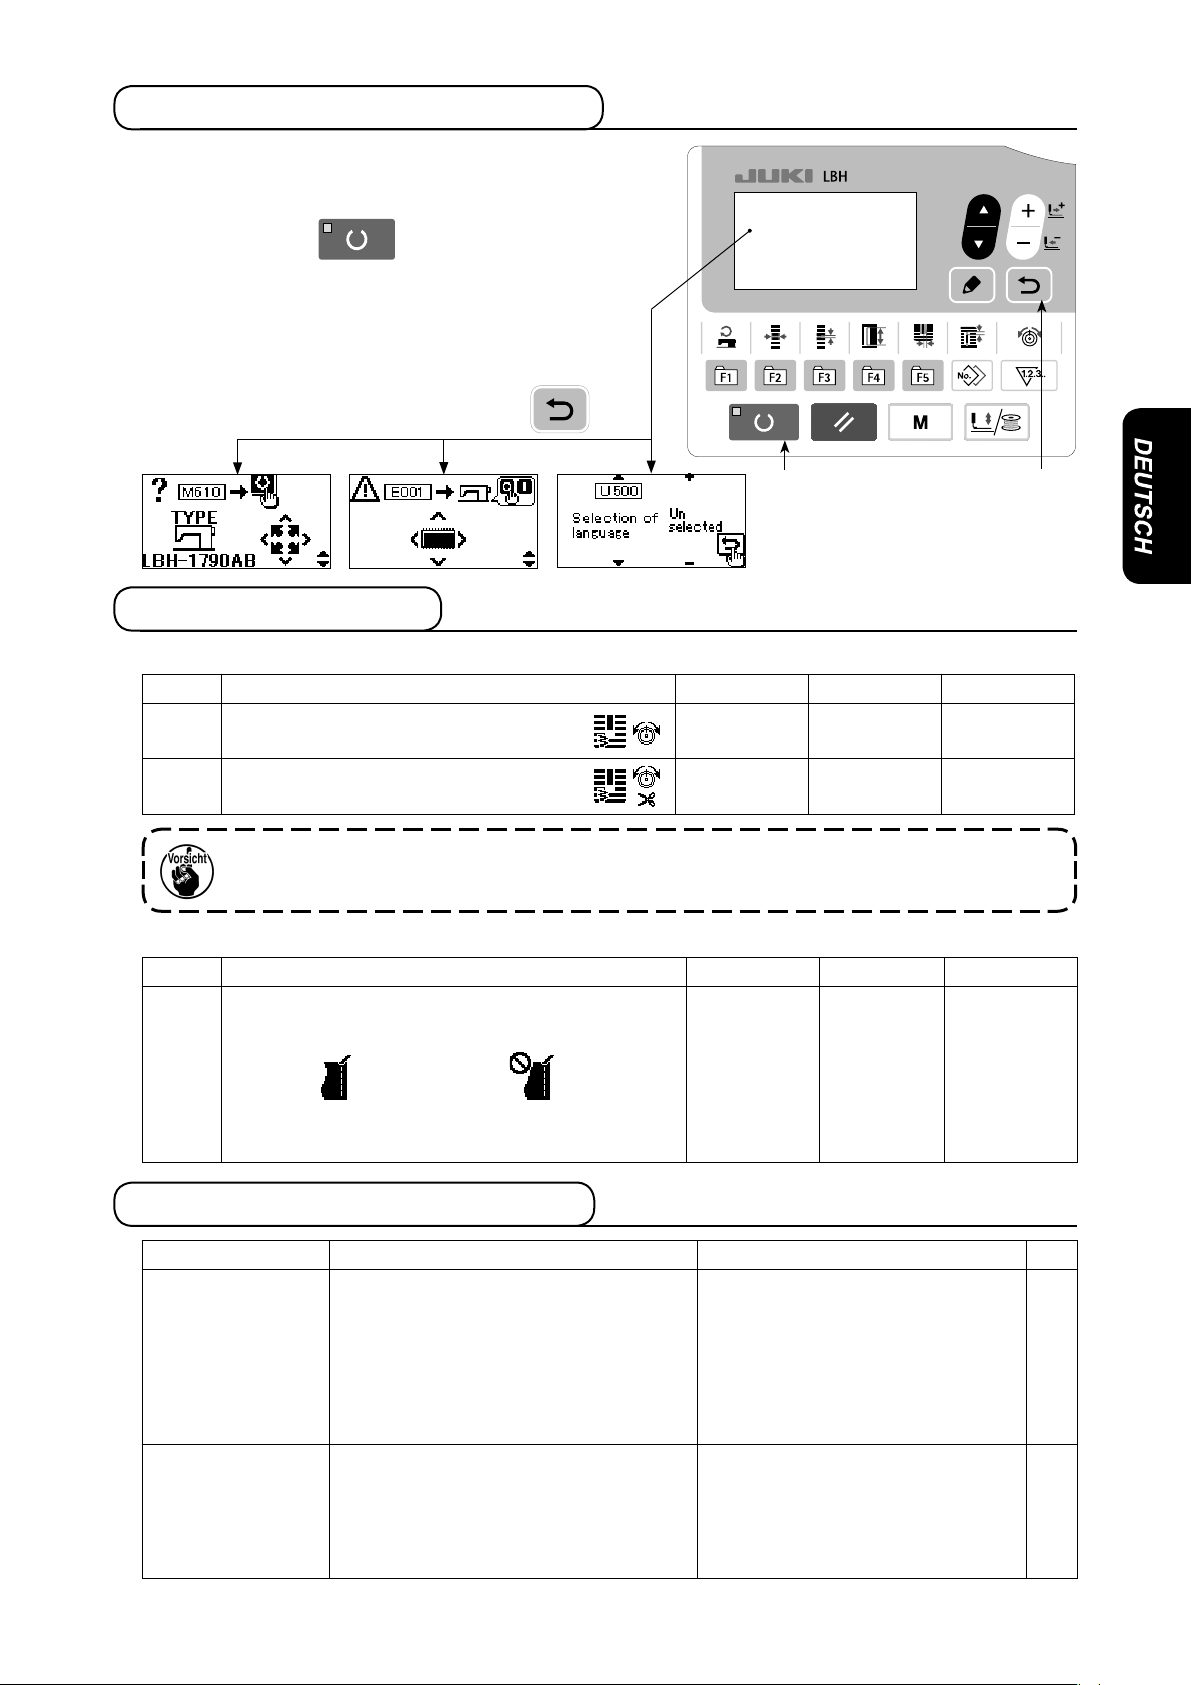
1. 下糸張力の調整
糸調子ねじ❷を右へ回せば、下糸張力は強く、左へ回せば弱くなります。
化繊フィラメント糸は、張力を弱めに、スパン糸は強めに調整してください。空転防止ばねが入っ
ていますので、釜にセットした場合の糸張力は、更に 0.05N 程強くなります。
❶
❷
パール縫い 0.05 〜 0.2N
ボビンケースから出ている糸の
端を持って、静かに上下に振っ
たとき、ボビンケースが静かに
下がってゆく程度
ウイップ縫い 0.15 〜 0.3N
ボビンケースから出ている糸の
端を持って、やや強く振ったと
き、やっとボビンケースが下がっ
てゆく程度
ボビンケース糸通し口❶が上になるような位置で、下糸を上に引き
出した時、下糸張力は下記のように調整してください。
– 2 –
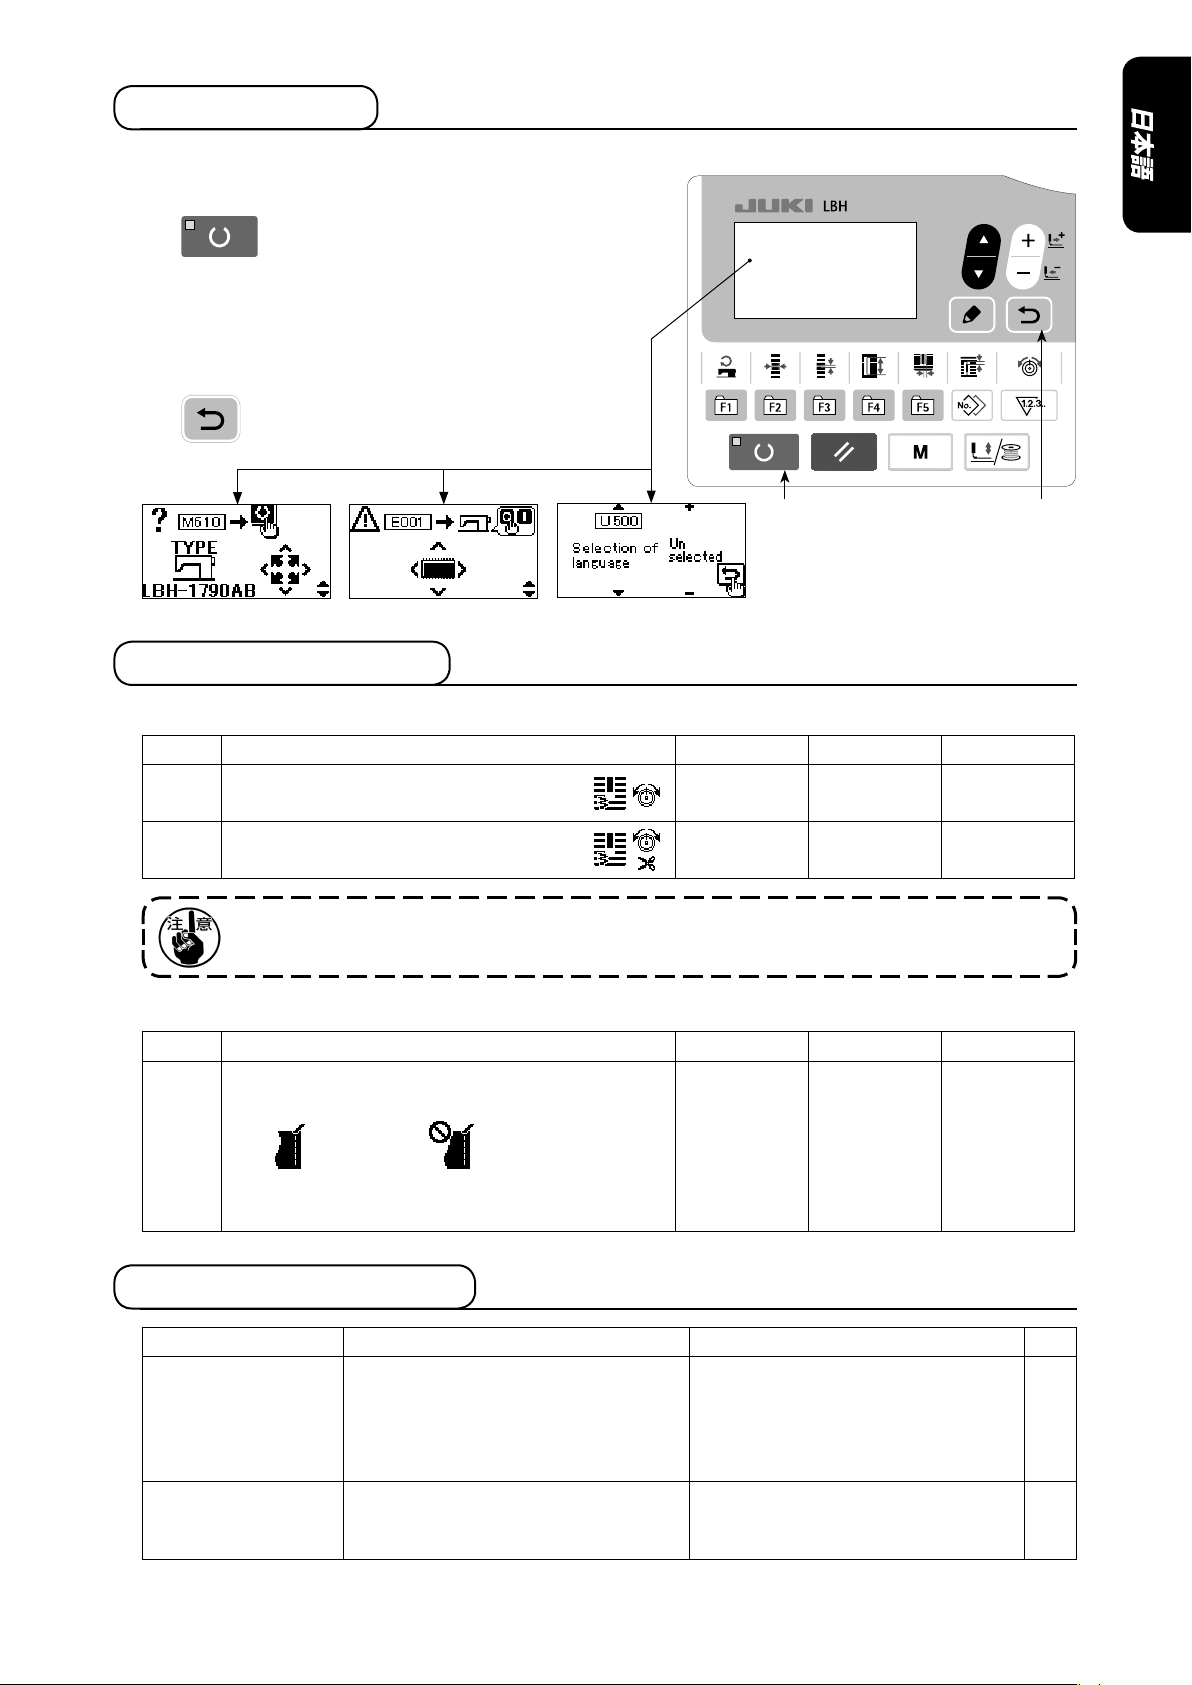
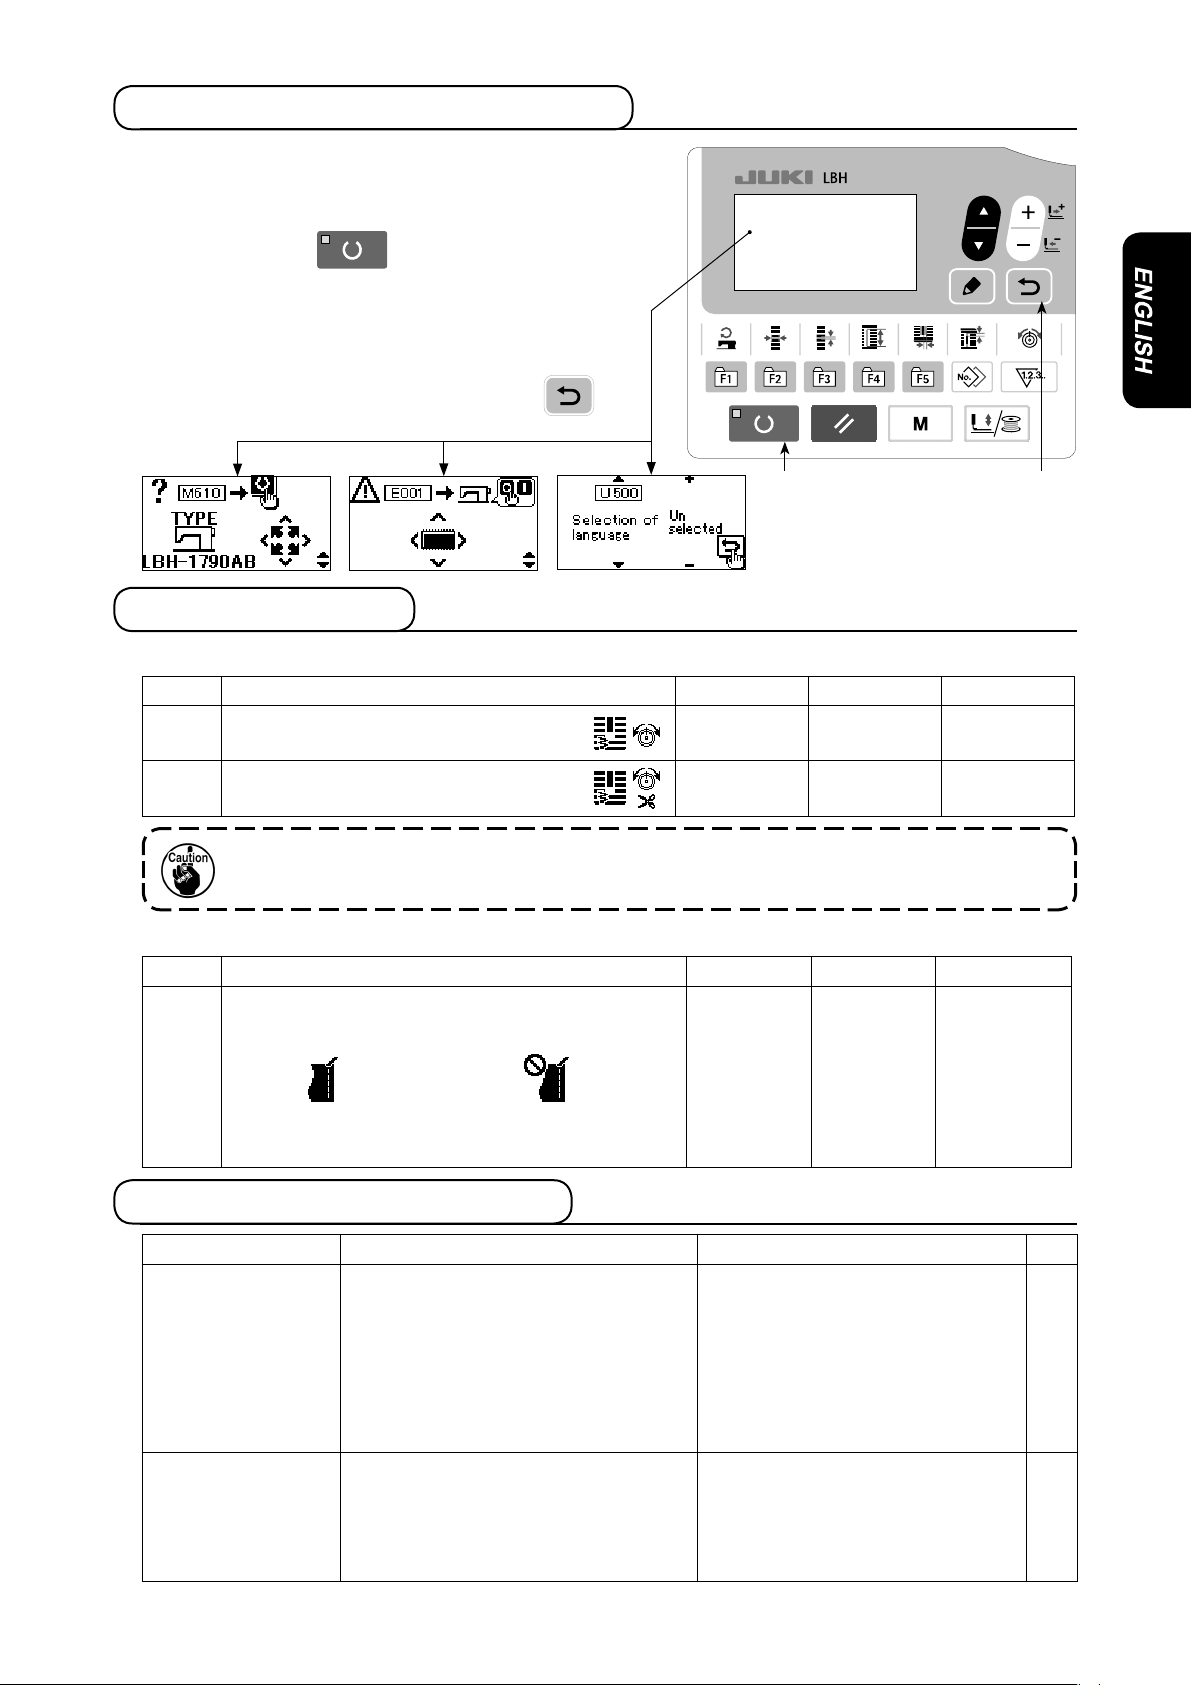
2. ミシンの機種選択
1) お買い上げ後、初めて電源を入れた際に、機
種確認画面が表示されますので、準備キー❶
を押してください。
2) 画面にエラー E001 が表示されたら、電源を切
ります。
3) 再び電源を入れると、言語選択画面が表示され
ます。表示させたい言語を選択し、戻るキー❷
を押してください。
No. 項目 設定範囲 編集単位 初期値
U006 縫い終わり上糸張力設定
0 〜 200 1 15
U007 糸切り時の上糸張力設定
0 〜 200 1 15
(1)レベル 1
3. メモリースイッチデータ
縫い終わり、糸切り時の上糸張力を下げるほど下糸残り長さは短くなりますが、下げ過ぎ
ると、縫い目のほつれが発生するので注意してください。
No. 項目 設定範囲 編集単位 初期値
K025 残短選択
残短機能の有無を選択します。
ー ー 残短機能あり
(2)レベル 2
残短機能あり 残短機能なし
(LBH-1790AB) (LBH-1790A)
現 象 原 因 対 策 頁
1. 下糸残り長さが
長い
1. 縫い終り・糸切張力が強すぎる。
2. 下糸張力が弱すぎる。
3. 糸切位置が合っていない。
4. 下糸補足板の位置が悪い。
5. 下糸たぐり板の位置が悪い。
○ 縫い終り・糸切張力を弱くする。
○ 下糸張力を強くする。
○ 縫い終り位置を補正する。
○ 下糸補足板の位置を合わせる。
○ 下糸たぐり板の位置を合わせる。
2
1
-
-
-
2. 縫い終わりの上
糸が長く残る
1. 縫い終り・糸切張力が弱すぎる。
2. 上糸切りはさみの位置が高すぎる。
○ 縫い終り・糸切張力を強くする。
○ はさみを押えと当たらない限り下
げる。
2
※
4. トラブル現象と原因・対策
※ LBH-1790A 取扱説明書「VI. 保守 2.上糸切りはさみの調整」を参照してください。
❶
❷
1) 3)2)
– 3 –
I.
IMPORTANT SAFETY INSTRUCTIONS
II.
SPECIFICATIONS
Main specications of the LBH-1790AB computer-controlled, lockstitch, buttonholing machine (shorter-thread
remaining type)
1) Before putting your sewing machine in operation, be sure to read this Instruction Manual as well as
the Instruction Manual and Cautions for Safety for the LBH-1790A without exceptions.
2) The contents included in this Instruction Manual only cover the features of the newly developed LBH-
1790AB shorter-thread remaining type which differ from those of the LBH-1790A. (The items which are
not contained in this Instruction Manual are described in the Instruction Manual for the LBH-1790A.)
3) To use the LBH-1790AB, be sure to select "With the shorter-thread remaining function" with the mem-
ory switch. (If the sewing machine is operated using the program which does not support the function
or selecting "Without the shorter-thread remaining function", the cloth trimming knife will not operate at
the correct position.)
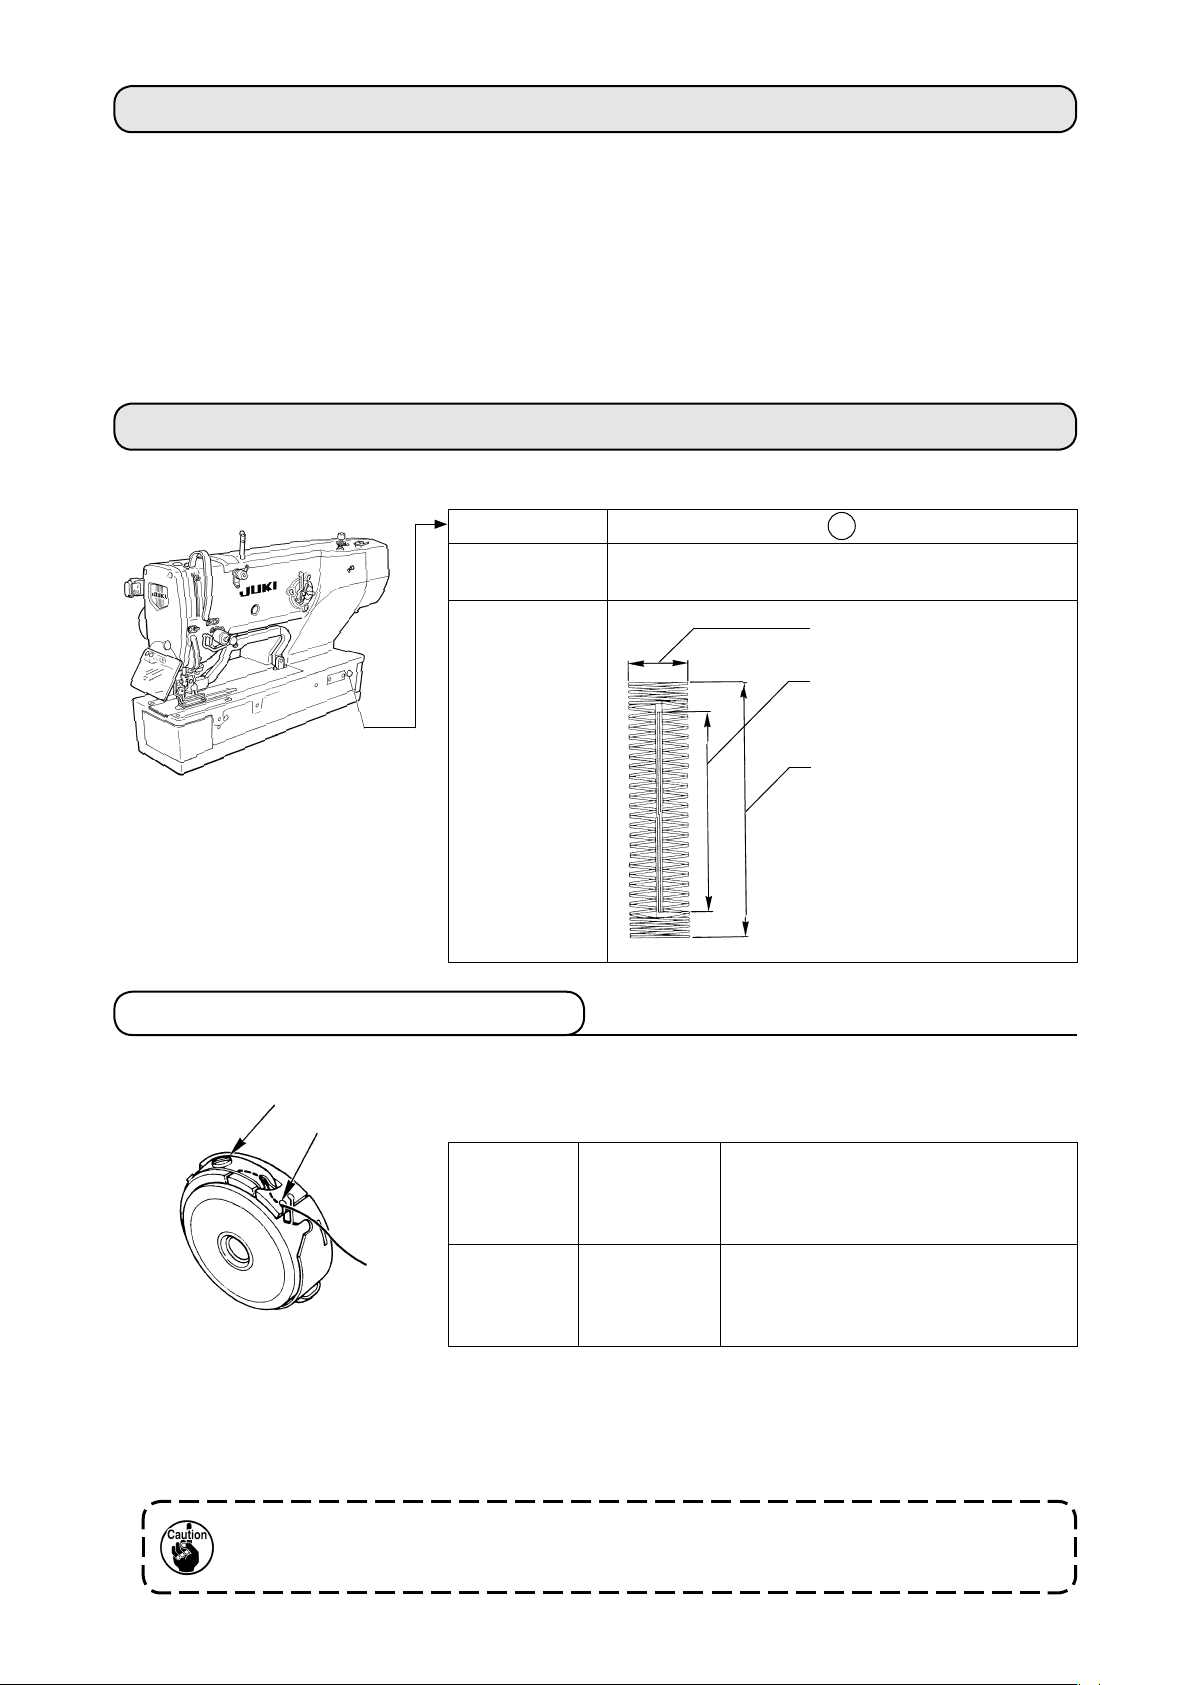
Subclass B
Major application
Buttonholing of cloth such as men’s shirts, blouses,
work uniforms, ladies' wear, etc.
Buttonholing size
Knife size used :
6.4 to 22.2 mm (1/4' to 7/8'
※
)
Buttonholing sewing length
Standard : Max. 25 mm
Standard : Max. 4 mm
※
Since the shorter-thread remaining
type model is equipped with the
"Type 1" presser foot, the knife
size is limited to 7/8'. (The throat
plate supports the knife size up to
1 inch.)
1. Adjusting the bobbin thread tension
Adjust the bobbin thread tension as given below when the bobbin
thread is pulled up at the position where thread slit
❶
of bobbin case
comes up.
Turning tension adjust screw
❷
clockwise will increase bobbin thread tension, and turning it counterclock-
wise will decrease the tension.
Adjust the bobbin thread tension to lower for synthetic lament thread, and to higher for spun thread. The
thread tension is higher by approximately 0.05N when the bobbin case is set to the hook since idle-pre-
vention spring is provided.
Maximize the bobbin thread tension as long as stitching failures (such as thread breakage
and stitch crest formation fault) do not occur. The higher the bobbin thread tension is set,
the shorter the remaining length of the bobbin thread will become.
❶
❷
Purl stitch 0.05 to 0.2N
To such an extent that bobbin case
quietly comes down when holding
thread end coming from bobbin case
and shaking it quietly up and down.
Whip stitch 0.15 to 0.3N
To such an extent that bobbin case
barely comes down when holding
thread end coming from bobbin case
and shaking it somewhat strongly.
– 4 –
2. Selection of the sewing machine model
1) When you turn the power ON for the first time
after the purchase of your sewing machine, the
model confirmation screen is displayed. Press
READY key
❶
.
2) When the error code "E001" is displayed on the
screen, turn the power OFF.
3) Then, re-turn the power ON. The language selec-
tion screen is displayed. Select one language to
be displayed and press RETURN key
❷
.
No. Item Setting range Edit unit Initial value
U006 Needle thread tension at sewing end
setting
0 to 200 1 15
U007 Needle thread tension at thread trim-
ming setting
0 to 200 1 15
(1) Level 1
3. Memory switch data
The remaining length of bobbin thread will be shorter as the needle thread tension is de-
creased at the end of sewing and at the time of thread trimming. Be aware that seam can
ravel if the needle thread tension is excessively decreased.
No. Item Setting range Edit unit Initial value
K025 Selection of the shorter-thread remaining function
With or without the shorter-thread remaining function is
selected using this memory switch.
ー ー
With the
short-
er-thread
remaining
function
(2) Level 2
With the shorter-thread
remaining function
(LBH-1790AB)
4. Troubles and corrective measures
Troubles Causes Corrective measures Page
1. Remaining length of
the bobbin thread is
long.
1. Needle thread tension is excessively high
at the end of sewing and at the time of
thread trimming.
2. Bobbin thread tension is too low.
3. Thread trimming position is wrong.
4. Bobbin thread supplementary plate is im-
properly positioned.
5. Bobbin thread hauling plate is improperly
positioned.
○ Decrease the needle thread tension
at the end of sewing and at the time of
thread trimming.
○ Increase the bobbin thread tension.
○ Correct the sewing end position.
○ Correct the position of the bobbin
thread supplementary plate.
○ Correct the bobbin thread hauling
plate.
4
3
–
–
–
2. Longer needle
thread remains at
the end of sewing.
1. Needle thread tension is excessively low
at the end of sewing and at the time of
thread trimming.
2. Position of needle thread trimmer is too
high.
○ Increase the needle thread tension at
the end of sewing and at the time of
thread trimming.
○ Lower the needle thread trimmer to
such an extent that it does not come
in contact with the presser.
4
※
※
Refer to "VI. MAINTENANCE 2. Adjusting the needle thread trimmer" in the Instruction Manual for the LBH-1790A.
❶
❷
1) 3)2)
Without the shorter-
thread remaining
function (LBH-1790A)
– 5 –
Stellen Sie die Spulenfadenspannung so hoch wie möglich ein, solange keine Nähstörungen
(wie z. B. Fadenbruch und Stichkammbildung) auftreten. Je höher die eingestellte Spulenfa-
denspannung ist, desto kürzer wird die Spulenfaden-Restlänge.
1) Bevor Sie Ihre Nähmaschine in Betrieb nehmen, lesen Sie unbedingt diese Bedienungsanleitung so-
wie die Sicherheitshinweise für das Modell LBH-1790A durch.
2) Diese Bedienungsanleitung behandelt nur die Funktionen des neu entwickelten Modells LBH-1790AB
mit Fadenabschneider mit kürzerem Fadenrestbetrag, die von denen des Modells LBH-1790A abwei-
chen. (Die Punkte, die nicht in dieser Bedienungsanleitung enthalten sind, werden in der Bedienungs-
anleitung für das Modell LBH-1790A beschrieben.)
3) Um das Modell LBH-1790AB zu benutzen, wählen Sie unbedingt die "Funktion mit kürzerem Faden-
rest" mit dem Speicherschalter. (Wird die Nähmaschine mit dem Programm betrieben, das die Funk-
tion oder die Wahl der "Funktion ohne kürzeren Fadenrestbetrag" nicht unterstützt, arbeitet das Stoff-
messer nicht an der korrekten Position.)
II. TECHNISCHE DATEN
Hauptspezikationen der computergesteuerten Steppstich-Knopochmaschine LBH-1790AB (mit kürzerem
Fadenrestbetrag).
I. WICHTIGE SICHERHEITSVORSCHRIFTEN
Unterklasse B
Hauptanwen-
dung
Knopochnähen in Herrenhemden, Blusen, Arbeitsklei-
dung, Damenbekleidung usw.
Knopochgröße
Verwendete Messergröße :
6,4 bis 22,2 mm
(1/4’ bis 7/8’
※
)
Knopochnählänge
Standard : Max. 25 mm
Standard : Max. 4 mm
※
Da das Modell in der Ausführung
mit kürzerem Fadenrestbetrag mit
dem Nähfuß "Typ 1" ausgestattet
ist, ist die Messergröße auf 7/8 Zoll
begrenzt. (Die Stichplatte unterstützt
eine Messergröße von bis zu 1 Zoll.)
Die Spulenfadenspannung wird durch Drehen der Spannungseinstellschraube
❷
nach rechts erhöht und
durch Drehen nach links verringert. Die Spulenfadenspannung für Synthetikfasergarn schwächer, und für
Fasergarn stärker einstellen. Die Spulenfadenspannung erhöht sich um ca. 0,05N {5g}, wenn die Spulen-
kapsel in den Greifer eingesetzt wird, da eine Leerlaufverhütungsfeder vorhanden ist.
1. Einstellen der Spulenfadenspannung
Die Spulenfadenspannung wie unten beschrieben einstellen, wenn der
Spulenfaden an der Position hochgezogen wird, an welcher der Schlitz
❶
der Spulenkapsel hochkommt.
Kettenstich
0,05 bis
0,2N
So stark, daß sich die Spulenkapsel sach-
te senkt, wenn das aus der Spulenkapsel
kommende Fadenende gehalten und lang-
sam auf und ab bewegt wird.
Überwend-
lichstich
0,15 bis
0,3N
So stark, daß sich die Spulenkapsel kaum
senkt, wenn das aus der Spulenkapsel
kommende Fadenende gehalten und
schnell auf und ab bewegt wird.
❶
❷
– 6 –
Nr. Posten Einstellbereich Editiereinheit Anfangswert
U006 Einstellung der Nadelfadenspannung
am Nähende
0 bis 200 1 15
U007 Einstellung der Nadelfadenspannung
beim Fadenabschneiden
0 bis 200 1 15
Die Spulenfaden-Restlänge wird kürzer, wenn die Nadelfadenspannung am Nahtende und
beim Fadenabschneiden verringert wird. Beachten Sie, dass die Naht sich verheddern kann,
wenn die Nadelfadenspannung übermäßig verringert wird.
2. Auswahl des Nähmaschinenmodells
1) Wenn Sie die Nähmaschine nach dem Kauf zum
ersten Mal einschalten, wird der Modellbestäti-
gungsbildschirm angezeigt. Drücken Sie die Bereit-
schaftstaste
❶
.
2)
Wenn der Fehlercode "E001" auf dem Bildschirm an-
gezeigt wird, schalten Sie die Stromversorgung aus.
3) Schalten Sie dann die Stromversorgung wieder
ein. Der Sprachenwahlbildschirm wird angezeigt.
Wählen Sie die anzuzeigende Sprache aus, und
drücken Sie dann die Rückstelltaste
❷
.
(1) Stufe 1
3. Speicherschalterdaten
Nr. Posten Einstellbereich Editiereinheit Anfangswert
K025
Auswahl der Funktion für kürzeren Fadenrestbetrag
Die Funktion mit oder ohne den kürzeren Fadenrestbe-
trag wird mit diesem Speicherschalter gewählt.
ー ー
Mit Funktion
für kürzeren
Fadenrest-
betrag
(2) Stufe 2
4. Störungen und abhilfemassnahmen
❶
❷
1) 3)2)
Störungen Ursachen Abhilfemaßnahmen Seite
1. Die Restlänge des
Spulenfadens ist
lang.
1.
Die Nadelfadenspannung ist am Nahtende
und beim Fadenabschneiden übermäßig hoch.
2. Spulenfadenspannung ist zu gering.
3. Die Fadenabschneideposition ist falsch.
4. Die Spulenfaden-Zusatzplatte ist falsch po-
sitioniert.
5. Die Spulenfaden-Förderplatte ist falsch po-
sitioniert.
○
Die Nadelfadenspannung am Nahtende
und beim Fadenabschneiden verringern.
○ Spulenfadenspannung erhöhen.
○ Die Nahtende-Position korrigieren.
○ Die Position der Spulenfaden-Zusatz-
platte korrigieren.
○ Die Spulenfaden-Förderplatte korrigie-
ren.
6
5
–
–
–
2. Ein längerer Na-
delfaden bleibt am
Nahtende übrig.
1. Die Nadelfadenspannung ist am Nahtende
und beim Fadenabschneiden übermäßig
niedrig.
2. Position des Nadelfadenabschneiders ist zu
hoch.
○ Die Nadelfadenspannung am Nahten-
de und beim Fadenabschneiden erhö-
hen.
○ Nadelfadenabschneider so weit ab-
senken, daß er nicht mit dem Stoffdrü-
cker in Berührung kommt.
6
※
※
Siehe "VI. WARTUNG 2. Einstellung des Nadelfadenabschneiders" in der Bedienungsanleitung für das
Modell LBH-1790A.
Mit Funktion für kürzeren
Fadenrestbetrag
(LBH-1790AB)
Ohne Funktion für kürzeren
Fadenrestbetrag
(LBH-1790A)

– 7 –
Maximiser la tension du l de canette tant que la couture n’est pas défaillante (rupture de l
et défaut de formation de points d’arête, par exemple). Plus la tension du l de canette est
élevée, plus la longueur restante du l de canette sera courte.
I. CONSIGNES DE SECURITE IMPORTANTES
II. CARACTERISTIQUES
Caractéristiques techniques principales de la machine à boutonnières à point noué, commandée par ordina-
teur LBH-1790AB (coupe-l de type l plus court restant)
1) Avant de mettre la machine à coudre en marche, veiller à lire impérativement ce mode d’emploi ainsi
que le mode d’emploi et les consignes de sécurité pour la LBH-1790A.
2) Ce mode d’emploi traite uniquement des fonctions de la LBH-1790AB à coupe-l de type l plus court
restant nouvellement développée, lesquelles diffèrent de celles de la LBH-1790A. (Les éléments non
présentés dans ce mode d’emploi sont décrits dans le mode d’emploi pour la LBH-1790A.)
3) Pour utiliser la LBH-1790AB, veiller à sélectionner « Avec la fonction de l plus court restant » au
moyen de l’interrupteur logiciel. (Si la machine à coudre est utilisée avec un programme ne prenant
pas en charge la fonction ou si « Sans fonction de l plus court restant » est sélectionné, le couteau
de coupe du tissu ne fonctionnera pas à la bonne position.)
Sous-classe B
Applications
principales
Confection de boutonnières sur des vêtements tels que
chemises d’homme, chemisiers, vêtements de travail,
vêtements de femme, etc.
Taille de bouton-
nière
Taille de couteau utilisée:
6,4 à 22,2 mm (1/4’ à 7/8’
※
)
Longueur de couture de
boutonnière
Standard: 25 mm maxi
Standard: 4 mm maxi
※
Étant donné que le modèle de type
l plus court restant est pourvu du
pied presseur de type 1, la taille
du couteau est limitée à 7/8’. (La
plaque à aiguille accepte une taille
de couteau allant jusqu’à 1 pouce.)
Lorsqu’on tourne la vis de réglage
❷
à droite, la tension du l de canette augmente. Lorsqu’on la tourne
à gauche, la tension diminue. Régler le l de canette à une tension plus faible pour un l continu synthé-
tique et à une tension plus forte pour un lé. La tension du l est supérieure d’environ 0,05N lorsque la
boîte à canette est placée sur le crochet, ceci étant dû à la présence du ressort anti-rotation à vide.
1. Réglage de la tension du l de canette
Point perlé 0,05 à 0,2N
La boîte à canette doit descendre lente-
ment lorsqu’on la laisse pendre au bout du
l en secouant légèrement celui-ci vertica-
lement.
Point roulé 0,15 à 0,3N
La boîte à canette doit à peine descendre
lorsqu’on la laisse pendre au bout du l en
secouant assez fortement celui-ci vertica-
lement.
❶
❷
Régler la tension du l de canette de la manière suivante en tirant le l
avec la fente de l
❶
de la boîte à canette tournée vers le haut.
 Loading...