

Page 1
VM9022
Installation and Operation Manual
Manual de Instrucciones
Guide d'instructions
Watts Peak
®
D
IV
video
240
Watts en Crête
Vatiosel Máximo
60Wx4
Page 2

Page 3

CONTENTS
Thank you for choosing a Jensen product. We hope you will find the instructions in this owner’s
manual clear and easy to follow. If you take a few minutes to look through it, you’ll learn how to
use all the features of your new Jensen VM9022 Mobile Multimedia Receiver for maximum
enjoyment.
Preparation............................................................................................................................ 1
Installation............................................................................................................................. 5
Anti-Theft Feature................................................................................................................. 7
Controls and Indicators......................................................................................................... 8
Remote Control................................................................................................................... 10
Using the TFT Monitor ........................................................................................................ 13
Operating Instructions......................................................................................................... 14
Multi-ZONE Operation......................................................................................................... 16
Setup Menu......................................................................................................................... 17
Tuner Operation.................................................................................................................. 20
Satellite Radio Operation.................................................................................................... 22
DVD/VCD Video Operation................................................................................................. 24
DVD/CD Audio Operation ................................................................................................... 27
MP3/WMA Operation.......................................................................................................... 29
iPod Operation.................................................................................................................... 31
Bluetooth Operation............................................................................................................ 32
Troubleshooting .................................................................................................................. 35
Specifications...................................................................................................................... 38
CONTENIDO
Gracias por elegir los productos Jensen. Esperamos que encuentre en este manual
instrucciones claras y fáciles de seguir. Si se toma unos pocos minutos para leerlo, aprenderá
cómo utilizar todas las funciones de su nuevo radio Jensen VM9022 para su máximo entretenimiento.
TABLE DES MATIÈRES
Merci d'avoir choisi un produit Jensen . Nous espérons que vous allez trouver les instructions
dans ce guide de propriétaire claires et faciles à suivre . Prenez quelques minutes à le consulter,
vous apprendrez à utiliser toutes les fonctions de votre nouvelle radio Jensen VM9022 pour en
tirer une jouissance maximum.
Preparation......................................................................................................................... 77
Installation.......................................................................................................................... 81
Fonction Anti-Vol................................................................................................................ 83
Controls et Indicateurs ....................................................................................................... 84
Telecommande................................................................................................................... 86
Utilisation du Moniteur TFT................................................................................................ 89
Instructions d'operation...................................................................................................... 90
Operation Multi-Zone.......................................................................................................... 92
Menu Configuration............................................................................................................ 93
Operation Tuner................................................................................................................. 96
Operation Radio Satellite ................................................................................................... 98
Operation DVD/VCD Video.............................................................................................. 100
Operation DVD/CD Audio................................................................................................. 103
Operation MP3/WMA ....................................................................................................... 105
Operation iPod ................................................................................................................. 107
Operation Bluetooth ......................................................................................................... 109
Depannage....................................................................................................................... 112
Specifications................................................................................................................... 115
Preparación......................................................................................................................... 39
Instalación........................................................................................................................... 43
Función Antirobo................................................................................................................. 45
Controles y Indicadores ...................................................................................................... 46
Control Remoto................................................................................................................... 48
Using the TFT Monitor ........................................................................................................ 51
Instrucciones de Operación ................................................................................................ 52
Operación de la Multizona .................................................................................................. 54
Menu de Configuración....................................................................................................... 55
Operación del Sintonizador................................................................................................. 58
Operación del Radio Satelital.............................................................................................. 60
Operación de Video DVD/VCD ........................................................................................... 62
Operación de Audio de DVD/CD......................................................................................... 65
Operación MP3/WMA ......................................................................................................... 67
Operación del iPod.............................................................................................................. 69
Operación de Bluetooth ...................................................................................................... 70
Solución de Problemas ....................................................................................................... 73
Specifications...................................................................................................................... 76
i
Page 4

ii
Page 5

VM9022
PREPARATION
Congratulations on your purchase of the Jensen VM9022
Mobile Multimedia Receiver.
It’s a good idea to read all of the instructions before beginning
the installation. We recommend having your Jensen VM9022
installed by a reputable installation shop.
Features
DVD
• Aspect Ratio – Cinema and Normal
• Fast Forward / Reverse – 2X, 4X, 8X and 32X
• Play, Pause, Stop, Next Chapter and Previous Chapter
• ESP – 2MB Buffer
CD / MP3 / WMA
• ID3 Tag Compatible
• Directory Search (MP3 / WMA Only)
• Direct Track Access via Remote control
• Burn up to 1500 MP3 and WMA Files onto a DVD+R /
RW
• Audible Forward / Reverse Track Search
• Random, Repeat and Intro
• Play, Pause, Stop, Next Track and Previous Track
• ESP – 2MB Buffer
AM-FM
• USA/Europe/Latin America/Asia Frequency Spacing
• 30 Station Presets (18 FM, 12 AM)
• Auto Stereo/Mono
• Local/Distance
• Auto Store/Preview Scan
• RDS (Radio Data System)
Sat Radio Ready
• Compatible with XM and Sirius Tuners (Sold
Separately)
• Requires XMDJEN100 or JXMC Cables for XMD1000
only (Sold Separately)
• Satellite Channel Name, Artist, Song and Categories
Displayed on TFT Screen
iPod
• jLinkDirect - High Speed Direct Connect Interface to
Access iPod Playlists, Artists, Albums, Songs, *Photos
and *Video (*Requires Photo or Video iPod)
• Power Management Charges iPod while Connected
MediaLink
• Under Dash Interface Allows Portable Media Devices to
• MediaLink
Chassis
• 2.0 DIN (Import / ISO-DIN Mountable)
• Motorized Swing-Down LCD Screen
• 6.5" TFT Active Matrix LCD with Anti-Glare Coating
• Screen Tilt / Angle Adjustment
• Heat Management System - Forced Air-Cooling to Keep
General
• Bluetooth – Bluetooth hands-free profile for safety /
• Navigation Ready (Nav101 Only)
• 38-Key Infrared Remote Control with 5-way Joystick
• Two Composite Video Outputs for Additional Screens
• Compatible with MZ7-TFT Rear Seat Monitors with
• Two Audio /Video Auxiliary Inputs
• 200-Ohm Preamp Line Output – All Audio Channels
• 4VRMS Line Output – All Channels
• Rotary Encoder Audio Control
• Seven-Band EQ with Eight Preset EQ Curves
• Spectrum Analyzer
• Front, Rear, Center and Subwoofer Line Output
• Built-In Integrated Center Channel Amplifier
• Subwoofer Crossover and Phase Control
• Dolby Digital / Pro-Logic ll
• Programmable Volume Control
• Rear Camera Input (Normal and Mirror Image View)
• 5-Way Joystick
4
be Connected
• USB – Supports Flash Memory and Hard Drives with
• LinkDirect iPod Connectivity
• 3.5mm Audio Only Input
• RCA Audio /Video Input
the Chip-Sets Operating at Nominal Temperatures
convenience and A2DP profile for streaming music from
a PDA / PMP
Touch Screen Interface
(40 Watts X 1)
4
Includes the Following Connectivity:
Audio Files
1
Page 6
VM9022
What’s in the Box
1. Left and Right Double DIN Mounting Brackets
2. Double DIN Half Sleeve Install Bracket
3. Remote Control with Battery
4. Rear Support Mounting Strap
5. iPod Jlink Cable
6. Two Custom Cosmetic Trim Rings
7. Parking Brake Wire
8. MediaLink Box
9. Screen Cleaning Cloth
10. M5x6 and M3x4 Screws to Mount Radio to Brackets
11. Speaker Output Harness
12. Power Input Harness
13. Center Channel Wire Harness
Optional Equipment
• NAV101
The VM9022 is "navigation ready." Before accessing
any navigation features, you must purchase and install
the NAV101 module. All installation and operating
instructions will be included with the NAV101 navigation
module.
Once the NAV101 is connected and operating properly,
the NAV source mode will become active. While the
NAV101 is not installed, the NAV option appears gray,
indicating the function is not available.
• Rear Camera
The VM9022 is "camera ready." Before accessing any
camera features, you must purchase and install a rear
video camera. Once the rear camera is connected and
operating properly, the CAMERA source mode will
become active. While the camera is not installed, the
CAMERA option appears gray, indicating the function is
not available.
• Satellite Radio Tuner
See “Satellite Radio Operation” on page 22.
• jLinkCable and iPod
See “MP3/WMA Operation” on page 29.
• Bluetooth Phone
See “Bluetooth Operation” on page 32.
• 3.5mm to 3.5mm Audio Cable
Sold separately at various retailers.
Tools and Supplies
You will need these tools and supplies to install your
VM9022:
• Torx type, flat-head and Philips screwdrivers
• Wire cutters and strippers
• Tools to remove existing radio (screwdriver, socket
wrench set or other tools)
• Electrical tape
• Crimping tool
• Volt meter/test light
• Crimp connections
• 18 gauge wire for power connections
• 16 – 18 gauge speaker wire
Disconnecting the Battery
To prevent a short circuit, be sure to turn off the ignition and
remove the negative (-) battery cable prior to installation.
NOTE: If the VM9022 is to be installed in a car equipped
with an on-board drive or navigation computer, do not
disconnect the battery cable. If the cable is
disconnected, the computer memory may be lost. Under
these conditions, use extra caution during installation to
avoid causing a short circuit.
WARNING! Only connect the unit to a12-volt power
supply with proper grounding.
WARNING! Never install this unit where operation and
viewing could interfere with safe driving conditions.
WARNING! T o reduce the risk of a traffic accident (except
when using for rear view video camera) never use the
video display function while driving the vehicle. This is a
violation of federal law.
WARNING! Never disassemble or adjust the unit.
WARNING! To prevent injury from shock or fire, never
expose this unit to moisture or water.
WARNING! To prevent damage to the mechanism inside
this unit, avoid impact to the TFT monitor.
WARNING! Using an improper fuse may cause damage
to the unit and result in a fire.
WARNING! Never use irregular discs.
2
Page 7
VM9022
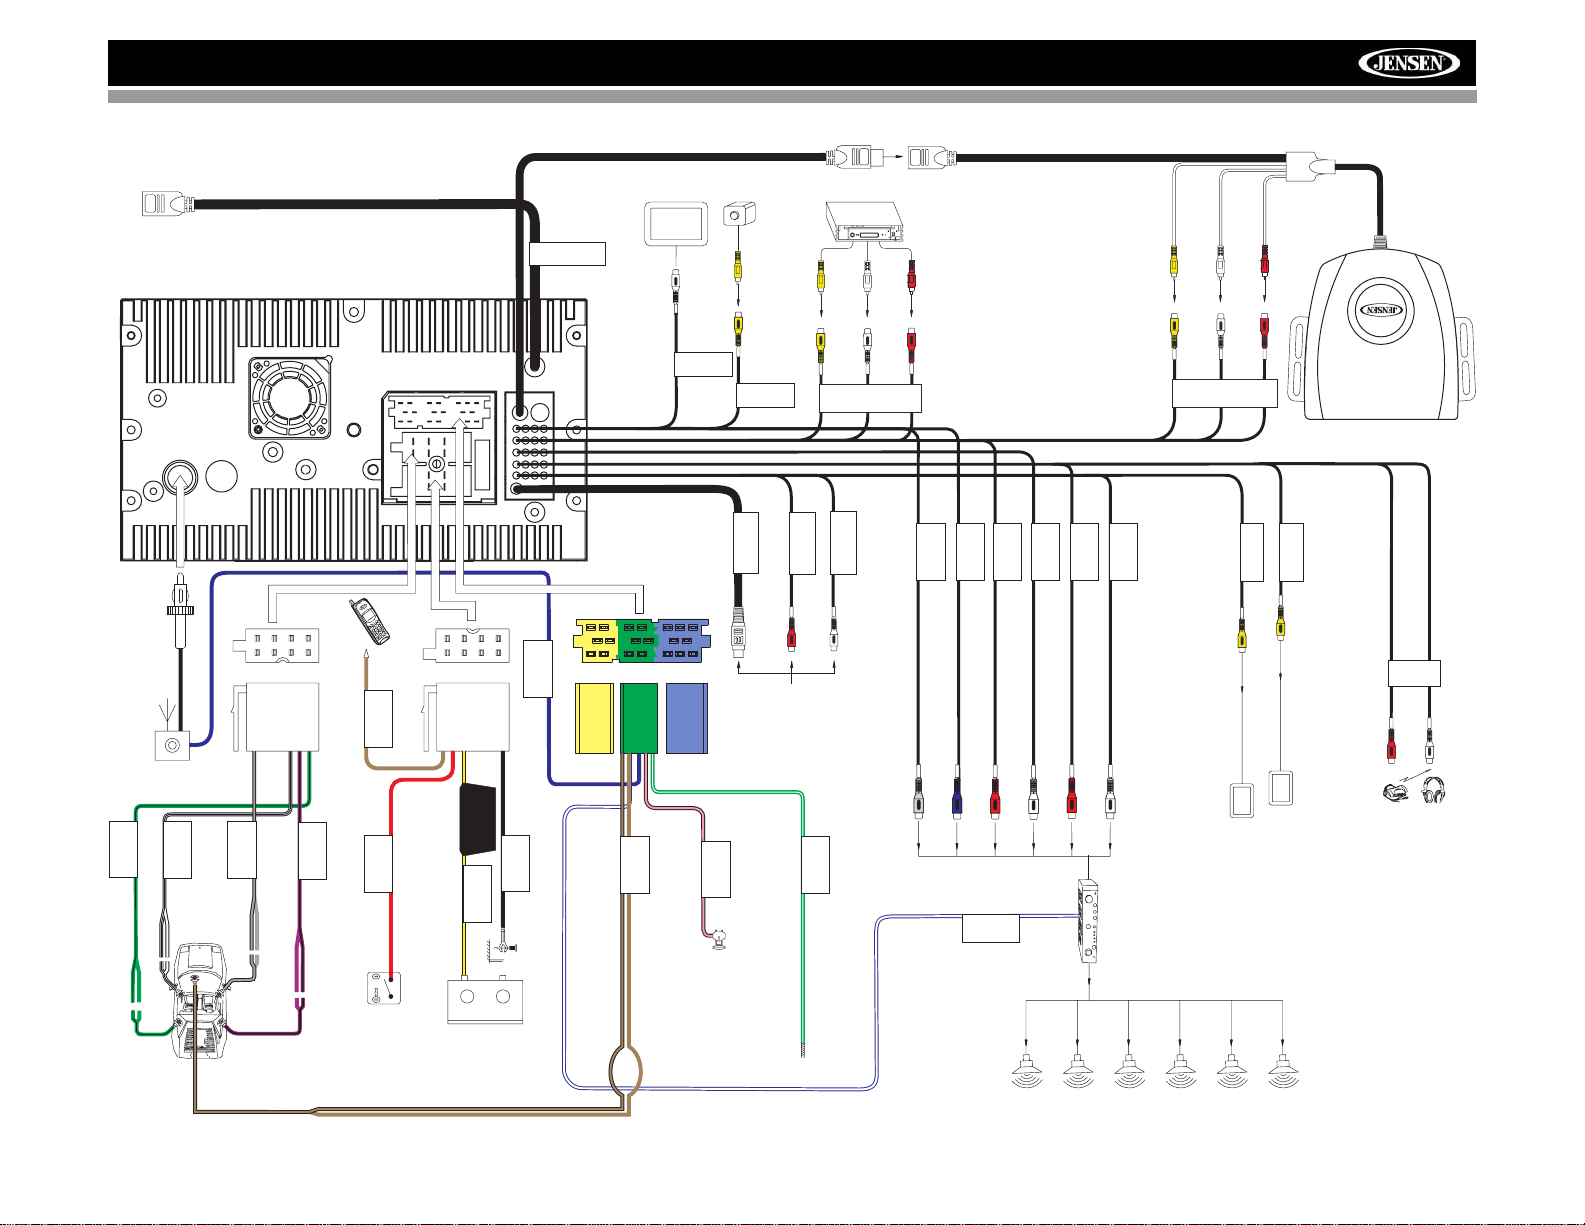
GREEN(+)
GREEN/BLACK(-)
WHITE(+)
WHITE/BLACK(-)
GREY(+)
GREY/BLACK(-)
PURPLE(+)
PURPLE/BLACK(-)
BLUE/WHITE
BATTERY
+
-
IGNITION SWITCH
RED
YELLOW
BLACK
BROWN(+)
BROWN/BLACK(-)
BROWN
(-)
PINK (-)
GREEN/WHITE (+)
BLUE
Auto Antenna
Cell Phone
BLUE
GREEN
YELLOW
GREY
BLUE
RED
WHITE
RED
WHITE
FRONT L
FRONT R
REAR
L
SURROUND
REAR
R
SURROUND
SUBWOOFER
CENTER
GND
P.CONT
MUTE
BATT
CENTER
PRK SW
REVERSE
ANT.CONT
ACC
REAR R
FRONT L
REAR L
FRONT R
WIRING DIAGRAM
Cell Phone
(-)
BROWN
Media Module Cable / BLACK
MZ7-TFTTouch
Screen (Sold
Separately)
NAV Bus
BLACK
MZ7-TFT
YELLOW
CAMERA
SATRadio
Rear View Video Camera
SATR
RED
* Satellite
Receiver
Connections
A/V System
YELLOW
External
WHITE
AUX IN2
SATL
WHITE
RED
Connections
SUBWOOFER
*NOTE:
See the
Multimedia
Diagram for
additional
connections
through the
MediaLink.
L
R
REAR
REAR
SURROUND
SURROUND
YELLOW
WHITE
AUX IN1
Rear Video 1
RED
VIDEO OUT1
YELLOW
Rear Video 2
VIDEO OUT2
YELLOW
*MediaLink
HEADPHONE
MULTIZONE
RED
WHITE
PURPLE(+)
(20A)
FILTER/FUSE
BROWN/BLACK(-)
BLUE
GREEN/WHITE (+)
BROWN(+)
External Power Amplifier
WIRELESS
HEADPHONE
(OPTIONAL)
3
Page 8
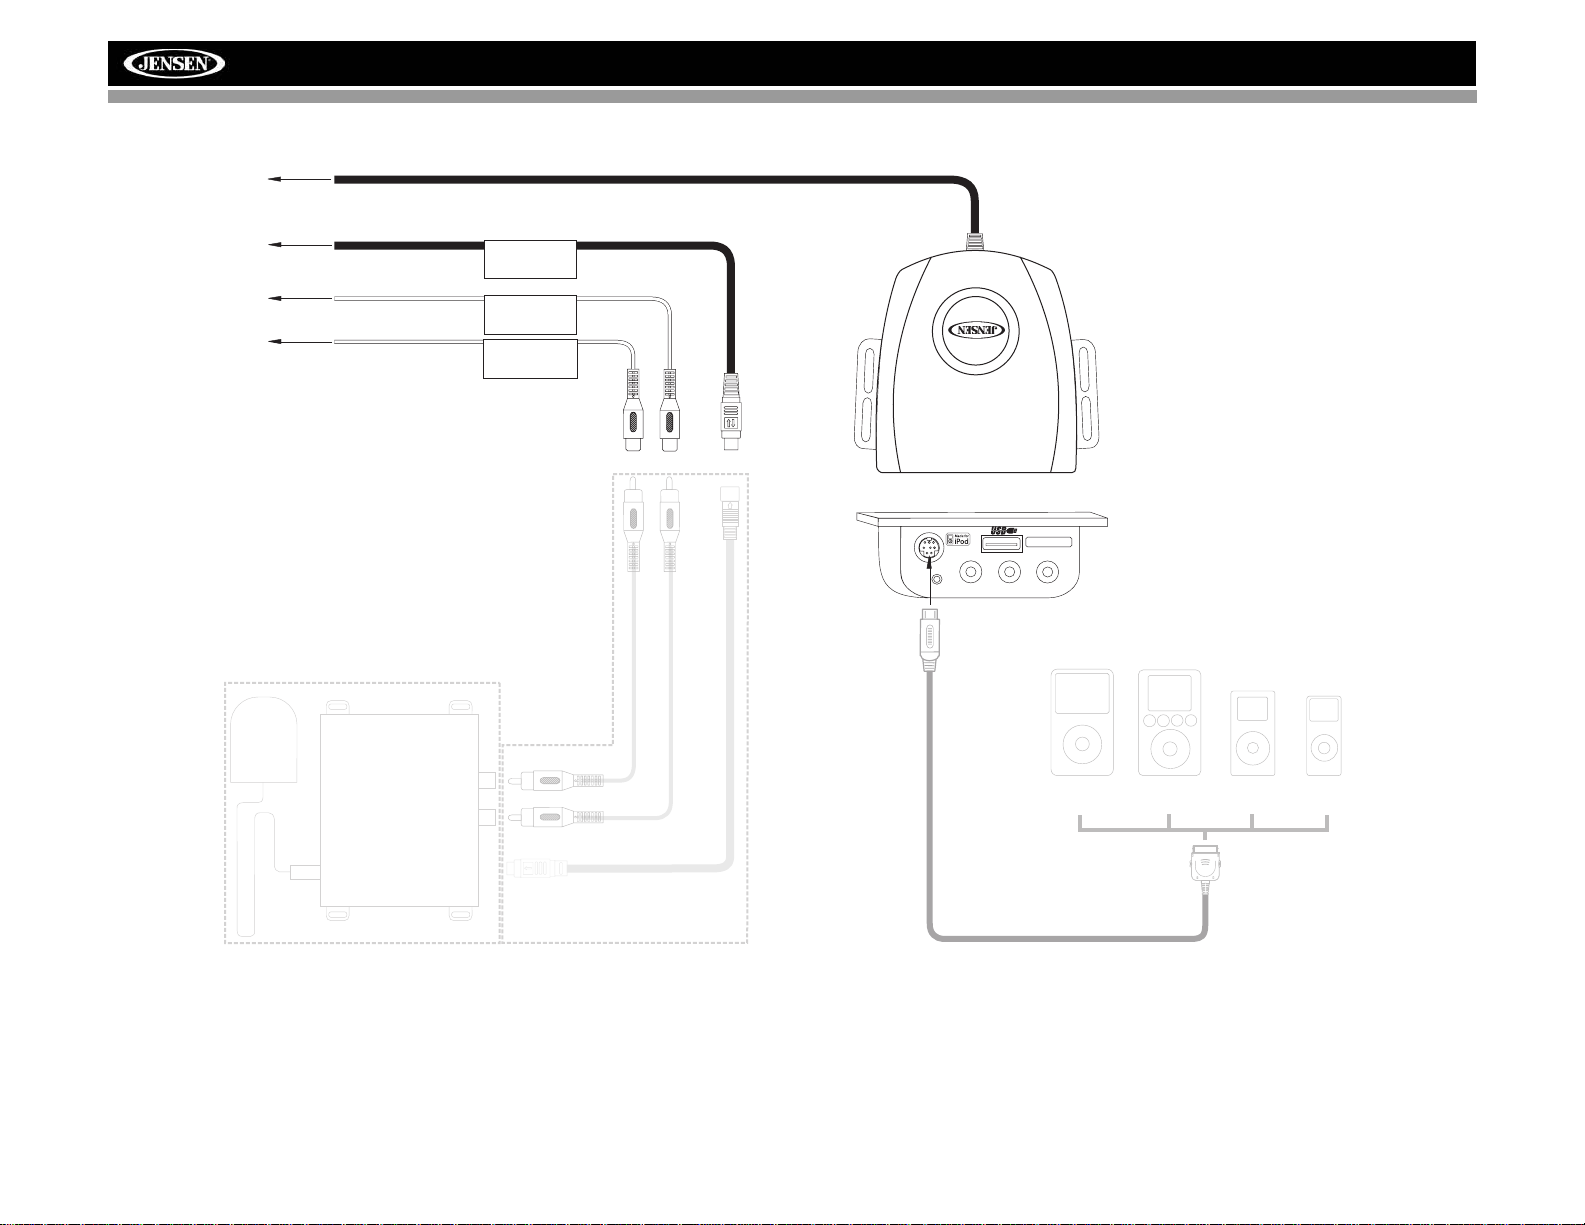
MEDIALINK AND SATELLITE CONNECTIONS
To Head Unit
*SAT Cable Kit: JXMC or XMDJEN100 (sold separately)
**XM or Sirius satellite tuner (sold separately)
SAT Radio
SAT L
SAT R
3.5mm - Audio
MediaLink
VIDEO LEFT RIGHT
VM9022
NOTE: GEN 5 iPod
recommended for
best performance.
**
*
iPod Video
jLink iPod Cable
(Included)
4
iPod NanoiPod MiniiPod
Page 9
VM9022
INSTALLATION
ISO DIN Installation
This unit is designed to fit into a 2.0 DIN dashboard opening,
found in many imported cars. The unit has threaded holes in
the chassis side panels which may be used with the original
factory mounting brackets of some Toyota, Nissan,
Mitsubishi, Isuzu, Hyundai and Honda vehicles to mount the
radio to the dashboard. Please consult with your local car
stereo specialty shop for assistance on this type of
installation.
1. Remove the existing factory radio from the dashboard or
center console mounting. Save all hardware and brackets as they will be used to mount the new radio.
2. Remove the factory mounting brackets and hardware
from the existing radio and attach them to the new radio.
ISO INSTALLATION
CAUTION: For proper operation of the CD player, the
chassis must be mounted within 30° of horizontal. Make
sure the unit is mounted within this limitation.
NOTE: It is the end-users responsibility to install and
operate this unit in a manner in accordance with local,
state and federal laws. The PARKING BRAKE wire MUST
BE CONNECTED as directed in the manual.
CAUTION: Do not block the cooling fan exit. If blocked,
the unit may overheat and become damaged.
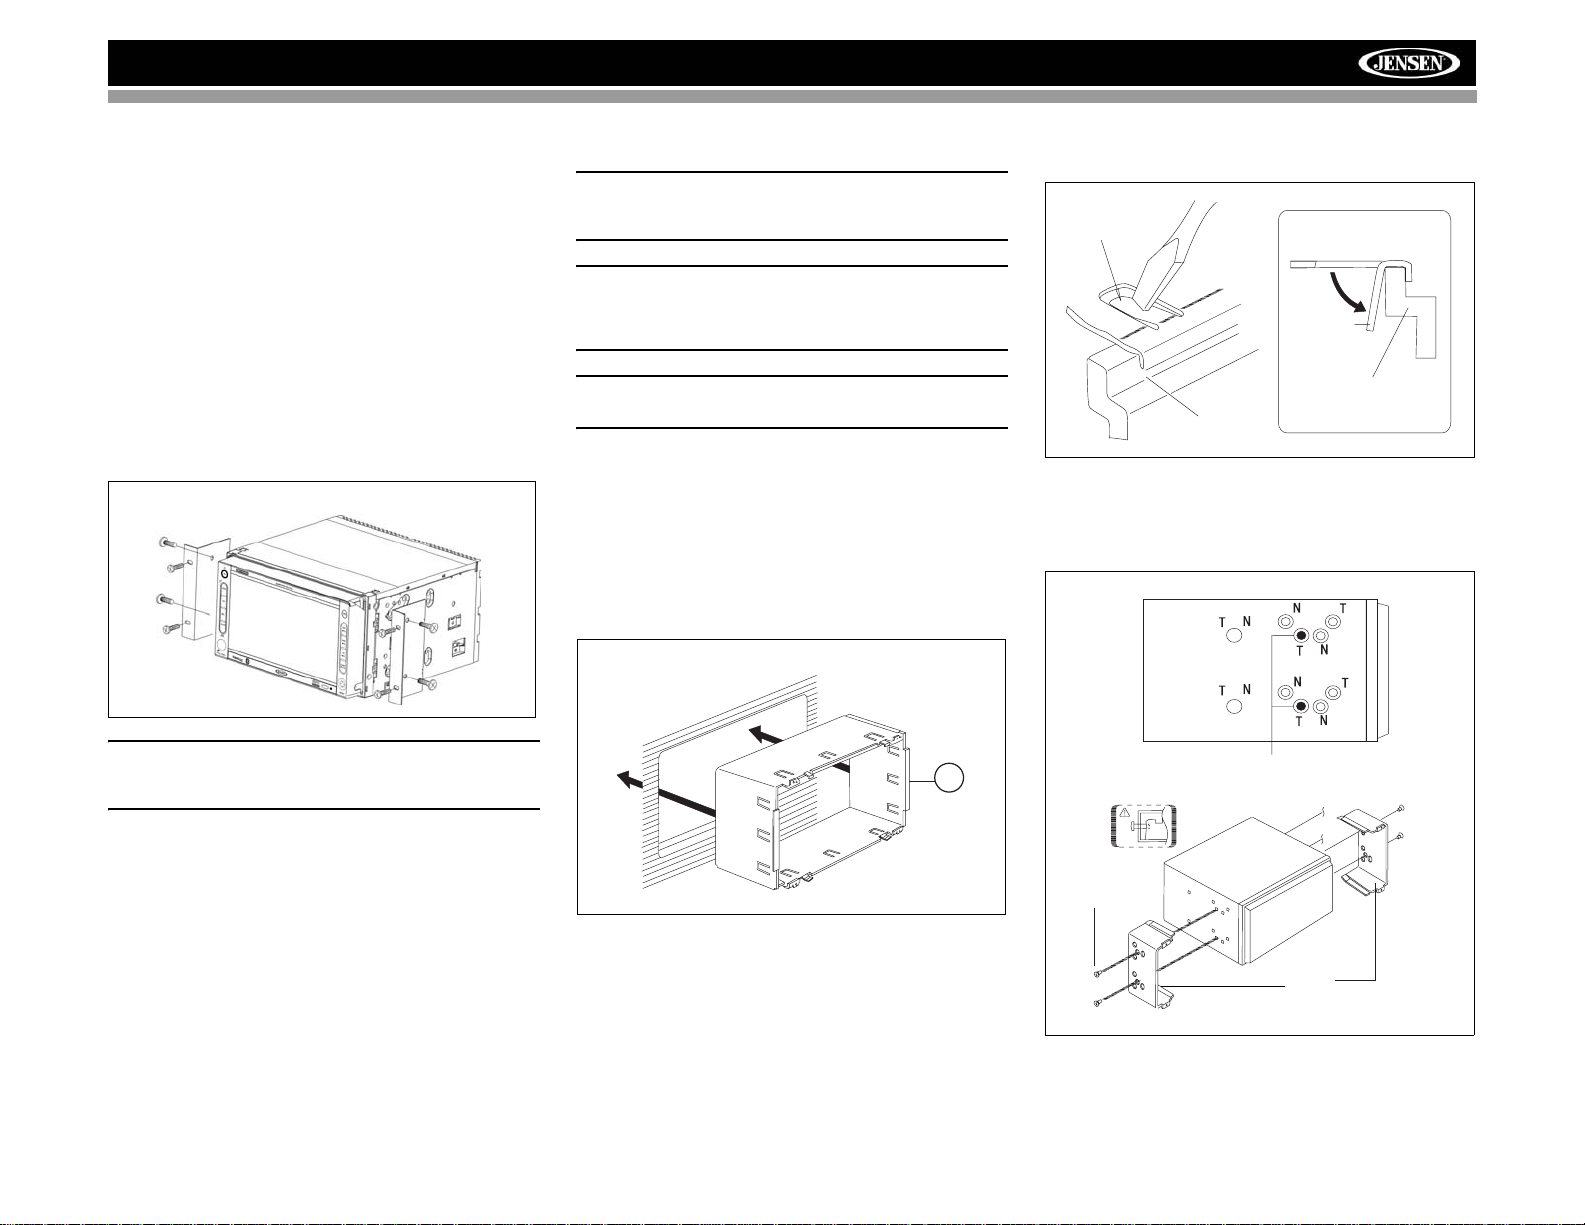
Installation Using Half-Sleeve
1. Press the metal levers on both sides to remove the halfsleeve from the radio.
2. Install the half-sleeve.
a. Install adapter if necessary (optional).
b. Install half-sleeve into adapter or dashboard (use only
the supplied screws). Do not force the sleeve into the
opening or cause it to bend or bow.
TAB
TAB
DASHBOARD
DASHBOARD
3. Use the M5 x 6 screws (provided) to install the mounting
brackets to each side of the radio using the holes
indicated below.
CAUTION: Do not exceed M5 X 6MM screw size. Longer
screws may touch and damage components inside the
chassis.
3. Place the radio in front of the dashboard opening so the
wiring can be brought through the mounting sleeve.
Follow the wiring diagram carefully and make certain all
connections are secure and insulated with wire nuts or
electrical tape. After completing the wiring connections,
plug the ISO connectors into the mating sockets on the
rear of the chassis. Turn the unit on to confirm operation
(vehicle ignition switch must be “on”). If the unit does not
operate, re-check all wiring until the problem is
corrected.
4. Mount the new radio assembly to the dashboard or
center console using the reverse procedure in step 1.
INSTALL HALF SLEEVE
2b
c. Locate the series of bend-tabs along the top, bottom
and sides of the mounting sleeve. With the sleeve fully
inserted into the dashboard opening, bend as many of
the tabs outward as necessary so that the sleeve is
firmly secured to the dashboard.
5
Install Bracket Here
Non-Designated
Screw Prohibited
M5X6
SCREW
BRACKET
4. Place the radio in front of the dashboard opening so the
wiring can be brought through the mounting sleeve.
Page 10
VM9022
CAUTION! Be careful not to damage the car wiring.
5. Complete wiring as illustrated in the wiring diagram on
page 3. Once the wiring is complete, reconnect the
battery negative terminal. If there is no ACC available,
connect the ACC lead to the power supply with a switch.
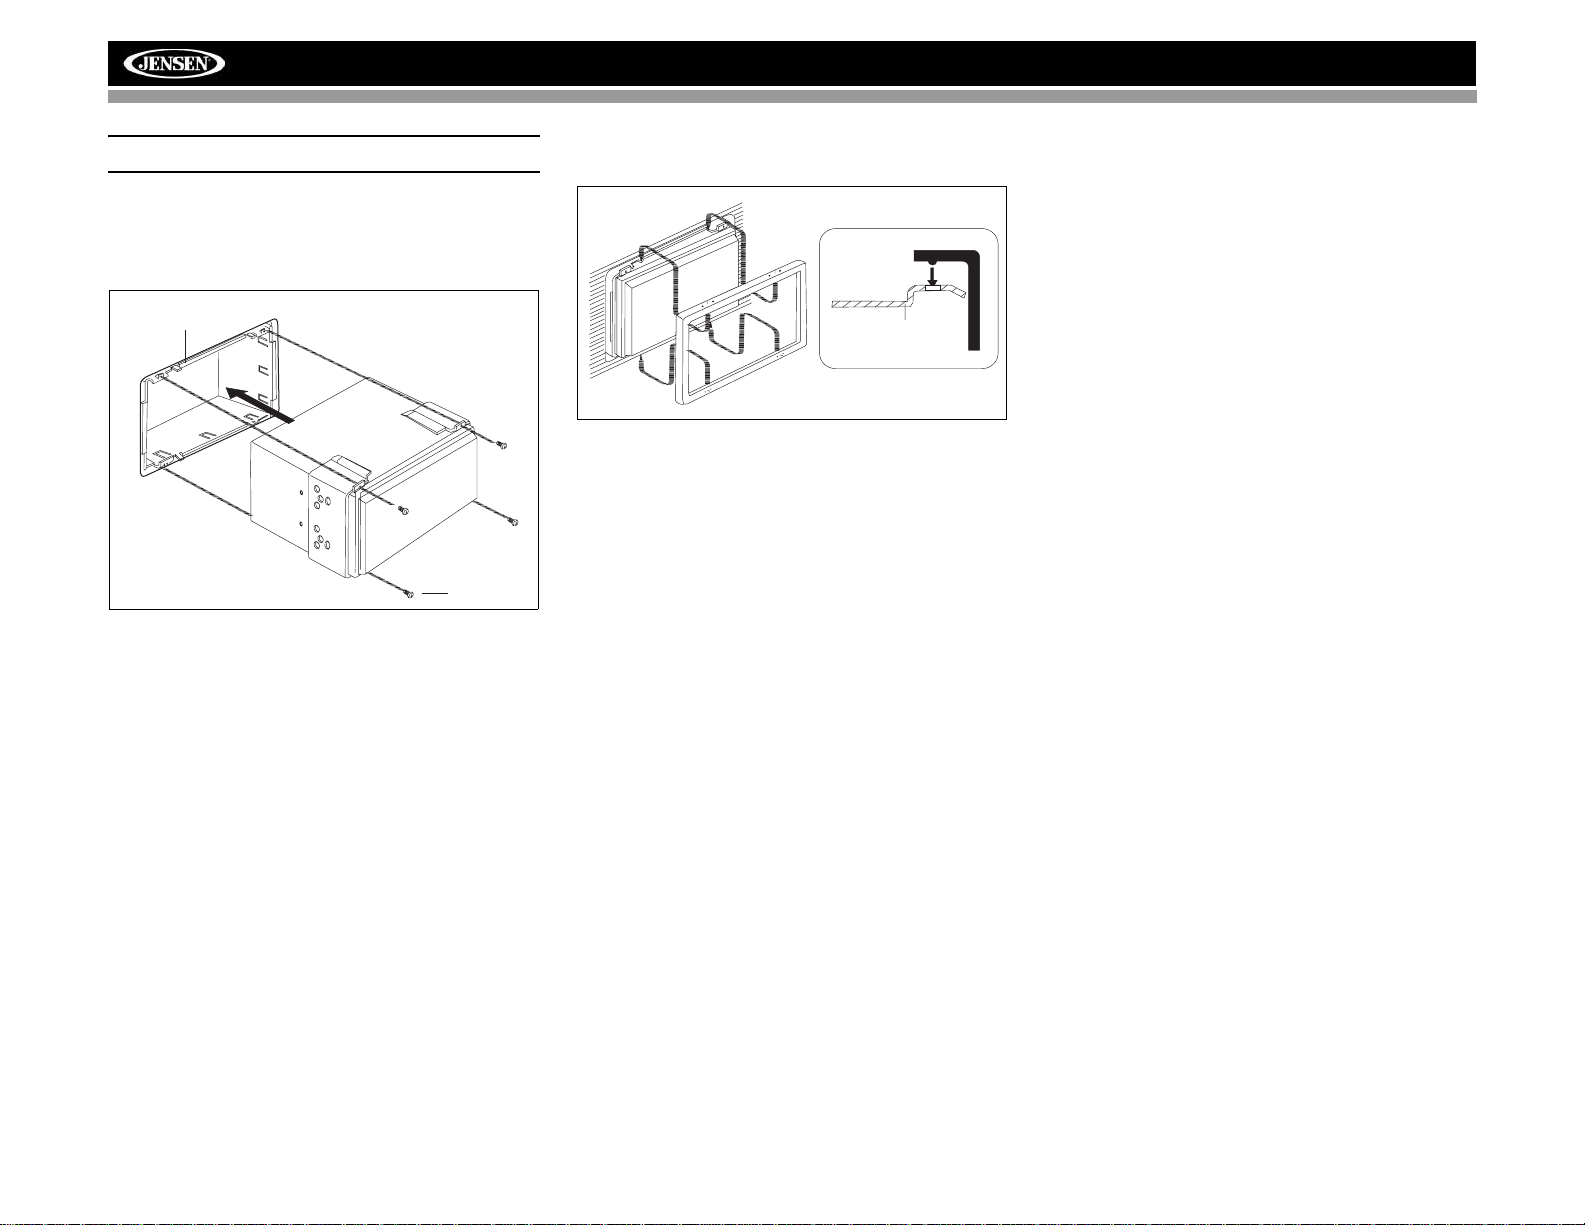
MOUNTING SLEEVE
M3x4
SCREW
After completing the wiring connections, turn the unit on to
confirm operation (ignition switch must be on). If unit does not
operate, recheck all wiring until problem is corrected. Once
proper operation is achieved, turn off the ignition switch and
proceed with final mounting of the chassis.
1. Connect wiring adapter to existing wiring harness.
2. Connect antenna lead.
3. Carefully slide the radio into the half-sleeve, making
sure it is right-side-up, until it is fully seated and the
spring clips lock it into place.
Using the Cosmetic Trim Ring
Two cosmetic trim rings are packaged with the VM9022 for
installation flexibility. The VM9022 will fit into most import
dashes with little or no modification to the dash board/cavity.
Some US domestic vehicle dashes will accept a Double-DIN
chassis, but there is usually a small gap between the radio
and dash piece after installation is complete. In this case, use
the appropriate trim ring to conceal any gaps that may be
present.
The 4 tabs on the trim ring will snap into four holes on top and
bottom of the mounting sleeve.
TRIM RING
OPTIONAL
MOUNTING
TRIM RING
SLEEVE
Installing the MediaLink External AV
Connector
The MediaLink allows you to connect a variety of external
devices, including a VCR, DVD player, portable MP3 player,
etc., to your VM9022 without removing the radio.
To install the MediaLink, connect it to the AUX-IN cables on
the back of the VM9022 (see the Wiring Diagram on page 3),
and then install the MediaLink in a location convenient for
plugging in auxiliary devices.
Replacing the Fuse
When replacing the fuse, use a new 20A replacement fuse.
Using a fuse with an improper rating could damage the unit
and cause a fire.
6
Page 11
VM9022
RADIO
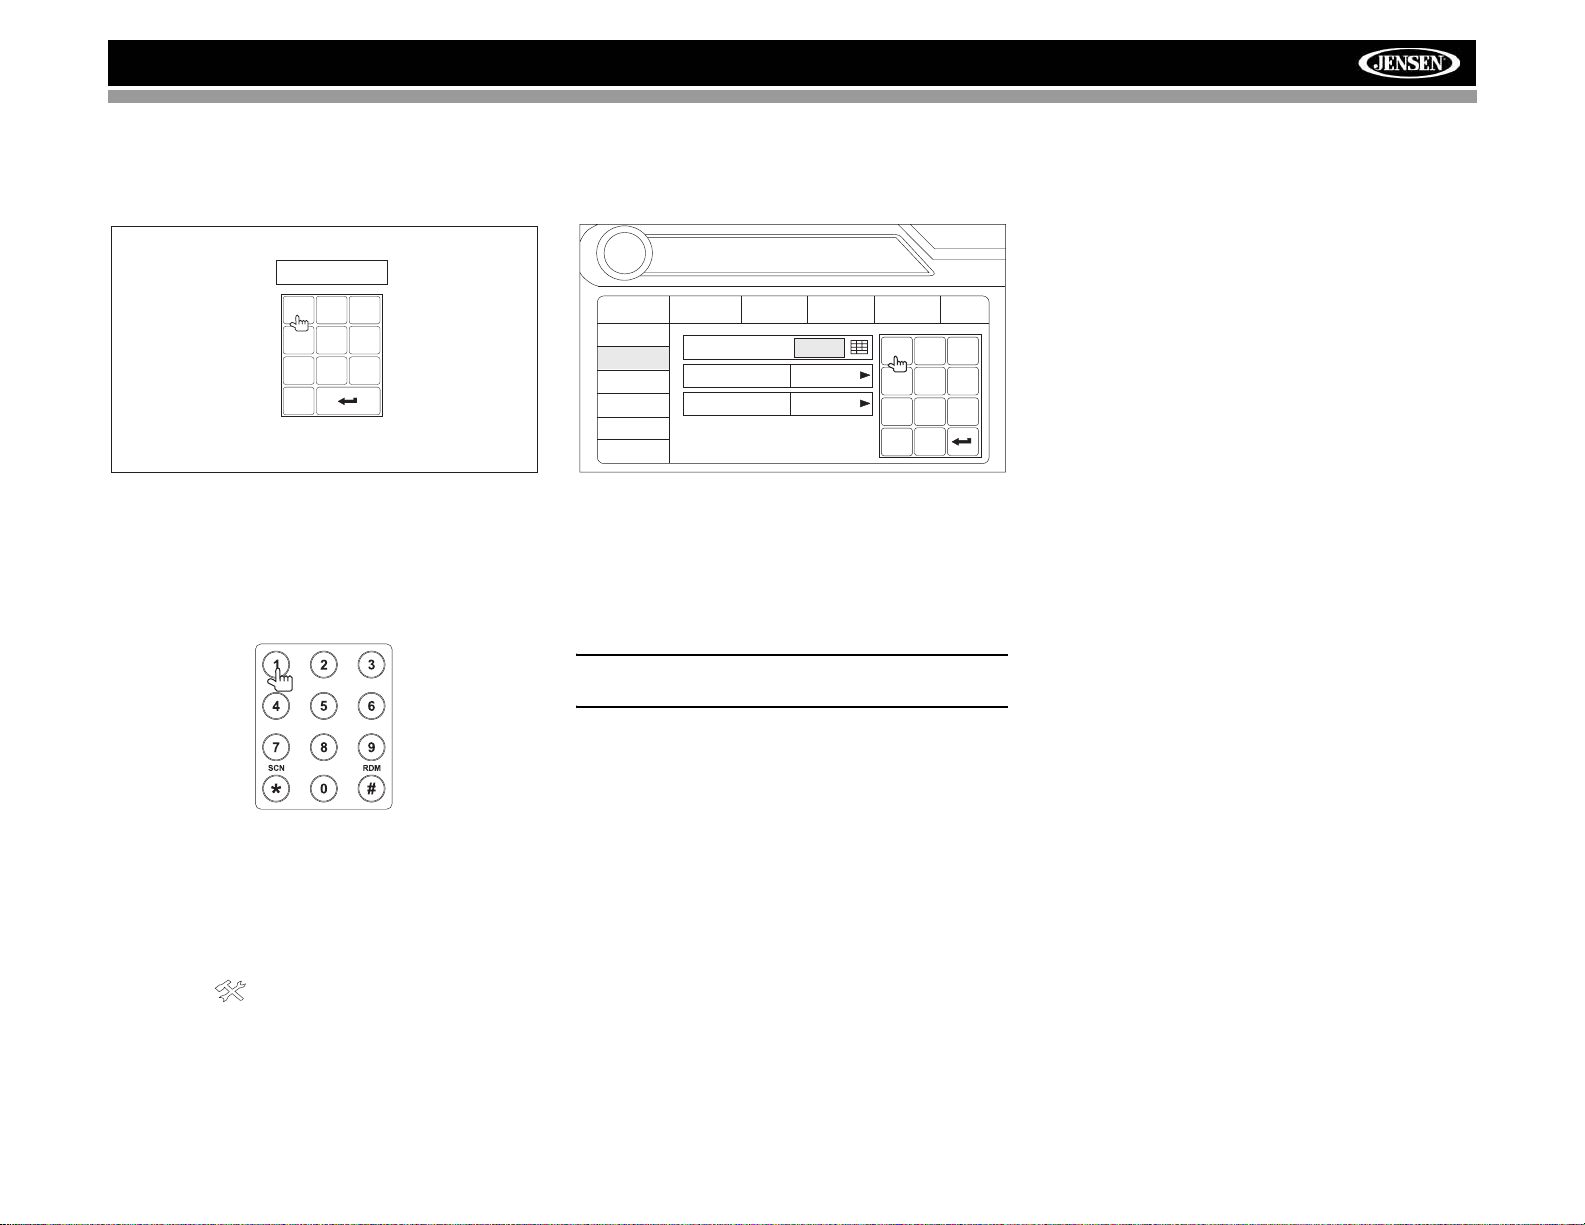
ANTI-THEFT FEATURE
The VM9022 is equipped with an anti-theft feature requiring
the user to enter a password upon initial power on.
Enter Password:
1
2
3
6
5
4
9
8
7
0
3. Touch the keypad icon next to the blue box in the
“Password” field to open the on-screen keypad.
02:40
SETUP
General
RDS
Rating
DivX
Hardware
P.VOL
TS Cal
Language
Password
Rating 8. Adult
Load Factory Reset
Audio
Speaker
Bluetooth
1
4
7
Clear
0
2
5
8
AM
Back
3
6
9
Entering the Default Password
The default user password is 012345 (6 digits). Enter the
password using the on-screen keypad and then press the
Enter (arrow) button. You can also use the remote control
keypad to enter the password.
Press the joystick Enter button (18) on the remote control to
confirm.
Changing the Password
To change the anti-theft and RATINGS protection password,
perform the following steps:
1. Press the SETUP button (31) on the remote control or
touch the button on the screen to enter the
“SETUP” menu.
2. Touch RATING to view the “RATING” sub-menu. An
open lock icon to the right of the “Password” field
indicates that a user password had not yet been
entered.
4. Enter a new 6-digit password and press the Enter
(arrow) button.
The "lock" icon will now appear closed and the new antitheft password will be set, as well as the password for
RATING protection (see “Rating Sub-menu Features”
on page 18).
NOTE: If you forget your password, contact Customer
Service at 1-800-323-4815 for assistance.
7
Page 12
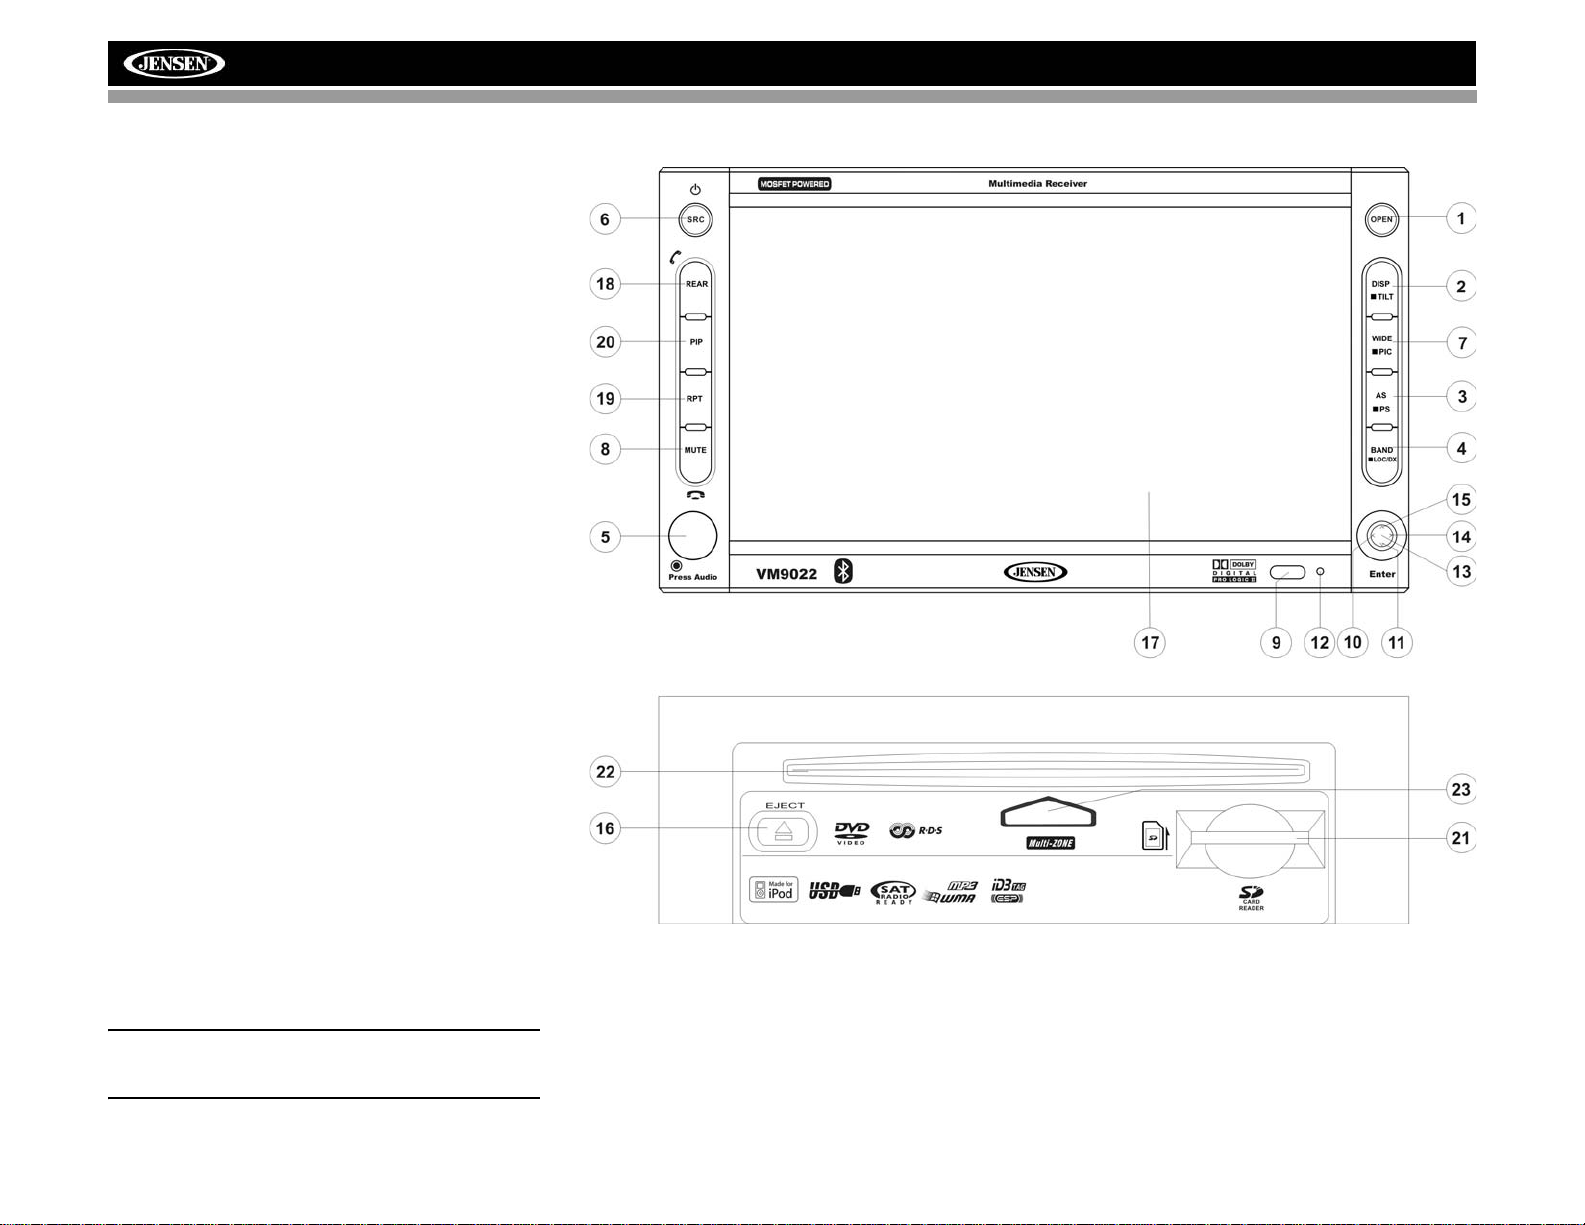
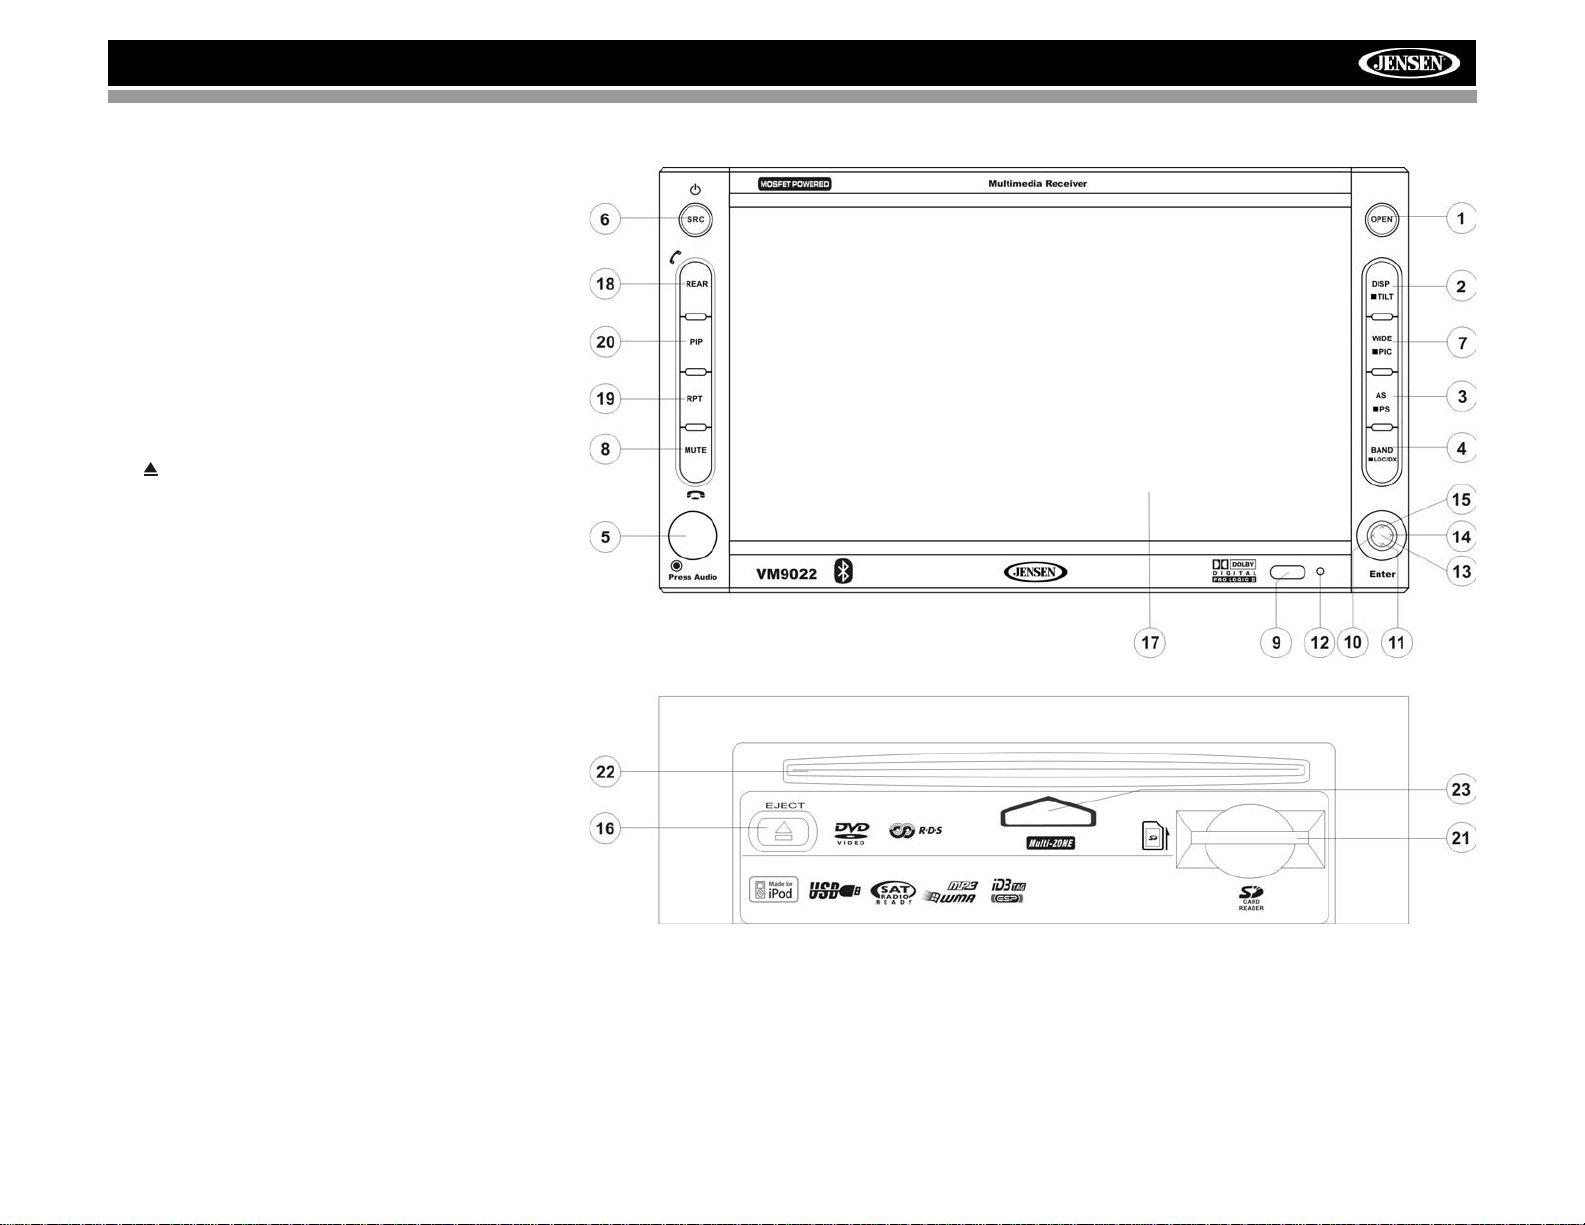
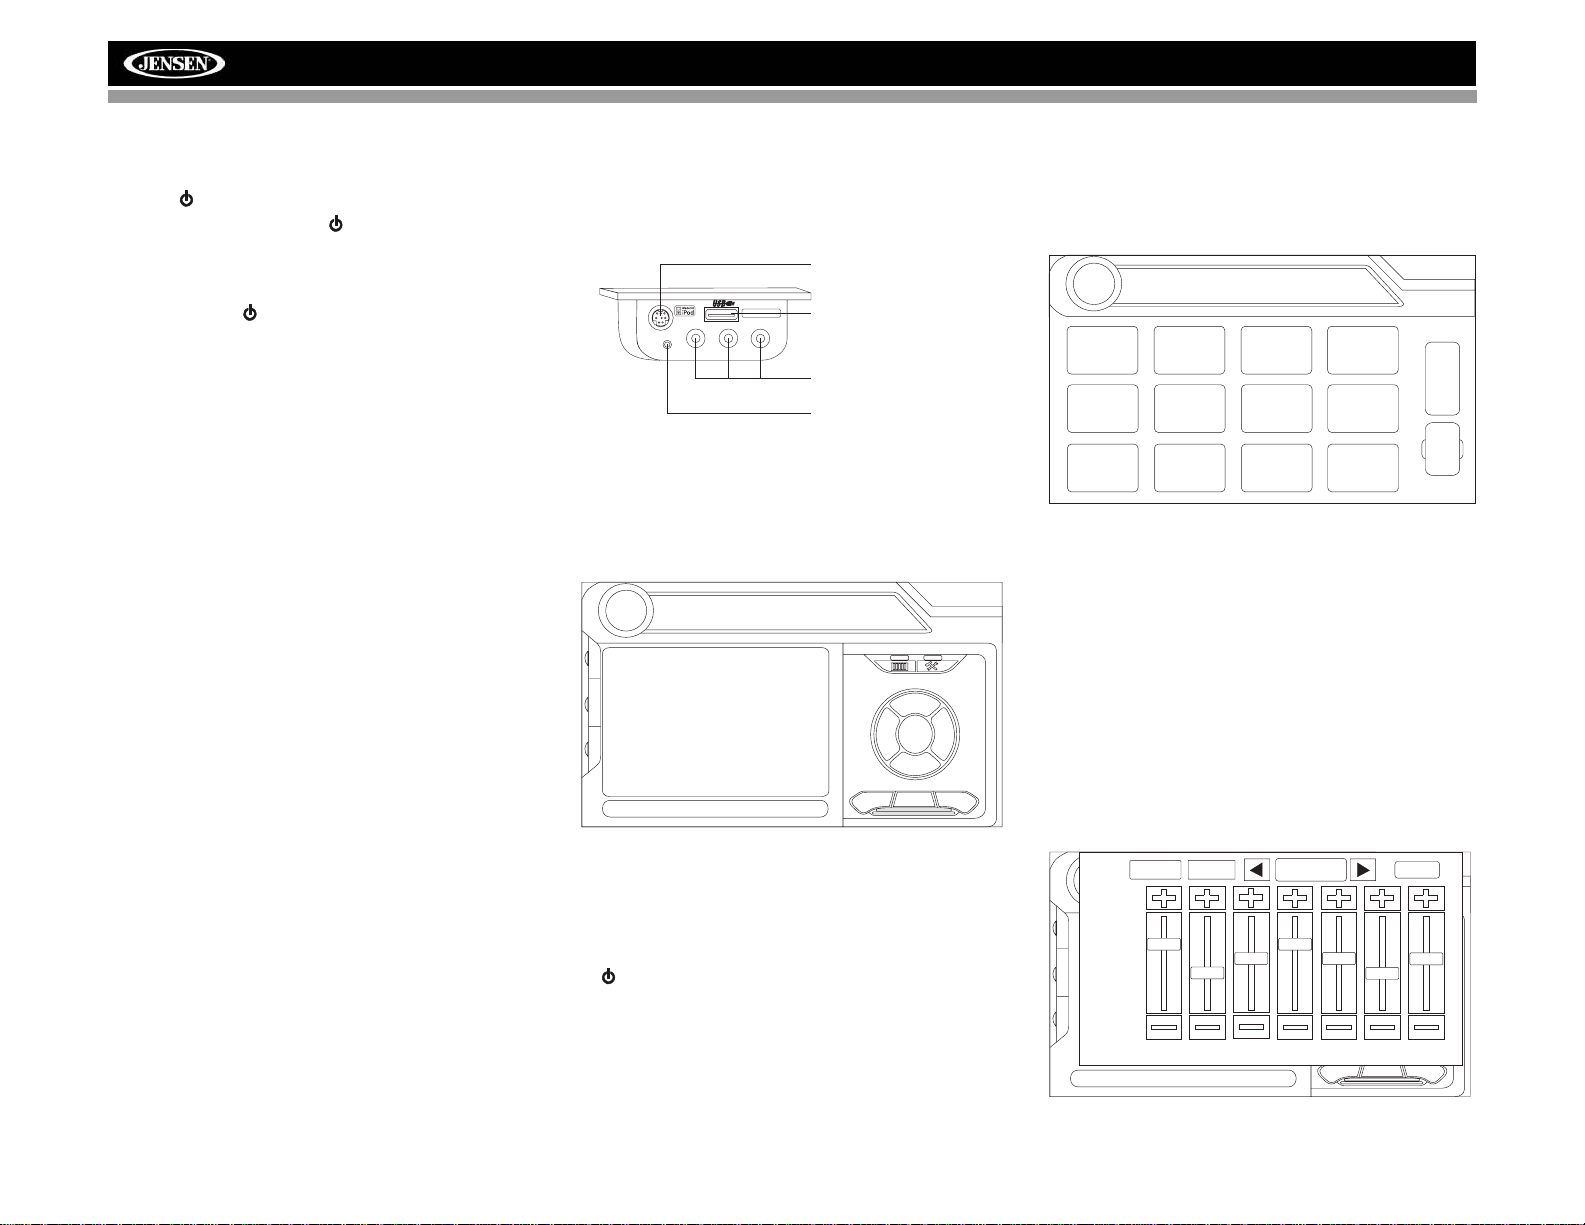
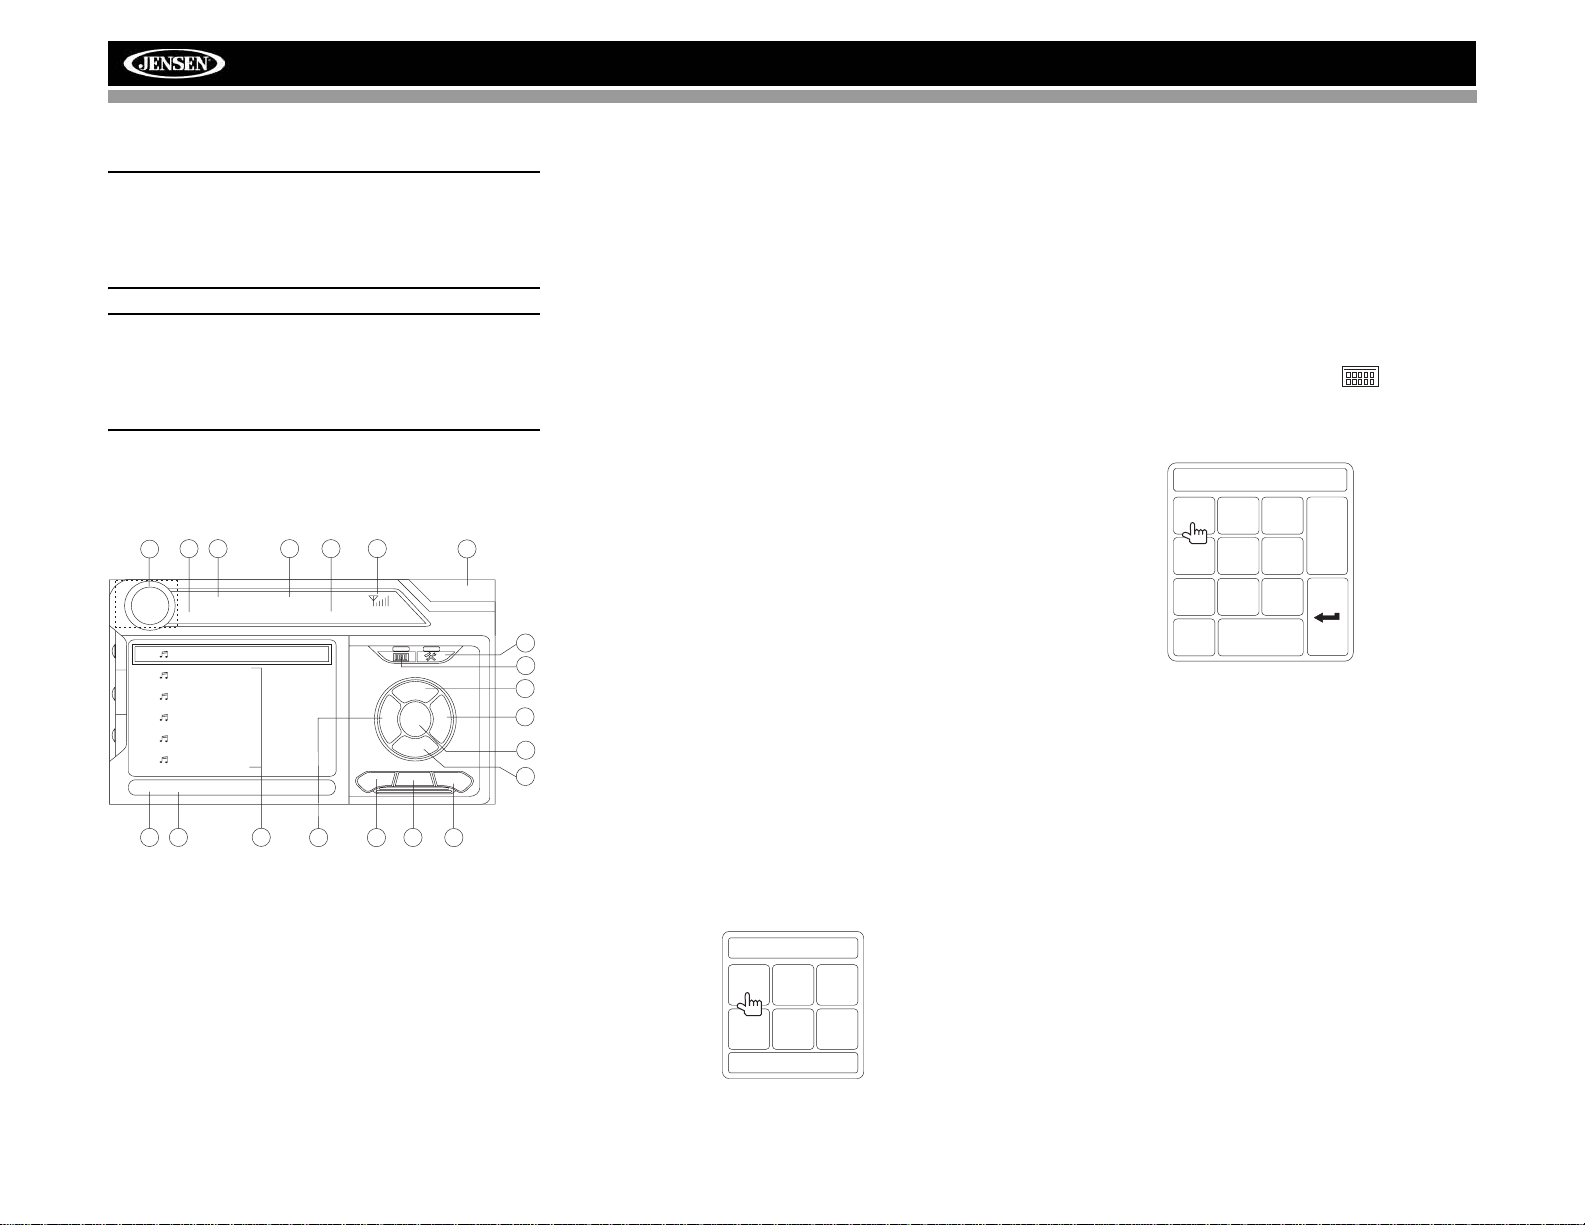
CONTROLS AND INDICATORS
Button Operation
1. OPEN
Press to activate the automatic mechanical system and move
the TFT monitor into viewing position. Press again to close
the TFT.
2. DISP/TILT
Press to cycle through information available on the TFT
screen.
In DVD Mode, press to view the top and bottom information
bars. Press again to turn “Display Off”.
Press and hold to activate the screen tilt function (use the
joystick to adjust the angle).
3. AS/PS
Press to automatically store the first six strong stations in
preset memory. Applies to current band only.
4. BAND/LOC/DX
Press the BAND button to change the AM, FM or SAT band.
Press and hold to turn strong local reception on/off.
5. AUDIO
Rotate to adjust the volume. Press to enter and/or confirm
audio settings.
6. SRC
Press to select playing mode.
When you change the source during navigation, the voice
prompts will still be heard, although the navigation map
cannot be seen. (The selected source audio will be muted
until the navigation voice prompt command is completed,
after which the source audio will resume.)
7. WIDE/PIC
Press to adjust the display aspect of the picture to one of
three settings: CINEMA, NORMAL or Standby (screen off).
Touch the screen to turn Standy mode off. NOTE: Only
CINEMA and Standby are available for non-video sources.
Press and hold to adjust Brightness and Contrast.
8. MUTE
Press to silence the receiver. Press again to resume the
previous volume level.
BT Mode: Answer/dial Bluetooth call.
NOTE: The VM9022 features Softmute, which will allow
the volume to increase or decrease gradually when the
MUTE function is activated or deactivated.
9. IR Remote Control Receiver
10. (left joystick)
DVD/Disc Mode: Press once to play back the previous
chapter/track.
TUNER Mode: Press once to auto-search for the previous
available radio station.
MENU Mode: Press once to move the cursor to the left.
VM9022
11. (down joystick)
DVD/Disc Mode: Press once for slow forward/slow reverse.
TUNER Mode: Press to go down one frequency step.
MENU Mode: Press once to move the cursor down.
12. Reset
Press to reset system settings to factory default (except the
password and parental lock setting).
8
Page 13
VM9022
CONTROLS AND INDICATORS
13.Pause/Play/Enter
Press to pause or resume playback or to confirm current
selection.
14. (right joystick)
DVD/Disc Mode: Press once to enter the next chapter or
track.
TUNER Mode: Press once to auto-search the next available
radio station.
MENU Mode: Press once to move the cursor to the right.
15. (up joystick)
DVD/Disc Mode: Press once for fast forward/fast reverse.
TUNER Mode: Press to go up one frequency step.
MENU Mode: Press once to move the cursor up.
16. ( )
Press once for disc insertion/ejection.
Press and hold to reset core mechanism position.
17. TFT Display
18. REAR
Select rear zone source. Allows front passengers to listen to
the radio while rear passengers listen to a CD, MP3, WMA or
watch DVDs.
BT Mode: Disconnect Bluetooth call.
19. RPT
Press to control repeat playback function.
20. PIP
Press to activate the Picture In Picture function.
NAV101 (optional): Press and hold to return to the NAV101
user interface.
21. SD Card Slot
Insert SD card for playback of audio files.
9
Page 14
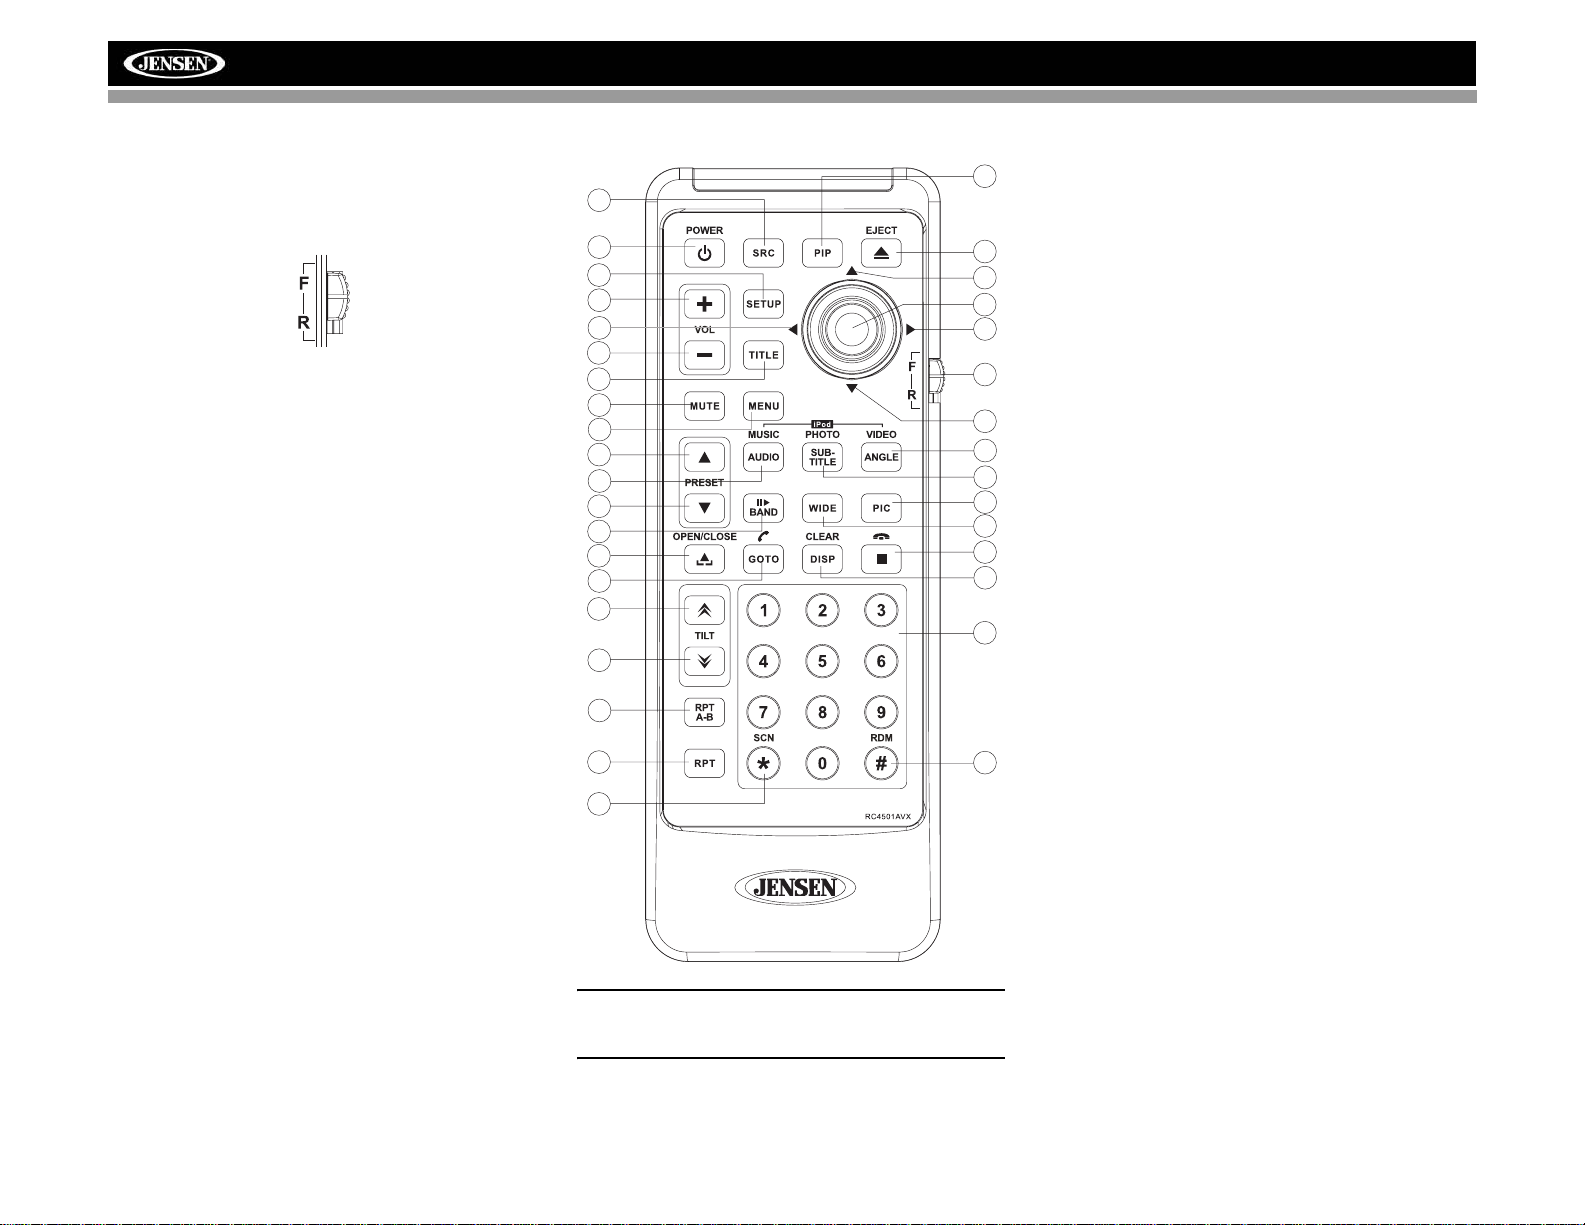
REMOTE CONTROL
The VM9022 Remote controls both the front and rear zones.
To switch from front to rear zone, move the F/R switch (32)
located on the right side of the controller.
VM9022
30
8
4
31
16
17
15
2
3
1
11
5
12
23
25
21
27
26
6
7
34
35
14
18
19
32
22
13
9
24
28
20
10
29
33
NOTE: Your remote control may differ slightly from the
one pictured here. The above diagram is for illustrative
purposes only.
10
Page 15
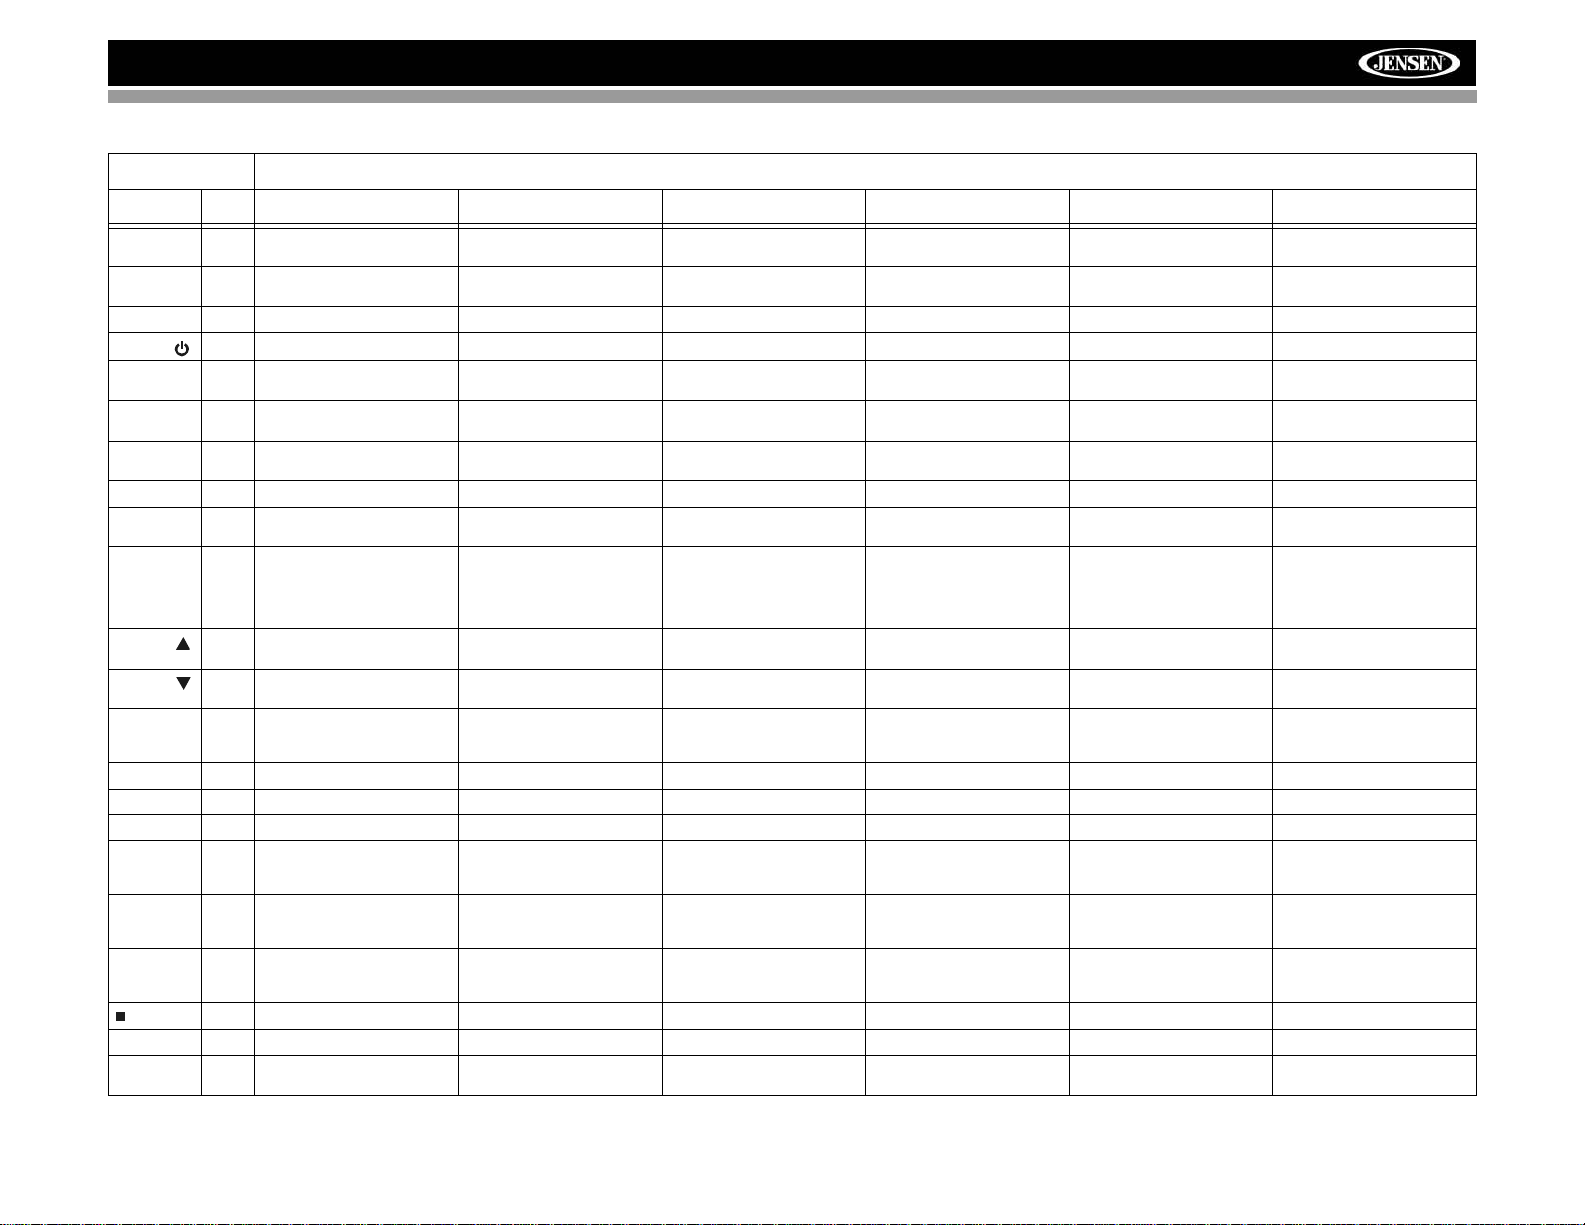
VM9022
Table 1: Remote Control Functions
Button Function
Name Ref# DVD VCD TUNER CD/MP3 SATELLITE iPod
MENU 1 Enters the main menu of the
TITLE 2 Enters the title menu of the
MUTE 3 Toggles on/off audio output Toggles on/off audio out put Toggles on/off audio output Toggles on/off audio output Toggles on/off audio output Toggles on/off audio output
POWER/
AUDIO 5 Changes the audio language
RPT A-B 6 Setup to repeat playback from
RPT 7 Repeats playback of current
SRC 8 Selects playing source Selects playing source Selects playing source Selects playing source Selects playing source Selects playing source
SUBTITLE 9 Language selection for subti-
DISP/
CLEAR
PRESET
PRESET
ANGLE 13 Plays back disc in different
Joystick /\ 14 Fast forwards the disc content Fast forwards the disc content Fast forwards the disc content Accesses iPod Menu
VOL - 15 Decreases volume Decreases volume Decreases volume Decreases volume Decreases volume Decreases volume
VOL + 16 Increases volume Increases volume Increases volume Increases volume Increases volume Increases volume
Joystick < 17 Selects the previous chapter
Joystick
(press)
Joystick > 19 Selects the next chapter for
GOTO 21 Enters Direct Access mode Enters Direct Access mode Enters Direct Access mode Enters Direct Access mode Enters Direct Access mode Enters Direct Access mode
Joystick \/ 22 Fast reverses the disc content Fast reverses the disc content Fast reverses the disc content Pauses playback/starts play-
disc
disc
4 Turns the power on/off Turns the power on/off Turns the power on/off Turns the power on/off Turns the power on/off Turns the power on/off
for disc playback
time frame A to time frame B
chapter
tle
10 Displays playing information/
Delete entry or move backwards to correct error in Direct
Access mode
11 Zooms in when playing DVD,
DivX or Photo
12 Zooms out when playing DVD,
DivX or Photo
angle (if available) for a scene
for playback
18 ENTER, Pauses playback/
starts playback
playback
20 Stops playback Stops playback Stops playback
Turns on/off PBC when playing VCD
Plays first ten seconds of each
chapter/title
Setup to repeat playback from
time frame A to time frame B
Repeats playback of current
chapter
Displays playing information/
Delete entry or move back-
wards to correct error in Direct
Access mode
Zooms in Navigates the preset station
Zooms out Navigates the preset station
Plays back Picture CD with
different angle (if available) of
picture displayed
Selects the previous chapter
for playback
ENTER, Pauses playback/
starts playback
Selects the next chapter for
playback
Displays audio mode
Delete entry or move back-
wards to correct error in Direct
Access mode
list
list
Switches MEM keypad off Switches MEM keypad off Selects iPod Video mode
Searches an available radio
station by decreasing tuning
frequency
Auto memory scan ENTER, Pauses playback/
Searches an available radio
station by increasing tuning
frequency
Displays diagnostics screen Displays iPod menu
Category list in CG mode
Repeats playback of current
track
Displays audio mode
Delete entry or move back-
wards to correct error in Direct
Access mode
Navigates list window Navigates the preset station
Navigates list window Navigates the preset station
Selects the previous track for
playback
starts playback
Selects the next track for playback
Displays audio mode
Delete entry or move back-
wards to correct error in Direct
Access mode
list
list
Searches an available radio
station by decreasing tuning
frequency
ENTER, Toggles the onscreen menu between CAT/
CH mode
Searches an available radio
station by increasing tuning
frequency
Selects iPod Music mode
Repeats playback of current
track
Selects iPod Photo mode
Displays audio mode
Delete entry or move back-
wards to correct error in Direct
Access mode
Navigates list window
Navigates list window
Selects prior track
ENTER
Selects the next track for playback
back
11
Page 16

VM9022
Table 1: Remote Control Functions
Button Function
Name Ref# DVD VCD TUNER CD/MP3 SATELLITE iPod
||>/BAND 23 Slow Forward/Slow Reverse
PIC 24 Displays Brightness/Contrast
OPEN/
CLOSE
TILT
TILT
WIDE 28 Selects display mode: CIN-
1, 2, 3, 4, 5,
6, 7, 8, 9, 0
(Numeric
Keypad)
PIP 30 Picture In Picture view of
SETUP 31 Displays Setup menu Displays Setup menu Displays Setup menu Displays Setup menu Displays Setup menu Displays Setup menu
F/R 32 F controls front zone
RDM 33 Plays all chapters in random
SCN 34 Preview scan Plays the first ten seconds of
EJECT 35 Ejects disc Ejects disc Ejects disc Ejects disc Ejects disc Ejects disc
X2, X4, X8
Controls
25 Opens/closes the TFT monitor Opens/closes the TFT monitor Opens/closes the TFT monitor Opens/closes the TFT monitor Opens/closes the TFT monitor Opens/Closes the TFT moni-
26 Decreases monitor tilt angle Decreases monitor tilt angle Decreases monitor tilt angle Decreases mon i tor tilt angle Decreases monitor tilt angle Decreases monitor tilt angle
27 Increases monitor tilt angle Increases monitor tilt angle Increases monitor tilt angle Increases monitor tilt angle Increases monitor tilt angle Increases monitor tilt angle
EMA, NORMAL or Standby
29 Directly accesses chapter 1-6 selects preset for current
Front source, Rear Zone or
NAV
R controls rear zone
order
Play/pause Selects AM/FM Band. Play/pause Selects SAT1, SAT2 or SAT3
Displays Brightness/Contrast
Controls
Selects display mode: CINEMA, NORMAL or Standby
Picture In Picture view of
Front source, Rear Zone or
NAV
F controls front zone
R controls rear zone
Displays Brightness/Contrast
Controls
Selects display mode: CINEMA or Standby
band
Picture In Picture view of
Front source, Rear Zone or
NAV
F controls front zone
R controls rear zone
Displays Brightness/Contrast
Controls
Selects display mode: CINEMA or Standby
Directly accesses track 1-6 selects preset for current
Picture In Picture view of
Front source, Rear Zone or
NAV
F controls front zone
R controls rear zone
Plays all tracks in random
order
each track
band.
Displays Brightness/Contrast
Controls
Selects display mode: CINEMA or Standby
band
Picture In Picture view of
Front source, Rear Zone or
NAV
F controls front zone
R controls rear zone
Preview scan
Displays Brightness/Contrast
Controls
tor
Selects display mode: CINEMA or Standby
Picture In Picture view of
Front source, Rear Zone or
NAV
F controls front zone
R controls rear zone
Plays all tracks in random
order
12
Page 17
VM9022
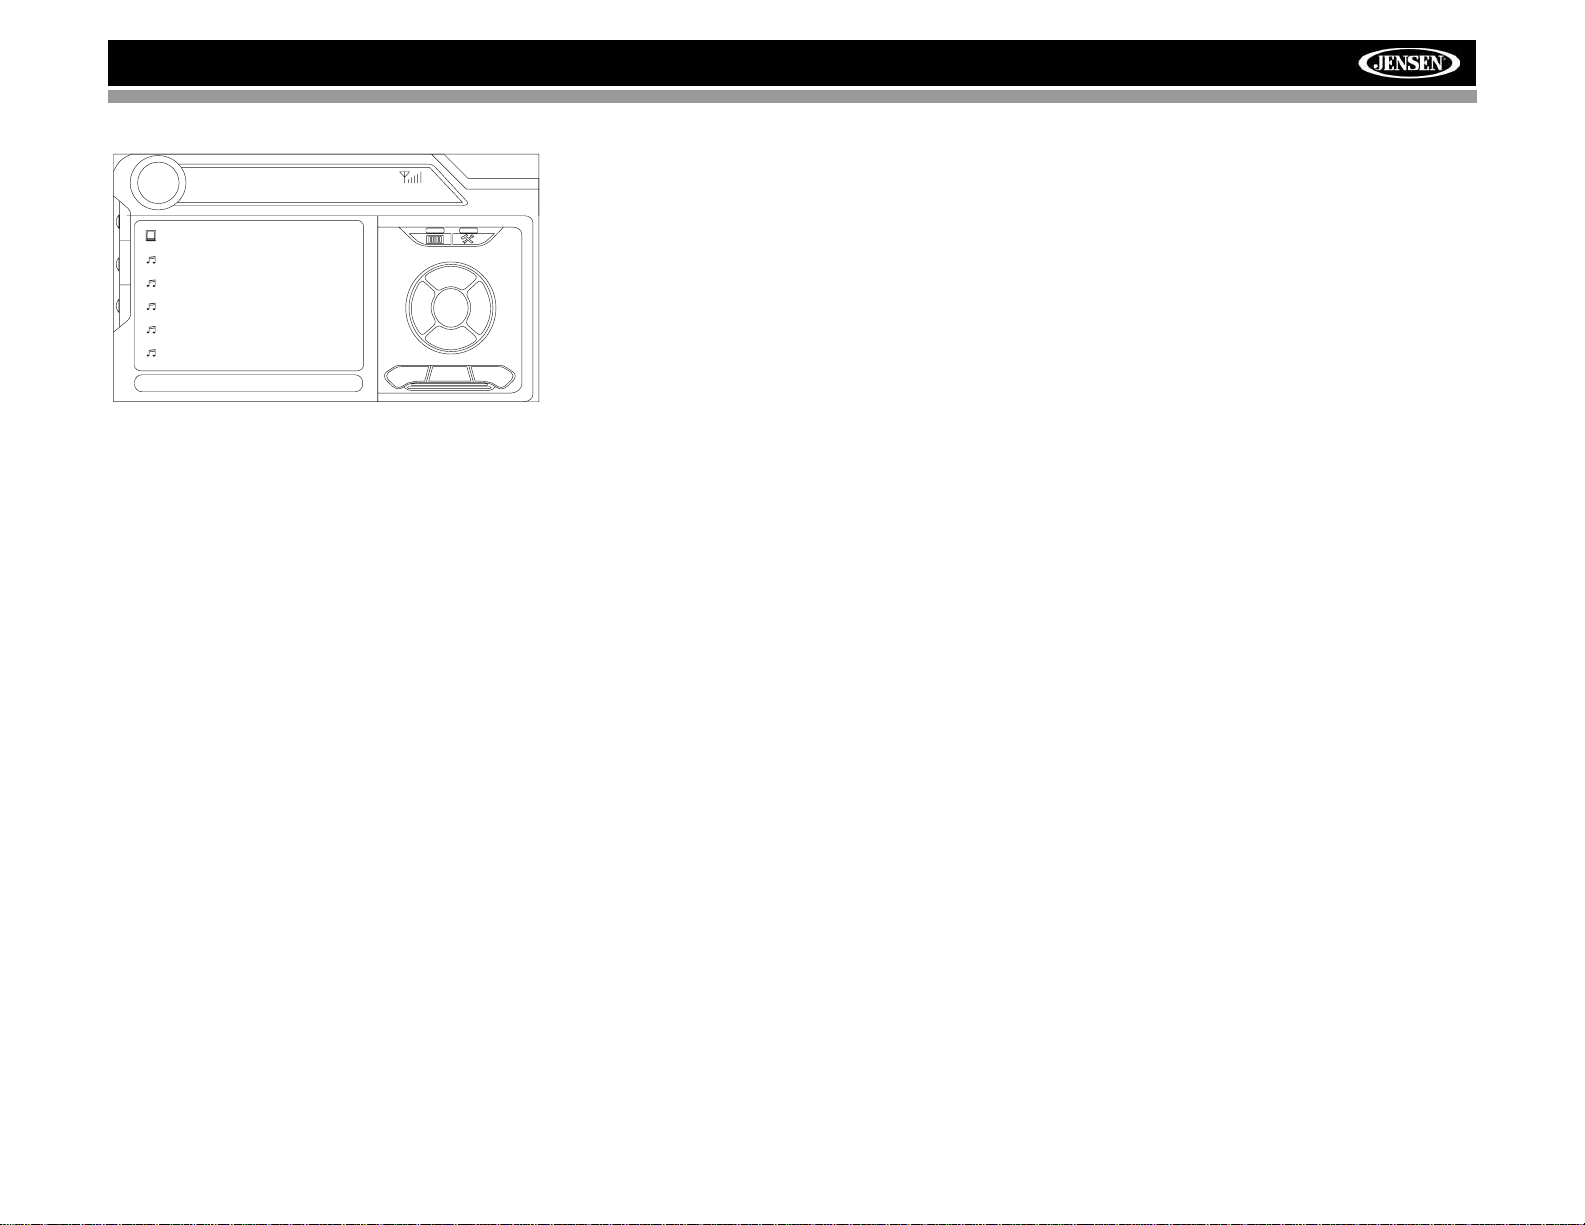
USING THE TFT MONITOR
Open/Close TFT Monitor
Open TFT Monitor
Press the OPEN button (1) on the front panel or press the
( ) button (25) on the remote control to slide the monitor
panel down to reveal the disc and SD card slots.
Close TFT Monitor
Press the OPEN button (1) on the front panel or press the
( ) button (25) on the remote control close the monitor
panel.
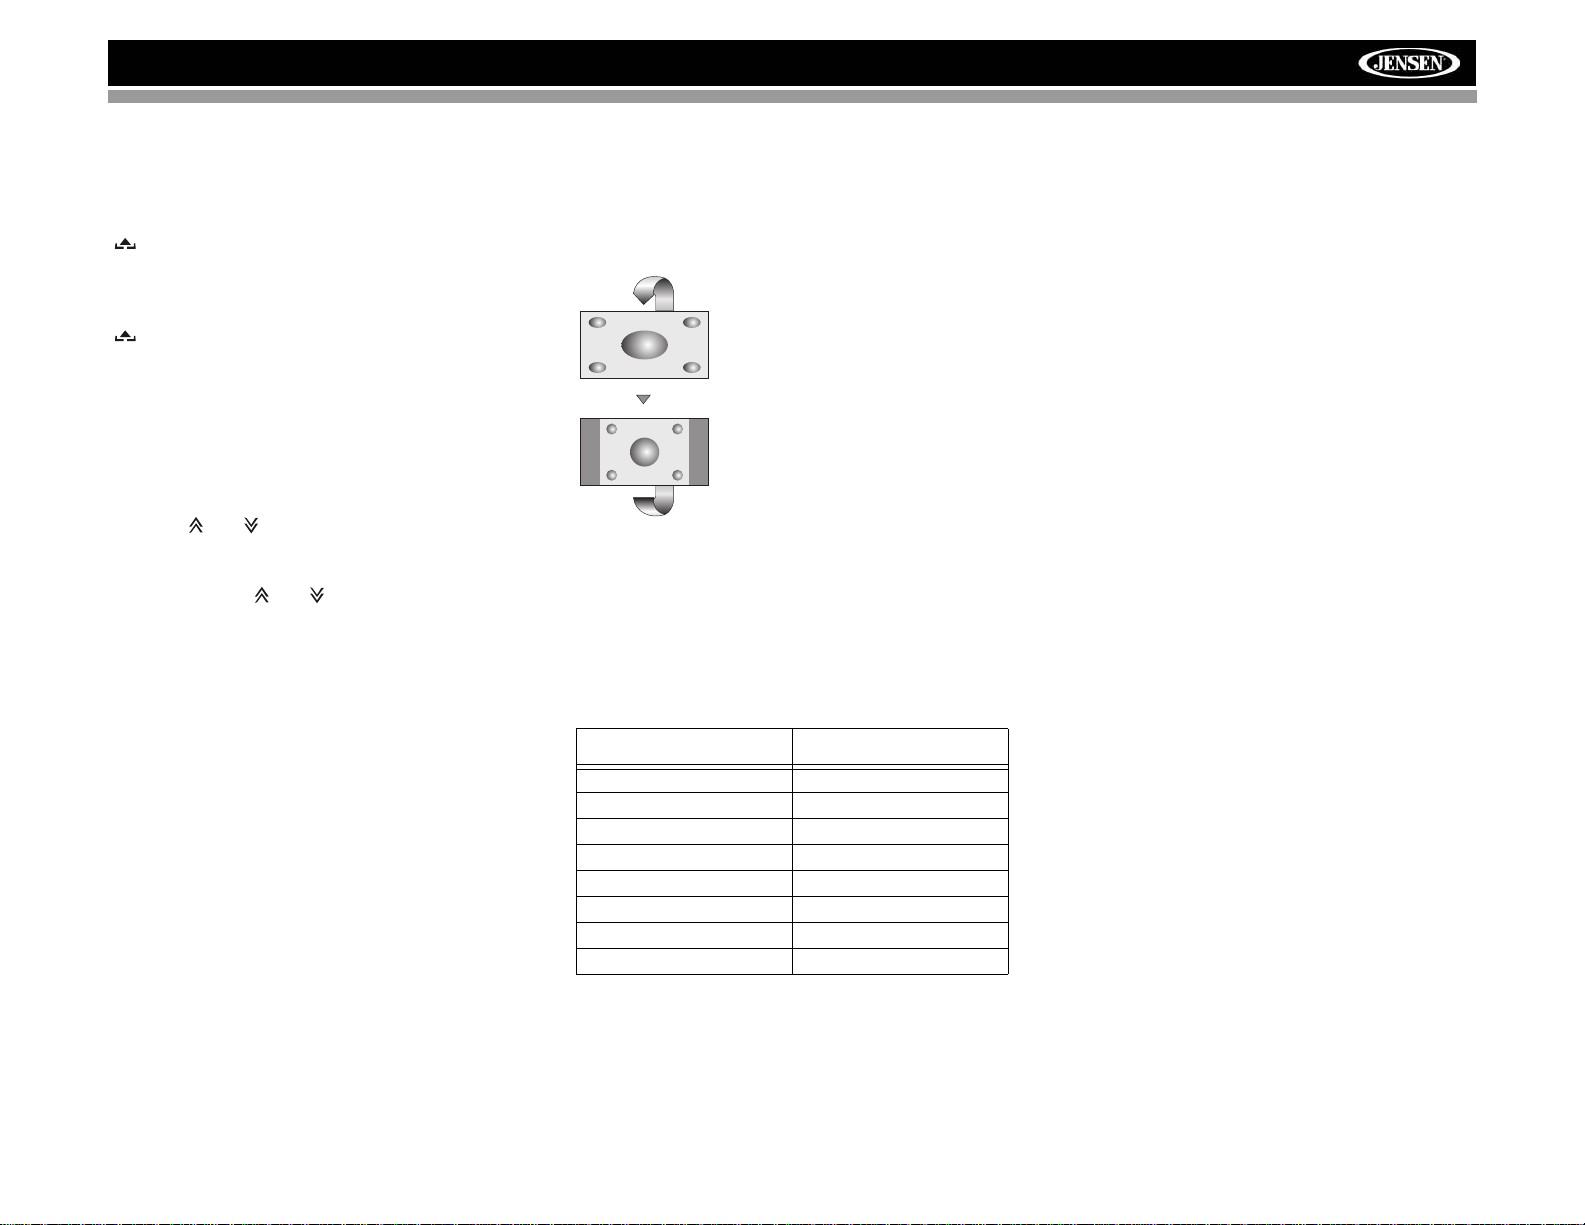
Monitor Tilt Angle Adjustment
A known characteristic of LCD panels is the quality of the
display in relationship to the viewing angle. The monitor
angle can be adjusted for optimum viewing using one of the
following methods.
Step by Step Angle Adjustment
Press the ( ) or ( ) button on the remote control (26, 27)
to adjust the tilt angle of the screen one step at a time.
Continuous Angle Adjustment
Press and hold the ( ) or ( ) button on the control panel
or remote control to adjust the tilt angle in a continuous
motion.
Reverse Driving Use
If the rear-view video camera is connected, the unit is on, and
the monitor is stationed inside the main compartment of the
unit, the monitor automatically moves into the viewing
position and switches to CAMERA mode upon reverse
driving. When the reverse driving stops, the monitor returns
to the main storage compartment.
If the monitor is in display mode, the monitor automatically
switches to CAMERA mode upon reverse driving. When the
reverse driving stops, the monitor returns to its original input
mode.
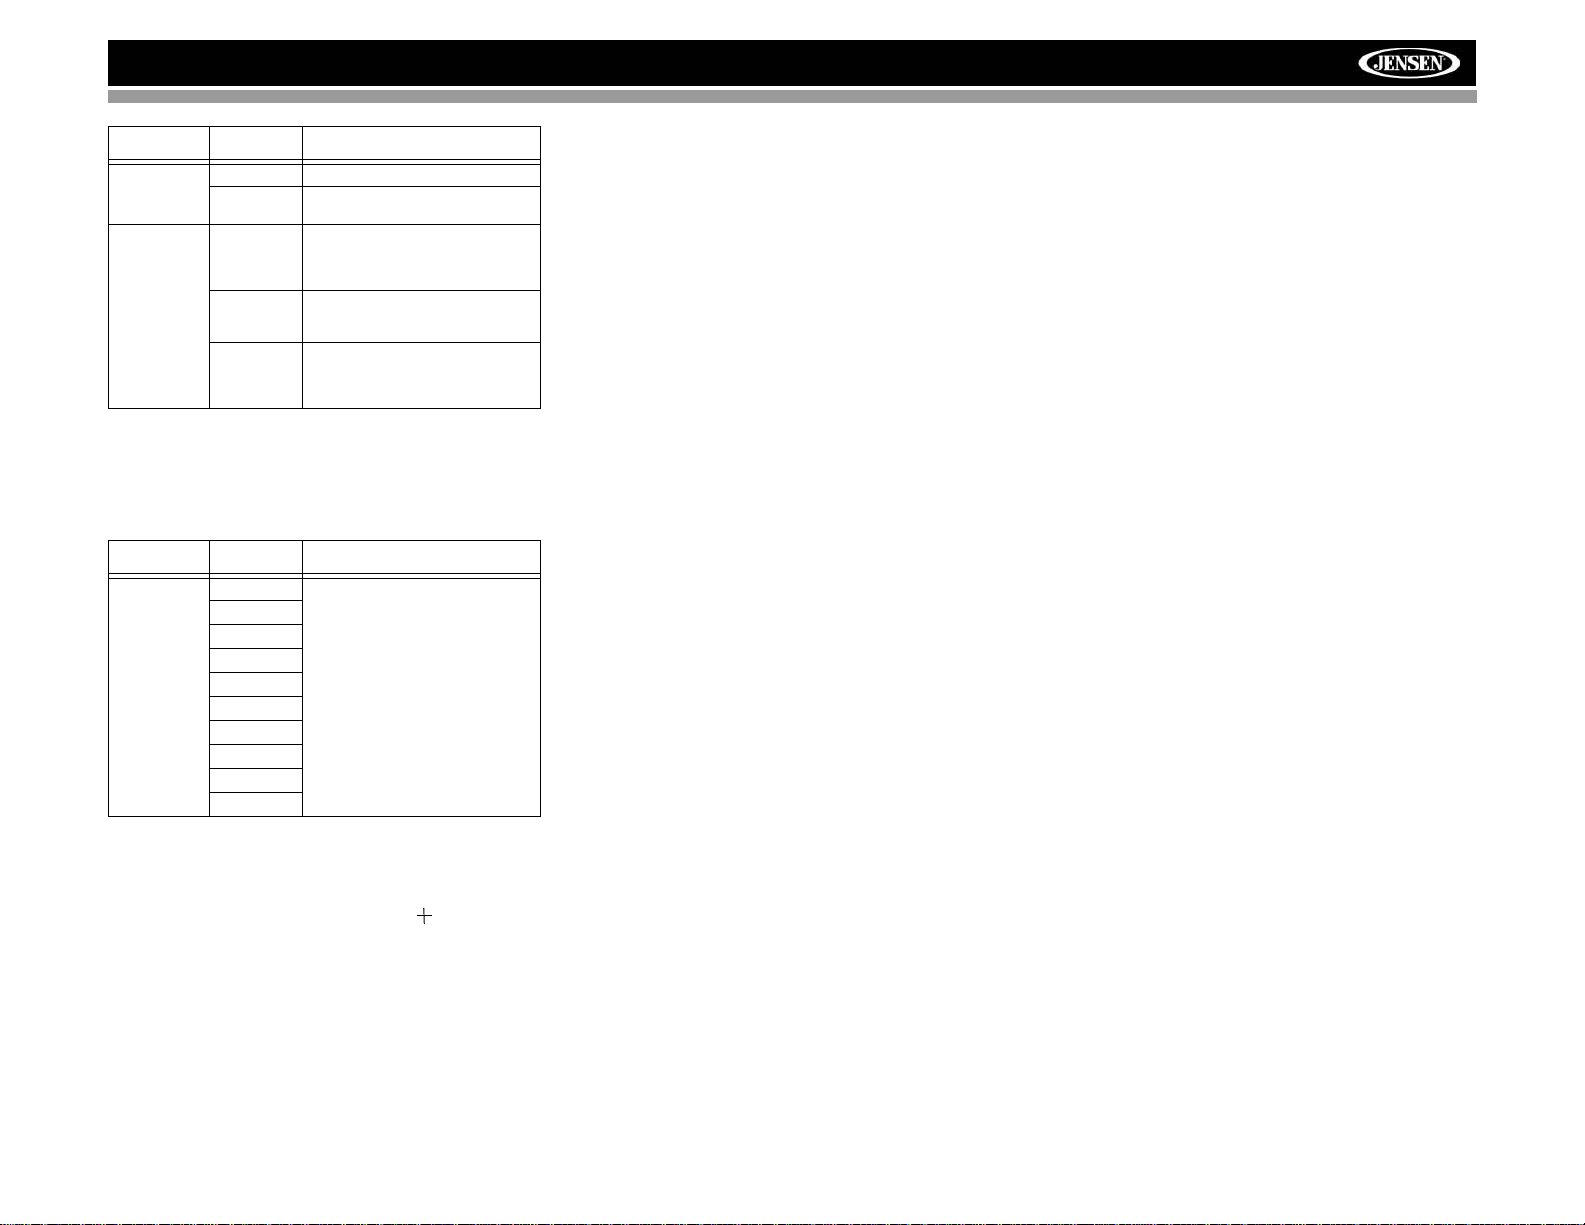
Aspect Ratio
Press the WIDE button (28) on the remote control or WIDE/
PIC button (7) on the monitor to adjust the aspect ratio as
follows (only active with video source):
CINEMA
The entire screen is extended
horizontally to the aspect ratio of 16 to
9. The extension ratio is the same at
any point.
NORMAL
The conventional display image has a
4 to 3 ratio of horizontal to vertical,
leaving a blank area on the right and
left sides of the display.
STANDBY
Screen becomes black. Touch screen
to resume.
Image Setting
Table 2 shows the video output mode for each playing
source.
Table 2: Video Output Modes
Playing Source Video Output Modes
RADIO RGB Mode
SAT RGB Mode
DISC RGB Mode
BT RGB Mode
AUX 1 CVBS Mode
AUX 2 CVBS Mode
NAV RGB Mode
CAMERA CVBS Mode
*CVBS – Composite Video Baseband Signal
Parameter Adjustment Procedure
1. Enter Picture Quality Setting Mode:
Press the PIC button (24) on the remote control or press
and hold the WIDE/PIC button (7) on the monitor.
2. Select Item to Set:
Use the up/down joystick buttons to select “BRIGHT” or
“CONTRAST”.
3. Set Parameters:
Use the left/right joystick buttons to modify the settings.
4. Exit Picture Quality Setting Mode:
Press the PIC button on the remote control or the WIDE/
PIC button on the monitor
Parking Brake
Parking Brake Inhibit
When the pink "Parking" wire is connected to the vehicle
brake switch, the front TFT monitor will display video
only when the parking brake sequence is engaged.
Before starting the parking brake sequence, the radio
must be on with the video media disc inserted and
playing.
Parking Brake Sequence
There are two situations that can start the Parking Brake
Sequence (this is the preferred method). The timing
window is between 3 ~ 5 seconds.
• Parking brake is engaged (on) when the vehicle is
started or the accessory/ignition is turned on. To
activate video, the following sequence of events
must be completed:
a. Release parking brake for 3 ~ 5 seconds.
b. Reapply parking brake.
c. Video should be displayed on the TFT monitor
within 1 ~ 2 seconds.
• Parking break is disengaged (off) when the vehicle
is started or the accessory/ignition is turned on. To
activate video, the following sequence of events
must be completed:
a. Set parking brake for 3 ~ 5 seconds.
b. Release parking brake for 3 ~ 5 seconds.
c. Reapply parking brake.
d. Video should be displayed on the TFT monitor
within 1 ~ 2 seconds.
13
Page 18
AUX1
DISC
OPERATING INSTRUCTIONS
Power On / Off
Press the /SRC button (6) (or any other button on the front
of the unit except reset), or the /POWER button (4) on the
remote control, to turn the unit on. The buttons on the front of
the unit light up and the current mode status appears on the
TFT screen (17).
Press and hold the button to power off the unit.The monitor
is drawn back into the main compartment.
Audible Beep Confirmation
An audible beep tone confirms each function selection. The
Beep tone can be disabled through the Setup menu.
Volume Adjustment
To increase or decrease the volume level, turn the rotary
encoder (5) on the front panel or press the VOL+/ VOL-
buttons (15, 16) on the remote control. When the volume
level reaches “0” or “40”, a beep sounds, indicating that the
adjustment limit has been reached. The volume ranges from
“0” to “40”. The TFT screen displays the volume level for 3
seconds.
Programmable Turn-On Volume
This feature allows the user to select a turn-on volume setting
regardless of the volume setting prior to turning the unit off.
To program a specific turn-on volume level, turn the AUDIO
control (2) to adjust the volume to the desired turn-on volume.
Push and hold the AUDIO button while the yellow speaker
icon and level indication is displayed on the screen. The unit
will beep two times to confirm your turn-on volume setting.
Mute
Press the MUTE button on the front panel (8) or remote
control (3) to mute the volume from the unit. Press the MUTE
button again to restore the volume. “MUTE” is displayed on
the screen. Adjusting the volume or using any of the audio
setup features cancels the mute function.
Line Mute
If the “MUTE” wire is connected, audio output mutes when a
telephone call is received by a cell phone.
Playing Source Selection
Press the SRC button on the front panel (6) or remote control
(8) to change between available playing sources in the
following order: RADIO, SAT, DISC, NAV, BT, iPod, SD, USB,
AUX1, AUX2 and CAMERA. The playing mode is displayed
on the TFT screen.
Auxiliary Devices
External peripheral devices can be connected to this unit via
4
RCA output (AUX IN 2) or the MediaLink
.
iPod Connector
(GEN 5 Recommended)
3.5mm -Audio
MediaLink
VIDEO LEFT RIGHT
USB Connector (Type A)
RCA Inputs (AUX 1)
3.5mm Left & Right
Stereo Inputs (AUX 1)
Select “AUX1” to play an auxiliary device connected via the
MediaLink RCA or 3.5mm inputs. For example, you can play
music files from a portable music player, video from a video
camera and even view photos stored on a digital camera.
No Video Signal
E
Q
R
E
A
R
P
I
P
Stereo PLII Music
01:53 PM
Select “AUX2” mode to access and control auxiliary devices
connected to the “AUX IN 2” inputs on the back of the radio.
Selecting a Source while Navigating
While navigating, other sources may be selected and listened
to such as AM-FM Tuner, CD, etc. To select a source, press
the /SRC button (6) and then select a source from the Front
Source Menu. Navigation voice prompts will be heard
automatically, although the navigation map cannot be seen.
(The selected source audio will be muted until the navigation
voice prompt command is completed, after which the source
audio will resume.)
VM9022
Source Menu
To access the SOURCE MENU, touch the TFT screen in the
top left corner of the screen.
SOURCE MENU
DISC
RADIO
AUX 1
SAT
AUX 2
SD
USB
iPod
CAMERA
NAV
OFF
This menu allows you to select a source for the front or rear
zone. Touch FRONT or REAR to choose the zone for which
you would like to specify the source. (See “Multi-ZONE
Operation” on page 16.)
Audio Control Menu
The Audio Control menu features a 7-band graphic equalizer,
which allows you to easily adjust your audio system to meet
the acoustical characteristics of your vehicle, which vary
depending on the type of vehicle and its measurements.
Proper setting of the Fader and Balance boosts the effects of
the cabin equalizer.
Press the AUDIO button (5) on the front panel to display the
audio menu.
E
Q
R
E
A
R
P
I
P
FAD-BAL EQ
+12 —
0—
–12 —
80 250 600 1k 4k 10k 16k
EQ: User
USER
F
R
O
N
T
BT
R
E
A
R
BACK
14
Page 19
VM9022
DISC
n
To adjust an audio feature:
1. Use the left/right joystick buttons to highlight the audio
feature to be adjusted.
2. Press the joystick Enter button on the control panel (13)
or remote control (18) to select the highlighted option.
3. Use the joystick to adjust the selected feature to the
desired setting.
Table 3: Audio Adjustments
Function Adjustment Options
EQ User In user mode, you can manually adjust
Acoustic Use the on-screen arrows to select a
Urban
Rave
Latin
Dance
Hip Hop
Rock
FAD-BAL Use this screen to adjust the output level for each
speaker in your surround system from 0 to -24dB.
You can also adjust the master volume from this
screen.
NOTE: The EQ mode will automatically change to
“USER” when individual EQ bands are adjusted.
Proper setting of the Fader and Balance complement the
effects of the cabin equalizer.
The Audio menu will automatically exit after a few seconds of
inactivity. To exit quickly, touch the top left corner of the
screen or press and hold the AUDIO button (5).
each of the seven frequency bands.
predefined equalization curve.
Alternate Display Options
A menu located on the left side of the screen provides
immediate access to the Equalizer, Rear Zone screen view
and PIP (Picture in Picture) features.
• EQ: Touch to view Spectrum Analyzer > Equalizer.
• REAR: Touch to view the Rear Zone screen. Control
options appear below the PIP image, depending on the
source.
DISC
AM/FM RADIO
BAND AS
CAT– CH– CH+ CAT+
SATELLITE
• PIP: Touch to view the Rear Zone, current Front Zone,
or NAV screen. Use the left/right arrows below the PIP
image to change the PIP source.
PIP: DISC
(Root)
MP3 4/84 00:00:23
E
1 Cherry Poppin Da
Q
2 Chris Isaak - Baby
R
E
3 Crazy Town - Butt
A
R
4 Phish - Birds Of A
P
I
5 Phish - Bouncin' R
P
6 Phish - Freebird (L
01:02 AM
1/2
System Reset
To correct a system halt or other
illegal operation, use the tip of a pen
to press the reset button (12) located
on the front bottom-right corner of the unit. After a system
reset, the unit restores all factory default settings.
NOTE: If the unit is reset while a DVD is playing, the DVD
resumes play once the reset is complete.
[RESET] Butto
15
Page 20
MULTI-ZONE OPERATION
DISC
Independent sources can be played simultaneously on the
VM9022. For example, a video game console can be seen on
the front screen while DVD video is available to rear
passengers.
Multi-Zone Limitations
DVD, USB and SD Card cannot be selected
simultaneously for Front and Rear viewing.
For example, if DVD is selected for the Rear
Zone, then the following sources cannot be
selected for Front Zone viewing: DVD, USB or
SD Card. If DVD is selected for the Front
Zone, then the following sources cannot be
selected for Rear Zone viewing: DVD, USB or
SD Card.
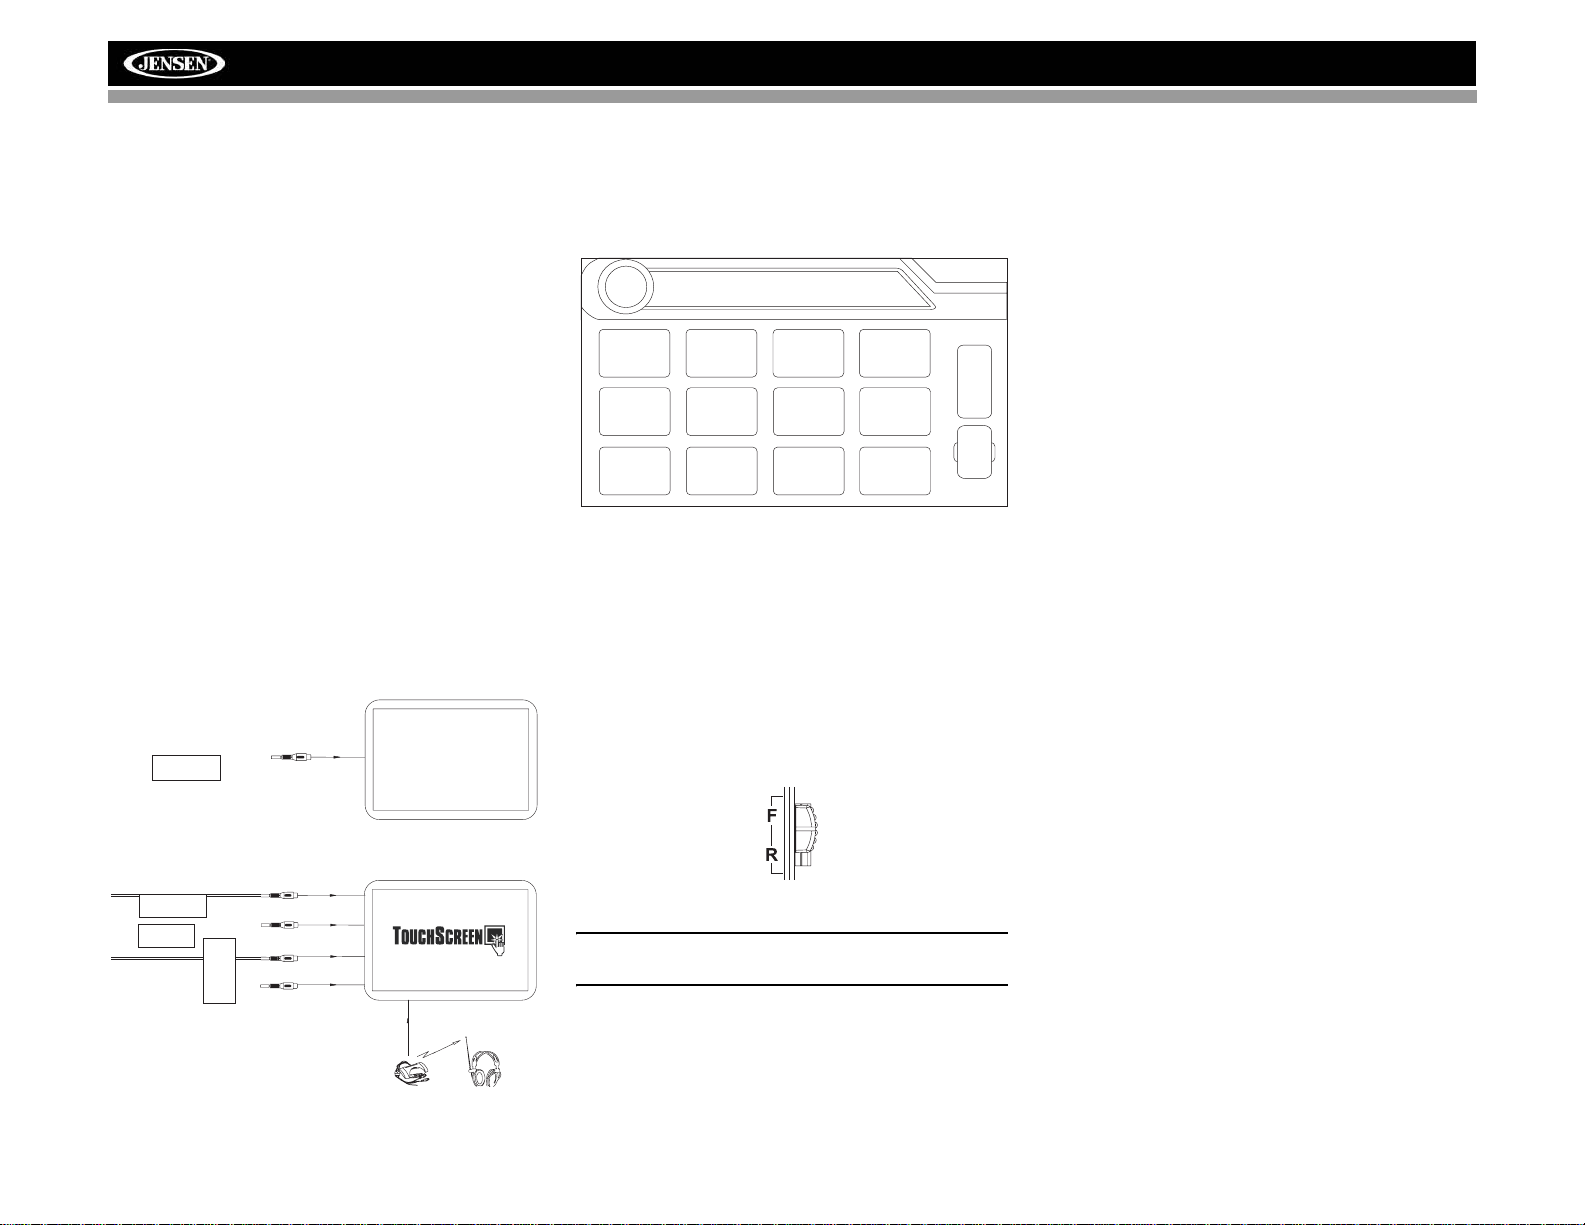
Connecting the Rear Zone Touch
Screen
You can connect up to two additional monitors (sold
separately) for rear passengers, one of which can be a Touch
Screen. You can also connect a wireless headphone system
to one of your rear monitors, as illustrated below.
Rear Video Screen
(Sold Separately)
YELLOW
VIDEO OUT 1
Changing the Rear Zone Source
To access the SOURCE MENU, touch the TFT screen in the
top left corner of the screen.
SOURCE MENU
DISC
RADIO
AUX 1
SAT
AUX 2
SD
USB
iPod
CAMERA
NAV
OFF
This menu allows you to select a source for the front or rear
zone. Touch FRONT or REAR to choose the zone for which
you would like to specify the source.
Controlling the Rear Zone Screen(s)
If you have a rear touch screen installed, you can touch the
screen to control most rear zone functions.
You can also use the remote control. The VM9022 remote
controls both the front and rear zones. To switch from front to
rear zone, move the F/R switch (32) located on the right side
of the remote controller.
F
R
O
N
T
BT
R
E
A
R
VM9022
Turning the Rear Screen Off
Touch the OFF button (on the SOURCE MENU) to suspend
operation of the rear screen. Any operation assigned
exclusively to the rear source will be suspended until
reactivated using either the front or rear zone touch screen or
the remote control.
VIDEO OUT 2
MZ-TFT
MULTIZONE
HEADPHONE
YELLOW
BLACK
WHITE
RED
MZ7TFTTouchScreen
(Sold Separately)
Wireless Headphone
(OPTIONAL)
NOTE: You cannot change or control the front zone
source from the rear zone video screen.
Touch the REAR button on the left side of the screen to view
a “Picture in Picture” image of the rear screen.
16
Page 21
RADIO
VM9022
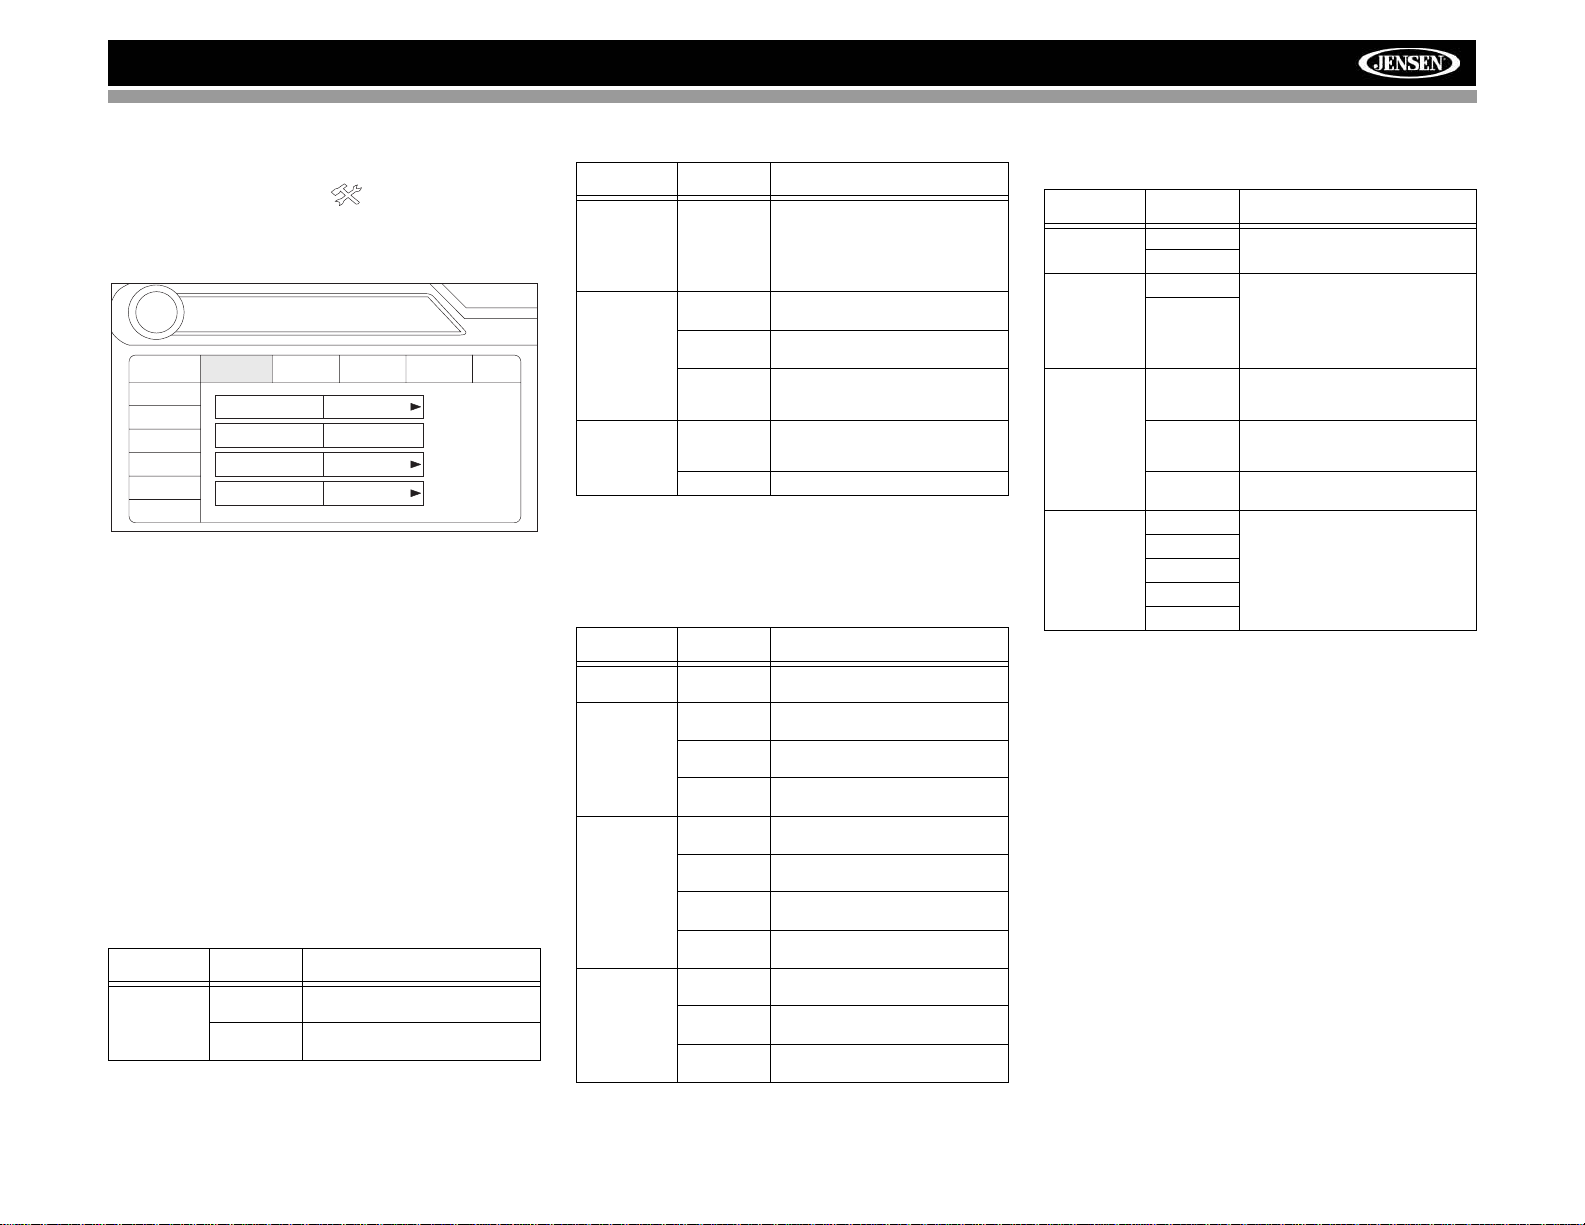
SETUP MENU
To access system settings, press the SETUP button (31) on
the remote control or touch the button on the screen to
enter the “SETUP” menu. The “GENERAL” sub-menu
appears highlighted in blue.
02:40
RADIO
General
RDS
Rating
DivX
Hardware
P.VOL
TS Cal
SETUP
Language
Clock Mode 12 Hour
Clock Adjust 04 : 31 AM
Video Input AUTO
Beep On
Audio
Speaker
Bluetooth
Accessing Menu Items
Touch the sub-menu name or use the joystick to select a submenu (Language, Audio, RDS, etc.).
The features available for adjustment under the highlighted
sub-menu option will appear in the center of the screen.
Adjusting a Feature
1. Use the touchscreen or press the /\ or V buttons on the
joystick to select the feature to be adjusted.
2. Enter the option field for the feature you want to adjust
by using the touchscreen or pressing the Enter
(joystick) button. A submenu appears in a second row
with the selected option highlighted in blue.
3. Select a new value by using the touchscreen or pressing
the /\ or V buttons on the joystick.
4. Use the touchscreen or press the Enter (joystick) button
to confirm setup.
General Sub-menu Features
Setting Options Function
Clock Mode 12 Hour Clock displays 12 hour time using
24 Hour Clock displays 24 hour time up to
AM and PM.
23:59.
AM
Back
Setting Options Function
Clock Adjust (HH:MM) The clock appears in the top right
Video Input
(Input circuitry autodetects the
video signal
from the Aux
In source).
Beep On When turned on, an audible beep
NTSC The color signals are output in the
PAL The color signals are output in the
Auto The color signal output is switched
Off No beep sounds.
Language Sub-menu Features
If a DVD supports more than 1 Subtitle or Audio language, all
the languages are available for selection during playback. If
the selected language is not supported by the DVD, then the
default language is used.
corner of the screen and on the TFT
screen during certain operations.
NOTE: The AM/PM indication will
change as you continue to adjust
the hour past 12.
standard NTSC format.
standard PAL format.
automatically based on the current
video input signal - NTSC or PAL.
tone confirms each function selection.
Setting Options Function
OSD English On Screen Display appears in
DVD Audio English DVD Audio is heard in English
Spanish DVD Audio is heard in Spanish
French DVD Audio is heard in French when
DVD Subtitle English DVD subtitles automatically appear
Spanish DVD subtitles automatically appear
French DVD subtitles automatically appear
Off DVD subtitles do not appear auto-
Disc Menu English DVD menu (if applicable) is dis-
Spanish DVD menu (if applicable) is dis-
French DVD menu (if applicable) is dis-
English.
when the option is available.
when the option is available.
the option is available.
in English when available.
in Spanish when available.
in French when available.
matically.
played in English.
played in Spanish.
played in French.
Audio Sub-menu Features
Setting Options Function
DRC Off Employ the Dynamic Range Control
On
Audio Mode Surround Choose Stereo to send the same
Stereo
Pro Logic II Music Optimized for music reproduction
Movie Optimized for video reproduction
Matrix Use with Dolby Matrix encoded
Sub. W Filter 50Hz Selecting a crossover frequency
80Hz
100Hz
120Hz
150Hz
Speaker Sub-menu Features
• Choose 4 CH, 4.1 CH or 5.1 CH depending on the
speaker configuration in your vehicle.
• Use the Test Tone feature to verify speaker settings.
Make changes using the EQ/FAD-BAL menu, accessed
by pressing and holding the AUDIO button (volume
control).
• Subwoofer Phase Adjustment: Touch the sub.w icon to
access the subwoofer polarity controls and reverse the
subwoofer signal polarity from 0° to 180°. Reversing
polarity can improve bass response related to speaker
configuration.
• Delay Setting: Delay is available when the media is
Dolby Digital encoded or digital bitstream.
• RL and RR only are available in 4.0 and 4.1 mode
• Touch the RL, RR and Cent speaker icons to access
the delay setting
• L and R Rear channels: 0 - 15 msec
• Center channel: 0 - 5 msec
for better playback for low volumes.
signal to the front and rear left/right
speakers. If you have a center
speaker, you can choose the Surround option when supported by
your media.
when playing music encoded in
Dolby.
when playing movies encoded in
Dolby.
media.
sets a cut-off frequency of the subwoofer's LPF (low-pass filter).
17
Page 22

VM9022
Bluetooth Sub-menu Features
Setting Options Function
Bluetooth On Enable Bluetooth function.
Off Disable Bluetooth function.
Auto Answer On The unit automatically answers all
Off Manually answer calls by touching
Connect Manual Connect the last active mobile
Auto Automatically connect when your
Pairing Code The default code is “1234”. Touch
incoming calls.
the “call” button.
phone by touching the CONNECT
icon when disconnected.
paired phone is in range.
the keypad icon to open the keypad
and enter the pairing code or pass
key required for Bluetooth connection to your mobile phone. Not all
phones/devices require a pairing
code. The default code is “0000” for
many models.
RDS Sub-menu Features
Setting Options Function
RDS On Unit will display Radio Data System
Off
CT On Automatically synchronize the
Off
information when available.
radio’s time based on RDS radio
signals.
Setting Options Function
Tuner Region USA AM Frequency Spacing - 10kHz
America 1 AM Frequency Spacing - 10kHz
Arabia AM Frequency Spacing - 9kHz
China AM Frequency Spacing - 9kHz
America 2 AM Frequency Spacing - 5kHz
Europe AM Frequency Spacing - 9kHz
Korea AM Frequency Spacing - 9kHz
OIRT (International
Radio and
Television
Organization)
Rating Sub-menu Features
The DVD system has a built-in parental lock feature to
prevent unauthorized persons from viewing restricted disc
content. By default, the rating system is set at the highest
setting (with no restrictions). The parental lock is released
AM Frequency Band 530kHz~1720kHz
FM Frequency Spacing - 200kHz
FM Frequency Band -
87.5MHz~107.9MHz
AM Frequency Band 530kHz~1720kHz
FM Frequency Spacing - 100kHz
FM Frequency Band -
87.5MHz~108.0MHz
AM Frequency Band 531kHz~1620kHz
FM Frequency Spacing - 100kHz
FM Frequency Band -
87.5MHz~108.0MHz
AM Frequency Band 522kHz~1620kHz
FM Frequency Spacing - 100kHz
FM Frequency Band -
87.5MHz~108.0MHz
AM Frequency Band 520kHz~1600kHz
FM Frequency Spacing - 100kHz
FM Frequency Band -
87.5MHz~108.0MHz
AM Frequency Band 522kHz~1620kHz
FM Frequency Spacing - 50kHz
FM Frequency Band -
87.5MHz~108.0MHz
AM Frequency Band 531kHz~1602kHz
FM Frequency Spacing - 200kHz
FM Frequency Band -
88.1MHz~107.9MHz
AM Frequency Spacing - 9kHz
AM Frequency Band 531kHz~1602kHz
FM Frequency Spacing - 200kHz
FM Frequency Band -
88.1MHz~107.9MHz
only by entering the correct password. Once the password is
entered, rating is available for setup.
Setting Options Function
Password _ _ _ _ _ _ Enter the default six-digit password
Rating 1. Kid Safe Select the appropriate rating level
2. G
3. PG
4. PG-13
5. PG-R
6. R
7. NC-17
8. Adult
Load Factory Reset Select “Reset” to restore the factory
T o reset the p assword, access the “RA TING” menu and enter
the current password. Once the correct password is entered,
you can access the “Password” field and enter a new one.
NOTE: Record the password and keep it in a safe place
for future reference. The rating for each disc is marked
on the disc, disc packing, or documentation. If the rating
is not available on the disc, the parental lock feature is
unavailable. Some discs restrict only portions of the disc
and the appropriate content will play. For details, please
refer to the disc description.
DivX Sub-Menu Features
Select the DivX sub-menu to view your DivX registration
code. Y ou must use this code to register your player , allowing
you to purchase video using the DivX Video On Demand
format.
Hardware Sub-menu Features
If the rear-view video camera is connected, the unit is on, and
the TFT monitor is retracted inside the unit, the TFT monitor
automatically moves into the viewing position and Camera
mode is selected upon shifting into REVERSE gear. When
shifting into DRIVE gear, the TFT monitor is retracted back
inside unit after ten seconds.
(012345).
for the intended audience.
You may override higher ratings by
using your password.
default settings for the Rating sys-
tem only.
18
Page 23
VM9022
Setting Options Function
Camera Normal
TFT Set
Open
Mirror Reverse the camera image as if
Auto The TFT panel automatically
Manual The TFT panel maintains its angle
Off The TFT panel automatically
looking through a rear-view mirror.
retracts when turned off and
resumes its previous angle when
the unit is turned back on.
adjustment setting when the radio is
turned on/off.
retracts when turned off and DOES
NOT resume its previous angle
when the unit is turned back on.
If the monitor is in display mode, the monitor automatically
switches to CAMERA mode upon reverse driving. When the
reverse driving stops, the monitor return to its original input
mode.
P.VOL Sub-menu Features
Setting Options Function
Source DISC Choose a source for which you
RADIO
SD
SAT
AUX 1
USB
BT
AUX 2
iPod
NAV
would like to increase the relative
volume (LEVEL).
Use the +/- buttons to increase or
decrease the relative volume for the
specified source up to 6 decibels.
Exiting the System Setup Menu
To exit setup mode and resume normal playback, press the
SETUP button (31) on the remote control or touch the BACK
button on the screen.
TS Cal (Screen Calibration)
To access the “Screen Calibration” function from the SETUP
menu, select the “TS CAL” option.
After entering calibration mode, a crosshair appears in a
corner quadrant of the screen. To begin calibration, press and
hold the crosshair for one second until it moves to the next
quadrant. Continue for each quadrant until the calibration is
completed.
To exit without performing calibration, touch the BACK
button.
19
Page 24

RADIO
TUNER OPERATION
Tuner TFT Display
17
26
8
E
P1 87.5 MHz
Q
P2 90.1 MHz
R
E
A
P3 98.1 MHz
R
P4 106.1 MHz
P
I
P5 107.9 MHz
P
P6 102.9 MHz
27
9
11
13
4
1
FM-1 P1 87.5 MHz
ST
PS:
7
AS
BAND
1/2
15
19
1. Current radio band indicator
2. Radio frequency indicator
3. Clock
4. Stereo broadcasting indicator
5. Strong Local signal broadcasting indicator
6. Preset radio stations: Touch to recall preset stations
7. RDS Information: PS (Program Service), PTY (Program
Type), RT (Radio Text)
8. EQ: Touch to view Spectrum Analyzer > Equalizer
9. Touch to access the direct entry screen
10. Current preset station indicator
11. |<<: Touch to seek backward
12. >>|: Touch to seek forward
13. : Touch to tune backward one step
2
24
10
5
LOC PTY RDS
20
14
12
16
PS
21
25
3
01:02 PM
AS
BAND
6
PTY
MEM
18
PS
1/2
23
LOC
2/2
22
14. : Touch to tune forward one step
15. BAND: Touch to change between AM/FM bands
16. AS: Touch to automatically store stations
17. Touch to view the SOURCE MENU and select a new
playback source
18. MEM: View screen used to enter current channel into
preset memory
19. 1/2 or 2/2: T ouch this page button to view a second p age
of on-screen buttons
20. Touch to view the SETUP menu
21. PS (Preview Scan): T ouch to scan all stations available,
stopping for 5 seconds at each and continuing until a
station is selected
22. LOC: Touch to tune to strong local stations
23. PTY: When PTY is pressed, the Program Type
categories are listed, allowing listeners to find similar
programming by genre. When a PTY category is
selected from the touch screen menu, the radio will start
scanning for the selected category.
24. Indicates the PTY function is activated
25. Indicates the RDS function is activated
26. REAR: Touch to view the Rear source screen
27. PIP: Touch to view Rear, Front or NAV source
Switch to Radio Tuner source
• Touch the top left corner of the screen (the RADIO
circle) to view the SOURCE MENU. Touch “RADIO”.
• Press the SRC button (6) on the front panel or remote
control (8) to switch to the AM/FM or RADIO source.
Select FM/AM Band
Touch the BAND button (15) on the screen, or press the
BAND button on the unit (4) or remote control (20) to change
between the following bands: FM1, FM2, FM3, AM1, and
AM2.
NOTE: The BAND button on the unit only works when the
TFT is closed.
Seek Tuning
To seek the next higher station:
• Touch the >>| button on screen.
• Move the joystick to the right.
To seek the next lower station:
• Touch the |<<| button on screen.
• Move the joystick to the left.
VM9022
Manual Tuning
To increase or decrease the tuning frequency one step:
• Touch the or buttons on screen.
• Move the joystick left/right.
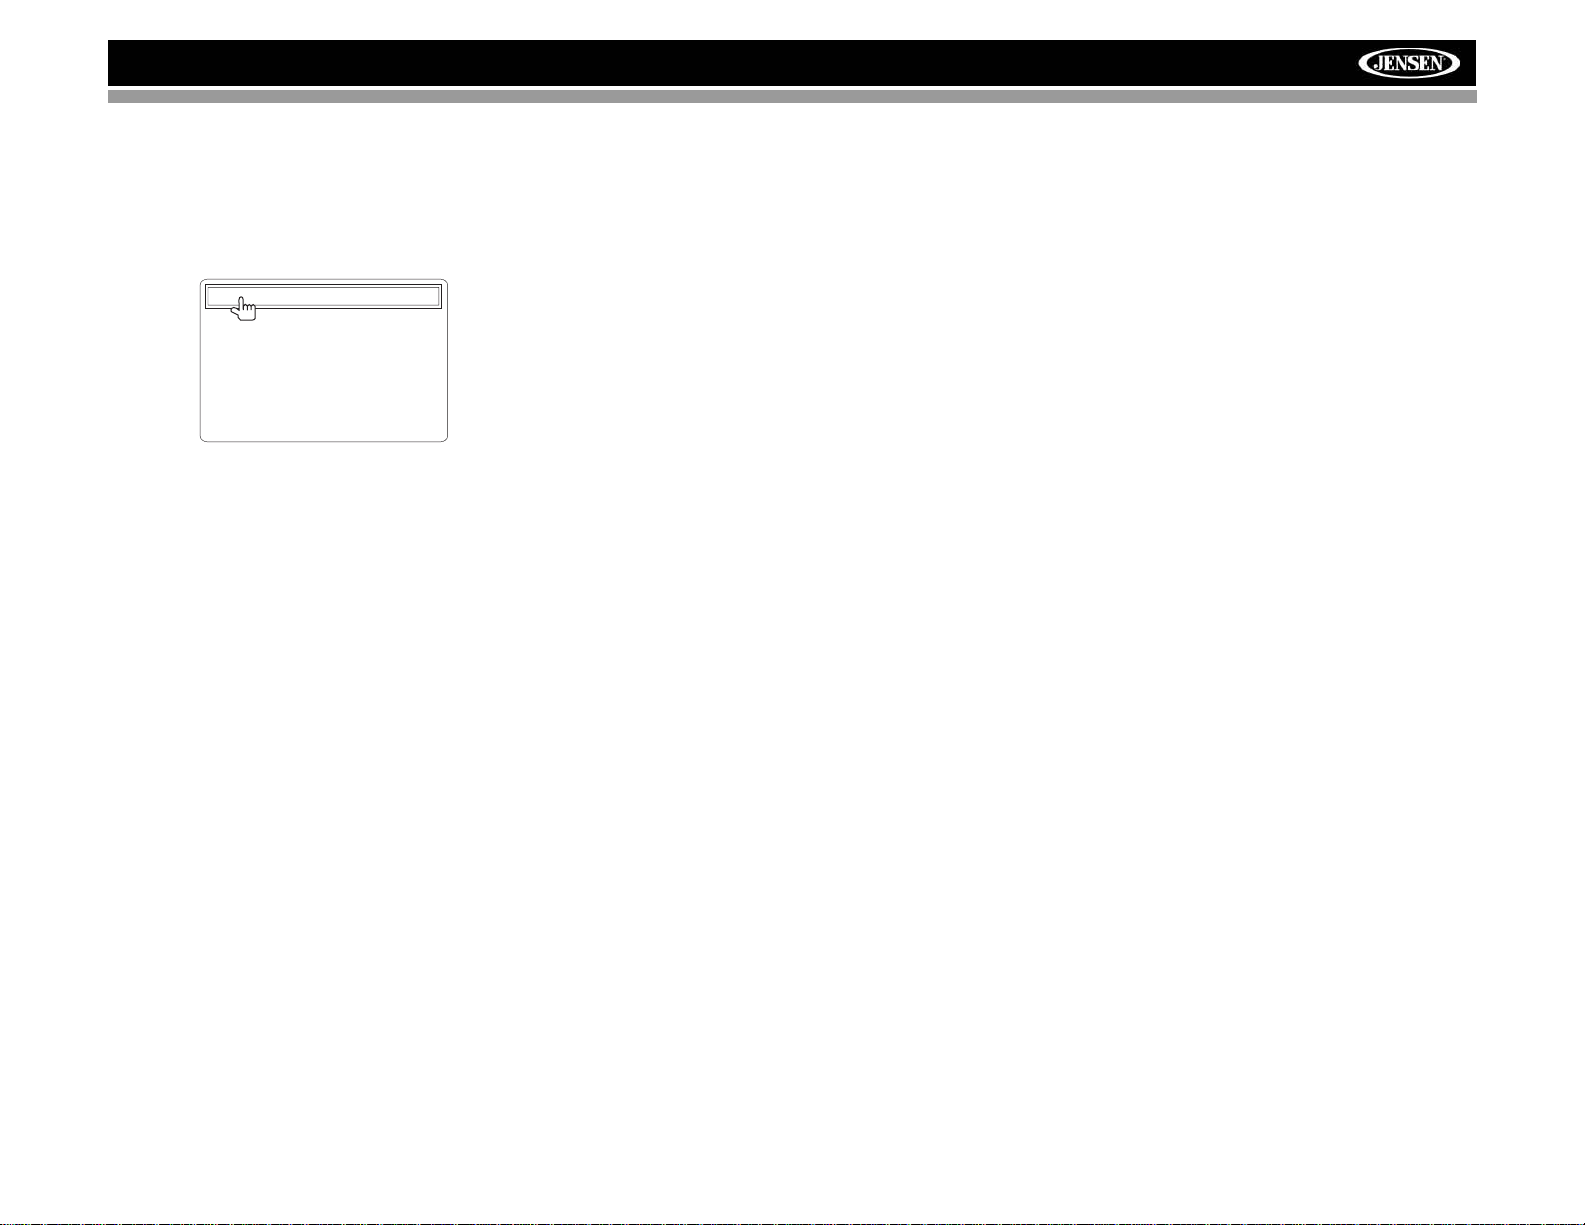
Direct Tuning
To enter a radio station directly, touch the button or
press the GOTO button (21) on the remote control to display
the direct entry menu.
FM:___._MHz
1
2
3
Exit
6
5
4
9
8
7
0
Clear
Enter the desired radio station using the on-screen number
pad. Press Enter to tune to the selected station. To exit the
screen without changing the station, touch Exit. T o clear your
entry and start over, touch Clear.
Using Preset Stations
Six numbered preset buttons store and recall stations for
each band. All six stored stations (P1-P6) for the current
band appear on the screen.
Storing a Station
1. Select a band (if needed), then select a station.
2. Touch the on-screen MEM button (18), on page 2/2 of
the onscreen options, to open the preset screen.
Mem: _
P1
P2
P3
P6
P5
P4
Exit
3. Touch the preset number in which you would like to
store the current station (or press EXIT to cancel and
20
Page 25
VM9022
close the menu). The preset number and station
appears highlighted.
Recalling a Station
1. Select a band (if needed).
2. Touch an on-screen preset button (6) to select the
corresponding stored station.
P1 87.5 MHz
P2 90.1 MHz
P3 98.1 MHz
P4 106.1 MHz
P5 107.9 MHz
P6 102.9 MHz
Auto Store (AS/PS)
To select six strong stations and store them in the current
band:
1. Select a band (if needed).
2. Press the AS/PS button (3) on the control panel or touch
AS on the screen for 2 seconds to activate the Auto
Store function.
The new stations replace stations already stored in that band.
Preview Scan (PS)
T o scan the AM or FM band for a preview of available stations
in your particular area, press and hold the AS/PS button (3)
on the control panel, or touch the PS button (21) on screen.
Touch again to stop preview scan.
Local Radio Station Seeking (LOC)
When the Local function is on, only radio stations with a
strong local radio signal are played. To activate the Local
function in AM/FM tuner mode, press and hold the BAND/
LOC/DX button (4) on the control panel, or touch the 1/2
button to access the second screen of menu options, and
then touch the on-screen LOC button. Repeat to turn Local
off. When the Local function is active, the LOC indicator at
the top of the screen is illuminated.
21
Page 26
SAT
SATELLITE RADIO OPERATION
Listeners can subscribe to XM® Radio on the Web by
visiting www.xmradio.com, or by calling (800) 967-2346.
Customers should have their Radio ID ready (see
“Displaying the Identification (ID) Code”). Customers can
receive a limited number of free-to-air channels without
activation.
Listeners can subscribe to Sirius® Radio on the Web by
visiting www.sirius.com, or by calling (888) 539-SIRIUS.
Customers should have their Sirius ID ready (Sirius ID is
located on the Satellite Radio Tuner, sold separately).
Customers can listen to music samples by tuning to
channel 184.
Accessing Satellite Radio Mode
Press the SRC button (8) on the front panel or remote control
(8) to switch to the SAT source.
18
E
P1 XM Preview
Q
P2 XM Preview
R
E
A
P3 XM Preview
R
P4 XM Preview
P
I
P5 XM Preview
P
P6 XM Preview
Title: Fridays XM144!
5
3 21
SAT1 CH001
XM Preview Preview
10
6
9
1. SAT channel name
2. SAT channel number
3. SAT band
4. Time
5. Song title
6. Artist name
7. Song category
8. Signal strength indicator
9. Current preset channels/on-screen preset buttons
10. CH -: Select the previous channel
11. CH +: Select the next channel
12. CAT +: Select next channel in current category only
8
7
4
01:02
+
CAT
CHCH
CG
-
+
CAT
-
BAND
16
MEM
19
DIAG
20
13. CAT -: Select previous channel in current category only
14. Touch to enter channel directly using keypad on screen
15. CG: Access Channel/Category Guide mode
16. BAND: Change between SAT1, SAT2 and SAT3 bands
17. Touch to view the SETUP menu
18. Touch this area to view the SOURCE MENU and select
19. MEM: View screen used to enter current channel into
20. DIAG: This feature is reserved for use by service
Displaying the Identification (ID)
Code
Before you listen to satellite radio, you must subscribe to the
service using your radio’s identification number. To display
the radio ID, press the left/right buttons (16, 17) on the
joystick or the CH - or CH + buttons on the touch screen
repeatedly to tune to channel “000”. The screen displays the
radio ID where the channel name is usually displayed.
Selecting a Station
Use the left/right joystick buttons or the CH - or CH + buttons
on the touch screen to change to another station.
17
Preset Mode
14
To enter preset mode, touch the BAND button on the screen,
12
or press the BAND button on the unit (14) or remote control
11
(20) to change between the following bands: SAT1, SAT2, or
SAT3 (indicated in the top left corner of the TFT screen).
15
Six numbered preset buttons store and recall stations for
13
each band. All six stored stations (P1-P6) for the current
band appear on the TFT screen.
Storing a Station
1. Select a band (if needed), then select a station.
2. Touch the on-screen MEM button (18) to open the
a new playback source
preset memory
professionals for troubleshooting.
preset screen.
Mem:
P1
P2
P3
P6
P5
P4
Exit
VM9022
3. Touch the preset number in which you would like to
store the current station (or press EXIT to cancel and
close the menu). The preset number and station
appears highlighted.
Recalling a Station
1. Select a band (if needed).
2. Touch an on-screen preset button to select the
corresponding stored station.
Direct Tuning
To enter a radio station directly, touch the button or
press the GOTO button (21) on the remote control to display
the direct entry menu.
CHNO:___/255
1
2
3
Exit
6
5
4
9
8
7
Clear
0
Enter the desired radio station using the on-screen number
pad. Touch the Enter button to tune to the selected station.
T o exit the screen without changing the station, touch Exit. To
clear your entry and start over, touch Clear.
Channel/Category Guide Mode
There are two search modes to help navigate through
channels and or categories. T o access the Channel/Category
Guide mode, press the Enter (joystick) button (18) on the
remote control or the CG button on the touch screen.
Channel Guide is the default search mode. To access
Category Guide, press the TITLE button (2) on the remote
control or touch CAT on the touch screen. To return to
Channel Guide, touch CH on the screen or press the
SUBTITLE button (9) on the remote control.
Channel Guide Mode
When Channel Guide mode is selected, the first six satellite
channels are displayed in the boxes in the bottom left of the
TFT screen and the on-screen menu changes to facilitate
search mode.
22
Page 27
VM9022
SAT
CH
CG
CAT
MEM
01:02
DIAG
SAT1 CH001
XM Preview Preview
E
Q
########
R
E
001 XM Preview
A
R
004 The 40s
P
I
005 The 50s
P
006 The 60s
007 The 70s
Title: www.xmradio.com
SCN
• While in Search Mode, to switch between Channel and
Category search modes, press the CH or CAT buttons
on the touch screen.
• Use the scroll bar and arrows on the touch screen to
view the next/previous page of stations. Each page
contains six channels to select from.
• Press the on-screen SCN button to preview each of the
6 channels displayed for 10 seconds.
• Press the CG button to return to the Preset Mode
screen.
• T o select a channel while in Channel Guide mode, touch
the channel name on the screen. The channel will begin
playing and the unit will return to the Preset Mode.
Category Guide Mode
When Category Mode is selected, folder icons appear on the
screen next to category choices.
• While in Search Mode, to switch between Channel and
Category search modes, press the CH or CAT buttons
on the touch screen.
• Use the scroll bar and arrows on the touch screen to
view the next/previous page of categories. Each page
contains six categories to select from.
• To select a category, touch the corresponding category
name or folder icon. The channels in that category will
be displayed on the screen.
• Use the scroll bar and arrows on the touch screen to
view the next/previous six stations in the selected
category.
• Touch the on-screen SCN button to preview each
channel in the selected category for 10 seconds.
• Touch the channel name to play that channel.
• Touch the on-screen CG button to return to the Preset
Mode screen.
23
Page 28
DVD/VCD VIDEO OPERATION
NOTE: When properly installed, DVD video cannot be
displayed on the main TFT screen unless the parking
brake is applied. If you attempt to play a DVD while the
vehicle is moving, the TFT screen displays “PARKING”
with a blue background. Rear video screens, if
applicable, will operate normally.
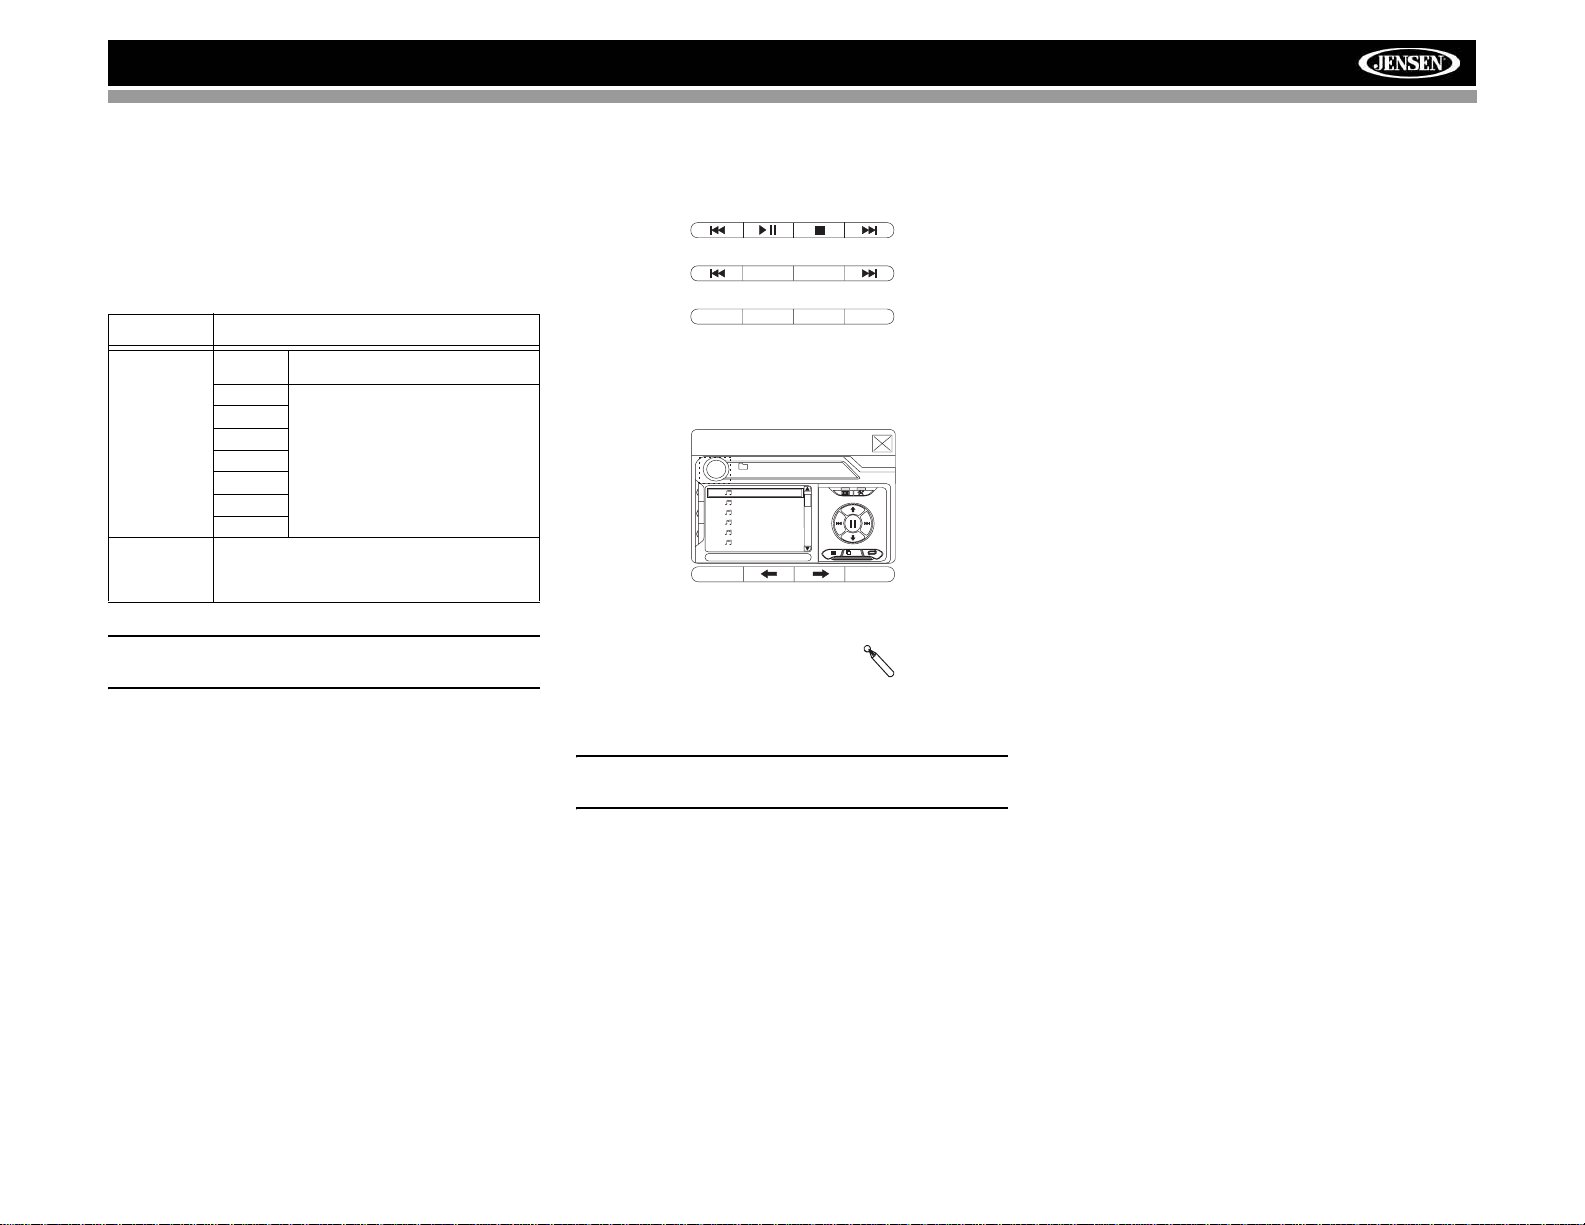
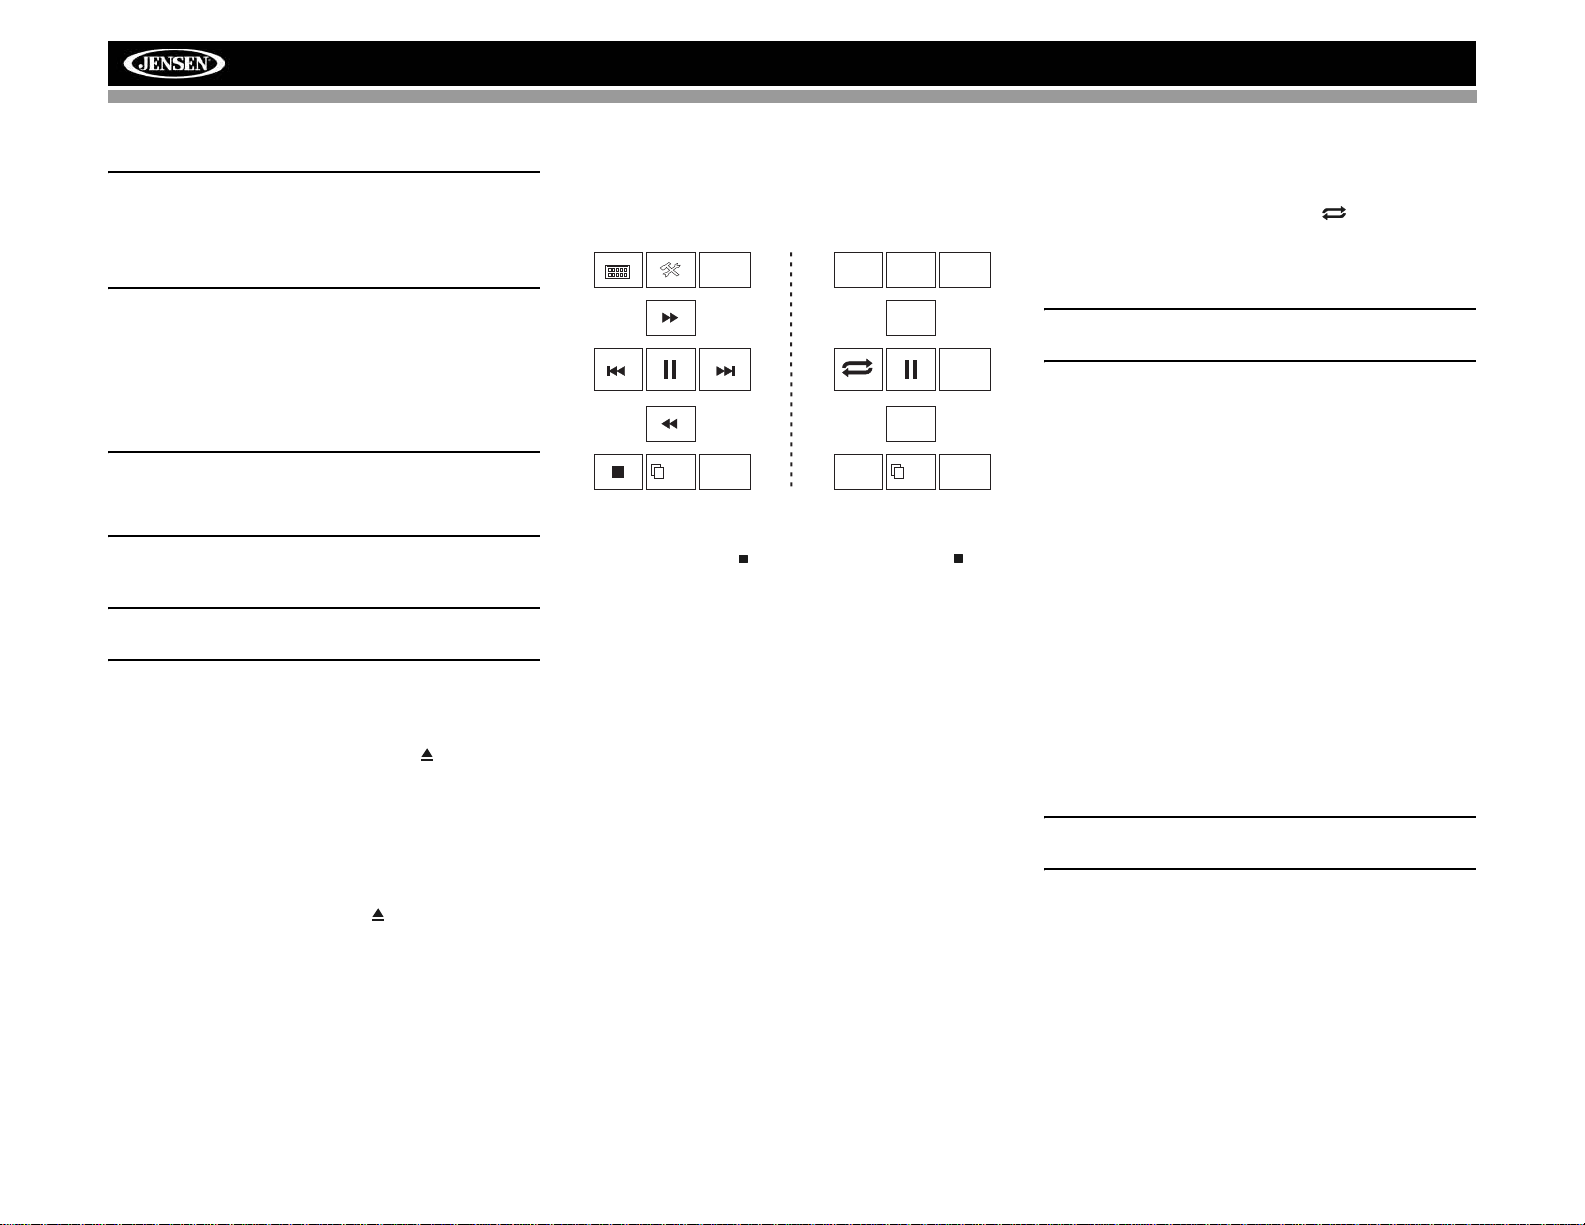
Controlling Playback
To access the on-screen controls, touch the screen. Touch
the 1/2 button to view a second page of controls
BACK
EQ
REAR
PIP
VM9022
Repeat Playback
Press the RPT button (19) on the control panel, the RPT
button (7) on the remote control, or the button on screen
to alter repeat mode according to the following:
• DVD: Repeat Chapter, Repeat Title, Repeat Off
• VCD (PBC Off): Repeat Single, Repeat Off
Inserting a Disc
To insert a disc, you must first press the OPEN button (1) on
the control panel or the OPEN/CLOSE button on the remote
control to reveal the disc slot (22). Insert a disc, label side up,
into the disc slot. The front panel will close automatically and
disc play begins.
NOTE: If Parental Lock (Rating) is activated and the disc
inserted is not authorized, the 6-digit code must be
entered and/or the disc must be authorized (see “General
Sub-menu Features” on page 17).
Y ou cannot insert a disc if there is already a disc in the unit or
if the power is off.
NOTE: DVD-R and DVD-RW will not play unless the
recording session is finalized and the DVD is closed.
Ejecting a Disc
To eject a disc, you must first press the OPEN button (1) on
the control panel or the OPEN/CLOSE button on the remote
control to reveal the disc slot (22). Press the button (21) on
the unit or remote control (35) to eject the disc. The unit
automatically reverts to Tuner mode. You may eject a disc
with the unit powered off. The unit will remain off after the
disc is ejected.
Reset the Loading Mechanism
If the disc loads abnormally or an abnormal core mechanism
operation occurs, press and hold the button (21) on the
unit or remote control (35) to reset the loading mechanism.
Normal operation resumes.
Accessing DVD Mode
To switch to DVD mode when a disc is already inserted,
press the SRC button (15) on the front panel or remote
control (8) until “DISC” appears at the bottom of the screen.
Press the TITLE button (2) on the remote control or on screen to select a different title for playback.
Stopping Playback
Touch the stop button ( ) on the screen or press the /
BAND button (20) on the remote control to stop DVD play.
Pausing Playback
Touch the pause button (||) on the screen (or press the
button on the remote control) to suspend disc playback.
Press the > button on the screen to resume disc playback.
Fast Forward Playback
Press the /\ button on the joystick or the >> button on the
screen to fast forward. Keep pressing and releasing the
button to increase the rate from “2X” to “4X”, “6X”, and “8X”.
Press the joystick Enter button (18) on the remote control or
touch the play button (>) to resume normal playback.
Fast Reverse Playback
Press the \/ joystick button or touch the << button on the
screen to play the current title in fast reverse. Keep pressing
and releasing the button to increase the rate from “2X” to
“4X”, “6X”, and “8X”.
Press the joystick Enter button (18) on the remote control or
touch the play button (>) to resume normal playback.
Slow Forward/Slow Reverse Playback
Press the ||>/BAND button on the remote control to slow
forward/slow reverse. Keep pressing and releasing the button
to increase the slow forward rate from “2X” to “4X” and “8X”
and then begin slow reverse.
1/2
MENU
TITLE
AUDIO
SUBTITLE
2/2
A-B
DISP
>/||
NOTE: For VCD play, the repeat function is not available
if PBC is on.
Sectional Repeat Function (A-B)
Use the A-B function to define a specific area of a disc to
repeat.
• Press the RPT A-B button (6) on the remote control (or
the A-B button on screen) to set the start point (A) of the
repeated section.
• Press the RPT A-B button again once you reach the
desired end point (B) of the repeated section. The
selected portion of the DVD will now repeat
continuously.
• Press the RPT A-B button again to cancel the A-B
section setting and stop repeat play.
Random Playback
With a DVD, VCD, or CD playing, press the RDM button on
the control panel (21) or remote control (33) to activate
random playback and play all chapters/tracks in random
order. “On” appears on the screen.
Press the > button on the joystick to play the next random
track.
Press the RDM button again to turn random play off.
NOTE: When a VCD is playing with PBC turned “On”,
activating random playback automatically turns PBC off.
Picture in Picture (PIP)
Press the PIP button (30) on the remote control to view a
Picture in Picture image of the Front source, Rear Zone or
NAV screen. Use the left/right arrows at the bottom of the
image to change the PIP source.
Accessing the DVD Menu
Press the MENU button (1) on the remote control to recall the
main DVD menu. Use the joystick to select a title from the
menu or touch the title on screen.
24
Page 29
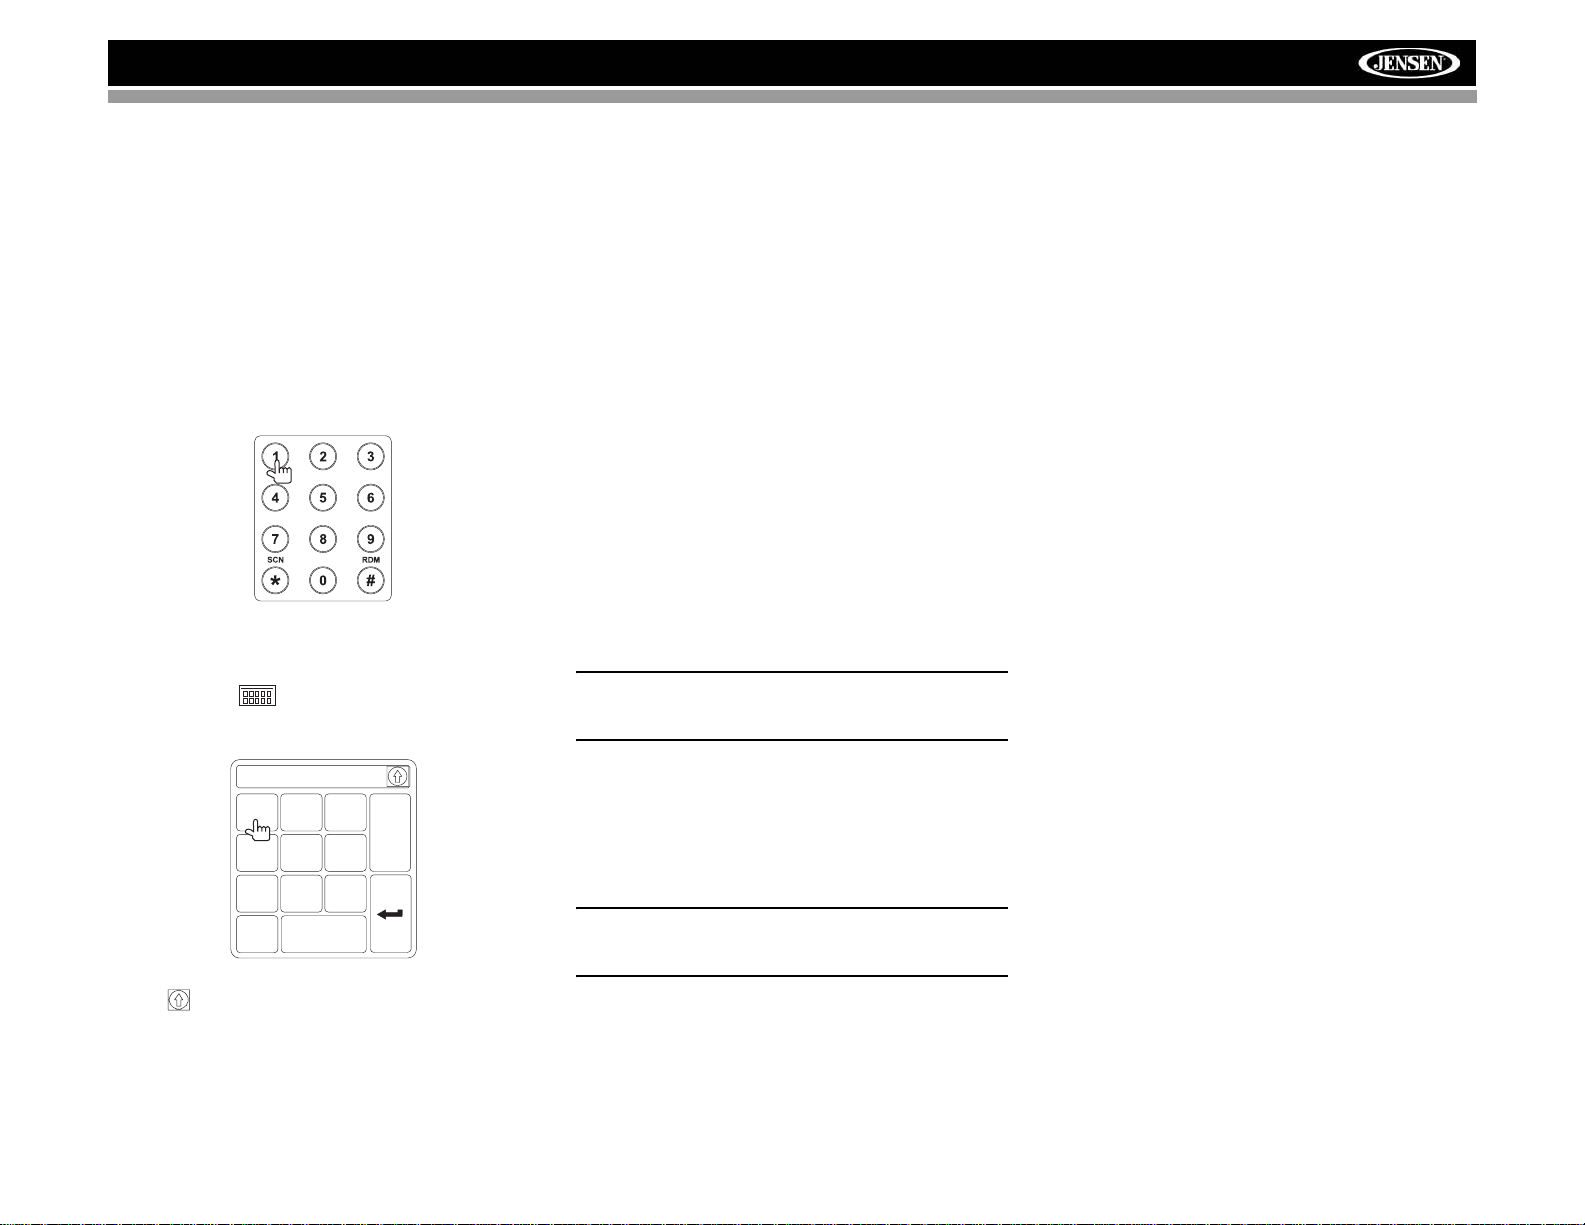
VM9022
Press the Enter (joystick) button to confirm your selection
and begin playback. You can also select a title using the
touch screen.
Moving Through Chapters
Press the > button on the joystick or the >>| button on screen
to advance to the next chapter on the DVD.
Press the < button on the joystick or the |<< button on screen
to move to the previous chapter.
Direct Chapter / Track Selection
Remote Control Direct Entry
During DVD, VCD and CD playback, you can use the
numeric keypad on the remote control (29) to access a track
directly.
Touch Screen Direct Entry
To select a title, chapter/track, or specific playback time
directly, touch the button on screen control to display
the direct entry menu.
To exit the screen without making a selection, touch Exit. To
clear your entry and start over, touch Clear.
Viewing an Alternate Picture Angle
(DVD Only)
Some DVDs contain scenes that have been shot
simultaneously from different angles. For discs recorded with
multiple angles, press the ANGLE button (13) on the remote
control to toggle available angles of the on-screen image.
Zooming
Press the PRESET /\ and \/ buttons (11, 12) on the remote
control to enlarge and pan through the video image using the
following options: “ZOOM 1.5”, “ZOOM 2”, “ZOOM 3”, and
“OFF”.
Multi-Language Discs (DVD Only)
Changing Audio Language
If you are watching a disc recorded in multiple languages,
press the AUDIO button (5) on the remote control to choose
a language.
Changing Subtitle Language
If you are watching a disc recorded in multiple languages with
subtitles, press the SUBTITLE button (9) on the remote
control to choose the language in which you would like the
subtitles to appear.
NOTE: During VCD playback, press the AUDIO button (5)
on the remote control to choose between Left Channel,
Right Channel, and Stereo.
information on the screen, including the media playing and
current playback time.
DVD Playback Information
The following information is displayed at the top of the screen
during DVD playback:
• Title: 05/08 – “05/08" indicates the fifth of 8 titles on the
DVD is currently playing.
• Chapter: 012/016 – “002/016" indicates that the second
of 16 titles on the DVD is currently playing.
• 00:41:28 – “00:41:28” indicates the playback time of the
current title.
The following information is displayed at the bottom of the
screen:
• Front: Source
• Rear: Source
•CLOCK
VCD Playback Information
The following information is displayed at the top of the screen
during VCD playback:
• VCD 2.0 – Format of current disc.
• Title: 06/18 – “06/18” indicates the sixth of 18 tracks on
the VCD is currently playing.
• 00:02:18 – “00:02:18” indicates the playback time of the
current track.
Chapter: _ _
1
2
3
Exit
6
5
4
9
8
7
Clear
0
Use the button to select Title, Chapter, or Time entry.
• Title: _/#
• Chapter: _ _/##
• Time: _ _:_ _:_ _
Enter the desired title, chapter/track, or time using the on-
screen number pad and then press the Enter (arrow) button.
PBC (Play Back Control - VCD Only)
For VCDs with play back functionality, play back control
(PBC) provides additional controls for VCD playback.
Press the MENU button (1) on the remote control to toggle
the PBC function “On”/”Off”. Once PBC is on, playback starts
from track 1 of the play list.
NOTE: When PBC is activated, fast forward, slow
playback, and previous/next track are available. Repeat
and direct track selection are not available.
When PBC is activated, selecting random, scan, or search
playback automatically deactivates PBC.
Playback Information
During DVD and VCD playback, press the DISP button on the
control panel (2) or remote control (10) to display playback
25
Page 30
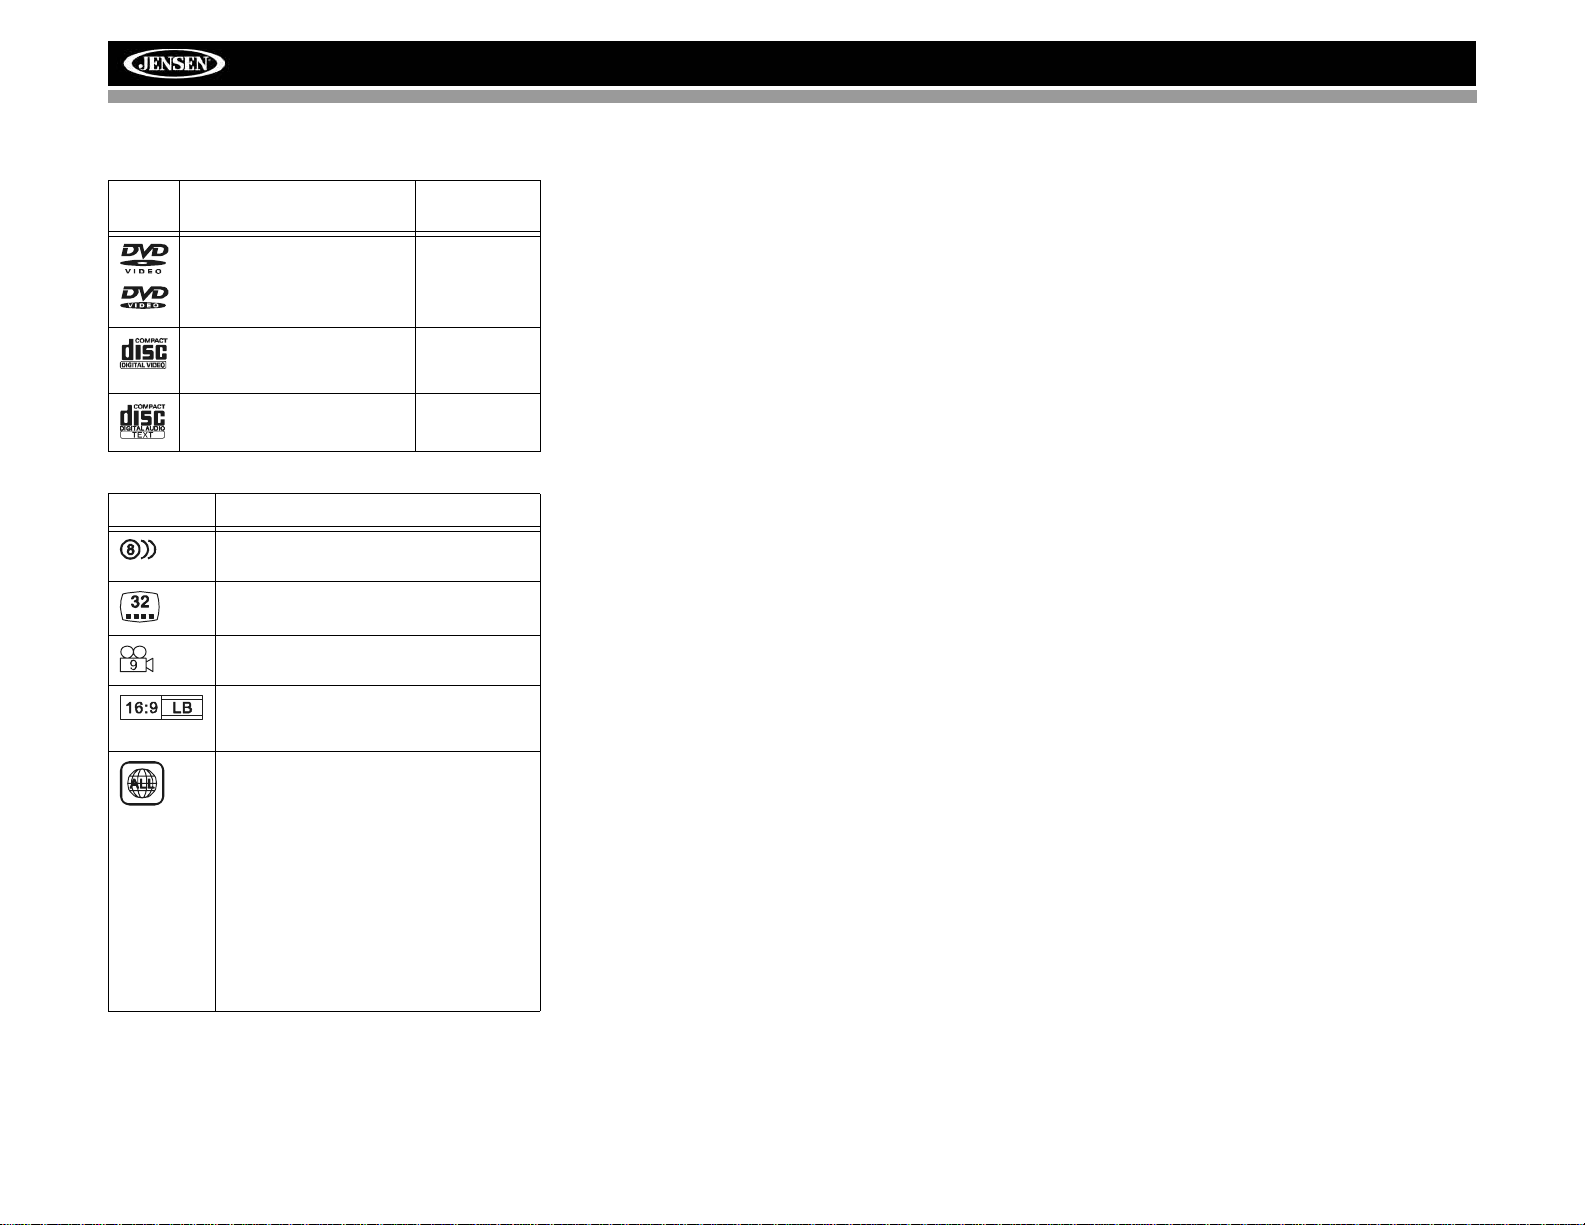
General Disc Information
Table 4: Disc Properties
Symb
ol
Symbol Meaning
12cm Disc Properties
Single side single layer (DVD-5)
Single side double layer (DVD-9)
Double side single layer (DVD-10)
Double side double layer (DVD-18)
Single side single layer (VCD)
Single side single layer 74 minutes
Table 5: Disc Symbols
Number of voice languages recorded. The number inside the icon indicates the number of languages on the disc (maximum of 8).
Number of subtitle languages available on the
disc (maximum of 32).
Max Play
Time
(MPEG 2
Method)
133 minutes
242 minutes
266 minutes
484 minutes
(MPEG 1
Method)
74 minutes
VM9022
Number of angles provided (maximum of 9).
Aspect ratios available. “LB” stands for Letter Box
and “PS” stands for Pan/Scan. In the example on
the left, the 16:9 video can be converted to Letter
Box video.
Indicates the region code where the disc can be
played.
• Region 1: USA, Canada, East Pacific Ocean
Islands
• Region 2: Japan, Western Europe, Northern
Europe, Egypt, South Africa, Middle East
• Region 3: Taiwan, Hong Kong, South Korea,
Thailand, Indonesia, South-East Asia
• Region 4: Australia, New Zealand, Middle and
South America, South Pacific Ocean Islands/
Oceania
• Region 5: Russia, Mongolia, India, Middle
Asia, Eastern Europe, North Korea, North
Africa, North-West Asia
• Region 6: Mainland China
• ALL: All regions
26
Page 31

DISC
VM9022
DVD/CD AUDIO OPERATION
Instructions for TFT control and Insert/Eject are the same for
DVD and CD operation. Please see the DVD/Disc Video
Operation section for information about these topics.
The VM9022 will play music or other audio files from the
following disc media/formats:
• CD-DA
• CD-R/RW
•DVD
•DVD+R/RW
•DVD-R/RW
Upon inserting a disc with the TFT screen open, the disc and
track title (if available), along with the track number and
playing time appear on the screen.
CD Player User Interface
The on-screen indicators and touch key areas for CD
playback are outlined below.
17
16
E
1 Track 01
Q
2 Track 02
R
E
3 Track 03
A
R
4 Track 04
P
5 Track 05
I
P
6 Track 06
4
3
TRACK 01
CD 1/10 01:23 04:31
5
DIR -
23
2
1
15
25
01:02
14
10
8
6
1/2
18
9
ALL
7
11
2/2
DIR +
24
12
13
21
19
20
22
1. Current track and total number of tracks on disc
2. Elapsed playing time/length of track
3. Current track title
4. Available track titles
5. ID3 information
6. ||: Touch to pause/play disc playback
7. : Touch to stop disc playback
8. >>|: Touch to move to next track
9. |<<: Touch to move to previous track
10. />>: Touch to navigate playlist/touch to fast forward
11. /<<: Touch to navigate playlist/touch to fast rewind or
reverse
12. Touch to activate/deactivate Repeat play mode
13. 1/2 or 2/2: T ouch this page button to view a second p age
of on-screen buttons
14. Touch to access the direct entry screen
15. Touch to view the SETUP menu
16. Touch to view Spectrum Analyzer > Equalizer
17. Touch to view the SOURCE MENU and select a new
playback source
18. Touch the scroll bar and arrows to view the previous/
next page of songs
19. Touch to access the Music menu
20. Touch to access the Video menu
21. Touch to access the Photo menu
22. Browse all files
23. DIR -: Touch to view the previous folder
24. DIR +: Touch to view the next folder
25. Current time
Controlling Playback
Stopping Playback
Touch the button on screen or press the button (20) on
the remote control to stop disc playback.
To resume playback, touch the button on screen or press
the joystick button.
Pausing Playback
Touch the button on screen or press the joystick button to
suspend or resume disc playback.
Moving Through Tracks
Press the >>| button (19) on the remote control or on screen
or use the > button on the joystick to advance to the next
track on the disc.
Press the |<< button (17) on the remote control or on screen
or use the < button on the joystick to move to the previous
track.
Repeat Playback
Touch the button on screen, press the RPT button on the
remote control (7) control panel (19) to alter repeat mode
according to the following:
• DVD: Repeat Chapter, Repeat Title, Repeat Off
• CD-DA: Repeat One, Repeat All, Repeat Off
• CD-R/RW: Repeat One, Repeat All, Repeat Off
• DVD-R/RW: Repeat One, Repeat All, Repeat Off
Track Scan Select (CD-DA discs only)
During disc play, press the SCN button on the remote control
(34) or control panel (20) to play the first 10 seconds of each
track. When a desired track is reached, press the SCN button
again to cancel the function and play the selected track.
Random Play Select
While disc play is stopped, press the RDM button on the
remote control (33) to play the tracks on the disc in a random,
shuffled order. Touch the RDM button again to cancel
Random Play mode.
NOTE: CD-R and CD-RW will not play unless the
recording session is finalized.
Fast Forward
Touch the button on screen or press the /\ button on the
joystick to fast forward. Keep pressing and releasing the
button to increase the rate from “2X” to “4X”, “6X”, and “8X”.
Fast Reverse
Touch the button on screen or press the /\ button on the
joystick to fast reverse. Keep pressing and releasing the
button to increase the rate from “2X” to “4X”, “6X”, and “8X”.
27
Page 32

Direct Track Entry
To select a track directly, touch the button on screen to
display the direct entry menu.
TRACK:__/##
1
2
3
Exit
6
5
4
9
8
7
Clear
0
Enter the desired track number using the on-screen number
pad, and then press the Enter (arrow) button. To exit the
screen without making a selection, touch Exit. To clear your
entry and start over, touch Clear.
VM9022
28
Page 33

VM9022
MP3/WMA OPERATION
Instructions for TFT control and Insert/Eject are the same for
DVD and MP3 operation. Please see the DVD/Disc Video
Operation section for information about these topics.
NOTE: When burning MP3 / WMA files onto a DVD
disc, use the 2X or 4X burning option, if available.
This slower burning speed will help eliminate
buffer errors and increase disc reading reliability.
Also, use folders when burning large numbers of
songs / files to a disc for easy music navigation.
Select the "Disc at Once" option and close your
disc.
MP3/WMA Media and File
Requirements
This player allows you to play back MP3 and WMA files
recorded onto CD-R/RWs, DVD+R/RWs, and DVD-R/RWs.
For CD-RW discs, please make sure it is formatted using the
full method and not the quick method to prevent illegal disc
operation.
Up to 1500 songs/files can be burned onto a disc for a MEGA
DVD music mix. Do not exceed this number of songs/files or
disc readability problems may occur.
MP3 Format Compatibility
The file naming formats listed below are compatible with this
unit:
• ISO 9660 – file name: 12 characters, file extension: 3
characters
• ISO 9660 – file name: 31 characters, file extension: 3
characters
• Joliet – 64 characters
If the file or folder name does not conform to ISO 9660 file
system standards, it may not be displayed or played back
correctly. Use the following settings when compressing audio
data for your MP3 disc:
• Transfer Bit Rate: 128kbps
• Sampling Frequency: 48kHz
NOTE: When recording MP3 up to the maximum
disc capacity , disable additional writing. For
recording on an empty disc up to maximum disc
capacity, use the "Disc at once" setting.
MP3 Playing Order
When selected for play, files and folders (Folder Search, File
Search or Folder Select) are accessed in the order they were
written by the CD writer. As a result, the order in which they
are expected to be played may not match the order in which
they are actually played. You may be able to set the order in
which MP3/WMA files are to be played by writing them onto a
medium such as a CD-R with their file names beginning with
play sequence numbers such as "01" to "99".
For example, a medium with the following folder/file hierarchy
is subject to Folder Search, File Search or Folder Select, as
shown below.
The VM9022 player will only recognize three folder levels and
does not display folders containing only other folders. In the
example above, the unit will display folders 3, 4, 6, and 8, but
not 2 and 7 since they do not contain any tracks directly.
Folder 5 is not recognized at all since it is at the fourth level.
Loading an SD Card
To Insert an SD card, you must first press the OPEN button
(1) on the control panel or the OPEN/CLOSE button on the
remote control to reveal the SD card slot (21). Insert the SD
card into the card slot and the unit will read the audio media
files on the card automatically.
EJECT
CARD
READER
T o remove the card, first press the SRC button (6) to switch to
another mode and stop SD playback. Grasp the SD card and
pull it straight out. Most cards have a thin recess that helps
with removal.
Loading a USB Device
1. Locate the USB jack located on the MediaLink4.
MediaLink
3.5mm - Audio
VIDEO LEFT RIGHT
Type A USB Connector
2. Insert the USB device into the USB connector. The unit
will read the audio media files on the USB device
automatically.
To remove the USB device, press the SRC button (6) to
switch to another mode and then remove the USB device
from the USB connector.
29
Page 34

VM9022
DISC
MP3 User Interface
The on-screen indicators and touch key areas for MP3
playback are outlined below.
20
17
16
18
(Root)
1
2
MP3 4/84 00:00:23
E
1 Cherry Poppin Da
Q
2 Chris Isaak - Baby
R
E
3 Crazy Town - Butt
A
R
4 Phish - Birds Of A
P
I
5 Phish - Bouncin' R
P
6 Phish - Freebird (L
4
5
DIR -
12
ALL
9
2/2
DIR +
1. Current track and total number of tracks on root of disc
2. Elapsed playing time, track length
3. Current time
4. Track titles
5. ID3 information
6. || : Touch to play/pause disc playback
7. : Touch to stop disc playback
8. >>|: Touch to move to next track
9. |<<: Touch to move to previous track
10. />>: Touch to navigate playlist/touch to fast forward
11. /<<: Touch to navigate playlist/touch to fast rewind or
reverse
12. DIR -: Touch to view the previous folder
13. DIR +: Touch to view the next folder
14. Touch to access the direct entry screen
15. Touch to view the SETUP menu
16. Touch to view Spectrum Analyzer > Equalizer
14
3
01:02 AM
15
10
8
6
1/2
19 20
7
11
24
22
23
13
25
17. Touch to view the SOURCE MENU and select a new
playback source
18. Folder name
19. 1/2 or 2/2: T ouch this page button to view a second p age
of on-screen buttons
20. Touch the scroll bar and arrows to view the previous/
next page of songs
21. Touch to activate/deactivate Repeat play mode
22. Touch to access the Music menu
23. Touch to access the Video menu
24. Touch to access the Photo menu
25. Browse all files
Controlling MP3/WMA Disc Playback
Playing MP3/WMA Files
After inserting a MP3/WMA disc, files will play in the
sequence of the “Root’ directory.
NOTE: When burning MP3 / WMA files onto a DVD
disc, use the 2X or 4X burning option, if available.
This slower burning speed will help eliminate
buffer errors and increase disc reading reliability.
Also, use folders when burning large numbers of
songs / files to a disc for easy music navigation.
Select the "Disc at Once" option and close your
disc.
Stopping Playback
Touch the button on screen or press the /BAND button
(20) on the remote control to stop disc playback.
To resume playback, touch the button on screen, press the
joystick button (13) on the front panel, or press the >/|| button
(18) on the remote control.
Pausing Playback
Touch the button on screen, press the joystick button (13)
on the front panel, or press the >/|| button (18) on the remote
control to suspend or resume disc playback.
Moving Through Tracks
Press the >>| button (19) on the remote control or on screen
or use the > button on the joystick (14) to advance to the next
track on the disc.
Press the |<< button (17) on the remote control or on screen
or use the < button on the joystick (10) to move to the
previous track.
Repeat Playback
T ouch the button on screen, press the RPT button ( 19) on
the control panel or press the RPT button (7) on the remote
control to alter repeat mode according to the following:
Repeat Single, Folder Repeat, Repeat Off.
Random Play Select
Press the RDM button (33) on the remote control to play the
files on the disc in a random, shuffled order. Press RDM
again to cancel Random Play mode.
NOTE: CD-R and CD-RW will not play unless the
recording session is finalized.
30
Page 35

iPod
VM9022
iPod OPERATION
iPod User Interface
The on-screen indicators and touch key areas for iPod
playback are outlined below.
17
16
15
1
A Rush of Blood to the Head
1:08 2/124
E
0001 A Rush Of Blood to
Q
0002 40
R
E
0003 4th of July
A
R
0004 A Little Less Conver
P
I
0005 A Message
P
0006 A Sort of Homecomi
Artist: Coldplay
4
5
1. Elapsed playing time
2. Current track and total number of files
3. Current time
4. Media titles/menu information
5. ID3 information
6. Enter
7. Touch to access photos
8. >>|: Touch to move to next track
9. |<<: Touch to move to previous track
10. Touch to access the iPod menu
11. >|| : Touch to play/pause disc playback
12. Touch to access music files
13. Touch to access video files
14. Touch to access the SETUP screen
15. Touch to view Spectrum Analyzer > Equalizer
16. Touch to view the SOURCE MENU and select a new
playback source
17. Song title
18. Touch to view the direct entry menu
19. Touch the scroll bar and arrows to view the previous/
next page of songs
Controlling Your iPod
The unit will automatically switch to iPod mode when an iPod
is plugged into the MediaLink
from any other source menu, press the SRC button (6) on the
2
14
18
01:02 AM
MENU
Enter
12
19
9
11
4
. To return to the iPod menu
7
3
10
8
6
13
front panel or remote control (8) until the iPod menu appears
on the screen.
NOTE: Be sure your iPod has the latest Apple firmware
installed to avoid connectivity issues.
The following touch screen icons and remote control buttons
are used to access the iPod menus:
Menu Touch Screen Remote Control
Music AUDIO
Photos SUB-TITLE
Videos ANGLE
Use the touchscreen, the joystick, or the directional keys on
the remote control to navigate the iPod menus.
iPod Music Playback
To access iPod music files, touch the button on screen or
press the AUDIO button (5) on the remote control.
• Touch the > || button on screen to play/pause.
• Touch >>| on screen, press the >>| button (19) on the
remote control, or press the > button on the joystick (17)
to move to the next item on the menu.
• Touch |<< on screen, press the |<< button (17) on the
remote control, or press the < button on the joystick (16)
to move to the previous item on the menu.
• Use the touch screen or press the >/|| button (18) on the
remote control or the joystick Enter button (20) on the
control panel to select the highlighted menu option.
• Press the >> button (14) on the remote control or the /\
button (18) on the joystick, or touch the MENU button on
screen to return to the previous menu.
Fast Forward/Fast Reverse
Press and hold the |<< or >>| buttons on screen or on the
remote control (17, 19) for 1 second and continue to hold for
fast forward or fast reverse. Release to resume normal
playback.
Photo Playback
While iPod photos can be viewed on the VM9022 screen, you
must use the iPod to control photo playback options.
Touch the icon on screen or press the SUB-TITLE button
(9) on the remote control to access the iPod PHOTO mode.
The VM9022 will release control back to the iPod so you can
select video media to be displayed on the TFT monitor. To
exit PHOTO mode, touch the screen.
Video Playback
While iPod video can be viewed on the VM9022 screen, you
must use the iPod to control video playback options.
Touch the
button on screen or press the ANGLE button
(13) on the remote control to access iPod VIDEO mode. The
VM9022 will release control back to the iPod so you can
select video media to be displayed on the TFT monitor. To
exit VIDEO mode, touch the screen, press the >> button (14)
on the remote control, or press the MENU button on the iPod.
NOTE: To transmit the video from your iPod to the
VM9022 screen, you must set the following options
through the iPod video settings menu: TV Out = On, TV
Signal = NTSC, and Widescreen = On.
NOTE: After disconnecting your iPod, the VM9022 will
always return to the last mode accessed when the iPod
is plugged back into the unit.
Direct Track/File Entry
To select a track/file directly, touch the button on
screen control to display the direct entry menu.
TRACK:__/##
1
2
3
Exit
6
5
4
9
8
7
Clear
0
Enter the desired track/file using the on-screen number pad.
Press the Enter (arrow) button to tune to the selected station.
T o exit the screen without changing the station, touch Exit. To
clear your entry and start over, touch Clear.
You can also use the numeric keypad (29) on the remote
control to access files directly.
31
Page 36

BT
BLUETOOTH OPERATION
About Bluetooth
Bluetooth is a short-range wireless radio connectivity
technology that is developed as a cable replacement for
mobile phones, handheld PCs and other devices. Bluetooth
operates in 2.4 GHz frequency range and transmits voice and
data at speeds up to 1 megabit per second. Bluetooth was
launched by a special interest group (SIG) comprised of
Ericsson Inc., Intel Corp., Nokia Corp., Toshiba and IBM in
1998, and it is currently developed by nearly 2,000
companies worldwide. The Bluetooth word mark and logos
are owned by the Bluetooth SIG, Inc. and any use of such
marks by Audiovox Corporation is under license. Other
trademarks and trade names are those of their respective
owners.
NOTE: The line-of-sight distance between this unit and
your cellular phone must be 8 meters or less for sending
and receiving voice and data via Bluetooth wireless
technology. However, the transmission distance may
become shorter than the estimated distance, depending
on the environment in use.
Before attempting to use the Bluetooth functions on the
VM9022, please make sure your mobile phone supports
Bluetooth functions (Headset or Handsfree profiles or both).
Adhere to the following guidelines for successful operation.
• Before using Bluetooth functions, you must pair your
mobile phone to the VM9022 head unit (see “Pairing the
Bluetooth System with Your Mobile Phone and Head
Unit”). To ensure the best reception for pairing and
reconnection, please make sure the phone battery is
fully charged before you begin.
• Try to perform pairing within a few minutes of the phone
being turned on.
• Once the unit has been paired with the phone, the unit’s
model number, “VM9022”, will be displayed on the
mobile phone.
• To achieve the best performance, always keep the
mobile phone within 3 meters of the head unit.
• Always keep a clear path between the mobile phone
and the head unit. Never place a metal object or any
other obstacle between the mobile phone and the head
unit.
• Some mobile phones (like Sony Ericsson) may have a
"Power Saving Mode" option. PLEASE DO NOT use the
power saving mode with the VM9022.
• Before accepting or making a call, make sure your
mobile phone's “Bluetooth function” is turned on.
• To ensure the best conversation quality/performance,
stay within one meter of the head unit when talking.
• To “disconnect” the mobile phone from the head unit,
turn the Bluetooth connectivity off on the mobile phone.
• Phone Book direct searching through the head unit
is only available if the mobile phone supports Phone
Book Download. If the feature is not supported, the
head unit will display “Phone book not provided by this
phone” when an attempt is made to download a phone
book.
Bluetooth User Interface
The on-screen indicators and touch key areas for Bluetooth
operation are outlined below.
15
14
17
1
Disconnected
E
1 Missed Calls
Q
2 Received Calls
R
E
3 Dialed Calls
A
R
4 Phone Book
P
I
P
Menu List
3
18
9
10
1156
MENU
4
13
9
7
12
PHONE INTERFACE MUSIC INTERFACE
24
2
01:02 AM
MENU
19
MENU
18
8
22
20
23
21
8
VM9022
1. Current connection status/device connected
2. Current time
3. Bluetooth menu
4. Current operation status
5. Toggle Music/Phone menu
6. Transfer active call back to handset
7. Pair your Bluetooth phone (first time use)
8. Connect/disconnect Bluetooth device (phone, PDA,
personal music player, etc.) with hand-free function
9. Exit call listing display
10. Mute/unmute microphone (located on left side of radio)
during active call
11. Answer incoming call/make call
12. Reject incoming call/end call/quit pairing process/quit
reading phone book or call listing
13. Touch to view the SETUP menu
14. Touch to view Spectrum Analyzer > Equalizer
15. Touch to view the SOURCE MENU and select a new
playback source
16. Indicates connection/current operation (--> indicates
incoming call, <-- indicates dialing alert)
17. Touch to access the direct entry screen
18. : Touch to stop playback
19. Touch the scroll bar and arrows to view the previous/
next page of songs
20. Toggle Music/Phone menu/mode
21. Play/Pause selected file
22. |<<: Touch to move to the previous file
23. >>|: Touch to move to the next file
24. Signal strength indicator
Hands Free Profile (HFP)
T o use a phone wirelessly with this unit, it is necessary to first
establish a connection using Bluetooth wireless technology.
Connection is normally established using HFP (Hands Free
Profile), which gives you full control of functions available on
the telephone source. However, depending on your phone,
the connection may be made using HSP (Head Set Profile),
making some functions unavailable. This is a limitation of
your phone, not the VM9022.
Since there are a number of Bluetooth mobile phone
implementations available on the market, operations with
your Bluetooth mobile phone using this unit vary greatly.
Please refer to the instruction manual that came with your
Bluetooth mobile phone along with this manual while
operating your phone with this unit.
32
Page 37

VM9022
Pairing the Bluetooth System with
Your Mobile Phone and Head Unit
1. Press the button (8) to initiate the pairing process.
Keep the mobile phone within 2 meters of the head unit
when pairing. (To terminate the pairing process, press
the button again.)
2. Select the Bluetooth setup option on the mobile phone
to be paired (please refer to the phone’s instruction
manual to learn how to enter Bluetooth setup, turn
Bluetooth on/off, and perform pairing).
NOTE: Some phones require a “pass key” or pairing
code to connect. If your phone requires a pass key or
pairing code, you will need to enter this number in the
Pairing Code field under the Bluetooth SETUP menu. The
default pairing code for many phones is “0000”. The
default code for the VM9022 is “1234”. See “Bluetooth
Sub-menu Features” on page 18 for instructions on
entering the pairing code.
3. Select “VM9022” from the pairing list on the mobile
phone.
• If pairing is successful, the TFT will display the paired
mobile phone model number or name (as specified in
your phone’s Bluetooth Setup menu).
• If pairing fails, “Phone Pairing Fail” is displayed at the
bottom of the screen.
Reconnecting
Once the Bluetooth device has been paired, you can touch
the connect button to reconnect.
NOTE: You can only connect to a phone using the
buttons on the on-screen Phone interface.
Each time the button is pressed, the head unit will
automatically reconnect with the mobile phone once (only if
the mobile phone was previously paired with the head unit).
Managing Incoming Calls
When connected to a Bluetooth phone, the unit will mute
audio output, pause CD play, and change to the Bluetooth
screen when a call is received. An incoming phone number
will appear at the top of the screen.
Answering an Incoming Call
To answer the call, touch the button.
For best reception, speak loudly and clearly. The microphone
is located on the left side of the unit.
T o end the conversation, press the button. The screen will
display the call duration for 3 seconds, and then return to the
previous mode.
Rejecting an Incoming Call
Touch the button to reject an incoming call. The call will
revert to your phone and can be answered directly or left for
voice mail.
Volume Control
To increase or decrease the volume level, turn the rotary
encoder (5) on the front panel or press the VOL+/ VOL-
buttons (15, 16) on the remote control.
Microphone Mute
To mute the microphone, touch the button. Touch again to
resume microphone functionality.
Making an Outgoing Call
NOTE: Press the button from the main Bluetooth
screen to automatically dial the last call received.
1. Touch the button to open the direct dial screen.
1
4
7
23
5 6
8
0
9
#
Exit
Clear
*
2. Use the 0-9, *, and # buttons to input the phone number.
• Touch the CLEAR button to clear the last digit.
• Touch the button to clear the entire number and
start over.
3. After entering the phone number, press the button to
dial the call. The direct dial screen will close once your
call is connected.
To end the conversation, press the button.
Call Transfer
While talking, to transfer audio from the head unit back to the
mobile phone, touch the button (7). The TFT will display
“Transfer”. You can only transfer a call after it has been
answered.
Menu List
The menu list appears on the left side of the screen and can
be accessed from other modes by touching the MENU button
on the right side of the screen.
NOTE: Not all phones allow access to missed, received
or dialed calls and some will not allow uploading of your
phone’s address book.
Missed Calls
The Missed Calls list retrieves the list of Missed numbers
from your phone. The last missed number is the first number
on the list. Touch the Missed Calls menu option to view the
list. To make a call from the Missed Calls list, touch the
number and then touch the button. The TFT will display
“Cannot get missed record” when the feature is not available.
Dialed Calls
The Dialed Calls list retrieves the list of dialed numbers from
your phone. The last dialed number is the first number on the
list. Touch the Dialed Calls menu option to view the list. To
make a call from the Dialed Calls list, touch the number and
then touch the button. The TFT will display “Cannot get
dialed record” when the feature is not available.
Received Calls
Use the Received Calls list to view the last 10 received
numbers stored on your phone. To access the Received list,
touch the Received Calls menu option. The last received
number is the first number on the list. T o make a call from the
Received Calls list, touch the number and then touch the
button. The TFT will display “Cannot get received record”
when the feature is not available.
Phone Book
1. Touch the Phone Book menu option to display the
phone book stored on your mobile phone, if compatible.
The screen will display “Ready...” while the phone book
is downloading.
2. Once the download is completed, you can use the arrow
buttons and scroll bar on the right side of the window to
navigate the list. Since the unit downloads one page of
entries at a time, there may be a slight delay while the
next page of numbers is downloaded.
33
Page 38

VM9022
3. Touch to highlight the number you want to dial and then
touch the button.
NOTE: Some mobile phones do not support Phone Book
upload through Bluetooth. This is a limitation of the
phone, not the VM9022.
Bluetooth Setup
Auto Answer
You can choose to have the VM9022 automatically answer
incoming calls to your paired Bluetooth phone. To turn “Auto
answer” on:
1. Touch the button to view the SETUP menu.
2. Select the “Bluetooth” sub-menu.
3. Touch the area to the right of “Auto answer” to select
“On”.
Auto Connect
The auto Connect option will allow the VM9022 to
automatically connect to your previously paired Bluetooth
when it is in range. When the Connect option is set to
“Manual”, you must press the button to re-establish a
connection with your phone. To turn auto “Connect” on:
1. Touch the button to view the SETUP menu.
2. Select the “Bluetooth” sub-menu.
3. Touch the area to the right of “Connect” to select “Auto”.
Advanced Audio Distribution Profile
(A2DP)
The VM9022 allows you to play back audio files from your
phone, PDA or personal music player using a Bluetooth
connection.
Before using an audio player, it may be necessary to enter a
PIN code into the unit. Enter the PIN code referring to
“Bluetooth Sub-menu Features” on page 18.
• A2DP: Stream audio from your Bluetooth compatible
audio player and listen to the music through your
VM9022. Play/pause, song selection, etc. are not
possible.
• AVRCP: Play back, pause, select songs, etc. while
streaming audio from your Bluetooth compatible audio
player to the VM9022.
NOTE: Song information (e.g. elapsed playing time, song
title, song index, etc.) cannot be displayed on this unit.
Since there are a number of Bluetooth audio players
available on the market, operations with your Bluetooth audio
player using this unit vary greatly.
Please refer to the instruction manual that came with your
Bluetooth audio player as well as this manual while operating
your player with the VM9022.
Refer to the MUSIC INTERFACE instructions under
“Bluetooth User Interface” on page 32 for information about
on-screen indicators and touch screen functions that may be
available during audio playback.
NOTE: Please quit A2DP mode before attempting to
make a phone call, as unexpected results may occur
depending on your mobile phone model.
The VM9022 can control a Bluetooth audio player via
Advanced Audio Distribution Profile (A2DP) or Audio/Video
Remote Control Profile (AVRCP). Bluetooth audio players (or
Bluetooth adapters) compatible with these profiles can be
connected to this unit. Functionality varies depending on the
profile used:
34
Page 39

VM9022
TROUBLESHOOTING
Table 6: Troubleshooting
Problem Cause Corrective Action
GENERAL
Unit will not power on Radio Fuse blown Install new fuse with correct rating
Car battery fuse blown Install new fuse with correct rating
Illegal operation Press the RESET button located in the bottom right corner of the front p anel
Remote control does not function Battery depleted Replace battery with new one
Battery installed incorrectly Remove battery and install correctly
No/low audio output Improper audio output connection Check wiring and correct
Volume set too low Increase volume level
Improper “MUTE” connection Review wiring diagram and check “MUTE” connection
Speakers damaged Replace speakers
Heavily biased volume balance Adjust the channel balance to the center position
Speaker wiring is in contact with metal part of car Insulate all speaker wiring connections
Poor sound quality or distortion Pirated disc is in use Use original copy
Speaker power rating not compat ible with unit Connect proper speakers
Speaker is shorted Check speaker contact
Tel-Mute malfunction “MUTE” wire is grounded Check that the “MUTE” connection is not grounded and that it’s properly insulated
Unit resets itself when engine is off Incorrect connection between ACC and positive battery
TFT MONITOR
No image Incorrect connection to parking brake wire Check wiring and correct
Flashing image or interference appears on screen DVD is not compatible with current TV system settings Change setup to accommodate disc
Prolonged image or improper height/width ratio display
Monitor stops at incorrect position Moving path is blocked Press OPEN key to restart monitor movement
TUNER
Weak station searching Auto antenna is not fully extended Connect the auto antenna control cable properly
CD/DVD
Cannot insert disc Disc already inside unit Eject current disc and insert new one
wire
PRK SW is activated and parking brake is not engaged Stop vehicle in safe place and apply parking brake
Improper video signal connections Check wiring and correct
Improper aspect ratio setup Use correct aspect ratio setting
Auto antenna not properly connected Connect the auto antenna control cable properly
LOCAL function is activated Turn LOCAL function off
Check wiring and correct
35
Page 40

Table 6: Troubleshooting
Problem Cause Corrective Action
Disc does not play back Disc is warped or scratched Use disc in good condition
Disc is dirty or wet Clean disc with soft cloth
Laser pickup is dirty Clean laser pickup with cleaning disc
Incompatible disc is used Use compatible disc
Disc rating exceeds Parental Lock rating limit Change Parental Lock settings to lower restriction
Disc region code is not compatible with unit Use disc with proper region code
Disc is inserted upside down Insert disc with label side up
Image blurred, distorted, or dark Disc is illegally copied Use original disc
PBC cannot be used during VCD playback PCB is not available on the disc
No repeat or searching while playing VCD PCB is on Turn PCB off
MP3
Interruption occurred during playback Disc is dirty or scratche d Clean disc or replace
File is damaged/bad recording Recreate disc with good files
Incorrect playback message displayed Message is longer than screen can display
SAT RADIO
No Sound Incorrect cable connections Check RCA cables
Satellite source not available Incorrect cable connections Check Satellite Data cable
IPOD
iPod source not available Incorrect cable connections Check jLink and MediaLink cables
Cannot see video and photo media on TFT screen Wrong iPod Video Settings Change iPod video settings to TV Out = On
VM9022
Error Messages
Table 7: Error Messages
Message Displayed Cause Corrective Action
Loading Disc is being read
No Disc Disc is dirty Clean disc with soft cloth
Disc is upside down Insert disc with label side up
Disc not present in loading compartment Insert disc
Bad Disc Disc is dirty Clean disc with soft cloth
Disc is upside down Insert disc with label side up
Unknown disc Disc format is not compatible with this unit
Region Error DVD is not compatible with region code of unit
Error Illegal mechanism operation Press EJECT key for 5 seconds to reset loading mechanism
36
Page 41

VM9022
Care and Maintenance
1. Use only a clean silicone cloth and neutral detergent to
clean the front panel or monitor. A rough cloth and nonneutral detergent (such as alcohol) may result in
scratching or discoloration.
2. Do not get water or cleaning fluids on the unit.
3. If the temperature inside the player gets too hot, a
protective circuit automatically stops play of the disc. If
this occurs, allow the unit to cool before operating the
player again.
4. Never insert anything other than a 5” (12 cm) disc into
the player as the mechanism can be damaged by
foreign objects.
5. Do not attempt to use a 3” (8 cm) CD-Single disc in this
unit, either with or without an adaptor, as damage to the
player and/or disc may occur. Such damage is not
covered by the Warranty on this product.
6. The CD player may not operate properly in extreme hot
or cold. If such conditions occur, allow the interior of the
vehicle to reach a normal temperature before using
player.
7. When the vehicle warms up during cold weather or
under damp conditions, condensation may appear on
the screen. Should this occur, the screen will not
operate properly until the moisture has evaporated.
8. We suggest you use a cleaning disc in this unit more
frequently than in the unit in your home due to the
environmental conditions of the vehicle.
37
Page 42

SPECIFICATIONS
DVD/CD Player
Compatible Disc Media: DVD + R / RW (Single and Dual
Layer) and CD-R / RW
Compatible Formats: CD-DA, MP3, WMA, VCD, SVCD, AVI,
MPEG 2, XviD, DivX and Kodak picture CD (JPEG)
Signal to Noise Ratio: >95dBA
Dynamic Range: >95dB
Frequency Response: 20Hz to 20 kHz, -3dB
Channel Separation: > 60dB @ 1 kHz
D/A Converter: High performance 24-bit / 192 kHz sample
rate, Multi-Bit Sigma-Delta Modulator
Video
Format: NTSC / PAL
Output: 1Vp-p, 75-ohm
Input: 1Vp-p, 75-ohm
FM Tuner
Mono Sensitivity (-30dB): 9dBf
Quieting Sensitivity (-50dB): 15dBf
Alternate Channel Selectivity: 70dB
Signal to Noise Ratio @ 1 kHz: 58dB
Image Rejection: 80dB
Stereo Separation @ 1 kHz: >30dB
Frequency Response: 30Hz - 15 kHz, -3dB
AM Tuner
Sensitivity (-20dB): 15uV
Signal to Noise Ratio @ 1 kHz: 50dB
Image Rejection: 60dB
Frequency Response: 50Hz - 2 kHz, -3dB
Monitor
Screen Size: 6.5" (Measured diagonally), 16:9 Widescreen
• 6.1" (155mm) W X 3.51" (89.2mm) H
Screen Type: TFT Liquid Crystal Display (LCD) active matrix
Response Time: 30mSec rise time, 50mSec fall time
Resolution:
• 280,800 sub pixels, 1200 (W) X 234 (H)
Viewing angle:
• 60 degrees left or right
• 40 degrees up
• 55 degrees down
General
Auxiliary Input Impedance: 10k-ohm
Power Supply: 11 to 16VDC, Negative Ground
Power Antenna (Blue): 500mA max, Current Limited
Protection
Amplifier Remote (Blue / White): 500mA max, Current
Limited Protection
Operating Temperature: -20C ~ 65C
VM9022
Fuse: 20-Amp, Mini ATM Type
DIN Chassis Dimensions: 7" X 7" X 4" (178mm x 178mm x
100mm)
CEA Power Ratings
Main Amplifier Power Output:
18 Watts RMS x 4 channels into 4-Ohms @ < 1% THD+N
Signal to Noise Ratio: 70dBA below reference (Reference: 1
Watt, 4-Ohms)
Frequency Response: 20 Hz - 20 kHz, -3dB.
Reference Supply Voltage: 14.4VDC
Center Amplifier Power Output:
22 watts RMS X 1 channels into 4-Ohms @ < 1% THD+N
Signal to Noise Ratio: 70dBA below reference. (Reference: 1
watt, 4-Ohms)
Frequency Response: 20Hz to 20 kHz, -3dB
Reference Supply Voltage: 14.4VDC
*Specifications subject to change without notice.
38
Page 43

VM9022
PREPARACIÓN
Felicitaciones por su compra del Receptor Multimedia Móvil
Jensen VM9022.
Es buena idea leer completamente las instrucciones antes de
iniciar la instalación. Recomendamos hacer instalar su
Jensen VM9022 por una tienda reconocida.
Características
DVD
• Proporción de Pantalla - Cinema, Normal y OFF
(Standby o esperando)
• Avance Rápido, Retroceso Rápido - 2X, 4X, 8X y 32X
• Reproducción, Pausa, Detención, Próximo Capítulo y
Capítulo Previo
• ESP - Búfer de 2MB
CD / MP3 / WMA
• Compatible con etiqueta ID3
• Búsqueda de Directorio (Solamente MP3 / WMA)
• Acceso Directo a Pista vía Control Remoto
• Quema hasta 1500 archivos MP3 y WMA en un
DVD+R/RW
• Búsqueda de Pista Audible en Avance / Retroceso
• Aleatorio, Repetición e Introducción
• Reproducción, Pausa, Detención, Próxima Pista y Pista
Previa
• ESP - Búfer de 2MB
AM/FM
• Espaciamiento de Frecuencia de EEUU/Europa/
Latinoamérica/Asia
• Programación de 30 estaciones (18 FM, 12AM)
• Estéreo/mono automático
• Local / Distante
• Almacenamiento Automático / Exploración de Vista
Previa
• RDS (Sistema de Datos de Radio)
Compatible con Radio Satelital
• Compatible con Radios SM y Sirius (Vendidos por
separado)
• Requiere XMDJEN100 y Cables JXMC para XMD1000
solamente (Vendidos por separado)
• Nombre de Canal Satelital, Artista, Canción y
Categorías en Pantalla TFT
iPod
• jLinkDirect - Interfaz de Conexión Directa de Alta
Velocidad para acceder a Listas de reproducción,
Artistas, Álbumes, Canciones, **Fotos y **Videos de
iPod (**Requiere un iPod con Fotos y Video)
• El Gestionador de Energía Carga el iPod mientras está
Conectado
MediaLink
• Interfaz de Bajo del Tablero Permite Conectar
• MediaLink* incluye la Conectividad siguiente:
Chassis
• DIN 2.0 (Importar / ISO-DIN Montables)
• Pantalla LCD motorizada
• LCD de Matriz Activa TFT de 6.5" con Cobertura
• Ajuste de Ángulo de Inclinación de Pantalla
• Sistema de Control de Calor - Enfriamiento por Aire
General
• Bluetooth - Bluetooth manos libre por seguridad y
• Compatible con Navegación (Solamente Nav101)
• Control Remoto Infrarrojo de 38 Teclas con Joystick de
• Dos Salidas de Video Compuestas para Pantallas
• Compatible con Monitores para Asientos Posteriores
• Dos Entradas Auxiliares de Audio / Video
• Salida de Línea de Preamplificación de 200-Ohm -
• Salida de Línea 4VRMS - Todos los Canales
• Control de Audio Rotativo
• Ecualizador de Siete Bandas con Ocho Curvas de
• Analizador de Espectro
• Salida de Línea Delantera, Posterior, Central y de
• Amplificador Incorporado de Canal Central Integrado
• (40 watts x 1)
• Cruzamiento de Altavoz de Graves y de Control de
• Dolby Digital / Pro-Logic ll
• Control de Volumen Programable
4
Dispositivos Multimedia Portables
• USB - Soporta Discos Duros y Memorias Extraíbles
• DIN de 8 pines LinkDirect para iPod
• Entrada Exclusiva de Audio de 3.5mm
• Entrada de Audio /Video RCA
Antibrillo
Forzado que Mantiene los Sets de Chips Operando a
Temperaturas Nominales
conveniencia y A2DP para corriente de música desde
un dispositivo de mano PDA / PMP
5 movimientos
Adhicionales
MZ7-TFT con Interfaz Pantalla Toque (Touch Screen)
Todos los Canales de Audio
Ecualización Preconfiguradas
Altavoz de Graves
Fase
• Entrada de Cámara Posterior (Vista de Imagen Normal
y Espejo)
• Joystick de 5 Movimientos
39
Page 44

VM9022
Lo que hay en la Caja
1. Ménsulas de Montaje de Doble DIN Izquierdo y Derecho
2. Ménsula de Instalación de Media Manga de DIN Doble
3. Control Remoto con Batería
4. Cinta de Montaje del Soporte Posterior
5. Cable Jlink para iPod
6. Dos Anillos de Ajuste Cosméticos a Medida
7. Cable de Freno de Mano
8. Caja de MediaLink
9. Paño de Limpieza de Pantalla
10. Tornillos M5 x 6 y M3 x 4 para Montar el Radio a las
Ménsulas
11. Arnés de Salida de Altoparlantes
12. Arnés de Entrada de Energía
13. Arnés de Cable de Canal Central
Equipamiento Opcional
• NAV101
El VM9022 es "compatible con navegación". Antes de
acceder a cualquier función de navegación, usted debe
comprar e instalar el módulo NAV101. Todas las
instrucciones de instalación y operación serán incluidas
con el módulo de navegación NAV101. Una vez que el
NAV101 está conectado y operando adecuadamente, el
modo de fuente NAV se activará. Mientras el NAV101
no está instalado, la opción NAV aparece en gris,
indicante que la función no está disponible.
• Cámara Posterior
El VM902 es "compatible con cámara". Antes de
acceder cualquier característica de cámara, debe
comprar e instalar una cámara de video posterior. Una
vez que la cámara posterior está conectado y operando
adecuadamente, el modo de fuente CAMERA se
activará. Mientras la cámara no esté instalada, la opción
CAMERA aparece en gris, indicando que la función no
está disponible.
• Radio Satelital
Vea “Operación del Radio Satelital” en la página 60.
• jLinkCable y iPod
Vea “Operación MP3/WMA” en la página 67.
• Teléfono Bluetooth
Vea “Operación de Bluetooth” en la página 70.
• Cable del Audio de 3.5mm a de 3.5mm
Vendido por separado.
Herramientas y Provisiones
Usted necesitará las siguientes herramientas y provisiones
para instalar su VM9022:
• Llave torx, destornilladores plano y Phillips
• Cúter y peladores de cables
• Herramientas para quitar el radio existente
(destornillador, set de socket wrench y otras
herramientas).
• Cinta aisladora
• Herramienta crimpadora
• Luz de testeo/medición de voltios
• Conectores para crimpar
• Cable de calibre 18 para conexiones eléctricas
• Cable para altavoz de calibre 16 - 18
Desconexión de la Batería
Para prevenir un cortocircuito, asegúrese de apagar la
ignición y quitar el cable negativo (-) de la batería antes de la
instalación.
NOTA: Si el VM9022 se instala en un automóvil equipado
con una unidad a bordo o una computadora de
navegación, no desconecte el cable de la batería. Si el
cable se desconecta, la memoria de la computadora
puede borrarse. Bajo estas condiciones, sea muy
cuidadoso durante la instalación para evitar un posible
cortocircuito.
¡CUIDADO! Solamente conecte la unidad a una fuente de
alimentación de 12 voltios con toma a tierra adecuada.
¡CUIDADO! Nunca instale la unidad donde pueda
interferir con la visión y las condiciones de manejo
seguro.
¡CUIDADO! Para reducir el riesgo de accidente de tráfico
(excepto cuado lo utilice la cámara de video para mirar
hacia atrás) nunca utilice la función de pantalla de video
mientras maneje el vehículo. Esta es una violación a la
ley federal.
¡CUIDADO! Nunca desarme o ajuste la unidad.
¡CUIDADO! Para prevenir lesiones por choque eléctrico
o incendio, nunca exponga la unidad a humedad o agua.
¡CUIDADO! Nunca utilice discos irregulares.
¡CUIDADO! Para prevenir daños al mecanismo adentro
de la unidad, evite impactar con el monitor TFT.
¡CUIDADO! Utilizar un fusible inapropiado puede causar
daño en la unidad y resultar en incendio.
¡CUIDADO! El monitor emplea un mecanismo
motorizado automático. Para evitar daños al mecanismo
central, por favor, no empuje, jale o atenúe el monitor
manualmente, o de otra forma que la explicada en
“Ajuste de Ángulo de Inclinación del Monitor” en la
página 51.
40
Page 45

VM9022
VERDE
(+)
VERDE/NEGRO
(-)
BLANCO
(+)
WHITE/BLACK(-)
GR (+)
IS
GRIS/NEGRO
(-)
VIOLETA
(+)
VIOLETA/NEGRO
(-)
AZUL/BLANCO
+
-
R
OJO
AMARILLO
NEGRO
MARRON (+)
MARRON/NEGRO (-)
MARRON (-)
ROSA(-)
VERDE/BLANCO (+)
AZUL
Antena
AZUL
VERDE
AMARILLO
GRIS
AZUL
ROJO
BLANCO
ROJO
BLANCO
FRONT L
FRONT R
REAR
L
SURROUND
REAR
R
SURROUND
SUBWOOFER
CENTER
GND
P.CONT
MUTE
BATT
CENTER
PRK SW
REVERSE
ANT.CONT
ACC
REAR R
FRONT L
REAR L
FRONT R
BATERIA
Amplificador
de
Energía
Externa
CABLEADO
/ NEGROCable del Módulo de los Medios
Control de antena de automóvil
(conecte a toma de control de antena)
(+)
(-)
BLANCO
(+)
VERDE
VERDE/NEGRO
TELÉFONO
CELULAR
(-)
IS
GR (+)
GRIS/NEGRO
(+)
VIOLETA
(-)
VIOLETA/NEGRO
Interruptor de Ignición
Enmudecer (deje abierto si no
está conectado)
OJO
R
(20A)
FILTER/FUSIBLE
NAV Bus
MARRON/NEGRO (-)
PantallaToque
MZ7-TFT(Vendu
Separamente)
NEGRO
MARRON (+)
MZ7-TFT
AMARILLO
Cámara de Vídeo
de la Visión Posterior
CAMERA
SATRadio
* Conexiones de
Receptador
Satélitel
AMARILLO
SATR
ROJO
VERDE/BLANCO (+)
Luz de Manejo en Reversa
Sistema Externo
de Audio/Video
BLANCO
AUX IN2
SATL
BLANCO
ROJO
*NOTA:
Connections
Diagram para
las conexiones
módulo de los
SUBWOOFER
Vea el
Multimedia
adicionales
a través del
medios.
L
R
REAR
REAR
SURROUND
SURROUND
Amplificador de
Energía Externa
AMARILLO
AUX IN1
BLANCO
Rear Video 1
Video Zona
TraseroAdicional
ROJO
VIDEO OUT1
AMARILLO
Rear Video 2
VIDEO OUT2
AMARILO
*MediaLink
HEADPHONE
MULTIZONE
ROJO
Auricular Inalámbrico
Infrarrojo (opcional)
BLANCO
41
Page 46

CONEXIONES MEDIALINK Y SATELITALES
SAT Radio
A la VM9022
*Kit de Cable SATELITAL: JXMC o XMDJEN100 (vendido
por separado)
VM9022
SAT L
SAT R
**Radio XM o Sirius satelital (vendido por separado).
**
MediaLink
3.5mm - Audio
VIDEO LEFT RIGHT
NOTA:
iPod de la generación 5
recomendado para el
mejor funcionamiento
*
iPod Video
Cable del jLink de iPod
(incluido)
iPod NanoiPod MiniiPod
42
Page 47

VM9022
INSTALACIÓN
Instalación de DIN ISO
Esta unidad está diseñada para encajar en una abertura de
tablero de DIN 2.0, encontradas en muchos automóviles
importados. Esta unidad tiene agujeros roscados en los
paneles laterales del chasis que pueden utilizarse con las
ménsulas de montar originales de fábrica que vienen con
algunos vehículos T oyota, Nissan, Mitsubishi, Isuzu, Hyundai
y Honda para motar el radio al tablero. Por favor, consulte en
su tienda local especialista en estéreos de automóviles si
necesita asistencia en este tipo de instalación.
1. Quite del tablero el radio existente de fábrica o centre la
consola de montaje. Guarde todos los elementos y
ménsulas, pues serán utilizados para montar el nuevo
radio.
2. Quite las ménsulas y elementos de montaje que vienen
de fábrica con el radio existente y adhiéralos al nuevo
radio.
Instalación de DIN ISO
conexiones de cables hasta que se solucione el
problema.
4. Monte el ensamblaje del nuevo radio al tablero o a la
consola central utilizando el procedimiento reverso al
paso 1.
CUIDADO: Para una correcta operación del equipo de
CD, el chasis debe estar montado dentro de los 30° de
horizontalidad. Asegúrese de que la unidad esté
montada dentro de este límite.
NOTA: Es responsabilidad del usuario final instalar y
operar esta unidad de forma acorde a leyes locales,
estatales y federales. El cable de FRENO DE MANO,
DEBE ESTAR CONECTADO como se indica en este
manual.
CUIDADO: No bloquee la salida del ventilador de
enfriamiento. Si se bloquea, la unidad puede
sobrecalentarse y dañarse.
Instalación Usando la Media Manga
1. Presione las palancas metálicas en ambos lados para
quitar la media manga del radio.
2. Instale la media manga.
a. Instale el adaptador si es necesario (opcional).
b. Instale la media manga dentro del adaptador o del
tablero (solamente utilice los tornillos provistos).
No fuerce la manga al introducirla en la abertura o
provoque que se doble.
c. Localice la serie de lengüetas para doblar en la parte
superior, inferior y costados de la manga de montaje.
Con la manga completamente insertada en la apertura
del tablero, doble hacia afuera todas las lengüetas que
sean necesarias para que la manga quede asegurada
firmemente al tablero.
Lengüetas
Lengüetas
TABLERO
TABLERO
CUIDADO: No exceda el tamaño de tornillo de M5 x 6MM.
Tornillos más largos pueden tocar y dañar componentes
dentro del chasis.
3. Ubique el radio en frente de la apertura del tablero de
manera tal que los cables puedan pasar por la manga
de montaje. Siga el diagrama de cableado
cuidadosamente y asegúrese que todas las conexiones
están bien hechas y aisladas con tuercas de cable o
cinta aisladora. Luego de completar las conexiones del
cableado, enchufe los conectores ISO en las tomas
correspondientes de la parte posterior del chasis.
Encienda la unidad para confirmar su operación (la
ignición del vehículo debe estar encendida). Si la
unidad no opera, verifique nuevamente todas las
Instalación Usando la Media Manga
2b
43
Page 48

VM9022
3. Utilice los tornillos M5 x 6 (provistos) para instalar las
ménsulas de montaje a cada lado del radio usando los
agujeros indicados abajo.
Instale Ménsula Aquí
Los tornillos no designados están prohibidos
TORNILLO
M5X6
Ménsula
4. Ubique el radio en frente de la abertura del tablero de
manera tal que los cables puedan pasar por la manga
de montaje.
¡CUIDADO! Tenga cuidado de no dañar el cableado del
automóvil.
5. Complete el cableado como se ilustra en el diagrama de
cableado. Una vez que se haya completado el
cableado, conecte nuevamente el terminal negativo de
la batería. Si no hay un ACC disponible, conecte la
punta del ACC a la alimentación de energía con un
interruptor.
MEDIA MANGA
TORNILLO
M3x4
Luego de completar las conexiones del cableado, encienda
la unidad para confirmar la operación (el interruptor de la
ignición debe estar encendido). Si la unidad no opera,
verifique nuevamente todas las conexiones de cables hasta
que se solucione el problema. Una vez que se alcanza una
operación correcta, apague el interruptor de ignición y
proceda con el montaje final del chasis.
1. Conecte el adaptador del cableado a un arnés de
cableado existente.
2. Conecte la punta de la antena.
3. Cuidadosamente deslice el radio dentro de la media
manga, asegurándose que el lado correcto esté hacia
arriba, hasta que esté completamente colocado y que
las presillas lo traben en su lugar.
Utilizando el Anillo de Ajuste Cosmético
Dos anillos de ajuste cosméticos se incluyen con el VM9022
para una instalación flexible. El VM9022 encajará en la
mayoría de los tableros importados con ninguna o muy poca
necesidad de modificación de la cavidad. Algunos tableros
de vehículos domésticos en Estados Unidos aceptarán un
chasis de Doble DIN, pero usualmente queda una pequeña
abertura entre el radio y el tablero luego que se completa la
instalación. En este caso, utilice el anillo de ajuste apropiado
para sellar cualquier abertura que se presente.
Las 4 lengüetas en el anillo de ajuste se ajustarán dentro de
cuatro agujeros arriba y abajo de la manga de montaje.
ANILLO
OPTIONAL
MEDIA
TRIM RING
MANGA
Instalando el Conector AV Externo
MediaLink
El MediaLink le permite conectar una variedad de
dispositivos externos, incluyendo un reproductor VCR, DVD,
MP3 portátil, etc., a su VM9022 sin quitar el radio.
Para instalar MediaLink, conéctelo a los cables AUX-IN en la
parte posterior del VM9022 (vea el Diagrama de Cableado),
y luego instale el MediaLink en una ubicación conveniente
para enchufar dispositivos auxiliares.
Reemplazando el Fusible
Cuando reemplace el fusible, hágalo por un fusible 20A
nuevo. Utilizar un fusible con una calificación inadecuada
puede dañar la unidad y causar fuego.
44
Page 49

VM9022
RADIO
FUNCIÓN ANTIROBO
El VM9022 está equipado con una función antirrobo que
requiere al usuario el ingreso de una contraseña durante el
encendido inicial.
Enter Password:
1
2
3
6
5
4
9
8
7
0
3. Toque el ícono de teclado al lado de la caja azul en el
campo de contraseña ("Password") para abrir el teclado
de pantalla.
02:40
AM
SETUP
General
RDS
Rating
DivX
Hardware
P.VOL
TS Cal
Language
Password
Rating 8. Adult
Load Factory Reset
Audio
Speaker
Bluetooth
Back
1
2
3
6
5
4
9
8
7
Clear
0
Ingresando la Contraseña de Fábrica
La contraseña por defecto es 012345 (6 dígitos). Ingrese
la contraseña usando el teclado de pantalla y luego presione
el botón Enter (flecha hacia abajo). T ambién puede utilizar el
teclado del control remoto para ingresar la contraseña.
Presione el botón "Enter" la palanca de mando (18) del
control remoto para confirmar.
Cambiando la Contraseña
Para cambiar la contraseña contra robos y categorías
(RATINGS), realice los siguientes pasos:
1. Presione el botón SETUP (31) en el control remoto o
toque el botón en la pantalla para ingresar al menú
"SETUP".
2. Toque RATING para ver el submenú "RATING". Un
ícono de un candado abierto a la derecha del campo de
la contraseña indica que no se ha ingresado aún una.
4. Ingrese la nueva contraseña de 6 dígitos y presione el
botón Enter (la flecha).
El ícono del candado aparecerá cerrado y la nueva
contraseña contra robos quedará grabada, como así
también la contraseña para la protección de las
categorías o RATING (vea “Funciones del Submenú
Calificación” en la página 56).
NOTA: Si olvida su contraseña, contáctese con Servicio
al Cliente al 1-800-323-4815.
45
Page 50

CONTROLES Y INDICADORES
Operación de Botónes
1. OPEN (Abrir)
Presione para activar el sistema mecánico automático y
mover el monitor TFT a una posición visible. Presione
nuevamente para cerrar la pantalla TFT.
2. DISP/TILT
Presione para pasar información disponible por la pantalla
TFT.
En Modo DVD, presione para ver las barras de información
superior e inferior. Presione nuevamente el botón para
apagar ("Display Off").
Mantenga presionado para activar la función de inclinar
pantalla (use la palanca de mando para ajustar el ángulo).
3. AS
Presione para guardar automáticamente las primeras seis
estaciones fuertes en memorias preconfiguradas. Se aplica a
la banda actual solamente.
4. BAND/LOC/DX
Presione el botón BAND para cambiar entre bandas AM, FM
o SAT.
Mantenga presionado para encender u apagar la recepción
de estaciones locales fuertes.
5. AUDIO
Gire para ajustar el volumen. Presione ingresar y/o confirmar
las configuraciones de audio.
6. SRC (FUENTE)
Presione para seleccionar el modo de reproducción.
Cuando cambie la fuente durante la navegación, las
solicitudes de voz aún se escucharán, aunque el mapa de
navegación no se podrá ver. (El audio de la fuente
seleccionada enmudecerá hasta que los comandos de la voz
de navegación se completen, luego de lo cual el audio
volverá).
7. WIDE (ANCHO)/PIC
Presione para ajustar el aspecto de la imagen en pantalla en
una de dos opciones: CINEMA (CINE), NORMAL o Standby
(pantalla apagada). NOTA: Solamente CINEMA y Standby
están disponibles para fuentes sin video.
Mantenga presionado para ajustar Brillo y Contraste.
8. MUTE (MUDO)
Presione para silenciar el receptor. Presione nuevamente
para reasumir el nivel de volumen previo.
Modo BT: Contesta llamada Bluetooth.
NOTA: El VM9022 posee Softmute, que permite
incrementar o disminuir el volumen gradualmente
cuando la función MUTE se activa o desactiva.
VM9022
46
Page 51

VM9022
CONTROLES Y INDICADORES
9. Receptor de Control Remoto IR
10. Joystick izquierdo
Modo DVD/Disco: Presione una vez para reproducir el
capítulo/pista previo.
Modo TUNER (SINTONIZADOR): Presione una vez para
buscar automáticamente una estación de radio previa
disponible.
Modo MENU: Presione una vez para mover el curso a la
izquierda.
11. Joystick abajo
Modo DVD/Disco: Presione una vez para avance o retroceso
en cámara lenta.
Modo TUNER (SINTONIZADOR): Presione para bajar un
paso en la frecuencia.
Modo MENU: Presione una vez para mover el cursor hacia
abajo.
12. Reset (Reiniciar)
Presione para reiniciar la configuración del sistema a como
sale fábrica (excepto la contraseña y la configuración de
bloqueo de padres).
14. (joystick derecho)
Modo DVD/Disco: Presione una vez para ingresar al capítulo
o pista siguiente.
Modo TUNER (SINTONIZADOR): Presione una vez para
buscar automáticamente una estación de radio siguiente
disponible.
Modo MENU: Presione una vez para mover el curso a la
derecha.
15. (joystick arriba)
Modo DVD/Disco: Presione una vez para avance rápido/
retroceso rápido.
Modo TUNER (SINTONIZADOR): Presione para subir un
paso en la frecuencia.
Modo MENU: Presione una vez para mover el cursor hacia
arriba.
16. ( )
Presione una vez para insertar o eyectar un disco.
Presione y mantenga presionado para reiniciar la posición
del mecanismo central.
17. Pantalla TFT
18. TRASERO
Seleccione la fuente de zona posterior. Permite a los
pasajeros delanteros escuchar el radio mientras los
pasajeros traseros escuchan CD, MP3, WMA o miran DVDs
Modo BT: Desconecta llamadas de Bluetooth.
19. RPT
Presione para controla la función de reproducción en
repetición.
20. PIP
Activa la función Picture in Picture (Imagen en Imagen).
NAV101 (opcional): Mantenga presionado para volver a la
interfaz de usuario NAV101.
21. Ranura para Tarjeta SD
Inserte una tarjeta SD para reproducir archivos de audio.
47
Page 52

CONTROL REMOTO
El Remoto del VM9022 controla las zonas delantera y
posterior. Para cambiar desde zona delantera a trasera,
mueva la llave F/R (32) ubicada en el lado derecho del
controlador..
VM9022
30
8
4
31
16
17
15
2
3
1
11
5
12
23
25
21
27
26
35
14
18
19
32
22
13
9
24
28
20
10
29
6
7
34
33
NOTA: Su control remoto puede ser ligeramente distinto
del que se exhibe aquí en imagen. El diagrama superior
es solamente ilustrativo.
48
Page 53

VM9022
Table 1: Funciones del Control Remoto
Botón Función
Nombre Ref# DVD VCD RADIO CD/MP3 SATÉLITE iPod
MENU 1 Ingresa al menú principal del
TITLE 2 Ingresa al menú de títulos del
MUTE 3 Alterna salida de audio encen-
POWER/
AUDIO 5 Cambia el audio del lenguaje
RPT A-B 6 Configurar para reproducir en
RPT 7 Repite la reproducción del
SRC
(FUENTE)
SUBTITLE 9 Selección de lenguaje para el
DISP/
CLEAR
PRESET
PRESET
ANGLE 13 Reproduce el disco en un
Joystick /\ 14 Adelante el contenido del
VOL - 15 Baja el volumen Baja el volumen Baja el volumen Baja el volumen Baja el volumen Baja el volumen
VOL + 16 Sube el volumen Sube el volumen Sube el volumen Sube el volumen Sube el volumen Sube el volumen
Joystick < 17 Selecciona el capítulo sigu-
Joystick
(presionar)
Joystick > 19 Selecciona el capítulo sigu-
disco
disco
dido/apagado
4 Enciende/apaga Enciende/apaga Enciende/apaga Enciende/apaga Enciende/apaga Enciende/apaga
en la reproducción de un
disco
repetición desde A hasta B
capítulo actual
8 Selecciona la fuente de repro-
ducción
subtítulo
10 Muestra información sobre la
reproducción
Borra lo ingresado o vuelve
hacia atrás para corregir
errores en modo de Acceso
Directo
11 Acercamiento cuando repro-
duce DVD, DivX o Foto
12 Aleja cuando reproduce DVD,
DivX o Foto
ángulo diferente de la escena
(si está disponible)
disco
iente para reproducir
18 ENTER, Detiene la reproduc-
ción/Inicia la reproducción
iente para reproducir
20 Detiene la reproducción Detiene la reproducción Detiene la reproducción
Enciende o apaga el PBC
cuando reproduce VCD
Reproduce los primeros diez
segundos de cada capítulo/
título
Alterna salida de audio encendido/apagado
Configurar para reproducir en
repetición desde A hasta B
Repite la reproducción del
capítulo actual
Selecciona la fuente de reproducción
Muestra información sobre la
reproducción
Borra lo ingresado o vuelve
hacia atrás para corregir
errores en modo de Acceso
Directo
Acercamiento Navega la lista de estaciones
Alejamiento Navega la lista de estaciones
Reproduce un CD de Imágenes con ángulo diferente
del exhibido (si está disponible)
Adelante el contenido del
disco
Selecciona el capítulo siguiente para reproducir
ENTER, Detiene la reproducción/Inicia la reproducción
Selecciona el capítulo siguiente para reproducir
Alterna salida de audio encendido/apagado
Selecciona la fuente de reproducción
Muestra información sobre la
reproducción
Borra lo ingresado o vuelve
hacia atrás para corre g i r
errores en modo de Acceso
Directo
preconfiguradas
preconfiguradas
Apaga el teclado de MEMO-
RIA
Busca una estación de radio
disponible subiendo en frecuencia
Escaneo automático de
memoria
Busca una estación de radio
disponible subiendo en frecuencia
Alterna salida de audio encendido/apagado
Repite la reproducción de la
pista actual
Selecciona la fuente de reproducción
Muestra información sobre la
reproducción
Borra lo ingresado o vuelve
hacia atrás para corre g i r
errores en modo de Acceso
Directo
Ventana de lista de navegación
Ventana de lista de navegación
Adelante el contenido del
disco
Selecciona la pista siguiente
para reproducir
ENTER, Detiene la reproducción/Inicia la reproducción
Selecciona la pista siguiente
para reproducir
Muestra pantalla de diagnóstico
Lista de categorías en modo
CG
Alterna salida de audio encendido/apagado
Selecciona la fuente de reproducción
Muestra información sobre la
reproducción
Borra lo ingresado o vuelve
hacia atrás para corregir
errores en modo de Acceso
Directo
Navega la lista de estaciones
preconfiguradas
Navega la lista de estaciones
preconfiguradas
Apaga el teclado de MEMORIA
Busca una estación de radio
disponible subiendo en frecuencia
ENTER, Cambia el menú en
pantalla entre modo CAT/CH
Busca una estación de radio
disponible subiendo en frecuencia
Muestra el menú iPod
Alterna salida de audio encendido/apagado
Selecciona modo de Música
iPod
Repite la reproducción de la
pista actual
Selecciona la fuente de reproducción
Selecciona modo de Foto
iPod
Muestra información sobre la
reproducción
Borra lo ingresado o vuelve
hacia atrás para corregir
errores en modo de Acceso
Directo
Ventana de lista de navegación
Ventana de lista de navegación
Selecciona modo de Música
iPod
Accede al Menú de iPod
Selecciona la pista siguiente
para reproducir
ENTER
Selecciona la pista siguiente
para reproducir
49
Page 54

Table 1: Funciones del Control Remoto
Botón Función
Nombre Ref# DVD VCD RADIO CD/MP3 SATÉLITE iPod
GOTO 21 Ingresa en modo de Acceso
Joystick \/ 22 Retroceso rápido del con-
||>/BAND 23 Avance Lento / Retroceso
PIC 24 Muestra Controles de Brillo /
OPEN/
CLOSE
TILT
TILT
WIDE 28 Selecciona modo de repro-
1, 2, 3, 4, 5,
6, 7, 8, 9, 0
(Teclado
Numérico)
PIP 30 Vista Imagen en Imagen (Pic-
SETUP 31 Muestra el menú de Configu-
F/R 32 F controla la zona delantera
RDM 33 Reproduce todos los capítulos
SCN 34 Escaneo de vistas previas Reproduce los primeros diez
EJECT 35 Eyecta el disco Eyecta el disco Eyecta el disco Eyecta el disco Eyecta el disco Eyecta el disco
Directo
tenido del disco
Lento X2, X4, X8
Contraste
25 Abre/Cierra el monitor TFT Abre/Cierra el monitor TFT Abre/Cierra el monitor TFT Abre/Cierra el monitor TFT Abre/Cierra el monitor TFT Abre/Cierra el monitor TFT
26 Reduce el ángulo de incli-
nación del monitor
27 Incrementa el ángulo de incli-
nación del monitor
ducción: CINEMA, NORMAL
o Standby.
29 Ingresa directamente al
capítulo
ture In Picture) de las fuentes
Delantera, Trasera o NAV
ración
R controla la zona posterior
en orden aleatorio
Ingresa en modo de Acceso
Directo
Retroceso rápido del contenido del disco
Reproducción/Pausa Selecciona Bandas AM/FM Reproducción/Pausa Selecciona bandas SAT1,
Muestra Controles de Brillo /
Contraste
Reduce el ángulo de inclinación del monitor
Incrementa el ángulo de inclinación del monitor
Selecciona modo de reproducción: CINEMA, NORMAL
o Standby.
Vista Imagen en Imagen (Picture In Picture) de las fuentes
Delantera, Trasera o NAV
Muestra el menú de Configuración
F controla la zona delantera
R controla la zona posterior
Ingresa en modo de Acceso
Directo
Muestra Controles de Brillo /
Contraste
Reduce el ángulo de inclinación del monitor
Incrementa el ángulo de inclinación del monitor
Selecciona modo de reproducción: CINEMA, NORMAL
o Standby.
1-6 selecciona lo que está en
memoria en la banda actual
Vista Imagen en Imagen (Picture In Picture) de las fuentes
Delantera, Trasera o NAV
Muestra el menú de Config u ración
F controla la zona delantera
R controla la zona posterior
Ingresa en modo de Acceso
Directo
Retroceso rápido del contenido del disco
Muestra Controles de Brillo /
Contraste
Reduce el ángulo de inclinación del monitor
Incrementa el ángulo de inclinación del monitor
Selecciona modo de reproducción: CINEMA, NORMAL
o Standby.
Ingresa directamente a la
pista
Vista Imagen en Imagen (Picture In Picture) de las fuentes
Delantera, Trasera o NAV
Muestra el menú de Configuración
F controla la zona delantera
R controla la zona posterior
Reproduce todas las pistas en
orden aleatorio
segundos de cada pista
Ingresa en modo de Acceso
Directo
SAT2 o SAT3
Muestra Controles de Brillo /
Contraste
Reduce el ángulo de inclinación del monitor
Incrementa el ángulo de inclinación del monitor
Selecciona modo de reproducción: CINEMA, NORMAL
o Standby.
1-6 selecciona lo que está en
memoria en la banda actual
Vista Imagen en Imagen (Picture In Picture) de las fuentes
Delantera, Trasera o NAV
Muestra el menú de Configuración
F controla la zona delantera
R controla la zona posterior
Escaneo de vistas previas
Ingresa en modo de Acceso
Directo
Detiene la reproducción/Inicia
la reproducción
Muestra Controles de Brillo /
Contraste
Reduce el ángulo de inclinación del monitor
Incrementa el ángulo de inclinación del monitor
Selecciona modo de reproducción: CINEMA, NORMAL
o Standby.
Vista Imagen en Imagen (Picture In Picture) de las fuentes
Delantera, Trasera o NAV
Muestra el menú de Configuración
F controla la zona delantera
R controla la zona posterior
Reproduce todas las pistas en
orden aleatorio
VM9022
50
Page 55

VM9022
USING THE TFT MONITOR
Abrir/Cerrar el Monitor TFT
Abrir el Monitor TFT
Presione el botón OPEN (1) en el panel delantero o presione
el botón ( , 25) en el control remoto para deslizar el panel
del monitor hacia abajo y mostrar las ranuras de disco y de
tarjeta SD.
Cerrar el Monitor TFT
Presione el botón OPEN (1) en el panel delantero o presione
el botón ( , 25) en el control remoto para cerrar el panel del
monitor.
Ajuste de Ángulo de Inclinación del
Monitor
Una característica conocida de los paneles LCD es la calidad
de la imagen en relación al ángulo de visión. El ángulo del
monitor se puede ajustar para una visión óptima utilizando
uno de los siguientes métodos.
Ajuste de Ángulo Paso a Paso
Presione el botón ( , 26) o ( , 27) en el control remoto
para ajustar el ángulo de inclinación de la pantalla de un
paso por vez.
Ajuste de Ángulo Continuo
Mantenga presionado el botón ( ) o ( ) en el panel de
control o control remoto para ajustar el ángulo de inclinación
en movimiento continuo.
Uso en Dirección Reversa
Si se conecta una cámara de video con vista hacia atrás, si la
unidad está encendida, y si el monitor se encuentra dentro
del compartimento principal de la unidad, el monitor
automáticamente se mueve a una posición visible y enciende
el modo CÁMARA (CAMERA) cuando se maneja en reversa.
Cuando se detiene el retroceso, el monitor vuelve a su
compartimiento principal.
Si el monitor está en modo de pantalla, el monitor
automáticamente cambia a modo CÁMARA (CAMERA)
cuando se maneja en reversa. Cuando se detiene el
retroceso, el monitor vuelve al modo original.
Proporción de la Imagen
Presione el botón WIDE (28) en el control remoto o el botón
WIDE/PIC (22) en el monitor para ajustar la proporción de la
imagen de siguiente forma (solamente activo con fuente de
video):
:
CINEMA (CINE)
Toda la pantalla se extiende
horizontalmente a una proporción 16 a
9. La proporción de extensión es la
misma en cualquier punto.
NORMAL
La imagen en pantalla convencional
tiene una proporción de 4 a 3
horizontal a vertical, dejando un área
en blanco en los lados derecho e
izquierdo de la pantalla.
STANDBY
La pantalla se pone negra. Toque la
pantalla para reasumir.
Configuración de la Imagen
Muestra el modo de salida de video para cada fuente de
reproducción.
Table 2: Modos de Salida de Video
Fuente de
Reproducción
RADIO Modo RGB
SAT Modo RGB
DISC Modo RGB
BT Modo RGB
AUX 1 Modo CVBS*
AUX 2 Modo CVBS*
NAV Modo RGB
CAMERA Modo CVBS*
*CVBS - Señas de base de banda de video compuesta
(Composite Video Baseband Signal)
Modos de Salida de
Video
Procedimiento de Ajuste de
Parámetro
1. Ingresar en Modo de Configuración de Calidad de
Imagen:
Presione el botón PIC (24) en el remoto o mantenga
presionado el botón WIDE/PICTURE (22) en el monitor.
2. Seleccione los elementos a configurar:
Use los botones del joystick arriba/abajo para
seleccionar brillo o contraste.
3. Configure los Parámetros:
Use los botones del joystick izquierdo/derecho para
modificar las configuraciones.
4. Salir del Modo de Configuración de Calidad de
Imagen:
Presione el botón PIC en el control remoto o el botón
WIDE/PICTURE en el monitor.
Freno de Mano
Bloqueo de Freno de Estacionamiento
Cuando el cable rosa de estacionamiento está conectado
al interruptor de freno del vehículo, el monitor TFT
delantero mostrará videos solamente cuando el freno de
mano esté activado. Antes de iniciar la secuencia de
freno de mano, el radio debe estar encendido con el
disco de video insertado y reproduciéndose.
Secuencia de Freno de Mano
Hay dos situaciones que pueden iniciar la Secuencia de
Freno de Mano (este es el método preferido). La ventana
de tiempo se da entre 3 y 5 segundos.
• El freno de manos está enganchado (activado)
cuando el vehículo se enciende o la ignición/
accesorio se enciende. Para activar el video, la
siguiente secuencia de eventos se debe completer:
a. Suelte el freno de mano por 3 a 5 segundos.
b. Aplique nuevamente el freno de mano
c. El video se debe mostrar en el monitor TFT
dentro de los 1 o 2 segundos.
• El freno de manos está desenganchado
(desactivado) cuando el vehículo se enciende o la
ignición/accesorio se enciende. Para activar el
video, la siguiente secuencia de eventos se debe
completar:
a. Coloque el freno de mano por 3 a 5 segundos.
b. Suelte el freno de mano por 3 a 5 segundos.
c. Aplique nuevamente el freno de mano
d. El video se debe mostrar en el monitor TFT
dentro de los 1 o 2 segundos.
51
Page 56

AUX1
DISC
INSTRUCCIONES DE OPERACIÓN
Encendido / Apagado
Presione el botón /SRC (6) (o cualquier otro botón en el
frente de la unidad excepto el de reinicio), o el botón /
POWER (4) en el control remoto, para encender la unidad.
Los botones en la parte delantera de la unidad se iluminan y
el estado del modo actual aparece en la pantalla TFT (17).
Mantenga presionado el botón para apagar la unidad. El
monitor de vuelve al compartimento principal.
Confirmación Bip Audible
Un sonido audible confirma la selección de cada función. El
tono de Bip se puede desactivar a través del menú de
Configuración.
Ajuste de Volumen
Para incrementar o bajar el volumen, gire el codificador
giratorio (5) en el panel delantero o presione los botones
VOL+/VOL- (15,16) en el control remoto. Cuando el
volumen alcanza "0" o "40", un sonido de bip indica que el
límite de ajuste se alcanzó. El volumen va desde "0" a "40".
La pantalla LCD o TFT exhiben el nivel de volumen por 3
segundos.
Volumen de Encendido Programable
Esta característica permite al usuario seleccionar el volumen
de encendido sin que influya el volumen al momento de
apagar la unidad. Para programar un nivel específico de
encendido, gire el control de AUDIO (2) para ajustar el
volumen a un nivel deseado. Mantenga presionado el botón
de AUDIO mientras se muestra en pantalla el icono del
altavoz amarillo y la indicación de nivel. La unidad sonará
dos bip para confirmar la configuración del volumen de
encendido.
Mute (mudo)
Presione el botón MUTE en el panel delantero (8) o en el
control remoto (3) para enmudecer el volumen de la unidad.
Presione el botón MUTE nuevamente para restablecer el
volumen. "MUTE" aparece en el LCD. Ajustar el volumen o
utilizar cualquiera de las funciones de configuración de audio
cancela la función de enmudecer.
Línea Muda
Si el cable de mudo "MUTE" está conectado, la salida del
audio se enmudece cuando una llamada de teléfono se
recibe en el teléfono del auto.
Selección de Fuente de Reproducción
Presione el botón SRC (6) en el panel delantero o (8) en el
control remoto para cambiar entre fuentes de reproducción
disponibles en el siguiente orden: RADIO, SAT, DISC, NAV,
BT, iPod, SD, USB, AUX1, AUX2 y CAMERA. El modo de
reproducción aparece en las pantallas TFT y LCD.
Dispositivos Auxiliares
Los dispositivos periféricos externos se pueden conectar a
esta unidad por la salida RCA (AUX IN 2) o por MediaLink
3.5mm -Audio
Seleccione "AUX 1" para reproducir un dispositivo auxiliar
conectado por el RCA o las entradas 3.5mm de MediaLink.
Por ejemplo, usted puede pasar archivos de música de un
reproductor portátil, video desde una cámara de video o
incluso ver fotos guardadas en una cámara digital.
E
Q
R
E
A
R
P
I
P
Stereo PLII Music
Seleccione el modo "AUX2" para acceder y controlar los
dispositivos auxiliares conectados a las entradas "AUX IN 2"
en la parte posterior del radio.
Seleccionando la Fuente mientras Navega
Mientras navega, otras fuentes se pueden seleccionar y
escuchar tales como Radio AM-FM, CD, etc. Para
MediaLink
VIDEO LEFT RIGHT
No Video Signal
4
Conector de iPod
(Recomendamos Generación 5)
Conector USB (Tipo A)
Conector USB (Tipo A)
Entradas estéreo Izquierda y
Derecha de 3.5mm (AUX 1)
01:53 PM
seleccionar una fuente, presione el botón /SRC (6) y luego
selecciona una fuente desde el Menú de Fuentes Delantero
(Front Source Menu). Las solicitudes de voz del navegador
se escucharán automáticamente, a pesar que el mapa de
navegación no se pueda ver. (El audio de la fuente
seleccionada enmudecerá hasta que los comandos de la voz
de navegación se completen, luego de lo cual el audio
volverá).
Menú de Fuente
.
Para acceder al menú de fuente (SOURCE MENU), toque la
pantalla TFT en la esquina superior izquierda.
SOURCE MENU
DISC
RADIO
AUX 1
SD
SAT
AUX 2
Este menú le permite seleccionar una fuente para la zona
delantera o posterior. Toque delantero (FRONT) o posterior
(REAR) para elegir la zona para la cual le gustaría
especificar la fuente. (Vea “Operación de la Multizona” en la
página 54.)
Menú de Control de Audio
El menú de Control de Audio posee un ecualizador gráfico de
7 bandas, que le permite ajustar fácilmente su sistema de
audio para alcanzar las características acústicas de su
vehículo, las cuales varían de acuerdo al tipo de vehículo y
sus medidas. Una configuración adecuada del Balance
izquierdo-derecho y delantero-trasero potencia los efectos
del ecualizador de la cabina.
USB
iPod
CAMERA
OFF
VM9022
NAV
F
R
O
N
T
BT
R
E
A
R
52
Page 57

VM9022
DISC
n
Presione el botón AUDIO (5) en el panel de delantero para
acceder al menú de audio.
E
Q
R
E
A
R
P
I
P
FAD-BAL EQ
+12 —
0—
–12 —
80 250 600 1k 4k 10k 16k
EQ: User
USER
BACK
Para ajustar un control de audio:
1. Presione los botones del joystick izquierdo o derecho
para iluminar la característica de audio que desea
ajustar.
2. Presione el botón ENTER en el joystick en el panel de
control (13) o en el control remoto (18) para seleccionar
la opción iluminada.
3. Use el joystick para ajustar la característica
seleccionada a la configuración deseada.
Table 3: Ajustes de Audio
Función Ajustes de Audio
EQ User En modo de usuario, usted puede
Acoustic Use las flechas en pantalla para selecUrban
Rave
Latin
Dance
Hip Hop
Rock
FAD-BAL Use esta pantalla para justar los niveles de salida
NOTA: El modo EQ automáticamente cambiará a "USER"
cuando bandas de ecualización individuales se ajusten.
para cada altavoz en su sistema envolvente (surround) desde 0 a -24dB. Usted también puede
ajustar el volumen maestro desde pantalla.
ajustar manualmente cada una de las
siete bandas de frecuencia.
cionar la curva de ecualización predefinida.
Una configuración adecuada del Balance izquierdo-derecho
y delantero-trasero complementan los efectos del
ecualizador de cabina.
El menú de Audio saldrá automáticamente luego de cinco
segundos de inactividad. Para salir rápidamente, toque la
esquina superior derecha de pantalla o mantenga presionado
el botón de AUDIO (5).
Opciones de Pantalla Alternativas
Un menú ubicado en la parte izquierda de la pantalla provee
acceso inmediato a las funciones de Ecualización, vista de
pantalla de Zona Posterior y PIP (Pantalla en Pantalla).
• EQ: para ver el Analizador de Espectro > Ecualizador.
• REAR: Toque para ver la pantalla de Zona Posterior.
Las opciones de control aparecen bajo las imágenes
PIP, dependiendo de la fuente.
DISC
AM/FM RADIO
BAND AS
CAT– CH– CH+ CAT+
SATELLITE
• PIP: Toque para ver la Zona Posterior, Zona Delantera
actual o pantalla NAV. Use las flechas izquierda/
derecha de abajo de la imagen PIP para cambiar la
fuente PIP.
PIP: DISC
(Root)
MP3 4/84 00:00:23
E
1 Cherry Poppin Da
Q
2 Chris Isaak - Baby
R
E
3 Crazy Town - Butt
A
R
4 Phish - Birds Of A
P
I
5 Phish - Bouncin' R
P
6 Phish - Freebird (L
01:02 AM
1/2
Reinicio del Sistema
Para corregir una interrupción del
sistema u otra operación ilegal, utilice
la punta de un lápiz para presionar el
botón de reinicio (12) ubicado en la esquina delantera
derecha inferior de la unidad. Luego del reinicio del sistema,
la unidad reestablece todas las configuraciones de fábrica.
[RESET] Butto
NOTA: Si la unidad se reinicia mientras está en ejecución
un DVD, el DVD reasume su reproducción una vez que el
reinicio se complete.
53
Page 58

DISC
OPERACIÓN DE LA MULTIZONA
Se puede reproducir fuentes independientes
simultáneamente en el VM9022. Por ejemplo, se puede ver
una consola de video juego en la pantalla delantera mientras
un video en DVD se muestre para los pasajeros de atrás.
Limitaciones de Multizonas
DVD, USB y Tarjeta SD no se pueden seleccionar
simultáneamente para vista Delantera y Posterior .
Por ejemplo, si un DVD se selecciona para la Zona
Posterior, entonces las otras fuentes no se
pueden seleccionar para ser vistas en la Zona
Delantera: DVD, USB o Tarjeta SD. Si un DVD se
selecciona para la Zona Delantera, entonces las
otras fuentes no se pueden seleccionar para ser
vistas en la Zona Posterior: DVD, USB o Tarjeta
SD.
Conectando la Pantalla Táctil de la
Zona Posterior
Usted puede conectar hasta dos monitores adicionales
(vendidos por separado) par los pasajeros de atrás, uno de
los cuales puede ser de Pantalla Táctil. Usted también puede
conectar un sistema de auriculares inalámbricos a uno de
sus monitores posteriores, como se ilustra abajo.
Pantalla de Video Posterior
(Vendido por Separado)
AMARILLO
VIDEO OUT 1
PantallaTáctil MZ7TFT
(Vendidopor Separado)
VIDEO OUT 2
MZ-TFT
MULTIZONE
HEADPHONE
AMARILLO
NEGRO
BLANCO
ROJO
Cambiando la Fuente de la Zona
Posterior
Para acceder al menú de fuente (SOURCE MENU), toque la
pantalla TFT en la esquina superior izquierda.
Este menú le permite seleccionar una fuente para la zona
delantera o posterior. Toque delantero (FRONT) o posterior
(REAR) para elegir la zona para la cual le gustaría
especificar la fuente.
Controlando la(s) Pantalla(s) de la
Zona Posterior
Si usted tiene una pantalla táctil posterior instalada, usted
puede tocar la pantalla para controlar la mayoría de las
funciones de la zona posterior.
Usted también puede usar un control remoto. El remoto del
VM9022 controla las zonas delantera y posterior. Para
cambiar desde zona delantera a trasera, mueva la llave F/R
(32) ubicada en el lado derecho del controlador.
SOURCE MENU
DISC
RADIO
AUX 1
SD
SAT
AUX 2
USB
iPod
CAMERA
NAV
OFF
VM9022
Toque el botón REAR (posterior) en el lado izquierdo de la
pantalla para ver una imagen "Picture in Picture" de la
pantalla posterior.
Apagando la Pantalla Posterior
Toque el botón OFF (en el MENÚ DE FUENTE) para
suspender la operación en la pantalla posterior. Cualquier
operación asignada exclusivamente a la fuente posterior se
suspenderá hasta que se reactive usando la pantalla táctil de
la zona delantera o posterior o el control remoto.
F
R
O
N
T
BT
R
E
A
R
Auriculares Inalámbricos
(Opcional)
NOTA: Usted no puede cambiar o controlar la fuente de
la zona delantera desde la pantalla de video de la zona
posterior.
54
Page 59

RADIO
VM9022
MENU DE CONFIGURACIÓN
Para acceder a las configuraciones del sistema, presione el
botón SETUP (31) en el control remoto o toque el botón
en la pantalla para ingresar al menú "SETUP". El sumenú
"GENERAL" aparaece iluminado en azul.
02:40
RADIO
General
RDS
Rating
DivX
Hardware
P.VOL
TS Cal
SETUP
Language
Clock Mode 12 Hour
Clock Adjust 04 : 31 AM
Video Input AUTO
Beep On
Audio
Speaker
Bluetooth
Accediendo a los Ítems del Menú
Toque el nombre del submenú o use el joystick para
seleccionarlo (Lenguaje, Audio, RDS, etc.).
Estas características disponibles para ajustarse bajo la
opción de submenú iluminada aparecerán en el centro de la
pantalla.
Ajustando una Función
1. Use la pantalla táctil o presione los botones /\ o V en el
joystick para seleccionar la característica a ajustarse.
2. Ingrese el campo de opción para la característica que
usted desea ajustar presionando la pantalla táctil o
presionando el botón ENTER (en el joystick). Un
submenú aparece en segunda fila con la opción
seleccionada remarcada en azul.
3. Seleccione un nuevo valor usando la pantalla táctil o
presionando los botones /\ o V en el joystick.
4. Use la pantalla táctil o presione el botón ENTER (en el
joystick) para confirmar la configuración.
Funciones del Submenú General
Configura
ción
Modo Reloj 12 Horas El reloj muestra el horario en 12
Opcione
s
horas utilizando AM y PM.
24 Horas El reloj muestra el horario en 24
horas hasta las 23:59.
Función
AM
Back
Configura
ción
Clock Adjust
(Ajuste del
Reloj)
Entrada de
Video
(El circuito de
entrada
detecta
automáticamente la
señal de
video desde
una fuente
Aux In)
Beep Encendido Cuando está encendido, un sonido
Opcione
s
(HH:MM) El reloj aparece en la esquina supe-
NTSC Las señales de color salen en el
PAL Las señales de color salen en el
Auto La salida de señal de color cambia
Apagado No hay sonidos de bip.
rior derecha de pantalla y en el LCD
durante ciertas operaciones. NOT A:
La indicación AM/PM cambiará
mientras siga ajustando las horas
pasada las 12.
formato estándar NTSC.
formato estándar PAL.
automáticamente basado en el
video la señal de entrada de video
actual -NTSC o PAL
audible confirma la selección de
cada función.
Función
Funciones del Submenú Lenguaje
Si un DVD soporta más de 1 Subtítulo o lenguaje de Audio,
todos los lenguajes están disponibles para ser seleccionados
durante la reproducción. Si el DVD no soporta el lenguaje
seleccionado, entonces se utiliza el lenguaje
predeterminado.
Configura
ción
OSD English Lo que muestra la Pantalla aparece
DVD Audio English El Audio del DVD se escucha en
Opcione
s
en Inglés.
Inglés cuando la opción está disponible.
Spanish El Audio del DVD se escucha en
French El Audio del DVD se escucha en
Español cuando la opción está disponible.
Francés cuando la opción está disponible.
Función
Configura
ción
DVD Subtitle English Los subtítulos del DVD automática-
Disc Menu English El menú DVD (si aplica) se muestra
Opcione
s
mente aparecen en Inglés cuando
están disponibles.
Spanish Los subtítulos del DVD automática-
French Los subtítulos del DVD automática-
Off Los subtítulos del DVD no apare-
Spanish El menú DVD (si aplica) se muestra
French El menú DVD (si aplica) se muestra
mente aparecen en Español
cuando están disponibles.
mente aparecen en Francés
cuando están disponibles.
cen automáticamente.
en Inglés.
en Español.
en Francés.
Función
Funciones del Submenú Audio
Configura
ción
DRC Off Emplee el Control de Rango
Audio Mode Surround Elija Estéreo para enviar la misma
Pro Logic II Music Optimizado para la reproducción de
Sub. W Filter 50Hz Seleccionando una frecuencia de
Opcione
s
On
Stereo
Movie Optimizado para la reproducción de
Matrix Use con multimedia codificado en
80Hz
100Hz
120Hz
150Hz
Dinámico para mejor reproducción
en volúmenes bajos.
señal a los altavoces delantero y
posterior izquierdos y derechos. Si
tiene un altavoz central, usted
puede optar por sonido envolvente
o Surround cuando su equipo lo
soporte.
música cuando se pasa música
codificada en Dolby .
video cuando se pasan películas
codificada en Dolby .
Dolby Matrix.
cruzamiento determina una frecuencia de corte del LPF (filtro de
paso bajo) del altavoz de graves.
Función
Funciones del Submenú Altavoz
• Elija 4 CH, 4.1 CH o 5.1 CH dependiendo de la
configuración del altavoz en su vehículo.
55
Page 60

VM9022
• Use la función Test Tone paa verificar las
configuraciones de los altavoces. Realice cambios
usando el menú EQ/FAD-BAL, al cual se accede
manteniendo presionado el botón AUDIO (en el control
de volumen).
• Ajuste de Fase del Altavoz de Graves: Toque el icono
sub.w para acceder a los controles de polaridad del
altavoz y revertir la polaridad de señal del altavoz de
graves de 0° a 180°. Revertir la polaridad puede
mejorar la respuesta de graves relacionada a la
configuración del altavoz.
• Configuración de la Demora (Delay): La Demora está
disponible cuando el equipo está codificado en Dolby
Digital o transmisión de bits digitales.
• RL y RR están solamente disponibles en modo 4.0 y
4.1
• Toque los iconos de altavoces RL, RR y Cent para
acceder a la configuración de demora.
• Canales Izquierdo (L) y Derechos (R) Posteriores: 0 -
15 mseg
• Canal central: 0 -5 mseg
Funciones del Submenú Bluetooth
Configur
ación
Bluetooth On Habilita la función Bluetooth.
Auto Answer On La unidad automáticamente responde
Connect Manual Conecta el último teléfono móvil activo
Pairing Code El código predeterminado es "1234".
Opcio
nes
Off Deshabilita la función Bluetooth.
todas las llamadas entrantes.
Off Manualmente se responde las llama-
Auto Conecta automáticamente cuando su
das tocando el botón "call".
tocando el icono CONNECT cuando
está desconectado.
teléfono emparejado está dentro del
rango.
T oque el icon o de teclado p ara abrirlo e
ingresar el código de emparejamiento o
pasar la contraseña requerida para la
conexión de Bluetooth a su teléfono
móvil. No todos los teléfonos requieren
un código de emparejamiento. El
código por defecto es "0000" para
muchos modelos.
Función
Funciones del Submenú RDS
Configu
ración
RDS On La unidad mostrará la información del
CT On Sincroniza automáticamente la hora
Tuner
Region
Opcion
es
Sistema de Datos de Radio cuando
esté disponible.
Off
de la radio basado en señales de
radio RDS.
Off
USA Esp aciado r de Frecuencia AM - 10 kHz
America 1 Espaciador de Frecuencia AM - 10kHz
Arabia Espaciador de Frecuencia AM - 9kHz
China Espaciador de Frecuencia AM - 9kHz
America 2 Espaciador de Frecuencia AM - 5kHz
Europe Espaciador de Frecuencia AM - 9kHz
Korea Espaciador de Frecuencia AM - 9kHz
Banda de Frecuencia AM -
530kHz~1720kHz
Espaciador de Frecuencia FM -
200kHz
Banda de Frecuencia FM -
87.5MHz~107.9MHz
Banda de Frecuencia AM -
530kHz~1720kHz
Espaciador de Frecuencia FM -
100kHz
Banda de Frecuencia FM -
87.5MHz~108.0MHz
Banda de Frecuencia AM -
531kHz~1620kHz
Espaciador de Frecuencia FM -
100kHz
Banda de Frecuencia FM -
87.5MHz~108.0MHz
Banda de Frecuencia AM -
522kHz~1620kHz
Espaciador de Frecuencia FM -
100kHz
Banda de Frecuencia FM -
87.5MHz~108.0MHz
Banda de Frecuencia AM -
520kHz~1600kHz
Espaciador de Frecuencia FM -
100kHz
Banda de Frecuencia FM -
87.5MHz~108.0MHz
Banda de Frecuencia AM -
522kHz~1620kHz
Espaciador de Frecuencia FM - 50kHz
Banda de Frecuencia FM -
87.5MHz~108.0MHz
Banda de Frecuencia AM -
531kHz~1602kHz
Espaciador de Frecuencia FM -
200kHz
Banda de Frecuencia FM -
88.1MHz~1087.9MHz
Función
Configu
ración
Opcion
es
OIRT
(Organización Internacional de
Radio y
Televisión)
Función
Espaciador de Frecuencia AM - 9kHz
Banda de Frecuencia AM 531kHz~1602kHz
Espaciador de Frecuencia FM 200kHz
Banda de Frecuencia FM -
88.1MHz~107.9MHz
Funciones del Submenú Calificación
El sistema de DVD tiene una función de bloqueo de padres
incorporada para prevenir que personas no autorizadas vean
contenidos restringidos. Por defecto, el sistema de
clasificación se configura en la clasificación más alta (sin
restricciones). El bloqueo de padres se libera solamente
solamente con la contraseña correcta. Una vez que se
ingresa la contraseña, la calificación está lista para ser
configurada.
Configura
ción
Password
(Contraseña)
Rating (clasificación)
Load Factory
(Carga de
Fabrica)
Opcione
s
_ _ _ _ _ _ Ingrese la contraseña de seis dígi-
1. Kid Safe
(Seguridad
de Niños)
2. G
3. PG
4. PG-13
5. PG-R
6. R
7. NC-17
8. Adult
Reset
(Reiniciar)
tos de fábrica (012345)
Seleccione el nivel de clasificación
adecuado para la audiencia a la
que se dirige.
Usted puede sustituir con una clasificación más alta utilizando su contraseña.
Seleccione "Reset" (reiniciar) para
reestablecer la configuración de
fabrica para el sistema de clasificación solamente.
Función
Para reestablecer la contraseña, acceda al menú "RATING"
e ingrese la contraseña actual. Una vez que se ingresa la
contraseña correcta, usted accede al campo "Password" e
ingresa la nueva contraseña.
56
Page 61

VM9022
NOTA: Guarde la contraseña y manténgala en un lugar
seguro para futura referencia. La clasificación de cada
disco está marcada en el disco, en su envoltorio o
documentación. Si el disco no tiene clasificación, el
función de bloqueo de padres no está disponible.
Algunos discos restringen solamente porciones del
disco y el contenido apropiado se verá. Para detalles,
por favor refiérase a la descripción del disco.
Funciones del Submenú DivX
Seleccione el submenú DivX para ver su código de registro
DivX. Usted debe usar este código para registrar su
reproductor, permitiéndole comprar videos usando el formato
Video DivX En Demanda (On Demand).
Funciones del Submenú de Hardware
Si la cámara de video posterior está conectada, la unidad
encendida y el monitor TFT está retraído dentro de la unidad,
el monitor TFT automáticamente se mueve a la posición de
visión y el modo Cámara se selecciona al pasar a marcha
REVERSA. Cuando se cambia a MARCHA, el monitor TFT
se retrae hacia adentro nuevamente luego de diez segundos.
Configura
ción
Camera Normal
TFT Set
Open
Opcione
s
Mirror
(Espejo)
Auto El panel TFT se abre automática-
Manual Cuando la ignición se APAGA, el
Off (apagado)
Revierte la imagen de la cámara
como si se estuviera mirando por el
espejo retrovisor.
mente cuando la unidad se
enciende.
panel TFT NO se retrae si previamente estaba hacia afuera
Usted debe presionar el botón
OPEN (1) para abrir el panel TFT.
Función
Funciones del Submenú P.VOL
Configura
ción
Source DISC Elija una fuente p ara la cual a usted
Opcione
s
RADIO
SD
SAT
AUX 1
USB
BT
AUX 2
iPod
NAV
Función
le gustaría incrementar el volumen
relativo (LEVEL).
Use los botones +/- para incrementar el volumen relativo para una
fuente específica hasta 6 decibeles.
TS Cal (Calibración de Pantalla)
Para acceder a la función "Calibración de Pantalla" del menú
de configuración (SETUP), seleccione la opción "TS CAL".
Luego de ingresar al modo calibración, una marca aparece
en la esquina del cuadrante de la pantalla. Para iniciar la
calibración, mantenga presionado la marca en cruz por un
segundo hasta que se mueva al próximo cuadrante.
Continúe para cada cuadrante hasta que haya completado la
calibración.
Para salir sin terminar la calibración, toque el botón BACK.
Saliendo del Menú de Configuración
de Sistema
Para salir del modo de configuración y reasumir una
reproducción normal, presione el botón SETUP (31) en el
control remoto o toque el botón BACK en la pantalla.
Si el monitor está en modo de pantalla, el monitor
automáticamente cambia a modo CÁMARA (CAMERA)
cuando se maneja en reversa. Cuando se detiene el
retroceso, el monitor vuelve al modo original.
57
Page 62

RADIO
OPERACIÓN DEL SINTONIZADOR
Pantalla del Sintonizador de TFT
17
26
8
E
P1 87.5 MHz
Q
P2 90.1 MHz
R
E
A
P3 98.1 MHz
R
P4 106.1 MHz
P
I
P5 107.9 MHz
P
P6 102.9 MHz
27
9
11
13
4
1
FM-1 P1 87.5 MHz
ST
PS:
7
AS
BAND
1/2
15
19
1. Indicador de Banda de Radio Actual
2. Indicador de Frecuencia de Radio
3. Reloj
4. Indicador de Transmisión en Estéreo
5. Indicador de Transmisión de Señal Local Fuerte
6. Estaciones de Radio Preseleccionada: Toque para
llamar estaciones preseleccionadas
7. Información RDS: PS (Servicio de Programa), PTY
(Tipo de Programa), RT (Texto de Radio)
8. EQ: Toque para ver el Analizador de Espectro >
Ecualizador
9. Toque para acceder la pantalla de entrada directa
10. Indicador de Estaciones Actualmente en Memoria
11. |<<: Toque para buscar hacia atrás
12. >>|: Toque para buscar hacia adelante
2
24
10
5
LOC PTY RDS
20
14
12
16
PS
21
25
01:02 PM
AS
BAND
6
PTY
MEM
18
PS
1/2
LOC
2/2
22
3
23
13. : Toque para sintonizar hacia atrás un lugar
14. : Toque para sintonizar hacia delante un lugar
15. BAND: Toque para cambiar entra bandas AM/FM
16. AS: Toque para guardar estaciones automáticamente
17. Toque para ver el menú de fuente (SOURCE MENU) y
seleccionar una nueva fuete de reproducción
18. MEM: Vea la pantalla usada para ingresar el canal
actual en la memoria preconfigurada
19. 1/2 o 2/2: Toque el botón de esta página para ver una
segunda página con botones en pantalla
20. Toque para ver el menú de configuración
21. PS (Escaneo Previo): Toque para escanear todas las
estaciones disponibles, deteniéndose por 5 segundos
en cada una y continuando hasta que se seleccione una
estación
22. LOC: Toque para sintonizar las estaciones fuertes
23. PTY: Cuando se presione PTY, las categorías de Tipos
de Programa se listan, permitiendo a los escuchas
encontrar programación similar por género. Cuando una
categoría PTY se selecciona de un menú de pantalla
táctil, el radio iniciará un escaneo hasta la segunda
categoría.
24. Indica que la función PTY está activa
25. Indica que la función RDS está activa
26. POSTERIOR: Toque para ver la pantalla de fuente
Posterior.
27. PIP: Toque para ver las fuentes Posterior, Delantera o
NAV
Cambio a fuente de Sintonizador de
Radio
• Toque la esquina superior izquierda de pantalla (el
círculo de RADIO) para ver el menú de fuente
(SOURCE MENU). Toque "RADIO".
• Presione el botón SRC (6) en el panel delantero o en el
control remoto (8) para cambiar a la fuente AM/FM o
RADIO.
Selección de banda FM/AM
Toque el botón BAND (15) en la pantalla, o presione el botón
BAND (4) en la unidad o (20) en el control remoto para
cambiar entre las siguientes bandas: FM1, FM2, FM3, AM1,
y AM2.
NOTA: El botón de banda (BAND) en la unidad solamente
trabaja cuando el TFT está cerrado.
VM9022
Búsqueda de Sintonía
Para buscar la próxima estación fuerte:
• Toque el botón >>| en pantalla.
• Mueva el joystick a la derecha.
Para buscar la próxima estación más abajo:
• Toque el botón|<<| en pantalla.
• Mueva el joystick a la izquierda.
Sintonía Manual
Para incrementar o bajar en la frecuencia de sintonía un
lugar:
• Toque los botones o en pantalla.
• Mueva el joystick a la izquierda/derecha.
Sintonía Directa
Para ingresar una estación de radio directamente, toque el
botón o presione el botón GOTO (21) en el control
remoto para mostrar el menú de entrada directa.
FM:___._MHz
1
2
3
Exit
6
5
4
9
8
7
0
Clear
Ingrese la estación de radio deseada usando el teclado en
pantalla. Presione ENTER para sintonizar la estación
seleccionada. Para salir de pantalla sin cambiar de estación,
toque Exit. Para limpiar lo ingresado e iniciar todo de nuevo,
toque Clear.
Utilizando Estaciones Preconfiguradas
Seis botones numerados almacenan y sintonizan estaciones
preseleccionadas por cada banda. T odas las seis estaciones
almacenadas en cada banda (P1 a P6) aparecen en la
pantalla.
Almacenando una Estación
1. Seleccione una banda (si es necesario), luego seleccione una estación.
58
Page 63

VM9022
2. Toque el botón MEM en pantalla (18) para abrir la
pantalla de preselección.
Mem: _
P1
P2
P3
P6
P5
P4
Exit
3. Toque el número preseleccionado en el cual le gustaría
guardar la estación actual (o presione EXIT para
cancelar y cerrar el menú). El número y la estación
preconfigurados aparecen iluminados.
Sintonizando una Estación
1. Seleccione una banda (si es necesario).
2. Toque un botón de preselección en pantalla (6) para
seleccionar la estación almacenada correspondiente.
P1 87.5 MHz
P2 90.1 MHz
P3 98.1 MHz
P4 106.1 MHz
P5 107.9 MHz
P6 102.9 MHz
Buscador de Estaciones de Radio Local
(LOC)
Cuando la función Local está encendida, solamente se
reproducen radios locales con señal fuerte. Para activar la
función Local en modo de radio AM/RM, presione y
mantenga presionado el boton BAND/LOC/DX (4) en
pantalla o toque el botón 1/2 para acceder a la segunda
pantalla de opciones de menú, y luego toque el botón en
pantalla LOC. Toque el botón LOC nuevametne para apagar
Local. Cuando la función Local está activa, el indicador LOC
en la parte superior de pantalla se ilumina.
Almacenamiento Automático (AS)
Para seleccionar seis estaciones fuertes y almacenarlas en
la banda actual:
1. Seleccione una banda (si es necesario).
2. Presione el botón AS (3) en el panel de control o toque
AS en pantalla por más de 2 segundos para activar la
función de Almacenamiento Automático (Auto Store).
The new stations replace stations already stored in that band.
Escaneo Previo (PS)
Para escanear las bandas AM o FM buscando vistas previas
de estaciones disponibles en su área, toque el botón PS (21).
Tóquelo nuevamente para detener el escaneo previo.
59
Page 64

SAT
OPERACIÓN DEL RADIO SATELITAL
Los escuchas pueden suscribirse a XM® Radio en la
Web visitando www.xmradio.com, o llamando al (800)
967-2346. Los clientes deben tener su identificación de
radio (Radio ID) a mano (vea "Mostrando el Código de
Identificación (ID)" Los clientes pueden recibir un
número limitado de canales gratuitos sin activación.
Los escuchas pueden suscribirse a Sirius® Radio en la
Web visitando www.sirius.com, o llamando al (888) 539SIRIUS. Los clientes deben tener su identificación Sirius
a mano (Sirius ID se encuentra en el Radio Satelital,
vendido por separado). Los clientes pueden escuchar
muestras de música sintonizando el canal 184.
Accediendo a Modo de Radio Satelital
Presione el botón SRC (8) en el panel delantero o en el
control remoto (8) para cambiar a la fuente SAT.
18
E
P1 XM Preview
Q
P2 XM Preview
R
E
A
P3 XM Preview
R
P4 XM Preview
P
I
P5 XM Preview
P
P6 XM Preview
Title: Fridays XM144!
5
3 21
SAT1 CH001
XM Preview Preview
10
6
9
1. Nombre de canal SAT
2. Número de canal SAT
3. Banda SAT
4. Hora
5. Título de la canción
6. Nombre de artista
7. Categoría de canción
8. Indicador de intensidad de señal
9. Canales actuales/botones preseleccionados en pantalla
10. CH -: Seleccione el canal anterior
11. CH +: Seleccione el próximo canal
8
7
4
01:02
+
CAT
CHCH
CG
-
+
CAT
-
BAND
16
MEM
19
DIAG
20
12. CAT +: Seleccione el próximo canal en la categoría
actual solamente
13. CAT -: Seleccione el previo canal en la categoría actual
solamente
14. Toque para ingresar al canal directamente usando un
teclado en pantalla
15. CG: Modo de Acceso a Canal/Guía de Categoría
16. BAND: Cambia entre bandas SAT1, SAT2 y SAT3
17. Toque para ver el menú de configuración
18. Toque esta área para ver el menú de fuente (SOURCE
MENU) y seleccionar una nueva fuete de reproducción
19. MEM: Vea la pantalla usada para ingresar el canal
actual en la memoria preconfigurada
20. DIAG: Esta función se reserve para ser el servicio
profesional como soluciones de problemas o preguntas.
Mostrando el Código de Identificación
(ID)
Antes de que escuche radio satelital, usted debe inscribirse
al servicio usando su número de identificación del radio.
Para mostrar el ID del radio, presione los botones izquierdo o
derecho (16, 17) en el joystick o los botones CH - or CH + en
la pantalla táctil repetidamente para sintonizar el canal "000".
La pantalla muestra el ID del radio donde usualmente se
17
muestra el nombre del canal.
14
Seleccionando una Estación
12
Use los botones izquierdo/derecho del joystick o los botones
11
CH - or CH + en la pantalla táctil para cambiar a otra
estación.
15
13
Modo de Preselección
Para ingresar en modo de preselección, toque el botón
BAND en la pantalla, o presione el botón BAND (14) en la
unidad o (20) en el control remoto para cambiar entre las
siguientes bandas: SAT1, SAT2 o SAT3 (indicado en la
esquina superior izquierda de la pantalla TFT).
Seis botones numerados almacenan y sintonizan estaciones
preseleccionadas por cada banda. T odas las seis estaciones
almacenadas en cada banda (P1 a P6) aparecen en la
pantalla TFT.
Almacenando una Estación
1. Seleccione una banda (si es necesario), luego seleccione una estación.
VM9022
2. Toque el botón MEM en pantalla (18) para abrir la
pantalla de preselección.
Mem:
P1
P2
P3
P6
P5
P4
Exit
3. Toque el número preseleccionado en el cual le gustaría
guardar la estación actual (o presione EXIT para
cancelar y cerrar el menú). El número y la estación
preconfigurados aparecen iluminados.
Sintonizando una Estación
1. Seleccione una banda (si es necesario).
2. Toque un botón de preselección en pantalla para
seleccionar la estación almacenada ahí.
Sintonía Directa
Para ingresar una estación de radio directamente, toque el
botón o presione el botón GOTO (21) en el control
remoto para mostrar el menú de entrada directa.
CHNO:___/255
1
2
3
Exit
6
5
4
9
8
7
Clear
0
Ingrese la estación de radio deseada usando el teclado en
pantalla. Toque el botón ENTER para sintonizar la estación
seleccionada. Para salir de pantalla sin cambiar de estación,
toque Exit. Para limpiar lo ingresado e iniciar todo de nuevo,
toque Clear.
60
Page 65

VM9022
SAT
Modo de Guía de Canal/Categoría
Hay dos modos de búsqueda que ayuda a navegar a través
de los canales o categorías. Para acceder al modo de Guía
de Canal/Categoría, presione el botón ENTER (18) en el
control remoto o el botón CG en la pantalla táctil.
Guía de Canal es el modo de búsqueda por defecto. Para
acceder a la Guía de Categoría, presione el botón TITLE (2)
en el control remoto o toque CAT en la pantalla táctil. Para
volver a Guía de Canal, toque CH en la pantalla o presione el
botón SUBTITLE (9) en el control remoto.
Modo de Guía de Canal
Cuando el modo de Guía de Canal se selecciona, se
muestran en cajas en la parte inferior izquierda de la pantalla
TFT los seis primeros canales satelitales y el menú en
pantalla cambia para facilitar el modo de búsqueda.
CH
CG
CAT
MEM
01:02
DIAG
SAT1 CH001
XM Preview Preview
E
Q
########
R
E
001 XM Preview
A
R
004 The 40s
P
I
005 The 50s
P
006 The 60s
007 The 70s
Title: www.xmradio.com
SCN
Modo de Guía de Categoría
Cuando se selecciona Modo de Categoría, iconos de
carpetas aparecen en pantalla al lado de las opciones de
categoría.
• Mientras está en Modo de Búsqueda, para cambiar
entre modos de búsqueda de Canal y Categoría,
presione los botones CH o CAT en la pantalla táctil.
• Use la barra de arrastrar y las flechas en la pantalla
táctil para ver las páginas previas/próximas de las
categorías. Cada página contiene seis categorías de
los cuales seleccionar.
• Para seleccionar una categoría, toque el nombre o el
icono de carpeta de la categoría correspondiente. Los
canales en esa categoría se mostrarán en pantalla.
• Use la barra de arrastrar y las flechas en la pantalla
táctil para ver las seis estaciones previas/próximas de la
categoría seleccionada.
• Toque el botón SCN en pantalla para ver previamente
cada uno de los canales en la categoría seleccionada
por 10 segundos.
• Toque el nombre del canal para reproducir ese canal.
• Toque el botón CG en pantalla para volver a la pantalla
de Modo de Preselección (Preset Mode).
• Mientras está en Modo de Búsqueda, para cambiar
entre modos de búsqueda de Canal y Categoría,
presione los botones CH o CAT en la pantalla táctil.
• Use la barra de arraster y las flechas en la pantalla táctil
para ver las páginas previas/próximas de las
estaciones. Cada página contiene seis canales de los
cuales seleccionar.
• Presione el botón SCN en pantalla para ver
previamente cada uno de los 6 canales en pantalla por
10 segundos.
• Presione el botón CG para volver a la pantalla de Modo
de Preselección (Preset Mode).
• Para seleccionar un canal mientras está en modo Guía
de Canal, toque el nombre del canal en pantalla. El
canal iniciará la reproducción y la unidad volverá a
Modo de Preselección (Preset Mode).
61
Page 66

OPERACIÓN DE VIDEO DVD/VCD
NOTA: Cuando está adecuadamente instalado, el video
en DVD no puede reproducirse en la pantalla TFT
principal a menos que el freno de mano esté puesto. Si
usted intenta ver un DVD mientras el vehículo está en
movimiento, la pantalla TFT muestra "PARKING" con un
fondo azul. Las pantallas de video traseras, si
corresponde, operarán normalmente.
Insertando un Disco
Para insertar un disco, usted debe primero presionar el botón
OPEN (1) en el panel de control o el botón OPEN/CLOSE en
el control remoto para dejar accesible la ranura de disco (22).
Inserte un disco, con el lado correcto hacia arriba, dentro de
la abertura. El panel delantero se cerrará automáticamente y
la reproducción inicia.
Accediendo a Modo DVD
Para cambiar a modo DVD cuando un disco ya está adentro,
presione el botón SRC (15) en el panel delantero o en el
control remoto (8) hasta que "DISC" aparece en la parte
inferior de la pantalla.
Controlando la Reproducción
Para acceder a los controles en pantalla, toque la pantalla.
Toque el botón 1/2 para ver una segunda página de
controles.
BACK
EQ
REAR
AUDIO
PIP
VM9022
Presione el botón de ENTER en el joystick (18) en el control
remoto o toque el botón de reproducción (>) para reiniciar la
reproducción normal.
Reproducción Avance Lento/Retroceso Lento
Presione el botón ||>/BAND en el control remoto para un
avance o retroceso lento. Mantenga presionando y soltando
el botón para incrementar la tasa de avance lento desde "2X"
a "4X" y "8X" y luego iniciar el retroceso lento.
Reproducción en Repetición
Presione el botón RPT (19) en el panel de control, el botón
RPT (7) en el control remoto, o el botón en pantalla para
alternar el modo de repetición entre los siguientes:
• DVD: Repetir Capítulo, Repetir Título, Apagar Repetir
• VCD (PBC apagado): Repetir Simple, Apagar Repetir
NOTA: Si el Bloqueo de Padres (Clasificación) está
activo y el disco insertado no es autorizado, un código
de 6 dígitos se debe ingresar y/o el disco debe estar (vea
Características de Submenú General). (vea “Funciones
del Submenú General” en la página 55).
Usted no puede insertar un disco si ya hay uno adentro de la
unidad o si está apagada.
NOTA: DVD-R y DVD-RW no se podrán reproducir a
menos que la sesión esté finalizada y el DVD cerrado.
Eyectando un Disco
Para eyectar un disco, usted debe primero presionar el botón
OPEN (1) en el panel de control o el botón OPEN/CLOSE en
el control remoto para dejar libre la ranura de disco (22).
Presione el botón (21) en la unidad o en el control remoto
(35) para eyectar al disco. La unidad automáticamente
vuelve al modo Radio. Usted puede eyectar un disco con la
unidad apagada. La unidad permanecerá apagada luego de
que el disco se eyecte.
Reinicie el Mecanismo de Carga
Si el disco se carga anormalmente o si ocurre una operación
del mecanismo central anormal, mantenga presionado el
botón (21) en la unidad o en el control remoto (35) para
reiniciar el mecanismo de carga. La operación normal
reasume.
A-B
SUBTITLE
MENU
1/2
Deteniendo la Ejecución
Presione el botón ( ) en la pantalla o el botón /BAND (20)
en el control remoto para detener la reproducción del DVD.
Deteniendo la Reproducción
Toque el botón de pausa (||) en pantalla (o presione el botón
>/|| en el control remoto) para suspender la reproducción del
disco. Presione el botón > en pantalla para reasumir la
reproducción del disco.
Reproducción en Avance Rápido
Presione el botón /\ en el joystick o el botón >> en pantalla
para adelantar rápidamente. Mantenga presionando y
soltando el botón para incrementar la velocidad "2X" a "4X",
"6X" y "8X".
Presione el botón de ingresar en el joystick (18) en el control
remoto o toque el botón de reproducción (>) para reiniciar la
reproducción normal.
Reproducción en Retroceso Rápido
Presione el botón del joystick \/ o toque el botón << en
pantalla para reproducir el título actual en retroceso rápido.
Mantenga presionando y soltando el botón para incrementar
la velocidad "2X" a "4X", "6X" y "8X".
TITLE
2/2
DISP
NOTA: Para una reproducción VCD, la función repetir no
está disponible si PBC está encendido.
Función de Repetición Seccional (A-B)
Utilice la función A-B para definir un área específica de un
disco para repetir.
• Presione el botón RPT A-B (6) en el control remoto (o el
botón A-B en pantalla) para configurar el punto de
partida (A) de la sección repetida.
• Presione el botón RPT A-B nuevamente una vez que
alcanzó el punto de finalización deseado (B) de la
sección repetida. La porción seleccionada del DVD se
repetirá ahora continuamente.
• Presione el botón RPT A-B nuevamente para cancelar
la configuración de la sección A-B y detener la
ejecución en repetición.
Reproducción Aleatoria
Con la reproducción de un DVD, VCD o CD, presione el
botón RDM (21) en el panel de control o (33) en el control
remoto para activar la reproducción aleatoria y reproducir
todos los capítulos/pistas en orden aleatorio. "On" aparece
en pantalla.
Presione el botón > en el joystick para reproducir la próxima
pista aleatoria.
Presione el botón RDM nuevamente para apagar la
reproducción aleatoria.
NOTA: Cuando un VCD se está reproduciendo con PBC
encendido en "On", el activar la reproducción aleatoria
automáticamente apaga el PBC.
62
Page 67

VM9022
Imagen en Imagen (PIP, Picture in
Picture)
Presione el botón PIP (30) en el control remoto para ver una
imagen Picture in Picture de las pantallas de fuente
Delantera, Zona Posterior o NAV. Use las flechas izquierda/
derecha en la parte inferior de la imagen para cambiar la
fuente PIP.
Accediendo al Menú DVD
Presione el botón MENU (1) en el control remoto para
mostrar el menú de DVD principal. Use el joystick para
seleccionar un título de un menú o toque el título en pantalla.
Presione el botón TITLE (2) en el control remoto o en
pantalla para seleccionar un título diferente para reproducir.
Presione el botón ENTER (en el joystick) para confirmar su
selección e iniciar la reproducción. Usted también puede
seleccionar un título usando la pantalla táctil.
Moviéndose a Través de Capítulos
Presione el botón > en el joystick o el botón >>| en pantalla
para avanzar al próximo capítulo del DVD.
Presione el botón < en el joystick o el botón |<< en pantalla
para ir al capítulo anterior.
Capítulo Directo / Selección de Pista
Entrada Directa del Control Remoto
Durante la reproducción del DVD, VCD y CD, usted puede
utilizar el teclado numérico en el control remoto (29) para
acceder a una pista directamente.
Entrada Directa de la Pantalla Táctil
Para seleccionar un título, capítulo/pista o un tiempo de
reproducción específico, toque el botón en la pantalla
de control para mostrar el menú de entrada directa.
Chapter: _ _
1
2
3
Exit
6
5
4
9
8
7
Clear
0
Use el botón para seleccionar la entrada de Título,
Capítulo u Hora.
• Título: _/#
• Capítulo: _ _/##
• Hora: _ _:_ _:_ _
Ingrese el título deseado, capítulo/pista u hora usando el
teclado en pantalla y luego presione el botón Enter. Para salir
de pantalla sin hacer una selección, toque Exit. Para limpiar
lo ingresado e iniciar todo de nuevo, toque Clear.
Viendo un Ángulo de Imagen Alterno
(DVD Solamente)
Algunos DVDs contienen escenas que han sido grabadas
simultáneamente desde diferentes ángulos. Para discos
grabados en múltiples ángulos, presione el botón ANGLE
(13) en el control remoto para alternar entre los ángulos
disponibles en la imagen en pantalla.
Acercándose
Presione los botones PRESET /\ y \/ (11, 12) en el control
remoto para agrandar y panear la imagen del video utilizando
las siguientes opciones: "ZOOM 1.5", "ZOOM 2", "ZOOM 3",
y "OFF".
Discos con Lenguaje Múltiple (DVD
Solamente)
Cambiando el Lenguaje del Audio
Si usted está mirando un disco grabado en múltiples
lenguas, presione el botón AUDIO (5) en el control remoto
para elegir un lenguaje.
Cambiando el Lenguaje del Subtítulo
Si usted está viendo un disco grabado en múltiples lenguajes
con subtítulos, presione el botón SUBTITLE (9) en el control
remoto para elegir el lenguaje en el cual le gustaría que
aparezcan los subtítulos.
NOTA: Durante la reproducción de un VCD, presione el
botón AUDIO (5) en el control remoto para elegir entre
Canal Izquierdo, Canal Derecho y Estéreo.
PBC (Control de Reproducción - VCD
Solamente)
Para VCDs con funcionalidad de reproducción, PBC (control
de reproducción) provee controles adicionales para la
reproducción de un VCD.
Presione le botón MENÚ (1) en el control remoto para
alternar la función PBC entre encendido o apagado ("On"/
"Off"). Una vez que el PBC esté encendido, la reproducción
comienza de la pista 1 de la lista de reproducción.
NOTA: Cuando el PBC se activa, el avance rápido,
reproducción lenta y pista previa/siguiente están
disponibles. Repetir y selección de pista directa no están
disponibles.
Cuando el PBC se activa, el seleccionar aleatorio, escaneo o
búsqueda automáticamente desactiva PBC.
Información de Reproducción
Durante la reproducción de DVD y VCD, presione el botón
DISP (2) en el panel de control o (10) en el control remoto
para mostrar información de reproducción en pantalla,
incluyendo el medio en reproducción y el tiempo de
reproducción actual.
Información de Reproducción de DVD
La siguiente información se muestra en la parte superior de
la pantalla durante la reproducción de un DVD:
• Título: 05/08 - "05/08" indica el quinto de 8 títulos en el
DVD que está reproduciéndose actualmente.
• Capítulo: 012/016 - "002/016" indica que el segundo de
16 títulos en el DVD se está reproduciendo
actualmente.
• 00:41:28 - "00:41:28" indica el tiempo de reproducción
del título actual.
La siguiente información se muestra en la parte inferior de la
pantalla:
• Delantero Fuente
• Trasero: Fuente
63
Page 68

VM9022
•RELOJ
Información de Reproducción de VCD
La siguiente información se muestra en la parte superior de
la pantalla durante la reproducción de un VCD:
• VCD 2.0 - Formato del disco actual.
• Título: 6/18 - "06/18" indica el sexto de 18 títulos en el
VCD que se está reproduciendo actualmente.
• 00:02:18 - "00:02:18" indica el tiempo de reproducción
del título actual.
Información General sobre Discos
Table 4: Propiedades del Disco
SímboloPropiedades de Disco de
12 cm
Lado simple capa simple (DVD-5)
Lado simple capa doble (DVD-9)
Lado doble capa simple (DVD-10)
Lado doble capa doble (DVD-18)
Lado simple capa simple (VCD)
Lado simple capa simple 74 minutos
Tiempo de
Repord.
Máx.
(Método MPEG
2)
133 minutos
242 minutos
266 minutos
484 minutos
(Método MPEG
1)
74 minutos
Table 5: Disc Symbols
Símbolo Significado
Indica el código de área donde el disco se puede
pasar.
• Región 1: Estados Unidos, Canadá, Islas del
Océano Pacífico Este
• Región 2: Japón, Europa de Oeste, Norte de
Europa, Egipto, Sudáfrica y Oriente Medio.
• Región 3: Taiwán, Hong King, Corea del Sur,
Tailandia, Indonesia y Sudeste Asiático.
• Región 4: Australia, Nueva Zelanda, América
Central y América del Sur, Islas Oceánicas del
Pacífico Sur/Oceanía.
• Región 5: Rusia, Mongolia, India, Asia
Central, Europa del Este, Corea del Norte,
África del Norte, Noroeste de Asia.
• Región 6: China Continental
• ALL: Todas las Regiones
Table 5: Disc Symbols
Símbolo Significado
Número de lenguajes de voz grabados. El
número dentro del ícono indica el número de lenguajes en el disco (máximo de 8) .
Número de lenguajes en subtítulos disponibles en
el disco (máximo de 32).
Número de ángulos provistos (máximo de 9).
Proporción de imagen disponible. "LB" significa
Letter Box (Buzón) y "PS" significa Pan/Scan
(paneo/escaneo). En el ejemplo en la izquierda, el
video 16:9 se puede convertir a video Letter Box.
64
Page 69

DISC
VM9022
OPERACIÓN DE AUDIO DE DVD/CD
Las instrucciones para control del TFT y de Insertar/Eyectar
son las mismas para la operación de DVD y CD. Por favor,
vea la sección Operación de Video DVD/Disco para obtener
información sobre estos temas.
El VM9022 pasará música u otros archivos de audio de los
siguientes soportes:
• CD-DA
• CD-R/RW
•DVD
•DVD+R/RW
•DVD-R/RW
Luego de insertar el disco con la pantalla TFT abierta, el
título del disco y la pista (si está disponible), junto con el
número de pista y el tiempo de reproducción aparecen en
pantalla.
Interfaz de Usuario del CD
Los indicadores en pantalla y las áreas de teclado táctil para
la reproducción de un CD se detallan abajo.
17
16
E
1 Track 01
Q
2 Track 02
R
E
3 Track 03
A
R
4 Track 04
P
5 Track 05
I
P
6 Track 06
4
3
TRACK 01
CD 1/10 01:23 04:31
5
DIR -
23
2
1
15
25
01:02
1/2
18
9
ALL
7
11
2/2
DIR +
24
12
13
21
19
20
22
1. Pista actual y número total de pistas en el disco
2. Tiempo de reproducción pasado/duración de la pista
3. Título de la pista actual
4. Títulos de pista disponibles
5. Información ID3
6. ||: Toque para detener/reproducir un disco
7. : Toque para detener la reproducción del disco
8. >>|: Toque para ir a la pista siguiente
9. |<<: Toque para ir a la pista anterior
10. />>: T oque para navegar la lista de reproducción/toque
para avance rápido
11. /<<: T oque para navegar la lista de reproducción/toque
para retroceso o reversa rápida
12. Touch to activate/deactivate Repeat play mode
13. 1/2 o 2/2: Toque el botón de esta página para ver una
segunda página con botones en pantalla
14. Toque para acceder la pantalla de entrada directa
15. Toque para ver el menú de configuración
16. Toque para ver el Analizador de Espectro > Ecualizador
17. Toque para ver el menú de fuente (SOURCE MENU) y
seleccionar una nueva fuete de reproducción
18. T oque la barra de desplazamiento y las flechas para ver
la página de canciones anterior o siguiente
19. Toque para acceder al menú de Música
20. Toque para acceder al menú de Video
21. Toque para acceder al menú de Foto
22. Explore todos los archivos
14
23. DIR -: Toque para ver la carpeta anterior
24. DIR +: Toque para ver la carpeta siguiente
10
25. Tiempo actual
8
Controlando la Reproducción
6
Deteniendo la Ejecución
Toque el botón en pantalla o presione el botón (20) en el
control remoto para detener la reproducción del disco.
Para reasumir la reproducción, toque el botón en pantalla o
presione el botón del joystick.
Deteniendo la Reproducción
Toque el botón en pantalla o presione el botón del joystick
para suspender o reasumir la reproducción del disco.
Explorando las Pistas
Presione el botón >>| (19) en el control remoto o en la
pantalla, o use el botón > en el joystick para avanzar la
próxima pista en el disco.
Presione el botón |<< (17) en el control remoto o en la
pantalla, o use el botón < en el joystick para ir la pista previa
en el disco.
Reproducción en Repetición
Toque el botón en pantalla, presione el botón RPT en el
control remoto (7) o en el panel de control (19) para alternar
el modo de repetición de acuerdo a lo siguiente.
• DVD: Repetir Capítulo, Repetir Título, Apagar Repetir
• CD-DA: Repetir Uno, Repetir Todo, No Repetir
• CD-R/RW: Repetir Uno, Repetir Todo, No Repetir
• DVD-R/RW: Repetir Uno, Repetir Todo, No Repetir
Selección de Escaneo de Pista (CD-DA solamente)
Durante la ejecución de un disco, presione el botón SCN (34)
en el control remoto o (20) en el panel de control para
reproducir los primeros 10 segundos de cada pista. Cuando
se alcance la pista deseada, presione SCN nuevamente para
cancelar la función y reproducir la pista seleccionada.
Selección de Reproducción Aleatoria (RANDOM)
Cuando un disco se detiene, presione el botón RDM en el
control remoto (33) para reproducir todas las pistas de un
disco en orden aleatorio. Presione nuevamente el botón
RDM para cancelar el modo de Reproducción Aleatoria.
NOTA: El CD-R y CD-RW no funcionarán a menos que la
sesión de grabación se cierre.
Avance Rápido
Presione el botón en pantalla o presione el botón /\ el
joystick para avance rápido. Mantenga presionando y
soltando el botón para incrementar la velocidad "2X" a "4X",
"6X" y "8X".
Retroceso Rápido
Presione el botón en pantalla o presione el botón /\ el
joystick para retroceso rápido. Mantenga presionando y
soltando el botón para incrementar la velocidad "2X" a "4X",
"6X" y "8X".
65
Page 70

Entrada Directa de Pista
Para seleccionar una pista directamente, toque el botón
en pantalla para mostrar el menú de entrada directa.
TRACK:__/##
1
2
3
Exit
6
5
4
9
8
7
Clear
0
Ingrese el número de pista deseado usando el teclado
numérico en pantalla, y luego presione el botón Enter. Para
salir de pantalla sin hacer una selección, toque Exit. Para
limpiar lo ingresado e iniciar todo de nuevo, toque Clear.
VM9022
66
Page 71

VM9022
OPERACIÓN MP3/WMA
Las instrucciones para control del TFT y de Insertar/Eyectar
son las mismas para la operación de DVD y MP3. Por favor,
vea la sección Operación de Video DVD/Disco para obtener
información sobre estos temas.
NOTA: Cuando queme archivos MP3/WMA en un
disco DVD, use la opción de 2X o 4X, si está
disponible. La velocidad de grabación más lenta
le ayudará a eliminar errores de búfer e
incrementará la calidad de lectura del disco.
También use carpetas cuando grabe un gran
número de canciones/archivos en un disco, para
mejorar la navegación. Seleccione la opción
"Disc at Once" y cierre el disco.
Requerimientos de Formatos y
Archivos MP3/WMA
Este reproductor le permite pasar archivos MP3 y WMA
grabados en CD-R/RWs, DVD+R/RWs, y DVD-R/RWs. Para
discos CD-RW, por favor asegúrese que esté formateado
utilizando un método completo y no un método rápido para
prevenir una operación de disco ilegal.
Se pueden grabar hasta 1500 canciones/archivos en un
disco en un mix de música de un MEGA DVD. No exceda
ese núermo de canciones/archivos o el disco puede
presentar problemas de lectura.
Compatibilidad del Formato MP3
Los formatos de nombre de archivo listados abajo son
compatibles con esta unidad:
• ISO 9660 - nombre de archivo: Extensión de archivo de
12 caracteres: 3 caracteres
• ISO 9660 - nombre de archivo: Extensión de archivo de
31 caracteres: 3 caracteres
• Joliet - 64 caracteres
Si el nombre del archivo o de la carpeta no cumple los
estándar del sistema de archivo ISO 9660, pude que no
aparezca o se reproduzca correcamente. Utilice la siguiente
configuración cuando esté comprimiendo datos de audio
para su disco MP3:
• Rango de Transferencia de Bits: 128kbps
• Frecuencia de Muestreo: 48kHz
NOTA: Cuando esté gra bando un MP3 a la
capacidad máxima del disco, deshabilite
grabaciones adicionales. Para grabar en un
disco vacío hasta el máximo de la capacidad del
disco, utilice la configuración "Disc at once"
(Disco de una vez).
Orden de Reproducción de MP3
Cuando se seleccionen para reproducción, los archivos y
carpetas (Búsqueda de Carpetas, Búsqueda de Archivos o
Selección de Carpetas) se acceden en el orden en el cual
fueron grabados en el CD. En consecuencia, el orden en el
cual se espera que sean reproducidos puede no ser igual al
orden en el cual se reproduzcan. Usted puede seleccionar el
orden en el cual archivos MP3/WMA se reproduzcan
grabándolos en un medio como un CD-R con sus nombres
de archivos empezando con una secuencia numérica tal
como del "01" al "99".
Por ejemplo, un medio con la siguiente jerarquía de carpetas/
archivos está sujeto a Búsqueda de Carpetas, Búsqueda de
Archivos o Selección de Carpetas, como se muestra abajo.
El reproductor VM9022 reconocerá solametne tres niveles de
carpetas y no muestra carpetas conteniendo otras carpetas.
En el ejemplo de arriba, la unidad mostrará carpetas 3,4, 6 y
8, pero no 2 y 7 debido a que no contienen ninguna pista
directamente. La carpeta 5 no se reconoce para nada
debido a que está en el cuarto nivel.
Cargando una Tarjeta SD
Para insertar una tarjeta SD, primero presione el botón
OPEN (1) en el panel de control o el botón OPEN/CLOSE en
el control remoto para dejar accesible la ranura de la tarjeta
SD (21). Inserte una tarjeta SD en la ranura para tarjetas y la
unidad leerá automáticamente los archivos de audio de la
tarjeta.
EJECT
CARD
READER
Para quitar la tarjeta, primero presione el botón SRC (6) para
cambiar a otro modo y detener la reproducción de la tarjeta
SD. Agarre la tarjeta SD y jálela hacia afuera. La mayoría de
las tarjetas tienen un pequeño hueco que ayuda a su
remoción.
Cargando un Dispositivo USB
1. Ubique la toma USB en el MediaLink4.
MediaLink
3.5mm - Audio
VIDEO LEFT RIGHT
Conectador USB Tipo A
2. Inserte un dispositivo USB en la toma USB. La unidad
leerá los archivos de sonido en el dispositivo USB
automáticamente.
Para quitar el dispositivo USB, presione el botón SRC (6)
para cambiar a otro modo y luego quitar el dispositivo USB
de la toma.
67
Page 72

VM9022
DISC
Interfaz de Usuario de MP3
Los indicadores en pantalla y las áreas de teclado táctil para
la reproducción de un MP3 se detallan abajo.
20
17
16
18
(Root)
MP3 4/84 00:00:23
E
1 Cherry Poppin Da
Q
2 Chris Isaak - Baby
R
E
3 Crazy Town - Butt
A
R
4 Phish - Birds Of A
P
I
5 Phish - Bouncin' R
P
6 Phish - Freebird (L
4
5
DIR -
ALL
2
9
2/2
DIR +
1
14
3
01:02 AM
15
10
8
6
1/2
19 20
7
11
24
22
23
16. Toque para ver el Analizador de Espectro > Ecualizador
17. Toque para ver el menú de fuente (SOURCE MENU) y
seleccionar una nueva fuete de reproducción
18. Nombre de la carpeta
19. 1/2 o 2/2: Toque el botón de esta página para ver una
segunda página con botones en pantalla
20. T oque la barra de desplazamiento y las flechas para ver
la página de canciones anterior o siguiente
21. Toque para activar/desactivar el modo de reproducción
en Repetición
22. Toque para acceder al menú de Música
23. Toque para acceder al menú de Video
24. Toque para acceder al menú de Foto
25. Explore todos los archivos
Controlando la Reproducción de
Discos MP3/WMA
Reproduciendo Archivos MP3/WMA
Luego de insertar un disco MP3/WMA, los archivos pasarán
en la secuencia del directorio raíz.
NOTA: Cuando queme archivos MP3/WMA en un
disco DVD, use la opción de 2X o 4X, si está
disponible. La velocidad de grabación más lenta
le ayudará a eliminar errores de búfer e
incrementará la calidad de lectura del disco.
También use carpetas cuando grabe un gran
número de canciones/archivos en un disco, para
mejorar la navegación. Seleccione la opción
"Disc at Once" y cierre el disco.
Presione el botón |<< (17) en el control remoto o en la
pantalla, o use el botón < en el joystick (10) para ir la pista
previa en el disco.
Reproducción en Repetición
Toque el botón en pantalla, o presione el botón RPT (19)
en el panel de control o el botón RPT (7) en el control
remoto, para alternar el modo de repetición entre los
siguientes: Repetir Solo, Repetir Carpeta, No Repetir.
Selección de Reproducción Aleatoria (RANDOM)
Presione el botón RDM (33) en el control remoto para
reproducir los archivos del disco en orden aleatorio. Presione
nuevamente RDM para cancelar el modo de Reproducción
Aleatoria.
NOTA: El CD-R y CD-RW no funcionarán a menos que la
sesión de grabación se cierre.
12
13
25
1. Pista actual y número total de pistas en la raíz del disco
2. Tiempo de reproducción pasado/duración de la pista
3. Tiempo actual
4. Títulos de las pistas
5. Información ID3
6. || : Toque para reproducir/detener un disco
7. : Toque para detener la reproducción del disco
8. >>|: Toque para ir a la pista siguiente
9. |<<: Toque para ir a la pista anterior
10. />>: T oque para navegar la lista de reproducción/toque
para avance rápido
11. /<<: T oque para navegar la list a de reproducción/toque
para retroceso o reversa rápida
12. DIR -: Toque para ver la carpeta anterior
13. DIR +: Toque para ver la carpeta siguiente
14. Toque para acceder la pantalla de entrada directa
15. Toque para ver el menú de configuración
Deteniendo la Ejecución
Toque el botón en pantalla o presione el botón /BAND
(20) en el control remoto para detener la reproducción del
disco.
Para reasumir la reproducción, toque el botón en pantalla,
o presione el botón del joystick (13) en el panel delantero, o
presione el botón >/|| (18) en el control remoto.
Deteniendo la Reproducción
Toque el botón en pantalla, o presione el botón del joystick
(13) en el panel delantero, o presione el botón >/|| (18) en el
control remoto para suspender o reasumir la reproducción
del disco.
Explorando las Pistas
Presione el botón >>| (19) en el control remoto o en la
pantalla, o use el botón > en el joystick (14) para avanzar la
próxima pista en el disco.
68
Page 73

iPod
VM9022
OPERACIÓN DEL iPod
Interfaz de Usuario de iPod
Los indicadores en pantalla y las áreas de teclado táctil para
la reproducción de un iPod se detallan abajo.
17
16
15
1
A Rush of Blood to the Head
1:08 2/124
E
0001 A Rush Of Blood to
Q
0002 40
R
E
0003 4th of July
A
R
0004 A Little Less Conver
P
I
0005 A Message
P
0006 A Sort of Homecomi
Artist: Coldplay
4
5
1. Tiempo de reproducción en curso
2. Pista actual y número total de archivos
3. T iem p o actu al
4. Títulos de media/información de m en ú
5. Información ID3
6. Enter (Ingre sar)
7. Toque para acceder a foto
8. >>|: Toque para ir a la pista siguiente
9. |<<: Toque para ir a la pista anterior
10. Toque para acceder al m enú de iPod
11. >|| : Toque para reproducir/detener un disco
12. Toque para acceder a archivos de música
13. Toque para acceder a archivos de video
14. Toque para acceder a pantalla de configuración (SETUP)
15. Toque para ver el Analizador de Espectro > Ecualizador
16. Toque para ver el menú de fuente (SOURCE MENU) y
seleccionar una nueva fuete de reproducción
17. Título de la canción
18. Toque para ver el menú de entrada directa
19. Toque la barra de desplazamiento y las flechas para ver la
página de canciones anterior o siguiente
Controlando Su iPod
La unidad automáticamente cambiará a modo de iPo d cua ndo un
iPod se enchufa en el MediaLink*. Para volver al menú de iPod
desde cualquier otra fuente, presione el botón
2
18
3
14
01:02 AM
MENU
Enter
12
19
9
11
13
7
SRC
(6) en el panel
10
8
6
de control o (8) en el control remoto hasta que el menú iPod
aparezca en pantalla.
NOTA: Asegúrese que su iPod tenga el último firmware de
Apple instalado para evitarproblemas de conectividad.
Los siguientes iconos de la pantalla táctil y los botones del
control remoto se usan para acceder a menús de iPod:
Menú Pantalla Táctil Control Remoto
Música AUDIO
Fotos SUB-TITLE
Videos ANGLE
Use la pantalla táctil, el joystick o las teclas direccionales en
el control remoto para navegar los menús de iPod.
Reproducción de Música en un iPod
Para acceder a los archivos de música de su iPod, toque el
botón en pantalla o presione el botón AUDIO (5) en el
control remoto.
• Toque el botón
• Toque
remoto o presione el botón
> ||
>>|
en pantalla para reproducir/pausar.
en pantalla, presione el botón
>
(17) en el joystick para mover al
>>|
(19) en el control
próximo ítem en el menú.
|<<
• Toque
en pantalla, presione el botón
remoto o presione el botón
<
(16) en el joystick para mover al
|<<
(17) en el control
ítem previo en el menú.
>/||
• Use la pantalla táctil o presione el botón
ENTER
remoto o el botón
en el joystick, o (20) en el panel de
(18) en el control
control para seleccionar la opción de menú iluminada.
>>
• Presione el botón
en el joystick, o toque el botón
(14) en el control remoto, el botón /\ (18)
MENU
en pantalla para volver a
los menúes previos.
Avance Rápido/Retroceso Rápido
Mantenga presionado los botones
|<<
o
>>|
en pantalla o en el
control remoto (17, 19) por 1 segundo y continúe presionan do p a ra
avance o retroceso rápido. Libere para reasumir la reproducción
normal.
Reproducción de Fotosk
Las fotos de iPod se pueden ver en la pantalla del VM9022, pero
debe usar el control del iPod para manejar las opcione s de
reproducción de fotos.
Toque el icono en pantalla o presione el botón SUB-
TITLE
(9)
en el control remoto para acceder al modo FO TO de iPod. El
VM9022 liberará el control de nuevo al iPod así puede seleccionar
el medio de video a mostrar en el monitor TFT. Para salir del modo
FOTO, toque la pantalla.
Reproducción de Video
Los videos de iPod se pueden ver en la pantalla del VM90 22 , pero
debe usar el control del iPod para manejar las opciones de
reproducción de videos.
Toque el icono
en pantalla o presione el botón
ANGLE
(13) en
el control remoto para acceder al modo VIDEO de iPo d. El VM902 2
liberará el control de nuevo al iPod así puede seleccionar el medio
de video a mostrar en el monitor TFT. Para salir del modo VIDEO,
>>
toque la pantalla, presione el botón
MENU
presione el botón
en el iPod.
(14) en el control remoto, o
NOTA: Para transmitir el video des de su iPod a la pant a l la del
VM9022, debe configurar las siguientes opcione s a tr avé s d el
menú de configuración de video del iPod: TV Out = On, TV
Signal = NTSC, y Widescreen = On.
NOTA: Luego de desconectar su iPod, el VM9022
siempre volverá al último modo en el que estaba cuando
el iPod es conectado de vuelta en la unidad.
Entrada Directa de Pista/Archivo
Para seleccionar una pista/archivo directamente, toque el botón
en el control de pantalla para mostrar el menú de entrada
directa.
TRACK:__/##
1
2
3
Exit
6
5
4
9
8
7
Clear
0
Ingrese la pista/archivo deseados usando el teclado en
pantalla. Presione el botón Enter para sintonizar la estación
seleccionada. Para salir de pantalla sin cambiar de estación,
toque Exit. Para limpiar lo ingresado e iniciar todo de nuevo,
toque Clear.
También puede utilizar el teclado numérico (29) del control
remoto para acceder a los archivos directamente.
69
Page 74

BT
OPERACIÓN DE BLUETOOTH
Acerca de Bluetooth
El Bluetooth es una tecnología inalámbrica de conectividad
de radio de rango corto que es desarrollada como reemplazo
de cables para teléfonos móviles, computadores de mano y
otros dispositivos. Bluetooth opera en un rango de
frecuencia de 2.4 GHz y transmite voz y datos a más de 1
megabit por segundo. Bluetooth fue lanzado por un grupo
SIG (Grupo de Interés Especial, por sus siglas en inglés)
conformado por Ericsson Inc., Intel Corp., Nokia Corp.,
Toshiba e IBM en 1998, y es desarrollado actualmente por
aproximadamente 2.000 compañías alrededor del mundo.
La marca Bluetooth® y logos son propiedad de Bluetooth
SIG, Inc. y cualquier uso de esas marcas por Audiovox
Corporation se realiza bajo licencia. Otras marcas y
nombres de marcas son de sus respectivos dueños.
NOTA: La distancia en la línea de visión entre esta
unidad y su teléfono celular debe ser de menos de 8
metros para enviar o recibir voz y datos vía la tecnología
inalámbrica Bluetooth. Sin embargo, la distancia de
transmisión puede ser menor que la distancia estimada,
dependiendo del ambiente en el que se use.
Antes de intentar utilizar las funciones Bluetooth en el
VM9022, por favor asegúrese de que su teléfono móvil
soporte funciones Bluetooth (Audífonos o Manos Libres, o
ambos). Siga los siguientes lineamientos para una
operación exitosa
• Antes de utilizar las funciones Bluetooth, usted debe
conectar su teléfono móvil a la unidad VM9022. Para
asegurar la mejor recepción para el emparejamiento y
reconexión, por favor asegúrese que la batería de su
teléfono esté completamente cargada antes de que
empiece.
• Intente realizar el emparejamiento en los primeros
minutos de prendido su teléfono.
• Una vez que la unidad ha sido emparejada con el
teléfono, el número de modelo de la unidad, "VM9022",
aparecerá en el teléfono móvil.
• Para lograr el mejor desempeño, siempre mantenga el
teléfono móvil dentro de los 3 metros de distancia a la
unidad central.
• Siempre mantenga limpio el camino entre el teléfono
móvil y la unidad Central. Nunca ubique un objeto
metálico u otro obstáculo entre el teléfono móvil y la
unidad central.
• Algunos teléfonos móviles (como Sony Ericsson)
pueden tener una opción de ahorro de energía. POR
FAVOR NO utilice la opción de ahorro de energía con el
VM9022.
• Antes de aceptar o realizar una llamada, asegúrese de
que la función Bluetooth de su teléfono móvil esté
encendida.
• Para asegurar la mejor calidad y desempeño en la
conversación, permanezca dentro de un metro de
distancia de la unidad central cuando hable.
• Para "desconectar" el teléfono móvil de la unidad
central, apague la conectividad Bluetooth en el teléfono
móvil.
• Búsqueda directa en la Agenda (Phone Book) a
través de la unidad central está solamente
disponible si el teléfono móvil soporta descargas de
agenda (Phone Book Download). Si esta función no
está disponible, la unidad central mostrará "Phone book
not provided by this phone" (Agenda no provista por
este teléfono) cuando se intente descargar una
agenda.
Interfaz de Usuario de Bluetooth
Los indicadores en pantalla y las áreas de teclado táctil para
la operación de Bluetooth se detallan abajo.
15
14
E
Q
R
E
A
R
P
P
17
1 Missed Calls
2 Received Calls
3 Dialed Calls
4 Phone Book
I
Menu List
3
1
Disconnected
4
24
2
01:02 AM
MENU
19
VM9022
18
MENU
9
10
1156
12
PHONE INTERFACE MUSIC INTERFACE
1. Estatus de conexión/dispositivo actual conectado
2. Vida de la batería del dispositivo Bluetooth
3. Tiempo actual
4. Menú Bluetooth
5. Estatus de operación actual
6. Alternar Música/Menú del Teléfono
7. Transferir llamada activa al dispositivo de mano
8. Emparejar su teléfono Bluetooth (uso por primera vez)
9. Conectar/desconectar dispositivo Bluetooth (teléfono,
PDA, reproductor de música personal, etc.) con función
manos libres
10. Salir de pantalla con lista de llamadas
11. Enmudecer/cancelar enmudecer micrófono (ubicado en
el lado izquierdo del radio) durante una llamada activa
12. Contestar llamada entrante/hacer llamada
13. Rechazar llamadas entrantes/finalizar llamada/cancelar
proceso de emparejamiento/cancelar lectura de agenda
o lista de llamadas
14. Toque para ver el menú de configuración
15. Toque para ver el Analizador de Espectro > Ecualizador
16. Toque para ver el menú de fuente (SOURCE MENU) y
seleccionar una nueva fuete de reproducción
17. Indica conexión/operación actual (--> indica llamada
entrante, <-- indica alerta de discado)
18. Toque para acceder la pantalla de entrada directa
19. : Toque para detener la reproducción
20. T oque la barra de desplazamiento y las flechas para ver
la página de canciones anterior o siguiente
21. Alternar Música/Menú del Teléfono/modo
22. Reproducir/Pausar archivo seleccionado
23. |<<: Toque para ir al archivo anterior
24. >>|: Toque para ir al archivo siguiente
25. Indicador de intensidad de señal
13
9
7
22
MENU
18
8
20
23
21
8
70
Page 75

VM9022
Perfil Manos Libre (HFP)
Para usar un teléfono de forma inalámbrica con esta unidad,
es necesario establecer primero una conexión utilizando la
tecnología inalámbrica Bluetooth. La conexión se establece
normalmente usando un perfil de manos libres o HFP (por
sus siglas en inglés), el cual le da control total de funciones
disponibles en la fuente telefónica. Sin embargo,
dependiendo del teléfono, la conexión puede ser realizada
usando HSP y aún así no disponer de todas las funciones.
Esta es una limitación de su teléfono, no del VM9022.
Dado que hay una gran cantidad de implementaciones de
teléfono móvil Bluetooth en el mercado, las operaciones con
su teléfono móvil Bluetooth usando esta unidad pueden
variar mucho.
Por favor, lea el manual de instrucciones que vinieron con su
teléfono móvil Bluetooth y este manual a la vez mientras
opera su teléfono con esta unidad.
Emparejando el Sistema Bluetooth
con su Teléfono Móvil y la Unidad
Central
1. Presione el botón (8) para iniciar el proceso de
emparejamiento. Mantenga el teléfono móvil dentro de
los 2 metros de distancia de la unidad central cuando
esté emparejando. (Para terminar el proceso de
emparejamiento, presione el botón nuevamente).
2. Seleccione la opción de configuración Bluetooth en el
teléfono móvil a ser emparejado (por favor, refiérase al
manual de instrucciones del teléfono para saber cómo
ingresar a la configuración Bluetooth, para encender o
apagar Bluetooth y para realizar emparejamientos).
NOTA: Algunos teléfonos requieren una "llave de paso"
o un código de emparejamiento para conectarse. Si su
teléfono requiere una llave de paso o un código de
emparejamiento, necesitará ingresar este número en el
campo de Código de Emparejamiento bajo el menú de
configuración de Bluetooth. El código de
emparejamiento por defecto es "0000" para muchos
teléfonos. Vea “Funciones del Submenú Bluetooth” en la
página 56 para obtener instrucciones sobre ingreso del
código de emparejamiento.
3. Seleccione "VM9022" de la lista de emparejamiento en
el teléfono móvil.
• Si el emparejamiento es exitoso, el TFT mostrará en
pantalla el número o nombre del modelo de teléfono
móvil emparejado (como se especifica en el menú de
Configuración de Bluetooth de su teléfono).
• Si el emparejamiento falla, "Phone Pairing Fail"
(Falla al Emparejar el T eléfono) aparecerá en la parte
inferior de la pantalla.
Reconectando
Una vez que el dispositivo Bluetooth ha sido emparejando,
puede tocar el botón de conexión para reconectarlo.
NOTA: Usted puede conectar solamente un teléfono
usando los botones en la interfaz de Teléfono en
pantalla.
Cada vez que se presiona el botón , la unidad centrar se
reconectará automáticamente con el teléfono móvil de una
vez (solamente si el teléfono móvil fue emparejado
previamente con la unidad central).
Recibiendo Llamadas Entrantes
Cuando esté conectado a un teléfono Bluetooth, la unidad
enmudecerá la salida de audio, pausará la reproducción de
CD y cambiará a la pantalla de Bluetooth cuando se reciba
una llamada. Un número de teléfono entrante aparecerá en
la parte superior de la pantalla. Si la pantalla está cerrada, el
número pasará por la el LCD. Si la llamada entrante no se
puede identificar, el TFT o LCD mostrará " Restricted
Number" (Número Restringido).
Contestar una Llamada Entrante
Para contestar la llamada, toque el botón .
Para una mejor recepción, hable fuerte y claro. El micrófono
está ubicado en la parte izquierda de la unidad.
Para finalizar la conversación, presione el botón . La
pantalla mostrará la duración de la llamada por 3 segundos,
y luego volverá al modo previo.
Rechazando una Llamada Entrante
Toque el botón para rechazar una llamada entrante. La
llamada volverá a su teléfono y puede contestarse o ir al
correo de voz.
Control de Volumen
Para incrementar o bajar el volumen, gire el codificador
giratorio (5) en el panel delantero o presione los botones
VOL+/VOL- (15,16) en el control remoto.
Enmudecimiento del Micrófono
Para enmudecer el micrófono, toque el botón . Tóquelo
nuevamente para reasumir la funcionalidad del micrófono.
Haciendo una Llamada
NOTA: Presione el botón desde la pantalla principal
de Bluetooth para discar automáticamente la última
llamada recibida.
1. Toque el botón para abrir la pantalla de discado
directo.
1
4
7
23
5 6
8
0
9
#
Exit
Clear
*
2. Utilice los botones 0-9, * y # para ingresar el número de
teléfono.
• Toque el botón CLEAR para borrar el último dígito.
• Toque el botón para borrar todo el número y
volver a empezar.
3. Luego de ingresar el número telefónico, presione el
botón para discar. La pantalla de discado directo se
cerrará una vez que su llamada se conecte.
Para finalizar la conversación, presione el botón .
Transferencia de Llamada
Mientras habla, para transferir audio desde la unidad central
hacia el teléfono móvil, toque el botón (7). La pantalla TFT
mostrará "Transfer" (Transferencia). Usted solamente puede
transferir una llamada luego de que haya sido contestada.
Lista de Menú
La lista de menú aparece en la parte izquierda de la pantalla
y se puede acceder a ella desde otros modos tocando el
botón MENU en la parte derecha de la pantalla.
NOTA: No todos los teléfonos permiten el acceso a
llamadas perdidas, recibidas o discadas, y algunos no
permitirán la carga de la agenda de su teléfono.
71
Page 76

VM9022
Llamadas Perdidas
La lista de Llamadas Perdidas trae la lista de números
perdidos de su teléfono. El último número perdido es el
primer número en la lista. Toque la opción de menú de
Llamadas Perdidas para ver la lista. Para realizar una
llamada de la lista de Llamadas Perdidas, toque el número y
luego toque el botón . El TFT mostrará "Cannot get
missed record" (No se puede obtener el registro perdido)
cuando la función no está disponible.
Llamadas Discadas
La lista de Llamadas Discadas trae la lista de números
discados de su teléfono. El último número discado es el
primer número en la lista. Toque la opción de menú de
Llamadas Discadas para ver la lista. Para realizar una
llamada de la lista de Llamadas Discadas, toque el número y
luego toque el botón . El TFT mostrará "Cannot get dialed
record" (No se puede obtener el registro discado) cuando la
función no está disponible.
Llamadas Recibidas
Use la lista de Llamadas Recibidas para ver los últimos 10
números recibitos almacenados en su teléfono. Para
acceder a la lista de Recibidos, toque la opción de menú de
Llamadas Recibidas. El último número recibido es el primer
número en la lista. Para realizar una llamada de la lista de
Llamadas Recibidas, toque el número y luego toque el botón
. El TFT mostrará "Cannot get received record" (No se
puede obtener el registro recibido) cuando la función no está
disponible.
Agenda
1. Toque la opción de menú de Agenda para mostrar la
agenda guardada en su teléfono móvil, si es compatible. La pantalla mostrará "Ready…" (Listo…) mientras
la agenda se baja.
2. Una vez completa la descarga, usted puede usar los
botones de flechas y la barra de desplazamiento del
lado derecho de la ventana para navegar la lista.
Debido a la que unidad baja una página de entradas a
la vez, puede haber una demora pequeña mientras la
próxima página de números se descarga.
3. Toque el número iluminado que desea para discar y
luego toque el botón .
NOTA: Algunos teléfonos móviles no soportan la carga
de la Agenda a través de Bluetooth. Esta es una
limitación de los teléfonos, no del VM9022.
Configuración de Bluetooth
Respuesta Automática
Usted puede elegir que el VM9022 conteste
automáticamente las llamadas entrantes a su teléfono
Bluetooth emparejado. Encienda la contestación automática
("Auto answer"):
1. Toque el botón para ver el menú de configuración
2. Seleccione el submenú "Bluetooth"
3. Toque el área a la derecha de "Auto anser" para
seleccionar "On" (Encendido).
Conexión Automática
La opción de Conexión automática permite al VM9022
conectar automáticamente a su Bluetooth emparejado
previamente cuando está dentro del rango. Cuando la
opción Conectar está configurada en "Manual", usted debe
presionar el botón para reestablecer una conexión con su
teléfono. Encienda la conexión automática ("Connect"):
1. Toque el botón para ver el menú de configuración
2. Seleccione el submenú "Bluetooth"
3. Toque el área a la derecha de "Connect" para
seleccionar "Auto" (Automático).
Perfil de Distribución de Audio
Avanzado (A2DP, por sus siglas en
inglés)
El VM9022 le permite pasar archivos de audio desde su
teléfono, PDA o reproductor de música personal usando una
conexión Bluetooth.
Antes de usar un reproductor de audio, puede ser necesario
ingresar un código PIN (número de identificación personal)
en la unidad. Ingrese el código PIN refiriéndose a “Funciones
del Submenú Bluetooth” en la página 56.
NOTA: Por favor, abandone el modo A2DP antes de
intentar hacer un llamado, pues puede tener resultados
no esperados dependiendo de su modelo de teléfono
móvil.
El VM9022 puede controla un reproductor de audio Bluetooth
por un Perfil de Distribución de Audio Avanzado (A2DP) o
por un Perfil de Control Remoto de Audio o Video (AVRCP).
Los reproductores de audio Bluetooth (o adaptadores
Bluetooth) compatibles con estos perfiles se pueden
conectar a esta unidad. La funcionalidad varía dependiendo
del perfil usado:
• A2DP: Reciba audio desde su reproductor compatible
con Bluetooth y escuche la música por su VM9022.
Reproducir/Detener, selección de canción, etc. no es
posible.
• AVRCP: Puede reproducir, detener, seleccionar
canción, etc. mientras recibe audio desde su
reproductor de audio Bluetooth en su VM9022.
NOTA: Información de canción (Ej. Tiempo de
reproducción, título de canción, índice, etc.) no se puede
mostrar en pantalla en esta unidad.
Dado que hay una gran cantidad de reproductores de audio
Bluetooth en el mercado, las operaciones con su reproductor
de audio Bluetooth usando esta unidad pueden variar
mucho.
Por favor, lea el manual de instrucciones que vino con su
reproductor de audio Bluetooth y este manual a la vez,
mientras opera su reproductor con el VM9022.
Lea las instrucciones sobre INTERFAZ DE MÚSICA en
“Interfaz de Usuario de Bluetooth” en la página 70 para
obtener información sobre indicadores en pantalla y
funciones de pantalla táctil que pueden estar disponibles
durante la reproducción de audio.
72
Page 77

VM9022
SOLUCIÓN DE PROBLEMAS
Table 6: Solución de Problemas
Problema Causa Acción Correctiva
GENERAL
La unidad no se enciende El Fusible del Radio se quemó Instale un nuevo fusible con la clasificación adecuada
El fusible de la batería del auto se quemó Instale un nuevo fusible con la clasificación adecuada
Operación Ilegal Presione el botón RESET localizado en la esquina derecha inferior del panel delantero
Control remoto no funciona Batería vacía Reemplace la betería por una nueva
Batería instalada incorrectamente Quite la batería e instálela correctamente
No hay sonido o es bajo Conexión de salida de audio inadecuada Verifique el cableado y corríjalo
Se puso el volumen muy bajo Incremente el nivel de volumen
Conexión "MUTE" inadecuada Revise el diagrama del cableado y verifique la conexión "MUTE"
Altavoces dañados Reemplace los altavoces
Balance de volumen fuertemente sesgado Ajuste el balance del canal a la posición central
El cable del altavoz está en contacto con una parte de
metal del automóvil
Calidad de sonido pobre o distorsión Disco pirata en uso Utilice copias originales
Potencia de parlante no compatible con la unidad Conecte altavoces adecuados
Altavoz está cortado Verifique el contacto del altavoz
Malfuncionamiento del Tel-Mute El cable de "MUTE" está conectado a tierra Verifique que la conexión "MUTE" no esté a tierra y que esté apropiadamente aislada
La unidad se reinicia sola cuando el motor está
apagado
MONITOR TFT
No hay imagen Conexión incorrecta al cable de freno de estaciona-
Imagen destellante o interferencia en pantalla El DVD no es compatible con la configuración del
Imagen prolongada o proporción de pantalla alto/
ancho inadecuadas
El monitor se detiene en una posición incorrecta La ruta de movimiento está bloqueada Presione el botón OPEN para reiniciar el movimiento del monitor
RADIO
Búsqueda de estaciones débil La antena del auto no está completamente extendida Conecte el cable de control de antena del auto adecuadamente
CD/DVD
No puede insertar un disco Hay un disco adentro de la unidad Eyecte el disco actual e inserte uno nuevo
Conexión incorrecta entre el ACC y el cable de batería
positivo
miento
PRK SW está activado y el freno de esta cionamiento no
enganchó
sistema de TV
Conexiones de señal de video inadecuadas Verifique el cableado y corríjalo
Configuración de proporción incorrecto Utilice una configuración de proporción correcta
La antena del auto no está adecuadamente conectada Conecte el cable de control de antena del auto adecuadamente
Función LOCAL está activada Apague la función LOCAL
Aísle todos los cables de conexión del altavoz
Verifique el cableado y corríjalo
Verifique el cableado y corríjalo
Detenga el vehículo en un lugar seguro y ponga el freno de estacionamiento
Cambie la configuración para acomodarse al disco
73
Page 78

Table 6: Solución de Problemas
Problema Causa Acción Correctiva
El disco no se reproduce El disco está doblado o rayado Utilice un disco en buenas condiciones
Disco sucio o mojado Limpie el disco con una tela suave
El láser está sucio Limpie la punta del láser con un disco de limpieza
Se utiliza un disco incompatible Utilice un disco compatible
La clasificación del disco excede el límite del Bloqueo
de Padres
El código de región del disco no es compatible con la
unidad
El disco está al revés Inserte el disco con el sello hacia arriba
Imagen borrosa, distorsionada u oscura El disco es una copia ilegal Utilice un disco original
El PBC no se puede utilizar durante la reproduc-
ción de VCD
No hay repetición o búsqueda mientras se repro-
duce un VCD
MP3
Ocurrió una interrupción durante la reproducción Disco sucio o rayado Limpie el disco o reemplace
Se muestra un mensaje de reproducción incorrecta El mensaje es más largo de lo que puede mostrar el
RADIO SATELITAL
No hay sonido Conexiones de cable incorrectas Verifique cables RCA
Fuente satelital no disponible Conexiones de cable incorrectas Verifique el cable de Datos Satelitales
IPOD
Fuente de iPod no disponible Conexiones de cable incorrectas Verifique cables jLink y MediaLink
No se puede ver soportes de video y foto en la
pantalla TFT
PCB no disponible en el disco
PCB está encendido Apague el PCB
El archivo está dañado o mal grabado Cree nuevamente el disco con archivos buenos
LCD
Configuración de Video de iPod Equivocada Cambie la configuración de video de iPod a TV Out = ON
Cambie la configuración del Bloqueo de Padres a una retricción inferior
Utilice un disco con código de región adecuado
VM9022
Mensajes de Error
Table 7: Mensajes de Error
Mensaje Mostrado Causa Acción Correctiva
Carga El disco está siendo leído
No Disc (no hay disco) El disco está sucio Limpie el disco con una tela suave
El disco está al revés Inserte el disco con el sello hacia arriba
El disco no está en el compartimento correspondiente Inserte un disco
Disco Malo El disco está sucio Limpie el disco con una tela suave
El disco está al revés Inserte el disco con el sello hacia arriba
Disco desconocido El formato del disco no es compatible con esta unidad
Region Error (Error de Región) El DVD no es compatible con el código de región de la
Error Operación del mecanismo ilegal Presion e EJEC T po r 5 segundos para reiniciar el mecanismo de carga
unidad
74
Page 79

VM9022
Cuidado y Mantenimiento
1. Utilice solamente un paño de silicona limpio y detergente neutro para limpiar el panel delantero o monitor.
Una tela dura y detergente que no sea neutro (tal como
alcohol) pueden rayar o causar decoloración.
2. No coloque agua o fluidos de limpieza en la unidad.
3. Si la temperatura dentro del reproductor llega a ser muy
caliente, un circuito de protección automáticamente
detendrá la ejecución del disco. En este caso, deje que
la unidad se enfríe antes de utilizar nuevamente el
reproductor.
4. Nunca inserte nada que no sea un disco de 12 cm (5")
dentro del reproductor, pues el mecanismo se puede
dañar debido a objetos extraños.
5. No intente utilizar CD simples de 8 cm. (3") en esta
unidad, con o sin adaptador, pues puede causar daños
en el equipo y/o en el disco. Tales daños no están
cubiertos por la garantía de este producto.
6. El reproductor de CD puede no operar apropiadamente
en calor o frío extremos. Si tales condiciones se dan,
espere hasta que el interior del vehículo alcance una
temperatura normal antes de utilizar el reproductor.
7. Cuando el vehículo se calienta durante clima frío o bajo
condiciones de humedad, puede aparecer
condensación en el panel LCD. Si esto ocurre, la
pantalla no operará apropiadamente hasta que la
humedad se haya evaporado.
8. Sugerimos que utilice un disco de limpieza en esta
unidad más frecuentemente que en la unidad en su
casa debido a las condiciones ambientales del vehículo.
75
Page 80

SPECIFICATIONS
Reproductor DVD/CD
Disco Multimedia Compatible: DVD + R / RW (Capa Simple y
Dual) y CD-R / RW
Formatos Multimedia Compatibles: CD-DA, MP3, WMA,
VCD, SVCD, AVI, MPEG1 / 2, XviD, DivX y Kodak picture CD
(JPEG).
Señal a Coeficiente de Ruido: >95dBA
Rango Dinámico: >95dB
Frecuencia de Respuesta 20Hz a 20 kHz, -3dB
Separación de Canal: > 60dB @ 1 kHz
Convertidor D/A: Performance alta de 24-bit /192 kHz
velocidad de muestra, Modulador Sigma-Delta Multi-Bit
Video
Formato: NTSC, PAL (auto-detección)
Salida: 1Vp-p (75-ohm)
Entrada: 1Vp-p (75-ohm)
Sintonizador FM
Sensitividad Mono(-30dB): 9dBf
Acallando Sensitividad (-50dB): 15dBf
Alternando Selectividad de Canal: 70dB
Señal a Coeficiente de Ruido @ 1kHz: 58dB
Rechazo de Imagen: 80dB
Separación de Canal @ 1 kHz: >30dB
Frecuencia de Respuesta 30Hz - 15 kHz, -3dB
Sintonizador AM
Sensibilidad (-20dB): 15uV
Señal a Coeficiente de Ruido @ 1kHz: 50dB
Rechazo de Imagen: 60dB
Frecuencia de Respuesta 50Hz -2 kHz, -3dB
Monitor
Tamaño de Pantalla: 6.5" (Medido diagonalmente), 16:9
Pantalla ancha
• 6.1" (155mm) W X 3.51" (89.2mm) H
Tipo de Pantalla: Pantalla TFT de Cristal Líquido (LCD) de
matriz activa
Tiempo de Respuesta: Tiempo de alzada 30mSeg, tiempo de
caída 50mSeg
Resolución:
• 280,800 sub pixels, 1200 (W) X 234 (H)
Ángulo de visión:
• 65 grados izquierda o derecha
• 40 grados arriba
• 55 grados abajo
General
Impedancia de Entrada Auxiliar: 10k-ohm
Alimentación...... 11 to 16VDC, negativo a tierra
VM9022
Antena de Energía (Azul): 500mZ máximo, protección
limitada de energía
Remoto del Amplificador (Azul/Blanco): 500mZ máximo,
protección limitada de energía
Temperatura de Operación: -20C ~ 65C
Fusibe: 15 ampere, tipo mini ATM
Dimensiones de chasis DIN: 7" X 7" X 4" (178mm x 178mm x
100mm)
Calificación de Energía CEA
Salida de Energía del Amplificador Principal:
Canales de 18 Wats RMS X 4 en 4-ohms @ < 1% THD+N
Coeficiente Señal a Ruido: 70dBA bajo referencia.
(Referencia: 1 Watt, 4-Ohms)
Frecuencia de Respuesta: 20 Hz - 20 kHz, -3dB.
Voltaje de Suministro de Referencia: 14.4VDC
Salida de Energía del Amplificador Central:
Canales 22 watts RMS X4 en 1-ohms @ < 1% THD+N
Coeficiente Señal a Ruido: 70dBA bajo referencia.
(Referencia: 1 watt, 4-ohms)
Frecuencia de Respuesta: 20Hz a 20 kHz, -3dB
Voltaje de Suministro de Referencia: 14.4VDC
* Especificaciones sujetas a cambios sin notificación.
76
Page 81

VM9022
PREPARATION
Félicitations d'avoir acheté un Récepteur Mobile Multimédia
Jensen VM9022.
C'est une bonne idée de lire toutes les instructions avant de
commencer l'installation : Nous recommandons que vous
fassiez installer votre Jensen VM9022 par une boutique
d'installation de bonne réputation.
Fonctions
DVD
• Rapport largeur/longueur - Cinéma, Normal et OFF (En
attente)
• Avance rapide, Recul rapide - 2X, 4X, 8X et 32X
• Jouer, faire pause, mis en arrêt, chapitre prochain et
chapitre précédent
• ESP - 2MB Tampon
CD / MP3 / WMA
• Compatible ID3 Tag
• Recherche répertoire (MP3 / WMA Only)
• Accès direct à la piste à travers la télécommande
• Inscrivez jusqu'à 1500 fichiers MP3 et WMA sur un
DVD+R / RW
• Recherche piste à l'arrière et l'avant audible
• Hasard ; Répétition et Intro
• Jouer ; Faire pause, Mis en arrêt, Piste prochaine et
Piste précédente.
• ESP - 2MB Tampon
AM-FM
• Etats-Unis/Europe/Amérique Latine/Asie Espacement
de fréquence
• 30 Stations Pré-réglées (18 FM, 12 AM)
• Automatique Stereo/Mono
• Local/Distance
• Mise en mémoire automatique/Balayage de prévue
• RDS (Radio Data System)
Prêt pour Radio satellite
• Compatible avec des tuners XM et Sirius (vendu
séparément)
• Exige des câbles XMDJEN100 ou JXMC pour
XMD1000 seulement (vendu séparément)
• Le nom de la chaîne satellite, l'artiste, la chanson et les
catégories sont affichées sur l'écran tactile.
iPod
• jLinkDirect - Interface branchement direct à haut vitesse
pour accéder aux listes d'écoute iPod, des artistes, des
albums, des chansons, des « Photos » et des « Vidéo »
(** Exige un iPod Photo ou Video)
• Le Power Management charge le iPod lorsqu'il est
branché
MediaLink
• L'interface sous le tableau de bord permet aux engins
• MediaLink4 comprend les branchements suivants
Chassis
• 2.0 DIN (Import/ISO-DIN Montable)
• Motorisé écran d'affichage aux cristaux liquides
• 6.5" TFT Matrice active affichage aux cristaux liquids
• Inclinaison de l'écran/Ajustement d'angle
• Système de gestion de la chaleur - Climatisation force
General
• Bluetooth - Profil Bluetooth mains libres pour la sécurité
• Prêt pour la navigation (Nav101 uniquement)
• 38-Clés Télécommande à infra-rouge avec une manette
• Deux sorties video composites pour des écrans
• Compatible avec des moniteurs MZ7-TFT pour les
• Deux entrées auxiliaire audio/vidéo
• 200-Ohm Sortie de ligne à préamplification - Toutes les
• Sortie de Ligne 4VRMS - Toutes les Chaînes
• Contrôle d'audio enchiffreur à rotation
• EQ à Sept Bandes avec huit courbes EQ pré-réglées
• Analyseur de spectrum
• Sortie de ligne Avant ; Arrière ; Centre et Caisson de
• Amplificateur chaîne centrale encastré (40 Watts X 1)
• Aire de recouvrement caisson de basse et Contrôle de
• Dolby Digital / Pro-Logic ll
• Contrôle de Volume Programmable
• Entrée camera arrière (Normal et Image Miroir)
• Manette à 5 directions
4
media portables d'être branches.
• USB - Soutien des disques durs et des lecteurs à
mémoire Flash
• LinkDirect 8-aiguille DIN pour iPod
• 3.5mm Entrée audio uniquement
• RCA Audio /Entrée Video
avec un enrobement anti-lumière éblouissante
pour garder les jeux de puces d'opération à des
températures nominales.
/ commodité et un profil A2DP pour la musique en
continu d'un PDA / PMP
à cinq directions
supplémentaires
sièges en arrière avec un interface à l'écran tactile
Chaînes Audio
basse
Phase
77
Page 82

VM9022
Ce qui est dans la boîte
1. Equerres de montage double DIN gauche et droite
2. Equerre d'installation demi-manche double DIN
3. Télécommande avec pile
4. Courroie de montage soutien arrière
5. Câble Jlink iPod
6. Deux rondelles décoratives personnalisées
7. Fil de frein de parking
8. Boîte MediaLink
9. Tissu pour nettoyer l'écran
10. Des écrous M5x6 et M3x4 pour monter la radio aux
équerres
11. Harnais de sortie haut parleur
12. Harnais d'entrée alimentation
13. Harnais de câble chaîne centrale
Equipement facultatif
• NAV101
Le VM9022 est prêt pour la navigation. Avant d'accéder
une fonction de navigation vous devez acheter et
installer le module NAV101. Toutes les instructions
relativement à l'installation et à l'opération seront
fournies avec le module NAV 101. Dès que le NAV101
est branché et est en opération normale, la mode de
source NAV deviendra active. Lorsque le NAV101 n'est
pas installé, l'option NA V app araît gris ; indiquant que la
fonction n'est pas disponible.
• Camera à l'arrière
Le VM9022 est prêt pour la caméra. Avant d'accéder
des fonctions de caméra, vous devez acheter et installer
une caméra vidéo de l'arrière. Dès que la caméra vidéo
de l'arrière est branchée et fonctionne normalement, la
mode de source CAMERA deviendra active. Lorsque la
caméra n'est pas installée l'option caméra apparaît grise
indiquant que la fonction n'est pas disponible.
• Tuner Radio Satellite
Voir « Operation Radio Satellite » à la page 98.
• jLinkCable and iPod
Voir « Operation MP3/WMA » à la page 105.
• Phone Bluetooth
Voir “Operation Bluetooth” à la page 109.
• Câble de 3.5mm à de 3.5mm
Vendu séparémente.
Outils et fournitures
Vous aurez besoin des outils et fournitures suivants pour
installer votre VM9022 :
• T ournevis à pointe à six lobes, tournevis à tête fraisée et
des tournevis Philips
• Coupes-fil et outils à dénuder
• Outils pour enlever la radio existantee (tournevis, un
ensemble de clés à douille et d'autres outils encore)
• Ruban isolant
• Outil à sertir
• Voltmère/lumière d'essai
• Branchements de sertissage
• Fil de taille 188 pour les branchements de puissance
• Fil de haut parleur de taille 16 à 18.
Débranchez la pile
Pour empêcher un court circuit soyez sûr de mettre le
commutateur d'allumage en arrêt et enlevez le cable négatif
de la pile (-) avant d'installer.
A NOTER Si le VM9022 est à installer dans une voiture
équipée d'un ordinateur à navigation ou à conduite à
bord, ne débranchez pas le cable de la pile. Si le cable
est débranché, l'ordinateur peut perdre sa mémoire.
Dans ces conditions, prenez des precautions
supplémentaires pendant l'installation pour éviter un
court-circuit.
AVERTISSEMENT! Ne branches que l'appareil à une
alimentation de 12 volt avec une terre correcte.
AVERTISSEMENT! N'installez jamais cet appareil là où
l'opération et le visionnement peuvent interférer avec la
conduite en sécurité.
AVERTISSEMENT! Pour réduire le risqué d'un accident
routière (sauf lorsque vous utilisez la camera video de
l'arrière) n'utilisez jamais les functions d'affichage video
lorsque vous conduisez le véhicule. C'est une violation
de la loi fédérale.
AVERTISSEMENT! Ne démontez ni ajustez jamais cet
appareil.
AVERTISSEMENT! N'utilisez jamais des disques de
forme irrégulières.
AVERTISSEMENT! Pour empêcher d'endommager le
mécanisme à l'intérieur de cet appareil, éviter de faire
impact sur l'écrant TFT.
AVERTISSEMENT! Utilisation d'un fusible qui n'est pas
correct peut endommager l'appareil et resulter en u ne
incendie.
AVERTISSEMENT! Pour empêcher d'être blessé d'un
choc ou du feu, n'exposez jamais cet appareil à
l'humidité ou à l'eau.
78
Page 83

VM9022
GREEN(+)
GREEN/BLACK(-)
WHITE(+)
WHITE/BLACK(-)
GREY(+)
GREY/BLACK(-)
PURPLE(+)
PURPLE/BLACK(-)
BLUE/WHITE
BATTERY
+
-
IGNITION SWITCH
RED
YELLOW
BLACK
BROWN(+)
BROWN/BLACK(-)
BROWN
(-)
PINK (-)
GREEN/WHITE (+)
BLUE
Auto Antenna
Cell Phone
BLUE
GREEN
YELLOW
GREY
BLUE
RED
WHITE
RED
WHITE
FRONT L
FRONT R
REAR
L
SURROUND
REAR
R
SURROUND
SUBWOOFER
CENTER
GND
P.CONT
MUTE
BATT
CENTER
PRK SW
REVERSE
ANT.CONT
ACC
REAR R
FRONT L
REAR L
FRONT R
CABLAGE
Cell Phone
(-)
BROWN
Media Module Cable / BLACK
MZ7-TFTTouch
Screen (Sold
Separately)
NAV Bus
BLACK
MZ7-TFT
YELLOW
CAMERA
SATRadio
Rear View Video Camera
SATR
RED
* Satellite
Receiver
Connections
A/V System
YELLOW
External
WHITE
AUX IN2
SATL
WHITE
RED
Connections
SUBWOOFER
*NOTE:
See the
Multimedia
Diagram for
additional
connections
through the
MediaLink.
L
R
REAR
REAR
SURROUND
SURROUND
YELLOW
WHITE
AUX IN1
Rear Video 1
RED
VIDEO OUT1
YELLOW
Rear Video 2
VIDEO OUT2
YELLOW
*MediaLink
HEADPHONE
MULTIZONE
RED
WHITE
PURPLE(+)
(20A)
FILTER/FUSE
BROWN/BLACK(-)
BLUE
GREEN/WHITE (+)
BROWN(+)
External Power Amplifier
WIRELESS
HEADPHONE
(OPTIONAL)
79
Page 84

MEDIALINK ET CONNEXIONS SATELLITES
À la VM9022
*Jeu de câbles SAT JXMC or XMDJEN100 (vendu
séparément)
VM9022
SAT Radio
SAT L
SAT R
**Tuner XM ou tuner Sirius satellite (vendu séparément)
**
MediaLink
3.5mm - Audio
VIDEO LEFT RIGHT
NOTE :
iPod de la génération 5
recommandé pour la
meilleure exécution.
*
iPod Video
Câble d'iPod de jLink
(Inclus)
iPod NanoiPod MiniiPod
80
Page 85

VM9022
INSTALLATION
Installation ISO DIN
Cet appareil est conçu pour aller dans une ouverture de
tableau de bord DIN ce qui se trouve dans beaucoup de
voitures étrangères. L'appareil a des trous sertis dans les
panneaux latéraux ce qui peut être utlisés avec les equerries
de montage d'origine d'usine de certains véhicules Toyota ;
Nissan ; Mitsubishi, Isuzu, Hyundai et Honda pour monter la
radio au tabeau de bord. Veuillez consulter avec votre
boutique de spécialité stéréo voiture locale pour aide dans ce
type d'installation.
1. Enlevez la radio d'usine existante depuis le tableau de
bord ou montage console central. Mettez à côté tout le
materiel et les equerries comme ils seront utilizes pour
monter la nouvelle radio.
2. Enlevez les equerries de montage d'usine et le materiel
de la radio existante et attachez-les à la nouvelle radio.
4. Montez la nouvelle radio au tableau de bord ou le
console central en utilisant l'étape 1 à l'envers.
CAUTION Pour une bonne operation de la platine CD, le
chassis doit être monté dans 30° de l'horizontal. Assurez
vous que l'appareil est monté à l'intérieur de cette
limitation.
A NOTER : C'est la responsabilité de l'utilisateur
d'installer et opérer cet appareil de manière à être
conforme aux lois locales, provincials et fédérales. Le fil
de FREIN DE PARKING DOIT ETRE BRANCHE de la
manière montrée dans ce guide.
CAUTION : Ne bloquez pas la sortie du ventilateur. Si
bloquez l'appareil peut surchauffer et être endommagé.
nécessaire pour que le manchon soit attaché de
manière sûre dans le tableau de bord.
Languette
TAB
TAB
Languette
DASHBOARD
Tableau de Bord
Tableau de Bord
DASHBOARD
INSTALLATION ISO
CAUTION : N'excédez pas la taille d'écrou M5 X 6MM.
.Des écrous plus longs peuvent toucher et endommager
des composants à l'intérieu du châssis.
3. Placez la radio devant l'ouverture de tableau de bord
pour que le câblage puisse être amenés à travers le
manchon de montage. Suivez le diagramme de câblage
attentivement et assurez-vous que tous les
branchements sont sûrs et isolés avec des boulons de
fils ou de la bande. Après avoir terminé les
branchements, branchez les connecteurs ISO dans les
prises femelles à l'arrière du chassis. Mettez l'appareil
en marche pour confirmer l'opération (le commutateur
d'allumage du véhicule doit être en marche). Si
l'appareil ne fonctionne pas, revérifiez tout le câblage
jusqu'à ce que le problème soit résolu.
Installation en utilisant le demi-manchon
1. Appuyez sur les leviers métalliques aux deux côtés pour
enlever le demi manchon de la radio.
2. Installez le demi manchon.
a. Installez l'adaptateur si nécessaire (facultatif).
b. Installez le demi manchon dans l'adaptateur ou le
ta bleau de bord (n'utilisez que les écrous fournis).
Ne forcez pas le manchon dans l'ouverture ou ne
le pliez pas.
INSTALLEZ LE DEMI MANCHON
2b
c. Trouvez la série de languettes de pliage le long du haut
; du bas et des côtés du manchon de montage. Avec le
manchon insérez totalement dans le tableau de bord,
pliez autant de languettes vers le dehors comme
3. Utilisez les écrous M5 x 6 (fourni) pour installer les
equerries de montage à chaque côté de la radio en
utilisant les trous comme indiquer ci-desssus.
Installez l'équerre Ici
Ecrou non-désigné interdit
ECROU
M5X6
EQUERRE
81
Page 86

VM9022
4. Placez la radio devant l'ouverture du tableau de bord
pour que le câblage puisse être amené à travers le
manchon de montage.
CAUTION! Soyez attentive à ne pas endommager le
câblage de la voiture.
5. Terminez le câblage comme illustré dans le diagramme
de câblage. Lorsque le câblage est terminé ; rebranchez
la borne negative de la pile. S'il n'y a pas d'ACC,
branchez la sortie ACC à l'alimentation avec un
interrupteur.
MANCHON DE MONTAGE
ECROU
M3x4
Après avoir terminé les branchements de câblage, mettez
l'appareil en marche pour confirmer l'opération (le
commutateur d'allumage doit être en marche). Si l'appareil ne
fonctionne pas, revérfiez tout le câblage jusqu'à ce que le
problème soit résolu. Lorsque le bon fonctionnement est
obtenu mettez le commutateur d'allumage en arrêt et
avancez avec le montage final du châssis.
1. Branchez l'adaptateur du câblage au harnais de
câblage existent.
2. Branchez le fil de sortie d'antenne
3. Glissez doucement la radio dans le demi-manchon ; en
vous rassurant que la bonne face est en haut ; jusqu'à
ce qu'elle soit bien assise et les cavaliers à ressort le
verrouillent en place.
Utiliser la rondelle décorative
Deux rondelles decoratives sont fournies avec le VM9022
pour la fléxibilité d'installation. Le VM9022 va aller avec la
plupart des tableaud e bord importés avec peu de ou aucune
modification au tableau de bord/cavité. Certains tableaux de
bord dans des véhicules domestiques américains
accepteront un châssis double DIN, mais il y a normalement
un petit écart entre la radio et le tableau de bord après la
terminaison d'installation. Dans ce cas utilisez les rondelles
décoratives fournies pour cachez des écarts qui peuvent être
présents.
Les 4 languettes sur la rondelle decorative vont aller dans
quatre trous en haut et en bas du manchon de montage.
RONDELLE
OPTIONAL
MANCHON
TRIM RING
DE MONTAGE
Installer le connnecteur AV Externe
MediaLink
Le MediaLink vous permet de brancher une varité d'engins
externs, y compris un VCR, platine DVD, platine MP3 portatif,
etc., à votre VM9022 sans enlever la radio.
Pour installer le MediaLink, branches le aux cables AUX-IN
sur le dos du VM9022 (voir diagramme de câblage) et puis
installer le MediaLink dans un emplacement convenable pour
brancher des engins auxiliaires.
Remplacer le fusible
Lorsque vous remplacez un fusible ; utilisez un nouveau
fusible de remplacement 20A. Utiliser un fusible du mauvais
classement peut endommager l'appareil et provoquer des
incendies.
82
Page 87

VM9022
RADIO
FONCTION ANTI-VOL
Le VM9022 est équipé d'une function anti-vol qui demande à
l'utilisateur d'entrer un mot de passé après la mise en marche
de l'alimentation.
Enter Password:
1
2
3
6
5
4
9
8
7
0
3. T ouchez l'icône sur le pave numérique à côté de la boîte
bleue dans le champ Mot de passé pour ouvrir le clavier
sur écran.
02:40
AM
SETUP
General
RDS
Rating
DivX
Hardware
P.VOL
TS Cal
Language
Password
Rating 8. Adult
Load Factory Reset
Audio
Speaker
Bluetooth
Back
1
2
3
6
5
4
9
8
7
Clear
0
Entrer le mot de passe par défaut
Le mot de passé par défaut est 012345 (6 chiffres). Entrez
le mot de passe en utilisant le pavé numérique sur l'écran et
puis appuyez sur ENTER (flèche). Vous pouvez aussi utiliser
la télécommande pour entrer le mot de passe.
Appuyez sur le bouton ENTER sur la manette (18) sur la
télécommande pour confirmer.
Changer le mot de passe
Pour changer l'anti-vol et le mot de passé pour protéger le
classement, suivez les étapes ci-dessous.
1. Appuyez sur le bouton SETUP (31) sur la télécommande ou touchez le bouton sur l'écran pour entrer
dans le menu SETUP.
2. Touchez RATING pour voir le sous-menu RATING. Un
icône verrou ouvert à la droite du champ 'Mot de Passe'
indique que le mot de passé de l'utilisateur n'a pas été
entré.
4. Entrez le nouveau mot de passé à 6 chiffres et appuyez
sur le bouton Enter (fleche).
L'icône 'lock' va maintenant apparaître fermé et le
nouveau mot de passé anti-vol va être réglé ; aussi bien
que le mot de passé pour la protection des
CLASSEMENT (Voir « Fonction sous-menu de
classement » à la page 94).
A NOTER : Si vous avez oublié votre mot de passé
prenez contact avec Customer Service à 1-800-323-4815
pour aide.
83
Page 88

CONTROLS ET INDICATEURS
Opération Bouton
1. open
Appuyez pour activer le système mécanique automatique et
déplacez le moniteur TFT dans une position de
visionnement. Appuyez de nouveau pour fermer le TFT.
2. DISP/TILT
Appuyez pour vous conduire à travers l'information
disponible sur l'écran TFT.
Dans la mode DVD appuyez pour voir les barres
d'information en haut et en bas. Appuyez de nouveau pour
mettre « Display Off » en arrêt.
Appuyez et maintenez l'appui pour activer la function
d'lnclinaison de l'écran (utilisez la manette pour ajuster
l'angle).
3. AS
Appuyez pour mettre automatiquement en mémoire les
premières six stations fortes dans la mémoire pré-réglée. Ne
s'applique qu'à la bande courante
4. BAND/LOC/DX
Appuyez sur le bouton BAND pour changer la bande AM, FM
or SAT.
Appuyez et maintenez l'appui pour mettre une reception local
forte en marche/en arrêt.
5. AUDIO
Faites tourner pour adjuster le volume. Appuyez pour entrer
et/ou confirmer les réglages audio.
6. SRC
Appuyez pour sélectionner la mode de reproduction.
Lorsque vous changez de source pendant la navigation, on
vous soufflera bien que la carte de navigation ne puisse pas
être vue. (La source sélectionnée audio sera muette jusqu'à
ce que le soufflement de navigation est terminé, après quoi la
source audio va reprendre).
7. Affichage aux cristaux liquides
8. MUTE
Appuyez pour assourdir le récepteur. Appuyez de nouveau
pour reprendre le niveau de volume précédent.
BT Mode : Répondre à un appel Bluetooth.
A NOTER : Le VM9022 a Softmute, qui permettrq le
volume d'augmenter et de diminuer graduellement
lorsque la function MUTE est activée ou désactivée.
9. IR Récepteur télécommande
10. (manette, gauche)
Mode DVD/Disc :Appuyez une fois pour reproduire le
chapitre/piste précédent.
Mode TUNER : Appuyez une fois pour chercher
automatiquement pour la station de radio précédente
disponible.
VM9022
Mode MENU : Appuyez une fois pour déplacer le curseur à
gauche.
84
Page 89

VM9022
CONTROLS ET INDICATEURS
11. (manette, bas)
Mode DVD/Disc : Appuyez une fois pour avancer/reculer en
ralenti.
Mode TUNER : Appuyez pour descendre une étape de
fréquence.
Mode MENU : Appuyez une fois pour déplacer le curseur
vers le bas.
12. Réinitialisationt
Appuyez pour réinitialiser les réglages du système au défaut
d'usine (sauf le mot de passé et le réglage de verrouille
parentale).
13.Pause/Jouer/Entrez
Appuyez sur pause pour faire pause dans ou reprendre la
reproduction ou pour confirmer la sélection courante.
14. (manette droite)
Mode DVD/Disc : Appuyez une fois pour entrer dans le
chapitre ou la piste prochains.
Mode TUNER : Appuyez une fois pour chercher
automatiquement la station de radio prochaine disponible.
Mode MENU : Appuyez une fois pour déplacez le curseur à
droite.
15. (manette, vers le haut)
Mode DVD/Disc : Appuyez une fois pour avance/recul
rapides.
Mode TUNER : Appuyez pour avancer/reculer d'une étape
de fréquence.
Mode MENU : Appuyez une fois pour déplacer le curseur
vers le haut.
16. ( )
Appuyez une fois pour insertion/éjection du disque.
Appuyez et maintenez l'appui pour réinitialiser la position du
mécanisme de cœur.
17. Affichage TFT
18. ARRIERE
Sélectionnez la source de la zone arrière. Permet aux
passagers d'avant d'écouter la radio alors que les passagers
d'arrière écoute un CD, MP3, WMA ou regardent des DVDs.
Mode BT : Débranchez l'appel Bluetooth.
19. RPT
Appuyez pour contrôler la fonction de répétition de
reproduction.
20. PIP
Activez l'Image dans la fonction Picture.
NAV101 (facultatif) : Appuyez et maintenez l'appui pour
retourner à l'interface d'utilisateur NAV101.
21. Entrée pour la carte SD
Insérez la carte SD pour la reproduction des fichiers audio.
85
Page 90

TELECOMMANDE
Le VM9022 Télécommande contrôle et la zone avant et la
zone arrière. Pour changer de la zone d'avant à la zone
d'arrière faites tourner l'interrupteur F/R (32) situé au côté
droite du contrôleur.
VM9022
30
8
4
31
16
17
15
2
3
1
11
5
12
23
25
21
27
26
35
14
18
19
32
22
13
9
24
28
20
10
29
6
7
34
33
A NOTER : Votre télécommande peut différer de celle
que vous voyez ici. Le diagramme ci-dessus ne sert qu'à
illustrer.
86
Page 91

VM9022
Table 1: Fonctions Télécommande
Bouton Fonction
Name Ref# DVD VCD TUNER CD/MP3 SATELLITE iPod
MENU 1 Entrez le menu principal du
TITLE 2 Entre le menu titre du disque Joue les dix premières sec-
MUTE 3 Bascule en marche/en arrêt la
POWER/
AUDIO 5 Changer la langue audio pour
RPT A-B 6 Configurez pour repeater la
RPT 7 Répète la reproduction du
SRC 8 Sélectionne la source de
SUBTITLE 9 Sélectionne la langue pour le
DISP/
CLEAR
PRESET
PRESET
ANGLE 13 Reproduit le disque d'un angle
Joystick /\ 14 Avance rapide du contenu du
VOL - 15 Diminue le volume Diminue le volume Diminue le volume Diminue le volume Diminue le volume Diminue le volume
VOL + 16 Augmente le volume Augmente le volume Augmente le volume Augmente le volume Augmente le volume Augmente le volume
Joystick < 17 Sélectionne le chapitre prece-
Joystick
(press)
Joystick > 19 Sélectionne le chapitre
disque
sortie audio
4 Met la puissance en marche/
en arrêt.
la reproduction du disque.
reproduction du délai A au
délai B.
chapitre courant.
reproduction
sous-titrage.
10 Afficher l'information de repro-
duction
Effacez l'entrée ou déplacez-
vous vers l'arrière pour corriger l'erreur dans la mode
Accès Direct.
11 Fait un zoom lorsqu'on joue
un DVD, Div-X ou Photo
12 Fait un zoom arrière lorsqu'on
joue un DVD ; DivX ou Photo.
different (si disponible) pour
une scène.
disque
dent pour reproduction.
18 ENTER, Fait pause dans la
reproduction/démarre la
reproduction
prochain pour reproduction.
Met le PBC en marche/en
arrêt lorsqu'on joue le VCD
ondes de chaque chapitre/
titre.
Bascule en marche/en arrêt la
sortie audio.
Met la puissance en marche/
en arrêt.
Configurez pour repeater la
reproduction du délai A au
délai B.
Répète la reproduction du
chapitre courant.
Sélectionne la source de
reproduction
Afficher l'information de reproduction
Effacez l'entrée ou déplacezvous vers l'arrière pour corriger l'erreur dans la mode
Accès Direct.
Fait un zoom Navigue la liste des stations
Fait zoom en arrière Navigue la liste des stations
Reproduit le Picture CD d'un
angle different (si disponible)
de l'image affichée.
Avance rapide du contenu du
disque
Sélectionne le chapitre precedent pour reproduction.
ENTER, Fait pause dans la
reproduction/démarre la
reproduction
Sélectionne le chapitre
prochain pour reproduction.
Bascule en marche/en arrêt la
sortie audio.
Met la puissance en marche/
en arrêt.
Sélectionne la source de
reproduction
Afficher l'information de reproduction
Effacez l'entrée ou déplacezvous vers l'arrière pour corriger l'erreur dans la mode
Accès Direct.
pré-réglées.
pré-réglées.
Met le clavier MEM en arrêt. Met le clavier MEM en arrêt. Sélectionne la mode VIdéo
Cherche une station de radio
disponible en diminuant la
fréquence de syntonisation.
Balayage de mémoire
automatique.
Cherche une station de radio
disponible en augmenter la
fréquence de syntonisation.
Afficher les diagnostiques
d'écran
Liste des categories en mode
CG
Bascule en marche/en arrêt la
sortie audio.
Met la puissance en marche/
en arrêt.
Répète la reproduction de la
piste courante
Sélectionne la source de
reproduction
Afficher l'information de reproduction
Effacez l'entrée ou déplacezvous vers l'arrière pour corriger l'erreur dans la mode
Accès Direct.
Navigue la liste fenêtre. Navigue la liste des stations
Navigue la liste fenêtre. Navigue la liste des stations
Avance rapide du contenu du
disque
Sélectionne la piste précédente pour reproduction.
ENTER, Fait pause dans la
reproduction/démarre la
reproduction
Sélectionne la piste prochaine
pour reproduction.
Bascule en marche/en arrêt la
sortie audio.
Met la puissance en marche/
en arrêt.
Sélectionne la source de
reproduction
Afficher l'information de reproduction
Effacez l'entrée ou déplacezvous vers l'arrière pour corriger l'erreur dans la mode
Accès Direct.
pré-réglées
pré-réglées
Cherche une station de radio
disponible en diminuant la
fréquence de syntonisation.
ENTER, Toggles the onscreen menu between CAT/
CH mode
Cherche une station de radio
disponible en augmenter la
fréquence de syntonisation.
Affiche le menu iPod
Bascule en marche/en arrêt la
sortie audio.
Met la puissance en marche/
en arrêt.
Sélectionne la mode musique
iPod.
Répète la reproduction de la
piste courante
Sélectionne la source de
reproduction
Sélectionne la mode photo
d'iPod.
Afficher l'information de reproduction
Effacez l'entrée ou déplacezvous vers l'arrière pour corriger l'erreur dans la mode
Accès Direct.
Navigue la liste des fenêtres.
Navigue la liste des fenêtres.
iPod.
Accéder au menu iPod.
Sélectionne la piste précédente.
ENTER
Sélectionne la piste prochaine
pour reproduction.
87
Page 92

VM9022
Table 1: Fonctions Télécommande
Bouton Fonction
Name Ref# DVD VCD TUNER CD/MP3 SATELLITE iPod
20 Arrête la reproduction. Arrête la reproduction. Arrête la reproduction.
GOTO 21 Entre la mode d'accès direct. Entre la mode d'accès direct. Entre la mode d'accès direct. Entre la mode d'accès direct. Entre la mode d'accès direct. Entre la mode d'accès direct.
Joystick \/ 22 Recul rapide du contenu du
||>/BAND 23 Avance en ralenti/Recule en
PIC 24 Affiiche les contrôles lumi-
OPEN/
CLOSE
TILT
TILT
WIDE 28 Sélectionne la mode
1, 2, 3, 4, 5,
6, 7, 8, 9, 0
(Numeric
Keypad)
PIP 30 Image dans vue d'image dans
SETUP 31 Affiche le menu configuration. Affiche le menu configuration. Affiche le menu configuration. Affiche le menu configurati
F/R 32 F contrôle la zone d'avant. R
RDM 33 Joue tous les chapitre dans
SCN 34 Balayage prevue Joue les dix premières sec-
EJECT 35 Ejecte le disque Ejecte le disque Ejecte le disque Ejecte le disque Ejecte le disque Ejecte le disque
disque
ralenti X2, X4, X8
nosité/contraste
25 Ouvre/ferme le moiniteur TFT. Ouvre/ferme le moiniteur TFT. Ouvre/ferme le moiniteur TFT. Ouvre/ferme le moiniteur TFT. Ouvre/ferme le moiniteur TFT. Ouvre/ferme le moiniteur TFT.
26 Diminue l'angle d'inclinaison
du moniteur.
27 Augmente l'angle d'inclinaison
du moniteur.
d'affichage : CINEMA, NORMAL or En attente
29 Accède directement au chapi-
tre
la source Avant, Zone
d'arrière ou NAV.
contrôle la zone d'arrière.
un ordre mélangé.
Recul rapide du contenu du
disque
Reproduction/Pause Sélectionne la bande AM/FM. Reproduction/Pause Sélectionne entre les bandes
Affiiche les contrôles luminosité/contraste
Diminue l'angle d'inclinaison
du moniteur.
Augmente l'angle d'inclinaison
du moniteur.
Sélectionne la mode
d'affichage : CINEMA, NORMAL or En attente
Image dans vue d'image dans
la source Avant, Zone
d'arrière ou NAV.
F contrôle la zone d'avant. R
contrôle la zone d'arrière.
Affiiche les contrôles luminosité/contraste
Diminue l'angle d'inclinaison
du moniteur.
Augmente l'angle d'inclinaison
du moniteur.
Sélectionne la mode
d'affichage : CINEMA, NORMAL or En attente
1 à 6 sélectionne pré-réglée
pour la bande courante.
Image dans vue d'image dans
la source Avant, Zone
d'arrière ou NAV.
F contrôle la zone d'avant. R
contrôle la zone d'arrière.
Recul rapide du contenu du
disque
Affiiche les contrôles luminosité/contraste
Diminue l'angle d'inclinaison
du moniteur.
Augmente l'angle d'inclinaison
du moniteur.
Sélectionne la mode
d'affichage : CINEMA, NORMAL or En attente
Accède directement au chapitre
Image dans vue d'image dans
la source Avant, Zone
d'arrière ou NAV.
on. Affiche le menu configuration. Affiche le menu configuration.
F contrôle la zone d'avant. R
contrôle la zone d'arrière.
Joue tous les chapitre dans
un ordre mélangé.
ondes de chaque piste.
SAT1, SAT2 ou SAT3.
Affiiche les contrôles lumi-
nosité/contraste
Diminue l'angle d'inclinaison
du moniteur.
Augmente l'angle d'inclinaison
du moniteur.
Sélectionne la mode
d'affichage : CINEMA, NORMAL or En attente
1 à 6 sélectionne pré-réglée
pour la bande courante.
Image dans vue d'image dans
la source Avant, Zone
d'arrière ou NAV.
F contrôle la zone d'avant. R
contrôle la zone d'arrière.
Balayage prevue
Fait pause dans la reproduction/démarre la reproduction.
Affiiche les contrôles luminosité/contraste
Diminue l'angle d'inclinaison
du moniteur.
Augmente l'angle d'inclinaison
du moniteur.
Sélectionne la mode
d'affichage : CINEMA, NORMAL or En attente
Image dans vue d'image dans
la source Avant, Zone
d'arrière ou NAV.
F contrôle la zone d'avant. R
contrôle la zone d'arrière.
Joue tous les chapitre dans
un ordre mélangé.
88
Page 93

VM9022
UTILISATION DU MONITEUR TFT
Ouvrir/Fermer Moniteur TFT
Ouvrir le moniteur TFT
Appuyez sur le bouton OPEN (1) sur le panneau d'avant ou
appuyez sur le bouton ( ) (25) sur la télécommande pour
glissez le panneau du moniteur pour révéler les fentes du
disque et de la carte SD.
Fermer le moniteur TFT
Appuyez sur le bouton OPEN (1) sur le panneau d'avant ou
appuyez sur le bouton ( ) (25) sur la télécommande pour
fermer le panneau du moniteur.
Ajustement de l'angle d'inclinaison du
moniteur
Un caractéristique connu des panneaux d'affichage aux
cristaux liquides est la qualité d'affichage par rapport à l'angle
de visionnement. L'angle du moniteur peut être ajusté pour
visionnement optimale en utilisant l'une des methods
suivantes :
Ajuste de l'angle étape par étape
Appuyez le bouton ( ) ou ( ) sur la télécommande (26,
27) pour ajuster l'angle d'inclinaison une étape à la fois.
Ajustement de l'angle continuel
Appuyez et maitnenez l'appui sur le bouton ( ) ou ( ) sur
le panneau de commande pour ajuster l'angle d'inclinaison
dans un mouvement continuel.
Utilisation de conduite à marche arrière
Si la caméra vidéo à vue arrière est branchée, l'appareil est
en marcher et le moniteur est stationné dans le compartiment
principal de l'appareil, le moniteur se déplace
automatiquement dans une position de visionnement et
change à la mode CAMERA durant la conduite à marche
arrière. Lorsque la marche arrière s'arrête, le moniteur
retourne au compartiment de stockage principal.
Si le moniteur est en mode d'affichage ; le moniteur change
automatiquement à la mode CAMERA durant la marche
arrière. Lorsque la marche arrière s'arrête, le moniteur
retourne à la mode d'entrée d'origine.
Rapport largeur/longueur
Appuyez sur le bouton WIDE (28) sur la télécommande ou le
bouton WIDE/PIC (22) sur le moniteur pour adjuster le
rapport largeur/longueur comme suit (active uniquement
avec la source vidéo) :
Réglage d'image
Table 2 smontre la mode de sortie video pour chaque source
de reproduction.
reproduction
RADIO RGB Mode
SAT RGB Mode
DISC RGB Mode
BT RGB Mode
AUX 1 CVBS Mode
AUX 2 CVBS Mode
NAV RGB Mode
CAMERA CVBS Mode
*CVBS – Composite Video Baseband Signal
CINEMA
L'écran tout entier est étendu
horizontalement dans un rapport
largeur/longueur de 16 à 9. Le rapport
d'extension est le même à n'importe
quel point.
NORMAL
L'image d'affichage conventionnelle a
un rapport de 4 à 3 ratio de l'horizontal
au vertical, laissant une zone blanche
à la gauche et à la droite de l'affichage.
STANDBY (EN ATTENTE)
L'écran deviant noir. Ecran tactile à
reprendre.
Table 2: Mode de sortie Vidéo
Source de
Modes de sortie vidéo
Procédure pour ajustement du paramètre
1. Entrez la mode de réglage pour la qualité d'image :
Appuyez sur le bouton PIC (24) sur la télécommande ou
appuyez et maintenez l'appui sur le bouton WIDE/PIC-
TURE (22) sur le moniteur.
2. Sélectionnez l'article à régler :
Utilisez la manette vers le haut/vers le bas pour
sélectionnez la Luminosité ou le Contraste.
3. Réglez les paramètres :
Utilisez les boutons manette gauche/droite pour
modifier les réglages.
4. Sortir de la mode de réglage de la qualité d'image :
Appuyez sur le bouton PIC sur la télécommande ou le
bouton WIDE/PICTURE sur le moniteur.
Freins de parking
Inhiber le frein de parking
Lorsque le fil rose du 'Parking' est branché à
l'interrupteur du frein du véhicule, le moniteur d'avant
TFT n'affichera du video que lorsque la sequence du
frein du parking est engagée. Avant de commencer la
séquence du frein de parking, la radio doit être en
marche avec le disque de media video inséré et jouant.
Séquence du frein de parking
Il y a deux situations qui peuvent démarrer la sequence
du frein de parking (ceci est la méthode préférée). La
fenêtre du délai est entre 3 à 5 secondes.
• Le frein de parking est engage (on) lorsque le
véhicule est démarré ou l'accessoire/l'allumage est
mis en marche. Pour activer la vidéo la séquence
d'événements suivante doit être terminée :
a. Relâchez le frein de parking pendant 3 à 5
secondes.
b. Rap pliquez le frein de parking.
c. Vidéo doit être a ffiché sur l e moniteur TFT dans
1 à 2 secondes.
• Le frein de parking est désengagé (off) lorsque le
véhicule a démarré ou l'accessoire/allumage est mis
en marche. Pour activer la vidéo, la séquence
d'événements suivante doit être terminée.
a. Réglez le frein de parking pour 3 à 5 secondes.
b. Relâchez le frein de parking pour 3 à 5
secondes.
c. Rappliquez le frein de parking.
d. Vidéo doit être affiché sur le moniteur TFT dans
1 à 2 secondes.
89
Page 94

AUX1
DISC
INSTRUCTIONS D'OPERATION
En marche/en arrêt
Appuyez sur le bouton /SRC (6) (ou n'importe quel bouton
sur le devant de l'appareil sauf le bouton de réinitialisation),
ou le bouton /POWER (4) sur la télécommande pour mettre
l'appareil en marche. Les boutons au-devant vont s'illuminer
et le statut mode courante apparaît sur l'écran TFT (17).
Appuyez et maintenez l'appui sur le bouton pour mettre
l'appareil en arrêt. Le moniteur se retire dans le compartiment
principal.
Confirmation Bip Audible
Une tonalité bip audible confirme la sélection de chaque
fonction. La tonalité Bip peut être désactivée à travers le
menu Configuration.
Ajustement de volume
Pour augmenter ou diminuer le niveau de volume, tournez
l'enchiffreur à rotation (5) sur le panneau d'avant ou appuyez
sur les boutons VOL+/ VOL- (15, 16) sur la télécommande.
Lorsque le niveau de volume atteint 0 ou 40 il y a un bip qui
indique que la limite d'ajustement est atteinte. Le volume va
de 0 à 40. L'affichage aux cristaux liquides ou l'écran TFT
affiche le niveau de volume pendant 3 secondes.
Volume de demurrage programmable
Cette function permet à l'utilisateur de sélectionner un
volume de demarrage peu importe le réglage de volume
avant la mise en arrêt de l'appareil. Pour programmer un
niveau de volume de démarrage, tournez le contrôle AUDIO
(2) pour ajuster le volume au niveau de v olume de
démarrage désiré. Appuyez et maintenez l'appui sur le
bouton AUDIO lorsque l'icône jaune du haut parleur et
l'indication du niveau est affiché sur l'écran. L'appareil va
faire bip deux fois pour confirmer votre réglage de volume de
démarrage.
Mute
Appuyez sur le bouton MUTE sur le panneau d'avant (8) ou
la télécommande (3) pour assourdir le volume de l'appareil.
Appuyez de nouveau sur MUTE pour rétablir le volume. «
MUTE » est affiché sur l'affichage aux cristaux liquides.
Ajustement du volume ou l'utilisation des fonctions de
configuration audio annulent la fonction muet.
Line Mute
Si le fil MUTE est branché ; la sortie audio est assourdi
lorsqu'un appel téléphonique est reçu par le téléphone de la
voiture.
Sélection de la source de reproduction
Appuyez sur le bouton SRC sur le panneau d'avant (6) ou sur
la télécommandel (8) pour changer entre les sources de
reproduction disponibles dans l'ordre suivant : RADIO, SAT,
DISC, NAV, BT, iPod, SD, USB, AUX1, AUX2 et CAMERA.
La mode de reproduction est affichée sur les écrans TFT et
d'affichage aux cristaux liquides.
Engins auxiliaires
Des engines périphériques externs peuvent être branches à
cet appareil par la sortie RCA (AUX IN 2) ou le MediaLink4.
Sélectionnez « AUX1 » pour jouer un engine auxiliaire
branches via le RCA MediaLink ou des entrées 3.5mm. Par
exemple ; vous pouvez jouer des fichiers musiques depuis
une platine portative, de la vidéo depuis une caméra vidéo et
même voir des photos stockées sur un appareil digital.
E
Q
R
E
A
R
P
I
P
Sélectionnez la mode « AUX2 » pour accéder à et contrôler
les engins auxiliaires branchés aux entrées AUX IN 2 sur le
dos de la radio.
MediaLink
3.5mm -Audio
VIDEO LEFT RIGHT
No Video Signal
Stereo PLII Music
Connecteur iPod
(Generation 5
Recommandée)
Connecteur USB (TypeA)
Entrées RCA (AUX 1)
3.5mm Entrées stéréo
gauche et droite (AUX 1)
01:53 PM
VM9022
Sélectionner une Source pendant la navigation
Pendant la navigation ; d'autres sources peuvent être
sélectionné telles que le tuner AM/FM, CD, etc. Pour
sélectionner une source appuyez sur le bouton /SRC (6) et
puis sélectionnez une source depuis le Menu Source d'avant.
Des soufflets vocaux de navigation seront automatiqument
entendu, bien que la carte de navigation ne soit pas visible.
(La source audio sélectionné sera muette jusqu'à ce que la
commande de soufflet vocal de navigation soit terminé, après
quoi le source audio reprendra la reproduction).
Source Menu
Pour accéder à la SOURCE MENU, touchez l'écran TFT
screen dans le coin gauche en haut de l'écran.
SOURCE MENU
DISC
RADIO
AUX 1
SAT
AUX 2
SD
USB
iPod
CAMERA
NAV
OFF
Ce menu vous permet de sélectionner une source pour la
zone d'avant ou d'arrière. Touchez FRONT ou REAR pour
choisir la zone pour laquelle vous voudriez spécifier la
source. (Voir « Operation Multi-Zone » à la page 92.)
Menu Contrôle d'Audio
Le menu Contrôle d'Audio a un égaliseur à 7-bande qui vous
permet de facilement ajuster votre système audio pour
satisfaire les caractéristiques acoustiques de votre véhicule
qui variant en fonction du type du véhicule et ses dimensions.
Le réglage approprié de l'équilibreur et la balance augmente
les effets de l'égaliseur de cabine.
F
R
O
N
T
BT
R
E
A
R
90
Page 95

VM9022
DISC
n
Appuyez sur le bouton AUDIO (5) sur le panneau d'avant
pour afficher le menu audio.
E
Q
R
E
A
R
P
I
P
FAD-BAL EQ
+12 —
0—
–12 —
80 250 600 1k 4k 10k 16k
EQ: User
USER
BACK
Pour ajuster une fonction audio :
1. Utilisez les boutons gauche/droite de la manette pour
surligner la fonction audio à être ajustée.
2. Appuyez sur le bouton ENTER de la manette sur le
panneau de contrôle (13) ou sur la télécommande (18)
pour sélectionner l'option surlignée.
3. Utilisez la manette pour ajuster la function sélectionnée
au réglage désiré.
Table 3: Ajustements Audio
Fonction Options d'ajustement s
EQ User Dans la mode utilisateur, vous pouvez
Acoustic Utilisez les flèches sur l'écran pour
Urban
Rave
Latin
Dance
Hip Hop
Rock
FAD-BAL Utilisez cet écran pour ajuster le niveau de sortie
pour chaque haut parleur dans votre système
quadriphonique de 0 à -24dB. Vous pouvez aussi
ajuster le volume maître depuis cet écran.
adjuster à la main chacune des sept
bandes de fréquence.
sélectionner une courbe d'égalisation
pré-définie.
Le menu AUDIO va automatiquement sortir au bout de
quelques secondes d'inactivité. Pour sortir rapidement,
touchez le coin gauche en haut de l'écran et appuyez et
maintenez l'appui sur le bouton AUDIO (5).
Options d'Affichage alternatives
Un menu situé sur le côté gauche de l'écran fournit un accès
immediate à l'égaliseur, vue d'écran Zone d'Arrière et les
fonctions PIP (Image dans l'Image).
• EQ : Touchez pour voir l'Analyseur de Spectrum >
Egaliseur.
• ARRIERE : Touchez pour voir l'écran de la zone
d'arrière. Les options de contrôle apparaissent audessous de l'image PIP en fonction de la source.
DISC
AM/FM RADIO
BAND AS
CAT– CH– CH+ CAT+
SATELLITE
• PIP : Touchez pour voir la Zone d'Arrière, la Zone
d'Avant courant ou l'écran NAV. Utilisez les flèches
gauche/droite au-dessous de l'image PIP pour changer
la source PIP.
PIP: DISC
(Root)
MP3 4/84 00:00:23
E
1 Cherry Poppin Da
Q
2 Chris Isaak - Baby
R
E
3 Crazy Town - Butt
A
R
4 Phish - Birds Of A
P
I
5 Phish - Bouncin' R
P
6 Phish - Freebird (L
01:02 AM
1/2
Réinitialisation du Système
Pour corriger un arrêt du système ou
d'autres opérations illégales, utilisez
la pointe d'une bille pour appuyer sur
le bouton de réinitialisation (12) situé sur le coin droite en bas
et en avant de l'appareil. Après la réinitialisation du système,
l'appareil rétablit tous les réglages d'usine par défaut.
[RESET] Butto
A NOTER : La mode EQ changera automatiquement à «
USER » lorsque des bandes EQ individuelles sont
ajustées.
Le réglage approprié de l'équibreur et la balance est un
complément aux effets de l'égaliseur de cabine.
A NOTER : Si l'appareil est reinitialisé lorsqu'un DVD est
en train de jouer, le DVD reprend la reproduction une fois
que la réinitialisation est terminée.
91
Page 96

OPERATION MULTI-ZONE
DISC
Des sources indépendantes peuvent être jou ées sim ultan éme nt sur
le VM9022. Par exemple, vous pouvez voir un console de jeurx
vidéos sur l' écran d'avant alors qu'un vidéo DVD est disponible
pour les passagers en arrière.
Limitations multi-zone
DVD, USB et Carte SD ne peuvent pas être sélectionnés
simultanément pour le visionnement Avant et Arrière.
Par exemple, si le DVD est sélectionné pour la zone
d'arrière, les sources suivante ne peuvent pas être
sélectionnées pour un visionnement zone d'avaqnt :
DVD, USB ou Carte SD. Si le DVD est sélectionné pour la
zone d'avant, alors les sources suivantes ne peuvent
pas être sélectionnées pour un visionnement zone
d'arrière : DVD, USB ou Carte SD.
Branchez l'écran tactile de la zone
d'arrière
Vous pouvez brancher jusqu'à deux moniteurs
supplémentaires (vendu séparément) pour les passagers en
arrière, dont l'un peut être un Ecran Tactile. Vous pouvez
également brancher un système de casque sans fil à l'un de
vos moniteurs en arrière comme illustré ci-dessous.
Ecran vidéo en arrière
(vendu séparément)
Jaune
VIDEO OUT 1
Changer la source de zone d'arrière
Pour accéder au MENU SOURCE touchez l'écran TFT au
coin gauche en haut de l'écran.
SOURCE MENU
DISC
RADIO
AUX 1
SAT
AUX 2
SD
USB
iPod
CAMERA
NAV
OFF
Ce menu vous permet de sélectionner la source pour la zone
d'avant ou d'arrière. Touchez FRONT ou REAR pour choisir
la zone pour laquelle vous voulez spécifier la source.
Contrôler l'écran Zone d'arrière
Si vous avez installé un écran tactile à l'arrière, vous pouvez
toucher l'écran pour contrôler la plupart des fonctions de la
zone d'arrière.
Vous pouvez aussi utiliser la télécommande. Le VM9022
télécommande et la zone d'avant et la zone d'arrière. Pour
changer d'avant en arrière, manipulez l'interrupteur F/R (32)
situé sur le côté droite de la télécommande.
F
R
O
N
T
BT
R
E
A
R
VM9022
Mettre l'écran d'arrière en arrêt
Touchez le bouton OFF (sur la SOURCE MENU) pour
suspendre l'opération de l'écran d'arrière. Tout opération
attribuée exclusivement à la source d'arrière sera suspendu
jusqu'à ce qu'elle soit réactivée en utilisant soit l'écran tactile
de la zone d'avant soit de la zone d'arrière ou de la
télécommande.
VIDEO OUT 2
MZ-TFT
MULTIZONE
HEADPHONE
Jaune
Noir
Blanc
Rouge
MZ7TFTEcran Tactile
(vendu séparément)
Casque sans fil
(Facultatif)
A NOTER : Vous ne pouvez changer ou contrôler la
source zone d'avant depuis l'écran vidéo de la zone
d'arrière.
Touchez le bouton REAR sur le côté gauche de l'écran pour
voir une image Picture in Picture de l'écran d'arrière.
92
Page 97

RADIO
VM9022
MENU CONFIGURATION
Pour accéder aux réglages du système, appuyez sur le
bouton SETUP (31) sur la télécommande ou touchez le
bouton sur l'écran pour entrer dans le menu « SETUP ».
Le sous-menu « GENERAL » apparaît surligné en bleu.
02:40
RADIO
General
RDS
Rating
DivX
Hardware
P.VOL
TS Cal
SETUP
Language
Clock Mode 12 Hour
Clock Adjust 04 : 31 AM
Video Input AUTO
Beep On
Audio
Speaker
Bluetooth
Accéder aux articles du menu
Touchez le nom du sous-menu ou bien utilisez la manette
pour sélectionner un sous-menu (Langue, Audio, RDS, etc.).
Les fonctions disponibles pour ajustement sous le sousmenu surligné apparaitront au centre de l'écran.
Ajustement d'une fonction
1. Utilisez l'écran tactile ou appuyez sur les boutons /\ ou V
buttons sur la manette pour sélectionner la function à
être ajustée.
2. Entre le champ d'options pour la function que vous
voulez ajuster en utilisant l'écran tactile ou en appuyant
sur le bouton (manette) ENTER. Un sous-menu
apparaît dans le deuxième rang avec l'option
sélectionnée surlignée en bleu.
3. Sélectionner une nouvelle valeur en utilisant l'écran
tactile ou en appuyant les boutons /\ ou V sur la
manette.
4. Use the touchscreen or press the ENTER (joystick)
button to confirm setup.
Fonctions sous-menu générales
Réglage Options Fonction
Clock Mode
(Mode d'Horloge)
12 Hour Horloge affiche l'heure à 12 heures
24 Hour Horloge affiche l'heure à 24 heures
en utilisant AM et PM.
jusqu'à 23:59.
AM
Back
Réglage Options Fonction
Clock Adjust
(Ajustement
d'horloge)
Video Input
(La circuiterie d'entrée
autodétecte
le signalement de
vidéo depuis
la source Aux
In). .
Beep On Lorsque mis en marche, un bip
Fonctions du sous-menu Langue
Si un DVD soutient plus d'un sous-titrage ou langue Audio,
toutes les langues sont disponibles pour sélection pendant la
reproduction. Si la langue sélectionnée n'est pas soutenue
par le DVD, une langue par défaut est utilisée.
(HH:MM) L'horloge apparaît au coin gauche
NTSC Les signaux en couleur sont sortis
PAL Les signaux en couleur sont sortis
Auto La sortie de signal en couleur est
Off Pas de tonalilté bip.
en haut de l'écran et sur l'écran
d'affichage aux cristaux liquides
durant certaines opérations. A
NOTER : L'indication AM/PM
changera lorsque vous continuez à
ajuster l'heure au-delà de 12 heures.
dans le format NTSC standardisé.
dans le format PAL standardisé.
mise en marcher automatiquement
en fonction du signal d'entrée video
courant - NTSC ou PAL.
audible confirmera la selection de
chaque function.
Réglage Options Fonction
OSD English Affichage sur écran apparaît en
DVD Audio English DVD Audio est entendu en anglais
Spanish DVD Audio est entendu en espag-
French DVD Audio est entendu en français
DVD Subtitle English Les sous-titres du DVD apparais-
Spanish Les sous-titres du DVD apparais-
French Les sous-titres du DVD apparais-
Off Les sous-titres du DVD n'apparais-
anglais.
lorsque l'option est disponible.
nol lorsque l'option est disponible.
lorsque l'option est disponible
sent automatiquement en anglais
lorsque celui-ci est disponible.
sent automatiquement en espagnol
lorsque celui-ci est disponible.
sent automatiquement en français
lorsque celui-ci est disponible.
sent pas automatiquement.
Réglage Options Fonction
Disc Menu English Le menu DVD (si disponible) est
Spanish Le menu DVD (si disponible) est
French Le menu DVD (si disponible) est
Fonction Audio sous-menu
affiché en anglais.
affiché en espagnol.
affiché en français.
Réglage Options Fonction
DRC Off Utilisez le Dynamic Range Control
On
Audio Mode Surround Choisissez Stéréo pour envoyer le
Stereo
Pro Logic II Music Optimisé pour la reproduction de la
Movie Optimisé pour la reproduction vidéo
Matrix Utilisez avec la media enchiffrée en
Sub. W Filter 50Hz Sélectionner un aire de recouvre-
80Hz
100Hz
120Hz
150Hz
Fonction sous-menu haut parleur
• Choisissez 4 CH, 4.1 CH ou 5.1 CH en function de la
configuration haut parleur dans votre véhicule.
• Utilisez la function Test Tone pour vérifier les réglages
de haut parleur. Faites des modifications en u tilisant le
menu EQ/FAD-BAL accédé par appuyant et maintenant
l'appui sur le bouton AUDIO (contrôle du volume).
• Ajustement de phase caisson de basset : Touchez
l'icône sub.w pour accéder aux contrôles de polarité
caisson de basse et inverser le signal de polarité
caisson de basse de 0° à 180°. Inversant la polarité peut
améliorer la réponse basse liée à la configuration haut
parleur.
pour une reproduction meilleure à
des volumes bas.
même signal aux hauts parleurs
d'avant et d'arrière de droite et de
gauche. Si vous avez un haut parleur de centre vous pouvez choisir
l'option Quadriphonique lorsque
celui-ci est soutenu par votre
media.
musique lorsqu'on joue la musique
enchiffrée en Dolby.
lorsqu'on joue des films enchiffrés
en Dolby.
Dolby Matrix.
ment règle une fréquence de coupure du filtre passe-bas du caisson
de basse.
93
Page 98

VM9022
• Retarder le réglage : Retarder est disponible lorsque la
media est Dolby Digital enchiffrée ou train de bits digital.
• RL et RR ne sont disponible que dans la mode 4.0 et
4.1
• Touchez les icons haut parleur RL, RR et Cent pour
accéder au réglage de retard.
• Chaînes L et R Rear : 0 - 15 msec
• Chaîne Centre Center channel : 0 - 5 msec
Fonctions Bluetooth Sous-menu
Réglage Options Fonction
Bluetooth On Active la fonction Bluetooth
Off Désactive la fonction Bluetooth
Auto Answer
(Auto
Réponse)
Connect
(Brancher)
Pairing Code
(Code
d'appariement)
Fonction sous-menu RDS
Réglages
RDS On L'appareil va afficher l'information de
CT On Synchronise automatiquement l'heure
On L'appareil va automatiquement
Off Répondez aux appels en touchant
Manual Branchez le dernier téléphone
Auto Branchez automatiquement lorsque
Option
s
Off
Off
répondre à des appels entrants.
le bouton 'call'.
mobile actif en touchant l'icône
CONNECT lorsqu'il est débranché.
cted.
votre téléphone apparié est dans la
gamme.
Le code par défaut est '1234'.
Touchez l'icône clavier pour ouvrir
le clavier et entrez le code d'appariement ou la clé de passé exigé
pour un branchement Bluetooth à
votre téléphone mobile. Toutes les
téléphones n'exige pas un code
d'appariement. Le code par défaut
est '0000' pour plusieurs téléphones.
Fonction
la Radio Data System lorsque celui-ci
est disponible.
de radio base sur les signaux radio
RDS.
Réglages
Tuner Region USA AM Espacement de fréquence -
Option
s
10kHz
AM Bande de fréquence 530kHz~1720kHz
FM Espacement de fréquence 200kHz
FM Bande de fréquence-
87.5MHz~107.9MHz
America 1 AM Espacement de fréquence -
Arabia AM Espacement de fréquence - 9kHz
China AM Espacement de fréquence - 9kHz
America 2 AM Esp ace ment de fréquence - 5kHz
Europe AM Espacement de fréquence - 9kHz
Korea AM Espacement de f réquence - 9 kHz
OIRT
(International
Radio and
Television
Organization)
10kHz
AM Bande de fréquence 530kHz~1720kHz
FM Espacement de fréquence 100kHz
FM Bande de fréquence-
87.5MHz~108.0MHz
AM Bande de fréquence531kHz~1620kHz
FM Espacement de fréquence100kHz
FM Bande de fréquence -
87.5MHz~108.0MHz
AM Bande de fréquence 522kHz~1620kHz
FM Espacement de fréquence 100kHz
FM Bande de fréquence -
87.5MHz~108.0MHz
AM Bande de fréquence520kHz~1600kHz
FM Espacement de fréquence 100kHz
FM Bande de fréquence -
87.5MHz~108.0MHz
AM Bande de fréquence 522kHz~1620kHz
FM Espacement de fréquence 50kHz
FM Bande de fréquence-
87.5MHz~108.0MHz
AM Bande de fréquence 531kHz~1602kHz
FM Espacement de fréquence200kHz
FM Bande de fréquence -
88.1MHz~107.9MHz
AM Espacement de fréquence - 9kHz
AM Bande de fréquence 531kHz~1602kHz
FM Espacement de fréquence 200kHz
FM Bande de fréquence-
88.1MHz~107.9MHz
Fonction
Fonction sous-menu de classement
Le système DVD a une verrouille parentale encastré pour
empêcher des personnes non-autorisées de voir du contenu
du disque restraint. Par défaut, le système de classement est
réglé au réglage le plus haut (sans restrictions). La verrouille
parentale n'est relâché qu'en entrant le mot de passé correct.
Lorsque le mot de passe est entré, le classement est
disponible pour configuration.
Réglage Options Fonction
Password _ _ _ _ _ _ Entrez le mot de passé à six chiffres
Rating 1. Kid Safe Sélectionnez le niveau de classe-
2. G
3. PG
4. PG-13
5. PG-R
6. R
7. NC-17
8. Adult
Load Factory Reset Sélectionner « Reset » pour rétablir
Pour régler le mot de passé de nouveau, accédez au menu
« RATING » et entrez le mot de passe courant. Lorsque le
mot de passe correct es entré, vous pouvez accéder au
champ « Password » et en entrez un nouveau.
A NOTER : Enregistrez le mot de passé et gardez-le dans
un endroit sûr pour référence à l'aven ir. Le classement
pour chaque disque est marqué sur le disque,
l'emballage du disque ou la documentation. Si le
classement n'est pas disponible sur le disque la fonction
verrouille parentale n'est pas disponible. Certains
disques restreint certaines parties du disque et le conten
u approprié va jouer. Pour des détails référez-vous à la
description du disque.
Fonction sous-menu DivX
Sélectionnez le sous-menu DivX pour voir votre code
d'enregistrement DivX. Vous devez utiliser ce code pour
enregistrer votre platine, vous permettant d'acheter du vidéo
en utilisant le format Vidéo sur Demande DivX. .
Fonctions sous-menu du matériel
Si la camera video à vue arrière est branchée, l'appareil est
en marche et le moniteur TFT est retire à l'intérieur de
l'appareil, le moniteur TFT se déplace automatiquement à
une position de visionnement et la mode Caméra est
par défaut (012345).
ment approprié pour l'assistance
voulue.
Vous pouvez passer outre aux
réglages plus haut en utilisant votre
mot de passe.
les réglages d'usine par défaut pour
le système classement uniquement.
94
Page 99

VM9022
sélectionnée lorsque la voiture est en marche arrière.
Lorsqu'on change à la vitesse DRIVE, le moniteur TFT est
retiré de nouveau à l'intérieur de l'appareil au bout de dix
secondes.
Réglage Options Fonction
Camera Normal
TFT Set
Open (Ouverture automatiqueTFT )
Mirror Inverse l'image camera comme si
Auto Le panneau TFT s'ouvre automa-
Manual Lorsque le commutateur d'allumage
Off Vous devez appuyez sur le bouton
on voyait à travers le miroir à vue
arrière
tiquement lorsque l'appareil est mis
en marche.
est mis en arrêt, le panneau TFT ne
se retire pas s'il était dehors précédemment.
OPEN (1) pour ouvrir le panneau
TFT.
Si le moniteur est en mode affichage, le moniteur change
automatiquement à la mode CAMERA lorsque vous êtes en
marche arrière. Lorsque la marche arrière s'arrête, le
moniteur revient à la mode d'entrée d'origine.
Fonctions sous-menu P.VOL
Réglage Options Fonction
Source DISC Choisissez la source pour laquelle
RADIO
SD
SAT
AUX 1
USB
BT
AUX 2
iPod
NAV
vous voudriez augmenter le volume
relative. (NIVEAU).
Utilisez les boutons +/- pour augmenter le volume relative pour une
source spécifiée jusqu'à 6 décibels.
Pour sortir sans performer la calibration, touchez le bouton
BACK .
Sortir du Menu Configuration du
Système
Pour sortir de la mode configuration et reprendre la
reproduction normale, appuyez sur le bouton SETUP (31) sur
la télécommande ou touchez le bouton BACK sur l'écran.
TS Cal (Calibration de l'écran)
Pour accéder à la fonction 'Calibration de l'écran' depuis le
menu SETUP, sélectionnez l'option TS CAL.
Après avoir entré la mode de calibration, des réticules +
apparaissent dans un quadrant au coin de l'écran. Pour
commencer la calibration, appuyez et maintenez l'appui sur
les réticules pendant une seconde jusqu'à ce qu'il se déplace
au prochain quadrant. Continuez pour chaque quadrant
jusqu'à ce que la calibration soit terminée.
95
Page 100

RADIO
OPERATION TUNER
Affichage Tuner TFT
17
26
8
E
P1 87.5 MHz
Q
P2 90.1 MHz
R
E
A
P3 98.1 MHz
R
P4 106.1 MHz
P
I
P5 107.9 MHz
P
P6 102.9 MHz
27
9
11
13
4
1
FM-1 P1 87.5 MHz
ST
PS:
7
AS
BAND
1/2
15
19
1. Indicateur de la bande radio courante
2. Indicateur de fréquence radio
3. Horloge
4. Indicateur de transmission en stéréo
5. Indicateur de transmission de signal local fort
6. Stations de radio pré-réglées : Touchez pour rappeler
des stations de radio pré-réglées
7. Information RDS : PS (Program Service), PTY (Program
Type), RT (Radio Text)
8. EQ : Touchez pour voir Analyseur de Spéctrum >
Egaliseur
9. Touchez pour accéder à l'écran d'entrée directe
10. Indicateur de station pré-réglée courante
11. |<< : Touchez pour chercher en arrière
12. >>| : Touchez pour chercher en avant
2
24
10
5
LOC PTY RDS
20
14
12
16
PS
21
25
3
01:02 PM
AS
BAND
6
PTY
MEM
18
PS
1/2
23
LOC
2/2
22
13. : Touchez pour syntoniser une étape vers l'arrière
14. : Touchez pour syntoniser vers l'avant une étape
15. BAND : Touchez pour changer entre les bandes AM/FM
16. AS : T ouchez pour mettre des stations automatiquement
en mémoire
17. Touchez pour voir la SOURCE MENU et sélectionner
une nouvelle source de reproduction.
18. MEM : Voir l'écran utilisé pour entrer la chaîne courante
dans la mémoire pré-réglée
19. 1/2 ou 2/2 : Touchez ce bouton page pour voir une
deuxième page des boutons sur écran.
20. Touchez pour voir le menu SETUP.
21. PS (Balayage prévu) : Touchez pour balayer toutes les
stations disponibles, arrêtant à chaque station pendant
5 secondes et continuant jusqu'à ce qu'une station soit
sélectionnée.
22. LOC : Touchez pour syntoniser aux stations locales
fortes
23. PTY : Lorsque le PTY est appuyé, les catégories du
Type de Programme sont listées, permettant aux
écouteurs de trouver des programmes semblables par
genre. Lorsqu'une catégorie PTY est électionnée depuis
le menu d'écran tactile, la radio commencera à balayer
pour la catégorie sélectionnée.
24. Indique que la fonction PTY est active
25. Indique que la fonction RDS est désactivée.
26. REAR : Touchez pour voir l'écran de source arrière.
27. PIP : Touchez pour voir Arrière ; avant u la source NAV
Changer à la source Tuner Radio
• Touchez le coin gauche en haut de l'écran (le cercle
RADIO) pour voir le SOURCE MENU. Touchez
« RADIO ».
• Appuyez sur le bouton SRC button (6) sur le panneau
d'avant ou la télécommande (8) pour changer à AM/FM
ou la source RADIO.
Sélectionner bande AM/FM
Touchez le bouton BAND (15) sur l'écran ou appuyez sur le
bouton BAND sur l'appareil (4) ou sur la télécommande (20)
pour changer entre les bandes suivantes : FM1, FM2, FM3,
AM1, et AM2.
A NOTER : Le bouton BAND sur l'appareil ne fonctionne
que lorsque le TFT est fermé.
VM9022
Recherche Syntonisation
Pour chercher la prochaine station vers le haut :
• Touchez le bouton >>| sur l'écran.
• Déplacez la manette à droite.
Pour chercher la prochaine stations vers le bas :
• Touchez le bouton |<< sur l'écran.
• Déplacez la manette à gauche.
Syntonisation à la main
Pour augmenter ou diminuer la fréquence de syntonisation
par une étape :
• Touchez les boutons ou sur l'écran.
• Déplacez la manette à gauche/à droite.
Syntonisation Directe
Pour entrer une station de radio directement ; touchez le
bouton ou bien appuyez sur le bouton GOTO (21) sur
la télécommande pour afficher le menu d'entrée directe.
FM:___._MHz
1
2
3
Exit
6
5
4
9
8
7
0
Clear
Entrez la station de radio désirée en utilisant le pavé
numérique sur l'écran. Appuyez Enter pour syntoniser à la
station sélectionnée. Pour sortir de l'écran sans changer la
station, touchez Exit. Pour annuler votre entrée et
recommencer, touchez Clear.
Utilisation des stations pré-réglées
Six boutons numerotés de pré-réglage mettent en mémoire
et rappellent des stations pour chaque bande. Toutes les six
stations mises en mémoire (P1 à P6) pour la bande courante
apparaissent sur l'écran.
Mettez une Station en mémoire
1. Sélectionnez une bande (si nécessaire) et puis sélectionnez une station.
96
 Loading...