


TABLE OF CONTENTS
SECTION 1. KNOW YOUR MACHINE
Names of Parts ................................................... |
4 |
Setting the Spool Pin .......................................... |
4 |
Standard Accessories ......................................... |
6 |
Accessory storage............................................... |
6 |
Extension Table .................................................. |
6 |
Free-arm sewing ................................................. |
6 |
SECTION 2. GETTING READY TO SEW |
|
Connecting the Power Supply ............................ |
8 |
Controlling the Sewing Speed .......................... |
10 |
Reverse Stitch Lever ........................................ |
10 |
Dropping the Feed Dog .................................... |
10 |
Raising and Lowering the Presser Foot ........... |
12 |
Changing the Presser Foot ............................... |
12 |
Removing and Attaching the Foot Holder ........ |
12 |
Changing Needles ............................................ |
14 |
Needle and Thread Chart.................................. |
14 |
Winding the Bobbin........................................... |
16 |
Setting the spool ............................................... |
16 |
Additional spool pin........................................... |
16 |
Removing the bobbin ........................................ |
16 |
Winding the bobbin ........................................... |
18 |
Additional spool pin........................................... |
18 |
Inserting the bobbin .......................................... |
20 |
Threading the Machine ..................................... |
22 |
Drawing up the Bobbin Thread ......................... |
24 |
Selecting the Stitch Pattern .............................. |
26 |
Pattern selector dial .......................................... |
26 |
Stitch Length Dial.............................................. |
26 |
Adjusting stretch stitch balance ........................ |
28 |
Balancing Needle Thread Tension ................... |
30 |
SECTION 4. UTILITY STITCHES |
|
Basic Zigzag ..................................................... |
36 |
Overcasting ....................................................... |
36 |
Knit Stitch .......................................................... |
36 |
Tricot Stitch (Multiple Zigzag Stitch) ................. |
38 |
Straight Stretch Stitch ....................................... |
40 |
Zigzag Stretch Stitch......................................... |
40 |
Button Sewing ................................................... |
42 |
4-Step Buttonhole ............................................. |
44 |
To adjust buttonhole stitch density ...................... |
44 |
Corded Buttonhole ............................................ |
46 |
Zipper Application ............................................. |
48 |
Blind Hemming.................................................. |
57 |
SECTION 5. DECORATIVE STITCHES |
|
Decorative Stretch Stitches .............................. |
56 |
Smocking .......................................................... |
58 |
Pin Tucking ....................................................... |
60 |
Shell Tucking .................................................... |
60 |
Patchwork ......................................................... |
62 |
SECTION 6. |
|
CARE AND MAINTENANCE |
|
Cleaning the Hook Race and Feed Dogs ......... |
64 |
Replacing the Bobbin Holder ............................ |
66 |
Replacing the Light Bulb ................................... |
66 |
Troubleshooting ................................................ |
68 |
SECTION 3. BASIC SEWING |
|
Straight Stitch Sewing....................................... |
32 |
Changing the sewing direction ......................... |
32 |
Finishing sewing ............................................... |
32 |
Seam guides on the needle plate ..................... |
34 |
Turning a square corner ................................... |
34 |
1
ÍNDICE
SECCIÓN 1: DESCRIPCIÓN DE LA MÁQUINA |
|
Nombre de las partes ............................................... |
5 |
Accesorios estándar .................................................. |
5 |
Compartimento de accesorios.................................. |
7 |
Tabla de ampliación ................................................. |
7 |
Costura con el brazo libre ........................................ |
7 |
SECCIÓN 2. PREPARATIVOS ANTES DE COSER |
|
Conexión a la fuente de alimentación ...................... |
9 |
Control de la velocidad de costura .......................... |
11 |
Palanca de retroceso.............................................. |
11 |
Bajada de los dientes de arrastre .......................... |
11 |
Subida y bajada del pie prensatelas ....................... |
13 |
Cambio del pie prensatelas ..................................... |
13 |
Desmontaje y montaje del sujetador del prensatelas ..... |
13 |
Cambio de la aguja ................................................. |
15 |
Tabla de agujas e hilos .......................................... |
15 |
Bobinado de la bobina ............................................ |
17 |
Fijación del carrete ................................................. |
17 |
Extracción de la bobina ........................................... |
17 |
Bobinado de la bobina ............................................. |
19 |
Colocación de la bobina .......................................... |
21 |
Enhebrado de la máquina ...................................... |
23 |
Extracción del hilo de la bobina ............................. |
12 |
Selección del patrón de la puntada ........................ |
27 |
Selector de patrones .............................................. |
27 |
Regulador de la longitud de la puntada .................. |
27 |
Equilibrio de la puntada elástica ............................ |
29 |
Equilibrado de la tensión del hilo de la aguja ......... |
31 |
SECCIÓN 3. COSTURA BÁSICA |
|
Puntada recta .......................................................... |
33 |
Cambio de la dirección de costura ......................... |
33 |
Cierre de la costura ................................................ |
33 |
Guías de costura en la placa de agujas ................. |
35 |
Esquinas en ángulo ................................................ |
35 |
SECCIÓN 4. PUNTADAS PRÁCTICAS |
|
Zigzag básico........................................................... |
37 |
Cobertura (Sobrehilado) ......................................... |
37 |
Puntada en tejidos de punto.................................... |
39 |
Puntada de tricot (puntada de tricot múltiple) ........ |
39 |
Puntada recta elástica ............................................. |
41 |
Puntada elástica en zigzag .................................... |
41 |
Costura de botones ................................................. |
43 |
Ojales en 4 pasos .................................................... |
45 |
Ajuste de la densidad de la puntada del ojal .......... |
45 |
Ojal acordonado ..................................................... |
47 |
Costura de cremalleras ........................................... |
49 |
Dobladillo invisible .................................................. |
49 |
SECCIÓN 5. PUNTADAS DECORATIVAS |
|
Bordado de realces decorativos ............................. |
57 |
Puntadas elásticas decorativas ............................... |
59 |
Fruncido .................................................................. |
61 |
Prendido con alfileres ............................................. |
61 |
Retenido de forros .................................................. |
61 |
Uniones ................................................................... |
61 |
Patchwork costura estilo parche ............................ |
63 |
SECCIÓN 6. CUIDADOS Y MANTENIMIENTO |
|
Limpieza de la carrera del portabobinas y los dientes |
|
de arrastre ............................................................... |
65 |
Cambio del portabobinas ....................................... |
67 |
Cambio de la bombilla ............................................ |
67 |
Detección y solución de problemas ....................... |
69 |
2
TABLE DES MATIERES
SECTION1CONNAISSEZVOTREMACHINE |
SECTION5POINTSDCORATIFS |
|
|
Dénominationdescomposants |
5 |
Poinstretchsdécoratifs |
57 |
stablissementPortebobinedu |
5 |
Smocks |
59 |
Accessoiresstandard |
7 |
Nervures |
61 |
Tabledextension |
7 |
Pointcoquilles |
61 |
Rangementdesaccessoires |
7 |
Patchwork |
63 |
Coutureaveclebraslibre |
7 |
|
|
|
|
SECTION6SOINSETENTRETIEN |
|
SECTION2SEPR PARERCOUDRE |
|
Nettoyagedulogementdecrochetetdesgriffes |
|
Raccordementdelamachineausecteur |
dentraînement9 |
65 |
|
Contrledelavitessedecouture |
1 |
Remplacementportecanettedu |
67 |
Levierdepointarrire |
1 |
Remplacementdelampoule |
67 |
Abaissementdesgriffesdentraînement |
1 |
Dépistagdespannes |
70 |
Relevageetabaissementdupieddebiche |
13 |
|
|
Changementpieddebichede |
13 |
|
|
Retrainstallationetportepieddu |
13 |
|
|
Changementdaiguille |
15 |
|
|
Remplissagdelcanette |
17 |
|
|
Portebobinesupplémentaire |
17 |
|
|
Retraitdelcanette |
17 |
|
|
Remplissagdelcanette |
19 |
|
|
Brocheportebobinesupplémentaire |
19 |
|
|
Introductiondelcanette |
21 |
|
|
Enfilagedelamachine |
23 |
|
|
Remonterlefildelacanette |
25 |
|
|
Sélectiondumotifdepoint |
27 |
|
|
Sélecteurdemotif |
27 |
|
|
Sélecteurdelongueurdepoint |
27 |
|
|
Pourajusterléquilibrdespointsélastiques 29 |
|
|
|
quilibragdelatensiondufildaiguille |
31 |
|
|
SECTION3COUTURESTANDARD |
|
|
|
Couturepointdroit |
3 |
|
|
Pourmodifierlesensdelacouture |
3 |
|
|
Pourterminerlacouture |
3 |
|
|
Guidesdecouturedelaplaqueaiguilles |
35 |
|
|
Tournerunanglevif |
35 |
|
|
SECTION4POINTSULITAIRES |
|
|
|
Pointzigzagdebase |
37 |
|
|
Surfilage |
37 |
|
|
Pointtricot |
39 |
|
|
Pointpourtissutricotpointzigzagmultiple |
39 |
|
|
Pointdroitélastique |
41 |
|
|
Pointzigzagélastique |
41 |
|
|
Couturdeboutons |
43 |
|
|
Boutonnirenphases4 |
45 |
|
|
Pourajusterladensitédespoints |
|
|
|
deboutonnire |
45 |
|
|
Boutonnirecordonnet |
47 |
|
|
Posedefermetureglissire |
49 |
|
|
Ourletinvisible |
5 |
|
|
3

y t r e w
q
u
!8
!6
i
!7
o
!0 |
!5 |
|
!1 |
!3 !4 |
|
!2 |
||
|
||
|
@1 |
|
@2 |
|
|
|
@0 |
|
|
@8 |
|
|
!9 |
|
@3 |
|
|
|
@4 |
|
@5 |
#0 |
|
|
||
|
@9 |
@6
@7
SECTION 1. KNOW YOUR MACHINE
Names of Parts
q Bobbin winder stopper w Bobbin winder spindle
e Hole for additional spool pin r Spool pin
t Bobbin winder thread guide y Thread guide
u Thread take-up lever i Face plate
o Thread cutter !0Needle plate
!1Extension table (Accessory storage) !2Hook cover plate
!3Hook cover plate release button !4Thread tension dial
!5Reverse stitch lever !6Stitch length dial !7Pattern selector dial !8Stitch width dial !9Presser foot
@0Needle
@1Needle clamp screw @2Foot holder
@3Setscrew
@4Carrying handle @5Handwheel @6Power switch @7Machine socket @8Drop feed lever @9Free-arm
#0Foot lifter
Setting the Spool Pin
q |
Insert the spool pin into the hole as shown. |
|
wq Spool pin
w Hole
4
SECCIÓN 1:
DESCRIPCIÓN DE LA MÁQUINA Nombre de las partes
q Tope de la bobinadora
w Huso de la bobinadora de bobinas
e Orificio para segundo pasador de carrete r Pasador de carrete
t Guía hilos de la bobinadora y Guía hilos
u Tira hilos i Placa frontal o Cortahilos
!0Placa de agujas
!1Tabla de ampliación (caja de accesorios) !2Placa de la cubierta del portabobinas !3Botón de apertura de la placa de cubierta del
portabobinas
!4Regulador de tensión del hilo !5Palanca de retroceso
!6Regulador de longitud de la puntada !7Selector de patrones
!8Regulador del ancho de la puntada !9Pie Prensatelas
@0Aguja
@1Tornillo de fijación de la aguja @2Soporte del pie
@3Tornillo de fijación @4Asa de transporte @5Volante
@6Interruptor de encendido @7Toma de la máquina
@8Baje la palanca de los dientes de arrastre @9Brazo libre
#0Alzador del pie prensatelas
Montaje del passador de carrete
IIntroduzca el pasador del carrete en el orificio. q Pasador de carrete
w Orificio
SECTION 1. CONNAISSEZ VOTRE MACHINE
Dénomination des composants
q Butée du dévidoir w Broche du dévidoir
e Trou pour porte-bobine supplémentaire r Porte-bobine
t Guide-fil du dévidoir y Guide-fil
u Levier releveur de fil i Plaque frontale
o Coupe-fil !0Plaque à aiguilles
!1Table d’extension (boîte de rangement d’accessoires)
!2Couvercle de crochet
!3Bouton d’ouverture du couvercle de crochet !4Sélecteur de tension du fil
!5Levier de point arrière !6Sélecteur de longueur de point !7Sélecteur de motif !8Sélecteur de largeur de point !9Pied-de-biche
@0Aiguille
@1Vis de pince-aiguille @2Porte-pied
@3Vis de blocage @4Poignée de transport @5Volant
@6Interrupteur de mise sous tension @7Prise de courant de la machine @8Levier d’escamotage des griffes
d’entraînement @9Bras libre #0Releveur de pied
Établissement du Porte-bobine
Insérez le porte-bobine dans le trou comme montré. q Porte-bobine
w Trou
5

qw
rt
u  i
i
!0 !1
q
e 
y
o
!2
e
w
r
Standard Accessories
q Zipper foot E
w Blind hemming foot G e Buttonhole foot B
r Sliding buttonhole foot J t Needles
y Bobbins
u Screwdriver i Lint brush
o Seam ripper (buttonhole opener) !0Spool holder (large)
!1Spool holder (small) !2Additional spool pin !3Felt cushion
ExtensionTable
Thextensiontableprovidesanextendedsewing areandcanbeasilyremovedforfreearm sewing Theaccessoriescanbestoredinthetable
Detachingthetable
Pullthetableawayfromthemachineas ilustrated
Attachingthetable
Pushthextensiontableinsertingthetabinto
theslotuntilthetablesnapsintothemachine
q Extensiontable
w Tab
e Slot
r Accessorystorage
Free-arm sewing
Free-arm sewing is used for stitching sleeves, waistbands, pant legs or any other tubular garments.
It is also useful for darning socks or mending knees or elbows.
6
Accesorios estándar
q Pie para cremalleras (E)
w Pie para dobladillo invisible (G) e Pie deslizante para ojales (J) r Agujas
t Bobinas
y Destornillador
u Cepillo para pelusa
i Descosedor (abridor de ojales) o Portacarretes (grande) !0Portacarretes (pequeño) !1Segundo pasador de carrete !2Cojín de fieltro
Accessoires standard
q Pied à semelle étroite E
w Pied pour ourlets à points cachés G e Pied de boutonnière J
r Aiguilles
t Canettes
y Tournevis
u Brosse anti-peluche
i Découd -vite (ouvre-boutonnière) o Disque fixe-bobine (grand modèle) !0Disque fixe-bobine (petit modèle) !1Porte-bobine supplémentaire !2Coussinet de feutre
Tabla de ampliación
Los accesorios estándar se pueden guardar en la caja de accesorios situada bajo la tabla de ampliación.
Desmontaje:
Extraiga la tabla de ampliación hacia la izquierda.
Montaje:
Introduzca el pasador por el orificio y empuje la tabla de ampliación para colocarla en su sitio.
q Caja de accesorios w Pasador
e Orificio
r Caja de accesorios
Costura con el brazo libre
La costura con el brazo libre se utiliza para coser mangas, cinturillas, perneras y demás prendas con forma de tubo.
También se utiliza para zurcir calcetines y arreglar rodilleras y coderas.
Table d’extension
Les accessoires standard peuvent être rangés dans la boîte de rangement d’accessoires sous la table d’extension.
Tirez la boîte de rangement se trouvant sous la table comme illustré.
Retrait:
Tirez la table d’extension vers la gauche.
Installation:
Insérez la broche dans le trou et poussez la table d’extension jusqu’à ce qu’elle s’encastre avec un claquement.
q Table d’extension w Broche
e Trou
r Boîte de rangement des accessoires
Couture avec le bras libre
Le bras libre permet de coudre les manches, les ceintures, les jambes de pantalons et autres vêtements cylindriques.
Il est également idéal pour repriser les chaussettes, les genoux de pantalons et les coudes de chemises.
7
SECTION 2. GETTING READY TO SEW
q
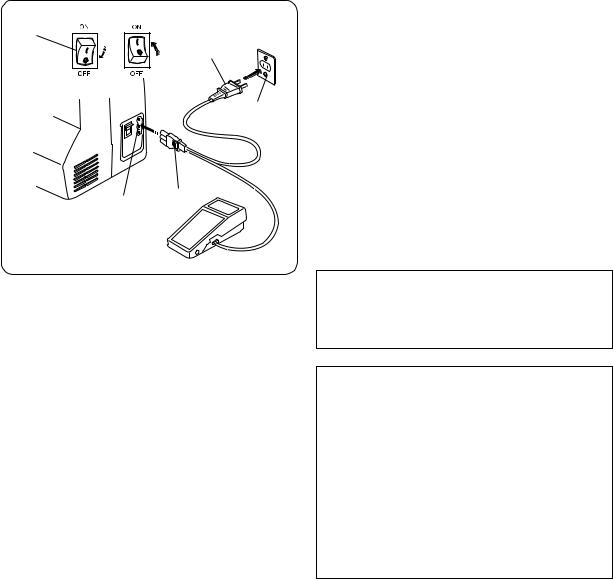
Connecting the Power Supply
r
z Turn the power switch off.
x Insert the machine plug into the machine
tsocket.
|
|
c Insert the power supply plug into the wall |
|
|
outlet. |
|
|
v Turn the power switch on. |
|
w |
q Power switch |
e |
w Machine plug |
|
|
|
e Machine socket |
|
|
r Power supply plug |
|
|
t Wall outlet |
|
|
NOTE: |
|
|
Before connecting to the power supply, make |
|
|
sure the voltage shown on the machine |
|
|
conforms to your electrical power. |
 WARNING:
While in operation, always keep your eyes on the sewing area, and do not touch any moving parts such as the thread take-up lever, handwheel or needle.
Always turn off the power switch and unplug from the power supply:
- when leaving the machine unattended. - when attaching or removing parts.
- when cleaning the machine.
Do not place anything on the foot control, otherwise the machine will run intermittently.
Operating Instructions:
The symbol "O" of a switch indicates the "off" position of a switch.
For an appliance with a polarized plug (one blade wider than the other):
To reduce the risk of electrical shock, this plug is intended to fit in a polarized outlet only one way. If it does not fit fully in the outlet, reverse the plug. If it still does not fit, contact a qualified electrician to install the proper outlet. Do not modify the plug in any way.
The foot controller Model YC-482J or TJC-150 is used with the sewing machine Model My Style 100 (USA market only).
8

SECCIÓN 2.
PREPARATIVOS ANTES DE COSER
Conexión a la alimentación
z Ponga el interruptor en la posición OFF.
x Introduzca el enchufe de la máquina en la toma de corriente.
cIntroduzca el enchufe de alimentación en la toma de la pared.
vPonga el interruptor en la posición ON. q Interruptor de encendido
w Enchufe de la máquina e Toma de la máquina
r Enchufe de alimentación t Toma de pared
NOTA:
Antes de conectar la máquina a la alimentación, cerciórese de que la tensión que muestra la máquina corresponde a la red eléctrica de su hogar.
 ATENCIÓN:
Mientras tenga la máquina en funcionamiento, no pierda de vista la zona de costura y no toque ninguna pieza móvil, como la palanca tira hilos, el volante o la aguja. No olvide apagar el interruptor y desenchufar la máquina de la red eléctrica:
-Cuando vaya a dejar la máquina sin vigilancia
-Cuando vaya a fijar o a retirar una pieza
-Cuando vaya a limpiar la máquina
No coloque ningún objeto sobre el pedal; si lo hace, la máquina funcionará intermitentemente.
Instrucciones de uso (E.E.U.U. y Canadá):
El símbolo “ O ” en un interruptor indica que está en la posición “ OFF ” (apagado).
Para los aparatos con enchufe polarizado (con una clavija más ancha que la otra).
Para reducir el riesgo de descarga eléctrica, este nchufe se debe utilizar en una tomaa polarizada de posición única.
Si el enchufe no entra totalmente en la toma de corriente, gírelo. Si aún as no entra bien, llame a un electricista calificado para que le instale una toma de corriente apropiada. No altere el enchufe en forma alguna.
Con la máquina Modelo My Style 100 se debe utilizar el pedal modelo YC-482J-EC.
SECTION 2. SE PRÉPARER À COUDRE
Raccordement de la machine au secteur
zMettez l’interrupteur d’alimentation en position d’arrêt.
xIntroduisez la fiche de la machine dans la prise de la machine.
cIntroduisez la fiche d’alimentation dans la prise murale.
vMettez l’interrupteur d’alimentation en position de marche.
q Interrupteur de mise sous tension w Fiche de la machine
e Prise de courant de la machine r Fiche d’alimentation
t Prise de courant murale
REMARQUE:
Avant le branchement, assurez-vous que le voltage indiqué sur la machine correspond au type de courant du secteur.
AVERTISSEMENT :
Pendant le fonctionnement de la machine, maintenez toujours votre attention sur la zone de couture, et ne touchez aucun élément en mouvement tel que le levier releveur de fil, le volant ou l’aiguille.
Coupez toujours l’interrupteur d’alimentation et débranchez la machine :
-lorsque vous laissez la machine sans surveil lance,
-lorsque vous installez ou démontez des éléments,
-lorsque vous nettoyez la machine.
Ne placez rien sur la pédale, sinon la machine risque de tourner par intermittence.
9

Controlling the Sewing Speed
Foot control
Sewing speed can be varied by the foot control. The harder you depress the foot control, the faster the machine runs.
Reverse Stitch Lever
Push the reverse stitch lever down to sew in reverse.
The machine will sew in reverse while the lever is pushed.
w |
e |
Dropping the Feed Dog |
|
The drop feed lever is located underneath the |
|||
|
|
||
|
|
free-arm bed on the front side of the machine. |
|
|
|
To drop the feed dog, push the lever in the |
|
|
|
direction of the arrow, as illustrated. |
|
|
|
To raise the feed dog, push the lever in the |
|
|
|
direction of the arrow, as illustrated, and turn the |
|
|
|
handwheel toward you. |
|
|
|
The feed dog must be up for regular sewing. |
|
|
|
q Drop feed lever |
|
|
|
w Raised position |
|
|
|
e Lowered position |
q
10
Control de la velocidad de costura
Pedal
La velocidad de costura se puede variar con el pedal de control de velocidad.
Cuanto más pise el pedal, a mayor velocidad funcionará la máquina.
Palanca de retroceso
Baje la palanca de retroceso para coser hacia atrás.
Mientras presione la palanca, la máquina coserá en sentido contrario.
Bajada de los dientes de arrastre
La palanca de los dientes de arrastre se encuentra bajo el alojamiento del brazo libre, en la parte posterior de la máquina.
Para bajar los dientes de arrastre, mueva la palanca en la dirección de la flecha, como muestra la ilustración.
Para elevar los dientes de arrastre, mueva la palanca en la dirección de la flecha, como muestra la ilustración, y gire el volante hacia usted.
Los dientes de arranque tienen que estar en la posición alta para la costura normal.
q Baje la palanca de los dientes de arrastre w Posición elevada
e Posición bajada
Contrôle de la vitesse de couture
Pédale
La pression exercée sur la pédale fait varier la vitesse de couture.
Plus vous appuyez sur la pédale, plus la machine va vite.
Levier de point arrière
Abaisser le levier de point arrière pour coudre en marche arrière.
La machine coud en marche arrière lorsque le levier est abaissé.
Abaissement des griffes d’entraînement
Le levier d’escamotage des griffes d’entraînement est situé sous le bâti du bras libre sur la face arrière de la machine.
Pour abaisser les griffes d’entraînement, positionnez le levier dans la direction de la flèche, comme illustré.
Pour relever les griffes d’entraînement, positionnez le levier dans la direction de la flèche, comme illustré, puis tournez le volant vers vous. Les griffes d’entraînement doivent se trouver en position relevée pour une couture normale.
qLevier d’escamotage des griffes d’entraînement
w Position relevée e Position abaissée
11
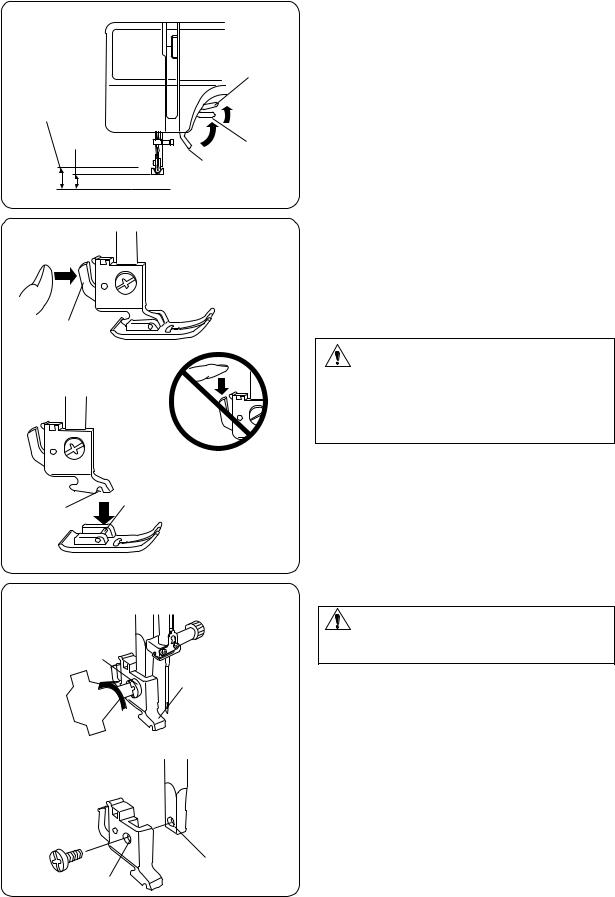
Raising and Lowering the Presser Foot
The presser foot lifter raises and lowers the presser foot.
eYou can raise the foot about 1/4" (0.6 cm) higher than the normal up position for easy removal of
e |
|
the presser foot, or to help you place heavy fabric |
|
|
|
under the foot. |
|
w |
w |
q Lowered position |
|
|
q |
w Normal up position |
|
|
e Extra up position |
||
|
|
Changing the Presser Foot |
|
|
|
To remove: |
|
|
|
Raise the needle to its highest position by turning |
|
|
|
the handwheel counterclockwise. Raise the |
|
|
|
presser foot, and press the lever on the back of |
|
q |
|
the foot holder. |
|
|
q Lever |
||
|
|
CAUTION: |
|
|
|
Turn OFF the power switch before changing the |
|
|
|
foot. Always use the proper foot for the selected |
|
|
|
pattern. The wrong foot can cause the needle to |
|
|
|
break. Do not push the lever down to prevent it |
|
|
|
from being broken. |
|
|
|
To attach: |
|
|
|
Place the desired presser foot, so that the pin on |
|
|
e |
the foot lies just under the groove on the foot |
|
w |
holder. Lower the presser foot lifter to lock the |
||
|
|||
|
|
foot in place. |
|
|
|
w Groove |
|
|
|
e Pin |
|
|
|
Removing and Attaching the Foot Holder |
|
|
|
WARNING: |
|
|
|
Turn OFF the power switch before detaching or |
|
|
q |
attaching the foot holder. |
|
|
w |
To remove: |
|
|
|
Remove the setscrew by turning it |
|
|
|
counterclockwise with a screwdriver and remove |
|
|
|
the foot holder. |
|
|
|
To attach: |
|
|
|
Match the hole in the foot holder with the |
|
|
|
threaded hole in the presser bar. Fit the setscrew |
|
|
|
into the hole. Tighten the screw by turning it |
|
|
|
clockwise with a screwdriver. |
|
|
|
q Setscrew |
|
|
|
w Foot holder |
|
|
r |
e Hole |
|
|
e |
r Threaded hole |
12

Subida y bajada del prensatelas
El alzador del prensatelas sube y baja el prensatelas
Puede subirlo hasta unos 0,6 cm por encima de la posición normal para facilitar el desmontaje del prensatelas o para colocar tejidos pesados bajo él.
qPosición bajada
wPosición normal elevada de la aguja ePosición de elevación adicional
Cambio del pie prensatelas
Extracción:
Levante la aguja hasta su posición más alta, girando el volante a la izquierda. Eleve el pie y pulse la palanca de la parte posterior del sujetador del pie.
qPalanca
 PRECAUCIÓN:
Ponga el interruptor en OFF antes de cambiar el pie. Utilice siempre el pie adecuado para el patrón que haya elegido.
Un pie incorrecto puede hacer que se rompa la aguja.
No baje la palanca para impedir que se rompa.
Montaje:
Coloque el pie de forma que el pasador quede bajo la ranura del prensatelas. Baje el soporte del pie hasta que quede bien colocado.
w Ranura e Pasador
Desmontaje y montaje del sujetador del prensatelas
 ATENCIÓN:
Ponga el interruptor en OFF antes de quitar o colocar el sujetador del prensatelas.
Extracción:
Saque el tornillo de sujeción, girándolo hacia la izquierda con un destornillador, y retire el sujetador del pie.
Montaje:
Haga coincidir el orificio del sujetador del pie con el orificio roscado de la barra del prensatelas. Introduzca el tornillo de sujeción en el orificio. Apriete el tornillo, girándolo a la derecha con un destornillador.
q Tornillo de fijación w Soporte del pie e Orificio
r Orificio roscado
Relevage et abaissement du pied-de-biche
Le releveur de pied permet de relever et d’abaisser le pied-de-biche.
Vous pouvez le relever à environ 0.6 cm audessus de la position relevée normale pour pouvoir retirer facilement le pied-de-biche, ou pour vous aider à placer une étoffe épaisse sous le pied.
q Position abaissée
w Position relevée normale e Position très relevée
Changement de pied-de-biche
Retrait :
Relevez l’aiguille à sa position la plus haute en tournant le volant en sens contraire des aiguilles d’une montre. Relevez le pied-de-biche, et appuyez sur le levier à l’arrière du porte-pied.
q Levier
ATTENTION :
Mettez l’interrupteur d’alimentation en position d’ARRÊT avant de changer le pied.
Utilisez toujours le pied approprié pour le motif sélectionné.
Un mauvais pied peut casser l’aiguille.
Ne pas pousser le levier vers le bas pour éviter de le casser.
Installation:
Placez le pied-de-biche désiré de façon à ce que la charnière du pied se trouve juste sous l’échancrure du porte-pied. Abaissez le releveur de pied pour verrouiller le pied en position.
w Échancrure e Charnière
Retrait et installation du porte-pied
 AVERTISSEMENT:
Mettez l’interrupteur d’alimentation en position d’ARRÊT avant de retirer ou d’installer le portepied.
Retrait:
À l’aide d’un tournevis, enlevez la vis de blocage en tournant en sens inverse des aiguilles d’une montre et retirez le porte-pied.
Installation:
Faites correspondre le trou pratiqué dans le porte-pied avec le trou fileté de l’axe du pied-de- biche. Placez la vis de blocage dans le trou. Serrez la vis avec un tournevis en tournant dans le sens des aiguilles d’une montre.
q Vis de blocage w Porte-pied
e Trou
r Trou fileté
13

|
Changing Needles |
q |
CAUTION: |
w q |
Always make sure to turn the power switch off |
|
and disconnect the machine from power supply |
|
before changing the needle. |
|
Raise the needle by turning the handwheel and |
e |
lower the presser foot. |
Turn off the power switch. |
z Loosen the needle clamp screw by turning it counterclockwise.
Remove the needle from the clamp. q Needle clamp screw
|
|
|
|
|
|
|
|
x Insert a new needle into the needle clamp with |
|
|
|
|
|
|
|
|
the flat side of the needle to the rear. |
|
|
|
|
|
|
|
|
When inserting the needle into the needle |
|
|
|
|
|
|
|
|
clamp, push it up against the stopper pin and |
|
|
|
|
|
|
|
|
tighten the needle clamp screw firmly. |
|
|
|
|
|
|
|
|
w Stopper pin |
|
|
|
|
|
|
|
|
|
r |
|
|
|
|
|
|
|
e Flat side |
|
|
|
|
|
|
|
||
|
|
|
|
|
|
|
||
|
|
|
|
|
|
|
||
|
|
|
|
|
|
|
|
|
To check needle straightness, place the flat side of the needle onto something flat (a needle plate, glass etc.) The gap between the needle and the flat surface should be consistent.
Never use a blunt needle. r Gap
Needle and Thread Chart
Fabric |
Thread |
Needle |
|
|
Lawn |
Silk #80-100 |
#9/65–11/75 |
Light |
Georgette |
Cotton #80-100 |
|
Tricot |
Synthetic #80-100 |
|
|
|
Wool, |
|
|
|
Polyester |
|
|
|
|
|
|
|
Cotton, |
Silk #50 |
#11/75–14/90 |
Medium |
Polyester |
Cotton #60-80 |
|
|
Fine jersey |
Synthetic #50-80 |
|
|
Wool |
Cotton #50 |
#14/90 |
|
|
|
|
|
Denim |
Silk #50 |
#14/90–16/100 |
Heavy |
Jersey |
Cotton #40-50 |
|
Coating |
Synthetic #40-50 |
|
|
|
|
||
|
Quilting |
Silk #30 |
#16/100 |
|
|
Cotton #50 |
|
|
|
|
|
14
Cambio de la agujas
 PRECAUCIÓN:
Asegúrese de que ha apagado y ha desenchufado la máquina de la red eléctrica antes de cambiar la aguja.
Levante la aguja girando el volante hacia usted y baje el pie prensatelas.Ponga el interruptor en OFF.
Afloje el tornillo de fijación de la aguja, girándolo hacia la izquierda.
zSaque la aguja de su sujeción. q Tornillo de fijación de la aguja
xIntroduzca una nueva aguja en la fijación, con el lado plano de la aguja hacia atrás.
Al introducir la aguja en la sujeción, empújela hacia arriba, hasta el pasador de tope, y apriete el tornillo de fijación con fuerza.
w Pasador de tope e Lado plano
Para comprobar que la aguja no está torcida, ponga el lado plano de la aguja sobre una superficie horizontal plana (placa de agujas, cristal, etc.).
La separación entre la aguja y la superficie plana tiene que ser constante.
No use agujas desgastadas. r Espacio
Selección de hilo y tela
|
Telas |
Hilo |
Tamaño |
|
|
de aguja |
|||
|
Crespón de China, |
Seda fina, |
9 |
|
Peso |
gasa, linón, organdí, |
algodón fino, |
||
crespón georgette, |
tela sintética |
o |
||
ligero |
||||
tricot |
fina, poliéster |
|||
10 |
||||
|
|
revestido de |
||
|
|
algodón fino |
|
|
|
|
|
|
|
|
Lino, algodón, piqué, |
seda 50, |
11 |
|
Peso |
sarga, puntos |
algodón 50 a 80, |
||
dobles, percal |
sintético 50 a |
o |
||
medio |
||||
|
60, poliéster |
14 |
||
|
|
revestido de |
||
|
|
algodón |
|
|
|
|
|
|
|
|
Tela tejana, tweed, |
seda 50, |
14 |
|
Peso |
gabardina, revestida, |
algodón 40 a 50, |
||
pañería y tapicería |
sintético 40 a |
o |
||
pesado |
||||
|
50, poliéster |
|||
|
|
revestido de |
16 |
|
|
|
algodón |
|
|
|
|
|
|
Changement d’aiguille
 ATTENTION:
Veillez à toujours mettre la machine hors tension et à débrancher le cordon d’alimentation de la prise secteur avant de changer l’aiguille.
Levez l’aiguille en tournant le volant vers vous et abaissez le pied-de-biche.
Mettez l’interrupteur d’alimentation en position d’arrêt.
zDesserrez la vis du pince-aiguille en la tournant dans le sens contraire des aiguilles d’une montre.
Déposez l’aiguille du pince-aiguille. q Vis de pince-aiguille
xIntroduisez une nouvelle aiguille dans le pinceaiguille, avec le côté plat orienté vers l’arrière. Au moment d’insérer l’aiguille dans le pinceaiguille, poussez-la au maximum vers le haut, contre l’axe de butée, puis serrez fermement la vis du pince-aiguille.
w Axe de butée e Côté plat
Pour vérifier si une aiguille est droite, placez le côté plat de l’aiguille sur une surface plane (plaque à aiguille, miroir etc.).
L’écartement entre l’aiguille et la surface plane doit être le même partout.
N’utilisez jamais une aiguille émoussée. r Écartement
|
Tissu |
Fil |
Aiguille |
|
|
|
|
|
Crêpe de chine, |
Fil de soie fin |
70 |
Léger |
voile, linon, |
Fil de coton fin |
|
Organdi, |
Fil synthétique fin |
ou |
|
|
georgette, |
Fil polyester fin |
80 |
|
Tricot |
Renforcé avec du |
|
|
|
coton |
|
|
Lainage, coton, |
Fil de soie 50 |
80 |
Moyen |
Piqué, serge, |
Fil de coton 50 à 80 |
|
Tricot double, |
Fil polyester |
ou |
|
|
Percale |
Renforcé avec du |
90 |
|
|
Coton |
|
|
|
Synthétique 50 à 60 |
|
|
Denim, tweed |
Fil de soie 50 |
90 |
Épais |
Gabardine, |
Fil de coton 40 à 50 |
|
tissu de man- |
Fil de polyester |
ou |
|
|
teau et de |
Renforcé avec |
100 |
|
rembourrage |
coton synthétique |
|
|
|
40 à 50 |
|
|
|
|
|
15
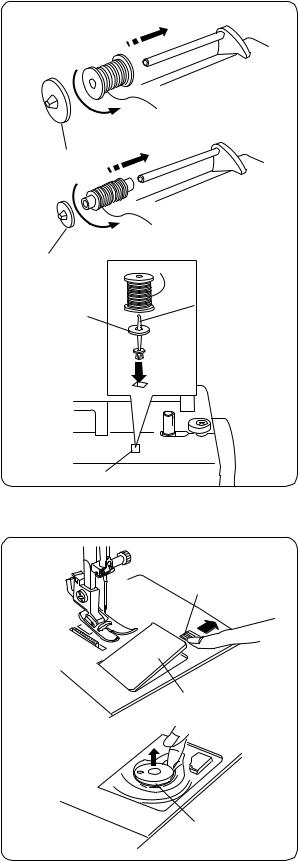
Winding the Bobbin
(A)
|
|
Setting the spool |
|
|
Place a spool of thread on the spool pin with the |
|
|
thread coming off the spool as illustrated. |
|
|
A: Press the large spool holder firmly against the |
|
(B) |
spool of thread. |
q |
q Large spool holder |
|
|
|
|
|
|
B: For a small spool, use the small spool holder. |
|
|
w Small spool holder |
w
|
|
Additional spool pin |
r |
e |
The additional spool pin is for bobbin winding |
|
without unthreading the machine. |
|
|
|
|
|
|
Insert the additional spool pin into the hole. |
|
|
Place the felt and a spool on the pin. |
|
|
e Additional spool pin |
|
|
r Spool pin felt |
|
|
t Spool pin hole |
t
|
|
Removing the bobbin |
z |
q |
z Push the hook cover plate release button to |
|
|
the right and remove the cover plate. |
|
|
q Hook cover plate release button |
|
|
w Hook cover plate |
w
x |
x Lift out the bobbin. |
|
e Bobbin |
||
|
e
16
Bobinado de la bobina |
Remplissage de la canette |
Fijación del carrete
Coloque el carrete de hilo en el pasador del carrete, haciendo que el hilo salga del carrete como se muestra.
A: Presione el sujetador de carrete grande firmemente contra el carrete de hilo.
q Sujetador de carrete grande
B: Para un carrete pequeño, utilice el sujetador pequeño.
w Sujetador de carrete pequeño
Segundo pasador de carrete
El pasador de carrete adicional sirve para enrollar las bobinas sin necesidad de desenhebrar la máquina.
Introduzca el pasador del carrete adicional en el orificio.
Ponga el fieltro y un carrete en el pasador. e Segundo pasador de carrete
r Fieltro del pasador de carrete t Orificio del pasador de carrete
Extracción de la bobina
zMueva a la derecha el botón de apertura de la placa de cubierta del portabobinas, y saque la cubierta.
q Botón de apertura de la placa de cubierta del portabobinas
w Placa de la cubierta del portabobinas
xExtraiga la bobina. e Bobina
Réglage de la bobine de fil
Placez une bobine de fil sur le porte-bobine, avec le fil positionné comme illustré.
A: Appuyez fermement le disque fixe-bobine grand modèle contre la bobine de fil.
q Disque fixe-bobine grand modèle
B: Pour une petite bobine, utilisez le disque fixebobine petit modèle.
w Disque fixe-bobine petit modèle
Porte-bobine supplémentaire
Le porte-bobine supplémentaire permet de remplir une canette sans désenfiler la machine.
Insérez le porte-bobine supplémentaire dans le trou.
Placez le feutre et une bobine sur l’axe. e Porte-bobine supplémentaire
r Feutre pour porte-bobine t Trou du porte-bobine
Retrait de la canette
zPoussez le bouton d’ouverture du couvercle de crochet vers la droite, puis retirez le couvercle de crochet.
q Bouton d’ouverture du couvercle de crochet
w Couvercle de crochet
xSoulevez la canette pour la sortir. e Canette
17
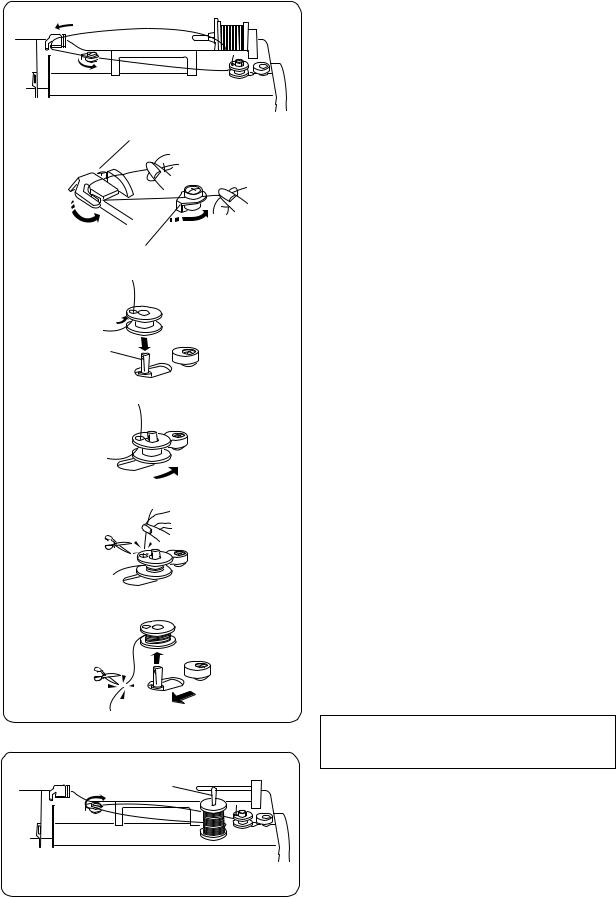
Winding the bobbin
z Hold the thread with both hands and
|
pass the thread under the thread guide. |
|
q Thread guide |
|
q |
z |
|
|
x Guide the thread around the bobbin |
|
winding thread guide. |
|
w Bobbin winding thread guide |
|
w |
x |
c Pass the thread through the hole in the |
|
|
|
bobbin from the inside to the outside. |
|
Put the bobbin on the bobbin winder |
e |
spindle. |
|
v Push the bobbin winder spindle to the |
c |
right. |
|
|
b Hold the free end of the thread in your |
v |
|
hand and start the machine. |
|
|
Stop the machine when the bobbin has been |
|
|
wound a few layers, and cut the thread close |
|
|
to the bobbin. |
|
|
n Start the machine again. When the bobbin |
b |
|
is fully wound, it will stop automatically. |
|
Stop the machine and return the bobbin |
|
|
|
|
|
|
winder spindle to its original position by |
|
|
moving it to the left, and cut the thread with a |
|
|
pair of scissors. Remove the bobbin from the |
|
|
bobbin winder spindle. |
|
|
NOTE: |
|
|
The machine will not sew until the spindle has |
|
|
been returned to the left. |
|
q |
Additional spool pin |
|
|
|
|
|
The additional spool pin is for bobbin winding |
|
|
without unthreading the machine. |
|
|
q Additional spool pin |
18

Bobinado de la bobina |
Remplissage de la canette |
xTire del hilo del carrete. Guíe el hilo alrededor del guía hilos.
q Guía hilos
xGuíe el hilo alrededor del guía hilos de la bobinadora.
w Guía hilos de la bobinadora
cInserte el hilo por el agujero de la bobina, pasándolo del lado interior al exterior. Ponga la bobina o el huso de la bobinadora.
v Empuje la bobina hacia la derecha.
bSujete con la mano el extremo libre del hilo y pise el pedal. Detenga la máquina cuando la bobina haya dado algunas vueltas y corte el hilo cerca de la bobina.
nPise de nuevo el pedal. La bobina se detendrá automáticamente cuando se acabe el bobinado.
Devuelva la bobinadora a su posición original desplazando el huso hacia la izquierda, y corte el hilo como se indica.
NOTA:
No mueva el huso de la bobinadora mientras la máquina esté funcionando.
Segundo pasador de carrete
El pasador de carrete adicional sirve para enrollar las bobinas sin necesidad de desenhebrar la máquina.
q Segundo pasador de carrete
zTirez le fil de la bobine. Guidez le fil autour du guide-fil.
q Guide-fil
xGuidez le fil autour du guide-fil du dévidoir. w Guide-fil du dévidoir
cFaites passer le fil par l’orifice de la canette, en l’enfilant de l’intérieur vers l’extérieur.
Placez la canette sur la broche du dévidoir. e Broche du dévidoir
vRepoussez la canette vers la droite.
vEn tenant l’extrémité libre du fil dans la main, appuyez sur la pédale. Arrêtez la machine après avoir enroulé plusieurs épaisseurs de fil sur la canette, puis coupez le fil tout près de la canette.
bAppuyez à nouveau sur la pédale. Quand la canette est complètement enroulée, elle s’arrête automatiquement.
Pour remettre le dévidoir à sa position initiale, déplacez la broche vers la gauche et coupez le fil comme illustré.
REMARQUE:
Ne touchez pas à la broche du dévidoir pendant le fonctionnement de la machine.
Broche porte-bobine supplémentaire
Introduisez la broche porte-bobine supplémentaire dans la plaque porte-bobine et dans le trou. Placez le feutre et une bobine sur la broche, comme illustré.
q Broche porte-bobine supplémentaire
19

|
Inserting the bobbin |
z |
q |
z Place the bobbin in the bobbin holder with the |
|
|
thread running off as illustrated. |
|
q Thread |
x |
x Guide the thread into the front notch on the |
|
front side of thebobbin holder. Draw the |
|
thread to the left, sliding it between the |
|
tension spring blades. |
|
w Front notch |
|
e Tension spring blade |
|
w |
|
e |
c |
c Continue to draw the thread lightly until the |
|
thread slips into the side notch. |
|
r Side notch |
r
v |
v Pull out about 4” (10 cm) of thread. Attach the |
|
hook cover plate. Check the threading by |
|
referring to the chart shown on the hook cover |
|
plate. |
|
t Thread |
|
y Hook cover plate |
t
y
20
Colocación de la bobina
zColoque la bobina en el portabobinas con el hilo saliendo por donde muestra la ilustración. q Hilo
xPase el hilo por la muesca de la parte delantera del portabobinas. Saque el hilo por la izquierda, pasándolo entre las hojas del muelle de tensión.
w Muesca delantera
e Hoja del muelle de tensión
cContinúe sacando hilo hasta que alcance la ranura lateral.
r Ranura lateral
vTire unos 10 cm de hilo. Fije la placa de cubierta del portabobinas. Compruebe el enhebrado; para ello, consulte el gráfico que aparece en la placa de cubierta del portabobinas
t Hilo
y Placa de la cubierta del portabobinas
Introduction de la canette
zPlacez la canette dans le support de canette en laissant le fil se dérouler comme illustré. q Fil
xGuidez le fil dans l’encoche frontale, du côté avant du support de canette. Tirez le fil vers la gauche, en le faisant glisser entre les lames de tension.
w Encoche frontale e Lame de tension
cContinuez à tirer le fil avec précaution jusqu’à ce qu’il s’engage dans l’encoche latérale.
r Encoche latérale
vTirez environ 10 cm de fil. Installez le couvercle de crochet. Référez-vous au schéma d’enfilage se trouvant sur le couvercle de crochet.
t Fil
y Couvercle de crochet
21
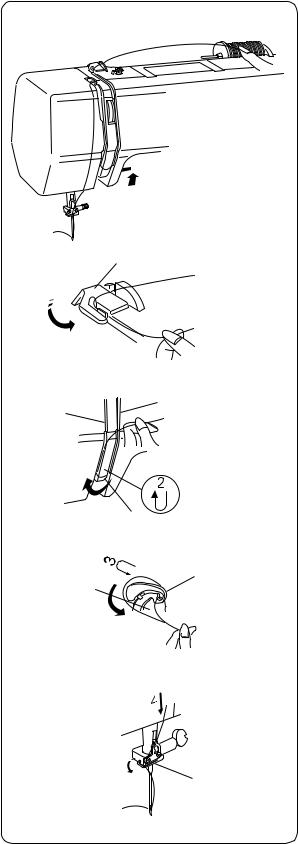
Threading the Machine
To set the needle thread:
Raise the presser foot.
Press the needle up/down button to raise the thread take-up lever to its highest position.
b
q |
z Draw the thread from the spool and pass it |
z |
under |
|
the thread guide. |
|
q Thread guide |
x |
|
w |
|
x Draw the thread down along the right |
|
|
|
channel and pull it up around the bottom of the |
|
r |
|
|
|
|
|
|
|
|
thread guide plate. |
|
|
|
|
Pull the thread up along the left channel. |
|
|
|
|
w Right channel |
|
|
|
|
e Thread guide plate |
|
|
|
|
r Left channel |
|
e |
|
|
c Firmly draw the thread from right to left over |
c |
|
|
|
|
|
|
|
the thread take-up lever and down into the |
|
|
|
|
t |
|
|
|
|
take-up lever eye. |
|
|
|
|
|
|
|
|
|
|
t Thread take-up lever |
v |
|
v Draw the thread down along the left channel |
|
|
|
b |
|
and slip the thread behind the needle bar |
|
|
thread guide from the left. |
|
|
y Needle bar thread guide |
|
y |
b Pass the thread through the needle eye from |
|
|
|
|
|
the front. |
22
Enhebrado de la máquina
Para colocar el hilo de la aguja:
Levante la palanca tira hilos hasta su posición más elevada, girando el volante.
Eleve el prensatelas.
zTire el hilo del carrete y páselo por debajo del guiahilos. Después, hágalo pasar por el canal derecho, hacia abajo.
q Guiahilos
xHaga pasar el hilo alrededor de la base de la placa del guiahilos.
Tire del hilo hacia arriba, por el canal izquierdo.
w Canal derecho
e Placa del guiahilos r Canal izquierdo
cPase firmemente el hilo de derecha a izquierda por encima de la palanca tira hilos y luego hacia abajo, por el ojo de la palanca tira hilos.
t Tira hilos
vLleve el hilo hacia abajo, por el canal izquierdo, y pase el hilo por detrás del guiahilos de la barra de agujas, desde la izquierda.
y Guiahilos de la barra de agujas
bPase el hilo por el ojo la aguja por la parte delantera.
Enfilage de la machine
Pour régler le fil d’aiguille:
Relevez le levier releveur de fil à son point le plus élevé en tournant le volant.
Relevez le pied-de-biche.
zTirez le fil de la bobine et faites-le passer sous le guide-fil.
q Guide-fil
xEnsuite, longez le conduit droit avec le fil vers le bas.
Tirez le fil autour de la partie inférieure de la plaque de guide-fil.
Tirez le fil vers le haut le long du conduit gauche.
w Conduit droit
e Plaque de guide-fil r Conduit gauche
cTirez fermement le fil de la droite vers la gauche par-dessus le levier releveur de fil et vers le bas dans le chas du levier releveur. t Levier releveur de fil
vTirez le fil vers le bas le long du conduit gauche et faites-le coulisser derrière le guide-fil de la barre d’aiguille depuis la gauche.
y Guide-fil de la barre d’aiguille
bEnfilez le fil dans le chas de l’aiguille depuis l’avant.
23
 Loading...