

Page 1

DellTM XPS 18
User’s Manual
Page 2

Notes, Cautions, and Warnings
NOTE: A NOTE indicates important information that helps you make better use
of your computer.
CAUTION: A CAUTION indicates potential damage to hardware or loss of data
if instructions are not followed.
WARNING: A WARNING indicates a potential for property damage, personal
injury, or death.
-------------------------------
Information in this document is subject to change without notice.
© 2013 Dell Inc. All rights reserved.
Reproduction of these materials in any manner whatsoever without the
written permission of Dell Inc. is strictly forbidden.
Trademarks used in this text: DellTM the DELL logo, and XPS are trademarks
of Dell Inc.; Microsoft®, and Windows® are either trademarks or registered
trademarks of Microsoft Corporation in the United States and/or other
countries.
Other trademarks and trade names may be used in this document to refer to
either the entities claiming the marks and names or their products.
Dell Inc. disclaims any proprietary interest in trademarks and trade names
other than its own.
2013 - 03 A00
Page 3

Page 4

4 │ 4 │
Contents
Features1 . . . . . . . . . . . . . . . . . . . . . . . . . . . . . 6
Accessories2 . . . . . . . . . . . . . . . . . . . . . . . . . . 10
Setting Up Your Computer3 . . . . . . . . . . . . . . . . 12
Connect the Power Cable to the Power Adapter . . . . . . 12
Charge Your Computer . . . . . . . . . . . . . . . . . 13
Insert an SD Card (optional) . . . . . . . . . . . . . . . 15
Turning On Your Computer . . . . . . . . . . . . . . . 16
Enable/Disable Wi-Fi . . . . . . . . . . . . . . . . . . 18
Connecting to a Network . . . . . . . . . . . . . . . . 18
Switch Networks . . . . . . . . . . . . . . . . . . . . 18
Using Your Computer4 . . . . . . . . . . . . . . . . . . . 19
Synchronizing Your Computer5 . . . . . . . . . . . . . . 31
Screen Orientation . . . . . . . . . . . . . . . . . . . 19
Windows 8 Start Screen . . . . . . . . . . . . . . . . .20
Gestures . . . . . . . . . . . . . . . . . . . . . . . 21
Using Headphones/Microphones . . . . . . . . . . . . 26
Removing the SD Card . . . . . . . . . . . . . . . . . 27
Turning O the Screen . . . . . . . . . . . . . . . . .28
Turning O Your Computer . . . . . . . . . . . . . . .28
Managing Computer Settings . . . . . . . . . . . . . .29
Page 5

│ 5 │ 5
Powered Stand (optional)6 . . . . . . . . . . . . . . . . . 32
Features . . . . . . . . . . . . . . . . . . . . . . . 32
Using the Powered Stand . . . . . . . . . . . . . . . . 34
Dock Your Computer on the Powered Stand. . . . . . . . 36
Undocking Your Computer . . . . . . . . . . . . . . . 37
Cleaning Your Computer7 . . . . . . . . . . . . . . . . . 38
Troubleshooting8 . . . . . . . . . . . . . . . . . . . . . . . 39
Locating Your Service Tag and Express Service Code9 43
Specifications10 . . . . . . . . . . . . . . . . . . . . . . . . 44
Page 6
6 │ Features
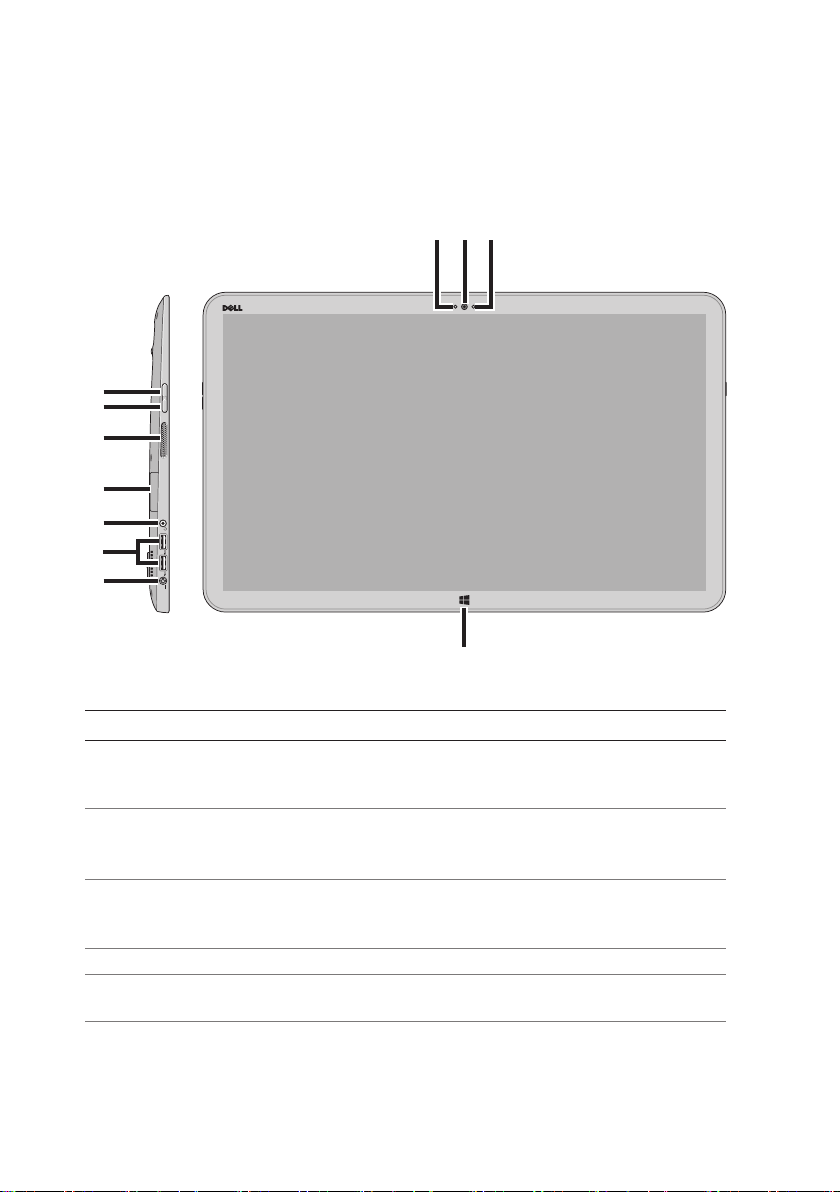
Features
This section provides information about the features available on your
computer.
8
10
9
7
6
5
4
3
2
1
11
Feature Functionality
Power-adapter port1 Connect the supplied power adapter to
provide power to the computer and charge
the battery.
USB 3.0 ports (2)2 Connect USB devices for transferring or
synchronizing data, music, photos, videos,
contacts, and so on.
Audio port (3.5 mm)3 Connect headphones, microphones, and
other audio equipment to listen to stereo
sound, record audio, or make calls.
SD-card slot4 Full-sized SD-card slot.
Left speaker5 Provides audio output for video and music
playback.
Page 7

Features │ 7
Feature Functionality
Volume-down button 6 Press to decrease the volume by one •
level.
Press and hold to continuously decrease •
the volume.
Volume-up button 7
Camera-status light8 Turns on when camera is active.
Front-facing camera9 Capture a front-view picture or record •
Ambient-light sensor10 Automatically adjusts the brightness of the
Windows button11 Press to access/show the Windows Start •
Press to increase the volume by one •
level.
Press and hold to continuously increase •
the volume.
videos.
Make video calls with web applications, •
such as Skype.
display’s backlight based on surrounding
light levels.
screen.
Press for quick access to the most •
recently used application or most
recently viewed screen.
Page 8

8 │ Features
1
2
Feature Functionality
Touchscreen display1 Touch the display to use on-screen controls
including buttons, menu items, and the
on-screen keyboard.
Docking port2 Connect to a Dell Powered Stand (optional).
Noble lock port3 Allows you to secure your computer using a
Noble lock.
Right speaker4 Provides audio output for video and music
playback.
Power and sleep/wake 5
button
Power/Battery-status 6
indicator
Press and release to turn your computer on or
o.
Indicates the power/battery charge status.
(see battery status table)
6
5
4
3
Page 9

Features │ 9
3
1
Feature Functionality
Right foot 1
CAUTION: Not for use in
portrait mode
Left foot 2
CAUTION: Not for use in
portrait mode
SD-card slot3 Full-sized SD-card slot.
Fold outwards to allow your computer to
stand upright, fold inwards to allow your
computer to lay flat.
Fold outwards to allow your computer to
stand upright, fold inwards to allow your
computer to lay flat.
2
Page 10

10 │ Accessories
Accessories
Your computer package includes the following accessories:
Power adapter and cable• — Provides power to your computer
and charges the battery.
USB to ethernet adapter (optional)• — Allows you to connect a
RJ45 (network) cable to your computer using a USB port.
Powered stand (optional)• — Allows your computer to be placed
upright with adjustable viewing angles and battery charging
capabilities.
Page 11

Accessories │ 11
Wireless keyboard and mouse (optional)• - Inputs text and
controls the cursor.
NOTE: The keyboard and mouse are already paired to your computer if
you ordered the keyboard and mouse along with your computer. If you
purchased the keyboard and mouse separately, or if you need to pair
them again, see Pairing the Wireless Keyboard and Mouse.
Page 12

12 │ Setting Up Your Computer
Setting Up Your Computer
This section provides information about setting up your computer for
first use.
WARNING: Before you begin any of the procedures in this section,
read the safety information that shipped with your computer.
For additional best practices information, see
www.dell.com/regulatory_compliance.
Connect the Power Cable to the Power
Adapter
Page 13
Setting Up Your Computer │ 1 3
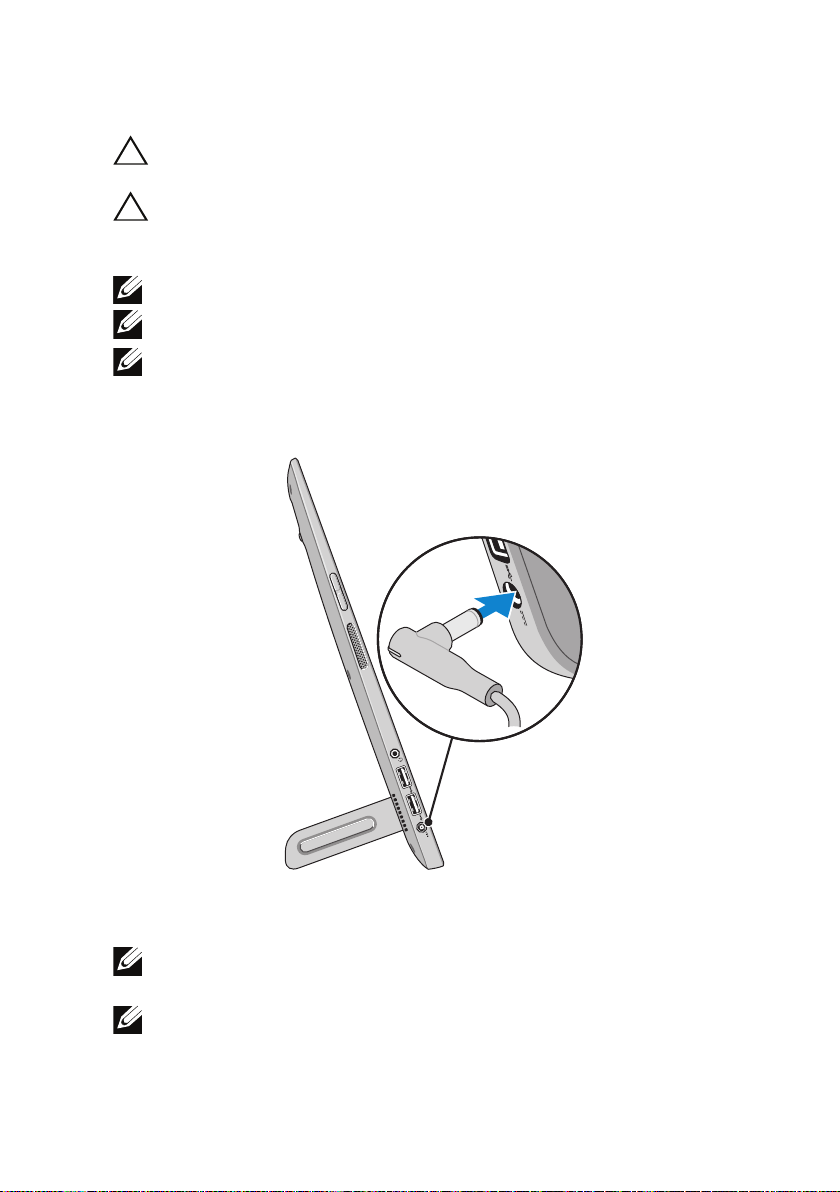
Charge Your Computer
CAUTION: Charge the battery in an environmental temperature between
0 °C and 40 °C (32 °F and 104 °F).
CAUTION: Use only the supplied power adapter and power cable to
charge your computer. Using unauthorized power adapters or power
cables may severely damage to your computer.
NOTE: Your computer cannot be charged through a USB cable.
NOTE: The battery is not fully charged when you first receive it.
NOTE: You receive your computer in shipping mode to prevent it from
accidentally turning on during shipping. To turn on your computer for the
first time, connect the power adapter and then press the power button.
Connect the power adapter to your computer.1
Connect the power adapter into an electrical outlet and charge 2
your computer until the battery is fully charged.
NOTE: A completely discharged battery takes 4-5 hours to charge fully
while the computer is turned o.
NOTE: The battery charge light on the right side of your computer turns
o once the battery is fully charged.
Page 14

14 │ Setting Up Your Computer
You can check the charge/power status of your computer by checking
the light on the side of your computer or the icon on the screen when
your computer is turned on:
Battery-charge indicator located on the right side of your computer:
Power state
S0/S1 (ON) Solid white Solid white Solid amber
S3 (Sleep)
S4/S5
(Hibernate or OFF)
Low battery
Battery with no
power adapter
Slow blinking
white
OFF OFF Solid amber
Fast blinking
amber
Power adapter
and battery fully
charged
Slow blinking
white
Fast blinking
amber
Power adapter
and battery is
charging
Slow blinking
amber
Fast blinking
amber
Battery icon displayed on the screen:
Battery icon Description
Battery is fully charged
Battery is charging
Computer is running on battery power
and the battery is discharging.
Computer is plugged in, and either no
battery is detected, or the battery isn’t
working correctly.
Battery is low
Battery is critically low
NOTE: You can check exact battery charge level by booting to the
operating system.
Page 15

Setting Up Your Computer │ 1 5
Insert an SD Card (optional)
Make sure the orientation of the SD card is correct so that the pins 1
on the card are facing the rear when inserted.
Push the slot cover down. 2
Push the SD card into the spring-loaded slot until it is locked firmly 3
into place.
NOTE: The SD-card slot is compatible with Standard-Capacity (SDSC),
High-Capacity (SDHC), the eXtended-Capacity (SDXC) storage cards,
Memory Stick, Memory Stick Pro, MMC, and xD, with a maximum storage
capacity of 2 TB.
Page 16

16 │ Setting Up Your Computer
Turning On Your Computer
CAUTION: Use your computer in an ambient temperature between 0 °C
and 35 °C (32 °F and 95 °F).
Press and release the 1 Power and Sleep/Wake button .
NOTE: After the button is pressed, there is a slight delay before your
computer turns on or o.
Complete all steps for the initial setup of Windows including 2
Personalize, Settings, Sign in.
Enable security on the Security & Dell Updates page.3
Configure wireless settings (optional). 4
Page 17

Setting Up Your Computer │ 1 7
Complete initial setup of Windows.5
Your computer is ready for use when the Windows Start screen is
displayed.
NOTE: A lock screen may be displayed when your computer wakes up
from a sleep state.
NOTE: If the login screen is not enabled, the Start screen appears after
you swipe-up on the lock screen.
Page 18

18 │ Setting Up Your Computer
Enable/Disable Wi-Fi
Swipe from the right edge of the display to access Charms.1
Touch 2 Settings → Change PC settings→ Wireless.
Move the slider to the right to enable Wi-Fi. Move the Wi-Fi 3
slider to the left to disable Wi-Fi.
Connecting to a Network
Swipe from the right edge of the display to access Charms.1
Touch 2 Settings → Available → Select an available
network→ Connect.
Switch Networks
NOTE: If you need to connect to another network later, access
Charms → and select the network you want to connect to.
Page 19

Using Your Computer │ 1 9
Using Your Computer
Screen Orientation
For optimal viewing experience, the screen orientation changes
automatically to portrait or landscape format depending on your
computer’s orientation. Automatic screen rotation is enabled by
default.
NOTE: Some applications may not support automatic screen rotation.
Enabling/Disabling automatic screen rotation
Swipe from the right edge of the display to access Charms.1
Touch 2 Settings → Screen .
Touch 3 or to toggle automatic screen rotation.
Page 20

20 │ Using Your Computer
Windows 8 Start Screen
The Windows 8 Start screen displays a list of default and custom Live
Tiles, which act as shortcuts to various installed applications.
Live Tiles on your Start screen update in real time with information
on news, sports, weather, stocks, social networks, and so on. The
tile-based user interface gives you direct access to your most recently
used applications, emails, photos, music, videos, contacts, social
media updates, and frequently viewed websites. You can pin desired or
favorite applications as Live Tiles to customize the Start screen.
NOTE: You can add or remove Live Tiles by using Pin or Unpin
options.
Accessing the Start screen
Press the • Windows button .
Swipe from the right edge of the display to access Charms, and •
then touch the Start icon .
NOTE: The Start icon in the Charms sidebar and the Start button
on your computer have the same functionality.
Getting more information on Windows 8
Touch the Getting Started With Windows tile on the Start screen to get
more information about the features of Windows 8.
 Loading...