


hp scanjet 8200 series scanner
English
user’s manual

copyright information
© Copyright Hewlett-Packard Company 2003
All rights reserved. Reproduction, adaptation, or translation without prior written
permission is prohibited, except as allowed under copyright laws.
This product incorporates Adobe's PDF technology, which contains an implementation of
Lempel-Ziv-Welch (LZW) data compression licensed under U.S. Patent 4,558,302.
trademark credits
Adobe and the Acrobat logo are registered trademarks or trademarks of Adobe
Systems Incorporated in the United States and other countries and regions.
Energy Star is a U.S. registered service mark of the United States Environmental Protection
Agency.
Microsoft and Windows are registered trademarks of Microsoft Corporation.
All other product names mentioned herein may be trademarks of their respective
companies.
document warranty
The information contained in this document is subject to change without notice.
Hewlett-Packard makes no warranty of any kind with respect to this information.
HEWLETT-PACKARD SPECIFICALLY DISCLAIMS ANY IMPLIED WARRANTY OF
MERCHANTABILITY AND FITNESS FOR A PARTICULAR PURPOSE.
Hewlett-Packard shall not be liable for any direct, indirect, incidental, consequential, or
other damage alleged in connection with the furnishing or use of this information.
The TWAIN Toolkit is distributed as is. The developers and distributors of the TWAIN
Toolkit expressly disclaim all implied, express or statutory warranties including, without
limitation, the implied warranties of merchantability, noninfringement of third party rights
and fitness for a particular purpose. Neither the developers nor the distributors shall be
liable for damages, whether direct, indirect, special, incidental, or consequential, as a
result of the reproduction, modification, distribution, or other use of the TWAIN Toolkit.
NOTICE TO U.S. GOVERNMENT USERS: RESTRICTED RIGHTS COMMERCIAL
COMPUTER SOFTWARE: Use, duplication, or disclosure by the Government is subject to
restrictions as set forth in subparagraph (c) (1) (ii) of the Rights in Technical Data Clause at
DFARS 52.227-7013.
Material scanned by this product may be protected by governmental laws and other
regulations, such as copyright laws. The customer is solely responsible for complying with
all such laws and regulations.
product restricted material
This HP product contains the following materials that might require special handling at
end-of-life:
• mercury in the scanner fluorescent lamp and transparent materials adapter (< 5 mg)
• lead in solder
For recycling information, contact www.hp.com/go/recycle, your local authorities, or the
Electronic Industries Alliance at www.eiae.org.
For information about HP’s environmental stewardship program, see environmental
stewardship program on page 24. For product warranty information see hewlett-packard
limited warranty statement on page 23.

contents
where do I find…? . . . . . . . . . . . . . . . . . . . . . . . . . . . . . . . . . 1
how to use the scanner. . . . . . . . . . . . . . . . . . . . . . . . . . . . . . 3
front panel overview . . . . . . . . . . . . . . . . . . . . . . . . . . . . . . . 3
install the software . . . . . . . . . . . . . . . . . . . . . . . . . . . . . . . . 4
scanning overview . . . . . . . . . . . . . . . . . . . . . . . . . . . . . . . . 4
scan documents . . . . . . . . . . . . . . . . . . . . . . . . . . . . . . . . . . 5
scan pictures . . . . . . . . . . . . . . . . . . . . . . . . . . . . . . . . . . . . 5
scan a document so text can be edited . . . . . . . . . . . . . . . . . . 6
save a document to disk or CD. . . . . . . . . . . . . . . . . . . . . . . . 6
e-mail a scanned document or picture . . . . . . . . . . . . . . . . . . . 7
copy documents or pictures . . . . . . . . . . . . . . . . . . . . . . . . . . 7
scan and preview multiple originals. . . . . . . . . . . . . . . . . . . . . 8
cancel a scan in progress . . . . . . . . . . . . . . . . . . . . . . . . . . . 8
change settings . . . . . . . . . . . . . . . . . . . . . . . . . . . . . . . . . . 9
select original types. . . . . . . . . . . . . . . . . . . . . . . . . . . . . . . 10
care and maintenance. . . . . . . . . . . . . . . . . . . . . . . . . . . . . 10
scanner installation problems . . . . . . . . . . . . . . . . . . . . . . . . 12
scanner initialization problems . . . . . . . . . . . . . . . . . . . . . . . 13
troubleshooting. . . . . . . . . . . . . . . . . . . . . . . . . . . . . . . . . . 13
scan from the ADF . . . . . . . . . . . . . . . . . . . . . . . . . . . . . . . . 14
choose acceptable media for the ADF . . . . . . . . . . . . . . . . . . 14
load originals in the ADF. . . . . . . . . . . . . . . . . . . . . . . . . . . 14
scan from the TMA . . . . . . . . . . . . . . . . . . . . . . . . . . . . . . . . 15
scan slides. . . . . . . . . . . . . . . . . . . . . . . . . . . . . . . . . . . . . 15
scan negatives . . . . . . . . . . . . . . . . . . . . . . . . . . . . . . . . . . 17
English
product support . . . . . . . . . . . . . . . . . . . . . . . . . . . . . . . . . . 19
accessibility website . . . . . . . . . . . . . . . . . . . . . . . . . . . . . . 19
hp scanjet website . . . . . . . . . . . . . . . . . . . . . . . . . . . . . . . 19
support process . . . . . . . . . . . . . . . . . . . . . . . . . . . . . . . . . 19
warranty . . . . . . . . . . . . . . . . . . . . . . . . . . . . . . . . . . . . . . . 24
hewlett-packard limited warranty statement. . . . . . . . . . . . . . . 24
regulatory information . . . . . . . . . . . . . . . . . . . . . . . . . . . . . 25
environmental stewardship program . . . . . . . . . . . . . . . . . . . 25
appendix A – SCSI setup and options . . . . . . . . . . . . . . . . . . 27
why use SCSI? . . . . . . . . . . . . . . . . . . . . . . . . . . . . . . . . . . 27
install the software . . . . . . . . . . . . . . . . . . . . . . . . . . . . . . . 27
install the scanner. . . . . . . . . . . . . . . . . . . . . . . . . . . . . . . . 27
compatible SCSI cards . . . . . . . . . . . . . . . . . . . . . . . . . . . . 29
iii

contents
appendix B – product specifications and options. . . . . . . . . . 30
scanner specifications. . . . . . . . . . . . . . . . . . . . . . . . . . . . . 30
automatic document feeder (ADF) specifications . . . . . . . . . . . 30
transparent materials adapter (TMA) specifications . . . . . . . . . 31
environmental specifications for the scanner, ADF, and TMA . . 31
purchase accessories . . . . . . . . . . . . . . . . . . . . . . . . . . . . . 31
purchase maintenance parts . . . . . . . . . . . . . . . . . . . . . . . . 31
iv
hp scanjet 8200 series

1
where do I find…?
This manual describes the HP Scanjet 8200 series scanner operation for a
computer using a Microsoft® Windows® operating system. See the table below
for information on Microsoft Windows NT® and Apple® Macintosh® systems.
Many resources are available to help you find the information you need. The
following table provides information resources.
Subject Location
Operating systems
•Apple Macintosh
•Windows NT
Product overview
Product introduction
Scanner setup
Software installation
Uninstall the software
Find help
•Software
• Third-party software
•Product specific
•SCSI users
Care and Maintenance
Apple Help Center
Setup Poster
User’s Manual – Install the Software
User’s Manual – Installation Problems
Precisionscan Pro Help
User’s Manual – Appendix A, SCSI Setup and Options
Setup Poster
User’s Manual – Front Panel Overview
HP Scanjet 8200 Series Help – Front Panel Overview
HP Scanjet 8200 Series Help – Product Introduction
Setup Poster – a single fold-out page that provides installation and
setup instructions
HP Scanjet 8200 Series Help – Install the Scanner
User’s Manual – Appendix A, SCSI Setup and Options
Setup Poster
User’s Manual – Install the Software
HP Scanjet 8200 Series Help – Uninstall the Software
HP Photo & Imaging Software Help – How to Use the Software
Third-party software documentation
HP Scanjet 8200 Series Help
User’s Manual – Appendix A, SCSI Setup and Options
HP Precisionscan Pro Help
User’s Manual – Care and Maintenance
English
1

chapter 1
Subject Location
Troubleshooting
• Install and setup
User’s Manual – Installation Problems
User’s Manual – Initialization Problems
•Scanner
HP Scanjet 8200 Series Help – Troubleshooting, Scanner
Problems
• Accessories
HP Scanjet 8200 Series Help – Troubleshooting, ADF Problems
HP Scanjet 8200 Series Help – Troubleshooting, TMA Problems
•Software
• Cleaning the underside
HP Photo & Imaging Software Help – Troubleshooting
www.hp.com/support
of the scanner glass
Using
•the scanner
• the accessories
User’s Manual – How to Use the Scanner
User’s Manual – Scan from the TMA
User’s Manual – Scan from the ADF
•the software
HP Photo & Imaging Software Help – How to Use the Software
Support
• General information
User’s Manual – HP Support
HP Scanjet 8200 Series Help – HP Support
•Website
• Phone numbers
www.hp.com/support
User’s Manual – HP Support
HP Scanjet 8200 Series Help – HP Support
Warranty
Purchase accessories and
options
User’s Manual – Hewlett-Packard Limited Warranty Statement
User’s Manual – Appendix B, Purchase Accessories
www.hpshopping.com (USA only) – for other regions use
www.hp.com and select your language
Purchase maintenance
supplies
2
User’s Manual – Appendix B, Purchase Maintenance Parts
www.hpshopping.com (USA only) – for other regions, use
www.hp.com and select your language
hp scanjet 8200 series
2
how to use the scanner
This section presents an overview of the scanner front panel and also contains
information about how to use and care for the scanner.
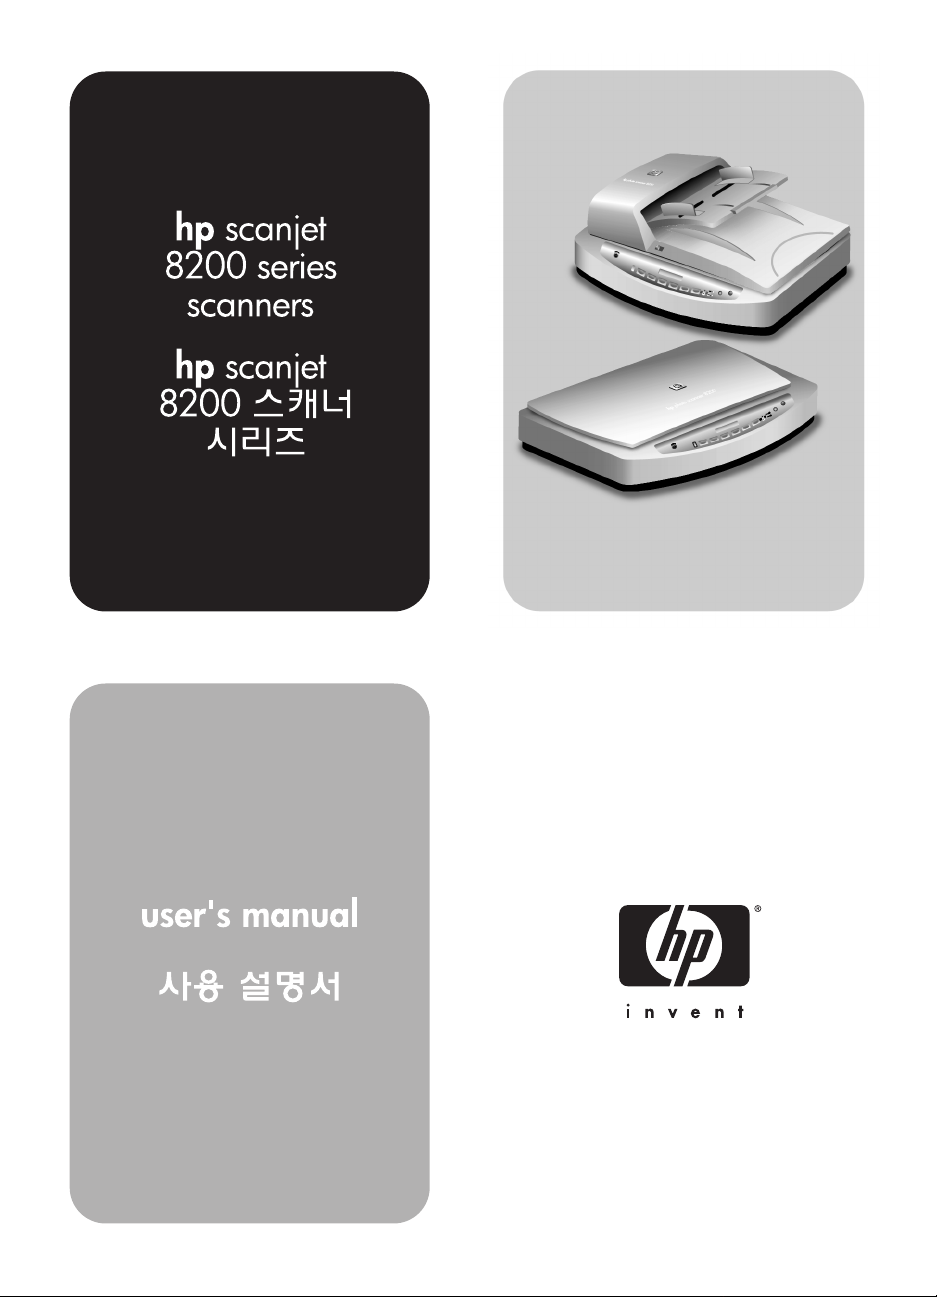
front panel overview
Feature Description
DESTINATION button Selects the destination (an application, such as a word
processor) for a scanned document. The destination
appears in the front panel display.
Select the destination before pressing the S
D
OCUMENT TO button.
S
CAN DOCUMENT TO
button
S
CAN PICTURE button Scans the picture into the HP Photo & Imaging Gallery.
E
DIT TEXT (OCR) button Scans the document text and pictures and displays
ILE DOCUMENTS button Scans the original document or picture to a file
F
E-MAIL button Scans the original document or picture and sends the
Scans an original document into the selected destination
(an application, such as a word processor). Use the
DESTINATION button to select the destination.
editable text in the defined word processor application.
destination that you enter. After scanning the original, a
dialog box appears where you can enter the file name,
file type, and location for the file.
scanned image to your e-mail software as an
attachment.
English
CAN
C
OPY button Starts the copy software and scans the original. The
scanned image is sent directly to the default printer.
Select the number of copies and whether the item should
be scanned in color or black and white before pressing
the COPY button.
N
UMBER OF COPIES button Selects the number of copies to be printed with the
C
OPY button. Select the number of copies before
pressing the C
appears in the front panel display.
OLOR/BLACK & WHITE
C
button
OWER SAVE button Turns off the scanner lamp, the panel lights, and the
P
Determines whether original items are scanned in color
or in black and white when copying.
front panel display.
OPY button. The number of copies
3

chapter 2
Feature Description
ANCEL button Cancels a scan while the scanner is scanning, or
C
cancels a series of scans when you use the Automatic
Document Feeder (ADF).
B
UTTON SETTINGS button Opens the Button Settings dialog box. From this dialog
box, you can change how the scanner buttons work.
Front panel display Displays scanner information, such as destinations,
number of copies, and error messages.
install the software
1 Close all applications on the computer.
2 Locate the HP Photo & Imaging software CD that is appropriate for your
language and operating system.
3 Insert the CD into the computer.
Windows: Follow the instructions on the screen. If the installation
application does not start automatically:
On the Start menu, click Run, and type: x:setup.exe (where x is the
letter of the CD drive).
Macintosh: Double-click the installer icon on the CD and follow the
instructions.
scanning overview
You can start scanning in one of three ways: from the front panel buttons, from
the HP Director, or from other applications.
Note: The HP Scanning software can prompt you to scan additional items.
This allows you to scan multiple items and send them to the final destination
all at one time. When previewing, it also allows you to preview and scan
multiple images before closing the preview window. For more information,
see scan and preview multiple originals.
For Windows NT and Macintosh users, see where do I find…? on page 1 for
scanning procedures.
scan from the front panel buttons
The front panel buttons provide shortcuts to often-used scanning functions, such
as scanning pictures and documents. Descriptions for using all the front panel
buttons are located in this manual.
scan from the hp director
Click the HP Director icon on the desktop to start the HP Photo & Imaging
software. The HP Director window appears. From this window you can begin
scanning, viewing, or printing images.
If the HP Director icon is not on the desktop, click Start, point to Programs, point
to Hewlett-Packard, point to Cameras and Scanners, and click HP Photo &
Imaging Director.
4
hp scanjet 8200 series

scan from other applications
You can bring an image directly into an open file in one of your applications if
the application is TWAIN compliant. Generally, the application is compliant if it
has a command such as Acquire, Scan, or Import New Object. If you are unsure
whether the application is compliant or what the command is, see the
documentation for the application.
scan documents
Use the SCAN DOCUMENT TO button ( ) to scan documents.
1 Place the originals face down on the scanner glass or face up in the ADF. If
you are scanning two-sided originals from an ADF, slide the D
to two-sided mode ( ).
2 Select a destination by pressing the D
desired destination appears in the front panel display.
3 Press the S
Note: A preview image will not appear when scanning from the ADF. To
change this preview setting, see the HP Photo & Imaging software Help.
4 Select the final scan area (the area inside the dotted lines) in the preview
image.
5 Make adjustments to the preview image if needed.
6 Click Accept.
The final scan area is scanned and appears in the specified destination.
how to use the scanner
English
UPLEX switch
ESTINATION button ( ) until the
CAN DOCUMENT TO button ( ).
scan pictures
Use the SCAN PICTURE button ( ) to scan pictures.
1 Place the original face down on the scanner glass and close the lid.
2 Press the SCAN PICTURE button ( ).
3 Select the final scan area (the area inside the dotted lines) in the preview
4 Make adjustments to the preview image if needed.
5 Click Accept.
user’s manual
Note: You can also use the S
from the TMA. For more information, see scan from the TMA on page 15.
A preview image of the scanned original appears.
image.
The final scan area is scanned and appears in the HP Photo & Imaging
Gallery. The scan is saved in the location specified in the Scan Pictures
Settings in the HP Photo & Imaging software.
CAN PICTURE button to s c an slides or negatives
5

chapter 2
scan a document so text can be edited
Use the EDIT TEXT button ( ) to scan documents to software that converts the
image to text and graphics and then places the results in a supported wordprocessing application.
1 Place the original face down on the scanner glass or face up in the ADF. If
you are scanning two-sided originals from an ADF, slide the D
to two-sided mode ( ). If you are scanning multiple originals without an
ADF, see scan and preview multiple originals on page 8.
2 Press the E
DIT TEXT button ( ).
Note: A preview image will not appear when scanning from the ADF. To
change this preview setting, see the HP Photo & Imaging software Help.
3 Select the final scan area (the area inside the dotted lines) in the preview
image.
4 Make adjustments to the preview image if needed.
5 Click Accept.
The final scan area is scanned and processed. The scanned items display
in the selected application, such as a word processor.
Note: The application can be changed in the Scan Button Settings of the
HP Photo & Imaging software.
save a document to disk or CD
UPLEX switch
Use the FILE DOCUMENTS button ( ) to save scanned documents to disk, such
as a hard disk or a CD.
1 Place the original face down on the scanner glass or face up in the ADF. If
you are scanning two-sided originals from an ADF, slide the D
UPLEX switch
to two-sided mode ( ). If you are scanning multiple originals without an
ADF, see scan and preview multiple originals on page 8.
2 Press the F
ILE DOCUMENTS button ( ).
Note: A preview image will not appear when scanning from the ADF. To
change this preview setting, see the HP Photo & Imaging software Help.
3 Select the final scan area (the area inside the dotted lines) in the preview
image.
4 Make adjustments to the preview image if needed.
5 Click Accept.
The final scan area is scanned.
6 The Save As dialog box appears. Select a destination folder.
7 Type a file name and choose a file type, and click OK.
The document is saved in the specified folder.
6
hp scanjet 8200 series

e-mail a scanned document or picture
Use the E-MAIL button ( ) to scan documents or pictures and insert them in an
e-mail message as an attachment. You must have an Internet connection and a
supported e-mail application.
1 Place the original face down on the scanner glass or face up in the ADF. If
you are scanning two-sided originals from an ADF, slide the D
to two-sided mode ( ).
Note: You ca n a l so use the E-
the TMA. For more information, see scan from the TMA on page 15.
2 Press the E-
MAIL button ( ).
A message appears asking if the original is a document or a picture.
3 Select Document or Picture, and click OK.
Note: A preview image will not appear when scanning from the ADF. To
change this preview setting, see the HP Photo & Imaging software Help.
4 Select the final scan area (the area inside the dotted lines) in the preview
image.
5 Make adjustments to the preview image if needed.
6 Click Accept.
The final scan area is scanned and your e-mail application is opened. The
scanned image is added as an attachment to the e-mail message.
7 The Save As dialog box appears. Type a file name and choose a file type,
and click OK.
8 Complete the e-mail as usual.
Note: To view the scanned image before you e-mail it, double-click the
attachment in your e-mail application.
Note: You can change the e-mail application in the HP Photo & Imaging
software. If your e-mail application does not appear in the list of supported
applications, save the scanned images to a file, and attach the file to your
e-mail.
MAIL button to scan slides or negatives from
how to use the scanner
UPLEX switch
English
copy documents or pictures
Use the COPY button ( ) to scan an original and send it to a printer.
1 Place the original face down on the scanner glass or face up in the ADF. If
you are scanning two-sided originals from an ADF, slide the D
to two-sided mode ( ).
2 Select the copy options:
– Select the number of copies by pressing the N
button ( ). The number of copies appears in the front panel display.
– Select how the original is scanned by pressing the COLOR/BLACK &
HITE button ( ).
W
3 Press the C
user’s manual
OPY button ( ). The copies are printed on the default printer.
UPLEX switch
UMBER OF COPIES
7

chapter 2
Note: To change any copy settings, such as size, darkness, or the printer,
click Cancel during processing. The HP Copying dialog box appears, where
you can change settings.
scan and preview multiple originals
Multiple originals can be scanned from the ADF, the TMA, or the scanner glass.
The ADF can scan one-sided or two-sided originals.
scan multiple originals from the scanner glass or TMA
If the original was scanned from the scanner glass or TMA, a dialog box
appears asking if there are more originals to scan. If you have more originals to
scan, click Yes, and then perform one of the following steps:
• Place another original on the glass or in the TMA, click New Scan, make
adjustments, and then click Accept.
OR
• Select another image within the preview window, make adjustments, and
then click Accept.
When you have finished scanning your items, click No when you receive the
prompt for another scan.
scan multiple originals from an ADF
1 Place the originals in the ADF face up, with the first page on top.
2 Press a button on the front panel to start scanning, such as the S
OCUMENT TO button ( ) or the E-MAIL button ( ). The button you
D
select determines the scan settings.
When the ADF is empty, a dialog box appears asking if there are more
pages to scan. If you want to scan more originals to the same destination,
load the next set of pages, and then click Scan.
3 When you have finished, click Done. The scans appear in the selected
destination.
CAN
preview multiple originals from an ADF
If multiple originals are scanned, an image counter appears in the top-right of
the preview window. The image counter shows the current preview image and
the total number of preview images. Click on the arrows in the image counter to
preview other pages.
cancel a scan in progress
Use the CANCEL button ( ) to cancel a scan during processing, or to cancel a
series of scans when the ADF is being used.
8
image counter in the preview window
hp scanjet 8200 series

change settings
You might want to change settings for the scanner to accommodate the type of
work that you do. The HP Scanjet 8200 series scanners enable you to change
button settings, scanning preferences, power usage, and whether the scanning
takes place immediately or waits for the warm-up cycle to complete.
how to use the scanner
change button settings
You can change settings for the scanner buttons by pressing the BUTTON
ETTINGS button ( ).
S
1 Press the B
The Button Settings dialog box appears.
2 Click the appropriate tab, and change the settings.
3 When finished with the changes, click OK.
UTTON SETTINGS button ( ).
change settings from the hp director
The Settings menu in the HP Photo & Imaging software provides a means of
changing all scanning settings. It includes button settings, scanning preferences,
and other settings that you can change. To change settings start the HP Director,
and click Settings.
turn preview image on or off
You can change whether a preview image appears or does not appear. See the
HP Photo & Imaging software help for instructions and locations.
use the Power Save button
Use the POWER SAVE button ( ) to turn off the lamp when not using the
scanner. When the P
small indicator lights, and the front panel display turn off.
To use the scanner again, press any button on the front panel or start a scan from
the HP Director. After a short warmup cycle, the scan begins.
OWER SAVE button ( ) is pressed, the scanner lamp, the
English
enable instant scanning
Use the instant scanning feature to set the scanner to begin scanning
immediately, without waiting for the lamp to warm up.
1 Open the HP Director, click Settings, and click Scan Preferences.
2 Click the Quality vs. Speed tab.
user’s manual
– To eliminate the lamp warm-up time and enable instant scanning, select
the Instant lamp warm-up check box.
– To reduce power consumption, clear the Instant lamp warm-up check
box.
9

chapter 2
select original types
If the software prompts you for an original type, you have two choices: Picture or
Document. The scanner optimizes settings based on your choice. Use the
following guidelines to determine the best original type for your needs.
If your original consists of Select this original type
Text, or both text and graphics Document
A printed photograph or graphic Picture
To change the original types, see change button settings on page 9.
care and maintenance
Occasional cleaning of your scanner helps ensure optimal performance. The
amount of care necessary depends upon several factors, including the amount
of use, the type of media that is fed through the ADF, and the environment. You
should perform routine cleaning as necessary.
Routine cleaning should include cleaning the scanner glass, the TMA, and the
ADF.
clean the scanner glass
1 Disconnect the power cable from the scanner.
2 Open the scanner lid.
3 Clean the glass using a soft, lint-free cloth sprayed with a mild glass
cleaner.
Caution! Use only glass cleaner. Avoid abrasives, acetone,
benzene, and carbon tetrachloride, all of which can damage the
scanner glass. Avoid isopropyl alcohol because it can leave
streaks on the glass.
clean the TMA
clean the ADF
10
Do not spray the glass cleaner directly on the glass. If too much
glass cleaner is applied, the cleaner could run to the edges and
damage the scanner.
4 Dry the scanner glass using a dry, soft, lint-free cloth.
5 When finished, reconnect the power cable to the scanner.
Clean the TMA using a dry, soft, lint-free cloth. If necessary, lightly spray the cloth
with glass cleaner and wipe the TMA.
The ADF requires periodic cleaning depending upon the amount of use and the
type of media that is fed through the ADF. You can clean the ADF two ways:
running the cleaning cloth through the ADF, or by manually cleaning the feed
rollers. Set up a cleaning routine that is appropriate for your scanner.
hp scanjet 8200 series

how to use the scanner
run the cleaning cloth through the ADF
1 Open the sealed container, starting at the notch. Take care not to tear the
cleaning cloth inside.
2 Remove the cleaning cloth and unfold.
3 Place the unfolded cloth into the paper input tray.
place the unfolded cloth into the paper input tray
4 Press the S
CAN DOCUMENT TO button.
The cleaning cloth will run through the ADF.
Wait two minutes to allow the components to dry before proceeding to the
next step.
5 Place up to five pages of printed paper in the paper input tray. Scan and
view the results.
English
user’s manual
scan up to five pages
6 If streaks still appear, repeat Steps 3 through 6.
The cleaning cloth can be cycled through the ADF up to five times.
clean the feed roll assembly manually
1 Open the hatch and lift the green tab to the fully open position. The feed
roller assembly should be in a nearly vertical position.
lift the green tab to expose the feed rollers
2 With a Paper Path Cleaning Cloth (C9915-60056), clean each of the feed
rollers and the small rubber pad located below the rollers.
Note: If you do not have the paper path cleaning cloth, use a lint-fee cloth
slightly dampened with isopropyl alcohol.
3 Wipe the area around the small rubber pad to remove any paper dust.
4 Lower the green tab and feed roller assembly.
5 Close the hatch.
11

chapter 2
maintain the ADF
If an unusual number of misfeeds occur, follow these steps:
• Clean the ADF to help reduce misfeeds. See clean the ADF on page 10.
• See the HP Scanject 8200 series help – ADF problems.
• If that does not help, install the ADF Roller Replacement kit (C9937-
68001). The ADF Roller Replacement kit contains a roller mechanism, a
separation pad, and a wrench used to replace the separation pad. See
purchase maintenance parts on page 31.
The ADF Roller Replacement kit contains instructions for replacing the
parts.
ordering maintenance supplies
You can purchase maintenance parts online at www.hp.com. Use search to find
the item, such as cleaning cloth, or ADF Roller Replacement kit.
scanner installation problems
If an “Error 04” in the front panel displays, it indicates that a Hi-Speed USB
connection error has occurred. Ensure that the Hi-Speed USB cable is securely
connected between the scanner and the computer.
• First, check your computer:
– Ensure that your computer meets the minimum system requirements that
are listed on the scanner box.
– If you do not have enough hard-disk space, remove unnecessary files
or install the software on a different disk drive.
• On a Microsoft® Windows computer, if you receive a message, such as
“Destination Directory Is Invalid” or “Program Folder Is Invalid” during
installation, do one of the following:
– Type a valid destination folder name. The destination folder cannot
contain the following characters: /, \, :, ?, *, <, >, “, or |.
– Find a valid folder using the Browse button.
• Check the cables:
– Ensure that the power cable is securely connected between the scanner
and a live electrical outlet or surge protector.
– If the power cable is connected to a surge protector, ensure that the
surge protector is plugged into an outlet and turned on.
– Use the Hi-Speed USB cable that was included with the scanner. Other
Hi-Speed USB cables might not be compatible with the scanner.
– Ensure that the Hi-Speed USB cable is securely connected between the
scanner and the computer.
– Disconnect the power cable from the scanner and turn off the computer.
After 30 seconds, reconnect the power cable to the scanner and then
turn on the computer, in that order.
– On a Macintosh computer, use the Apple System Profiler to ensure that
the scanner is connected to the computer correctly.
• Enter the scanner diagnostic mode:
12
hp scanjet 8200 series

a. Disconnect the Hi-Speed USB cable (or SCSI cable) from the scanner.
Ensure that the scanner power cable is still connected to the power
source.
b. Press the E
The carriage in the scanner should move forward and backward, and
the lamp should turn on.
c. To end the test, disconnect the power cable.
If the scanner lamp does not turn on or the carriage does not move, a
problem exists with the scanner hardware. See product support on
page 19.
DIT TEXT ( ) and E-MAIL ( ) buttons at the same time.
scanner initialization problems
If you receive a message that the scanner initialization failed:
1 Close the error message dialog box and close the application that was
open when you received the error message.
2 Then, do the following:
– Turn the scanner off by disconnecting the power cable. Turn the
scanner back on by reconnecting the power cable.
– Disconnect the USB cable from the computer and then reconnect the
USB cable.
– Ensure that the cables that connect the computer to the scanner are
securely fastened.
– Turn the computer off for 10 seconds and then turn it on again.
If the scanner still fails to initialize, run the Repair utility (Windows computers
only). See scanner still does not work properly in the troubleshooting section of
the HP Scanjet 8200 series help.
how to use the scanner
English
troubleshooting
To solve other problems with the scanner, see the troubleshooting section of the
HP Scanjet 8200 series help.
To solve problems with the scanner software, see the HP Photo & Imaging
software help.
user’s manual
13
scan from the ADF
3
This section describes how to select originals that are acceptable for the
Automatic Document Feeder (ADF), and how to load and scan originals from the
ADF.
choose acceptable media for the ADF
The ADF works best when the originals meet the following specifications:
• standard media of A4, U.S. letter and legal sized paper
• nonstandard media ranging in size from 88.9 by 127 mm
(3.5 by 5 inches) to 216 by 356 mm (8.5 by 14 inches)
• media weights from 60 to 90 g/m
• media that is square-shaped or rectangular and in good condition
• media that is free of perforations, or punch holes
• media that is free of wet glue, correction fluid, or ink
Note: Avoid putting multipart forms, transparencies, magazine pages, gumbacked pages, and light-weight paper in the ADF.
Before placing an original in the ADF, check for and remove:
• curls or wrinkles
• staples, paper clips, and any other attached material
If the originals do not meet these criteria, scan from the scanner glass.
2
(16 to 24 pounds)
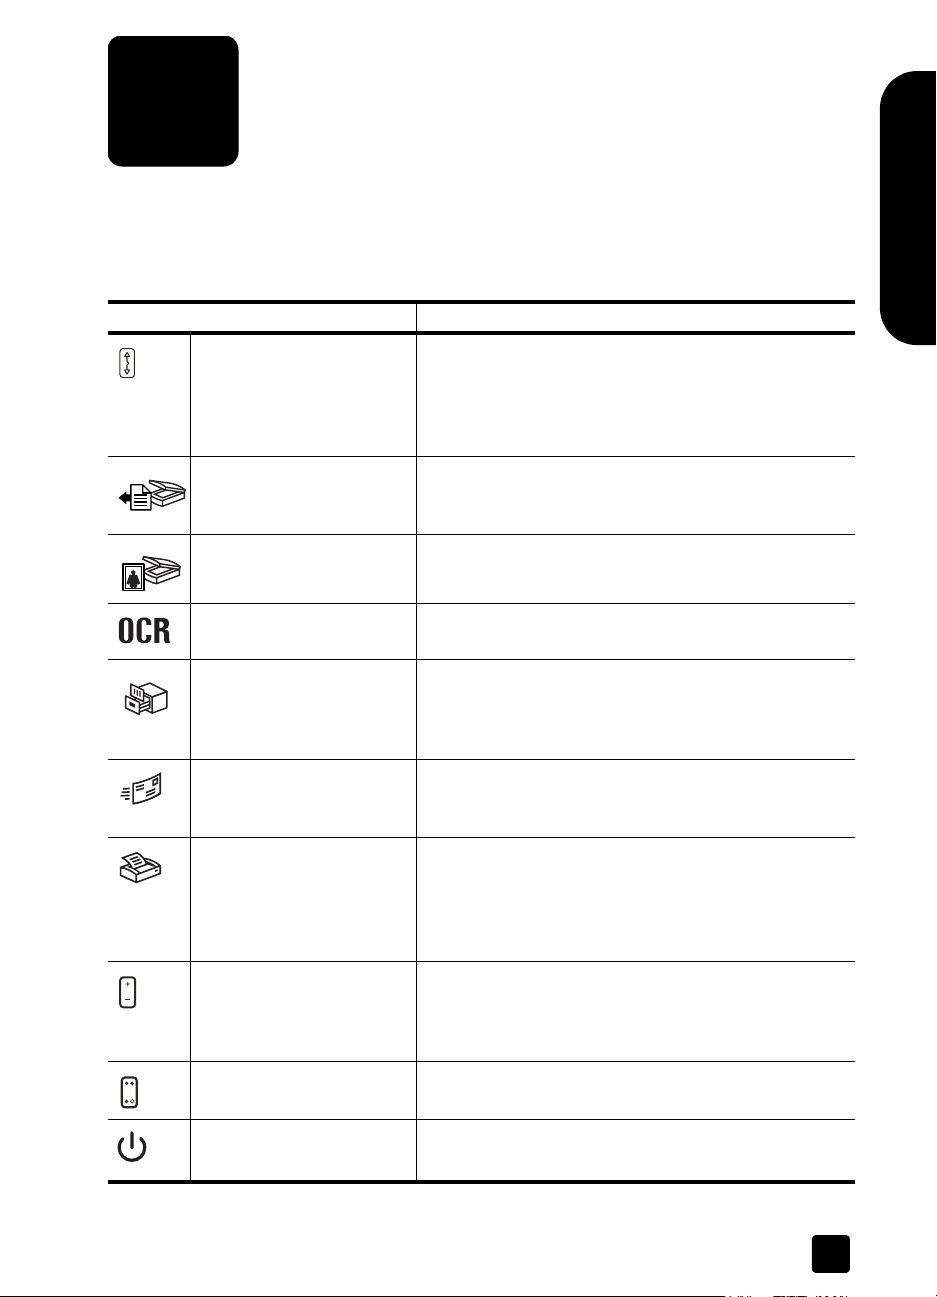
load originals in the ADF
1 Place a stack of similarly-sized originals face up in the document input tray,
with the first page on top. See the icon on the paper input tray.
2 Adjust the paper guides to center the stack.
3 Use the D
originals.
4 Press a scanner button or use the HP Director to begin scanning. Follow the
instructions on the computer screen to finish scanning.
14
UPLEX switch on the ADF to select one-sided or two-sided
load paper and center in the tray
4
scan from the TMA
scan slides
Use the Transparent Materials Adapter (TMA) to scan 35 mm slides or negatives.
Note: To scan large transparent items, such as a presentation transparency,
place the item on the scanner glass under a sheet of white paper and scan
as usual.
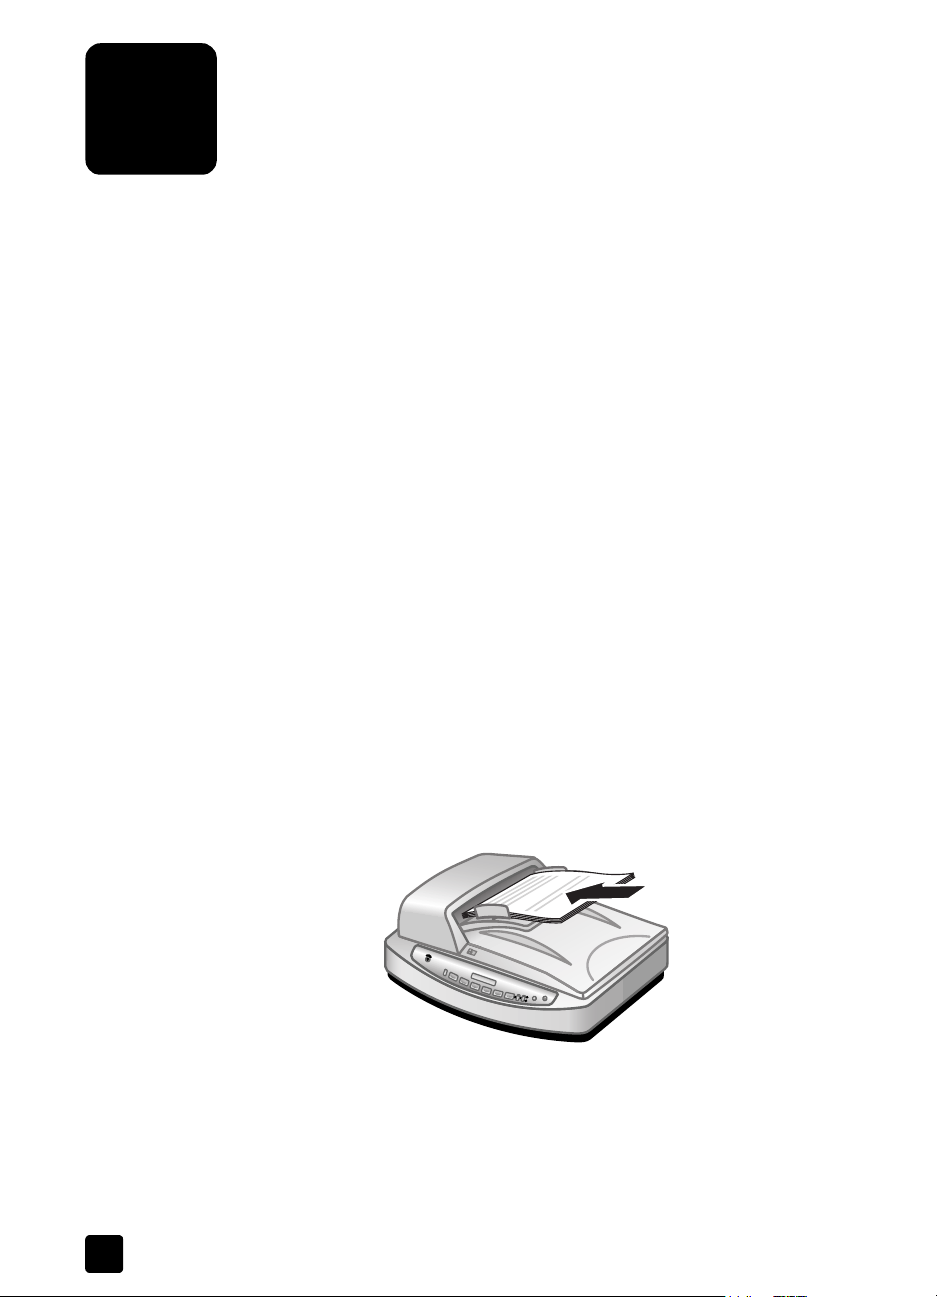
To scan 35 mm slides, use the slide holder that is part of the built-in TMA.
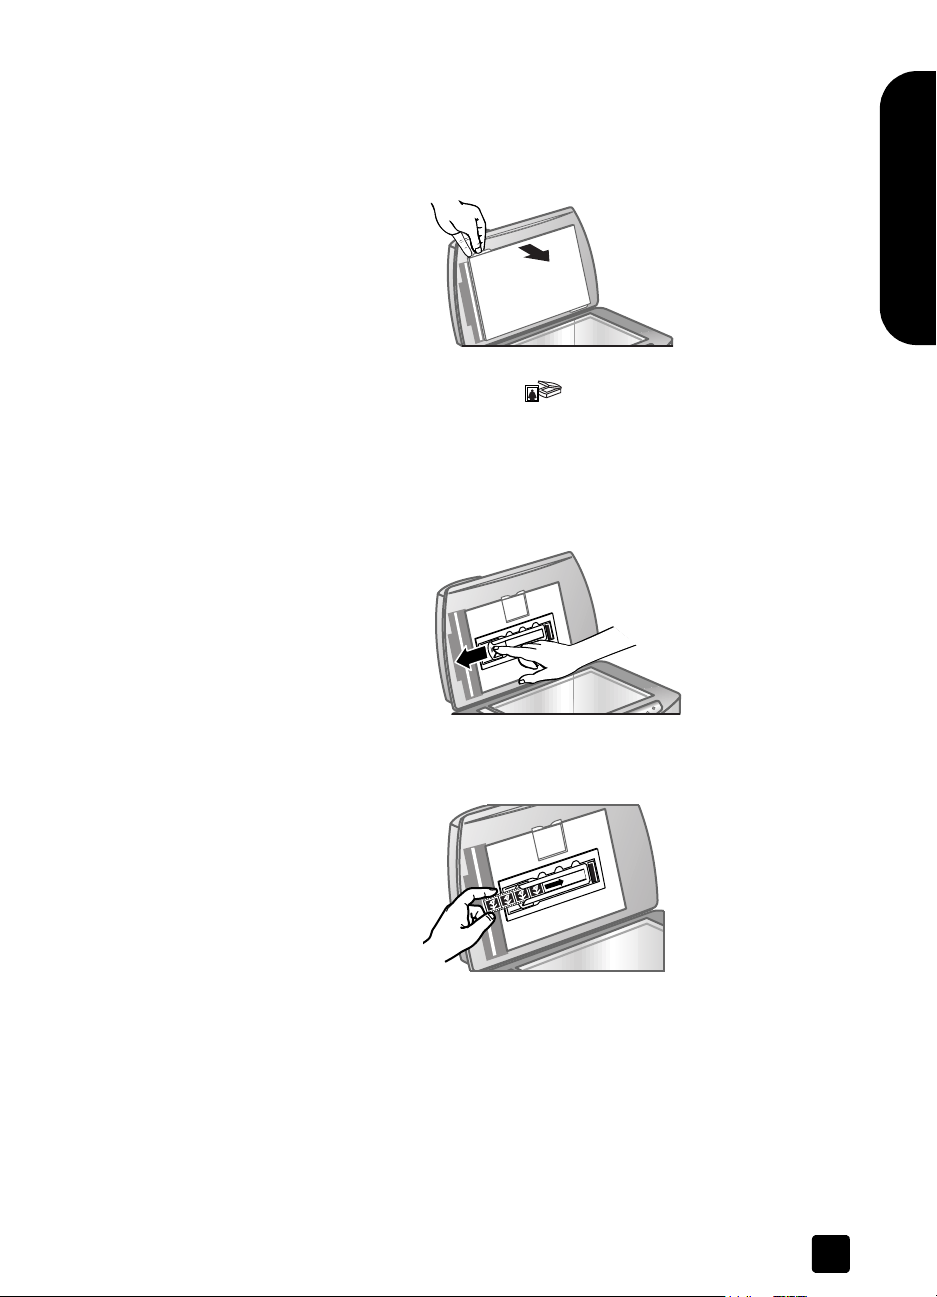
1 Open the scanner lid and remove the TMA cover.
remove the TMA cover
2 Click the SCAN PICTURE button ( ).
A dialog box appears asking what you are scanning.
3 Select Slides from a Transparent Materials Adapter (TMA).
Note: Do not click Scan until the slides are loaded and the lid is closed.
4 Remove the negative holder, if present, from the slide holder.
English
remove the negative holder
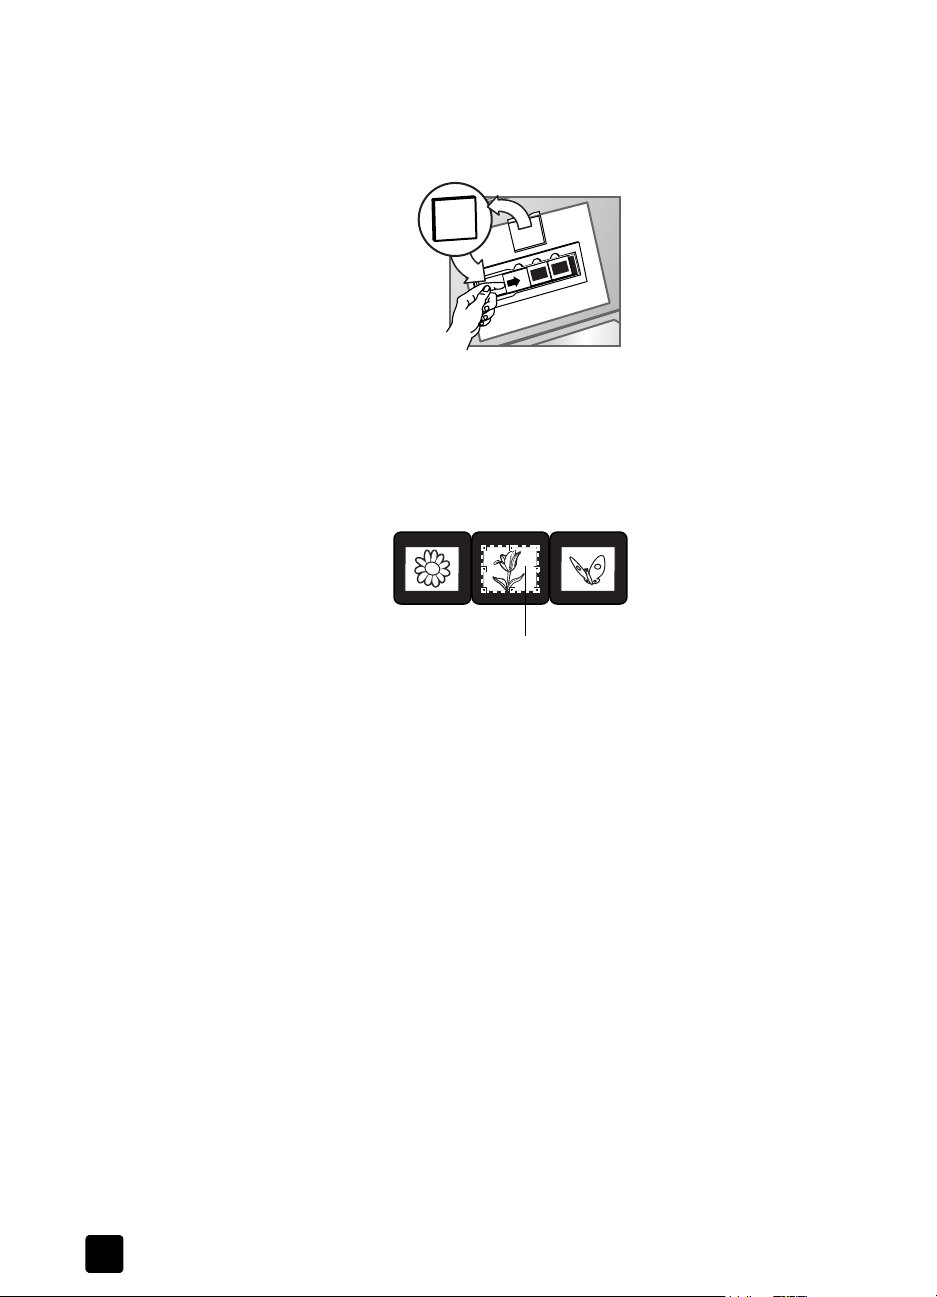
5 Place up to three slides into the slide holder. Insert the slides with the front
of the slides facing you.
insert the slides
15
chapter 4
6 After loading the last slide, insert the slide light-shield until it touches the
slides.
Note: Inserting the slide light-shield prevents stray light on the scanned
image.
insert the slide light-shield
7 Close the scanner lid.
8 In the Scan Picture window, click Scan.
9 The scanner performs a preview scan, and the preview image appears.
10 Select a final scan area within a slide. Click and drag a border around the
area you want for a final scan (final scan area).
Final scan area
select a final scan area
11 Scale the image to the desired size and make any other adjustments you
want, and then click Accept.
12 A dialog box appears asking if there are more originals to scan. If you
have more slides to scan, click Yes, and then perform one of the following
steps:
– Place another slide in the TMA, click New Scan, make adjustments,
and then click Accept.
OR
– Select another image within the preview window, make adjustments,
and then click Accept.
13 When you have finished scanning your items, click No when you receive
the prompt for another scan.
The images appear in the HP Photo & Imaging Gallery.
14 When finished, remove the slides. Replace the slide light-shield, the
negative holder, the negative light-shield, and the TMA cover.
16
hp scanjet 8200 series
scan negatives
To scan 35 mm negatives use the negative holder that is part of the built-in TMA.
1 Open the scanner lid and remove the TMA cover.
2 Click the SCAN PICTURE button ( ).
3 Select Negatives from a Transparent Materials Adapter (TMA).
4 Remove the negative light-shield from the negative holder. The negative
scan from the TMA
English
remove the TMA cover
A dialog box appears asking what you are scanning.
Note: Do not click Scan until the negative is loaded and the lid is closed.
holder is stored in the slide holder.
user’s manual
remove the negative light-shield
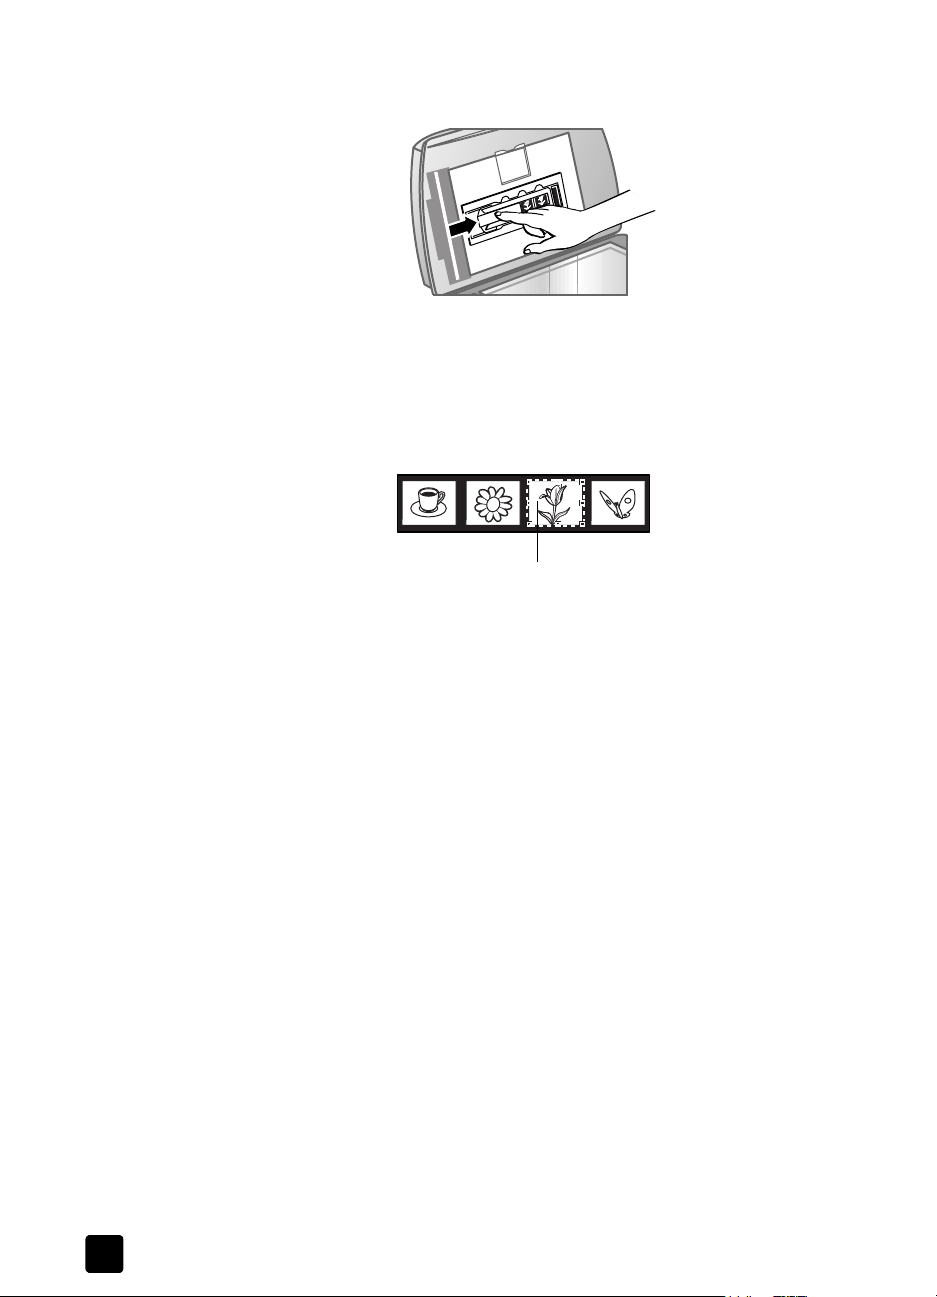
5 Slide a negative strip into the negative holder so that the shiny side faces
the scanner glass when the scanner lid is closed.
insert a negative strip
Note: Negatives are easily damaged. Touch them only on their edges.
6 If you are scanning a negative strip that has fewer than four frames, insert
the negative light-shield into the negative holder until it touches the
negative strip.
17
chapter 4
Note: Inserting the negative light-shield prevents stray light on the scanned
image.
insert the negative light-shield
7 Close the scanner lid.
8 In the Scan Picture window, click Scan.
The scanner performs a preview scan, and the preview image appears.
9 Select a final scan area. Click and drag a border around the area you
want for a final scan (final scan area).
Final scan area
select a final scan area
10 Scale the image to the desired size and make any other adjustments you
want, and then click Accept.
11 A dialog box appears asking if there are more originals to scan. If you
have more negatives to scan, click Yes, and then perform one of the
following steps:
– Place another negative strip in the TMA, click New Scan, make
adjustments, and then click Accept.
OR
– Select another image within the preview window, make adjustments,
and then click Accept.
12 When you have finished scanning your items, click No when you receive
the prompt for another scan.
The images appear in the HP Photo & Imaging Gallery.
13 When finished, remove the negative strip. Replace the negative holder, the
negative light-shield, and the TMA cover.
18
hp scanjet 8200 series

5
product support
This section contains support information including phone numbers and website
information.
For regulatory information, see the regulatory_supplement.htm file on the CD that
comes with the scanner.
accessibility website
Customers with disabilities can get help by visiting www.hp.com/hpinfo/
community/accessibility/prodserv.
hp scanjet website
Visit www.scanjet.hp.com for the following information:
• tips for scanning more effectively and creatively
• HP Scanjet driver updates and software
support process
The HP support process works most effectively if you perform the following steps
in the order specified:
1 Read the troubleshooting section of the User's Manual and review the
electronic help for the software and scanner.
2 Access the HP Support website. If you have access to the Internet, you can
obtain a wide range of information about your scanner. Visit the HP
website for product help, drivers, and software updates at www.hp.com/
support. Customer Care is available in the following languages: Dutch,
English, French, German, Italian, Portuguese, Spanish, Swedish, Traditional
Chinese, Simplified Chinese, Japanese, and Korean. (Danish, Finnish, and
Norwegian support information is available in English only.)
3 Access HP e-support. If you have access to the Internet, connect with HP via
e-mail by going to www.hp.com/support. You will receive a personal reply
from an HP Customer Care technician. E-mail support is available in the
languages listed at that website.
4 Contact your local HP dealer. If your scanner has a hardware failure, take
it to your local HP dealer for a solution. Service is free during your
scanner's limited warranty period. After the warranty period, the dealer
will quote a service charge.
5 Contact HP support by phone. Please consult the following website to
check the details and conditions of phone support in your country or
region: www.hp.com/support. As a part of HP's continuing efforts to
improve phone support information services, we advise you to check the
HP website on a regular basis for new information regarding service
English
19

chapter 5
features and delivery. If you cannot solve the problem by using the above
options, call HP while you are in front of your computer and scanner. For
faster service, please be prepared to provide the following information:
– the scanner's model number (located on the scanner's lid)
– the scanner's serial number (located on the bottom of the scanner)
– the computer's operating system
– the version of the scanner software (located on the scanner's CD label)
– messages displayed at the time the situation occurred
The applicable conditions for HP phone support are subject to change
without notice. Depending on your country/region, a fee may be charged
for phone information.
Telephone support is free from the date of purchase for the period shown in
the following table:
Locations Free Phone Support Period
United States 1 year
Africa 30 days
Asia Pacific 1 year
Canada 1 year
Europe 30 days
Latin America 1 year
Middle East 30 days
phone support in the United States
Support is available both during and after the warranty period.
Within the period of your warranty, telephone support is provided free of charge.
Call (208) 323-2551. If this is a long distance call for you, long distance charges
will apply.
U.S. phone support is available in both English and Spanish 24 hours a day, 7
days a week (days and hours of support may change without notice).
After the warranty period, call (208) 323-2551. Charges are $25.00 per issue,
and are charged to your credit card. If you think your HP product needs service,
call HP Customer Support, which can help determine if service is required.
20
hp scanjet 8200 series

phone support in Europe, Middle East, and Africa
Algeria +213 (0) 61 56 45 43
Austria +43 (0) 820 87 4417
Bahrain +973 800 728
product support
Belgium +32 070 300 005 (Dutch)
+32 070 300 004 (French)
Czech Republic +42 (0) 2 6130 7310
Denmark +45 70202845
Egypt +20 02 532 5222
Finland +358 (0)203 66 767
France +33 (0) 8 92 69 60 22 (Euro 0.34/min)
Germany +49 (0) 180 5652 180 (Euro 0.12/min)
Greece +30 10 60 73 603
Hungary +36 (0) 1 382 1111
Ireland +353 1890 923902
Israel +972 (0) 9 830 4848
Italy +39 848 800 871
Luxembourg 900 40 006 (French)
900 40 007 (German)
Morocco +212 224 04747
Netherlands 0900 2020165 (Euro 0.10 per minute)
Norway +47 815 62 070
English
user’s manual
Poland +48 22 865 98 00
Portugal +351 808 201 492
Romania +40 1 315 44 42
Russian Federation + 7 095 797 3520 (Moscow)
+ 7 812 346 7997 (St Petersburg)
Saudi Arabia +966 800 897 1444
Slovakia +421 2 6820 8080
South Africa 086 000 1030 (RSA)
+27-11 258 9301 (Outside RSA)
Spain +34 902 010 059
Sweden +46 (0) 77-120 4765
Switzerland +41 0848 672 672 (German, French, Italian –
Peak time 0.08 CHF/Outside peak 0.04 CHF)
21

chapter 5
Tunisia +216 1 891 222
Turkey +90 216 579 71 71
Ukraine +7 (380 44) 490-3520
United Arab
+971 4 883 845
Emirates
United Kingdom +44 (0)870 010 4320
other phone support worldwide
Argentina +54 0 810 555 5520
Australia +63 (3) 8877 8000 (or local (03) 8877 8000)
Brazil +55 (11) 3747 7799 (Grande São Paulo)
+55 0800 157751 (Outside Grande São Paulo)
Canada +1 905 206 4663 (During the warranty period)
+1 877 621 4722 (After the warranty period)
Central America
and the Caribbean
Chile +56 800 22 5547 (Post-sales Business Computing)
China +86 (10) 6564 5959
Colombia +57 9 800 114 726
Guatemala +502 1 800 999 5105
Hong Kong SAR +852 3002 8555
India 1 600 112267 or +91 11 682 6035 (Hindi & English)
+1 800 711 2884
+56 800 360 999 (Post-sales Home Computing)
22
Indonesia +62 (21) 350 3408
Japan 0570 000 511 (Inside Japan)
+81 3 3335 9800 (Outside Japan)
Korea, Republic of
+82 (2) 3270 0700 (Seoul)
0 80-999-0700 (Outside Seoul)
Malaysia +60 1 800 805 405
Mexico +52 58 9922 (Mexico City)
+52 01 800 472 6684 (Outside Mexico City)
New Zealand +64 (9) 356 6640
Peru +51 0 800 10111
Philippines + 63 (2) 867 3551
Puerto Rico +1 877 2320 589
Singapore +65 6272 5300
hp scanjet 8200 series

Taiwan +886 0 800 010055
Thailand +66 (2) 661 4000
United States 1 800 474-6836 (800 HPINVENT)
Venezuela +58 0 800 4746 8368
product support
Vietnam +84 (0) 8 823 4530
English
user’s manual
23

warranty
6
This topic contains warranty, regulatory, and environmental stewardship
program information.
hewlett-packard limited warranty statement
The HP Scanjet 8200 series digital flatbed scanner has a limited warranty of one
(1) year.
1 HP warrants to you, the end-user customer, that HP hardware, accessories,
and supplies will be free from defects in materials and workmanship after
the date of purchase, for the period specified above. If HP receives notice
of such defects during the warranty period, HP will, at its option, either
repair or replace products which prove to be defective. Replacement
products may be either new or equivalent in performance to new.
2 HP warrants to you that HP software will not fail to execute its
programming instructions after the date of purchase, for the period
specified above, due to defects in material and workmanship when
properly installed and used. If HP receives notice of such defects during the
warranty period, HP will replace software which does not execute its
programming instructions due to such defects.
3 HP does not warrant that the operation of HP products will be
uninterrupted or error free. If HP is unable, within a reasonable time, to
repair or replace any product to a condition as warranted, you will be
entitled to a refund of the purchase price upon prompt return of the
product.
4 HP products may contain remanufactured parts equivalent to new in
performance or may have been subject to incidental use.
5 This warranty does not apply to defects resulting from (a) improper or
inadequate maintenance or calibration, (b) software, interfacing, parts, or
supplies not supplied by HP, (c) unauthorized modification or misuse, (d)
operation outside of the published environmental specifications for the
product, or (e) improper site preparation or maintenance.
6 TO THE EXTENT ALLOWED BY LOCAL LAW, THE ABOVE WARRANTIES
ARE EXCLUSIVE AND NO OTHER WARRANTY OR CONDITION,
WHETHER WRITTEN OR ORAL, IS EXPRESSED OR IMPLIED, AND HP
SPECIFICALLY DISCLAIMS ANY IMPLIED WARRANTIES OR CONDITIONS
OF MERCHANTABILITY, SATISFACTORY QUALITY, AND FITNESS FOR A
PARTICULAR PURPOSE. Some countries, states, or provinces do not allow
limitations on the duration of an implied warranty, so the above limitation
or exclusion might not apply to you. This warranty gives you specific legal
rights, and you might also have other rights that vary from country to
country, state to state, or province to province.
24

7 HP’s limited warranty is valid in any country or locality where HP has a
support presence for this product and where HP has marketed this product.
The level of warranty service you receive may vary according to local
standards. HP will not alter the form, fit, or function of the product to make
it operate in a country in which it was never intended to function for legal
or regulatory reasons.
8 TO THE EXTENT ALLOWED BY LOCAL LAW, THE REMEDIES IN THIS
WARRANTY STATEMENT ARE YOUR SOLE AND EXCLUSIVE REMEDIES.
EXCEPT AS INDICATED ABOVE, IN NO EVENT WILL HP OR ITS
SUPPLIERS BE LIABLE FOR LOSS OF DATA OR FOR DIRECT, SPECIAL,
INCIDENTAL, CONSEQUENTIAL (INCLUDING LOST PROFIT OR DATA),
OR OTHER DAMAGE, WHETHER BASED IN CONTRACT, TORT, OR
OTHERWISE. Some countries, states, or provinces do not allow the
exclusion or limitation of incidental or consequential damages, so the
above limitation or exclusion may not apply to you.
9 THE WARRANTY TERMS CONTAINED IN THIS STATEMENT, EXCEPT TO
THE EXTENT LAWFULLY PERMITTED, DO NOT EXCLUDE, RESTRICT, OR
MODIFY AND ARE IN ADDITION TO THE MANDATORY STATUTORY
RIGHTS APPLICABLE TO THE SALE OF THIS PRODUCT TO YOU.
regulatory information
Regulatory information is located on the HP Photo & Imaging software CD that
comes with the scanner. On the CD, browse for the file named
regulatory_supplement.htm.
warranty
English
environmental stewardship program
protecting the environment
Hewlett-Packard Company is committed to providing quality products in an
environmentally sound manner. This product has been designed with attributes
to minimize impacts on our environment.
energy consumption
Energy usage drops significantly while the scanner is in low-power mode, which
saves natural resources and saves money without affecting the high performance
of this product. This product qualifies for E
program to encourage the development of energy-efficient office products. As an
ENERGY STAR Partner, Hewlett-Packard Company has determined that this product
NERGY STAR guidelines for energy efficiency.
meets E
plastics
Plastic parts over 25 g (0.88 oz) are marked according to international
standards that enhance the ability to identify plastics for recycling purposes at
the end of the product's life.
user’s manual
NERGY STAR®, which is a voluntary
25

chapter 6
disassembly/end of life
This HP product (the HP Scanjet 8200 series digital flatbed scanner) is designed
for ease of disassembly and to provide end-of-life disposal options by use of
common fasteners and snap-fitting parts.
product restricted material
This HP product contains the following materials that might require special
handling at end-of-life:
• mercury in the fluorescent lamp in the scanner and transparent materials
• lead in solder
For recycling information, contact
authorities or the Electronic Industries Alliance at www.eiae.org.
recycling materials
HP offers a variety of product end-of-life return programs in a number of
geographic areas. To determine if a program is available in your area, please
contact your nearest HP sales office.
Products returned to HP are reused, recycled, or disposed of in a responsible
manner. Each month, HP reuses or recycles more than 1.6 million kg (3.5 million
pounds) of material at our product recovery centers in Grenoble, France;
Boeblingen, Germany; and Roseville, California, USA. This represents 99
percent by weight of all the material we receive from customers and
HP operations.
adapter (< 5 mg)
www.hp.com/go/recycle or contact your local
26
hp scanjet 8200 series

7
appendix A – SCSI setup and options
This section describes how to set up the HP Scanjet 8200 series scanner with a
Small Computer Serial Interface (SCSI).
why use SCSI?
If your computer uses Windows NT, the scanner must be attached with SCSI. If
your computer already has SCSI devices attached, you can attach the scanner
to an existing external SCSI string. The scanner must be the last device in the SCSI
string and the computer must have a compatible SCSI adapter. The scanner also
must have a SCSI module.
For a list of compatible SCSI adapter cards, see compatible SCSI cards on
page 29.
install the software
HP recommends that you install the software first.
Note: For Windows NT, users must install the HP Precisionscan Pro
software.
1 Remove any previous versions of HP scanning software.
2 Close all open applications on the computer and insert the CD.
3 From the Start menu, click Run, and type: x:setup.exe (where x is the letter
of the CD drive).
install the scanner
English
The SCSI module must be inserted in the scanner and a SCSI card must be in the
computer before installing the scanner.
1 Unplug the power cord from the scanner, and turn off the computer.
2 Install the SCSI module in the scanner:
a. Remove the two mounting screws that attach the SCSI access cover on
the back of the scanner and remove the cover.
1 2 1
remove SCSI access cover
27

chapter 7
b. Insert the SCSI module (C9939AC3) into the scanner.
insert the SCSI module
c. Insert and tighten the two mounting screws.
tighten the two mounting screws
3 Install the SCSI card into your computer (from the SCSI kit –
C6271) using
the instructions that came with the SCSI kit.
4 Connect the SCSI cable between the computer and the SCSI module.
5 Connect the power cord and adapter as shown in the following illustration.
Power adapter cable
6 Turn on the computer.
7 If other SCSI devices are installed on this SCSI card and the scanner does
not work, there might be a SCSI address conflict.
8 If there is a SCSI address conflict, change the scanner SCSI address.
Change the scanner SCSI address
If you have several SCSI devices attached to a single SCSI adapter card, each
SCSI device must have a unique SCSI ID. If the scanner does not work after
adding the scanner to a multi-device SCSI string, you might need to change the
SCSI address. To change the scanner SCSI ID (preset to 2), follow these steps:
1 Turn the computer off.
2 Ensure that the scanner is on.
3 Press the S
button ( ) on the scanner at the same time.
SCSI Address: 2 should appear on the front panel display.
CAN DOCUMENT TO button ( ) and the EDIT TEXT
1
Power adapter
connect the power
2
Power co rd
28
hp scanjet 8200 series

appendix A – SCSI setup and options
4 Press the NUMBER OF COPIES button ( ) to select a different SCSI address
number. The number appears in the front panel display.
5 To exit the SCSI address settings, press any button on the scanner front
panel except the N
6 Turn the computer on.
UMBER OF COPIES button ( ).
compatible SCSI cards
Windows Compatible SCSI Cards
Adaptec 19160 Adaptec APA 1480A Slim
Adaptec 2100S 1Channel Ultra Adaptec AVA 2906 PCI
Adaptec 2904 Adaptec AVA 2930 Ultra
Adaptec 29160 Ultra Adaptec AVA 39160 Ultra
Adaptec 39320D Ultra AdvanSys 915
Adaptec AAA 131U2 RAIDPCI To Ultra2 SIDE-2935LVD or SIDE-2936UW or SIDE-2930C
or SIDE-DU280
Adaptec AHA 291OC lomega Jaz Jet 32Bit PCI to SCSI
Adaptec AHA 2940U Ultra Symbios Logic 53C1010 or 53C895
Adaptec AHA 2944UW Ultra Wide Tekram DC390 or 395UW or DC315U or DC-
315 or DC-390U2W
Macintosh Compatible SCSI Cards
Adaptec AHA 2930 U2B AdvanSys SCSI 915
Adaptec AHA 2930 UI Apple 53C875
English
user’s manual
29

appendix B – product specifications
8
and options
This section contains the product specifications for the HP Scanjet 8200 series
scanners and accessories.
scanner specifications
Name Description
Scanner type Flatbed
Weight (without lid) 2.79 kg (6.2 pounds)
Maximum original size 296 x 494 x 73 mm (11.7 x 19.8 x 2.9 inches)
Scanning element Charged-coupled device
Interface Hi-Speed USB and SCSI-2
Optical resolution 4800 dpi
Selectable resolution 12 dpi to 999,999 dpi at 100 percent scaling
AC line voltage 100 -120 V 60 Hz – North America
200-240 V 50 Hz – Continental Europe, United Kingdom, Australia
100-240 V 50 Hz/60 Hz – rest of the world
Power consumption For power consumption data, see the regulatory_supplement.htm file
on the HP Photo & Imaging software CD.
All HP Scanjet 8200 series scanners are E
NERGY STAR partner, Hewlett-Packard Company has determined
an E
that this product meets the E
efficiency.
NERGY STAR guidelines for energy
NERGY STAR compliant. As
automatic document feeder (ADF) specifications
Name Description
Size 584 x 318 x 89 mm (23.0 x 12.5 x 3.5 inches)
Weight (with TMA) 2.7 kg (6.0 pounds)
Paper tray capacity 50 peices of 75 g/m
Maximum paper size 216 x 356 mm (8.5 x 14 inches)
Minimum paper size 89 x 127 mm (3.5 x 5 inches)
Maximum paper weight 90g/m
Power requirements 1.0 A, 32 V, 32 watts (supplied by scanner)
30
2
(24 pounds)
800 mA, 19 watts (peak) 625 mA, 15 watts (nominal)
2
(20 pound bond)

appendix B – product specifications and options
transparent materials adapter (TMA) specifications
Name Description
Media Types and
Capacity
Size 565 x 320 x 64 mm (22.2 x 12.6 x 2.5 inches)
Weight 1.6 kg (3.5 pounds)
Power requirements 16 VDC, 425 mA, 6.8 watts (supplied by scanner)
Slides: up to 3 slides, 35 mm, mounted on a frame that is
1.05 x 1.9 mm thick and 49.8 x 50.8 mm square.
Negatives: up to 4 frames of a 35 mm negative strip.
environmental specifications for the scanner, ADF, and TMA
Name Description
Temperature Operating: 10° to 35° C (50° to 95° F)
Storage: -40° to 70° C (-40° to 158° F)
Relative humidity Operating: 15 percent to 80 percent noncondensing
10° to 35° C (50° to 95° F)
Storage: up to 90 percent at
-40° to 70° C or (-40° to 158° F)
purchase accessories
You can purchase accessories at your local retailer or online at
www.hpshopping.com (USA only). For other regions, use www.hp.com and
select your language. Then select the shopping section.
English
Option Name Part Number
SCSI Kit (contains a SCSI card and cable) C6271
SCSI Module (contains a SCSI port for the scanner) C9939AC3
15 ppm ADF with built-in TMA C9936A
25 ppm ADF with built-in TMA C9937A
purchase maintenance parts
You can purchase the following maintenance parts at www.hp.com. In the
Search box, type “ADF Roller Replacement kit” or “cleaning cloth” to find
information on purchasing the parts.
Name Part Number
ADF Roller Replacement kit C9937-68001
Cleaning Cloth 10 pack C9915-60056
user’s manual
31

index
index
A
accessibility, website for, 19
accessories, purchase, 31
acquire scans, 5
adapter cards, list of, 29
address, change SCSI, 28
ADF (automatic document
feeder)
choose acceptable
media,
14
clean, 10
maintain, 12
prepare media for use, 14
purchase, 31
roller replacement kit, 31
scan from, 14
attach files to e-mail, 7
automatic document feeder
(ADF)
choose acceptable
14
media,
clean, 10
maintain, 12
prepare media for use, 14
purchase, 31
roller replacement kit, 31
scan from, 14
B
Button Settings
4
button,
change, 9
buttons
Cancel,
Color/Black & White, 3
Copy, 3, 7
Destination, 3
Edit Text, 3
E-mail button, 3
File Documents, 3
Number of Copies, 3
Powe r Save, 3, 9
Scan Document To, 3
Scan Picture, 3
settings, 4, 9
4, 8
C
cancel
copies printing,
scanning, 8
Cancel button
description,
use, 8
change
preview images,
printer settings, 7
clean
ADF,
10
scanner glass, 10
TMA, 10
cleaning cloth, part
number,
cloth, cleaning, 31
Color/Black & White button,
description,
copies
7
print,
Copy button
description,
use, 7
curls in media, 14
customer support, 19
custom-size paper, 14
7
4
5
31
3
3
D
Destination button,
description,
destination directory
invalid,
directory invalid, 12
disabilities, assistance for, 19
display, front panel, 4
document scans
from Scan Document To
button, 5
3
12
E
Edit Text button
description,
use, 6
electrical specifications
TMA,
E-mail button
description,
use, 7
end-of-life return programs, 26
3
30
3
energy consumption
Energy Star,
TMA, 30
Energy Star
description,
website, 25
environmental
specifications,
stewardship program, ii, 25
25
25
31
F
feed roll assembly, replace, 12
File Documents button
on scanner,
use, 6
files
attach to e-mail,
output types, 10
final scan area, 16, 18
forms, scan, 14
Front Panel display,
description,
3
7
4
H
hardware
test mode,
help
phone support,
websites, 19
holder, negative, 17
HP Copying software, 7
HP Photo & Imaging Gallery, 5
HP Scanjet transparent
materials adapter (TMA)
negatives, scan, 17
slides, scan, 15
specifications, 30
humidity specifications, 31
12
20
I
ID, change SCSI, 28
images
preview and change,
import scans, 5
install
scanner with SCSI,
test hardware, 12
Instant Lamp Warm-up
9
setting,
5
27
32

index
instant scan, 9
invalid directory or folder
message,
12
L
lamp in scanner
warm-up,
9
M
maintain
12
ADF,
clean scanner, 10
order supplies, 12
TMA, 10
media
acceptable types for
ADF, 14
messages
invalid directory or
folder, 12
multipart forms, scan, 14
N
negatives
17
holder,
light-shield, 17, 18
scan with TMA, 17
NT, software installation, 27
Number of Copies button,
description,
3
O
operating temperature
specifications,
31
order
maintenance supplies,
12
originals
preview multiple originals,
scan multiple, 8
select type of, 10
output file types, 10
P
paper
acceptable types for
ADF, 14
phone support, 20
power consumption
Energy Star,
25
TMA, 30
Power Save button
description,
3
use, 9
power specifications
TMA,
30
preview images
multiple originals,
view and change, 5
print
7
copies,
printers
change settings,
product specifications, 30
programs
scan from,
5
R
recycle, 25, 26
regulatory information, 25
replace
feed rolls in ADF,
return programs, 26
roller replacement kit, ADF, 31
S
scan
attach files to e-mail,
cancel, 8
multiple originals, 8
negatives, 17
overview, 4
slides, 15
with Copy button, 7
with Edit Text button, 6
with E-mail button, 7
with File Documents
6
button,
with Scan Document To
5
button,
8
with Scan Pictures button, 5
Scan Document To button, 3
scan documents, 5
Scan Picture button
scan pictures,
5
use, 5
scanner
care and cleaning,
glass, clean, 10
install, 27
SCSI
change scanner address,
install scanner, 27
list of compatible adapter
cards,
29
setup scanner with, 27
size
30
TMA,
8
slides
holder,
15
light-shield, 16
scan, 15
software
7
installation, SCSI,
27
English
specifications
environmental,
31
product, 30
scanner, 30
TMA, 31
stewardship program, 25
storage specifications, 31
12
supplies, order, 12
support, customer, 19
T
technical support, 19
telephone support, 20
7
temperature specifications, 31
test
scanner hardware,
12
TMA. See HP Scanjet
transparent materials
adapter (TMA)
transparencies, scan,
14
transparent materials adapter.
See HP Scanjet
transparent materials
adapter (TMA)
TWAIN
scan from,
5
V
view
preview images,
5
W
warranty, ii, 24
websites
10
disability assistance,
Energy Star, 25
19
recycling, 26
weight
TMA,
ADF,
30
14
28
weights of media acceptable
wrinkles in media, 14
user’s manual
33


HP Scanjet 8200 시리즈 스캐너
사용 설명서
한국어

저작권 정보
© Copyright Hewlett-Packard Company 2003
All rights reserved. 저작권법에 따라 허용되는 경우를 제외하고, 서면 승인 없는 복제, 개
조 또는 변경은 금지되어 있습니다.
이 제품은 미국 특허 번호 4,558,302에 의해 허가된 LZW (Lempel-Ziv-Welch) 데이터
압축의 구현을 포 함하는 Adobe의 PDF 기술을 포함합니 다.
상표
Adobe 및 Acrobat 로고는 미국 및 기타 국가에서 Adobe Systems Incorporated의
등록 상표 또는 상표입 니다.
Energy Star는 미국 환경보호청 (EPA)의 미국 등록 서비스 상표입니다.
Microsoft 및 Windows는 Microsoft Corporation의 등록 상표입니다.
이 설명서에 언급된 기타 모든 제품의 이름은 해당 회사의 상표입니다.
문서 보증
이 문서에 포함된 정보는 사전 통보 없이 변경될 수 있습니다.
Hewlett-Packard는 이 정보에 대하여 어떠한 보증도 하지 않습니다.
Hewlett-Packard는 특히 특정한 목적에 대한 적합성 및 상업적 판매에 대한 암
시적인 보증을 부인합니다.
Hewlett-Packard는 이 정보의 사용 또는 제공에 관련하여 추정된 모든 직접, 간접 또는
기타 손상에 대한 책임 이 없습니다.
TWAIN 도구 키트는 있는 그대로 배포됩니다. TWAIN 도구 키트의 개발자 및 배포자는
제한, 묵시적인 상업적 보증, 제3자 권리의 비침해 및 특정 목적에 대한 적합성 없이,
모든 명시된 표현 또는 법적 보증 포함을 부인 합니다. 개발자 또는 배포자는 TWAIN
도구 키트의 복제, 변경 , 배포 또는 기타 사용 결과로 인한 직접, 간접, 부수적, 파생적
또는 특수한 손해에 대한 책임이 없습니다.
정부 사용자 주의 사항: 제한된 권리의 상업용 컴퓨터 소프트웨어:
사용, 복제 또는 공개는 D FARS 52.227-7013의 기술 데이터 조항에 있는 권리의 (c) (1)
(ii) 호에서 규정된 바와 같이 제한되어 있습니다.
이 제품을 사용하여 스캔된 인쇄물은 저작권법 같은 정부의 법 및 기타 규정에 의해
보호받습니다. 사용자는 이러한 모든 법 및 규정을 전적으로 준수해야 할 의무가
있습니다.
정부에 의한
제품에 들어 있는 특수 처리 요구 물질
이 HP 제품에는 특수한 처리가 필요한 다음 물질이 포함되어 있습니다.
• 스캐너 형광등 및 투명 재료 어댑터에 포함된 수은 (5mg 이하)
• 납
재활용에 대한 정보는 www.hp.com/go/recycle, 지역 당국 또는 EIA 홈페이지
(www.eiae.org)에 문의하십시오.
HP의 환경 관리 프로그램에 대한 정보는 24페이지의 환경 관리 프로그램을 참조하십시
오. 제품 보증에 대한 정보 는 23페이지의 Hewlett-Packard 제한 보증서를 참조하십시오.

차례
정보를 얻으려면? . . . . . . . . . . . . . . . . . . . . . . . . . . . . . . . . . . .1
스캐너 사용 방법 . . . . . . . . . . . . . . . . . . . . . . . . . . . . . . . . . . .3
전면 패널 개요 . . . . . . . . . . . . . . . . . . . . . . . . . . . . . . . . . . . . 3
소프트웨어 설치 . . . . . . . . . . . . . . . . . . . . . . . . . . . . . . . . . . . 4
스캔 개요. . . . . . . . . . . . . . . . . . . . . . . . . . . . . . . . . . . . . . . . 4
문서 스캔. . . . . . . . . . . . . . . . . . . . . . . . . . . . . . . . . . . . . . . . 5
그림 스캔. . . . . . . . . . . . . . . . . . . . . . . . . . . . . . . . . . . . . . . . 5
문자열을 편집할 수 있도록 문서 스캔. . . . . . . . . . . . . . . . . . . . 6
디스크 또는 CD에 문서 저장 . . . . . . . . . . . . . . . . . . . . . . . . . . 6
스캔한 문서 또는 그림을 이메일로 보내기 . . . . . . . . . . . . . . . . 6
문서 또는 그림 복사 . . . . . . . . . . . . . . . . . . . . . . . . . . . . . . . . 7
여러 장의 원본 스캔 및 미리보기 . . . . . . . . . . . . . . . . . . . . . . . 7
스캔 작업 중 스캔 취소 . . . . . . . . . . . . . . . . . . . . . . . . . . . . . . 8
설정 변경. . . . . . . . . . . . . . . . . . . . . . . . . . . . . . . . . . . . . . . . 8
원본 형식 선택 . . . . . . . . . . . . . . . . . . . . . . . . . . . . . . . . . . . . 9
관리 및 유지보수 . . . . . . . . . . . . . . . . . . . . . . . . . . . . . . . . . 10
스캐너 설치 문제 . . . . . . . . . . . . . . . . . . . . . . . . . . . . . . . . . 12
스캐너 초기화 문제. . . . . . . . . . . . . . . . . . . . . . . . . . . . . . . . 13
문제 해결. . . . . . . . . . . . . . . . . . . . . . . . . . . . . . . . . . . . . . . 13
한국어
ADF를 사용한 스캔 . . . . . . . . . . . . . . . . . . . . . . . . . . . . . . . . .14
ADF에 사용 가능한 용지 선택 . . . . . . . . . . . . . . . . . . . . . . . . 14
ADF에 원본 로드 . . . . . . . . . . . . . . . . . . . . . . . . . . . . . . . . . 14
TMA를 사용한 스캔. . . . . . . . . . . . . . . . . . . . . . . . . . . . . . . . .15
슬라이드 스캔 . . . . . . . . . . . . . . . . . . . . . . . . . . . . . . . . . . . 15
음화 스캔. . . . . . . . . . . . . . . . . . . . . . . . . . . . . . . . . . . . . . . 17
제품 지원 . . . . . . . . . . . . . . . . . . . . . . . . . . . . . . . . . . . . . . . .19
장애인용 웹사이트 . . . . . . . . . . . . . . . . . . . . . . . . . . . . . . . . 19
HP Scanjet 웹사이트 . . . . . . . . . . . . . . . . . . . . . . . . . . . . . . . 19
지원 절차. . . . . . . . . . . . . . . . . . . . . . . . . . . . . . . . . . . . . . . 19
보증 . . . . . . . . . . . . . . . . . . . . . . . . . . . . . . . . . . . . . . . . . . . .23
Hewlett-Packard 제한 보증서 . . . . . . . . . . . . . . . . . . . . . . . . . 23
규정 정보. . . . . . . . . . . . . . . . . . . . . . . . . . . . . . . . . . . . . . . 24
환경 관리 프로그램. . . . . . . . . . . . . . . . . . . . . . . . . . . . . . . . 24
부록 A - SCSI 설치 및 옵션 . . . . . . . . . . . . . . . . . . . . . . . . . . .26
SCSI를 사용하는 이유 . . . . . . . . . . . . . . . . . . . . . . . . . . . . . . 26
소프트웨어 설치 . . . . . . . . . . . . . . . . . . . . . . . . . . . . . . . . . . 26
스캐너 설치 . . . . . . . . . . . . . . . . . . . . . . . . . . . . . . . . . . . . . 26
호환 가능한 SCSI 카드 . . . . . . . . . . . . . . . . . . . . . . . . . . . . . 28
iii

차례
부록 B - 제품 사양 및 옵션 . . . . . . . . . . . . . . . . . . . . . . . . . . . 29
스캐너 사양 . . . . . . . . . . . . . . . . . . . . . . . . . . . . . . . . . . . . . 29
자동 문서 공급기 (ADF) 사양 . . . . . . . . . . . . . . . . . . . . . . . . . 29
투명 재료 어댑터 (TMA) 사양. . . . . . . . . . . . . . . . . . . . . . . . . 30
스캐너, ADF 및 TMA 사용 환경 조건 . . . . . . . . . . . . . . . . . . . 30
부속품 구매 . . . . . . . . . . . . . . . . . . . . . . . . . . . . . . . . . . . . . 30
유지 관리용 부품 구매 . . . . . . . . . . . . . . . . . . . . . . . . . . . . . 30
iv
hp scanjet 8200 시리즈

1
정보를 얻으려면?
이 설명서에서는 Microsoft
HP Scanjet 8200 시리즈 스캐너 작동에 대해 설명합니다. Microsoft Windows
®
NT
및 Apple
여러 가지 문서를 통해 필요한 정보를 얻을 수 있습니다. 다음 표에는 이러한
문서가 나열되어 있습니다.
주제 위치
운영 체제
• Apple Macintosh
•Windows NT
제품 개요
제품 소개
스캐너 설치
소프트웨어 설치
소프트웨어 제거
도움말 찾기
• 소프트웨어
• 소프트웨어 (타사 제품)
• 제품 관련
•SCSI 사용자
관리 및 유지보수
®
Apple 지원 센터
설치 포스터
사용 설명서 - 소프트웨어 설치
사용 설명서 - 설치 문제
Precisionscan Pro 도움말
사용 설명서 - 부록 A, SCSI 설정 및 옵션
설치 포스터
사용 설명서 - 전면 패널 개요
HP Scanjet 8200 시리즈 도움말 - 전면 패널 개요
HP Scanjet 8200 시리즈 도움말 - 제품 소개
설치 포스터 - 설치 및 설정 방법에 대해 설명하는 접는 방식의
페이지 (한 장)
HP Scanjet 8200 시리즈 도움말 - 스캐너 설치
사용 설명서 - 부록 A, SCSI 설정 및 옵션
설치 포스터
사용 설명서 - 소프트웨어 설치
HP Scanjet 8200 시리즈 도움말 - 소프트웨어 제거
HP 사진 및 이미지 소프트웨어 도움말 - 소프트웨어 사용 방법
타사의 소프트웨어 설명서
HP Scanjet 8200 시리즈 도움말
사용 설명서 - 부록 A, SCSI 설정 및 옵션
HP Precisionscan Pro 도움말
사용 설명서 - 관리 및 유지보수
Macintosh
®
Windows
®
시스템에 대한 정보는 아래의 표를 참조하십시오.
®
운영 체제를 사용하는 컴퓨터에서의
한국어
1

1 장
주제 위치
문제 해결
• 설치 및 설정
• 스캐너
• 부속품
• 소프트웨어
• 스캐너 유리 안쪽 청소
사용 설명서 - 설치 문제
사용 설명서 - 초기화 문제
HP Scanjet 8200 시리즈 도움말 - 문제 해결, 스캐너 문제
HP Scanjet 8200 시리즈 도움말 - 문제 해결, ADF 문제
HP Scanjet 8200 시리즈 도움말 - 문제 해결, TMA 문제
HP 사진 및 이미지 소프트웨어 도움말 - 문제 해결
www.hp.com/support
사용법
• 스캐너
• 부속품
• 소프트웨어
사용 설명서 - 스캐너 사용 방법
사용 설명서 - TMA를 사용한 스캔
사용 설명서 - ADF를 사용한 스캔
HP 사진 및 이미지 소프트웨어 도움말 - 소프트웨어 사용 방법
지원
• 일반 정보
• 웹사이트
• 전화 번호
보증
부속품 및 옵션 구매 사용 설명서 - 부록 B, 부속품 구매
유지 관리용 소모품 구매 사용 설명서 - 부록 B, 유지 관리용 부품 구매
사용 설명서 - HP 기술 지원
HP Scanjet 8200 시리즈 도움말 - HP 기술 지원
www.hp.com/support
사용 설명서 - HP 기술 지원
HP Scanjet 8200 시리즈 도움말 - HP 기술 지원
사용 설명서 - Hewlett-Packard 제한 보증서
www.hpshopping.com (미국만 해당) - 다른 국가의 경우
www.hp.com에서 해당 언어를 선택하십시오.
www.hpshopping.com (미국만 해당) - 다른 국가의 경우
www.hp.com에서 해당 언어를 선택하십시오.
2
hp scanjet 8200 시리즈

스캐너 사용 방법
2
이 단원에서는 스캐너 전면 패널에 대한 개요와 스캐너 사용 및 관리 방법에 대
해 설명합니다.
전면 패널 개요
기능 설명
대상 단추 스캔한 문서를 보낼 대상 (워드 프로세서 같은 응용 프로
그램)을 선택합니다. 대상은 전면 패널 디스플레이에
표시됩니다.
문서 스캔 대상 단추를 누르기 전에 먼저 대상을 선택합
니다.
문서 스캔 대상 단추 선택한 대상 (워드 프로세서 같은 응용 프로그램)으로
원본 문서를 스캔합니다. 대상을 선택하려면 대상 단추
를 사용합니다.
그림 스캔 단추 그림을 HP 사진 및 이미지 갤러리에 스캔합니다.
문자열 편집 (OCR) 단추 문서의 문자열과 그림을 스캔하여 지정된 워드 프로세서
응용 프로그램에서 편집할 수 있는 문자열을 표시합니다.
파일 문서 단추 입력한 대상 파일로 원본 문서 또는 그림을 스캔합니다.
원본을 스캔하면 파일 이름, 파일 형식 및 파일 위치를
입력할 수 있는 대화 상자가 표시됩니다.
이메일 단추 원본 문서 또는 그림을 스캔하여 스캔한 이미지를 이메
일 소프트웨어에 첨부 파일로 전송합니다.
복사 단추 복사 소프트웨어를 시작하여 원본을 스캔합니다. 스캔한
이미지는 기본 프린터로 바로 전송됩니다.
복사 단추를 누르기 전에 먼저 인쇄 매수와 컬러 또는
흑백으로 스캔할지 여부를 선택합니다.
인쇄 매수 단추 복사 단추로 인쇄할 인쇄 매수를 선택합니다. 복사 단추
를 누르기 전에 먼저 인쇄 매수를 선택합니다. 인쇄 매수
는 전면 패널 디스플레이에 표시됩니다.
컬러/흑백 단추 복사 시 원본 항목을 컬러 또는 흑백으로 스캔할지 여부
를 결정합니다.
한국어
절전 단추 스캐너 램프, 패널 표시등 및 전면 패널 디스플레이를
끕니다.
3

2 장
기능 설명
취소 단추 스캔하는 도중 스캔 작업을 취소하거나 자동 문서 공급
기 (ADF)를 사용할 때 일련의 스캔 작업을 취소합니다.
단추 설정 단추 단추 설정 대화 상자를 엽니다. 이 대화 상자에서 스캐너
단추의 작동 방법을 변경할 수 있습니다.
전면 패널 디스플레이 대상, 인쇄 매수 및 오류 메시지를 비롯한 스캐너 정보를
표시합니다.
소프트웨어 설치
1 컴퓨터에서 실행 중인 모든 응용 프로그램을 닫습니다.
2 사용자의 언어 및 운영 체제에 적합한 HP 사진 및 이미지 소프트웨어 CD를
찾습니다.
3 컴퓨터에 CD를 삽입합니다.
Windows: 화면의 지침에 따라 수행하십시오. 설치 응용 프로그램이 자동
으로 시작되지 않는다면 다음과 같이 수행하십시오.
시작 메뉴에서 실행을 누르고 x:setup.exe를 입력합니다 (x는 CD 드라이
브의 문자입니다).
Macintosh: CD에서 설치관리자 아이콘을 더블 클릭하고 지침을 따르십시오.
스캔 개요
전면 패널 단추, HP 관리자 또는 다른 응용 프로그램에서 스캔을 시작할 수 있습
니다.
주: HP 스캐닝 소프트웨어에서 항목을 추가로 스캔할지 묻는 상자를 표시할
수 있습니다. 이를 통해 여러 항목을 스캔하고 모든 항목을 동시에 최종 대
상으로 전송할 수 있습니다. 미리보는 경우에는 미리보기 창을 닫기 전 여러
이미지를 미리보고 스캔할 수도 있습니다. 자세한 내용은 여러 장의 원본 스
캔 및 미리보기를 참조하십시오.
Windows NT 및 Macintosh 사용자의 경우 스캔 절차를 보려면 1페이지의 정보를
얻으려면?을 참조하십시오.
전면 패널 단추를 사용한 스캔
전면 패널 단추를 통해 사진 및 문서 스캔을 비롯하여 자주 사용하는 스캔 기능
에 대한 바로가기를 사용할 수 있습니다. 모든 전면 패널 단추의 사용에 대한 설
명은 이 설명서에 들어 있습니다.
HP 관리자를 사용한 스캔
HP 사진 및 이미지 소프트웨어를 시작하려면 바탕 화면에 있는 HP 관리자 아이
콘을 누릅니다. HP 관리자 창이 표시됩니다. 이 창에서 이미지 스캔, 보기 또는
인쇄를 시작할 수 있습니다.
바탕 화면에 HP 관리자 아이콘이 없으면 시작을 누르고 프로그램을 가리킨 다음
Hewlett-Pac kard에서 카메라 및 스캐너를 가리키고 HP 사진 및 이미지 관리자를
누릅니다.
4
hp scanjet 8200 시리즈

다른 응용 프로그램을 사용한 스캔
이미지를 TWAIN 호환 응용 프로그램에 열려 있는 파일에 바로 가져올 수 있습니
다. 일반적으로 취득, 스캔 또는 새 개체 가져오기 같은 명령이 있으면 이 응용 프
로그램은 TWAIN에 적합한 프로그램입니다. 응용 프로그램의 적합성 여부 또는
명령에 대해 잘 모르는 경우 응용 프로그램 설명서를 참조하십시오.
문서 스캔
문서를 스캔하려면 문서 스캔 대상 단추 ()를 사용합니다.
1 원본의 앞면을 스캐너 유리 또는 ADF를 향하도록 놓습니다. ADF를 사용하
여 양면 원본을 스캔하려면 양면 스캔 스위치를 양면 모드 ()로 전환합니
다.
2 전면 패널 디스플레이에 원하는 대상이 나타날 때까지 대상 단추 ()를
눌러 대상을 선택합니다.
3 문서 스캔 대상 단추 ()를 누릅니다.
주: ADF에서 스캔할 때는 미리보기 이미지가 나타나지 않습니다. 이 미리보
기 설정을 변경하려면 HP 사진 및 이미지 소프트웨어 도움말을 참조하십시오.
4 미리보기 이미지에서 최종 스캔 영역 (점선 안의 영역)을 선택합니다.
5 필요할 경우 미리보기 이미지를 조정합니다.
6 승인을 누릅니다.
최종 스캔 영역이 스캔되어 지정한 대상에 표시됩니다.
그림 스캔
그림을 스캔하려면 그림 스캔 단추 ()를 사용합니다.
1 스캐너 유리 위에 원본의 스캔할 면을 아래로 놓고 덮개를 덮습니다.
주: 그림 스캔 단추를 사용하여 TMA에서 슬라이드 또는 음화를 스캔할 수
도 있습니다. 자세한 내용은 15페이지의 TMA를 사용한 스캔을 참조하십시
오.
2 그림 스캔 단추 ()를 누릅니다.
스캔한 원본의 미리보기 이미지가 표시됩니다.
3 미리보기 이미지에서 최종 스캔 영역 (점선 안의 영역)을 선택합니다.
4 필요할 경우 미리보기 이미지를 조정합니다.
5 승인을 누릅니다.
최종 스캔 영역이 스캔되어 HP 사진 및 이미지 갤러리에 표시됩니다. 스
캔한 이미지는 HP 사진 및 이미지 소프트웨어의 그림 스캔 설정에서 지
정한 위치에 저장됩니다.
스캐너 사용 방법
한국어
사용 설명서
5

2 장
문자열을 편집할 수 있도록 문서 스캔
문자열 편집 단추 ()를 눌러 문서를 스캔하여 소프트웨어로 보내면 이 소프
트웨어는 이미지를 문자열과 그림으로 변환하여 지원되는 워드 프로세싱 응용
프로그램으로 결과를 보냅니다.
1 원본의 앞면을 스캐너 유리 또는 ADF를 향하도록 놓습니다. ADF를
사용하여 양면 원본을 스캔하려면 양면 스캔 스위치를 양면 모드 ()로
전환합니다. ADF를 사용하지 않고 여러 장의 원본을 스캔하려면 7페이지의
여러 장의 원본 스캔 및 미리보기를 참조하십시오.
2 문자열 편집 단추 ()를 누릅니다.
주: ADF에서 스캔할 때는 미리보기 이미지가 나타나지 않습니다. 이 미리보
기 설정을 변경하려면 HP 사진 및 이미지 소프트웨어 도움말을 참조하십시오.
3 미리보기 이미지에서 최종 스캔 영역 (점선 안의 영역)을 선택합니다.
4 필요할 경우 미리보기 이미지를 조정합니다.
5 승인을 누릅니다.
최종 스캔 영역이 스캔되어 처리됩니다. 스캔한 항목은 워드 프로세서 같이
선택한 응용 프로그램에 표시됩니다.
주: 응용 프로그램은 HP 사진 및 이미지 소프트웨어의 스캔 단추 설정에서
변경할 수 있습니다.
디스크 또는 CD 에 문서 저장
스캔한 문서를 하드 디스크 또는 CD 같은 디스크에 저장하려면 파일 문서 단추
()를 사용합니다.
1 원본의 앞면을 스캐너 유리 또는 ADF를 향하도록 놓습니다. ADF를 사용하
여 양면 원본을 스캔하려면 양면 스캔 스위치를 양면 모드 ()로 전환합니
다. ADF를 사용하지 않고 여러 장의 원본을 스캔하려면 7페이지의 여러 장
의 원본 스캔 및 미리보기를 참조하십시오.
2 파일 문서 단추 ()를 누릅니다.
주: ADF에서 스캔할 때는 미리보기 이미지가 나타나지 않습니다. 이 미리보
기 설정을 변경하려면 HP 사진 및 이미지 소프트웨어 도움말을 참조하십시오.
3 미리보기 이미지에서 최종 스캔 영역(점선 안의 영역)을 선택합니다.
4 필요할 경우 미리보기 이미지를 조정합니다.
5 승인을 누릅니다.
최종 스캔 영역이 스캔됩니다.
6 다른 이름으로 저장 대화 상자가 표시됩니다. 대상 폴더를 선택합니다.
7 파일 이름을 입력하고 파일 형식을 선택한 다음 확인을 누릅니다.
지정한 폴더에 문서가 저장됩니다.
스캔한 문서 또는 그림을 이메일로 보내기
문서 또는 그림을 스캔하여 이메일 메시지에 첨부 파일로 삽입하려면 이메일
단추 ()를 사용합니다. 이 경우 인터넷이 연결되어 있어야 하며 지원되는
이메일 응용 프로그램이 있어야 합니다.
6
hp scanjet 8200 시리즈

스캐너 사용 방법
1 원본의 앞면을 스캐너 유리 또는 ADF를 향하도록 놓습니다. ADF를 사용하
여 양면 원본을 스캔하려면 양면 스캔 스위치를 양면 모드 ()로 전환합니
다.
주: 이메일 단추를 사용하여 TMA에서 슬라이드 또는 음화를 스캔할 수도
있습니다. 자세한 내용은 15페이지의 TMA를 사용한 스캔을 참조하십시오.
2 이메일 단추 ()를 누릅니다.
원본이 문서인지 그림인지를 묻는 메시지가 표시됩니다.
3 문서 또는 그림을 선택하고 확인을 누릅니다.
주: ADF에서 스캔할 때는 미리보기 이미지가 나타나지 않습니다. 이 미리보
기 설정을 변경하려면 HP 사진 및 이미지 소프트웨어 도움말을 참조하십시오.
4 미리보기 이미지에서 최종 스캔 영역 (점선 안의 영역)을 선택합니다.
5 필요할 경우 미리보기 이미지를 조정합니다.
6 승인을 누릅니다.
최종 스캔 영역이 스캔되고 이메일 응용 프로그램이 열립니다. 스캔한 이미
지가 이메일 메시지에 첨부 파일로 추가됩니다.
7 다른 이름으로 저장 대화 상자가 표시됩니다. 파일 이름을 입력하고 파일
형식을 선택한 다음 확인을 누릅니다.
8 평소대로 이메일을 작성합니다.
주: 이메일로 전송하기 전에 스캔한 이미지를 보려면 이메일 응용 프로그램
에서 첨부 파일을 더블 클릭합니다.
주: HP 사진 및 이미지 소프트웨어에서 이메일 응용 프로그램을 변경할 수
있습니다. 지원되는 응용 프로그램 목록에 사용자의 이메일 응용 프로그램이
표시되지 않으면 스캔한 이미지를 파일에 저장하여 이메일에 첨부합니다.
한국어
문서 또는 그림 복사
원본을 스캔하여 프린터로 보내려면 복사 단추 ()를 사용합니다.
1 원본의 앞면을 스캐너 유리 또는 ADF를 향하도록 놓습니다. ADF를 사용하
여 양면 원본을 스캔하려면 양면 스캔 스위치를 양면 모드 ()로 전환합니
다.
2 다음에서 복사 옵션을 선택합니다.
– 인쇄 매수 단추 ()를 눌러 인쇄 매수를 선택합니다. 인쇄 매수는 전면
패널 디스플레이에 표시됩니다.
– 컬러/흑백 단추 ()를 눌러 원본 스캔 방법을 선택합니다.
3 복사 단추 ()를 누릅니다. 기본 프린터에 복사물이 인쇄됩니다.
주: 크기, 밝기 같은 복사 설정 또는 프린터를 변경하려면 작업이 진행되는
동안 취소를 누릅니다. 설정을 변경할 수 있는 HP 복사 대화 상자가 표시됩
니다.
여러 장의 원본 스캔 및 미리보기
ADF, TMA 또는 스캐너 유리를 사용하여 여러 장의 원본을 스캔할 수 있습니다.
ADF에서는 단면 또는 양면 원본을 스캔할 수 있습니다.
사용 설명서
7

2 장
스캐너 유리 또는 TMA를 사용하여 여러 장의 원본 스캔
스캐너 유리 또는 TMA에서 원본을 스캔하면 스캔할 원본이 더 남았는지를 묻는
대화 상자가 표시됩니다. 추가로 스캔할 원본이 있으면 예를 누르고 다음 단계 중
하나를 수행합니다.
• 유리 또는 TMA에 추가로 스캔할 원본을 놓고 새로 스캔을 누르고 조정한
다음 승인을 누릅니다.
또는
• 미리보기 창에서 다른 이미지를 선택하고 조정한 다음 승인을 누릅니다.
항목 스캔을 마친 경우 다른 항목을 스캔할지 묻는 상자가 표시되면 아니오를
누릅니다.
ADF를 사용하여 여러 장의 원본 스캔
1 첫 번째 페이지가 맨 위로 오게 하여 ADF에 원본을 위로 향하여 놓습니다.
2 전면 패널에서 문서 스캔 대상 단추 () 또는 이메일 단추 () 같은 단
추를 눌러 스캔을 시작합니다. 선택한 단추에 따라 스캔 설정이 달라집니다.
ADF가 비어 있으면 스캔할 페이지가 더 남았는지 묻는 대화 상자가 표시됩
니다. 같은 대상에 원본을 추가로 스캔하려면 다음 페이지를 올려 놓고 스캔
을 누릅니다.
3 작업을 마치면 완료를 누릅니다. 선택한 대상에 스캔이 나타납니다.
ADF를 사용하여 여러 장의 원본 미리보기
여러 장의 원본을 스캔하는 경우 미리보기 창의 오른쪽 위에 이미지 카운터가
나타납니다. 이미지 카운터에는 현재의 미리보기 이미지와 미리보기 이미지의
총 수가 표시됩니다. 다른 페이지를 미리 보려면 이미지 카운터의 화살표를
누릅니다.
스캔 작업 중 스캔 취소
스캔 작업 중 스캔을 취소하거나 ADF를 사용하는 경우 일련의 스캔을 취소하려
면 취소 단추 ()를 사용합니다.
설정 변경
작업의 성격에 맞게 스캐너의 설정을 변경해야 할 경우가 있습니다. HP Scanjet
8200 시리즈 스캐너에서는 단추 설정, 스캔 기본사항, 전원 사용 및 스캔을 즉시
수행할지 또는 준비 과정이 끝난 후 수행할지 여부를 변경할 수 있습니다.
단추 설정 변경
단추 설정 단추 ()를 눌러 스캐너 단추의 설정을 변경할 수 있습니다.
8
미리보기 창의 이미지 카운터
hp scanjet 8200 시리즈

1 단추 설정 단추 ()를 누릅니다.
단추 설정 대화 상자가 표시됩니다.
2 해당 탭을 누르고 설정을 변경합니다.
3 변경 작업을 마쳤으면 확인을 누릅니다.
HP 관리자를 사용하여 설정 변경
HP 사진 및 이미지 소프트웨어의 설정 메뉴에서 모든 스캔 설정을 변경할 수
있습니다. 여기에는 단추 설정, 스캔 기본사항 및 사용자가 변경할 수 있는 다른
설정이 포함됩니다. 설정을 변경하려면 HP 관리자를 시작하고 설정을 누릅니다.
미리보기 이미지 설정 또는 해제
미리보기 이미지를 표시하거나 표시하지 않도록 설정을 변경할 수 있습니다.
방법과 위치에 대한 자세한 내용은 HP 사진 및 이미지 소프트웨어 도움말을
참조하십시오.
절전 단추 사용
스캐너를 이용하지 않을 때는 절전 단추 ()를 사용하여 램프를 끕니다.
절전 단추 ()를 누르면 스캐너 램프, 작은 표시등 및 전면 패널 디스플레이가
꺼집니다.
스캐너를 다시 사용하려면 전면 패널에 있는 단추를 누르거나 HP 관리자를 통해
스캔을 시작합니다. 그러면 간단한 준비 과정을 마친 후 스캔이 시작됩니다.
순간 스캐닝 기능 사용
순간 스캐닝 기능을 사용하여 램프가 준비될 때까지 기다리지 않고 곧바로 스캔
을 시작하도록 설정할 수 있습니다.
1 HP 관리자에서 설정을 누른 다음 스캔 기본사항을 누릅니다.
2 품질 대 속도 탭을 누릅니다.
– 램프 준비 시간을 없애고 순간 스캐닝을 사용하려면 순간 램프 준비
확인란을 선택합니다.
– 전력 소모를 줄이기 위해 순간 램프 준비 확인란의 선택을 해제합니다.
스캐너 사용 방법
한국어
원본 형식 선택
원본 형식을 확인하는 메시지가 표시되면 그림 또는 문서 중에서 선택할 수 있습
니다. 선택한 내용에 따라 스캐너 설정이 최적화됩니다. 다음 지침에 따라 가장
적합한 원본 형식을 결정합니다.
원본 구성 선택할 원본 형식
문자 또는 문자와 그래픽 문서
인쇄된 사진 또는 그래픽 그림
원본 형식을 변경하려면 8페이지의 단추 설정 변경을 참조하십시오.
사용 설명서
9

2 장
관리 및 유지보수
종종 스캐너를 청소하면 스캐너가 더 잘 작동합니다. 스캐너를 얼마나 자주 청소
해야 하는지는 사용량, ADF를 통해 공급되는 용지의 종류 및 사용 환경을 비롯한
몇 가지 요인에 따라 다릅니다. 필요에 따라 주기적으로 청소하는 것이 좋습니다.
이 때 스캐너 유리, TMA 및 ADF도 청소해야 합니다.
스캐너 유리 청소
1 스캐너에서 전원 케이블을 분리합니다.
2 스캐너 덮개를 엽니다.
3 부드럽고 보풀이 없는 천에 순한 유리 세정액을 뿌려 유리를 닦습니다.
주의! 유리 세정액만 사용하십시오. 연마제, 아세톤, 벤젠 및 사염
화탄소는 스캐너 유리를 손상시킬 수 있으므로 이러한 물질이 포함
된 세제는 사용하지 마십시오. 이소프로필 알콜은 유리에 자국을
남길 수 있으므로 사용하지 마십시오.
유리 세정액을 유리에 직접 뿌리면 안됩니다. 유리 세정액을 너무
많이 사용하면 스캐너에 흠집 및 손상이 생길 수 있습니다.
4 부드럽고 보풀이 없는 마른 천으로 스캐너 유리를 닦아 건조시킵니다.
5 청소가 끝나면 스캐너에 전원 케이블을 다시 연결합니다.
TMA 청소
부드럽고 보풀이 없는 마른 천으로 TMA를 청소합니다. 필요한 경우 유리 세정액
을 천에 조금만 뿌려 TMA를 닦습니다.
ADF 청소
ADF는 사용량 및 ADF를 통해 공급하는 용지의 종류에 따라 주기적으로 청소해
야 합니다. ADF는 청소용 헝겊을 사용하여 청소하거나 용지 공급 롤러를 직접
청소합니다. 스캐너에 적절한 청소 계획을 세우는 것이 좋습니다.
청소용 헝겊을 사용하여 ADF 청소
1
홈이 있는 곳에서 시작하여 닫혀 있는 컨테이너를 엽니다. 안쪽에서 청소용
헝겊이 찢어지지 않도록 주의하십시오.
2 청소용 헝겊을 꺼내 폅니다.
3 이 헝겊을 용지 입력함에 넣습니다.
헝겊을 용지 입력함에 넣기
10
hp scanjet 8200 시리즈

스캐너 사용 방법
4 문서 스캔 대상 단추를 누릅니다.
청소용 헝겊이 ADF를 통해 지나갑니다.
다음 단계로 진행하기 전에 구성 요소가 마를 때까지 2분간 기다립니다.
5 용지 입력함에 인쇄된 종이를 최대 다섯 페이지까지 놓습니다. 스캔하여
결과를 봅니다.
최고 다섯 페이지까지 스캔
6 여전히 자국이 나타나면 3-6단계를 반복합니다.
청소용 헝겊은 ADF에서 최고 다섯 번까지 사용할 수 있습니다.
용지 공급 롤러 어셈블리를 직접 청소
뚜껑을 열고 녹색 탭을 완전히 열릴 때까지 들어 올립니다. 용지 공급 롤러
1
어셈블리는 거의 수직 상태로 배치되어 있습니다.
한국어
2 용지 경로 청소용 헝겊 (C9915-60056)을 사용하여 각 용지 공급 롤러와 롤
3 작은 고무 패드 주변의 종이 찌꺼기를 닦아 냅니다.
4 녹색 탭과 용지 공급 롤러 어셈블리를 내립니다.
5 뚜껑을 닫습니다.
ADF 유지보수
용지 공급에 문제가 자주 발생하면 다음 단계를 따르십시오.
•ADF를 청소하여 용지가 제대로 공급되도록 합니다. 10페이지의 ADF 청소
• HP Scanject 8200 시리즈 도움말 - ADF 문제를 참조하십시오.
• 이 방법이 도움이 되지 않는 경우 ADF 롤러 교체 키트 (C9937-68001)를
녹색 탭을 들어 올려 용지 공급 롤러 노출
러 아래의 작은 고무 패드를 청소합니다.
주: 용지 경로 청소용 헝겊이 없으면 이소프로필 알콜을 약간 적신 보풀이
없는 헝겊을 사용합니다.
를 참조하십시오.
설치하십시오. ADF 롤러 교체 키트에는 롤러 장치, 착탈 가능한 패드 및
패드 교체용 렌치가 들어 있습니다. 30페이지의 유지 관리용 부품 구매를
참조하십시오.
ADF 롤러 교체 키트에는 부품을 교체하기 위한 지침이 들어 있습니다.
사용 설명서
11

2 장
유지 관리용 소모품 주문
www.hp.com에서 유지 관리용 부품을 온라인으로 구입할 수 있습니다. 검색 기
능을 이용하여 청소용 헝겊 또는 ADF 롤러 교체 키트 같은 항목을 찾습니다.
스캐너 설치 문제
전면 패널에 "오류 04"가 표시되면 Hi-Speed USB 연결 오류가 발생했음을 나타
냅니다. 컴퓨터와 스캐너가 Hi-Speed USB 케이블로 올바르게 연결되어 있는지 확
인합니다.
• 우선 컴퓨터를 점검합니다.
– 사용하고 있는 컴퓨터가 스캐너 상자에 표시된 최소 시스템 요구사항에
– 하드 디스크 공간이 부족한 경우 필요 없는 파일을 제거하거나 소프트
• Microsoft
니다" 또는 "프로그램 폴더가 잘못되었습니다"와 같은 메시지가 나타나면
다음 중 하나를 수행합니다.
– 올바른 대상 폴더 이름을 입력합니다. 대상 폴더 이름에는 /, \, :, ?, *,
– 찾아보기 단추를 사용하여 유효한 폴더를 찾습니다.
• 케이블을 확인합니다.
– 스캐너와 콘센트 또는 서지 보호기가 전원 케이블로 올바르게 연결되어
– 전원 케이블이 서지 보호기에 연결되어 있는 경우 서지 보호기가 콘센
– 스캐너와 함께 제공되는 Hi-Speed USB 케이블을 사용합니다. 다른
– 컴퓨터와 스캐너가 Hi-Speed USB 케이블로 올바르게 연결되어 있는지
– 스캐너에서 전원 케이블을 분리하고 컴퓨터를 끕니다. 30초 후에 전원
–Macintosh 컴퓨터의 경우에는 Apple System Profiler를 사용하여 스캐너
• 다음과 같이 스캐너 진단 모드로 들어갑니다.
a. 스캐너에서 Hi-Speed USB 케이블 (또는 SCSI 케이블)을 분리합니다.
b. 문자열 편집 ()과 이메일 () 단추를 동시에 누릅니다.
c. 테스트를 끝내려면 전원 케이블을 분리합니다.
스캐너 램프가 켜지지 않거나 캐리지가 움직이지 않으면 스캐너 하드웨어
에 문제가 있는 경우입니다. 19페이지의 제품 지원을 참조하십시오.
맞는지 확인합니다.
웨어를 다른 디스크 드라이브에 설치합니다.
® Windows® 컴퓨터에서 설치 도중 "대상 디렉토리가 잘못되었습
<, >, " 또는 | 등의 문자가 포함될 수 없습니다.
있는지 확인합니다.
트에 연결되어 있고 전원이 들어오는지 확인합니다.
Hi-Speed USB 케이블은 이 스캐너와 호환되지 않을 수 있습니다.
확인합니다.
케이블을 스캐너에 연결한 다음 컴퓨터를 켭니다.
가 컴퓨터와 올바르게 연결되어 있는지 확인하십시오.
스캐너 전원 케이블이 전원에서 분리되어 있는지 확인합니다.
스캐너의 캐리지가 앞뒤로 움직이고 램프가 켜져야 합니다.
12
hp scanjet 8200 시리즈

스캐너 초기화 문제
스캐너를 초기화하지 못했다는 메시지가 표시되면 다음과 같이 하십시오.
1 오류 메시지 대화 상자를 닫고 오류 메시지가 표시될 때 열려 있던 응용 프
로그램을 종료합니다.
2 그런 다음 다음과 같이 하십시오.
– 전원 케이블의 연결을 끊어 스캐너를 끕니다. 전원 케이블을 다시 연결
하여 스캐너를 켭니다.
– 컴퓨터에서 USB 케이블을 분리한 다음 다시 연결합니다.
– 컴퓨터와 스캐너를 연결하는 케이블이 단단히 고정되어 있는지 확인합
니다.
–10초간 컴퓨터를 껐다가 다시 켭니다.
그래도 스캐너가 초기화되지 않으면 복구 유틸리티를 실행합니다 (Windows를
사용하는 컴퓨터에만 해당).
문제 해결
스캐너와 관련된 다른 문제를 해결하려면 HP Scanjet 8200 시리즈 도움말의 문
제 해결 단원을 참조하십시오.
스캐너 소프트웨어와 관련된 문제를 해결하려면 HP 사진 및 이미지 소프트웨어
도움말을 참조하십시오.
스캐너 사용 방법
한국어
사용 설명서
13

3
ADF를 사용한 스캔
이 단원에서는 자동 문서 공급기(ADF)에 사용할 수 있는 원본을 선택하는 방법과
ADF에서 원본을 로드하여 스캔하는 방법에 대해 설명합니다.
ADF에
ADF에
사용 가능한 용지 선택
ADF는 원본이 다음 사양을 만족하는 경우 가장 잘 작동합니다.
• A4, letter (미국) 및 규격 크기의 표준 용지
• 88.9 x 127mm (3.5 x 5인치)에서 216 x 356mm
(8.5 x 14인치) 크기의 비표준 용지
• 무게가 60에서 90g/m
• 양호한 상태의 정사각형이나 직사각형으로 된 용지
• 절취선 및 펀치 구멍이 없는 용지
• 끈적한 접착제, 수정액 또는 잉크가 묻지 않은 용지
주: 다중 용지, 투명 용지, 잡지, 접착 용지 및 매우 가벼운 용지는 사용하지
마십시오.
ADF에 원본을 올려 놓기 전에 다음을 확인하고 제거하십시오.
• 머리카락이나 주름
• 스테이플, 종이 클립 및 기타 이물질
원본이 이들 기준에 맞지 않을 경우 스캐너 유리에서 스캔하십시오.
2
(16에서 24lb)인 용지
원본 로드
1
첫 번째 페이지가 맨 위에 오도록 문서 용지함에 비슷한 크기로 된 원본을
쌓아둡니다. 입력 용지함의 아이콘을 확인합니다.
14
용지를 용지함에 넣어 정렬
2
용지 조정대를 조정하여 쌓아둔 원본을 중앙에 맞춥니다.
3
ADF의 양면 스캔 스위치를 사용하여 단면 또는 양면 원본을 선택합니다.
4
스캐너 단추를 누르거나 HP 관리자를 사용하여 스캔을 시작합니다. 화면에
나온 지침에 따라 스캔을 완료합니다.

TMA를 사용한 스캔
4
35mm 슬라이드 또는 음화를 스캔하려면 투명 재료 어댑터 (TMA)를 사용합니다.
슬라이드 스캔
35mm 슬라이드를 스캔하려면 내장 TMA의 슬라이드 홀더를 사용합니다.
1
2
3
4
주: 프리젠테이션용 투명지 같이 커다란 투명 항목을 스캔하려면 흰 종이 아
래에 항목을 댄 상태로 스캐너 유리에 올려 놓은 다음 평소대로 스캔합니다.
스캐너 덮개를 열고 TMA 덮개를 제거합니다.
한국어
TMA 덮개 제거
그림 스캔 단추 ()를 누릅니다.
스캔할 대상을 묻는 대화 상자가 표시됩니다.
투명 재료 어댑터 (TMA)의 슬라이드를 선택합니다.
주: 슬라이드를 올려 놓고 덮개를 닫을 때까지 스캔 단추를 누르지 마십시오.
슬라이드 홀더에 음화 홀더가 있으면 제거합니다.
음화 홀더 제거
5
최대 세 개의 슬라이드를 슬라이드 홀더에 넣습니다. 슬라이드의 앞면이
사용자를 향하도록 슬라이드를 삽입합니다.
슬라이드 삽입
15

4 장
6
마지막 슬라이드를 넣은 다음 슬라이드 광 실드가 슬라이드에 닿을 때까지
삽입합니다
.
주: 슬라이드 광 실드를 삽입하면 스캔한 이미지에 빛이 닿는 것을 막을 수
한 다음
.
승인을
슬라이드 광 실드 삽입
.
스캔을 누릅니다
최종 스캔 영역
최종 스캔 영역 선택
.
슬라이드를 놓고
누릅니다
.
.
.
.
.
새로 스캔을 누르고 필요한 부분을 조정
있습니다
7
스캐너 덮개를 닫습니다
8
그림 스캔 창에서
9
스캔 미리보기가 실행되고 미리보기 이미지가 표시됩니다
10
슬라이드에서 최종 스캔 영역을 선택합니다. 최종 스캔 영역으로 지정할 영
역 주위의 경계를 누르고 끕니다
11
이미지의 크기를 원하는 대로 조절하고 필요할 경우 이미지를 조정한 다음
승인을 누릅니다
12
스캔할 원본이 더 있는지 묻는 대화 상자가 표시됩니다. 추가로 슬라이드를
스캔하려면 예를 누르고 다음 단계 중 하나를 수행합니다
–TMA에 다른
또는
–
미리보기 창에서 다른 이미지를 선택하고 조정한 다음
13
항목 스캔을 마친 다음 다른 항목을 스캔할지 묻는 상자가 표시되면
를 누릅니다
이미지가
14
작업을 마쳤으면 슬라이드를 제거합니다. 슬라이드 광 실드, 음화 홀더, 음
화 광 실드 및
.
HP사진 및
TMA
이미지 갤러리에 나타납니다
덮개를 원래 상태로 돌려 놓습니다
승인을
.
.
누릅니다
아니오
.
16
hp scanjet 8200 시리즈

음화 스캔
TMA 를 사용한 스캔
35mm
음화를 스캔하려면 내장
1
스캐너 덮개를 열고
그림 스캔 단추 ()를
2
스캔할 대상을 묻는 대화 상자가 표시됩니다
투명 재료 어댑터 (TMA)의 음화를 선택합니다
3
주: 음화를 올려 놓고 덮개를 닫을 때까지
4
음화 홀더에서 음화 광 실드를 제거합니다. 음화 홀더는 슬라이드 홀더에
저장되어 있습니다
TMA의 음화
TMA
덮개를 제거합니다
TMA 덮개 제거
누릅니다
.
홀더를 사용합니다
.
.
.
.
스캔
.
단추를 누르지 마십시오
.
한국어
사용 설명서
음화 광 실드 제거
5
스캐너 덮개를 닫을 때 빛나는 부분이 스캐너 유리를 향하도록 음화 홀더에
음화 띠를 밀어 넣습니다
주: 음화는 쉽게 손상될 수 있으므로 이를 다룰 때는 가장자리만 만지십시오
6
프레임이 4개 이하인 음화 띠를 스캔하려면 음화 광 실드가 음화 띠에 닿을
때까지 음화 홀더에 밀어 넣습니다
.
음화 띠 삽입
.
.
17

4 장
주: 음화 광 실드를 삽입하면 스캔한 이미지에 빛이 닿는 것을 막을 수 있습
.
니다
음화 광 실드 삽입
7
스캐너 덮개를 닫습니다
8
그림 스캔 창에서
스캔 미리보기가 실행되고 미리보기 이미지가 표시됩니다
9
최종 스캔 영역을 선택합니다. 최종 스캔 영역으로 지정할 영역 주위의 경계
를 누르고 끕니다
10
이미지의 크기를 원하는 대로 조절하고 필요할 경우 이미지를 조정한 다음
승인을
누릅니다
11
스캔할 원본이 더 있는지 묻는 대화 상자가 표시됩니다. 추가로 음화를 스캔
예를 누르고 다음 단계 중 하나를 수행합니다
하려면
.
스캔을 누릅니다
.
최종 스캔 영역
최종 스캔 영역 선택
.
.
.
.
–TMA에 다른 음화 띠를 놓고 새로 스캔을 누르고 조정한 다음
누릅니다
.
또는
–
미리보기 창에서 다른 이미지를 선택하고 조정한 다음
12
항목 스캔을 마친 경우 다른 항목을 스캔할지 묻는 상자가 표시되면
를 누릅니다
이미지가
13
작업을 마쳤으면 음화 띠를 제거합니다. 음화 홀더, 음화 광 실드 및
덮개를 원래 상태로 돌려 놓습니다
.
HP사진 및
이미지 갤러리에 나타납니다
.
승인을 누릅니다
.
승인을
아니오
TMA
.
18
hp scanjet 8200 시리즈

제품 지원
5
이 단원에서는 전화 번호 및 웹사이트 정보를 비롯한 지원 정보를 다룹니다.
규정 정보에 대해서는 스캐너와 함께 제공된 CD의 regulatory_supplement.htm
파일을 참조하십시오.
장애인용 웹사이트
장애가 있는 사용자는 웹사이트 www.hp.com/hpinfo/community/accessibility/
prodserv에서 도움을 받을 수 있습니다.
HP Scanjet 웹사이트
다음 정보를 얻으려면 www.scanjet.hp.com을 방문하십시오.
• 보다 효율적으로 스캔하는 데 필요한 추가 정보
• HP Scanjet 드라이버 업데이트 및 소프트웨어
지원 절차
다음 단계를 순서대로 따르면 보다 효율적으로 HP 지원을 받을 수 있습니다.
1 사용 설명서의 문제 해결 단원을 읽고 소프트웨어와 스캐너에 대한 온라인
도움말을 살펴봅니다.
2 HP 고객으뜸지원센터 웹사이트에 방문합니다. 인터넷을 통해 스캐너에
대한 다양한 정보를 얻을 수 있습니다. 제품 도움말, 드라이버 및 소프트웨
어 업데이트에 대한 자세한 내용은 HP 웹사이트 (www.hp.com/support)를
방문하십시오. 고객으뜸지원센터는 네덜란드어, 영어, 프랑스어, 독일어,
이탈리아어, 포르투갈어, 스페인어, 스웨덴어, 중국어 번체, 중국어 간체,
일본어 및 한국어를 지원합니다. 덴마크, 핀란드 및 노르웨이의 지원 정보
는 영어로만 표시됩니다.
3 HP 온라인 고객으뜸지원센터를 방문합니다. www.hp.com/support에서 HP
에 이메일로 지원을 요청하면 HP 고객으뜸지원센터의 기술 전문가로부터
회신을 받을 수 있습니다. 이메일 지원은 해당 웹사이트에 표시된 언어로
이루어집니다.
4 HP 지역 대리점에 문의합니다. 스캐너 하드웨어에 문제가 발생한 경우 HP
지역 대리점에 가지고 가서 수리를 받으십시오. 스캐너의 제한 보증 기간
동안 서비스는 무료로 제공됩니다. 이 기간이 지나면 대리점에서는 서비스
비용에 대한 견적을 작성합니다.
5 전화로 HP 고객으뜸지원센터에 연락합니다. www.hp.com/support에서
해당 국가 또는 지역에서의 전화 지원에 대한 세부 내용과 조건을 확인하십
시오. 보다 향상된 HP 전화 지원 정보 서비스를 받기 위해 정기적으로 HP 웹
사이트를 방문하여 서비스 기능과 제공에 관련된 새로운 정보를 확인하는
것이 좋습니다.
한국어
19

5 장
위 방법으로도 문제를 해결할 수 없는 경우 컴퓨터와 스캐너를 바로 사용할
수 있는 곳에서 HP에 전화하십시오. 신속한 서비스를 위해 다음 정보를 즉
시 제공할 수 있도록 준비해 두는 것이 좋습니다.
– 스캐너 모델 번호 (스캐너 덮개에 있습니다.)
– 스캐너 일련 번호 (스캐너 바닥에 있습니다.)
– 컴퓨터 운영 체제
– 스캐너 소프트웨어의 버전 (스캐너 CD 라벨에 있습니다.)
– 문제 발생 시 표시된 메시지
HP 전화 지원에 대한 적용 조건은 사전 통보 없이 변경될 수 있습니다. 국가
또는 지역에 따라 전화 제공 정보에 대해 요금이 부과될 수도 있습니다.
전화 지원 서비스는 스캐너 구입일로부터 다음 표에 나타난 기간 동안 무료
로 제공됩니다.
지역 무료 전화 지원 기간
라틴 아메리카 1년
미국 1년
아시아 태평양 1년
아프리카 30일
유럽 30일
중동 30일
캐나다 1년
20
hp scanjet 8200 시리즈

유럽, 중동 및 아프리카에서의 전화 지원
제품 지원
그리스
+30 10 60 73 603
남아프리카 086 000 1030 (RSA 지역)
+27-11 258 9301 (RSA 이외 지역)
네덜란드 0900 2020165 (유로화 분당 0.10)
노르웨이
덴마크
+47 815 62 070
+45 70202845
독일 +49 (0) 180 5652 180 (유로화 분당 0.12)
러시아 + 7 095 797 3520 (모스크바)
+ 7 812 346 7997 (상트 페테르부르크)
루마니아
+40 1 315 44 42
룩셈부르크 900 40 006 (프랑스어)
900 40 007 (독일어)
모로코
바레인
+212 224 04747
+973 800 728
벨기에 +32 070 300 005 (네덜란드어)
+32 070 300 004 (프랑스어)
사우디아라비아
스웨덴
+966 800 897 1444
+46 (0) 77-120 4765
스위스 +41 0848 672 672 (독일어, 프랑스어, 이탈리아어
– 피크 타임 0.08 CHF/피크 타임 외 0.04 CHF)
스페인
슬로바키아
아랍에미리트
아일랜드
알제리
영국
오스트리아
우크라이나
이스라엘
이집트
이탈리아
체코 공화국
터키
튀니지
포르투갈
폴란트
+34 902 010 059
+421 2 6820 8080
+971 4 883 845
+353 1890 923902
+213 (0) 61 56 45 43
+44 (0)870 010 4320
+43 (0) 820 87 4417
+7 (380 44) 490-3520
+972 (0) 9 830 4848
+20 02 532 5222
+39 848 800 871
+42 (0) 2 6130 7310
+90 216 579 71 71
+216 1 891 222
+351 808 201 492
+48 22 865 98 00
한국어
사용 설명서
21

5 장
프랑스 +33 (0) 8 92 69 60 22 (유로화 분당 0.34)
필란드
헝가리
기타 지역에서의 전화 지원
+358 (0)203 66 767
+36 (0) 1 382 1111
과테말라
뉴질랜드
대만
말레이시아
+502 1 800 999 5105
+64 (9) 356 6640
+886 0 800 010055
+60 1 800 805 405
멕시코 +52 58 9922 (멕시코시티)
+52 01 800 472 6684 (멕시코시티 이외 지역)
미국
베네수엘라
베트남
1 800 474-6836 (800 HPINVENT)
+58 0 800 4746 8368
+84 (0) 8 823 4530
브라질 +55 (11) 3747 7799 (그란데 상파울루)
+55 0800 157751 (그란데 상파울루 외 지역)
싱가포르
아르헨티나
+65 6272 5300
+54 0 810 555 5520
오스트레일리아 +63 (3) 8877 8000 (또는 현지 (03) 8877 8000)
인도 1 600 112267 또는 +91 11 682 6035 (힌디어 및 영어)
인도네시아
+62 (21) 350 3408
일본 0570 000 511 (일본)
+81 3 3335 9800 (일본 이외 지역)
중국
중앙 아메리카 및
+86 (10) 6564 5959
+1 800 711 2884
카리브 해
칠레 +56 800 22 5547 (판매 후 비지니스 컴퓨팅)
+56 800 360 999 (판매 후 가정용 컴퓨팅)
캐나다 +1 905 206 4663 (제품 보증 기간 동안)
+1 877 621 4722 (제품 보증 기간이 만료된 경우)
콜롬비아
태국
페루
푸에르토리코
필리핀
한국
홍콩 SAR
+57 9 800 114 726
+66 (2) 661 4000
+51 0 800 10111
+1 877 2320 589
+ 63 (2) 867 3551
+82 (2) 3270 0700 (서울)
0 80-999-0700 (서울 이외 지역)
+852 3002 8555
22
hp scanjet 8200 시리즈

보증
6
여기에는 보증, 규정 및 환경 관리 프로그램에 대한 정보가 포함되어 있습니다.
Hewlett-Packard 제한 보증서
HP Scanjet 8200 시리즈 디지털 평판형 스캐너에는 1년의 제한 보증이 적용됩니
다.
1
HP는 HP 하드웨어, 부속품 및 소모품에 재료나 제조상의 결함이 없음을
최종 사용자인 고객에게 제품 구입일로부터 위에 명시한 기간 동안 보증합
니다. 보증 기간 동안 결함 발생을 통지할 경우 HP의 재량에 따라 결함이
입증된 제품을 수리 또는 교환받을 수 있습니다. 교환 제품은 신품이거나
신품과 동등한 성능의 제품일 수 있습니다.
2
HP는 모든 파일을 올바로 설치하고 사용할 경우 HP 소프트웨어가 재료나
제조상의 결함으로 인한 실패 없이 프로그래밍 명령을 실행할 것임을 제품
구입일로부터 위에 명시한 기간 동안 보증합니다. 보증 기간 동안 그와 같은
결함 발생을 HP에 통지할 경우 해당 결함으로 인해 프로그래밍 명령을 실행
할 수 없는 소프트웨어를 교환받을 수 있습니다.
3
HP는 HP 제품의 작동이 중단되지 않거나 오류가 없을 것이라고는 보증하지
않습니다. HP가 적절한 시간 안에 제품을 보증 조건에 따라 수리하거나
교체할 수 없는 경우 제품 반환에 따른 환불을 제공할 것입니다.
4
HP 제품에는 성능이 신품과 동등한 재생 부품이 포함되거나 부수적으로
사용될 수 있습니다.
5
HP는 (a) 부적절하거나 부적당한 유지보수 또는 조정, (b) HP에서 공급하지
않은 소프트웨어, 인터페이스, 부품 또는 소모품 사용, (c) 무단 개조 또는
오용, (d) 제품의 지정된 작동 환경 사양을 벗어난 작동, (e) 부적절한 설치
장소 준비 및 유지보수로 인한 결함에 책임이 없습니다.
6
현지 법률에 의해 허용되는 한도 내에서 HP는 이 제품에 관해 서면으
로든 구두로든 다른 어떤 보증도 하지 않습니다. 특히 HP는 만족할
만한 품질의 우수성, 특정한 목적에 대한 적합성, 상업적 판매에 따른
별도의 어떠한 암시적인 보증이나 조건도 제시하지 않습니다.
국가, 주 또는 지방에서는 묵시적 보증 기간에 대한 제한을 허용하지 않으므
로 위의 제한이나 예외가 적용되지 않을 수 있습니다. 이 보증은 고객에게
특정 법적 권리를 제공하며 고객은 국가, 주 또는 지방에 따라 서로 다른
권리를 가질 수도 있습니다.
한국어
어떤
23

6 장
7
HP의제한 보증은 HP가이 제품을 판매하고 이 제품에 대한 지원 서비스를
제공하는 지역이나 국가에서 유효합니다. 보증 서비스의 수준은 현지 조건
에 따라 다를 수 있습니다. HP 는 법이나 규정을 따르기 위해 과거 의도적으
로 변경한 경우가 없는 한 특정 국가에서만 작동되도록 제품의 형태, 맞춤
설정 또는 기능을 변경하지 않습니다.
8
현지 법률에 의해 허용되는 한도 내에서 위에 서술한 배상은 고객에
게 유일하고도 배타적인 배상입니다. 위에 서술한 내용을 제외한 어
떠한 경우에도 계약, 불법행위 또는 기타 다른 법적 이론에 근거하든
아니든 직접, 간접, 특수, 돌발적 또는 연속적 손상 (손실 이익 또는
데이터 포함)에 대해서는 HP 또는 해당 공급자가 책임을 지지 않습니
어떤 국가, 주 또는 지방에서는 돌발적 또는 연속적 손상에 대한 예외나
다.
제한을 허용하지 않으므로 위의 제한이나 예외가 적용되지 않을 수도 있습
니다.
9
이 보증서에 포함된 보증 조건은 법률에 의해 허용되는 경우를 제외하고는
이 제품을 고객에게 판매할 때 적용되는 강제적인 법적 권리를 배제, 제한
또는 변경하지 않으며 이에 추가될 뿐입니다.
규정 정보
규정 정보는 스캐너와 함께 제공되는 HP 사진 및 이미지 소프트웨어 CD에 들어
있습니다. CD에서 regulatory_supplement.htm 파일을 참조하십시오.
환경 관리 프로그램
환경 보호
Hewlett-Packard는 최상의 제품을 제공함과 동시에 환경을 보호하고자 노력하고
있습니다. 이 제품은 환경에 미치는 영향을 최소화하도록 설계되었습니다.
에너지 소비량
플라스틱
24
절전 모드에서 에너지 사용량을 획기적으로 줄였으므로 이 제품의 성능을 최대
한 활용하면서도 자연 자원과 비용을 모두 절약할 수 있습니다. 이 제품은 에너
지 절약형 사무 제품 개발을 유도하는 자발적 프로그램의 하나인 E
인증 제품입니다. Hewlett-Packard는 E
지 효율성에 대한 E
무게가 25g (0.88 oz) 이상인 플라스틱 부품은 제품의 최종 처리 단계에서 재활
용률을 높이기 위해 국제 표준에 맞는 마크를 표시합니다.
NERGY STAR
NERGY STAR
기준에 부합함을 확인합니다.
참여 업체로서 이 제품이 에너
NERGY STAR
hp scanjet 8200 시리즈
®

분해/최종 처리
이 HP 제품 (HP Scanjet 8200 시리즈 디지털 평판형 스캐너)은 분해하기 쉽도록
설계되었으며 일반적인 잠금 장치를 사용한 최종 처리 옵션을 제공합니다.
제품에 들어 있는 특수 처리 요구 물질
이 HP 제품에는 특수한 처리가 필요한 다음 물질이 포함되어 있습니다.
• 스캐너 형광등 및 투명 재료 어댑터에 포함된 수은 (5mg 이하)
• 납
재활용에 대한 정보는
(www.eiae.org)에 문의하십시오.
www.hp.com/go/recycle
보증
, 지역 당국 또는 EIA 홈페이지
한국어
사용 설명서
25

부록 A - SCSI 설치 및 옵션
7
이 단원에서는 SCSI (Small Computer Serial Interface)를 사용하여 HP Scanjet
8200 시리즈 스캐너를 설치하는 방법에 대해 설명합니다.
SCSI 를 사용하는 이유
컴퓨터에서 Windows NT를 사용하는 경우 스캐너는 SCSI와 연결되어 있어야 합
니다. 컴퓨터에 이미 SCSI 장치가 있으면 기존의 외부 SCSI 스트링에 스캐너를 연
결할 수 있습니다. 스캐너는 SCSI 스트링의 마지막 장치여야 하며 컴퓨터에는 호
환 가능한 SCSI 어댑터가 있어야 합니다. 스캐너에도 SCSI 모듈이 있어야 합니다.
호환 가능한 SCSI 어댑터 카드의 목록을 보려면 28페이지의 호환 가능한 SCSI 카
드를 참조하십시오.
소프트웨어 설치
먼저 소프트웨어를 설치하는 것이 좋습니다.
주: Windows NT의 경우 HP Precisionscan Pro 소프트웨어를 설치해야 합니
다.
1
이전 버전의 HP 스캐닝 소프트웨어가 있으면 제거합니다.
2
컴퓨터에서 열려 있는 모든 응용 프로그램을 닫고 CD를 넣습니다.
3
시작 메뉴에서 실행을 누르고 x:setup.exe를 입력합니다 (x는 CD 드라이브
의 문자입니다).
스캐너 설치
26
스캐너를 설치하기 전에 스캐너에 SCSI 모듈이 삽입되어 있어야 하고 컴퓨터에
SCSI 카드가 있어야 합니다.
1
스캐너에서 전원 코드를 분리하고 컴퓨터를 끕니다.
2
스캐너에 SCSI 모듈을 설치합니다.
a. 스캐너 뒷면의 SCSI 액세스 덮개에서 두 개의 나사를 풀고 덮개를 제거
합니다.
1 2 1
SCSI 액세스 덮개 제거

b. 스캐너에 SCSI 모듈 (C9939AC3)을 삽입합니다.
SCSI 모듈 삽입
c. 두 개의 마운트 나사를 끼우고 조입니다.
두 개의 나사 조이기
3
SCSI 키트 -
에 포함된 SCSI 카드를 SCSI 키트와 함께 제공된 지침에
C6271
따라 컴퓨터에 설치합니다.
4
SCSI 모듈과 컴퓨터를 SCSI 케이블로 연결합니다.
5
다음 그림과 같이 전원 코드와 어댑터를 연결합니다.
부록 A - SCSI 설치 및 옵션
한국어
전원 어댑터 케이블
6
컴퓨터를 켭니다.
7
이 SCSI 카드에 다른 SCSI 장치가 설치되어 있고 스캐너가 작동하지 않는
8
경우 SCSI 주소의 충돌 때문일 수 있습니다.
9
SCSI 주소 충돌이 발생하면 스캐너 SCSI 주소를 변경합니다.
스캐너 SCSI 주소 변경
하나의 SCSI 어댑터 카드에 여러 SCSI 장치가 연결되어 있으면 SCSI 장치마다
고유한 SCSI ID가 있어야 합니다. 복수 장치 SCSI 스트링에 스캐너를 연결한 후
스캐너가 작동하지 않으면 SCSI 주소를 변경해야 할 수 있습니다. 스캐너 SCSI ID
(2로 설정되어 있음)를 변경하려면 다음 단계를 따르십시오.
컴퓨터를 끕니다.
1
스캐너가 켜져 있는지 확인합니다.
2
스캐너의 문서 스캔 대상 단추 ()와 문자열 편집 단추 ()를 동시
3
에 누릅니다.
SCSI 주소: 2가 전면 패널 디스플레이에 나타납니다.
1
전원 어댑터
전원 연결
2
전원 코드
사용 설명서
27

7 장
인쇄 매수 단추 ()를 눌러 다른 SCSI 주소에 해당하는 번호를 선택합니다.
4
번호가 전면 패널 디스플레이에 표시됩니다.
5 SCSI 주소 설정을 끝내려면 스캐너 전면 패널에서 인쇄 매수 단추 ()를
제외하고 아무 단추나 누르십시오.
컴퓨터를 켭니다.
6
호환 가능한
Windows 호환 SCSI 카드
Adaptec 19160 Adaptec APA 1480A Slim
Adaptec 2100S 1Channel Ultra Adaptec AVA 2906 PCI
Adaptec 2904 Adaptec AVA 2930 Ultra
Adaptec 29160 Ultra Adaptec AVA 39160 Ultra
Adaptec 39320D Ultra AdvanSys 915
Adaptec AAA 131U2 RAIDPCI To Ultra2
Adaptec AHA 291OC lomega Jaz Jet 32Bit PCI - SCSI
Adaptec AHA 2940U Ultra
Adaptec AHA 2944UW Ultra Wide
Macintosh 호환 SCSI 카드
Adaptec AHA 2930 U2B AdvanSys SCSI 915
Adaptec AHA 2930 UI Apple 53C875
SCSI
카드
SIDE-2935LVD 또는 SIDE-2936UW 또는 SIDE2930C 또는 SIDE-DU280
Symbios Logic 53C1010 또는 53C895
Tekram DC390 또는 395UW 또는 DC315U 또는
DC-315 또는 DC-390U2W
28
hp scanjet 8200 시리즈

부록 B - 제품 사양 및 옵션
8
이 단원에서는 HP Scanjet 8200 시리즈 스캐너 및 부속품에 대한 제품 사양에 대
해 설명합니다.
스캐너 사양
제목 설명
스캐너 종류 평판형
무게 (덮개 제외)
최대 원본 크기 296 x 494 x 73mm (11.7 x 19.8 x 2.9인치)
스캐닝 요소
인터페이스 Hi-Speed USB 및 SCSI-2
광해상도
선택 해상도 100% 배율에서 12dpi~999,999dpi
AC 전압 북미 지역 - 100-120V 60Hz
전력 소비량 전력 소비량 데이터를 보려면 HP 사진 및 이미지 소프트웨어 CD의
2.79kg (6.2lb)
CCD (Charged Coupled Device)
4800dpi
유럽 대륙, 영국, 호주 지역 - 200-240V 50Hz
그 밖의 지역 - 100-240V 50Hz/60Hz
regulatory_supplement.htm 파일을 참조하십시오.
모든 HP Scanjet 8200 시리즈 스캐너는 E
Hewlett-Packard는 E
성에 대한 E
NERGY STAR
NERGY STAR
기준에 부합함을 확인합니다.
참여 업체로서 이 제품이 에너지 효율
NERGY STAR
를 준수합니다.
한국어
자동 문서 공급기 (ADF) 사양
제목 설명
크기 584 x 318 x 89mm (23.0 x 12.5 x 3.5인치)
무게 (TMA 포함)
용지함 용량 75g/m
최대 용지 크기 216 x 356mm (8.5 x 14인치)
최소 용지 크기 89 x 127mm (3.5 x 5인치)
최대 용지 무게
전력 요구 사항 1 .0A , 32V, 32watts (스캐너에서 공급)
2.7kg (6.0lb)
2
50장 (본드지 20lb)
2
90g/m
800mA, 19watts (최고) 625mA, 15watts (보통)
(24lb)
29

8 장
투명 재료 어댑터 (TMA) 사양
제목 설명
용지 종류 및 용량 슬라이드: 최대 3장의 슬라이드, 35mm,
두께 1.05 - 1.9mm, 면적 49.8 x 50.8mm의 프레임에 장착
음화: 35mm 음화 띠, 최대 4프레임
크기 565 x 320 x 64mm (22.2 x 12.6 x 2.5인치)
무게
전력 요구 사항 16VDC, 425mA, 6.8watts (스캐너에서 공급)
1.6kg (3.5lb)
스캐너 , ADF 및 TMA 사용 환경 조건
제목 설명
온도 작동: 10
보관: -40
상대 습도 작동: 비응축 상대습도 15% - 80%
섭씨 10
보관: 90% 이하
섭씨 -40
°~35°C (50°~95° F)
°~70°C (-40°~158° F)
°~35°C ( 50° F~95° F)
°~70°C (-40° F~58° F)
부속품 구매
부속품은 지역 대리점 또는 온라인 www.hpshopping.com (미국만 해당)에서
구매할 수 있습니다. 다른 국가의 경우 www.hp.com에서 해당 언어를 선택하십
시오. 그런 다음 쇼핑 링크를 선택합니다.
옵션 이름 부품 번호
SCSI 키트 (SCSI 카드 및 케이블 포함)
SCSI 모듈 (스캐너 SCSI 포트 포함)
TMA가 내장된 15ppm ADF
TMA가 내장된 25ppm ADF
유지 관리용 부품 구매
www.hp.com에서 다음과 같은 유지 관리용 부품을 구입할 수 있습니다. 검색
상자에 "ADF 롤러 교체 키트" 또는 "청소용 헝겊"을 입력하여 부품 구매에 관련
된 정보를 검색합니다.
제목 부품 번호
ADF 롤러 교체 키트
청소용 헝겊 10팩
C6271
C9939AC3
C9936A
C9937A
C9937-68001
C9915-60056
30
hp scanjet 8200 시리즈

색인
A
ADF(자동 문서
구매
롤러 교체 키트
사용 가능한 용지 선택
사용할 용지 준비
스캔 장비
유지보수
청소
공급기
)
30
,
30
,
,
14
,
14
11
,
10
,
E
Energy Star
설명
,
24
웹사이트
24
,
H
HP Scanjet 투명 재료
(TMA)
사양
29
,
슬라이드, 스캔
음화, 스캔
HP 복사
HP 사진 및
소프트웨어
이미지 갤러리
어댑터
15
,
17
,
7
,
I
ID, SCSI 변경,
27
N
소프트웨어 설치
NT,
26
,
S
SCSI
스캐너 설치
스캐너 주소 변경
호환 가능한 어댑터 카드 목
록
,
26
27
,
28
,
T
TMA. HP Scanjet 투명 재료
터
TWAIN
스캔 장비
(TMA)를
참조하십시오
,
5
ᆨ
고객으뜸지원센터
관리 프로그램
교체
ADF의 용지 공급 롤러,
규정 정보
,
24
19
,
24
,
,
,
14
5
어댑
11
그림 스캔 단추
그림 스캔
사용
,
기술지원
ᆮ
다중 용지, 스캔
단추
그림 스캔
대상
,
문서 스캔 대상
문자열 편집
복사
,
설정
,
이메일 단추
인쇄 매수
절전
,
취소
,
컬러/흑백
파일 문서
단추 설정
단추
,
변경
,
대상 단추, 설명
도움말
웹사이트
디스플레이, 전면 패널
ᆯ
롤러 교체 키트
ᆷ
메시지
유효하지 않은 디렉터리 또
는 폴더
무게
TMA,
문서 스캔
문서 스캔 대상 단추 사용
문서 스캔 대상 단추
.
문서 스캔
문자열 편집 단추
사용
,
설명
,
미리보기 이미지
보기 및 변경
여러 장의 원본
5
,
19
3
3, 7
4, 9
3, 9
4, 8
4
9
29
6
3
,
,
,
,
,
,
,
5
3
,
,
3
3
,
3
19
, ADF,
12
5
ᆸ
변경
미리보기 이미지
프린터 설정
보관 사양
보기
14
,
보증
복사 단추
,
3
3
3
복사본
부속품, 구매
비규격 용지
30
,
미리보기 이미지
ii, 23
,
사용
,
7
설명
,
3
인쇄
7
,
,
5
7
,
,
5
30
,
14
,
한국어
ᄉ
사양
3
,
4
,
30
3
,
,
5
8
,
사용 가능한 용지 무게
설치
소모품, 주문
소프트웨어
순간 램프 준비 설정
순간 스캔
순환 프로그램
스캐너
스캐너 램프
5
,
스캔
30
TMA,
스캐너
29
,
제품
29
,
환경
30
,
14
ADF,
사용하여 스캐너 설
SCSI를
치
26
,
하드웨어 테스트
,
설치
, SCSI,
9
,
관리 및 청소
설치
26
,
유리, 청소
준비
9
,
개요
,
4
그림 스캔 단추 사용
문서 스캔 대상 단추 사용
문자열 편집 단추 사용
복사 단추 사용
슬라이드
여러 장의 원본
음화
,
17
,
,
15
12
,
26
10
25
,
10
12
,
9
,
5
,
,
7
,
7
,
5
,
6
31

색인
이메일 단추 사용,
이메일에 파일 첨부,
8
취소,
파일 문서 단추 사용,
스캔 가져오기,
광 실드,
스캔,
홀더,
5
16
15
15
30
스캔 취득,
슬라이드
습도 사양,
6
6
6
5
ᄋ
어댑터 카드, 목록,
에너지 소비량
Energy Star,
29
TMA,
온도 사양,
용지
ADF에 사용 가능한 용지 유
14
형,
용지 공급 롤러 어셈블리, 교체
11
,
용지, 스캔,
용지의 말림,
용지의 비틀림,
원본
여러 장 스캔,
여러 장의 원본 미리 보기,
형식 선택,
웹사이트
Energy Star,
장애인 지원,
재활용,
유지보수
11
ADF,
10
TMA,
소모품 주문,
스캐너 청소,
유효하지 않은 디렉터리 또는
폴더 메시지,
음화
TMA를 사용한 스캔,
28
24
30
14
14
14
7
9
24
19
25
12
10
12
17
광 실드,
홀더,
이메일 단추
사용,
설명,
이메일에 파일 첨부,
이미지
미리보기 및 변경,
인쇄
복사본,
인쇄 매수 단추, 설명,
17, 18
17
6
3
7
ᄌ
작동 온도 사양,
잘못된 대상 디렉터리,
잘못된 디렉터리,
장애인, 웹사이트,
장애인, 지원,
재활용,
전기 사양
TMA,
전력 사양
TMA,
전력 소비량
Energy Star,
TMA,
전면 패널 디스플레이, 설명,
절전 단추
8
사용,
설명,
제품 사양,
주문
유지 관리용 소모품,
주소, SCSI 변경,
지원, 고객,
19
24
29
29
29
9
3
29
19
ᄎ
청소
10
ADF,
10
TMA,
스캐너 유리,
청소용 헝겊, 부품 번호,
최종 스캔 영역,
30
12
19
24
27
10
16, 18
최종 처리 순환 프로그램,
출력 파일 형식,
취소
복사본 인쇄,
스캐닝,
6
5
취소 단추
사용,
설명,
9
7
8
8
4
25
ᄏ
3
12
컬러/흑백 단추, 설명,
크기
TMA,
29
ᄐ
테스트
스캐너 하드웨어,
투명 재료 어댑터. HP Scanjet 투
명 재료 어댑터(TMA)를 참
조하십시오.
투명 재료, 스캔,
3
12
14
ᄑ
파일
6
9
3
5
7
12
4
파일 문서 단추
프로그램
프린터
이메일에 첨부,
출력 형식,
6
사용,
스캐너,
스캔 장비,
설정 변경,
ᄒ
하드웨어
12
30
17
ii, 24
30
30
테스트 모드,
헝겊, 청소용,
홀더, 음화,
환경
관리 프로그램,
사양,
32
hp scanjet 8200 시리즈


www.hp.com
Printed in U.S.A. 2002
*C9930−90125*
C9930-90125
 Loading...