

Hp PHOTOSMART 8400 User Manual [zh]
快速入門
Quick Start
HP Photosmart 8400 series

2
從包裝盒中取出 HP Photosmart 印表機
Unpack the HP Photosmart printer
1
1. 移除膠帶和印表機內部與四周的包裝厚紙板。
2. 檢查包裝盒中的內容物:
a. HP Photosmart 8400 series 印表機
b. 列印墨匣護套
c. 列印墨匣
d. 相紙儲存袋
e. 紙張樣本
f. USB 纜線
g. 電源和變壓器
h. HP Photosmart 軟體光碟
i. 使用者文件
1. Remove the tape and cardboard packaging from inside and
around the printer.
2. Check the contents of the box:
a. HP Photosmart 8400 series printer
b. Print cartridge protector
c. Print cartridges
d. Photo paper storage bag
e. Paper sampler
f. USB cable
g. Power supply and power adapter
h. HP Photosmart software on CD
i. User documentation
d
e
f
g
h
a
b
c
i
3
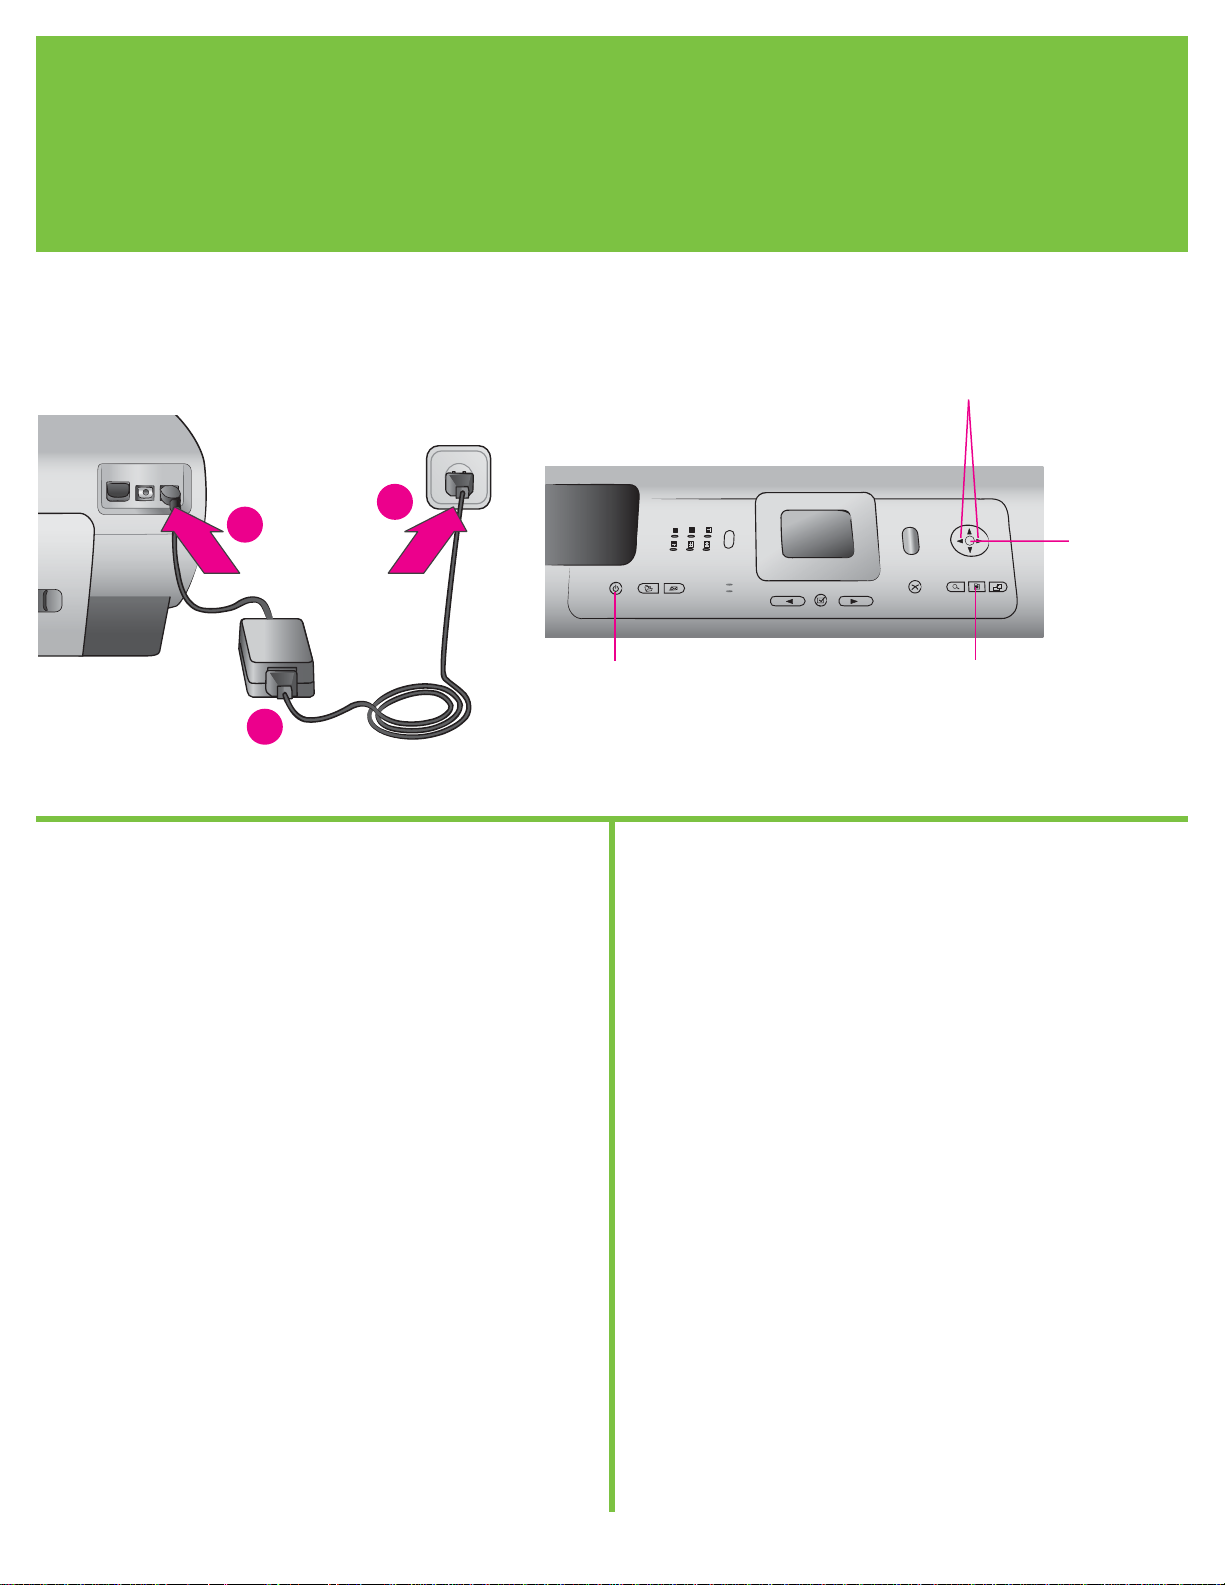
1. 將電源線一端與印表機連接,另一端則接到牆上插座。
!
重要:軟體安裝期間,未獲得提示前請勿連接 USB 纜線。
2. 按「開啟」,開啟印表機。
3. 當印表機螢幕上出現「Select Language」(選擇語言)時,
請使用導覽
或 反白顯示您的語言。
4. 按「OK」選取您的語言。
5. 使用導覽
或 反白顯示「Yes」(是)進行確認,然後按
「OK」。會出現「確認」的畫面。
6. 當印表機螢幕上出現「Select Country/Region」(選擇國家/
地區)時,請反白顯示您的國家/地區,然後按「OK」。
1. Connect the power cord to the printer and to a wall outlet.
!
Important: Do not connect the USB cable until prompted
during software installation.
2. Press On to turn on the printer.
3. When Select Language appears on the printer screen, use
Navigation
or to highlight your language.
4. Press OK to select your language.
5. Use Navigation
or to highlight Yes to confirm, then press
OK. A confirmation screen appears.
6. When Select Country/Region appears on the printer screen,
highlight your country/region, then press OK. A confirmation
screen appears.
接上電源並設定您的語言
Connect the power and set your language
2
a
b
c
「開啟」按鈕
On button
導覽
和
Navigation and
「OK」按鈕
OK button
「功能表」按鈕
Menu button
4
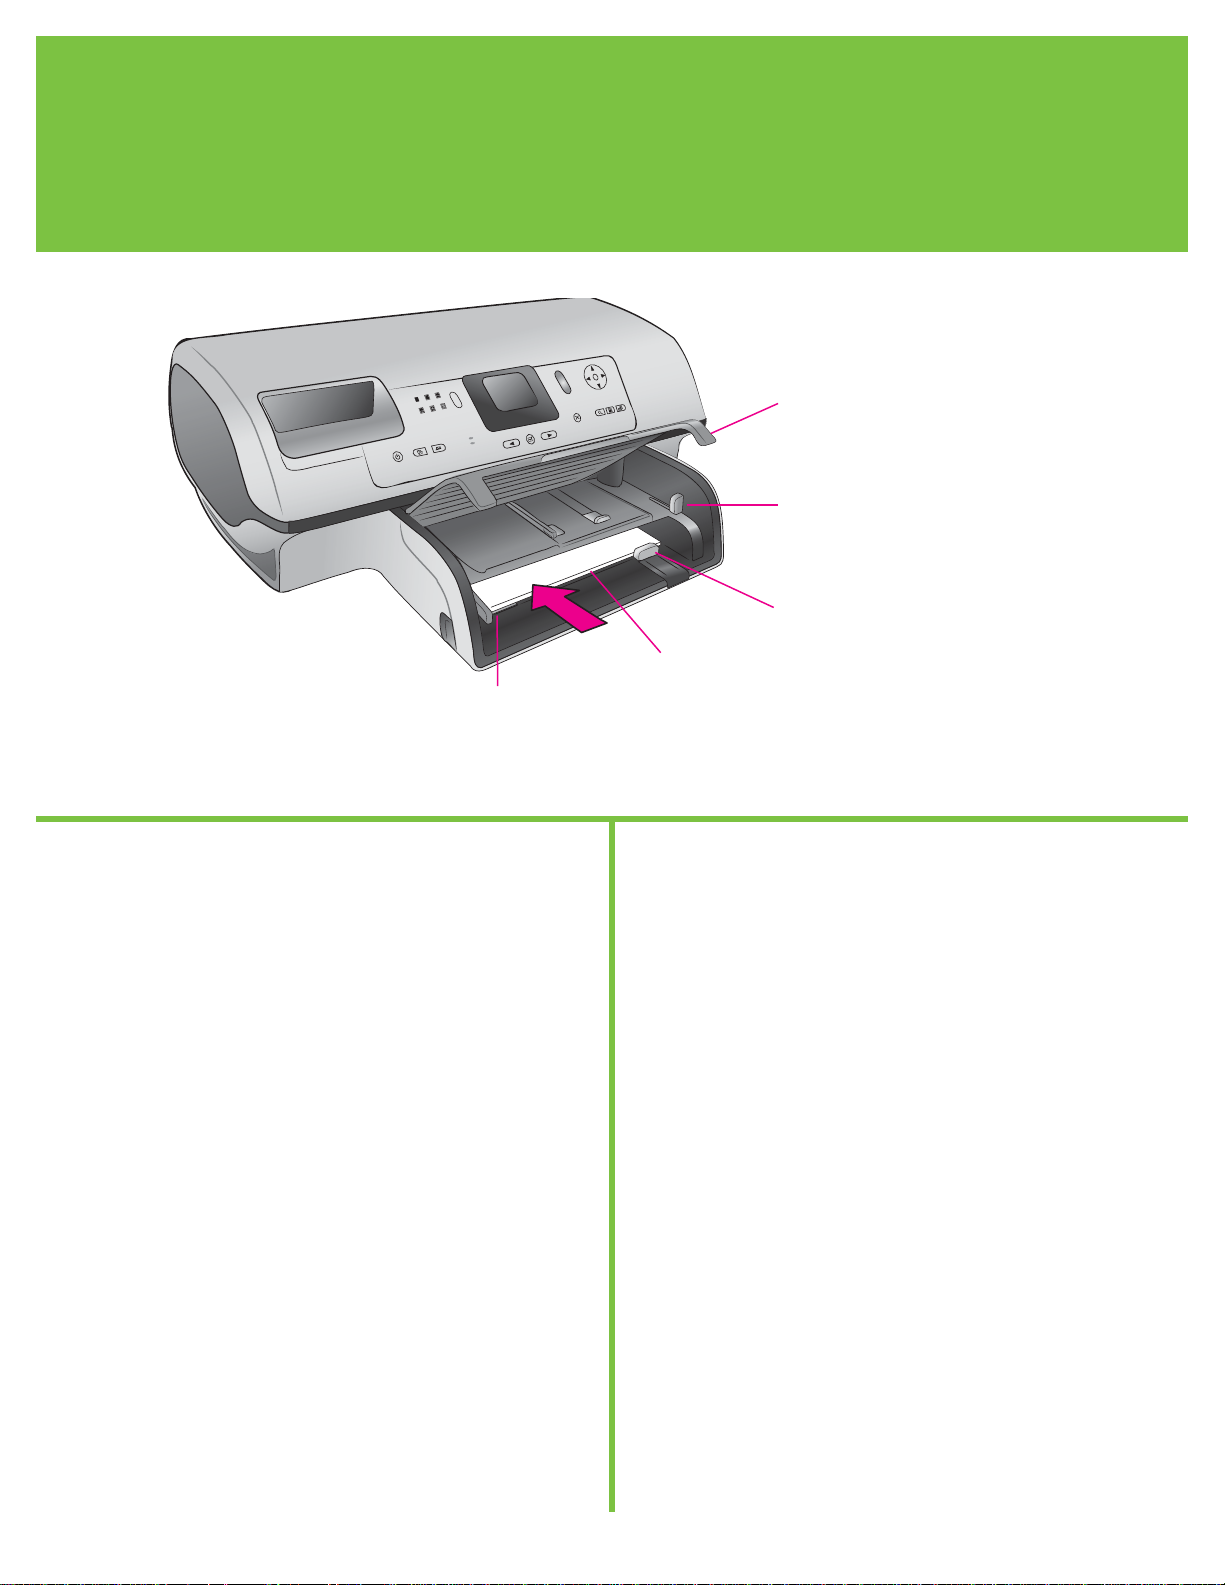
裝入一般紙張
Load plain paper
3
裝入一般紙張以校正列印墨匣。
1. 提起出紙匣。
2. 將進紙匣上的紙張長度導板拉出,並將紙張寬度導板滑到最
左側。
3. 在進紙匣中放入一疊 Letter 尺寸的一般紙張(不超過 100 張)。
4. 調整紙張寬度導板與紙張長度導板,使其緊靠紙張邊緣但不會
使紙張彎曲。
5. 放下出紙匣。
6. 請確定相片匣滑塊朝印表機前方拉出。這樣會拉開相片匣。
註:若要列印精美的 10x15 公分(4x6 英吋)相片,請使用相
片匣。請參閱此手冊的第 12 頁或是《使用者手冊》以取得更多
資訊。
Load plain paper to align the print cartridges.
1. Raise the Out tray.
2. Pull out the paper-length guide on the In tray and slide the
paper-width guide as far to the left as it will go.
3. Place a stack of plain letter paper (no more than 100 sheets) in
the In tray.
4. Adjust the paper-width guide and the paper-length guide to fit
close to the edges of the paper without bending the paper.
5. Lower the Out tray.
6. Make sure the photo tray slider is pulled toward the front of the
printer. This disengages the photo tray.
Note: To print beautiful 10x15 cm (4x6 inch) photos, use the
Photo tray. See page 12 of this booklet or the User’s Guide for
more information.
出紙匣
Out tray
相片匣滑塊
Photo tray slider
紙張長度導板
Paper-length guide
紙張寬度導板
Paper-width guide
進紙匣
In tray
5
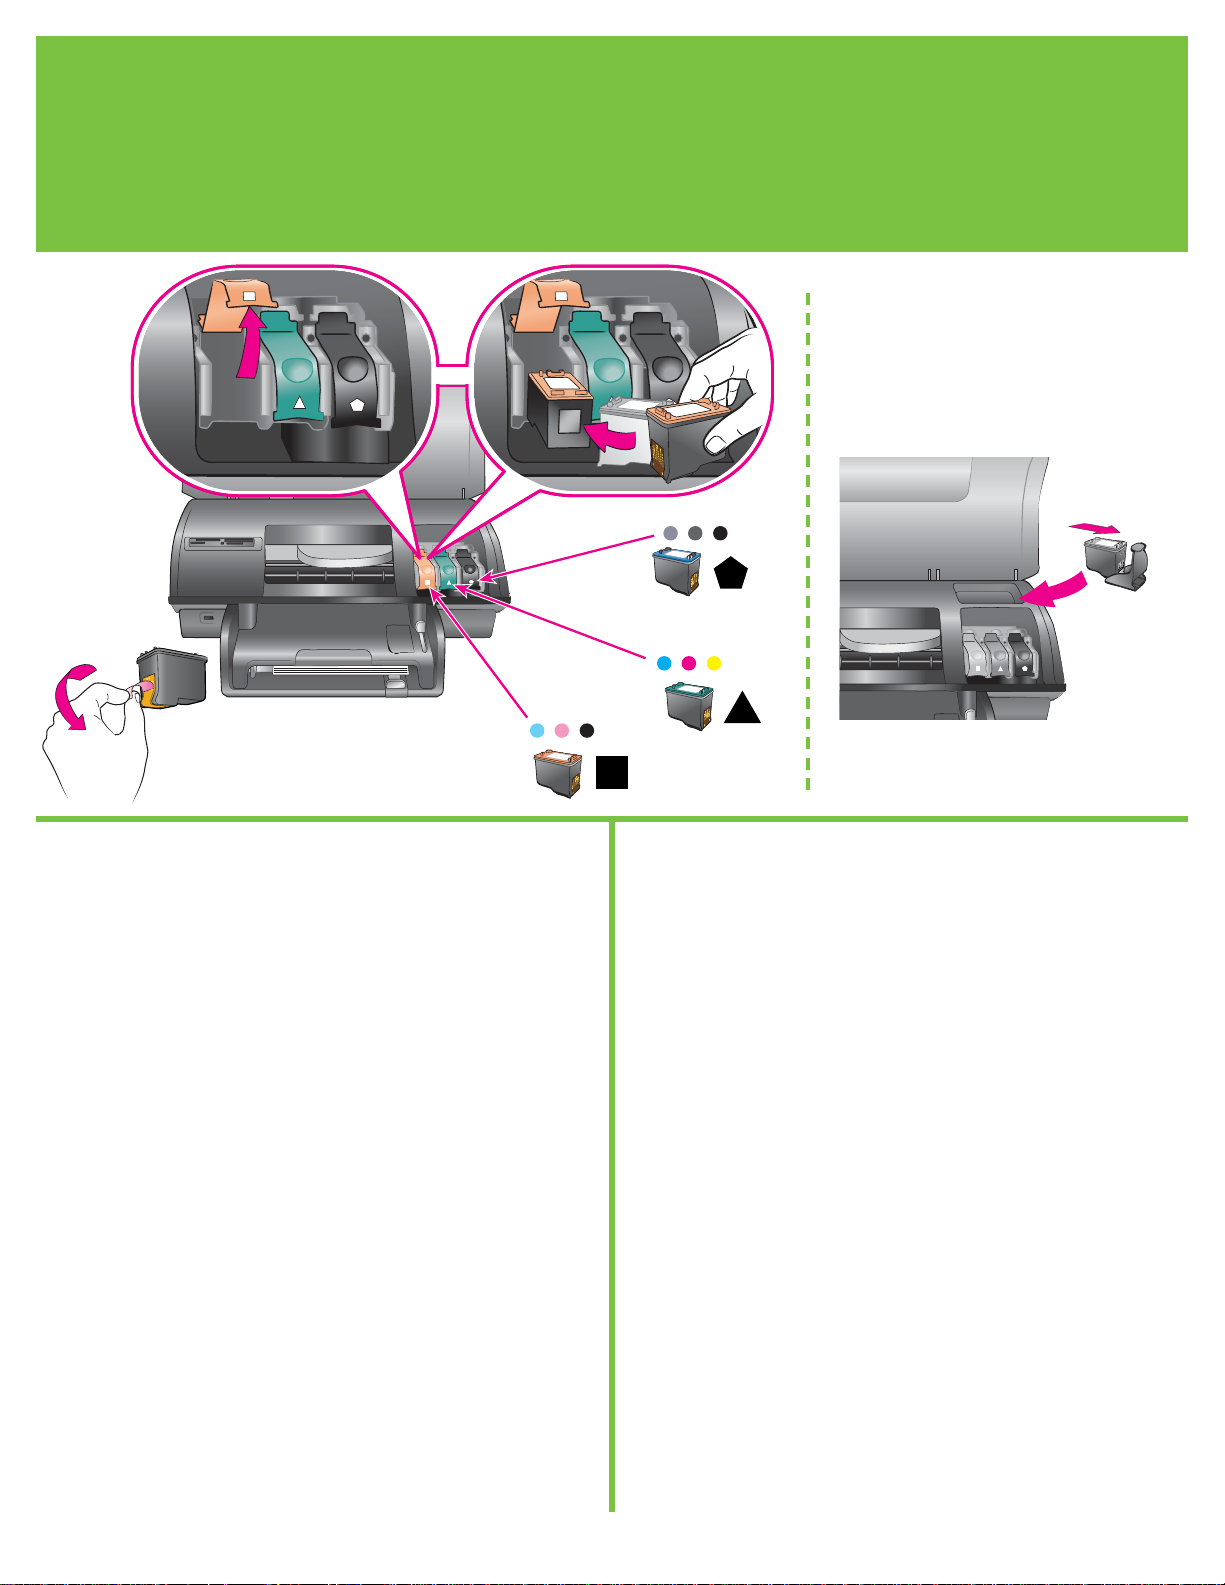
1. 提起頂蓋,接著下壓並拉出列印墨匣閂鎖。
2. 打開相片列印墨匣,然後拉開粉紅色標籤以移除透明膠帶。
請勿碰觸墨水噴嘴或銅色接點。
3. 手持墨匣使銅接點先進入印表機。將墨匣滑入金屬桿下方托架
的左側。將墨匣向內推,直到卡至定位。
4. 向下推壓墨匣閂鎖,直到鎖住為止。
5. 重複此程序以安裝三色與灰色相片列印墨匣。
6. 放下頂蓋。當印表機螢幕提示您列印校正頁時,請按控制台上
的「OK」。
* 將所有未使用的列印墨匣儲存於此。
您可以選購黑色列印墨匣。請閱讀此手冊的封底,找出最適用於您
列印專案的墨匣。
1. Raise the top cover, then push down and pull out the print
cartridge latch.
2. Unwrap the Photo print cartridge, then pull the pink tab to
remove the clear tape. Do not touch the ink nozzles or copper-
colored contacts.
3. Hold the cartridge so the copper-colored contacts go into the
printer first. Slide the cartridge into the left side of the cradle
under the metal bar. Push the cartridge until it snaps into place.
4. Push down on the cartridge latch until it locks.
5. Repeat this process to install the Tri-color and Gray Photo print
cartridges.
6. Lower the top cover. Press OK on the control panel when the
printer screen prompts you to print an alignment page.
* Store any unused print cartridge here.
You can purchase an optional Black print cartridge. Check the
back cover of this booklet to find the best cartridges to use for your
print projects.
安裝列印墨匣
Install the print cartridges
4
* 儲存選用的列印墨匣與護套。
* Store the optional print cartridge and protector.
 Loading...