

Page 1

HP Photosmart 8000 series User’s Guide
English
Page 2

www.hp.com/support
Support for the following countries/regions is available at www.hp.com/support:
Austria, Belgium, Central America & The Caribbean, Denmark, Spain, France,
Germany, Ireland, Italy, Luxembourg, Netherlands, Norway, Portugal, Finland,
Sweden, Switzerland, and the United Kingdom.
61 56 45 43
Argentina (Buenos Aires)
Argentina
Australia
Australia
(out-of-warranty)
800 171
Brasil (Sao Paulo)
Brasil
Canada
Canada
Chile
Colombia (Bogota)
Colombia
Costa Rica
Česká republika
Ecuador (Andinatel)
Ecuador (Pacifitel)
2 532 5222
El Salvador 800-6160
Guatemala
Magyarország
India
Indonesia
(0) 9 830 4848
Jamaica
(Mississauga Area)
54-11-4708-1600
0-800-555-5000
1300 721 147
1902 910 910
55-11-4004-7751
0-800-709-7751
(905) 206-4663
1-(800)-474-6836
800-360-999
021-3881-4518
800-810-3888
571-606-9191
01-8000-51-4746-8368
0-800-011-1046
261 307 310
1-999-119 ℡
800-711-2884
1-800-225-528 ℡
800-711-2884
+ 30 210 6073603
801 11 22 55 47
800 9 2649
1-800-711-2884
2802 4098
1 382 1111
1 600 44 7737
+62 (21) 350 3408
1-800-711-2884
0570-000511
03-3335-9800
1588-3003
Malaysia
Mexico (Mexico City)
Mexico
22 404747
New Zealand
Nigeria 1 3204 999
Pan ama
Para guay
Per ú
Philippines
Pol ska
Puerto Rico
República Dominicana
România
()
(-)
800 897 1444
Singapore
Slovakia
South Africa
(International)
South Africa (RSA)
Rest Of West Africa
71 89 12 22
Trinidad & Tobago 1-800-711-2884
Türkiye
800 4520
United States
Uruguay 0004-054-177
Venezuela (Caracas)
Venezuela
Viêt Nam
1800 805 405
55-5258-9922
01-800-472-68368
0800 441 147
1-800-711-2884
009 800 54 1 0006
0-800-10111
2 867 3551
22 5666 000
1-877-232-0589
1-800-711-2884
(21) 315 4442
095 7973520
812 3467997
6 272 5300
2 50222444
+ 27 11 2589301
086 0001030
+ 351 213 17 63 80
02-8722-8000
+66 (2) 353 9000
90 216 444 71 71
(380 44) 4903520
1-800-474-6836
58-212-278-8666
0-800-474-68368
+84 88234530
Page 3

Copyrights and trademarks
© Copyright 2005 Hewlett-Packard
Development Company, L.P.
The information contained herein is
subject to change without notice.
Reproduction, adaptation or
translation without prior written
permission is prohibited, except as
allowed under the copyright laws.
Notice
The only warranties for HP products
and services are set forth in the
express warranty statements
accompanying such products and
services. Nothing herein should be
construed as constituting an
additional warranty. HP shall not be
liable for technical or editorial errors
or omissions contained herein.
The Hewlett-Packard Development
Company, L.P. shall not be liable for
incidental or consequential damages
in connection with, or arising out of
the furnishing, performance, or use of
this document and the program
material which it describes.
Trademarks
HP, the HP logo, and Photosmart are
property of Hewlett-Packard
Development Company, L.P.
The SD logo is a trademark of its
proprietor.
Microsoft, Windows, and Windows XP
are registered trademarks of Microsoft
Corporation.
Intel and Pentium are trademarks or
registered trademarks of Intel
Corporation or its subsidiaries in the
United States and other countries.
iPod is a trademark of Apple
Computer, Inc.
Bluetooth is a trademark owned by its
proprietor and used by HewlettPackard Company under license.
Other brands and their products are
trademarks or registered trademarks
of their respective holders.
The embedded software in the printer
is based in part on the work of the
Independent JPEG Group.
Portions of the software are ©
Copyright 1998, 1999, 2000 Thai
Open Source Software Center Ltd.
and Clark Cooper. © Copyright 2001,
2002, 2003 Expat maintainers.
The copyrights to certain photos
within this document are retained by
the original owners.
Regulatory model
identification number for
HP Photosmart 8001 - 8099
series
For regulatory identification purposes,
the product is assigned a Regulatory
Model Number. The Regulatory
Model Number for the product is
VCVRA-0506. This regulatory number
should not be confused with the
marketing name (HP Photosmart
8050, HP Photosmart 8053, etc.) or
product number (Q6351A, Q6352A,
etc.).
Environmental statements
Hewlett-Packard Company is
committed to providing quality
products in an environmentally sound
manner.
Protecting the environment
This printer has been designed with
several attributes to minimize impact
on our environment. For more
information, go to HP's Commitment
to the Environment website at
www.hp.com/hpinfo/globalcitizenship/
environment/.
Ozone production
This product generates no
appreciable ozone gas (O
Paper use
This product is suited for the use of
recycled paper according to DIN
19309.
Plastics
Plastic parts over 24 grams (0.88
ounces) are marked according to
international standards that enhance
the ability to identify plastics for
recycling purposes at the end of the
printer life.
Material Safety Data Sheets
Material Safety Data Sheets (MSDS)
can be obtained from the HP website
at www.hp.com/go/msds. Customers
without Internet access should
contact HP Customer Care.
Recycling program
HP offers an increasing number of
product return and recycling programs
in many countries, and partners with
some of the largest electronics
recycling centers throughout the
world. HP conserves resources by
reselling some of its most popular
products.
).
3
Disposal of waste equipment by
users in private households in the
European Union:
This symbol on the product or on its
packaging indicates that this product
must not be disposed of with your
other household waste. Instead, it is
your responsibility to dispose of your
waste equipment by handing it over to
a designated collection point for the
recycling of waste electrical and
electronic equipment. The separate
collection and recycling of your waste
equipment at the time of disposal will
help to conserve natural resources
and ensure that it is recycled in a
manner that protects human health
and the environment. For more
information about where you can drop
off your waste equipment for
recycling, please contact your local
city office, your household waste
disposal service or the shop where
you purchased the product.
For more information regarding return
and recycling of HP products
generally, please visit:www.hp.com/
hpinfo/globalcitizenship/environment/
recycle/index.html.
Page 4

Contents
1 Welcome ...............................................................................................................3
Accessing the onscreen HP Photosmart Printer Help ............................................ 3
Printer parts ...........................................................................................................4
Printer menu ..........................................................................................................6
2 Getting ready to print ..........................................................................................9
Loading paper ........................................................................................................9
Choosing the right paper ................................................................................9
Printing from the control panel or a computer .................................................9
Loading your paper ....................................................................................... 10
Using print cartridges ...........................................................................................11
Purchasing replacement print cartridges ......................................................12
Print cartridge tips ......................................................................................... 12
Inserting and replacing the print cartridges ...................................................12
When you are not using a print cartridge ......................................................13
3 Printing without a computer .............................................................................15
Getting connected ...............................................................................................15
Printing photos from a memory card ....................................................................16
Inserting a memory card ...............................................................................16
Deciding which photos to print ......................................................................18
Selecting a photo layout ...............................................................................19
Selecting photos to print ...............................................................................20
Printing your photos ...................................................................................... 21
Removing a memory card ............................................................................24
Improving photo quality ................................................................................24
Getting creative ............................................................................................25
Printing photos from a digital camera ..................................................................27
Printing photos from other Bluetooth devices ......................................................28
Printing photos from an HP iPod .........................................................................29
4 Printing from a computer ..................................................................................31
Using creative options in the printer software ......................................................31
HP Image Zone ............................................................................................31
HP Image Zone Express ..............................................................................31
HP Instant Share ..........................................................................................32
5 Care and maintenance ......................................................................................33
Cleaning and maintaining the printer ...................................................................33
Cleaning the outside of the printer ................................................................33
Automatically cleaning the print cartridges ...................................................33
Manually cleaning the print cartridge contacts ..............................................34
Printing a test page ....................................................................................... 34
Aligning the print cartridges ..........................................................................35
Printing a sample page .................................................................................35
Updating the software ..........................................................................................36
Storing the printer and print cartridges ................................................................. 36
Memory card types ................................................................................16
Supported file formats ...........................................................................17
HP Photosmart 8000 series User's Guide 1
Page 5

Storing the printer .........................................................................................36
Storing the print cartridges ...........................................................................37
Maintaining the quality of photo paper .................................................................37
Storing photo paper ......................................................................................37
Handling photo paper ...................................................................................37
6 Troubleshooting ................................................................................................39
Printer hardware problems ..................................................................................39
Printing problems .................................................................................................41
Error messages ...................................................................................................46
Paper errors .................................................................................................46
Print cartridge errors .....................................................................................47
Memory card errors ......................................................................................48
Proof sheet errors .........................................................................................50
Bluetooth printing problems .................................................................................51
7 HP Customer Care .............................................................................................53
HP Customer Care by phone ...............................................................................53
Placing a call ................................................................................................54
Return to HP repair service (North America only) ................................................54
Additional warranty options ..................................................................................54
8 Specifications ....................................................................................................55
System requirements ...........................................................................................55
Printer specifications ...........................................................................................56
9 HP Warranty .......................................................................................................59
Index...........................................................................................................................61
2 HP Photosmart 8000 series
Page 6

1
Welcome
Thank you for purchasing an HP Photosmart 8000 series printer! With this new photo
printer you can print beautiful photos, save photos to a computer, and create fun and
easy projects with or without a computer.
This guide primarily explains how to print without a computer. To learn how to print
from a computer, install the printer software and view the onscreen Help. For an
overview of using a computer and the printer together, see Printing from a computer.
For information about installing the software, see the Quick Start booklet.
The printer comes with the following documentation:
● Quick Start booklet: The HP Photosmart 8000 series Quick Start booklet
explains how to set up the printer, install the printer software, and print your first
photo.
● User's Guide: The HP Photosmart 8000 series User's Guide is the book you are
reading. This book describes the basic features of the printer, explains how to
use the printer without connecting a computer, and contains hardware
troubleshooting information.
● HP Photosmart Printer Help: The onscreen HP Photosmart Printer Help
describes how to use the printer with a computer and contains software
troubleshooting information.
Accessing the onscreen HP Photosmart Printer Help
After you have installed the HP Photosmart printer software on a computer, you can
view the onscreen HP Photosmart Printer Help:
● Windows PC: From the Start menu, select Programs (in Windows XP, select All
Programs) > HP > Photosmart 8000 series > Photosmart Help.
● Macintosh: Select Help > Mac Help in the Finder, then select Help Center >
HP Image Zone Help > HP Photosmart Printer Help.
HP Photosmart 8000 series User's Guide 3
Page 7

Chapter 1
Printer parts
Front of printer
1 Output tray: After printing, remove your photos and documents from this tray.
2 Main tray: Place plain paper, transparencies, envelopes, or other media in this tray for
printing.
3 Printer screen: Use this screen to view your photos and menu options.
4 Main cover: Raise the main cover to access the print cartridges.
5 Top cover: Open the top cover to access the Photo cassette. Use the Photo cassette to
print on smaller photo paper.
6 On: Press this button to turn on the printer or put it into power save mode.
7
Camera port: Connect a PictBridge-compatible digital camera, the optional HP Bluetooth
wireless printer adapter, or an HP iPod to this port.
8 Memory card slots: Insert memory cards here.
®
Inside view
1 Photo cassette: Load photo paper or other supported small media into this cassette, and
insert the cassette into the Main tray for printing. For information on how to load the photo
cassette, see Loading your paper.
2 Paper-width guide: Adjust this guide for different paper widths.
3 Output tray extender: Lift the tab, and then pull it towards you to extend the Output tray.
The Output tray extender catches the printed paper as it ejects from the printer.
4 HP Photosmart 8000 series
Page 8

Back of printer
1 Rear access door: Open this door to clear a paper jam.
2 USB port: Use this port to connect a computer to the printer.
3 Power cord connection: Use this port to connect the power cord included with the printer.
Control panel
1 Select Photos arrows: Scroll through the photos and control video playback on a memory
card.
2 OK: Select a menu or dialog choice and play/pause a video clip during playback.
3 Print: Print selected photos from the inserted memory card.
4 Cancel: Deselect photos, to exit a menu, or to stop an action you have requested.
5 Menu: View the printer menu.
6 Layout: Choose a photo layout.
7 HP Instant Share: Send a photo via e-mail (if connected). For more information, see
Getting connected.
8 Zoom: Enter Zoom mode and zoom in on the currently displayed photo, and to exit 9-up
view mode.
9 Rotate: Rotate the currently displayed photo.
HP Photosmart 8000 series User's Guide 5
Page 9

Chapter 1
Indicator lights
1 On light: Solid green if the printer is on, otherwise off.
2 Memory Card light: Solid green if a memory card is correctly inserted; flashing green if the
printer is accessing a memory card; and off if no memory card is inserted or more than one
card is inserted.
3 Print light: Solid green if the printer is ready to print, pulsing green if the printer is busy
printing.
4 Status light: Flashing red if there is an error or if some user action is required.
Printer menu
Press Menu to access the printer menu. If you are viewing a submenu, pressing
Menu returns you to the main printer menu.
To navigate the printer menu
● Press
Menu items that are not accessible are grayed out.
● Press OK to open a menu or select an option.
● Press Cancel to exit the current menu.
or to scroll through the menu options displayed on the printer screen.
Print Options
● Print all: Print all the photos on the memory card inserted in the printer.
● Print proof sheet: Print a proof sheet of all photos on the inserted memory card.
The proof sheet allows you to select photos to print, number of copies, and the
print layout.
● Scan proof sheet: Scan a printed proof sheet marked with selected photos for
printing.
● Video action prints: Print nine frames that are automatically selected from your
video clip.
● Print range: Select the beginning and the end of the print range using the Select
Photos arrows.
● Print index page: Print thumbnail views of all photos on the inserted memory
card.
● Print panoramic photos: Select to turn panoramic printing On or Off (default).
Select On to print all selected photos with a 3:1 aspect ratio; load 10 x 30 cm (4 x
12 inch) paper before printing.
● Print stickers: Select to turn sticker printing On or Off (default). Select On to
print 16 photos per page; load special sticker media if desired.
● Passport photo mode: If you select On, the printer prompts you to select the
passport photo size. Passport mode tells the printer to print all photos in the
6 HP Photosmart 8000 series
Page 10

selected size. Each page contains one photo. However, if you specify several
copies of the same photo, they all appear on the same page (if enough space is
available). Allow photos to dry for one week before laminating.
Edit
● Remove red-eye: Select to remove red-eye from the photo displayed on the
printer screen. The printer automatically removes red-eye by default. Use the
Preferences menu to disable automatic red-eye removal.
●
Photo brightness: Press
or to increase or decrease the photo brightness.
● Add frame: Use the Select Photos arrows to select a pattern and a color for a
frame.
● Add color effect: Use the Select Photos arrows to select a color effect. The
color effect does not affect frames created with the Add frame option. These
color effects are only for printing and do not change your original digital photo.
Tools
● View 9-up: View nine images at once from the inserted memory card.
● Slide show: Press OK to pause and unpause the slide show; press Cancel to
stop the slide show.
● Print quality: Choose either Best (default) or Normal print quality.
● Print sample page: Select to print a sample page useful for checking the print
quality of the printer.
● Print test page: Select to print a test page containing information about the
printer that can help in troubleshooting problems.
● Clean cartridges: Select to clean the print cartridges. After the cleaning finishes,
the printer prints a test page. You have the option to clean the cartridges again if
the test page shows that they are still not clean.
● Align cartridges: Select to align the print cartridges.
Bluetooth
● Device address: Some devices with Bluetooth wireless technology require you to
enter the address of the device they are trying to locate. This menu option shows
the device address.
● Device name: You can select a device name for the printer that appears on other
devices with Bluetooth wireless technology when they locate the printer.
● Passkey: Press
to increase number by one; press to decrease the number.
Press OK to move to next number.
If the printer Bluetooth Security level is set to High, you can assign a numerical
passkey that Bluetooth device users trying to locate the printer must enter before
printing. The default passkey is 0000.
● Visibility: You can set the Bluetooth-equipped printer to be visible or invisible to
other devices with Bluetooth wireless technology by changing this accessibility
option. When Visibility is set to Not visible, only devices that know the device
address can print to it.
● Security level: Select Low or High. The Low setting does not require users of
other devices with Bluetooth wireless technology to enter the printer passkey.
HP Photosmart 8000 series User's Guide 7
Page 11

Chapter 1
High requires users of other devices with Bluetooth wireless technology to enter
the printer passkey.
● Reset Bluetooth options: Select to reset all items in the Bluetooth menu to their
default values.
Help
● Memory cards: Press
or to scroll through the memory cards supported by
the printer, then press OK to see how to insert the memory card.
● Cartridges: Press
or to scroll through the HP print cartridges available for
the printer, then press OK to see how to insert the cartridge.
● Photo Sizes: Press
● Paper Loading: Press
or to scroll through the available photo sizes.
or to scroll through information on loading paper.
● Paper Jams: Select to see how to remove a paper jam.
● Camera Connect: Select to see where to connect a PictBridge-compatible digital
camera to the printer.
Preferences
● SmartFocus: Select On (default) or Off. This setting improves blurred photos.
● Adaptive lighting: Select On (default) or Off. This setting improves lighting and
contrast.
● Date/time: Use this option to include the date and/or time on your printed photos.
● Colorspace: The Auto-select default tells the printer to use the Adobe RGB
colorspace, if available. The printer defaults to sRGB if Adobe RGB is not
available.
● Paper detect: Select On (default) and the printer will automatically detect the
paper type and size when you print. When you select Off, you will be asked to
select the paper type and size each time you print.
● Preview animation: Select On (default) or Off. When this feature is turned on,
after you select a photo the printer will briefly display a print preview of the photo
in the selected layout. Note: This feature is not available in all printer models.
● Video enhancement: Select On or Off (default). When you select On, the quality
of photos printed from video clips will be improved.
● Auto redeye removal: Select On (default) or Off to automatically remove redeye effect from images.
● Restore defaults: Restores factory settings for all menu items except Select
language and Select country/region (under Language in Preference menu)
and Bluetooth settings (under Bluetooth in the main printer menu). This setting
does not affect HP Instant Share or Network defaults.
● Language: Select to indicate the language you want used on the printer screen,
and the country/region setting. The country/region setting determines the
supported media sizes.
8 HP Photosmart 8000 series
Page 12

2
Getting ready to print
This section includes information on the following topics:
● Loading paper
● Using print cartridges
Loading paper
Learn how to choose the right paper for your print job and how to load it in the Main
tray or Photo cassette for printing.
Choosing the right paper
For a list of available HP paper, or to purchase supplies, go to:
● www.hpshopping.com (U.S.)
● www.hp.com/go/supplies (Europe)
● www.jpn.hp.com/supply/inkjet (Japan)
● www.hp.com/paper (Asia/Pacific)
To get the best results from the printer, choose from these high-quality HP photo
papers.
To print
High-quality, long-lasting prints and
enlargements
Medium- to high-resolution images from
scanners and digital cameras
Instant dry, water and fingerprintresistant glossy photos
Casual and business photos HP Photo paper
Text documents, draft versions, test and
alignment pages
To keep your paper in good condition for printing:
● Store the photo paper in its original packaging or in a resealable plastic bag.
● Keep the paper flat in a cool, dry place. If the corners curl, place the paper in a
plastic bag and gently bend it in the opposite direction until it lies flat.
● Hold photo paper by the edges to avoid smears.
Printing from the control panel or a computer
When printing from a computer, the printer prints paper sizes from 7.6 x 12.7 cm to
22 x 61 cm (3 x 5 inch to 8.5 x 14 inch). The list below describes which paper sizes
Use this paper
HP Premium Plus photo paper
(Also known as Colorfast Photo Paper in
some countries/regions.)
HP Premium photo paper
HP Advanced photo paper
HP Everyday photo paper
HP Multipurpose paper
HP Photosmart 8000 series User's Guide 9
Page 13

Chapter 2
are supported when printing directly from the control panel. Supported sizes when
printing from the control panel A6, A4, 10 x 15 cm (4 x 6 inch) with or without a tab,
3.5 x 5 inch, 5 x 7 inch, 8.5 x 11 inch, Hagaki, and L-size.
Loading your paper
Paper loading tips:
● Before loading paper, slide out the paper-width guide to make room for the paper.
● Load only one type and size of paper at a time. Do not mix paper types or sizes in
the Main tray or the Photo cassette.
● After loading paper, extend the Output tray extender to hold your printed pages.
This prevents printed pages from dropping off of the Output tray.
Use the directions in the following table to load the most commonly used paper sizes
into the printer.
Paper type
● 10 x 15 cm
(4 x 6 inch)
photo paper
(with or without
tab)
● 7.62 x 13 cm
(3 x 5 inch)
photo paper
● Index cards
● Hagaki cards
● A6 paper
● L-size cards
How to load Tray to load
1. Remove any paper that is
Photo cassette into the Main tray
loaded in the Main tray.
2. Raise the top cover and
remove the Photo cassette.
3. Squeeze the paper-width
guide and slide it to the left
until it stops.
4. Load up to 20 sheets of
paper into the Photo
cassette with the side to be
printed facing down.
If you are using tabbed
1 Paper-width guide
2 Paper-length guide
paper, insert the tabbed end
first.
5. Adjust the paper- length and
paper-width guides of the
Photo cassette to fit the
loaded paper.
6. Line up the Photo cassette
with the right side of the
Main tray, then slide it into
the printer until it snaps into
place.
7. Extend the Output tray
extender to hold your printed
pages.
8. When you finish printing,
remove the Photo cassette
and store it in the cassette
storage area.
● Letter or A4
paper
1. Remove any paper that is
loaded in the Main tray.
Main tray – larger paper sizes
● Transparencies
10 HP Photosmart 8000 series
Page 14

(continued)
Paper type How to load Tray to load
● 20 x 25 cm
(8 x 10 inch)
photo paper
● Envelopes
28.0 cm
(11 inches)
wide and
greater
● 13 x 18 cm
(5 x 7 inch)
photo paper
● 2L-size paper
● 10 x 20 cm
(4 x 8 inch)
photo cards
● B5 paper
● Envelopes
smaller than
28.0 cm
(11 inches)
wide
2. Squeeze the paper-width
guide and slide it to the left
until it stops.
3. Load plain paper, photo
paper, envelopes or
transparencies in the Main
tray with the side to be
printed facing down.
Load envelopes with the flap
on the left. Tuck the flaps
inside the envelopes to
avoid paper jams.
4. Squeeze the paper-width
guide and slide it to the right
so it touches the edges of
the paper without bending it.
5. Extend the Output tray
extender to hold your printed
pages.
1. Raise the Output tray.
2. Remove any paper that is
loaded in the Main tray.
3. Squeeze the paper-width
guide and slide it to the left
until it stops.
4. Load photo paper with the
side to be printed facing
down.
If you are using tabbed
paper, insert the tabbed end
first.
Load envelopes with the flap
on the left. Tuck the flaps
inside the envelopes to
avoid paper jams.
5. Squeeze the paper-width
guide and slide it to the right
so it touches the edges of
the paper without bending it.
Main tray – envelopes
Main tray – smaller paper sizes
Tip Raise the Output tray before
loading small paper sizes not
supported by the Photo cassette.
Lower the Output tray after loading
the paper.
Using print cartridges
Your HP Photosmart 8000 series printer can print color and black-and-white photos.
HP provides different types of print cartridges so you can choose the best cartridges
for your project.
HP Photosmart 8000 series User's Guide 11
Page 15

Chapter 2
Purchasing replacement print cartridges
When purchasing replacement cartridges, refer to the cartridge numbers that appear
on the back cover of this guide. These cartridge numbers may vary by country/region.
You can also find the cartridge numbers in the printer software.
To find the correct print cartridge numbers for Windows users
1.
Right-click the HP Digital Imaging Monitor icon on the far right of the Windows
taskbar and select Launch/Show HP Solution Center.
2. Select Settings, and then select Print Settings > Printer Toolbox.
3. Select the Estimated Ink Levels tab, and then click Print Cartridge Information.
To find the correct print cartridge numbers for Macintosh users
1. Click HP Image Zone in the Dock.
2. Choose Maintain Printer from the Settings pop-up menu.
3. Click Launch Utility, and then choose Supplies Status from the pop-up menu.
Print cartridge tips
HP Vivera Inks deliver true-to-life photo quality and exceptional fade resistance
resulting in vivid colors that last for generations! HP Vivera Inks are speciallyformulated and scientifically tested for quality, purity, and fade resistance.
For best print quality, HP recommends that you install all retail print cartridges before
the install-by date stamped on the box.
For optimal printing results, HP recommends using only genuine HP print cartridges.
Genuine HP print cartridges are designed and tested with HP printers to help you
easily produce great results, time after time.
®
Note HP cannot guarantee the quality or reliability of non-HP ink. Printer
service or repairs required as a result of printer failure or damage attributable
to the use of non-HP ink will not be covered under warranty.
Caution To prevent ink loss or spillage: leave the print cartridges installed
while transporting the printer, and avoid leaving used print cartridge(s) out of
the printer for extended lengths of time.
Inserting and replacing the print cartridges
To prepare the printer and cartridges
1. Make sure the power is on and you have removed the cardboard from inside the
printer.
2. Raise the main cover of the printer.
3. Remove the bright pink tape from the cartridges.
12 HP Photosmart 8000 series
Page 16

Note Do not touch the ink nozzles or the copper-colored contacts, and do not
re-tape the cartridges.
To insert the cartridges
1. If you are replacing an HP Black, HP Photo, or HP Gray Photo cartridge, push
down and pull outward on the cartridge in the right stall to remove it.
2. Hold the new cartridge with the label on top. Slide the cartridge at a slight upward
angle into the right stall so the copper-colored contacts go in first. Gently push
the cartridge until it snaps into place.
Caution To avoid print carriage jams, make sure the print cartridge
snaps securely into place as you insert it.
3. Repeat the previous steps to install the HP Tri-color cartridge in the left stall.
4. Lower the main cover.
When you are not using a print cartridge
Whenever you remove a print cartridge from the printer, store it in the print cartridge
protector. The cartridge protector keeps the ink from drying out when the cartridge is
not being used. Failure to properly store your cartridge can cause the cartridge to
malfunction.
➔
To insert a cartridge into the cartridge protector, slide the cartridge into the
protector at a slight angle and snap it securely into place.
HP Photosmart 8000 series User's Guide 13
Page 17

Chapter 2
Once you have inserted a cartridge into the cartridge protector, place it in the storage
area located in the printer.
14 HP Photosmart 8000 series
Page 18

3
Printing without a computer
The HP Photosmart 8000 series printer lets you select, enhance, and print photos
without even turning on the computer. Once you've set up the printer using the
instructions in the Quick Start booklet, you can insert a memory card in the printer and
print your photos using the buttons on the printer control panel.
Once you have set up the printer, you can print from any of the following:
● Memory card
● PictBridge-compatible digital camera
● Bluetooth device
● HP iPod (with photos stored in it)
Getting connected
This printer offers several ways of connecting to computers or other devices. Each
connection type lets you do different things.
Connection type and what you need
Memory cards
A compatible digital camera memory card
Insert the memory card into the
appropriate memory card slot on the
front of the printer.
PictBridge
A PictBridge-compatible digital camera
and a USB cable.
Connect the camera to the camera port
on the front of the printer.
Bluetooth
An optional HP Bluetooth wireless
printer adapter.
Connect the HP Bluetooth wireless
printer adapter to the camera port on the
front of the printer.
HP iPod
An HP iPod and the USB cable that
came with it.
Connect the HP iPod to the camera port
on the front of the printer.
This lets you...
Print directly from a memory card to the
printer. See Printing photos from a
memory card.
Print quick proofs of photos on a
memory card directly from the printer
control panel.
Print directly from a PictBridgecompatible digital camera to the printer.
For more information, see Printing
photos from a digital camera and the
camera documentation.
Print from any device with Bluetooth
wireless technology to the printer.
Print directly from an HP iPod (with
photos stored in it) to the printer. For
more information, see Printing photos
from an HP iPod.
HP Photosmart 8000 series User's Guide 15
Page 19

Chapter 3
Printing photos from a memory card
You can print photos from a memory card by inserting the card into the printer and
using the printer control panel to select, enhance, and print photos. You can also print
camera-selected photos—photos you marked for printing using a digital camera—
directly from a memory card.
Printing from a memory card is quick and easy, and does not drain the digital camera
batteries. For more information on inserting memory cards, see Inserting a memory card.
This section tells you how to do the following:
● Insert a memory card
● Decide which photos to print
● Select a photo layout
● Select photos
● Improve photo quality
● Print the selected photos
Inserting a memory card
After you have taken pictures with a digital camera, you can remove the memory card
from the camera and insert it into the printer to view and print your photos. The printer
can read the following types of memory cards: CompactFlash, Memory Stick,
Microdrive, MultiMediaCard, Secure Digital, and xD-Picture Card.
Memory card slots
1 CompactFlash I and II, Microdrive
2 Secure Digital, MultiMediaCard (MMC)
3 xD-Picture Card
4 Memory Stick
Caution Using any other type of memory card may damage the memory card
and the printer.
Memory card types
Find your memory card in the following table and use the instructions to insert the
card into the printer.
16 HP Photosmart 8000 series
Page 20

Guidelines:
● Insert only one memory card at a time.
● Gently push the memory card into the printer until it stops. The memory card
does not insert all the way into the printer; do not try to force it.
● When the memory card is inserted correctly, the Memory Card light flashes and
then remains solid green.
Caution 1 Inserting the memory card any other way may damage the card
and the printer.
Caution 2 Do not pull out a memory card while the Memory Card light is
flashing green. For more information, see Removing a memory card.
Memory card
How to insert the memory card
CompactFlash ● Front label faces up, and if the label has an arrow, the arrow
points toward the printer
● Edge with metal pinholes goes into the printer first
Memory Stick ● Angled corner is on the left
● Metal contacts face down
● If you are using a Memory Stick Duo or Memory Stick PRO Duo
card, attach the adapter that came with the card before you
insert the card into the printer
Microdrive ● Front label faces up, and if the label has an arrow, the arrow
points toward the printer
● Edge with metal pinholes goes into the printer first
MultiMediaCard ● Angled corner is on the right
● Metal contacts face down
Secure Digital ● Angled corner is on the right
● Metal contacts face down
xD-Picture Card ● Curved side of card points toward you
● Metal contacts face down
HP Photosmart 8000 series User's Guide 17
Page 21

Chapter 3
Supported file formats
The printer can recognize and print JPEG and uncompressed TIFF files directly from
the memory card. You can also print video clips from MPEG-1, Motion-JPEG
QuickTime, and Motion-JPEG AVI files. If your digital camera saves photos and video
clips in other file formats, save the files to your computer and print them using a
software application. For more information, see the onscreen HP Photosmart Printer
Help.
Deciding which photos to print
You can decide which photos to print by viewing the photos on the printer screen, by
printing a photo index, or by printing a proof sheet.
To decide which photos to print, try one of these options
View photos on the printer
screen
You can view photos one at a
time or nine at a time on the
printer screen.
Tip To move quickly
through the photos, press
and hold Select Photos
or
. When you reach the last
photo in either direction, the
display continues with the
first or last photo.
Print a photo index
A photo index shows
thumbnail views and index
numbers for up to 2000 photos
on a memory card. Use plain
paper instead of photo paper
to cut costs.
A photo index may be several
pages long.
To view photos
1. Insert a memory card.
2.
Press Select Photos
or . Press and hold
the button to view the photos rapidly. When
you reach the last photo in either direction,
the display returns to the first or last photo
and continues.
To view nine photos at a time
1. Insert a memory card.
2. Press Menu.
3. Select Tools, then press OK.
4. Select View 9-up, then press OK.
5. Use the Select Photos arrows to move
through the photos.
To exit 9-up view mode and return to viewing one
photo at a time, press Zoom.
To print a photo index
1. Insert a memory card.
2. Load several sheets of plain paper in the Main
tray.
3. Press Menu.
4. Select Print options, then press OK.
5. Select Print index page, then press OK.
Print a proof sheet
A proof sheet shows
thumbnail views of all photos
stored on a memory card. A
proof sheet is different than a
photo index because it
18 HP Photosmart 8000 series
To print a proof sheet
1. Insert a memory card.
2. Load several sheets of plain paper in the Main
tray.
3. Press Menu.
4. Select Print options, then press OK.
Page 22

(continued)
To decide which photos to print, try one of these options
provides spaces for you to
select photos to print, specify
the number of copies to print,
and select the photo layout.
Selecting a photo layout
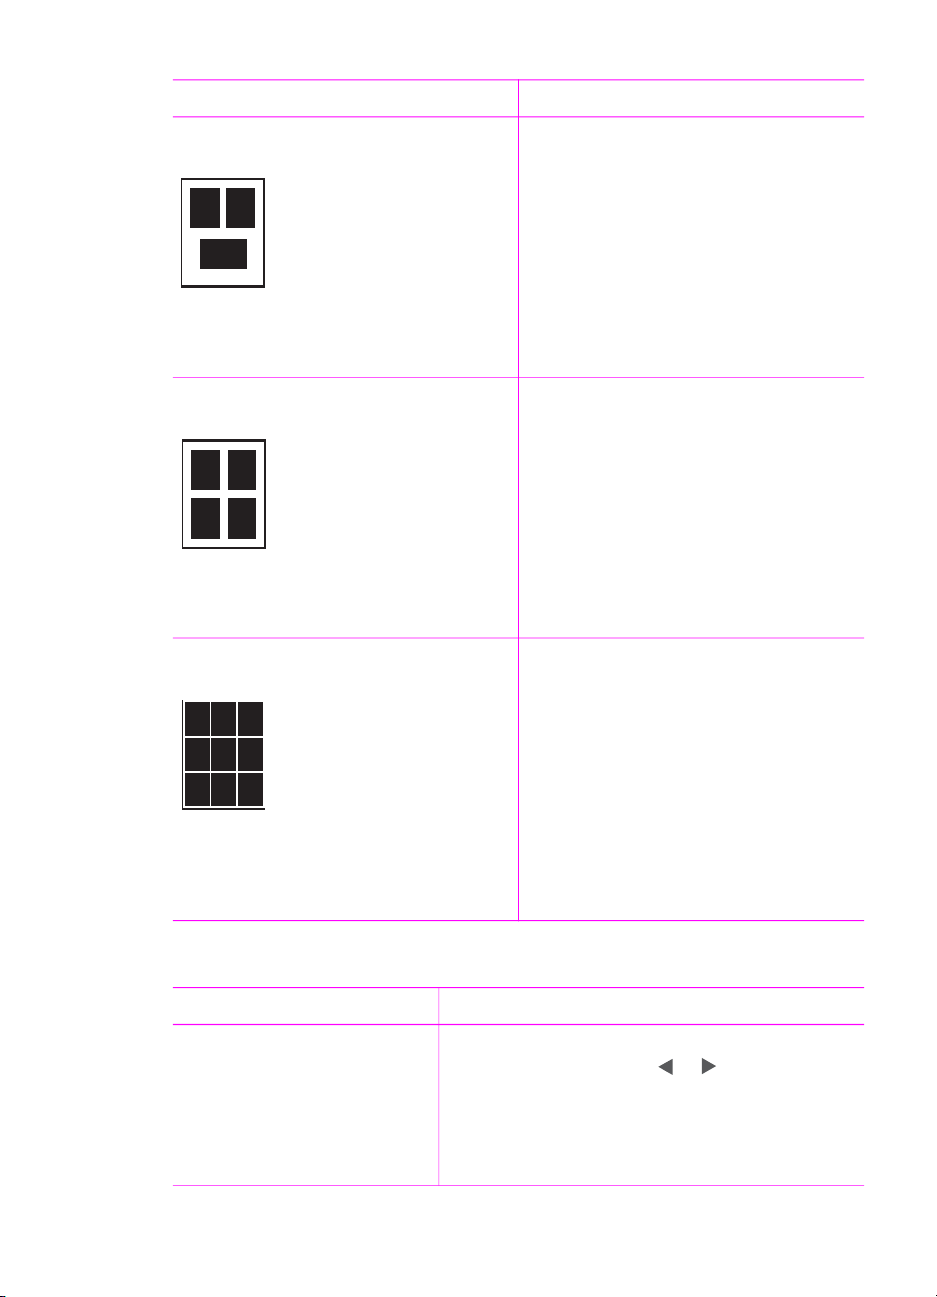
Press Layout on the printer to select a layout for the photos you want to print. All
photos selected from the printer control panel will print in this layout. The actual size
of the prints will vary according to the size of paper you load in the printer, as shown
in the following table. The printer may rotate the photos to fit the layout.
Layout
1 per page borderless 4 x 6 inch (4 x 6 inch)
1 per page 3.5 x 5 inch (3.25 x 4.75 inch)
5. Select Print proof sheet, then press OK.
Note A proof sheet may be several pages long.
Paper size (photo size)
10 x 15 cm (10 x 15 cm)
A6 (10.5 x 14.8 cm)
5 x 7 inch (5 x 7 inch)
A5 (14.8 x 21.0 cm)
A4 (21.0 x 29.7 cm)
8.5 x 11 inch (8.5 x 11 inch)
4 x 6 inch (3.75 x 5.75 inch)
10 x 15 cm (9.53 x 14.6 cm)
5 x 7 inch (4.75 x 6.75 inch)
8 x 10 inch (7.75 x 9.75 inch)
8.5 x 11 inch (8 x 10 inch)
A6 (9.86 x 14.16 cm)
A4 (20 x 25 cm)
Hagaki (9.36 x 14.16 cm)
L (8.25 x 12.06 cm)
2 per page 3.5 x 5 inch (2.25 x 3.25 inch)
4 x 6 inch (2.75 x 3.75 inch)
5 x 7 inch (3.25 x 4.75 inch)
8 x 10 inch (4.75 x 6.5 inch)
8.5 x 11 inch (5 x 7 inch)
A6 (6.92 x 9.86 cm)
A4 (13 x 18 cm)
Hagaki (6.8 x 9.36 cm)
L (5.87 x 8.25 cm)
HP Photosmart 8000 series User's Guide 19
Page 23
Chapter 3
(continued)
Layout Paper size (photo size)
3 per page 3.5 x 5 inch (1.5 x 2.25 inch)
4 x 6 inch (1.75 x 2.625 inch)
5 x 7 inch (2.25 x 3.375 inch)
8 x 10 inch (3.33 x 5 inch)
8.5 x 11 inch (4 x 6 inch)
A6 (4.77 x 7.15 cm)
A4 (10 x 15 cm)
Hagaki (4.52 x 6.78 cm)
L (3.96 x 5.94 cm)
4 per page 3.5 x 5 inch (1.5 x 2.25 inch)
4 x 6 inch (1.75 x 2.5 inch)
5 x 7 inch (2.2 x 3.25 inch)
8 x 10 inch (3.5 x 4.75 inch)
8.5 x 11 inch (3.5 x 5 inch)
A6 (4.77 x 6.92 cm)
A4 (9 x 13 cm)
Hagaki (4.52 x 6.5 cm)
L (3.96 x 5.7 cm)
9 per page 3.5 x 5 inch (1 x 1.375 inch)
Selecting photos to print
If you want to… Follow these steps
Select a photo
Note You can also select
photos from an HP iPod. For
more information, see
Printing photos from an
HP iPod.
4 x 6 inch (1.125 x 1.5 inch)
5 x 7 inch (1.5 x 2 inch)
8 x 10 inch (2.25 x 3 inch)
8.5 x 11 inch (2.5 x 3.25 inch) – Wallet
size
A6 (3.07 x 4.05 cm)
A4 (6.4 x 8.4 cm)
Hagaki (2.9 x 3.86 cm)
L (2.53 x 3.36 cm)
1. Insert a memory card.
2.
Press Select Photos
or to display the
photo you want to select.
3. Press OK to select the displayed photo.
A check mark appears in the bottom corner of
the photo.
20 HP Photosmart 8000 series
Page 24

(continued)
If you want to… Follow these steps
Select more than one copy
of a photo
Deselect one or all photos
When you deselect a photo,
the printer discards any
changes you made to the print
settings for that photo.
Note Deselecting photos
does not delete them from
the memory card.
Select photos on a proof
sheet
After you print a proof sheet,
you can use it to select
specific photos to print.
For information about printing
a proof sheet, see Deciding
which photos to print.
1. Insert a memory card.
2.
Press Select Photos
or to display the
photo you want to select.
3. Press OK once for each copy of the displayed
photo you want to print.
The number of times that the photo has been
selected appears at the bottom of the photo.
For example, if you select a photo twice, x2
appears.
1.
Press Select Photos
or to display the
photo you want to deselect.
2. Press Cancel to deselect the displayed photo
for printing. If a photo was selected multiple
times, the printer removes one selection of
the photo each time you press Cancel.
To deselect all photos, press Cancel until a
message appears on the printer screen asking if
you want to deselect all photos. Select Yes, then
press OK.
1. Select the photos you want to print by filling in
the circle below each photo with a dark pen.
2. Select the number of copies you want of each
photo by filling in the copies section. Make
sure to only fill in one choice.
3. Select a photo layout in the print layout
section. Make sure to only fill in one choice.
Once you fill out the proof sheet, scan it to print
the selected photos.
Printing your photos
If you want to… Follow these steps:
Print one photo
Before you begin, make sure
that the memory card is
inserted in the printer and the
Main tray or Photo cassette is
loaded with the correct paper.
Print multiple photos
Before you begin, make sure
that the memory card is
inserted in the printer and the
HP Photosmart 8000 series User's Guide 21
1. Press Layout until the desired layout appears.
2.
Press Select Photos
or to display the
photo you want to print.
3. Press OK to select the photo.
4. Press Print to print the photo.
1. Press Layout until the desired layout appears.
2.
Press Select Photos
or to display the
photos you want to print.
3. When a photo you want to print appears on
the printer screen, press OK to select the
photo.
Page 25

Chapter 3
(continued)
If you want to… Follow these steps:
Main tray or Photo cassette is
loaded with the correct paper.
Print more than one copy of
a photo
Before you begin, make sure
that the memory card is
inserted in the printer and the
Main tray or Photo cassette is
loaded with the correct paper.
Print all photos on the
memory card
Before you begin, make sure
that the memory card is
inserted in the printer and the
Main tray or Photo cassette is
loaded with the correct paper.
Use the Photo cassette for
smaller photo paper sizes.
Print a continuous range of
photos
Before you begin, make sure
that the memory card is
inserted in the printer and the
Main tray or Photo cassette is
loaded with the correct paper.
4. To select additional photos, use the Select
Photos
and press OK when a photo you
want to print appears on the screen.
5. When you have selected all the photos you
want to print and have made any desired
changes to the print settings, press Print.
1. Press Layout until the desired layout appears.
2.
Press Select Photos
or to display the
photo you want to print.
3. Press OK once for each copy of the displayed
photo you want to print.
4. Press Print.
1. Press Layout until the desired layout appears.
2. Press Menu.
3. Select Print options, then press OK.
4. Select Print all, then press OK to begin
printing all photos on the memory card.
The first frame of each video clip on the
memory card will also print.
1. Press Layout until the desired layout appears.
2. Press Menu.
3. Select Print options, then press OK.
4. Select Print range, then press OK.
5.
Press Select Photos
or until the first
photo you want to print appears on the left
side of the printer screen, then press OK.
6.
Press Select Photos
or until the last
photo you want to print appears on the right
side of the printer screen, then press OK.
The selected range of photos begins printing.
The first frame of each video clip in the
selected range will also print.
Print the photos you
selected on a proof sheet
After you've filled out the proof
sheet as described in
Selecting photos to print, you
can scan it to print the
selected photos. Make sure
the same memory card used
when you printed the proof
22 HP Photosmart 8000 series
1. Make sure that the memory card is inserted in
the printer, and then press Menu.
2. Select Print options, and then press OK.
3. Select Scan proof sheet, and then press OK.
4. Load the proof sheet in the Main tray with the
printed side facing down and the top of the
page facing toward the printer.
If the printed proof sheet spans several
pages, insert the pages in reverse order to
allow the printer to scan them all properly.
Page 26

(continued)
If you want to… Follow these steps:
sheet is inserted when you
scan that proof sheet.
Photos printed from a proof
sheet use the default print
settings. Any print settings you
have applied to photos, such
as cropping, color effects, and
decorative frames, are ignored.
Print photos from video clips
You can view video clips on
the printer screen, and select
and print individual frames.
When you first insert a
memory card containing a
video clip, the printer uses the
first frame of the video clip to
represent the clip on the
printer screen.
The printer recognizes video
clips recorded in these formats:
● Motion-JPEG AVI
● Motion-JPEG QuickTime
● MPEG-1
The printer ignores video clips
in any other format.
5. Press OK to begin scanning.
6. When a message appears on the printer
screen prompting you to load paper, then load
the photo paper.
7. Press OK to start printing the photos you
selected on the proof sheet.
Before you begin, make sure that the memory
card is inserted in the printer and the Main tray is
loaded with the correct paper.
1. Press Layout until the desired layout appears
in the bottom of the printer screen.
2.
Press Select Photos
or to display the
video clip you want to print.
3. Press OK to play the video clip.
You can fast-forward the video while it is
playing by pressing and holding Select
Photos
.
4. To pause the video while it is playing, press OK.
You can play the video in slow motion by
pressing and holding Select Photos
while
the video is paused.
5. To select the displayed video frame, press OK.
6. Press Print to begin printing.
Print a video action print
A video action print is a series
of nine automatically selected
frames from a video clip.
1. Insert a memory card containing one or more
video clips.
2. Load photo paper, and then press Menu.
3. Select Print options, and then press OK.
4. Select Video action prints, and then press OK.
5.
Press Select Photos
or to highlight the
video clip you want to print as a video action
print.
6. Press OK, then press Print.
Print camera-selected
photos from a memory card
When you select photos for
printing using a digital camera,
the camera creates a Digital
Print Order Format (DPOF) file
that identifies the selected
photos. The printer can read
DPOF 1.0 and 1.1 files directly
1. Use the digital camera to select the photos
you want to print. For more information, see
the documentation that came with the camera.
2. If you selected default as the photo layout
with the camera, press Layout to select a
photo layout.
If you select a photo layout other than default
with the camera, photos print in the cameraselected layout regardless of the printer setting.
from a memory card.
HP Photosmart 8000 series User's Guide 23
Page 27

Chapter 3
(continued)
If you want to… Follow these steps:
After printing, the printer
deletes the DPOF file and
unmarks the photos.
Stop printing To stop a print job in progress, press Cancel.
Removing a memory card
Wait until the Memory Card light stops flashing and remains solid green, then gently
pull the memory card to remove it from the printer.
Caution If the Memory Card light is flashing green, then the printer is
accessing the memory card. Do not remove a memory card while it is being
accessed because this may damage the printer or the memory card.
Improving photo quality
The printer provides a variety of enhancements that can improve the quality of a photo
printed from a memory card. These print settings do not change the original photo.
They only affect printing.
Problem
Red-eye in flash photos
By default, the automatic redeye removal feature is turned
on in the Preferences menu.
This feature removes red-eye
from all photos just before
printing. If you still have redeye problems, remove red-eye
from individual photos using
the Remove red-eye feature in
the Edit menu.
3. Remove the memory card from the digital
camera and insert it into the printer.
4. When Print DPOF photos? appears on the
printer screen, select Yes, and then press OK.
The photos you selected with a camera will
print.
How to correct it
Automatic red-eye removal (all photos)
1. Press Menu.
2. Select Preferences, then press OK.
3. Select Auto remove red-eye, then press OK.
4. Select On, then press OK.
Manual red-eye removal (one photo at a time)
1.
Press Select Photos
or to display the
photo you want to fix.
2. Press Menu.
3. Select Edit, then press OK.
4. Select Remove red-eye, then press OK.
Photos with poor brightness To adjust the brightness of a photo
1.
Press Select Photos or to display the
photo you want to fix.
2. Press Menu.
3. Select Edit, then press OK.
4. Select Photo brightness, then press OK.
5. Use the Select Photos arrows to increase or
decrease photo brightness to the desired
level, then press OK.
24 HP Photosmart 8000 series
Page 28

(continued)
Problem How to correct it
Blurred photos
This preference affects all
printed photos.
Photos with poor lighting
and contrast
This preference affects all
printed photos.
Poor-quality video clips
This preference photos printed
from video clips.
Note This feature does not
improve photos printed using
the Video action prints. This
feature also does not work
with photos printed in the 9per-page layout.
Getting creative
The printer provides a variety of tools and effects that let you use your photos in
creative ways. These print settings do not change the original photo. They only affect
printing.
To automatically focus images for clearer,
sharper detail
1. Press Menu.
2. Select Preferences, then press OK.
3. Select SmartFocus, then press OK.
4. Select On, then press OK.
To apply adaptive lighting to a photo
1. Press Menu.
2. Select Preferences, then press OK.
3. Select Adaptive Lighting, then press OK.
4. Select On, then press OK.
For information about printing photos from video
clips, see Printing photos from a memory card.
To improve the quality of photos printed from
video clips
1. Press Menu.
2. Select Preferences, then press OK.
3. Select Video enhancement, then press OK.
4. Select On, then press OK.
To try these features…
Add a color effect
You can set the printer to print
a selected photo in Black &
white, or with a Red filter,
Blue filter, or Green filter.
For brown tones that look
similar to photos produced in
the early 1900s, use Sepia or
Antique. Use Antique for a
hand-colored appearance.
Follow these steps
1.
Press Select Photos
or to display the
photo to which you want to add a color effect.
2. Press Menu.
3. Select Edit, then press OK.
4. Select Add color effect, then press OK.
5. Select a color effect, then press OK.
The photo appears on the printer screen with
the selected color effect applied. The effect
does not change the original photo. It only
affects printing.
Use Solarize to give a
darkroom look. Use Metallic
to give light colors a metallic
look.
HP Photosmart 8000 series User's Guide 25
Page 29

Chapter 3
(continued)
To try these features… Follow these steps
Create borderless prints
You can set the printer to print
borderless photos.
Add a decorative frame
Choose from a palette of
different patterns and colors to
make the frame stand out.
Add the date and time to
your prints
You can print a stamp on the
front of your photos that
shows when the photo was
taken. This preference affects
all prints.
Changes that you make to the
photo using the printer control
panel do not affect the date
and time information.
1. Press Layout.
2. Select One photo per sheet, borderless,
then press OK.
Make sure to use photo paper. If you use plain
paper, the printer will override the borderless
setting and print with narrow white borders on all
sides to prevent paper jams.
1.
Press Select Photos
or to display the
photo to which you want to add a frame.
2. Press Menu.
3. Select Edit, then press OK.
4. Select Add frame, then select OK.
5. Use the Select Photos arrows to highlight the
frame pattern you want to use, then press OK.
6. Use the Select Photos arrows to highlight the
frame color you want to use, then press OK.
The photo appears on the printer screen with
the frame.
1. Press Menu.
2. Select Preferences, then press OK.
3. Select Date/time, then press OK.
4. Select one of the following date/time stamp
options:
– Date/time
– Date only
5. Press OK.
Change the print quality
You can change the print
quality for photos. Best quality
is the default and produces
the highest quality photos.
Normal quality conserves ink
and prints faster.
View a slide show
You can view all the photos
stored on a memory card in
sequence like a slide show.
To change the print quality to Normal for one
print job
1. Press Menu.
2. Select Tools, then press OK.
3. Select Print quality, then press OK.
4. Select Normal, then press OK.
Print quality will revert to Best after this print job.
To view a slide show on the printer screen
1. Press Menu.
2. Select Tools, then press OK.
3. Select Slide Show, then press OK.
Press OK to pause or resume a slide show.
Press Cancel to stop the slide show.
Crop a photo 1.
Press Select Photos
or to display the
photo you want to crop.
26 HP Photosmart 8000 series
Page 30

(continued)
To try these features… Follow these steps
Press Zoom to enter Zoom
mode, where you can increase
or decrease the magnification
by 0.25x. The maximum level
is 5.0x.
Note The crop box changes
from green to yellow if
printing at the selected
magnification will noticeably
reduce the print quality.
Print panoramic photos
Note All photos printed in
panoramic mode are printed
borderless.
Print stickers
Load Avery C6611 or C6612
photo sticker paper before
printing. This 10 x 15 cm
(4 x 6 inch) paper has 16
rectangular or oval stickers
per page.
2. Press Zoom to enter Zoom mode and
increase the magnification of the photo by
0.25x.
3.
Press Select Photos
magnification level by 0.25x.
Press Select Photos
magnification level by 0.25x. The minimum
magnification level is 1.0x.
4. At any magnification level, use the Select
Photos arrows to move the crop box left,
right, up, or down.
5. Press OK when the portion of the image you
want to print is in the crop box.
1. Press Menu.
2. Select Print options, then press OK.
3. Select Print panoramic photos.
4. Select On, then press OK. The top of the
printer screen displays Panoramic mode until
you turn it off in the menu.
5. Load 10 x 30 cm (4 x 12 inch) media. If
desired, use the instructions described above
for cropping a photo before printing. The crop
box has a 3:1 aspect ratio.
1. Press Menu.
2. Select Print options, then press OK.
3. Select Print stickers, then press OK.
4. Select On, then press OK. The top of the
printer screen displays Sticker mode until
you turn it off in the menu.
to increase the
to decrease the
Printing photos from a digital camera
You can print photos by connecting an HP direct-printing digital camera or a
PictBridge-compatible digital camera directly to the printer with a USB cable. If you
have a Bluetooth-compatible digital camera, you can insert the optional HP Bluetooth
wireless printer adapter in the printer and send photos to the printer wirelessly.
When you print from a digital camera, the printer uses the settings that you selected
on the camera. For more information, see the documentation that came with the
camera.
To print photos from a…
Digital camera with
Bluetooth wireless
technology
HP Photosmart 8000 series User's Guide 27
Follow these steps
1. Set the Bluetooth options for the printer using
the Bluetooth menu on the printer screen. For
more information, see Printer menu.
Page 31

Chapter 3
(continued)
To print photos from a… Follow these steps
If you have a Bluetooth digital
camera, you can purchase the
optional HP Bluetooth wireless
printer adapter and print from
the camera using a Bluetooth
wireless connection.
Note For information on
how to print from other
Bluetooth wireless devices,
see Printing without a
computer.
Digital camera with
PictBridge technology
Note Some PictBridge
cameras might list the 5 x 7
inch paper size as 2L,
127 x 178 mm, or 13 x 18 cm.
HP direct-printing digital
camera
2. Load photo paper in the printer. For
information, see Loading paper.
3. Insert the HP Bluetooth wireless printer
adapter into the camera port on the front of
the printer.
The light on the adapter will flash when the
adapter is ready to receive data.
4. Follow the instructions in the documentation
that came with the digital camera to send
photos to the printer.
1. Turn on the PictBridge-compatible digital
camera and select the photos you want to print.
2. Load photo paper in the printer.
3. Make sure the camera is in PictBridge mode,
then connect it to the camera port on the
front of the printer using the USB cable that
came with the camera.
Once the printer recognizes the PictBridgecompatible camera, the selected photos print
automatically.
1. Turn on the HP direct-printing digital camera
and select the photos you want to print.
2. Connect the camera to the USB port on the
back of the printer using the USB cable that
came with the camera.
3. Load photo paper in the printer. Use the
Photo cassette for smaller photo paper sizes.
4. Follow the instructions on the camera screen.
Printing photos from other Bluetooth devices
You can also print from other devices with Bluetooth wireless technology, such as
PDAs, notebook computers, and mobile phones. For more information, see Getting
connected, the onscreen HP Photosmart Printer Help, and the documentation that
came with the Bluetooth device.
Note To use Bluetooth connectivity, all devices must have the necessary
hardware and software installed. In addition, an HP Bluetooth wireless printer
adapter must be connected to the camera port on the front of the printer.
The basic procedure for printing from any Bluetooth device is the same:
1. Have the device search for available Bluetooth printers.
2. Select the printer when it appears on the device.
3. Print.
Check the documentation that came with the device for detailed instructions.
28 HP Photosmart 8000 series
Page 32

Printing photos from an HP iPod
Before using the steps below to import photos to and print photos from your HP iPod,
make sure your images and your HP iPod meet the following requirements:
● The images you copy to the HP iPod must be in JPEG format.
● Make sure the HP iPod is formatted in Windows (FAT 32 file structure).
The HP iPod defaults to the Windows file structure. To check if your HP iPod was
formatted for Windows, go to Settings > About on your HP iPod. If it was
formatted in Windows, it will display Format Windows at the bottom of the
screen. If it was not formatted in Windows, you must connect the HP iPod to a
Windows PC using the USB cable that came with the HP iPod and follow the
onscreen instructions.
Note 1 HP iPods that have only been connected to a Macintosh are not
compatible with the printer; however, you can connect the HP iPod to a
Windows PC to make it compatible. After connecting to a Windows PC,
Macintosh users can still fully synchronize their HP iPods back to
Macintosh and Mac iTunes and maintain printer support.
Note 2 HP iPods might not be available in your country/region.
To import photos to an HP iPod
1. Copy photos from a memory card to your HP iPod using the Belkin Media Reader
for iPod.
2. Verify that photos are on your HP iPod by selecting Photo Import on the HP iPod
menu. Photos appear as Rolls.
To print photos from an HP iPod
1. Connect the HP iPod to the camera port on the front of the printer using the USB
cable that came with the HP iPod. The printer screen displays Reading Device
for several minutes while the photos are read. Then the photos appear on the
printer screen.
2. Select the photo(s) you want to print and press Print. For more information on
selecting and printing photos, see Selecting photos to print.
If you are unable to print to the HP Photosmart printer using your HP iPod, please
contact HP Customer Care. See HP Customer Care.
HP Photosmart 8000 series User's Guide 29
Page 33

Chapter 3
30 HP Photosmart 8000 series
Page 34

4
Printing from a computer
All HP photo printers come with the HP Image Zone software, which helps you do
more with your photos than ever before. Use it to get creative with your pictures: edit
them, share them, and create fun projects such as greeting cards.
The HP Photosmart printer software interface appears whenever you print. It controls
the resolution and color, and it usually chooses those settings automatically. If you are
printing a digital photo, adjust the printer software settings to produce the best-quality
print.
Be sure to download the latest printer software update every couple of months to
ensure you have the latest features and improvements. For more information, see
Updating the software.
Using creative options in the printer software
Read through these tips on how to open and use HP Image Zone, HP Image Zone
Express, and HP Instant Share.
HP Image Zone
HP Image Zone is an easy-to-use software program that gives you everything you
need to have fun with your photos, in addition to basic photo editing and printing. This
software also gives you access to HP Instant Share so that you can easily share your
photos.
Open HP Image Zone (Windows users)
➔
Double-click the HP Image Zone icon on your desktop. If you need help, see the
onscreen Help within HP Image Zone.
Open HP Image Zone (Macintosh users)
➔
Click the HP Image Zone icon in the Dock. If you need help, select HP Image
Zone Help from the Help menu.
Explore the many features of HP Image Zone:
● View — View photos in multiple sizes and ways. Easily organize and manage
your photos.
● Edit — Crop your photos and fix photos with red eye. Automatically adjust and
enhance your photos in different sizes and in multiple layouts.
● Print — Print your photos in different sizes and in multiple layouts.
● Share — Send photos to family and friends without the bulky attachments using
HP Instant Share, a better way to send e-mail.
● Create — Easily create album pages, cards, calendars, panoramic photos, CD
labels, and more.
● Back-up — Make back-up copies of your photos to store and save.
HP Image Zone Express
HP Image Zone Express is an easy-to-use software program that gives you basic
photo editing and printing capabilities. This software also gives you access to
HP Photosmart 8000 series User's Guide 31
Page 35

Chapter 4
HP Instant Share so that you can easily share your photos. HP Image Zone Express
is only available for Windows users.
Open HP Image Zone Express (Windows users)
➔
Double-click the HP Image Zone Express icon on your desktop. If you need
help, see the onscreen Help within HP Image Zone Express.
Explore the many features of HP Image Zone Express:
● View — View photos in multiple sizes and ways. Easily organize and manage
your photos.
● Edit — Crop your photos and fix photos with red eye. Automatically adjust and
enhance your photos to make them perfect.
● Print — Print your photos in different sizes and in multiple layouts.
● Share — Send photos to family and friends without the bulky attachments with
HP Instant Share, a better way to send e-mail.
HP Instant Share
HP Instant Share allows you to send photos to family and friends without bulky e-mail
attachments. The printer must be connected through a USB cable to a computer with
Internet access and have all the HP software installed. For more information, see the
HP Image Zone or HP Image Zone Express onscreen Help.
Open HP Instant Share (Windows users)
➔
Click the HP Instant Share tab within HP Image Zone or HP Image Zone Express.
Open HP Instant Share (Macintosh users)
➔
Click the Applications tab in HP Image Zone, then double-click HP Instant Share.
32 HP Photosmart 8000 series
Page 36

5
Care and maintenance
The HP Photosmart 8000 series printer requires very little maintenance. Follow the
guidelines in this chapter to extend the life span of the printer and printing supplies,
and to ensure that the photos you print are always of the highest quality.
Cleaning and maintaining the printer
Keep the printer and print cartridges clean and well maintained using the simple
procedures in this section.
Cleaning the outside of the printer
To clean the exterior of the printer
1. Turn off the printer, then disconnect the power cord from the back of the printer.
2. Wipe the outside of the printer with a soft cloth that has been lightly moistened
with water.
Caution Do not use any type of cleaning solution. Household cleaners and
detergents may damage the printer finish. Do not clean the interior of the
printer. Keep all fluids away from the interior. Do not lubricate the metal rod on
which the print cartridge cradle slides. Noise is normal when the cradle moves
back and forth.
Automatically cleaning the print cartridges
If you notice white lines or single-color streaks on the photos you print, the print
cartridges may need to be cleaned. Do not clean the cartridges more often than
necessary, since cleaning uses up ink. Follow the steps in this section to run an
automatic cartridge-cleaning procedure.
To automatically clean the print cartridges
1. Press Menu.
2. Select Tools, then press OK.
3. Select Clean cartridges, then press OK.
4. Following the directions on the printer screen, load paper so the printer can print
a test page after cleaning the cartridges. Use plain paper to conserve photo paper.
5. Press OK to begin cleaning the print cartridges.
6. When the printer finishes cleaning the cartridges and prints a test page, it asks
whether you want to Continue to second level cleaning. Check the test page
and select from the following options:
– If the test page has white streaks or missing colors, the print cartridges need
to be cleaned again. Select Yes, then press OK to continue to a second level
cleaning.
– If the print quality of the test page looks good, select No, then press OK.
You can clean the cartridges up to three times. Each successive cleaning is more
thorough and uses more ink.
HP Photosmart 8000 series User's Guide 33
Page 37

Chapter 5
If you complete all three levels of cleaning using this procedure and you still notice
white streaks or missing colors on the test page, you may need to clean the print
cartridge contacts. For more information, see Manually cleaning the print cartridge
contacts.
Note If a cartridge has been recently dropped, you may also see white
streaks or missing colors in your prints. This problem is temporary and clears
up within 24 hours.
Manually cleaning the print cartridge contacts
If you use the printer in a dusty environment, debris may accumulate on the coppercolored contacts and cause printing problems.
To clean the print cartridge contacts
1. Gather the following items to clean the contacts:
– Distilled water (tap water may contain contaminants that can damage the
print cartridge)
– Cotton swabs or other soft, lint-free material that will not stick to the print
cartridge
2. Open the main cover of the printer.
3. Remove the print cartridge and place it on a piece of paper with the ink nozzle
plate facing up. Be careful not to touch the copper-colored contacts or the ink
nozzle plate with your fingers.
4. Lightly moisten a cotton swab with distilled water and squeeze any excess water
from the swab.
5. Gently wipe the copper-colored contacts with the cotton swab.
6. Repeat steps 4 and 5 until no ink residue or dust appears on a clean swab.
7. Insert the print cartridge in the printer, then close the main cover.
Printing a test page
You can print a test page to check the condition of the print cartridge.
1. Press Menu.
2. Select Tools, then press OK.
3. Select Print test page, then press OK.
4. Following the directions on the printer screen, load paper so the printer can print
a test page. Use plain paper to conserve photo paper.
5. Press OK to begin printing the test page.
The test page contains the following information:
Caution Do not leave the print cartridge outside the printer for more than
30 minutes. Ink nozzles exposed to the air longer than this may dry out
and cause printing problems.
Caution Do not touch the ink nozzle plate. Touching the ink nozzle plate
will result in clogs, ink failure, and bad electrical connections.
34 HP Photosmart 8000 series
Page 38
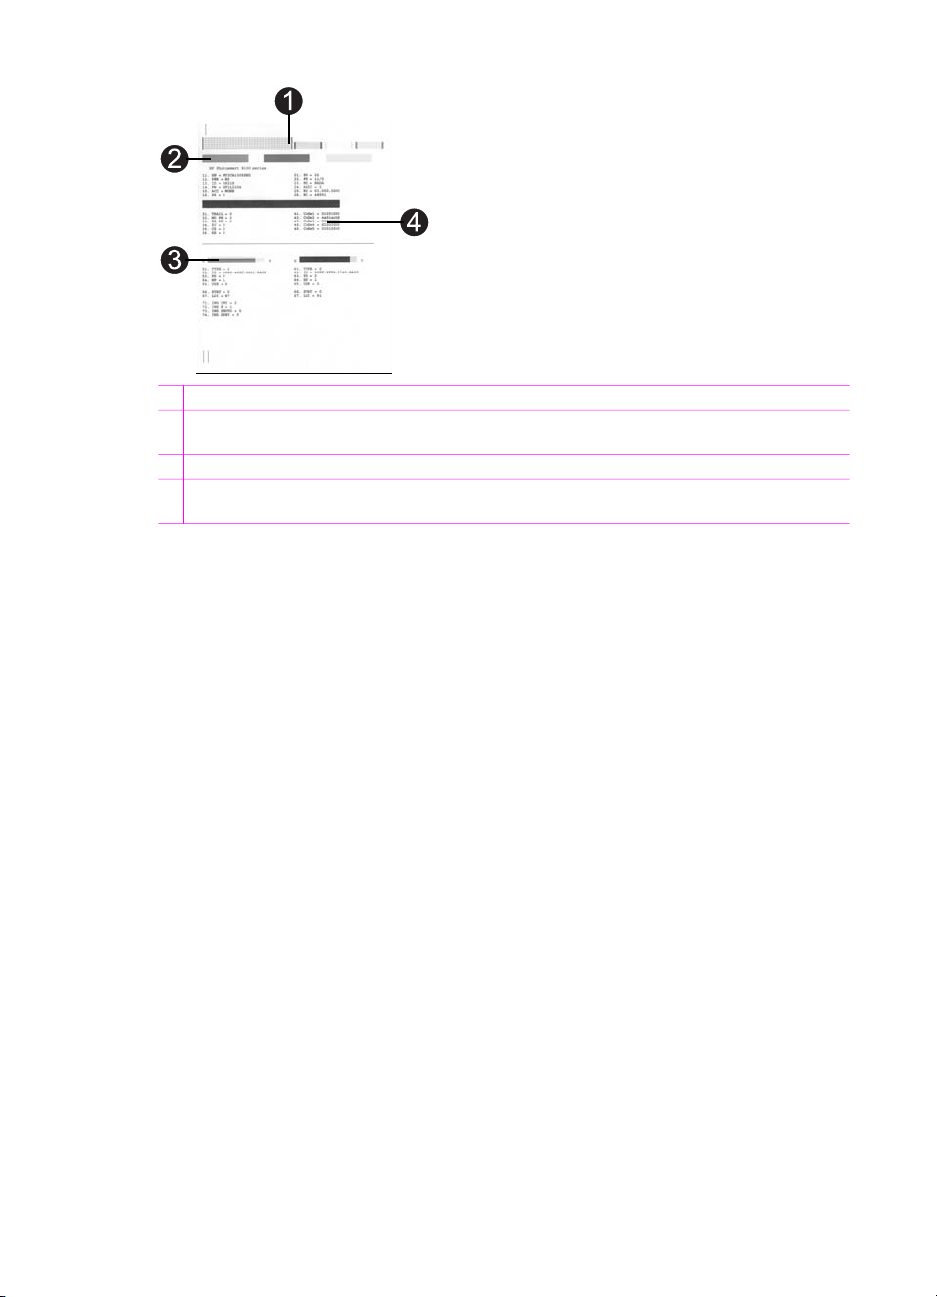
1 Image print quality. If the lined bars look good, photos should print well.
2 Ink nozzle quality. If there are white streaks in the solid bars on this page, try cleaning the
print cartridge.
3 Estimated ink level. This indicator shows how much ink is left in the print cartridge.
4 Diagnostic information. Use the text information on this page when working with
Customer Care to solve printing problems.
Aligning the print cartridges
The first time you install a print cartridge in the printer, the printer aligns it
automatically. However, if colors in the photos you print are misaligned, or if the
alignment page does not print correctly when you install a new print cartridge, use the
following procedure to align the print cartridges.
To align the print cartridges
1. Press Menu.
2. Select Tools, then press OK.
3. Select Align cartridge.
4. Following the directions on the printer screen, load paper so the printer can print
an alignment page. Use plain paper to conserve photo paper.
5. Press OK to begin aligning the print cartridge.
When the printer finishes aligning the cartridge, it prints an alignment page to
confirm that the alignment was successful.
– The check marks verify that the print cartridge is installed correctly and
functioning properly.
– If an “x” appears to the left of any of the bars, align the print cartridge again.
If the “x” still appears, replace the print cartridge.
Printing a sample page
You can print a sample page to test the printer photo printing quality and to make sure
the paper is loaded correctly.
1. Load paper in the Main tray. Use plain paper to conserve photo paper.
2. Press Menu.
3. Select Tools, then press OK.
4. Select Print sample page, then press OK.
HP Photosmart 8000 series User's Guide 35
Page 39

Chapter 5
Updating the software
Download the latest printer software update periodically to ensure you have the latest
features and improvements. To download printer software updates, visit www.hp.com/
support or use HP Software Update. Make sure the computer is connected to the
Internet before performing software updates.
Note These procedures do not update the HP Image Zone software. In some
countries/regions, you can contact HP directly to order HP Image Zone
software updates on CD.
Downloading the software (Windows users)
1.
From the Windows Start menu, select Programs (All Programs in Windows
XP) > HP > HP Software Update.
2. Click Next. HP Software Update searches the HP website for printer software
updates. If the computer does not have the most recent version of the printer
software installed, a software update appears in the HP Software Update window.
If the computer has the most recent version of the printer software installed, No
new updates are available appears in the HP Software Update window.
3. If a software update is available, check the box beside the update to select it.
4. Click Next.
5. Follow the onscreen instructions.
Downloading the software (Macintosh users)
1. Click HP Image Zone in the Dock.
2. Click the Applications tab.
3. Click HP Software Update.
4. Follow the onscreen instructions to check for software updates.
If you are behind a firewall, you need to enter the proxy server information in the
updater.
®
Storing the printer and print cartridges
Protect the printer and print cartridges by storing them properly when you are not
using them.
Storing the printer
For safe and convenient storage of the printer, the Main and Output trays fold up into
the printer. You can store the paper trays by following these steps:
1. Turn off the printer.
2. Remove all paper from the paper trays.
3. If the Output tray extender is extended, push it in.
4. Lift and fold up the Output tray.
5. Lift and fold up the Main tray until it snaps into place.
36 HP Photosmart 8000 series
Page 40

The printer is built to withstand long or short periods of inactivity.
● Store the printer indoors out of direct sunlight in a place without temperature
extremes.
● If the printer and print cartridge have not been used for one month or more, clean
the print cartridges before printing. For more information, see Cleaning and
maintaining the printer.
Storing the print cartridges
When you store the printer, always leave the active print cartridges inside the printer.
The printer stores the print cartridges in a protective cap during the power-down cycle.
Caution Make sure the printer completes its power-down cycle before you
unplug the power cord. This allows the printer to store the print cartridges
properly.
Follow these tips to help maintain HP print cartridges and ensure consistent print
quality:
● When you remove a print cartridge from the printer, store it in a print cartridge
protector to prevent the ink from drying out.
In some countries/regions the cartridge protector is not included with the printer,
but comes with the HP Gray Photo cartridge that can be purchased separately. In
other countries/regions, the protector is included with the printer.
● Keep all unused print cartridges in their original sealed packages until they are
needed. Store print cartridges at room temperature (15–35 degrees C or 59–95
degrees F).
● Do not remove the plastic tape covering the ink nozzles until you are ready to
install the print cartridge in the printer. If the plastic tape has been removed from
the print cartridge, do not attempt to reattach it. Reattaching the tape damages
the print cartridge.
Maintaining the quality of photo paper
For best results with photo paper, follow the guidelines in this section.
Storing photo paper
● Store the photo paper in its original packaging or in a resealable plastic bag.
● Store the packaged photo paper on a flat, cool, and dry surface.
● Return unused photo paper to its original packaging or in a resealable plastic
bag. Paper left in the printer or exposed to the environment may curl or yellow.
Handling photo paper
● Always hold photo paper by the edges to avoid fingerprints.
● If the photo paper has curled edges, place it in its plastic storage bag and gently
bend it in the opposite direction of the curl until the paper lies flat.
HP Photosmart 8000 series User's Guide 37
Page 41

Chapter 5
38 HP Photosmart 8000 series
Page 42

6
Troubleshooting
The HP Photosmart printer is designed to be reliable and easy to use. This chapter
answers frequently asked questions about using the printer and printing without a
computer. It contains information about the following topics:
● Printer hardware problems
● Printing problems
● Error messages
● Bluetooth printing problems
For additional troubleshooting information, see:
● Software installation troubleshooting: The Quick Start booklet that came with
the printer.
● Printer software and printing from a computer troubleshooting: The
onscreen HP Photosmart Printer Help. For information about viewing the
onscreen Printer Help, see Welcome.
Printer hardware problems
Before contacting Customer Care, read this section for troubleshooting tips or go to
the online support services at www.hp.com/support.
Note If you want to connect the printer to a computer with a USB cable,
HP recommends using a cable of less than 3 meters (10 feet) in length to
minimize injected noise due to potential high electromagnetic fields.
The Print light is pulsing green but the printer is not printing.
Solution The printer is busy processing information. Wait for it to finish.
The Status light is flashing red.
Solution
The printer requires attention. Try the following:
● Check the printer screen for instructions. If you have a digital camera
connected to the printer, check the camera screen for instructions.
● If the printer is not connected to a computer, check for the following problems:
– Main cover open
– Out of paper
– Paper jam
– Print carriage jammed or stuck
– Print cartridge missing or inserted incorrectly
– Print cartridge tape not removed
HP Photosmart 8000 series User's Guide 39
Page 43

Chapter 6
– Incorrect print cartridge installed
– Packaging materials are not removed
● If you are unable to solve the problem by using the instructions above, urn off
the printer, then unplug the power cord. Wait about 10 seconds, then plug it
in again. Turn on the printer.
The Status light flashed amber briefly after I turned the printer off.
Solution This is a normal part of the power-down process. It does not indicate a
problem with the printer.
The Status light is flashing amber.
Solution
A printer error has occurred. Try the following:
● Check the printer screen for instructions. If you have a digital camera
connected to the printer, check the camera screen for instructions. If the
printer is connected to a computer, check the computer monitor for
instructions.
● Turn off the printer, then unplug the power cord. Wait about 10 seconds, then
plug it in again. Turn on the printer.
● If the Status light continues to flash amber, go to www.hp.com/support or
contact Customer Care.
The printer does not find and display the photos I stored on my memory card.
Solution
Try the following:
● Turn off the printer, then unplug the power cord. Wait about 10 seconds, then
plug it in again. Turn on the printer.
● The memory card may contain file types the printer cannot read directly from
the memory card.
– Save the photos to a computer, then print them from the computer. For
more information, see the documentation that came with the camera and
the onscreen HP Photosmart Printer Help.
– The next time you take photos, set the digital camera to save them in a
file format the printer can read directly from the memory card. For a list
of supported file formats, see Specifications. For instructions on setting
the digital camera to save photos in specific file formats, see the
documentation that came with the camera.
– The memory card may need to be reformatted if the problem persists.
40 HP Photosmart 8000 series
Page 44

The printer makes noises when I turn it on, or starts making noises on its own
after it has been sitting unused for a while.
Solution The printer may make noises after long periods of inactivity
(approximately 2 weeks), or when its power supply has been interrupted and then
restored. This is normal operation—the printer is performing an automatic
maintenance procedure to ensure that it produces the best quality output.
The printer is plugged in, but it will not turn on.
Solution
● The printer may have drawn too much power. Unplug the printer power cord.
Wait about 10 seconds, then plug the power cord back in. Turn on the printer.
● The printer may be plugged into a power strip that is turned off. Turn on the
power strip, then turn on the printer.
Printing problems
Before contacting Customer Care, read this section for troubleshooting tips or go to
the online support services at www.hp.com/support.
The printer does not print borderless photos when I print from the control panel.
Solution
Make sure you have selected an appropriate paper size. The printer cannot print
borderless photos on all sizes of paper. For information about selecting the paper
size for borderless photos, see Choosing the right paper.
Printing is very slow.
Solution
● You may be printing a project containing a high-resolution graphic, a highresolution photo, or a PDF. Large, complex projects containing graphics or
photos print slower than text documents.
● The printer may be in Ink-backup Printing Mode. The printer enters this mode
when one of the print cartridges has been removed. Replace the missing
print cartridge.
I selected the Print new option in the printer menu, and got more photos than I
expected.
Solution To the printer, a “new” photo on a memory card is one that you
haven't printed from the printer control panel. When you select Print new, the
printer will print all photos that have not previously been printed from the control
HP Photosmart 8000 series User's Guide 41
Page 45

Chapter 6
panel. To print the photos you want, select them manually. For more information,
see Selecting photos to print.
I selected the Print new option in the printer menu, but the printer did not print
the new photos stored on the memory card.
Solution There are no new photos on the memory card, or the photos have
already been printed from the printer control panel. To print the photos you want,
select them manually. For more information, see Selecting photos to print.
Photo paper does not feed into the printer correctly from the Photo cassette.
Solution
● If you are using the Photo cassette for printing, there may be paper loaded in
the Main tray. Remove any paper from the Main tray before inserting the
Photo cassette for printing.
● The Photo cassette paper guides may not be adjusted correctly. Make sure
that the Photo cassette paper-width guide and the paper-length guide fit
close to the edges of the paper without bending the paper.
● The Photo cassette may not be engaged. Insert the Photo cassette until it
snaps into place. For more information about loading the Photo cassette, see
Loading your paper.
● The printer may be in an extremely high- or low- humidity environment. Load
one sheet of photo paper at a time.
● The paper you are trying to load might be too large for the Photo cassette.
For a list of sizes that you can use with the Photo cassette, see Loading your
paper.
● The photo paper may be curled. If the photo paper is curled, place the paper
in a plastic bag and gently bend it the opposite direction of the curl until the
paper lies flat. If the problem persists, then use photo paper that is not curled.
Paper does not feed into the printer correctly from the Main tray.
Solution
● There may be too much paper loaded in the Main tray. Remove some paper
from the tray and try printing again.
● The paper guides may not be adjusted correctly. Make sure that the paperwidth guide and the paper-length guide fit close to the edges of the paper
without bending the paper.
● Two or more pieces of paper may be sticking together. Remove the paper
from the Main tray, fan the edges of the stack to separate the sheets of
paper, then reload the paper and try printing again.
● If the paper is wrinkled or bent, try using different paper.
42 HP Photosmart 8000 series
Page 46

● If you are loading small photo paper, use the Photo cassette. For a list of
sizes that you can place in the Main tray and Photo cassette, see Loading
your paper.
● The paper may be too thin or too thick. Use HP paper for best results. For
more information, see Choosing the right paper.
Printed pages are dropping off of the Output tray.
Solution Pages can drop off of the Output tray when they are printed. To
prevent this, always extend the Output tray extension when you print.
The printout is rippled or curled.
Solution The project you are printing uses a larger amount of ink than normal.
Print the project from a computer, and use the printer software to lower the ink
saturation level. See the onscreen HP Photosmart Printer Help for more
information.
The document printed at an angle or is off-center.
Solution
● The paper may not be loaded correctly. Reload the paper, make sure that
the paper is correctly oriented in the Main tray, and that the paper-width
guide and the paper-length guide fit close to the edges of the paper. For
paper-loading instructions, see Loading your paper.
● The photo paper may not be loaded correctly. Reload the photo paper, make
sure that the photo paper is correctly oriented in the Photo cassette, and that
the paper-width guide and the paper-length guide fit close to the edges of the
photo paper. Load the Photo cassette into the Main tray. For photo paperloading instructions, see Loading your paper.
● The print cartridges may need to be aligned. For more information, see
Aligning the print cartridges.
Colors are not printing satisfactorily.
Solution
● You may not be using the best print cartridges for the project. To print text
documents and graphics, use the HP Tri-color and HP Black print cartridges.
To print color photos, use the HP Tri-color and HP Photo or HP Gray Photo
cartridges. For more information, see Inserting and replacing the print
cartridges.
● You may be printing in Ink-backup Printing Mode. The printer enters Inkbackup printing mode when one of the print cartridges is missing. Replace
the missing cartridge.
HP Photosmart 8000 series User's Guide 43
Page 47

Chapter 6
● A cartridge is out of ink. Replace it.
● Some of the ink nozzles on a cartridge are clogged. Clean the cartridges.
See Cleaning and maintaining the printer.
No page came out of the printer. —OR— The paper jammed while printing.
Solution
● The printer may need attention. Read the printer screen for instructions.
● The power may be off or there may be a loose connection. Make sure the
power is on, and that the power cord is securely connected.
● You may not have any paper in the Main tray or Photo cassette. Check that
the paper is loaded correctly. For paper-loading instructions, see Loading
your paper.
● The paper may have jammed while printing.
– Turn off the printer, then unplug it from the power source. Clear the
printer of any paper that may be obstructing the paper path. For more
information, see To clear a paper jam.
– If you were printing labels, make sure a label did not become unglued
from the label sheet while going through the printer.
– If you experience paper jams when using the Photo cassette, make sure
that the photo paper-width guide and the photo paper-length guide fit
close to the edges of the photo paper without bending the paper. Make
sure the Photo cassette is fully engaged by gently pushing the Photo
cassette toward the printer until it stops. If you still have problems, try
loading one sheet of photo paper at a time.
A blank page came out of the printer.
Solution
● You may have begun printing and then cancelled the process. If you
cancelled the process before printing started, the printer may have already
loaded paper in preparation for printing. The next time you print, the printer
will eject the blank page before starting the new printing project.
● Check the ink-level icons on the printer screen. Replace any print cartridges
that are out of ink. For more information, see Inserting and replacing the print
cartridges.
● If you are trying to print a fax, first save the fax in a graphic format such as
TIFF. Place it in a word processing document and print it from there.
The photo did not print using the printer default print settings.
Solution You may have changed the print settings for the selected photo. Print
settings you apply to an individual photo override the printer default print settings.
Discard all print settings that have been applied to an individual photo by
deselecting the photo. For more information, see Selecting photos to print.
44 HP Photosmart 8000 series
Page 48

The printer ejects the paper when preparing to print.
Solution Direct sunlight could be interfering with the operation of the automatic
paper sensor. Move the printer out of direct sunlight.
Print quality is poor.
Solution
● You may be printing in Ink-backup Printing Mode. The printer enters Inkbackup Printing Mode when one of the print cartridges is missing. Replace
the missing print cartridge with a new one. For more information, see
Inserting and replacing the print cartridges.
● If you magnified the photo using the Zoom button on the printer control
panel, you may have magnified the photo too much. To reduce the
magnification, press Zoom to enter Zoom mode, and then press Select
Photos
one or more times to reduce the magnification.
● One of the print cartridges may be running out of ink. If a print cartridge is
running low on ink, replace it. For more information, see Inserting and
replacing the print cartridges.
● Use photo paper designed for the printer. For best results, use HP paper.
● You may be printing on the wrong side of the paper. Make sure the paper is
loaded with the side to be printed facing down.
● You may have selected a low-resolution setting on the digital camera.
Reduce the size of the image and try printing again. For better results in the
future, set the digital camera to a higher photo resolution.
● There may be a problem with a print cartridge. Try the following:
– Remove and then reinsert the print cartridges.
– Run an automatic print cartridge cleaning procedure from the printer
control panel. For more information, see Cleaning and maintaining the
printer.
– Align the print cartridges from the printer control panel. For more
information, see Aligning the print cartridges.
– If this does not solve the problem, try cleaning the copper-colored
contacts on the print cartridges. For more information, see Manually
cleaning the print cartridge contacts.
– If these solutions do not work, replace the print cartridge(s).
Printed photos are not fitting to the paper as desired.
Solution
● You may have loaded the photo paper incorrectly. Load the photo paper with
the side to be printed facing down.
● The photo paper may not have fed into the printer correctly. Try the following:
– If you have a paper jam, see To clear a paper jam.
– Load one sheet of photo paper at a time.
● You may have selected the wrong layout. For information, see Selecting a
photo layout.
HP Photosmart 8000 series User's Guide 45
Page 49

Chapter 6
● You may have chosen the wrong paper size for the selected layout. For
information, see Selecting a photo layout
● See the HP Photosmart online printer help for information on how to optimize
photo quality.
The photos I marked for printing in the digital camera do not print.
Solution Some digital cameras, such as the HP 318 and HP 612, let you mark
photos for printing in both the camera's internal memory and on the memory card.
If you mark photos in the internal memory, and then move photos from the
camera's internal memory to the memory card, the marks do not transfer. Mark
photos for printing after you transfer them from the digital camera's internal
memory to the memory card.
Error messages
Before contacting Customer Care, read this section for troubleshooting tips or go to
the online support services at www.hp.com/support.
Error messages that appear on the printer screen can be divided into the following
types:
● Paper errors
● Print cartridge errors
● Memory card errors
● Proof sheet errors
Paper errors
Before contacting Customer Care, read this section for troubleshooting tips or go to
the online support services at www.hp.com/support.
Error message: Paper jam. Clear jam then press OK.
Solution
Caution Do NOT remove jammed paper from the front of the printer.
Doing so can cause irreversible damage to the printer.
To clear a paper jam
1. Turn off the printer, and then unplug the printer.
2. Remove the rear access door.
46 HP Photosmart 8000 series
Page 50

3. Gently remove the jammed paper from the printer.
4. Replace the rear access door.
5. Plug in the printer and turn it on.
6. When you have cleared the paper jam, print your document again.
Error message: Out of paper. Load paper then press OK.
Solution Load paper, then press OK to print again. For paper-loading
instructions, see Loading paper.
Error message: Unsupported media size. Job was cancelled. Press OK.
Solution The printer cannot use the size of paper loaded. Press OK, then load
a supported paper size instead. For a list of supported paper sizes, see Printer
specifications.
Error message: Automatic paper sensor failed.
Solution The automatic paper sensor is obstructed or damaged. Try moving
the printer out of direct sunlight, then press OK and try printing again. If this does
not work, go to www.hp.com/support or contact Customer Care.
Print cartridge errors
Before contacting Customer Care, read this section for troubleshooting tips or go to
the online support services at www.hp.com/support.
Error message: Cartridge failed.
Solution The specified print cartridge may be old or damaged. Try the following:
1. Remove the cartridge and then reinstall it. For more information, see
Inserting and replacing the print cartridges.
2. If this does not work, replace the cartridge.
Error message: Cartridge failed. Replace it, or remove it to print using inkbackup printing mode.
Solution The specified print cartridge may be old or damaged. Try the following:
1. Remove the cartridge and then reinstall it. For more information, see
Inserting and replacing the print cartridges.
2. If this does not work, replace the cartridge. You can also print in Ink-backup
Printing Mode by removing the damaged cartridge.
HP Photosmart 8000 series User's Guide 47
Page 51

Chapter 6
Error message: Cartridge not compatible.
Solution You have inserted a print cartridge that does not work with the printer.
Replace the print cartridge with one that is compatible with the printer. For more
information, see the back cover of this guide.
Error message: All print cartridges are missing.
Solution The print cartridges are either not installed or are installed incorrectly.
Install the print cartridges using the instructions in Inserting and replacing the
print cartridges.
Error message: Ink is low.
Solution The specified print cartridge is low on ink. Replace the print cartridge.
For more information, see the back cover of this guide.
Error message: One or more cartridges have failed.
Solution One or more of the print cartridges have failed. Replace the failed
cartridges with new HP print cartridges. For more information, see the back cover
of this guide.
Error message: One or more cartridges are not compatible.
Solution One or more of the print cartridges are not HP print cartridges.
Replace the non-HP print cartridges with supported HP print cartridges. For more
information, see the back cover of this guide.
Error message: Print cartridge cradle is stuck. Clear jam then press OK.
Solution Follow these steps to clear any obstruction in the path of the print
cartridge cradle:
1. Lift the main cover to access the print cartridges.
2. Clear any obstruction in the cradle path.
3. Close the main cover.
4. Press OK to continue.
The current page will eject and the print job will continue on the next
available sheet of paper.
Error message: Main cover is open.
Solution Close the main cover of the printer.
Memory card errors
Before contacting Customer Care, read this section for troubleshooting tips or go to
the online support services at www.hp.com/support.
48 HP Photosmart 8000 series
Page 52

Error message: Photo is missing. —OR— Some photos are missing.
Solution The printer cannot read the file on the memory card or the file was
accidentally deleted, or one or more files specified for the job are missing from
the memory card. Try saving the photos to the computer using the digital camera
rather than the memory card. If a photo is missing, you may have accidentally
deleted the photo from the card.
Error message: Card access error.
Solution The printer cannot read the data on the memory card and cannot
complete any current print or save jobs. The data may be corrupted or there may
be a physical problem with the memory card. Try the following:
● Save the files to the computer and access them from there.
● If this does not work, use a new memory card or reformat the memory card
using the digital camera. Any photos on the memory card will be lost.
● If this does not work, the photo files may be damaged or unreadable. Before
you contact Customer Care, try another memory card to determine if it is the
printer or the memory card that is failing.
Error message: Cannot print photos.
Solution More than 10 photos specified for a print job may be corrupt, missing,
or are an unsupported file type. For information about supported file types, see
Printer specifications. Try the following:
● Try saving the photos to the computer using the digital camera rather than
the memory card.
● Save the files to the computer and print from the computer.
● Print a photo index and reselect photos. For more information, see Deciding
which photos to print.
Error message: Card is locked. Cannot access card.
Solution The printer cannot read the memory card because the memory card is
password protected. Follow these steps:
1. Remove the memory card from the printer.
2. Insert the memory card in the device you originally used to store the
password on the memory card.
3. Remove the password from the memory card using the same software you
used to store the password.
4. Remove the memory card and reinsert it in the printer memory card slot.
5. Try printing again.
Error message: Use only 1 card at a time. Please remove a memory card.
Solution The printer has two or more different types of memory cards inserted
simultaneously or a memory card inserted and a digital camera connected to the
HP Photosmart 8000 series User's Guide 49
Page 53

Chapter 6
camera port at the same time. Remove memory cards or disconnect the camera
until only one card is in the printer or one camera is connected.
Error message: Card was removed. Job was cancelled.
Solution You removed a memory card from the printer while it was busy
printing a file from the memory card or saving files to the computer. Follow these
steps:
1. Press OK.
2. Reinsert the memory card and print selected photos or saved files again. The
To avoid damage to memory cards, do not remove them from the printer memory
card slot while they are being accessed. For more information, see Removing a
memory card.
Error message: Cannot display this photo.
Solution The memory card contains image formats that the printer does not
support or the file is corrupted. For a list of supported image formats, see
Specifications. Access photos using the computer.
Proof sheet errors
Before contacting Customer Care, read this section for troubleshooting tips or go to
the online support services at www.hp.com/support.
memory card must remain inserted until the print or save job is complete.
Error message: Could not read proof sheet. Scan cancelled.
Solution The proof sheet is smeared or has stray marks. Print a new proof
sheet. For more information, see Deciding which photos to print.
Error message: Can not detect the proof sheet. Scan cancelled.
Solution You may have loaded the proof sheet with the printed side facing up.
Follow these steps:
1. Insert the proof sheet into the Main tray with the printed side facing down.
2. Try scanning again. For more information, see Selecting photos to print.
Error message: Multiple number of copies selected. Scan cancelled.
Solution You filled in more than one circle for the number of copies at the
bottom of the proof sheet. The layout you select applies to each photo selected
on the proof sheet. Print a new proof sheet and try again. For more information,
see Deciding which photos to print.
50 HP Photosmart 8000 series
Page 54

Error message: Multiple layouts selected. Scan cancelled.
Solution You filled in more than one layout circle at the bottom of the proof
sheet. Follow these steps:
1. Print a new proof sheet.
2. Completely fill in the circle to select one of the seven layouts.
3. Try scanning the proof sheet again. For more information, see Selecting
photos to print.
Error message: Layout not selected.
Solution You have not filled in a layout circle at the bottom of the proof sheet
beneath the layout you want to use for the photos. Completely fill in the circle
below one of the seven layout icons at the bottom of the proof sheet. The printer
will print the photos using that layout.
Error message: No images selected.
Solution You have not filled in the circles on the proof sheet beneath the
photos you want to print, or you may not have filled in the circles completely.
Follow these steps:
● Follow the steps on the proof sheet to select the photos you want to print and
try again. For more information, see Selecting photos to print.
● For best results, be sure to fill in the circles completely with a dark pen or
Number 2 pencil.
Error message: Card contents do not match proof sheet. Scan cancelled.
Solution The card inserted is not the same card as the one you used to print
the proof sheet. Remove the card and reinsert the card you used to print the
proof sheet.
Bluetooth printing problems
Before contacting HP Customer Care, read this section, or go to the online support
services at www.hp.com/support. Be sure to also read the documentation that came
with your HP Bluetooth wireless printer adapter and your Bluetooth device.
HP Photosmart 8000 series User's Guide 51
Page 55

Chapter 6
My Bluetooth device cannot find the printer.
Solution
● Make sure the Bluetooth device is plugged into the camera port on the front
of the printer. The light on the adapter flashes when the adapter is ready to
receive data.
● You may be too far from the printer. Move the Bluetooth device closer to the
printer. The maximum recommended distance between the Bluetooth device
and the printer is 10 meters (30 feet).
● Make sure that your Bluetooth device is compatible with the printer. For more
information, see Specifications.
No page came out of the printer.
Solution The printer may not recognize the type of file sent by the Bluetooth
device. For a list of supported file formats, see Printer specifications.
Print quality is poor.
Solution The photo you printed may be low resolution. For better results, set
the digital camera to a higher resolution. Photos taken with VGA-resolution
cameras, such as those found in wireless phones, may not have high enough
resolution to produce a high-quality print.
52 HP Photosmart 8000 series
Page 56

7
HP Customer Care
Note The name of HP support services may vary by country/region.
If you have a problem, follow these steps:
1. Check the documentation that came with the printer.
– Quick Start booklet: The HP Photosmart 8000 series Quick Start booklet
explains how to set up the printer and print your first photo.
– User's Guide: The User's Guide is the book you are reading. This book
describes the basic features of the printer, explains how to use the printer
without connecting a computer, and contains hardware troubleshooting
information.
– HP Photosmart Printer Help: The onscreen HP Photosmart Printer Help
describes how to use the printer with a computer and contains software
troubleshooting information.
2. If you are unable to solve the problem using the information in the documentation,
visit www.hp.com/support to do the following:
– Access online support pages
– Send HP an e-mail message for answers to your questions
– Connect with an HP technician by using online chat
– Check for software updates
Support options and availability vary by product, country/region, and language.
3. For Europe only: Contact your local point of purchase. If the printer has a
hardware failure, you will be asked to bring the printer to where you purchased it.
Service is free during the printer limited warranty period. After the warranty
period, you will be quoted a service charge.
4. If you are unable to solve the problem using the onscreen Help or HP websites,
call Customer Care using the number for your country/region. For a list of country/
region phone numbers, see HP Customer Care by phone.
HP Customer Care by phone
While the printer is under warranty, you can obtain free phone support. For more
information, see the warranty included in the box, or go to www.hp.com/support to
check the duration of your free support.
After the free phone support period, you can obtain help from HP at an additional cost.
Contact your HP dealer or call the support phone number for your country/region for
support options.
To receive HP support by phone, call the appropriate support phone number for your
location. Standard phone company charges apply.
North America: Call 1-800-474-6836 (1-800 HP invent). U.S. phone support is
available in both English and Spanish languages 24 hours a day, 7 days a week (days
and hours of support may change without notice). This service is free during the
warranty period. A fee may apply outside the warranty period.
HP Photosmart 8000 series User's Guide 53
Page 57

Chapter 7
Western Europe: Customers in Austria, Belgium, Denmark, Spain, France, Germany,
Ireland, Italy, Netherlands, Norway, Portugal, Finland, Sweden, Switzerland, and the
United Kingdom should go to www.hp.com/support to access phone support numbers
in their country/region.
Other countries/regions: See the list of support telephone numbers inside the front
cover of this guide.
Placing a call
Call HP Customer Care while you are near the computer and printer. Be prepared to
provide the following information:
● Printer model number (located on the front of the printer)
● Printer serial number (located on the bottom of the printer)
● Computer operating system
● Version of printer driver:
● Messages displayed on the printer screen or on the computer monitor
● Answers to the following questions:
– Windows PC: To see the printer driver version, right-click the Memory Card
icon in the Windows taskbar and select About.
– Macintosh: To see the printer driver version, use the Print dialog box.
– Has the situation you are calling about happened before? Can you recreate
the situation?
– Did you install any new hardware or software on your computer around the
time that the situation occurred?
Return to HP repair service (North America only)
HP will arrange to have your product picked up and delivered to an HP Central Repair
Center. We pay for the round-trip shipping and handling. This service is free for the
duration of the hardware warranty period.
Additional warranty options
Extended service plans are available for the printer at additional costs. Go to
www.hp.com/support, select your country/region and language, then explore the
services and warranty area for information about the extended service plans.
Note This service might not be available in your country/region.
54 HP Photosmart 8000 series
Page 58

8
Specifications
This section lists the minimum system requirements for installing the printer software, and
provides selected printer specifications.
For a complete list of printer specifications and system requirements, see the onscreen
HP Photosmart Printer Help. For information about viewing the onscreen Help, see Welcome.
System requirements
Component Windows PC minimum Macintosh minimum
Operating system
Processor
RAM 128 MB recommended 128 MB
Free disk space 500 MB 150 MB
Video display 800 x 600, 16-bit or higher 800 x 600, 16-bit or higher
CD-ROM drive 4x 4x
Connectivity USB 2.0 full-speed:
Browser Microsoft Internet Explorer
Microsoft® Windows 98, 2000
Professional, Me, XP Home,
and XP Professional
Intel® Pentium® II (or
equivalent) or higher
Microsoft Windows 98, 2000
Professional, Me, XP Home,
and XP Professional
PictBridge: using front
camera port
Bluetooth: using optional HP
Bluetooth wireless printer
adapter
5.5 or later
Mac OS X 10.2 and greater
G3 or greater
USB 2.0 full-speed: Mac
OS X 10.2 and greater
PictBridge: using front
camera port
—
HP Photosmart 8000 series User's Guide 55
Page 59

Chapter 8
Printer specifications
Category Specifications
Media specifications Recommended maximum length: 35.6 cm (14 inch)
Media sizes Photo paper, 10 x 15 cm (4 x 6 inch)
Recommended maximum thickness: 292 µm (11.5 mil)
Photo paper with tab, 10 x 15 cm with 1.25 cm tab (4 x 6 inch with
0.5 inch tab)
Photo paper, 13 x 18 cm (5 x 7 inch)
Photo paper, 10 x 30 cm (4 x 12 inch) panorama
Photo cards, 10 x 20 cm (4 x 8 inch)
Index cards, 10 x 15 cm (4 x 6 inch)
Hagaki cards, 10.0 x 14.8 cm (3.9 x 5.8 inch)
A6 cards, 10.5 x 14.8 cm (4.1 x 5.8 inch)
L-size cards, 9.0 x 12.7 cm (3.5 x 5 inch)
L-size cards with tab, 9.0 x 12.7 cm with 1.25 cm tab (3.5 x 5 inch
with 0.5 inch tab)
Media sizes
supported
Media types
supported
Image file formats JPEG Baseline
Video file formats Motion-JPEG AVI
Supported sizes when printing from a computer
7.6 x 12.7 cm to 22 x 61 cm (3 x 5 inch to 8.5 x 24 inch)
Supported sizes when printing from the control panel
Metric: A6, A4, 10 x 15 cm (with and without tab); Imperial:
3.5 x 5 inch, 4 x 6 inch (with and without tab), 4 x 12 inch, 5 x 7 inch,
8 x 10 inch, 8.5 x 11 inch; Other: Hagaki and L-size
Paper (plain, inkjet, photo, and panoramic photo)
Envelopes
Transparencies
Labels
Cards (index, greeting, Hagaki, A6, L-size)
Iron-on transfers
Avery C6611 and C6612 photo sticker paper: 10 x 15 cm
(4 x 6 inch), 16 rectangular or oval stickers per page
TIFF 24-bit RGB uncompressed interleaved
TIFF 24-bit YCbCr uncompressed interleaved
TIFF 24-bit RGB packbits interleaved
TIFF 8-bit gray uncompressed/packbits
TIFF 8-bit palette color uncompressed/packbits
TIFF 1-bit uncompressed/packbits/1D Huffman
Motion-JPEG QuickTime
MPEG-1
Memory cards CompactFlash Type I and II
56 HP Photosmart 8000 series
Page 60

(continued)
Category Specifications
Microdrive
MultiMediaCard
Secure Digital
Memory Sticks
xD-Picture Card
Memory cardsupported file
formats
Paper tray – media
sizes supported
Paper tray capacity Main tray
Power consumption Printing: 21.0 W AC
Printing: See Supported file formats
Saving: All file formats
Main tray
7.6 x 12.7 cm to 21.6 x 35.6 cm (3 x 5 inch to 8.5 x 14 inch)
Photo cassette
Output tray
All supported sizes
100 sheets of plain paper
15 envelopes
20–40 cards (depending on thickness)
20 sheets of labels
25 transparencies, iron-on transfers, or photo paper
Photo cassette
20 sheets of photo paper
Output tray
50 sheets of plain paper
10 cards or envelopes
25 sheets of labels or iron-on transfers
Idle: 5.3 W AC
Power requirements Input frequency: 50/60 Hz, (+/- 3Hz)
Input voltage
Power supply model number 0957–2083: 200 to 240, Vac (+/- 10%)
Power supply model number 0957–2084: 100 to 240, Vac (+/- 10%)
Environmental
specifications
Print cartridges 1 HP Black
HP Photosmart 8000 series User's Guide 57
Recommended temperature range: 15–30° C (59–86° F)
Maximum temperature range: 10–35° C (50–95° F)
Storage temperature range: -30–65° C (–22–149° F)
Recommended humidity range: 20–80% RH
Maximum humidity range: 15–80% RH
1 HP Tri-color
1 HP Photo
Page 61

Chapter 8
(continued)
Category Specifications
1 HP Gray Photo
Note The print cartridge numbers you can use with this printer
appear on the back cover of this guide.
Print speed
(maximum)
Black printouts: 30 pages per minute
Color printouts: 24 pages per minute
Photos: 27 seconds for each 10 x 15 cm (4 x 6 inch) photo
Connectivity USB 2.0 full-speed: Microsoft Windows 98, 2000 Professional, Me,
XP Home, and XP Professional; Mac OS X 10.2 and greater)
PictBridge: Microsoft Windows 98, 2000 Professional, Me,
XP Home, and XP Professional; Mac OS X 10.2 and greater
Bluetooth: Microsoft Windows XP Home and XP Professional
USB support Universal Serial Bus (USB): 2.0 full-speed compliant cable. 10 feet (3
meters) or less in length. (Microsoft Windows 98, 2000 Professional,
Me, XP Home, and XP Professional; Mac OS X 10.2 and greater.)
58 HP Photosmart 8000 series
Page 62

HP printer limited warranty statement
HP product Duration of limited warranty
Software 90 days
Print cartridges Until the HP ink is depleted or the “end of warranty” date printed
on the cartridge has been reached, whichever occurs first. This
Accessories 1 year
Printer peripheral hardware (see the following for details) 1 year
A. Extent of limited warranty
1. Hewlett-Packard (HP) warrants to the end-user customer that the HP products specified above will be free from
defects in materials and workmanship for the duration specified above, which duration begins on the date of purchase
by the customer.
2. For software products, HP's limited warranty applies only to a failure to execute programming instructions. HP does
not warrant that the operation of any product will be uninterrupted or error free.
3. HP's limited warranty covers only those defects that arise as a result of normal use of the product, and does not cover
any other problems, including those that arise as a result of:
a. Improper maintenance or modification;
b. Software, media, parts, or supplies not provided or supported by HP;
c. Operation outside the product's specifications;
d. Unauthorized modification or misuse.
4. For HP printer products, the use of a non-HP ink cartridge or a refilled ink cartridge does not affect either the warranty
to the customer or any HP support contract with the customer. However, if printer failure or damage is attributable to
the use of a non-HP or refilled ink cartridge, HP will charge its standard time and materials charges to service the
printer for the particular failure or damage.
5. If HP receives, during the applicable warranty period, notice of a defect in any product which is covered by HP's
warranty, HP shall either repair or replace the product, at HP's option.
6. If HP is unable to repair or replace, as applicable, a defective product which is covered by HP's warranty, HP shall,
within a reasonable time after being notified of the defect, refund the purchase price for the product.
7. HP shall have no obligation to repair, replace, or refund until the customer returns the defective product to HP.
8. Any replacement product may be either new or like-new, provided that it has functionality at least equal to that of the
product being replaced.
9. HP products may contain remanufactured parts, components, or materials equivalent to new in performance.
10. HP's Limited Warranty Statement is valid in any country where the covered HP product is distributed by HP. Contracts
for additional warranty services, such as on-site service, may be available from any authorized HP service facility in
countries where the product is distributed by HP or by an authorized importer.
B. Limitations of warranty
TO THE EXTENT ALLOWED BY LOCAL LAW, NEITHER HP NOR ITS THIRD PARTY SUPPLIERS MAKES ANY
OTHER WARRANTY OR CONDITION OF ANY KIND, WHETHER EXPRESS OR IMPLIED WARRANTIES OR
CONDITIONS OF MERCHANTABILITY, SATISFACTORY QUALITY, AND FITNESS FOR A PARTICULAR
PURPOSE.
C. Limitations of liability
1. To the extent allowed by local law, the remedies provided in this Warranty Statement are the customer's sole and
exclusive remedies.
2. TO THE EXTENT ALLOWED BY LOCAL LAW, EXCEPT FOR THE OBLIGATIONS SPECIFICALLY SET FORTH IN
THIS WARRANTY STATEMENT, IN NO EVENT SHALL HP OR ITS THIRD PARTY SUPPLIERS BE LIABLE FOR
DIRECT, INDIRECT, SPECIAL, INCIDENTAL, OR CONSEQUENTIAL DAMAGES, WHETHER BASED ON
CONTRACT, TORT, OR ANY OTHER LEGAL THEORY AND WHETHER ADVISED OF THE POSSIBILITY OF
SUCH DAMAGES.
D. Local law
1. This Warranty Statement gives the customer specific legal rights. The customer may also have other rights which vary
from state to state in the United States, from province to province in Canada, and from country to country elsewhere
in the world.
2. To the extent that this Warranty Statement is inconsistent with local law, this Warranty Statement shall be deemed
modified to be consistent with such local law. Under such local law, certain disclaimers and limitations of this Warranty
Statement may not apply to the customer. For example, some states in the United States, as well as some
governments outside the United States (including provinces in Canada), may:
a. Preclude the disclaimers and limitations in this Warranty Statement from limiting the statutory rights of a consumer
(e.g., the United Kingdom);
b. Otherwise restrict the ability of a manufacturer to enforce such disclaimers or limitations; or
c. Grant the customer additional warranty rights, specify the duration of implied warranties which the manufacturer
cannot disclaim, or allow limitations on the duration of implied warranties.
3. THE TERMS IN THIS WARRANTY STATEMENT, EXCEPT TO THE EXTENT LAWFULLY PERMITTED, DO NOT
EXCLUDE, RESTRICT, OR MODIFY, AND ARE IN ADDITION TO, THE MANDATORY STATUTORY RIGHTS
APPLICABLE TO THE SALE OF THE HP PRODUCTS TO SUCH CUSTOMERS.
Dear Customer,
You will find below the name and address of the HP entity responsible for the performance of the HP Limited Warranty in your
country.
You may have additional statutory rights against the seller based on your purchase agreement. Those rights are not
in any way affected by this HP Limited Warranty.
Ireland: Hewlett-Packard Ireland Ltd. 30 Herbert Street IRL-Dublin 2
United Kingdom: Hewlett-Packard Ltd, Cain Road, Bracknell, GB-Berks RG12 1HN
warranty does not cover HP ink products that have been refilled,
remanufactured, refurbished, misused, or tampered with.
HP Limited Warranty
Page 63

Chapter 9
60 HP Photosmart 8000 series
Page 64

Index
A
Adaptive Lighting 24
aligning print cartridges 35
alignment page 35
antique coloration 25
B
Bluetooth
connecting to printer 15
menu settings 6
troubleshooting 51
borderless photos
selecting layout 19
borderless prints 25
buttons 5
C
camera-selected photos 21
cameras
connecting to printer 15
direct-printing 27
PictBridge 27
port 4
printing from 27
cartridges. See print cartridges
cleaning
print cartridges 33
printer 33
computer
printing from 3, 31
printing without 15
system requirements 55
control panel 5
cropping photos 25
Customer Care 53
D
date and time stamps 25
digital cameras. See cameras
documentation, printer 3
DPOF files 21
E
error messages 46
F
file formats, supported 18
framing photos 25
H
help. See troubleshooting
help, onscreen 3
HP direct-printing digital
cameras 27
HP Image Zone 31
HP Image Zone Express 31
HP Instant Share 31, 32
HP iPod 15
HP Software Update 31
I
ink level, checking 34
inserting
memory cards 16
print cartridges 12
J
JPEG file format 18
L
layout, selecting 19
lights 6
loading paper 10
M
memory cards
inserting 16
printing photo index 18
removing 24
supported file formats 18
menu, printer 6
O
onscreen Help 3
P
paper
buying and choosing 9
loading 10
maintaining 9, 37
sizes 56
trays 4
photos
antique coloration 25
cropping 25
date and time stamp 25
framing 25
improving quality 24
index 18
printing 21
red-eye removal 24
selecting for print 20
selecting layout 19
sepia tones 25
supported file formats 18
zooming 25
PictBridge cameras 27
print cartridges
aligning 35
cleaning 33
inserting 12
replacing 12
storing 13, 37
testing 34
printer
cleaning 33
connecting 15
documentation 3
error messages 46
menu 6
parts 4
specifications 56
storing 36
printer help
accessing 3
onscreen 3
printer software
updating 36
printer software, updating 31
printing
from a computer 3, 31
from a memory card 21
from BlueTooth device
15
from cameras 27
from memory cards 15
from PictBridge camera
15
HP Photosmart 8000 series User's Guide 61
Page 65

multiple copies 20
multiple photos 20
photo index 18
selecting layout 19
test page 34
without computer 15
Q
quality
photo paper 37
photos 24
printing test page 34
R
red-eye removal 24
regulatory notices 63
removing memory cards 24
replacing print cartridges 12
S
sepia tones 25
slide show 25
SmartFocus 24
specifications 55
storing
photo paper 37
print cartridges 13, 37
printer 36
system requirements 55
T
test page 34
TIFF file format 18
trays, paper 4
troubleshooting
Bluetooth 51
Customer Care 53
error messages 46
flashing lights 39
U
USB
port 4
specifications 55
V
video action prints 23
Z
zooming and cropping 25
62 HP Photosmart 8000 series
Page 66
Regulatory notices
Hewlett-Packard Company
This device complies with part 15 of the FCC Rules. Operation is subject to the following two conditions:
● This device may not cause harmful interference, and
● This device must accept any interference received, including interference that may cause undesired operation.
Pursuant to Part 15.21 of the FCC Rules, any changes or modifications to this equipment not expressly approved by HewlettPackard Company may cause harmful interference, and void your authority to operate this equipment. Use of a shielded data
cable is required to comply with the Class B limits of Part 15 of the FCC Rules.
For further information, contact: Hewlett-Packard Company, Manager of Corporate Product Regulations, 3000 Hanover
Street, Palo Alto, CA 94304, (650) 857-1501.
Note
This equipment has been tested and found to comply with the limits for a Class B digital device, pursuant to part 15 of the
FCC rules. These limits are designed to provide reasonable protection against harmful interference in a residential
installation. This equipment generates, uses, and can radiate radio frequency energy and, if not installed and used in
accordance with the instructions, can cause harmful interference to radio communications. However, there is no guarantee
that interference will not occur in a particular installation. If this equipment does cause harmful interference to radio or
television reception, which can be determined by turning the equipment off and on, the user is encouraged to try to correct
the interference by one or more of the following measures:
● Reorient or relocate the receiving antenna.
● Increase the separation between the equipment and the receiver.
● Connect the equipment into an outlet on a circuit different from that to which the receiver is connected.
● Consult the dealer or an experienced radio/TV technician for help.
LED indicator statement
The display LEDs meet the requirements of EN 60825-1.
Page 67

 Loading...