

Page 1

HP Neoview Script Guide
HP Part Number: 544530-001
Published: May 2007
Edition: HP Neoview Release 2.1
Page 2

© Copyright 2007 Hewlett-Packard Development Company, L.P.
Legal Notice
Confidential computersoftware. Valid license from HP required for possession, use or copying. Consistent with FAR 12.211 and 12.212, Commercial
Computer Software, Computer Software Documentation, and Technical Data for Commercial Items are licensed to the U.S. Government under
vendor’s standard commercial license.
The informationcontained hereinis subject to change without notice. Theonly warranties forHP productsand services are set forth in the express
warranty statements accompanying such products and services. Nothing herein should be construed as constituting an additional warranty. HP
shall not be liable for technical or editorial errors or omissions contained herein.
Export of the information contained in this publication may require authorization from the U.S. Department of Commerce.
Microsoft, Windows, and Windows NT are U.S. registered trademarks of Microsoft Corporation.
Intel, Pentium, and Celeron are trademarks or registered trademarks of Intel Corporation or its subsidiaries in the United States and other
countries.
Java is a U.S. trademark of Sun Microsystems, Inc.
Motif, OSF/1, UNIX, X/Open, and the "X" device are registered trademarks, and IT DialTone and The Open Group are trademarks of The Open
Group in the U.S. and other countries.
Open Software Foundation, OSF, the OSF logo, OSF/1, OSF/Motif, and Motif are trademarks of the Open Software Foundation, Inc. OSF MAKES
NO WARRANTY OF ANY KIND WITH REGARD TO THE OSF MATERIAL PROVIDED HEREIN, INCLUDING, BUT NOT LIMITED TO, THE
IMPLIED WARRANTIES OF MERCHANTABILITY AND FITNESS FOR A PARTICULAR PURPOSE. OSF shall not be liable for errors contained
herein or for incidental consequential damages in connection with the furnishing, performance, or use of this material.
© 1990, 1991, 1992, 1993 Open Software Foundation, Inc. The OSF documentation and the OSF software to which it relates are derived in part
from materials supplied by the following:© 1987, 1988, 1989 Carnegie-Mellon University. © 1989, 1990, 1991 Digital Equipment Corporation. ©
1985, 1988, 1989, 1990 Encore Computer Corporation. © 1988 Free Software Foundation, Inc. © 1987, 1988, 1989, 1990, 1991 Hewlett-Packard
Company. © 1985, 1987, 1988, 1989, 1990, 1991, 1992 International Business Machines Corporation. © 1988, 1989 Massachusetts Institute of
Technology. © 1988, 1989, 1990 Mentat Inc. © 1988 Microsoft Corporation. © 1987, 1988, 1989, 1990, 1991, 1992 SecureWare, Inc. © 1990, 1991
Siemens NixdorfInformationssysteme AG. © 1986, 1989,1996, 1997Sun Microsystems, Inc. © 1989,1990, 1991Transarc Corporation.OSFsoftware
and documentationare basedin parton the Fourth Berkeley SoftwareDistribution underlicense from The Regents of the Universityof California.
OSF acknowledgesthe followingindividuals and institutions for their role in its development:Kenneth C.R.C. Arnold, Gregory S. Couch, Conrad
C. Huang, Ed James, Symmetric Computer Systems, Robert Elz. © 1980, 1981, 1982, 1983, 1985, 1986, 1987, 1988, 1989 Regents of the University
of California.
Page 3

Table of Contents
About This Document.......................................................................................................15
Intended Audience................................................................................................................................15
New and Changed Information in This Edition...................................................................................15
Document Organization.......................................................................................................................15
Notation Conventions...........................................................................................................................16
General Syntax Notation.................................................................................................................16
Related Documentation........................................................................................................................17
Neoview Customer Library.............................................................................................................18
Neoview Support Library................................................................................................................18
Publishing History................................................................................................................................19
HP Encourages Your Comments..........................................................................................................19
1 Introduction to Neoview Script...................................................................................21
2 Installing Neoview Script.............................................................................................23
Preinstallation Procedures....................................................................................................................23
Installing and Verifying the Java Runtime Environment (JRE)......................................................23
Installing a Supported Java Version...........................................................................................23
Verifying the Java Version..........................................................................................................24
Setting the PATH to a Supported Java Version on Windows....................................................24
Setting the PATH to a Supported Java Version on Linux or UNIX............................................26
Installing and Verifying the Neoview JDBC Type 4 Driver............................................................26
Installing the JDBC Driver.........................................................................................................26
Verifying the JDBC Driver..........................................................................................................26
Installing Perl or Python..................................................................................................................27
Installation Procedures.........................................................................................................................27
Downloading the Installer...............................................................................................................27
Verifying the Version of the Installer File........................................................................................28
Running the Installer.......................................................................................................................28
Installer Wizard Steps................................................................................................................28
Launching the Installer Wizard............................................................................................28
Using the Installer Wizard....................................................................................................29
Command-Line Installation Steps..............................................................................................33
Postinstallation Procedures...................................................................................................................34
Verifying the Installed Software Files..............................................................................................34
Verifying the Installed Version of Neoview Script..........................................................................35
Setting the Look and Feel of the Neoview Script Interface.............................................................35
Supported Look-and-Feel Types................................................................................................36
Setting the Look and Feel at a Command-Line Prompt............................................................37
Setting the Look and Feel in the System Properties on Windows.............................................37
Setting the Look and Feel in the User Profile on Linux or UNIX..............................................39
Testing the Launch of Neoview Script............................................................................................39
3 Launching the Neoview Script Interface....................................................................41
Launching the Neoview Script Interface on Windows.........................................................................41
Creating a Shortcut to hpnvs.cmd...................................................................................................41
Launching the Neoview Script Interface on Linux or UNIX................................................................44
Setting the PATH of hpnvs.sh..........................................................................................................44
Table of Contents 3
Page 4

Presetting the Optional Launch Parameters....................................................................................45
Logging In to the Database Platform....................................................................................................45
Default Login...................................................................................................................................45
Login Parameters.............................................................................................................................46
Using Optional Launch Parameters................................................................................................46
Logging In When Launching Neoview Script...........................................................................47
Running a Command When Launching Neoview Script..........................................................47
Example of Running an SQL Statement With -q or -sql.......................................................48
Example of Running a Neoview Script Interface Command With -q or -sql.......................48
Running a Script File When Launching Neoview Script...........................................................48
Example of a Script File........................................................................................................49
Example of Running a Script File With -s or -script.............................................................49
Launching Neoview Script Without Connecting to the Database.............................................49
Example of Launching Neoview Script File With -noconnect..............................................50
Exiting the Neoview Script Interface....................................................................................................50
4 Running Commands Interactively in the Neoview Script Interface.........................51
Neoview Script Interface......................................................................................................................51
Product Banner................................................................................................................................51
Interface Prompts............................................................................................................................51
Breaking the Command Line...........................................................................................................51
Case Sensitivity................................................................................................................................52
Using Neoview Script Interface Commands........................................................................................52
Showing the Session Attributes.......................................................................................................52
Setting and Showing the Idle Timeout Value for the Session.........................................................53
Customizing the Standard Prompt..................................................................................................53
SET PROMPT Command...........................................................................................................53
SET TIME Command.................................................................................................................53
Setting and Showing the SQL Terminator.......................................................................................54
Displaying the Elapsed Time...........................................................................................................54
Setting and Showing the Current Schema.......................................................................................55
Limiting the Result Set of a Query..................................................................................................55
Showing Information About SQL Database Objects.......................................................................55
Showing the Schemas.................................................................................................................56
Showing the Tables in a Schema................................................................................................56
Showing the Dependent Objects of a Table................................................................................56
Showing the Views in a Schema.................................................................................................57
Showing the Synonyms in a Schema.........................................................................................57
Displaying Executed Commands....................................................................................................58
Editing and Reexecuting a Command.............................................................................................58
Clearing the Interface Window.......................................................................................................58
Obtaining Help................................................................................................................................58
Running SQL Statements......................................................................................................................59
Executing an SQL Statement...........................................................................................................59
Repeating an SQL Statement...........................................................................................................59
Preparing and Executing SQL Statements......................................................................................60
Preparing an SQL Statement......................................................................................................60
Setting Parameters......................................................................................................................61
Displaying the Parameters of the Session..................................................................................61
Resetting the Parameters............................................................................................................61
Executing a Prepared SQL Statement........................................................................................62
Logging Output....................................................................................................................................63
Starting the Logging Process...........................................................................................................63
SPOOL ON or LOG ON Command...........................................................................................63
4 Table of Contents
Page 5

SPOOL log-file or LOG log-file Command................................................................................64
Using the CLEAR Option...........................................................................................................64
Logging Concurrent Neoview Script Sessions...........................................................................64
Stopping the Logging Process.........................................................................................................64
Viewing the Contents of a Log File.................................................................................................64
5 Running Scripts in the Neoview Script Interface.......................................................67
Creating a Script File.............................................................................................................................67
Supported SQL Statements in Script Files.......................................................................................67
Permitted Neoview Script Interface Commands in Script Files......................................................67
Disallowed Interface Commands in Script Files........................................................................67
Comments........................................................................................................................................67
Section Headers...............................................................................................................................67
Example of a Script File...................................................................................................................68
Running a Script File.............................................................................................................................68
Logging Output....................................................................................................................................69
Running Scripts in Parallel...................................................................................................................69
6 Running Neoview Script From Perl or Python............................................................71
Setting the Login Environment Variables.............................................................................................71
Setting the Login Environment Variables on Windows..................................................................71
Setting Login Environment Variables on the Command Line...................................................71
Setting Login Environment Variables in the System Properties................................................72
Setting the Login Environment Variables on Linux or UNIX.........................................................73
Setting Login Environment Variables on the Command Line...................................................73
Setting Login Environment Variables in the User Profile..........................................................74
Perl and Python Wrapper Scripts.........................................................................................................74
Launching Neoview Script From the Perl or Python Command Line.................................................74
Perl and Python Commands on Windows......................................................................................75
Perl and Python Commands on Linux or UNIX.............................................................................75
Launching Neoview Script From a Perl or Python Program...............................................................76
Setting the Login Environment Variables........................................................................................76
Using SQL Statements in a Perl or Python Program.......................................................................76
Example of a Perl Program (example.pl)...................................................................................76
Example of a Python Program (example.py).............................................................................77
Running the Perl or Python Program..............................................................................................77
A Neoview Script Interface Commands........................................................................79
@ Command..........................................................................................................................................81
Syntax..............................................................................................................................................81
Considerations.................................................................................................................................82
Examples..........................................................................................................................................82
/ Command...........................................................................................................................................82
Syntax..............................................................................................................................................82
Considerations.................................................................................................................................82
Example...........................................................................................................................................82
CLEAR Command................................................................................................................................83
Syntax..............................................................................................................................................83
Considerations.................................................................................................................................83
Example...........................................................................................................................................83
CONNECT Command..........................................................................................................................83
Syntax..............................................................................................................................................83
Considerations.................................................................................................................................83
Table of Contents 5
Page 6

Examples..........................................................................................................................................84
DISCONNECT Command....................................................................................................................84
Syntax..............................................................................................................................................84
Considerations.................................................................................................................................84
Examples..........................................................................................................................................84
ENV Command.....................................................................................................................................85
Syntax..............................................................................................................................................85
Considerations.................................................................................................................................85
Examples..........................................................................................................................................86
EXIT Command....................................................................................................................................86
Syntax..............................................................................................................................................86
Considerations.................................................................................................................................87
Examples..........................................................................................................................................87
FC Command........................................................................................................................................87
Syntax..............................................................................................................................................87
Considerations.................................................................................................................................88
Examples..........................................................................................................................................88
HELP Command...................................................................................................................................90
Syntax..............................................................................................................................................90
Considerations.................................................................................................................................90
Examples..........................................................................................................................................90
HISTORY Command............................................................................................................................90
Syntax..............................................................................................................................................91
Considerations.................................................................................................................................91
Example...........................................................................................................................................91
LOG Command.....................................................................................................................................91
Syntax..............................................................................................................................................91
Considerations.................................................................................................................................92
Examples..........................................................................................................................................92
MODE Command.................................................................................................................................92
Syntax..............................................................................................................................................92
Considerations.................................................................................................................................93
Examples..........................................................................................................................................93
OBEY Command...................................................................................................................................93
Syntax..............................................................................................................................................93
Considerations.................................................................................................................................94
Examples..........................................................................................................................................94
PRUN Command..................................................................................................................................95
Syntax..............................................................................................................................................95
Considerations.................................................................................................................................96
Example...........................................................................................................................................96
QUIT Command...................................................................................................................................97
Syntax..............................................................................................................................................97
Considerations.................................................................................................................................97
Examples..........................................................................................................................................97
RECONNECT Command.....................................................................................................................98
Syntax..............................................................................................................................................98
Considerations.................................................................................................................................98
Examples..........................................................................................................................................98
REPEAT Command...............................................................................................................................98
Syntax..............................................................................................................................................98
Considerations.................................................................................................................................99
Examples..........................................................................................................................................99
RESET PARAM Command...................................................................................................................99
Syntax.............................................................................................................................................100
6 Table of Contents
Page 7

Considerations...............................................................................................................................100
Example.........................................................................................................................................100
RUN Command..................................................................................................................................100
Syntax.............................................................................................................................................100
Considerations...............................................................................................................................100
Example.........................................................................................................................................100
SAVEHIST Command.........................................................................................................................101
Syntax.............................................................................................................................................101
Considerations...............................................................................................................................101
Examples........................................................................................................................................101
SET COLSEP Command.....................................................................................................................101
Syntax.............................................................................................................................................102
Considerations...............................................................................................................................102
Examples........................................................................................................................................102
SET HISTOPT Command....................................................................................................................102
Syntax.............................................................................................................................................102
Considerations...............................................................................................................................102
Examples........................................................................................................................................102
SET IDLETIMEOUT Command..........................................................................................................103
Syntax.............................................................................................................................................103
Considerations...............................................................................................................................104
Examples........................................................................................................................................104
SET MARKUP Command...................................................................................................................104
Syntax.............................................................................................................................................104
Considerations...............................................................................................................................104
Examples........................................................................................................................................104
SET LIST_COUNT Command............................................................................................................106
Syntax.............................................................................................................................................106
Considerations...............................................................................................................................106
Examples........................................................................................................................................107
SET PARAM Command......................................................................................................................107
Syntax.............................................................................................................................................108
Considerations...............................................................................................................................108
Examples........................................................................................................................................108
SET PROMPT Command....................................................................................................................109
Syntax.............................................................................................................................................109
Considerations...............................................................................................................................109
Examples........................................................................................................................................109
SET SQLPROMPT Command.............................................................................................................110
Syntax.............................................................................................................................................110
Considerations...............................................................................................................................111
Examples........................................................................................................................................111
SET SQLTERMINATOR Command....................................................................................................112
Syntax.............................................................................................................................................112
Considerations...............................................................................................................................112
Examples........................................................................................................................................112
SET TIME Command..........................................................................................................................112
Syntax.............................................................................................................................................112
Considerations...............................................................................................................................112
Examples........................................................................................................................................113
SET TIMING Command.....................................................................................................................113
Syntax.............................................................................................................................................113
Considerations...............................................................................................................................113
Examples........................................................................................................................................113
SHOW COLSEP Command................................................................................................................113
Table of Contents 7
Page 8

Syntax.............................................................................................................................................114
Considerations...............................................................................................................................114
Examples........................................................................................................................................114
SHOW HISTOPT Command..............................................................................................................114
Syntax.............................................................................................................................................114
Considerations...............................................................................................................................114
Examples........................................................................................................................................114
SHOW IDLETIMEOUT Command.....................................................................................................114
Syntax.............................................................................................................................................114
Considerations...............................................................................................................................114
Examples........................................................................................................................................115
SHOW LIST_COUNT Command.......................................................................................................115
Syntax.............................................................................................................................................115
Considerations...............................................................................................................................115
Examples........................................................................................................................................115
SHOW MARKUP Command..............................................................................................................115
Syntax.............................................................................................................................................115
Considerations...............................................................................................................................115
Examples........................................................................................................................................116
SHOW MODE Command...................................................................................................................116
Syntax.............................................................................................................................................116
Considerations...............................................................................................................................116
Example.........................................................................................................................................116
SHOW MVGROUPS Command.........................................................................................................116
Syntax.............................................................................................................................................116
Considerations...............................................................................................................................117
Examples........................................................................................................................................117
SHOW MVS Command......................................................................................................................117
Syntax.............................................................................................................................................117
Considerations...............................................................................................................................118
Examples........................................................................................................................................118
SHOW PARAM Command.................................................................................................................118
Syntax.............................................................................................................................................119
Considerations...............................................................................................................................119
Example.........................................................................................................................................119
SHOW PREPARED Command...........................................................................................................119
Syntax.............................................................................................................................................119
Considerations...............................................................................................................................119
Examples........................................................................................................................................120
SHOW SCHEMA Command..............................................................................................................120
Syntax.............................................................................................................................................120
Considerations...............................................................................................................................120
Example.........................................................................................................................................120
SHOW SCHEMAS Command............................................................................................................120
Syntax.............................................................................................................................................120
Considerations...............................................................................................................................121
Examples........................................................................................................................................121
SHOW SESSION Command...............................................................................................................122
Syntax.............................................................................................................................................122
Considerations...............................................................................................................................122
Examples........................................................................................................................................123
SHOW SQLPROMPT Command........................................................................................................123
Syntax.............................................................................................................................................123
Considerations...............................................................................................................................124
Example.........................................................................................................................................124
8 Table of Contents
Page 9

SHOW SQLTERMINATOR Command...............................................................................................124
Syntax.............................................................................................................................................124
Considerations...............................................................................................................................124
Example.........................................................................................................................................124
SHOW SYNONYMS Command.........................................................................................................124
Syntax.............................................................................................................................................124
Considerations...............................................................................................................................125
Examples........................................................................................................................................125
SHOW TABLE Command...................................................................................................................125
Syntax.............................................................................................................................................126
Considerations...............................................................................................................................126
Examples........................................................................................................................................126
SHOW TABLES Command.................................................................................................................127
Syntax.............................................................................................................................................127
Considerations...............................................................................................................................128
Examples........................................................................................................................................128
SHOW TIME Command.....................................................................................................................128
Syntax.............................................................................................................................................129
Considerations...............................................................................................................................129
Example.........................................................................................................................................129
SHOW TIMING Command................................................................................................................129
Syntax.............................................................................................................................................129
Considerations...............................................................................................................................129
Example.........................................................................................................................................129
SHOW VIEWS Command...................................................................................................................129
Syntax.............................................................................................................................................129
Considerations...............................................................................................................................130
Examples........................................................................................................................................130
SPOOL Command...............................................................................................................................130
Syntax.............................................................................................................................................130
Considerations...............................................................................................................................131
Examples........................................................................................................................................131
VERSION Command..........................................................................................................................131
Syntax.............................................................................................................................................131
Considerations...............................................................................................................................132
Example.........................................................................................................................................132
B Supported SQL Statements.......................................................................................133
C Connectivity Service Commands.............................................................................135
INFO DS Command............................................................................................................................135
Syntax.............................................................................................................................................135
Considerations...............................................................................................................................135
Example.........................................................................................................................................135
Index...............................................................................................................................137
Table of Contents 9
Page 10

10
Page 11

List of Figures
1-1 Neoview Script Within a Neoview Platform Network.................................................................21
11
Page 12

12
Page 13

List of Tables
2-1 Locations of Neoview Script Software Files..................................................................................34
13
Page 14

14
Page 15

About This Document
This manual describes how to use the Neoview Script command-line interface on a client
workstation to manage a database on a Neoview data warehousing platform. Neoview Script
enables you to perform daily administrative tasks by running SQL statements interactively or
from script files.
Intended Audience
This manual is intended for database administrators and support personnel who are maintaining
and monitoring a Neoview database.
New and Changed Information in This Edition
New or Changed InformationChapter or Appendix
“Setting the Look and Feel of the
Neoview Script Interface” (page 35)
“Launching the Neoview Script
Interface” (page 41)
Appendix A: Neoview Script
Interface Commands
There is a new look and feel property value, BTEQ (to support Teradata). This
property affects the formatting of status messages. The look and feel property
value Oracle is no longer available, butis supported for backwardcompatibility.
For more information, see “Setting the Look and Feel of the Neoview Script
Interface” (page 35).
There is a new optional launch parameter -noconnect. For more information,
see“Launching Neoview Script Without Connecting to the Database” (page 49).
This appendix describes these new interface commands:
• CONNECT
• RECONNECT
• SET MARKUP
• SET COLSEP
• SET HISTOPT
• SHOW COLSEP
• SHOW HISTOPT
• SHOW MARKUP
• SHOW PREPARED
This appendix also includes changes these existing interface commands:
• DISCONNECT
• ENV
• PRUN
• SESSION
• SET TIME
• SHOW TABLE
• SHOW SESSION
Document Organization
Neoview Script
Script
Chapter 3:Launching theNeoview
Script Interface
Interactively inthe Neoview Script
Interface
Neoview Script Interface
Introduces Neoview Script and describes its capabilities.Chapter 1: Introduction to
Describes how to install Neoview Script on the client workstation.Chapter 2: Installing Neoview
Describes how to launch, log in to, and exit the Neoview Script interface on a
client workstation.
Describes how to run commands interactively in the Neoview Script interface.Chapter 4: Running Commands
Describes how to run script files in the Neoview Script interface.Chapter 5: Running Scripts in the
Intended Audience 15
Page 16

Script From Perl or Python
Appendix A: Neoview Script
Interface Commands
Statements
Commands
Notation Conventions
General Syntax Notation
This list summarizes the notation conventions for syntax presentation in this manual.
UPPERCASE LETTERS Uppercase letters indicate keywords and reserved words. Type these
Describes how to run Neoview Script from Perl or Python.Chapter 6: Running Neoview
Provides syntax, considerations, and examples for Neoview Script interface
commands.
Lists the SQL statements that Neoview Script supports.Appendix B: Supported SQL
Provides syntax,considerations, and examples for connectivity service commands.Appendix C: Connectivity Service
items exactly as shown. Items not enclosed in brackets are required.
For example:
SELECT
Italic Letters
Italic letters, regardless of font, indicate variable items that you
supply. Items not enclosed in brackets are required. For example:
file-name
Computer Type
Computer type letters within text indicate case-sensitive keywords
and reserved words. Type these items exactly as shown. Items not
enclosed in brackets are required. For example:
myfile.sh
[ ] Brackets Brackets enclose optional syntax items. For example:
DATETIME [start-field TO] end-field
A group of items enclosed in brackets is a list from which you can
choose one item or none. The items in the list can be arranged either
vertically, with aligned brackets on each side of the list, or
horizontally, enclosed in a pair of brackets and separated by vertical
lines. For example:
DROP SCHEMA schema [CASCADE]
[RESTRICT]
DROP SCHEMA schema [ CASCADE | RESTRICT ]
{ } Braces Braces enclose required syntax items. For example:
16 About This Document
FROM { grantee[, grantee]...}
A group of items enclosed in braces is a list from which you are
required to choose one item. The items in the list can be arranged
either vertically, with aligned braces on each side of the list, or
horizontally, enclosed in a pair of braces and separated by vertical
lines. For example:
INTERVAL { start-field TO end-field }
{ single-field }
INTERVAL { start-field TO end-field | single-field }
Page 17

| Vertical Line A vertical line separates alternatives in a horizontal list that is enclosed
in brackets or braces. For example:
{expression | NULL}
… Ellipsis An ellipsis immediately following a pair of brackets or braces indicates
that you can repeat the enclosed sequenceof syntax items anynumber
of times. For example:
ATTRIBUTE[S] attribute [, attribute]...
{, sql-expression}...
An ellipsis immediately following a single syntax item indicates that
you can repeat that syntax item any number of times. For example:
expression-n…
Punctuation Parentheses, commas, semicolons, and other symbols not previously
described must be typed as shown. For example:
DAY (datetime-expression)
@script-file
Quotation marks around a symbol such as a bracket or brace indicate
the symbol is a required character that you must type as shown. For
example:
"{" module-name [, module-name]... "}"
Item Spacing Spaces shown between items are required unless one of the items is
a punctuation symbol such as a parenthesis or a comma. For example:
DAY (datetime-expression)
DAY(datetime-expression)
If there is no space between two items, spaces are not permitted. In
this example, no spaces are permitted between the period and any
other items:
myfile.sh
Line Spacing If the syntax of a command is too long to fit on a single line, each
continuation line is indented three spaces and is separated from the
preceding line by a blank line. This spacing distinguishes items in a
continuation line from items in a vertical list of selections. For
example:
match-value [NOT] LIKE pattern
[ESCAPE esc-char-expression]
Related Documentation
The HP Neoview Library consists of:
• “Neoview Customer Library”
• “Neoview Support Library” (page 18)
Related Documentation 17
Page 18

Neoview Customer Library
This manual is part of the Neoview customer library:
• Administration
Neoview Database Administrator’s Guide
Neoview DB Admin Online Help
Neoview Management Dashboard Client
Guide for Database Administrators
Neoview Script Guide
Neoview Script Online Help
• Reference
Neoview SQL Reference Manual
Information about how to load and manage the Neoview database
by using the Neoview DB Admin and other tools.
Context-sensitive help topics that describe how to use the HP
Neoview DB Admin management interface.
Information on using the Dashboard Client, includinghow to install
the Client, start and configure the Client Server Gateway (CSG), use
the Client windows and property sheets, interpret entity screen
information, anduse Commandand Control to manage queries from
the Client.
Site-planning information and basic hardware information.Neoview Owner’s Manual
Information about using the HP Neoview Script command-line
interface to run SQL statements interactively or from script files.
Command-line helpthat describesthe interfacecommands supported
in the current operating mode of Neoview Script.
Reference information about the syntax of SQL statements,
functions, and other SQL language elements supported by the
Neoview database software.
Cause, effect, and recovery information for error messages.Neoview Messages Manual
Release 2.1
• Connectivity
Neoview JDBC Type 4 Driver API Reference
Neoview JDBC Type 4 Driver Programmer’s
Reference
Neoview ODBC Drivers Manual
ODBC Client Administrator Online Help
README files
Neoview Support Library
Information about known problems that are visible to customers.README for Neoview Platform for
Reference information about the HP Neoview JDBC Type 4 Driver
API.
Information about using the HP Neoview JDBC Type 4 driver,
which provides Java applications on client workstations access a
Neoview database.
Information about using HP Neoview ODBC drivers on a client
workstation to access a Neoview database.
Context-sensitive help topics that describe how to use the ODBC
client interface.
— README for HP JDBC Type 4 Driver
— README for HP ODBC Driver for Windows
— README for HP ODBC Driver for Linux and HP-UX
— README for HP Neoview Script
Neoview Database Support Guide
18 About This Document
Reference information for using the boot software.Boot Application Online Help
Procedures and reference information that are unique to the Neoview
database software or not documented in other HP manuals.
Page 19
Guide
Installation and replacement procedures.Neoview Hardware Installation and Support
Neoview Management Dashboard Support Guide
Neoview Migration and Upgrade Guide
Neoview ODBC and JDBC Troubleshooting
Guide
Neoview SQL Metadata Quick Reference
Neoview System Console Installer Guide
Neoview Query Support Guide
Neoview Virtual TapeServer Installation and
Support Guide
Neoview Workload Management Services Guide
Publishing History
Information on managing and configuring Dashboard from the
Dashboard Server and Client, including starting and running
Dashboard, usingDiscrete Object Thresholds (DOTs), using Dashboard
Command Interpretercommands, usingthe EntityDefinition Language
(EDL), and using Dashboard data definitions and record declarations.
Procedures for adding hardware, installing RVUs and updating other
software and firmware.
Guidelines for troubleshooting ODBC and JDBC connectivity to an
HP Neoview data warehousing platform.
Quick guide to schemas, tables, columns, and data types for Version
2000 Neoview SQL metadata.
Information about installing and configuring applications on the
Neoview system console
Information related to query execution plans and how to affect the
query performance of Neoview databases
Information about installing and maintaining the Neoview Virtual
TapeServer (VTS).
Information about using Neoview Workload Management Services
(NWMS) to manage workload and resources on a Neoview data
warehousing platform.
HP Encourages Your Comments
HP encourages your comments concerning this document. We are committed to providing
documentation that meets your needs. Send any errors found, suggestions for improvement, or
compliments to:
pubs.comments@hp.com
Include the document title, part number, and any comment, error found, or suggestion for
improvement you have concerning this document.
Publication DateProduct VersionPart Number
August 2006HP Neoview Release 1.0542714-003
October 2006HP Neoview Release 1.1543708-001
November 2006HP Neoview Release 1.2543707-001
March 2007HP Neoview Release 2.0544356-001
May 2007HP Neoview Release 2.1544530-001
Publishing History 19
Page 20

20
Page 21
1 Introduction to Neoview Script
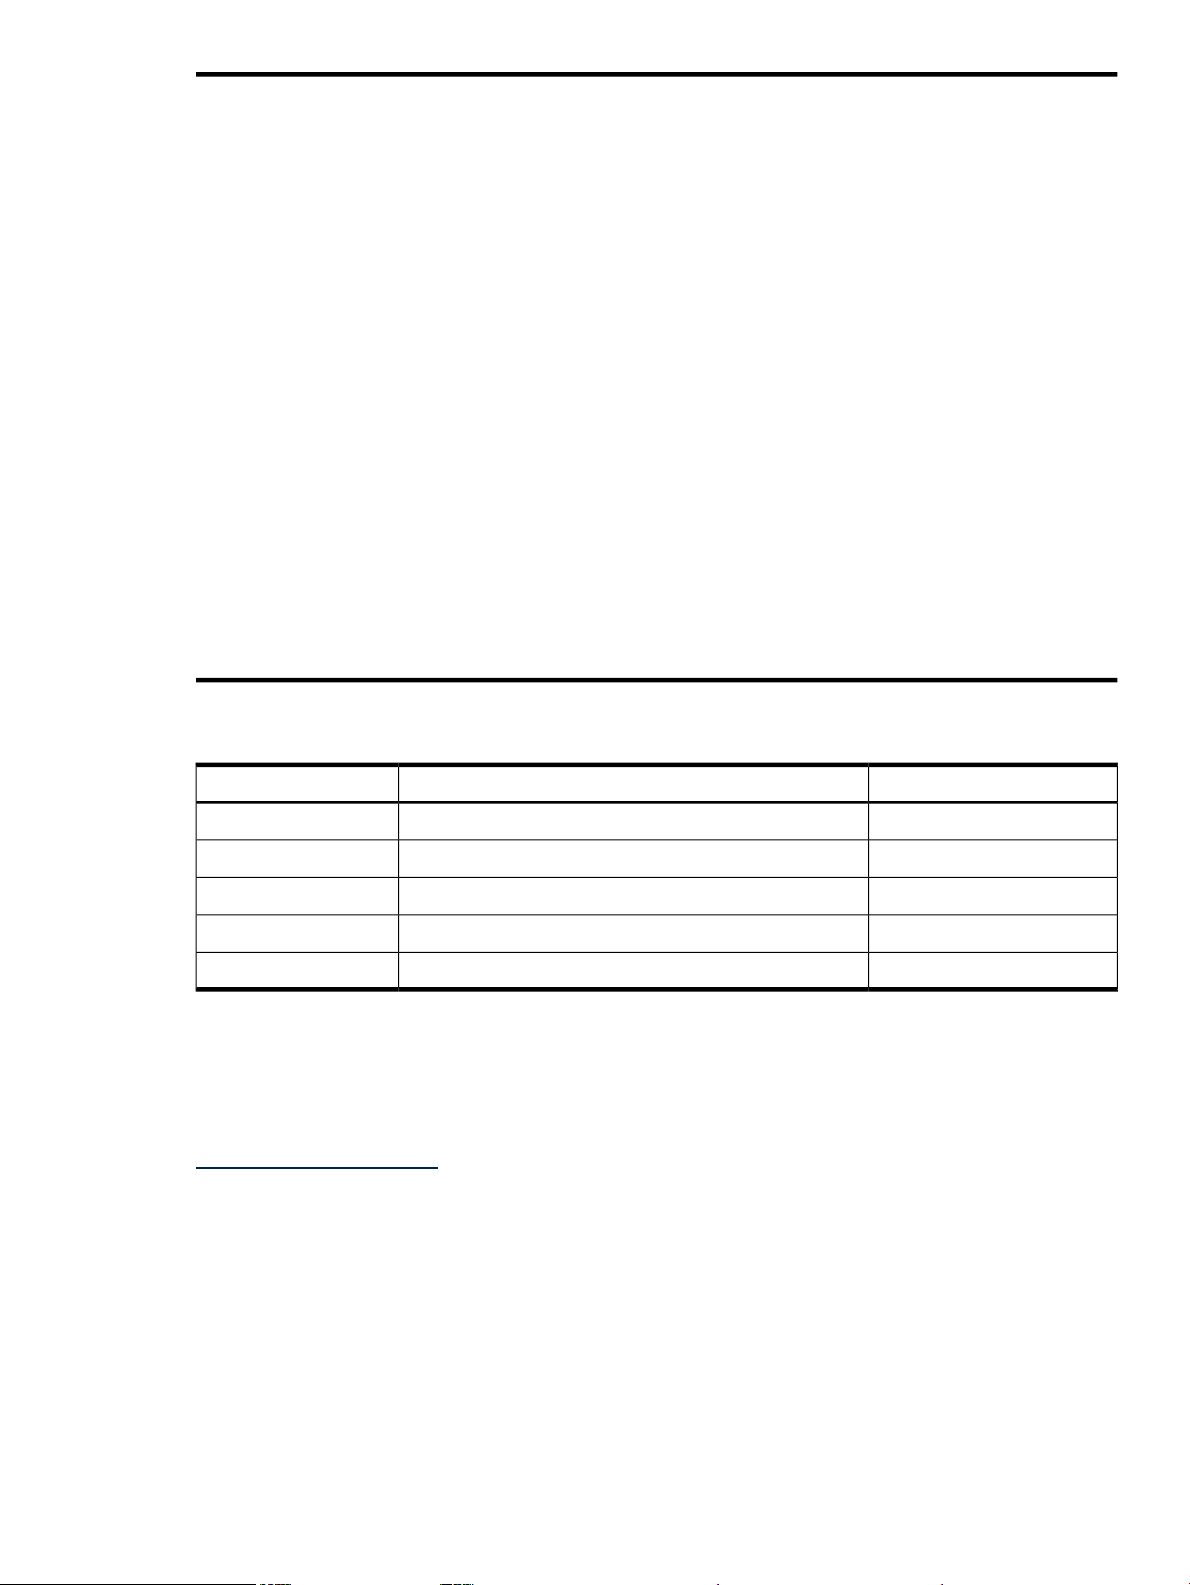
Neoview Script is a command-line interface that you download and install on a client workstation
that has the Neoview JDBC Type 4 Driver installed. Operating systems that support the JDBC
driver include Windows, Linux, and UNIX. The JDBC driver connects Neoview Script on a client
workstation to a Neoview database on a Neoview data warehousing platform.
Figure 1-1 Neoview Script Within a Neoview Platform Network
Neoview Script enables you to perform daily administrative and database management tasks
by running SQL statements interactively or from script files. You can also run Neoview Script
from a Perl or Python command line or from Perl or Python programs. Neoview Script supports
many SQL statements. For a list of these statements, see Appendix B (page 133).
Neoview Script does not support:
• Adding, modifying, and deleting users
• Changing user passwords
• Job scheduling
21
Page 22

22
Page 23

2 Installing Neoview Script
NOTE: If you are manuallyinstalling Neoview Script on a Linux platformthat has the Neoview
data loader installed, use the services or sysadmin ID instead of root, which has been frozen for
the loader. The best way to install NeoviewScript on the loader platform is by using the Neoview
Loader Supplemental executive (Installsuppkt). For more information, see the Neoview Migration
and Upgrade Guide.
To install Neoview Script, follow these procedures:
1. Preinstallation procedures:
• “Installing and Verifying the Java Runtime Environment (JRE)” (page 23)
• “Installing and Verifying the Neoview JDBC Type 4 Driver” (page 26)
• “Installing Perl or Python” (page 27)
2. Installation procedures:
• “Downloading the Installer” (page 27)
• “Verifying the Version of the Installer File” (page 28)
• “Running the Installer” (page 28)
3. Postinstallation procedures:
• “Verifying the Installed Software Files” (page 34)
• “Verifying the Installed Version of Neoview Script” (page 35)
• “Setting the Look and Feel of the Neoview Script Interface” (page 35)
• “Testing the Launch of Neoview Script” (page 39)
Preinstallation Procedures
• “Installing and Verifying the Java Runtime Environment (JRE)” (page 23)
• “Installing and Verifying the Neoview JDBC Type 4 Driver” (page 26)
• “Installing Perl or Python” (page 27)
Installing and Verifying the Java Runtime Environment (JRE)
Neoview Script and the Neoview JDBC Type 4 Driver require a compatible Java version to be
installed on the client workstation. The supported Java versions are:
• JRE 1.4.2
• JRE 1.4.2_01, 1.4.2_02, 1.4.2_03, 1.4.2_04, 1.4.2_05, 1.4.2_06, 1.4.2_07, 1.4.2_10, and 1.4.2_11
These Java versions are not supported:
• Versions before 1.4.2
• Version 1.5
If you are using U.S. Daylight Savings Time (DST), be aware that the start and stop dates for
DST will change from the first Sunday in April to the second Sunday in March and from the last
Sunday in October to the first Sunday in November, starting in 2007. To avoid using incorrect
times, make sure that your Java Runtime Environment uses the correct DST rules. JRE 1.4.2_11
and later versions support the new DST rules.
Installing a Supported Java Version
To install one of the supported Java versions on the client workstation, follow the instructions
on the Sun Microsystems Web site:
http://java.sun.com/j2se/desktopjava/jre/index.jsp
Preinstallation Procedures 23
Page 24

After installing the Java version, proceed with “Verifying the Java Version” (page 24).
Verifying the Java Version
To display the Java version of the client workstation on the screen, enter:
java -version
For example:
C:\>java -version
java version "1.4.2_10"
Java(TM) 2 Runtime Environment, Standard Edition (build 1.4.2_10-b03)
Java HotSpot(TM) Client VM (build 1.4.2_10-b03, mixed mode)
C:\>
If the returned version is not supported or is unavailable, see:
• “Setting the PATH to a Supported Java Version on Windows” (page 24)
• “Setting the PATH to a Supported Java Version on Linux or UNIX” (page 26)
Setting the PATH to a Supported Java Version on Windows
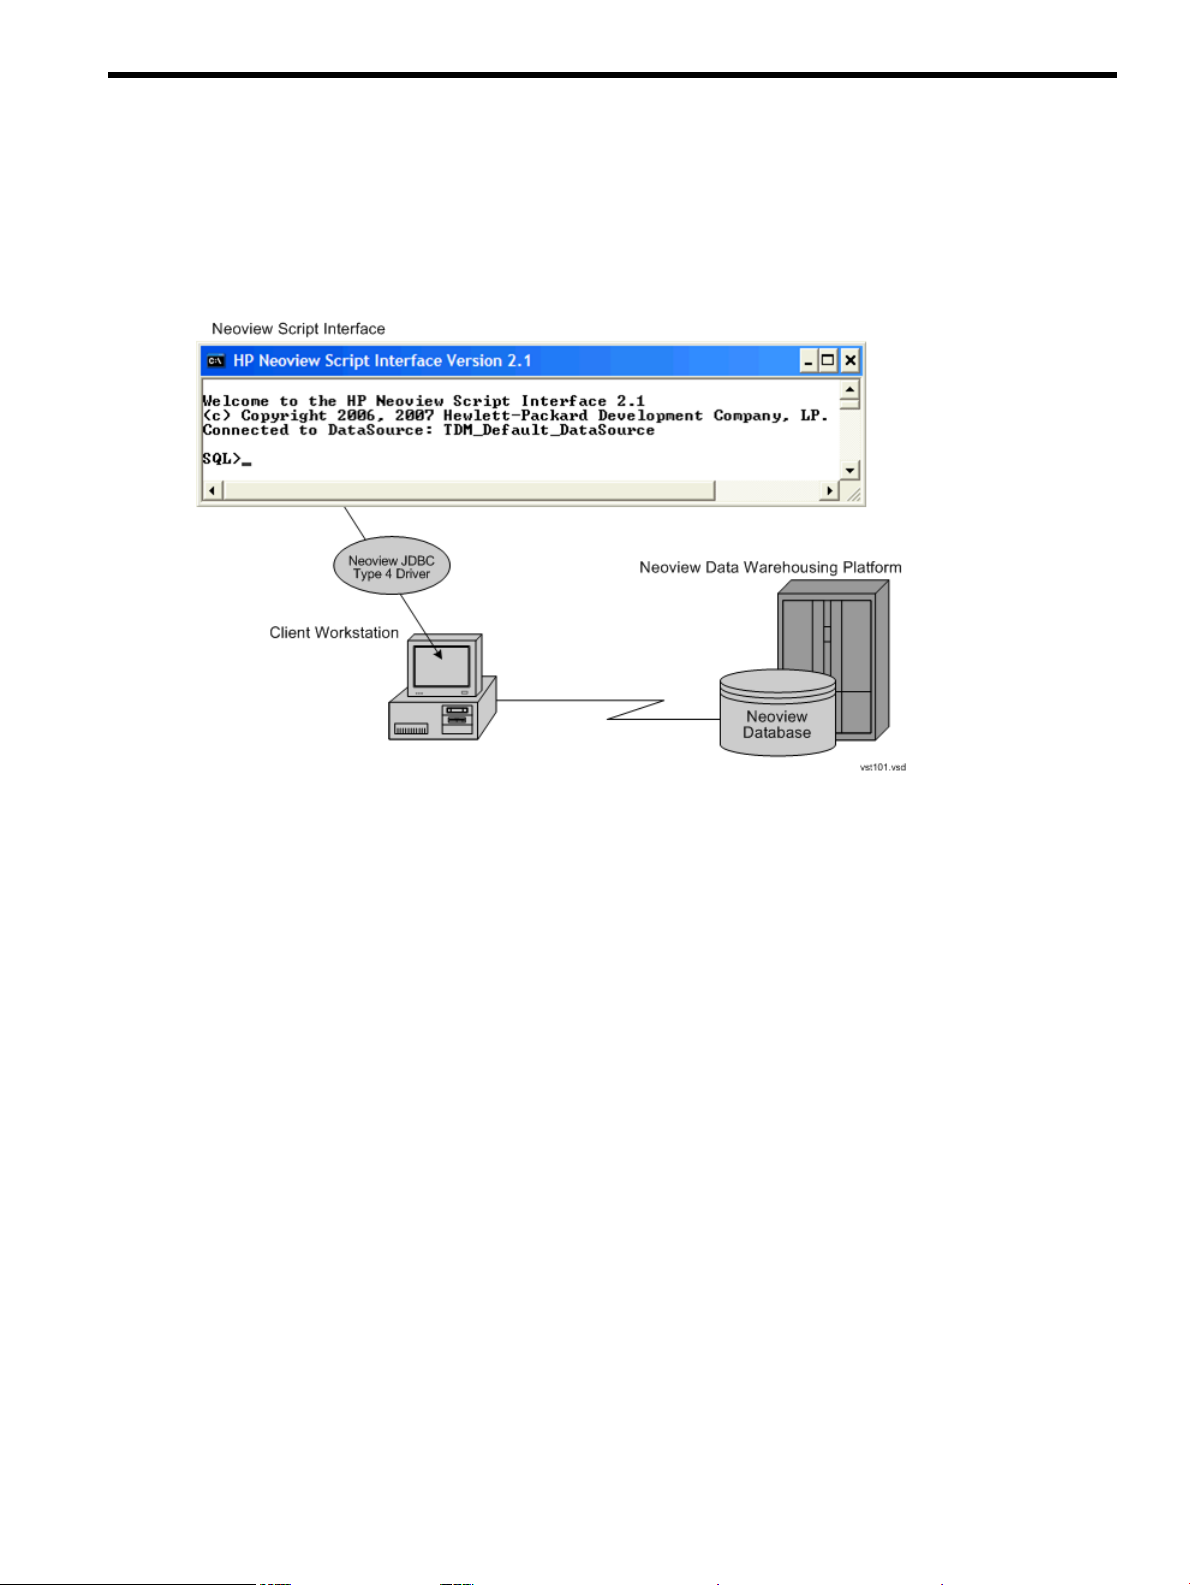
1. Right-click the My Computer icon on your desktop, and then select Properties:
2. In the System Properties dialog box, click the Advanced tab.
3. Click the Environment Variables button:
24 Installing Neoview Script
Page 25
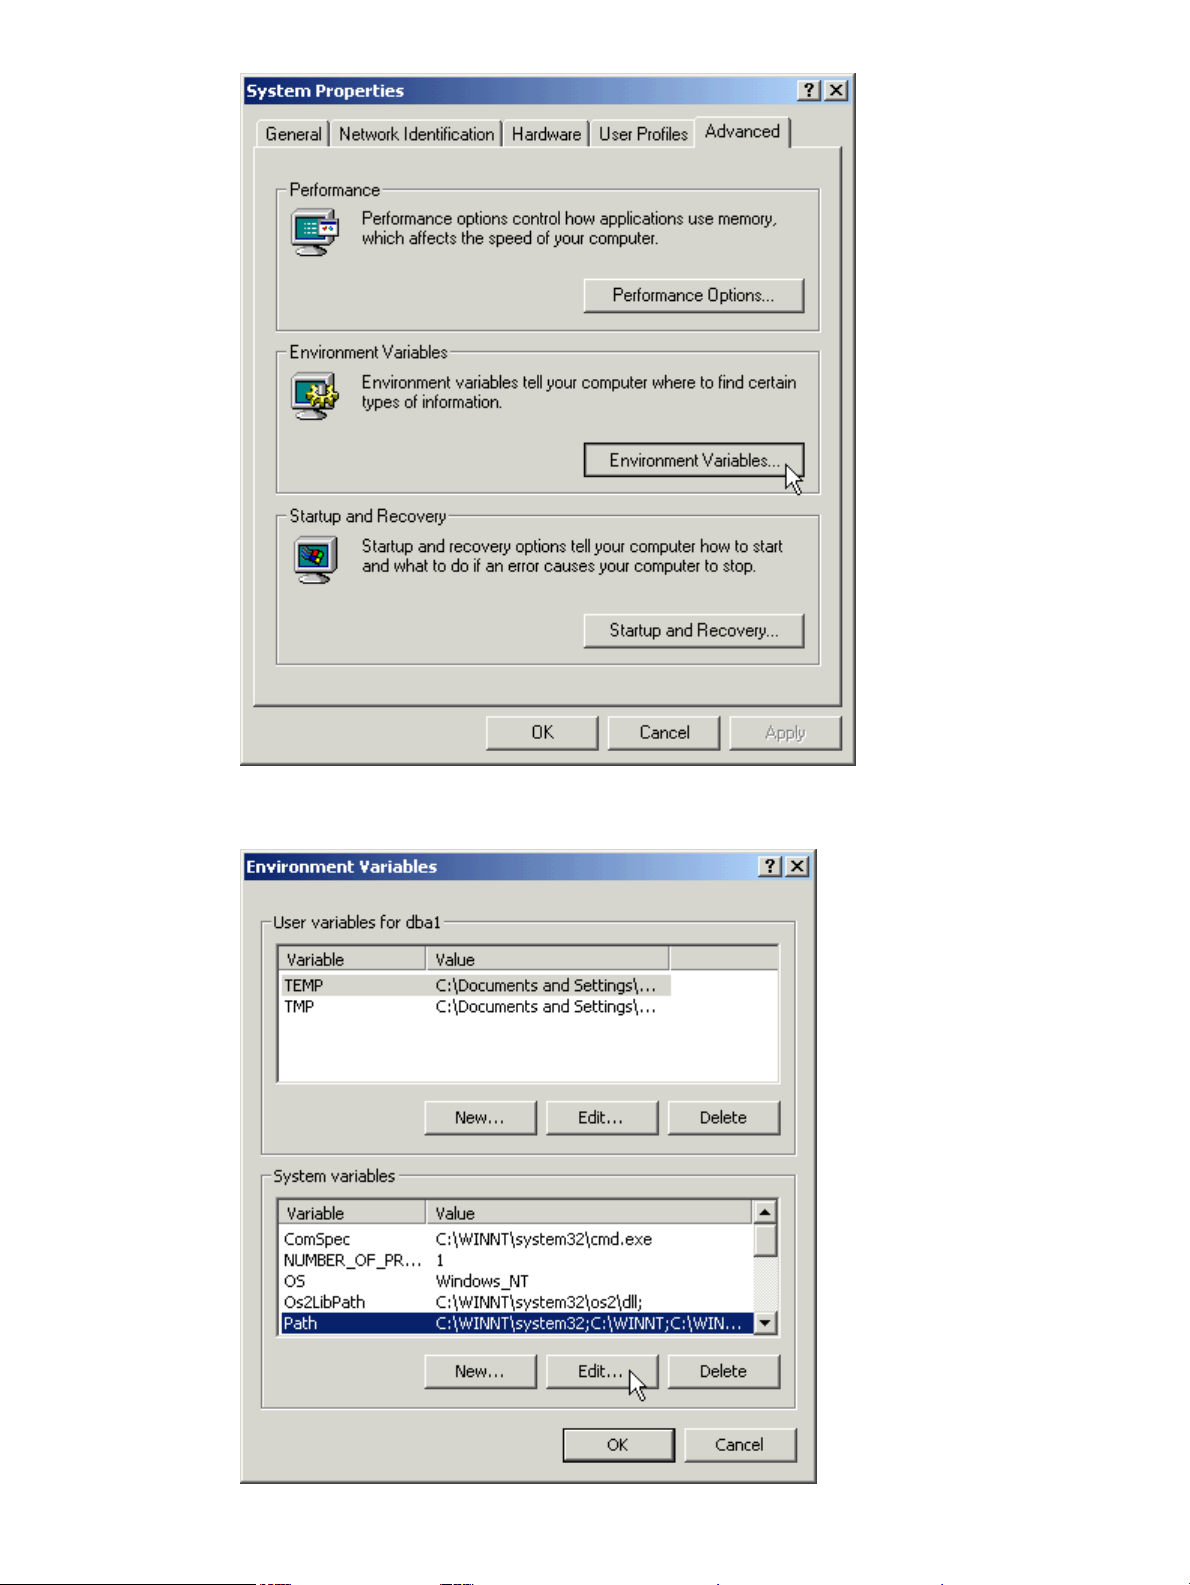
4. Under System variables, select the variable named Path, and then click Edit:
Preinstallation Procedures 25
Page 26
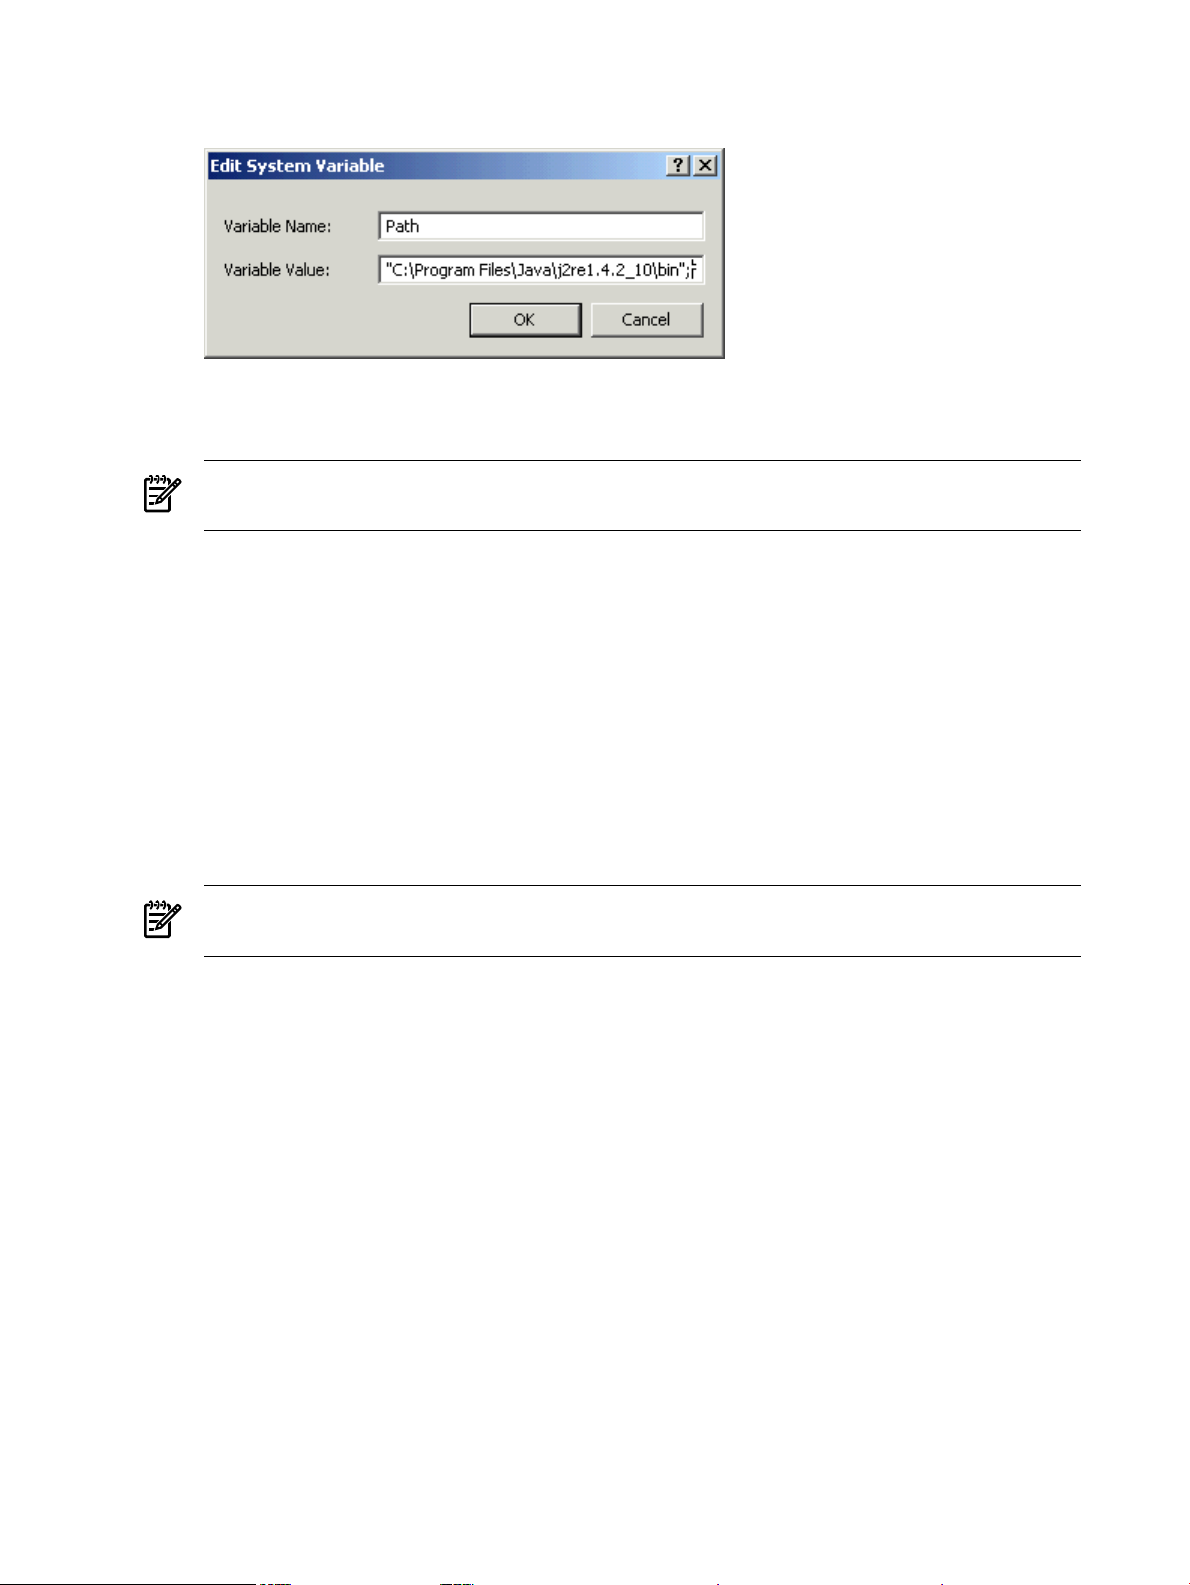
5. Place the cursor at the beginning of the Variable Value field and type the path of the Java
bin directory, ending with a semicolon (;):
For example:
"C:\Program Files\Java\j2re1.4.2_10\bin";
NOTE: Check that no space is after the semicolon (;) in the path. If there are spaces in the
directory name, delimit the entire directory path in double quotes (") before the semicolon.
6. Click OK.
7. Verify that the updated Path appears under System variables, and click OK.
8. In the System Properties dialog box, click OK to accept the changes.
Setting the PATH to a Supported Java Version on Linux or UNIX
1. Open the user profile (.profile or .bash_profile for the Bash shell) in the /home
directory. For example:
vi .profile
2. In the user profile, set the PATH environment variable to include the path of the Java bin
directory. For example:
export PATH=/opt/java1.4/jre/bin:$PATH
NOTE: Place the path of the Java bin directory before $PATH, and check that no space is
after the colon (:) in the path. In the C shell, use the setenv command instead of export.
3. To activate the changes, either log out and log in again or execute the user profile. For
example:
. .profile
Installing and Verifying the Neoview JDBC Type 4 Driver
Neoview Script requires a compatible JDBC driver to be installed on the client workstation. For
Neoview Release 2.1, Neoview Script requires the JDBC Type 4 Driver for Neoview Release 2.1.
Installing the JDBC Driver
To install the JDBC driver:
1. Download and extract the product distribution file.
2. Set the CLASSPATH to the product JAR file.
For information about how to install, verify, and use the JDBC driver, see the Neoview JDBC Type
4 Driver Programmer’s Reference or the product README.
Verifying the JDBC Driver
To display the version of the JDBC driver that is already installed on the client workstation:
26 Installing Neoview Script
Page 27
1. Change the directory to the lib directory, which contains the JDBC driver JAR file:
• On Windows, enter this command:
cd jdbc-installation-directory\lib
jdbc-installation-directory is the directory where you installed the JDBC
driver.
• On Linux or UNIX, enter this command:
cd jdbc-installation-directory/lib
jdbc-installation-directory is the directory where you installed the JDBC
driver.
2. Enter this command to return version information:
java -jar hpt4jdbc.jar
For example:
C:\>cd install\hpt4jdbc\lib
C:\install\hpt4jdbc\lib>java -jar hpt4jdbc.jar
T1249_N24_AAK(R2.1)_11MAY07_HP_JDBCT4_2007_04_05
C:\install\hpt4jdbc\lib>
If the JAR file is inaccessible or the returned version is not supported, see “Installing the JDBC
Driver” (page 26).
Installing Perl or Python
If you plan to use Perl or Python scripts with Neoview Script, verify that you have Perl or Python
installed on the client workstation. Neoview Script supports these versions of Perl and Python:
• Perl version 5.6.1
• Python version 2.3.4
If you do not have Perl or Python, download it from any open source software provider. You
can perform this installation procedure anytime before or after installing Neoview Script.
NOTE: Neoview Script provides a beta version of enhanced support for Perl and Python
programs. This beta version requires Jython (for Python programs) and a different version of
Perl to be installed on the client workstation. For more information, see the README in the
Neoview Script samples directory.
Installation Procedures
NOTE: Before following the installation procedures, you must install the Neoview JDBC Type
4 Driver on the client workstation. For more information, see “Preinstallation Procedures”
(page 23).
• “Downloading the Installer” (page 27)
• “Verifying the Version of the Installer File” (page 28)
• “Running the Installer” (page 28)
Downloading the Installer
The NeoviewScript softwareis available as a downloadable installer file, hpnvsInstaller.jar,
on the Software Depot site.
Installation Procedures 27
Page 28
1. Locate or create a directory or folder for the installer file anywhere on the client workstation.
2. On the client workstation, start a Web browser and navigate to the download site:
http://www.software.hp.com
3. Enter “Neoview Script” in the search box in the upper right corner of the Software Depot
home page.
4. Click the HP Neoview Script link that appears in the search results.
5. Follow instructions to download HP Neoview Script, which includes the
hpnvsInstaller.jar file, to the directory or folder in Step 1.
NOTE: In the File Download dialog box, make sure to select the Save or Save this file to
disk option.
Verifying the Version of the Installer File
To display the version of the downloaded installer file:
1. Change to the directory where you downloaded the Neoview Script installer file:
cd installer-directory
installer-directory is the directory where you downloaded the installer.
2. Enter this command to return version information:
java -jar hpnvsInstaller.jar v
For example:
C:\>cd download
C:\download>java -jar hpnvsInstaller.jar v
T0774_N24_AAC(R2.1)_11MAY07_HP_hpnvs_2007_04_12
C:\download>
Running the Installer
NOTE: Before running the installer, you must install the Neoview JDBC Type 4 Driver on the
client workstation. For more information, see “Preinstallation Procedures” (page 23).
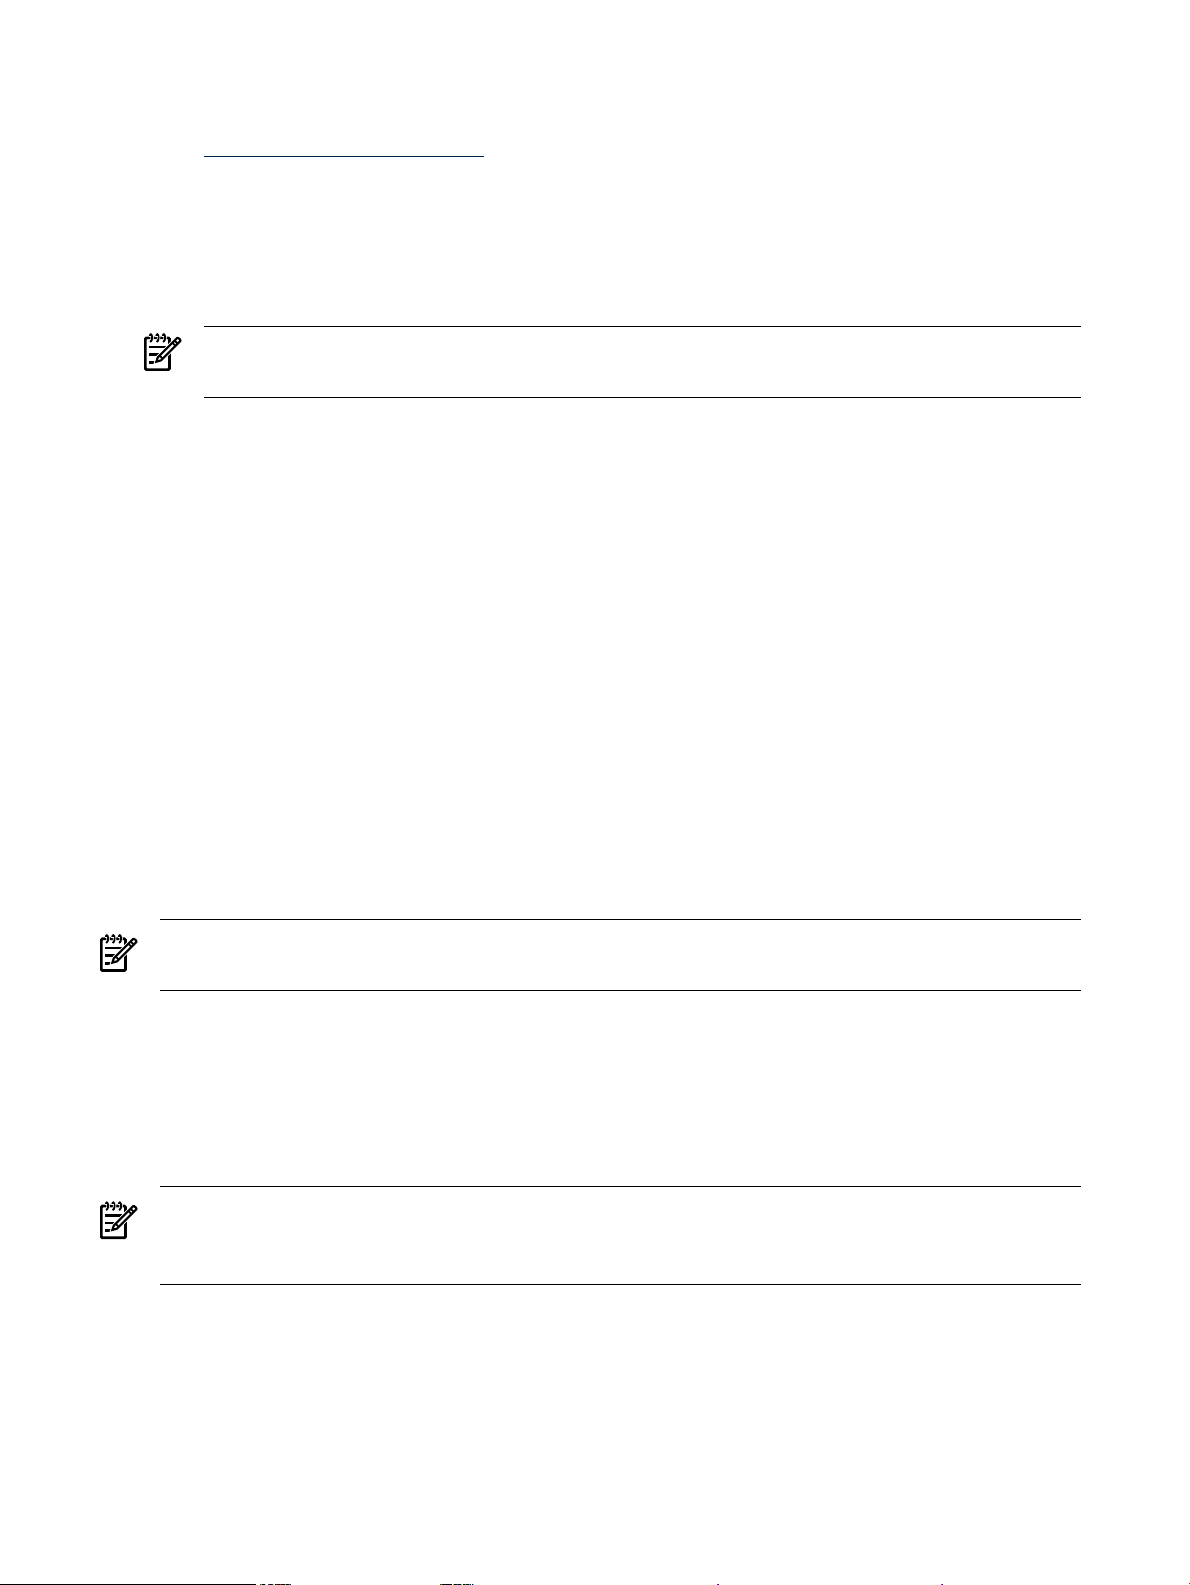
You have a choice of running the installer from the Installer Wizard Graphical User Interface
(GUI) or from the command line:
• “Installer Wizard Steps” (page 28)
• “Command-Line Installation Steps” (page 33)
Installer Wizard Steps
NOTE: On Linux or UNIX, to run the Installer Wizard, you must have the X Window system
installed on the client workstation. If the client workstation does not have the X Window system,
see the “Command-Line Installation Steps” (page 33).
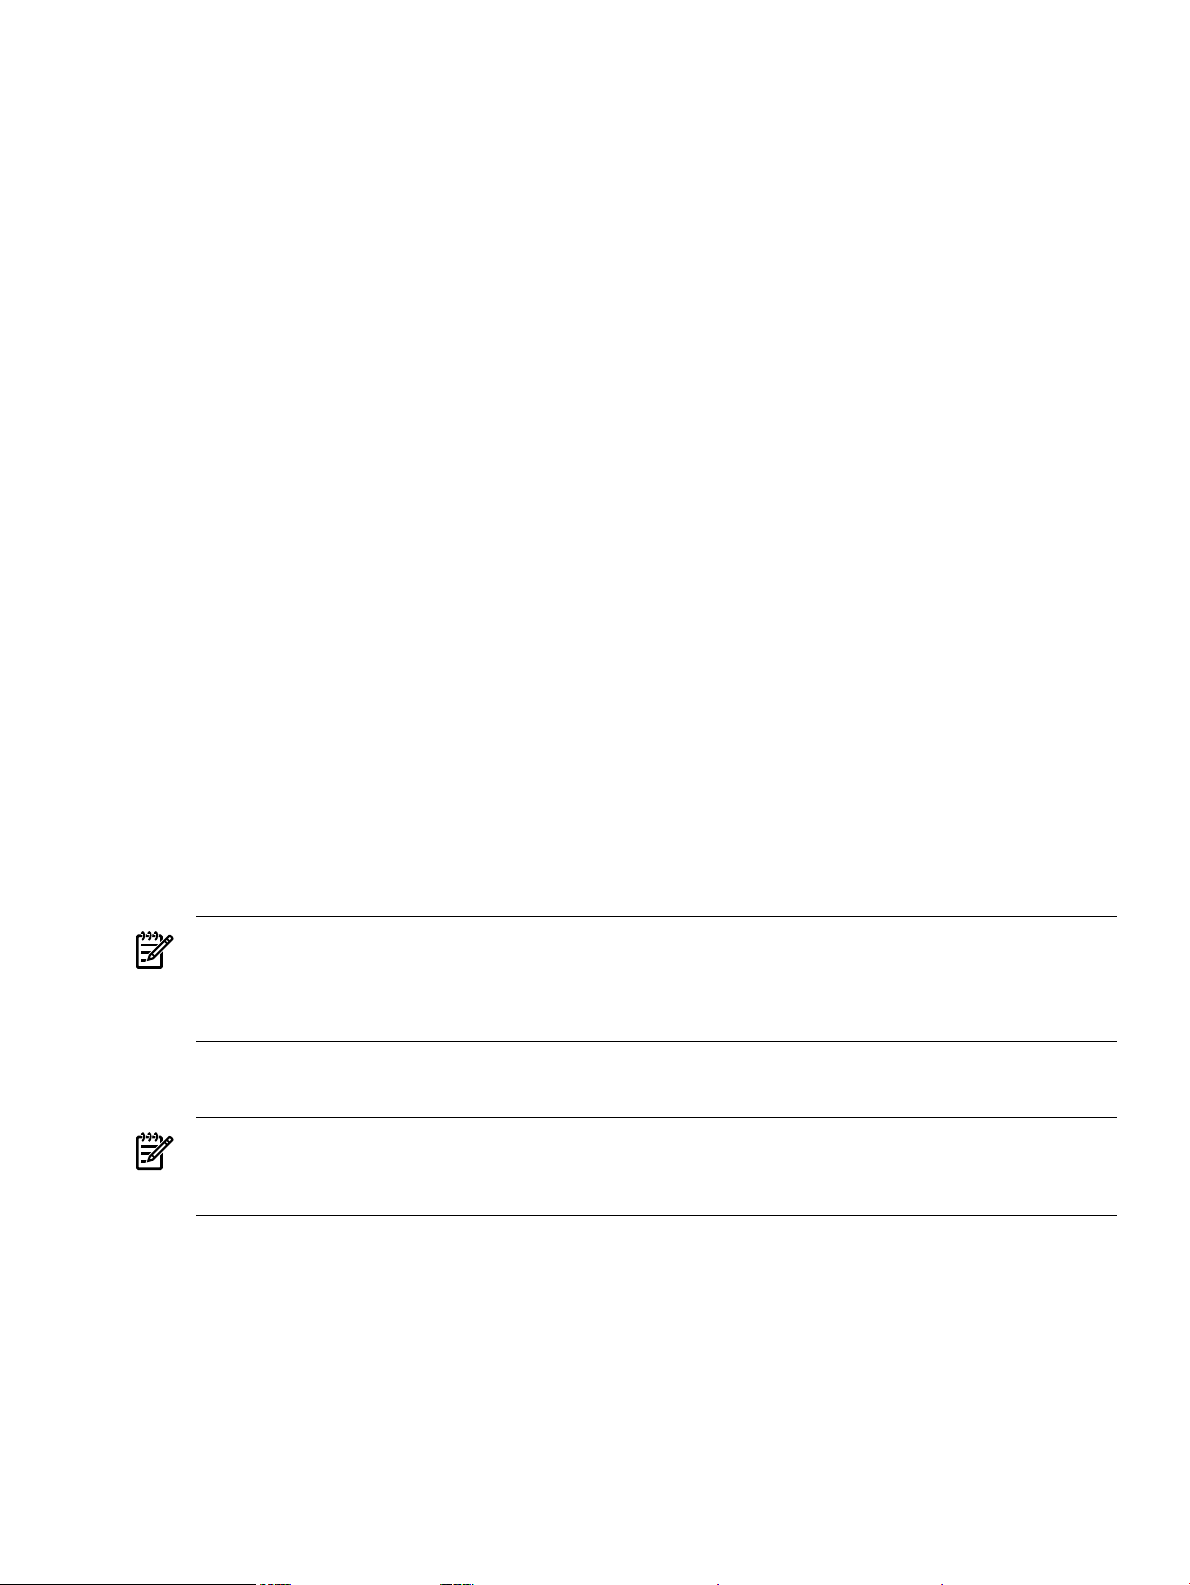
Launching the Installer Wizard
1. Locate the hpnvsInstaller.jar file in the folder where you downloaded the installer.
2. Verify that the hpnvsInstaller.jar file appears as an Executable JAR File.
If not, skip the next two steps and go to Step 5.
3. Double-click the hpnvsInstaller.jar file icon to launch the Installer Wizard.
4. Proceed to “Using the Installer Wizard” (page 29).
28 Installing Neoview Script
Page 29
5. At a command prompt, change to the directory where you downloaded the installer:
cd installer-directory
installer-directory is the directory where you downloaded the installer file,
hpnvsInstaller.jar.
6. Launch the Installer Wizard by entering:
java -jar hpnvsInstaller.jar
7. Proceed to “Using the Installer Wizard” (page 29).
Using the Installer Wizard
When you execute hpnvsInstaller.jar, the Installer Wizard appears:
1. To locate the JDBC driver JAR file, click Browse next to HP Neoview JDBC Type 4 Driver
JAR file:
2. Select the lib folder of the JDBC driver, and then click Open:
Installation Procedures 29
Page 30
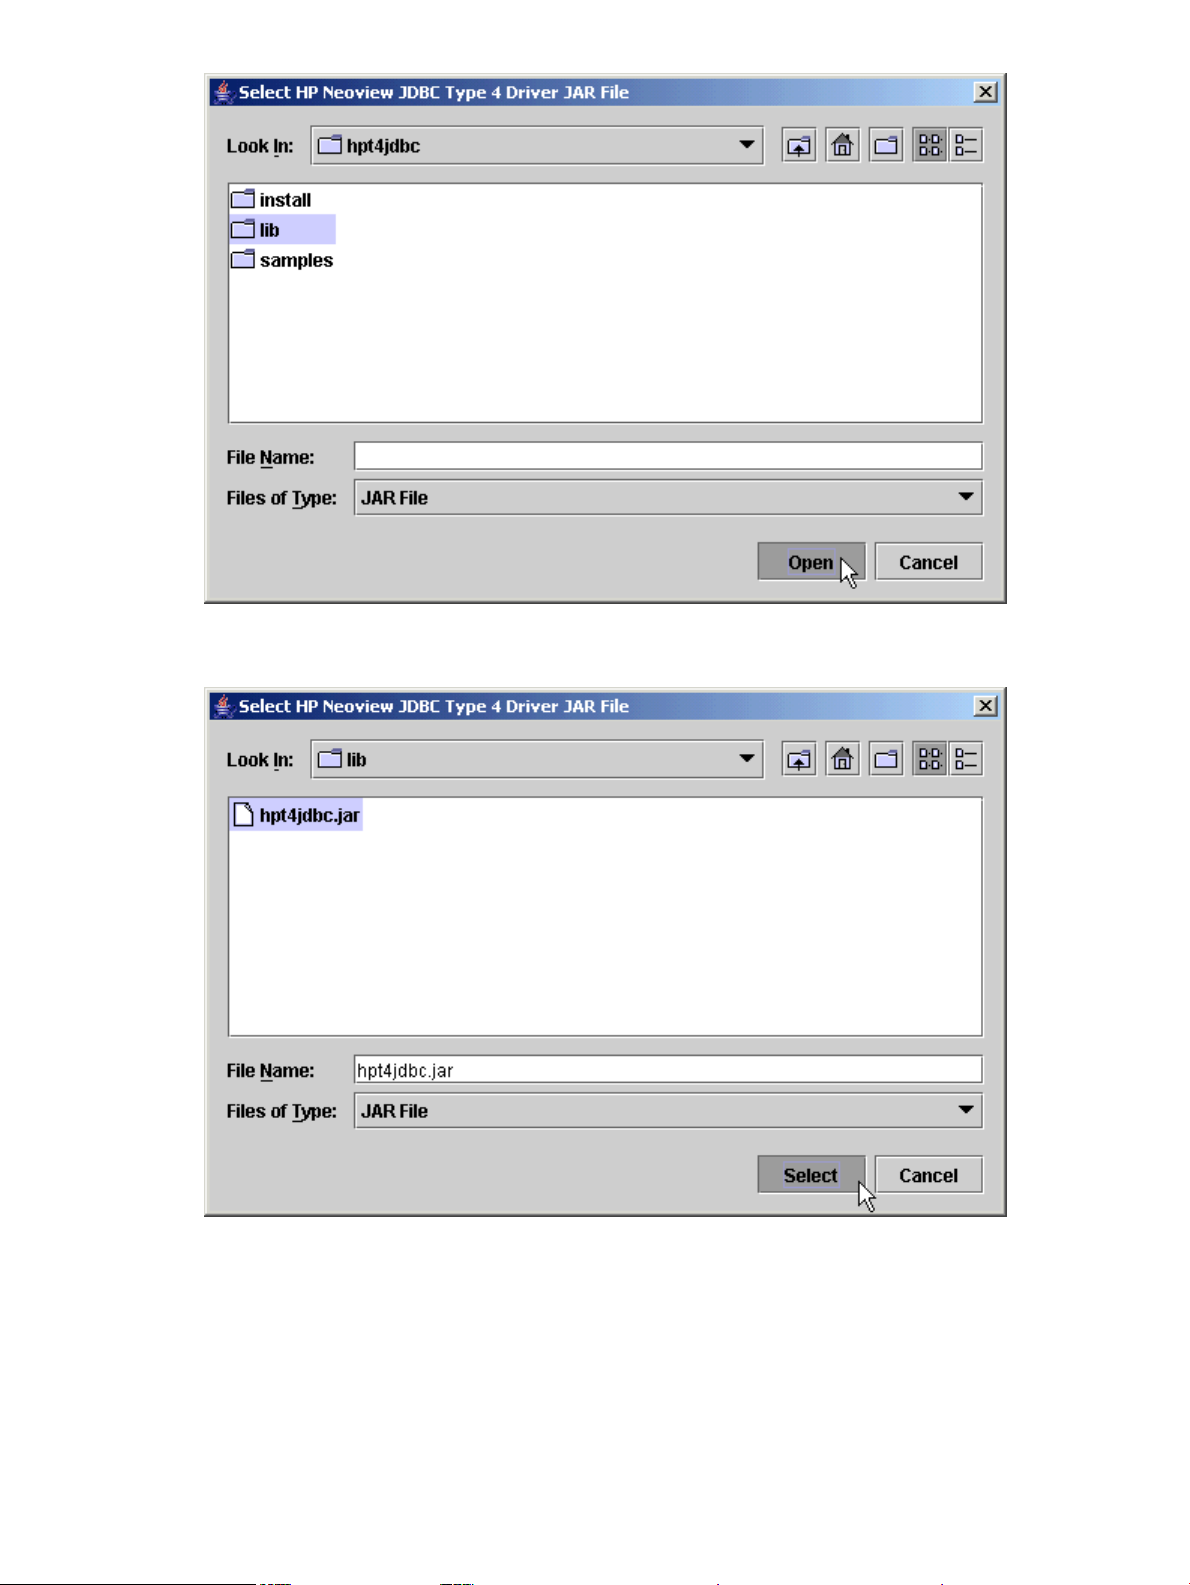
3. Select hpt4jdbc.jar so that it appears in the File Name box, and then click Select:
The Installer Wizard now displays the path of the JDBC driver JAR file:
30 Installing Neoview Script
Page 31

4. To find an installation location for Neoview Script, click Browse next to HP Neoview Script
installation directory:
5. Select the folder where you want to install Neoview Script so that the directory path appears
in the File Name box, and then click Select:
Installation Procedures 31
Page 32

The Installer Wizard displays the directory where the Neoview Script will be installed.
6. Click Install to start the installation:
32 Installing Neoview Script
Page 33

The Installation Status dialog box appears on the screen, indicating how many files are
installed in the installation directory:
The number of files that are extracted and installed is 15. All these files are stored in the
nvscript subdirectory within the installation directory.
7. Click OK, and proceed with “Verifying the Installed Software Files” (page 34).
Command-Line Installation Steps
1. At a command prompt, change to the directory where you downloaded the installer:
cd installer-directory
installer-directory is the directory where you downloaded the installer.
2. Launch the command-line installer by entering:
java -jar hpnvsInstaller.jar cm
The command-line installer starts and prompts you to enter the location of the JDBC driver
JAR file:
3. Enter the full directory path and file name of the JDBC driver JAR file, hpt4jdbc.jar,
which is located in the JDBC driver lib directory:
HP Neoview JDBC Type 4 Driver JAR File
-------------------------------------Enter the location and file name: c:\install\hpt4jdbc\lib\hpt4jdbc.jar
Installation Procedures 33
Page 34

4. Enter an existing directory where you would like to install Neoview Script:
HP Neoview Script
-------------------------------------Enter the installation directory: c:\install
The installation status appears, indicating how many files are installed in the installation
directory:
HP Neoview Script
-------------------------------------Enter the installation directory: c:\install
Extracted 15 files from the
/C:/download/hpnvsInstaller.jar
archive into the
c:\install
directory.
Installation Complete.
C:\download>
The number of files that are extracted and installed is 15. All these files are stored in the
nvscript subdirectory within the installation directory.
5. Proceed with “Verifying the Installed Software Files” (page 34).
Postinstallation Procedures
• “Verifying the Installed Software Files” (page 34)
• “Verifying the Installed Version of Neoview Script” (page 35)
• “Testing the Launch of Neoview Script” (page 39)
Verifying the Installed Software Files
After downloadingand running the installer file,hpnvsInstaller.jar, verify that the Neoview
Script software files are installed in the correct locations. See Table 2-1 (page 34).
Table 2-1 Locations of Neoview Script Software Files
hpnvs.cmdinstall>nvscript>bin
hpnvs.pl
hpnvs.py
hpnvs.sh
hpnvs-perl.pl
hpnvs-python.py
hpnvs.jarinstall>nvscript>lib
Session.pminstall>nvscript>lib>perl
DescriptionFilesDirectory
Windows launch file
Perl wrapper script
Python wrapper script
Linux or UNIX launch file
Beta version Perl wrapper script
Beta version Python wrapper script
Product JAR file
Product file
1
1
34 Installing Neoview Script
Session.pyinstall>nvscript>lib>python
READMEinstall>nvscript>samples
sample.pl
sample.py
sample.sql
Product file
Readme file that describes how to use
the sample scripts
Sample Perl program
Sample Python program
Sample SQL script
Page 35

Table 2-1 Locations of Neoview Script Software Files (continued)
sample-beta.pl
DescriptionFilesDirectory
Beta version of sample Perl program
1
sample-beta.py
1 Neoview Script provides a beta version of enhanced support for Perl andPython programs. This functionality enables
multiple SQL statements to run in one database connection from a Perl or Python program. For more information,
see the README in the Neoview Script samples directory.
Verifying the Installed Version of Neoview Script
To display the installed version of Neoview Script without launching Neoview Script and
connecting to the database platform:
1. Change to the lib directory, which contains the Neoview Script JAR file:
• On Windows, enter:
cd hpnvs-installation-directory\nvscript\lib
hpnvs-installation-directory is the directory where you installed the Neoview
Script software files.
• On Linux or UNIX, enter:
cd hpnvs-installation-directory/nvscript/lib
hpnvs-installation-directory is the directory where you installed the Neoview
Script software files.
2. Enter this command to return version information:
java -jar hpnvs.jar
For example:
C:\>cd install\nvscript\lib
Beta version of sample Python
program
1
C:\install\nvscript\lib>java -jar hpnvs.jar
T0774_N24_AAC(R2.1)_11MAY07_HP_hpnvs_2007_04_12
C:\install\nvscript\lib>
If the JAR file is inaccessible or the returned version is not supported, see “Installation
Procedures” (page 27).
To display the installed versions of Neoview Script and the JDBC Type 4 Driver in the Neoview
Script interface:
1. Launch the Neoview Script interface. See Chapter 3 (page 41).
2. Enter the VERSION command to display information about the build versions:
SQL>version
Neoview Script Build Version : T0774_N24_AAC(R2.1)_11MAY07_HP_hpnvs_2007_04_12
JDBC Type 4 Driver Build Version : T1249_N24_AAK(R2.1)_11MAY07_HP_JDBCT4_2007_04_05
SQL>
If the returned version is not supported, see “Installation Procedures” (page 27).
Setting the Look and Feel of the Neoview Script Interface
To determine the look and feel of the Neoview Script interface, set the -DhpnvsLF property by
using the _JAVA_OPTIONS environment variable. This property affects the formatting of status
messages. This property does not restrict the SQL statements, commands, or syntax that you can
Postinstallation Procedures 35
Page 36

execute in the Neoview Script interface. Each look-and-feel type accepts all the SQL statements,
commands, and syntax that Neoview Script currently supports.
Supported Look-and-Feel Types
Currently, Neoview Script supports the SQLPlus and Teradata look-and-feel types, in addition
to the default look and feel, Neoview SQL. The default look and feel, Neoview SQL, appears as
shown below:
Welcome to the HP Neoview Script Interface 2.1
(c) Copyright 2006, 2007 Hewlett-Packard Development Company, LP.
Connected to DataSource: TDM_Default_DataSource
SQL>create view persnl.salarylist
+>as select salary from persnl.employee;
--- SQL operation complete.
SQL>
The -DhpnvsLF property value for setting the SQLPlus look and feel is SQLPlus. The SQLPlus
look and feel appears as shown below:
Picked up _JAVA_OPTIONS: -DhpnvsLF=SQLPlus
Welcome to the HP Neoview Script Interface 2.1
(c) Copyright 2006, 2007 Hewlett-Packard Development Company, LP.
Connected to DataSource: TDM_Default_DataSource
SQL>create view persnl.salarylist
+>as select salary from persnl.employee;
View created.
SQL>
NOTE: The look and feel property value Oracle is supported for backward compatibility.
The -DhpnvsLF property value for setting the Teradata look and feel is BTEQ. Setting this
property results in a Teradata personality for the messages logged for all SQL operations within
Neoview Script. The Teradata look and feel appears as shown below:
SQL>set schema sch;
*** Schema has been set.
*** Total elapsed time was 16 second(s).
SQL>select * from book;
BOOKID BOOKTITLE BOOKAUTHORID ISCHECKEDOUT
----------- ------------------------------ ------------ ----------- 13333 UML Simplified 93333 0
11111 C++ Internals 91111 0
12222 Object Oriented Design 92222 0
*** Query completed. 3 rows found. 4 columns returned.
*** Total elapsed time was 1 second(s).
SQL>
To set the look and feel, see:
• “Setting the Look and Feel at a Command-Line Prompt” (page 37)
• “Setting the Look and Feel in the System Properties on Windows” (page 37)
• “Setting the Look and Feel in the User Profile on Linux or UNIX” (page 39)
36 Installing Neoview Script
Page 37

If you do not set a look and feel, the default is Neoview SQL.
Setting the Look and Feel at a Command-Line Prompt
To set the _JAVA_OPTIONS environment variable for each session at a command-line prompt:
• On Windows, enter this command:
set _JAVA_OPTIONS=-DhpnvsLF=look-and-feel-type
look-and-feel-type is one of the “Supported Look-and-Feel Types” (page 36). For
example:
set _JAVA_OPTIONS=-DhpnvsLF=SQLPlus
set _JAVA_OPTIONS=-DhpnvsLF=BTEQ
• On Linux or UNIX, enter this command:
export _JAVA_OPTIONS=-DhpnvsLF=look-and-feel-type
look-and-feel-type is one of the “Supported Look-and-Feel Types” (page 36). For
example:
export _JAVA_OPTIONS=-DhpnvsLF=SQLPlus
export _JAVA_OPTIONS=-DhpnvsLF=BTEQ
To return to the default look and feel, Neoview SQL, set the -DhpnvsLF property value to nvs.
If you specify an invalid value, a warning message is displayed and the property value is set to
nvs.
Setting the Look and Feel in the System Properties on Windows
1. Right-click the My Computer icon on your desktop and then select Properties.
2. In the System Properties dialog box, select the Advanced tab and click Environment
Variables.
Postinstallation Procedures 37
Page 38

3. If _JAVA_OPTIONS does not appear among the environment variables, click New under
System or User variables. If _JAVA_OPTIONS already exists, click Edit.
4. Type _JAVA_OPTIONS for the Variable Name and the -DhpnvsLF property value for the
Variable Value, and click OK.
The Variable Value must include:
-DhpnvsLF=look-and-feel-type
look-and-feel-type is one of the “Supported Look-and-Feel Types” (page 36). For
example:
-DhpnvsLF=SQLPlus
5. Verify that the new or updated _JAVA_OPTIONS appears under System or User variables
and click OK.
38 Installing Neoview Script
Page 39

6. In the System Properties dialog box, click OK to accept the changes.
To return to the default look and feel, Neoview SQL, set the -DhpnvsLF property value to nvs.
Setting the Look and Feel in the User Profile on Linux or UNIX
1. Open the user profile (.profile or .bash_profile for the Bash shell) in the /home
directory. For example:
vi .profile
2. Add this export command (or a setenv command for the C shell) to the user profile. For
example:
export _JAVA_OPTIONS=-DhpnvsLF=look-and-feel-type
look-and-feel-type is one of the “Supported Look-and-Feel Types” (page 36). For
example:
export _JAVA_OPTIONS=-DhpnvsLF=SQLPlus
export _JAVA_OPTIONS=-DhpnvsLF=BTEQ
3. To activate the changes, either log out and log in again or execute the user profile. For
example:
. .profile
To return to the default look and feel, Neoview SQL, set the -DhpnvsLF property value to nvs.
Testing the Launch of Neoview Script
1. Launch the Neoview Script interface and verify that you can connect to the database. For
instructions, see Chapter 3 (page 41).
This window should appear:
Postinstallation Procedures 39
Page 40

2. If you cannot connect to the database, verify that:
1. The database platform is available and running, the port number is correct for the
database platform, and you are authorized to log in to that database platform. To create
a user ID to log in to the database, see the Neoview Database Administrator’s Guide.
2. The version of the Neoview JDBC Type 4 Driver is compatible with the Java Runtime
Environment (JRE) of the workstation. See “Installing and Verifying the Java Runtime
Environment (JRE)” (page 23).
3. You installed the Neoview Script software files correctly. See “Verifying the Installed
Software Files” (page 34).
40 Installing Neoview Script
Page 41

3 Launching the Neoview Script Interface
This chapter describes how to launch the Neoview Script interface from the Windows, Linux, or
UNIX environment:
• “Launching the Neoview Script Interface on Windows” (page 41)
• “Launching the Neoview Script Interface on Linux or UNIX” (page 44)
• “Logging In to the Database Platform” (page 45)
• “Using Optional Launch Parameters” (page 46)
• “Launching Neoview Script Without Connecting to the Database” (page 49)
• “Exiting the Neoview Script Interface”
For information about launching Neoview Script from Perl or Python, see Chapter 6 (page 71).
Launching the Neoview Script Interface on Windows
1. Find the Windows launch file, hpnvs.cmd, in the Neoview Script bin folder:
2. Double-click the hpnvs.cmd file.
The Neoview Script interface appears, prompting you to enter the host name or IP address
of the database platform, your user name, password, and a data source name. See “Logging
In to the Database Platform” (page 45).
Creating a Shortcut to hpnvs.cmd
To enable a user to launch Neoview Script from a shortcut icon on the desktop:
1. Right-click the desktop and select New > Shortcut:
Launching the Neoview Script Interface on Windows 41
Page 42

2. Type the location of hpnvs.cmd within double quotes (“) or click Browse to locate that file,
and then click Next:
For the location of the Neoview Script software files, see Table 2-1 (page 34).
3. Type a name for the shortcut and click Finish:
42 Launching the Neoview Script Interface
Page 43

4. If desired, specify optional launch parameters for the shortcut:
a. Right-click the shortcut icon and select Properties:
b. Click the Shortcut tab.
c. In the Target box, insert a space after "...\nvscript\bin\hpnvs.cmd" and add
the optional launch parameters:
Launching the Neoview Script Interface on Windows 43
Page 44

For more information, see “Using Optional Launch Parameters” (page 46).
d. Click OK.
5. To launch Neoview Script, double-click the shortcut icon.
The Neoview Script interface appears. If you did not set the optional launch parameters,
the Neoview Script interface prompts you to enter the host name or IP address of the database
platform, your user name, password, and a data source name. See “LoggingIn to the Database
Platform” (page 45).
Launching the Neoview Script Interface on Linux or UNIX
In the terminal window, enter:
./hpnvs-installation-directory/nvscript/bin/hpnvs.sh
hpnvs-installation-directory is the directory where you installed the Neoview Script
software files. For more information, see Table 2-1 (page 34).
Setting the PATH of hpnvs.sh
To enable a user to launch Neoview Script anywhere on the client workstation:
1. Open the user profile (.profile or .bash_profile for the Bash shell) in the /home
directory. For example:
vi .profile
2. In the user profile, set the PATH environment variable to include the path of the hpnvs.sh
file. For example:
export PATH=/hpnvs-installation-directory/nvscript/bin/:...
44 Launching the Neoview Script Interface
Page 45

hpnvs-installation-directory is the directory where you installed the Neoview
Script software files. For more information, see Table 2-1 (page 34). Check that no space is
after the colon (:) in the path.
NOTE: In the C shell, use the setenv command instead of export.
3. To activate the changes, either log out and log in again or execute the user profile. For
example:
. .profile
4. On the command line, execute the hpnvs.sh file to launch Neoview Script:
hpnvs.sh
The Neoview Script interface appears, prompting you to enter the host name or IP address
of the database platform, your user name, password, and a data source name. See “Logging
In to the Database Platform” (page 45).
NOTE: To enable all users to launch Neoview Script anywhere on the system, create a
symbolic link to the hpnvs.sh file in the /usr/bin or /usr/local/bin directory:
ln -s ./hpnvs-installation-directory/nvscript/bin/hpnvs.sh /usr/bin/hpnvs.sh
Presetting the Optional Launch Parameters
To preset the optional launch parameters for each session, use an alias command. For example:
alias hpnvs='hpnvs.sh -h sys0101.mylab.mycorp.net:18650 -u dba1 -p xxxxxx -dsn DataSourceName'
You can add the alias, hpnvs, to the user profile, or you can enter it at a command prompt. For
more informationabout the optional launchparameters, see “Using Optional Launch Parameters”
(page 46).
Logging In to the Database Platform
• “Default Login” (page 45)
• “Login Parameters” (page 46)
Default Login
NOTE: You must be authorized to log in to the database platform. To create a user ID to log in
to the database, see the Neoview Database Administrator’s Guide.
1. After you launch the Neoview Script interface, Neoview Script prompts you to enter the
host name or IP address of the database platform:
Host Name/IP Address: _
Enter a host name:
host-name[.domain-name][:port-number]
• If you do not specify the domain name, Neoview Script uses the domain of the client
workstation.
• If you do not specify a port number, Neoview Script uses the default port number,
which is 18650.
Or enter an IP address:
IP-address[:port-number]
2. Enter your user name.
Logging In to the Database Platform 45
Page 46

3. Enter your password.
4. Enter the name of a data source that is available and running (that is, started).
If you do not enter a data source, Neoview Script connects to Admin_Load_DataSource
by default. Admin_Load_DataSource is the recommended data source for Neoview Script
connections. If Admin_Load_DataSource (or any data source that you specify) is not
started, Neoview Script returns an error and prompts you to close the session. If you specify
a data source that does not exist, Neoview Script returns a warning and connects to
TDM_Default_DataSource instead.
After you finish logging in to the database platform, the SQL prompt appears.
Host Name/IP Address: sys0101.mylab.mycorp.net:18650
User Name: dba1
Password:
DataSource Name [Admin_Load_DataSource]:
Welcome to the HP Neoview Script Interface 2.1
(c) Copyright 2006, 2007 Hewlett-Packard Development Company, LP.
Connected to DataSource: Admin_Load_DataSource
SQL>
At the prompt, you can enter an SQL statement or a Neoview Script interface command. For
more information, see Chapter 4 (page 51).
Login Parameters
Instead of the default method of logging in to the database platform, use the login parameters
-h (or -host), -u (or -user), -p (or -password), and -dsn when launching Neoview Script.
For more information, see “Logging In When Launching Neoview Script” (page 47).
Using Optional Launch Parameters
To customize how you launch and log in to the Neoview Script interface, use these optional
parameters:
{-h | -host} host-name[:port-number]{-h |
-host} IP-address[:port-number]
{-u | -user} user-name
{-p | -password} password
-dsn data-source-name
DescriptionLaunch Parameter
Specifies the host name or IP address of the database
platform to which you want the client to connect. The
host-name should include the domain name of the
database platform if it is different from the domain of the
client workstation. If you do not specify a port number,
Neoview Script uses the default port number, which is
18650. For more information, see “Logging In When
Launching Neoview Script” (page 47).
Specifies the user name to log in to the database platform.
For more information, see “Logging In When Launching
Neoview Script” (page 47).
Specifies thepassword of the user to login tothe database
platform. For more information, see “Logging In When
Launching Neoview Script” (page 47).
Specifies the name of a data source. The recommended
data source for Neoview Script connections is
Admin_Load_DataSource. If
Admin_Load_DataSource (or any data source that you
specify) is not started, Neoview Script returns an error
and prompts you to close the session. If you specify adata
source that does not exist, Neoview Script returns a
warning and connects to TDM_Default_DataSource
instead. For more information, see “Logging In When
Launching Neoview Script” (page 47).
46 Launching the Neoview Script Interface
Page 47

{-q | -sql} "command"
{-s | -script} script-file-name
-noconnect
Logging In When Launching Neoview Script
To avoid entering a host name, user name, password, or data source when the Neoview Script
interface launches, use the -h (or -host), -u (or -user), -p (or -password), or -dsn
command-line parameters.
NOTE: You can include these parameters in a shortcut to the hpnvs.cmd file or in a launch
file for the hpnvs.sh file. For more information, see “Creating a Shortcut to hpnvs.cmd” (page 41)
or “Presetting the Optional Launch Parameters” (page 45), respectively.
DescriptionLaunch Parameter
Specifies that an SQL statement or a Neoview Script
interface command be run when launching the Neoview
Script interface. You cannot specify this parameter at the
same time as the -s or -script parameter. For more
information, see “Running a Command When Launching
Neoview Script” (page 47).
Specifies that a script file be run when launching the
Neoview Script interface. You cannot specify this
parameter at the same time as the -q or -sql parameter.
For more information, see “Running a Script File When
Launching Neoview Script” (page 48).
Launches a Neoview script session without connecting to
the Neoview platform (database).For more information,
see “Launching Neoview Script Without Connecting to
the Database” (page 49).
• On Windows, in the Command Prompt window, enter:
cd hpnvs-installation-directory\nvscript\bin
hpnvs.cmd -h sys0101.mylab.mycorp.net:18650 -u dba1 -p xxxxxx
-dsn DataSourceName
• On Linux or UNIX, in the terminal window, enter:
cd hpnvs-installation-directory/nvscript/bin
./hpnvs.sh -h sys0101.mylab.mycorp.net:18650 -u dba1 -p xxxxxx
-dsn DataSourceName
The Neoview Script interface launches and prompts you to enter an SQL statement or a Neoview
Script interface command:
Welcome to the HP Neoview Script Interface 2.1
(c) Copyright 2006, 2007 Hewlett-Packard Development Company, LP.
Connected to DataSource: Admin_Load_DataSource
SQL>
Running a Command When Launching Neoview Script
To execute an SQL statement or a Neoview Script interface command when launching Neoview
Script, use the -q or -sql command-line parameter. This parameter enables you to run a single
command on the command line without having to enter commands in the Neoview Script
interface.
NOTE: You cannot specify this parameter at the same time as the -s or -script parameter.
When using -q or -sql, you must enclose the command in double quotes. The SQL terminator
is not required at the end of an SQL statement and is disallowed after a Neoview Script interface
command.
Logging In to the Database Platform 47
Page 48

Although you can run any of the Neoview Script interface commands with -q or -sql, the @,
OBEY, and PRUN commands are the most useful. For a list of supported SQL statements, see
Appendix B (page 133).
Example of Running an SQL Statement With -q or -sql
Use -q or -sql with the CREATE SCHEMA statement to create a schema when launching the
Neoview Script interface:
• On Windows, in the Command Prompt window, enter:
cd hpnvs-installation-directory\nvscript\bin
hpnvs.cmd -q "create schema persnl"
• On Linux or UNIX, in the terminal window, enter:
cd hpnvs-installation-directory/nvscript/bin
./hpnvs.sh -q "create schema persnl"
After you enter the SQL statement, the Neoview Script interface launches, prompts you to log
in by default (if you did not specify -h, -u, -p, and -dsn on the command line), runs the SQL
statement, and then returns to the command prompt:
Host Name/IP Address: sys0101.mylab.mycorp.net:18650
User Name: dba1
Password:
DataSource Name [Admin_Load_DataSource]:
--- SQL operation complete.
C:\install\nvscript\bin>_
Example of Running a Neoview Script Interface Command With -q or -sql
Use -q or -sql with the PRUN command to run multiple script files simultaneously from the
command line:
• On Windows, in the Command Prompt window, enter:
cd hpnvs-installation-directory\nvscript\bin
hpnvs.cmd -q "prun"
• On Linux or UNIX, in the terminal window, enter:
cd hpnvs-installation-directory/nvscript/bin
./hpnvs.sh -q "prun"
After you enter the Neoview Script interface command, the Neoview Script interface launches,
prompts you to log in by default (if you did not specify -h, -u, -p, and -dsn on the command
line), and runs the command. The parallel run (PRUN) operation prompts you to enter settings
and then executes the script files. At the endof the PRUN operation, the Neoview Script interface
returns to the command prompt. For more information about the PRUN operation, see “PRUN
Command” (page 95).
Running a Script File When Launching Neoview Script
To run a script file when launching Neoview Script, use the -s or -script command-line
parameter.
NOTE: You cannot specify this parameter at the same time as the -q or -sql parameter.
After you launch the Neoview Script interface with -s or -script, Neoview Script executes
the script file. The Neoview Script interface remains open until you enter the EXIT, QUIT, or
48 Launching the Neoview Script Interface
Page 49

DISCONNECT command. To quit the interface immediately after executing a script file, include
the EXIT, QUIT, or DISCONNECT command at the end of the script file.
Example of a Script File
You can create a script file that contains SET commands that customize a session when you
launch Neoview Script:
For more information, see “Creating a Script File” (page 67).
Example of Running a Script File With -s or -script
• On Windows, in the Command Prompt window, enter:
cd hpnvs-installation-directory\nvscript\bin
hpnvs.cmd -s settings.txt
Specify the full path of the script file if it is outside the directory of hpnvs.cmd.
• On Linux or UNIX, in the terminal window, enter:
cd hpnvs-installation-directory/nvscript/bin
./hpnvs.sh -s settings.txt
Specify the full path of the script file if it is outside the directory of hpnvs.sh.
The Neoview Script interface launches, prompts you to log in by default (if you did not specify
-h, -u, -p, and -dsn on the command line), and runs the commands in the script file:
Host Name/IP Address: sys0101.mylab.mycorp.net:18650
User Name: dba1
Password:
DataSource Name [Admin_Load_DataSource]:
Welcome to the HP Neoview Script Interface 2.1
(c) Copyright 2006, 2007 Hewlett-Packard Development Company, LP.
Connected to DataSource: Admin_Load_DataSource
SQL>SET IDLETIMEOUT 0
SQL>SET SQLPROMPT *
*SET TIME ON
14:14:57 *SET TIMING ON
2:14:57 PM *SET SQLTERMINATOR .
2:14:57 PM *
Launching Neoview Script Without Connecting to the Database
To start a Neoview Script session without connecting to the Neoview platform, use the
-noconnect option.
Logging In to the Database Platform 49
Page 50

Example of Launching Neoview Script File With -noconnect
• On Windows, in the Command Prompt window, enter:
cd hpnvs-installation-directory\nvscript\bin
hpnvs.cmd -noconnect
• On Linux or UNIX, in the terminal window, enter:
cd hpnvs-installation-directory/nvscript/bin
./hpnvs.sh -noconnect
Exiting the Neoview Script Interface
To exit the Neoview Script interface, enter one of these commands at a prompt:
• EXIT
• QUIT
For example:
SQL>quit
These commands are not case-sensitive and do not require a terminator before you press Enter.
After you enter one of these commands, the Neoview Script interface immediately quits running
and disappears from the screen.
50 Launching the Neoview Script Interface
Page 51

4 Running Commands Interactively in the Neoview Script
Interface
After launching the Neoview Script interface, you can run SQL statements and Neoview Script
interface commands in the interface.
• “Neoview Script Interface” (page 51)
• “Using Neoview Script Interface Commands” (page 52)
• “Running SQL Statements” (page 59)
• “Logging Output” (page 63)
Neoview Script Interface
• “Product Banner” (page 51)
• “Interface Prompts” (page 51)
• “Breaking the Command Line” (page 51)
• “Case Sensitivity” (page 52)
Product Banner
After you launch Neoview Script and connect to the database platform, the product banner
appears in the Neoview Script interface. The product banner displays the version of Neoview
Script and the data source to which you are connected:
Interface Prompts
During a session, Neoview Script prompts you to enter SQL statements and Neoview Script
interface commands:
SQL>
+>
Breaking the Command Line
You cannot break a Neoview Script interface command over multiple lines. Each Neoview Script
interface command must be entered on one line. If you accidentally break a Neoview Script
interface command across more than one line, enter the SQL terminator and then reenter the
command on one line.
Standard prompt in SQL mode. You can change the
standard prompt, SQL>, to something else by using the
SET SQLPROMPT command. For more information, see
the “Customizing the Standard Prompt” (page 53).
Continuation prompt. Continue the SQL statement from
the previous line. Use the SQL terminator (a semicolon by
default) to terminate an SQL statement. For more
information, see “Setting and Showing the SQL
Terminator” (page 54). Note: Neoview Script interface
commands mustbe entered on one line and donot require
an SQL terminator.
Neoview Script Interface 51
Page 52

You can continue any SQL statement over multiple lines, breaking that statement at any point
except within a word, a numeric literal, or a multicharacter operator (for example, <=). To break
a string literal in a DML statement, use a concatenation operator (||). For more information, see
the concatenation operator in the Neoview SQL Reference Manual.
To terminate an SQL statement that spans multiple lines, use the SQL terminator for the session.
You can also include several SQL statements on the same command line provided that each one
is terminated by the SQL terminator. For more information, see “Setting and Showing the SQL
Terminator” (page 54).
Case Sensitivity
In the Neoview Script interface, you can enter SQL statements and Neoview Script interface
commands in uppercase, lowercase, or mixed-case characters. All parts of statements and
commands are case-insensitive except for parts that you enclose in single-quotes (') or
double-quotes (").
Using Neoview Script Interface Commands
The Neoview Script interface commands allow you to customize the Neoview Script interface
(for example, by using SET commands) or return information about the interface settings or
database objects (for example, by using SHOW commands):
• “Showing the Session Attributes” (page 52)
• “Setting and Showing the Idle Timeout Value for the Session” (page 53)
• “Customizing the Standard Prompt” (page 53)
• “Setting and Showing the SQL Terminator” (page 54)
• “Displaying the Elapsed Time” (page 54)
• “Setting and Showing the Current Schema” (page 55)
• “Limiting the Result Set of a Query” (page 55)
• “Showing Information About SQL Database Objects” (page 55)
• “Displaying Executed Commands” (page 58)
• “Editing and Reexecuting a Command” (page 58)
• “Clearing the Interface Window” (page 58)
• “Obtaining Help” (page 58)
For more information about the Neoview Script interface commands, see Appendix A (page 79).
NOTE: Each Neoview Script interface command must be entered on one line. If you accidentally
break a Neoview Script interface command across more than one line, enter the SQL terminator
and then reenter the command on one line.
Showing the Session Attributes
To display the attributes and settings of the current Neoview Script session, use the ENV, SHOW
SESSION, or SESSION command. For example, this SESSION command displays the session
attributes:
SQL>session
COLSEP " "
DATASOURCE TDM_Default_DataSource
HISTOPT ALL
IDLETIMEOUT 30 min(s)
LIST COUNT 0 [All Rows]
LOG OFF
LOOK AND FEEL BTEQ
MARKUP RAW
MODE SQL
PROMPT SQL>
52 Running Commands Interactively in the Neoview Script Interface
Page 53

SCHEMA USR
SERVER neo0101.acme.com:18650
SQLTERMINATOR ;
TIME OFF
TIMING OFF
USER role.dba
SQL>
For more information, see the “ENV Command” (page 85) or “SHOW SESSION Command”
(page 122).
Setting and Showing the Idle Timeout Value for the Session
The idle timeout value of a session determines when the session expires after a period of inactivity.
To set the idle timeout value of a session, enter the SET IDLETIMEOUT command. For example,
this SET IDLETIMEOUT 0 command sets the idle timeout to an infinite amount of time so that
the session never expires:
SQL>set idletimeout 0
SQL>
To show the idle timeout value that is in effect for the session, enter the SHOW IDLETIMEOUT
command. For example, this SHOW IDLETIMEOUT command displays an idle timeout of zero
minutes, which means that the session never expires:
SQL>show idletimeout
IDLETIMEOUT 0 min(s) [Never Expires]
SQL>
For more information, see the “SET IDLETIMEOUT Command” (page 103) and the “SHOW
IDLETIMEOUT Command” (page 114).
Customizing the Standard Prompt
To change the standard prompt in the Neoview Script interface, use one or both of these
commands:
• “SET PROMPT Command” (page 109)
• “SET TIME Command” (page 53)
SET PROMPT Command
The SET PROMPT command changes the default prompt to a specified character or string. For
example, this SET PROMPT command changes the prompt to the operating mode (SQL) and
ENTER>:
SQL>set prompt "%MODE ENTER>"
SQL ENTER>
For more information, see the “SET PROMPT Command” (page 109).
SET TIME Command
The SET TIME ON command causes the current time of the client workstation to be displayed
in the prompt:
SQL ENTER>set time on
20:32:26 SQL ENTER>
The SET TIME OFF command removes the current time from the prompt:
Using Neoview Script Interface Commands 53
Page 54

20:32:26 SQL ENTER>set time off
SQL ENTER>
For more information, see the “SET TIME Command” (page 112).
Setting and Showing the SQL Terminator
The SQL terminator symbolizes the end of an SQL statement. By default, the SQL terminator is
a semicolon (;).
To change the SQL terminator, enter the SET SQLTERMINATOR command. For example, this
SET TERMINATOR command sets the SQL terminator to a period (.):
SQL>set sqlterminator .
SQL>insert into sales.custlist
+>(select * from invent.supplier
+>where suppnum=8).
--- 1 row(s) inserted.
SQL>
To show the SQL terminator that is in effect for the session, enter the SHOW SQLTERMINATOR
command. For example, this SHOW TERMINATOR command displays SQLTERMINATOR .,
where the period (.) is the SQL terminator for the session:
SQL>show sqlterminator
SQLTERMINATOR .
SQL>
For more information, see the “SET SQLTERMINATOR Command” (page 112) and the “SHOW
SQLTERMINATOR Command” (page 124).
Displaying the Elapsed Time
By default, Neoview Script does not display the elapsed time of an SQL statement after the
statement executes. To display the elapsed time after each SQL statement executes, enter the SET
TIMING ON command:
SQL>set timing on
SQL>select suppname, street, city, state, postcode
+>from invent.supplier
+>where suppnum=3;
SUPPNAME STREET CITY STATE POSTCODE
----------------- -------------------- -------------- ------------ ---------HIGH DENSITY INC 7600 EMERSON NEW YORK NEW YORK 10230
--- 1 row(s) selected.
Elapsed :00:00:00.111
SQL>
To prevent the elapsed time from being displayed after each SQL statement executes, enter the
SET TIMING OFF command:
SQL>set timing off
SQL>/
SUPPNAME STREET CITY STATE POSTCODE
----------------- -------------------- -------------- ------------ ---------HIGH DENSITY INC 7600 EMERSON NEW YORK NEW YORK 10230
--- 1 row(s) selected.
54 Running Commands Interactively in the Neoview Script Interface
Page 55

SQL>
For more information, see the “SET TIMING Command” (page 113).
Setting and Showing the Current Schema
By default, the schema of the session is USR. The SQL statement, SET SCHEMA, allows you to
set the schema for the Neoview Script session. For example, this SET SCHEMA statement changes
the default schema to PERSNL for the session:
SQL>set schema persnl;
--- SQL operation complete.
SQL>delete from employee
+>where first_name='TIM' and
+>last_name='WALKER';
--- 1 row(s) deleted.
SQL>
The schema that you specify with SET SCHEMA remains in effect until the end of the session or
until you execute another SET SCHEMA statement.
If you execute this statement in a script file, it affects not only the SQL statements in the script
file but all subsequent SQL statements that are run in the current session. If you set the schema
in a script file, reset the default schema for the session at the end of the script file.
For more information about the SET SCHEMA statement, see the Neoview SQL Reference Manual.
The SHOW SCHEMA command displays the current schema for the session. For example, this
SHOW SCHEMA commanddisplays SCHEMA PERSNL, where PERSNL is the name of the current
schema for the session:
SQL>show schema
SCHEMA PERSNL
SQL>
For more information, see the “SHOW SCHEMA Command” (page 120).
Limiting the Result Set of a Query
To set the maximum number of rows to be returned by SELECT statements that are executed in
the session, enterthe SET LIST_COUNT command. For example, thisSET LIST_COUNT command
limits the result set of queries to 20 rows:
SQL>set list_count 20
To show the limit that is in effect for the session, enter the SHOW LIST_COUNT command. For
example, this SHOW LIST_COUNT command shows that the number of rows returned by
SELECT statements is unlimited:
SQL>show list_count
LISTCOUNT 0 [All Rows]
For more information, see the “SET LIST_COUNT Command” (page 106) and the “SHOW
LIST_COUNT Command” (page 115).
Showing Information About SQL Database Objects
• “Showing the Schemas” (page 56)
• “Showing the Tables in a Schema” (page 56)
• “Showing the Dependent Objects of a Table” (page 56)
Using Neoview Script Interface Commands 55
Page 56

• “Showing the Views in a Schema” (page 57)
• “Showing the Synonyms in a Schema” (page 57)
Showing the Schemas
The SHOW SCHEMAS command displays the schemas that exist in the default catalog:
SQL>show schemas
SCHEMA NAMES
----------------------------------------------------------------------------DBA001 DBA082 DBMGR
DBSCRIPT_SALES DEFINITION_SCHEMA_VERSION_1200 DEMOSCH
DEMOSCH1 DEMOSCH2 DEMO_SCH
DEV060525 DS_SCH D_SALES
HMGR HPNVS HPNVSSCH
HPNVS_SAMPLE HPNVS_SAMPLE INVENT
ODBC_INVENT ODBC_PERSNL ODBC_SALES
ODBC_SCHEMA ODBC_TEST PERSNL
PUBLIC_ACCESS_SCHEMA ROLEDBA ROLEMGR
ROLEUSER SALES SCH
SERVICES T4JDBC_SCHEMA TEST1
USR
SQL>
For more information, see the “SHOW SCHEMAS Command” (page 120).
Showing the Tables in a Schema
The SHOW TABLES command displays the tables that exist in the current schema. For example,
this SHOW TABLES command displays all the tables in the current schema, PERSNL:
SQL>show schema
SCHEMA PERSNL
SQL>show tables
TABLE NAMES
---------------------------------------------------------------DEPT EMPLOYEE JOB PROJECT
SQL>
For more information, see the “SHOW TABLES Command” (page 127).
Showing the Dependent Objects of a Table
The SHOW TABLE command displays information about the indexes, materialized views, or
synonyms of a specified table. For example, this SHOW TABLE command with the INDEXES
option displays information about each index of the EMPLOYEE table:
SQL>show table persnl.employee, indexes
COLUMN NAME ORDER INDEX TYPE UNIQUE CARDINALITY POSITION
------------------------------- ----- ---------- ------ ----------- --------
Index 1 :EMPLOYEE
----------------EMPNUM ASC Other Yes 0 1
Index 2 :XEMPDEPT
----------------DEPTNUM ASC Other No 0 1
Index 3 :XEMPNAME
----------------LAST_NAME ASC Other No 0 1
FIRST_NAME ASC Other No 0 2
56 Running Commands Interactively in the Neoview Script Interface
Page 57

SQL>
For more information, see the “SHOW TABLE Command” (page 125).
Showing the Views in a Schema
The SHOW VIEWS command displays the views that exist in the current schema. For example,
this SHOW VIEWS command displays all the views in the current schema, INVENT:
SQL>set schema invent;
--- SQL operation complete.
SQL>show schema
SCHEMA INVENT
SQL>show views
VIEW NAMES
----------------------------------------------------------------
VIEW207 VIEW207N VIEWCS VIEWCUST
SQL>
For more information, see the “SHOW VIEWS Command” (page 129).
The SHOW MVS command displays the materialized views that exist in the current schema. For
example, this SHOW MVS command displays all the materialized views in the current schema,
PERSNL:
SQL>set schema persnl;
--- SQL operation complete.
SQL>show schema
SCHEMA PERSNL
SQL>show mvs;
MATERIALIZED VIEW NAMES
-------------------------------------------------------------
mvemp1 mvemp2 mvemp3 mvjobdesc
SQL>
For more information, see the “SHOW MVS Command” (page 117).
Showing the Synonyms in a Schema
The SHOW SYNONYMS command displays the synonyms that exist in the current schema. For
example, this SHOW SYNONYMS command displays all the synonyms in the current schema,
SALES:
SQL>set schema sales;
--- SQL operation complete.
SQL>show schema
SCHEMA SALES
SQL>show synonyms
SYNONYM NAMES
-------------------------------------------------------------
CUST DTLS ORDR PRTS
SQL>
Using Neoview Script Interface Commands 57
Page 58

For more information, see the “SHOW SYNONYMS Command” (page 124).
Displaying Executed Commands
To display commands that were recently executed in the Neoview Script session, enter the
HISTORY command. The HISTORY command associates each command with a number that
you can use to reexecute or edit the command with the FC command. See “Editing and
Reexecuting a Command” (page 58).
For example, this HISTORY command displays a maximum of 100 commands that were entered
in the session:
SQL>history
1> set idletimeout 0
2> set schema persnl;
3> select * from project;
SQL>
To save the session history in a user-specified file, enter the SAVEHIST command. For example,
this SAVEHIST command saves the session history in a file named history.txt in the local
directory where you are running Neoview Script:
SQL>savehist history.txt
For more information, see the “HISTORY Command” (page 90) and the “SAVEHIST Command”
(page 101).
Editing and Reexecuting a Command
To edit and reexecute a command in the history buffer of a Neoview Script session, enter the FC
command. To display the commands in the history buffer, use the HISTORY command. See
“Displaying Executed Commands” (page 58).
For example, this FC command and its delete (D) editing command correct a SELECT statement
that was entered incorrectly:
SQL>fc
SQL>selecct * from employee;
.... d
SQL>select * from employee;
....
Pressing Enter executes the corrected SELECT statement.
For more information, see the “FC Command” (page 87).
Clearing the Interface Window
After entering commands in the Neoview Script interface, you can clear the interface window
by using the CLEAR command. For example, this CLEAR command clears the interface window
so that only the prompt appears at the top of the window:
SQL>clear
For more information, see the “CLEAR Command” (page 83).
Obtaining Help
To display help text for an interface command that is supported in the current operating mode
of Neoview Script,enter the HELP command. For example, thisHELP command displays syntax
and examples of the FC command:
SQL>help fc
For more information, see the “HELP Command” (page 90).
58 Running Commands Interactively in the Neoview Script Interface
Page 59

Running SQL Statements
In the Neoview Script interface, you can run SQL statements interactively. For a list of SQL
statements that you can run interactively, see Appendix B (page 133).
This subsection shows examples of:
• “Executing an SQL Statement” (page 59)
• “Repeating an SQL Statement” (page 59)
• “Preparing and Executing SQL Statements” (page 60)
To run SQL statements from script files in the Neoview Script interface, see Chapter 5 (page 67).
Executing an SQL Statement
For example, you can query the EMPLOYEE table and return an employee’s salary by executing
this SELECT statement in the Neoview Script interface:
SQL>select salary
+>from persnl.employee
+>where jobcode=100;
SALARY
----------
175500.00
137000.10
139400.00
138000.40
75000.00
90000.00
118000.00
80000.00
70000.00
90000.00
56000.00
--- 11 row(s) selected.
SQL>
If the SQL statement executes successfully, Neoview Script returns a message indicating that the
SQL operation was successful, followed by the standard prompt. If a problem occurs during the
execution of the SQL statement, Neoview Script returns an error message. For information about
error messages, see the Neoview Messages Manual.
Repeating an SQL Statement
To run a previously executed SQL statement, use the /, RUN, or REPEAT command.
SQL>/
SALARY
----------
175500.00
137000.10
139400.00
138000.40
75000.00
90000.00
118000.00
80000.00
70000.00
90000.00
56000.00
--- 11 row(s) selected.
Running SQL Statements 59
Page 60

SQL>
For moreinformation, see the “/ Command”(page 82), “RUN Command” (page 100), or “REPEAT
Command” (page 98).
Preparing and Executing SQL Statements
You can prepare, or compile, an SQL statement by using the PREPARE statement and later
execute the prepared SQL statement by using the EXECUTE statement.
• “Preparing an SQL Statement” (page 60)
• “Setting Parameters” (page 61)
• “Displaying the Parameters of the Session” (page 61)
• “Resetting the Parameters” (page 61)
• “Executing a Prepared SQL Statement” (page 62)
Preparing an SQL Statement
Use the PREPARE statement to compile an SQL statement for later execution with the EXECUTE
statement. You can also use the PREPARE statement to check the syntax of an SQL statement
without executing the statement. For example, this PREPARE statement compiles a SELECT
statement named empsal and detects a syntax error:
SQL>prepare empsal from
+>select salary from employee
+>where jobcode = 100;
*** ERROR[4082] Table, view or stored procedure NEO.INVENT.EMPLOYEE does not exist or is inaccessible.
*** ERROR[8822] The statement was not prepared.
SQL>
You can then correct the syntax of the SQL statement and prepare it again:
SQL>prepare empsal from
+>select salary from persnl.employee
+>where jobcode = 100;
--- SQL command prepared.
To specify a parameter to be supplied later, either in a SET PARAM statement or in the USING
clause of an EXECUTE statement, use one of these types of parameters in the SQL statement:
• Named parameter, which is represented by ?param-name
• Unnamed parameter, which is represented by a question mark (?) character
For example, this prepared SELECT statement specifies unnamed parameters for salary and job
code:
SQL>prepare findemp from
+>select * from persnl.employee
+>where salary > ? and jobcode = ?;
--- SQL command prepared.
This PREPARE statement prepares another SELECT statement named empcom, which has one
named parameter, ?dn, for the department number, which appears twice in the statement:
SQL>prepare empcom from
+>select first_name, last_name, deptnum
+>from persnl.employee
+>where deptnum <> ?dn and salary <=
+>(select avg(salary)
+>from persnl.employee
+>where deptnum = ?dn);
--- SQL command prepared.
For the syntax of the PREPARE statement, see the Neoview SQL Reference Manual.
60 Running Commands Interactively in the Neoview Script Interface
Page 61

Setting Parameters
In a Neoview session, you can set a parameter of an SQL statement (either prepared or not) by
using the SET PARAM command.
NOTE: The parameter name is case-sensitive. If you specify it in lowercase in the SET PARAM
command, you must specify it in lowercase in other statements, such as DML statements or
EXECUTE.
For example, this SET PARAM command sets a value for the parameter named ?sal, which
you can apply to one of the unnamed parameters in the prepared findemp statement or to a
named parameter with an identical name in an SQL statement:
SQL>set param ?sal 40000.00
This SELECT statement uses sal as a named parameter:
SQL>select last_name
+>from persnl.employee
+>where salary = ?sal;
This SET PARAM command sets a value for the parameter named dn, which you can apply to
the named parameter, ?dn, in the prepared empcom statement or to a named parameter with an
identical name in an SQL statement:
SQL>set param ?dn 1500
For the syntax of the SET PARAM command, see the “SET PARAM Command” (page 107).
Displaying the Parameters of the Session
To determine what parameters you have set in the current session, use the SHOW PARAM
command. For example, this SHOW PARAM commanddisplays the recent SET PARAMsettings:
SQL>show param
dn 1500
sal 40000.00
SQL>
For the syntax ofthe SHOWPARAM command, see the “SHOW PARAM Command” (page 118).
Resetting the Parameters
To change the value of a parameter, specify the name of the parameter in the RESET PARAM
command and then use the SET PARAM command to change the setting. For example, suppose
that you want to change the salary parameter to 80000.00:
SQL>reset param ?sal
SQL>set param ?sal 80000.00
SQL>
Entering the RESET PARAM command withoutspecifying a parameter name clears all parameter
settings in the session. For example:
SQL>reset param
SQL>show param
SQL>
To use the parameters that you had set before, you must reenter them in the session:
SQL>set param ?dn 1500
SQL>set param ?sal 80000.00
SQL>show param
Running SQL Statements 61
Page 62

dn 1500
sal 80000.00
SQL>
For the syntax of the RESET PARAM command, see the “RESET PARAM Command” (page 99).
Executing a Prepared SQL Statement
To execute a prepared SQL statement, use the EXECUTE statement.
For example, this EXECUTE statement executes the prepared empsal statement, which does
not have any parameters:
SQL>execute empsal;
SALARY
----------
137000.10
90000.00
75000.00
138000.40
56000.00
136000.00
80000.00
70000.00
175500.00
90000.00
118000.00
--- 11 row(s) selected.
SQL>
This EXECUTE statement executes the prepared empcom statement, which has one named
parameter, ?dn, which was set by SET PARAM for the department number:
SQL>execute empcom;
FIRST_NAME LAST_NAME DEPTNUM
--------------- -------------------- ------ALAN TERRY 3000
DAVID TERRY 2000
PETE WELLINGTON 3100
JOHN CHOU 3500
MANFRED CONRAD 4000
DINAH CLARK 9000
DAVE FISHER 3200
GEORGE FRENCHMAN 4000
KARL HELMSTED 4000
JOHN JONES 4000
JOHN HUGHES 3200
WALTER LANCASTER 4000
MARLENE BONNY 4000
BILL WINN 2000
MIRIAM KING 2500
GINNY FOSTER 3300
MARIA JOSEF 4000
HERB ALBERT 3300
RICHARD BARTON 1000
XAVIER SEDLEMEYER 3300
DONALD TAYLOR 3100
LARRY CLARK 1000
JIM HERMAN 3000
GEORGE STRICKER 3100
OTTO SCHNABL 3200
TIM WALKER 3000
62 Running Commands Interactively in the Neoview Script Interface
Page 63

TED MCDONALD 2000
PETER SMITH 3300
MARK FOLEY 4000
HEIDI WEIGL 3200
ROCKY LEWIS 2000
SUE CRAMER 1000
MARTIN SCHAEFFER 3200
HERBERT KARAJAN 3200
JESSICA CRINER 3500
--- 35 row(s) selected.
SQL>
This EXECUTE statement executes the prepared findemp statement, which has two unnamed
parameters: ?sal, which was set by SET PARAM for the salary, and a parameter that was not
set in advance for the job code:
SQL>execute findemp using ?sal, 100;
EMPNUM FIRST_NAME LAST_NAME DEPTNUM JOBCODE SALARY
------ --------------- -------------- ------- ------- --------
213 ROBERT WHITE 1500 100 90000.00
23 JERRY HOWARD 1000 100 137000.10
1 ROGER GREEN 9000 100 175500.00
29 JANE RAYMOND 3000 100 136000.00
32 THOMAS RUDLOFF 2000 100 138000.40
43 PAUL WINTER 3100 100 90000.00
65 RACHEL MCKAY 4000 100 118000.00
--- 7 row(s) selected.
SQL>
For the syntax of the EXECUTE statement, see the Neoview SQL Reference Manual.
Logging Output
To log a Neoview Script session, use the SPOOL or LOG command. The SPOOL and LOG
commands record into a log file the commands that you enter in the Neoview Script interface
and the output of those commands.
• “Starting the Logging Process” (page 63)
• “Stopping the Logging Process” (page 64)
• “Viewing the Contents of a Log File” (page 64)
Starting the Logging Process
To start logging, enter one of these commands:
• SPOOL ON or LOG ON
• SPOOL log-file or LOG log-file
For moreinformation, see the “LOG Command” (page 91) and the “SPOOL Command” (page130).
SPOOL ON or LOG ON Command
The SPOOL ON or LOG ON command logs information about a session in the sqlspool.lst
file, which Neoview Script stores in the Neoview Script bin directory:
• On Windows:
hpnvs-installation-directory\nvscript\bin\sqlspool.lst
Logging Output 63
Page 64

hpnvs-installation-directory is the directory where you installed the Neoview
Script software files. For more information, see Table 2-1 (page 34).
• On Linux or UNIX:
hpnvs-installation-directory/nvscript/bin/sqlspool.lst
hpnvs-installation-directory is the directory where you installed the Neoview
Script software files. For more information, see Table 2-1 (page 34).
For example, this SPOOL ON command starts logging the session in the sqlspool.lst file:
SQL>spool on
SPOOL log-file or LOG log-file Command
The SPOOL log-file and LOG log-file commands record information about a session in
a log file that you specify. If you specify a directory for the log file, the directory must exist as
specified. Otherwise, an error occurs when you try to run the SPOOL or LOG command. If you
do not specify a directory for the log file, Neoview Script uses the Neoview Script bin directory.
For example, this SPOOL log-file command starts logging the session in the
persnl_updates.log file in the C:\log directory:
SQL>spool C:\log\persnl_updates.log
Using the CLEAR Option
The CLEAR option clears the contents of an existing log file before logging new information to
the file. If you omit CLEAR, Neoview Script appends new information to existing information
in the log file.
For example, this SPOOL log-file CLEAR command clears existing information from the
specified log file and starts logging the session in the log file:
SQL>spool C:\log\persnl_updates.log clear
Logging Concurrent Neoview Script Sessions
If you plan to run two or more Neoview Script sessions concurrently on the same workstation,
use the SPOOL log-file or LOG log-file command and specify a unique name for each
log file. Otherwise, each session writes information to the same log file, making it difficult to
determine which information belongs to each session.
Stopping the Logging Process
To stop logging, enter one of these commands:
• SPOOL OFF
• LOG OFF
For example, this SPOOL OFF command stops logging in a Neoview Script session:
SQL>spool off
Viewing the Contents of a Log File
The log file is an ASCII text file that contains all the lines in the Neoview Script interface from
the time you start logging to the time you stop logging. The logged lines include prompts, entered
commands, output from commands, and diagnostic messages.
For example, this log file contains information from when you started logging to when you
stopped logging:
64 Running Commands Interactively in the Neoview Script Interface
Page 65

For information about error messages that might appear in the log file, see the Neoview Messages
Manual.
Logging Output 65
Page 66

66
Page 67

5 Running Scripts in the Neoview Script Interface
In the Neoview Script interface, you can run script files.
• “Creating a Script File” (page 67)
• “Running a Script File” (page 68)
• “Logging Output” (page 69)
• “Running Scripts in Parallel” (page 69)
Creating a Script File
A script file that you run in the Neoview Script interface must be an ASCII text file that contains
only these elements:
• “Supported SQL Statements in Script Files” (page 67)
• “Permitted Neoview Script Interface Commands in Script Files” (page 67)
• “Comments” (page 67)
• “Section Headers” (page 67)
For an example, see “Example of a Script File” (page 68).
NOTE: You cannot use shell commands in a script file that you run in the Neoview Script
interface. To create shell scripts that run Neoview Script, see Chapter 6 (page 71).
Supported SQL Statements in Script Files
See Appendix B (page 133).
Permitted Neoview Script Interface Commands in Script Files
Most Neoview Script interface commands are supported in script files except for a few disallowed
interface commands. For a list of interface commands, see Appendix A (page 79).
Disallowed Interface Commands in Script Files
• FC
Starting in Neoview Release 2.0, you can use @ and OBEY commands in script files.
Comments
You can include comments anywhere in a script file. SQL also supports comments. Comments
are useful for documenting the functionality of the script file and for debugging.When debugging,
use comments to disable specific statements or commands without removing them from the
script file.
To denote a comment in a script file, use two hyphens before the comment:
-- comment
The end of the line marks the end of the comment.
Section Headers
To create sections of commands within a script file, put a section header at the beginning of each
section:
?SECTION section-name
The section-name cannot begin with a number or an underscore. Each section name in a script
file should be unique because Neoview Script executes the first section that it finds that matches
Creating a Script File 67
Page 68

the section name in the @ or OBEY command. For more information, see the“@ Command”
(page 81) or the “OBEY Command” (page 93).
Example of a Script File
This script file creates tables in the inventory schema:
Running a Script File
To run a script file in the Neoview Script interface, use the @ or OBEY command. The @ and
OBEY commands run one script file at a time in the Neoview Script interface. To run a script file
when launching Neoview Script, see “Running a Script File When Launching Neoview Script”
(page 48).
For example, this @ command runs a script file, sch_invent.sql, that creates tables in the
inventory schema:
@C:\ddl_scripts\sch_invent.sql
68 Running Scripts in the Neoview Script Interface
Page 69

NOTE: If the script file is outside the directory of the hpnvs.cmd or hpnvs.sh file (by default,
the Neoview Script bin directory), you must specify the full path of the script file in the @ or
OBEY command. For the Neoview Script bin directory, see Table 2-1 (page 34).
SQL>@C:\ddl_scripts\sch_invent.sql
SQL>-- CREATE SCHEMA
SQL>CREATE SCHEMA INVENT;
--- SQL operation complete.
SQL>-- CREATE TABLES/VIEWS in SCHEMA INVENT
SQL>SET SCHEMA INVENT;
--- SQL operation complete.
SQL>CREATE TABLE INVENT.supplier (
+> suppnum NUMERIC (4) UNSIGNED
+> NO DEFAULT
+> NOT NULL
+> ,suppname CHARACTER (18)
+> NO DEFAULT
+> NOT NULL
+> ,street CHARACTER (22)
+> NO DEFAULT
+> NOT NULL
+> ,city CHARACTER (14)
+> NO DEFAULT
+> NOT NULL
+> ,state CHARACTER (12)
+> NO DEFAULT
+> NOT NULL
+> ,postcode CHARACTER (10)
+> NO DEFAULT
+> NOT NULL
+> ,PRIMARY KEY (suppnum)
+> );
--- SQL operation complete.
For more information about the @ and OBEY commands, see the “@ Command” (page 81) and
the “OBEY Command” (page 93).
Logging Output
To log output of a Neoview Script session while running one script file at a time, use the SPOOL
or LOG command. When you run an OBEY or @ command, Neoview Script displays each
command inthe script file, the output for each command,and diagnostic messages in the Neoview
Script interface. The SPOOL or LOG command captures this output as it appears in the Neoview
Script interface and logs it in a log file.
For more information, see “Logging Output” (page 63).
Running Scripts in Parallel
In the Neoview Script interface, the @ and OBEY commands allow you to run only one script
file at a time. However, the PRUN command allows you torun multiple script files simultaneously.
Logging Output 69
Page 70

NOTE: Starting with the 2.1 release, the PRUN command can be run in non-interactive mode.
The PRUN command now allows options to be specified on the command line, which enables
PRUN to be run in script and/or obey files.
The PRUNcommand is most useful for running sets of data definition language (DDL) statements
simultaneously, which speeds up the process of creating large databases. Put all dependent or
related DDL statements in the same script file.
For more information on running scripts in parallel using the PRUN command, see the “PRUN
Command” (page 95).
70 Running Scripts in the Neoview Script Interface
Page 71

6 Running Neoview Script From Perl or Python
You can execute an SQL statement in Perl or Python by invoking the Neoview Script Perl or
Python wrapper script. To use the Perl or Python wrapper script, see:
• “Setting the Login Environment Variables” (page 71)
• “Perl and Python Wrapper Scripts” (page 74)
• “Launching Neoview Script From the Perl or Python Command Line” (page 74)
• “Launching Neoview Script From a Perl or Python Program” (page 76)
These instructions assume that you installed the Neoview Script product. For more information,
see Chapter 2 (page 23).
NOTE: Neoview Script provides a beta version of enhanced support for Perl and Python
programs. This functionality enables multiple SQL statements to run in one database connection
from a Perl or Python program. For more information, see the README in the Neoview Script
samples directory.
Setting the Login Environment Variables
Before launching Neoview Script from Perl or Python, set these login environment variables:
DescriptionEnvironment Variable
HPNVS_SERVER=host-name[:port-number]
HPNVS_SERVER=IP-address[:port-number]
HPNVS_USER=user-name
HPNVS_PASSWORD=password
HPNVS_DATASOURCE=data-source-name
Specifies the host name or IP address of the database
platform to which you want the client to connect. The
host-name should include the domain name of the
database platform if it is different from the domain of the
client workstation. If you do not specify a port number,
Neoview Script uses the default port number, which is
18650.
Specifies the user name to log in to the database platform.
Specifies thepassword of the user to login tothe database
platform.
Specifies the name of a data source.
If you do not set these environment variables, Neoview Script prompts you to enter the host
name, user name, and password each time you invoke Neoview Script on the Perl or Python
command line. Invoking Neoview Script from within a Perl or Python program requires you to
set these login environment variables.
To set the login environment variables, see the instructions for the operating system of the client
workstation:
• “Setting the Login Environment Variables on Windows” (page 71)
• “Setting the Login Environment Variables on Linux or UNIX” (page 73)
Setting the Login Environment Variables on Windows
You can set the login environment variables for the session at command prompts, or you can set
the login environment variables for the system or user by including them in the System Properties.
Setting Login Environment Variables on the Command Line
At each command prompt, enter one of these commands:
set HPNVS_SERVER=host-name:port-number
set HPNVS_USER=user-name
Setting the Login Environment Variables 71
Page 72

set HPNVS_PASSWORD=password
set HPNVS_DATASOURCE=data-source-name
Setting Login Environment Variables in the System Properties
1. Right-click the My Computer icon on your desktop, and then select Properties:
2. In the System Properties dialog box, click the Advanced tab.
3. Click the Environment Variables button:
72 Running Neoview Script From Perl or Python
Page 73

4. In the Environment Variables dialog box, click New under System or User variables,
whichever you prefer.
5. In the New User Variable dialog box, type the name of the login environment variable for
the Variable Name and the required value for the Variable Value, and then click OK:
6. Verify that the environment variable appears under System or User variables.
7. Repeat Step 4 to Step 6 for each login environment variable.
8. After adding all four login environment variables, click OK in the Environment Variables
and System Properties dialog boxes to accept the changes.
Setting the Login Environment Variables on Linux or UNIX
You can set the login environment variables for the session at command prompts, or you can set
the login environment variables for each user by including the variables in the user profile on a
Linux or UNIX client workstation.
Setting Login Environment Variables on the Command Line
At each command prompt in any shell except the C shell, enter one of these commands:
Setting the Login Environment Variables 73
Page 74

export HPNVS_SERVER=host-name:port-number
export HPNVS_USER=user-name
export HPNVS_PASSWORD=password
export HPNVS_DATASOURCE=data-source-name
At each command prompt in the C shell, enter one of these commands:
setenv HPNVS_SERVER=host-name:port-number
setenv HPNVS_USER=user-name
setenv HPNVS_PASSWORD=password
setenv HPNVS_DATASOURCE=data-source-name
Setting Login Environment Variables in the User Profile
To set the login environment variables in the user profile:
1. Open the user profile (.profile or .bash_profile for the Bash shell) in the /home
directory. For example:
vi .profile
2. Add these export commands (or setenv commands for the C shell) to the user profile.
For example:
export HPNVS_SERVER=host-name:port-number
export HPNVS_USER=user-name
export HPNVS_PASSWORD=password
export HPNVS_DATASOURCE=data-source-name
3. To activate the changes, either log out and log in again or execute the user profile. For
example:
. .profile
Perl and Python Wrapper Scripts
The Perl or Python wrapper script enables you to invoke Neoview Script from Perl or Python to
execute an SQL statement. The Perl wrapper script is hpnvs.pl, and the Python wrapper script
is hpnvs.py. By default, these wrapper scripts are located in the Neoview Script bin directory:
• On Windows:
hpnvs-installation-directory\nvscript\bin
hpnvs-installation-directory is the directory where you installed the Neoview
Script software files. For more information, see Table 2-1 (page 34).
• On Linux or UNIX:
hpnvs-installation-directory/nvscript/bin
hpnvs-installation-directory is the directory where you installed the Neoview
Script software files. For more information, see Table 2-1 (page 34).
To use the Perl and Python wrapper scripts, see:
• “Launching Neoview Script From the Perl or Python Command Line” (page 74)
• “Launching Neoview Script From a Perl or Python Program” (page 76)
Launching Neoview Script From the Perl or Python Command Line
You can run an SQL statement by invoking the Neoview Script Perl or Python wrapper script
on the Perl or Python command line:
74 Running Neoview Script From Perl or Python
Page 75

You can pass only one SQL statement at a time on the Perl or Python command line. The SQL
statement must:
• Be enclosed in double quotes (") without the SQL terminator (;)
• Contain fully qualified database objectnames (for example, neo.schema-name.obj-name)
• Contain the syntax of one of the supported SQL statements. See Appendix B (page 133).
See “Perl and Python Commands on Windows” (page 75) and “Perl and Python Commands on
Linux or UNIX” (page 75).
Perl and Python Commands on Windows
In these examples, hpnvs-installation-directory is the directory where you installed
the Neoview Script software files. For more information, see Table 2-1 (page 34).
• On the Perl command line, enter:
cd hpnvs-installation-directory\nvscript\bin
perl hpnvs.pl "sql-statement-string"
For example:
>cd install\nvscript\bin
>perl hpnvs.pl "POPULATE INDEX neo.persnl.xempname
>ON neo.persnl.employee"
• On the Python command line, enter:
cd hpnvs-installation-directory\nvscript\bin
python hpnvs.py "sql-statement-string"
For example:
>cd install\nvscript\bin
>python hpnvs.py "SELECT * FROM neo.persnl.employee"
The command returns this output:
EMPNUM FIRST_NAME LAST_NAME DEPTNUM JOBCODE SALARY
------ --------------- -------------- ------- ------- ------- 1 ROGER GREEN 9000 100 175500.00
23 JERRY HOWARD 1000 100 137000.10
29 JANE RAYMOND 3000 100 136000.00
32 THOMAS RUDLOFF 2000 100 138000.40
...
--- 61 row(s) selected.
Perl and Python Commands on Linux or UNIX
In these examples, hpnvs-installation-directory is the directory where you installed
the Neoview Script software files. For more information, see Table 2-1 (page 34).
• On the Perl command line, enter:
cd hpnvs-installation-directory/nvscript/bin
perl hpnvs.pl "sql-statement-string"
Launching Neoview Script From the Perl or Python Command Line 75
Page 76

For example:
>cd /usr/local/hp/nvscript/bin
>perl hpnvs.pl "POPULATE INDEX neo.persnl.xempname
>ON neo.persnl.employee"
• On the Python command line, enter:
cd hpnvs-installation-directory/nvscript/bin
python hpnvs.py "sql-statement-string"
For example:
>cd /usr/local/hp/nvscript/bin
>python hpnvs.py "SELECT * FROM neo.persnl.employee"
The command returns this output:
EMPNUM FIRST_NAME LAST_NAME DEPTNUM JOBCODE SALARY
------ --------------- -------------- ------- ------- ------- 1 ROGER GREEN 9000 100 175500.00
23 JERRY HOWARD 1000 100 137000.10
29 JANE RAYMOND 3000 100 136000.00
32 THOMAS RUDLOFF 2000 100 138000.40
...
--- 61 row(s) selected.
Launching Neoview Script From a Perl or Python Program
You can executean SQL statement by invoking the Neoview Script Perl or Python wrapper script
in a Perl or Python program. You can pass only one SQL statement at a time in a perl or python
command. To execute an SQL statement in a Perl or Python program, follow these instructions:
• “Setting the Login Environment Variables” (page 76)
• “Using SQL Statements in a Perl or Python Program” (page 76)
• “Running the Perl or Python Program” (page 77)
Setting the Login Environment Variables
To invoke the Perl or Python wrapper script in a Perl or Python program, you must set the login
environment variables. For more information, see “Setting the Login Environment Variables”
(page 71).
Using SQL Statements in a Perl or Python Program
In a Perl or Python program, each SQL statement that you invoke with the Perl or Python wrapper
script must:
• Be enclosed in double quotes (") without the SQL terminator (;)
• Contain fully qualified database objectnames (for example, neo.schema-name.obj-name)
• Contain the syntax of one of the supported SQL statements. See Appendix B (page 133).
For examples, see “Example of a Perl Program (example.pl)” (page 76) and“Example of a Python
Program (example.py)” (page 77).
Example of a Perl Program (example.pl)
#########################################################################
# Example Perl program that maintains a database using hpnvs.pl #
#########################################################################
#---------------------------------------------------------------------------$reorgtable="REORG TABLE neo.persnl.employee";
$updatestats="UPDATE STATISTICS FOR TABLE neo.persnl.employee ".
"ON EVERY COLUMN";
$selecttable="SELECT COUNT(*) FROM neo.persnl.employee";
print "\n";
76 Running Neoview Script From Perl or Python
Page 77

#-----Reorganize the table -------------------------------------------------$status=`perl /usr/local/hp/nvscript/bin/hpnvs.pl "$reorgtable"`;
print "Reorg status :".$status;
print "\n";
#----------Update the statistics of the table-------------------------------$status=`perl /usr/local/hp/nvscript/bin/hpnvs.pl "$updatestats"`;
print "Update statistics status :".$status;
print "\n";
#--------------Fetch results------------------------------------------------@resultrows=`perl /usr/local/hp/nvscript/bin/hpnvs.pl "$selecttable"`;
#-------------Display the results-------------------------------------------foreach $rowvalue (@resultrows)
{
print $rowvalue;
}
Example of a Python Program (example.py)
import os
import sys
import string
if __name__ == '__main__':
#Define SQL statements
reorgtable="REORG TABLE neo.persnl.employee";
updatestats="UPDATE STATISTICS FOR TABLE neo.persnl.employee "
updatestats=updatestats + "ON EVERY COLUMN";
selecttable="SELECT COUNT(*) FROM neo.persnl.employee";
#Contruct a list of SQL statements to be executed
stmnt = [reorgtable,updatestats,selecttable]
print "\n";
for stmntstr in stmnt:
cin, cout ,cerr = os.popen3('python /usr/local/hp/nvscript/bin/hpnvs.py "'+stmntstr+'"')
while 1:
text = cout.read()
if text:
print text
else:
break
while 1:
text = cerr.read()
if text:
print text
else:
break
cin.close()
cout.close()
Running the Perl or Python Program
Before running the Perl or Python program, make sure that you included the absolute path of
the Perl or Python wrapper script (hpnvs.pl or hpnvs.py) in the program file:
• On Windows:
hpnvs-installation-directory\nvscript\bin\hpnvs.pl
or
hpnvs-installation-directory\nvscript\bin\hpnvs.py
hpnvs-installation-directory is the directory where you installed the Neoview
Script software files. For more information, see Table 2-1 (page 34).
• On Linux or UNIX:
hpnvs-installation-directory/nvscript/bin/hpnvs.pl
or
hpnvs-installation-directory/nvscript/bin/hpnvs.py
Launching Neoview Script From a Perl or Python Program 77
Page 78

hpnvs-installation-directory is the directory where you installed the Neoview
Script software files. For more information, see Table 2-1 (page 34).
To run a Perl program, enter the perl command at a command prompt, as this example shows:
>perl example.pl
To run a Python program, enter the python command at a command prompt, as this example
shows:
>python example.py
78 Running Neoview Script From Perl or Python
Page 79

A Neoview Script Interface Commands
Neoview Script supports these commands in the Neoview Script interface or in script files that
you run in the Neoview Script interface. For a list of Neoview Script interface commands that
are available only to HP support, see the Neoview Database Support Guide.
@
Neoview Script interface commands
contained in a specified script file.
/
statement.
CLEAR
only the prompt appears at the top of
the screen.
CONNECT
DISCONNECT
ENV
EXIT
FC
HELP
HISTORY
LOG
MODE
OBEY
QUIT
RECONNECT
RESET PARAM
Creates a new connection to the
Neoview platform from a current or
existing Neoview Script session.
Terminates the connection to the
Neoview platform.
Neoview Script session.
Neoview Script interface.
command. Thiscommand isrestricted
to the Neoview Script interface and is
disallowed in script files.
commands that are supported in the
current operating mode.
Displays recently executed
commands.
Neoview Script interface to a log file.
current session to be either SQL for
database commands or CS for
connectivity service commands.
Neoview Script interface commands
contained in a specified script file.
Neoview Script interface.
Neoview platform using the login
credentials of the last successful
connection.
Reexecutes a command.REPEAT
Clears all parameter values or a
specified parameter value in the
current session.
SyntaxDescriptionCommand
See the “@ Command” (page 81).Runs the SQL statements and
See the “/ Command” (page 82).Runs the previously executed SQL
See the “CLEAR Command” (page83).Clears the command console so that
See the “CONNECT Command”
(page 83).
See the “DISCONNECT Command”
(page 84).
See the “ENV Command” (page 85).Displays attributes of the current
See the “EXIT Command” (page 86).Disconnects from and exits the
See the “FC Command” (page 87).Edits and reexecutes a previous
See the “HELP Command” (page 90).Displays help text for the interface
See the “HISTORY Command”
(page 90).
See the “LOG Command” (page 91).Logs commands and output from the
See the “MODE Command” (page 92).Determines the operating modeof the
See the “OBEY Command” (page 93).Runs the SQL statements and
See the “PRUN Command” (page 95).Runs script files in parallel.PRUN
See the “QUIT Command” (page 97).Disconnects from and exits the
See the “RECONNECT Command”.Creates a new connection to the
See the “REPEAT Command”
(page 98).
See the “RESET PARAM Command”
(page 99).
79
Page 80

RUN
SAVEHIST
SESSION
SET COLSEP
SET HISTOPT
SET IDLETIMEOUT
SET LIST_COUNT
SET MARKUP
SET PARAM
SET PROMPT
SET SQLPROMPT
SET SQLTERMINATOR
SET TIME
SET TIMING
SHOW COLSEP
SHOW HISTOPT
SHOW IDLETIMEOUT
SHOW LIST_COUNT
SHOW MARKUP
SHOW MODE
statement.
Saves the session history in a
user-specified file.
Displays attributes of the current
Neoview Script session.
Sets the column separator and allows
you to control the formatting of the
result displayed for SQL queries.
Sets the history option and controls
how commands are added to the
history buffer.
Sets the idle timeout value for the
current session.
Sets the maximum number of rows to
be returned by SELECT statements
that areexecuted afterthis command.
Sets the markup format and controls
how resultsare displayedby Neoview
Script.
Sets a parameter value in the current
session.
Sets the prompt of the current session
to a specified string or to a session
variable.
Sets the SQL prompt of the current
session to a specified string. The
default is SQL.
Sets the SQL statement terminator of
the current session to a specified
string. The default is a semicolon (;).
Causes the local time of the client
workstation to be displayed aspart of
the interface prompt.
Causes the elapsed time to be
displayed after each SQL statement
executes.
separator for the current Neoview
Script session.
Displays the value that has been set
for the history option of the current
setting.
Displays the idle timeout value of the
current session.
Displays the maximum number of
rows to be returned by SELECT
statements in the current session.
Displays the value that has been set
for the markup option for the current
Neoview Script session.
Displays the operating mode of the
current session.
SyntaxDescriptionCommand
See the “RUN Command” (page 100).Runs the previously executed SQL
See the “SAVEHIST Command”
(page 101).
See the “SHOW SESSION Command”
(page 122).
See the “SET COLSEP Command”
(page 101).
See the “SET HISTOPT Command”
(page 102).
See the “SET IDLETIMEOUT
Command” (page 103).
See the“SET LIST_COUNT Command”
(page 106).
See the“SET MARKUP Command”
(page 104).
See the “SET PARAM Command”
(page 107).
See the “SET PROMPT Command”
(page 109).
See the“SET SQLPROMPT Command”
(page 110).
See the “SET SQLTERMINATOR
Command” (page 112).
See the “SET TIME Command”
(page 112).
See the“SET TIMING Command”
(page 113).
See the “SHOW COLSEP Command”.Displays the value of the column
See the “SHOW HISTOPT Command”
(page 114).
See the “SHOW IDLETIMEOUT
Command” (page 114).
See the “SHOW LIST_COUNT
Command” (page 115).
See the “SHOWMARKUP Command”
(page 115).
See the “SHOW MODE Command”
(page 116).
80 Neoview Script Interface Commands
Page 81

SHOW MVGROUPS
SHOW MVS
SHOW PARAM
SHOW PREPARED
SHOW SCHEMA
SHOW SCHEMAS
SHOW SESSION
SHOW SQLPROMPT
SHOW SQLTERMINATOR
SHOW SYNONYMS
SHOW TABLE
SHOW TABLES
SHOW TIME
SHOW TIMING
SHOW VIEWS
SPOOL
VERSION
Displays all or a set of the
materialized view groups in the
current schemaof theNeoview Script
session.
Displays all or a set of the
materialized views in the current
schema of the Neoview Script session.
Displays the parameters that are set
in the current session.
Displays the prepared statements in
the current Neoview Script session.
Displays the current schema of the
Neoview Script session.
Displays all or a set of the schemas
that exist in the default catalog of the
current session.
Displays attributes of the current
Neoview Script session.
Displays thevalue of the SQLprompt
for the current session.
Displays the SQL statement
terminator of the current session.
Displays all or a set of the synonyms
in the current schema of the Neoview
Script session.
Displays information about the
dependent objects (indexes,
materialized views, or synonyms) of
a specified table.
Displays all or a set of the tables that
exist in the current schema of the
Neoview Script session.
Displays the setting for the local time
in the SQL prompt.
Displays the setting for the elapsed
time.
Displays all or a set of the views that
exist in the current schema of the
Neoview Script session.
Neoview Script interface to a log file.
Displays the build versions of
Neoview Script and the JDBC Type 4
Driver.
SyntaxDescriptionCommand
See the “SHOW MVGROUPS
Command” (page 116).
See the “SHOW MVS Command”
(page 117).
See the “SHOW PARAM Command”
(page 118).
See the “SHOW PREPARED
Command” (page 119).
See the“SHOW SCHEMACommand”
(page 120).
See the“SHOW SCHEMAS Command”
(page 120).
See the “SHOW SESSION Command”
(page 122).
See the “SHOW SQLPROMPT
Command” (page 123).
See the “SHOW SQLTERMINATOR
Command” (page 124).
See the “SHOW SYNONYMS
Command” (page 124).
See the “SHOW TABLE Command”
(page 125).
See the “SHOW TABLES Command”
(page 127).
See the “SHOW TIME Command”
(page 128).
See the “SHOW TIMING Command”
(page 129).
See the “SHOW VIEWS Command”
(page 129).
See the“SPOOL Command”(page 130).Logs commands and output from the
See the “VERSION Command”
(page 131).
@ Command
The @command executes the SQL statements and Neoview Script interface commands contained
in a specified script file.
Syntax
@script-file [ (section-name )]
@ Command 81
Page 82

script-file
(section-name) is the name of a section within the script-file to execute. If you specify
Considerations
• In the Neoview Script interface, you must enter the command on one line. The command
does not require an SQL terminator.
• Space is disallowed between the @ sign and the first character of the file name.
• You can execute this command in a script file.
• You can specify only one script file at a time using the @ command. To run multiple script
files in parallel, see “Running Scripts in Parallel” (page 69).
Examples
• This @ command runs the script file from the local directory (the same directory where you
are running Neoview Script):
SQL>@ddl.sql
is the name of an ASCII text file that contains SQL statements, Neoview
Script interface commands, and comments. If the script file exists outside
the local directory where you launch Neoview Script (by default, the
Neoview Script bin directory), specify the full directory path of the script
file.
section-name, the @ command executes the commands between the
header line for the specified section and the header line for the next section
(or the end of the script file). Ifyou omit section-name, the @ command
executes the entire script file. For more information, see “Section Headers”
(page 67).
• This @ command runs the script file in the specified directory on a Windows workstation:
SQL>@c:\my_files\ddl.sql
• This @ command runs the script file in the specified directory on a Linux or UNIX
workstation:
SQL>@./my_files/ddl.sql
/ Command
The / command executes the previously executed SQL statement. This command does not repeat
a Neoview Script interface command.
Syntax
/
Considerations
• In the Neoview Script interface, you must enter the command on one line. The command
does not require an SQL terminator.
• You can execute this command only in SQL mode.
Example
This / command executes the previously executed SELECT statement:
SQL>select count(*) from persnl.employee;
(EXPR)
--------------------
62
--- 1 row(s) selected.
82 Neoview Script Interface Commands
Page 83

SQL>/
(EXPR)
------------------- 62
--- 1 row(s) selected.
SQL>
CLEAR Command
The CLEAR command clears the interface window so that only the prompt appears at the top
of the window. CLEAR does not clear the log file or reset the settings of the session.
Syntax
CLEAR
Considerations
In the Neoview Script interface, you must enter the command on one line. The command does
not require an SQL terminator.
Example
This CLEAR command clears the interface window:
SQL>clear
After the CLEAR command executes, the interface window appears with only the prompt
showing:
SQL>
CONNECT Command
The CONNECT command creates a new connection to the Neoview platform from the current
or existing Neoview Script session.
Syntax
CONNECT [username [/password][@hostname][,dsnName]]
username
password
hostname
dsnName specifies the name of a data source. If the dsnName is not specified, the value is
specifies the user name to log in to the database platform. If the user name is not
specified, Neoview Script prompts for the user name.
specifies the password of the user to log in to the database platform. If the password
is not specified, Neoview Script prompts for the password.
specifies the host name or IP address of the database platform to which you want
the client to connect. If the hostname is not specified, the value is automatically
used from thecurrent Neoview Script session. If Neoview Script was invoked with
the -noconnect launch parameter, you are prompted for a hostname value.
automatically used from the current Neoview Script session. If Neoview Script
was invoked with the -noconnect launch parameter, you are prompted for a
dsnName value.
Considerations
In the Neoview Script interface, you must enter the command on one line.
CLEAR Command 83
Page 84

If NeoviewScript wasinvoked with the -noconnect launch parameter, Neoview Scriptprompts
you for the values.
Currently, none of the commands work with the -noconnect option.
Examples
These commands create a new connection to the Neoview platform from the current or existing
Neoview Script interface:
SQL>connect
User Name: super.services
Password:
Connected to DataSource TDM_Default_DataSource.
SQL>connect super.services/password
Connected to DataSource TDM_Default_DataSource.
SQL>connect super.services/password@host0101
Connected to DataSource TDM_Default_DataSource.
SQL>connect super.services,NVSCRIPT
Password:
Connected to DataSource NVSCRIPT.
DISCONNECT Command
The DISCONNECT command terminates the connection from the Neoview platform, not from
the Neoview Script interface.
Syntax
DISCONNECT [IF ERRORCODE{=|<|>|<=|>=|<>}error-code]
error-code
Considerations
In the Neoview Script interface, you must enter the command on one line.
Examples
is an integer that represents an error condition of the previously executed
command. If the previously executed command returns this error code, the
Neoview Script interface disconnects and exits.
Commands that execute successfully in the Neoview Script interface have an
error code of zero (0). Interface commands that do not perform SQL operations
and that fail to execute have an error code of -1. A failed SQL operation has a
specific SQLerror code associated withthe error condition. For more information
about SQL error messages, see the Neoview Messages Manual.
This command terminates the connection to the Neoview platform. You can connect to the
Neoview platform by using the CONNECT and RECONNECT commands:
SQL>disconnect
Session Disconnected. Please connect to the database by using connect/reconnect command.
84 Neoview Script Interface Commands
Page 85

ENV Command
ENV displays attributes of the current Neoview Script session. You can also use the SESSION
and SHOW SESSION commands to perform the same function.
Syntax
ENV
Considerations
• In the Neoview Script interface, you must enter the command on one line. The command
does not require an SQL terminator.
• ENV displays these attributes:
COLSEP
DATASOURCE
HISTOPT
IDLETIMEOUT
LIST COUNT
LOG
LOOK AND FEEL
MARKUP
MODE
PROMPT
SCHEMA
SERVER
SQLTERMINATOR
TIME
Current columnseparator, which is usedto control how query results are displayed.
For more information, see “SET COLSEP Command” (page 101).
Name of the data source that you entered when logging in to the database platform.
For more information, see “Logging In to the Database Platform” (page 45).
Current history options, which controls how the commands are added to the
history buffer. For more information, see “SET HISTOPT Command” (page 102).
Current idle timeout value, which determines when the session expires after a
period of inactivity. By default, the idle timeout is 30 minutes. For more
information, see “Setting and Showing the Idle Timeout Value for the Session”
(page 53) and “SET IDLETIMEOUT Command” (page 103).
Current list count, which is the maximum number of rows that can be returned
by SELECTstatements. Bydefault, thelist count is all rows. For more information,
see “SET LIST_COUNT Command” (page 106).
Current log file and the directory containing the log file. By default, logging during
a session is turned off. For more information, see “Logging Output” (page 63)
and “LOG Command” (page 91) or “SPOOL Command” (page 130).
Current look and feel of the Neoview Script interface. This property affects the
formatting of status messages. For more information, see “Setting the Look and
Feel of the Neoview Script Interface” (page 35).
Current markup option selected for the session. The default option is RAW. For
more information, see “SET MARKUP Command” (page 104).
Current operating mode of the session. The default mode is SQL. For more
information, see “MODE Command” (page 92).
Current prompt for the session. In SQL mode, the default is SQL>. In CS mode,
the default is CS#. For more information,see “Customizing the Standard Prompt”
(page 53) and “SET PROMPT Command” (page 109).
Current schema. The default is USR. For more information, see “Setting and
Showing the Current Schema” (page 55).
Host name and port number that you entered when logging in to the database
platform. For more information, see “Logging In to the Database Platform”
(page 45).
Current SQL statement terminator. The default is a semicolon (;). For more
information, see“Setting and Showing the SQL Terminator” (page 54)and “SHOW
SQLTERMINATOR Command” (page 124).
Current setting (on or off) of the local time as part of the prompt. When this
command is set to on, military time is displayed. By default, the local time is off.
For more information, see “Customizing the Standard Prompt” (page 53) and
“SET TIME Command” (page 112).
ENV Command 85
Page 86

Examples
• This ENV command displays the attributes of the current session:
TIMING
USER
SQL>env
COLSEP " "
DATASOURCE TDM_Default_DataSource
HISTOPT ALL
IDLETIMEOUT 30 min(s)
LIST COUNT 0 [All Rows]
LOG OFF
LOOK AND FEEL BTEQ
MARKUP RAW
MODE SQL
PROMPT SQL>
SCHEMA USR
SERVER neo0101.acme.com:18650
SQLTERMINATOR ;
TIME OFF
TIMING OFF
USER role.dbaSQL>
Current setting (on or off) of the elapsed time. By default, the elapsed time is off.
For more information, see “Displaying the Elapsed Time” (page 54) and “SET
TIMING Command” (page 113).
User name that you entered when logging in to the database platform. For more
information, see “Logging In to the Database Platform” (page 45).
• This ENV command shows the effect of setting various session attributes:
4:16:43 PM >env
COLSEP " "
DATASOURCE TDM_Default_DataSource
HISTOPT ALL
IDLETIMEOUT 0 min(s) [Never Expires]
LIST COUNT 0 [All Rows]
LOG c:\mydir\examples.log
LOOK AND FEEL BTEQ
MARKUP RAW
MODE SQL
PROMPT 4:16:49 PM >
SCHEMA PERSNL
SERVER sys0101.mylab.mycorp.net:18650
SQLTERMINATOR .
TIME ON
TIMING ON
USER dba1
4:16:49 PM >
EXIT Command
The EXIT command disconnects from and exits the Neoview Script interface.
Syntax
EXIT [IF ERRORCODE{=|<|>|<=|>=|<>}error-code]
86 Neoview Script Interface Commands
Page 87

error-code
Considerations
In the Neoview Script interface, you must enter the command on one line. The command does
not require an SQL terminator.
Examples
• This command disconnects from and exits the Neoview Script interface, which disappears
from the screen:
SQL>exit
• In a script file, the conditional exit command causes the script file to quit running and
disconnect from and exit the Neoview Script interface when the previously run command
returns error code 4082:
log c:\errorCode.log
select * from employee;
exit if errorcode=4082
log off
These results are logged when error code 4082 occurs:
SQL>select * from employee;
is an integer that represents an error condition of the previously executed
command. If the previously executed command returns this error code, the
Neoview Script interface disconnects and exits.
Commands that execute successfully in the Neoview Script interface have an
error code of zero (0). Interface commands that do not perform SQL operations
and that fail to execute have an error code of -1. A failed SQL operation has a
specific SQLerror code associated withthe error condition. For more information
about SQL error messages, see the Neoview Messages Manual.
*** ERROR[4082] Table, view or stored procedure NEO.USR.EMPLOYEE
does not exist or is inaccessible.
*** ERROR[8822] The statement was not prepared.
SQL>exit if errorcode=4082
FC Command
The FC command allows you to edit and reissue a command in the history buffer of a Neoview
Script session. You can display the commands in the history buffer by using the HISTORY
command. For information about the history buffer, see the “HISTORY Command” (page 90).
Syntax
FC [text | [-]number]
text
[-]number
Without text or number, FC retrieves the most recent command.
is the beginning text of a command in the history buffer. Case is not significant
in matching the text to a command.
is either a positive integer that is the ordinal number of a command in the history
buffer or a negative integer that indicates the position of a command relative to
the most recent command.
FC Command 87
Page 88

Considerations
• In the Neoview Script interface, you must enter the command on one line. The command
does not require an SQL terminator.
• You cannot execute this command in a script file. You can execute this command only at a
command prompt.
• As each line of the command is displayed, you can modify the line by entering these editing
commands (in uppercase or lowercase letters) on the line below the displayed command
line:
Examples
• Reexecute the most recent command that begins with SH:
D
Icharacters
Rcharacters
characters
Deletes the character immediately above the letter D.
Repeat to delete more characters.
Inserts characters in front of the character immediately
above the letter I.
Replaces existingcharacters one-for-one with characters,
beginning with the character immediately above the
letter R.
Replaces existingcharacters one-for-one with characters,
beginning with the first character immediately above
characters. characters must begin with a nonblank
character.
To specify more than one editing command on a line, separate the editing commands with
a double slash (//). The end of a line terminates an editing command or a set of editing
commands.
After you edit a line of the command, Neoview Script displays the line again and allows
you to edit it again. Press Enter without specifying editing commands to stop editing the
line. If that line is the last line of the command, pressing Enter executes the command.
To terminate a command without saving changes to the command, use the double slash (//),
and then press Enter.
SQL>fc sh
SQL>show schema
....
Pressing Enter executes the SHOW SCHEMA command and displays the current schema,
PERSNL:
SQL>fc sh
SQL>show schema
....
SCHEMA PERSNL
SQL>
• Correct an SQL statement that you entered incorrectly by using the delete (D) editing
command:
SQL>selecct * from persnl.employee;
*** ERROR[15001] A syntax error occurred at or before:
selecct * from persnl.employee;
^
*** ERROR[8822] The statement was not prepared.
SQL>fc
SQL>selecct * from persnl.employee;
.... d
88 Neoview Script Interface Commands
Page 89

SQL>select * from persnl.employee;
....
Pressing Enter executes the corrected SELECT statement.
• Correct an SQL statement that you entered incorrectly by using more than one editing
command:
SQL>selt * fromm persnl.employee;
*** ERROR[15001] A syntax error occurred at or before:
selt * fromm persnl.employee;
^
*** ERROR[8822] The statement was not prepared.
SQL>fc
SQL>selt * fromm persnl.employee;
.... iec// d
SQL>select * from persnl.employee;
....
Pressing Enter executes the corrected SELECT statement.
• Modify a previously executed statement by replacing a value in the WHERE clause with
another value:
SQL>select first_name, last_name
+>from persnl.employee
+>where jobcode=111;
--- 0 row(s) selected.
SQL>fc
SQL>select first_name, last_name
....
SQL>from persnl.employee
....
SQL>where jobcode=111;
450
....
SQL>where jobcode=450;
....
Pressing Enter lists the first and last names of all of the employees whose job code is 450.
• Modify a previously executed statement by replacing a column name in the select list with
another column name:
SQL>select first_name, last_name
+>from persnl.employee
+>where jobcode=450;
FIRST_NAME LAST_NAME
--------------- -------------------MANFRED CONRAD
WALTER LANCASTER
JOHN JONES
KARL HELMSTED
THOMAS SPINNER
--- 5 row(s) selected.
SQL>fc
SQL>select first_name, last_name
.... R empnum,
SQL>select empnum, last_name
....
SQL>from persnl.employee
....
FC Command 89
Page 90

SQL>where jobcode=450;
....
Pressing Enter lists the employee number and last names of all employees whose job code
is 450:
EMPNUM LAST_NAME
------ ------------------- 180 CONRAD
215 LANCASTER
216 JONES
225 HELMSTED
232 SPINNER
--- 5 row(s) selected.
SQL>
HELP Command
The HELP command displays help text for the interface commands that are supported in the
current operating mode.
Syntax
HELP [command-name]
command-name
Considerations
In the Neoview Script interface, you must enter the command on one line. The command does
not require an SQL terminator.
Examples
• This HELP command lists all the commands that are supported in SQL mode:
SQL>help
• This HELP command lists all the SET commands that are supported in SQL mode:
SQL>help set
• This HELP command shows help text for SET IDLETIMEOUT:
SQL>help set idletimeout
is the name of an interface command that is supported in the current
operating mode. If you do not specify a command, Neoview Script returns
a list of all commands that are supported in the current mode. If you specify
SET, Neoview Script returns a list of all SET commands that are supported
in the current mode. If you specify SHOW, Neoview Script returns a list of
all SHOW commands that are supported in the current mode.
• This HELP command lists all the SHOW commands that are supported in CS mode:
CS#help show
HISTORY Command
The HISTORY command displays recently executed commands, identifying each command by
a number that you can use to reexecute or edit the command.
90 Neoview Script Interface Commands
Page 91

Syntax
HISTORY [number]
number
Considerations
• In the Neoview Script interface, you must enter the command on one line. The command
does not require an SQL terminator.
• You can use the FC command to edit and reexecute a command in the history buffer, or use
the REPEAT command to reexecute a command without modifying it. See the “FC Command”
(page 87) or the “REPEAT Command” (page 98).
Example
Display the three most recent commands and use FC to redisplay one:
SQL>history 3
14> set schema sales;
15> show tables
16> show views
SQL>fc 14
SQL>set schema sales
....
Now you can use the edit capabilities of FC to modify and execute a different SET SCHEMA
statement.
is the number of commands to display. The default number is 10. The maximum
number is 100.
LOG Command
The LOG command logs the entered commands and their output from the Neoview Script
interface to a log file.
Syntax
LOG { ON [CLEAR] | log-file [CLEAR] | OFF }
ON
ON CLEAR
log-file
log-file CLEAR instructs Neoview Script to clear the contents of the specified log-file
OFF stops the logging process.
starts the loggingprocess and records information in the sqlspool.lst
file in the Neoview Script bin directory.
instructs Neoview Script to clear the contents of the sqlspool.lst file
before logging new information to the file.
is the name of a log file into which Neoview Script records the entered
commands and their output. If you want the log file to exist outside the
local directorywhere you launch Neoview Script (by default, the Neoview
Script bin directory), specify the full directory path of the log file. The
log file does not need to exist, but the specified directory must exist before
you execute the LOG command.
before logging new information to the file.
LOG Command 91
Page 92

Considerations
• In the Neoview Script interface, you must enter the command on one line. The command
does not require an SQL terminator.
• Use a unique name for each log file to avoid writing information from different Neoview
Script sessions into the same log file.
Examples
• This command starts the logging process and records information to the sqlspool.lst
file in the Neoview Script bin directory:
SQL>log on
• This command starts the logging process and appends new information to an existing log
file, persnl_updates.log, in the local directory(the same directory where youare running
Neoview Script):
SQL>log persnl_updates.log
• This command starts the logging process and appends new information to a log file,
sales_updates.log, in the specified directory on a Windows workstation:
SQL>log c:\log_files\sales_updates.log
• This command starts the logging process and appends new information to a log file,
sales_updates.log, in the specified directory on a Linux or UNIX workstation:
SQL>log ./log_files/sales_updates.log
• This command starts the logging process and clears existing information from the log file
before logging new information to the file:
SQL>log persnl_ddl.log clear
• This command stops the logging process:
SQL>log off
For more information, see “Logging Output” (page 63).
MODE Command
The MODE command determines the operating mode of the current session to be either SQL for
database commands or CS for connectivity service commands. The default mode for Neoview
Script sessions is SQL.
Syntax
MODE { SQL | CS }
SQL specifies SQL mode and supports the use of all SQL statements and Neoview Script
interface commands. The connectivity service commands are disallowed in SQL mode.
CS specifies connectivity service (CS) mode and supports the use of connectivity service
commands. For more information, see Appendix C (page 135).
CS mode also supports these Neoview Script interface commands:
• @ and OBEY
• CLEAR
• CONNECT, RECONNECT, DISCONNECT, EXIT, and QUIT
• ENV, SESSION, and SHOW SESSION
• FC and REPEAT
• HELP
• HISTORY and SAVEHIST
• LOG and SPOOL
92 Neoview Script Interface Commands
Page 93

• MODE and SHOW MODE
• SET COLSEP and SHOW COLSEP
• SET HISTOPT and SHOW HISTOPT
• SET IDLETIMEOUT and SHOW IDLETIMEOUT
• SET MARKUP and SHOW MARKUP
• SET PROMPT
• SET TIME and SHOW TIME
• SET TIMING and SHOW TIMING
• VERSION
All other interface commands are disallowed in CS mode.
Considerations
• In the Neoview Script interface, you must enter the command on one line. The command
does not require an SQL terminator.
• You cannot execute the MODE command or any connectivity service commands in PRUN
script files. However, you can execute the MODE command in OBEY or @ script files.
Examples
• This command changes the Neoview Script session to CS mode operation:
SQL>mode cs
CS#
For more information, see Appendix C (page 135).
• This command returns the Neoview Script session to SQL mode operation:
CS#mode sql
SQL>
OBEY Command
The OBEY command executes the SQL statements and Neoview Script interface commands
contained in a specified script file.
Syntax
OBEY script-file [ (section-name) ]
script-file
(section-name) is the name of a section within the script-file to execute. If you specify
is the name of an ASCII text file that contains SQL statements, Neoview
Script interface commands, and comments. If the script file exists outside
the local directory where you launch Neoview Script (by default, the
Neoview Script bin directory), specify the full directory path of the script
file.
section-name, the OBEY command executes the commands between
the header line for the specified section and the header line for the next
section (or the end of the script file). If you omit section-name, the
OBEY command executes the entire script file. For more information, see
“Section Headers” (page 67).
OBEY Command 93
Page 94

Considerations
• In the Neoview Script interface, you must enter the command on one line. The command
does not require an SQL terminator.
• Put a space between OBEY and the first character of the file name.
• You can execute this command in a script file.
• You can specify only one script file at a time using the OBEY command. To run multiple
script files in parallel, see “Running Scripts in Parallel” (page 69).
Examples
• This OBEY command runs the script file from the local directory (the same directory where
you are running Neoview Script):
SQL>obey ddl.sql
• This OBEY command runs the script file in the specified directory on Windows.
SQL>obey c:\my_files\ddl.sql
• This OBEY command runs the script file in the specified directory on a Linux or UNIX
workstation:
SQL>obey ./my_files/ddl.sql
• This sample file contains sections to be used in conjunction with the OBEY command:
?section droptable
DROP TABLE COURSE
?section create
CREATE TABLE COURSE
(
CNO VARCHAR(3) NOT NULL,
CNAME VARCHAR(22) NOT NULL,
CDESCP VARCHAR(25) NOT NULL,
CRED INT,
CLABFEE NUMERIC(5,2),
CDEPT VARCHAR(4) NOT NULL,
primary key (cno)
) ;
?section insert
INSERT INTO COURSE VALUES
('C11', 'INTRO TO CS','FOR ROOKIES',3, 100, 'CIS');
INSERT INTO COURSE VALUES
('C22', 'DATA STRUCTURES','VERY USEFUL',3, 50, 'CIS');
INSERT INTO COURSE VALUES
('C33', 'DISCRETE MATHEMATICS',
'ABSOLUTELY NECESSARY',3, 0,'CIS');
?section select
SELECT * FROM course;
?section delete
purgedata course;
To run only the commands in section create, execute the following :
SQL>obey C:\Scripts\course.sql (create)
SQL>?section create
SQL>CREATE TABLE COURSE
+>(
94 Neoview Script Interface Commands
Page 95

+> CNO VARCHAR(3) NOT NULL,
+> CNAME VARCHAR(22) NOT NULL,
+> CDESCP VARCHAR(25) NOT NULL,
+> CRED INT,
+> CLABFEE NUMERIC(5,2),
+> CDEPT VARCHAR(4) NOT NULL,
+> primary key (cno)
+>) ;
--- SQL Operation complete.
To run only the commands in the insert section, execute the following :
SQL>obey C:\Scripts\course.sql (insert)
SQL>?section insert
SQL>INSERT INTO COURSE VALUES
+> ('C11', 'INTRO TO CS','FOR ROOKIES',3, 100, 'CIS');
--- 1 row(s) inserted.
SQL>INSERT INTO COURSE VALUES
+> ('C22', 'DATA STRUCTURES','VERY USEFUL',3, 50, 'CIS');
--- 1 row(s) inserted.
SQL>INSERT INTO COURSE VALUES
+> ('C33', 'DISCRETE MATHEMATICS',
'ABSOLUTELY NECESSARY',3, 0, 'CIS');
--- 1 row(s) inserted.
PRUN Command
The PRUN command runs script files in parallel.
Syntax
PRUN [-d | -defaults] | PRUN [-sd | -scriptsdir directoryName]
[-e | -extension extension]
[-ld | -logsdir logDirectory]
[-o | -overwrite {y | n}]
[-c | -connections num]
scriptsdir
extension The default is .sql.
logsdir
overwrite
connections
In this directory, PRUN processes every file with the specified extension. If
you do not specify a directory or if you specify an invalid directory, an error
message occurs and you are prompted to reenter the directory. Note: Verify
that this directory contains valid script files.
In this directory, PRUN creates a log file for each script file by appending the
.log extension to the name of the script file. If you do not specify a log file
directory, PRUN places the log files in the same directory as the script files.
Note: PRUN puts the prun.err.log summary filein the error subdirectory.
If you specify (y), PRUN overwrites the contents of existing log files. By default,
PRUN keep the original information in the log files and appends new
information at the end of each file.
Enter a number for the maximum number of connections for the data sources.
The data source should support this number of connections.
PRUN Command 95
Page 96

Considerations
• In the Neoview Script interface, you must enter the command on one line. The command
does not require an SQL terminator.
• You can execute this command only in SQL mode.
• If the PRUN command is executed without any arguments, Neoview Script prompts for the
PRUN arguments. If one or more options are specified, the PRUN command runs without
prompting for more input. In the non-interactive mode, if any options are not specified then
the default value of is used.
• The -d option or -defaults cannot be specified with any other option.
Example
• To use PRUN, enter the PRUN command in the Neoview Script interface:
SQL>prun
Enter * as input to stop the current prun session
--------------------------------------------------
Enter the scripts directory : c:\ddl_scripts
Enter the script file extension[sql] :
Enter the logs directory[scripts dir] : c:\log
Overwrite the log files (y/n)[n]? : y
Enter the number of connections(2-248)[2]: 3
After you enter the number of connections, PRUN starts to process the script files and
displays this status:
Status: In Progress.......
After executing all the script files, PRUN returns a summary of the operation:
_____________________________________________
PARALLELRUN(PRUN) SUMMARY
_____________________________________________
Total files present ........................3
Total files processed ......................3
Total sqls processed ......................40
Total errors ...............................4
Total warnings .............................0
Total successes ...........................36
Total connections ..........................5
Total connection failures...................0
Please verify the error log file c:\log\error\prun.err.log
SQL>
• This PRUN command initiates a parallel run operation with the -d option:
SQL>prun -d
SQL> prun -scriptsdir ./prun/sql –e sql –ld ./prun/logs –o y –connections 5
PRUN options are -scriptsdir c:/_nvs/prun
-logsdir c:/_nvs/prun/logs
-extension sql
-overwrite y
-connections 5
Status: Complete
_____________________________________________
PARALLELRUN(PRUN)SUMMARY
_____________________________________________
Total files present ......................99
Total files processed ....................99
Total sqls processed ....................198
Total errors ..............................0
Total warnings ............................0
Total warnings ............................0
96 Neoview Script Interface Commands
Page 97

Total connections .........................5
Total connection failures..................0
You can execute this command only in SQL mode.
• PRUN can be started in non-interactive mode using the –q parameter, thus requiring no
input:
hpnvs.cmd -h arc0101.caclab.cac.cpqcorp.net -dsn
TDM_Default_DataSource -u super.services -p host1
-q "prun –sd c:/_nvs/prun -o y -c 3"
• PRUN can be started in non-interactive mode from an obey file:
SQL>obey startPrun.txt
SQL>prun -sd c:/_nvs/prun -ld c:/_nvs/prun/logs -e sql -o y -c 5
PRUN options are -scriptsdir c:/_nvs/prun
-logsdir c:/_nvs/prun/logs
-extension sql
-overwrite yes
-connections 5
Status: Complete
For a summary of all errors and warnings that occurred during the PRUN operation, go to the
error subdirectory in the same directory as the log files (for example, C:\log\error) and
open the prun.err.log summary file.
For details about the errors that occurred during the execution of a script file, open each individual
log file (<script-file.sql>.log)
QUIT Command
The QUIT command disconnects from and exits the Neoview Script interface.
Syntax
QUIT [IF ERRORCODE{=|<|>|<=|>=|<>}error-code]
error-code
Considerations
In the Neoview Script interface, you must enter the command on one line. The command does
not require an SQL terminator.
Examples
is an integer that represents an error condition of the previously executed
command. If the previously executed command returns this error code, the
Neoview Script interface disconnects and exits.
Commands that execute successfully in the Neoview Script interface have an
error code of zero (0). Interface commands that do not perform SQL operations
and that fail to execute have an error code of -1. A failed SQL operation has a
specific SQLerror code associated withthe error condition. For more information
about SQL error messages, see the Neoview Messages Manual.
• This command disconnects from and exits the Neoview Script interface, which disappears
from the screen:
SQL>quit
• In a script file, the conditional exit command causes the script file to quit running and
disconnect from and exit the Neoview Script interface when the previously run command
returns error code 4082:
QUIT Command 97
Page 98

log c:\errorCode.log
select * from employee;
quit if errorcode=4082
log off
These results are logged when error code 4082 occurs:
SQL>select * from employee;
*** ERROR[4082] Table, view or stored procedure NEO.USR.EMPLOYEE
does not exist or is inaccessible.
*** ERROR[8822] The statement was not prepared.
SQL>quit if errorcode=4082
RECONNECT Command
The RECONNECT command creates a new connection to the Neoview platform using the login
credentials of the last successful connection.
Syntax
RECONNECT
Considerations
The host name or IP address and port number, credentials (user name and password) and the
datasource names values are used from information previously entered. This is the information
specified at launch or when the last CONNECT command was executed.
If NeoviewScript wasinvoked with the -noconnect launch parameter, Neoview Scriptprompts
you for the values.
Examples
This command creates a new connection to the Neoview platform using the login credentials of
the last successful connection:
SQL>reconnect
Connected to DataSource TDM_Default_DataSource
REPEAT Command
The REPEAT command reexecutes a previous command.
Syntax
REPEAT [ text | [-]number ]
text
[-]number
specifies the text of the most recently executed command. The command must
have been executed beginning with text, but text need be only as many
characters as necessary to identify the command. Neoview Script ignores leading
blanks.
is an integer that identifies a command in the history buffer. If number is negative,
it indicates the position of the command in the history buffer relative to the current
command; if number is positive, it is the ordinal number of a command in the
history buffer.
The HISTORY command displays the commands or statements in the history
buffer. See the “HISTORY Command” (page 90).
98 Neoview Script Interface Commands
Page 99

Considerations
• In the Neoview Script interface, you must enter the command on one line. The command
does not require an SQL terminator.
• To reexecute the immediately preceding command, enter REPEAT without specifying a
number. If you enter more than one command on a line, the REPEAT command reexecutes
only the last command on the line.
• When a command is selected for repeat, and the SQL terminator value has changed since
the execution of that command, Neoview script replaces the SQL terminator in the command
with the current SQL terminator value and executes the command.
Examples
• Display the previously executed commands and reexecute the second to the last command:
SQL>history
1> set idletimeout 0
2> log on
3> set schema persnl;
4> select * from employee;
5> show tables
6> select * from dept;
7> show views
8> select * from emplist;
SQL>
SQL>repeat -2
show views
VIEW NAMES
------------------------------------------------------------EMPLIST MGRLIST
SQL>
• Reexecute the fifth command in the history buffer:
SQL>repeat 5
show tables
TABLE NAMES
------------------------------------------------------------DEPT EMPLOYEE JOB PROJECT
SQL>
• Reexecute the SHOW TABLES command:
SQL>repeat show
show tables
TABLE NAMES
------------------------------------------------------------DEPT EMPLOYEE JOB PROJECT
SQL>
RESET PARAM Command
The RESET PARAM command clears all parameter values or a specified parameter value in the
current session.
RESET PARAM Command 99
Page 100

Syntax
RESET PARAM [param-name]
param-name
Considerations
• In the Neoview Script interface, you must enter the command on one line. The command
does not require an SQL terminator.
• You can execute this command only in SQL mode.
• To clear several parameter values but not all, you must use a separate RESET PARAM
command for each parameter.
Example
This RESET PARAM command clears the setting of the ?sal (salary) parameter, and the SET
PARAM command resets it to a new value:
SQL>reset param ?sal
SQL>set param ?sal 80000.00
For more information, see “Resetting the Parameters” (page 61).
is the name of the parameter for which you specified a value. Parameter names
are case-sensitive. For example, the parameter ?pn is not equivalent to the
parameter ?PN. param-name can be preceded by a question mark (?), such as
?param-name.
If you do not specify a parameter name, all of the parameter values in the current
session are cleared.
RUN Command
The RUN command executes the previously executed SQL statement. This command does not
repeat a Neoview Script interface command.
Syntax
RUN
Considerations
• In the Neoview Script interface, you must enter the command on one line. The command
does not require an SQL terminator.
• You can execute this command only in SQL mode.
Example
This RUN command executes the previously executed SELECT statement:
SQL>select count(*) from persnl.employee;
(EXPR)
--------------------
62
--- 1 row(s) selected.
SQL>run
(EXPR)
100 Neoview Script Interface Commands
 Loading...