

Page 1
ANALOG FAX ACCESSORY 500
Send Fax Driver Guide
Page 2

Page 3

HP Analog Fax Accessory 500
Send Fax Driver Guide
Page 4

Copyright and License
Trademark Credits
© 2013 Copyright Hewlett-Packard
Development Company, L.P.
Reproduction, adaptation, or translation
without prior written permission is
prohibited, except as allowed under the
copyright laws.
The information contained herein is subject
to change without notice.
The only warranties for HP products and
services are set forth in the express
warranty statements accompanying such
products and services. Nothing herein
should be construed as constituting an
additional warranty. HP shall not be liable
for technical or editorial errors or omissions
contained herein.
Edition 1, 4/2013
Part number: CC487–91240
Microsoft®, Windows®, Windows® XP, and
Windows Vista® are U.S. registered
trademarks of Microsoft Corporation.
All products mentioned herein may be
trademarks of their respective companies.
Local country/region laws may prohibit the
use of this product outside of the countries/
regions specified. It is strictly forbidden by
law in most countries/regions to connect
nonapproved telecommunications
equipment (fax machines) to public
telephone networks.
®
ENERGY STAR
and the ENERGY STAR
mark are registered U.S. marks.
®
Page 5

Table of contents
1 Set up ................................................................................................................................................................ 1
Introduction ........................................................................................................................................... 2
System requirements ........................................................................................................................... 3
Operating systems ............................................................................................................... 3
Displays ............................................................................................................................... 3
Hardware ............................................................................................................................. 3
Network ................................................................................................................................ 3
Install the MFP Send Fax driver ........................................................................................................... 4
Determine if the MFP supports the MFP Send Fax driver ................................................... 4
Upgrade the MFP firmware and download the driver .......................................................... 4
Verify that the MFP e-mail feature is configured (optional) .................................................. 5
Configure the billing-code feature (optional) ........................................................................ 6
Install the driver ................................................................................................................... 6
Install the driver in Windows XP .......................................................................... 6
Install the driver in Windows Vista .................................................................... 19
Uninstall the HP MFP Send Fax driver ............................................................................................... 28
2 Send faxes ...................................................................................................................................................... 29
Send a fax to a single recipient .......................................................................................................... 30
Send a fax to multiple recipients ........................................................................................................ 33
Send a fax by using the phone book .................................................................................................. 36
Cancel a fax job .................................................................................................................................. 40
Insert special characters in the fax number ........................................................................................ 41
Edit the phone book ........................................................................................................................... 42
Add names to the phone book ........................................................................................... 42
Add groups to the phone book ........................................................................................... 44
Remove names from the phone book ................................................................................ 44
Edit names in the phone book ........................................................................................... 47
Export phone book entries to a comma-separated values (CSV) formatted file ................................ 50
Import phone book entries from a CSV formatted file ........................................................................ 51
Voice Calls and Retries ...................................................................................................................... 52
Fax Call Report .................................................................................................................. 52
ENWW iii
Page 6

Fax Activity Log ................................................................................................................. 52
T.30 Report ........................................................................................................................ 52
3 Configuration ................................................................................................................................................... 53
Set the sender information ................................................................................................................. 54
Set the fax quality ............................................................................................................................... 56
Set the notification settings ................................................................................................................ 57
Set the cover page information .......................................................................................................... 59
Set the preview preference ................................................................................................................ 61
Set the fax driver printer preferences ................................................................................................. 62
Set the billing-code configuration ....................................................................................................... 64
4 Solve problems ............................................................................................................................................... 65
Functional errors ................................................................................................................................ 66
The test page does not print .............................................................................................. 66
The e-mail notification is disabled ...................................................................................... 66
An e-mail confirmation is not received ............................................................................... 67
PC FAX SEND or PC Fax Send does not appear on the MFP control panel .................... 67
The bitmap does not appear or print on the cover page .................................................... 68
The preview does not appear ............................................................................................ 68
A billing code is required after disabling the feature .......................................................... 68
The billing code text box does not appear ......................................................................... 69
The default fields do not refresh ........................................................................................ 70
Changed settings do not take effect .................................................................................. 70
Changed settings do not take effect in a Point-and-Print installation ................................ 71
Warning messages ............................................................................................................................. 72
PC fax feature may be disabled at the MFP warning ........................................................ 72
Error messages .................................................................................................................................. 73
Index ................................................................................................................................................................... 77
iv ENWW
Page 7

1 Set up
Introduction
●
System requirements
●
Install the MFP Send Fax driver
●
Uninstall the HP MFP Send Fax driver
●
ENWW 1
Page 8

Introduction
You can use the HP LaserJet MFP Send Fax driver to send faxes from your computer to one or more
HP multifunction peripherals (MFP). After it is installed, the driver can be accessed by printing to the
MFP Send Fax driver.
This guide describes the fax functions that are included with the MFP Send Fax driver.
Conventions used in this guide
TIP: Tips provide helpful hints or shortcuts.
NOTE: Notes provide important information to explain a concept or to complete a task.
CAUTION: Cautions indicate procedures that you should follow to avoid losing data or damaging
the product.
WARNING! Warnings alert you to specific procedures that you should follow to avoid personal
injury, catastrophic loss of data, or extensive damage to the product.
2 Chapter 1 Set up ENWW
Page 9

System requirements
Operating systems
The MFP Send Fax driver is supported on the following operating systems:
Windows® XP SP2 or later, 32–bit
●
NOTE: Microsoft retired mainstream support for Windows XP in April 2009. HP will continue to
provide best-effort support for the discontinued XP operating system.
Windows Vista® 32–bit and 64–bit
●
Windows® 7, 32–bit and 64–bit
●
Windows® 8, 32–bit and 64–bit
●
Windows 2003 Server, SP1 or later, 32–bit and 64–bit
●
Windows Server 2008, 32–bit and 64–bit
●
Windows Server 2008 R2, 64–bit
●
Windows 2012 Server, 64–bit
●
Max OS X 10.6 and 10.7
●
Displays
The MFP Send Fax module supports display types that have a super video graphics adapter (SVGA)
resolution of 800 x 600 pixels or greater.
Hardware
An HP LaserJet analog fax accessory must be installed in the MFP before installing the MFP Send
Fax driver. See the
installing this hardware.
Download fax card installation instructions, user documentation, and software from the following URL:
www.hp.com/support/ljanalogfaxaccessory500
Network
The MFP Send Fax driver must be used on a network printer. It is not intended to be used on a local
printer, USB, and serial or parallel connections.
HP LaserJet Analog Fax Accessory 500 Fax Guide
for more information about
ENWW System requirements 3
Page 10

Install the MFP Send Fax driver
Determine if the MFP supports the MFP Send Fax driver
The most current versions of the MFP firmware contain support for the MFP Send Fax driver.
1. From the Home screen, scroll to and touch the Administration button.
2. Open the following menus:
Fax Settings
●
Fax Send Settings
●
Fax Send Setup
●
General Fax Send Settings
●
3. Touch the PC Fax Send option.
NOTE: If the PC Fax Send option does not appear on your MFP menu, upgrade the MFP
firmware.
4. Touch the Save button.
Upgrade the MFP firmware and download the driver
1. View the configuration information on the MFP control panel to determine the current firmware
version.
a. From the Home screen, scroll to and touch the Administration button.
b. Open the following menus:
Reports
●
Configuration/Status Pages
●
c. Touch the Configuration Page option and then touch the Print button.
d. The firmware datecode is listed in the section called Device Information.
NOTE: The firmware datecode is in the following format: YYYYMMDD XX.XXX.X. The first
string of numbers is the date, where YYYY represents the year, MM represents the month, and
DD represents the date. For example, a firmware datecode that begins with 20040225
represents February 25, 2004. The second string of numbers represents the revision number of
the firmware.
2. Download the most current firmware.
a. Go to the Web site for your product:
http://www.hp.com/go/lj500mfpm525_firmware
●
http://www.hp.com/go/lj500colormfpm575_firmware
●
www.hp.com/go/ljm4555mfp_firmware
●
www.hp.com/go/cljcm4540mfp_firmware
●
4 Chapter 1 Set up ENWW
Page 11
www.hp.com/go/cljcm3530mfp_firmware
●
www.hp.com/go/ljMFPM725_firmware
●
b. In the Select operating system pane, click Cross operating system (BIOS, Firmware,
Diagnostics, etc.).
c. If the date that is listed in the firmware table is more recent than the datecode that is printed
on the MFP configuration page, click Download next to the appropriate file.
NOTE: Different firmware files are available for the various operating systems.
d. In the File Download dialog box that opens, click Save.
e. In the File Name text box in the Save As window that opens, type the location on your
computer where you want to save the firmware update file.
f. Click Save.
g. After the file has been downloaded, close the File Download dialog box, if necessary.
3. If the CD that came with the MFP or fax accessory is not available, download the MFP Send Fax
driver.
a. Click Back to return to the Select operating system pane.
NOTE: If you do not return to the Select operating system pane when you click Back, see
step 2 for instructions about navigating to it.
b. In the Select operating system pane, click the appropriate operating system.
NOTE: The MFP Send Fax driver is supported in Windows XP, Windows XP Professional
x64, Windows Vista, Windows 7 32 bit, and Windows 7 64 bit.
c. In the Driver table that appears, click Download next to the HP MFP Send Fax driver.
d. In the File Download dialog box that opens, click Save.
e. In the File Name text box on the Save As window that opens, type the location on your
computer where you want to save the MFP Send Fax driver file.
f. Click Save.
g. After the file has been downloaded, close the File Download dialog box, if necessary.
4. Install the downloaded firmware file. See the MFP user guide for instructions about installing the
remote firmware update (RFU).
Verify that the MFP e-mail feature is configured (optional)
Configure e-mail function on the MFP in order to receive an e-mail notification when a fax has been
sent by using the MFP Send Fax driver.
NOTE: The e-mail notification feature is optional.
See the appropriate MFP user guide for instructions about configuring the e-mail function.
ENWW Install the MFP Send Fax driver 5
Page 12
Configure the billing-code feature (optional)
HP MFP Send Fax supports the use of billing codes when sending faxes.
NOTE: The billing-code feature is optional.
1. From the Home screen, scroll to and touch the Administration button.
2. Open the following menus:
Fax Settings
●
Fax Send Settings
●
Fax Send Setup
●
Billing Codes
●
3. Touch the Enable Billing Codes feature to enable billing codes.
NOTE: To disable billing codes, deselect the Enable Billing Codes feature, touch the Save
button, and then skip the remaining steps.
To allow users to edit billing codes, touch the Allow users to edit billing codes feature.
4. Touch the Default Billing Code text box to open the keyboard.
5. Enter the billing code and then touch the OK button.
6. Touch the Minimum Length text box to open the keypad.
7. Type the minimum number of digits you want in the billing code, and then touch the OK button.
8. Touch the Save button.
Install the driver
Install the MFP Send Fax driver by using the Add a Printer wizard in Windows:
NOTE: If you are using the software CD supplied with the MFP, you can install the Send Fax driver
by clicking the Install button or the Advanced Install Options button in the CD Browser.
Download send fax driver software from the following URL:
www.hp.com/support/ljanalogfaxaccessory500
Install the driver in Windows XP
1. In Windows Explorer, double-click the downloaded MFP Send Fax driver executable file to
extract the driver files.
2. Click Start, click Settings, and then click Printers and Faxes.
3. In the Printer Tasks pane in the Printers and Faxes window, click Add a printer.
4. In the Add Printer Wizard welcome dialog box, click Next.
6 Chapter 1 Set up ENWW
Page 13
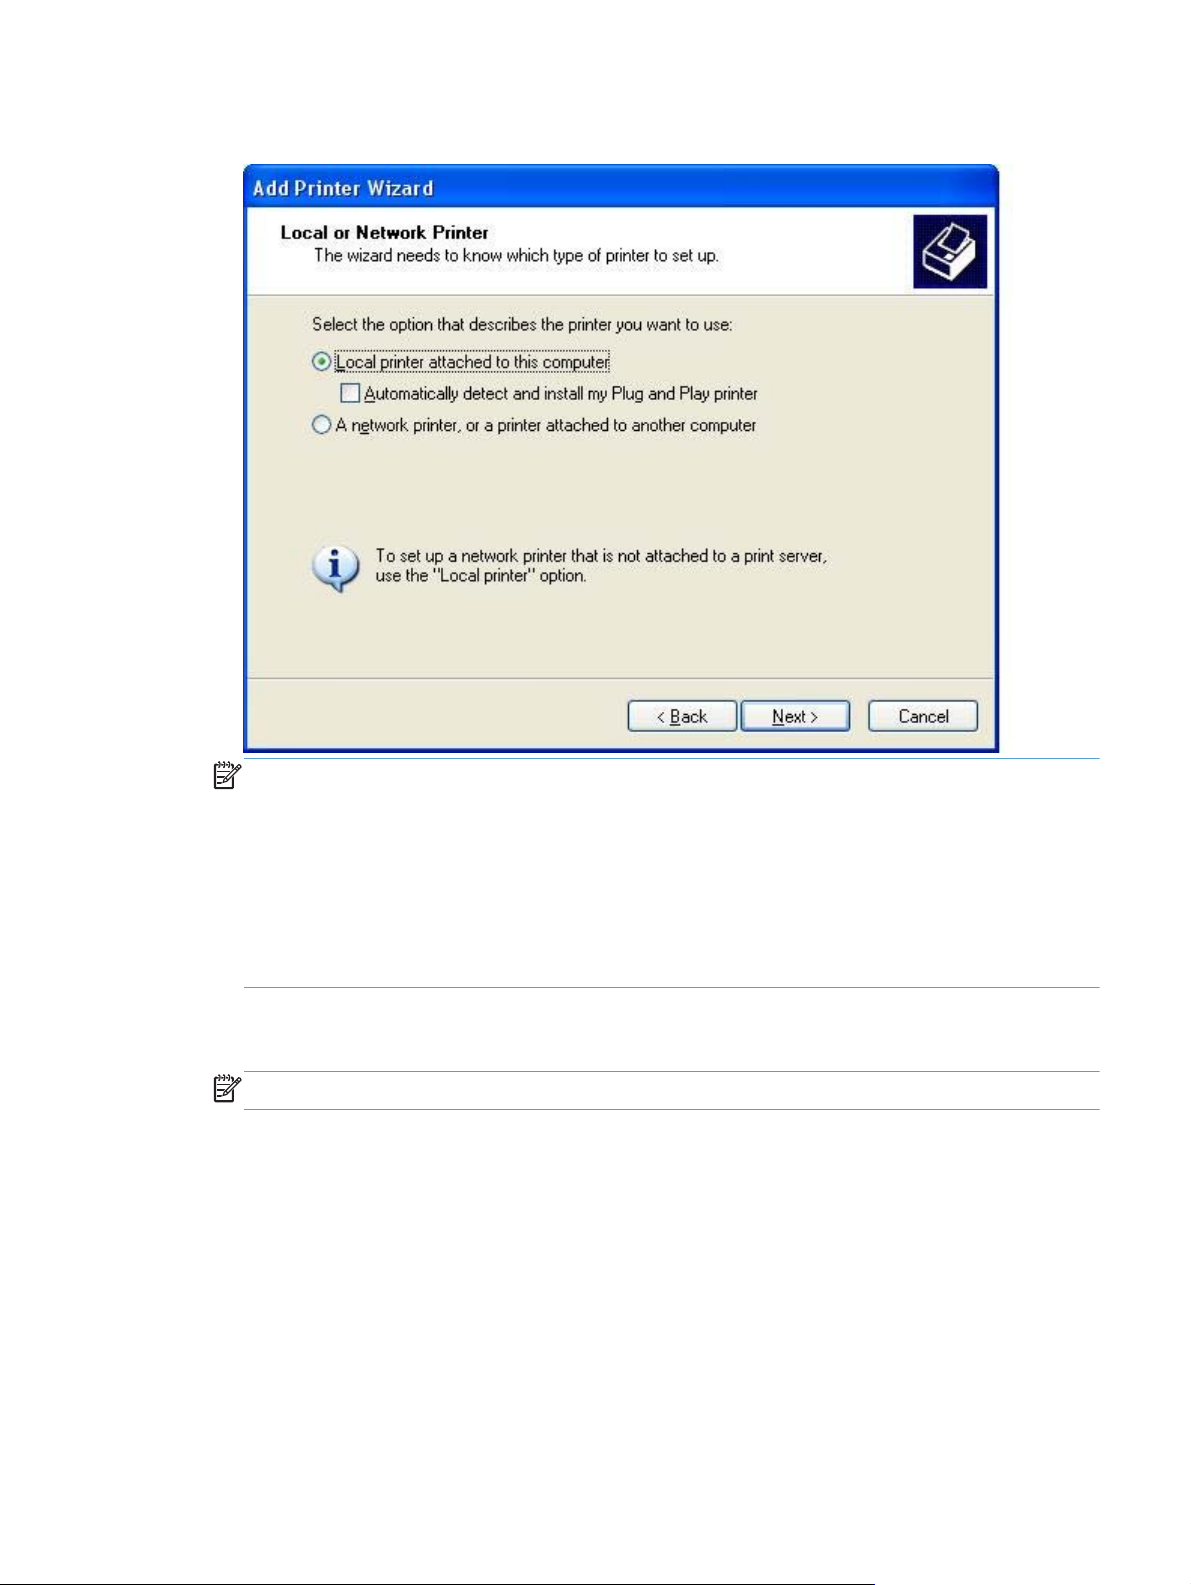
5. Under Local or Network Printer, select Local printer attached to this computer. Click Next.
NOTE: Select Local printer attached to this computer to install the MFP Send Fax driver on a
network printer. The printer name is HP MFP Send Fax when the driver is installed on a local
printer.
If you select A network printer, or a printer attached to another computer, then the IP address of
the computer is required. Some features, such as fax preview, are not available if the driver is
installed by using the network printer installation (Point-and-Print).
The MFP Send Fax driver cannot be installed on a printer that is connected to the computer
through a serial or parallel port. It must be on a network.
6. If your computer is already connected to the MFP, under Select a Printer Port, select Use the
following port.
NOTE: If your computer is not connected to the MFP, go to step 8.
ENWW Install the MFP Send Fax driver 7
Page 14
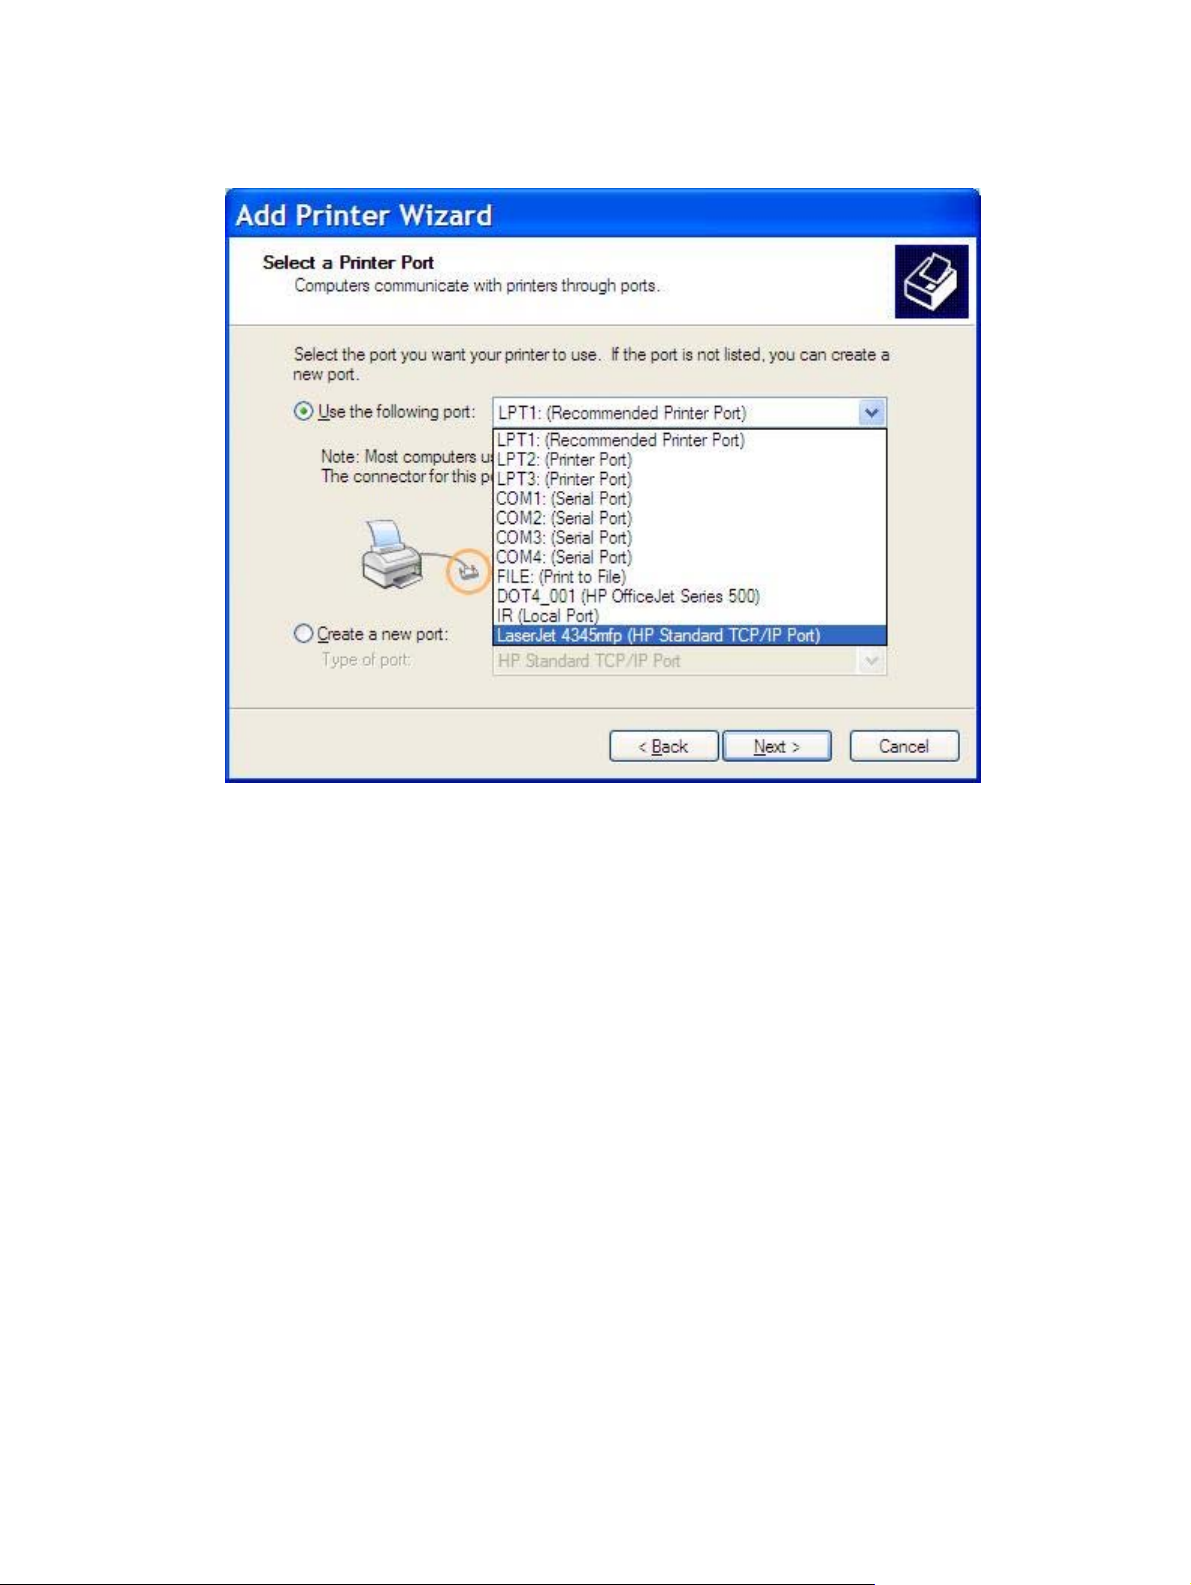
7. In the Use the following port drop-down menu, select the name or IP address of the MFP. Click
Next and then go to step 13.
8 Chapter 1 Set up ENWW
Page 15
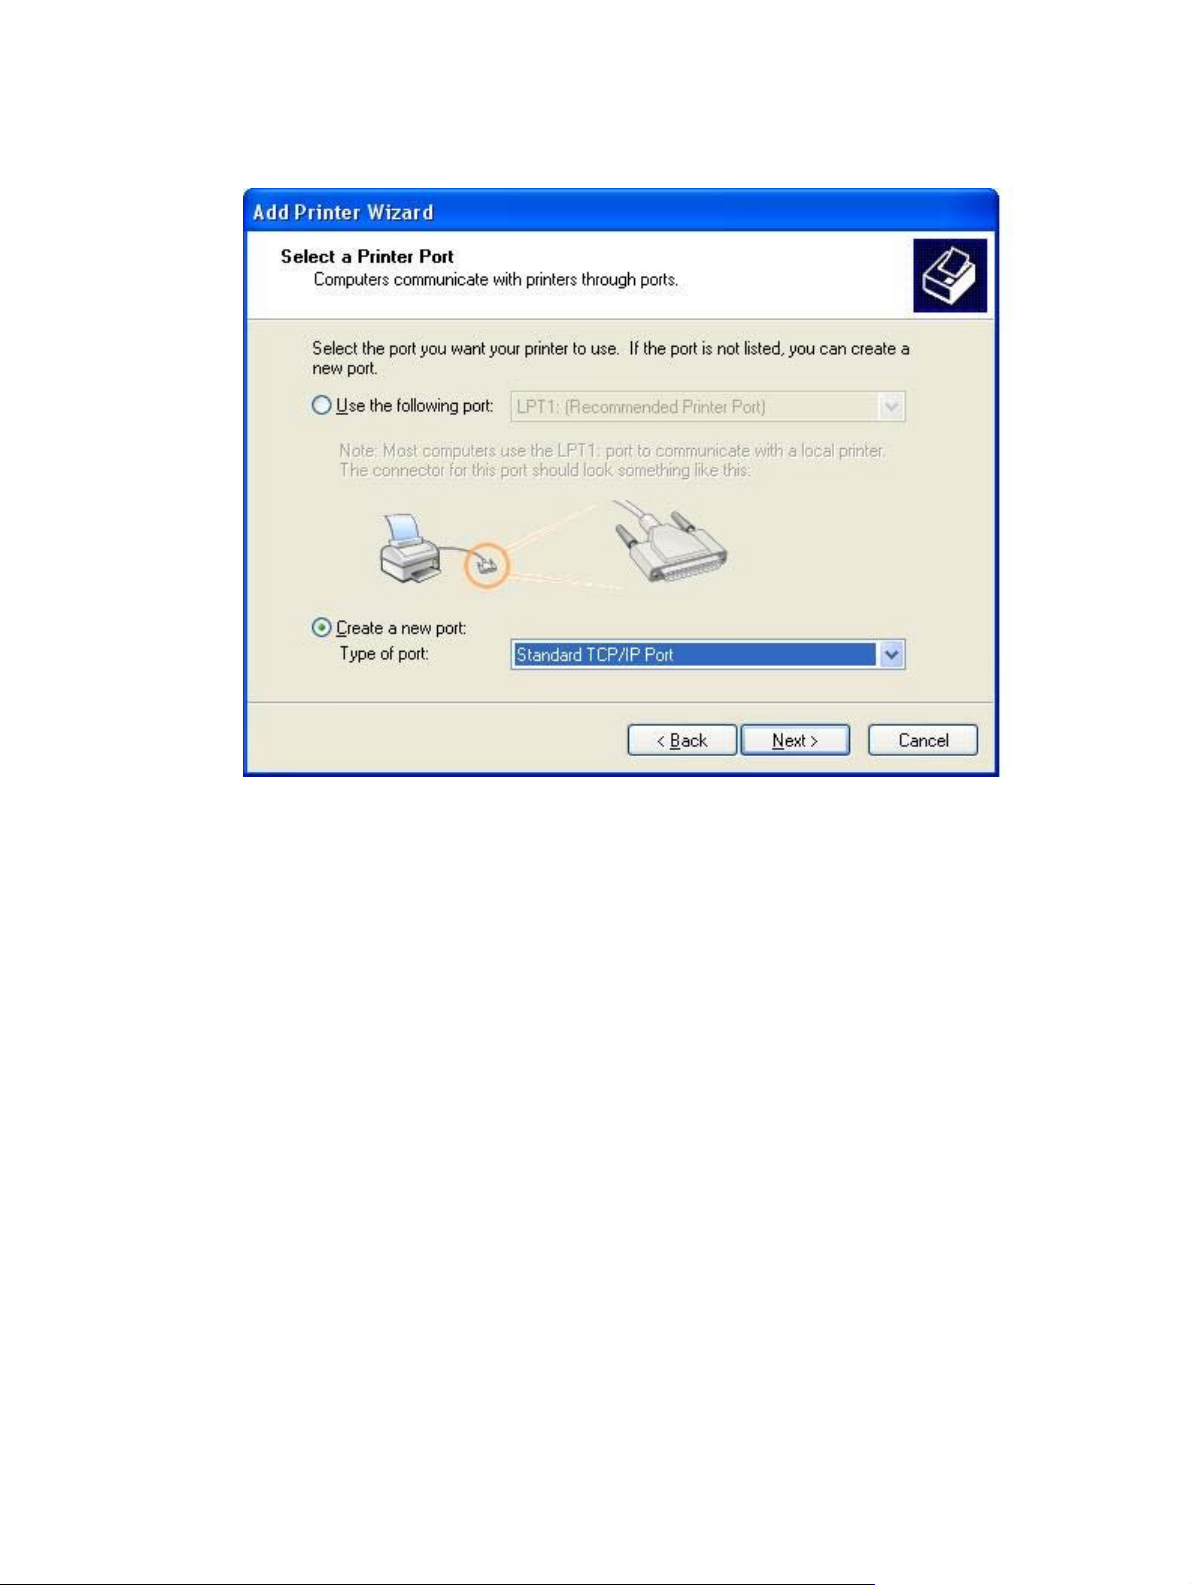
8. If your computer is not connected to the MFP, select Create a new port under Select a Printer
Port.
9. In the Type of port drop-down menu, select Standard TCP/IP Port. Click Next.
ENWW Install the MFP Send Fax driver 9
Page 16
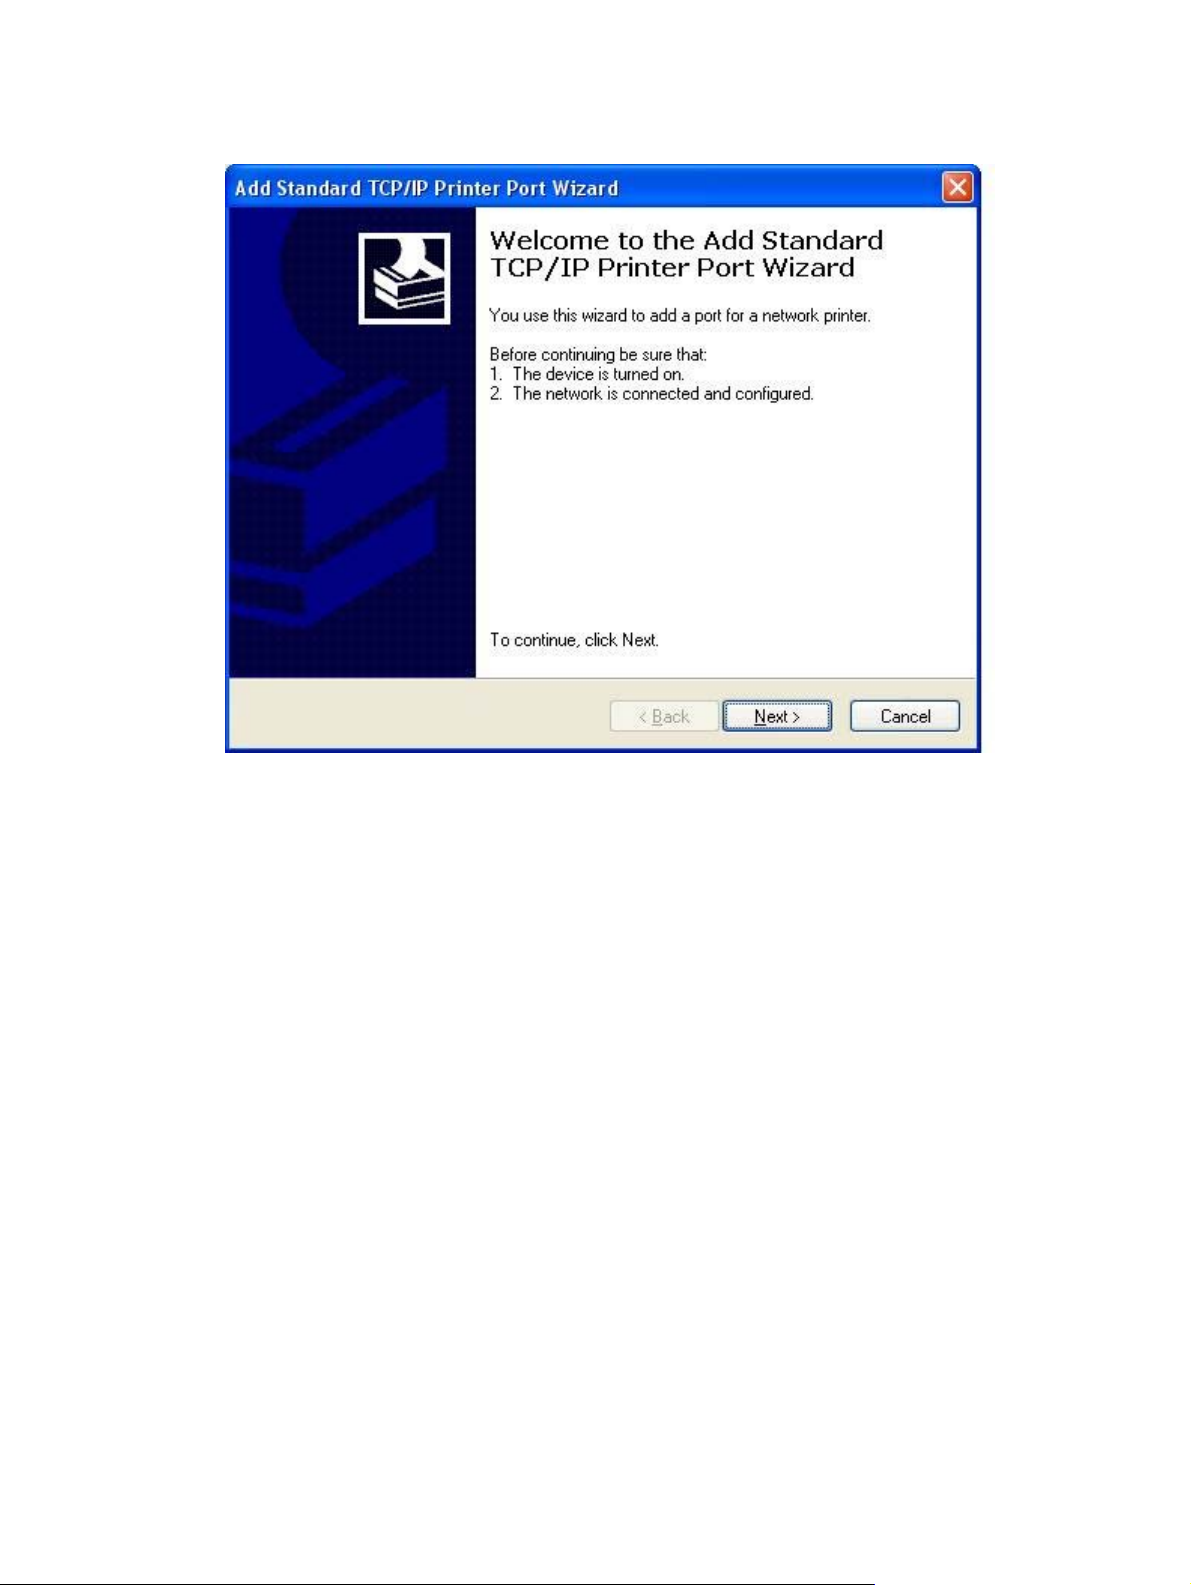
10. In the Add Standard TCP/IPPrinter Port Wizard dialog box, click Next.
10 Chapter 1 Set up ENWW
Page 17
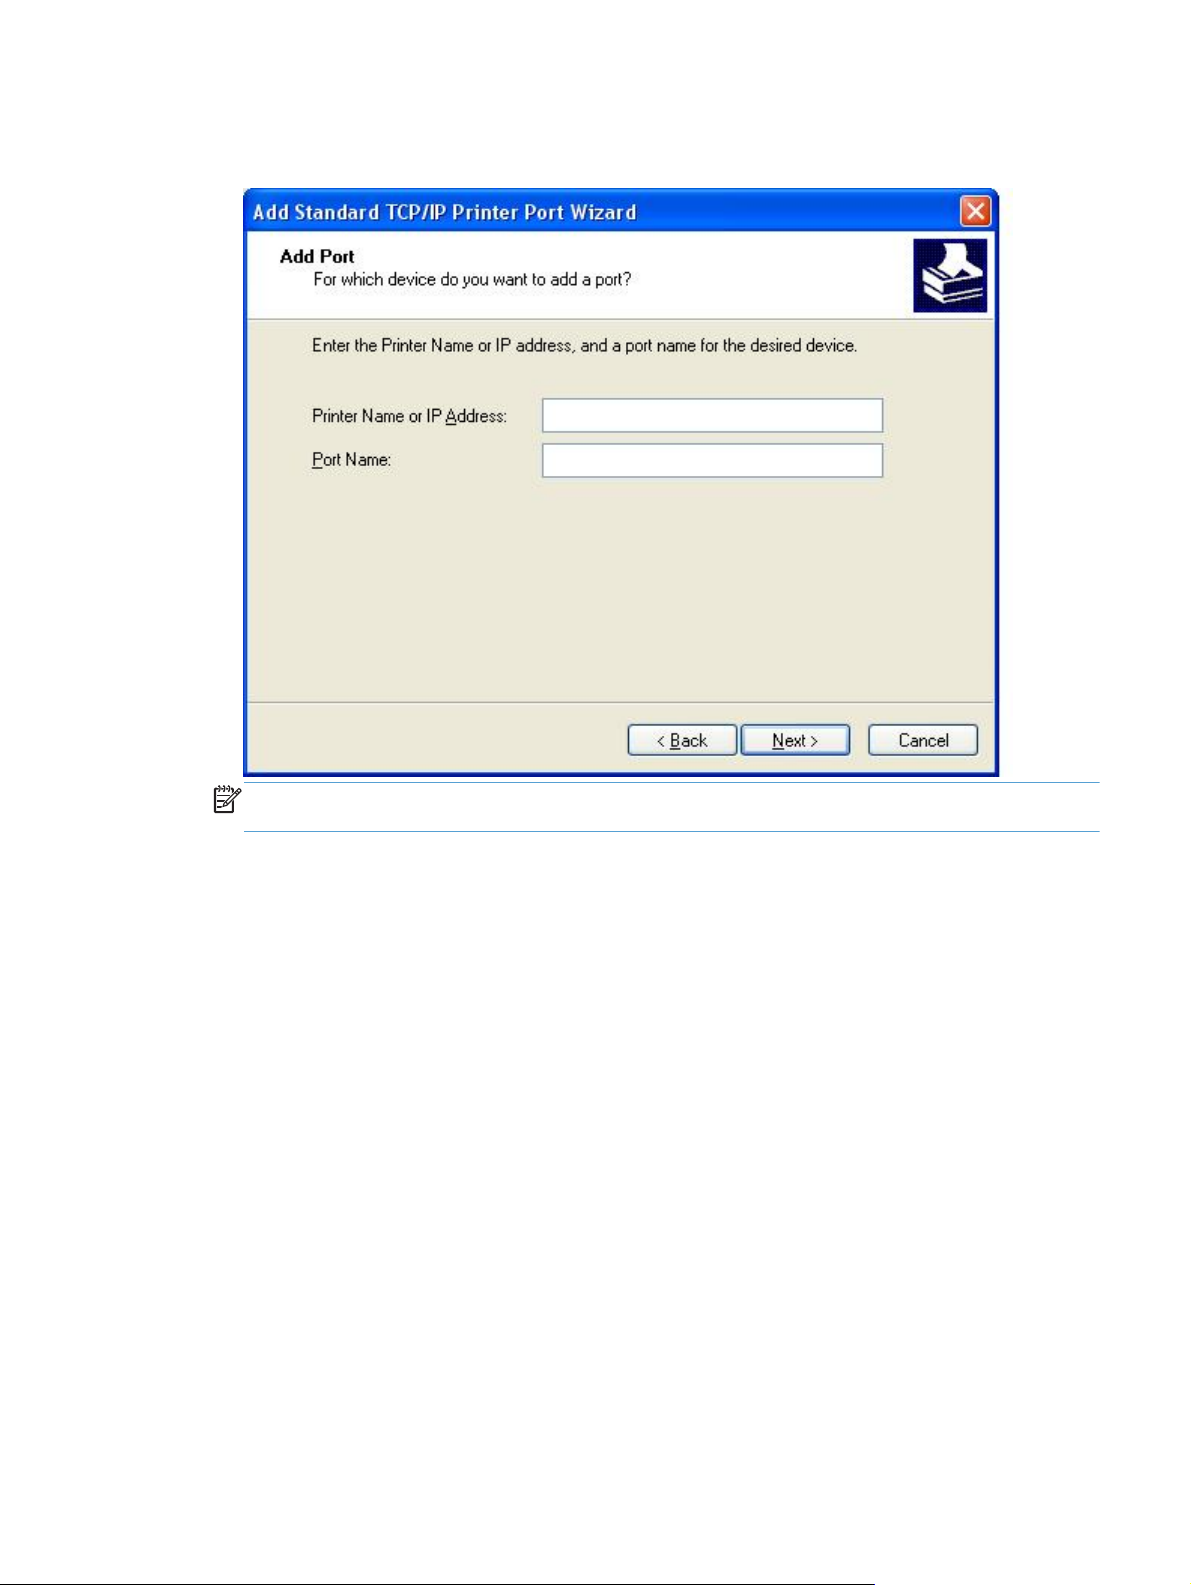
11. Under Add Port, type the MFP printer name or IP address in the Printer Name or IP Address text
box and then click Next.
NOTE: The default port name is the name that you typed in the Printer Name or IP Address
text box. You can change this name by typing a new name in the Port Name text box.
12. Click Finish.
ENWW Install the MFP Send Fax driver 11
Page 18
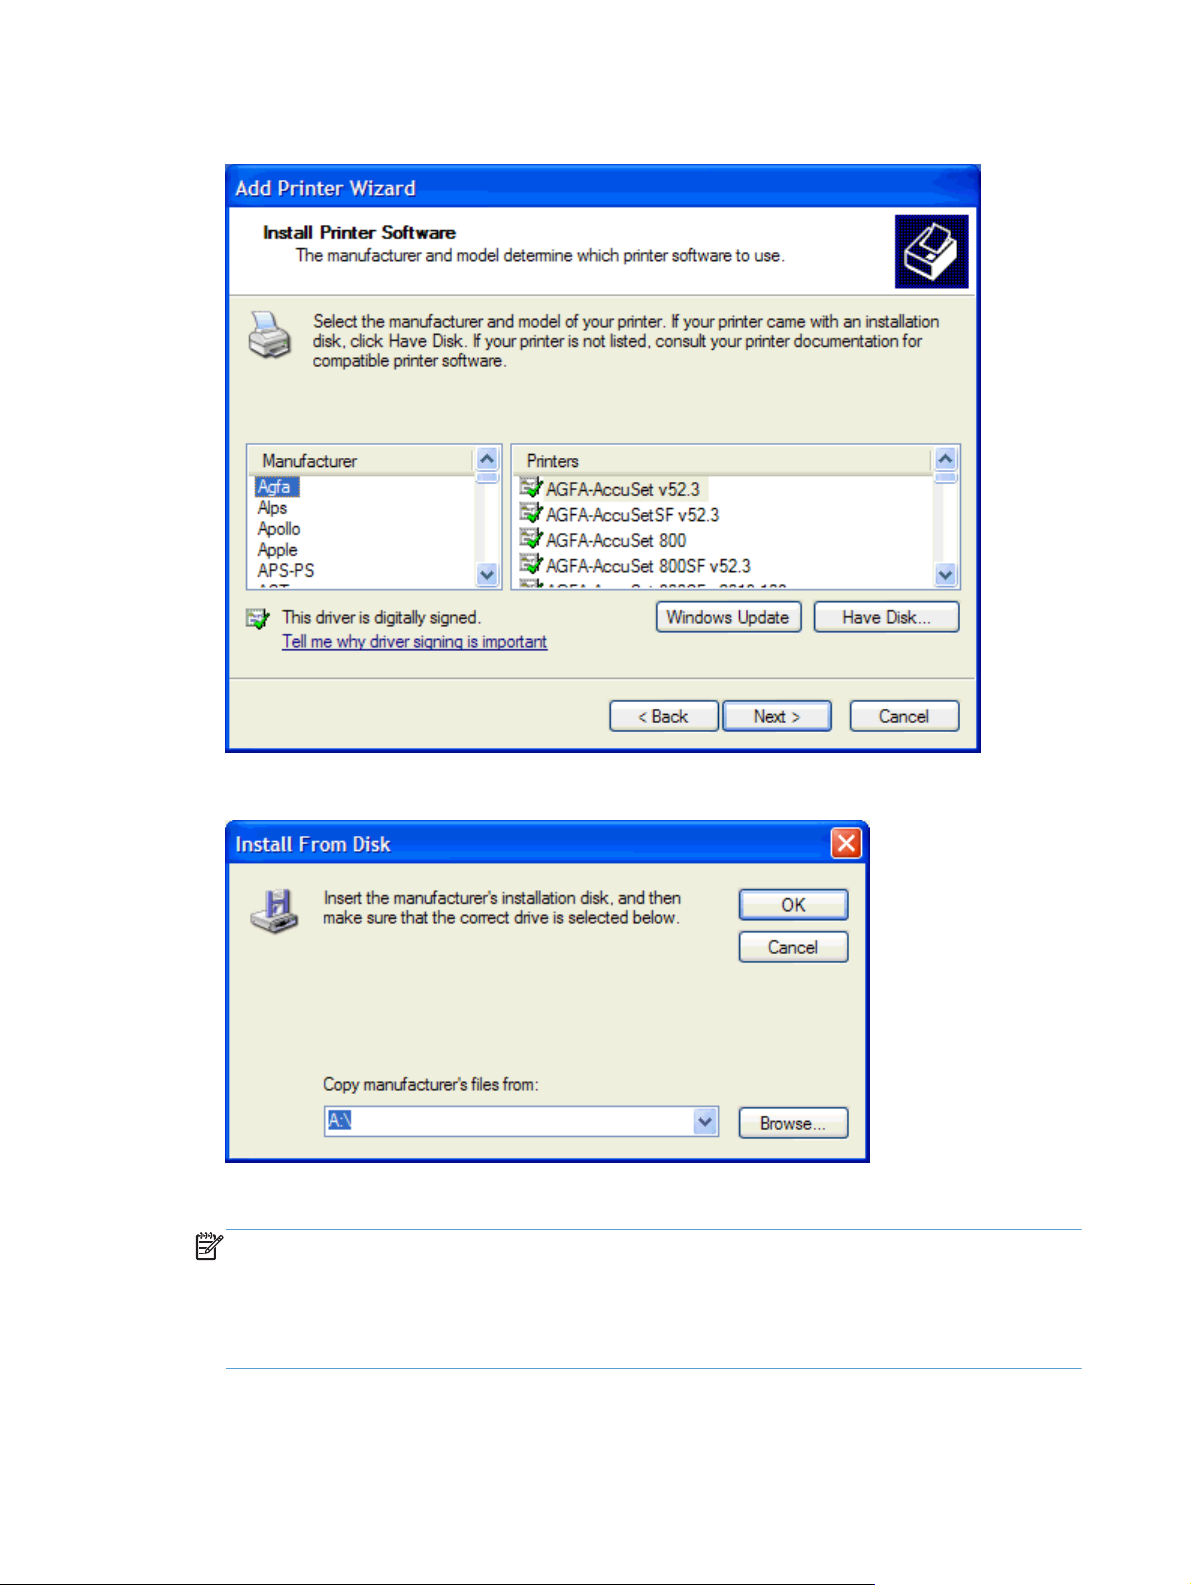
13. Under Install Printer Software, click Have Disk.
14. In the Install From Disk dialog box, click Browse.
15. Browse to and select the MFP Send Fax driver .INF file extracted in step 1.
NOTE: Two versions of the .INF file are available: a 32-bit version for Windows 2000, Windows
XP, and Windows 7 and a 64-bit version for Windows XP Professional x64, Windows Vista, and
Windows 7.
The following message displays if you select the wrong version of the file: The specified location
does not contain information about your printer.
16. Click Open.
12 Chapter 1 Set up ENWW
Page 19
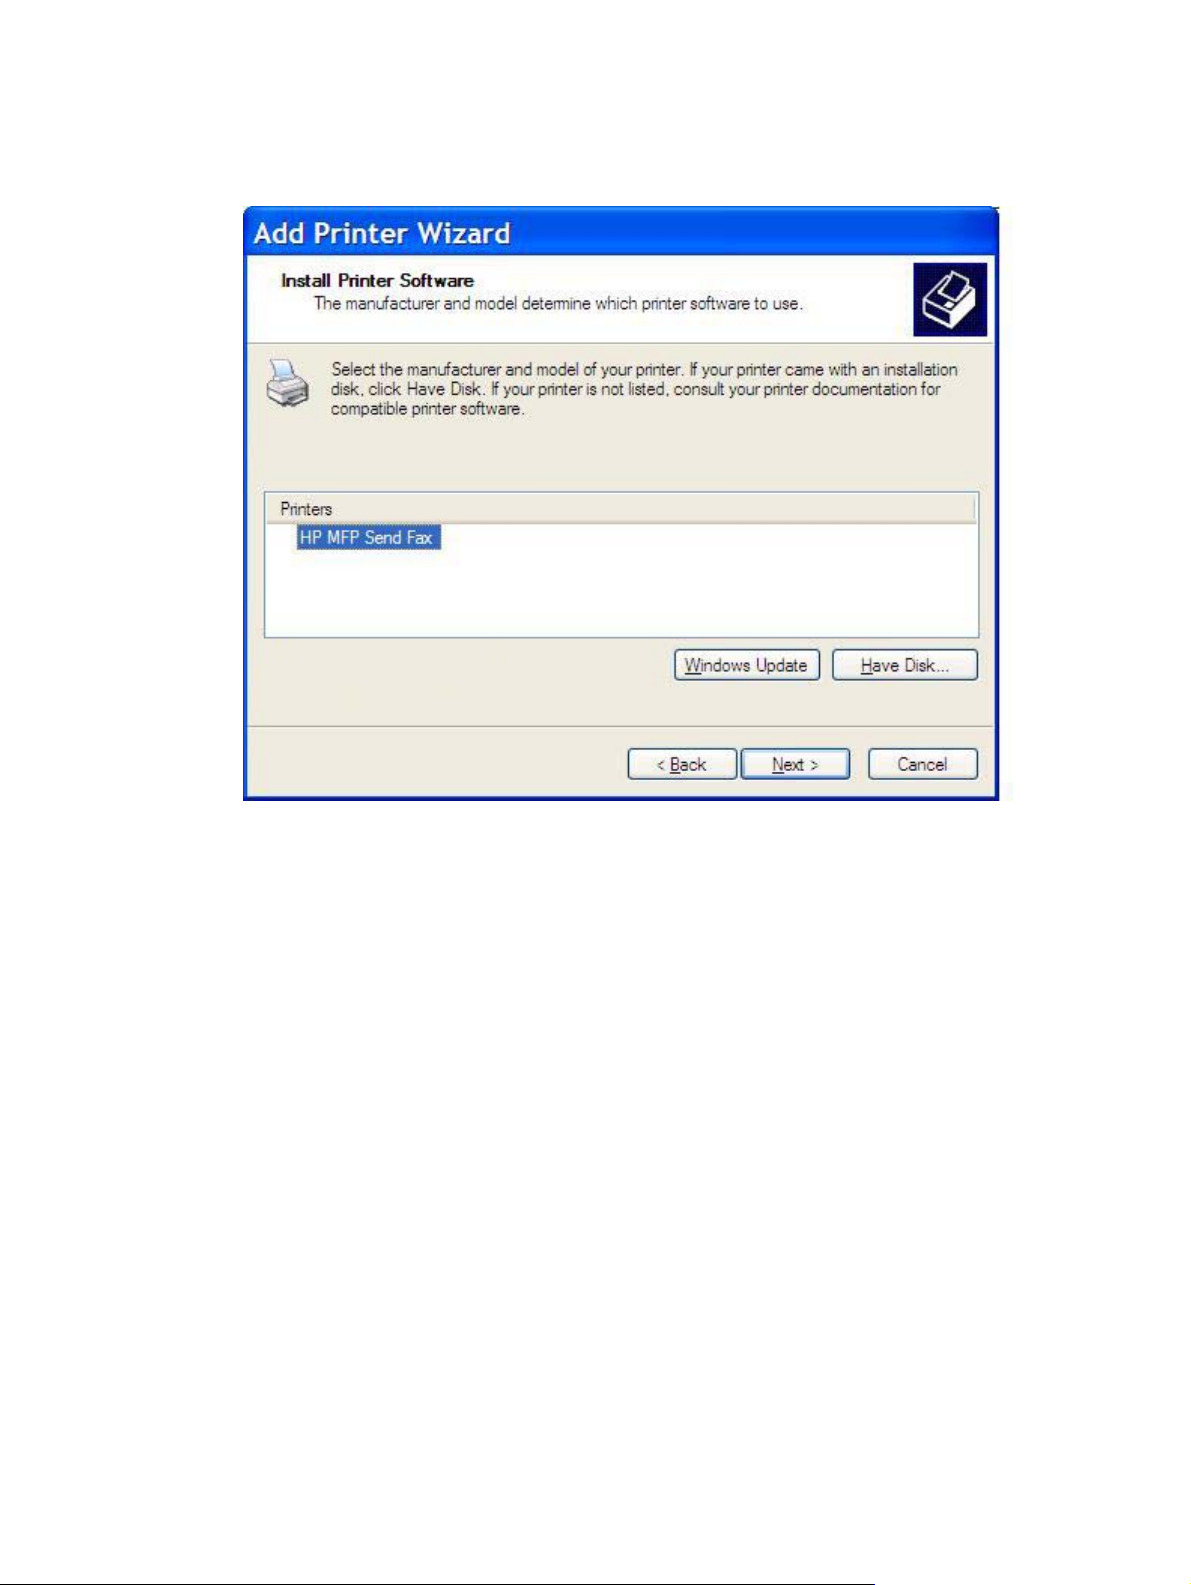
17. Click OK.
18. Under Install Printer Software, click Next.
ENWW Install the MFP Send Fax driver 13
Page 20
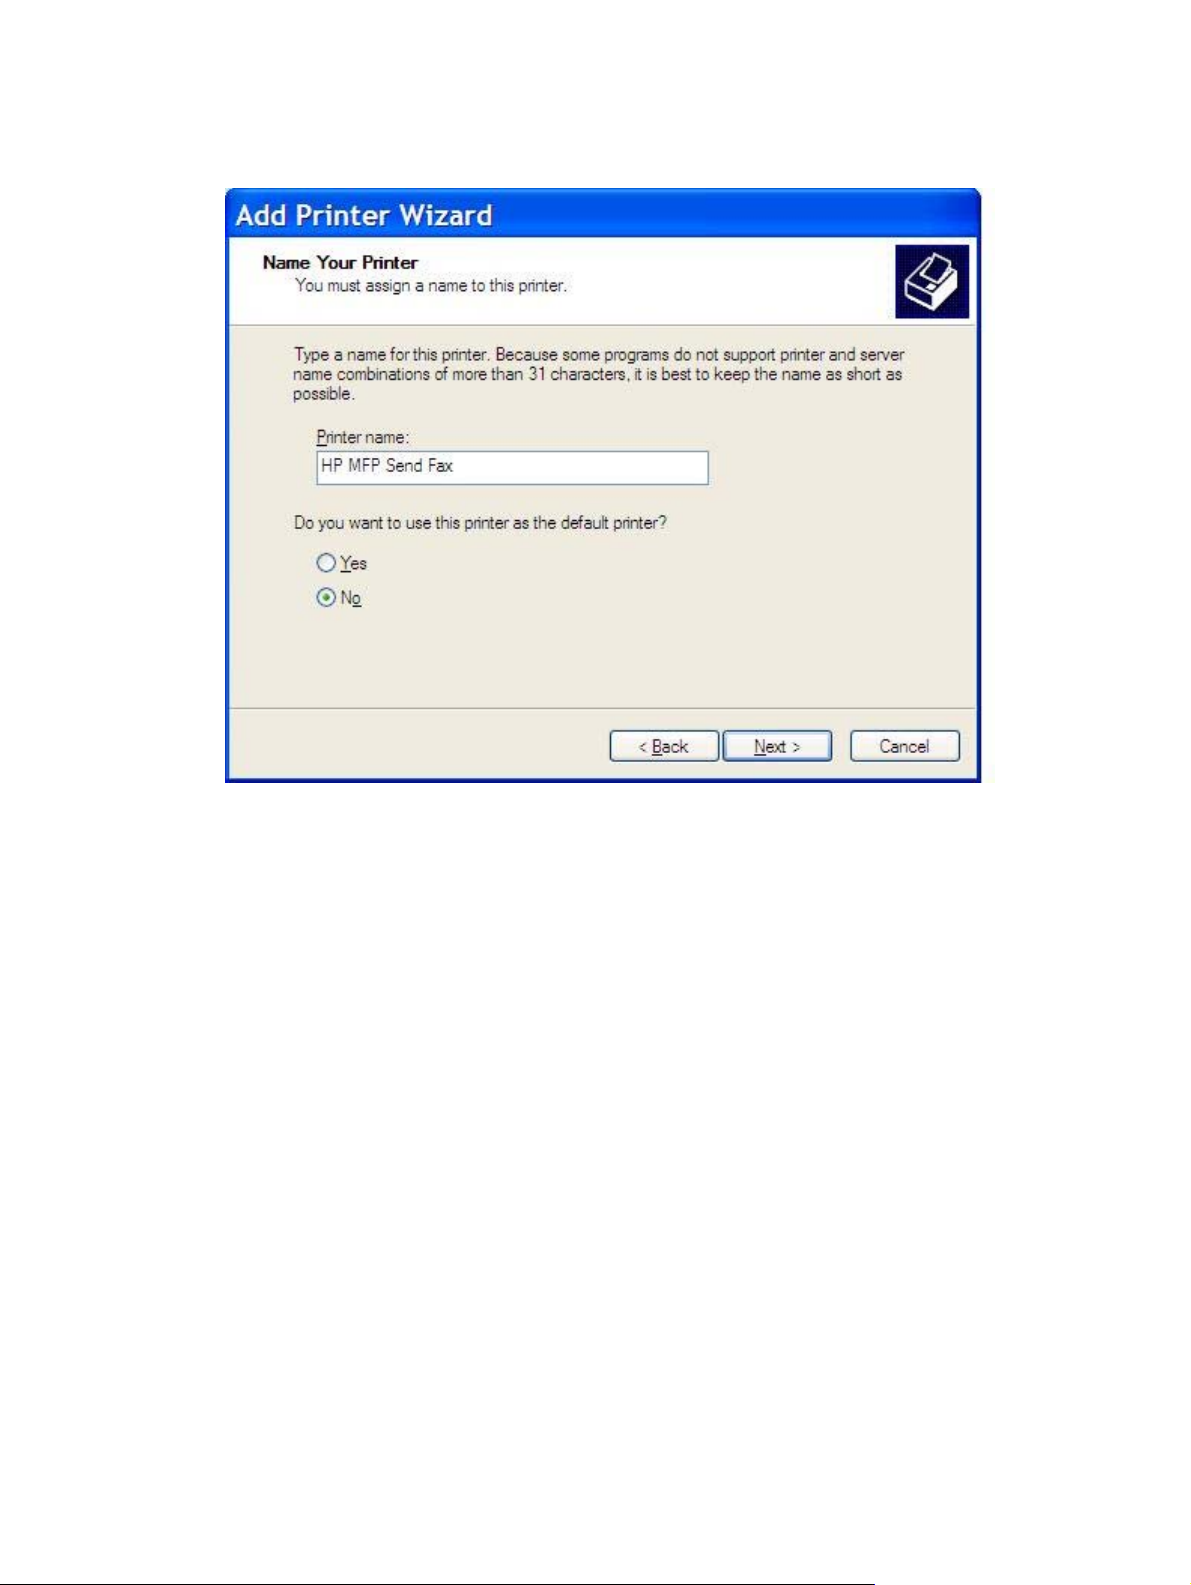
19. In the Printer name text box under Name Your Printer, type a name for the printer. The default
printer name is HP MFP Send Fax.
20. Click Next.
14 Chapter 1 Set up ENWW
Page 21
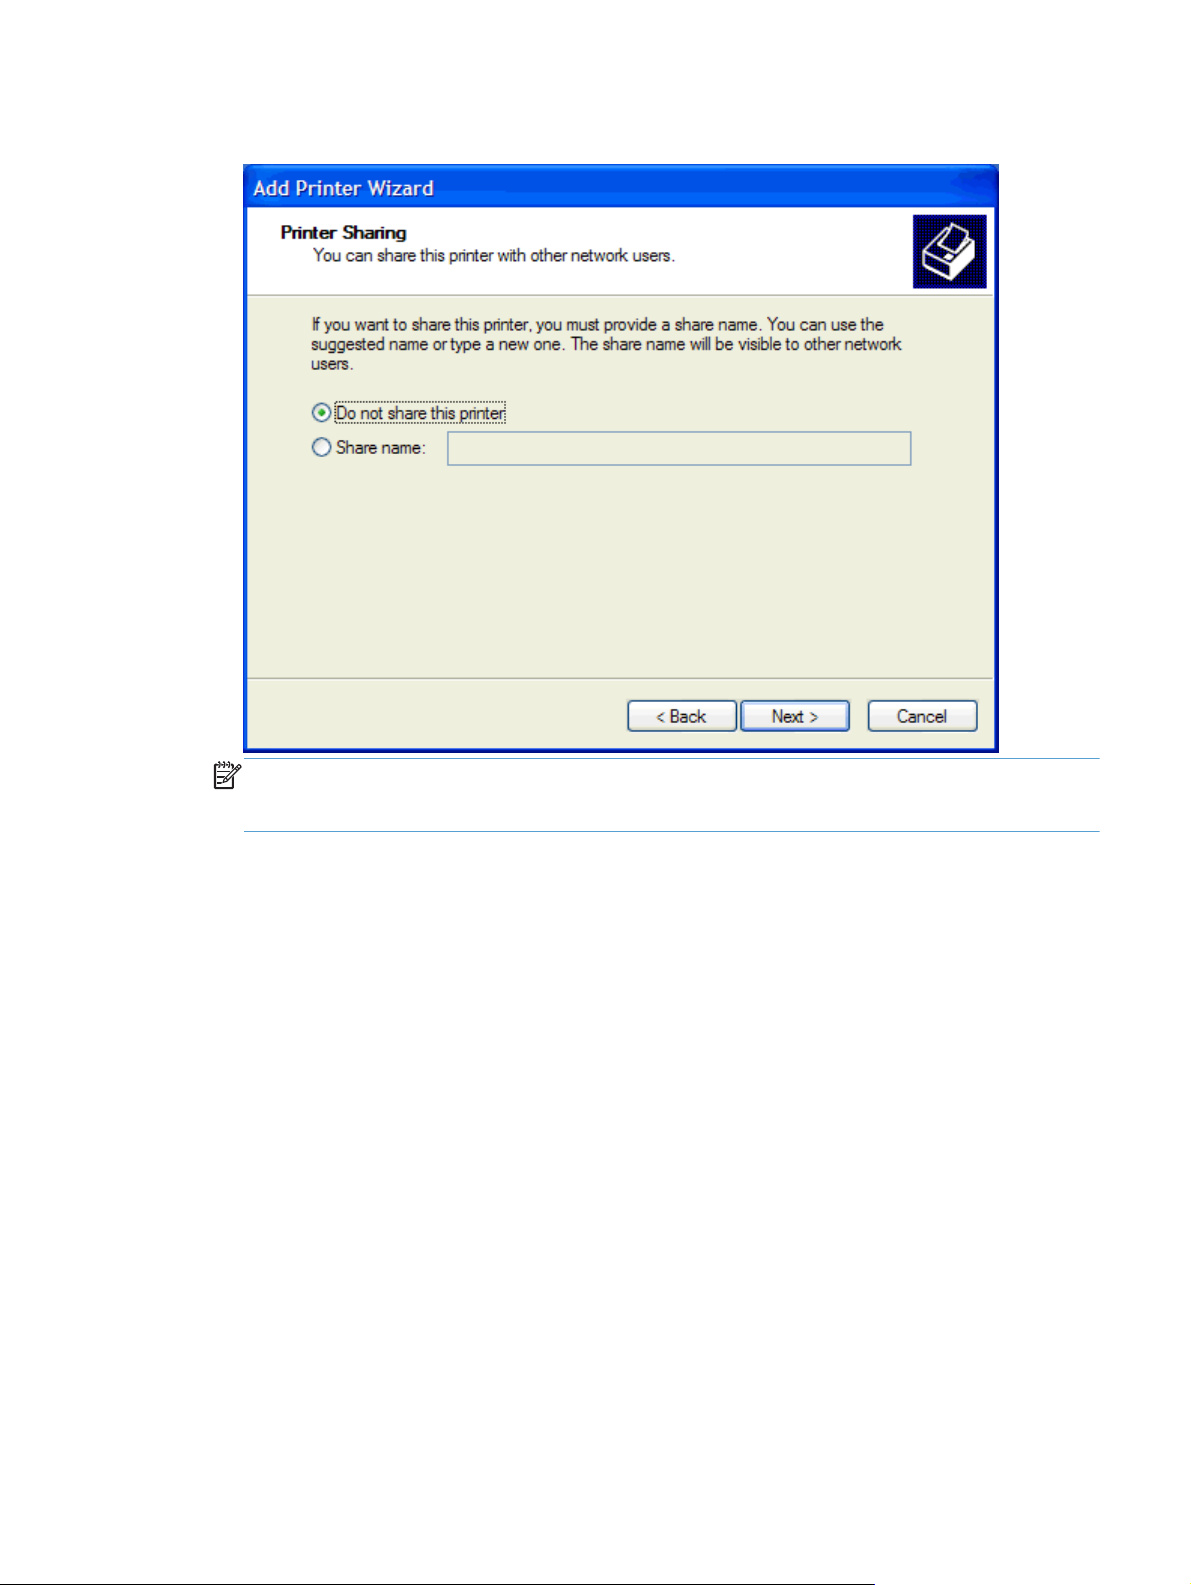
21. Under Printer Sharing, click Next.
NOTE: You can share the printer by selecting Share name on the Printer Sharing window. The
MFP Send Fax driver is then available for a Point-and-Print connection. Some features, such as
fax preview, are not available if the driver is accessed by using a Point-and-Print connection.
22. Under Print Test Page, select Yes to print a test page and then click Next.
ENWW Install the MFP Send Fax driver 15
Page 22

NOTE: Selecting Yes to print a test page sends a fax. No page is printed.
a. In the Completing the Add Printer Wizard dialog box, click Finish to complete the wizard
and continue sending a test fax.
16 Chapter 1 Set up ENWW
Page 23
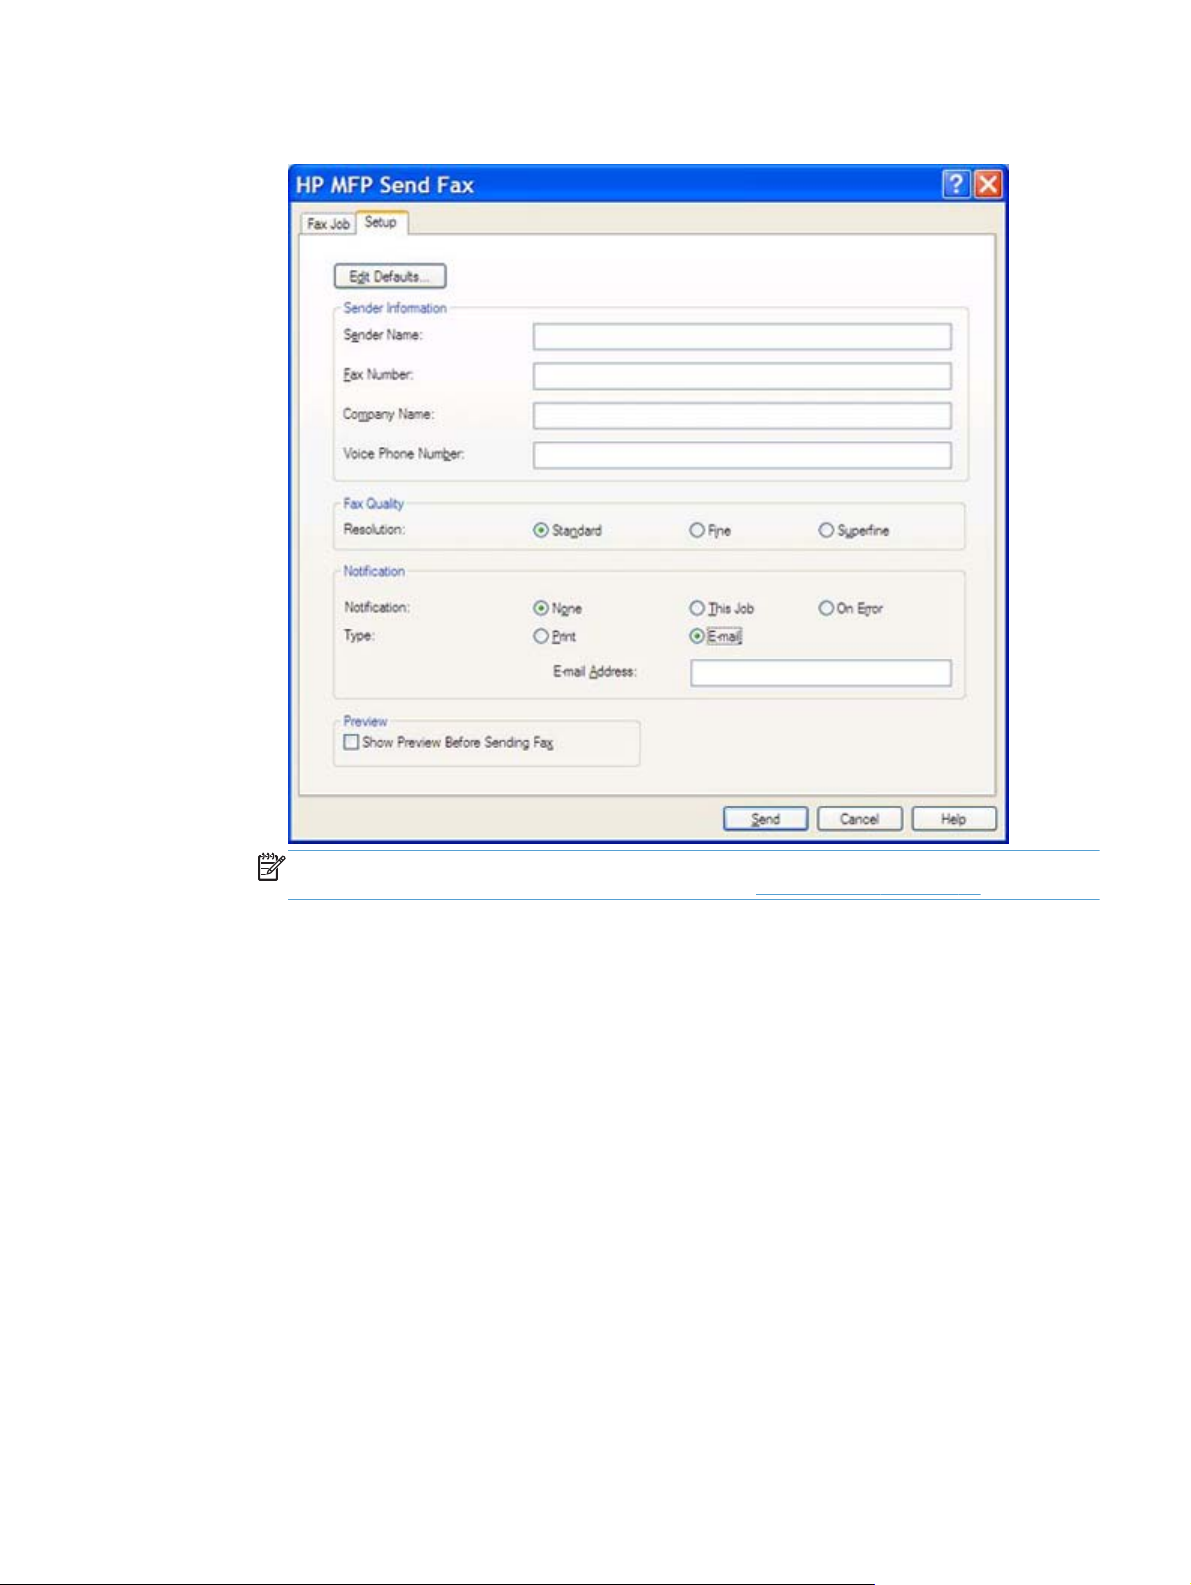
b. In the HP MFP Send Fax dialog box, click the Fax Job tab.
NOTE: The Setup information is not required to send a test page. To set the default
sender information and fax settings for all faxes, see
Configuration on page 53.
ENWW Install the MFP Send Fax driver 17
Page 24

c. In the Fax Number text box under Fax To, type the fax number where the test page will be
sent, click To -> to enter the number in the Fax Recipients list.
d. Click Send.
18 Chapter 1 Set up ENWW
Page 25
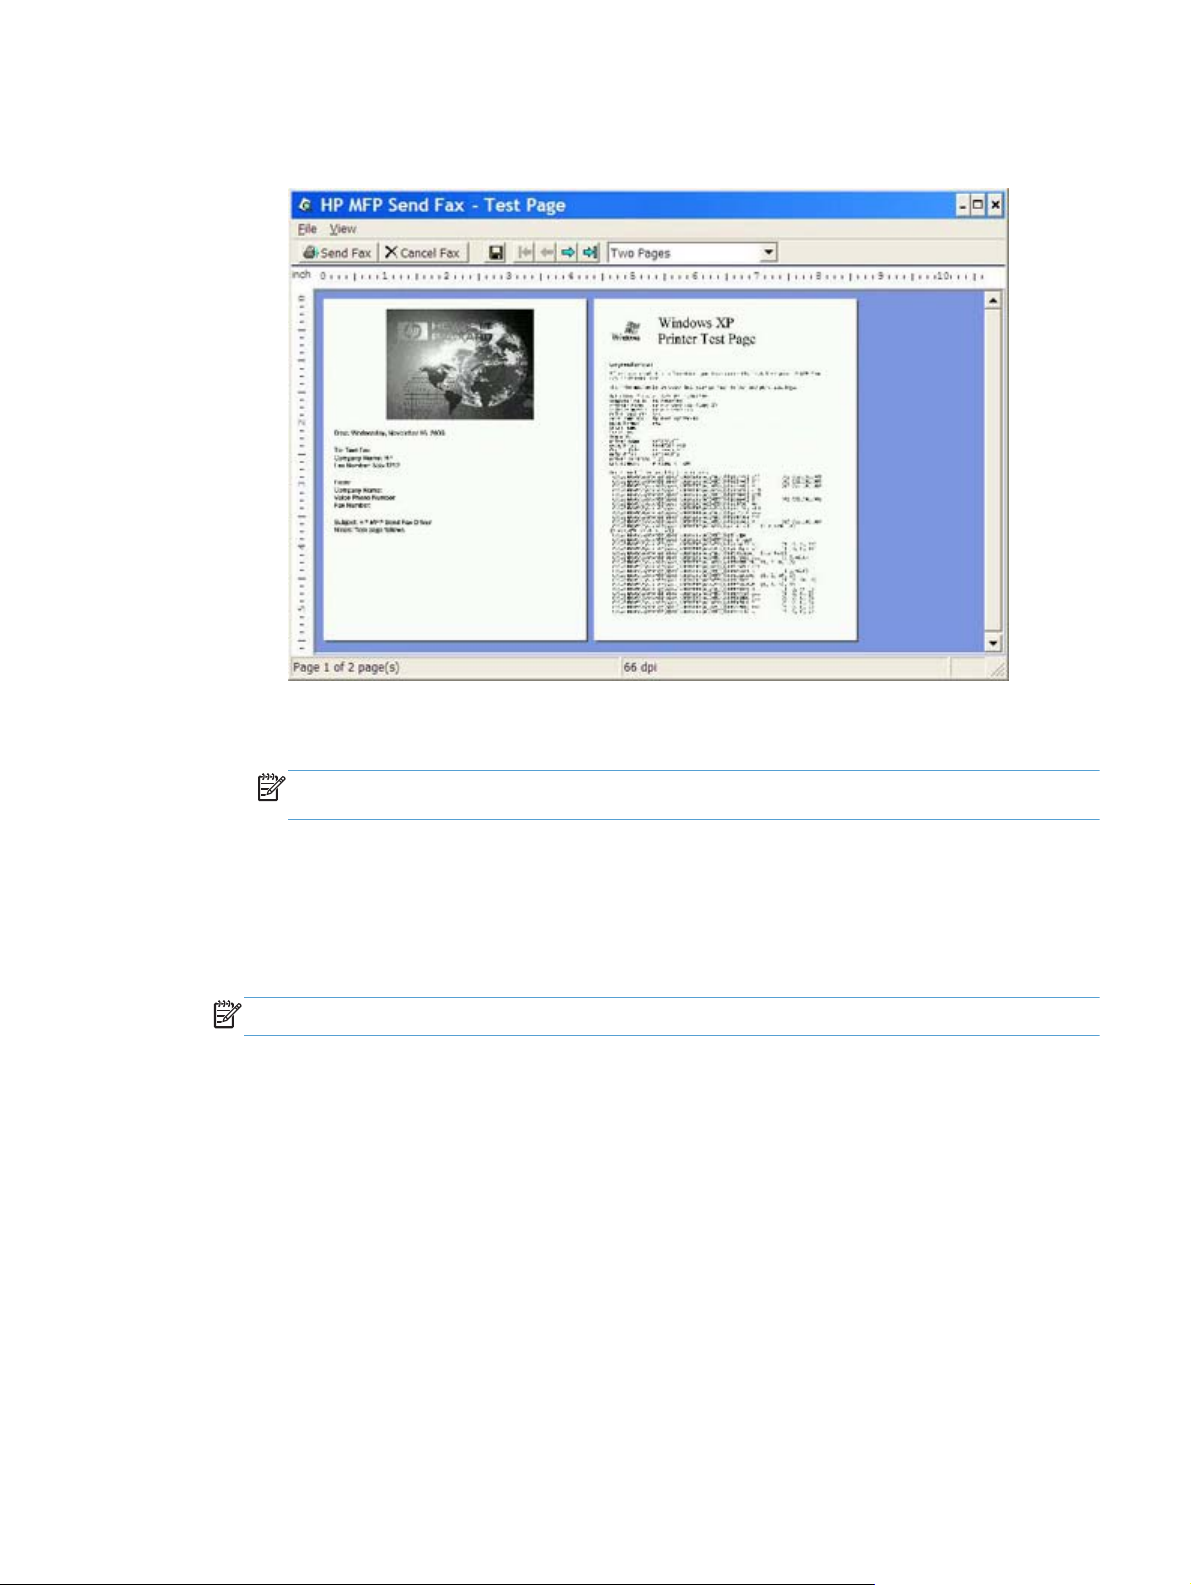
e. The preview window opens if you selected Show Preview Before Sending Fax on the Setup
tab. On the toolbar, click Send Fax.
f. A message appears asking if the test page printed. Verify that the test page printed on the
receiving fax machine and then click OK.
NOTE: The test page is delivered to the fax number that you typed in the Fax Number text
box on the Fax Job tab.
Install the driver in Windows Vista
1. In Windows Explorer, double-click the downloaded MFP Send Fax driver executable file to
extract the driver files.
2. Click Start, click Control Panel, and then click Printer.
NOTE: The Printer menu is located under the Hardware and Sound heading.
3. In the Printer window, click the Add a printer button on the top menu bar.
4. In the Add printer welcome dialog box, click Next.
ENWW Install the MFP Send Fax driver 19
Page 26
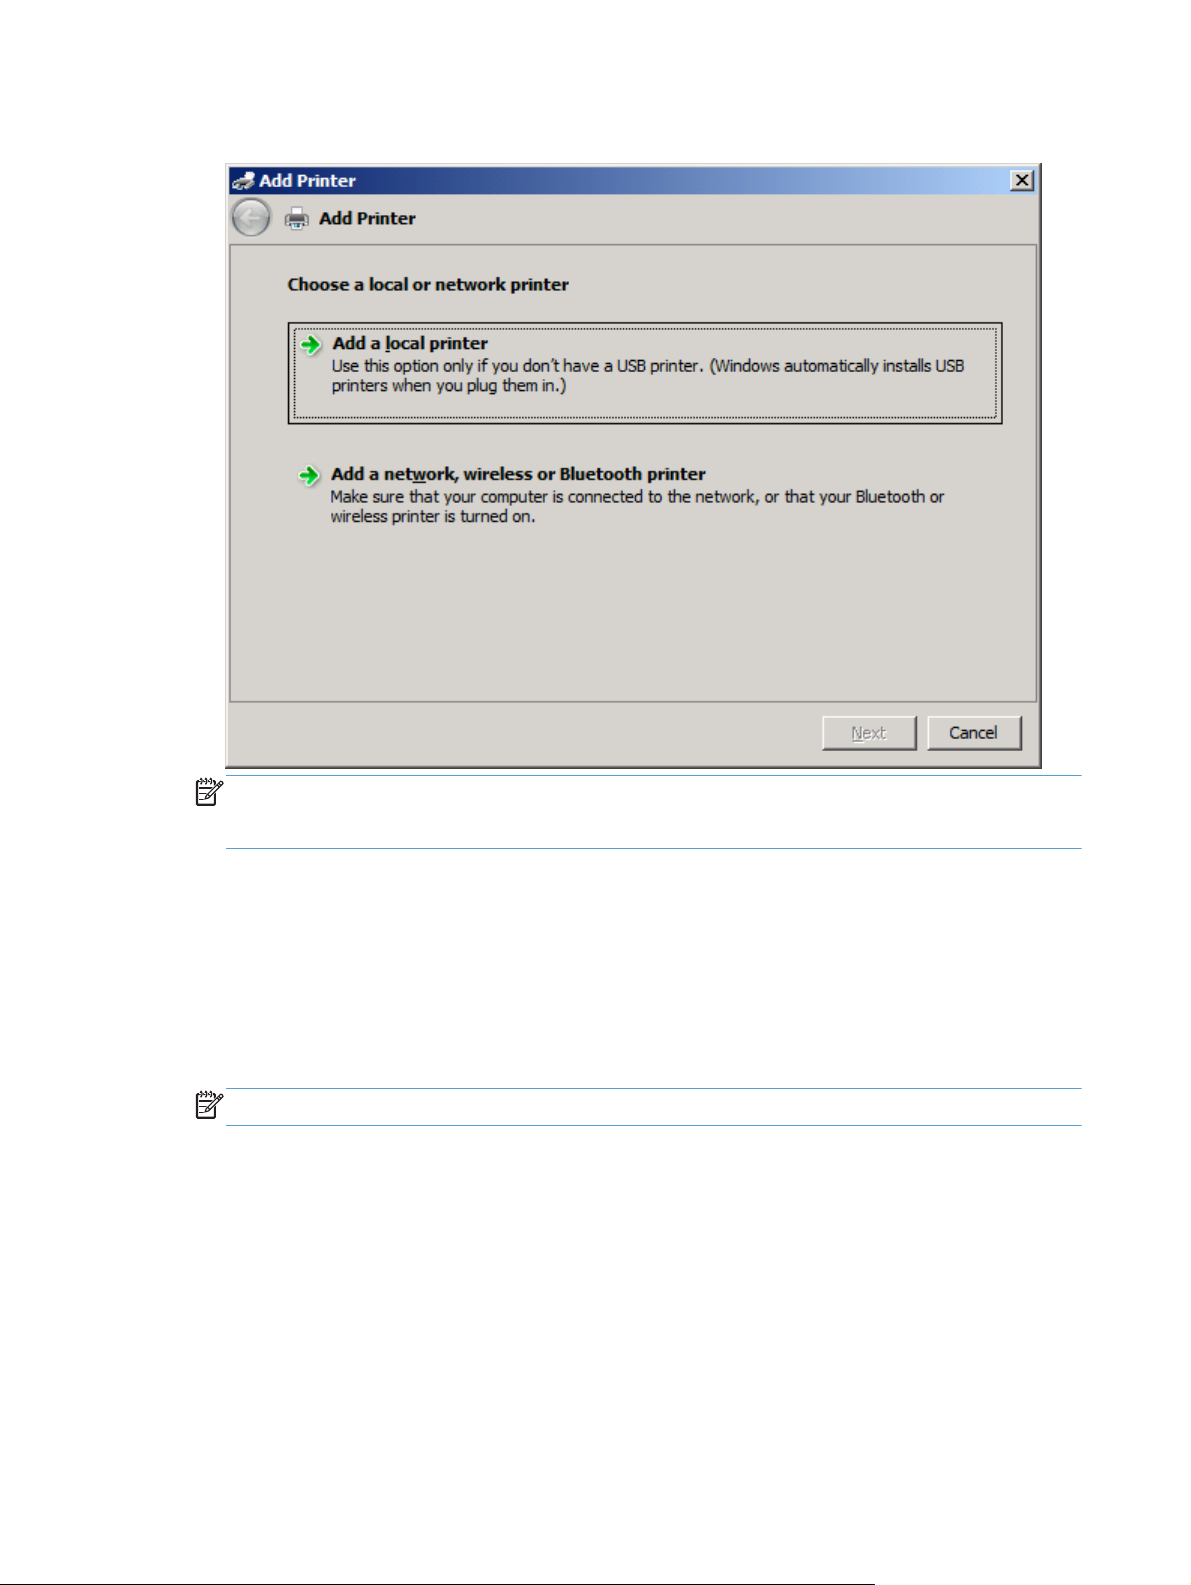
5. Under Choose a local or network printer, click the Add a local printer button.
NOTE: Select Choose a local or network printer to install the MFP Send Fax driver on a
network printer. The printer name is HP MFP Send Fax when the driver is installed on a local
printer.
If you select Add a network, wireless or Bluetooth printer, then the IP address of the computer is
required. Some features, such as fax preview, are not available if the driver is installed by using
the network printer installation (Point-and-Print).
The MFP Send Fax driver cannot be installed on a printer that is connected to the computer
through a serial, parallel, or USB port. It must be on a network.
6. If your computer is already connected to the MFP, under Choose a printer port, select Use an
existing port.
NOTE: If your computer is not connected to the MFP, go to step 8.
20 Chapter 1 Set up ENWW
Page 27

7. In the Use an existing port drop-down menu, select the name or IP address of the MFP. Click
Next and then go to step 12.
ENWW Install the MFP Send Fax driver 21
Page 28

8. If your computer is not connected to the MFP, select Create a new port under Choose a printer
port.
9. In the Type of port drop-down menu, select Standard TCP/IP Port. Click Next.
22 Chapter 1 Set up ENWW
Page 29

10. Under Type a printer hostname or IP address, type the MFP printer name or IP address in the
Hostname or IP address text box and then click Next.
NOTE: The default port name is the name that you typed in the Hostname or IP address text
box. You can change this name by typing a new name in the Port name text box.
ENWW Install the MFP Send Fax driver 23
Page 30

11. Under Install the print driver, click Have Disk.
12. In the Install From Disk dialog box, click Browse.
13. Browse to and select the MFP Send Fax driver .INF file extracted in step 1.
NOTE: Two versions of the .INF file are available: a 32-bit version for Windows 2000, Windows
XP, Windows Vista, and Windows 7; and a 64-bit version for Windows XP Professional x64,
Windows Vista x64, and Windows 7
The following message displays if you select the wrong version of the file: The specified location
does not contain information about your printer.
14. Click Open.
24 Chapter 1 Set up ENWW
Page 31

15. Click OK.
16. Under Install the printer driver, click Next.
ENWW Install the MFP Send Fax driver 25
Page 32

17. In the Printer name text box the default name HP MFP Send Fax is displayed. You can change
this name by typing a new name in the text box.
18. Click Next.
26 Chapter 1 Set up ENWW
Page 33

19. A screen with a test page option is displayed. To send a test fax to another machine, click Print a
test page.
NOTE: Although the button option is labeled Print a test page, no page is printed locally.
20. Click Finish.
ENWW Install the MFP Send Fax driver 27
Page 34

Uninstall the HP MFP Send Fax driver
Uninstall the MFP Send Fax driver in Windows XP
1. Click Start, click Settings, and then click Printers and Faxes.
2. In the Printers and Faxes window, right-click the MFP printer where MFP Send Fax is installed
and then click Delete.
3. Click Start, click Settings, and then click Printers and Faxes.
4. Right-click in the Printers and Faxes window and then click Server Properties.
5. In the Print Server Properties dialog box, click Drivers.
6. Select the MFP Send Fax driver and then click Remove.
7. Click OK.
Uninstall the MFP Send Fax driver in Windows Vista
1. Click Start, click Control Panel, and then click Printer.
2. In the Printers window, right-click the MFP printer where MFP Send Fax is installed and then
click Delete.
3. Right-click the Printers window and then click Server Properties.
4. In the Print Server Properties dialog box, click the Drivers tab.
5. Select the MFP Send Fax driver and then click Remove.
6. Click OK
28 Chapter 1 Set up ENWW
Page 35

2 Send faxes
Send a fax to a single recipient
●
Send a fax to multiple recipients
●
Send a fax by using the phone book
●
Cancel a fax job
●
Insert special characters in the fax number
●
Edit the phone book
●
Export phone book entries to a comma-separated values (CSV) formatted file
●
Import phone book entries from a CSV formatted file
●
Voice Calls and Retries
●
ENWW 29
Page 36

Send a fax to a single recipient
1. Open the document to be faxed in the software program in which it was created.
2. Click File and then click Print.
3. Select the HP MFP Send Fax driver from the list of printers.
4. Click OK or Print.
NOTE: Click the button that sends a document to the printer. This might not be labeled the
same way in all programs.
5. Under Fax To in the HP MFP Send Fax dialog box, type the recipient name, fax number, and
company name. The fax number is the only required information.
The Recipient Name drop-down box includes individual recipients as well as group names. If the
text box is blank and the drop-down list is selected, the drop-down list contains the 20 most
recently used names, sorted in alphabetical order. If the drop-down list contained text when you
opened the drop-down menu, the list shows all matching entries. The Recipient Name dropdown
list holds a maximum of 20 entries. After the maximum is reached, a new entry replaces the
oldest entry in the list.
NOTE: See Insert special characters in the fax number on page 41 for a list of special
characters that you can use in the Fax Number text field.
30 Chapter 2 Send faxes ENWW
Page 37

6. Click Add to Phone Book to add the recipient information to the MFP Send Fax phone book. This
step is optional.
NOTE: Click Clear Fields to remove all of the values in the Recipient Name, Fax Number, and
Company Name text boxes.
7. The default cover page information appears under Include With Fax in the HP MFP Send Fax
dialog box. This information can be changed for any individual fax job.
NOTE: To set the default cover page settings for all faxes, see Configuration on page 53.
8. If the billing-code feature is enabled, type the billing code under Billing Information in the
HP MFP Send Fax dialog box. The billing code can be changed for any individual fax job.
9. To send the fax with the default sender, fax quality, notification information, and preview
preferences, click Send.
NOTE: Click the Setup tab in the HP MFP Send Fax dialog box to view the sender, fax quality,
notification, and preview settings. This information can be changed for any individual fax job.
Click Send to send the fax.
ENWW Send a fax to a single recipient 31
Page 38

10. If you selected Show Preview Before Sending Fax on the Setup tab, a preview of the fax job
appears. Review the fax for accuracy.
NOTE: The preview function is not available when you use Point-and-Print. Point-and-Print is a
Windows feature that you can use to connect, print, or fax to a remote printer without using
installation disks. Files and configuration information are automatically downloaded from the
print server to the client.
11. Click View or use the zoom drop-down menu to change the size of the document preview.
12. Click the arrow buttons to navigate through the document.
13. Click Send Fax to send the fax or click Cancel Fax to close the send fax driver.
32 Chapter 2 Send faxes ENWW
Page 39

Send a fax to multiple recipients
1. Open the document to be faxed in the software program in which it was created.
2. Click File and then click Print.
3. Select the HP MFP Send Fax driver from the list of printers.
4. Click OK or Print.
NOTE: Click the button that sends a document to the printer. This might not be labeled the
same way in all programs.
5. Under Fax To in the HP MFP Send Fax dialog box, type the recipient name, fax number, and
company name.
The Recipient Name drop-down box includes individual recipients as well as group names. If the
text box is blank and the drop-down list is selected, the drop-down list contains the 20 most
recently used names, sorted in alphabetical order. If the drop-down list contained text when you
opened the drop-down menu, the list shows all matching entries. The Recipient Name dropdown list holds a maximum of 20 entries. After the maximum is reached, a new entry replaces
the oldest entry in the list.
NOTE: The fax number is the only required information. Insert special characters in the fax
number on page 41 for a list of special characters that you can use in the Fax Number text
field.
ENWW Send a fax to multiple recipients 33
Page 40

6. Click Add to Phone Book to add the recipient information to the MFP Send Fax phone book. This
step is optional.
NOTE: Click Clear Fields to remove all of the values in the Recipient Name, Fax Number, and
Company Name text boxes.
7. Click To -> to add the recipient information to the Fax Recipients field.
8. Repeat steps 5 through 7 for each fax recipient. The fax is sent to all of the names that appear in
the FaxRecipients field.
9. If the billing-code feature is enabled, type the billing code under Billing Information in the
HP MFP Send Fax dialog box. The billing code can be changed for any individual fax job.
10. To send the fax with the default sender, fax quality, notification information, and preview
preferences, click Send.
NOTE: Click the Setup tab on the HP MFP Send Fax dialog box to view the sender, fax quality,
notification, and preview settings. This information can be changed for any individual fax job.
Click Send to send the fax.
34 Chapter 2 Send faxes ENWW
Page 41

11. If you selected Show Preview Before Sending Fax on the Setup tab, a preview of the fax job
appears. Review the fax for accuracy.
NOTE: The preview function is not available when you use Point-and-Print. Point-and-Print is a
Windows feature that you can use to connect, print, or fax to a remote printer without using
installation disks. Files and configuration information are automatically downloaded from the
print server to the client.
12. Click View or use the zoom drop-down menu to change the size of the document preview.
13. Click the arrow buttons to navigate through the document.
14. Click Send Fax to send the fax or click Cancel Fax to close the send fax driver.
ENWW Send a fax to multiple recipients 35
Page 42

Send a fax by using the phone book
1. Open the document to be faxed in the software program in which it was created.
2. Click File and then click Print.
3. Select the HP MFP Send Fax driver from the list of printers.
4. Click OK or Print.
NOTE: Click the button that sends a document to the printer. This might not be labeled the
same way in all programs.
5. Under Fax To in the HP MFP Send Fax dialog box, click the book icon.
36 Chapter 2 Send faxes ENWW
Page 43

6. In the Add Recipients From Phone Book dialog box, select the name of each fax recipient and
click To -> to populate the Fax Recipients field.
7. After you have added all of the fax recipients to the Fax Recipients field, click OK.
NOTE: The maximum number of fax recipients is 100.
8. The default cover page information appears under Include With Fax in the HP MFP Send Fax
dialog box. This information can be changed for any individual fax job.
NOTE: To set the default cover page settings for all faxes, see Configuration on page 53.
NOTE: When cover page is used with multiple recipients, the preview will only show the cover
page for the first recipient. However, the cover page will be sent separately for each recipient.
Only one recipient’s name is shown on each cover page.
ENWW Send a fax by using the phone book 37
Page 44

9. If the billing-code feature is enabled, type the billing code under Billing Information in the
HP MFP Send Fax dialog box. The billing code can be changed for any individual fax job.
10. To send the fax to all of the fax recipients with the default sender, fax quality, notification
information, and preview preferences, click Send.
NOTE: Click the Setup tab on the HP MFP Send Fax dialog box to view the sender, fax quality,
notification, and preview settings. This information can be changed for any individual fax job.
Click Send to send the fax.
38 Chapter 2 Send faxes ENWW
Page 45

11. If you selected Show Preview Before Sending Fax on the Setup tab, a preview of the fax job
appears. Review the fax for accuracy.
NOTE: The preview function is not available when you use Point-and-Print. Point-and-Print is a
Windows feature that you can use to connect, print, or fax to a remote printer without using
installation disks. Files and configuration information are automatically downloaded from the
print server to the client.
12. Click View or use the zoom drop-down menu to change the size of the document preview.
13. Click the arrow buttons to navigate through the document.
14. Click Send Fax to send the fax or click Cancel Fax to close the send fax driver.
ENWW Send a fax by using the phone book 39
Page 46

Cancel a fax job
1. On the MFP control panel, press the red Stop button.
NOTE: A menu displays that lists the active jobs that can be canceled.
2. Select the desired item to cancel and touch OK.
40 Chapter 2 Send faxes ENWW
Page 47

Insert special characters in the fax number
The Fax Number text field accepts special characters in addition to the numbers 0 through 9.
Table 2-1 Special characters
Special Character Function
- Use a hyphen in the fax number to make the number easier
( ) Use parenthesis in the fax number to make the number
[ ] Use an opening and closing bracket to hide a portion of the
* The asterisk is transmitted as a touch-tone.
# The number sign is transmitted as a touch-tone.
, A comma represents a 2-second pause when the fax number
to read.
easier to read.
fax number so that it does not print on the fax cover sheet,
call reports, or e-mail confirmations. For example, a fax
number might include a calling-card access code. Type
brackets around the calling-card access code portion of the
fax number to prevent showing this information.
is dialed. Use multiple commas for a longer pause during
dialing.
ENWW Insert special characters in the fax number 41
Page 48

Edit the phone book
The phone book can be used to store the contact information that appears under Fax To in the
HP MFP Send Fax dialog box. Names can be added and removed from the phone book.
The MFP Send Fax phone book can be imported and exported.
Add names to the phone book
NOTE: You can add names to the phone book or the Fax Job tab by clicking the book icon, or on
the Setup tab by clicking Edit Phone Book.
1. On the Fax Job tab under Fax To in the HP MFP Send Fax dialog box, click the book icon. This
opens the Add Recipients from Phone Book dialog box.
42 Chapter 2 Send faxes ENWW
Page 49

2. In the Add Recipients from Phone Book dialog box click Edit Phone Book. This opens the Edit
Phone Book dialog box. In the Edit Phone Book dialog box, click Add Entry to open the Add
Entry to Phone Book dialog box. Type the recipient name, fax number, and company name, and
then click OK.
3. Click Edit Phone Book.
4. In the Add to Phone Book dialog box, type the recipient name, fax number, and company name
in the text boxes.
5. Click OK.
6. In the Edit Phone Book dialog box, click Add Entry to add additional names.
7. Click OK when you are finished adding names to the phone book.
ENWW Edit the phone book 43
Page 50

Add groups to the phone book
NOTE: You can add a group to the phone book on the Fax Job tab by clicking the book icon, or on
the Setup tab by clicking Edit Phone Book. If you add a group from the Setup tab, go to step 3 of this
procedure.
1. On the Fax Job tab under Fax To in the HP MFP Send Fax dialog box, click the book icon. This
opens the Add Recipients from Phone Book dialog box.
2. In the Add Recipients from Phone Book dialog box, highlight a name in the list and click Edit
Phone Book.
3. In the Edit Phone Book dialog box, click Add Group. This opens the Add Group to Phone Book
dialog box. Type the group name into the Group Name text box and then type a name or select
one from the list at the left of the dialog box. Click Add to copy the selected name into the
Members box. When you have completed adding a group, click OK.
NOTE: You can verify contact information before adding the information to a group by clicking
Details. This opens the Details dialog box. Verify the information and click OK or Cancel. You
cannot edit information in this dialog box.
Remove names from the phone book
NOTE: You can remove names from the phone book on the Fax Job tab by clicking the book icon,
or on the Setup tab by clicking Edit Phone Book. If you remove names from the Setup tab, go to step
3 of this procedure.
1. On the Fax Job tab under Fax To in the HP MFP Send Fax dialog box, click the book icon. This
opens the Add Recipients from Phone Book dialog box.
44 Chapter 2 Send faxes ENWW
Page 51

ENWW Edit the phone book 45
Page 52

2. In the Add Recipients from Phone Book dialog box, highlight a name in the list and click Edit
Phone Book.
46 Chapter 2 Send faxes ENWW
Page 53

3. In the Edit Phone Book dialog box, select the name that you want to delete and then click
Delete. Verify the delete in the CONFIRM dialog box. Clicking Yes permanently deletes this
entry from the Phone Book.
Edit names in the phone book
NOTE: You can edit names in the phone book on the Fax Job tab by clicking the book icon, or on
the Setup tab by clicking Edit Phone Book. If you edit names from the Setup tab, go to step 3 of this
procedure.
1. On the Fax Job tab under Fax To in the HP MFP Send Fax dialog box, click the book icon.
ENWW Edit the phone book 47
Page 54

48 Chapter 2 Send faxes ENWW
Page 55

2. In the Add Recipients From Phone Book dialog box, select the name that you want to edit and
then click Edit Phone Book. This opens the Edit Phone Book dialog box.
3. In the Edit Phone Book dialog box, highlight an existing name and click Edit. The Edit Phone
Book Entry dialog box opens and displays the current contact information. Edit the Recipient
Name, Fax Number, and Company Name as needed and click OK. This returns you to the Edit
Phone Book dialog box.
NOTE: To review contact information before sending the fax, select a name in the Edit Phone
Book dialog box and click Details. The Details dialog box opens. Verify the information and click
OK or Cancel. You can not edit information in this dialog box.
4. Click OK when you are done editing.
ENWW Edit the phone book 49
Page 56

Export phone book entries to a comma-separated values (CSV) formatted file
You can export contact information from the phone book to a .CSV file.
1. You can export names from the phone book from the Fax Job or the Setup tab.
Fax Job tab: Click the book icon and then click Edit Phone Book in the Add Recipients from
●
Phone Book dialog box.
Setup tab: Click Edit Phone Book.
●
2. In the Edit Phone Book dialog box, click Export... to open the File Save As dialog box. Type the
path and file name of the exported .CSV file and then click OK. All currently saved phone book
entries are written to the file. If the file path and name already exist, the existing .CSV file is
overwritten with the contents of the phone book.
50 Chapter 2 Send faxes ENWW
Page 57

Import phone book entries from a CSV formatted file
You can import contact information to the phone book from a properly formatted .CSV file. When
importing from a .CSV file, the software assumes that the first record in the file is a header record so
the contents of the first record are not imported. If the .CSV file entry is not properly formatted, the
program discards the entire record.
1. You can import names into the phone book in the Fax Job or the Setup tab.
Fax Job tab: Click the book icon and then click Edit Phone Book in the Add Recipients from
●
Phone Book dialog box.
Setup tab: Click Edit Phone Book.
●
2. In the Edit Phone Book dialog box, click Import... to open the File Open dialog box. Highlight the
file you want to import and click OK.
3. After the highlighted file has been validated, the Map Fields dialog box opens. Highlight an entry
in the From column and then highlight a field in the To column. Click Map. You must select
mappings for the Name and Phone Number fields. Specifying a mapping for the Company name
field is optional. The mapping selections you make here apply to all records in the .CSV file.
ENWW Import phone book entries from a CSV formatted file 51
Page 58

Voice Calls and Retries
Voice calls are not included in the Fax Activity log and do not generate a T.30 report. The following
sections provide information on retries of a fax job.
Fax Call Report
When all fax attempts have been exhausted, a Fax Call Report will be printed for a fax send. It shows
the fax job log ID. The result of the final attempt is printed on the Fax Call Report.
A Fax Call Report does not print for voice calls.
NOTE: A Fax Call Report only generates Job numbers for final attempts. If one of these reports is
printed manually from the menu and the last call was neither the final attempt nor a Voice call the Job
number will be zero.
Fax Activity Log
Voice Calls are not included in the Fax Activity Log by default. Only the final attempt will be displayed
in the Fax Activity Log.
T.30 Report
Voice Calls will not cause a T.30 report to print. All retry attempts will cause a T.30 report to print.
52 Chapter 2 Send faxes ENWW
Page 59

3 Configuration
Set the sender information
●
Set the fax quality
●
Set the notification settings
●
Set the cover page information
●
Set the preview preference
●
Set the fax driver printer preferences
●
Set the billing-code configuration
●
ENWW 53
Page 60

Set the sender information
The default sender information is included on all faxes that you send by using the MFP Send Fax
driver, including cover pages. The sender information can be changed for individual faxes by using
the text fields on the Setup tab.
NOTE: To apply any changes to the current job only, select the Apply Defaults to this job check box
before exiting the Default Settings dialog box.
1. On the Setup tab, click Edit Defaults.
54 Chapter 3 Configuration ENWW
Page 61

2. Under Sender Information in the Default Settings dialog box, type the default sender name,
company name, fax number, and voice phone number.
NOTE: The information in the sender information fields on the Setup tab is updated the
time
that the sender information is typed in the sender information fields in the Default Settings
dialog box. If the default sender information is changed later, the sender information fields on the
Setup tab are
dialog box. To show the new information, exit from the MFP Send Fax driver and then restart the
driver.
3. Click OK.
NOTE: To set all of the default information at the same time, select the fax quality, notification,
cover page, and preview settings and then click OK.
ENWW Set the sender information 55
not
refreshed. The changes are saved, but the information does not appear in the
first
Page 62

Set the fax quality
The fax quality setting defines the resolution that the MFP uses to send the fax. The following are the
available quality settings:
Standard: 200 x 100 dots per inch (dpi)
●
Fine: 200 x 200 dpi
●
Superfine: 300 x 300 dpi
●
Set the fax quality
1. On the Setup tab, click Edit Defaults.
2. Under Fax Quality in the Default Settings dialog box, select the default quality for sending faxes.
3. Click OK.
NOTE: To set all of the default information at the same time, select the sender information,
notification, cover page, and preview settings and then click OK.
56 Chapter 3 Configuration ENWW
Page 63

Set the notification settings
The notification settings determine when and how notification of the status of an outgoing fax is sent.
1. On the Setup tab, click Edit Defaults.
2. Under Notification in the Default Settings dialog box, select when to receive notifications:
None: notification is not sent.
●
This Job: notification is sent when a fax is sent.
●
On Error: notification is sent when an error occurs.
●
3. Select the type of notification to send:
Print: notification is printed on the default printer.
●
E-mail: notification is sent in an e-mail message. Type the e-mail address in the E-mail
●
Address text box.
ENWW Set the notification settings 57
Page 64

NOTE: The e-mail function must be configured on the MFP in order to receive an e-mail
notification.
4. Click OK.
NOTE: To set all of the default information at the same time, select the sender information, fax
quality, cover page, and preview settings and then click OK.
58 Chapter 3 Configuration ENWW
Page 65

Set the cover page information
Standardize the look of the fax cover page by using a default cover page. Fields are available for
notes, a subject line, and a company logo or other image. The cover-page settings can be modified
on the Fax Job tab for individual fax jobs.
1. On the Setup tab, click Edit Defaults.
2. Under Include With Fax in the Default Settings dialog box, select Cover Page (Single recipient
only).
3. In the Notes text box, type the default notes.
4. In the Subject text box, type the default subject line.
5. Click Overlay to include an image on the cover page.
ENWW Set the cover page information 59
Page 66

6. Browse to and select a bitmap image file, such as a company logo.
NOTE: The bitmap image is converted to grayscale on the cover sheet and is located in the top
one-third of the page.
7. Click OK.
NOTE: To set all of the default information at the same time, select the sender information, fax
quality, notification, and preview settings and then click OK.
NOTE: When cover page is used with multiple recipients, the preview will only show the cover page
for the first recipient. However, the cover page will be sent separately for each recipient. Only one
recipient's name is shown on each cover page.
60 Chapter 3 Configuration ENWW
Page 67

Set the preview preference
The preview preference can be set to automatically preview every fax job before it is sent.
1. On the Setup tab, click Edit Defaults.
2. Under Preview in the Default Settings dialog box, select Show Preview Before Sending Fax to
preview each fax automatically before it is sent. When Show Preview Before Sending Fax is
selected, the Send button changes to Preview and Send.
3. Click OK.
NOTE: To set all of the default information at the same time, select the sender information, fax
quality, notification, and cover page settings and then click OK.
ENWW Set the preview preference 61
Page 68

Set the fax driver printer preferences
1. Click Start, click Settings, and then click Printers and Faxes.
2. On the Printers and Faxes window, right-click HP MFP Send Fax and then click Printing
Preferences.
3. In the HP MFP Send Fax Document Properties dialog box, click Paper/Quality to set the default
paper and quality properties. To save the settings and close the dialog box, click OK.
NOTE: The Advanced tab on the HP MFP Send Fax Document Properties dialog box does not
contain any information that affects the MFP Send Fax driver. This tab is a standard Windows
tab and cannot be removed for this driver.
62 Chapter 3 Configuration ENWW
Page 69

4. Click Services to check the status of the printer and supplies or to start the embedded Web
server. The Services tab options only appear if the MFP Send Fax driver is connected to a valid
TCP/IP port.
NOTE: See the appropriate MFP user guide for more information about the Embedded Web
server.
5. To save any changes to the default settings and close the dialog box, click OK.
ENWW Set the fax driver printer preferences 63
Page 70

Set the billing-code configuration
HP MFP Send Fax supports the use of billing codes when sending faxes.
1. From the Home screen, scroll to and touch the Administration button.
2. Open the following menus:
Fax Settings
●
Fax Send Settings
●
Fax Send Setup
●
Billing Codes
●
3. Touch the Enable Billing Codes feature to enable billing codes.
NOTE: To disable billing codes, deselect the Enable Billing Codes feature, touch the Save
button, and then skip the remaining steps.
To allow users to edit billing codes, touch the Allow users to edit billing codes feature.
4. Touch the Default Billing Code text box to open the keyboard.
5. Enter the billing code and then touch the OK button.
6. Touch the Minimum Length text box to open the keypad.
7. Type the minimum number of digits you want in the billing code, and then touch the OK button.
8. Touch the Save button.
64 Chapter 3 Configuration ENWW
Page 71

4 Solve problems
Functional errors
●
Warning messages
●
Error messages
●
ENWW 65
Page 72

Functional errors
The test page does not print
View the MFP Send Fax configuration information on the MFP control panel to determine if the driver
installation was successful and the PC Fax Send feature is enabled.
1. From the Home screen, scroll to and touch the Administration button.
2. Open the following menus:
Fax Settings
●
Fax Send Settings
●
Fax Send Setup
●
General Fax Send Settings
●
3. Touch the PC Fax Send check box.
4. Touch the Save button.
If PC Fax Send is not in menu, see
control panel on page 67.
The e-mail notification is disabled
The e-mail notification type is disabled under Notification on the Setup tab in the HP MFP Send Fax
dialog box because the e-mail function is not enabled on the MFP.
See the user guide for instructions about configuring the e-mail function.
Update the HP MFP Send Fax settings after enabling the e-mail feature on the MFP.
1. Click Start, click Settings, and then click Printers and Faxes.
2. Under Printer Tasks in the Printers and Faxes window, right-click the name of the MFP and then
click Properties.
3. In the HP MFP Send Fax Properties dialog box, click Device Settings.
PC FAX SEND or PC Fax Send does not appear on the MFP
66 Chapter 4 Solve problems ENWW
Page 73

4. In the Automatic Configuration drop-down menu, select Update Now.
5. Click OK.
An e-mail confirmation is not received
No e-mail confirmation is sent if the receiving fax machine does not answer, or is busy, or if the
number of redials that is configured on the MFP has not been reached. After the MFP has reached
the configured number of redials, a confirmation notification is sent.
PC FAX SEND or PC Fax Send does not appear on the MFP control panel
PC FAX SEND or PC Fax Send does not appear on the MFP control panel after installing the MFP
Send Fax driver.
Firmware is packaged in bundles called remote firmware updates (RFUs). These bundles contain
firmware updates for the MFP and different sub-systems located in the MFP. When the RFU bundle is
sent to the MFP, the MFP sends the individual firmware updates to its other sub-systems.
Sometimes, not all of these updates happen at the same time.
Complete the firmware update:
ENWW Functional errors 67
Page 74

1. Verify that the MFP firmware has been updated to the most current version available. If the
firmware has not been updated, see
on page 4.
2. Turn the MFP off and then turn it on again.
3. From the Home screen, scroll to and touch the Administration button.
4. Open the following menus:
Fax Settings
●
Fax Send Settings
●
Fax Send Setup
●
General Fax Send Settings
●
5. Touch the PC Fax Send option.
NOTE: If the PC Fax Send option does not appear on your MFP menu, upgrade the MFP
firmware.
6. Touch the Save button.
If PC FAX SEND or PC Fax Send still does not appear on the MFP control panel, see the
HP LaserJet MFP Analog Fax Accessory 500 Fax Guide
configured correctly.
Upgrade the MFP firmware and download the driver
to ensure that the analog fax accessory is
If the analog fax accessory is configured correctly and PC FAX SEND or PC Fax Send still does not
appear on the MFP control panel, contact HP Customer Care.
The bitmap does not appear or print on the cover page
The bitmap file will not appear or print on the cover page if the bitmap file is too large. The fax imagerendering process will bypass rendering the image on the cover page if the performance of the
computer would be significantly reduced. Reduce the size of the bitmap to include it on the cover
page.
The preview does not appear
To see a preview of the fax job, select Show Preview Before Sending Fax on the Setup tab.
A billing code is required after disabling the feature
A billing code is required in the Billing Code text box on the Fax Job tab after the billing-code feature
has been disabled at the MFP.
not
Update the driver so that the Billing Code text box does
1. Click Start, click Settings, and then click Printers and Faxes.
2. Under Printer Tasks on the Printers and Faxes window, right-click the name of the MFP and
then click Properties.
appear on the Fax Job tab:
3. In the HP MFP Send Fax Properties dialog box, click Device Settings.
68 Chapter 4 Solve problems ENWW
Page 75

4. In the Automatic Configuration: drop-down menu, select Update Now.
5. Click OK.
The billing code text box does not appear
If the billing-code feature was disabled at the MFP when the MFP Send Fax driver was installed, the
Billing Code text box does not appear on the Fax Job tab.
Enable billing codes and make the Billing code text box available on the Fax Job tab:
1. From the Home screen, scroll to and touch the Administration button.
2. Open the following menus:
Fax Settings
●
Fax Send Settings
●
Fax Send Setup
●
Billing Codes
●
ENWW Functional errors 69
Page 76

3. Touch the Enable Billing Codes feature to enable billing codes.
NOTE: To disable billing codes, deselect the Enable Billing Codes feature, touch the Save
button, and then skip the remaining steps.
To allow users to edit billing codes, touch the Allow users to edit billing codes feature.
4. Touch the Default Billing Code text box to open the keyboard.
5. Enter the billing code and then touch the OK button.
6. Touch the Minimum Length text box to open the keypad.
7. Type the minimum number of digits you want in the billing code, and then touch the OK button.
8. Touch the Save button.
The default fields do not refresh
The information in the sender information fields on the Setup tab is updated the
sender information is entered in the sender information fields in the Default Settings dialog box. If the
default sender information is changed later, the sender information fields on the Setup tab are
refreshed. The changes are saved, but the information does not appear in the dialog box. To show
the new information, exit from the MFP Send Fax driver and then restart the driver.
Changed settings do not take effect
The MFP Send Fax driver captures MFP fax configuration information during installation. If the MFP
settings are changed after the driver is installed, complete a manual update by using the Update Now
feature to synchronize the driver with the MFP settings. Normally, closing and reopening the driver
will automatically accomplish this process.
Synchronize the driver with the MFP settings by using Update Now:
1. Click Start, click Settings, and then click Printers and Faxes.
2. Under Printer Tasks in the Printers and Faxes window, right-click the name of the MFP and then
click Properties.
3. In the HP MFP Send Fax Properties dialog box, click Device Settings.
first time
that the
not
70 Chapter 4 Solve problems ENWW
Page 77

4. In the Automatic Configuration: drop-down menu, select Update Now.
5. Click OK.
Changed settings do not take effect in a Point-and-Print installation
If you are using a Point-and-Print installation, the notification, billing code, billing-code length, and faxenabled features cannot be refreshed by using the Update Now feature. To make these setting
changes take effect in a Point-and-Print installation, delete the Send Fax printer and then reinstall the
printer.
NOTE: The fax preview function is not available when you use Point-and-Print.
ENWW Functional errors 71
Page 78

Warning messages
The following warning messages might appear when you use the HP MFP Send Fax driver.
PC fax feature may be disabled at the MFP warning
The PC fax feature may be disabled at the MFP warning appears if the driver port has been changed.
Update the configuration settings:
1. In the MFP Send Fax Warning message box, click OK.
2. Verify that the MFP firmware has been updated to the most current version available. See
Determine if the MFP supports the MFP Send Fax driver on page 4.
3. Verify that the PC FAX SEND or PC Fax Send feature is enabled on the MFP. See
HP MFP Send Fax driver on page 28.
Uninstall the
72 Chapter 4 Solve problems ENWW
Page 79

Error messages
If a fax problem occurs that prevents or interrupts sending or receiving a fax, an error message is
generated that helps determine the cause of the problem. Here is a list of messages and their cause/
solution.
Table 4-1 Error messages
At least one fax number is required
Cause Solution
A fax number was not typed in the Fax Number text box on
the Fax Job tab.
Missing required information: Billing Code
Cause Solution
A billing code was not typed in the Billing Code text box on
the Fax Job tab. This error only occurs when billing-code
feature is enabled.
The billing code must be at least “n” digits
Cause Solution
The billing code was configured on the MFP to contain a
specified number of digits. This error occurs when the billingcode feature is enabled and the billing code in the Billing
Code text box on the Fax Job tab does not contain the
correct number of digits.
Missing required information: E-mail address
Type a fax number in the Fax Number text box on the Fax
Job tab.
Type a billing code in the Billing Code text box on the Fax
Job tab.
Check the billing code that is typed in the Billing Code text
box on the Fax Job tab. Type a billing code that contains the
specified number of digits.
Cause Solution
An e-mail address was not typed in the E-mail address text
box on the Setup tab when E-mail notification was selected.
The file cannot be found
Cause Solution
A fax was sent with an invalid path specified in the Image
text box on the Fax Job tab or the Setup tab.
A fax was sent with a path to a missing image file specified in
the Image text box on the Fax Job tab or the Setup tab.
A fax was sent with a path to an invalid file type specified in
the Image text box on the Fax Job tab or the Setup tab.
Type an e-mail address in the in the E-mail address text box
on the Setup tab.
Type a valid path to the image in the Image text box on the
Fax Job tab or the Setup tab.
Type a valid path to the image in the Image text box on the
Fax Job tab or the Setup tab.
Type a valid path to a bitmap image in the Image text box on
the Fax Job tab or the Setup tab.
ENWW Error messages 73
Page 80

The e-mail address is not in a recognized format. Do you still want to use it?
Cause Solution
The e-mail address in the E-mail address text box on the
Setup tab is not a valid e-mail address.
Reached maximum number of entries
Cause Solution
The Fax Recipients list contains the maximum number of fax
recipients.
The Fax Recipients list is limited to 100 entries.
The phone book contains the maximum number of entries.
The phone book is limited to 10,000 entries.
Reached maximum number of entries in a group
Cause Solution
The maximum number of group entries has been exceeded. Remove entries from the group.
Click Yes to send the e-mail to the specified address.
Click No to return to the Setup tab to change the e-mail
address.
The maximum number of fax numbers has been entered.
Send the fax to any remaining recipients by using a separate
fax job.
Remove entries in the phone book.
Reached maximum number of group entries
Cause Solution
The group contains the maximum number of entries. Remove entries from the group.
Data is not valid
Cause Solution
The file type or file format is incorrect. The file must be a .CSV file.
Mapping for minimum required fields not specified
Cause Solution
The mapping between the name and phone number fields (at
minimum) is not mapped to the .CSV file.
Import the file again. In the Mapping dialog box, select the
correct mapping for the fields that are not mapping correctly.
74 Chapter 4 Solve problems ENWW
Page 81

Duplicate group name specified
Cause Solution
An identical group name exists. Type in a new unique group name.
Export error
Cause Solution
The phone book could not be exported as a result of a filewrite error or insufficient disk space.
Import error
Cause Solution
The phone book could not be imported because valid entries
for all fields could not be found or a duplicate entry exists.
Be sure the location where the phone book is to be saved is
not write-protected and that disk space is available.
Be sure the source .CSV file is not corrupt and is organized
correctly. Eliminate duplicate entries before importing.
ENWW Error messages 75
Page 82

76 Chapter 4 Solve problems ENWW
Page 83

Index
B
billing codes
configure 6, 64
disable 68
enable 68
enable text box on the Fax Job
tab 69
bitmap
missing from cover page 68
C
cancel
fax job 40
cautions 2
Comma Separated Values (CSV)
file
export phone book entries to
50, 51
configure
billing codes 6, 64
cover page information 59
e-mail 5
fax quality 56
MFP Send Fax driver 1, 53
MFP Send Fax driver default
settings 53
notification settings 57
preview preference 61
printer preference 62
sender information 54
contact information
add to phone book from Fax
Job tab 42
add to phone book from Setup
tab 42
delete from phone book 44
edit in phone book from Fax
Job tab 47
edit in phone book from Setup
tab 47
edit phone book from Fax Job
tab 42
export from phone book using
the Fax Job tab 50
export from phone book using
the Setup tab 50
import to phone book using the
Fax Job tab 51
import to phone book using the
Setup tab 51
control panel
PC FAX SEND does not
appear 67
conventions, document 2
cover page
bitmap missing 68
cover page information
configure 59
D
default fields
refresh 70
displays
supported 3
document conventions 2
download driver 4
E
e-mail
configure 5
confirmation not received 67
notification disabled 66
error messages 73
errors
HP MFP Send Fax driver 66
F
fax 29
configure quality 56
job preview hidden 68
send through phone book 36
send to a single recipient 30
send to multiple recipients 33
use special characters in the
number 41
Fax Job tab
enable billing code text box
69
H
hardware
supported 3
HP MFP Send Fax driver
error messages 73
errors 66
warning messages 72
I
install
MFP Send Fax driver 6
J
job preview
hidden 68
M
manually update settings 70
MFP Send Fax driver
configure 1, 53
download driver 4
install instructions 4, 6
PC FAX SEND does not
appear in control panel 67
problem solving 65
troubleshoot 65
Page 84

uninstall 28
upgrade firmware 4
multiple fax recipients
send fax 33
N
network requirements 3
notes 2
notification settings
configure 57
O
operating systems
supported 3
P
phone book
add contact information from
the Fax Job tab 42
add contact information from
the Setup tab 42
delete contact information 44
edit contact information 47
edit contact information from
Fax Job tab 47
edit contact information from
Setup tab 47
edit contact information from
the Fax Job tab 42
export contact information from
Fax Job tab 50, 51
export contact information from
Setup tab 50, 51
export entries to a CSV file 50
import entries from a CSV file
51
send fax 36
Point-and-Print installation
fax-enabled features 71
update billing codes 71
update billing-code length 71
update notification settings 71
preview preference
configure 61
printer preference
configure 62
problem solving 65
S
sender information
configure 54
single recipient
send fax 30
special characters
insert in the fax number 41
supported displays 3
supported hardware 3
supported operating systems 3
system requirements 3
T
test page
does not print 66
print 15
tips 2
troubleshoot 65
U
uninstall
MFP Send Fax driver 28
update settings 70
upgrade firmware 4
V
voice calls and retries 52
W
warning
PC fax feature disabled 72
warning messages 72
warnings 2
R
refresh
default fields 70
Page 85

Page 86

© 2013 Hewlett-Packard Development Company, L.P.
www.hp.com
 Loading...