

Page 1

HP Color LaserJet CP3525 Series – Manage and maintain
Load paper and print media
How do I? Steps to perform
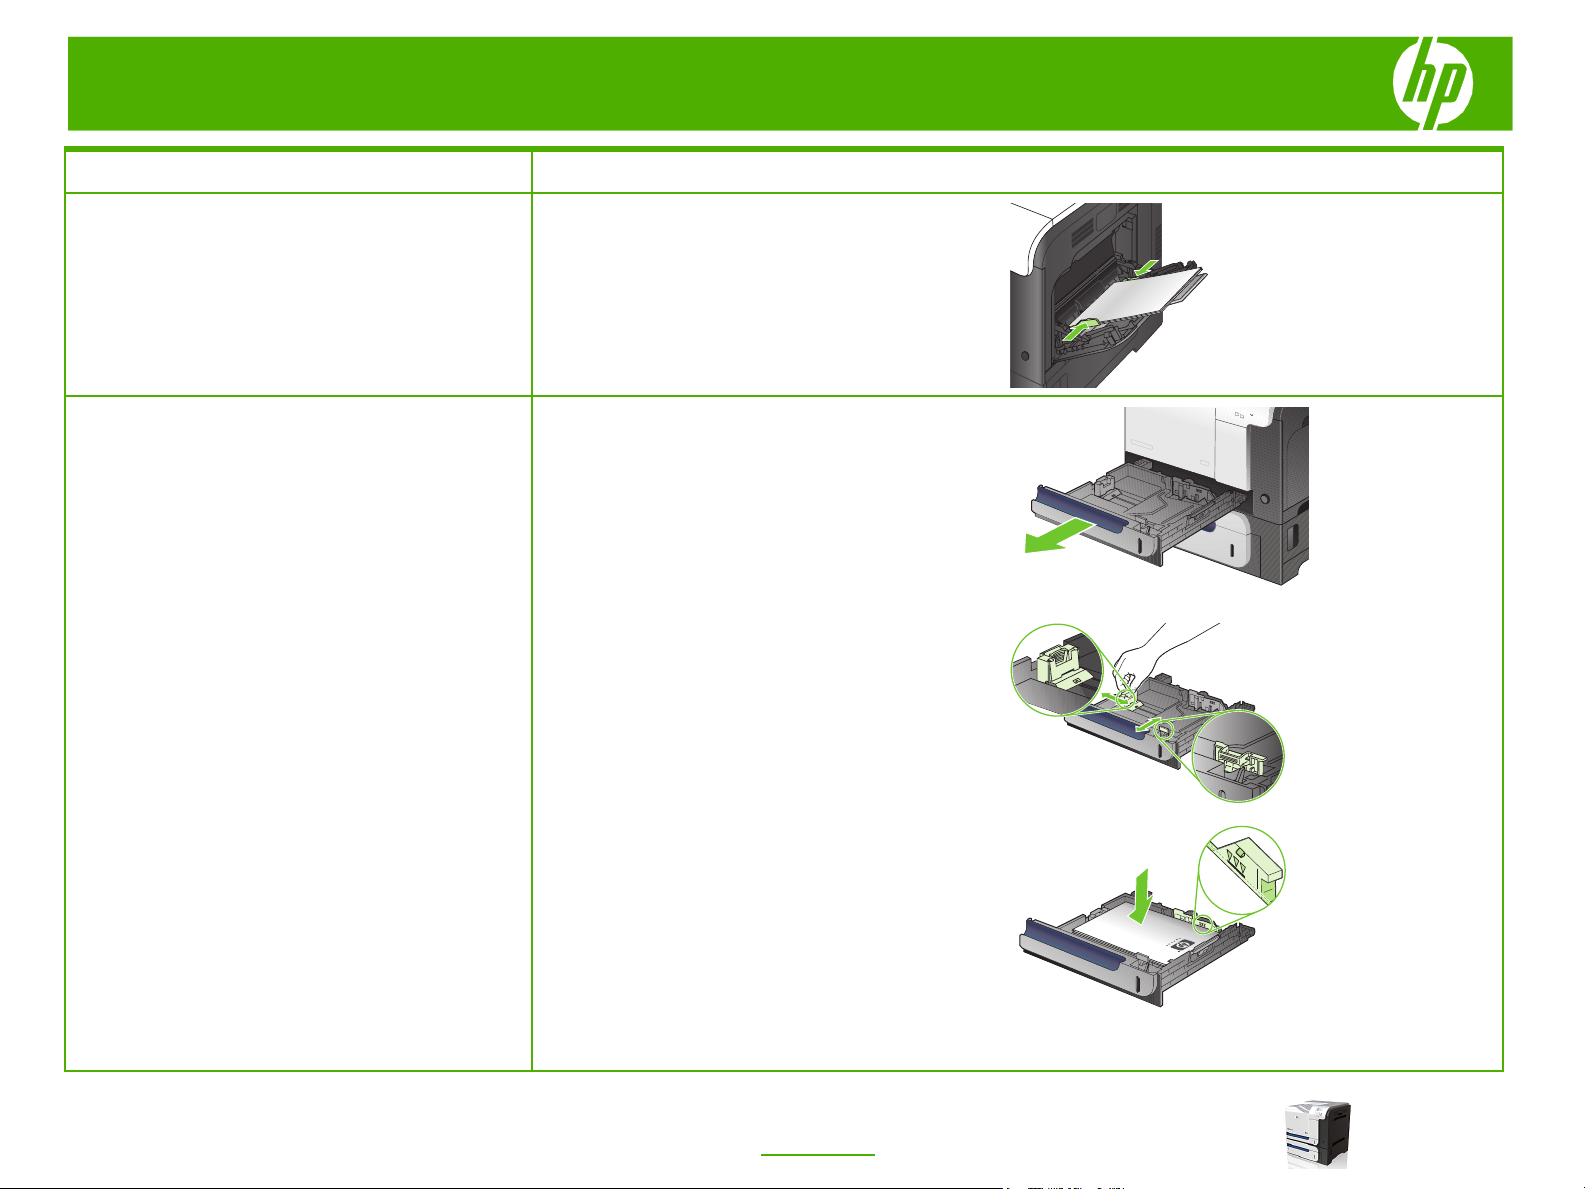
1 Open Tray 1.
Load Tray 1
CAUTION: To avoid jams, never add or remove paper
from Tray 1 during printing.
2 Fold out the tray extension to support the paper and
set the side guides to the correct width.
3 Load paper in the tray face down and the short, top
edge going into the product first.
© 2008 Copyright Hewlett-Packard
Development Company, L.P.
4 Make sure the stack fits under the tabs on the guides
and does not exceed the load-level indicators.
1
www.hp.com
Page 2
HP Color LaserJet CP3525 Series – Manage and maintain
How do I? Steps to perform
5 Adjust the side guides so that they lightly touch the
Load Tray 1 (continued)
Load Tray 2
CAUTION: Do not print envelopes, labels, postcards, or
unsupported sizes of paper from the Tray 2. Print these
types of paper only from Tray 1.
paper stack but do not bend it.
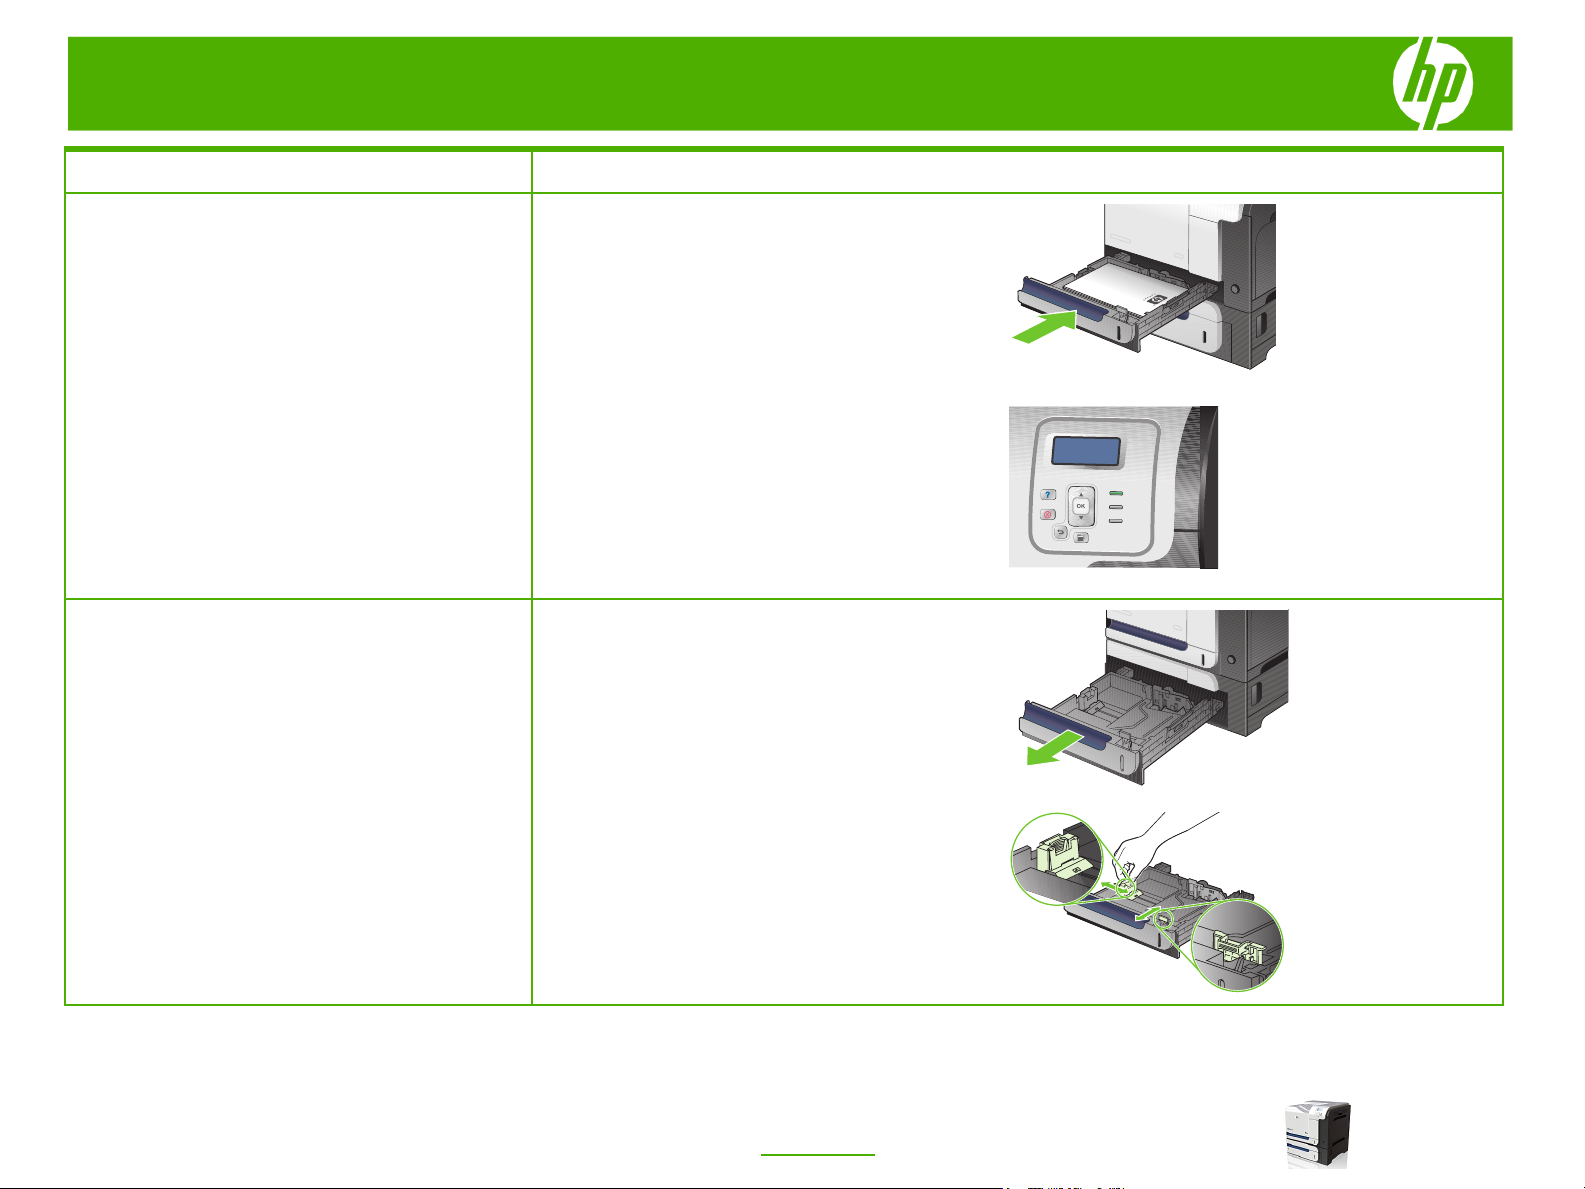
1 Slide open the tray.
NOTE: Do not open the tray while it is in use.
2 Adjust the paper-length and paper-width guides by
squeezing the adjustment latch and sliding the
guides to the size of the paper being used.
© 2008 Copyright Hewlett-Packard
Development Company, L.P.
3 Load paper into the tray face up. Check the paper to
verify the guides lightly touch the stack, but do not
bend it.
NOTE: To prevent jams, do not overfill the tray. Be
sure the top of the stack is below the tray full
indicator.
NOTE: If the tray is not adjusted correctly, an error
message might appear during printing or the paper
might jam.
2
www.hp.com
Page 3
HP Color LaserJet CP3525 Series – Manage and maintain
How do I? Steps to perform
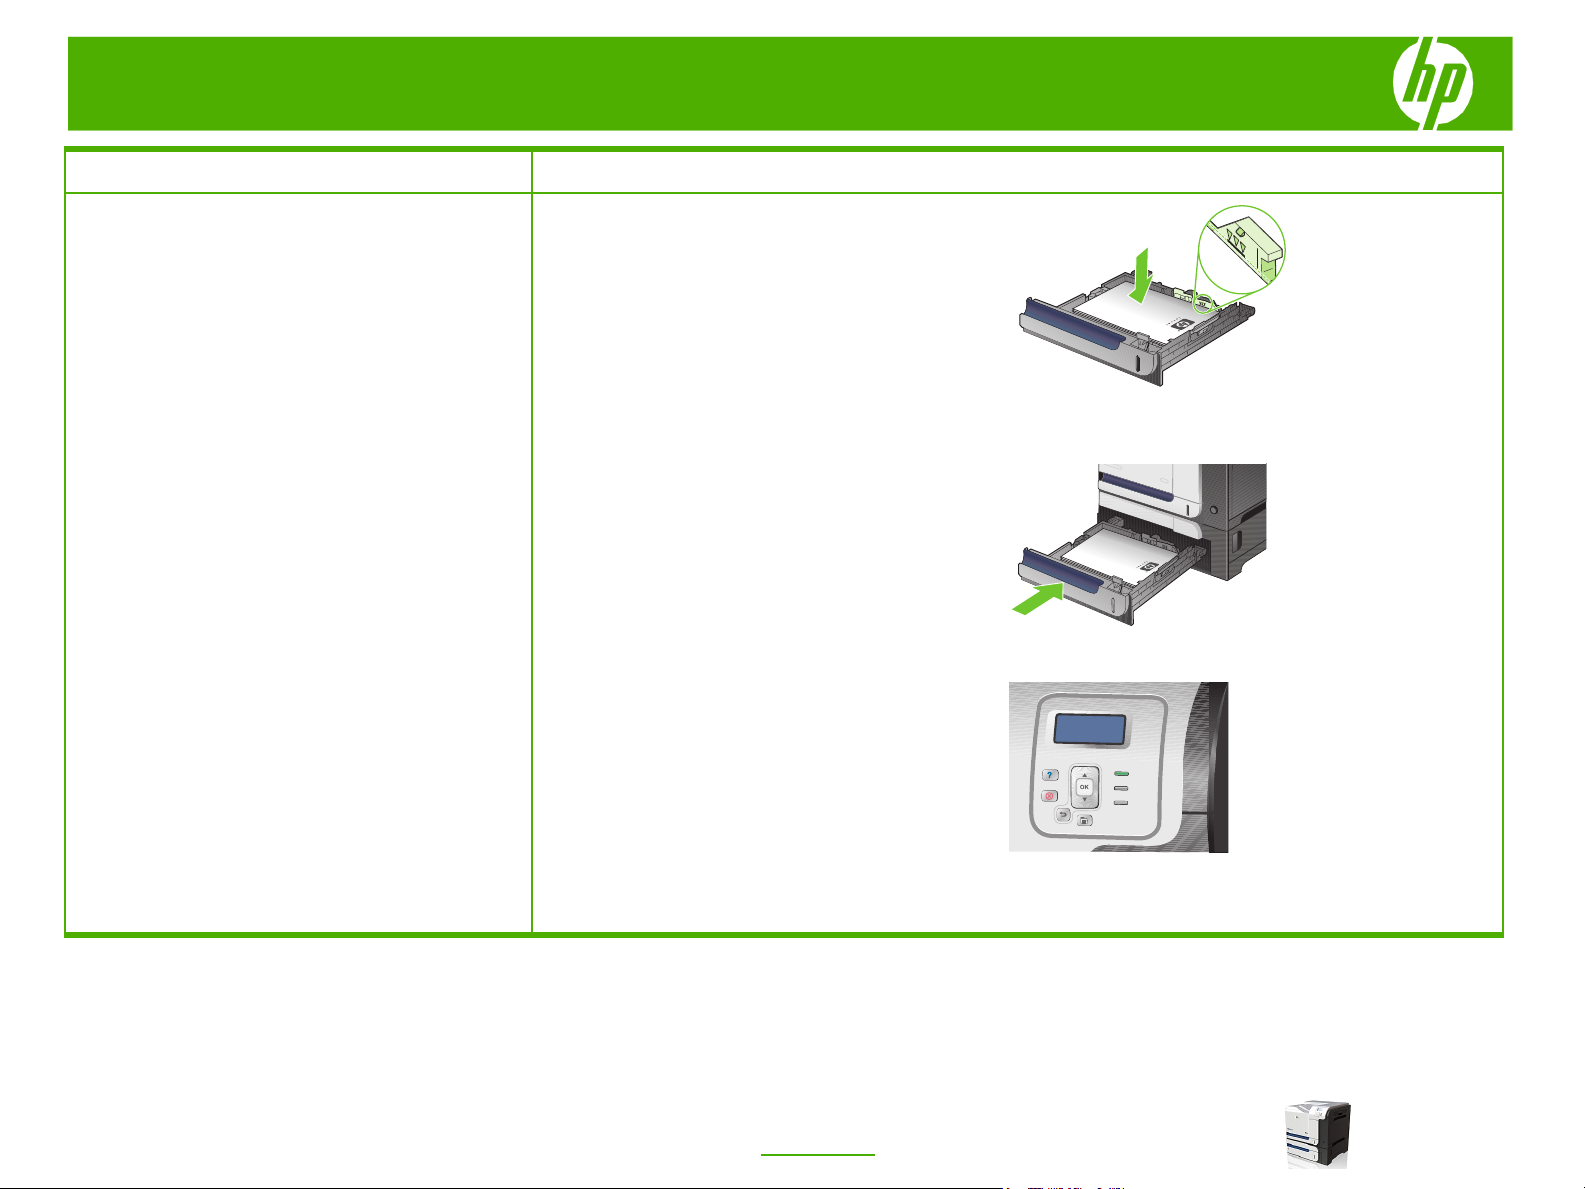
4 Slide the tray into the product.
Load Tray 2 (continued)
5 The control panel shows the tray’s paper type and
Load standard-sized paper into Tray 3
size. If the configuration is not correct, follow the
instructions on the control panel to change the size or
type.
1 Slide open the tray.
NOTE: Do not open the tray while it is in use.
© 2008 Copyright Hewlett-Packard
Development Company, L.P.
2 Adjust the paper-length and paper-width guides by
squeezing the adjustment latches and sliding the
guides to the size of the paper being used.
3
www.hp.com
Page 4
HP Color LaserJet CP3525 Series – Manage and maintain
How do I? Steps to perform
3 Load paper into the tray face up. Check the paper to
Load standard-sized paper into Tray 3
(continued)
verify the guides lightly touch the stack, but do not
bend it.
NOTE: To prevent jams, do not overfill the tray. Be
sure the top of the stack is below the tray full
indicator.
NOTE: If the tray is not adjusted correctly, an error
message might appear during printing or the paper
might jam.
4 Slide the tray into the product.
5 The control panel shows the tray’s paper type and
size. If the configuration is not correct, follow the
instructions on the control panel to change the size or
type.
© 2008 Copyright Hewlett-Packard
Development Company, L.P.
4
www.hp.com
Page 5

HP Color LaserJet CP3525 Series – Manage and maintain
Change print cartridges
How do I? Steps to perform
1 Open the front door. Make sure that the door is
Change print cartridges
CAUTION: If toner gets on clothing, wipe it off with a dry
cloth and wash the clothes in cold water. Hot water sets
toner into fabric.
completely open.
2 Grasp the handle of the used print cartridge and pull
out to remove.
3 Remove the new print cartridge from its protective
bag.
4 Store the used print cartridge in a protective bag.
Information about recycling used print cartridges is
on the print-cartridge box.
NOTE: Be careful not to damage the memory tag on the
print cartridge.
© 2008 Copyright Hewlett-Packard
Development Company, L.P.
5
www.hp.com
Page 6

HP Color LaserJet CP3525 Series – Manage and maintain
How do I? Steps to perform
5 Grasp both sides of the print cartridge and distribute
Change print cartridges (continued)
CAUTION: Avoid prolonged exposure to light.
CAUTION: Do not touch the green roller. Doing so can
damage the cartridge.
the toner by gently rocking the print cartridge.
6 Remove the orange protective cover from the print
cartridge.
7 Align the print cartridge with its slot and insert the
print cartridge until it clicks into place.
© 2008 Copyright Hewlett-Packard
Development Company, L.P.
8 Close the front door.
6
www.hp.com
Page 7

HP Color LaserJet CP3525 Series – Manage and maintain
Replace the toner collection unit
How do I? Steps to perform
1 Open the front door. Make sure that the door is
Replace the toner collection unit
NOTE: The toner collection unit is designed for a single
use. Do not attempt to empty the toner collection unit
and reuse it. Doing so could lead to toner being spilled
inside the product, which could result in reduced print
quality.
completely open.
2 Grasp the blue label at the top of the toner collection
unit and remove it from the product.
3 Place the attached blue cap over the blue opening at
the top of the unit.
© 2008 Copyright Hewlett-Packard
Development Company, L.P.
4 Remove the new toner collection unit from its
packaging.
7
www.hp.com
Page 8

HP Color LaserJet CP3525 Series – Manage and maintain
How do I? Steps to perform
5 Insert the bottom of the new unit into the product first
Replace the toner collection unit
(continued)
NOTE: If the toner collection unit is not installed
correctly, the front door does not close completely.
and then push the top of the unit until it clicks into
place.
6 Close the front door.
© 2008 Copyright Hewlett-Packard
Development Company, L.P.
8
www.hp.com
Page 9

HP Color LaserJet CP3525 Series – Manage and maintain
Clear jams
How do I? Steps to perform
1 Open the right door.
Clear jams in the right door
WARNING! To avoid electrical shock, remove any
necklaces, bracelets, or other metal items before
reaching into the inside of the product.
CAUTION: The fuser can be hot while the product is in
use. Wait for the fuser to cool before handling it.
2 If paper is jammed as it enters the output bin, gently
pull the paper downward to remove it.
3 If paper is jammed inside the right door, gently pull
the paper to remove it.
© 2008 Copyright Hewlett-Packard
Development Company, L.P.
4 Lift the paper-feed cover on the inside of the right
door. If jammed paper is present, gently pull the
paper straight out to remove it.
9
www.hp.com
1
2
Page 10

HP Color LaserJet CP3525 Series – Manage and maintain
How do I? Steps to perform
5 Close the paper-feed cover.
Clear jams in the right door (continued)
6 Gently pull the paper out of the pickup area.
7 Look for paper in the Tray 2 roller area. Near the
bottom of the right side, squeeze the two white levers
upward to release the jam-access door. Remove any
jammed paper, and close the door.
8 If paper is visible entering the bottom of the fuser,
gently pull downward to remove it.
© 2008 Copyright Hewlett-Packard
Development Company, L.P.
10
www.hp.com
Page 11

HP Color LaserJet CP3525 Series – Manage and maintain
How do I? Steps to perform
9 Paper could be jammed inside the fuser where it
Clear jams in the right door (continued)
CAUTION: Do not touch the rollers on the transfer roller.
Contaminates can affect print quality.
CAUTION: The fuser can be hot while the product is in
use. Wait for the fuser to cool before handling it.
CAUTION: Even if the body of the fuser has cooled, the
rollers that are inside could still be hot. Do not touch the
fuser rollers until they have cooled.
would not be visible. Remove the fuser to check for
jammed paper inside.
a.Grasp the fuser handles, lift up slightly, and
pull out the fuser.
b.Open the jam-access door. If paper is jammed
inside the fuser, gently pull it straight up to
remove it. If the paper tears, remove all paper
fragments.
1.Open the jam-access door
2.Remove the jammed paper
c Close the jam-access door, and push the
fuser completely into the product.
2
1
© 2008 Copyright Hewlett-Packard
Development Company, L.P.
10 Close the right door.
11
www.hp.com
Page 12

HP Color LaserJet CP3525 Series – Manage and maintain
How do I? Steps to perform
1 If paper is visible from the output bin, grasp the
Clear jams in the output bin area
Clear jams in Tray 1
leading edge and remove it.
2 If jammed paper is visible in the duplex output area,
gently pull it to remove it.
1 If jammed paper is visible in Tray 1, clear the jam by
gently pulling the paper straight out. Press the OK
button to clear the message.
© 2008 Copyright Hewlett-Packard
Development Company, L.P.
2 If you cannot remove the paper, or if no jammed
paper is visible in Tray 1, close Tray 1 and open the
right door.
12
www.hp.com
Page 13

HP Color LaserJet CP3525 Series – Manage and maintain
How do I? Steps to perform
3 If paper is visible inside the right door, gently pull the
Clear jams in Tray 1 (continued)
trailing edge to remove it.
4 Gently pull the paper out of the pick up area.
5 Close the right door.
Clear jams in Tray 2
CAUTION: Opening a tray when paper is jammed can
cause the paper to tear and leave pieces of paper in the
tray, which might cause another jam. Be sure to clear
jams before opening the tray.
© 2008 Copyright Hewlett-Packard
Development Company, L.P.
1 Open Tray 2 and make sure that the paper is stacked
correctly. Remove any jammed or damaged sheets
of paper.
13
www.hp.com
Page 14

HP Color LaserJet CP3525 Series – Manage and maintain
How do I? Steps to perform
2 Close the tray.
Clear jams in Tray 2 (continued)
1 Open Tray 3 and make sure that the paper is stacked
Clear jams in the optional 500-sheet paper
and heavy media tray (Tray 3)
correctly. Remove any damaged or jammed sheets
of paper.
2 Close Tray 3.
Clear jams in the lower right door (Tray 3)
© 2008 Copyright Hewlett-Packard
Development Company, L.P.
1 Open the lower right door.
14
www.hp.com
Page 15

HP Color LaserJet CP3525 Series – Manage and maintain
How do I? Steps to perform
2 If paper is visible, gently pull the jammed paper up or
Clear jams in the lower right door (Tray 3)
down to remove it.
(continued)
3 Close the lower right door.
© 2008 Copyright Hewlett-Packard
Development Company, L.P.
15
www.hp.com
 Loading...