

Page 1

Page 2

HP LaserJet 4100, 4100N,
4100TN, and 4100DTN Printers
English
Getting Started Guide
Page 3

© Copyright HewlettPackard Company 2001
All Rights Reserved.
Reproduction, adaptation, or
translation without prior written
permission is prohibited,
except as allowed under the
copyright laws.
Publication number
C8049-90903
First Edition, February 2001
Warranty
The information contained in
this document is subject to
change without notice.
Hewlett-Packard makes no
warranty of any kind with
respect to this information.
HEWLETT-PACKARD
SPECIFICALLY DISCLAIMS
THE IMPLIED WARRANTY
OF MERCHANT ABILITY AND
FITNESS FOR A
PARTICULAR PURPOSE.
Hewlett-Packard shall not be
liable for any direct, indirect,
incidental, consequential, or
other damage alleged in
connection with the furnishing
or use of this information.
Trademark Credits
Adobe and PostScript are
trademarks of Adobe Systems
Incorporated which may be
registered in certain
jurisdictions.
Microsoft is a registered
trademark of Microsoft
Corporation.
FCC Statement
This equipment has been
tested and found to comply
with the limits for a Class B
digital device, pursuant to P art
15 of the FCC rules. These
limits are designed to provide
reasonable protection against
harmful interference in a
residential installation. This
equipment generates, uses,
and can radiate radio
frequency energy. If it is not
installed and used in
accordance with the
instructions, it may cause
harmful interference to radio
communications. However,
there is no guarantee that
interference will not oc cur in a
particular installation.
If this equipment does cause
harmful interference to radio or
television reception, whi ch can
be determined by turning the
equipment off and on, the user
is encouraged to try to correct
the interference by one or more
of the following measures:
Reorient or relocate the
receiving antenna.
Increase separation
between equipment and
receiver.
Connect equipment to an
outlet on a circuit
different from that to
which the receiver is
located.
Consult your dealer or an
experienced radio/TV
technician.
Any changes or modifications
to the printer that are not
expressly approved by HP
could void the user’s authority
to operate this equipment.
Use of a shielded interface
cable is required to comply with
the Class B limits of Part 15 of
FCC rules.
See the online user guide for
other regulatory information
and product specifications.
Hewlett-Packard Company
11311 Chinden Boulevard
Boise, Idaho 83714 USA
Page 4

1
Getting Started Guide
Getting Started
Introduction . . . . . . . . . . . . . . . . . . . . . . . . . . . . . . . . . . . . . . . . . 1-5
Where to look for information . . . . . . . . . . . . . . . . . . . . . . . . . . . 1-6
Installation checklist . . . . . . . . . . . . . . . . . . . . . . . . . . . . . . . . . .1-8
Step 1: Check package contents. . . . . . . . . . . . . . . . . . . . . . . . . 1-9
Step 2: Remove internal packaging . . . . . . . . . . . . . . . . . . . . .1-10
Step 3: Prepare printer location. . . . . . . . . . . . . . . . . . . . . . . . . 1-12
Step 4: Locate printer parts. . . . . . . . . . . . . . . . . . . . . . . . . . . . 1-14
Step 5: Install accessories. . . . . . . . . . . . . . . . . . . . . . . . . . . . . 1-16
Step 6: Install the toner cartridge . . . . . . . . . . . . . . . . . . . . . . .1-17
Step 7: Load trays . . . . . . . . . . . . . . . . . . . . . . . . . . . . . . . . . . . 1-18
Step 8: Attach the power cord. . . . . . . . . . . . . . . . . . . . . . . . . . 1-21
Step 9: Change the control panel language (optional) . . . . . . .1-22
Step 10: Test the printer . . . . . . . . . . . . . . . . . . . . . . . . . . . . . . 1-23
Step 11: Connect printer cables . . . . . . . . . . . . . . . . . . . . . . . . 1-24
Step 12: Install the printing software. . . . . . . . . . . . . . . . . . . . . 1-27
Step 13: Verify printer setup . . . . . . . . . . . . . . . . . . . . . . . . . . . 1-30
Step 14: Distribute software to network clients (optional) . . . . . 1-31
Step 15: Install the software for network clients (optional) . . . . 1-32
Step 16: Access the user documentation . . . . . . . . . . . . . . . . . 1-33
HP Customer Care
Find product support on the World Wide Web . . . . . . . . . . . . . 1-35
Get answers through e-mail . . . . . . . . . . . . . . . . . . . . . . . . . . . 1-35
Tools and documentation . . . . . . . . . . . . . . . . . . . . . . . . . . . . . 1-35
Connect with other users online . . . . . . . . . . . . . . . . . . . . . . . . 1-36
We stay in touch . . . . . . . . . . . . . . . . . . . . . . . . . . . . . . . . . . . . 1-36
Web registration . . . . . . . . . . . . . . . . . . . . . . . . . . . . . . . . . . . . 1-36
HP SupportPack . . . . . . . . . . . . . . . . . . . . . . . . . . . . . . . . . . . . 1-36
Talk to a technical support agent . . . . . . . . . . . . . . . . . . . . . . . 1-37
English
Quick Reference
Control panel. . . . . . . . . . . . . . . . . . . . . . . . . . . . . . . . . . . . . . . 1-39
Printing tasks. . . . . . . . . . . . . . . . . . . . . . . . . . . . . . . . . . . . . . . 1-49
Paper jams . . . . . . . . . . . . . . . . . . . . . . . . . . . . . . . . . . . . . . . . 1-52
Correcting output quality problems . . . . . . . . . . . . . . . . . . . . . . 1-58
About the toner cartridge. . . . . . . . . . . . . . . . . . . . . . . . . . . . . . 1-67
Paper sizes supported. . . . . . . . . . . . . . . . . . . . . . . . . . . . . . . . 1-69
EN 1-3
Page 5

1-4 Getting Started Guide EN
Page 6
Getting Started
This section of the guide contains information for unpacking and
setting up the printer.
Introduction
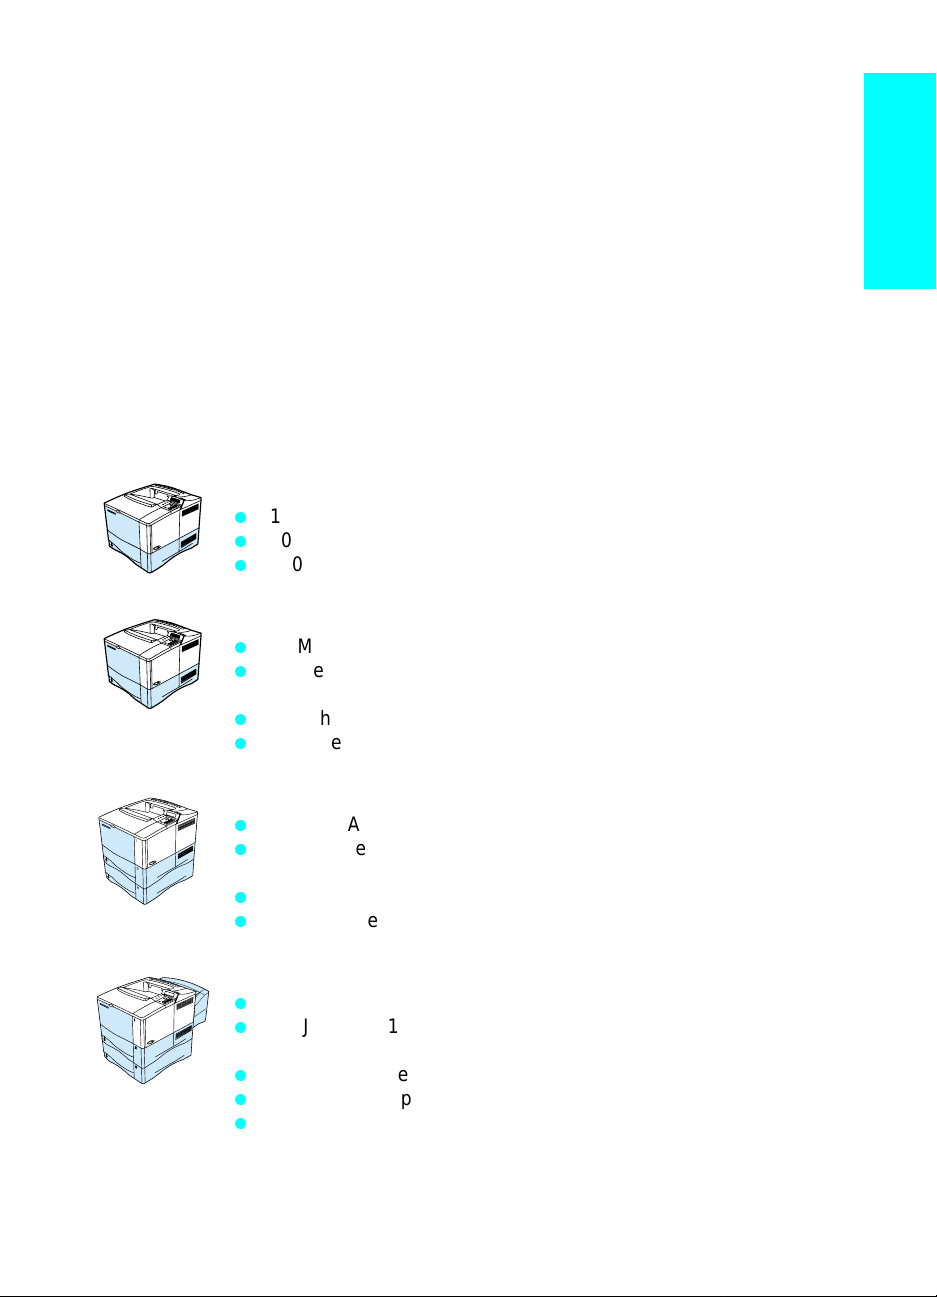
Congratulations on your purchase of the HP LaserJet 4100 printer.
The printer is available in four configurations:
HP LaserJet 4100
16 MB RAM
100-sheet paper tray
500-sheet paper tray
HP LaserJet 4100N
32 MB RAM
HP JetDirect 10/100Base-TX print server card for network
connection
100-sheet paper tray
500-sheet paper tray
English
HP LaserJet 4100TN
32 MB RAM
HP JetDirect 10/100Base-TX print server card for network
connection
100-sheet paper tray
two 500-sheet paper trays
HP LaserJet 4100DTN
32 MB RAM
HP JetDirect 10/100Base-TX print server card for network
connection
100-sheet paper tray
two 500-sheet paper trays
duplex printing accessory (duplexer)
EN Introduction 1-5
Page 7
Where to look for information
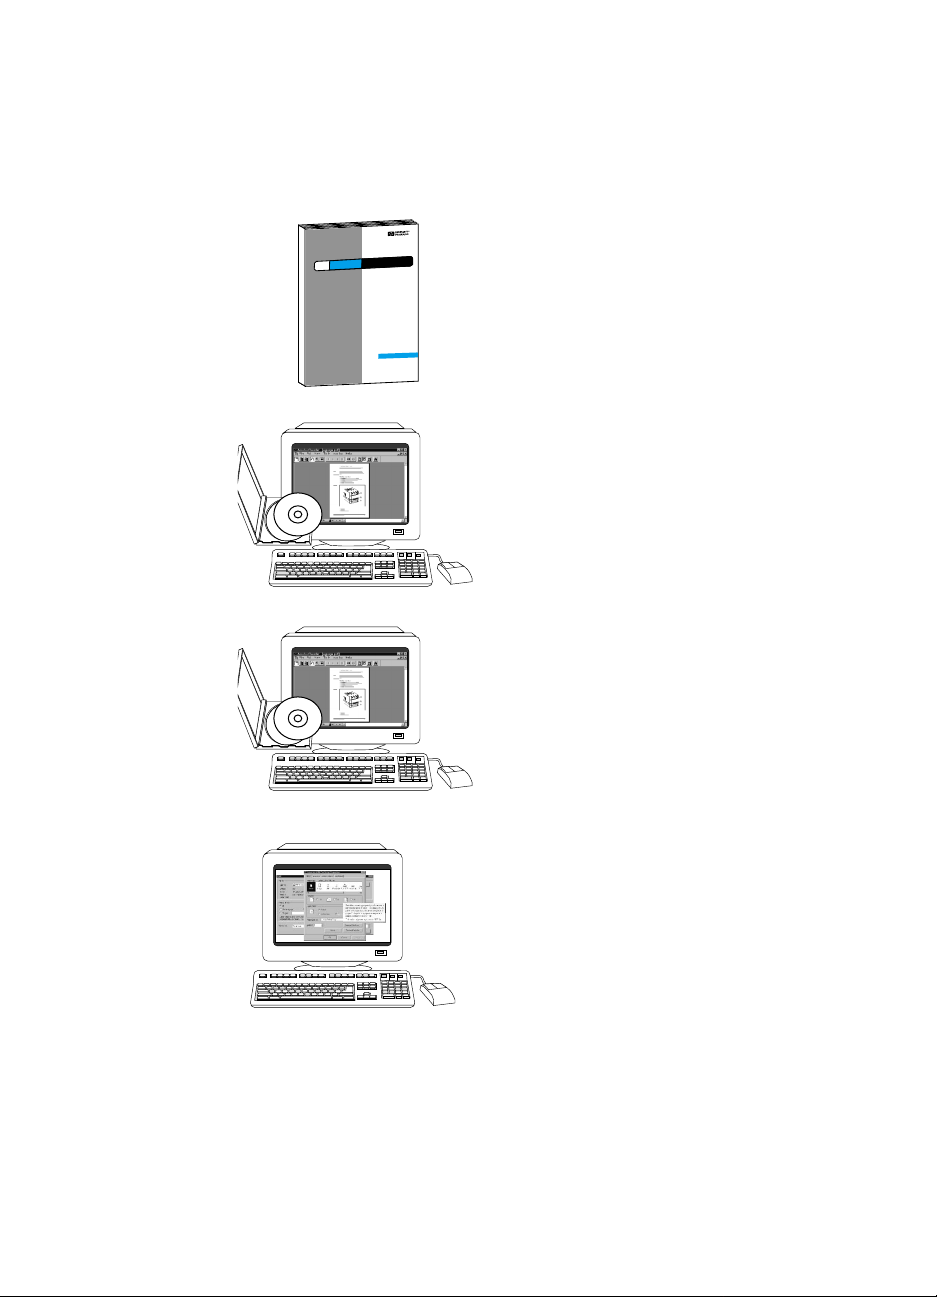
Getting Started Guide
Information for setting up your printer
(Getting Started), as well as tips and
quick information for using the printer
(Quick Reference).
Online User Guide
Detailed information on using and
troubleshooting the printer, available on
the CD that came with the printer. If you
would like a hard copy, print the user
guide using your printer.
HP JetDirect Print Server
Administrator’s Guide
Information for configuring and
troubleshooting the HP JetDirect
print server, available on the CD that
came with the printer.
Online Help
Information on printer options that are
available from within printer drivers. To
view a Help file, access the online help
through the printer driver.
1-6 Getting Started EN
Page 8
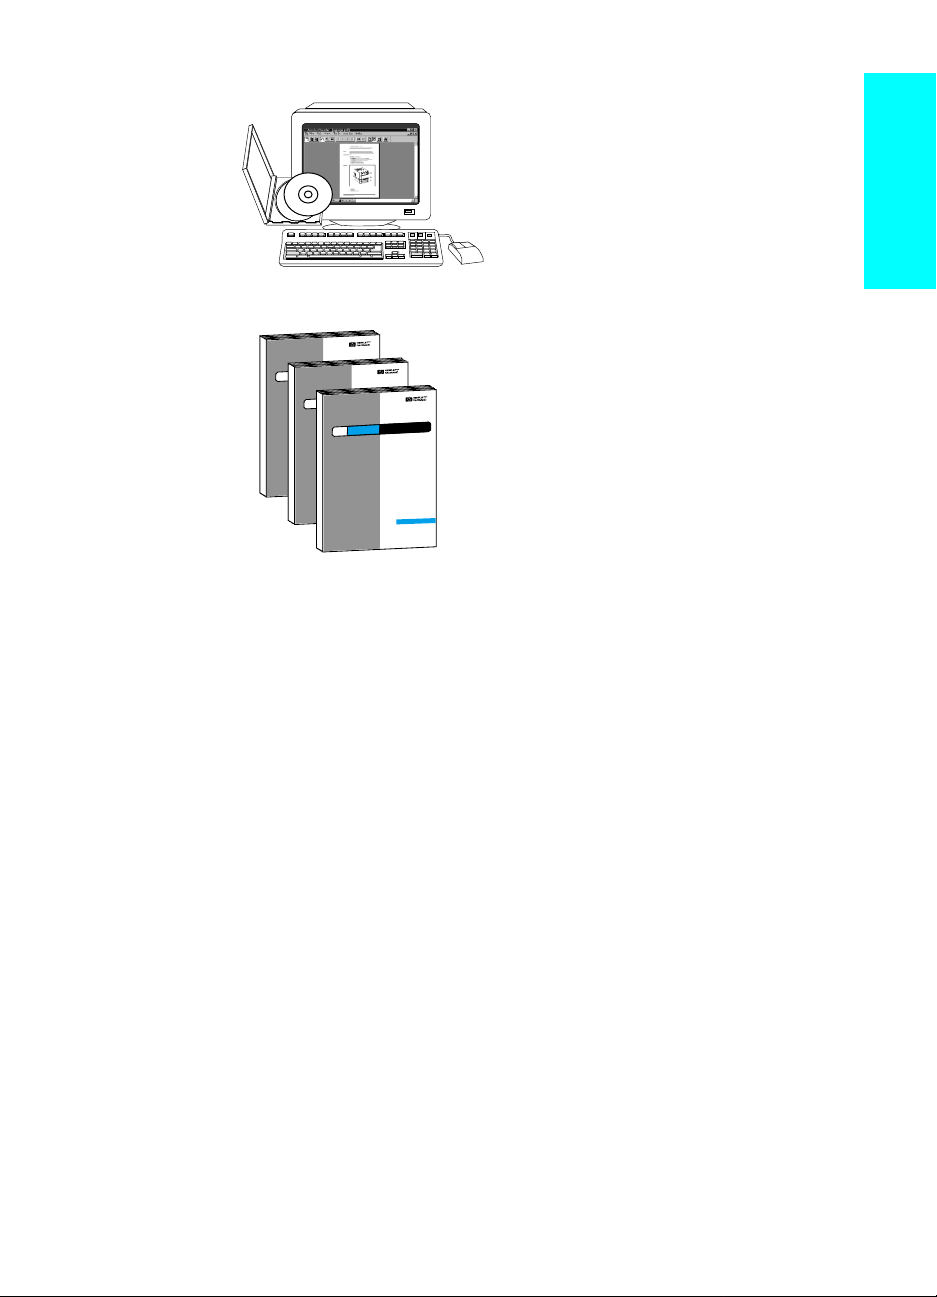
HP Fast InfraRed Receiv er
User Guide
Information on using and
troubleshooting the HP Fast InfraRed
Receiver.
Accessory guides
Instructions for installing and using
accessories or toner cartridges,
included with the accessory.
Additional information is available on the World Wide Web
at http://www.hp.com/support/lj4100.
English
EN Where to look for information 1-7
Page 9

Installation checklist
Follow the steps below to set up and install the printer.
G Step 1: Check package contents . . . . . . . . . . . . . . . . . . . . . . . .1-9
G Step 2: Remove internal packaging. . . . . . . . . . . . . . . . . . . . .1-10
G Step 3: Prepare printer location . . . . . . . . . . . . . . . . . . . . . . . .1-12
G Step 4: Locate printer parts . . . . . . . . . . . . . . . . . . . . . . . . . . .1-14
G Step 5: Install accessories. . . . . . . . . . . . . . . . . . . . . . . . . . . .1-16
G Step 6: Install the toner cartridge. . . . . . . . . . . . . . . . . . . . . . .1-17
G Step 7: Load trays . . . . . . . . . . . . . . . . . . . . . . . . . . . . . . . . . .1-18
G Step 8: Attach the power cord . . . . . . . . . . . . . . . . . . . . . . . . .1-21
G Step 9: Change the control panel language (optional). . . . . . .1-22
G Step 10: Test the printer. . . . . . . . . . . . . . . . . . . . . . . . . . . . . .1-23
G Step 11: Connect printer cables. . . . . . . . . . . . . . . . . . . . . . . .1-24
G Step 12: Install the printing software . . . . . . . . . . . . . . . . . . . .1-27
G Step 13: Verify printer setup. . . . . . . . . . . . . . . . . . . . . . . . . . .1-30
G Step 14: Distribute software to network clients (optional) . . . .1-31
G Step 15: Install the software for network clients (optional). . . .1-32
G Step 16: Access the user documentation . . . . . . . . . . . . . . . .1-33
WARNING! The printer is heavy. We recommend having two people move it.
Note To learn about all the features and capabilities of the printer, see the
online user guide (av ailab le on the CD that came with the printer) and
the Help menus (in the printer driver online help).
1-8 Getting Started EN
Page 10
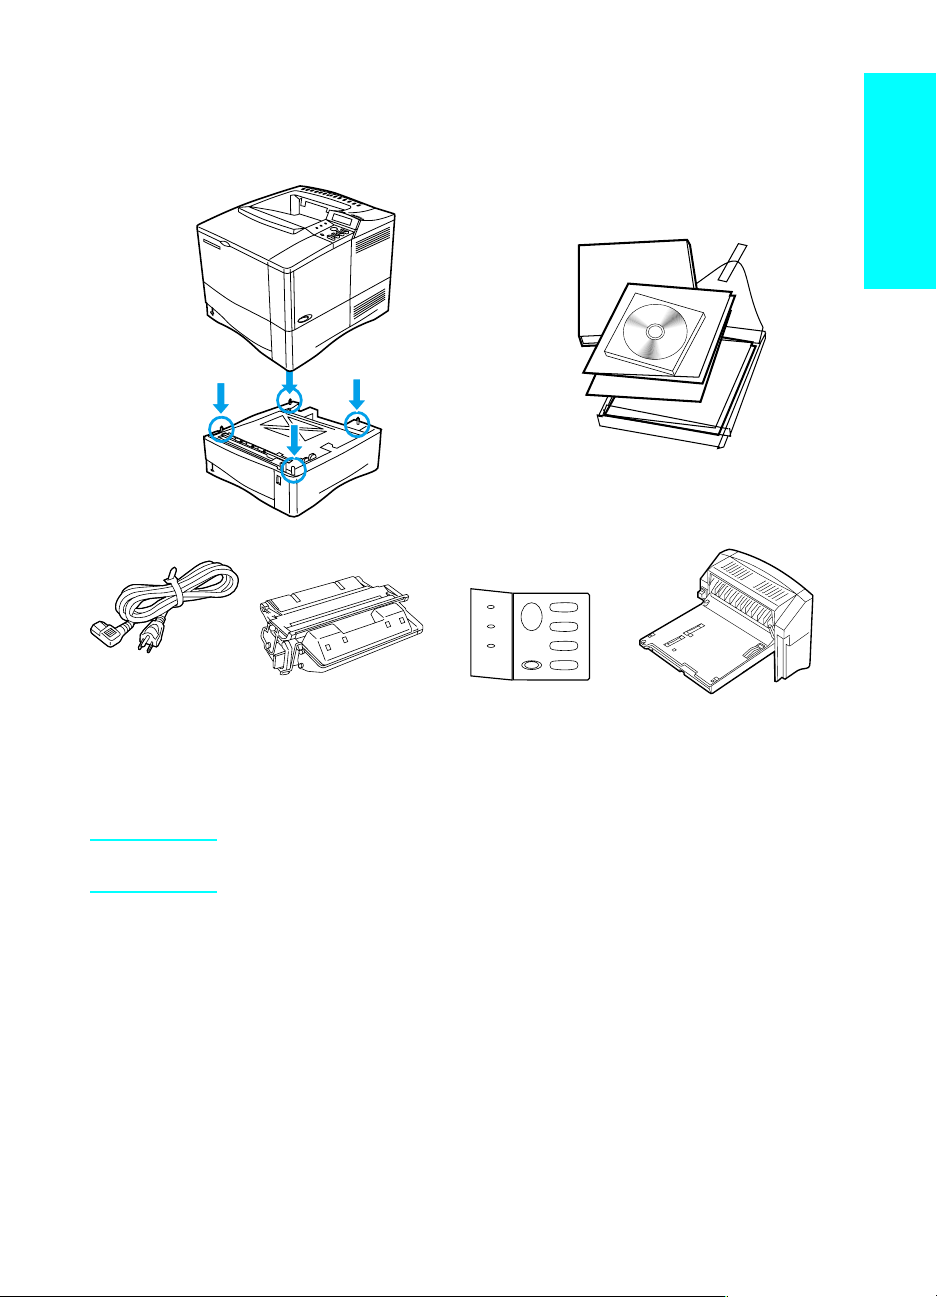
Step 1: Check package contents
Printer
Power cord
Toner cartridge
Second 500-sheet
paper tray
(included with
4100TN and
4100DTN only)
Control panel overlay
(might already be
installed on printer)
Printer software
and documentation
Duplexer (included with
4100DTN only)
English
Note An IEEE parallel cable is not included in the pac kage contents. See the
online user guide on the CD for ordering information.
EN Step 1: Check package contents 1-9
Page 11
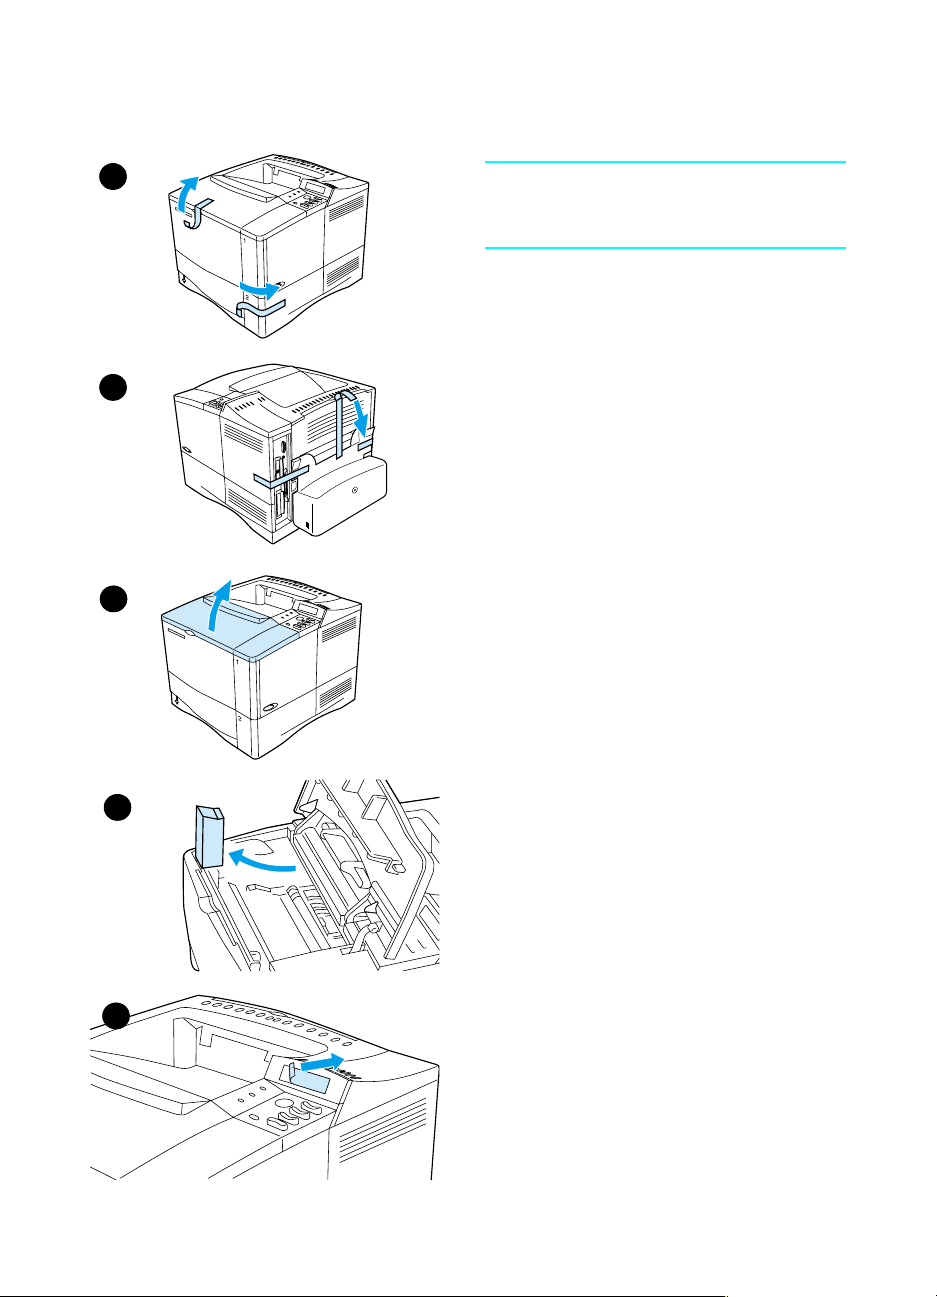
Step 2: Remove internal packaging
1
2
3
Note
Save all packaging material. You might
need to repack the printer at a later date.
1 Remove the shipping bag and tape
from the front of the printer.
2 Remove the tape from the back of
the printer.
3 Open the top cover.
4 Remove the foam packing material
from inside the toner cartridge cavity .
5 Remove the plastic film on the
control panel display.
Continued on the next page.
4
5
1-10 Getting Started EN
Page 12
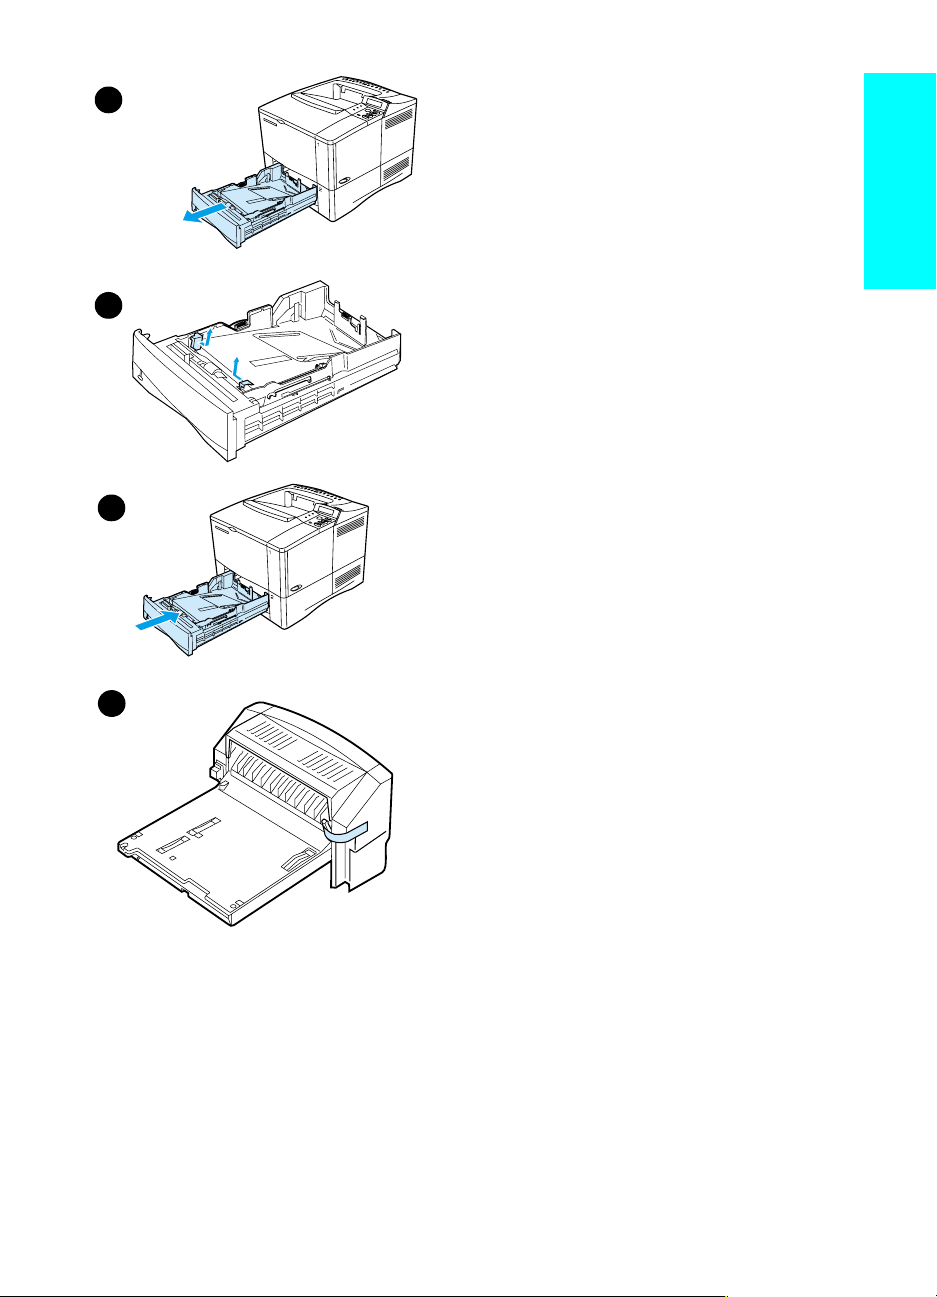
6
7
8
6 Slide tray 2 out of the printer.
7 Remove all packaging materials and
any spacers from the tray.
8 Slide tray 2 back into the printer.
9 For 4100TN and 4100DTN models,
repeat steps 6 through 8 for tray 3.
10 For the 4100DTN model, remo ve the
duplex er from its shipping bag and
then remove all tape from the
duplexer.
English
10
EN Step 2: Remove internal packaging 1-11
Page 13
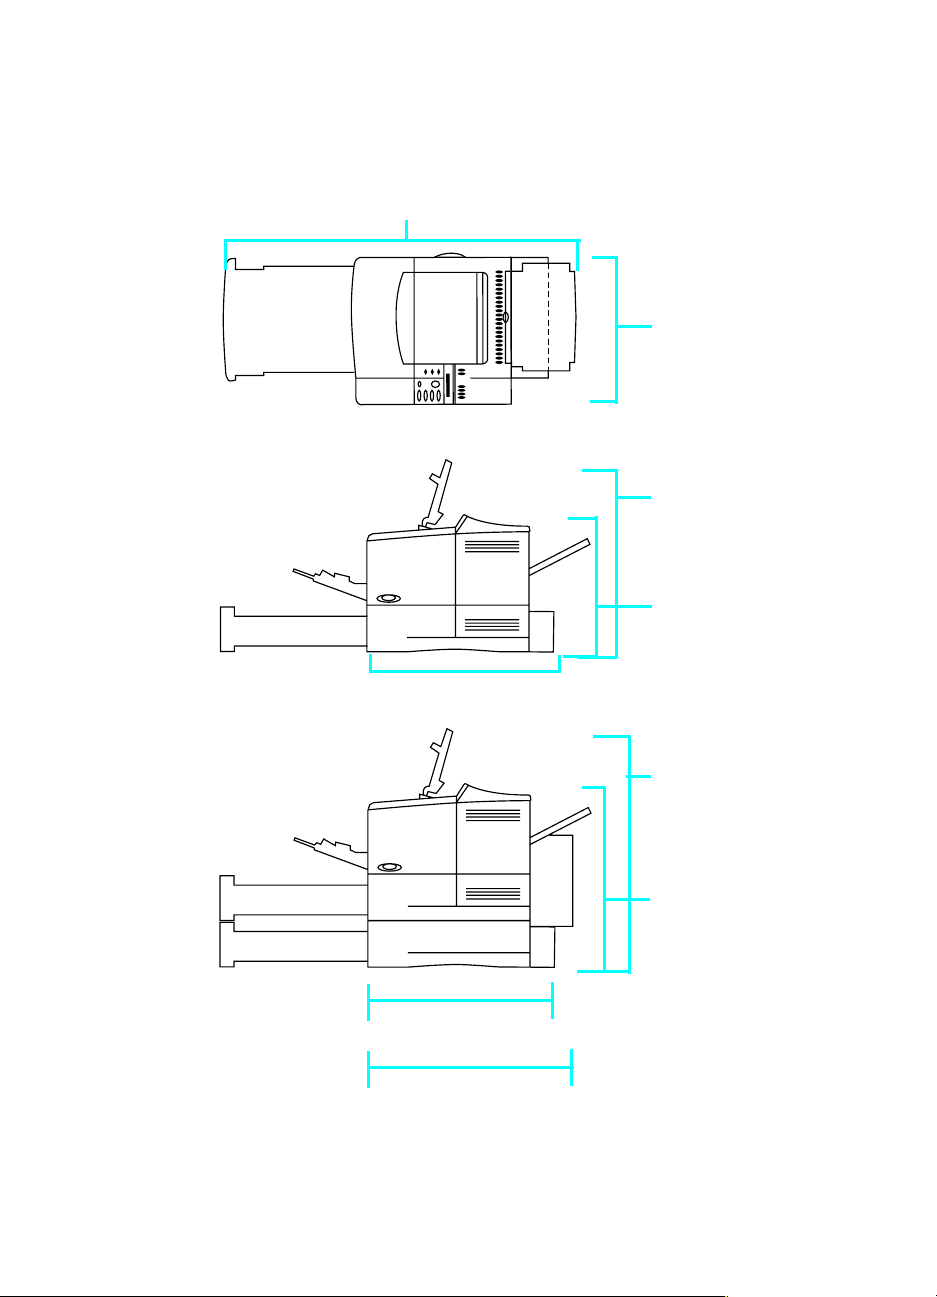
Step 3: Prepare printer location
1043 mm (41.1 in)
full length (trays and rear output bin open)
HP LaserJet
4100/4100N/
4100TN/4100DTN
390 mm (15.4 in)
HP LaserJet
4100/4100N
475 mm
(18.7 in)
top cover open
345 mm
(13.6 in)
top cover closed
506 mm (19.9 in)
trays and rear output bin closed
HP LaserJet
4100TN/4100DTN
595 mm
(23.4 in)
top cover open
465 mm
(18.3 in)
top cover closed
HP LaserJet 4100TN
trays and rear output bin closed
HP LaserJet 4100DTN
trays and rear output bin closed
506 mm (19.9 in)
565 mm (22.2 in)
1-12 Getting Started EN
Page 14

Printer weights (without toner cartridge or paper installed)
HP LaserJet 4100/4100N printers 18 kg (39 lb)
HP LaserJet 4100TN printer 25 kg (55 lb)
HP LaserJet 4100DTN printer 28 kg (62 lb)
Location requirements for the printer
• Sturdy, level surface for placement
• Space allowance around the printer
• Well-ventilated room
• No exposure to direct sunlight or
chemicals, including ammonia-based
cleaning solutions
• Relative humidity 20% to 80%
English
• Adequate power supply (1 00 to 127 V
or 220 to 240 V line voltage,
50/60 Hz)
• Stable environment—no abrupt
temperature or humidity chang es
• Room temperature 50° to 91° F
(10°to 32° C)
EN Step 3: Prepare printer location 1-13
Page 15
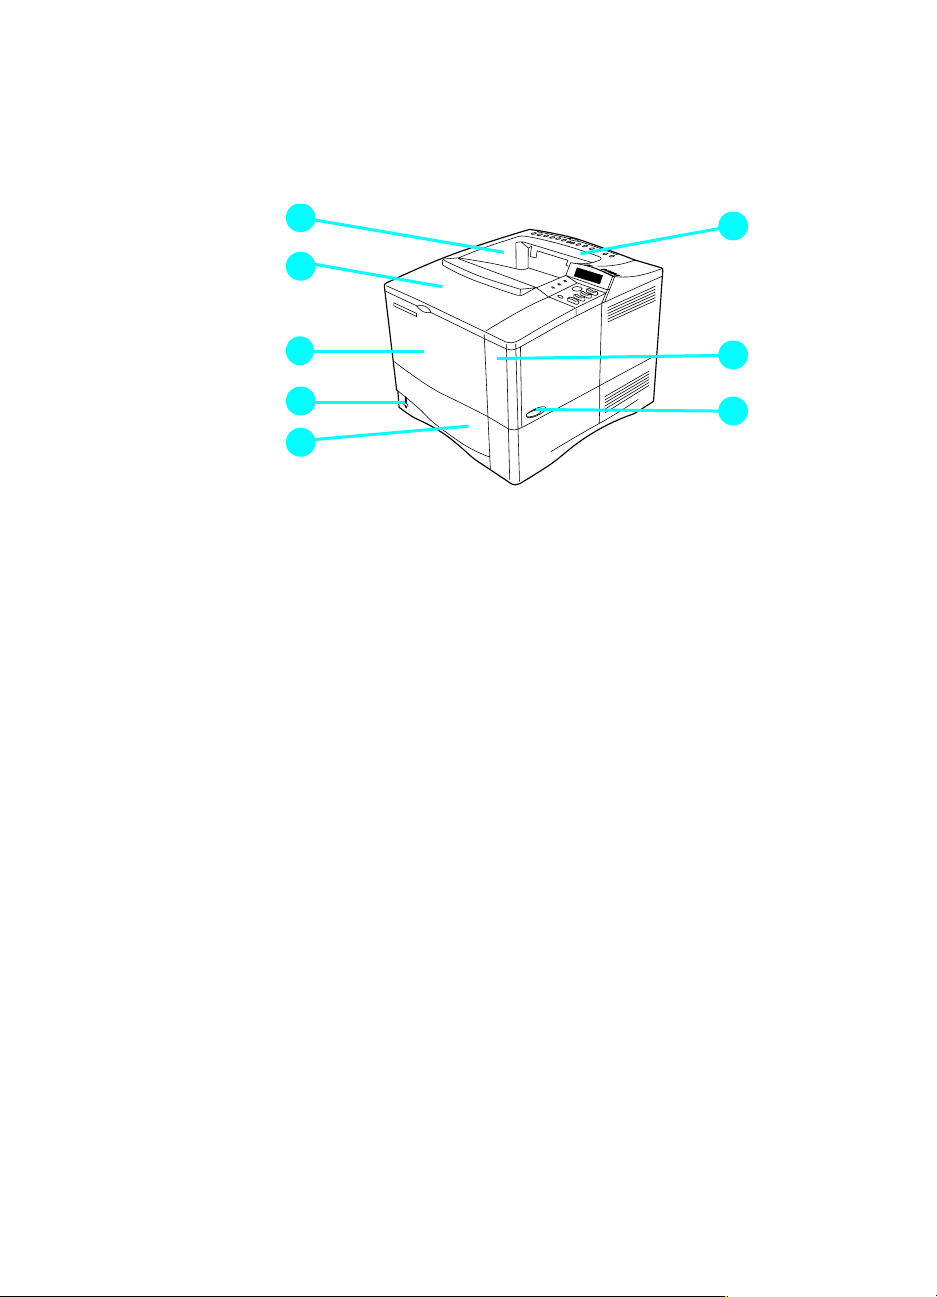
Step 4: Locate printer parts
Front view
8
7
6
5
4
1 Control panel
2 Tray number
3 Power switch
4 Tray 2 (500-sheet)
5 Paper level indicator
6 Tray 1, closed (100-sheet)
7 Top cover (toner cartridge underneath)
8 Top output bin
1
2
1
2
3
1-14 Getting Started EN
Page 16
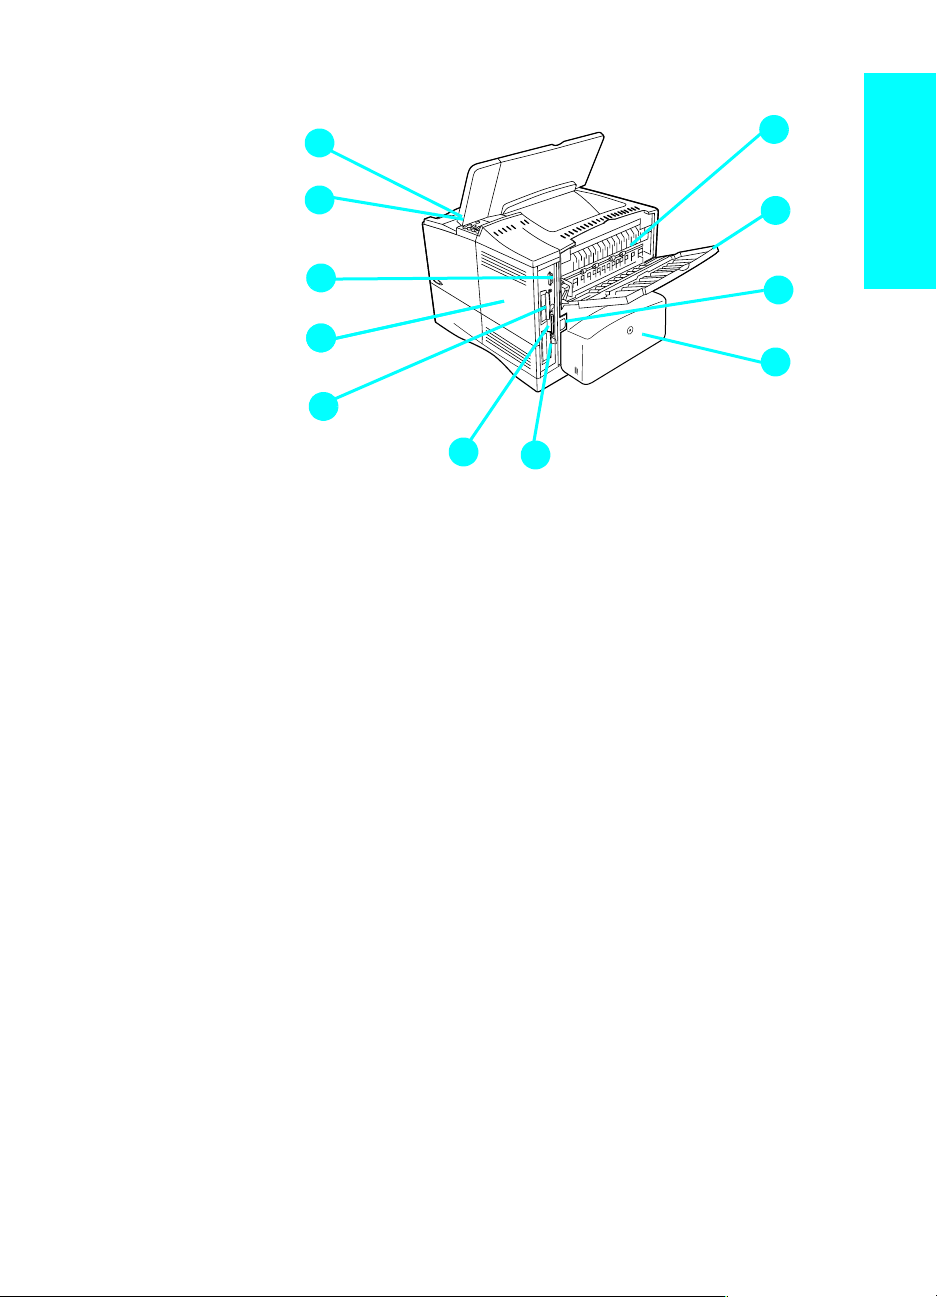
Back view
11
10
9
8
8
7
6
1 Fuser (can be removed to clear paper jams)
2 Rear output bin (straight-throu gh paper path)
3 Power connector
4 Dust cover (tray 2 dust cover not installed if duplexer is installed)
5 Parallel interface port
6 Enhanced I/O (EIO) slots
7 Fast InfraRed (FIR) port for an optional FIR receiver
8 Memory access door (more than one DIMM can be installed)
9 Accessory interface port
10 Serial number and model number (under top cover)
11 Toner cartridge access (under top cover)
5
1
2
3
4
English
EN Step 4: Locate printer parts 1-15
Page 17
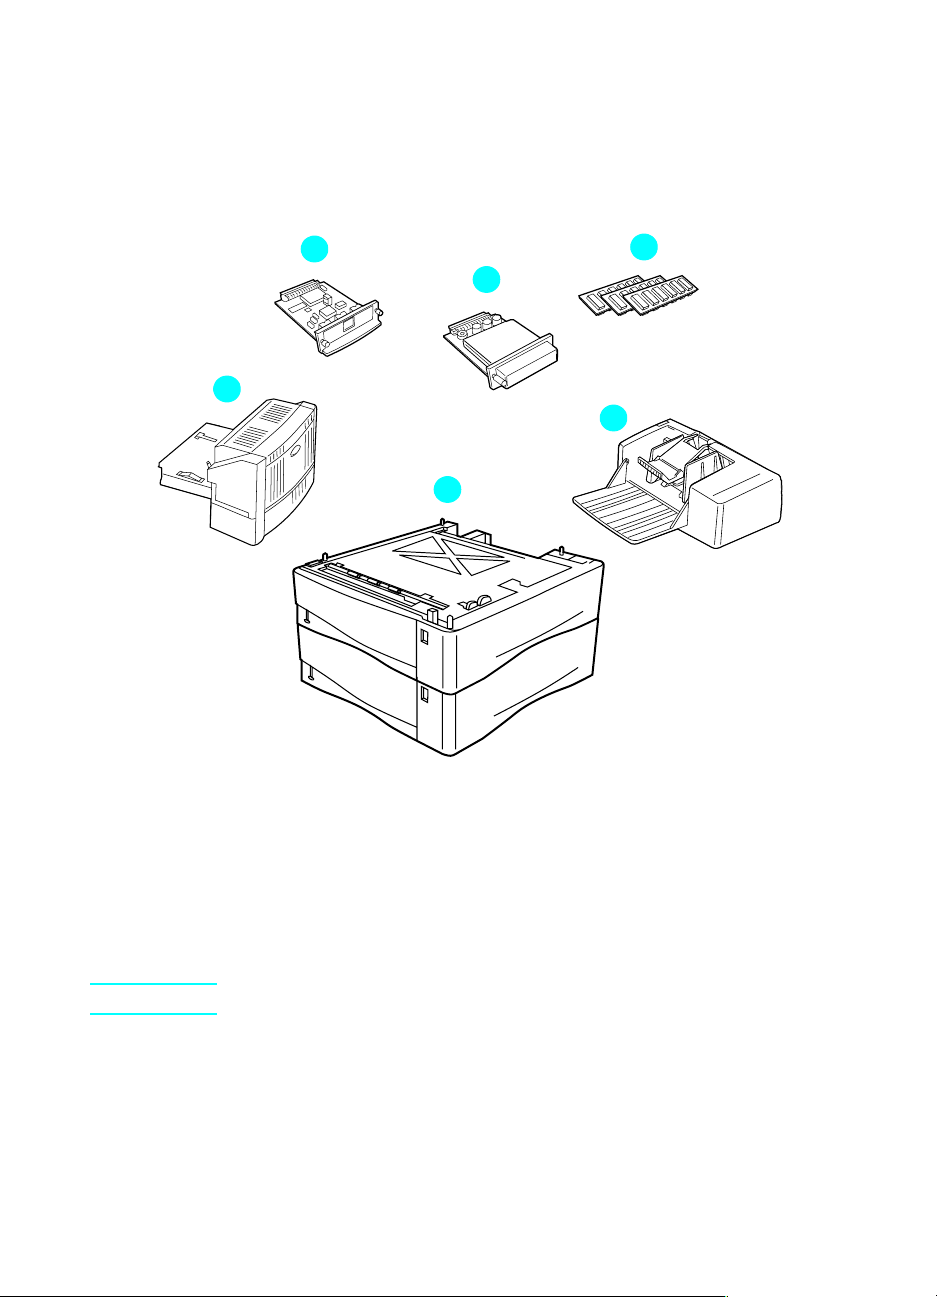
Step 5: Install accessories
Install any accessories that you have purchased with the printer. Use
the separate installation instructio ns for the accessories.
1
2
4
5
1 HP JetDirect print server (EIO card)
2 Hard disk accessory (EIO card)
3 Memory DIMM, flash DIMM, or font DIMM
4 Duplex printing accessory (duplexer), for 2-sided printing
5 Stackable 500-sh eet paper tra y (maximum of tw o , as shown here ,
for a total input capacity of 1,600 sheets)
6 Envelope feeder
3
6
Note See the online user guide for information on ordering accessories.
1-16 Getting Started EN
Page 18
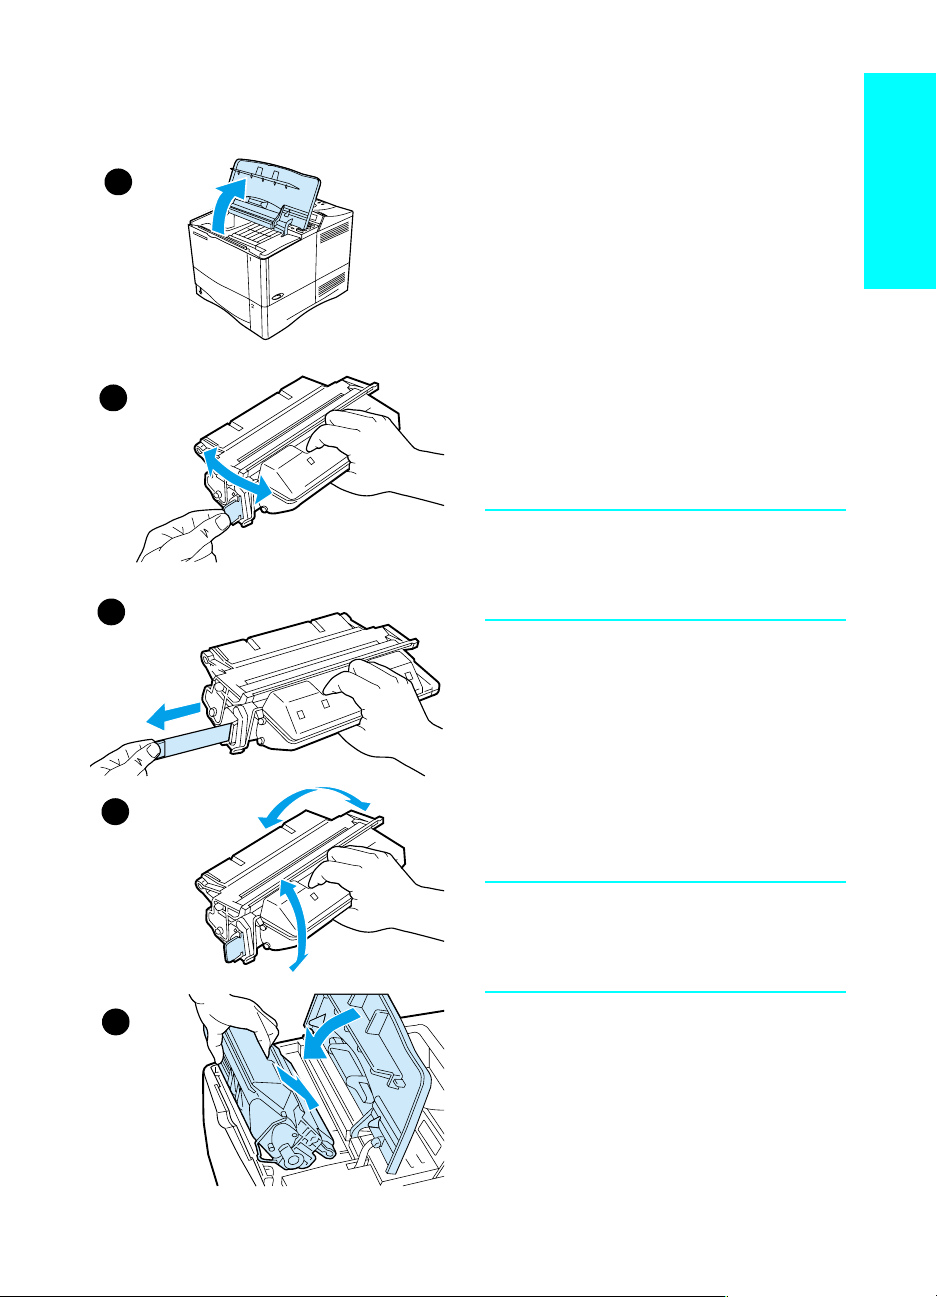
Step 6: Install the toner cartridge
1
2
3
4
1 Remove the toner cartridg e from it s
packaging (save packaging for
possible cartridge storage). Open
the printer by lifting the top cover.
2 Locate the sealing tape tab on the
end of the cartridge. Carefully bend
the tab back and forth until it
separates from the cartridge.
3 Firmly pull the tab straight out from
the toner cartridge to remove the
entire length of tape (56 cm, or 22
in). Avoid touching any black toner
on the tape.
Note
If the tab separates from the tape, grasp
the tape and pull it out of the toner
cartridge.
4 Gently shake the toner cartridge
when installing it for the first time.
5 Position the toner cartridge as
shown with the arrow pointing into
the printer. Slide the toner cartridge
into the printer as far as it will go.
If the toner cartridge is installed
correctly, the top cover will close easily.
English
Note
If toner gets on your clothing, wipe it off
with a dry cloth and wash clothing in cold
water. (Hot water sets toner into fabric.)
5
EN Step 6: Install the toner cartridge 1-17
Page 19
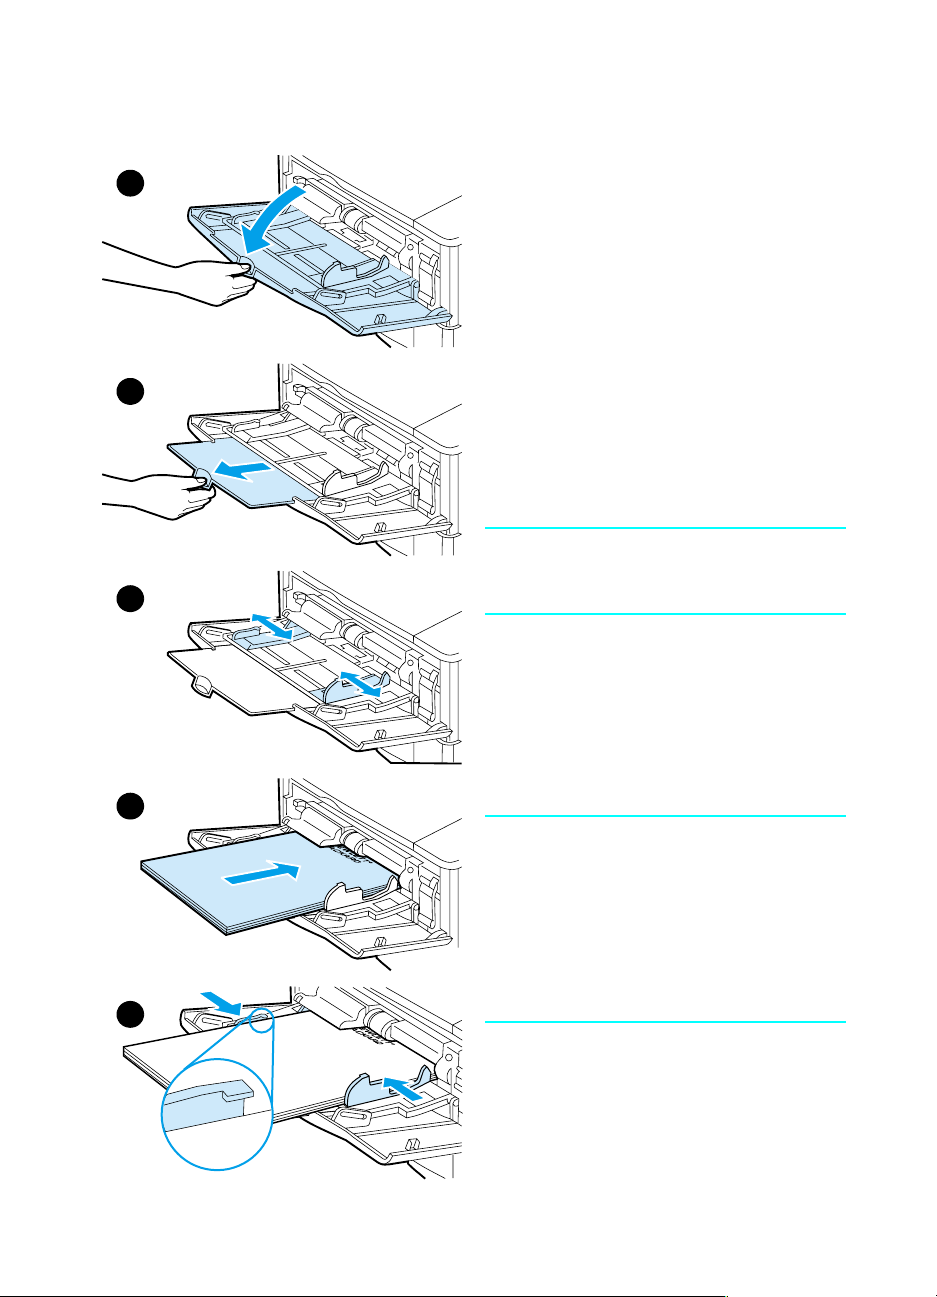
Step 7: Load trays
1
2
3
Loading tray 1
Tray 1 is a multi-purpose tray that holds
up to 100 sheets of paper, 10 env elopes ,
or 20 index cards. The printer’s default is
to pull paper from tray 1 first. See the
online user guide for information on how
to change this default.
Tray 1 provides a con venie nt wa y to print
envelopes, transparencies, custom-size
paper, or other types of media without
having to unload the other trays. It can
also be used just as a convenient
additional input tray.
Note
To avoid paper jams, do not load trays
while the printer is printing.
1 Open tray 1.
2 Pull out the tray extension.
3 Set the side guides to the desired
width.
4 Load paper in the tray.
4
Note
Make sure the paper fits under the tabs
on the guides and not above the load
level indicators.
Generally, load paper with the side to be
printed up, and the top, short edge
5
1-18 Getting Started EN
toward the printer.
5 Adjust the side guides so that they
lightly touch the paper stack but do
not bend the paper.
Page 20
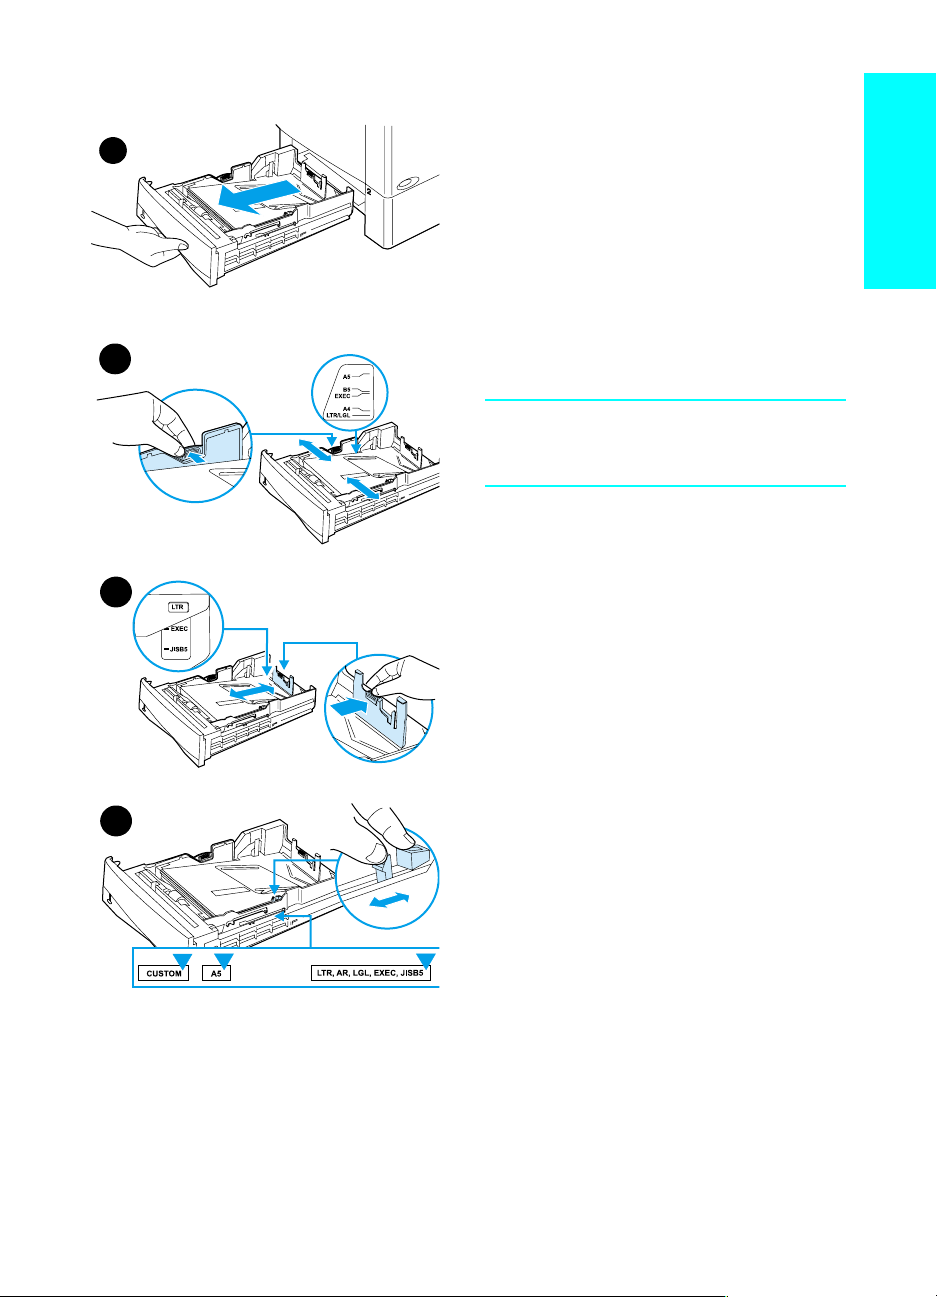
Loading trays 2, 3, and 4
1
2A
2B
Trays 2, 3, and 4 are 500-sheet paper
trays. Tray 3 is optional and comes with
the 4100TN and 4100DTN models. Tray
4 is an additional 500-sheet option.
The trays adjust for six standard siz es of
media, as well as for man y cust om siz es
(see the online user guide for details).
Three adjustments on the trays let the
printer sense the paper size that is
loaded.
Note
To avoid paper jams, do not load trays
while the printer is printing.
1 Pull the tray completely out of the
printer.
2 If the tray is not already set to the
desired paper size, you will need to
make up to three adjustments:
2A: To adjust the width, squeeze the
lever on the left guide and slide the
guides into place to match the width
of the paper.
English
2B: To adjust the length, squeeze
the leve r on the rear paper guide and
2C
EN Step 7: Load trays 1-19
slide it to the desired paper size until
it clicks into place. Standard sizes
are labeled. For A5-size paper, lift
the metal backstop near the center
of the tray.
2C: To make the third adjustment,
squeeze the blue tab located on the
right side of the tray and move it to
the correct position based on the
paper size required.
Continued on the next page.
Page 21

3 Load paper into the tray.
3
4 Make sure the paper is fl at in the tra y
at all four corners and below the
front and back tabs.
5 Slide the tray back into the printer.
Note
If the tray is not properly adjusted, the
printer might display an error message
4
or paper might jam.
5
1-20 Getting Started EN
Page 22

Step 8: Attach the power cord
1 Locate the power switch on the right
1
2
3
side of the printer. Make sure the
printer is switched off.
2 Connect the power cord to the
printer and a grounded power strip
or an AC outlet.
WARNING!
To prevent electric shock, connect the
power cord only to a grounde d outlet.
Only use the power cord that came with
the printer.
Note
If you have installed the optional
duplexer, it will need to be pulled
outward in order to connect th e power
cord. Push the duplexer back in before
switching the printer on.
English
3 Switch the printer on.
4 After the printer warms up, the
READY message should be visible on
the control panel display and the
READY light will remain on.
4
If the
READY message does not
READY
EN Step 8: Attach the power cord 1-21
appear, go to the problem-solving
chapter in the online user guide.
Page 23
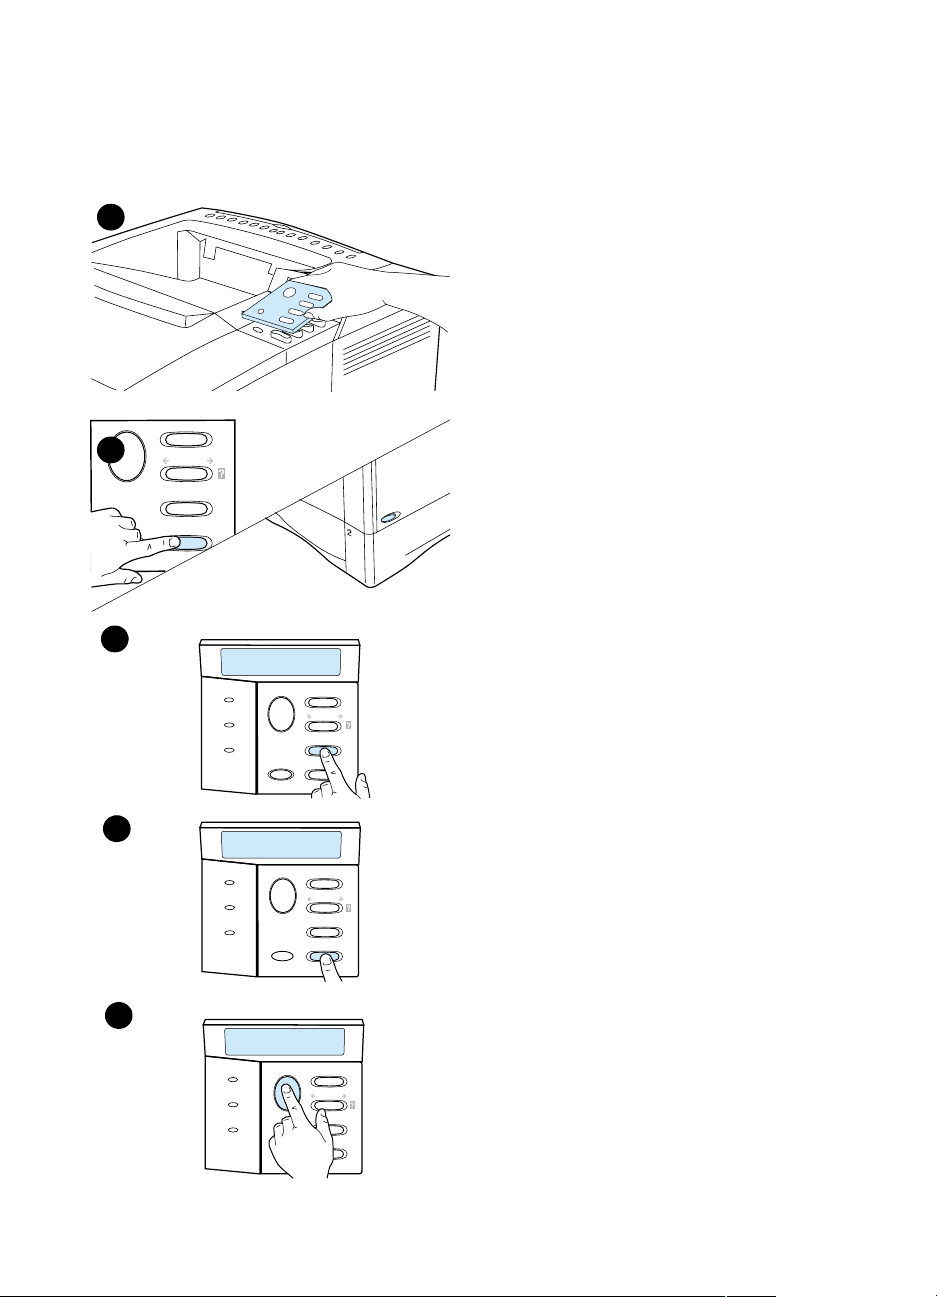
Step 9: Change the control panel language (optional)
2
3
4
Follow these ste ps to cha nge the con trol
panel language from English to a
language of your choice.
1 Turn the printer off.
2 If it is not already installed, place the
control panel overlay (translated to
your language) onto the control
panel and snap it into place.
3 Hold down S
the printer on until the message
SELECT LANGUAGE briefly appears in
the display. Then release SELECT.
After warming up, the printer
displays LANGUAGE=ENGLISH.
4 Press - V
available display languages.
5 Press S
language as the new default. An
asterisk appears in the r igh t si de of
the display.
6 Press G
display message.
ELECT while switching
ALUE + to scroll through the
ELECT to save your display
O to return to a READY
5
6
1-22 Getting Started EN
Page 24

Step 10: Test the printer
1
READY
network or computer, print a
configuration page to make sure the
English
printer is operating correctly.
1 Make sure the printer is on and the
READY message is displayed.
Before connecting the printer to a
2 Press M
ENU until the display reads
INFORMATION MENU.
2
INFORMATION
MENU
3 Press I
TEM until the display reads
PRINT CONFIGURATION PAGE.
4 Press S
ELECT to print.
5 Look at the configuration page to
see how the printer is configured.
Note
3
PRINT
CONFIGURATION
If an HP JetDirect print server is
installed, an HP JetDirect configuration
page will also print.
If the configuration page does not print
correctly, see the problem-solving
chapter in the online user guide.
4
PRINT
CONFIGURATION
5
EN Step 10: Test the printer 1-23
Page 25

Step 11: Connect printer cables
The printer includes several interface ports:
IEEE-1284 parallel
accessory port for optional paper handling accessories
Fast infrared (FIR)
Ethernet 10/100Base-TX (RJ-45)—standard on the HP LaserJet
4100N, 4100TN, and 4100DTN model printers
Note An EIO serial port is not included, but you can install an EIO card se rial
port. See the online user guide for ordering information.
Accessory port
FIR port
for some optional
paper handling
accessories (this
is not a serial port)
Parallel port
RJ-45 port
(if equipped) for
10/100Base-TX
1-24 Getting Started EN
Page 26

Connecting a parallel cable
1
Use the parallel port when directly
connecting the printer to a pers on a l
computer.
English
CAUTION
Make sure the printer is turned off bef ore
connecting the parallel cable.
Note
2
To ensure reliability, use an IEEE-1284
compliant parallel cable (these cables
are clearly marked with “IEEE-1284”).
Only IEEE-1284 cables support all of the
printer’s advanced features.
1 Connect the parallel cable to the
parallel port on the printer.
2 Snap the wire clips in place to
secure the cable to the printer.
The cable should install easily. If
installation is difficult, check the
cable orientation.
3 Connect the other end of the cable
to the parallel port on the computer.
EN Step 11: Connect printer cables 1-25
Page 27

Connecting to an Ethernet 10/100Base-TX
network
Use the RJ-45 port to con ne ct th e printer to an Ethernet
10/100Base-TX network.
CAUTION Make sure the printer is turned off befo re connecting to the RJ-45 port.
1 Connect a twisted-pair network cable to the RJ-45 port on the
HP JetDirect 610N print server card.
2 Connect the other end of the cable to the network.
Note For a successful link, eith er th e 10 or 100 LED at the p ort should turn
on when the printer is turned on. If the print server is unable to link to
the network, see the problem-solving chapter in the online user guide.
1-26 Getting Started EN
Page 28

Step 12: Install the printing software
The printer comes with printing software on a CD. The printer drivers
on this CD must be installed to take full advantage of the printer
features. If your computer does not have a CD drive, but you have
access to one, you can copy the drivers onto diskettes for installation
into your computer.
Depending on the configuration of Windows-driven computers, the
installation program for the printer software automatically checks the
computer for Internet access to obtain the latest software. The most
recent drivers are also available at http://www.hp.com/support/lj4100.
If you have questions, see “HP Customer Care” on page 1-35. For
more details, see the HP Customer Care Service and Support
information in the online user guide.
Note If the printing software does not allow installation on y our network, see
the HP JetDirect Print Server Administrator’s Guide.
After installation, software must be configured to use accessories
such as the duplexer, envelope feeder, and 500-sheet paper trays.
Installing Windows printing software
English
These installation instructions are for single users and network
administrators. Procedures for installing the software vary according
to operating system and network environment. Use the instructions
below that best match your system and environment.
Windows
The setup software detects both the version of Windows that you are
running and the language that is selected in your operating system.
The setup software then installs printer drivers and software that are
appropriate for your system.
For single users, inst all the software on the computer that is
connected to the printer.
For Novell NetWare or Microsoft® networks, run the printer
installation software. On NetWare networks, you will be able to
set up the appropriate queues on the NetWare server and HP
JetDirect print server. On IP networks, you can set up IP
configuration parameters.
For Windows NT 4.0 and Windows 2000 server networks, install
the software on the server, then share the printer.
EN Step 12: Install the printing software 1-27
Page 29

1 Single user: Log onto the computer that is connected to the
printer.
2 Network administrator: Depending on your environment, log
onto the network administrator workstation or onto t he server with
supervisor or administrative privileges.
Follow the steps below to install your printer software.
Windows 95, Windows 98, Windows NT 4.0, and
Windows 2000
1 Close all running applications.
2 Insert the CD into the CD drive.
Note If your computer is not configured to automatically start the CD, click
Start, and then Run. T ype D:\Setup.exe at the prompt and click OK.
3 Follow the instructions on the computer screen.
Windows 3.1x
Install both drivers and fonts from your CD.
1 Close all running applications.
2 Insert the CD into the CD drive.
3 From the Program Manager, select Main, select Control Panel,
select Printers, and then select Install.
4 Follow the instructions on the screen to add a printer.
5 To install fonts, locate the appropriate font installer on the CD for
your system and run it.
Note For latest or additional drivers, go to http://www.hp .com/support/lj4100
on the World Wide Web.
1-28 Getting Started EN
Page 30

Installing Macintosh printing software
On a Macintosh-compatible computer, the installation procedures are
the same for a network administrat or, a network client, and a single
user. Install the software on any computer that will be printing to the
printer.
Note If the computer is connected to the printer b y a LocalTalk (Printer Port)
or EtherNet connection, the AppleTalk (or Network) control panel must
be configured for the cor rect connection to communicate with the
printer.
The Macintosh partition on the CD contains an installer program for
each available language. Find the language that is appropriate for
your operating system, and then use the installer program for that
language.
1 Quit all open applications.
2 Insert the CD into the CD drive.
3 Double-click the Installer icon and follow the instructions on the
screen.
4 Open the Chooser from the Apple menu.
5 Click the Apple LaserWriter 8 icon. If the icon is not there,
contact your Macintosh dealer.
English
6 If you are on a network with m ultiple z ones , select the z one in t he
AppleTalk Zones box where the printer is located. If this is
unknown, ask your network administrator.
7 Double-click the desired printer. A Desktop Printer icon should
appear.
8 Close the Chooser by clicking the go-away (close) box in the
upper-left corner.
EN Step 12: Install the printing software 1-29
Page 31

Step 13: Verify printer setup
The easiest way to verify that the softw are installation has been
completed successfully is to print a document from a software
application.
1 Load a software application of your choice and open or create a
simple document.
2 Make sure the correct printer driver is selected.
3 Print the document.
If the document prints, installation is complete. If nothing printed, see
the problem-solving chapter in the online user guide.
1-30 Getting Started EN
Page 32

Step 14: Distribute software to network clients (optional)
Before a network client can print to the printer, the printing system
software must be installed on the client workstation. Rathe r than
distribute the contents of the CD to each client, you can place disk
images of the installation software onto a public directory. The
software’s Customization Utility allows you to copy disk images only
for Windows operating systems to a designated directory.
Creating disk images with the Installer’s
Customization Utility
1 Insert the CD into the CD drive.
Note If AutoPlay does not automatically begin the installer progr am, click
Start and then click Run. Type D:\Setup.exe at the prompt (this
assumes your CD drive is the D: drive).
2 When prompted to choose the method of installation, click
Customization Utility.
3 Select the language and operating system v ersions f or which y ou
want to create disk images, a nd then choose t he drivers y ou w ant
included in the disk images.
English
4 Assign a path to the drive and directory where you want to copy
the disk images.
5 Follow the instructions on the screen.
EN Step 14: Distribute software to network clients (o ptional) 1-31
Page 33

Step 15: Install the software for network clients (optional)
Before a client can print to the printer , the printing system software
must be installed on the client workstation. Procedures for installing
the software vary, depending on the operating system you are using.
Use the instructions below that apply to your operating system.
Windows
The procedures for in stalling end-use r software on client worksta tions
are similar to the installation procedures for network administrators.
1 Install the end-user software on client workstations by running
Setup.exe.
2 Follow the instructions on the screen.
Note To install the end-user software onto a Windows NT 4.0 or Windows
2000 workstation, you must have administrator privileges on that
workstation.
Guidelines:
Do not install the PCL driver or PostScript™ emulation driver(s)
onto Windows NT workstations when you install other end-user
software. Clear the PCL and PostScript Driver check boxes in
the Components list during the Custom I nstall. The driver(s) will
be installed from the server when you connect to the network
printer.
Users of a shared network v ersion of Windows can inst all only the
drivers that the network administrator installed during the netwo rk
administrator installation.
For a minimal install (driver only) in Windows 3.1x, install using
the operating system.
For a minimal install in Windows 9x, Windows NT 4.0, or
Windows 2000, use the Add Printer Wizard.
1-32 Getting Started EN
Page 34

Step 16: Access the user documentation
The CD also contains the online user guide, the HP JetDirect Print
Server Administrator’s Guide, the Adobe
English language, and the Fast Infrared Rec eiver User Guide. This
documentation can be viewed directly fro m the CD or loaded onto
your computer.
Note To view user documentation, your system must have Adobe Acrobat
Reader installed.
™
Acrobat Reader for the
Installing the Adobe Acrobat Reader from the
CD
Windows 95, Windows 98, Windows NT 4.0, or
Windows 2000
1 Double-click the CD drive icon from My Computer.
2 Double-click the English folder and then the Adobe folder.
Double-click the folder for your operating system and run the
executable. The English version of Acrobat Reader will be
installed onto your hard drive.
Windows 3.1x
English
1 From the Main Group Window, double-click File Manager, and
then double-click CD drive.
2 Double-click the English folder and then the Adobe folder.
Double-click the folder for your operating system and run the
executable. The English version of Acrobat Reader will be
installed onto your hard drive.
Note If you already have Adobe Acrobat Reader on your operating system
and would like the newest version, or if you need a v er sion oth er than
English, go to http://www.adobe.com on the World Wide Web.
EN Step 16: Access the user documentation 1-33
Page 35

Viewing the user documentation from the CD
Windows 95, Windows 98, Windows NT 4.0, or
Windows 2000
1 Insert the CD into the CD drive.
Note If AutoPlay does not automatically begin the installer progr am, click
Start and then click Run. Type D:\Setup.exe at the prompt (this
assumes your CD drive is the D: drive).
2 Click Documentation.
Windows 3.1x
1 From the Main Group Window, double-click File Manager, and
then double-click CD drive.
2 Double-click the preferred language.
3 Select the appropriate documentation folder.
4 Double-click the document to view.
1-34 Getting Started EN
Page 36

HP Customer Care
Your HP LaserJet 4100 printer sets the standard for qualit y and
reliability. Your purchase is backed by HP Customer Care,
outstanding service, support, and online training.
Find product support on the W orld Wide Web
The web is a great place to learn more about the HP LaserJet 4100
printer. With just a few quick clicks, you will find updated software,
tools, training material, and technical solutions. This service is
available 24 hours a day, 7 days a week, free of charge. Find us on
the World Wide Web at http://www.hp.com/support/lj4100.
Get answers through e-mail
English
Get one-to-one assistance. Sen d your e -mail questions b y visiting our
website at http://www.hp.com/support/lj4100.
Tools and documentation
We have designed a variety of informative tools to assist you with
training and troubleshooting. You can locate these tools at
http://www.hp . com/support/lj4100. From there, you can:
use our “Troubleshooting Trees” to resolve questions or problems
with printer operation
download interactive training material, the latest versions of the
printer manuals, or product data sheets
use the virtual prod u ct to learn about the printer from the inside
out
EN Find product support on the World Wide Web 1-35
Page 37

Connect with other users online
Go online to http://www.hp.com/support/lj4100, anytime, and you'll
find other users with great ideas and suggestions for using your HP
LaserJet 4100 printer at our online HP LaserJet 4100 printer user
forum.
We stay in touch
When you sign up for Subscription Services, we will send you e-mail
about topics of your choice, such as updated software, product
announcements, and other impo rtant news about your HP LaserJet
4100 printer. Sign up online at http://www.hp.com/support/lj4100.
Web registration
Save yourself the time, trouble, and postage of filling out the
registration card. Simply log on to http://www.hp.com/support/lj4100
and complete your registratio n electronically. Using a simple form and
step-by-step instructions, you can register your product within
minutes. HP can inform you of product news, software updates, and
other enhancements.
HP SupportPack
HP SupportPack is a packaged service agreement that upgrades
your basic HP LaserJet product warranty (1 year), and extends
coverage to 5 years.
The HP SupportPacks are sold by HP resellers and are available in
either a shrink-wrap version for a 3-year service package only (you
must register with HP to activa te service) or an electronic version f or a
1-, 2-, 3-, 4-, or 5-year service package (you can register by fax or on
the World Wide Web).
For ordering and pricing details, contact y ou r local HP reseller or visit
our web site at http://www.hp.com/go/printerservices for more
information.
1-36 HP Customer Care EN
Page 38

Talk to a technical support agent
Call your local Customer Care Center to speak directly with a suppo rt
agent who specializes in the HP LaserJet 4100 printer. Refer to the
“Service and Support” chapter in the online user guide to find the
phone number of the HP Customer Care Cent er nearest y ou. Be sure
to have your product serial number ready before making the phone
call.
Your product serial number is located on the inside top cover of the
printer (example: USAB123456). Record your product serial number
below for future reference and easy access.
Serial Number: _______________________________
English
EN Talk to a technical support agent 1-37
Page 39

1-38 HP Customer Care EN
Page 40

Quick Reference
This section of the guide contains tips and quick in formation on how
to use the printer. See “Wher e to look for information” on page 1-6 for
additional sources of information.
Control panel
11
10
1
READY
Ready
Data
9
Attention
Go
Cancel
Job
Menu
Item
– Value +
Select
8
2
3
4
5
6
7
English
1 Displays printer messages
2 Places the printer online or offline, resumes printing, and exits
menus
3 Cycles through menus
4 Displays available help messages
5 Cycles through items in a selected menu
6 Cycles through values in a selected menu item
7 Saves the control panel setting you have selected
8 Cancels the current print job
9 Lights when action is required (when lit, see the displa y m essage)
10 Lights when the printer is processing information (when lit, see
the display message)
11 Lights when the printer is online and ready to print
EN Control panel 1-39
Page 41

Using the printer Help system
This printer features an online help system on the control panel that
provides instructions for resolving most printer errors. Certain control
panel messages alternate with instructions on accessing the online
help system.
Whenever a [?] appears in an error message or the message
alternates with
the I
TEM key to navigate through a sequence of instructions.
FOR HELP PRESS THE ? KEY, press the right side of
Note To exit the online help system, press either GO or SELECT.
Changing a control panel setting
Some menus and items are available only when certain accessories
are installed or when certain features are activated. You can print a
menu map at the printer using the steps on on page 1-41.
1 Press M
2 Press I
3 Press – V
4 Press S
ENU until the desired menu appears.
TEM until the desired item appears.
ALUE + until the desired setting appears.
ELECT to save the selection. An asterisk (*) appears
beside the new setting.
5 Press G
O to exit the menu.
1-40 Quick Reference EN
Page 42

Checking the printer configuration
From the printer, you can print the following inf ormation pages , which
give details about the printer and its configuration:
Menu map
Configuration page
PCL or PS font list
Supplies status page
To print a menu map
1 Press MENU until INFORMATION MENU appears.
English
2 Press I
3 Press S
TEM until PRINT MENU MAP appears.
ELECT to print the menu map.
To print a configuration page
1 Press MENU until INFORMATION MENU appears.
2 Press I
3 Press S
TEM until PRINT CONFIGURATION appears.
ELECT to print the configuration page.
To print a PCL or PS font list
1 Press MENU until INFORMATION MENU appears.
2 Press I
TEM until PRINT PCL FONT LIST or PRINT PS FONT LIST
appears.
3 Press S
ELECT to print the font list.
To print a supplies status page
1 Press MENU until INFORMATION MENU appears.
2 Press I
3 Press S
TEM until PRINT SUPPLIES STATUS PAGE appears.
ELECT to print the page.
EN Control panel 1-41
Page 43

Common printer messages
This table includes some of the most co mmon printer messages . See
the online user guide for a more complete list.
Common printer messages
Message Explanation
ACCESS DENIED
MENUS LOCKED
BAD DUPLEXER
CONNECTION
BAD ENV FEEDER
CONNECTION
BAD OPT TRAY
CONNECTION
CANNOT DUPLEX
CLOSE REAR BIN
CHECK INPUT
DEVICE
alternates with
PAPER PATH OPEN
PLEASE CLOSE IT
The printer control panel function you are trying to access has been
locked to prevent unauthorized access.
See your network administrator.
The duplexer is not properly connected to the printer.
Ensure that the right-angle power cord that shipped with the printer
is being used.
Try removing and reinstalling the duplexer. Then turn the printer off
and back on.
The envelope feeder is not connected properly to the printer.
Try removing and reinstalling the envelope feeder. Then turn the
printer off and back on.
There is a problem with an optional 500-sheet paper tray connection
with the printer:
• the tray is not connected properly
• more than two optional 500-sheet paper trays hav e been installed
(the printer cannot support more than four trays total)
• the electronics in the paper tray are faulty
Try removing and reinstalling the paper tray. Then turn the printer off
and back on.
The printer cannot duplex because the rear output bin is open.
Close the rear output bin.
The optional input tray cannot feed paper to the printer because a
door or paper guide is open.
Check the doors and paper guides and close any that are open.
CHECK OUTPUT
DEVICE
alternates with
The optional output device is not properly connected to the printer. A
proper connection must be made for printing to continue.
CLOSE OUTPUT
DELIVERY PATH
CHECKING PAPER
PATH
The engine is checking for possible paper jams or paper that was not
cleared from the printer.
1-42 Quick Reference EN
Page 44

Common printer messages (continued)
Message Explanation
CLOSE TOP COVER
ENV FEEDER LOAD
[TYPE] [SIZE]
ENVELOPE FEEDER
SIZE = [xxxxx]
ENVELOPE FEEDER
TYPE = [xxxxx]
The top cover is open and must be closed for printing to continue.
A job has been sent to the envelope feeder and it is empty.
Load the correct size and type in the feeder. Pressing GO will prompt
a question asking if you would rather print on another available size
of envelop e in th e printer. Press -VALUE+ to scroll through the
available types and size s; pr ess SELECT to accept an alternate type
or size.
Make sure the envelope size and type are set correctly from the P aper
Handling Menu in the printer control panel (see the description of the
Paper Handling Menu in the online user guide).
The printer is asking what size of envelopes has been loaded in the
envelope feeder. In response, you can take either of the following
actions:
• press SELECT to accept the current envelope size
• press -VALUE+ to change the size and then press SELECT to accept
the new size
If you do not press any buttons, the message disappears in about 1
minute.
Note
Changing the size here changes the default for envelope size in the
envelope feeder in the Paper Handling Menu (see the description of
the Paper Handling Menu in the online user guide).
The printer has received a job under the following conditions:
• the env elope type requested by the job is not available in the printer
• envelopes have just been placed in the envelope feeder (thus
triggering the paper sensor)
You can take either of the following actions:
• press SELECT to accept the paper type and then press GO
• press +VALUE- to change the type, press SELECT to accept the new
type, and then press GO to continue
English
INPUT DEVICE
CONDITION
[xx.yy]
INSTALL TONER
CARTRIDGE
EN Control panel 1-43
An input paper handling device has a condition that needs attention
before printing can resume.
Turn the printer off.
Disconnect the cable to the input paper handling devices and then
reconnect it.
Turn the printer on.
See the documentation that came with the paper handling device for
assistance.
The toner cartridge has been removed and must be reinstalled for
printing to continue.
Page 45

Common printer messages (continued)
Message Explanation
INSTALL TRAY [x]
MANUALLY FEED
[TYPE] [SIZE]
NON HP TONER
DETECTED
alternates with
PRESS GO TO
CONTINUE
OFFLINE
OUTPUT BIN FULL
alternates with
CLEAR PAPER FROM
[BINNAME ]
PAPER WRAPPED
AROUND FUSER
PERFORM PRINTER
MAINTENANCE
The specified tray is not installed and must be inserted and closed
for printing to continue.
Load the requested paper into tray 1.
Press GO if the desired paper is already loaded in tray 1.
The printer has detected that the toner cartridge is not a genuine HP
toner cartridge. If you belie ve you purchased an HP toner cartridge,
call the HP fraud hotline (1-877-219-3183, toll-free in North America).
Any printer repair required as a result of using non-HP toner is not
covered under the printer warranty.
Press GO to place the printer online.
The output bin is full and needs to be emptied.
Turn the printer off to keep the paper from wrapping more firmly
around the fuser. Open the top cover and remov e the toner cartridge.
Remove all visible paper . If you cannot locate the paper, lea ve printer
turned off and remove the fuser to remove paper (see the online user
guide for steps to clear fuser jams).
To ensure optimum print quality, the printer prompts you to perform
routine maintenance every 200,000 pages (see the online user guide
for information on printer maintenance).
PROCESSING AUTO
CLEANING PAGE
PROCESSING
CLEANING PAGE
TONER LOW
The printer is conducting the auto cleaning page process. This can
take up to 2.5 minutes.
The printer is conducting the manual cleaning page process. This can
take up to 2.5 minutes.
The message first appears when about 15% of the toner is remaining
the toner cartridge (about 1,500 pages remaining for the 10,000-page
cartridge and ab out 900 pages remaining for the 6,000-page
cartridge at 5% coverage). Depending on how the printer has been
configured, it will either continue to print or stop.
If the printer has stopped, you can resume printing by pressing GO
for each job.
Y ou might want to ensure that you ha ve a replacement toner cartridge
on hand.
See the online user guide for information on how to configure the
printer’s response to toner messages.
1-44 Quick Reference EN
Page 46

Common printer messages (continued)
Message Explanation
TONER OUT
TRAY [x] EMPTY
[TYPE] [SIZE]
TRAY 1 LOAD
[TYPE] [SIZE]
The toner cartridge has run out of toner. Depending on how the printer
has been configured, it will either continue to print or stop.
If the printer has stopped, you can resume printing by pressing GO
for each job.
Replace the toner cartridge.
See the online user guide for information on how to configure the
printer’s response to toner messages.
Load paper in the empty tray (x) to clear the message.
If you do not load the specified tray, the printer will continue printing
from the next tray with the same paper size, and the message will
continue to appear.
This message occurs for the following reasons:
• tray 1 was requested from the application, but the tray is empty
• the printer cannot find the requested size of paper in the printer
If the correct paper size is loaded, the adjustments to the tray have
not been set correctly , either in the control panel or on the tra y itself.
To set adjustments on the tray, see “Loading tray 1” on page 1-49.
Load the requested paper into tray 1, or press SELECT to override the
message and print on a loaded paper size.
If printing does not continue, press GO.
If you are trying to print A4- or letter-size paper and this message
appears, make sure the default paper size is set correctly from the
Printing Menu in the printer control panel and also in the software
program (see the description of the Printing Menu in the online user
guide).
Press GO to print from the next available tray.
Press -VALUE+ to scroll through the available types and sizes.
Press SELECT to accept the alternate type or size.
English
EN Control panel 1-45
Page 47

Common printer messages (continued)
Message Explanation
TRAY [x] LOAD
[TYPE] [SIZE]
where x is tray 2, 3,
or 4
TRAY 1 SIZE =
[xxxx]
This message occurs for the following reasons:
• tray 2, 3, or 4 was requested, but the tray is empty
• tray 2, 3, or 4 was requested, but the adjustments are not set for
the requested type of size
Make sure that all three paper size adjustments have been made (see
the explanation of adjustments in “Loading trays 2, 3, and 4” on page
1-50). Also make sure that the type has been set at the control panel
(see the description of the Paper Handling Menu in the online user
guide).
Load the requested paper into an indicated tray, or press SELECT to
override the message and print on a loaded paper size.
If printing does not continue, press GO.
If you are trying to print A4- or letter-size paper and this message
appears, make sure the default paper size is set correctly from the
Printing Menu in the printer control panel and also in the software
program (see the description of the Printing Menu in the online user
guide).
Press GO to print from the next available tray.
Press -VALUE+ to scroll through the available types and sizes.
Press SELECT to accept the alternate type or size.
The printer is asking what size of paper has been loaded in tray 1. In
response, you can take either of the following actions:
• press SELECT to accept the paper size
• press -VALUE+ to change the size and then press SELECT to accept
the new size
The printer will first display the TRAY 1 TYPE =xxxx message (see
the description of that message). If you do not press any buttons in
the timeout period (about 1 minute), it displays this TRAY 1
SIZE=xxxx
Note
Changing the size here changes the default for tray 1 paper size in
the Paper Handling Menu (see the description of the Paper Handling
Menu in the online user guide).
message.
1-46 Quick Reference EN
Page 48

Common printer messages (continued)
Message Explanation
TRAY 1 TYPE =
[xxxx]
USE [TYPE]
[SIZE] INSTEAD?
xx.yy
PRINTER ERROR
PRESS GO TO
CONTINUE
The printer has received a job under the three following conditions:
• the paper type requested by the job is not available in the printer
• tray 1 has been set for CASSETTE
• paper has been placed in tray 1 (thus triggering tray 1’s paper
sensor)
If you do not press any buttons, the message disappears in about 1
minute). You can take either of the following actions:
• press SELECT to accept the paper type
• press -VALUE+ to change the type and then press SELECT to accept
the new type
Note
Changing the type here changes the default for tray 1 paper type in
the Paper Handling Menu (see the description of the Paper Handling
Menu in the online user guide).
If you do not do anything during the timeout period (about 1 minute),
the printer will print on the paper in tray 1. It will also change the default
for tray 1 paper type in the P aper Handling Menu to the type requested
by the application that sent the job.
If the requested paper size or type is not available, the printer asks if
it should use another paper size or type instead.
Press -VALUE+ to scroll through the available types and sizes. Press
SELECT to accept the alternate type or size.
A printer error has occurred that can be cleared by pressing GO in
the printer control panel.
English
13.x PAPER JAM
[LOCATION]
EN Control panel 1-47
Paper has either jammed in the printer or has been caught in a
paper tray.
1. Open the top cover or tray indicated by the message.
2. Clear all paper from the area. If necessary, remove
the toner cartridge, duplexer, or paper trays.
3. If the message persists, check for paper in all other
areas.
Caution
Ensure that all jammed paper is removed before closing the cov er or
tray. Open and close the top cover to clear the message. See “P aper
jams” on page 1-52 for more detailed information.
Page 49

Common printer messages (continued)
Message Explanation
41.3 UNEXPECTED
PAPER SIZE
alternates with
EXPECTED
[TYPE] [SIZE]
41.x
PRINTER ERROR
alternates with
PRESS GO TO
CONTINUE
54.1 REMOVE
SEALING TAPE
alternates with
FROM TONER
CARTRIDGE
The printer detected a paper size different than what it was expecting.
This is typically caused if two or more sheets stick together in the
printer or if the paper tray is not properly adjusted.
Reload the tray with the correct paper size.
Ensure that paper in the tray is loaded under the front and back tabs.
If you are printing from tray 1, verify that the correct paper size is
selected in the control panel (see the description of the Paper
Handling Menu in the online user guide).
If you are printing from tray 2, 3, or 4, verify that the three paper size
adjustments on the paper tray have been made correctly (see the
description of adjustments in “Loading trays 2, 3, and 4” on page 1-
19).
After performing the actions above, press GO. The page containing
the error will automatically be reprinted if jam recovery is enabled.
(Or, you might want to press CANCEL JOB to clear the job from the
printer’s memory.)
A temporary printing error occurred.
Press GO. The page containing the error will automatically be
reprinted if jam recovery is enabled.
If the error does not clear, turn the printer off, then turn the printer on.
The toner cartridge has been installed without removing the sealing
tape.
Open the top cover and remove the toner cartridge. Pull the sealing
tape tab to remove the strip. Reinstall the toner cartridge and close
the top cover.
1-48 Quick Reference EN
Page 50

Printing tasks
See the online user guide for complet e inf ormation about load ing and
orienting paper for duplexing.
Loading tray 1
English
Note To avoid paper
1
2
jams, do not load
trays while the
printer is printing.
Letterhead/prepunched
3
4
5
Transparencies
Envelopes
Card stock/custom sizes
Labels
EN Printing tasks 1-49
Page 51

Loading trays 2, 3, and 4
Note Trays 2, 3, and 4 are 500-sheet paper trays. Tray 3 is optional and
comes with the 4100TN and 4100DTN models only. Tray 4 is an
additional 500-sheet option.
The trays adjust for six standard sizes of media as well as for many
custom sizes. See the online user guide for details.
1
2
5
Note Make sure paper is
under the front and
back tabs to avoid
paper jams.
6
3
7
4
1-50 Quick Reference EN
Page 52

Loading envelopes in the envelope feeder
1
2
3
Selecting the output bin
Top
output
bin
4
English
5
Rear
output
bin
Use the top output bin when
printing the following:
most typical print jobs
transparencies
EN Printing tasks 1-51
Opening the rear output bin might
improve results with the following:
envelopes
labels
small custom-size paper
postcards
heavy paper
Page 53

Paper jams
Locations
Back
1 Top cover and toner cartridge area
2 Optional envelope feeder
3 Input tray areas
4 Optional duplexer
5 Output areas (top and rear)
6 Fuser area
5 1 2
4
6
Front
3
1-52 Quick Reference EN
Page 54

Clearing top cover and toner cartridge areas
1
5
English
2
3
4
6
7
EN Paper jams 1-53
Page 55

Clearing the optional envelope feeder
1
2
3
Clearing input tray areas
Trays 2, 3, and 4
4
5
1
2
1-54 Quick Reference EN
3
4
Page 56

Clearing the optional duplexer
1
5
English
2
3
4
6
7
8
Clearing output areas
31
2
EN Paper jams 1-55
4
Page 57

Clearing the fuser area
Use this procedure when paper has jammed inside the printer and
cannot otherwise be removed, or when a page has torn while you
were trying to clear a jam from the fuser.
1
2
3
4
7
8
9
10
5
6
1-56 Quick Reference EN
11
Page 58

Solving repeated paper jams
Check all the paper jam locations (see “Pape r jams” on page 1-
52). A piece of paper might be stuck so mewhere in the printer.
Even a small torn piece of paper in the printe r pa th can caus e
repeated jams.
If using a duplexer, check all areas (including under the duplexer).
Check that paper is correctly loaded in the trays, that all three
adjustments have been made, and that the trays are not
overfilled. M ake sure paper is under the front and back tabs. See
the sections on loading paper (pages 1-18 and 1-19).
Check that all trays and paper handling accessories are
completely inserte d int o the printer. (If a tray is opene d du ring a
print job, this might cause a paper jam.)
Check that all covers and doors are closed. (If a cover or door is
opened during a print job, this might cause a paper jam.)
Try printing to a different output bin.
The sheets might be sticking together. Try bending the stack to
separate each sheet. Do not fan the stack.
If you are printing from tray 1, try reducing the size of the stack.
If printing from the envelope feeder, make sure it is loaded
correctly , pushing the bottom en velopes in slightly farther than the
top envelopes.
If you are printing small sizes, feed paper short edge first.
Turn over the stack of paper in the tr a y. Also try rotating the paper
180°.
Check the characteristics of the media you are using. Use only
paper that meets HP specifications (see the online user guide for
paper specifications). Try using different paper to see if the
problem goes away. Do not use curled, deformed, damaged, or
irregular paper.
Avoid using paper that has already been used in a printer or
copier.
Do not print on both sides of envelopes or transparencies.
Print only on full sheets of labels and do not print on both sides of
label sheets.
Check that the power supplied to the printer is steady and meets
printer specifications (see the online user guide for printer
specifications).
Clean the printer (see the online user guide procedures).
Perform preventative printer maintenance if maintenance is due
(see the online user guide for details).
English
EN Paper jams 1-57
Page 59

Correcting output quality problems
This section of the manual helps you define p rint quality problems
and what to do to correct them. Often output quality problems can be
handled quite easily by making sure that your printer is properly
maintained, using media that meets HP specifications, or running a
cleaning page.
Use the examples in the image defect table starting on this page to
determine which output quality problem you ar e experiencing, then
see the corresponding reference pages to troubleshoot. These
examples consist of the most common methods to remedy print
quality problems. If you still have problems after trying the suggested
remedies, see “HP Customer Care” on page 1-35.
Note The examples belo w d epict lette r-siz e paper that has passed throu gh
the printer short-edge first.
Image defect table
See “Light print
(partial page)” on
page 1-60
See “Dropouts”
on page 1-61
See “Light print (entire
page)” on page 1-60
See “Dropouts” on
page 1-61
See “Specks”
on page 1-60
See “Dropouts” on
page 1-61
See “Specks”
on page 1-60
See “Lines”
on page 1-61
1-58 Quick Reference EN
Page 60

Image defect table (continued)
English
See “Gray
background”
on page 1-62
See “Repeating
image” on page 1-64
See “Toner smear” on
page 1-62
See “Misformed
characters”
on page 1-64
See “Loose toner” on
page 1-63
See “Page skew” on
page 1-64
See “Repeating
defects” on page 1-63
See “Curl or wave” on
page 1-65
See “Wrinkles or
creases” on page 1-65
EN Correcting output quality problems 1-59
See “Vertical white
lines” on page 1-65
See “Tire tracks” on
page 1-66
See “White spots on
black” on page 1-66
Page 61

Light print (partial page)
1 The toner cartridge might be low. Replace the toner cartridge.
2 Maintenance might be due. Check this by printing a copy of the
supplies status page (see the online user guide). If maintenance
is due, order and install the printer maintenance kit (see the
online user guide).
3 The toner cartridge might be almost empty. Replace the toner
cartridge.
Light print (entire page)
1 At the printer control panel, use the Print Quality Menu to turn
EconoMode off (see the online user guide for details).
2 At the printer control panel, use the Print Quality Menu to
increase the toner density setting (see the online user guide for
details).
3 Try using a different type of paper.
4 The toner cartridge might be almost empty. Replace the toner
cartridge.
Specks
Specks might appear on a page after a jam has been cleared.
1 Print a few more pages to see if the problem corrects itself.
2 If specks occur frequen tly, set your printer up to a utomatically run
a cleaning page (see the online user guide for details).
3 Clean the inside of the printer and run a man ual clea ning page to
clean the fuser (see the online user guide for cleaning details).
4 Try using a different type of paper.
5 Check for toner cartridge leaks. If the toner cartridge is leaking,
replace it.
1-60 Quick Reference EN
Page 62

Dropouts
1 Make sure that the environmental specif ications for the printer are
being met (see the online user guide for printer specificat ion s) .
2 If the paper is rough and the toner easily r ub s of f, either try
changing the fuser mode to High 1 or High 2 ( s ee t he de scriptio n
of the Paper Handling Me nu in the o nline user guide), or try using
a smoother paper.
3 Try changing to a different paper type.
Lines
English
1 Print a few more pages to see if the problem corrects itself.
2 Clean the inside of the printer and run a man ual clea ning page to
clean the fuser (see the online user guide for cleaning
procedures).
3 Replace the toner cartridge.
4 Maintenance might be due. Check this by printing a copy of the
supplies status page. If maintenance is due, order and install the
printer maintenance kit (see the on lin e use r guide for details).
EN Correcting output quality problems 1-61
Page 63

Gray background
1 Do not use paper that has already been run through the printer.
2 Print a few more pages to see if the problem corrects itself.
3 Turn over the stack of paper in the tra y. Also, try rotating the paper
°.
180
4 At the printer control panel, use the Print Quality Menu to
decrease the toner density setting (see the online user guide for
details).
5 Make sure that the environmental specif ications for the printer are
being met (see the online user guide for printer specificat ion s) .
6 Replace the toner cartridge.
Toner smear
See also “Loose toner” on page 1-63.
1 Print a few more pages to see if the problem corrects itself.
2 Try using a different type of paper.
3 Make sure that the environmental specif ications for the printer are
being met (see the online user guide for printer specificat ion s) .
4 Clean the inside of the printer and run a man ual clea ning page to
clean the fuser (see the online user guide for cleaning
procedures).
5 Maintenance might be due. Check this by printing a copy of the
supplies status page. If maintenance is due, order and install the
printer maintenance kit (see the on lin e use r guide for details).
6 Replace the toner cartridge.
1-62 Quick Reference EN
Page 64

Loose toner
Loose toner , in this cont e xt , is defined as t oner that can be rubbed o ff
the page.
1 If paper is heavy or rough, try using a high fuser mode so that
toner fuses more completely onto the paper. At the printer control
panel, use the CONFIGURE FUSER MODE MENU item on the
Paper Handling Men u to do this (see the online user guide for
details).
2 If you have observed a rougher texture on one side of your paper,
try printing on the non-rough side.
3 Make sure that the environmental specif ications for the printer are
being met (see the online user guide for printer specificat ion s) .
4 Make sure that paper type and quality meet HP specifications
(see the online user guide for paper specifications).
5 Maintenance might be due. Check this by printing a copy of the
supplies status page. If maintenance is due, order and install the
printer maintenance kit (see the on lin e use r guide for details).
Repeating defects
English
See also “Repeating image” on page 1-64.
1 Print a few more pages to see if the problem corrects itself.
2 If the distance between defects is 38 mm (1.5 in) or 94 mm
(3.76 in), the toner cartridge might need to be replaced.
3 Clean the inside of the printer and run a man ual clea ning page to
clean the fuser (see the online user guide for cleaning
procedures).
4 Maintenance might be due. Check this by printing a copy of the
supplies status page. If maintenance is due, order and install the
printer maintenance kit (see the on lin e use r guide for details).
EN Correcting output quality problems 1-63
Page 65

Repeating image
This type of defect might occur when using preprinted forms or a
large quantity of narrow media.
1 Print a few more pages to see if the problem corrects itself.
2 Make sure that paper type and quality meet HP specifications
(see the online user guide for paper specifications).
3 If you observe that this type of defect occurs on wide paper (such
as letter- or A4-size paper) just after printing on narrow media
(such as envelopes), you can set SMALL PAPER SPEED on the
Paper Handling Menu to SLOW (see the online user guide for
details). Note that this will slow down printing.
4 Maintenance might be due. Check this by printing a copy of the
supplies status page. If maintenance is due, order and install the
printer maintenance kit (see the on lin e use r guide for details).
Misformed characters
1 Print a few more pages to see if the problem corrects itself.
2 Make sure that the environmental specif ications for the printer are
being met (see the online user guide for printer specificat ion s) .
3 Maintenance might be due. Check this by printing a copy of the
supplies status page. If maintenance is due, order and install the
printer maintenance kit (see the on lin e use r guide for details).
Page skew
1 Print a few more pages to see if the problem corrects itself.
2 Verify that there are no torn pieces of paper inside the printer.
3 Make sure that paper is loaded correctly, all adjustments have
been made, and the paper is u nder the corner tabs (s ee “Loading
tray 1” on page 1-49 and “Loading trays 2, 3, and 4” on page 1-
50).
4 Turn over the stack of paper in the tray or rotate the paper 180
5 Make sure that paper type and quality meet HP specifications
(see the online user guide for paper specifications).
6 Make sure that the environmental specif ications for the printer are
being met (see the online user guide for printer specificat ion s) .
1-64 Quick Reference EN
°.
Page 66

Curl or wave
1 Turn over the stack of paper in the tra y. Also, try rotating the paper
180
°.
2 Make sure that paper type and quality meet HP specifications
(see the online user guide for paper specifications).
3 Make sure that the environmental specif ications for the printer are
being met (see the online user guide for printer specificat ion s) .
4 Try printing to a different output bin.
5 If media is lightweight and smooth, try using a low fuser mode to
reduce the heat in the fusing process. At the printer contro l panel,
use the
Handling Menu to do this (see the online user guide for details).
CONFIGURE FUSER MODE MENU item on the Paper
Wrinkles or creases
1 Print a few more pages to see if the problem corrects itself.
2 Make sure that the environmental specif ications for the printer are
being met (see the online user guide for printer specificat ion s) .
3 Turn over the stack of paper in the tra y. Also, try rotating the paper
180
°.
English
4 Make sure that paper is loaded correctly, all adjustments have
been made, and the paper is u nder the corner tabs (s ee “Loading
tray 1” on page 1-18 and “Loading trays 2, 3, and 4” on page 1-
19).
5 Make sure that paper type and quality meet HP specifications
(see the online user guide for paper specifications).
6 If envelopes are creasing, try storing envelopes so that they lie
flat.
Vertical white lines
1 Print a few more pages to see if the problem corrects itself.
2 Make sure that paper type and quality meet HP specifications
(see the online user guide for paper specifications).
3 Replace the toner cartridge.
EN Correcting output quality problems 1-65
Page 67

Tire tracks
This defect typically occurs wh en the toner cartridge has far
exceeded its rated usage of 10,000 pages (for example, printing a
very large quantity of pages with very little toner coverage).
1 Replace the toner cartridge.
2 Reduce the number of pages that you print with very low toner
coverage.
3 Use the 6,000-page cartridge if you cannot reduce the n umbe r of
pages with very little toner coverage (part number C8061A).
White spots on black
1 Print a few more pages to see if the problem corrects itself.
2 Make sure that paper type and quality meet HP specifications
(see the online user guide for paper specifications).
3 Make sure that the environmental specif ications for the printer are
being met (see the online user guide for printer specificat ion s) .
4 Replace the toner cartridge.
1-66 Quick Reference EN
Page 68

About the toner cartridge
Cartridge interaction (shaking)
When you install a toner cartridge for the first time, gently shake it
from side to side to distribute the toner evenly inside the cartridge.
Due to new cartridge design, this is the only time you will need to
shake the cartridge.
Checking the toner level
You can check the toner level by printing a supplies status page from
the printer control panel.
1 Press M
appears.
2 Press I
3 Press S
ENU on the printer control panel until INFORMATION MENU
TEM until PRINT SUPPLIES STATUS PAGE appears.
ELECT to print the supplies status page.
Cartridge authentication
The printer will let you know that a cartridge is not a genuine HP toner
cartridge when you insert it in the printer. If you insert a used HP
cartridge from another HP printer, the printer can take up to 20
printed pages to receive the message authenticating that the
cartridge is a genuine HP part.
If the printer control panel message states that this is not a genuine
HP toner cartridge and you believe you purchased an HP cartridge,
call the HP fraud hotline at 1-887-219-3183 (toll-free in North
America).
English
EN About the toner cartridge 1-67
Page 69

Toner low and toner out conditions
Toner low condition
When toner is low, the printer control panel displays the TONER LOW
message and the printer will continue to print. The message first
appears when about 15% of the toner rema ins in the ca rtridge (about
1,500 pages remaining for the 10,000-page cartridge and about 900
pages remaining for the 6,000-page cartridge at 5% page coverage).
You might prefer to have the printer stop instead of continuing when
the
TONER LOW message first appears—for example, if you want print
quality to remain consistently high during print jobs or if you do not
want toner to run out during a long print job. See the online user guide
for information on how to configure the printer to stop. You can
resume printing by pressing G
Toner out condition
When the toner cartridge runs out of toner, the printer control panel
displays the
can continue printing the current job by pressing G
continues to appear for every job until you take one of the following
actions:
replace the toner cartridge
press GO (the printer will print the current job)
TONER OUT message and the printe r sto ps printing. You
O.
O. The message
See the online user guide for information on how to configure the
printer to continue. Subsequent jobs will continue to print indefinitely
TONER OUT is displayed.
while
1-68 Quick Reference EN
Page 70

Paper sizes supported
Supported sizes and weights of paper (one-sided printing) - tray 1
Size Dimensions
Paper (custom
minimum size)
Paper (maximum
size)
Transparencies
Labels
Envelopes
a. The printer supports a wide range of paper sizes. Check the printer software for
supported sizes. See the online user guide for information on printing custom-size
paper.
b. Capacity may vary depending on paper weight and thickness, and environmental
conditions.
76 by 127 mm
(3 by 5 in)
216 by 356 mm
(8.5 by 14 in)
Same as minimum
and maximum paper
sizes listed above.
a
60 to 199 g/m
(16 to 53 lb)
Thickness:
0.099 to 0.114 mm
0.0039 to 0.0045 in
Thickness:
0.127 mm to 0.178 mm
(0.005 to 0.007 in)
75 to 105 g/m
(20 to 28 lb)
Weight Capacity
2
2
100 sheets of 75 g/m2
(20 lb) paper
50 transparencies
50 labels
10 envelopes
Supported sizes and weights of paper - duplex
printing accessory (duplexer)
b
English
Size Dimensions Weight
Letter
A4
Executive
Legal
B5 (JIS)
EN Paper sizes supported 1-69
216 by 279 mm
(8.5 by 11 in)
210 by 297 mm
(8.3 by 11.7 in)
184 by 267 mm
(7.3 by 10.5 in)
216 by 356 mm
(8.5 by 14 in)
182 by 257 mm
(7.2 by 10 in)
60 to 105 g/m
(16 to 28 lb)
2
Page 71

Supported sizes and weights of paper - trays 2, 3, and 4
Size Dimensions
a
Weight Capacity
b
Letter
A4
Executive
Executive (JIS)
(custom
16K (custom
c
)
c
)
Legal
B5 (ISO) (customc)
B5 (JIS)
A5
Custom
c
216 by 279 mm
(8.5 by 11 in)
210 by 297 mm
(8.3 by 11.7 in)
184 by 267 mm
(7.3 by 10.5 in)
216 by 330 mm
(8.5 by 13 in)
197 by 273 mm
(7.75 by 10.75 in)
216 by 356 mm
(8.5 by 14 in)
176 by 250 mm
(6.9 by 9.9 in)
182 by 257 mm
(7.2 by 10 in)
148 by 210 mm
(5.8 by 8.2 in)
148 by 210 mm
to 216 by 356 mm
(5.8 by 8.2 in
to 8.5 by 14 in)
60 to 105 g/m
(16 to 28 lb)
500 sheets of 75 g/m
2
(20 lb) paper
50 transparencies
2
a. The printer supports a wide range of paper sizes. Check the printer software for
supported sizes.
b. Capacity may vary depending on paper weight and thickness and environmental
conditions.
c. See the online user guide for information on printing custom-size paper.
1-70 Quick Reference EN
Page 72

Declaration of Conformity
according to ISO/IEC Guide 22 and EN 45014
Manufacturer’s Name: Hewlett-Packard Company
Manufacturer’s Address: 11311 Chinden Boulevard
Boise, Idaho 83714-1021, USA
declares that the product
Product Name: HP LaserJet 4100 / 4100N / 4100TN / 4100DTN /
4100SE
Model Numbers:
C8049A / C8050A / C8051A / C8052A / C8048A
Product Options: ALL
conforms to the following Product Specifications:
Safety: IEC 950:1991+A1+A2+A3+A4 / EN 60950:1992+A1+A2+A3+A4+A11
IEC 825-1:1993 +A1 / EN 60825-1:1994 +A11 Class 1 Laser/LED Product
EMC: CISPR 22:1997 / EN 55022:1998 Class B
EN 61000-3-2:1995
EN 61000-3-3:1995
EN 55024: 1998
FCC Title 47 CFR, Part 15 Class B
AS / NZS 3548:1995
1
2
/ ICES-002, Issue 2
Supplementary Information:
The product herewith complies with the requirements of the EMC Directive 89/336/EEC and the Low Voltage
Directive 73/23/EEC, and carries the CE-Marking accordingly:
1. The product was tested in a typical configuration with Hewlett-Packard Personal Computer Systems.
2. This Device complies with Part 15 of the FCC Rules. Operation is subject to the following two Conditions:
(1) this device may not cause harmful interference, and (2) this device must accept any interference
received, including interference that may cause undesired operation.
3. Product exhibits Class A operation when connected to Local Area Network (LAN) cables using print
server accessories.
English
Boise, Idaho, USA
February 2001
For regulatory topics ONLY, contact:
Australia Contact: Product Regulations Manager, Hewlett-Pac kard Australia Ltd.,
European Contact: Your Local Hewlett-Packard Sales and Service Office or
USA Contact: Product Regulations Manager, Hewlett-Packard Company,
EN Paper sizes supported 1-71
31-41 Joseph Street, Blackburn, Victoria 3130, Australia
Hewlett-Packard Gmbh, Department HQ-TRE / Standards
Europe, Herrenberger Straße110-140, D-71034 Böblingen
(FAX: +49-7031-14-3143)
PO Box 15, Mail Stop 160, Boise, ID 83707-0015 (Phone:
208-396-6000)
Page 73

1-72 Quick Reference EN
Page 74

 Loading...