

Page 1
HP LaserJet 3050/3052/3055/3390/3392
All-in-One User Guide
Page 2

Page 3

HP LaserJet 3050/3052/3055/3390/3392
All-in-One
User Guide
Page 4

Copyright and License
Trademark Credits
© 2006 Copyright Hewlett-Packard
Development Company, LP
Reproduction, adaptation, or translation
without prior written permission is
prohibited, except as allowed under the
copyright laws.
The information contained in this document
is subject to change without notice.
The only warranties for HP products and
services are set forth in the express
warranty statements accompanying such
products and services. Nothing herein
should be construed as constituting an
additional warranty. HP shall not be liable
for technical or editorial errors or omissions
contained herein.
Part number Q6500-90929
Edition 1, 4/2006
Adobe Photoshop® and PostScript® are
trademarks of Adobe Systems Incorporated.
Corel® is a trademark or registered
trademark of Corel Corporation or Corel
Corporation Limited.
Linux is a U.S. registered trademark of
Linus Torvalds.
Microsoft®, Windows®, Windows NT®,
and Windows® XP are U.S. registered
trademarks of Microsoft Corporation.
UNIX® is a registered trademark of The
Open Group.
ENERGY STAR® and the ENERGY STAR
logo® are U.S. registered marks of the
United States Environmental Protection
Agency.
Page 5

Table of contents
1 All-in-one basics
All-in-one configurations..........................................................................................................................2
HP LaserJet 3050 all-in-one...................................................................................................2
HP LaserJet 3052/3055 all-in-one..........................................................................................3
HP LaserJet 3390/3392 all-in-one..........................................................................................4
All-in-one features....................................................................................................................................5
All-in-one parts.........................................................................................................................................7
HP LaserJet 3050 all-in-one parts..........................................................................................7
Front view...............................................................................................................7
Back view...............................................................................................................8
Interface ports........................................................................................................8
Control panel..........................................................................................................9
HP LaserJet 3052/3055 all-in-one parts...............................................................................10
Front view.............................................................................................................10
Back view.............................................................................................................10
Interface ports......................................................................................................11
Control panel........................................................................................................11
HP LaserJet 3390/3392 all-in-one parts...............................................................................12
Front view.............................................................................................................12
Back view.............................................................................................................12
Interface ports......................................................................................................13
Control panel........................................................................................................13
2 Software
Software installation..............................................................................................................................16
Typical installation.................................................................................................................16
Minimum installation.............................................................................................................16
Printer drivers........................................................................................................................................17
Supported printer drivers......................................................................................................17
Additional drivers..................................................................................................................17
Select the correct printer driver.............................................................................................18
Printer-driver Help (Windows)...............................................................................................18
Gaining access to the printer drivers....................................................................................19
What other software is available?.........................................................................................19
Software for Windows............................................................................................................................20
Software components for Windows......................................................................................20
HP ToolboxFX......................................................................................................20
Embedded Web server (EWS).............................................................................20
Using Add or Remove Programs to uninstall........................................................................20
ENWW iii
Page 6

Software for Macintosh..........................................................................................................................21
HP Director...........................................................................................................................21
Macintosh Configure Device (Mac OS X V10.3 and Mac OS X V10.4)...............................21
PDEs (Mac OS X V10.3 and Mac OS X V10.4)...................................................................22
Installing software for Macintosh..........................................................................................22
To remove software from Macintosh operating systems......................................................23
3 Media specifications
General guidelines.................................................................................................................................26
Choosing paper and other media..........................................................................................................26
HP media..............................................................................................................................26
Media to avoid.......................................................................................................................27
Media that can damage the all-in-one..................................................................................27
Guidelines for using media....................................................................................................................28
Paper.....................................................................................................................................28
Labels....................................................................................................................................29
Transparencies.....................................................................................................................29
Envelopes.............................................................................................................................30
Card stock and heavy media................................................................................................31
Letterhead and preprinted forms..........................................................................................32
Supported media weights and sizes......................................................................................................33
Printing and storage environment.........................................................................................................36
Installing Macintosh printing system software for direct connections (USB).......22
Installing Macintosh printing system software for networks.................................23
Label construction................................................................................................29
Envelope construction..........................................................................................30
Envelopes with double-side seams......................................................................30
Envelopes with adhesive strips or flaps...............................................................31
Envelope storage.................................................................................................31
Card stock construction........................................................................................31
Card stock guidelines...........................................................................................31
4 Using the all-in-one
Loading media into the input trays........................................................................................................38
Loading documents to fax, copy, or scan.............................................................................38
Loading input trays, HP LaserJet 3050/3052/3055 all-in-one..............................................40
Priority input slot...................................................................................................40
250-sheet input tray (tray 1).................................................................................40
Loading input trays, HP LaserJet 3390/3392 all-in-one.......................................................41
Single-sheet priority input slot (tray 1).................................................................41
250-sheet input tray (tray 2 or optional tray 3).....................................................41
Controlling print jobs..............................................................................................................................42
Print-settings priorities..........................................................................................................42
Selecting a source................................................................................................................42
Selecting a type or size.........................................................................................................42
Using the all-in-one control panel..........................................................................................................43
Changing the all-in-one control-panel display language......................................................43
Changing the default media size and type...........................................................................43
To change the default media size........................................................................43
To change the default media type........................................................................44
iv ENWW
Page 7

5 Printing
Changing the default tray configuration ..............................................................44
Using the all-in-one volume controls....................................................................................45
Changing the alarm volume.................................................................................45
Changing the volume for the fax..........................................................................45
Changing the ring volume of the fax....................................................................46
Changing the all-in-one control-panel key-press volume....................................46
Using features in the Windows printer driver........................................................................................48
Creating and using quick sets...............................................................................................48
Creating and using watermarks............................................................................................49
Resizing documents..............................................................................................................49
Setting a custom paper size from the printer driver..............................................................50
Using different paper and printing covers.............................................................................50
Printing a blank first page or last page.................................................................................50
Printing multiple pages on one sheet of paper.....................................................................51
Printing on both sides...........................................................................................................51
To print on both sides automatically (HP LaserJet 3390/3392 all-in-one)...........52
To print on both sides manually (HP LaserJet 3050/3052/3055 all-in-one)........52
To print on both sides manually (HP LaserJet 3390/3392 all-in-one).................54
Using features in the Macintosh printer driver.......................................................................................55
Creating and using presets in Mac OS X V10.3 and Mac OS X V10.4................................55
Printing a cover page (Macintosh)........................................................................................56
Printing multiple pages on one sheet of paper (Macintosh).................................................56
Printing on both sides (Macintosh).......................................................................................57
To print on both sides automatically (HP LaserJet 3390/3392 all-in-one)...........57
To print on both sides manually (HP LaserJet 3050/3052/3055 all-in-one)........57
To print on both sides manually (HP LaserJet 3390/3392 all-in-one)
(Macintosh)...........................................................................................................59
Selecting an output location (HP LaserJet 3390/3392 all-in-one).........................................................60
Printing on special media......................................................................................................................61
Printing on special media (HP LaserJet 3050/3052/3055 all-in-one)...................................61
Printing on special media (HP LaserJet 3390/3392 all-in-one)............................................62
Transparencies and labels....................................................................................................63
Custom-size media and card stock.......................................................................................63
Colored paper.......................................................................................................................63
Envelopes.............................................................................................................................64
Heavy paper..........................................................................................................................64
Letterhead and preprinted forms..........................................................................................64
Canceling a print job..............................................................................................................................65
6 Fax
Basic fax features and tasks..................................................................................................................68
Fax control-panel buttons.....................................................................................................68
Specifying the fax settings....................................................................................................68
Setting the time and date.....................................................................................69
Setting the fax header..........................................................................................69
Sending faxes.......................................................................................................................70
Using manual dial.................................................................................................................73
Redialing manually................................................................................................................74
ENWW v
Page 8

To redial manually................................................................................................74
Canceling a fax job...............................................................................................................75
To cancel the current fax job................................................................................75
To cancel a fax job by using the Fax Job Status.................................................75
Changing the default light/dark (contrast) setting.................................................................75
Changing resolution settings................................................................................................76
Changing the default glass-size setting................................................................................77
Selecting tone-dialing or pulse-dialing mode........................................................................77
Changing the redial settings.................................................................................................78
Changing autoreduction settings for incoming faxes............................................................79
Blocking or unblocking fax numbers.....................................................................................80
Advanced fax features and tasks..........................................................................................................81
Using speed-dial entries, one-touch keys, and group-dial entries.......................................81
Using dialing characters.......................................................................................81
To insert a pause.................................................................................81
To program or edit speed-dial entries and one-touch keys.................................82
To delete speed-dial entries and one-touch keys................................................83
To program speed-dial entries or one-touch keys quickly...................................83
To manage group-dial entries..............................................................................84
To program group-dial entries.............................................................84
To delete group-dial entries.................................................................84
To delete an individual from a group-dial entry...................................85
To delete all phone book entries.........................................................85
Inserting a dial prefix.............................................................................................................86
Sending a delayed fax..........................................................................................................87
Using billing codes................................................................................................................88
Reprinting a fax.....................................................................................................................89
Automatic two-sided printing (duplexing) of received faxes (HP LaserJet 3390/3392
all-in-one only)......................................................................................................................90
Deleting faxes from memory.................................................................................................90
Using fax forwarding.............................................................................................................91
Using fax polling....................................................................................................................91
Changing the silence-detect mode.......................................................................................92
Creating stamp-received faxes.............................................................................................92
Setting the fax-error-correction mode...................................................................................93
Changing the V.34 setting....................................................................................................93
Changing the sound-volume settings...................................................................................94
To change the fax-sounds (line-monitor) volume (HP LaserJet 3050 all-in-
one)......................................................................................................................94
To change the fax-sounds (line-monitor) volume (HP LaserJet
3055/3390/3392 all-in-one)..................................................................................94
To change the ring volume..................................................................................94
Fax logs and reports..............................................................................................................................95
Printing the fax activity log....................................................................................................95
Printing a fax call report........................................................................................................96
Setting print times for the fax call report...............................................................................96
Including the first page of each fax on the fax call report.....................................................97
Printing a phone book report................................................................................................97
Printing the billing-code report..............................................................................................97
Printing the block-fax list.......................................................................................................98
vi ENWW
Page 9

Printing all fax reports...........................................................................................................98
Sending and receiving faxes by using a computer................................................................................99
Other ways to set up your fax..............................................................................................................102
To receive faxes when you hear fax tones.........................................................................102
Setting the answer mode....................................................................................................102
Changing ring patterns (distinctive ring).............................................................................104
Changing the rings-to-answer setting.................................................................................105
Using the rings-to-answer setting......................................................................105
To set the number of rings-to-answer................................................................105
Sending a fax by dialing from an extension telephone.......................................................106
Changing the detect-dial-tone setting.................................................................................106
Receiving faxes on a shared phone line.............................................................................107
To receive faxes when you hear fax tones........................................................107
Making an extension telephone available to receive faxes................................................107
Connecting the all-in-one to a phone line (HP LaserJet 3050/3055 all-in-one).................108
Connecting the all-in-one to a phone line (HP LaserJet 3390/3392 all-in-one).................109
Connecting additional devices.............................................................................................................111
Using a dedicated fax line...................................................................................................111
Using a shared telephone line............................................................................................111
To connect additional devices to the HP LaserJet 3050/3055 all-in-one...........................112
To connect additional devices to the HP LaserJet 3390/3392 all-in-one...........................115
7 Copy
8 Scan
Starting a copy job...............................................................................................................................120
Canceling a copy job...........................................................................................................................121
Adjusting the copy quality....................................................................................................................122
Adjusting the lighter/darker (contrast) setting......................................................................................123
Reducing or enlarging copies..............................................................................................................124
Adjusting the copy size.......................................................................................................124
Changing the number of copies..........................................................................................................126
Changing the copy-collation setting....................................................................................................127
Copying onto media of different types and sizes................................................................................128
Copying two-sided documents (HP LaserJet 3050 all-in-one)............................................................130
Copying two-sided documents (HP LaserJet 3052/3055 all-in-one)...................................................131
Using automatic two-sided printing (duplexing) to copy documents (HP LaserJet 3390/3392 all-
in-one)..................................................................................................................................................132
Changing tray selection (HP LaserJet 3390/3392 all-in-one).............................................................134
Copying photos and books (HP LaserJet 3052/3055/3390/3392 all-in-one only)..............................135
Viewing copy settings (HP LaserJet 3390/3392 all-in-one only).........................................................137
Understanding scanning methods.......................................................................................................140
Scanning from the all-in-one control panel (Windows).......................................................................141
Programming the all-in-one Scan To button.......................................................................141
To create, modify, or delete destinations............................................................................142
Scanning to e-mail..............................................................................................................142
Scanning to a file................................................................................................................143
Scanning to other programs...............................................................................................143
Scanning by using HP LaserJet Scan (Windows)...............................................................................144
Scanning from the all-in-one and HP Director (Macintosh).................................................................145
ENWW vii
Page 10

Canceling a scan job...........................................................................................................................146
Scanning by using other software.......................................................................................................147
Scanning a photo or a book.................................................................................................................148
Scanning by using optical character recognition (OCR) software.......................................................149
Scanner resolution and color...............................................................................................................150
To clean the scanner glass..................................................................................................................152
9 Networking
Set up the all-in-one and use it on the network (HP LaserJet 3052/3055/3390/3392 all-in-one
only).....................................................................................................................................................154
Using the embedded Web server or HP ToolboxFX...........................................................................157
Setting a network password................................................................................................................157
Using the all-in-one control panel........................................................................................................158
Supported network protocols...............................................................................................................160
TCP/IP configuration...........................................................................................................................162
Using DHCP........................................................................................................................................163
Using BOOTP......................................................................................................................................168
Scanning to e-mail..............................................................................................................145
Scanning to a file................................................................................................................145
Scanning to a software program.........................................................................................146
Using page-by-page scanning............................................................................................146
Using TWAIN-compliant and WIA-compliant software.......................................................147
Scanning from a TWAIN-enabled program........................................................147
To scan from a TWAIN-enabled program.........................................147
Scanning from a WIA-enabled program (Windows XP only).............................147
To scan from a WIA-enabled program..............................................147
Readiris...............................................................................................................................149
Resolution and color guidelines..........................................................................................151
Color....................................................................................................................................151
Configuring a network-port-connected all-in-one...............................................................154
Configuring a direct-connected shared all-in-one...............................................................155
Changing from a direct-connected shared all-in-one to a network-port-connected all-
in-one..................................................................................................................................156
Network configuration page................................................................................................158
Configuration page..............................................................................................................158
IP configuration...................................................................................................................158
Manual configuration..........................................................................................158
Automatic configuration......................................................................................159
Link speed and duplex settings..........................................................................................159
Server-based, AutoIP, and manual TCP/IP configuration..................................................162
Server-based TCP/IP configuration....................................................................................162
Default IP address configuration (AutoIP)..........................................................................162
TCP/IP configuration tools..................................................................................................163
UNIX systems.....................................................................................................................163
Windows systems...............................................................................................................164
Windows NT 4.0 Server.....................................................................................164
Windows 2000 Server........................................................................................166
NetWare systems................................................................................................................167
To discontinue DHCP configuration...................................................................................167
Why use BOOTP?..............................................................................................................168
viii ENWW
Page 11

BOOTP on UNIX.................................................................................................................169
Systems that use Network Information Service (NIS).......................................169
Configuring the BOOTP server..........................................................................169
Bootptab file entries...........................................................................................169
Configuring for LPD printing................................................................................................................171
Introduction.........................................................................................................................171
About LPD..........................................................................................................172
Requirements for configuring LPD.....................................................................173
LPD setup overview............................................................................................................173
Step 1. Setting up IP parameters.......................................................................173
Step 2. Setting up print queues..........................................................................173
Step 3. Printing a test file...................................................................................173
LPD on UNIX systems........................................................................................................174
Configuring print queues for BSD-based systems.............................................174
Example: Printcap entry.....................................................................................174
Example: Creating spooling directory................................................................175
Configuring print queues using SAM (HP-UX systems)....................................175
Printing a test file................................................................................................176
LPD on Windows NT/2000 systems...................................................................................177
Installing TCP/IP software (Windows NT)..........................................................177
Configuring a network all-in-one for Windows 2000 systems............................179
Configuring a network all-in-one for Windows NT 4.0 systems.........................180
Verifying the configuration.................................................................................180
Printing from Windows clients............................................................................180
LPD on Windows XP systems ...........................................................................................181
Adding Windows optional networking components...........................................181
Configuring a network LPD all-in-one................................................................181
Adding a new LPD all-in-one.............................................................181
Creating an LPR port for an installed all-in-one................................182
TCP/IP.................................................................................................................................................183
Introduction.........................................................................................................................183
Internet Protocol (IP)..........................................................................................183
Transmission Control Protocol (TCP)................................................................183
User Datagram Protocol (UDP).........................................................................183
IP address...........................................................................................................................184
IP address: network portion...............................................................................184
IP address: host portion.....................................................................................184
IP address structure and class...........................................................................184
Configuring IP parameters..................................................................................................185
Dynamic Host Configuration Protocol (DHCP)..................................................185
BOOTP...............................................................................................................185
Subnets...............................................................................................................................186
Subnet mask......................................................................................................186
Gateways............................................................................................................................186
Default gateway.................................................................................................186
10 Convenience stapler (HP LaserJet 3392 all-in-one only)
Understanding the convenience stapler..............................................................................................188
Loading staples....................................................................................................................................189
Using the convenience stapler............................................................................................................191
ENWW ix
Page 12

Clearing stapler jams...........................................................................................................................193
11 How do I?
Print: How do I?...................................................................................................................................196
Fax: How do I?.....................................................................................................................................207
Copy: How do I?..................................................................................................................................223
Change the all-in-one print settings, such as volume or print quality, in HP ToolboxFX...196
Print on both sides (Windows)............................................................................................197
To print on both sides automatically (HP LaserJet 3390/3392 all-in-one).........197
To print on both sides manually (HP LaserJet 3050/3052/3055 all-in-one)......197
To print on both sides manually (HP LaserJet 3390/3392 all-in-one)...............199
Print on both sides (Macintosh)..........................................................................................200
To print on both sides automatically (HP LaserJet 3390/3392 all-in-one).........200
To print on both sides manually (HP LaserJet 3050/3052/3055 all-in-one)......201
To print on both sides manually (HP LaserJet 3390/3392 all-in-one)
(Macintosh).........................................................................................................202
Use the single-sheet priority input slot (tray 1)...................................................................202
Print on special media........................................................................................................203
Printing on special media (HP LaserJet 3050/3052/3055 all-in-one)................203
Printing on special media (HP LaserJet 3390/3392 all-in-one).........................204
Transparencies and labels.................................................................................205
Custom-size media and card stock....................................................................205
Colored paper....................................................................................................205
Envelopes...........................................................................................................205
Heavy paper.......................................................................................................206
Letterhead and preprinted forms........................................................................206
Use the Setup Wizard.........................................................................................................207
Send a fax from the all-in-one ............................................................................................207
Reprint a fax........................................................................................................................208
Print the fax activity log.......................................................................................................209
Forward received faxes to another fax number..................................................................210
Send and receive faxes by using a computer....................................................................211
Add or delete a contact.......................................................................................................213
To delete speed-dial entries and one-touch keys...............................................................214
Fax phone book..................................................................................................................214
To program or edit speed-dial entries and one-touch keys................................................216
Create a new group list.......................................................................................................217
To program group-dial entries............................................................................217
To delete group-dial entries...............................................................................218
To delete an individual from a group-dial entry..................................................218
To delete all phone book entries........................................................................219
Import contacts from another source..................................................................................219
Change the default light/dark (contrast) setting..................................................................220
Change resolution settings.................................................................................................221
Use the all-in-one control-panel buttons.............................................................................222
Enter text from the control panel.........................................................................................222
Copy two-sided documents (HP LaserJet 3050 all-in-one)................................................223
Copy two-sided documents (HP LaserJet 3052/3055 all-in-one).......................................224
Use automatic two-sided printing (duplexing) to copy documents (HP LaserJet
3390/3392 all-in-one)..........................................................................................................225
x ENWW
Page 13

Reduce or enlarge copies...................................................................................................227
Adjusting the copy size......................................................................................227
Adjust the lighter/darker (contrast) setting..........................................................................228
Change the copy-collation setting......................................................................................229
Adjust the copy quality........................................................................................................230
Copy onto media of different types and sizes....................................................................231
Change tray selection (HP LaserJet 3390/3392 all-in-one)...............................................232
Change the number of copies.............................................................................................233
Scan: How do I?..................................................................................................................................234
Use HP LaserJet Scan.......................................................................................................234
Scan from the all-in-one control panel................................................................................234
Program the all-in-one Scan To button...............................................................................235
Create, modify, or delete destinations................................................................................235
Scan to e-mail.....................................................................................................................236
Scan to a folder...................................................................................................................236
Network: How do I?.............................................................................................................................237
Set up the all-in-one and use it on the network..................................................................237
To configure a network port-connected all-in-one configuration (direct
mode or peer-to-peer printing)...........................................................................237
To configure a direct-connected shared all-in-one (client server printing)........238
To change from a direct-connected shared all-in-one to a network port-
connected all-in-one configuration.....................................................................239
Set my network password...................................................................................................239
Other: How do I?..................................................................................................................................240
Clean the paper path..........................................................................................................240
To clean the paper path from HP ToolboxFX....................................................240
To clean the paper path from the all-in-one control panel.................................241
Restore the factory-set defaults..........................................................................................241
Use the Embedded Web server (EWS)..............................................................................242
Find the user guide.............................................................................................................242
User guide links..................................................................................................242
Where to look for more information....................................................................242
Setting up the all-in-one....................................................................242
Using the all-in-one...........................................................................243
Receive toner warnings......................................................................................................243
Receive toner warnings from the all-in-one at the all-in-one control panel
(HP LaserJet 3390/3392 all-in-one)...................................................................243
Receive toner warnings from the all-in-one at my computer (HP LaserJet
3390/3392 all-in-one).........................................................................................243
Receive toner warning e-mail messages from the all-in-one (HP LaserJet
3390/3392 all-in-one).........................................................................................244
View the control-panel menu items for the all-in-one (HP LaserJet 3390/3392 all-in-
one).....................................................................................................................................244
Use the convenience stapler..............................................................................................245
Load staples........................................................................................................................247
Clear stapler jams...............................................................................................................249
Replace the print cartridge..................................................................................................251
Clear jams...........................................................................................................................253
Clear jams from the print cartridge area............................................................253
Clear jams from the input trays (HP LaserJet 3050/3052/3055 all-in-one).......254
ENWW xi
Page 14

Clear jams from the input trays (HP LaserJet 3390/3392 all-in-one)................254
Clear jams from the output bin...........................................................................258
Clear jams from the straight-through output path (HP LaserJet 3390/3392
all-in-one)...........................................................................................................259
Clear jams from the automatic two-sided printing (duplexing) path..................261
Clear jams from the automatic document feeder (ADF)....................................264
Order new supplies.............................................................................................................266
12 Managing the all-in-one and maintenance
Information pages................................................................................................................................268
Demo page.........................................................................................................................268
Usage page.........................................................................................................................268
Configuration page..............................................................................................................268
Supplies Status page (HP LaserJet 3390/3392 all-in-one)................................................270
Network configuration page................................................................................................271
Fax logs and reports...........................................................................................................271
HP ToolboxFX.....................................................................................................................................272
To view HP ToolboxFX.......................................................................................................272
Status..................................................................................................................................273
Event log............................................................................................................273
Alerts...................................................................................................................................274
Set up status alerts............................................................................................274
Set up e-mail alerts............................................................................................274
Fax......................................................................................................................................275
Fax tasks............................................................................................................275
Fax phone book.................................................................................................275
Fax send log.......................................................................................................277
Fax receive log...................................................................................................277
Help.....................................................................................................................................277
System settings...................................................................................................................278
Device information.............................................................................................278
Paper handling...................................................................................................279
Print quality.........................................................................................................279
Paper types........................................................................................................279
System setup......................................................................................................280
Service...............................................................................................................280
Device Polling....................................................................................................280
Print settings.......................................................................................................................280
Printing...............................................................................................................280
PCL 5e...............................................................................................................281
PostScript...........................................................................................................281
Network settings.................................................................................................................281
Macintosh Configure Device (Mac OS X V10.3 and Mac OS X V10.4)..............................................282
Embedded Web server........................................................................................................................283
Features..............................................................................................................................283
Managing supplies...............................................................................................................................284
Checking status and ordering supplies (HP LaserJet 3390/3392 all-in-one only).............284
To check supplies status by using the control panel.........................................284
To check supplies status by using HP ToolboxFX............................................284
Storing supplies..................................................................................................................285
xii ENWW
Page 15

Cleaning the all-in-one.........................................................................................................................287
Changing the print cartridge................................................................................................................295
Changing the automatic document feeder (ADF) on the HP LaserJet 3390/3392 all-in-one.............297
Changing the automatic document feeder (ADF) pickup roller and load arm assembly
(HP LaserJet 3052/3055/3390/3392 all-in-one)..................................................................................299
13 Troubleshooting
Troubleshooting checklist....................................................................................................................304
Clearing jams.......................................................................................................................................308
Control-panel messages......................................................................................................................323
Print problems......................................................................................................................................332
Replacing and recycling supplies.......................................................................................285
HP policy on non-HP supplies............................................................................................285
Resetting the all-in-one for non-HP supplies (HP LaserJet 3390/3392 all-in-
one)....................................................................................................................285
HP fraud hotline..................................................................................................................285
To clean the exterior...........................................................................................................287
To clean the scanner glass and white platen (HP LaserJet 3050 all-in-one).....................287
To clean the scanner glass (HP LaserJet 3052/3055/3390/3392 all-in-one).....................288
To clean the lid backing (HP LaserJet 3052/3055/3390/3392 all-in-one)..........................289
To clean the automatic document feeder (ADF) pickup roller assembly (HP LaserJet
3052/3055/3390/3392 all-in-one)........................................................................................290
Cleaning the paper path.....................................................................................................293
To clean the paper path from HP ToolboxFX....................................................293
To clean the paper path from the all-in-one control panel.................................294
Causes of jams...................................................................................................................308
Tips to avoid jams ..............................................................................................................308
Where to look for jams........................................................................................................309
Print cartridge area.............................................................................................................309
Input trays (HP LaserJet 3050/3052/3055 all-in-one).........................................................311
Input trays (HP LaserJet 3390/3392 all-in-one)..................................................................312
Output bin...........................................................................................................................315
Straight-through output path (HP LaserJet 3390/3392 all-in-one).....................................315
Automatic two-sided printing (duplexing) path (HP LaserJet 3390/3392 all-in-one)..........317
Jams occur in the automatic document feeder (ADF)........................................................320
Alert and warning messages .............................................................................................323
Alert and warning message tables.....................................................................323
Critical error messages.......................................................................................................330
Critical error message-tables.............................................................................330
Print quality problems.........................................................................................................332
Improving print quality........................................................................................332
Understanding print-quality settings..................................................332
To temporarily change print-quality settings.....................332
To change print-quality settings for all future jobs............332
Identifying and correcting print defects..............................................................333
Print-quality checklist.........................................................................333
General print-quality issues...............................................................333
Media-handling problems...................................................................................................337
Print-media guidelines........................................................................................338
Solving print-media problems............................................................................338
ENWW xiii
Page 16

Performance problems.......................................................................................................339
Fax problems.......................................................................................................................................341
Problems receiving faxes....................................................................................................341
Problems sending faxes.....................................................................................................343
Voice-call problems.............................................................................................................345
Media-handling problems...................................................................................................345
Performance problems.......................................................................................................346
Copy problems.....................................................................................................................................347
Preventing problems...........................................................................................................347
Image problems..................................................................................................................347
Media-handling problems...................................................................................................348
Performance problems.......................................................................................................350
Scan problems.....................................................................................................................................351
Solving scanned-image problems......................................................................................351
Scan-quality problems........................................................................................................353
Preventing problems..........................................................................................353
Solving scan-quality problems...........................................................................353
Network problems................................................................................................................................354
Verifying that the all-in-one is on and online.......................................................................354
Resolving communication problems with the network........................................................354
Control-panel display problems...........................................................................................................356
Stapler problems (HP LaserJet 3392 all-in-one).................................................................................356
Troubleshooting PostScript (PS) errors...............................................................................................357
Troubleshooting common Macintosh problems..................................................................................358
Problems with Mac OS X V10.3 and Mac OS X V10.4......................................................358
Troubleshooting tools..........................................................................................................................359
All-in-one pages and reports...............................................................................................359
Demo page.........................................................................................................359
Configuration page.............................................................................................359
Supplies Status page (HP LaserJet 3390/3392 all-in-one)................................359
Fax reports..........................................................................................................................360
Fax activity log...................................................................................................361
Fax call report....................................................................................................361
Phone book report..............................................................................................361
Billing-code report..............................................................................................362
HP ToolboxFX.....................................................................................................................362
To view HP ToolboxFX......................................................................................362
Troubleshooting tab...........................................................................................362
Service menu......................................................................................................................363
Restoring the factory-set defaults......................................................................363
Cleaning the paper path.....................................................................................363
T.30 protocol trace.............................................................................................364
Archive print.......................................................................................................364
Appendix A Accessories and ordering information
Supplies...............................................................................................................................................366
Memory (HP LaserJet 3390/3392 all-in-one)......................................................................................366
Cable and interface accessories.........................................................................................................366
Paper-handling accessories (HP LaserJet 3390 all-in-one)................................................................366
User-replaceable parts........................................................................................................................367
xiv ENWW
Page 17

Paper and other print media................................................................................................................367
Supplementary documentation............................................................................................................368
Appendix B Service and support
Hewlett-Packard limited warranty statement.......................................................................................372
Print Cartridge Limited Warranty Statement.......................................................................................373
Availability of support and service.......................................................................................................374
HP Customer Care..............................................................................................................................374
Hardware service.................................................................................................................................375
Extended warranty...............................................................................................................................375
Guidelines for repacking the printer....................................................................................................376
Appendix C All-in-one specifications
Physical specifications.........................................................................................................................378
Electrical specifications.......................................................................................................................378
Power consumption.............................................................................................................................379
Environmental specifications...............................................................................................................379
Acoustic emissions..............................................................................................................................380
Appendix D Regulatory information
FCC compliance..................................................................................................................................382
Environmental Product Stewardship program.....................................................................................383
Protecting the environment.................................................................................................383
Ozone production................................................................................................................383
Power consumption............................................................................................................383
HP LaserJet printing supplies.............................................................................................384
Nederlands..........................................................................................................................385
Taiwan.................................................................................................................................385
Disposal of waste equipment by users in private household in the European Union........386
Material safety data sheet...................................................................................................386
For more information...........................................................................................................386
Telephone Consumer Protection Act (United States).........................................................................387
IC CS-03 requirements........................................................................................................................388
EU statement for telecom operation....................................................................................................389
New Zealand telecom statements.......................................................................................................389
Declaration of conformity (HP LaserJet 3390, 3392, 3055, and 3050)...............................................390
Declaration of conformity (HP LaserJet 3052)....................................................................................391
Country-/region-specific safety statements.........................................................................................392
Laser safety statement.......................................................................................................392
Canadian DOC statement...................................................................................................392
Korean EMI statement........................................................................................................392
Finnish laser statement.......................................................................................................393
Glossary..............................................................................................................................................................395
Index....................................................................................................................................................................399
ENWW xv
Page 18

xvi ENWW
Page 19

1 All-in-one basics
All-in-one configurations
●
●
All-in-one features
All-in-one parts
●
ENWW 1
Page 20
All-in-one configurations
The all-in-one is available in the following configurations.
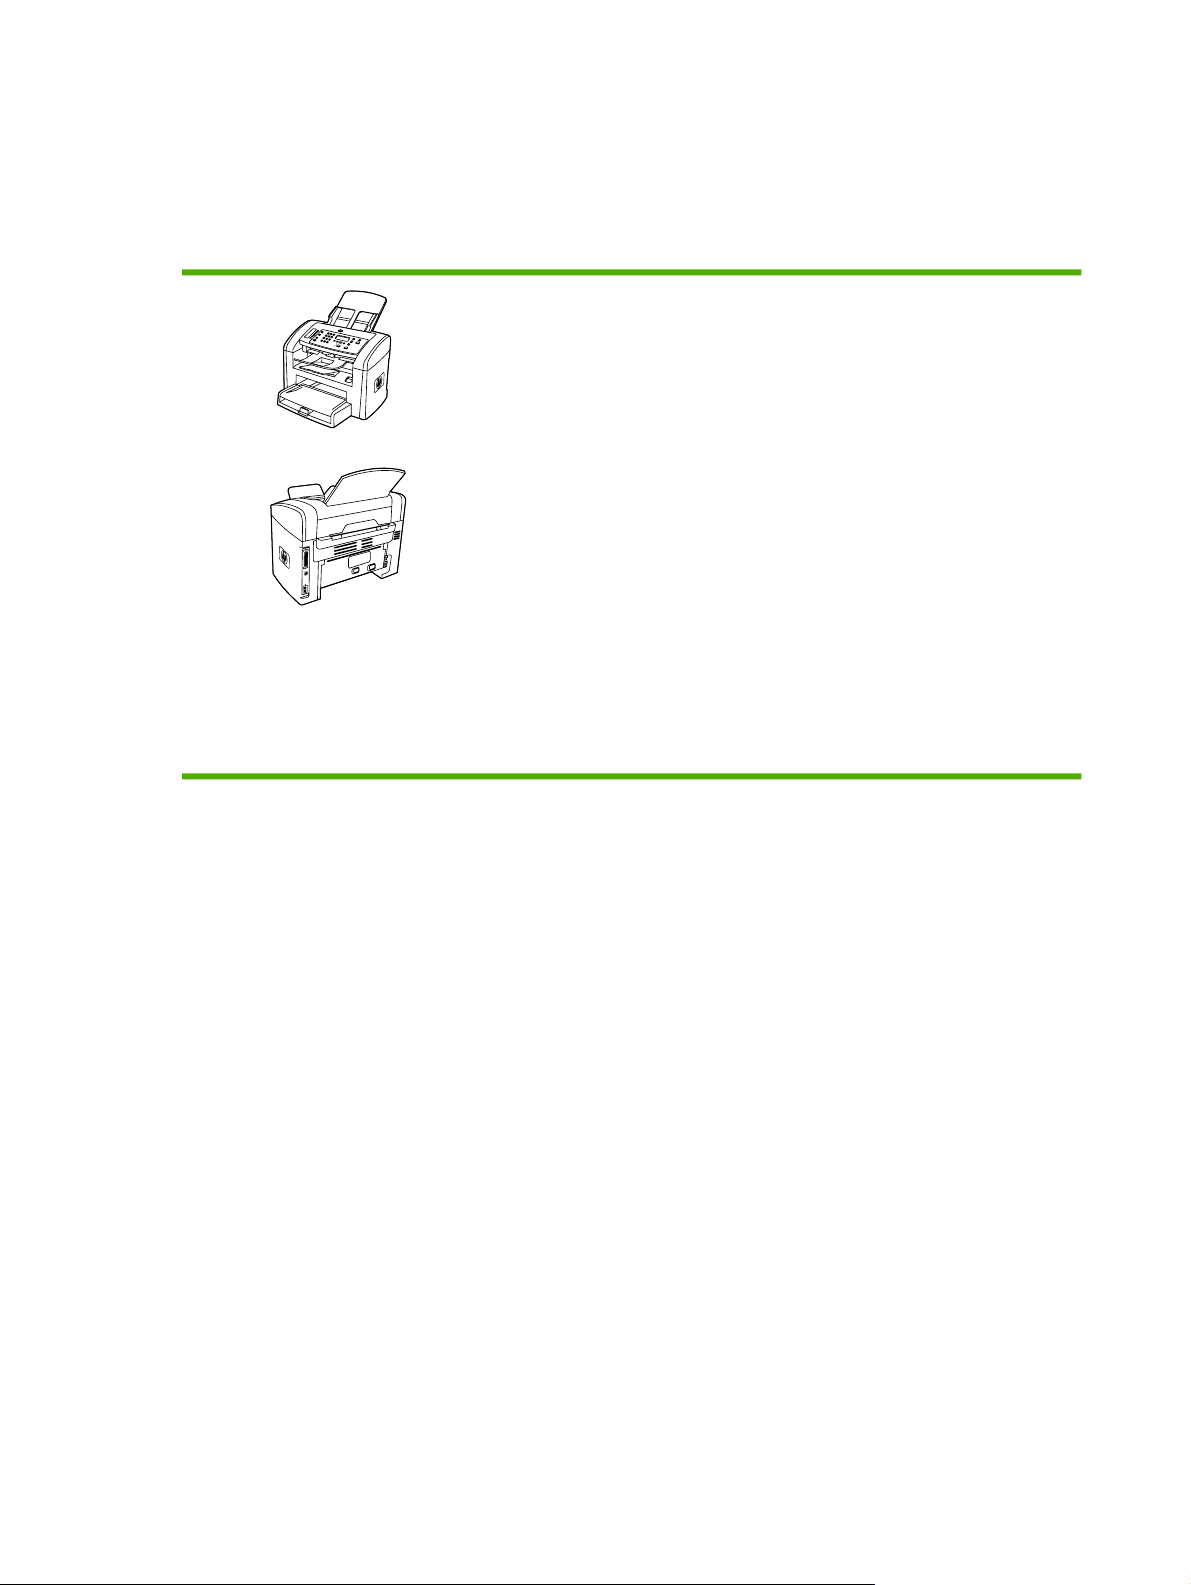
HP LaserJet 3050 all-in-one
HP LaserJet 3050 all-in-one printer, fax, copier, scanner
Prints letter-size pages at speeds up to 19 pages per
●
minute (ppm) and A4-size pages at speeds up to 18 ppm
PCL 5e and PCL 6 printer drivers and HP postscript
●
level 3 emulation.
Priority input slot holds up to 10 pages.
●
Tray 1 holds up to 250 sheets of print media or 10
●
envelopes.
Average yield for the standard black print cartridge is
●
2000 pages in accordance with ISO/IEC 19752. Actual
yield depends on specific use.
Hi-Speed universal serial bus (USB) 2.0 port.
●
V.34 fax modem and 4-megabyte (MB) flash fax-
●
storage memory.
64-MB random-access memory (RAM).
●
30-page automatic document feeder (ADF).
●
2 Chapter 1 All-in-one basics ENWW
Page 21
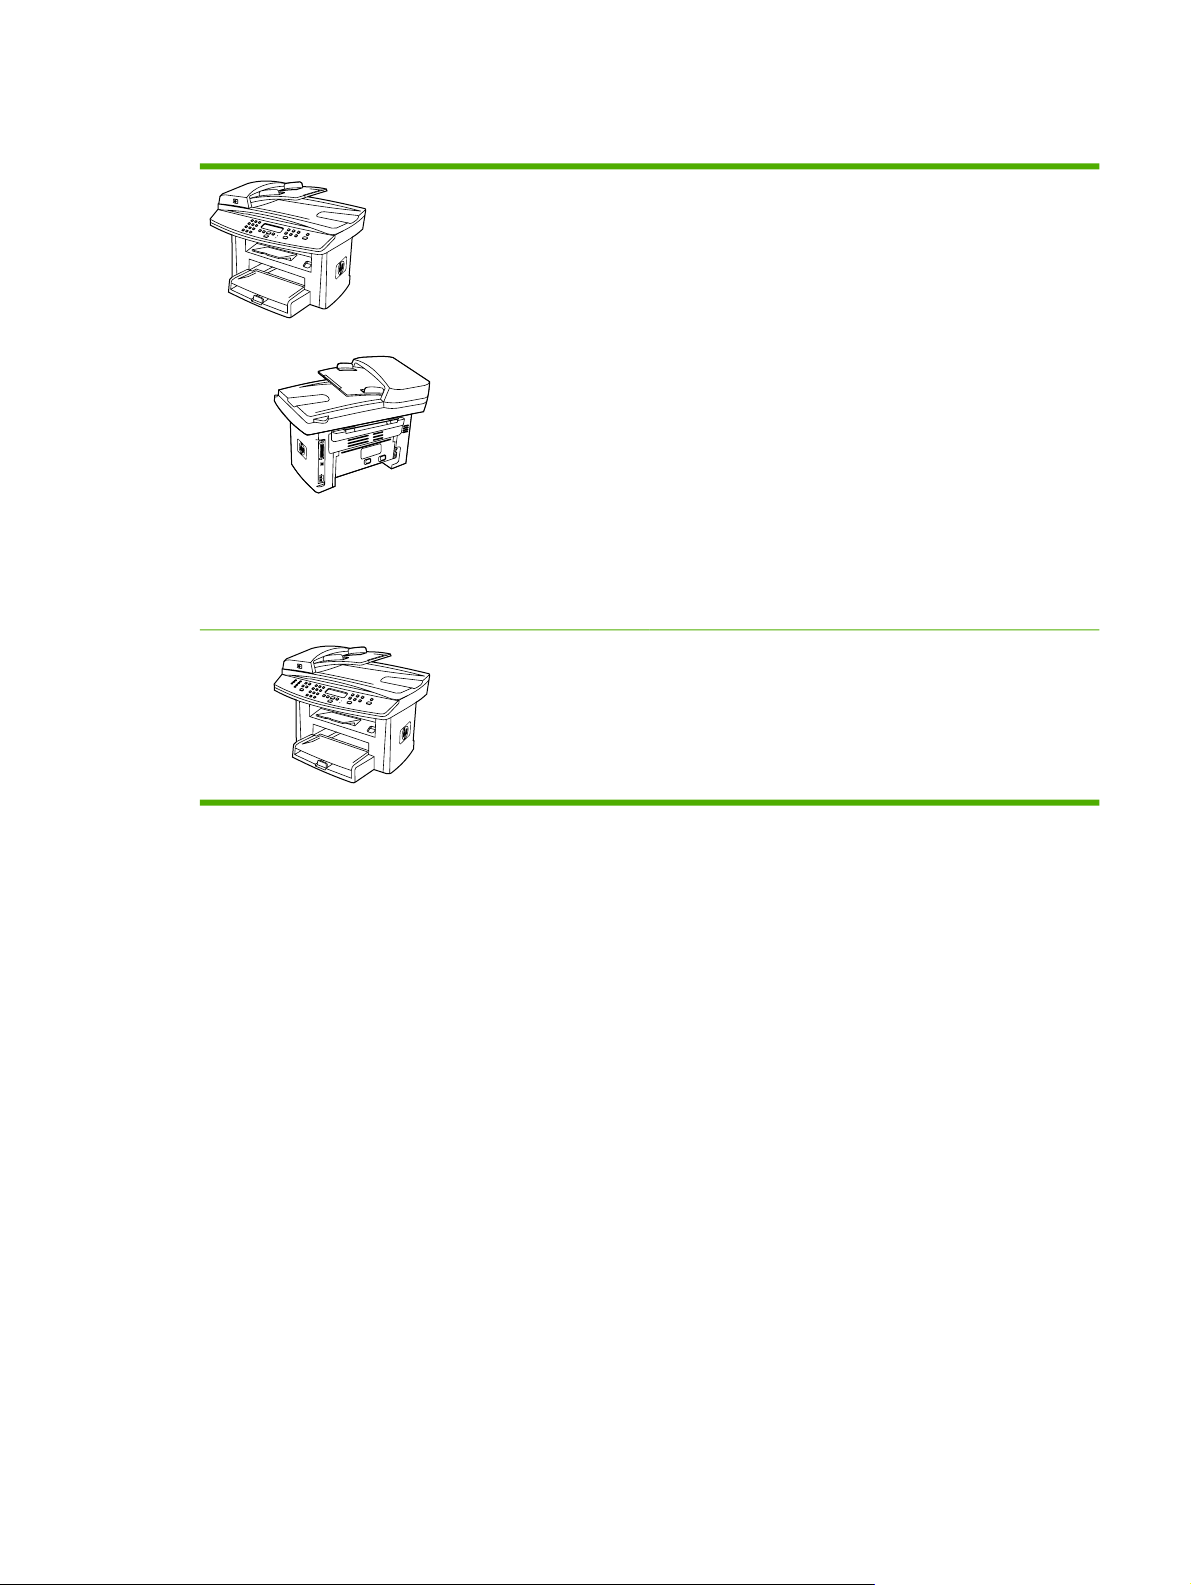
HP LaserJet 3052/3055 all-in-one
HP LaserJet 3052 all-in-one printer, scanner, copier
Prints letter-size pages at speeds up to 19 ppm and A4-
●
size pages at speeds up to 18 ppm
● PCL 5e and PCL 6 printer drivers and HP postscript
level 3 emulation
Priority input slot holds up to 10 pages.
●
Tray 1 holds up to 250 sheets of print media or 10
●
envelopes.
Average yield for the standard black print cartridge is
●
2000 pages in accordance with ISO/IEC 19752. Actual
yield depends on specific use.
Hi-Speed USB 2.0 port and port for connecting to a
●
10/100Base-T network.
64-MB RAM.
●
50-page automatic document feeder (ADF).
●
The HP LaserJet 3055 all-in-one printer, fax, copier,
scanner has all of the features of the HP LaserJet 3052 all-
in-one, plus:
V.34 fax modem and 4-MB flash fax-storage memory.
●
ENWW All-in-one configurations 3
Page 22
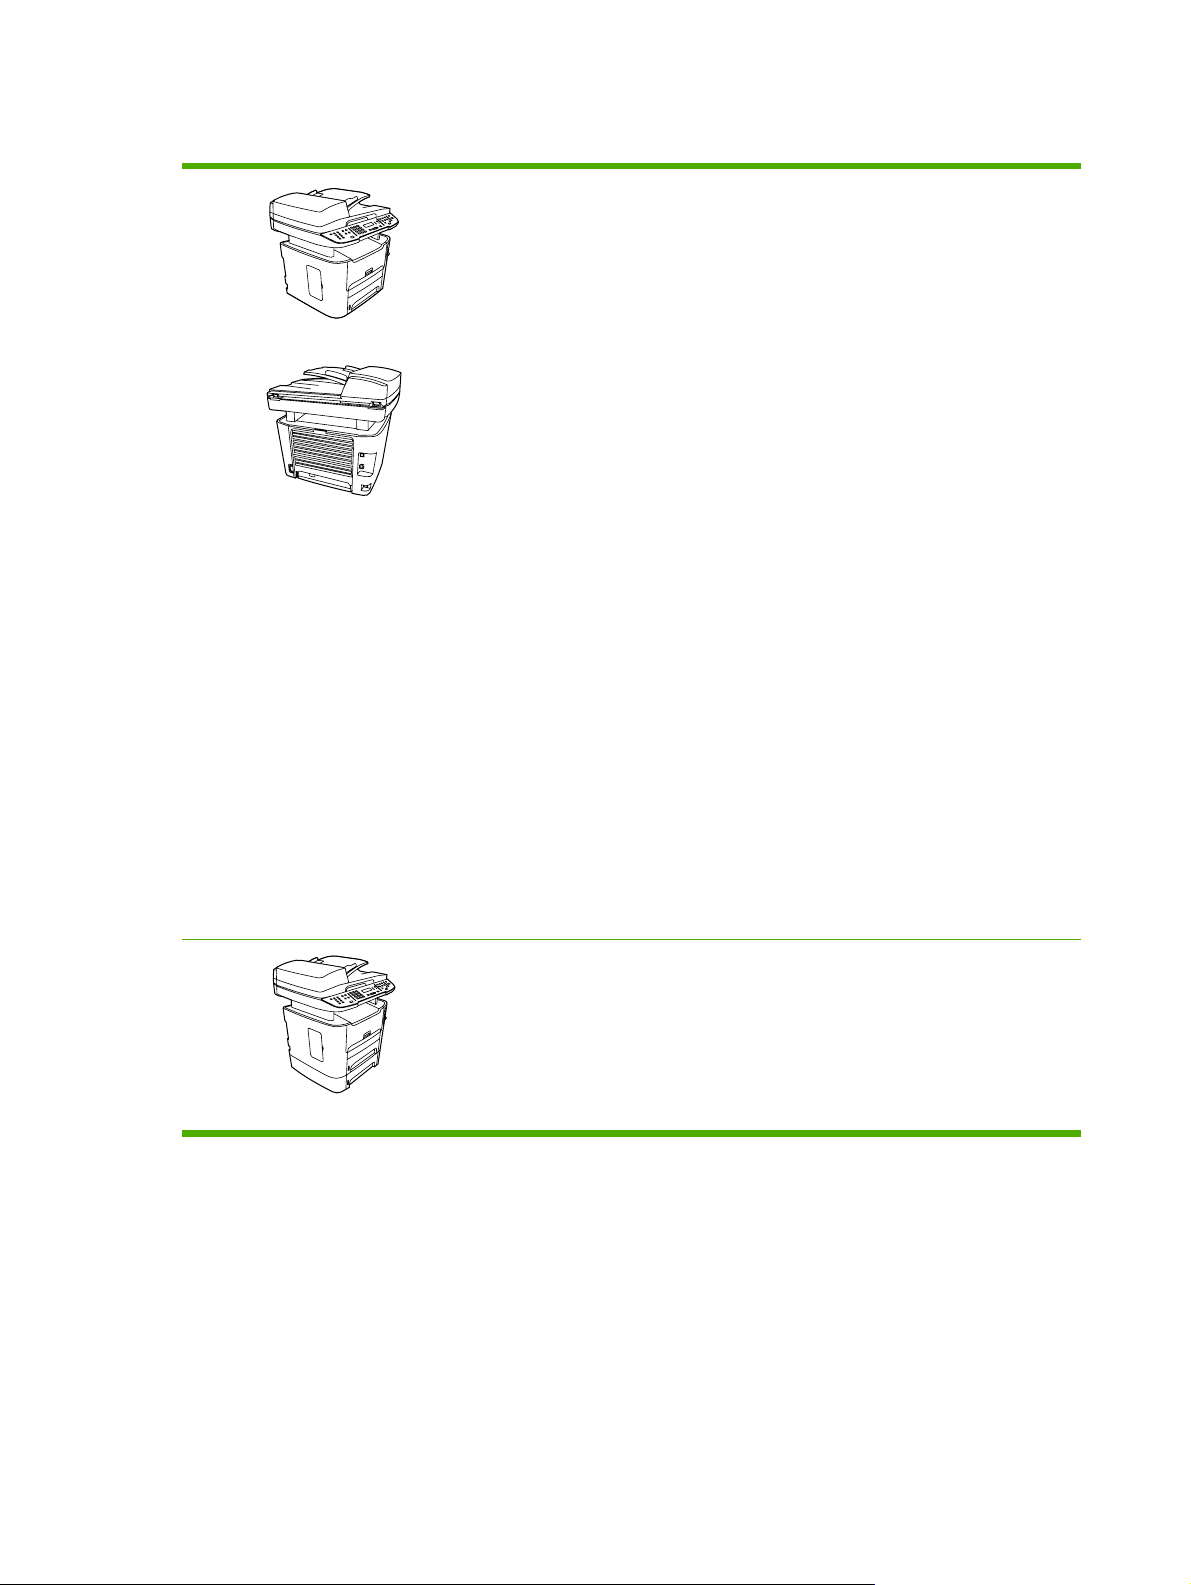
HP LaserJet 3390/3392 all-in-one
HP LaserJet 3390 all-in-one printer, fax, copier, scanner
Prints letter-size pages at speeds up to 22 ppm and A4-
●
size pages at speeds up to 21 ppm.
● PCL 5e and PCL 6 printer drivers and HP postscript
level 3 emulation.
Single-sheet priority input slot (tray 1) for sheet-fed
●
printing.
Tray 2 holds up to 250 sheets of print media or 10
●
envelopes.
Optional 250-sheet input tray (tray 3) available.
●
Automatic 2–sided (duplex) printing, receiving faxes,
●
and copying.
Average yield for the standard black print cartridge is
●
2500 pages in accordance with ISO/IEC 19752. Actual
yield depends on specific use.
Average yield for the high-capacity print cartridge is
●
6000 pages in accordance with ISO/IEC 19752. Actual
yield depends on specific use.
Hi-Speed USB 2.0 port and port for connecting to a
●
10/100Base-T network.
V.34 fax modem and 4-MB flash fax-storage memory.
●
64-MB RAM.
●
Flatbed scanner and 50-page automatic document
●
feeder (ADF).
One available DIMM slot for memory expansion and
●
additional font support (memory expandable to 192 MB).
The HP LaserJet 3392 all-in-one printer, fax, copier,
scanner has all of the features of the HP LaserJet 3390 allin-one, plus:
Additional 250-sheet input tray (tray 3) included.
●
64-MB memory DIMM.
●
● Convenience stapler.
4 Chapter 1 All-in-one basics ENWW
Page 23

All-in-one features
Excellent print quality
1200 dots per inch (dpi) with Image REt 2400 text and graphics.
●
Adjustable settings to optimize print quality.
●
The HP UltraPrecise print cartridge has a finer toner formulation that provides sharper
●
text and graphics.
Fax
Copy
Scan
Staple
Networking (HP LaserJet
3052/3055/3390/3392 all-inone only)
Full-functionality fax capabilities with a V.34 fax; includes a phone book, fax polling,
●
and delayed-fax features (HP LaserJet 3050 all-in-one, HP LaserJet 3055 all-in-one,
HP LaserJet 3390 all-in-one, and HP LaserJet 3392 all-in-one).
For more information, see
Includes ADF that allows faster, more efficient copy jobs with multiple-page documents.
●
For more information, see
The HP LaserJet 3052/3055/3390/3392 all-in-one provides 1200 ppi, 24-bit full-color
●
scanning from letter/A4-size scanner glass.
The HP LaserJet 3050 all-in-one provides 600 pixels per inch (ppi), 24–bit full-color
●
scanning from the contact image sensor through the automatic document feeder (ADF).
All models include an ADF that allows faster, more efficient scan jobs with multiple-
●
page documents.
For more information, see
The HP LaserJet 3392 all-in-one includes a convenience stapler for fast and
●
convenient stapling of up to 20 sheets of 80 g/m
Large-capacity replaceable staple cassette holds 1,500 staples.
●
For more information, see
TCP/IP
●
LPD
●
Fax.
Copy.
Scan.
2
or 20 lb media at the all-in-one.
Convenience stapler (HP LaserJet 3392 all-in-one only).
9100
●
Fast printing performance, built-in Intellifont and TrueType scaling technologies, and
Printer driver features
Automatic languageswitching
Interface connections
Environmental features
Economical printing ● N-up printing (printing more than one page on a sheet). See Printing multiple pages on
●
advanced imaging capabilities are benefits of the PCL 6 printer language.
The all-in-one automatically determines and switches to the appropriate printer
●
language (such as PS or PCL 6) for the print job.
Hi-Speed USB 2.0 port.
●
10/100 ethernet (RJ45) network port (HP LaserJet 3052/3055/3390/3392 all-in-one
●
only).
● PowerSave mode (HP LaserJet 3052/3055/3390/3392 all-in-one only)
ENERGY STAR® qualified
●
one sheet of paper or Printing multiple pages on one sheet of paper (Macintosh).
Two-sided printing using the automatic duplexer (HP LaserJet 3390/3392 all-in-one
●
only).
Economode setting uses less toner.
●
ENWW All-in-one features 5
Page 24

Supplies
Accessibility
A Supplies Status page with a print cartridge gauge that show the supply levels that
●
remain (HP supplies only; HP LaserJet 3390/3392 all-in-one).
No-shake cartridge design.
●
Authentication for HP print cartridges (HP LaserJet 3390/3392 all-in-one).
●
Enabled supplies-ordering capability (HP LaserJet 3390/3392 all-in-one).
●
Online user guide that is compatible with text screen-readers.
●
Print cartridges can be installed and removed by using one hand.
●
All doors and covers can be opened by using one hand.
●
6 Chapter 1 All-in-one basics ENWW
Page 25
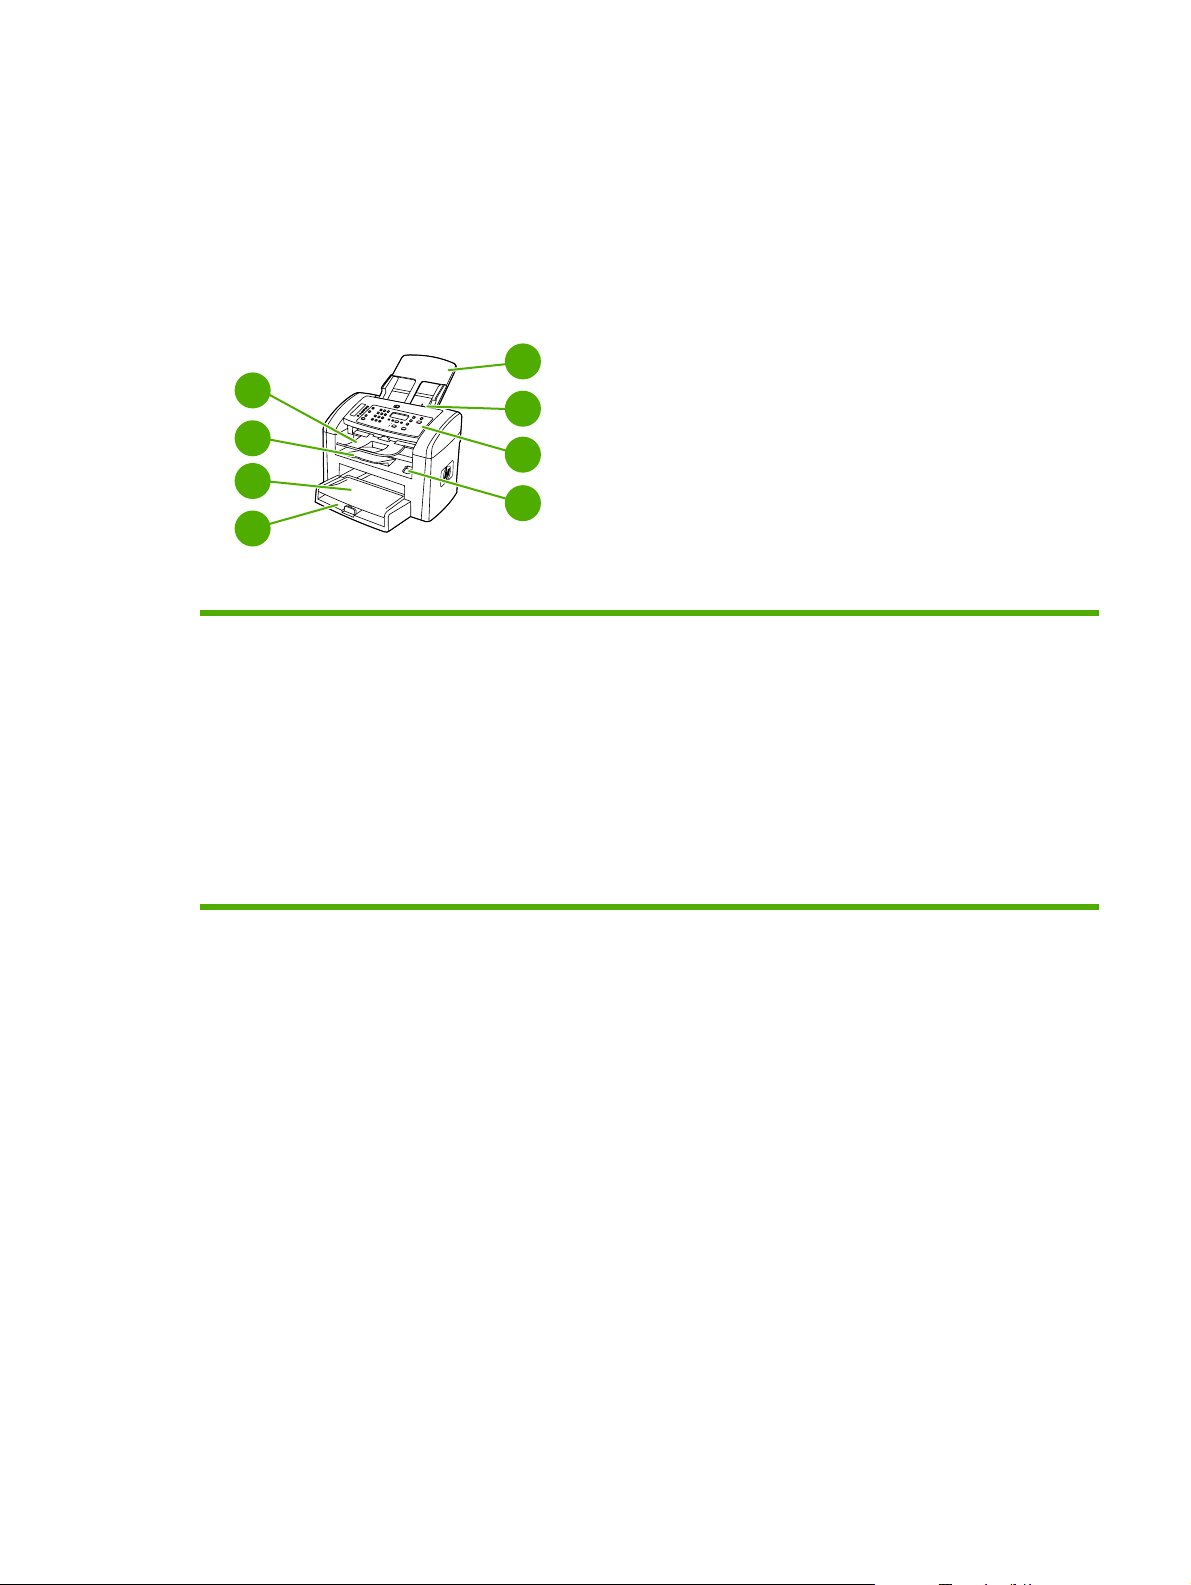
All-in-one parts
Before using the all-in-one, familiarize yourself with the parts of the all-in-one
HP LaserJet 3050 all-in-one parts
Front view
4
3
2
1
1 Tray 1
2 Priority input slot
3 Output bin
5
6
7
8
4 Automatic document feeder (ADF) output bin
5 ADF input tray
6 ADF media lever
7 Control panel
8 Cartridge-door release
ENWW All-in-one parts 7
Page 26
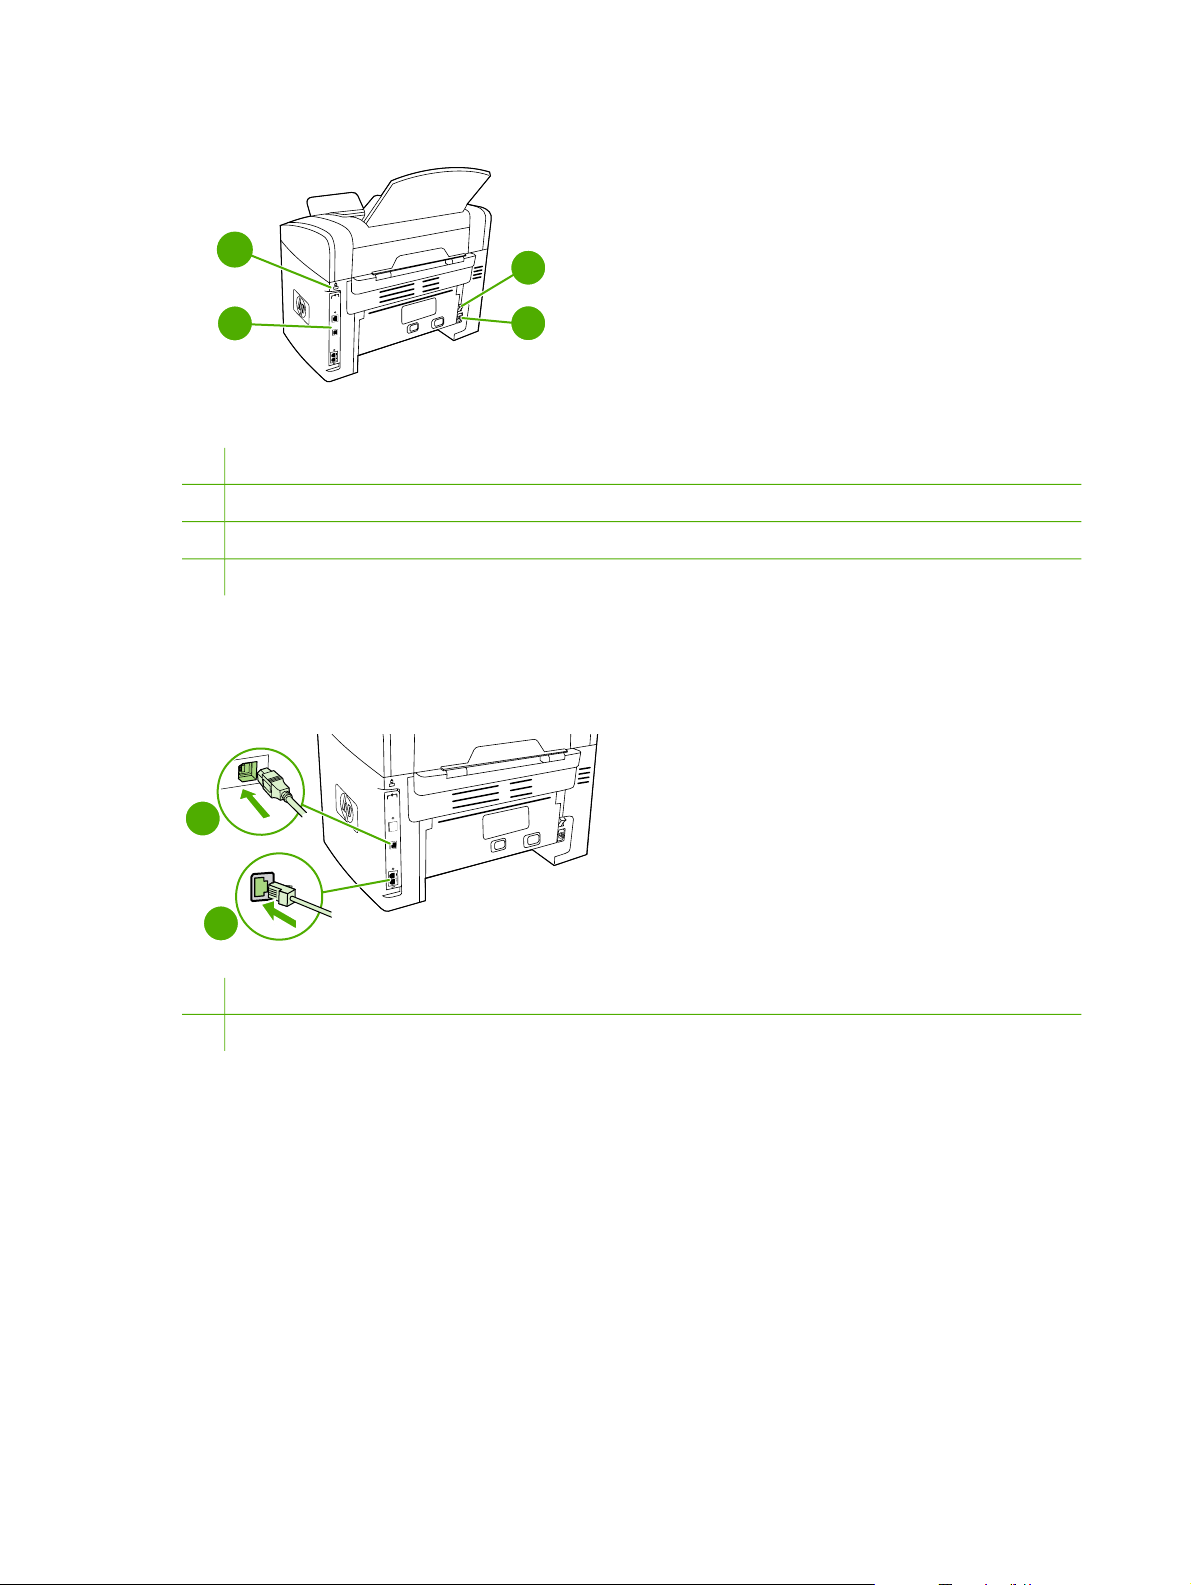
Back view
10
11
9
Interface ports
9
10
Security-lock slot
11
Power switch.
Power receptacle
12
Interface ports
The HP LaserJet 3050 all-in-one contains one Hi-Speed USB 2.0 port and fax ports.
12
1
2
Hi-Speed USB 2.0 port
1
Fax ports
2
8 Chapter 1 All-in-one basics ENWW
Page 27

Control panel
1
1 Fax controls. Use the fax controls to change commonly used fax settings. For information about using the fax
controls, see
2 Alphanumeric buttons. Use the alphanumeric buttons to type data into the all-in-one control-panel display and dial
telephone numbers for faxing. For information about using alphanumeric key characters, see
3 Menu and cancel controls. Use these controls to select menu options, determine the all-in-one status, and cancel
the current job.
4 Copy controls. Use these controls to change commonly used default settings and to start copying. For instructions
about copying, see
5 Scan controls. Use these controls to scan to e-mail or to a folder. For instructions about scanning, see Scan.
2 3 5
Fax.
Copy.
4
Fax.
ENWW All-in-one parts 9
Page 28
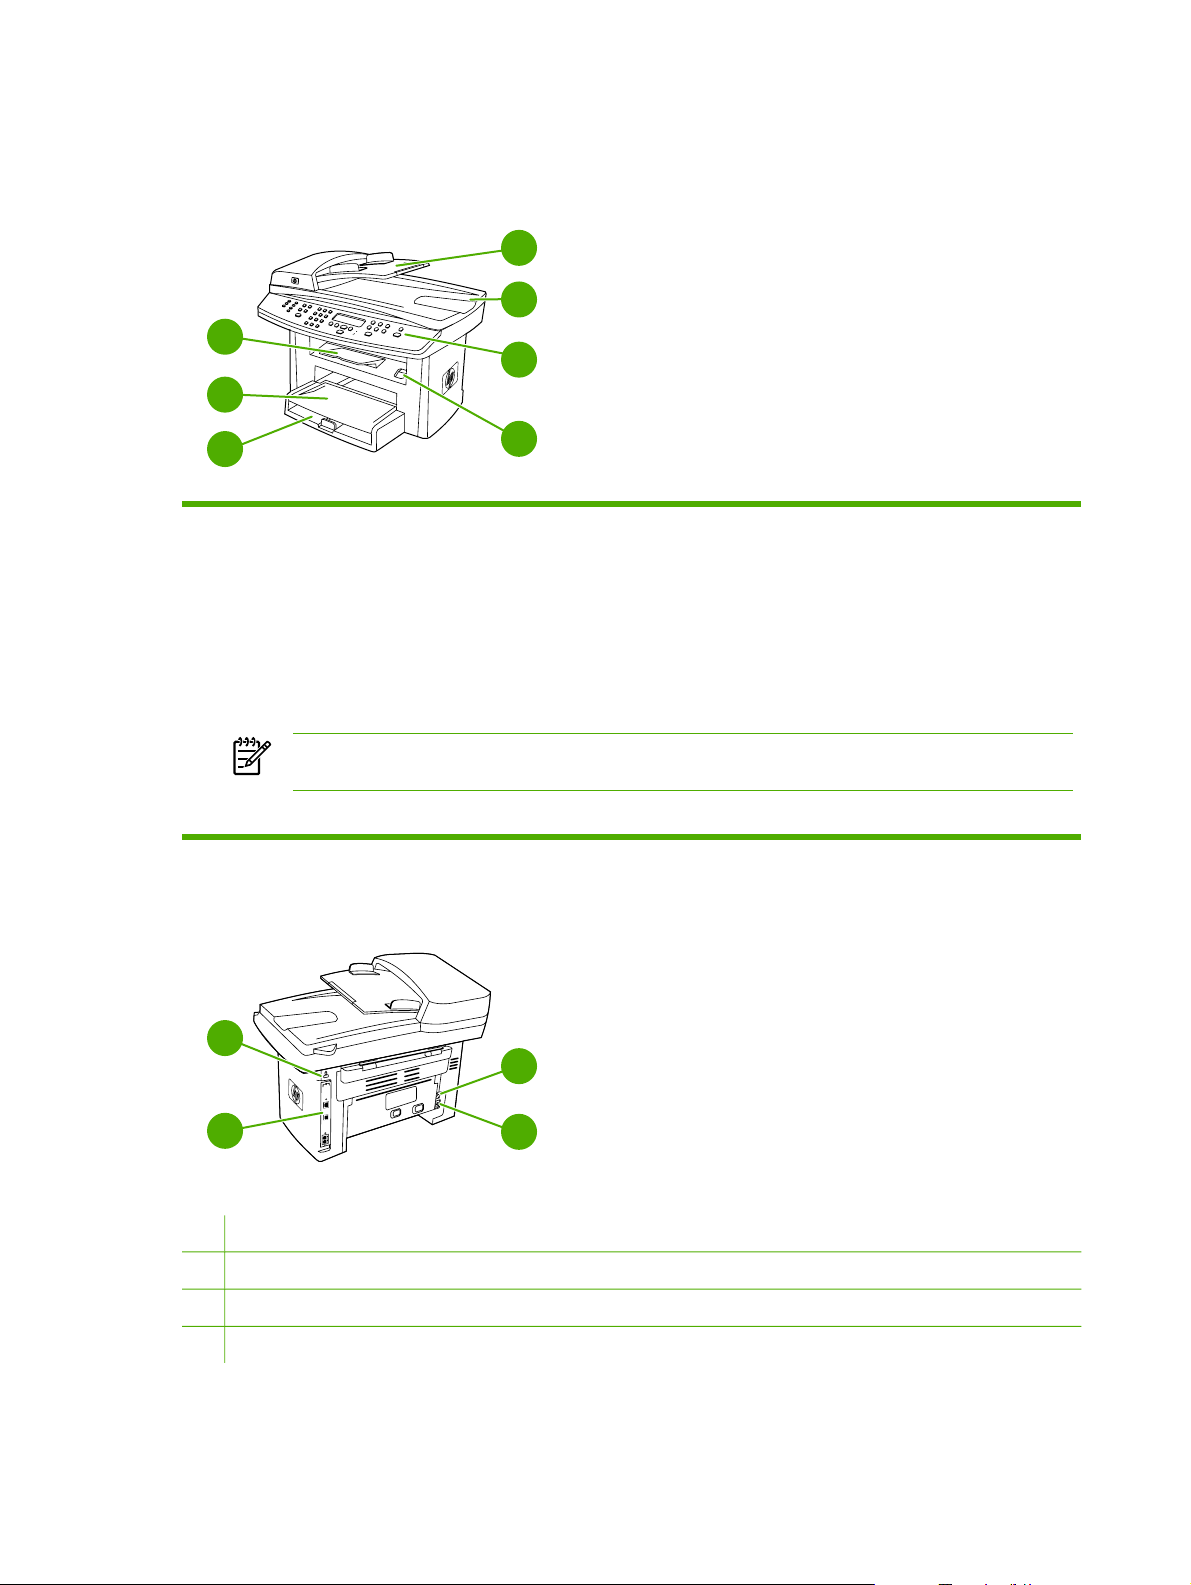
HP LaserJet 3052/3055 all-in-one parts
Front view
4
5
3
6
2
1
1 Tray 1
2 Priority input slot
3 Output bin
4 Automatic document feeder (ADF) input tray
5 ADF output bin
6 Control panel
NOTE The control panel for the HP LaserJet 3055 all-in-one, with fax controls, is shown. The control panel
for the HP LaserJet 3052 all-in-one does not have fax controls.
7 Cartridge-door release
7
Back view
9
10
8
8 Interface ports
9
Security-lock slot
10
Power connector
11 Power receptacle
10 Chapter 1 All-in-one basics ENWW
11
Page 29
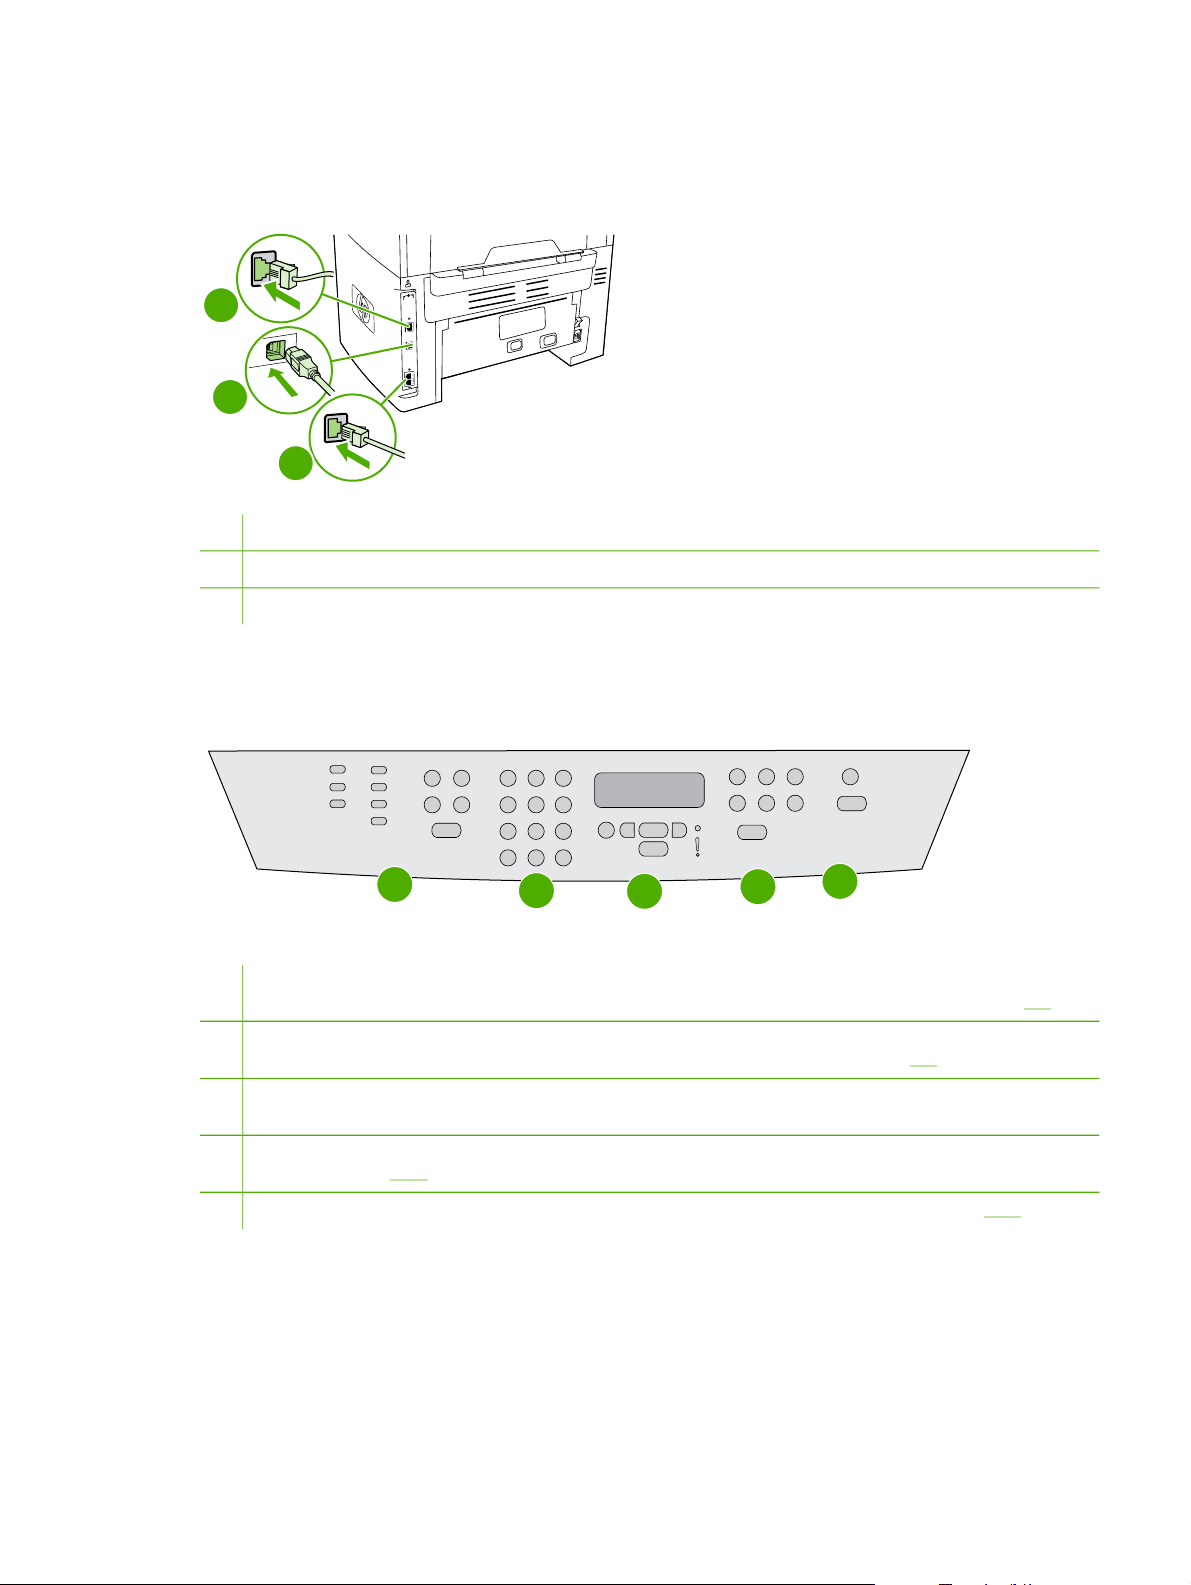
Interface ports
The HP LaserJet 3052/3055 all-in-one has two interface ports: a 10/100Base-T (RJ-45) network port
and a Hi-Speed USB 2.0 port. The HP LaserJet 3055 all-in-one also has fax ports.
1
2
3
1 Network port
2
Hi-Speed USB 2.0 port
3
Fax ports (HP LaserJet 3055 all-in-one only)
Control panel
1
1 Fax controls (HP LaserJet 3055 all-in-one only; the HP LaserJet 3052 all-in-one does not have fax controls).
Use the fax controls to change commonly used fax settings. For information about using the fax controls, see
2 Alphanumeric buttons. Use the alphanumeric buttons to type data into the all-in-one control-panel display and dial
telephone numbers for faxing. For information about using alphanumeric key characters, see
3
Menu and cancel controls. Use these controls to select menu options, determine the all-in-one status, and cancel
the current job.
4
Copy controls. Use these controls to change commonly used default settings and to start copying. For instructions
about copying, see
5
Scan controls. Use these controls to scan to e-mail or to a folder. For instructions about scanning, see
Copy.
2
3
4
5
Fax.
Fax.
Scan.
ENWW All-in-one parts 11
Page 30
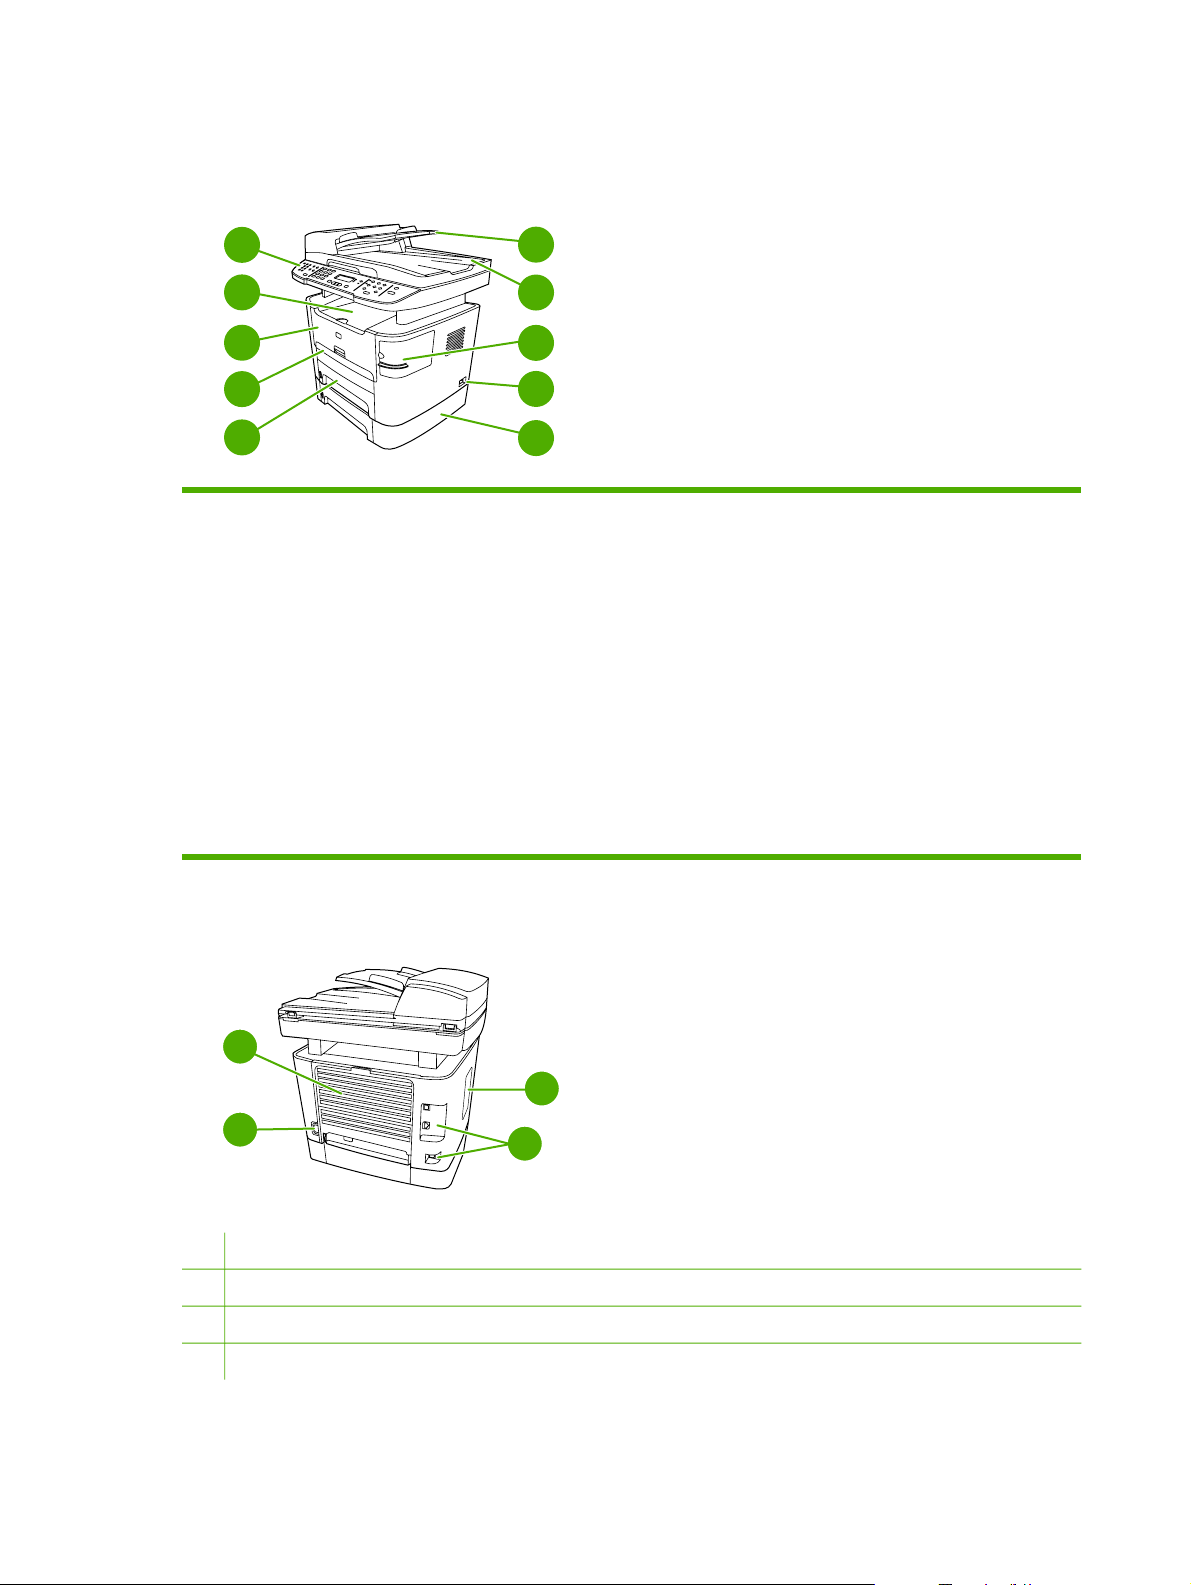
HP LaserJet 3390/3392 all-in-one parts
Front view
5
4
3
2
1
1 Tray 2
2 Single-sheet priority input slot (tray 1)
3 Print-cartridge door
4 Top (face-down) output bin
5 Control panel
6 Automatic document feeder (ADF) input tray
7 Automatic document feeder (ADF) output bin
8 Convenience stapler (HP LaserJet 3392 all-in-one only)
9
Power switch
6
7
8
9
10
10 Optional tray 3 (standard on HP LaserJet 3392 all-in-one; optional on HP LaserJet 3390 all-in-one).
Back view
12
13
11
11 Power connector
12 Rear output door (face-up output bin for the straight-through output path)
13 DIMM door
14 Interface ports
14
12 Chapter 1 All-in-one basics ENWW
Page 31

Interface ports
The HP LaserJet 3390/3392 all-in-one has two interface ports: a 10/100Base-T (RJ-45) network port
and a Hi-Speed USB 2.0 port. The HP LaserJet 3390/3392 all-in-one also has fax ports.
1
1
Hi-Speed USB 2.0 port
2
Network port
3
Fax ports
2
3
Control panel
Use the following illustration to identify the all-in-one control-panel components.
1
Shift
05
06
07
08
1
Fax controls. Use the fax controls to change commonly used fax settings. For information about using the fax
controls, see
2
Alphanumeric buttons. Use the alphanumeric buttons to type data into the all-in-one control-panel display and dial
telephone numbers for faxing. For information about using alphanumeric key characters, see
Fax.
2
3
4
5
Fax.
3
Menu and cancel controls. Use these controls to select menu options, determine the all-in-one status, and cancel
the current job.
4
Copy controls. Use these controls to change commonly used default settings and to start copying. For instructions
about copying, see
5
Scan controls. Use these controls to scan to e-mail or to a folder. For instructions about scanning, see
Copy.
Scan.
ENWW All-in-one parts 13
Page 32

14 Chapter 1 All-in-one basics ENWW
Page 33

2 Software
Software installation
●
●
Printer drivers
Software for Windows
●
Software for Macintosh
●
ENWW 15
Page 34

Software installation
If your computer meets the recommended minimum requirements, you have two options when
installing the software from the CDs that came with the all-in-one.
Typical installation
The following software is included with a typical installation:
HP ToolboxFX
●
HP LaserJet Scan program and driver
●
HP LaserJet Fax
●
Readiris OCR (not installed with other software; separate installation is required)
●
Printer drivers (PCL 6, PCL 5e, PostScript Level 2 emulation)
●
HP Director (Macintosh)
●
HP All-in-One Setup Assistant (Macintosh)
●
Minimum installation
The following software is included with a minimum installation:
PCL 6 printer driver
●
HP LaserJet Scan program and driver
●
NOTE Minimum installation supports faxing by using the control panel.
16 Chapter 2 Software ENWW
Page 35

Printer drivers
The product comes with software that allows the computer to communicate with the product (by
using a printer language). This software is called a printer driver. Printer drivers provide access to
product features, such as printing on custom-sized paper, resizing documents, and inserting
watermarks.
Supported printer drivers
The following printer drivers are provided for the product. If the printer driver that you want is not on
the product CD or is not available on
program that you are using, and request a driver for the product.
NOTE The most recent drivers are available at www.hp.com. Depending on the
configuration of Windows-based computers, the installation program for the product software
automatically checks the computer for Internet access in order to obtain the latest drivers.
www.hp.com, contact the manufacturer or distributor of the
Operating system
Microsoft® Windows® 98
Windows Millennium (Me)
Windows 2000
Windows® XP
Windows Server 2003
Mac OS X V10.3 and
Mac OS X V10.4
1
Not all product features are available from all drivers or operating systems. See the context-sensitive help in the printer
driver for available features.
2
A Macintosh printer driver and the necessary PostScript (PS) Printer Description files (PPDs) are included with the all-inone.
1
Fax driver PCL 6 printer
X
X
X X X
driver
X
X
X
X
X
PCL 5 printer
driver
X
X
X
X
X
PS printer
driver
X
X
X
X
X
PPD2 printer
driver
Additional drivers
The following drivers are not included on the CD, but are available from the Internet.
UNIX® model scripts.
●
Linux drivers.
●
Windows XP 64-bit drivers
●
®
You can obtain Model Scripts for UNIX
and Linux by downloading them from the Internet or by
requesting them from an HP-authorized service or support provider. For Linux support see
www.hp.com/go/linux. For UNIX support see www.hp.com/go/jetdirectunix_software.
ENWW Printer drivers 17
Page 36

Select the correct printer driver
Select a printer driver based on the operating system that you are using and the way that you use
the product. See the printer-driver Help for the features that are available. For information about
gaining access to the printer-driver Help, see Printer-driver Help.
The PCL 6 printer driver can provide the best overall performance and access to your printer
●
features.
The PCL 5 printer driver is recommended for general office monochrome and color printing.
●
Use the PostScript (PS) driver if you are printing primarily from PostScript-based programs such
●
as Adobe PhotoShop
PS flash font support.
NOTE The product automatically switches between PS and PCL printer languages.
®
and CorelDRAW®, for compatibility with PostScript Level 3 needs, or for
Printer-driver Help (Windows)
Printer-driver Help is separate from program Help. The printer-driver help provides explanations for
the buttons, checkboxes, and drop-down lists that are in the printer driver. It also includes
instructions for performing common printing tasks, such as printing on both sides, printing multiple
pages on one sheet, and printing the first page or covers on different paper.
Activate the printer-driver Help screens in one of the following ways:
Click the Help button.
●
● Press the F1 key on the computer keyboard.
Click the question-mark symbol in the upper-right corner of the printer driver.
●
Right-click on any item in the driver, and then click What's This?.
●
18 Chapter 2 Software ENWW
Page 37

Gaining access to the printer drivers
Use one of the following methods to open the printer drivers from your computer:
Operating System To change the settings for all
print jobs until the software
program is closed
Windows 98 and
Windows Milennium
Edition (Me)
Windows 2000, XP,
and Server 2003
Mac OS X V10.3
and
Mac OS X V10.4
1. On the File menu in the
software program, click
Print.
2. Select the name of the
printer, and then click
Properties.
The steps can vary; this
procedure is most common.
1. On the File menu in the
software program, click
Print.
2. Select the name of the
printer, and then click
Properties or
Preferences.
The steps can vary; this
procedure is most common.
1. On the File menu, click
Print.
2. Change the settings that
you want on the various
pop-up menus.
To change the print job
default settings (for example,
turn on Print on Both Sides
by default)
1. Click Start, click Settings,
and then click Printers.
2. Right-click the printer icon,
and then select Properties.
1. Click Start, click Settings,
and then click Printers or
Printers and Faxes.
2. Right-click the printer icon,
and then select Printing
Preferences.
1. On the File menu, click
Print.
2. Change the settings that
you want on the various
pop-up menus.
3. On the Presets pop-up
menu, click Save as and
type a name for the preset.
These settings are saved in the
Presets menu. To use the new
settings, you must select the
saved preset option every time
you open a program and print.
To change the configuration
settings (for example, add a
tray or enable/disable Manual
Duplexing)
1. Click Start, click Settings,
and then click Printers.
2. Right-click the printer icon,
and then select Properties.
3. Click the Configure tab.
1. Click Start, click Settings,
and then click Printers or
Printers and Faxes.
2. Right-click the printer icon,
and then select Properties.
3. Click the Device Settings
tab.
1. Open Printer Setup
Utility by selecting the
hard drive, clicking
Applications, clicking
Utilities, then double-
clicking Printer Setup
Utility.
2. Click on the print queue.
3. On the Printers menu,
click Show Info.
4. Click the Installable
Options menu.
What other software is available?
The all-in-one CDs include the HP Scanning software. See the Readme file that is provided on the allin-one CD for additional included software and for supported languages.
ENWW Printer drivers 19
Page 38

Software for Windows
When you install the software for Windows, you can directly connect the all-in-one to a computer by
using a USB cable, or you can connect the all-in-one to the network by using the internal print server.
See the getting started guide for installation instructions, and see the Readme file for the latest
software information.
The following software is available to all all-in-one users, whether you connect the all-in-one directly
to a computer by using a USB cable or to the network by using a print server.
Software components for Windows
HP ToolboxFX
You must perform a typical installation to use HP ToolboxFX.
HP ToolboxFX provides links to all-in-one status information and help information, such as this user
guide, and tools for diagnosing and solving problems. See
Embedded Web server (EWS)
The EWS is a Web-based interface that provides simple access to all-in-one status and
configurations, including network configurations and Smart Printing Supplies (SPS) functionality.
You can gain access to the EWS through the network connection to the all-in-one. Type the all-inone IP address in a Web browser to open the all-in-one EWS homepage. From the homepage, you
can use the tabs and left navigation menu to check the status of the all-in-one, configure the all-inone, or check the status of the supplies.
HP ToolboxFX for more information.
Supported browsers include:
Internet Explorer 5.0 or later
●
Netscape Navigator 4.75 or later
●
Opera 6.05 or later
●
Safari 1.2 or later
●
Using Add or Remove Programs to uninstall
Use the Add or Remove Programs method in Windows to remove the all-in-one software. This
method does not require you to have the software CD.
1. Click Start, point to Settings, and click Control Panel.
● In Windows XP, click Start, and then click Control Panel
2. Double-click Add or Remove Programs.
3. Scroll through the list of software programs and click HP LaserJet 3390/3392 all-in-one.
4. Click Remove.
20 Chapter 2 Software ENWW
Page 39

Software for Macintosh
For Mac OS X V10.3 and Mac OS X V10.4, use Print Center to print.
The all-in-one includes the following software for Macintosh computers.
NOTE For Macintosh computers, HP ToolboxFX is not supported.
HP Director
HP Director is a software program that is used when working with documents. When the document is
loaded into the automatic document feeder (ADF) and the computer is connected directly to the all-inone, HP Director appears on the computer screen to initiate faxing, scanning, or changing settings
on the all-in-one through Macintosh Configure Device.
Also included is the HP all-in-one Setup Assistant, which sets up the fax and print queues.
Macintosh Configure Device (Mac OS X V10.3 and Mac OS X V10.4)
Macintosh Configure Device is a Web-based program that provides access to information about the
all-in-one (for example, information about supplies status and all-in-one settings). Use Macintosh
Configure Device to monitor and manage the all-in-one from the computer
NOTE You must perform a complete software installation to use Macintosh Configure Device.
Check the all-in-one status and print information pages.
●
Check and change all-in-one system settings.
●
Check default print settings.
●
Check and change fax settings, including fax send, fax receive, fax phone book and speed-dial
●
settings, and fax reports.
Check and change network settings, including IP configuration, Advanced, mDNS, SNMP,
●
network configuration, and password.
You can view Macintosh Configure Device when the all-in-one is directly connected to your computer
or when it is connected to the network.
NOTE You do not have to have Internet access to open and use Macintosh Configure Device.
To view Macintosh Configure Device when the all-in-one is directly connected to the computer
1. Open HP Director by clicking the HP Director icon in the dock.
2. In HP Director, click Settings.
3. Select Configure device to open the Macintosh Configure Device home page in a browser.
ENWW Software for Macintosh 21
Page 40

To view Macintosh Configure Device when the all-in-one is connected to a network
1. Open one of the following supported Web browsers:
Safari 1.2 or later
●
Microsoft Internet Explorer 5.0 or later
●
Netscape Navigator 4.75 or later
●
Opera 6.05 or later
●
2. Enter the IP address of the all-in-one into the Web browser to open the Macintosh Configure
Device home page.
PDEs (Mac OS X V10.3 and Mac OS X V10.4)
PDEs are code plug-ins that provide access to all-in-one features, such as information about the
number of copies, two-sided printing, and quality settings. An installation program for the PDEs and
other software is provided on the HP LaserJet 3390/3392 all-in-one CD for Macintosh.
Installing software for Macintosh
This section describes how to install Macintosh printing system software.
Installing Macintosh printing system software for direct connections (USB)
This section explains how to install the printing system software for Mac OS X V10.3 and
Mac OS X V10.4.
The Apple PostScript driver must be installed in order to use the PPD files. Use the Apple PostScript
driver that came with your Macintosh computer.
To install the printing system software
1. Connect a USB cable between the USB port on the printer and the USB port on the computer.
Use a standard 2-meter (6.56-foot) USB cable.
2. Insert the printer CD into the CD-ROM drive and run the installer.
3. Double-click the CD icon on the desktop
4. Double-click the Installer icon.
5. Follow the instructions on the computer screen.
6. USB queues are created automatically when the printer is attached to the computer. However,
the queue will use a generic PPD if the installer has not been run before the USB cable is
connected. To change the queue PPD, open the Print Center or Printer Setup Utility, select the
correct printer queue, and then click Show Info to open the Printer Info dialog box. In the popup menu, select Printer Model, and then, in the pop-up menu in which Generic is selected,
select the correct PPD for the printer.
7. Print a test page or a page from any software program to make sure that the all-in-one software
is correctly installed.
22 Chapter 2 Software ENWW
Page 41

If installation fails, reinstall the all-in-one software. If this fails, see the installation notes or latebreaking readme files on the CD or the flyer that came in the box, or go to the appropriate
support Web site for help or more information (see
HP Customer Care).
Installing Macintosh printing system software for networks
To install printer drivers for Mac OS X V10.3 and Mac OS X V10.4
1. Connect the network cable between the HP LaserJet 3052/3055/3390/3392 all-in-one and a
network port.
2. Insert the CD into the CD-ROM drive, and then double-click the CD icon on the desktop.
3. Double-click the Installer icon in the HP LaserJet Installer folder.
4. Follow the HP all-in-one setup assistant instructions on the computer screen.
NOTE The setup assistant should prompt you to restart the computer and to provide
the IP address of the all-in-one to complete the network installation.
To remove software from Macintosh operating systems
To remove the printing software from your Macintosh computer, open the Finder, navigate to
Applications/HP LaserJet aio/HP Uninstaller, and then run the uninstaller program.
ENWW Software for Macintosh 23
Page 42

24 Chapter 2 Software ENWW
Page 43

3 Media specifications
General guidelines
●
●
Choosing paper and other media
Guidelines for using media
●
Supported media weights and sizes
●
Printing and storage environment
●
ENWW 25
Page 44

General guidelines
Some media might meet all of the guidelines in this manual and still not produce satisfactory results.
This problem might be the result of improper handling, unacceptable temperature and humidity
levels, or other variables over which Hewlett-Packard has no control.
Before purchasing large quantities of print media, always test a sample and make sure that the print
media meets the requirements specified in this user guide and in the HP LaserJet Printer Family
Print Media Guide, which you can view on the Web at
ordering information, see
CAUTION Using media that does not meet HP specifications can cause problems for the all-
in-one, requiring repair. This repair is not covered by the Hewlett-Packard warranty or service
agreements.
The all-in-one accepts a variety of media, such as cut-sheet paper (including up to 100% recycledfiber-content paper), envelopes, labels, transparencies, LaserJet glossy paper, HP LaserJet Tough
paper, and custom-size paper. Properties such as weight, composition, grain, and moisture content
are important factors that affect performance and output quality. Media that does not meet the
guidelines outlined in this manual can cause the following problems:
Poor print quality
●
Increased jams
●
Premature wear on the all-in-one, requiring repair
●
www.hp.com/support/ljpaperguide. For
Accessories and ordering information.
Choosing paper and other media
The HP LaserJet all-in-one produces documents that have excellent print quality. You can print on a
variety of media, such as paper (including up to 100% recycled fiber content paper), envelopes,
labels, transparencies, and custom-size media.
Properties such as weight, grain, and moisture content are important factors that affect performance
and quality. To achieve the best possible print quality, only use high-quality media that is designed
for laser printers. See
NOTE Always test a sample of the media before you purchase large quantities. Your media
supplier should understand the requirements specified in the HP LaserJet Printer Family Print
Media Guide (HP part number 5963-7863). See
information.
HP media
HP recommends that you use HP LaserJet media in the all-in-one.
Guidelines for using media for detailed paper and media specifications.
Guidelines for using media for more
26 Chapter 3 Media specifications ENWW
Page 45

Media to avoid
The all-in-one can handle many types of media. Using media that is outside the specifications
degrades print quality and increases the chance of jams occurring.
Do not use media that is too rough.
●
Do not use media that contains cutouts or perforations other than standard 3-hole punched
●
paper.
Do not use multipart forms.
●
● Do not use paper that contains a watermark if you are printing solid patterns.
Media that can damage the all-in-one
In rare circumstances media can damage the all-in-one. Avoid the following types of media to
prevent possible damage:
Do not use media with staples attached.
●
Do not use transparencies designed for inkjet printers or other low-temperature printers. Use
●
only transparencies that are specified for use with HP LaserJet printers.
Do not use photo paper intended for inkjet printers.
●
Do not use paper that is embossed or coated and is not designed for the temperature of the
●
image-fuser. Select media that can tolerate temperatures of 200°C (392°F) for 0.1 second.
HP manufactures a media that is designed for the all-in-one.
Do not use letterhead paper that was produced with low-temperature dyes or thermography.
●
Preprinted forms or letterhead must use inks that can tolerate temperatures of 200°C (392°F)
for 0.1 second.
Do not use any media that produces emissions, or that melts, offsets, or discolors when
●
exposed to 200°C (392°F) for 0.1 second.
To order HP LaserJet printing supplies, go to
ghp/buyonline.html/ worldwide.
www.hp.com/go/ljsupplies in the U.S. or to www.hp.com/
ENWW Choosing paper and other media 27
Page 46

Guidelines for using media
The following sections provide guidelines and instructions for printing on transparencies, envelopes,
and other special media. Guidelines and specifications are included to help you select media that
optimizes print quality and avoid media that can cause jams or damage the all-in-one.
Paper
For best results, use conventional 80-g/m2 or 20 lb paper. Make sure that the paper is of good quality
and free of cuts, nicks, tears, spots, loose particles, dust, wrinkles, voids, and curled or bent edges.
If you are unsure about what type of paper you are loading (such as bond or recycled), check the
label on the package of paper.
Some paper causes print quality problems, jamming, or damage to the all-in-one.
Table 3-1 Paper usage
Symptom Problem with paper Solution
Poor print quality or toner adhesion
Problems with feeding
Dropouts, jamming, or curl Stored improperly Store paper flat in its moistureproof
Increased gray background shading Might be too heavy Use lighter paper.
Excessive curl
Problems with feeding
Jamming or damage to all-in-one Cutouts or perforations Do not use paper with cutouts or
Problems with feeding Ragged edges Use good quality paper.
Too moist, too rough, too smooth, or
embossed
Too moist, wrong grain direction, or
short-grain construction
Try another kind of paper that has a
smoothness rating of 100-250 Sheffield
and has 4-6 % moisture content.
Check the all-in-one and make sure
that the appropriate media type has
been selected.
wrapping.
Use long-grain paper.
Use the straight-through output path
(HP LaserJet 3390/3392 all-in-one only).
Check the all-in-one and make sure
that the appropriate media type has
been selected.
perforations.
NOTE The all-in-one uses heat and pressure to fuse toner to the paper. Make sure that any
colored paper or preprinted forms use inks that are compatible with the fuser temperature of
200°C (392°) for 0.1 second.
Do not use letterhead that is printed with low-temperature inks, such as those used in some
types of thermography.
Do not use raised letterhead.
Do not use transparencies that are designed for inkjet printers or other low-temperature
printers. Use only transparencies that are specified for use with HP LaserJet printers.
28 Chapter 3 Media specifications ENWW
Page 47

Labels
For the HP LaserJet 3050/3052/3055 all-in-one, HP recommends that you print labels from the
priority input slot. For the HP LaserJet 3390/3392 all-in-one, HP recommends that you print labels
from the single-sheet priority input slot (tray 1) and use the straight-through output path. See
media into the input trays for more information.
CAUTION Do not feed a sheet of labels through the all-in-one more than once. The
adhesive degrades and might damage the all-in-one.
Label construction
When selecting labels, consider the quality of the following components:
Adhesives: The adhesive material should be stable at 200°C (392°F), the maximum fuser
●
temperature.
Arrangement: Only use labels with no exposed backing between them. Labels can peel off
●
sheets that have spaces between the labels, causing serious jams.
Curl: Before printing, labels must lie flat with no more than 13 mm (0.5 inch) of curl in any
●
direction.
Condition: Do not use labels with wrinkles, bubbles, or other indications of separation.
●
Loading
Transparencies
Transparencies must be able to withstand 200°C (392°F), the all-in-one maximum fuser temperature.
CAUTION You can print transparencies from a 250-sheet tray (tray 1 on the HP LaserJet
3050/3052/3055 all-in-one; tray 2 or optional tray 3 on the HP LaserJet 3390/3392 all-in-one).
However, do not load more than 75 transparencies at one time into the tray.
ENWW Guidelines for using media 29
Page 48

Envelopes
For the HP LaserJet 3050/3052/3055 all-in-one, HP recommends that you print envelopes from the
priority input slot. For the HP LaserJet 3390/3392 all-in-one, HP recommends that you print
envelopes from the single-sheet priority input slot (tray 1) and use the straight-through output path.
Loading media into the input trays for more information.
See
Envelope construction
Envelope construction is critical. Envelope fold lines can vary considerably, not only between
manufacturers, but also within a box from the same manufacturer. Successful printing on envelopes
depends upon the quality of the envelopes. When selecting envelopes, consider the following
components:
●
Weight: The weight of the envelope paper should not exceed 90 g/m
result.
Construction: Before printing, envelopes should lie flat with less than 6 mm (0.25 inch) of curl,
●
and should not contain air. Envelopes that trap air can cause problems. Do not use envelopes
that contain clasps, snaps, tie strings, transparent windows, holes, perforations, cutouts,
synthetic materials, stamping, or embossing. Do not use envelopes with adhesives that require
pressure to seal them.
Condition: Make sure that the envelopes are not wrinkled, nicked, or otherwise damaged.
●
Make sure that the envelopes do not have any exposed adhesive.
2
(24 lb), or jamming might
Envelopes with double-side seams
An envelope with double-side-seam construction has vertical seams at both ends of the envelope
rather than diagonal seams. This style might be more likely to wrinkle. Make sure that the seam
extends all the way to the corner of the envelope as shown in the following illustration:
1
2
1 Acceptable envelope construction
2 Unacceptable envelope construction
30 Chapter 3 Media specifications ENWW
Page 49

Envelopes with adhesive strips or flaps
Envelopes with a peel-off adhesive strip or with more than one flap that folds over to seal must use
adhesives compatible with the heat and pressure in the all-in-one: 200°C (392°F). The extra flaps
and strips might cause wrinkling, creasing, or jams.
Envelope storage
Proper storage of envelopes contributes to good print quality. You should store envelopes flat. If air
is trapped in an envelope, creating an air bubble, the envelope might wrinkle during printing.
Card stock and heavy media
You can print many types of card stock from the input tray, including index cards and postcards.
Some card stock performs better than others because its construction is better suited for feeding
through a laser printer. The HP LaserJet 3390/3392 all-in-one is designed to accommodate card
stock by opening the rear output door to use the straight-through output path.
2
For optimum performance, do not use paper heavier than 157 g/m
might cause misfeeds, stacking problems, jams, poor toner fusing, poor print quality, or excessive
mechanical wear.
NOTE You might be able to print on heavier paper if you do not fill the input tray to capacity
and if you use paper with a smoothness rating of 100-180 Sheffield.
(42 lb). Paper that is too heavy
Card stock construction
●
Smoothness: 135-157 g/m
100-180 Sheffield. 60-135 g/m
100-250 Sheffield.
Construction: Card stock should lie flat with less than 5 mm (0.2 inch) of curl.
●
Condition: Make sure that the card stock is not wrinkled, nicked, or otherwise damaged.
●
2
(36-42 lb) card stock should have a smoothness rating of
2
(16-36 lb) card stock should have a smoothness rating of
Card stock guidelines
Set margins at least 2 mm (0.08 inch) away from the edges.
ENWW Guidelines for using media 31
Page 50

Letterhead and preprinted forms
Letterhead is premium paper that often has a watermark, sometimes uses cotton fiber, and is
available in a wide range of colors and finishes with matching envelopes. Preprinted forms can be
made of a broad spectrum of paper types ranging from recycled to premium.
Many manufacturers now design these grades of paper with properties optimized for laser printing
and advertise the paper as laser compatible or laser guaranteed. Some of the rougher surface
finishes, such as cockle, laid, or linen, might require the special fuser modes that are available on
some printer models to achieve adequate toner adhesion.
NOTE Some page-to-page variation is normal when printing with laser printers. This
variation cannot be observed when printing on plain paper. However, this variation is obvious
when printing on preprinted forms because the lines and boxes are already placed on the page.
To avoid problems when using preprinted forms, embossed paper, and letterhead, observe the
following guidelines:
Avoid using low-temperature inks (the kind used with some types of thermography).
●
Use preprinted forms and letterhead paper that have been printed by offset lithography or
●
engraving.
Use forms that have been created with heat-resistant inks that will not melt, vaporize, or release
●
emissions when heated to 200°C (392°F) for 0.1 second. Typically, oxidation-set or oil-based
inks meet this requirement.
● When the form is preprinted, be careful not to change the moisture content of the paper, and do
not use materials that change the paper's electrical or handling properties. Seal the forms in
moisture-proof wrap to prevent moisture changes during storage.
Avoid processing preprinted forms that have a finish or coating.
●
Avoid using heavily embossed or raised-letterhead papers.
●
● Avoid papers that have heavily textured surfaces.
Avoid using offset powders or other materials that prevent printed forms from sticking together.
●
32 Chapter 3 Media specifications ENWW
Page 51

Supported media weights and sizes
For optimum results, use conventional 75 to 90 g/m2 (20 to 24 lb) photocopy paper. Verify that the
paper is of good quality and is free of cuts, nicks, tears, spots, loose particles, dust, wrinkles, curls,
and bent edges.
NOTE The all-in-one supports a wide range of standard and custom sizes of print media.
The capacity of trays and bins can vary depending on media weight and thickness and on
environmental conditions. Use only transparencies that are designed for use with HP LaserJet
printers. Inkjet and monochrome transparencies are not supported for the all-in-one.
Table 3-2 Priority input slot specifications, HP LaserJet 3050/3052/3055 all-in-one
Media
Dimensions
1
Paper Minimum: 76 x 127 mm
(3 x 5 inches)
Weight Capacity
60 to 163 g/m2 (16 to 43 lb) Up to 10 sheets of 80 g/m2 or 20
lb paper
2
Maximum: 216 x 356 mm (8.5
x 14 inches)
HP Cover paper
3
Same as the preceding listed
203 g/m2 (75 lb cover)
1 sheet
minimum and maximum sizes
Transparencies and opaque film
Thickness: 0.10 to 0.13 mm
1 transparency
(3.9 to 5.1 mils)
Labels
4
Thickness: up to 0.23 mm (up
1 sheet of labels
to 9 mils)
Envelopes
1
The all-in-one supports a wide range of standard and custom sizes of print media. Check the printer driver for supported sizes.
2
Capacity can vary depending on media weight and thickness, and environmental conditions.
3
Hewlett-Packard does not guarantee results when printing with other types of heavy paper.
4
Smoothness: 100 to 250 (Sheffield).
Up to 90 g/m2 (16 to 24 lb)
Up to 10
Table 3-3 Tray 1 specifications, HP LaserJet 3050/3052/3055 all-in-one
Media
Dimensions
1
Minimum size 76 x 127 mm (3.0 x 5.0 inches)
Maximum size
216 x 356 mm (8.5 x 14 inches)
Weight
Capacity
60 to 163 g/m2 (16 to 43 lb) 250 sheets of 80 g/m2 or 20
lb paper
2
Letter 216 x 279 mm (8.5 x 11 inches)
A4 210 x 297 mm (8.3 x 11.7 inches)
Legal 216 x 356 mm (8.5 x 14 inches)
16K (195 x 270 mm) 195 x 270 mm (7.7 x 10.6 inches)
16K (7.75 x 10.75 inch) 197 x 273 mm (7.8 x 10.7 inches)
16K (184 x 260 mm) 184 x 260 mm (7.2 x 10.2 inches)
A5 148 x 210 mm (5.8 x 8.3 inches)
B5 (ISO) 176 x 250 mm (6.9 x 9.9 inches)
B5 (JIS) 182 x 257 mm (7.2 x 10 inches)
ENWW Supported media weights and sizes 33
Page 52

Table 3-3 Tray 1 specifications, HP LaserJet 3050/3052/3055 all-in-one (continued)
Media
Dimensions
1
Weight
Capacity
Executive 191 x 267 mm (7.3 x 10.5 inches)
8.5 x 13 inches 216 x 330 mm (8.5 x 13 inches)
1
The all-in-one supports a wide range of standard and custom sizes of print media. Check the printer driver for supported sizes.
2
Capacity can vary depending on the media weight and thickness, and environmental conditions.
2
Table 3-4 Single-sheet priority input slot specifications, HP LaserJet 3390/3392 all-in-one
Media
Dimensions
1
Paper Minimum: 76 x 127 mm
Weight Capacity
60 to 163 g/m2 (16 to 43 lb)
1 sheet
2
(3 x 5 inches)
Maximum: 216 x 356 mm (8.5
x 14 inches)
HP Cover paper
3
Same as the preceding listed
203 g/m2 (75 lb cover)
1 sheet
minimum and maximum sizes
Transparencies and opaque film
Thickness: 0.10 to 0.13 mm
1 transparency
(3.9 to 5.1 mils)
Labels
4
Thickness: up to 0.23 mm (up
1 sheet of labels
to 9 mils)
Envelopes
1
The all-in-one supports a wide range of standard and custom sizes of print media. Check the printer driver for supported sizes.
2
Capacity can vary depending on media weight and thickness, and environmental conditions.
3
Hewlett-Packard does not guarantee results when printing with other types of heavy paper.
4
Smoothness: 100 to 250 (Sheffield).
Up to 90 g/m2 (16 to 24 lb)
1 envelope
Table 3-5 Tray 2 and optional tray 3 specifications, HP LaserJet 3390/3392 all-in-one
Media
Dimensions
1
Minimum size 148 x 210 mm (5.8 x 8.3 inches)
Maximum size 216 x 356 mm (8.5 x 14 inches)
Weight
Capacity
60 to 105 g/m2 (16 to 28 lb) 250 sheets of 80 g/m2 or 20
lb paper
2
Letter 216 x 279 mm (8.5 x 11 inches)
A4 210 x 297 mm (8.3 x 11.7 inches)
Legal 216 x 356 mm (8.5 x 14 inches)
A5 148 x 210 mm (5.8 x 8.3 inches)
B5 (ISO) 176 x 250 mm (6.9 x 9.9 inches)
B5 (JIS) 182 x 257 mm (7.2 x 10 inches)
Executive 191 x 267 mm (7.3 x 10.5 inches)
8.5 x 13 inches 216 x 330 mm (8.5 x 13 inches)
1
The all-in-one supports a wide range of standard sizes of print media. Check the printer driver for supported sizes.
2
Capacity can vary depending on the media weight and thickness, and environmental conditions.
34 Chapter 3 Media specifications ENWW
Page 53

Table 3-6 Automatic document feeder (ADF) specifications, HP LaserJet 3050 all-in-one
Media Dimensions Weight or thickness Capacity
Minimum size 148 x 105 mm (5.83 x 4.13
Maximum size
1
For legal-sized (216 x 356 mm; 8.5 x 14 inches) and larger media, feed one sheet at a time through the ADF.
inches)
216 x 381 mm (8.5 x 15 inches)
60 to 105 g/m2 (16 to 28 lb) 30 sheets (80 g/m2or 20 lb bond)
1
Table 3-7 ADF specifications, HP LaserJet 3052/3055/3390/3392 all-in-one
Media Dimensions Weight or thickness Capacity
Minimum-size 127 x 127 mm (5 x 5 inches)
Maximum-size 216 x 381 mm (8.5 x 15 inches)
60 to 90 g/m2 (16 to 24 lb bond) 50 sheets (80 g/m2or 20 lb bond)
NOTE When faxing, copying, or scanning using the HP LaserJet 3052/3055/3390/3392 all-in-
one, use the flatbed scanner if the original is fragile, thin, thick, too small for the ADF, or a
photograph. Also use the flatbed scanner for the fit-to-page copying feature. The flatbed
scanner provides the best fax, copy, and scan resolution.
ENWW Supported media weights and sizes 35
Page 54

Printing and storage environment
Ideally, the printing and media-storage environment should be at or near room temperature, and not
too dry or too humid. Remember that paper absorbs and loses moisture rapidly.
Heat works with humidity to damage paper. Heat causes the moisture in paper to evaporate, while
cold causes it to condense on the sheets. Heating systems and air conditioners remove most of the
humidity from a room. As paper is opened and used, it loses moisture, causing streaks and
smudging. Humid weather or water coolers can cause the humidity to increase in a room. As paper is
opened and used it absorbs any excess moisture, causing light print and dropouts. Also, as paper
loses and gains moisture it can distort. This issue can cause jams.
As a result, paper storage and handling are as important as the paper-making process itself. Paper
storage environmental conditions directly affect the feed operation and print quality.
Care should be taken not to purchase more paper than can be easily used in a short time (about
three months). Paper stored for long periods can experience heat and moisture extremes, which can
cause damage. Planning is important to prevent damage to a large supply of paper.
Unopened paper in sealed reams can remain stable for several months before use. Opened
packages of paper have more potential for environmental damage, especially if they are not wrapped
with a moisture-proof barrier.
The media-storage environment should be maintained to ensure optimum performance. The required
condition is 20° to 24°C (68° to 75°F), with a relative humidity of 45% to 55%. The following
guidelines are helpful when evaluating the storage environment:
Print media should be stored at or near room temperature.
●
● The air should not be too dry or too humid.
The best way to store an opened ream of paper is to rewrap it tightly in its moisture-proof
●
wrapping. If the all-in-one environment is subject to extremes, unwrap only the amount of paper
to be used during the day's operation to prevent unwanted moisture changes.
Avoid storing paper and print media near heating and air conditioning vents or near windows
●
and doors that are frequently open.
36 Chapter 3 Media specifications ENWW
Page 55

4 Using the all-in-one
Loading media into the input trays
●
●
Controlling print jobs
Using the all-in-one control panel
●
ENWW 37
Page 56

Loading media into the input trays
The following sections describe how to load media into the different input trays.
CAUTION Printing on wrinkled, folded, or damaged media can cause jams. See Guidelines
for using media for more information.
Loading documents to fax, copy, or scan
Use these instructions to load originals into the all-in-one for scanning. For the best quality scans,
use the flatbed scanner.
To load originals onto the flatbed scanner (HP LaserJet 3052/3055/3390/3392 all-in-one only)
1. Make sure that the automatic document feeder (ADF) contains no media.
2. Lift the flatbed scanner cover.
3. Place the original document face-down on the flatbed scanner with the upper-left corner of the
document at the lower-right corner of the glass.
HP LaserJet
HP LaserJet 3390/3392
4. Gently close the lid.
The document is ready to be faxed/copied/scanned.
To load originals into the automatic document feeder (ADF)
NOTE The ADF capacity for the HP LaserJet 3050 all-in-one is up to 30 sheets of 80 g/m
20 lb media. The ADF capacity for the HP LaserJet 3052/3055/3390/3392 all-in-one is up to
50 sheets of 80 g/m
3052/3055
2
or 20 lb media.
2
or
38 Chapter 4 Using the all-in-one ENWW
Page 57

CAUTION To prevent damage to the all-in-one, do not use an original that contains
correction tape, correction fluid, paper clips, or staples. Also, do not load photographs, small
originals, or fragile originals into the ADF.
1. For the HP LaserJet 3050 all-in-one, insert the top-end of the stack of originals into the ADF
input tray, with the media stack face-down and the first page to be copied at the bottom of the
stack.
Make sure that the ADF media lever is set correctly for single-page or multiple-page documents.
-or-
For the HP LaserJet 3052/3055/3390/3392 all-in-one, insert the top-end of the stack of originals
into the ADF input tray, with the media stack face-up and the first page to be copied on top of
the stack.
2. Slide the stack into the ADF until it does not move any farther.
HP LaserJet 3050
Document Loaded appears on the control-panel display.
3. Adjust the media guides until they are snug against the media.
HP LaserJet 3050
4. The document is now ready to be faxed/copied/scanned.
HP LaserJet 3052/3055
HP LaserJet 3390/3392
HP LaserJet
HP LaserJet 3390/3392
3052/3055
ENWW Loading media into the input trays 39
Page 58

Loading input trays, HP LaserJet 3050/3052/3055 all-in-one
Priority input slot
The priority input slot on the HP LaserJet 3050/3052/3055 all-in-one holds up to 10 sheets of media
up to 163 g/m
forward and the side to be printed facing up. To prevent jams and skewing, always adjust the side
media guides before feeding the media.
2
(43 lb) in weight or one envelope, transparency, or card. Load media with the top
250-sheet input tray (tray 1)
The input tray holds up to 250 pages of 80 g/m2 or 20 lb paper or fewer pages of heavier media
(25 mm (0.9 inch) or less stack height). Load media with the top forward and the side to be printed
facing down. To prevent jams and skewing, always adjust the side and rear media guides.
NOTE When you add new media, make sure that you remove all of the media from the input
tray and straighten the stack of new media. This helps to prevent multiple sheets of media
from feeding into the all-in-one, which can cause jams.
40 Chapter 4 Using the all-in-one ENWW
Page 59

Loading input trays, HP LaserJet 3390/3392 all-in-one
Single-sheet priority input slot (tray 1)
The single-sheet priority input slot on the HP LaserJet 3390/3392 all-in-one holds one sheet of media
up to 163 g/m
forward and the side to be printed facing up. To prevent jams and skewing, always adjust the side
media guides before feeding the media.
NOTE When feeding media into the single-sheet priority input slot on the HP LaserJet
3390/3392 all-in-one, the all-in-one pulls the media partially into the all-in-one and then
pauses. You must wait for the all-in-one to stop before feeding another sheet of media. You
can only feed one sheet of media at a time.
2
(43 lb) in weight or one envelope, transparency, or card. Load media with the top
250-sheet input tray (tray 2 or optional tray 3)
NOTE Tray 3 is optional for the HP LaserJet 3390 all-in-one.
The input tray holds up to 250 pages of 80 g/m2 or 20 lb paper or fewer pages of heavier media
(25 mm (0.9 inch) or less stack height). Load media with the top forward and the side to be printed
facing down. To prevent jams and skewing, always adjust the side and rear media guides.
NOTE When you add new media, make sure that you remove all of the media from the input
tray and straighten the stack of new media. This helps to prevent multiple sheets of media
from feeding into the all-in-one, which can cause jams.
ENWW Loading media into the input trays 41
Page 60

Controlling print jobs
This section provides basic printing instructions. When making changes to printing settings, follow
the hierarchy of how changes are prioritized.
NOTE The names of commands and dialog boxes might vary depending on your software
program.
Print-settings priorities
When making changes to printing settings, follow the hierarchy of how changes are prioritized. (Note
that the names of commands and dialog boxes might vary depending on your software program.)
"Page Setup" dialog box. This dialog box opens when you click Page Setup or a similar
●
command on the File menu in your software program. This dialog box is part of the program in
which you are working. Settings that are changed here override settings that are changed
anywhere else.
"Print" dialog box. This dialog box opens when you click Print, Print Setup, or a similar
●
command on the File menu in your software program. It is also part of the program, but it has a
lower priority than the Page Setup dialog box. Settings that are changed in the Print dialog box
do not override settings that are changed in the Page Setup dialog box. Settings that are
changed here do override settings that are changed in the printer driver.
Printer driver. The printer driver opens when you click Properties in the Print dialog box.
●
Settings that are changed here do not override settings that are changed anywhere else. (For
Macintosh, the printer driver settings are integrated into the Print dialog box.)
Selecting a source
You can print by source (tray) or by type or size. To print by source, follow these steps. For
Macintosh operating systems, types and sizes are grouped together under the Paper Source pop-up
menu.
Windows: In the Print dialog box in your software program, select the Source (tray), if possible.
●
Otherwise, select a tray from the Source is field from the Paper tab in your printer driver.
Mac OS X V10.3 and Mac OS X V10.4: From the Print dialog box, select the tray or type of
●
media on the Paper Feed pop-up menu.
Selecting a type or size
You can print by source (tray) or by type or size. If you are printing on special print media, such as
heavy paper, it is important to print by type to achieve good results. To print by type or size, follow
these steps. For Macintosh operating systems, types and sizes are all grouped together under the
Paper Source pop-up menu.
Windows: In the printer driver, select a type in the Type is field of the Paper tab. Or, select a
●
size from the Size is field. For some paper, such as letterhead, you select both a type and size.
Mac OS X V10.3 and Mac OS X V10.4: In the Print dialog box, select the tray or type of media
●
on the Paper Feed pop-up menu.
42 Chapter 4 Using the all-in-one ENWW
Page 61

Using the all-in-one control panel
You can configure settings at the all-in-one control panel.
Changing the all-in-one control-panel display language
Use this procedure to print reports or to show messages on the all-in-one control-panel display in a
language other than the default for your country/region.
To change the all-in-one control-panel display language
1. Press Menu.
2.
Use the < or the > button to select System setup, and then press
3.
Use the < or the > button to select Language, and then press
4. Use the < or the > button to select the language that you want.
5.
Press
The all-in-one automatically restarts.
to save your selection.
.
.
Changing the default media size and type
Set the size and type of media that you usually load in the input tray. The all-in-one uses these
settings for copying, printing reports, printing faxes, and determining autoreduction sizes for incoming
faxes.
To change the default media size
1. Press Menu.
2.
Use the < or the > button to select System setup, and then press
3.
Use the < or the > button to select Paper setup, and then press
4.
Use the < or the > button to select Def. paper size, and then press
5. Use the < or the > button to select the size.
.
.
.
6.
Press
ENWW Using the all-in-one control panel 43
to save your selection.
Page 62

To change the default media type
1. Press Menu.
2.
Use the < or the > button to select System setup, and then press
3.
Use the < or the > button to select Paper setup, and then press
4.
Use the < or the > button to select Def. paper type, and then press
5. Use the < or the > button to select the type.
6.
Press
to save your selection.
.
.
.
Changing the default tray configuration
The default tray configurations (size and type) are set to Any, which means that any type and any
size of supported media can be printed from that tray. Configure your trays for the size and type
using the following instructions only if you regularly need to print on a specific size and type of media.
To change the default media size for a tray
1. Press Menu.
2.
Use the < or the > button to select System setup, and then press .
3.
Use the < or the > button to select Paper setup, and then press
4.
Use the < or the > button to select Tray 1 (or tray 2 or optional tray 3), and then press
5.
Use the < or the > button to select Paper size, and then press
.
.
.
6. Use the < or the > button to select the size.
7.
Press
To change the default media type for a tray
1. Press Menu.
2.
Use the < or the > button to select System setup, and then press
3.
Use the < or the > button to select Paper setup, and then press
4.
Use the < or the > button to select Tray 1 (or tray 2 or optional tray 3), and then press
5.
Use the < or the > button to select Paper type, and then press
6. Use the < or the > button to select the type.
7.
Press
to save your selection.
.
.
.
to save your selection.
.
44 Chapter 4 Using the all-in-one ENWW
Page 63

Using the all-in-one volume controls
You can control the volume of the following sounds:
The alarm sound that the all-in-one emits when it requires attention, such as when the all-in-one
●
door is open.
The beeps that are emitted when you press the all-in-one control-panel buttons.
●
The phone line sounds for outgoing faxes.
●
The ring volume for incoming faxes.
●
Changing the alarm volume
The alarm sounds when the all-in-one presents an alert or critical error message. The alarm duration
length is one second.
To change the alarm volume
1. Press Menu.
2.
Use the < or the > button to select System setup, and then press
3.
Use the < or the > button to select Volume settings, and then press
4.
Press
5. Use the < or the > button to select Off, Soft, Medium, or Loud.
6.
Press
to select Alarm volume.
to save your selection.
NOTE The factory-set default for the alarm volume is Soft.
.
.
Changing the volume for the fax
This setting determines the volume of various fax sounds that occur when the all-in-one is sending or
receiving fax jobs.
To change the volume for the fax
1. Press Volume.
2. Use the < or the > button to select Off, Soft, Medium, or Loud.
3.
Press
to save your selection.
NOTE The factory-set default is Soft.
ENWW Using the all-in-one control panel 45
Page 64

Changing the ring volume of the fax
The fax ring sounds when the all-in-one is initially sending or receiving a call. The ring duration
length depends on the local telecom ring-pattern length.
To change the ring volume of the fax
1. Press Menu.
2.
Use the < or the > button to select System setup, and then press
3.
Use the < or the > button to select Volume settings, and then press
4.
Press the < or the > button once to select Ring volume, and then press
5. Use the < or the > button to select Off, Soft, Medium, or Loud.
6.
Press
to save your selection.
NOTE The factory-set default is Soft.
.
.
.
Changing the all-in-one control-panel key-press volume
The key-press volume controls the sound that is made when an all-in-one control-panel button is
pressed.
To change the all-in-one control-panel key-press volume
1. Press Menu.
2.
Use the < or the > button to select System setup, and then press
3.
Use the < or the > button to select Volume settings, and then press
4.
Use the < or the > button to select Key-press volume, and then press
.
.
.
5. Use the < or the > button to select Off, Soft, Medium, or Loud.
6.
Press
46 Chapter 4 Using the all-in-one ENWW
to save your selection.
NOTE The factory-set default for the all-in-one control-panel key-press volume is Soft.
Page 65

5 Printing
This section provides information about common printing tasks.
●
Using features in the Windows printer driver
Using features in the Macintosh printer driver
●
Selecting an output location (HP LaserJet 3390/3392 all-in-one)
●
Printing on special media
●
Canceling a print job
●
For information about managing the all-in-one and its settings by using the HP ToolboxFX, see
HP ToolboxFX.
NOTE Many of the functions that are described in this chapter also can be performed by
using the HP ToolboxFX. For instructions about using the HP ToolboxFX, see the
HP ToolboxFX online Help.
ENWW 47
Page 66

Using features in the Windows printer driver
When you print from a software program, many of the product features are available from the printer
driver. For complete information about the features that are available in the printer driver, see the
printer-driver Help. The following features are described in this section:
Creating and using quick sets
●
Creating and using watermarks
●
Resizing documents
●
Setting a custom paper size from the printer driver
●
Using different paper and printing covers
●
Printing a blank first page or last page
●
Printing multiple pages on one sheet of paper
●
Printing on both sides
●
NOTE Settings in the printer driver and software program generally override control-panel
settings. Software-program settings generally override printer-driver settings.
Creating and using quick sets
Use quick sets to save the current driver settings for reuse. For example, you can save the pageorientation, print-on-both-sides, and paper-source settings in a quick set. Quick sets are available on
most printer-driver tabs. You can save up to 25 Print Task Quick Sets.
NOTE The printer driver might report that 25 Print Task Quick Sets have been defined when
fewer than 25 are visible. Some predefined Print Task Quick Sets, which do not apply to your
product, might be included and are counted in the total number.
To create a quick set
1. Open the printer driver (see
2. Select the print settings that you want to use.
3. In the Print Task Quick Sets box, type a name for the selected settings (for example "Quarterly
Report" or "My Project Status").
4. Click Save.
To use quick sets
1. Open the printer driver (see
2. Select the quick set that you want to use from the Print Task Quick Sets drop-down list.
3. Click OK. The product is now set to print according to the saved settings in the quick set.
Gaining access to the printer drivers).
Gaining access to the printer drivers).
NOTE To restore printer-driver default settings, select Default Print Settings from the Print
Task Quick Sets drop-down list.
48 Chapter 5 Printing ENWW
Page 67

Creating and using watermarks
A watermark is a notice, such as "Confidential," that is printed in the background of each page of a
document.
To use an existing watermark
1. Open the printer driver (see
2. From the Effects tab, click the Watermarks drop-down list.
3. Click the watermark that you want to use.
4. If you want the watermark to appear only on the first page of the document, click First Page Only.
5. Click OK. The product is now set to print the watermark that you have selected.
To remove the watermark, click (none) in the Watermarks drop-down list.
Gaining access to the printer drivers).
Resizing documents
Use the document resizing options to scale a document to a percentage of its normal size. You can
also choose to print a document on a different size paper, with or without scaling.
To reduce or enlarge a document
1. Open the printer driver (see
2. On the Effects tab, next to % of normal size, type the percentage by which you want to reduce
or enlarge your document.
You can also use the scroll bar to adjust the reduce or enlarge percentage.
3. Click OK. The product is now set to scale the document to the reduce or enlarge percentage
that you selected.
Gaining access to the printer drivers).
To print a document onto a different paper size
1. Open the printer driver (see
2. On the Effects tab, click Print Document On.
3. Select the target paper size to print on.
4. To print the document on the target paper size without scaling it to fit, make sure that the Scale
to Fit option is not selected.
5. Click OK. The product is now set to print the document as you specified.
ENWW Using features in the Windows printer driver 49
Gaining access to the printer drivers).
Page 68

Setting a custom paper size from the printer driver
To set a custom paper size
1. Open the printer driver (see
2. On the Paper or Paper/Quality tab, click Custom.
3. On the Custom Paper Size window, type the name of the custom paper size.
4. Type the paper-size length and width. If you type a size that is too small or too large, the driver
automatically adjusts the size to the minimum or maximum size that is allowed.
5. If necessary, click the button to change the unit of measure between millimeters and inches.
6. Click Save.
7. Click Close. The product is now set to print the document on the custom-size paper that you
selected. The name that you saved appears in the paper-size list for future use.
Gaining access to the printer drivers).
Using different paper and printing covers
Follow these instructions for printing a first page that is different from other pages in the print job.
1. Open the printer driver (see
2. On the Paper or Paper/Quality tab, select the appropriate paper for the first page of the print job.
3. Click Use Different Paper/Covers.
Gaining access to the printer drivers).
4. In the list box, click the pages or covers that you want to print on different paper.
5. To print front or back covers, you must also select Add Blank or Preprinted Cover.
-or-
Select the appropriate paper type or source for the other pages of the print job. The product is
now set to print the document on the paper that you selected.
NOTE The paper size must be the same for all pages of the print job.
Printing a blank first page or last page
To print a blank first page or last page
1. Open the printer driver (see
2. On the Paper or Paper/Quality tab, click Use Different Paper/Covers.
3. In the list box, click Front Cover or Back Cover.
4. Click Add Blank or Preprinted Cover.
Gaining access to the printer drivers).
50 Chapter 5 Printing ENWW
Page 69

Printing multiple pages on one sheet of paper
You can print more than one page on a single sheet of paper. This feature is available in some
drivers and provides a cost-effective way to print draft pages.
To print more than one page on a sheet of paper, look for a layout or pages-per-sheet option in the
driver. (This is sometimes called 2-up, 4-up, or n-up printing.)
To print multiple pages on one sheet of paper
1. Open the printer driver (see
2. Click the Finishing tab.
3. In the section for Document Options, select the number of pages that you want to print on
each sheet (1, 2, 4, 6, 9, or 16).
4. If the number of pages is greater than 1, select the correct options for Print Page Borders and
Page Order.
● Click Print Page Borders if you want to print a border around each page on the sheet.
Click Page Order to select the order and placement of the pages on the sheet.
●
5. Click OK. The product is now set to print the number of pages per sheet that you have selected.
Gaining access to the printer drivers).
Printing on both sides
Automatic two-sided printing (duplexing) is available using the automatic duplexer on the
HP LaserJet 3390/3392 all-in-one. Manual duplexing is available on the HP LaserJet
3050/3052/3055/3390/3392 all-in-one. To duplex manually, print on both sides of a page by feeding
the page through the all-in-one twice.
NOTE In the printer driver, Print on Both Sides (manually) is available only when duplex
printing is not available or when duplex printing is not supported for the type of print media
being used.
ENWW Using features in the Windows printer driver 51
Page 70

To print on both sides automatically (HP LaserJet 3390/3392 all-in-one)
1. Insert enough paper into one of the trays to accommodate the print job. If you are loading
special paper such as letterhead, load it in one of the following ways:
For tray 1, load the letterhead paper with the front side up, bottom-edge first.
●
For all other trays, load the letterhead paper with front side down, and the top edge at the
●
back of the tray.
CAUTION Do not load paper that is heavier than 105 g/m2 (28 lb bond). This could lead
to a jam in the all-in-one.
2. Open the printer driver (see Gaining access to the printer drivers).
3. For Windows, on the Finishing tab, click Print on Both Sides.
4. Click OK. The product is now ready to print on both sides of the paper.
To print on both sides manually (HP LaserJet 3050/3052/3055 all-in-one)
NOTE The printer driver also contains instructions and graphics for manually duplexing.
1. In the software program, open the all-in-one properties (printer driver).
2. On the Finishing tab, select Print on Both Sides.
NOTE If the Print on Both Sides option is dimmed or unavailable, open the all-in-one
properties (printer driver). On the Device Settings tab or the Configure tab, select
Allow Manual Duplexing, and then click OK. Repeat steps 1 and 2.
3. Print the document.
4. After one side has been printed, remove the remaining media from the input tray, and set it
aside until after you finish your manual duplexing job.
HP LaserJet 3050 HP LaserJet 3052/3055
52 Chapter 5 Printing ENWW
Page 71

5. Gather the printed pages, keep the printed side facing down, and straighten the stack.
HP LaserJet 3050 HP LaserJet 3052/3055
6. Place the stack of media in the input tray again. The printed side should be facing down with the
top edge feeding into the all-in-one first.
1
HP LaserJet 3050 HP LaserJet 3052/3055
7. On the computer screen, click OK and wait for the second side to print.
ENWW Using features in the Windows printer driver 53
Page 72

To print on both sides manually (HP LaserJet 3390/3392 all-in-one)
1. Insert enough paper into one of the trays to accommodate the print job. If you are loading
special paper such as letterhead, load it in one of the following ways:
For tray 1, load the letterhead paper with the front side up, bottom-edge first.
●
For all other trays, load letterhead paper with front side down, and the top edge at the back
●
of the tray.
CAUTION Do not load paper that is heavier than 105 g/m2 (28 lb bond). Jamming could
result.
2. Open the printer driver (see Gaining access to the printer drivers).
3. On the Finishing tab, select Print on Both Sides (manually).
4. Click OK.
5. Send the print job to the product.
6. Go to the all-in-one. Remove any blank paper that is in tray 1. Insert the printed stack into the
tray that is specified on the control panel. Load the paper with the printed side up, and the
bottom-edge feeding into the all-in-one first. Follow the instructions in the pop-up window that
appears before feeding the output stack back for printing the second half of the job.
7. A prompt might appear on the control-panel display that instructs you to press a button to
continue.
54 Chapter 5 Printing ENWW
Page 73

Using features in the Macintosh printer driver
When you print from a software program, many of the features are available from the printer driver.
For complete information about the features that are available in the printer driver, see the printerdriver Help. The following features are described in this section:
Creating and using presets in Mac OS X V10.3 and Mac OS X V10.4
●
Printing a cover page (Macintosh)
●
Printing multiple pages on one sheet of paper (Macintosh)
●
Printing on both sides (Macintosh)
●
NOTE Settings in the printer driver and software program generally override control-panel
settings. Software-program settings generally override printer-driver settings.
Creating and using presets in Mac OS X V10.3 and Mac OS X V10.4
Use presets to save the current driver settings for reuse. For example, you can save the page
orientation, print-on-both-sides feature, and paper-type settings in a preset.
To create a preset
1. Open the printer driver (see
2. Select the print settings that you want to use.
3. In the Presets box, click Save As..., and type a name for the preset (for example "Quarterly
Report" or "My Project Status").
4. Click OK.
To use presets
1. Open the printer driver (see
2. In the Presets menu, select the preset that you want to use.
NOTE To restore printer-driver default settings, select Standard from the Presets pop-up
menu.
Gaining access to the printer drivers).
Gaining access to the printer drivers).
ENWW Using features in the Macintosh printer driver 55
Page 74

Printing a cover page (Macintosh)
If you want to, you can print a separate cover page for your document that includes a message (such
as “Confidential”).
To print a cover page
1. Open the printer driver (see
2. On the Cover Page pop-up menu, select whether to print the cover page Before Document or
After Document.
3. If you are using Mac OS X V10.3 or Mac OS X V10.4, in the Cover Page Type pop-up menu,
select the message that you want to print on the cover page.
NOTE To print a blank cover page, select Standard as the Cover Page Type.
Gaining access to the printer drivers).
Printing multiple pages on one sheet of paper (Macintosh)
You can print more than one page on a single sheet of paper. This feature provides a cost-effective
way to print draft pages.
To print multiple pages on one sheet of paper
1. Open the printer driver (see
2. Click the Layout pop-up menu.
3. Next to Pages per Sheet, select the number of pages that you want to print on each sheet (1,
2, 4, 6, 9, or 16).
4. If the number of pages is greater than 1, next to Layout Direction, select the order and
placement of the pages on the sheet.
5. Next to Borders, select the type of border to print around each page on the sheet.
Gaining access to the printer drivers).
56 Chapter 5 Printing ENWW
Page 75

Printing on both sides (Macintosh)
Automatic two-sided printing (duplexing) is available by using the automatic duplexer on the
HP LaserJet 3390/3392 all-in-one. Manual duplexing is available on the HP LaserJet
3050/3052/3055/3390/3392 all-in-one. To duplex manually, print on both sides of a page by feeding
the page through the all-in-one twice.
To print on both sides automatically (HP LaserJet 3390/3392 all-in-one)
1. Insert enough paper into one of the trays to accommodate the print job. If you are loading
special paper such as letterhead, load it in one of the following ways:
For tray 1, load the letterhead paper with the front side up and the bottom-edge feeding
●
into the all-in-one first.
For all other trays, load the letterhead paper with the front side down and the top edge at
●
the back of the tray.
CAUTION Do not load paper that is heavier than 105 g/m2 (28-lb bond). Jamming might
result.
2. Open the printer driver (see Gaining access to the printer drivers).
3. Open the Layout pop-up menu.
4. Next to Two Sided Printing, select either Long-Edge Binding or Short-Edge Binding.
5. Click Print.
To print on both sides manually (HP LaserJet 3050/3052/3055 all-in-one)
1. On the Print dialog, select Printer Features.
2. On the Feature Sets list, select Finishing, and then select Manually print on 2nd side.
3. Print the document.
4. After one side has been printed, remove the remaining media from the input tray, and set it
aside until after you finish your manual duplexing job.
HP LaserJet 3050 HP LaserJet 3052/3055
ENWW Using features in the Macintosh printer driver 57
Page 76

5. Gather the printed pages, keep the printed side facing down, and straighten the stack.
HP LaserJet 3050 HP LaserJet 3052/3055
6. Place the stack of media in the input tray again. The printed side should be facing down with the
top edge feeding into the all-in-one first.
1
HP LaserJet 3050 HP LaserJet 3052/3055
7. On the computer screen, click OK and wait for the second side to print.
58 Chapter 5 Printing ENWW
Page 77

To print on both sides manually (HP LaserJet 3390/3392 all-in-one) (Macintosh)
1. Insert enough paper into one of the trays to accommodate the print job. If you are loading
special paper such as letterhead, load it in one of the following ways:
For tray 1, load the letterhead paper with the front side up, bottom-edge first.
●
For all other trays, load letterhead paper with front side down, and the top edge at the back
●
of the tray.
CAUTION Do not load paper that is heavier than 105 g/m2 (28 lb bond). Jamming could
result.
2. Open the printer driver (see Gaining access to the printer drivers).
3. On the Finishing tab, select Print on Both Sides (manually).
4. Click OK.
5. Send the print job to the product.
6. Go to the all-in-one. Remove any blank paper that is in tray 1. Insert the printed stack into the
tray that is specified on the control panel. Load the paper with the printed side up, and the
bottom-edge feeding into the all-in-one first. Follow the instructions in the pop-up window that
appears before feeding the output stack back for printing the second half of the job.
7. A prompt might appear on the control-panel display that instructs you to press a button to
continue.
ENWW Using features in the Macintosh printer driver 59
Page 78

Selecting an output location (HP LaserJet 3390/3392 allin-one)
The HP LaserJet 3390/3392 all-in-one comes with the top output bin and a rear output door for
printing to a straight-through output path. Print jobs emerge from the top output bin when the rear
output door is closed. Print jobs emerge from the back of the all-in-one when the rear output door is
open.
Open the rear output door to use the straight-through output path if problems occur when
●
printing to the top output bin, or when printing on such media as card stock, envelopes, labels,
or photo paper. Remove each sheet as it exits the all-in-one.
Use the top output bin when printing most jobs, including jobs on average-weight paper,
●
letterhead, and transparencies. The top output bin can hold up to 125 sheets. Prevent more
than 125 sheets from accumulating in the top output bin, or jams can occur.
1
1 Rear output door
2 Top output bin
2
60 Chapter 5 Printing ENWW
Page 79

Printing on special media
Use these guidelines when printing on special types of media.
NOTE Not all features are available for all printer drivers or operating systems. See the all-in-
one properties (driver) online Help for information about the available features for the driver.
Printing on special media (HP LaserJet 3050/3052/3055 all-in-one)
1. Open the media input tray and remove any media.
2. Load the media. Make sure that the top of the media is forward and the side to be printed on is
facing up.
3. Adjust the media guides to the length and width of the media.
4. For Windows printer drivers, on the Paper tab or the Paper/Quality tab, select your media type
from the Type is: drop-down list.
For Macintosh printer drivers, on the Paper/Quality tab or the Paper tab (the Paper Type/
Quality tab for some Macintosh drivers), select your media type.
5. Print the document.
ENWW Printing on special media 61
Page 80

Printing on special media (HP LaserJet 3390/3392 all-in-one)
1. Open the rear output door.
2. Before feeding the media, open the single-sheet priority input slot (tray 1), and adjust the media
guides to the width of the media.
3. Feed a single page into the single-sheet priority input slot (tray 1). Make sure that the top of the
media is forward and the side to be printed (rough side) is facing up. The media feeds partially
into the all-in-one, and then the all-in-one pauses.
4. For Windows printer drivers, open the all-in-one Properties (or Printing Preferences in
Windows 2000 and XP). See
For Macintosh drivers, on the Paper/Quality tab or the Paper tab (the Printer Features tab for
some Mac drivers), choose the correct media type.
5. Print the document. Remove the media from the back of the all-in-one as it prints to prevent it
from sticking together, and place the printed pages on a flat surface.
Gaining
access
to
the
printer
drivers for instructions.
62 Chapter 5 Printing ENWW
Page 81

Transparencies and labels
Only use transparencies and labels that are recommended for use in laser printers, such as
HP transparency film and HP LaserJet labels. See
CAUTION Be sure to set the correct media type in the all-in-one settings. The all-in-one
adjusts the fuser temperature according to the media type setting. When printing on special
media such as transparencies or labels, this adjustment prevents the fuser from damaging the
media as it passes through the all-in-one.
CAUTION Inspect the media to make sure that it is not wrinkled or curled and that it does
not have any torn edges or missing labels.
NOTE You can load multiple transparencies in the main input tray (tray 2). However, do not
load more than 75 transparencies at a time.
Guidelines for using media for more information.
Custom-size media and card stock
Use the main input tray for multiple sheets. See Supported media weights and sizes for the
supported media sizes.
CAUTION Make sure that the sheets are not stuck together before you load them.
Colored paper
Colored paper should be of the same high quality as white xerographic paper.
●
Pigments used must be able to withstand the fuser temperature of 200°C (392°F) for 0.1 second
●
without deterioration.
Do not use paper with a colored coating that was added after the paper was produced.
●
ENWW Printing on special media 63
Page 82

Envelopes
Only use envelopes that are recommended for laser printers. See Guidelines for using media for
more information.
NOTE For the HP LaserJet 3390/3392 all-in-one, you must load envelopes one at a time in
the single-sheet priority input slot (tray 1).
To prevent the envelope from curling as it prints, open the rear output door (HP LaserJet 3390/3392
all-in-one).
Heavy paper
●
Any tray will print most heavy media that does not exceed 105 g/m
●
Use tray 1 for card stock (135 g/m
●
In either the software program or the printer driver, select Heavy (106 g/m
43 lb bond) or Cardstock (135 g/m
2
to 216 g/m
2
to 216 g/m
2
; 50 to 80 lb cover).
2
; 50 to 80 lb cover) as the media type, or print
2
(28 lb bond).
2
to 163 g/m
2
; 28 to
from a tray that is configured for heavy paper. Because this setting affects all print jobs, it is
important to return the all-in-one back to its original settings after the job has printed.
CAUTION Using paper that is heavier than the media specification recommended for this all-
in-one can cause misfeeds, jams, reduced print quality, and excessive mechanical wear.
Some heavier media, such as HP Cover Stock, can be safely used.
Letterhead and preprinted forms
The all-in-one can print on letterhead and preprinted forms that can withstand temperatures of 200°C
(392°F).
NOTE To print a single-page cover letter on letterhead, followed by a multiple-page
document, feed the letterhead face up in the single-sheet priority input slot (tray 1), and load
the standard paper in the main input tray (tray 2). The all-in-one automatically prints from the
single-sheet priority input slot first.
64 Chapter 5 Printing ENWW
Page 83

Canceling a print job
If your print job is currently printing, you can cancel it by pressing Cancel on the all-in-one control
panel.
CAUTION Pressing Cancel clears the job that the all-in-one is currently processing. If more
than one process is running (for example, the all-in-one is printing a document while receiving
a fax), pressing Cancel clears the process that currently appears on the all-in-one control
panel.
You can also cancel a print job from a software program or a print queue.
To stop the print job immediately, remove the remaining print media from the all-in-one. After printing
stops, use one of the following options:
Device control panel: To cancel the print job, press and release Cancel on the all-in-one
●
control panel.
Software program: Typically, a dialog box appears briefly on the computer screen, allowing
●
you to cancel the print job.
Windows print queue: If a print job is waiting in a print queue (computer memory) or print
●
spooler, delete the job there.
Windows 98, Windows Me, or Windows 2000: Go to the Printer dialog box. Click Start,
●
click Settings, and then click Printers. Double-click the all-in-one icon to open the window,
select your print job, and then click Delete.
Windows XP: Click Start, click Settings, and then click Printers and Faxes. Double-click
●
the icon for the all-in-one to open the window, right-click the print job that you want to
cancel, and then click Cancel.
Macintosh print queue: Open the print queue by double-clicking the all-in-one icon in the dock.
●
Then highlight the print job and click Delete.
ENWW Canceling a print job 65
Page 84

66 Chapter 5 Printing ENWW
Page 85

6 Fax
Basic fax features and tasks
●
●
Advanced fax features and tasks
Fax logs and reports
●
Sending and receiving faxes by using a computer
●
Other ways to set up your fax
●
Connecting additional devices
●
NOTE Many of the functions that are described in this chapter also can be performed by
using the HP ToolboxFX. For instructions about using the HP ToolboxFX, see the
HP ToolboxFX online Help.
ENWW 67
Page 86

Basic fax features and tasks
Fax control-panel buttons
The controls for sending faxes are located on the left side of the control panel.
This section describes how to fax a document.
Specifying the fax settings
Before you can begin using the all-in-one fax features, you must complete the following tasks:
Setting the time and date
●
Setting the fax header
●
NOTE If you are installing the all-in-one software on your computer, you can skip the
remaining instructions in this chapter. The software installer automatically helps you to set up
the fax settings, unless you are using Microsoft Windows® 95 or Windows NT®. See the
electronic User Guide for instructions.
Shift
05
06
07
08
HP LaserJet 3390/3392HP LaserJet 3050 HP LaserJet 3055
If you completed the software installation, you are ready to send faxes from your computer. If
you did not complete the fax setup process at the time you installed the software, you can
complete it at any time by using the Fax Setup Wizard in the all-in-one program group (click
Start, Programs, HP, the name of your all-in-one, and HP Fax Setup Wizard).
In the United States and many other regions/countries, setting the time, date, and other fax
header information is a legal requirement.
68 Chapter 6 Fax ENWW
Page 87

Setting the time and date
To set the time and date
To set or change the time and date, use the following steps. If you need help entering any
information, see
1. On the control panel, press Menu.
Enter text from the control panel.
2.
Use the < or the > button to select System setup, and then press
3. Press Menu to select Time/Date.
4.
Use the < or the > button to specify either the 12-hour or the 24-hour clock, and then press
5. Use the alphanumeric buttons to enter the current time.
6. If you specified the 12-hour clock, use the < or the > button to move the cursor past the fourth
character. Select 1 for A.M. or 2 for P.M., and then press
-or-
If you specified the 24-hour clock, press
7.
NOTE Make sure that you use two digits to specify the month and day, in that order (for
example, use “05” for May and “01” for the first day of the month of May).
8. Press Menu.
.
.
.
Setting the fax header
To set the fax header
To set or change the fax header information, complete the following steps. If you need help entering
any information, see
Enter text from the control panel.
.
1. On the control panel, press Menu.
2.
Use the < or the > button to select Fax setup, and then press
3.
Use the < or the > button to select Fax Header, and then press
4.
Use the alphanumeric buttons to enter your fax number, and then press
5.
Use the alphanumeric buttons to enter your company name, and then press
NOTE The maximum number of characters allowed in the fax number is 20. The maximum
number of characters allowed in the company name is 40.
ENWW Basic fax features and tasks 69
.
.
.
.
Page 88

Sending faxes
To send a fax to one recipient
1. Use the alphanumeric buttons on the all-in-one control panel to dial the number.
If the fax number you are calling has been assigned to a one-touch key, press that key.
-or-
If the fax number you are calling has a speed-dial entry, press Phone Book, use the
alphanumeric buttons to specify the speed-dial entry, and then press
2. Load the document into the automatic document feeder (ADF) input tray or on the flatbed
scanner.
3. Press Start Fax. If the pages that you want to send are in the ADF, then faxing begins
automatically.
4. If the all-in-one ADF sensor detects that no document is loaded into the ADF input tray, Send
from glass? 1=Yes 2=No appears on the control-panel display. To send the fax from the
flatbed scanner, press 1 to select YES, and then press
.
.
After you press
5.
If you have already placed the document on the flatbed scanner, press
document on the flatbed scanner and then press
After scanning the page, Another page? 1=Yes 2=No appears on the control-panel display.
6. If you have more pages to scan, press 1 to select YES, and then repeat step 5 for each page of
the fax job.
-or-
If you are finished, press 2 to select NO.
When the last page of the fax has exited the all-in-one, you can start sending another fax, copying, or
scanning.
You can assign a one-touch key or speed-dial entry numbers that you use regularly. See
or edit speed-dial entries and one-touch keys and To program group-dial entries. If you have
electronic phone books available, you might be able to use them to select recipients. Electronic
phone books are generated by using third-party software programs.
To send a fax to multiple recipients
You can send a fax to several fax numbers at once. If you want to send a fax to a group of fax
numbers that you have assigned to a group-dial entry, see the information later in this section about
sending faxes by using group-dial entries. If you want to send a fax to a group of numbers (maximum
of 20) that have not been assigned a group-dial entry, see the information later in this section about
sending faxes to groups manually (ad hoc faxing).
, Load page:X Press appears on the control-panel display.
(or place the
).
To program
In the rare instance that your document does not fit into memory, complete one of the following:
Clear saved faxes from the fax memory. For more information, see
-or-
70 Chapter 6 Fax ENWW
Deleting faxes from memory.
Page 89

Divide the document into smaller sections, and then send the document as multiple fax jobs.
To send a fax by using a group-dial entry
1. Load the document into the automatic document feeder (ADF) input tray or on the flatbed
scanner.
2. Press the one-touch key for the group.
Press Phone Book, use the alphanumeric buttons to specify the group-dial entry, and then
press
3. Press Start Fax. If the pages that you want to send are in the ADF, then faxing begins
automatically.
4. If the all-in-one ADF sensor detects that no document is loaded into the ADF input tray, Send
from glass? 1=Yes 2=No appears on the control-panel display. To send the fax from the
flatbed scanner, press 1 to select YES, and then press
.
.
After you press
5.
If you have already placed the document on the flatbed scanner, press
document on the flatbed scanner and then press
After scanning the page, Another page? 1=Yes 2=No appear on the control-panel display.
6. If you have more pages to scan, press 1 to select YES, and then repeat step 5 for each page of
the fax job.
-or-
If you are finished, press 2 to select NO.
The all-in-one scans the document into memory and sends the fax to each number specified. If a
number in the group is busy or does not answer, the all-in-one redials the number based on its redial
setting. If all redial attempts fail, the all-in-one updates the fax activity log with the error and proceeds
to the next number in the group.
To send a fax to a group manually (ad hoc faxing)
Use the following instructions to send a fax to a group of recipients that has not been assigned a
group-dial entry:
1. Load the document into the automatic document feeder (ADF) input tray or on the flatbed
scanner.
, Load page:X Press appears on the control-panel display. .
(or place the
).
2. Use the alphanumeric buttons.
If the fax number that you are calling has been assigned a one-touch key, press that key.
-or-
If the fax number that you are calling has been assigned a speed-dial entry, press Phone Book,
use the alphanumeric buttons to specify the speed-dial entry, and then press
3.
Press
4. To continue dialing numbers, repeat steps 2 and 3.
ENWW Basic fax features and tasks 71
.
.
Page 90

-or-
If you are finished dialing numbers, go to the next step.
5. Press Start Fax. If the pages that you want to send are in the ADF, then faxing begins
automatically.
6. If the all-in-one ADF sensor detects that no document is loaded into the ADF input tray, Send
from glass? 1=Yes 2=No appears on the control-panel display. To send the fax from the
flatbed scanner, press 1 to select YES, and then press
.
After you press
7.
If you have already placed the document on the flatbed scanner, press
document on the flatbed scanner and then press
, Load page: X Press appears on the control-panel display. .
(or place the
).
After scanning the page, Another page? 1=Yes 2=No appears on the control-panel display.
8. If you have more pages to scan, press 1 to select YES, and then repeat step 7 for each page of
the fax job.
-or-
If you are finished, press 2 to select NO.
The all-in-one sends the fax to each fax number. If a number in the group is busy or does not
answer, the all-in-one redials that number based on its redial setting. If all redial attempts fail, the allin-one updates the fax activity log by adding the error, and then it proceeds to the next number in the
group.
NOTE The fax activity log feature is not supported in the software for Windows 98 or
Windows Me, but you can print the fax activity log by using the control panel. For instructions,
Printing the fax activity log.
see
72 Chapter 6 Fax ENWW
Page 91

Using manual dial
Usually, the all-in-one dials after you press Start Fax. At times, however, you might want the all-in-
one to dial each number as you press it. For example, if you are charging your fax call to a calling
card, you might need to dial the fax number, wait for the acceptance tone of your telephone
company, and then dial the calling card number. When dialing internationally, you might need to dial
part of the number and then listen for dial tones before continuing to dial.
To use manual dial with the automatic document feeder (ADF)
1. Load the document into the automatic document feeder (ADF) input tray.
2. On the all-in-one control panel, press Start Fax.
3. Begin dialing.
NOTE The all-in-one dials the number as you press each digit. This allows you to wait
for pauses, dial tones, international-access tones, or calling-card-acceptance tones
before continuing to dial.
To use manual dial with the flatbed scanner (HP LaserJet 3050/3052/3055 all-in-one)
1. On the all-in-one control panel, press Start Fax.
The control-panel display shows the following message: Send from glass? 1=Yes 2=No.
2. Press 1 to select YES. The control-panel display shows the following message: Load page:X
Press
3. Scan a page into memory by placing the sheet print-side-down on the flatbed scanner and
pressing
message: Another page? 1=Yes 2=No.
4. If you have more pages to scan, press 1 to select YES, and then repeat step 3 for each page of
the fax job.
-or-
If you are finished, press 2 to select NO, and then go to the next step.
5. When all pages are scanned into memory, begin dialing. The all-in-one dials the number as you
press each digit. This allows you to wait for pauses, dial tones, international access tones, or
calling card acceptance tones before continuing to dial.
, where X is the page number.
. After scanning the page, the all-in-one control-panel display shows the following
ENWW Basic fax features and tasks 73
Page 92

Redialing manually
If you want to send another document to the last fax number that was dialed, use the following
procedure to redial manually. If you are trying to resend the same document that you sent the first
time, wait until the automatic redial attempts have stopped or until you have stopped them yourself.
Otherwise, the recipient might get the fax twice: once from the manual redial attempt and once from
one of the automatic redial attempts.
NOTE To stop the current redial attempt for a fax, or to cancel all pending, automatic redial
attempts for a fax, see
settings.
To redial manually
1. Load the document into the automatic document feeder (ADF) input tray or onto the flatbed
scanner.
2. On the all-in-one control panel, press Redial.
3. Press Start Fax. If the pages that you want to send are in the ADF, then faxing begins
automatically.
4. If the all-in-one ADF sensor detects that no document is loaded into the ADF input tray, Send
from glass? 1=Yes 2=No appears on the control-panel display. To send the fax from the
flatbed scanner, press 1 to select YES, and then press
Canceling a fax job. To change redial settings, see Changing the redial
.
After you press
5.
If you have already placed the document on the flatbed scanner, press
document on the flatbed scanner and then press
After scanning the page, Another page? 1=Yes 2=No appears on the control-panel display.
6. If you have more pages to scan, press 1 to select YES, and then repeat step 5 for each page of
the fax job.
-or-
If you are finished, press 2 to select NO.
The all-in-one sends the fax to the number that it redialed. If the number is busy or does not answer,
the all-in-one redials the number based on its redial setting. If all redial attempts fail, the all-in-one
updates the fax activity log by adding the error.
, Load page:X Press appears on the control-panel display.
(or place the
).
74 Chapter 6 Fax ENWW
Page 93

Canceling a fax job
Use these instructions to cancel a single fax that is currently dialing or a fax that is being transmitted
or received.
To cancel the current fax job
Press Cancel on the control panel. Any pages that have not been transmitted are canceled. Pressing
Cancel also stops group-dial jobs.
To cancel a fax job by using the Fax Job Status
Use this procedure to cancel a fax job in the following situations:
The all-in-one is waiting to redial after encountering a busy signal, an unanswered call, or a
●
communication error.
The fax is scheduled to be sent at a future time.
●
Use the following steps to cancel a fax job by using the Fax Job Status:
1. On the all-in-one control panel, press Menu.
2.
Press
3. Use the < or the > button to scroll through pending jobs until you reach the job that you want to
clear.
4.
Press
5.
Press
to select Fax Job status.
to select the job that you want to cancel.
to confirm that you want to cancel the job.
Changing the default light/dark (contrast) setting
The contrast affects the lightness and darkness of an outgoing fax as it is being sent.
To change the default light/dark (contrast) setting
The default light/dark setting is the contrast that is normally applied to items that are being faxed.
The slider is set to the middle as the default setting.
1. On the all-in-one control panel, press Menu.
2.
Use the < or the > button to select Fax setup, and then press
3.
Use the < or the > button to select Fax Send setup, and then press
4.
Use the < or the > button to select Def. Light/dark, and then press
5. Use the < button to move the slider to the left to make the fax lighter than the original, or use the
> button to move the slider to the right to make the fax darker than the original.
.
.
.
6.
Press
ENWW Basic fax features and tasks 75
to save your selection.
Page 94

Changing resolution settings
NOTE Increasing the resolution increases the fax size. Larger faxes increase the send time
and could exceed the available memory in the all-in-one.
The factory-set default resolution setting is Fine.
Use this procedure to change the default resolution for all fax jobs to one of the following settings:
Standard: This setting provides the lowest quality and the fastest transmission time.
●
Fine: This setting provides a higher resolution quality than Standard that is usually appropriate
●
for text documents.
Superfine: This setting is best used for documents that mix text and images. The transmission
●
time is slower than Fine but faster than Photo.
Photo: This setting produces the best images, but greatly increases the transmission time.
●
To change the default resolution setting
1. On the all-in-one control panel, press Menu.
2.
Use the < or the > button to select Fax setup, and then press
3.
Use the < or the > button to select Fax Send setup, and then press
4.
Use the < or the > button to select Def. Resolution, and then press
5. Use the < or the > button to change the resolution setting.
6.
Press
To adjust the resolution for the current fax job
1. On the all-in-one control panel, press Resolution to show the current resolution setting.
2. Use the < or the > button to select the appropriate resolution setting.
3.
Press
to save the selection.
to save the selection.
NOTE This procedure changes the fax resolution for the current fax job. For instructions
about changing the default fax resolution, see
NOTE To change the fax contrast or glass-scan size, you must change the default settings.
Changing the default light/dark (contrast) setting or Changing the default glass-size setting.
See
Changing resolution settings.
.
.
.
76 Chapter 6 Fax ENWW
Page 95

Changing the default glass-size setting
This setting determines which paper size the flatbed scanner scans when you send a fax from the
scanner. The factory-set default is determined by the region/country in which you purchased the allin-one.
To change the default glass-size setting
1. On the all-in-one control panel, press Menu.
2.
Use the < or the > button to select Fax setup, and then press
3.
Use the < or the > button to select Fax Send setup, and then press
4.
Use the < or the > button to select Def. Glass size, and then press
5. Use the < or the > button to select the correct paper size setting: A4 or Letter.
6.
Press
to save your selection.
.
.
.
Selecting tone-dialing or pulse-dialing mode
Use this procedure to set the all-in-one to tone-dialing or pulse-dialing mode. The factory-set default
is Tone. Do not change this setting unless you know that your telephone line cannot use tone dialing.
To select tone-dialing or pulse-dialing
1. On the all-in-one control panel, press Menu.
2.
Use the < or the > button to select Fax setup, and then press
3.
Use the < or the > button to select Fax Send setup, and then press
4.
Use the < or the > button to select Dialing Mode, and then press
5.
Use the < or the > button to select Tone or Pulse, and then press
.
.
.
to save your selection.
NOTE The pulse-dialing option is not available in all regions/countries.
ENWW Basic fax features and tasks 77
Page 96

Changing the redial settings
If the all-in-one was unable to send a fax because the receiving fax machine did not answer or was
busy, the all-in-one attempts to redial based on the redial-on-busy, redial-on-no-answer, and redialon-communication-error options. Use the procedures in this section to turn these options on or off.
To change the redial-on-busy option
If this option is turned on, the all-in-one redials automatically if it receives a busy signal. The factoryset default for the redial-on-busy option is On.
1. On the all-in-one control panel, press Menu.
2.
Use the < or the > button to select Fax setup, and then press
3.
Use the < or the > button to select Fax Send setup, and then press
4.
Use the < or the > button to select Redial if busy, and then press
5.
Use the < or the > button to select On or Off, and then press
To change the redial-on-no-answer option
If this option is turned on, the all-in-one redials automatically if the receiving machine does not
answer. The factory-set default for the redial-on-no-answer option is Off.
1. On the all-in-one control panel, press Menu.
2.
Use the < or the > button to select Fax setup, and then press
3.
Use the < or the > button to select Fax Send setup, and then press
4.
Use the < or the > button to select Redial-no answer, and then press
5.
Use the < or the > button to select On or Off, and then press
To change the redial-on-communication-error option
If this option is turned on, the all-in-one redials automatically if some sort of communication error
occurs. The factory-set default for the redial-on-communication-error option is On.
.
.
.
.
.
.
.
.
1. On the all-in-one control panel, press Menu.
2.
Use the < or the > button to select Fax setup, and then press
3.
Use the < or the > button to select Fax Send setup, and then press
4.
Use the < or the > button to select Redial Comm Err., and then press
5.
Use the < or the > button to select On or Off, and then press
78 Chapter 6 Fax ENWW
.
.
.
.
Page 97

Changing autoreduction settings for incoming faxes
If the fit-to-page option is turned on, the all-in-one automatically reduces long faxes up to 75% to fit
the information on the default paper size (for example, the fax is reduced from legal to letter size).
If the fit-to-page option is turned off, long faxes print at full size on multiple pages. The factory-set
default for incoming fax autoreduction is On.
If you have the stamp-received faxes option turned on, you might also want to turn on autoreduction.
This reduces the size of the incoming faxes slightly, and prevents the page-stamp from forcing a fax
onto two pages.
NOTE Make sure that the media-size setting matches the size of the media that is loaded in
the tray.
To change autoreduction for incoming faxes
1. On the all-in-one control panel, press Menu.
2.
Use the < or the > button to select Fax setup, and then press
3.
Use the < or the > button to select Fax Recv. setup, and then press
4.
Use the < or the > button to select Fit to page, and then press
5.
Use the < or the > button to select On or Off, and then press
.
.
.
to save your selection.
ENWW Basic fax features and tasks 79
Page 98

Blocking or unblocking fax numbers
If you do not want to receive faxes from specific people or businesses, you can block as many as 30
fax numbers by using the control panel. When you block a fax number and someone from that
number sends you a fax, the control-panel display indicates that the number is blocked, the fax does
not print, and the fax is not saved in memory. Faxes from blocked fax numbers appear in the fax
activity log with a “discarded” designation. You can unblock blocked fax numbers individually or all at
one time.
NOTE The sender of a blocked fax is not notified that the fax failed.
To print a list of numbers that you have blocked, see Printing the block-fax list. To print the fax
activity log, see
To block or unblock a fax number
Complete the following steps to block or unblock fax numbers by using the control panel:
1. On the all-in-one control panel, press Menu.
2.
Use the < or the > button to select Fax setup, and then press
Printing the fax activity log.
.
3.
Use the < or the > button to select Fax Recv. setup, and then press
4.
Use the < or the > button to select Block faxes, and then press
5.
To block a fax number, use the < or the > button to select Add entry, and then press
the fax number exactly as it appears in the header (including spaces), and then press
a name for the blocked number, and then press
To unblock a single fax number, use the < or the > button to select Delete entry, and then
press
press
-or-
To unblock all blocked fax numbers, use the < or the > button to select Clear all, and then press
. Use the < or the > button to select the fax number that you want to delete, and then
to confirm the deletions.
. Press again to confirm the deletions.
.
.
.
. Enter
. Enter
80 Chapter 6 Fax ENWW
Page 99

Advanced fax features and tasks
Using speed-dial entries, one-touch keys, and group-dial entries
You can store frequently dialed fax numbers or groups of fax numbers as one-touch keys, speed-dial
entries, or group-dial entries.
In the all-in-one phone book, a total of 120 entries are available for speed-dial entries and group-dial
entries. For example, if you program 100 of the entries as speed-dials, the remaining 20 can be used
for group-dials.
Using dialing characters
When using the control panel to enter your name in the header or to enter a name for a one-touch
key, speed-dial entry, or group-dial entry, press the appropriate alphanumeric button repeatedly until
the letter that you need appears. Then, press the > button to select that letter and move to the next
space.
numbers appear on each alphanumeric button when the default language is set to English.
Table 6-1 Alphanumeric buttons and corresponding characters
Table 6-1 Alphanumeric buttons and corresponding characters shows which letters and
Button number Characters Button number Characters
1 1 7 P Q R S p q r s 7
2 A B C a b c 2 8 T U V t u v 8
3 D E F d e f 3 9 W X Y Z w x y z 9
4 G H I g h i 4 0 0
5 J K L j k l 5 * ( ) + - . / , “ * & @ R W
6 M N O m n o 6 # space # ,
NOTE Use > to move the cursor on the control panel and use < to delete characters.
To insert a pause
You can insert pauses into a fax number that you are dialing or programming to a one-touch key,
speed-dial entry, or group-dial entry. Pauses are often needed when dialing internationally or
connecting to an outside line.
Press # (Pause) repeatedly until a comma (,) appears on the control-panel display, indicating
●
that the pause will occur at that point in the dialing sequence.
Press * (Symbols) repeatedly until W appears on the control-panel display to have the all-in-one
●
wait for a dial tone before dialing the remainder of the telephone number.
Press * (Symbols) repeatedly until R appears on the control-panel display to have the all-in-one
●
perform a hook flash.
ENWW Advanced fax features and tasks 81
Page 100

To program or edit speed-dial entries and one-touch keys
Speed-dial entries 1 through 10 (HP LaserJet 3050 all-in-one), 1 through 12 (HP LaserJet 3055 all-inone), or 1 through 16 (HP LaserJet 3390/3392 all-in-one) are also associated with their
corresponding one-touch keys on the control panel. The one-touch keys can be used for speed-dial
or group-dial entries. A maximum of 50 characters can be entered for a single fax number.
NOTE To gain access to all of the speed-dial entries, you must use the Shift button. Speed-
dial entries 6 through 10 (HP LaserJet 3050 all-in-one), 7 through 12 (HP LaserJet 3055 all-inone), and 9 through 16 (HP LaserJet 3390/3392 all-in-one) are all available by pressing Shift
and the associated one-touch key on the control panel.
NOTE Speed-dial entries, one-touch keys, and group-dial entries are more easily
programmed from the software. For instructions about programming speed-dial entries, onetouch keys, and group-dial entries using HP ToolboxFX, see the HP ToolboxFX online Help.
Complete the following steps to program speed-dial entries and one-touch keys from the all-in-one
control panel:
1. On the all-in-one control panel, press Menu.
2.
Use the < or the > button to select Fax setup, and then press
3.
Press
4.
Press
5.
Press
6. Use the alphanumeric buttons to specify the speed-dial entry number that you want to associate
with this fax number, and then press
also associates the fax number with the corresponding one-touch key.
7. Use the alphanumeric buttons to enter the fax number. Include any pauses or other needed
numbers, such as an area code, an access code for numbers outside a PBX system (usually a
9 or 0), or a long distance prefix.
8.
Press
9. Use the alphanumeric buttons to enter a name for the fax number. To do so, repeatedly press
the alphanumeric button for the letter that you need until the letter appears. (For a list of
characters, see
to select Phone Book.
to select Individual setup.
to select Add/Edit.
. Selecting a number from 1 to 10, 1 to 12, or 1 to 16
NOTE When entering a fax number, press Pause until a comma (,) appears if you want
to insert a pause in the dialing sequence, or press * until W appears if you want the all-inone to wait for a dial tone.
.
Using dialing characters.)
.
NOTE To insert punctuation, press the asterisk (*) button repeatedly until the character
that you want appears, and then press the > buttton to go to the next space.
10.
Press
11. If you have more speed-dial entries or one-touch keys to program, repeat steps 1 through 10.
82 Chapter 6 Fax ENWW
to save the information.
 Loading...