

Page 1
fax
hp LaserJet 3330mfp
Page 2

Page 3

hp LaserJet 3330mfp
fax guide
Page 4

Copyright Information
© 2001 Hewlett-Packard
Company
All Rights Reserved.
Reproduction, adaptations, or
translation without prior written
permission is prohibited except
as allowed under copyright
laws.
Part number C9126-90919
First edition, September 2001
Warranty
The information contained in
this document is subject to
change without notice.
Hewlett-Packard makes no
warranty of any kind with
respect to this information.
HEWLETT-PACKARD
SPECIFICALLY DISCLAIMS
THE IMPLIED WARRANTY OF
MERCHANTABILITY AND
FITNESS FOR A PARTICULAR
PURPOSE.
Hewlett-Packard shall not be
liable for any direct, indirect,
incidental, consequential, or
other damage alleged in
connection with the furnishing or
use of this information.
NOTICE TO U.S.
GOVERNMENT USERS:
RESTRICTED RIGHTS
COMMERCIAL COMPUTER
SOFTWARE: “Use, duplication,
or disclosure by the
Government is subject to
restrictions as set forth in
subparagraph (c) (1)(ii) of the
Rights in Technical Data Clause
at DFARS 52.227-7013.”
Safety Information
WARNING!
Potential Shock Hazard
Always follow basic safety
precautions when using this
product to reduce risk of injury
from fire or electric shock.
1 Read and understand all
instructions in the
electronic user guide.
2 Observe all warnings and
instructions marked on the
product.
3 Use only a grounded
electrical outlet when
connecting the
HP LaserJet 3330 product
to a power source. If you
do not know whether the
outlet is grounded, check
with a qualified electrician.
4 Do not touch the contacts
on the end of the
telephone cord or any of
the sockets on the
HP LaserJet 3330 product.
Replace damaged cords
immediately.
5 Never install telephone
wiring during a lightning
storm.
6 Unplug this product from
wall outlets and telephone
jacks before cleaning.
7 Do not install or use this
product near water or
when you are wet.
8 Install the product securely
on a stable surface.
9 Install the product in a
protected location where
no one can step on or trip
over the telephone line and
the telephone line will not
be damaged.
10 If the product does not
operate normally, see the
electronic user guide.
11 Refer all servicing
questions to qualified
personnel.
Information regarding FCC
Class B, Parts 15 and 68
requirements and other
regulatory requirements can be
found in the electronic user
guide.
Trademark Credits
®
Microsoft
Windows NT
, Windows®, and
®
are U.S.
registered trademarks of
Microsoft Corporation.
All other products mentioned
herein may be trademarks of
their respective companies.
Local country laws may prohibit
the use of this product outside
of the countries specified. It is
strictly forbidden by law in most
countries to connect
nonapproved
telecommunications equipment
(fax machines) to public
telephone networks.
Hewlett-Packard Company
11311 Chinden Boulevard
Boise, Idaho 83714 U.S.A.
Page 5

Contents
1 Setting up
Introduction. . . . . . . . . . . . . . . . . . . . . . . . . . . . . . . . . . . . . . . . . . . . . . 5
Connecting the product to a phone line . . . . . . . . . . . . . . . . . . . . . . . . 5
To connect the product to a phone line . . . . . . . . . . . . . . . . . . . . . 6
Connecting additional devices . . . . . . . . . . . . . . . . . . . . . . . . . . . . . . . 8
To connect additional devices with RJ11 or
British Telecom sockets . . . . . . . . . . . . . . . . . . . . . . . . . . . . 10
To connect additional devices with British Telecom sockets. . . . 12
Specifying the fax settings . . . . . . . . . . . . . . . . . . . . . . . . . . . . . . . . . 13
To enter text from the control panel. . . . . . . . . . . . . . . . . . . . . . . 13
To set the time and date . . . . . . . . . . . . . . . . . . . . . . . . . . . . . . . 13
To set the fax header. . . . . . . . . . . . . . . . . . . . . . . . . . . . . . . . . . 14
Setting the answer mode . . . . . . . . . . . . . . . . . . . . . . . . . . . . . . . . . . 14
To set the answer mode . . . . . . . . . . . . . . . . . . . . . . . . . . . . . . . 15
Setting rings-to-answer. . . . . . . . . . . . . . . . . . . . . . . . . . . . . . . . . . . . 15
Recommended rings-to-answer table . . . . . . . . . . . . . . . . . . . . . 16
To set the number of rings-to-answer . . . . . . . . . . . . . . . . . . . . . 16
Enabling answer ring patterns . . . . . . . . . . . . . . . . . . . . . . . . . . . . . . 17
To enable answer ring patterns . . . . . . . . . . . . . . . . . . . . . . . . . . 17
2 Faxing (basic)
Loading originals to fax. . . . . . . . . . . . . . . . . . . . . . . . . . . . . . . . . . . . 19
To load fax documents . . . . . . . . . . . . . . . . . . . . . . . . . . . . . . . . 19
Sending faxes. . . . . . . . . . . . . . . . . . . . . . . . . . . . . . . . . . . . . . . . . . . 19
To send a fax to one recipient . . . . . . . . . . . . . . . . . . . . . . . . . . . 19
Changing the default contrast and resolution for outgoing faxes . . . . 20
To change the default contrast . . . . . . . . . . . . . . . . . . . . . . . . . . 20
To change the default resolution . . . . . . . . . . . . . . . . . . . . . . . . . 21
Deleting faxes from memory. . . . . . . . . . . . . . . . . . . . . . . . . . . . . . . . 21
To delete faxes from memory . . . . . . . . . . . . . . . . . . . . . . . . . . . 21
Sending faxes from the software . . . . . . . . . . . . . . . . . . . . . . . . . . . . 21
To send a fax from the software . . . . . . . . . . . . . . . . . . . . . . . . . 22
3 Faxing (advanced)
About speed-dial codes, one-touch keys, and group-dial codes . . . . 23
To program speed-dial codes and one-touch keys . . . . . . . . . . . 23
To delete speed-dial codes and one-touch keys . . . . . . . . . . . . . 24
To quickly program speed-dial codes or one-touch keys . . . . . . 25
To program a one-touch key for alternate long distance. . . . . . . 25
To manage group-dial codes. . . . . . . . . . . . . . . . . . . . . . . . . . . . 26
To program group-dial codes . . . . . . . . . . . . . . . . . . . . . . . . . . . 26
To delete group-dial codes . . . . . . . . . . . . . . . . . . . . . . . . . . . . . 27
ENGB 3
Page 6

To delete an individual from a group-dial code . . . . . . . . . . . . . . 27
To delete all phone book entries . . . . . . . . . . . . . . . . . . . . . . . . . 28
Using dialing characters . . . . . . . . . . . . . . . . . . . . . . . . . . . . . . . . . . . 28
To insert a pause or wait . . . . . . . . . . . . . . . . . . . . . . . . . . . . . . . 29
Inserting a dial prefix. . . . . . . . . . . . . . . . . . . . . . . . . . . . . . . . . . . . . . 29
To set the dial prefix . . . . . . . . . . . . . . . . . . . . . . . . . . . . . . . . . . 29
Enabling an extension phone . . . . . . . . . . . . . . . . . . . . . . . . . . . . . . . 30
Using manual dial . . . . . . . . . . . . . . . . . . . . . . . . . . . . . . . . . . . . . . . . 30
To use manual dial . . . . . . . . . . . . . . . . . . . . . . . . . . . . . . . . . . . 30
Printing the fax activity log . . . . . . . . . . . . . . . . . . . . . . . . . . . . . . . . . 30
To print the fax activity log. . . . . . . . . . . . . . . . . . . . . . . . . . . . . . 31
Changing the fax call report print times . . . . . . . . . . . . . . . . . . . . . . . 31
To set fax call report print times . . . . . . . . . . . . . . . . . . . . . . . . . 31
4 Troubleshooting
Is your fax set up correctly? . . . . . . . . . . . . . . . . . . . . . . . . . . . . . . . . 33
What type of phone line are you using? . . . . . . . . . . . . . . . . . . . 33
Are you using a surge protection device? . . . . . . . . . . . . . . . . . . 34
Are you using a phone company voice messaging service?. . . . 34
Are you using an answering machine? . . . . . . . . . . . . . . . . . . . . 34
General fax problems . . . . . . . . . . . . . . . . . . . . . . . . . . . . . . . . . . . . . 35
Receiving fax problems . . . . . . . . . . . . . . . . . . . . . . . . . . . . . . . . . . . 36
Sending fax problems. . . . . . . . . . . . . . . . . . . . . . . . . . . . . . . . . . . . . 39
Accessing the electronic user guide . . . . . . . . . . . . . . . . . . . . . . . . . . 42
To access the electronic user guide from the product software . 42
To access the electronic user guide from the product CD-ROM. 42
4 ENGB
Page 7

Introduction
Setting up
Congratulations on your purchase of the HP LaserJet 3330mfp, a
powerful business tool with the capabilities of a full range of office
equipment. You can use the product to fax, print, copy, and scan.
This guide was written to describe the fax functions of this product and
to help you complete the following tasks:
● Connect your product to a phone line
● Connect additional devices
● Specify your fax settings
● Set the answer mode and rings-to-answer
● Enable answer ring patterns
We recommend that you save this Fax Guide so you can refer back to
instructions on specific fax features.
If you need general setup instructions for your product, such as
instructions for installing the print cartridge, installing the media input
trays and the automatic document feeder (ADF) input tray, installing the
product software, and connecting the product to a network, please see
the getting started guide that came with the product.
Connecting the product to a phone line
The first step toward using your fax is connecting the product to the
phone line.
Note In order for the product to fax correctly, it must be the first device connected
to the phone jack.
ENGB Introduction 5
Page 8
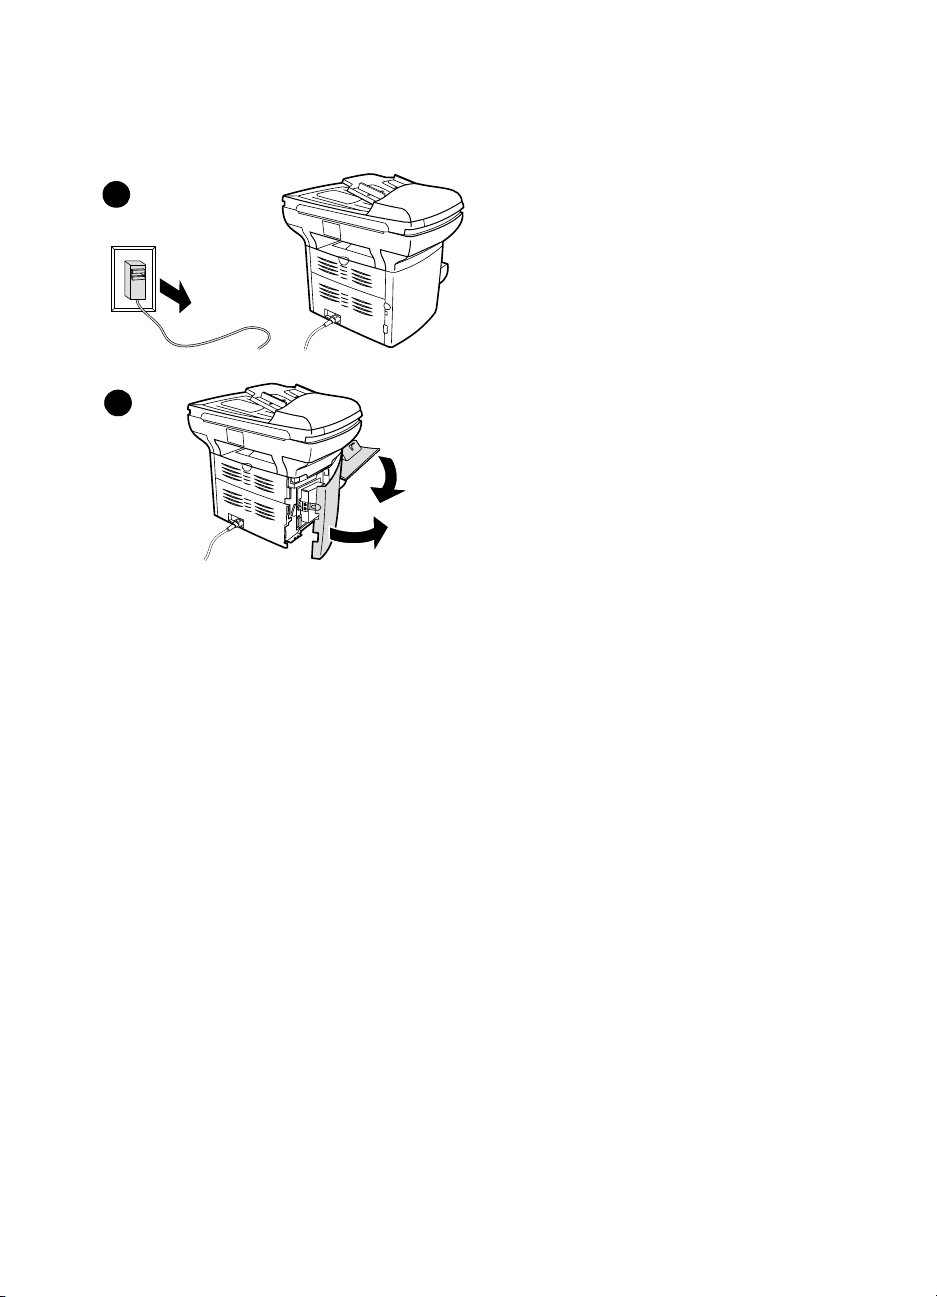
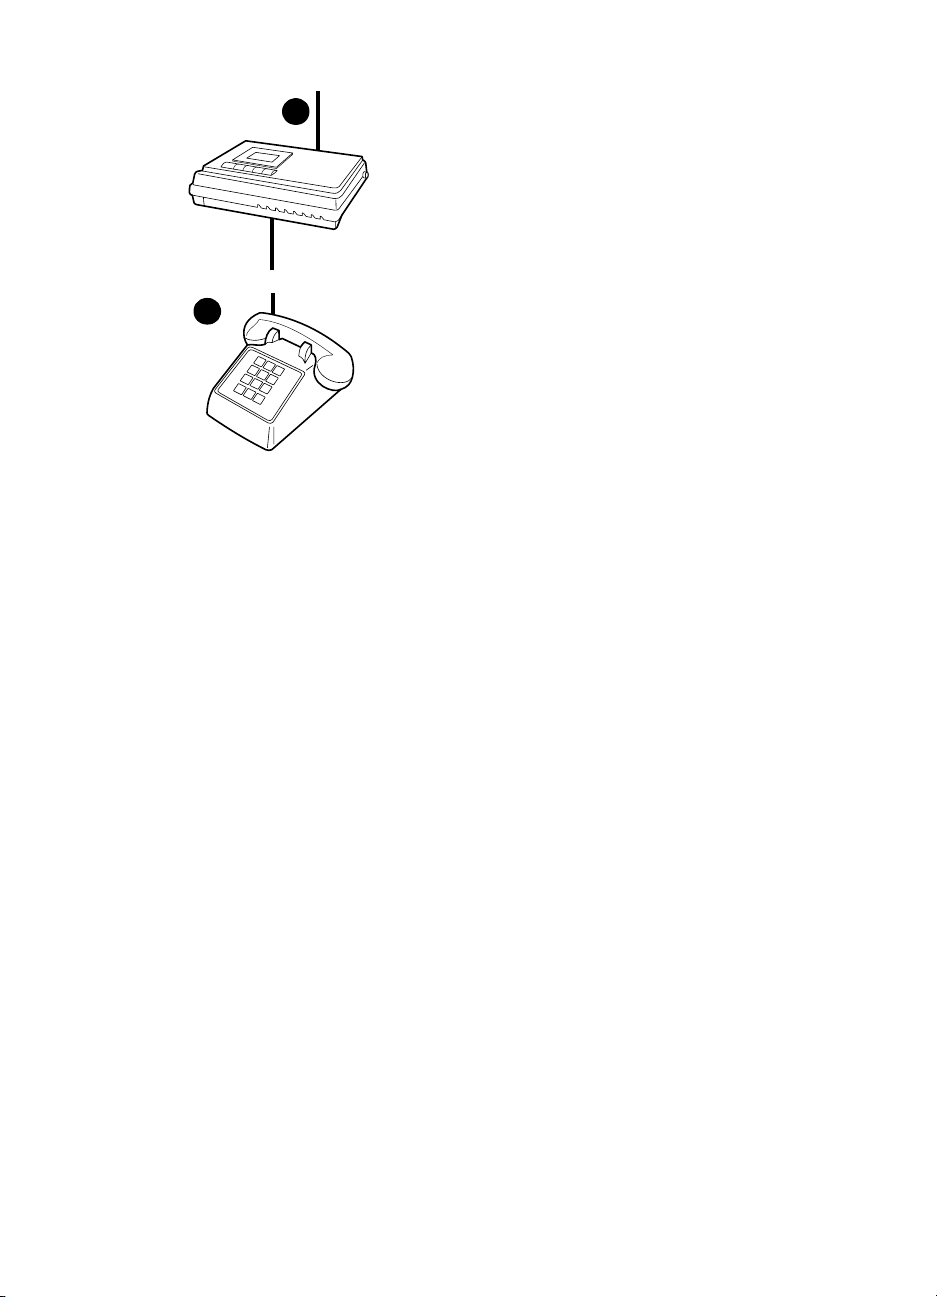
To connect the product to a phone line
Use these steps to connect the product to a
1
2
phone line, even if you have two telephone
numbers on that line and use a ring pattern
service (such as distinctive ring).
1 If a phone cord is plugged into the phone
jack, unplug the cord and set it aside.
2 Open the print cartridge door and swing
open the left side panel to reveal the
phone line sockets.
6 Chapter 1 Setting up ENGB
Page 9
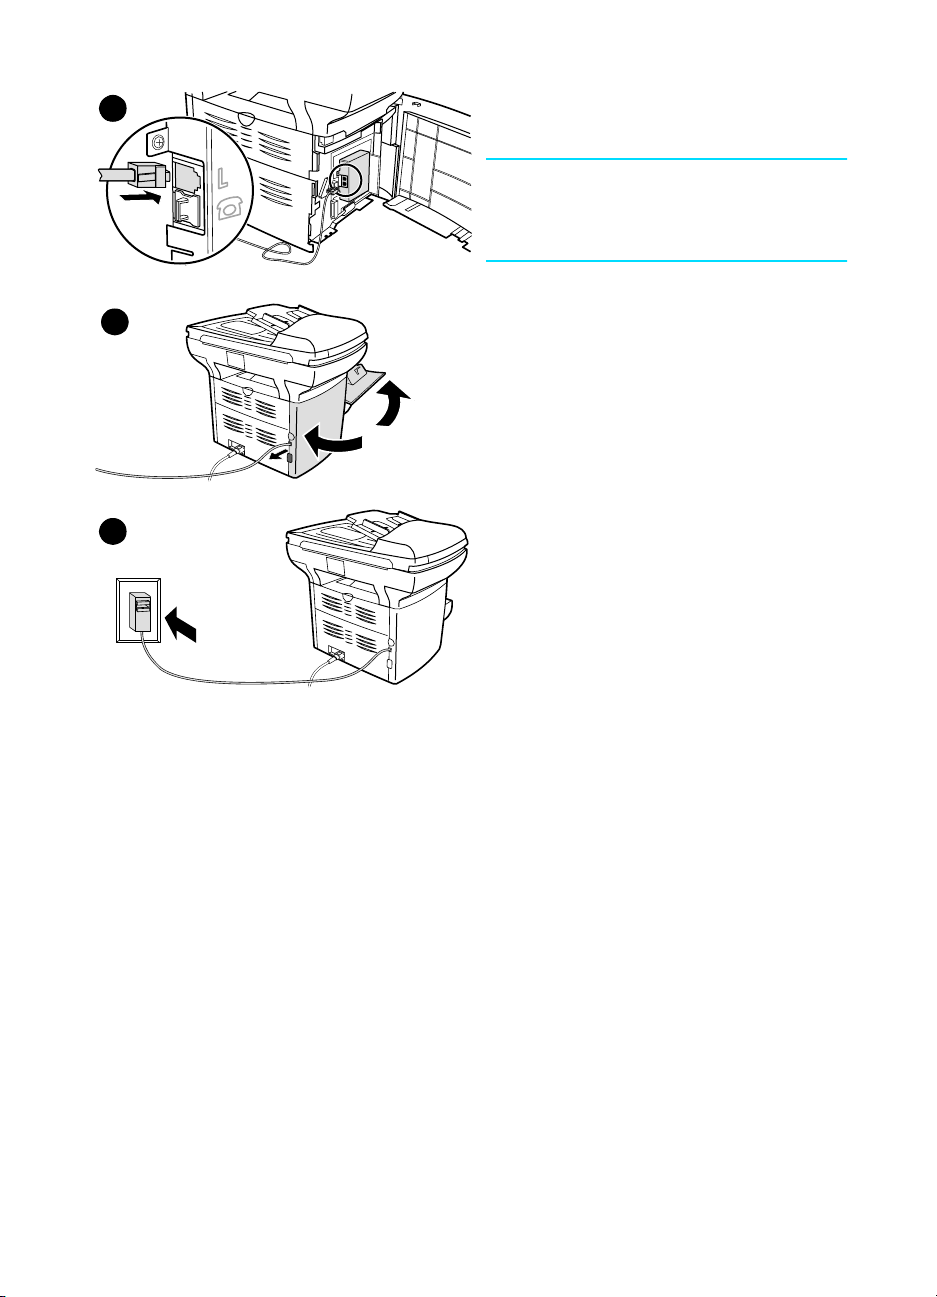
3 Take the phone cord included with the
3
4
5
product and plug one end of it into the
product’s line socket (the socket on top).
Note
You must use the phone cord that came with
the product in order for the product to
function correctly.
4 Close the left side panel and the print
cartridge door. When closing the left side
panel, ensure the phone line is routed
through the upper notch in the panel.
5 Plug the other end of the phone cord into
the phone jack on the wall.
If you want to connect additional devices,
such as a phone, to the phone line, continue
to “Connecting additional devices” on page 8.
If you do not want to connect other devices,
continue to “Specifying the fax settings” on
page 13.
ENGB Connecting the product to a phone line 7
Page 10

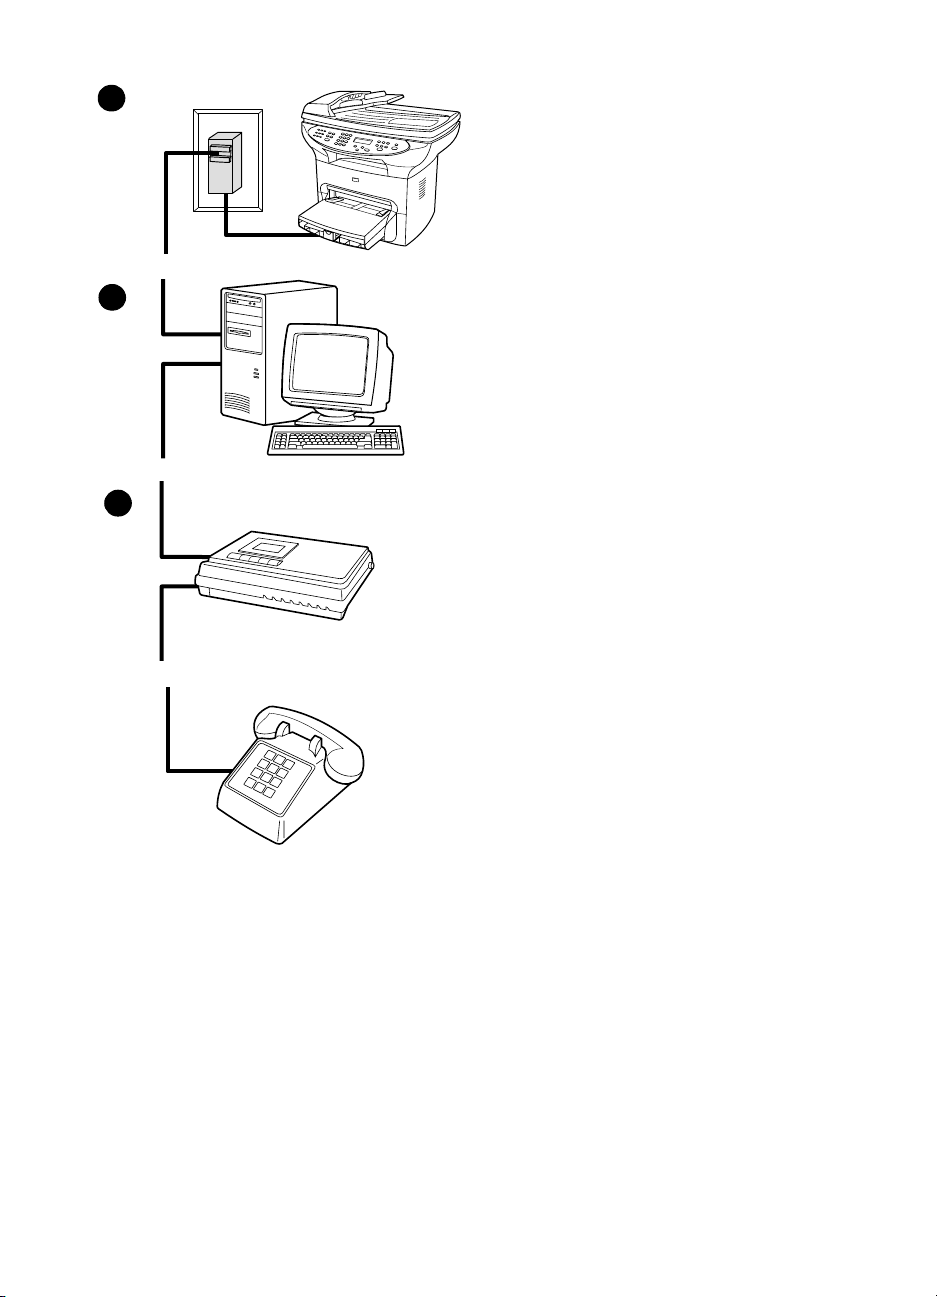
Connecting additional devices
Depending on the setup of your phone lines, you can connect additional
devices to the phone line along with your HP LaserJet 3330.
As a general rule, no more than three or four devices should be
connected to a single phone line. If too many devices are connected to a
single phone line, one or more of the devices may not detect an
incoming call. If this occurs, disconnect one or more of the devices.
Note The HP LaserJet 3330 cannot replace a computer modem. It will not act
as a data modem for sending and receiving e-mail, connecting to the
Internet, or communicating with other computers.
Dedicated fax line
If you connected your HP LaserJet 3330 to a phone line that is used only
for fax calls, you may want to connect the following devices:
● Modem: You can connect a computer modem (external or internal)
to the fax line if you want to use the fax line for e-mail or for access
to the Internet, but you cannot send or receive faxes while using the
line for these purposes.
● Extra phone: You can connect an extra phone to the fax line if you
want to make outgoing calls on the fax line.
You should not connect the following devices:
● Answering machine or computer voicemail: If you use computer
voicemail, you must connect a modem (external or internal) to your
dedicated voice line. Then, use the dedicated voice line to connect
to the Internet and receive voicemail.
Shared phone line
If you connected your HP LaserJet 3330 to a phone line that is shared
between fax calls and voice calls, or if you have one phone line with two
phone numbers and a ring pattern service, you may want to connect the
following devices:
● Modem: You can connect a computer modem (external or internal)
to the shared line if you want to use the shared line for e-mail or for
access to the Internet, but you cannot send or receive faxes while
using the line for these purposes.
● Phone: You can connect a phone to the shared line if you want to
make or receive voice calls on the shared line.
● Answering machine or computer voicemail: You should connect
these devices to the same phone jack as the product to make sure
the different devices do not interfere with one another.
8 Chapter 1 Setting up ENGB
Page 11

Note It is possible to connect devices to another phone jack for the same phone
line (in another room, for example); however, the devices may interfere
with faxing and with each other.
How you connect the additional devices depends on whether the
devices have British Telecom sockets on the back. Phones or
combination phone answering machines do not have this socket and do
not need one. However, check your additional devices. Most answering
machines and some modems have British Telecom sockets. Many
external modems and internal modems in computers have RJ11
sockets.
After you have checked your additional devices, check the following table
and continue with the instructions shown:
To connect: See the instructions:
One or more additional devices, all
of which have British Telecom
sockets
One or more additional devices,
any one of which has an RJ11
socket
“To connect additional devices with
British Telecom sockets” on
page 12
“To connect additional devices with
RJ11 or British Telecom sockets”
on page 10
ENGB Connecting additional devices 9
Page 12
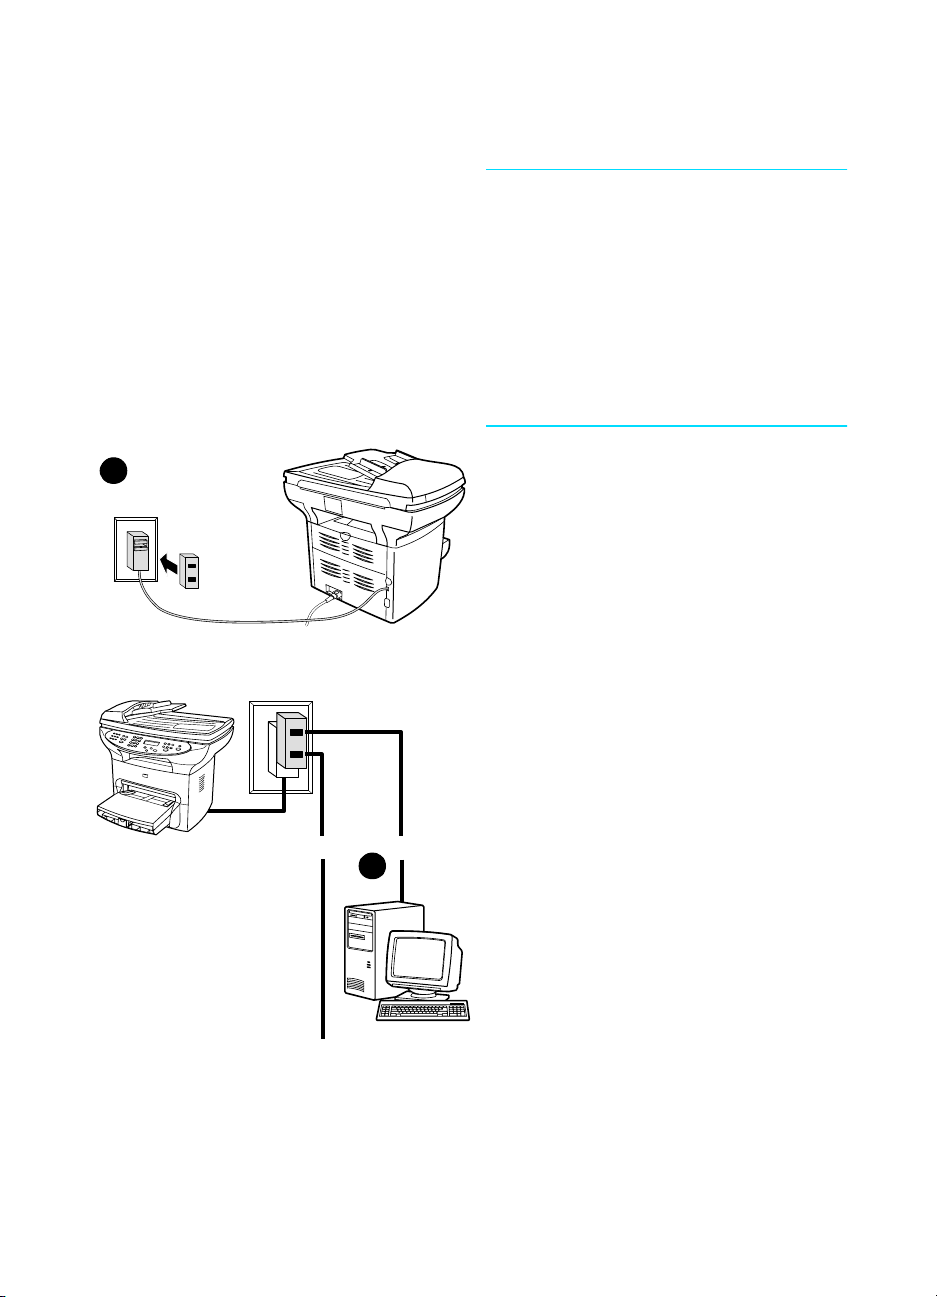
To connect additional devices with RJ11 or British Telecom sockets
Note
In the rare instance that you want to connect
two devices that do not have British Telecom
“Tel” sockets in addition to a phone and/or an
answering machine, you will not be able to
connect all of the devices to a single phone
jack. You might be able to connect devices to
another phone jack for this phone line.
However, if you have an answering machine,
connect it to the same phone jack as the
product.
2
1 If you have not yet connected your
product to a phone line, see “Connecting
the product to a phone line” on page 5
before proceeding. The product should
already be connected to the left side of
the phone jack.
2 Plug a dual adapter (not included) into
the phone cord for the product.
3 Unplug all of the additional devices you
want to connect from their power
sources.
4 To connect a device without a British
Telecom “Tel” socket (usually an internal
or external modem), plug its phone cord
into one side of the dual adapter.
4
10 Chapter 1 Setting up ENGB
Page 13
5 To connect an answering machine, plug
5
6
the answering machine’s phone cord into
the other side of the dual adapter.
6 To connect a phone, plug the phone’s
cord into the “Tel” socket on the
answering machine. If you did not
connect an answering machine, plug the
cord into the other side of the dual
adapter.
7 After you have finished connecting
additional devices, plug all of the devices
back into their power source.
8 Continue to “Specifying the fax settings”
on page 13.
ENGB Connecting additional devices 11
Page 14
2
To connect additional devices with British Telecom sockets
1 Unplug all additional devices from their
power sources.
2 If you have not yet connected your
product to a phone line, see “Connecting
the product to a phone line” on page 5
before proceeding. The product should
3
4
already be connected to the left side of
the phone jack.
3 To connect an internal or external
modem, plug the modem’s phone cord
into the phone jack with the product.
4 To connect an answering machine, plug
the answering machine’s phone cord into
the phone jack with the product (or into
the “Tel” socket on the last device you
connected).
5 To connect a phone, plug the phone cord
into the phone jack with the product (or
into the “Tel” socket on the last device
you connected).
6 After you have finished connecting
additional devices, plug them all back
into their power sources.
7 Continue to “Specifying the fax settings”
on page 13.
12 Chapter 1 Setting up ENGB
Page 15

Specifying the fax settings
Before you can begin using your product’s fax features, you must
complete the following tasks:
● Set the time and date
● Set your fax header
● Set the answer mode
● Set rings-to-answer
● Enable answer ring patterns, if needed
Note If you will be installing the product software on your computer, you can
skip the remaining instructions in this chapter. The software install will
automatically walk you through setting up the fax settings. See the getting
started guide for instructions.
Note In the U.S. and many other regions, setting the time, date, and other fax
header information is a legal requirement.
To enter text from the control panel
Use the following instructions to enter information from the product’s
control panel with the alphanumeric keypad and the < and > buttons:
● Numbers: To enter numbers, press the numeric button for the
number you need.
● Letters: To enter letters, repeatedly press the numeric button for the
letter you need until that letter appears (for example, if the first letter
you need is a “C,” press 2 repeatedly until a “C” appears in the
control panel display).
● Punctuation marks: To enter punctuation marks, repeatedly press
* until the character you want appears in the control panel display.
● Spaces: After entering any character, press > twice to create a
space after that character and move the cursor to an insertion point
after the space.
● Errors: If you enter a character incorrectly, use the < button to
erase the incorrect character, then enter the correct character.
To set the time and date
To set or change the time and date, use the following steps. If you need
help entering any information, see “To enter text from the control panel”
on page 13.
1 On the control panel, press menu/enter.
2 Using the < and > buttons, select Time/Date, Header, and press
menu/enter.
ENGB Specifying the fax settings 13
Page 16

3 Press menu/enter to select Time/Date.
4 Using the < and > buttons, specify either the 12-hour or the 24-hour
clock, and press menu/enter.
5 Using the alphanumeric keypad, enter the current time.
6 If you specified the 12-hour clock, use the < and > buttons to move
the cursor past the fourth character. Select 1 for a.m. or 2 for p.m.,
and press menu/enter.
OR
If you specified the 24-hour clock, press menu/enter.
7 Using the alphanumeric keypad, enter the current date.
• Make sure you use two digits to specify the month and day (for
example, use “05” for May and “01” for the first day of the month).
8 Press menu/enter.
To set the fax header
To set or change the fax header information, use the following steps. If
you need help entering any information, see “To enter text from the
control panel” on page 13.
1 On the control panel, press menu/enter.
2 Using the < and > buttons, select Time/Date, Header, and press
menu/enter.
3 Using the < and > buttons, select Fax Header, and press
menu/enter.
4 Using the alphanumeric keypad, enter your fax number, and press
menu/enter.
5 Using the alphanumeric keypad, add the name of your company,
and press menu/enter.
Setting the answer mode
Depending on your situation, you can set the HP LaserJet 3330’s
answer mode to automatic or manual.
● Automatic: In automatic answer mode, the product answers
incoming calls after a specified number of rings or upon recognition
of special fax tones. To specify the number of rings, see “Setting
rings-to-answer” on page 15.
● Manual: In manual answer mode, the product never answers calls.
You must start the fax-receiving process yourself, either by pressing
start fax on the control panel or by picking up a phone connected to
that line and dialing 1-2-3.
The default answer mode is automatic.
14 Chapter 1 Setting up ENGB
Page 17

Note Although most users leave the answer mode set to automatic, voice callers
who dial the fax phone number will hear fax tones if the phone is not
answered, or if they do not hang up by the specified number of
rings-to-answer. If you do not want voice callers to hear fax tones, use the
manual setting, but remember that fax calls are not received automatically.
To set the answer mode
To set or change the answer mode, use the following steps:
1 On the control panel, press menu/enter.
2 Using the < and > buttons, select Fax Setup, and press
menu/enter.
3 Using the < and > buttons, select Fax Recv. Setup, and press
menu/enter.
4 Press menu/enter to select Answer Mode.
5 Using the < and > buttons, select Automatic or Manual, and press
menu/enter.
6 The control panel display shows the answer mode setting you
specified.
Setting rings-to-answer
When the answer mode is set to automatic, the product’s
rings-to-answer setting determines the number of times the phone rings
before an incoming call is answered.
If the product is connected to a line receiving both fax and voice calls (a
shared line) with an answering machine, you may need to adjust the
rings-to-answer. The number of rings-to-answer for the product must be
greater than the rings-to-answer on the answering machine. This allows
the answering machine to answer the incoming call and record a
message if it is a voice call. When the answering machine answers the
call, the product listens to the call and automatically answers it if it
detects fax tones.
The default setting for rings-to-answer is two.
ENGB Setting rings-to-answer 15
Page 18

Recommended rings-to-answer table
Use the following table to determine the number of rings-to-answer to
use.
Type of phone line Recommended rings-to-answer
Dedicated fax line (receiving
only fax calls)
One line with two separate
numbers and ring pattern
service
Shared line (receiving both fax
and voice calls) with only an
attached phone
Shared line (receiving both fax
and voice calls) with an attached
answering machine or computer
voicemail
To set the number of rings-to-answer
To set or change the number of rings-to-answer, use the following steps:
1 On the control panel, press menu/enter.
2 Using the < and > buttons, select Fax Setup, and press
menu/enter.
3 Using the < and > buttons, select Fax Recv. Setup, and press
menu/enter.
4 Using the < and > buttons, select Rings To Answer, and press
menu/enter.
5 Using the alphanumeric keypad, enter the number of
rings-to-answer, and press menu/enter.
Leave at two rings.
Leave at two rings. (If you have an answering
machine or computer voicemail for the other phone
number, make sure the product is set to a lesser
number of rings than the answering system. Also, see
“Enabling answer ring patterns” on page 17.)
Set to five rings.
Two rings more than the answering machine or
computer voicemail. (You cannot set the product to
more than six rings.)
16 Chapter 1 Setting up ENGB
Page 19

Enabling answer ring patterns
Ring pattern or distinctive ring service is available through some local
phone companies and allows you to have more than one phone number
on a single line. Each phone number has a unique ring pattern, allowing
you to answer voice calls and the product to answer fax calls.
If you subscribe to a ring pattern service with your phone company, you
must set the product to answer the correct ring pattern.
Note If you do not have ring pattern service and you change the ring pattern
settings to something other than All Rings, the product might not be able
to receive faxes.
To enable answer ring patterns
To enable answer ring patterns, use the following steps:
1 On the control panel, press menu/enter.
2 Using the < and > buttons, select Fax Setup, and press
menu/enter.
3 Using the < and > buttons, select Fax Recv. Setup, and press
menu/enter.
4 Using the < and > buttons, select Answer Ring Type, and press
menu/enter.
5 Using the < and > buttons, select the ring pattern you want, and
press menu/enter.
6 After product installation is complete, ask someone you know to
send you a fax in order to verify that the ring pattern service is
working correctly.
ENGB Enabling answer ring patterns 17
Page 20

18 Chapter 1 Setting up ENGB
Page 21

Faxing (basic)
This chapter will present some of the basic faxing features available on
your HP LaserJet 3330. For complete information on all fax features, as
well as information about all other product features, refer to the
electronic user guide that came on your product CD-ROM. For
instructions on accessing the electronic user guide see “Accessing the
electronic user guide” on page 42.
Loading originals to fax
Use the following instructions to load original documents for faxing.
To load fax documents
1 Before loading the fax documents into the ADF input tray, make sure
there is nothing on the scanner glass.
2 Put the top ends of the document to be faxed print side up in the
ADF input tray with the first page to be scanned at the top of the
stack.
3 Push the document up against the side of the ADF input tray.
4 Slide the document into the ADF input tray until it does not move
any farther.
The document is now ready to be faxed.
Sending faxes
To send a fax to one recipient
Note If you want to improve the quality of a paper document before faxing it,
scan the document, straighten or clean the image, and send it as a fax
from the software. For more information, see the electronic user guide.
1 Dial the fax number using one of the following methods:
• Use the alphanumeric keypad on the product’s control panel.
• If the fax number you are calling has been assigned to a
one-touch key, press that key.
ENGB Loading originals to fax 19
Page 22

• If the fax number you are calling has a speed-dial code, press
speed dial, enter the speed-dial code using the alphanumeric
keypad, and press menu/enter.
Note When dialing with the alphanumeric keypad, include any pauses or other
needed numbers, such as an area code, an access code for numbers
outside a PBX system (usually a 9 or 0), or a long-distance prefix. For
more information, see “Using dialing characters” on page 28.
2 Load the document into the ADF input tray.
3 Adjust any fax settings, such as resolution.
4 Press fax/send.
When the last page of the fax has exited the product, you can start
sending another fax, copying, or scanning.
To fax to numbers you use regularly, you can assign a one-touch key or
speed-dial code. See “To program speed-dial codes and one-touch
keys” on page 23 and “To program group-dial codes” on page 26. If you
have electronic phone books available, you may be able to use them for
selecting recipients. Electronic phone books are generated with
third-party applications.
Changing the default contrast and resolution for outgoing faxes
The contrast affects the lightness and darkness of an outgoing fax as it
is being sent. Resolution affects the sharpness of outgoing faxes. It also
affects the transmission speed of faxes.
To change the default contrast
The default contrast is the contrast normally applied to items being
faxed. The slider is set to the middle as the default contrast setting.
1 Press menu/enter.
2 Use the < or > button to select Fax Setup and press menu/enter.
3 Use the < or > button to select Fax Send Setup and press
menu/enter.
4 Use the < or > button to select Def. Light/Dark.
5 Use the < button to move the slider to the left to make the fax lighter
than the original, or use the > button to move the slider to the right
to make the fax darker than the original.
6 Press menu/enter to save your selection.
20 Chapter 2 Faxing (basic) ENGB
Page 23

To change the default resolution
Resolution affects the quality, in dots per inch, of documents to be faxed.
It also affects the transmission speed.
Use this procedure to change the default resolution for all faxes.
1 Press resolution to display the current resolution setting.
2 Use the < or > button to display the desired resolution setting.
3 Press menu/enter to save the selection.
Deleting faxes from memory
Use this procedure only if you are concerned someone else has access
to your product and will try to reprint faxes from the reprint memory.
CAUTION In addition to clearing the reprint memory, this procedure clears any fax
currently being sent, unsent faxes pending redial, faxes scheduled to be
sent at a future time, and faxes not printed or forwarded.
To delete faxes from memory
1 Press menu/enter.
2 Press > once to display Fax Functions and press menu/enter.
3 Use the < or > button to select Clear Saved Faxs, and press
menu/enter.
4 Press menu/enter to confirm the deletion.
Sending faxes from the software
This section and the following section contain some instructions about
sending and receiving faxes using the software that came with the
product. All other software-related topics are covered in the software
help, which can be accessed from the software program’s Help menu.
Note The HP LaserJet Director and HP LaserJet Document Manager are not
supported for Microsoft Windows 95. If you use Windows 95, you can send,
but not receive, faxes with the software. However, all fax features are
available from the control panel.
You can fax electronic documents from your computer in the following
situations:
● The HP LaserJet product is connected directly to your computer or
connected to your computer over a network using an HP Jetdirect
print server.
ENGB Deleting faxes from memory 21
Page 24

Note See the getting started guide for a complete list of supported HP Jetdirect
print servers.
● The product software is installed on your computer.
● You are using Microsoft Windows 98, ME, NT 4.0 SP3, 2000, or XP,
or Mac OS 9.1 or X.
To send a fax from the software
The procedure for faxing jobs from the software may vary; the most
typical steps are shown here.
1 Select a document to fax using one of the following methods:
• Open the document in the HP LaserJet Document Manager on
Windows-compatible computers.
• Open the document in the HP LaserJet Workplace on
Macintosh-compatible computers.
• Open a document in a Windows application such as Microsoft
Word. From the application, select Print from the File menu,
then select HP LaserJet Series Fax from the Printer Name
drop-down list in the print dialog box. Click OK.
• Load the document into the ADF input tray.
2 Add one or more recipients on the HP LaserJet Send Fax dialog
box.
3 Include a cover page (optional).
4 Click Send Now.
OR
Click Send Later and select a date and time.
For more information on sending a fax using the HP LaserJet Workplace
(Mac OS), the HP LaserJet Document Manager (Windows), or the HP
LaserJet Director, see the electronic user guide.
22 Chapter 2 Faxing (basic) ENGB
Page 25

Faxing (advanced)
This chapter will present a few of the advanced faxing features available
on your HP LaserJet 3330. For complete information on all fax features,
as well as information about all other product features, refer to the
electronic user guide that came on your product CD-ROM. For
instructions on accessing the electronic user guide see “Accessing the
electronic user guide” on page 42.
About speed-dial codes, one-touch keys, and group-dial codes
You can store frequently dialed fax numbers or groups of fax numbers as
one-touch keys, speed-dial codes, or group-dial codes.
In the product’s phone book, there are a total of 275 codes available that
can be used for speed-dial codes and group-dial codes. For example, if
you program 225 of the codes as speed-dials, the remaining 50 can be
used for group-dials.
See the following procedures for more information about how to use
speed-dial codes, one-touch keys, and group-dial codes:
To program speed-dial codes and one-touch keys
Speed-dial codes 1 through 9 are also associated with their
corresponding one-touch keys on the control panel. The one-touch keys
can be used for speed-dial or group-dial codes. A maximum of 50
characters can be entered for a single fax number.
Note Speed-dial codes, one-touch keys, and group-dial codes are more easily
programmed from the software. For instructions on programming
speed-dial codes, one-touch keys, and group-dial codes using the product
software, see the electronic user guide.
Use the following steps to program speed-dial codes and one-touch
keys from the product’s control panel:
1 Press menu/enter.
2 Use the < or > button to select Fax Setup and press menu/enter.
ENGB About speed-dial codes, one-touch keys, and group-dial codes 23
Page 26

3 Press menu/enter to select Phone Book.
4 Press menu/enter to select Individual Setup.
5 Press menu/enter to select Add.
6 Using the alphanumeric keypad, enter the speed-dial code number
you want to associate with this fax number, and press menu/enter.
Choosing a number from 1 to 9 also associates the fax number with
the corresponding one-touch key.
Note When entering a fax number, you can use a comma (,) for a pause, or the
letter R if you want the product to wait for a dial tone.
7 Using the alphanumeric keypad, enter the fax number. Include any
pauses or other needed numbers, such as an area code, an access
code for numbers outside a PBX system (usually a 9 or 0), or a long
distance prefix.
8 Press menu/enter.
9 Using the alphanumeric keypad, enter a name for the fax number.
To do so, repeatedly press the numeric button for the letter you
need until the letter appears. (For a list of characters, see “Using
dialing characters” on page 28.)
Note To insert punctuation, press the asterisk (*) repeatedly until the character
you want appears and press > to go to the next space.
10 Press menu/enter to save the information.
11 If you have more speed-dial codes or one-touch keys to program,
repeat steps 1 through 10.
To delete speed-dial codes and one-touch keys
1 Press menu/enter.
2 Use the < or > button to select Fax Setup and press menu/enter.
3 Press menu/enter to select Phone Book.
4 Press menu/enter to select Individual Setup.
5 Use the < or > button to select Delete and press menu/enter.
6 Using the alphanumeric keypad, enter the number of the speed-dial
code you want to delete, and press menu/enter.
7 Press menu/enter to confirm the deletion.
24 Chapter 3 Faxing (advanced) ENGB
Page 27

To quickly program speed-dial codes or one-touch keys
Note The following procedure cannot be used to program a group-dial code. For
group-dial code instructions, see “To program group-dial codes” on
page 26.
Use the following method to program speed-dial codes and one-touch
keys easily from the product control panel:
1 On the product control panel, press phone book, enter an
unprogrammed speed-dial code, and press menu/enter.
OR
Press an unprogrammed one-touch key. The control panel display
will notify you that the speed-dial code or one-touch key has not
been programmed.
2 Press menu/enter to program the speed-dial code or one-touch
key.
3 Enter the fax number and press menu/enter. Include pauses, or
other needed numbers, such as an area code, an access code for
numbers outside a PBX system (usually a 9 or 0), or a long distance
prefix. (See “Using dialing characters” on page 28 for more
information.)
Note When entering a fax number you can use a comma (,) for a pause, or the
letter R if you want the product to wait for a dial tone.
4 Enter a name for the fax number. To do so, repeatedly press the
numeric button for the letter you need until the letter appears. (See
“Using dialing characters” on page 28 for a list of characters.)
5 Press menu/enter to save the information.
To program a one-touch key for alternate long distance
If you use an alternate long distance carrier, you can program a
one-touch key to dial the service’s access number before a fax number.
When you need to use this one-touch key, press it, enter the fax number,
and press fax/send. Both the access number and the fax number are
then dialed together. If the access number is used almost every time you
dial a fax, it might be easier to program the access number as a dialing
prefix (see “Inserting a dial prefix” on page 29 for more information).
Note Speed-dial codes, one-touch keys, and group-dial codes are more easily
programmed from the software (not available in Windows 95). For
instructions on programming speed-dial codes, one-touch keys, and
group-dial codes using the product software, see the electronic user guide.
ENGB About speed-dial codes, one-touch keys, and group-dial codes 25
Page 28

Use this procedure if the access number has more than 10 characters or
if you only occasionally use the access number.
1 Follow steps 1 through 6 of “To program speed-dial codes and
one-touch keys” on page 23. When entering the fax number, you
might also have to do one or both of the following tasks:
• If you have to wait for an access tone at some point in the
number, enter one or more three-second pauses by pressing
pause/redial.
• Enter a personal identification number (PIN), if applicable.
2 When you are finished entering the access number, press
pause/redial. A pause at the end of the string tells the product not
to dial this number until you dial the fax number.
3 Continue with steps 7 through 10 of “To program speed-dial codes
and one-touch keys” on page 23.
To manage group-dial codes
If you send information to the same group of people on a regular basis,
you can program a group-dial code to simplify the task. Any available
speed-dial codes can be programmed with group-dial codes. Group-dial
codes using numbers 1 through 9 are also associated with the
corresponding one-touch key on the control panel. Any individual can be
added to a group. All group members must have programmed speed-dial
codes or one-touch keys assigned to them before being added to the
group-dial code.
Use the instructions below to manage your group-dial codes.
Note Speed-dial codes, one-touch keys, and group-dial codes are more easily
programmed from the software. For instructions on programming
speed-dial codes, one-touch keys, and group-dial codes using the product
software, see the electronic user guide.
To program group-dial codes
1 Assign a speed-dial code to each fax number you want in the group.
(For instructions, see “To program speed-dial codes and one-touch
keys” on page 23.)
2 Press menu/enter.
3 Use the < or > button to select Fax Setup and press menu/enter.
4 Press menu/enter to select Phone Book.
5 Use the < or > button to select Group Setup and press menu/enter.
6 Use the < or > button to select Add Group and press menu/enter.
26 Chapter 3 Faxing (advanced) ENGB
Page 29

7 Using the alphanumeric keypad, enter the number you want to
associate with this group and press menu/enter. Choosing 1
through 9 also associates the group with the corresponding
one-touch key.
8 Using the numeric keypad, enter a name for the group. See “Using
dialing characters” on page 28 for instructions on using the keypad.
After the name of the group has been entered, press menu/enter.
9 Press the one-touch key or choose the speed-dial code for the
group member you want, and press menu/enter. Press
menu/enter again to confirm the addition. Repeat this step for each
group member you want to add.
10 When you are finished, press cancel.
11 If you have more group-dial codes to enter, press menu/enter and
repeat steps 1 through 11.
To delete group-dial codes
1 Press menu/enter.
2 Use the < or > button to select Fax Setup, and press menu/enter.
3 Press menu/enter to select Phone Book.
4 Use the < or > button to select Group Setup, and press menu/enter.
5 Use the < or > button to select Delete Group, and press
menu/enter.
6 Using the alphanumeric keypad, enter the number of the group-dial
you want to delete and press menu/enter.
7 Press menu/enter to confirm the deletion.
To delete an individual from a group-dial code
1 Press menu/enter.
2 Use the < or > button to select Fax Setup, and press menu/enter.
3 Press menu/enter to select Phone Book.
4 Use the < or > button to select Group Setup, and press menu/enter.
5 Use the < or > button to select Del. # in Group, and press
menu/enter.
6 Use the < or > button to select the individual you want to delete from
the group.
7 Press menu/enter to confirm the deletion.
8 Repeat steps 6 and 7 to delete other individuals from the group.
OR
Press cancel if you are finished.
ENGB About speed-dial codes, one-touch keys, and group-dial codes 27
Page 30

To delete all phone book entries
You can delete all speed-dial codes, one-touch keys, and group-dial
codes that are programmed in the product.
CAUTION Once speed-dial codes, one-touch keys, and group-dial codes are deleted,
they cannot be recovered.
1 Press menu/enter.
2 Use the < or > button to select Fax Setup, and press menu/enter.
3 Press menu/enter to select Phone Book.
4 Use the < or > button to select Delete All, and press menu/enter.
5 Press menu/enter to confirm the deletion.
Using dialing characters
When using the control panel to enter your name in the header or type a
name for a one-touch key, speed-dial code, or group-dial code, press the
appropriate numeric button repeatedly until the letter you need appears.
Then, press > to select that letter and move to the next space. This table
shows which letters and numbers appear on each numeric button when
the default language is set to English:
button number characters
11
2 A B C a b c
3D E F d e f
4 G H I g h i
5J K L j k l
6M N O m n o
7P Q R S p q r s
8 T U V t u v
28 Chapter 3 Faxing (advanced) ENGB
Page 31

9 W X Y Z w x y z
00
* ( ) + - . / , “ * & @
# space #
To insert a pause or wait
You can insert pauses into a fax number you are dialing or programming
to a one-touch key, speed-dial code, or group-dial code. Pauses are
often needed when dialing internationally or connecting to an outside
line.
Press pause/redial to enter a three-second pause in your dialing
sequence. A comma appears on the control panel display, indicating the
pause will occur at that point in the dialing sequence.
Inserting a dial prefix
A dial prefix is a number or group of numbers automatically added to the
beginning of every fax number you enter at the control panel or from the
software.
By default, this setting is off. You may want to turn this setting on and
enter a prefix if, for example, you have to dial a number such as 9 to get
a phone line outside your company’s phone system. While this setting is
on, you can still dial a fax number without the dial prefix by using manual
dial. For instructions, see “Using manual dial” on page 30.
To set the dial prefix
1 Press menu/enter.
2 Use the < or > button to select Fax Setup, and press menu/enter.
3 Press > once to select Fax Send Setup, and press menu/enter.
4 Use the < or > button to select Dial Prefix, and press menu/enter.
5 Use the < or > button to select On or Off, and press menu/enter.
6 If you choose On, use the numeric buttons to enter the prefix, and
press menu/enter. You can use numbers, pauses, and dialing
symbols.
ENGB Inserting a dial prefix 29
Page 32

Enabling an extension phone
With this setting turned on, you can alert the product to pick up the
incoming fax call by pressing 1-2-3 sequentially on the telephone
keypad. The default is Yes. Turn this setting off only if you have a service
from your telephone company that also uses the 1-2-3 sequence. The
service will not work if it conflicts with the product.
1 Press menu/enter.
2 Use the < or > button to select Fax Setup, and press menu/enter.
3 Use the < or > button to select Fax Recv. Setup, and press
menu/enter.
4 Use the < or > button to select Extension Phone, and press
menu/enter.
5 Use the < or > button to select On or Off, and press menu/enter to
save your selection.
Using manual dial
Normally, the product dials after you press fax/send. At times, however,
you might want the product to dial each number as you press it. For
example, if you are charging your fax call to a calling card, you may need
to dial the fax number, wait for the acceptance tone of your telephone
company, and then dial the calling card number. When dialing
internationally, you might need to dial part of the number and then listen
for dial tones before continuing to dial.
To use manual dial
1 Load the document into the ADF input tray.
2 Press fax/send.
3 Begin dialing. The fax number dials as you press each digit. This
allows you to wait for pauses, dial tones, international access tones,
or calling card acceptance tones before continuing to dial.
Printing the fax activity log
On demand, you can print a log of the last 40 faxes. This log includes
entries for:
● All faxes received to the product
● All faxes sent from the control panel
● All faxes sent from the HP LaserJet Document Manager (for
Windows-compatible computers directly connected to the product)
● All faxes sent from the HP Workplace (for Macintosh-compatible
computers directly connected to the product)
30 Chapter 3 Faxing (advanced) ENGB
Page 33

Note The HP LaserJet Document Manager is not supported for Microsoft
Windows 95.
To print the fax activity log
1 Press menu/enter.
2 Use the < or > button to select Reports and press menu/enter.
3 Use the < or > button to select Fax Activity Log and press
menu/enter.
4 Press menu/enter to select Print Log Now. The product exits the
menu settings and prints the log.
Changing the fax call report print times
The fax call report is a brief report indicating the status of the last sent or
received fax. You can set your product to print a fax call report after the
following events:
● Every Fax Error (the default)
● Send Fax Error
● Receive Fax Error
● Every Fax
● Send Fax Only
● Never
Note If you choose Never, you will have no indication that a fax failed to transmit
unless you print a fax activity log.
To set fax call report print times
Use the following steps to set when the fax call report prints:
1 Press menu/enter.
2 Use the < or > button to select Reports and press menu/enter.
3 Use the < or > button to select Fax Call Report and press
menu/enter.
4 Press the > button once to select Print Report and press
menu/enter.
5 Use the < or > button to select the option for when you want the fax
call reports to print.
6 Press menu/enter to save your selection.
ENGB Changing the fax call report print times 31
Page 34

32 Chapter 3 Faxing (advanced) ENGB
Page 35

Troubleshooting
Use the information in this chapter to troubleshoot general fax issues.
For more advanced fax troubleshooting information, see the electronic
user guide.
Is your fax set up correctly?
Use the following checklist to help you define what is causing any faxing
problems you might be encountering.
● Are you using the phone cord supplied with the product?
This product has been tested with the supplied phone cord to meet
RJ11 specifications.
● Is the Fax/Phone line connector installed in the correct socket
on the product?
It should be plugged into the product’s line socket (the socket on top
with an “L” next to it). You must open the left side panel to access
the socket. See “Connecting the product to a phone line” on page 5
for details.
● Is the Fax/Phone line connector seated into the socket on the
product?
Gently pull on the Fax/Phone line connector to make sure it is well
seated into the socket.
● Is the phone wall jack working properly?
Verify that a dial tone exists by attaching a phone to the wall jack.
Can you hear a dial tone and can you make a phone call?
What type of phone line are you using?
● Dedicated line: A unique fax/phone number assigned to receive or
send faxes. The phone cord should be connected to the top port
inside the left side panel of the product (the one that is not labeled
with a telephone icon).
● Shared phone line: A system where both phone calls and faxes
are received or sent using the same phone number and phone line.
A single standard phone line can only perform one function at a
time. You cannot send a fax while talking on the phone or while
connecting to the Internet using the same phone line.
ENGB Is your fax set up correctly? 33
Page 36

● PBX system: A business environment phone system. Standard
home phones and the HP LaserJet 3330 use an analog phone
signal. PBX systems are digital and are incompatible with standard
phones and with devices such as the HP LaserJet 3330. You need
to have access to a standard analog phone line in order to send and
receive faxes.
● Roll-over lines: A phone system feature where, when one
incoming line is busy, the next call “rolls over” to the next available
line. Try attaching the product to the first incoming phone line. The
product will answer the phone after it rings the number of times set
in the product’s rings-to-answer setting. (See “Setting
rings-to-answer” on page 15.)
● Distinctive ring service: The phone company can assign two
phone numbers to one physical line and assign each number a
distinctive ring pattern. Make sure the product is set to respond to
the correct distinctive ring pattern assigned to the fax phone number
by your phone service provider. (See “Enabling answer ring
patterns” on page 17.)
Are you using a surge protection device?
This is a device used between the wall jack and the product to protect
the product against electrical power passed through the phone lines.
These can cause some fax communication problems by degrading the
quality of the phone signal. If you are having problems sending or
receiving faxes and are using one of these devices, connect the product
directly to the phone jack on the wall to determine whether the problem
is with the surge protection device.
Are you using a phone company voice messaging service?
This is a voice messaging service used to replace telephone answering
devices. If the messaging service’s rings-to-answer setting is lower than
the product’s rings-to-answer setting, the messaging service answers
the call and the product is not able to receive faxes. If the product’s
rings-to-answer setting is lower than that of the messaging service, the
product will answer all calls and no call will ever be routed to the
messaging service. The only voice messaging solution that can be
successfully used with the product is a stand-alone telephone answering
machine.
Are you using an answering machine?
An answering machine should be connected directly to the port located
inside the left side panel of the product that is labeled with the telephone
icon or should be shared on the same phone line extension.
34 Chapter 4 Troubleshooting ENGB
Page 37

Set the product’s rings-to-answer for one ring more than the number of
rings for which the answering machine is set. See “Setting
rings-to-answer” on page 15 for more information.
Note If an answering machine is connected on the same phone line but on a
different jack, it may interfere with the product’s ability to receive faxes.
General fax problems
Use the tables in this section to solve fax problems.
Problem Cause Solution
Document stops
feeding in the middle of
faxing.
Fax activity logs or fax
call reports are printing
at unwanted times.
The volume for sounds
coming from the
product is too high or
too low.
The maximum length of a
page you can load is 381 mm
(15 inches). Faxing of a
longer page stops at 381 mm
(15 inches).
The minimum page size for
the ADF is 127 by 127 mm (5
by 5 inches). If the item is too
small, it can jam inside the
ADF.
The fax activity log or fax call
reports settings are not
correct.
The volume setting needs to
be adjusted.
If there is no jam and it has been
less than one minute, wait a
moment before pressing Cancel.
If there is a jam, see the topics in
the electronic user guide on
clearing jams. Then, resend the
job.
If there is a jam, see the topics in
the electronic user guide on
clearing jams.
Print a configuration report and
check when the reports print. See
the topics in the electronic user
guide on printing a configuration
report, setting when the fax call
report prints, and setting the fax
activity log to print automatically.
See the topic in the electronic user
guide on changing the sound
volume for instructions about
changing volume settings.
ENGB General fax problems 35
Page 38

Receiving fax problems
Use the table in this section to solve problems that might occur when
receiving faxes.
Problem Cause Solution
Unable to start
receiving faxes from an
extension phone.
Voice calls are not being
received by the phone
or answering machine
connected to the line.
The extension phone setting
might be disabled.
The telephone cord might not
be securely connected.
The phone cord might not be
connected properly.
The answer mode or
rings-to-answer settings
might not be set properly.
See “Enabling an extension phone”
on page 30 for instructions about
changing this setting.
Check that the telephone cord is
securely connected between the
phone and the product (or other
device connected to the product).
Press 1-2-3 in sequence, wait for
three seconds, and then hang up.
See “Connecting the product to a
phone line” on page 5 to check the
installation. The product must be
the first device connected to the
phone line.
See “Setting the answer mode” on
page 14 or “Setting
rings-to-answer” on page 15 to
determine which settings you need.
The rings-to-answer must be set
higher than for the answering
machine.
The answering machine or
phone might not be
functioning.
Incoming fax calls are
not being answered by
the product.
36 Chapter 4 Troubleshooting ENGB
The answer mode might be
set to manual.
Connect the phone or answering
machine directly to the phone line
and determine whether it works by
itself.
If the answer mode is set to
manual, the product never answers
calls. You have to answer the
phone and start receiving the fax
yourself. See “Setting the answer
mode” on page 14 for more
information.
Page 39

Problem Cause Solution
Incoming fax calls are
not being answered by
the product (continued).
The rings-to-answer setting
might not be set correctly.
The answer ring pattern
feature might be turned on,
but you do not have the
service, or you do have the
service and the feature is not
set correctly.
The phone cord might not be
connected properly, or the
phone cord is not working.
The product may not be able
to hear incoming fax tones
due to a voice message being
played by the answering
machine.
Check the rings-to-answer setting
for your configuration. See “Setting
rings-to-answer” on page 15 to
determine which setting you need.
Check the answer ring pattern
feature to make sure it is set
properly. See “Enabling answer
ring patterns” on page 17.
See “Connecting the product to a
phone line” on page 5 to check the
installation. Make sure you are
using the phone cord that came
with the product.
Re-record your answering machine
message, leaving at least two
seconds of silence at the beginning
of the message.
There might be too many
devices connected to the
phone line.
Try removing the last device
connected and determine whether
the product works. If not, continue
removing devices one at a time and
retry after removing each one.
The phone line might not be
working.
Do one of the following:
● Turn up the volume on the
product and press fax/send on
the control panel. If you hear a
dial tone, the phone line is
working.
● Disconnect the product from
the phone jack and connect a
phone. Try to make a phone
call to make sure the phone
line is working.
ENGB Receiving fax problems 37
Page 40

Problem Cause Solution
Incoming fax calls are
not being answered by
the product (continued).
Faxes are transmitting
or being received very
slowly.
A voice messaging service
may be interfering with the
product answering calls.
The product might be out of
paper and the memory is full.
You might be sending or
receiving a very complex fax,
such as one with many
graphics.
Do one of the following:
● Discontinue the messaging
service.
● Get a phone line dedicated to
fax calls.
● Set the product to answer in
manual mode. In manual
mode, you must start the faxreceive process yourself.
● Leave the product set to
automatic mode and lower the
rings-to-answer for the product
to a number less than the
rings-to-answer for the voice
mail (see “Setting
rings-to-answer” on page 15).
The product will answer all
incoming calls.
Refill the paper input tray. The
product will print all of the faxes it
has saved in memory and will then
resume answering fax calls.
Complex faxes take longer to be
sent or received.
The receiving fax machine
might have a slow modem
speed.
The resolution at which the
fax was sent or is being
received is very high. A
higher resolution typically
results in better quality, but
also requires a longer
transmission time.
The product only sends the fax at
the fastest modem speed the
receiving fax machine can use.
If you are receiving the fax, call and
ask the sender to lower the
resolution and resend the fax.
If you are sending, lower the
resolution and resend the fax. See
“Changing the default contrast and
resolution for outgoing faxes” on
page 20 to change the default
setting.
38 Chapter 4 Troubleshooting ENGB
Page 41

Problem Cause Solution
Faxes are transmitting
or being received very
slowly (continued).
Faxes are not printing
or are printing
incorrectly at the
product.
Faxes are printing on
two pages instead of
one.
If there is a poor phone line
connection, the product and
the receiving fax machine
slow down the transmission
to adjust for errors.
There is no media in the
media input tray.
The receive to PC option
might be selected, and faxes
are being received by the
computer.
The autoreduction setting
may not be set correctly.
Hang up and resend the fax.
Have the phone company check
the phone line.
Load media. Any faxes received
while the input tray is empty are
stored in memory and will print
once the tray has been refilled.
Check to determine whether the
computer is receiving faxes:
Click Start, point to Programs,
point to HP LaserJet 3300, point to
Too ls, and click HP LaserJet
Device Configuration.
Click the Fax tab, then the Receive
tab.
Clear the Receive to PC check box
if it is selected, and click OK.
If you want faxes to be reduced to
fit on one page, the autoreduction
setting should be on. If the setting
is off, faxes may print on multiple
pages. See the autoreduction topic
in the electronic user guide to
adjust the setting.
Received faxes are too
light or are printing only
on half of the page.
The product ran out of toner
while printing a fax.
The product stores up to 10 of the
most recently printed faxes. As
soon as possible, replace the print
cartridge and see the instructions
for reprinting a fax in the electronic
user guide.
Sending fax problems
Use the table in this section to solve problems that might occur when
sending faxes.
ENGB Sending fax problems 39
Page 42

Problem Cause Solution
Faxes quit during
sending.
The product is receiving
faxes but is not sending
them.
The fax machine to which you
are sending might be
malfunctioning.
Your phone line might not be
working.
If your product is on a PBX
system, the PBX system
might be generating a dial
tone the product cannot
detect.
There might be a poor phone
connection.
Try sending to another fax
machine.
Do one of the following:
● Turn up the volume on the
product and press fax/send on
the control panel. If you hear a
dial tone, the phone line is
working.
● Disconnect the product from
the phone jack and connect a
phone. Try to make a phone
call to make sure the phone
line is working.
Disable the detect dial tone setting.
See the dial tone setting topic in
the electronic user guide.
Try again later.
The fax machine to which you
are sending might be
Try sending to another fax
machine.
malfunctioning.
Your phone line might not be
working.
Do one of the following:
● Turn up the volume on the
product and press fax/send on
the control panel. If you hear a
dial tone, the phone line is
working.
● Disconnect the product from
the phone jack and connect a
phone. Try to make a phone
call to make sure the phone
line is working.
40 Chapter 4 Troubleshooting ENGB
Page 43

Problem Cause Solution
Outgoing fax calls keep
dialing.
Faxes you send are not
arriving at the receiving
fax machine.
You cannot dial all of
the numbers in a long
fax number.
The product will automatically
redial a fax number if the
redial on busy option is set to
on.
The receiving fax machine
might be off or have an error
condition, such as being out
of paper.
A fax might be in memory
because it is waiting to redial
a busy number, there are
other jobs ahead of it waiting
to be sent, or the fax is set up
for a delayed send.
The maximum number of
digits or characters that can
be entered into a fax number
is 50.
To stop the redials while the
product is dialing, press Cancel.
See the redial topic in the
electronic user guide if you need to
change the setting.
Call the recipient to make sure the
fax machine is on and ready to
receive faxes.
If a fax job is in memory for any of
these reasons, an entry for the job
appears in the fax log. Print the fax
activity log (see “Printing the fax
activity log” on page 30) and check
the Status column for jobs with a
Pending designation.
Try dialing the fax number in
manual mode. See “Using manual
dial” on page 30.
ENGB Sending fax problems 41
Page 44

Accessing the electronic user guide
To access the electronic user guide from the product software
If you have installed the product software, you can access the electronic
user guide by selecting User Guide from the software’s Help menu.
To access the electronic user guide from the product CD-ROM
If you have not installed the product software, you can still view the
electronic user guide on your computer by following these steps:
1 To open the Welcome screen, insert the product software CD-ROM
in your computer’s CD drive.
• If the Welcome screen does not open, click Start on the
Windows task bar, click Run, type Z:\setup (where Z is your CD
drive letter), and click OK.
2 From the Welcome screen, click Documentation.
3 From the Documentation screen, click PDF Format or HTML Help
Format in the User Guide Viewing Options box.
Note If you are running Windows 95 on your computer, you must have Internet
Explorer 4.01 or greater to view or print the electronic user guide in HTML
Help format.
To view or print the electronic user guide in PDF format, you must have
Adobe Acrobat Reader installed on your computer.
42 Chapter 4 Troubleshooting ENGB
Page 45

Page 46

copyright © 2001
Hewlett-Packard Company
www.hp.com/support/lj3300
English
*C9126-90919*
*C9126-90919*
C9126-90919
 Loading...