

Fax
ñ÷ô
hp LaserJet 3300


hp LaserJet 3330mfp
English
fax guide

Copyright Information
© 2001 Hewlett-Packard
Company
All Rights Reserved.
Reproduction, adaptations, or
translation without prior written
permission is prohibited except
as allowed under copyright laws.
Part number C9126-90924
First edition, October 2001
Warranty
The information contained in
this document is subject to
change without notice.
Hewlett-Packard makes no
warranty of any kind with
respect to this information.
HEWLETT-PACKARD
SPECIFICALLY DISCLAIMS
THE IMPLIED WARRANTY OF
MERCHANTABILITY AND
FITNESS FOR A PARTICULAR
PURPOSE.
Hewlett-Packard shall not be
liable for any direct, indirect,
incidental, consequential, or
other damage alleged in
connection with the furnishing or
use of this information.
NOTICE TO U.S.
GOVERNMENT USERS:
RESTRICTED RIGHTS
COMMERCIAL COMPUTER
SOFTWARE: “Use, duplication,
or disclosure by the
Government is subject to
restrictions as set forth in
subparagraph (c) (1)(ii) of the
Rights in Technical Data Clause
at DFARS 52.227-7013.”
Safety Information
WARNING!
Potential Shock Hazard
Always follow basic safety
precautions when using this
product to reduce risk of injury
from fire or electric shock.
1 Read and understand all
instructions in the
electronic user guide.
2 Observe all warnings and
instructions marked on the
product.
3 Use only a grounded
electrical outlet when
connecting the
HP LaserJet 3330 product
to a power source. If you
do not know whether the
outlet is grounded, check
with a qualified electrician.
4 Do not touch the contacts
on the end of the
telephone cord or any of
the sockets on the
HP LaserJet 3330 product.
Replace damaged cords
immediately.
5 Never install telephone
wiring during a lightning
storm.
6 Unplug this product from
wall outlets and telephone
jacks before cleaning.
7 Do not install or use this
product near water or
when you are wet.
8 Install the product securely
on a stable surface.
9 Install the product in a
protected location where
no one can step on or trip
over the telephone line and
the telephone line will not
be damaged.
10 If the product does not
operate normally, see the
electronic user guide.
11 Refer all servicing
questions to qualified
personnel.
Information regarding FCC
Class B, Parts 15 and 68
requirements and other
regulatory requirements can be
found in the electronic user
guide.
Trademark Credits
Microsoft®, Windows®, and
Windows NT® are U.S.
registered trademarks of
Microsoft Corporation.
All other products mentioned
herein may be trademarks of
their respective companies.
Local country laws may prohibit
the use of this product outside
of the countries specified. It is
strictly forbidden by law in most
countries to connect
nonapproved
telecommunications equipment
(fax machines) to public
telephone networks.
Hewlett-Packard Company
11311 Chinden Boulevard
Boise, Idaho 83714 U.S.A.

Contents
1 Setting up
Introduction. . . . . . . . . . . . . . . . . . . . . . . . . . . . . . . . . . . . . . . . . . . . . . 5
Connecting the product to a phone line . . . . . . . . . . . . . . . . . . . . . . . . 5
To connect the product to a jack with one phone line. . . . . . . . . . . . . . 6
To connect the product to a jack with two phone lines . . . . . . . . . 8
Connecting additional devices . . . . . . . . . . . . . . . . . . . . . . . . . . . . . . 10
To connect additional devices . . . . . . . . . . . . . . . . . . . . . . . . . . . 11
Specifying the fax settings . . . . . . . . . . . . . . . . . . . . . . . . . . . . . . . . . 13
To enter text from the control panel. . . . . . . . . . . . . . . . . . . . . . . 13
To set the time and date . . . . . . . . . . . . . . . . . . . . . . . . . . . . . . . 13
To set the fax header. . . . . . . . . . . . . . . . . . . . . . . . . . . . . . . . . . 14
Setting the answer mode . . . . . . . . . . . . . . . . . . . . . . . . . . . . . . . . . . 14
To set the answer mode . . . . . . . . . . . . . . . . . . . . . . . . . . . . . . . 15
Setting rings-to-answer. . . . . . . . . . . . . . . . . . . . . . . . . . . . . . . . . . . . 15
Recommended rings-to-answer table . . . . . . . . . . . . . . . . . . . . . 16
To set the number of rings-to-answer . . . . . . . . . . . . . . . . . . . . . 16
Enabling answer ring patterns . . . . . . . . . . . . . . . . . . . . . . . . . . . . . . 17
To enable answer ring patterns. . . . . . . . . . . . . . . . . . . . . . . . . . 17
2 Faxing (basic)
Loading originals to fax. . . . . . . . . . . . . . . . . . . . . . . . . . . . . . . . . . . . 19
To load fax documents . . . . . . . . . . . . . . . . . . . . . . . . . . . . . . . . 19
Sending faxes. . . . . . . . . . . . . . . . . . . . . . . . . . . . . . . . . . . . . . . . . . . 19
To send a fax to one recipient . . . . . . . . . . . . . . . . . . . . . . . . . . . 19
Changing the default contrast and resolution for outgoing faxes . . . . 20
To change the default contrast . . . . . . . . . . . . . . . . . . . . . . . . . . 20
To change the default resolution . . . . . . . . . . . . . . . . . . . . . . . . . 20
Deleting faxes from memory. . . . . . . . . . . . . . . . . . . . . . . . . . . . . . . . 21
To delete faxes from memory . . . . . . . . . . . . . . . . . . . . . . . . . . . 21
Sending faxes from the software . . . . . . . . . . . . . . . . . . . . . . . . . . . . 21
To send a fax from the software . . . . . . . . . . . . . . . . . . . . . . . . . 22
English
3 Faxing (advanced)
About speed-dial codes, one-touch keys, and group-dial codes . . . . 23
To program speed-dial codes and one-touch keys . . . . . . . . . . . 23
To delete speed-dial codes and one-touch keys. . . . . . . . . . . . . 24
To quickly program speed-dial codes or one-touch keys . . . . . . 25
To program a one-touch key for alternate long distance. . . . . . . 25
To manage group-dial codes. . . . . . . . . . . . . . . . . . . . . . . . . . . . 26
To program group-dial codes . . . . . . . . . . . . . . . . . . . . . . . . . . . 26
To delete group-dial codes . . . . . . . . . . . . . . . . . . . . . . . . . . . . . 27
To delete an individual from a group-dial code . . . . . . . . . . . . . . 27
ENXC 3

To delete all phone book entries . . . . . . . . . . . . . . . . . . . . . . . . . 28
Using dialing characters . . . . . . . . . . . . . . . . . . . . . . . . . . . . . . . . . . . 28
To insert a pause or wait . . . . . . . . . . . . . . . . . . . . . . . . . . . . . . . 29
Inserting a dial prefix. . . . . . . . . . . . . . . . . . . . . . . . . . . . . . . . . . . . . . 29
To set the dial prefix . . . . . . . . . . . . . . . . . . . . . . . . . . . . . . . . . . 29
Enabling an extension phone . . . . . . . . . . . . . . . . . . . . . . . . . . . . . . . 30
Using manual dial. . . . . . . . . . . . . . . . . . . . . . . . . . . . . . . . . . . . . . . . 30
To use manual dial . . . . . . . . . . . . . . . . . . . . . . . . . . . . . . . . . . . 30
Printing the fax activity log . . . . . . . . . . . . . . . . . . . . . . . . . . . . . . . . . 30
To print the fax activity log. . . . . . . . . . . . . . . . . . . . . . . . . . . . . . 31
Changing the fax call report print times . . . . . . . . . . . . . . . . . . . . . . . 31
To set fax call report print times . . . . . . . . . . . . . . . . . . . . . . . . . 31
4 Troubleshooting
Is your fax set up correctly? . . . . . . . . . . . . . . . . . . . . . . . . . . . . . . . . 33
What type of phone line are you using? . . . . . . . . . . . . . . . . . . . 33
Are you using a phone line splitter? . . . . . . . . . . . . . . . . . . . . . . 34
Are you using a surge protection device? . . . . . . . . . . . . . . . . . . 34
Are you using a phone company voice messaging service?. . . . 35
Are you using an answering machine? . . . . . . . . . . . . . . . . . . . . 35
General fax problems . . . . . . . . . . . . . . . . . . . . . . . . . . . . . . . . . . . . . 36
Receiving fax problems . . . . . . . . . . . . . . . . . . . . . . . . . . . . . . . . . . . 37
Sending fax problems. . . . . . . . . . . . . . . . . . . . . . . . . . . . . . . . . . . . . 41
Accessing the electronic user guide . . . . . . . . . . . . . . . . . . . . . . . . . . 43
To access the electronic user guide from the
product software. . . . . . . . . . . . . . . . . . . . . . . . . . . . . . . . . . 43
To access the electronic user guide from the
product CD-ROM . . . . . . . . . . . . . . . . . . . . . . . . . . . . . . . . . 43
4 ENXC

1
Introduction
Setting up
English
Congratulations on your purchase of the HP LaserJet 3330mfp, a
powerful business tool with the capabilities of a full range of office
equipment. You can use the product to fax, print, copy, and scan.
This guide was written to describe the fax functions of this product and
to help you complete the following tasks:
● Connect your product to a phone line
● Connect additional devices
● Specify your fax settings
● Set the answer mode and rings-to-answer
● Enable answer ring patterns
We recommend that you save this Fax Guide so you can refer back to
instructions on specific fax features.
If you need general setup instructions for your product, such as
instructions for installing the print cartridge, installing the media input
trays and the automatic document feeder (ADF) input tray, installing the
product software, and connecting the product to a network, please see
the getting started guide that came with the product.
Connecting the product to a phone line
The first step toward using your fax is connecting the product to the
phone line. The way you connect the product to the phone line depends
on how many phone lines you have coming into the phone jack and, if
there are multiple lines, which line you want to use for faxing.
Note In order for the product to fax without interruption, it must be the first device
connected to the phone jack.
ENXC Introduction 5
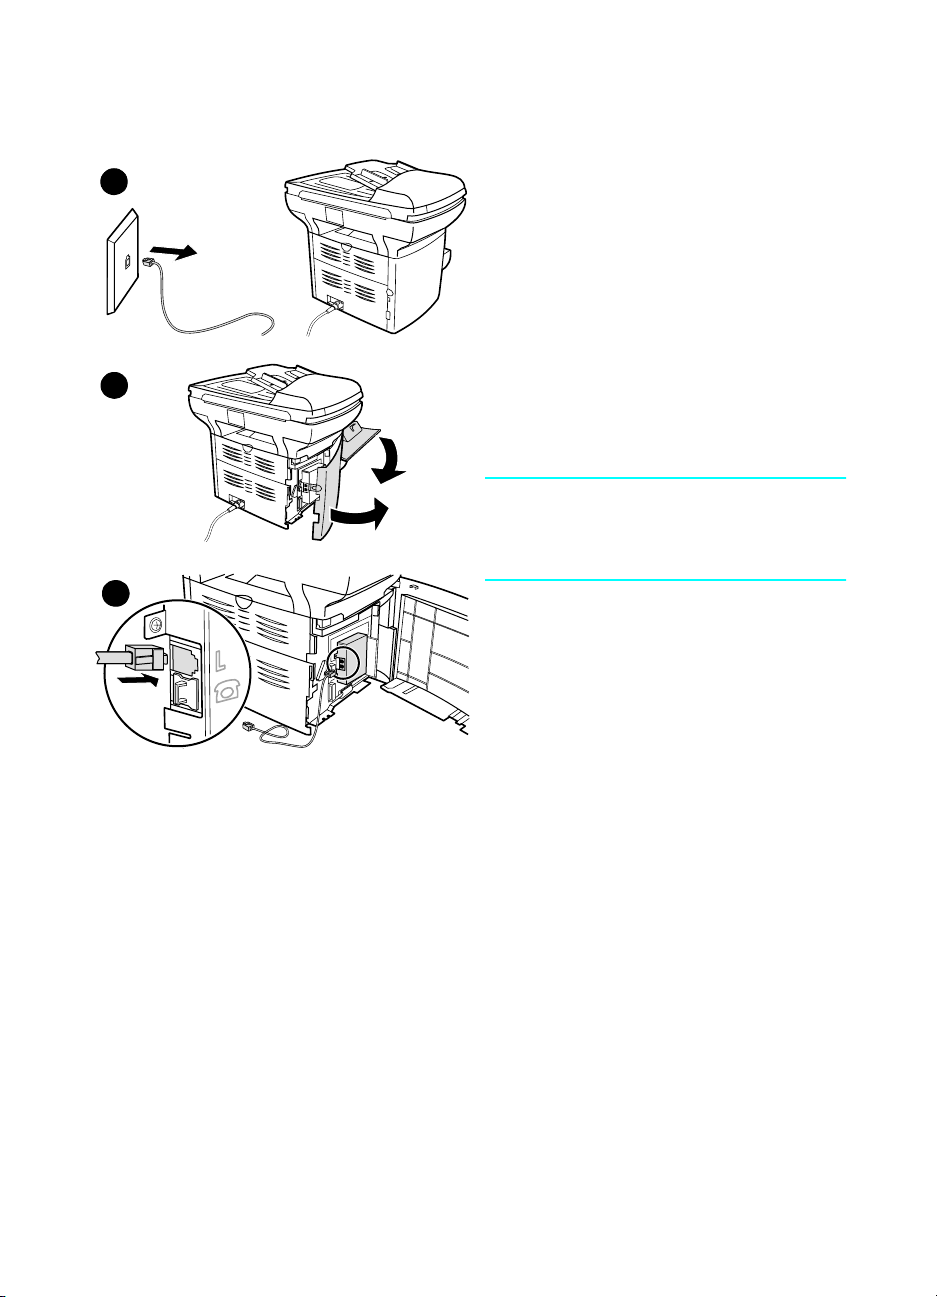
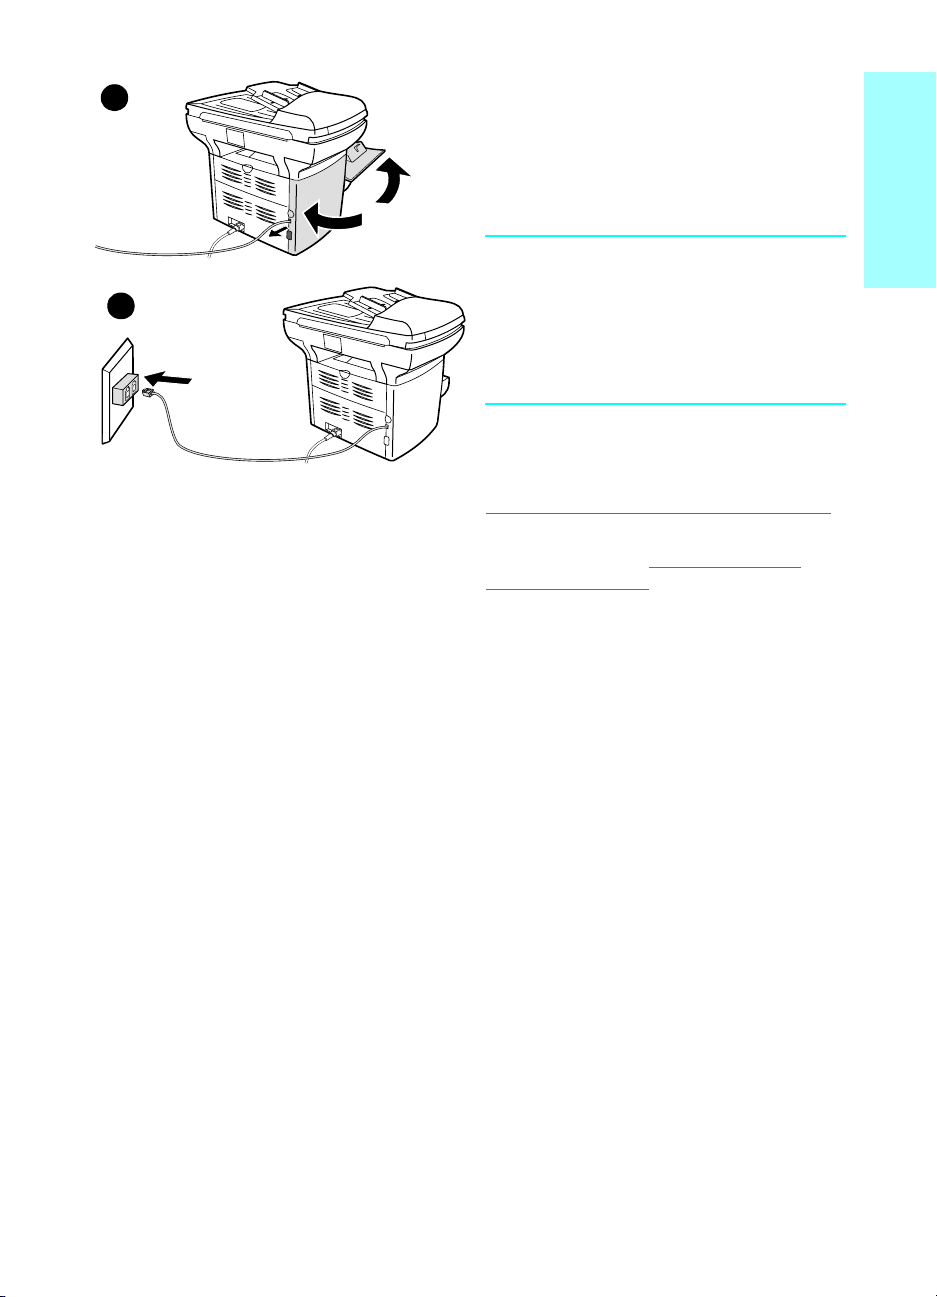
To connect the product to a
jack with one phone line
Use these steps to connect the product to a
1
2
3
single phone jack with one phone line, even if
you have two telephone numbers on that line
and use a ring pattern service (such as
distinctive ring).
1 If a phone cord is plugged into the phone
jack, unplug the cord and set it aside.
2 Open the print cartridge door and swing
open the left side panel to reveal the
phone line sockets.
3 Take the phone cord included with the
product and plug one end of it into the
product’s line socket (the socket on top).
Note
You must use the phone cord that came with
the product in order for the product to
function correctly.
6 Chapter 1 Setting up ENXC
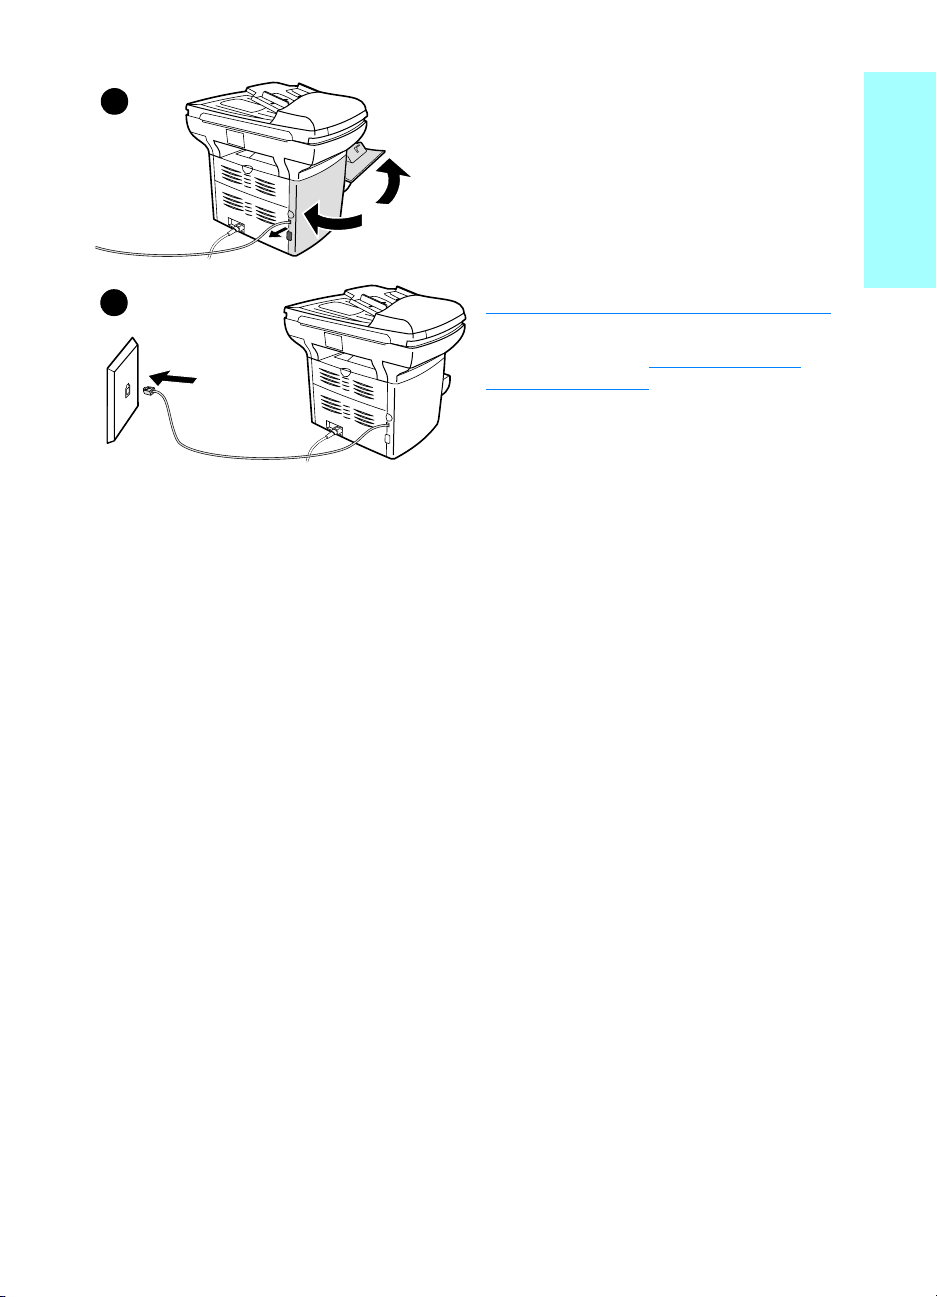
4
5
4 Close the left side panel and the print
cartridge door. When closing the left side
panel, ensure the phone line is routed
through the upper notch in the panel.
5 Plug the other end of the phone cord into
the phone jack on the wall.
If you want to connect additional devices
(such as a phone, an answering machine, or
a caller ID box) to the phone line, see
“Connecting additional devices” on page 10
If you do not want to connect any additional
devices, continue to “Specifying the fax
settings” on page 13.
English
.
ENXC Connecting the product to a phone line 7
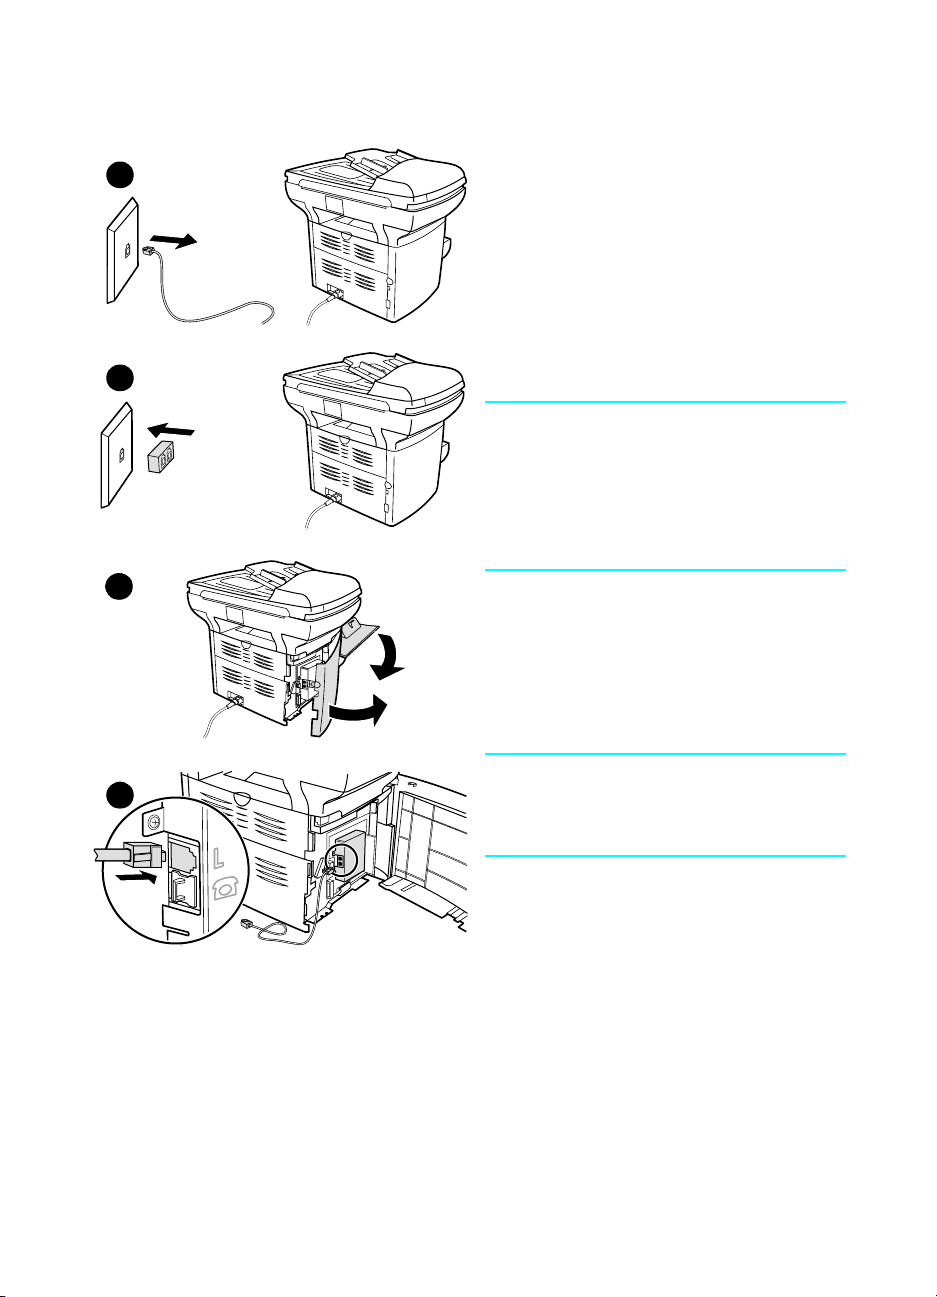
To connect the product to a jack with two phone lines
1
2
Use these steps to connect the product to a
single or split phone jack if you have a
dedicated line for fax calls and a separate line
for voice calls.
1 If a phone cord is plugged into the phone
jack, unplug the cord and set it aside.
2 If you do not have a phone jack with a
built-in splitter, plug an external
Line1/Line2 splitter (not included) into
the phone jack.
Note
There are two different kinds of splitters:
Parallel splitters (also called “T” splitters)
provide two phone line outlets for a line with a
single phone number; Line1/Line2 splitters
provide two phone line outlets for a line with
two unique phone numbers.
3
3 Open the print cartridge door and swing
open the left side panel to reveal the
phone line sockets.
4 Take the phone cord included with the
product and plug one end of it into the
product’s line socket (the socket on top).
4
8 Chapter 1 Setting up ENXC
Note
You must use the phone cord that came with
the product in order for the product to
function correctly.
5
6
5 Close the left side panel and the print
cartridge door. When closing the left side
panel, ensure the phone line is routed
through the upper notch in the panel.
6 Plug the other end of the phone cord into
the jack on the fax side of the splitter.
Note
If you do not know which side of the splitter is
for the fax number, connect a phone to one
splitter jack and dial the fax number. If you get
a busy signal, the phone is connected to the
fax jack. If you get a ringing signal, the phone
is connected to the phone jack.
If you want to connect additional devices
(such as a phone, an answering machine, or
a caller ID box) to the phone line, see
“Connecting additional devices” on page 10.
If you do not want to connect any additional
devices, continue to “Specifying the fax
settings” on page 13.
English
ENXC Connecting the product to a phone line 9

Connecting additional devices
Depending on the setup of your phone lines, you can connect additional
devices to the phone line along with your HP LaserJet 3330.
As a general rule, no more than three or four devices should be
connected to a single phone line. If too many devices are connected to a
single phone line, one or more of the devices may not detect an
incoming call. If this occurs, disconnect one or more of the devices.
Note The HP LaserJet 3330 cannot replace a computer modem. It will not act
as a data modem for sending and receiving e-mail, connecting to the
Internet, or communicating with other computers.
Dedicated fax line
If you connected your HP LaserJet 3330 to a phone line that is used only
for fax calls, you may want to connect the following devices:
● Caller ID box
● Modem: You can connect a computer modem (external or internal)
to the fax line if you want to use the fax line for e-mail or for access
to the Internet, but you cannot send or receive faxes while using the
line for these purposes.
● Extra phone: You can connect an extra phone to the fax line if you
want to make outgoing calls on the fax line.
You should not connect the following devices:
● Answering machine or computer voicemail: If you use computer
voicemail, you must connect a modem (external or internal) to your
dedicated voice line. Then, use the dedicated voice line to connect
to the Internet and receive voicemail.
Shared phone line
If you connected your HP LaserJet 3330 to a phone line that is shared
between fax calls and voice calls, or if you have one phone line with two
phone numbers and a ring pattern service, you may want to connect the
following devices:
● Caller ID box
● Modem: You can connect a computer modem (external or internal)
to the shared line if you want to use the shared line for e-mail or for
access to the Internet, but you cannot send or receive faxes while
using the line for these purposes.
● Phone: You can connect a phone to the shared line if you want to
make or answer voice calls on the shared line.
● Answering machine or computer voicemail: You should connect
these devices to the same phone jack as the product to make sure
the different devices do not interfere with one another.
10 Chapter 1 Setting up ENXC
Note It is possible to connect devices to another phone jack for the same phone
line (in another room, for example); however, the devices may interfere
with faxing and with each other.
To connect additional devices
3
4
Connect additional devices in the order
shown below. The output for each device is
connected to the input of the next, forming a
chain. If you do not want to connect a device,
skip it and continue to the next device.
1 Unplug the power for all devices you
want to connect.
2 If you have not yet connected your
product to a phone line, see “Connecting
the product to a phone line” on page 5
before proceeding. The product should
already be connected to a phone jack.
3 Open the print cartridge door and swing
open the left side panel to reveal the
phone line sockets.
4 Remove the plastic insert from the
bottom phone socket inside the left side
panel of the product.
English
ENXC Connecting additional devices 11
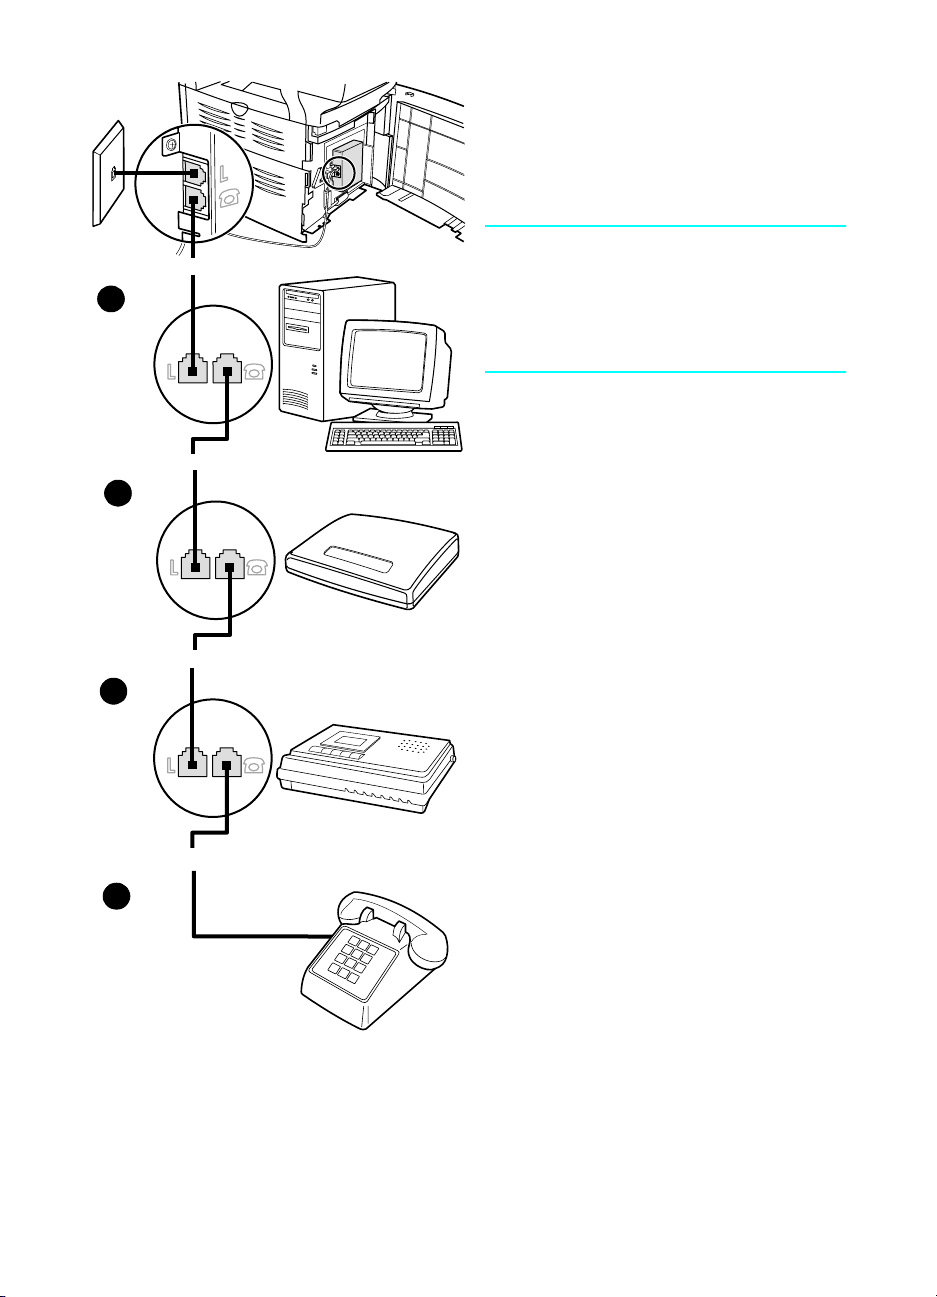
5 To connect an internal or external
modem on a computer, plug one end of a
phone cord into the product’s “phone”
socket (the socket on the bottom). Plug
the other end of the phone cord into the
modem’s “line” socket.
Note
Some modems have a second “line” socket to
5
6
7
connect to a dedicated voice line. If you have
two “line” sockets, check your computer
documentation to make sure you connect to
the correct “line” socket.
6 To connect a caller ID box, plug a phone
cord into the previous device’s “phone”
socket. Plug the other end of the phone
cord into the caller ID box’s “line” socket.
7 To connect an answering machine, plug
a phone cord into the previous device’s
“phone” socket. Plug the other end of the
phone cord into the answering machine’s
“line” socket.
8 To connect a phone, plug a phone cord
into the previous device’s “phone”
socket. Plug the other end of the phone
cord into the phone’s “line” socket.
9 After you have finished connecting
additional devices, plug all of the devices
into their power sources.
10 Close the left side panel and the print
cartridge door. When closing the left side
panel, ensure the phone line is routed
through the upper notch in the panel.
8
12 Chapter 1 Setting up ENXC

Specifying the fax settings
Before you can begin using your product’s fax features, you must
complete the following tasks:
● Set the time and date
● Set your fax header
● Set the answer mode
● Set rings-to-answer
● Enable answer ring patterns, if needed
Note If you will be installing the product software on your computer, you can skip
the remaining instructions in this chapter. The software install will
automatically walk you through setting up the fax settings. See the getting
started guide for instructions.
Note In the U.S. and many other regions, setting the time, date, and other fax
header information is a legal requirement.
To enter text from the control panel
Use the following instructions to enter information from the product’s
control panel with the alphanumeric keypad and the < and > buttons:
● Numbers: To enter numbers, press the numeric button for the
number you need.
● Letters: To enter letters, repeatedly press the numeric button for the
letter you need until that letter appears (for example, if the first letter
you need is a “C,” press 2 repeatedly until a “C” appears in the
control panel display).
● Punctuation marks: To enter punctuation marks, repeatedly press
* until the character you want appears in the control panel display.
● Spaces: After entering any character, press > twice to create a
space after that character and move the cursor to an insertion point
after the space.
● Errors: If you enter a character incorrectly, use the < button to
erase the incorrect character, then enter the correct character.
English
To set the time and date
To set or change the time and date, use the following steps. If you need
help entering any information, see “To enter text from the control panel”
on page 13.
1 On the control panel, press menu/enter.
2 Using the < and > buttons, select Time/Date, Header, and press
menu/enter.
ENXC Specifying the fax settings 13

3 Press menu/enter to select Time/Date.
4 Using the < and > buttons, specify either the 12-hour or the 24-hour
clock, and press menu/enter.
5 Using the alphanumeric keypad, enter the current time.
6 If you specified the 12-hour clock, use the < and > buttons to move
the cursor past the fourth character. Select 1 for a.m. or 2 for p.m.,
and press menu/enter.
OR
If you specified the 24-hour clock, press menu/enter.
7 Using the alphanumeric keypad, enter the current date.
• Make sure you use two digits to specify the month and day (for
example, use “05” for May and “01” for the first day of the month).
8 Press menu/enter.
To set the fax header
To set or change the fax header information, use the following steps. If
you need help entering any information, see “To enter text from the
control panel” on page 13.
1 On the control panel, press menu/enter.
2 Using the < and > buttons, select Time/Date, Header, and press
menu/enter.
3 Using the < and > buttons, select Fax Header, and press
menu/enter.
4 Using the alphanumeric keypad, enter your fax number, and press
menu/enter.
5 Using the alphanumeric keypad, add the name of your company,
and press menu/enter.
Setting the answer mode
Depending on your situation, you can set the HP LaserJet 3330’s
answer mode to automatic or manual.
● Automatic: In automatic answer mode, the product answers
incoming calls after a specified number of rings or upon recognition
of special fax tones. To specify the number of rings, see “Setting
rings-to-answer” on page 15.
● Manual: In manual answer mode, the product never answers calls.
You must start the fax-receiving process yourself, either by pressing
start fax on the control panel or by picking up a phone connected to
that line and dialing 1-2-3.
The default answer mode is automatic.
14 Chapter 1 Setting up ENXC

Note Although most users leave the answer mode set to automatic, voice callers
who dial the fax phone number will hear fax tones if the phone is not
answered, or if they do not hang up by the specified number of
rings-to-answer. If you do not want voice callers to hear fax tones, use the
manual setting, but remember that fax calls are not received automatically.
To set the answer mode
To set or change the answer mode, use the following steps:
1 On the control panel, press menu/enter.
2 Using the < and > buttons, select Fax Setup, and press
menu/enter.
3 Using the < and > buttons, select Fax Recv. Setup, and press
menu/enter.
4 Press menu/enter to select Answer Mode.
5 Using the < and > buttons, select Automatic or Manual, and press
menu/enter.
6 The control panel display shows the answer mode setting that you
specified.
Setting rings-to-answer
When the answer mode is set to automatic, the product’s
rings-to-answer setting determines the number of times the phone rings
before an incoming call is answered.
If the product is connected to a line receiving both fax and voice calls (a
shared line) with an answering machine, you may need to adjust the
rings-to-answer. The number of rings-to-answer for the product must be
greater than the rings-to-answer on the answering machine. This allows
the answering machine to answer the incoming call and record a
message if it is a voice call. When the answering machine answers the
call, the product listens to the call and automatically answers it if it
detects fax tones.
The default setting for rings-to-answer is five for the U.S. and Canada, or
two for other regions.
English
ENXC Setting rings-to-answer 15

Recommended rings-to-answer table
Use the following table to determine the number of rings-to-answer to
use.
Type of phone line Recommended rings-to-answer setting
Dedicated fax line (receiving
only fax calls)
One line with two separate
numbers and ring pattern
service
Shared line (receiving both fax
and voice calls) with only an
attached phone
Shared line (receiving both fax
and voice calls) with an attached
answering machine or computer
voicemail
To set the number of rings-to-answer
To set or change the number of rings-to-answer, use the following steps:
1 On the control panel, press menu/enter.
2 Using the < and > buttons, select Fax Setup, and press
menu/enter.
3 Using the < and > buttons, select Fax Recv. Setup, and press
menu/enter.
4 Using the < and > buttons, select Rings To Answer, and press
menu/enter.
5 Using the alphanumeric keypad, enter the number of
rings-to-answer, and press menu/enter.
Set to one or two rings.
Note: Set to two rings if you are using a caller ID box.
One or two rings. (If you have an answering machine
or computer voicemail for the other phone number,
make sure the product is set to a lesser number of
rings than the answering system. Also, see “Enabling
answer ring patterns” on page 17.)
Five rings or greater.
Two rings more than the answering machine or
computer voicemail. (Do not set the product to more
than nine rings in the U.S. and Canada, or to more
than six rings in other regions.)
16 Chapter 1 Setting up ENXC

Enabling answer ring patterns
Ring pattern or distinctive ring service is available through some local
phone companies and allows you to have more than one phone number
on a single line. Each phone number has a unique ring pattern, allowing
you to answer voice calls and the product to answer fax calls.
If you subscribe to a ring pattern service with your phone company, you
must set the product to answer the correct ring pattern.
Note If you do not have ring pattern service and you change the ring pattern
settings to something other than All Rings, the product might not be able
to receive faxes.
To enable answer ring patterns
To enable answer ring patterns, use the following steps:
1 On the control panel, press menu/enter.
2 Using the < and > buttons, select Fax Setup, and press
menu/enter.
3 Using the < and > buttons, select Fax Recv. Setup, and press
menu/enter.
4 Using the < and > buttons, select Answer Ring Type, and press
menu/enter.
5 Using the < and > buttons, select the ring pattern you want, and
press menu/enter.
6 After product installation is complete, ask someone you know to
send you a fax in order to verify that the ring pattern service is
working correctly.
English
ENXC Enabling answer ring patterns 17

18 Chapter 1 Setting up ENXC

Faxing (basic)
2
This chapter will present some of the basic faxing features available on
your HP LaserJet 3330. For complete information on all fax features, as
well as information about all other product features, refer to the
electronic user guide that came on your product CD-ROM. For
instructions on accessing the electronic user guide see “Accessing the
electronic user guide” on page 43.
Loading originals to fax
Use the following instructions to load original documents for faxing.
To load fax documents
1 Before loading the fax documents into the ADF input tray, check to
make sure there is nothing on the scanner glass.
2 Put the top ends of the document to be faxed print side up in the
ADF input tray with the first page to be scanned at the top of the
stack.
3 Push the document up against the side of the ADF input tray.
4 Slide the document into the ADF input tray until it does not move
any farther.
The document is now ready to be faxed.
English
Sending faxes
To send a fax to one recipient
Note If you want to improve the quality of a paper document before faxing it,
scan the document, straighten or clean the image, and send it as a fax
from the software. For more information, see the electronic user guide.
1 Dial the fax number using one of the following methods:
• Use the alphanumeric keypad on the product’s control panel.
• If the fax number you are calling has been assigned to a
one-touch key, press that key.
ENXC Loading originals to fax 19

• If the fax number you are calling has a speed-dial code, press
speed dial, enter the speed-dial code using the alphanumeric
keypad, and press menu/enter.
Note When dialing with the alphanumeric keypad, include any pauses or other
needed numbers, such as an area code, an access code for numbers
outside a PBX system (usually a 9 or 0), or a long-distance prefix. For
more information, see “Using dialing characters” on page 28.
2 Load the document into the ADF input tray.
3 Press fax/send.
When the last page of the fax has exited the product, you can start
sending another fax, copying, or scanning.
To fax to numbers you use regularly, you can assign a one-touch key or
speed-dial code. See “To program speed-dial codes and one-touch
keys” on page 23 and “To program group-dial codes” on page 26. If you
have electronic phone books available, you may be able to use them for
selecting recipients. Electronic phone books are generated with
third-party applications.
Changing the default contrast and resolution for outgoing faxes
The contrast affects the lightness and darkness of an outgoing fax as it
is being sent. Resolution affects the sharpness of outgoing faxes. It also
affects the transmission speed of faxes.
To change the default contrast
The default contrast is the contrast normally applied to items being
faxed. The slider is set to the middle as the default contrast setting.
1 Press menu/enter.
2 Use the < or > button to select Fax Setup and press menu/enter.
3 Use the < or > button to select Fax Send Setup and press
menu/enter.
4 Use the < or > button to select Def. Light/Dark.
5 Use the < button to move the slider to the left to make the fax lighter
than the original, or use the > button to move the slider to the right
to make the fax darker than the original.
6 Press menu/enter to save your selection.
To change the default resolution
Resolution affects the quality, in dots per inch, of documents to be faxed.
It also affects the transmission speed.
20 Chapter 2 Faxing (basic) ENXC

Use this procedure to change the default resolution for all faxes.
1 Press resolution to display the current resolution setting.
2 Use the < or > button to display the desired resolution setting.
3 Press menu/enter to save the selection.
Deleting faxes from memory
Use this procedure only if you are concerned someone else has access
to your product and will try to reprint faxes from the reprint memory.
CAUTION In addition to clearing the reprint memory, this procedure clears any fax
currently being sent, unsent faxes pending redial, faxes scheduled to be
sent at a future time, and faxes not printed or forwarded.
To delete faxes from memory
1 Press menu/enter.
2 Press > once to display Fax Functions and press menu/enter.
3 Use the < or > button to select Clear Saved Faxs, and press
menu/enter.
4 Press menu/enter to confirm the deletion.
English
Sending faxes from the software
This section and the following section contain some instructions for
sending and receiving faxes using the software that came with the
product. All other software-related topics are covered in the software
help, which can be accessed from the software program’s Help menu.
Note The HP LaserJet Director and HP LaserJet Document Manager are not
supported for Microsoft Windows 95. If you use Windows 95, you can send,
but not receive, faxes with the software. However, all fax features are
available from the control panel.
You can fax electronic documents from your computer in the following
situations:
● The HP LaserJet product is connected directly to your computer or
connected to your computer over a network using an HP Jetdirect
print server.
Note See the getting started guide for a complete list of supported HP Jetdirect
print servers.
● The product software is installed on your computer.
ENXC Deleting faxes from memory 21

You are using Microsoft Windows 98, ME, NT 4.0 SP3, 2000, or XP,
●
or Mac OS 9.1 or X.
To send a fax from the software
The procedure for faxing jobs from the software may vary; the most
typical steps are listed below.
1 Select a document to fax using one of the following methods:
• Open the document in the HP LaserJet Document Manager on
Windows-compatible computers.
• Open the document in the HP LaserJet Workplace on
Macintosh-compatible computers.
• Open a document in a Windows application such as Microsoft
Word. From the application, select Print from the File menu,
then select HP LaserJet Series Fax from the Printer Name
drop-down list in the print dialog box. Click OK.
• Load the document into the ADF input tray.
2 Add one or more recipients on the HP LaserJet Send Fax dialog
box.
3 Include a cover page (optional).
4 Click Send Now.
OR
Click Send Later and select a date and time.
For more information on sending a fax using the HP LaserJet Workplace
(Mac OS), the HP LaserJet Document Manager (Windows), or the HP
LaserJet Director, see the electronic user guide.
22 Chapter 2 Faxing (basic) ENXC

Faxing (advanced)
3
This chapter will present a few of the advanced faxing features available
on your HP LaserJet 3330. For complete information on all fax features,
as well as information about all other product features, refer to the
electronic user guide. For instructions on accessing the electronic user
guide see “Accessing the electronic user guide” on page 43.
About speed-dial codes, one-touch keys, and group-dial codes
You can store frequently dialed fax numbers or groups of fax numbers as
one-touch keys, speed-dial codes, or group-dial codes.
In the product’s phone book, there are a total of 275 codes available that
can be used for speed-dial codes and group-dial codes. For example, if
you program 225 of the codes as speed-dials, the remaining 50 can be
used for group-dials.
See the following procedures for more information about how to use
speed-dial codes, one-touch keys, and group-dial codes:
English
To program speed-dial codes and one-touch keys
Speed-dial codes 1 through 9 are also associated with their
corresponding one-touch keys on the control panel. The one-touch keys
can be used for speed-dial or group-dial codes. A maximum of 50
characters can be entered for a single fax number.
Note Speed-dial codes, one-touch keys, and group-dial codes are more easily
programmed from the software. For instructions on programming
speed-dial codes, one-touch keys, and group-dial codes using the product
software, see the electronic user guide.
Use the following steps to program speed-dial codes and one-touch
keys from the product’s control panel:
1 Press menu/enter.
2 Use the < or > button to select Fax Setup and press menu/enter.
3 Press menu/enter to select Phone Book.
ENXC About speed-dial codes, one-touch keys, and group-dial codes 23

4 Press menu/enter to select Individual Setup.
5 Press menu/enter to select Add.
6 Using the alphanumeric keypad, enter the speed-dial code number
you want to associate with this fax number, and press menu/enter.
Choosing a number from 1 to 9 also associates the fax number with
the corresponding one-touch key.
Note When entering a fax number, you can use a comma (,) for a pause, or the
letter R if you want the product to wait for a dial tone.
7 Using the alphanumeric keypad, enter the fax number. Include any
pauses or other needed numbers, such as an area code, an access
code for numbers outside a PBX system (usually a 9 or 0), or a long
distance prefix.
8 Press menu/enter.
9 Using the alphanumeric keypad, enter a name for the fax number.
To do so, repeatedly press the alphanumeric button for the letter you
need until the letter appears. (For a list of characters, see “Using
dialing characters” on page 28.)
Note To insert punctuation, press the asterisk (*) repeatedly until the character
you want appears and press > to go to the next space.
10 Press menu/enter to save the information.
11 If you have more speed-dial codes or one-touch keys to program,
repeat steps 1 through 10.
To delete speed-dial codes and one-touch keys
1 Press menu/enter.
2 Use the < or > button to select Fax Setup and press menu/enter.
3 Press menu/enter to select Phone Book.
4 Press menu/enter to select Individual Setup.
5 Use the < or > button to select Delete and press menu/enter.
6 Using the alphanumeric keypad, enter the number of the speed-dial
code you want to delete, and press menu/enter.
7 Press menu/enter to confirm the deletion.
24 Chapter 3 Faxing (advanced) ENXC

To quickly program speed-dial codes or one-touch keys
Note The following procedure cannot be used to program a group-dial code. For
group-dial code instructions, see “To program group-dial codes” on
page 26.
Use the following method to program speed-dial codes and one-touch
keys easily from the product control panel:
1 On the product control panel, press phone book, enter an
unprogrammed speed-dial code, and press menu/enter.
OR
Press an unprogrammed one-touch key. The control panel display
will notify you that the speed-dial code or one-touch key has not
been programmed.
2 Press menu/enter to program the speed-dial code or one-touch
key.
3 Enter the fax number, and press menu/enter. Include pauses, or
other needed numbers, such as an area code, an access code for
numbers outside a PBX system (usually a 9 or 0), or a long distance
prefix. (See “Using dialing characters” on page 28
information.)
Note When entering a fax number you can use a comma (,) for a pause, or the
letter R if you want the product to wait for a dial tone.
for more
English
4 Enter a name for the fax number. To do so, repeatedly press the
numeric button for the letter you need until the letter appears. (See
“Using dialing characters” on page 28
5 Press menu/enter to save the information.
for a list of characters.)
To program a one-touch key for alternate long distance
If you use an alternate long distance carrier, you can program a
one-touch key to dial the service’s access number before a fax number.
When you need to use this one-touch key, press it, enter the fax number,
and press fax/send. Both the access number and the fax number are
then dialed together. If the access number is used almost every time you
dial a fax, it might be easier to program the access number as a dialing
prefix (see “Inserting a dial prefix” on page 29
Note Speed-dial codes, one-touch keys, and group-dial codes are more easily
programmed from the software (not available in Windows 95). For
instructions on programming speed-dial codes, one-touch keys, and
group-dial codes using the product software, see the electronic user guide.
ENXC About speed-dial codes, one-touch keys, and group-dial codes 25
for more information).

Use this procedure if the access number has more than 10 characters or
if you only occasionally use the access number.
1 Follow steps 1 through 6 of “To program speed-dial codes and
one-touch keys” on page 23. When entering the fax number, you
might also have to do one or both of the following tasks:
• If you have to wait for an access tone at some point in the
number, enter one or more three-second pauses by pressing
pause/redial.
• Enter a personal identification number (PIN), if applicable.
2 When you are finished entering the access number, press
pause/redial. A pause at the end of the string tells the product not
to dial this number until you dial the fax number.
3 Continue with steps 7 through 10 of “To program speed-dial codes
and one-touch keys” on page 23.
To manage group-dial codes
If you send information to the same group of people on a regular basis,
you can program a group-dial code to simplify the task. Any available
speed-dial codes can be programmed with group-dial codes. Group-dial
codes using numbers 1 through 9 are also associated with the
corresponding one-touch key on the control panel. Any individual can be
added to a group. All group members must have programmed speed-dial
codes or one-touch keys assigned to them before being added to the
group-dial code.
Use the instructions below to manage your group-dial codes.
Note Speed-dial codes, one-touch keys, and group-dial codes are more easily
programmed from the software. For instructions on programming
speed-dial codes, one-touch keys, and group-dial codes using the product
software, see the electronic user guide.
To program group-dial codes
1 Assign a speed-dial code to each fax number you want in the group.
(For instructions, see “To program speed-dial codes and one-touch
keys” on page 23.)
2 Press menu/enter.
3 Use the < or > button to select Fax Setup and press menu/enter.
4 Press menu/enter to select Phone Book.
5 Use the < or > button to select Group Setup and press menu/enter.
6 Use the < or > button to select Add Group and press menu/enter.
26 Chapter 3 Faxing (advanced) ENXC

7 Using the alphanumeric keypad, enter the number you want to
associate with this group and press menu/enter. Choosing 1
through 9 also associates the group with the corresponding
one-touch key.
8 Using the alphanumeric keypad, enter a name for the group. See
“Using dialing characters” on page 28
keypad. After the name of the group has been entered, press
menu/enter.
9 Press the one-touch key or choose the speed-dial code for the
group member you want, and press menu/enter. Press
menu/enter again to confirm the addition. Repeat this step for each
group member you want to add.
10 When you are finished, press cancel.
11 If you have more group-dial codes to enter, press menu/enter and
repeat steps 1 through 11.
for instructions on using the
To delete group-dial codes
1 Press menu/enter.
2 Use the < or > button to select Fax Setup, and press menu/enter.
3 Press menu/enter to select Phone Book.
4 Use the < or > button to select Group Setup, and press menu/enter.
5 Use the < or > button to select Delete Group, and press
menu/enter.
6 Using the alphanumeric keypad, enter the number of the group-dial
you want to delete and press menu/enter.
7 Press menu/enter to confirm the deletion.
English
To delete an individual from a group-dial code
1 Press menu/enter.
2 Use the < or > button to select Fax Setup, and press menu/enter.
3 Press menu/enter to select Phone Book.
4 Use the < or > button to select Group Setup, and press menu/enter.
5 Use the < or > button to select Del. # in Group, and press
menu/enter.
6 Use the < or > button to select the individual you want to delete from
the group.
7 Press menu/enter to confirm the deletion.
8 Repeat steps 6 and 7 to delete other individuals from the group.
OR
Press cancel if you are finished.
ENXC About speed-dial codes, one-touch keys, and group-dial codes 27

To delete all phone book entries
You can delete all speed-dial codes, one-touch keys, and group-dial
codes that are programmed in the product.
CAUTION Once speed-dial codes, one-touch keys, and group-dial codes are deleted,
they cannot be recovered.
1 Press menu/enter.
2 Use the < or > button to select Fax Setup, and press menu/enter.
3 Press menu/enter to select Phone Book.
4 Use the < or > button to select Delete All, and press menu/enter.
5 Press menu/enter to confirm the deletion.
Using dialing characters
When using the control panel to enter your name in the header or type a
name for a one-touch key, speed-dial code, or group-dial code, press the
appropriate numeric button repeatedly until the letter you need appears.
Then, press > to select that letter and move to the next space. This table
shows which letters and numbers appear on each numeric button when
the default language is set to English:
button number characters
11
2 A B C a b c
3D E F d e f
4 G H I g h i
5J K L j k l
6M N O m n o
7P Q R S p q r s
8 T U V t u v
28 Chapter 3 Faxing (advanced) ENXC

9 W X Y Z w x y z
00
* ( ) + - . / , “ * & @
#space #
To insert a pause or wait
You can insert pauses into a fax number you are dialing or programming
to a one-touch key, speed-dial code, or group-dial code. Pauses are
often needed when dialing internationally or connecting to an outside
line.
Press pause/redial to enter a three-second pause in your dialing
sequence. A comma appears on the control panel display, indicating the
pause will occur at that point in the dialing sequence.
Inserting a dial prefix
A dial prefix is a number or group of numbers automatically added to the
beginning of every fax number you enter at the control panel or from the
software.
By default, this setting is off. You may want to turn this setting on and
enter a prefix if, for example, you have to dial a number such as 9 to get
a phone line outside your company’s phone system. While this setting is
on, you can still dial a fax number without the dial prefix by using manual
dial. For instructions, see “Using manual dial” on page 30
English
.
To set the dial prefix
1 Press menu/enter.
2 Use the < or > button to select Fax Setup, and press menu/enter.
3 Press > once to select Fax Send Setup, and press menu/enter.
4 Use the < or > button to select Dial Prefix, and press menu/enter.
5 Use the < or > button to select On or Off, and press menu/enter.
6 If you choose On, use the numeric buttons to enter the prefix, and
press menu/enter. You can use numbers, pauses, and dialing
symbols.
ENXC Inserting a dial prefix 29

Enabling an extension phone
With this setting turned on, you can alert the product to pick up the
incoming fax call by pressing 1-2-3 sequentially on the telephone
keypad. The default is Yes. Turn this setting off only if you have a service
from your telephone company that also uses the 1-2-3 sequence. The
service will not work if it conflicts with the product.
1 Press menu/enter.
2 Use the < or > button to select Fax Setup, and press menu/enter.
3 Use the < or > button to select Fax Recv. Setup, and press
menu/enter.
4 Use the < or > button to select Extension Phone, and press
menu/enter.
5 Use the < or > button to select On or Off, and press menu/enter to
save your selection.
Using manual dial
Normally, the product dials after you press fax/send. At times, however,
you might want the product to dial each number as you press it. For
example, if you are charging your fax call to a calling card, you may need
to dial the fax number, wait for the acceptance tone of your telephone
company, and then dial the calling card number. When dialing
internationally, you might need to dial part of the number and then listen
for dial tones before continuing to dial.
To use manual dial
1 Load the document into the ADF input tray.
2 Press fax/send.
3 Begin dialing. The fax number dials as you press each digit. This
allows you to wait for pauses, dial tones, international access tones,
or calling card acceptance tones before continuing to dial.
Printing the fax activity log
On demand, you can print a log of the last 40 faxes. This log includes
entries for:
● All faxes received to the product
● All faxes sent from the control panel
● All faxes sent from the HP LaserJet Document Manager (for
Windows-compatible computers directly connected to the product)
● All faxes sent from the HP Workplace (for Macintosh-compatible
computers directly connected to the product)
30 Chapter 3 Faxing (advanced) ENXC

Note The HP LaserJet Document Manager is not supported for Microsoft
Windows 95.
To print the fax activity log
1 Press menu/enter.
2 Use the < or > button to select Reports, and press menu/enter.
3 Use the < or > button to select Fax Activity Log and press
menu/enter.
4 Press menu/enter to select Print Log Now. The product exits the
Menu settings and prints the log.
Changing the fax call report print times
The fax call report is a brief report indicating the status of the last sent or
received fax. You can set your product to print a fax call report after the
following events:
● Every Fax Error (the default)
● Send Fax Error
● Receive Fax Error
● Every Fax
● Send Fax Only
● Never
English
Note If you choose Never, you will have no indication that a fax failed to transmit
unless you print a fax activity log.
To set fax call report print times
Use the following steps to set when the fax call report prints:
1 Press menu/enter.
2 Use the < or > button to select Reports and press menu/enter.
3 Use the < or > button to select Fax Call Report and press
menu/enter.
4 Press the > button once to select Print Report and press
menu/enter.
5 Use the < or > button to select the option for when you want the fax
call reports to print.
6 Press menu/enter to save your selection.
ENXC Changing the fax call report print times 31

32 Chapter 3 Faxing (advanced) ENXC

Troubleshooting
4
Use the information in this chapter to troubleshoot general fax issues.
For more advanced fax troubleshooting information, see the electronic
user guide.
Is your fax set up correctly?
Use the following checklist to help you define what is causing any faxing
problems you might be encountering.
● Are you using the phone cord supplied with the product?
This product has been tested with the supplied phone cord to meet
RJ11 specifications.
● Is the Fax/Phone line connector installed in the correct socket
on the product?
It should be plugged into the product’s line socket (the socket on top
with an “L” next to it). You must open the left side panel to access
the socket. See “Connecting the product to a phone line” on page 5
for details.
● Is the Fax/Phone line connector seated into the socket on the
product?
Gently pull on the Fax/Phone line connector to make sure it is well
seated into the socket.
● Is the phone wall jack working properly?
Verify that a dial tone exists by attaching a phone to the wall jack.
Can you hear a dial tone and can you make a phone call?
English
What type of phone line are you using?
● Dedicated line: A unique fax/phone number assigned to receive or
send faxes. The phone cord should be connected to the top port
inside the left side panel of the product (the one that is not labeled
with a telephone icon).
● Shared phone line: A system where both phone calls and faxes
are received or sent using the same phone number and phone line.
A single standard phone line can only perform one function at a
time. You cannot send a fax while talking on the phone or while
connecting to the Internet using the same phone line.
ENXC Is your fax set up correctly? 33

PBX system: A business environment phone system. Standard
●
home phones and the HP LaserJet 3330 use an analog phone
signal. PBX systems are digital and are incompatible with standard
phones and with devices such as the HP LaserJet 3330. You need
to have access to a standard analog phone line in order to send and
receive faxes.
● Roll-over lines: A phone system feature where, when one
incoming line is busy, the next call “rolls over” to the next available
line. Try attaching the product to the first incoming phone line. The
product will answer the phone after it rings the number of times set
in the product’s rings-to-answer setting. (See “Setting
rings-to-answer” on page 15.)
● Distinctive ring service: The phone company can assign two
phone numbers to one physical line and assign each number a
distinctive ring pattern. Make sure the product is set to respond to
the correct distinctive ring pattern assigned to the fax phone
number by your phone service provider. (See “Enabling answer ring
patterns” on page 17.)
Are you using a phone line splitter?
Phone line splitter: Device used to split out two or more phone line jacks
to connect phones or devices to the same phone line wall jack.
Confusion can result from the existence of two different kinds of splitters.
Parallel splitters (also called “T” splitters) split a single line into two jacks,
allowing two devices to be plugged into the same line. Line1/Line 2
splitters provide two phone line outlets from a single jack with two
unique phone numbers (two phone lines are connected to a single wall
jack). A Line1/Line2 splitter must be used if you have a fax line and a
voice line coming into the same wall jack. See “To connect the product to
a jack with two phone lines” on page 8 for instructions.
Note Parallel or “T” splitters should not be used with the product, as they can
degrade the quality of the phone signal. If you need to attach a second
device to the phone line along with the product, plug the second device
into the product’s “phone” socket (the socket on the bottom) inside the
product’s left side panel. See “Connecting additional devices” on page 10
for instructions.
Are you using a surge protection device?
This is a device used between the wall jack and the product to protect
the product against electrical power passed through the phone lines.
These can cause some fax communication problems by degrading the
quality of the phone signal. If you are having problems sending or
receiving faxes and are using one of these devices, connect the product
directly to the phone jack on the wall to determine whether the problem
is with the surge protection device.
34 Chapter 4 Troubleshooting ENXC

Are you using a phone company voice messaging service?
This is a voice messaging service used to replace telephone answering
devices. If the messaging service’s rings-to-answer setting is lower than
the product’s rings-to-answer setting, the messaging service answers
the call and the product is not able to receive faxes. If the product’s
rings-to-answer setting is lower than that of the messaging service, the
product will answer all calls and no call will ever be routed to the
messaging service. The only voice messaging solution that can be
successfully used with the product is a stand-alone telephone answering
machine.
Are you using an answering machine?
An answering machine should be connected directly to the port located
inside the left side panel of the product that is labeled with the telephone
icon or should be shared on the same phone line extension.
Set the product’s rings-to-answer for one ring more than the number of
rings for which the answering machine is set. See “Setting
rings-to-answer” on page 15 for more information.
Note If an answering machine is connected on the same phone line but on a
different jack, it may interfere with the product’s ability to receive faxes.
English
ENXC Is your fax set up correctly? 35

General fax problems
Use the tables in this section to solve fax problems.
Problem Cause Solution
Document stops
feeding in the middle of
faxing.
Fax activity logs or fax
call reports are printing
at unwanted times.
The volume for sounds
coming from the
product is too high or
too low.
The maximum length of a
page you can load is 381 mm
(15 inches). Faxing of a
longer page stops at 381 mm
(15 inches).
The minimum page size for
the ADF is 127 by 127 mm (5
by 5 inches). If the item is too
small, it can jam inside the
ADF.
The fax activity log or fax call
reports settings are not
correct.
The volume setting needs to
be adjusted.
If there is no jam and it has been
less than one minute, wait a
moment before pressing Cancel.
If there is a jam, see the topics in
the electronic user guide on
clearing jams. Then, resend the
job.
If there is a jam, see the topics in
the electronic user guide on
clearing jams.
Print a configuration report and
check when the reports print. See
the topics in the electronic user
guide on printing a configuration
report, setting when the fax call
report prints, and setting the fax
activity log to print automatically.
See the topic in the electronic user
guide on changing the sound
volume for instructions about
changing volume settings.
36 Chapter 4 Troubleshooting ENXC

Receiving fax problems
Use the table in this section to solve problems that might occur when
receiving faxes.
Problem Cause Solution
Unable to start
receiving faxes from an
extension phone.
Voice calls are not being
received by the phone
or answering machine
connected to the line.
The extension phone setting
might be disabled.
The telephone cord might not
be securely connected.
The phone cord might not be
connected properly.
The answer mode or
rings-to-answer settings
might not be set properly.
See “Enabling an extension phone”
on page 30 for instructions about
changing this setting.
Check that the telephone cord is
securely connected between the
phone and the product (or other
device connected to the product).
Press 1-2-3 in sequence, wait for
three seconds, and then hang up.
See “Connecting the product to a
phone line” on page 5 to check the
installation. The product must be
the first device connected to the
phone line.
See “Setting the answer mode” on
page 14 or “Setting
rings-to-answer” on page 15 to
determine which settings you need.
The rings-to-answer must be set
higher than for the answering
machine.
English
The answering machine or
phone might not be
functioning.
Incoming fax calls are
not being answered by
the product.
ENXC Receiving fax problems 37
The answer mode might be
set to manual.
Connect the phone or answering
machine directly to the phone line
and determine whether it works by
itself.
If the answer mode is set to
manual, the product never answers
calls. You have to answer the
phone and start receiving the fax
yourself. See “Setting the answer
mode” on page 14 for more
information.

Problem Cause Solution
Incoming fax calls are
not being answered by
the product (continued).
The rings-to-answer setting
might not be set correctly.
The answer ring pattern
feature might be turned on,
but you do not have the
service, or you do have the
service and the feature is not
set correctly.
The phone cord might not be
connected properly, or the
phone cord is not working.
The product may not be able
to hear incoming fax tones
due to a voice message being
played by the answering
machine.
Check the rings-to-answer setting
for your configuration. See “Setting
rings-to-answer” on page 15 to
determine which setting you need.
Check the answer ring pattern
feature to make sure it is set
properly. See “Enabling answer
ring patterns” on page 17.
See “Connecting the product to a
phone line” on page 5 to check the
installation. Make sure you are
using the phone cord that came
with the product.
Re-record your answering machine
message, leaving at least two
seconds of silence at the beginning
of the message.
There might be too many
devices connected to the
phone line.
Try removing the last device
connected and determine whether
the product works. If not, continue
removing devices one at a time
and retry after removing each one.
The phone line might not be
working.
Do one of the following:
● Turn up the volume on the
product and press fax/send on
the control panel. If you hear a
dial tone, the phone line is
working.
● Disconnect the product from
the phone jack and connect a
phone. Try to make a phone
call to make sure the phone
line is working.
38 Chapter 4 Troubleshooting ENXC

Problem Cause Solution
Incoming fax calls are
not being answered by
the product (continued).
Faxes are transmitting
or being received very
slowly.
A voice messaging service
may be interfering with the
product answering calls.
The product might be out of
paper and the memory is full.
You might be sending or
receiving a very complex fax,
such as one with many
graphics.
Do one of the following:
● Discontinue the messaging
service.
● Get a phone line dedicated to
fax calls.
● Set the product to answer in
manual mode. In manual
mode, you must start the faxreceive process yourself.
● Leave the product set to
automatic mode and lower the
rings-to-answer for the product
to a number less than the
rings-to-answer for the voice
mail (see “Setting
rings-to-answer” on page 15).
The product will answer all
incoming calls.
Refill the media input tray. The
product will print all of the faxes it
has saved in memory and will then
resume answering fax calls.
Complex faxes take longer to be
sent or received.
English
The receiving fax machine
might have a slow modem
speed.
The resolution at which the
fax was sent or is being
received is very high. A
higher resolution typically
results in better quality, but
also requires a longer
transmission time.
ENXC Receiving fax problems 39
The product only sends the fax at
the fastest modem speed the
receiving fax machine can use.
If you are receiving the fax, call and
ask the sender to lower the
resolution and resend the fax.
If you are sending, lower the
resolution and resend the fax. See
“Changing the default contrast and
resolution for outgoing faxes” on
page 20 to change the default
setting.

Problem Cause Solution
Faxes are transmitting
or being received very
slowly (continued).
Faxes are not printing
or are printing
incorrectly at the
product.
Faxes are printing on
two pages instead of
one.
If there is a poor phone line
connection, the product and
the receiving fax machine
slow down the transmission
to adjust for errors.
There is no media in the
media input tray.
The receive to PC option
might be selected, and faxes
are being received by the
computer.
The autoreduction setting
may not be set correctly.
Hang up and resend the fax.
Have the phone company check
the phone line.
Load media. Any faxes received
while the input tray is empty are
stored in memory and will print
once the tray has been refilled.
Check to determine whether the
computer is receiving faxes:
Click Start, point to Programs,
point to HP LaserJet 3300, point to
Tools, and click HP LaserJet
Device Configuration.
Click the Fax tab, then the Receive
tab.
Clear the Receive to PC check
box if it is selected, and click OK.
If you want faxes to be reduced to
fit on one page, the autoreduction
setting should be on. If the setting
is off, faxes may print on multiple
pages. See the autoreduction topic
in the electronic user guide to
adjust the setting.
Received faxes are too
light or are printing only
on half of the page.
40 Chapter 4 Troubleshooting ENXC
The product ran out of toner
while printing a fax.
The product stores up to 10 of the
most recently printed faxes. As
soon as possible, replace the print
cartridge and see the instructions
for reprinting a fax in the electronic
user guide.

Sending fax problems
Use the table in this section to solve problems that might occur when
sending faxes.
Problem Cause Solution
Faxes quit during
sending.
The product is receiving
faxes but is not sending
them.
The fax machine to which you
are sending might be
malfunctioning.
Your phone line might not be
working.
If your product is on a PBX
system, the PBX system
might be generating a dial
tone the product cannot
detect.
Try sending to another fax
machine.
Do one of the following:
● Turn up the volume on the
product and press fax/send on
the control panel. If you hear a
dial tone, the phone line is
working.
● Disconnect the product from
the phone jack and connect a
phone. Try to make a phone
call to make sure the phone
line is working.
Disable the detect dial tone setting.
See the dial tone setting topic in
the electronic user guide.
English
There might be a poor phone
connection.
The fax machine to which you
are sending might be
malfunctioning.
ENXC Sending fax problems 41
Try again later.
Try sending to another fax
machine.

Problem Cause Solution
The product is receiving
faxes but is not sending
them (continued).
Outgoing fax calls keep
dialing.
Faxes you send are not
arriving at the receiving
fax machine.
Your phone line might not be
working.
The product will automatically
redial a fax number if the
redial on busy option is set to
on.
The receiving fax machine
might be off or have an error
condition, such as being out
of paper.
A fax might be in memory
because it is waiting to redial
a busy number, there are
other jobs ahead of it waiting
to be sent, or the fax is set up
for a delayed send.
Do one of the following:
● Turn up the volume on the
product and press fax/send on
the control panel. If you hear a
dial tone, the phone line is
working.
● Disconnect the product from
the phone jack and connect a
phone. Try to make a phone
call to make sure the phone
line is working.
To stop the redials while the
product is dialing, press Cancel.
See the redial topic in the
electronic user guide if you need to
change the setting.
Call the recipient to make sure the
fax machine is on and ready to
receive faxes.
If a fax job is in memory for any of
these reasons, an entry for the job
appears in the fax log. Print the fax
activity log (see “Printing the fax
activity log” on page 30) and check
the Status column for jobs with a
Pending designation.
You cannot dial all of
the numbers in a long
fax number.
The maximum number of
digits or characters that can
be entered into a fax number
Try dialing the fax number in
manual mode. See “Using manual
dial” on page 30.
is 50.
42 Chapter 4 Troubleshooting ENXC

Accessing the electronic user guide
To access the electronic user guide from the product software
If you have installed the product software, you can access the electronic
user guide by selecting User Guide from the software’s Help menu.
To access the electronic user guide from the product CD-ROM
If you have not installed the product software, you can still view the
electronic user guide on your computer by following these steps:
1 To open the Welcome screen, insert the product software CD-ROM
in your computer’s CD drive.
• If the Welcome screen does not open, click Start on the
Windows task bar, click Run, type Z:\setup (where Z is your CD
drive letter), and click OK.
2 From the Welcome screen, click Documentation.
3 From the Documentation screen, click PDF Format or HTML Help
Format in the User Guide Viewing Options box.
Note If you are running Windows 95 on your computer, you must have Internet
Explorer 4.01 or greater to view or print the electronic user guide in HTML
Help format.
English
To view or print the electronic user guide in PDF format, you must have
Adobe Acrobat Reader installed on your computer.
ENXC Accessing the electronic user guide 43

44 Chapter 4 Troubleshooting ENXC


ינורטקלאה שמתשמל ךירדמל השיג
ל השיגרצומה תנכותמ ינורטקלאה שמתשמל ךירדמ
רצומה תנכות תא תנקתה םא , לע שמתשמל ינורטקלאה ךירדמל תשגל ךתורשפאב
תריחב ידיUser Guide) שמתשמל ךירדמ ( טירפתמהרזעההנכותה לש .
רצומה רוטילקתמ ינורטקלאה שמתשמל ךירדמל השיג
רצומה תנכות תא תנקתה אל םא ,רדמב ןייעל לכות ןיידע שמתשמל ינורטקלאה ךי
םיאבה םיבלשה עוציב ידי לע בשחמב:
1 ךסמה תא חותפל ידכWelcome , ןנוכל רצומה תנכות רוטילקת תא סנכה
תירבע
תינבתב ינורטקלאה שמתשמל ךירדמה תא סיפדהל וא גיצהל ידכPDF , שי
בשחמב םירוטילקתה.
• ךסמה םאWelcomeחתפנ וניא , לחתה לע ץחל)Start ( תומישמה תרושב
לשWindows , הלעפה לע ץחל)Run( , דלקהz:\setup) רשאכZ תוא איה
כםירוטילקתה ןנו ( רושיא לע ץחלו)OK.(
2 ךסמהמWelcome , לע ץחלDocumentation) דועית.(
3 דועיתה ךסממ , לע ץחלPDF Format לע וא HTML Help Format
הביתבUser Guide Viewing Options) ךירדמה לש הגצה תויורשפא
שמתשמל.(
ןקתומ בשחמב םאWindows 95 , ןיקתהל שיInternet Explorer 4.01 וא
רתוי םדקתמ , תינבתב ינורטקלאה שמתשמל ךירדמה תא סיפדהל וא גיצהל ידכ
HTML Help.
בשחמב ןיקתהלAdobe Acrobat Reader.
הרעה
43
HEXC םיסקפ חולשמב תויעב

ןורתפ הביס היעב
תואבה תולועפהמ תחא עצב:
● לוקה תמצוע תא רבגה
לע ץחלו רצומבfax/send
הרקבה חולב . עמשת םא
גויח לילצ ,ןיקת ןופלטה וק.
● עקשמ רצומה תא קתנ
ןופלט רישכמ רבחו ןופלטה .
וקש אדוול ידכ רשקתהל הסנ
ןיקת ןופלטה.
רשאכ םירזוח םיגויח קיספהל ידכ
בוש גייחמ רצומה , לע ץחל
Cancel.
תורדגהה תא תונשל ךנוצרב םא ,
ךירדמב רזוחה גויחה אשונב ןייע
ינורטקלאה שמתשמל.
אדוול ידכ ןעמנה לא רשקתה
לבקל ןכומו לעפומ סקפה רישכמש
םיסקפ.
תאצמנ סקפה תדובע םא ןורכיזב
הלא תוביסמ תחאמ , לש המושר
סקפה ןמויב העיפומ הדובעה .
סקפה תוליעפ ןמוי תא ספדה) האר
דומעב30 ( סוטטסב תודובע קודבו
Pending הדומעב Status.
בצמב סקפה רפסמ תא גייחל הסנ
ינדי . האר"ינדי גויחב שומיש "
דומעב30.
רפסמ תיטמוטוא בוש גייחי רצומה
יחה תורשפא םא סקפ רזוחה גו
תלעפומ סופת רשאכ.
יובכ לבקמה סקפה רישכמש ןכתיי
האיגש בצמב אצמנ וא , ריינ ןוגכ
ןוויכ ןורכיזב אצמנ סקפהש ןכתיי
רפסמל רזוח גויחל ןיתממ אוהש
חלשיהל תוניתממש , סקפהש וא
"סקפה תוליעפ ןמוי תספדה "
ההשומ חולשמל רדגומ.
ןיזהל ןתינ סקפ רפסמב50 תורפס
רתויה לכל םיוות וא.
ייןיקת וניא ןופלטה וקש ןכת.
לזאש.
סופת ,נפל תופסונ תודובע ןנשי וי
םיסקפ לבקמ רצומה , ךא
םתוא חלוש וניא)ךשמה(
תוגיוחמ תואצוי סקפ תוחיש
בושו בוש.
םניא םיחלשנש םיסקפ
סקפה רישכמל םיעיגמ
לבקמה.
לכ תא גייחל תורשפא ןיא
ךורא סקפ רפסמב תורפסה.
42
קרפ 4 תויעב ןורתפ HEXC

םיסקפ חולשמב תויעב
חולשמ תעב שחרתהל תויושעש תויעב רותפל ידכ הז ףיעסב הלבטב שמתשה
םיסקפ.
ןורתפ הביס היעב
רחא סקפ רישכמל חולשל הסנ. סקפה רישכמב הלקת שיש ןכתיי
תואבה תולועפהמ תחא עצב:
תירבע
ןופלט רישכמ רבחו ןופלטה .
וקש אדוול ידכ רשקתהל הסנ
גויחה לילצ יוהיז תרדגה תא לטב .
חה לילצ תרדגה אשונב ןייע גוי
ינורטקלאה שמתשמל ךירדמב.
רתוי רחואמ דעומב בוש הסנ. עורג ןופלטה וק רוביחש ןכתיי.
רחא סקפ רישכמל חולשל הסנ. ןכתיי סקפה רישכמב הלקת שיש
ךלהמב עטקנ סקפה
לבקמה.
ןיקת וניא ןופלטה וקש ןכתיי.
החילשה.
● ה לוקה תמצוע תא רבג
לע ץחלו רצומבfax/send
הרקבה חולב . עמשת םא
גויח לילצ ,ןיקת ןופלטה וק.
● עקשמ רצומה תא קתנ
ןיקת ןופלטה.
תכרעמל רבוחמ רצומה םא
הייזכרמ)PBX( , תכרעמש ןכתיי
גויח לילצ הקיפמ הייזכרמה
תוהזל לוכי וניא רצומהש.
לבקמה.
םיסקפ לבקמ רצומה , ךא
םתוא חלוש וניא.
41
HEXC םיסקפ חולשמב תויעב

ןורתפ הביס היעב
סקפה תא בוש חלשו קתנ.
וק תא קודבל ןופלטה תרבחמ שקב
ןופלטה.
דה ירמוח ןעטהספ . סקפ לכ
קיר הנזהה שגמ רשאכ לבקתמש ,
יולימ רחאל ספדויו ןורכיזב ןסחואמ
שגמה.
לבקמ בשחמה םא עובקל ידכ קודב
םיסקפ:
לע ץחלStart , לע עבצה
Programs ,לע עבצה
Tools לע ץחלו HP LaserJet
Device Configuration.
הייסיטרכה לע ץחלFax רחאלו
הייסיטרכה לע ןכמReceive.
ןומיסה תבית תא הקנ
תנמוסמ , לע ץחלוOK.
יסקפש ךנוצרב םא ךכ ונטקוי ם
דחא דומעב וסנכייש , תורשפא
תויהל הכירצ תיטמוטואה הנטקהה
תלעפומ . הניא הרדגהה םא
תלעפומ , תויהל םייושע םיסקפ
םידומע רפסמ לע םיספדומ . ידכ
תורדגהה תא תונשל , אשונב ןייע
ךירדמב תיטמוטואה הנטקהה
ינורטקלאה שמתשמל.
העורג ןופלטה וק רוביח תוכיא םא ,
וטאי לבקמה סקפה רישכמו רצומה
תואיגש ןקתל ידכ רודישה בצק תא.
תנזה שגמב הספדה ירמוח ןיא
הספדהה ירמוח.
תורשפאה הרחבנש ןכתיי
Receive to PC םיסקפהו
בשחמב םילבקתמ.
HP LaserJet 3300 , לע עבצה
Receive to PC , איה םא
הנטקהה תורדגהש ןכתיי
וכנ ןניא תיטמוטואהתונ.
וא םירדושמ םיסקפה
תיטיא הרוצב םילבקתמ
דואמ)ךשמה.(
וא םיספדומ םניא םיסקפ
היוגש הרוצב םיספדומש
רצומב.
ינש לע םיספדומ םיסקפ
דחא לע םוקמב םידומע.
דע ןסחאמ רצומה10 םיסקפה
וספדוהש םינורחאה . תא ףלחה
תוריהמב הספדהה תינסחמ
תירשפאה , תספדהל תוארוהב ןייעו
שמתשמל ךירדמב סקפ לש תרזוח
ינורטקלאה.
תספדה ןמזב לזא רצומב רנוטה
םיריהב םילבקתמש םיסקפה
סקפ.
פדומ וא ידמ יצח לע קר םיס
דומעהמ.
40
קרפ 4 תויעב ןורתפ HEXC

ןורתפ הביס היעב
תואבה תולועפהמ תחא עצב:
● תועדוהה תוריש תא לטב.
עירפמ ילוק הנעמ תורישש ןכתיי
תוחישל תונעל רצומל.
תוחיש לע הנוע וניא רצומה
תוסנכנ סקפ)ךשמה.(
● תוחישל ידועיי ןופלט וק ןמזה
סקפ.
● תונעל רצומה תא רדגה
ינדי בצמב .ינדי בצמב , ךילע
ךילהת תא ךמצעב ליחתהל
סקפה תלבק.
● בצמב רצומה תא ראשה
תירבע
רפסמל רצומה לש הנעמל
םילוצלצה לש הזמ ןטק
ילוקה ראודה לש הנעמל
תוחישה לכ לע הנעי
רחאלו ןורכיזב ורמשנש םיסקפה
סקפ תוחישל תונעל רוזחי ןכמ.
םיסקפ לש הלבק וא החילש
רתוי בר ןמז תכרוא םיבכרומ.
וטוא םילוצלצה תא רדגהו יטמ
) האר" םילוצלצ תרדגה
הנעמל " דומעב15 .( רצומה
תוסנכנה.
תא אלמ ירמוח תנזה שגמ
הספדהה . לכ תא סיפדי רצומה
ןורכיזהו לזא רצומב ריינהש ןכתיי
סקפ לבקתמ וא חלשנש ןכתיי
אלמ.
דואמ בכרומ ,המגודל , םע סקפ
הבר הקיפרג.
תיטיא הרוצב םילבקתמ
סקפה וא םירדושמ םי
דואמ.
קר םיסקפ חולשל לוכי רצומה
רתויב ההובגה םדומה תוריהמב
לבקמה סקפה רישכמ לש.
סקפה לבקמ התא םא , לא רשקתה
תא דירוהל ונממ שקבו חלושה
סקפה תא בוש חולשלו היצולוזרה.
סקפה תא בוש חלשו היצולוזרה .
תרירב תרדגה תא תונשל ידכ
רובע לדחמה תרירב תייצולוזרו
םיאצוי םיסקפ " דומעב20.
39
רישכמ לש םדומה תוריהמש ןכתיי
תיטיא לבקמה סקפה.
לבקתמ וא חלשנ הבש היצולוזרה
דואמ ההובג סקפה .ללכ ךרדב ,
הבוט תוכיא תנתונ ההובג היצולוזר
ה התא םאחלוש , תא דרוה
לדחמה , האר" תוידוגינ יוניש
רתוי , ןמז תשרוד םג ךא רודיש
רתוי ךורא.
HEXC בקב תויעבםיסקפ תל

ןורתפ הביס היעב
הנעמל םילוצלצה תרדגה תא קודב
רישכמה לש הרוצתה רובע . ידכ
עובקלהשורדה הרדגהה תא , האר
15.
לוצלצ סופד תנוכת תא קודב
הכלהכ תרדגומ איהש אדוו הנעמל .
האר ," םילוצלצ סופד תלעפה
הנעמל " דומעב17.
הנקתהה תקידבל , האר" רוביח
ןופלט וקל רצומה " דומעב5 . דפקה
ףרוצמש ןופלטה טוחב שמתשהל
רצומל.
וה תא שדחמ טלקה ןובישמה תעד
לש תוינש יתש תוחפל ראשהו
העדוהה תליחתב טקש.
ןורחאה רישכמה תא ריסהל הסנ
רצומה םא קודבל ידכ רבוחמש
לעופ .אל םא , תא ריסהל הסנ
בוש הסנו הז רחא הזב םירישכמה
םהמ דחא לכ תרסה רחאל.
הנעמל םילוצלצ תרדגהש ןכתיי
הכלהכ תרדגומ הניא.
"הנעמל םילוצלצ תרדגה " דומעב
תנוכתש ןכתיי הנעמ לוצלצ סופד
הניא הנוכתהו םייק תורישהש
יוארכ תרדגומ.
רבוחמ וניא ןופלטה טוחש ןכתיי
תא עומשל לוכי וניא רצומהש ןכתיי
העדוה בקע סנכנה סקפה ילילצ
ןובישמה ידי לע תעמשומש תילוק.
םיבר םירישכמ םירבוחמש ןכתיי
ןופלטה וקל ידמ.
תוחיש לע הנוע וניא רצומה
תוסנכנ סקפ)ךשמה.(
תלעפומ ,םייק וניא תורישה ךא , וא
הכלהכ ,םוגפ ןופלטה טוחש וא.
תואבה תולועפהמ תחא עצב:
לע ץחלו רצומבfax/send
הרקבה חולב . עמשת םא
גויח לילצ ,ןיקת ןופלטה וק.
ןופלט רישכמ רבחו ןופלטה .
וקש אדוול ידכ רשקתהל הסנ
ןופלטהןיקת .
ןיקת וניא ןופלטה וקש ןכתיי.
● לוקה תמצוע תא רבגה
● עקשמ רצומה תא קתנ
38
קרפ 4 תויעב ןורתפ HEXC

םיסקפ תלבקב תויעב
תלבק תעב שחרתהל תויושעש תויעב רותפל ידכ הז ףיעסב הלבטב שמתשה
םיסקפ.
ןורתפ הביס היעב
וז הרדגה יונישל תוארוה תלבקל ,
האר"ןימזל החולש ןופלט תכיפה "
דומעב30.
תירבע
רישכמ ןיב ןופלטה טוחש קודב
רצומל ןופלטה) רחא רישכמ וא
רצומל רבוחמש (בטיה רבוחמ.
ץחל1-2-3ףצרב , שולש ןתמה
קתנ ןכמ רחאלו תוינש.
הנקתהה תקידבל , האר" רוביח
ןופלט וקל רצומה " דומעב5 .
ה תויהל ךירצ רצומה רישכמ
ןופלטה וקל רבוחמש ןושארה.
תושורדה תורדגהה תא עובקל ידכ ,
האר"הנעמה בצמ תרדגה " דומעב
14 וא "הנעמל םילוצלצ תרדגה "
דומעב15 . רפסמ רידגהל שי
לוצלצ לש הזמ הובג הנעמל םי
ןובישמה.
החולשה ןופלט תרדגהש ןכתיי
תלעפומ הניא.
רבוחמ וניא ןופלטה טוחש ןכתיי
בטיה.
רבוחמ וניא ןופלטה טוחש ןכתיי
בטיה.
וא הנעמה בצמ תורדגהש ןכתיי
תורדגומ ןניא הנעמל םילוצלצ
הכלהכ.
תלבק ליחתהל תורשפא ןיא
החולש ןופלטמ םיסקפ.
ןניא תוליגר תוחיש
רישכמ ידי לע תולבקתמ
ןובישמה וא ןופלטה
וקל םירבוחמש.
תא וא ןופלטה רישכמ תא רבח
קודבו ןופלטה וקל תורישי ןובישמה
דרפנב םילעופ םה םא.
ינדיכ רדגומ הנעמה בצמ םא ,
עי אל רצומהתוחישל הנ . ךילע
תלבק תא ליחתהלו ןופלטל תונעל
ךמצעב סקפה .ףסונ עדימ תלבקל ,
37
ןופלטה רישכמ וא ןובישמהש ןכתיי
ינדיכ רדגומ הנעמה בצמש ןכתיי.
האר"הנעמה בצמ תרדגה " דומעב
14.
םיניקת םניא.
תוחיש לע הנוע וניא רצומה
תוסנכנ סקפ.
HEXC בקב תויעבםיסקפ תל

תויללכ סקפ תויעב
שמתשהסקפ תויעב רותפל ידכ הז ףיעסב הלבטב.
ןורתפ הביס היעב
תוחפ הפלחו ריינ עקתנ אל םא
הקדמ , לע ץחלתש ינפל עגר ןתמה
Cancel.
ריינ עקתנ םא , םיאשונב ןייע
ינורטקלאה שמתשמל ךירדמב
עקתנש ריינ יוקינל עגונב . רחאל
ןכמ ,הדובעה תא בוש חלש.
ריינ עקתנ םא , םיאשונב ןייע
ירדמב ינורטקלאה שמתשמל ך
עקתנש ריינ יוקינל עגונב.
ידעומ תא קודבו הרוצת חוד ספדה
תוחודה תספדה . םיאשונב ןייע
ינורטקלאה שמתשמל ךירדמבש
הרוצת חוד תספדה תודוא , תרדגה
סקפ תחיש חוד תספדה ידעומ
ןמוי לש תיטמוטוא הספדה תרדגהו
סקפ תוליעפ.
תורדגה יוניש לע תוארוה תלבקל
לוקה תמצוע , יוניש אשונב ןייע
שמתשמל ךירדמב לוקה תמצוע
ינורטקלאה.
ןועטל ןתינש יברמה דומעה ךרוא
רצעית רתוי ךורא דומע לש סקפב
ה רובע ירעזמה דומעה לדוג- ADF
וא סקפה תוליעפ ןמוי תורדגה
לוקה תמצוע תרדגה תא ןווכל שי.
ןמזב תקספנ ךמסמה תנזה
אוה381מ " מ)15ץניא ' .( החילש
ב- 381מ " מ)15ץניא '.(
אוה127 לע 127מ " מ)5 לע 5
ץניא' .(ידמ ןטק טירפה םא , אוה
עקתיהל לולעב - ADF.
תוחוד וא סקפ תוליעפ ינמוי
ש תוחודתונוכנ ןניא סקפה תחי.
םיספדומ סקפ תחיש
םילילצ לש לוקה תמצוע
רצומה ידי לע םיקפומש
סקפ תחילש.
םייוצר אל םידעומב.
הובגידמ הכומנ וא ה.
36
קרפ 4 תויעב ןורתפ HEXC

ןופלטה תרבח לש ילוק את תורישב שומיש השענ םאה?
והזםינובישמ ףילחהל דעונש תוילוק תועדוה תוריש . הנעמל םילוצלצה תרדגה םא
רצומה לש הנעמל םילוצלצה תרדגהמ הכומנ תועדוהה תוריש לש , תועדוהה תוריש
םיסקפ לבקל לכוי אל רצומהו תוחישל הנעי . רצומה לש הנעמל םילוצלצה תרדגה םא
תועדוהה תוריש לש וזמ הכומנ ,וחישה לכל הנעי רצומה בתונת אל החיש ףאו ת
תועדוהה תורישל . םע החלצהב שמתשהל ןתינ ובש דיחיה תוילוקה תועדוהה ןורתפ
דרפנ ןובישמ אוה רצומה.
ןובישמב שומיש השענ םאה?
תנמוסמשו רצומה לש ילאמשה חולב תמקוממש האיציל תורישי ןובישמ רבחל שי
ןופלט לש למסב ,ןופלט וק תחולש התואב ותוא ףתשל וא.
גה רפסמ רשאמ תוחפ דחא לוצלצכ רצומה לש הנעמל םילוצלצה רפסמ תא רד
תירבע
דרפנ עקשב ךא ןופלט וק ותואל רבוחמ ןובישמ םא , רצומל עירפהל לולע אוה
ןובישמה רובע רדגומש םילוצלצה .ףסונ עדימ תלבקל , האר" םילוצלצ תרדגה
הנעמל " דומעב15.
םיסקפ לבקל.
הרעה
35
HEXC הכלהכ ןקתומ סקפה םאה?

יטרדנטס יגולנא.
אבה יונפה וקל תרבעומ האבה . סנכנה ןופלטה וקל רצומה תא רבחל הסנ
ןושארה . םילוצלצ תרדגהב עבקנש םילוצלצה רפסמ רחאל ןופלטל הנעי רצומה
מלרצומב הנע) . האר"הנעמל םילוצלצ תרדגה " דומעב15.(
דחוימ לוצלצ סופד רפסמ לכל תוצקהלו דחא . סופדל ביגהל רדגומ רצומהש אדו
תוריש קפס ידי לע סקפה לש ןופלטה רפסמל הצקומש ןוכנה דחוימה לוצלצה
ופלטהן) .האר ,"הנעמל םילוצלצ סופד תלעפה " דומעב17.(
ןופלט וק לצפמב שומיש השענ םאה?
ןופלט וק לצפמ :ןופלט וק יעקש ינש לוציפל שמשמש ןקתה ,רתוי וא , ירישכמ רוביחל
ריקב ןופלט וק עקש ותואל םירישכמ וא ןופלט . ינש םימייקש ןוויכ םרגיהל לולע לובלב
םילצפמ לש םינוש םיגוס .פמ םייליבקמ םילצ) ילצפמ םג םיארקנ"T(" , וק םילצפמ
וק ותואל םירישכמ ינש רבחל םירשפאמ ךכו םיעקש ינשל דדוב .וד םילצפמ- םייווק
םיידוחיי ןופלט ירפסמ ינש םע דדוב עקשמ ןופלט יעקש ינש םיקפסמ) ןופלט יווק ינש
ריקב דדוב עקשל םירבוחמ .(וד לצפמב שמתשהל שי-ו סקפה וק םא יווק ןופלטה וק
ריקב עקש ותואל םיסנכנ ליגרה .תוארוה תלבקל , האר" ינש םע עקשל רצומה רוביח
ןופלט יווק " דומעב8.
וא םייליבקמ םילצפמב שמתשהל ןיא הז רצומב"T" , עוגפל םילולע םהש ןוויכ
ןופלטה תוא תוכיאב .רצומה םע דחי ןופלטה וקל ינש רישכמ רבחל ךנוצרב םא ,
ה רישכמה תא עקת עקשל ינש"phone " רצומבש)ןותחתה עקשה ( חולבש
רצומה לש ילאמשה .תוארוה תלבקל , האר"םיפסונ םירישכמ רוביח " דומעב10.
● הייזכרמ)PBX:( תיקסע הביבסל ןופלט תכרעמ . םייטרדנטס םייתיב םינופלט
הו- HP LaserJet 3330יגולנא ןופלט תואב םישמתשמ . תוכרעמPBX
)הייזכרמ ( ןוגכ םירישכמלו םייטרדנטסה םינופלטל תומאות ןניאו תוילטיגיד ןה
ה- HP LaserJet 3330. םיסקפ לבקלו חולשל ידכ , ןופלט וקל השיג השורד
● בר תכרעמ-תיווק:סופת דחא וק רשאכ הבש תינופלט תכרעמ תנוכת , החישה
● דחוימ לוצלצ תוריש: יזיפ וקל ןופלט ירפסמ ינש תוצקהל הלוכי ןופלטה תרבח
הרעה
חתמ בציימב שומיש השענ םאה?
רצומה ןיבל ריקב עקשה ןיב םירבחמ הז ןקתה , םרז ינפמ רצומה לע ןגהל ידכ
ןופלטה יווק ךרד רבועש ילמשח .ע הלא םינקתה סקפ תרושקת תויעבל םורגל םייוש
ןופלטה תוא תוכיאב העיגפ בקע . םיסקפ לש הלבק וא החילשב תויעב תוררועתמ םא
הלא םינקתהמ דחאב שומיש השענו , ריקב ןופלטה עקשל תורישי רצומה תא רבח
חתמה בציימב הצוענ היעבה םא ררבל ידכ.
34
קרפ 4 תויעב ןורתפ HEXC

תויעב ןורתפ
סקפב תויללכ תויעב רותפל ידכ הז קרפב עדימב שמתשה . םדקתמ עדימ תלבקל
סקפב תויעב ןורתפ תודוא רתוי ,ינורטקלאה שמתשמל ךירדמב ןייע.
םאההכלהכ ןקתומ סקפה?
תירבע
תמישרב רזעיה סקפב יהשלכ היעבל םרוגה תא אוצמל ידכ האבה תרוקיבה
הב תלקתנש.
●
רצומל ףרוצמש ןופלטה טוחב שומיש השענ םאה?
יטרפמ לע הנועש ףרוצמה ןופלטה טוח םע קדבנ הז רצומRJ11.
● ןופלטה וק רבחמ םאה/רצומב ןוכנה עקשב ןקתומ סקפ?
ומבש וקה עקשל ורבחל שי רצ) תואה םע ןוילעה עקשה"L "ודיצל .( תשגל ידכ
עקשל ,ילאמשה חולה תא חותפל ךילע .םיטרפל , האר" וקל רצומה רוביח
ןופלט " דומעב5.
● ןופלטה וק רבחמ םאה/רצומב עקשל בטיה רבוחמ סקפ?
ןופלטה וק רבחמ תא תונידעב ךושמ/עקשל בטיה רבוחמ אוהש אדוול ידכ סקפ .
● יקבש ןופלטה עקש םאההרושכ לעופ ר?
ריקב עקשל ןופלט רישכמ רוביח ידי לע גויח לילצ ונשיש אדו . לילצ עמשנ םאה
ןופלט תחיש עצבל ןתינ םאהו גויח?
33
ןופלטה וק גוס והמ?
● ידועיי וק:סקפ רפסמ /םיסקפ לש החילשל וא הלבקל הצקומ ידוחיי ןופלט . טוח
משה חולה ךותב הנוילעה האיציל רבוחמ תויהל ךירצ ןופלטה רצומה לש ילא) וז
ןופלט לש למסב תנמוסמ הניאש.(
● ףתושמ ןופלט וק: םיסקפה ןהו תוליגרה ןופלטה תוחיש ןה הבש תכרעמ
ןופלט וקו ןופלט רפסמ ותוא ךרד םיחלשנ וא םילבקתמ . יטרדנטס ןופלט וק
םעפ לכב דבלב תחא הלועפ עצבל לוכי דדוב . החיש ןמזב סקפ חולשל ןתינ אל
ח ןמזב וא ןופלטבןופלט וק ותואב םישמתשמשכ טנרטניאל רובי.
HEXC הכלהכ ןקתומ סקפה םאה?

קרפ 3 םיסקפ חולשמ)םדקתמ( HEXC
32

ל- HP LaserJet Document Managerב הכימת ןיא - Microsoft Windows
95.
הרעה
סקפה תוליעפ ןמוי תא סיפדהל ידכ.
1 לע ץחלmenu/enter.
Reports לע ץחלו menu/enter.
Fax Activity Log לע ץחלו
menu/enter.
Print Log Now. אצוי רצומה
ה תורדגהמ- Menuןמויה תא סיפדמו .
2 ןצחלה תועצמאב > וא ,< רחב
3 ןצחלה תועצמאב > וא ,< רחב
4 לע ץחלmenu/enter רוחבל ידכ
תירבע
לבקתה וא חלשנש ןורחאה סקפה סוטטס תא ןייצמש רצק חוד אוה סקפ תחיש חוד .
סקפ תחיש חוד לש הספדהה ידעומ יוניש
יש חוד סיפדי רצומהש רידגהל ךתורשפאבםיאבה םיעוריאה רחאל סקפ תח:
סקפ תאיגש לכ) לדחמה תרירב(
●
●
חלשנש סקפ תאיגש
●
לבקתהש סקפ תאיגש
●
סקפ לכ
●
דבלב חלשנ סקפ
●
םעפ ףא
רחבת םאNever) םעפ ףא( , סקפ תחילש םא תעדל תורשפא ךל היהת אל
הלשכנ ,סקפ תוליעפ ןמוי סיפדת ןכ םא אלא.
הרעה
סקפ תחיש חוד תספדה ידעומ תרדגה
סקפ תחיש חוד ספדוי יתמ עובקל ידכ םיאבה םיבלשה תא עצב:
1 לע ץחלmenu/enter.
Reports לע ץחלו menu/enter.
Fax Call Report לע ץחלו
menu/enter.
Print Report לע ץחלו
menu/enter.
סקפ תחיש.
2 ןצחלה תועצמאב > וא ,< רחב
3 ןצחלה תועצמאב > וא ,< רחב
4 ןצחלה לע ץחל > רוחבל ידכ תחא םעפ
5 ןצחלב שמתשה > וא < תוחוד תספדהל היוצרה תורשפאה תא רוחבל ידכ
6 לע ץחלmenu/enterךתריחב תא רומשל ידכ .
31
HEXC סקפ תחיש חוד לש הספדהה ידעומ יוניש

ןימזל החולש ןופלט תכיפה
תלעפומ וז הרדגה רשאכ)On( , תסנכנ סקפ תחיש לבקל רצומל תורוהל ךתורשפאב
לע הציחל ידי לע1-2-3ןופלטה לש םישקמה חולב ףצרב . איה לדחמה תרירבYes.
תוריש ונשי םא קר וז הרדגה לטב ףצרב שמתשמ םגש ןופלטה תרבח לש 1-2-3 .
רצומה םע שגנתמ אוה םא לעפי אל תורישה.
Fax Setup לע ץחלו menu/enter.
Fax Recv. Setup לע ץחלו
menu/enter.
menu/enter.
On וא Off לע ץחלו menu/enter ידכ
ךתריחב תא רומשל.
ללכ ךרדב , לע הציחל רחאל גייחמ רצומהfax/send. תאז םע , םימעפלש ןכתיי
וילע הציחלה םע רפסמ לכ גייחי רצומהש הצרת .המגודל , תא בייחל ךנוצרב םא
תחישגויח סיטרכל סקפה ,סקפה רפסמ תא גייחל ךילע היהיש ןכתיי , לילצל ןיתמהל
ןופלטה תרבח לש רושיא ,גויחה סיטרכ רפסמ תא גייחל ןכמ רחאלו .ימואלניב גויחב ,
לכותש ינפל גויח ילילצל ןיתמהל ןכמ רחאלו רפסמהמ קלח גייחל ךילע היהיש ןכתיי
גויחב ךישמהל.
1 לע ץחלmenu/enter.
2 ןצחלה תועצמאב > וא ,< רחב
3 ןצחלב שמתשה > וא < רוחבל ידכ
4 ןצחלה תועצמאב > וא ,< רחבExtension Phone לע ץחלו
5 ןצחלה תועצמאב > וא ,< רחב
ינדי גויחב שומיש
ינדי גויחב שמתשהל ידכ
1 עט הנזהה שגמב ךמסמה תא ןADF.
2 לע ץחלfax/send.
3 גויחב לחתה .רפסמ לכ לע הציחל רחאל גיוחמ סקפה רפסמ . הז רבד
תויהשהל ןיתמהל רשפאמ ,גויח ילילצ ,תימואלניב השיג ילילצ , ילילצ וא
גויח סיטרכ רושיא ,גויחה ךשמה ינפל.
סקפה תוליעפ ןמוי תספדה
לש ןמוי סיפדהל ךתורשפאב40סקפה םינורחאה םי ,השירד יפ לע . ללוכ הז ןמוי
רובע תומושר:
רצומה ידי לע ולבקתנש םיסקפה לכ
●
●
הרקבה חולמ וחלשנש םיסקפה לכ
●
המ וחלשנש םיסקפה לכ- HP LaserJet Document Manager) רובע
ימאות םיבשחמWindowsרצומל תורישי םירבוחמש (
המ וחלשנש םיסקפה לכ- HP Workplace) יבשחמ רובע ימאות ם
●
Macintoshרצומל תורישי םירבוחמש (
קרפ 3 םיסקפ חולשמ)םדקתמ( HEXC
30

W X Y Z w x y z 9
0 0
( ) + - . / , “ * & @ *
חוור# #
הנתמה וא הייהשה תפסוה
ויהשה ףיסוהל ךתורשפאב תנכתמ התא ותואש וא גייחמ התא וילאש סקפ רפסמב ת
תירבע
הרקבה חול תגוצתב עיפומ ,ןייצמ רשאהייהשה היהת גויחה ףצרב וז הדוקנבש .
רפסמ לכ תליחתל תיטמוטוא תפסוותמש םירפסמ תצובק וא רפסמ איה גויח תמודיק
הנכותהמ וא הרקבה חולב ןזומש סקפ.
לדחמ תרירבכ ,הליעפ הניא וז הרדגה . ןיזהלו וז הרדגה ליעפהל הצרתש ןכתיי
הרבחה לש ןופלטה .הליעפ וז הרדגהשכ , תמודיק אלל סקפ רפסמ גייחל לכות ןיידע
ינדי גויח ידי לע גויחה .תוארוה תלבקל , האר"ינדי גויחב שומיש " דומעב30.
רוציק שקמל ,יתצובק גויח דוק וא ריהמ גויח דוק . תושורד תויהשה תובורק םיתעל
וחל גויח תעב"ץוח וקל תורבחתה וא ל.
לע ץחלpause/redialתוינש שולש לש הייהשה גויחה ףצרב ןיזהל ידכ . קיספ
גויח תמודיק תפסוה
תמודיק ,המגודל ,סמ גייחל שי םא ןוגכ רפ9 תכרעמל ץוחמ ןופלט וק לבקל ידכ
29
גויחה תמודיק תרדגה
1 לע ץחלmenu/enter.
Fax Setup לע ץחלו menu/enter.
Fax Send Setup לע ץחלו
menu/enter.
On וא Off לע ץחלו menu/enter.
On ,חלו תמודיקה תא ןיזהל ידכ םיירפסמה םינצחלב שמתשה ץ
2 ןצחלה תועצמאב > וא ,< רחב
3 לע ץחל > רוחבל ידכ תחא םעפ
4 ןצחלה תועצמאב > וא ,< רחבDial Prefix לע ץחלו menu/enter.
5 ןצחלה תועצמאב > וא ,< רחב
6 רחבת םא
לעmenu/enter. םירפסמב שמתשהל ךתורשפאב ,גויח ינמיסו תויהשה.
HEXC גויחה תמודיק תרדגה

םינופלטה סקנפ תומושר לכ תקיחמ
ריהמה גויחה ידוק לכ תא קוחמל ךתורשפאב , יתצובקה גויחה ידוקו רוציקה ישקמ
רצומב םיתנכותמש.
ריהמ גויח ידוק תקיחמ רחאל ,יתצובק גויח ידוקו רוציק ישקמ ,םרזחשל ןתינ אל.
תוריהז
1 לע ץחלmenu/enter.
Fax Setup לע ץחלו menu/enter.
Phone Book.
Delete All לע ץחלו menu/enter.
2 ןצחלה תועצמאב > וא ,< רחב
3 לע ץחלmenu/enter רוחבל ידכ
4 ןצחלה תועצמאב > וא ,< רחב
5 לע ץחלmenu/enterהקיחמה תא רשאל ידכ .
גויח יוותב שומיש
תוכב ךמש תנזהל הרקבה חולב שומיש תעברוציק שקמ רובע םש תדלקהל וא תר ,
יתצובק גויח דוק וא ריהמ גויח דוק , דע תופיצרב םיאתמה ירפסמה ןצחלה לע ץחל
היוצרה תואה תעפוהל .ןכמ רחאל , לע ץחל > םוקימל רובעלו תואה תא רוחבל ידכ
אבה . ירפסמ ןצחל לכ לע םיעיפומש םירפסמהו תויתואה תא הגיצמ וז הלבט
דחמה תרירב תפששכתילגנאכ תרדגומ ל:
םיוות ןצחל רפסמ
1 1
A B C a b c 2
D E F d e f 3
G H I g h i 4
J K L j k l 5
M N O m n o 6
P Q R S p q r s 7
T U V t u v 8
8
קרפ 3 םיסקפ חולשמ)םדקתמ( HEXC
26

7 ירמונאפלאה םישקמה חול תועצמאב , ךיישל ךנוצרבש רפסמה תא ןזה
לע ץחלו וז הצובקלmenu/enter. ןכ ומכ , תריחב1 דע 9 תא תכיישמ
םיאתמה רוציקה שקמל הצובקה.
8 ירמונאפלאה םישקמה חול תועצמאב ,הצובקה רובע םש ןזה . תלבקל
םישקמה חולב שומיש תוארוה , האר"גויח יוותב שומיש " דומעב28 . רחאל
הצובקה םש תנזה , לע ץחלmenu/enter.
9 רבח רובע ריהמה גויחה דוקב רחב וא רוציקה שקמ לע ץחל יוצרה הצובקה
לע ץחלוmenu/enter. לע בוש ץחלmenu/enter תא רשאל ידכ
הפסוהה .ףיסוהל ךנוצרבש הצובק רבח לכ רובע הז בלש לע רוזח.
10 םויסל , לע ץחלcancel.
11 דחא יתצובק גויח דוקמ רתוי ןיזהל ךנוצרב םא , לע ץחלmenu/enter
םיבלש לע רוזחו1 דע 11.
תירבע
Fax Setup לע ץחלו menu/enter.
Phone Book.
Group Setup לע ץחלו menu/enter.
Delete Group לע ץחלו menu/enter.
יתצובק גויח ידוק תקיחמ
1 ל לע ץחmenu/enter.
2 ןצחלה תועצמאב > וא ,< רחב
3 לע ץחלmenu/enter רוחבל ידכ
4 ןצחלה תועצמאב > וא ,< רחב
5 ןצחלה תועצמאב > וא ,< רחב
6 נאפלאה םישקמה חול תועצמאבירמו , יתצובקה גויחה דוק רפסמ תא ןזה
לע ץחלו קוחמל ךנוצרבשmenu/enter.
7 לע ץחלmenu/enterהקיחמה תא רשאל ידכ .
יתצובק גויח דוקמ דדוב ןעמנ תקיחמ
1 לע ץחלmenu/enter.
Fax Setup לע ץחלו menu/enter.
Phone Book.
Group Setup לע ץחלו menu/enter.
Del. # in Group לע ץחלו
menu/enter.
ןיפוליח
לע ץחלcancelתמייס םא .
2 ןצחלה תועצמאב > וא ,< רחב
3 לע ץחלmenu/enter רוחבל ידכ
4 ןצחלה תועצמאב > וא ,< רחב
5 ןצחלה תועצמאב > וא ,< רחב
6 ןצחלה תועצמאב > וא <הצובקהמ קוחמל ךנוצרבש ןעמנה תא רחב.
7 לע ץחלmenu/enterהקיחמה תא רשאל ידכ .
8 םיבלש לע רוזח6ו - 7מנ הצובקהמ קוחמל ידכ םיפסונ םינע.
27
HEXC ריהמ גויח ידוק תודוא ,יתצובק גויח ידוקו רוציק ישקמ

מ רתוי השיגה רפסמל םא הז ךילהב שמתשה- 10 שומיש וב השענ םא וא םיוות
דבלב תוקוחר םיתעל.
1 םיבלש עצב1 דע 6 ףיעסב "רוציק ישקמו ריהמ גויח ידוק תונכת " דומעב
23 .ה תעבסקפה רפסמ תנז , רתוי וא תחא עצבל ךילע היהיש ןכתיי
תואבה תולטמהמ:
• רפסמב תמיוסמ הדוקנב השיג לילצל ןיתמהל שי םא ,תחא הייהשה ןזה , וא
רתוי , לע הציחל ידי לע תוינש שולש לשpause/redial.
• ךרוצה תדימב , ישיא יוהיז רפסמ ןזה)PIN.(
2 השיגה רפסמ תא ןיזהל תמייסש רחאל ,ע ץחל לpause/redial. הייהשה
סקפה רפסמ גויחל דע הז רפסמ גייחל אל רצומל הרומ תזורחמה ףוסב.
3 םיבלשב ךשמה7 דע 10 ףיעסב "רוציק ישקמו ריהמ גויח ידוק תונכת "
דומעב23.
יתצובק גויח ידוק לוהינ
עובק ןפואב םישנא תצובק התואל עדימ חלוש התא םא , גויח דוק תנכתל ךתורשפאב
יתצובקהלטמה תא טשפל ידכ . גויח דוקב תנכתל ןתינ ןימז ריהמ גויח דוק לכ
יתצובק . םירפסמב םישמתשמה יתצובק גויח ידוק1 דע 9 ישקמל םג םיכיושמ
הרקבה חולב םימיאתמה רוציקה .רפסמ לכ הצובקל ףיסוהל ןתינ . הצובקה ירבח לכל
םהל הצקומה רוציק שקמ וא תנכותמ ריהמ גויח דוק תויהל ךירצ היהי ןתינש ינפל
יתצובקה גויחה דוקל םפיסוהל.
יתצובקה גויחה ידוק תא להנל ידכ ןלהל תוארוהה תא עצב.
ריהמ גויח ידוק תונכת , ךרד עצבל רתוי לק יתצובק גויח ידוקו רוציק ישקמ
הנכותה .ריהמ גויח ידוק תונכת לע תוארוה תלבקל , גויח ידוקו רוציק ישקמ
מה תנכות תועצמאב יתצובקרצו ,ינורטקלאה שמתשמל ךירדמב ןייע.
הרעה
יתצובק גויח ידוק תונכת
1 הצובקל ףיסוהל ךנוצרבש סקפ רפסמ לכל ריהמ גויח דוק הצקה .) תלבקל
תוארוה , האר"רוציק ישקמו ריהמ גויח ידוק תונכת " דומעב23.(
2 לע ץחלmenu/enter.
3 ןצחלה תועצמאב > וא ,< רחבFax Setup לע ץחלו menu/enter.
Phone Book.
Group Setup לע ץחלו menu/enter.
Add Group לע ץחלו menu/enter.
4 לע ץחלmenu/enter רוחבל ידכ
5 ןצחלה תועצמאב > וא ,< רחב
6 ןצחלה תועצמאב > וא ,< רחב
קרפ 3 םיסקפ חולשמ)םדקתמ( HEXC
26

רוציק ישקמ וא ריהמ גויח ידוק לש ריהמ תונכת
יתצובק גויח דוק תנכתל ידכ אבה ךילהב שמתשהל ןתינ אל . לע תוארוה תלבקל
יתצובק גויח ידוק , האר"יתצובק גויח ידוק תונכת " דומעב26.
הרעה
חולמ רוציק ישקמו ריהמ גויח ידוק תולקב תנכתל ידכ האבה הטישב שמתשה
לש הרקבהרצומה :
1 רצומה לש הרקבה חולב , לע ץחלphone book , יונפ ריהמ גויח דוק ןזה
לע ץחלוmenu/enter.
ןיפוליחל
יונפ רוציק שקמ לע ץחל . דוקש העדוה גצות רצומה לש הרקבה חולב
תנכותמ וניא רוציקה שקמ וא ריהמה גויחה.
תירבע
םישורד ,גויח רוזא ןוגכ , תזכרמ תכרעמל ץוחמ םירפסמל השיג דוק) ךרדב
גויח יוותב " דומעב28.(
סקפ רפסמ תנזה תעב , קיספב שמתשהל ךתורשפאב), (הייהשהל , תואב ואR
גויח לילצל ןיתמי רצומהש ךנוצרב םא.
התעפוהל דע היוצרה תואה) .םיוות תמישר תלבקל , האר" יוותב שומיש
2 לע ץחלmenu/enterציקה שקמ וא ריהמה גויחה דוק תא תנכתל ידכ רו.
3 לע ץחלו סקפה רפסמ תא ןזהmenu/enter. םירפסמ וא תויהשה לולכ
ללכ9 וא 0 (ץוח תחיש תמודיק וא) .ףסונ עדימ תלבקל , האר" שומיש
4 סקפה רפסמ רובע םש ןזה .ךכ םשל , לש ירפסמה ןצחלה לע תופיצרב ץחל
גויח " דומעב28.(
5 לע ץחלmenu/enterעדימה תא רומשל ידכ .
הרעה
25
גויח שקמ תונכתיפולח תוימואלניב תוחיש קפסל ריהמ
יפולח ץוח תוחיש קפס ךל שי םא , רפסמ גויחל רוציק שקמ תנכתל ךתורשפאב
סקפה רפסמ ינפל תורישה לש השיגה .הז רוציק שקמב שמתשהל ךילעשכ , ץחל
וילע , לע ץחלו סקפ רפסמ ןזהfax/send. דחי וגייוחי סקפה רפסמו השיגה רפסמ .
שמשמ השיגה רפסמ םאסקפל גויח לכב טעמכ , תא תנכתל רתוי לק תויהל לוכי
גויח תמודיקכ השיגה רפסמ)ףסונ עדימ תלבקל , האר"גויח תמודיק תפסוה " דומעב
29 .(
ריהמ גויח ידוק תונכת , ךרד עצבל רתוי לק יתצובק גויח ידוקו רוציק ישקמ
הנכותה)ב ןימז אל- Windows 95.( ויח ידוק תונכת לע תוארוה תלבקלריהמ ג ,
רצומה תנכות תועצמאב יתצובק גויח ידוקו רוציק ישקמ , שמתשמל ךירדמב ןייע
ינורטקלאה.
הרעה
HEXC ריהמ גויח ידוק תודוא ,יתצובק גויח ידוקו רוציק ישקמ

Individual Setup.
Add.
4 לע ץחלmenu/enter רוחבל ידכ
5 לע ץחלmenu/enter רוחבל ידכ
6 ירמונאפלאה םישקמה חול תועצמאב , ריהמה גויחה דוק רפסמ תא ןזה
לע ץחלו הז סקפ רפסמל ךיישל ךנוצרבשmenu/enter. ןכ ומכ , תריחב
מ רפסמ- 1 דע 9םיאתמה רוציקה שקמל סקפה רפסמ תא תכיישמ .
סקפ רפסמ תנזה תעב , קיספב שמתשהל ךתורשפאב), (הייהשהל ,וא תואב R
הרעה
גויח לילצל ןיתמי רצומהש ךנוצרב םא.
7 ירמונאפלאה םישקמה חול תועצמאב ,סקפה רפסמ תא ןזה . תויהשה לולכ
םישורד םירפסמ וא ןהשלכ ,גויח רוזא ןוגכ , ץוחמ םירפסמל השיג דוק
תזכרמ תכרעמל) ללכ ךרדב9 וא 0 (ץוח תחיש תמודיק וא.
8 לע ץחלmenu/enter.
9 חול תועצמאבירמונאפלאה םישקמה ,סקפה רפסמ רובע םש ןזה . םשל
ךכ ,התעפוהל דע היוצרה תואה לש ירמונאפלאה ןצחלה לע תופיצרב ץחל .
)םיוות תמישר תלבקל , האר"גויח יוותב שומיש " דומעב28.(
קוסיפ ינמיס ףיסוהל ידכ , תיבכוכ לע תופיצרב ץחל (*) יוצרה ותה תעפוהל דע
הרעה
לע ץחל ןכמ רחאלו >ידכאבה םוקימל רובעל .
10 לע ץחלmenu/enterעדימה תא רומשל ידכ .
11 םיפסונ רוציק ישקמ וא ריהמ גויח ידוק תנכתל ךילע םא , םיבלש לע רוזח1
דע10.
רוציק ישקמו ריהמ גויח ידוק תקיחמ
1 לע ץחלmenu/enter.
Fax Setup לע ץחלו menu/enter.
Phone Book.
Individual Setup.
Delete לע ץחלו menu/enter.
לע ץחלו קוחמל ךנוצרבשmenu/enter.
2 ןצחלה תועצמאב > וא ,< רחב
3 לע ץחלmenu/enter רוחבל ידכ
4 לע ץחלmenu/enter רוחבל ידכ
5 ןצחלה תועצמאב > וא ,< רחב
6 ירמונאפלאה םישקמה חול תועצמאב , ריהמה גויחה דוק רפסמ תא ןזה
7 לע ץחלmenu/enterמה תא רשאל ידכ הקיח.
קרפ 3 םיסקפ חולשמ)םדקתמ( HEXC
24

םיסקפ חולשמ)םדקתמ(
ב תונימזש תומדקתמה סקפה תונוכתמ המכ גיצי הז קרפ- HP LaserJet 3330.
פה תונוכת לכ לע אלמ עדימ תלבקלסק ,רצומה תונוכת לכ תודוא עדימ םג ומכ , ןייע
ינורטקלאה שמתשמל ךירדמב . שמתשמל ךירדמל השיג לע עדימ תלבקל
ינורטקלאה , האר"ינורטקלאה שמתשמל ךירדמל השיג " דומעב43.
תירבע
סקפ ירפסמ לש תוצובק וא סקפ ירפסמ ןסחאל ךתורשפאב ישקמכ רידת םיגייוחמש
רצומה לש םינופלטה סקנפב , לכה ךסב םינימז275 שמתשהל ןתינ םהבש םידוק
יתצובק גויח ידוקו ריהמ גויח ידוק רובע .המגודל , תנכתת םא225 גויחכ םידוקהמ
ריהמ גויח ידוקב שומישה ןפוא תודוא ףסונ עדימ תלבקל , גויח ידוקו רוציק ישקמ
רוציק ישקמו ריהמ גויח ידוק תונכת
ריהמה גויחה ידוק1 דע 9הרקבה חולב םימיאתמה רוציקה ישקמל םג םיכיושמ .
גויח וא ריהמ גויח ידוק רובע רוציקה ישקמב שמתשהל ןתיניתצובק . רפסמ רובע
ריהמ גויח ידוק תונכת ,הנכותה ךרד עצבל רתוי לק יתצובק גויח ידוקו רוציק ישקמ .
ריהמ גויח ידוק תונכת לע תוארוה תלבקל , יתצובק גויח ידוקו רוציק ישקמ
רצומה תנכות תועצמאב ,ינורטקלאה שמתשמל ךירדמב ןייע.
לש הרקבה חולמ רוציק ישקמו ריהמ גויח ידוק תנכתל ידכ םיאבה םיבלשה תא עצב
Fax Setup לע ץחלו menu/enter.
Phone Book.
ריהמ גויח ידוק תודוא ,יתצובק גויח ידוקו רוציק ישקמ
רוציק ,יתצובק גויח ידוק וא ריהמ גויח ידוק.
ריהמ ,ה ראשב שמתשהל ךתורשפאב- 50םייתצובק םיגויחכ .
יתצובק ,םיאבה םיכילהב ןייע:
דדוב סקפ , ןיזהל ןתינ50רתויה לכל םיוות .
רצומה:
1 לע ץחלmenu/enter.
2 ןצחלה תועצמאב > וא ,< רחב
3 לע ץחלmenu/enter רוחבל ידכ
הרעה
23
HEXC ריהמ גויח ידוק תודוא ,יתצובק גויח ידוקו רוציק ישקמ

●
יש השענב שומ- Microsoft Windows 98/ME/NT 4.0 SP3/2000/XP , וא
Mac OS 9.1/X.
הנכותהמ סקפ חולשל ידכ
תונתשהל יושע הנכותהמ סקפ תודובע תחילשל ךילהה ; רתויב םיצופנה םיבלשה
ןלהל םימושר.
1 תואבה תוטישהמ תחאב סקפב חולשמל ךמסמ רחב:
• ב ךמסמה תא חתפ- HP LaserJet Document Manager םיבשחמב
ימאותWindows.
• ב ךמסמה תא חתפ- HP LaserJet Workplace ימאות םיבשחמב
Macintosh.
• םושייב ךמסמ חתפWindows ןוגכ Microsoft Word. םושייב , רחבPrint
)הספדה ( טירפתהמFile) ץבוק ( רחב ןכמ רחאלוHP LaserJet Series
Fax תחתפנה המישרהמ Printer Nameודה תביתב -חישהספדהה לש .
לע ץחלOK) רושיא.(
• הנזהה שגמב ךמסמה תא ןעטADF.
2 ודה תביתב רתוי וא דחא ןעמנ ףסוה- חישHP LaserJet Send Fax.
3 החיתפ ףד לולכ)ילנויצפוא.(
4 לע ץחלSend Now.
ןיפוליחל
לע ץחלSend Laterהעשו ךיראת רחבו .
ה תועצמאב םיסקפ תחילש לע ףסונ עדימ תלבקל- HP LaserJet Workplace
) הלעפה תכרעמMac( ,ה- HP LaserJet Document Manager) Windows( , וא
ה- HP LaserJet Director ,ינורטקלאה שמתשמל ךירדמב ןייע.
22
קרפ 2 םיסקפ חולשמ)תודוסי( HEXC

םיסקפה לכ רובע לדחמה תרירב תייצולוזר תא תונשל ידכ הז ךילהב שמתשה.
1 לע ץחלresolutionתיחכונה היצולוזרה תרדגה תא גיצהל ידכ .
2 ןצחלב שמתשה >א ו <היוצרה היצלוזרה תרדגה תא גיצהל ידכ.
3 לע ץחלmenu/enterהריחבה תא רומשל ידכ .
ןורכיזהמ םיסקפ תקיחמ
סיפדהל הסניו ךלש רצומל שגיי רחא והשימש הצור ךניא םא הז ךילהב שמתשה
הספדהה ןורכיזמ םיסקפ שדחמ.
שדחמ הספדהה ןורכיז יוקינל ףסונב ,ואב חלשנש סקפ לכ קחומ הז ךילהעגר ות ,
ןיתממ רזוח גויחב וחלשנ אלש םיסקפ , רחואמ דעומב חולשמל םידעוימש םיסקפ
ונפוה וא וספדוה אלש םיסקפו רתוי.
תוריהז
תירבע
ןורכיזהמ םיסקפ קוחמל ידכ
1 לע ץחלmenu/enter.
Fax Functions לע ץחלו
menu/enter.
Clear Saved Faxs לע ץחלו
menu/enter.
2 לע ץחל > תא גיצהל ידכ תחא םעפ
3 ןצחלה תועצמאב > וא ,< רחב
4 לע ץחלmenu/enterהקיחמה תא רשאל ידכ .
הנכותהמ םיסקפ תחילש
תועצמאב םיסקפ לש הלבקו החילשל תופסונ תוארוה םיללוכ אבה ףיעסהו הז ףיעס
רצומל תפרוצמש הנכותה . הרזעב םיטרופמ הנכותל םירושקש םירחאה םיאשונה לכ
הנכותה לש ,תשגל ןתינ הילאשהנכותה לש הרזע טירפתהמ .
חולשל ךתורשפאב ,לבקל אל ךא ,הנכותה תועצמאב םיסקפ .תאז םע , תונוכת לכ
הרקבה חולמ תונימז סקפה.
ךתורשפאבםיאבה םיבצמב בשחמהמ םיינורטקלא םיכמסמ חולשל:
ה רצומ- HP LaserJet תשר ךרד בשחמל רבוחמ וא בשחמל תורישי רבוחמ
הספדה תרש תועצמאבHP Jetdirect.
הספדה יתרש לש האלמ המישר תלבקלHP Jetdirectםיכמתנש , ךירדמב ןייע
הלחתהה.
21
יסקפ תקיחמןורכיזהמ ם
ב- Microsoft Windows 95ב הכימת ןיא - HP LaserJet Directorו
ב- HP LaserJet Document Manager. ב שמתשמ התא םא- Windows 95 ,
●
● בשחמב תנקתומ רצומה תנכות.
הרעה
הרעה
HEXC

לע ץחלו ירמונאפלאה םישקמה חול תועצמאב ריהמה גויחה דוק תא ןזה
menu/enter.
ירמונאפלאה םישקמה חולמ גויחה תעב ,םישורד םירפסמ וא ןהשלכ תויהשה לולכ ,
גויח רוזא ןוגכ , ץוחמ םירפסמל השיג דוק תזכרמ תכרעמל) ללכ ךרדב9 וא 0 ( וא
ץוח תחיש תמודיק .ףסונ עדימ תלבקל , האר"גויח יוותב שומיש " דומעב28.
רצומהמ אצי סקפה לש ןורחאה דומעהשכ ,ףסונ סקפ חולשל ליחתהל ךתורשפאב ,
סמל סקפ חולשל ידכרידת שומישב םירפ , דוק וא רוציק שקמ תוצקהל ךתורשפאב
םינעמנ רוחבל ידכ םהב שמתשהל .ב םיקפומ םיינורטקלא םינופלט יסקנפ תועצמא
ותחילש םע אצויה סקפה תוריהב לע העיפשמ תוידוגינה . לע העיפשמ היצולוזרה
םיאצויה םיסקפה לש תודחה .ףסונב ,םיסקפה לש רודישה תוריהמ לע העיפשמ איה.
• ריהמ גויח דוק שי גייחל ךנוצרבש סקפה רפסמל םא , לע ץחלspeed dial ,
הרעה
2 הנזהה שגמב ךמסמה תא ןעטADF.
3 לע ץחלfax/send.
קיתעהלקורסל וא .
ריהמ גויח . האר"רוציק ישקמו ריהמ גויח ידוק תונכת " דומעב23ו " גויח ידוק תונכת
יתצובק " דומעב26 .םיינורטקלא םינופלט יסקנפ ךתושרב םא , לכותש ןכתיי
דצ ימושיי-ישילש.
יצולוזרו תוידוגינ יונישיםיאצוי םיסקפ רובע לדחמה תרירב ת
לדחמה תרירב תוידוגינ יוניש
תוידוגינ םיחלשנש םיטירפ רובע ללכ ךרדב תשמשמש תוידוגינה איה לדחמה תרירב
סקפב .לדחמה תרירב תוידוגינ תרדגהכ עצמאל ןווכמ ןווחמה .
1 לע ץחלmenu/enter.
2 ןצחלה תועצמאב > וא ,< רחבFax Setup לע ץחלו menu/enter.
Fax Send Setup לע ץחלו
menu/enter.
Def. Light/Dark.
רוקמהמ רתוי ריהב , ןצחלב שמתשה וא > לע הנימי ןווחמה תא זיזהל ידכ
רוקמהמ רתוי ההכ היהי סקפהש תנמ.
3 ןצחלה תועצמאב > וא ,< רחב
4 תשה ןצחלב שמ > וא < רוחבל ידכ
5 ןצחלב שמתשה < היהי סקפהש תנמ לע הלאמש ןווחמה תא זיזהל ידכ
6 לע ץחלmenu/enterךתריחב תא רומשל ידכ .
רירב תייצולוזר יונישלדחמה ת
תוכיאה לע העיפשמ היצולוזרה ,ץניאל תודוקנב ')dpi( , םיחלשנש םיכמסמ לש
סקפב .ףסונב ,רודישה תוריהמ לע העיפשמ איה.
20
קרפ 2 םיסקפ חולשמ)תודוסי( HEXC

םיסקפ חולשמ)תודוסי(
סקפה תונוכתמ קלח גיצי הז קרפב תונימזש תויסיסבה- HP LaserJet 3330.
סקפה תונוכת לכ לע אלמ עדימ תלבקל ,רצומה תונוכת לכ תודוא עדימ םג ומכ , ןייע
רצומה רוטילקתב אצמנש ינורטקלאה שמתשמל ךירדמב . השיג לע עדימ תלבקל
תירבע
סקפב חולשמל רוקמ יכמסמ ןועטל ידכ תואבה תוארוהה תא עצב.
ינורטקלאה שמתשמל ךירדמל , האר"ינורטקלאה שמתשמל ךירדמל השיג " דומעב
43.
מסמ תניעטסקפב חולשמל רוקמ יכ
סקפ יכמסמ ןועטל ידכ
1 הנזהה שגמב סקפה יכמסמ תניעט ינפלADF , רבד ןיאש אדוול ידכ קודב
קרוסה לש תיכוכזה חטשמ לע.
2 דצה רשאכ סקפב חולשל ךנוצרבש ךמסמה לש ןוילעה הצקה תא חנה
יפלכ הנופ ספדומה הנזהה שגמב הלעמADF , הקירסל ןושארה דומעהו
המירעה שארב אצמנ.
3 הלעמ ךמסמה תא ףוחד , הנזהה שגמ דצ לאADF.
4 הנזהה שגמ ךותל ךמסמה תא קלחהADFףוסה דע .
סקפב חולשמל ןכומ ךמסמה תעכ.
19
םיסקפ תחילש
דחא ןעמנל סקפ חולשמ
סקפב ותחילש ינפל ריינה ךמסמ תוכיא תא רפשל ךנוצרב םא ,ךמסמה תא קורס ,
הנכותהמ סקפכ התוא חלשו הנומתה תא הקנ וא רשיי .ףסונ עדימ תלבקל , ןייע
ינורטקלאה שמתשמל ךירדמב.
• רצומה לש הרקבה חולבש ירמונאפלאה םישקמה חולב שמתשה.
• גייחל ךנוצרבש סקפה רפסמל רוציק שקמ הצקוה םא , לע ץחלהז שקמ.
1 תואבה תוטישהמ תחאב סקפה רפסמ תא גייח:
הרעה
HEXC סקפב חולשמל רוקמ יכמסמ תניעט

18
קרפ 1 הנקתה HEXC

הנעמל םילוצלצ סופד תלעפה) תונידמה לכב ןימז וניא הז תורש(
ופלט תורבח רפסמ ךרד ןימז ידוחיי לוצלצ וא לוצלצ סופד תורישן רשפאמו תוימוקמ
דדוב וק לע דחא ןופלט רפסממ רתוי קיזחהל .ולשמ ידוחיי לוצלצ ןופלט רפסמ לכל ,
תוחיש לע תונעל רשפאמשסקפ תוחיש לע תונעל רצומלו תוליגר .
ןופלטה תרבחב לוצלצ סופד תורישל תמשרנ םא , הנעיש ךכ רצומה תא רידגהל ךילע
םיאתמה לוצלצה סופדל.
מ הנוש הרדגהל לוצלצה סופד תורדגה תא הנשתו לוצלצ סופד תוריש ךל ןיא םא-
All Rings ,םיסקפ לבקל לכוי אל רצומהש ןכתיי.
תירבע
הנעמל םילוצלצ סופד ליעפהל ידכ ,םיאבה םיבלשה תא עצב:
Fax Setup לע ץחלו menu/enter.
Fax Recv. Setup לע ץחלו
menu/enter.
Answer Ring Type לע ץחלו
menu/enter.
menu/enter.
הכלהכ לעופ לוצלצה סופד תורישש אדוול.
הל ידכהנעמל םילוצלצ סופד ליעפ
1 הרקבה חולב , לע ץחלmenu/enter.
2 םינצחלה תועצמאב >ו- ,< רחב
3 םינצחלה תועצמאב >ו- ,< רחב
4 םינצחלה תועצמאב >ו- ,< רחב
5 םינצחלה תועצמאב >ו- ,< לע ץחלו יוצרה לוצלצה סופד תא רחב
6 רצומה תנקתה תמלשה רחאל , תנמ לע סקפ ךילא חולשל רכממ שקב
הרעה
17
HEXC הנעמל םילוצלצ סופד תלעפה

הנעמל םיצלמומ םילוצלצ תלבט
הנעמל םילוצלצה רפסמ תא עובקל ידכ האבה הלבטב שמתשה.
םיצלמומ הנעמל םילוצלצ תרדגה ןופלט וק גוס
םיינש וא דחא לוצלצ רדגה.
הרעה:ההוזמ החיש ךסמב שומיש השענ םא םילוצלצ ינש רדגה .
םיינש וא דחא לוצלצ) . ראוד וא ןובישמ רבוחמ ינשה ןופלטה רפסמל םא
בשחמב ילוק , הנטק רצומה לש םילוצלצה רפסמ תרדגהש אדו
הנעמה תכרעמ רובע הרדגההמ .ףסונב , האר"צ סופד תלעפה םילוצל
הנעמל " דומעב17.(
רתוי וא םילוצלצ השימח.
בשחמב ילוקה ראודה וא ןובישמה רשאמ רתוי םילוצלצ ינש) . ןיא
העשתמ רתויל רצומה תא רידגהלהראב םילוצלצ "הדנקבו ב , רתוי וא
םירחא םירוזאב םילוצלצ השישמ.(
םידרפנ םירפסמ ינש םע דחא וק
ידועיי סקפ וק)תלבק
דבלב סקפ תוחיש(
לוצלצ תינבת תורישו
ףתושמ וק) ןהו סקפ תוחיש ןה תלבק
תוליגר תוחיש ( קר וילא רבוחמש
ןופלט רישכמ
ףתושמ וק) ןהו סקפ תוחיש ןה תלבק
תוליגר תוחיש ( ןובישמ וילא רבוחמש
בשחמב ילוק ראוד וא
הנעמל םילוצלצה רפסמ תא רידגהל ידכ
הנעמל םילוצלצה רפסמ תא תונשל וא רידגהל ידכ ,םיאבה םיבלשה תא עצב:
1 רקבה חולבה , לע ץחלmenu/enter.
Fax Setup לע ץחלו menu/enter.
Fax Recv. Setup לע ץחלו
menu/enter.
Rings To Answer לע ץחלו
menu/enter.
לע ץחלוmenu/enter.
2 םינצחלה תועצמאב >ו- ,< רחב
3 םינצחלה תועצמאב >ו- ,< רחב
4 םינצחלה תועצמאב >ו- ,< רחב
5 ירמונאפלאה םישקמה חול תועצמאב ,וצלצה רפסמ תא ןזה הנעמל םיל
16
קרפ 1 הנקתה HEXC

יטמוטואכ הנעמה בצמ תרדגה תא םיריאשמ םישמתשמה בורש תורמל , ירשקתמ
םינוע אל םא סקפ ילילצ ועמשי סקפה לש ןופלטה רפסמ תא וגייחיש תוליגר תוחיש
סקפ ילילצ ועמשי תוליגר תוחיש ירשקתמש ,ינדי הרדגהב שמתשה , רוכז ךא
תיטמוטוא ולבקתי אל סקפה תוחישש.
הנעמה בצמ תא רידגהל ידכ
הנעמה בצמ תא תונשל וא רידגהל ידכ ,םיאבה םיבלשה תא עצב:
Fax Setup לע ץחלו menu/enter.
Fax Recv. Setup לע ץחלו
menu/enter.
תירבע
Automatic וא Manual לע ץחלו
menu/enter.
יטמוטואכ רדגומ הנעמה בצמשכ , תא תעבוק רצומה לש הנעמל םילוצלצה תרדגה
הנעית תסנכנ החישש ינפל לצלצי ןופלטהש םימעפה רפסמ.
תוליגר תוחיש ןהו סקפ תוחיש ןה לבקמש וקל רבוחמ רצומה םא)ףתושמ וק ( םע
ןובישמב הנעמל םילוצלצה רפסממ לודג תויהל ךירצ רצומה לש הנעמל . הז רבד
הליגר החיש וז םא תועדוה טילקהלו תוסנכנ תוחישל תונעל ןובישמל רשפאמ .
החישל הנוע ןובישמהשכ , רצומה"בישקמ "וזמ םא תיטמוטוא הנועו החישל ילילצ םיה
הרא רובע השימח אוה הנעמל םילוצלצה רפסמל לדחמה תרירב תרדגה"הדנקו ב , וא
םירחא םירוזאל םיינש.
ןופלטל ,ל םה םא ואןיוצש הנעמל םילוצלצה רפסמ רחאל וקתני א . ןיינועמ ךניא םא
1 הרקבה חולב ,ע ץחל לmenu/enter.
2 םינצחלה תועצמאב >ו- ,< רחב
3 םינצחלה תועצמאב >ו- ,< רחב
4 לע ץחלmenu/enter רוחבל ידכ Answer Mode.
5 םינצחלה תועצמאב >ו- ,< רחב
6 ה חול תגוצתתנייצש הנעמה בצמ תרדגה תא הגיצמ הרקב.
הרעה
הנעמל םילוצלצ תרדגה
ןובישמ ,כתייהנעמל םילוצלצה רפסמ תא םיאתהל ךילע היהיש ן . םילוצלצה רפסמ
סקפ.
15
HEXC הנעמל םילוצלצ תרדגה

Time/Date.
לע ץחלו תועשmenu/enter.
יעיברה ותל רבעמ ןמסה . רחב1 רקוב רובע )a.m (. וא2 םיירהצ רובע
ןיפוליחל
לש ןועש תנייצ םא24תועש , לע ץחלmenu/enter.
3 לע ץחלmenu/enter רוחבל ידכ
4 םינצחלה תועצמאב >ו- ,< לש ןועשב ךנוצרב םא ןייצ12 וא תועש 24
5 ירמונאפלאה םישקמה חול תועצמאב ,תיחכונה העשה תא ןזה.
6 לש ןועש תנייצ םא12תועש , םינצחלב שמתשה >ו- < תא זיזהל ידכ
)p.m (. לע ץחל ןכמ רחאלוmenu/enter.
7 ירמונאפלאה םישקמה חול תועצמאב ,יחכונה ךיראתה תא ןזה.
• םויהו שדוחה ןויצל תורפס יתשב שמתשהל דפקה)המגודל ,ב שמתשה-" 05
"ו יאמ רובע-" 01 "הז שדוחב ןושארה םויה רובע.(
8 לע ץחלmenu/enter.
סקפה תרתוכ תרדגה
סקפה תרתוכ עדימ תא תונשל וא רידגהל ידכ ,ה תא עצבםיאבה םיבלש . השורד םא
והשלכ עדימ תנזהב הרזע ךל , האר"הרקבה חולמ טסקט תנזה "
דומעב13.
1 הרקבה חולב , לע ץחלmenu/enter.
2 םינצחלה תועצמאב >ו- ,< רחבTime/Date, Header לע ץחלו
menu/enter.
Fax Header לע ץחלו menu/enter.
menu/enter.
menu/enter.
3 םינצחלה תועצמאב >ו- ,< רחב
4 מה חול תועצמאבירמונאפלאה םישק , לע ץחלו סקפה רפסמ תא ןזה
5 ירמונאפלאה םישקמה חול תועצמאב , לע ץחלו הרבחה םש תא ףסוה
הנעמה בצמ תרדגה
בצמל םאתהב ,ה לש הנעמה בצמ תא רידגהל ךתורשפאב- HP LaserJet 3330
ינדי וא יטמוטואכ.
● יטמוטוא:יטמוטוא הנעמ בצמב ,ע רצומה רפסמ רחאל תוסנכנ תוחיש לע הנו
םידחוימ סקפ ילילצ יוהיז םע וא םילוצלצ לש רדגומ . רפסמ תא ןייצל ידכ
םילוצלצה , האר"הנעמל םילוצלצ תרדגה " דומעב15.
ינדי:ינדי הנעמ בצמב ,תוחיש לע הנוע וניא רצומה . ךילהת תא ליחתהל ךילע
●
ךמצעב סקפה תלבק , לע הציחל ידי לע ואstart fax ידי לע וא הרקבה חולב
גויחו הז וקל רבוחמש ןופלטה תרפופש תמרה1-2-3.
יטמוטוא אוה לדחמה תרירב הנעמ בצמ.
14
קרפ 1 הנקתה HEXC

רצומה לש סקפה תונוכתב שמתשהל ליחתהל לכותש ינפל , תא םילשהל ךילע
תירבע
קוחה לש השירד הווהמ.
הרקבה חולמ טסקט תנזה
חול תועצמאב רצומה לש הרקבה חולמ עדימ ןיזהל ידכ תואבה תוארוהב שמתשה
םינצחלהו ירמונאפלאה םישקמה >ו-< :
תואה תעפוהל דע)המגודל , איה הנושארה תואה םא"C" , לע תופיצרב ץחל2
הרקבה חול תגוצתב יוצרה.
חוורה רחאל הסינכ תדוקנל ןמסה תא זיזהלו ות.
ןוכנה ותה תא ןזה ןכמ רחאלו.
סקפה תורדגה תעיבק
תואבה תולטמה:
●
ךיראתהו העשה תא רדגה
● סקפה תרתוכ תא רדגה
●
הנעמה בצמ תא רדגה
● הנעמל םילוצלצה רפסמ תא רדגה
●
הנעמ לוצלצ סופד לעפה ,ךרוצה תדימב
תהל ךתנווכב םאבשחמב רצומה תנכות תא ןיק , תוארוהה לע גלדל ךתורשפאב
הז קרפב תורתונה .סקפה תורדגה תעיבקב תיטמוטוא ךתוא ליבות הנכותה תנקתה .
תוארוהל ,הנושאר הלעפהל ךירדמב ןייע.
הראב"םירחא םיבר םירוזאבו ב ,העשה תרדגה , רחא סקפ תרתוכ עדימו ךיראתה
םירפסמ:םירפסמ ןיזהל ידכ ,יוצרה רפסמה לש ירפסמה ןצחלה לע ץחל.
תויתוא:תויתוא ןיזהל ידכ ,צרה תואה לש ירפסמה ןצחלה לע תופיצרב ץחל היו
תעפוהל דע"C "הרקבה חול תגוצתב.(
םיחוור:והשלכ ות תנזה רחאל , לע םיימעפ ץחל >חאל חוור רוציל ידכ ותוא ר
תואיגש:יוגש ות תנזה םא , ןצחלב שמתשה < יוגשה ותה תא קוחמל ידכ
●
●
● קוסיפ ינמיס:קוסיפ ינמיס ןיזהל ידכ , לע תופיצרב ץחל * ותה תעפוהל דע
●
●
הרעה
ההרע
13
ךיראתהו העשה תרדגה
ךיראתהו העשה תא תונשל וא רידגהל ידכ ,םיאבה םיבלשה תא עצב . ךל השורד םא
והשלכ עדימ תנזהב הרזע , האר"הרקבה חולמ טסקט תנזה " דומעב13.
1 הרקבה חולב , לע ץחלmenu/enter.
Time/Date, Header לע ץחלו menu/
enter.
2 םינצחלה תועצמאב >ו- ,< רחב
HEXC סקפה תורדגה תעיבק

5 בשחמב ינוציח וא ימינפ םדומ רבחל ידכ ,
עקשל ןופלטה טוח לש דחא הצק עקת
ןמוסמש"phone " רצומב)ןותחתה עקשה .(
ינשה הצקה תא עקת עקשל ןופלטה טוח לש
ןמוסמש"line "םדומב.
הרעה
5
6
עקשל ןופלטה טוח לש ינשה הצקה תא עקת
7
עקש ונשי םימיוסמ םימדומב"line " דעוימש ינש
ידועיי ליגר ןופלט וק רוביחל . יעקש ינש םנשי םא"line
" , השענ רוביחהש אדוול ידכ בשחמה דועיתב ןייע
ןוכנה עקשב.
6 ההוזמ החיש ךסמ רבחל ידכ , טוח תא עקת
ןמוסמש עקשל ןופלטה" phone " הדיחיב
תמדוקה . טוח לש ינשה הצקה תא עקת
ןמוסמש עקשל ןופלטה"line " החישה ךסמב
ההוזמה.
7 ןובישמ רבחל ידכ , ןופלטה טוח תא עקת
ןמוסמש עקשל"phone "תמדוקה הדיחיב .
ןמוסמש"line "ןובישמב.
8 ןופלט רישכמ רבחל ידכ , טוח תא עקת
ה ןמוסמש עקשל ןופלט"phone " הדיחיב
תמדוקה . טוח לש ינשה הצקה תא עקת
ןמוסמש עקשל ןופלטה"line " רישכמב
ןופלטה.
9 םירישכמה תא רבחל תמייסש רחאל
םיפסונה ,למשחל םירישכמה לכ תא רבח.
10 תינסחמ תלד תאו ילאמשה חולה תא רוגס
הספדהה .ילאמשה חולה תריגס תעב , אדו
רבוע ןופלטה טוחשחולב ןוילעה ץירחה ךרד .
8
12
קרפ 1 הנקתה HEXC

ןופלט וק ותוא לש רחא ןופלט עקשל םירישכמ רבחל ןתינ)רחא רדחב ,המגודל( ; םע
תאז ,הזל הזו םיסקפ תלבקו חולשמל עירפהל םילולע םירישכמה.
הרעה
3
רישכמה לש הסינכל תרבוחמ רישכמ לכ לש האיציה
תירבע
4
תא ףושחל ידכ ילאמשה דצה חול תא חתפו
םיפסונ םירישכמ רבחל ידכ
סונ םירישכמ רבחןלהל גצומש רדסה יפל םיפ .
אבה ,תרשרש תריצי ךות . רבחל ןיינועמ ךניא םא
רישכמ ,אבה רישכמל ךשמהו וילע גלד.
1 םירישכמה לכ לש למשחה תקפסא תא קתנ
רבחל ךנוצרבש.
2 וק לא רצומה תא תרביח אל ןיידע םא
ןופלטה ,ףיעסב ןייע ךישמתש ינפל" רוביח
ןופלט וקל רצומה " דומעב5 . ךירצ רצומה
ןופלט עקשל רבכ רבוחמ תויהל.
3 בבוסו הספדהה תינסחמ תלד תא חתפ
ןופלטה וק יעקש.
4 ןופלטה עקשמ קיטסלפה ףסות תא רסה
רצומב ילאמשה חולה ךותבש ןותחתה.
11
HEXC םיפסונ םירישכמ רוביח

םיפסונ םירישכמ רוביח
ןופלטה יווק לש הנקתהל םאתהב , םיפסונ םירישכמ ןופלטה וק לא רבחל ךתורשפאב
ל ףסונב- HP LaserJet 3330.
ללככ ,וי רבחל ןיאדחא ןופלט וקל םירישכמ העברא וא השולשמ רת. םירישכמ םא
דחא ןופלט וקל םירבוחמ ידמ םיבר , החיש תוהזל אל לולע םירישכמהמ רתוי וא דחא
תסנכנ. שחרתמ הז רבד םא ,םירישכמהמ רתוי וא דחא קתנ.
ה- HP LaserJet 3330בשחמ םדומ ףילחהל לוכי וניא . םינותנ םדומכ לעפי אל אוה
חילשלינורטקלא ראוד לש הלבקו ה , םיבשחמ םע תרושקת וא טנרטניאל רוביח
םירחא.
ידועיי סקפ וק
ה תא תרביח םא- HP LaserJet 3330דבלב סקפ תוחישל שמשמש ןופלט וקל ,
םיאבה םירישכמה תא רבחל הצרתש ןכתיי:
●
ההוזמ החיש ךסמ.
● םדומ :בשחמ םדומ רבחל ךתורשפאב (ימינפ וא ינוציח) אםא סקפה וק ל
טנרטניאל השיגל וא ינורטקלא ראוד רובע סקפה וקב שמתשהל ךנוצרב , ךא
חולשל לכות אלולא תורטמל שמשי וקה דוע לכ םיסקפ לבקל וא .
●
ףסונ ןופלט: עצבל ךנוצרב םא סקפה וק לא ףסונ ןופלט רבחל ךתורשפאב
סקפה וקמ תואצוי תוחיש.
ןיאםיאבה םירישכמה תא רבחל :
ןובישמבשחמב ילוק ראוד וא : בשחמב ילוק ראודב שמתשמ התא םא , ךילע
●
םדומ רבחל)ימינפ וא ינוציח (תוליגר תוחישל שמשמש ידועייה ןופלטה וק לא.
ןכמ רחאל , רבחתהל ידכ תוליגר תוחישל ידועייה ןופלטה וקב שמתשה
ילוק ראוד לבקל ידכו טנרטניאל.
הרעה
ףתושמ ןופלט וק
ה תא תרביח םא- HP LaserJet 3330 תוחישלו סקפ תוחישל ףתושמש ןופלט וקל
תוליגר ,לוצלצ תינבת תורישו ןופלט ירפסמ ינש םע דחא ןופלט וק ךתושרב םא וא ,
םיאבה םירישכמה תא רבחל הצרתש ןכתיי:
ההוזמ החיש ךסמ
●
● םדומ: בשחמ םדומ רבחל ךתורשפאב)ימינפ וא ינוציח ( םא ףתושמה וקה לא
תושמה וקב שמתשהל ךנוצרבטנרטניאל השיגל וא ינורטקלא ראוד רובע ף , ךא
ולא תורטמל שמשי וקה דוע לכ םיסקפ לבקל וא חולשל לכות אל.
●
ןופלט: תוחיש עצבל ךנוצרב םא ףתושמה וקה לא ןופלט רבחל ךתורשפאב
ףתושמה וקהמ תוחישל תונעל וא תואצוי.
בשחמב ילוק ראוד וא ןובישמ: עקש ותואל הלא םירישכמ רבחל ךילע ןופלטה
●
רצומה רבוחמ וילאש ,הזל הז ועירפי אל םינושה םירישכמהש חיטבהל ידכ.
10
קרפ 1 הנקתה HEXC

5 תלד תאו ילאמשה חולה תא רוגס
5
לצפמה לש סקפה דצבש עקשב.
ךייש לצפמה לש דצ הזיא עדוי ךניא םא רפסמל
6
הספדהה תינסחמ. חולה תריגס תעב
ילאמשה , ךרד רבוע ןופלטה טוחש אדו
חולב ןוילעה ץירחה.
6 ןופלטה טוח לש ינשה הצקה תא עקת
הרעה
סקפה , גייחו לצפמב םיעקשה דחא לא ןופלט רבח
סקפה רפסמ תא .סופת לילצ עמשנ םא , רישכמ
סקפה עקש לא רבוחמ ןופלטה . לילצ עמשנ םא
גויח ,ןופלטה עקש לא רבוחמ ןופלטה רישכמ.
תירבע
םיפסונ םירישכמ ןופלטה וקל רבחל ךנוצרב םא
םיפסונ םירישכמ רבחל ןיינועמ ךניא םא , ךשמה
)ןופלט רישכמ ןוגכ ,ההוזמ החיש ךסמ וא ןובישמ(,
האר"םיפסונ םירישכמ רוביח "
דומעב10.
ףיעסל"סקפה תורדגה תעיבק " דומעב13.
9
HEXC ןופלט וקל רצומה רוביח

עקשל רצומה תא רבחל ידכ הלא םיבלש עצב
תוליגר תוחישל דרפנ וקו סקפ תוחישל.
דצב ותוא חנהו טוחה תא קתנ.
2
דדוב ןופלט רפסמ םע וקמ ןופלט וק יעקש ;
ףושחל ידכ ילאמשה דצה חול תא חתפו
3
לש ןופלטה עקשב דחא הצק עקתו
ל רצומה רוביח יווק ינש םע עקש
ןופלט
לצופמ וא דדוב ןופלט , ידועיי וק ךתושרב םא
1 ןופלטה עקשל רבוחמ ןופלט טוח םא ,
2 ןופלט עקש ךתושרב ןיא םא לצפמ םע
ללכומ ,וד לצפמ ןופלטה עקשב עקת-
ינוציח יווק)לולכ אל.(
הרעה
יגוס ינש םנשיםםילצפמ לש םינוש : םילצפמ
םיליבקמ) ילצפמ םג םייורק"T (" ינש םיקפסמש
וד םילצפמ- םייווק)Line1/Line2 ( ינש םיקפסמ
םע וק רובע ןופלט וק יעקש ןופלט ירפסמ ינש
םיידוחיי.
3 בבוסו הספדהה תינסחמ תלד תא חתפ
ןופלטה וק יעקש תא.
4 רצומל ףרוצמש ןופלטה טוח תא חק
רצומה)ןוילעה עקשה.(
הרעה
יוארכ לעפי רצומהש תנמ לע , שמתשהל ךילע
ל ףרוצמש ןופלטה טוחברצומ.
4
8
קרפ 1 הנקתה HEXC

4 תלד תאו ילאמשה חולה תא רוגס
4
םיפסונ םירישכמ ןופלטה וקל רבחל ךנוצרב םא
5
םיפסונ םירישכמ רבחל ןיינועמ ךניא םא , ךשמה
הספדהה תינסחמ. חולה תריגס תעב
ילאמשה , ךרד רבוע ןופלטה טוחש אדו
חולב ןוילעה ץירחה.
5 ינשה הצקה תא עקת ןופלטה טוח לש
ריקבש ןופלטה עקשב.
)ןופלט רישכמ ןוגכ , החיש ךסמ וא ןובישמ
ההוזמ( , האר"םיפסונ םירישכמ רוביח " דומעב
10.
ףיעסל"סקפה תורדגה תעיבק " דומעב13.
תירבע
7
HEXC אובמ

1
ןופלט עקשל רצומה תא רבחל ידכ הלא םיבלש עצב
דחא ןופלט וק םע דדוב , ירפסמ ינש ךתושרב םא םג
הז וק לע ןופלט לוצלצ תינבת תורישב שומיש השענו
דצב ותוא חנהו טוחה תא.
2
3
ףושחל ידכ ילאמשה דצה חול תא חתפו
ןופלטה וק יעקש תא.
צומה לש ןופלטה עקשב דחא הצק ר
יוארכ לעפי רצומהש תנמ לע , טוחב שמתשהל ךילע
רצומל ףרוצמש ןופלטה.
דחא
)ןוגכ ,דחוימ לוצלצ.(
1 ןופלטה עקשל רבוחמ ןופלט טוח םא , קתנ
2 בבוסו הספדהה תינסחמ תלד תא חתפ
3 עקתו רצומל ףרוצמש ןופלטה טוח תא חק
)ןוילעה עקשה.(
הרעה
ןופלט וק םע עקשל רצומה רוביח
6
קרפ1 הנקתה HEXC

הנקתה
תירבע
ה תשיכר לגרל תוכרב- HP LaserJet 3330mfp ,בר יקסע ילכ- בלשמה המצוע
תולוכי וכותב רובעידרשמה דויצה חווט אולמ . ידכ רצומב שמתשהל ךתורשפאב
עוציבב עייסל ידכו הז רצומ לש סקפה תולועפ תא ראתל ידכ בתכנ הז ךירדמ
תואבה תולטמה:
תומיוסמ סקפ תונוכת.
רצומה רובע תויללכ הנקתה תוארוה ךל תושורד םא , תינסחמ תנקתהל תוארוה ןוגכ
שרל רצומה רוביחו רצומה תנכות תנקתהת , ףרוצמש הנושאר הלעפהל ךירדמב ןייע
אובמ
חולשלםיסקפ לבקלו ,סיפדהל ,קיתעהלקורסלו .
● ןופלט וקל רצומה תא רבחל
● םיפסונ םירישכמ רבחל
● סקפה תורדגה תא עובקל
● הנעמל םילוצלצה רפסמו הנעמה בצמ תא רידגהל
● הנעמל םילוצלצ סופד ליעפהל
מ ונא רובע תוארוה תלבקל וב ןייעל לכותש ידכ הז סקפ ךירדמ רומשל םיצילמ
וידה , יטמוטואה םיכמסמה ןיזמו הספדהה ירמוח לש טלקה ישגמ תנקתה)ADF( ,
רצומל.
ןופלט וקל רצומה רוביח
ןופלטה וקל רצומה רוביח אוה סקפב שומישל ןושארה דעצה. וקל רצומה רוביח ןפוא
ןופלטה עקשל םיסנכנש ןופלטה יווק רפסמב יולת ןופלטה ,םיווק רפסמ שי םאו , וקה
סקפה רובע שמתשהל ךנוצרב ובש.
רצומהש תנמ לעהערפה אלל םיסקפ לבקיו חלשי , ןושארה רישכמה תויהל וילע
ןופלטה עקשל רבוחמש.
5
הרעה
HEXC אובמ

יתצובק גויח ידוק לוהינ...............................................................28
יתצובק גויח ידוק תונכת..............................................................28
יתצובק גויח ידוק תקיחמ.............................................................29
יתצובק גויח דוקמ דדוב ןעמנ תקיחמ.............................................29
םינופלטה סקנפ תומושר לכ תקיחמ..............................................30
גויח יוותב שומיש..............................................................................30
הנתמה וא הייהשה תפסוה..........................................................31
גויח תמודיק תפסוה..........................................................................31
תרדגהגויחה תמודיק.................................................................31
ןימזל החולש ןופלט תכיפה.................................................................32
ינדי גויחב שומיש..............................................................................32
ינדי גויחב שמתשהל ידכ.............................................................32
סקפה תוליעפ ןמוי תספדה.................................................................32
סקפה תוליעפ ןמוי תא סיפדהל ידכ...............................................33
סקפ תחיש חוד לש הספדהה ידעומ יוניש..............................................33
סקפ תחיש חוד תספדה ידעומ תרדגה...........................................33
4תויעב ןורתפ
הכלהכ ןקתומ סקפה םאה?................................................................35
ןופלטה וק גוס והמ?...................................................................35
ןופלט וק לצפמב שומיש השענ םאה?............................................36
חתמ בציימב שומיש השענ םאה?.................................................36
ןופלטה תרבח לש ילוק את תורישב שומיש השענ םאה?...................37
ןובישמב שומיש השענ םאה?.......................................................37
תויללכ סקפ תויעב............................................................................38
םיסקפ תלבקב תויעב........................................................................39
םיסקפ חולשמב תויעב.......................................................................43
ורטקלאה שמתשמל ךירדמל השיגינ.....................................................45
רצומה תנכותמ ינורטקלאה שמתשמל ךירדמל השיג.........................45
רצומה רוטילקתמ ינורטקלאה שמתשמל ךירדמל השיג.....................45
HEXC
4

םיניינע ןכות
1הנקתה
אובמ..............................................................................................5
ןופלט וקל רצומה רוביח......................................................................5
דחא ןופלט וק םע עקשל רצומה רוביח..................................................6
ןופלט יווק ינש םע עקשל רצומה רוביח...........................................8
םיפסונ םירישכמ רוביח......................................................................10
םיפסונ םירישכמ רבחל ידכ..........................................................11
תירבע
הרקבה חולמ טסקט תנזה...........................................................13
הנעמה בצמ תא רידגהל ידכ........................................................15
הנעמל םיצלמומ םילוצלצ תלבט....................................................16
הנעמל םילוצלצה רפסמ תא רידגהל ידכ.........................................16
הנעמל םילוצלצ סופד ליעפהל ידכ.................................................17
םיאצוי םיסקפ רובע לדחמה תרירב תייצולוזרו תוידוגינ יוניש.....................20
לדחמה תרירב תוידוגינ יוניש.......................................................20
לדחמה תרירב תייצולוזר יוניש.....................................................20
ןורכיזהמ םיסקפ קוחמל ידכ.........................................................21
הנכותהמ סקפ חולשל ידכ...........................................................22
רוציק ישקמו ריהמ גויח ידוק תונכת...............................................25
רוציק ישקמו ריהמ גויח ידוק תקיחמ..............................................26
רוציק ישקמ וא ריהמ גויח ידוק לש ריהמ תונכת...............................27
סקפה תורדגה תעיבק........................................................................13
ךיראתהו העשה תרדגה..............................................................13
סקפה תרתוכ תרדגה.................................................................14
הנעמה בצמ תרדגה..........................................................................14
הנעמל םילוצלצ תרדגה......................................................................15
הנעמל םילוצלצ סופד תלעפה..............................................................17
2 םיסקפ חולשמ )תודוסי(
יכמסמ תניעטסקפב חולשמל רוקמ ......................................................19
סקפ יכמסמ ןועטל ידכ................................................................19
םיסקפ תחילש..................................................................................19
דחא ןעמנל סקפ חולשמ..............................................................19
ןורכיזהמ םיסקפ תקיחמ.....................................................................21
לשהנכותהמ םיסקפ תחי....................................................................21
3 םיסקפ חולשמ )םדקתמ(
ריהמ גויח ידוק תודוא ,יתצובק גויח ידוקו רוציק ישקמ..............................25
גויח שקמ תונכתיפולח תוימואלניב תוחיש קפסל ריהמ .....................27
3
HEXC

שמתשמל ךירדמב ינורטקלאה .
10 יוארכ לעופ וניא רצומה םא , ןייע
11 שונב תולאשה לכבתוריש א ,
םיכמסומ םידבוע לא הנפ.
תושירדל עגונב עדימFCC Class B ,
םיקלח15ו - 68 הניקת תושירדו
ךירדמב אוצמל ןתינ תורחא
ינורטקלאה שמתשמל.
םיירחסמ םינמיס תויוכז
Microsoft ® ,Windows ®
הראב םימושר םיירחסמ" לש ב
Microsoft Corporation.
ןאכ םירכזומש םירצומה ראש לכ
לש םיירחסמ םינמיס תויהל םייושע
תומיאתמה תורבחה.
רוסאל םייושע םיימוקמ הנידמ יקוח
תולובגל ץוחמ הז רצומב שומישה לע
תוניוצמה תונידמה. טלחומ רוסיא לח ,
לע-קוח יפ ,תונידמה בורב , דויצ רבחל
רשוא אלש תרושקת)סקפ ירישכמ (
םינופלט תותשרלתוירוביצ.
םירצוי תויוכז עדימ
© 2001 Hewlett-Packard
תוחיטב יאשונב עדימ
תולמשחתה תנכס
העיגפה תנכס תא תיחפהל תנמ לע
תולמשחתה וא הפירשמ האצותכ
הז רצומב שומיש תעב , לועפל שי
תוחיטב יאשונב.
ו- Windows NT ® םינמיס םה
ךירדמב תועיפומה תוארוהה
ינורטקלאה שמתשמל.
רצומ לע תומושרה תוארוההו
רוביח תעב דבלב הקראה
רצומהHP LaserJet 3330
חתמ רוקמל. ךניאש הרקמב
קראומ עקשה םא חוטב , הנפ
ךמסומ יאלמשחל.
םיעקשה דחאב וא ןופלטה
רצומבשHP LaserJet 3330.
םימוגפ םילבכ ףילחהל שי
ידיימ ןפואב.
םיקרב תרעס.
יוקינ ינפל ןופלט עקשמו ילמשח.
םימ תברקב וב שמתשהל , וא
בוטר התא רשאכ.
ביצי חטשמ.
והשימש הנכס ןיא ובש ןגומ
ןופלטה טוח לע ךורדי , לקתי וא
הרהזא!
הב תויסיסבה הרהזאה תוארוהל םאת
1 לכ תא ןיבהלו ןויעב אורקל שי
2 תורהזאה לכ רחא אלמל שי
הז.
3 םע ילמשח עקשב שמתשהל שי
4 טוח הצקבש םיעגמב תעגל ןיא
5 תעב ןופלט יווק חותמל ןיא
6 עקשמ הז רצומ קתנל שי
7 הז רצומ ןיקתהל ןיא וא
8 לע רצומה תא ןיקתהל שי
9 םוקימב רצומה תא ןיקתהל שי
וב ,קזניי אל טוחה ובשו.
בתכב רושיא אלל םירוסא םוגרת וא
ןותנ הז ךמסמב לולכה עדימה
שארמ העדוה אלל םייונישל.
הז עדימל עגונב והשלכ גוסמ תוירחא .
HEWLETT-PACKARD הריסמ
תוריחס יבגל אללכמ תוירחא שרופמב
תמיוסמ הרטמל המאתהו.
הרא תלשממ ישמתשמל העדוה"ב:
תויוכז םע תירחסמ בשחמ תנכות
יפכ תולבגמל םינותנ הלשממה ידי לע
Rights in Technical Data Clause
Hewlett-Packard Company
11311 Chinden Boulevard
Boise, Idaho 83714 U.S.A.
Company
תורומש תויוכזה לכ. לופכש , המאתה
שארמ , יקוחב השרומש יפכ דבלמ
םירצויה תויוכז.
קלח רפסמC9126-90924
הנושאר האצוה ,ס רבמטפ2001
הינמרגב ספדוה
תוירחא
Hewlett-Packard הקינעמ הניא
Hewlett-Packard היהת אל
תיארחאגב ןירישי קזנ לכ ,ףיקע ,
ירקמ ,ל עגונב רחא וא יתאצותא הקפס
הז עדימב שומישל וא.
תולבגומ: "שומיש , הפישח וא לופכיש
תתב עבקנש- הקספ© (1) (ii)ה לש -
ב- DFARS 52.227-7013."

hp LaserJet 3330mfp
תירבע
סקפ ךירדמ


copyright © 2001
Hewlett-Packard Company
www.hp.com/support/lj3300
English -
ъйшбт
*C9126-90924*
*C9126-90924*
C9126-90924
 Loading...