

Page 1
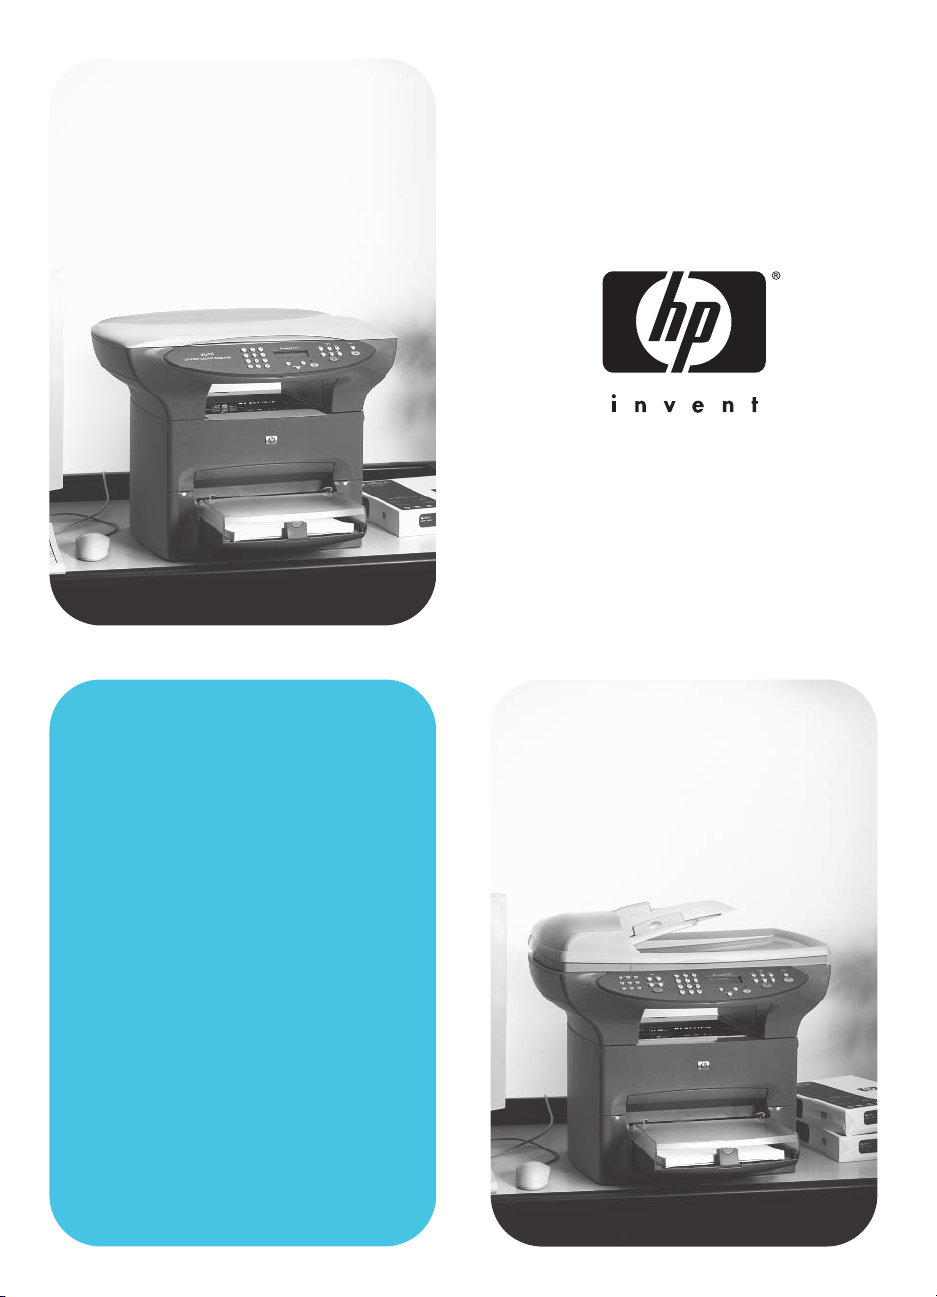
hp LaserJet 3300mfp
start
Page 2

Page 3

hp LaserJet 3300mfp series
getting started guide
Page 4

Copyright Information
Copyright
Hewlett-Packard Company
All Rights Reserved.
Reproduction, adaptation,
or translation without prior
written permission is prohibited,
except as allowed under the
copyright laws.
Part number: C9124-90952
First Edition: January 2002
2002,
©
FCC Regulations
This equipment has been tested
and found to comply with the
limits for a Class B digital
device, pursuant to Part 15 of
the FCC rules. These limits are
designed to provide reasonable
protection against harmful
interference in a residential
installation. This equipment
generates, uses, and can
radiate radio frequency energy.
If this equipment is not installed
and used in accordance with the
instructions, it may cause
harmful interference to radio
communications. However,
there is no guarantee that
interference will not occur in a
particular installation. If this
equipment does cause harmful
interference to radio or
television reception, which can
be determined by turning the
equipment off and on, the user
is encouraged to try to correct
the interference by one or more
of the following measures:
Reorient or relocate the
receiving antenna.
Increase separation between
equipment and receiver.
Connect equipment to an outlet
on a circuit different from that to
which the receiver is located.
Consult your dealer or an
experienced radio/TV
technician.
Any changes or modifications to
the product that are not
expressly approved by HP could
void the user’s authority to
operate this equipment.
Use of a shielded interface
cable is required to comply with
the Class B limits of Part 15 of
FCC rules.
For more regulatory information,
see the HP LaserJet 3300
electronic user guide.
Warranty
The information contained in
this document is subject to
change without notice.
Hewlett-Packard makes no
warranty of any kind with
respect to this inform a ti o n .
HEWLETT-PACKARD
SPECIFICALLY DISCLAIMS
THE IMPLIED WARRANTY
OF MERCHANTABILITY
AND FITNESS FOR A
PARTICULARPURPOSE.
Hewlett-Packard shall not be
liable for any direct, indirect,
incidental, consequential,
or other damage alleged in
connection with the furnishing
or use of this information.
Trademark Credits
Microsoft®, Windows®,
and Windows NT® are
U.S.registered trademarks
of Microsoft Corporation.
All other products mentioned
herein may be trademarks of
their respective companies.
Hewlett-Packard Company
11311 Chinden Boulevard
Boise, Idaho 83714 U.S.A.
Page 5

Contents
1 Introduction
HP LaserJet 3300 series products . . . . . . . . . . . . . . . . . . . . . . . . . . . . 3
Environmental requirements. . . . . . . . . . . . . . . . . . . . . . . . . . . . . . . . . 8
Network connection requirements . . . . . . . . . . . . . . . . . . . . . . . . . . . . 9
To use a supported HPJetdirect print server . . . . . . . . . . . . . . . 10
2 Setting up your product
Assembling your product . . . . . . . . . . . . . . . . . . . . . . . . . . . . . . . . . . 11
To unpack your product . . . . . . . . . . . . . . . . . . . . . . . . . . . . . . . . 11
To connect a printer cable to your product. . . . . . . . . . . . . . . . . . . . . 12
To install a print cartridge . . . . . . . . . . . . . . . . . . . . . . . . . . . . . . 13
To install and load the media input tray and priority input tray. . . . . . 14
To install the ADF input tray . . . . . . . . . . . . . . . . . . . . . . . . . . . . 15
To connect the power cord . . . . . . . . . . . . . . . . . . . . . . . . . . . . . 15
Verifying your work. . . . . . . . . . . . . . . . . . . . . . . . . . . . . . . . . . . . . . . 16
To self-test the printer . . . . . . . . . . . . . . . . . . . . . . . . . . . . . . . . . 16
To self-test the copier using the ADF input tray . . . . . . . . . . . . . 16
To self-test the copier using the flatbed scanner. . . . . . . . . . . . . 17
To print a control panel menu map . . . . . . . . . . . . . . . . . . . . . . . 17
Completing your product setup. . . . . . . . . . . . . . . . . . . . . . . . . . . . . . 18
Connecting your product to a computer . . . . . . . . . . . . . . . . . . . . . . . 18
To connect your product to a computer. . . . . . . . . . . . . . . . . . . . 19
Connecting your product to a network . . . . . . . . . . . . . . . . . . . . . . . . 19
To connect your 3320n product to a network using the
HP Jetdirect 310x print server . . . . . . . . . . . . . . . . . . . . . . . 20
To mount the print server . . . . . . . . . . . . . . . . . . . . . . . . . . . . . . 21
Installing the software. . . . . . . . . . . . . . . . . . . . . . . . . . . . . . . . . . . . . 21
To install the software (Windows) . . . . . . . . . . . . . . . . . . . . . . . . 22
To install only the print driver (Windows). . . . . . . . . . . . . . . . . . . 23
Installing only the print driver on Windows XP . . . . . . . . . . . . . . 23
To install the software (Macintosh OS 9.1) . . . . . . . . . . . . . . . . . 24
To install the software (Macintosh OS X) . . . . . . . . . . . . . . . . . . 24
3 Troubleshooting
Troubleshooting your HP LaserJet 3300 series product. . . . . . . . . . . 25
To use the troubleshooting table. . . . . . . . . . . . . . . . . . . . . . . . . 25
Where to go for more information. . . . . . . . . . . . . . . . . . . . . . . . . . . . 30
To access the electronic user guide from the product software . 30
To access the electronic user guide from the product CD-ROM. 31
To get information by phone . . . . . . . . . . . . . . . . . . . . . . . . . . . . 31
To get information on the Internet . . . . . . . . . . . . . . . . . . . . . . . . 31
To get information by e-mail . . . . . . . . . . . . . . . . . . . . . . . . . . . . 31
ENWW 1
Page 6

2
ENWW
Page 7

Introduction
1
Congratulations on your purchase of the HP LaserJet 3300 series
all-in-one product, a powerful business tool with the capabilities of a full
range of office eq uip me nt. You can use the pro duc t for printing, copying,
color scanning, scanning to the web, and scanning to e-mail.
Use this guide to help you complete the following tasks:
● Acquaint yourself with the produc t
● Assemble the product hardware
● Connect the product to a computer or a network
● Install the product software
HP LaserJet 3300 series products
HP LaserJet 3300 series products print and copy up to 15 pages per
minute (ppm) and come standard with the following features:
● Flatbed copier/scan ner
● 32 megabytes (MB) of random access memory (RAM)
● Dual in-line memory module (DIMM) slot for adding fonts and
memory
● USB 1.1 port and IEEE 1284-B parallel port
The following table shows the different models available, and each
model’s package contents and additional features.
ENWW HP LaserJet 3300 series products 3
Page 8
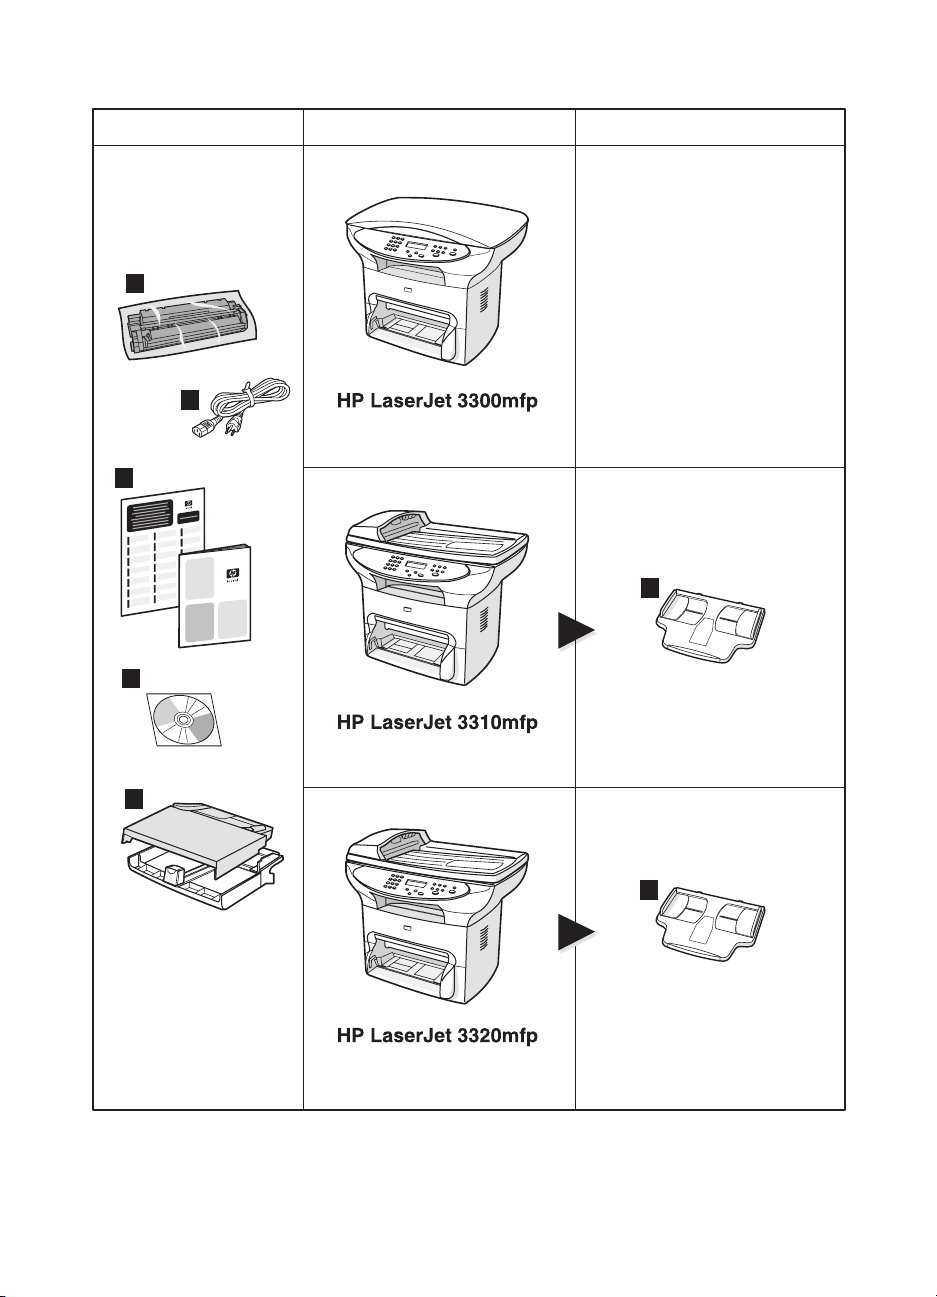
Package contents Model Additional contents
1
2
3
6
4
5
4 1 Introduction
6
ENWW
Page 9

Description
The HP LaserJet 3300mfp comes standard with a flatbed copier/scanner, 32 MB of RAM, a dual in-line
memory module (DIMM) slot for adding fonts and memory, a USB 1.1 port, and an IEEE 1284-B parallel
port.
Package contents: 1) Print cartridge; 2) power cord; 3) getting started guide and support flyer;
4) CD-ROM containing product software and electronic user guide; 5) 250-sheet media input tray and
priority input tray.
Note: The HP LaserJet 3300se mfp differs from the HP LaserJet 3300 product only by the inclusion of
specialized software. This product is only available in the U.S.
The HP LaserJet 3310mfp comes standard with a flatbed copier/scanner, 32 MB of RAM, a dual in-line
memory module (DIMM) slot for adding fonts and memory, a USB 1.1 port, and an IEEE 1284-B parallel
port. It has no scan buttons on the control panel. Scanning functionality can be accessed through the
product software when the product is connected to a computer. It also comes with a 50-page automatic
document feeder (ADF).
Package contents: 1) Print cartridge; 2) power cord; 3) getting started guide and support flyer;
4) CD-ROM containing product software and electronic user guide; 5) 250-sheet media input tray and
priority input tray; 6) ADF input tray.
The HP LaserJet 3320mfp comes standard with a flatbed copier/scanner, 32 MB of RAM, a dual in-line
memory module (DIMM) slot for adding fonts and memory, a USB 1.1 port, and an IEEE 1284-B parallel
port. It has scan buttons on the control panel and comes with a 50-page automatic document feeder
(ADF).
Package contents: 1) Print cartridge; 2) power cord; 3) getting started guide and support flyer;
4) CD-ROM containing product software and electronic user guide; 5) 250-sheet media input tray and
priority input tray; 6) ADF input tray.
ENWW HP LaserJet 3300 series products 5
Page 10
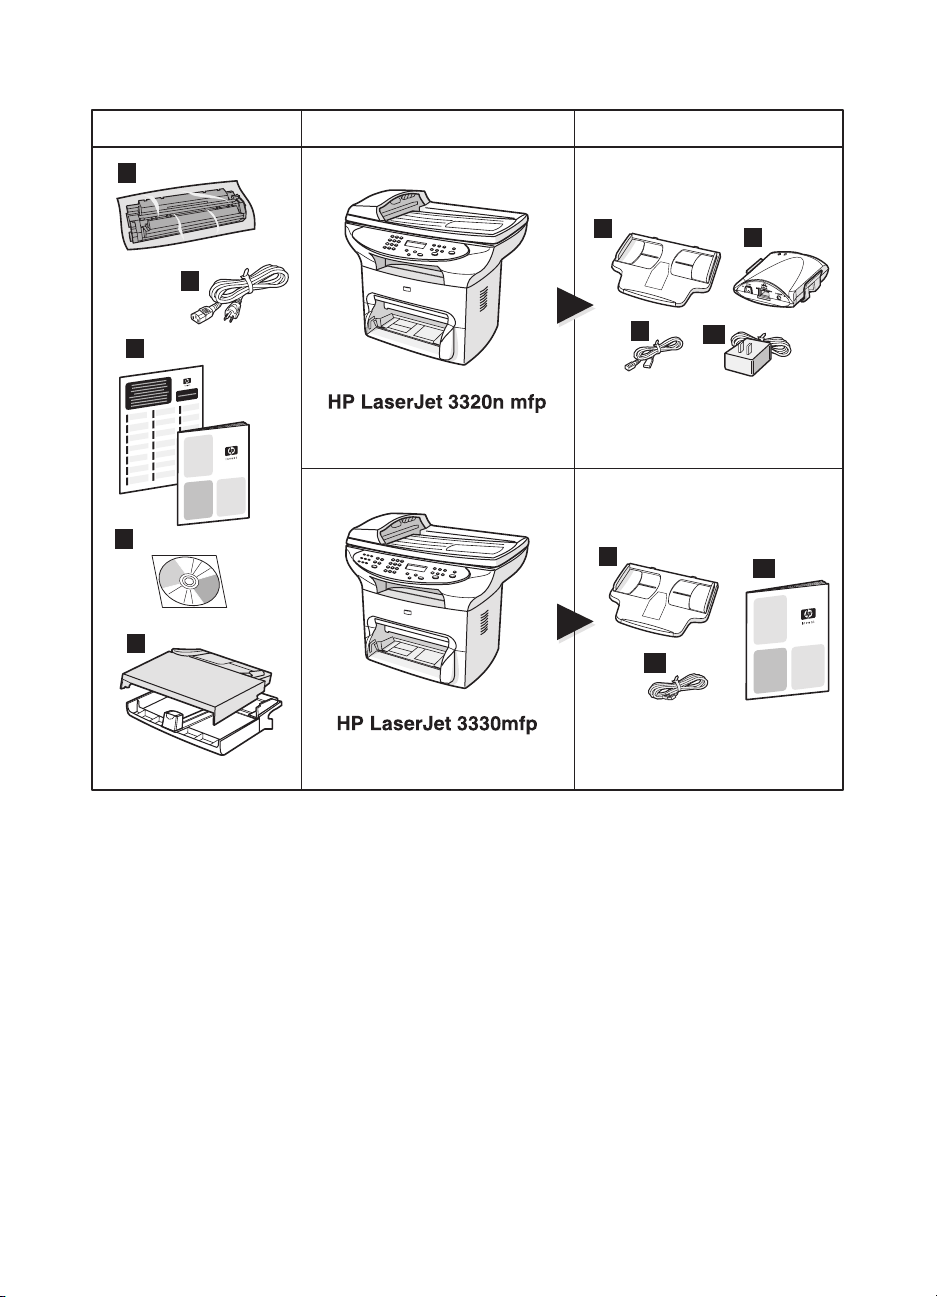
Package contents Model Additional contents
1
6
2
8
3
4
6
5
11
7
9
10
6 1 Introduction
ENWW
Page 11

Description
The HP LaserJet 3320n mfp comes standard with a flatbed copier/scanner, 32 MB of RAM, a dual in-line
memory module (DIMM) slot for adding fonts and memory, a USB 1.1 port, an IEEE 1284-B parallel port,
and a 50-page automatic document feeder (ADF). It includes an HP Jetdirect 310x print server for
connecting to a 10Base-T or 100Base-Tx network (sometimes called Ethernet and Fast Ethernet,
respectively). The print server provides network solutions for communicating over TCP/IP, IPX, Novell
Netware, and AppleTalk protocols.
Package contents: 1) Print cartridge; 2) power cord; 3) getting started guide and support flyer;
4) CD- ROM containing product software, print server software, and electronic user guide; 5) 250-sheet
media input tray and priority input tray; 6) ADF input tray; 7) HP Jetdirect 310x print server with mounting
clip; 8) USB 1.1 cable; 9) print server power adapter.
The HP LaserJet 3330mfp comes standard with a flatbed copier/scanner, 32 MB of RAM, a dual in-line
memory module (DIMM) slot for adding fonts and memory, a USB 1.1 port, an IEEE 1284-B parallel port,
and a 50-page automatic document feeder (ADF). It also comes with full-functionality fax capabilities and
includes V.34 fax with speed dial, fax polling, and dela yed fax features.
Package contents: 1) Print cartridge; 2) power cord; 3) getting started guide and support flyer;
4) CD-ROM containing product software, fax software, and electronic user guide; 5) 250-sheet media input
tray and priority input tray; 6) AD F input tray; 10) fax guide; 11) phone cord.
Note Only the HP LaserJet 3320n product includes a printer cable. Any USB 1.1
cable or IEEE 1284-B parallel cable can be used to connect the product
to a computer. Cables may be purchased at http://www.buy.hp.com. For
more information on HP accessories, see the product’s electronic user
guide.
ENWW HP LaserJet 3300 series products 7
Page 12

Environmental requirements
Install the product in a location that meets the following requirements:
● Situate the product on a sturdy, level surface out of direct sunlight
and away from dust, open flames, and ammonia fumes.
● Make sure the environment is well ventilated, free from abrupt
temperature or humidity changes, and within the following limits:
• Temperature: 15 to 32.5° C (59 to 90.5° F)
• Relative Humidity: 10 to 80% humidity (no condensation)
● Make sure th at th ere is e nou gh s pac e aro und the product f o r m ed ia
access and proper ventilation; media fed into the straight-through
media path will emerge behind the product.
8 1 Introduction
53 cm (21 inches)
74 cm (29 inches)
81 cm (32 inches)
ENWW
Page 13

Network connection requirements
If you purchas ed an H P LaserJet 3320n and want to conn ect the p roduct
to a network using the HP Jetdirect 310x print server included with the
product, use the instructions in this guide.
If you purchased an HP LaserJet 3300 series product other than the
HP LaserJet 3320n and want to connect the product to a network, you
must use a suppo rted HP Jetdirect print server and fo llo w th e proc edure
described in “To use a supported HP Jetdirect print server” on page 10.
Your choice of print server depends on the type of network connection
you have and the number of devices you want to connect to the print
server.
The following print servers are supported by HP LaserJet 3300 series
products and are available from your local HP dealer or at
http://www.buy.hp.com.
Product
Model
HP Jetdirect 170x J3258B 10Base-T network connection
HP Jetdirect 175x J6035A 10Base-T or 100Base-Tx network
HP Jetdirect 300x J3263A 10Base-T or 100Base-Tx network
HP Jetdirect 310x J6038A 10Base-T or 100Base-Tx network
HP Jetdirect 500x J3264A Token Ring network connection
HP Jetdirect 500x J3265A BNC, 10Base-T, or 100Base-Tx
number Print server use
(connects one product to a network)
connection (connects one product to a
network)
connection (connects one product to a
network)
connection (included with HP LaserJet
3320n products - connects one
product to a network)
(connects the product and up to two
other devices to a network)
Note: The product is supported only
on Port 1 of this print server.
network connection (connects the
product and up to two other devices to
a network)
Firmware
version number
All
All
H.08.00 or higher
All
J.08.00 or higher
J.08.00 or higher
Note: The product is supported only
on Port 1 of this print server.
ENWW Network connection requirements 9
Page 14

Note HP does not recommend using HP Jetdirect print servers with firmware
earlier than that listed above. To check the firmware version number, see
your print server’s documentation for instructions on printing a
configuration page.
If you have an HP Jetdirect 170x print server and the model number is
not J3258B, your print server is not compatible with the HP LaserJet
3300 series product.
If you have an HP Jetdirect 300x or 500x print server and the firmware
version n umber is not H.08 .00 or J .08 .00 or hig her, you must do wnloa d a
firmware upgrade from HP’s web site at
http://www.hp.com/support/net_printing to use your print server with
HP LaserJet 3300 series products.
To use a supported HP Jetdirect print server
If you are connecting your pr oduct to a network with an HP Jetdirect
print server purchased separately from an HPLaserJet 3320n product,
use the following procedure to set up your product.
1 Follow the instructions in this guide to assemble your product’s
hardware.
2 See your print server’s documentation to connect the HP LaserJet
3300 series product to a network using one of the supported
HP Jetdirect print servers list ed above.
3 See “Installing the software” on page 21 to install the product
software included with your HP LaserJet 3300 series product.
Note Do not install the software included with any separately purchased
HP Jetdirect print server. Use the product software on your HP LaserJet
3300 series product CD-ROM.
10 1 Introduction
ENWW
Page 15

Setting up your
2
Assembling your product
Note Only the HP LaserJet 3320n product includes a printer cable. Any USB
product
Use the procedures in this chapter to assemble your HP LaserJet 3300
series product, connect it to a com puter or a netw ork, connect the p ow er
cord, and install the product software.
This section shows you how to connect the printer cable to the product,
install the print cartridge, install the media input trays and the automatic
document f eeder (ADF ) input tr ay, and connec t the produ ct’s powe r cord.
1.1 cable or IEEE 1284-B parallel ca ble can be used to c onnect the product
to a computer. Cables may be purchased at http://www.buy.hp.com. For
more information on HP accessories, see the product’s electronic user
guide.
To unpack your product
Remove all packing tape and cardboard from the unit before continuing
with the product setup.
ENWW Assembling your product 11
Page 16

To connect a printer cable to your product
1
To connect a printer cable to your product,
use the following steps:
Note
If you want to use your HP LaserJet 3300
product as a stand-alone copier or fax
machine—without connecting it to a
computer—skip this section and see “To
install a print cartridge” on page 13.
2
Note
Windows 95 and Windows NT 4.0 do not
support USB cable connections with the
printer. Macintosh computers do not support
parallel cable connections.
3
1
2
4
1 Open the print cartridge door by pulling
the sides of the door forward as shown.
2 Open the product’s left side panel by
pressing t he release latch.
3 Plug one end of the USB (1) or parallel
cable (2) into the correct socket inside
the left side panel as shown.
4 Thread the cable through the left side
panel opening as shown, and close the
left side panel.
12 2 Setting up your product
Note
If you are using a USB cable, it should be
threaded through the upper notch in the lef t
side panel. If you are using a parallel cable, it
should be threaded through the lower notch.
After you have connected the printer cable,
leave the print cartridge door open and
proceed to “To install a print cartridge” on
page 13. You will connect the printer cable to
your computer later in the setup process.
ENWW
Page 17

To install a print cartridge
1
2
3
4
To install a print cartridge, use the following
steps:
CAUTION
To prevent damage to the print cartridge, do
not expose it to light for more than a few
minutes.
1 Make sure the print cartridge door is
open.
2 Remove the print cartridge from its
packaging, and locate the sealing tape at
the end of the cartridge.
3 To remove the sealing tape from the
cartridge, grasp the tape and pull it
straight out from the cartridge. Avoid
touching any black to ner on the tape.
4 Insert the cartridge as shown, with the
arrows pointing into the product.
5 Close the print cartridge door. The print
cartridge engages when the door is
closed.
Note
If toner gets on your clothing or other fabric,
wipe off the toner with a dry cloth. Wash the
items in cold water and air dry.
CAUTION
Hot water or heat from a dryer can set toner
into fabric.
Hewlett-Packard Company cannot
5
ENWW Assembling your product 13
recommend the use of non-HP print
cartridges, either new, refilled, or
remanufactured. Since they are not HP
products, HP canno t influ ence t heir de sign or
control their quality.
Page 18

To install and load the media input tray and priority input tray
1
2
3
To install and load the media input tray and
the priority input tray, use the following steps:
1 Slide the trays in and down at an angle
as shown until they fit securely. Remove
the tape connecting the two trays.
2 Remove the priority input tray. On the
media input tray, slide the media guides
out and pull the long m edia supp ort back
to accommodate your media.
3 Place the media into the input tray.
4 Adjust the guides until the y are flush with
the media.
5 Install the priority input tray over the
media input tray.
Note
If the media guides are not sufficiently tight,
your media may skew and cause a media
jam.
4
5
14 2 Setting up your product
ENWW
Page 19

To install the ADF input tray
If your product has an automatic document feeder (ADF), use the
following steps to install the ADF input tray:
1 Align the two tabs on the input tray with the two grooves in the
ADF lid.
2 Slide the tray into the grooves as shown until the tray snaps into
place.
To connect the power cord
To connect your product to a power source, use the following steps.
1 If you ha v e the 22 0V product, locat e the po wer s witch on t he bac k of
the product and make sure the product is switched off.
2 Connect the power cord to the product, as shown (1).
3 Plug the other end of the power cord directly into a grounded AC
outlet (2).
1
2
4 If you have the 220V product, switch on the power. If you have the
110V product, there is no power switch. It will automatically power
on when it is plugged in.
Note HP does not recommend the use of uninterrupted power supply (UPS)
battery backup devices or surge suppressors with this product. Many surge
suppressors and battery backups can cause print defects.
ENWW Assembling your product 15
Page 20

Verifying your work
At this point in the setup process, verify your work by testing your HP
LaserJet 3300 product’s printing and copying functions.
To self-test the printer
To test the printer, use the following steps:
1 On the product’s control panel, press the menu/enter button.
2 Use the < and > buttons to select Reports, and press the
menu/enter button.
3 Use the < and > buttons to select Config Report and press the
menu/enter button.
A configuration page prints, showing the product’s current configuration
and the control panel displ ay returns to Ready. If the page does not print
successfully, see “Troubleshooting” on page25.
To self-test the copier using the ADF input tray
Use the configuration page you just printed to test the copier.
1 Adjust the guides on the ADF input tray to the size of the
configuration page.
2 Place the configuration page into the ADF input tray top first, print
side up. Verify that the control panel display reads Document
Loaded.
3 On the product’s control panel, press start/copy.
The product makes a copy of the configuration page and the control
panel display returns to Ready. If the page does not copy successfully,
see “Troubleshooting” on page 25.
1
16 2 Setting up your product
2
ENWW
Page 21

To self-test the copier using the flatbed scanner
If your product does not have an ADF input tray, you can still test the
copier by placing the configuration page on the flatbed scanner glass.
1 Place the configuration page face down on the flatbed scanner
glass as shown.
2 Gently close the lid.
3 On the product’s control panel, press start/copy.
The product makes a copy of the configuration page and the control
panel display returns to Ready. If the page does not copy successfully,
see “Troubleshooting” on page 25.
CAUTION To pre vent damaging the produc t, do not all ow th e scann er lid to f a ll onto
the scanner glass surf ace . Alwa ys clo se the scanner lid when the product
is not in use.
To print a control panel menu map
In addition to printing a configuration page, you can also test your
product by printi ng a me nu m ap tha t sh ows all of t he con trol pan el men u
options.
To print a control panel menu map, use the following steps:
1 On the product’s control panel, press menu/enter.
2 Use the < and > buttons to select Reports, and press menu/enter.
3 Use the < and > buttons to select Menu Structure, and press
menu/enter.
A menu map prints, showing all of the product’s control panel menu
options. If the menu map does not print successfully, see
“Troubleshooting” on page 25.
ENWW Verifying your work 17
Page 22

Completing your product setup
After you ha ve asse mbled the hardwa re and tested y our produc t, choose
one of the configurations listed in the table below, and follow the
instructions to finish setting up your HP LaserJet 3300 series product.
Configuration Instructions
Stand-alone copier Setup is complete—your product is ready to use.
Connected to a dedicated computer
or computers
Connected to a network with an HP
Jetdirect 310x print server
Connected to a network with an HP
Jetdirect print server other than the
310x model
Connected to a phone line only, for
faxing and copying functionality (HP
LaserJet 3330 only)
Connected to a phone line and a
dedicated computer, for full printing,
copying, scanning, and faxing
functionality (HP LaserJet 3330 only)
See “Connecting your product to a computer” on page 18.
See “Connecting your product to a network” on page 19.
Note: If you purchased your HP Jetdirect 310x print server
separately from the HP LaserJet 3320n product, do not
install the software that came with the print server. Use the
product software on your HP LaserJet 3300 series product
CD-ROM.
See the documentation for your HP Jetdirect print server,
and then see “Installing the software” on page 21.
Note: Do not install the software that is included with HP
Jetdirect print servers. Use the product software included on
your HP LaserJet 3300 series product CD-ROM.
See the HP LaserJet 3330 product fax guide for instructions
on connecting your product to a phone line.
See the HP LaserJet 3330 product fax guide for instructions
on connecting your product to a phone line, and then see
“Installing the software” on page 21 of this guide.
Connecting your product to a computer
This section shows you how to connect your HP LaserJet 3300 product
to a computer with the printer cab le y ou conne cted to the product ea rlier .
You can connect two PCs to y our HP LaserJet 3300 product—one with a
parallel cable and one with the USB cable—allowing the product to be
shared.
Note Computers running Windows 95 or Windows NT 4.0 SP3 do not support
USB cable connections. Macintosh computers do not support parallel
cable connections.
18 2 Setting up your product
ENWW
Page 23

Note If you are using a parallel cable, connect it directly to a dedicated IEEE
1284-B bidirectional, ECP-compliant parallel port. If the parallel port has
another device attached to it (such as an external storage device), that
device must be disconnected.
To connect your product to a computer
Note If you ha ve not connec ted a printer cable to your product, s ee “To connect
a printer cable to your product” on page 12 before performing this
procedure.
1 With your computer running, quit all open applications.
2 Plug the USB (1) or parallel cable (2) from the printer into the
appropriate socket on your PC or Macintosh computer as shown.
1
CAUTION Do not connect a parallel cable to a serial port on your computer. Doing
so can damage the product, and the two p ort types can be easily confused.
If you need help identifying the parallel port, see your computer’s
documentation.
3 If the New Hardware Wizard window appears on your computer
screen, click Cancel.
2
Connecting your product to a network
Use the procedures in this section to connect your HP LaserJet 3320n
product to a netwo rk using th e HP Jetdirect 310x print server and moun t
the print server on your product or another surface.
If you are using a separately purchased HP Jetdirect print server to
connect your HPLaserJet 3300 series product to a network, see
“Network connection requirements” on page 9 and “To use a supported
HP Jetdirect print server” on page 10.
ENWW Connecting your product to a network 19
Page 24

2
To connect your 3320n product to a network using the HP Jetdirect 310x print server
Note
If you ha ve not conn ected a USB cab le to the
product, see “To connect a printer cable to
your product” on page12 before performing
3
4
5
1
2
6
this procedure.
1 Locate the HP Jetdirect 310x print server
that came with the product.
2 With the USB symbol on the cab le facing
up, plug the rectangular end of the USB
cable (that is connected to the product)
into the USB socket at the front of the
print server. Make sure the plug is fully
inserted.
3 Attach the print server to a 10Base-T or
100Base-Tx local network by plugging a
network cable into the network port on
the print server’s rear panel.
4 Plug the print server power adapter into
a power outlet. Plug the other end of the
power adapter cable into the power
socket on the rear of the print server.
5 The power/status light (1) blinks
green for about 15 seconds and then
turns solid green t o indicat e a succ essful
power connection. The 10 or 100 LED
light (2) indicates a successful network
connection.
6 To print a configuration page, briefly
press and release the test button on
the print server’s rear panel. A
configuration page is printed by the
HP LaserJet 3320n product. If a page
does not print, see “Troubleshooting” on
page 25.
20 2 Setting up your product
ENWW
Page 25

To mount the print server
To mount the HP Jetdirect 310x print server to your product, use the
attached adhesive tape to secure the mounting clip included with your
product as shown (1).
To mount the print server to another surface, such as a table or wall,
secure the mounting clip with the attach ed adh es ive tape or use the
mounting screw holes (2).
Note If mounting the print server on the back of the product, do not cover any
of the product’s ve nti lat ion ho les.
2
1
Installing the software
After you have successfully connected the product to your computer or
to a network, use this section to install the product software. The
software must be installed on each computer that will be using the
product in order to take full advantage of the product features and to
enable network printing.
If you have not yet connected the product to your computer, see
“Connecting your product to a computer” on page 18 or “Connecting
your product to a network” on page 19 before installing the product
software.
The follo wi ng printer drivers are available within the s oftware installation
program.
● The PCL 6 printer driver supports the most of the product’s printing
features.
● The PCL 5e driver provides backward compatibility with older
LaserJet printers.
● The PS printer driver emulates PostScript® level 2 features
(PostScript is a registered trademark of Adobe Systems
Incorporated).
The PCL 6 printer driver is ins talled by def a ult. To install one of the other
printer drivers, select the Custom Install option and select an alternate
printer driver.
ENWW Installing the software 21
Page 26

Note You can scan with the product software or any compatible
TWAIN-compliant scanning application. A list of compatible applications
is included in the readme.tx t file on the prod uc t’s CD-ROM.
To install the software (Windows)
Use the instructions below to install the product software on a PC
running Windows 95, 98, NT 4.0 SP3, ME, 2000, or XP. Windows 95
users will have basic softwar e functionality only. For information on
installing the printer driver only, see the next section.
Note You must have Administr ator privileges (on s tart and restart) to install the
software on Windo ws NT 4.0 SP3, XP, or 2000.
1 Quit any open programs on your PC. If the New Hardware Wizard
appears, click Cancel.
2 To open the Welcome screen, insert the product so ftw a r e CD- ROM
in your computer’s CD driv e .
• If the Welcome screen does not open, click Start on the
Windows task bar, click Run, type Z:\setup (where Z is your CD
drive letter), and click OK.
3 Follow the onscreen instructions.
4 Click Software Installation.
5 Follow the onscreen instructions to install the software.
• If the product is connected to a network, select Connected to
the network when prompted, then select the type of network
connection.
• Before installation is complete, select Print a test page when
the prompt appears.
6 Click Finish.
7 If you are prompted to restart your computer, click Yes. The test
page prints after your computer restarts. If you are not prompted to
restart your computer, a test page prints immediately.
8 If the test page prints correctly, installation is complete. If the test
page does not print correctly, see “Troubleshooting” on page 25.
Note On systems running Wind ow s 20 00, or Win do ws 9 8 syst ems w ith a USB
connection, the Ne w Hardware Wizard windo w may be displ ayed after y ou
restart the computer. If this happens, click Next to complete the install
process.
22 2 Setting up your product
ENWW
Page 27

To install only the printer driver (Windows)
If you install only the printer driver, and not the complete software, you
will have printing capabiliti es but no fax an d sc an capabilities from a PC.
Follo w the ins tructio ns b el o w to use the Add Printer W iz ard to install the
print driver on a PC running Windows 95 , 98, NT 4. 0 SP3, ME, or 2000.
1 Insert the software CD-RO M in you r computer' s CD drive . Clos e the
window for the automatic software installation.
2 On the Windows taskbar, click Start, point to Settings, and then
click Printers.
3 Double-click Add Printer. Follow the onscreen instructions. The
path to the driver .inf file is ...\language\drivers\WinXX\PCL6\.
To install only the printer driver (Windows XP)
1 Connect the printer to the computer by either parallel cable or USB
cable. If the Found Ne w Hardware Wizar d does not appear after a
minute, restart the computer.
2 Insert the CD that came with the printer. If Autoplay runs, and the
software installation window appears, close the window.
3 When the Found New Hardware Wizard appears, select Install
from a list or specific location. Then click Next.
4 When the wizard prompts you for search options, deselect Search
removable media, and select Include this location in the sea r ch .
5 Click Browse. In the browse window, browse to this location on the
CD: …\language\drivers\WinXP\xpdot4inf\, and then click OK.
6 Click Next.
7 If your computer is connected to the printer with a USB cable, the
wizard will prompt you to select the best match for your hardware.
Select HP LaserJet 3300 USB, and then click Next.
8 When the finish screen appears, click Finish.
9 After a moment, another Fou nd New Hard ware Wizar d will appea r .
Select Install from a list or specific location. Then click Next.
10 When the wizard prompts you for search options, deselect Search
removable media, and select Include this location in the sea r ch .
11 Click Browse. In the browse window, browse to this location on the
CD: …\language\drivers\WinXP\PCL6\, and then click OK.
12 Click Next. When the finish screen appears, click Finish.
Note T o ins tall additional driv ers, such as the PS driv er or the PCL5e driver , use
the Add Printer Wizard. For the drivers' .inf files, browse to the folders
inside the WinXP folder mentione d abo v e . Wh en prom pted by the wizard
for a port, select the "dot4_001" port.
ENWW Installing the software 23
Page 28

To install the software (Macintosh OS 9.1)
Use the instructions below to install the soft ware on a Macintosh
computer running Mac OS 9.1 . If the co mputer is running Ma c OS X see
“To install the software (Macintosh OS X)” on page24.
1 Insert the product software CD-ROM into your CD drive.
2 In the CD folder, double-click the HP All-in-One Installer icon.
3 Follow the onscreen instructions and click Install.
4 When prompted, restart the computer. After the computer restarts,
the HP All-in-One Setup Assistant starts automatically.
5 Follow the onscreen instructions to complete the installation.
To install the software (Macintosh OS X)
Use the instructions below to install the soft ware on a Macintosh
computer running Mac OS X.
1 Insert the product software CD-ROM into your CD drive.
2 In the CD folder, double-click the HP All-in-One Installer icon.
3 Follow the onscreen instructions and click Install.
• If prompted, enter a us er name and pas s w ord with Ad mini str ator
privileges.
4 When prompted, restart the computer. After the computer restarts,
the HP All-in-One Setup Assistant starts automatically.
5 Follow the onscreen instructions.
6 Open the Print Center from the Applications\Utilities folder, and
select Add Printer.
7 Select Directory Services and choose HP AIO Print.
8 Highlight the entry for the product you just installed and click Add.
9 If your product has no fax capability, close the Print Center and the
installation is complete. If you have the HP LaserJet 3330 product,
continue with the following steps.
10 Select Add Printer.
11 Select Directory Services and choose HP AIO Fax.
12 Highlight the entry for the product you just installed and click Add.
13 Close the Print Center. The installation is complete.
24 2 Setting up your product
ENWW
Page 29

Troubleshooting
3
Troubleshooting your HP LaserJet 3300 series product
If you have a problem setting up your product or installing the product
software, first check the troubleshooting table below to determine
whether you can identify and solve the problem. If you are unable to
solve the problem, se e “Where to go for more information” on page30.
To use the troubleshooting table
This troubleshooting table provides information for solving the following
types of problems:
● Basic operation problems
● Software installation problems (Windows)
● Software installation problems (Macintosh)
● Print server installation problems
Problem Possible cause Solution
Basic operation pr oblems
The product has no power
and no lights are lit on the
control panel.
ENWW Troubleshooting your HP LaserJet 3300 series product 25
The product is not
getting any power.
Make sure the power cord is attached
securely to both the product and a power
outlet.
If you have a 220V unit, make sure the power
is switched on.
If the power cord is connected to a power
strip, make sure the power strip is switched
on.
Page 30

Problem Possible cause Solution
Pages print, but are totally
blank.
The current job stops and
the following message is
displayed on the product’s
control panel:
Printer Jam
Clear Paper Pat h
The following message is
displayed on the product’s
control panel:
Door Open Or No print
cartridge
The sealing tape is still
in the print cartridge.
The file has blank
pages.
If making a copy, the
original might be
loaded incorrectly
There is a media jam. Clear the jammed media from the product. For
The print cartridge door
is open or there is no
print cartridge in the
product’s print cartridge
cavity.
Remove the print cartridge and pull out the
sealing tape. Reinstall the print cartridge. Try
printing the file again.
Check the file you are printing to determine
whether there is content on all of its pages.
The original must be loaded into the ADF print
side up. If loaded print side down, the copy will
print out blank.
further instructions on clearing media jams,
see the electronic user guide.
After the media jam has been successfully
cleared and all of the product doors and
panels are closed, the product either
completes the current job or returns to its
Ready state.
First, make sure you have correctly loaded a
print cartridge into your product. For
instructions on loading the print cartridge, see
“To install a print cartridge” on page 13.
After checking the print cartridge, close the
print cartridge door securely.
When the problem is solved, the product
either completes the current job or returns to
its Ready state.
The current job stops and
the following message is
displayed on the product’s
control panel:
Printer Tray Is Empty
Add Paper
26 3 Troubleshooting
The product is out of
paper.
Load paper into the media input tray or the
priority input tray. For instructions on loading
the media input trays, see “To install and load
the media input tray and priority input tray” on
page 14.
If media is already loaded, remove it, check
for and remove any jams, and reload the input
tray.
When the problem is solved, the product
either completes the current job or returns to
its Ready state.
ENWW
Page 31

Problem Possible cause Solution
The current copying or
scanning job stops and the
following message is
displayed on the product’s
control panel:
Doc Feeder Jam. Clear,
Reload
The current copying or
scanning job stops and
one of the following
messages is displayed on
the product’s control panel:
50 Fuser Error
51 Laser Error
52 Scanner Erro r
57 Fan Error
79 Service Erro r
CCD Scanner Error
Scanner Bulb
Failure
Software installation problems (Windows)
When installing software,
the following onscreen
message is displayed:
“Setup has determined that
you do not have enough
disk space on the selected
drive. Please reduce the
set of install components
or change the install drive.”
There is a media jam in
the automatic
document feeder
(ADF).
The product is
experiencing a critical
device error.
After you selected the
product software
components and data
directories, the
installation program
determined that there
was not enough space
on the hard drive you
specified. The software
requires at least 175
MB of available disk
space.
Clear any jammed or misfed media from the
ADF. For further instructions on clearing
media jams, see the electronic user guide.
After the media jam has been successfully
cleared, reload the job into the ADF.
Unplug the printer for 5 minutes, and then plug
it back in. If the error persists, contact HP
customer service at the number provided on
the support flyer included with the product, or
visit http://www.hp.com.
Try the following solutions:
• Select fewer components to install during
the installation process. This can be done
using the Custom install option.
• Delete any unnecessary files on the
selected drive and archive older data to
floppy disks or other storage media
before installing the product software.
• Install the product software on a different
hard drive. This can be done using the
Custom install option.
ENWW Troubleshooting your HP LaserJet 3300 series product 27
Page 32

Problem Possible cause Solution
The software did not
install.
The computer cannot read
the installation CD-ROM.
Software installation problems (Macintosh)
When installing software
on a Macintosh computer,
the product does not
appear in the Select
Device dialog.
You might not have
closed all of the
applications that were
running on your
computer. All
applications except
Systray and Explorer
should be closed
before running the
install program.
You did not specify the
correct CD-ROM drive.
The CD-ROM is
damaged.
The computer did not
detect the product
correctly.
To check for open applications in Windows
95, 98, or ME, press Ctrl+Alt+Delete. If any
applications other than Systray and Explorer
are open, select one and click End Task.
Repeat the procedure for all other open
applications, and then reinstall the software.
To check for open programs in Windows
NT 4.0 SP3, 2000, or XP, press
Ctrl+Alt+Delete. Select the Applications tab
(Task Manager in NT 4.0). If any applications
other than Systray and Explorer are open,
select one and click End Task. Repeat for all
other open applications, and then reinstall the
software.
Check for the proper disk drive letter. Often, it
is D or E for the CD-ROM drive.
Contact HP customer service at the number
provided on the support flyer that came with
your product or visit http://www.hp.com.
Make sure the product’s control panel display
reads Ready. From the installation program,
click Continue to return to the Sele c t De vice
dialog, and try to reinstall the product
software. If the computer still does not detect
the product, make sure that the USB cable or
the network cable is connected correctly.
Replace any faulty cables.
28 3 Troubleshooting
If TCP/IP is selected in the Select Device
dialog, make sure the IP address shown is
correct.
ENWW
Page 33

Problem Possible cause Solution
Print server installation problems
The HP Jetdirect print
server is unable to print a
configuration page or the
status lights are abnormal.
When the product is
connected to the network
using an HP Jetdirect print
server, the following
onscreen message is
displayed while installing
the product software: “All
in One configuration
cannot continue because
the required protocols
were not found on your
computer.”
The print server is not
correctly installed.
The IPX/SPX or
TCP/IP protocols are
not installed on your
computer.
Check all of the cable and power connections.
Make sure the product’s control panel display
reads Ready. Review the installation steps in
“Connecting your product to a network” on
page 19.
If you are using the HP Jetdirect 310x print
server with the HP LaserJet 3320n product,
see the electronic user guide for more detailed
troubleshooting information.
If you are using another HP Jetdirect print
server and HP LaserJet 3300 series product,
run the HP Jetdirect CD-ROM, select
Networking Help, and select
Troubleshooting.
Install an IPX/SPX protocol that is compatible
with NW Link or a TCP/IP protocol on your
computer.
ENWW Troubleshooting your HP LaserJet 3300 series product 29
Page 34

Problem Possible cause Solution
When the product is
connected to the network
using an HP Jetdirect print
server, you receive one of
the following messages:
“The configuration wizard
did not find your
HP LaserJ et 3300 All in
One on the network.”
“The configuration wizard
was unable to find an All in
One at the specified
address.”
“The Jetdirect model found
at the specified address
does not support All in One
devices.”
The HP Jet direct print
server is not configured
yet (TCP/IP).
The print server you
are using is not one of
the HP Jet direct print
servers that works with
the product.
The power cord is
loose.
The network cable is
loose.
The network cable is
faulty.
The USB cable is loose
or not directly
connected.
If you installed the product software, uninstall
it. Reinstall the software, and select
Connected to the network when prompted.
See “Network connection requirements” on
page 9 for a list of compatible HP Jetdirect
print servers.
Make sure the power cord is securely
connected to the product and the power
source. Also, make sure that the power
adapter for the HP Je tdirect print server is
securely connected to the power source.
Make sure that the network cable connecting
the HP Jetdirect print server to the network
wall outlet is securely attached. Make sure
that the network cable connecting the
computer to the network wall outlet is also
securely attached.
Try another network cable.
Make sure the USB cable between the
HP J etdirect print server and the product is
securely connected.
The USB cable is
faulty.
The IP address is null.
If you have another USB 1.1 cable, try
connecting it to the product and the
HP Jetdirect pri n t se r ver.
Print a configuration page for the network by
pressing the test button on the print server’s
rear panel. If the IP address is 0.0.0.0, wait 2
minutes and print the configuration page
again. If the IP address is still 0.0.0.0, see the
electronic user guide for more information.
Where to go for more information
To access the electronic user guide from the product software
If you ha ve installed the pro duc t s oftware, you c an a cces s t he e le ctro nic
user guide by selecting User Guide from the software’s Help menu.
30 3 Troubleshooting
ENWW
Page 35

To access the electronic user guide from the product CD-ROM
If you have not installed the product software, you can still view the
electronic user guide on your computer by following these steps:
1 To open the Welcome screen, insert the product so ftw a r e CD- ROM
in your computer’s CD driv e .
• If the Welcome screen does not open, click Start on the
Windows task bar, click Run, type Z:\setup (where Z is your CD
drive letter), and click OK.
2 From the Welcome screen, clic k Documentation.
3 From the D ocu me nta t io n scre en, cl ick PDF Format or HTML Help
Format in the User Guide Viewi ng Options box.
Note If you are runnin g Wind ow s 95 on y our c ompu ter, you m us t ha v e Internet
Explorer 4.01 or g reater to v iew or print the electr onic user guid e in HTML
Help format.
To view or print the electronic user guide in PDF format, you must have
Adobe® Acrobat Reader installed on your computer.
To get information by phone
If your problem remains unresolved after you try the solutions provided
in the troubleshooting table, contact HP customer service at the number
provided on the support flyer.
To get information on the Internet
Whether you are a beginner or advanced user, HP Customer Care
online is a great place to learn more about your product. Click your way
to the answ ers, tr aining , and softw are upd ates yo u need, 24 ho urs a da y,
7 days a week, all at no charge to you.
In the U.S., visit http://www .hp .com/support/lj3300 (site is in English). In
Europe, visit http://www.hp.com/cposupport/eschome.html and click on
the Choose your own country/language link.
To get information by e-mail
Get assistance conveniently and quickly with e-mail. E-mail your
question to HP, and you will receive a reply within 24 hours on business
days. It’s that simple. E-mail questions from HP’s web site at
http://www .hp.com/support/lj3300 (s i t e is i n En g l i s h ) .
ENWW Where to go for more information 31
Page 36

Page 37

Page 38

copyright © 2002
Hewlett-Packard Company
www.hp.com/support/lj3300
english
*C9124-90952*
*C9124-90952*
C9124-90952
 Loading...