

Page 1
Page 2
Page 3
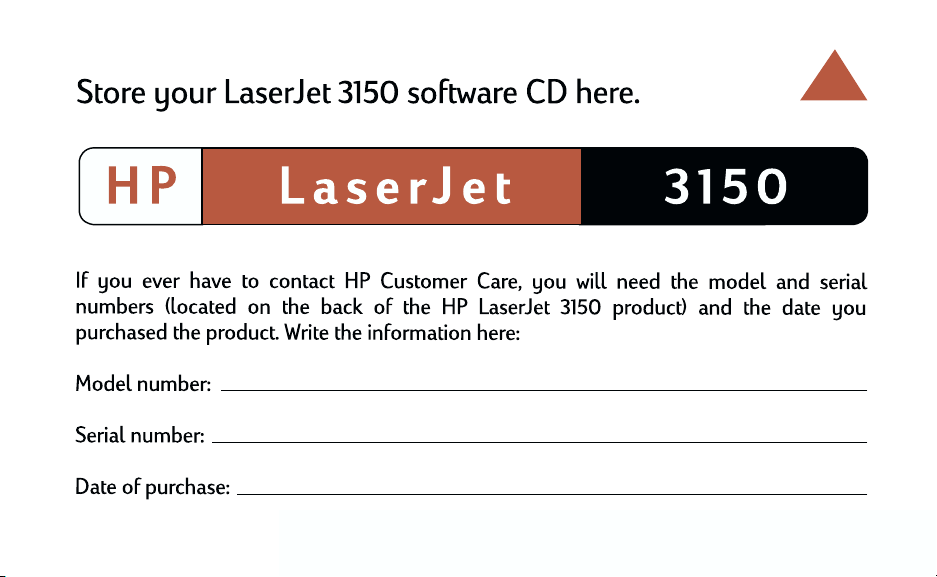
Remove paper from the input tra y before
loading more paper to ensure proper
paper feeding. Attach this label to the
product as a reminder.
EN
1
Page 4

2
EN
Page 5

HP LaserJet 3150 Product
G etting S tarte d Guide
Page 6

Copyright Information
© 1999 Hewlett-Packard
Company
All Rights Reserved.
Reproduction, adaptations, or
translation without prior written
permission is prohibited except
as allowed under copyright
laws.
Part Number: C4256-90927
First Edition, February 2000
Warranty
The information contained in
this document is subject to
change without notice.
Hewlett-Packard makes no
warranty of any kind with
respect to this information.
HEWLETT-PACKARD
SPECIFICALLY DISCLAIMS
THE IMPLIED WARRANTY OF
MERCHANTABILITY AND
FITNESS FOR A PARTICULAR
PURPOSE
Hewlett-Packard shall not be
liable for any dire ct, indirect,
incidental, consequential, or
other damage alleged in
connection with the furnishing or
use of this information.
NOTICE TO U.S.
GOVERNMENT USERS:
RESTRICTED RIGHTS
COMMERCIAL COMPUTER
SOFTWARE: Use, duplication,
or disclosure by the
Government is subject to
restrictions as set forth in
subparagraph (c)(1)(ii) of the
Rights in Technical Data Clause
at DFARS 52.227-7013.
Material scanned by this
product may be protected by
governmental laws and other
regulations, such as copyright
laws. The customer is solely
responsible for complying with
all such laws and regulations.
Trademark Credits
JetSuite is a trademark of
eFax.com, Inc. Microsoft,
Windows, and MS-DOS are
U.S. registered trademarks of
Microsoft Corporation.
E
NERGY STAR is a U.S.
registered service mark of the
U.S. EPA. CompuServe is a
trademark of CompuServe, Inc.
All other products mentioned
herein may be trademarks of
their respective companies.
This product is approved
for use in the following
countries only:
Canada and the United
States.
Local country laws may prohibit
the use of this product outside
of the countries specified. It is
strictly forbidden by law in most
countries to connect
nonapproved telecommunications equipment (fax
machines) to public telephone
networks.
Safety Informa tion
WARNING!
Potential Shock Ha z a rd
Always follow basic safety
precautions when using this
product to reduce risk of injury
from fire or electric shock.
1 Read and understand all
instructions in the user
guide.
2 Observe all warnings and
instructions marked on the
product.
3 Use only a grounded
electrical outlet when
connecting the
HP LaserJet 3150 product
to a power source. If you
don’t know whether the
outlet is grounded, check
with a qualified electrician.
4 Do not touch the contacts
on the end of the
telephone cord or any of
the sockets on the
HP LaserJet 3150 product.
Replace damaged cords
immediately.
5 Never install telephone
wiring during a lightning
storm.
6 Unplug this product from
wall outlets and telephone
jacks before cleaning.
7 Do not install or use this
product near water or
when you are wet.
8 Install the product securely
on a stable surface.
9 Install the product in a
protected location where
no one can step on or trip
over the line cord and the
line cord will not be
damaged.
10 If the product does not
operate normally, see
chapter 8 in the
11 Refer all servicing
questions to qualified
personnel.
Information regarding FCC
Class B, Parts 15 and 68
requirements can be found in
Appendix A in the
user guide
user guide
.
.
Hewlett-Packard Company
11311 Chinden Boulevard
Boise, Idaho 83714 U.S.A.
Page 7

Contents
Introduction . . . . . . . . . . . . . . . . . . . . . . . . . . . . . . . . . . . . . . . . . . . . 7
Checking the box contents . . . . . . . . . . . . . . . . . . . . . . . . . . . . . . . . 8
Recording important information. . . . . . . . . . . . . . . . . . . . . . . . . 9
Choosing an installation . . . . . . . . . . . . . . . . . . . . . . . . . . . . . . . . . 10
Checking the phone line and computer. . . . . . . . . . . . . . . . . . . . . . 11
1 Insta lling hardwa re
Identifying parts. . . . . . . . . . . . . . . . . . . . . . . . . . . . . . . . . . . . . . . . 15
Installing the toner cartridge . . . . . . . . . . . . . . . . . . . . . . . . . . . . . . 18
Attaching supports. . . . . . . . . . . . . . . . . . . . . . . . . . . . . . . . . . . . . . 20
Attaching the paper loading label . . . . . . . . . . . . . . . . . . . . . . . . . . 21
Loading paper . . . . . . . . . . . . . . . . . . . . . . . . . . . . . . . . . . . . . . . . . 22
Connecting the product to the phone line . . . . . . . . . . . . . . . . . . . . 23
Connecting other devices to the phone line . . . . . . . . . . . . . . . . . . 26
Deciding what else to connect . . . . . . . . . . . . . . . . . . . . . . . . . 26
Connecting other devices, overview. . . . . . . . . . . . . . . . . . . . . 29
Connecting the product power cord . . . . . . . . . . . . . . . . . . . . . . . . 34
Testing the hardware . . . . . . . . . . . . . . . . . . . . . . . . . . . . . . . . 36
2 Finishing the installa tion
Option A: Connecting directly to a computer. . . . . . . . . . . . . . . . . . 38
Connecting to a computer. . . . . . . . . . . . . . . . . . . . . . . . . . . . . 39
Preparing for software installation . . . . . . . . . . . . . . . . . . . . . . 40
a. Installing the software for a directly connected computer. . . 42
b. Printing a document as a test . . . . . . . . . . . . . . . . . . . . . . . 43
Sharing the product . . . . . . . . . . . . . . . . . . . . . . . . . . . . . . . . . 44
Option B: Connecting to a network . . . . . . . . . . . . . . . . . . . . . . . . . 45
Preparing for software installation . . . . . . . . . . . . . . . . . . . . . . 46
a. Installing software for network computers . . . . . . . . . . . . . . 47
b. Printing a document as a test . . . . . . . . . . . . . . . . . . . . . . . 48
Option C: Completing a standalone installation . . . . . . . . . . . . . . . 49
a. Setting the time and date . . . . . . . . . . . . . . . . . . . . . . . . . . . 50
b. Setting the fax header. . . . . . . . . . . . . . . . . . . . . . . . . . . . . . 51
c. Setting answer mode and rings to answer . . . . . . . . . . . . . . 53
d. Enabling distinctive ring detection . . . . . . . . . . . . . . . . . . . . 55
e. Printing a self-test report . . . . . . . . . . . . . . . . . . . . . . . . . . . 57
Troubleshooting . . . . . . . . . . . . . . . . . . . . . . . . . . . . . . . . . . . . . . . 58
HP Customer Care . . . . . . . . . . . . . . . . . . . . . . . . . . . . . . . . . . . . . 62
EN
5
Page 8

3 Exploring the product a nd software
What you will learn . . . . . . . . . . . . . . . . . . . . . . . . . . . . . . . . . . . . . 64
Exploring the product . . . . . . . . . . . . . . . . . . . . . . . . . . . . . . . . . . . 65
Loading items to be faxed, copied, or scanned . . . . . . . . . . . . 65
Sending a fax using the control panel . . . . . . . . . . . . . . . . . . . 66
Verifying fax capability . . . . . . . . . . . . . . . . . . . . . . . . . . . . . . . 67
Exploring the software. . . . . . . . . . . . . . . . . . . . . . . . . . . . . . . . . . . 68
Overview. . . . . . . . . . . . . . . . . . . . . . . . . . . . . . . . . . . . . . . . . . 68
Sending a fax using the Document Assistant . . . . . . . . . . . . . 73
Making a copy using the Document Assistant . . . . . . . . . . . . . 74
Scanning an item . . . . . . . . . . . . . . . . . . . . . . . . . . . . . . . . . . . 75
Scanning to text using OCR . . . . . . . . . . . . . . . . . . . . . . . . . . 77
Taking the next step . . . . . . . . . . . . . . . . . . . . . . . . . . . . . . . . . . . . 78
Warranty
Warranty information. . . . . . . . . . . . . . . . . . . . . . . . . . . . . . . . . . . . 79
Hewlett-Packard limited warranty statement . . . . . . . . . . . . . . 79
Year 2000 warranty . . . . . . . . . . . . . . . . . . . . . . . . . . . . . . . . . 80
Index
6
EN
Page 9

Getting Started Guide
Introduction
Thank you for purchasing the HP LaserJet 3150 product, a powerful
business tool with the capabilities of a full range of office equipment:
use it to print, fax, copy, and scan. Increase your productivity by doing
more than one task at a time. Send an electronic fax while the
HP LaserJet 3150 product makes copies, or scan a document while
printing.
Using this guide, you will check the box contents and phone line and
computer requirements. Then, the guide leads you through setting up
the product and learning how to do the most basic tasks in three easy
sections:
Installing ha rdware.
supports.
Finishing the insta llation.
computer using a parallel cable, connect the product to the
network using a HP JetDirect print server, or not to connect the
product at all (standalone). If you can connect the product to a
computer or network, HP strongly recommends doing so and
installing the software. This gives you the maximum product
functionality.
Exploring the product and softwa re.
tasks and get up and running quickly with your new HP LaserJet
3150 product.
At the end of each procedure in this guide is this paragraph:
Connect parts such as cables and
Connect the product directly to a
Discover how to do basic
Check your work
Use it to ensure that you completed the procedure successfully, or to
find the next one you need.
EN
Introduction
7
Page 10
C hecking the box contents
A
B
D
F
G
K
H
L
J
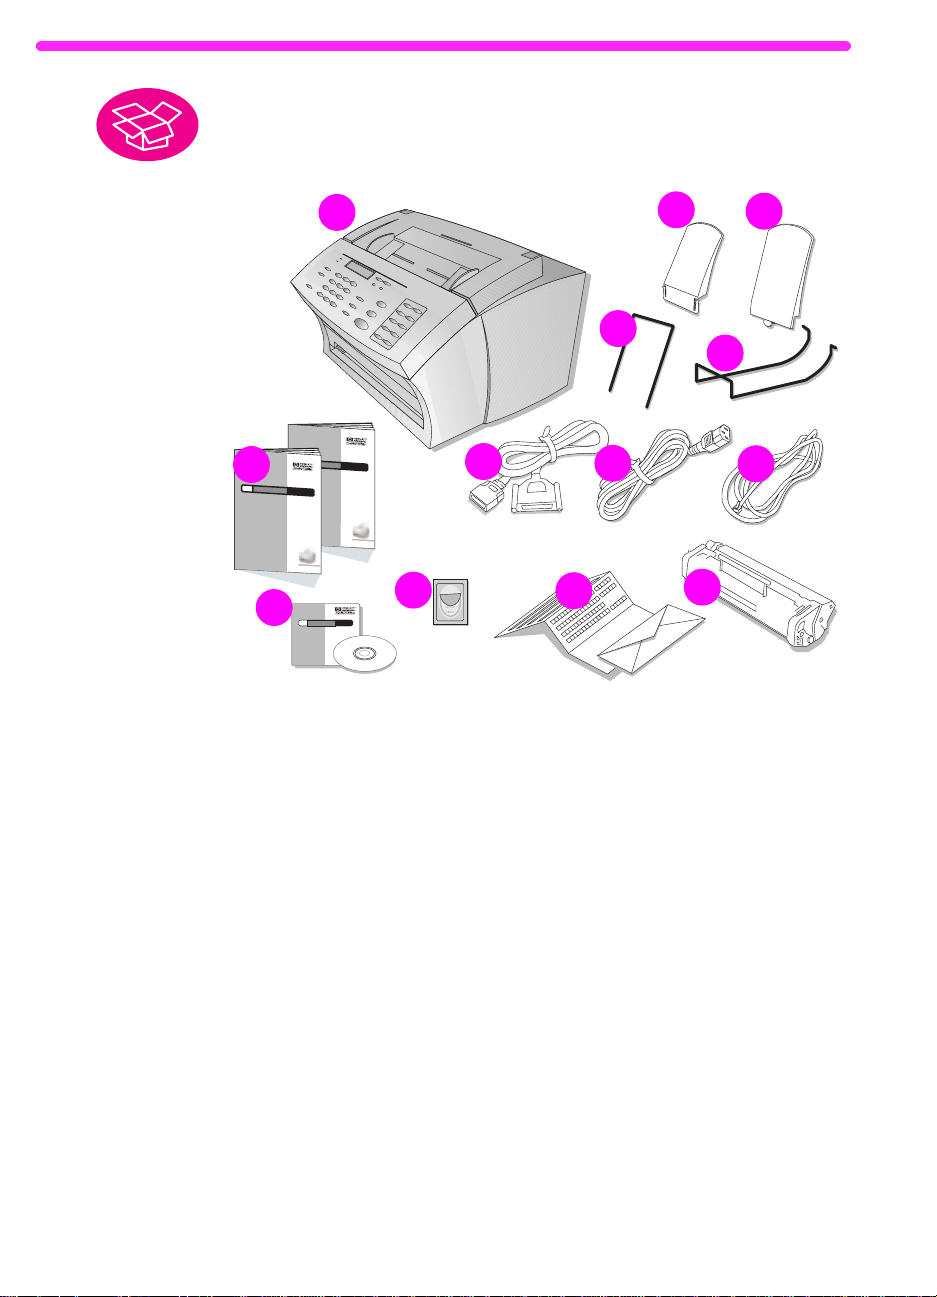
Unpack the box and check that it includes the following items:
A HP LaserJet 3150 product H Power Cord
C
E
I
M
8
B Paper Output Support I Telephone Cord
C Paper Input Support J Software on CD-ROM
D Document Feeder Support K Paper Loading Label
E Document Output Support L Product Registration Packet
F Documentation (User Guide and
This Getting Started Guide)
G IEEE-1284 Compliant Parallel
Cable (with a “C” Connector)
Save the box and packing material in case you need to move or ship
the HP LaserJet 3150 product later.
M HP LaserJet Toner Cartridge
EN
Page 11

Check your work
Does the package contain all of the items?
Go to "Recording important information” below.
Yes.
❏
Do one of the following:
No.
❏
• Contact your dealer for instructions regarding obtaining the
missing part or parts.
• If you are missing the software and have Internet access, visit
the website at www.hp.com/go/support/lj3150 and download
the software from there.
• Gather this information: the product serial number and model
number (on the back of the product), the item missing, and the
purchase date. Then, call HP Customer Care at:
Canada: (905) 206-4663
U.S.: (208) 323-2551
When you are ready, go to "Recording important information”
below.
R ecording important infor mation
EN
If you ever have to contact HP Customer Care, you will need the
product model number and serial number, located on the back of the
HP LaserJet 3150 product. Take a moment now to record the
information on the inside front cover of this guide. Because you will
also need the date of purchase, HP recommends storing your dated
sales receipt or proof of purchase in the pocket on the inside back
cover of this guide.
Check your work
When you are ready, go to “Choosing an installation” on page 10.
Checking the box contents
9
Page 12

C hoosing an installation
The HP LaserJet 3150 product can function in one of three
installations: as a standalone fax and copier not connected to a
computer, connected to a network using an HP JetDirect print server,
or directly connected to a computer. If it is connected to a computer
on the local area network (LAN), you can share the product with other
network users.
The product works in any of these situations, but feature availability
varies. This table shows which features are available depending on
how you connect the product.
Feature or Function: Connected
directly to
computer,
local user*
Faxing to and from the HPLaserJet 3150
product (walk-up)
Copying from the HP LaserJet 3150
product (walk-up)
Access through the control panel to
HP LaserJet 3150 product setup options,
fax and copy options, and setup for onetouch keys and speed-dial and group-dial
codes (walk-up)
Printing from your computer to the
HP La serJet 3150 product
Access to PC Fax Phone Books
Scanning from the HP LaserJet 3150
product to your computer
Faxing electronic documents from your
computer (PC faxing)
Optical character recognition (OCR)
software for converting scanned images
to editable text documents
Receiving faxes to your computer (PC
faxing)
Access to special copying features, such
as two or four pages per sheet (2 up and
4 up) and collation for very large
documents
Quick access through the software to
HP LaserJet 3150 product setup options,
fax options, and setup for one-touch keys
and speed-dial codes
* Available to user of the computer directly connected to the product.
** Available to other users on the network when Windows sharing is enabled from the computer directly
connected to the product.
✓✓✓✓
✓✓✓✓
✓✓✓✓
✓✓✓
✓✓
✓✓
✓✓
✓✓
✓
✓
✓
Connected
directly to
computer
(shared),
other users**
Connected
to network
via HP
JetDirect
print server
Standalone fax
and
copier, no
software
10
EN
Page 13

C hecking the phone line and computer
Before you begin connecting the hardware, make sure that you meet
the requirements for the phone line. If you are installing softw are, also
ensure that your computer or network meets the requirements.
C hecking phone line require ments
You can connect the HP LaserJet 3150 product to a phone line only
for fax calls (a dedicated line) or a phone line for both voice calls and
fax calls (a shared line). In most cases, you can choose either one.
Howeve r, the HP LaserJet 3150 product cannot work with digital
telephone lines (only with analog) and might not be able to work on a
shared line with telephone system features such as the automatic
answering systems often used in large companies, voice mail, call
waiting, and some other advanced features provided by your local
telephone company.
●
Important!
both fax and voice calls (a shared line) and have the types of
telephone system features mentioned above, HP recommends
getting a second phone line dedicated to fax calls.
●
Caution!
storms or for other reasons experiences numerous blac kouts , it is
strongly recommended that you purchase and use a telephone
line surge protector. Electrical surges and power interruptions can
damage the HP LaserJet 3150 product.
If you are trying to connect the product to a line for
If you live in an area that is subject to frequent electrical
Check your work
Have you decided to get a telephone line surge protector or second
phone line?
❏
❏
If you are going to install the software, go to “Checking
No.
computer or network requirements” on page 12. Otherwise, go to
“Installing hardware” on page 15.
If you need a second phone line, contact your local phone
Yes.
company. If you need a telephone line surge protector, you can
obtain one from your local computer or electronics retailer.
EN
Once you resolve these issues, go to “Checking computer or
network requirements” on page 12 if you are installing software.
Otherwise, go to “Installing hardware” on page 15.
Checking the phone line and computer
11
Page 14

Ch ecking compute r or networ k requireme nts
If you are installing software, y our computer or network needs to meet
the following minimum requirements.
Connecting dire ctly to a computer using a pa r allel cable
If you are connecting the product directly to a computer using a
parallel cable, your computer:
●
must be an IBM computer (or 100% compatible) with a 486 33
MHz processor or better (Pentium
for Microsoft
●
must be running Windows 3.1x, 9x, NT 4.0, or 2000.
●
must have 16 megabytes (MB) or more of random access
®
Windows NT 4.0 or 2000).
memory (RAM) for Windows 3.1x or 9x; 32 MB or more of RAM
for Windows NT 4.0 or 2000.
●
must have 65 MB or more of free hard-disk space.
●
should have a dedicated, IEEE-1284 bidirectional or ECPcompliant parallel port to which the HP LaserJet 3150 product
can be connected directly. If you have a device such as an
external disk drive or switch box connected to the computer’s
parallel port, you might have to unhook the device to connect and
use the HP LaserJet 3150 product, or use two parallel ports on
the computer.
®
90 MHz processor or better
12
Connecting to a network using an H P JetDire ct pr int ser ver
The computers that will be using the product software need to meet
the following requirements:
●
must be an IBM computer (or 100% compatible) with a 486 33
MHz processor or better (Pentium 90 MHz processor or better f or
Windows NT 4.0 or 2000).
●
must be running Windows 9x, NT 4.0, or 2000.
●
must have 16 megab ytes or more of RAM f or Windows 9x; 32 MB
or more of RAM for Windows NT 4.0 or 2000.
●
must have 65 MB or more of free hard-disk space.
EN
Page 15

For the network, you need the following:
You must have an installed network using the TCP/IP or IPX/SPX
●
network protocol. Circle the one you have . If y ou do not know, ask
the person who installed your network. (If you are using the IPX/
SPX network protocol, you must configure the HP JetDirect print
server using Direct mode,
servers are
You need a cable for your type of network connection (not
●
supported.)
not
Queue Server mode. Also, Novell
not
included). This cable is used to connect the print server to a
network jack. If you do not know what type you need, ask the
person who installed your network.
You need a supported HP JetDirect print server (not included).
●
Which one you use depends on the type of network connection
you have and how many devices y ou need to connect to the print
server.
•
HP JetDirect 170X (J3258
B
— J3258A is
not
supported) .
You can use this model if you have a 10Base-T network
connection and only need to connect the product to this print
server.
•
HP JetDirect 300X (J3263) with a firmware revision of
H.08.00 or higher*.
Use this model if you hav e a 10Base-T or
10/100Base-TX network connection and only need to connect
the product to this print server.
•
HP JetDirect 500X (J3265) with a firmware revision of
J.08 .0 0 or highe r*.
Use this model if you have a BNC,
10Base-T, or 10/100Base-TX network connection and need to
connect the product and up to two other devices to this print
server.
•
HP JetDirect 500X (J3264) with a firmware revision of
J.08 .0 0 or highe r*.
Use this model if you have a Token Ring
network connection. You can connect the product and up to
two other devices to this print server.
EN
Circle the one you have or you are buying.
* You can check the firmware revision number by printing a
configuration page for the print server. Instructions for printing the
configuration page and checking and upgrading firmware appear
later in the setup process in the "Option B: Connecting to a
network” section.
Checking the phone line and computer
13
Page 16

Check your work
Does your computer or network meet the requirements?
Yes. You are ready to begin. Go to “Installing hardware” on page
❏
15.
No. Either you will not be able to install the software , or it might not
❏
work correctly. Do one of the following:
• Install the software on a computer that meets the
requirements. Use the software and product with that
computer.
• Use the HP LaserJet 3150 product without installing the
software. The product will still work as a fax machine and
convenience copier.
• Upgrade your computer, network, or HP JetDirect print server
to meet the requirements. If you need a new print server, see
page 13 for a list of supported HP JetDirect print servers.
Once you resolve these issues, go to “Installing hardware” on
page 15.
14
EN
Page 17
1
Installing hardware
In this section, you will connect or install all of the parts, such as
cables and the toner cartridge.
the product on a sturdy, level surface in a well-ventilated area.
Identifying parts
Before setting up the HP LaserJet 3150 product, make sure you can
identify the following parts related to the scanner path and paper print
path.
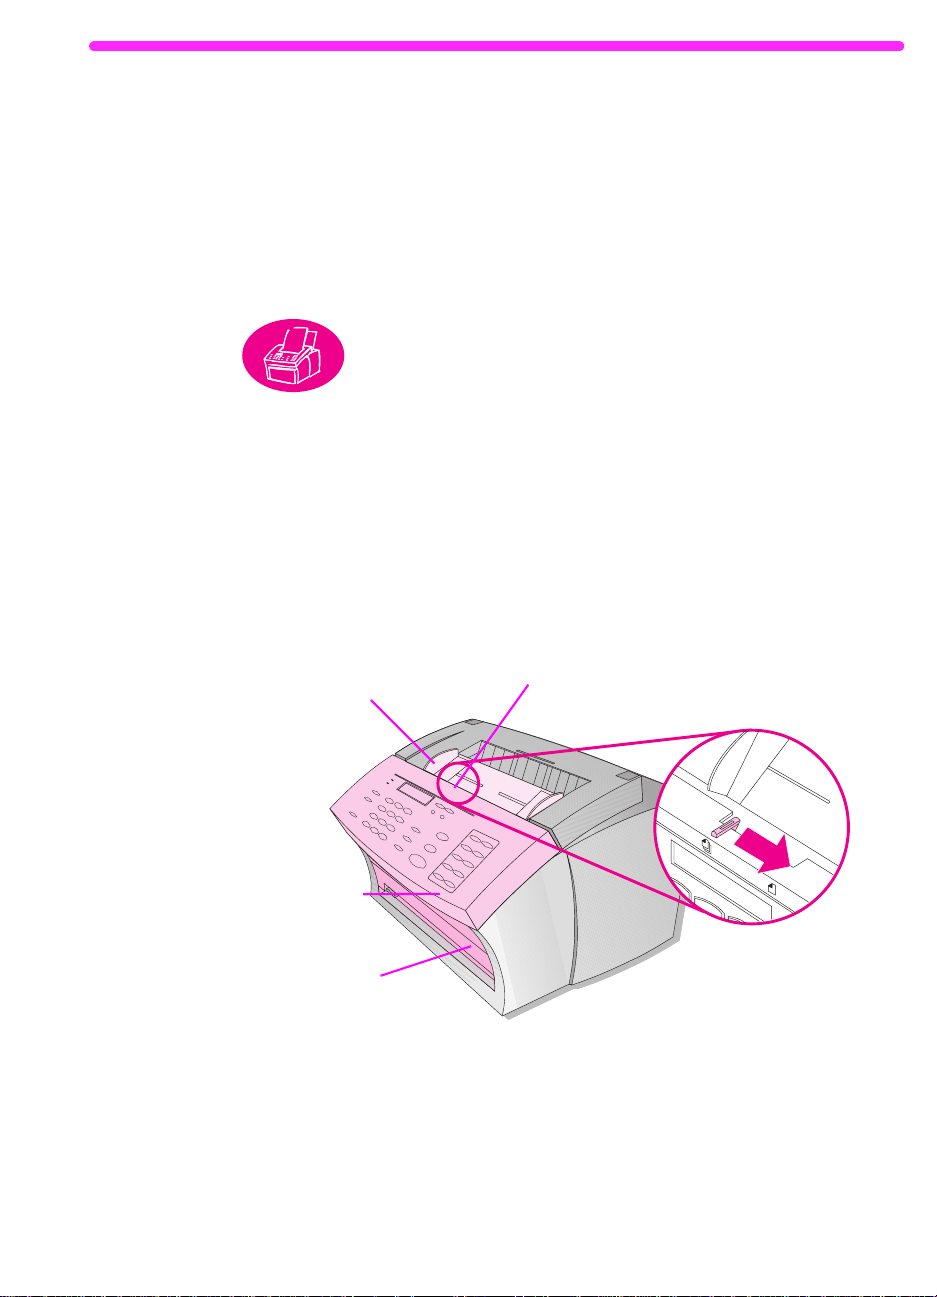
I dentifying sca nner pa th parts
Items to be faxed, copied, or scanned use the scanner path, which
consists of the following parts:
Before beginning, make sure to place
Document
Feeder Tray
ocument
elease Door/
ontrol Panel
Document
Output Slot
Special Media Lever (on top edge
of Document Release Door)
EN
Identifying parts
15
Page 18
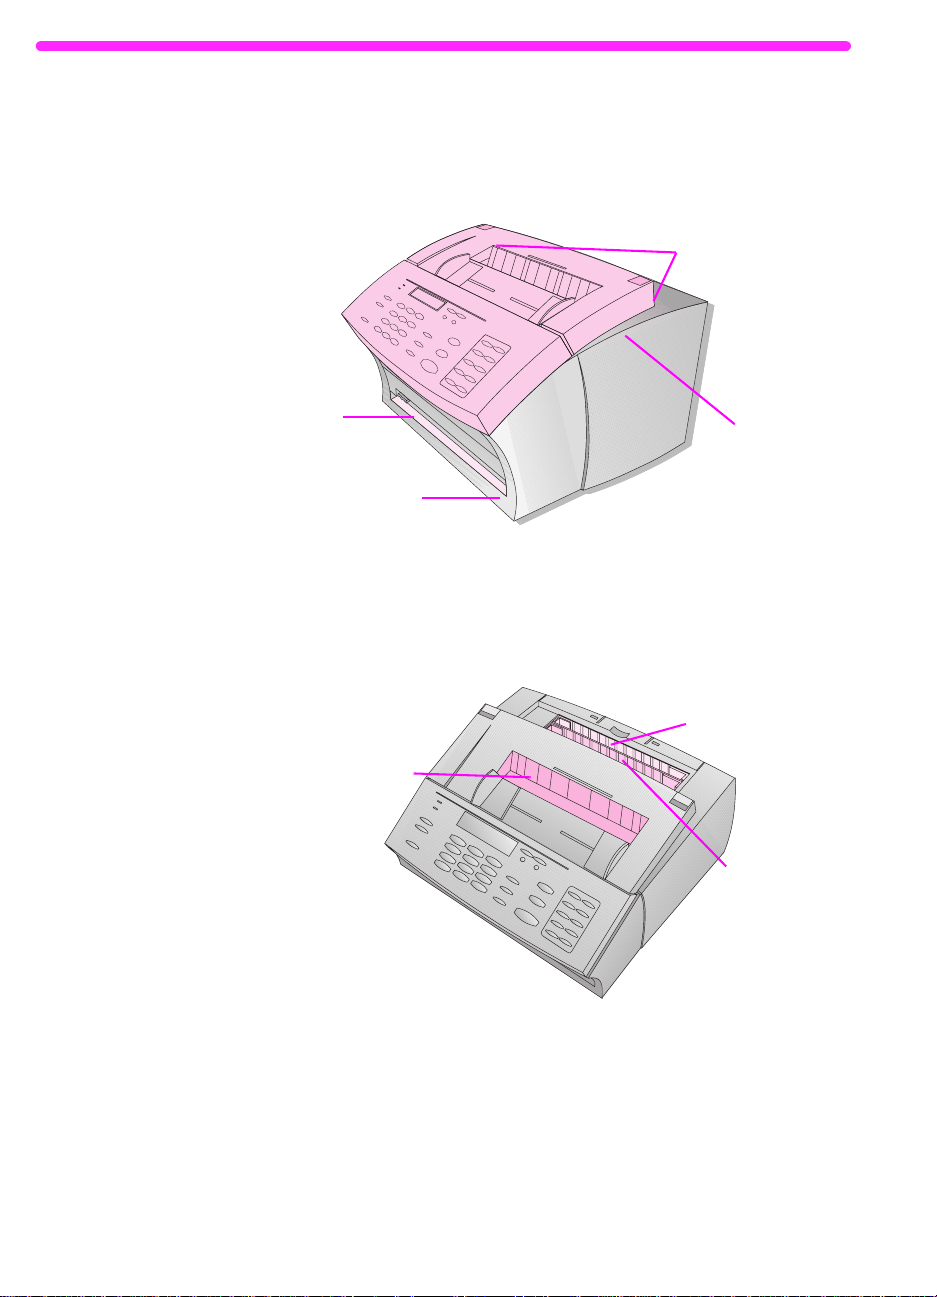
I dentifying printer pa th parts
Printer Door
Front Paper
Output
Printer Door
Release Latches
Paper P ath
Lever
Single-Sheet
Input Slot
Paper Input Bin
Paper Output Bin
Paper f or printing, receiving f axes, and copy output follows the printer
path. This path consists of the following parts:
16 1 Installing hardware
EN
Page 19
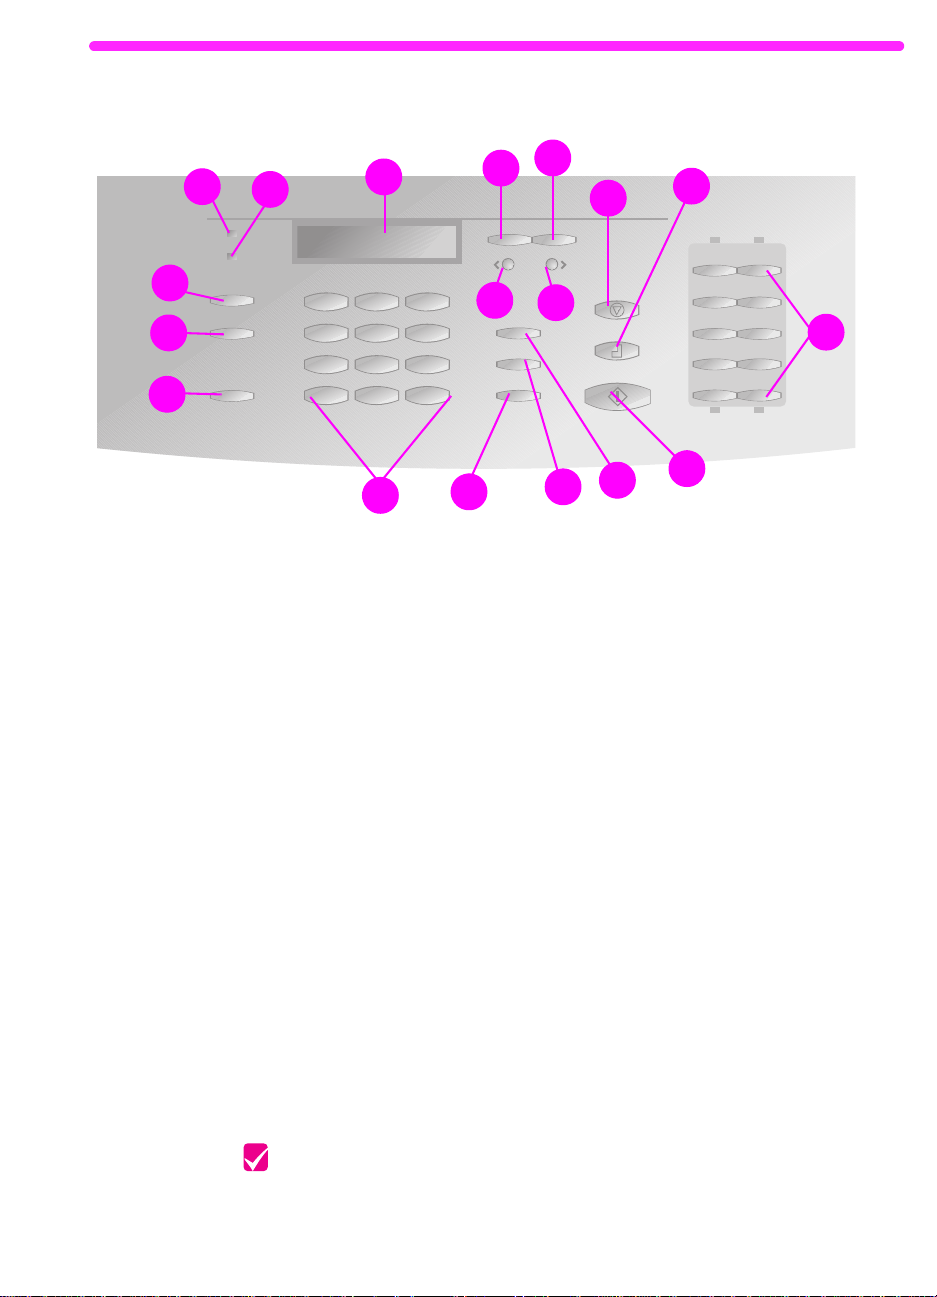
I dentifying control pa nel fe atures
A
B
C
D
E
H
I
R
F
G
Q
J
P
L
O
Look for the follo wing ke ys and features on the control panel. The y are used to f ax paper-based
documents, make copies, and adjust settings for the HP LaserJet 3150 product.
AReady Light – When solid, indicates the
HP LaserJet 3150 product is ready and has no
error conditions.
BError light – When solid, indicates an error
condition.
C Control P anel Display – Displays messages
or Menu settings.
D Enter/Menu key – Use to gain access to the
Menu, save a selection, or go down one level
in the Menu settings.
EBack Space key – Use to go up one level in
the Menu settings or to backspace when
typing text.
FBack Arrow key (<) – Use to scroll back
through items at the same Menu level or mo ve
back through text.
GForward Arrow key (>) – Used to scroll
forward through items at the same Menu lev el.
Also use to insert a space when typing text.
HStop/Clear key – Stops or clears any action in
progress or exits the Menu settings.
ICopy key – Starts the copy function. R Contrast key – Use to adjust the contrast, or
N
J One-touch keys – Store frequently dialed fax
KStart key – Starts sending paper faxes. Also
LManual Dial key – Use to dial each digit as it is
MSpeed-Dial key – Press this key plus a one-,
NRedial/Pause key – Press to redial the last fax
ONumeric keys – Use to enter fax numbers. Also
PVolume key – Use to adjust the volume for
QResolution key – Use to adjust the resolution, or
M
numbers.
starts scans in network mode.
pressed. Often used for dialing with calling cards
or international dialing.
two- or three-digit code to fax or e-mail to
previously stored fax numbers or e-mail
addresses.
number or use to insert a pause into a fax
number.
use to add letters when typing a name in the f ax
header or for speed-dials.
incoming and outgoing fax connection sounds.
sharpness, for the current fax or copy job.
difference between light and dark areas, for the
current fax or copy job.
K
EN
Check your work
When you are ready, go to “Installing the toner cartridge” on page 18.
Identifying parts
17
Page 20
1
2
3
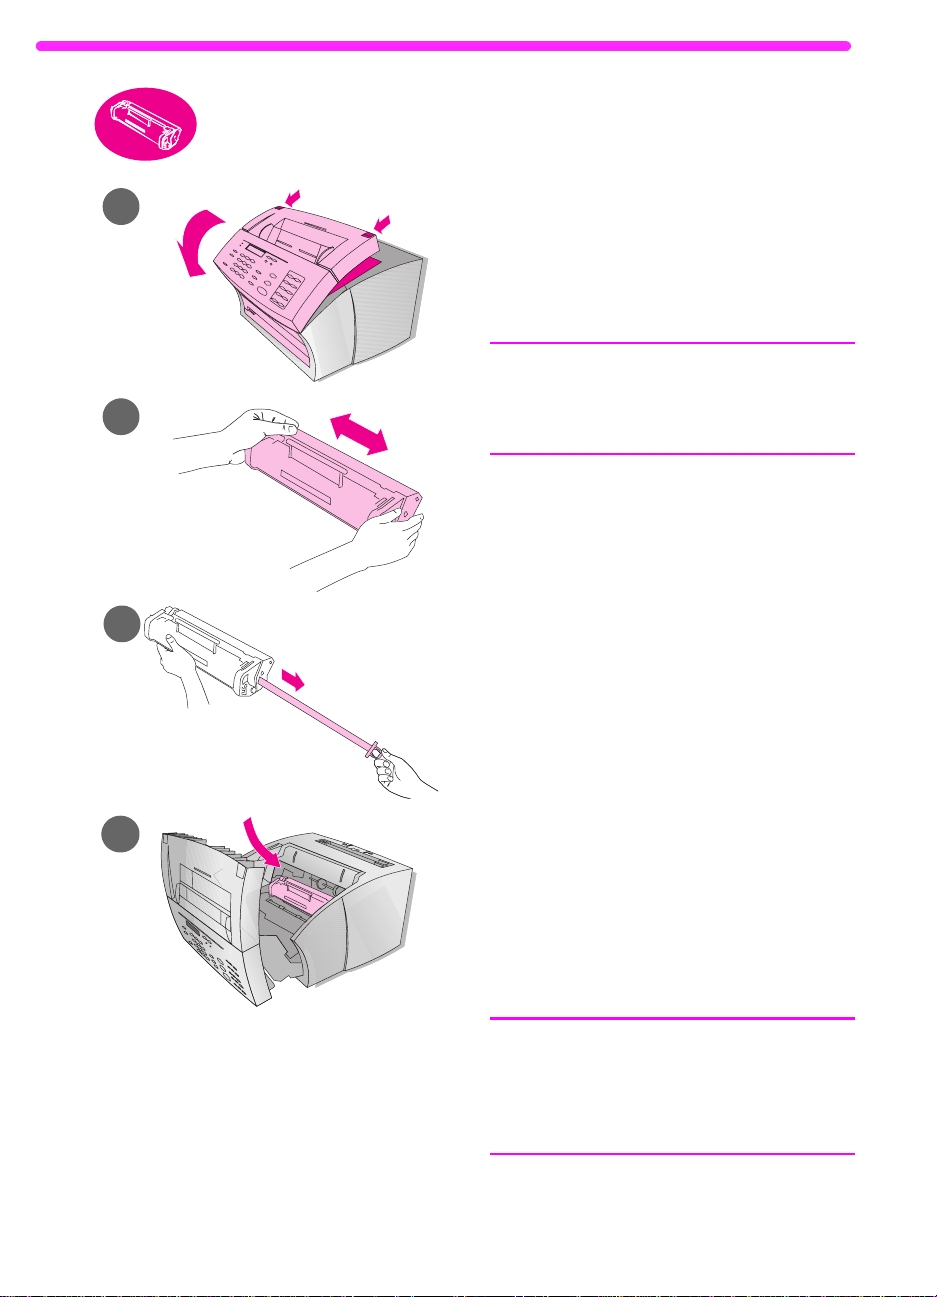
I nstalling the toner cartr idge
HP recommends using HP LaserJet
toner cartridges, such as the one
included in the box. HP has designed its
HP LaserJet 3150 product and toner
cartridges to work together to give you
optimal image quality and reliability.
CAUTION!
To prevent damage, do not expose the
toner cartridge to light for more than a
few minutes.
To install the toner ca rtridge
1 Use the two printer door release
latches to pull open the printer door.
2 Shake the toner cartridge several
times from side to side (about two
times per second) to distribute the
toner evenly.
4
18 1 Installing hardware
3 Grasp the end of the clear sealing
tape on the side of the cartridge
and pull firmly to remove the entire
length of the tape (about twice as
long as the cartridge).
4 Hold the cartridge by the handle (so
that the arrows are facing the
HP LaserJet 3150 product) and
slide the cartridge into the black
grooves in the product. Rotate the
cartridge firmly into place and close
the printer door.
Note
If toner gets on your clothing, wipe it off
with a dry cloth and wash clothing in cold
water . Hot water and heat from the dryer
set toner into fabric.
EN
Page 21

Check your work
Did you remove the tape strip , and did the printer door latch securely?
Go to “Attaching supports” on page 20.
Yes.
❏
Do the following:
No.
❏
• Make sure to remove the tape strip.
• Open and close the printer door again. If it still does not latch,
the toner cartridge may not be completely seated. Remove the
toner cartridge and reinsert it.
Reycling toner ca rtr idges
To reduce landfill waste, HP has adopted a recycling program for
toner cartridges. When you replace an empty HP LaserJet toner
cartridge, follow the instructions in the box of the new toner cartridge
to recycle the empty one. You can return the empty toner cartridge
free of charge using a postage-paid shipping label found inside the
new toner cartridge box.
Since 1990, the HP LaserJet Toner Cartridge Recycling Program has
collected more than 25 million used HP LaserJet cartridges that
otherwise may have been discarded in the world’s landfills.
EN
Installing the toner cartridge
19
Page 22
1
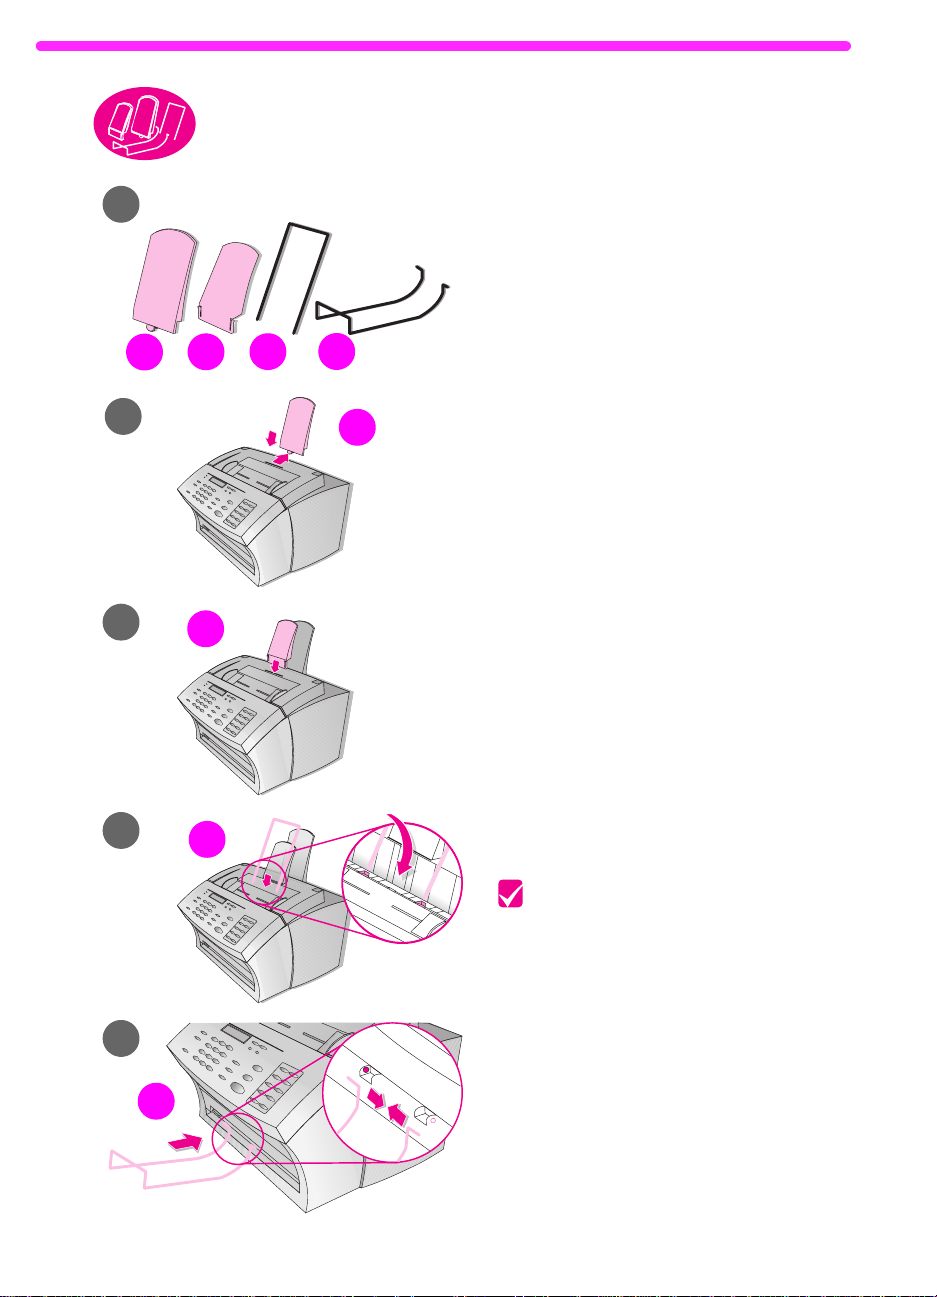
Atta ching supports
There are four supports you need to
install to support media or items feeding
into or coming out of the HP LaserJet
3150 product.
To atta ch supports
3
4
2
a
b
b
c
c
d
a
1 Locate the:
●
paper input support (a),
●
paper output support (b),
●
document feeder support (c),
●
document output support (d).
2 Align the paper input support (a)
with the groove on the paper input
bin and push the guide straight
back into the groove.
3 Insert the paper output support (b)
into the groove on the paper output
bin.
4 Insert the document feeder support
(c) into the grooves on the back of
the document feeder tray.
5 Squeeze the ends of the document
output support (d), insert it into the
holes on document output slot, and
release the support.
Check your work
5
d
20 1 Installing hardware
When you have attached the supports,
go to “Attaching the paper loading label”
on page 21.
EN
Page 23

2
3
Atta ching the paper loading label
Attach the label titled “Remove Paper
Before Reloading” to the HP LaserJet
3150 product.
To atta ch the la bel
Locate the label that was shipped in
1
the front of this guide.
Carefully remove the label from its
2
backing sheet.
Attach the label to the HP LaserJet
3
3150 product near the paper input
bin.
As the label indicates, always remove
and realign all paper together before
reloading. This reduces multiple feeds
and jams.
Check your work
EN
When you have attached the label, go to
“Loading paper” on page 22.
Attaching the paper loading label
21
Page 24
1
2
3
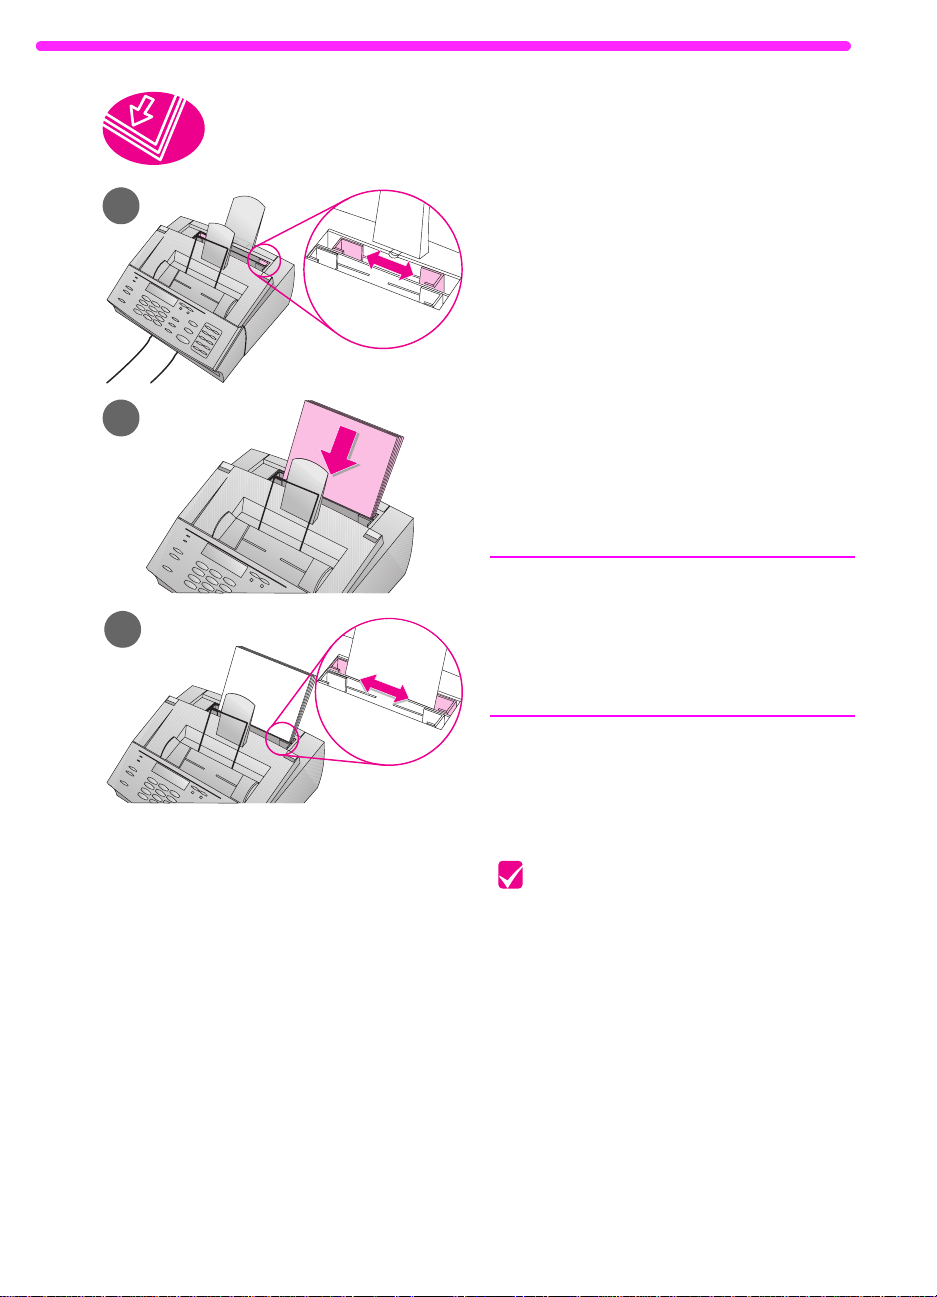
Loa ding paper
You can load up to 100 sheets of 20 lb
(75 g/m2) paper into the paper input bin.
The HP LaserJet 3150 product prints,
copies, and prints received faxes using
media from the paper input bin (or the
single-sheet input slot).
To load the pape r input bin
1 Adjust the guides on the paper input
bin to the size of media you are
loading.
2 Insert up to 100 sheets of paper
into the paper input bin. Be careful
not to overfill the bin.
Note
When adding paper to an existing stack
in the paper input bin, always remov e the
existing paper and realign it with the new
paper before loading to reduce multiple
feeds or jams.
22 1 Installing hardware
3 Readjust the guides to fit snugly
against the edges of the stack.
Check your work
After you have loaded the paper, go to
“Connecting the product to the phone
line” on page 23.
EN
Page 25

C onnecting the product to the phone line
In order for the HP LaserJet 3150 product to fax properly, it must be
the first device connected to the wall jack. Once you have decided
into which wall jack you w ant to plug the product, check the bo x belo w
for your situation and follow the instructions for that situation.
I only have one phone line coming to this wa ll jack. (T his
❏
includes anyone who has two phone numbers on one line with
distinctive ring service.)
only one phone line” on page 24.
Go to “To connect to a wall jack that has
I have tw o phone lines coming to this w all jack.
❏
connect to a wall jack that has two phone lines” on page 25.
Go to “To
EN
Connecting the product to the phone line
23
Page 26
1
2
3
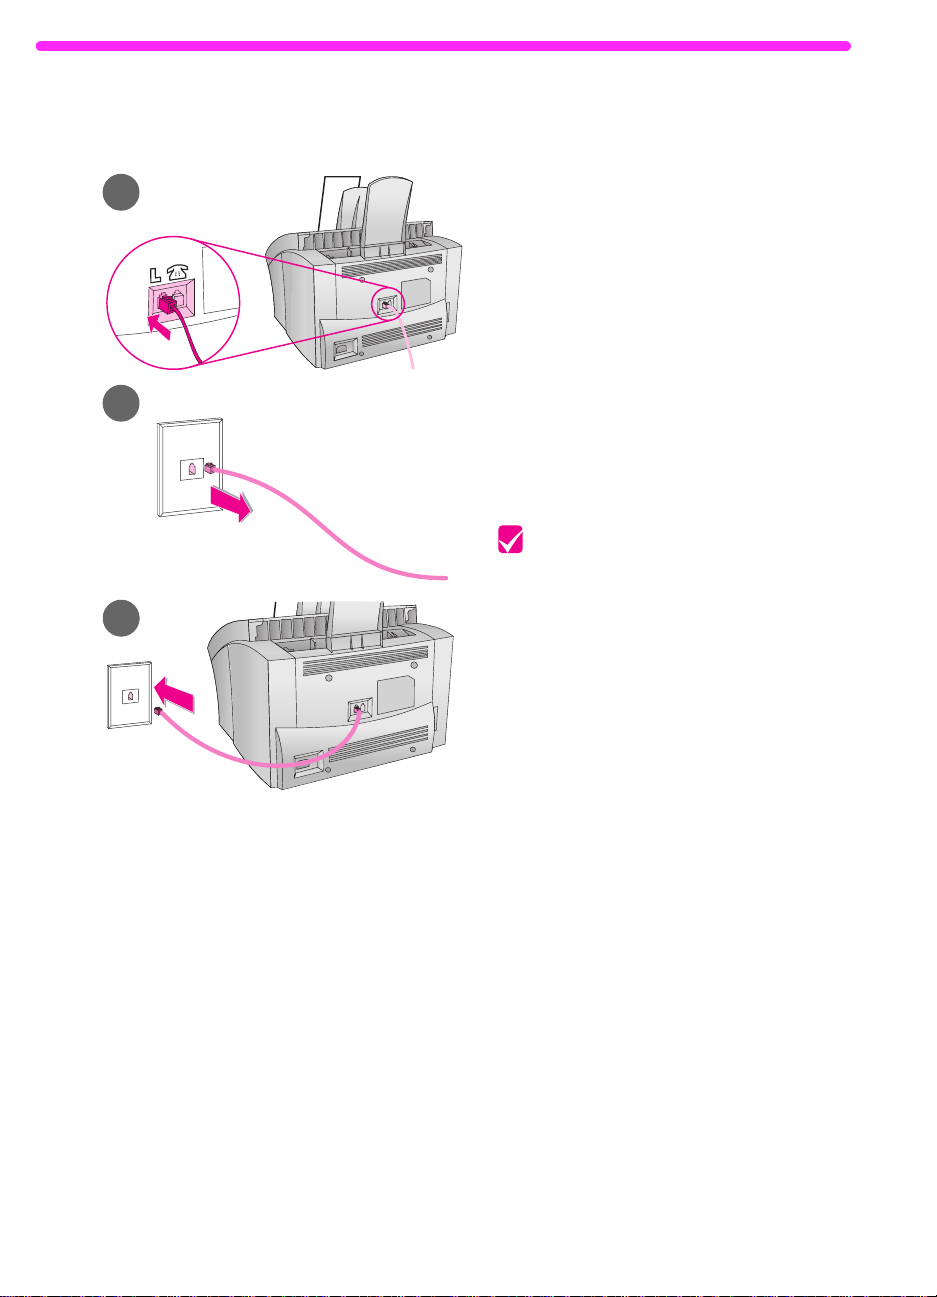
To connect to a w all ja ck that
ha s only one phone line
1 Plug the included telephone cord
into the jack on the back of the
product marked with an “L.”
2 If any telephone cord is plugged
into the wall jack, unplug the cord
and set it aside.
3 Plug the other end of the product’s
phone cord into the wall jack.
Check your work
Do one of the following:
●
If you are connecting other devices
such as a telephone to the phone
line, go to “Connecting other
devices to the phone line” on page
26.
●
If you are not connecting other
devices, go to “Connecting the
product power cord” on page 34.
24 1 Installing hardware
EN
Page 27
1
2
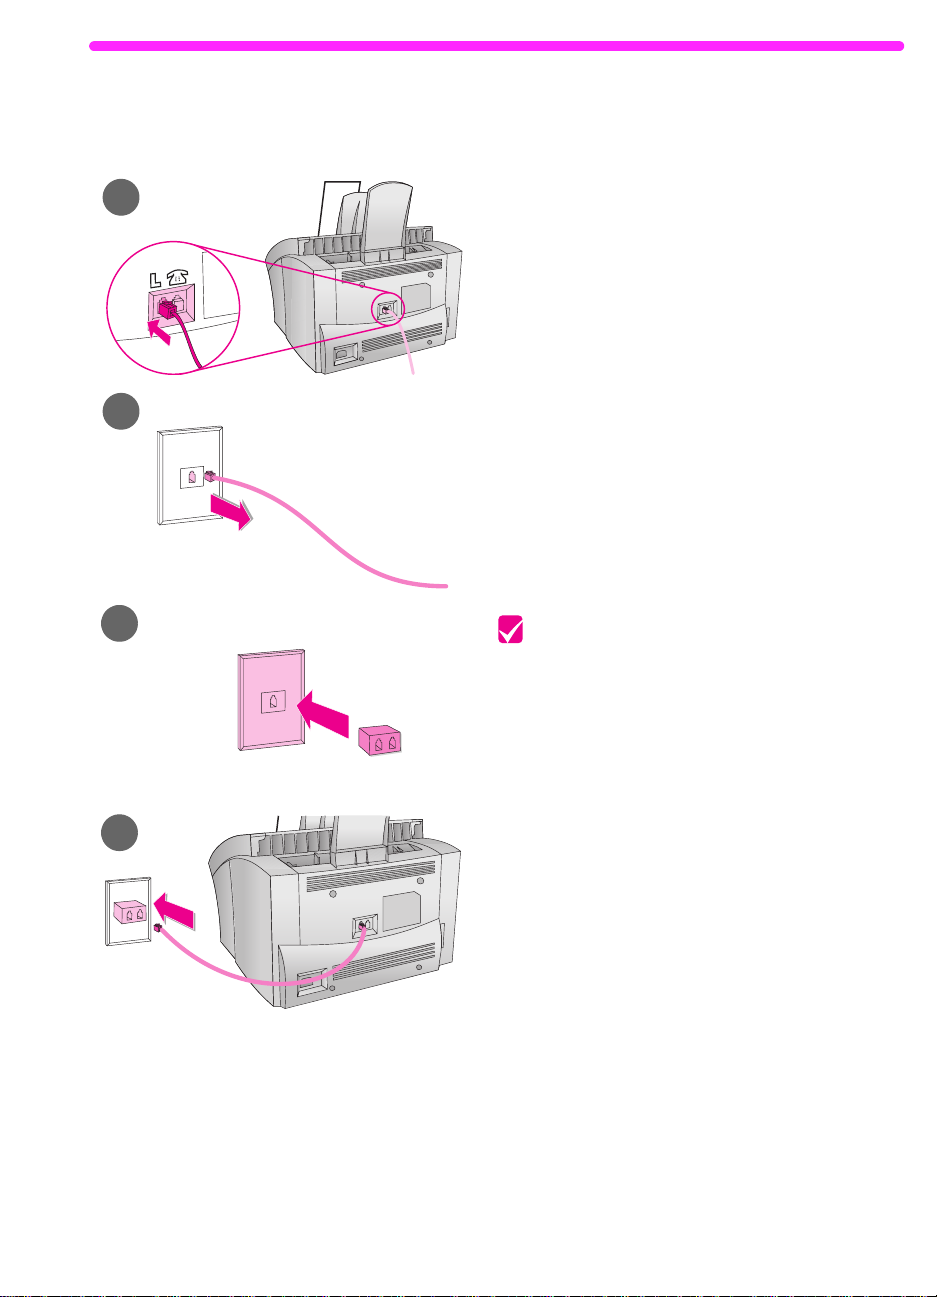
To connect to a w all ja ck that
ha s two phone line s
Plug the included telephone cord
1
into the jack on the back of the
product marked with an “L.”
If any telephone cord is plugged
2
into the wall jack, unplug it and set it
aside.
If you do not have a wall jack that
3
has a built-in splitter, plug a splitter
(not included) into the wall jack.
Plug the cord into the side of the
4
splitter for the fax number.
3
4
Check your work
Do one of the following:
If you are connecting other devices
●
such as a telephone to the same
phone line, go to “Connecting other
devices to the phone line” on page
26.
If you are not connecting other
●
devices, go to “Connecting the
product power cord” on page 34.
EN
Connecting the product to the phone line
25
Page 28

C onnecting other devices to the phone line
,I\RXKDYHDFRPSXWHUPRGHP
If you have an internal computer modem or an e xternal modem
please note that the HP LaserJet 3150 product
cannot
be used
as a data modem to communicate with other computers, to
send and receive e-mail, or to connect to the Internet. You must
keep the computer modem connected to a phone line for these
purposes.
In this section, you will decide what (if any) other devices to connect
to the same phone line as the HP LaserJet 3150 product and then
connect them.
D eciding wha t else to connect
In the last step, you connected the HP LaserJet 3150 product to the
wall jack. Generally, there are only four other devices you might want
or need to connect to the same phone line:
●
a telephone
●
an answering machine
●
a caller ID box
●
an external modem or a computer with an internal modem
Which, if any, of these you connect to this phone line depends on your
situation, which should be one of the following situations.
26 1 Installing hardware
EN
Page 29

Situation 1: You connected the HP LaserJet 3150
product to a wall ja c k with a phone line for fax ca lls
only (a dedica ted fax line ).
You do not need to connect any other devices. However:
You can connect your external modem or computer with internal
●
modem to this same phone line if you want to use the fax line to
access the Internet or e-mail.
You can connect an extra telephone to this wall jack if you would
●
like to make
To connect any of these devices to the same phone line as the
HP LaserJet 3150 product, go to “Connecting other devices,
overview” on page 29. If you have another wall jack for this phone
line, you can connect the extra phone and/or external modem or
computer with internal modem to the other wall jack.
outgoing
voice calls on this phone line.
Note
Because this is a dedicated fax line, you should never have an
answering machine or computer voicemail connected to it.
using computer voicemail, you
modem or the external modem to your dedicated
connect to the Internet or e-mail using the dedicated voice line.
connect the computer with internal
must
voice
If you are
line. You will
Situation 2: You connected the HP LaserJet 3150
product to a wall ja c k with a phone line for fax a nd
voice calls ( a sha red line) .
Connect any other devices you ha ve to this phone line . To connect the
other devices you have to the same wall jack as the product, go to
“Connecting other devices, overview” on page 29.
If you have another wall jack for this phone line, you can connect
some of the devices to that wall jack. However, if you have an
answering machine or computer with voicemail, mak e sure to connect
it to the same wall jack as the HP LaserJet 3150 product.
EN
Connecting other devices to the phone line
27
Page 30

S pecia l situations
You have tw o phone line s coming into one wa ll jack.
When you connected the HP LaserJet 3150 product, you should hav e
plugged it into a splitter connected to the wall jack. Proceed as if that
side of the splitter is a phone line for fax calls only (a dedicated line).
See “Situation 1” above.
You have one phone line with two phone numbe rs and distinctive
ring service.
Use the same guidelines in “Situation 2” above for connecting other
devices. You will change settings for distinctive ring later in the setup.
28 1 Installing hardware
EN
Page 31

C onnecting other de vices, overview
PhoneAnswering
Machine
External
Modem
Computer with
Internal Modem
HP LaserJet
3150 Product
Line
Phone
Line
Phone
Line
Phone
Line
Phone
Line
Phone
Caller
ID box
If you are not connecting one (or more) of the devices shown, just
cross it out. Then, in the order indicated, you will connect the devices
you do have to the HP LaserJet 3150 product.
product and other devices” on page 30 to begin step-by-step
instructions.
See “a. Preparing the
EN
Keep in mind these important points:
The HP LaserJet 3150 product
●
the wall jack. If it isn’t, it cannot answer incoming fax calls.
As the drawing indicates, always plug between the “Line” jack on
●
one device and the “Phone” jack on another device.
Some computers have a second “Line” jack which is used to
●
connect the computer to a dedicated
second “Line” jack, check your computer’s documentation to
ensure you are connecting to the correct “Line” jack.
be the device connected into
must
line. If you have a
voice
Connecting other devices to the phone line
29
Page 32

a. Pre par ing the product a nd other de vices
1 Unplug all devices from their power sources.
2 Remove the plastic insert from the “Phone” jack on the back of
the HP LaserJet 3150 product.
b. Connecting a computer with an internal modem
Did you decide to connect a computer with an internal modem to the
same wall jack as the HP LaserJet 3150 product?
No. Go to “c. Connecting an external modem” on page 31.
❏
❏
30 1 Installing hardware
Yes. Plug the computer’s cord into the “Phone” jack on the
HP LaserJet 3150 product.
Line
Phone
EN
Page 33

c. Conne cting an e xter nal modem
Did you decide to connect an external modem to the same wall jack
as the HP LaserJet 3150 product?
Go to "d. Connecting a caller identification box.”
No.
❏
Plug the external modem’s cord to the “Phone” jack on the
Yes.
❏
HP LaserJet 3150 product (or on the computer with an internal
modem).
Line
Phone
d. Conne cting a ca ller identifica tion box
EN
Did you decide to connect a caller identification box to the same wall
jack as the HP LaserJet 3150 product?
Go to "e. Connecting an answering machine.”
No.
❏
Plug the caller identification box’s cord into the “Phone” jack
Yes.
❏
on the HP LaserJet 3150 product
connected
.
Connecting other devices to the phone line
or the last device you
Line
Phone
31
Page 34

e. Connecting an answering machine
Did you decide to connect an answering machine to the same wall
jack as the HP LaserJet 3150 product?
No. Go to "f. Connecting a telephone.”
❏
Yes. Plug the answering machine’s cord into the “Phone” jack on
❏
the HP LaserJet 3150 product
or the last device you connected
Line
Phone
f. Connecting a telephone
Did you decide to connect a telephone to the same wall jack as the
HP LaserJet 3150 product?
.
❏
❏
32 1 Installing hardware
No. Go to "g. Reconnecting to the power source.”
Yes. Plug the telephone’s cord into the “Phone” jack on the
HP LaserJet 3150 product
or the last device you connected
.
EN
Page 35

g. Re connecting to the pow er source
Plug all devices you just connected back into their power source.
Check your work
After ensuring that all phone cords are securely connected, go to
“Connecting the product power cord” on page 34.
EN
Connecting other devices to the phone line
33
Page 36

C onnecting the product pow er cord
The HP LaserJet 3150 product does not
1
have a power switch. It turns on when
the power cord is connected.
CAUTION!
HP does not recommend using battery
backup or uninterruptible power supplies
with this product. Using them could
damage the product.
To connect the product po wer cord
1 Connect the power cord to the connector on the back of the
HP LaserJet 3150 product.
2 Plug the other end into a grounded power strip or wall outlet.
Once the power is connected, the product turns on and runs an
internal self-test.
Note If you have plugged the product into a power strip , keep the power strip
turned on at all times. Otherwise, the product cannot receive faxes.
34
EN
Page 37

Check your work
Does the control panel display say:
Fax Header
Yes.
❏
No.
❏
• Unplug the power cord from the power source and the product.
• If you plugged the power cord into a surge protector, unplug
• If you received the message
When you do see
Ready
or
Go to “Testing the hardware” on page 36.
Do the following:
Then, replug it in.
the power cord and plug it directly into a working wall outlet.
unplug the HP LaserJet 3150 product’s
wall and the product and then replug it in. Then, press and
hold S
TOP/CLEAR
again for a dial tone.
If this still does not produce a dial tone, plug the product phone
cord into another wall jack and test again, plug a telephone
into the wall jack and try to make an outgoing call, or try using
a different phone cord. This ensures that the wall jack and
phone cord are working.
, go to “Testing the hardware” on page 36.
?
Ready
for seven seconds so the product will check
Use MENU or Software to Set Fax Header
Use MENU or Software to Set
Self Test: No Dial Tone
cord from the
phone
,
or
EN
Connecting the product power cord
35
Page 38

Testing the hardware
After plugging in the power cord, you should be able to print the
demonstration page and make a copy of it. This test ensures that the
hardware is working properly.
2
3
To test the hardware
1 At the product control panel, press
V
OLUME+CONTRAST
The demonstration page prints.
2 Adjust the guides in the document
feeder tray to the size of the page.
3 Place the page top first, face down,
into the document feeder tray. Wait
for the HP LaserJet 3150 product to
load it.
4 Press C
The HP LaserJet 3150 product makes
one copy and returns to the READY state.
OPY
.
simultaneously.
Check your work
Were you able to print and copy the demonstration page?
Yes. Great! You have finished the hardware installation. Save the
❏
demonstration page for use later in the setup , and go to “Finishing
the installation” on page 37.
36
No. Try printing and copying the page again, making sure to press
❏
(
not
C
OPY
Once you have printed and copied the demonstration page, go to
“Finishing the installation” on page 37.
S
, which would try to send the page as a fax).
TART
EN
Page 39

2
Finishing the installation
In this section, you will connect the product directly to a computer
using a parallel cable, connect the product to the network using a
HP JetDirect print server, or not to connect the product at all
(standalone). If you can connect the product to a computer or
network, HP strongly recommends doing so and installing the
software. This gives you the maximum product functionality.
Check your work
Choose one of the following installations:
I am conne cting the product directly to a compute r using a
❏
par alle l cable.
on page 38.
I am conne cting the product to the networ k using an
❏
HP JetDire ct pr int ser ver.
network” on page 45.
See “Option A: Connecting directly to a computer”
See “Option B: Connecting to a
I am not connecting the product to a computer or network.
❏
“Option C: Completing a standalone installation” on page 49.
See
EN
37
Page 40

O ption A: Connecting directly to a
compute r
In this section, you will do the following:
Connect the product to a computer using a parallel cable.
❏
Install the software.
❏
If you want, share the product with other network users so they
❏
can print to it. Note that sharing the product may slow down your
computer while other users are printing to the product.
See the pages that follow for step-by-step instructions.
38 2 Finishing the installation
EN
Page 41

2
3
C onnecting to a computer
Use this procedure to connect the
product to a computer using a parallel
cable.
Important!
The HP LaserJet 3150 product should
be connected directly to a dedicated
parallel port on the computer. See
“Checking computer or network
requirements” on page 12 for more
information.
To connect the product to a compute r
Turn off the computer.
1
Squeeze the clips on the sides of the parallel cable and attach it
2
to the connector on the back of the HP LaserJet 3150 product.
Gently tug on the cable to ensure it is securely connected, and
then push it back in.
CAUTION!
EN
Connect the other end of the cable to a parallel port on the
3
computer. Secure the cable by tightening the screws.
Turn the computer on again.
4
Do not connect the parallel cable to a serial port on the computer. Doing
so can damage the HP LaserJet 3150 product. If you need help locating
the parallel port, see the documentation for the computer.
Check your work
Go to “Preparing for software installation” on page 40.
Option A: Connecting directly to a computer
39
Page 42

Preparing for software installation
This section contains instructions for installing the HP LaserJet 3150
x
software on a computer running Windows 3.1
when the HP LaserJet 3150 product is directly connected to a
computer. You will also set required fax settings during the
installation.
When you install software, y ou will be asked if y ou want an Express or
a Custom installation. The Express installation installs all of the
software and is recommended for first-time users. If you choose the
Express installation, the following items install:
●
Installer software – installs all software.
●
Configuration software – helps you configure and set up the
HP LaserJet 3150 product.
●
Driver software – allows you to print from your computer to the
HP LaserJet 3150 product and scan from the HP LaserJet 3150
product to the computer.
●
PC Fax software – allows you to send faxes from and receive
faxes to your computer.
●
Document Assistant software – allows you to use the software to
fax, cop y, scan, or e-mail a
●
The JetSuite™ Pro software for Hewlett-Packard – allows you to
paper
document.
print, fax, copy, and scan from your computer. Also lets you
annotate, organize, and store scanned items.
●
Optical character recognition (OCR) software – used to convert
scanned images into text that can be edited in word-processing
software.
●
Software Help – provides help for using the software.
●
Product registration – provides an easy wa y for y ou to register the
product so you can be notified about software and firmware
updates as they become available.
, 9x, NT 4.0, or 2000
40 2 Finishing the installation
EN
Page 43

I f you alre ady ha ve a P C fa x prog ram
The JetSuite software that came with the HP LaserJet 3150 product
includes a PC fax program. HP recommends using the included
JetSuite PC fax program because it is designed to work with the
HP LaserJet 3150 product, but you can continue using the PC fax
program you already have. The only requirement is that you must
choose one of the PC fax programs to ans wer incoming f ax calls: both
programs cannot try to answer fax calls coming to the same line.
Do one of the following:
To use the JetSuite PC fax program, change the setup for your
●
other PC fax program so that the other program doesn’t answer
incoming calls. Or, uninstall the other program.
To continue using your PC fax program, see the Readme.txt file
●
for a list of PC fax packages that have been tested for
compatibility with the HP LaserJet 3150 product.
I f you alre ady ha ve scanning softwa re
The HP LaserJet 3150 product comes with scanning software. You
can use it or any other TWAIN-compliant scanning software that is
compatible with the product. See the Readme.txt file for a list of
programs that have been tested for compatibility.
EN
Option A: Connecting directly to a computer
41
Page 44

a . I n stalling the softw are for a directly
conne cted computer
Follow the installation instructions for your operating system.
To install software on Windows 9x, NT 4.0, or 2000
Note To install the software on Windows NT 4.0 or 2000, you must have
administrator privileges (on start and restart).
1 If the “New Hardware Found” screen has opened, click Cancel.
2 Quit all open programs using the Close Prog r ams or Task
Manager dialog box.
3 Insert the CD-ROM into the CD-ROM drive (usually D). When the
welcome screen opens, follow the directions on screen. (If the
welcome screen does not open, click Start, and then Run. Type
X:SETUP, replacing “X” with the letter of your drive , and clic k OK.)
4 Follow the instructions on the screen. The setup takes a few
minutes. When it is complete, remov e the CD-R OM and store it in
the pocket on the inside front cover of this getting started guide.
To install the softw are on Windows 3 .1
1 Quit all open programs except Program Manager:
2 Insert the CD-ROM into the CD-ROM drive (usually D).
3 From the File menu in Program Manager, choose Run.
4 Type X:SETUP, replacing “X” with the letter of your driv e, and clic k
OK.
Note Windows-32 Bit extensions (Win32s) are required. If prompted to install
Win32s and Freecell, click OK and Con tinue to install these programs.
5 Follow the instructions on the screen. The setup takes a few
minutes. When it is complete, remov e the CD-R OM and store it in
the pocket on the inside of the front cover.
42 2 Finishing the installation
x
EN
Page 45

b. Printing a document as a te st
Print an electronic document to ensure that the HP LaserJet 3150
product and software are working properly.
To print a document a s a te st
Open a document created in a program such as Wordpad or
1
Write.
On the
2
HP LaserJet 3150 product is selected and click OK.
menu, select the
File
command. Make sure the
Print
Check your work
Did the document print?
Great! You have finished installing the software and setting
Yes.
❏
the required settings. If you want to share the product with other
network users so they can print to the product, go to “Sharing the
product” on page 44. Otherwise, go to “Exploring the product and
software” on page 64 to begin a fast and easy tutorial to learn how
to use the product and software.
Do the following:
No.
❏
• Go to “Troubleshooting” on page 58 to check for messages
and solutions to common installation issues.
• If the troubleshooting section does not resolve the issue, see
“HP Customer Care” on page 62.
Once you resolve the problem, go to “Sharing the product” on page
44. Otherwise, go to “Exploring the product and software” on page
64 to begin a fast and easy tutorial to learn how to use the product
and software.
EN
Option A: Connecting directly to a computer
43
Page 46

S har ing the product
Using Windows sharing, the person using the computer directly
connected to the HP LaserJet 3150 product can allow other users on
the network to print to it. Computers running Windows 3.11 can use
Windows sharing to print, but the computer directly connected to the
x
product must be running Windows 9
because printing using Windows sharing is unidirectional, network
users do not receive printer status messages when they print to the
product.
See the computer documentation to enable Windows sharing. Once
the product is shared, install the printer drivers on all computers you
want to allow to print to the product. For Windows 9
the easiest way to do this is to use the following procedure, which
does not require the CD-ROM. For Windows 3.1
documentation for your computer to install printer drivers.
To add the printe r dr iver to networ k computers for 9x,
NT 4.0, and 2000
1 On the Start menu, point to Settings, and click Printers.
2 Double-click Add Printer and click Next.
3 Follow the directions on screen. Also:
, NT 4.0, or 2000. Also note that
x
, NT 4.0, or 2000,
x
, see the
• When asked if the product is a local or network printer, select
Network Printer.
• To find the printer, click Browse, locate the printer name, and
click OK.
• When prompted, print a test page to ensure the printer driver
is installed properly.
Check your work
When you are ready, go to “Exploring the product and software” on
page 64 to begin a fast and easy tutorial to learn how to use the
product and software.
44 2 Finishing the installation
EN
Page 47

O ption B: Connecting to a network
y
(
)
(
)
p
g
(
)
8SJUDGLQJILUPZDUH
If you have a 300X or 500X print server and the firmware
revision is not H.08.00 or J.08.00 or higher, you can download a
firmware upgrade from the HP website at http://www.hp.com/
support/net_printing. Or, see the documentation that came with
the HP JetDirect print server.
To connect the product to the network using an HP JetDirect print
server, you need to do the following.
a Purchase and install a supported HP JetDirect print server or
check that the one you hav e is supported. (See page 13 for a
list of supported print servers. See the documentation f o r the
print server to install it.)
b Test the hardware installation b
for the HP JetDirect print server. To do this, press
print server.
printer language.
for further instructions.
c Check
located in the first section of the configuration page you just
printed.
• If you have a 170X print server and the model number is
not
J3258B, you must get a new print server.
• If you have a 300X or 500X print server and the firmware
revision number is
must upgrade firmware before proceeding. (See
“Upgrading firmware” below.)
d Connect the HP LaserJet 3150 product to the print server.
See the documentation for the print server.
e
f Install the JetSuite™ Pro software for Hewlett-Packard on all
ortant!
Im
product and replug it in. Otherwise, the product does not
detect that it is on a network and will not work correctly.
computers that want to use it.
installation” on page 46.
If the page does not print, use ASCII as the
See the documentation for the print server
the model or firmware revision number, which is
not
H.08.00 or J.08.00 or higher, you
Unplu
the power cord for the HP LaserJet 3150
printing a configuration page
Test
on the
See “Preparing for software
EN
Option B: Connecting to a network
45
Page 48

Preparing for software installation
This section contains instructions for installing the HP LaserJet 3150
software. When you install the user software, you will be asked if you
want an Express or a Custom installation. The Express installation
installs all of the software and is recommended for first-time users. If
you choose the Express installation, the following items install:
●
Installer software – installs all software.
●
Configuration software – helps you configure and set up the
HP LaserJet 3150 product.
●
Driver software – allows you to print from your computer to the
HP LaserJet 3150 product and scan from the HP LaserJet 3150
product to the computer.
●
PC Fax software – allows you to send faxes from your computer.
●
The JetSuite Pro software – allows you to print, send faxes, and
scan from your computer. Also lets you annotate, organize, and
store scanned items.
●
Optical character recognition (OCR) software – used to convert
scanned images into text that can be edited in word-processing
software.
●
Software Help – provides help for using the software.
●
Product registration – provides an easy wa y for y ou to register the
product so you can be notified about software and firmware
updates as they become available.
I f you alre ady ha ve a P C fa x prog ram
The JetSuite software that came with the HP LaserJet 3150 product
includes a PC fax program. In a network installation, you must use
this PC fax program to send faxes through the product.
I f you alre ady ha ve scanning softwa re
The HP LaserJet 3150 product comes with scanning software. You
can use it or any other TWAIN-compliant scanning software that is
compatible with the product. (TWAIN is an industry standard.) See
the Readme.txt file for a list of programs that have been tested for
compatibility.
46 2 Finishing the installation
EN
Page 49

a . I nstalling software for networ k computers
Use this procedure to do any network configuration and install
software on network computers. In order to install the software, the
computers must be running Windows 9
, NT 4.0, or 2000.
x
Note
For IPX/SPX users:
mode.
For TCP/IP users:
services port on client computers. The HP LaserJet 3150 product
does not use this type of port.
Important!
LPT1 port at installation. Do
installed port to another port, such as an HP JetDirect port, or the
product will not work correctly.
The HP LaserJet 3150 product may be assigned to the
You must use the IPX/SPX protocol in Direct
It is not necessary to create a TCP/IP printing
redirect the product from the default
not
To install software
To install the software on Windows NT 4.0 or 2000, you must have
administrator privileges (on start and restart).
Quit all open programs using the
1
Manager
Insert the CD-ROM into the CD-ROM drive (usually D or E).
2
When the welcome screen opens, follo w the directions on screen.
(If the welcome screen does not open, click
Type X:SETUP, replacing “X” with the letter of your drive , and click
OK
dialog box.
.)
Close P rog rams
Start
or
Task
, and then
Run
.
EN
Follow the instructions on the screen.
3
Important!
you reach the fax set up portion of the installation, choose
you know someone else set the fax settings, or if the control
panel display on the product says
Remove the CD-ROM when the setup is finished.
4
Repeat steps 1-4 for all other computers on which you want to
5
install software.
When finished, store the CD-ROM in the pocket on the inside of
6
the front cover of this getting started guide.
Only one person should set the fax settings. When
.
READY
Option B: Connecting to a network
Skip
if
47
Page 50

b. Printing a document as a te st
Print an electronic document to ensure that you can use the software
you installed to print to HP LaserJet 3150 product.
To print a document a s a te st
1 Open a document created in a program such as Word or
Wordpad.
2 On the File menu, select the Print command. Make sure the
HP LaserJet 3150 product is selected and click OK.
Check your work
Did the document print?
Yes. Great! The product is now ready to work on the network. Go
❏
to “Exploring the product and software” on page 64 to begin a fast
and easy tutorial to learn how to use the product and software.
No. Do the following:
❏
• Go to “Troubleshooting” on page 58 to check for solutions to
messages and common installation issues.
• If the troubleshooting section does not resolve the issue, see
“HP Customer Care” on page 62.
48 2 Finishing the installation
EN
Page 51

O ption C: Completing a standalone
g
g
7ROHDUQPRUH
For information on changing other settings, such as adjusting
the speaker volume or programming a key to store a special
dialing code, see chapter 7, “Managing Basic Features,” in the
user guide.
insta llation
Certain settings must be determined before using the HP LaserJet
3150 product as a standalone fax machine. If you have installed the
software, you already set these features, and you can go “Exploring
the product and software” on page 64.
If you do not intend to install the software now, you need to do the
following (described in greater detail on the next few pages):
a Set the correct time and date.
time and date is a legal requirement.
b Enter the fax header information.
requirement.
not available until it is filled in.
c Check the answer mode and number of rin
settings. Depending on your configuration, you may or may
not have to alter these settings.
If you have distinctive ring service from your local telephone
d
company, you need to enable distinctive ring detection
e Print a self-test report to ensure the product is workin
properly.
Most HP LaserJet 3150 product functions are
In the United States, setting the
Filling it in is a legal
s-to-answer
.
Check your work
Go to “a. Setting the time and date” on page 50 to begin checking and
changing these settings.
EN
Option C: Completing a standalone installation
49
Page 52

a . S etting the time a nd date
The time and date information is included in the header that prints at
the top of faxes you send.
date is a legal requirement.
control panel display when the HP LaserJet 3150 product is idle.
To set the time a nd date
In the United States, setting the time and
The time and date also show on the
1 Press E
NTER/MENU
.
2 Use the < and > keys to select TIME/DATE, HEADER and press
E
NTER/MENU
3 Press E
.
NTER/MENU
to select TIME/DATE.
4 Use the < and > keys to select a 12-hour or 24-hour clock and
press E
NTER/MENU
.
5 Enter the current time using the numeric keys.
6 If you chose the 24-hour clock, press E
- Or -
If you need to change the AM or PM designation, use the < and >
keys to select the correct one, and then press E
7 Enter the current date using the numeric keys. Make sure to enter
the month and day using both digits, such as “05” for May.
Note If you enter a number incorrectly , press B
entry. Then re-enter the number.
8 Press E
9 Press S
NTER/MENU
TOP/CLEAR
.
to exit the Menu settings.
NTER/MENU
ACK SPACE
.
NTER/MENU
.
until you reach the
Check your work
Go to “b. Setting the fax header” on page 51.
50 2 Finishing the installation
EN
Page 53

b. Setting the fa x header
Note
This information prints at the top of faxes you send.
legal requirement.
Most HP LaserJet 3150 product functions are not
Filling it in is a
available until it is filled in.
To use special dialing symbols, see chapter 7, “Managing Basic
Features,” in the user guide.
To set the fax hea der
Press E
1
Use the < and > keys to select
2
E
Use the < and > keys to select
3
E
Enter your fax number and press E
4
NTER/MENU
NTER/MENU
NTER/MENU
numbers, press > to insert spaces. To add a plus sign, press *.
Use the numeric keys to add the name of your company (32
5
characters maximum). To do so, repeatedly press the numeric
key f or the letter you need until the letter appears . (For e xample, if
the first letter you need is a “C,” press 2 repeatedly until a
appears.) Press > to go to the next space.
.
TIME/DATE, HEADER
and press
.
FAX HEADER
and press
.
NTER/MENU
. To separate
C
Note
EN
To insert punctuation, press * repeatedly until the character you want
appears, and then press > to go to the next space.
To delete a letter, press < or > until you reach the space to the right of
the letter, and then press B
When you have finished, press E
6
7
Press S
TOP/CLEAR
ACK SPACE
to exit the Menu settings.
.
NTER/MENU
.
Option C: Completing a standalone installation
51
Page 54

Check your work
Does the control panel display say READY AUTO, followed by the date
and time you set?
Yes. Go to “c. Setting answer mode and rings to answer” on page
❏
53.
No. Do the following:
❏
• If the control panel display does not say READY AUTO, repeat
step b.
• If the control panel display does not show the correct time and
date, repeat step a to change them.
When you are ready, go to “c. Setting answer mode and rings to
answer” on page 53.
52 2 Finishing the installation
EN
Page 55

c. Setting a nsw er mode and rings to a nsw er
The answer mode is set to Automatic or Manual depending on your
situation. In Automatic mode, the HP LaserJet 3150 product answers
incoming calls after the number of rings to answer specified. Or, it
“listens” for fax tones when an answering machine connected to the
line answers first and then answers if it is a fax call. In Manual mode,
the HP LaserJet 3150 product never answ ers calls. You must start the
fax receiving process yourself, either by pressing S
control panel or by picking up a phone connected to that line (and
possibly pressing ***).
If the HP LaserJet 3150 product is set to Automatic mode, you may
need to adjust the rings-to-answer setting. This is especially
important if the HP LaserJet 3150 product is connected to a line
receiving both fax and voice calls (a shared line) with an answering
machine. The rings to answer on the HP LaserJet 3150 product must
be higher than the rings to answer on the answering machine. This
allows the answering machine to ans wer the incoming call and record
a message if it is a voice call. This also allows the HP LaserJet 3150
product to listen to the call, and if it detects fax tones, to take the call.
For the HP LaserJet 3150 product, the factory default ans wer mode is
Automatic, and the default number of rings to answer is 5. Use the
table below to determine what settings to use given your situation.
TART
on the
If you have: Do this with the
answer mode:
A line only receiving fax calls (a
dedicated line).
A line receiving both fax and voice
calls (a shared line) and only a
telephone.
A line receiving both fax and voice
calls (a shared line) and an
answering machine or computer
voicemail.
One line with distinctive ring
service (two separate phone
numbers).
*In Automatic, the HP LaserJet 3150 product automatically answers fax calls. However, people calling to
speak to you hear fax tones if you do not answer or they do not hang up by the number of rings at which
the product answers. Use Ma nual if you do not w ant vo ice callers ev er to hear f ax tones , but remember th at
fax calls are not received automatically.
EN
Leave set to
Automatic.
Leave set to
Automatic*.
Leave set to
Automatic.
Leave set to
Automatic
And do this with the number of rings to
answer on the HP LaserJet 3150 product:
Change to 1 or 2 rings.
Leave set to 5.
Set to 2 higher than answering machine or
computer voicemail. For example, set to 6 if
answering machine answers at 4.
HP LaserJet 3150 product no higher than 9
Change to 1 or 2 rings. (If you have an answering
machine or computer voicemail for the other phone
number, make sure the product is set
the answering system.) Also see “d. Enabling
distinctive ring detection” on page 55.
Set the
lower
.
than
Option C: Completing a standalone installation
53
Page 56

To set the answer mode
1 Press E
NTER/MENU
.
2 Use the < and > keys to select FAX SETTINGS and press
E
NTER/MENU
.
3 Use the < and > keys to select INCOMING FAXES and press
E
NTER/MENU
4 Press E
.
NTER/MENU
to select ANSWER MODE.
5 Use the < and > keys to select AUTOMATIC or MANUAL and press
E
NTER/MENU
6 Press S
.
TOP/CLEAR
to exit the Menu settings.
To set the n umber of r ings to answer
1 Press E
NTER/MENU
2 Use the < and > keys to select FAX SETTINGS and press
E
NTER/MENU
3 Use the < and > keys to select INCOMING FAXES and press
E
NTER/MENU
4 Use the < and > keys to select to select RINGS TO ANSWER and
press E
NTER/MENU
.
.
.
.
5 Enter the number of rings to answer and press E
6 Press S
Check your work
Does the upper right corner of the display show the answer mode
setting (Automatic or Manual) that you chose?
Yes. If you have distinctive ring service, go to “d. Enabling
❏
distinctive ring detection” on page 55. Otherwise, go to “e. Printing
a self-test report” on page 57.
No. Do the following:
❏
Try setting the answer mode again. When you are ready, go to “d.
Enabling distinctive ring detection” on page 55 (if you have
distinctive ring service) or “e. Printing a self-test report” on page
57.
54 2 Finishing the installation
TOP/CLEAR
to exit the Menu settings.
NTER/MENU
.
EN
Page 57

d. Enabling distinctive r ing dete ction
If you subscribe to distinctive ring service with your telephone
company, use this procedure to enable the HP LaserJet 3150 product
to detect distinctive ring patterns.
service, do not change this setting, or the HP LaserJet 3150 product
will not be able to receive faxes.
W hat is distinctive r ing service ?
Distinctive ring service is available from some local telephone
companies. It allows you to ha ve two or three phone numbers on one
line. This costs less than paying for two or three separate lines. Each
of the phone numbers will have a different ring pattern. For example,
calls to the voice number ring with a single-ring pattern, and to the fax
number ring with a double-ring pattern.These distinctive ring patterns
allow you to ans wer the call if it is a v oice call and allo w the product to
answer if it is a fax call.
Ho w do I ge t it?
If you would like distinctive ring service, call your local telephone
company to check availability and to subscribe. (Your telephone
company may use a different name for this service. For example, it’s
called “Identa-ring” in parts of New Jersey and “RingMaster” in parts
of Florida.) As of this printing, the service is only available in some
areas.
If you do not have distinctive ring
EN
If distinctive ring is available and you choose to subscribe to it, keep
the following points in mind:
Make sure the telephone company assigns the double-ring
●
pattern to the fax number. The HP LaserJet 3150 product ignores
the others.
While distinctive ring service may allow you to have up to three
●
phone numbers on the same line, the HP LaserJet 3150 product
only supports two numbers. The HP LaserJet 3150 product
cannot detect the difference between the second and third ring
patterns and would answer calls coming to both the second and
third numbers.
Option C: Completing a standalone installation
55
Page 58

To ena ble distinctive ring detection
,I\RXKDYHDQDQVZHULQJPDFKLQHRUFRPSXWHU
YRLFHPDLORQWKLVOLQHIRUWKHRWKHUSKRQHQXPEHU
Make sure the HP LaserJet 3150 product’s rings to answer is set
to a
lower
number than the rings to answer on the answering
machine or voicemail. In the case of distinctive ring, the
HP LaserJet 3150 product must answer calls first in order to be
able to receive fax calls.
Note Only change this setting to Y es if yo u have distinctiv e ring service from
your telephone company.
not change this setting or the HP LaserJet 3150 product will not be able
to receive faxes.
1 Call your local telephone company and subscribe to distinctive
ring service.
If you do not hav e distinctive ring service, do
2 Press E
3 Use the < and > keys to select FAX SETTINGS and press
E
4 Use the < and > keys to select INCOMING FAXES and press
E
5 Use the < and > keys to select DISTINCTIVE RING and press
E
6 Use the < and > keys to select YES or NO and press E
7 Press S
NTER/MENU
NTER/MENU
NTER/MENU
NTER/MENU
TOP/CLEAR
.
.
.
.
NTER/MENU
to exit the Menu settings.
.
Check your work
Does the control panel display say DISTINCT in the upper right
corner?
Yes. Go to “e. Printing a self-test report” on page 57.
❏
No. Repeat this step to try enabling distinctive ring. When you are
❏
ready, go to “e. Printing a self-test report” on page 57.
56 2 Finishing the installation
EN
Page 59

e . Pr inting a self- t est re port
Print a self-test report from the product to ensure that the product is
working correctly.
To print a self- test re port
Press E
1
Use the < and > keys to select
2
Use the < and > keys to select
3
E
The HP LaserJet 3150 product exits the Menu settings and prints the
report, which confirms the HP LaserJet 3150 product is working.
NTER/MENU
NTER/MENU
.
REPORTS
SELF TEST
.
and press E
and press
NTER/MENU
.
Check your work
Check the report. In the Self Test Results section, do all tests have a
PASS entry?
Great! You have finished setting the required settings. Go to
Yes.
❏
“Exploring the product and software” on page 64 to begin a fast
and easy tutorial on how to use the product.
See “HP Customer Care” on page 62.
No.
❏
EN
Option C: Completing a standalone installation
57
Page 60

Troubleshooting
Use the following table to solve problems that might occur when
installing the software or changing settings manually.
Problem Cause Solution
When installing
software, you receive
this message: “Setup
has determined that you
do not have enough disk
space on the selected
drive. Please reduce the
set of install components
or change the install
drive.”
The software did not
install (Windows 9
NT 4.0, or 2000)
The computer cannot
read the installation
CD-ROM.
x,
The JetSuite software
requires at least 65 MB of
available disk space to be
installed.
All programs
and Explorer should be
closed.
The correct drive may not
have been specified.
The CD-ROM may be
damaged.
except
Systray
After you select the JetSuite software and data
directories, the installation program checks that
your computer has enough available disk space.
Try deleting unnecessary files or archiving older
data to floppy disks or some other medium.
To check in Windows 9x, press
TRL+ALT+DELETE
C
click one and click
open programs. Then, reinstall the software.
To check in Windows NT 4.0 or 2000, press
TRL+ALT+DELETE
C
other programs are open, click one an d clic k
Task
. Repeat for all other open programs. Then,
reinstall the software.
Check for the proper d isk drive letter. Often, it is D
or E for the CD-ROM drive.
Contact HP Customer Care. See page 62.
. If other programs are open,
End Task
. On the
. Repeat for all other
Applications
tab, if
End
You receive this
message “There are not
enough free COM ports
on this system. You must
have at least one
available COM port to
install this software.”
The software needs at least
one COM port. At least one
COM port is not available.
58 2 Finishing the installation
See the documentation for your computer to free
a COM port.
EN
Page 61

Problem Cause Solution
When the product is
directly connected to
your computer, you
receive this message:
“JetSuite Fax has
detected that the
HP LaserJet 31 50 is
either switched off or is
not connected to your
computer.”
When the product is
connected to the
network using an
HP JetDirect print
server, you receive this
message: “JetSuite Fax
has detected that the
HP LaserJet 31 50 is
either switched off or is
not connected to your
computer.”
The parallel cable is loose or
not directly connected.
The power cord is loose.
The parallel cable may be
faulty.
The BIOS setting for your
computer may not be set
correctly.
The power cord is loose.
The network cord is loose.
Make sure the parallel cable between the
computer and the HP LaserJet 3150 product is
securely connected.
Make sure the power cord is securely connected
between the HP LaserJet 3150 product and the
power source.
If you have another “size C” parallel cable, try
attaching it to the HP LaserJet 3150 product.
Ensure that the computer has a parallel port with
a bidirectional data bus. (EPP or unidirectional
ports are not supported.)
Change the parallel port mode setting in the
computer’s BIOS. HP recommends setting it to
ECP or bidirectional, but other modes may also
work. For instructions on changing the setting,
see Appendix C in the user guide, see the
computer documentation, or contact the
computer manufacturer.
Make sure the power cord is securely connected
between the HP LaserJet 3150 product and the
power source. Also, ensure the po wer cord f or the
HP JetDirect print server is securely connected to
the power source.
Ensure the network cable is securely connect
between the HP JetDirect print server and the
wall outlet for the network. Also ensure the
network cable between the computer and the wall
is securely connected.
EN
The parallel cable is loose or
not directly connected.
The parallel cable may be
faulty.
The HP JetDirect print server
may not be configured yet
(TCP/IP).
HP JetDirect print server is
incorrectly configured
(TCP/IP).
Make sure the parallel cable between the
HP Jet Direct print server and the HP LaserJet
3150 product is securely connected.
If you have another “size C” parallel cable, try
connecting it between the HP LaserJet 3150
product and the HP JetDirect print server.
Use the HP JetAdmin software, the HP WebJet
Admin software, BOOTP, DHCP, or telnet to
configure the HP JetDirect print server.
See the documentation that came with the
HP JetDirect print server for troubleshooting
information.
Troubleshooting
59
Page 62

Problem Cause Solution
When the product is
connected to the
network using an
HP JetDirect print
server, you receive this
message: “All in One
configuration cannot
continue because the
required protocols were
not found on your
computer.”
When the product is
connected to the
network using an
HP JetDirect print
server, you re ceive one
of these messages:
z
“The configuration
wizard did not find
your HP LaserJet
3150 All in One on
the network.”
z
“The configuration
wizard was unable to
find an All in One at
the specified
address.”
z
“The JetDirect model
found at the specified
address does not
support All in One
devices.”
The IPX/SPX or TCP/IP
protocols are not installed on
your computer.
The print server you are
using is not one of the
HP JetDirect print servers
that works with the product.
The power cord is loose.
The network cord is loose.
The parallel cable is loose or
not directly connected.
The parallel cable may be
faulty.
Install an IPX/SPX protocol that is compatible with
NW Link or a TCP/IP protocol on your computer.
See “Connecting to a network using an
HP Jet Direct print server” on page 12 for a list of
compatible HP JetDirect print servers.
Make sure the power cord is securely connected
between the HP LaserJet 3150 product and the
power source. Also, ensure the po wer cord f or the
HP JetDirect print server is securely connected to
the power source.
Ensure the network cable is securely connect
between the HP JetDirect print server and the
wall outlet for the network. Also ensure the
network cable between the computer and the wall
is securely connected.
Make sure the parallel cable between the
HP Jet Direct print server and the HP LaserJet
3150 product is securely connected.
If you have another “size C” parallel cable, try
connecting it between the HP LaserJet 3150
product and the HP JetDirect print server.
The HP JetDirect print server
may not be configured yet
(TCP/IP).
HP JetDirect print server is
incorrectly configured
(TCP/IP).
60 2 Finishing the installation
If you installed the HP LaserJet 3150 software,
uninstall it. Then, re-install the software and
select the Network Install option.
See the documentation that came with the
HP JetDirect print server for troubleshooting
information.
EN
Page 63

EN
Troubleshooting
61
Page 64

HP Customer Care
2QOLQH
Connect with HP! Whether you are a beginner or
advanced user, HP Customer Care online is a
great place to learn more about your product.
Click your way to the answers, training, and
software updates you need, 24 hours a day, 7
days a week, all at no charge to you. Visit http://
www.hp .com/support/lj3150. (Site is in English.)
(PDLO
Get assistance conveniently and quickly with
e-mail. E-mail your question to HP, and you will
receive a reply within 24 hours on business
days. It’s that simple. E-mail questions via HP’s
website at http://www.hp.com/support/lj3150.
(Site is in English.)
62
8VHUIRUXPV
Go online, anytime, to find other users with great
ideas and usage suggestions at HP’s online user
forum for the HP LaserJet 3150 product. Visit
HP’s website at http://www.hp.com/support/lj3150.
(Site is in English.)
EN
Page 65

Your purchase is backed by HP Customer Care — award-winning service
and support. HP Customer Care is our promise to provide support solutions
that keep you up and running...and learning how to do more with your
HP LaserJet 3150 product.
3URDFWLYHQRWLILFDWLRQ
When you sign up for Proactive Notification, we
will send you e-mail about topics of your choice,
like: updated software, product announcements,
and other important news on your HP LaserJet
3150 product. Sign up online at
http://www.hp .com/support/lj3150. (Site is in English.)
%\SKRQH
Speak with a trained service technician who
specializes in your HP LaserJet 3150 product.
HP promises that your call will be answered in
fewer than 3 min utes , or you’ll get a free, prepaid
15 minute phone card. Call:
U.S.: 208-323-2551, M-F 6AM to 10PM and
SAT 9AM to 4PM (Mountain Time).
Canada: 905-206-4663, M-F 8AM to 12AM and
SAT 10AM to 6PM (Eastern Time).
Before calling, please have the purchase date
and note the product model and serial numbers,
which are on the back of the product, or you
might have written them on the inside front
cover.
%\ID[
When you just want the facts — and you want
them fast by fax — call HP FIRST, HP’s
automated fax-on-demand service for easy-tounderstand support documents.
Contact: (800) 333-1917
EN
HP Customer Care
63
Page 66

3
Exploring the product and
software
W hat you will learn
This section will help you learn the basics of the HP LaserJet 3150
product. It contains the most general information about how to do
everyday tasks. You’ll also find many pointers to more inf ormation and
how to get help.
You will learn:
●
how to use the control panel to send a fax and make a copy
●
about the software features
●
how to use the Document Assistant to send a fax, make a copy,
and scan an item
●
about how OCR software works
64 3 Exploring the product and software
EN
Page 67

E xploring the product
,PSRUWDQW
Important, detailed guidelines regarding the size and type of
items you can load and how to load special items (such as
photographs and newspaper articles) appear in the “Faxing”
chapter of the user guide. See these guidelines before loading
any other items.
1
2
Loa ding items to be fa xed,
copie d, or sca nned
Whether you are faxing, copying, or
scanning using the software, the
procedure for loading the item is the
same.
To load an item
1
2
Wait f or the HP LaserJet 3150 product to
load the page.
Check your work
Does the control panel display say
#COPIES
?
Adjust the guides in the document
feeder tray to the size of the
demonstration page you printed
earlier in the setup.
Place the page top first, face down,
into the document feeder tray.
DOCUMENT LOADED PHONE# OR
Go to “Sending a fax using the control panel” on page 66.
Yes.
❏
Gently pull the top of the control panel toward you until it
No.
❏
releases. Remove the document, close the control panel, and
reinsert the document. When you are ready, go to “Sending a fax
using the control panel” on page 66.
EN
Exploring the product
65
Page 68

S ending a fax using the control panel
,I\RXQRUPDOO\GLDODSUHIL[
You can program a dialing prefix that is added to all outgoing
numbers dialed at the control panel. See the “Managing Basic
Features” chapter in the user guide.
You can send a fax using the control panel. If you installed the
software and your computer is on, the Document Assistant appears
on the computer screen when you load a document in the document
feeder tray. As soon as you start the fax using the control panel, the
Document Assistant disappears.
To send a fax using the control panel
1 After the fax is loaded in the document feeder tray, dial the fax
number using the numeric keys.
Note Include any pauses or other needed numbers, such as an area code,
an access code for numbers outside a PBX system (usually a 9 or 0),
or a long distance prefix.
2 Press S
to begin faxing.
TART
Check your work
Does the control panel display say 1 PAGE SENT and then return to
the READY state?
Yes. Go to “Verifying fax capability” on page 67.
❏
No. Do the following:
❏
• If there is an error message on the control panel display,
correct the problem indicated. Then, try resending the fax.
• Ask someone you know to send a fax to you to confirm you
can receive faxes.
• See the Troubleshooting and Maintenance chapter of the user
guide for more information.
When you are ready, Go to “Verifying fax capability” on page 67.
66 3 Exploring the product and software
EN
Page 69

Ve r ifying fax capability
+LQW
You can also request the fax from any telephone. Just dial the
toll-free number and follow the voice prompts after you connect.
7ROHDUQPRUH
For more information about sending faxes from the control
panel, see the “Faxing” chapter in the user guide.
Verify the fax function of the HP LaserJet 3150 product is working
properly by calling a special HP phone number. When you call, HP
faxes y ou a document about y our ne w HP LaserJet 3150 product and
using the HP First Fax system. HP First is a con venient w ay to receiv e
the latest information about HP products.
To ver ify fax ca pability
On the control panel, press M
1
Dial 1 800 677 1304 (spaces or dashes do not have to be dialed).
2
When you connect, follow the voice prompts to enter your fax
3
number and confirm it.
After the voice prompt “Goodbye,” press S
4
Within 2 to 3 minutes, HP faxes a one- or two-page document to
confirm the fax function is working. The document explains how to
receive more information about your new HP LaserJet 3150 product.
ANUAL DIAL
.
TOP/CLEAR
twice.
Check your work
Did the HP document arrive?
Go to “Exploring the software” on page 68.
Yes.
❏
The HP First system may be busy. Do the following:
No.
❏
• Try again later.
• Ask someone you know to send you a fax.
Once you verify fax capability, go to “Exploring the software” on
page 68.
EN
Exploring the product
67
Page 70

E xplor ing the softw are
Click anywhere
on this screen
to activate it
You must have installed the software on your computer to explore the
features and do the tasks in this section. Once you read the o v erview ,
use the instructions later in this section to send a fax, make a copy,
and scan using the software.
Overvie w
The three, main parts of the software that you see and use regularly
are the Document Assistant, the document viewer, and the desktop.
I ntroducing the D ocument Assista nt
To see and use the Document assistant, the product must be directly
connected to your computer . The Document Assistant is a dialog box
that appears on the computer screen when you load a document into
the document feeder tray.
If you have a compatible e-mail program, four icons appear on this
screen. Otherwise, only three appear. Click anywhere on the
Document Assistant to activate it.
68 3 Exploring the product and software
EN
Page 71

Once activated, the Document Assistant displays buttons for the pc
Click here to
begin scanning
to e-mail
Click PC Copy to
begin copying
Click Scan to
begin scanning
Click PC Fax to
begin faxing
Click Cancel
to make the
Document
Assistant
disappear
Click Configure to gain
access to configuration
settings
Click Help for
information
fax, pc copy, and scan functions. If you have a compatible e-mail
program, a
Scan to E-mail
button also appears. Click the button for
the function you want:
EN
At the bottom of the Document Assistant are the
and
Cancel
buttons. Click
Configure
to use the software and
HP LaserJet 3150 product configuration settings.
Configure, Help
takes you to
Help
,
the Help for the JetSuite Pro software and the HP LaserJet 3150
product. Clicking
Cancel
closes the Document Assistant.
To fax or copy a document, you can use this Document Assistant or
the product control panel. (If you choose the control panel, the
Document Assistant closes.) If you are scanning (or scanning to email), you must begin the task using the Document Assistant, the
JetSuite Pro software, or another program (such as a TWAINcompliant one). You
cannot
use the control panel.
Exploring the software
69
Page 72

I ntroducing the docume nt viewer
Manager
toolbar
Close-up view
of a scanned
item
Annotation
toolbar
Toolbar
Status
toolbar
When you initiate a scan from the Document Assistant or the JetSuite
Pro software, the scanned item appears as an unnamed file in the
document viewer of the JetSuite Pro software. Identify the different
parts of the document viewer window:
The document viewer allows you to work with the content of the
scanned item. Use the document viewer to:
●
highlight text or images or add electronic sticky notes using the
annotation tools.
●
clean up or adjust the scanned item.
●
send the item to print or fax, or attach it to an e-mail message.
70 3 Exploring the product and software
EN
Page 73

I ntroducing the de sktop
When you close a document in the document viewer, it appears as a
thumbnail (a small image) or file name in the desktop of the JetSuite
Pro software. Identify the following features on the desktop:
File toolbar
JetSuite
folders
Manager
toolbar
Note
Thumbnail of
a scanned
item
Status toolbar
Network users do not see the Fax Receiv e folder or related f eatures or
options. They also do not see the PC Copy icon, features, or options.
The desktop shows thumbnails of .jsd documents and icons of
documents in other graphics file formats or file formats for common
word-processing, spreadsheet, and presentation programs. Use the
desktop to:
organize and file a saved, scanned item in a folder.
●
send the scanned item to another program, such as a word-
●
processing program.
manage faxes sent from the computer and view fax logs for all
●
faxes. A user whose computer is directly connected to the
product can also manage faxes received to the computer.
EN
To view a .jsd document again in the document viewer , double-clic k its
thumbnail. If you double-click the thumbnail of a file on the desktop
with a different format, the file opens in the program associated with
that extension on your computer.
For more information about scanning and the JetSuite software, see
chapter 5, “Scanning,” in the user guide and the Help.
Exploring the software
71
Page 74

Using Help
You installed the Help when you installed the JetSuite Pro software.
Help contains detailed procedures that guide you through any task
you want to perform from the software. It provides information that is
specific to the current task. Help is also a troubleshooting tool. When
questions arise or a problem occurs, the quickest way to find a
solution is to access your Help.
Help contains the following general topics:
Installation Help — provides help for installing the software and
determining required settings.
General Information Help — gives overview information for the print,
fax, copy, and scan functions. Also gives overview information for the
JetSuite Pro software.
Troubleshooting — gives solutions for common problems.
How Do I — provides step-by-step instructions for printing, faxing,
copying, scanning, configuration, and other JetSuite Pro software
tasks.
You can access Help by:
●
clicking Help on the Document Assistant or any screen where the
Help button appears.
●
selecting Contents from the Help menu on the desktop or
document viewer.
●
pressing F1 on the computer keyboard.
Acce ssing the Je tSuite Pro software
You can access the JetSuite Pro software by:
●
using the Document Assistant, as described earlier
●
using the Program Manager in Windows 3.1x or the Start menu
x
in Windows 9
●
double-clicking the HP LaserJet 3150 product icon on the
Windows 9x, NT 4.0, or 2000 taskbar (at the bottom, right of the
screen)
●
double-clicking the JetSuite Pro icon on the Windows desktop (f or
Windows 9
72 3 Exploring the product and software
, NT 4.0, or 2000
x
, NT 4.0, or 2000 only)
EN
Page 75

S ending a fa x using the Document Assistant
Click here
7ROHDUQPRUH
See the “Faxing” chapter in the user guide for more detail about
when to fax from the control panel, the Document Assistant, the
JetSuite Pro Desktop or another program such as a wordprocessing program.
For more information about using the Document Assistant and
JetSuite Pro software, see the Help.
The product must be directly connected to your computer for you to
see and use the Document Assistant. Then, you can send a fax by
clicking
PC Fax
To send a fax using the Docume nt Assistant
After you load the document in the document feeder tray, the
1
Document Assistant appears on the computer screen. Click
anywhere on the Document Assistant to activate it.
on the Document Assistant.
Click
2
3
4
PC Fax
When the
recipient’s name and f ax n umber and add a cov er page (optional).
Click
Send Fax
.
JetSuite PC Se nd F ax
to begin sending the fax.
dialog box appears, type the
EN
Exploring the software
73
Page 76

M aking a copy using the Document Assista nt
7ROHDUQPRUH
See the “Copying” chapter in the user guide for more detail about
when to choose to copy from the control panel or the Document
Assistant.
For more information about using the Document Assistant, see
the Help.
The product must be directly connected to your computer for you to
see and use the Document Assistant. Then, you can initiate a copy b y
clicking PC Copy on the Document Assistant.
To make a copy using the D ocument Assista nt
1 After you load the document in the document feeder tray, the
Document Assistant appears on the computer screen. Click
anywhere on the Document Assistant to activate it.
2 Click PC Copy.
Click here
3 In the dialog box that appears, adjust options, such as contrast
and pages per sheet.
4 Click Start Copy to begin copying.
74 3 Exploring the product and software
EN
Page 77

S canning an ite m
Click here
You must have installed the software to scan an item. You can start a
scan from the Document Assistant or the JetSuite Pro software by
clicking
must be directly connected to your computer.)
When the next dialog box opens, you have three destination options:
Scan to JetSuite Desktop Viewer, Scan to File
. (To see and use the Document Assistant, the product
Scan
, or
Scan to Text
.
●
Select
Scan to Je tSuite Desktop Vie w er
(the default) to place
the item in the document viewer of the JetSuite Pro software.
Using this program, you can annotate, organize, and store
important documents.
●
Select
Scan to File
to create a file of the item without viewing it
now.
●
Select
Scan to Text
, to convert the item to editable text and open
it as an unnamed file in your word-processing program.
To scan using the Document Assista nt
Load the document into the document feeder tray.
1
When the Document Assistant appears, click anywhere on it to
2
activate it.
Click
3
Scan
.
EN
In the dialog box that appears, adjust any options, such as
4
contrast, ensure
and click
After it has been scanned, the item appears in the document
5
Start Scan
Scan to Je tSuite De sktop Vie w er
.
is selected,
viewer. Explore the options: Add annotations and hyperlinks, and
then send the item to fax, print, or another task.
Exploring the software
75
Page 78

To scan using the JetS uite Pro softwa re
1 In the JetSuite Pro desktop or document viewer, click the Scan
icon on the Manager toolbar.
2 In the dialog box that appears, adjust any settings, such as scan
mode or contrast.
3 Choose Scan to Je tSuite Desktop Viewe r, Scan to File, or
Scan to Text as the destination.
4 Select the Use Start button on device to begin scan check box.
The Start Scan button becomes unavailable, and the scanner
path on the product is now unavailable to other users for the ne xt
three minutes.
5 At the HP LaserJet 3150 product, load the document into the
document feeder tray.
6 Press Start. The document is scanned item goes to the
destination you chose.
Hint You can also start a scan from the JetSuite Pro software by clicking the
Scan icon on the Manager toolbar, loading the document, and
returning to the computer to click Start Scan. In this case , mak e sure
the U se the Sta rt button on de vice to be gin scan check box is
cleared.
76 3 Exploring the product and software
EN
Page 79

S canning to te xt using OCR
7ROHDUQPRUH
For more information about scanning and the OCR software, see
the “Scanning” chapter in the user guide, and see the Help.
For more information about scanning to e-mail, see the “E-mailing
Portable Documents” chapter in the user guide, and see the Help .
When you are scanning an item and choose
Assistant or in the JetSuite Pro software and then select
, the JetSuite Pro software initiates the scan using the best
Text
settings for text. Then, the OCR software discards any graphics on
the scanned item and converts the text to editable text. When the
OCR software has finished, the converted text appears as an untitled
file in your word-processing program.
Because OCR conversions are ne ver perf ect, proof the con verted text
carefully .
on the Document
Scan
Scan to
EN
Exploring the software
77
Page 80

Taking the ne xt step
'R\RXNQRZ"
The HP LaserJet 3150 product still works like a regular fax
machine and copier when you turn off the computer or the
software is not working. Even if you normally receive faxes to
your computer and you turn it off, faxes are received into the
product memory and will upload to the computer when you turn it
on again.
Congratulations! You have successfully set up the product and you
can now put it to work helping you sav e time. Explore these additional
sources of information:
●
See the us er gu ide for more inf ormation on how to do da y-to-day
tasks, adjust seldom-changed settings, use troubleshooting,
order parts, and more.
●
See the Help for more information on using the software for dayto-day tasks, changing settings, and troubleshooting.
●
Registe r your product! Your name is never sold, and your
privacy is protected.
are notified when software and firmware upgrades become
available, so you can always have the most current features,
fixes, and information.
●
Use H P Customer C are , a nd not just when you ha ve a
proble m. On page page 62, find out how to obtain information in
fast, convenient ways, such as visiting the HP LaserJet 3150
product website, e-mailing, and ev en talking to a real, liv e person.
And registering the product ensures that you
78 3 Exploring the product and software
EN
Page 81

Warranty
W a rr anty information
H ewlett-P ackard limited warranty stateme nt
HP LaserJet 3150 product ONE-YEAR LIMITED WARRANTY
HP warrants to you, the end-user customer, that HP hardware,
1
accessories, and supplies, will be free from defects in materials
and workmanship after the date of purchase, for the period
specified above. If HP receives notice of such defects during the
warranty period, HP will, at its option, either repair or replace
products which prove to be def ectiv e. Replacement products ma y
be either new or like-new.
HP warrants to you that HP software will not fail to execute its
2
programming instructions after the date of purchase, for the
period specified above, due to defects in material and
workmanship when properly installed and used. If HP receives
notice of such defects during the warranty period, HP will replace
software media which does not execute its programming
instructions due to such defects.
EN
HP does not warrant that the operation of HP products will be
3
uninterrupted or error free. If HP is unable, within a reasonable
time, to repair or replace any product to a condition as warranted,
you will be entitled to a refund of the purchase price upon prompt
return of the product.
HP products may contain remanufactured parts equivalent to a
4
new in performance or may have been subject to incidental use.
Warranty does not apply to defects resulting from (a) improper or
5
inadequate maintenance or calibration, (b) software, interfacing,
parts or supplies not supplied by HP, (c) unauthorized
modification or misuse, (d) operation outside of the published
environmental specifications for the product, or (d) improper site
preparation or maintenance.
Warranty information
79
Page 82

6 HP MAKES NO OTHER EXPRESS WARRANTY OR
CONDITION WHETHER WRITTEN OR ORAL. TO THE
EXTENT ALLOWED BY LOCAL LAW, ANY IMPLIED
WARRANTY OR CONDITION OR MERCHANTABILITY,
SATISFACTORY QUALITY, OR FITNESS FOR A PARTICULAR
PURPOSE IS LIMITED TO THE DURATION OF THE EXPRESS
WARRANTY SET FORTH ABOVE. Some countries, states or
provinces do not allow limitations on the duration of an implied
warranty, so the above limitation or exclusion might not apply to
you. This warranty gives you specific legal rights and you might
also have other rights that vary from country to country, state to
state, or province to province.
7 TO THE EXTENT ALLOWED BY LOCAL LAW, THE REMEDIES
IN THIS WARRANTY STATEMENT ARE YOUR SOLE AND
EXCLUSIVE REMEDIES. EXCEPT AS INDICATED ABOVE, IN
NO EVENT WILL HP OR ITS SUPPLIERS BE LIABLE FOR
LOSS OF DATA OR FOR DIRECT, SPECIAL, INCIDENTAL,
CONSEQUENTIAL (INCLUDING LOST PROFIT OR DATA), OR
OTHER DAMAGE, WHETHER BASED IN CONTRACT, TORT,
OR OTHERWISE. Some countries, states or provinces do not
allow the exclusion or limitation of incidental or consequential
damages, so the above limitation or exclusion may not apply to
you.
80 3 Warranty
Year 2000 warranty
Subject to all of the terms and limitations of the HP Limited Warranty
Statement provided with this HP Product, HP warrants that this
HP product will be able to accurately process date data (including, but
not limited to, calculating, comparing, and sequencing) from, into, and
between the 20th and 21st centuries, and the year 1999 and 2000,
including leap year calculations, when used in accordance with the
Product documentation provided by HP (including any instructions f or
installing patches or upgrades), provided that all other products (e.g.,
hardware, software, firmware) used in combination with such
HP product(s) properly exchange date data. The duration of the Year
2000 warranty extends through January 31, 2001.
HP makes no representation or warranty respecting the accuracy or
reliability of information about non-HP products. Such information is
provided by manufacturers of those products, and customers are
urged to contact the manufacturer directly to verify Year 2000
readiness.
EN
Page 83

Index
Symbols
.jsd documents 71
Numerics
10/100Base-TX connection 13
10Base-T connection 13
A
adjusting speaker volume 49
analog telephone lines 11
Annotation toolbar 70
answer mode
default 53
description 53
setting 53
answering machine, connecting 29, 32
arrow keys on control panel 17
attaching
answering machine 29, 32
caller identification box 31
choosing what devices to connect 26
computer with internal modem 30
dedicated fax line 27
directly to a computer using a parallel cable 39
HP LaserJet 3150 product 23
modem 29
other devices 29
paper loading label 21
shared line 27
supports 20
telephone 29, 32
telephone cord 11
to network using HP JetDirect print server 45
automatic answer mode.
available disk space, not enough 58
avoiding jams 21, 22
See
answer mode 7
B
backup, battery 34
battery backup 34
bidirectional communication
not established 59, 60
requirements 12
bins
paper input 16
paper output 16
BNC connection 13
box contents 8
buttons
Cancel 69
Configure 69
control panel 17
Help 69, 72
Scan to E-mail 69
C
cables
network 13
parallel 8, 39
call waiting 11
caller identification box 31
Cancel button 69
cartridges, toner
illustration 8
installing 18
preventing damage 18
recycling 19
CD-ROM
damaged 58
unable to read 58
checking
firmware revisions 13
hardware installation 36
cleaning toner from clothing 18
clearing actions using control panel 17
closing Document Assistant 69
clothing, cleaning toner from 18
COM ports not available 58
communication not established 59, 60
compact disc.
compatible software 41, 46
Configure button 69
configuring
answer mode 53
dialing prefixes 66
fax header 51
rings-to-answer setting 53
connecting
answering machine 29, 32
caller identification box 31
choosing what devices to connect 26
computer with internal modem 30
dedicated fax line 27
directly to a computer using a parallel cable 39
external modem 31
HP LaserJet 3150 product 23
modem 29
See
CD-ROM 7
EN
Index
81
Page 84

connecting (continued)
other devices 29
shared line 27
supports 20
telephone 29, 32
telephone cord 11
to network using HP JetDirect print server 45
to the Internet 26
to wall jack 23
connections
10/100Base-TX 13
10Base-T 13
BNC 13
network 13
Token Ring 13
contents of box 8
contrast key on control panel 17
control panel
illustration 15
keys and lights 17
using to fax, copy, or scan 69
copy key on control panel 17
copying
guidelines 74
using the control panel 69
using the Document Assistant 74
cord, power
connecting 34
illustration 8
cord, telephone
connecting 11
illustration 8
Custom installation 40, 46
customer support.
See
HP Customer Care
D
data modem.
date
setting for fax 50
where displayed 17
dedicated fax line 27
dedicated lines
connecting 27
description 11
defaults
answer mode 53
rings to answer 53
demonstration page 36
desktop.
destination options for scanning 75
dial tone missing 35
dialing prefixes 66
See
modem
See
JetSuite Pro desktop
digital telephone lines 11
disk drive, external, connecting 12
disk space
not enough 58
requirements 12
distinctive ring
description 55
enabling 55
with one phone line and two phone numbers 28
Document Assistant
closing 69
description 68
using to access JetSuite Pro software 72
using to copy 74
using to scan 75
using to send faxes 73
document feeder support
attaching 20
illustration 8
document feeder tray 15
document output slot 15
document output support
attaching 20
illustration 8
document release door 15
document viewer
purpose 70
toolbars 70
window description 70
documentation
included in box 8
sources for help and information 78
doors
document release 15
printer 16
downloading print servers 13
E
electrical surges 11
e-mail customer support 62
enabling distinctive ring 55
enter key on control panel 17
EPP ports 59
equipment testing 36
error light on control panel 17
error messages
installation 58
where displayed 1 7
exiting menu settings 17
Express installation 40, 46
external disk drive, connecting 12
external modem.
See
modem
82 Index
EN
Page 85

F
fax
answer mode 53
date and time settings 50
required features 49
rings to answer 53
fax header 51
fax line, connecting 27
fax logs 71
fax software.
faxing
guidelines 73
troubleshooting 66
using the control panel 66
using the Document Assistant 73
verifying capability 67
viewing logs 71
fax-on-demand support 63
features of the product 7, 10
files
.jsd 71
graphics discarded by OCR 77
scanning to 75
firmware revisions for print servers 13
Freecell program 42
front paper output slot 16
See
PC fax software 7
G
graphics discarded by OCR software 77
H
hard disk space requirements 12
hardware
testing 36
troubleshooting 58
header for faxes 51
Help button 69, 72
help, online
customer support 62
using 72
HP Customer Care
contacting 62
e-mail support 62
fax-on-demand support 63
online support 62
phone support 63
Proactive Notification 63
user forums 62
website 62
HP JetDirect print servers
configuring 47
models 13
using to connect to product 45
I
information sources 78
inserting a pause in a fax 17
installation
components installed 40, 46
Custom 40, 46
Express 40, 46
messages 58
online help 72
requirements 12
sharing with other users 44
testing product and software 48
testing the hardware 36
troubleshooting 58
unpacking 8
installing
software 40, 46
software in Windows 3.1
software in Windows 95/NT 4.0 42, 47
internal modem.
Internet, connecting to 26
IPX/SPX
requirement 13
using to connect product 47
item doesn’t load 65
See
x
modem
42
J
jack, connecting to 23
jams, avoiding 21, 22
JetDirect print servers
configuring 47
models 13
using to connect to product 45
JetSuite Pro desktop
description 71
folders 71
toolbars 71
window description 71
JetSuite Pro software
accessing 72
description 72
desktop 71
document viewer 70
using to scan 76
K
keys
on control panel 17
programing for special dialing codes 49
EN
Index
83
Page 86

L
label, paper loading
attaching 21
illustration 8
latches for releasing printer door 16
lever, paper path 16
lights on control panel 17
lines
analog 11
dedicated 11
digital 11
shared 11
telephone 11
loading
guidelines 65
items to be faxed, copied, or scanned 65
media 22
problem 65
special items 65
logs for faxes 71
M
manual answer mode.
Manual Dial key on control panel 17
media
jams 21, 22
loading 22
memory requirements 12
menu key on control panel 17
menu settings
exiting 17
scrolling through 17
messages
installation 58
where displayed 17
modem
connecting 29
external 27, 31
internal 27, 30
using with HP LaserJet 3150 product 26
modes
answer 53
automatic and manual answer 53
operating 10
See
answer mode
N
network
adding the printer driver 44
connecting using HP JetDirect print server 45
requirements 13
sharing with other users 44
no dial tone 35
not enough disk space 58
Novell servers 13
O
OCR
graphics discarded during 77
using to scan text 77
one-touch keys 17
online help
customer support 62
using 72
online user forum 62
operating modes 10
optical character recognition (OCR).
overview of the product 7
See
P
paper
jams 22
loading 22
paper input bin 16
illustration 16
loading 22
paper input support
attaching 20
illustration 8
paper loading label
attaching 21
illustration 8
paper output bin 16
paper output support
attaching 20
illustration 8
paper path lever 16
parallel cable
connecting directly to computer with 39
illustration 8
parallel ports
areas of conflict 12
installation requirements 12
parts
illustration for printer path 16
illustration for scanner path 15
unpacking 8
path
printer 16
scanner 15
pause key on control panel 17
PBX systems 66
PC fax software
included with HP LaserJet 3100 product 46
included with HP LaserJet 3150 product 41
using your own 41, 46
phone lines
dedicated fax 27
one with two phone numbers 28
two coming into one wall jack 28
with distinctive ring 28
See
phone.
telephone
OCR
84 Index
EN
Page 87

ports
device conflicts 12
EPP 59
installation requirements 12
not available 58
serial 39
TCP/IP printing services 47
unidirectional 59
power
interruptions 11
strip recommendation 34
supply backup 34
switch 34
power cord
connecting 34
illustration 8
print servers
adding to network computers 44
checking firmware revisions 13
downloading 13
HP JetDirect 45
models 13
upgrading 13
printer 16
door 16
path 16
printing
document test 43, 48
self-test report 57
Proactive Notification 63
problems.
product announcements 63
product registration packet 8
product warranty 79
programming keys for special dialing codes 49
protectors, surge 11
protocol requirement 13
See
troubleshooting
R
RAM (random access memory) requirements 12
random access memory (RAM) requirements 12
ready light on control panel 17
recycling toner cartridges 19
redial key on control panel 17
registration packet 8
release latches 16
requirements for installation 12
resolution key on control panel 17
rings to answer
changing 53
default 53
S
Scan to E-mail button 69
scanner
parts 15
path 15
scanning 75
description 75
destination options 75
guidelines 77
to document viewer 75
to file 75
to text 75
to text using OCR 77
using the Document Assistant 75
using the JetSuite Pro software 76
scanning software, TWAIN-compliant 41, 46
scans in network mode 17
self-test report 57
sending faxes.
serial ports 39
setting
fax answer mode 53
fax features 49
fax header information 51
shared lines
connecting 27
description 11
rings-to-answer 53
sharing the product 44
single-sheet input 16
single-sheet input slot 16
software
compatible 41, 46
installing 40, 46
list of components installed 46
troubleshooting 58
TWAIN-compliant scanning 41, 46
updates 62, 63
software included in box 8
sound, controlling with control panel 17
speaker volume 49
special media lever 15
speed dial key on control panel 17
start key on control panel 17
starting
copy function 17
paper faxes 17
stop key on control panel 17
stopping actions using control panel 17
support.
See
faxing 78
See
HP Customer Care
EN
Index
85
Page 88

supports
attaching 20
illustration 8
unpacking 8
surge protectors 11
switch box, connecting 12
switch, power 34
system requirements 12
U
unidirectional ports 59
uninterruptible power supply (UPS) 34
unpacking 8
updating software 62, 63
upgrading print servers 13
UPS (uninterruptible power supply) 34
user forum support 62
T
TCP/IP
printing services port 47
requirement 13
technical support.
telephone
connecting 29, 32
See
lines.
See online help
lists.
See software help
lists.
telephone cord
connecting 11
illustration 8
telephone customer support 63
testing
hardware 36
printing a self-test report 57
product and software 43, 48
text
scanning to 75
scanning to using OCR 77
thumbnails 71
time
setting for fax 50
where displayed 17
Token Ring connection 13
toner cartridges
illustration 8
installing 18
preventing damage 18
recycling 19
toner, cleaning from clothing 18
training 62
tray, document feeder 15
troubleshooting 65
fax capability 67
fax delivery 66
installation 58
printing a self-test report 57
using online help 72
TWAIN-compliant software 41, 46, 69
See
phone lines
HP Customer Care 22
V
verifying fax capability 67
voicemail
description 11
using with dedicated fax lines 27
volume for speaker 49
volume key on control panel 17
W
wall jack, connecting to 23
warranty
product 79
year 2000 80
websites
HP Customer Care 62
HP website 13
Win32s program 42
Windows
installation requirements 12
installing HP LaserJet 3100 software in 46
installing HP LaserJet 3150 software in 40
installing software in Windows 3.1
installing software in Windows 95/NT 4.0 42, 47
sharing 44
x
42
Y
year 2000 (Y2K) warranty 80
86 Index
EN
Page 89

Page 90

 Loading...