

Page 1

useuse
LaserJet 2300
hp
hp embedded web server
color LaserJet 2500
hp
LaserJet 4100mfp
hp
LaserJet 4200
hp
LaserJet 4300
hp
color LaserJet 4600
hp
color LaserJet 5500
hp
LaserJet 9000mfp
hp
Page 2

Page 3

hp embedded web server
user guide
Page 4

© Copyright Hewlett-Packard Company 2003
Trademark Credits
All Rights Reserved.
Reproduction, adaptation, or translation without
prior written permission is prohibited, except as
allowed under the copyright laws.
The information contained in this document or
software is subject to change without notice.
EWS v. 5.0
Edition 1, 4/2003
Java™ is a U.S. trademark of Sun
Microsystems, Inc.
Microsoft® and Windows® are U.S. registered
trademarks of Microsoft Corp.
Netscape is a U.S. trademark of Netscape
Communications Corporation.
ii ENWW
Page 5

Contents
1 Overview
What is an embedded Web server?. . . . . . . . . . . . . . . . . . . . . . . . . . . . . . .1
Features. . . . . . . . . . . . . . . . . . . . . . . . . . . . . . . . . . . . . . . . . . . . . . . . .1
Additional features with a permanent storage device. . . . . . . . . . . . . . .2
HP Web Jetadmin and the HP Embedded Web Server. . . . . . . . . . . . .2
System requirements. . . . . . . . . . . . . . . . . . . . . . . . . . . . . . . . . . . . . . . . . .2
Opening the HP Embedded Web Server. . . . . . . . . . . . . . . . . . . . . . . . . . .2
Navigating through the HP Embedded Web Server . . . . . . . . . . . . . . . . . .3
2 Viewing Product Status from the Information Pages
Device Status. . . . . . . . . . . . . . . . . . . . . . . . . . . . . . . . . . . . . . . . . . . . . . . .6
Configuration Page . . . . . . . . . . . . . . . . . . . . . . . . . . . . . . . . . . . . . . . . . . .7
Supplies Status . . . . . . . . . . . . . . . . . . . . . . . . . . . . . . . . . . . . . . . . . . . . . .9
Event Log. . . . . . . . . . . . . . . . . . . . . . . . . . . . . . . . . . . . . . . . . . . . . . . . . .10
Usage Page. . . . . . . . . . . . . . . . . . . . . . . . . . . . . . . . . . . . . . . . . . . . . . . .11
Device Information. . . . . . . . . . . . . . . . . . . . . . . . . . . . . . . . . . . . . . . . . . .12
Control Panel . . . . . . . . . . . . . . . . . . . . . . . . . . . . . . . . . . . . . . . . . . . . . . .13
3 Configuring the Product from the Settings Pages
Configure Device . . . . . . . . . . . . . . . . . . . . . . . . . . . . . . . . . . . . . . . . . . . .16
Using the menus on the Configure Device page . . . . . . . . . . . . . . . . .17
Email . . . . . . . . . . . . . . . . . . . . . . . . . . . . . . . . . . . . . . . . . . . . . . . . . . . . .18
Configuring outgoing e-mail . . . . . . . . . . . . . . . . . . . . . . . . . . . . . . . . .19
Configuring incoming e-mail. . . . . . . . . . . . . . . . . . . . . . . . . . . . . . . . .19
Alerts . . . . . . . . . . . . . . . . . . . . . . . . . . . . . . . . . . . . . . . . . . . . . . . . . . . . .20
Using the Alerts page with a product . . . . . . . . . . . . . . . . . . . . . . . . . .21
Sending e-mail commands to the product . . . . . . . . . . . . . . . . . . . . . .23
AutoSend. . . . . . . . . . . . . . . . . . . . . . . . . . . . . . . . . . . . . . . . . . . . . . . . . .25
Security . . . . . . . . . . . . . . . . . . . . . . . . . . . . . . . . . . . . . . . . . . . . . . . . . . .26
Enabling outgoing e-mail . . . . . . . . . . . . . . . . . . . . . . . . . . . . . . . . . . .27
Enabling incoming e-mail. . . . . . . . . . . . . . . . . . . . . . . . . . . . . . . . . . .27
Other Links. . . . . . . . . . . . . . . . . . . . . . . . . . . . . . . . . . . . . . . . . . . . . . . . .28
Adding a Link . . . . . . . . . . . . . . . . . . . . . . . . . . . . . . . . . . . . . . . . . . . .29
Removing a Link. . . . . . . . . . . . . . . . . . . . . . . . . . . . . . . . . . . . . . . . . .29
Device Information. . . . . . . . . . . . . . . . . . . . . . . . . . . . . . . . . . . . . . . . . . .29
Language. . . . . . . . . . . . . . . . . . . . . . . . . . . . . . . . . . . . . . . . . . . . . . . . . .30
Time Services . . . . . . . . . . . . . . . . . . . . . . . . . . . . . . . . . . . . . . . . . . . . . .31
Digital Sending. . . . . . . . . . . . . . . . . . . . . . . . . . . . . . . . . . . . . . . . . . . . . .32
4 Managing Network Operation from the Networking Pages
Overview . . . . . . . . . . . . . . . . . . . . . . . . . . . . . . . . . . . . . . . . . . . . . . . . . .33
5 Using the Other Links as a resource
hp instant support . . . . . . . . . . . . . . . . . . . . . . . . . . . . . . . . . . . . . . . . . . .36
How hp instant support works . . . . . . . . . . . . . . . . . . . . . . . . . . . . . . .36
Information you can get from hp instant support . . . . . . . . . . . . . . . . .36
Order Supplies. . . . . . . . . . . . . . . . . . . . . . . . . . . . . . . . . . . . . . . . . . . . . .36
Product Support . . . . . . . . . . . . . . . . . . . . . . . . . . . . . . . . . . . . . . . . . . . .37
Index
ENWW iii
Page 6

iv Contents ENWW
Page 7

1
Ov erview
What is an embedded Web server?
A Web server provides an environment in which Web programs can run, much in the same way
that an operating system, such as Microsoft® Windows®, provides an environment in which
programs can run on your computer. A Web browser, such as Microsoft Internet Explorer or
Netscape Navigator, can show output from a Web server.
An “embedded” Web server (EWS) resides on a hardware device (such as a printer) or in the
firmware, rather than as software that is loaded on a network server.
The advantage of an embedded Web server is that it provides an interface to the product that
anyone who has a network-connected computer and a standard Web browser can open and
use. No special software needs to be installed or configured.
With the HP Embedded Web Server, you can view product status information, change settings,
and manage the product at your computer.
Note In this guide, the terms “product” and “device” are sometimes used interchangeably. When
products or devices are discussed in this guide, the information pertains to HP LaserJet printers,
HP color LaserJet printers, and HP LaserJet MFPs unless otherwise noted. For specific
information about what features your printer or MFP supports, see the documentation that came
with your product.
Features
You can use the HP Embedded Web Server to view product and network status and to manage
printing functions from your computer, rather than at the product control panel. With the
HP Embedded Web Server, you can do these tasks:
● View control-panel messages and product-status information.
● Determine the remaining life for all supplies.
● Use the Order Supplies link to connect to a Web page that facilitates online ordering of
supplies from a reseller of your choice.
● Gain access to the product's technical support page.
● Gain access to specific support for recent product events.
● View and change tray configurations.
● View and change product configuration.
● View and print information pages, such as the Configuration page.
● Receive alerts about product events, such as when the product is low on supplies, through
e-mail.
● Add or customize links to other websites.
● Select the language in which to display the embedded Web server pages.
● View and change network configuration.
ENWW What is an embedded Web server? 1
Page 8

Additional features with a permanent storage device
If you have a permanent storage device installed in your product, such as a hard disk or flash
disk, you can view, set up, and retain additional information.
● Alerts. Set up fo ur d ifferent destination li sts , wit h up t o 20 reci pie nts on ea ch of th e f o ur li sts .
(Without the permanent storage device, you can send alerts to only two e-mail addresses.)
● Other Links. Add up to five additional links to the websites of your choice. (Without the extra
storage, you can add one additional link.)
A hard disk might have come with your product, depending on your product model. If your
product does not have a hard disk, you can order one. For more information, see the user guide
that came with your product, or go to: http://www.hp.com/go/buy_hp
http://www.hp.com/country/us/eng/othercountriesbuy.htm
.
(within t h e Un i t ed S t at e s) o r
HP Web Jetadmin and the HP Embedded Web Server
HP’s Web Jetadmin is a Web-based system management tool that you can use with a Web
browser.
The HP Embedded Web Server and Web Jetadmin work together to meet all of your product
management needs. You can install and manage networked devices effectively. Network
administrators can manage networked devices remotely, from practically anywhere.
The HP Embedded Web Server provides a simple, easy-to-use solution for one-to-one product
management in environments that have a limited number of products. However, environments
that have several products might want to use HP Web Jetadmin for group product management.
With HP Web Jetadmin you can discover, manage, and configure multiple devices
simultaneously.
HP Web Jetadmin is available from HP online support (http://www.hp.com/go/webjetadmin
System requirements
● A Web browser installed on your computer. The HP Embedded Web Server is designed to
work best with later versions of most Web browsers. For ex ample, Netscape Navigator 6.2
or later, or Microsoft Internet Explorer 5.01 and later for Macintosh computers or Internet
Explorer 6.0 or later for Windows work well with this Web server.
● A transmission control protocol/Internet protocol (TCP/IP)-based network connection.
Opening the HP Embedded Web Server
Note You cannot view the embedded Web server pages from outside of a firewall.
1 Open a Web browser.
2 In the Address or Go to field, type the IP address that is assigned to the product (for
example, http://192.168.1.1) or the host name (for example; http://www.[your_server].com).
If you do not know the IP address for the product, it is listed on the Configuration page. See the
user guide that came with your product to see how to print a Configuration page at the control
panel.
).
2 Overview ENWW
Page 9
Navigating through the HP Embedded Web Server
The HP Embedded Web Server has pages that can be used to view product information and
change configuration options. You can gain access to these pages by clicking one of the tabs
(Information, Settings, and Networking) and then clicking one of the menus on the navigation
bar that is located on the left side of the screen.
The following illustration and table provide information about the EWS screens.
1
2
5
3
4
Challot EWS screen
Description More information
feature
Product name
1
and IP address
Tabs Information tab View information about the pro duc t.
2
View the product name and IP address.
You cannot configure the product
from these pages.
Settings tab Use the feature on this tab to
configure the product.
Networking tab View network status and configure
the product’s network card.
See “Viewing Product Status from the
Information Pages” on page 5.
See “Configuring the Product from the
Settings Pages” on page 15.
See “M anaging Ne twork Operati on from the
Networking P ages” on page 33.
ENWW Navigating through the HP Embedded Web Server 3
Page 10

Challot EWS screen
feature
Menus Different on each
3
Other Links hp instant support Connect to a set of Web resources
4
Page content Different on each
5
Description More information
Click a tab to show the menus.
tab
● See “Using the Other Links as a
that help solve problems and
describe what additional services
are available for your HP product.
Order Supplies Use the Internet to order genuine
HP supplies for your HP product.
Product Support Use spec ific p roduct help from H P’s
website to solve a problem.
Click a menu to show a page.
menu
resource” on page35.
● See “O th er Links” on pag e28.
● See “Viewing Product Status from the
Information Pages” on page 5.
● See “C o nfi guring the Produ ct from the
Settings Pages” on page 15.
● See “M an agi ng N etw ork Oper ation
from the Networking Pages” on
page 33.
4 Overview ENWW
Page 11

Viewing Product Status from
2
the Information Pages
The Information pages are for informational purposes only; you cannot configure the printer from
these pages. To configure the printer through the EWS, “Configuring the Product from the
Settings Pages” on page 15.
The following are the Information pages:
● Device Status (page 6)
● Configuration Page (page 7)
● Supplies Status (page 9)
● Event Log (page 10)
● Usage Page (page 11)
● Device Information (page 12)
● Control Panel (page 13)
Note Some products do not support all of these pages.
ENWW 5
Page 12
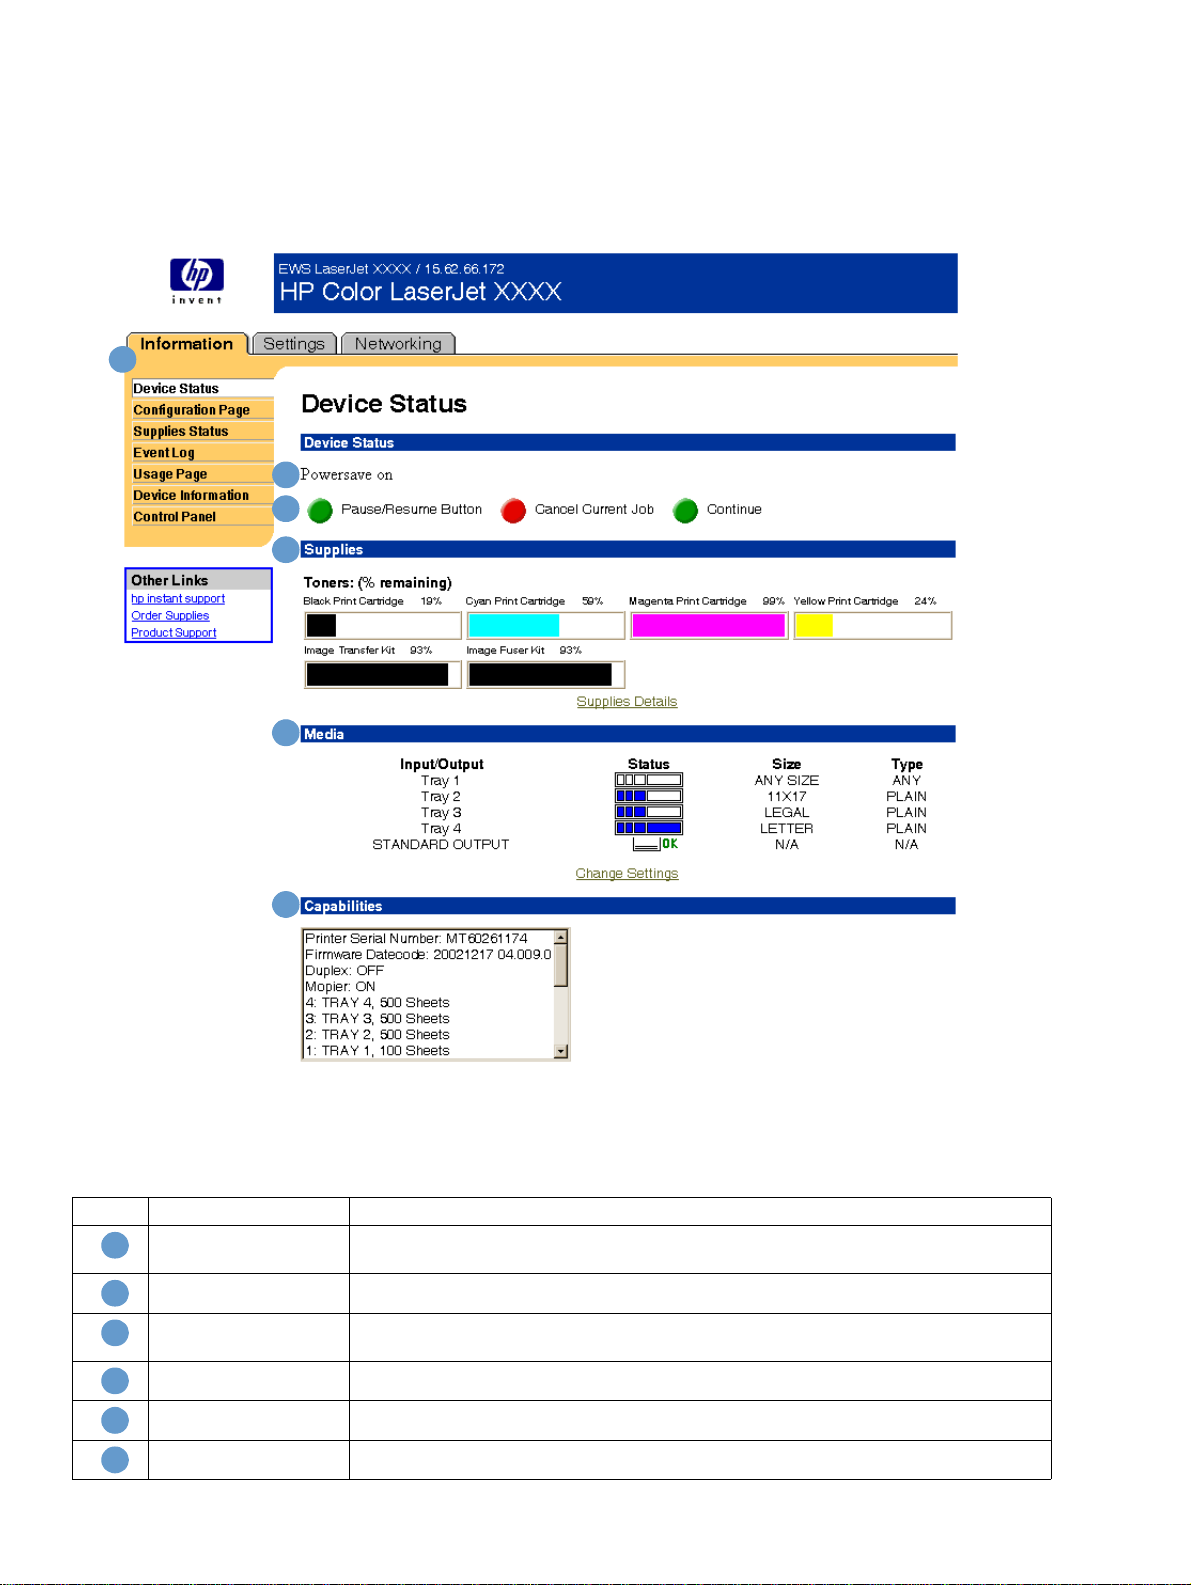
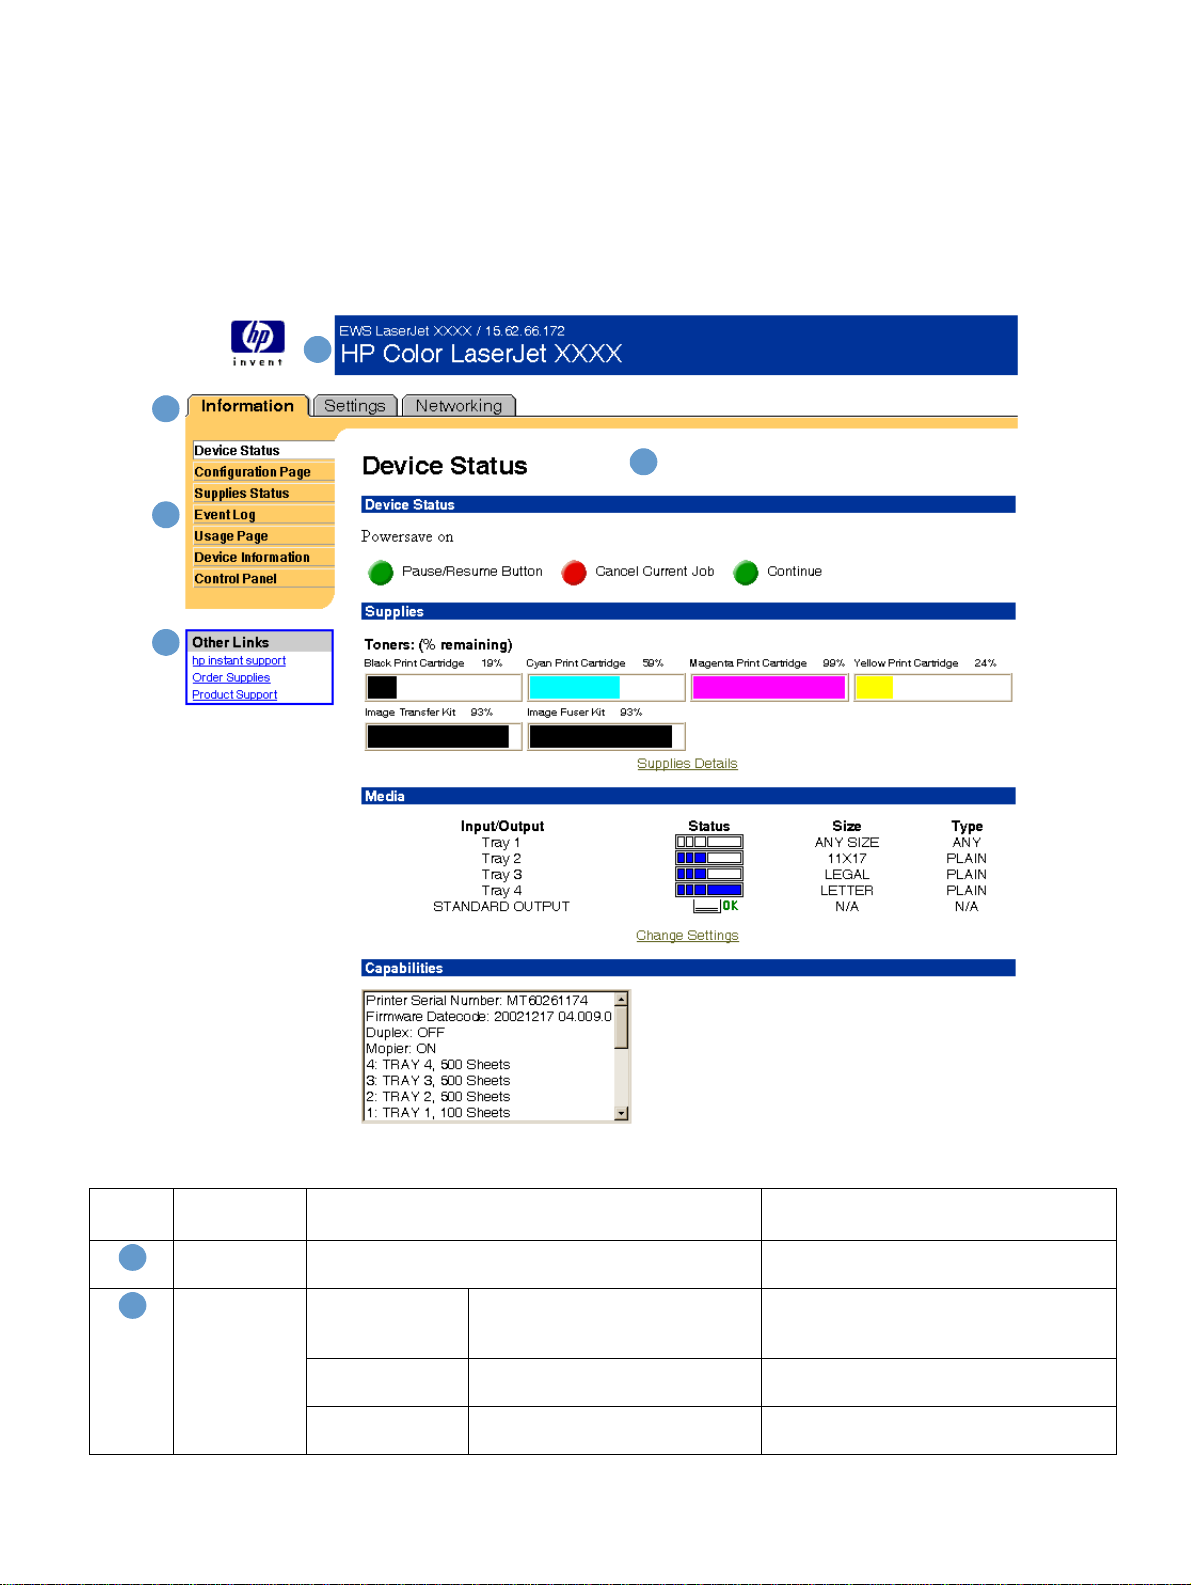
Device Status
Use the Device Status page to view the current status of the product. The following illustration
and table describe how to use this page.
1
2
3
4
5
6
Callout Area on the page Information or capability provided by the area
EWS tabs and menus For more information, see “Navigating through the HP Embedded Web Server” on
1
Device status Shows the product’s status (the same as what appears on the control-panel display).
2
Control panel buttons Use these control-panel buttons just as you would at the product. To select which
3
Supplies Shows the perc entage of life remaining for each supply.
4
Media Shows the status and configuration information for the input trays and output bins.
5
Capabilities Lists the accessories that are installed in the product.
6
page 3.
control-panel buttons appear on this page, go to the Security page on the Settings tab.
6 Viewing Product Status from the Information Pages ENWW
Page 13
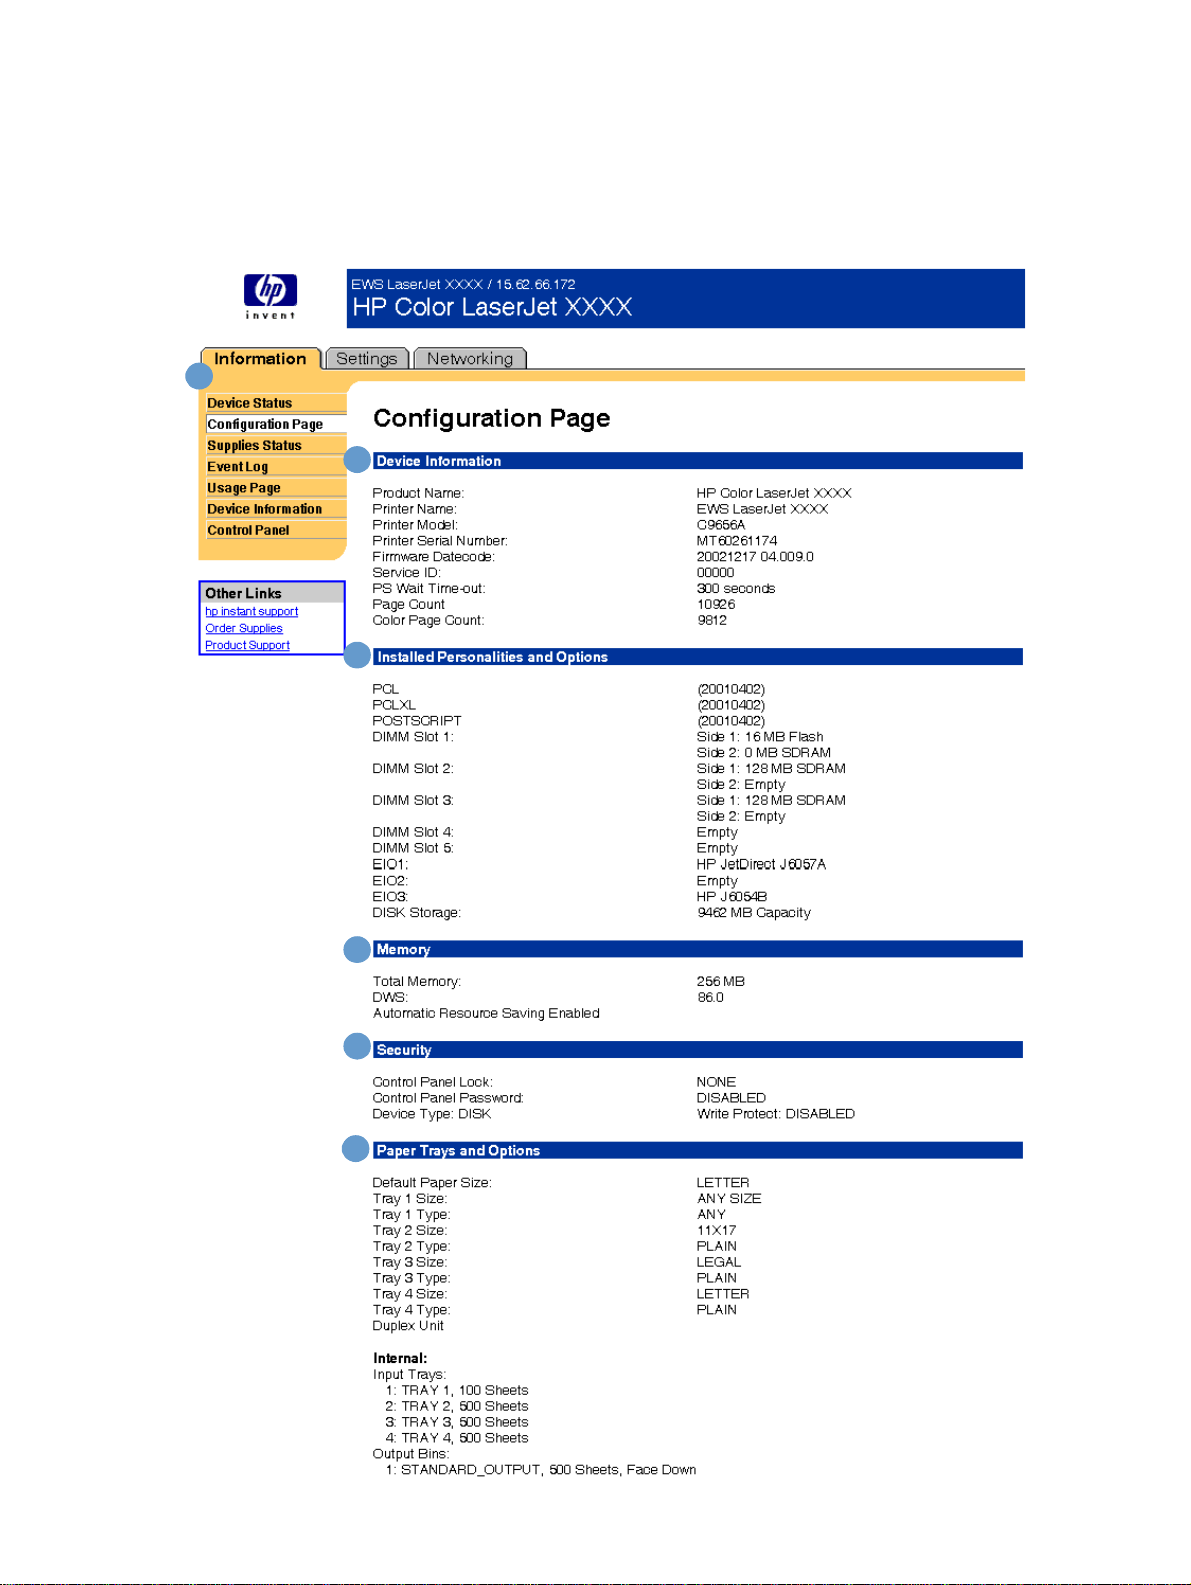
Configuration Page
Use the Configuration page to view current product settings, help troubleshoot printer problems,
and verify the installation of optional accessories, such as dual inline memory modules (DIMMs)
or paper-handling devices. The following illustration and table describe how to use this page.
1
2
3
Note: See the table on
the following page for
information about the
callouts.
4
5
6
ENWW Configuration Page 7
Page 14
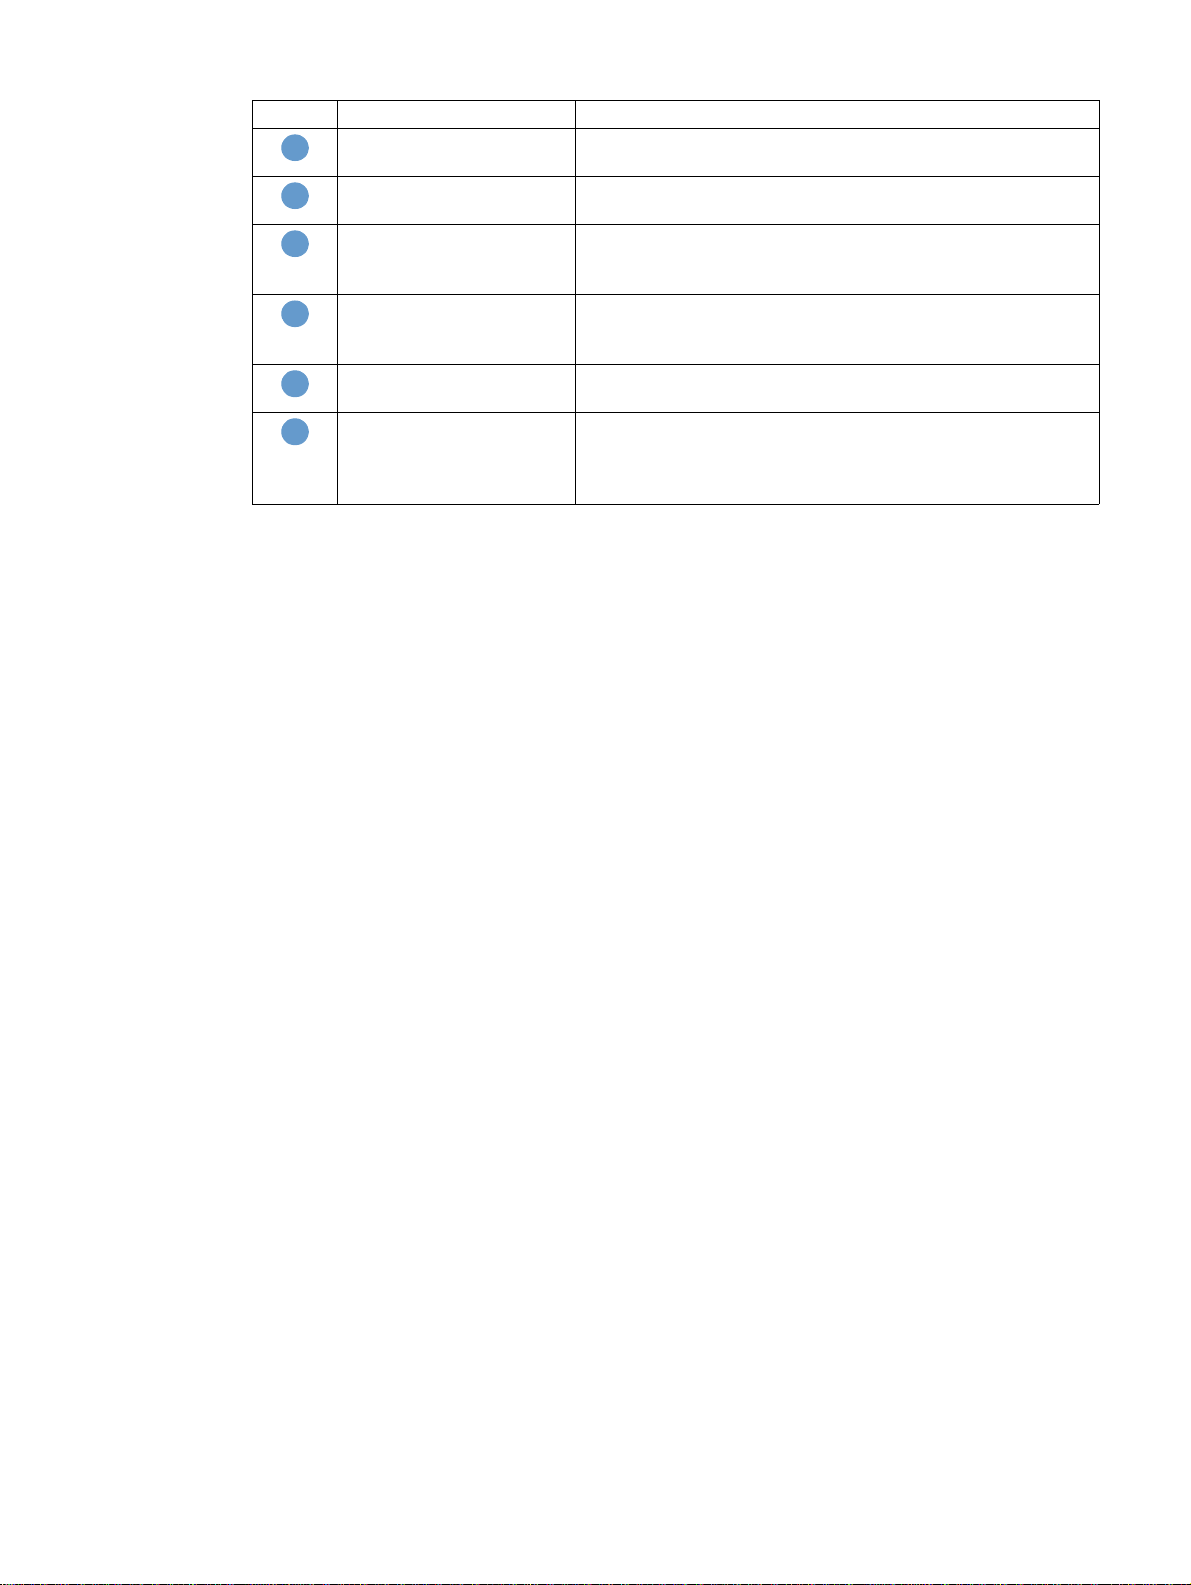
Callout Area on the page Information or capability provided b y the area
EWS tabs and menus For more infor mation, see “Navigating through the HP Embedded
1
Device Information Lists the serial number, page counts, and other information for
2
Installed Personalities and
3
Options
Memory Lists the memory information, PCL Driver Work Space (DWS),
4
Security Lists the status of the Control Panel Lock, Cont rol Panel
5
Paper Trays and Options Lists the size and type of media that is specified for each of the
6
Web Server” on page 3.
the product.
Lists all of the pri nter lang uages that are insta lled (such as p rinter
command language [PC L ] a nd PostScript [PS]), and lists options
that are installed in each DIMM slot and EIO slot.
and input/output (I/O) buffering and Resource Saving
information.
Passwo rd, and Write Protect options.
trays in the product. If a duplexer or any paper-handling
accessories are inst alled o n th e produ ct , inf ormation ab out tho se
devices is listed here as well.
8 Viewing Product Status from the Information Pages ENWW
Page 15
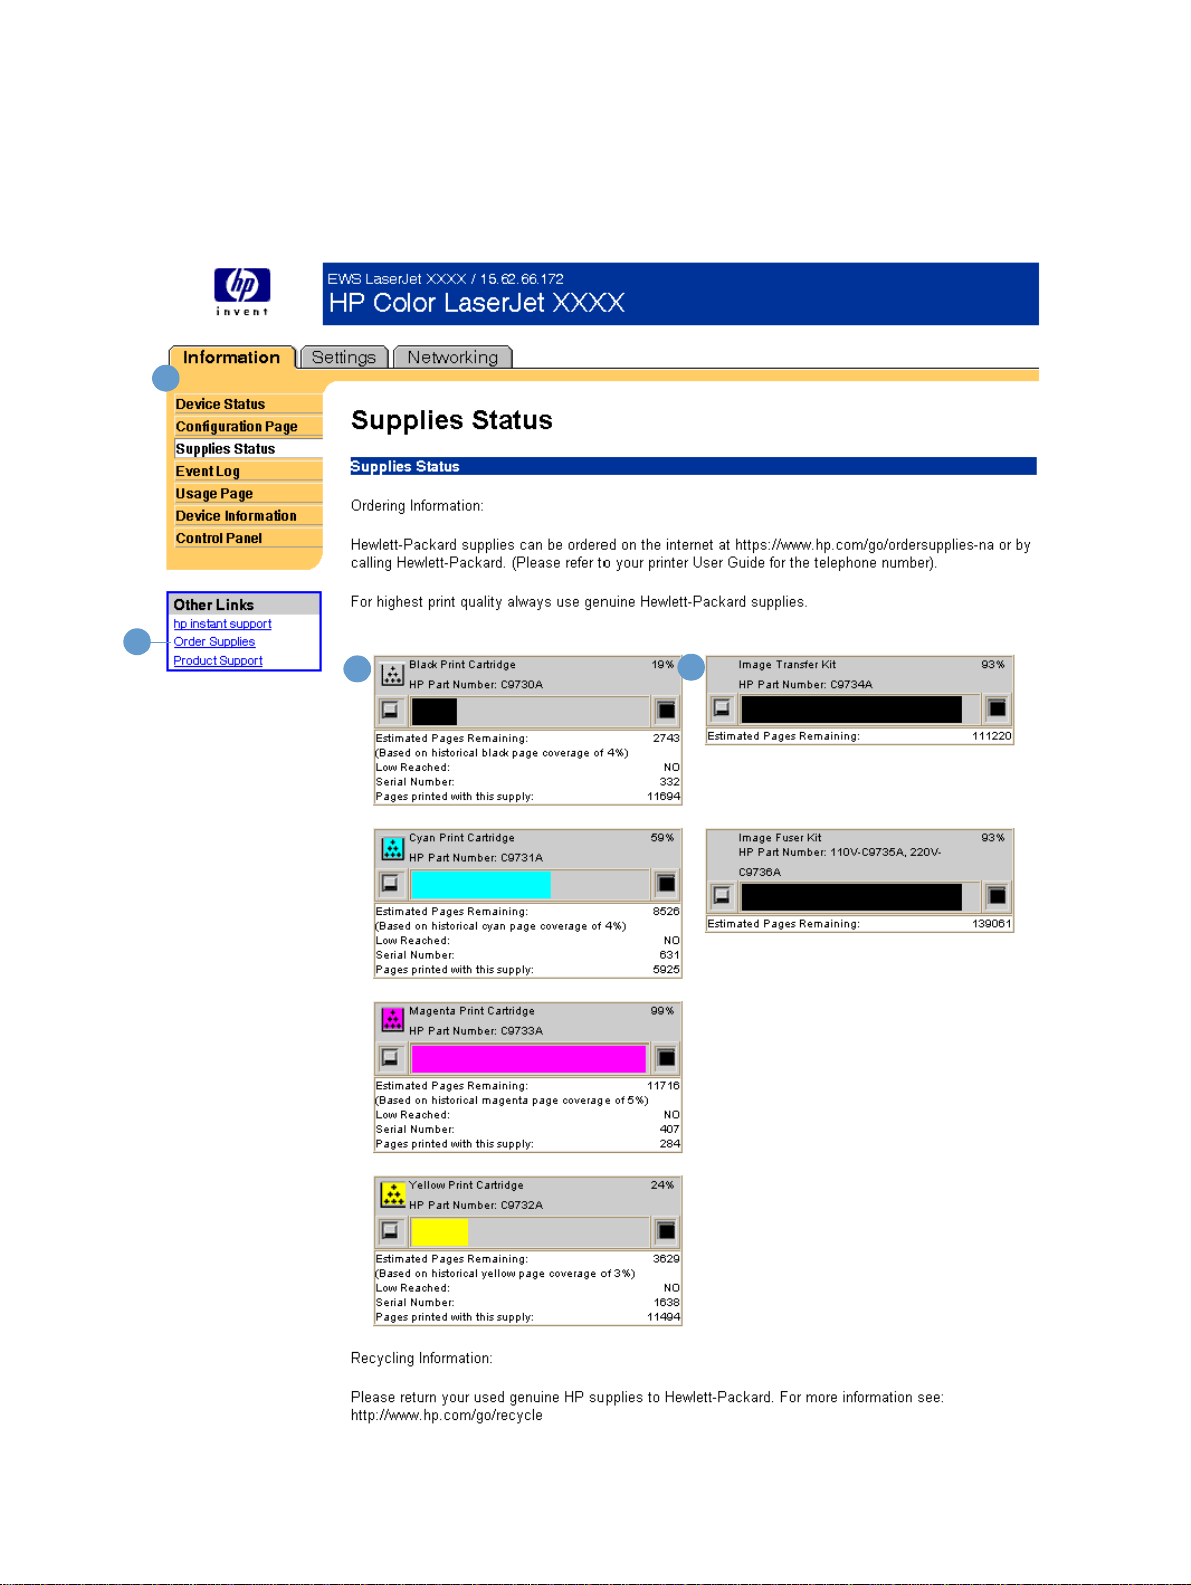
Supplies Status
The Supplies Status page shows more detailed supplies information and provides part numbers
for genuine HP supplies. (It is helpful to have the part numbers available when ordering
supplies.) The following illustration and table describe how to use this page.
1
2
3
4
Note: See the table on
the following page for
information about the
callouts.
ENWW Supplies Status 9
Page 16

Event Log
Callout Area on the page Information or capability provided by the area
EWS tabs and menus For more information, see “Navigating through the HP Embedded Web
1
Order Supplies Use this feature to connect to a Web page that facilitates online
2
Cartridge/Image Drum
3
Information
Long-life Supplies
4
Information
Server” on page 3.
ordering of supplies from a reseller of your choice.
If availa b le , lists the percent o f life remaining and the estimated number
of pages remaining before the supply is empty; the total number of
pages that have been processed with the supply; the supply serial
number and HP part number; and an indication of whether or not the
supply has reached the lo w status.
If availa b le , lists the percent o f life remaining and the estimated number
of pages remaining with the supply.
The Event Log shows the most recent printer events, including printer jams, service errors, and
other printer errors. The following illustration and table describe how to use this page.
1
2 3
4 5
6
Callout Area on the page Information or capability provided b y the area
EWS tabs and menus For more information, see “Navigating t hrough the HP Embedd ed
1
Number Lists the order in which the errors oc curred. Th e last e rror to occur
2
Page Count Lists the number of pages tha t had be en printe d from the pro duc t
3
Event Shows the internal error code for each error.
4
Description or Personality Indicates whether the error occurred because a problem within a
5
Product Support Provides access to HP’s support website for prod uc t-sp ec ifi c
6
Web Server” on page 3.
has the highest number.
when the error occurred.
product personality or as a result of a jam.
troubleshooting information.
10 Viewing Produ ct Sta t us from the Info rmati on Pag es ENWW
Page 17

Usage Page
The Usage page gives a page count for each size of media that has passed through the printer,
shows the different paper types that were used, and shows the average percentage of toner
coverage per page for each color. The following illustration and table describe how to use this
page.
Note For some products, this page is only available if the product has a permanent storage device
installed.
1
2
3
Callout Area on the page Information or capability provided by the area
EWS tabs and menus For more information, see “Na vigating th rough the HP Embedd ed
1
Usage Totals (equivalent) Indicates the types of pages that have been printed, the number
2
Coverage Indicates the amount of toner used on a page.
3
Web Server” on page 3.
of single-sided pages that have been printed, the number of
duplexed pages that have been printed, and the total number of
pages that have been printed.
ENWW Usage Page 11
Page 18

Device Information
The Device Information page shows the device description; asset number; company name and
contact person; and the printer’s IP address, model, number, and serial number.
Note The printer name, asset number, company name, and contact person that appear on this Device
Information page on the Information tab can be specified on the Device Information page that
is located on the Settings tab.
12 Viewing Produ ct Sta t us from the Info rmati on Pag es ENWW
Page 19

Control Panel
For products that have a control panel, the Control Panel page shows the product control panel
display as if you were standing at the product. Because this view shows the product status, it can
help you troubleshoot problems with the product.
ENWW Control Panel 13
Page 20

14 Viewing Produ ct Sta t us from the Info rmati on Pag es ENWW
Page 21

Configuring the Product from
3
the Settings Pages
Use the pages on the Settings tab to configure the product from your computer. The following
are the Settings pages:
● Configure Device (page 16)
● Email (page 18)
● Alerts (page 20)
● AutoSend (page 25)
● Security (page 26)
● Other Links (page 28)
● Device Information (page 29)
● Language (page 30)
● Time Services (page 31)
● Digital Sending (page 32)
Note Some products do not support all of these pages.
ENWW 15
Page 22

Configure Device
You can use the Configure Device page to print information product pages and configure the
product remotely. The following illustration, table, and example procedure describe how to use
this page. The following example shows the Information menu options.
Note If your product has a control-panel display , these menus are similar to the menus that are available
at your product control panel. Some of the product control panel menus are not available from
the embedded Web server.
See the documentation that came with your product for more information about the different
menus that your product supports.
1
2
3
4
Callout Area on the page Information or capability provided by the area
EWS tabs and menus For more information, see “Navigating through the HP Embedded W eb
1
Select A Menu Information menu Print product information pages, which
2
Plus sign Click the plus sign( ) next to a menu, or click the menu itself, to see
3
Menu subentries Gain access to product information or to configure the product.
4
Server” on page 3.
provide details about the product and its
configuration.
Paper Handling menu Set the type of paper that is in each tray.
Configure Device menu Configure the product and thereby affect
the product’s behavior. For example, you
can configure Powersave and product
personality settings from this menu.
the submenus or subentries.
16 Configuring the Product from the Settings Pages ENWW
Page 23

Using the menus on the Configure Device page
This procedure is provided only as an example. Other menu items can be set in a similar
manner.
Note Printer drivers and software programs frequently override selections that are made in the Printing
menu and the Paper Handling menu. For more information, see the user guide that came with
your
product.
Any changes are reflected on the Printer Status page, the Configuration page, and the Paper
Handling menu.
Follow these steps to select the paper size for Tray 1 (example procedure):
1 Click PAPER HANDLING.
2 Next to TRAY 1 SIZE, select A4 from the list, and then click Apply to save the change.
ENWW Configure Device 17
Page 24

Use the Email page to configure e-mail settings for outgoing and incoming mail, which allows you
to configure product alerts. The following illustration, table, and procedures describe how to use
this page.
Note For some products, you enable incoming and outgoing e-mail on this page, and for other products
you enable e-mail on the Security page.
For some products, this page is called Email Server.
1
2
3
4
5
Callout Area on the page Information or capability provided by the area
EWS tabs and menus For more information, see “Navigati ng thro ugh th e H P Emb edded Web
1
Outgoing Email Configure outgoing e-mail if you intend to use the Alerts or AutoSend
2
Device Email Address This is the prod uct’ s e-m ail address tha t appears in pro duct alerts. This
3
Incoming Email Configure incoming e-mail if you intend to request information pages
4
Set Security Open the Security page in a new window.
5
Server” on page 3.
features. For more information, see “Using the Alerts page with a
product” on page 21.
is not the e-mail address that you want to use when sending
commands to the product. See “Sending e-mail commands to the
product” on page 23.
from the product by usi ng e- mai l messages. F or m ore in formation, see
“Sending e-mail commands to the product” on page 23.
18 Configuring the Product from the Settings Pages ENWW
Page 25

Configuring outgoing e-mail
It is only necessary to configure outgoing e-mail if you intend to use the Alerts or AutoSend
feature.
1 Gather the following information. (Your organization’s network or e-mail administrator
typically provides the information that is required to configure outgoing mail.)
• The Internet protocol (IP) address of the simple mail transfer protocol (SMTP) mail server
on your network. The EWS uses the SMTP Server IP address to relay e-mail messages
to other computers.
• The e-mail domain name suffix that is used to address e-mail messages within your
organization.
2 Type the SMTP server IP address in the SMTP Server text box.
3 Type the domain name, and then click Apply to save the changes.
Configuring incoming e-mail
You should configure incoming e-mail if you intend to request information pages from the
product by using e-mail messages. For more information, see “Sending e-mail commands to the
product” on page 23.
1 Establish a Post Office Protocol 3 (POP3) mailbox account for the
within your organization’s network.
Each POP3 account requires a username and a password. The username combined with
the product’s domain name (which is specified in the outgoing mail configuration) is the email address for the product. For example, if the POP3 mailbox account username is
“product” and the POP3 server is “hp.com”, the product’s e-mail address will be
“product@hp.com”.
Note Each product that is configured for incoming mail must have its own POP3 mailbox account on
your network’s e-mail server.
The POP3 mailbox accounts are typically configured by your organization’s network or e-mail
administrator.
2 Type the IP address of the POP3 mail server in the POP3 Server text box.
3 Type username and password for the product’s mailbox account, and then click Apply to
save the changes.
product on a mail server
ENWW Email 19
Page 26

Alerts
From the Alerts page, you can set up the product to send problem and status alerts to anyone
through e-mail messages. More than one individual can receive alerts, with each person
receiving only specific alerts. For example, an administrative assistant might be responsible for
ordering print cartridges or fixing jams, and could receive advanced warning on cartridge-low
situations or be alerted to a jam situation. Similarly , the long-life supplies might be handled by an
external service provider who could receive alerts about fuser kits, image drums, and transfer
kits. The following illustration, table, and procedures describe how to use this page.
With a permanent storage device, such as a hard disk, installed you can create up to four
different destination lists, with up to 20 recipients for each list. (Without the permanent storage
device, you can send alerts to only two e-mail addresses.)
Note In order for alerts to function, outgoing e-mail must be enabled. To enable outgoing mail, see
“Configuring outgoing e-mail” on page 19.
1
2
3
4
5
Callout Area on the page Information or capability provided b y the area
EWS tabs and menus For more infor mation, see “Navigating through the HP Embedded
1
Notific ation Distribution Lists Click Edit to create a new destination list or modify an existing
2
Configure Email Settings Open the Email page in a new window.
3
Set Security Open the Security page in a new window.
4
Select Events Open the alerts to be sent for each destination list.
5
Web Server” on page 3.
list.
20 Configuring the Product from the Settings Pages ENWW
Page 27

Using the Alerts page with a product
This section contains information about these alerts features:
● “To configure Alerts” on page 21
● “To delete destinations and destination lists” on page 23
To configure Alerts
With a permanent storage device installed, you can set up four different lists, with up to 20
recipients on each of the four lists. Without a hard disk, you have room for only two e-mail
addresses.
1 If you do not have a permanent storage device, type up to two e-mail addresses. Click Apply
and continue to step 2.
-Or-
If you do have a permanent storage device, complete the following steps to change the
e-mail list name and add e-mail addresses.
a. Click Edit next to the list that you want to add to or modify.
b. Type an e-mail address for people who you want to receive alerts, and then click Add. In
large environments, system administrators can route e-mail addresses to list servers or
universal resource locators (URLs) for expanded alerts. You can add one destination at a
time and up to 20 total destinations.
c. For the List Name, type a name, such as Service or Supplies, and then click Apply.
d. Repeat step c to add additional recipient addresses. When you have finished adding
recipients, click Back to return to the Alerts page.
After you set up the destination lists, you can further refine the event alerts by selecting
specific details and options within each event. Continue with the following steps to refine
event alerts.
ENWW Alerts 21
Page 28

2 Do one of the following:
• Select the check box for an alert category, and then click Apply to save your changes.
When you select a check box for an alert category, you automatically select all of the
individual alerts that are associated with that event category. Continue to step 4.
Alert category Description
Supplies Select specific supplies alerts, such as Cartridge Low or Fuser Kit Low.
Service Select s pe cific events that require service, such as “Printe r Erro r” o r “D u plex
Error, Chec k Duplexer”.
Media Path Select events that are associated with the paper path, such as removing a
jam or loading a tray.
Advisory Select advisory events such as “Page too complex” or “Insufficient Memory”.
-Or-
• Click an alert category (such as Supplies or Service) to view the individual alerts that are
available for that event. Select the individual alerts for each destination list. The following
example shows the Supplies Individual Alerts for an HP color LaserJet product.
22 Configuring the Product from the Settings Pages ENWW
Page 29

3 Click any individual alerts that are hyperlinks (underlined with blue) to set a threshold value.
Set the threshold value for the individual event, and then click OK or Apply.
The threshold value for Supplies is a percentage, 0 percent through 20 percent, that
represents the amount of supply that remains. For example, if you set the threshold value for
the “Cartridge Low (Order)” alert at 15 percent, the product sends you an e-mail alert
message when 15 percent of the print-cartridge life remains.
The threshold value for service and for the paper path is a user-specified number of minutes.
This is the amount of time that an event will be ignored before an e-mail alert message is
sent. For example, you might want to set the threshold value for the “Tray Open” alert to 10
minutes to allow someone to close the tray after loading the tray or clearing a jam.
4 Click Email Contents to select the information that you want to be included with your e-mail
alert messages, such as supplies and usage information. You can configure the e-mail
contents differently for each alert category.
Note For some products, the list of available attachments that can be included as part of all e-mail
alerts messages is available by clicking the Choose Attachments button, which is located on
the main Alerts page.
For these products, the selected attachments are used for all destinations or destination lists.
5 Click Apply to save the information, and then click Back twice to return to the main Alerts
page.
6 Repeat steps 1 through 5 for each additional list.
To delete destinations and destination lists
● You must delete all of the destination e-mails in a list in order to delete the list.
Sending e-mail commands to the product
Another method for receiving information pages is by requesting them from the product. When
outgoing and incoming mail are configured, the product can attach information pages, such as
the supplies status page or Configuration page, to e-mail messages. You can use this feature to
solve a problem or check the status of supplies.
To request information pages by using an e-mail message
When composing a message to the product, you must properly format the To, From, and
Subject fields in your e-mail program.
1 Enable the outgoing and incoming e-mail by following the instructions that are listed in this
chapter. (For more information, see “Security” on page 26.)
2 From your e-mail program, compose a message to the product by completing the following
steps:
a In the To field, type the product’s e-mail address. The username combined with the
product’s domain name (which is specified in the outgoing mail configuration) is the email address for the product. For example, if the POP3 mailbox account username is
“product” and the POP3 server is “hp.com”, the product’s e-mail address will be
“product@hp.com”.
b Your e-mail program should automatically complete the From field as your return e-mail
address.
ENWW Alerts 23
Page 30

c In the Subject field, type the appropriate text for the format and page that you would like
to attach. You can request a Configuration page, a Supplies Status page, or an
AutoSend page. For example, if you would like to attach the Configuration page in HTML
format, type “this.configpage?configpage=email&format=html”.
Page HTML format XML format Text format
Configuration page this.configpage?configpage
=email&format=html
Supplies Status page this.configpage?suppliespage
=email&format=html
AutoSend page not applicable this.configpage?autosend
this.configpage?configpage
=email&format=xml
this.configpage?suppliespage
=email&format=xml
=email&format=xml
this.configpage?configpage
=email&format=text
this.configpage?suppliespage
=email&format=text
not applicable
3 Click Send.
The product checks for new e-mail messages once every 3 minutes. When the product receives
the e-mail message, it generates a reply and sends the requested information back to the
sender's e-mail address (as specified in the From field of the original e-mail message).
Note Depending on delays in the network and your organization’s mail server, a response might take
from 1 minute to several hours to arrive back in your e-mail program’s Inbox.
If the To, From, and Subject fields are not properly formatted in your e-mail message, the product
does not send a message in response.
24 Configuring the Product from the Settings Pages ENWW
Page 31

AutoSend
Use the AutoSend page to send device configuration and supplies usage information periodically
to Hewlett-Packard. This feature enables you to have a relationship with Hewlett-Packard that is
designed to provide you with services that include but are not limited to proactive cartridge
replacement, pay-per-page contracts, support agreements, and usage tracking. The following
illustration, table, and procedure describe how to use this page.
Note The AutoSend page is only available for the HP LaserJet 2300 series printer.
1
4
2
3
Callout Area on the page Information or capability provided by the area
EWS tabs and menus For more information, see “Na vigating th rough the HP Embedd ed
1
Enable AutoSend Select this check box to enable the AutoSend feature.
2
Send every [interval] Select the interval at which you want the product to send the
3
Hewlett-Packard Online
4
Privacy Statement
Web Server” on page 3.
product configuration and supplies usage information to HP.
View more information about how HP treats the information that
is sent by AutoSend .
To enable the AutoSend feature
1 Enable the outgoing and incoming e-mail by following the instructions that are listed in this
chapter. (For more information, see “Security” on page 26.)
2 Select the Enable AutoSend check box.
3 Click an option to specify the interval at which you want the product to send the product
configuration and supplies usage information to HP, and then type the number of days,
weeks, months, or pages printed.
4 Click Apply.
ENWW AutoSend 25
Page 32

Security
1
The following illustration and table describe how to use this page.
2
3
4
5
Callout Area on the page Information or capability provided b y the area
EWS tabs and menus For more infor mation, see “Navigating through the HP Embedded
1
Password Set a password to control who can cancel jobs remotely or gain
2
Display on Device Status
3
Page
Enable Email Enable or disable outgoing or incoming e-mail.
4
Web Server” on page 3.
access to the Settings pages. The username is already set as
“laserjet”. After the password has been set, users are prompted
to type a password when they open the Settings pages.
Select the control-panel buttons that you want to appear on the
Device Status page (on the Information tab).
Note For some products, you enable
incoming and outgoing e-mail on this
page, and for other products you
enable e-mail on the Email page.
Configure Email Settings Open the Email page in a new window.
5
26 Configuring the Product from the Settings Pages ENWW
Page 33

Enabling outgoing e-mail
It is only necessary to enable outgoing e-mail if you intend to use the Alerts or AutoSend feature.
Note After you enable outgoing e-mail, configure it by following the instructions in “Email” on page 18.
● Select the Enable Outgoing Email check box, and then click Apply to save the changes.
Enabling incoming e-mail
You should enable incoming e-mail if you intend to request information pages from the product
by using e-mail messages. For more information, see
page 23
Note After you enable incoming e-mail, configure it by following the instructions in “Email” on page 18.
● Select the Enable Incoming Email check box, and then click Apply to save the changes.
.
“Sending e-mail commands to the product” on
ENWW Security 27
Page 34

Other Links
Use the Other Links page to add or customize up to five links to the websites of your choice (see
the following note). These links appear on the left navigational bar throughout the embedded
Web server pages. Three permanent links (hp instant support, Order Supplies, and Product
Support) have already been established. The following illustration, table, and procedures
describe how to use this page.
Note With a permanent storage device installed, you can add up to five additional links; without the
extra storage, you can add one additional link.
1
2
3
4
Callout Area on the page Information or capability provided by the area
EWS tabs and menus For more information, see “Navigating through the HP Embedded W eb
1
Add Link Add a user-defined link.
2
User-defined Links Lists the user-defined links that have been added. Use this area to
3
Other Links hp instant support Connect to Web resources that help you to
4
Server” on page 3.
delete links.
solve specific problems and determine
what additional services are available for
your product. (Detailed information,
including serial number, error conditions,
and status, is forwarded to
Hewlett-Packard’s Customer Care.
Hewlett-Packard treats this information as
confidential.)
Order Suppl ies Connect to a Web page that facilitates
online ordering of supplies from a reseller
of your choice.
Product Support Gain access to specific product help from
the HP website.
28 Configuring the Product from the Settings Pages ENWW
Page 35

Adding a Link
1 Under Add Link, type the URL and the name as you would like them to appear in the
embedded Web server pages.
2 Click Add Link.
Removing a Link
1 Under User-defined Links, select the link or links that you would like to remove.
2 Click Remove Selected Link.
Device Information
Use the Device Information page to name the product and assign an asset number to it. You can
add the name of the primary contact for information about the product. The product IP address,
product model, product number, and serial number are also available on this page.
Note If you make any changes on the Device Information page, click Apply to save the changes.
The information that is typed here appears on the Device Information page that can be opened
from the Information tab. It also appears in e-mail messages that are sent from the product.
This might be useful if you need to locate the product to replace supplies or fix a problem.
ENWW Device Information 29
Page 36

Language
1
Use the Language page to select the language in which the embedded Web server pages
appear. The following illustration and table describe how to use this page.
2
3
4
CAUTION Selecting View Pages in Printer Language or Select a Language changes the language for
everyone who uses the embedded Web server.
Callout Area on the page Information or capability provided b y the area
EWS tabs and menus For more information, see “Na vigat ing throug h the HP Em bedded
1
View Pages in Browser
2
Language
(default)
View Pages in Printer
3
Language
Web Server” on page 3.
Use this feature to detect which language is selected for your
Web browser and displays the embedded Web server pages in
the same language.
Use this feature to detect which language is selected for the
product control panel and displays the embedded Web server
pages in the same language.
Select A Language Display the embedded Web server pages in the selected
4
language from these choices:
● English
● French
● German
● Italian
● Spanish
● Swedish
● Danish
● Norwegian
● Dutch
● Finnish
● Portuguese
Note The default language is the language that the Web browser is currently using. If your browser and
control panel both use a language that is not available for the embedded Web server, English is
selected as the default.
If you make any changes on the Language page, click Apply to save your changes.
30 Configuring the Product from the Settings Pages ENWW
Page 37

Time Services
Use the Time Services page to update the product time, configure time servers and the port on
the network, and specify the frequency with which the product synchronizes with the time
service. The following illustration and table describe how to use this page.
1
2
3
4
5
6
8
Callout Area on the page Information or capability provided by the area
EWS tabs and menus For more information, see “Na vigatin g through the HP Embedded
1
Current Device Time Shows the Coordinated Universal Time (UTC). This is updated
2
Network Time Server Address Lists the IP address of a Network Time Server that the product
3
Synchronize Time with Server every Lists how often the product will refresh its current time with the
4
Local Port to Receive Time from Server Lists the port that the product uses to retrieve data from the
5
Time Server Status Shows the current status of the connection to the Network Time
6
Get Time When clicked, updates the Current Device Time.
7
Use Defaults Replaces the current settings with the default settings.
8
Web Server” on page 3.
when you open the Time Services page or when you click the
Get Time button.
uses to set the Current Device Time.
Network Time Server.
Network Time Server.
Server.
7
ENWW Time Services 31
Page 38

Digital Sending
For products that have digital sending capabilities, such as an MFP, this page opens a
configuration applet for your browser that you can use to configure various digital sending
options and settings. Use the Digital Sending pages to do these tasks:
● Add the administrator’s contact information: name, e-mail address, phone number, and
location.
● Enable and configure the Send-to-Email features of the MFP.
● Enable users to use a centralized network address book.
● View the job information and error events.
Note Click the Help button for more information about the Digital Sending pages.
32 Configuring the Product from the Settings Pages ENWW
Page 39

Managing Network Operation
4
1
from the Networking Pages
Overview
Use the Networking pages to configure and manage your printer on your network. The
appearance and features of the Networking pages will differ, depending on the model and
version of your HP Jetdirect print server. The following screen is similar to what you might see
when you click Networking. From the left navigational bar, click the Networking menu for the
page that you want to view.
2
Callout Area on page Information or capability provided by area on page
EWS tabs and menus For more information, see “Na vigating th rough the HP Embedd ed
1
Help Click Help for more information about the options on the
2
ENWW Overview 33
Web Server” on page 3.
Networking tab.
Page 40

Depending on your HP Jetdirect print server model and operating version, the following are
some tasks that you can perform from the Networking pages:
● Change network configuration settings for various types of network connections.
● Enable or disable printing protocols.
● Set up a support contact and support URLs.
● Set up a password to control who can remotely access the Networking pages.
● Configure the security of your product through the use of passwords, access lists, and
management protocols.
● View general network status information, including network statistics that are stored on the
print server, for network troubleshooting or optimization.
● View protocol information for all supported network connections.
● Display the HP Jetdirect Configuration page.
● Set the frequency at which the embedded Web server checks the network status.
For more information about the Networking pages, see the following sources:
● Help. On each Networking page, a Help link under Other Links provides a description of the
networking features and helpful tips for using them. Also, from the Help page you can gain
access to additional help from HP’s website.
● HP Jetdirect Print Server Administrator's Guide. This guide is normally available on the
software CD that came with your product. To download the most recent version of the guide,
go to: http://www.hp.com/support/net_printing
.
34 Managing Network Operation from the Networking Pages ENWW
Page 41

Using the Other Links as a
5
resource
The Other Links area contains three permanent links that provide quick access to
product-specific information, such as interactive troubleshooting and ordering information for HP
genuine supplies.
Note You can use the Edit Other Links page on the Settings tab to add or customize up to five links to
the websites of your choice. (With a permanent storage device installed, you can add up to five
additional links; without the extra storage, you can add one additional link.) These links appear
on the left navigational bar throughout the embedded Web server pages. For more information,
see “Other Links” on page 28.
ENWW 35
Page 42

hp instant support
Hewlett-Packard offers hp instant support, an internet-based support system that collects
diagnostic information from your product and matches it with HP’s information database. At hp
instant support, you can find intelligent solutions that help you resolve problems quickly and
easily.
How hp instant support works
Information is gathered from your product and securely transmitted to Hewlett-Packard when
you click hp instant support. The hp instant support website reads the product data to analyze
the product’s current status. The website creates a customized Web page that appears in the
browser window and contains easy-to-follow te xt and visual aids. The hp instant support website
also directs you to additional services that are available for your product.
Before any of the product data is sent to Hewlett-Packard for analysis, you can view all of the
information (for example, serial number, error conditions, and product status) that will be
forwarded. Hewlett-Packard treats this information as confidential.
Information you can get from hp instant support
The hp instant support website provides these tools for troubleshooting and for maintenance:
● Firmware and software updates.
● Troubleshooting for recent events that are listed on the Event Log. For example, the product
might show a jam as the most recent event listed in the event Log. The hp instant support
website detects the event and provides troubleshooting information for the jam.
● Support packs.
● Product documentation, such as user guides and getting started guides.
Order Supplies
The Order Supplies link connects you to a Web page that facilitates your online ordering of
supplies from a reseller of your choice. The supplies that you need are preselected. You can
change quantities or select additional items. Your items are added to the shopping cart, ready for
checkout, ensuring that the correct supplies are ordered through your selected reseller.
36 Using the Other Links as a resource ENWW
Page 43

Product Support
The Product Support link connects you to a Web page that brings together a comprehensive
menu of support resources that business people need. From this Web page, y ou can accomplish
these tasks and more:
● Find a list of HP products at one site: desktops, workstations, servers, storage devices,
printer, scanners, digital imaging, and mobile devices.
● Obtain technical support. Solve a problem; find information to set up, install, and configure
your product; discover and use a product; maintain your product; upgrade and migrate your
product software and driver; and recycle products or dispose of them correctly.
● Gain access to self-solve resources such as FAQs, user documentation, features and
specifications, and product compatibility information.
● Collaborate with HP and with your peers through discussion groups, e-mail support, and
phone support.
● Use task-based navigation to identify the task area that you want to work on and quickly
discover related topics and tools.
In addition, you can find these features: hot topics, a subscription center, product rebate offers
and other announcements, and training and education opportunities.
ENWW Product Support 37
Page 44

38 Using the Other Links as a resource ENWW
Page 45

Index
A
accessing embedded Web server 2
accessories, verifying installed 7
alerts
deleting destination lists 23
e-mailing information pages 23
features 2, 20
incoming e-mail configuration 19, 27
outgoing mail configuration 19, 27
asset number 12
AutoSend 25
B
browser, required 2
buttons, control panel 6
C
cartridge
ordering 28, 36
status 9
usage information 11
Configuration menu 16
Configuration page 7
Configure Device page 16
consumables. See supplies
contact person 29
control panel
buttons 6
menus 16
Control Panel page 13
counts, page 11
customer support
instant 28, 36
product 37
flash disks, features available with 2
G
Go button 26
group product management 2
H
hard disks, features available with 2
help
instant support 28, 36
product support 37
hp instant support 28, 36
HP Jetdirect Print Server Administrator’s Guide 34
HP Web Jetadmin 2
I
incoming e-mail configuration 19, 27
Information menu 16
information pages
available 5
e-mailing 23
ink cartridge. See print cartridge
IP address
e-mail configuration 19
locating 2, 12
IP-based network 2
J
Jetadmin, HP Web 2
Job Cancel button 26
K
keys, control panel 6
D
destination lists
defined 20
deleting 23
Device Information page 12, 29
Device Status page 6
Digital Sending pages 32
DIMMs, verifying installed 7
E
Edit Other Links page 35
e-mail
alerts 20
incoming, configuring 19, 27
information pages 23
outgoing, configuring 19, 27
e-mail support 37
embedded Web server, defined 1
error messages 10
Event Log 10
F
FAQs 37
features 1
firewalls 2
L
Language page 30
links
editing 28
features 2
log, event 10
M
mailbox configuration 19, 27
media usage 11
memory, verifying installed 7
menus, control panel 16
messages, error 10
N
navigating 3
Networking pages 33
networks
types supported 2
Web Jetadmin 2
O
online help
instant support 28, 36
product support 37
ENWW Index 39
Page 46

opening embedded Web server 2
ordering
hard disks 2
supplies 28, 36
Other Links area 35
Other Links page 28
outgoing mail configuration 19, 27
P
page counts 11
Paper Handling menu 16
paper usage 11
password 26
phone support 37
POP3 configuration 19, 27
print cartridge
ordering 28, 36
status 9
usage information 11
product support 37
R
recycle supplies 37
remote configuration 16
S
Security page 26
serial number 12
Settings pages 15
status
alerts 20
e-mailing information pages 23
network 33
supplies 9
supplies
AutoSend feature 25
ordering 28, 36
status page 9
usage information 11
Supplies Status page 9
support
instant 28, 36
product 37
system requirements 2
T
technical support
instant 28, 36
product 37
Time Services page 31
toner cartridge. See print cartridge
troubleshooting
Configuration page 7
instant support 28, 36
product support 37
U
usage information, AutoSend 25
Usage page 11
username 26
W
Web browser, required 2
Web Jetadmin 2
websites, support
instant 28, 36
product 37
40 Index ENWW
Page 47

Page 48

copyright 2003
Hewlett-Packard Company
www.hp.com
©
 Loading...