

Page 1

EMS Hardware Monitors User's Guide
Manufacturing Part Number: B6191-90028
September 2001
© Copyright 2001 Hewlett-Packard Company
Page 2

Legal Notices
The information contained in this document is subject to change without notice.
Hewlett-Packard makes no warranty of any kind with regard to this manual, including, but not limited to, the
implied warranties of merchantability and fitness for a particular purpose. Hewlett-Packard shall not be
liable for errors contained herein or direct, indirect, special, incidental or consequential damages in
connection with the furnishing, performance, or use of this material.
Copyright © 2001 Hewlett-Packard Company.
This document contains information which is protected by copyright. All rights are reserved. Reproduction,
adaptation, or translation without prior written permission is prohibited, except as allowed under the
copyright laws.
Corporate Offices:
Hewlett-Packard Co.
3000 Hanover St.
Palo Alto, CA 94304
Use, duplication or disclosure by the U.S. Government Department of Defense is subject to restrictions as set
forth in paragraph (b)(3)(ii) of the Rights in Technical Data and Software clause in FAR 52.227-7013.
Rights for non-DOD U.S. Government Departments and Agencies are as set forth in FAR 52.227-19(c)(1,2).
Use of this manual and flexible disc(s), compact disc(s), or tape cartridge(s) supplied for this pack is restricted
to this product only. Additional copies of the programs may be made for security and back-up purposes only.
Resale of the programs in their present form or with alterations, is expressly prohibited.
A copy of the specific warranty terms applicable to your Hewlett-Packard product and replacement parts can
be obtained from your local Sales and Service Office.
© Copyright 1980, 1984, 1986 AT&T Technologies, Inc. UNIX and System V are registered trademarks of
AT&T in the USA and other countries.
UNIX is a registered trademark in the United States and other countries, licensed exclusively through
X/Open Company Limited.
© Copyright 1979, 1980, 1983, 1985-1990 Regents of the University of California. This software is based in
part on the Fourth Berkeley Software Distribution under license from the Regents of the University of
California.
Copyright © The Regents of the University of Colorado, a body corporate 1979
This document has been reproduced and modified with the permission of the Regents of the University of
Colorado, a body corporate.
PostScript is a trademark of Adobe Systems, Inc.
Ethernet is a trademark of Xerox Corporation.
© Copyright 1985-1986, 1988 Massachusetts Institute of Technology. X Window System is a trademark of the
Massachusetts Institute of Technology.
MS-DOS and Microsoft are U.S. registered trademarks of Microsoft Corporation.
OSF/Motif is a trademark of the Open Software Foundation, Inc. in the U.S. and other countries. Certification
for conformance with OSF/Motif user environment pending.
AutoRAID(tm) is a trademark of Hewlett-Packard Company for the Advanced Disk Array product.
2
Page 3

Printing History
September 2001 Edition 1
The printing date and part number indicate the current edition. The printing date changes when a new
edition is printed. (Minor corrections and updates which are incorporated at reprint do not cause the date to
change.) The part number changes when extensive technical changes are incorporated.
New editions of this manual will incorporate all material updated since the previous edition.
Internal Date: July 17, 2001
Event Management Lab Hewlett-Packard Co. 19091 Pruneridge Ave. Cupertino, CA 95014
3
Page 4

4
Page 5

1. Introduction
Hardware Monitoring Overview . . . . . . . . . . . . . . . . . . . . . . . . . . . . . . . . . . . . . . . . . . 12
What is Hardware Monitoring? . . . . . . . . . . . . . . . . . . . . . . . . . . . . . . . . . . . . . . . . . 12
How Does Hardware Monitoring Work? . . . . . . . . . . . . . . . . . . . . . . . . . . . . . . . . . . . 13
Benefits of Hardware Monitoring . . . . . . . . . . . . . . . . . . . . . . . . . . . . . . . . . . . . . . . . 14
Products Supported by Hardware Monitors . . . . . . . . . . . . . . . . . . . . . . . . . . . . . . . . 15
Tips for Hardware Monitoring . . . . . . . . . . . . . . . . . . . . . . . . . . . . . . . . . . . . . . . . . . 16
Hardware Monitoring Terms . . . . . . . . . . . . . . . . . . . . . . . . . . . . . . . . . . . . . . . . . . . . 17
2. Installing and Using Monitors
The Steps Involved . . . . . . . . . . . . . . . . . . . . . . . . . . . . . . . . . . . . . . . . . . . . . . . . . . . . . 22
Installing EMS Hardware Monitors . . . . . . . . . . . . . . . . . . . . . . . . . . . . . . . . . . . . . . . 24
Supported System Configuration . . . . . . . . . . . . . . . . . . . . . . . . . . . . . . . . . . . . . . . . 24
Removing EMS Hardware Monitors . . . . . . . . . . . . . . . . . . . . . . . . . . . . . . . . . . . . . . 25
Checking for Special Requirements . . . . . . . . . . . . . . . . . . . . . . . . . . . . . . . . . . . . . . . . 26
Using Hardware Monitoring Requests . . . . . . . . . . . . . . . . . . . . . . . . . . . . . . . . . . . . . 32
What Is a Monitoring Request? . . . . . . . . . . . . . . . . . . . . . . . . . . . . . . . . . . . . . . . . . 32
Some Monitoring Request Examples . . . . . . . . . . . . . . . . . . . . . . . . . . . . . . . . . . . . . 32
Running the Monitoring Request Manager . . . . . . . . . . . . . . . . . . . . . . . . . . . . . . . . . . 34
Enabling Hardware Event Monitoring . . . . . . . . . . . . . . . . . . . . . . . . . . . . . . . . . . . . . 35
Default Monitoring Requests . . . . . . . . . . . . . . . . . . . . . . . . . . . . . . . . . . . . . . . . . . . 36
Listing Monitor Descriptions . . . . . . . . . . . . . . . . . . . . . . . . . . . . . . . . . . . . . . . . . . . . . 37
Viewing Current Monitoring Requests . . . . . . . . . . . . . . . . . . . . . . . . . . . . . . . . . . . . . 38
Adding a Monitoring Request . . . . . . . . . . . . . . . . . . . . . . . . . . . . . . . . . . . . . . . . . . . . . 39
Example of Adding a Monitoring Request . . . . . . . . . . . . . . . . . . . . . . . . . . . . . . . . . 43
Modifying Monitoring Requests . . . . . . . . . . . . . . . . . . . . . . . . . . . . . . . . . . . . . . . . . . . 45
Verifying Hardware Event Monitoring . . . . . . . . . . . . . . . . . . . . . . . . . . . . . . . . . . . . . 46
Checking Detailed Monitoring Status . . . . . . . . . . . . . . . . . . . . . . . . . . . . . . . . . . . . . . 47
Retrieving and Interpreting Event Messages . . . . . . . . . . . . . . . . . . . . . . . . . . . . . . . . 48
Sample Event Message . . . . . . . . . . . . . . . . . . . . . . . . . . . . . . . . . . . . . . . . . . . . . . . . 48
Deleting Monitoring Requests . . . . . . . . . . . . . . . . . . . . . . . . . . . . . . . . . . . . . . . . . . . . 49
Disabling Hardware Event Monitoring . . . . . . . . . . . . . . . . . . . . . . . . . . . . . . . . . . . . . 50
Contents
3. Detailed Description
The Detailed Picture of Hardware Monitoring . . . . . . . . . . . . . . . . . . . . . . . . . . . . . . . 52
Components from Three Different Applications . . . . . . . . . . . . . . . . . . . . . . . . . . . . . 53
Hardware Monitoring Request Manager . . . . . . . . . . . . . . . . . . . . . . . . . . . . . . . . . . 53
EMS Hardware Event Monitor . . . . . . . . . . . . . . . . . . . . . . . . . . . . . . . . . . . . . . . . . . 54
5
Page 6

Contents
Polling or Asynchronous? . . . . . . . . . . . . . . . . . . . . . . . . . . . . . . . . . . . . . . . . . . . . . . 54
Startup Client . . . . . . . . . . . . . . . . . . . . . . . . . . . . . . . . . . . . . . . . . . . . . . . . . . . . . . . 54
Peripheral Status Monitor (PSM) . . . . . . . . . . . . . . . . . . . . . . . . . . . . . . . . . . . . . . . . 55
Event Monitoring Service (EMS) . . . . . . . . . . . . . . . . . . . . . . . . . . . . . . . . . . . . . . . . . 55
File Locations . . . . . . . . . . . . . . . . . . . . . . . . . . . . . . . . . . . . . . . . . . . . . . . . . . . . . . . . 56
Startup Process (in Detail) . . . . . . . . . . . . . . . . . . . . . . . . . . . . . . . . . . . . . . . . . . . . . 57
Asynchronous Event Detection (in Detail) . . . . . . . . . . . . . . . . . . . . . . . . . . . . . . . . . 59
Event Polling (in Detail) . . . . . . . . . . . . . . . . . . . . . . . . . . . . . . . . . . . . . . . . . . . . . . . . 61
4. Using the Peripheral Status Monitor
Peripheral Status Monitor Overview . . . . . . . . . . . . . . . . . . . . . . . . . . . . . . . . . . . . . . . 66
How Does the PSM Work? . . . . . . . . . . . . . . . . . . . . . . . . . . . . . . . . . . . . . . . . . . . . . . . 67
PSM Components . . . . . . . . . . . . . . . . . . . . . . . . . . . . . . . . . . . . . . . . . . . . . . . . . . . . . 69
PSM States . . . . . . . . . . . . . . . . . . . . . . . . . . . . . . . . . . . . . . . . . . . . . . . . . . . . . . . . . . 69
PSM Resource Paths . . . . . . . . . . . . . . . . . . . . . . . . . . . . . . . . . . . . . . . . . . . . . . . . . . 69
Configuring MC/ServiceGuard Package Dependencies with the PSM . . . . . . . . . . . . 71
Configuring Package Dependencies using SAM . . . . . . . . . . . . . . . . . . . . . . . . . . . . 72
Configuring Package Dependencies by Editing the Configuration File . . . . . . . . . . 73
Creating EMS Monitoring Requests for PSM . . . . . . . . . . . . . . . . . . . . . . . . . . . . . . . . 74
Monitoring Request Parameters . . . . . . . . . . . . . . . . . . . . . . . . . . . . . . . . . . . . . . . . . . 75
Specifying When to Send Event - <Notify>. . . . . . . . . . . . . . . . . . . . . . . . . . . . . . . . . 75
Determining the Frequency of Events - <Options> . . . . . . . . . . . . . . . . . . . . . . . . . . 75
Setting the Polling Interval - <Polling Interval> . . . . . . . . . . . . . . . . . . . . . . . . . . . . 75
Selecting Protocols for Sending Events - <Notify Via> . . . . . . . . . . . . . . . . . . . . . . . 76
Adding a Notification Comment - <Comment> . . . . . . . . . . . . . . . . . . . . . . . . . . . . . 78
Copying Monitoring Requests . . . . . . . . . . . . . . . . . . . . . . . . . . . . . . . . . . . . . . . . . . . . 79
Modifying Monitoring Requests . . . . . . . . . . . . . . . . . . . . . . . . . . . . . . . . . . . . . . . . . . . 80
Removing Monitoring Requests . . . . . . . . . . . . . . . . . . . . . . . . . . . . . . . . . . . . . . . . . . . 81
Viewing Monitoring Requests . . . . . . . . . . . . . . . . . . . . . . . . . . . . . . . . . . . . . . . . . . . . 82
Using the set_fixed Utility to Restore Hardware UP State . . . . . . . . . . . . . . . . . . . . . 83
5. Hardware Monitor Configuration Files
Monitor Configuration Files . . . . . . . . . . . . . . . . . . . . . . . . . . . . . . . . . . . . . . . . . . . . . . 86
File Names . . . . . . . . . . . . . . . . . . . . . . . . . . . . . . . . . . . . . . . . . . . . . . . . . . . . . . . . . . 87
File Format . . . . . . . . . . . . . . . . . . . . . . . . . . . . . . . . . . . . . . . . . . . . . . . . . . . . . . . . . . 87
Considerations for Modifying the Monitor Configuration File Settings . . . . . . . . . . 88
6
Page 7

Sample Global Configuration File . . . . . . . . . . . . . . . . . . . . . . . . . . . . . . . . . . . . . . . 89
Sample Monitor-Specific Configuration File . . . . . . . . . . . . . . . . . . . . . . . . . . . . . . . 90
Startup Configuration File . . . . . . . . . . . . . . . . . . . . . . . . . . . . . . . . . . . . . . . . . . . . . . . 92
File Names . . . . . . . . . . . . . . . . . . . . . . . . . . . . . . . . . . . . . . . . . . . . . . . . . . . . . . . . . . 92
File Format . . . . . . . . . . . . . . . . . . . . . . . . . . . . . . . . . . . . . . . . . . . . . . . . . . . . . . . . . . 92
Considerations for Modifying the Startup Configuration File Settings . . . . . . . . . . 93
Default File Entries . . . . . . . . . . . . . . . . . . . . . . . . . . . . . . . . . . . . . . . . . . . . . . . . . . . 95
Peripheral Status Monitor (PSM) Configuration File . . . . . . . . . . . . . . . . . . . . . . . . . . 96
File Names . . . . . . . . . . . . . . . . . . . . . . . . . . . . . . . . . . . . . . . . . . . . . . . . . . . . . . . . . . 96
File Format . . . . . . . . . . . . . . . . . . . . . . . . . . . . . . . . . . . . . . . . . . . . . . . . . . . . . . . . . . 96
Considerations for Modifying the PSM Configuration File . . . . . . . . . . . . . . . . . . . . 97
Example File Entries . . . . . . . . . . . . . . . . . . . . . . . . . . . . . . . . . . . . . . . . . . . . . . . . . 100
6. Special Procedures
Fibre Channel Arbitrated Loop Hub Monitor . . . . . . . . . . . . . . . . . . . . . . . . . . . . . . . 102
History . . . . . . . . . . . . . . . . . . . . . . . . . . . . . . . . . . . . . . . . . . . . . . . . . . . . . . . . . . . . 102
Supported Products . . . . . . . . . . . . . . . . . . . . . . . . . . . . . . . . . . . . . . . . . . . . . . . . . . 102
Special Requirements . . . . . . . . . . . . . . . . . . . . . . . . . . . . . . . . . . . . . . . . . . . . . . . . 102
Resource Path . . . . . . . . . . . . . . . . . . . . . . . . . . . . . . . . . . . . . . . . . . . . . . . . . . . . . . 102
Executable File . . . . . . . . . . . . . . . . . . . . . . . . . . . . . . . . . . . . . . . . . . . . . . . . . . . . . . 102
Monitor Behavior . . . . . . . . . . . . . . . . . . . . . . . . . . . . . . . . . . . . . . . . . . . . . . . . . . . . 102
PSM State Control . . . . . . . . . . . . . . . . . . . . . . . . . . . . . . . . . . . . . . . . . . . . . . . . . . . 102
Initial Monitor Configuration . . . . . . . . . . . . . . . . . . . . . . . . . . . . . . . . . . . . . . . . . . 103
Adding or Removing an FC-AL Hub . . . . . . . . . . . . . . . . . . . . . . . . . . . . . . . . . . . . . 104
Configuration Files . . . . . . . . . . . . . . . . . . . . . . . . . . . . . . . . . . . . . . . . . . . . . . . . . . 104
Fibre Channel Switch Monitor . . . . . . . . . . . . . . . . . . . . . . . . . . . . . . . . . . . . . . . . . . . 107
History . . . . . . . . . . . . . . . . . . . . . . . . . . . . . . . . . . . . . . . . . . . . . . . . . . . . . . . . . . . . 107
Supported Products . . . . . . . . . . . . . . . . . . . . . . . . . . . . . . . . . . . . . . . . . . . . . . . . . . 107
Special Requirements . . . . . . . . . . . . . . . . . . . . . . . . . . . . . . . . . . . . . . . . . . . . . . . . 107
Resource Path . . . . . . . . . . . . . . . . . . . . . . . . . . . . . . . . . . . . . . . . . . . . . . . . . . . . . . 107
Executable File . . . . . . . . . . . . . . . . . . . . . . . . . . . . . . . . . . . . . . . . . . . . . . . . . . . . . . 107
Monitor Behavior . . . . . . . . . . . . . . . . . . . . . . . . . . . . . . . . . . . . . . . . . . . . . . . . . . . . 107
PSM State Control . . . . . . . . . . . . . . . . . . . . . . . . . . . . . . . . . . . . . . . . . . . . . . . . . . . 107
Initial Monitor Configuration . . . . . . . . . . . . . . . . . . . . . . . . . . . . . . . . . . . . . . . . . . 107
Adding or Removing an FC Switch . . . . . . . . . . . . . . . . . . . . . . . . . . . . . . . . . . . . . . 108
Configuration Files . . . . . . . . . . . . . . . . . . . . . . . . . . . . . . . . . . . . . . . . . . . . . . . . . . 109
Contents
7
Page 8

Contents
8
Page 9

About This Manual
This guide is intended for use by system administrators and others involved in managing HP-UX system
hardware resources. It describes the installation and use of EMS Hardware Monitors—an important tool in
managing the operation and health of system hardware resources.
The book is organized as follows:
• Chapter 1, “Introduction,” provides a foundation for understanding what the hardware monitors are and
how they work. Although not required reading, this material will help you use the hardware event
monitors efficiently.
• Chapter 2, “Installing and Using Monitors,” describes the procedures for creating and managing
monitoring requests.
• Chapter 3, “Detailed Description,” gives a detailed picture of the components involved in hardware
monitoring, their interaction, and the files involved.
• Chapter 4, “Using the Peripheral Status Monitor,”covers the PSM, which serves as the interface between
the event-driven hardware event monitors and MC/ServiceGuard.
• Chapter 5, “Hardware Monitor Configuration Files,” describes how to control the operation of hardware
monitors by modifying the configuration files.
• Chapter 6, “Special Procedures,” describes monitor-specific tasks.
NOTE The information previously contained in the chapter entitled “Monitor Data Sheets,” has been
moved to the Web at http://docs.hp.com/hpux/onlinedocs/diag/ems/emd_summ.htm.
An HP-UX man page is available for each monitor. To access the man page, type:
monitorname
man
where
Typographical Conventions
This guide uses the following typographical conventions:
NOTE Notes contain important information.
CAUTION Caution messages indicate procedures which, if not observed, could result in damage to your
equipment or loss of your data.
WARNI NG Warning messages indicate procedures or practices which, if not observed, could
result in personal injury.
monitorname
is the executable file listed in the data sheet.
9
Page 10

Supporting Documentation
The following documentation contains information related to the installation and use of the hardware event
monitors:
• Support Plus: Diagnostics User's Guide - provides information on installing the EMS Hardware Monitors.
• Managing MC/ServiceGuard (B3936-90024) - provides information on creating package dependencies for
hardware resources.
• Using EMS HA Monitors (B5735-90001) - provides detailed information on using EMS to create
monitoring requests. Note: this manual pertains to high availability (HA) monitors rather than to the
hardware monitors.
Related Web Site
The following web site provides information on hardware monitoring.
• http://docs.hp.com/hpux/diag—the online library for information about EMS Hardware Monitors
• http://docs.hp.com/hpux/onlinedocs/diag/ems/emd_summ.htm—Data sheets for the hardware
event monitors
Reader Comments
We welcome your comments about our documentation. If you have editorial suggestions or recommended
improvements for this document, please write to us. You can reach us through e-mail at
dst-support@am.exch.hp.com, or by sending your letter to: Documentation Manager M/S 42L9, Hewlett
Packard Company, 19483 Pruneridge Ave., Cupertino, CA 95014-0604. USA. Please include the following
information in your message:
• Title of the manual you are referencing.
• Manual part number (from the title page).
• Edition number or publication date (from the title page).
•Your name.
• Your company’s name.
Serious errors, such as technical inaccuracies that may render a program or a hardware device inoperative,
should be reported to your HP Response Center or directly to a Support Engineer.
10
Page 11

1 Introduction
This chapter introduces the EMS Hardware Monitors. The topics discussed in this chapter include:
• What is hardware monitoring?
• How does hardware monitoring work?
• Benefits of hardware monitoring
• Products supported by hardware monitoring
• Tips for hardware monitoring
• Hardware monitoring terms
NOTE Do I Really Need to Read This Chapter?
Although it is not essential that you read this material before using the hardware monitors, it
will help you understand how monitoring works, which in turn should help you use it
effectively. New users are strongly encouraged to read through the general overview material
before proceeding to Chapter 2, “Installing and Using Monitors”.
Introduction
Chapter 1
11
Page 12

Introduction
Hardware Monitoring Overview
Hardware Monitoring Overview
What is Hardware Monitoring?
Hardware monitoring is the process of watching a hardware resource (such as a disk) for the occurrence of
any unusual activity, called an event. When an event occurs, it is reported using a variety of notification
methods (such as email). Event detection and notification are all handled automatically with minimal
involvement on your part.
To achieve a high level of system reliability and availability, it is essential that you know when any system
resource is experiencing a problem. Hardware monitoring gives you the ability to detect problems with your
system hardware resources. By providing immediate detection and notification, hardware monitoring allows
you to quickly identify and correct problems—often before they impact system operation.
Another important feature of hardware monitoring is its integration with applications responsible for
maintaining system availability, such as MC/ServiceGuard. It is vital that these applications be alerted to
hardware problems immediately so they can take the necessary action to avoid system interruption.
Hardware monitoring is easily integrated with MC/ServiceGuard, and the necessary notification methods are
provided for communication with other applications such as HP OpenView.
Hardware monitoring is designed to provide a high level of protection against system hardware failure with
minimal impact on system performance. By using hardware monitoring, you can virtually eliminate
undetected hardware failures that could interrupt system operation or cause data loss.
12
Chapter 1
Page 13
Introduction
Hardware Monitor ing Overvie w
How Does Hardware Monitoring Work?
The following figure shows the basic components involved in hardware monitoring.
Figure 1-1 Components Involved in Hardware Monitoring
The typical hardware monitoring process works as follows:
1. While monitoring its hardware resources, the hardware event monitor detects some type of abnormal
behavior on one of the resources.
2. The hardware event monitor creates the appropriate event message, which includes suggested corrective
action, and passes it to the Event Monitoring Service (EMS).
3. EMS sends the event message to the system administrator using the notification method specified in the
monitoring request.
4. The system administrator (or Hewlett-Packard service provider) receives the messages, corrects the
problem, and returns the hardware to its normal operating condition.
5. If the Peripheral Status Monitor (PSM) has been properly configured, events are also processed by the
PSM. The PSM changes the device status to DOWN if the event is serious enough. The change in device
status is passed to EMS, which in turn alerts MC/ServiceGuard. The DOWN status will cause
MC/ServiceGuard to failover any package associated with the failed hardware resource.
NOTE The Difference Between Hardware Event Monitoring and Hardware Status
Monitoring
Hardware event monitoring is the detection of events experienced by a hardware resource. It is
the task of the EMS Hardware Monitors to detect hardware events. Events are temporary in
the sense that the monitor detects them but does not remember them. Of course the event itself
may not be temporary—a failed disk will likely remain failed until it is replaced.
Hardware status monitoring is an extension of event monitoring that converts an event to a
change in device status. This conversion, performed by the Peripheral Status Monitor, provides
a mechanism for remembering the occurrence of an event by storing the resultant status. This
persistence provides compatibility with applications such as MC/ServiceGuard, which require a
change in device status to manage high availability packages.
Chapter 1
13
Page 14

Introduction
Hardware Monitoring Overview
Benefits of Hardware Monitoring
Hardware monitoring provides the following benefits:
• Reduces system downtime by detecting hardware failures when they occur, allowing you to quickly
identify and correct problems.
• Integrates into MC/ServiceGuard and other applications responsible for maintaining system availability.
These applications can now add many hardware resources to the components they monitor.
• Minimizes the time required to isolate and repair failures through detailed messages describing what the
problem is and how to fix it.
• Includes a default monitoring configuration that offers immediate protection for your system hardware
without any intervention on your part after monitoring is enabled.
• Provides a common tool for monitoring a wide variety of system hardware resources.
• Offers a variety of notification methods to alert you when a problem occurs. No longer do you need to check
the system console to determine if something has gone wrong.
• Requires minimal maintenance once installed and configured. New hardware resources added to the
system are automatically included in the monitoring structure.
14
Chapter 1
Page 15

Introduction
Hardware Monitor ing Overvie w
Products Supported by Hardware Monitors
EMS hardware monitors are provided for a wide range of system hardware resources. The following list
identifies the types of hardware supported by monitors at the time of publication. A detailed list of the specific
hardware products supported by each hardware monitor is included in http://docs.hp.com/hpux/diag/ the online library for information about EMS Hardware Monitors (look for “Supported Products” under EMS
Hardware Monitors).
• HP disk arrays, including AutoRAID Disk Arrays and High Availability Disk Arrays
• HP disk devices, including CD-ROM drives and MO drives
• HP SCSI tape devices, including many DLT libraries and autochangers
• HP Fibre Channel SCSI Multiplexer
• HP Fibre Channel Adapters
• HP Fibre Channel Adapter (A5158)
• High Availability Storage Systems
• HP Fibre Channel Arbitrated Loop Hubs
• HP Fibre Channel Switch
• System memory
• Core hardware
• Low Priority Machine Checks (LPMCs)
• HP-UX kernel resources
• HP Fibre Channel disk array FC60
• SCSI1, SCSI2, SCSI3 interface cards
• System information
• HP UPSs (Uninterruptible Power Systems)
• Devices supported by HP device management software (Remote Monitor)
NOTE Will new products be supported?
Hewlett-Packard's strategy is to provide monitoring for all critical system hardware resources,
including new products. For the latest information on what products are supported by EMS
Hardware Monitors, visit the hardware monitoring web pages available at
www.docs.hp.com/hpux/systems/.
Chapter 1
15
Page 16

Introduction
Hardware Monitoring Overview
Tips for Hardware Monitoring
Here are some tips for using hardware monitoring. ✓ Keep hardware monitoring enabled to protect your system from undetected failures. Hardware
monitoring is an important tool for maintaining high-availability on your system. In a high-availability
environment, the failure of a hardware resource makes the system vulnerable to another failure. Until the
failed hardware is repaired, the backup hardware resource represents a single-point of failure. Without
hardware monitoring you may not be aware of the failure. But if you are using hardware monitoring, you
are alerted to the failure. This allows you to repair the failure and restore high-availability as quickly as
possible.
✓ Integrate the peripheral status monitor (PSM) into your MC/ServiceGuard strategy. An
important feature of hardware monitoring is its ability to communicate with applications responsible for
maintaining system availability, such as MC/ServiceGuard. The peripheral status monitor (PSM) allows
you to integrate hardware monitoring into MC/ServiceGuard. The PSM gives you the ability to failover a
package based on an event detected by hardware monitoring. If you are using MC/ServiceGuard, you
should consider using the PSM to include your system hardware resources in the MC/ServiceGuard
strategy. In addition, the necessary notification methods are provided for communicating with network
management application such as HP OpenView.
✓ Utilize the many notification methods available. The notification methods provided by hardware
monitoring provide a great deal of flexibility in designing a strategy to keep you informed of how well your
system hardware is working. The default monitoring configuration was selected to provide a variety of
notification for all supported hardware resources. As you become familiar with hardware monitoring, you
may want to customize the monitoring to meet your individual requirements.
✓ Use email and/or textfile notification methods for all your requests. Both of these methods, which
are included in the default monitoring, receive the entire content of the message so you can read it
immediately. Methods such as console and syslog alert you to the occurrence of an event but do not deliver
the entire message. You are required to retrieve the message using the resdata utility, which requires an
additional step.
✓ Use the `All monitors' option when creating a monitoring request. This applies the monitoring
request to all monitors. This has the benefit of ensuring a new class of hardware resource added to your
system will automatically be monitored. This means that new hardware is protected from undetected
hardware failure with no effort on your part.
✓ Easily replicate your hardware monitoring on all your systems. Once you have implemented a
hardware monitoring strategy on one of your system, you can replicate that same monitoring on other
systems. Simply copy all of the hardware monitor configuration files to each system that will use the same
monitoring. The monitor configuration files live in /var/stm/config/tools/monitor. Of course, you
must have installed hardware event monitoring on each system before you copy the configuration files to
it. Be sure to enable monitoring on all systems.
16
Chapter 1
Page 17

Introduction
Hardware Monitor ing Overvie w
Hardware Monitoring Terms
The following terms are used throughout this guide. Understanding them is important when learning how
the hardware event monitors work and how to use them effectively.
Table 1-1 Hardware Monitoring Terms
Term De fin it io n
Asynchronous event detection
Default monitoring request
Event Monitoring Service (EMS)
EMS hardware monitors
EMS high availability (HA) monitors
The ability to detect an event at the time it occurs. When an
event occurs the monitor is immediately aware of it. This
method provides quicker notification response than polling.
The default monitoring configuration created when the EMS
Hardware Monitors are installed. The default requests
ensure that a complete level of protection is automatically
provided for all supported hardware resources.
The application framework used for monitoring system
resources on HP-UX 10.20 and 11.x. EMS hardware monitors
use the EMS framework for reporting events and creating
PSM monitoring requests. The EMS framework is also used
by EMS High Availability monitors.
The monitors described in this manual. They monitor
hardware resources such as I/O devices (disk arrays, tape
drives, etc.), interface cards, and memory. They are
distributed on the Support Plus Media and are managed
with the Hardware Monitoring Request Manager
(monconfig).
These monitors are different than EMS hardware monitors
and are not described in this manual. They monitor disk
resources, cluster resources, network resources and system
resources. They are designed for a high availability
environment and are available at additional cost. For more
information, refer to Using EMS HA Monitors, which can be
downloaded from http://docs.hp.com/hpux/ha/
Chapter 1
Event severity level Each event that occurs within the hardware is assigned a
severity level, which reflects the impact the event may have
on system operation. The severity levels provide the
mechanism for directing event notification. For example, you
may choose a notification method for critical events that will
alert you immediately to their occurrence, and direct less
important events to a log file for examination at your
convenience. Also, when used with MC/ServiceGuard to
determine failover criteria, severe and critical events cause
failover.
Hardware event Any unusual or notable activity experienced by a hardware
resource. For example, a disk drive that is not responding, or
a tape drive that does not have a tape loaded. When any such
activity occurs, the occurrence is reported as an event to the
event monitor.
17
Page 18

Introduction
Hardware Monitoring Overview
Table 1-1 Hardware Monitoring Terms
Term De fin it io n
Hardware event monitor
Hardware resource A hardware device used in system operation. Resources
MC/ServiceGuard Hewlett-Packard's application for creating and managing
A monitor daemon that gathers information on the
operational status of hardware resources. Each monitor is
responsible for watching a specific group or type of hardware
resources. For example, the tape monitor handles all tape
devices on the system. The monitor may use polling or
asynchronous event detection for tracking events.
Unlike a status monitor, an event monitor does not
“remember” the occurrence of an event. It simply detects and
reports the event. An event can be converted into a more
permanent status condition using the Peripheral Status
Monitor.
supported by hardware monitoring include mass storage
devices such as disks and tapes, connectivity devices such as
hubs and multiplexors, and device adapters.
high availability clusters of HP 9000 Series 800 computers. A
high availability computer system allows application
services to continue in spite of a hardware or software
failure. Hardware monitoring integrates with
MC/ServiceGuard to ensure that hardware problems are
detected and reported immediately, allowing
MC/ServiceGuard to take the necessary action to maintain
system availability. MC/ServiceGuard is available at
additional cost
18
Monitoring request A group of settings that define how events for a specific
monitor are handled by EMS. A monitoring request identifies
the severity levels of interest and the type of notification
method to use when an event occurs. A monitoring request is
applied to each hardware device (or instance) supported by
the monitor.
Monitoring requests are created for hardware events using
the Hardware Monitoring Request Manager. Monitoring
requests are created for changes in hardware status using
the EMS GUI.
Multiple-view As of the June 2000 release (IPR 0006), certain monitors will
allow event reporting to be tailored for different targets
(clients). This “multiple-view” (“Predictive-enabled”) feature
will be added to all hardware monitors in future releases.
Previously, hardware monitors generated events the same
way for all targets. The problem is that different targets,
such as Predictive Support, may have different requirements
for events.
Chapter 1
Page 19

Table 1-1 Hardware Monitoring Terms
Term De fin it io n
Introduction
Hardware Monitor ing Overvie w
Peripheral Status Monitor (PSM)
Polling The process of connecting to a hardware resource at regular
Predictive-enabled See “multiple-view.” This feature enables hardware monitors
Resource instance A specific hardware device. The resource instance is the last
Resource path Hardware event monitors are organized into classes (and
Included with the hardware event monitors, the PSM is a
monitor daemon that acts as a hardware status monitor by
converting events to changes in hardware resource status.
This provides compatibility with MC/ServiceGuard, which
uses changes in status to manage cluster resources. Through
the EMS GUI, the PSM is also used to create hardware
status monitoring requests.
intervals to determine its status. Any events that occur
between polling intervals will not be detected until the next
poll, unless the monitor supports asynchronous event
monitoring.
to work with Predictive Support.
element of the resource path and is typically the hardware
path to the resource (e.g., 10_12_5.0.0), but it may also be a
product ID as in the case of AutoRAID disk arrays. There
may be multiple instances for a monitor, each one
representing a unique hardware device for which the
monitor is responsible.
subclasses) for creating monitoring requests. These classes
identify the unique path to each hardware resource
supported by the monitor. Two similar resource paths exist
for each hardware resource—an event path used for creating
event monitoring requests, and a status path used for
creating PSM monitoring requests.
Chapter 1
19
Page 20

Introduction
Hardware Monitoring Overview
20
Chapter 1
Page 21

Installing and Using Monitors
2 Installing and Using Monitors
This chapter instructs you on how to use the EMS Hardware Monitors to manage your hardware resources.
The topics discussed in this chapter include:
• An overview of the steps involved
• Installing EMS Hardware Monitors
• Adding and managing monitor requests
• Disabling and enabling EMS Hardware Monitors
NOTE You don't need to completely understand the terms and concepts to begin protecting your
system with EMS Hardware Monitors by following the procedures in this chapter. If a term or
concept puzzles you, refer to Chapter 1, “Introduction,” or to Chapter 3, “Detailed Description.”
Chapter 2
21
Page 22

Installing and Using Monitors
The Steps Involved
The Steps Involved
The steps involved in installing and configuring hardware monitoring are shown in Figure 2-1 on page 23.
Each step is described in detail in this chapter on the page indicated.
Step 1: (HP-UX 10.20 or 11.x only.) Install the Support Tools from the most current copy of Support Plus Media you can find. You can also download this package over the Web. See “Installing EMS Hardware Monitors”. This step is only necessary for HP-UX 10.20 or 11.x. With HP-UX 11i, the Support Tools are automatically installed when the OS is installed.
Step 2: Examine the list of supported products to see if any of your devices have special requirements in order to be monitored. For example, if monitoring FC-AL hubs, edit the file: /var/stm/config/tools/monitor/dm_fc_hub. See “Fibre Channel Arbitrated Loop Hub Monitor”.
Step 3: (Releases earlier than June 1999 only.) Enable hardware event monitoring. See “Enabling Hardware Event Monitoring”. This step is only necessary if you have a release of the Diagnostic/IPR Media earlier than June 1999.
Step 4: Determine whether default monitoring requests are adequate. See “Viewing Current Monitoring Requests”.
Step 5: Add or modify monitoring requests as necessary. See “Adding a Monitoring Request” and “Modifying Monitoring Requests”.
Step 6: If desired, verify monitor operation (recommended but optional). See “Verifying Hardware Event Monitoring”.
NOTE How Long Will it Take to Get Hardware Monitoring Working?
You can get hardware monitoring installed and working in minutes. Once the software is
installed, you simply need to run the Hardware Monitoring Request Manager and enable
monitoring. The default hardware monitoring configuration should meet your monitoring
requirements without any changes or modifications. If you find that the default monitoring
should be customized, you can always return later and add or modify monitoring requests as
needed.
NOTE If I'm Already Using EMS HA Monitors, Can I Also Use the EMS GUI to Manage
Hardware Monitoring?
For the most part, no. Hardware event monitoring is managed using the Hardware Monitoring
Request Manager, which serves the same function the EMS GUI serves for the EMS HA
monitors. The only portion of hardware monitoring that is managed using the EMS GUI is
status monitoring done using the Peripheral Status Monitor (PSM) described in Chapter 4,
“Using the Peripheral Status Monitor.”
22
Chapter 2
Page 23
Installing and Using Monitors
Figure 2-1 The Steps for Installing and Configuring Hardware Monitoring
The Steps Invol ved
Chapter 2
23
Page 24

Installing and Using Monitors
Installing EMS Hardware Monitors
Installing EMS Hardware Monitors
The EMS Hardware Monitors software is distributed with the Support Tools (diagnostics). All the necessary
files for hardware monitoring are installed automatically when the Support Tools are installed. There are
several different ways that the Support Tools are installed:
• The Support Plus Media: installing the OnlineDiag depot from the Support Plus Media using swinstall.
• HP Software Depot website: downloading the “Support Tools for the HP 9000” in the “Enhancement
Releases” product category, then using swinstall to install the OnlineDiag depot.
• Automatic: with HP-UX 11i, the Support Tools are automatically installed from the OE CD-ROM when
the operating system is installed.
Complete instructions for installing STM are contained in Chapter 5 of the Support Plus: Diagnostics User's Guide.
The following software components are installed for hardware monitoring:
• All hardware event monitors
• Monitor configuration files
• Monitoring Request Manager
• EMS framework, including the EMS graphical interface
All EMS Hardware Monitors on the CD-ROM will be installed on your system, but only those that support
hardware resources you are using will be active. If you add a new hardware resource to your system that uses
an installed monitor, the monitor will be launched when the system is restarted, following the execution of the
IOSCAN utility, or when the Enable Monitoring option is selected from the Hardware Monitoring Request
Manager. This ensures that immediate monitoring and notification are provided for the new hardware
resource.
NOTE Reinstalling or upgrading the STM software will erase the current Peripheral Status Monitor
(PSM) configuration. Any MC/ServiceGuard package dependencies or EMS monitoring
requests you have created with the PSM will be lost. Before reinstalling the STM software,
record the current PSM configuration so you can easily recreate it after the software has been
installed. Or you can comment out the PSM dependencies in the ServiceGuard configuration
files, then re-enable them after the STM software has been installed.
Supported System Configuration
To use the hardware event monitors your system must meet the following requirements:
• HP 9000 Series 700 or 800 Computer
• HP-UX 10.20 or 11.x (Hardware event monitoring is not currently available on the special high security
systems, HP-UX 10.26 (TOS) and HP-UX 11.04 (VVOS).
• Support Plus Media, the more current the better. The hardware event monitors were first distributed in
the February 1999 release (IPR 9902). Before the September 1999 release, the Support Plus Media was
called the Diagnostic/IPR Media.
Rather than use the Support Plus Media, you can download the Support Tools (including STM and the
hardware event monitors) over the Web. See Chapter 5 of the Support Plus: Diagnostics User's Guide for
24
Chapter 2
Page 25

Installing and Using Monitors
Installing EMS Hardware Monitors
more information
• If you are using MC/ServiceGuard (optional), you must have version A.10.11 on HP-UX 10.20, or version
A.11.04 for HP-UX 11.x.
Removing EMS Hardware Monitors
The hardware monitoring software can be removed using the swremove utility. Run swremove and select the OnlineDiag bundle. This will remove the hardware monitoring software components and the STM software
components.
Chapter 2
25
Page 26

Installing and Using Monitors
Checking for Special Requirements
Checking for Special Requirements
Some devices have special requirements in order to be monitored. Examine the tables of supported products
below to see if any of your devices have special requirements.
Table 2-1 Disk Arrays
Product Model/Product
Number
HP AutoRAID Disk Array
Supported by: AutoRAID Disk Array
Monitor
HP High Availability Disk Array
Supported by: High-Availability Disk
Array Monitor
HP Fast/Wide SCSI Disk Array
Supported by: Fast/Wide SCSI Disk
Array Monitor
HP Fibre Channel High Availability
Disk Array (Model 60/FC)
Supported by Disk Array FC60 Monitor
12H 12
30/FC 20 10
C243XHA None
60/FC Requires AM60Srvr
Special Requirements
Requires the
following ARMServer
versions:
B.10.01.10 for HP-UX
10.X (Patch
PHCO_21309)
B.11.00.10 for HP-UX
11.X (Patch
PHCO_21435)
None
daemon, part of the
Array Manager 60
disk array
management
software.
26
For HP-UX 11.00:
patch PHCO_21315
For HP-UX 10.20:
patch PHCO_21314
Chapter 2
Page 27

Tab l e 2-2 D is k Pr od uct s
Installing and Using Monitors
Checking for Special Require ments
Product Model/Product
Number
All disks bound to the sdisk and disc30
drivers and not under the control of
another event monitor (such as a disk
array monitor).
Supported by: Disk Monitor
NA None
Special Requirements
Table 2-3 Tape Products (all supported by the SCSI Tape Devices Monitor)
Product Model/Product
Number
DDS-2 Autoloader A3400A None
DDS-3 Autoloader A3716A None
DDS-4 Autoloader C6370A, C6371A March 00 Release
DLT4000 4/48 Library; HP-UX; Differential SCSI
DLT4000 2/48 Library; HP-UX; Differential SCSI
A3544A None
A3545A None
Special Requirements
DLT4000 2/28 Library; HP-UX; Differential SCSI
DLT 4000 and 7000; 2/28; Drives Differential; Robotics SE/Diff
DLT 4000 & 7000; 4/48: Drives Differential; Robotics SE/Diff
DLT 4000 and 7000; 15 slot; Deskside/Rack; Differential
DLT 4000 and 7000; 588 slot; Drives Diff; Robotics SE
DLT 4000 and 7000; 100 slot; Drives Diff; Robotics SE
DLT 4000 and 7000; 30 slot; Differential A4853A None
DLT7000 8-slot Library A5501A March 00 Release
DLT8000 8-slot Library A1375A March 00 Release
DLT8000 20-slot Library A5583A,A5584A,
A3546A None
A4850A None
A4855A None
A4851A None
A4845A None
A4846A None
March 00 Release
A4680AZ,
A4680AHP,
A4681AHP
Chapter 2
27
Page 28

Installing and Using Monitors
Checking for Special Requirements
Table 2-3 Tape Products (all supported by the SCSI Tape Devices Monitor)
Product Model/Product
Number
DLT8000 40-slot Library A5585A, A5586A,
A4682AZ,
A4682AHP,
A4683AHP
DLT8000 60-slot Library A5587A, A5588A,
A4684AZ,
A4684AHP,
A4685AHP
DLT8000 100-slot Library A4665A, A4666A June 00 Release
DLT8000 120-slot Library A4667A, A4668A June 00 Release
DLT8000 140-slot Library A4669A, A4670A June 00 Release
DLT8000 700-slot Library A5597A March 00 Release
DLT8000 180-slot Library A5617A March 00 Release
All SCSI tape resources bound to the
following device drivers:
tape2 - HP-PB tape driver
stape - HSC tape driver
Special
Requirements
March 00 Release
March 00 Release
None
All the tape products in the above table are monitored by the SCSI Tape Devices Monitor.
Table 2-4 High Availability Storage Systems
Product Model/Product
Number
HP High Availability Storage System
Supported by: High-Availability Storage
System Monitor
1010D None
Special
Requirements
Table 2-5 Fibre Channel SCSI Multiplexers
Product Model/Product
Number
HP Fibre Channel SCSI Multiplexer
Supported by: Fibre Channel SCSI
Multiplexer Monitor
A3308A Firmware version
Special
Requirements
3840
28
Chapter 2
Page 29

Table 2-6 Fibre Channel Adapters
Installing and Using Monitors
Checking for Special Require ments
Product Model/Product
Number
HP Fibre Mass Storage Channel
Adapters
Supported by: Fibre Channel Mass
Storage Channel Adapter
A5158A (Tachyon-TL) Fibre Channel
Mass Storage Channel Adapter
Supported by: A5158A Fibre Channel
Mass Storage Channel Adapter
A3404A A3591A A3636A A3740A
A5158A B.11.00 Tachlite
Table 2-7 Fibre Channel Arbitrated Loop (FC-AL) Hub
Product Model/Product
Number
HP Fibre
Channel
Arbitrated Loop
Hubs
Supported by:
Fibre Channel
Arbitrated Loop
Hub Monitor
A3724A A4839A
Special Requirements
The FC-AL Hub monitor requires:
Device Firmware revisions:
• Device Agent Firmware revision 2.14 or greater
• Hub Controller Firmware revision 3.06 or greater
Firmware and installation instructions are available at http://www.software.hp.com
Special Requirements
The following driver
revisions are
required: B.10.20
TFC plus Dart40
B.11.00 release
IPR9808 (Rocklin
version)
driver (td) Dart 48
B.11.00 release IPR
0003
Chapter 2
C++ runtime support patches:
• 10.20 PHSS_17872 (has a dependency: PHSS_17225)
• 11.00 PHSS_21906
Before using the hub monitor, edit the
monitor configuration file
(/var/stm/config/tools/monitor/dm_fc_hub.cfg
) to indicate what hubs will be monitored.
See “Fibre Channel Arbitrated Loop Hub
Monitor” on page 102.
29
Page 30

Installing and Using Monitors
Checking for Special Requirements
Table 2-8 Fibre Channel Switch
Product Model/Product
HP Fibre
Channel Switch
Supported by:
Fibre Channel
Switch Monitor
Tab l e 2- 9 Mem or y
Product Model/Product
All system memory.
Supported by: Memory Monitor
Special Requirements
Number
A5223A The FC Switch monitor requires:
C++ runtime support patches:
• 10.20 PHSS_17872 (has a dependency: PHSS_17225)
• 11.00 PHSS_21906
Before using the switch monitor, edit the
monitor configuration file
(/var/stm/config/tools/monitor/dm_fc_sw.cfg)
to indicate what switches will be monitored.
See “Fibre Channel Arbitrated Loop Hub
Monitor” on page 102.
Special
Number
NA None
Requirements
Tab l e 2-10 S yst e m
Product Model/Product
Core hardware (hardware within the
SPU cabinet)
Supported by: Core Hardware Monitor
Low Priority Machine Checks (LPMCs)
Supported by: LPMC Monitor
HP-UX Kernel Resources
Supported by: Kernel Resource Monitor
System Status
Supported by: System Status Monitor
Special
Number
NA HP-UX 11.x
NA HP-UX 11.x
NA HP-UX 11.x.
NA None
Requirements
Requires
configuration
through SAM.
30
Chapter 2
Page 31

Tab l e 2-11 I nt erf ac e Ca r ds
Installing and Using Monitors
Checking for Special Require ments
Product Model/Product
SCSI1, SCSI2, & SCSI3 interface cards.
Supported by: SCSI123 Monitor
Tab l e 2- 1 2 Oth er s
Product Model/Product
All devices managed by HP device
management software. Current
plans are for many different types
of devices to be supported,
including disk drives, disk arrays,
disk jbods, tape drives, tape
libraries, FC hubs, switches and
bridges.
Supported by: Remote Monitor
HP UPSs (Uninterruptible Power
Systems):
Supported by: UPS Monitor
Number
NA None
Number
As of July 13, 2000:
HP A6188A storage
array
HP A6189A storage
array
HP Power Trust
A2941A (600 VA)
A2994A (1300 VA)
A2996B (1.3kVA)
A2997B (1.8kVA)
A2998B (3.0kVA)
A3589B (5.5kVA)
Special Requirements
Special Requirements
HP-UX 11xx, Sept. 2000 or later TCP/IP port 2818 must be available.
The HP-UX monitoring
daemon, ups_mond,
which is shipped on all
Series 800 systems (but
not on S700 systems)
Chapter 2
HP Power TrustII
A1353A (2.0kVA,
120V)
A1354A (2.0kVA,
240V)
A1356A (3.0kVA,
240V)
Explorer UPS
31
Page 32

Installing and Using Monitors
Using Hardw are Monitoring Requests
Using Hardware Monitoring Requests
Monitoring requests are used to implement your strategy for monitoring hardware resources. The Hardware
Monitoring Request Manager is the tool you use to create and manage hardware event monitoring requests.
The following procedures describe how to use the Hardware Monitoring Request Manager to perform the
tasks involved in managing monitoring requests for all hardware event monitors.
What Is a Monitoring Request?
A monitoring request is the mechanism by which you manage how hardware event notification takes place.
EMS uses a monitoring request to determine what events should be reported, and what notification method
should be used to report them.
In building a monitoring request, you define the components that comprise the monitoring request. See
Figure 2-2 on page 33.
When building a request you must make the following decisions:
• WHAT hardware should be monitored? This is defined by selecting the monitor responsible for the
hardware resources you want to monitor. You can select multiple monitors for each monitoring request,
which gives you the ability to use a single request for a variety of hardware.
• WHAT events should be reported? Although the monitor can detect all hardware events, you can limit
the events that are reported. This is done by specifying the severity level(s) and an arithmetic operator.
Each severity level is assigned a numeric value to work with the operator (e.g., CRITICAL=5). Together
these settings determine which events to report. For example, you may be interested in all events greater
than or equal to Major Warning (>=MAJOR WARNING).
• HOW will notification be sent? You must select the notification method you want to use when an event
occurs. You may want to use several notification methods, but each method will require its own monitoring
request.
Some Monitoring Request Examples
The following monitoring request applies to all monitors. It sends all events with a severity greater than or
equal to MAJOR WARNING to an email address of sysad@hp.com:
Send events generated by all monitors
with severity >= MAJOR WARNING to EMAIL sysad@hp.com
The following monitoring request sends information events for all monitors to a text log:
Send events generated by all monitors
with severity = INFORMATION to TEXTLOG /var/opt/resmon/log/information.log
32
Chapter 2
Page 33

Figure 2-2 Building a Monitoring Request
Installing and Using Monitors
Using Hardw a re Monit or ing Requests
Chapter 2
33
Page 34

Installing and Using Monitors
Running the Monitoring Request Manager
Running the Monitoring Request Manager
NOTE You must be logged on as root to run the Monitoring Request Manager.
To run the Monitoring Request Manager, type:
/etc/opt/resmon/lbin/monconfig
The opening screen indicates if monitoring is currently enabled or disabled. Since the June 1999 release,
monitoring is enabled by default.
The opening screen looks like this:
========================================================
========== Event Monitoring Service ===========
========== Monitoring Request Manager ===========
========================================================
INDICATES
EVENT MONITORING IS CURRENTLY ENABLED <== MONITORING
========================================================
====== Monitoring Request Manager Main Menu ========
========================================================
Select:
(S)how current monitoring requests configured via monconfig
(C)heck detailed monitoring status
(L)ist descriptions of available monitor
(A)dd a monitoring request <== MAIN MENU
(D)elete a monitoring request SELECTION
(M)odify an existing monitoring request OPTIONS
(E)nable Monitoring
(K)ill (disable) monitoring
(H)elp
(Q)uit
Enter selection: [s]
STATUS
34
Chapter 2
Page 35

Installing and Using Monitors
Enabling Hardware Event Monitoring
Enabling Hardware Event Monitoring
Hardware event monitoring must be enabled to protect your system from undetected hardware failures. All
hardware monitoring requests are ignored while monitoring is disabled. Once monitoring has been enabled,
all hardware event monitors and their associated monitoring requests will become operational.
NOTE As of the June 1999 release, the hardware event monitors are automatically enabled when the
Support Tools bundle containing STM and the monitors is installed.
NOTE Are There Any Fibre Channel Arbitrated Loop Hubs or Fibre Channel Switches You
Wan t to Monito r?
An EMS Hardware Monitor is included for FC-AL hubs and FC switches. However, unlike the
other hardware monitors, these monitors require some initial configuration before they will
function. To ensure that your FC-AL hubs or FC switches are monitored, you should perform
the initial configuration before enabling monitoring. For information on performing the initial
configuration, refer to “Fibre Channel Arbitrated Loop Hub Monitor”, and “Fibre Channel
Switch Monitor” in Chapter 6, “Special Procedures.” When you have configured these monitors.
return here and continue with the procedure to enable monitoring.
To enable hardware event monitoring (only necessary for February and April 1999 releases):
1. Run the Hardware Monitoring Request Manager by typing:
/etc/opt/resmon/lbin/monconfig
2. From the main menu selection prompt, enter E
Hardware event monitoring is now enabled. The default monitoring requests shown in Table 2-13 on page 36
will be used to monitor your hardware. If these settings are adequate, you are done. If you want to add or
modify the monitoring you can do so using the Monitoring Request Manager.
Chapter 2
35
Page 36

Installing and Using Monitors
Enabling Hardware Event Monitoring
Default Monitoring Requests
A set of default monitoring requests are created for each hardware event monitor. These default requests
provide a complete level of monitoring and protection for the hardware resources under the control of the
monitor. The default monitoring requests listed in Table 2-13 on page 36 are used for all hardware event
monitors.
NOTE When to Modify the Default Monitoring Requests
You can use the default monitoring requests provided and achieve a complete level of
protection. However, the default monitoring requests provide a limited number of notification
options. By modifying or adding new monitoring requests, you gain greater control over what
notification methods are used to alert you when events occur. You can add new notification
methods or remove those that may not be required. Creating custom monitoring requests also
allows you to manage which severity levels you want reported.
Table 2-13 Default Monitoring Requests for Each Monitor
Severity Levels Notification Method
All TEXTLOG File:
/var/opt/resmon/log/event.log
Serious, Critical.
As of IPR 9904
Major Warning
Serious, Critical.
As of IPR 9904
Major Warning
Serious, Critical.
As of IPR 9904
Major Warning
SYSLOG
CONSOLE.
Note: As of the June 1999 release, messages
are no longer sent to the console by default.
EMAIL address: root
36
Chapter 2
Page 37

Installing and Using Monitors
Listing Monitor Descriptions
Listing Monitor Descriptions
One of the first steps in managing monitoring requests is selecting the proper monitor for the hardware
resource. You must know what hardware resources each monitor is responsible for to ensure that you select
the proper monitor. Listing the descriptions of the available monitors will show you what hardware resources
each monitor supports.
To list the descriptions of available monitors:
1. Run the Hardware Monitoring Request Manager by entering:
/etc/opt/resmon/lbin/monconfig
2. From the main menu selection prompt, enter L
A complete list of the available monitors and the hardware type each supports is displayed. Identify the name
of the desired monitor and then proceed with the monitoring request task.
NOTE For a detailed list of the specific products each monitor supports, refer to the Diagnostics
website at:
http://docs.hp.com/hpux/diag/
Under “EMS Hardware Monitors,” click on “Supported Products” and “Data Sheets.” You can
also refer to the man page for the particular monitor; for example, “man_disk_em”.
Chapter 2
37
Page 38

Installing and Using Monitors
Viewing Current Monitoring Requests
Viewing Current Monitoring Requests
Before adding or modifying monitoring requests, you should examine the current monitoring requests. These
include the default monitoring requests created during system startup. By examining the current requests,
you can determine what additional requests may be needed to implement your monitoring and notification
strategy.
The option to Show Monitoring Requests displays all the monitoring requests that have been created using
the Hardware Monitoring Request Manager, even requests that are inactive. See “Checking Detailed
Monitoring Status” on page 47, for information on viewing only active monitoring requests.
To view (or show) the current monitoring requests:
1. Run the Hardware Monitoring Request Manager by entering:
/etc/opt/resmon/lbin/monconfig
2. From the main menu selection prompt, enter S
A list of all the current monitoring requests configured for the hardware event monitors is displayed. The
display will be similar to the following screen, which shows the default monitoring requests.
============================================================
========== Current Monitoring Requests ===============
============================================================
EVENT MONITORING IS CURRENTLY ENABLED
The current monitor configuration is:
1) Send events generated by all monitors
with severity >= INFORMATION to TEXTLOG / var/opt/resmon/log/event.log
2) Send events generated by all monitors
with severity >= MAJOR WARNING to SYSLOG
3) Send events generated by all monitors
with severity >= MAJOR WARNING to EMAIL root
Hit <enter> to continue...
38
Chapter 2
Page 39

Installing and Using Monitors
Adding a Monitoring Request
Adding a Monitoring Request
Adding a monitoring request is a convenient way to add another notification method for a monitor. Each new
notification method requires its own monitoring request.
Monitoring requests can only be added at the monitor level, which creates an identical request for all
instances of the hardware resources supported by the monitor. Monitoring requests cannot be added for a
specific hardware instance. An “A(ll)” option allows you to add a monitoring request for all monitors in one
operation.
NOTE Using the “All monitors” option when creating a request has the benefit of applying the request
to a new class of supported hardware resource that you may add to your system. This ensures
that the new hardware is automatically included in your monitoring strategy.
To add a monitoring request:
1. Run the Hardware Monitoring Request Manager by typing:
/etc/opt/resmon/lbin/monconfig
2. From the main menu selection prompt, enter A.
3. At the Monitors selection prompt, enter the number assigned to the monitor for which you are creating a
request. The numbers for the monitors are listed on the screen. You can enter multiple numbers separated
by commas, or you can enter “a” to create a request for all monitors.
4. At the Criteria Threshold prompt, enter the number for the desired severity level. See Table 2-15 on
page 41.
5. At the Criteria Operator prompt, enter the number for the desired operator. See Table 2-14 on page 40.
6. At the Notification Method prompt, enter the number for the desired method. See Table 2-14 on page 40. If
the notification method you selected requires you to input additional information, do so when promoted.
7. At the User Comment prompt, enter any comments about this monitoring request that you desire. This
text will be sent with events which match this monitoring request. This feature is NEW, as of the June
2000 release.
8. At the Client Configuration File prompt, enter (C)lear to use the default client configuration file, or enter
A(dd) to specify the name of a specific client configuration file for this request. This file allows you to
enable/disable events, set thresholding criteria and severity levels for events on a per-client basis (for
example, for Predictive Support). Adding a client configuration file at this prompt does not create or edit
the file; it merely sets up the monitoring request to use the file. Unless you have a specific client that
requires a client configuration file, choose (C)lear (the default). This feature is NEW, as of the June 2000
release. It is only valid for monitors that are Multiple-View (Predictive-Enabled).
9. Save the request when prompted.
Repeat the above steps for each new monitoring request.
NOTE Are monitoring requests automatically applied to new hardware resources?
Because monitoring requests are created at the monitor level and not at the hardware instance
level, a new hardware resource added to the system inherits the same monitoring requests
assigned to other hardware of the same type. This ensures that new hardware is automatically
added to the monitoring configuration. When you restart the system or perform an ioscan, the
Chapter 2
39
Page 40

Installing and Using Monitors
Adding a Monitoring Request
new hardware will be included in event monitoring.
If you add a new class of supported hardware resource to your system, any monitoring requests
that apply to All monitors are used for the new hardware, ensuring that your hardware is
protected immediately from undetected failure.
For hardware monitoring to recognize new devices, the new devices must be properly added
and configured, so that they are recognized by the kernel (ioscan must see them).
Table 2-14 Monitoring Requests Configuration Settings
Setting Description
Criteria Thresholds
Criteria Operators
This value identifies the severity level used in conjunction with the
criteria operator to generate an event message. See Table 2-15 on
page 41, for an explanation of severity levels.
This value identifies the arithmetic operator used with the criteria
threshold to control what events are reported. Valid operators are:
<(lessthan)
<= (less than or equal to)
>(greaterthan)
>= (greater than or equal than)
! (not equal to)
Operators treat each severity level as a numeric value assigned as
follows:
Critical = 5
Serious = 4
Major warning = 3
Minor warning = 2
Informational = 1
The criteria operators allow you to direct events of several severity
levels using the same notification method. For example, to direct both
Serious and Critical events using the same method, you would use a
condition of >= Serious.
40
Chapter 2
Page 41

Table 2-14 Monitoring Requests Configuration Settings
Setting Description
Installing and Using Monitors
Adding a Monitoring Request
Notification Method
The following notification methods are available.
EMAIL* - sends notification to the specified email address
TEXTLOG* - sends notification to specified file
SNMP - sends notification using SNMP traps
CONSOLE - sends notification to the system console
TCP - sends notification to the specified target host and port
UDP - sends notification to the specified target host and port
OPC - sends notification to OpenView ITO applications (available
only on systems with OpenView installed).
SYSLOG - sends notification to the system log
Only one notification method can be selected for each monitor
request, consequently you will need to create multiple requests to
direct event notification to different targets. * These are the only
methods that deliver the entire content of the event message. The
remaining methods alert you to the occurrence of an event, but
require you to retrieve the complete message content using resdata
explained later in this chapter.
Table 2-15 Event Severity Levels
Event Severity Level
Description MC/ServiceGuard
Response
Critical An event that will or has already
caused data loss, system down time,
or other loss of service. System
operation will be impacted and
normal use of the hardware should
not continue until the problem is
corrected. Immediate action is
required to correct the problem.
Serious An event that may cause data loss,
system down time, or other loss of
service if left uncorrected. System
operation and normal use of the
hardware may be impacted. The
problem should be repaired as soon as
possible.
Major Warning
An event that could escalate to a
Serious condition if not corrected.
System operation should not be
impacted and normal use of the
hardware can continue. The problem
should be repaired at a convenient
time.
If MC/ServiceGuard is installed and this is a critical component, a package fail-over WILL occur.
If MC/ServiceGuard is installed and this is a critical component, a package fail-over WILL occur.
If MC/ServiceGuard is
installed and this is a
critical component, a
package fail-over WILL
NOT occur.
Chapter 2
41
Page 42

Installing and Using Monitors
Adding a Monitoring Request
Table 2-15 Event Severity Levels
Event
Severity
Level
Minor Warning
Information An event that occurs as part of the
Description MC/ServiceGuard
An event that will not likely escalate
to a more severe condition if let
uncorrected. System operation will
not be interrupted and normal use of
the hardware can continue. The
problem can be repaired at a
convenient time.
normal operation of the hardware. No
action is required.
Response
If MC/ServiceGuard is
installed and this is a
critical component, a
package fail-over WILL
NOT occur.
If MC/ServiceGuard is
installed and this is a
critical component, a
package fail-over WILL
NOT occur.
42
Chapter 2
Page 43

Installing and Using Monitors
Adding a Monitoring Request
Example of Adding a Monitoring Request
The following example illustrates the process of adding a monitoring request. In this example a request is
added that will send all CRITICAL events detected by the AutoRAID disk array monitor to an email address
of admin@hp.com.
===================================================================
=========== Monitoring Configuration Main Menu =============
===================================================================
Select:
(S)how current monitoring requests configured via monconfig
(C)heck detailed monitoring status
(L)ist descriptions of available monitors
(A)dd a monitoring request
(D)elete a monitoring request
(M)odify an existing monitoring request
(E)nable Monitoring
(K)ill (disable) monitoring
(H)elp
(Q)uit
Enter selection: [s] a <== SELECT ADD OPTION
===========================================================================
===================== Add Monitoring Request =====================
===========================================================================
Start of edit configuration:
A monitoring request consists of:
A list of monitors to which it applies
A severity range (A relational expression and a severity. For example,
%< "MAJOR WARNING" means events with a severity "INFORMATION" and
"MINOR WARNING")
A notification method
Please answer the following questions to specify a monitoring request.
Monitors to which this configuration can apply:
1) /storage/events/disk_arrays/AutoRAID
2) /storage/events/disks/default
3) /adapters/events/FC_adapter
4) /connectivity/events/multiplexors/FC_SCSI_mux
5) /storage/events/enclosures/ses_enclosure
6) /storage/events/tapes/SCSI_tape
7) /storage/events/disk_arrays/FW_SCSI
8) /storage/events/disk_arrays/High_Availability
Enter monitor numbers separated by commas
{or (A)ll monitors, (Q)uit, (H)elp} [a] 1 <== SELECT AUTORAID MONITOR
Criteria Thresholds:
1) Informational 2) Minor Warning 3) Major Warning
4) Serious 5) Critical
Enter selection {or (Q)uit,(H)elp} [4] 5 <== SELECT ONLY
Criteria Operator:
1) %< 2) %<= 3) > 4) >= 5) = 6) !
Enter selection {or (Q)uit,(H)elp} [4] 5 <== (=CRITICAL)
CRITICAL EVENTS
Notification Method:
1) UDP 2) TCP 3) OPC 4) SNMP
5) TEXTLOG 6) SYSLOG 7) EMAIL 8) CONSOLE
Enter selection {or (Q)uit,(H)elp} [7] <== SELECT EMAIL
ADDRESS FOR
Enter Email Address: [root] admin@hp.com admin@hp.com
Chapter 2
43
Page 44

Installing and Using Monitors
Adding a Monitoring Request
User Comment:
(C)lear (A)dd
Enter selection {or (Q)uit,(H)elp} [c] a <== ADD COMMENT
Enter comment: [] This is a test message. IF DESIRED
Client Configuration File:
(C)lear (A)dd
Use Clear to use the default file.
Enter selection {or (Q)uit,(H)elp} [c] c <== SPECIFY CLCFG FILE
New entry:
Send events generated by all monitors
/storage/events/disk_arrays/AutoRAID <== NEW MONITORING
with severity = CRITICAL to EMAIL admin@hp.com REQUEST
with comment:
This is a test message
Are you sure you want to keep these changes?
{(Y)es,(N)o,(H)elp} [n] y
IF DESIRED (USUALLY
CHOOSE DEFAULT)
44
Chapter 2
Page 45

Installing and Using Monitors
Modifying Monitoring Requests
Modifying Monitoring Requests
Modifying an existing monitoring request is a convenient way to alter one of the settings used in the request.
Simply select a monitoring request and then change the desired setting. All other aspects of the request
remain unchanged.
To modify a monitoring request:
1. Run the Hardware Monitoring Request Manager by typing:
/etc/opt/resmon/lbin/monconfig
2. From the main menu selection prompt, enter M
All current monitoring requests are displayed.
3. From the list of current monitoring requests, enter the number of the request you want to modify.
4. As you are prompted for each monitoring request setting, change the settings to achieve the desired
results.
5. Save the request when prompted.
Chapter 2
45
Page 46

Installing and Using Monitors
Verifying Hardwa re E v e nt Mo nito ri n g
Verifying Hardware Event Monitoring
Once you have created the monitoring requests you need for your system, you may want to verify that they
are working as you expect. The most effective way of verifying hardware event monitoring is to simulate a
hardware failure or event. Depending on the hardware, you can do this by removing a disk from an array,
unplugging a cable, turning off the hardware resource, using known defective media, etc.
The simulated fault should generate event messages using all the notification methods you have specified. If
it does not, check the monitoring requests and make sure they are configured properly.
46
Chapter 2
Page 47

Installing and Using Monitors
Checking Detail ed Monitoring Status
Checking Detailed Monitoring Status
This option lets you view the detailed information for all active monitoring requests. This information is
organized by resource instance, and lists all the monitoring requests currently applied to each instance.
Unlike the option to Show Monitoring Requests which displays all the monitoring requests that have been
created using the Hardware Monitoring Request Manager, the detailed status displays only the requests that
are currently active. For example, you can create a monitoring request for a monitor that is inactive, but it
will not be displayed in the detailed list.
A monitor that is not active will be identified with a status of NOT MONITORING. Any monitor that does not
have any resources to monitor will be inactive.
NOTE Where Did the TCP Requests Come From?
You may notice that most resources have a TCP monitoring request that you did not create.
This request is created automatically by the Peripheral Status Monitor (PSM) to allow it to
gather event information from each monitor.
The following sample is representative of the types of entries displayed for detailed monitoring status.
For /storage/events/disks/default/10_12_5.2.0:
Events >= 1 (INFORMATION) Goto TEXTLOG; file=/var/opt/resmon/log/event.log
Events >= 4 (MAJOR WARNING) Goto SYSLOG
Events >= 4 (MAJOR WARNING) Goto EMAIL; addr=root
Events = 5 (CRITICAL) Goto TCP; host=hpbs1266.boi.hp.com port=53327
For /adapters/events/FC_adapter/8_12.8:
Events >= 1 (INFORMATION) Goto TEXTLOG; file=/var/opt/resmon/log/event.log
Events >= 4 (MAJOR WARNING) Goto SYSLOG
Events >= 4 (MAJOR WARNING) Goto EMAIL; addr=root
>/connectivity/events/multiplexors/FC_SCSI_mux ... NOT MONITORING.
(Possibly there is no hardware to monitor.)
>/system/events/memory ... OK.
For /system/events/memory/49:
Events >= 1 (INFORMATION) Goto TEXTLOG; file=/var/opt/resmon/log/event.log
Events >= 4 (MAJOR WARNING) Goto SYSLOG
Events >= 4 (MAJOR WARNING) Goto EMAIL; addr=root
Events >= 4 (MAJOR WARNING) Goto TCP; host=hpbs1266.boi.hp.com port=53327
Chapter 2
47
Page 48

Installing and Using Monitors
Retrieving and Interpreti ng Event Messages
Retrieving and Interpreting Event Messages
Event messages generated by hardware monitoring can be delivered using a variety of notification methods.
To simplify receiving event messages you may want to use the email and/or textfile notification methods. Both
of these methods, which are included in the default monitoring, receive the entire content of the message so
you can read it immediately.
Methods such as console, syslog, and SNMP alert you to the occurrence of an event but do not deliver the entire message. You are required to retrieve it using the resdata utility. For these methods, the event notification will include a message similar to the following:
Execute the following command to obtain event details: /opt/resmon/bin/resdata
-R 392036357 -r /storage/events/tapes/SCSI_tape/10_12_5.0.0 -n 392036353 -a
It is important that you execute the command exactly as indicated, including the two critical number fields
that are indexes for the resdata entries.
Sample Event Message
The following is a portion of a sample event message.
> Event Monitoring Service Event Notification %<
Notification Time: Wed Sep 9 10:48:30 1998
hpbs8684 sent Event Monitor notification information:
/storage/events/disks/default/10_4_4.0.0 is >= 1.
Its current value is CRITICAL(5).
Event data from monitor:
Event Time : Wed Sep 9 10:48:30 1998
Hostname : hpbs8684.boi.hp.com IP Address : 15.62.120.25
Event Id : 0x0035f6b15e00000000 Monitor : disk_em
Event # : 100037 Event Class : I/O
Severity : CRITICAL
Disk at hardware path 10/4/4.0.0 : Media failure
Associated OS error log entry id(s):
000000000000000000
Description of Error:
The device was unsuccessful in reading data for the current I/O request
due to an error on the medium. The data could not be recovered. The
request was likely processed in a way which could cause damage to or loss
of data.
Probable Cause / Recommended Action:
The medium in the device is flawed. If the medium is removable, replace
the medium with a fresh one. Alternatively, if the medium is not
removable, the device has experienced a hardware failure.
Repair or replace the device, as necessary.
=-+-=-+-=-+-=-+-=-+-=-+-=-+-=-+-=-+-=-+-=-+-=-+-=-+-=-+-=-+-=-+-=-+-=-+-=-+-=
48
Chapter 2
Page 49

Installing and Using Monitors
Deleting Monitor ing Requests
Deleting Monitoring Requests
You may want to delete any monitor requests for a hardware resource that has been removed from your
system. Only requests created exclusively for the missing resource should be deleted.
CAUTION Use careful consideration before deleting monitoring requests or you may make your system
vulnerable to undetected hardware failures. This is particularly true for the default monitoring
requests, which provide protection for all the supported hardware resources on your system.
To delete a monitoring request:
1. Run the Hardware Monitoring Request Manager by typing:
/etc/opt/resmon/lbin/monconfig
2. From the main menu selection prompt, enter D All current monitoring requests are displayed.
3. From the list of current monitoring requests, enter the number assigned to the request you want to delete.
4. Delete the request when prompted to do so.
Chapter 2
49
Page 50

Installing and Using Monitors
Disabling Hardware Event Monitoring
Disabling Hardware Event Monitoring
You can disable hardware event monitoring if desired. However, all EMS Hardware Monitors will be disabled.
You cannot disable a specific monitor. While monitoring is disabled, all monitoring requests are disabled. The
monitoring requests are retained and become operational when monitoring is re-enabled.
CAUTION Use careful consideration before disabling hardware event monitoring. Be aware that ALL
hardware monitoring will be disabled. While monitoring is disabled, your hardware resources
are vulnerable to undetected failures.
Disabling monitoring will impact MC/ServiceGuard if package dependencies have been created
for the hardware event monitors.
To disable hardware event monitoring:
1. Run the Hardware Monitoring Request Manager by typing:
/etc/opt/resmon/lbin/monconfig
2. From the main menu selection prompt, enter K.
3. Confirm disabling when prompted to do so. When you are ready to re-enable hardware event monitoring,
see “Enabling Hardware Event Monitoring”.
50
Chapter 2
Page 51

Detailed Description
3 Detailed Description
This chapter describes EMS Hardware Monitors in detail. The topics discussed in this chapter include:
• Hardware monitoring architecture.
• Hardware monitoring request manager.
• EMS hardware event monitor.
• Polling or asynchronous?
• Startup client.
• Peripheral status monitor.
• Event monitoring service (EMS).
• File locations.
• Startup process (in detail).
• Asynchronous event detection (in detail).
• Event polling (in detail).
Chapter 3
51
Page 52

Detailed Description
The Detailed Picture of Hardware Monitoring
The Detailed Picture of Hardware Monitoring
The following figure shows the major components involved in hardware monitoring and the communication
paths between them.
Figure 3-1 Hardware Monitoring Architecture
52
Chapter 3
Page 53

Detailed Description
The Detailed Picture of Hardware Monitoring
Components from Three Different Applications
Hardware event monitoring involves components from three different applications:
• Event Monitoring System (EMS) provides the framework for event notification. EMS was originally
developed to support system monitoring, but the existing framework is used to manage hardware event
monitoring as well.
• Hardware event monitoring components include the event monitor, associated configuration files, and the
hardware monitoring request manager.
• Support Tools Manager provides the low-level error handling components that are also used for recording
and viewing system errors.
Hardware Monitoring Request Manager
Hardware event monitoring requests are created and managed using the Hardware Monitoring Request Manager program. This tool allows you to easily create monitoring requests for all the hardware event
monitors running on your system. The Hardware Monitoring Request Manager uses all the notification
methods supported by Event Monitoring Service (EMS), giving you the ability to create a consistent
notification strategy for both system resources and hardware resources. The Hardware Monitoring Request
Manager is also used to enable or disable hardware monitoring.
Once created, all hardware event monitoring requests are handled by EMS, which uses the request settings to
determine how an event should be reported.
Chapter 3
53
Page 54

Detailed Description
The Detailed Picture of Hardware Monitoring
EMS Hardware Event Monitor
The EMS hardware event monitor is the key component in the event monitoring architecture. An event
monitor is a daemon process, running in the background continuously. The event monitor watches all
instances of the hardware resources it supports, waiting for the occurrence of any failures or other unusual
events. The monitor may use polling, asynchronous event detection, or both.
When an event occurs, the monitor alerts EMS and passes it the appropriate event message. The event
monitor also tells the PSM about the event. If the event is serious enough the PSM will change the status of
the hardware to DOWN.
Two configuration files control the operation of each hardware event monitor:
• Global monitor configuration file. The settings defined in this file are used for all hardware event
monitors, unless overridden by a monitor-specific file.
• Monitor-specific configuration file. Each monitor includes its own configuration file with optimized
settings. The settings defined in the monitor-specific file override corresponding settings defined in the
global configuration file.
NOTE The settings defined by the monitor-specific configuration file have been carefully selected to
meet the needs of most users. It is possible to alter these settings, but it is not recommended
unless you fully understand the implications of doing so. For information on modifying the
monitor-specific configuration files, see Chapter 5, “Hardware Monitor Configuration Files.”
NOTE As of the June 2000 release, several of the hardware monitors have been converted to be
“multiple-view” (Predictive-enabled). These monitors use a different file for configuration, the
Client Configuration File.
Polling or Asynchronous?
Hardware event monitors employ two methods of tracking events: polling and asynchronous event detection.
A monitor may use one or both of the methods to detect events.
Using polling, a monitor checks the status of its hardware resources at regular intervals, typically 60
minutes. Any unusual condition reported by the hardware will trigger an event by the monitor. The polling
interval is selected to provide reasonable detection without impacting system performance. The main
disadvantage of polling is that an event will not be detected until the next time the resource is polled, which
makes the system vulnerable to another hardware failure.
Asynchronous detection allows a monitor to detect an event when it occurs, usually during an I/O to the
device. An event typically results in a log entry made by the hardware device driver. The monitor detects the
log entry and initiates the event notification. Asynchronous event monitoring allows immediate notification
and response to a critical situation.
Startup Client
The startup client launches and configures the hardware event monitors each time the system is started, or
following the execution of the IOSCAN utility. The startup client starts each monitor and configures its
hardware resources using a set of default monitoring requests.
Each monitor has its own startup configuration file, which contains the default monitoring requests and any customized requests created using the Hardware Monitoring Request Manager. During system startup,
54
Chapter 3
Page 55

Detailed Description
The Detailed Picture of Hardware Monitoring
following the execution of the IOSCAN utility, or when managing requests using the Hardware Monitoring
Request Manager, the startup client reads each configuration file and creates the monitoring requests defined
by the entries in the file. The Hardware Monitoring Request Manager updates the contents of the startup
configuration file when you add or modify monitoring requests.
Peripheral Status Monitor (PSM)
The sole purpose of the peripheral status monitor (PSM) is to convert events detected by a hardware event monitor to changes in hardware resource status. This conversion is required for use with MC/ServiceGuard in controlling package failover. When an event occurs, the PSM determines if it is serious enough to warrant a change in hardware resource status to DOWN. If it is, the PSM alerts EMS, which then informs MC/ServiceGuard.
More information about the PSM is included in Chapter 4, “Using the Peripheral Status Monitor.”
Event Monitoring Service (EMS)
The event monitoring service (EMS) provides the framework within which hardware monitoring takes
place. EMS manages the monitoring requests created for each monitor. When an event occurs, the associated
monitor alerts EMS and passes it an event message. EMS then uses the monitoring request to determine how
(or if) the event message should be delivered. EMS manages all hardware event notification.
EMS also provides the graphical interface for creating and managing PSM monitoring requests. Like event
monitoring requests, all PSM monitoring requests are managed by EMS.
Other system monitors are available for EMS at additional cost. For more information on EMS and available
monitors, see Using EMS HA Monitors (B5735-90001).
Chapter 3
55
Page 56

Detailed Description
The Detailed Picture of Hardware Monitoring
File Locations
The following table lists the locations of the files involved in hardware monitoring.
Table 3 -1File L ocations
Directories and Files Description
/usr/sbin/stm/uut/bin/tools/monitor/monitor_name Monitor executable files. /var/stm/config/tools/monitor/Global.cfg Default monitor configuration file. /var/stm/config/tools/monitor/monitor_name.cfg Monitor-specific configuration files. /var/stm/config/tools/monitor/default_monitor_name.clcfg Monitor client configuration file.
Only for hardware monitors
converted to multiple-view
(Predictive-enabled). New as of
June 2000 release.
/var/stm/config/tools/monitor/monitor_name.sapcfg Monitor startup configuration files. /var/stm/config/tools/monitor/monitor_name.psmcfg PSM configuration files. /etc/opt/resmon/lbin/monconfig Hardware Monitoring Request
Manager file
/etc/opt/resmon/lbin/startcfg_client Startup client file /etc/opt/resmon/lbin/set_fixed PSM set_fixed utility file /etc/opt/resmon/dictionary/monitor_name.dict Monitor dictionary files
In the above table, monitor_name is the name of a particular monitor such as armmon.
56
Chapter 3
Page 57

Detailed Description
The Detailed Picture of Hardware Monitoring
Startup Process (in Detail)
The following steps describe the process used to start the hardware monitoring. The startup process is
illustrated in Figure 3-2 on page 57.
The startup process is managed by the startup client (startcfg_client). The startup client is run when the system is restarted, following an IOSCAN, when the enable monitoring command is executed from the Hardware Monitoring Request Manager, or when monconfig changes the monitor requests.
1. When the system is restarted, following an IOSCAN, or when the enable monitoring command is executed,
the Hardware Monitoring Request Manager (monconfig) calls the start up client (startcfg_client).
2. The startup client reads the contents of a monitor startup configuration file and registers the monitoring
requests contained in the file with the EMS registrar. This causes the associated monitor to start running.
If monitoring is already enabled, the startup client unregisters all current monitoring requests, then reads
the content of the startup configuration files and registers the requests again.
3. The monitor examines the IOSCAN results table to determine if there are any hardware resources on the
system that it is responsible for monitoring. If it finds such resources, the monitor continues to run. If it
does not find any resources, the monitor stops.
4. If the monitor supports asynchronous event detection, it registers with diaglogd, indicating what types of errors the monitor wants to receive. The monitor may specify a product description, product number, or driver name.
5. The startup client then repeats the process for all monitor startup configuration files.
Figure 3-2 Monitoring Startup Process
Chapter 3
57
Page 58

Detailed Description
The Detailed Picture of Hardware Monitoring
Disabling Monitoring
Hardware monitoring can be disabled using the Hardware Monitoring Request Manager. Disabling
monitoring disables all EMS Hardware Monitors. Individual monitors cannot be disabled using the Hardware
Monitoring Request Manager.
When monitoring is disabled all existing monitoring requests are unregistered, and then a kill -2 command is issued to stop all monitors.
58
Chapter 3
Page 59

Detailed Description
The Detailed Picture of Hardware Monitoring
Asynchronous Event Detection (in Detail)
The following steps describe the process involved in asynchronous event detection. The asynchronous
detection is illustrated in Figure 3-3 on page 60.
1. A device driver detects an error during an I/O with the device.
2. The device driver passes the error information, including SCSI sense data, to the diag2 pseudo driver, which adds information indicating the instance of the driver logging the error to the message header. The error message is then passed to the diaglogd daemon used by STM to monitor recoverable errors.
3. Diaglogd uses the instance information to retrieve hardware path, product type, product name, and driver name information from the message header. This information is used to determine which monitor, if any, the information should be passed to. The error message is also written to the raw error log (/var/stm/logs/os/log#.raw.cur).
During startup, each asynchronous monitor registered with diaglogd, indicating what types of errors the monitor wants to receive. The monitor may specify a product description, product number, or driver name. If a monitor is registered to receive the error, the message is passed to it.
4. The monitor decodes the error to determine if an event should be reported. If an event should be reported,
the monitor passes the event message to Event Monitoring Service (EMS).
5. EMS uses the current monitoring requests for the monitor to determine what action to take. Based on the
requests, the event is reported using the specified notification method(s).
Event Decoding
In addition to monitoring hardware, many of the EMS hardware monitors also act as message decoders for
logtool, which is used to read the contents of the raw error log. If the error uses an EMS hardware monitor
as the decoder, logtool launches a new instance of the monitor to perform the decoding. In this way all
events that have occurred on the device, including those IGNORED by the monitor, can be viewed.
Chapter 3
59
Page 60
Detailed Description
The Detailed Picture of Hardware Monitoring
Figure 3-3 Asynchronous Event Detection Process
60
Chapter 3
Page 61

Detailed Description
The Detailed Picture of Hardware Monitoring
Event Polling (in Detail)
The following is the process used for gathering event information using polling. The polling process is
illustrated in Figure 3-4 on page 62.
1. At the interval defined by the polling value in the monitor configuration file, the monitor communicates
with all the devices it is currently monitoring. The monitor sends pass-thru commands to all SCSI devices,
and uses the appropriate protocol for other types of devices. The exact type and sequence of
communication used during a polling operation is monitor-specific.
2. Each device responds to the message from the monitor by returning data indicating its status. The
information returned in response to polling is not entered in the raw error log.
3. The monitor interprets the information from the device to determine if an event should be reported. If an
event should be reported, the monitor passes the event message to EMS.
4. EMS uses the current monitoring requests for the monitor to determine what action to take. Based on the
requests, the event is reported using the specified notification method(s).
FC-AL Hub and FC Switch Polling Processes
Unlike the other EMS hardware monitors, the FC-AL hub monitor and FC switch monitor use SNMP to
gather information from the hubs or switches they are monitoring. Using the hub or switch IP addresses
defined in the hub or switch configuration files, the monitor polls the devices at the defined polling interval
(60 minutes by default) using SNMP.
The reporting of events is handled in the same way as all other monitors. Event information gathered by the
hub and switch monitors does not get written to the raw error log, and the hub and switch monitors do not act
as a decoder for logtool.
Memory Monitor Polling
The memory monitor polling process uses different components to retrieve event information. The memory
monitor polling process is illustrated in Figure 3-5 on page 63.
1. At regular intervals (default 60 minutes) the memlogd daemon polls the memory hardware.
2. If a single-bit error is detected, memlogd uses the values from the memory configuration file to determine the severity of the error, and then passes the appropriate event message to the memory monitor.
The error is also logged in memlog, which can read using logtool. All decoding of memory error messages is performed by memlogd.
3. The memory monitor determines if the event should be reported. If the event should be reported, the
monitor passes the event message to Event Monitoring Service (EMS).
4. EMS uses the current monitoring requests for the memory monitor to determine what action to take.
Based on the requests, the event is reported using the specified notification method(s).
Chapter 3
61
Page 62

Detailed Description
The Detailed Picture of Hardware Monitoring
Figure 3-4 Monitoring Polling Process
62
Chapter 3
Page 63
Figure 3-5 Memory Monitor Polling Process
Detailed Description
The Detailed Picture of Hardware Monitoring
Chapter 3
63
Page 64

Detailed Description
The Detailed Picture of Hardware Monitoring
64
Chapter 3
Page 65

Using the Peripheral Status Monitor
4 Using the Peripheral Status Monitor
This chapter describes the peripheral status monitor, which converts hardware events to status information
for use by MC/ServiceGuard. The topics in this chapter include:
• An overview of the PSM
• How to configure MC/ServiceGuard package dependencies with the PSM
• How to create EMS monitoring requests for the PSM
Chapter 4
65
Page 66

Using the Peripheral Status Monitor
Peripher al Status Monitor Overview
Peripheral Status Monitor Overview
The primary function of the peripheral status monitor, or PSM, is to convert hardware events into changes in
device status. These changes in status can then be used by MC/ServiceGuard to control package failover.
The information in Chapter 2, “Installing and Using Monitors,” described how to configure your system to
detect hardware events using the Monitoring Request Manager. In this chapter you will learn how to use the
PSM to convert these events into changes in device status using the EMS GUI, which is accessed through
SAM.
NOTE Can I Use the PSM Without MC/ServiceGuard?
Even if you are not using MC/ServiceGuard, you can still use the PSM to create hardware
status monitoring requests using EMS. This allows you to get notification for changes in
hardware resource status, much as you can for other EMS monitors. If you create a PSM
monitoring request, when a hardware event occurs you may be alerted twice—once for the
event itself and again if the event caused the status of the resource to change to DOWN.
66
Chapter 4
Page 67

Using the Peripheral Status Monitor
How Does the PSM Work?
How Does the PSM Work?
The PSM converts hardware events detected by the EMS Hardware Monitors to “UP” or “DOWN” status,
which is used by MC/ServiceGuard in controlling package failover. Figure 4-1 on page 68 illustrates how the
PSM works with the other components of hardware monitoring.
Because hardware event monitors detect and report the occurrence of events rather that resource status, a
method is required to alert MC/ServiceGuard when a hardware resource has a status that may impact data
availability. The PSM provides this functionality, serving as the interface between the hardware event
monitors and MC/ServiceGuard.
Some monitors can determine when a problem has been corrected and the hardware is functioning properly.
These monitors automatically alert the PSM when the hardware is fixed, and the PSM will return the state of
the hardware to UP. Other monitors do not have the capability of determining when the hardware problem is
corrected. With these monitors it will be necessary for the user to use the set_fixed utility to manually
return the operational state to UP.
Chapter 4
67
Page 68
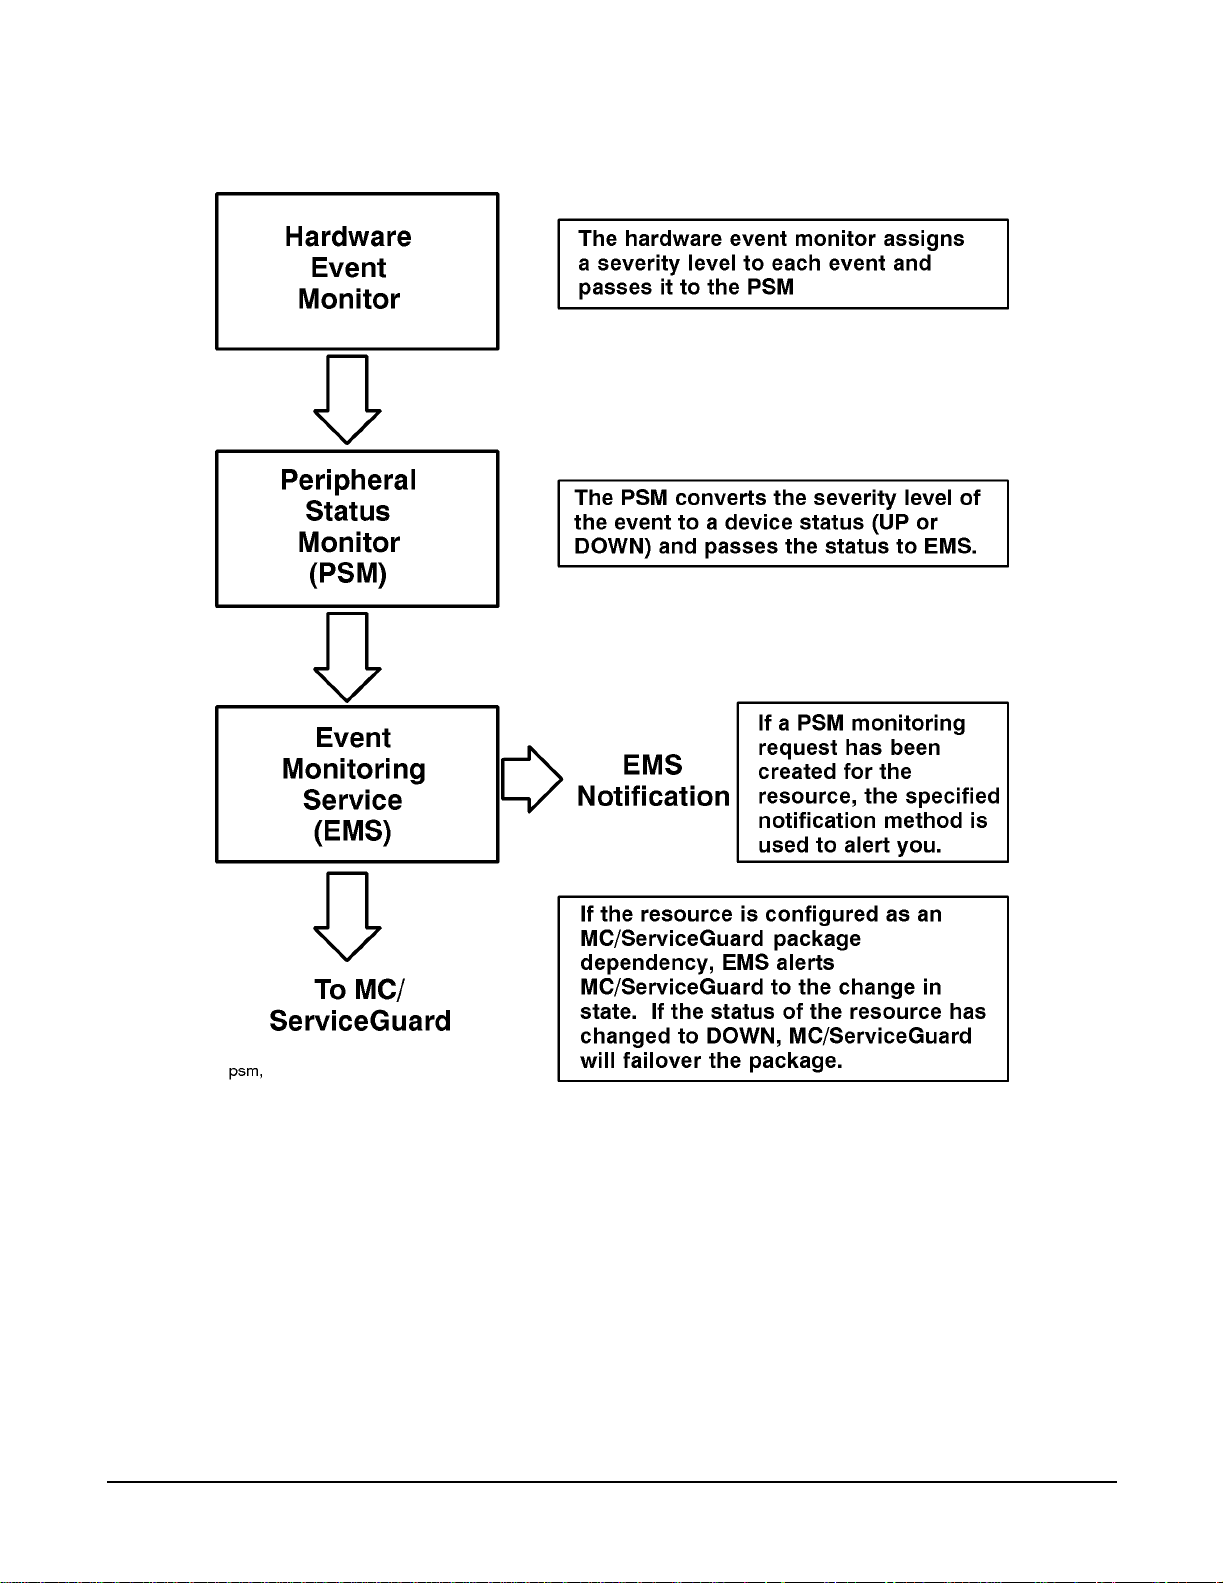
Using the Peripheral Status Monitor
How Does the PSM Work?
Figure 4-1 Peripheral Status Monitor
68
Chapter 4
Page 69

Using the Peripheral Status Monitor
How Does the PSM Work?
PSM Components
The PSM comprises the following components, which are installed along with the hardware event monitors.
Each component has its own man page containing detailed information about its operation.
• psmctd - the Peripheral Status Client/Target daemon used to monitor the state of hardware resources.
• psmmon - the utility used to monitor the state of resources recognized by the psmctd daemon.
• set_fixed - the utility used to manually change the status of a hardware resource from DOWN to UP.
Used only for monitors that do not the have capability to perform this operation automatically.
PSM States
The PSM can assume the three status conditions shown in the following table. These are the values you can
use to define a monitoring request.
Tab l e 4-1 P SM Sta tus
Condition Interpretation
Up The hardware is operating normally.
Down An event has occurred that indicates a
failure with the hardware.
Unknown Cannot determine the state of the
hardware. This state is treated as DOWN by
the PSM.
PSM Resource Paths
Selecting a hardware resource for PSM monitoring requires the selection of the correct resource path. The
resource class path is the means by which EMS identifies system resources. Resources are divided into
classes and subclasses based on their type or function. For example, the resource classes for PSM monitoring
include adapters, connectivity, and storage.
The resource path ends with the resource instance, which uniquely identifies a hardware resource. There is
an instance for each individual hardware resource supported by the monitor. The resource instance is
typically the hardware path to the device (e.g., 10_12_5.0.0), but it may also be a device name as in the case of
AutoRAID disk arrays.
EMS monitoring requests are applied at the resource instance level. This is unlike event monitoring requests
created using the Hardware Monitoring Request Manager, which are applied at the monitor level. Thus when
creating an EMS monitoring request you must select the specific resource you want to monitor. An all (*)
option allows you to apply a PSM monitoring request to all current instances of the hardware. A monitoring
request will not be applied to new hardware added to the system after the request is created.
PSM resource class path names are structured as follows:
/top_level_resource_class/status/subclass/subclass/instance
For example, the PSM resource class path for a SCSI tape device at hardware path 10_12_5.0.0 would be:
/storage/status/tapes/SCSI_tape/10_12_5.0.0
The PSM resource class path for an AutoRAID disk array with an ID of 000000105781 would be:
/storage/status/disk_arrays/AutoRAID/000000105781
Chapter 4
69
Page 70

Using the Peripheral Status Monitor
How Does the PSM Work?
The status resource class path for each monitor is included in the monitor descriptions are available on the
Web at http://docs.hp.com/hpux/onlinedocs/diag/ems/emd_summ.htm.
An HP-UX man page is available for each monitor. To access the man page, type (where
executable file listed in the data sheet): man
monitorname
monitorname
is the
70
Chapter 4
Page 71

Using the Peripheral Status Monitor
Configuring MC/ServiceGuar d Package Dependencies with the PSM
Configuring MC/ServiceGuard Package Dependencies with the PSM
The PSM allows you to create MC/ServiceGuard package dependencies for resources monitored by EMS
Hardware Monitors.
To use the PSM with MC/ServiceGuard, you configure one or more of the resource instances available in the
PSM as MC/ServiceGuard package dependencies. This creates an EMS monitoring request that monitors the
status of the resource and alerts MC/ServiceGuard if the status of the resource changes.
Here are some examples of how PSM monitoring requests might be used:
• In a cluster where one copy of data is shared between all nodes in a cluster, you may want to failover a
package if the host adapter has failed on the node running the package. Because buses, controllers, and
disks are shared, package failover to another node because of bus, controller, or disk failure would not
successfully run the package. To make sure you have proper failover in a shared data environment, you
must create identical package dependencies on all nodes in the cluster. MC/ServiceGuard can then
compare the resource “UP” values on all nodes and failover to the node that has the correct resources
available.
• In a cluster where each node has its own copy of data, you may want to failover a package to another node
for a host adapter, bus, controller, or disk failure. In this sort of cluster of web servers, where each node has
a copy of the data and users are distributed for load balancing, you can failover a package to another node
with the correct resources available. Again, the package resource dependencies should be configured the
same on all nodes.
NOTE You should create the same requests on all nodes in an MC/ServiceGuard cluster.
There are two methods for configuring PSM package dependencies; using SAM, or by editing the package
configuration file.
Chapter 4
71
Page 72

Using the Peripheral Status Monitor
Configuring MC/ServiceGuard Package Dependencies with the PSM
Configuring Package Dependencies using SAM
The procedure assumes you have taken the necessary steps to create the package to which you will be adding
resource dependencies. Complete instructions for configuring MC/ServiceGuard clusters and packages are
provided in Managing MC/ServiceGuard.
To create a package resource dependency:
1. From the command line, start the graphical version of SAM by typing: sam
2. Double-click the Clusters icon.
3. Double-click the High Availability Clusters icon.
4. Double-click on the Package Configuration icon. The High Availability Clusters screen is displayed showing all requests configured on that system.
5. From the Actions menu, select either Create/Add a Package or Modify Package Configuration. Depending on which option you selected, the Create/Add Package screen is displayed or the Modify
Package screen is displayed.
6. If you have not yet done so, specify a Package Name and Node and Specify a Package SUBNET Address.
Then click on “Specify Package Resource Dependencies…” to add PSM resources as package dependencies.
The Package Resource Dependencies screen is displayed.
7. To make a package dependent on an EMS HA Monitors resource, click Add Resource. The Add Resources
screen is displayed listing all the installed resources discovered by MC/ServiceGuard. The resource classes
used for PSM monitoring are adapters, connectivity, storage, and system.
8. Double-click on the appropriate PSM resource class, then on the status class, then on the remaining
resource subclasses until the PSM monitor instances are displayed in the Resource Names list. Select
the desired PSM resource and click OK. A Resource Parameters screen is displayed
9. Enter an appropriate Resource Polling Interval value. This value determines how often EMS checks the PSM for changes in status. The value you select for polling should be related to how critical the resource is to system operation. You may want to use a short polling interval for critical resources, and a longer interval for non-critical resources. Be aware that polling can impact system performance, so avoid using a short polling interval for all resources.
10.Select UP from the list of Available Resource Values, then click < — Add — .
11.Click OK to add the package dependency.
Package failover will now occur if the status of the resource changes from UP.
72
Chapter 4
Page 73

Using the Peripheral Status Monitor
Configuring MC/ServiceGuar d Package Dependencies with the PSM
Configuring Package Dependencies by Editing the Configuration File
You can also add PSM package dependencies by editing the package configuration file in /etc/cmcluster/pkg.ascii. See the Managing MC/ServiceGuard for details on modifying this file.
When using the MC/ServiceGuard commands (e.g., cmapplyconf) to specify the use of the PSM Resource Monitor, the section of the package configuration file that has the keyword “RESOURCE_NAME” must be uncommented and set to the value of the resource name of interest. The PSM has a different resource path name for hardware resource being monitored.
For example, assume you want to create a dependency on a SCSI disk that has a resource path of /storage/status/disks/default/10_0_5.0.0. You want to use a polling interval of 10 seconds and identify UP as the only state that will not cause failover. The following entry would be added to the configuration file to add a package dependency for this disk:
RESOURCE_NAME /storage/status/disks/default/10_0_5.0.0
RESOURCE_POLLING_INTERVAL 10
RESOURCE_UP_VALUE =UP
Chapter 4
73
Page 74

Using the Peripheral Status Monitor
Creating EMS Monitoring Requests for PSM
Creating EMS Monitoring Requests for PSM
In addition to creating MC/ServiceGuard package dependencies, you can also use the PSM to create EMS
monitoring requests. Because it is a state monitor rather than an event monitor, the process and options
available for creating PSM requests with EMS are identical to those for the other system monitors available
for EMS.
To create a PSM monitoring request:
1. From the command line, start the graphical version of SAM by typing: sam
2. Double-click the Resource Management icon.
3. Double-click on the Event Monitoring Service icon. The Event Monitoring Service main screen is displayed showing all monitoring requests configured on the
system. Included are any PSM monitoring requests you may have created, and any requests created for
other EMS monitors that may be running on your system. If you have not created any requests, the field
area of the screen will be empty.
4. From the Actions menu select Add Monitoring Request. The top level resource classes are displayed. The resource classes used for PSM monitoring are adapters,
connectivity, storage, and system.
5. Double-click on the appropriate resource class, then on the status class, then on the remaining resource
subclasses until the PSM monitor instances are displayed in the Resource Instance list.
6. Select the desired PSM resource instance and click OK. If there are multiple instances, you can select the
* (All Instances) option to apply the monitoring request to all instances of the selected resource. All
Instances is a convenient way to create many requests at one time.
The Monitoring Request Parameters screen is displayed for the selected PSM resource.
7. Using the various parameter fields available, define the monitoring request. A description of the various
parameters and how they are used is included in the following section.
Although there are many possible ways to define the monitoring request, the following settings are
recommended for PSM requests:
• Notify conditions set to “Notify When value is…Not Equal Up (0)”
• Options set to Initial and Return
• Pollin g Interval set to an appropriate value
• Notify via set to the desired notification method
8. Click OK to save the monitoring request. The request will be added to those in the Current Monitoring Requests screen.
Repeat the above steps for each new PSM monitoring request. It will be necessary to create a new monitoring
request for each notification method.
74
Chapter 4
Page 75

Using the Peripheral Status Monitor
Monitoring Request Parameters
Monitoring Request Parameters
The following information describes in detail the monitoring request parameters and offers tips on how to use
them.
Specifying When to Send Event - <Notify>
One of the first steps in creating a monitoring request involves specifying the conditions under which you
want to be alerted. The following options are available for selecting when to send an alert.
Tab l e 4-2 P SM Sta tus
When value is…
When value changes
At each interval
You define the conditions under which you wish to be notified for a
particular resource using an operator (=, not equal, >, >=, <, <=)
and a value returned by the monitor (UP, DOWN, UNKNOWN).
Text values are mapped to numerical values.
This notification might be used for a resource that does not change
frequently, but you need to know each time it does.
This sends notification at each polling interval. It would most
commonly be used for reminders or gathering data for system
analysis. Use this for only a small number of resources at a time,
and with long polling intervals of several minutes or hours; there is
a risk of affecting system performance.
Determining the Frequency of Events - <Options>
If you select the When value is… from the <Notify> options, the Options box is displayed. Select one or more of these options:
Tab l e 4-3 P SM Sta tus
Initial Use this option for testing a new request to ensure it is sending alerts
to the desired destinations.
Repeat Use this option for urgent alerts. The Repeat option sends an alert at
each polling interval as long as the notify condition is met. Use this
option with caution; there is a risk of high CPU use or filling log files
and alert windows.
Return Use this option to track when a condition returns to its previous
value.
These Options are not available if you have selected When value changes or At each interval from the <Notify> list. In these cases the options default to:
• Repeat and Return - Not selected
•Initial - Selected
Setting the Polling Interval - <Polling Interval>
The polling interval specifies how often EMS will check the PSM for changes in hardware status. The polling
Chapter 4
75
Page 76

Using the Peripheral Status Monitor
Monitoring Request Parameters
interval is the maximum amount of elapsed time before EMS will be aware of a change in status for the
hardware resource being monitored. A short polling interval will ensure that you have recent data. However,
a short polling interval may use more CPU and system resources. You must weigh the importance of being
able to respond quickly against the importance of maintaining good system performance.
Some considerations include:
• MC/ServiceGuard monitors resources every few seconds. You may want to use a short polling interval (30
seconds or less) when it is critical that you make a quick failover decision.
• You may want a polling interval of 5 minutes or so for monitoring less critical resources.
• You may want to set a very long polling interval (4 hours) to monitor failed disks that are not essential to
the system, but which should be replaced in the next few days.
Selecting Protocols for Sending Events - <Notify Via>
Using the <Notify via> option, you can specify the method EMS uses to send events. The options are:
opcmsg ITO
This option sends messages to ITO applications via the opcmsg daemon. IT Operation 4.0 or above must be
installed on the resource server for this option to display.
The ITO message severity options are:
• Critical
• Major
• Minor
• War n ing
• Normal
A specified severity other than Normal is returned under the following conditions:
•The When value is . . . condition evaluates to TRUE
•The When value changes condition evaluates to TRUE
See the HP OpenView IT/Operations Administrators Task Guide (Part Number B4249-90003) for more information on configuring notification severity.
Templates for configuring IT/Operations and Network Node events can be found on the Hewlett-Packard
High Availability public web page at http://www.hp.com/go/ha.
To set the opcmsg ITO:
1. Specify the notification type from the <Notify> list.
2. Select the opcmsg ITO option from the <Notify via> list.
3. Select the severity from the <Severity> list, (Critical, Major, Minor, Warning, Normal).
SNMP traps
This option sends messages to applications using SNMP traps, such as Network Node Manager. See HP OpenView Using Network Node Manager (P/N J1169-90002) for more information on configuring SNMP
traps.
The following traps are used by EMS:
76
Chapter 4
Page 77

Using the Peripheral Status Monitor
Monitoring Request Parameters
EMS_NORMAL_OID "1.3.6.1.4.1.11.2.3.1.7.0.1" - Normal notification
EMS_ABNORMAL_OID "1.3.6.1.4.1.11.2.3.1.7.0.2" - Abnormal notification
EMS_RESTART_OID "1.3.6.1.4.1.11.2.3.1.7.0.4" - Restart notification
Specify the ITO message severity for both normal and abnormal events:
• Critical
• Major
• Minor
• War n ing
• Normal
A specified severity other than Normal is returned under the following conditions:
Certain SNMP trap monitoring requests can map directly to severity levels. For these requests, a toggle
button <Map severity from value> is displayed. If this is selected, options selected from <Severity> are
ignored.
•The When value is… condition evaluates to TRUE
•The When value changes condition evaluates to TRUE
To set the SNMP trap:
1. Specify the notification type from the <Notify> list.
2. Select the opcmsg ITO option from the <Notify via> list.
3. Select the severity from the <Severity> list, (Critical, Major, Minor, Warning, Normal).
TCP and UDP
This option sends TCP or UDP encoded events to the target host name and port indicated for that request.
Thus the message can be directed to a user-written socket program.
To set the TCP or UDP conditions:
1. Select the TCP or UDP option, as appropriate, from the <Notify via> list.
2. Specify the target host name and the port.
This option sends event notification to the specified email address
To set for email notification:
1. Select the Email option from the <Notify via> list.
2. Specify the full email address in the Email Address field.
syslog
This option sends event notification to the system log.
For an abnormal event, a system logging level of error will be associated with the logged message.
An abnormal event message (error) is returned under the following conditions:
•The When value is . . . condition evaluates to TRUE
•The When value changes condition evaluates to TRUE
Chapter 4
77
Page 78

Using the Peripheral Status Monitor
Monitoring Request Parameters
To set for a system log notification:
1. Select the Syslog option from the <Notify via> list.
Console
This option sends event notification to the system console.
To set for a console notification:
1. Select the Console option from the <Notify via> list.
Textlog
This option sends event notification to the specified file.
To set for an text log notification:
1. Select the Textlog option from the <Notify via> list.
2. Specify the filename and path in the File Path field.
A default path, /var/opt/resmon/log/event.log, is displayed when the Textlog option is selected. Note that EMS HA Monitors will not create the file, it will add notifications to an existing file.
Adding a Notification Comment - <Comment>
The notification comment is useful for sending task reminders to the recipients of an event. For example, you
may want to add the name of the person to contact if an event occurs. If you have configured
MC/ServiceGuard package dependencies, you may want to enter the package name as a comment in the
corresponding request.
78
Chapter 4
Page 79

Using the Peripheral Status Monitor
Copying Monitoring Requests
Copying Monitoring Requests
There are two ways to use the copy function:
• To create requests for multiple resources using the same monitoring parameters. This is a quick way to set requests for multiple resources.
• To create requests for the same resource using different monitoring parameters. This is a quick way to create requests that send events using multiple notification methods.
To create requests for multiple resources using the same monitoring parameters:
1. From the Event Monitoring Service main screen, select the monitoring request whose parameters you
wish to copy. You need to have configured at least one similar request for a similar instance.
2. From the Actions menu select Copy Monitoring Request. The Add Monitoring Request screen is displayed.
3. From the Add Monitoring Request screen, select a different resource instance and click OK. The Monitoring Request Parameters screen is displayed.
4. Click OK in the Monitoring Request Parameters screen. A message is displayed indicating the new request has been added, and the Event Monitoring Service
main screen is displayed.
To create requests for the same resource using different monitoring parameters:
1. From the Event Monitor Service main screen, select the monitoring request with the instance for which
you wish to have multiple monitoring requests.
You need to have configured at least one request for the instance.
2. From the Actions menu select Copy Monitoring Request. The Add Monitoring Request screen is displayed.
3. Click OK in the Add Monitoring Request screen. The Monitoring Request Parameters screen is displayed.
4. In the Monitoring Request Parameters screen, modify the parameters as desired.
5. Click OK. A message is displayed indicating the new request has been added, and the Event Monitoring Service
main screen is displayed.
Chapter 4
79
Page 80

Using the Peripheral Status Monitor
Modifying Monito ri ng Request s
Modifying Monitoring Requests
To change the monitoring parameters of a request:
1. From the Event Monitoring Service main screen, select the monitoring request whose parameters you
wish to modify.
2. From the Actions menu select Modify Monitoring Request. The Monitoring Request Parameters screen is displayed.
3. In the Monitoring Request Parameters screen, modify the parameters as desired.
4. Click OK.
A message is displayed indicating the request has been modified, and the Event Monitoring Service main
screen is displayed.
80
Chapter 4
Page 81

Using the Peripheral Status Monitor
Removing Monitoring Reque sts
Removing Monitoring Requests
The Remove Monitoring Requests functions with multiple requests as well as single requests.
To remove monitoring requests:
1. From the Event Monitoring Service main screen, select the monitoring request you wish to remove. To select contiguous multiple requests, hold the To select individual multiple requests, hold the
2. From the Actions menu select Remove Monitoring Request. A Confirmation screen is displayed.
3. Click OK. A message is displayed indicating the request(s) has been removed, and the Event Monitoring Service
main screen is displayed.
4. To start monitoring the resource again you must recreate the request, either by copying a similar request
for a similar resource or by re-entering the information.
Shift key and click.
Ctrl key and click.
Chapter 4
81
Page 82

Using the Peripheral Status Monitor
Viewing Monitoring Requests
Viewing Monitoring Requests
To view the parameters for a monitoring request:
1. From the Event Monitoring Service main screen, select the monitoring request you wish to view and
either:
• Double-click, or
•From the Actions menu select View Monitoring Request The View Monitoring Request Parameters screen is displayed. The parameters listed here match the
parameters specified for the monitoring request.
2. To exit the View Monitoring Request screen, click OK.
82
Chapter 4
Page 83

Using the Peripheral Status Monitor
Using the set_fixed Utility to Restore Hardware UP State
Using the set_fixed Utility to Restore Hardware UP State
Most hardware event monitors cannot detect when a hardware failure has been repaired and the resource has
been returned to normal operation. Consequently, these monitors cannot alert the PSM to change the status
of its hardware resources from DOWN to UP. It is necessary for you to manually change the status of the
hardware resources using the set_fixed utility included with the PSM. To determine if a monitor requires
use of the set_fixed utility, refer to the monitor descriptions in Chapter 6, “Monitor Data Sheets.”
The set_fixed utility includes its own man page describing how to change the state of the resource.
NOTE Make sure you have repaired the problem before you use the set_fixed utility to return the
hardware resource status to UP. If the hardware is not repaired, the change in status to UP
may cause MC/ServiceGuard to erroneously assume the hardware is working properly.
To restore the operating state of a resource to UP:
1. If necessary, list the hardware resources that currently have a status of DOWN by typing:
/etc/opt/resmon/lbin/set_fixed -L
2. Set the status of the DOWN hardware resource to UP by typing:
set_fixed -n
resource_name
The resource_name is the status resource path name to the hardware resource that has been repaired. When
specifying the resource_name you can use wildcards such as “*” to indicate all instances.
Example 4-1 Example of Using set_fixed
The following example sets to UP the status of the SCSI tape device at hardware path 10_12_5.0.0
set_fixed -n /storage/status/tapes/SCSI_tape/10_12_5.0.0
The following example sets to UP the status of all AutoRAID disk arrays.
set_fixed -n /storage/status/disk_arrays/AutoRAID/*
Chapter 4
83
Page 84

Using the Peripheral Status Monitor
Using the set_fixed Utility to Restore Hardware UP State
84
Chapter 4
Page 85

Hardware Monitor Configuration Files
5 Hardware Monitor Configuration Files
Several configuration files are used to control the operation of each hardware event monitor. The operation of
the monitor can be altered by editing the contents of the various configuration files. Before altering the
contents of a configuration file, you should have a thorough understanding of what effects the changes will
have on monitor operation. The following paragraphs should provide the understanding you need for using
configuration files properly.
CAUTION Before editing any configuration file, create a backup copy of it. This will allow you to recreate
the original environment if the changes you make do not produce the desired results.
Chapter 5
85
Page 86

Hardware Monitor Configuration Fil es
Monitor Configuration Files
Monitor Configuration Files
Two configuration files control the operation of each hardware event monitor:
• Global monitor configuration file. The settings defined in this file are used for all monitors, unless
overridden by a monitor-specific file.
• Monitor-specific configuration file. Each monitor includes its own configuration file with optimized
settings. Settings defined in the monitor-specific file override comparable settings defined in the global
configuration file.
NOTE As of the June 2000 release, several of the hardware monitors have been converted to be
“multiple-view” (Predictive-enabled). These monitors use a different file for configuration, the
Client Configuration File (for example, default_disk_em.clcfg).
The common operating parameters defined by the monitor configuration files for all monitors include:
• Polling Interval - identifies the frequency at which the monitor polls the hardware for status. This value is
selected to provide current device status without seriously impacting system performance.
• Repeat Frequency - indicates how often the same event should be reported. Events that continue to exist
should not overburden the system with a continuous stream of messages. A value of once a day is used as
the default repeat frequency.
• Severity Action - determines whether the severity level will be passed to EMS for reporting or ignored.
• Event Definition - identifies each event handled by the monitor, defines its severity level, and determines
what action the monitor will take when the event occurs. Actions include ignoring the event, passing it on
to EMS, or using the default action defined by the Severity Action setting.
NOTE When Do Changes Made to a Configuration File Take Effect?
Changes made to a monitor-specific configuration file are invoked at the next polling interval or
when an event occurs, which ever comes first. In either of these situations, the monitor reads
its configuration file for any changes and implements any new settings.
86
Chapter 5
Page 87

Hardware Monitor Configuration Files
Monitor Configuration Files
File Names
Global configuration file: /var/stm/config/tools/monitor/Global.cfg The file naming convention for the startup configuration files is:
/var/stm/config/tools/monitor/monitor_name.cfg
monitorname is the name of the monitor executable
File Format
Settings in the device configuration file use the following conventions:
• Configuration settings consist of a term defining the characteristic to be configured, followed by a value
assigned to the term.
For example, POLL_INTERVAL 60
• There must be at least one space between the term and each value.
• Comments begin with the pound character (#) and continue until the end of the line. A comment may occur
on a line by itself, or after a blank space following the value in a configuration entry.
For example, either of the following are valid comments:
# Valid values for severity_name are:
SEVERITY_ACTION CRITICAL NOTIFY # notify on critical events
Table 5-1 lists the common fields used to define monitor configuration settings. In addition to the common
parameters, some monitors include other parameters in their configuration file. Any additional configuration
parameters used by each monitor are listed in the monitor descriptions in the data sheets for the hardware
event monitors available on the Web at http://docs.hp.com/hpux/onlinedocs/diag/ems/emd_summ.htm.
NOTE An HP-UX man page is available for each monitor. To access the man page, type (where
monitorname is the executable file listed in the data sheet): man monitorname
Table 5-1 Monitor Configuration File Entries
Setting Values Description
SEVERITY_ACTION <severity> <action>
Valid severity values are:
CRITICAL
SERIOUS
MAJOR_WARNING
MINOR_WARNING
INFORMATIONAL
Valid action values are:
Defines whether the monitor should report or ignore events for the indicated severity level.
Chapter 5
NOTIFY
IGNORE
87
Page 88

Hardware Monitor Configuration Fil es
Monitor Configuration Files
Table 5-1 Monitor Configuration File Entries
Setting Values Description
DEFINE_EVENT <event_num><severity> <action>
POLL_INTERVAL <interval> interval must be a
event_num must be a positive integer less than 65536 for monitor-defined events, or larger than 100000 for SCSI default events
Valid severity values are:
CRITICAL
SERIOUS
MAJOR_WARNING
MINOR_WARNING
INFORMATIONAL
Valid action values are:
NOTIFY
IGNORE
DEFAULT
positive integer
indicating number of
minutes to wait between
polls
Identifies an event, the
severity to be applied to
the event, and the action
the monitor should take
when the event occurs.
An action of DEFAULT
indicates that the value
specified in the
SEVERITY_ACTION
definition for the
specified severity should
be used.
Defines how often the monitor should poll the device to determine if an event has occurred.
REPEAT_FREQUENCY <frequency>
frequency must be a positive integer indicating the number of minutes to wait before a repeat event can be generated
Defines how often
repeat alerts should be
generated for the sane
event. Events for a
specific device should
not be reported more
often than the specified
frequency.
Considerations for Modifying the Monitor Configuration File Settings
The default configuration settings for each monitor have been carefully selected to provide efficient
monitoring for most systems. However, it may be necessary to modify these settings in specific situations.
Here are some considerations for altering the configuration settings.
NOTE Settings in the Global.cfg configuration file apply to all monitors, so you should avoid
changing these settings. If you need to change the parameters for a monitor, do so using the
monitor-specific configuration file.
88
Chapter 5
Page 89

Hardware Monitor Configuration Files
Monitor Configuration Files
Event Definition
You may want to alter the event definition in a monitor-specific configuration file to change the severity level
assigned to an event, or to suppress reporting of an event.
NOTE Be aware that any changes you make to the event definition will impact all instances of the
monitor's hardware resources. You cannot modify the behavior of a specific hardware resource.
For example, if a disk array is repeatedly reporting the same event and you would like to
suppress it, you can do so by changing the event definition. But the change will suppress that
event even if it occurs on a different disk array. This may not be the result you want.
• Changing the severity level assigned to an event. If you feel that the severity level assigned to an
event does not reflect its importance in your environment, you can make the event more or less important.
For example, if an event is currently assigned a severity level of MAJOR WARNING but from experience
you feel it represents a CRITICAL condition, you can change the DEFINE_EVENT setting for the event.
• Ignoring an event. By default, all events are reported. If you are getting repeated notification for an
event, you can ignore the event. When the condition that caused the event is corrected, you can once again
set the event for notification.
Severity Action
By default, all severity levels are reported to EMS. This default was selected because even lower level events
such as INFORMATION may provide valuable data for identifying trends that could lead to more serious
conditions. Consequently, it is recommended that you do not suppress the reporting of any events.
However, if you do want to suppress the reporting of less important events, you can change the severity action
to IGNORE. This will affect all events in that category, and all instances of the monitor's hardware resources.
Polling Interval
If you need more frequent polling to isolate a potential problem with the hardware, the polling interval can be
reduced. Be aware that more frequent polling may impact system performance, so you may want to shorten
the polling period only temporarily until the problem is solved. Avoid using a low polling interval for all
monitors or system performance may suffer.
Repeat Frequency
If you need to be alerted to an event frequently, the repeat frequency can be reduced. The default repeat
frequency is once a day.
Sample Global Configuration File
The following sample shows a portion of the global monitor configuration file.
## Global.cfg: Sentinel Global Configuration File
#POLL_INTERVAL 60 # in minutes (one hour)
REPEAT_FREQUENCY 1440 # in minutes (one day)
## DEFAULT ACTIONS FOR EACH SEVERITY
# (Action can be NOTIFY or IGNORE)
#SEVERITY_ACTION CRITICAL NOTIFY
SEVERITY_ACTION SERIOUS NOTIFY
Chapter 5
89
Page 90

Hardware Monitor Configuration Fil es
Monitor Configuration Files
SEVERITY_ACTION MAJOR_WARNING NOTIFY
SEVERITY_ACTION MINOR_WARNING NOTIFY
SEVERITY_ACTION INFORMATION NOTIFY
## EXPLANATION OF EVENT CONFIGURATION LINES
## configverb event# severity- action- -msg-number-in-library-catalog#
# DEFINE_EVENT 100001 INFORMATION DEFAULT # msg num 1
#
## EXPLANATION OF DEVICE STATUS INTERPRETATION FOR EVENT
## D = DIRECT ACCESS DEVICE
# T = SEQUENTIAL ACCESS DEVICE
# L = PRINTER DEVICE
# P = PROCESSOR DEVICE
# W = WRITE ONCE READ MULTIPLE DEVICE
# R = READ ONLY (CD-ROM) DEVICE
# S = SCANNER DEVICE
# O = OPTICAL MEMORY DEVICE
# M = MEDIA CHANGER DEVICE
# C = COMMUNICATION DEVICE
#
# DTLPWRSOMC = SCSI Device Class
#
#--> [ 28 00 06 ] DTLPWRSOMC Not-ready to ready transition. Medium changed.
#
# cc qq kk ss Data elements equating to event
#
# cc = SCSI Additional Sense Code
# qq = SCSI Additional Sense Code Qualifier
# kk = SCSI Sense Key
# ss = SCSI Hardware Status
## DEFAULT CONFIGURATION FOR SCSI DEVICE EVENTS
#-
DEFINE_EVENT 100001 INFORMATION DEFAULT # msg num 1
#[00]
#[0c]
# [ 00 00 00 ] DTLPWRSOMC No additional sense information.
#[00]
#[04]
Sample Monitor-Specific Configuration File
The following is a sample of a device configuration file.
#****************************************************************************#
#* dm_ses_enclosure.cfg : monitor configuration statements for all *#
#* events handled by the ses_enclosure monitor *#
#****************************************************************************#
#****************************************************************************#
#* These items will appear in the global config file, but are repeated *#
#* here for documentation purposes. They could also appear here to override*#
#* the global values. *#
#****************************************************************************#
90
Chapter 5
Page 91

Hardware Monitor Configuration Files
Monitor Configuration Files
#POLL_INTERVAL 5 # polling interval in minutes
#REPEAT_FREQUENCY 1440 # in minutes, for one day
#****************************************************************************#
#* This list of default actions for each severity also appears in the *#
#* global configuration file, and should not generally appear here. *#
#* It is shown for documentation purposes. *#
#****************************************************************************#
#SEVERITY_ACTION INFORMATION NOTIFY
#SEVERITY_ACTION MINOR_WARNING NOTIFY
#SEVERITY_ACTION MAJOR_WARNING NOTIFY
#SEVERITY_ACTION SERIOUS NOTIFY
#SEVERITY_ACTION CRITICAL NOTIFY
#****************************************************************************#
#* cfg-verb event# severity- action- -description- *#
#****************************************************************************#
DEFINE_EVENT 101 CRITICAL DEFAULT # The disk is indicating a fault
DEFINE_EVENT 102 CRITICAL DEFAULT # The disk is not on the FC link
DEFINE_EVENT 201 CRITICAL DEFAULT # The power supply has faulted
DEFINE_EVENT 202 CRITICAL DEFAULT # The power supply is not recieving adequate AC
DEFINE_EVENT 301 CRITICAL DEFAULT # The fan is not providing cooling
DEFINE_EVENT 302 CRITICAL DEFAULT # Temperature has exceeded critial threshold
DEFINE_EVENT 303 MAJOR_WARNING DEFAULT # Temperature has exceeded warning threshold
DEFINE_EVENT 304 CRITICAL DEFAULT # Temperature has exceeded low critial threshold
DEFINE_EVENT 305 MAJOR_WARNING DEFAULT # Temperature has exceeded low warning threshold
DEFINE_EVENT 306 MAJOR_WARNING DEFAULT # Temperature sensor may have failed
DEFINE_EVENT 401 CRITICAL DEFAULT # The enclosure services controller has failed
DEFINE_EVENT 501 CRITICAL DEFAULT # The SCSI port/transceiver has lost the link
DEFINE_EVENT 502 CRITICAL DEFAULT # The transmit signal has been lost
DEFINE_EVENT 601 CRITICAL DEFAULT # Over voltage critical threshold exceeded
DEFINE_EVENT 602 MAJOR_WARNING DEFAULT # Over voltage warning threshold exceeded
DEFINE_EVENT 603 CRITICAL DEFAULT # Under voltage critical threshold exceeded
DEFINE_EVENT 604 MAJOR_WARNING DEFAULT # Under voltage warning threshold exceeded
DEFINE_EVENT 605 MAJOR_WARNING DEFAULT # Voltage sensor may have failed
Chapter 5
91
Page 92

Hardware Monitor Configuration Fil es
Startup Configuration File
Startup Configuration File
Each hardware event monitor has its own startup configuration file which contains the monitoring requests
currently defined for the monitor. At startup, following the execution of the ioscan utility, or when using the
Hardware Monitoring Request Manager (monconfig) to manage monitoring requests, the entries in the
startup configuration file are used to create monitoring requests for the monitor.
Each monitoring request in the startup configuration file is applied to all instances of the monitor's hardware
resources. An identical set of default requests are included in the startup configuration file for each monitor.
You modify the contents of the startup configuration file using the Hardware Monitoring Request Manager.
When you use the Hardware Monitoring Request Manager to create or manage monitoring requests, the
results are stored as an entry in the monitor's startup configuration file. If you have selected the All Monitors
option for the request, an entry will be made in the startup configuration file for all the monitors.
NOTE When Do Changes Made to a Startup Configuration File Take Effect?
Changes made to a startup configuration file are invoked when the system is restarted,
following the execution of the IOSCAN utility, or when the Hardware Monitoring Request
Manager is used to manage monitoring requests. For example, when you add, delete, or modify
a monitoring request using the Hardware Monitoring Request Manager, the changes to the
startup configuration file will take effect immediately.
File Names
The file naming convention for the startup configuration files is:
/var/stm/config/tools/monitor/monitorname.sapcfg
monitorname is the name of the monitor executable.
File Format
Entries in the startup configuration file use the following conventions:
• The startup configuration file contains monitoring request entries identifying the notification method and
reporting criteria for the monitor. Each entry contains records consisting of a keyword, followed by a colon
(:), followed by the value assigned to the keyword. For example, Criteria Threshold: INFORMATION
• 'MONITOR' must be the first keyword found in each entry, but the remaining records in the entry are not
order-dependent. For example:
MONITOR: /storage/events/disk_arrays/FW_SCSI
• Comments begin with the pound character (#) and continue until the end of the line. A comment may occur
on a line by itself or after a blank space following the value for a keyword.
For example, either of the following are valid comments:
# Default monitoring entries
Target Type: SYSLOG # Send events to syslog
Table 5-2 identifies the keywords that make up each entry in the startup configuration file. Each entry must
contain the keywords identified as required.
92
Chapter 5
Page 93

Hardware Monitor Configuration Files
Startup Configuration File
Considerations for Modifying the Startup Configuration File Settings
While you can edit the contents of the startup configuration file directly, the better approach is to use the
Hardware Monitoring Request Manager (monconfig) to create and manage your monitoring requests. Using
the monitoring request manager you can create requests for multiple monitors simultaneously. And the
Hardware Monitoring Request Manager ensures that all request entries are formatted correctly.
The only benefit that editing the configuration file offers is that you can use the COMMENT setting to add information that will be included with the event.
Table 5-2 Startup Configuration File Entries
Keyword Values Description
MONITOR (required) A valid event monitor
resource path
Criteria Threshold (required) Valid values include:
CRITICAL
SERIOUS
MAJOR_WARNING
MINOR_WARNING
INFORMATIONAL
Criteria Operator (required) Valid operators are:
%< (less than)
%<= (less than or equal to
)
> (greater than)
>= (greater than or equal
to)
!(notequalto)
Identifies the hardware
event monitor to which
the entry applies. All
entries must use the
resource path for the
monitor being
configured.
Note: This must the first keyword in each entry
Defines the severity level used as the notification criteria threshold.
This value identifies the
arithmetic operator
used with the criteria
threshold to control
what events are
reported. The operator
treats each severity
level as a numeric value
assigned as follows:
Chapter 5
Critical = 5
Serious = 4
Major warning = 3
Minor warning = 2
Informational = 1
The event severity
received is the left
operand and the
Criteria Threshold value
is the right operand.
93
Page 94

Hardware Monitor Configuration Fil es
Startup Configuration File
Table 5-3 Startup Configuration File Entries
Keyword Values Description
Target Type (required) Valid values include:
UDP
TCP
OPC
SNMP
TEXTLOG
SYSLOG
EMAIL
CONSOLE
Target Type Modifier
(required for the following target types)
UDP
Target UDP Host - hostname of the machine to which UDP event messages will be sent
Target UDP Port - port number on the host that will be used for the network connection
TCP
Target TCP Host - hostname of the machine to which TCP event messages will be sent
Target TCP Port - port number on the host that will be used for the network connection
USERLOG
Target USERLOG - name of the log file to which TCP event messages will be sent
EMAIL
Target EMAIL Address - email address of the recipient of the event messages
Identifies the method of notification used.
Comment: (Optional) Any text string. An optional field which will be
presented as user data in each
event meeting this criteria.
94
Chapter 5
Page 95

Hardware Monitor Configuration Files
Startup Configuration File
Default File Entries
The following default monitoring requests illustrate the structure of the entries in the startup configuration
file.
Table 5-4 Default Monitoring Requests
Description Entry
Entry to send all events to textlog
Entry to send SERIOUS and CRITICAL events to syslog
Entry to send SERIOUS and CRITICAL events to email
MONITOR: /storage/events/disk_arrays/FW_SCSI
Criteria Threshold: INFORMATION
Criteria Operator: >=
Target Type: TEXTLOG
Target TEXTLOG File: /var/opt/resmon/log/event.log
MONITOR: /storage/events/disk_arrays/FW_SCSI
Criteria Threshold: SERIOUS
Criteria Operator: >=
Target Type: SYSLOG
MONITOR: /storage/events/disk_arrays/FW_SCSI
Criteria Threshold: SERIOUS
Criteria Operator: >=
Target Type: EMAIL
Target EMAIL address: root
Chapter 5
95
Page 96

Hardware Monitor Configuration Fil es
Peri pher a l St atus Monit or (PSM) Configuration File
Peripheral Status Monitor (PSM) Configuration File
Interaction between the PSM and a hardware event monitor is controlled by a PSM configuration file. This
file defines what severity levels will result in DOWN status being reported, and what action, if any, is
required to return the hardware to UP status. Any hardware event monitor that does not include a PSM
configuration file will not be monitored by the PSM.
NOTE When Do Changes Made to a PSM Configuration File Take Effect?
The PSM checks its configuration files every 10 seconds, so any changes will be invoked when
the file is checked. If the hardware configuration has changed and the PSM is communicating
with all the monitors to determine what their resources are, it may take a few minutes for any
changes to a configuration file to take effect.
File Names
The file naming convention for the PSM configuration files is:
/var/stm/config/tools/monitor/monitorname.psmcfg
monitorname is the name of the monitor executable.
File Format
The PSM configuration file contains a single entry using the following conventions:
• The entry consists of keywords defining the characteristic to be configured, followed by a value assigned to
the keyword.
• There must be at least one space between the keyword and each value.
• Comments begin with the pound character (#) and continue until the end of the line. A comment may occur
on a line by itself or after a blank space following the value for a keyword.
Table 5-5 identifies the keywords that make up the entry in the PSM configuration file. The entry must
contain the keywords identified as required.
96
Chapter 5
Page 97

Hardware Monitor Configuration Files
Peripheral Status Monitor (PSM) Configuration File
Considerations for Modifying the PSM Configuration File
• The only change you should consider making to the PSM configuration file is redefining the severity levels
which cause a change to DOWN status. By default, SERIOUS and CRITICAL events will result in a
DOWN status. If you want to include lower level events, or restrict the status change to just CRITICAL
events, you can do so using the DOWN_SEVERITY_THRESHOLD and DOWN_SEVERITY_OPERATOR settings.
NOTE Do not attempt to change the value of MONITOR_STATE_HANDLING. Changing this value may
result in unpredictable results when attempting to reset the hardware status of the resource to
UP.
It is recommended that you not lower the severity levels that can cause a DOWN status. If you do, events that do not warrant a status of DOWN may cause it to occur.
Chapter 5
97
Page 98

Hardware Monitor Configuration Fil es
Peri pher a l St atus Monit or (PSM) Configuration File
Table 5-5 PSM Configuration File Fields
Keyword Values Description
MONITOR_RESOURCE_NAME (required)
PSM_RESOURCE_NAME (Optional)
MONITOR_STATE_HANDLING (Optional)
A valid event monitor resource path name
A valid PSM (status) resource path name
Identifies the type of state handling the monitor performs.
Valid values include:
NO_UP_CONTROL (Default) - the monitor
uses the severity mapping of events to
control the DOWN state as well as calling
the appropriate API routines to send
DOWN state messages to the PSM. The UP
state will be controlled by the set_fixed(1m)
command.
Identifies the hardware
event monitor to which
the entry applies Note:
This must the first
keyword in the file.
This value should be related to MONITOR_RESOURCE_ NAME.
If not specified, the
default will be created by
replacing the word
“events” in the
MONITOR_RESOURCE_
NAME with the word
“status”.
98
UP_STATE_CONTROL- the monitor uses
the severity mapping of events to control
the DOWN state as well as calling the
appropriate API routines to send DOWN
state messages to the PSM. The monitor
itself controls the UP state by calling the
appropriate API routines to send UP state
messages to the PSM.
ALL_STATE_CONTROL - the monitor itself
controls both states by calling the
appropriate API routines to send UP and
DOWN state messages to the PSM.
Chapter 5
Page 99

Table 5-5 PSM Configuration File Fields
Keyword Values Description
Hardware Monitor Configuration Files
Peripheral Status Monitor (PSM) Configuration File
DOWN_SEVERITY_THRESHOLD (Optional. This value is required if DOWN_SEVERITY_OPERATOR is specified)
DOWN_SEVERITY_OPERATOR (Optional)
Valid values include:
CRITICAL
SERIOUS (De
fault)
MAJOR_WAR
NING
MINOR_WAR
NING
INFORMATIO
NAL
Valid values include:=
!=
<
<=
>
>= (Default)
Defines the event severity level used with DOWN_SEVERITY_OPE RATOR
Defines the operator used with the event severity and DOWN_SEVERITY_THR ESHOLD as operands.
The event severity
received is the left
operand and the
DOWN_SEVERITY_THR
ESHOLD value is the
right operand.
Chapter 5
99
Page 100

Hardware Monitor Configuration Fil es
Peri pher a l St atus Monit or (PSM) Configuration File
Example File Entries
The following examples illustrate the various types of file entries that can be made for the PSM monitor.
Example 1: Use all default values. SERIOUS and CRITICAL event will cause DOWN status.
MONITOR_RESOURCE_NAME: /storage/events/disks/default
Example 2: Change the entry so MAJOR_WARNING events will also cause DOWN status.
MONITOR_RESOURCE_NAME: /storage/events/disks/default
DOWN_SEVERITY_THRESHOLD: MAJOR_WARNING
DOWN_SEVERITY_OPERATOR: >=
100
Chapter 5
 Loading...